Embed Size (px)
Citation preview
Trade of Motor Mechanic
Module 10
Unit 2
Screw Tread cuTTing
Phase
2

Produced by
In cooperation with:
Subject Matter Experts
Martin McMahon
&
CDX Global
Curriculum Revision 2.2 16-01-07
© SOLAS 2013
Revision 3.0 November 2013
Module 10 - Unit 2 Screw Tread Cutting
Trade of Motor Mechanic - Phase 2 Course Notes
Table of ContentsIntroduction ........................................................................................................ 1Unit Objective ..................................................................................................... 11.0 Hazards and Safety Procedures ............................................................... 3
1.1 Health and Safety .......................................................................... 32.0 Drilling and Internal Thread Cutting Exercise ....................................... 4
2.1 Repairing an Internal Thread ....................................................... 72.2 Cutting and Repairing Threads and Using a Thread
Pitch Gauge ................................................................................... 93.0 External Thread Cutting ........................................................................14
3.1 Dies ..............................................................................................163.2 Repairing an External Thread .....................................................18
Self Assessment ................................................................................................ 20Suggested Exercises ......................................................................................... 20Training Resources ........................................................................................... 20Suggested Further Reading ...............................................................................21

Revision 3.0 November 20131
Module 10 - Unit 2 Screw Tread Cutting
Trade of Motor Mechanic - Phase 2 Course Notes
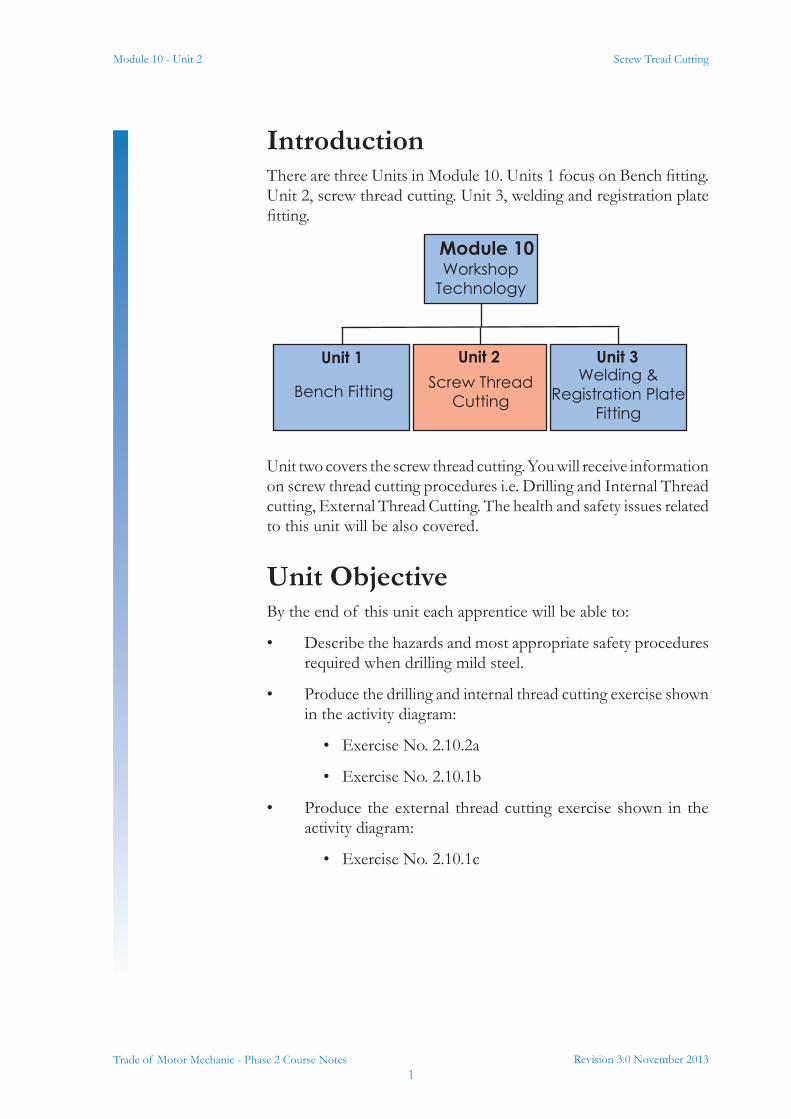
IntroductionThere are three Units in Module 10. Units 1 focus on Bench fitting. Unit 2, screw thread cutting. Unit 3, welding and registration plate fitting.
Unit two covers the screw thread cutting. You will receive information on screw thread cutting procedures i.e. Drilling and Internal Thread cutting, External Thread Cutting. The health and safety issues related to this unit will be also covered.
Unit ObjectiveBy the end of this unit each apprentice will be able to:
• Describe the hazards and most appropriate safety procedures required when drilling mild steel.
• Produce the drilling and internal thread cutting exercise shown in the activity diagram:
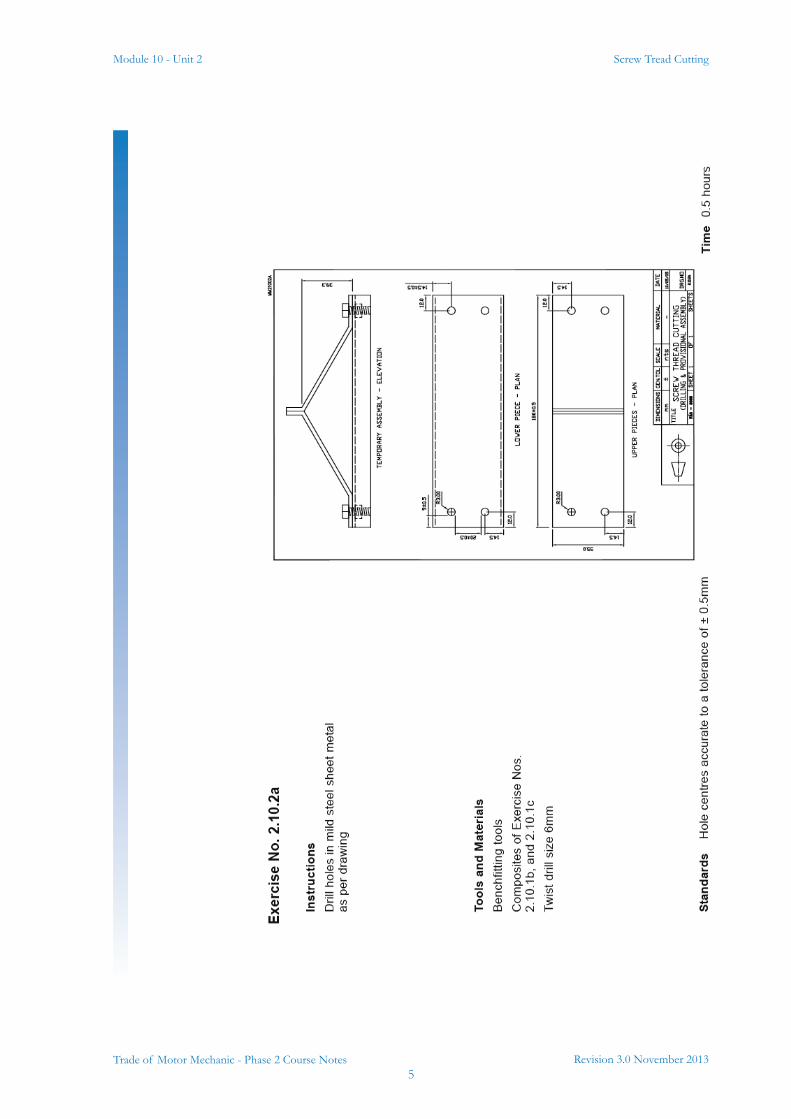
• Exercise No. 2.10.2a
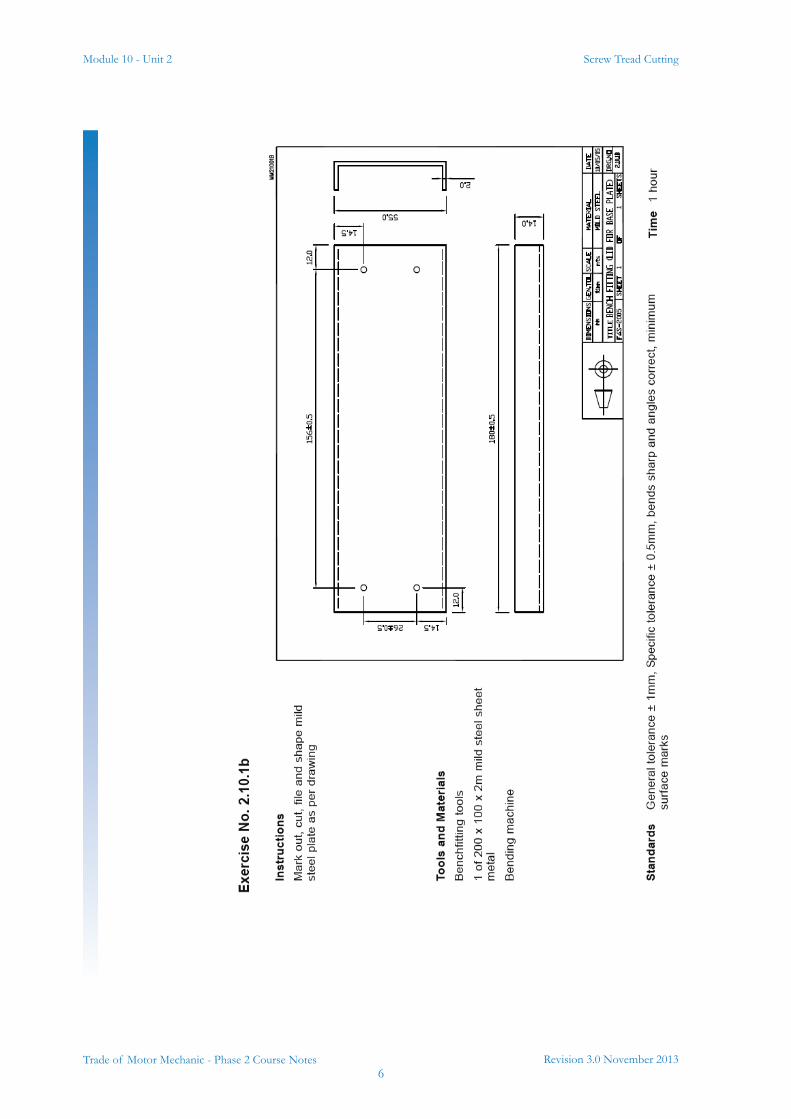
• Exercise No. 2.10.1b
• Produce the external thread cutting exercise shown in the activity diagram:
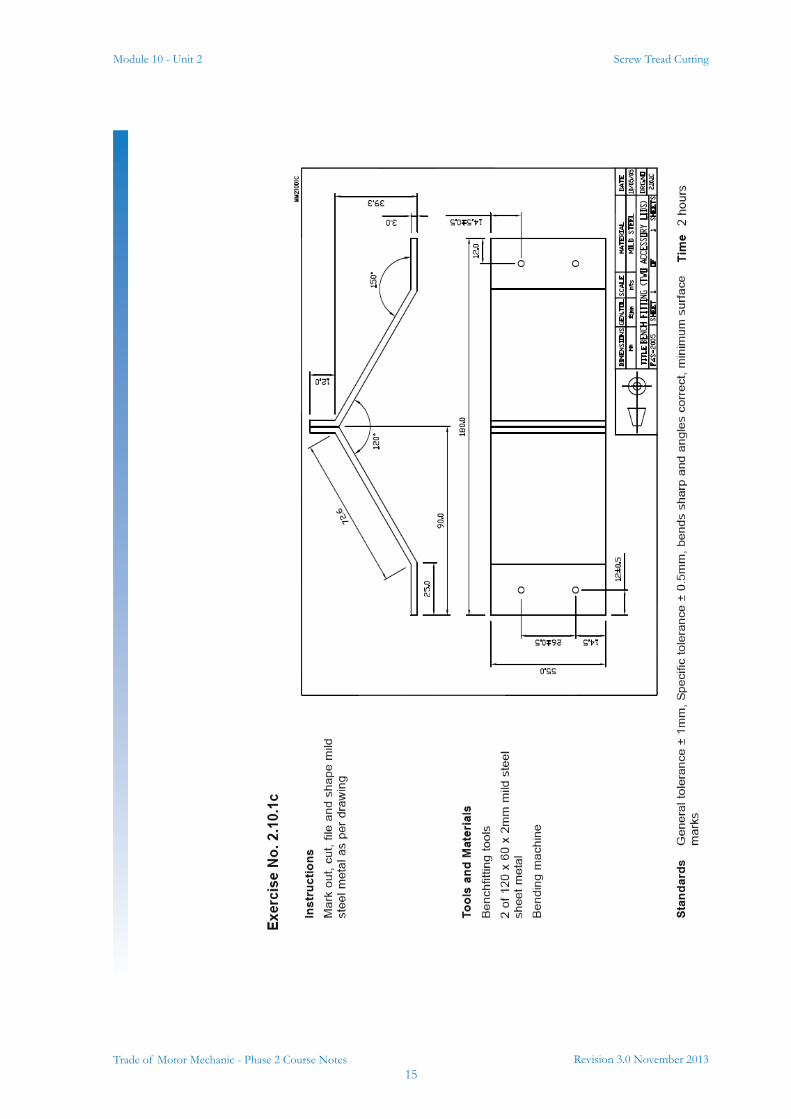
• Exercise No. 2.10.1c
Module 10Workshop
Technology
Unit 1 Unit 2 Unit 3
Bench Fitting Screw ThreadCutting
Welding &Registration Plate
Fitting


Revision 3.0 November 20133
Module 10 - Unit 2 Screw Tread Cutting
Trade of Motor Mechanic - Phase 2 Course Notes
1.0 Hazards and Safety Procedures
1.1 Health and SafetyIf the proper safety procedures are not adhered to when Screw Thread cutting this could lead to serious injury \health problems to personnel.
Instruction is given in the proper safety precautions which include the following:
• Material securely clamped for drilling procedures
• Safety glasses worn at all times
• Hair caps worn where necessary
• No loose clothing worn
• Gloves worn when handling 'rough' metal
• Danger of personal injury/component damage by incorrect or non-use of vice clamps on drill bench
• Use of drill, safety switch operation, use of parallel bar support for work piece, use of work piece clamps etc., selection of appropriate drill speed
Refer to motor risk assessments, Environmental policy and Material Safety Data Sheets (MSDS)
Key Learning Points• Material securely clamped for drilling procedures, safety
glasses worn at all times, hair caps worn where necessary, no loose clothing worn, gloves worn when handling 'rough' metal
• Danger of personal injury/component damage by incorrect or non-use of vice clamps on drill bench
• Use of drill, safety switch operation, use of parallel bar support for work piece, use of work piece clamps etc., selection of appropriate drill speed

Module 10 - Unit 2
Revision 3.0 November 20134
Screw Tread Cutting
Trade of Motor Mechanic - Phase 2 Course Notes
2.0 Drilling and Internal Thread Cutting Exercise
This is a practical task. Please refer to your instructor for additional information.
Key Learning Points• Selection of appropriate drill diameter for thread type/
diameter, procedure started with small drill size etc., drilling located within tolerances prescribed on the activity diagrams
• Measuring and marking out skills
• 'Tap' threads cut/finished to correct diameter, threads cut square, smooth etc., use of start, intermediate and final taps
Practical Task
Revision 3.0 November 20135
Module 10 - Unit 2 Screw Tread Cutting
Trade of Motor Mechanic - Phase 2 Course Notes
Module 10 - Unit 2
Revision 3.0 November 20136
Screw Tread Cutting
Trade of Motor Mechanic - Phase 2 Course Notes
Revision 3.0 November 20137
Module 10 - Unit 2 Screw Tread Cutting
Trade of Motor Mechanic - Phase 2 Course Notes
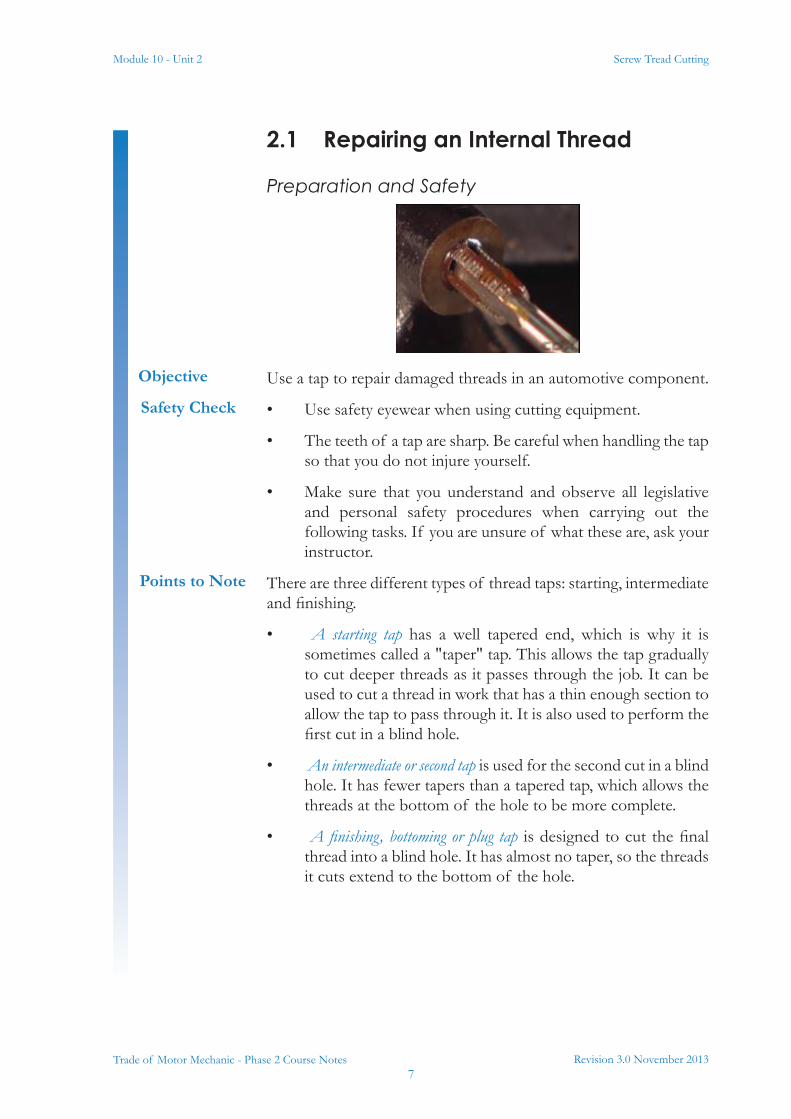
2.1 Repairing an Internal Thread
Preparation and Safety
Use a tap to repair damaged threads in an automotive component.
• Use safety eyewear when using cutting equipment.
• The teeth of a tap are sharp. Be careful when handling the tap so that you do not injure yourself.
• Make sure that you understand and observe all legislative and personal safety procedures when carrying out the following tasks. If you are unsure of what these are, ask your instructor.
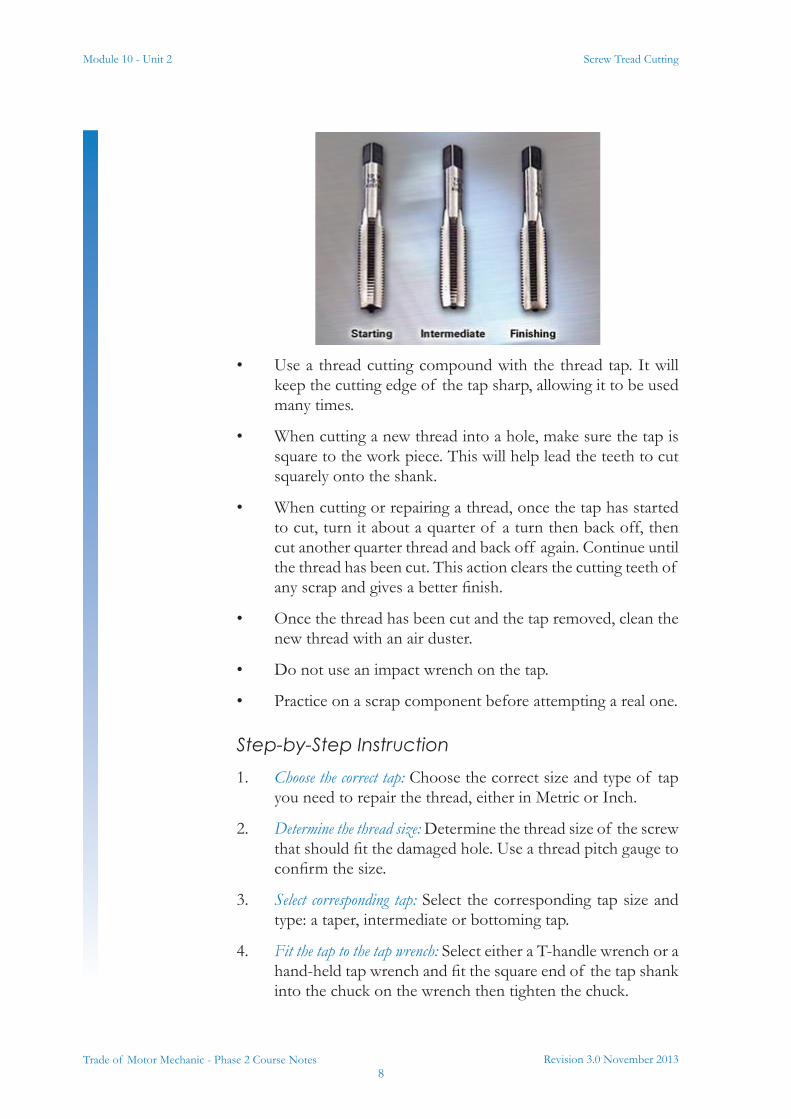
There are three different types of thread taps: starting, intermediate and finishing.
• A starting tap has a well tapered end, which is why it is sometimes called a "taper" tap. This allows the tap gradually to cut deeper threads as it passes through the job. It can be used to cut a thread in work that has a thin enough section to allow the tap to pass through it. It is also used to perform the first cut in a blind hole.
• An intermediate or second tap is used for the second cut in a blind hole. It has fewer tapers than a tapered tap, which allows the threads at the bottom of the hole to be more complete.
• A finishing, bottoming or plug tap is designed to cut the final thread into a blind hole. It has almost no taper, so the threads it cuts extend to the bottom of the hole.
Objective
Safety Check
Points to Note
Module 10 - Unit 2
Revision 3.0 November 20138
Screw Tread Cutting
Trade of Motor Mechanic - Phase 2 Course Notes
• Use a thread cutting compound with the thread tap. It will keep the cutting edge of the tap sharp, allowing it to be used many times.
• When cutting a new thread into a hole, make sure the tap is square to the work piece. This will help lead the teeth to cut squarely onto the shank.
• When cutting or repairing a thread, once the tap has started to cut, turn it about a quarter of a turn then back off, then cut another quarter thread and back off again. Continue until the thread has been cut. This action clears the cutting teeth of any scrap and gives a better finish.
• Once the thread has been cut and the tap removed, clean the new thread with an air duster.
• Do not use an impact wrench on the tap.
• Practice on a scrap component before attempting a real one.
Step-by-Step Instruction1. Choose the correct tap: Choose the correct size and type of tap
you need to repair the thread, either in Metric or Inch.
2. Determine the thread size: Determine the thread size of the screw that should fit the damaged hole. Use a thread pitch gauge to confirm the size.
3. Select corresponding tap: Select the corresponding tap size and type: a taper, intermediate or bottoming tap.
4. Fit the tap to the tap wrench: Select either a T-handle wrench or a hand-held tap wrench and fit the square end of the tap shank into the chuck on the wrench then tighten the chuck.
Revision 3.0 November 20139
Module 10 - Unit 2 Screw Tread Cutting
Trade of Motor Mechanic - Phase 2 Course Notes
5. Apply thread cutting compound: Apply a small amount of thread cutting compound to the cutting teeth of the tap. Position the tap in the damaged hole, making sure that it’s square to the hole and not at an angle.
6. Rotate the tap clockwise: Slowly and carefully turn the tap wrench in a clockwise direction into the damaged hole. You will feel the tap removing the metal from inside the hole, making the thread. Continue to turn the tap until it has bottomed in the hole or has passed all the way through.
7. Remove the tap counter clockwise: To remove the tap, turn the wrench counter-clockwise up and out of the hole. Clean any filings or particles from the cutting threads and the flute of the tap before you remove it from the wrench.
8. Clean out the hole and test it: Clean out any filings or particles from the hole you have just repaired. You can then test the repair by using the correct size screw or bolt and tightening it by hand. Sometimes you’ll find the damage was so severe that the tap wrench procedure fails to fix the problem. If this happens refer the job to your instructor.
2.2 Cutting and Repairing Threads and Using a Thread Pitch Gauge
Preparation and SafetyIdentify the common types, length, diameter, grade and thread pitch of threaded fasteners.
• Never use a bolt that has been over-tightened. Its tensile strength is very low and it could break.
• Use the correct tool to tighten or loosen bolts, otherwise you could break them.
• Make sure that you understand and observe all legislative and personal safety procedures when carrying out the following tasks. If you are unsure of what these are, ask your instructor.
Objective
Safety Check
Module 10 - Unit 2
Revision 3.0 November 201310
Screw Tread Cutting
Trade of Motor Mechanic - Phase 2 Course Notes
• Fasteners are used to secure components or pieces of components together. There are two main types of fasteners: inch and metric. They are not compatible.
• Bolts are identified in four ways:
• Length
• Diameter
• Thread Pitch
• Tensile Strength
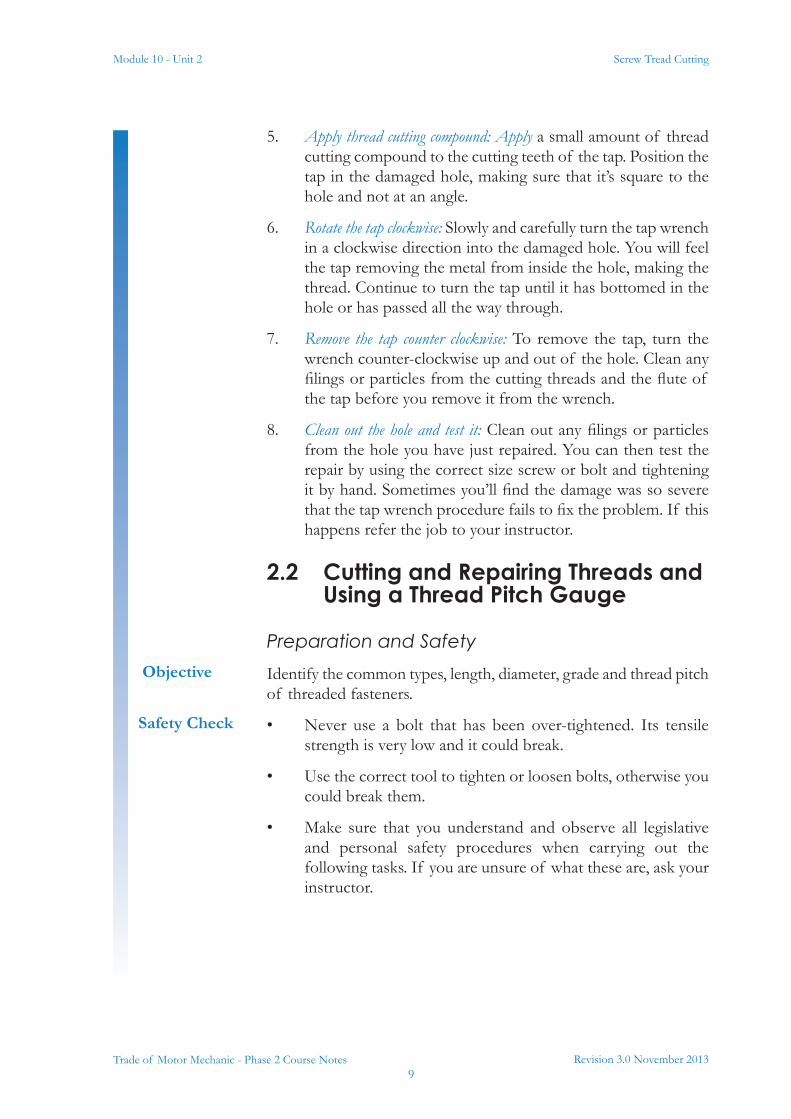
• A bolt’s length is the distance from under the head of the bolt to the far end of the thread. Metric bolt sizes might be 25mm, 40mm, etc.
• The bolt diameter is the thickness of the bolt shank. This will be 6mm, 8mm, 10mm, etc. if it is a metric bolt.
• Fine threads can achieve a greater tightening force than coarse threads.
• Coarse threads are used in softer materials because they have a greater grip on the material.
• The measurement of thread pitch for UNC and UNF bolts is described in the number of threads-per-inch (TPI).
• Metric bolts define their pitch by the distance between each thread. There are still fine and coarse threads but this time the bolt dimension may be 6mm x 40mm x 1.0 or 1.25 in the case of a fine thread. A coarse threaded bolt of a similar size will have the dimensions of 6mm x 40mm x 1.75 or 2.0.
• The suitability of a bolt for an application is determined by its tensile strength and its yield strength. The tensile strength is defined as the maximum stretching stress a bolt can withstand without breaking. The yield strength is the maximum stress a bolt can withstand and still return to its original form.
Points to Note
Revision 3.0 November 201311
Module 10 - Unit 2 Screw Tread Cutting
Trade of Motor Mechanic - Phase 2 Course Notes
• There are two standards of bolt grading in use. The Society of Automotive Engineers (SAE) and the American National Standards Institute (ANSI) apply the ANSI standard. This grading applies to the strength of the bolt. The second is the International Standards Organization (ISO) grading for tensile strength and yield strength of the bolt.
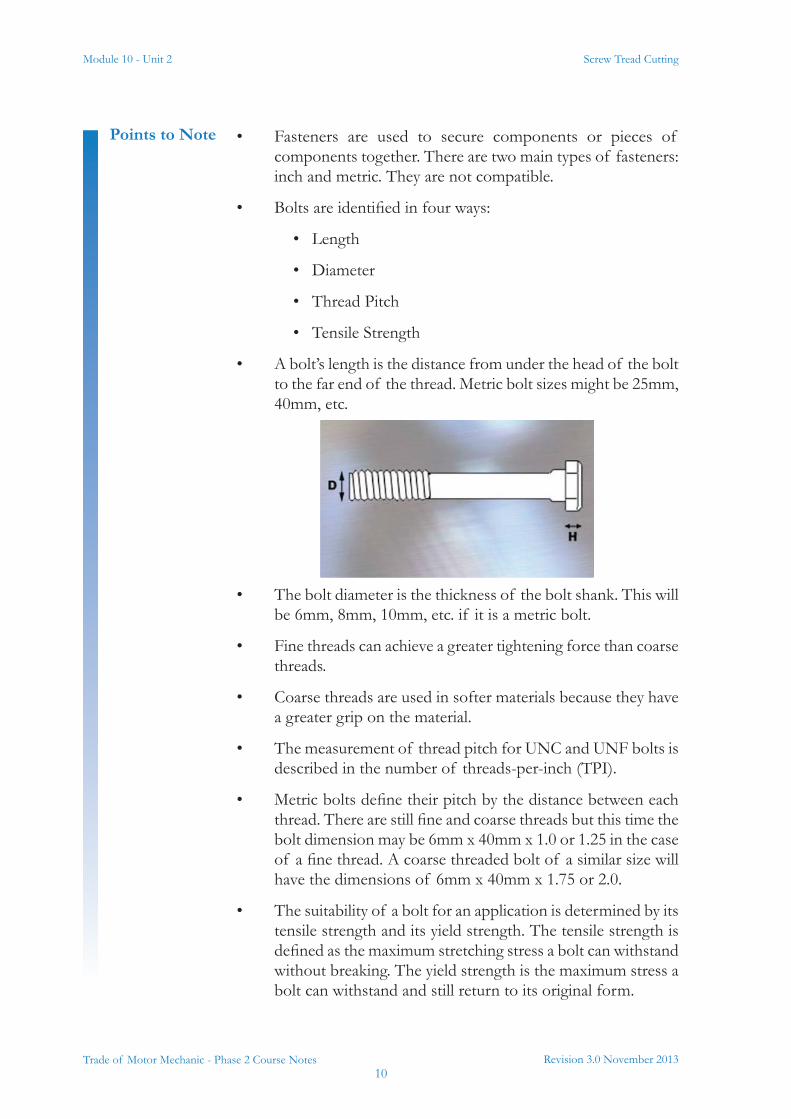
• A bolt graded by the ANSI standard is identified by the number of lines arranged around the head of the bolt. The minimum value of tensile strength is defined as 2. A bolt of this value has no lines on its head.
• 0 lines = Grade 2 tensile strength
• 3 lines = Grade 5
• 5 lines = Grade 7
• 6 lines = Grade 8
• A high grade-value = a high tensile value.
• The ISO standard uses two numbers on the head of the bolt. The first number indicates the tensile strength; the second number signifies the yield strength.
Module 10 - Unit 2
Revision 3.0 November 201312
Screw Tread Cutting
Trade of Motor Mechanic - Phase 2 Course Notes
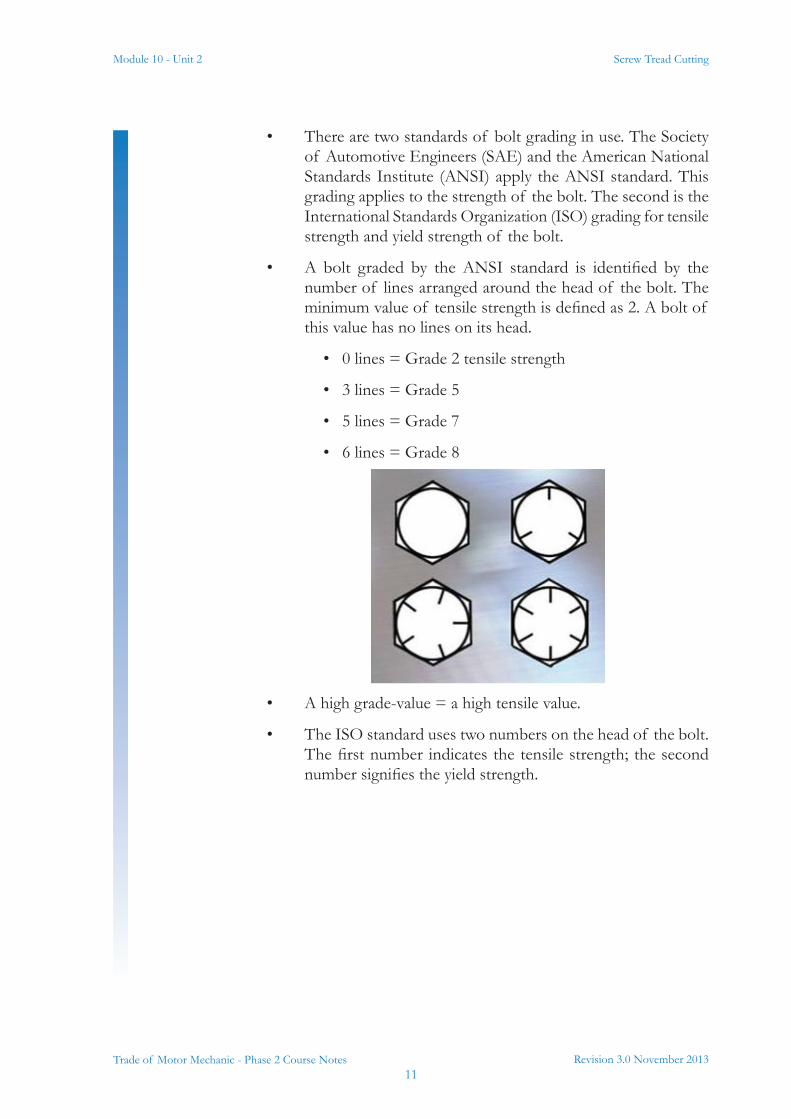
• If a bolt is marked 8.8, it has a tensile strength of 800 MegaPascals (MPa) and a yield strength value of 640 MPa, 80% of its tensile strength. A marking of 10.9 indicates a tensile value of 1000 MPa with a yield strength of 900 MPa, 90% of its tensile strength.
• 4 = 400 MPa
• 5 = 500 MPa
• 8 = 800 MPa
• 10 = 1000 MPa
• 0.5 = 50%
• 0.6 = 60%
• 0.7 = 70%, etc.
• Always use a bolt suitable for the application. If a bolt with too high tensile strength is used and not tightened to its designed value, it may fail. That is because high tensile bolts have less resistance to fatigue than bolts with a lower tensile value.
Revision 3.0 November 201313
Module 10 - Unit 2 Screw Tread Cutting
Trade of Motor Mechanic - Phase 2 Course Notes
Step-by-Step Instruction1. Choose a pitch gauge: To determine the thread pitch of a particular
fastener, you need to use a thread pitch gauge.
2. Check gauge markings: Open out the pitch gauge set and examine the markings on the toothed blades. The markings will be either in inch units or in metric units. The numbers stamped on the toothed blade of an inch gauge set indicate the number of threads per inch of thread length. For example: 16 threads to the inch. Look at the numbers on the blade of a Metric pitch gauge set. The numbers indicate the width between each thread in millimetres. For example: a thread pitch of 1.5 millimetres.
3. Measure a known size: Choose a fastener of a size you know, e.g. 3/8 inch U-N-C bolt. Using your inch gauge set, select each blade and hold the toothed edge against the thread of the bolt. Continue trying the blades until you find one that matches exactly the thread on your bolt. Check the number on the blade; it should read 16. That is, 16 threads per inch.
4. Measure an unknown size: Now choose a fastener whose size you do not know. If it is a metric bolt, select the metric thread pitch gauge. Repeat the procedure with the blades against the thread of the bolt, until you find a perfect match. Check the number on the blade; it will tell you the thread pitch of this fastener in millimetres.
5. Correctly store gauge: When you have finished, be sure to fold all of the blades back into their casing before putting the gauge set away. This is to protect the blade teeth from damage.
Module 10 - Unit 2
Revision 3.0 November 201314
Screw Tread Cutting
Trade of Motor Mechanic - Phase 2 Course Notes
3.0 External Thread Cutting
This is a practical task. Please refer to your instructor for additional information.
Key Learning Points• Screw threads cut/finished square, smooth, lengths within
prescribed tolerances, correct use of die adjustment, threat cutting lubricant etc.
• Final measurements of components within tolerances prescribed on the activity diagrams
Practical Task
Revision 3.0 November 201315
Module 10 - Unit 2 Screw Tread Cutting
Trade of Motor Mechanic - Phase 2 Course Notes

Module 10 - Unit 2
Revision 3.0 November 201316
Screw Tread Cutting
Trade of Motor Mechanic - Phase 2 Course Notes
3.1 DiesThreads are cut on screws, bolts, nuts, studs and inside holes to allow components to be attached and assembled.The pitch of a thread is the distance between the crests.
It’s measured by a thread pitch gauge, which come in sets. By laying the blades along the bolt it’s easy to find one with teeth that fit neatly into the thread.
Revision 3.0 November 201317
Module 10 - Unit 2 Screw Tread Cutting
Trade of Motor Mechanic - Phase 2 Course Notes
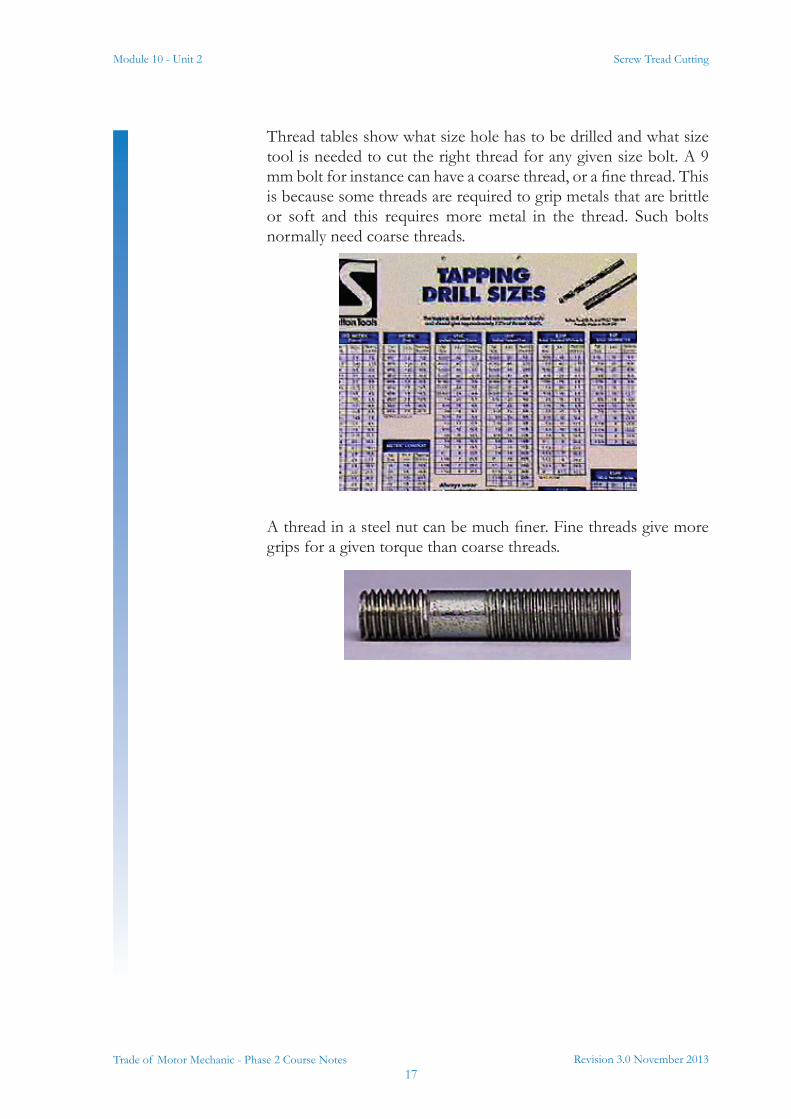
Thread tables show what size hole has to be drilled and what size tool is needed to cut the right thread for any given size bolt. A 9 mm bolt for instance can have a coarse thread, or a fine thread. This is because some threads are required to grip metals that are brittle or soft and this requires more metal in the thread. Such bolts normally need coarse threads.
A thread in a steel nut can be much finer. Fine threads give more grips for a given torque than coarse threads.
Module 10 - Unit 2
Revision 3.0 November 201318
Screw Tread Cutting
Trade of Motor Mechanic - Phase 2 Course Notes
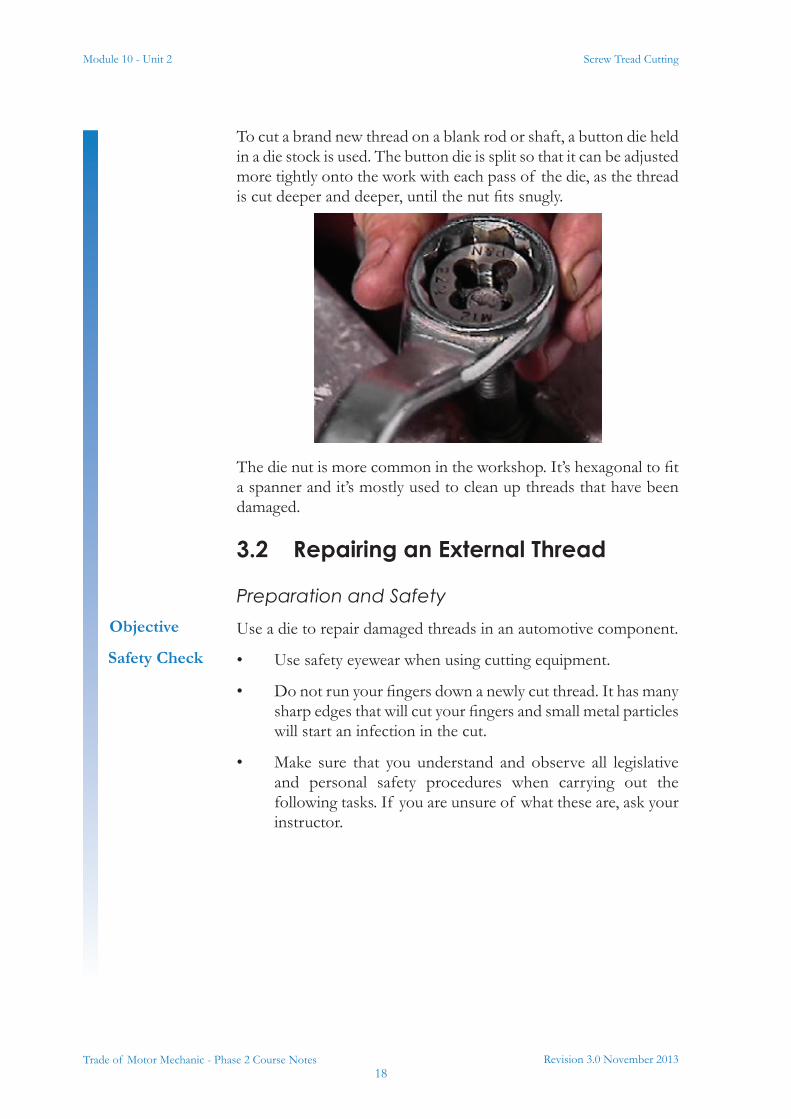
To cut a brand new thread on a blank rod or shaft, a button die held in a die stock is used. The button die is split so that it can be adjusted more tightly onto the work with each pass of the die, as the thread is cut deeper and deeper, until the nut fits snugly.
The die nut is more common in the workshop. It’s hexagonal to fit a spanner and it’s mostly used to clean up threads that have been damaged.
3.2 Repairing an External Thread
Preparation and SafetyUse a die to repair damaged threads in an automotive component.
• Use safety eyewear when using cutting equipment.
• Do not run your fingers down a newly cut thread. It has many sharp edges that will cut your fingers and small metal particles will start an infection in the cut.
• Make sure that you understand and observe all legislative and personal safety procedures when carrying out the following tasks. If you are unsure of what these are, ask your instructor.
Objective
Safety Check
Revision 3.0 November 201319
Module 10 - Unit 2 Screw Tread Cutting
Trade of Motor Mechanic - Phase 2 Course Notes
• A die is a metalworking tool used to repair or cut new outside threads on fasteners.
• The die is installed in a tool called a "die stock". It gives the leverage to turn the die over the new thread. The diestock locates the die in place using thumbscrews that match indentations in the outer edge of the die.
• The die has a top and a bottom. The bottom has tapered threads to guide the thread into the die.
• Use a thread cutting compound with the die. It will keep the cutting edge of the die sharp, allowing it to be used many times.
• If cutting a new thread on a bolt or stud, make sure the top of the shank is square. This will help lead the die teeth squarely onto the shank.
• Make sure the die is square to the shaft of the stud or bolt at the start of the thread cutting process.
• When cutting or repairing a thread, once the die has started to cut, turn the die about a quarter of a turn then back off. Cut another quarter of the thread and back off again. Continue until the thread has been cut. This action clears the cutting teeth of any scrap and gives a better finish.
• Once the thread has been cut and the die removed, clean the new thread with a wire brush. This will remove any sharp edges and any left over scrap from the new thread.
• Do not use a wrench to tighten the die locating thumbscrews.
Points to Note

Module 10 - Unit 2
Revision 3.0 November 201320
Screw Tread Cutting
Trade of Motor Mechanic - Phase 2 Course Notes
Self AssessmentSee Unit 3
Suggested ExercisesProduce the thread cutting exercise components/exercise shown in the activity diagram Nos. 2.10.2a, 2.10.2b and 2.10.2c to the specified tolerances.
Training Resources• Technical information in book/electronic form on the drilling
of metal, appropriate diameter for internal thread cutting, the use of thread cutting taps and dies and the identification/determination of industry standard finish
• Basic metalwork benches, vices, tool kits, drill bits, metal thread cutting taps and dies, thread cutting lubricant, workbenches, appropriate metal
• First aid kit
Revision 3.0 November 201321
Module 10 - Unit 2 Screw Tread Cutting
Trade of Motor Mechanic - Phase 2 Course Notes
Suggested Further Reading• Advanced Automotive Diagnosis. Tom Denton. ISBN
0340741236
• Automobile Electrical and Electronic Systems (3rd Edition). Tom Denton. ISBN 0750662190
• Automotive Mechanics (10th Edition). William H. Crouse and Donald L. Anglin. ISBN 0028009436
• Bosch Automotive Electrics Automotive Electronics: Systems and Components (4th Edition). Robert Bosch. ISBN 0837610508
• Bosch Automotive Handbook (6th Edition). Robert Bosch. ISBN 1860584748
• Bosch Automotive Technology Technical Instruction booklet series (numerous titles)
• Hillier’s Fundamentals of Motor Vehicle Technology: Book One (5th Edition). V.A.W. Hillier and Peter Coombes. ISBN 0748780823
• Hillier’s Fundamentals of Motor Vehicle Technology: Book Two (5th Edition). V.A.W. Hillier and Peter Coombes. ISBN 0748780998
• Modern Automotive Technology. James E. Duffy. ISBN 1566376106
• Motor Vehicle Craft Studies - Principles. F.K. Sully. ISBN 040800133X
• National Car Test (NCT) Manual (Department of Transport, Vehicle Testers Manual - DoT VTM). Department of Transport
• Transmission, Chassis and Related Systems (Vehicle Maintenance and Repair Series: Level 3) (3rd Edition) John Whipp and Roy Brooks. ISBN 186152806X
• Vehicle and Engine Technology (2nd Edition). Heinz Heisler. ISBN 0340691867
• http://www.cdxglobal.com/
• http://auto.howstuffworks.com/
• http://www.autoshop101.com/
• http://www.cdxetextbook.com/
• Automotive Encyclopedia and Text Book Resource (CD version of e-textbook), Available from your instructor.

Notes


27-33 Upper Baggot Street
Dublin 4