Embed Size (px)
Citation preview
TC 21-305-3
TRAINING PROGRAM FORTHE M939 SERIES 5-TON TACTICAL
CARGO TRUCK
DISTRIBUTION RESTRICTION: Approved for public release; distribution is unlimited.
HEADQUARTERS, DEPARTMENT OF THE ARMY
*TC 21-305-3
i
Training Circular HEADQUARTERSNo. 21-305-3 DEPARTMENT OF THE ARMY
Washington, D.C., 1 August 1997
TRAINING PROGRAM FORTHE M939 SERIES 5-TON TACTICAL CARGO TRUCK
TABLE OF CONTENTS
Page
PREFACE...............................................................................................................................iii
CHAPTER 1 RISK MANAGEMENT .............................................................................. 1-11-1. GENERAL............................................................................................ 1-11-2. BACKGROUND................................................................................... 1-11-3. DEFINITIONS...................................................................................... 1-11-4. RISK MANAGEMENT PROCESS....................................................... 1-21-5. RISK ASSESSMENT ELEMENTS ...................................................... 1-31-6. DECISION AID .................................................................................... 1-71-7. RISK CONTROL ALTERNATIVES .................................................... 1-71-8. SUPERVISION..................................................................................... 1-71-9. PAYOFFS............................................................................................. 1-7
CHAPTER 2 INSTRUCTIONAL AIDS ........................................................................... 2-12-1. STUDENT REQUIREMENTS.............................................................. 2-12-2. INSTRUCTOR REQUIREMENTS....................................................... 2-12-3. TRAINING FACILITIES...................................................................... 2-22-4. TRAINING AIDS AND DEVICES ....................................................... 2-2
CHAPTER 3 SAMPLE TRAINING SCHEDULE ........................................................... 3-1
CHAPTER 4 LESSON OUTLINES FOR TRUCK OPERATIONS ............................... 4-1Use Technical Manuals (TMs) and Lubrication Orders (LOs), andMake Entries on DA Form 2404 (Equipment Inspection and MaintenanceWorksheet) .................................................................................................... 4-1Prepare DD Form 1970 (Motor Equipment Utilization Record)....................... 4-10Report an Accident (Make Required Entries on DD Form 518 and SF 91) ...... 4-15Perform Operator Preventive Maintenance Checks and Services (PMCS)........ 4-27Identify Cab Controls, Instruments, and Indicators ......................................... 4-31Operate the Central Tire Inflation System (CTIS) on an M939A2 SeriesVehicle .......................................................................................................... 4-36
DISTRIBUTION RESTRICTION: Approved for public release; distribution is unlimited.
*This publication supersedes TC 21-305-3, 10 December 1990.Page

TC 21-305-3
ii
Drive an M939 Series Cargo Truck............................................................. 4-40Drive an M939 Series Cargo Truck on the Road.......................................... 4-51Drive an M939 Series Cargo Truck Off Road.............................................. 4-64Drive an M939 Series Cargo Truck at Night ............................................... 4-73
CHAPTER 5 LESSON OUTLINES FOR TRAILER OPERATIONS...........................5-1Perform Operator Preventive Maintenance Checks and Services (PMCS)on Trailers ....................................................................................................5-1Drive an M939 Series Cargo Truck with Trailer............................................5-4
CHAPTER 6 SAMPLE TRAINING AREAS FOR THE 5-TON CARGO TRUCK .....6-1
CHAPTER 7 END OF COURSE COMPREHENSIVE TEST .......................................7-1
GLOSSARY............................................................................................................ Glossary-1
REFERENCES ....................................................................................................References-1
INDEX .........................................................................................................................Index-1

TC 21-305-3
iii
PREFACE
This TC provides a training program for the M939 series 5-ton cargo vehicle operator according toAR 600-55. It provides standardized training and testing in the operation, maintenance, and safetyof this vehicle. It stresses hands-on training with minimal classroom instruction and does not includeany theater-unique requirements. Also during the development of this TC, it was assumed that eachdriver candidate would have a state driver’s license, have completed accident avoidance trainingaccording to TC 21-305, and possess an OF 346 (stamped as a learner’s permit).
The lesson content for this training program is arranged sequentially and separated into threechapters (Chapters 4, 5, and 7). Chapter 4 contains training for driving operations and Chapter 5for trailer operations. Testing is contained in Chapter 7. For those operators trained on truckoperations, testing is conducted after the training in Chapter 4. Operators that are trained in traileroperations are tested after receiving all training in Chapters 4 and 5. This allows the commander theflexibility to tailor 5-ton operator training based on the unit’s equipment. Also, all training should beannotated on DA Form 348 (or ULLS-generated DA Form 348-E) according to AR 600-55.
To provide effective training, each instructor should ensure his operators are trained and tested to thestandards in this TC. Any deviation from the successful completion of these basic standards willonly lessen the soldiers’ overall driving effectiveness.
Graduates of this training program (licensed drivers) should be supervised until they have gained theexperience to safely operate the M939 series 5-ton cargo truck. They should not be placed insituations that may be above their skill level. Periodically, the supervisor should ride with eachdriver to observe safe operating procedures and to determine the need for additional training.
The proponent of this publication is HQ TRADOC. Submit changes for improving this publicationon DA Form 2028 (Recommended Changes to Publications and Blank Forms) and forward it toCommandant, US Army Transportation School, ATTN: ATSP-TDI-DX, Fort Eustis, Virginia23604-5389.
The US Army’s environmental strategy into the 21st century defines the Army’s leadershipcommitment and philosophy for meeting present and future environmental challenges. It provides aframework to ensure that environmental stewardship ethic governs all Army activities. The Army’senvironmental vision is to be a national leader in environmental and natural resource stewardship forpresent and future generations, as an integral part of all Army missions. The Army’s environmentalvision statement communicates the Army’s commitment to the environment.
Unless this publication states otherwise, masculine nouns and pronouns do not refer exclusively tomen.

TC 21-305-3
1-1
CCHHAAPPTTEERR 11
RRIISSKK MMAANNAAGGEEMMEENNTT
1-1. GENERAL. This chapter explains risk management as it applies to wheeled vehicle drivertraining. For more detailed risk management guidance, refer to FM 101-5, Appendix J.
1-2. BACKGROUND. Ground vehicle accidents cost the Army millions of dollars each yearand significantly reduce mission capabilities. Leaders must develop techniques that will saveresources. Because the Army must be prepared to operate worldwide, the training mission hasbecome increasingly demanding and so have the risks inherent in that mission. This increase in riskrequires leaders to balance mission needs with hazards involved and make wise risk decisions.
1-3. DEFINITIONS.
a. Risk Management. Risk management is the process of identifying and controllinghazards to protect the force. It is a step-by-step process that provides a framework for analyzingany mission or task. The following are the five steps of risk management:
(1) Step 1 – Identify Hazards. Identify hazards to the force. Consider all aspectsof current and future situation, environment, and known historical problem areas.
(2) Step 2 – Assess Hazards. Assess hazards to determine risks. Assess theimpact of each hazard in terms of potential loss and cost based on probability and severity.
(3) Step 3 – Develop Controls and Make Risk Decision. Develop controlmeasures that eliminate the hazards or reduce its risk. As control measures are developed, risks arereevaluated until all risks are reduced to a level where benefits outweigh potential cost.
(4) Step 4 – Implement Controls. Put controls in place that eliminate the hazardsor reduce their risk.
(5) Step 5 – Supervise and Evaluate. Enforce standards and controls. Evaluatethe effectiveness of control and adjust/update as necessary.
b. Hazard. Any real or potential condition that can cause injury, illness, or death ofpersonnel; or damage to or loss of equipment or property.
c. Risk. Chance of hazard or bad consequences; exposure to chance of injury or loss.Risk level is expressed in terms of hazard probability and severity.
d. Exposure. The frequency and length of time subjected to a hazard.
e. Probability. The likelihood that an event will occur.
TC 21-305-3
1-2
f. Severity. The expected consequence of an event in terms of degree of injury, propertydamage, or other mission impairing factors (loss of combat power, adverse publicity, and so forth)that could occur.
g. Controls. Actions taken to eliminate hazards or reduce their risk.
h. Risk Assessment. The identification and assessment of hazards (first two steps of riskmanagement process).
i. Residual Risk. The level of risk remaining after controls have been identified andselected for hazards that may result in loss of combat power. Controls are identified and selecteduntil residual risk is at an acceptable level or until it cannot be practically reduced further.
j. Risk Decision. The decision to accept or not accept the risk(s) associated with anaction.
1-4. RISK MANAGEMENT PROCESS. The risk management process uses the followingapproach:
a. Identify Hazards. Look for hazards in each phase of the training or operation.
b. Assess the Risk. Ask these questions:
• What type of injury or equipment damage can be expected?• What is the probability of an accident happening?
NOTE: A low probability of an accident and an expected minor injury equals low risk. A highprobability of an accident and an expected fatality equals extremely high risk.
c. Develop Risk Control Alternatives and Make Risk Decisions. If you cannoteliminate the risk, then you must control it without sacrificing essential mission requirements. Youcan control some risks by modifying tasks, changing location, increasing supervision, wearingprotective clothing, changing time of operation, and so on. Decisions take several forms:
• Selecting from available controls.• Modifying the mission because risk is too great.• Accepting risk because mission benefits outweigh potential loss.
d. Implement Risk Control Measures. You must integrate procedures to control risksinto plans, orders, SOPs, and training. You must also ensure risk reduction measures are usedduring actual operations.
e. Supervise the Operations. Make sure leaders know what controls are in place, whatstandards are expected, and then hold those in charge accountable for implementation. This is thepoint when accident prevention actually happens.

TC 21-305-3
1-3
1-5. RISK ASSESSMENT ELEMENTS. There are no hard and fast rules for assessing risk.Different training tasks involve different elements that can affect training safety. However, thefollowing seven elements are central to safely completing most driver training tasks:
• Soldier qualification.• Supervision.• Vehicle type.• Equipment.• Weather.• Time of day.• Terrain.
Using matrices that assign a risk level to each of the elements is one way to quickly appreciate theoverall risks. The following matrices (Tables 1-1 through 1-7) are examples of risk assessments forthe seven elements common to driver training missions.
NOTE: The factors are arbitrarily weighted. Modify them based on your particular mission andunit.
• Measure soldier qualification risk (Table 1-1) by comparing the level of task difficultyto the soldier’s military driving experience.
Table 1-1. Soldier qualification risk value
SOLDIER QUALIFICATION RISK VALUE
DRIVING EXPERIENCE
TASK
COMPLEXROUTINESIMPLE
Low
LICENSED OVER 1YEAR
Moderate
Low
LICENSED UNDER 1YEAR
HighModerate
Low
UNLICENSED
HighHigh
Moderate
EXAMPLE: Unlicensed drivers learning braking techniques in a 5-ton cargo truck with air brakeswould be a high risk situation requiring substantial controls (new drivers generally do not haveexperience with air brake vehicles).

TC 21-305-3
1-4
• Measure vehicle type risk (Table 1-2) by comparing the vehicle configuration to thelocations of the training tasks.
Table 1-2. Vehicle type risk value
VEHICLE TYPE RISK VALUE
VEHICLE CONFIGURATION
LOCATION OF TRAINING
ROADLow
SMALLTRUCKS
Moderate
Low
HighModerate
Low
COMBINATION UNITS
HighHigh
Moderate
STRAIGHT TRUCKS
TRAINING AREAMOTOR POOL
EXAMPLE: Driving a 5-ton cargo truck over the road would have a high risk value.
• Measure weather risk (Table 1-3) by comparing road conditions with visibility.
Table 1-3. Weather risk value
WEATHER RISK VALUE
VISIBILITY
ROADCONDITIONS
UNFAVORABLELow
CLEAR
Moderate
Low
HighModerate
RESTRICTED
HighHigh
REDUCED
ADEQUATEFAVORABLE Moderate High
EXAMPLE: Driving on icy roads in fog would have a high risk value.

TC 21-305-3
1-5
• Measure terrain risk (Table 1-4) by comparing the physical features of the land with theexisting road network.
Table 1-4. Terrain risk value
TERRAIN RISK VALUE
ROAD NETWORK
TYPE OFTERRAIN
MOUNTAINLow
IMPROVED ROADS
Moderate
Low
HighModerate
Low
UNIMPROVED
HighHigh
Moderate
SECONDARY ROADS
DESERT/JUNGLEFLAT/ROLLING
EXAMPLE: Driver training conducted at Fort Bragg, NC, over trails would have a moderate riskvalue.
• Measure supervision risk (Table 1-5) by comparing the level of supervision to the tasklocation.
Table 1-5. Supervision risk value
SUPERVISION RISK VALUE
TASK LOCATION
LEVEL OFSUPERVISION
MOTOR POOL
LowHigh
Low
HighModerate
Low
OFF ROAD/CONGESTED ROAD
HighHigh
Moderate
TRAINING AREA/NONCONGESTED ROAD
NOT OBSERVINGOBSERVINGIN VEHICLE
EXAMPLE: A student driving alone, but observed, in a training area would have a moderate riskvalue.

TC 21-305-3
1-6
• Measure equipment risk (Table 1-6) by comparing the equipment’s age to the time(months) since the last semiannual service. Equipment age is defined as; old is 15 or more years old,average is 5 to 15 years old, and new is 5 or less years old.
Table 1-6. Equipment risk value
EQUIPMENT RISK VALUE
LAST SEMIANNUAL SERVICE
EQUIPMENT AGE 0 TO 2 MONTHS +4 MONTHS+2 TO 4 MONTHS
OLDAVERAGE NEW
ModerateLowLow
ModerateModerate
Low
High HighModerate
EXAMPLE: An eight-year-old 5-ton cargo truck serviced 3 months ago would have a moderate riskvalue.
• Measure time of day risk (Table 1-7) by comparing the level of light to familiarity withthe route.
Table 1-7. Time of day risk value
TIME OF DAY RISK VALUE
LIGHT LEVEL
ROUTEFAMILIARITY
DAY NIGHTDAWN/DUSK
Moderate
Low
Low
Moderate
Low
High High
Moderate
NEVER DRIVEN ROUTE DRIVEN ROUTE 1 TO 3 TIMES FAMILIAR ROUTE
High
EXAMPLE: A driving task over a familiar route that starts during the day but ends at dusk wouldhave a moderate risk value.

TC 21-305-3
1-7
After assessing all the risks, the overall risk value equals the highest risk identified for any oneelement. Now is the time to focus on high risk elements and develop controls to reduce risks to anacceptable level. Control examples may include conducting training in a different location or at adifferent time of day, putting an instructor in the vehicle with the student, waiting for better weather,using a different vehicle, and so on.
1-6. DECISION AID. The level of the decision maker should correspond to the level of the risk.The greater the risk, the more senior the final decision maker should be. The matrix shown in Table1-8 is a proposed decision aid to help determine the leadership decision-making level.
Table 1-8. Proposed decision aid
DECISION AID
RISK
LOWMODERATE
HIGH
DECISION LEVEL
SENIOR INSTRUCTOR COMPANY COMMANDERBATTALION COMMANDER
a. Moderate risk training warrants complete unit command involvement. For example, amoderate risk value in the weather element category indicates the soldiers are more susceptible tocold injuries and require closer supervision or a rescheduling of training. If you cannot reduce therisk level, the company commander should decide to train or defer the mission.
b. Operations with a high risk value warrant battalion involvement. If you cannot reducethe risk level, the battalion commander should decide to train or defer the mission.
1-7. RISK CONTROL ALTERNATIVES. The following options can help control risk:
• Eliminate the hazard totally, if possible, or substitute a less hazardous alternative.• Reduce the magnitude of the hazard by changing tasks, locations, times, and so forth.• Modify operational procedures to reduce risk exposure consistent with mission needs.• Train and motivate personnel to perform to standards to avoid hazards.
1-8. SUPERVISION. Leaders must monitor the training to ensure risk control measures arefollowed. Never underestimate subordinates ability to sidetrack a decision they do not understand orsupport. You must also monitor the impact of risk reduction procedures when they are implementedto see that they really work. This is especially true of new, untested procedures.
1-9. PAYOFFS. Risk management lets you use realistic training scenarios reducing personneland equipment losses while training. Risk management is consistent with METT-T decisionprocesses and can be used in battle to increase mission effectiveness.

TC 21-305-3
1-8
SAMPLE RISK ASSESSMENT WORK SHEET FOR DRIVER TRAINING
TRAINING TASK: ___________________________________________________________
RISK LEVEL: ________________
____________1. SOLDIER QUALIFICATION
SOLDIER QUALIFICATION RISK VALUE
DRIVING EXPERIENCE
TASK
COMPLEXROUTINESIMPLE
Low
LICENSED OVER 1YEAR
Moderate
Low
LICENSED UNDER 1YEAR
HighModerate
Low
UNLICENSED
HighHigh
Moderate
____________2. VEHICLE TYPE
VEHICLE TYPE RISK VALUE
VEHICLE CONFIGURATION
LOCATION OF TRAINING
ROADLow
SMALLTRUCKS
Moderate
Low
HighModerate
Low
COMBINATION UNITS
HighHigh
Moderate
STRAIGHT TRUCKS
TRAINING AREAMOTOR POOL
____________3. WEATHER
WEATHER RISK VALUE
VISIBILITY
ROADCONDITIONS
UNFAVORABLELow
CLEAR
Moderate
Low
HighModerate
RESTRICTED
HighHigh
REDUCED
ADEQUATEFAVORABLE Moderate High

TC 21-305-3
1-9
____________4. TERRAIN
TERRAIN RISK VALUE
ROAD NETWORK
TYPE OFTERRAIN
MOUNTAINLow
IMPROVED ROADS
Moderate
Low
HighModerate
Low
UNIMPROVED
HighHigh
Moderate
SECONDARY ROADS
DESERT/JUNGLEFLAT/ROLLING
____________5. SUPERVISION
SUPERVISION RISK VALUE
TASK LOCATION
LEVEL OFSUPERVISION
MOTOR POOL
LowHigh
Low
HighModerate
Low
OFF ROAD/CONGESTED ROAD
HighHigh
Moderate
TRAINING AREA/NONCONGESTED ROAD
NOT OBSERVINGOBSERVINGIN VEHICLE
____________6. EQUIPMENT
EQUIPMENT RISK VALUE
LAST SEMIANNUAL SERVICE
EQUIPMENT AGE 0 TO 2 MONTHS +4 MONTHS+2 TO 4 MONTHS
OLDAVERAGE NEW
ModerateLowLow
ModerateModerate
Low
High HighModerate

TC 21-305-3
1-10
_____________7. TIME OF DAY
TIME OF DAY RISK VALUE
LIGHT LEVEL
ROUTEFAMILIARITY
DAY NIGHTDAWN/DUSK
Moderate
Low
Low
Moderate
Low
High High
Moderate
NEVER DRIVEN ROUTE DRIVEN ROUTE 1 TO 3 TIMES FAMILIAR ROUTE
High
____________OVERALL RISK LEVEL
DECISION AID
RISK
LOWMODERATE
HIGH
DECISION LEVEL
SENIOR INSTRUCTOR COMPANY COMMANDERBATTALION COMMANDER
APPROVED BY: ____________________________________________ DATE: ____________
TC 21-305-3
2-1
2-1. STUDENT REQUIREMENTS.
a. Vehicles Per Student. Vehicle to student ratio is contained in the instructional materialand varies from 1:1 to 1:2.
b. Forms Per Student.
• DD Form 518. Accident Identification Card.• DD Form 1970. Motor Equipment Utilization Record (or DA Form 5987-E, Motor
Equipment Dispatch).• DA Form 348. Equipment Operator’s Qualification Record (Except Aircraft).• DA Form 2404. Equipment Inspection and Maintenance Worksheet (or DA Form
5988-E, Equipment Inspection Maintenance Worksheet).• DA Form 6125-R. Road Test Score Sheet.• OF 346. US Government Motor Vehicle Operator’s Identification Card.• SF Form 91. Motor Vehicle Accident Report.
c. Publications Per Student.
• TM 9-2320-272-10. Operator’s Manual for Truck, 5-Ton, 6X6, M939, M939A1,and M939A2 Series Trucks (Diesel).
• LO 9-2320-272-12. Lubrication Order for Truck, 5-Ton, 6X6, M939, M939A1,and M939A2 Series Trucks (Diesel).
d. Nonstandard Items.
• Forty empty POL drums, traffic cones, or locally fabricated standards.• Vehicle loads.
2-2. INSTRUCTOR REQUIREMENTS.
• One each of the above forms.• One each of the above publications.• AR 385-55. Prevention of Motor Vehicle Accidents.• AR 600-55. The Army Driver and Operator Standardization Program (Selection,
Training, Testing, and Licensing).• DA Pamphlet 738-750. Functional Users Manual for the Army Maintenance
Management System (TAMMS).• FM 21-305. Manual for the Wheeled Vehicle Driver.• STP 55-88M12-SM. Soldier’s Manual, MOS 88M, Motor Transport Operator,
Skill Levels 1/2.• All HN or local directives and regulations.

TC 21-305-3
2-2
2-3. TRAINING FACILITIES.
• Classroom.• Motor pool.• Training area(s).• Suitable road network for driver training (primary, secondary, and off road).
2-4. TRAINING AIDS AND DEVICES.
• Overhead projector.• Projection screen.• Transparencies (paper copies included with the instructional material).• Television monitor.• Videocassette player.• TVT 20-1088. M939 Series: Operating at Risk. 1996. (PIN: 708408).• TVT 55-16. The M939A2 Series Cargo Truck. 1991. (PIN: 709233DA).

TC 21-305-3
3-1
CHAPTER 3
SAMPLE TRAINING SCHEDULE
TASKWHEN WHAT WHERE NUMBER
TRUCK OPERATIONSDAY 1
0730-0830 Use TM, LO, and Make Entries on Classroom 551-721-1352DA Form 2404
0830-0930 Prepare DD Form 1970 Classroom 551-721-13660930-1130 Report an Accident Classroom 551-721-13881130-1230 Lunch1230-1300 Perform Operator PMCS Classroom 551-721-13521300-1400 Identify Cab Controls, Instruments, Motor Pool 551-721-1352
and Indicators1400-1430 Operate CTIS on the M939A2 Series Motor Pool 551-721-1391
Vehicle1430-1630 Perform Operator PMCS Motor Pool 551-721-1352
TRUCK OPERATIONSDAY 2
0730-0800 Drive an M939 Series Cargo Truck Classroom 551-721-13660800-0830 Perform Before-Operation PMCS Motor Pool 551-721-13520830-1130 Drive an M939 Series Cargo Truck Training Area 551-721-13661130-1230 Lunch1230-1600 Drive an M939 Series Cargo Truck Training Area 551-721-1366
(continued)1600-1630 Perform After-Operation PMCS Motor Pool 551-721-1352
TRUCK OPERATIONSDAY 3
0730-0830 Drive an M939 Series Cargo Truck on Motor Pool 551-721-1366the Road
0830-0900 Perform Before-Operation PMCS Motor Pool 551-721-13520900-1130 Drive an M939 Series Cargo Truck on Driver 551-721-1366
the Road Training Route1130-1230 Lunch1230-1600 Drive an M939 Series Cargo Truck on Driver 551-721-1366
the Road (continued) Training Route1600-1630 Perform After-Operation PMCS Motor Pool 551-721-1352

TC 21-305-3
3-2
TASKWHEN WHAT WHERE NUMBER
TRUCK OPERATIONSDAY 4
0730-0800 Drive an M939 Series Cargo Truck Off Road Motor Pool 551-721-13600800-0830 Perform Before-Operation PMCS Motor Pool 551-721-13520830-1130 Drive an M939 Series Cargo Truck Off Road 551-721-1360
Off Road DriverTraining Area
1130-1230 Lunch1230-1400 Drive an M939 Series Cargo Truck Off Road 551-721-1360
Off Road (continued) DriverTraining Area
1400-1430 Perform After-Operation PMCS Motor Pool 551-721-13521900-1930 Perform Before-Operation PMCS Motor Pool 551-721-13521930-2330 Drive an M939 Series Cargo Truck at Night Motor Pool/ 551-721-1366
DriverTraining Route
2330-2400 Perform After-Operation PMCS Motor Pool 551-721-1352
TRUCK OPERATIONSDAY 5
1230-1300 Perform Before-Operation PMCS Motor Pool 551-721-13521300-1600 Drive an M939 Series Cargo Truck on Driver 551-721-1366
the Road (continued) Training Route1600-1630 Perform After-Operation PMCS Motor Pool 551-721-1352
TRUCK OPERATIONSDAY 6
NOTE: This day 6 is for straight truck drivers only. Drivers training for trailer operations willcontinue to trailer operations day 6 and testing on day 8.
0730-0800 Perform Before-Operation PMCS Motor Pool 551-721-13520800-1100 Drive an M939 Series Cargo Truck on Driver 551-721-1366
Training Route1100-1130 Perform After-Operation PMCS Motor Pool 551-721-13521130-1230 Lunch1230-1630 End of Course Comprehensive Test Classroom/ All Tasks
Motor Pool/Road Test
and Route/Off RoadTraining Area
Perform PMCS Motor Pool 551-721-1352

TC 21-305-3
3-3
TASKWHEN WHAT WHERE NUMBER
TRAILER OPERATIONSDAY 6
0730-0830 Perform PMCS on Trailers Motor Pool 551-721-13530830-0900 Perform Before-Operation PMCS Motor Pool 551-721-1352
551-721-13530900-1130 Drive an M939 Series Cargo Truck Motor Pool/ 551-721-1380
with Trailer Training Area/ 551-721-1385DriverTraining Route
1130-1230 Lunch1230-1600 Drive an M939 Series Cargo Truck Training Area/ 551-721-1380
with Trailer (continued) Driver 551-721-1385Training Route
1600-1630 Perform After-Operation PMCS Motor Pool 551-721-1352551-721-1353
TRAILER OPERATIONSDAY 7
0730-0800 Perform Before-Operation PMCS Motor Pool 551-721-1352551-721-1353
0800-1130 Drive an M939 Series Cargo Truck Training Area/ 551-721-1380with Trailer (continued) Driver 551-721-1385
Training Route1130-1230 Lunch1230-1600 Drive an M939 Series Cargo Truck Training Area/ 551-721-1380
with Trailer (continued) Driver 551-721-1385Training Route
1600-1630 Perform After-Operation PMCS Motor Pool 551-721-1352551-721-1353
TRAILER OPERATIONSDAY 8
0730-0800 Perform Before-Operation PMCS Motor Pool 551-721-13520800-1100 Drive an M939 Series Cargo Truck on Driver 551-721-1366
the Road (continued) Training Route1100-1130 Perform After-Operation PMCS Motor Pool 551-721-13521130-1230 Lunch1230-1630 End of Course Comprehensive Test Classroom/ All Tasks
Motor Pool/Road Test
and Route/Off RoadTraining Area 551-721-1352
Perform PMCS Motor Pool 551-721-1353
TC 21-305-3
4-1
LESSON TITLE: USE TECHNICAL MANUALS (TMs) AND LUBRICATION ORDERS(LOs), AND MAKE ENTRIES ON DA FORM 2404 (EQUIPMENTINSPECTION AND MAINTENANCE WORKSHEET)
TASK NUMBER: 551-721-1352 (Perform Vehicle Preventive Maintenance Checks andServices [PMCS])
A. TRAINING OBJECTIVE.
TASK: Use the M939 Series TM/LO and make operator entries onDA Form 2404.
CONDITIONS: Given instruction, TM 9-2320-272-10, LO 9-2320-272-12,DA Form 2404, and a practical exercise.
STANDARD: Locate information in the TM/LO and make the required operatorentries on DA Form 2404 in the correct sequence according toDA Pamphlet 738-750. Each student has 15 minutes to completethe practical exercise without error and will be graded on aGO/NO-GO basis.
B. INTERMEDIATE TRAINING.
Intermediate Training Objective 1
TASK: Use the M939 Series TM and LO.
CONDITIONS: Given instruction, TM 9-2320-272-10, LO 9-2320-272-12, and apractical exercise in a classroom environment.
STANDARD: Answer the questions correctly in the practical exercise bylocating information in the TM/LO. Each student will be gradedon a GO/NO-GO basis.
Intermediate Training Objective 2
TASK: Document a no-fault situation on DA Form 2404.
CONDITIONS: Given instruction, TM 9-2320-272-10, a practical exercise, andDA Form 2404 in a classroom environment.
STANDARD: You must fill out a no-fault situation on DA Form 2404 in thecorrect sequence according to DA Pamphlet 738-750. Eachstudent will be graded on a GO/NO-GO basis.

TC 21-305-3
4-2
Intermediate Training Objective 3
TASK: Document a fault situation on DA Form 2404.
CONDITIONS: Given instruction, TM 9-2320-272-10, a practical exercise, andDA Form 2404 in a classroom environment.
STANDARD: You must fill out a fault situation on DA Form 2404 in the correctsequence according to DA Pamphlet 738-750. Each student willbe graded on a GO/NO-GO basis.
C. ADMINISTRATIVE INSTRUCTIONS.
1. Training time: As scheduled.
2. Training location: Scheduled classroom.
3. Training type: Conference and practical exercise.
4. Students: Scheduled personnel.
5. Principal and assistant instructors required: One primary instructor for the class and oneassistant instructor for every 20 students for the practical exercise.
6. Training aids and equipment: Overhead projector, screen, transparency (DA Forms2404), TM 9-2320-272-10 (one per student), LO 9-2320-272-12 (one per student), DA Form 2404(four per student), and a practical exercise situation sheet (one per student).
7. References: DA Pamphlet 738-750, TM 9-2320-272-10, and LO 9-2320-272-12.
D. SEQUENCE OF ACTIVITY.
NOTE: Before class arrival, ensure that each student desk or table has a TM 9-2320-272-10,LO 9-2320-272-12, and two DA Forms 2404. Completed samples of DA Forms 2404 are shown inFigure 4-1, page 4-6 and Figure 4-2, page 4-7. These samples can be used to make transparenciesfor an overhead projection system or reproduced as student handouts.
1. Introduction:
a. Interest device.
b. Tie-in.
c. Lesson objective (paragraph A).
d. Procedures:
(1) Explanation.

TC 21-305-3
4-3
(2) Practical exercise.
(3) Summary.
2. Explanation and demonstration:
a. Proper technique for using the M939 Series -10 series TM.
(1) Front cover index - corresponding thumb tab blackened pages andtable of contents.
(2) Warning summary and caution - warning statements.
(3) PMCS tables.
(4) Alphabetical subject index.
b. Use of the M939 series LO 9-2320-272-12.
(1) Cards (tables).
(2) Warnings, cautions, and notes.
(3) Level of maintenance codes.
(4) Lubricant abbreviations and intervals.
(5) Lubricate after fording and high-pressure washing.
c. DA Form 2404 no-fault situation:
NOTE: If the organization is using ULLS, ULLS generated DA Form 5988-E may be used insteadof using DA Form 2404. The blocks of DA Form 5988-E are completed similar to those of DAForm 2404.
(1) Organization.
(2) Nomenclature and model.
(3) Registration/serial number/NSN.
(4) Type of inspection (PMCS).
(5) TM number and TM date.
(6) Date of inspection (column c).
TC 21-305-3
4-4
(7) Type of inspection (entered in column d when used for concurrentinspections).
(8) Disposition of DA Form 2404.
d. DA Form 2404 fault situation.
NOTE: If the organization is using ULLS, ULLS generated DA Form 5988-E may be used insteadof using DA Form 2404. The blocks of DA Form 5988-E are completed similar to those of DAForm 2404.
(1) Deferred maintenance. Check DA Form 2408-14 for any deferredmaintenance before listing faults on DA Form 2404. Do not list faults thatare already listed on DA Form 2404 or DA Form 2408-14. (This form isnot required when an automated system such as ULLS, provides a list orprintout of deferred maintenance and uncorrected faults that includes allelements on the DA Form 2408-14.)
NOTE: Explain to the students that when a DA Form 2404 has previous no-fault daily annotations,a new form does not have to be initiated when a fault is found. Tell them to use the same form andsome of the steps listed below would already be completed.
(2) Organization.
(3) Nomenclature and model.
(4) Registration/serial number/NSN.
(5) Miles. If the reading is in kilometers, put the letter “K” before thenumber.
(6) Hours.
(7) Date.
(8) Type of inspection (PMCS).
(9) TM number and TM date.
(10) Signature and rank in block 8a.
(11) TM item number entered in column a. Circle item number if thefault makes the equipment NMC.
(12) Status symbol entered in column b.
(13) Deficiencies or shortcomings entered in column c.
(14) Disposition of DA Form 2404.

TC 21-305-3
4-5
3. Practical exercise: Hand out one practical exercise and two DA Forms 2404 (or if usingULLS, ULLS generated DA Form 5988-E) to each student. Students will complete the practicalexercise as outlined in paragraph 2 above within 15 minutes.
4. Evaluate: Check each student’s practical exercise.
5. Summary:
a. Recap main points.
b. Allow for questions.
c. Clarify questions.
d. Give closing statement.
6. Retraining: Retrain and retest NO-GOs after normal duty hours.
E. SAFETY RESTRICTIONS. None.
F. ENVIRONMENTAL CONSIDERATIONS. None.
G. ADDITIONAL COMMENTS AND INFORMATION. Recommended instructional time is1.0 hours (.5 conference and .5 practical exercise).

TC 21-305-3
4-6
SAM
PLE
Figure 4-1. DA Form 2404 (No Fault Situation)

TC 21-305-3
4-7
SAM
PLE
Figure 4-2. DA Form 2404 (Fault Situation)

TC 21-305-3
4-8
PRACTICAL EXERCISE
LESSON TITLE: USE TECHNICAL MANUALS AND LUBRICATION ORDERS ANDMAKE ENTRIES ON DA FORM 2404
NAME___________________________________RANK___________DATE_______________
To complete this practical exercise, you will need appropriate vehicle operator’s TM, LO, two blankDA Forms 2404 (or ULLS generated DA Form 5988-E), and a pencil. You have 15 minutes tocomplete this practical exercise.
FIRST REQUIREMENT
Using the appropriate vehicle TM and LO, answer the following questions by writing your answer inthe space provided after each question.
1. At what interval does the operator check the transmission for proper operation?
2. Where would you find the definition for the different classes of leaks?
3. In what section of the operator’s TM would you find the BII authorized for the M923A2 cargotruck?
4. In what paragraph of the operator’s TM would you find instructions for correct brakingprocedures?
5. What type of gear oil is used for the transfer case?
6. In what publication did you find the answer to question 5 above?

TC 21-305-3
4-9
SECOND REQUIREMENT
NAME___________________________________RANK___________DATE_______________
From the following information, make the required operator entries on DA Form 2404 (or ULLSgenerated DA Form 5988-E):
You are assigned to the 58th Transportation Company as the operator of an M923A2 5-ton cargotruck, with registration number 23G9J111.
a. On 13 January 1997, you perform a daily PMCS and find no faults.
b. On 14 January 1997, you perform a daily PMCS and again find no faults.
c. On 15 January 1997, you perform a daily PMCS and your vehicle voltmeter isregistering in the red. Your odometer reading is 21,864 miles and your hour meter reads 1546.
d. On 16 January 1997, you perform a daily PMCS and find your voltmeter has beenrepaired. No other faults are discovered.
e. On 17 January 1997, you perform a weekly PMCS and find no faults.
TC 21-305-3
4-10
LESSON TITLE: PREPARE DD FORM 1970 (MOTOR EQUIPMENT UTILIZATIONRECORD)
TASK NUMBER: 551-721-1366 (Drive Vehicle with Automatic Transmission)
A. TRAINING OBJECTIVE.
TASK: Make correct vehicle operator entries on DD Form 1970.
CONDITIONS: Given instruction, DD Form 1970, pencil, and a practical exercise.
STANDARD: Make the required operator entries on DD Form 1970 in correctsequence according to DA Pamphlet 738-750. Each student has15 minutes to complete the practical exercise with no errors.Students will be graded on a GO/NO-GO basis.
B. INTERMEDIATE TRAINING. None.
C. ADMINISTRATIVE INSTRUCTIONS.
1. Training time: As scheduled.
2. Training location: Classroom.
3. Training type: Conference and practical exercise.
4. Students: Scheduled personnel.
5. Principal and assistant instructors required: One primary instructor for the conferenceand one assistant instructor for each 20 students for the practical exercise.
6. Training aids and equipment: Overhead projector, screen, transparencies, practicalexercise situation sheet (one per student), and DD Form 1970 (one per student).
7. References: DA Pamphlet 738-750.
D. SEQUENCE OF ACTIVITY.
1. Introduction:
a. Interest device.
b. Tie-in.
c. Lesson objective (paragraph A).

TC 21-305-3
4-11
d. Procedures:
(1) Explanation.
(2) Practical exercise.
(3) Summary.
2. Explanation and demonstration:
NOTE: Two completed samples of DD Form 1970 are shown in Figure 4-3, page 4-12, andFigure 4-4, page 4-13. These samples can be used to make transparencies for an overheadprojection system or reproduced as student handouts.
a. Explain the purpose and use of DD Form 1970. Also explain the dispatcherentries entered on the form.
b. Explain the operator entries that must be entered on DD Form 1970.
3. Practical exercise: Hand out one practical exercise and one DD Form 1970 to eachstudent. Students will complete the practical exercise within 15 minutes.
4. Evaluate: Check each student’s practical exercise.
5. Summary:
a. Recap main points.
b. Allow for questions.
c. Clarify questions.
d. Give closing statement.
6. Retraining: Retrain NO-GOs and slow learners. NO-GOs will be retrained after normalduty hours.
E. SAFETY RESTRICTIONS. None.
F. ENVIRONMENTAL CONSIDERATIONS. None.
G. ADDITIONAL COMMENTS AND INFORMATION. Recommended instructional time is1 hour (.5 conference and .5 practical exercise).

TC 21-305-3
4-12
SAM
PLE
Note: An * denotes dispatcher entries.
Figure 4-3. Sample 1 of DD Form 1970

TC 21-305-3
4-13
SAM
PLE
Note: An * denotes dispatcher entries.
Figure 4-4. Sample 2 of DD Form 1970
TC 21-305-3
4-14
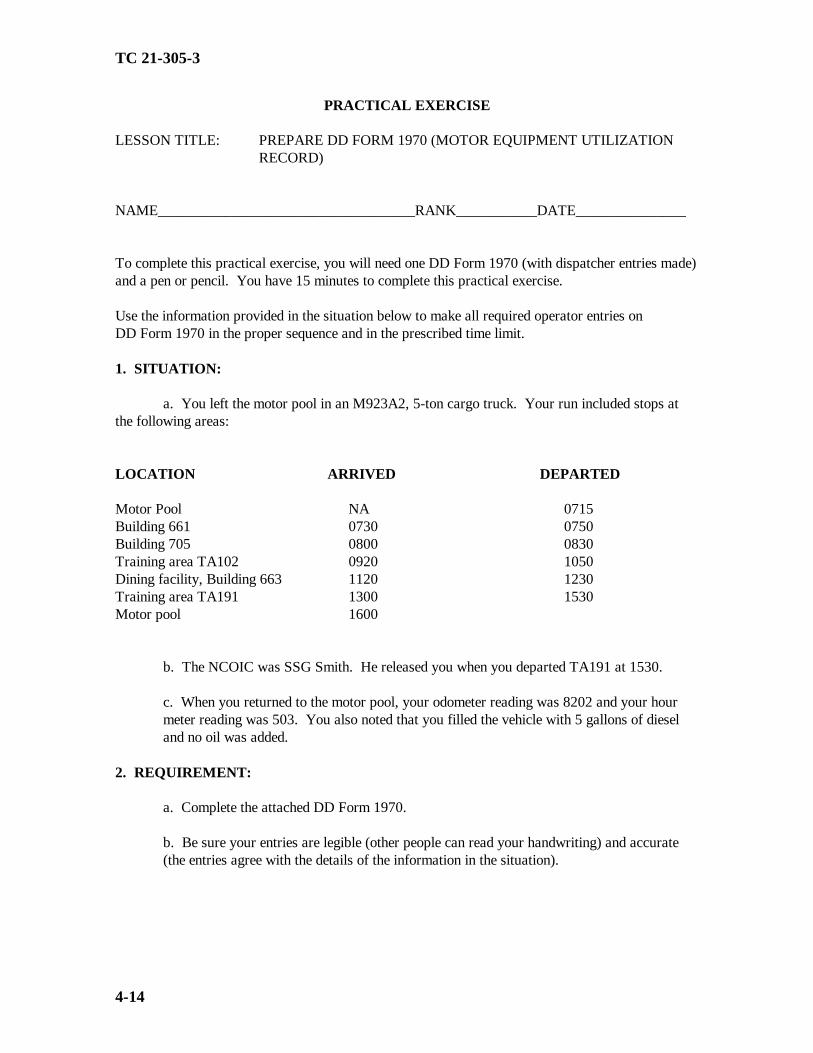
PRACTICAL EXERCISE
LESSON TITLE: PREPARE DD FORM 1970 (MOTOR EQUIPMENT UTILIZATIONRECORD)
NAME___________________________________RANK___________DATE_______________
To complete this practical exercise, you will need one DD Form 1970 (with dispatcher entries made)and a pen or pencil. You have 15 minutes to complete this practical exercise.
Use the information provided in the situation below to make all required operator entries onDD Form 1970 in the proper sequence and in the prescribed time limit.
1. SITUATION:
a. You left the motor pool in an M923A2, 5-ton cargo truck. Your run included stops atthe following areas:
LOCATION ARRIVED DEPARTED
Motor Pool NA 0715Building 661 0730 0750Building 705 0800 0830Training area TA102 0920 1050Dining facility, Building 663 1120 1230Training area TA191 1300 1530Motor pool 1600
b. The NCOIC was SSG Smith. He released you when you departed TA191 at 1530.
c. When you returned to the motor pool, your odometer reading was 8202 and your hourmeter reading was 503. You also noted that you filled the vehicle with 5 gallons of dieseland no oil was added.
2. REQUIREMENT:
a. Complete the attached DD Form 1970.
b. Be sure your entries are legible (other people can read your handwriting) and accurate(the entries agree with the details of the information in the situation).

TC 21-305-3
4-15
LESSON TITLE: REPORT AN ACCIDENT (MAKE REQUIRED ENTRIES ONDD FORM 518 AND SF 91)
TASK NUMBER: 551-721-1388 (Complete DD Form 518 and SF 91)
A. TRAINING OBJECTIVE.
TASK: Make required entries on DD Form 518 and SF 91.
CONDITIONS: Given instruction, DD Form 518, SF 91, pencil, and a practicalexercise.
STANDARD: Make the required entries on DD Form 518 and SF 91 accurately,legibly, and completely according to FM 21-305. Each studenthas one hour to complete the practical exercise with no errors.Students will be graded on a GO/NO-GO basis.
B. INTERMEDIATE TRAINING. None.
C. ADMINISTRATIVE INSTRUCTIONS.
1. Training time: As scheduled.
2. Training location: Classroom.
3. Training type: Conference and practical exercise.
4. Students: Scheduled personnel.
5. Principal and assistant instructors required: One primary instructor for the conferenceand one assistant instructor for each 20 students for the practical exercise.
6. Training aids and equipment: Overhead projector, screen, transparencies, practicalexercise situation sheet (one per student), DD Form 518 (one per student), and SF 91 (one perstudent).
7. References: FM 21-305.
D. SEQUENCE OF ACTIVITY.
1. Introduction:
a. Interest device.
b. Tie-in.
c. Lesson objective (paragraph A).

TC 21-305-3
4-16
d. Procedures:
(1) Explanation.
(2) Practical exercise.
(3) Summary.
2. Explanation and demonstration:
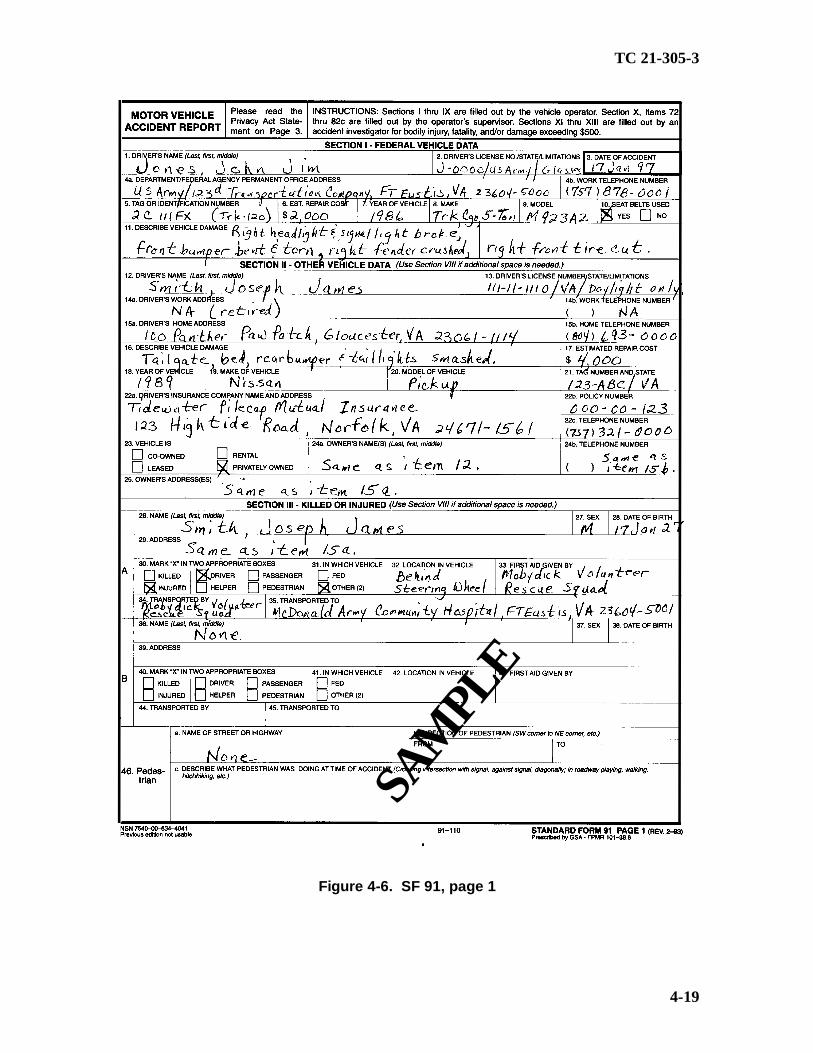
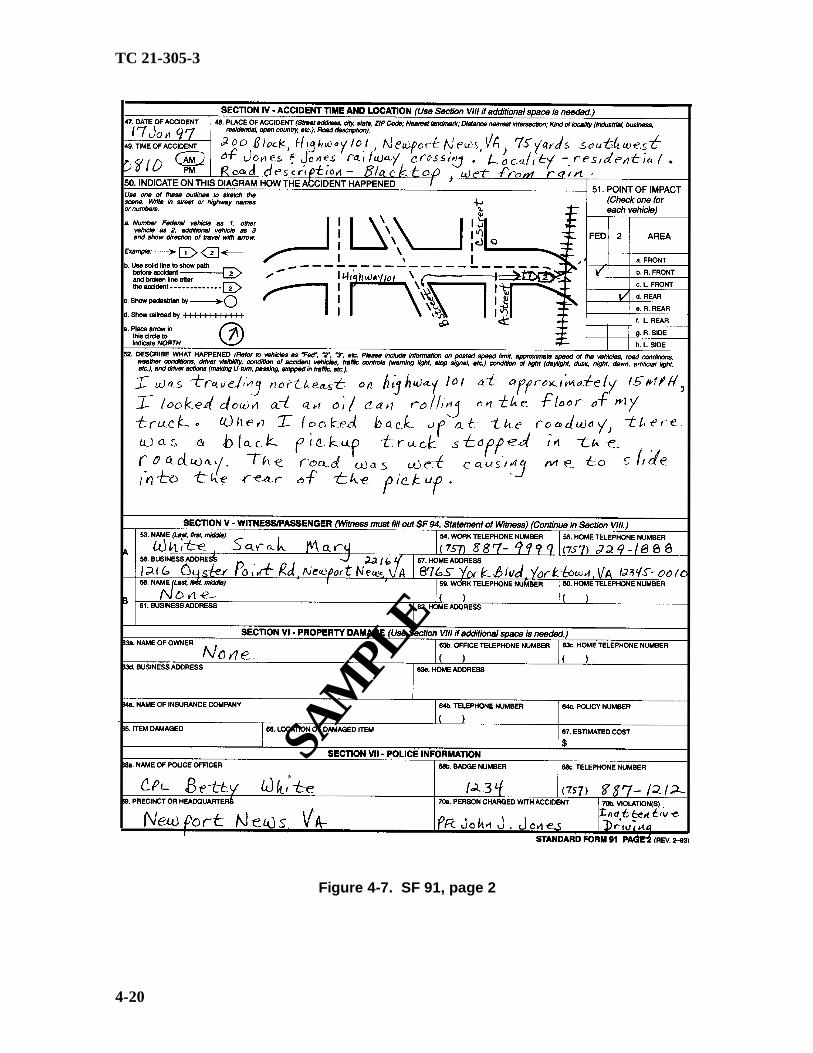
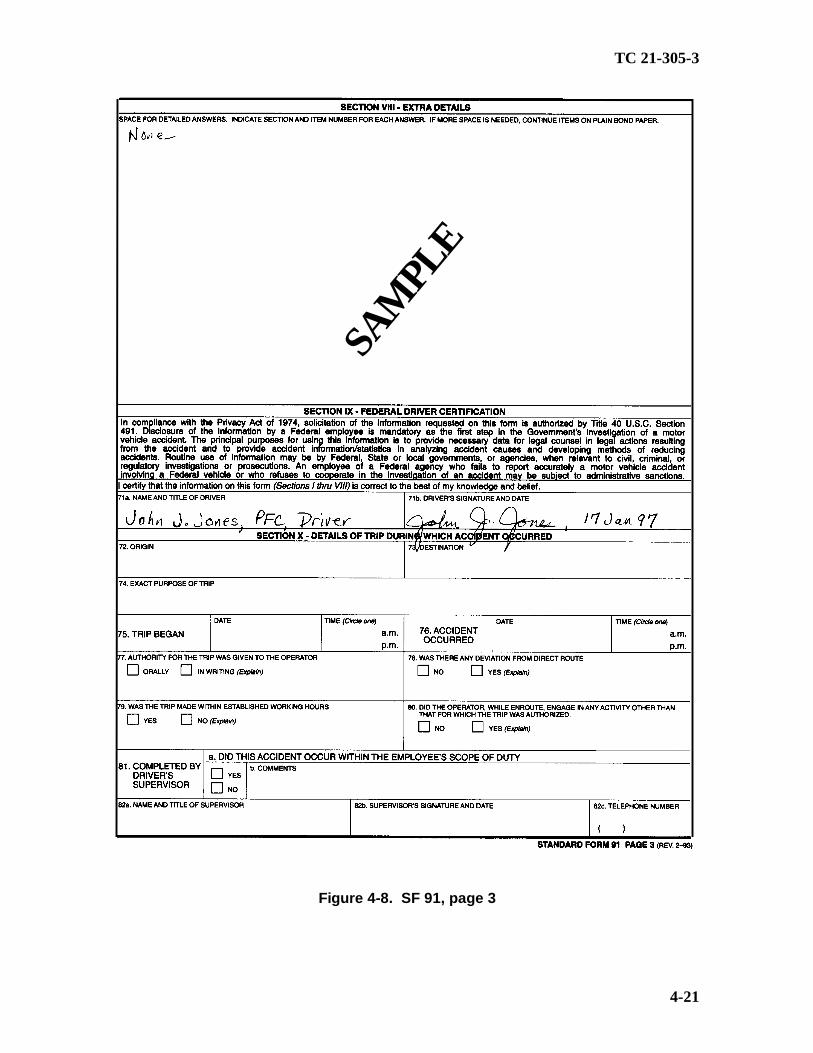
NOTE: A completed sample of a DD Form 518 is shown in Figure 4-5, page 4-18. A completedsample of SF 91 is shown in Figures 4-6 through 4-9, pages 4-19 through 4-22, and a completedsample of SF 94 is shown in Figures 4-10 and 4-11, pages 4-23 and 4-24. These samples can beused to make transparencies for an overhead projection system or reproduced as student handouts.
a. Precautions and procedures. The following is not necessarily in the correctorder. Each accident must be assessed to determine what should be done and inwhat order.
(1) Stop immediately.
(2) Take precautions to prevent further accidents or injuries by using roadguards, highway warning devices, and flares.
(3) Render first aid to the injured.
(4) If fire breaks out, use an extinguisher or sand. Notify the firedepartment. Take precautions to prevent fire; for example, shut offengines and prohibit smoking.
(5) Notify authorities (civil or military depending on who has jurisdiction)for emergency services (police, ambulance, rescue, or fire fighting).
(6) Follow the rules or regulations of the state or area where accident tookplace when moving the vehicle from the scene of the accident.
b. Driver’s responsibilities.
(1) When involved in an accident, always stop and investigate theaccident.
(2) Secure hard-to-get facts first (names and addresses of people involvedand witnesses, condition of the road, position of the vehicles, and anestimate of the amount of damage). Ask the witness(es) to completeSF 94.
(3) Be exact. Spell names correctly. Give street addresses by number.State visible damage. Show exactly where vehicles were before and afterthe accident and what obstacles blocked the driver’s view.

TC 21-305-3
4-17
(4) Do not sign any paper or make any statement as to who was at fault(except to your supervisor or to a Federal Government investigator).
(5) Be polite. Try to get all the necessary information.
(6) Submit all reports and data to your supervisor ASAP but do notexceed one working day.
c. Instructions for filling out DD Form 518.
(1) Explain the purpose and use of DD Form 518. This form is used togive any persons involved in an accident all of the information that theyrequire from you.
(2) Explain how to fill out this form block by block. Ensure zip codes areincluded and the students know that disclosure of the social securitynumber is voluntary.
(3) Explain the disposition of the form. Give it to the person directlyinvolved in the accident. Or, if a parked vehicle, place it in or on theparked vehicle in a conspicuous and secure location, such as under thewindshield wiper.
d. Instructions for filling out SF 91.
(1) Explain the purpose and use of SF 91. Even though an accident isminor or not your fault, you must report it so that the facts will be clearlypresented and so that you can give the names of the witnesses.
(2) Explain how to fill out this form block by block. The driver isresponsible for filling out Sections I through IX. Section X, items 72through 82c are filled out by the driver’s supervisor. Sections XI throughXIII are filled out by an accident investigator for bodily injury, fatality,and/or damage exceeding $500. No blocks should be left completelyblank. If there is no information to put in a certain block, write None,Unknown, or NA.
e. SF 94 may be given to any witness at the scene of the accident. It is normallymailed to the witness by the investigating officer, commander, or supervisor.
3. Practical exercise: Hand out one practical exercise, SF 91, and DD Form 518 to eachstudent. Students will complete the practical exercise within one hour.
4. Evaluate: Check each student’s practical exercise.

TC 21-305-3
4-18
5. Summary:
a. Recap main points.
b. Allow for questions.
c. Clarify questions.
d. Give closing statement.
6. Retraining: Retrain NO-GOs and slow learners. NO-GOs will be retrained after normalduty hours.
E. SAFETY RESTRICTIONS. None.
F. ENVIRONMENTAL CONSIDERATIONS. None.
G. ADDITIONAL COMMENTS AND INFORMATION. Recommended instructional time is2 hours (1.0 conference and 1.0 practical exercise).
SAM
PLE
Figure 4-5. DD Form 518
TC 21-305-3
4-19
SAM
PLE
Figure 4-6. SF 91, page 1
TC 21-305-3
4-20
SAM
PLE
Figure 4-7. SF 91, page 2
TC 21-305-3
4-21
SAM
PLE
Figure 4-8. SF 91, page 3

TC 21-305-3
4-22
SAM
PLE
Figure 4-9. SF 91, page 4

TC 21-305-3
4-23
SAM
PLE
Figure 4-10. SF 94, front

TC 21-305-3
4-24
SAM
PLE
FILE REFERENCE:
Figure 4-11. SF 94, back

TC 21-305-3
4-25
PRACTICAL EXERCISE
LESSON TITLE: REPORT AN ACCIDENT (MAKE REQUIRED ENTRIES ONDD FORM 518 AND SF 91)
NAME___________________________________RANK___________DATE_______________
To complete this practical exercise, you will need one DD Form 518, one SF 91, and a pen or pencil.You have 45 minutes to complete this practical exercise.
1. SITUATION:
On Friday, 17 January 1997 at 0800, you left the motor pool in an M925A2, 5-ton cargo truck(registration number AA101BB) that had been dispatched to you. Your destination was the orderlyroom, Company A, 225th Infantry Battalion, Fort Walk, NY 09111-5000. You were to report toyour first sergeant.
Approximately 10 minutes later, you were driving east on MacArthur Boulevard (a four-lane street)in the right lane at 20 MPH. A civilian vehicle driving north on Pershing Street made a right turn(east) onto MacArthur Boulevard. You applied your brakes but hit the civilian’s truck on the leftrear fender. The civilian was in the right lane traveling 5 to 10 MPH when you hit him. His truckmoved 20 to 30 feet ahead after the collision and stopped by the right curb. Your vehicle also movedanother 20 to 30 feet and ended up in the left lane. The weather was clear. The concrete roadwaywas dry.
You stopped your vehicle, jumped out, and ran to the civilian’s vehicle. Luckily, he was not hurt.Since there were no other occupants in either vehicle and no threat of fire or explosion, there was noneed to call the fire company or an ambulance. You and the civilian driver exchanged information.You wrote down the following information from his driver’s license and registration:
Operator’s name: John P. JonesOperator’s home address: 121 Buffalo Street, Indian, Montana 54321-1000Operator’s state permit number and state: 111-00-1000, MontanaMake of vehicle: DodgeType: Dakota pickupYear: 1990Vehicle license number and state: 123-ABC, MontanaVehicle owned by: John P. JonesOwner’s address: 121 Buffalo Street, Indian, Montana 54321-1000
If you have any reason to doubt the information you were given was correct, note it on your form.Record the estimates of damage to each vehicle. You looked at the civilian’s truck. His left rearfender was dented, taillight broken, and the tailgate was bent. He estimated the amount of damage at$1,000. Then you looked at your vehicle. Your front bumper was scratched and bent; youapproximate the amount of damage at $200.

TC 21-305-3
4-26
After estimating the damage, you went to a telephone across the street and called the MP. Withinminutes MP officer SPC Joe Smith, Badge Number 321, Company B, 123d MP Battalion, arrived.He recorded comments made by you and the civilian. There were no other witnesses to the accident.The officer did record that there is a traffic light with a turn-on-red signal at the southeast corner ofPershing Street, that your vehicle was equipped with seat belts, and that you were wearing your seatbelt at the time of the accident. Since you had recorded the information and given the other driver acopy of DD Form 518, you drove back to the motor pool.
2. REQUIREMENT:
a. Complete the attached DD Form 518 and SF 91.
b. Be sure your entries are legible (other people can read your handwriting) and accurate(the entries agree with the details of the information in the situation). Use your name, rank, socialsecurity number, and present age to complete these forms. Your military driver’s license number isR-1456. You live in the A Company barracks. The barracks telephone number is 555-9999.
TC 21-305-3
4-27
LESSON TITLE: PERFORM OPERATOR PREVENTIVE MAINTENANCE CHECKSAND SERVICES (PMCS)
TASK NUMBER: 551-721-1352 (Perform Vehicle Preventive Maintenance Checks andServices [PMCS])
A. TRAINING OBJECTIVE.
TASK: Perform operator PMCS on an M939 series cargo truck.
CONDITIONS: Given instruction, DA Form 2404 (or ULLS generated DA Form5988-E), pencil, TM 9-2320-272-10, equipment records folder,rags, lubricants, coolant, and an M939 series cargo truck with BII.
STANDARD: Inspect the vehicle according to the PMCS tables listed inTM 9-2320-272-10, correct all faults within the operator’s level ofmaintenance, and legibly record all others on DA Form 2404 (orULLS generated DA Form 5988-E). If no faults are found, makenecessary entries on DA Form 2404 (or ULLS generated DAForm 5988-E).
B. INTERMEDIATE TRAINING. None.
C. ADMINISTRATIVE INSTRUCTIONS.
1. When training will be given: As scheduled.
2. Training location: Classroom and motor pool as scheduled.
3. Training type: Conference, demonstration, and practical exercise.
4. Who will be trained: Personnel as scheduled.
5. Principal and assistant instructors required: One primary instructor for the class and oneassistant instructor for every two students for the demonstration and practical exercise.
6. Training aids and equipment: Television, VCR, TVT 55-16, hearing protection, rags,lubricants, and coolant. DA Form 2404 (or ULLS generated DA Form 5988-E), pencil,TM 9-2320-272-10, equipment records folder, and an M939 series cargo truck with BII for everytwo students.
7. References: AR 385-55, DA Pamphlet 738-750, and TM 9-2320-272-10.

TC 21-305-3
4-28
D. SEQUENCE OF ACTIVITY.
1. Introduction:
a. Interest device.
b. Tie-in.
c. Lesson objective (paragraph A).
d. Procedures:
(1) Explanation.
(2) Practical exercise.
(3) Summary.
2. Explanation and demonstration:
a. Show TVT 55-16.
b. Demonstrate before, during, after, weekly, and monthly checks to students.
3. Practical exercise:
a. Assign students to vehicles and issue TM 9-2320-272-10, pencils, DA Form2404 (or ULLS generated DA Form 5988-E), and equipment records folder. Tellstudents where rags, lubricants, and coolant are located.
b. Students perform PMCS.
4. Evaluate: Check each student’s PMCS performance.
5. Summary:
a. Recap main points.
b. Allow for questions.
c. Clarify questions.
d. Give closing statement.
6. Retraining: Students perform PMCS daily and have it reinforced throughout the course.PMCS is tested on the EOCCT.

TC 21-305-3
4-29
E. SAFETY RESTRICTIONS.
1. Ensure that all chock blocks are in place when vehicles are parked or maintenance is tobe performed.
2. Ensure the transmission is in N, the parking brake is set, and the engine is shut off beforeleaving the vehicle, when the vehicle is parked, or maintenance is being performed.
3. Ensure all personnel remove all wristwatches, rings, bracelets, ID tags, neck chains, andany other jewelry before working in or around the vehicle.
4. Ensure all personnel pay particular attention to the cautions and warnings listed in theoperator’s manual.
5. Ensure the driver and ground guides know and understand the hand and arm signals,especially the signal to stop, as outlined in FM 21-305.
6. Ensure ground guide(s) are used when backing.
7. Ensure all backing is conducted at a speed of 5 MPH or less.
8. Hearing protection is required for all personnel working in and around this vehicle whilethe engine is running.
9. Inspect all seat belts for damage and ensure all occupants wear seat belts while thevehicle is in operation.
10. Ensure personnel maintain at least three points of contact when mounting ordismounting the vehicle (to include performing PMCS).
11. Ensure all personnel are clear of vehicle before engine start is attempted. Operatormust visually check to see that all areas of the truck are clear of personnel before attempting to startthe engine. Failure to do so could result in serious injury or death to personnel.
12. Extreme care should be taken when removing the surge tank filler cap if the temperaturegauge reads above 175° F. Steam or hot coolant under pressure will cause injury such as seriousburns.
13. The exhaust pipe and muffler can become very hot during vehicle operation. Be carefulnot to touch these parts with bare hands or allow the body to come in contact with the exhaust pipeor muffler. Exhaust system parts can become hot enough to cause serious burns.
14. Reemphasize the removal of all jewelry such as rings, ID tags, or bracelets beforeworking around batteries. Be careful not to short out battery terminals. If jewelry or tools contactthe battery terminal, a direct short may occur resulting in instant heating, damage to equipment, andinjury to personnel. Do not smoke or use open flame near batteries. Batteries may explode from aspark. Battery acid is harmful to skin and eyes.

TC 21-305-3
4-30
15. Fuel is very flammable and can explode easily. To avoid serious injury or death, keepfuel away from open fire and keep a fire extinguisher within easy reach when working with fuel. Donot work on the fuel system when the engine is hot. Fuel can be ignited by the hot engine. Whenworking with fuel, post signs that read: “NO SMOKING WITHIN 50 FEET OF VEHICLE”.
16. Alcohol used in alcohol evaporator is flammable, poisonous, and explosive. Do notsmoke when adding fluid and do not drink fluid. Failure to do this will result in injury or death.
17. Do not put the vehicle in motion until the low air pressure warning light goes out andthe alarm (buzzer) stops sounding. Air pressure gauges should indicate at least 90 psi. If warningscontinue beyond three minutes, and/or pressure gauges do not reach 90 psi, turn the ignition switchand battery switch to OFF positions, and notify unit maintenance. Failure to do this could result ininjury or death.
18. When raising the vehicle hood, ensure it is secured from falling. Do this by securing thehood retaining bar to the bumper bracket with the safety pin. Failure to do so may damage thevehicle or cause injury or death to personnel.
F. ENVIRONMENTAL CONSIDERATIONS.
1. Ensure that all hazardous materials and hazardous wastes are stored and labeledproperly.
2. Ensure that spill kits are within reach when changing or adding vehicle fluids or in thecase of vehicle failures. Spill kits should enable the soldiers to contain a spill on land or in water.
3. Ensure that drip pans remain under parked vehicles.
4. Ensure that containers are the proper size and type for draining vehicle fluids.
G. ADDITIONAL COMMENTS AND INFORMATION. Recommended instructional time is2.5 hours (.5 conference, 1.0 demonstration and 1.0 practical exercise). The remaining PMCS isperformed throughout the course in conjunction with driving tasks.

TC 21-305-3
4-31
LESSON TITLE: IDENTIFY CAB CONTROLS, INSTRUMENTS, AND INDICATORS
TASK NUMBER: 551-721-1352 (Perform Vehicle Preventive Maintenance Checks andServices [PMCS])
A. TRAINING OBJECTIVE.
TASK: Identify cab controls, instruments, and indicators.
CONDITIONS: Given instruction on the M939 series cargo truck and arequirement to identify and explain the functions of cab controls,instruments, and indicators.
STANDARD: Correctly identify and explain the functions of cab controls,instruments, and indicators.
B. INTERMEDIATE TRAINING. None.
C. ADMINISTRATIVE INSTRUCTIONS.
1. Training time: As scheduled.
2. Training location: Scheduled motor pool.
3. Training type: Conference.
4. Students: Scheduled personnel.
5. Principal and assistant instructors required: One primary instructor for the class and oneassistant instructor for every three students.
6. Training aids and equipment: One M939 series cargo truck for each three students. Ifthe class is large, a PA system may be needed for the primary instructor.
7. References: TM 9-2320-272-10.
D. SEQUENCE OF ACTIVITY.
1. Introduction:
a. Interest device.
b. Tie-in.
c. Lesson objective (paragraph A).

TC 21-305-3
4-32
d. Procedures:
(1) Explanation.
(2) Summary.
NOTE: The instructor will emphasize the importance of safely getting into and out of the cab(maintaining three points of contact), observing all warnings, and using seat belts.
NOTE: At this time, separate the class into groups of three and assign each group to a vehicle.Ensure each group has an assistant instructor. The assistant instructor will identify and demonstratethe use of each item to his group of students as the instructor explains each item.
2. Explanation and demonstration: Location, description, and use of the cab controls,instruments, and indicators.
a. Air cleaner indicator shows red when engine air filter needs servicing.
b. Parking brake warning light illuminates when parking brakes are engaged.
c. Low air pressure warning light illuminates when air brake system pressure dropsbelow 50 to 60 psi.
d. Spring brake warning light illuminates when spring brakes are engaged.
e. Low coolant level light (M939A2 series vehicle) illuminates when engine coolantlevel is low.
f. Axle lock-in light illuminates when front-wheel drive lock-in switch is engaged.
g. High beam indicator illuminates when front headlights are on high beam.
h. Hand throttle control sets engine speed at desired rpm without maintaining pressureon the accelerator pedal. The throttle control locks in the desired position when pulledout. Rotating the control handle clockwise or counterclockwise unlocks it. The handthrottle is used for engine warm up and so forth. It is NOT to be used as a “cruisecontrol”.
i. Battery switch activates and deactivates all electrical circuits on or off except arcticheater and lights.
j. Ignition switch has off, run, and start positions. Switch automatically returns fromstart to run when hand pressure is released.
k. Tachometer indicates engine speed in rpm and operating hours in tenths.
l. Speedometer/odometer indicates vehicle speed and total mileage.

TC 21-305-3
4-33
m. Engine coolant temperature gauge indicates engine coolant temperature. Thenormal engine coolant operating temperature for M939/A1 series vehicles is 175 to195° F and 190 to 200° F for the M939A2 series vehicles.
n. Primary air pressure gauge indicates air pressure in the primary brake system. Thenormal pressure is 90 to 130 psi.
o. Defroster control opens vents to direct heated air to the windshield.
p. Heat vent control controls the amount of heat blown into the cab by adjusting theopening of the heat ventilation doors.
q. Fresh air vent control pulls out to open ventilation doors. This allows outside air tocirculate in the cab.
r. Spring brake release control is pushed in to release spring brakes independently ofthe mechanical parking brake. The control is used to release spring brakes in order totest and adjust mechanical brakes.
s. Voltmeter indicates the charging condition of the battery.
t. Secondary air pressure gauge indicates air pressure in the secondary brake system.The normal operating pressure is 90 to 130 psi.
u. Transmission oil temperature gauge indicates the temperature of the transmissionoil. The normal operating temperature is 120 to 220° F.
v. Engine oil pressure gauge indicates oil pressure when the engine is running.The normal operating pressure at idle is 15 psi.
w. Fuel gauge indicates the fuel level in the fuel tank.
x. Emergency engine stop control is pulled out to cut off fuel to the engine. It isused only in an emergency.
y. Heater blower motor switch activates the heater blower.
z. Wiper motor switches activate wipers and controls windshield wiper speed.
aa. Windshield washer control is pushed in to spray cleaning solution on thewindshield.
bb. Turn signal control lever is moved down to operate the vehicle left turn signals, upto operate the right turn signals. The level automatically returns to the off positionafter the turn is completed. The turn signal control is also equipped with a hazard tabbutton control (four-way flashers).
cc. Horn button is pressed to operate the vehicle horn.
TC 21-305-3
4-34
dd. Front wheel drive lock-in switch allows operator to engage front wheel driveand is used only when the vehicle’s transfer case is in high range. In low range,the vehicle’s front-wheel drive engages automatically. The vehicle may be inmotion or stopped to engage the front-wheel drive lock-in switch.
ee. Light switch controls the operation of the vehicle’s lights.
ff. Ether start switch injects ether into the engine for cold weather starting.
gg. Instrument panel lights illuminate instrument panel gauges.
hh. Transmission power take-off control lever (M925/A1/A2 and M928/A1/A2)engages the transmission PTO to provide power for the winch.
ii. Front winch control lever (M925/A1/A2 and M928/A1/A2) is pulled back towind the front winch and forward to unwind for lowering loads during A-frameoperation.
jj. Automatic transmission selector lever is used to select the vehicle driving gear.
kk. Mechanical parking brake control lever is pulled up to engage the parkingbrakes and down to disengage the brakes. The knob on top of the handle is turnedclockwise to increase parking brake tension, counterclockwise to decrease parkingbrake tension. Applying the parking brake lever also trips a valve to release airpressure from the spring brakes. This engages the spring brakes.
ll. Transfer case shift lever is pushed down to high range for light load operations,up to low range for heavy road operations. Six-wheel drive is achievedautomatically when the transfer case shift lever is placed in low range.
mm. Accelerator pedal controls speed.
nn. Brake pedal is depressed to stop or slow the vehicle.
oo. Dimmer switch is depressed to raise or lower the headlight beam.
pp. Cowl ventilator (one on each side of cab) is opened manually to provide freshair ventilation.
qq. Access door (M939/A1) opens to provide access to the transmission dipstickand oil fill.
rr. Transmission dipstick (M939/A1) is turned counterclockwise to remove and tocheck transmission oil level.
3. Practical exercise: None.
4. Evaluate: Students are evaluated daily during driving tasks and are tested during the EOCCT.

TC 21-305-3
4-35
5. Summary:
a. Recap main points.
b. Allow for questions.
c. Clarify questions.
d. Give closing statement.
6. Retraining: Training is reinforced during daily driving tasks.
E. SAFETY RESTRICTIONS.
1. Ensure that all chock blocks are in place when vehicles are parked or maintenance is tobe performed.
2. Ensure the transmission is in N, the parking brake is set, and the engine is shut off beforeleaving the vehicle, when the vehicle is parked, or maintenance is being performed.
3. Ensure all personnel remove all wristwatches, rings, bracelets, ID tags, neck chains, andany other jewelry before working in or around the vehicle.
4. Ensure all personnel pay particular attention to the cautions and warnings listed in theoperator’s manual.
5. Ensure personnel maintain at least three points of contact when mounting or dismountingthe vehicle (to include performing PMCS).
F. ENVIRONMENTAL CONSIDERATIONS. None.
G. ADDITIONAL COMMENTS AND INFORMATION. Recommended instructional time is 1hour conference.

TC 21-305-3
4-36
LESSON TITLE: OPERATE THE CENTRAL TIRE INFLATION SYSTEM (CTIS) ONAN M939A2 SERIES VEHICLE
TASK NUMBER: 551-721-1391 (Operate a Central Tire Inflation System (CTIS) on theM939A2 Series Vehicle)
A. TRAINING OBJECTIVE.
TASK: Operate the CTIS on the M939A2 series cargo truck.
CONDITIONS: Given instruction on the M939A2 series cargo truck and arequirement to locate the controls and explain the function ofCTIS in all four operating modes.
STANDARD: Correctly locate the controls and explain the operation of theCTIS.
B. INTERMEDIATE TRAINING. None.
C. ADMINISTRATIVE INSTRUCTIONS.
1. Training time: As scheduled.
2. Training location: Motor pool as scheduled.
3. Training type: Conference.
4. Students: Scheduled personnel.
5. Principal and assistant instructors required: One primary instructor for the class.
6. Training aids and equipment: An M939A2 series cargo truck for the class.
7. References: TM 9-2320-272-10 and STP 55-88M12-SM.
D. SEQUENCE OF ACTIVITY.
1. Introduction:
a. Interest device.
b. Tie-in.
c. Lesson objective (paragraph A).
d. Procedures:
(1) Explanation.

TC 21-305-3
4-37
(2) Practical exercise.
(3) Summary.
2. Explanation and demonstration:
NOTE: The instructor should point out the location of the components and controls as he isexplaining each item to the students.
a. Central tire inflation system . The CTIS is designed to work automatically incase of tire leakage. The CTIS will also adjust tire pressure when a road surfaceselection is made to preset values.
b. CTIS integration with the air brake system. The CTIS uses the same aircompressor that supplies air to the vehicle brakes. The vehicle brakes are alwaysgiven priority over the CTIS. When brake operation causes the air pressure in theair reservoir to fall below a preset limit (90 to 105 psi), inflation will stop until theair compressor has refilled the brake reservoir. If the CTIS was deflating the tires,it would continue to do so.
c. Rapid inflation. The most rapid tire pressure increase is achieved duringvehicle operation. Keep the transmission downshifted to a lower gear andmaintain engine speed at 2,000 rpm. This engages the turbocharger whichsupplies extra air directly to the air compressor.
d. Selector panel. The selector panel is part of the ECU and contains selectors forfour preset tire pressure modes and a run flat selector. Each selector has its ownlight. A steady selector light shows that the tire pressure selected has beenachieved. A flashing selector light means that the system is working to change tirepressures.
(1) HWY mode. The highway tire pressure selector is the normaloperating mode of CTIS. The highway mode is automatically set eachtime the engine is started. The HWY mode is 60 psi. If a lower tirepressure mode had been selected the last time the truck was operated, theCTIS will automatically begin to inflate to the highway setting.
(2) X-C mode. The cross-country tire pressure selector is used foroperating the vehicle on non-paved secondary roads and unimprovedsurfaces. It allows operation up to 35 MPH. When 35 MPH is exceededfor more than one minute, the amber overspeed warning light on theinstrument panel will flash. If 35 MPH is exceeded for more than twominutes, the CTIS will automatically begin to inflate to the HWYpressure. (When driving on secondary roads, the driver must be aware ofhis speed. If the system does add air to the tires, this smaller footprint cancause traction problems and the driver may lose control of the vehicle.This is especially true of “washboard roads” that cause tires to bounce.)

TC 21-305-3
4-38
(3) Sand mode. When the mission requires maximum traction in sand,snow, or mud, select sand on the selector panel. It allows operation up to20 MPH. When 20 MPH is exceeded for more than one minute, the amberoverspeed warning light on the instrument panel will flash. If 20 MPH isexceeded for more than two minutes, CTIS will automatically begin toinflate to the X-C pressure.
(4) Emergency mode. When the mission requires maximum traction onextremely adverse terrain, select emergency mode by depressing EMERon the selector panel. The dash mounted amber warning light willilluminate. Operation in emergency mode is limited to 10 minutes, thenthe system automatically inflates to the sand pressures. If the missiondemands extended emergency mode use, select EMER as needed.
(5) Run flat selector. When the mission requires operation with apunctured tire, select run flat by depressing RUN FLAT on the selectorpanel. Run flat causes CTIS to check tire pressure every 15 seconds.Normally, checks occur every 15 minutes. Repeated damage detectionresults in repeated inflation attempts. The punctured tire receives a newsupply of air each 15 seconds. Operation in run flat is limited to 10minutes unless reselected. If no longer required, press the run flat selectora second time.
3. Practical exercise: The practical exercise for this lesson is integrated in the driving andoff-road driving lessons.
4. Evaluate: Students are evaluated in the driving lessons and tested on the EOCCT.
5. Summary:
a. Recap main points.
b. Allow for questions.
c. Clarify questions.
d. Give closing statement.
6. Retraining: Training is reinforced during daily driving tasks.
CAUTION
Speed must be limited to 10 MPH in the emergency mode to prevent damage totires.

TC 21-305-3
4-39
E. SAFETY RESTRICTIONS. None.
F. ENVIRONMENTAL CONSIDERATIONS. None.
G. ADDITIONAL COMMENTS AND INFORMATION.
1. Recommended instructional time is .5 hour conference.
2. The following additional M939A2 CTIS tasks are contained in STP 55-88M12-SM:
TASK NUMBER TASK
551-721-1392 Remove and Remount Tires on Vehicle with Central Tire Inflation System(CTIS)
551-721-1393 Replace Rear Wheel with Spare Tire on the M939A2 Series Vehicle551-721-1394 Remove the Rear Wheel Valve from the M939A2 Series Vehicle551-721-1395 Install Rear Wheel Valve on the Spare Tire of an M939A2 Series Vehicle551-721-1396 Replace Front Wheel with Spare Tire on the M939A2 Series Vehicle551-721-1397 Remove the Front Wheel Valve from the M939A2 Series Vehicle551-721-1398 Install Front Wheel Valve on the Spare Tire of a M939A2 Series Vehicle

TC 21-305-3
4-40
LESSON TITLE: DRIVE AN M939 SERIES CARGO TRUCK
TASK NUMBER: 551-721-1366 (Drive Vehicle with Automatic Transmission)
A. TRAINING OBJECTIVE.
TASK: Drive an M939 series cargo truck.
CONDITIONS: Given instruction, DD Form 1970 (or ULLS generated DA Form5987-E), DA Form 2404 (or ULLS generated DA Form 5988-E),pencil, TM 9-2320-272-10, equipment records folder, rags,lubricants, coolant, a suitable driver training area, an M939 seriescargo truck with BII, and a requirement to drive the truck; start thevehicle, put the vehicle in motion, read gauges, upshift anddownshift the transmission, manipulate the controls, use correctbraking procedures, perform basic driving maneuvers to includebacking using ground guides, and shut off the engine.
STANDARD: Drive the vehicle correctly and safely without accident or injury.
B. INTERMEDIATE TRAINING. None.
C. ADMINISTRATIVE INSTRUCTIONS.
1. Training time: As scheduled.
2. Training location: Classroom, motor pool, and training area as scheduled.
3. Training type: Conference, demonstration, and practical exercise.
4. Students: Scheduled personnel.
5. Principal and assistant instructors required: One primary instructor for the conference,one assistant instructor for the demonstration, and one assistant instructor for each two students forthe practical exercise.
6. Training aids and equipment: Television, VCR, TVT 55-16, TVT 20-1088, rags,lubricants, coolant, and 40 traffic cones or empty POL drums. DD Form 1970 (or ULLS generatedDA Form 5987-E), DA Form 2404 (or ULLS generated DA Form 5988-E), pencil, TM 9-2320-272-10, equipment records folder, and an M939 series cargo truck with BII for each two students.
7. References: AR 385-55, DA Pamphlet 738-750, FM 21-305, and TM 9-2320-272-10.
D. SEQUENCE OF ACTIVITY.
1. Introduction:
a. Interest device.

TC 21-305-3
4-41
b. Tie-in.
c. Lesson objective (paragraph A).
d. Procedures:
(1) Explanation.
(2) Practical exercise.
(3) Summary.
2. Explanation and demonstration:
NOTE: An instructor will be in the cab sitting next to the driver, with nothing between the studentand instructor, whenever a student is driving the M939 series cargo truck.
a. Show TVT 55-16 and TVT 20-1088.
b. Place vehicle in motion:
(1) Perform before-operation PMCS.
(2) Remove and stow wheel chocks.
(3) Check load, if present, for blocking and bracing and cargo tiedownsfor security.
(4) Adjust seat as needed.
(5) Adjust each rear view mirror so back of truck and view of road can beseen.
(6) Adjust and fasten seat belt.
WARNING
When raising the vehicle hood, ensure it is secured from falling. Do this bysecuring the hood retaining bar to the bumper bracket with the safety pin.Failure to do so may damage the vehicle, or cause injury or death topersonnel.

TC 21-305-3
4-42
(7) Start engine and allow it to warm up.
(8) Check all gauges and instruments. Ensure that they are registeringnormal readings.
(9) Turn on lights as appropriate .
(10) With the transmission range selector in N, select the transfer casedriving range:
(a) Depress lockout switch and press transfer case shift leverdown to high range for normal driving conditions. (The transfercase may be shifted to high range when the vehicle is stopped ormoving at any speed.)
(b) Depress lockout switch and lift transfer case shift lever up tolow range if vehicle is heavily loaded, facing a steep grade, and/oroperating off road. (The transfer case may be shifted to low rangewhen the vehicle is stopped or moving at speeds of 22 MPH orless.)
WARNING
Ensure all personnel are clear of vehicle before engine start is attempted.Operator must visually check to see that all areas of the truck are clear ofpersonnel before attempting to start the engine. Failure to do so could result inserious injury or death to personnel.
WARNING
Do not put the vehicle in motion until the low air pressure warning light goes outand the alarm (buzzer) stops sounding. Air pressure gauges should indicate atleast 90 psi. If warnings continue beyond three minutes, and/or pressure gaugesdo not reach 90 psi, turn the ignition switch and battery switch to OFF positions,and notify unit maintenance. Failure to do this could result in injury or death.
CAUTION
Do not shift the transfer case shift lever from high range to low range, or lowrange to high range, unless the transmission range selector is in N.

TC 21-305-3
4-43
(11) Apply the service brake, and move the transmission range selector tothe appropriate range as shown in Table 4-1.
Table 4-1. Transmission driving range selection table
Range
Selection
Condition
Maximum Operating Speeds w/Transfer Case
M939Series
M939A1 andM939A2 Series
In High In Low In High In Low
R (reverse)
N (neutral)
1-5 (drive)
1-4 (fourth)
1-3 (third)
1-2 (second)
1 (first)
Easy grades clear of trafficwith ground guide
Good roads, grades, trafficcondition
Moderate grades, trafficrestricted speed limits
Moderate grades, heavytraffic, restricted speed limits
Steep grades, heavy traffic,rough terrain
Starting heavy loads, extremegrades, rough terrain
5 MPH
-
*50 MPH
*43 MPH
*33 MPH
*25 MPH
*12 MPH
-
-
22 MPH
17 MPH
13 MPH
10 MPH
5 MPH
5 MPH
-
*50 MPH
*50 MPH
*38 MPH
*29 MPH
*15 MPH
* PRECAUTIONARY NOTE: The following information was extracted from GPM, TACOMNo. 96-4:1. A large number of driving accidents have occurred while operating/driving the M939 series 5-ton trucks. The cause of these accidents are commonly the result of the vehicle operators drivingtoo fast for the conditions and/or locking the wheels when attempting to stop the vehicles.2. The air brakes of the M939 series truck are very sensitive when the trucks are lightly loaded,empty, or when driving on wet/slippery pavement.3. The operator must gradually apply the brakes when stopping the vehicle. “Overbraking” willlockup the rear wheels. Locking the wheels may cause the engine to stall which leads to loss ofsteering. Any of these situations can lead to: loss of vehicle control often resulting in collisons,jackknifing, and/or rollovers.4. For these reasons the maximum safe operating speeds for the M939 series truck is limited to:highway and secondary roads -- 40 MPH, cross country roads - 35 MPH, sand and snow - 25MPH, and icy conditions - 12 MPH.5. A new GPM is expected to be released by TACOM during FY 97.
-
-
26 MPH
20 MPH
16 MPH
12 MPH
6 MPH

TC 21-305-3
4-44
(12) Release the parking brake by pushing forward to the floor.
(13) Release the service brake pedal and slowly press the acceleratorpedal until the vehicle reaches the desired speed.
(14) Accelerate, brake, and steer as required.
(15) Manually downshift the transmission range selector to match drivingconditions.
c. Stop the truck.
(1) Release the accelerator pedal.
(2) Depress the brake pedal.
WARNING
Do not use hand throttle while driving. When brakes are applied, the handthrottle does not automatically disengage. Using the hand throttle as a cruisecontrol device could result in injury or death.
CAUTION
Do not hold the steering wheel at the full left or right position for longer than 10seconds. Power steering oil overheating and pump damage can result.
WARNING
Apply brakes gradually when slowing or stopping and pump brakes graduallywhen slowing or stopping the vehicle on ice, snow, or wet pavement. A panicstop will cause the vehicle wheels to lock and the engine to stall. Power steeringwill be lost. Failure to apply brakes gradually can result in injury or death.
WARNING
Rapid operation repeatedly of service brakes will consume compressed air supplyand cause automatic spring brake application. Failure to follow proper servicebrake operating procedures may cause serious injury or death to personnel.

TC 21-305-3
4-45
(3) As the vehicle begins to reduce speed, decrease brake pedal pressure.
(4) Stop smoothly by releasing the brake pedal pressure gradually as thestopping rate increases.
(5) After stopping, apply the brake just enough to keep the truck stopped.
d. Backing the truck. Since the driver cannot see directly behind his vehicle,backing is always a dangerous maneuver. Common sense therefore dictates thatbacking be avoided whenever possible. For example, if the vehicle must beparked, the driver parks so that he will be able to pull forward when leaving. Eventhough planning ahead can reduce the need to back, almost everyone who driveswill have to back on occasion. These four simple rules will help in backing safely:
(1) Inspect your intended path.
(2) Back and turn toward the driver’s side.
(3) Use four-way flashers and horn.
(4) Use ground guide(s).
WARNING
Do not back up without a ground guide. Failure to do this may result in damage tovehicle, injury, or death.
WARNING
When backing or going forward, ground guides should never stand directly in thevehicle’s path. Keep 10 yards between the vehicle and ground guides at the frontor rear and at the corners of the vehicle (never directly behind the vehicle).Ground guides must not position themselves between the vehicle being guided andanother object where an inadvertent engine surge or momentary loss of vehiclecontrol could cause injury. The vehicle driver will immediately stop the vehicle ifhe loses sight of ground guides or notes that the guide is dangerously positionedbetween the vehicle and another object. In such cases, the vehicle driver willsecure his vehicle, dismount, and make an on-the-spot correction beforecommencing operations.
CAUTION
Do not back up with transfer case shift lever in low range.
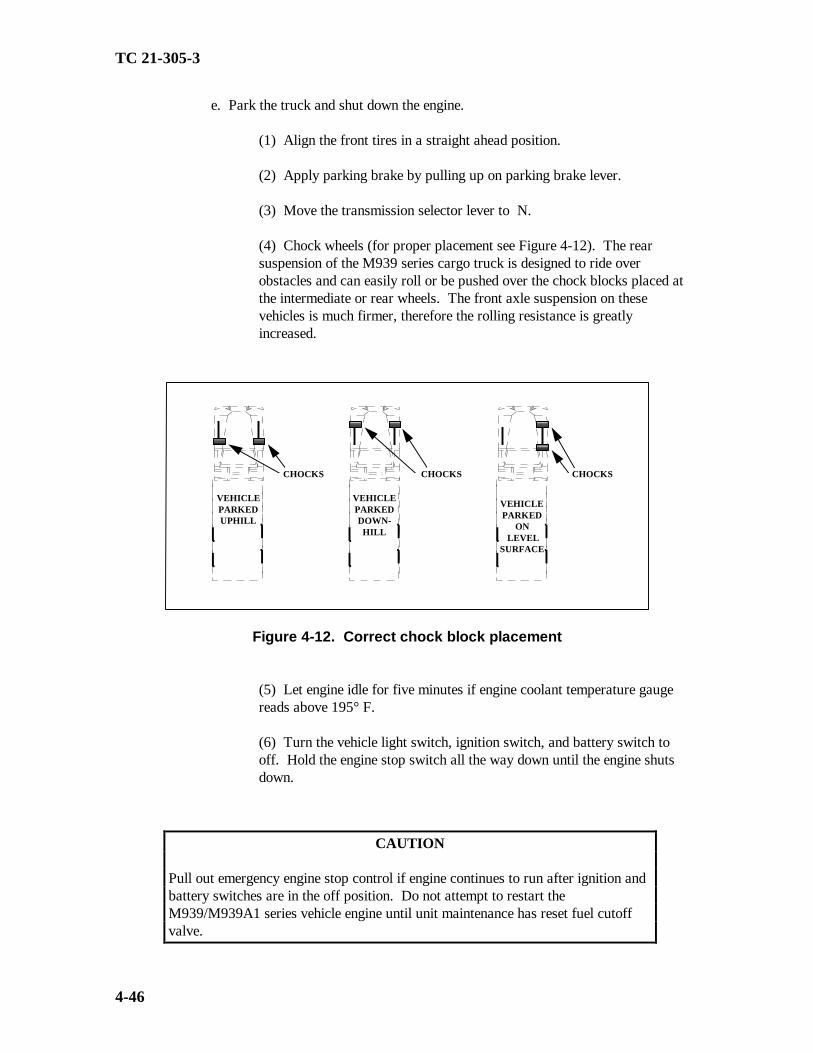
TC 21-305-3
4-46
e. Park the truck and shut down the engine.
(1) Align the front tires in a straight ahead position.
(2) Apply parking brake by pulling up on parking brake lever.
(3) Move the transmission selector lever to N.
(4) Chock wheels (for proper placement see Figure 4-12). The rearsuspension of the M939 series cargo truck is designed to ride overobstacles and can easily roll or be pushed over the chock blocks placed atthe intermediate or rear wheels. The front axle suspension on thesevehicles is much firmer, therefore the rolling resistance is greatlyincreased.
Figure 4-12. Correct chock block placement
(5) Let engine idle for five minutes if engine coolant temperature gaugereads above 195° F.
(6) Turn the vehicle light switch, ignition switch, and battery switch tooff. Hold the engine stop switch all the way down until the engine shutsdown.
VEHICLEPARKEDDOWN-HILL
CHOCKS CHOCKS
VEHICLEPARKEDUPHILL
VEHICLEPARKED
ON LEVEL
SURFACE
CHOCKS
CAUTION
Pull out emergency engine stop control if engine continues to run after ignition andbattery switches are in the off position. Do not attempt to restart theM939/M939A1 series vehicle engine until unit maintenance has reset fuel cutoffvalve.

TC 21-305-3
4-47
(7) Perform after-operation PMCS.
f. Give safety briefing to include safety restrictions and ground guide precautionsfor backing the truck.
g. Demonstrate hand and arm signals required for this exercise.
h. Demonstrate driving within the training area.
3. Practical exercise:
a. Assign students to vehicles and issue TM 9-2320-272-10, pencil, DD Form1970 (or ULLS generated DA Form 5987-E), DA Form 2404 (or ULLS generatedDA Form 5988-E), and equipment records folder. Tell students where rags,lubricants, and coolant are located.
b. Students perform before-operation PMCS.
c. Students practice maneuvering the truck through the courses laid out in thetraining area(s). Sample training areas are in Chapter 6 (Figures 6-1 through 6-7).During-operation PMCS is also conducted at this time.
NOTE: As each student practices driving, an assistant instructor rides in the seat next to the driver.The assistant instructor explains driving techniques, ensures the driver is aware of driving situations,and conducts AARs with each driver. Now is the time to pass on valuable experience and correctany bad driving habits.
d. Students perform after-operation PMCS. Ensure all operator entries requiredon DD Form 1970 (or ULLS generated DA Form 5987-E) and DA Form 2404 (orULLS generated DA Form 5988-E) are accurate, complete, and legible.
4. Evaluate: Check each student’s performance of PMCS and driving.
5. Summary:
a. Recap main points.
b. Allow for questions.
WARNING
When raising the vehicle hood, ensure it is secured from falling. Do this bysecuring the hood retaining bar to the bumper bracket with the safety pin. Failureto do so may damage the vehicle, or cause injury or death to personnel.

TC 21-305-3
4-48
c. Clarify questions.
d. Give closing statement.
6. Retraining: Retrain NO-GOs and slow learners. This can be accomplished usingTVT 55-16. Students perform driving tasks daily and are tested on the EOCCT.
E. SAFETY RESTRICTIONS.
1. Ensure that all chock blocks are in place when vehicles are parked or maintenance is tobe performed.
2. Ensure the transmission is in N, the parking brake is set, and the engine is shut off beforeleaving the vehicle, when the vehicle is parked, or maintenance is being performed.
3. Ensure all personnel remove all wristwatches, rings, bracelets, ID tags, neck chains, andany other jewelry before working in or around the vehicle.
4. Ensure all personnel pay particular attention to the cautions and warnings listed in theoperator’s manual.
5. Ensure the driver and ground guides know and understand the hand and arm signals,especially the signal to stop, as outlined in FM 21-305.
6. Ensure ground guide(s) are used when backing.
7. Ensure all backing is conducted at a speed of 5 MPH or less.
8. Hearing protection is required for all personnel working in and around this vehicle whilethe engine is running.
9. Inspect all seat belts for damage and ensure all occupants wear seat belts while thevehicle is in operation.
10. Ensure personnel maintain at least three points of contact when mounting ordismounting the vehicle (to include performing PMCS).
11. Ensure all personnel are clear of vehicle before engine start is attempted. Operatormust visually check to see that all areas of the truck are clear of personnel before attempting to startthe engine. Failure to do so could result in serious injury or death to personnel.
12. Extreme care should be taken when removing the surge tank filler cap if the temperaturegauge reads above 175° F. Steam or hot coolant under pressure will cause injury such as seriousburns.
13. The exhaust pipe and muffler can become very hot during vehicle operation. Be carefulnot to touch these parts with bare hands or allow the body to come in contact with the exhaust pipeor muffler. Exhaust system parts can become hot enough to cause serious burns.

TC 21-305-3
4-49
14. Reemphasize the removal of all jewelry such as rings, ID tags, or bracelets beforeworking around batteries. Be careful not to short out battery terminals. If jewelry or tools contactthe battery terminal, a direct short may occur resulting in instant heating, damage to equipment, andinjury to personnel. Do not smoke or use open flame near batteries. Batteries may explode from aspark. Battery acid is harmful to skin and eyes.
15. Fuel is very flammable and can explode easily. To avoid serious injury or death, keepfuel away from open fire and keep a fire extinguisher within easy reach when working with fuel. Donot work on the fuel system when the engine is hot. Fuel can be ignited by the hot engine. Whenworking with fuel, post signs that read: “NO SMOKING WITHIN 50 FEET OF VEHICLE”.
16. Alcohol used in alcohol evaporator is flammable, poisonous, and explosive. Do notsmoke when adding fluid and do not drink fluid. Failure to do this will result in injury or death.
17. Do not use hand throttle while driving. When brakes are applied, the hand throttle doesnot automatically disengage. Using the hand throttle as a cruise control device will result in injury ordeath.
18. Apply brakes gradually when slowing or stopping and pump brakes gradually whenslowing or stopping the vehicle on ice, snow, or wet pavement. A panic stop will cause the vehiclewheels to lock and the engine to stall. Power steering will be lost. Failure to apply brakes graduallycan result in injury or death.
19. Rapid operation repeatedly of service brakes will consume compressed air supply andcause automatic spring brake application. Failure to follow proper service brake operatingprocedures may cause serious injury or death to personnel.
20. Never use the parking brake for normal braking. The wheels will lock up causing asevere skid. A skidding vehicle could result in serious injury or death.
21. Excessive use of the service brake to control downhill speed will result in the loss ofbraking power because of heat buildup.
22. Do not put the vehicle in motion until the low air pressure warning light goes out andthe alarm (buzzer) stops sounding. Air pressure gauges should indicate at least 90 psi. If warningscontinue beyond three minutes, and/or pressure gauges do not reach 90 psi, turn the ignition switchand battery switch to OFF positions, and notify unit maintenance. Failure to do this will result ininjury or death.
23. When raising the vehicle hood, ensure it is secured from falling. Do this by securing thehood retaining bar to the bumper bracket with the safety pin. Failure to do so may damage thevehicle, or cause injury or death to personnel.

TC 21-305-3
4-50
F. ENVIRONMENTAL CONSIDERATIONS.
1. Ensure that all hazardous materials and hazardous wastes are stored and labeledproperly.
2. Ensure that spill kits are within reach when changing or adding vehicle fluids or in thecase of vehicle failures. Spill kits should enable the soldiers to contain a spill on land or in water.
3. Ensure that drip pans remain under parked vehicles.
4. Ensure that containers are the proper size and type for draining vehicle fluids.
G. ADDITIONAL COMMENTS AND INFORMATION. Recommended instructional time is 8hours (.5 conference, .5 demonstration, and 7.0 practical exercise, including 1.0 PMCS).

TC 21-305-3
4-51
LESSON TITLE: DRIVE AN M939 SERIES CARGO TRUCK ON THE ROAD
TASK NUMBER: 551-721-1366 (Drive Vehicle with Automatic Transmission)
A. TRAINING OBJECTIVE.
TASK: Drive an M939 series cargo truck (empty, partially loaded [2 to 3tons], and fully loaded) on the road (primary and secondary).
CONDITIONS: Given instruction, DD Form 1970 (or ULLS generated DA Form5987-E), DA Form 2404 (or ULLS generated DA Form 5988-E),pencil, TM 9-2320-272-10, equipment records folder, rags,lubricants, coolant, designated driving route (improved surfacedand secondary roads), an M939 series cargo truck with BII, vehicleloads, and a requirement to drive a designated route (to includemaking right and left turns, making gradual steering corrections,signal intentions in advance, pass oncoming vehicles, maintainvehicle interval, obey highway warning and regulatory signs,operate the lights as required, monitor gauges and indicator lights,upshift/downshift the transmission through all gear ranges,manipulate the controls, and perform basic driving maneuvers toinclude downhill braking and backing using ground guides).
STANDARD: Operate the vehicle correctly and safely without accident or injury.
B. INTERMEDIATE TRAINING. None.
C. ADMINISTRATIVE INSTRUCTIONS.
1. Training time: As scheduled.
2. Training location: Motor pool and driver training route (built up and rural areas) asscheduled.
3. Training type: Conference and practical exercise.
4. Students: Scheduled personnel.
5. Principal and assistant instructors required: One primary instructor for the conferenceand one assistant instructor for each two students for the practical exercise.
6. Training aids and equipment: Hearing protection, rags, lubricants, coolant, DD Form1970 (or ULLS generated DA Form 5987-E), DA Form 2404 (or ULLS generated DA Form 5988-E), pencil, TM 9-2320-272-10, equipment records folder, an M939 series cargo truck with BII foreach two students, and vehicle loads.
7. References: AR 385-55, DA Pamphlet 738-750, FM 21-305, and TM 9-2320-272-10.

TC 21-305-3
4-52
D. SEQUENCE OF ACTIVITY.
1. Introduction:
a. Interest device.
b. Tie-in.
c. Lesson objective (paragraph A).
d. Procedures:
(1) Explanation.
(2) Practical exercise.
(3) Summary.
2. Explanation and demonstration:
NOTE: An instructor will be in the cab sitting next to the driver, with nothing between the studentand instructor, whenever a student is driving the M939 series cargo truck.
NOTE: The students will be required to drive the vehicle fully loaded, partially loaded, and empty.If three vehicles are used, the following arrangement will allow the students to rotate in a round robinfashion:
• One vehicle should be loaded (load should be as close to maximum weight aspossible [-5 tons]).
• A second vehicle should be partially loaded (2 to 3 tons).• The third vehicle should be empty.
NOTE: To prevent loss of cargo or shifting en route, check cargo for blocking/bracing and cargotiedowns for security before operation and repeatedly during operation.
a. Explain braking precautions. Most likely, this is the first exposure to air brakeequipped vehicles for these students. They really need to understand the differencebetween air brakes and hydraulic brakes. The M939 family carries with it a knownrisk: They have conventional air-brake systems, and the air brakes are verysensitive. Air brakes are unique in that braking force is proportional to pedal travel,but the driver does not experience resistance from the brake pedal. Air brakes donot “feel” like hydraulic brakes. The untrained driver, or even the cross-trained one,may respond to this lack of resistance by applying too much force to the brakepedal. This causes the brakes to lock up and the vehicle to become uncontrollable.All drivers of these trucks must be thoroughly trained in operating tactical truckswith air brakes. A warning is printed in the technical manual. This warning canalso be considered a control: Apply brakes gradually when stopping. Panic stops

TC 21-305-3
4-53
will cause vehicle wheels to lock and the engine to stall. Power steering will be lost.Failure to apply brakes gradually may result in injury or death.
b. Explain procedures for hill climbing.
(1) The engine works hardest when moving a loaded vehicle up a grade.Proper use of gear ranges will shorten the time on hills.
(2) Unless the hill is extreme, begin in gear range 1-5 (drive), and depressthe accelerator pedal all the way downward. Keep it there as the vehiclemoves up the grade. Remain in this gear range and allow the transmissionto upshift and downshift automatically. If the transmission is constantlychanging gears, then downshift one selection at a time, such as 1-4, then1-3.
(3) As you progress up the hill count the number of downshifts.
NOTE: The automatic transmission is equipped with a lockup clutch which automatically engagesafter the load is rolling and torque demand is low. This provides increased fuel economy at highwaycruising speeds. It automatically releases at lower vehicle speeds. Lockup engagement, like rangeshifts, may be felt under some conditions and you may hear a slight change in engine sound as rpmdrop. A little driving experience will enable you to tell the difference between gear range changesand lockup engagement or disengagement.
WARNING
Apply brakes gradually when slowing or stopping and pump brakes graduallywhen slowing or stopping the vehicle on ice, snow, or wet pavement. A panic stopwill cause the vehicle wheels to lock and the engine to stall. Power steering will belost. Failure to apply brakes gradually can result in injury or death.
WARNING
Rapid operation repeatedly of service brakes will consume compressed air supplyand cause automatic spring brake application. Failure to follow proper servicebrake operating procedures may cause serious injury or death to personnel.
WARNING
Never use the parking brake for normal braking. The wheels will lock up causinga severe skid. A skidding vehicle could result in serious injury or death.

TC 21-305-3
4-54
(4) When you reach the top of the hill, manually downshift the transmissionto the gear that the transmission is in (this was the reason for counting thenumber of downshifts). This is normally the gear the truck should be in todescend the other side of the hill.
(5) For starting on maximum grades with maximum load (such as vehiclefully loaded), stop the vehicle and shift the transmission to N and thetransfer to low. Start in transmission gear range 1 or 1-2, depress theaccelerator pedal to the floor, and manually upshift the transmissionselector lever one range at a time, shifting when engine speed approaches2,000 rpm.
c. Explain procedures for downhill driving.
(1) Select a “safe” speed that is not too fast for the following:
• Total weight of the vehicle and cargo.• Length of the grade.• Steepness of the grade.• Road conditions.• Weather.
(2) Manually downshift the transmission into a lower gear before startingdowngrade. (The general rule is to use the same gear to descend the gradethat would be needed to climb the grade.)
CAUTION
Do not accelerate at full power when downshifting or upshifting to and fromforward driving range 1 (first).
CAUTION
Do not allow the M939 series vehicles to exceed 5 MPH or M939A1/A2 seriesvehicles to exceed 6 MPH when transfer case is in low and the transmission is in1 (first). Failure to do so will result in damage to internal engine components.
CAUTION
Do not allow engine speed to exceed 2,100 rpm in any transmission gear ratio.

TC 21-305-3
4-55
(3) Check brakes before starting the downgrade.
(4) Pay attention to signs indicating the location of escape ramps.
(5) When vehicle speed reaches the maximum “safe” speed, apply thebrakes just hard enough to feel a definite slowdown.
(6) When the vehicle speed has been reduced to approximately 5 MPHbelow the “safe” speed, release the brakes. (This brake application shouldlast for about 3 seconds.)
NOTE: New drivers generally have two problems with air brake systems on down grades:
• They try to maintain a constant speed down hill by dragging thebrakes. This glazes the brakes and they become completelyineffective.
• They drain the air system by continually pumping the brakes.
(7) When vehicle speed has increased to the “safe” speed, repeat steps(5) and (6).
(8) If braking power diminishes, pull off to the side of the road and allowthe brakes to cool.
CAUTION
Do not allow engine speed to exceed 2,100 rpm in any transmission gear ratio.
CAUTION
Excessive use of the service brake to control downhill speed will result in the lossof braking power because of heat buildup.
WARNING
Rapid operation repeatedly of service brakes will consume compressed air supplyand cause automatic spring brake application. Failure to follow proper servicebrake operating procedures may cause serious injury or death to personnel.
TC 21-305-3
4-56
d. Explain following distances.
(1) Maintain one second for each ten feet of vehicle length (40 MPH andless). (The M923A2 is 40.8 feet long [other models vary], so at speeds ofup to 40 MPH, allow four seconds following distance.)
(2) Increase by one second for speeds over 40 MPH. At 45 MPH, with theM923A2, allow five seconds following distance.
(3) Increase by several seconds for rain, fog, and winter conditions.
e. Explain driving in adverse weather conditions. Two major hazards associated indriving during adverse weather conditions are reduced visibility and reducedtraction.
(1) Countermeasures for driving during periods of reduced visibility:
(a) Travel at reduced speeds and be prepared to meet suddenchanges in road conditions.
(b) Do not use high beams. Switch to low beams if high beams areon.
(c) Look to the right if blinded by oncoming vehicles.
(d) Do not overrun the headlights and stay twice the normaldistance from the vehicle ahead.
(e) Give turn signals sooner.
(f) Apply brakes sooner and press brake pedal lightly to give earlywarning that vehicle will slow or stop.
(g) Use defrosters and wipers to help keep the windshield clear.
(h) Keep windshield, windows, mirrors, headlights, brake lights,reflectors, and area around air cleaner intake free of snow and ice.Snow and ice may melt, refreeze, and cause restriction in the airintake system.
(i) Watch for pedestrians and vehicles pulled over to the side of theroad.

TC 21-305-3
4-57
(j) Use caution when weather reduces visibility to near zero. Thisis particularly true at night, in heavy snow, in a downpour of rain,or dense fog. When this happens, it is unsafe to drive.
• Exit the highway, stop, and wait until visibility improvesbefore continuing.
• Do not stop on the shoulder with flashers on. Stopping onshoulders may induce a rear end collision/chain reaction.
(2) Reduced traction countermeasures:
(a) Install tire chains, if needed, for snow or ice. Use tire chains onthe intermediate axle tires only. For M939 series vehicles, placechains on outside tires. Remove as soon as mission allows. ForM939A2 series vehicles, select the sand setting on the CTISselector panel. (Tire chains are authorized for use on the M939A2series vehicles, however chains could cause damage to CTIScomponents.)
(b) Pump the brakes gradually when stopping the vehicle on snowand ice (pumping air brake vehicles may be dangerous, do notpump the brakes more than three to four times and allow the airpressure to build back up before reapplying the brakes). Suddenbraking will cause wheels to lock and vehicle to slide out of control.
CAUTION
Attempting operation of the M939 series cargo truck with only one drive wheelequipped with tire chain may result in damage to tire and/or power train.
WARNING
Apply brakes gradually when slowing or stopping and pump brakes graduallywhen slowing or stopping the vehicle on ice, snow, or wet pavement. A panic stopwill cause the vehicle wheels to lock and the engine to stall. Power steering will belost. Failure to apply brakes gradually can result in injury or death.
WARNING
Rapid operation repeatedly of service brakes will consume compressed air supplyand cause automatic spring brake application. Failure to follow proper servicebrake operating procedures may cause serious injury or death to personnel.

TC 21-305-3
4-58
(c) Place the transmission shift lever and the transfer case shiftlever in the appropriate driving range to descend or climb steephills.
(d) Place the vehicle in motion slowly to prevent wheels fromspinning.
(e) Press the accelerator pedal slowly when changing speed.
(f) Keep the accelerator pedal steady after vehicle reaches thedesired speed.
(g) Turn the vehicle slowly and make gradual steering adjustmentswhen on slippery surfaces.
(h) Steer the vehicle away from ruts and large snow banks.
(i) Steer the vehicle straight up and down hills if possible.
(j) Check for black ice. Black ice is clear and cannot be seenbecause the road surface is visible through the ice. The icebecomes invisible to the driver. Black ice usually occurs onbridges, beneath underpasses, in dips in the road, in shaded areas,and on lower sides of banked curves.
• When driving in rain or near freezing temperatures, feel forice along the front of a mirror. If ice is there it may be onthe road surface as well.
• When in doubt, test surface traction by first checking to seethat nothing is following your vehicle, then slow down andapply the brakes gently to see if the vehicle skids.
(k) Sudden changes in speed or direction result from overacceleration, over braking, and over steering. These changes resultin skidding and jackknifing. Use the following procedures if thevehicle’s rear skids:
• Let up on the accelerator pedal.• Steer in the same direction in which the rear of the vehicle
is skidding.• When vehicle is under control, press the brake pedal
lightly.• Steer vehicle on a straight course and slowly press the
accelerator pedal.

TC 21-305-3
4-59
(l) Do the following if the vehicle starts to slide while climbing ahill:
• Let up on the accelerator pedal.• Steer the vehicle in the direction of the slide until the
vehicle stops sliding.• Slowly press the accelerator pedal and steer the vehicle on
a straight course.
(m) The best advice in regard to a stuck vehicle is to avoid gettingstuck. However, do the following if the vehicle does get stuck:
• Shovel clear path ahead of each wheel. Put boards, brush,sand, gravel, or similar material in cleared paths to getbetter traction.
• If the vehicle is equipped with CTIS (M939A2 series),lower the tire pressure to the emergency setting.
• If additional power is needed to extract vehicle whenmired in snow, place transmission in 1 (first gear range)and transfer case in low range. Do not rock the vehicle orspin the wheels.
• If vehicle remains stuck, use wrecker or another vehicleequipped with winch to tow or winch the stuck vehicle.
• If vehicle is equipped with a self recovery winch, it maybe used to help free the vehicle.
(n) Drive slowly and test brakes after driving through slush orwater. If brakes slip do the following:
• Continue to drive slowly.• Apply moderate pressure on brake pedal to cause slight
brake drag.• When brakes are dry and they no longer slip and uneven
braking ceases, let up on the brake pedal.• Resume normal driving speed.
(o) When driving during hot weather, adjust your driving forbleeding tar conditions on the roadway. Do the following to driveunder these conditions:
• Frequently scan the roadway ahead.• Identify a black tar area ahead.• Maintain steady speed.• Make no sudden steering maneuvers.• Make no sudden braking maneuvers.• If braking is required, ensure all wheels are on a similar
surface.

TC 21-305-3
4-60
f. Explain driving on secondary roads.
(1) When driving CTIS equipped vehicles, select the X-C setting on theCTIS selector panel. Speed in this mode is limited to 35 MPH. If thisspeed is exceeded for more than two minutes, CTIS will automaticallyinflate the tires to the highway setting. At the highway setting, this smallerfootprint can cause traction problems and the driver may lose control of thevehicle.
(2) Do not drive in dust clouds created by other vehicles. Maintain alonger following distance when traveling on dusty roads. Establishprocedures to warn approaching vehicles (driving in dust and otherrestricted visibility conditions) of vehicles that are stopped or broken down.
(3) Drive slowly on secondary roads. All models of the M939 series truckshave been known to lose traction on secondary roads, especially when thevehicles are empty or lightly loaded. This is because the rear wheels tend tobounce on the rough road.
(4) Travel on the solid part of the roadway and stay away from the edge ofsoft shouldered roads. Edges of trails and secondary roads have beenknown to give way, causing the vehicle to roll on its side.
g. Give safety briefing to include safety restrictions and ground guide precautionsfor backing the truck.
3. Practical exercise:
a. Assign students to vehicles and issue TM 9-2320-272-10, pencil, DD Form 1970(or ULLS generated DA Form 5987-E), DA Form 2404 (or ULLS generated DAForm 5988-E), and equipment records folder. Tell students where rags, lubricants,and coolant are located.
b. Students perform before-operation PMCS.
c. Students practice driving the truck on the road (primary and secondary). During-operation PMCS is also conducted at this time.
NOTE: As each student practices driving, an assistant instructor rides in the seat next to the driver.The assistant instructor explains driving techniques, ensures the driver is aware of driving situations,and conducts AARs with each driver. Now is the time to pass on valuable experience and correctany bad driving habits.
d. Students perform after-operation PMCS. Ensure all operator entries required onDD Form 1970 (or ULLS generated DA Form 5987-E) and DA Form 2404 (orULLS generated DA Form 5988-E) are accurate, complete, and legible.
4. Evaluate: Check each student’s performance of PMCS and driving.

TC 21-305-3
4-61
5. Summary:
a. Recap main points.
b. Allow for questions.
c. Clarify questions.
d. Give closing statement.
6. Retraining: Retrain NO-GOs and slow learners. Students perform driving tasks dailyand are tested on the EOCCT.
E. SAFETY RESTRICTIONS.
1. Ensure that all chock blocks are in place when vehicles are parked or maintenance is tobe performed.
2. Ensure the transmission is in N, the parking brake is set, and the engine is shut off beforeleaving the vehicle, when the vehicle is parked, or maintenance is being performed.
3. Ensure all personnel remove all wristwatches, rings, bracelets, ID tags, neck chains, andany other jewelry before working in or around the vehicle.
4. Ensure all personnel pay particular attention to the cautions and warnings listed in theoperator’s manual.
5. Ensure the driver and ground guides know and understand the hand and arm signals,especially the signal to stop, as outlined in FM 21-305.
6. Ensure ground guide(s) are used when backing.
7. Ensure all backing is conducted at a speed of 5 MPH or less.
8. Hearing protection is required for all personnel working in and around this vehicle whilethe engine is running.
9. Inspect all seat belts for damage and ensure all occupants wear seat belts while thevehicle is in operation.
10. Ensure personnel maintain at least three points of contact when mounting ordismounting the vehicle (to include performing PMCS).
11. Ensure all personnel are clear of vehicle before engine start is attempted. Operatormust visually check to see that all areas of the truck are clear of personnel before attempting to startthe engine. Failure to do so could result in serious injury or death to personnel.
TC 21-305-3
4-62
12. Extreme care should be taken when removing the surge tank filler cap if the temperaturegauge reads above 175° F. Steam or hot coolant under pressure will cause injury such as seriousburns.
13. The exhaust pipe and muffler can become very hot during vehicle operation. Be carefulnot to touch these parts with bare hands or allow the body to come in contact with the exhaust pipeor muffler. Exhaust system parts can become hot enough to cause serious burns.
14. Reemphasize the removal of all jewelry such as rings, ID tags, or bracelets beforeworking around batteries. Be careful not to short out battery terminals. If jewelry or tools contactthe battery terminal, a direct short may occur resulting in instant heating, damage to equipment, andinjury to personnel. Do not smoke or use open flame near batteries. Batteries may explode from aspark. Battery acid is harmful to skin and eyes.
15. Fuel is very flammable and can explode easily. To avoid serious injury or death, keepfuel away from open fire and keep a fire extinguisher within easy reach when working with fuel. Donot work on the fuel system when the engine is hot. Fuel can be ignited by the hot engine. Whenworking with fuel, post signs that read: “NO SMOKING WITHIN 50 FEET OF VEHICLE”.
16. Alcohol used in alcohol evaporator is flammable, poisonous, and explosive. Do notsmoke when adding fluid and do not drink fluid. Failure to do this will result in injury or death.
17. Do not use hand throttle while driving. When brakes are applied, the hand throttle doesnot automatically disengage. Using the hand throttle as a cruise control device will result in injury ordeath.
18. Apply brakes gradually when slowing or stopping and pump brakes gradually whenslowing or stopping the vehicle on ice, snow, or wet pavement. A panic stop will cause the vehiclewheels to lock and the engine to stall. Power steering will be lost. Failure to apply brakes graduallycan result in injury or death.
19. Rapid operation repeatedly of service brakes will consume compressed air supply andcause automatic spring brake application. Failure to follow proper service brake operatingprocedures may cause serious injury or death to personnel.
20. Never use the parking brake for normal braking. The wheels will lock up causing asevere skid. A skidding vehicle could result in serious injury or death.
21. Excessive use of the service brake to control downhill speed will result in the loss ofbraking power because of heat buildup.
22. Do not put the vehicle in motion until the low air pressure warning light goes out andthe alarm (buzzer) stops sounding. Air pressure gauges should indicate at least 90 psi. If warningscontinue beyond three minutes, and/or pressure gauges do not reach 90 psi, turn the ignition switchand battery switch to OFF positions, and notify unit maintenance. Failure to do this will result ininjury or death.

TC 21-305-3
4-63
23. When raising the vehicle hood, ensure it is secured from falling. Do this by securing thehood retaining bar to the bumper bracket with the safety pin. Failure to do so may damage thevehicle or cause injury or death to personnel.
24. Ensure a safe following distance and speed are maintained when driving on thedesignated route (as determined by the local command).
F. ENVIRONMENTAL CONSIDERATIONS.
1. Ensure that all hazardous materials and hazardous wastes are stored and labeledproperly.
2. Ensure that spill kits are within reach when changing or adding vehicle fluids or in thecase of vehicle failures. Spill kits should enable the soldiers to contain a spill on land or in water.
3. Ensure that drip pans remain under parked vehicles.
4. Ensure that containers are the proper size and type for draining vehicle fluids.
G. ADDITIONAL COMMENTS AND INFORMATION. Recommended instructional time is16 hours (1.0 conference and 15.0 practical exercise, including 3.0 PMCS).

TC 21-305-3
4-64
LESSON TITLE: DRIVE AN M939 SERIES CARGO TRUCK OFF ROAD
TASK NUMBER: 551-721-1360 (Drive Cargo Vehicle on Side Roads and UnimprovedRoads)
A. TRAINING OBJECTIVE.
TASK: Drive an M939 series cargo truck (empty, partially loaded [2 to 3tons], and fully loaded) off road.
CONDITIONS: Given instruction, DD Form 1970 (or ULLS generated DA Form5987-E), DA Form 2404 (or ULLS generated DA Form 5988-E),pencil, TM 9-2320-272-10, equipment records folder, rags,lubricants, coolant, designated driving route (improved surfacedand secondary roads), an M939 series cargo truck with BII, vehicleloads, and a requirement to operate the vehicle off road (to includestreams, ravines, gullies, ditches, wooded areas, rocky terrain,swamps, and mud).
STANDARD: Operate the vehicle safely at reduced speeds and over rough terrainwithout injury to personnel or damage to the vehicle.
B. INTERMEDIATE TRAINING. None.
C. ADMINISTRATIVE INSTRUCTIONS.
1. Training time: As scheduled.
2. Training location: Motor pool and off road driver training area as scheduled. Aclassroom is required if optional videotape is shown.
3. Training type: Conference and practical exercise.
4. Students: Scheduled personnel.
5. Principal and assistant instructors required: One primary instructor for the conferenceand one assistant instructor for each two students for the practical exercise.
6. Training aids and equipment: Hearing protection, rags, lubricants, coolant, DD Form1970 (or ULLS generated DA Form 5987-E), DA Form 2404 (or ULLS generated DA Form 5988-E), pencil, TM 9-2320-272-10, equipment records folder, an M939 series cargo truck with BII foreach two students, and vehicle loads. Television, VCR, and TVT 55-16 are required if the videotapeis reshown to the students.
7. References: AR 385-55, DA Pamphlet 738-750, FM 21-305, and TM 9-2320-272-10.

TC 21-305-3
4-65
D. SEQUENCE OF ACTIVITY.
1. Introduction:
a. Interest device.
b. Tie-in.
c. Lesson objective (paragraph A).
d. Procedures:
(1) Explanation.
(2) Practical exercise.
(3) Summary.
2. Explanation and demonstration:
NOTE: An instructor will be in the cab sitting next to the driver, with nothing between the studentand instructor, whenever a student is driving the M939 series cargo truck.
NOTE: The students will be required to drive the vehicle fully loaded, partially loaded, and empty.If three vehicles are used, the following arrangement will allow the students to rotate in a round robinfashion:
• One vehicle should be loaded (load should be as close to maximum weight aspossible [-5 tons]).
• A second vehicle should be partially loaded (2 to 3 tons).• The third vehicle should be empty.
NOTE: To prevent loss of cargo or shifting en route, check cargo for blocking/bracing and cargotiedowns for security before operation and repeatedly during operation.
a. As an option, show TVT 55-16, to reinforce driving tasks. This step may bedeleted because the students should have viewed this TVT in earlier lessons.
b. General off road driving procedures:
(1) For starting with heavy loads, extreme grades, and in rough terrain,with the transfer case shift lever in high, and the transmission selector leverin 1 (first), limit speed to 12 MPH (15 MPH for the M939A1 and A2models). If the transfer case shift lever is in low and the transmissionselector lever is in 1 (first), limit speed to 5 MPH (6 MPH for the M939A1and A2 models).

TC 21-305-3
4-66
(2) For steep grades, heavy traffic, and rough terrain, with the transfer caseshift lever in high and the transmission selector lever in 1-2 (second), limitspeed to 25 MPH (29 MPH for the M939A1 and A2 models). If thetransfer case shift lever is in low and the transmission selector lever is in1-2 (second), limit speed to 10 MPH (12 MPH for the M939A1 and A2models).
(3) When operating M939A2 series vehicles cross country, pre-select theX-C mode on the CTIS selector panel. When the mission requiresmaximum traction in sand, snow, or mud, select sand on the selector panel.When the mission requires maximum traction in extremely adverse terrain,select emergency on the selector panel.
(4) When operating vehicle without CTIS (M939 and A1 series vehicles)off the road in heavy rain, deflate tires to 25 psi. Inflate tires immediatelyto the correct pressure when operation changes to paved roads.
c. Shallow ditches require the following maneuvers:
(1) Stop the vehicle.
(2) Check the terrain for obstacles.
(3) Place the transfer case shift lever in high.
(4) Engage front wheel drive lock-in switch.
(5) Place the transmission shift lever in 1 or 1-2.
(6) Steer the vehicle toward the ditch so that one wheel on the axle willleave the ditch as the other wheel on the same axle enters it.
d. Deep ditches require the following driving techniques:
(1) Stop the vehicle.
(2) Check the terrain for obstacles.
(3) Cut away sides of the ditch, if necessary.
(4) Place the transfer case shift lever in low (low range automaticallyengages 6X6 drive).
(5) Place the transmission shift lever in 1 or 1-2.
(6) Approach the ditch at an angle.
(7) Accelerate the vehicle enough to keep it rolling as it goes up the otherside.

TC 21-305-3
4-67
e. Gullies and ravines require the following maneuvers:
(1) Stop the vehicle.
(2) Check the terrain for obstacles.
(3) Place the transfer case shift lever in low (low range automaticallyengages 6X6 drive).
(4) Place the transmission shift lever in 1 or 1-2.
(5) Ease the front wheels over the edge into the ravine.
(6) Steer a straight course so that both front wheels strike the bottom at thesame time.
(7) Accelerate enough so that the vehicle can climb up the opposite bank.
f. Wooded area driving techniques include the following:
(1) Stop the vehicle.
(2) Check the terrain for obstacles.
(3) Remove tarps and bows as necessary.
(4) Place the transfer case shift lever in high.
(5) If needed, engage front wheel drive lock-in switch.
(6) Place the transmission shift lever in 1 or 1-2.
(7) Maneuver around obstacles.
(8) Center larger saplings on the vehicle bumper.
g. Rocky terrain requires the following driving techniques:
(1) Stop the vehicle. CTIS should be set to the X-C mode. Any lower tirepressure can cause breaks in the tires as large rocks force the tire to contactthe rim.
(2) Check the terrain for obstacles.
(3) Drive slowly choosing route while advancing. Drivers should achieve a“rolling” effect as they cross large rocks by braking as the vehicle’s wheelsride over a rock so the axle settles relatively gently on the far side.

TC 21-305-3
4-68
(4) Remove stones as often as possible from between dual tires (M939series vehicles only).
h. Fording shallow streams (30 inches or less) calls for these handling techniques:
(1) Stop the vehicle.
(2) Check the terrain for obstacles.
(3) Check the stream for depth and firm support.
(4) Tighten fuel tank cap.
(5) Secure all loose objects on vehicle.
(6) Make sure battery caps are all installed and tight. Make suretransmission dipstick is secured.
(7) Start engine. Make sure engine is running properly.
(8) Pull the transfer case shift lever up to low range and place thetransmission selector lever in 1 (first).
(9) Enter water slowly at a gentle sloping area.
(10) Maintain a constant vehicle speed while fording, and exit water in anarea with a gentle slope. Unless absolutely necessary, do not stop while inthe water.
(11) If vehicle accidentally enters water deeper than 30 inches, do thefollowing:
• Apply brake pedal and hold to stop vehicle.• Shift transmission to N and transfer case to high range.• Move the transmission shift lever to R.• Let up on the brake pedal and slowly back vehicle out of the
water.
WARNING
Do not attempt to cross water deeper than 30 inches. Limit vehicle speed whilefording to 3 or 4 MPH. Failure to do this could result in damage to the vehicle orinjury or death to personnel.

TC 21-305-3
4-69
(12) After leaving the water, apply the brake pedal lightly and hold whiledriving slowly to dry out brake linings.
(13) When clear of the fording area, stop the vehicle, apply and release theparking brakes several times to remove water from brake components.
(14) Wash all parts of vehicle with fresh water as soon as possible andhave it serviced by organizational maintenance.
i. Mud and swamps require the following driving techniques:
(1) Stop the vehicle.
(2) Place the transfer case shift lever in low (low range automaticallyengages 6X6 drive).
(3) Place the transmission shift lever in 1-5.
(4) Place vehicle in motion slowly without causing wheels to spin or engineto race.
(5) Place transfer case shift lever in high range when vehicle is under way.If necessary, engage front wheel dive lock-in switch.
j. Clean mud from wheels, brakes, axles, universal joints, steering mechanism, andradiator as soon as possible. Make sure the axle breather vent caps move freely onbreather body.
k. Give safety briefing, to include reinforcing ground guide safety procedures forbacking the vehicle.
3. Practical exercise:
a. Assign students to vehicles and issue TM 9-2320-272-10, pencil, DD Form 1970(or ULLS generated DA Form 5987-E), DA Form 2404 (or ULLS generated DAForm 5988-E), and equipment records folder. Tell students where rags, lubricants,and coolant are located.
b. Students perform before-operation PMCS.
WARNING
Do not rely on service brakes until they dry out. Keep applying brakes untiluneven braking ceases. Failure to do this could result in injury or death.
TC 21-305-3
4-70
c. Students practice driving the truck off road. During-operation PMCS is alsoconducted at this time.
NOTE: As each student practices driving, an assistant instructor rides in the seat next to the driver.The assistant instructor explains driving techniques, ensures the driver is aware of driving situations,and conducts AARs with each driver. Now is the time to pass on valuable experience and correctany bad driving habits.
d. Students perform after-operation PMCS. Ensure all operator entries required onDD Form 1970 (or ULLS generated DA Form 5987-E) and DA Form 2404 (orULLS generated DA Form 5988-E) are accurate, complete, and legible.
4. Evaluate: Check each student’s performance of PMCS and off road driving.
5. Summary:
a. Recap main points.
b. Allow for questions.
c. Clarify questions.
d. Give closing statement.
6. Retraining: Retrain NO-GOs and slow learners. Students perform driving tasks dailyand are tested on the EOCCT.
E. SAFETY RESTRICTIONS.
1. Ensure that all chock blocks are in place when vehicles are parked or maintenance is tobe performed.
2. Ensure the transmission is in N, the parking brake is set, and the engine is shut off beforeleaving the vehicle, when the vehicle is parked, or maintenance is being performed.
3. Ensure all personnel remove all wristwatches, rings, bracelets, ID tags, neck chains, andany other jewelry before working in or around the vehicle.
4. Ensure all personnel pay particular attention to the cautions and warnings listed in theoperator’s manual.
5. Ensure the driver and ground guides know and understand the hand and arm signals,especially the signal to stop, as outlined in FM 21-305.
6. Ensure ground guide(s) are used when backing.
7. Ensure all backing is conducted at a speed of 5 MPH or less.

TC 21-305-3
4-71
8. Hearing protection is required for all personnel working in and around this vehicle whilethe engine is running.
9. Inspect all seat belts for damage and ensure all occupants wear seat belts while thevehicle is in operation.
10. Ensure personnel maintain at least three points of contact when mounting ordismounting the vehicle (to include performing PMCS).
11. Ensure all personnel are clear of vehicle before engine start is attempted. Operatormust visually check to see that all areas of the truck are clear of personnel before attempting to startthe engine. Failure to do so could result in serious injury or death to personnel.
12. Extreme care should be taken when removing the surge tank filler cap if the temperaturegauge reads above 175° F. Steam or hot coolant under pressure will cause injury such as seriousburns.
13. The exhaust pipe and muffler can become very hot during vehicle operation. Be carefulnot to touch these parts with bare hands or allow the body to come in contact with the exhaust pipeor muffler. Exhaust system parts can become hot enough to cause serious burns.
14. Reemphasize the removal of all jewelry such as rings, ID tags, or bracelets beforeworking around batteries. Be careful not to short out battery terminals. If jewelry or tools contactthe battery terminal, a direct short may occur resulting in instant heating, damage to equipment, andinjury to personnel. Do not smoke or use open flame near batteries. Batteries may explode from aspark. Battery acid is harmful to skin and eyes.
15. Fuel is very flammable and can explode easily. To avoid serious injury or death, keepfuel away from open fire and keep a fire extinguisher within easy reach when working with fuel. Donot work on the fuel system when the engine is hot. Fuel can be ignited by the hot engine. Whenworking with fuel, post signs that read: “NO SMOKING WITHIN 50 FEET OF VEHICLE”.
16. Alcohol used in alcohol evaporator is flammable, poisonous, and explosive. Do notsmoke when adding fluid and do not drink fluid. Failure to do this will result in injury or death.
17. Do not use hand throttle while driving. When brakes are applied, the hand throttle doesnot automatically disengage. Using the hand throttle as a cruise control device could result in injuryor death.
18. Apply brakes gradually when slowing or stopping and pump brakes gradually whenslowing or stopping the vehicle on ice, snow, or wet pavement. A panic stop will cause the vehiclewheels to lock and the engine to stall. Power steering will be lost. Failure to apply brakes graduallycan result in injury or death.
19. Rapid operation repeatedly of service brakes will consume compressed air supply andcause automatic spring brake application. Failure to follow proper service brake operatingprocedures may cause serious injury or death to personnel.

TC 21-305-3
4-72
20. Never use the parking brake for normal braking. The wheels will lock up causing asevere skid. A skidding vehicle could result in serious injury or death.
21. Excessive use of the service brake to control downhill speed will result in the loss ofbraking power because of heat buildup.
22. Do not put the vehicle in motion until the low air pressure warning light goes out andthe alarm (buzzer) stops sounding. Air pressure gauges should indicate at least 90 psi. If warningscontinue beyond three minutes, and/or pressure gauges do not reach 90 psi, turn the ignition switchand battery switch to OFF positions and notify unit maintenance. Failure to do this will result ininjury or death.
23. When raising the vehicle hood, ensure it is secured from falling. Do this by securing thehood retaining bar to the bumper bracket with the safety pin. Failure to do so may damage thevehicle or cause injury or death to personnel.
24. Do not rely on service brakes until they dry out. Keep applying brakes until unevenbraking ceases. Failure to do this could result in injury or death.
25. Ensure a safe following distance and speed are maintained when driving on thedesignated route (as determined by the local command).
F. ENVIRONMENTAL CONSIDERATIONS.
1. Ensure that all hazardous materials and hazardous wastes are stored and labeledproperly.
2. Ensure that spill kits are within reach when changing or adding vehicle fluids or in thecase of vehicle failures. Spill kits should enable the soldiers to contain a spill on land or in water.
3. Ensure that drip pans remain under parked vehicles.
4. Ensure that containers are the proper size and type for draining vehicle fluids.
G. ADDITIONAL COMMENTS AND INFORMATION. Recommended instructional time is 6hours (.5 conference and 5.5 practical exercise, including 1.0 PMCS).

TC 21-305-3
4-73
LESSON TITLE: DRIVE AN M939 SERIES CARGO TRUCK AT NIGHT
TASK NUMBER: 551-721-1366 (Drive Vehicle with Automatic Transmission)
A. TRAINING OBJECTIVE.
TASK: Drive an M939 series cargo truck at night.
CONDITIONS: Given instruction, DD Form 1970 (or ULLS generated DA Form5987-E), DA Form 2404 (or ULLS generated DA Form 5988-E),pencil, TM 9-2320-272-10, equipment records folder, rags,lubricants, coolant, designated driving route (improved surfacedand secondary roads), an M939 series cargo truck with BII, and arequirement to drive a designated route at night with headlightsusing defensive driving (accident avoidance) methods; operate thelights, monitor gauges and indicator lights, manipulate the controls,and perform basic driving maneuvers to include downhill brakingand backing using ground guides.
STANDARD: Operate the vehicle correctly and safely without accident or injury.
B. INTERMEDIATE TRAINING. None.
C. ADMINISTRATIVE INSTRUCTIONS.
1. Training time: As scheduled.
2. Training location: Motor pool and driver training route (built up and rural areas) asscheduled.
3. Training type: Conference and practical exercise.
4. Students: Scheduled personnel.
5. Principal and assistant instructors required: One primary instructor for the conferenceand one assistant instructor for each two students for the practical exercise.
6. Training aids and equipment: Rags, lubricants, coolant, DD Form 1970 (or ULLSgenerated DA Form 5987-E), DA Form 2404 (or ULLS generated DA Form 5988-E), pencil, TM 9-2320-272-10, equipment records folder, and an M939 series cargo truck with BII for each twostudents.
7. References: AR 385-55, DA Pamphlet 738-750, FM 21-305, and TM 9-2320-272-10.

TC 21-305-3
4-74
D. SEQUENCE OF ACTIVITY.
1. Introduction:
a. Interest device.
b. Tie-in.
c. Lesson objective (paragraph A).
d. Procedures:
(1) Explanation.
(2) Practical exercise.
(3) Summary.
2. Explanation and demonstration:
NOTE: An instructor will be in the cab, sitting next to the driver with nothing between the studentand instructor, whenever a student is driving the M939 series cargo truck.
a. Night driving factors.
(1) Driver factors:
(a) Vision. The driver has limited vision at night because of thefollowing:
• Eyes need time to adjust to the change between light anddarkness.
• Drivers cannot see as sharply at night.• Drivers cannot see to the sides as well at night.
(b) Glare. Temporary blindness is caused by glare, normally fromoncoming headlights but sometimes from other lights.
(c) Fatigue. Reduces the ability to see clearly. The driverbecomes less alert, slower to see hazards, and does not react aspromptly.
(d) Driver inexperience. Newness to driving, coupled with theproblems of reduced vision, glare, and fatigue account for the factnew drivers have higher nighttime accident rates than moreexperienced drivers.

TC 21-305-3
4-75
(2) Roadway factors:
(a) Low illumination. Illumination provided by street lights isoften only fair to poor. On most roads, the only illumination isfrom the driver’s headlights. Headlights are useful for a relativelyshort and narrow path directly ahead of the vehicle. Headlights donot bend around corners.
(b) Variation in illumination. The driver must constantly adjust hiseyes to different types and degrees of lighting. Flashing lightsdistract as much as they illuminate. Traffic signs are hard to seeagainst the background of other lights especially in towns andcities.
(c) Familiarity with roads. The driver needs to be particularlyalert on roads that he has never driven during the day. On familiarroads, drivers tend to be overconfident. This is dangerous becauseof the following:
• The view of the roadway is not the same.• Situations on some stretches will change.
(d) Other road users. The driver must adjust his driving to hazardssuch as pedestrians, joggers, bicyclists, and animals.
(e) Drinking drivers. The likelihood of encountering drunkendrivers increases after sundown. Be especially alert when drivingnear roadside taverns and similar attractions.
(3) Vehicle factors:
(a) Headlights. Sight distance is limited to the range of theheadlights. Therefore, the driver must drive at a speed that allowshim to stop within his sight distance.
(b) Auxiliary lights. Trucks are better seen at night by otherdrivers when reflectors, marker lights, clearance lights, tail lights,and brake lights are clean and working properly.
(c) Turn signals. The ability to communicate with other driversdepends on turn signals. Nonfunctional or dirty turn signal lightsgreatly increase the risk of an accident.
(d) Windshield and wipers. A clean windshield and properlyworking wipers are a must for safe driving.
(e) Mirrors. Mirrors help the driver see what is going on aroundhim. Keep them clean and properly adjusted.

TC 21-305-3
4-76
b. Night driving procedures.
(1) Preparing to drive at night:
(a) Getting yourself ready.
• If you wear glasses, be sure they are clean.• Remove sunglasses.• Be well rested.
(b) Plan your route.
• Know the location of rest stops.• Plan for hazards such as unlighted areas, exit ramps,
construction areas, and other changes in the highwayenvironment.
(c) Getting the vehicle ready.
• Ensure windshield, mirrors, lights, and reflectors are clean.• Ensure all lights are operational.
(2) Driving at night:
(a) Avoid blinding others.
• Dim high beams when oncoming vehicles are less than 500feet away.
• Do not use high beams to retaliate against other drivers.
(b) Avoid glare.
• Set interior panel lights at the lowest setting to reduceglare.
• Look to the right when oncoming vehicles are using highbeams.
(c) Maximize visibility.
• Use low beams when desired visual range is about 250 feet.• Use high beams when there are no oncoming vehicles and
desired visual range is 350 to 500 feet.
(d) Adjust basic driving techniques.
• Exercise additional caution because of reduced vision.• Signal earlier than you would during daylight to give other
drivers more time to react.

TC 21-305-3
4-77
3. Practical exercise:
a. Assign students to vehicles and issue TM 9-2320-272-10, pencil, DD Form 1970(or ULLS generated DA Form 5987-E), DA Form 2404 (or ULLS generated DAForm 5988-E), and equipment records folder. Tell students where rags, lubricants,and coolant are located.
b. Students perform before-operation PMCS to include the operation andcleanliness of all lights.
c. Give safety briefing with emphasis on safety precautions for night operations.
d. Students drive the designated route. During-operation PMCS is also conductedat this time.
NOTE: As each student practices driving, an assistant instructor rides in the seat next to the driver.The assistant instructor explains driving techniques, ensures the driver is aware of driving situations,and conducts AARs with each driver. Now is the time to pass on valuable experience and correctany bad driving habits.
e. Students perform after-operation PMCS. Ensure all operator entries required onDD Form 1970 (or ULLS generated DA Form 5987-E) and DA Form 2404 (orULLS generated DA Form 5988-E) are accurate, complete, and legible.
4. Evaluate: Check each student’s performance of PMCS and night driving.
5. Summary:
a. Recap main points.
b. Allow for questions.
c. Clarify questions.
d. Give closing statement.
6. Retraining: Retrain NO-GOs and slow learners.
E. SAFETY RESTRICTIONS.
1. Ensure that all chock blocks are in place when vehicles are parked or maintenance is tobe performed.
2. Ensure the transmission is in N, the parking brake is set, and the engine is shut off beforeleaving the vehicle, when the vehicle is parked, or maintenance is being performed.
3. Ensure all personnel remove all wristwatches, rings, bracelets, ID tags, neck chains, andany other jewelry before working in or around the vehicle.

TC 21-305-3
4-78
4. Ensure all personnel pay particular attention to the cautions and warnings listed in theoperator’s manual.
5. Ensure the driver and ground guides know and understand the hand and arm signals,especially the signal to stop, as outlined in FM 21-305.
6. Ensure ground guide(s) are used when backing.
7. Ensure all backing is conducted at a speed of 5 MPH or less.
8. Hearing protection is required for all personnel working in and around this vehicle whilethe engine is running.
9. Inspect all seat belts for damage and ensure all occupants wear seat belts while thevehicle is in operation.
10. Ensure personnel maintain at least three points of contact when mounting ordismounting the vehicle (to include performing PMCS).
11. Ensure all personnel are clear of vehicle before engine start is attempted. Operatormust visually check to see that all areas of the truck are clear of personnel before attempting to startthe engine. Failure to do so could result in serious injury or death to personnel.
12. Extreme care should be taken when removing the surge tank filler cap if the temperaturegauge reads above 175° F. Steam or hot coolant under pressure will cause injury such as seriousburns.
13. The exhaust pipe and muffler can become very hot during vehicle operation. Be carefulnot to touch these parts with bare hands or allow the body to come in contact with the exhaust pipeor muffler. Exhaust system parts can become hot enough to cause serious burns.
14. Reemphasize the removal of all jewelry such as rings, ID tags, or bracelets beforeworking around batteries. Be careful not to short out battery terminals. If jewelry or tools contactthe battery terminal, a direct short may occur resulting in instant heating, damage to equipment, andinjury to personnel. Do not smoke or use open flame near batteries. Batteries may explode from aspark. Battery acid is harmful to skin and eyes.
15. Fuel is very flammable and can explode easily. To avoid serious injury or death, keepfuel away from open fire and keep a fire extinguisher within easy reach when working with fuel. Donot work on the fuel system when the engine is hot. Fuel can be ignited by the hot engine. Whenworking with fuel, post signs that read: “NO SMOKING WITHIN 50 FEET OF VEHICLE”.
16. Alcohol used in alcohol evaporator is flammable, poisonous, and explosive. Do notsmoke when adding fluid and do not drink fluid. Failure to do this will result in injury or death.
17. Do not use hand throttle while driving. When brakes are applied, the hand throttle doesnot automatically disengage. Using the hand throttle as a cruise control device will result in injury ordeath.

TC 21-305-3
4-79
18. Apply brakes gradually when slowing or stopping and pump brakes gradually whenslowing or stopping the vehicle on ice, snow, or wet pavement. A panic stop will cause the vehiclewheels to lock and the engine to stall. Power steering will be lost. Failure to apply brakes graduallycan result in injury or death.
19. Rapid operation repeatedly of service brakes will consume compressed air supply andcause automatic spring brake application. Failure to follow proper service brake operatingprocedures may cause serious injury or death to personnel.
20. Never use the parking brake for normal braking. The wheels will lock up causing asevere skid. A skidding vehicle could result in serious injury or death.
21. Excessive use of the service brake to control downhill speed will result in the loss ofbraking power because of heat buildup.
22. Do not put the vehicle in motion until the low air pressure warning light goes out andthe alarm (buzzer) stops sounding. Air pressure gauges should indicate at least 90 psi. If warningscontinue beyond three minutes, and/or pressure gauges do not reach 90 psi, turn the ignition switchand battery switch to OFF positions, and notify unit maintenance. Failure to do this will result ininjury or death.
23. When raising the vehicle hood, ensure it is secured from falling. Do this by securing thehood retaining bar to the bumper bracket with the safety pin. Failure to do so may damage thevehicle or cause injury or death to personnel.
24. Ensure a safe following distance and speed are maintained when driving on thedesignated route (as determined by the local command).
F. ENVIRONMENTAL CONSIDERATIONS.
1. Ensure that all hazardous materials and hazardous wastes are stored and labeledproperly.
2. Ensure that spill kits are within reach when changing or adding vehicle fluids or in thecase of vehicle failures. Spill kits should enable the soldiers to contain a spill on land or in water.
3. Ensure that drip pans remain under parked vehicles.
4. Ensure that containers are the proper size and type for draining vehicle fluids.
G. ADDITIONAL COMMENTS AND INFORMATION. Recommended instructional time is 5hours (.5 conference and 4.5 hours practical exercise, including 1.0 PMCS).

TC 21-305-3
5-1
LESSON TITLE: PERFORM OPERATOR PREVENTIVE MAINTENANCE CHECKSAND SERVICES (PMCS) ON TRAILERS
TASK NUMBER: 551-721-1353 (Perform Preventive Maintenance Checks and Services[PMCS] on Trailers)
A. TRAINING OBJECTIVE.
TASK: Perform operator PMCS on a trailer.
CONDITIONS: Given instruction, DA Form 2404 (or ULLS generated DA Form5988-E), pencils, appropriate trailer operator’s manual, equipmentrecords folder, rags, lubricants, and a trailer coupled to an M939series cargo truck with BII.
STANDARD: Inspect the trailer according to the PMCS tables listed in theappropriate trailer operator’s manual, correct all faults within theoperator’s level of maintenance, and legibly record all others on DAForm 2404 (or ULLS generated DA Form 5988-E). If no faultsare found, make necessary entries on DA Form 2404 (or ULLSgenerated DA Form 5988-E).
B. INTERMEDIATE TRAINING. None.
C. ADMINISTRATIVE INSTRUCTIONS.
1. When training will be given: As scheduled.
2. Training location: Motor pool as scheduled.
3. Training type: Demonstration and practical exercise.
4. Who will be trained: Personnel as scheduled.
5. Principal and assistant instructors required: One primary instructor for the class and oneassistant instructor for every two students for the demonstration and practical exercise.
6. Training aids and equipment: Rags, lubricants, DA Form 2404 (or ULLS generated DAForm 5988-E), pencil, appropriate trailer operator’s manual, equipment records folder, and a trailercoupled to an M939 series cargo truck with BII for each two students.
7. References: AR 385-55, DA Pamphlet 738-750, and appropriate trailer operator’smanual.

TC 21-305-3
5-2
D. SEQUENCE OF ACTIVITY.
1. Introduction:
a. Interest device.
b. Tie-in.
c. Lesson objective (paragraph A).
d. Procedures:
(1) Explanation.
(2) Practical exercise.
(3) Summary.
2. Explanation and demonstration: Demonstrate before, during, and after checks tostudents.
3. Practical exercise:
a. Assign students to coupled trailers and issue trailer operator’s manuals, pencils,DA Form 2404 (or ULLS generated DA Form 5988-E), and equipment recordsfolder. Tell students where rags and lubricants are located.
b. Students perform PMCS.
4. Evaluate: Check each student’s PMCS performance.
5. Summary:
a. Recap main points.
b. Allow for questions.
c. Clarify questions.
d. Give closing statement.
6. Retraining: Retrain NO-GOs and slow learners.

TC 21-305-3
5-3
E. SAFETY RESTRICTIONS.
1. Ensure that all chock blocks are in place when vehicles are parked or maintenance is tobe performed.
2. If trailer is not coupled to towing vehicle, ensure the trailer wheels are securely chocked.Failure to do so may cause the trailer to roll, resulting in injury to personnel or damage toequipment.
3. Ensure the transmission is in N, the parking brake is set, and the engine is shut off beforeleaving the vehicle, when the vehicle is parked, or maintenance is being performed.
4. Ensure all personnel remove all wristwatches, rings, bracelets, ID tags, neck chains, andany other jewelry before working in or around the vehicle or trailer.
5. Ensure all personnel pay particular attention to the cautions and warnings listed in theoperator’s manuals.
6. Ensure personnel maintain at least three points of contact when mounting or dismountingthe trailer (to include performing PMCS).
7. Ensure all personnel stand clear of towing vehicle and trailer during coupling anduncoupling operations. Failure to follow this warning may result in serious injury or death.
F. ENVIRONMENTAL CONSIDERATIONS.
1. Ensure that all hazardous materials and hazardous wastes are stored and labeledproperly.
2. Ensure that spill kits are within reach when changing or adding vehicle fluids or in thecase of vehicle failures. Spill kits should enable the soldiers to contain a spill on land or in water.
3. Ensure that drip pans remain under parked vehicles.
4. Ensure that containers are the proper size and type for draining vehicle fluids.
G. ADDITIONAL COMMENTS AND INFORMATION. Recommended instructional time is1.0 hours (.5 demonstration and .5 practical exercise). The remaining PMCS is performed inconjunction with driving tasks.

TC 21-305-3
5-4
LESSON TITLE: DRIVE AN M939 SERIES CARGO TRUCK WITH TRAILER
TASK NUMBER: 551-721-1380 (Transport General Cargo in Trailer) and 551-721-1385(Couple/Uncouple Pintle-Connected Trailer)
A. TRAINING OBJECTIVE.
TASK: Drive an M939 series cargo truck with trailer.
CONDITIONS: Given instruction, DD Form 1970 (or ULLS generated DA Form5987-E), DA Form 2404 (or ULLS generated DA Form 5988-E),pencil, TM 9-2320-272-10, appropriate trailer operator’s manual,equipment records folder, rags, lubricants, coolant, designateddriving route (improved surfaced and secondary roads), an M939series cargo truck with BII, trailer and vehicle loads, suitabletraining area, and a requirement to drive a designated route.
STANDARD: Without accident or injury, drive the designated route. Couple anduncouple the trailer, back the trailer in a straight line, and performbasic driving maneuvers.
B. INTERMEDIATE TRAINING. None.
C. ADMINISTRATIVE INSTRUCTIONS.
1. When training will be given: As scheduled.
2. Training location: Motor pool, training area, and driver training route as scheduled.
3. Training type: Conference, demonstration, and practical exercise.
4. Who will be trained: Personnel as scheduled.
5. Principal and assistant instructors required: One primary instructor for the conferenceand one assistant instructor for every two students for the demonstration and practical exercise.
6. Training aids and equipment: Rags, lubricants, coolant, 40 traffic cones or empty POLdrums, suitable driver training area, and designated driving route (improved surfaced and secondaryroads). DD Form 1970 (or ULLS generated DA Form 5987-E), DA Form 2404 (or ULLSgenerated DA Form 5988-E), pencil, TM 9-2320-272-10, appropriate trailer operator’s manual,equipment records folder, and a trailer coupled to an M939 series cargo truck with BII for each twostudents.
7. References: AR 385-55, DA Pamphlet 738-750, FM 21-305, TM 9-2320-272-10, andappropriate trailer operator’s manual.

TC 21-305-3
5-5
D. SEQUENCE OF ACTIVITY.
1. Introduction:
a. Interest device.
b. Tie-in.
c. Lesson objective (paragraph A).
d. Procedures:
(1) Explanation.
(2) Practical exercise.
(3) Summary.
2. Explanation and demonstration:
NOTE: The instructions contained in this lesson for a pintle-connected trailer are in general termsbecause this lesson covers a variety of trailers. Although procedures for these types of trailers aresimilar, the instructor should consult the specific trailer operator’s manual for detailed instructions.Also, when towing other authorized equipment such as towed howitzers, consult the specific TM forthe equipment being towed before conducting any towing operations.
a. Connect the trailer to the vehicle.
(1) Sound the horn before backing. Using ground guides, back thevehicle to the trailer. Be sure no one stands between the vehicle andtrailer.
WARNING
All personnel must stand clear of towing vehicle and trailer during coupling operation. Failure to comply with this warning may resultin serious injury or death to personnel.
WARNING
Do not back up without a ground guide. Failure to do this may resultin damage to vehicle, injury, or death.

TC 21-305-3
5-6
(2) Stop the vehicle. Engage the parking brake. Shut off the engine. Getout of the vehicle to connect the trailer.
(3) Remove the pintle safety cotter pin and open the pintle. Release thetrailer handbrake(s).
(4) Lift the trailer. (Some trailers are light and can be lifted by oneperson, while others will require several people, and still others have amechanical lift.) Secure the trailer drawbar ring in the pintle of the towingvehicle. Close the pintle. Install the pintle safety cotter pin in the pintle.
(5) Hook the two safety chains from the trailer to the rear lifting shacklesof the towing vehicle.
(6) Raise the retractable support (landing leg).
(7) Connect the intervehicular brake hoses to the towing vehicle. Turn onthe air supply.
(8) Connect the intervehicular electrical cable to the towing vehicle.
(9) Operate the controls in the towing vehicle to check brake action andoperation of all lights.
CAUTION
Do not back up with transfer case shift lever in low range.
WARNING
When backing or going forward, ground guides should never standdirectly in the vehicle’s path. Keep 10 yards between the vehicleand ground guides at the front or rear and at the corners of thevehicle (never directly behind the vehicle). Ground guides must not position themselves between the vehicle being guided and anotherobject where an inadvertent engine surge or momentary loss ofvehicle control could cause injury. The vehicle driver willimmediately stop the vehicle if he loses sight of ground guides ornotes that the guide is dangerously positioned between the vehicleand another object. In such cases, the vehicle driver will secure hisvehicle, dismount, and make an on-the-spot correction beforecommencing operations.

TC 21-305-3
5-7
b. Disconnect the trailer from the vehicle.
(1) Position the trailer on level ground if possible.
(2) Close the vehicle’s air coupling shut-off cock(s) and disconnect theintervehicular brake hose(s). Stow on the bracket provided on the trailer.
(3) Lower the retractable support (landing leg). Ensure it is locked inposition to prevent the trailer from falling.
(4) Unhook the safety chains.
(5) Remove the pintle safety cotter pin and open the pintle.
(6) With assistance, remove the drawbar ring from the towing vehicle andlower the trailer on its support leg.
(7) Apply the trailer hand brake or chock wheels to prevent trailermovement.
(8) Close the pintle. Reinstall the pintle safety cotter pin in the pintle.
(9) Level the trailer if required and perform after-operation PMCS on thetrailer.
c. Driving. When driving the towing vehicle and trailer, keep the overall lengthof the unit in mind when passing other vehicles and turning. Backing is alsoaffected because the unit is hinged in the middle.
(1) Safely towing a trailer requires increased concentration, alertness, andstrict compliance with towing speeds.
WARNING
All personnel must stand clear of towing vehicle and trailer duringuncoupling operation. Failure to comply with this warning mayresult in serious injury or death to personnel.
WARNING
Before moving trailer, ensure all loose equipment is properly stowedand that nothing will drag on the ground. If trailer is loaded, ensurethat load is properly secured. Failure to follow this warning mayresult in injury to personnel or damage to equipment.

TC 21-305-3
5-8
(2) Trailers have a tendency to fishtail or swerve very easily when thedriver makes an erratic movement of any magnitude. This can be causedby–
(a) Speed.
(b) A slight swerve to miss a pothole.
(c) A quick lane change.
(d) A slip of the hand on the steering wheel.
(e) Rough or uneven road.
(3) To prevent trailer fishtail or swerve–
(a) Never exceed the recommended speed for the trailer that youare towing.
(b) Never exceed the trailer’s maximum recommended weightcapacity.
(c) Always slow down for curves, wet or rough roads, ordowngrades.
(d) Anticipate all stops to take longer as a result of the addedweight. Brake early and gently. Do not slam on the brakes.
(e) On downgrades, slow down before starting downhill. Use alower gear. Let the engine compression help slow the vehicle.
(4) To correct trailer fishtail or swerve–
(a) Steer straight ahead.
(b) Gradually decelerate.
(c) Do not brake until both the towing vehicle and trailer havestabilized.
(5) When turning corners, allow for the fact that the trailer wheels turninside the turning radius of the towing vehicle.
(a) To make a right turn–
• Check traffic ahead, to the rear, and to the right side.• If not in the right-hand lane, be sure that lane is clear,
signal, and move into the lane well in advance of the turn.

TC 21-305-3
5-9
• Signal for the turn at least 150 feet in advance and reducespeed.
• Check other traffic that is in, at, or approaching theintersection. (Be sure no bicycle or motorcycle is to theright. Be especially alert for pedestrians.)
• Take a position farther from the curb or edge of thepavement (still within the right lane) than the driver wouldif driving a straight truck (no trailer).
• Drive the truck approximately halfway into the intersectionand then cut sharply to the right. This will keep the trailerwheels off the curb.
• Keep the vehicle close enough to the edge of the road toprevent following vehicles from trying to pass on the right.
• During the turn, monitor the mirrors for off-tracking andkeep both hands on the steering wheel.
• If you cannot make the turn without swinging into anotherlane, turn wide as you complete the turn.
• If you must cross into an oncoming lane and a vehiclecomes toward you, allow it to get by you. Stop if you haveto, but do not back up.
• After completing the turn, cancel the signal.• When it is safe to do so, steer the vehicle into the desired
lane (four-lane roads).
(b) To make a left turn–
• Check traffic ahead, to the rear, and to both sides.• Signal for the turn at least 150 feet in advance and reduce
speed.• Check other traffic that is in, at, or approaching the
intersection.• Ensure there is an adequate gap to make a turn in front of
traffic.• Before turning, drive the truck into the center of the
intersection to allow for the trailer.• Turn hard to the left. Watch for oncoming traffic, if
applicable.• During the turn, monitor the mirrors for off-tracking and
keep both hands on the steering wheel.• If you are turning into a multi-lane street, enter the right
lane.• If there are two left turning lanes, start your turn from the
right-most lane.• After completing the turn, cancel the signal.

TC 21-305-3
5-10
(6) Stopping requires more distance when pulling a trailer. Apply brakesgradually and smoothly. Stepping on the brake pedal will stop both thetowing vehicle and trailer.
d. Backing the trailer in a straight line. Since the driver cannot see directlybehind the vehicle, backing is always dangerous. Avoid backing wheneverpossible, even if you must go around the block to do so. When backing followthese rules.
(1) Get out of the vehicle. Check the area to the sides, rear, and overheadfor obstructions.
(2) Use ground guides to direct while backing.
WARNING
Apply brakes gradually when slowing or stopping and pump brakes gradually when slowing or stopping the vehicle on ice, snow, or wetpavement. A panic stop will cause the vehicle wheels to lock and theengine to stall. Power steering will be lost. Failure to apply brakesgradually can result in injury or death.
WARNING
Rapid operation repeatedly of service brakes will consumecompressed air supply and cause automatic spring brake application.Failure to follow proper service brake operating procedures maycause serious injury or death to personnel.
WARNING
When backing or going forward, ground guides should never standdirectly in the vehicle’s path. Keep 10 yards between the vehicle andground guides at the front or rear and at the corners of the vehicle(never directly behind the vehicle). Ground guides must not positionthemselves between the vehicle being guided and another objectwhere an inadvertent engine surge or momentary loss of vehiclecontrol could cause injury. The vehicle driver will immediately stopthe vehicle if he loses sight of ground guides or notes that the guide isdangerously positioned between the vehicle and another object. Insuch cases, the vehicle driver will secure his vehicle, dismount, andmake an on-the-spot correction before commencing operations.

TC 21-305-3
5-11
(3) Adjust the rearview mirrors before backing.
(4) Sound the horn before backing, where it is legal to do so.
(5) Remember, when backing, the trailer’s rear will move in the oppositedirection from which the front towing vehicle wheels are turned.
(a) If the wheels are turned to the right, the trailer will go left.
(b) If the wheels are turned to the left, the trailer will go right.
(6) Make gradual steering corrections in relation to trailer alignment.
(7) Pull up if necessary to improve the trailer’s alignment.
(8) Stop the vehicle when the desired position is reached.
e. Explain to the students that they must perform before-, during-, and after-operation PMCS on their assigned vehicle.
f. Demonstrate hand and arm signals required for this exercise.
g. Demonstrate driving through each maneuver.
3. Practical exercise:
a. Assign students to vehicles/trailers and issue TM 9-2320-272-10, traileroperator’s manuals, pencil, DD Form 1970 (or ULLS generated DA Form 5987-E),DA Form 2404 (or ULLS generated DA Form 5988-E), and equipment recordsfolder. Tell students where rags, lubricants, and coolant are located.
b. Students perform before-operation PMCS.
c. Students practice maneuvering the truck through the courses laid out in thetraining area(s). Sample training areas are in Chapter 6. During-operation PMCSis also conducted at this time.
NOTE: As each student practices driving, an assistant instructor rides in the seat next to the driver.The assistant instructor explains driving techniques, ensures the driver is aware of driving situations,and conducts AARs with each driver. Now is the time to pass on valuable experience and correctany bad driving habits.
d. After the students have mastered driving the vehicle in the training area, theywill practice driving on the road.
CAUTION
Do not back up with transfer case shift lever in low range.

TC 21-305-3
5-12
e. Students perform after-operation PMCS. Ensure all operator entries requiredon DD Form 1970 (or ULLS generated DA Form 5987-E) and DA Form 2404 (orULLS generated DA Form 5988-E) are accurate, complete, and legible.
4. Evaluate: Check each student’s performance of PMCS and driving.
5. Summary:
a. Recap main points.
b. Allow for questions.
c. Clarify questions.
d. Give closing statement.
6. Retraining: Retrain NO-GOs and slow learners.
E. SAFETY RESTRICTIONS.
1. Ensure that all chock blocks are in place when vehicles are parked or maintenance is tobe performed.
2. Ensure the transmission is in N, the parking brake is set, and the engine is shut off beforeleaving the vehicle, when the vehicle is parked, or maintenance is being performed.
3. Ensure all personnel remove all wristwatches, rings, bracelets, ID tags, neck chains, andany other jewelry before working in or around the vehicle.
4. Ensure all personnel pay particular attention to the cautions and warnings listed in theoperator’s manuals.
5. Ensure the driver and ground guides know and understand the hand and arm signals,especially the signal to stop, as outlined in FM 21-305.
6. Ensure ground guide(s) are used when backing.
7. Ensure all backing is conducted at a speed of 5 MPH or less.
8. Hearing protection is required for all personnel working in and around this vehicle whilethe engine is running.
9. Inspect all seat belts for damage and ensure all occupants wear seat belts while thevehicle is in operation.
10. Ensure personnel maintain at least three points of contact when mounting ordismounting the vehicle (to include performing PMCS).

TC 21-305-3
5-13
11. Ensure all personnel are clear of vehicle before engine start is attempted. Operatormust visually check to see that all areas of the truck are clear of personnel before attempting to startthe engine. Failure to do so could result in serious injury or death to personnel.
12. Extreme care should be taken when removing the surge tank filler cap if the temperaturegauge reads above 175° F. Steam or hot coolant under pressure will cause injury such as seriousburns.
13. The exhaust pipe and muffler can become very hot during vehicle operation. Be carefulnot to touch these parts with bare hands or allow the body to come in contact with the exhaust pipeor muffler. Exhaust system parts can become hot enough to cause serious burns.
14. Reemphasize the removal of all jewelry such as rings, ID tags, or bracelets beforeworking around batteries. Be careful not to short out battery terminals. If jewelry or tools contactthe battery terminal, a direct short may occur resulting in instant heating, damage to equipment, andinjury to personnel. Do not smoke or use open flame near batteries. Batteries may explode from aspark. Battery acid is harmful to skin and eyes.
15. Fuel is very flammable and can explode easily. To avoid serious injury or death, keepfuel away from open fire and keep a fire extinguisher within easy reach when working with fuel. Donot work on the fuel system when the engine is hot. Fuel can be ignited by the hot engine. Whenworking with fuel, post signs that read: “NO SMOKING WITHIN 50 FEET OF VEHICLE”.
16. Alcohol used in alcohol evaporator is flammable, poisonous, and explosive. Do notsmoke when adding fluid and do not drink fluid. Failure to do this could result in injury or death.
17. Do not use hand throttle while driving. When brakes are applied, the hand throttle doesnot automatically disengage. Using the hand throttle as a “cruise control” device could result ininjury or death.
18. Apply brakes gradually when slowing or stopping and pump brakes gradually whenslowing or stopping the vehicle on ice, snow, or wet pavement. A panic stop will cause the vehiclewheels to lock and the engine to stall. Power steering will be lost. Failure to apply brakes graduallycan result in injury or death.
19. Rapid operation repeatedly of service brakes will consume compressed air supply andcause automatic spring brake application. Failure to follow proper service brake operatingprocedures may cause serious injury or death to personnel.
20. Never use the parking brake for normal braking. The wheels will lock up causing asevere skid. A skidding vehicle could result in serious injury or death.
21. Excessive use of the service brake to control downhill speed will result in the loss ofbraking power because of heat buildup.

TC 21-305-3
5-14
22. Do not put the vehicle in motion until the low air pressure warning light goes out andthe alarm (buzzer) stops sounding. Air pressure gauges should indicate at least 90 psi. If warningscontinue beyond three minutes, and/or pressure gauges do not reach 90 psi, turn the ignition switchand battery switch to OFF positions, and notify unit maintenance. Failure to do this could result ininjury or death.
23. When raising the vehicle hood, ensure it is secured from falling. Do this by securing thehood retaining bar to the bumper bracket with the safety pin. Failure to do so may damage thevehicle or cause injury or death to personnel.
24. All personnel must stand clear of towing vehicle and trailer during coupling anduncoupling operations. Failure to comply with this warning may result in serious injury or death topersonnel.
25. Before moving trailer, ensure all loose equipment is properly stowed and that nothingwill drag on the ground. If trailer is loaded, ensure that load is properly secured. Failure to followthis warning may result in injury to personnel or damage to equipment.
F. ENVIRONMENTAL CONSIDERATIONS.
1. Ensure that all hazardous materials and hazardous wastes are stored and labeledproperly.
2. Ensure that spill kits are within reach when changing or adding vehicle fluids or in thecase of vehicle failures. Spill kits should enable soldiers to contain a spill on land or in water.
3. Ensure that drip pans remain under parked vehicles.
4. Ensure that containers are the proper size and type for draining vehicle fluids.
G. ADDITIONAL COMMENTS AND INFORMATION. Recommended instructional time is15 hours (.5 conference, .5 demonstration, and 14.0 practical exercise, including 2.0 PMCS).

TC 21-305-3
6-1
CHAPTER 6
SAMPLE TRAINING AREAS FOR THE 5-TON CARGO TRUCK
This chapter shows the sample training areas for the 5-ton cargo truck. The figures in thischapter depict the 5-ton cargo as follows:
• Figure 6-1, page 6-2, stopping within the prescribed limits.• Figure 6-2, page 6-3, diminishing clearance.• Figure 6-3, page 6-4, offset alley.• Figure 6-4, page 6-5, serpentine course.• Figure 6-5, page 6-6, forward stop/straight line backing.• Figure 6-6, page 6-7, left and right turns.• Figure 6-7, page 6-8, alley dock.

TC 21-305-3
6-2
5-TON CARGO STOPPING WITHINPRESCRIBED LIMITS
A B C
258' MIN
200' 20' 38'
NOTES:
THE DISTANCE (WIDTH) BETWEEN TRAFFIC CONES IS 12 FEET.
THE DRIVER PULLS OUT AT POINT A. HIS SPEED AT POINT B SHOULD BE 10 MPH WITH TRUCK LOADED AND 20 MPH WITH TRUCK EMPTY. HE APPLIES HIS BRAKES AT POINT B AND MUST STOP BEFORE REACHING POINT C.
TRAFFIC CONES = STOP LINE =
START POINT APPLIES BRAKES STOP LINE
Figure 6-1. 5-ton cargo stopping within prescribed limits

TC 21-305-3
6-3
5-TON CARGO DIMINISHING CLEARANCE
FORWARD =
NOTES:
TRAFFIC CONES =
STOP LINE =
200’
START
FINISH
ABCDE
25' 25' 25' 25' 25'
25'
25'
8'6" 8'8" 8'10" 9' 9'6"
10'
75'
100’
Figure 6-2. 5-ton cargo diminishing clearance

TC 21-305-3
6-4
START
5-TON CARGO OFFSET ALLEY
26'
26'
50'
26'
50'
50'
180’
FORWARD =
NOTES:
TRAFFIC CONES =
STOP LINE =
WIDTH OF ALLEY IS 9’2”
WIDTH OF ALLEY IS 9’2”
Figure 6-3. 5-ton cargo offset alley

TC 21-305-3
6-5
M
START
FINISH
50' 40' 40' 70'
5-TON CARGO SERPENTINE COURSE
NOTES:
MINIMUM SIZE OF AREA IS 200’ LONG AND 35’ WIDE.
IF YOU HAVE A PERMANENT SITE, USE PAINT TO MARK THE FIXED BOUNDARIES. TO MINIMIZE CONFUSION, PAINT OUT EXISTING LINES WITH A COLOR THAT MATCHES THEPAVING. IF YOU CANNOT PAINT LINES, USE TRAFFIC CONES, ENGINEER TAPE OR YELLOWPOLYPROPYLENE ROPE.
EMPTY POL DRUMS = FIXED BOUNDARIES =
STANDARD = (WIDTH BETWEEN STANDARDS IS 12’)
FORWARD = BACKING =
START AND FINISH = MIDPOINT = M
200’
35’
Figure 6-4. 5-ton cargo serpentine course

TC 21-305-3
6-6
5-TON CARGO FORWARD STOP/STRAIGHT LINE BACKING
2’ 12’ 2’
IF YOU HAVE A PERMANENT SITE, USE PAINT TO MARK THE FIXED BOUNDARIES. TO MINIMIZE CONFUSION, PAINT OUT EXISTING LINES WITH A COLOR THAT MATCHES THEPAVING. IF YOU CANNOT PAINT LINES, USE TRAFFIC CONES, ENGINEER TAPE OR YELLOW POLYPROPYLENE ROPE.
SCORING STANDARD FOR THE FORWARD STOP IS THE DRIVER DRIVES THROUGH THE ALLEY AND STOPS SO THAT THE FRONT OF THE TRUCK IS BETWEEN THE CLEARANCE LINE AND THE STOP LINE, WITHOUT HITTING ANY CONES OR TOUCHING THE BOUNDARIES.
SCORING STANDARD FOR THE STRAIGHT LINE BACKING IS THE DRIVER PULLS HIS VEHICLE COMPLETELY OUT OF THE ALLEY. HE THEN MUST BACK THROUGH THE ALLEY AND STOP WHEN THE FRONT OF THE TRUCK IS BETWEEN THE STOP LINE AND THE CLEARANCE LINE WITHOUT HITTING ANY CONES OR TOUCHING THE BOUNDARY.
200' MIN
100' MIN50' MIN 50' MIN
6” WIDE BACKINGSTOP LINE
2” WIDECLEARANCE LINE
6” WIDE FORWARD STOP LINE
2” WIDECLEARANCE LINE
DRIVES IN
BACKS OUT
NOTES:
TRAFFIC CONES = FIXED BOUNDARIES =
Figure 6-5. 5-ton cargo forward stop/straight line backing

TC 21-305-3
6-7
18" MARK
5-TON CARGO LEFT AND RIGHT TURNS
X
X
18" MARK
34’
17’
17’
IF YOU HAVE A PERMANENT SITE, USE PAINT TO MARK THE FIXED BOUNDARIES. TO MINIMIZE CONFUSION, PAINT OUT EXISTING LINES WITH A COLOR THAT MATCHES THEPAVING. IF YOU CANNOT PAINT LINES, USE TRAFFIC CONES, ENGINEER TAPE OR YELLOW POLYPROPYLENE (POLY) ROPE.
ONE TRAINING AREA CAN BE USED FOR BOTH MANEUVERS, BUT THE MANEUVERS MUSTBE DONE SEPARATELY, SUCH AS ALL STUDENTS DOING THE RIGHT TURN FIRST, THEN THE LEFT TURN.
THE ACCEPTABLE STANDARD IS, THE REAR WHEELS OF THE TRUCK (OR TRAILER) MUSTBE WITHIN 18” OF THE CONE, WITHOUT HITTING THE CONE OR GOING OVER ANYBOUNDARIES.
NOTES:
TRAFFIC CONES = FIXED BOUNDARIES =
Figure 6-6. 5-ton cargo left and right turns

TC 21-305-3
6-8
5-TON CARGO ALLEY DOCK
NOTES:
IF YOU HAVE A PERMANENT SITE, USE PAINT TO MARK THE FIXED BOUNDARIES. TO MINIMIZE CONFUSION, PAINT OUT EXISTING LINES WITH A COLOR THAT MATCHES THEPAVING. IF YOU CANNOT PAINT LINES, USE TRAFFIC CONES, ENGINEER TAPE OR YELLOWPOLYPROPYLENE ROPE.
THE DRIVER WILL DRIVE FORWARD TO THE LEFT SIDE OF THE REFERENCE LINE,WITHOUTGOING PAST THE OUTER BOUNDARIES, KEEPING THE ALLEY ENTRANCE ON HIS LEFT SIDE.HE WILL THEN BACK IN A CURVED PATH INTO THE ALLEY.
THE SCORING STANDARD IS TO BACK INTO THE ALLEY, WITHOUT HITTING ANY CONES ORTOUCHING ANY BOUNDARIES, AND STOP WITH THE REAR OF THE TRUCK BETWEEN THESTOP AND CLEARANCE LINES, WITH NO MORE THAN 2 PULL-UPS.
TRAFFIC CONES = FIXED BOUNDARIES =
STOP LINE
2” WIDECLEARANCE LINE
12’
70’
USE 2 CONESTO MARK ALLEY ENTRANCE
70’
2’
70’
START POSITION
IMAGINARYREFERENCELINE
Figure 6-7. 5-ton cargo alley dock

TC 21-305-3
7-1
LESSON TITLE: END OF COURSE COMPREHENSIVE TEST (EOCCT)
TASK NUMBER: All previously taught tasks.
A. TRAINING OBJECTIVE.
TASK: Pass the EOCCT.
CONDITIONS: Given an examination booklet, pencil, DD Form 1970 (or ULLSgenerated DA Form 5987-E), DA Form 2404 (or ULLS generatedDA Form 5988-E), TM 9-2320-272-10, equipment records folder,rags, lubricants, coolant, an M939 series cargo truck with BII, roadtest route, and a suitable off road training area. When testing fortrailer operations, additional requirements are appropriate traileroperator’s TM and a trailer coupled to an M939 series cargo truck.
STANDARD: Pass all written and performance tests.
B. INTERMEDIATE TRAINING.
Intermediate Training Objective 1
TASK: Pass a written examination.
CONDITIONS: Given an examination booklet and pencil.
STANDARD: Answer correctly 21 of 30 questions within 40 minutes. Use eitherthe primary written test or the alternate written test.
Intermediate Training Objective 2
TASK: Pass the driver’s road test.
CONDITIONS: Given DD Form 1970 (or ULLS generated DA Form 5987-E),DA Form 2404 (or ULLS generated DA Form 5988-E), pencil,TM 9-2320-272-10, equipment records folder, rags, lubricants,coolant, road test route, an M939 series cargo truck with BII, androad test route. When testing for trailer operations, additionalrequirements are appropriate trailer operator’s manual and a trailercoupled to an M939 series cargo truck.
STANDARD: Achieve a score of 75 or higher. Use the driver’s performance test(road test) instructions and the driver’s road test score sheet(DA Form 6125-R).

TC 21-305-3
7-2
Intermediate Training Objective 3
TASK: Drive the M939 series cargo truck off road.
CONDITIONS: Given DD Form 1970 (or ULLS generated DA Form 5987-E),DA Form 2404 (or ULLS generated DA Form 5988-E),TM 9-2320-272-10, equipment records folder, rags, lubricants,coolant, a suitable off road training area, an M939 series cargotruck with BII, and a requirement to operate the truck off road (toinclude ditches, marshes, gullies, ravines, steep grades, woods,mud, rocky terrain, and shallow streams [30 inches or less]) duringdaylight hours. When testing for trailer operations, additionalrequirements are appropriate trailer operator’s manual and a trailercoupled to an M939 series cargo truck.
STANDARD: Operate the vehicle safely at reduced speeds, taking precautions notto damage the truck while driving over rough terrain and receive allGOs on the performance test checklist.
C. ADMINISTRATIVE INSTRUCTIONS.
1. Training time: As scheduled.
2. Training location: Classroom, motor pool, road test route, and off road training area(s)as scheduled.
3. Training type: Performance evaluation.
4. Students: Scheduled personnel.
5. Principal and assistant instructors required: One primary instructor for the class for thewritten tests and one assistant instructor for every student for the performance tests.
6. Training aids and equipment: Hearing protection, rags, lubricants, coolant, examinationbooklet, pencil, DD Form 1970 (or ULLS generated DA Form 5987-E), DA Form 2404 (or ULLSgenerated DA Form 5988-E), DA Form 6125-R, TM 9-2320-272-10, equipment records folder, andan M939 series cargo truck with BII for every student. When testing for trailer operations,additional requirements are appropriate trailer operator’s manual and a trailer coupled to an M939series cargo truck.
7. References: AR 385-55, AR 600-55, DA Pamphlet 738-750, FM 21-305, TM 9-2320-272-10, and appropriate trailer operator’s manual.
D. SEQUENCE OF ACTIVITY.
1. Introduction:
a. Interest device.

TC 21-305-3
7-3
b. Tie-in.
c. Lesson objective (paragraph A).
d. Procedures.
(1) Performance testing.
(2) Evaluation.
(3) Summary.
2. Performance testing:
NOTE: The driver will test in the order listed below and will not do the next test until hesuccessfully passes the previous test.
a. Intermediate training objective 1 (written test).
b. Intermediate training objective 2 (road test).
c. Intermediate training objective 3 (off road driving without trailer).
3. Evaluate: Check written test results, road test score sheets, and performance testchecklists.
4. Summary:
a. Recap main points.
b. Allow for questions.
c. Clarify questions.
d. Give closing statement.
5. Retraining: Retrain and retest NO-GOs.
E. SAFETY RESTRICTIONS.
1. Ensure that all chock blocks are in place when vehicles are parked or maintenance is tobe performed.
2. Ensure the transmission is in N, the parking brake is set, and the engine is shut off beforeleaving the vehicle, when the vehicle is parked, or maintenance is being performed.
3. Ensure all personnel remove all wristwatches, rings, bracelets, ID tags, neck chains, andany other jewelry before working in or around the vehicle.

TC 21-305-3
7-4
4. Ensure all personnel pay particular attention to the cautions and warnings listed in theoperator’s manual.
5. Ensure the driver and ground guides know and understand the hand and arm signals,especially the signal to stop, as outlined in FM 21-305.
6. Ensure ground guide(s) are used when backing.
7. Ensure all backing is conducted at a speed of 5 MPH or less.
8. Hearing protection is required for all personnel working in and around the vehicle whilethe engine is running.
9. Inspect all seat belts for damage and ensure all occupants wear seat belts while thevehicle is in operation.
10. Ensure personnel maintain at least three points of contact when mounting ordismounting the vehicle (to include performing PMCS).
11. Ensure all personnel are clear of vehicle before engine start is attempted. Operatormust visually check to see that all areas of the truck are clear of personnel before attempting to startthe engine. Failure to do so could result in serious injury or death to personnel.
12. Extreme care should be taken when removing the surge tank filler cap if the temperaturegauge reads above 175° F. Steam or hot coolant under pressure will cause injury such as seriousburns.
13. The exhaust pipe and muffler can become very hot during vehicle operation. Be carefulnot to touch these parts with your bare hands or allow the body to come in contact with the exhaustpipe or muffler. Exhaust system parts can become hot enough to cause serious burns.
14. Reemphasize the removal of all jewelry such as rings, ID tags, or bracelets beforeworking around batteries. Be careful not to short out battery terminals. If jewelry or tools contactthe battery terminal, a direct short may occur resulting in instant heating, damage to equipment, orinjury to personnel. Do not smoke or use open flame near batteries. Batteries may explode from aspark. Battery acid is harmful to skin and eyes.
15. Fuel is very flammable and can explode easily. To avoid serious injury or death, keepfuel away from open fire and keep a fire extinguisher within easy reach when working with fuel. Donot work on the fuel system when the engine is hot. Fuel can be ignited by the hot engine. Whenworking with fuel, post signs that read: “NO SMOKING WITHIN 50 FEET OF VEHICLE”.
16. Alcohol used in alcohol evaporator is flammable, poisonous, and explosive. Do notsmoke when adding fluid and do not drink fluid. Failure to do this will result in injury or death.
17. Do not use hand throttle while driving. When brakes are applied, the hand throttle doesnot automatically disengage. Using the hand throttle as a cruise control device could result in injuryor death.

TC 21-305-3
7-5
18. Apply brakes gradually when slowing or stopping and pump brakes gradually whenslowing or stopping the vehicle on ice, snow, or wet pavement. A panic stop will cause the vehiclewheels to lock and the engine to stall. Power steering will be lost. Failure to apply brakes graduallycan result in injury or death.
19. Rapid operation repeatedly of service brakes will consume compressed air supply andcause automatic spring brake application. Failure to follow proper service brake operatingprocedures may cause serious injury or death to personnel.
20. Never use the parking brake for normal braking. The wheels will lock up causing asevere skid. A skidding vehicle could result in serious injury or death.
21. Excessive use of the service brake to control downhill speed will result in the loss ofbraking power because of heat buildup.
22. Do not put the vehicle in motion until the low air pressure warning light goes out andthe alarm (buzzer) stops sounding. Air pressure gauges should indicate at least 90 psi. If warningscontinue beyond three minutes, and/or pressure gauges do not reach 90 psi, turn the ignition switchand battery switch to OFF positions and notify unit maintenance. Failure to do this could result ininjury or death.
23. When raising the vehicle hood, ensure it is secured from falling. Do this by securing thehood retaining bar to the bumper bracket with the safety pin. Failure to do so may damage thevehicle or cause injury or death to personnel
24. All personnel must stand clear of towing vehicle and trailer during coupling anduncoupling operations. Failure to comply with this warning may result in serious injury or death.
25. Before moving trailer, ensure all loose equipment is properly stowed and that nothingwill drag on the ground. If trailer is loaded, ensure that load is properly secured. Failure to followthis warning may result in injury to personnel or damage to equipment.
26. If trailer is not coupled to towing vehicle, ensure the trailer wheels are securely chocked.Failure to do so may cause the trailer to roll, resulting in injury to personnel or damage toequipment.
F. ENVIRONMENTAL CONSIDERATIONS.
1. Ensure that all hazardous materials and wastes are stored and labeled properly.
2. Ensure that spill kits are within reach when changing or adding vehicle fluids or in thecase of vehicle failures. Spill kits should enable the soldiers to contain a spill on land or in water.
3. Ensure that drip pans remain under parked vehicles.
4. Ensure that containers are the proper size and type for draining vehicle fluids.
G. ADDITIONAL COMMENTS AND INFORMATION. Recommended testing time is 4.0hours.

TC 21-305-3
7-6
NAME _____________________________________ RANK __________ DATE __________
Instructions for Test
A. This test consists of 30 multiple choice questions.
B. Read all questions and answers carefully; then write the answer that is MOST correct on theblank line to the left.
C. Any unanswered questions will be scored as incorrect responses.
___________1. In which gear do you start the engine?
a. 1-5.
b. 1-3.
c. “P”.
d. “N”.
___________2. What should you do when stopping the vehicle with a load?
a. Use the engine as a brake.
b. Downshift the transmission.
c. Use the service brakes.
d. All of the above.
___________3. How do you gain access to the battery compartment?
a. Raise the two-person crew seat.
b. Raise the hood.
c. Open the access door on the right fender.
d. Open the access panel above the right running board.

TC 21-305-3
7-7
___________4. The brake system in the M939 series vehicles is --
a. An air over hydraulic system.
b. An air brake system.
c. A hydraulic over air system.
d. A hydraulic system.
___________5. For normal driving conditions, use which transmission gear range?
a. 1-5.
b. 1-4.
c. 1-3.
d. 1-2.
___________6. The recommended method of braking this truck is –
a. Push pedal down hard until the tires start to slide.
b. Continuously apply and release the brake pedal - pump the brakes.
c. Apply brakes gradually when slowing or stopping.
d. Deploy the parachute.
___________7. How many personnel are authorized to ride in the cab?
a. 1.
b. 2.
c. 3.
d. As many as can get in the cab.
___________8. The maximum hard bottom fording depth is how many inches?
a. 30.
b. 36.
c. 40.
d. 48.

TC 21-305-3
7-8
___________9. What braking procedure is used when stopping on ice or snow?
a. There is no specific method for applying the brakes.
b. Hit the brake pedal hard.
c. Ride the brakes.
d. Pump the brakes gradually.
___________10. What color will the air cleaner indicator show when it needs servicing?
a. Yellow.
b. Green.
c. Blue.
d. Red.
___________11. The spring brake warning light illuminates when --
a. Spring brakes are not engaged.
b. There is too much tension on spring brake.
c. There is not enough tension on spring brake.
d. Spring brakes are engaged.
___________12. What is the purpose of the slave receptacle?
a. Of no purpose.
b. Hooks up to AC current to play your radio.
c. Is the plug-in point to slave start your vehicle when batteries have becomedischarged.
d. To power auxillary work lights.

TC 21-305-3
7-9
___________13. What is the purpose of the tire davit boom?
a. To hold the spare tire in place.
b. To assist the driver in lifting and guiding the spare tire over the side of the truck.
c. To assist in replacing davits.
d. To raise the truck.
___________14. At what interval must the air tanks be drained?
a. After daily operation.
b. During daily operation.
c. Weekly operation.
d. Monthly operation.
___________15. What sequence and interval is used when performing PMCS?
a. No specific sequence or interval.
b. Any way that gets the job completed.
c. Made in the sequence as listed and at the designated intervals as set forth in theoperator’s (-10) manual.
d. Conduct weekly checks prior to any daily checks.
___________16. Do not operate the starter continuously for more than how many seconds?
a. 5.
b. 8.
c. 10.
d. 15.

TC 21-305-3
7-10
___________17. The air pressure gauge must read how many psi before the warning light goes outand the warning buzzer stops?
a. 30 to 40.
b. 40 to 50.
c. 50 to 60.
d. 90 to 150.
___________18. What is a safe engine oil pressure gauge reading?
a. 15 psi or higher.
b. 10 psi.
c. 5 psi.
d. Any of the above.
___________19. When do you upshift and downshift the transmission selector lever?
a. When you want to.
b. When you reach the bottom of a grade.
c. As necessary whenever driving conditions change.
d. Never.
___________20. What is the maximum safe speed, in MPH, for shifting the transfer shift leverfrom high range to low range?
a. 42.
b. 32.
c. 30.
d. 22.

TC 21-305-3
7-11
___________21. All M939 series vehicles are equipped with what type of hood?
a. A tilt forward hood.
b. A tilt back hood.
c. A split hood.
d. Cab over.
___________22. Which way should the vehicle face when parking in sand or extremely coldweather?
a. Into the wind.
b. No specific way.
c. Away from the wind.
d. Sideways.
___________23. The purpose of the hand throttle is for which one of the following?
a. Engine warm-up and material handling equipment.
b. Highway operation, using it as a “cruise control”.
c. Raising and lowering the heavy hood.
d. Lowering the spare tire.
___________24. Hearing protection is required for --
a. The driver only.
b. The assistant driver only.
c. Anyone working around the vehicle when the engine is running.
d. All the above.

TC 21-305-3
7-12
___________25. When the air brake pressure falls below 50 to 60 psi the low air pressure warninglight will --
a. Start flashing.
b. Illuminate.
c. Go out.
d. Do nothing.
___________26. The two air pressure gauges found on the M939 series vehicles are --
a. Primary and Secondary.
b. Primary and backup.
c. Secondary and backup.
d. Over and under.
___________27. What is the purpose of the emergency engine stop control?
a. Cuts off fuel to the engine and can be used at anytime.
b. Cuts off fuel to the engine in emergency situations only.
c. Cuts off fuel to engine if fuel pump delivers too much fuel to engine.
d. Disengages the ignition system.
___________28. When does the warning alarm buzzer sound?
a. Only when parking brakes are engaged.
b. The air-brake system pressure drops below 50 to 60 psi or when parking brake isengaged.
c. Only when air-brake system pressure drops below 50 to 60 psi.
d. When spring brakes are applied.

TC 21-305-3
7-13
___________29. The transmission selector lever must be in what position to shift transfer case shiftlever?
a. “N”.
b. “1”.
c. “5”.
d. In any position.
___________30. How do you accelerate when operating in a sandy environment?
a. Any way.
b. Rapidly.
c. Slowly.
d. Run the engine to 1,500 rpm, then shift the transmission to 1-2.

TC 21-305-3
7-14
1. d 16. c
2. d 17. c
3. a 18. a
4. b 19. c
5. a 20. d
6. c 21. a
7. c 22. c
8. a 23. a
9. d 24. d
10. d 25. b
11. d 26. a
12. c 27. b
13. b 28. b
14. a 29. a
15. c 30. c
TC 21-305-3
7-15
NAME _____________________________________ RANK __________ DATE __________
Instructions for Test
A. This test consists of 30 multiple choice questions.
B. Read all questions and answers carefully; then write the answer that is MOST correct on theblank line to the left.
C. Any unanswered questions will be scored as incorrect responses.
___________1. What is the purpose of the emergency engine stop control?
a. Cuts off fuel to the engine in emergency situations only.
b. Cuts off fuel to the engine and can be used at anytime.
c. Cuts off fuel to engine if fuel pump delivers too much fuel to engine.
d. Disengages the ignition system.
___________2. When does the warning alarm buzzer sound?
a. Only when parking brakes are engaged.
b. The air-brake system pressure drops below 50 to 60 psi or when parking brake isengaged.
c. Only when air-brake system pressure drops below 50 to 60 psi.
d. When spring brakes are applied.
___________3. The spring brake warning light illuminates when --
a. Spring brakes are not engaged.
b. There is too much tension on spring brake.
c. There is not enough tension on spring brake.
d. Spring brakes are engaged.

TC 21-305-3
7-16
___________4. The transmission selector lever must be in what position to shift transfer case shiftlever?
a. “5”.
b. “1”.
c. “N”.
d. In any position.
___________5. How do you accelerate when operating in a sandy environment?
a. Any way.
b. Rapidly.
c. Slowly.
d. Run the engine to 1,500 rpm, then shift the transmission to 1-2.
___________6. The brake system in the M939 series vehicles is --
a. An air over hydraulic system.
b. An air brake system.
c. A hydraulic over air system.
d. A hydraulic system.
___________7. Hearing protection is required for --
a. The driver only.
b. The assistant driver only.
c. Anyone working around the vehicle when the engine is running.
d. All of the above.

TC 21-305-3
7-17
___________8. The maximum hard bottom fording depth is how many inches?
a. 30.
b. 36.
c. 40.
d. 48.
___________9. What is the purpose of the slave receptacle?
a. Of no purpose.
b. Hooks up to AC current to play your radio.
c. Is the plug-in point to slave start your vehicle when batteries have becomedischarged.
d. To power auxillary work lights.
___________10. For normal driving conditions, use which transmission gear range?
a. 1-5.
b. 1-4.
c. 1-3.
d. 1-2.
___________11. The recommended method of braking this truck is –
a. Push pedal down hard until the tires start to slide.
b. Continuously apply and release the brake pedal - pump the brakes.
c. Apply brakes gradually when slowing or stopping.
d. Deploy the parachute.

TC 21-305-3
7-18
___________12. How many personnel are authorized to ride in the cab?
a. 1.
b. 2.
c. 3.
d. As many as can get in the cab.
___________13. What sequence and interval is used when performing PMCS?
a. No specific sequence or interval.
b. Any way that gets the job completed.
c. Made in the sequence as listed and at the designated intervals as set forth in theoperator’s (-10) manual.
d. Conduct weekly checks prior to any daily checks.
___________14. Do not operate the starter continuously for more than how many seconds?
a. 5.
b. 8.
c. 10.
d. 15.
___________15. What is the purpose of the tire davit boom?
a. To hold the spare tire in place.
b. To assist the driver in lifting and guiding the spare tire over the side of the truck.
c. To assist in replacing davits.
d. To raise the truck.

TC 21-305-3
7-19
___________16. At what interval must the air tanks be drained?
a. During daily operation.
b. After daily operation.
c. Weekly operation.
d. Monthly operation.
___________17. The air pressure gauge must read how many psi before the warning light goes outand the warning buzzer stops?
a. 30 to 40.
b. 40 to 50.
c. 50 to 60.
d. 90 to 150.
___________18. What is a safe engine oil pressure gauge reading?
a. 15 psi or higher.
b. 10 psi.
c. 5 psi.
d. Any of the above.
___________19. Which way should the vehicle face when parking in sand or extremely coldweather?
a. Into the wind.
b. No specific way.
c. Away from the wind.
d. Sideways.
TC 21-305-3
7-20
___________20. When the air brake pressure falls below 50 to 60 psi the low air pressure warninglight will --
a. Illuminate.
b. Start flashing.
c. Go out.
d. Do nothing.
___________21. All M939 series vehicles are equipped with what type of hood?
a. A tilt back hood.
b. A tilt forward hood.
c. A split hood.
d. Cab over.
___________22. The purpose of the hand throttle is for which one of the following?
a. Engine warm-up and material handling equipment.
b. Highway operation, using it as a “cruise control”.
c. Raising and lowering the heavy hood.
d. Lowering the spare tire.
___________23. The two air pressure gauges found on the M939 series vehicles are --
a. Primary and backup.
b. Secondary and backup.
c. Over and under.
d. Primary and Secondary .

TC 21-305-3
7-21
___________24. In which gear do you start the engine?
a. 1-5.
b. 1-3.
c. “P”.
d. “N”.
___________25. When do you upshift and downshift the transmission selector lever?
a. When you want to.
b. When you reach the bottom of a grade.
c. As necessary whenever driving conditions change.
d. Never.
___________26. What is the maximum safe speed, in MPH, for shifting the transfer shift leverfrom high range to low range?
a. 42.
b. 32.
c. 30.
d. 22.
___________27. What should you do when stopping the vehicle with a load?
a. Use the engine as a brake.
b. Downshift the transmission.
c. Use the service brakes.
d. All of the above.

TC 21-305-3
7-22
___________28. How do you gain access to the battery compartment?
a. Raise the two-person crew seat.
b. Raise the hood.
c. Open the access door on the right fender.
d. Open the access panel above the right running board.
___________29. What braking procedure is used when stopping on ice or snow?
a. There is no specific method for applying the brakes.
b. Hit the brake pedal hard.
c. Ride the brakes.
d. Pump the brakes gradually.
___________30. What color will the air cleaner indicator show when it needs servicing?
a. Yellow.
b. Red.
c. Green.
d. Blue.

TC 21-305-3
7-23
1. a 16. b
2. b 17. c
3. d 18. a
4. c 19. a
5. c 20. a
6. b 21. b
7. d 22. a
8. a 23. d
9. c 24. d
10. a 25. c
11. c 26. d
12. c 27. d
13. c 28. a
14. c 29. d
15. b 30. b

TC 21-305-3
7-24
INTERMEDIATE TRAINING OBJECTIVE 2
DRIVER’S PERFORMANCE TEST (ROAD TEST) INSTRUCTIONS
1. GENERAL.
a. This test is to be conducted according to the guidelines set forth in AR 600-55. Also, thespecific directions for this test are to be followed without deviation. No omissions or changes in thewording of these directions are permitted.
b. The purpose of the road test is to evaluate the driver’s ability to drive safely in most on-the-road situations. It serves as the basis for the issuance of an operator’s permit and provides ameans for instructional reinforcement and counseling. Driving weaknesses that surface as a result ofthe test should be called to the attention of the examinee so that specific steps can be taken toeliminate these weaknesses.
c. Final evaluations will be recorded on DA Form 348 (or ULLS generated DA Form 348-E). Once this transfer of information has been accomplished, the completed DA Form 6125-R willbe destroyed.
d. The examiner will be a thoroughly qualified operator of the M939 series 5-ton cargotruck. He will also be familiar with the road test route and the testing procedures as set forth inAR 600-55 and this TC. Before administering the test to any examinees, he must practiceadministering the test to a regular licensed driver qualified on the M939 series vehicles (must bespecifically qualified on the model he is driving, such as M923A2 or M923) This practiceadministration will help him become acquainted with the test route and testing procedures.
NOTE: Operators trained in trailer operations will perform these tests with the trailer connected tothe vehicle.
e. The road test will consist of three scored phases: the PMCS test, the vehicle control test,and the on-the-road driving test. The driver will be tested on these phases in the order listed and willnot move on to the next phase until successfully passing the previous phase. If the driver fails anyphase of the test, the entire road test will be terminated at that point and the examiner will annotatethe DA Form 6125-R and conduct an AAR with the driver. This procedure will help to ensure thatonly safe and proficient drivers get behind the wheel of the M939 series vehicles.
2. SETTING UP THE ROAD TEST. For the road test, the driver drives a predeterminedroute. To set up the test, the examiner must plan the route to be used. Once a route is established(in a given locality) it should be used for all examinees who are to be tested in the M939 seriesvehicles. Should it prove necessary to vary the route, care should be taken that the different kinds ofroute requirements, as well as the number of requirements remain the same. Every road test routewill meet the following requirements (to the extent possible):
TC 21-305-3
7-25
a. An area to conduct PMCS.
(1) The site should be a flat parking area suitable for heavy vehicles.
(2) There should be at least 8 feet of open space around the vehicle. This will givethe driver room to conduct the inspection and the examiner room to observe the driver’s inspectionperformance.
(3) The site should be quiet enough that the examiner can hear the driver explainwhat he is doing during the inspection.
(4) Avoid using a parking space on a street or any place where traffic is passingclose by.
b. A vehicle control test area with the following maneuvers:
(1) Forward stop (see Figure 6-5). Pull vehicle forward through a straight alleyand then stop the vehicle so that the frontmost part of the vehicle is within 2 feet of the forward stopline.
(2) Straight line backing (see Figure 6-5). Back the vehicle through a straight alleyand then stop the vehicle so that the frontmost part of the vehicle is within 2 feet of the stop line.
(3) Right turn (see Figure 6-6). Drive the vehicle forward about 30 to 50 feet, andthen turn the vehicle right around a cone or other point. Bring the rear tires of the vehicle within 18inches from the cone without touching it.
(4) Alley dock (see Figure 6-7). Pull the vehicle forward past the alley, keeping thealley entrance on the left. Back in a curved path into the alley without touching the sides and stopthe rear of the vehicle within 2 feet of the stop line at the rear of the alley.
c. On-the-road driving test with the following maneuvers:
(1) Eight left turns and eight right turns. Include turns at traffic lights, stop signs,and uncontrolled intersections. The turns should range from easy to somewhat difficult for a heavyvehicle. Get a mixture of types of intersections so that they vary in complexity.
(2) A straight section of urban business streets. The section should be 1 to 2 mileslong with moderate traffic density. It should contain through intersections and intersections withtraffic lights. Try to get a section where the driver can make lane changes somewhere along theroute. The section should be one that lets the examiner see how the driver copes with traffic in atypical business area.
(3) Two through intersections and two intersections where a stop has to be made.If possible, these intersections should be included in the urban section.
(4) Two railway crossings. Try to get at least one uncontrolled crossing. Thecrossing should have enough sight distance for the examiner to see if the driver makes head searchmovements when approaching each crossing. The driver’s attempt to look left and right down the

TC 21-305-3
7-26
track will often be the only way to tell if the driver noticed the crossing. If the area does not haveany railway crossings, simulate this exercise.
(5) Two curves, one to the left and one to the right. Try to get curves tight enoughto produce noticeable off-tracking.
(6) A two-lane rural or semirural road. This section should be about 2 miles long.If there is no rural road near the motor pool, an industrial street with few entrances and a higherspeed limit is a good substitute. An undeveloped suburban road is another good substitute. Ingeneral, use any road that has characteristics similar to a rural road.
(7) A section of expressway. The section should start with a conventional rampentrance and end with a conventional ramp exit. The section should be long enough for the M939series 5-ton cargo truck to make two lane changes. A section of four-lane highway can be used ifthere is no expressway is available.
(8) A downgrade. The grade should be steep enough and long enough to requiregearing down and braking. A steep short hill is the next best choice if a long grade cannot be found.If the local area does not have any steep grades, simulate this exercise.
(9) An upgrade. The grade should be steep enough and long enough to require gearchanging to maintain speed. A steep short hill is the next best choice if a long grade cannot befound. If it is hard to find steep grades in the local area, use the same grade for both the downgradeand the upgrade.
(10) A downgrade for stopping. This is a grade where a vehicle can safely stop (orpull off) and park for a minute or so. The grade only needs to be steep enough to cause a vehicle toroll if the driver does not park properly. If the local area does not have any steep grades, simulatethis exercise.
(11) An upgrade for stopping. This is another grade where a vehicle can safelystop and park for a minute or so. If needed, use the same grade as was used for the downgrade stop.
(12) One underpass or low clearance and one bridge. The underpass should have aposted clearance height. The bridge should have a posted weight limit. If the local area does nothave underpasses or bridges with posted limits, use ones that do not have posted limits. If needed,substitute a bridge for an underpass or an underpass for a bridge. If the local area does not have anylow clearances or bridges, look for places that have signs an M939 series vehicle driver should see.Examples of such signs are “No Commercial Vehicles after 11:00 PM” or “Bridge with 12 TonWeight Limit in 2 Miles.”
d. Route design.
(1) When designing a route, try to include all of the specified maneuvers. If there isnot an ideal example for a maneuver, find the closest substitute. Do not drop a maneuver becausethere is not an ideal example. The most important thing is to have a route that tests the driver in aswide a variety of situations as possible.

TC 21-305-3
7-27
(2) There is no minimum length for a route and no minimum amount of time that aroute must take. A route is acceptable whenever it has all the specified maneuvers. It is a good ideato have at least two routes available so that there is an alternate route if construction or trafficprevents using the primary route.
3. ADMINISTERING THE ROAD TEST.
a. Preventing accidents.
(1) Road tests should normally NOT be given if road or weather conditions presenta hazard such as ice, snow, rain, or blowing dust. The exception is when testing is specifically fordriving under such conditions.
(2) The examiner must always watch traffic conditions and warn the examinee ofdangers which he may not see. If the driver becomes involved in a dangerous or unlawful movingtraffic incident or an accident, terminate the test immediately. The examiner will drive the vehicleback to the start point once on-scene responsibilities are fulfilled.
b. Beginning the road test.
(1) Fill in the driver’s name and your name (examiner’s) on the front of the RoadTest Score Sheet. (A sample of a completed DA Form 6125-R is shown in Figure 7-1, page 7-28and Figure 7-2, page 7-29). A reproducible DA Form 6125-R is located at the back of AR 600-55.Read the following instructions to the driver at the beginning of the test:
DURING THE ROAD TEST, I WILL GIVE YOU DIRECTIONS AS WE GO ALONG.
I WILL ALWAYS GIVE DIRECTIONS FOR TURNS, AND SO ON, AS FAR IN ADVANCE ASPOSSIBLE.
THERE WILL BE NO TRICK DIRECTIONS TO GET YOU TO DO SOMETHING ILLEGAL ORUNSAFE.
KEEP IN MIND THAT YOU ARE ALWAYS IN CHARGE OF THE VEHICLE. DO NOT FOLLOWA DIRECTION IF IT TURNS OUT AT THE LAST MINUTE TO LEAD TO AN UNSAFE ACT.
AS WE GO ALONG, I WILL BE MAKING VARIOUS MARKS ON THE SCORING FORM. WHENYOU SEE THIS, IT DOES NOT NECESSARILY MEAN YOU HAVE DONE ANYTHING WRONG.IT IS BEST FOR YOU TO CONCENTRATE ON DRIVING AND NOT WORRY ABOUT WHAT IAM DOING.
YOUR SCORED TEST BEGINS WITH BEFORE-OPERATIONS PREVENTIVE MAINTENANCECHECKS AND SERVICES. IF YOU ARE SUCCESSFUL IN THAT PORTION OF THE TEST,YOU WILL PROCEED TO THE VEHICLE CONTROL TEST, AND FINALLY TO THE ON-THE-ROAD DRIVING TEST.
ARE THERE ANY QUESTIONS?
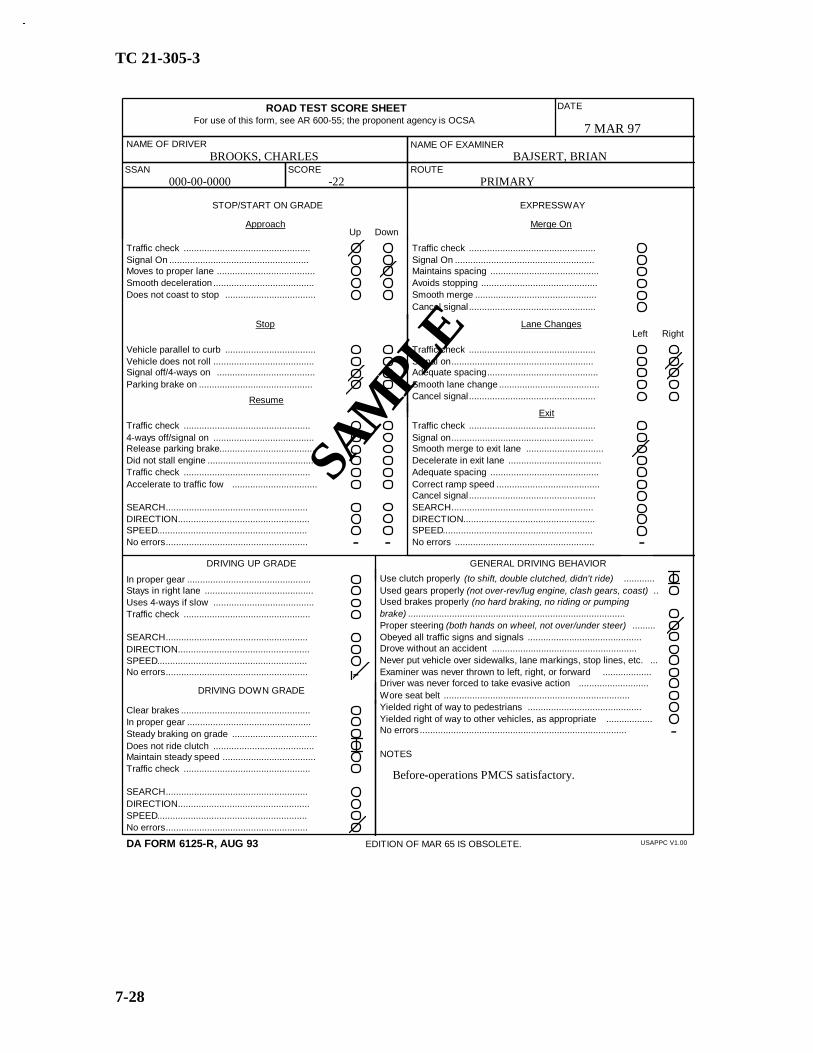
TC 21-305-3
7-28
7 MAR 97
BROOKS, CHARLES
000-00-0000 -22 PRIMARY
ROAD TEST SCORE SHEET For use of this form, see AR 600-55; the proponent agency is OCSA
..............
.............................................................................................
....................................................................................................
......................
...................................................................................................
..............................................................
................................................................................
STOP/START ON GRADE
Approach
Traffic checkSignal On Moves to proper laneSmooth deceleration Does not coast to stop
EXPRESSWAY
Merge On
Traffic checkSignal OnMaintains spacingAvoids stoppingSmooth mergeCancel signal
Stop Lane Changes
Vehicle parallel to curbVehicle does not rollSignal off/4-ways onParking brake on
Resume
Traffic checkSignal onAdequate spacingSmooth lane changeCancel signal
ExitTraffic check4-ways off/signal onRelease parking brakeDid not stall engineTraffic checkAccelerate to traffic fow
SEARCHDIRECTIONSPEEDNo errors
Traffic checkSignal onSmooth merge to exit laneDecelerate in exit laneAdequate spacingCorrect ramp speedCancel signalSEARCHDIRECTIONSPEEDNo errors
DRIVING UP GRADE
In proper gearStays in right laneUses 4-ways if slowTraffic check
SEARCHDIRECTIONSPEEDNo errors
DRIVING DOWN GRADE
Clear brakesIn proper gearSteady braking on gradeDoes not ride clutchMaintain steady speedTraffic check
SEARCHDIRECTIONSPEEDNo errors
GENERAL DRIVING BEHAVIOR
Use clutch properly (to shift, double clutched, didn't ride) Used gears properly (not over-rev/lug engine, clash gears, coast) Used brakes properly (no hard braking, no riding or pumping brake) Proper steering (both hands on wheel, not over/under steer) Obeyed all traffic signs and signalsDrove without an accident Never put vehicle over sidewalks, lane markings, stop lines, etc.Examiner was never thrown to left, right, or forwardDriver was never forced to take evasive actionWore seat belt Yielded right of way to pedestriansYielded right of way to other vehicles, as appropriateNo errors
NOTES
DA FORM 6125-R, AUG 93 EDITION OF MAR 65 IS OBSOLETE.
Up Down
USAPPC V1.00
Left Right
.......................................................................................................
.............................................................................
...................................
................................................................................................................
............................................
........................................................................................
..............................................................................
..................................................................................
...........................................................................................................
.................................................................................................................
..........................................................................................
........................................................................................
...........................................................................................................
.................................................................................................................
..................................................................................................
........................................................................
.....................................................................................
...........................................................................................................
.................................................................................................................
.......................................................................................................
.......................................................................................
................................................................................................
........................................................................................................
..................................................................................
.................................................
........................................................................................................
..................................................................
..................................................................................
........................................................................................................
.............................................................................................................
......................................................
DATE
NAME OF DRIVER NAME OF EXAMINER
SSAN SCORE ROUTE
SAM
PLE
BAJSERT, BRIAN
-
- - -
-
Before-operations PMCS satisfactory.

TC 21-305-3
7-29
SAMPLE
..................
.................
.............................
..........................................
................................................
Know weight limit on bridgeNo error Know clearance of underpassNo errors
..............................................................
...........................................................
URBAN/RURAL
.............
...............
......
LEFT TURNS
1 2 3 4 5 6 7 8Approach
RIGHT TURNS
Traffic checkSignal onSmooth decelerationDid not coast to start ofturnCorrect lane to beginturn
1 2 3 4 5 6 7 8 RAILWAY CROSSINGS
Checks for trains Followed relevant laws Did not change gears Did not stop on tracks No errorsIf Vehicle Stops
Gap to vehicle in frontNot over stop lineCame to full stopWheels straight aheadStop was necessary
Turning
Traffic checkBoth hands on wheelNo gear changeProper speedTurn not too wide/short
Completes Turn
Turned into correct laneTraffic CheckCancel signalAccelerated to trafficflow
SEARCHDIRECTIONSPEEDNo errors
1 2 3 4 5 6 7 8
1 2 3 4 5 6 7 8
1 2 3 4 5 6 7 8
1 2 3 4 5 6 7 8
1 2 3 4 5 6 7 8
1 2 3 4 5 6 7 8
BRIDGE/UNDERPASS
CURVES
Reduce speed on enteringMaintain speed going throughStay in laneTraffic check No errors
INTERSECTIONS
Regular traffic checkSelects proper laneKeeps vehicle in laneAdequate following distanceAppropriate speed
SEARCHDIRECTIONSPEEDNo errors
STRAIGHT SECTIONS
LANE CHANGES
Traffic checkSignal oneAdequate spacingSmooth lane changeCancel signalNo errors
Stopping
Traffic checkSmooth decelerationDid not coast to stopGap to vehicle in frontNot over stop lineCame to full stop
Traffic checkYields as necessaryNo lane changeNo gear changeAccelerates to traffic flow
SEARCHDIRECTIONSPEEDNo errors
Driving Through
REVERSE OF DA FORM 6125-R, AUG 93 USAPPC V1.00
.....................................................................................................................
.........................................................................
.........................................
....................................................................................
.......................................................................
..............................................
.................................................................................................................
......................................................................................................................
............................................................................................................
........................................................................................
..............................................................................................................
...................................................................................
...........................................
.......................................................................
.....................................................................................................
............................................................................................................
...................................
..............................................................................
...........................................
........................................................
...................................................
...........................................
.....................
..............................
......................................
.....
.............................
.............................
Urban Rural
Left Right
Left Right
1 2 3
1 2 3 4
1 2Regular traffic
- -
- -
--
- -
- - - -
- - ------

TC 21-305-3
7-30
(2) The road test actually begins when the driver starts his before-operationsPMCS. If the driver performs the PMCS to appropriate standards, the examiner will annotate in theNOTES section of the DA Form 6125-R “Before-operations PMCS satisfactory.” If he does notperform PMCS to the examiner’s satisfaction, the examiner will stop the road test at that point andfail the driver. In this situation, the examiner will annotate “Before-operations PMCSunsatisfactory” in the NOTES section, list specific deficiencies if any, and refer the driver for furthertraining. The examiner will follow the same procedures for grading during- and after-operationsPMCS.
(3) If the driver successfully completes the before-operations PMCS, he willproceed to the vehicle control test. It is important to ensure that the driver is proficient in basicvehicle control skills before taking him on the road with other traffic.
(a) Upon arrival at the vehicle control test site, give the driver an overviewof all four exercises (forward stop, straight line backing, right turn, and alley dock). Use a diagramof the site to show the driver what to do, and explain that he will get detailed instructions for eachexercise as it comes up. When he is ready, the driver gets into the vehicle and proceeds to the firstexercise for instructions.
(b) The examiner will evaluate the exercises from the ground and observethe driver’s ability to control the vehicle during each maneuver. If the driver demonstratessatisfactory vehicle control skills, the examiner will indicate in the NOTES section “Vehicle controltest satisfactory.” If the driver is unable to satisfactorily negotiate the course, the examiner will stopthe road test and fail the driver at that point. The examiner will indicate in the NOTES section“Vehicle control test unsatisfactory,” indicate specific weaknesses if any, and refer the driver forfurther training.
(4) If the driver satisfactorily completes the vehicle control test, he will proceed tothe driving portion of the road test. When the driver is ready, get into the vehicle with the driver andstart giving directions for following the road test route. Give the directions in this form: At the(location), make (maneuver). For example, “At the next intersection, turn right,” or “At the stopsign, turn left.”
(5) If necessary, give combined directions. For example, “Immediately after youcomplete your right turn, you will have to turn left into that road over there.”
(6) Avoid using commercial signs or buildings as landmarks for directions unlessthere is no alternative. Do not assume that the driver is familiar enough with the area that he knowssuch landmarks.
(7) Give directions well before the maneuver is to be performed. Always give adirection at a point where the driver can see where he will do the maneuver. However, give thedirections close enough to the location so the driver can be sure of where to do the maneuver. Forexample, do not tell the driver to turn at the next intersection if there is another intersection beforethe one where you want the driver to turn.

TC 21-305-3
7-31
(8) In addition to directions for getting the driver around the route, there are somedirections to give for the expressway, urban straight, and rural sections.
(a) At the beginning of the expressway section say, “We will be drivingalong this expressway for about (2 or however many) miles. When it is safe to do so, make a lanechange to the left. Then when it is safe to do so, make a lane change to the right.”
(b) At the beginning of the urban straight section, say, “We will be drivingalong this street for about (2 or however many) miles. When it is safe to do so, make a lane changeto the left. Then when it is safe to do so, make a lane change back to the right. When we get nearthe end of this section, I will tell you what to do next.”
(c) At the beginning of the rural section, say, “We will be driving along thisroad for about (2 or however many) miles. When we get near the end, I will tell you what to donext.”
(9) In general, give all directions in a way that avoids distracting the driver. Also,avoid unnecessary conversation.
4. SCORING THE ROAD TEST.
a. The scoring form for the road test is DA Form 6125-R, a two-sided single sheet. (Asample of a completed DA Form 6125-R is at Figures 7-1 and 7-2). A reproducible DA Form 6125-R is located at the back of AR 600-55. The main headings in the boxes give the names of thedifferent maneuvers. Each maneuver has a list of driver behaviors to be scored. Beside eachbehavior is a letter “O” used for marking the driver for the behavior. In cases where a maneuver isdone several times on the route, there is a column of O’s for each time the maneuver appears on theroute.
b. To score a behavior, draw a stroke through the O whenever the driver’s performance isunsatisfactory. Make no mark if the driver performs the behavior correctly. For each maneuver,there is a “No Errors” category at the bottom of the list of behaviors. There is a space beside “NoErrors” where you can put a check mark if the driver is satisfactory on all behaviors. These checkmarks will show that you scored the driver even if the driver made no errors.
c. The only other marking that needs to be done on the test is to indicate maneuvers thatwere not done. A maneuver might not be done because you missed it for some reason or becausethere was no opportunity for it on the route. To show that a maneuver was not performed, draw avertical line down through the entire column of O’s used for marking that maneuver.
d. To score the maneuver, follow these steps:
(1) Find the maneuver on the score sheet and be ready to mark it.
(2) Check the driver and the traffic. When the driver can pay attention, give thedirections for the next maneuver.
TC 21-305-3
7-32
(3) Watch the driver perform the maneuver.
(4) Mark the score sheet.
e. Mark the driver’s score sheet immediately after each maneuver. Do not try to rememberwhat the driver did and mark the sheet later on in the route or back at the office.
f. The following paragraphs describe how to mark the score sheet for each type ofmaneuver:
(1) Stop/start on a grade. There are two columns of O’s to mark: one for theupgrade stop and one for the downgrade stop. The columns are labeled “Up” and “Down.” Thebehaviors are organized in three groups: approach, stop, and resume. Score each group separatelyas the driver does them. Score the approach as soon as the driver comes to a stop. Then check thestop behaviors and score them before telling the driver to continue. After the driver pulls away,score the rest of the behaviors.
(2) Expressway. Score the expressway section in three phases: merge on, lanechanges, and exit. Mark each phase as the driver completes it. There are two columns of O’s forthe lane changes. Mark the one labeled “Left” for the lane change to the left. Mark the one labeled“Right” for the lane change to the right.
(3) Driving upgrade and driving downgrade. Driving up a grade and driving downa grade are scored separately. Observe how the driver handles the grade and score the behaviorslisted. It is especially important that the driver uses the proper gear and appropriate signals andspeed on grades because these can affect other traffic.
(4) General driving behavior. General behaviors such as gear changing should bemarked at the end of the test. Specific actions such as traffic violations can be marked when theyhappen. There is also space to write notes. Use this space to make notes of things that do not fitinto any scoring categories or to record any unusual events during the test. Remember to draw avertical line through behaviors that are not graded, such as use of clutch when grading on the M939series vehicle.
(5) Turns. There are eight columns of O’s on the left of the box; eight columns ofO’s on the right (see Figure 7-2). The columns on the left are for left turns. The ones on the rightare for right turns. The columns are numbered according to the order in which the turns occur on theroute. Column 1 of the left turn columns is for the first left turn on the route, column 2 is for thesecond turn, and so on. The first few times an examiner uses a route, it is a good idea to write thenames of the locations of the turns at the tops of the columns. This will help keep track of the turnsuntil the route is completely memorized.
(a) Mark a turn in four steps: “Approach,” “If Vehicle Stops,” “Turning,”and “Completes Turn.” Mark the “If Vehicle Stops” section only if the driver has to make a legalstop before starting the turn, such as at a traffic light, a stop sign, or yield sign. Do not mark thissection if the driver stops for some other reason, such as being blocked by other vehicles part wayaround the turn.

TC 21-305-3
7-33
(b) It is important to observe whether the driver is aware of his vehicleposition throughout the turn, because it can affect other traffic. If there is more than one left turnlane, the driver should start his turn from the rightmost turn lane.
(6) Railway crossing. This section has three columns for scoring. The ones labeled“1” and “2” are for actual railway crossings on the route. The one labeled “S” is for the simulatedcrossing. Vehicles transporting passengers or hauling hazardous cargo are required by law to stopbetween 15 and 50 feet from the nearest railroad crossing and take whatever actions are necessary(for example an open window) to look and listen for trains.
(7) Bridge/underpass. There is one space for marking a bridge and one for markingan underpass.
(8) Curves. There are two columns for scoring curves. The one labeled “Left” isfor a curve that turns to the left. The column labeled “Right” is for a curve that turns to the right.Drivers should reduce to a safe speed before entering the curve, then maintain that speed during thecurve.
(9) Urban/rural straight sections. This section has two columns. Use the onelabeled “Urban” for the urban section. Use the one labeled “Rural” for the rural section. In mostcases you will mark the driver when he gets to the end of the section. However, if you see the drivermake an error while driving along the section, such as driving in the wrong lane, mark the error assoon as you see it. The driver should drive in the right lane if it is clear or in the center lane if theright lane is blocked or has a large volume of merging traffic.
(10) Lane changes. The column labeled “Left” is for a lane change to the left. Thecolumn labeled “Right” is for a lane change to the right. The lane changes are part of the urbansection (in addition to the expressway section). Mark each lane change as soon as the driver makesit.
(11) Intersections. There are four columns for marking the driver on intersections.Columns 1 and 2 are for intersections where the driver has to make a legal stop; for example, at atraffic light or a stop sign. Columns 3 and 4 are for marking intersections that the driver goesstraight through. There are two phases to marking a stop intersection, stopping and driving through.For a stop intersection, driving through items cover the time from when the driver starts off from thestop to when the driver resumes normal traffic speed. For a driving through intersection, you onlymark columns 3 and 4. The urban straight section normally has more than enough intersections toscore. Start scoring the intersections as soon as the examinee begins driving along the section.Score stop and through intersections in whatever order they come up in. It does not matter if anintersection with traffic lights is sometimes scored as a stop intersection and sometimes scored as athrough intersection.
(12) Search, direction, and speed. Most of the grading blocks discussed above haveareas for grading search, direction, and speed in addition to the other behaviors listed. These aregeneral categories which the examiner should be monitoring through each exercise.
(a) Search. At all times during the road test the driver must be constantlychecking the front, sides, and rear of his vehicle for traffic, pedestrians, obstructions, emergencies,

TC 21-305-3
7-34
and so forth. During each maneuver, the examiner must observe whether the driver is checkingaround him and yields right of way to other road users when appropriate.
(b) Direction. The driver must be aware of the position of his vehicle at alltimes. During each maneuver, the examiner must observe the vehicle position in the lane, whetherthe vehicle is in the correct lane, and whether the driver maintains the appropriate distance fromtraffic, stop lines, and so on.
(c) Speed. The driver must be aware not only of his speed in comparisonwith the speed limit, but how his speed affects other traffic. During each maneuver the examinermust watch to see that the driver maintains posted speed limits, accelerates and decelerates smoothly,uses the proper gear for his speed, and blends in with the traffic flow. The examiner must alsoobserve that the driver does not lug or race the engine, coast the vehicle, change gears or brake ontracks or in the middle of intersections, stall the engine, and so forth.
(13) Driver errors at nonmarking locations. Since the examiner scores atpredetermined locations, there will be occasions when the driver makes an error at some place otherthan one of these locations. Score the error in the General Driving Behavior section of the form ifappropriate. Otherwise, ignore the error. If the route has a lot of places where the examiner cannotscore the driver, the route is probably inefficient. If the driver makes errors in places where theexaminer does not score, the driver will likely make errors in places where scoring can be done. Donot decide where to score a driver based on when the driver makes an error. Stick to scoring at thepredetermined locations.
5. COMPUTING THE DRIVER’S SCORE.
a. Road test score sheet. At the end of the test, make sure all driver and examinerinformation is completed. Check that everything is marked clearly and correctly. Be sure to crossout maneuvers that were not done on the test. Review the scored maneuvers for repeated errors andscore errors in the general driving behavior. Carefully add the number of marked letter O’s andwrite the total in the “Score” space on the front of the form. A passing score is 25 errors or less.The driver fails the road test if he makes 26 or more errors (errors accumulated on the vehiclecontrol test DO NOT count toward the score on the driving portion of the road test). If the score isclose to a failing score, double-check that you have added correctly.
b. Failures. Annotate reason for failure in the Notes section; for example, “Examineeexhibited undue nervousness.” The following are some reasons for failures:
(1) Any unsafe driving act.
(2) Failure to properly perform PMCS.
(3) Not knowing location and function of gauges and controls.
(4) Unsatisfactory performance on vehicle control test.
(5) Undue nervousness.
(6) Failure to achieve minimum passing score.

TC 21-305-3
7-35
NOTE: If the individual scores 25 errors or less, but the examiner feels that the individual needsadditional training, the examiner has the right not to issue a license.
c. After-action review. Whether the driver passes or fails, the examiner will review theresults of the road test with him and bring to his attention any weaknesses that require furtherpractice or training. If the driver failed, tell him what caused him to fail. Advise him that anstandard Army OF 346 cannot be issued and he will have to retake the entire performance test at alater date. Whether pass or fail, the results must be recorded on the DA Form 6125-R.

TC 21-305-3
7-36
INTERMEDIATE TRAINING OBJECTIVE 3
PERFORMANCE TEST - OFF ROAD DRIVING
NAME _____________________________ RANK __________ UNIT ___________________
EVALUATOR _____________________________ DATE _______________________
STEPS
1. PRESETS THE CTIS SELECTOR TO THE CROSS-COUNTRY (X-C) MODE (M939A2 SERIES).
2. SHIFTS THE TRANSFER CASE SHIFT LEVER WITH THETRANSMISSION IN THE “N” POSITION.
3. SHIFTS THE TRANSFER CASE SHIFT LEVER WHENVEHICLE SPEED IS LESS THAN 22 MPH.
4. ALLOWS CTIS AMPLE TIME TO ADJUST BEFOREENCOUNTERING ADVERSE TERRAIN (M939A2 SERIES).
5. ENGAGES FRONT WHEEL DRIVE LOCK-IN ONLY WHENTHE TRANSFER CASE IS IN HIGH RANGE.
6. SETS THE TRANSMISSION RANGE SELECTOR TO 1 ASNEEDED.
7. ANTICIPATES TERRAIN AND, BEFORE NEGOTIATING,TAKES POSITIVE ACTION TO MATCH CTIS (M939A2SERIES), TRANSMISSION AND TRANSFER CASE GEARSELECTION TO TERRAIN FEATURES.
8. DOES NOT SHIFT INTO ANY LOWER GEAR THAN ISNECESSARY TO MAINTAIN HEADWAY.
9. CHECKS FOR OBSTRUCTIONS/CLEARANCES ANDCHOOSES THE BEST ROUTE OF TRAVEL TO AVOIDOBSTACLES.
10. MAINTAINS CONTROL OF THE VEHICLE.
11. MANEUVERS AROUND, NOT OVER OBSTACLES.
GO NO-GO

TC 21-305-3
7-37
STEPS
12. DRIVES SLOWLY ENOUGH TO PREVENT TRUCK DAMAGE,LOOSE OR SHIFTING CARGO, AND INJURY TO VEHICLEOCCUPANTS.
13. MANUALLY DOWNSHIFTS/UPSHIFTS THE TRANSMISSIONPROPERLY WHEN NECESSARY, SUCH AS ON GRADES.
14. DOES NOT BACK THE VEHICLE WITH THE TRANSFERCASE IN LOW.
15. DOES NOT ALLOW THE VEHICLE TO EXCEED 5 MPHWHEN THE TRANSFER CASE IS IN LOW AND THETRANSMISSION IS IN “1”.
16. ASCENDS/DESCENDS HILLS IN A STRAIGHT APPROACH.
17. CROSSES RAVINES AND DITCHES PROPERLY.
18. DOES NOT EXCEED THE FORDING DEPTH/SPEED.
GO NO-GO

TC 21-305-3
Glossary-1
AAR after-action reviewAC alternating currentAR Army regulationASAP as soon as possibleATTN attentionBII basic issue itemsCTIS central tire inflation systemDA Department of the ArmyDD Department of DefenseE electronic (as in electronic forms)ECU electronic control unitEMER emergencyEOCCT end of course comprehensive testFY fiscal yearF FahrenheitFM field manualGPM ground precautionary messageHN host nationHQ headquartersHWY highwayID identificationK kilometersLO lubrication orderMP military policeMETT-T mission, enemy, terrain, troops, and time availableMIN minimumMOS military occupational specialtyMPH miles per hourN neutralNA not applicableNC North CarolinaNCOIC noncommissioned officer in chargeNMC not mission capableNo. numberNSN national stock numberNY New YorkOF optional formP parkPA public addressPIN production identification numberPMCS preventive maintenance checks and servicesPOL petroleum, oils, and lubricantspsi pounds per square inchPTO power take-offQty quantity

TC 21-305-3
Glossary-2
R reverserpm revolutions per minuterqr requirementS simulatedSF standard formSOP standing operating procedureSSG staff sergeantSPC specialistSTP soldier training publicationTA training areaTACOM US Army Tank-automotive and Armaments CommandTAMMS The Army Maintenance Management SystemTC training circularTM technical manualTRADOC United States Army Training and Doctrine CommandTVT training videotapeULLS unit level logistics systemUS United States (of America)VCR video cassette recorderw withX-C cross-country
TC 21-305-3
References-1
SOURCES USED
These are the sources quoted or paraphrased in this publication.
AR 385-55. Prevention of Motor Vehicle Accidents. 12 March 1987.
AR 600-55. The Army Driver and Operator Standardization Program (Selection, Training, Testing, and Licensing). 31 December 1993.
DA Form 348. Equipment Operator’s Qualification Record (Except Aircraft). October 1964.
DA Form 2028. Recommended Changes to Publications and Blank Forms. February 1974.
DA Form 2404. Equipment Inspection and Maintenance Worksheet. April 1979.
DA Form 2408-14. Uncorrected Fault Record. June 1994.
DA Form 5987-E. Motor Equipment Dispatch. March 1991.
DA Form 5988-E. Equipment Inspection Maintenance Worksheet. March 1991.
DA Form 6125-R. Road Test Score Sheet. August 1993.
DA Pamphlet 738-750. Functional Users Manual for the Army Maintenance Management System (TAMMS). 1 August 1994.
DD Form 518. Accident Identification Card. October 1978.
DD Form 1970. Motor Equipment Utilization Record. April 1981.
FM 21-305. Manual for the Wheeled Vehicle Driver. 27 August 1993.
FM 101-5. Staff Organization and Operations. 25 May 1984.
LO 9-2320-272-12. Truck, 5-Ton, 6X6, M939, M939A1, and M939A2 Series (Diesel).11 June 1990.
OF 346. US Government Motor Vehicle Operator’s Identification Card. November 1985.
SF Form 91. Motor Vehicle Accident Report. February 1993.
SF Form 94. Statement of Witness. February 1983.
STP 55-88M12-SM. Soldier’s Manual, MOS 88M, Motor Transport Operator, Skill Levels 1/2. 23 December 1993.

TC 21-305-3
References-2
TC 21-305. Training Program for Wheeled Vehicle Accident Avoidance. 19 August 1996.
TM 9-2320-272-10. Operator’s Manual for Truck, 5-Ton, 6X6, M939, M939A1, and M939A2 Series (Diesel). 15 August 1996.
TVT 20-1088. M939 Series: Operating at Risk. 1996.
TVT 55-16. The M939A2 Series Cargo Truck. 1991.

TC 21-305-3
Index-1
INDEX
correct chock block placement, 4-46DA Form 2404
fault situation, 4-7no fault situation, 4-6
DA Form 6125-Rback, 7-29front, 7-28
DD Form 518 (sample), 4-18DD Form 1970 (samples), 4-12 and 4-13decision aid, 1-7end of course comprehensive test, 7-1forms
DA Form 2404, 4-6 and 4-7DA Form 6125-R, 7-28 and 7-29DD Form 518 (sample), 4-18DD Form 1970 (samples), 4-12 and 4-13SF 91, pages 4-19 through 4-22SF 94, pages 4-23 and 4-24
instructional aids, 2-1 and 2-2instructions for driver’s performance test (road test), 7-24intermediate training objective 1, 7-6 through 7-23intermediate training objective 2, 7-24 through 7-35intermediate training objective 3, 7-36 and 7-37lesson outlines (trailer operations)
drive an M939 series cargo truck with trailer, 5-4perform operator PMCS on trailers, 5-1
lesson outlines (truck operations)drive an M939 series cargo truck, 4-40drive an M939 series cargo truck at night, 4-73drive an M939 series cargo truck off road, 4-64drive an M939 series cargo truck on the road, 4-51identify cab controls, instruments, and indicators, 4-31operate the CTIS on an M939A2 series vehicle, 4-36perform operator PMCS, 4-27prepare DD Form 1970, 4-10report an accident (make required entries on DD Form 518 and SF 91), 4-15use TMs and LOs, and make entries on DA Form 2404, 4-1
practical exerciseprepare DD Form 1970, 4-14report an accident (make required entries on DD Form 518 and SF 91), 4-25use TMs and LOs and make entries on DA Form 2404, 4-8 and 4-9
risk management process 1-1 and 1-2risk assessment elements, 1-3risk assessment work sheet (sample), 1-8, 1-9. 1-10risk control alternatives, 1-7

TC 21-305-3
Index-2
risk valueequipment, 1-6soldier qualification, 1-3supervision, 1-5terrain, 1-5time of day, 1-6vehicle type, 1-4weather, 1-4
sample training schedule, 3-1, 3-2, 3-3SF 91, pages 4-19 through 4-22SF 94
back, 4-24front, 4-23
tablesdecision aid, 1-7equipment risk value, 1-6soldier qualification risk value, 1-3supervision risk value, 1-5terrain risk value, 1-5time of day risk value, 1-6transmission driving range selection table, 4-43vehicle type risk value, 1-4weather risk value, 1-4
training areas for 5-ton cargo (samples)alley dock, 6-8diminishing clearance, 6-3forward stop/straight line backing, 6-6left and right turns, 6-7offset alley, 6-4serpentine course, 6-5stopping within prescribed limits, 6-2
transmission driving range selection table, 4-43written tests
alternate, 7-15primary, 7-6

TC 21-305-3
1 August 1997
By Order of the Secretary of the Army:
DENNIS J. REIMERGeneral, United States Army Chief of Staff
Official:
Administrative Assistant to the Secretary of the Army
DISTRIBUTION:
Active Army, Army National Guard, and US Army Reserve: To be distributed in accordance withthe initial distribution number 114938, requirements for TC 21-305-3.

PIN: 065890-000