Embed Size (px)
Citation preview

Copyright (C) 2008 D&M Holdings Inc. All rights reserved.
Trans Music Manager for DENONOwner’s Manual
3525 10001 003D

�
1Insert the included CD-ROM (Trans Music Manager) in your PC. The top menu screen is displayed.
[Selectable items]
Trans Music Manager : Installs “Trans Music Manager”.
Open a brief manual : Opens the owner’s manual of “Trans Music Manager”. Italian, Spanish, Dutch and Swedish owner’s manual are located in the “doc”
folder (select “Browse CD”).Browse CD : Opens the folders and applications on the included “Trans Music Manager”
CD-ROM. Language : You can choose to display the Wizard screen in English, Japanese, German or
French.
Installing “Trans Music Manager” 2Click on “Trans Music Manager”.

�
3Click on “Next >”.
[Selectable items]
Next > : Continue to next step.
4Carefully read the license agreement, and then click “Yes”.
[Selectable items]
Yes : Agree.
�
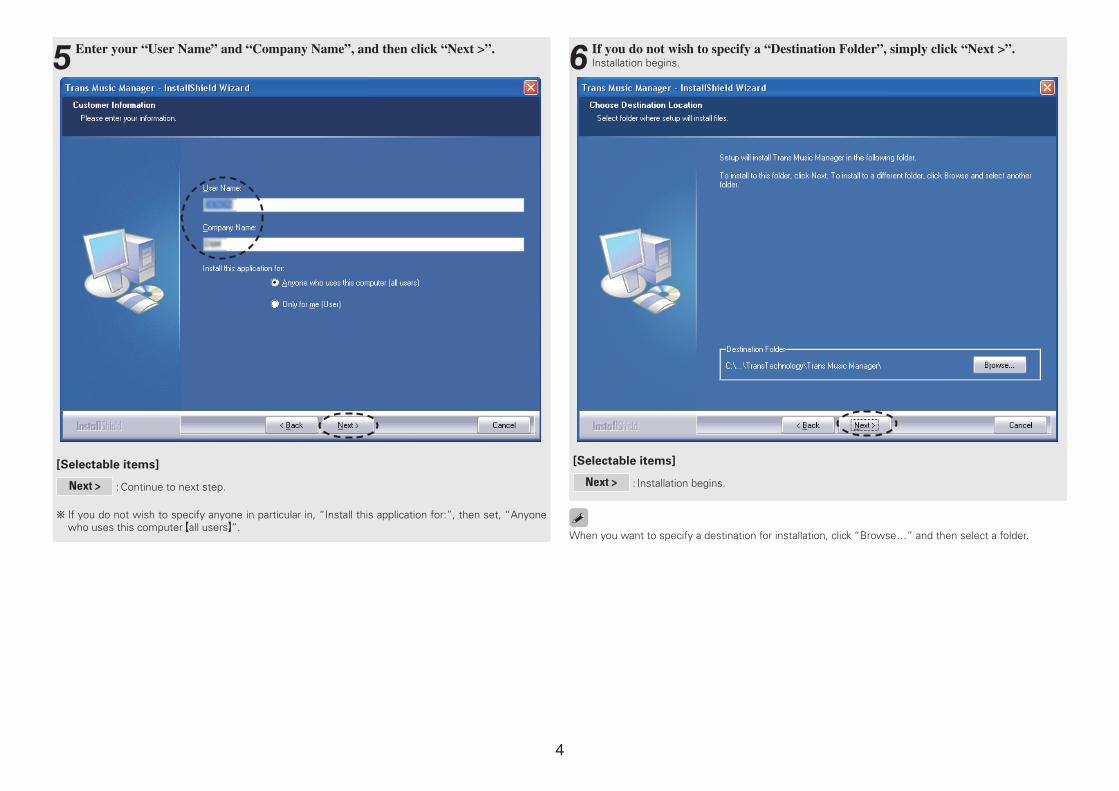
When you want to specify a destination for installation, click “Browse…” and then select a folder.
5Enter your “User Name” and “Company Name”, and then click “Next >”.
[Selectable items]
Next > : Continue to next step.
b If you do not wish to specify anyone in particular in, “Install this application for:”, then set, “Anyone who uses this computer Gall usersH”.
6If you do not wish to specify a “Destination Folder”, simply click “Next >”. Installation begins.
[Selectable items]
Next > : Installation begins.

�
7When installation has finished, click on “Finish”.
[Selectable items]
Finish : Installation finishes.
b When installation finishes, the “Trans Music Manager” icon is placed on the desktop of your PC.
8Click on “Quit”.
NOTE• When a USB flash drive is connected to the main unit, Denon accepts no liability in the event of the USB
flash drive’s data loss or damage. Be sure to back up important data. • When re-installing Trans Music Manager, first uninstall the currently installed Trans Music Manager.

�
How to use Trans Music Manager
Before using Trans Music Manager
1Connect the USB flash drive containing recorded MP3 files to your personal computer.
2Double click the “Trans Music Manager” icon on your PC to start Trans Music Manager.
Copyright protected WMA files cannot be played.
About USB flash drive
• Only use a USB flash drive. Do not connect any other USB device.• When a USB flash drive is connected to the main unit, Denon accepts no liability in the event of the USB
flash drive’s data loss or damage. Be sure to back up important data. • The USB flash drive does not operate via a USB hub. • Operation and power supply are not guaranteed for all USB flash drives. • The main unit’s USB port cannot be connected to a PC using a USB cable.• Insert the USB flash drive straight and fully into the USB port. Avoid inserting at an angle as this can cause
damage. • You cannot use USB flash drives that are copyright protected. • You cannot record on an external hard disk drive. • You cannot record via a USB cable (including extension cable).
About compatible OS and personal computers
• The following OS are compatible. ⋅ Windows 2000⋅ Windows XP⋅ Windows Vista (The display screen may differ in part depending on the personal computer.)
• You cannot output information to a personal computer by connecting the main unit to a personal computer.
• Operations such as system suspend, sleep (standby mode), hibernation, etc., cannot be guaranteed for all PCs.
• During use, if there is no software response, turn off the power one time.
To update “Trans Music Manager for DENON”
Download the latest version (updated version) of “Trans Music Manager for DENON” from the following home page. http://www.transtechnology.co.jp/products/soft/tmm/for-DENON.htmlThen execute the downloaded “Updater.exe” file (double-click).

�
Auto Splitter (Auto MP3 Splitter)Analog recorded music files become a single file with the record’s A side or B side. Of course, this is not the only way you can enjoy the music. Files can more conveniently be split into individual tracks. To do this, use the Auto MP3 Splitterz function of Trans Music Manager.
z: Analog records usually have a 2 ~ 3 second silent gap between tracks. The Auto MP3 function is a splitting function that detects these gaps to split files.
1Select “Auto MP3 Splitter” from the “Menu”. 2Click on “···”.
b If there is no “My Music” folder on your PC, the “Save Folder” message is not displayed. In this case, create a “My Music” folder on your PC.

�
3Select the file you want to split in the “Open” dialog box, and then click on “Open”. 4If necessary, set “Level Threshold”, “Duration” and “Offset”.
b The default values are set.
[Settable Items]
Level Threshold : Set the volume level for detection of silence. (Setting range: 1 ~ 100, default values: 50) For a file containing little noise, lower the setting (closer to 0). For a file with a lot of
noise, raise the setting.
Duration : Set the continuous period of the silent parts. (Setting range: 0 ~ 4000 msec, default values: 2000 msec) The units are msec (one thousandth of a second). GExampleH When you want to set 2 seconds, set 2000 msec.
Offset : Set whether to split approximately however many msec before the start of the next track.
(Default values: 200 msec) The set value is a negative number. The units are msec (one thousandth of a second). GExampleH When you want to set 0.2 seconds, set -200 msec.
�
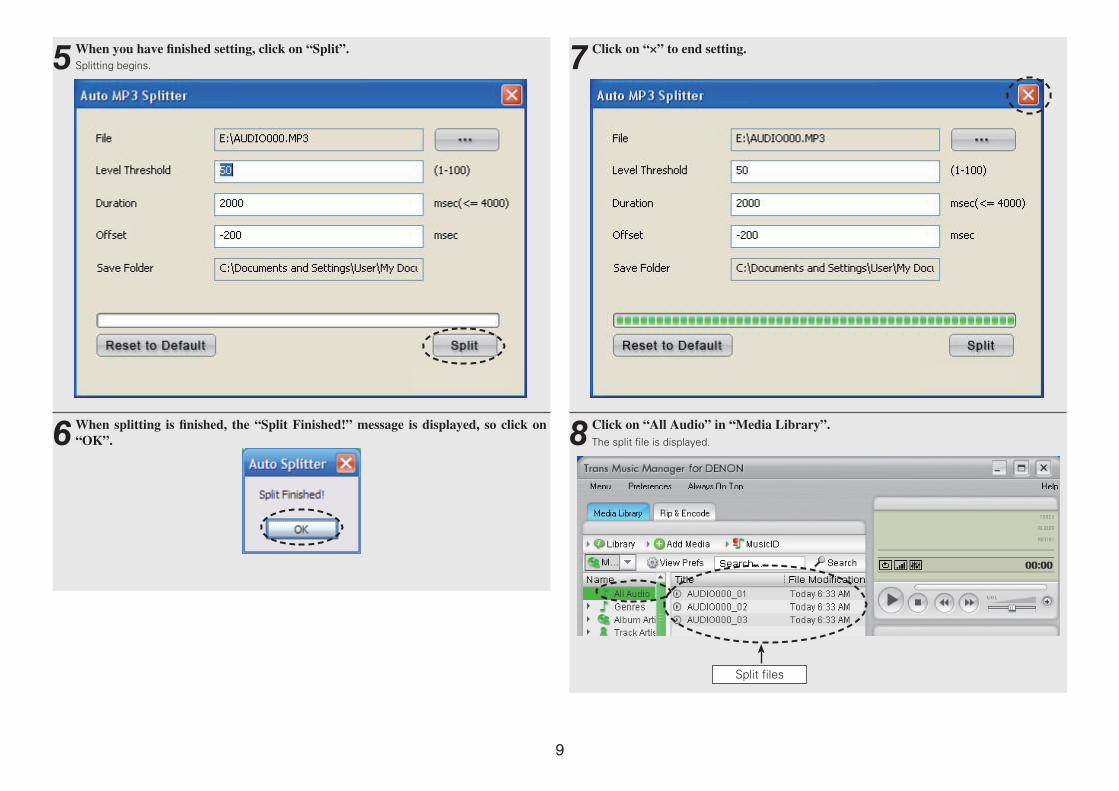
5When you have finished setting, click on “Split”. Splitting begins.
6When splitting is finished, the “Split Finished!” message is displayed, so click on “OK”.
7Click on “×” to end setting.
8Click on “All Audio” in “Media Library”. The split file is displayed.
Split files
10
When the same filename exists at the destination, we recommend that before splitting the file, you either change the destination filename or delete it. See “Changing the Filename” (vpage 23) for details on how to change filenames. See “Deleting Tracks” (vpage 28) for details on how to delete tracks.
• The splitting time depends on the length of tracks and number of splits. The longer the track, or the greater the number of splits, the more splitting time it takes.
• During Auto MP3 Splitter operation, splitting will not be performed accurately if the number of tracks is too low or too high. Change the “Threshold Value” in Step 4, and perform splitting again, either by Auto or Manual (“Manual MP3 Splitter” vpage 11).
• When the split file is not displayed, select the file from “My Documents¥My Music¥DENON¥AUDIOxxx” with “Menu” – “Track Cue” – “File/Add URL”, and click on “All Audio”.
NOTEIf the final track is shorter than 10 seconds, Auto MP3 Splitter operation cannot be performed. In this case, do the splitting manually (“Manual MP3 Splitter” vpage 11).
About split files
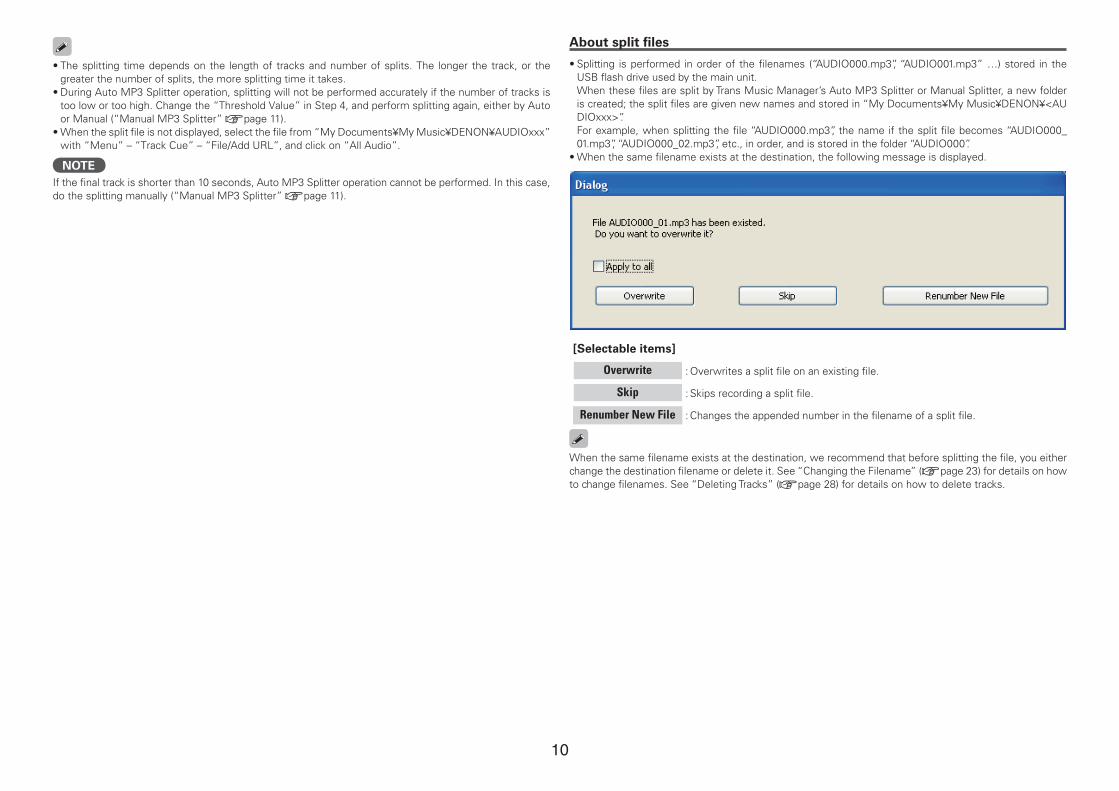
• Splitting is performed in order of the filenames (“AUDIO000.mp3”, “AUDIO001.mp3” …) stored in the USB flash drive used by the main unit. When these files are split by Trans Music Manager’s Auto MP3 Splitter or Manual Splitter, a new folder is created; the split files are given new names and stored in “My Documents¥My Music¥DENON¥<AUDIOxxx>”. For example, when splitting the file “AUDIO000.mp3”, the name if the split file becomes “AUDIO000_ 01.mp3”, “AUDIO000_02.mp3”, etc., in order, and is stored in the folder “AUDIO000”.
• When the same filename exists at the destination, the following message is displayed.
[Selectable items]
Overwrite : Overwrites a split file on an existing file.
Skip : Skips recording a split file.
Renumber New File : Changes the appended number in the filename of a split file.

11
Manual MP3 SplitterIf there is too much noise or in the case of a continuous medley composed of multiple tracks, when the track gap is short or for any other reason the Auto MP3 Splitter operation may not possible, use the Manual MP3 Splitter while listening to the playback sound.
1Select “Manual MP3 Splitter” from the “Menu”. 2Click on “···”.

1�
5Click “2” at the split position. Pause playback. 3Select the file you want to split in the “Open” dialog box, and then click on
“Open”.
4If the waveform graphic is displayed, click “1”. Playback begins. Waveform Graphic

1�
6Click on “Mark” to insert a split point. The split point is displayed on the split list.
b Without playing a track, you can move the slider to search for the track changeover point. b When adjusting the split point, clicking on “..0” plays back approximately 2 seconds before the stop
point. Also, clicking on “1..” plays back approximately 2 seconds after the stop point.
7Repeat Step 4 ~ 6 to set all of the split points (Marks).
Split list
Split point
8When you have finished setting a split point, click on “Split”. Splitting begins.
[Operable items]
Split : Splitting begins.
Delete : Deletes the split point you selected from among the set split points.
Reset : Clear the entire split list.
9When splitting is finished, the “Split Finished!” message is displayed, so click on “OK”.

1�
• The splitting time depends on the length of tracks and number of splits. The longer the track, or the greater the number of splits, the more splitting time it takes.
• Files of over 60 minutes in length cannot be split manually.
10Click on “×” to end setting.
11Click on “All Audio” in “Media Library”. The split file is displayed.
Split files

1�
Using the MusicID function
Before using the MusicID functionYou must connect to the Internet to use the MusicID function.
1Connect a LAN cable.
2When connecting by wireless LAN, check the signal strength.
b When using the MusicID function, if the signal strength is low or a MusicID search takes 3 ~ 5 minutes, try again under strong signal conditions.
3When it is necessary to set a proxy server due to the ISP (Internet Service Provider) you subscribe to, carry out the following operations.
q Click on “Preferences”. w In “Settings” – “System Integration” - “Network Connection” - “Proxy Settings”,
place a check mark against “Connect to Internet through proxy Server”. e Place a check mark against “Only use proxy port 80 (HTTP) connections”, and
enter proxy host name and proxy port. r Click on “Seve and Close”.
4Connecting to the Internet.
q Click on “Preferences”. w For connection to the Internet, select the connection method: “Settings” – “System
Integration” - “Network Connection” – “Internet Connection”. e Click on “Seve and Close”.
Using the MusicID function to append track information to filesMusicID can be used to identify tracks as albums or as individual tracks.
Identify tracks as albums
1Select files (multiple) you want to process with MusicID in “Media Library”.
Gracenote musicIDSM music recognition service“Gracenote MusicID SM music recognition service” is a service offered by Gracenote® that is commonly known as CDDB®. The service lets you automatically obtain CD titles, artist names, track names, etc., in text format by connecting to the Gracenote® server on the Internet.
b Trans Music Manager is a trademark and registered trademark of Trans Technology, Inc. Information concerning music identification technology is offered by Gracenote, Inc. Gracenote® and CDDB® are registered trademarks of Gracenote.
1�
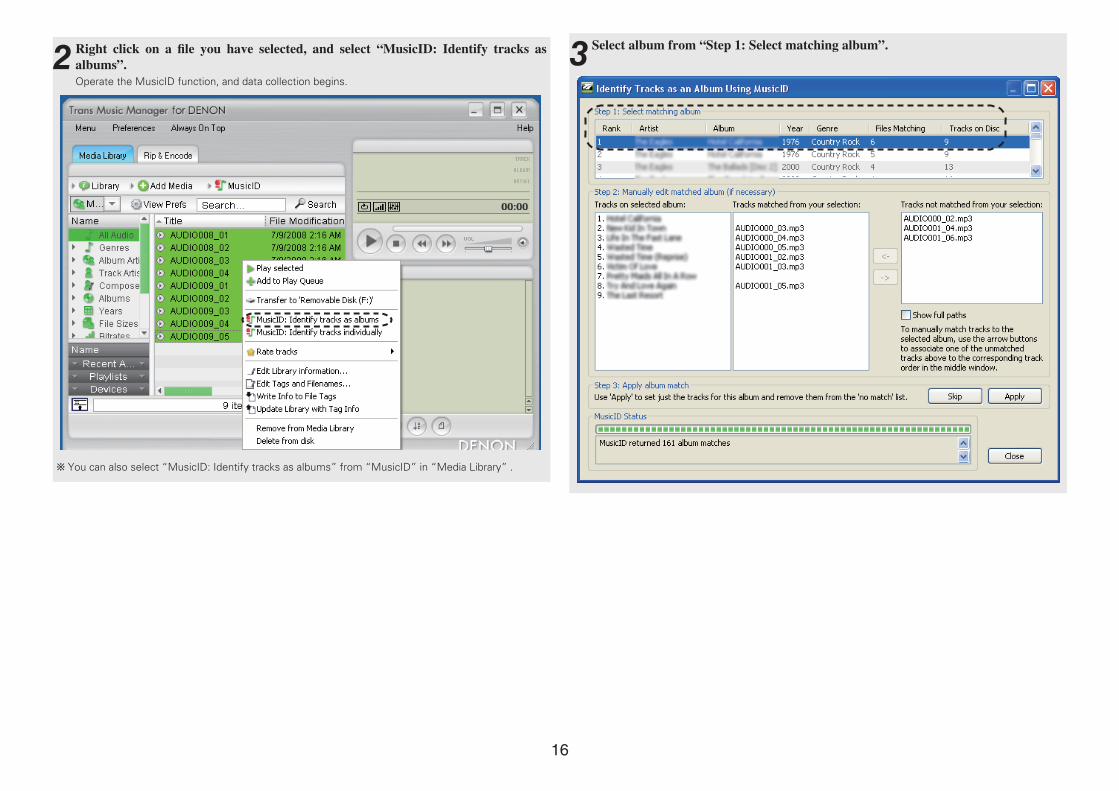
2Right click on a file you have selected, and select “MusicID: Identify tracks as albums”.
Operate the MusicID function, and data collection begins.
b You can also select “MusicID: Identify tracks as albums” from “MusicID” in “Media Library” .
3Select album from “Step 1: Select matching album”.

1�
4Manually select tracks that are not identified automatically. q Select 1 track from “Tracks not matched from your selection”.
w Select the relevant tracks from “Tracks on selected album”. e Click on to “←” to fill up the “Tracks matched from your selection” column. r Repeat q ~ e for all tracks.
w q
e
5Click on “Apply” to set the result. The MusicID result is displayed in “Media Library”.
If track names are not attached in a multiple selection, perform MusicID for individual tracks (“Identifying tracks individually” vpage 18).

1�
2 Left click on “MusicID”, and select “Identify selected tracks”.
Identifying tracks individually
1Select files you want to process with MusicID in “Media Library”.

1�
3Select matching track information from “Current file list”. 4Click on “Apply” to set the result. The MusicID result is displayed in “Media Library”.

�0
In the following cases, track names may not be attached even if you perform MusicID.⋅ When not registered in the CD database of Gracenote, Inc.⋅ When the analog record source has not been converted to CD.⋅ When converted to CD, if noise reduction is applied or tracks have been edited.
In such cases, enter the track names by the following procedure. q Right click on the file you selected in Step 1, and select “Edit Tags and Filenames…”. The “Tag and File Editor” starts. w Enter individual items.e After operating “Write Tags”, click on “Close” to finish.

�1
Embedding accessed track information in files Even if a track name is identified by MusicID, an update in Media Library alone will not be saved to the file. Also, with players other than Trans Music Manager, the track information will not be displayed during file play. Embed track information in files by the following procedure.
1Select a file in “Media Library” for which you want to embed track information. 2Right click on the selected files, and select “Edit Tags and Filenames …”
The “Tag and File Editor” starts.

��
4Click on “Write Tags”. Track information of Media Library is displayed.
b The changed part is displayed in red characters. If necessary, you can also edit tags. b You can perform this operation in “Media Library”.
qRight click on a file you have selected. wSelect “Write Info to File Tags”.
3Click on “From Media Library” .

��
2 Right click on the selected files, and select “Edit Tags and Filenames …”. The “Tag and File Editor” starts.
Changing the filenameSince track information (tag information) is embedded, the file information is displayed when played on another music player. However, since it is difficult to search when the filename is AUDIO003_01.mp3, etc., rewrite with a filename that is easily recognizable.
1Select a file from “Media Library” for which you want to change the filename from among files with embedded track information (tag information).

��
3Click on “File Renamer” .
4Select a filename template you like from “Select Renaming Template”.
5 Click on “Rename Files” . The filename is changed.
b If you want to change to a filename of different format from the existing template, click “Editor”. “Filename Template Editor” is displayed, and you can change the filename to the one you want.

��
6 Click on “Close” to end setting .

��
Storing tracks in USB flash driveStore tracks in USB flash drive when you change file names.
1Click “Devices” in “Media Library”. 2Click on the target device.

��
3Select the tracks you want to copy. 4Drag and drop tracks for copying into the black box to the right of “Devices”.
Drag and drop

��
Deleting tracksWhen you perform Auto MP3 Splitter or Manual MP3 Splitter operations, the split tracks are displayed in Media Library. You can delete these split tracks.
Deleting tracks from Media Library
1Select a track you want to delete in “Media Library”. 2Right click on the selected files, and select “Remove from Media Library”. The track is deleted from Media Library.
NOTETake care when selecting “Delete from disk” in Step 2, because the tracks are deleted from the hard disk of your PC as well as from Media Library.

��
2 Right click on the selected files, and select “Delete from disk”. Tracks are completely deleted from Media Library and your personal computer.
Tracks are deleted from Media Library and your personal computer
1Select a track you want to delete in “Media Library”.