Embed Size (px)
Citation preview

AKJZNAzsqknsxxkjnsjxGetting Started Guide Page 1
Transferring Your Hosting to Us// Getting Started Guide
Getting Started Guide
Transferring Your Hosting to Us

Getting Started Guide: Transferring Your Hosting to Us
Version 1 (11.4.2010)
© Copyright 2010 All rights reserved.
Distribution of this work or derivative of this work is prohibited unless prior written permission is obtained from the copyright holder.
Trademarks used in this bookLinux® is a registered trademark of Linus Torvalds.Mac® is a registered trademarks of Apple Computer, Inc.SmartFTP® is a registered trademark of SmartSoft, Ltd.Fetch® is a registered trademark of Fetch Softworks.Windows XP®, Windows Vista® Entourage®, Windows Live® and Outlook® are registered trademarks of Microsoft Corporation in the United States and/or other countries.
All other trademarks and copyrights are the property of their respective owners.
AKJZNAzsqknsxxkjnsjxGetting Started Guide Page 2
Transferring Your Hosting to Us// Getting Started Guide

Table of ContentsIntroduction 5AUTHORIZING A DOMAIN NAME TRANSFER FROM YOUR ACCOUNT! 6
CHECKING DOMAIN NAME TRANSFER PROCESS! 7
Setting Up Your New Hosting Account 10SETTING UP YOUR HOSTING ACCOUNT! 10
CHECKING YOUR HOSTING ACCOUNT STATUS ! 11
GETTING COPIES OF YOUR WEBSITE! 13
FTP CLIENT SETTINGS ! 13
UPLOADING YOUR WEBSITE FILES! 14
PREVIEWING YOUR WEBSITE WITH PREVIEW DNS! 15
Troubleshooting 17WHY CANʼT I UPLOAD MY WEBSITE?! 17
AKJZNAzsqknsxxkjnsjxGetting Started Guide Page 3
Transferring Your Hosting to Us// Getting Started Guide
WHY ISNʼT MY WEBSITE DISPLAYING CORRECTLY?! 19
Setting Up Your Email 21
Updating Your Nameservers 24
Updating Your Mail Servers 26
AKJZNAzsqknsxxkjnsjxGetting Started Guide Page 4
Transferring Your Hosting to Us// Getting Started Guide

IntroductionNow that you've purchased a shared hosting account, you're probably anxious to get your services transferred over from your previous provider. This guide will walk you through the process of transferring your domain name, moving your website files, and setting up your email, all with as little downtime as possible.
TRANSFERRING YOUR DOMAIN NAME
A domain name transfer moves your domain name registration from one registrar to another. These instructions are to transfer your domain name from your current registrar to us.
Before authorizing your domain name transfer, make sure:
• The domain name is unlocked at your current registrar.
• You have an authorization code from your current registrar, if required. Some domain name extensions - many country-code top-level domain names (ccTLDs) do not require authorization codes.
• The administrative contact for the domain name has a valid, published email address in the Whois database.
• You have purchased a domain name transfer from us.
AKJZNAzsqknsxxkjnsjxGetting Started Guide Page 5
Transferring Your Hosting to Us// Getting Started Guide
• You have the transfer authorization email we sent to the domain name's administrative contact right after the transfer purchase.
Once you've gathered and verified the information, you're ready to begin authorization of the transfer.
AUTHORIZING A DOMAIN NAME TRANSFER TO YOUR ACCOUNT
These steps indicate to us that you agree with the domain name's transfer and that you authorize us to continue the transfer process. When you purchase the domain transfer, make sure you choose Keep the existing nameservers on my transferring domain names as currently set at my domain registrar.
To Authorize a Domain Name Transfer to Your Account
1. Log in to your Account Manager.
The Account Manager is where you manage account administrative functions and
hosting-related products such as email. The Hosting Control Center is where you configure hosting-account functionality.
2. In the My Products section, click Domain Manager.
AKJZNAzsqknsxxkjnsjxGetting Started Guide Page 6
Transferring Your Hosting to Us// Getting Started Guide

3. From the Domains menu, select Pending Transfers.
4. Click Authorization and select Begin Transfer Authorization.
5. In the Transaction ID and Security Code fields, enter the codes from the email sent to the domain name's administrative contact, and then click Next. A list of domain names included in the transfer displays.
6. Click Next to confirm the transfer of the listed domain names.
7. If applicable, enter the Authorization Code from the current registrar, and then click Finish.
CHECKING DOMAIN NAME TRANSFER PROCESS
You can track your transfer's progress and view recommended action(s) to complete the transfer from the Pending Transfers page.
To Check the Transfer Process
1. Log in to your Account Manager.
2. In the My Products section, click Domain Manager.
3. From the Domains menu, select Pending Transfers.
AKJZNAzsqknsxxkjnsjxGetting Started Guide Page 7
Transferring Your Hosting to Us// Getting Started Guide

4. The following information displays for each pending transfer:
Progress The current step in the domain transfer process. Mouse over over the step to view a tooltip for the domain name's current step.
Recommended Action
The recommended action to continue transferring the domain name.
Admin Email The administrative email address associated with the domain name.
5. Click the domain name to display additional information:
Status The current status in the transfer process.
Step A description of the current step in the transfer process.
NOTE: For most domain name extensions, the move between registrars takes from 5 to 7 days once the transfer is authorized.
The process and time required for the transfer can vary for certain extensions, primarily ccTLDs. For more information on exceptions to the transfer process for a specific domain name extension, see help content for that extension.
AKJZNAzsqknsxxkjnsjxGetting Started Guide Page 8
Transferring Your Hosting to Us// Getting Started Guide

For more information about transferring domain names to us from a particular registrar, see these guides:
1&1 directNIC eNom Gandi iHoldings, Inc.
Network Solutions
Dotster Melbourne IT Register.com Tucows
AKJZNAzsqknsxxkjnsjxGetting Started Guide Page 9
Transferring Your Hosting to Us// Getting Started Guide

Setting Up Your New Hosting AccountBefore you can upload a website to your hosting account, you have to set up the hosting account. This involves creating a File Transfer Protocol (FTP) user name and password, as well as getting your domain’s nameservers (DNS). Your hosting account’s DNS information points your domain name to your hosting account.
SETTING UP YOUR HOSTING ACCOUNT
Your account is not automatically set up when you purchase a hosting plan. You need to log in and complete the setup process in the Hosting Control Center.
To Set up Your Hosting Account
1. Log in to your Account Manager.
2. In the My Products section, click Web Hosting.
3. Next to the hosting account you want to set up, click Launch.
4. The End User License Agreement displays. Read the agreement, select that you have read and agree to it, and click Next.
5. Enter a new User Name and Password for your hosting account, and confirm your password.
AKJZNAzsqknsxxkjnsjxGetting Started Guide Page 10
Transferring Your Hosting to Us// Getting Started Guide

This is the User ID and password that you use to connect to your hosting account with an FTP client. This is also the data you need to access your free Web Statistics.
6. Click Next.
7. Enter your domain name, and then click Next.
8. Update the default account options if necessary, and then click Next.
9. (Optional) If you have a credit for an SSL certificate you want to add, select the appropriate certificate, select that you have read and agree to the SSL Subscriber Agreement, and then click Next.
10. Confirm your settings. To update information, use the Previous button.
11. Click Finish.
CHECKING YOUR HOSTING ACCOUNT STATUS
While you’re waiting for your hosting account setup to finish, you can check its status. The status for your hosting account displays on the Hosting page in the Hosting Control Center.
AKJZNAzsqknsxxkjnsjxGetting Started Guide Page 11
Transferring Your Hosting to Us// Getting Started Guide

To Check the Status of Your Hosting Account
1. Log in to your Account Manager.
2. In the My Products section, click Web Hosting.
3. Next to the account you want to check, click Actions.
The Status field displays the current status of your hosting account:
Initialize Account You still need to set up your hosting account. To set up your hosting account, click Launch next to the account you want to set up.
Pending DNS Your domain name’s nameservers must be set correctly.
Pending Account Change
Your account is being upgraded or downgraded.
Pending Setup Your account is setting up. It may take up to 24 hours for us to configure your hosting account before you can use it.
Setup Your account is set up.
AKJZNAzsqknsxxkjnsjxGetting Started Guide Page 12
Transferring Your Hosting to Us// Getting Started Guide
Once your hosting account is set up, you can log in to the Hosting Control Center to manage your account, set up databases, and install various website features.
GETTING COPIES OF YOUR WEBSITE
If you don’t have a copy of your website files on your local computer, you need to download them from your current hosting provider. Create a folder on your desktop to download a copy of the files into. Use an FTP client to connect to your existing server.
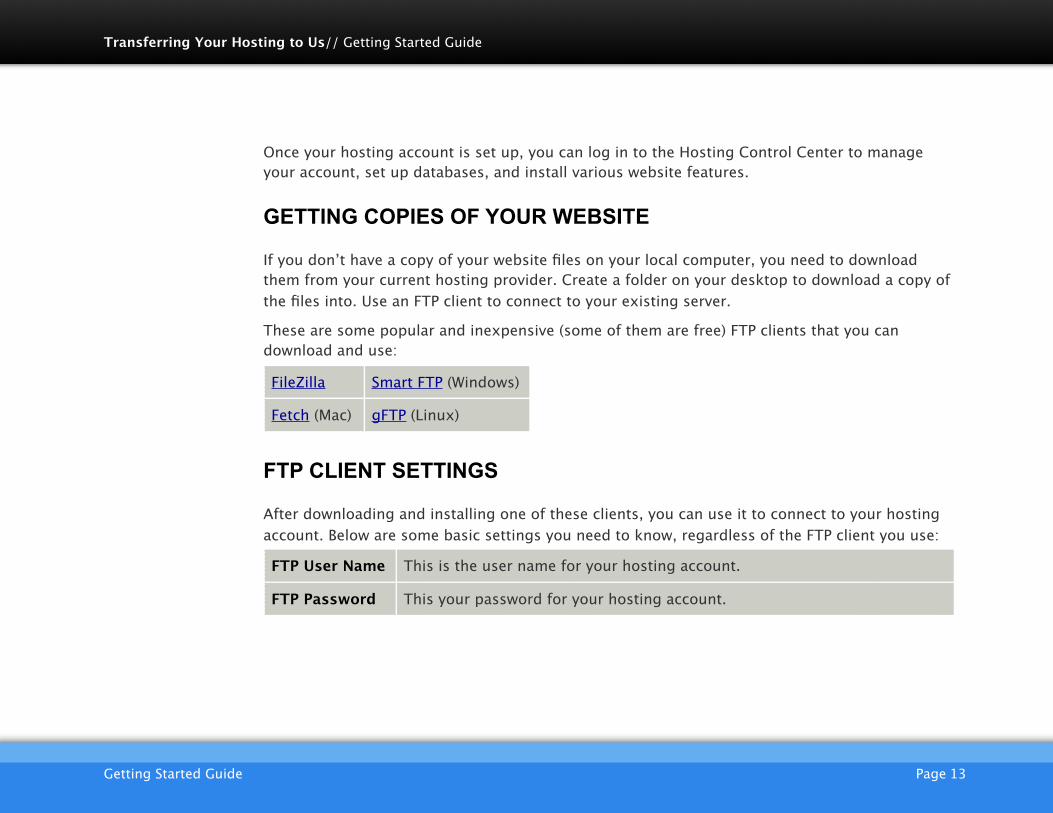
These are some popular and inexpensive (some of them are free) FTP clients that you can download and use:
FileZilla Smart FTP (Windows)
Fetch (Mac) gFTP (Linux)
FTP CLIENT SETTINGS
After downloading and installing one of these clients, you can use it to connect to your hosting account. Below are some basic settings you need to know, regardless of the FTP client you use:
FTP User Name This is the user name for your hosting account.
FTP Password This your password for your hosting account.
AKJZNAzsqknsxxkjnsjxGetting Started Guide Page 13
Transferring Your Hosting to Us// Getting Started Guide

Website URL http://www.coolexample.com where coolexample.com is your domain name.
FTP Site URL http://www.coolexample.com where coolexample.com is your domain name.
Start Directory Some FTP clients will ask for a ”Home” or ”Start” directory. Try leaving the box blank or enter a single forward slash (i.e., /).
UPLOADING YOUR WEBSITE FILES
You can upload your files using an FTP client or through the Hosting Control Center. If you choose to upload your files using an FTP client you need to input the server IP address (located in the Hosting Control Center) for the Host Name.
Follow these steps to upload your website files. Keep in mind, the website won’t be ”live” with us until the domain nameservers are updated. This process prepares your hosting account for the switch over to our services.
To Upload Your Website Using Your Hosting Control Center
1. Log in to your Account Manager.
2. Under the Products section, click Web Hosting.
3. Next to the hosting account you want to use, click Launch.
AKJZNAzsqknsxxkjnsjxGetting Started Guide Page 14
Transferring Your Hosting to Us// Getting Started Guide

4. Under the Content section of the Hosting Control Center, click the FTP Client icon.
5. If a security certificate window displays, click Yes or Trust to accept the certificate and open the FTP program. In general, this is what the FTP program looks like when you open it for the first time: (image here)
6. In the Local System section, go to the location on your computer where you saved your index.html file and select your file.
7. Click the >> arrows to upload the index.html file to your hosting account.
PREVIEWING YOUR WEBSITE WITH PREVIEW DNS
The Preview DNS feature is enabled by default on our hosting accounts. It remains active for 14 days, but you can re-enable it at any time.
To Preview Your Website with Preview DNS
1. Log in to your Account Manager.
AKJZNAzsqknsxxkjnsjxGetting Started Guide Page 15
Transferring Your Hosting to Us// Getting Started Guide

2. From the Products section, click Web Hosting.
3. Next to the hosting account you want to use, click Launch.
4. In the Account Summary panel, click View to display your primary domain's DNS information.
5. If Preview DNS is enabled, click Preview my site.
Once it's set up, you can access it using:
http://coolexample.com.previewdns.com where coolexample.com is your domain name.
Once you verify your site functions correctly using Preview DNS, you can point your domain to our Web hosting.
AKJZNAzsqknsxxkjnsjxGetting Started Guide Page 16
Transferring Your Hosting to Us// Getting Started Guide

TroubleshootingSometimes, despite your preparations, something on your website just doesn’t work. We have identified some of the most common problems that might you experience. This section presents important information and recommendations for fixing these problems.
WHY CAN’T I UPLOAD MY WEBSITE?
If you are having trouble uploading your site content, there are a couple of things you can check to make sure your files end up in the right place.
Use the correct password to upload files
Use your hosting account password to upload files. Change your password through the Hosting Control Center.
To Change Your Hosting Account Password
1. Log in to your Account Manager.
2. Under the My Products section, select Hosting.
3. Next to the hosting account you want to modify, click Open.
4. Under the Settings section of the Hosting Control Center, click Account Login.
AKJZNAzsqknsxxkjnsjxGetting Started Guide Page 17
Transferring Your Hosting to Us// Getting Started Guide

5. To change your hosting account password, enter a new password in the fields and click Update.
Verify the directory you’re using
You must upload files to the appropriate directory in order for your website content to display.
Depending on your FTP client, you may be asked for a "home" or "start" directory. Our hosting service doesn’t require this, so leave that field blank. If your client requires a value, enter a single forward slash (i.e., /).
AKJZNAzsqknsxxkjnsjxGetting Started Guide Page 18
Transferring Your Hosting to Us// Getting Started Guide
WHY ISN’T MY WEBSITE DISPLAYING CORRECTLY?
Even though you set up your hosting and uploaded your files, it’s possible your website still won’t display. There is no need to fret. The following issues can be potential show-stoppers, so check each item to verify your settings are correct.
Verify your home page file name
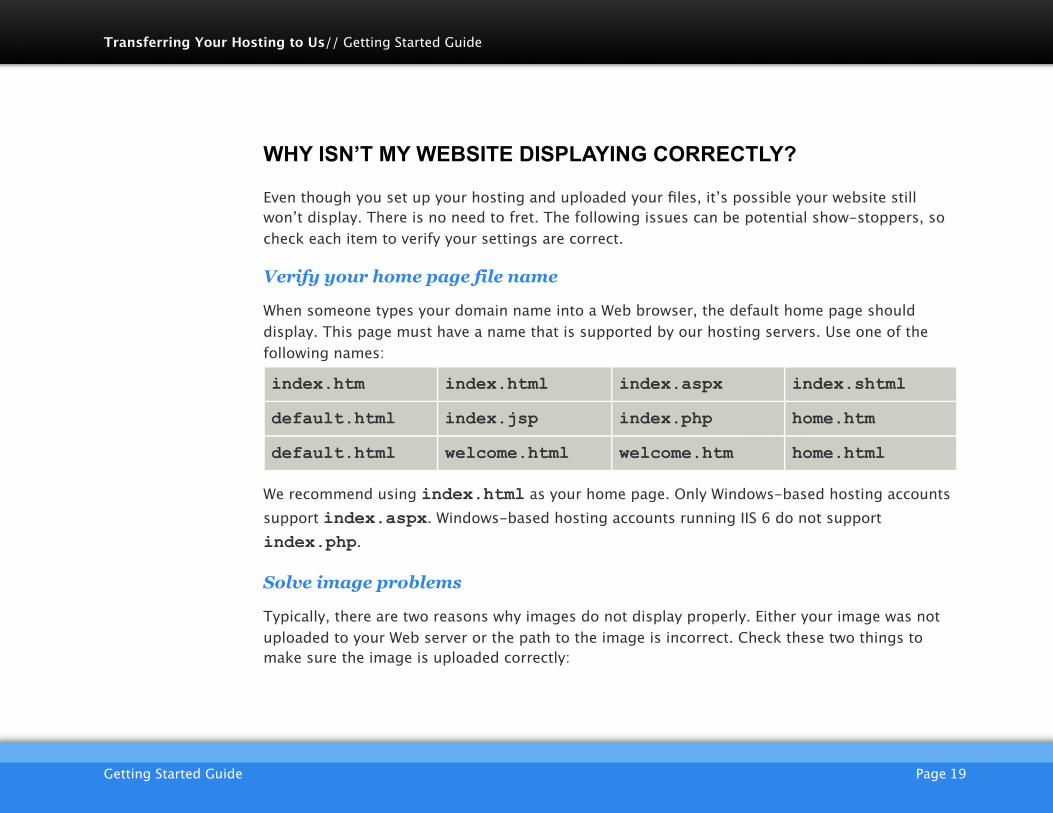
When someone types your domain name into a Web browser, the default home page should display. This page must have a name that is supported by our hosting servers. Use one of the following names:
index.htm index.html index.aspx index.shtml
default.html index.jsp index.php home.htm
default.html welcome.html welcome.htm home.html
We recommend using index.html as your home page. Only Windows-based hosting accounts support index.aspx. Windows-based hosting accounts running IIS 6 do not support index.php.
Solve image problems
Typically, there are two reasons why images do not display properly. Either your image was not uploaded to your Web server or the path to the image is incorrect. Check these two things to make sure the image is uploaded correctly:
AKJZNAzsqknsxxkjnsjxGetting Started Guide Page 19
Transferring Your Hosting to Us// Getting Started Guide

• Double-check that the path to your image and the name of the image are the same, including the use of uppercase and lowercase letters. If these names are not identical, the server cannot find your image.
• When the server cannot find an image, a red X displays. Right-click on the red X and select properties to see the link to the image.
Correct broken site links
If you create your website’s pages on your local computer, the code needs to reflect the change that occurs when you upload site content. Web page URLs, image paths, and database names can all be environment-sensitive.
We recommend using relative URLs when linking to Web pages. Relative URLs identify a Web page in relation to, or in the context of, the current page. Because they do not reference the domain name, relative URLs do not require modifications when changing environments.
Ensure your DNS is pointed correctly
If you registered your domain through us, your DNS records were automatically updated when you set up your hosting account. If you registered your domain name somewhere else, double-check that the nameservers are correct.
Refresh your Web browser
Browsers can cache Web pages. To clear the cache and refresh your page, press CTRL + F5 on your keyboard.
AKJZNAzsqknsxxkjnsjxGetting Started Guide Page 20
Transferring Your Hosting to Us// Getting Started Guide

Setting Up Your EmailDepending on the amount of space you need for your email accounts, you have two options for setting up email.
You can use the free email credits included with the purchase of a hosting account, or you can purchase an email plan. Follow these steps to set up your email. Keep in mind, the email won’t be active with us until the domain nameservers are updated. This process prepares your email for the switch over to our services.
To Set Up an Email Account
1. Log in to your Account Manager.
2. In My Products, click Email.
NOTE: If the Email option does not display in My Products, you can use a free email credit. Click Free Products, click Email Account List, click Use Credit, select the domain you want to use from the list on the right side of the screen, and then click Continue. The account displays as a new account in the Email Account
list.
AKJZNAzsqknsxxkjnsjxGetting Started Guide Page 21
Transferring Your Hosting to Us// Getting Started Guide

3. Click Setup Account next to the email account you want to use.
4. If an option to add addresses or view all email plans displays, click View All to display all of your email plans.
5. Click Add next to the plan you want to use.
6. On the Settings tab, complete the following:
Email Address Enter the first part of your new email address and either select a domain registered or hosted with us from the drop down list or enter a domain name that is registered elsewhere.
Set Password Your password in Web-Based Email for this address.
Confirm Password Confirms the password.
Space for this mailbox The amount of storage space for this email address
Make this mailbox a catchall
When email is sent to the domain for an address that does not exist, it will automatically be forwarded to this address.
7. (Optional) Go to the Related Products tab to associate this email address with other products, such as Calendar or Online File Folder.
AKJZNAzsqknsxxkjnsjxGetting Started Guide Page 22
Transferring Your Hosting to Us// Getting Started Guide

8. (Optional) Go to the Advanced tab to configure your carbon copy and SMTP settings.
9. (Optional) Go to the Auto Reply tab to create an automatic reply to all emails you receive.
10. Click OK to complete email address setup.
AKJZNAzsqknsxxkjnsjxGetting Started Guide Page 23
Transferring Your Hosting to Us// Getting Started Guide

Updating Your NameserversOnce you successfully transferred your domain to us, you can change your nameservers to point to our services.
To avoid any delays, be sure:
• Your hosting account is setup and the files are uploaded
• All email accounts are set up in the Email Control Center
To Update Your Nameservers
1. Log in to your Account Manager.
2. In the My Products section, select Domain Manager.
3. Select the domain names you want to modify.
4. Click Nameservers.
5. Select I have a hosting account with these domains.
6. Click OK.
AKJZNAzsqknsxxkjnsjxGetting Started Guide Page 24
Transferring Your Hosting to Us// Getting Started Guide

NOTE: Remember that it usually takes about 4-8 hours for .COM and .NET domains and about 24-48 hours for all other domain extensions before nameservers on other networks are able to access the information after the central registry gets it.
This period is referred to as the propagation period.
Once these changes have propagated, your site and email will be live on our servers.
AKJZNAzsqknsxxkjnsjxGetting Started Guide Page 25
Transferring Your Hosting to Us// Getting Started Guide
Updating Your Mail ServersYour domain name's MX or Mail Records control delivery of email sent to your domain name. Once your domain name has successfully transferred to us, you can your MX Records in the Email Control Center.
To Update Your MX Records
1. Log in to your Account Manager.
2. In the My Products section, click Email.
1. On the Manage Email page, click Manage Account next to the account you want to change.
2. Go to the Domains tab.
3. Select the domain account you want to verify MX records for, and then click Server Addresses.
4. Make a note of the Host Names and MX Records Correct Settings, and then click OK.
5. In the My Account menu, click Domain Manager.
6. Click the domain name for your email account.
7. Click Total DNS Control.
AKJZNAzsqknsxxkjnsjxGetting Started Guide Page 26
Transferring Your Hosting to Us// Getting Started Guide

8. Click the edit icon next to the following CNAMES, and replace the settings with the ones you previously noted:
IMAP POP SMTP
9. Click the edit icon next to the email CNAME, and replace with one of the following:
email.secureserver.net email.europe.secureserver.net email.asia.secureserver.net
NOTE: The email server global location is the same as your smtp global server location.
Please allow up to 48 hours for the new settings to propagate throughout the Internet.
For information about setting up your email account to work with a specific email client, see one of the following help articles:
Outlook 2007 Entourage Apple Mail Windows Vista Android
Outlook 2010 Thunderbird iPhone Windows Live
AKJZNAzsqknsxxkjnsjxGetting Started Guide Page 27
Transferring Your Hosting to Us// Getting Started Guide