Embed Size (px)
Citation preview
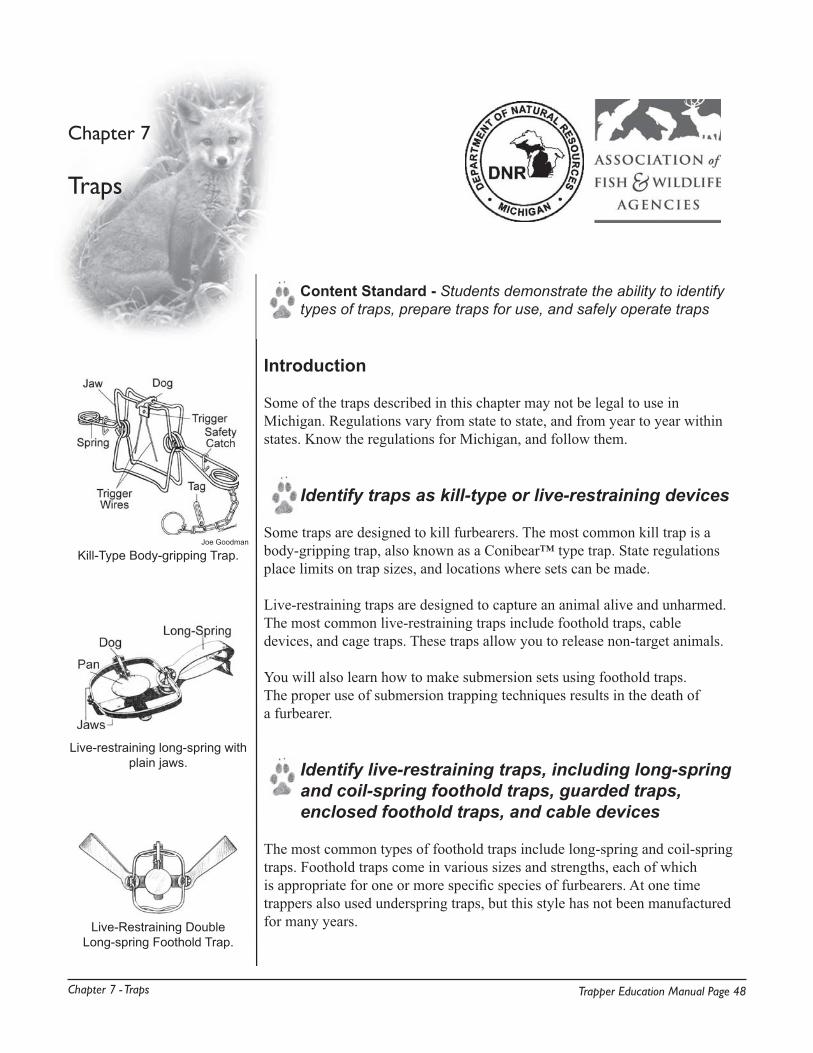
Chapter 7 - Traps Trapper Education Manual Page 48
Content Standard - Students demonstrate the ability to identify types of traps, prepare traps for use, and safely operate traps
Introduction
Some of the traps described in this chapter may not be legal to use in Michigan. Regulations vary from state to state, and from year to year within states. Know the regulations for Michigan, and follow them.
Identify traps as kill-type or live-restraining devices
Some traps are designed to kill furbearers. The most common kill trap is a body-gripping trap, also known as a Conibear™ type trap. State regulations place limits on trap sizes, and locations where sets can be made.
Live-restraining traps are designed to capture an animal alive and unharmed. The most common live-restraining traps include foothold traps, cabledevices, and cage traps. These traps allow you to release non-target animals.
You will also learn how to make submersion sets using foothold traps. The proper use of submersion trapping techniques results in the death of a furbearer.
Identify live-restraining traps, including long-spring and coil-spring foothold traps, guarded traps, enclosed foothold traps, and cable devices
The most common types of foothold traps include long-spring and coil-spring traps. Foothold traps come in various sizes and strengths, each of which is appropriate for one or more specifi c species of furbearers. At one time trappers also used underspring traps, but this style has not been manufactured for many years.
Joe Goodman
Kill-Type Body-gripping Trap.
Live-restraining long-spring with plain jaws.
Live-Restraining DoubleLong-spring Foothold Trap.
Chapter 7
Traps
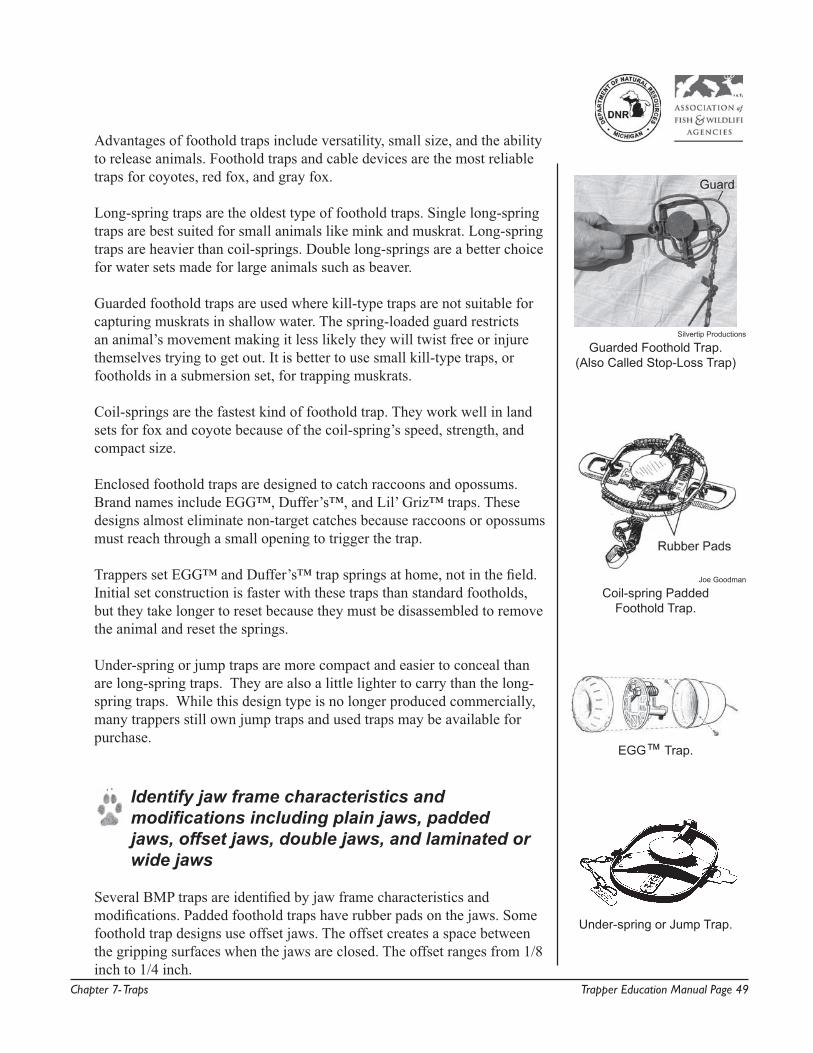
Chapter 7- Traps Trapper Education Manual Page 49
Advantages of foothold traps include versatility, small size, and the ability to release animals. Foothold traps and cable devices are the most reliable traps for coyotes, red fox, and gray fox.
Long-spring traps are the oldest type of foothold traps. Single long-spring traps are best suited for small animals like mink and muskrat. Long-spring traps are heavier than coil-springs. Double long-springs are a better choice for water sets made for large animals such as beaver.
Guarded foothold traps are used where kill-type traps are not suitable for capturing muskrats in shallow water. The spring-loaded guard restricts an animal’s movement making it less likely they will twist free or injure themselves trying to get out. It is better to use small kill-type traps, or footholds in a submersion set, for trapping muskrats.
Coil-springs are the fastest kind of foothold trap. They work well in land sets for fox and coyote because of the coil-spring’s speed, strength, and compact size.
Enclosed foothold traps are designed to catch raccoons and opossums. Brand names include EGG™, Duffer’s™, and Lil’ Griz™ traps. These designs almost eliminate non-target catches because raccoons or opossums must reach through a small opening to trigger the trap.
Trappers set EGG™ and Duffer’s™ trap springs at home, not in the field.Initial set construction is faster with these traps than standard footholds, but they take longer to reset because they must be disassembled to remove the animal and reset the springs.
Under-spring or jump traps are more compact and easier to conceal than are long-spring traps. They are also a little lighter to carry than the long-spring traps. While this design type is no longer produced commercially, many trappers still own jump traps and used traps may be available for purchase.
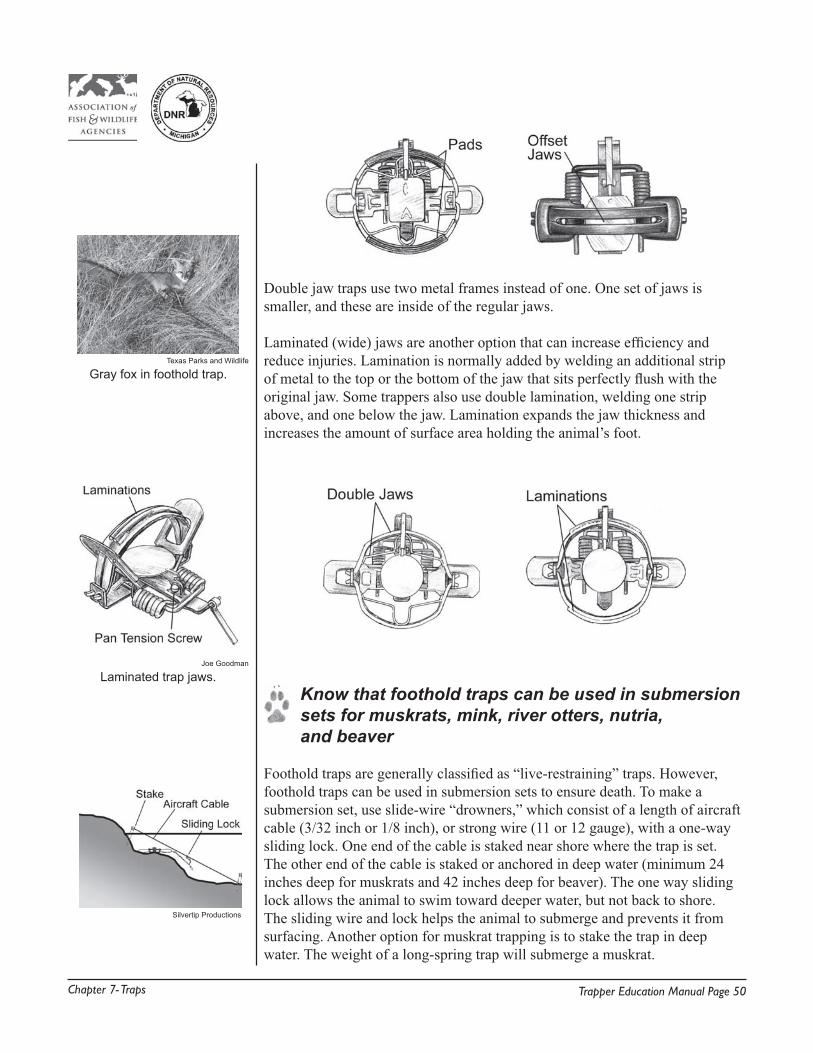
Identify jaw frame characteristics and modifications including plain jaws, padded jaws, offset jaws, double jaws, and laminated or wide jaws
Several BMP traps are identified by jaw frame characteristics and modifications. Padded foothold traps have rubber pads on the jaws. Some foothold trap designs use offset jaws. The offset creates a space between the gripping surfaces when the jaws are closed. The offset ranges from 1/8 inch to 1/4 inch.
Silvertip Productions
Guarded Foothold Trap. (Also Called Stop-Loss Trap)
Joe Goodman
Coil-spring Padded Foothold Trap.
EGG™ Trap.
Under-spring or Jump Trap.
Chapter 7- Traps Trapper Education Manual Page 50
Double jaw traps use two metal frames instead of one. One set of jaws is smaller, and these are inside of the regular jaws.
Laminated (wide) jaws are another option that can increase efficiency and reduce injuries. Lamination is normally added by welding an additional strip of metal to the top or the bottom of the jaw that sits perfectly flush with the original jaw. Some trappers also use double lamination, welding one strip above, and one below the jaw. Lamination expands the jaw thickness and increases the amount of surface area holding the animal’s foot.
Know that foothold traps can be used in submersion sets for muskrats, mink, river otters, nutria, and beaver
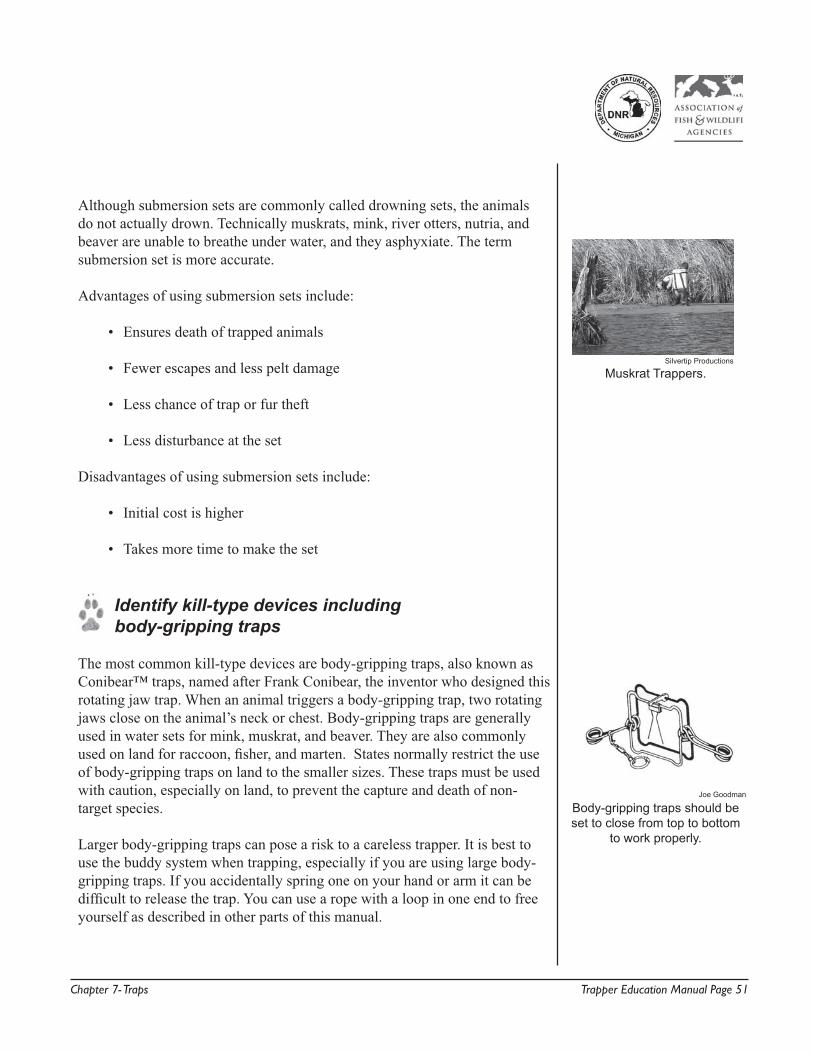
Foothold traps are generally classified as “live-restraining” traps. However, foothold traps can be used in submersion sets to ensure death. To make a submersion set, use slide-wire “drowners,” which consist of a length of aircraft cable (3/32 inch or 1/8 inch), or strong wire (11 or 12 gauge), with a one-way sliding lock. One end of the cable is staked near shore where the trap is set. The other end of the cable is staked or anchored in deep water (minimum 24 inches deep for muskrats and 42 inches deep for beaver). The one way sliding lock allows the animal to swim toward deeper water, but not back to shore. The sliding wire and lock helps the animal to submerge and prevents it from surfacing. Another option for muskrat trapping is to stake the trap in deep water. The weight of a long-spring trap will submerge a muskrat.
Texas Parks and Wildlife
Gray fox in foothold trap.
Joe Goodman
Laminated trap jaws.
Silvertip Productions
Chapter 7- Traps Trapper Education Manual Page 51
Although submersion sets are commonly called drowning sets, the animals do not actually drown. Technically muskrats, mink, river otters, nutria, and beaver are unable to breathe under water, and they asphyxiate. The term submersion set is more accurate.
Advantages of using submersion sets include:
• Ensures death of trapped animals
• Fewer escapes and less pelt damage
• Less chance of trap or fur theft
• Less disturbance at the set
Disadvantages of using submersion sets include:
• Initial cost is higher
• Takes more time to make the set
Identify kill-type devices including body-gripping traps
The most common kill-type devices are body-gripping traps, also known as Conibear™ traps, named after Frank Conibear, the inventor who designed this rotating jaw trap. When an animal triggers a body-gripping trap, two rotating jaws close on the animal’s neck or chest. Body-gripping traps are generally used in water sets for mink, muskrat, and beaver. They are also commonly used on land for raccoon, fisher, and marten. States normally restrict the use of body-gripping traps on land to the smaller sizes. These traps must be used with caution, especially on land, to prevent the capture and death of non-target species.
Larger body-gripping traps can pose a risk to a careless trapper. It is best to use the buddy system when trapping, especially if you are using large body-gripping traps. If you accidentally spring one on your hand or arm it can be difficult to release the trap. You can use a rope with a loop in one end to free yourself as described in other parts of this manual.
Muskrat Trappers.
Joe Goodman
Body-gripping traps should be set to close from top to bottom
to work properly.
Silvertip Productions
Chapter 7- Traps Trapper Education Manual Page 52
Identify live-restraining cage traps and kill-type colony traps for use in submersion sets
Cage traps may be difficult to use because of their size. Raccoons, skunks, opossums, fisher, and weasels can be caught in cage traps. Fox and coyotes may avoid cage traps. If you need to trap near buildings or in areas used by pets, cage traps are a good choice.
Submarine or colony traps are a type of cage trap designed to be used in submersion sets for muskrats and mink. It is called a colony trap because you can catch an entire family, or colony, of muskrats at one time. Check regulations before using a colony trap in your state.
Identify non-powered cable devices, powered cabledevices, relaxing locks, and non-relaxing locks
Non-powered cable devices consist of a cable, a lock, and a swivel. These devices catch animals by the neck or body. A cable device should be equipped with a swivel, and set in an area where a restrained furbearer will not entangle it on brush, fences or saplings. Larger furbearers such as beaver, fox, and coyote can be caught with cable devices. Use cable devices cautiously because they could hold livestock, deer, or other animals. Trappers can use a “stop” on the cable that restricts the loop from closing below a certain diameter, allowing non-target animals to get out. The use of a “break-away” lock system allows larger animals, such as deer, to break the device loose and go free.
Relaxing locks move in both directions on a cable. Non-relaxing locks only slide in one direction. If an animal pulls against the cable it gets tighter and will not release.
Powered cable devices are used to catch animals by the foot. The cable loop is mounted on a device that looks similar to a foothold trap. When the animal steps on the pan, it trips v-shaped coil-springs similar to those found on body-gripping traps. The cable loop has a stop to prevent it from closing below a certain size, so that small animals will escape. Although relatively new, this trap has been tested and approved for use in trapping Eastern coyotes as part of the BMP trap testing project. This type of trap is not legal to use in Michigan.
Another type of powered cable device uses heavy duty springs to kill an animal by making the cable close tight around the neck or body. This device is not legal to use in Michigan.
Live-restraining cage trap.
Kill-type submarine or colony trap.
Massachusetts Div Fisheries and Wildlife
Biologist with Hancock Trap - a large live-trap for beaver.
Joe Goodman
Cable Device.
Chapter 7- Traps Trapper Education Manual Page 53
Identify trap anchoring systems including single stakes, cross stakes, earth anchors, drags, grapples, and springs
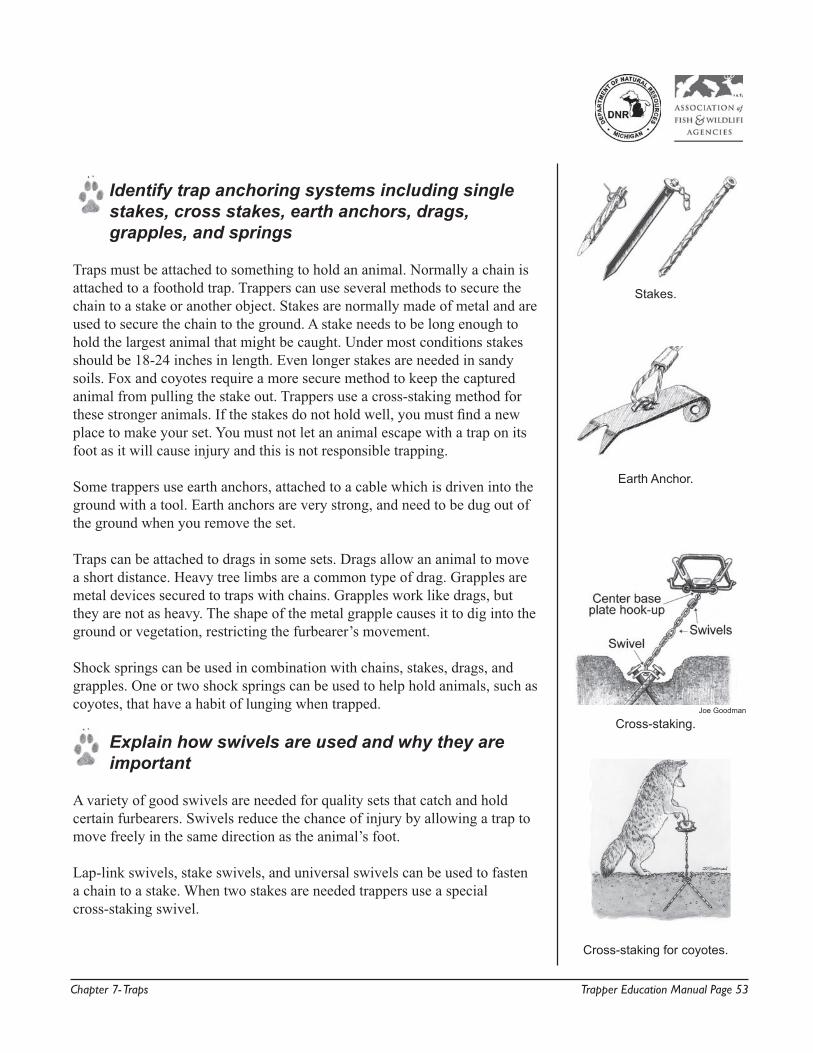
Traps must be attached to something to hold an animal. Normally a chain is attached to a foothold trap. Trappers can use several methods to secure the chain to a stake or another object. Stakes are normally made of metal and are used to secure the chain to the ground. A stake needs to be long enough to hold the largest animal that might be caught. Under most conditions stakes should be 18-24 inches in length. Even longer stakes are needed in sandy soils. Fox and coyotes require a more secure method to keep the captured animal from pulling the stake out. Trappers use a cross-staking method for these stronger animals. If the stakes do not hold well, you must find a new place to make your set. You must not let an animal escape with a trap on its foot as it will cause injury and this is not responsible trapping.
Some trappers use earth anchors, attached to a cable which is driven into the ground with a tool. Earth anchors are very strong, and need to be dug out of the ground when you remove the set.
Traps can be attached to drags in some sets. Drags allow an animal to move a short distance. Heavy tree limbs are a common type of drag. Grapples are metal devices secured to traps with chains. Grapples work like drags, but they are not as heavy. The shape of the metal grapple causes it to dig into the ground or vegetation, restricting the furbearer’s movement.
Shock springs can be used in combination with chains, stakes, drags, and grapples. One or two shock springs can be used to help hold animals, such as coyotes, that have a habit of lunging when trapped.
Explain how swivels are used and why they areimportant
A variety of good swivels are needed for quality sets that catch and hold certain furbearers. Swivels reduce the chance of injury by allowing a trap to move freely in the same direction as the animal’s foot.
Lap-link swivels, stake swivels, and universal swivels can be used to fasten a chain to a stake. When two stakes are needed trappers use a special cross-staking swivel.
Stakes.
Earth Anchor.
Joe Goodman
Cross-staking.
Cross-staking for coyotes.
Chapter 7- Traps Trapper Education Manual Page 54
Universal swivels can be used in the middle of chains. Four-way swivel is another name for a universal swivel. A universal swivel is also used to attach the chain to a trap at the center of the base-plate.
S-hooks are used on some swivels. A special S-hook tool can be used to close the hook without damaging it. Coyote trappers use heavy duty S-hooks to keep it from pulling open.
Swivels of various types, including universal swivels, are also used in combination with sliding locks in submersion sets.
Always use the highest quality swivels in your trap systems to prevent an animal from escaping or being injured. The proper use of swivels is an important part of responsible trapping.
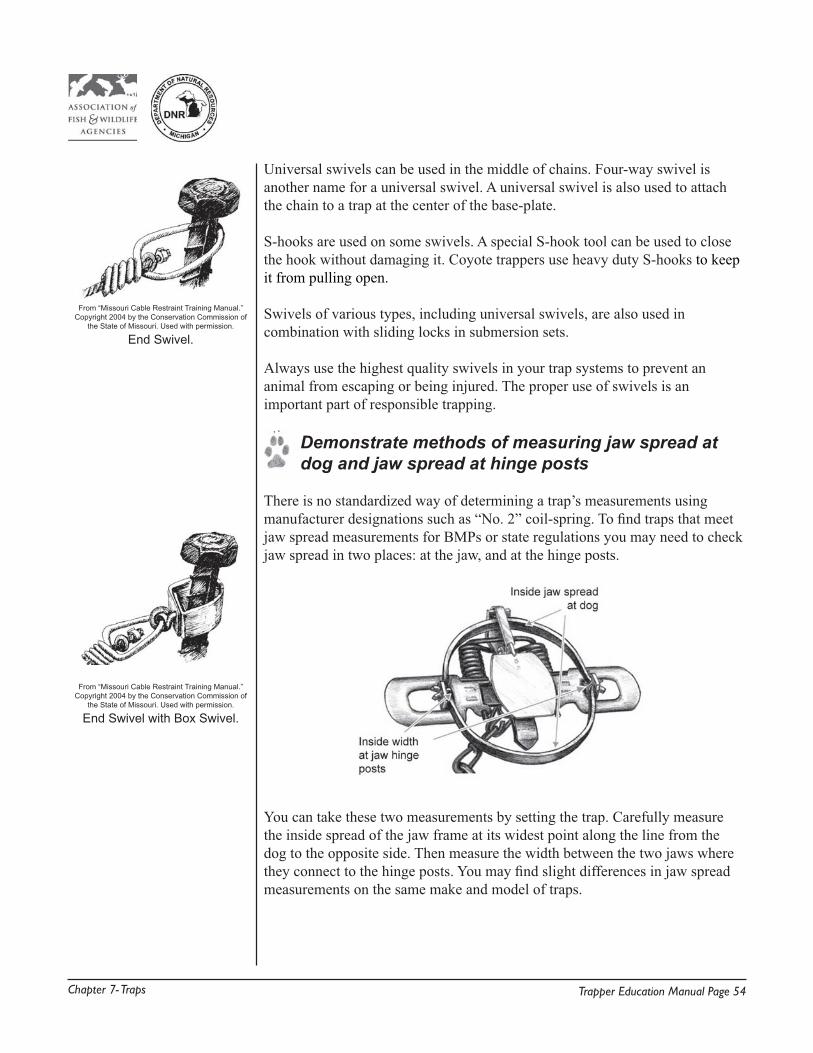
Demonstrate methods of measuring jaw spread at dog and jaw spread at hinge posts
There is no standardized way of determining a trap’s measurements using manufacturer designations such as “No. 2” coil-spring. To find traps that meet jaw spread measurements for BMPs or state regulations you may need to check jaw spread in two places: at the jaw, and at the hinge posts.
You can take these two measurements by setting the trap. Carefully measure the inside spread of the jaw frame at its widest point along the line from the dog to the opposite side. Then measure the width between the two jaws where they connect to the hinge posts. You may find slight differences in jaw spread measurements on the same make and model of traps.
From “Missouri Cable Restraint Training Manual.” Copyright 2004 by the Conservation Commission of
the State of Missouri. Used with permission.
End Swivel.
From “Missouri Cable Restraint Training Manual.” Copyright 2004 by the Conservation Commission of
the State of Missouri. Used with permission.
End Swivel with Box Swivel.
Chapter 7- Traps Trapper Education Manual Page 55
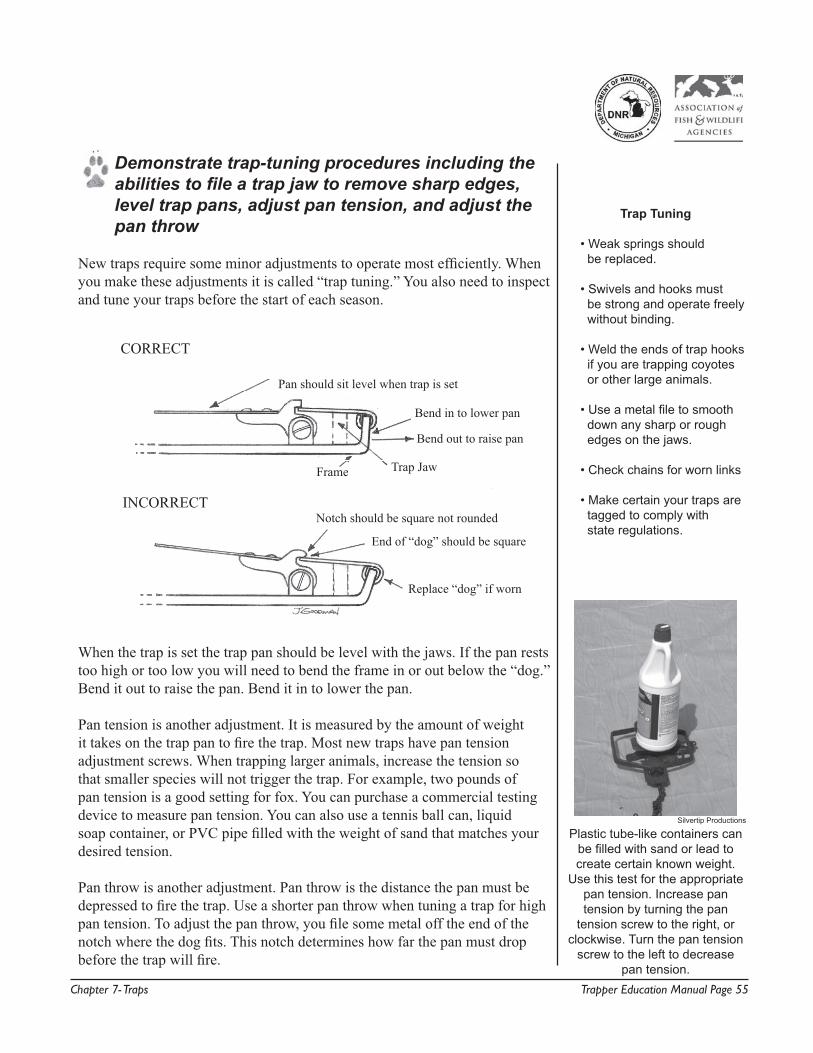
Demonstrate trap-tuning procedures including theabilities to file a trap jaw to remove sharp edges, level trap pans, adjust pan tension, and adjust the pan throw
New traps require some minor adjustments to operate most efficiently. When you make these adjustments it is called “trap tuning.” You also need to inspect and tune your traps before the start of each season.
When the trap is set the trap pan should be level with the jaws. If the pan rests too high or too low you will need to bend the frame in or out below the “dog.” Bend it out to raise the pan. Bend it in to lower the pan.
Pan tension is another adjustment. It is measured by the amount of weight it takes on the trap pan to fire the trap. Most new traps have pan tension adjustment screws. When trapping larger animals, increase the tension so that smaller species will not trigger the trap. For example, two pounds of pan tension is a good setting for fox. You can purchase a commercial testing device to measure pan tension. You can also use a tennis ball can, liquid soap container, or PVC pipe filled with the weight of sand that matches your desired tension. Pan throw is another adjustment. Pan throw is the distance the pan must be depressed to fire the trap. Use a shorter pan throw when tuning a trap for high pan tension. To adjust the pan throw, you file some metal off the end of the notch where the dog fits. This notch determines how far the pan must drop before the trap will fire.
Trap Tuning
• Weak springs should be replaced.
• Swivels and hooks must be strong and operate freely without binding.
• Weld the ends of trap hooks if you are trapping coyotes or other large animals.
• Use a metal file to smooth down any sharp or rough edges on the jaws.
• Check chains for worn links
• Make certain your traps are tagged to comply with state regulations.
Silvertip Productions
Plastic tube-like containers can be filled with sand or lead to create certain known weight.
Use this test for the appropriate pan tension. Increase pan tension by turning the pan
tension screw to the right, or clockwise. Turn the pan tension
screw to the left to decrease pan tension.
CORRECT
INCORRECT
Bend in to lower pan
Bend out to raise pan
Trap JawFrame
Notch should be square not rounded
End of “dog” should be square
Replace “dog” if worn
Pan should sit level when trap is set
Chapter 7- Traps Trapper Education Manual Page 56
Use a file to make certain the end of the dog and the notch in the trap pan are squared off. If the dog or the notch is rounded, your trap may release too easily.
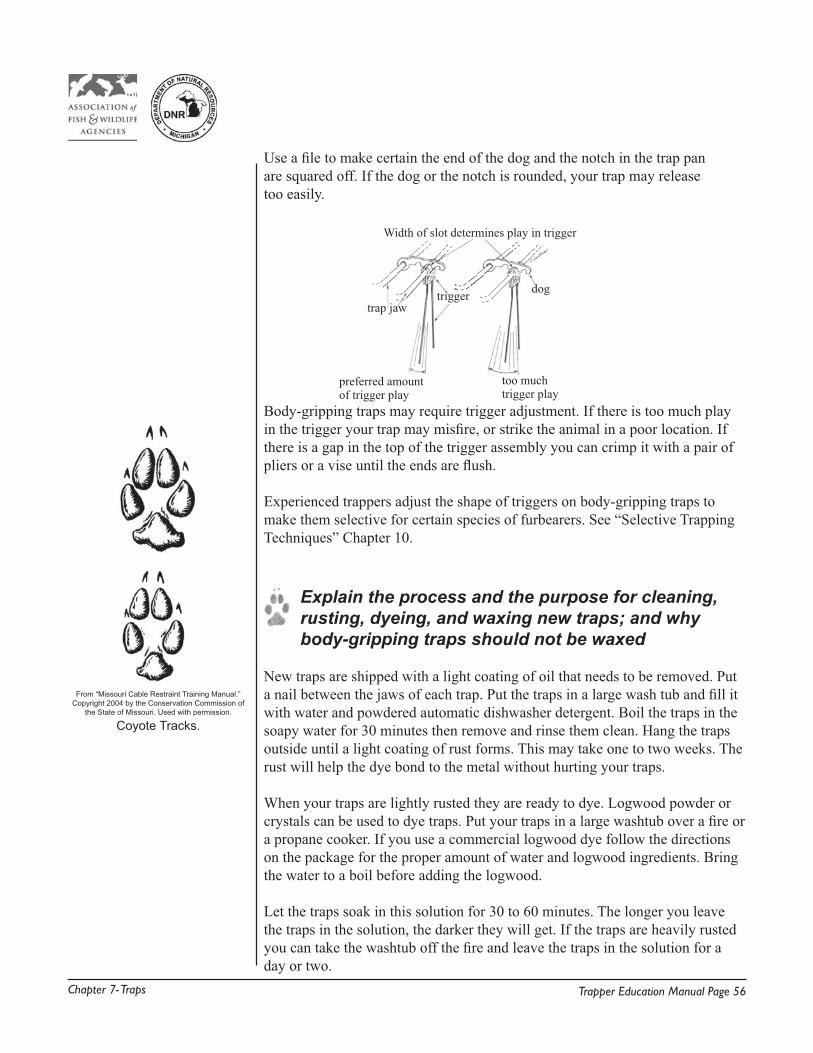
Body-gripping traps may require trigger adjustment. If there is too much play in the trigger your trap may misfire, or strike the animal in a poor location. If there is a gap in the top of the trigger assembly you can crimp it with a pair of pliers or a vise until the ends are flush.
Experienced trappers adjust the shape of triggers on body-gripping traps to make them selective for certain species of furbearers. See “Selective Trapping Techniques” Chapter 10.
Explain the process and the purpose for cleaning,rusting, dyeing, and waxing new traps; and why body-gripping traps should not be waxed
New traps are shipped with a light coating of oil that needs to be removed. Put a nail between the jaws of each trap. Put the traps in a large wash tub and fill it with water and powdered automatic dishwasher detergent. Boil the traps in the soapy water for 30 minutes then remove and rinse them clean. Hang the traps outside until a light coating of rust forms. This may take one to two weeks. The rust will help the dye bond to the metal without hurting your traps.
When your traps are lightly rusted they are ready to dye. Logwood powder or crystals can be used to dye traps. Put your traps in a large washtub over a fire or a propane cooker. If you use a commercial logwood dye follow the directions on the package for the proper amount of water and logwood ingredients. Bring the water to a boil before adding the logwood.
Let the traps soak in this solution for 30 to 60 minutes. The longer you leave the traps in the solution, the darker they will get. If the traps are heavily rusted you can take the washtub off the fire and leave the traps in the solution for a day or two.
From “Missouri Cable Restraint Training Manual.” Copyright 2004 by the Conservation Commission of
the State of Missouri. Used with permission.
Coyote Tracks.
Width of slot determines play in trigger
trigger dogtrap jaw
preferred amountof trigger play
too muchtrigger play
Chapter 7- Traps Trapper Education Manual Page 57
High temperatures can weaken your trap springs so it is best to lower the water temperature to a simmer after you add the traps. A propane cooker allows you to adjust the heat easier than an open fire.
Walnut hulls and maple bark contain tannic acid, just as logwood does. As an option to buying logwood, you can boil walnut hulls or maple bark for an hour before adding your traps.
Some trappers prefer to use petroleum-based dips to color and protect their traps. Note: If you are using padded jaw traps, do not dip the pads. No fire is needed with dips. These products are fast and simple. Add unleaded gas or lantern fuel to the dip according to the directions. You simply dip your pre-rusted traps in this solution, and then hang them outside to dry. You will get a harder and more even coating if you use petroleum-based dips when the air temperature is above 70 degrees F. Always read and follow manufacturer’s directions.
Waxing is another way to protect traps and make them operate faster. To wax traps, submerge them in boiling water. Place trap wax in the water and let it melt. The wax will float. Using a hooked stick, slowly and carefully lift the traps out of the water one at a time. The traps should come out with a thin, even coat of wax. Shake the traps to remove excess wax. If the wax is too thick or too heavy, put the traps back in the water and allow them to heat a bit longer before removing them.
Some trappers prefer to dip their traps in pure wax with no water. Exercise caution because trap wax is flammable. Wax can catch fire, or cause severe burns if it splashes on you.
A less traditional but safer and easier way to wax traps is to dip them in acrylic floor wax at room temperature. This covers your traps with a thin, even coat that tends to last longer than other waxes.
No matter how you wax traps, make certain you keep the wax and the container free of odors. Furbearers have a keen sense of smell. If your traps have odors on them furbearers may shy away from your sets. If the odor is an attractive one, the furbearer may dig it up and ruin your set.
Body-gripping traps require no waxing. It makes them slippery and dangerous. Petroleum based dips or dyeing is acceptable for body-gripping traps.
If you have waxed or dipped a foothold trap, you must clean the end of the dog and the pan notch. If you do not remove the dip or wax, the trap may not stay set. Use a file to clean wax or dip off of these parts.
Joe Goodman
Body-grip trap setting tongs.
Safety gripper.
Using safety gripper.
Joe Goodman
Using setting tongs.
Chapter 7- Traps Trapper Education Manual Page 58
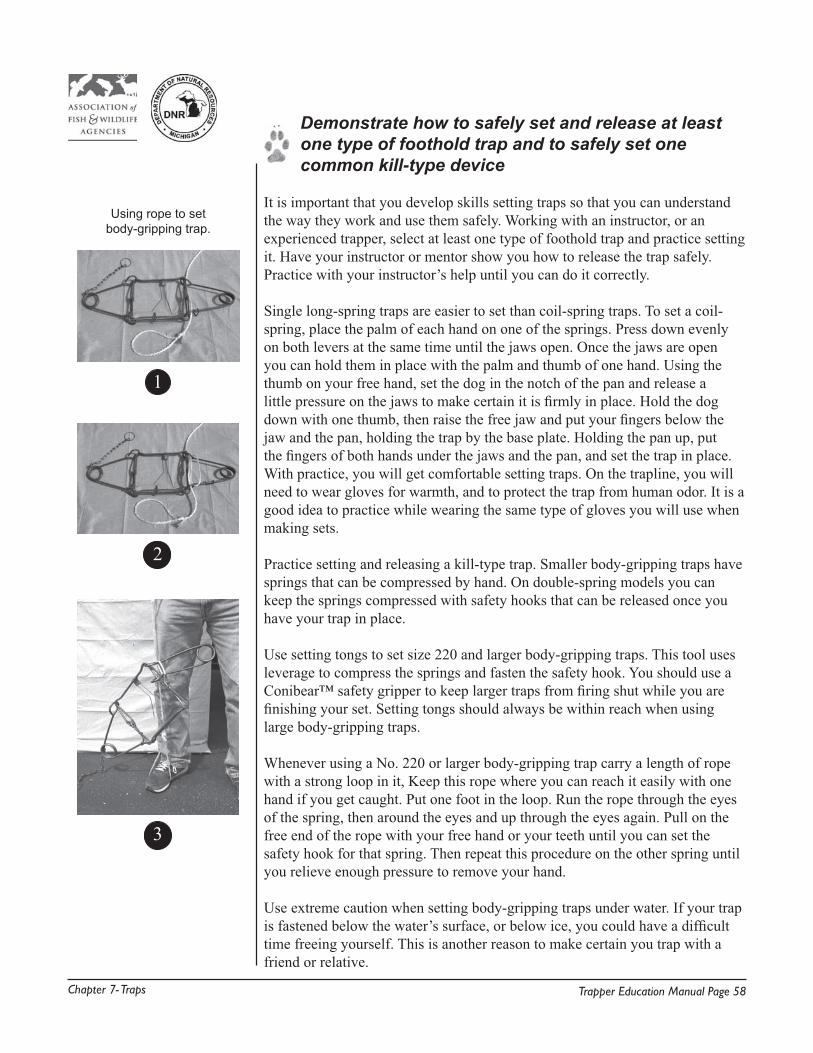
Using rope to set body-gripping trap.
Demonstrate how to safely set and release at least one type of foothold trap and to safely set one common kill-type device
It is important that you develop skills setting traps so that you can understand the way they work and use them safely. Working with an instructor, or an experienced trapper, select at least one type of foothold trap and practice setting it. Have your instructor or mentor show you how to release the trap safely. Practice with your instructor’s help until you can do it correctly.
Single long-spring traps are easier to set than coil-spring traps. To set a coil-spring, place the palm of each hand on one of the springs. Press down evenly on both levers at the same time until the jaws open. Once the jaws are open you can hold them in place with the palm and thumb of one hand. Using the thumb on your free hand, set the dog in the notch of the pan and release a little pressure on the jaws to make certain it is firmly in place. Hold the dog down with one thumb, then raise the free jaw and put your fingers below the jaw and the pan, holding the trap by the base plate. Holding the pan up, put the fingers of both hands under the jaws and the pan, and set the trap in place. With practice, you will get comfortable setting traps. On the trapline, you will need to wear gloves for warmth, and to protect the trap from human odor. It is a good idea to practice while wearing the same type of gloves you will use when making sets.
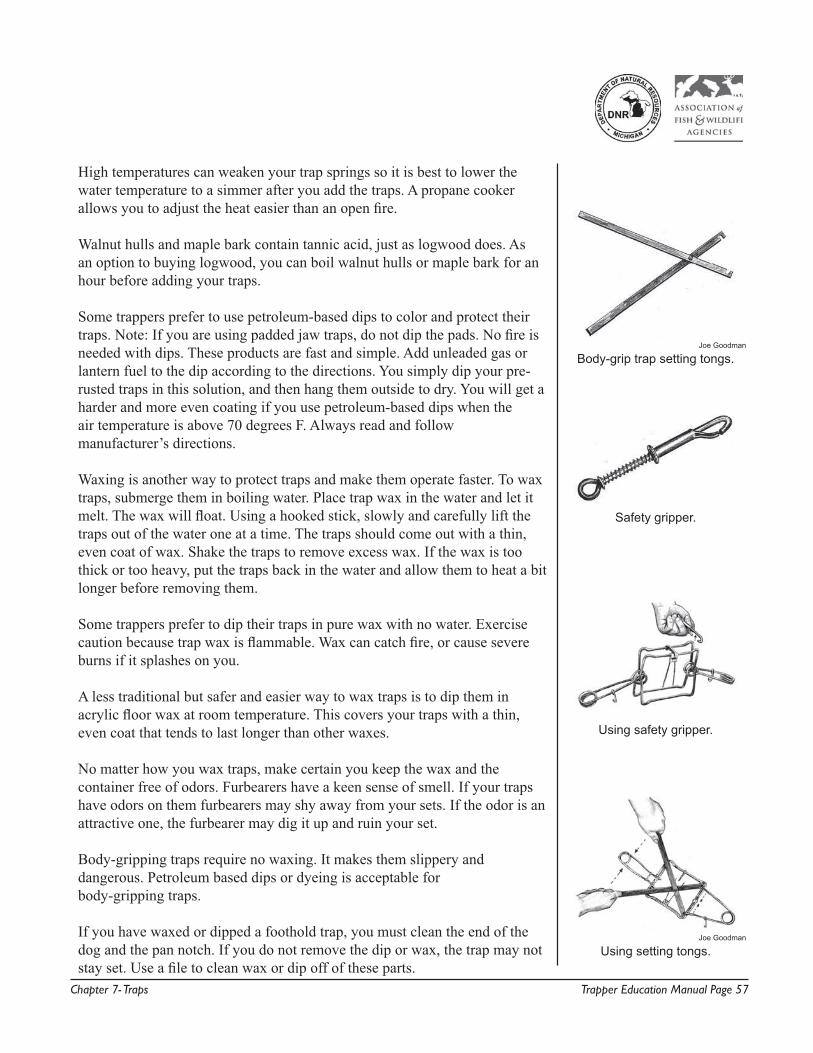
Practice setting and releasing a kill-type trap. Smaller body-gripping traps have springs that can be compressed by hand. On double-spring models you can keep the springs compressed with safety hooks that can be released once you have your trap in place.
Use setting tongs to set size 220 and larger body-gripping traps. This tool uses leverage to compress the springs and fasten the safety hook. You should use a Conibear™ safety gripper to keep larger traps from firing shut while you are finishing your set. Setting tongs should always be within reach when using large body-gripping traps.
Whenever using a No. 220 or larger body-gripping trap carry a length of rope with a strong loop in it, Keep this rope where you can reach it easily with one hand if you get caught. Put one foot in the loop. Run the rope through the eyes of the spring, then around the eyes and up through the eyes again. Pull on the free end of the rope with your free hand or your teeth until you can set the safety hook for that spring. Then repeat this procedure on the other spring until you relieve enough pressure to remove your hand.
Use extreme caution when setting body-gripping traps under water. If your trap is fastened below the water’s surface, or below ice, you could have a difficult time freeing yourself. This is another reason to make certain you trap with a friend or relative.
2
3
1
Chapter 7 - Traps Review Trapper Education Manual Page 59
Chapter 7 Review – Traps
Content Standard - Students demonstrate the ability to identify types of traps, prepare traps for use, and safely operate traps.
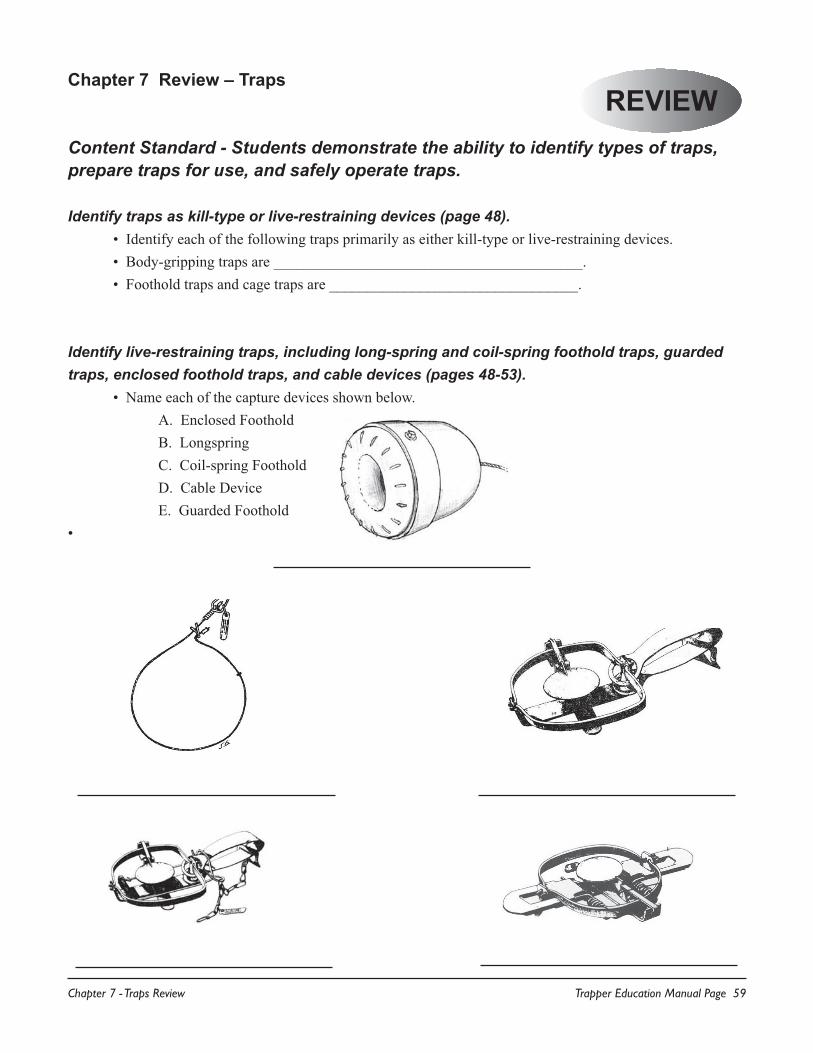
Identify traps as kill-type or live-restraining devices (page 48). • Identify each of the following traps primarily as either kill-type or live-restraining devices. • Body-gripping traps are _________________________________________. • Foothold traps and cage traps are _________________________________.
Identify live-restraining traps, including long-spring and coil-spring foothold traps, guarded traps, enclosed foothold traps, and cable devices (pages 48-53). • Name each of the capture devices shown below. A. Enclosed Foothold B. Longspring C. Coil-spring Foothold D. Cable Device E. Guarded Foothold•
REVIEW
Chapter 7 - Traps Review Trapper Education Manual Page 60
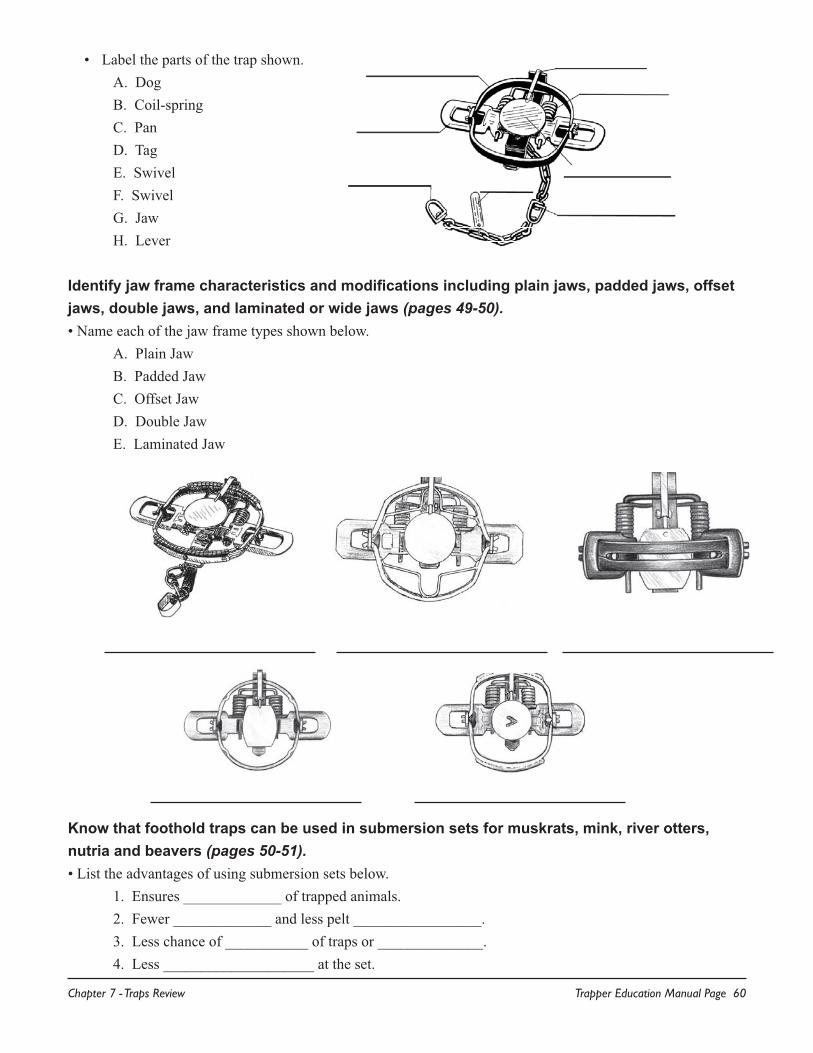
Label the parts of the trap shown.• A. Dog B. Coil-spring C. Pan D. Tag E. Swivel F. Swivel G. Jaw H. Lever
Identify jaw frame characteristics and modifications including plain jaws, padded jaws, offset jaws, double jaws, and laminated or wide jaws (pages 49-50).• Name each of the jaw frame types shown below. A. Plain Jaw B. Padded Jaw C. Offset Jaw D. Double Jaw E. Laminated Jaw
Know that foothold traps can be used in submersion sets for muskrats, mink, river otters, nutria and beavers (pages 50-51).• List the advantages of using submersion sets below. 1. Ensures _____________ of trapped animals. 2. Fewer _____________ and less pelt _________________. 3. Less chance of ___________ of traps or ______________. 4. Less ____________________ at the set.
Chapter 7 - Traps Review Trapper Education Manual Page 61
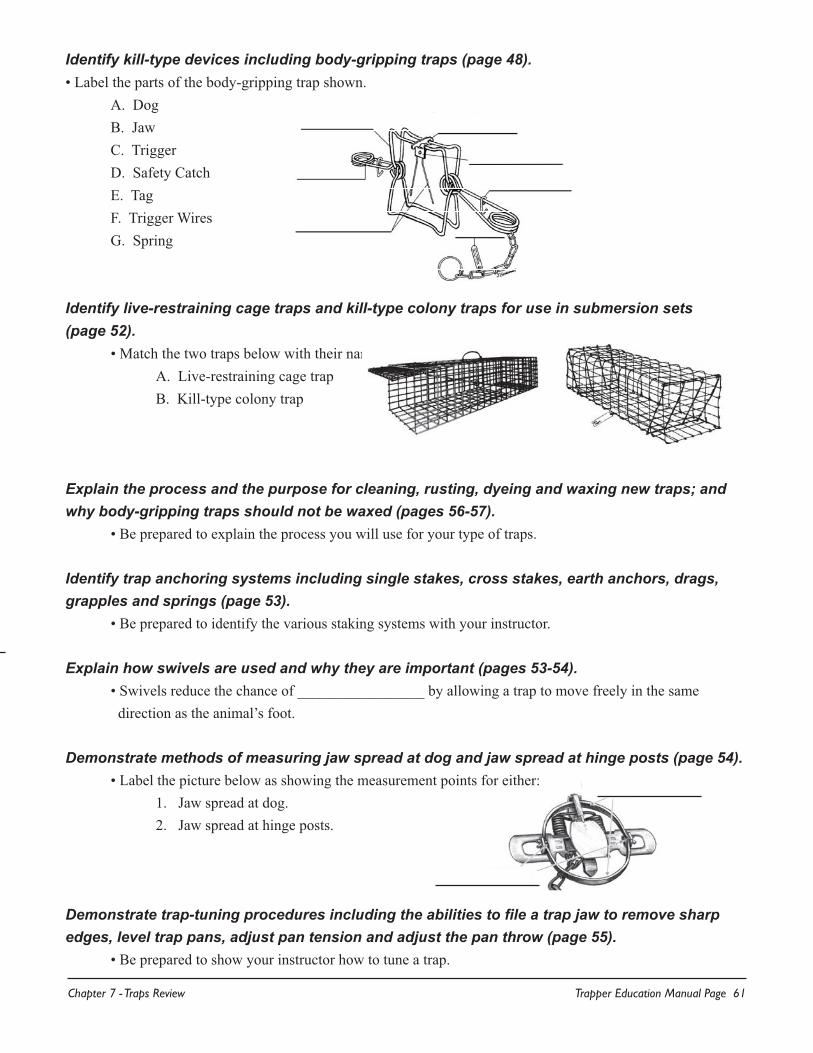
Identify kill-type devices including body-gripping traps (page 48).• Label the parts of the body-gripping trap shown. A. Dog B. Jaw C. Trigger D. Safety Catch E. Tag F. Trigger Wires G. Spring
Identify live-restraining cage traps and kill-type colony traps for use in submersion sets (page 52). • Match the two traps below with their name. A. Live-restraining cage trap B. Kill-type colony trap
Explain the process and the purpose for cleaning, rusting, dyeing and waxing new traps; and why body-gripping traps should not be waxed (pages 56-57). • Be prepared to explain the process you will use for your type of traps.
Identify trap anchoring systems including single stakes, cross stakes, earth anchors, drags, grapples and springs (page 53). • Be prepared to identify the various staking systems with your instructor.
Explain how swivels are used and why they are important (pages 53-54). • Swivels reduce the chance of _________________ by allowing a trap to move freely in the same direction as the animal’s foot.
Demonstrate methods of measuring jaw spread at dog and jaw spread at hinge posts (page 54). • Label the picture below as showing the measurement points for either: 1. Jaw spread at dog. 2. Jaw spread at hinge posts.
Demonstrate trap-tuning procedures including the abilities to file a trap jaw to remove sharp edges, level trap pans, adjust pan tension and adjust the pan throw (page 55). • Be prepared to show your instructor how to tune a trap.