Embed Size (px)
Citation preview

Travel
Reimbursement
System
For Mileage Only
Version 2.1 – 8/11/2009
Travel Reimbursement System (TRS) User’s Guide
Getting Started (Indigo)
Page 2 of 24 Printed: 8/28/2009 10:42:34 AM
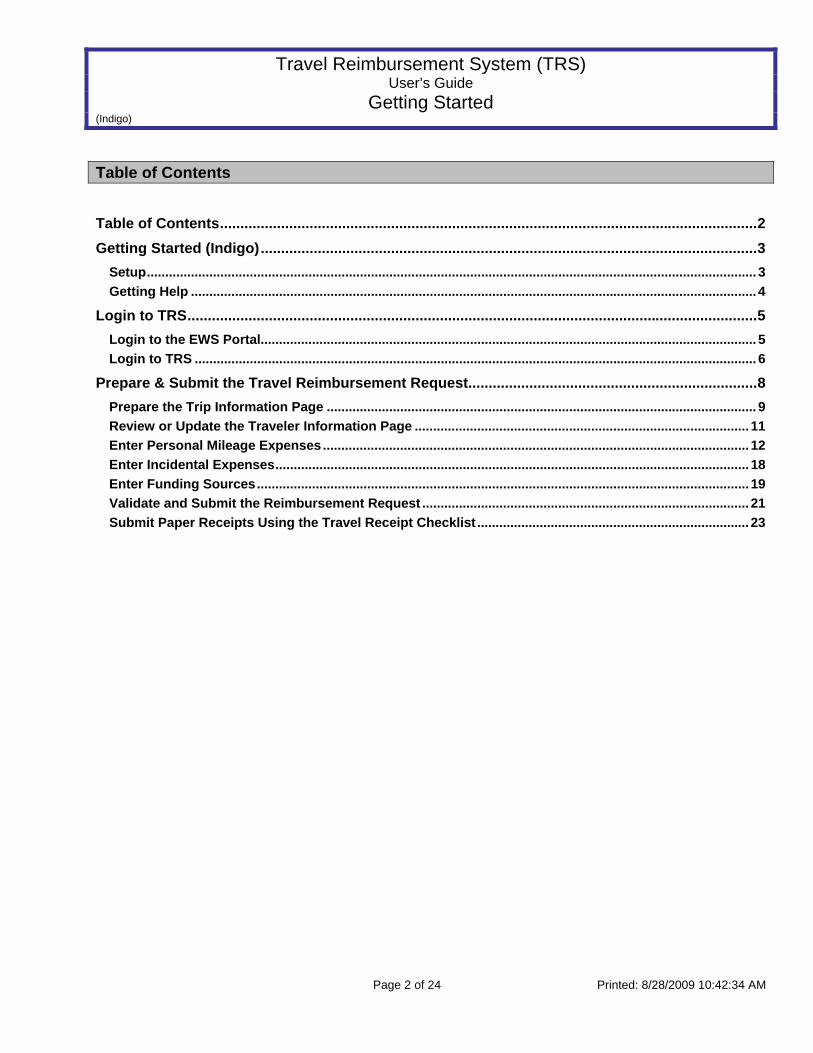
Table of Contents
Table of Contents....................................................................................................................................2 Getting Started (Indigo)..........................................................................................................................3
Setup...................................................................................................................................................................... 3 Getting Help .......................................................................................................................................................... 4
Login to TRS............................................................................................................................................5 Login to the EWS Portal....................................................................................................................................... 5 Login to TRS ......................................................................................................................................................... 6
Prepare & Submit the Travel Reimbursement Request.......................................................................8 Prepare the Trip Information Page ..................................................................................................................... 9 Review or Update the Traveler Information Page ........................................................................................... 11 Enter Personal Mileage Expenses.................................................................................................................... 12 Enter Incidental Expenses................................................................................................................................. 18 Enter Funding Sources...................................................................................................................................... 19 Validate and Submit the Reimbursement Request ......................................................................................... 21 Submit Paper Receipts Using the Travel Receipt Checklist .......................................................................... 23
Travel Reimbursement System (TRS) User’s Guide
Getting Started (Indigo)
Page 3 of 24 Printed: 8/28/2009 10:42:34 AM
Getting Started (Indigo)
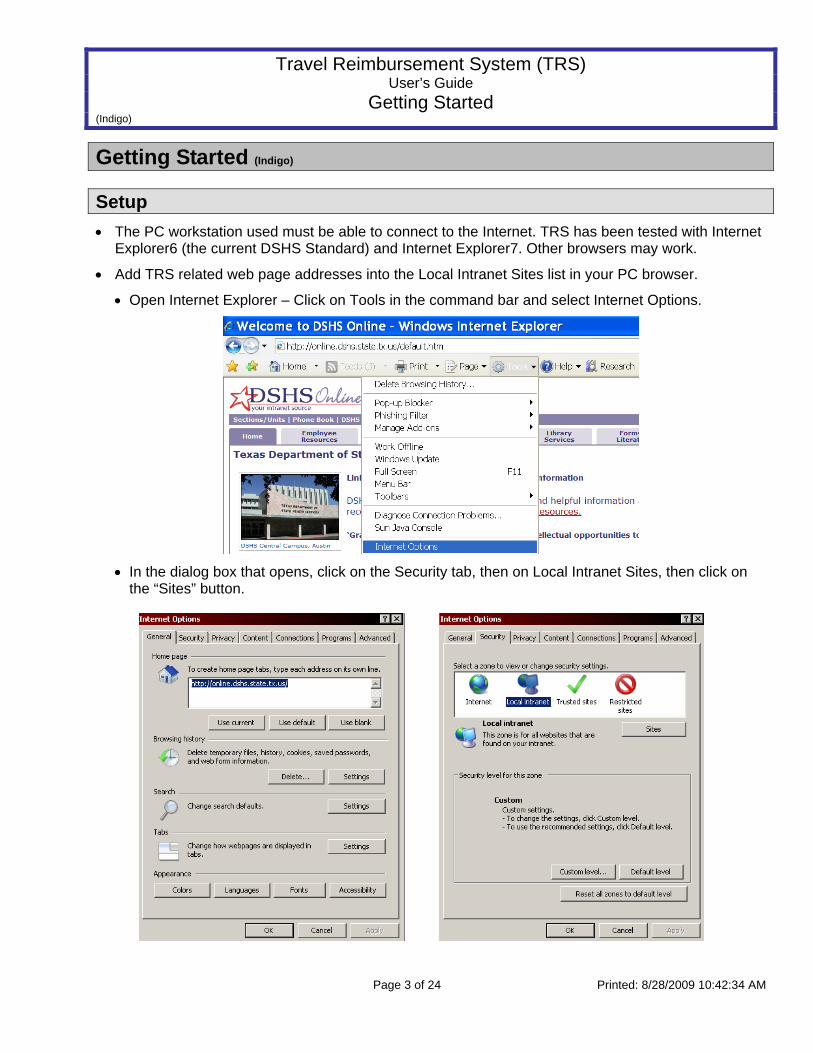
Setup • The PC workstation used must be able to connect to the Internet. TRS has been tested with Internet
Explorer6 (the current DSHS Standard) and Internet Explorer7. Other browsers may work.
• Add TRS related web page addresses into the Local Intranet Sites list in your PC browser.
• Open Internet Explorer – Click on Tools in the command bar and select Internet Options.
• In the dialog box that opens, click on the Security tab, then on Local Intranet Sites, then click on
the “Sites” button.
Travel Reimbursement System (TRS) User’s Guide
Getting Started (Indigo)
Page 4 of 24 Printed: 8/28/2009 10:42:34 AM
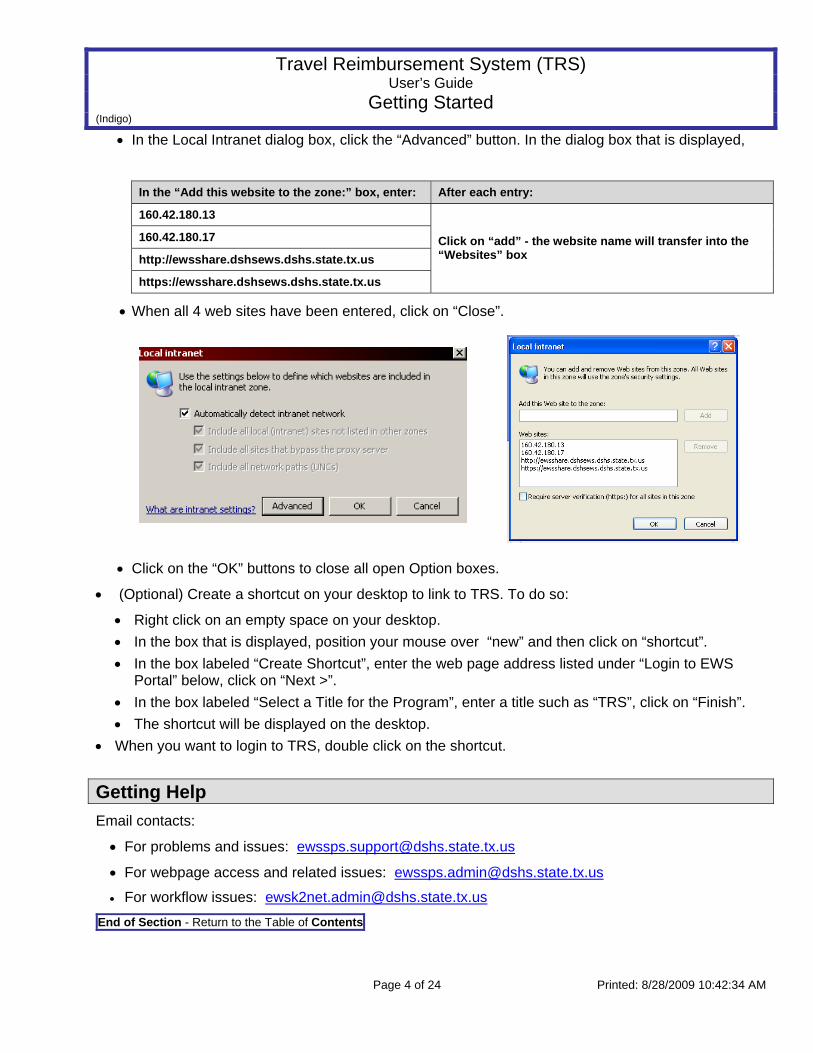
• In the Local Intranet dialog box, click the “Advanced” button. In the dialog box that is displayed,
In the “Add this website to the zone:” box, enter: After each entry:
160.42.180.13
160.42.180.17
http://ewsshare.dshsews.dshs.state.tx.us
https://ewsshare.dshsews.dshs.state.tx.us
Click on “add” - the website name will transfer into the “Websites” box
• When all 4 web sites have been entered, click on “Close”.
• Click on the “OK” buttons to close all open Option boxes.
• (Optional) Create a shortcut on your desktop to link to TRS. To do so:
• Right click on an empty space on your desktop. • In the box that is displayed, position your mouse over “new” and then click on “shortcut”. • In the box labeled “Create Shortcut”, enter the web page address listed under “Login to EWS
Portal” below, click on “Next >”. • In the box labeled “Select a Title for the Program”, enter a title such as “TRS”, click on “Finish”. • The shortcut will be displayed on the desktop.
• When you want to login to TRS, double click on the shortcut.
Getting Help Email contacts:
• For problems and issues: [email protected]
• For webpage access and related issues: [email protected]
• For workflow issues: [email protected]
End of Section - Return to the Table of Contents
Travel Reimbursement System (TRS) User’s Guide for Mileage Only Reimbursement Requests
Page 5 of 24 Printed: 8/28/2009 10:42:34 AM
Login to TRS Using TRS requires two logins. First you login to the Electronic Workflow System (EWS) Portal, and second, you login in to the TRS application. The user name and password for both logins is the same.
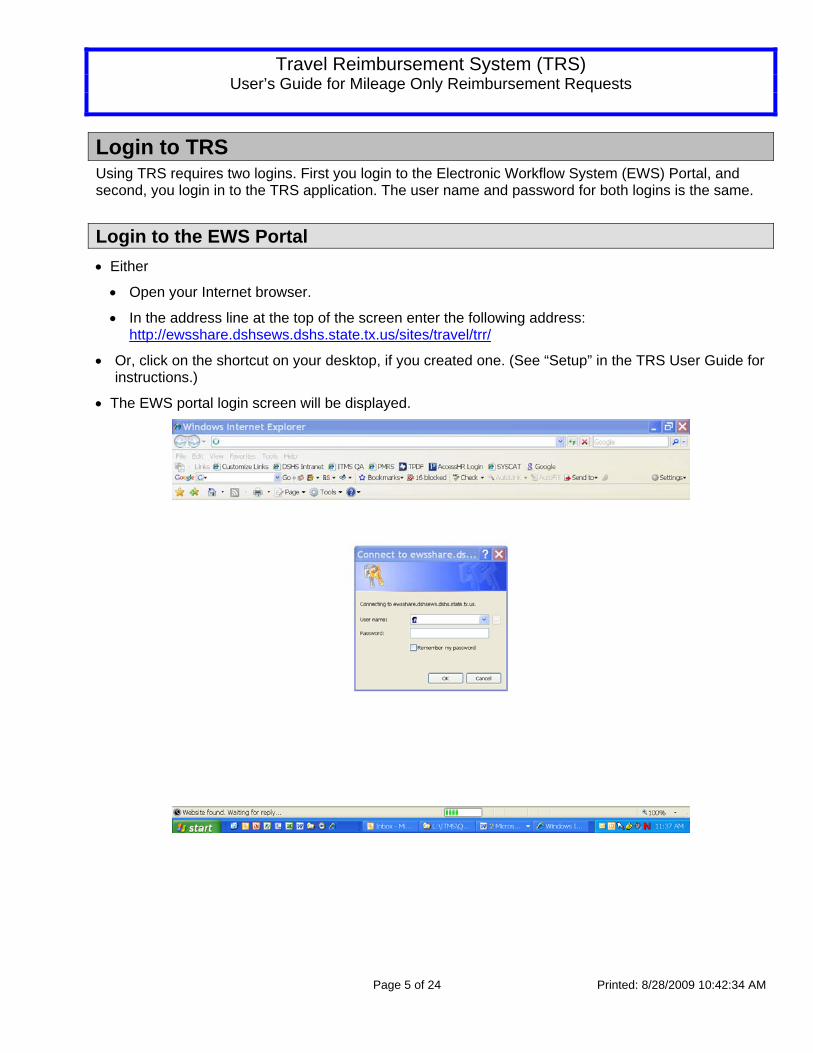
Login to the EWS Portal • Either
• Open your Internet browser.
• In the address line at the top of the screen enter the following address: http://ewsshare.dshsews.dshs.state.tx.us/sites/travel/trr/
• Or, click on the shortcut on your desktop, if you created one. (See “Setup” in the TRS User Guide for instructions.)
• The EWS portal login screen will be displayed.
Travel Reimbursement System (TRS) User’s Guide for Mileage Only Reimbursement Requests
Page 6 of 24 Printed: 8/28/2009 10:42:34 AM
• Enter your User Name and your Password and click “OK".
• Your User Name will be: DSHSEWS\Your 11 digit employee number (be sure to use the backward slash and include leading zeroes)
• Your initial password is your Department ID followed by the last 5 digits of your Employee ID. (Case sensitive, use upper case, this results in an 11 character password)
• It is recommended that you change your password when you first login. To do this from the TRS Home Page select Administrative Functions, Change Password. Once you have changed your password you may need to login again.
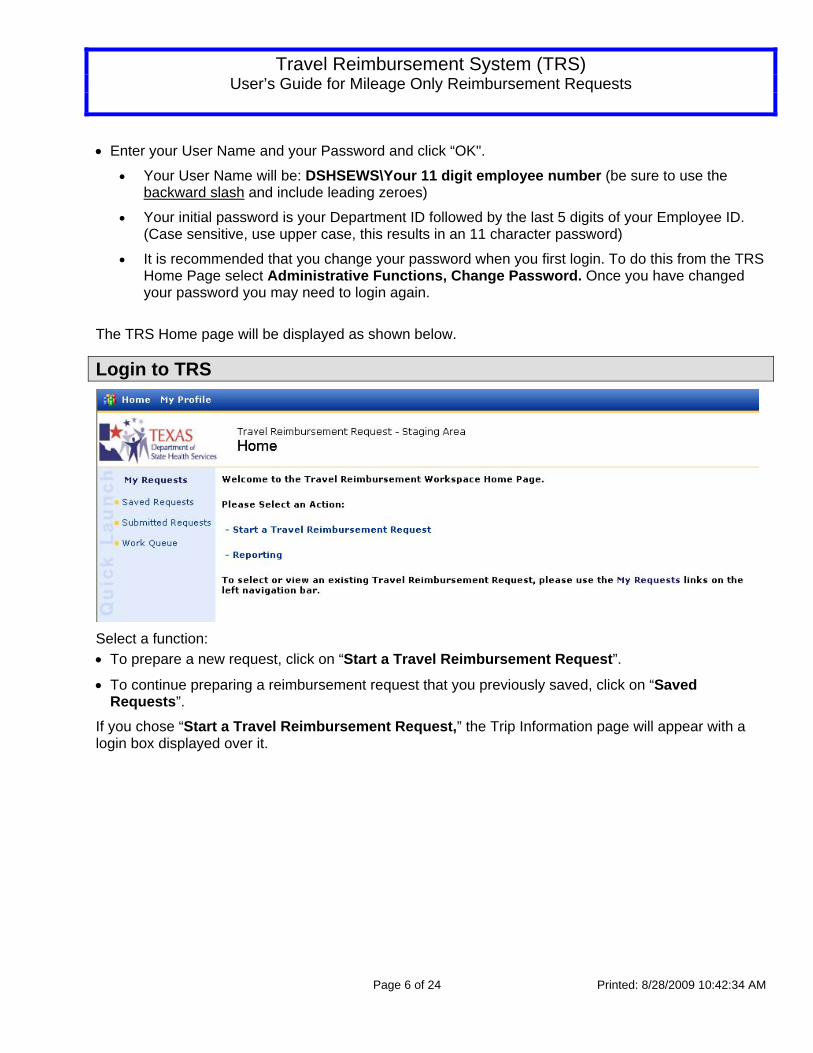
The TRS Home page will be displayed as shown below.
Login to TRS
Select a function: • To prepare a new request, click on “Start a Travel Reimbursement Request”.
• To continue preparing a reimbursement request that you previously saved, click on “Saved Requests”.
If you chose “Start a Travel Reimbursement Request,” the Trip Information page will appear with a login box displayed over it.
Travel Reimbursement System (TRS) User’s Guide for Mileage Only Reimbursement Requests
Page 7 of 24 Printed: 8/28/2009 10:42:34 AM
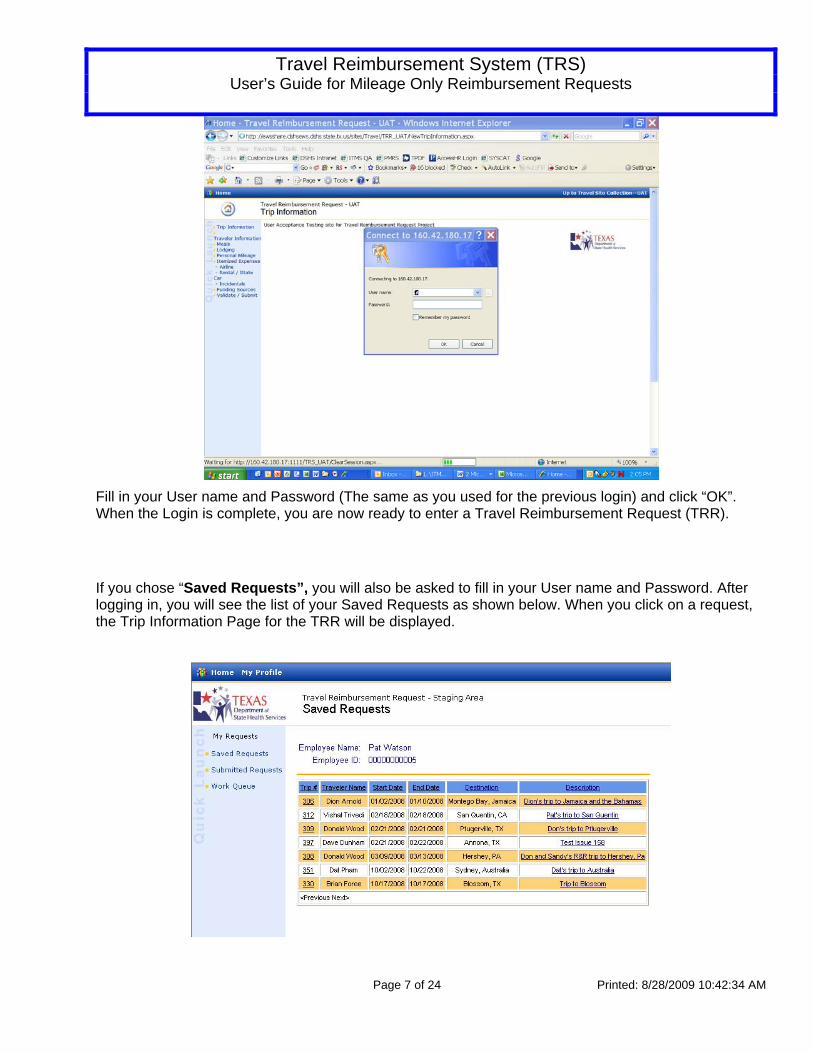
Fill in your User name and Password (The same as you used for the previous login) and click “OK”. When the Login is complete, you are now ready to enter a Travel Reimbursement Request (TRR).
If you chose “Saved Requests”, you will also be asked to fill in your User name and Password. After logging in, you will see the list of your Saved Requests as shown below. When you click on a request, the Trip Information Page for the TRR will be displayed.
Travel Reimbursement System (TRS) User’s Guide for Mileage Only Reimbursement Requests
Page 8 of 24 Printed: 8/28/2009 10:42:34 AM
Prepare & Submit the Travel Reimbursement Request To complete a Travel Reimbursement Request for Mileage only, the only pages involved are:
• Trip Information pate • Traveler Information page • Personal Mileage page • Incidental Expenses page if you have incidental expenses such as parking fees, • Funding Sources page, and • Validate and Submit page.
Travel Reimbursement System (TRS) User’s Guide for Mileage Only Reimbursement Requests
Page 9 of 24 Printed: 8/28/2009 10:42:34 AM
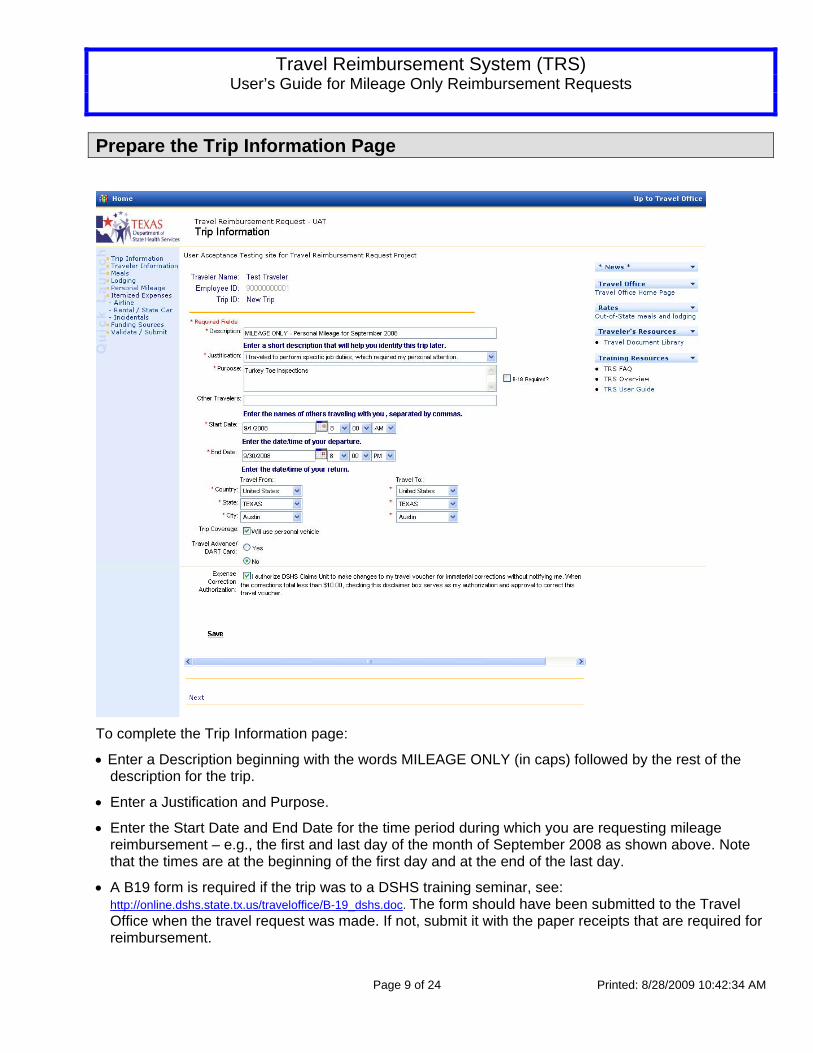
Prepare the Trip Information Page
To complete the Trip Information page:
• Enter a Description beginning with the words MILEAGE ONLY (in caps) followed by the rest of the description for the trip.
• Enter a Justification and Purpose.
• Enter the Start Date and End Date for the time period during which you are requesting mileage reimbursement – e.g., the first and last day of the month of September 2008 as shown above. Note that the times are at the beginning of the first day and at the end of the last day.
• A B19 form is required if the trip was to a DSHS training seminar, see: http://online.dshs.state.tx.us/traveloffice/B-19_dshs.doc. The form should have been submitted to the Travel Office when the travel request was made. If not, submit it with the paper receipts that are required for reimbursement.
Travel Reimbursement System (TRS) User’s Guide for Mileage Only Reimbursement Requests
Page 10 of 24 Printed: 8/28/2009 10:42:34 AM
When you have completed the page, click on “Save”, TRS will verify that all required information has been entered.
• If required information is missing, TRS will post a message on the bottom of the screen or in a pop up box. If this occurs, enter the missing information and click on “Save” again.
• If no errors are found, TRS will assign a trip number (“New Trip” will be replaced with the trip number) and will create a Reimbursement Request record for the trip.
To exit the page
Click on: To: Next, at the bottom of the page or Select “Traveler Information” in the Quick Launch Navigator
Go to the Traveler Information Page if you want to verify your personal information, you are a Surrogate Traveler, or you need to claim assistive status
“Personal Mileage” in the Quick Launch navigator
Go to the Personal Mileage Page
Home, in the blue bar at the top of the page
Discontinue preparation of the Travel Reimbursement Request at this time & go to the TRS Home Page
Important Note: If you exit the page before you have clicked on “Save”, a record for the request will not be created in the system; you will have, in effect, deleted the request.
Travel Reimbursement System (TRS) User’s Guide for Mileage Only Reimbursement Requests
Page 11 of 24 Printed: 8/28/2009 10:42:34 AM
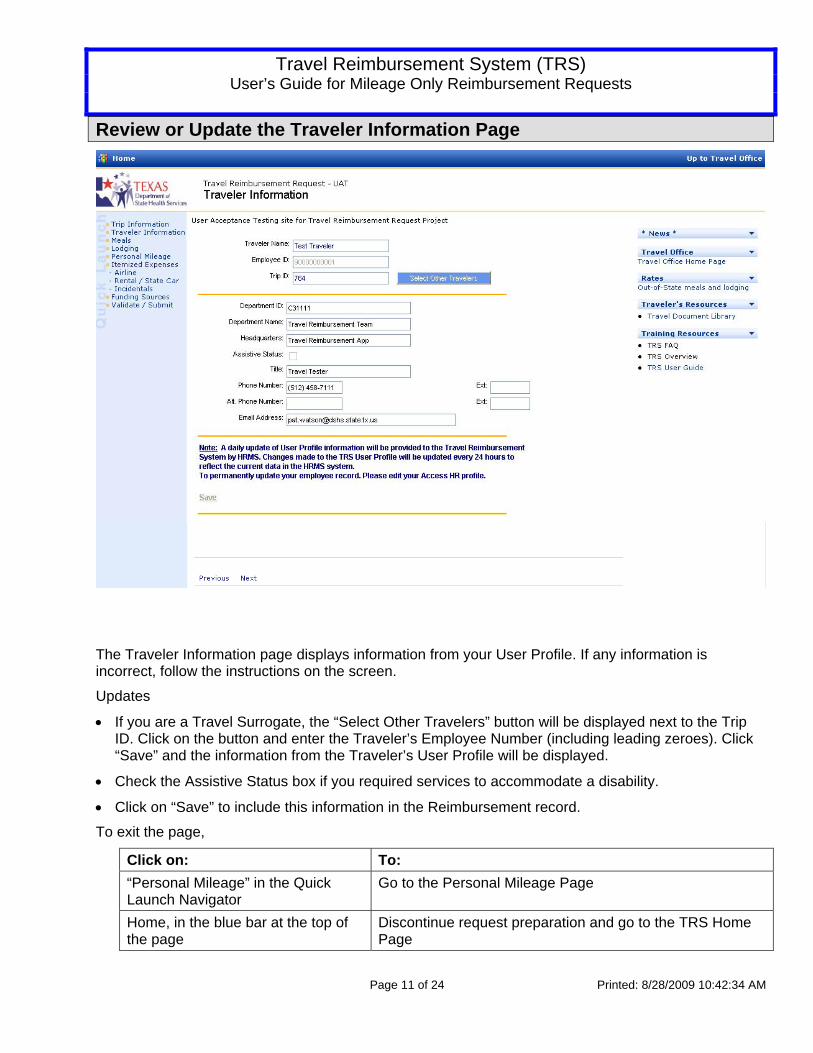
Review or Update the Traveler Information Page
The Traveler Information page displays information from your User Profile. If any information is incorrect, follow the instructions on the screen.
Updates
• If you are a Travel Surrogate, the “Select Other Travelers” button will be displayed next to the Trip ID. Click on the button and enter the Traveler’s Employee Number (including leading zeroes). Click “Save” and the information from the Traveler’s User Profile will be displayed.
• Check the Assistive Status box if you required services to accommodate a disability.
• Click on “Save” to include this information in the Reimbursement record.
To exit the page,
Click on: To: “Personal Mileage” in the Quick Launch Navigator
Go to the Personal Mileage Page
Home, in the blue bar at the top of the page
Discontinue request preparation and go to the TRS Home Page

Travel Reimbursement System (TRS) User’s Guide for Mileage Only Reimbursement Requests
Page 12 of 24 Printed: 8/28/2009 10:42:34 AM
Enter Personal Mileage Expenses A separate entry is made for each Originating and Destination Location traveled using your personal vehicle. For each entry:
• Enter the Date and the Originating and Destination locations.
• Enter Mileage.
• To have TRS calculate the mileage between your Originating and Destination locations, click on “Calculate Mileage”. TRS will calculate the mileage and uncheck the odometer checkbox.
– or –
• Determine the mileage based on your odometer readings and enter it in the first box on the mileage line. If the odometer checkbox is not checked, click on the Odometer check box to indicate to reviewers that you used your odometer to determine mileage.
TRS will apply the current reimbursement rate per mile to calculate the reimbursement for the trip.
On September 2, 2008, Test Traveler traveled to Waco to inspect turkey toes and used his odometer reading to record the distance. This is the entry before clicking on “Save”.
Travel Reimbursement System (TRS) User’s Guide for Mileage Only Reimbursement Requests
Page 13 of 24 Printed: 8/28/2009 10:42:34 AM
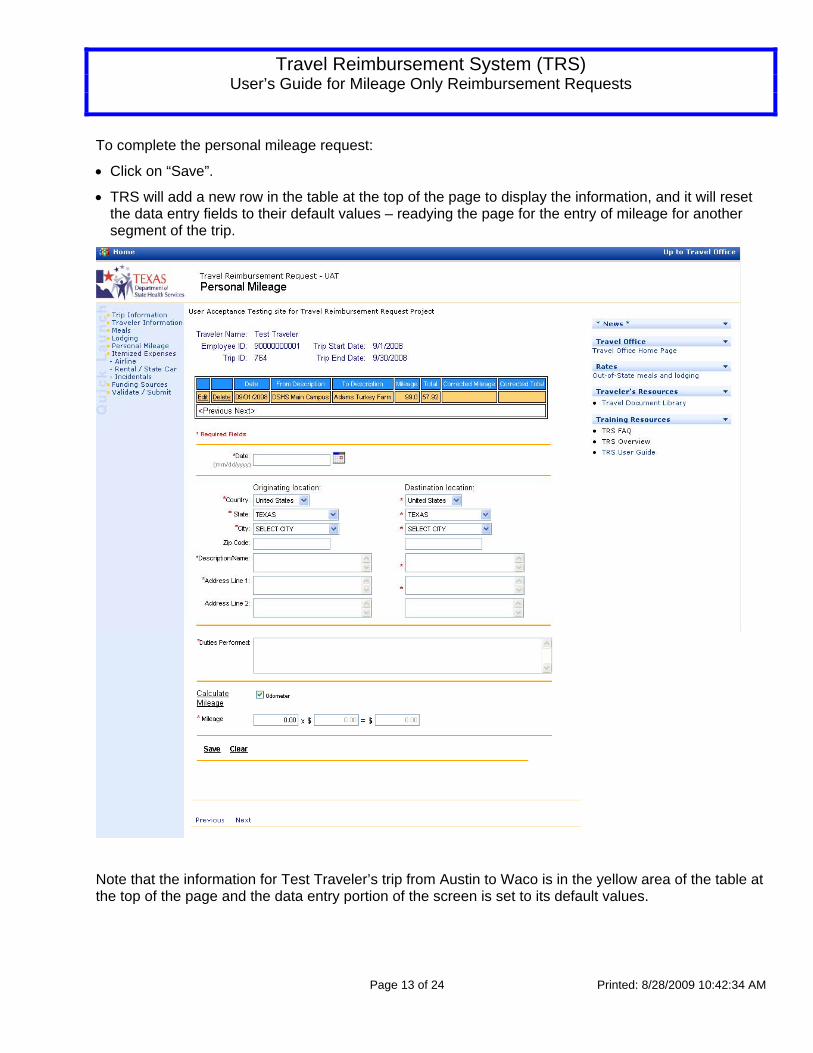
To complete the personal mileage request:
• Click on “Save”.
• TRS will add a new row in the table at the top of the page to display the information, and it will reset the data entry fields to their default values – readying the page for the entry of mileage for another segment of the trip.
Note that the information for Test Traveler’s trip from Austin to Waco is in the yellow area of the table at the top of the page and the data entry portion of the screen is set to its default values.
Travel Reimbursement System (TRS) User’s Guide for Mileage Only Reimbursement Requests
Page 14 of 24 Printed: 8/28/2009 10:42:34 AM
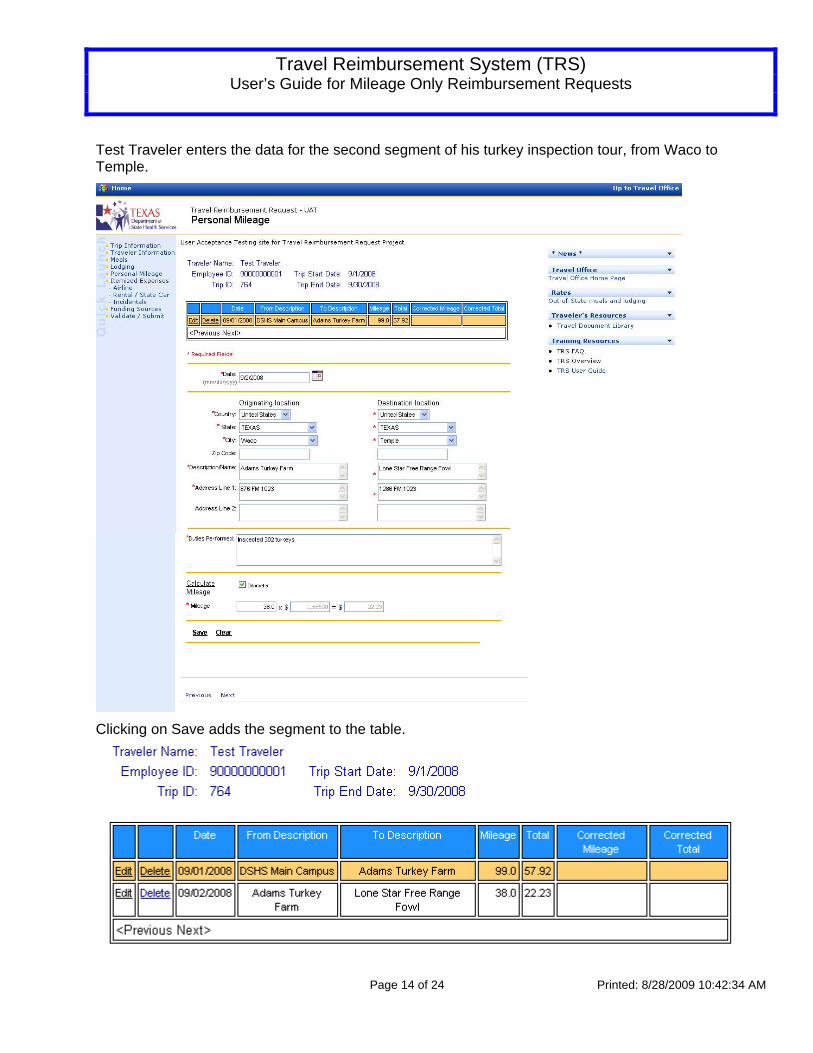
Test Traveler enters the data for the second segment of his turkey inspection tour, from Waco to Temple.
Clicking on Save adds the segment to the table.
Travel Reimbursement System (TRS) User’s Guide for Mileage Only Reimbursement Requests
Page 15 of 24 Printed: 8/28/2009 10:42:34 AM
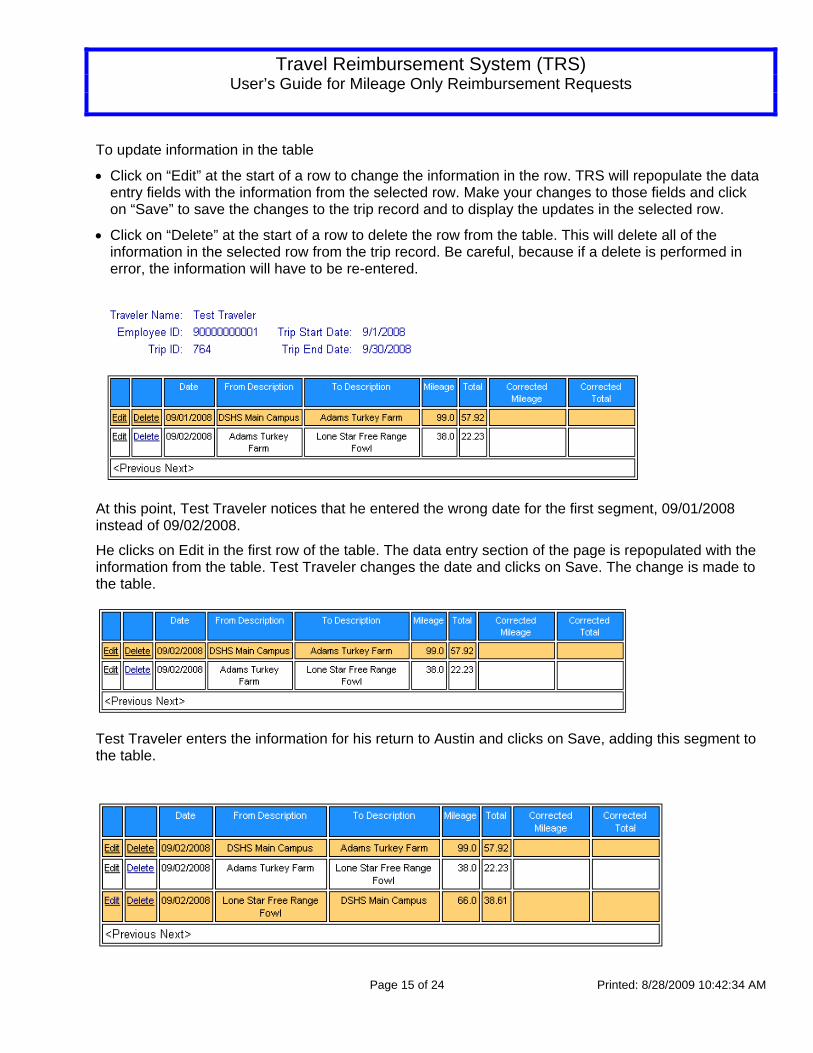
To update information in the table
• Click on “Edit” at the start of a row to change the information in the row. TRS will repopulate the data entry fields with the information from the selected row. Make your changes to those fields and click on “Save” to save the changes to the trip record and to display the updates in the selected row.
• Click on “Delete” at the start of a row to delete the row from the table. This will delete all of the information in the selected row from the trip record. Be careful, because if a delete is performed in error, the information will have to be re-entered.
At this point, Test Traveler notices that he entered the wrong date for the first segment, 09/01/2008 instead of 09/02/2008.
He clicks on Edit in the first row of the table. The data entry section of the page is repopulated with the information from the table. Test Traveler changes the date and clicks on Save. The change is made to the table.
Test Traveler enters the information for his return to Austin and clicks on Save, adding this segment to the table.
Travel Reimbursement System (TRS) User’s Guide for Mileage Only Reimbursement Requests
Page 16 of 24 Printed: 8/28/2009 10:42:34 AM
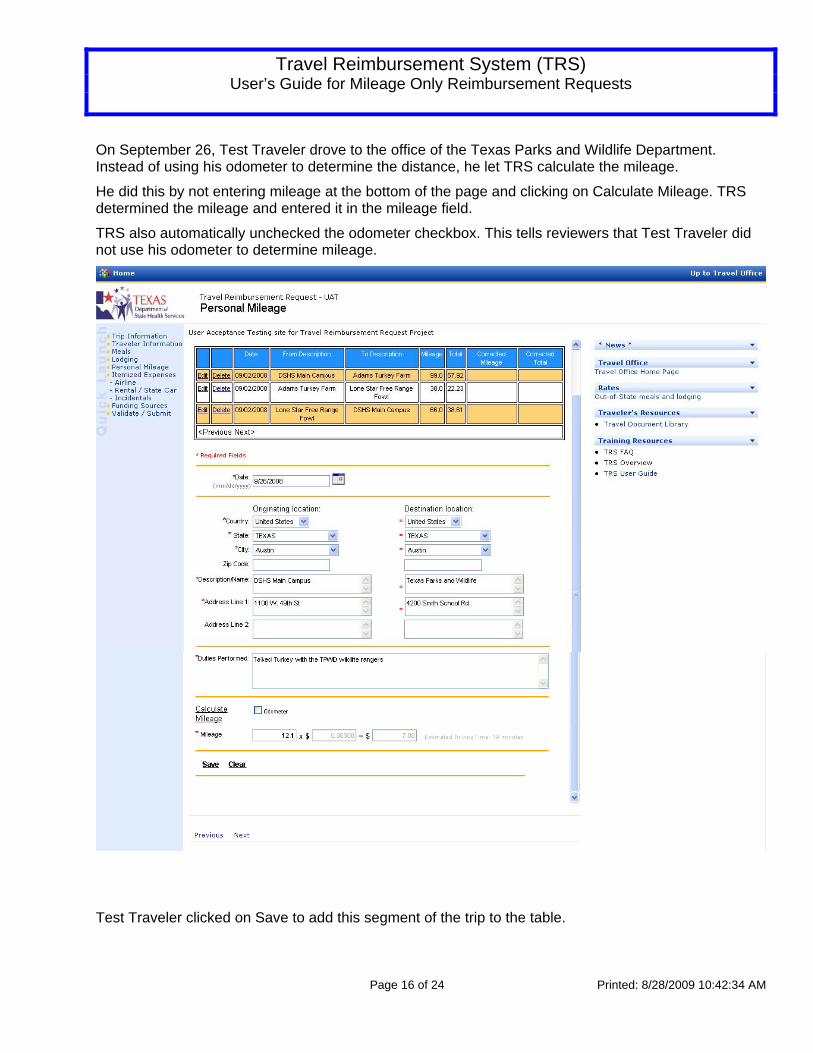
On September 26, Test Traveler drove to the office of the Texas Parks and Wildlife Department. Instead of using his odometer to determine the distance, he let TRS calculate the mileage.
He did this by not entering mileage at the bottom of the page and clicking on Calculate Mileage. TRS determined the mileage and entered it in the mileage field.
TRS also automatically unchecked the odometer checkbox. This tells reviewers that Test Traveler did not use his odometer to determine mileage.
Test Traveler clicked on Save to add this segment of the trip to the table.

Travel Reimbursement System (TRS) User’s Guide for Mileage Only Reimbursement Requests
Page 17 of 24 Printed: 8/28/2009 10:42:34 AM
Test Traveler entered the return trip, once again asking TRS to calculate the mileage and clicked on Save. Interestingly, TRS calculated a different number of miles for the outbound trip that it did for the return trip. This is probably due to one-way streets, such as access roads. The personal mileage table now reflects both trips Test Traveler made in September.
Click on: To: “Incidentals” in the Quick Launch Navigator
Go to the Incidentals page if there are any to report
“Funding Sources” in the Quick Launch Navigator
Go to the Funding Sources page to enter the funding sources for all of his trips for the month
Home, in the blue bar at the top of the page
Discontinue request preparation & go to the TRS Home Page
Travel Reimbursement System (TRS) User’s Guide for Mileage Only Reimbursement Requests
Page 18 of 24 Printed: 8/28/2009 10:42:34 AM
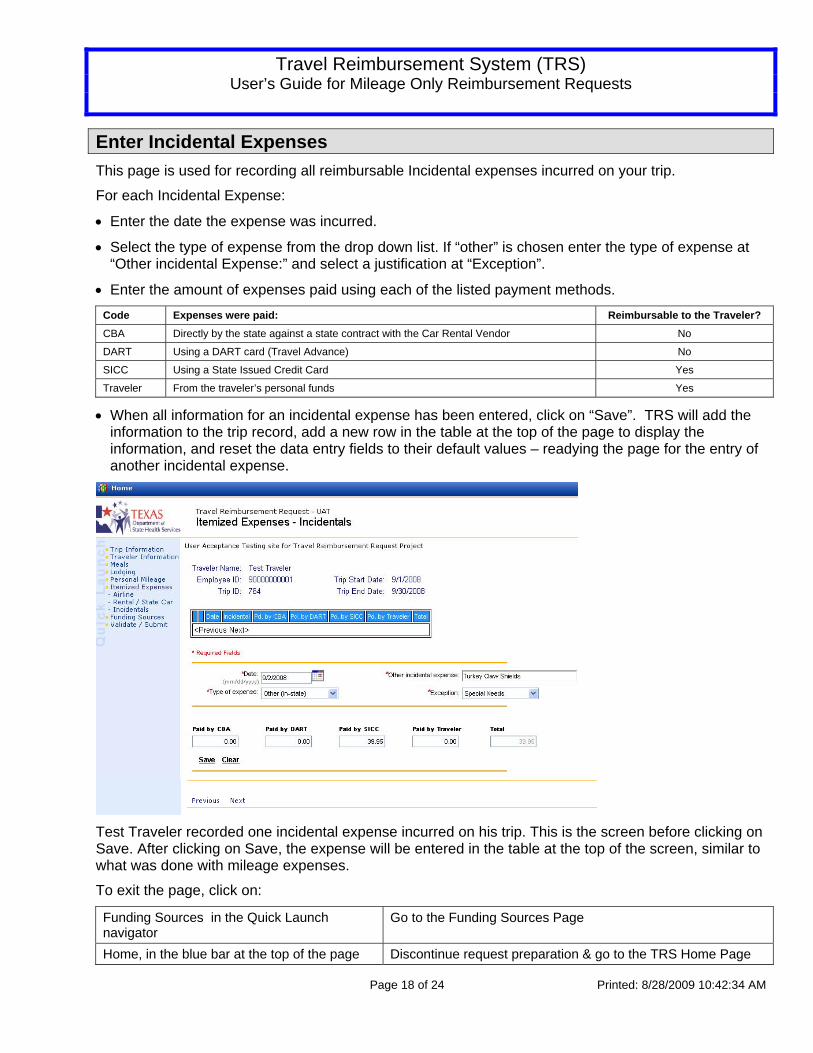
Enter Incidental Expenses This page is used for recording all reimbursable Incidental expenses incurred on your trip.
For each Incidental Expense:
• Enter the date the expense was incurred.
• Select the type of expense from the drop down list. If “other” is chosen enter the type of expense at “Other incidental Expense:” and select a justification at “Exception”.
• Enter the amount of expenses paid using each of the listed payment methods. Code Expenses were paid: Reimbursable to the Traveler? CBA Directly by the state against a state contract with the Car Rental Vendor No
DART Using a DART card (Travel Advance) No
SICC Using a State Issued Credit Card Yes
Traveler From the traveler’s personal funds Yes
• When all information for an incidental expense has been entered, click on “Save”. TRS will add the information to the trip record, add a new row in the table at the top of the page to display the information, and reset the data entry fields to their default values – readying the page for the entry of another incidental expense.
Test Traveler recorded one incidental expense incurred on his trip. This is the screen before clicking on Save. After clicking on Save, the expense will be entered in the table at the top of the screen, similar to what was done with mileage expenses.
To exit the page, click on:
Funding Sources in the Quick Launch navigator
Go to the Funding Sources Page
Home, in the blue bar at the top of the page Discontinue request preparation & go to the TRS Home Page
Travel Reimbursement System (TRS) User’s Guide for Mileage Only Reimbursement Requests
Page 19 of 24 Printed: 8/28/2009 10:42:34 AM
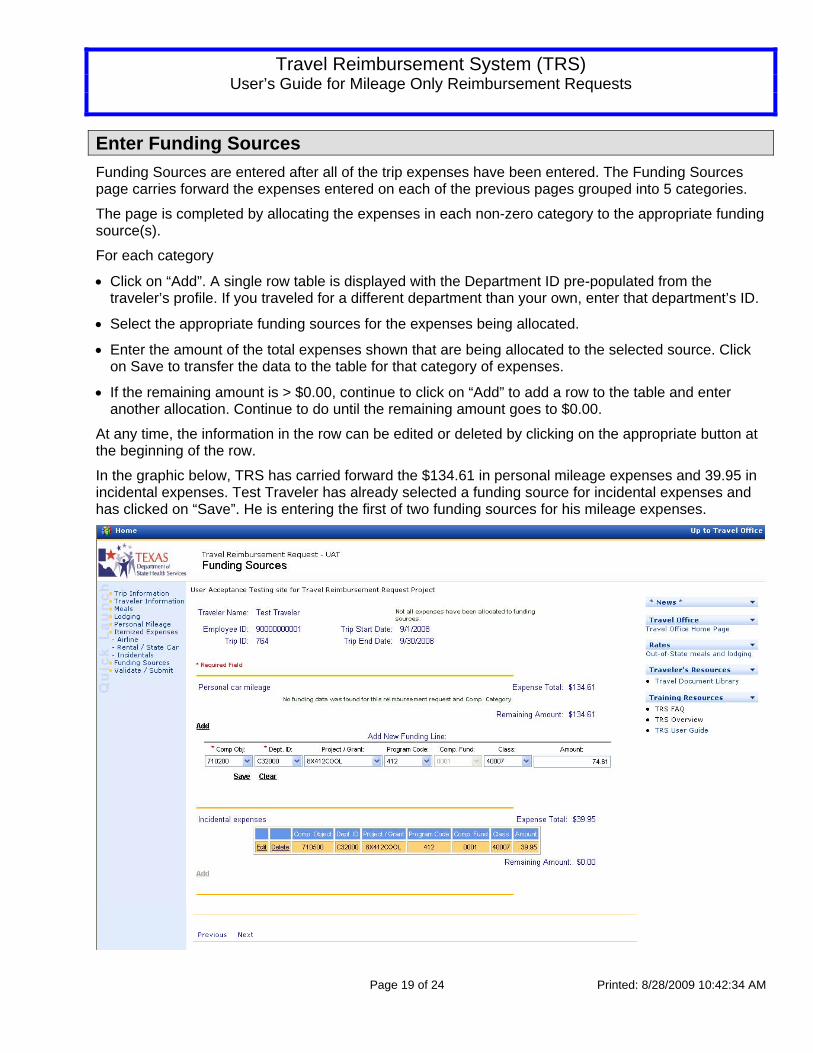
Enter Funding Sources Funding Sources are entered after all of the trip expenses have been entered. The Funding Sources page carries forward the expenses entered on each of the previous pages grouped into 5 categories.
The page is completed by allocating the expenses in each non-zero category to the appropriate funding source(s).
For each category
• Click on “Add”. A single row table is displayed with the Department ID pre-populated from the traveler’s profile. If you traveled for a different department than your own, enter that department’s ID.
• Select the appropriate funding sources for the expenses being allocated.
• Enter the amount of the total expenses shown that are being allocated to the selected source. Click on Save to transfer the data to the table for that category of expenses.
• If the remaining amount is > $0.00, continue to click on “Add” to add a row to the table and enter another allocation. Continue to do until the remaining amount goes to $0.00.
At any time, the information in the row can be edited or deleted by clicking on the appropriate button at the beginning of the row.
In the graphic below, TRS has carried forward the $134.61 in personal mileage expenses and 39.95 in incidental expenses. Test Traveler has already selected a funding source for incidental expenses and has clicked on “Save”. He is entering the first of two funding sources for his mileage expenses.
Travel Reimbursement System (TRS) User’s Guide for Mileage Only Reimbursement Requests
Page 20 of 24 Printed: 8/28/2009 10:42:34 AM
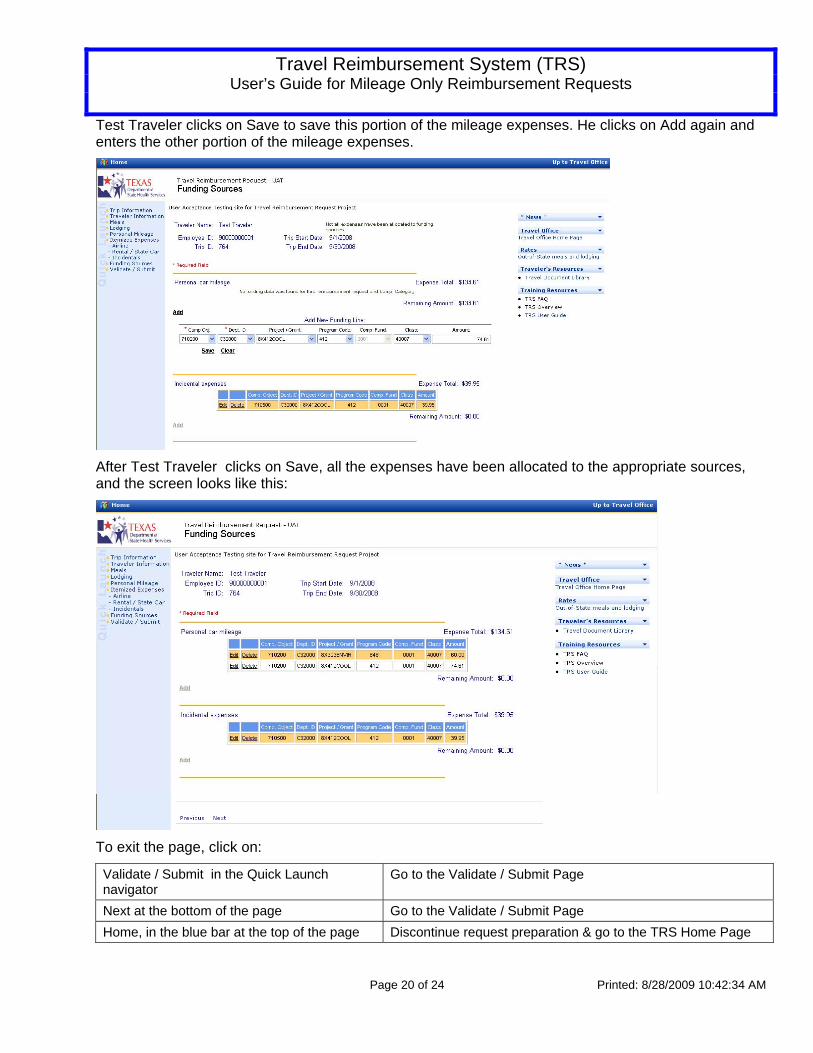
Test Traveler clicks on Save to save this portion of the mileage expenses. He clicks on Add again and enters the other portion of the mileage expenses.
After Test Traveler clicks on Save, all the expenses have been allocated to the appropriate sources, and the screen looks like this:
To exit the page, click on:
Validate / Submit in the Quick Launch navigator
Go to the Validate / Submit Page
Next at the bottom of the page Go to the Validate / Submit Page Home, in the blue bar at the top of the page Discontinue request preparation & go to the TRS Home Page
Travel Reimbursement System (TRS) User’s Guide for Mileage Only Reimbursement Requests
Page 21 of 24 Printed: 8/28/2009 10:42:34 AM
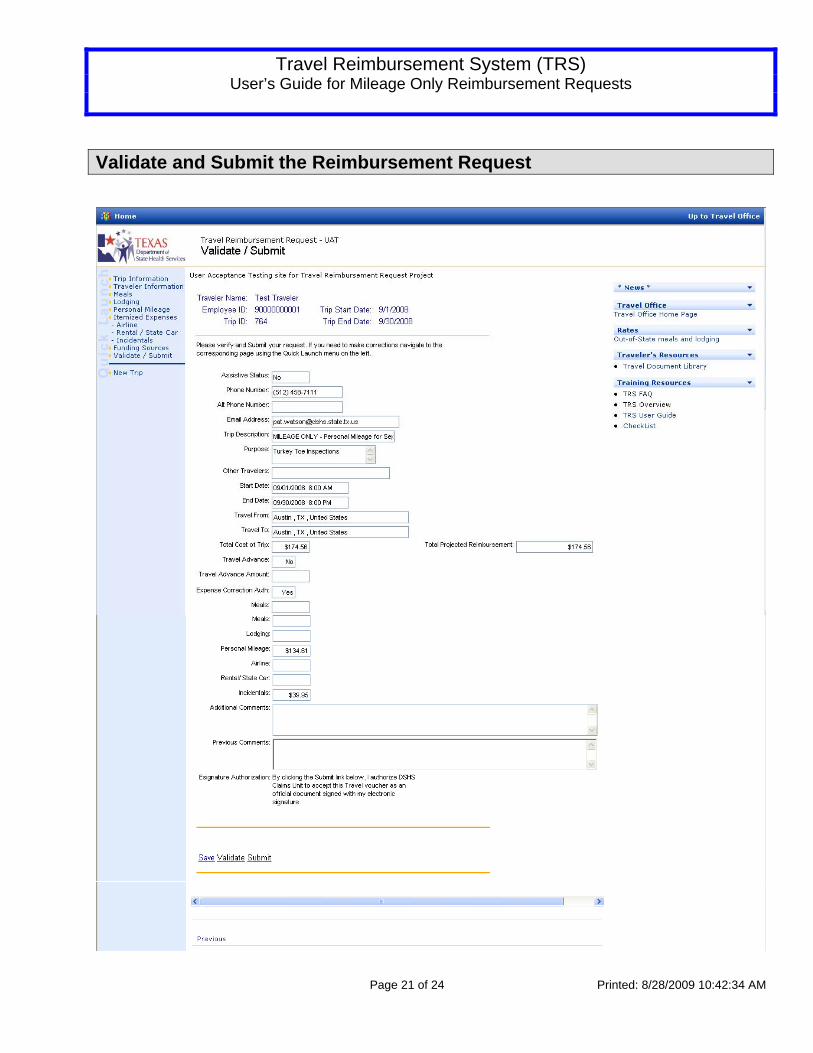
Validate and Submit the Reimbursement Request
Travel Reimbursement System (TRS) User’s Guide for Mileage Only Reimbursement Requests
Page 22 of 24 Printed: 8/28/2009 10:42:34 AM
This screen displays key information entered on the Travel Reimbursement Request.
Validate
• Click on Validate for a final check on the validity of fields in the reimbursement requests. If no errors are found, the text “System level validations were verified. Please click Submit” will be displayed.
• If any error messages are displayed, go back to the appropriate screen, make the corrections, click on “Save” to save the corrections, and return here to revalidate the request.
Submit
• After validation has completed successfully, click on “Submit” to submit the completed request into the approval process.
• If the Traveler submits the request, it will go to the Traveler’s Manager. If the Surrogate Traveler submits the page, it will go to the Traveler who will submit it to his/her Manager.
Delete
• Click on Delete to delete the request, removing it from further consideration. (Note: The request may be deleted only after it has been originally submitted. If the request has not yet been submitted, the Delete link will not be visible.)
Travel Reimbursement System (TRS) User’s Guide for Mileage Only Reimbursement Requests
Page 23 of 24 Printed: 8/28/2009 10:42:34 AM
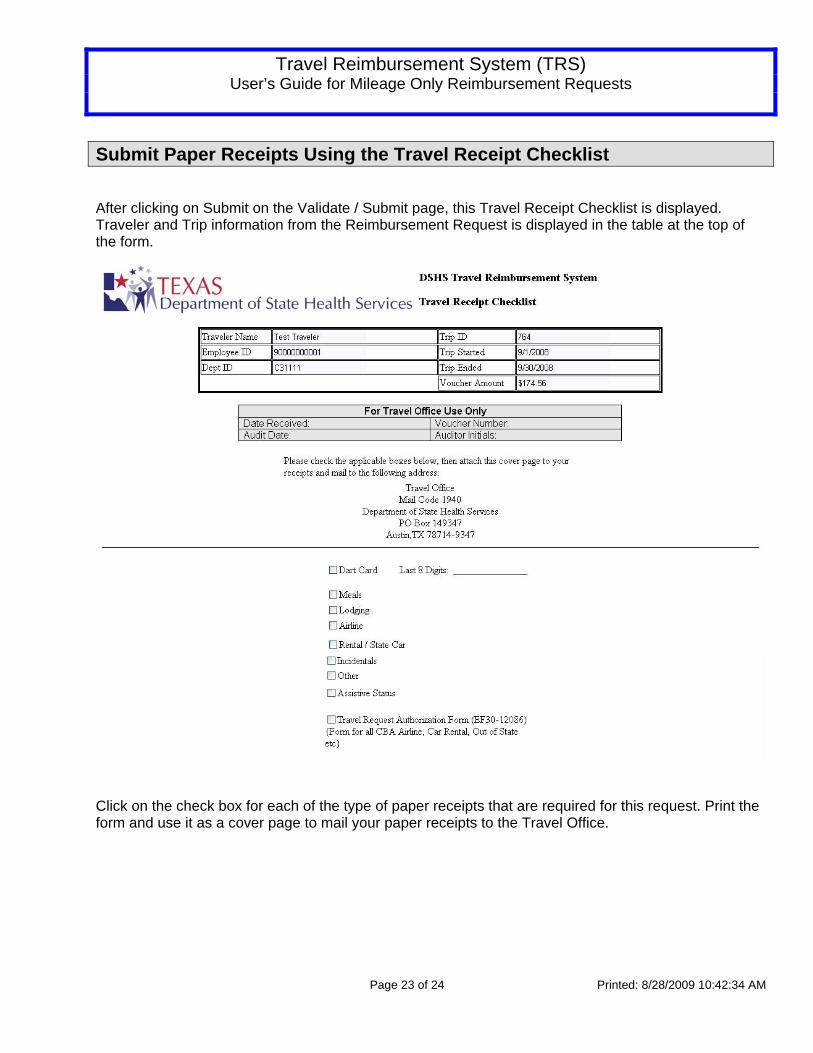
Submit Paper Receipts Using the Travel Receipt Checklist
After clicking on Submit on the Validate / Submit page, this Travel Receipt Checklist is displayed. Traveler and Trip information from the Reimbursement Request is displayed in the table at the top of the form.
Click on the check box for each of the type of paper receipts that are required for this request. Print the form and use it as a cover page to mail your paper receipts to the Travel Office.
Travel Reimbursement System (TRS) User’s Guide for Mileage Only Reimbursement Requests
Page 24 of 24 Printed: 8/28/2009 10:42:34 AM
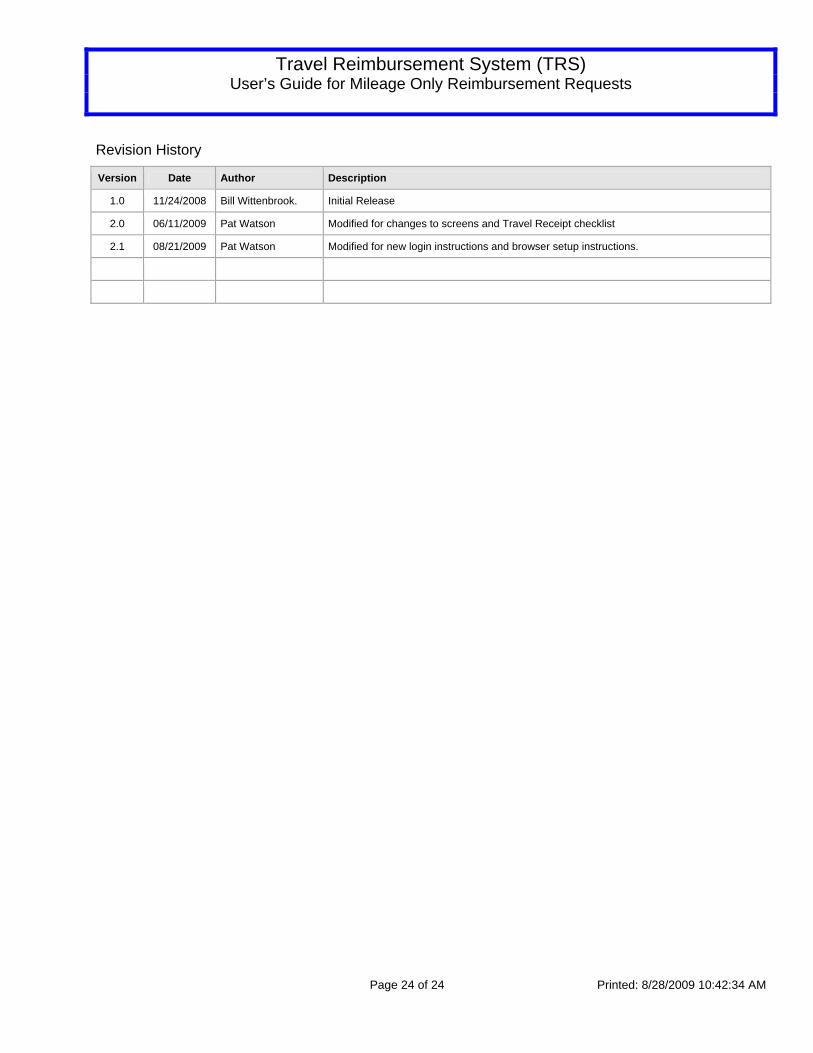
Revision History
Version Date Author Description
1.0 11/24/2008 Bill Wittenbrook. Initial Release
2.0 06/11/2009 Pat Watson Modified for changes to screens and Travel Receipt checklist
2.1 08/21/2009 Pat Watson Modified for new login instructions and browser setup instructions.