Embed Size (px)
Citation preview
Troi Dialog Plug-in 3.5.2USER GUIDEApril 2004
Troi AutomatiseringVuurlaan 182408 NB Alphen a/d Rijn The NetherlandsTel: +31-172-426606Fax: +31-172-470539
You can also visit the Troi web site at: <http://www.troi.com/> for additional information.
Troi Dialog Plug-in is copyright 1998-2004 of Troi Automatisering. All rights reserved.
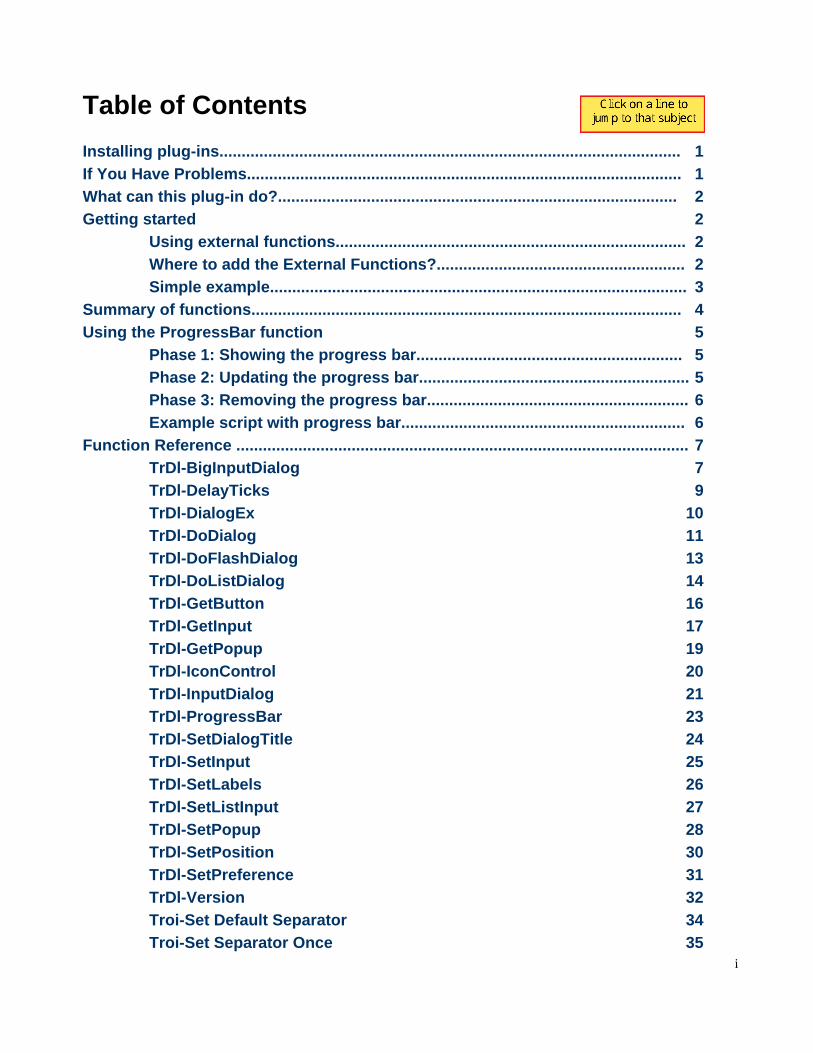
Table of Contents
Installing plug-ins........................................................................................................ 1If You Have Problems.................................................................................................. 1What can this plug-in do?.......................................................................................... 2Getting started 2
Using external functions............................................................................... 2Where to add the External Functions?........................................................ 2Simple example.............................................................................................. 3
Summary of functions................................................................................................. 4Using the ProgressBar function 5
Phase 1: Showing the progress bar............................................................ 5Phase 2: Updating the progress bar............................................................. 5Phase 3: Removing the progress bar........................................................... 6Example script with progress bar................................................................ 6
Function Reference ...................................................................................................... 7TrDl-BigInputDialog 7TrDl-DelayTicks 9TrDl-DialogEx 10TrDl-DoDialog 11TrDl-DoFlashDialog 13TrDl-DoListDialog 14TrDl-GetButton 16TrDl-GetInput 17TrDl-GetPopup 19TrDl-IconControl 20TrDl-InputDialog 21TrDl-ProgressBar 23TrDl-SetDialogTitle 24TrDl-SetInput 25TrDl-SetLabels 26TrDl-SetListInput 27TrDl-SetPopup 28TrDl-SetPosition 30TrDl-SetPreference 31TrDl-Version 32Troi-Set Default Separator 34Troi-Set Separator Once 35
i
Installing plug-ins
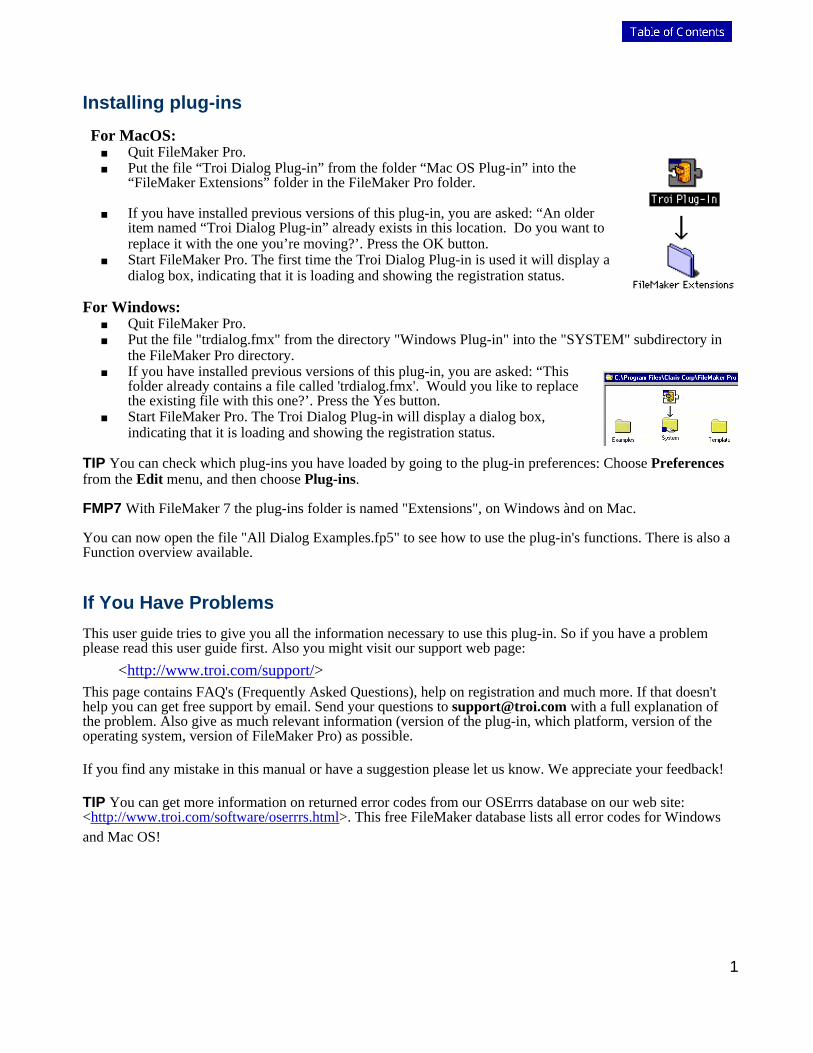
For MacOS: n Quit FileMaker Pro.n Put the file “Troi Dialog Plug-in” from the folder “Mac OS Plug-in” into the
“FileMaker Extensions” folder in the FileMaker Pro folder.
n If you have installed previous versions of this plug-in, you are asked: “An older item named “Troi Dialog Plug-in” already exists in this location. Do you want to replace it with the one you’re moving?’. Press the OK button.
n Start FileMaker Pro. The first time the Troi Dialog Plug-in is used it will display a dialog box, indicating that it is loading and showing the registration status.
For Windows: n Quit FileMaker Pro.n Put the file "trdialog.fmx" from the directory "Windows Plug-in" into the "SYSTEM" subdirectory in
the FileMaker Pro directory. n If you have installed previous versions of this plug-in, you are asked: “This
folder already contains a file called 'trdialog.fmx'. Would you like to replace the existing file with this one?’. Press the Yes button.
n Start FileMaker Pro. The Troi Dialog Plug-in will display a dialog box, indicating that it is loading and showing the registration status.
TIP You can check which plug-ins you have loaded by going to the plug-in preferences: Choose Preferences from the Edit menu, and then choose Plug-ins.
FMP7 With FileMaker 7 the plug-ins folder is named "Extensions", on Windows ànd on Mac.
You can now open the file "All Dialog Examples.fp5" to see how to use the plug-in's functions. There is also a Function overview available.
If You Have Problems
This user guide tries to give you all the information necessary to use this plug-in. So if you have a problem please read this user guide first. Also you might visit our support web page:
<http://www.troi.com/support/>This page contains FAQ's (Frequently Asked Questions), help on registration and much more. If that doesn't help you can get free support by email. Send your questions to [email protected] with a full explanation of the problem. Also give as much relevant information (version of the plug-in, which platform, version of the operating system, version of FileMaker Pro) as possible.
If you find any mistake in this manual or have a suggestion please let us know. We appreciate your feedback!
TIP You can get more information on returned error codes from our OSErrrs database on our web site: <http://www.troi.com/software/oserrrs.html>. This free FileMaker database lists all error codes for Windows and Mac OS!
1
What can this plug-in do?The Troi Dialog Plug-in is a very powerful tool for adding dynamic dialog functions to FileMaker Pro.With it you can show several types of dialogs from a FileMaker Script, where the dialog text and the but-tonsare generated dynamically. All from within FileMaker you can:
• show dialogs• show input dialogs• show password dialogs• show flash dialogs• show list dialogs• show big input dialogs.
Getting started
Using external functions
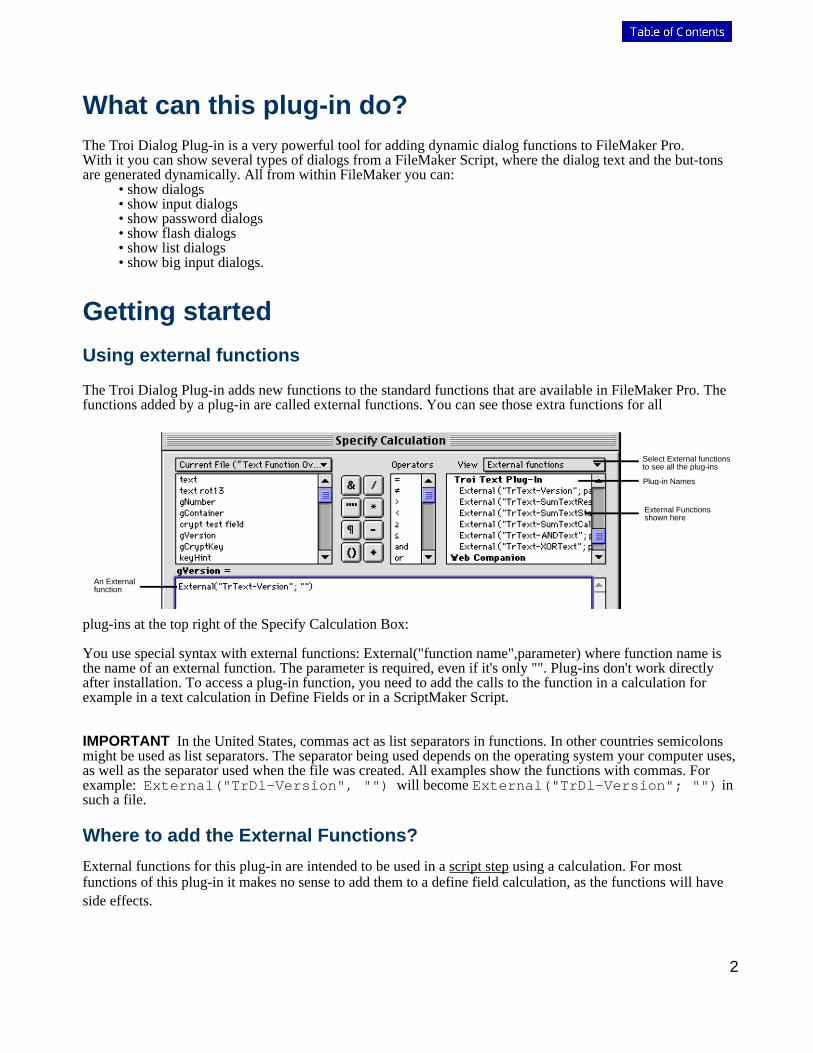
The Troi Dialog Plug-in adds new functions to the standard functions that are available in FileMaker Pro. The functions added by a plug-in are called external functions. You can see those extra functions for all
plug-ins at the top right of the Specify Calculation Box:
You use special syntax with external functions: External("function name",parameter) where function name is the name of an external function. The parameter is required, even if it's only "". Plug-ins don't work directly after installation. To access a plug-in function, you need to add the calls to the function in a calculation for example in a text calculation in Define Fields or in a ScriptMaker Script.
IMPORTANT In the United States, commas act as list separators in functions. In other countries semicolons might be used as list separators. The separator being used depends on the operating system your computer uses, as well as the separator used when the file was created. All examples show the functions with commas. For example: External("TrDl-Version", "") will become External("TrDl-Version"; "") in such a file.
Where to add the External Functions?
External functions for this plug-in are intended to be used in a script step using a calculation. For most functions of this plug-in it makes no sense to add them to a define field calculation, as the functions will have side effects.
2
Select External functions to see all the plug-ins
Plug-in Names
External Functions shown here
An External function
Simple example
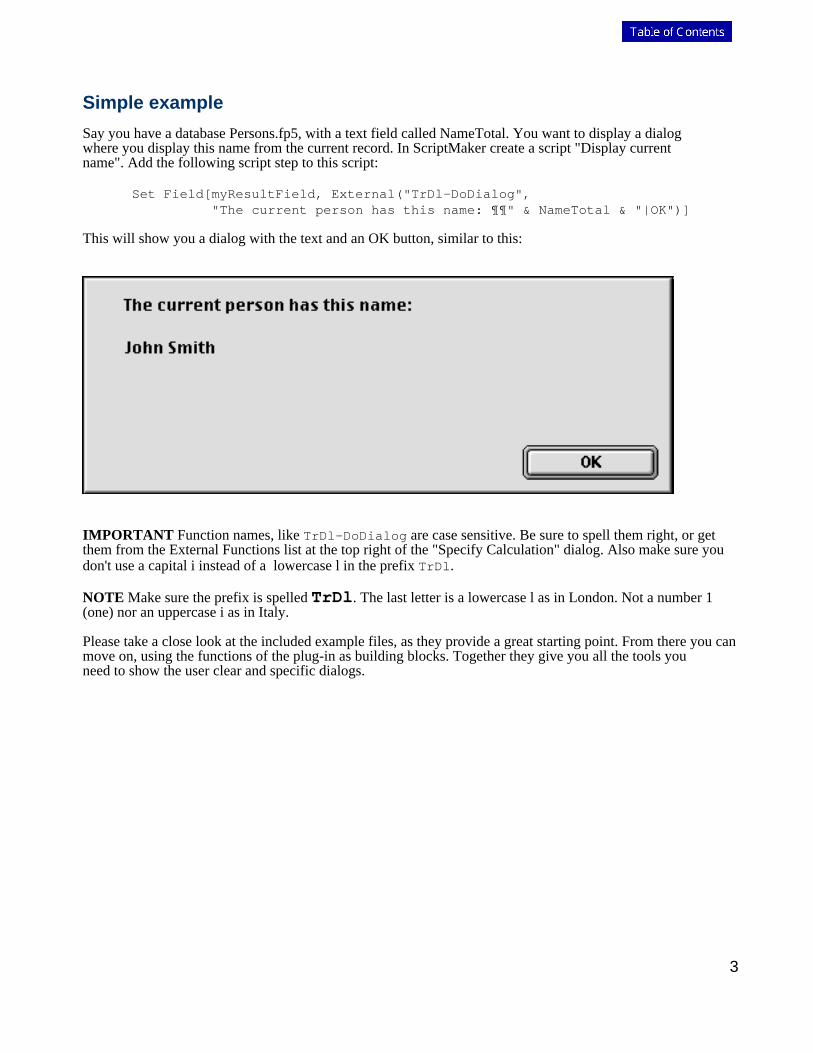
Say you have a database Persons.fp5, with a text field called NameTotal. You want to display a dialogwhere you display this name from the current record. In ScriptMaker create a script "Display currentname". Add the following script step to this script:
Set Field[myResultField, External("TrDl-DoDialog", "The current person has this name: ¶¶" & NameTotal & "|OK")]
This will show you a dialog with the text and an OK button, similar to this:
IMPORTANT Function names, like TrDl-DoDialog are case sensitive. Be sure to spell them right, or get them from the External Functions list at the top right of the "Specify Calculation" dialog. Also make sure you don't use a capital i instead of a lowercase l in the prefix TrDl.
NOTE Make sure the prefix is spelled TrDl. The last letter is a lowercase l as in London. Not a number 1 (one) nor an uppercase i as in Italy.
Please take a close look at the included example files, as they provide a great starting point. From there you can move on, using the functions of the plug-in as building blocks. Together they give you all the tools youneed to show the user clear and specific dialogs.
3
Summary of functions
The Troi Dialog Plug-in adds the following functions:
function name short descriptionTrDl-BigInputDialog Displays an input dialog box, in which the user can enter a long text.TrDl-DelayTicks Waits a specified period of time.TrDl-DialogEx Displays a dialog box, this function has extra possibilities.TrDl-DoDialog Displays a dialog box (similar to the "Show Message" script step).TrDl-DoFlashDialog Displays a flash dialog box for a specified period of time.TrDl-DoListDialog Displays a list dialog box, from which the user can choose an item.TrDl-GetButton Returns the number of the button clicked in the last dialog shown. TrDl-GetInput Returns the contents of one of the input fields. TrDl-GetPopup Returns the current popup list stored in the plug-in. TrDl-IconControl Sets the custom icon.TrDl-InputDialog Shows an input dialog, with up to 9 input, password,popup or checkbox
fields.TrDl-ProgressBar Displays a progress bar dialog box.TrDl-SetDialogTitle Sets the default Dialog Title for the title bar of dialogs.TrDl-SetInput Sets the text to be pre-entered in the input fields of the next input dialog.TrDl-SetLabels Sets the label text to be displayed next to the input fields of the next input
dialog.TrDl-SetListInput Preselect a item from the items in a list dialog.TrDl-SetPopup Sets the values to be used for the popup list.TrDl-SetPosition Sets the position on the screen of dialogs to be shown.TrDl-SetPreference Sets preferences.TrDl-Version Use this function to see which version of the plug-in is loaded. This
function is also used to register the plug-in.
Troi-DoDialog (obsolete name, for compatibility only) Displays a dialog boxTroi-Set Default Separator Changes the default separator text to the given separator.Troi-Set Separator Once Changes the separator to the given separator, for one function.
4
Using the ProgressBar function
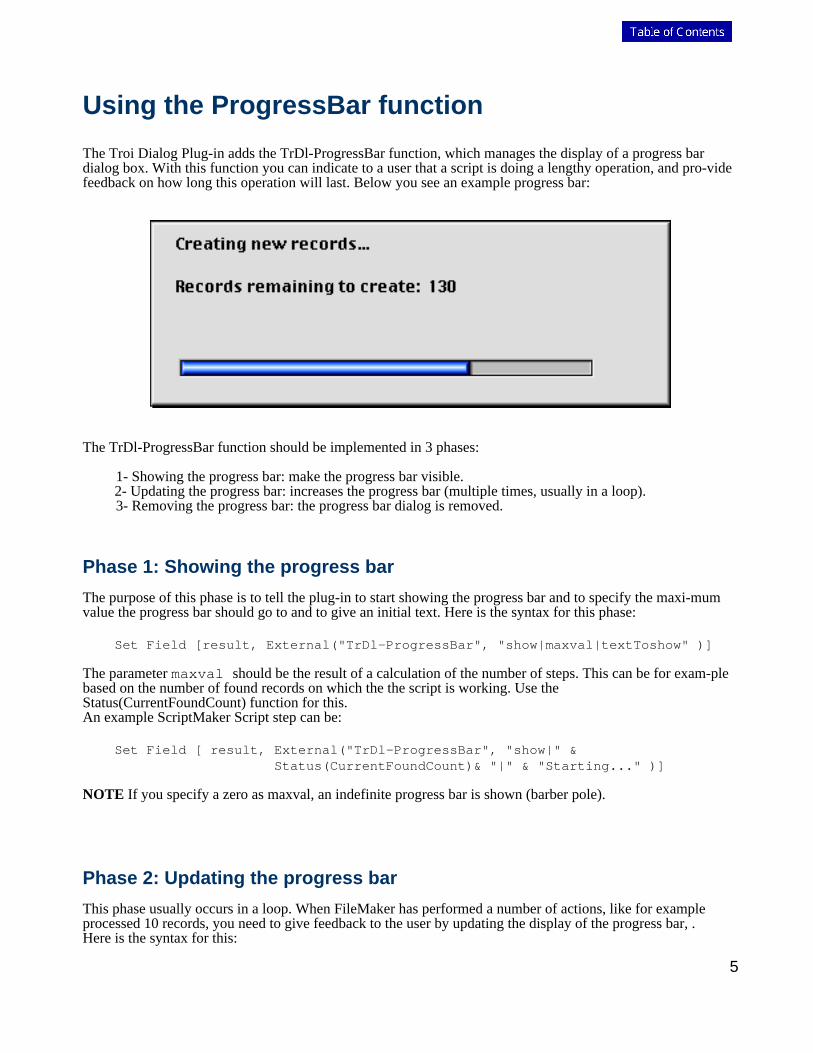
The Troi Dialog Plug-in adds the TrDl-ProgressBar function, which manages the display of a progress bardialog box. With this function you can indicate to a user that a script is doing a lengthy operation, and pro-videfeedback on how long this operation will last. Below you see an example progress bar:
The TrDl-ProgressBar function should be implemented in 3 phases:
1- Showing the progress bar: make the progress bar visible.2- Updating the progress bar: increases the progress bar (multiple times, usually in a loop).3- Removing the progress bar: the progress bar dialog is removed.
Phase 1: Showing the progress bar
The purpose of this phase is to tell the plug-in to start showing the progress bar and to specify the maxi-mumvalue the progress bar should go to and to give an initial text. Here is the syntax for this phase:
Set Field [result, External("TrDl-ProgressBar", "show|maxval|textToshow" )]
The parameter maxval should be the result of a calculation of the number of steps. This can be for exam-plebased on the number of found records on which the the script is working. Use theStatus(CurrentFoundCount) function for this.An example ScriptMaker Script step can be:
Set Field [ result, External("TrDl-ProgressBar", "show|" &Status(CurrentFoundCount)& "|" & "Starting..." )]
NOTE If you specify a zero as maxval, an indefinite progress bar is shown (barber pole).
Phase 2: Updating the progress bar
This phase usually occurs in a loop. When FileMaker has performed a number of actions, like for exampleprocessed 10 records, you need to give feedback to the user by updating the display of the progress bar, .Here is the syntax for this:
5
Set Field [ result, External("TrDl-ProgressBar","incr|increase value|newtext" )]
The parameter increase value should be the result of a calculation of the number of steps that havebeen handled. You can also give an optional new text to be shown.
So an example ScriptMaker Script step can be:
Set Field [ result, External("TrDl-ProgressBar","incr|10|Still working..." )]
Phase 3: Removing the progress bar
If you no longer want to show the progress bar dialog you need to remove the progress bar. This step usual-lyoccurs just after the end of the loop. This phase has only "stop" as parameter:
Set Field [ result, External("TrDl-ProgressBar", "stop" )]
Example script with progress bar
We assume that in your FileMaker file the following fields are defined:gNumberOfSteps Global, numbergResult Global, text
Below you see an example ScriptMaker script which combines the 3 phases:
Comment [Calculate the number of steps.]Set Field [gNumberOfSteps, Status(CurrentFoundCount)]Comment [Make the progress bar visible with the initial text]Comment [the 2nd parameter indicates the total number of steps:]Set Field [gResult, External("TrDl-ProgressBar" ,
"show|" & gNumberOfSteps &"|Showing a simple progress bar...¶¶Please wait.")]
Go to Record[First]L o o pComment [Increase the progress bar by 1]Set Field [gResult, External("TrDl-ProgressBar" , "incr|1") ]...You should do your time consuming stuff here!...Go to Record[Next, Exit after last]
End LoopComment [Remove the progress bar.]Set Field [gResult, External("TrDl-ProgressBar" , "stop")]
6
Function ReferenceTrDl-BigInputDialog
Syntax External("TrDl-BigInputDialog", "switches|prompt|button1|button2|button3|button4|initialText")
Displays an input dialog box, in which the user can enter a long text (up to the FileMaker limit of 64000 characters).
Parametersswitches this determines the behaviour of the dialog and which information is returned.prompt the text of the dialogbutton1..4 the text of the 1st to the 4th button (from the right to left)initialText the initial textIf you specify an empty button text, no button will be displayed.
Switches can be empty or you can add one or both of these switches:-ReturnButtonText return the *text* of the button, instead of the number-SelectAllText select the initial text when the dialog is first shown-MaxChars=x maximum number of characters allowed. If more characters are typed the dialog beeps-MinChars=y the minimum number of characters before buttons that require text will be enabled
You can also add one of these switches:-DefaultButton1 -DefaultButton2 -DefaultButton3 -DefaultButton4This indicates which button will be selected when the user presses the ENTER key on the Numeric Keypad.
You can also add one or more of these switches:-Button1NeedsText -Button2NeedsText -Button3NeedsText -Button4NeedsTextIf you add this switch the button is disabled until there is (enough) text.
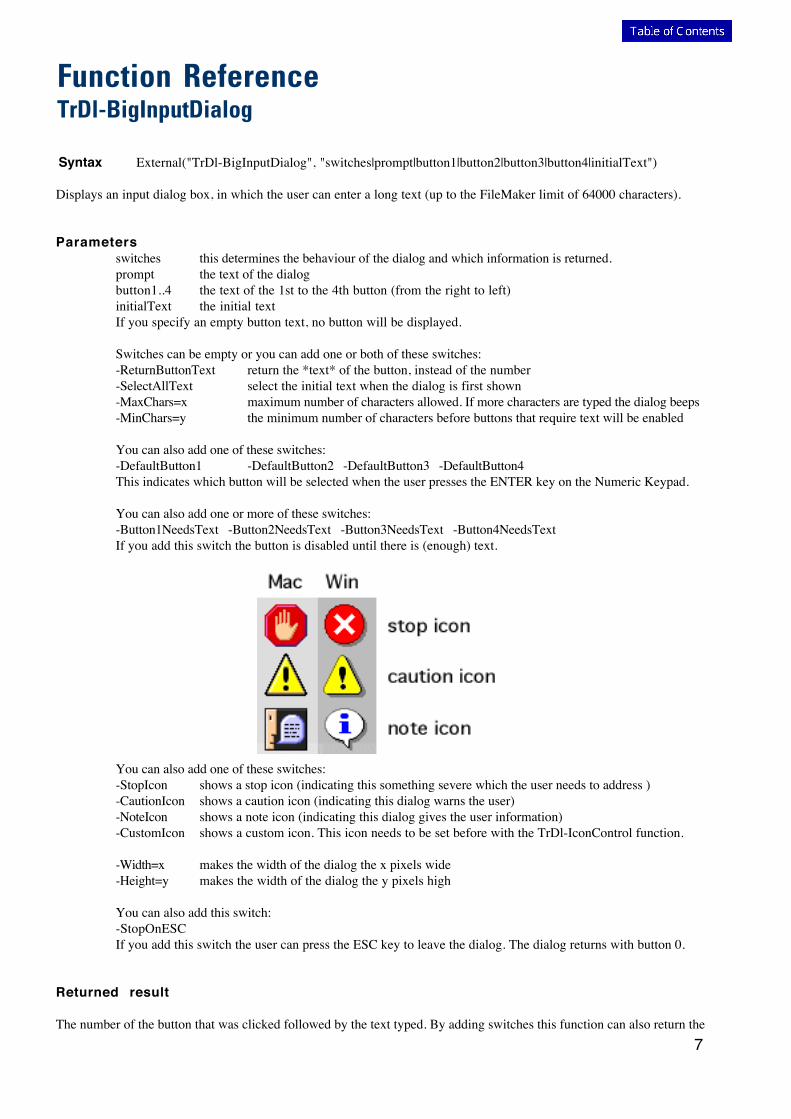
You can also add one of these switches:-StopIcon shows a stop icon (indicating this something severe which the user needs to address )-CautionIcon shows a caution icon (indicating this dialog warns the user)-NoteIcon shows a note icon (indicating this dialog gives the user information)-CustomIcon shows a custom icon. This icon needs to be set before with the TrDl-IconControl function.
-Width=x makes the width of the dialog the x pixels wide-Height=y makes the width of the dialog the y pixels high
You can also add this switch:-StopOnESCIf you add this switch the user can press the ESC key to leave the dialog. The dialog returns with button 0.
Returned result
The number of the button that was clicked followed by the text typed. By adding switches this function can also return thetext of the button.
The plug-in can also return an error code:$$-92 ddpLenErr, when the minimum number of characters allowed is bigger than the maximum
number of characters.$$-108 memFullErr, ran out of memory
$$-207 notEnoughBufferSpace, the result is too big.
Other error codes may be returned.
Special considerations
See "TrDl-SetDialogTitle" if you want to change the title of the dialog.
If you type the RETURN key (on Windows labelled as ENTER) on the main keyboard, a return character is entered in thetext. You can exit this dialog with the ENTER key on the numeric keypad (normally at the right of the keyboard). Thedefault button will be returned.
You can set the maximum numbers of characters the a user can type in with the "-MaxChars" switch. For example"-MaxChars=100 will beep when the maximum number of characters is reached. If you don't set this limit the maximumwill be 64000 characters.The -SelectAllText switch will make that the initial text is selected when the dialog is first shown.
Example usage
Set Field [ result, External("TrDl-BigInputDialog","-noteIcon -stopOnESC |Please type in your text: |OK|Cancel|Help|Stop|" &"your story here!¶this on a new line...") ]
This will show an input dialog, with a large text area to type in. The icon is a note icon. The text area has the text "yourstory here!" and "this on a new line..." already filled in.
Example 2
This is an example for a (simple) dictionary. We assume that in your FileMaker file the following text fields are defined:keywordText and definitionText. Finally a global text field gResult. keywordText should contain keywords anddefinitionText should contain definitions for that keyword. To make an editing dialog for this dictionary add in ScriptMakerthe following script steps:
Set Field [ gResult, External("TrDl-SetDialogTitle", "Your titletext") ]Set Field [ gResult, External("TrDl-BigInputDialog", "-NoteIcon -Button1NeedsText -DefaultButton1 -dialogName=MyDictionary.|Please improve this definition of " & """"& keywordText & """" & ":|OK|Cancel|||" & definitionText ) ]Set Field [ definitionText, External("TrDl-GetInput", "-text1") ]
This will show a text for a definition taken from the field definitionText. The keyword will be shown between quotes, byputting 2 quotes in a text string. In the calculation this looks like this: """"
7
TrDl-BigInputDialog
Syntax External("TrDl-BigInputDialog", "switches|prompt|button1|button2|button3|button4|initialText")
Displays an input dialog box, in which the user can enter a long text (up to the FileMaker limit of 64000 characters).
Parametersswitches this determines the behaviour of the dialog and which information is returned.prompt the text of the dialogbutton1..4 the text of the 1st to the 4th button (from the right to left)initialText the initial textIf you specify an empty button text, no button will be displayed.
Switches can be empty or you can add one or both of these switches:-ReturnButtonText return the *text* of the button, instead of the number-SelectAllText select the initial text when the dialog is first shown-MaxChars=x maximum number of characters allowed. If more characters are typed the dialog beeps-MinChars=y the minimum number of characters before buttons that require text will be enabled
You can also add one of these switches:-DefaultButton1 -DefaultButton2 -DefaultButton3 -DefaultButton4This indicates which button will be selected when the user presses the ENTER key on the Numeric Keypad.
You can also add one or more of these switches:-Button1NeedsText -Button2NeedsText -Button3NeedsText -Button4NeedsTextIf you add this switch the button is disabled until there is (enough) text.
You can also add one of these switches:-StopIcon shows a stop icon (indicating this something severe which the user needs to address )-CautionIcon shows a caution icon (indicating this dialog warns the user)-NoteIcon shows a note icon (indicating this dialog gives the user information)-CustomIcon shows a custom icon. This icon needs to be set before with the TrDl-IconControl function.
-Width=x makes the width of the dialog the x pixels wide-Height=y makes the width of the dialog the y pixels high
You can also add this switch:-StopOnESCIf you add this switch the user can press the ESC key to leave the dialog. The dialog returns with button 0.
Returned result
The number of the button that was clicked followed by the text typed. By adding switches this function can also return thetext of the button.
The plug-in can also return an error code:$$-92 ddpLenErr, when the minimum number of characters allowed is bigger than the maximum
number of characters.$$-108 memFullErr, ran out of memory
$$-207 notEnoughBufferSpace, the result is too big.
Other error codes may be returned.
Special considerations
See "TrDl-SetDialogTitle" if you want to change the title of the dialog.
If you type the RETURN key (on Windows labelled as ENTER) on the main keyboard, a return character is entered in thetext. You can exit this dialog with the ENTER key on the numeric keypad (normally at the right of the keyboard). Thedefault button will be returned.
You can set the maximum numbers of characters the a user can type in with the "-MaxChars" switch. For example"-MaxChars=100 will beep when the maximum number of characters is reached. If you don't set this limit the maximumwill be 64000 characters.The -SelectAllText switch will make that the initial text is selected when the dialog is first shown.
Example usage
Set Field [ result, External("TrDl-BigInputDialog","-noteIcon -stopOnESC |Please type in your text: |OK|Cancel|Help|Stop|" &"your story here!¶this on a new line...") ]
This will show an input dialog, with a large text area to type in. The icon is a note icon. The text area has the text "yourstory here!" and "this on a new line..." already filled in.
Example 2
This is an example for a (simple) dictionary. We assume that in your FileMaker file the following text fields are defined:keywordText and definitionText. Finally a global text field gResult. keywordText should contain keywords anddefinitionText should contain definitions for that keyword. To make an editing dialog for this dictionary add in ScriptMakerthe following script steps:
Set Field [ gResult, External("TrDl-SetDialogTitle", "Your titletext") ]Set Field [ gResult, External("TrDl-BigInputDialog", "-NoteIcon -Button1NeedsText -DefaultButton1 -dialogName=MyDictionary.|Please improve this definition of " & """"& keywordText & """" & ":|OK|Cancel|||" & definitionText ) ]Set Field [ definitionText, External("TrDl-GetInput", "-text1") ]
This will show a text for a definition taken from the field definitionText. The keyword will be shown between quotes, byputting 2 quotes in a text string. In the calculation this looks like this: """"
8

TrDl-DelayTicks
Syntax Set Field [ result, External("TrDl-DelayTicks", "ticks" )]
Waits a specified period of time.
Parametersticks The time the function waits, in 1/60th of a second
Returned result
This function always returns 0.
Special considerations
A maximum time of 2 minutes can be specified.
On Mac OS X there is a problem where FileMaker does not update the screen after a TrDl-DelayTicks step, even if you do adifferent Set Field step. To workaround this please add this step before the TrDl-DelayTicks step: Pause/ResumeScript[0:00:00]
Example usage
Set Field[gButtonNr, External("Troi-DelayTicks", "180")] will wait for 180 ticks = 3 seconds.
9
TrDl-DialogEx
Syntax External("TrDl-DialogEx", "switches|prompt|button1|button2|button3|button4")
Displays a dialog box, from which the user can choose a button.
Parametersswitches this determines the behaviour of the dialog and which information is returnedprompt the text of the dialogbutton1..4 the text of the 1st to the 4th button (from the right to left)If you specify an empty button text, no button will be displayed at that place.
Switches can be empty or one of these:-NoteIcon shows a note icon (indicating this dialog gives the user information)-CautionIcon shows a caution icon (indicating this dialog warns the user)-StopIcon shows a stop icon (indicating this something severe which the user needs to address )-CustomIcon shows a custom icon. This icon needs to be set before with the TrDl-IconControl function
Returned result
The number of the button that was clicked.
Special considerations
See "TrDl-SetDialogTitle" if you want to change the title of the dialog.See also the functions "TrDl-GetInput" and TrDl-GetButton for easy parsing of the result.
Example usage
External("TrDl-DialogEx", "-NoteIcon |Hi, ¶¶Hello world!|OK|Cancel")
This shows a dialog with a note icon. If the user chooses the OK button "1" will be returned.If the user chooses the Cancelbutton "2" will be returned.
Example 2
We assume that in your FileMaker file the following fields are defined: Name Text result Global, text
The Name field contain names of persons. In ScriptMaker add the following script steps:
Set Field [ result, External("TrDl-DialogEx", "-CustomIcon |Hi, ¶The name is""" & Name & """.") ]
This shows a dialog with a custom icon and a OK button. The text of the field name is added, so you get something like:Hi,The name is "Peter Baanen".
Note the use of two times a double quote to add the double quote to the calculation. The custom icon needs to be set in anearlier script step with the TrDl-IconControl function.
10
TrDl-DoDialog
Syntax Set Field [ result, External("TrDl-DoDialog", "prompt|button1|button2|button3|button4|switches" )]
Displays a dialog box (similar to the "Show Message" script step). The dialog is built from calculations and fields.
Parameters prompt the text of the dialog button1 the text of the 1st button (from the right) button2 the text of the 2nd button (from the right) button3 the text of the 3rd button (from the right) button4 the text of the 4th button (from the right) switches (optional) see below userlabel (only for userpassword) text of the label of the username input field passwordlabel (only for userpassword) text of the label of the password input field
If you specify an empty button text, no button will be displayed. Switches can be set to:input to display an input dialog boxpassword to display a password input dialog boxuserpassword to get a dialog box which asks for a username and password
You can also add this extra switch for the userpassword dialog:-StartField1 start with the cursor in the first input field-StartField2 start with the cursor in the second input field
Returned result
The number of the button that was pushed, and the text input if applicable.
Special considerations
See also "TrDl-DialogEx", which has more possibilities.
IMPORTANT Use only in a script. Do not use this function in a calculated field definition, because when FileMakercalculates the fields this will result into a repeated dialog for EACH record. Not funny if you have 100,000 records. Also donot use the separator in the text or buttons itself. See also "Troi-Set Default Separator" and "Troi-Set Separator Once" ifyou want to use a different separator.
See "TrDl-SetDialogTitle" if you want to change the title of the dialog. See also the functions "TrDl-GetInput" andTrDl-GetButton for easy parsing of the result.
Example usage
Set Field[gButtonNr,External(TrDl-DoDialog, "Do you want to save the text?|OK|Cancel||Don't Save")]
This will show a dialog box with 3 buttons.
Example 2
We assume that in your FileMaker file the following fields are defined: gDialogText Global, text gOKButtonLabel Global, text
gCancelButtonLabel Global, text result Global, text
The gDialogText field contains the text you want to display, and can be filled for example with a calculation.gOKButtonLabel and gCancelButtonLabel should be filled with "OK" and "Cancel" for use in the English language, andwith translations in other languages. In ScriptMaker add the following script step:
Set Field [ result, External("TrDl-DoDialog", gDialogText & "|" &gOKButtonLabel "|" &gCancelButtonLabel ) ]
This shows a dialog with the text and an OK and Cancel button in the appropriate language.
Example 3
This example will show an UserPassword dialog. We assume that in your FileMaker file the following fields is defined: result Global, text
In ScriptMaker add the following script step:
Set Field [ result, External("TrDl-DoDialog","¶Please enter user name and password:|OK |Cancel|||Userpassword -StartField1 |" &Status(CurrentUserName) & "|User Name: |Password: ") ]
This shows a dialog with two input fields: one for user name the other for the password. The switch "-StartField1" willselect the first field, so the user can edit the user name right away. If the user is usually the same, add a switch"-StartField2" instead, so that user only has to give the password.
11
TrDl-DoDialog
Syntax Set Field [ result, External("TrDl-DoDialog", "prompt|button1|button2|button3|button4|switches" )]
Displays a dialog box (similar to the "Show Message" script step). The dialog is built from calculations and fields.
Parameters prompt the text of the dialog button1 the text of the 1st button (from the right) button2 the text of the 2nd button (from the right) button3 the text of the 3rd button (from the right) button4 the text of the 4th button (from the right) switches (optional) see below userlabel (only for userpassword) text of the label of the username input field passwordlabel (only for userpassword) text of the label of the password input field
If you specify an empty button text, no button will be displayed. Switches can be set to:input to display an input dialog boxpassword to display a password input dialog boxuserpassword to get a dialog box which asks for a username and password
You can also add this extra switch for the userpassword dialog:-StartField1 start with the cursor in the first input field-StartField2 start with the cursor in the second input field
Returned result
The number of the button that was pushed, and the text input if applicable.
Special considerations
See also "TrDl-DialogEx", which has more possibilities.
IMPORTANT Use only in a script. Do not use this function in a calculated field definition, because when FileMakercalculates the fields this will result into a repeated dialog for EACH record. Not funny if you have 100,000 records. Also donot use the separator in the text or buttons itself. See also "Troi-Set Default Separator" and "Troi-Set Separator Once" ifyou want to use a different separator.
See "TrDl-SetDialogTitle" if you want to change the title of the dialog. See also the functions "TrDl-GetInput" andTrDl-GetButton for easy parsing of the result.
Example usage
Set Field[gButtonNr,External(TrDl-DoDialog, "Do you want to save the text?|OK|Cancel||Don't Save")]
This will show a dialog box with 3 buttons.
Example 2
We assume that in your FileMaker file the following fields are defined: gDialogText Global, text gOKButtonLabel Global, text
gCancelButtonLabel Global, text result Global, text
The gDialogText field contains the text you want to display, and can be filled for example with a calculation.gOKButtonLabel and gCancelButtonLabel should be filled with "OK" and "Cancel" for use in the English language, andwith translations in other languages. In ScriptMaker add the following script step:
Set Field [ result, External("TrDl-DoDialog", gDialogText & "|" &gOKButtonLabel "|" &gCancelButtonLabel ) ]
This shows a dialog with the text and an OK and Cancel button in the appropriate language.
Example 3
This example will show an UserPassword dialog. We assume that in your FileMaker file the following fields is defined: result Global, text
In ScriptMaker add the following script step:
Set Field [ result, External("TrDl-DoDialog","¶Please enter user name and password:|OK |Cancel|||Userpassword -StartField1 |" &Status(CurrentUserName) & "|User Name: |Password: ") ]
This shows a dialog with two input fields: one for user name the other for the password. The switch "-StartField1" willselect the first field, so the user can edit the user name right away. If the user is usually the same, add a switch"-StartField2" instead, so that user only has to give the password.
12
TrDl-DoFlashDialog
Syntax Set Field [ result, External("TrDl-DoFlashDialog", "ticks|text|switches" )]
Displays a flash dialog box for a specified period of time.
Parametersticks The time this dialog must be visible, in 1/60th of a second.text Specifies the text you want to displayswitches (optional) this changes the behaviour of the dialog
Switches can be empty or one of these:-NoteIcon shows a note icon (indicating this dialog gives the user information)-CautionIcon shows a caution icon (indicating this dialog warns the user)-StopIcon shows a stop icon (indicating this something severe which the user needs to address )-CustomIcon shows a custom icon. This icon needs to be set before with the TrDl-IconControl function
Returned result
This function always returns 0.
Special considerations
You can hold flash dialogs on the screen longer, or get rid of them early. This is what is possible:
- To dismiss a flash dialog: click on the dialog or press the ENTER or SPACE key.- To keep a flash dialog longer on the screen: click on the dialog and hold the mousebutton down. Or keep the ENTER orSPACE key down. When you release the mousebutton or key the dialog goes away.
IMPORTANT: Use only in a script. Do not use this function in a calculated field definition, because when FileMakercalculates the fields, this will result into a repeated dialog for EACH record. Not funny if you have 100,000 records. Alsodo not use the separator in the text or buttons itself. See also "Troi-Set Default Separator" and "Troi-Set Separator Once" ifyou want to use a different separator.
Example usage
Set Field[gButtonNr, External(TrDl-DoFlashDialog, "120|Have a nice day")]
This will show a flash dialog box for 120 ticks = 2 seconds.
Example 2
We assume that in your FileMaker file the following fields are defined: gDialogText Global, text gTicksPrefs Global, text result Global, text
The gDialogText field contains the text you want to display, and can be filled for example with a calculation. gTicksPrefsshould be filled with a time in 1/60th of a second. You can then use this as a preference. In ScriptMaker add the followingscript step:
Set Field [ result, External("TrDl-DoFlashDialog", gTicksPrefs & "|" & gDialogText & "|" & "-NoteIcon" ) ]
This shows a flash dialog with the text and a note icon.
13
TrDl-DoListDialog
Syntax External("TrDl-DoListDialog", "switches|prompt|button1|button2|button3|button4|listitems")
Displays a list dialog box, from which the user can choose an item.
Parametersswitches this determines the behaviour of the dialog and which information is returned.prompt the text of the dialogbutton1..4 the text of the 1st to the 4th button (from the right to left)listitems the list of items (separated by a "|" char) from which the user can choose from
If you specify an empty button text, no button will be displayed.
Switches can be empty or you can add one or both of these switches:-ReturnButtonText return the *text* of the button, instead of the number-ReturnListText return the *text* of the listitem selected, instead of the index in the list.
You can also add one of these switches:-DefaultButton1 -DefaultButton2 -DefaultButton3 -DefaultButton4
This indicates which button will be selected when the user presses the ENTER key.
You can also add one or more of these switches:-Button1NeedsSelection -Button2NeedsSelection -Button3NeedsSelection -Button4NeedsSelection
If you add this switch the button is disabled until the user selects an item.
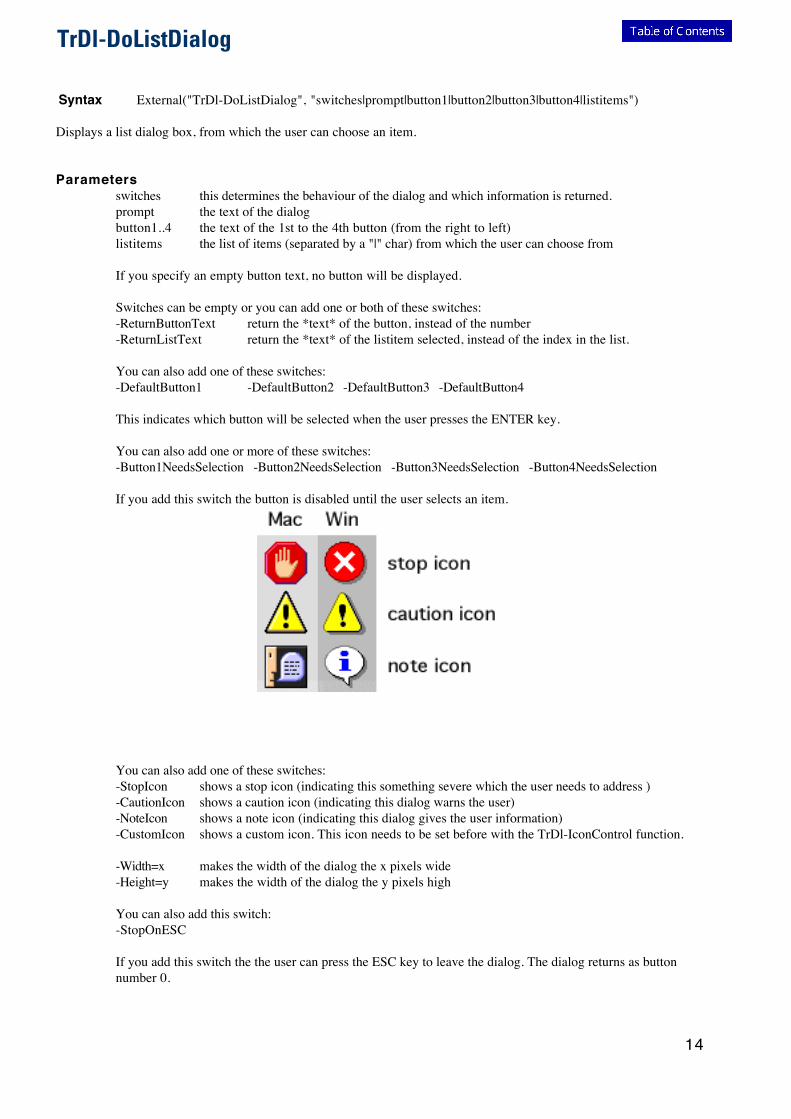
You can also add one of these switches:-StopIcon shows a stop icon (indicating this something severe which the user needs to address )-CautionIcon shows a caution icon (indicating this dialog warns the user)-NoteIcon shows a note icon (indicating this dialog gives the user information)-CustomIcon shows a custom icon. This icon needs to be set before with the TrDl-IconControl function.
-Width=x makes the width of the dialog the x pixels wide-Height=y makes the width of the dialog the y pixels high
You can also add this switch:-StopOnESC
If you add this switch the the user can press the ESC key to leave the dialog. The dialog returns as buttonnumber 0.
Returned result
The number of the button that was clicked followed by the index in the list of the item that was selected. By addingswitches this function can also return the text of the button and/or the item selected.
The plug-in can also return an error code:$$-92 = ddpLenErr , when the amount of list data is over 32768 characters
Special considerations
See "TrDl-SetDialogTitle" if you want to change the title of the dialog.
You can now type the first letter of the item you want to select.
DoListDialog now (starting with version 3.1.2) returns an error $$-92 = ddpLenErr, when the amount of list data is over32768 characters (this is the limit of the Mac OS List Manager). Please make sure your data is limited to 32767 charactersor less.
Example usage
Set Field [ result, External("TrDl-DoListDialog", "-noteIcon |Please select a fruit: |OK|Cancel|Help|Stop|" &"Apple|Pear|Lemon") ]
This will show a list of 3 items to chose from, with a note icon. If the user chooses the first item and pressed the OKbutton "1|1" will be returned.
Example 2
We assume that in your FileMaker file the following fields are defined: gFlavors Global, text result Global, text
gFlavors should contain a list of items to choose from with each items separated by a "|". In ScriptMaker add the followingscript steps:
Set Field [ result, External("TrDl-DoListDialog", "-returnListText -Button1NeedsSelection |Please select a fruit:|OK|Cancel|||" & gFlavors) ]
This will show the list items to chose from. The dialog uses a custom icon. This icon needs to be set before with theTrDl-IconControl function. The OK button can be pressed after the user selected an item.
14
TrDl-DoListDialog
Syntax External("TrDl-DoListDialog", "switches|prompt|button1|button2|button3|button4|listitems")
Displays a list dialog box, from which the user can choose an item.
Parametersswitches this determines the behaviour of the dialog and which information is returned.prompt the text of the dialogbutton1..4 the text of the 1st to the 4th button (from the right to left)listitems the list of items (separated by a "|" char) from which the user can choose from
If you specify an empty button text, no button will be displayed.
Switches can be empty or you can add one or both of these switches:-ReturnButtonText return the *text* of the button, instead of the number-ReturnListText return the *text* of the listitem selected, instead of the index in the list.
You can also add one of these switches:-DefaultButton1 -DefaultButton2 -DefaultButton3 -DefaultButton4
This indicates which button will be selected when the user presses the ENTER key.
You can also add one or more of these switches:-Button1NeedsSelection -Button2NeedsSelection -Button3NeedsSelection -Button4NeedsSelection
If you add this switch the button is disabled until the user selects an item.
You can also add one of these switches:-StopIcon shows a stop icon (indicating this something severe which the user needs to address )-CautionIcon shows a caution icon (indicating this dialog warns the user)-NoteIcon shows a note icon (indicating this dialog gives the user information)-CustomIcon shows a custom icon. This icon needs to be set before with the TrDl-IconControl function.
-Width=x makes the width of the dialog the x pixels wide-Height=y makes the width of the dialog the y pixels high
You can also add this switch:-StopOnESC
If you add this switch the the user can press the ESC key to leave the dialog. The dialog returns as buttonnumber 0.
Returned result
The number of the button that was clicked followed by the index in the list of the item that was selected. By addingswitches this function can also return the text of the button and/or the item selected.
The plug-in can also return an error code:$$-92 = ddpLenErr , when the amount of list data is over 32768 characters
Special considerations
See "TrDl-SetDialogTitle" if you want to change the title of the dialog.
You can now type the first letter of the item you want to select.
DoListDialog now (starting with version 3.1.2) returns an error $$-92 = ddpLenErr, when the amount of list data is over32768 characters (this is the limit of the Mac OS List Manager). Please make sure your data is limited to 32767 charactersor less.
Example usage
Set Field [ result, External("TrDl-DoListDialog", "-noteIcon |Please select a fruit: |OK|Cancel|Help|Stop|" &"Apple|Pear|Lemon") ]
This will show a list of 3 items to chose from, with a note icon. If the user chooses the first item and pressed the OKbutton "1|1" will be returned.
Example 2
We assume that in your FileMaker file the following fields are defined: gFlavors Global, text result Global, text
gFlavors should contain a list of items to choose from with each items separated by a "|". In ScriptMaker add the followingscript steps:
Set Field [ result, External("TrDl-DoListDialog", "-returnListText -Button1NeedsSelection |Please select a fruit:|OK|Cancel|||" & gFlavors) ]
This will show the list items to chose from. The dialog uses a custom icon. This icon needs to be set before with theTrDl-IconControl function. The OK button can be pressed after the user selected an item.
15
TrDl-GetButton
Syntax Set Field [ result, External("TrDl-GetButton", "" )]
Returns the number of the button clicked in the last dialog shown.
Parametersnone, please leave empty for future use.
Returned result
The number of the button clicked in the last dialog shown.
Special considerations
This function makes it easy to get the button number of a dialog that returns multiple results.
The button number is saved by the plug-in until a next dialog is displayed. Please be aware that each dialog function of theplug-in resets the number. Dialogs that have no buttons will set the button number to 0. (This is to be able to extend thefunctionality of these functions in the future).
When the FileMaker application stops, the saved button number is reset to 0.
See also the function "TrDl-GetInput".
Example usage
Set Field[ gUsername,External(TrDl-GetButton, "")]
This will return the number of the button clicked, for example 3.
Example 2
This example will show a password dialog. We assume that in your FileMaker file the following field is defined: result Global, text
In ScriptMaker add the following script steps:
Set Field [ result, External("TrDl-InputDialog", "-StopIcon -StartField2 -Bullet2 | 2 |" & "Please enter your name and password: |OK|Cancel") ]If [External("TrDl-GetButton", "" )=1 and External("TrDl-GetInput", "-text1" )= "sesame"] ... do your secret stuff here...End If
16
TrDl-GetInput
Syntax Set Field [ result, External("TrDl-GetInput", "switches" )]
returns the contents of one of the input fields. This makes it easy to get the result without parsing.
Parametersswitches specify which input data from the last dialog is returned.
Switches can be set to:-Text1 this will return the text of the first input field (from the top) from the last dialog.-Text2 this will return the text of the second input field (from the top) from the last dialog.-Text3 this will return the text of the third input field (from the top) from the last dialog....-Text9 this will return the text of the 9th input field (from the top) from the last dialog.
Returned result
The text of the specified input field, from the last dialog shown.
Special considerations
The text of the input field(s) is saved by the plug-in until a next dialog is displayed. Please be aware that each dialogfunction of the plug-in resets the text. Dialogs that have no input field(s) will set the text to "". (This is to be able toextend the functionality of these functions in the future).
When the FileMaker application stops, the input data is reset to "".
See also the function "TrDl-GetButton".
Example usage
Set Field[ gUsername,External("TrDl-GetInput", "-Text1")]
This will put the data of the first input field of the last dialog shown, for example "John", in the global field gUserName.
Example 2
This example will show an an input dialog with 5 input fields. We use the Get-Input function to easily get the data out.We assume that in your FileMaker file the following fields are defined: Name Text
Address TextCity TextZip TextCountry Text
result Global, text
In ScriptMaker add the following script steps:
Set Field [ result, External("TrDl-InputDialog", "-NoteIcon |5|Please enter your personal data: |OK|Cancel") ]If [ External("TrDl-GetButton", "" )=1 ] Set Field [ Name, External("TrDl-GetInput" , "-text1") ] Set Field [ Address, External("TrDl-GetInput" , "-text2") ] Set Field [ City, External("TrDl-GetInput" , "-text3") ] Set Field [ Zip, External("TrDl-GetInput" , "-text4") ] Set Field [ Country, External("TrDl-GetInput" , "-text5") ]End If
Example 3
This example will show an an list dialog with 1 input field. We use the Get-Input function to easily get the data out. Weassume that in your FileMaker file the following fields are defined: FlavourChozen Text result Global, text
In ScriptMaker add the following script steps: Set Field [ result, External("TrDl-DoListDialog", "-noteIcon -returnListText |Please select a fruit:" &
"|OK|Cancel|Help|Stop|" & "Apple|Pear|Lemon|Prune") ] Set Field [ FlavourChozen, External("TrDl-GetInput" , "-text1") ]
17
TrDl-GetInput
Syntax Set Field [ result, External("TrDl-GetInput", "switches" )]
returns the contents of one of the input fields. This makes it easy to get the result without parsing.
Parametersswitches specify which input data from the last dialog is returned.
Switches can be set to:-Text1 this will return the text of the first input field (from the top) from the last dialog.-Text2 this will return the text of the second input field (from the top) from the last dialog.-Text3 this will return the text of the third input field (from the top) from the last dialog....-Text9 this will return the text of the 9th input field (from the top) from the last dialog.
Returned result
The text of the specified input field, from the last dialog shown.
Special considerations
The text of the input field(s) is saved by the plug-in until a next dialog is displayed. Please be aware that each dialogfunction of the plug-in resets the text. Dialogs that have no input field(s) will set the text to "". (This is to be able toextend the functionality of these functions in the future).
When the FileMaker application stops, the input data is reset to "".
See also the function "TrDl-GetButton".
Example usage
Set Field[ gUsername,External("TrDl-GetInput", "-Text1")]
This will put the data of the first input field of the last dialog shown, for example "John", in the global field gUserName.
Example 2
This example will show an an input dialog with 5 input fields. We use the Get-Input function to easily get the data out.We assume that in your FileMaker file the following fields are defined: Name Text
Address TextCity TextZip TextCountry Text
result Global, text
In ScriptMaker add the following script steps:
Set Field [ result, External("TrDl-InputDialog", "-NoteIcon |5|Please enter your personal data: |OK|Cancel") ]If [ External("TrDl-GetButton", "" )=1 ] Set Field [ Name, External("TrDl-GetInput" , "-text1") ] Set Field [ Address, External("TrDl-GetInput" , "-text2") ] Set Field [ City, External("TrDl-GetInput" , "-text3") ] Set Field [ Zip, External("TrDl-GetInput" , "-text4") ] Set Field [ Country, External("TrDl-GetInput" , "-text5") ]End If
Example 3
This example will show an an list dialog with 1 input field. We use the Get-Input function to easily get the data out. Weassume that in your FileMaker file the following fields are defined: FlavourChozen Text result Global, text
In ScriptMaker add the following script steps: Set Field [ result, External("TrDl-DoListDialog", "-noteIcon -returnListText |Please select a fruit:" &
"|OK|Cancel|Help|Stop|" & "Apple|Pear|Lemon|Prune") ] Set Field [ FlavourChozen, External("TrDl-GetInput" , "-text1") ]
18
TrDl-GetPopup
Syntax Set Field [ result, External("TrDl-GetPopup", "switches" )]
Returns the popup list that is currently stored in the plug-in.
Parametersswitches specifies which popuplist is returned
Switches must be one of these switches:-Popup1 get popup list 1-Popup2 get popup list 2-Popup3 get popup list 3-Popup4 get popup list 4... ...-Popup8 get popup list 8-Popup9 get popup list 9
Returned result
The list of popup values separated by returns.
Special considerations
If there is no popup list the result is an empty text.
Example usage
Set Field[ gResult, External("TrDl-GetPopup" , "-Popup1") ]
This will return the popup list 1 as currently set in the plug-in. For example it may return: Patrick Jonathan Brent - Guest
19
TrDl-IconControl
Syntax External("TrDl-IconControl", "-setCustomIcon")
Sets the custom icon, to be used in subsequent dialogs where the switch "-customIcon" is specified.
Parametersswitch set to "-SetCustomIcon" Other switches may be added in future versions.
Returned result
If successful it returns 0.If unsuccessful it returns an error code starting with $$ and the error code. Possible codes are:$$-50 = parameter error, the clipboard was not saved first.$$-41 = not enough memory.
Other errors may be returned. (See OSErrrs for more information on error codes.)
Special considerations
You can specify an image of any size. However as the dialogs show the icons at 32x32 pixels it is best to use that size.You can use a custom icon with the and the functions: DialogEx, DoListDialog and InputDialog.
Example usage
We assume that in your FileMaker file the following fields are defined: gCustomIcon Global, container gErrorCode Global, text
gCustomIcon should contain an icon. In ScriptMaker add the following script steps:Copy [Select, "gCustomIcon"]Set Field [gErrorCode, External("TrDl-IconControl", "-setCustomIcon")]If [Left( gErrorCode , 2 ) = "$$"] Beep Show Message [An error occurred.]End If
This will set the custom icon to the contents of the container field "gCustomIcon".
20
TrDl-InputDialog
Syntax External("TrDl-InputDialog", "switches|nr. of fields|prompt|button1|button2|button3|button4")
Displays an input dialog box, which the user can fill the input fields. Each of the up to 9 input fields can be a normal textinput field, a password field, a popup menu or a checkbox.
Parametersswitches this determines the behaviour of the dialog and which information is returned.nr. of fields the number of inputfields to be shown. This can be 1 to 9.prompt the text of the dialogbutton1..4 the text of the 1st to the 4th button (from the right to left)
If you specify an empty button text, no button will be displayed. Switches can be empty or you can add one orboth of these switches:-ReturnButtonText return the *text* of the button, instead of the number
To indicates which button will be selected when the user presses the ENTER key you can add one of theseswitches:-DefaultButton1 -DefaultButton2 -DefaultButton3 -DefaultButton4
For each field you can also add one of these field format switches:-Bullet1 -Bullet2 -Bullet3 -Bullet4 ... -Bullet9-Popup1 -Popup2 -Popup3 -Popup4 ... -Popup9-Checkbox1 -Checkbox2 -Checkbox3 -Checkbox4 ...-Checkbox9This indicates for a field if it is a bullet field, a popup field or a checkbox field. If you don't specify a fieldformat switch the field will be a normal input field.
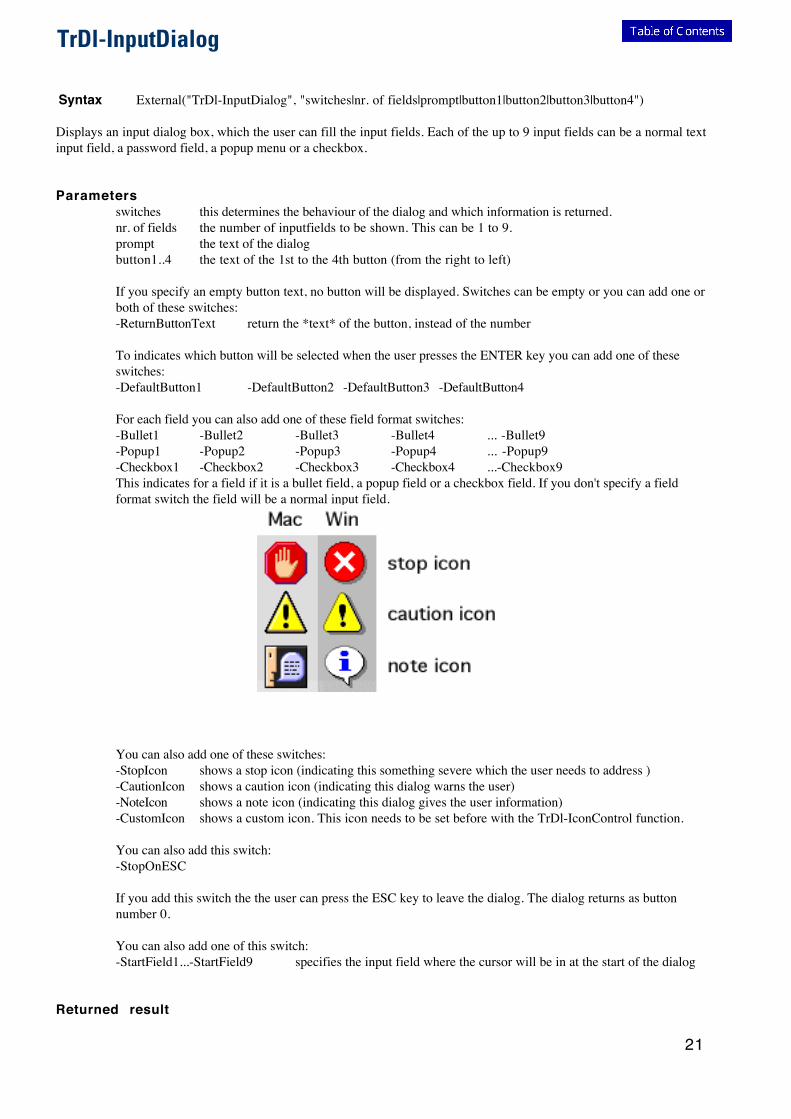
You can also add one of these switches:-StopIcon shows a stop icon (indicating this something severe which the user needs to address )-CautionIcon shows a caution icon (indicating this dialog warns the user)-NoteIcon shows a note icon (indicating this dialog gives the user information)-CustomIcon shows a custom icon. This icon needs to be set before with the TrDl-IconControl function.
You can also add this switch:-StopOnESC
If you add this switch the the user can press the ESC key to leave the dialog. The dialog returns as buttonnumber 0.
You can also add one of this switch:-StartField1...-StartField9 specifies the input field where the cursor will be in at the start of the dialog
Returned result
The number of the button that was clicked followed by the text of the input fields. By adding switches this function canalso return the text of the button.
Special considerations
See "TrDl-SetDialogTitle" if you want to change the title of the dialog.See "TrDl-SetPosition" if you want to change the position of the dialog.See "TrDl-SetInput" to set the text to be preentered into the input fields.See "TrDl-SetLabels" to set the labels to the left of the input fields.See "TrDl-SetPopup" to set the popup values to be used for popup fields.
Example usage
Set Field [ result, External("TrDl-InputDialog", "-NoteIcon |5 |Please enter your personal data: |OK|Cancel|Help|Stop|") ]
This will show 5 input fields to fill in, with a note icon. If the user clicked the OK button a possible result can be:"1|John|Smith|Berkeley|USA".
Example 2
We assume that in your FileMaker file the following fields are defined: result Global, text gErrorCode Global, text
In ScriptMaker add the following script steps: Set Field [ gErrorCode, External("TrDl-SetLabels", "-Unused |Name|Password|Remember password")] Set Field [ gErrorCode, External("TrDl-SetInput", "-Unused |" &Status(CurrentUserName) &"||1")] Set Field [ result, External("TrDl-InputDialog","-StopIcon -Bullet2 -Checkbox3 |3|Please enter your name and password: |OK|Cancel|Help|Stop|") ]
This will show the a user/password dialog which has also a checkbox callled "Remember password". The checkbox will bechecked because the input for that field is set to 1.
21
TrDl-InputDialog
Syntax External("TrDl-InputDialog", "switches|nr. of fields|prompt|button1|button2|button3|button4")
Displays an input dialog box, which the user can fill the input fields. Each of the up to 9 input fields can be a normal textinput field, a password field, a popup menu or a checkbox.
Parametersswitches this determines the behaviour of the dialog and which information is returned.nr. of fields the number of inputfields to be shown. This can be 1 to 9.prompt the text of the dialogbutton1..4 the text of the 1st to the 4th button (from the right to left)
If you specify an empty button text, no button will be displayed. Switches can be empty or you can add one orboth of these switches:-ReturnButtonText return the *text* of the button, instead of the number
To indicates which button will be selected when the user presses the ENTER key you can add one of theseswitches:-DefaultButton1 -DefaultButton2 -DefaultButton3 -DefaultButton4
For each field you can also add one of these field format switches:-Bullet1 -Bullet2 -Bullet3 -Bullet4 ... -Bullet9-Popup1 -Popup2 -Popup3 -Popup4 ... -Popup9-Checkbox1 -Checkbox2 -Checkbox3 -Checkbox4 ...-Checkbox9This indicates for a field if it is a bullet field, a popup field or a checkbox field. If you don't specify a fieldformat switch the field will be a normal input field.
You can also add one of these switches:-StopIcon shows a stop icon (indicating this something severe which the user needs to address )-CautionIcon shows a caution icon (indicating this dialog warns the user)-NoteIcon shows a note icon (indicating this dialog gives the user information)-CustomIcon shows a custom icon. This icon needs to be set before with the TrDl-IconControl function.
You can also add this switch:-StopOnESC
If you add this switch the the user can press the ESC key to leave the dialog. The dialog returns as buttonnumber 0.
You can also add one of this switch:-StartField1...-StartField9 specifies the input field where the cursor will be in at the start of the dialog
Returned result
The number of the button that was clicked followed by the text of the input fields. By adding switches this function canalso return the text of the button.
Special considerations
See "TrDl-SetDialogTitle" if you want to change the title of the dialog.See "TrDl-SetPosition" if you want to change the position of the dialog.See "TrDl-SetInput" to set the text to be preentered into the input fields.See "TrDl-SetLabels" to set the labels to the left of the input fields.See "TrDl-SetPopup" to set the popup values to be used for popup fields.
Example usage
Set Field [ result, External("TrDl-InputDialog", "-NoteIcon |5 |Please enter your personal data: |OK|Cancel|Help|Stop|") ]
This will show 5 input fields to fill in, with a note icon. If the user clicked the OK button a possible result can be:"1|John|Smith|Berkeley|USA".
Example 2
We assume that in your FileMaker file the following fields are defined: result Global, text gErrorCode Global, text
In ScriptMaker add the following script steps: Set Field [ gErrorCode, External("TrDl-SetLabels", "-Unused |Name|Password|Remember password")] Set Field [ gErrorCode, External("TrDl-SetInput", "-Unused |" &Status(CurrentUserName) &"||1")] Set Field [ result, External("TrDl-InputDialog","-StopIcon -Bullet2 -Checkbox3 |3|Please enter your name and password: |OK|Cancel|Help|Stop|") ]
This will show the a user/password dialog which has also a checkbox callled "Remember password". The checkbox will bechecked because the input for that field is set to 1.
22
TrDl-ProgressBar
Syntax Set Field [ result, External("TrDl-ProgressBar", "command|maxval/incrval|text" )]
Displays a progress bar dialog box.
Parameterscommand the command to be usedmaxval the number of steps that should be usedincrval indicates how much steps the progress bar should increasetext the text to be shown
The first 'command' parameter indicates the commands, which may be: Show, Incr or Stop. They are to be usedas follows:1- Show command: makes the progress bar dialog box visible.2- Incr command: increases the progress bar (multiple times, usually in a loop).3- Stop command: the dialog is removed.
Returned result
This function returns no result.
Special considerations
If you specify a zero as maxval, an indefinite progress bar is shown (barber pole).
In some cases the time to perform lengthy scripts might increase, as FileMaker updates the screen after the ProgressBarstep. A freeze screen step does not always help.
IMPORTANT Use only in a script. Do not use this function in a calculated field definition, because when FileMakercalculates the fields this will result into a repeated dialog for EACH record. Also do not use the separator in the parameteritself.
Note that functions that use the clipboard, like pasting in a container field will not work, as they try to paste in theprogressbar window.
With FileMaker Pro 7 has a subtle change in how it handles plug-ins. This results in a delay in showing the contents ofthe progress bar. You will first see the dialog window, without any text and progress bar drawn in. After a short delay itwill show the correct contents.We are looking for ways to improve this. Note that this is a graphic defect only, and should not influence your solution inother ways.
Example usage
Use this function to indicate to a user that a script is doing a lengthy operation and provide feedback on how long thisoperation will last.
For a detailed description see the section "Using the TrDl-ProgressBar function" in the user guide.
23
TrDl-SetDialogTitle
Syntax Set Field [ result , External("TrDl-SetDialogTitle", "DialogTitle") ]
Sets the default Dialog Title for the title bar of dialogs.
ParametersdialogTitle the title of the dialog that you want to use for all subsequent dialogs
Returned result
An error code. Currently the plug-in always returns 0
Special considerations
The title will stay the same for all following dialogs until you change it again or restart FileMaker. If you add this functionto your startup script, all dialogs with a title bar will show the title you've given.
NOTE On Mac OS all dialogs except the list dialog have no title bar. This function has no effect for these title bar-lessdialogs.
Example usage
External("TrDl-SetDialogTitle", "Troi's Dialog Demo Solution")
This will set the title of subsequent dialogs to "Troi's Dialog Demo Solution".
Example 2
We assume that in your FileMaker file the following fields are defined: gDialogTitle Global, text gResult Global, text
In ScriptMaker add the following script step: Set Field [ gResult , External("TrDl-SetDialogTitle", gDialogTitle ) ]
This script will use the contents of the global text field to set the dialog title.
24
TrDl-SetInput
Syntax Set Field [ result, External("TrDl-SetInput", "switches |text1|text2|text3|text4|...|text9" )]
Sets the text to be pre-entered in the input fields of the next input dialog.
Parametersswitches not used, reserved for future use. Leave blank or put "-Unused"text1...text9 the text that will be pre-entered into the input fields 1 to 9.
Returned result
An error code. Currently the plug-in always returns 0.
Special considerations
The text of the input field(s) is saved by the plug-in until a dialog is displayed. Please be aware that each dialog function ofthe plug-in resets the text. Dialogs that have no input field(s) will set the text to "". (This is to be able to extend thefunctionality of these functions in the future).
When the FileMaker application stops, the input data is reset to "".
For password fields: the text is ignored (as you can't see it anyway).For popup fields: if the text is present in the list of possible choices the first one is selected.For checkbox fields: use 1 and 0 to check resp. uncheck a checkbox field.
Example usage
Set Field[ gErrorCode,External(TrDl-SetInput, "-Unused|Apple|London|16|Brown|Square")]
This will set the text to be used as the pre-entered text in the next InputDialog function to the five texts.
Example 2
This example will set the pre-entered text to your user name and the value from a field. We assume that in your FileMakerfile the following field is defined: gErrorCode Global, text gFieldText Global, text
In ScriptMaker add the following script step:
Set Field [ result, External("TrDl-SetInput", "-Unused |" & Status(CurrentUserName) & "|" & gFieldText) ]
25
TrDl-SetLabels
Syntax Set Field [ result, External("TrDl-SetLabels", "switches |label1|label2|label3|label4|label5" )]
Sets the label text to be displayed next to the input fields of the next input dialog.
Parametersswitches not used, reserved for future use. Leave blank or put "-Unused"label1...label9 the text that will be used as labels for the input fields 1 to 9.
Returned result
An error code. Currently the plug-in always returns 0.
Special considerations
The labels of the input fields are saved by the plug-in until they are set again. So you only have to set them once if youwant to use the same labels for multiple dialogs. When the FileMaker application stops, the labels are reset to "".
If you have less than 5 fields for the next dialog box you can only specify the labels you need.
Note that for checkbox fields the label is put to the right of the checkbox.
Example usage
Set Field[ gErrorCode, External("TrDl-SetLabels", "-Unused |Name|Address|City|Zip|Country")]
This will set the labels for fields 1 to 5.
Example 2
This example will set the labels from a field, this makes it easy to translate a dialog to a different language. We assumethat in your FileMaker file the following fields are defined: gErrorCode Global, text gLabel1 ... gLabel6 Globals, text
In ScriptMaker add the following script step:
Set Field [ result, External("TrDl-SetLabels", "-Unused |" & gLabel1 & "|" & gLabel2 & "|" & gLabel3 & "|" & gLabel4& "|" & gLabel5 & "|" & gLabel6 & "|" & gLabel7 & "|" & gLabel8 & "|" & gLabel9) ]
26
TrDl-SetListInput
Syntax External("TrDl-SetListInput", "switches|preselectedText")
This function allows you to preselect a item from the list in the TrDl-DoListDialog function.
Parametersswitches not used, reserved for future use. Leave blank or put "-unused"preselectedText the text of the list dialog to be selected
Returned result
An error code. Currently the plug-in always returns 0.
Special considerations
See "TrDl-DoListDialog" for more information on the actual list dialog.
Example usage
Set Field [ result, External("TrDl-SetListInput", "-unused |" & "Lemon") ]Set Field [ result, External("TrDl-DoListDialog", "-noteIcon |Please select a fruit: |OK|Cancel|Help|Stop|" &"Apple|Pear|Lemon") ]
This will show a list dialog with the Lemon selected when the dialog starts.
27
TrDl-SetPopup
Syntax Set Field [ result, External("TrDl-SetPopup", "switches |popupvalue 1¶popupvalue 2¶...popupvalue n" )]
Sets the values to be used for the popup list.
Parametersswitches specifies which popuplist is setpopupvalues the list of text strings to be used. Separate each item with a return "¶"
Switches must be one of these switches:-Popup1 set popup list 1-Popup2 set popup list 2-Popup3 set popup list 3-Popup4 set popup list 4... ...-Popup8 set popup list 8-Popup9 set popup list 9
Returned result
An error code. Currently the plug-in always returns 0.
Special considerations
If you put a hyphen "-" on a separate line as a popupitem then the popup show in the input dialog will have a separatorline.
The popupvalues of this popup are saved by the plug-in until you set this popup again. So you only have to set a popuponce if you want to use the same popup list for the same field in multiple dialogs. When the FileMaker application stops,the popups are reset to "".
You can limit to specifing the popups you will be using, for example popup 3 and popup 5.
Note that the number of separate popupvalues is limited to 2048. Each item can be up to 255 characters. The total numberof characters may not exceed FileMaker 64000 character limit. If no items are given the popup will be disabled (grayed out).
Example usage
Set Field[ gErrorCode, External("TrDl-SetPopup", "-Popup2 | " & "Patrick¶Jonathan¶Brent¶-¶Guest") ]
This will set the the popup list 2 to: Patrick Jonathan Brent - Guest
All next input dialogs, which have a popup as field 2, will use this list.
Example 2
This example will show an input with 2 popup lists. The first list is filled from a field. The second is filled from avaluelist. We assume that in your FileMaker file a value list "PopupValues" is defined and also the following fields: gErrorCode Global, text gPopupData Global, text gInputText1 Global, text gInputText2 Global, text gResult Global, text
In ScriptMaker add the following script steps:
Set Field [ gErrorCode, External("TrDl-SetPopup", "-Popup1 |" & gPopupData) ]Set Field [ gErrorCode, External("TrDl-SetPopup", "-Popup2 |" & ValueListItems( Status(CurrentFileName), "PopupValues" ) ) ]Set Field [ gResult, External("TrDl-SetInput", "-Unused |" & gInputText1 & "|" & gInputText2 ]
Note that the popups are preselected with the values from gInputText1 and gInputText2, if that text is present in the list ofpossible choices.
Example 3
To clear the values from a popup list use a command like this:
Set Field[ gErrorCode, External("TrDl-SetPopup", "-Popup2 |") ]
This will set the popup list 2 to an empty value.
28
TrDl-SetPopup
Syntax Set Field [ result, External("TrDl-SetPopup", "switches |popupvalue 1¶popupvalue 2¶...popupvalue n" )]
Sets the values to be used for the popup list.
Parametersswitches specifies which popuplist is setpopupvalues the list of text strings to be used. Separate each item with a return "¶"
Switches must be one of these switches:-Popup1 set popup list 1-Popup2 set popup list 2-Popup3 set popup list 3-Popup4 set popup list 4... ...-Popup8 set popup list 8-Popup9 set popup list 9
Returned result
An error code. Currently the plug-in always returns 0.
Special considerations
If you put a hyphen "-" on a separate line as a popupitem then the popup show in the input dialog will have a separatorline.
The popupvalues of this popup are saved by the plug-in until you set this popup again. So you only have to set a popuponce if you want to use the same popup list for the same field in multiple dialogs. When the FileMaker application stops,the popups are reset to "".
You can limit to specifing the popups you will be using, for example popup 3 and popup 5.
Note that the number of separate popupvalues is limited to 2048. Each item can be up to 255 characters. The total numberof characters may not exceed FileMaker 64000 character limit. If no items are given the popup will be disabled (grayed out).
Example usage
Set Field[ gErrorCode, External("TrDl-SetPopup", "-Popup2 | " & "Patrick¶Jonathan¶Brent¶-¶Guest") ]
This will set the the popup list 2 to: Patrick Jonathan Brent - Guest
All next input dialogs, which have a popup as field 2, will use this list.
Example 2
This example will show an input with 2 popup lists. The first list is filled from a field. The second is filled from avaluelist. We assume that in your FileMaker file a value list "PopupValues" is defined and also the following fields: gErrorCode Global, text gPopupData Global, text gInputText1 Global, text gInputText2 Global, text gResult Global, text
In ScriptMaker add the following script steps:
Set Field [ gErrorCode, External("TrDl-SetPopup", "-Popup1 |" & gPopupData) ]Set Field [ gErrorCode, External("TrDl-SetPopup", "-Popup2 |" & ValueListItems( Status(CurrentFileName), "PopupValues" ) ) ]Set Field [ gResult, External("TrDl-SetInput", "-Unused |" & gInputText1 & "|" & gInputText2 ]
Note that the popups are preselected with the values from gInputText1 and gInputText2, if that text is present in the list ofpossible choices.
Example 3
To clear the values from a popup list use a command like this:
Set Field[ gErrorCode, External("TrDl-SetPopup", "-Popup2 |") ]
This will set the popup list 2 to an empty value.
29
TrDl-SetPosition
Syntax Set Field [ result, External("TrDl-SetPosition", "switches |left|top" )]
Sets the position on the screen of dialogs to be shown.
Parametersswitches specifies the scope of the SetPosition functionleft the left co-ordinate (in pixels) of the dialogtop the top co-ordinate (in pixels) of the dialog
Switches can be empty or must be one of these switches:-All show all subsequent dialogs at the specified position-Once show only the next dialog at the specified position
If you don't specify a switch the position is set once. If you want to reset the position to the default positionuse this switch:-Default show all subsequent dialogs at the default position
Returned result
An error code. Currently the plug-in always returns 0.
Special considerations
On the Mac the plug-in makes sure the dialog does not display under the menu bar.
Example usage
Set Field[ gErrorCode, External("TrDl-SetPosition", "-Once | 100| 150") ]
This will set the position of the next dialog box to 100 pixels from the left and 150 pixels from the top of the screen.
Example 2
This example will use fields to set the position fror all next dialogs. We assume that in your FileMaker file the followingfields are defined: gErrorCode Global, text gLeft Global, text gTop Global, text
In ScriptMaker add the following script steps:
Set Field [ gErrorCode, External("TrDl-SetPosition", "-All |" & gLeft & "|" & gTop) ]
30

TrDl-SetPreference
Syntax Set Field [ result, External("TrDl-SetPreference", "switches|value") ]
Sets preferences.
Parametersswitches specifies which preference to setvalue the value to set it to.
Switches can be only this switch:-ProgressbarDefunctTicks Set the time the progress bar disappears automatically in 1/60th of a second.
Returned result
If successful it returns 0.If unsuccessful it returns an error code starting with $$ and the error code. Possible codes are:$$-50 = parameter error.
Example usage
Set Field[ gErrorCode, External("TrDl-SetPreference", "-ProgressbarDefunctTicks |" & 20*60) ]
This will change the time of automatic removal of a progressbar dialog to 20 seconds. When you forget to remove theProgressBar window the plug-in removes it automatically after 30 seconds.In some special cases you might want to change this, for example to be able to have a longer debug time.
31
TrDl-Version
Syntax Set Field [ result, External("TrDl-Version", "switches") ]
Use this function to see which version of the plug-in is loaded. This function is also used to register the plug-in.
Parametersswitches determine the behaviour of the function
switches can be one of this:-GetVersionString the version string is returned (default)-GetVersionNumber Returns the version number of the plug-in-ShowFlashDialog Shows the Flash Dialog of the plug-in (returns 0)
If you leave the parameter empty the version string is returned.
Returned result
The function returns "" if this plug-in is not loaded. If the plug-in is loaded the result depends on the input parameter. It iseither a:
-GetVersionString:If you asked for the version string it will return for example "Troi Dialog Plug-in 3.0"
-GetVersionNumber:If you asked for the version number it returns the version number of the plug-in x1000. For example version 2.2 willreturn number 2200.
-ShowFlashDialog:This will show the flash dialog and then return the error code 0.
Special considerations
Important: always use this function to determine if the plug-in is loaded. If the plug-in is not loaded use of externalfunctions may result in data loss, as FileMaker will return an empty field to any external function that is not loaded.
Example usage
External(TrDl-Version, "") will for example return "Troi Dialog Plug-in 3.0".
Example 2
External("TrDl-Version", "-GetVersionNumber") will return 1100 for version 1.1.External("TrDl-Version", "-GetVersionNumber") will return 1101 for version 1.1b1External("TrDl-Version", "-GetVersionNumber") will return 2130 for version 2.1.3
So for example to use a feature introduced with version 1.3 test if the result is equal or greater than 1300.
32

Troi-DoDialog (old name)
Syntax Set Field [ result, External("Troi-DoDialog", "prompt|button1|button2|button3|button4|switches" )]
Displays a dialog box (similar to the "Show Message" script step).
Parameters
Returned result
Special considerations
•See “TrDl-DoDialog”. This is an old name, and is supplied for compatiblity with version 1.0 of Troi FM Plug-in.•
33
Troi-Set Default Separator
Syntax Set Field [ result, External("Troi-Set Default Separator", "separator" )]
Changes the default separator text to the given separator. The new separator is used until an other separator is specified.
ParametersThe separator text is used by the plug-in to split one parameter into multiple parts. At FileMaker startup theseparator text defaults to "|". Use this function if you want to specify a parameter part which has the currentseparator in it.
Returned result
Special considerations
The separator is shared between all Troi plug-ins.TIP Always try to specify a separator which you know won't be in any of the parameters.
Example usage
Set Field[gDontCare, External(Troi-Set Default Separator, "<->")]
34

Troi-Set Separator Once
Syntax Set Field [ result, External("Troi-Set Separator Once", "separator" )]
Changes the default separator text to the given separator, for ONE Troi Plug-in function only. After the function has beencalled the separator will revert to the default separator.
ParametersThe separator text is used by the plug-in to split one parameter into multiple parts. At FileMaker startup theseparator text defaults to "|". Use this function if you want to specify a parameter part which has the currentseparator in it.
Returned result
Example usage
Set Field[gDontCare, External(Troi-Set Separator Once, "<->")]
35