Embed Size (px)
Citation preview

INSULIN ON BOARD (IOB)
Units 1.1 u 1:09 hrsTime Remaining
B10:20 AMJuly 22, 2016 235 u
OPTIONS
BOLUS
100%

Customer Technical Support: (877) 801-6901 3
Congratulations on the purchase of your new t:slim System. Your decision to use insulin pump therapy is a sign of your commitment to your diabetes care. We recognize and respect the importance of your decision. We also recognize that your t:slim System purchase is only the beginning of your relationship with Tandem. Our commit-ment goes much deeper than simply supplying products to help you in your diabetes management. We pledge to be here to support you with training and education through our network of Clinical Diabetes Specialists. We also pledge to be here to support you with our dedicated Customer Technical Support.
This User Guide is designed to assist you with the features and functions of the t:slim System. It provides important warnings and cautions on proper op-eration as well as technical information to ensure your safety. It also provides step-by-step instructions on how to properly program, manage and care for your t:slim System.
Changes in equipment, software, or procedures occur periodically; informa-tion describing these changes will be included in future editions of this User Guide. Please contact Tandem Diabe-tes Care Customer Technical Support at (877) 801-6901 to obtain a replace-ment copy of the User Guide that is the correct version for your pump.
No part of this publication may be reproduced, stored in a retrieval sys-tem, nor transmitted in any form or by any means, electronic or mechanical, without the prior written permission of Tandem Diabetes Care, Inc., San Diego, California, USA.
Tandem Diabetes Care, Inc. 11045 Roselle Street San Diego, CA 92121 USA (858) 366-6900 www.tandemdiabetes.com
Need help? We are here for you 24 hours a day, 7 days a week at (877) 801-6901.
© 2017 Tandem Diabetes Care, Inc. All rights reserved. Tandem Diabetes Care, touch simplicity, t:connect, and t:slim are registered trademarks of Tandem Diabetes Care, Inc.
Humalog® is a registered trademark of Eli Lilly and Company.
NovoLog® is a registered trademark of Novo Nordisk A/S.
Comfort™ is a trademark of Unomedical A/S.
Bluetooth® is a registered trademark of Bluetooth SIG, Inc.
All other trademarks and copyrights are the property of their respective owners.
t:slim Insulin Pump User Guide Software Version: Trestles
Table of Contents
Customer Technical Support: (877) 801-69014
Section 1 – Before You Begin
Chapter 1 – Introduction1.1 System Description .......................................................................................................161.2 About this User Guide ...................................................................................................161.3 Important User Information ...........................................................................................171.4 Important Pediatric User Information ............................................................................171.5 Conventions of this Guide .............................................................................................18
Chapter 2 – Important Safety Information2.1 Indications for Use ........................................................................................................202.2 Contraindications ..........................................................................................................202.3 System Warnings ..........................................................................................................202.4 System Precautions ......................................................................................................242.5 Potential Benefits From Using the System ....................................................................272.6 Possible Risks From Using the System ........................................................................282.7 Working with your Healthcare Provider .........................................................................282.8 Emergency Kit ...............................................................................................................292.9 Verification of Proper Functionality................................................................................30
Table of Contents
Customer Technical Support: (877) 801-6901 5
Chapter 3 – Getting to Know Your t:slim System3.1 What your t:slim System Package Includes ..................................................................323.2 System Terminology ......................................................................................................323.3 Explanation of System Symbols....................................................................................343.4 Explanation of System Icons .........................................................................................353.5 Explanation of System Colors .......................................................................................363.6 Screen Lock ..................................................................................................................383.7 Home Screen .................................................................................................................403.8 Status Screen ................................................................................................................423.9 Bolus Screen .................................................................................................................443.10 Options Screen ..............................................................................................................463.11 My Pump Screen ...........................................................................................................483.12 Number Keypad Screen ................................................................................................503.13 Letter Keypad Screen ....................................................................................................52
Table of Contents
Customer Technical Support: (877) 801-69016
Section 2 – Key Pump Features
Chapter 4 – Getting Started4.1 Charging the t:slim Pump ..............................................................................................564.2 Using the Touch Screen ................................................................................................584.3 Turning on the t:slim Pump Screen ...............................................................................584.4 Unlocking the t:slim Pump Screen ................................................................................584.5 Edit Time .......................................................................................................................594.6 Edit Date ........................................................................................................................59
Chapter 5 – Infusion Site Care and Loading Cartridge5.1 Infusion Site Selection and Care ...................................................................................625.2 Cartridge Instructions for Use .......................................................................................645.3 Filling and Loading a t:slim Cartridge ............................................................................645.4 Filling Tubing .................................................................................................................705.5 Filling Cannula ...............................................................................................................725.6 Setting Site Reminder ...................................................................................................73
Table of Contents
Customer Technical Support: (877) 801-6901 7
Chapter 6 – Personal Profile6.1 Personal Profile Overview .............................................................................................766.2 Creating a New Profile ...................................................................................................766.3 Programming a New Personal Profile ...........................................................................786.4 Editing or Reviewing an Existing Profile ........................................................................816.5 Duplicating an Existing Profile .......................................................................................826.6 Activating an Existing Profile .........................................................................................826.7 Renaming an Existing Profile .........................................................................................836.8 Deleting an Existing Profile ............................................................................................83
Chapter 7 – Bolus7.1 Bolus Overview .............................................................................................................867.2 Food Bolus Using Units.................................................................................................867.3 Food Bolus Using Grams ..............................................................................................877.4 Correction Bolus ............................................................................................................887.5 Extended Bolus .............................................................................................................897.6 Canceling or Stopping a Bolus......................................................................................90
Table of Contents
Customer Technical Support: (877) 801-69018
Chapter 8 – Stop/Resume Insulin8.1 Stopping Insulin Delivery ...............................................................................................948.2 Resuming Insulin Delivery .............................................................................................94
Section 3 – Additional Pump Operations
Chapter 9 – Temporary Basal Rate9.1 Setting a Temp Rate ......................................................................................................989.2 Stopping a Temp Rate ...................................................................................................99
Chapter 10 – Quick Bolus10.1 Setting Up Quick Bolus ...............................................................................................10210.2 Delivering Quick Bolus ................................................................................................102
Table of Contents
Customer Technical Support: (877) 801-6901 9
Chapter 11 – t:slim Pump Settings11.1 t:slim Pump Volume .....................................................................................................10611.2 Screen Options ............................................................................................................106
Chapter 12 – t:slim Pump Info and History12.1 t:slim Pump Info ..........................................................................................................11012.2 t:slim Pump History .....................................................................................................110
Chapter 13 – t:slim Pump Reminders13.1 Low BG Reminder .......................................................................................................11213.2 High BG Reminder ......................................................................................................11313.3 After Bolus BG Reminder ............................................................................................11413.4 Missed Meal Bolus Reminder......................................................................................11413.5 Site Reminder ..............................................................................................................115
Chapter 14 – User Settable Alerts and Alarms14.1 Low Insulin Alert ..........................................................................................................11814.2 Auto-Off Alarm ............................................................................................................118
Table of Contents
Customer Technical Support: (877) 801-690110
Section 4 – t:slim Pump Safety Alerts and Alarms
Chapter 15 – t:slim Pump Alerts15.1 Low Insulin Alert ..........................................................................................................12315.2 Low Power Alerts ........................................................................................................12415.3 Incomplete Bolus Alert ................................................................................................12615.4 Incomplete Temp Rate Alert ........................................................................................12715.5 Incomplete Load Sequence Alerts ..............................................................................12815.6 Incomplete Setting Alert ..............................................................................................13115.7 Basal Rate Required Alert ...........................................................................................13215.8 Max Hourly Bolus Alert ................................................................................................13315.9 Max Bolus Alerts .........................................................................................................13415.10 Max Basal Alerts .........................................................................................................13615.11 Min Basal Alerts ..........................................................................................................13815.12 Connection Error Alert .................................................................................................14015.13 Power Source Alert......................................................................................................14115.14 Data Error Alert ............................................................................................................142
Table of Contents
Customer Technical Support: (877) 801-6901 11
Chapter 16 – t:slim Pump Alarms16.1 Resume Pump Alarm ..................................................................................................14516.2 Low Power Alarms ......................................................................................................14616.3 Empty Cartridge Alarm ................................................................................................14816.4 Cartridge Error Alarm ..................................................................................................14916.5 Cartridge Removal Alarm ............................................................................................15016.6 Temperature Alarm ......................................................................................................15116.7 Occlusion Alarms ........................................................................................................15216.8 Screen On/Quick Bolus Button Alarm .........................................................................15416.9 Altitude Alarm ..............................................................................................................15516.10 Reset Alarm .................................................................................................................156
Chapter 17 – t:slim Pump Malfunction17.1 Malfunction ..................................................................................................................158
Table of Contents
Customer Technical Support: (877) 801-690112
Section 5 – Living With and Caring for Your t:slim System
Chapter 18 – Lifestyle Issues and Travel18.1 Overview ......................................................................................................................162
Chapter 19 – Taking Care of Your t:slim System19.1 Overview ......................................................................................................................166
Table of Contents
Customer Technical Support: (877) 801-6901 13
Section 6 – Technical Specifications and Warranty
Chapter 20 – Technical Specifications20.1 Overview ......................................................................................................................17020.2 t:slim System Specifications .......................................................................................17120.3 t:slim Pump Options and Settings ..............................................................................17620.4 t:slim Pump Performance Characteristics ...................................................................17820.5 Electromagnetic Compatibility ....................................................................................18020.6 Electromagnetic Emissions .........................................................................................18120.7 Electromagnetic Immunity ...........................................................................................18220.8 Distances Between the t:slim Pump and RF Equipment ............................................18420.9 FCC Notice Concerning Interference ..........................................................................18720.10 Warranty Information ...................................................................................................18820.11 Returned Goods Policy ...............................................................................................190
Index
Section 1
Before You Begin

Chapter 1
Introduction
Customer Technical Support: (877) 801-690116
Chapter 1 – Introduction
1.1 System Description
The t:slim System is made up of the t:slim® Insulin Pump and the t:slim 3mL (300 units) cartridge. The t:slim Insulin Pump delivers insulin in two ways: con-tinuous, or basal insulin delivery, and bolus insulin delivery to cover carbohy-drates eaten (food bolus) and to lower high blood glucose (correction bolus). The disposable cartridge is filled with up to 300 units of U-100 insulin and attached to the pump. The cartridge is replaced every few days.
The t:slim System is indicated for use in individuals 6 years of age and greater.
The t:slim System is intended for single patient use and requires a prescription.
The device is indicated for use with NovoLog or Humalog U-100 insulin.
Product information, including electron-ic versions of the User Guide, a Guide to Successful Pumping, t:connect Getting Started and User Guides are available at www.tandemdiabetes.com.
1.2 About this User Guide
This User Guide covers important information on how to operate your t:slim System. It provides step-by-step instructions to help you properly program, manage and care for the System. It also provides important warnings and cautions on proper operation and technical information to ensure your safety.
In this Guide, the t:slim Pump may be referred to as “your pump” or “your t:slim Pump”. The t:slim cartridge may be referred to as “your cartridge.” Together, the t:slim Insulin Pump and the t:slim cartridge may be referred to as “your system”.
The User Guide is organized into sec-tions that allow you to learn to use your t:slim System.
Pump screens used in this Guide to demonstrate how to use features are examples only. They should not be considered suggestions for your indi-vidual needs.
Customer Technical Support: (877) 801-6901 17
Before You B
egin1
Chapter 1 – Introduction
1.3 Important User Information
Review all instructions in this User Guide before using the System.
If you are not able to use the System according to the instructions in this User Guide, you may be putting your health and safety at risk.
Pay special attention to Warnings and Precautions in this User Guide. Warnings and Precautions are identified with .
If you still have questions after reading this User Guide, contact Tandem Dia-betes Care Customer Technical Sup-port at (877) 801-6901. We are here for you 24 hours a day, 7 days a week.
1.4 Important Pediatric User Information
The following recommendations are meant to help younger users and their caregivers program, manage and care for the System.
Younger children may inadvertently press or tap the pump, leading to unin-tentional delivery of insulin.
It is the responsibility of the healthcare provider and caregiver to determine if the user is appropriate for treatment with this device.
We recommend reviewing the Quick Bolus and Feature Lock capabilities of the Tandem pump and determining how they best fit with your care plan. These features are detailed in Chapters 10 and 11 of this User Guide.
Inadvertent dislodgement of the infu-sion site may occur more frequently with children so consider securing the infusion site and tubing.
WARNINGDO NOT allow small children (either pump users or non-users) to ingest small parts, such as the rubber USB port cover and cartridge components. Small parts could pose a choking hazard. If ingested or swallowed, these small component pieces may cause internal injury or infection.
WARNINGThe System includes parts (such as the USB cable and infusion set tubing) that could pose a strangulation or asphyxi-ation hazard. Always use the appropri-ate length of infusion set and arrange cables and tubing to minimize the risk of strangulation. ENSURE that these parts are stored in a secure place when not in use.
WARNINGFor patients who do not self-manage their disease, the Feature Lock function should ALWAYS be ON when the pump is not being used by a caregiver. The Feature Lock function is intended to prevent inadvertent button presses that may lead to insulin delivery or changes in the pump settings. These
Customer Technical Support: (877) 801-690118
Chapter 1 – Introduction
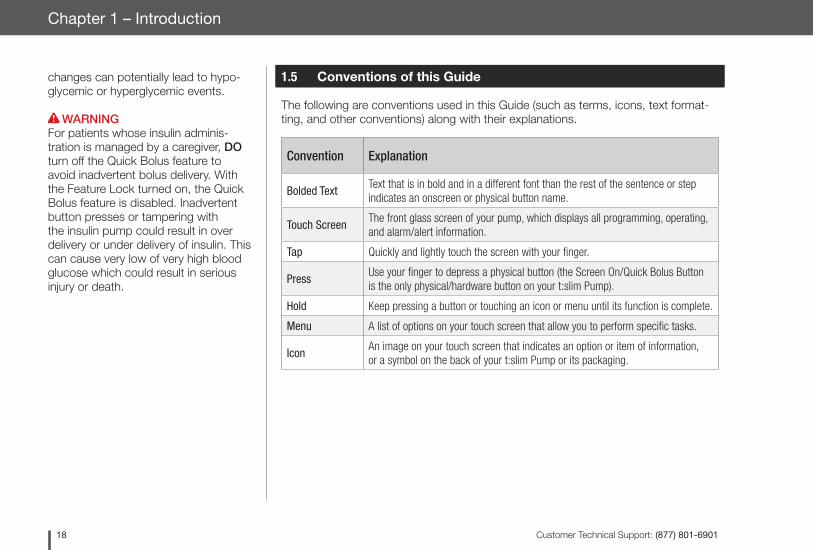
1.5 Conventions of this Guide
The following are conventions used in this Guide (such as terms, icons, text format-ting, and other conventions) along with their explanations.
Convention Explanation
Bolded TextText that is in bold and in a different font than the rest of the sentence or step indicates an onscreen or physical button name.
Touch ScreenThe front glass screen of your pump, which displays all programming, operating, and alarm/alert information.
Tap Quickly and lightly touch the screen with your finger.
PressUse your finger to depress a physical button (the Screen On/Quick Bolus Button is the only physical/hardware button on your t:slim Pump).
Hold Keep pressing a button or touching an icon or menu until its function is complete.
Menu A list of options on your touch screen that allow you to perform specific tasks.
IconAn image on your touch screen that indicates an option or item of information, or a symbol on the back of your t:slim Pump or its packaging.
changes can potentially lead to hypo-glycemic or hyperglycemic events.
WARNINGFor patients whose insulin adminis-tration is managed by a caregiver, DO turn off the Quick Bolus feature to avoid inadvertent bolus delivery. With the Feature Lock turned on, the Quick Bolus feature is disabled. Inadvertent button presses or tampering with the insulin pump could result in over delivery or under delivery of insulin. This can cause very low of very high blood glucose which could result in serious injury or death.

Chapter 2
Important Safety Information
Customer Technical Support: (877) 801-690120
Chapter 2 – Important Safety Information
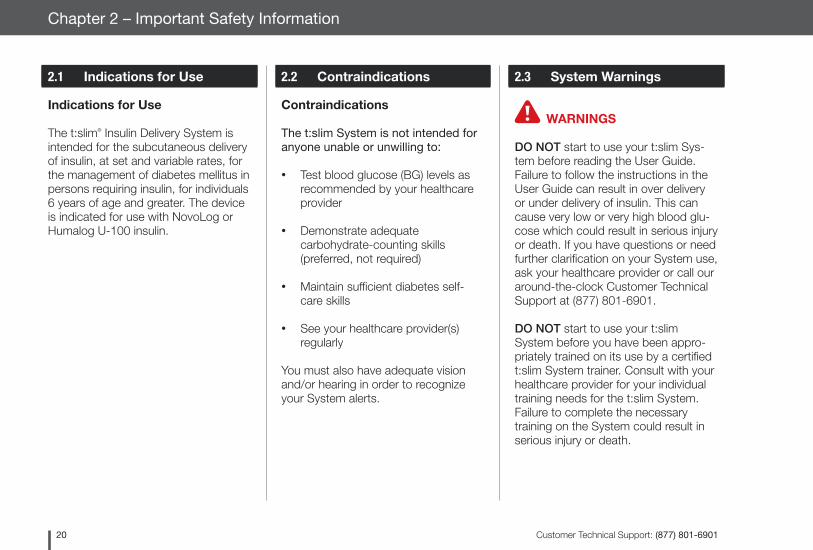
2.1 Indications for Use
Indications for Use
The t:slim® Insulin Delivery System is intended for the subcutaneous delivery of insulin, at set and variable rates, for the management of diabetes mellitus in persons requiring insulin, for individuals 6 years of age and greater. The device is indicated for use with NovoLog or Humalog U-100 insulin.
2.3 System Warnings
WARNINGS
DO NOT start to use your t:slim Sys-tem before reading the User Guide. Failure to follow the instructions in the User Guide can result in over delivery or under delivery of insulin. This can cause very low or very high blood glu-cose which could result in serious injury or death. If you have questions or need further clarification on your System use, ask your healthcare provider or call our around-the-clock Customer Technical Support at (877) 801-6901.
DO NOT start to use your t:slim System before you have been appro-priately trained on its use by a certified t:slim System trainer. Consult with your healthcare provider for your individual training needs for the t:slim System. Failure to complete the necessary training on the System could result in serious injury or death.
2.2 Contraindications
Contraindications
The t:slim System is not intended for anyone unable or unwilling to:
• Test blood glucose (BG) levels as recommended by your healthcare provider
• Demonstrate adequate carbohydrate-counting skills (preferred, not required)
• Maintain sufficient diabetes self-care skills
• See your healthcare provider(s) regularly
You must also have adequate vision and/or hearing in order to recognize your System alerts.
Customer Technical Support: (877) 801-6901 21
Before You B
egin1
Chapter 2 – Important Safety Information
DO NOT use any other insulin with your System other than U-100 Humalog® or NovoLog®. Only Humalog® and NovoLog® have been tested and found to be compatible for use in the System. Use of insulin with lesser or greater concentration can result in un-der delivery or over delivery of insulin. This can cause very high or a very low blood glucose.
DO NOT put any other drugs or med-ications inside your System cartridge. The System is designed only for Con-tinuous Subcutaneous Insulin Infusion (CSII) using Humalog® or NovoLog® insulin. Use of other drugs or medica-tions can damage the pump and result in injury if infused.
DO NOT start to use your System before consulting with your healthcare provider to determine which features are most appropriate for you. Only your healthcare provider can determine and help you adjust your Basal Rate(s), Carb Ratio(s), Correction Factor(s), Tar-get BG, and duration of insulin action. Incorrect settings can result in over delivery or under delivery of insulin. This
can cause very low or very high blood glucose.
DO be prepared to inject insulin with an alternative method if delivery is interrupted for any reason. Your t:slim System is designed to deliver insulin reliably, but because it uses only rapid-acting insulin, you will not have long-acting insulin in your body. Failure to have an alternative method of insulin delivery can lead to very high blood glucose or Diabetic Ketoacidosis (DKA).
DO use only FDA cleared insulin infu-sion sets with a tubing connector and follow their instructions for use. Failure to do so may result in over delivery or under delivery of insulin and may cause very low or very high blood glucose.
DO NOT place your infusion set on any scars, lumps, moles, stretch marks or tattoos. Placing your infusion set in these areas can cause swelling, irritation or infection. This can affect insulin absorption and cause high or low blood glucose.
DO NOT ignore infusion set cannula
fractures. Infusion set cannulas may fracture on rare occasions. If an infu-sion set cannula breaks and no portion of it is visible above the skin, do not attempt to remove it. Seek professional medical help if you have symptoms of infection or inflammation—redness, swelling or pain—at the insertion site. If you experience a broken infusion set cannula, please report this to Tandem Customer Technical Support at (877) 801-6901.
NEVER fill your tubing while your infusion set is connected to your body. Always ensure that the infusion set is disconnected from your body before filling the tubing. Failure to disconnect your infusion set from your body before filling the tubing can result in over de-livery of insulin. This can cause serious injury or death from very low blood glucose.
DO NOT reuse cartridges or use cartridges other than those manufac-tured by Tandem Diabetes Care, Inc. Use of cartridges not manufactured by Tandem Diabetes Care, Inc. or reuse of cartridges may result in over delivery or
Customer Technical Support: (877) 801-690122
Chapter 2 – Important Safety Information
under delivery of insulin. This can cause very low or very high blood glucose.
ALWAYS twist the tubing connector between the cartridge tubing and the infusion set tubing an extra quarter of a turn to ensure a secure connection. A loose connection can cause insulin to leak, resulting in under delivery of insu-lin. This can cause high blood glucose.
DO NOT disconnect the tubing con-nector between the cartridge tubing and the infusion set tubing. If the connection comes loose, disconnect the infusion set from your body before tightening. Failure to disconnect before tightening can result in over delivery of insulin. This can cause low blood glucose.
DO NOT remove or add insulin from a filled cartridge after loading onto the pump. This will result in an inaccurate display of the insulin level on the Home Screen and you could run out of insulin before the pump detects an empty cartridge. This can cause very high blood glucose, or Diabetic Ketoacido-sis (DKA).
DO NOT deliver a bolus until you have reviewed the calculated bolus amount on the pump display. If you dose an in-sulin amount that is too high or too low, this could cause very high or very low blood glucose. You can always adjust the insulin units up or down before you decide to deliver your bolus.
DO NOT allow small children (either pump users or non-users) to ingest small parts, such as the rubber USB port cover and cartridge components. Small parts could pose a choking hazard. If ingested or swallowed, these small component pieces may cause internal injury or infection.
The System includes parts (such as the USB cable and infusion set tubing) that could pose a strangulation or asphyxi-ation hazard. Always use the appropri-ate length of infusion set and arrange cables and tubing to minimize the risk of strangulation. ENSURE that these parts are stored in a secure place when not in use.
For patients who do not self-manage their disease, the Feature Lock function should ALWAYS be ON when the
pump is not being used by a caregiver. The Feature Lock function is intended to prevent inadvertent button presses that may lead to insulin delivery or changes in the pump settings. These changes can potentially lead to hypo-glycemic or hyperglycemic events.
For patients whose insulin adminis-tration is managed by a caregiver, DO turn off the Quick Bolus feature to avoid inadvertent bolus delivery. With the Feature Lock turned on, the Quick Bolus feature is disabled. Inadvertent button presses or tampering with the insulin pump could result in over delivery or under delivery of insulin. This can cause very low or very high blood glucose which could result in serious injury or death.
Customer Technical Support: (877) 801-6901 23
Before You B
egin1
Chapter 2 – Important Safety Information
WARNING – Radiology and Medical Procedures and your t:slim System
ALWAYS notify the provider/technician about your diabetes and your t:slim System. If you need to discontinue use of the System for medical proce-dures, follow your healthcare provider’s instructions to replace missed insulin when you reconnect to the pump. Check your blood glucose before dis-connecting from the pump and again when you reconnect and treat high blood glucose levels as recommended by your healthcare provider.
DO NOT expose your pump, transmit-ter, or sensor to:
• X-ray
• Computed Tomography (CT) scan
• Magnetic Resonance Imaging (MRI)
• Positron Emission Tomography (PET) scan
• Other exposure to radiation
The t:slim System is magnetic reso-nance (MR) unsafe. You must take off your pump, transmitter, and sensor and leave them outside the procedure room if you are going to have any of the above procedures.
In addition to the above, DO NOT expose your pump, transmitter, or sensor to:
• Pacemaker/Automatic Implantable
• Cardioverter Defibrillator (AICD) placement or reprogramming
• Cardiac Catheterization
• Nuclear Stress Test
You must take off your pump, trans-mitter, and sensor and leave them outside the procedure room if you are going to have any of the above medical procedures.
There are other procedures where you should proceed with caution:
• Laser Surgery – Your System can usually be worn during the
procedure. However, some lasers can create interference and cause the System to alarm.
• General Anesthesia – Depending on the equipment being used, you may or may not need to remove your System. Be sure to ask your healthcare provider.
There is no need to disconnect for electrocardiograms (EKGs) or colonos-copies. If you have questions, contact Tandem Diabetes Care Customer Tech-nical Support at (877) 801-6901.
Customer Technical Support: (877) 801-690124
Chapter 2 – Important Safety Information
2.4 System Precautions
PRECAUTIONS
DO NOT open or attempt to repair your System. The System is a sealed device that should be opened and re-paired only by Tandem Diabetes Care, Inc. Modification could result in a safety hazard. If your System seal is broken, the System is no longer watertight and the warranty is voided.
CHANGE your infusion set every 48 to 72 hours as recommended by your healthcare provider. Wash your hands with anti-bacterial soap before handling the infusion set and thoroughly clean the insertion site on your body to avoid infection. Contact your healthcare pro-vider if you have symptoms of infection at your insulin infusion site.
ALWAYS remove all air bubbles from the System before beginning insu-lin delivery. Ensure there are no air bubbles when drawing insulin into the filling syringe, hold the pump with the white fill port pointed up when filling the tubing, and ensure that there are no
air bubbles in the tubing when filling. Air in the system takes space where insulin should be and can affect insulin delivery.
CHECK your infusion site daily for proper placement and leaks. RE-PLACE your infusion set if you notice leaks around the site. Improperly placed sites or leaks around the infu-sion site can result in under delivery of insulin.
CHECK your infusion set tubing daily for any leaks, air bubbles, or kinks. Air in the tubing, leaks in the tubing, or kinked tubing may restrict or stop insu-lin delivery and result in under delivery of insulin.
CHECK the tubing connection between your cartridge tubing and infu-sion set tubing daily to ensure it is tight and secure. Leaks around the tubing connection can result in under delivery of insulin.
DO NOT change your infusion set before bedtime or if you will not be able to test your blood glucose 1–2 hours after the new infusion set is placed. It
is important to confirm that the infusion set is inserted correctly and delivering insulin. It is also important to respond quickly to any problems with the inser-tion to ensure continued insulin delivery.
ALWAYS check that your cartridge has enough insulin to last through the night before going to bed. If you are sleep-ing, you could fail to hear the Empty Cartridge Alarm and miss part of your basal insulin delivery.
CHECK your System’s personal settings regularly to ensure they are correct. Incorrect settings can result in over delivery or under delivery of insulin. Consult with your healthcare provider as needed.
ALWAYS make sure that the correct time and date are set on your System. When editing time, always check that the AM/PM setting is accurate. AM is to be used from midnight until 11:59 AM. PM is to be used from noon until 11:59 PM. Not having the correct time and date setting may affect safe insulin delivery.
Customer Technical Support: (877) 801-6901 25
Before You B
egin1
Chapter 2 – Important Safety Information
CONFIRM that the screen display turns on, you can hear audible beeps, feel the pump vibrate, and see the green LED light blinking around the edge of the Screen On Button when you connect a power source to the USB port. These features are used to notify you about alerts, alarms, and other conditions that require your attention. If these features are not working, discontinue use of the System and contact Tandem Diabetes Care Customer Technical Support at (877) 801-6901.
CHECK your System regularly for potential alarm conditions that may display. It is important to be aware of conditions that may affect insulin de-livery and require your attention so you can respond as soon as possible.
DO NOT use the vibrate feature for alerts and alarms during sleep unless otherwise directed by your healthcare provider. Having the volume for alerts and alarms set to high will help ensure that you don’t miss an alert or alarm.
ALWAYS look at the screen to confirm correct programming of the bolus
amount when you first use the Quick Bolus feature. Looking at the screen will ensure that you are correctly using the beep/vibration commands to pro-gram the intended bolus amount.
DO NOT use your pump if you think it might be damaged due to dropping it or hitting it against a hard surface. Check that the System is working properly by plugging a power source into the USB port and confirming that the display turns on, you hear audible beeps, feel the pump vibrate, and see the green LED light blinking around the edge of the Screen On Button. If you are unsure about potential dam-age, discontinue use of the System and contact Tandem Diabetes Care Customer Technical Support at (877) 801-6901.
AVOID exposure of your System to temperatures below 40°F (5°C) or above 99°F (37°C). Insulin can freeze at low temperatures or degrade at high temperatures. Insulin that has been exposed to conditions outside of the manufacturer’s recommended ranges can affect the safety and performance of the System.
AVOID submersing your pump in fluid beyond a depth of 3 feet or for more than 30 minutes (IPX7 rating). If your pump has been exposed to fluid be-yond these limits, check for any signs of fluid ingress. If there are signs of fluid entry, discontinue use of the pump and contact Tandem Diabetes Care Customer Technical Support at (877) 801-6901.
AVOID areas where there may be flammable anesthetics or explosive gases. The System is not suitable for use in these areas and there is a risk of explosion. Remove your pump if you need to enter these areas.
MAKE SURE to not move further than the length of the USB cable when you are connected to the pump and to a charging source. Moving further than the length of the USB cable may cause the cannula to be pulled out of the infusion site. For this reason it is recommended not to charge the pump while sleeping.
DISCONNECT your infusion set from your body while on high-speed/high
Customer Technical Support: (877) 801-690126
Chapter 2 – Important Safety Information
gravity amusement park thrill rides. Rapid changes in altitude or gravity can affect insulin delivery and cause injury.
DISCONNECT your infusion set from your body before flying in an aircraft without cabin pressurization or in planes used for aerobatics or combat simulation (pressurized or not). Rapid changes in altitude or gravity can affect insulin delivery and cause injury.
CONSULT your healthcare provider about lifestyle changes such as weight gain or loss, and starting or stopping exercise. Your insulin needs may change in response to lifestyle chang-es. Your basal rate(s) and other settings may need adjustment.
CHECK your blood glucose using a blood glucose meter following a gradu-al elevation change of up to 1,000 feet, such as when snow skiing or driving on a mountain road. Delivery accuracy can vary up to 15% until 3 units of total insulin have been delivered or elevation has changed by more than 1,000 feet. Changes in delivery accuracy can affect insulin delivery and cause injury.
ALWAYS check with your healthcare provider for specific guidelines if you want or need to disconnect from the pump for any reason. Depending on the length of time and reason you are disconnecting, you may need to replace missed basal and/or bolus insulin. Check your blood glucose before disconnecting from the pump and again when you reconnect, and treat high blood glucose (BG) levels as recommended by your healthcare provider.
ENSURE that your personal insulin de-livery settings are programmed into the pump before you use the System if you receive a warranty replacement. Failure to enter your insulin delivery settings could result in over delivery or under delivery of insulin. This can cause very low or very high blood glucose which could result in serious injury or death. Consult your healthcare provider as needed.
Interference with your System’s electronics by cell phones can occur if worn in close proximity. It is recom-mended that your pump and cell phone be worn at least 6.4 inches apart.
ALWAYS dispose of used System components such as cartridges, syringes, needles, and infusion sets following the instructions from your healthcare provider. Wash your hands thoroughly after handling used System components.
Customer Technical Support: (877) 801-6901 27
Before You B
egin1
Chapter 2 – Important Safety Information
2.5 Potential Benefits From Using the System
• The t:slim System provides an automated way to deliver basal and bolus insulin. Delivery can be fine-tuned based on up to 6 customizable Personal Profiles, each with up to 16 time-based settings for Basal Rate, Carb Ratio, Correction Factor, and Target BG. In addition, the Temp Rate feature allows you to program a temporary basal rate change for up to 72 hours.
• The t:slim System gives you the option of delivering a bolus all at once, or delivering a percentage over an extended period of time without navigating to different menus. You can also program a bolus more discreetly using the Quick Bolus feature, which can be used without looking at the pump, and can be programmed in increments of either units of insulin or grams of carbohydrate.
• From the bolus screen, the “calculator within a calculator”
feature allows you to enter multiple carbohydrate values and add them together. The System’s bolus calculator will recommend a bolus based on the entire amount of carbohydrates entered, which can help eliminate guesswork.
• The System keeps track of the amount of active insulin from food and correction boluses (IOB). When programming additional food or correction boluses, the pump will subtract the amount of IOB from the recommended bolus if your BG is below the target set in your active Personal Profile. This can help prevent insulin stacking, which can lead to hypoglycemia.
• You can program a number of reminders that will prompt you to retest your BG after a low or high BG is entered, as well as a “Missed Meal Bolus Reminder” which will alert you if a bolus isn’t entered during a specified period of time. If activated, these can help reduce the likelihood that you will forget to check your blood glucose or bolus for meals.
• You have the ability to view a variety of data right on your screen, including the time and amount of your last bolus, your total insulin delivery by day, as well as broken into basal, food bolus, and correction bolus.
Customer Technical Support: (877) 801-690128
Chapter 2 – Important Safety Information
2.6 Possible Risks From Using the System
As with any medical device, there are risks associated with using the t:slim System. Many of the risks are common to insulin therapy in general, but there are additional risks associated with continuous insulin infusion. Reading your User Guide and following the Instructions for Use are critical for the safe operation of your system. Consult your health care provider about how these risks may impact you.
Inserting and wearing an infusion set might cause infection, bleeding, pain or skin irritations (redness, swelling, bruising, itching, scarring or skin discol-oration).
There is a remote chance that an infu-sion set cannula fragment could remain under your skin if the cannula breaks while you are wearing it. If you think a cannula has broken under your skin, contact your healthcare provider and call Tandem Diabetes Care Customer Technical Support at (877) 801-6901.
Other risks associated with infusion sets include occlusions and air bubbles in the tubing, which can affect insulin delivery.
Risks that could result from pump failure include the following:
• possible hypoglycemia (low blood glucose) from over-delivery of insulin due to a hardware defect
• hyperglycemia (high blood glucose) and ketosis possibly leading to Diabetic Ketoacidosis (DKA) due to pump failure resulting in cessation of insulin delivery due to either a hardware defect or software anomaly.
2.7 Working with your Healthcare Provider
Any clinical language presented in this User Guide is based on the assumption that you have been educated by your healthcare provider on certain terms and how they apply to you in your diabetes management. Your healthcare provider can help you establish diabe-tes management guidelines that best fit your lifestyle and needs.
Monitor your blood glucose (BG) with the guidance of your healthcare provid-er. According to the American Associa-tion of Diabetes Educators’ white paper Insulin Pump Therapy: Guidelines for Successful Outcomes, patients should routinely check their BG levels at least 4 times daily (optimally 6 to 8 times daily) in order to detect hyperglycemia (high blood glucose) and hypoglycemia (low blood glucose) early. Undetected hyperglycemia or hypoglycemia can result without proper monitoring.
Consult your healthcare provider before using the System to determine which features are most appropriate for you. Only your healthcare provider can de-
Customer Technical Support: (877) 801-6901 29
Before You B
egin1
Chapter 2 – Important Safety Information
termine and help you adjust your basal rate(s), insulin-to-carbohydrate ratio(s), correction factor(s), blood glucose (BG) target, and duration of insulin action.
2.8 Emergency Kit
Make sure that you always have an in-sulin syringe and vial of insulin with you as a backup for emergency situations. You should also always have an ap-propriate emergency kit with you. Talk with your healthcare provider regarding what items this kit should include.
Supplies to carry every day:
• Blood glucose testing supplies: meter, strips, control solution, lancets, meter batteries
• Fast-acting carbohydrate to treat low blood glucose
• Extra snack for longer coverage than fast-acting carbohydrate
• Glucagon emergency kit
• Rapid-acting insulin and syringes
• Infusion sets (minimum of 2)
• Insulin pump cartridges (minimum of 2)
• Infusion site preparation products (antiseptic wipes, skin adhesive)
• Diabetes identification card or jewelry

Customer Technical Support: (877) 801-690130
Chapter 2 – Important Safety Information
2.9 Verification of Proper Functionality
A power supply (AC adapter with micro-USB connector) is provided as part of the System. Before using your System, ensure that the following occur when you connect a power supply into the USB port of your t:slim Pump:
• You hear an audible alert
• Your see the green light illuminate from the edge around the Screen On/Quick Bolus Button
• You feel a vibratory alert
• You see a charge symbol (lightning bolt) on the battery level indicator
In addition, before using the System, ensure the following:
• Press the Screen On/Quick Bolus Button to turn the screen on so that you can see the display
• When the display screen is on, the touch screen responds to your finger tap
PRECAUTIONCONFIRM that the screen display turns on, you can hear audible beeps, feel the pump vibrate, and see the green LED light blinking around the edge of the Screen On Button when you connect a power source to the USB port. These features are used to notify you about alerts, alarms, and other conditions that require your attention. If these features are not working, discontinue use of the System and contact Tandem Diabetes Care Customer Technical Support at (877) 801-6901.
Chapter 3
Getting to Know Your t:slim System
Customer Technical Support: (877) 801-690132
Chapter 3 – Getting to Know Your t:slim System
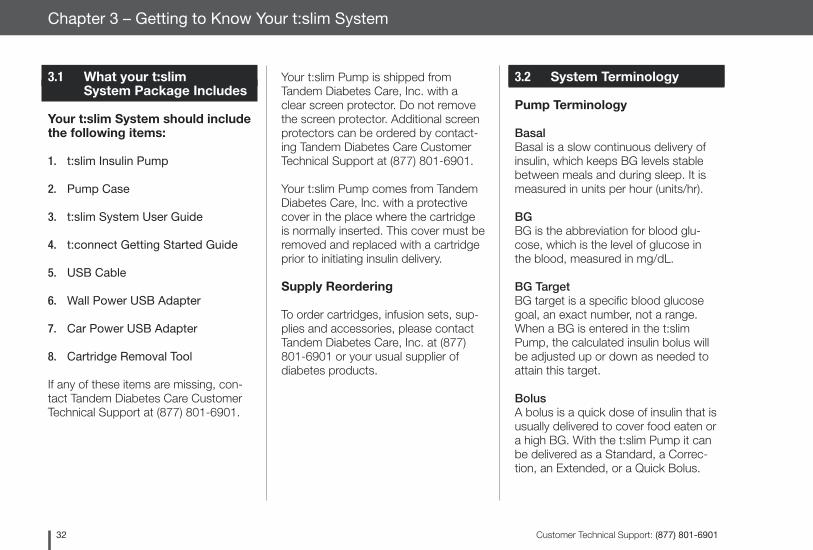
3.1 What your t:slim System Package Includes
Your t:slim System should include the following items:
1. t:slim Insulin Pump
2. Pump Case
3. t:slim System User Guide
4. t:connect Getting Started Guide
5. USB Cable
6. Wall Power USB Adapter
7. Car Power USB Adapter
8. Cartridge Removal Tool
If any of these items are missing, con-tact Tandem Diabetes Care Customer Technical Support at (877) 801-6901.
Your t:slim Pump is shipped from Tandem Diabetes Care, Inc. with a clear screen protector. Do not remove the screen protector. Additional screen protectors can be ordered by contact-ing Tandem Diabetes Care Customer Technical Support at (877) 801-6901.
Your t:slim Pump comes from Tandem Diabetes Care, Inc. with a protective cover in the place where the cartridge is normally inserted. This cover must be removed and replaced with a cartridge prior to initiating insulin delivery.
Supply Reordering
To order cartridges, infusion sets, sup-plies and accessories, please contact Tandem Diabetes Care, Inc. at (877) 801-6901 or your usual supplier of diabetes products.
3.2 System Terminology
Pump Terminology
BasalBasal is a slow continuous delivery of insulin, which keeps BG levels stable between meals and during sleep. It is measured in units per hour (units/hr).
BGBG is the abbreviation for blood glu-cose, which is the level of glucose in the blood, measured in mg/dL.
BG TargetBG target is a specific blood glucose goal, an exact number, not a range. When a BG is entered in the t:slim Pump, the calculated insulin bolus will be adjusted up or down as needed to attain this target.
BolusA bolus is a quick dose of insulin that is usually delivered to cover food eaten or a high BG. With the t:slim Pump it can be delivered as a Standard, a Correc-tion, an Extended, or a Quick Bolus.
Customer Technical Support: (877) 801-6901 33
Before You B
egin1
Chapter 3 – Getting to Know Your t:slim System
CannulaThe cannula is the part of the infusion set that is inserted under the skin through which insulin is delivered.
CarbCarbs or Carbohydrates are sugars and starches that the body breaks down into glucose and uses as an energy source, measured in grams.
Carb RatioThe carb ratio is the number of grams of carbohydrate that 1 unit of insulin will cover. Also known as insulin-to-carbo-hydrate ratio.
Correction BolusA correction bolus is given to correct high BG.
Correction FactorA correction factor is the amount of BG that is lowered by 1 unit of insulin. Also known as the Insulin Sensitivity Factor (ISF).
Extended BolusAn extended bolus is a bolus that is delivered over a period of time. It is commonly used to cover food that
takes longer to digest. When admin-istering an extended bolus with your t:slim Pump, enter the DELIVER NOW portion to dose a percentage of insulin immediately and the remaining percent-age over a period time.
GramsGrams are a unit of measurement for carbohydrates.
Insulin DurationInsulin duration is the amount of time that insulin is active and available in the body after a bolus has been delivered. This also relates to the calculation for Insulin on Board (IOB).
Insulin On Board (IOB)IOB is the insulin that is still active (has the ability to continue to lower the BG) in the body after a bolus has been delivered.
LoadLoad refers to the process of removing, filling, and replacing a new cartridge and infusion set.
Personal ProfileA personal profile is a personalized
group of settings that defines the de-livery of basal and bolus insulin within specific time segments throughout a 24 hour period.
Quick BolusQuick bolus (using the Quick Bolus Button) is a way to deliver a bolus by following beep/vibration commands without navigating through or viewing the t:slim Pump screen.
Temp RateTemp rate is an abbreviation for a tem-porary basal rate. It is used to increase or decrease the current basal rate for a short period of time to accommodate special situations. 100% is the same basal rate as programmed. 120% means 20% more and 80% means 20% less than the programmed basal rate.
UnitsUnits are the measurement for insulin.
USB CableUSB is the abbreviation for Universal Serial Bus. The USB cable connects into the t:slim Pump’s micro USB port.
Customer Technical Support: (877) 801-690134
Chapter 3 – Getting to Know Your t:slim System
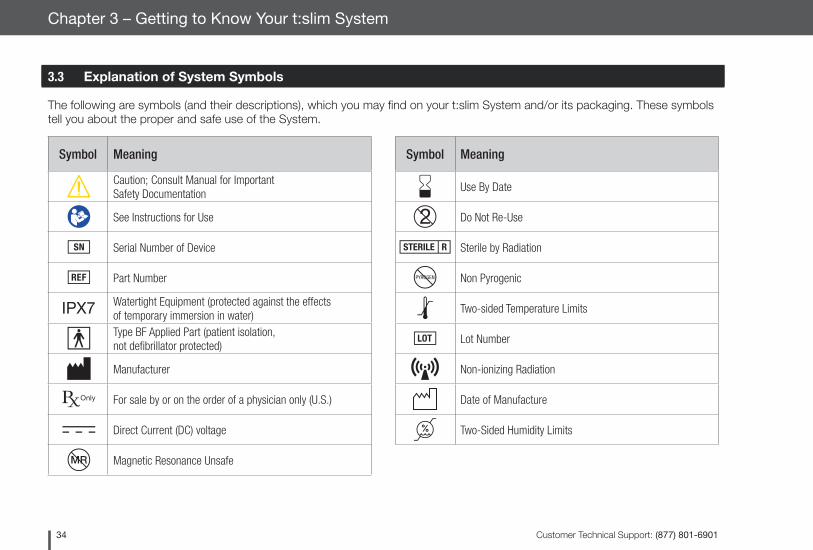
3.3 Explanation of System Symbols
The following are symbols (and their descriptions), which you may find on your t:slim System and/or its packaging. These symbols tell you about the proper and safe use of the System.
Symbol Meaning Symbol Meaning
Caution; Consult Manual for Important Safety Documentation
Use By Date
See Instructions for Use Do Not Re-Use
Serial Number of Device Sterile by Radiation
Part Number Non Pyrogenic
Watertight Equipment (protected against the effects of temporary immersion in water)
Two-sided Temperature Limits
Type BF Applied Part (patient isolation, not defibrillator protected)
Lot Number
Manufacturer Non-ionizing Radiation
For sale by or on the order of a physician only (U.S.) Date of Manufacture
Direct Current (DC) voltage Two-Sided Humidity Limits
Magnetic Resonance Unsafe
Customer Technical Support: (877) 801-6901 35
Before You B
egin1
Chapter 3 – Getting to Know Your t:slim System
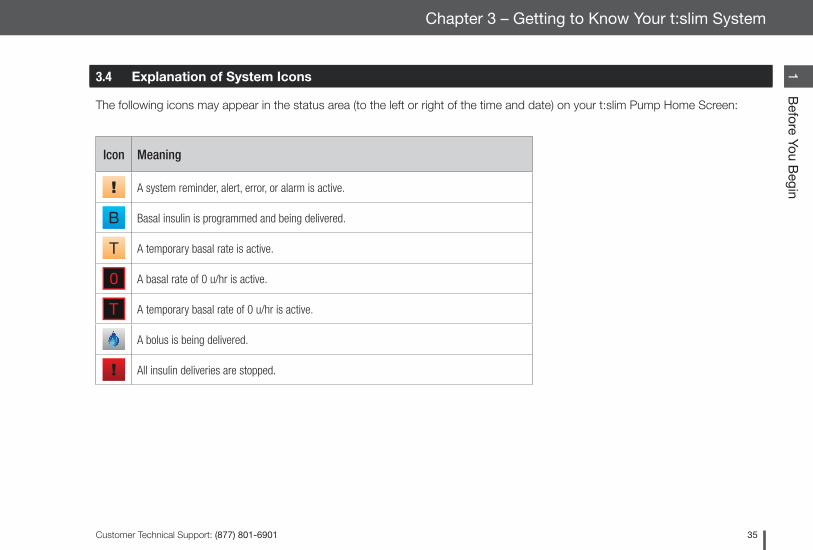
3.4 Explanation of System Icons
The following icons may appear in the status area (to the left or right of the time and date) on your t:slim Pump Home Screen:
Icon Meaning
A system reminder, alert, error, or alarm is active.
Basal insulin is programmed and being delivered.
A temporary basal rate is active.
A basal rate of 0 u/hr is active.
A temporary basal rate of 0 u/hr is active.
A bolus is being delivered.
All insulin deliveries are stopped.
Customer Technical Support: (877) 801-690136
Chapter 3 – Getting to Know Your t:slim System
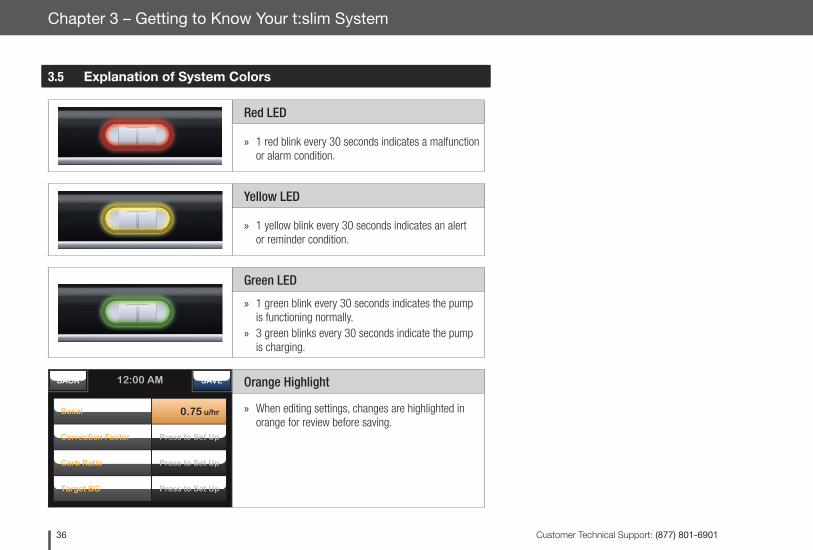
12:00 AM SAVEBACK
Basal 0.75 u/hr
Correction Factor Press to Set Up
Carb Ratio Press to Set Up
Target BG Press to Set Up
3.5 Explanation of System Colors
Red LED
» 1 red blink every 30 seconds indicates a malfunction or alarm condition.
Yellow LED
» 1 yellow blink every 30 seconds indicates an alert or reminder condition.
Green LED
» 1 green blink every 30 seconds indicates the pump is functioning normally.
» 3 green blinks every 30 seconds indicate the pump is charging.
Orange Highlight
» When editing settings, changes are highlighted in orange for review before saving.
Customer Technical Support: (877) 801-6901 37
Before You B
egin1
Chapter 3 – Getting to Know Your t:slim System
THIS PAGE IS INTENTIONALLY
LEFT BLANK
Customer Technical Support: (877) 801-690138
Chapter 3 – Getting to Know Your t:slim System
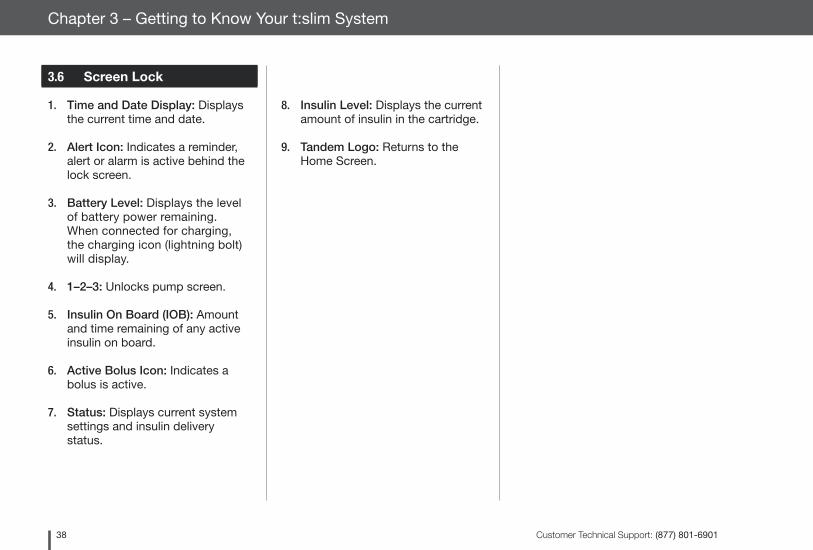
3.6 Screen Lock
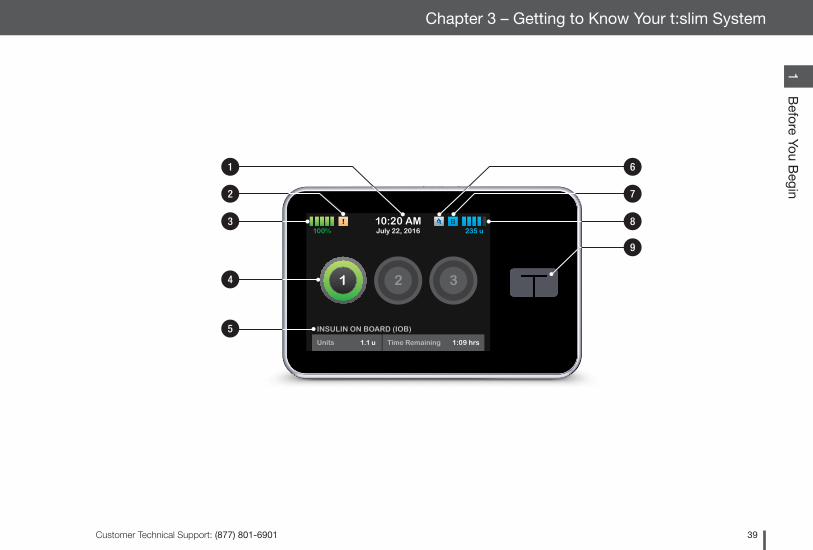
1. Time and Date Display: Displays the current time and date.
2. Alert Icon: Indicates a reminder, alert or alarm is active behind the lock screen.
3. Battery Level: Displays the level of battery power remaining. When connected for charging, the charging icon (lightning bolt) will display.
4. 1–2–3: Unlocks pump screen.
5. Insulin On Board (IOB): Amount and time remaining of any active insulin on board.
6. Active Bolus Icon: Indicates a bolus is active.
7. Status: Displays current system settings and insulin delivery status.
8. Insulin Level: Displays the current amount of insulin in the cartridge.
9. Tandem Logo: Returns to the Home Screen.
Customer Technical Support: (877) 801-6901 39
Before You B
egin1
Chapter 3 – Getting to Know Your t:slim System
INSULIN ON BOARD (IOB)
Units 1.1 u 1:09 hrsTime Remaining
B10:20 AMJuly 22, 2016 235 u100%
2 31
! 8
6
7
9
5
3
4
1
2

Customer Technical Support: (877) 801-690140
Chapter 3 – Getting to Know Your t:slim System
3.7 Home Screen
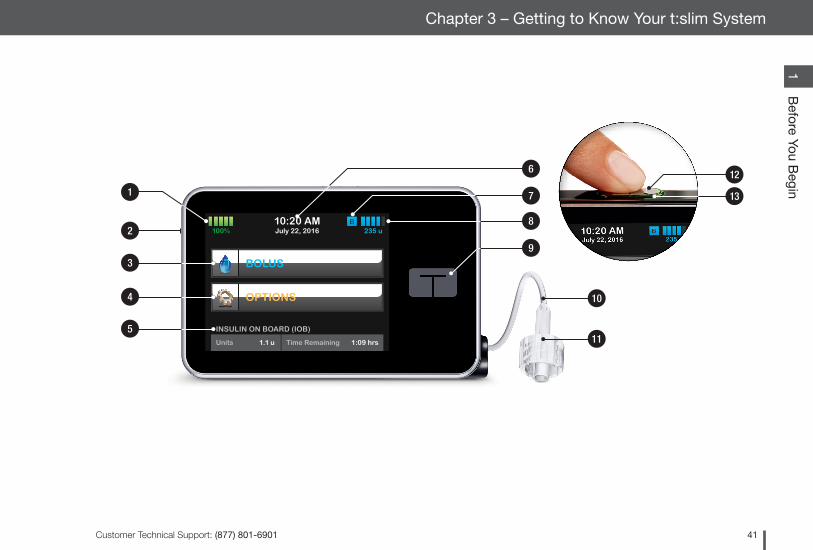
1. Battery Level: Displays the level of battery power remaining. When connected for charging, the charging icon (lightning bolt) will display.
2. USB Port: Port to charge your t:slim Pump battery. Close the cover when not in use.
3. Bolus: Program and deliver a bolus.
4. Options: Stop/Resume insulin delivery, manage Pump Settings, program a Temp Rate, Load cartridge, and view History.
5. Insulin On Board (IOB): Amount and time remaining of any active insulin on board.
6. Time and Date Display: Displays the current time and date.
7. Status: Displays current system settings and insulin delivery status.
8. Insulin Level: Displays the current amount of insulin in the cartridge.
9. Tandem Logo: Returns to the Home Screen.
10. Cartridge Tubing: Tubing that is attached to the cartridge.
11. Tubing Connection: Connects the cartridge tubing to the infusion set tubing.
12. Screen On/Quick Bolus Button: Turns the t:slim Pump screen on/off or programs a Quick Bolus (if activated).
13. LED Indicator: Illuminates when connected to a power supply and indicates proper functionality.
Customer Technical Support: (877) 801-6901 41
Before You B
egin1
Chapter 3 – Getting to Know Your t:slim System
INSULIN ON BOARD (IOB)
Units 1.1 u 1:09 hrsTime Remaining
B10:20 AMJuly 22, 2016 235 u100%
OPTIONS
BOLUS
10
11
8
7
9
6
2
1
3
4
5
13
12
Customer Technical Support: (877) 801-690142
Chapter 3 – Getting to Know Your t:slim System
3.8 Status Screen
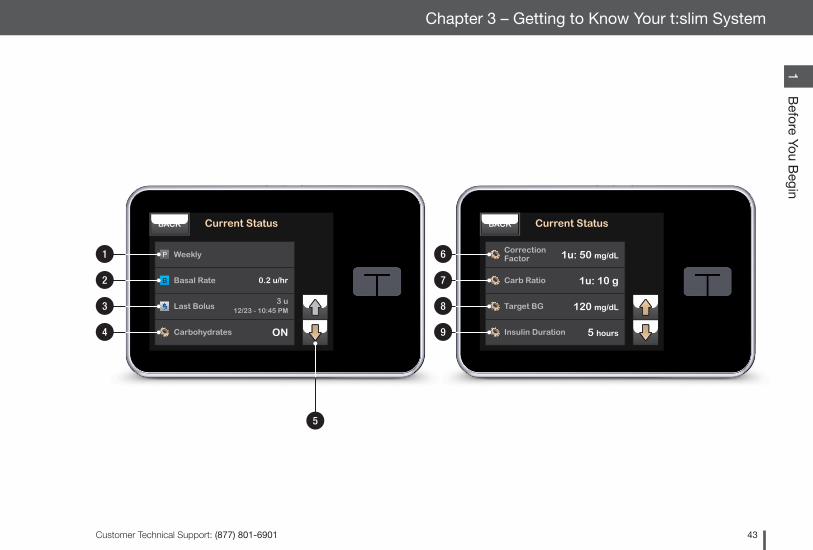
The status screen can be accessed from the lock screen and the Home Screen. It is for display only, no chang-es can be made from this screen.
1. Profile: Displays current active Personal Profile.
2. Basal Rate: Displays current basal rate being delivered. (If a Temp Rate is active, it is displayed in units/hr.)
3. Last Bolus: Displays the amount, date and time of last bolus.
4. Carbohydrates: Indicates whether feature is on or off.
5. Up/Down Arrow: Indicates there is more information.
6. Correction Factor: Displays current correction factor used to calculate a bolus.
7. Carb Ratio: Displays current carb ratio used to calculate a bolus.
8. Target BG: Displays current BG target used to calculate a bolus.
9. Insulin Duration: Displays current insulin duration setting used to calculate insulin on board.
Customer Technical Support: (877) 801-6901 43
Before You B
egin1
Chapter 3 – Getting to Know Your t:slim System
BACK Current Status
WeeklyP
Basal Rate 0.2 u/hrB
Carbohydrates ON
Last Bolus3 u
12/23 - 10:45 PM
BACK Current Status
Insulin Duration 5 hours
Target BG 120 mg/dL
Carb Ratio 1u: 10 g
CorrectionFactor 1u: 50 mg/dL
5
1
2
3
4
6
7
8
9
Customer Technical Support: (877) 801-690144
Chapter 3 – Getting to Know Your t:slim System
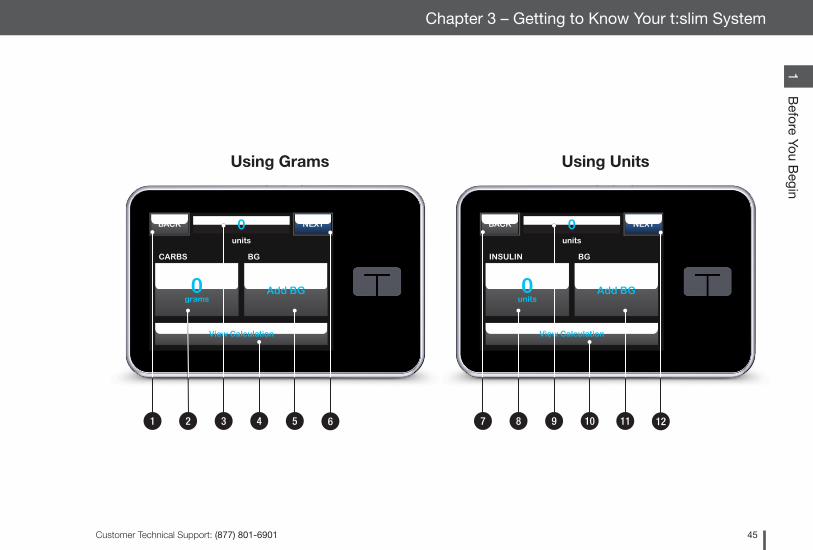
3.9 Bolus Screen
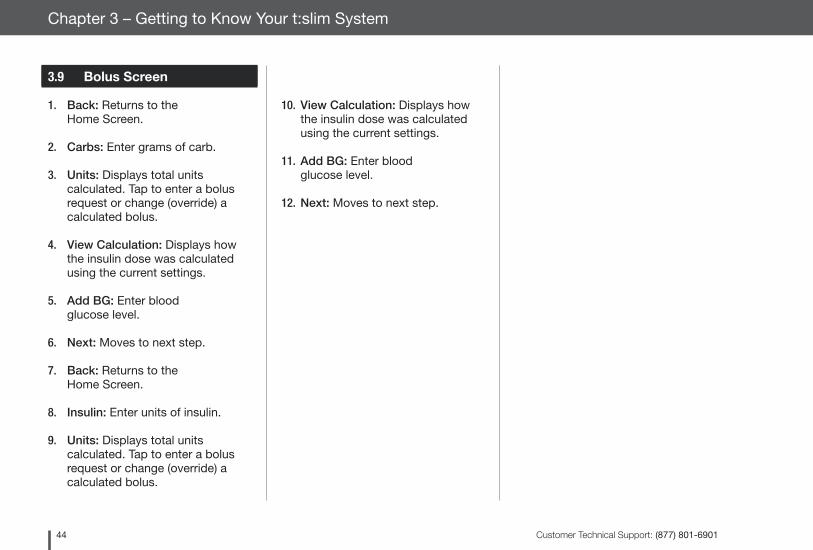
1. Back: Returns to the Home Screen.
2. Carbs: Enter grams of carb.
3. Units: Displays total units calculated. Tap to enter a bolus request or change (override) a calculated bolus.
4. View Calculation: Displays how the insulin dose was calculated using the current settings.
5. Add BG: Enter blood glucose level.
6. Next: Moves to next step.
7. Back: Returns to the Home Screen.
8. Insulin: Enter units of insulin.
9. Units: Displays total units calculated. Tap to enter a bolus request or change (override) a calculated bolus.
10. View Calculation: Displays how the insulin dose was calculated using the current settings.
11. Add BG: Enter blood glucose level.
12. Next: Moves to next step.
Customer Technical Support: (877) 801-6901 45
Before You B
egin1
Chapter 3 – Getting to Know Your t:slim System
units
NEXTBACK 0
BG
View Calculation
Add BG
CARBS
grams0
units
NEXTBACK 0
BG
View Calculation
Add BG
INSULIN
units0
1 2 4 5 63 7 8 10 11 129
Using Grams Using Units
Customer Technical Support: (877) 801-690146
Chapter 3 – Getting to Know Your t:slim System
3.10 Options Screen
1. Back: Returns to the Home Screen.
2. Stop Insulin: Stops insulin delivery. If insulin delivery is stopped, RESUME INSULIN will be displayed.
3. My Pump: Personal Profiles, Alert Settings, Pump Settings, and Pump Info.
4. Load: Change Cartridge, Fill Tubing, Fill Cannula, and Site Reminder.
5. Temp Rate: Programs a temporary basal rate.
6. Menu Arrows: Indicates additional menu options are available.
7. Up/Down Arrow: Indicates there is more information.
8. History: Displays historical log of pump events.

Customer Technical Support: (877) 801-6901 47
Before You B
egin1
Chapter 3 – Getting to Know Your t:slim System
BACK Options
Load
My Pump
STOP INSULIN
Temp Rate
BACK Options
History
76
2
3
1
4
5
8
Customer Technical Support: (877) 801-690148
Chapter 3 – Getting to Know Your t:slim System
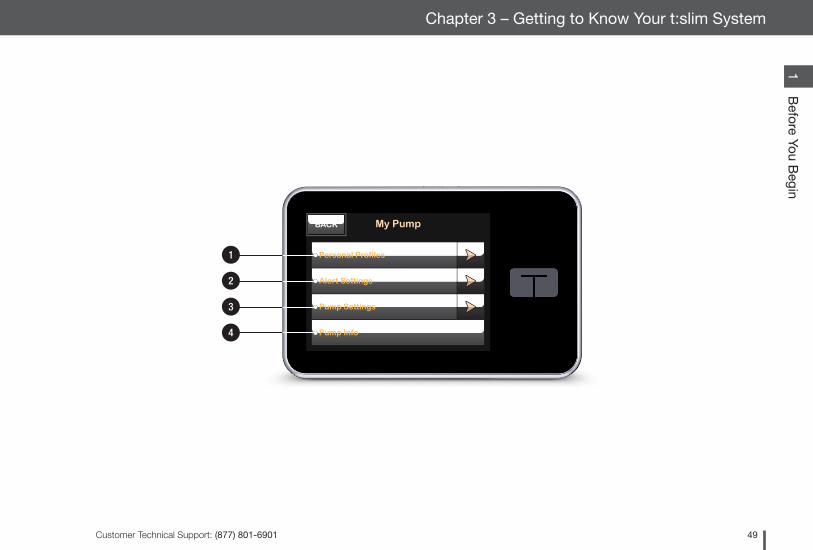
3.11 My Pump Screen
1. Personal Profiles: A group of settings that defines basal and bolus delivery.
2. Alert Settings: Customize Pump Reminders and Alerts.
3. Pump Settings: Customize Quick Bolus, Pump Volume, Screen Options, and Time and Date.
4. Pump Info: Displays t:slim Pump serial number, Tandem Diabetes Care Customer Technical Support phone number, website, and other technical information.
Customer Technical Support: (877) 801-6901 49
Before You B
egin1
Chapter 3 – Getting to Know Your t:slim System
BACK My Pump
Pump Settings
Alert Settings
Personal Profiles
Pump Info
1
2
3
4
Customer Technical Support: (877) 801-690150
Chapter 3 – Getting to Know Your t:slim System
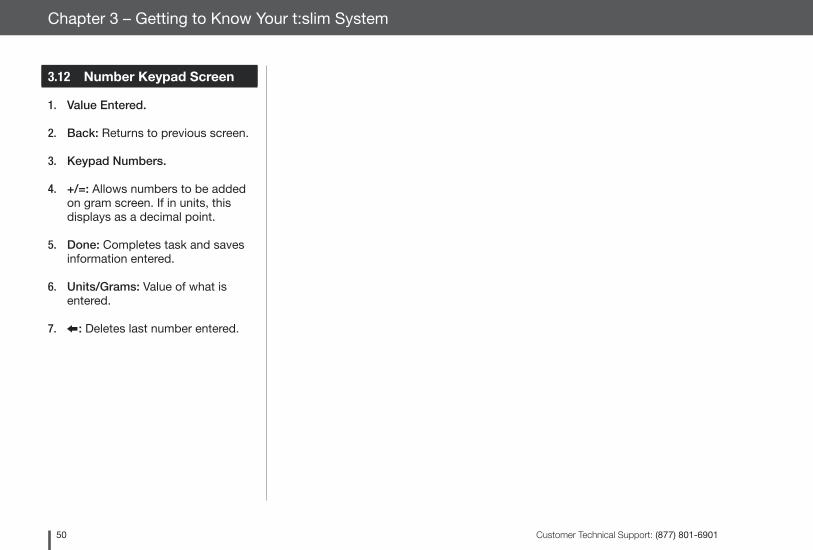
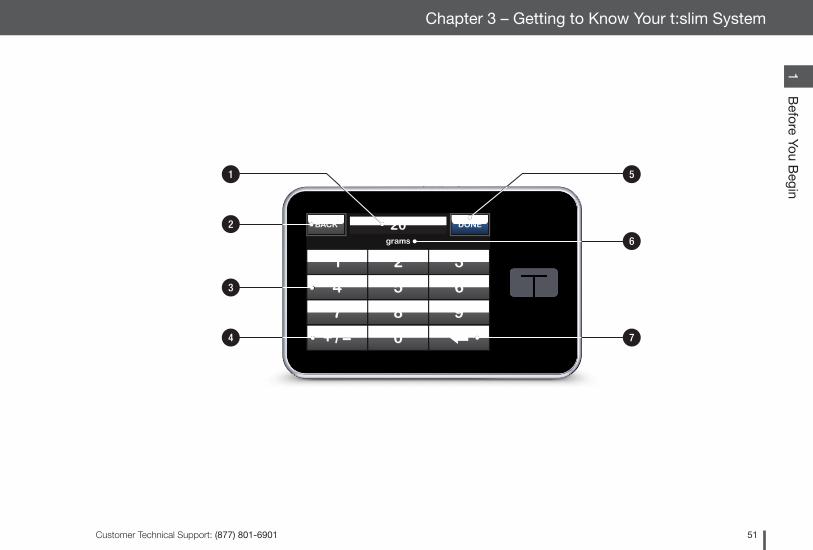
3.12 Number Keypad Screen
1. Value Entered.
2. Back: Returns to previous screen.
3. Keypad Numbers.
4. +/=: Allows numbers to be added on gram screen. If in units, this displays as a decimal point.
5. Done: Completes task and saves information entered.
6. Units/Grams: Value of what is entered.
7. : Deletes last number entered.
Customer Technical Support: (877) 801-6901 51
Before You B
egin1
Chapter 3 – Getting to Know Your t:slim System
grams
21 3
0
87 9
54 6
DONEBACK 20
+ / =
3
4
1
2
5
6
7
Customer Technical Support: (877) 801-690152
Chapter 3 – Getting to Know Your t:slim System
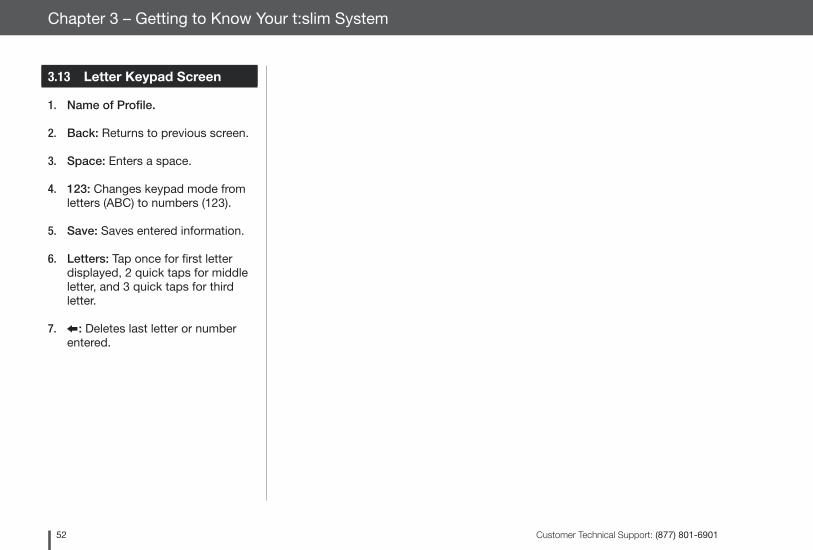
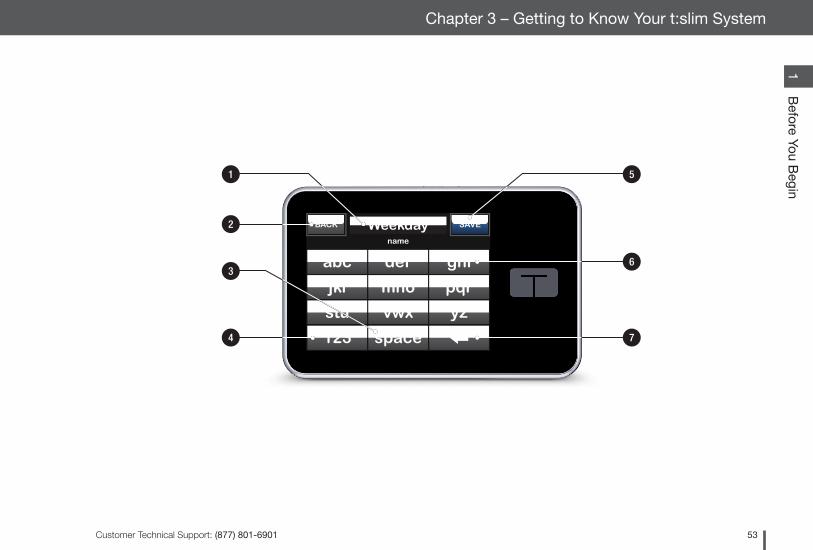
3.13 Letter Keypad Screen
1. Name of Profile.
2. Back: Returns to previous screen.
3. Space: Enters a space.
4. 123: Changes keypad mode from letters (ABC) to numbers (123).
5. Save: Saves entered information.
6. Letters: Tap once for first letter displayed, 2 quick taps for middle letter, and 3 quick taps for third letter.
7. : Deletes last letter or number entered.
Customer Technical Support: (877) 801-6901 53
Before You B
egin1
Chapter 3 – Getting to Know Your t:slim System
name
defabc ghi
space
vwxstu yz
mnojkl pqr
SAVEBACK Weekday
123
1
36
2
4 7
5
Section 2
Key Pump Features

Chapter 4
Getting Started
Customer Technical Support: (877) 801-690156
Chapter 4 – Getting Started
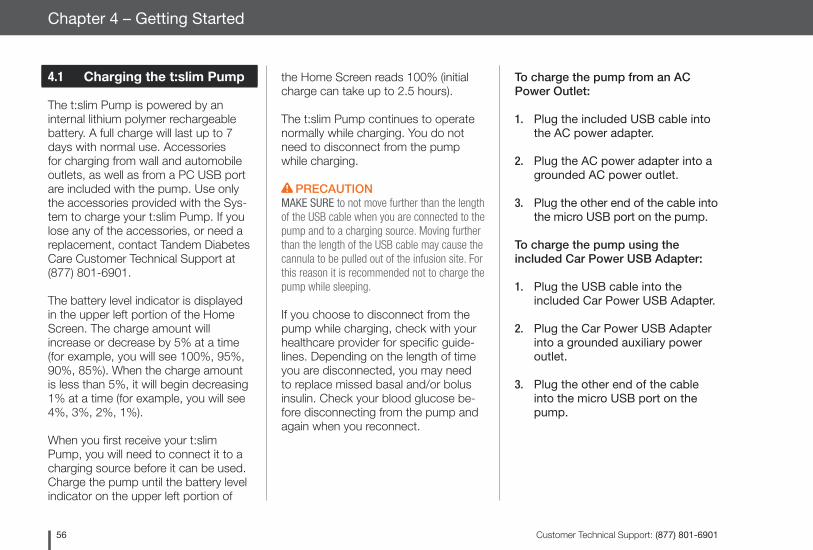
4.1 Charging the t:slim Pump
The t:slim Pump is powered by an internal lithium polymer rechargeable battery. A full charge will last up to 7 days with normal use. Accessories for charging from wall and automobile outlets, as well as from a PC USB port are included with the pump. Use only the accessories provided with the Sys-tem to charge your t:slim Pump. If you lose any of the accessories, or need a replacement, contact Tandem Diabetes Care Customer Technical Support at (877) 801-6901.
The battery level indicator is displayed in the upper left portion of the Home Screen. The charge amount will increase or decrease by 5% at a time (for example, you will see 100%, 95%, 90%, 85%). When the charge amount is less than 5%, it will begin decreasing 1% at a time (for example, you will see 4%, 3%, 2%, 1%).
When you first receive your t:slim Pump, you will need to connect it to a charging source before it can be used. Charge the pump until the battery level indicator on the upper left portion of
To charge the pump from an AC Power Outlet:
1. Plug the included USB cable into the AC power adapter.
2. Plug the AC power adapter into a grounded AC power outlet.
3. Plug the other end of the cable into the micro USB port on the pump.
To charge the pump using the included Car Power USB Adapter:
1. Plug the USB cable into the included Car Power USB Adapter.
2. Plug the Car Power USB Adapter into a grounded auxiliary power outlet.
3. Plug the other end of the cable into the micro USB port on the pump.
the Home Screen reads 100% (initial charge can take up to 2.5 hours).
The t:slim Pump continues to operate normally while charging. You do not need to disconnect from the pump while charging.
PRECAUTIONMAKE SURE to not move further than the length of the USB cable when you are connected to the pump and to a charging source. Moving further than the length of the USB cable may cause the cannula to be pulled out of the infusion site. For this reason it is recommended not to charge the pump while sleeping.
If you choose to disconnect from the pump while charging, check with your healthcare provider for specific guide-lines. Depending on the length of time you are disconnected, you may need to replace missed basal and/or bolus insulin. Check your blood glucose be-fore disconnecting from the pump and again when you reconnect.
Customer Technical Support: (877) 801-6901 57
Key P
ump
Features2
Chapter 4 – Getting Started
WARNINGWhen using the Car Power USB Adapter, the charger must be connected to an isolated, battery powered 12 Volt system, such as an automobile. Connecting the DC vehicle adapter charger to 12 Volt DC that is generated by a power supply connected to alternating current (AC) mains is prohibited.
To charge the pump using a USB port on a Personal Computer (PC):
Ensure that the PC complies with the IEC 60950-1 (or equivalent) safety standard.
1. Plug the included USB cable into your computer.
2. Plug the other end of the cable into the micro USB port on the pump.
Before using a Mac or PC to charge the t:slim Pump, it is recommended that a driver be installed on the com-puter by downloading the t:connect Uploader Software from our website at www.tandemdiabetes.com. This will also allow communication between the pump, the PC, and the t:connect Ap-
plication. Depending on your comput-er, charging time will vary. The pump will display a CONNECTION ERROR ALERT message if it is not charging properly.
When you charge the t:slim Pump, you will notice the following:
• The screen illuminates
• An audible alert
• The LED (edge around the Screen On/Quick Bolus Button) blinks green
• A vibrating alert
• A charge symbol (lightning bolt) on the battery level indicator appears
PRECAUTIONCONFIRM that the screen display turns on, you can hear audible beeps, feel the pump vibrate, and see the green LED light blinking around the edge of the Screen On Button when you connect a power source to the USB port. These features are used to notify you about alerts, alarms, and other conditions that require your attention. If these features are not working,
discontinue use of the System and contact Tandem Diabetes Care Customer Technical Support at (877) 801-6901.
Charging Tips
Tandem Diabetes Care, Inc. recom-mends periodically checking the bat-tery level indicator, charging the pump for a short period of time every day (10 to 15 minutes), and also avoiding frequent full discharges.
NOTE: Fully Discharged BatteryIf the battery is fully discharged, the screen may not power on immediately when connected to a charging source. The LED around the Screen On/Quick Bolus Button will blink green until there is enough charge to power on the touch screen.
Customer Technical Support: (877) 801-690158
Chapter 4 – Getting Started
4.2 Using the Touch Screen
To turn on your t:slim Pump screen, first press the Screen On/Quick Bolus Button, then use the pad of your finger to quickly and lightly tap on the screen. Do not use your finger nail or other object to interact with the screen. It will not activate the screen or its functions.
Your t:slim Pump is designed to give you quick and easy access to the func-tions that you will use in your day-to-day diabetes management - whether basic or advanced.
The t:slim Pump has several safe-ty features to prevent unintentional interaction with the touch screen. The screen must be unlocked by tapping 1–2–3 in sequence. On all screens, if three non-active areas of the touch screen are tapped before an active area is tapped, the screen will turn off to prevent accidental button presses.
NOTE: Touch Screen TipsWhen using the t:slim Pump, tap the Tandem Logo to return to the Home Screen or tap BACK to return to the previous screen.
4.3 Turning on the t:slim Pump Screen
1. To turn on your t:slim Pump screen, press the Screen On/Quick Bolus Button, located on the top of the pump, once.
ZZ The Screen Lock screen will be displayed.
NOTE: Turning off the Pump ScreenTurn off the pump screen by pressing the Screen On/Quick Bolus button before placing the pump back in its case or any pocket/ clothing. Always position the pump screen away from the skin when worn under clothing.
The pump continues to function nor-mally when the screen is not on.
4.4 Unlocking the t:slim Pump Screen
The screen lock screen appears any-time you turn on the screen, and after a bolus or temp rate is requested. To unlock the screen:
1. Press Screen On/Quick Bolus Button.
2. Tap 1.
3. Tap 2.
4. Tap 3.
ZZ The pump screen is now unlocked. The last screen that was viewed will be displayed.
You must tap 1–2–3 in sequential order to unlock the pump. If you do not press 1–2–3 in sequential order, the pump will force you to restart the unlock sequence from the beginning.
Customer Technical Support: (877) 801-6901 59
Key P
ump
Features2
Chapter 4 – Getting Started
4.5 Edit Time
After powering up your t:slim Pump for the first time, set the current time and date. Refer back to this section if you need to edit the time for either traveling in a different time zone or adjusting for Daylight Savings Time.
PRECAUTIONALWAYS make sure that the correct time and date are set on your System. When editing time, always check that the AM/PM setting is accurate. AM is to be used from midnight until 11:59 AM. PM is to be used from noon until 11:59 PM. Not having the correct time and date setting may affect safe insulin delivery.
1. From the Home Screen, tap OPTIONS.
2. Tap My Pump.
3. Tap Pump Settings.
4. Tap Time and Date.
5. Tap Edit Time.
6. Tap Time.
7. Using the onscreen keypad, enter the hour and minutes. Verify and tap DONE.
8. Tap Time of Day to set AM or PM.
9. Verify the correct time is set and tap SAVE.
Any edits to Time or Date will not be saved until you tap SAVE.
4.6 Edit Date
1. From the Time and Date screen tap Edit Date.
2. Tap Month.
3. Find and tap the current month displayed on the right. Use Up/Down Arrow to view months not displayed.
4. Tap Day. Using the onscreen keypad enter the current day. Verify and tap DONE.
5. Tap Year.
6. Using the onscreen keypad enter the current year. Verify and tap DONE.
7. Verify the correct date is set and tap SAVE.
8. Tap Tandem Logo to return to the Home Screen.

Customer Technical Support: (877) 801-690160
Chapter 4 – Getting Started
THIS PAGE IS INTENTIONALLY
LEFT BLANK
Chapter 5
Infusion Site Care and Loading Cartridge
Customer Technical Support: (877) 801-690162
Chapter 5 – Infusion Site Care and Loading Cartridge
5.1 Infusion Site Selection and Care
WARNINGDO use only FDA cleared insulin infusion sets with a tubing connection and follow their instructions for use. Failure to do so may result in over delivery or under delivery of insulin and may cause very low or very high blood glucose.
WARNINGDO NOT ignore infusion set cannula fractures. Infusion set cannulas may fracture on rare occasions. If an infusion set cannula breaks and no portion of it is visible above the skin, do not attempt to remove it. Seek professional medical help if you have symptoms of infection or inflammation—redness, swelling or pain—at the insertion site. If you experience a broken infusion set cannula, please report this to Tandem Customer Technical Support at (877) 801-6901.
PRECAUTIONCHECK your infusion site daily for proper placement and leaks. REPLACE your infusion set if you notice leaks around the site. Improperly placed sites or leaks around the infusion site can result in under delivery of insulin.
» Any scars, moles, stretch marks, or tattoos.
» Areas within 3 inches of your CGM sensor site.
Site Rotation:
PRECAUTIONCHANGE your infusion set every 48–72 hours as recommended by your healthcare provider. Wash your hands with anti-bacterial soap before handling the infusion set and thoroughly clean the insertion site on your body to avoid infection. Contact your healthcare provider if you have symptoms of infection at your insulin infusion site.
• The infusion set must be replaced and rotated every 48–72 hours, or more often if needed.
• With experience, you will find areas that not only provide better absorption, but are more comfortable. Keep in mind, using the same areas may cause scarring or lumps which can affect insulin absorption.
• Consult your healthcare provider to establish a rotation schedule that best fits your needs.
General Guidelines
WARNINGDO NOT place your infusion set on any scars, lumps, moles, stretch marks or tattoos. Placing your infusion set in these areas can cause swelling, irritation or infection. This can affect insulin absorption and cause high or low blood glucose.
Site Selection:
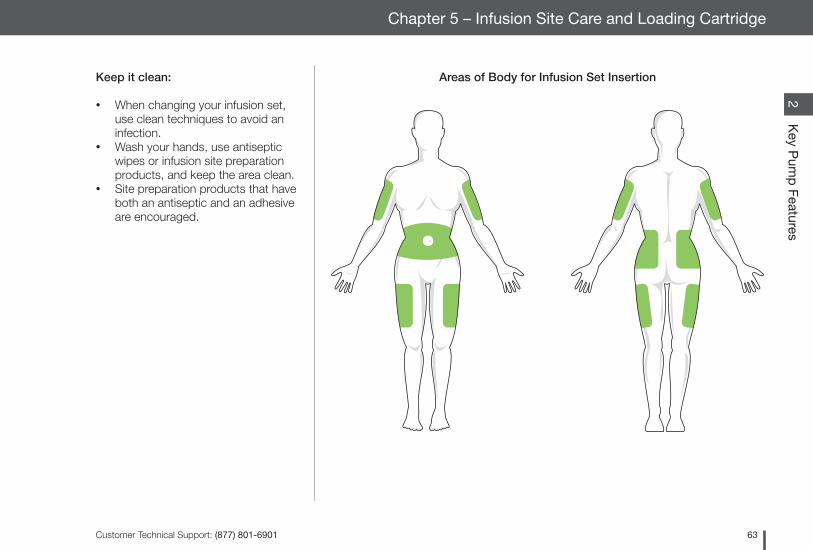
• Your infusion set can be worn anywhere on your body that you would normally inject insulin. Absorption varies from site to site. Discuss options with your healthcare provider.
• The most commonly used sites are the abdomen, upper buttocks, hips, upper arms, and upper legs.
• The abdomen is the most popular site because of access to fatty tissue. If using the abdominal area, AVOID: » Areas that would constrict
the site such as the belt line, waistline, or where you would normally bend.
» Areas 2 inches around your belly button.
Customer Technical Support: (877) 801-6901 63
Key P
ump
Features2
Chapter 5 – Infusion Site Care and Loading Cartridge
Areas of Body for Infusion Set InsertionKeep it clean:
• When changing your infusion set, use clean techniques to avoid an infection.
• Wash your hands, use antiseptic wipes or infusion site preparation products, and keep the area clean.
• Site preparation products that have both an antiseptic and an adhesive are encouraged.
Customer Technical Support: (877) 801-690164
Chapter 5 – Infusion Site Care and Loading Cartridge
5.2 Cartridge Instructions for Use
For complete cartridge labeling, consult the Cartridge Instructions for Use included in the t:slim Cartridge box.
5.3 Filling and Loading a t:slim Cartridge
This section describes how to fill the cartridge with insulin and load the cartridge into your t:slim Pump. The single-use disposable cartridge can hold up to 300 units (3.0 mL) of insulin.
WARNINGDO NOT use any other insulin with your System other than U-100 Humalog® or NovoLog®. Only Humalog® and NovoLog® have been tested and found to be compatible for use in the System. Use of insulin with lesser or greater concentration can result in under delivery or over delivery of insulin. This can cause very high or a very low blood glucose.
WARNINGDO NOT reuse cartridges or use cartridges other than those manufactured by Tandem
Diabetes Care, Inc. Use of cartridges not manufactured by Tandem Diabetes Care, Inc. or reuse of cartridges may result in over delivery or under delivery of insulin. This can cause very low or very high blood glucose.
Before you begin, make sure you have the following items:
• 1 unopened cartridge
• 3.0 mL syringe and fill needle
• Vial of Humalog® or NovoLog® insulin
• Alcohol prep swab
• 1 new infusion set
• Infusion set Instructions for Use
NOTE: Removing the CartridgeDo NOT remove the used cartridge from the pump during the load process until prompted on the t:slim Pump screen.
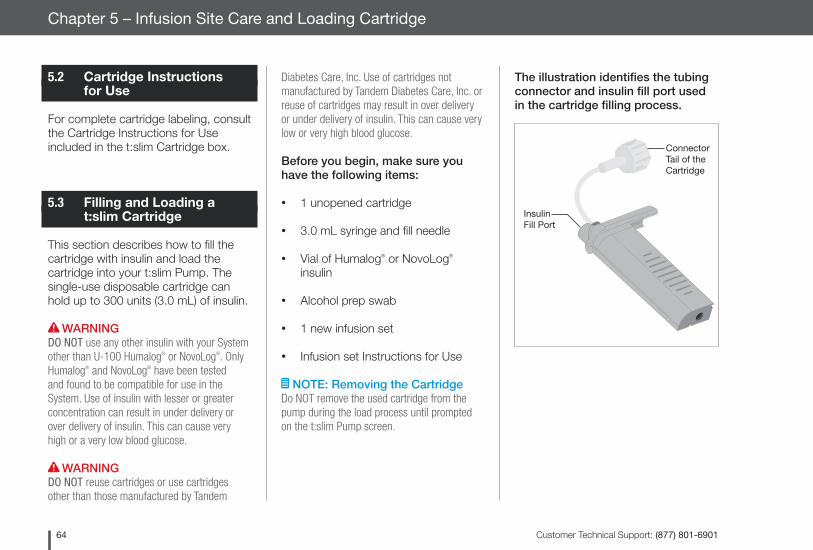
The illustration identifies the tubing connector and insulin fill port used in the cartridge filling process.
Connector Tail of the Cartridge
Insulin Fill Port
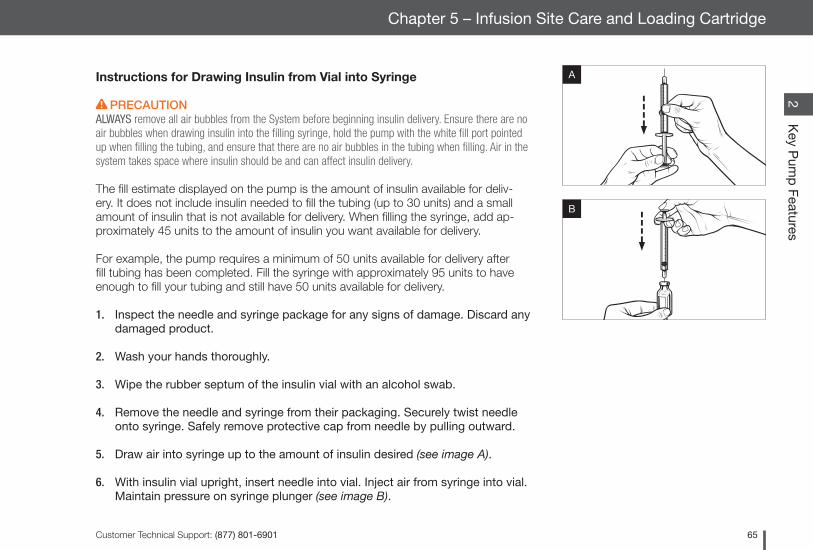
Customer Technical Support: (877) 801-6901 65
Key P
ump
Features2
Chapter 5 – Infusion Site Care and Loading Cartridge
Instructions for Drawing Insulin from Vial into Syringe
PRECAUTIONALWAYS remove all air bubbles from the System before beginning insulin delivery. Ensure there are no air bubbles when drawing insulin into the filling syringe, hold the pump with the white fill port pointed up when filling the tubing, and ensure that there are no air bubbles in the tubing when filling. Air in the system takes space where insulin should be and can affect insulin delivery.
The fill estimate displayed on the pump is the amount of insulin available for deliv-ery. It does not include insulin needed to fill the tubing (up to 30 units) and a small amount of insulin that is not available for delivery. When filling the syringe, add ap-proximately 45 units to the amount of insulin you want available for delivery.
For example, the pump requires a minimum of 50 units available for delivery after fill tubing has been completed. Fill the syringe with approximately 95 units to have enough to fill your tubing and still have 50 units available for delivery.
1. Inspect the needle and syringe package for any signs of damage. Discard any damaged product.
2. Wash your hands thoroughly.
3. Wipe the rubber septum of the insulin vial with an alcohol swab.
4. Remove the needle and syringe from their packaging. Securely twist needle onto syringe. Safely remove protective cap from needle by pulling outward.
5. Draw air into syringe up to the amount of insulin desired (see image A).
6. With insulin vial upright, insert needle into vial. Inject air from syringe into vial. Maintain pressure on syringe plunger (see image B).

Customer Technical Support: (877) 801-690166
Chapter 5 – Infusion Site Care and Loading Cartridge
7. With needle still inserted into vial, turn vial and syringe upside down. Release syringe plunger. Insulin will begin to flow from the vial into the syringe.
8. Slowly pull back the plunger to the desired amount of insulin (see image C).
9. While the filling needle is still in the vial and upside down, tap the syringe so that any air bubbles rise to the top (see image D). Then slowly push the plunger upwards, forcing any air bubbles back into the vial.
10. Check the syringe for air bubbles and do one of the following:
» If there are air bubbles present, repeat step 9.
» If no air bubbles are present, remove the filling needle from the vial.
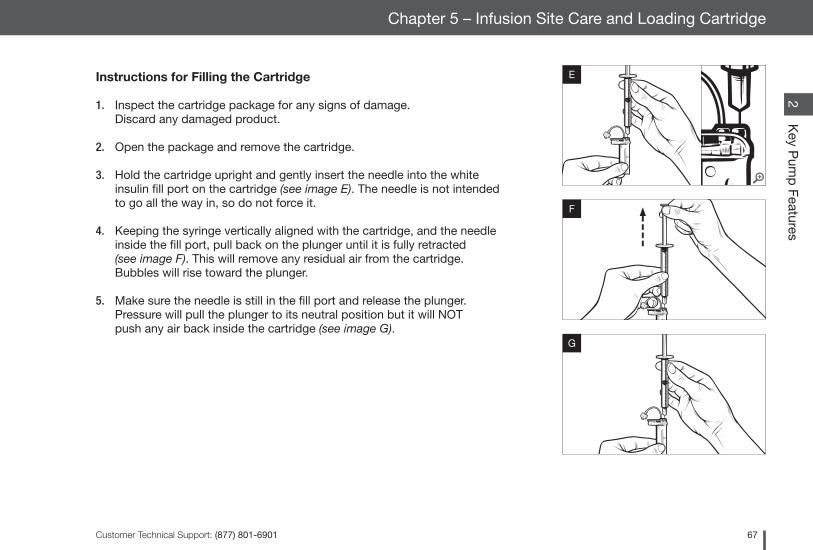
Customer Technical Support: (877) 801-6901 67
Key P
ump
Features2
Chapter 5 – Infusion Site Care and Loading Cartridge
Instructions for Filling the Cartridge
1. Inspect the cartridge package for any signs of damage. Discard any damaged product.
2. Open the package and remove the cartridge.
3. Hold the cartridge upright and gently insert the needle into the white insulin fill port on the cartridge (see image E). The needle is not intended to go all the way in, so do not force it.
4. Keeping the syringe vertically aligned with the cartridge, and the needle inside the fill port, pull back on the plunger until it is fully retracted (see image F). This will remove any residual air from the cartridge. Bubbles will rise toward the plunger.
5. Make sure the needle is still in the fill port and release the plunger. Pressure will pull the plunger to its neutral position but it will NOT push any air back inside the cartridge (see image G).
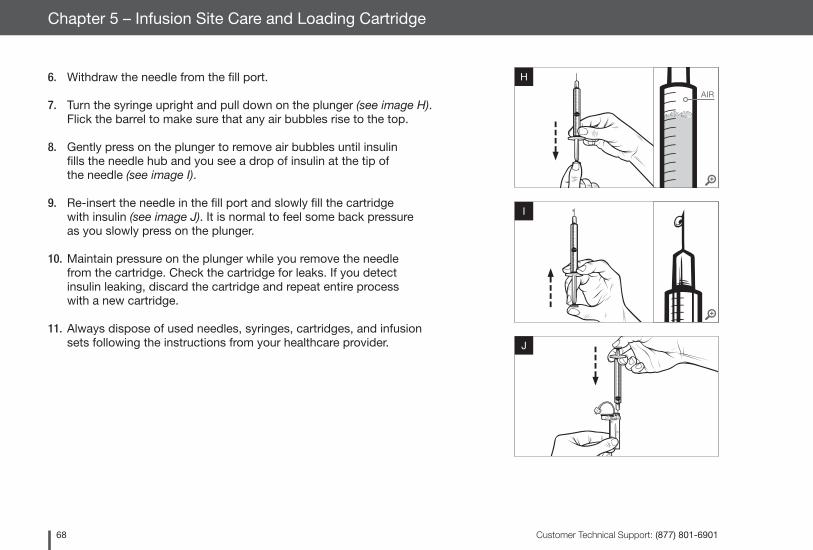
Customer Technical Support: (877) 801-690168
Chapter 5 – Infusion Site Care and Loading Cartridge
6. Withdraw the needle from the fill port.
7. Turn the syringe upright and pull down on the plunger (see image H). Flick the barrel to make sure that any air bubbles rise to the top.
8. Gently press on the plunger to remove air bubbles until insulin fills the needle hub and you see a drop of insulin at the tip of the needle (see image I).
9. Re-insert the needle in the fill port and slowly fill the cartridge with insulin (see image J). It is normal to feel some back pressure as you slowly press on the plunger.
10. Maintain pressure on the plunger while you remove the needle from the cartridge. Check the cartridge for leaks. If you detect insulin leaking, discard the cartridge and repeat entire process with a new cartridge.
11. Always dispose of used needles, syringes, cartridges, and infusion sets following the instructions from your healthcare provider.
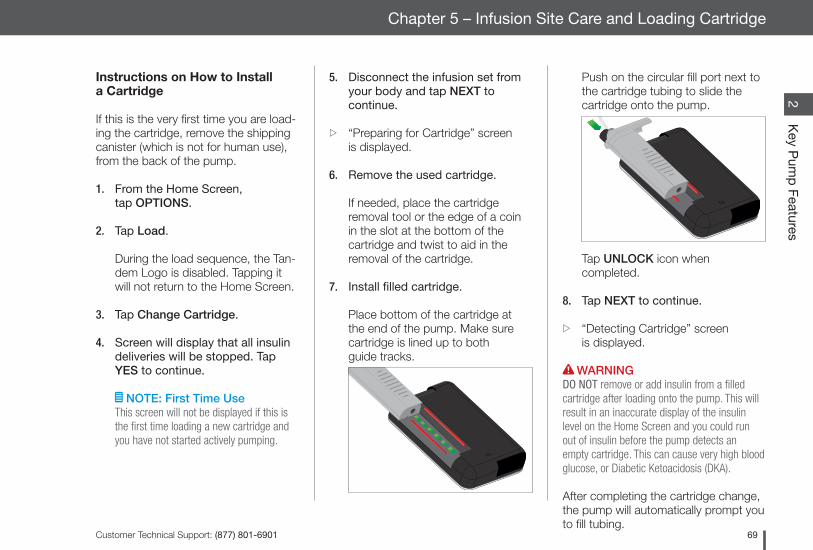
Customer Technical Support: (877) 801-6901 69
Key P
ump
Features2
Chapter 5 – Infusion Site Care and Loading Cartridge
Instructions on How to Install a Cartridge
If this is the very first time you are load-ing the cartridge, remove the shipping canister (which is not for human use), from the back of the pump.
1. From the Home Screen, tap OPTIONS.
2. Tap Load.
During the load sequence, the Tan-dem Logo is disabled. Tapping it will not return to the Home Screen.
3. Tap Change Cartridge.
4. Screen will display that all insulin deliveries will be stopped. Tap YES to continue.
NOTE: First Time UseThis screen will not be displayed if this is the first time loading a new cartridge and you have not started actively pumping.
5. Disconnect the infusion set from your body and tap NEXT to continue.
ZZ “Preparing for Cartridge” screen is displayed.
6. Remove the used cartridge.
If needed, place the cartridge removal tool or the edge of a coin in the slot at the bottom of the cartridge and twist to aid in the removal of the cartridge.
7. Install filled cartridge.
Place bottom of the cartridge at the end of the pump. Make sure cartridge is lined up to both guide tracks.
Push on the circular fill port next to the cartridge tubing to slide the cartridge onto the pump.
Tap UNLOCK icon when completed.
8. Tap NEXT to continue.
ZZ “Detecting Cartridge” screen is displayed.
WARNINGDO NOT remove or add insulin from a filled cartridge after loading onto the pump. This will result in an inaccurate display of the insulin level on the Home Screen and you could run out of insulin before the pump detects an empty cartridge. This can cause very high blood glucose, or Diabetic Ketoacidosis (DKA).
After completing the cartridge change, the pump will automatically prompt you to fill tubing.
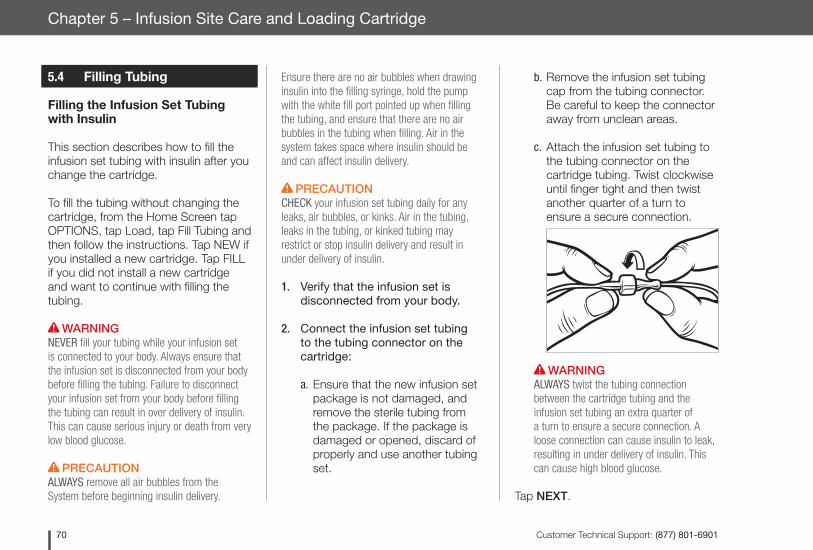
Customer Technical Support: (877) 801-690170
Chapter 5 – Infusion Site Care and Loading Cartridge
5.4 Filling Tubing
Filling the Infusion Set Tubing with Insulin
This section describes how to fill the infusion set tubing with insulin after you change the cartridge.
To fill the tubing without changing the cartridge, from the Home Screen tap OPTIONS, tap Load, tap Fill Tubing and then follow the instructions. Tap NEW if you installed a new cartridge. Tap FILL if you did not install a new cartridge and want to continue with filling the tubing.
WARNINGNEVER fill your tubing while your infusion set is connected to your body. Always ensure that the infusion set is disconnected from your body before filling the tubing. Failure to disconnect your infusion set from your body before filling the tubing can result in over delivery of insulin. This can cause serious injury or death from very low blood glucose.
PRECAUTIONALWAYS remove all air bubbles from the System before beginning insulin delivery.
Ensure there are no air bubbles when drawing insulin into the filling syringe, hold the pump with the white fill port pointed up when filling the tubing, and ensure that there are no air bubbles in the tubing when filling. Air in the system takes space where insulin should be and can affect insulin delivery.
PRECAUTIONCHECK your infusion set tubing daily for any leaks, air bubbles, or kinks. Air in the tubing, leaks in the tubing, or kinked tubing may restrict or stop insulin delivery and result in under delivery of insulin.
1. Verify that the infusion set is disconnected from your body.
2. Connect the infusion set tubing to the tubing connector on the cartridge:
a. Ensure that the new infusion set package is not damaged, and remove the sterile tubing from the package. If the package is damaged or opened, discard of properly and use another tubing set.
b. Remove the infusion set tubing cap from the tubing connector. Be careful to keep the connector away from unclean areas.
c. Attach the infusion set tubing to the tubing connector on the cartridge tubing. Twist clockwise until finger tight and then twist another quarter of a turn to ensure a secure connection.
WARNINGALWAYS twist the tubing connection between the cartridge tubing and the infusion set tubing an extra quarter of a turn to ensure a secure connection. A loose connection can cause insulin to leak, resulting in under delivery of insulin. This can cause high blood glucose.
Tap NEXT.
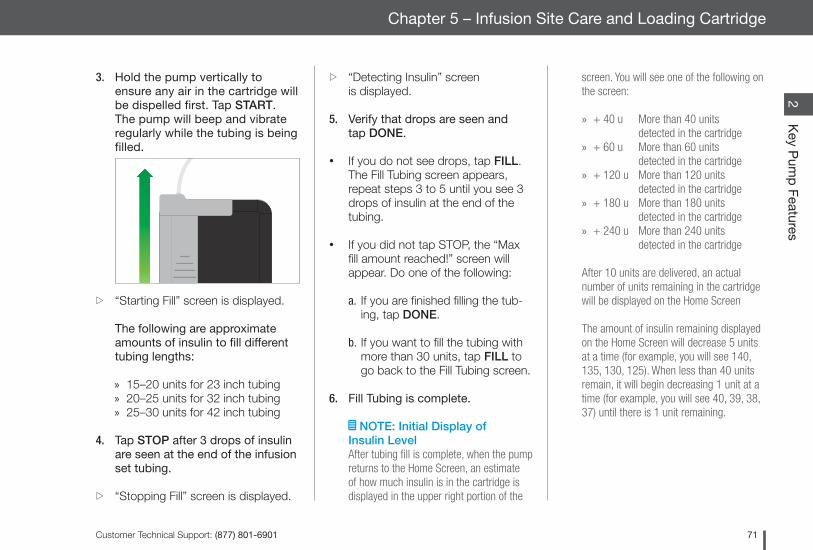
Customer Technical Support: (877) 801-6901 71
Key P
ump
Features2
Chapter 5 – Infusion Site Care and Loading Cartridge
3. Hold the pump vertically to ensure any air in the cartridge will be dispelled first. Tap START. The pump will beep and vibrate regularly while the tubing is being filled.
ZZ “Starting Fill” screen is displayed.
The following are approximate amounts of insulin to fill different tubing lengths:
» 15–20 units for 23 inch tubing » 20–25 units for 32 inch tubing » 25–30 units for 42 inch tubing
4. Tap STOP after 3 drops of insulin are seen at the end of the infusion set tubing.
ZZ “Stopping Fill” screen is displayed.
ZZ “Detecting Insulin” screen is displayed.
5. Verify that drops are seen and tap DONE.
• If you do not see drops, tap FILL. The Fill Tubing screen appears, repeat steps 3 to 5 until you see 3 drops of insulin at the end of the tubing.
• If you did not tap STOP, the “Max fill amount reached!” screen will appear. Do one of the following:
a. If you are finished filling the tub-ing, tap DONE.
b. If you want to fill the tubing with more than 30 units, tap FILL to go back to the Fill Tubing screen.
6. Fill Tubing is complete.
NOTE: Initial Display of Insulin LevelAfter tubing fill is complete, when the pump returns to the Home Screen, an estimate of how much insulin is in the cartridge is displayed in the upper right portion of the
screen. You will see one of the following on the screen:
» + 40 u More than 40 units detected in the cartridge
» + 60 u More than 60 units detected in the cartridge
» + 120 u More than 120 units detected in the cartridge
» + 180 u More than 180 units detected in the cartridge
» + 240 u More than 240 units detected in the cartridge
After 10 units are delivered, an actual number of units remaining in the cartridge will be displayed on the Home Screen
The amount of insulin remaining displayed on the Home Screen will decrease 5 units at a time (for example, you will see 140, 135, 130, 125). When less than 40 units remain, it will begin decreasing 1 unit at a time (for example, you will see 40, 39, 38, 37) until there is 1 unit remaining.
Customer Technical Support: (877) 801-690172
Chapter 5 – Infusion Site Care and Loading Cartridge
5.5 Filling Cannula
Filling the Infusion Set Cannula with Insulin
This section describes how to fill the infusion set cannula with insulin after you fill the tubing.
To fill the cannula without filling the tubing, from the Home Screen, tap OP-TIONS, tap Load, tap Fill Cannula and then follow the instructions below.
If you are using a steel needle infu-sion set, there is no cannula. Skip this section.
To Fill the Cannula
1. Tap Fill Cannula.
2. Insert a new infusion set and connect filled tubing to site, then tap NEXT.
3. Tap Edit Fill Amount.
The cannula fill amount displayed is based on your last cannula
fill amount. Filling stops at this amount.
4. Select amount needed for cannula fill.
Refer to your infusion set instruc-tions for use for proper cannula fill amount.
If the amount needed is not listed, tap Other amount and use the onscreen keypad to enter a value between 0.1 to 1.0 unit.
5. Tap START.
ZZ “Starting Fill” screen is displayed.
ZZ After fill is complete, “Stopping Fill” screen is displayed.
NOTE: Stopping FillYou can tap STOP at any time during the fill process if you want to stop filling the cannula.
The screen will return to the Load menu if the Site Reminder is turned off. Tap DONE to resume insulin if finished. Or tap Site Reminder to set reminder. If Site Reminder is on, the pump will automatically display the Site Reminder Screen (refer to next section).
Customer Technical Support: (877) 801-6901 73
Key P
ump
Features2
Chapter 5 – Infusion Site Care and Loading Cartridge
5.6 Setting Site Reminder
This section describes how to set the Site Reminder after you fill the cannula.
To set the Site Reminder without filling the cannula, from the Home Screen, tap OPTIONS, tap Load, tap Site Reminder then follow the instructions below.
PRECAUTIONDO NOT change your infusion set before bedtime or if you will not be able to test your blood glucose 1–2 hours after the new infusion set is placed. It is important to confirm that the infusion set is inserted correctly and delivering insulin. It is also important to respond quickly to any problems with the insertion to ensure continued insulin delivery.
1. Tap SAVE if correct. Tap Edit Reminder if settings need to be changed.
2. Tap Remind Me In and select the number of days (1–3).
ZZ The default for the Site Reminder is set for 3 days
3. Tap Remind Me At. Use the onscreen keypad to enter time and tap DONE.
4. Tap Time of Day to change AM or PM. Tap DONE.
5. Verify Site Reminder is set correctly and tap SAVE.
ZZ “Setting Saved” screen is displayed.
6. Load screen is displayed. Tap DONE.
ZZ A reminder to test BG in 1 to 2 hours will display.
7. Tap RESUME.
NOTE: First Time UseIf this is the first time using your t:slim Pump and a Personal Profile has not been defined, a screen will notify you that a profile must be activated to resume insulin. Tap CLOSE.
8. RESUMING INSULIN screen is temporarily displayed.
Customer Technical Support: (877) 801-690174
Chapter 5 – Infusion Site Care and Loading Cartridge
THIS PAGE IS INTENTIONALLY
LEFT BLANK

Chapter 6
Personal Profile
Customer Technical Support: (877) 801-690176
Chapter 6 – Personal Profile
6.1 Personal Profile Overview
WARNINGDO NOT start to use your System before consulting with your healthcare provider to determine which features are most appropriate for you. Only your healthcare provider can determine and help you adjust your Basal Rate(s), Carb Ratio(s), Correction Factor(s), Target BG, and duration of insulin action. Incorrect settings can result in over delivery or under delivery of insulin. This can cause very low or very high blood glucose.
A Personal Profile is a group of settings that define basal and bolus delivery within specific time segments through-out a 24-hour period. Each profile can be personalized with a name. Within a Personal Profile the following can be set:
• Timed Settings: Basal Rate, Correction Factor, Carb Ratio and Target BG.
• Bolus Settings: Insulin Duration, Max Bolus and Carbohydrates setting (on/off).
6.2 Creating a New Profile
Creating Personal Profiles
You can create up to 6 Personal Pro-files, however, only 1 can be active at a time. In the Personal Profiles screen, the active profile is positioned at the top of the list and is marked as ON. When you create a Personal Profile, you can set any or all of the following Timed Settings:
• Basal Rate (your basal rate in units/hr)
• Correction Factor (amount 1 unit of insulin lowers BG)
• Carb Ratio (grams of carbs covered by 1 unit of insulin)
• Target BG (your ideal BG level, measured in mg/dL)
Although you do not need to define every setting, some pump features require certain settings to be defined and activated. When you are creating a new profile, your pump prompts you to
The t:slim Pump uses the settings in your active profile to calculate the delivery of basal insulin, food boluses and correction boluses based on your Target BG. If you only define a basal rate in Timed Settings, your pump will only be able to deliver basal insulin and standard and extended boluses. Your pump will not calculate correction boluses.
Up to 6 different Personal Profiles can be created and up to 16 different time segments can be set in each Personal Profile. Having several Personal Profiles provides more flexibility for your body and lifestyle. For example, you could have “Weekday” and “Weekend” pro-files if you have different insulin delivery needs on weekdays and weekends, based on schedule, food intake, activi-ty, and exercise, etc.
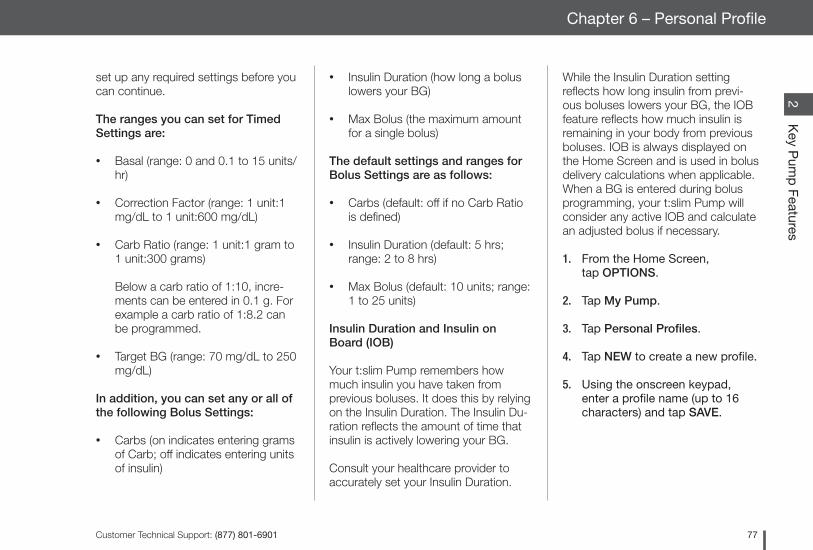
Customer Technical Support: (877) 801-6901 77
Key P
ump
Features2
Chapter 6 – Personal Profile
set up any required settings before you can continue.
The ranges you can set for Timed Settings are:
• Basal (range: 0 and 0.1 to 15 units/hr)
• Correction Factor (range: 1 unit:1 mg/dL to 1 unit:600 mg/dL)
• Carb Ratio (range: 1 unit:1 gram to 1 unit:300 grams)
Below a carb ratio of 1:10, incre-ments can be entered in 0.1 g. For example a carb ratio of 1:8.2 can be programmed.
• Target BG (range: 70 mg/dL to 250 mg/dL)
In addition, you can set any or all of the following Bolus Settings:
• Carbs (on indicates entering grams of Carb; off indicates entering units of insulin)
• Insulin Duration (how long a bolus lowers your BG)
• Max Bolus (the maximum amount for a single bolus)
The default settings and ranges for Bolus Settings are as follows:
• Carbs (default: off if no Carb Ratio is defined)
• Insulin Duration (default: 5 hrs; range: 2 to 8 hrs)
• Max Bolus (default: 10 units; range: 1 to 25 units)
Insulin Duration and Insulin on Board (IOB)
Your t:slim Pump remembers how much insulin you have taken from previous boluses. It does this by relying on the Insulin Duration. The Insulin Du-ration reflects the amount of time that insulin is actively lowering your BG.
Consult your healthcare provider to accurately set your Insulin Duration.
While the Insulin Duration setting reflects how long insulin from previ-ous boluses lowers your BG, the IOB feature reflects how much insulin is remaining in your body from previous boluses. IOB is always displayed on the Home Screen and is used in bolus delivery calculations when applicable. When a BG is entered during bolus programming, your t:slim Pump will consider any active IOB and calculate an adjusted bolus if necessary.
1. From the Home Screen, tap OPTIONS.
2. Tap My Pump.
3. Tap Personal Profiles.
4. Tap NEW to create a new profile.
5. Using the onscreen keypad, enter a profile name (up to 16 characters) and tap SAVE.
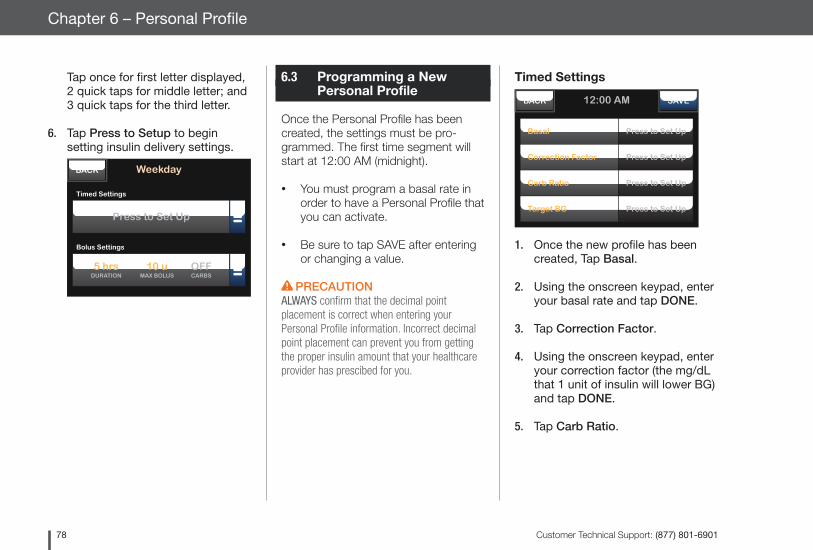
Customer Technical Support: (877) 801-690178
Chapter 6 – Personal Profile
Tap once for first letter displayed, 2 quick taps for middle letter; and 3 quick taps for the third letter.
6. Tap Press to Setup to begin setting insulin delivery settings.
BACK Weekday
Timed Settings
Press to Set Up
Bolus Settings
5 hrsDURATION
10 uMAX BOLUS
OFFCARBS
6.3 Programming a New Personal Profile
Once the Personal Profile has been created, the settings must be pro-grammed. The first time segment will start at 12:00 AM (midnight).
• You must program a basal rate in order to have a Personal Profile that you can activate.
• Be sure to tap SAVE after entering or changing a value.
PRECAUTIONALWAYS confirm that the decimal point placement is correct when entering your Personal Profile information. Incorrect decimal point placement can prevent you from getting the proper insulin amount that your healthcare provider has prescibed for you.
Timed Settings
1. Once the new profile has been created, Tap Basal.
2. Using the onscreen keypad, enter your basal rate and tap DONE.
3. Tap Correction Factor.
4. Using the onscreen keypad, enter your correction factor (the mg/dL that 1 unit of insulin will lower BG) and tap DONE.
5. Tap Carb Ratio.
12:00 AM SAVEBACK
Basal Press to Set Up
Correction Factor Press to Set Up
Carb Ratio Press to Set Up
Target BG Press to Set Up
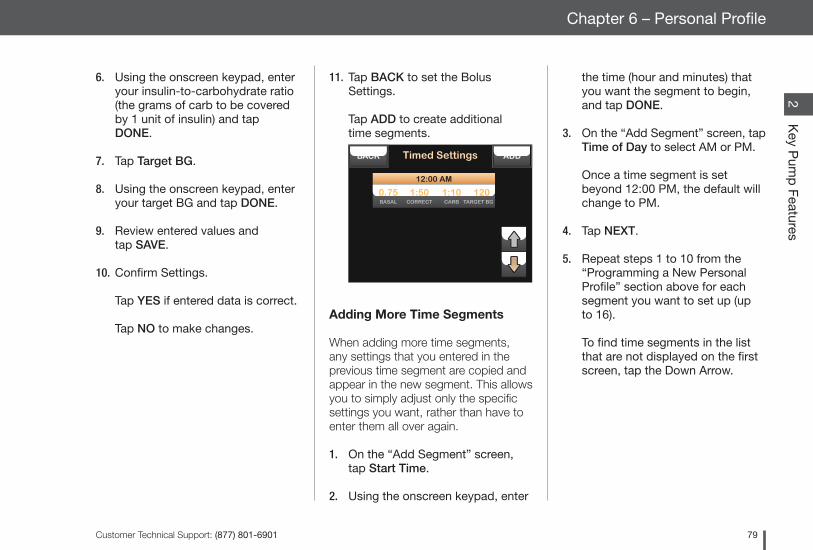
Customer Technical Support: (877) 801-6901 79
Key P
ump
Features2
Chapter 6 – Personal Profile
6. Using the onscreen keypad, enter your insulin-to-carbohydrate ratio (the grams of carb to be covered by 1 unit of insulin) and tap DONE.
7. Tap Target BG.
8. Using the onscreen keypad, enter your target BG and tap DONE.
9. Review entered values and tap SAVE.
10. Confirm Settings. Tap YES if entered data is correct. Tap NO to make changes.
11. Tap BACK to set the Bolus Settings. Tap ADD to create additional time segments.
Adding More Time Segments
When adding more time segments, any settings that you entered in the previous time segment are copied and appear in the new segment. This allows you to simply adjust only the specific settings you want, rather than have to enter them all over again.
1. On the “Add Segment” screen, tap Start Time.
2. Using the onscreen keypad, enter
BACK Timed Settings ADD
12:00 AM
0.75BASAL
1:50CORRECT
1:10CARB TARGET BG
120
the time (hour and minutes) that you want the segment to begin, and tap DONE.
3. On the “Add Segment” screen, tap Time of Day to select AM or PM.
Once a time segment is set beyond 12:00 PM, the default will change to PM.
4. Tap NEXT.
5. Repeat steps 1 to 10 from the “Programming a New Personal Profile” section above for each segment you want to set up (up to 16).
To find time segments in the list that are not displayed on the first screen, tap the Down Arrow.
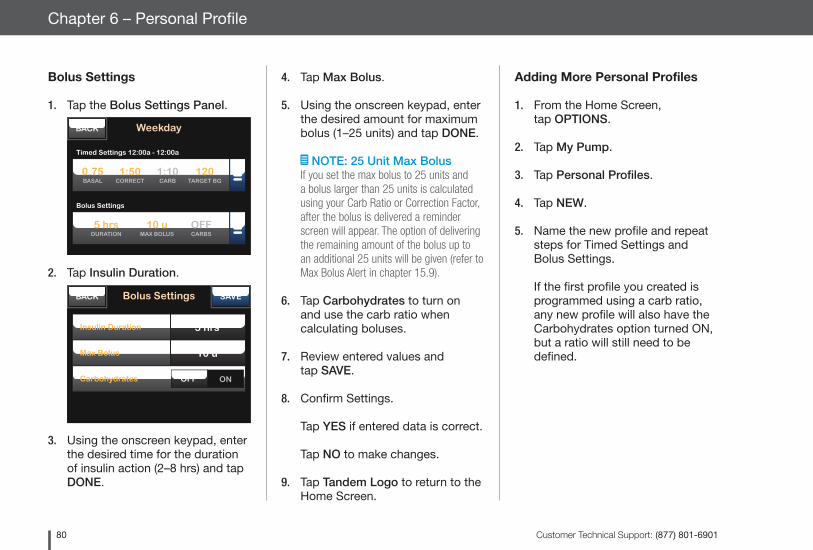
Customer Technical Support: (877) 801-690180
Chapter 6 – Personal Profile
Bolus Settings
1. Tap the Bolus Settings Panel.
2. Tap Insulin Duration.
3. Using the onscreen keypad, enter the desired time for the duration of insulin action (2–8 hrs) and tap DONE.
BACK Weekday
Bolus Settings
5 hrsDURATION
10 uMAX BOLUS
OFFCARBS
Timed Settings 12:00a - 12:00a
0.75BASAL
1:50CORRECT
120TARGET BG
1:10CARB
SAVEBACK
Insulin Duration 5 hrs
Max Bolus 10 u
Bolus Settings
Carbohydrates ONOFF
4. Tap Max Bolus.
5. Using the onscreen keypad, enter the desired amount for maximum bolus (1–25 units) and tap DONE.
NOTE: 25 Unit Max BolusIf you set the max bolus to 25 units and a bolus larger than 25 units is calculated using your Carb Ratio or Correction Factor, after the bolus is delivered a reminder screen will appear. The option of delivering the remaining amount of the bolus up to an additional 25 units will be given (refer to Max Bolus Alert in chapter 15.9).
6. Tap Carbohydrates to turn on and use the carb ratio when calculating boluses.
7. Review entered values and tap SAVE.
8. Confirm Settings. Tap YES if entered data is correct. Tap NO to make changes.
9. Tap Tandem Logo to return to the Home Screen.
Adding More Personal Profiles
1. From the Home Screen, tap OPTIONS.
2. Tap My Pump.
3. Tap Personal Profiles.
4. Tap NEW.
5. Name the new profile and repeat steps for Timed Settings and Bolus Settings.
If the first profile you created is programmed using a carb ratio, any new profile will also have the Carbohydrates option turned ON, but a ratio will still need to be defined.
Customer Technical Support: (877) 801-6901 81
Key P
ump
Features2
Chapter 6 – Personal Profile
6.4 Editing or Reviewing an Existing Profile
1. From the Home Screen, tap OPTIONS.
2. Tap My Pump.
3. Tap Personal Profiles.
4. Tap the name of the Personal Profile to edit or review.
5. Tap Edit.
6. Tap Timed Settings Panel.
7. Tap the desired time segment to edit.
8. Tap Basal, Correction Factor, Carb Ratio or Target BG to make changes as needed and use the onscreen keypad to enter changes. Tap DONE.
9. View recent changes and tap SAVE.
10. Confirm Settings. Tap YES if entered data is correct. Tap NO to make changes.
11. Edit other time segments within the Timed Settings by tapping on them and using the same steps described above.
12. Tap BACK after editing all of the time segments.
13. Tap the Bolus Settings Panel to change DURATION, MAX BOLUS or CARBS as needed. Use the onscreen keypad to enter desired changes. Tap SAVE.
14. Confirm Settings. Tap YES if entered data is correct. Tap NO and make changes.
15. Tap Tandem Logo to return to the Home Screen.
NOTE: Adding or Deleting Time SegmentsTo Add a time segment: » Tap ADD. » Enter desired start time.
To Delete a time segment: » Tap on the X to the left of the time
segment. » Tap YES to confirm.
Customer Technical Support: (877) 801-690182
Chapter 6 – Personal Profile
6.5 Duplicating an Existing Profile
1. From the Home Screen, tap OPTIONS.
2. Tap My Pump.
3. Tap Personal Profiles.
4. Tap the name of the Personal Profile to duplicate.
5. Tap Duplicate.
6. Confirm profile to duplicate by tapping YES.
7. Using the onscreen keypad, enter the name (up to 16 characters) for the new profile and tap SAVE.
ZZ “Profile Duplicated” screen is displayed.
ZZ A new Personal Profile will be cre-ated with the same settings as the profile copied.
8. Tap the Timed Settings or Bolus Settings Panel to make changes to the new profile.
6.6 Activating an Existing Profile
1. From the Home Screen, tap OPTIONS.
2. Tap My Pump.
3. Tap Personal Profiles.
4. Tap the name of the Personal Profile to be activated.
» The Activate and Delete options are disabled for the active profile because the profile is already activated. You cannot delete a profile until you have activated another profile.
» If you have only 1 profile defined, you do not need to activate it (that profile is automatically activated).
5. Tap Activate.
ZZ A screen to confirm the activation request is displayed.
Customer Technical Support: (877) 801-6901 83
Key P
ump
Features2
Chapter 6 – Personal Profile
6. Tap YES.
ZZ “Profile Activated” screen is displayed.
6.7 Renaming an Existing Profile
1. From the Home Screen, tap OPTIONS.
2. Tap My Pump.
3. Tap Personal Profiles.
4. Tap the name of the Personal Profile to be renamed.
5. Tap Down Arrow, and then Rename.
6. Using the onscreen keypad, rename the profile name (up to 16 characters) and tap SAVE.
7. Tap Tandem Logo to return to the Home Screen.
6.8 Deleting an Existing Profile
1. From the Home Screen, tap OPTIONS.
2. Tap My Pump.
3. Tap Personal Profiles.
4. Tap the name of the Personal Profile to be deleted.
The active Personal Profile cannot be deleted.
5. Tap Delete.
6. Tap YES.
ZZ “Profile Deleted” screen is displayed.
7. Tap Tandem Logo to return to the Home Screen.

Customer Technical Support: (877) 801-690184
Chapter 6 – Personal Profile
THIS PAGE IS INTENTIONALLY
LEFT BLANK

Chapter 7
Bolus
Customer Technical Support: (877) 801-690186
Chapter 7 – Bolus
7.1 Bolus Overview
WARNINGDO NOT deliver a bolus until you have reviewed the calculated bolus amount on the pump display. If you dose an insulin amount that is too high or too low, this could cause very high or very low blood glucose. You can always adjust the insulin units up or down before you decide to deliver your bolus.
A bolus is a quick dose of insulin that is usually delivered to cover food eaten or to correct a high BG.
The minimum bolus size is 0.05 units. The maximum bolus size is 25 units. If you attempt to deliver a bolus that is larger than the amount of insulin in the cartridge, a message screen appears indicating that there is not enough insulin to deliver the bolus.
Your t:slim Pump offers you the ability to deliver different boluses to cover car-bohydrate intake (food bolus) and bring your BG back to target (correction bolus). Food and correction boluses can also be programmed together.
If Carbohydrates is turned on in your
7.2 Food Bolus Using Units
If bolusing using a carb ratio skip to the next chapter, Food Bolus Using Grams.
1. From the Home Screen, tap BOLUS.
2. Tap 0 units.
3. Using the onscreen keypad enter units of insulin to be delivered, then tap DONE.
PRECAUTIONALWAYS confirm that the decimal point placement is correct when entering bolus information. Incorrect decimal point placement can prevent you from getting the proper amount of insulin that your healthcare provider has prescribed for you.
4. Tap NEXT to confirm the units of insulin to be delivered.
5. Confirm Request. Tap YES if entered data is correct. Tap NO to go back to make changes or view calculations.
active personal profile, you will enter grams of carbohydrate and the bolus will be calculated using your Carb Ratio.
You can always override the calculated bolus by tapping the area above “units” located at the top of the bolus screen between BACK and NEXT. The override function is always active.
If Carbohydrates is turned off in your active personal profile, you will enter units of insulin to request the bolus.
PRECAUTIONCHECK your System’s personal settings regularly to ensure they are correct. Incorrect settings can result in over delivery or under delivery of insulin. Consult your healthcare provider as needed.
Customer Technical Support: (877) 801-6901 87
Key P
ump
Features2
Chapter 7 – Bolus
6. Tap DELIVER.
7. The bolus initiated screen is temporarily displayed.
7.3 Food Bolus Using Grams
1. From the Home Screen, tap BOLUS.
2. Tap 0 grams.
3. Using the onscreen keypad enter grams of carb and tap DONE.
To add multiple carb values enter first value, then tap +/=, enter second value, tap +/=. Continue until done.
To clear the value entered and start over, tap the back arrow.
4. Check that the grams of carb are entered in the correct location on the screen.
5. Tap NEXT to confirm the units of insulin to be delivered.
You can always tap View Cal-culation to display the Delivery Calculation screen.
6. Confirm Request. Tap YES if entered data is correct. Tap NO to go back to make changes or view calculations.
7. Tap DELIVER.
8. The bolus initiated screen is temporarily displayed.
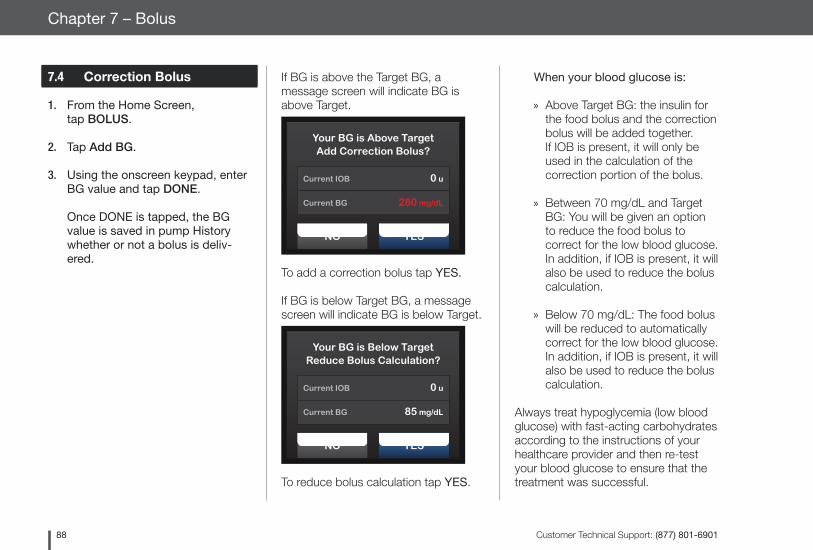
Customer Technical Support: (877) 801-690188
Chapter 7 – Bolus
7.4 Correction Bolus
1. From the Home Screen, tap BOLUS.
2. Tap Add BG.
3. Using the onscreen keypad, enter BG value and tap DONE.
Once DONE is tapped, the BG value is saved in pump History whether or not a bolus is deliv-ered.
If BG is above the Target BG, a message screen will indicate BG is above Target.
To add a correction bolus tap YES.
If BG is below Target BG, a message screen will indicate BG is below Target.
To reduce bolus calculation tap YES.
NO YES
Your BG is Above Target Add Correction Bolus?
Current IOB 0 u
Current BG 280 mg/dL
NO YES
Your BG is Below Target Reduce Bolus Calculation?
Current IOB 0 u
Current BG 85 mg/dL
When your blood glucose is:
» Above Target BG: the insulin for the food bolus and the correction bolus will be added together. If IOB is present, it will only be used in the calculation of the correction portion of the bolus.
» Between 70 mg/dL and Target BG: You will be given an option to reduce the food bolus to correct for the low blood glucose. In addition, if IOB is present, it will also be used to reduce the bolus calculation.
» Below 70 mg/dL: The food bolus will be reduced to automatically correct for the low blood glucose. In addition, if IOB is present, it will also be used to reduce the bolus calculation.
Always treat hypoglycemia (low blood glucose) with fast-acting carbohydrates according to the instructions of your healthcare provider and then re-test your blood glucose to ensure that the treatment was successful.
Customer Technical Support: (877) 801-6901 89
Key P
ump
Features2
Chapter 7 – Bolus
4. Tap NEXT to confirm the units of insulin to be delivered.
You can always tap View Cal-culation to display the Delivery Calculation screen.
5. Confirm Request. Tap YES if entered data is correct. Tap NO to go back to make changes or view calculations.
6. Tap DELIVER.
7. The bolus initiated screen is temporarily displayed.
7.5 Extended Bolus
The Extended Bolus feature allows you to deliver part of the bolus now and part of the bolus slowly over a period of up to 8 hours. This can be helpful for high fat meals such as pizza or if you have gastroparesis (delayed stomach emptying). When using extended bolus, any correction bolus amount will always be given in the DELIVER NOW portion. Talk with our healthcare provider to determine if this feature is appropriate for you as well as for recommendations on the split between now and later and the duration for the later portion.
Only 1 extended bolus can be active at any given time. However, if the DELIVER LATER portion of an extend-ed bolus is active, you can request another standard bolus.
1. From the Home Screen, tap BOLUS.
2. Tap 0 grams (or 0 units).
3. Using the onscreen keypad enter grams of carb (or units of insulin). Tap DONE.
4. If desired, tap Add BG and using the onscreen keypad enter BG value. Tap DONE.
5. Tap NEXT to confirm the units of insulin to be delivered.
You can always tap View Cal-culation to display the Delivery Calculation screen.
6. Confirm Request. Tap YES if entered data is correct. Tap NO to go back to make changes or view calculations.
7. Tap EXTENDED to turn on the extended feature, then tap NEXT.
8. Tap 50% under DELIVER NOW to adjust the percentage of the food bolus that is to be delivered immediately.
The percentage value for DELIVER LATER is automatically calculated by the pump. The default is 50% NOW and 50% LATER. The de-fault for DURATION is 2 hours.
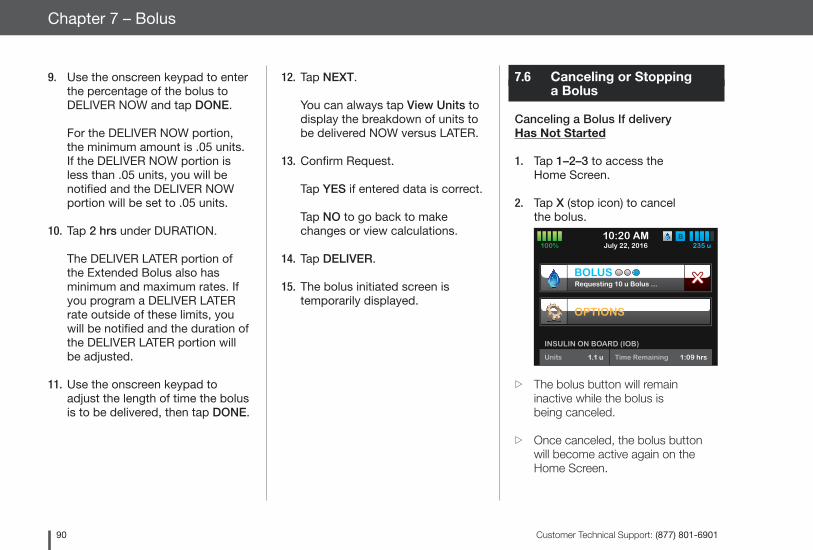
Customer Technical Support: (877) 801-690190
Chapter 7 – Bolus
9. Use the onscreen keypad to enter the percentage of the bolus to DELIVER NOW and tap DONE.
For the DELIVER NOW portion, the minimum amount is .05 units. If the DELIVER NOW portion is less than .05 units, you will be notified and the DELIVER NOW portion will be set to .05 units.
10. Tap 2 hrs under DURATION.
The DELIVER LATER portion of the Extended Bolus also has minimum and maximum rates. If you program a DELIVER LATER rate outside of these limits, you will be notified and the duration of the DELIVER LATER portion will be adjusted.
11. Use the onscreen keypad to adjust the length of time the bolus is to be delivered, then tap DONE.
12. Tap NEXT.
You can always tap View Units to display the breakdown of units to be delivered NOW versus LATER.
13. Confirm Request. Tap YES if entered data is correct. Tap NO to go back to make changes or view calculations.
14. Tap DELIVER.
15. The bolus initiated screen is temporarily displayed.
7.6 Canceling or Stopping a Bolus
Canceling a Bolus If delivery Has Not Started
1. Tap 1–2–3 to access the Home Screen.
2. Tap X (stop icon) to cancel the bolus.
ZZ The bolus button will remain inactive while the bolus is being canceled.
ZZ Once canceled, the bolus button will become active again on the Home Screen.
INSULIN ON BOARD (IOB)
Units 1.1 u 1:09 hrsTime Remaining
B10:20 AMJuly 22, 2016 235 u
OPTIONS
100%
Requesting 10 u Bolus ...
BOLUS
Customer Technical Support: (877) 801-6901 91
Key P
ump
Features2
Chapter 7 – Bolus
Stopping a Bolus if delivery of the bolus Has Started:
1. Tap 1–2–3 to access the Home Screen.
2. Tap X (stop icon) to stop delivery.
3. Tap YES.
ZZ The BOLUS STOPPED screen is displayed and the units delivered are calculated.
4. Units requested and delivered are shown. Tap CLOSE.
Customer Technical Support: (877) 801-690192
Chapter 7 – Bolus
THIS PAGE IS INTENTIONALLY
LEFT BLANK
Chapter 8
Stop/Resume Insulin

Customer Technical Support: (877) 801-690194
Chapter 8 – Stop/Resume Insulin
8.1 Stopping Insulin Delivery
You can stop all insulin delivery at any time. When you stop all insulin delivery, any active bolus and any active temp rate are immediately stopped. No in-sulin delivery can take place while your pump is stopped.
1. From the Home Screen, tap OPTIONS.
2. Tap STOP INSULIN.
3. Tap STOP.
ZZ The “All Deliveries Stopped” screen appears before returning to the Home Screen showing the status “ALL DELIVERIES STOPPED”. A red exclamation mark icon also appears to the right of the time and date.
8.2 Resuming Insulin Delivery
1. If pump screen is not on, press Screen On/Quick Bolus Button once to turn on your t:slim Pump screen.
2. Tap 1–2–3 to access the Home Screen.
3. Tap RESUME.
4. The RESUMING INSULIN screen is temporarily displayed.
– OR –
1. From the Home Screen, tap OPTIONS.
2. Tap RESUME INSULIN.
3. Tap RESUME.
4. The RESUMING INSULIN screen is temporarily displayed.
Customer Technical Support: (877) 801-6901 95
Key P
ump
Features2
Chapter 8 – Stop/Resume Insulin
THIS PAGE IS INTENTIONALLY
LEFT BLANK
Section 3
Additional Pump Operations

Chapter 9
Temporary Basal Rate
Customer Technical Support: (877) 801-690198
Chapter 9 – Temporary Basal Rate
9.1 Setting a Temp Rate
A Temp Rate is used to increase or decrease (by percentage) the current basal rate for a period of time. This fea-ture can be helpful for situations such as exercise or illness.
When you enter the Temp Rate screen, the default values are 100% (current basal rate) and a Duration of 0:15 min. The Temp Rate can be set from a minimum of 0% of current basal rate to a maximum of 250% of current basal rate in increments of 1%.
Duration can be set from a minimum of 15 minutes to a maximum of 72 hours in increments of 1 minute.
If you program a Temp Rate greater than 0% but less than the minimum allowable basal rate of 0.1 units/hr, you will be notified that the selected rate is too low and that it will be set to the minimum allowable rate for delivery.
If you program a Temp Rate more than the maximum allowable basal rate of 15 units/hr, you will be notified that the selected rate is too high and that it will
8. The Screen Lock screen will be displayed with the icon indicating a Temp Rate is active.
An orange “T” means a Temp Rate is active. A red “T” means a Temp Rate of 0 is active.
be set to the maximum allowable rate for delivery.
1. From the Home Screen, tap OPTIONS.
2. Tap Temp Rate.
3. Tap Temp Rate.
4. Using the onscreen keypad enter desired percentage. The current rate is 100%. An increase is greater than 100% and decrease is less than 100%. Tap DONE.
5. Tap Duration. Using the onscreen keypad enter desired length of time for Temp Rate. Tap DONE.
You can always tap View Units to see the actual units to be deliv-ered.
6. Verify settings and tap START.
7. The “TEMP RATE STARTED” screen is temporarily displayed.
Customer Technical Support: (877) 801-6901 99
Ad
ditional P
ump
Op
erations3
Chapter 9 – Temporary Basal Rate
9.2 Stopping a Temp Rate
To stop an active temp rate:
1. From the Home Screen, tap OPTIONS.
2. On the Options screen, tap X (stop icon) on the right side of Temp Rate.
3. On the confirmation screen, tap STOP. The “TEMP RATE STOPPED” screen appears before returning to the Options screen.

Customer Technical Support: (877) 801-6901100
Chapter 9 – Temporary Basal Rate
THIS PAGE IS INTENTIONALLY
LEFT BLANK
Chapter 10
Quick Bolus
Customer Technical Support: (877) 801-6901102
Chapter 10 – Quick Bolus
10.1 Setting Up Quick Bolus
Setting up the Quick Bolus function en-ables you to deliver a bolus by simply pressing a button. It is a way to deliver a bolus by following beep/vibration commands without navigating through or viewing the pump screen.
The default for the Quick Bolus function is off. Quick Bolus can be set to either units of insulin or grams of carbohy-drate. The increment options are 0.5, 1.0, 2.0, and 5.0 units; or 2, 5, 10 and 15 grams of carb.
The quick bolus delivery setting (grams of carbohydrate or units of insulin) is independent of the active Personal Profile bolus setting.
1. From the Home Screen, tap OPTIONS.
2. Tap My Pump.
3. Tap Pump Settings.
4. Tap Quick Bolus.
5. Tap Increment Type.
10.2 Delivering Quick Bolus
If the Quick Bolus function is turned On, you can deliver a bolus without having to look at the t:slim Pump’s screen. Simply use the Quick Bolus Button to deliver your bolus. Quick boluses are delivered as standard boluses (there is no BG entry or extended bolus).
PRECAUTIONALWAYS look at the screen to confirm correct programming of the bolus amount when you first use the Quick Bolus feature. Looking at the screen will ensure that you are correctly using the beep/vibration commands to program the intended bolus amount.
1. Press and hold Quick Bolus Button. The Quick Bolus screen will appear. Listen for 2 beeps (if Pump Volume is set to beep) or feel for vibrations (if Pump Volume is set to vibrate).
2. Press Quick Bolus Button for each increment until desired amount is reached. The pump will beep/vibrate for each button press.
6. Tap units of insulin or grams of carbohydrate to select.
7. Tap Increment Amount.
8. Select the preferred increment amount.
NOTEThe increment amount is added with each press of the Quick Bolus Button when delivering a quick bolus.
9. Review entered values and tap SAVE.
10. Confirm Settings. Tap YES if entered data is correct. Tap NO to go back to make changes.
11. Tap Tandem Logo to return to the Home Screen.
Customer Technical Support: (877) 801-6901 103
Ad
ditional P
ump
Op
erations3
Chapter 10 – Quick Bolus
3. The pump will beep/vibrate once for each increment pressed to confirm desired amount.
4. After the pump beeps/vibrates, press and hold Quick Bolus Button to deliver the bolus.
NOTE: Safety Features » If you want to cancel the bolus and
return to the Home Screen, tap CANCEL on the QUICK BOLUS screen.
» If more than 10 seconds have passed with no input, the bolus is canceled and never delivered.
» You cannot exceed the Max Bolus setting defined in your active Personal Profile when using the Quick Bolus feature. Once you reach the Max Bolus amount, a different tone will sound to notify you (if Quick Bolus is set to vibrate, the pump will stop vibrating in response to additional button presses to notify you). Look at the screen to confirm the bolus amount.
» You cannot exceed 20 button presses when using the Quick Bolus feature. Once you reach 20 button presses, a different tone will sound to notify you (if Quick Bolus is set to vibrate, the pump will stop vibrating in response to
additional button presses to notify you). Look at the screen to confirm the bolus amount.
» If you hear a different tone at any point during programming or the pump stops vibrating in response to button presses, look at the screen to confirm the bolus amount. If the Quick Bolus screen does not display the correct bolus amount, use the touch screen to enter bolus information.
5. The bolus initiated screen is temporarily displayed.
Customer Technical Support: (877) 801-6901104
Chapter 10 – Quick Bolus
THIS PAGE IS INTENTIONALLY
LEFT BLANK
Chapter 11
t:slim Pump Settings
Customer Technical Support: (877) 801-6901106
Chapter 11 – t:slim Pump Settings
11.1 t:slim Pump Volume
Pump Volume is pre-set to high. A change to the Pump Volume can be made in Pump Settings.
Pump Volume can be personalized for the Button taps, Quick Bolus, Bolus, Reminders, Alerts, and Alarms. Options for Pump Volume include high, medi-um, low and vibrate.
PRECAUTIONDO NOT use the vibrate feature for alerts and alarms during sleep unless otherwise directed by your healthcare provider. Having the volume for alerts and alarms set to high will help ensure that you don’t miss an alert or alarm.
1. From the Home Screen, tap OPTIONS.
2. Tap My Pump.
3. Tap Pump Settings.
4. Tap Pump Volume.
5. Tap desired option. Use Up/Down Arrow to view additional options.
11.2 Screen Options
The Screen Options for your t:slim Pump include Screen Timeout and Feature Lock.
You can set the Screen Timeout to the length of time you want the screen to stay on before it automatically turns off. The default for the Screen Timeout is 30 seconds. The options are 15, 30, 60, and 120 seconds.
You can always turn the screen off before it automatically times out by pressing the Screen On/Quick Bolus button.
Feature Lock is pre-set to off. With the Feature Lock turned on, you cannot de-liver a bolus, change any pump settings or access any Personal Profiles.
1. From the Home Screen, tap OPTIONS.
2. Tap My Pump.
3. Tap Pump Settings.
4. Tap Screen Options.
6. Select preferred volume.
7. Continue to make changes for all Pump Volume options by repeating steps 5 and 6. Tap SAVE when all changes are complete.
8. Tap Tandem Logo to return to the Home Screen.
Customer Technical Support: (877) 801-6901 107
Ad
ditional P
ump
Op
erations3
Chapter 11 – t:slim Pump Settings
5. Tap desired option.
For Screen Timeout
1. Tap Screen Timeout.
2. Select preferred time and tap SAVE.
3. Tap Tandem Logo to return to the Home Screen.
For Feature Lock
1. Tap Feature Lock to turn On or Off and tap SAVE.
ZZ A screen to verify that you want to activate the Feature Lock will be displayed.
2. Tap YES to confirm.
3. Tap SAVE.
4. Tap Tandem Logo to return to the Home Screen.
NOTE: Pump VolumeWhen Feature Lock is turned on, Pump Volume will be set to high until the Feature Lock is turned off.
To Turn the Feature Lock Off
1. From the Home Screen, tap OPTIONS.
2. Tap My Pump.
3. Tap Pump Settings.
4. Tap Screen Options.
5. Tap Feature Lock.
6. Tap YES.
7. Tap SAVE.

Customer Technical Support: (877) 801-6901108
Chapter 11 – t:slim Pump Settings
THIS PAGE IS INTENTIONALLY
LEFT BLANK

Chapter 12
t:slim Pump Info and History
Customer Technical Support: (877) 801-6901110
Chapter 12 – t:slim Pump Info and History
12.1 t:slim Pump Info
Your t:slim Pump allows access to information about your pump. In the Pump Info screen you have access to items such as your pump Serial Num-ber, Tandem Diabetes Care Customer Technical Support telephone num-ber, website, and software/hardware versions.
1. From the Home Screen, tap OPTIONS.
2. Tap My Pump.
3. Tap Pump Info.
4. Scroll through the Pump Info using the Up/Down Arrows.
5. Tap Tandem Logo to return to the Home Screen.
by date. The event details in each report are listed by time.
The letter “D” (D: Alert) before an Alert or Alarm indicates the time it was de-clared. The letter “C” (C: Alert) indicates the time it was cleared.
Bolus History shows the bolus request, the bolus start time, and the bolus completion time.
1. From the Home Screen, tap OPTIONS.
2. Tap the Down Arrow.
3. Tap History.
4. Tap desired option.
5. Tap Tandem Logo to return to the Home Screen.
12.2 t:slim Pump History
Pump History displays a historical log of pump events. At least 90 days of data can be viewed in History. When the maximum number of events is reached, the oldest events are removed from the history log and replaced with the most recent events.The following can be viewed in History:
Delivery Summary, Total Daily Dose, Bolus, Basal, Load, BG, Alerts and Alarms, and Complete.
Delivery Summary breaks down total insulin delivery by basal and bolus types into units and percentages. It can be viewed by the selected time period of: Today, 7 Day, 14 Day and 30 Day Average.
Total Daily Dose breaks down basal and bolus delivery into units and per-centages for each individual day. You can scroll through each individual day to see your total insulin delivery.
The Bolus, Basal, Load, BG, Alerts and Alarms, and Complete are categorized

Chapter 13
t:slim Pump Reminders
Customer Technical Support: (877) 801-6901112
Chapter 13 – t:slim Pump Reminders
Your t:slim Pump lets you know import-ant information about the System with Reminders, Alerts, and Alarms. Re-minders are displayed to notify you of an option that you have set (for exam-ple, a reminder to check you BG after a bolus). Alerts display automatically to notify you about safety conditions that you need to know (for example, an alert that your insulin level is low). Alarms display automatically to let you know of an actual or potential stopping of insulin delivery (for example, an alarm that the insulin cartridge is empty). Pay special attention to Alarms.
If multiple Reminders, Alerts, and Alarms happen at the same time, Alarms will be displayed first, Alerts will be displayed second, and Reminders will be dis-played third. Each must be confirmed separately until all have been confirmed.
Information in this section will help you learn how to respond to Reminders.
Reminders notify you with a single sequence of 3 notes or a single vibra-tion depending on the volume/vibrate setting in Pump Volume. They repeat
13.1 Low BG Reminder
The Low BG Reminder prompts you to re-test your BG after a low BG value is entered. When turning this reminder on, you need to set a low BG value that triggers the reminder, as well as how much time should pass before the reminder occurs.
The default for this reminder is pre-set to off. If on, Remind Me Below 70 mg/dL, and Remind Me After 15 min, but you can set these values from 70 to 120 mg/dL and 10 to 20 min.
1. From the Home Screen, tap OPTIONS.
2. Tap My Pump.
3. Tap Alert Settings.
4. Tap Pump Reminders.
5. Tap Low BG.
6. Low BG is set to on; to turn off, tap LOW BG.
a. Tap Remind Me Below and
every 10 minutes until acknowledged. Reminders do not escalate.

Customer Technical Support: (877) 801-6901 113
Ad
ditional P
ump
Op
erations3
Chapter 13 – t:slim Pump Reminders
using the onscreen keypad, enter a Low BG value (from 70 to 120 mg/dL) that you want to trigger the reminder, then tap DONE.
b. Tap Remind Me After and using the onscreen keypad, enter the time (from 10 to 20 min), then tap DONE.
c. Tap SAVE when all changes are complete.
d. Tap Tandem Logo to return to the Home Screen.
To Respond to the Low BG Reminder
To clear the reminder, tap CLOSE and then check BG using your blood glucose meter.
13.2 High BG Reminder
The High BG Reminder prompts you to re-test your BG after a high BG value is entered. When you turn this reminder on, you need to set a high BG value that triggers the reminder, as well as how much time should pass before the reminder occurs.
The default for this reminder is pre-set to off. If on, Remind Me Above 200 mg/dL, and Remind Me After 120 min, but you can set these values from 150 to 300 mg/dL and 1 to 3 hrs.
1. From the Home Screen, tap OPTIONS.
2. Tap My Pump.
3. Tap Alert Settings.
4. Tap Pump Reminders.
5. Tap High BG.
6. High BG is set to on; to turn off, tap High BG.
a. Tap Remind Me Above and us-
ing the onscreen keypad, enter a High BG value (from 150 to 300 mg/dL) that you want to trigger the reminder, then tap DONE.
b. Tap Remind Me After and using the onscreen keypad, enter the time (from 1 to 3 hours), then tap DONE.
c. Tap SAVE when all changes are complete.
7. Tap Tandem Logo to return to the Home Screen.
To Respond to the High BG Reminder
To clear the reminder tap CLOSE and then check BG using your blood glucose meter.
Customer Technical Support: (877) 801-6901114
Chapter 13 – t:slim Pump Reminders
13.3 After Bolus BG Reminder
The After Bolus BG Reminder prompts you to test your BG at a selected time after bolus delivery. When turning this reminder on, you need to set how much time should pass before the reminder occurs. The default is 1 hour and 30 minutes. It can be set from 1 to 3 hours.
1. From the Home Screen, tap OPTIONS.
2. Tap My Pump.
3. Tap Alert Settings.
4. Tap Pump Reminders.
5. Tap After Bolus BG.
6. After Bolus BG is set to on; to turn off, tap After Bolus BG.
a. Tap Remind Me After and using the onscreen keypad, enter the time (from 1 to 3 hours) that you want to trigger the reminder, then tap DONE.
7. Tap SAVE when all changes are complete.
8. Tap Tandem Logo to return to the Home Screen.
To Respond to the After Bolus BG Reminder
To clear the reminder tap CLOSE and then check BG using your blood glucose meter.
13.4 Missed Meal Bolus Reminder
The Missed Meal Bolus Reminder lets you know if a bolus was not deliv-ered during a specified time period. 4 separate reminders are available. When programming this reminder you need to select the Days, the Start Time, and End Time for each reminder.
1. From the Home Screen, tap OPTIONS.
2. Tap My Pump.
3. Tap Alert Settings.
4. Tap Pump Reminders.
5. Tap Missed Meal Bolus.
Customer Technical Support: (877) 801-6901 115
Ad
ditional P
ump
Op
erations3
Chapter 13 – t:slim Pump Reminders
6. On the Missed Meal Bolus screen, tap which reminder you want to set (Reminder 1 to 4) and do the following:
a. Tap Reminder 1 (or 2, 3, 4).
b. Reminder 1 is set to on; to turn off, tap Reminder 1.
c. Tap Selected Days and tap the day(s) you want the reminder to be on, then tap BACK.
d. Tap Start Time, tap Time and using the onscreen keypad enter the start time, then tap DONE.
e. Tap Time of Day to select AM or PM, then tap DONE.
f. Tap End Time, tap Time and using the onscreen keypad enter the end time, then tap DONE.
g. Tap Time of Day to select AM or PM, then tap DONE.
h. Tap SAVE when all changes are complete.
7. Tap Tandem Logo to return to the Home Screen.
To Respond to the Missed Meal Bolus Reminder
To clear the reminder tap CLOSE and deliver a bolus if necessary.
13.5 Site Reminder
The Site Reminder prompts you to change your infusion set. The default for this reminder is pre-set to off. If on, the reminder can be set for 1 to 3 days and at a time of day selected by you.
For detailed information on the Site Reminder feature, refer to Chapter 5.6.
To Respond to the Site Reminder
To clear the reminder tap CLOSE and change your infusion set.
Customer Technical Support: (877) 801-6901116
Chapter 13 – t:slim Pump Reminders
THIS PAGE IS INTENTIONALLY
LEFT BLANK
Chapter 14
User Settable Alerts and Alarms
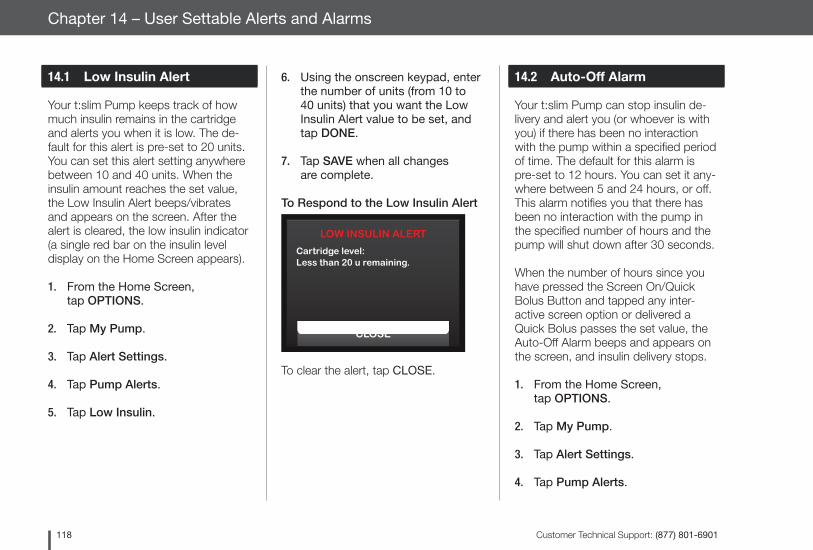
Customer Technical Support: (877) 801-6901118
Chapter 14 – User Settable Alerts and Alarms
14.1 Low Insulin Alert
Your t:slim Pump keeps track of how much insulin remains in the cartridge and alerts you when it is low. The de-fault for this alert is pre-set to 20 units. You can set this alert setting anywhere between 10 and 40 units. When the insulin amount reaches the set value, the Low Insulin Alert beeps/vibrates and appears on the screen. After the alert is cleared, the low insulin indicator (a single red bar on the insulin level display on the Home Screen appears).
1. From the Home Screen, tap OPTIONS.
2. Tap My Pump.
3. Tap Alert Settings.
4. Tap Pump Alerts.
5. Tap Low Insulin.
14.2 Auto-Off Alarm
Your t:slim Pump can stop insulin de-livery and alert you (or whoever is with you) if there has been no interaction with the pump within a specified period of time. The default for this alarm is pre-set to 12 hours. You can set it any-where between 5 and 24 hours, or off. This alarm notifies you that there has been no interaction with the pump in the specified number of hours and the pump will shut down after 30 seconds.
When the number of hours since you have pressed the Screen On/Quick Bolus Button and tapped any inter-active screen option or delivered a Quick Bolus passes the set value, the Auto-Off Alarm beeps and appears on the screen, and insulin delivery stops.
1. From the Home Screen, tap OPTIONS.
2. Tap My Pump.
3. Tap Alert Settings.
4. Tap Pump Alerts.
6. Using the onscreen keypad, enter the number of units (from 10 to 40 units) that you want the Low Insulin Alert value to be set, and tap DONE.
7. Tap SAVE when all changes are complete.
To Respond to the Low Insulin Alert
To clear the alert, tap CLOSE.
LOW INSULIN ALERT
Cartridge level:Less than 20 u remaining.
CLOSE

Customer Technical Support: (877) 801-6901 119
Ad
ditional P
ump
Op
erations3
Chapter 14 – User Settable Alerts and Alarms
5. Tap Auto-Off.
A confirmation screen will appear. Tap YES to continue. Tap NO to go back.
6. Verify Auto-Off is set to on, then tap Time.
7. Using the onscreen keypad, enter the number of hours (from 5 to 24 hrs) that you want the Auto-Off Alarm to be triggered, and tap DONE.
8. Tap DONE, then tap SAVE when all changes are complete.
9. Tap Tandem Logo to return to the Home Screen.
To Respond to Auto-Off Warning
1. Tap DO NOT SHUT DOWN.
The warning clears and the pump returns to normal operation.
If you do not clear the warning within the 30-second countdown period, the AUTO-OFF ALARM occurs, accom-panied by an audible alarm. This alarm notifies you that your pump has stopped delivering insulin.
WARNINGAuto-Off alarm will shut pump down if no action is taken.
DO NOT SHUT DOWN
No buttons pressed in: 12 hrs
Pump will shut down in: 30 sec
Auto-Off Alarm Screen
1. Tap CLOSE. The Home Screen then appears, indicating a status of “All Deliveries Stopped.” You must resume delivery to continue therapy, (refer to Chapter 8.2).
AUTO-OFF ALARM
ALL DELIVERIES STOPPED!
No activity for more than6 hours.
CLOSE
Section 4
t:slim Pump Safety Alerts and Alarms
Chapter 15
t:slim Pump Alerts
Customer Technical Support: (877) 801-6901122
Chapter 15 – t:slim Pump Alerts
Your t:slim Pump lets you know import-ant information about the System with Reminders, Alerts, and Alarms. Re-minders are displayed to notify you of an option that you have set (for exam-ple, a reminder to check you BG after a bolus). Alerts display automatically to notify you about safety conditions that you need to know (for example, an alert that your insulin level is low). Alarms display automatically to let you know of an actual or potential stopping of insulin delivery (for example, an alarm that the insulin cartridge is empty). Pay special attention to Alarms.
If multiple Reminders, Alerts, and Alarms happen at the same time, Alarms will be displayed first, Alerts will be displayed second, and Reminders will be dis-played third. Each must be confirmed separately until all have been confirmed.
Information in this section will help you learn how to respond to Alerts.
Alerts notify you with 2 sequences of 3 notes or 2 vibrations depending on the volume/vibrate setting selected in Pump Volume. They repeat regularly until ac-knowledged. Alerts do not escalate.
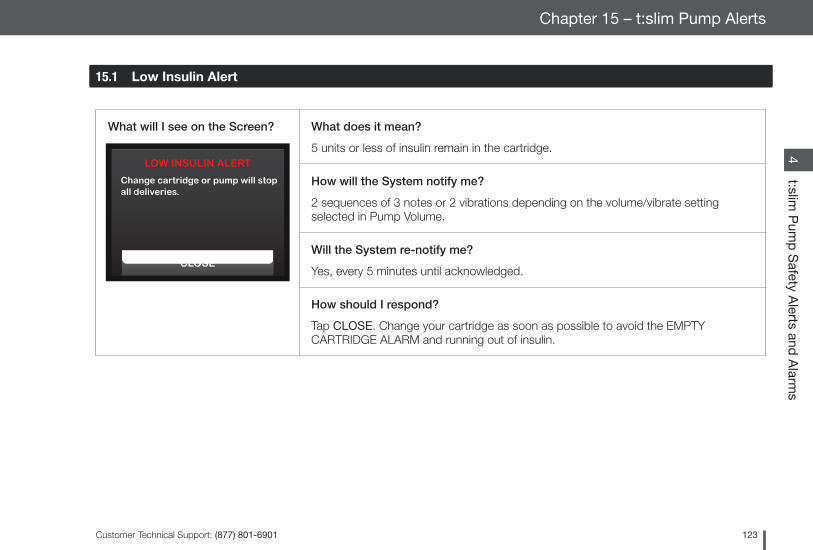
Customer Technical Support: (877) 801-6901 123
t:slim P
ump
Safety A
lerts and A
larms
4Chapter 15 – t:slim Pump Alerts
15.1 Low Insulin Alert
What will I see on the Screen? What does it mean?
5 units or less of insulin remain in the cartridge.
How will the System notify me?
2 sequences of 3 notes or 2 vibrations depending on the volume/vibrate setting selected in Pump Volume.
Will the System re-notify me?
Yes, every 5 minutes until acknowledged.
How should I respond?
Tap CLOSE. Change your cartridge as soon as possible to avoid the EMPTY CARTRIDGE ALARM and running out of insulin.
LOW INSULIN ALERT
Change cartridge or pump will stop all deliveries.
CLOSE
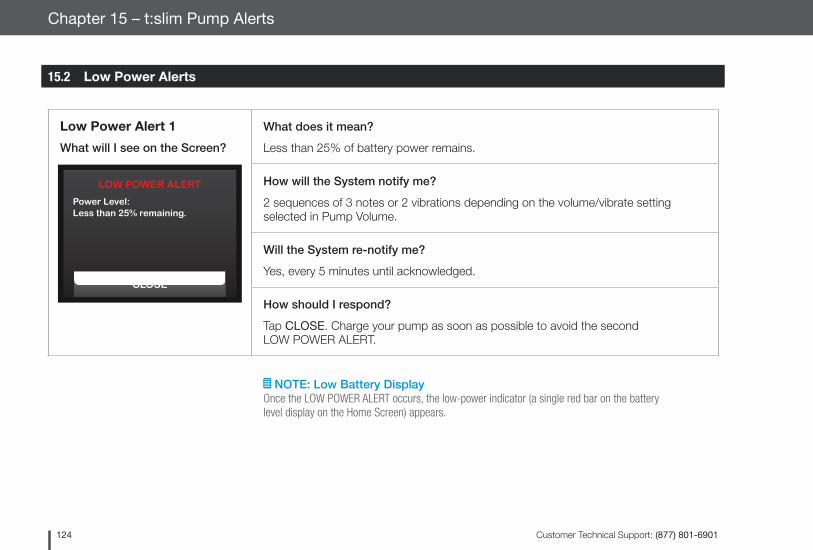
Customer Technical Support: (877) 801-6901124
Chapter 15 – t:slim Pump Alerts
Low Power Alert 1
What will I see on the Screen?
What does it mean?
Less than 25% of battery power remains.
How will the System notify me?
2 sequences of 3 notes or 2 vibrations depending on the volume/vibrate setting selected in Pump Volume.
Will the System re-notify me?
Yes, every 5 minutes until acknowledged.
How should I respond?
Tap CLOSE. Charge your pump as soon as possible to avoid the second LOW POWER ALERT.
LOW POWER ALERT
Power Level:Less than 25% remaining.
CLOSE
15.2 Low Power Alerts
NOTE: Low Battery DisplayOnce the LOW POWER ALERT occurs, the low-power indicator (a single red bar on the battery level display on the Home Screen) appears.

Customer Technical Support: (877) 801-6901 125
t:slim P
ump
Safety A
lerts and A
larms
4Chapter 15 – t:slim Pump Alerts
Low Power Alert 2
What will I see on the Screen?
What does it mean?
Less than 5% of battery power remains. Insulin delivery will continue for 30 minutes and then the pump will power off and insulin delivery will stop.
How will the System notify me?
2 sequences of 3 notes or 2 vibrations depending on the volume/vibrate setting selected in Pump Volume.
Will the System re-notify me?
Yes, every 5 minutes until acknowledged.
How should I respond?
Tap CLOSE. Charge your pump immediately to avoid the LOW POWER ALARM and system power off.
LOW POWER ALERT
Recharge pump or all deliverieswill stop.
CLOSE
NOTE: Low Battery DisplayOnce the second LOW POWER ALERT occurs, the low-power indicator (a red 5% on the battery level display on the Home Screen) appears.
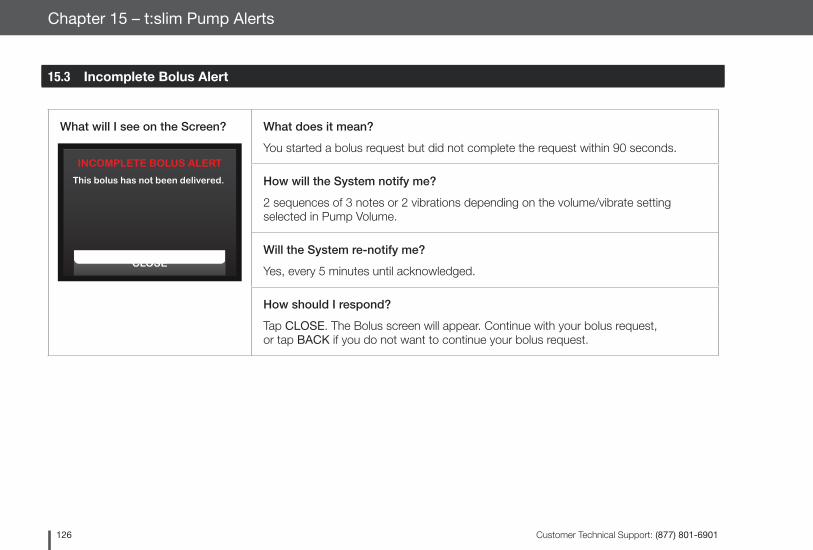
Customer Technical Support: (877) 801-6901126
Chapter 15 – t:slim Pump Alerts
15.3 Incomplete Bolus Alert
What will I see on the Screen? What does it mean?
You started a bolus request but did not complete the request within 90 seconds.
How will the System notify me?
2 sequences of 3 notes or 2 vibrations depending on the volume/vibrate setting selected in Pump Volume.
Will the System re-notify me?
Yes, every 5 minutes until acknowledged.
How should I respond?
Tap CLOSE. The Bolus screen will appear. Continue with your bolus request, or tap BACK if you do not want to continue your bolus request.
INCOMPLETE BOLUS ALERT
This bolus has not been delivered.
CLOSE
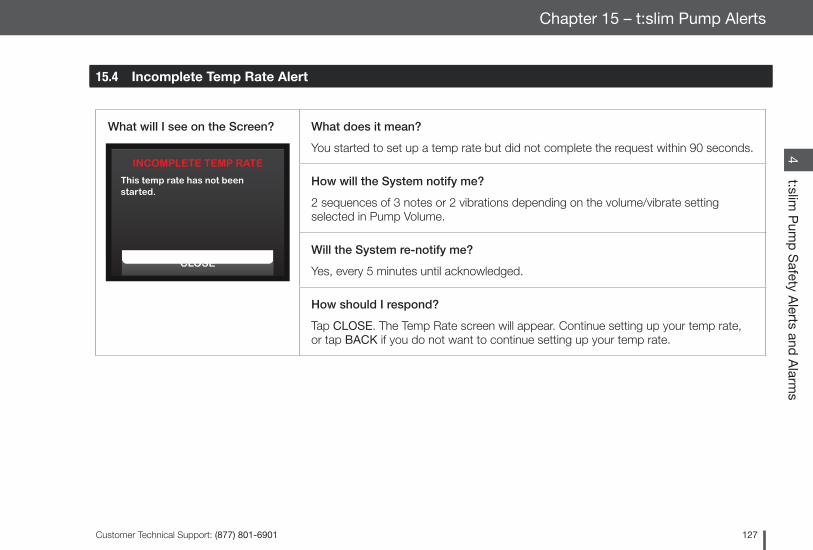
Customer Technical Support: (877) 801-6901 127
t:slim P
ump
Safety A
lerts and A
larms
4Chapter 15 – t:slim Pump Alerts
15.4 Incomplete Temp Rate Alert
What will I see on the Screen? What does it mean?
You started to set up a temp rate but did not complete the request within 90 seconds.
How will the System notify me?
2 sequences of 3 notes or 2 vibrations depending on the volume/vibrate setting selected in Pump Volume.
Will the System re-notify me?
Yes, every 5 minutes until acknowledged.
How should I respond?
Tap CLOSE. The Temp Rate screen will appear. Continue setting up your temp rate, or tap BACK if you do not want to continue setting up your temp rate.
INCOMPLETE TEMP RATE
This temp rate has not beenstarted.
CLOSE
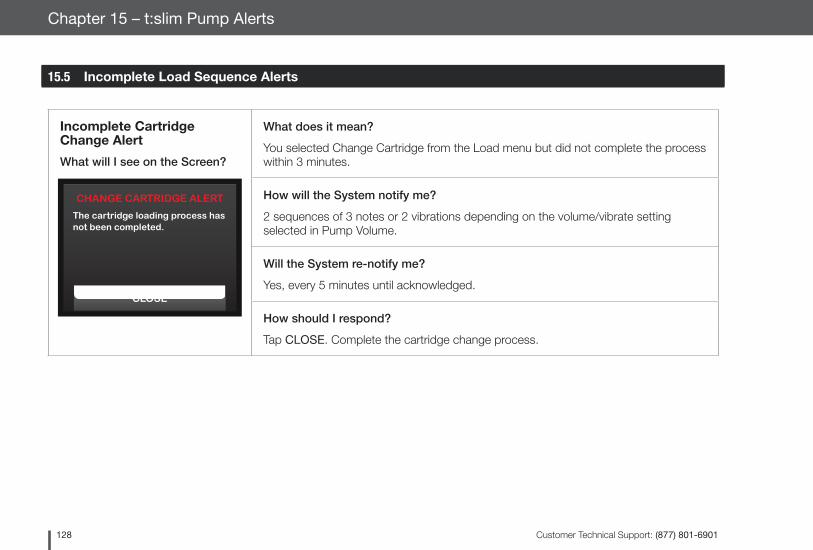
Customer Technical Support: (877) 801-6901128
Chapter 15 – t:slim Pump Alerts
Incomplete Cartridge Change Alert
What will I see on the Screen?
What does it mean?
You selected Change Cartridge from the Load menu but did not complete the process within 3 minutes.
How will the System notify me?
2 sequences of 3 notes or 2 vibrations depending on the volume/vibrate setting selected in Pump Volume.
Will the System re-notify me?
Yes, every 5 minutes until acknowledged.
How should I respond?
Tap CLOSE. Complete the cartridge change process.
CHANGE CARTRIDGE ALERT
The cartridge loading process hasnot been completed.
CLOSE
15.5 Incomplete Load Sequence Alerts
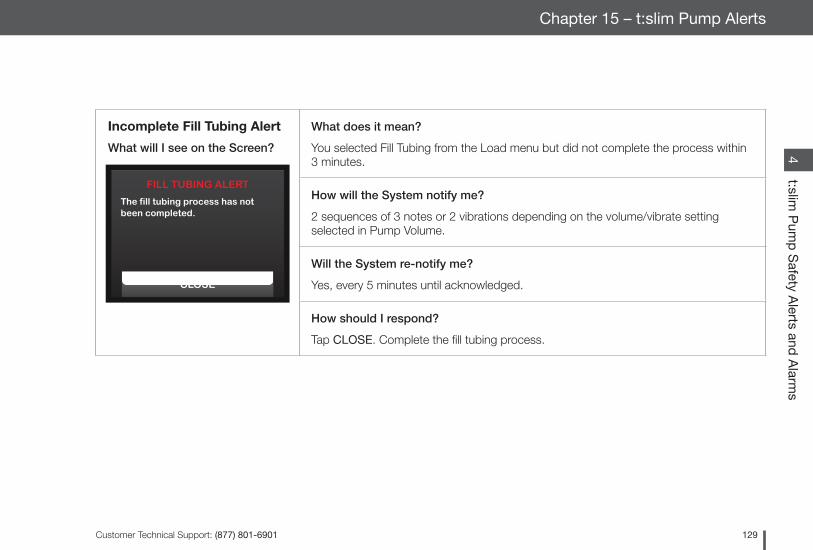
Customer Technical Support: (877) 801-6901 129
t:slim P
ump
Safety A
lerts and A
larms
4Chapter 15 – t:slim Pump Alerts
Incomplete Fill Tubing Alert
What will I see on the Screen?
What does it mean?
You selected Fill Tubing from the Load menu but did not complete the process within 3 minutes.
How will the System notify me?
2 sequences of 3 notes or 2 vibrations depending on the volume/vibrate setting selected in Pump Volume.
Will the System re-notify me?
Yes, every 5 minutes until acknowledged.
How should I respond?
Tap CLOSE. Complete the fill tubing process.
FILL TUBING ALERT
The fill tubing process has not been completed.
CLOSE
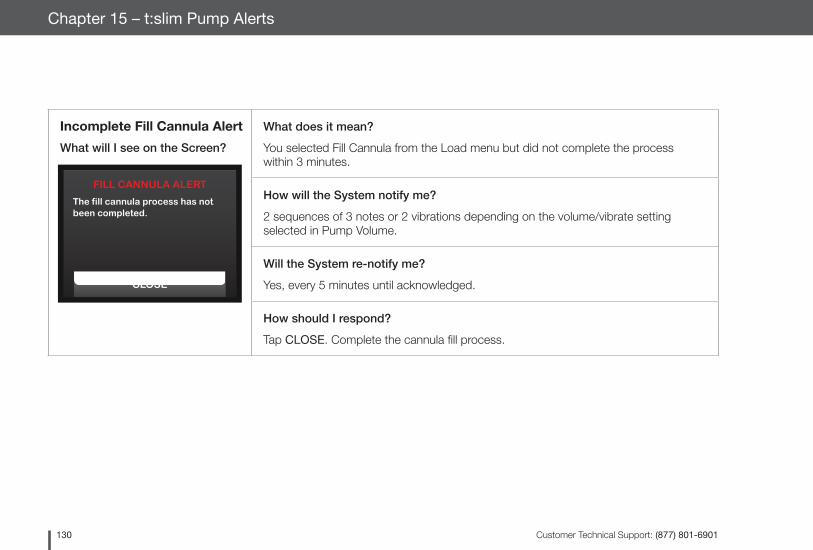
Customer Technical Support: (877) 801-6901130
Chapter 15 – t:slim Pump Alerts
Incomplete Fill Cannula Alert
What will I see on the Screen?
What does it mean?
You selected Fill Cannula from the Load menu but did not complete the process within 3 minutes.
How will the System notify me?
2 sequences of 3 notes or 2 vibrations depending on the volume/vibrate setting selected in Pump Volume.
Will the System re-notify me?
Yes, every 5 minutes until acknowledged.
How should I respond?
Tap CLOSE. Complete the cannula fill process.
FILL CANNULA ALERT
The fill cannula process has not been completed.
CLOSE

Customer Technical Support: (877) 801-6901 131
t:slim P
ump
Safety A
lerts and A
larms
4Chapter 15 – t:slim Pump Alerts
15.6 Incomplete Setting Alert
What will I see on the Screen? What does it mean?
You started to set up a new Personal Profile but did not save or complete the programming within 5 minutes.
How will the System notify me?
2 sequences of 3 notes or 2 vibrations depending on the volume/vibrate setting selected in Pump Volume.
Will the System re-notify me?
Yes, every 5 minutes until acknowledged.
How should I respond?
Tap CLOSE. Complete programming the Personal Profile.
INCOMPLETE SETTING
A setting was being modified, buthas not been saved.
CLOSE
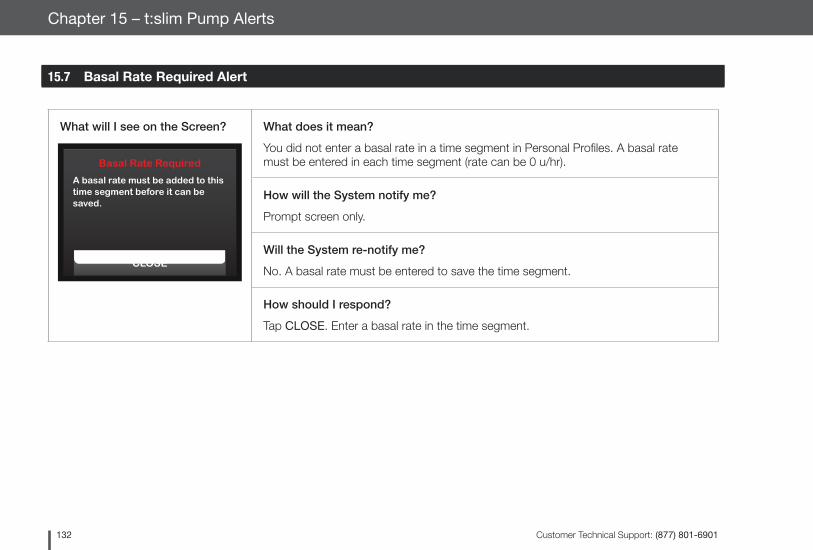
Customer Technical Support: (877) 801-6901132
Chapter 15 – t:slim Pump Alerts
15.7 Basal Rate Required Alert
What will I see on the Screen? What does it mean?
You did not enter a basal rate in a time segment in Personal Profiles. A basal rate must be entered in each time segment (rate can be 0 u/hr).
How will the System notify me?
Prompt screen only.
Will the System re-notify me?
No. A basal rate must be entered to save the time segment.
How should I respond?
Tap CLOSE. Enter a basal rate in the time segment.
Basal Rate Required
A basal rate must be added to this time segment before it can besaved.
CLOSE
Customer Technical Support: (877) 801-6901 133
t:slim P
ump
Safety A
lerts and A
larms
4Chapter 15 – t:slim Pump Alerts
15.8 Max Hourly Bolus Alert
What will I see on the Screen? What does it mean?
In the previous 60 minutes, you requested total bolus delivery that is more than 1.5 times your Max Bolus setting.
How will the System notify me?
Prompt screen only.
Will the System re-notify me?
No. You must tap BACK or CONTINUE to deliver the bolus.
How should I respond?
Tap BACK to return to the Bolus screen and adjust the bolus delivery amount. Tap CONTINUE to deliver the bolus.
MAX HOURLY BOLUS ALERT
Your Max Hourly Bolus has beenexceeded.
Press CONTINUE to confirm therequested 14 u bolus.
BACK CONTINUE

Customer Technical Support: (877) 801-6901134
Chapter 15 – t:slim Pump Alerts
Max Bolus Alert 1
What will I see on the Screen?
What does it mean?
You requested a bolus larger than the Max Bolus setting in your active Personal Profile.
How will the System notify me?
Prompt screen only.
Will the System re-notify me?
No. You must tap BACK or CONTINUE to deliver the bolus.
How should I respond?
Tap BACK to return to the Bolus screen and adjust the bolus delivery amount, or tap CONTINUE to deliver the amount of your Max Bolus setting.
MAX BOLUS ALERT
Your 20 u Max Bolus setting has been exceeded.
Press CONTINUE to confirm abolus of 20 u.
BACK CONTINUE
15.9 Max Bolus Alerts
Customer Technical Support: (877) 801-6901 135
t:slim P
ump
Safety A
lerts and A
larms
4Chapter 15 – t:slim Pump Alerts
Max Bolus Alert 2
What will I see on the Screen?
What does it mean?
Your Max Bolus is set to 25 units and you requested a bolus larger than 25 units.
How will the System notify me?
Prompt screen only.
Will the System re-notify me?
No. You must tap NO or YES to deliver the remaining amount of the bolus request.
How should I respond?
Before responding to this Alert, always consider if your bolus insulin needs have changed since you requested the original bolus.
Tap YES to deliver the remaining amount of the bolus request. A confirmation screen will appear.
Tap NO if you do not want to deliver the remaining amount of the bolus request.
Your 25 u Max Bolus has been delivered. There are 10 uremaining from your current request.
Would you like to request theremaining 10u?
NO YES
The following applies only if you have Carbs turned on in your active Personal Profile and your Max Bolus amount is set to 25 units.

Customer Technical Support: (877) 801-6901136
Chapter 15 – t:slim Pump Alerts
Max Basal Alert 1
What will I see on the Screen?
What does it mean?
When entering a basal rate or requesting a temp rate, you requested a basal rate more than 2 times the highest basal rate defined in your Personal Profile.
How will the System notify me?
Prompt screen only.
Will the System re-notify me?
No. You must tap BACK or CONTINUE to move forward.
How should I respond?
Tap BACK to return to the previous screen to adjust the amount, or tap CONTINUE to dismiss the alert and continue with the request.
MAX BASAL ALERT
You are going to exceed 2x yourhighest basal setting. PressCONTINUE to override the setting.
BACK CONTINUE
15.10 Max Basal Alerts
Customer Technical Support: (877) 801-6901 137
t:slim P
ump
Safety A
lerts and A
larms
4Chapter 15 – t:slim Pump Alerts
Max Basal Alert 2
What will I see on the Screen?
What does it mean?
An active temp rate exceeded 2 times your highest basal setting defined in your Personal Profile.
How will the System notify me?
2 sequences of 3 notes or 2 vibrations depending on the volume/vibrate setting selected in Pump Volume.
Will the System re-notify me?
Yes, every 5 minutes until acknowledged.
How should I respond?
Tap CLOSE and review your current temp rate in the Options menu.
MAX BASAL ALERT
You have exceeded 2x your highest basal setting. Please review your current temp rate in the Options menu.
CLOSE
Customer Technical Support: (877) 801-6901138
Chapter 15 – t:slim Pump Alerts
Min Basal Alert 1
What will I see on the Screen?
What does it mean?
When entering a basal rate or requesting a temp rate, you requested a basal rate less than half of the lowest basal rate defined in your Personal Profile.
How will the System notify me?
Prompt screen only.
Will the System re-notify me?
No. You must tap BACK or CONTINUE to move forward.
How should I respond?
Tap BACK to return to the previous screen to adjust the amount, or tap CONTINUE to dismiss the alert and continue with the request.
MIN BASAL ALERT
The programmed rate is less than half your lowest basal setting. Press CONTINUE to confirm.
BACK CONTINUE
15.11 Min Basal Alerts
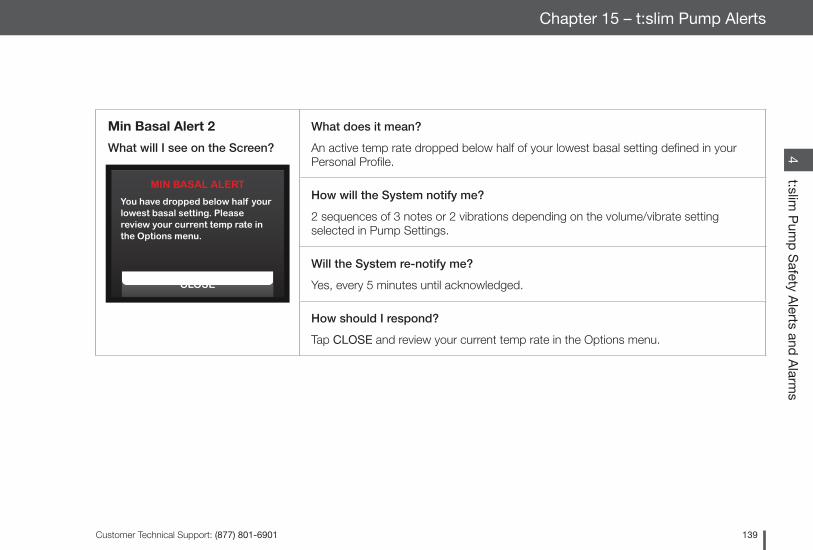
Customer Technical Support: (877) 801-6901 139
t:slim P
ump
Safety A
lerts and A
larms
4Chapter 15 – t:slim Pump Alerts
Min Basal Alert 2
What will I see on the Screen?
What does it mean?
An active temp rate dropped below half of your lowest basal setting defined in your Personal Profile.
How will the System notify me?
2 sequences of 3 notes or 2 vibrations depending on the volume/vibrate setting selected in Pump Settings.
Will the System re-notify me?
Yes, every 5 minutes until acknowledged.
How should I respond?
Tap CLOSE and review your current temp rate in the Options menu.
MIN BASAL ALERT
You have dropped below half your lowest basal setting. Please review your current temp rate in the Options menu.
CLOSE

Customer Technical Support: (877) 801-6901140
Chapter 15 – t:slim Pump Alerts
15.12 Connection Error Alert
What will I see on the Screen? What does it mean?
You connected your t:slim Pump to a computer with the USB cable to charge it or upload data to t:connect and a connection could not be made.
How will the System notify me?
2 sequences of 3 notes or 2 vibrations depending on the volume/vibrate setting selected in Pump Settings.
Will the System re-notify me?
Yes, every 5 minutes until acknowledged.
How should I respond?
Tap CLOSE. Disconnect and reconnect the USB cable to try again.
CONNECTION ERROR ALERT
Pump cannot connect with thecomputer. Press CLOSE andreconnect the USB cable to tryagain.
CLOSE
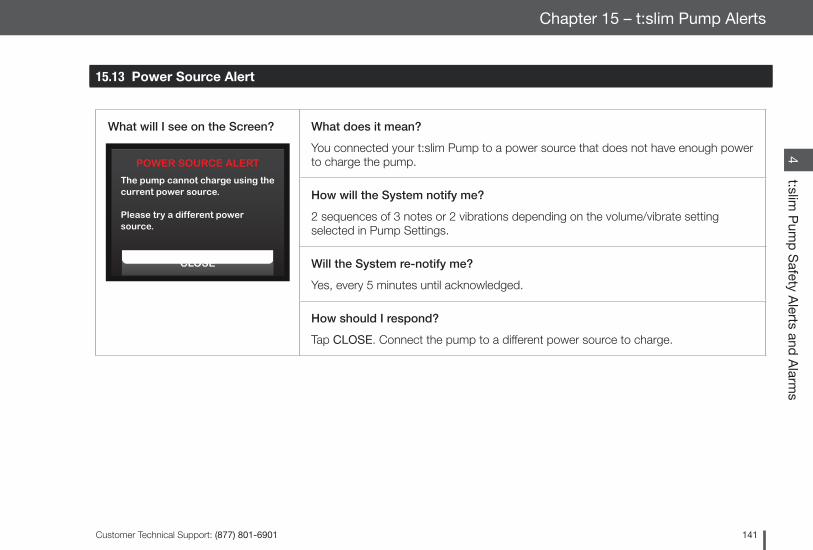
Customer Technical Support: (877) 801-6901 141
t:slim P
ump
Safety A
lerts and A
larms
4Chapter 15 – t:slim Pump Alerts
15.13 Power Source Alert
What will I see on the Screen? What does it mean?
You connected your t:slim Pump to a power source that does not have enough power to charge the pump.
How will the System notify me?
2 sequences of 3 notes or 2 vibrations depending on the volume/vibrate setting selected in Pump Settings.
Will the System re-notify me?
Yes, every 5 minutes until acknowledged.
How should I respond?
Tap CLOSE. Connect the pump to a different power source to charge.
POWER SOURCE ALERT
The pump cannot charge using thecurrent power source.
Please try a different powersource.
CLOSE

Customer Technical Support: (877) 801-6901142
Chapter 15 – t:slim Pump Alerts
15.14 Data Error Alert
What will I see on the Screen? What does it mean?
Your t:slim Pump encountered a condition that could potentially result in a loss of data.
How will the System notify me?
2 sequences of 3 notes or 2 vibrations depending on the volume/vibrate setting selected in Pump Settings.
Will the System re-notify me?
Yes, every 5 minutes until acknowledged.
How should I respond?
Tap CLOSE. Check your Personal profiles and pump settings to verify that they are accurate (refer to Chapter 6.4).
DATA ERROR ALERT
Please verify that your activeprofile and pump settings are accurate.
CLOSE
Chapter 16
t:slim Pump Alarms

Customer Technical Support: (877) 801-6901144
Chapter 16 – t:slim Pump Alarms
PRECAUTIONCHECK your System regularly for potential alarm conditions that may display. It is important to be aware of conditions that may affect insulin delivery and require your attention so you can respond as soon as possible.
Your t:slim Pump lets you know import-ant information about the System with Reminders, Alerts, and Alarms. Re-minders are displayed to notify you of an option that you have set (for exam-ple, a reminder to check you BG after a bolus). Alerts display automatically to notify you about safety conditions that you need to know (for example, an alert that your insulin level is low). Alarms display automatically to let you know of an actual or potential stopping of insulin delivery (for example, an alarm that the insulin cartridge is empty). Pay special attention to Alarms.
If multiple Reminders, Alerts, and Alarms happen at the same time, Alarms will be displayed first, Alerts will be displayed second, and Reminders will be dis-played third. Each must be confirmed separately until all have been confirmed.
Information in this section will help you learn how to respond to Alarms.
Alarms notify you with 3 sequences of 3 notes or 3 vibrations depending on the volume/vibrate setting selected in Pump Volume. If not acknowledged, alarms escalate to highest volume and vibe. Alarms repeat regularly until the condi-tion that caused the alarm is corrected.
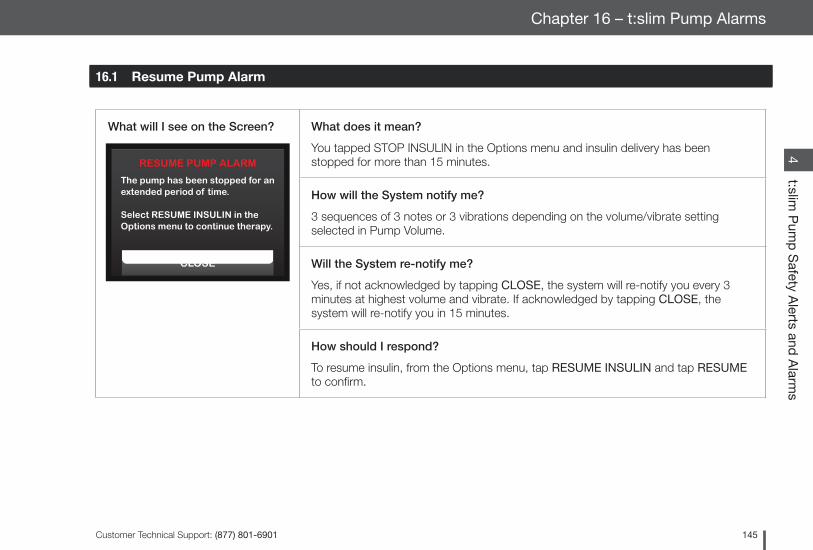
Customer Technical Support: (877) 801-6901 145
t:slim P
ump
Safety A
lerts and A
larms
4Chapter 16 – t:slim Pump Alarms
16.1 Resume Pump Alarm
What will I see on the Screen? What does it mean?
You tapped STOP INSULIN in the Options menu and insulin delivery has been stopped for more than 15 minutes.
How will the System notify me?
3 sequences of 3 notes or 3 vibrations depending on the volume/vibrate setting selected in Pump Volume.
Will the System re-notify me?
Yes, if not acknowledged by tapping CLOSE, the system will re-notify you every 3 minutes at highest volume and vibrate. If acknowledged by tapping CLOSE, the system will re-notify you in 15 minutes.
How should I respond?
To resume insulin, from the Options menu, tap RESUME INSULIN and tap RESUME to confirm.
RESUME PUMP ALARM
The pump has been stopped for an extended period of time.
Select RESUME INSULIN in theOptions menu to continue therapy.
CLOSE
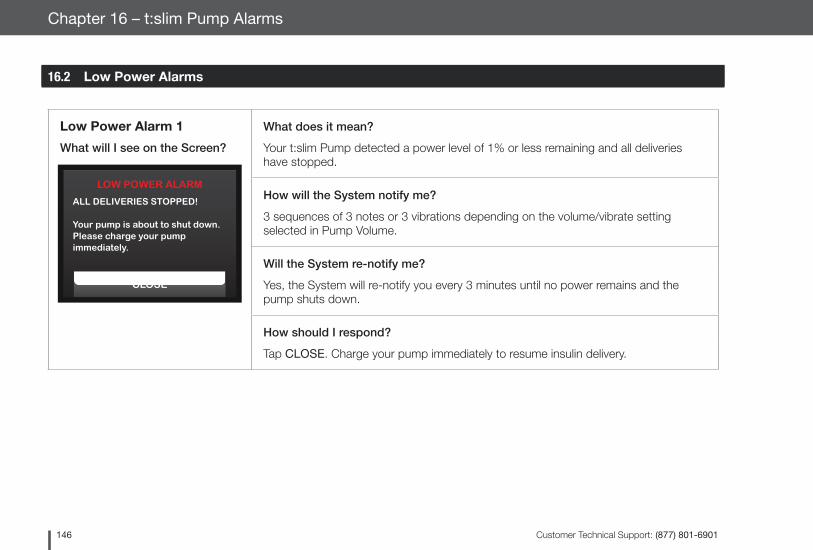
Customer Technical Support: (877) 801-6901146
Chapter 16 – t:slim Pump Alarms
Low Power Alarm 1
What will I see on the Screen?
What does it mean?
Your t:slim Pump detected a power level of 1% or less remaining and all deliveries have stopped.
How will the System notify me?
3 sequences of 3 notes or 3 vibrations depending on the volume/vibrate setting selected in Pump Volume.
Will the System re-notify me?
Yes, the System will re-notify you every 3 minutes until no power remains and the pump shuts down.
How should I respond?
Tap CLOSE. Charge your pump immediately to resume insulin delivery.
LOW POWER ALARM
ALL DELIVERIES STOPPED!
Your pump is about to shut down. Please charge your pump immediately.
CLOSE
16.2 Low Power Alarms
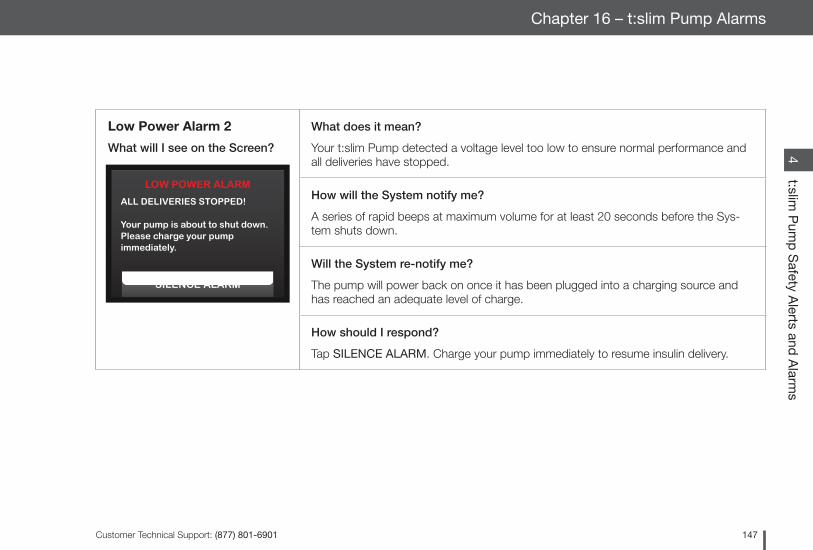
Customer Technical Support: (877) 801-6901 147
t:slim P
ump
Safety A
lerts and A
larms
4Chapter 16 – t:slim Pump Alarms
Low Power Alarm 2
What will I see on the Screen?
What does it mean?
Your t:slim Pump detected a voltage level too low to ensure normal performance and all deliveries have stopped.
How will the System notify me?
A series of rapid beeps at maximum volume for at least 20 seconds before the Sys-tem shuts down.
Will the System re-notify me?
The pump will power back on once it has been plugged into a charging source and has reached an adequate level of charge.
How should I respond?
Tap SILENCE ALARM. Charge your pump immediately to resume insulin delivery.
LOW POWER ALARM
ALL DELIVERIES STOPPED!
Your pump is about to shut down.Please charge your pumpimmediately.
SILENCE ALARM
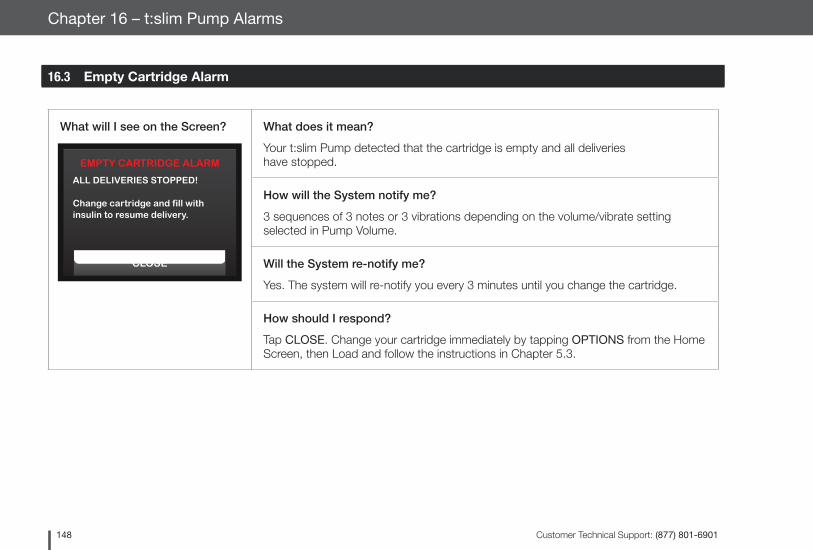
Customer Technical Support: (877) 801-6901148
Chapter 16 – t:slim Pump Alarms
16.3 Empty Cartridge Alarm
What will I see on the Screen? What does it mean?
Your t:slim Pump detected that the cartridge is empty and all deliveries have stopped.
How will the System notify me?
3 sequences of 3 notes or 3 vibrations depending on the volume/vibrate setting selected in Pump Volume.
Will the System re-notify me?
Yes. The system will re-notify you every 3 minutes until you change the cartridge.
How should I respond?
Tap CLOSE. Change your cartridge immediately by tapping OPTIONS from the Home Screen, then Load and follow the instructions in Chapter 5.3.
EMPTY CARTRIDGE ALARM
ALL DELIVERIES STOPPED!
Change cartridge and fill withinsulin to resume delivery.
CLOSE
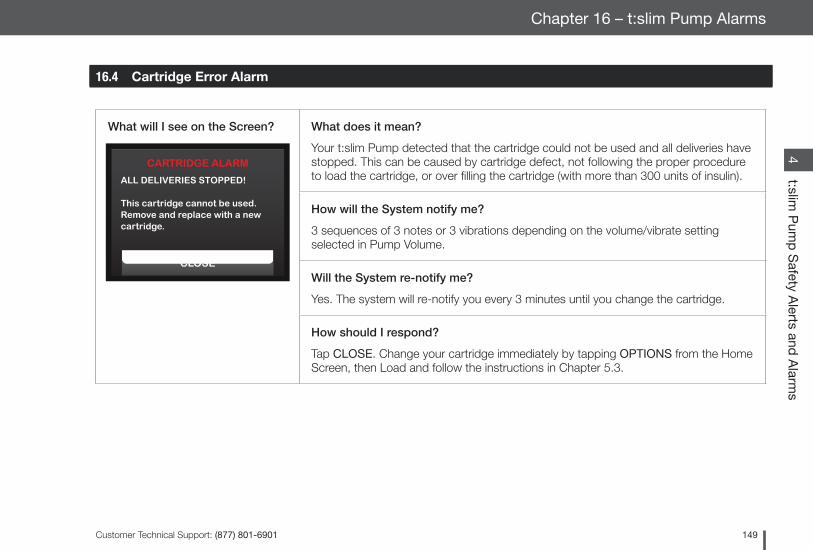
Customer Technical Support: (877) 801-6901 149
t:slim P
ump
Safety A
lerts and A
larms
4Chapter 16 – t:slim Pump Alarms
16.4 Cartridge Error Alarm
What will I see on the Screen? What does it mean?
Your t:slim Pump detected that the cartridge could not be used and all deliveries have stopped. This can be caused by cartridge defect, not following the proper procedure to load the cartridge, or over filling the cartridge (with more than 300 units of insulin).
How will the System notify me?
3 sequences of 3 notes or 3 vibrations depending on the volume/vibrate setting selected in Pump Volume.
Will the System re-notify me?
Yes. The system will re-notify you every 3 minutes until you change the cartridge.
How should I respond?
Tap CLOSE. Change your cartridge immediately by tapping OPTIONS from the Home Screen, then Load and follow the instructions in Chapter 5.3.
CARTRIDGE ALARM
ALL DELIVERIES STOPPED!
This cartridge cannot be used.Remove and replace with a newcartridge.
CLOSE
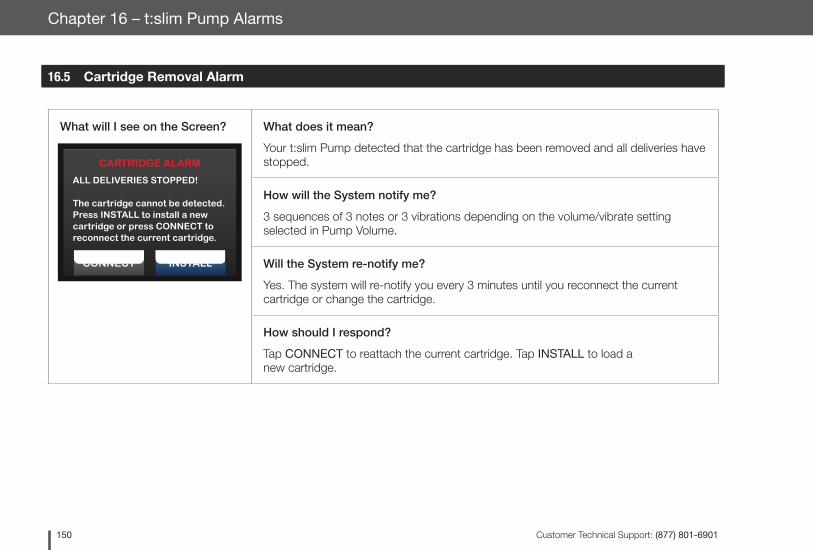
Customer Technical Support: (877) 801-6901150
Chapter 16 – t:slim Pump Alarms
16.5 Cartridge Removal Alarm
What will I see on the Screen? What does it mean?
Your t:slim Pump detected that the cartridge has been removed and all deliveries have stopped.
How will the System notify me?
3 sequences of 3 notes or 3 vibrations depending on the volume/vibrate setting selected in Pump Volume.
Will the System re-notify me?
Yes. The system will re-notify you every 3 minutes until you reconnect the current cartridge or change the cartridge.
How should I respond?
Tap CONNECT to reattach the current cartridge. Tap INSTALL to load a new cartridge.
CARTRIDGE ALARM
ALL DELIVERIES STOPPED!
The cartridge cannot be detected. Press INSTALL to install a new cartridge or press CONNECT to reconnect the current cartridge.
CONNECT INSTALL
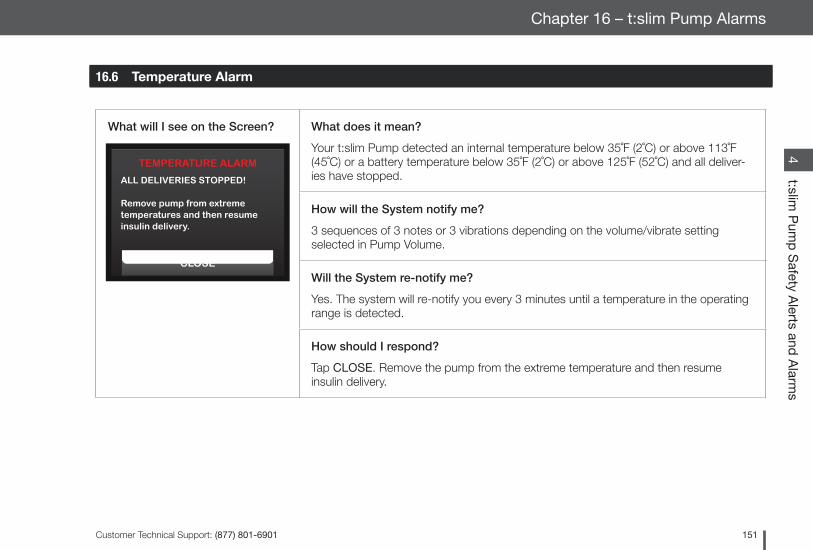
Customer Technical Support: (877) 801-6901 151
t:slim P
ump
Safety A
lerts and A
larms
4Chapter 16 – t:slim Pump Alarms
16.6 Temperature Alarm
What will I see on the Screen? What does it mean?
Your t:slim Pump detected an internal temperature below 35˚F (2˚C) or above 113˚F (45˚C) or a battery temperature below 35˚F (2˚C) or above 125˚F (52˚C) and all deliver-ies have stopped.
How will the System notify me?
3 sequences of 3 notes or 3 vibrations depending on the volume/vibrate setting selected in Pump Volume.
Will the System re-notify me?
Yes. The system will re-notify you every 3 minutes until a temperature in the operating range is detected.
How should I respond?
Tap CLOSE. Remove the pump from the extreme temperature and then resume insulin delivery.
TEMPERATURE ALARM
ALL DELIVERIES STOPPED!
Remove pump from extremetemperatures and then resumeinsulin delivery.
CLOSE
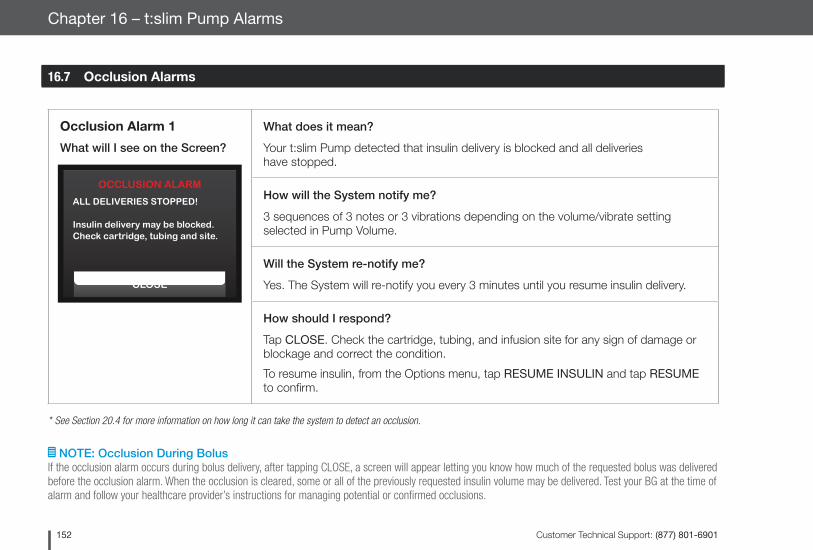
Customer Technical Support: (877) 801-6901152
Chapter 16 – t:slim Pump Alarms
NOTE: Occlusion During BolusIf the occlusion alarm occurs during bolus delivery, after tapping CLOSE, a screen will appear letting you know how much of the requested bolus was delivered before the occlusion alarm. When the occlusion is cleared, some or all of the previously requested insulin volume may be delivered. Test your BG at the time of alarm and follow your healthcare provider’s instructions for managing potential or confirmed occlusions.
Occlusion Alarm 1
What will I see on the Screen?
What does it mean?
Your t:slim Pump detected that insulin delivery is blocked and all deliveries have stopped.
How will the System notify me?
3 sequences of 3 notes or 3 vibrations depending on the volume/vibrate setting selected in Pump Volume.
Will the System re-notify me?
Yes. The System will re-notify you every 3 minutes until you resume insulin delivery.
How should I respond?
Tap CLOSE. Check the cartridge, tubing, and infusion site for any sign of damage or blockage and correct the condition.
To resume insulin, from the Options menu, tap RESUME INSULIN and tap RESUME to confirm.
* See Section 20.4 for more information on how long it can take the system to detect an occlusion.
OCCLUSION ALARM
ALL DELIVERIES STOPPED!
Insulin delivery may be blocked. Check cartridge, tubing and site.
CLOSE
16.7 Occlusion Alarms
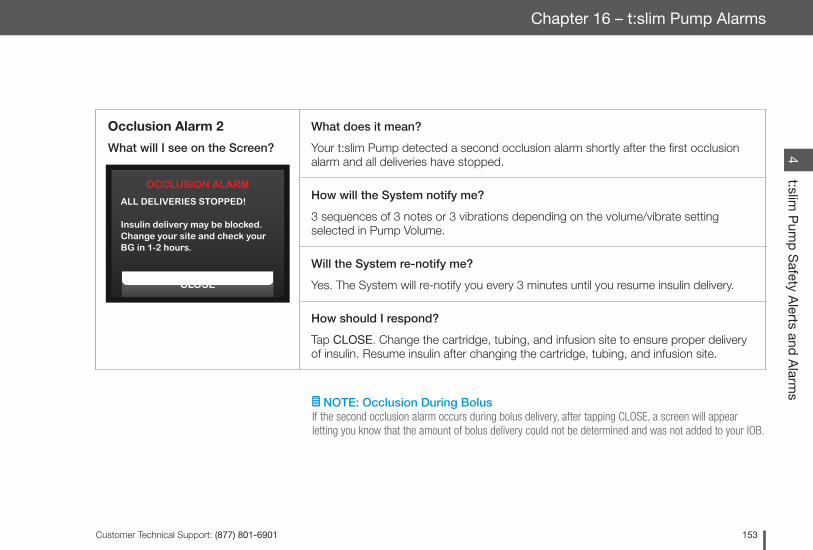
Customer Technical Support: (877) 801-6901 153
t:slim P
ump
Safety A
lerts and A
larms
4Chapter 16 – t:slim Pump Alarms
NOTE: Occlusion During BolusIf the second occlusion alarm occurs during bolus delivery, after tapping CLOSE, a screen will appear letting you know that the amount of bolus delivery could not be determined and was not added to your IOB.
Occlusion Alarm 2
What will I see on the Screen?
What does it mean?
Your t:slim Pump detected a second occlusion alarm shortly after the first occlusion alarm and all deliveries have stopped.
How will the System notify me?
3 sequences of 3 notes or 3 vibrations depending on the volume/vibrate setting selected in Pump Volume.
Will the System re-notify me?
Yes. The System will re-notify you every 3 minutes until you resume insulin delivery.
How should I respond?
Tap CLOSE. Change the cartridge, tubing, and infusion site to ensure proper delivery of insulin. Resume insulin after changing the cartridge, tubing, and infusion site.
OCCLUSION ALARM
ALL DELIVERIES STOPPED!
Insulin delivery may be blocked. Change your site and check your BG in 1-2 hours.
CLOSE
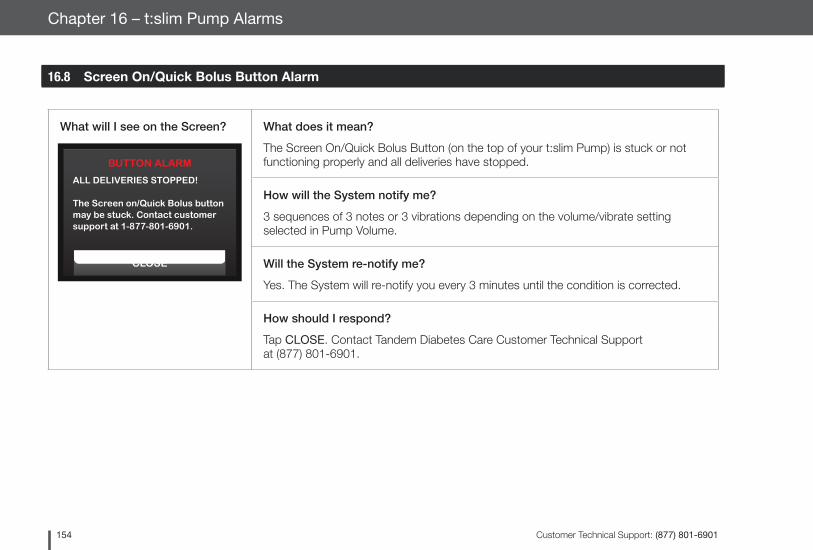
Customer Technical Support: (877) 801-6901154
Chapter 16 – t:slim Pump Alarms
16.8 Screen On/Quick Bolus Button Alarm
What will I see on the Screen? What does it mean?
The Screen On/Quick Bolus Button (on the top of your t:slim Pump) is stuck or not functioning properly and all deliveries have stopped.
How will the System notify me?
3 sequences of 3 notes or 3 vibrations depending on the volume/vibrate setting selected in Pump Volume.
Will the System re-notify me?
Yes. The System will re-notify you every 3 minutes until the condition is corrected.
How should I respond?
Tap CLOSE. Contact Tandem Diabetes Care Customer Technical Support at (877) 801-6901.
BUTTON ALARM
ALL DELIVERIES STOPPED!
The Screen on/Quick Bolus button may be stuck. Contact customer support at 1-877-801-6901.
CLOSE

Customer Technical Support: (877) 801-6901 155
t:slim P
ump
Safety A
lerts and A
larms
4Chapter 16 – t:slim Pump Alarms
16.9 Altitude Alarm
What will I see on the Screen? What does it mean?
Your t:slim Pump detected a pressure difference between inside the cartridge and the surrounding air within the validated operating range of -1,300 feet to 10,000 feet and all deliveries have stopped.
How will the System notify me?
3 sequences of 3 notes or 3 vibrations depending on the volume/vibrate setting selected in Pump Volume.
Will the System re-notify me?
Yes. The System will re-notify you every 3 minutes until the condition is corrected.
How should I respond?
Tap CLOSE. Remove the cartridge from the pump (this will allow the cartridge to fully vent) and then reconnect the cartridge.
ALTITUDE ALARM
ALL DELIVERIES STOPPED!
Remove cartridge from pump, reconnect cartridge and then resume insulin.
CLOSE

Customer Technical Support: (877) 801-6901156
Chapter 16 – t:slim Pump Alarms
16.10 Reset Alarm
What will I see on the Screen? What does it mean?
Your t:slim Pump detected that one if its micro-processors experienced a reset and all deliveries have been stopped.
How will the System notify me?
3 sequences of 3 notes or 3 vibrations depending on the volume/vibrate setting selected in Pump Volume.
Will the System re-notify me?
Yes. The System will re-notify you every 3 minutes until you tap CLOSE.
How should I respond?
Tap CLOSE. Contact Tandem Diabetes Care Customer Technical Support at (877) 801-6901.
PUMP HAS BEEN RESET
All active deliveries have been stopped and your IOB and Max Hourly Bolus have been reset.
Please contact Customer Service at 1-877-801-6901.
CLOSE

Chapter 17
t:slim Pump Malfunction
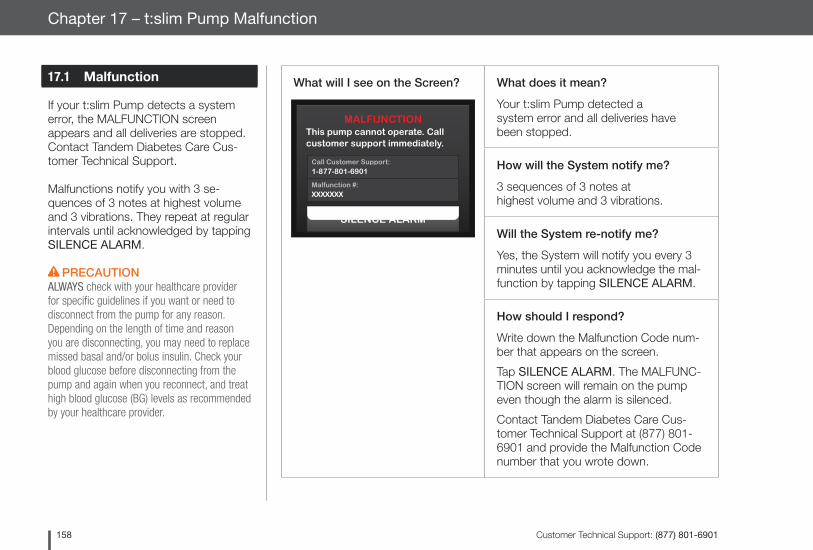
Customer Technical Support: (877) 801-6901158
Chapter 17 – t:slim Pump Malfunction
17.1 Malfunction
If your t:slim Pump detects a system error, the MALFUNCTION screen appears and all deliveries are stopped. Contact Tandem Diabetes Care Cus-tomer Technical Support.
Malfunctions notify you with 3 se-quences of 3 notes at highest volume and 3 vibrations. They repeat at regular intervals until acknowledged by tapping SILENCE ALARM.
PRECAUTIONALWAYS check with your healthcare provider for specific guidelines if you want or need to disconnect from the pump for any reason. Depending on the length of time and reason you are disconnecting, you may need to replace missed basal and/or bolus insulin. Check your blood glucose before disconnecting from the pump and again when you reconnect, and treat high blood glucose (BG) levels as recommended by your healthcare provider.
What will I see on the Screen? What does it mean?
Your t:slim Pump detected a system error and all deliveries have been stopped.
How will the System notify me?
3 sequences of 3 notes at highest volume and 3 vibrations.
Will the System re-notify me?
Yes, the System will notify you every 3 minutes until you acknowledge the mal-function by tapping SILENCE ALARM.
How should I respond?
Write down the Malfunction Code num-ber that appears on the screen.
Tap SILENCE ALARM. The MALFUNC-TION screen will remain on the pump even though the alarm is silenced.
Contact Tandem Diabetes Care Cus-tomer Technical Support at (877) 801-6901 and provide the Malfunction Code number that you wrote down.
MALFUNCTIONThis pump cannot operate. Call customer support immediately.
SILENCE ALARM
Call Customer Support:1-877-801-6901
Malfunction #:XXXXXXX
Customer Technical Support: (877) 801-6901 159
t:slim P
ump
Safety A
lerts and A
larms
4Chapter 17 – t:slim Pump Malfunction
THIS PAGE IS INTENTIONALLY
LEFT BLANK
Section 5
Living With and Caring for Your t:slim System

Chapter 18
Lifestyle Issues and Travel
Customer Technical Support: (877) 801-6901162
Chapter 18 – Lifestyle Issues and Travel
18.1 Overview
While the convenience and flexibility of the t:slim System allow most users to participate in a variety of activities, some lifestyle changes may be re-quired. Additionally, your insulin needs may change in response to lifestyle changes.
PRECAUTION
CONSULT your healthcare provider about lifestyle changes such as weight gain or loss, and starting or stopping exercise. Your insulin needs may change in response to lifestyle chang-es. Your basal rate(s) and other settings may need adjustment.
Physical Activity
The t:slim System can be worn during most forms of exercise, such as running, cycling, hiking, and resistance training. During exercise, the pump can be worn in the provided case, your pocket, or other third-party “sport cases.” For activities where contact is a concern, such as baseball, hockey, martial arts, or basketball, you can
period of time. Your pump should not be worn in hot tubs or Jacuzzis.
Extreme Altitudes
Some activities, such as hiking, skiing or snowboarding, could expose your pump to extreme altitudes. The t:slim Pump has been tested at altitudes up to 10,000 feet at standard operating temperatures.
Extreme Temperatures
You should avoid activities which could expose your System to temperatures below 40˚F (5˚C) or above 99˚F (37˚C), as insulin can freeze at low tempera-tures or degrade at high temperatures.
Other Activities Which Require Removing Your Pump
There are other activities, such as bathing and intimacy, when it may be more convenient for you to remove your pump. It is safe to do so for short periods of time. If planning to dis-connect from your pump, discuss a plan with your health care provider for compensating for any basal delivery
disconnect from your pump for short periods of time. If planning to discon-nect from your pump, discuss a plan with your healthcare provider to com-pensate for any basal insulin delivery you miss while disconnected, and be sure to continue to check your blood glucose levels.
Aquatic Activities
PRECAUTION
AVOID submersing your pump in fluid beyond a depth of 3 feet or for more than 30 minutes (IPX7 rating). If your pump has been exposed to fluid be-yond these limits, check for any signs of fluid ingress. If there are signs of fluid entry, discontinue use of the pump and contact Tandem Diabetes Care Customer Technical Support at (877) 801-6901.
Your t:slim Pump is watertight to a depth of 3 feet for up to 30 minutes (IPX7 rating), but it is not waterproof. Your pump should not be worn while swimming, scuba diving, surfing, or during any other activities that could submerge the pump for an extended
Customer Technical Support: (877) 801-6901 163
Living With and
Caring for Your t:slim
System
5Chapter 18 – Lifestyle Issues and Travel
you miss while disconnected, and be sure to check your blood glucose levels frequently. Missing basal delivery could cause your blood sugar to rise.
Travel
The flexibility afforded by an insulin pump can simplify some aspects of travel, but it still requires planning. Be sure to order your pump supplies before your trip so that you have enough supplies with you while you’re away from home. In addition to pump supplies, you should also always bring the following items:
• The items listed in the Emergency Kit described in Section 2.8.
• A prescription for both rapid-acting and long-acting insulin of the type recommended by your healthcare provider in case you need to take insulin by injection.
• A letter from your HCP explaining the medical need for your insulin pump and other supplies.
Traveling by Air
PRECAUTION
DO NOT expose your System to X-ray screening used for carry-on and checked luggage. Newer full body scanners used in airport security screening are also a form of X-ray and your System should not be exposed to them. Notify the Transportation Security Administration (TSA) Agent that your System cannot be exposed to X-ray machines and request an alternate means of screening.
Visit TSA’s website if you have any questions or concerns.
www.tsa.govEmail: [email protected] Phone: 1-866-289-9673.
Your System has been designed to withstand common electromagnetic interference including airport metal detectors.
Pack your pump supplies in your carry-on luggage. DO NOT pack your
supplies in checked luggage as it could get delayed or lost.
If traveling internationally, contact Tandem Diabetes Care Customer Support prior to your trip to obtain a travel loaner pump in case your pump malfunctions outside of Tandem’s replacement area.

Customer Technical Support: (877) 801-6901164
Chapter 18 – Lifestyle Issues and Travel
THIS PAGE IS INTENTIONALLY
LEFT BLANK
Chapter 19
Taking Care of Your t:slim System
Customer Technical Support: (877) 801-6901166
Chapter 19 – Taking Care of Your t:slim System
19.1 Overview
This section provides information on caring for and maintaining your System.
Cleaning Your System
When cleaning your t:slim Pump, use a damp lint-free cloth. Do not use house-hold or industrial cleaners, solvents, bleach, scouring pads, chemicals, or sharp instruments. Never submerge the pump in water or use any other liq-uid to clean it. Do not place the pump in the dishwasher or use hot water to clean it. If needed, use only a very mild detergent, such as a bit of liquid soap with warm water. When drying your pump, use a soft towel; never place your pump in a microwave oven or baking oven to dry it.
Storing Your System
If you need to stop using your t:slim Pump for a long period of time, you can place the pump in storage mode. To place the pump in storage mode, con-nect the pump to a power source and then press and hold down the Screen On/Quick Bolus Button for 25 seconds. The pump will beep 3 times before go-ing into storage mode. Disconnect the pump from the power source.
Keep the pump protected when not in use. Store at temperatures between -4°F and 140°F and at relative humidity levels between 20% and 90%.
To bring the pump out of storage mode, simply connect the pump to a power source.
Inspecting Your System for Damage
PRECAUTIONDO NOT use your pump if you think it might be damaged due to dropping it or hitting it against a hard surface. Check that the System is working properly by plugging a power source into the USB port and confirming that the display turns on, you hear audible beeps, feel the pump vibrate, and see the green LED light blinking around the edge of the Screen On Button. If you are unsure about potential damage, discontinue use of the System and contact Tandem Diabetes Care Customer Technical Support at (877) 801-6901.
If you drop your t:slim Pump or it has been hit against something hard, ensure that it is still working properly. Check that the touch screen is working and clear, and that the cartridge and infusion set are properly in place. Check for leaks around the cartridge and at the tubing connector to the infu-sion set. Immediately contact Tandem Diabetes Care Customer Technical Support at (877) 801-6901 if you notice any cracks, chips, or other damage.
Customer Technical Support: (877) 801-6901 167
Living With and
Caring for Your t:slim
System
5Chapter 19 – Taking Care of Your t:slim System
Disposing of System Components
Consult your healthcare provider for instructions for disposal of devices con-taining electronic waste such as your pump and for instructions for disposal of potentially bio-hazardous materials such as used cartridges, needles, syringes, and infusion sets.
Section 6
Technical Specifications and Warranty

Chapter 20
Technical Specifications
Customer Technical Support: (877) 801-6901170
Chapter 20 – Technical Specifications
20.1 Overview
This section provides tables of technical specifications, performance characteristics, options, settings, and electromagnetic compli-ance information for the t:slim System. The specifications in this section meet the international standards set forth in IEC 60601-1 and IEC 60601-2-24.
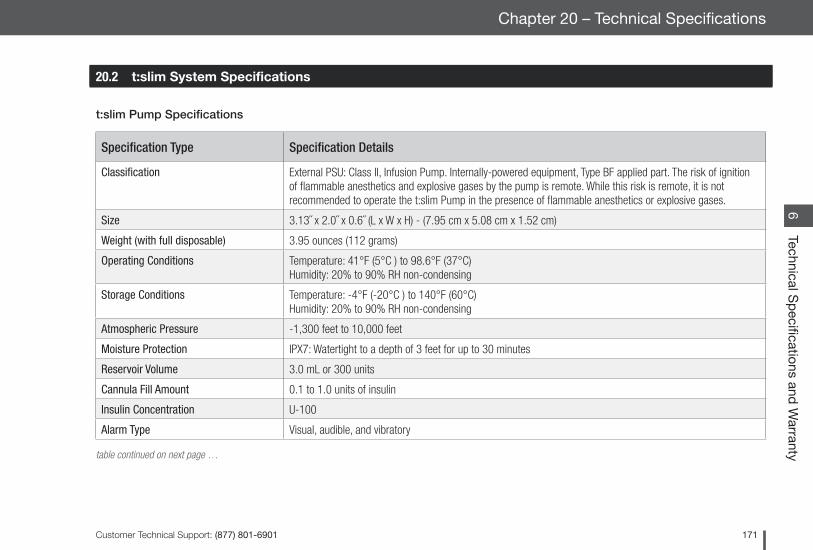
Customer Technical Support: (877) 801-6901 171
Technical Sp
ecifications and W
arranty6
Chapter 20 – Technical Specifications
t:slim Pump Specifications
Specification Type Specification Details
Classification External PSU: Class II, Infusion Pump. Internally-powered equipment, Type BF applied part. The risk of ignition of flammable anesthetics and explosive gases by the pump is remote. While this risk is remote, it is not recommended to operate the t:slim Pump in the presence of flammable anesthetics or explosive gases.
Size 3.13˝ x 2.0˝ x 0.6˝ (L x W x H) - (7.95 cm x 5.08 cm x 1.52 cm)
Weight (with full disposable) 3.95 ounces (112 grams)
Operating Conditions Temperature: 41°F (5°C ) to 98.6°F (37°C) Humidity: 20% to 90% RH non-condensing
Storage Conditions Temperature: -4°F (-20°C ) to 140°F (60°C) Humidity: 20% to 90% RH non-condensing
Atmospheric Pressure -1,300 feet to 10,000 feet
Moisture Protection IPX7: Watertight to a depth of 3 feet for up to 30 minutes
Reservoir Volume 3.0 mL or 300 units
Cannula Fill Amount 0.1 to 1.0 units of insulin
Insulin Concentration U-100
Alarm Type Visual, audible, and vibratory
table continued on next page …
20.2 t:slim System Specifications
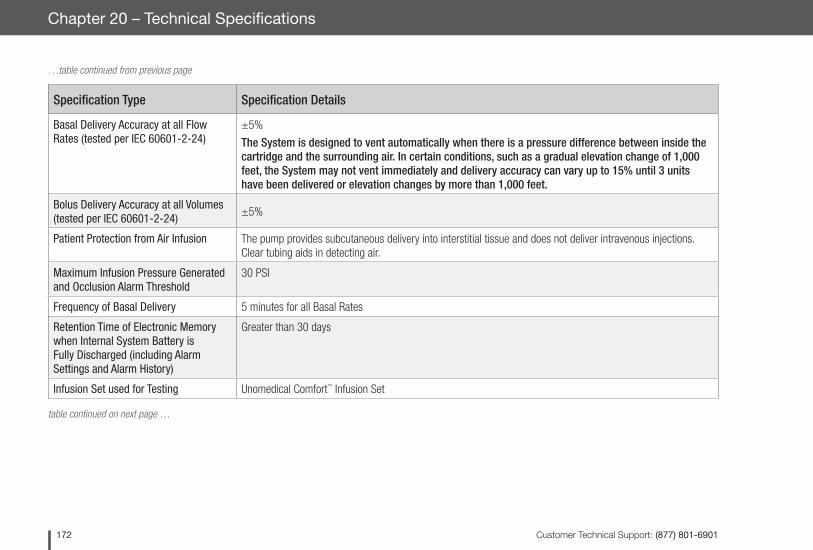
Customer Technical Support: (877) 801-6901172
Chapter 20 – Technical Specifications
…table continued from previous page
Specification Type Specification Details
Basal Delivery Accuracy at all Flow Rates (tested per IEC 60601-2-24)
±5%
The System is designed to vent automatically when there is a pressure difference between inside the cartridge and the surrounding air. In certain conditions, such as a gradual elevation change of 1,000 feet, the System may not vent immediately and delivery accuracy can vary up to 15% until 3 units have been delivered or elevation changes by more than 1,000 feet.
Bolus Delivery Accuracy at all Volumes (tested per IEC 60601-2-24)
±5%
Patient Protection from Air Infusion The pump provides subcutaneous delivery into interstitial tissue and does not deliver intravenous injections. Clear tubing aids in detecting air.
Maximum Infusion Pressure Generated and Occlusion Alarm Threshold
30 PSI
Frequency of Basal Delivery 5 minutes for all Basal Rates
Retention Time of Electronic Memory when Internal System Battery is Fully Discharged (including Alarm Settings and Alarm History)
Greater than 30 days
Infusion Set used for Testing Unomedical Comfort™ Infusion Set
table continued on next page …
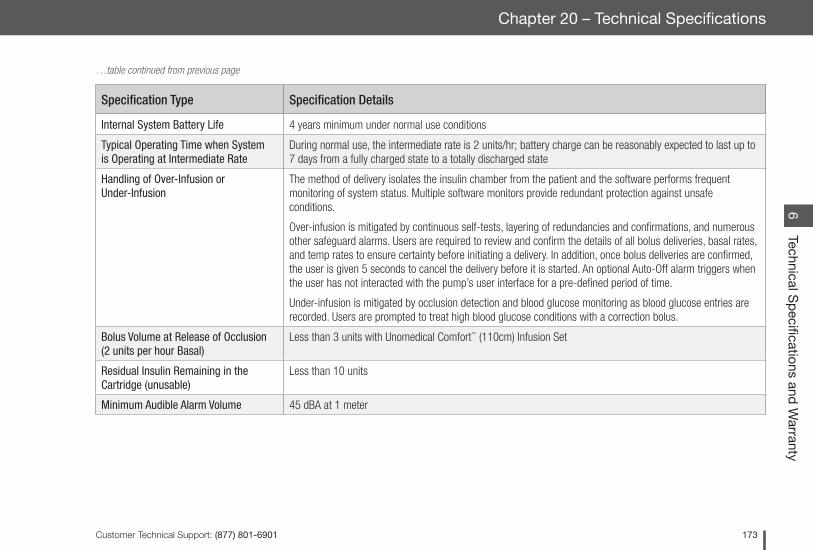
Customer Technical Support: (877) 801-6901 173
Technical Sp
ecifications and W
arranty6
Chapter 20 – Technical Specifications
…table continued from previous page
Specification Type Specification Details
Internal System Battery Life 4 years minimum under normal use conditions
Typical Operating Time when System is Operating at Intermediate Rate
During normal use, the intermediate rate is 2 units/hr; battery charge can be reasonably expected to last up to 7 days from a fully charged state to a totally discharged state
Handling of Over-Infusion or Under-Infusion
The method of delivery isolates the insulin chamber from the patient and the software performs frequent monitoring of system status. Multiple software monitors provide redundant protection against unsafe conditions.
Over-infusion is mitigated by continuous self-tests, layering of redundancies and confirmations, and numerous other safeguard alarms. Users are required to review and confirm the details of all bolus deliveries, basal rates, and temp rates to ensure certainty before initiating a delivery. In addition, once bolus deliveries are confirmed, the user is given 5 seconds to cancel the delivery before it is started. An optional Auto-Off alarm triggers when the user has not interacted with the pump’s user interface for a pre-defined period of time.
Under-infusion is mitigated by occlusion detection and blood glucose monitoring as blood glucose entries are recorded. Users are prompted to treat high blood glucose conditions with a correction bolus.
Bolus Volume at Release of Occlusion (2 units per hour Basal)
Less than 3 units with Unomedical Comfort™ (110cm) Infusion Set
Residual Insulin Remaining in the Cartridge (unusable)
Less than 10 units
Minimum Audible Alarm Volume 45 dBA at 1 meter
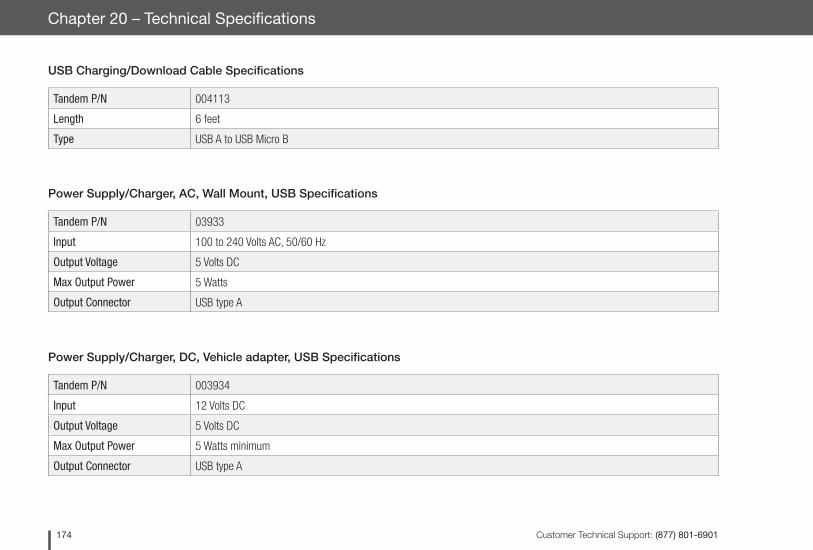
Customer Technical Support: (877) 801-6901174
Chapter 20 – Technical Specifications
Power Supply/Charger, DC, Vehicle adapter, USB Specifications
Tandem P/N 003934
Input 12 Volts DC
Output Voltage 5 Volts DC
Max Output Power 5 Watts minimum
Output Connector USB type A
Power Supply/Charger, AC, Wall Mount, USB Specifications
Tandem P/N 03933
Input 100 to 240 Volts AC, 50/60 Hz
Output Voltage 5 Volts DC
Max Output Power 5 Watts
Output Connector USB type A
USB Charging/Download Cable Specifications
Tandem P/N 004113
Length 6 feet
Type USB A to USB Micro B
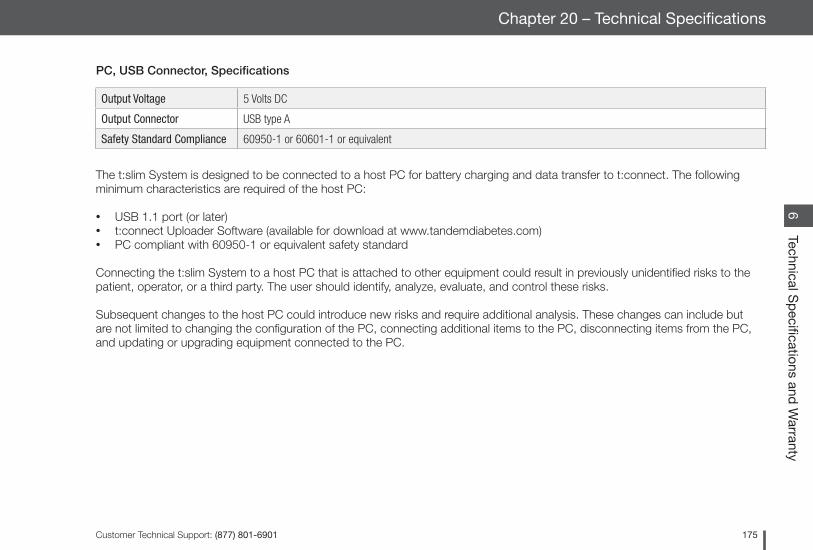
Customer Technical Support: (877) 801-6901 175
Technical Sp
ecifications and W
arranty6
Chapter 20 – Technical Specifications
PC, USB Connector, Specifications
Output Voltage 5 Volts DC
Output Connector USB type A
Safety Standard Compliance 60950-1 or 60601-1 or equivalent
The t:slim System is designed to be connected to a host PC for battery charging and data transfer to t:connect. The following minimum characteristics are required of the host PC:
• USB 1.1 port (or later)• t:connect Uploader Software (available for download at www.tandemdiabetes.com)• PC compliant with 60950-1 or equivalent safety standard
Connecting the t:slim System to a host PC that is attached to other equipment could result in previously unidentified risks to the patient, operator, or a third party. The user should identify, analyze, evaluate, and control these risks.
Subsequent changes to the host PC could introduce new risks and require additional analysis. These changes can include but are not limited to changing the configuration of the PC, connecting additional items to the PC, disconnecting items from the PC, and updating or upgrading equipment connected to the PC.
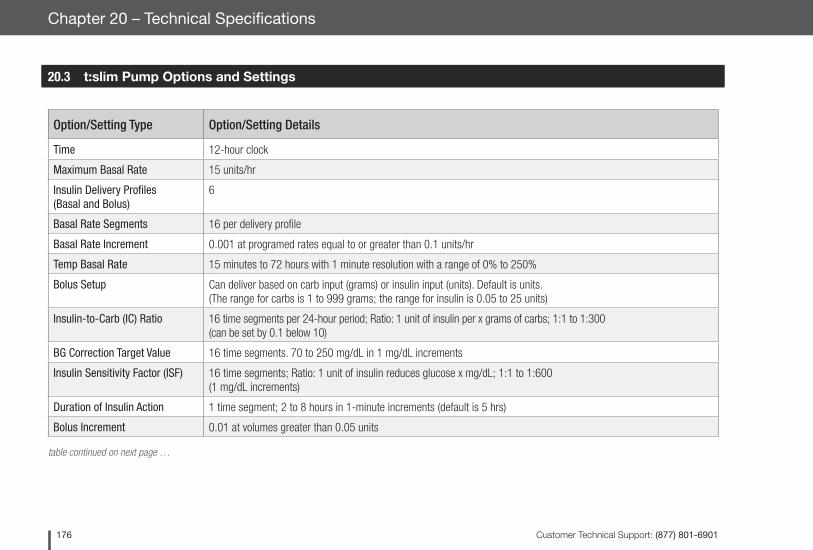
Customer Technical Support: (877) 801-6901176
Chapter 20 – Technical Specifications
20.3 t:slim Pump Options and Settings
Option/Setting Type Option/Setting Details
Time 12-hour clock
Maximum Basal Rate 15 units/hr
Insulin Delivery Profiles (Basal and Bolus)
6
Basal Rate Segments 16 per delivery profile
Basal Rate Increment 0.001 at programed rates equal to or greater than 0.1 units/hr
Temp Basal Rate 15 minutes to 72 hours with 1 minute resolution with a range of 0% to 250%
Bolus Setup Can deliver based on carb input (grams) or insulin input (units). Default is units. (The range for carbs is 1 to 999 grams; the range for insulin is 0.05 to 25 units)
Insulin-to-Carb (IC) Ratio 16 time segments per 24-hour period; Ratio: 1 unit of insulin per x grams of carbs; 1:1 to 1:300 (can be set by 0.1 below 10)
BG Correction Target Value 16 time segments. 70 to 250 mg/dL in 1 mg/dL increments
Insulin Sensitivity Factor (ISF) 16 time segments; Ratio: 1 unit of insulin reduces glucose x mg/dL; 1:1 to 1:600 (1 mg/dL increments)
Duration of Insulin Action 1 time segment; 2 to 8 hours in 1-minute increments (default is 5 hrs)
Bolus Increment 0.01 at volumes greater than 0.05 units
table continued on next page …
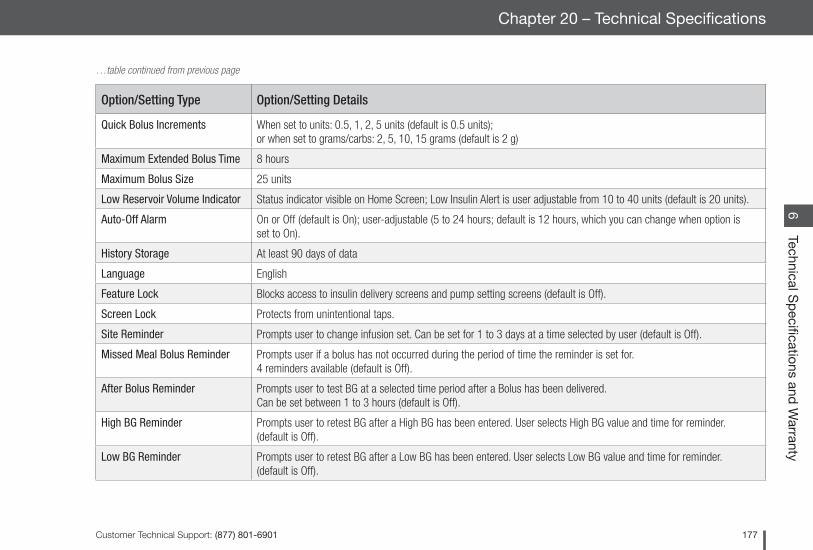
Customer Technical Support: (877) 801-6901 177
Technical Sp
ecifications and W
arranty6
Chapter 20 – Technical Specifications
…table continued from previous page
Option/Setting Type Option/Setting Details
Quick Bolus Increments When set to units: 0.5, 1, 2, 5 units (default is 0.5 units); or when set to grams/carbs: 2, 5, 10, 15 grams (default is 2 g)
Maximum Extended Bolus Time 8 hours
Maximum Bolus Size 25 units
Low Reservoir Volume Indicator Status indicator visible on Home Screen; Low Insulin Alert is user adjustable from 10 to 40 units (default is 20 units).
Auto-Off Alarm On or Off (default is On); user-adjustable (5 to 24 hours; default is 12 hours, which you can change when option is set to On).
History Storage At least 90 days of data
Language English
Feature Lock Blocks access to insulin delivery screens and pump setting screens (default is Off).
Screen Lock Protects from unintentional taps.
Site Reminder Prompts user to change infusion set. Can be set for 1 to 3 days at a time selected by user (default is Off).
Missed Meal Bolus Reminder Prompts user if a bolus has not occurred during the period of time the reminder is set for. 4 reminders available (default is Off).
After Bolus Reminder Prompts user to test BG at a selected time period after a Bolus has been delivered. Can be set between 1 to 3 hours (default is Off).
High BG Reminder Prompts user to retest BG after a High BG has been entered. User selects High BG value and time for reminder. (default is Off).
Low BG Reminder Prompts user to retest BG after a Low BG has been entered. User selects Low BG value and time for reminder. (default is Off).
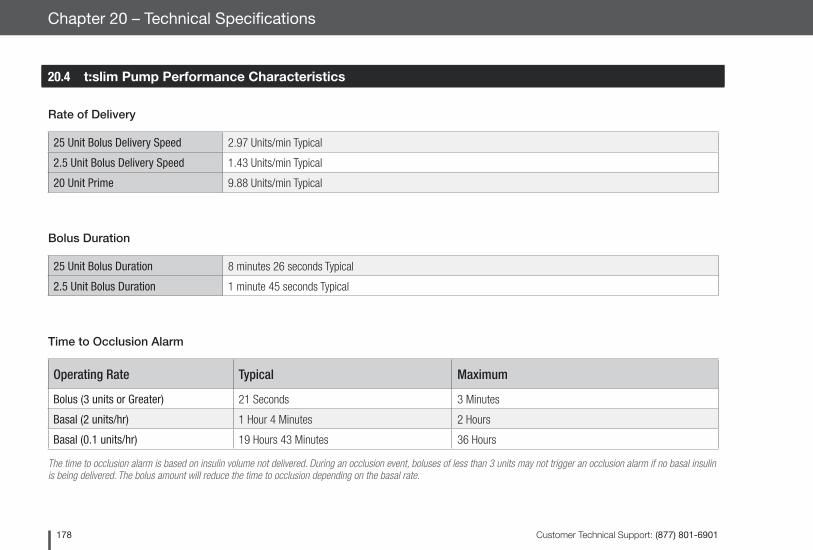
Customer Technical Support: (877) 801-6901178
Chapter 20 – Technical Specifications
20.4 t:slim Pump Performance Characteristics
Time to Occlusion Alarm
Operating Rate Typical Maximum
Bolus (3 units or Greater) 21 Seconds 3 Minutes
Basal (2 units/hr) 1 Hour 4 Minutes 2 Hours
Basal (0.1 units/hr) 19 Hours 43 Minutes 36 Hours
The time to occlusion alarm is based on insulin volume not delivered. During an occlusion event, boluses of less than 3 units may not trigger an occlusion alarm if no basal insulin is being delivered. The bolus amount will reduce the time to occlusion depending on the basal rate.
Rate of Delivery
25 Unit Bolus Delivery Speed 2.97 Units/min Typical
2.5 Unit Bolus Delivery Speed 1.43 Units/min Typical
20 Unit Prime 9.88 Units/min Typical
Bolus Duration
25 Unit Bolus Duration 8 minutes 26 seconds Typical
2.5 Unit Bolus Duration 1 minute 45 seconds Typical
Customer Technical Support: (877) 801-6901 179
Technical Sp
ecifications and W
arranty6
Chapter 20 – Technical Specifications
THIS PAGE IS INTENTIONALLY
LEFT BLANK
Customer Technical Support: (877) 801-6901180
Chapter 20 – Technical Specifications
20.5 Electromagnetic Compatibility
The information contained in this section is specific to the t:slim System. This information provides reasonable assurance of normal operation, but does not guarantee such under all conditions. If the t:slim System must be used in close proximity with other electri-cal equipment, the System should be observed in this environment to verify normal operation. Special precautions for electromag-netic compatibility must be taken when using medical electrical equipment. The System shall be placed into service with adher-ence to the EMC information provided here. Using cables and accessories not specified in this User Guide may adversely impact safety, performance, and electromagnetic compatibility, including increased emissions and/or decreased immunity.
For IEC 60601-1 testing, Essential Performance for the t:slim System is defined as follows:
• The System will not over deliver a clinically significant amount of insulin.
• The System will not under deliver a clinically significant amount of insulin without notification to the user.
• The System will not deliver a clinically significant amount of insulin after occlusion release.
This section contains the following tables of information:
• Electromagnetic Emissions
• Electromagnetic Immunity
• Distances Between the t:slim System and RF Equipment
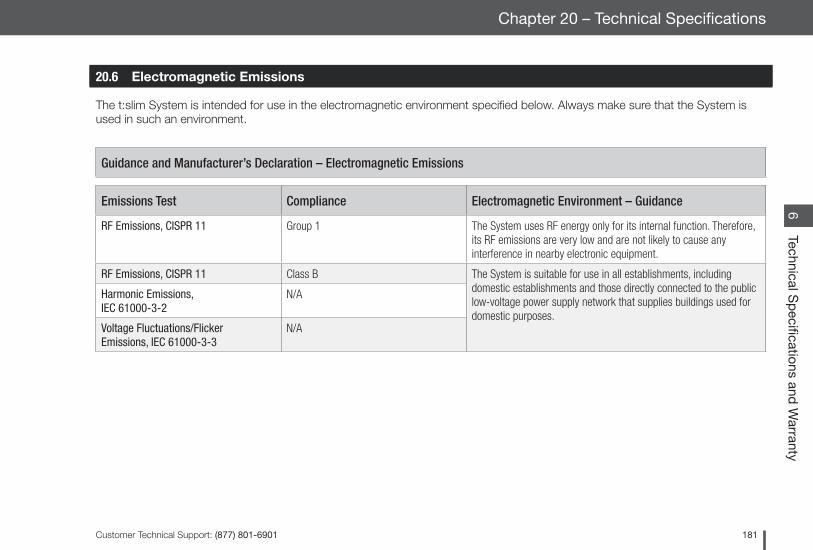
Customer Technical Support: (877) 801-6901 181
Technical Sp
ecifications and W
arranty6
Chapter 20 – Technical Specifications
20.6 Electromagnetic Emissions
The t:slim System is intended for use in the electromagnetic environment specified below. Always make sure that the System is used in such an environment.
Guidance and Manufacturer’s Declaration – Electromagnetic Emissions
Emissions Test Compliance Electromagnetic Environment – Guidance
RF Emissions, CISPR 11 Group 1 The System uses RF energy only for its internal function. Therefore, its RF emissions are very low and are not likely to cause any interference in nearby electronic equipment.
RF Emissions, CISPR 11 Class B The System is suitable for use in all establishments, including domestic establishments and those directly connected to the public low-voltage power supply network that supplies buildings used for domestic purposes.
Harmonic Emissions, IEC 61000-3-2
N/A
Voltage Fluctuations/Flicker Emissions, IEC 61000-3-3
N/A
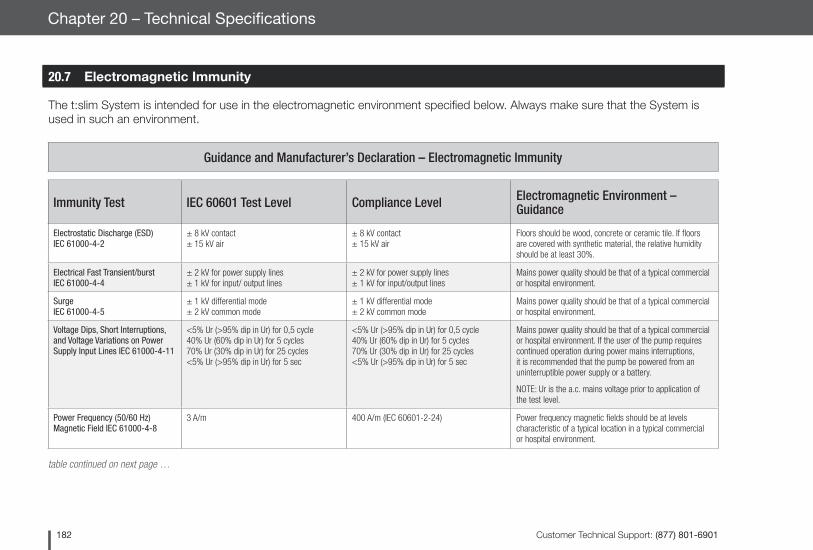
Customer Technical Support: (877) 801-6901182
Chapter 20 – Technical Specifications
20.7 Electromagnetic Immunity
The t:slim System is intended for use in the electromagnetic environment specified below. Always make sure that the System is used in such an environment.
Guidance and Manufacturer’s Declaration – Electromagnetic Immunity
Immunity Test IEC 60601 Test Level Compliance Level Electromagnetic Environment – Guidance
Electrostatic Discharge (ESD) IEC 61000-4-2
± 8 kV contact± 15 kV air
± 8 kV contact± 15 kV air
Floors should be wood, concrete or ceramic tile. If floors are covered with synthetic material, the relative humidity should be at least 30%.
Electrical Fast Transient/burst IEC 61000-4-4
± 2 kV for power supply lines± 1 kV for input/ output lines
± 2 kV for power supply lines± 1 kV for input/output lines
Mains power quality should be that of a typical commercial or hospital environment.
Surge IEC 61000-4-5
± 1 kV differential mode± 2 kV common mode
± 1 kV differential mode± 2 kV common mode
Mains power quality should be that of a typical commercial or hospital environment.
Voltage Dips, Short Interruptions, and Voltage Variations on Power Supply Input Lines IEC 61000-4-11
<5% Ur (>95% dip in Ur) for 0,5 cycle40% Ur (60% dip in Ur) for 5 cycles70% Ur (30% dip in Ur) for 25 cycles<5% Ur (>95% dip in Ur) for 5 sec
<5% Ur (>95% dip in Ur) for 0,5 cycle40% Ur (60% dip in Ur) for 5 cycles70% Ur (30% dip in Ur) for 25 cycles<5% Ur (>95% dip in Ur) for 5 sec
Mains power quality should be that of a typical commercial or hospital environment. If the user of the pump requires continued operation during power mains interruptions, it is recommended that the pump be powered from an uninterruptible power supply or a battery.
NOTE: Ur is the a.c. mains voltage prior to application of the test level.
Power Frequency (50/60 Hz) Magnetic Field IEC 61000-4-8
3 A/m 400 A/m (IEC 60601-2-24) Power frequency magnetic fields should be at levels characteristic of a typical location in a typical commercial or hospital environment.
table continued on next page …
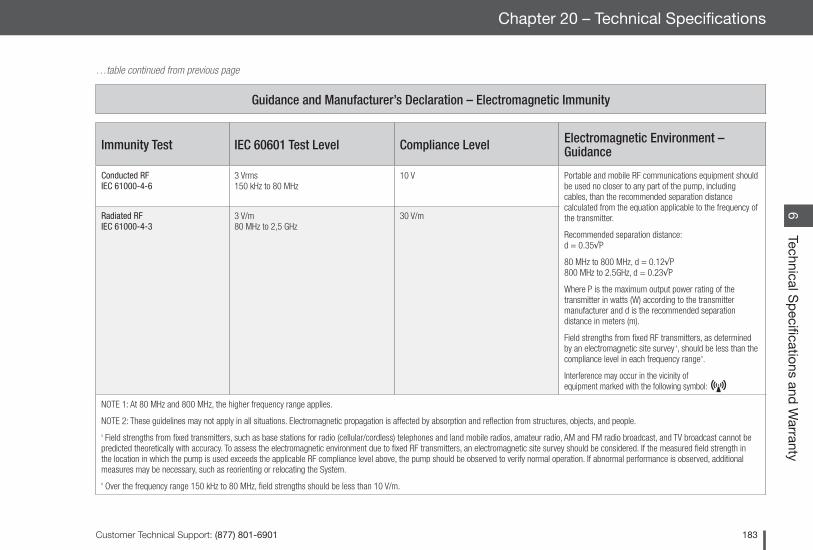
Customer Technical Support: (877) 801-6901 183
Technical Sp
ecifications and W
arranty6
Chapter 20 – Technical Specifications
…table continued from previous page
Guidance and Manufacturer’s Declaration – Electromagnetic Immunity
Immunity Test IEC 60601 Test Level Compliance Level Electromagnetic Environment – Guidance
Conducted RF IEC 61000-4-6
3 Vrms150 kHz to 80 MHz
10 V Portable and mobile RF communications equipment should be used no closer to any part of the pump, including cables, than the recommended separation distance calculated from the equation applicable to the frequency of the transmitter.
Recommended separation distance: d = 0.35√P
80 MHz to 800 MHz, d = 0.12√P 800 MHz to 2.5GHz, d = 0.23√P
Where P is the maximum output power rating of the transmitter in watts (W) according to the transmitter manufacturer and d is the recommended separation distance in meters (m).
Field strengths from fixed RF transmitters, as determined by an electromagnetic site survey a, should be less than the compliance level in each frequency rangeb.
Interference may occur in the vicinity of equipment marked with the following symbol:
Radiated RF IEC 61000-4-3
3 V/m80 MHz to 2,5 GHz
30 V/m
NOTE 1: At 80 MHz and 800 MHz, the higher frequency range applies.
NOTE 2: These guidelines may not apply in all situations. Electromagnetic propagation is affected by absorption and reflection from structures, objects, and people.a Field strengths from fixed transmitters, such as base stations for radio (cellular/cordless) telephones and land mobile radios, amateur radio, AM and FM radio broadcast, and TV broadcast cannot be predicted theoretically with accuracy. To assess the electromagnetic environment due to fixed RF transmitters, an electromagnetic site survey should be considered. If the measured field strength in the location in which the pump is used exceeds the applicable RF compliance level above, the pump should be observed to verify normal operation. If abnormal performance is observed, additional measures may be necessary, such as reorienting or relocating the System.b Over the frequency range 150 kHz to 80 MHz, field strengths should be less than 10 V/m.
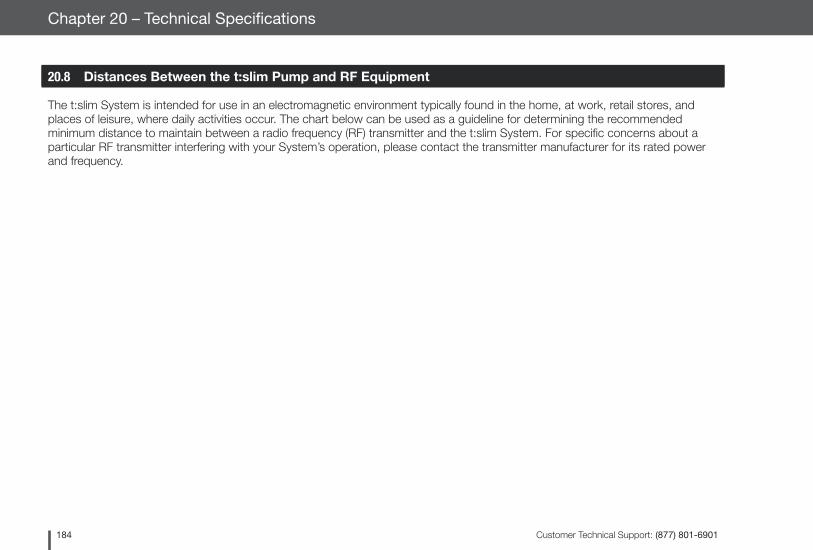
Customer Technical Support: (877) 801-6901184
Chapter 20 – Technical Specifications
20.8 Distances Between the t:slim Pump and RF Equipment
The t:slim System is intended for use in an electromagnetic environment typically found in the home, at work, retail stores, and places of leisure, where daily activities occur. The chart below can be used as a guideline for determining the recommended minimum distance to maintain between a radio frequency (RF) transmitter and the t:slim System. For specific concerns about a particular RF transmitter interfering with your System’s operation, please contact the transmitter manufacturer for its rated power and frequency.
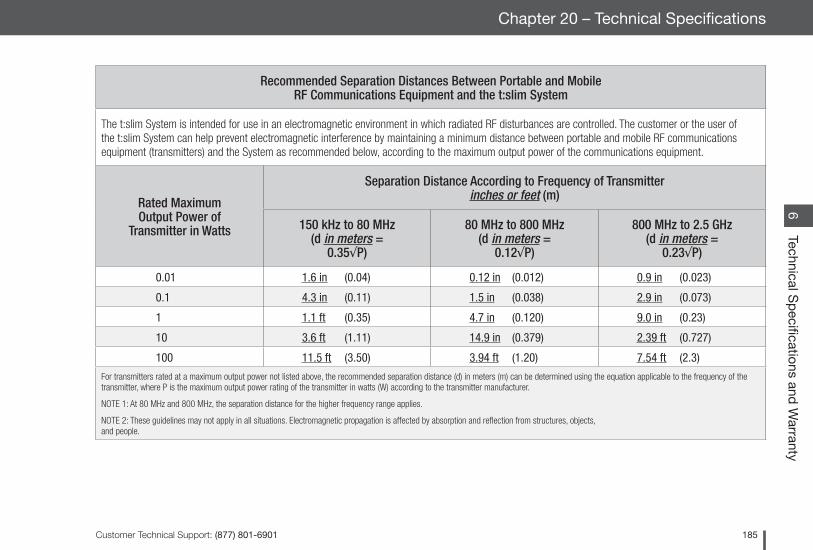
Customer Technical Support: (877) 801-6901 185
Technical Sp
ecifications and W
arranty6
Chapter 20 – Technical Specifications
Recommended Separation Distances Between Portable and Mobile RF Communications Equipment and the t:slim System
The t:slim System is intended for use in an electromagnetic environment in which radiated RF disturbances are controlled. The customer or the user of the t:slim System can help prevent electromagnetic interference by maintaining a minimum distance between portable and mobile RF communications equipment (transmitters) and the System as recommended below, according to the maximum output power of the communications equipment.
Rated Maximum Output Power of
Transmitter in Watts
Separation Distance According to Frequency of Transmitter inches or feet (m)
150 kHz to 80 MHz (d in meters =
0.35√P)
80 MHz to 800 MHz (d in meters =
0.12√P)
800 MHz to 2.5 GHz (d in meters =
0.23√P)
0.01 1.6 in (0.04) 0.12 in (0.012) 0.9 in (0.023)
0.1 4.3 in (0.11) 1.5 in (0.038) 2.9 in (0.073)
1 1.1 ft (0.35) 4.7 in (0.120) 9.0 in (0.23)
10 3.6 ft (1.11) 14.9 in (0.379) 2.39 ft (0.727)
100 11.5 ft (3.50) 3.94 ft (1.20) 7.54 ft (2.3)
For transmitters rated at a maximum output power not listed above, the recommended separation distance (d) in meters (m) can be determined using the equation applicable to the frequency of the transmitter, where P is the maximum output power rating of the transmitter in watts (W) according to the transmitter manufacturer.
NOTE 1: At 80 MHz and 800 MHz, the separation distance for the higher frequency range applies.
NOTE 2: These guidelines may not apply in all situations. Electromagnetic propagation is affected by absorption and reflection from structures, objects, and people.
Customer Technical Support: (877) 801-6901186
Chapter 20 – Technical Specifications
The table below provides a list of typical devices for various levels of transmitter power and frequency, and the recommended separation distances from the transmitter and the System.
Rated Maximum Output Power of Transmitter in Watts
Typical DevicesRecommended
Separation Distance Inch (Meters)
0.001WBluetooth Class 3 (standard 1 meter range)Commonly used as bluetooth headset
0.3 in (0.007 m)
0.01WInternet to music adaptorCommonly used for FM wireless music streaming
0.5 in (0.013 m)
0.1WBluetooth Class 1 (100 meter range)Wireless router (WiFi)
2.9 in (0.073 m)
0.5W Typical cellular/smart phone * 6.4 in (0.163 m)
1W Typical microwave oven RF leakage 9 in (0.23 m)
* Caution: Interference with pump electronics by cell phones can occur if worn in close proximity. It is recommended that your pump and cell phone be worn at least 6.4 inches apart.
Customer Technical Support: (877) 801-6901 187
Technical Sp
ecifications and W
arranty6
Chapter 20 – Technical Specifications
20.9 FCC Notice Concerning Interference
The t:slim Pump complies with FCC/IC RF exposure limits for general popula-tion/uncontrolled exposure.
t:slim Pumps equipped with a Blue-tooth® RF option transmit at a maxi-mum effective radiated power of 3.4 mW in the 2.4 GHz ISM band, which covers the frequency range from 2.40 GHz to 2.50 GHz.
The t:slim Pump complies with Part 15 of the FCC rules. Operation is subject to the following two conditions:
1. This device may not cause harmful interference, and;
2. This device must accept any interference received, including interference that my cause undesired operation
Compliance with these guidelines provides reasonable protection against harmful interference in a normal resi-dential environment. The t:slim Pump
generates, uses, and can radiate radio frequency energy, and may cause harmful interference to radio commu-nications. There is no guarantee that interference will not occur in a particu-lar installation. If the t:slim Pump does cause harmful interference to radio or television reception, the interference may be corrected by one of the follow-ing measures:
• Move or relocate the t:slim Pump
• Increase the distance between the t:slim Pump and the other device that is emitting or receiving interference
Changes or modifications not expressly approved by Tandem Diabetes Care, Inc. could void the user’s authority to operate the equipment.
Customer Technical Support: (877) 801-6901188
Chapter 20 – Technical Specifications
20.10 Warranty Information
Warranty
t:slim Insulin Pump
Tandem Diabetes Care, Inc. (“Tan-dem”) warrants the t:slim Insulin Pump against defects in materials and work-manship, under normal use, for the period of 4 years from the original date of shipment of the pump to the original end use purchaser (the “Warranty Period”). For any defective t:slim Pump covered by the foregoing warranty, Tandem will, at its discretion, repair the pump or replace it with a new or refurbished t:slim Pump, subject to the conditions and exclusions stated here-in. Repair or replacement of a t:slim Pump will not extend the original 4 year warranty, which will continue to apply. If your t:slim Pump is replaced, then you must return your original pump to Tandem in accordance with Tandem’s instructions. In the event the defective t:slim Pump is not returned, then this warranty shall be void and you will not be entitled to future pump replacement or repairs.
The warranty is valid only if the t:slim Pump is used in accordance with Tandem’s instructions for use and user manual and will not apply if:
• damage results from changes or modifications made to the t:slim Insulin Pump by the user or third persons after the date of manufacture;
• damage results from service or repairs performed to any part of the t:slim Pump by any person or entity other than Tandem;
• the t:slim Pump seal is broken;• a non-Tandem cartridge is used
with the t:slim Pump;• damage consists of scratches
and wear to surfaces and other externally exposed parts due to wear and tear;
• damage results from an event or accident beyond the control of Tandem; or
• damage results from negligence or improper use, including but not limited to improper storage or physical abuse.
From time-to-time Tandem may offer software updates for your t:slim Pump to help to ensure the up-to-date functionality of your pump or software that are intended to add new features to your t:slim Pump. Tandem reserves the right to offer those updates, if any, in its sole discretion either at no charge or for an additional fee to be determined at a future date. To the extent that an update is offered at no charge, it is considered to be included in the original cost of your pump. Any future software updates will be subject to your acceptance of other terms and conditions that may be applicable at that time, including additional terms that may modify or limit the terms of this Warranty.
This warranty shall be personal to the original end use purchaser. Any sale, rental or other transfer or use of the t:slim Pump covered by this warranty to or by a user other than the original end use purchaser shall cause this warranty to immediately terminate. This warranty only applies to the t:slim Pump and does not apply to other products or accessories. This warranty is valid only in the United States. No
Customer Technical Support: (877) 801-6901 189
Technical Sp
ecifications and W
arranty6
Chapter 20 – Technical Specifications
employee of Tandem or any other party is authorized to make any warranty in addition to those made in this Warranty.
The remedies provided for in this warranty are the exclusive remedies available for any warranty claims. Neither Tandem nor its suppliers or distributors shall be liable for losses, liabilities, claims or damages of any kind or nature whatsoever, including, without limitation, any indirect, incidental, consequential, or special damages of any kind caused by or arising out of a defect in the product. All other warranties, express or implied, are excluded, including the warranties of merchantability and fitness for a particular purpose.
Warranty
t:slim Cartridges
Tandem Diabetes Care, Inc. (“Tandem”) warrants its cartridge against defects in materials and workmanship for one use during the period of 3 days after the individual cartridge sterile packag-ing has been opened, not to exceed 6 months from date of shipment of the cartridge to the end user (the “Warranty Period”). During the Warranty Period, Tandem will replace any defective cartridge, subject to the conditions and exclusions stated herein.
The warranty is valid only if the cartridges are used in accordance with the accompanying instructions for use and user guide and will not apply if:
• the cartridge has been used for more than a single-time use by a single end-user;
• damage results during the improper opening of the sterile package not in conformance with the procedures outlined in the associated Instructions for Use;
• the sterile package is compromised while in the control of the user by any means other than purposeful opening by the user at the time of intended product use;
• damage results from changes or modifications made to the cartridge by the user or third persons after the date of manufacture;
• damage results from service or repairs performed to any part of the cartridge by any person or entity other than Tandem;
• damage is caused by use of the cartridge with any non-Tandem insulin pump;
• damage results from an event or accident beyond the control of Tandem; or
• damage results from negligence or improper use, including but not limited to improper storage or otherwise.
This warranty shall be personal to the original end use purchaser. Any sale, rental or other transfer or use of the product covered by this warranty to or by a user other than the original end use purchaser shall cause this warranty to immediately terminate. This war-
Customer Technical Support: (877) 801-6901190
Chapter 20 – Technical Specifications
20.11 Returned Goods Policy
Any insulin pump product (“Pump”) that was originally purchased from Tan-dem Diabetes Care®, Inc. (“Tandem”) or one of its authorized distributors may be re-turned to Tandem only for the following reasons: (1) during the applicable warranty period (which is set forth in the user guide for the Pump), the customer experiences an issue with the Pump that is covered by the warranty set forth in the user guide for the Pump, then Tandem will repair or replace the Pump as provided under the applicable warranty above, and (2) during the thirty (30) day period after the shipment of the Pump, if the customer discovers that the Pump is not suited for the customer based on a valid, good faith medical reason which has been confirmed by the customer’s physician, then Tandem or the au-tho-rized distributor will accept the re-turn of the Pump and provide a refund to the customer and/or its insurance company for the amount actually paid for the Pump. Tandem will not accept or be obligated to accept for return any Pump that is not based on one of the two reasons. To assure prompt
handling when returning a Pump, the customer must first obtain a returned materials authorization (RMA) number from Tandem’s or its authorized distrib-utor’s Customer Service Department. This returned materials authorization number must be clearly written on the outer box. If Tandem or the authorized distributor provides a label, the label must be attached or taped to the outer box. If no label is provided, Tandem recommends shipping via insured ground service with a tracking number. Tandem is not responsible for lost or damaged packages.
To obtain a returned materials authori-zation (RMA) number and shipping ad-dress, please contact Tandem Diabetes Care Customer Technical Support at (877) 801-6901.
Returns pre-authorized by Tandem’s authorized distributors should be sent to the distributor authorizing the return, unless other instructions are provided.
Returns made without the returned materials authorization number will be returned to the customer, freight col-
ranty does not apply to insulin pumps and other accessories. This warranty is valid only in the United States. No employee of Tandem or any other party is authorized to make any warranty in addition to those made in this Warranty.
The remedies provided for in this warranty are the exclusive remedies available for any warranty claims. Neither Tandem nor its suppliers or distributors shall be liable for losses, liabilities, claims or damages of any kind or nature whatsoever, including, without limitation, any indirect, incidental, consequential, or special damages of any kind caused by or arising out of a defect in the product. All other warranties, express or implied, are excluded, including the warranties of merchantability and fitness for a particular purpose.
Customer Technical Support: (877) 801-6901 191
Technical Sp
ecifications and W
arranty6
Chapter 20 – Technical Specifications
lect. This policy is subject to applicable law.
Customer Technical Support: (877) 801-6901192
Index
Index
Alert Icon 38
Alert Settings 48
Basal Rate Required Alert 132
Connection Error Alert 140
Data Error Alert 142
Incomplete Bolus Alert 126
Incomplete Cartridge Change Alert 128
Incomplete Fill Cannula Alert 130
Incomplete Fill Tubing Alert 129
Incomplete Load Sequence Alerts 128
Incomplete Setting Alert 131
Incomplete Temp Rate Alert 127
Low Insulin Alert 118, 123
Low Power Alerts 124
Max Basal Alerts 136
Max Bolus Alerts 134
Max Hourly Bolus Alert 133
Min Basal Alerts 138
Power Source Alert 141
Altitude Alarm 155
Arrows
Menu Arrows 46
Up/Down Arrows 46
BBasal 32, 76, 78
Basal Delivery Accuracy 172
Basal Rate 76
Basal Rate Required Alert 132
Current Basal Rate 42
Frequency of Basal Delivery 172
Setting Basal Rate 78
Temp Basal Rate 33
Temp Basal Rate - Setting Up 98
Temp Basal Rate - Stopping 99
Temporary Basal Rate 46
Battery 56
Battery Level 38, 40
Battery Power Alerts 124
Charging 56
Charging Tips 57
Benefits From Using the System 27
AAccessories 32, 56
AC Power Adapter 56
Active Bolus 38
Additional Pump Operations 96
After Bolus BG Reminder 114
Air Bubbles
Checking For 70
Removing 65, 70
Airport Security 163
Alarms 117, 143
Altitude Alarm 155
Auto-Off Alarm 118
Cartridge Error Alarm 149
Cartridge Removal Alarm 150
Empty Cartridge Alarm 148
Low Power Alarms 146
Occlusion Alarm 152, 178
Reset Alarm 156
Resume Pump Alarm 145
Screen On/Quick Bolus Button Alarm 154
Temperature Alarm 151
Alerts 117, 121
Customer Technical Support: (877) 801-6901 193
Index
BG 32
High BG Reminder - Setting Up 113
Low BG Reminder - Setting Up 112
Target BG 32, 76
Target BG - Setting Up 79
Bluetooth 186, 187
Bolus 32, 85
Active Bolus Icon 38
Bolus Delivery Accuracy 172
Bolus Overview 86
Bolus Screen 44
Bolus Settings 77
Canceling a Bolus 90
Correction Bolus 33
Correction Bolus, Above Target 88
Correction Bolus, Below Target 88
Extended Bolus 33, 89
Food Bolus Using Grams 87
Food Bolus Using Units 86
Max Bolus 77
Max Bolus - Setting Up 80
Quick Bolus 17, 33, 101
Quick Bolus - Delivering 102
Quick Bolus - Setting Up 102
Rate of Delivery 178
Stopping a Bolus 90
CCanceling a Bolus 90
Cannula 33
Fill Cannula 46
Filling Cannula 72
Carbohydrates 33, 42
Carbohydrates Setting 77
Carbohydrates - Setting Up 80
Food Bolus Using 45, 87
Carb Ratio 33
Carb Ratio Setting 77
Carb Ratio - Setting Up 78
Carbs 33
Cartridge 46, 64
Cartridge Error Alarm 149
Cartridge Removal Alarm 150
Cartridge Tubing 40
Change Cartridge 69
Filling the Cartridge 67
Load Cartridge 33, 46, 64, 69
Charging 56
Charging Tips 57
Cleaning Your System 166
Colors
Explanation of Colors 36
Connection Error Alert 140
Contents
System Contents 32
Contraindications 20
Correction Bolus 33
Correction Bolus, Above Target 88
Correction Bolus, Below Target 88
Correction Factor 33
Correction Factor Setting 77
Correction Factor - Setting Up 78
Customer Technical Support 3
DData Error Alert 142
Date
Date Display 38
Edit Date 59
Customer Technical Support: (877) 801-6901194
Index
Default
After Bolus BG Reminder 114
Auto-Off Alarm 118
Carbs 77
Extended Bolus 89
High BG Reminder 113
Insulin Duration 77
Low BG Reminder 112
Low Insulin Alert 118
Max Bolus 77
Quick Bolus 102
Screen Timeout 106
Site Reminder 115
Temp Rate 98
Delivery Summary 110
Disconnect 23, 25, 26, 70
Disposing of System Components 167
EEdit
Edit Date 59
Editing an Existing Profile 81
Edit Site Reminder 73
Edit Time 59
Electromagnetic
Electromagnetic Compatibility 180
Electromagnetic Emissions 181
Electromagnetic Immunity 182
Emergency Kit 29
Empty Cartridge Alarm 148
Extended Bolus 33, 89
FFeature Lock 17, 107
Pediatric 17
Turning Off 107
Turning On 107
Fill
Fill Cannula 46
Filling Cannula 72
Filling Cartridge 67
Filling Tubing 70
Fill Port 64, 67
Fill Tubing 46
Food Bolus Using Grams 87
Food Bolus Using Units 86
GGrams 33
Food Bolus Using 45, 87
HHealthcare Provider 28
High BG Reminder 113
History 46
Pump 110
Home Screen
Home Screen 40
IIcons
Explanation of Icons 35
Incomplete
Incomplete Bolus Alert 126
Incomplete Cartridge Change Alert 128
Incomplete Fill Cannula Alert 130
Incomplete Fill Tubing Alert 129
Incomplete Load Sequence Alerts 128
Customer Technical Support: (877) 801-6901 195
Index
Incomplete Setting Alert 131
Incomplete Temp Rate Alert 127
Indications for Use 20
Infusion Set Risks 62
Infusion Site Care 62
Pediatric 17
Insulin
Insulin Duration 77
Insulin Level Display 38, 71
Insulin on Board (IOB) 33, 38, 77
Insulin On Board (IOB) Display 38
Insulin-to-Carbohydrate Ratio 33
Resume Insulin Delivery 46, 94
Stop Insulin Delivery 94
U-100 Insulin 16, 20, 21
KKeypad 50
Letter Keypad 52
Number Keypad 50
LLED 36, 40
Lifestyle Issues 161
Load Cartridge 64, 69
Low BG Reminder 112
Low Insulin Alert 118, 123
Low Power Alarms 146
Low Power Alerts 124
MMalfunction 158
Max Basal Alerts 136
Max Bolus 77
Max Bolus Setting 77
Max Bolus - Setting Up 80
Max Bolus Alerts 134
Max Hourly Bolus Alert 133
Min Basal Alerts 138
Missed Meal Bolus Reminder 114
My Pump Screen 48
NNew Personal Profile
Programming 78
OOcclusion Alarm 152
Time to Occlusion Alarm 178
Options Screen 46
Overview
System Description 16
PPediatric
Feature Lock 17, 107
Important Pediatric User Information 17
Infusion Site Care 17, 62
Performance Characteristics
t:slim Pump 178
Personal Profile 33, 46
Activating an Existing Profile 82
Adding More Personal Profiles 80
Creating a New Profile 76
Deleting an Existing Profile 83
Duplicating an Existing Profile 82
Editing an Existing Profile 81
Personal Profile Overview 76
Customer Technical Support: (877) 801-6901196
Index
Programming a New Personal Profile 78
Renaming an Existing Profile 83
Reviewing an Existing Profile 81
Power Source Alert 141
Precautions
Using t:slim Pump 24
Pump Info 46, 110
QQuick Bolus 17, 33, 101
Delivering 102
Quick Bolus Button 40
Setting Up 102
RReminders 111
After Bolus BG Reminder 114
High BG Reminder 113
Low BG Reminder 112
Missed Meal Bolus Reminder 114
Site Reminder 46, 73, 115
Reset Alarm 156
Resume Insulin 46
Resume Pump Alarm 145
Resuming Insulin Delivery 94
Returned Goods Policy 190
Risks From Using the System 28
SSafety Information 19
Contraindications 20
Emergency Kit 29
Indications for Use 20
Precautions - t:slim Pump 24
Verification of Proper Functionality 30
Screen
Home Screen 46
Screen Lock 58
Screen On/Quick Bolus Button Alarm 154
Screen Options 106
Screen Protector 32
Screens
Bolus Screen 44
Home Screen 40
Letter Keypad Screen 52
My Pump Screen 48
Number Keypad Screen 50
Options Screen 46
Screen Lock Screen 38
Status Screen 42
Screen Timeout 106
Serial Number 34, 110
Settings 46
Pump Settings 105, 176
Site Reminder 46
Setting Up 73, 115
Specifications 171
System Specifications 171
t:slim Pump 171
Status
Status Screen 42
Stopping a Bolus 90
Stopping a Temp Rate 99
Stopping Insulin Delivery 94
Storing Your System 166
Customer Technical Support: (877) 801-6901 197
Index
Supply Reordering 32
Symbols
Explanation of Symbols 34
TTandem Logo 40, 58
Target BG 32
Target BG Setting 77
Target BG - Setting Up 79
Temperature Alarm 151
Temp Rate 33, 46
Incomplete Temp Rate Alert 127
Setting a Temp Rate 98
Stopping a Temp Rate 99
Time
Edit Time 59
Time and Date Display 38
Time Segment 76, 78, 79
Timed Settings 77, 78
Travel Issues 163
Tubing
Cartridge Tubing 40
Filling Tubing 70
Tubing Connector 40, 64, 70
UUnits 33
Food Bolus Using Units 45, 86
Unlocking the Screen 58
USB
USB Adapter 56, 174
USB Cable 32, 33, 56, 174
USB Port 40, 56
VVerification of Proper Functionality 30
View Calculation 44
Volume
Pump Volume 106
WWarranty 188
Water Resistance 162
t:slim Pump 162, 171

© 2017 Tandem Diabetes Care, Inc. All rights reserved. Tandem Diabetes Care, touch simplicity, t:connect, and t:slim are registered trademarks of Tandem Diabetes Care, Inc.
For a list of patents, please see www.tandemdiabetes.com/patents.
010375_B
11045 Roselle Street • San Diego, California 92121
Phone: (877) 801-6901www.tandemdiabetes.com