Embed Size (px)
Citation preview

C H A P T E R 20
Tuning Intrusion Policies Using RulesYou can use the Rules page in an intrusion policy to configure rule states and other settings for shared object rules, standard text rules, and preprocessor rules.
You enable a rule by setting its rule state to Generate Events or to Drop and Generate Events. Enabling a rule causes the system to generate events on traffic matching the rule. Disabling a rule stops processing of the rule. Optionally, you can set your intrusion policy so that a rule set to Drop and Generate Events in an inline deployment generates events on, and drops, matching traffic. See Setting Drop Behavior in an Inline Deployment, page 19-5 for more information. In a passive deployment, a rule set to Drop and Generate Events just generates events on matching traffic.
You can filter rules to display a subset of rules, enabling you to select the exact set of rules where you want to change rule states or rule settings.
When an intrusion rule or rule argument requires a disabled preprocessor, the system automatically uses it with its current configuration even though it remains disabled in the network analysis policy’s user interface. For more information, see Limitations of Custom Policies, page 11-11.
See the following sections for more information:
• Understanding Intrusion Prevention Rule Types, page 20-1 describes the intrusion rules and preprocessor rules you can view and configure in an intrusion policy.
• Viewing Rules in an Intrusion Policy, page 20-2 describes how you can change the order of rules on the Rules page, interpret the icons on the page, and focus in on rule details.
• Filtering Rules in an Intrusion Policy, page 20-9 describes how you can use rule filters to find the rules for which you want to apply rule settings.
• Setting Rule States, page 20-19 describes how to enable and disable rules from the Rules page.
• Filtering Intrusion Event Notification Per Policy, page 20-20 explains how to set event filtering thresholds for specific rules and set suppression on specific rules.
• Adding Dynamic Rule States, page 20-28 explains how to set rule states that trigger dynamically when rate anomalies are detected in matching traffic.
• Adding SNMP Alerts, page 20-31 describes how to associate SNMP alerts with specific rules.
• Adding Rule Comments, page 20-32 describes how to add comments to rules in an intrusion policy.
Understanding Intrusion Prevention Rule TypesLicense: Protection
An intrusion policy contains two types of rules: intrusion rules and preprocessor rules.
20-1ASA FirePOWER Module User Guide

Chapter 20 Tuning Intrusion Policies Using Rules Viewing Rules in an Intrusion Policy
An intrusion rule is a specified set of keywords and arguments that detects attempts to exploit vulnerabilities on your network; an intrusion rule analyzes network traffic to check if it matches the criteria in the rule. The system compares packets against the conditions specified in each rule and, if the packet data matches all the conditions specified in a rule, the rule triggers. The system includes two types of intrusion rules created by the Cisco Vulnerability Research Team (VRT): shared object rules, which are compiled and cannot be modified (except for rule header information such as source and destination ports and IP addresses), and standard text rules, which can be saved and modified as new custom instances of the rule.
The system also includes preprocessor rules, which are rules associated with preprocessor and packet decoder detection options. You cannot copy or edit preprocessor rules. Most preprocessor rules are disabled by default and must be enabled (that is, set to Generate Events or to Drop and Generate Events) if you want the system to generate events for preprocessor rules and, in an inline deployment, drop offending packets.
The VRT determines the default rule states of Cisco’s shared object rules, standard text rules, and preprocessor rules for each default intrusion policy included with the system.
The following table describes each type of rule included with the ASA FirePOWER module.
Viewing Rules in an Intrusion PolicyLicense: Protection
You can adjust how rules are displayed in the intrusion policy, and can sort rules by several criteria. You can also display the details for a specific rule to see rule settings, rule documentation, and other rule specifics.
The Rules page has four primary areas of functionality:
• the filtering features—for more information, see Filtering Rules in an Intrusion Policy, page 20-9
Table 20-1 Rule types
Type Description
shared object rule An intrusion rule created by the Cisco Vulnerability Research Team (VRT) that is delivered as a binary module compiled from C source code. You can use shared object rules to detect attacks in ways that standard text rules cannot. You cannot modify the rule keywords and arguments in a shared object rule; you are limited to either modifying variables used in the rule, or modifying aspects such as the source and destination ports and IP addresses and saving a new instance of the rule as a custom shared object rule. A shared object rule has a GID (generator ID) of 3. See Modifying Existing Rules, page 23-102 for more information.
standard text rule An intrusion rule either created by the VRT, copied and saved as a new custom rule, created using the rule editor, or imported as a local rule that you create on a local machine and import. You cannot modify the rule keywords and arguments in a standard rule created by the VRT; you are limited to either modifying variables used in the rule, or modifying aspects such as the source and destination ports and IP addresses and saving a new instance of the rule as a custom standard text rule. See Modifying Existing Rules, page 23-102, Understanding and Writing Intrusion Rules, page 23-1 and Importing Local Rule Files, page 35-14 for more information. A standard text rule created by the VRT has a GID (generator ID) of 1. Custom standard text rules that you create using the rule editor or import as local rules have a SID (Signature ID) of 1000000 or greater.
preprocessor rule A rule associated with a detection option of the packet decoder or with one of the preprocessors included with the ASA FirePOWER module. You must enable preprocessor rules if you want them to generate events. These rules have a decoder- or preprocessor-specific GID (generator ID).
20-2ASA FirePOWER Module User Guide

Chapter 20 Tuning Intrusion Policies Using Rules Viewing Rules in an Intrusion Policy
• the rule attribute menus—for more information, see Setting Rule States, page 20-19, Filtering Intrusion Event Notification Per Policy, page 20-20, Adding Dynamic Rule States, page 20-28, Adding SNMP Alerts, page 20-31, and Adding Rule Comments, page 20-32
• the rules listing—for more information, see the Rules Page Columns table.
• the rule details—for more information, see Viewing Rule Details, page 20-4
You can also sort rules by different criteria; for more information, see Sorting the Rule Display, page 20-4.
Note that the icons used as column headers correspond to the menus in the menu bar, where you access those configuration items. For example, the Rule State menu is marked with the same icon ( ) as the Rule State column.
The following table describes the columns on the Rules page.
You can also use the layer drop-down list to switch to the Rules page for other layers in your policy. Note that, unless you add layers to your policy, the only editable views listed in the drop-down list are the policy Rules page and the Rules page for a policy layer that is originally named My Changes; note also that making changes in one of these views is the same as making the changes in the other. See Using Layers in a Network Analysis or Intrusion Policy, page 12-1 for more information. The drop-down list also lists the Rules page for the read-only base policy. See Understanding the Base Layer, page 12-2 for information on the base policy.
Table 20-2 Rules Page Columns
Heading Description For more information, see...
GID Integer which indicates the Generator ID (GID) for the rule.
Viewing Events, page 26-1
SID Integer which indicates the Snort ID (SID), which acts a unique identifier for the rule.
Viewing Events, page 26-1
Message Message included in events generated by this rule, which also acts as the name of the rule.
Defining the Event Message, page 23-11
The rule state for the rule, which may be one of three states:
• drop and generate events ( )
• generate events ( )
• disable ( )
Note that you can access the Set rule state dialog box for a rule by clicking on its rule state icon.
Setting Rule States, page 20-19
Event filter, including event thresholds and event suppression, applied to the rule.
Filtering Intrusion Event Notification Per Policy, page 20-20
Dynamic rule state for the rule, which goes into effect if specified rate anomalies occur.
Adding Dynamic Rule States, page 20-28
Alerts configured for the rule (currently SNMP alerts only).
Adding SNMP Alerts, page 20-31
Comments added to the rule. Adding Rule Comments, page 20-32
20-3ASA FirePOWER Module User Guide

Chapter 20 Tuning Intrusion Policies Using Rules Viewing Rules in an Intrusion Policy
To view the rules in an intrusion policy:
Step 1 Select Configuration > ASA FirePOWER Configuration > Policies > Intrusion Policy.
The Intrusion Policy page appears.
Step 2 Click the edit icon ( ) next to the policy you want to edit.
If you have unsaved changes in another policy, click OK to discard those changes and continue. See Resolving Conflicts and Committing Policy Changes, page 11-15 for information on saving unsaved changes in another policy.
The Policy Information page appears.
Step 3 Click Rules on the Policy Information page.
The Rules page appears. By default, the page lists the rules alphabetically by message.
Note that selecting Rules above the dividing line in the navigation panel takes you to the same rules listing. You can view and set all rule attributes in your policy in this view.
Sorting the Rule DisplayLicense: Protection
You can sort rules by any of the columns in the Rules page by clicking on the heading title or icon.
Note that an up ( ) or down ( ) arrow on a heading or icon indicates that the sort is on that column in that direction.
To sort rules in an intrusion policy:
Step 1 Select Configuration > ASA FirePOWER Configuration > Policies > Intrusion Policy.
The Intrusion Policy page appears.
Step 2 Click the edit icon ( ) next to the policy you want to edit.
If you have unsaved changes in another policy, click OK to discard those changes and continue. See Resolving Conflicts and Committing Policy Changes, page 11-15 for information on saving unsaved changes in another policy.
The Policy Information page appears.
Step 3 Click Rules.
The Rules page appears. By default, the page lists the rules alphabetically by message.
Step 4 Click the title or icon in the top of the column you want to sort by.
The rules are sorted by the column, in the direction indicated by the arrow that appears on the column heading. To sort in the opposite direction, click the heading again. The sort order and the arrow reverse.
Viewing Rule DetailsLicense: Protection
20-4ASA FirePOWER Module User Guide

Chapter 20 Tuning Intrusion Policies Using Rules Viewing Rules in an Intrusion Policy
You can view rule documentation and rule overhead from the Rule Detail view. You can also view and add rule-specific features.
Note that local rules do not have any overhead, unless they are mapped to a vulnerability.
To view rule details:
Step 1 Select Configuration > ASA FirePOWER Configuration > Policies > Intrusion Policy.
The Intrusion Policy page appears.
Step 2 Click the edit icon ( ) next to the policy you want to edit.
If you have unsaved changes in another policy, click OK to discard those changes and continue. See Resolving Conflicts and Committing Policy Changes, page 11-15 for information on saving unsaved changes in another policy.
The Policy Information page appears.
Step 3 Click Rules.
The Rules page appears. By default, the page lists the rules alphabetically by message.
Step 4 Highlight the rule whose rule details you want to view.
Table 20-3 Rule Details
Item Description For more information, see...
Summary The rule summary. For rule-based events, this row appears when the rule documentation contains summary information.
Viewing Events, page 26-1
Rule State The current rule state for the rule. Also indicates the layer where the rule state is set.
Setting Rule States, page 20-19; Using Layers in a Network Analysis or Intrusion Policy, page 12-1
Thresholds Thresholds currently set for this rule, as well as the facility to add a threshold for the rule.
Setting a Threshold for a Rule, page 20-6
Suppressions Suppression settings currently set for this rule, as well as the facility to add suppressions for the rule.
Setting Suppression for a Rule, page 20-6
Dynamic State Rate-based rule states currently set for this rule, as well as the facility to add dynamic rule states for the rule.
Setting a Dynamic Rule State for a Rule, page 20-7
Alerts Alerts currently set for this rule, as well as the facility to add an alert for the rule. Currently, only SNMP alerts are supported.
Setting an SNMP Alert for a Rule, page 20-8
Comments Comments added to this rule, as well as the facility to add comments for the rule.
Adding a Rule Comment for a Rule, page 20-8
Documentation The rule documentation for the current rule, supplied by the Cisco Vulnerability Research Team (VRT).
Viewing Events, page 26-1
20-5ASA FirePOWER Module User Guide

Chapter 20 Tuning Intrusion Policies Using Rules Viewing Rules in an Intrusion Policy
Step 5 Click Show details.
The Rule Detail view appears. To hide the details again, click Hide details.
Tip You can also open Rule Detail by double-clicking a rule in the Rules view.
Setting a Threshold for a Rule
License: Protection
You can set a single threshold for a rule from the Rule Detail page. Adding a threshold overwrites any existing threshold for the rule. For more information on thresholding, see Configuring Event Thresholding, page 20-21.
Note that a revert icon ( ) appears in a field when you type an invalid value; click it to revert to the last valid value for that field or to clear the field if there was no previous value.
To set a threshold from the rule details:
Step 1 Click Add next to Thresholds.
The Set Threshold dialog box appears.
Step 2 From the Type drop-down list, select the type of threshold you want to set:
• Select Limit to limit notification to the specified number of event instances per time period.
• Select Threshold to provide notification for each specified number of event instances per time period.
• Select Both to provide notification once per time period after a specified number of event instances.
Step 3 From the Track By drop-down list, select Source or Destination to indicate whether you want the event instances tracked by source or destination IP address.
Step 4 In the Count field, type the number of event instances you want to use as your threshold.
Step 5 In the Seconds field, type a number between 0 and 2147483647 that specifies the time period, in seconds, for which event instances are tracked.
Step 6 Click OK.
The system adds your threshold and displays an event filter icon ( ) next to the rule in the Event Filtering column. If you add multiple event filters to a rule, the system includes an indication over the icon of the number of event filters.
Setting Suppression for a Rule
License: Protection
You can set one or more suppressions for a rule from the Rule Detail page. For more information on suppression, see Configuring Suppression Per Intrusion Policy, page 20-25.
Note that a revert icon ( ) appears in a field when you type an invalid value; click it to revert to the last valid value for that field or to clear the field if there was no previous value.
20-6ASA FirePOWER Module User Guide

Chapter 20 Tuning Intrusion Policies Using Rules Viewing Rules in an Intrusion Policy
To set suppression from the rule details:
Step 1 Click Add next to Suppressions.
The Add Suppression dialog box appears.
Step 2 From the Suppression Type drop-down list, select one of the following options:
• Select Rule to completely suppress events for a selected rule.
• Select Source to suppress events generated by packets originating from a specified source IP address.
• Select Destination to suppress events generated by packets going to a specified destination IP address.
Step 3 If you selected Source or Destination for the suppression type, the Network field appears. In the Network field, enter the IP address, an address block, or a comma-separated list comprised of any combination of these. If the intrusion policy is associated with the default action of an access control policy, you can also specify or list a network variable in the default action variable set.
For information on using IPv4 CIDR and IPv6 prefix length address blocks, see IP Address Conventions, page 1-4.
Step 4 Click OK.
The system adds your suppression conditions and displays an event filter icon ( ) next to the rule in the Event Filtering column next the suppressed rule. If you add multiple event filters to a rule, a number over the icon indicates the number of filters.
Setting a Dynamic Rule State for a Rule
License: Protection
You can set one or more dynamic rule states for a rule from the Rule Detail page. The first dynamic rule state listed has the highest priority. Note that when two dynamic rule states conflict, the action of the first is carried out. For more information on dynamic rule states, see Understanding Dynamic Rule States, page 20-28.
Note that a revert icon ( ) appears in a field when you type an invalid value; click it to revert to the last valid value for that field or to clear the field if there was no previous value.
To set a dynamic rule state from the rule details:
Step 1 Click Add next to Dynamic State.
The Add Rate-Based Rule State dialog box appears.
Step 2 From the Track By drop-down list, select an option to indicate how you want the rule matches tracked:
• Select Source to track the number of hits for that rule from a specific source or set of sources.
• Select Destination to track the number of hits for that rule to a specific destination or set of destinations.
• Select Rule to track all matches for that rule.
Step 3 Optionally, if you set Track By to Source or Destination, enter the IP address of each host you want to track in the Network field.
For information on using IPv4 CIDR and IPv6 prefix length notation, see IP Address Conventions, page 1-4.
20-7ASA FirePOWER Module User Guide

Chapter 20 Tuning Intrusion Policies Using Rules Viewing Rules in an Intrusion Policy
Step 4 Next to Rate, indicate the number of rule matches per time period to set the attack rate:
• In the Count field, using an integer between 0 and 2147483647, specify the number of rule matches you want to use as your threshold.
• In the Seconds field, using an integer between 0 and 2147483647, specify the number of seconds that make up the time period for which attacks are tracked.
Step 5 From the New State drop-down list, select the new action to be taken when the conditions are met:
• Select Generate Events to generate an event.
• Select Drop and Generate Events to generate an event and drop the packet that triggered the event in inline deployments or to generate an event in passive deployments.
• Select Disabled to take no action.
Step 6 In the Timeout field, using an integer between 1 and 2147483647 (approximately 68 years), type the number of seconds you want the new action to remain in effect. After the timeout occurs, the rule reverts to its original state. Specify 0 to prevent the new action from timing out.
Step 7 Click OK.
The system adds the dynamic rule state and displays a dynamic state icon ( ) next to the rule in the Dynamic State column. If you add multiple dynamic rule state filters to a rule, a number over the icon indicates the number of filters.
If any required fields are blank, you receive an error message indicating which fields you must fill.
Setting an SNMP Alert for a Rule
License: Protection
You can set an SNMP alert for a rule from the Rule Detail page. For more information on SNMP alerts, see Adding SNMP Alerts, page 20-31.
To add an SNMP alert from the rule details:
Step 1 Click Add SNMP Alert next to Alerts.
The system adds the alert and displays an alert icon ( ) next to the rule in the Alerting column. If you add multiple alerts to a rule, the system includes an indication over the icon of the number of alerts.
Adding a Rule Comment for a Rule
License: Protection
You can add a rule comment for a rule from the Rule Detail page. For more information on rule comments, see Adding Rule Comments, page 20-32.
To add a comment from the rule details:
Step 1 Click Add next to Comments.
The Add Comment dialog box appears.
20-8ASA FirePOWER Module User Guide

Chapter 20 Tuning Intrusion Policies Using Rules Filtering Rules in an Intrusion Policy
Step 2 In the Comment field, type the rule comment.
Step 3 Click OK.
The system adds the comment and displays a comment icon ( ) next to the rule in the Comments column. If you add multiple comments to a rule, a number over the icon indicates the number of comments.
Tip To delete a rule comment, click Delete in the rule comments section. Note that you can only delete a comment if the comment is cached with uncommitted intrusion policy changes. After intrusion policy changes are committed, the rule comment is permanent.
Filtering Rules in an Intrusion PolicyLicense: Protection
You can filter the rules you display on the Rules page by a single criteria, or a combination of one or more criteria.
The filter you construct is shown in the Filter text box. You can click keywords and keyword arguments in the filter panel to construct a filter. When you select multiple keywords, the system combines them using AND logic to create a compound search filter. For example, if you select preprocessor under Category and then select Rule Content > GID and enter 116, you get a filter of Category: “preprocessor” GID:”116” which retrieves all rules that are preprocessor rules and have a GID of 116.
The Category, Microsoft Vulnerabilities, Microsoft Worms, Platform Specific, Preprocessor, and Priority filter groups allow you to submit more than one argument for a keyword, separated by commas. For example, you can press Shift and then select os-linux and os-windows from Category to produce the filter Category:"os-windows,os-linux", which retrieves any rules in the os-linux category or in the os-windows category.
To show the filter panel, click the show icon ( ).
To hide the filter panel, click the hide icon ( ).
For more information, see the following topics:
• Understanding Rule Filtering in an Intrusion Policy, page 20-9
• Setting a Rule Filter in an Intrusion Policy, page 20-17
Understanding Rule Filtering in an Intrusion PolicyLicense: Protection
Rule filter keywords help you find the rules for which you want to apply rule settings, such as rule states or event filters. You can filter by a keyword and simultaneously select the argument for the keyword by selecting the argument you want from the Rules page filter panel.
For more information, see the following sections:
• Guidelines for Constructing Intrusion Policy Rule Filters, page 20-10
• Understanding Rule Configuration Filters, page 20-12
20-9ASA FirePOWER Module User Guide

Chapter 20 Tuning Intrusion Policies Using Rules Filtering Rules in an Intrusion Policy
• Understanding Rule Content Filters, page 20-14
• Understanding Rule Categories, page 20-16
• Editing a Rule Filter Directly, page 20-16
Guidelines for Constructing Intrusion Policy Rule Filters
License: Protection
In most cases, when you are building a filter, you can use the filter panel to the left of the Rules page in the intrusion policy to select the keywords/arguments you want to use.
Rule filters are grouped into rule filter groups in the filter panel. Many rule filter groups contain sub-criteria so that you can more easily find the specific rules you are looking for. Some rule filters have multiple levels that you can expand to drill down to individual rules.
Items in the filter panel sometimes represent filter type groups, sometimes represent keywords, and sometimes represent the argument to a keyword. Use the following rules of thumb to help you build your filters:
• When you select a filter type group heading that is not a keyword (Rule Configuration, Rule Content, Platform Specific, and Priority), it expands to list the available keywords.
When you select a keyword by clicking on a node in the criteria list, a pop-up window appears, where you supply the argument you want to filter by.
If that keyword is already used in the filter, the argument you supply replaces the existing argument for that keyword.
• When you select a filter type group heading that is a keyword (Category, Classifications, Microsoft Vulnerabilities, Microsoft Worms, Priority, and Rule Update), it lists the available arguments.
When you select an item from this type of group, the argument and the keyword it applies to are immediately added to the filter. If the keyword is already in the filter, it replaces the existing argument for the keyword that corresponds to that group.
For example, if you click os-linux under Category in the filter panel, Category:"os-linux" is added to the filter text box. If you then click os-windows under Category, the filter changes to Category:"os-windows".
• Reference under Rule Content is a keyword, and so are the specific reference ID types listed below it. When you select any of the reference keywords, a pop-up window appears, where you supply an argument and the keyword is added to the existing filter. If the keyword is already in use in the filter, the new argument you supply replaces the existing argument.
For example, if you click Rule Content > Reference > CVE ID in the filter panel, a pop-up window prompts you to supply the CVE ID. If you enter 2007, then CVE:”2007” is added to the filter text box. In another example, if you click Rule Content > Reference in the filter panel, a pop-up window prompts you to supply the reference. If you enter 2007, then Reference:”2007” is added to the filter text box.
• When you select rule filter keywords from different groups, each filter keyword is added to the filter and any existing keywords are maintained (unless overridden by a new value for the same keyword).
For example, if you click os-linux under Category in the filter panel, Category:"os-linux" is added to the filter text box. If you then click MS00-006 under Microsoft Vulnerabilities, the filter changes to Category:"os-linux" MicrosoftVulnerabilities:"MS00-006".
• When you select multiple keywords, the system combines them using AND logic to create a compound search filter. For example, if you select preprocessor under Category and then select Rule Content > GID and enter 116, you get a filter of Category: “preprocessor” GID:”116”, which retrieves all rules that are preprocessor rules and have a GID of 116.
20-10ASA FirePOWER Module User Guide

Chapter 20 Tuning Intrusion Policies Using Rules Filtering Rules in an Intrusion Policy
• The Category, Microsoft Vulnerabilities, Microsoft Worms, Platform Specific, and Priority filter groups allow you to submit more than one argument for a keyword, separated by commas. For example, you can press Shift and then select os-linux and os-windows from Category to produce the filter Category:"os-windows,app-detect", which retrieves any rules in the os-linux category or in the os-windows category.
The same rule may be retrieved by more than one filter keyword/argument pair. For example, the DOS Cisco attempt rule (SID 1545) appears if rules are filtered by the dos category, and also if you filter by the High priority.
Note The Cisco VRT may use the rule update mechanism to add and remove rule filters.
Note that the rules on the Rules page may be either shared object rules (generator ID 3) or standard text rules (generator ID 1). The following table describes the different rule filters.
Table 20-4 Rule Filter Groups
Filter Group Description
Multiple Argument Support? Heading is... Items in List are...
Rule Configuration
Finds rules according to the configuration of the rule. See Understanding Rule Configuration Filters, page 20-12.
No A grouping keywords
Rule Content Finds rules according to the content of the rule. See Understanding Rule Content Filters, page 20-14.
No A grouping keywords
Category Finds rules according to the rule categories used by the rule editor. Note that local rules appear in the local sub-group. See Understanding Rule Categories, page 20-16.
Yes A keyword arguments
Classifications Finds rules according to the attack classification that appears in the packet display of an event generated by the rule. See Defining the Intrusion Event Classification, page 23-12.
No A keyword arguments
Microsoft Vulnerabilities
Finds rules according to Microsoft bulletin number. Yes A keyword arguments
Microsoft Worms
Finds rules based on specific worms that affect Microsoft Windows hosts.
Yes A keyword arguments
Platform Specific
Finds rules according to their relevance to specific versions of operating systems.
Note that a rule may affect more than one operating system or more than one version of an operating system. For example, enabling SID 2260 affects multiple versions of Mac OS X, IBM AIX, and other operating systems.
Yes A keyword arguments
Note that if you pick one of the items from the sub-list, it adds a modifier to the argument.
Preprocessors Finds rules for individual preprocessors.
Note that you must enable preprocessor rules associated with a preprocessor option to generate events for the option when the preprocessor is enabled; see Setting Rule States, page 20-19.
Yes A grouping sub-groupings
20-11ASA FirePOWER Module User Guide

Chapter 20 Tuning Intrusion Policies Using Rules Filtering Rules in an Intrusion Policy
Understanding Rule Configuration Filters
License: Protection
You can filter the rules listed in the Rules page by several rule configuration settings.
When you select a keyword by clicking on a node in the criteria list, a pop-up window appears, where you supply the argument you want to filter by.
If that keyword is already used in the filter, the argument you supply replaces the existing argument for that keyword.
See the following procedures for more information on the rule configuration settings you can use to filter.
To use the Rule State filter:
Step 1 Under Rule Configuration, click Rule State.
Step 2 From the Rule State drop-down list, select the rule state to filter by:
• To find rules that only generate events, select Generate Events, then click OK.
• To find rules that are set to generate events and drop the matching packet, select Drop and Generate Events, then click OK.
• To find disabled rules, select Disabled, then click OK.
The Rules page updates to display rules according to current rule state.
To use the Threshold filter:
Step 1 Under Rule Configuration, click Threshold.
Step 2 From the Threshold drop-down list, select the threshold setting to filter by:
• To find rules with a threshold type of limit, select Limit, then click OK.
• To find rules with a threshold type of threshold, select Threshold, then click OK.
Priority Finds rules according to high, medium, and low priorities.
The classification assigned to a rule determines its priority. These groups are further grouped into rule categories. Note that local rules (that is, rules that you create) do not appear in the priority groups.
Yes A keyword arguments
Note that if you pick one of the items from the sub-list, it adds a modifier to the argument.
Rule Update Finds rules added or modified through a specific rule update. For each rule update, view all rules in the update, only new rules imported in the update, or only existing rules changed by the update.
No A keyword arguments
Table 20-4 Rule Filter Groups (continued)
Filter Group Description
Multiple Argument Support? Heading is... Items in List are...
20-12ASA FirePOWER Module User Guide

Chapter 20 Tuning Intrusion Policies Using Rules Filtering Rules in an Intrusion Policy
• To find rules with a threshold type of both, select Both, then click OK.
• To find rules with thresholds tracked by source, select Source, then click OK.
• To find rules with thresholds tracked by destination, select Destination, then click OK.
• To find any rule with a threshold set, select All, then click OK.
The Rules page updates to display rules where the type of threshold indicated in the filter has been applied to the rule.
To use the Suppression filter:
Step 1 Under Rule Configuration, click Suppression.
Step 2 From the Suppression drop-down list, select the suppression setting to filter by:
• To find rules where events are suppressed for packets inspected by that rule, select By Rule, then click OK.
• To find rules where events are suppressed based on the source of the traffic, select By Source, then click OK.
• To find rules where events are suppressed based on the destination of the traffic, select By Destination, then click OK.
• To find any rule with suppression set, select All, then click OK.
The Rules page updates to display rules where the type of suppression indicated in the filter has been applied to the rule.
To use the Dynamic State filter:
Step 1 Under Rule Configuration, click Dynamic State.
Step 2 From the Dynamic State drop-down list, select the suppression setting to filter by:
• To find rules where a dynamic state is configured for packets inspected by that rule, select By Rule, then click OK.
• To find rules where a dynamic state is configured for packets based on the source of the traffic, select By Source, then click OK.
• To find rules where a dynamic state is configured based on the destination of the traffic, select By Destination, then click OK.
• To find rules where a dynamic state of Generate Events is configured, select Generate Events, then click OK.
• To find rules where a dynamic state of Drop and Generate Events is configured, select Drop and Generate Events, then click OK.
• To find where a dynamic state of Disabled is configured, select Disabled, then click OK.
• To find any rule with suppression set, select All, then click OK.
The Rules page updates to display rules where the dynamic rule state indicated in the filter has been applied to the rule.
20-13ASA FirePOWER Module User Guide
Chapter 20 Tuning Intrusion Policies Using Rules Filtering Rules in an Intrusion Policy
To use the Alert filter:
Step 1 Under Rule Configuration, click Alert.
Step 2 From the Alert drop-down list, select the alert setting to filter by: SNMP.
Step 3 Click OK.
The Rules page updates to display rules where you have applied an alert filter.
To use the Comment filter:
Step 1 Under Rule Configuration, click Comment.
Step 2 In the Comment field, type the string of comment text to filter by, then click OK.
The Rules page updates to display rules where comments applied to the rule contain the string indicated in the filter.
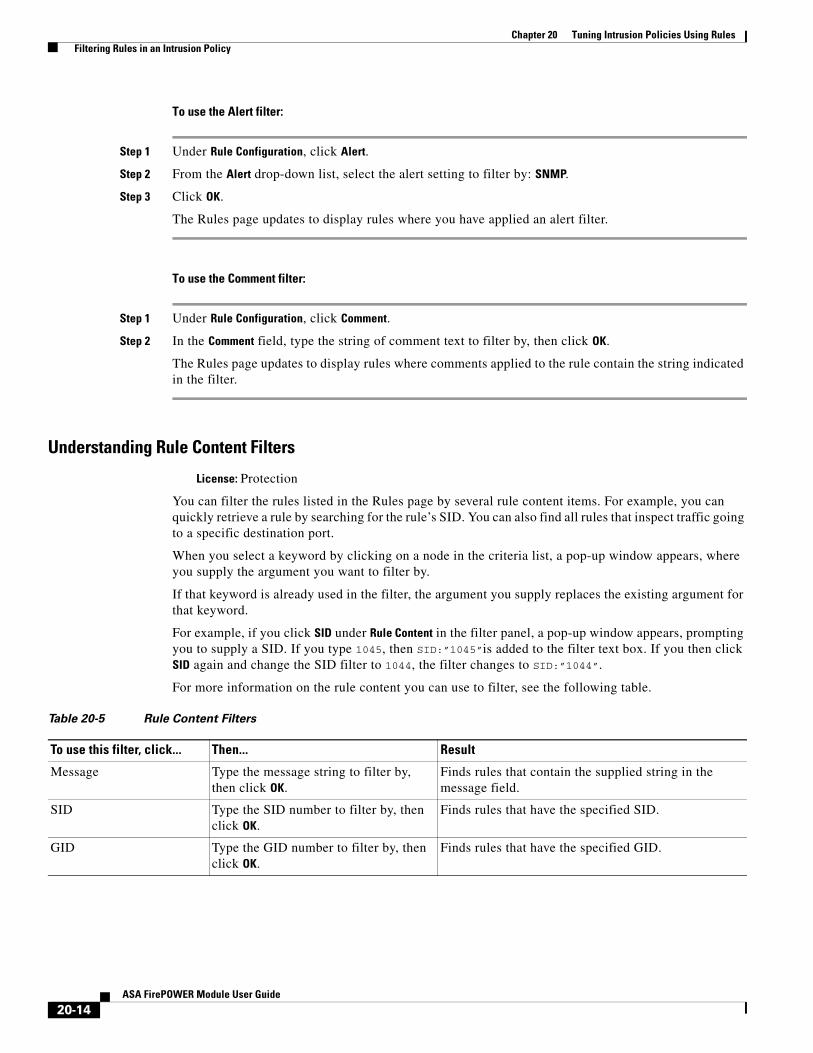
Understanding Rule Content Filters
License: Protection
You can filter the rules listed in the Rules page by several rule content items. For example, you can quickly retrieve a rule by searching for the rule’s SID. You can also find all rules that inspect traffic going to a specific destination port.
When you select a keyword by clicking on a node in the criteria list, a pop-up window appears, where you supply the argument you want to filter by.
If that keyword is already used in the filter, the argument you supply replaces the existing argument for that keyword.
For example, if you click SID under Rule Content in the filter panel, a pop-up window appears, prompting you to supply a SID. If you type 1045, then SID:”1045”is added to the filter text box. If you then click SID again and change the SID filter to 1044, the filter changes to SID:”1044”.
For more information on the rule content you can use to filter, see the following table.
Table 20-5 Rule Content Filters
To use this filter, click... Then... Result
Message Type the message string to filter by, then click OK.
Finds rules that contain the supplied string in the message field.
SID Type the SID number to filter by, then click OK.
Finds rules that have the specified SID.
GID Type the GID number to filter by, then click OK.
Finds rules that have the specified GID.
20-14ASA FirePOWER Module User Guide

Chapter 20 Tuning Intrusion Policies Using Rules Filtering Rules in an Intrusion Policy
Reference Type the reference string to filter by, then click OK.
To enter a string for a specific type of reference that you want to filter by, select CVE ID, URL, Bugtraq ID, Nessus ID, Arachnids ID, or Mcafee ID, then type a string and click OK.
Finds rules that contain the supplied string in the reference field.
Action Select the action to filter by:
• To find alert rules, select Alert, then click OK.
• To find pass rules, select Pass, then click OK.
Finds rules that start with alert or pass.
Protocol Select the protocol to filter by: ICMP, IP, TCP, or UDP; then click OK.
Finds rules that include the selected protocol.
Direction Select a directional setting to filter by:
• To find rules that inspect traffic moving in a specific direction, select Directional, then click OK.
• To find rules that inspect traffic moving in either direction between a source and destination, select Bidirectional, then click OK.
Finds rules based on whether the rule includes the indicated directional setting.
Source IP Type the source IP address to filter by, then click OK.
Note that you can filter by a valid IP address, a CIDR block/prefix length, or using variables such as $HOME_NET or $EXTERNAL_NET.
Finds rules that use the specified addresses or variables for the source IP address designation in the rule.
Destination IP Type the destination IP address to filter by, then click OK.
Note that you can filter by a valid IP address, a CIDR block/prefix length, or using variables such as $HOME_NET or $EXTERNAL_NET.
Finds rules that use the specified addresses or variables for the source IP address designation in the rule.
Source port Type the source port to filter by, then click OK.
The port value must be an integer between 1 and 65535 or a port variable.
Finds rules that include the specified source port.
Destination port Type the destination port to filter by, then click OK.
The port value must be an integer between 1 and 65535 or a port variable.
Finds rules that include the specified destination port.
Table 20-5 Rule Content Filters (continued)
To use this filter, click... Then... Result
20-15ASA FirePOWER Module User Guide

Chapter 20 Tuning Intrusion Policies Using Rules Filtering Rules in an Intrusion Policy
Understanding Rule Categories
License: Protection
The ASA FirePOWER module places rules in categories based on the type of traffic the rule detects. On the Rules page, you can filter by rule category, so you can set a rule attribute for all rules in a category. For example, if you do not have Linux hosts on your network, you could filter by the os-linux category, then disable all the rules showing to disable the entire os-linux category.
Note The Cisco VRT may use the rule update mechanism to add and remove rule categories.
Editing a Rule Filter Directly
License: Protection
You can edit your filter to modify the special keywords and their arguments that are supplied when you click on a filter in the filter panel. Custom filters on the Rules page function like those used in the rule editor, but you can also use any of the keywords supplied in the Rules page filter, using the syntax displayed when you select the filter through the filter panel. To determine a keyword for future use, click on the appropriate argument in the filter panel on the right. The filter keyword and argument syntax appear in the filter text box.
To see lists of arguments for keywords which only support specific values, see Understanding Rule Configuration Filters, page 20-12, Understanding Rule Content Filters, page 20-14, and Understanding Rule Categories, page 20-16. Remember that comma-separated multiple arguments for a keyword are only supported for the Category and Priority filter types.
You can use keywords and arguments, character strings, and literal character strings in quotes, with spaces separating multiple filter conditions. A filter cannot include regular expressions, wild card characters, or any special operator such as a negation character (!), a greater than symbol (>), less than symbol (<), and so on. When you type in search terms without a keyword, without initial capitalization of the keyword, or without quotes around the argument, the search is treated as a string search and the category, message, and SID fields are searched for the specified terms.
All keywords, keyword arguments, and character strings are case-insensitive. Except for the gid and sid keywords, all arguments and strings are treated as partial strings. Arguments for gid and sid return only exact matches.
Each rule filter can include one or more keywords in the format:
Rule Overhead Select the amount of rule overhead to filter by: Low, Medium, High, or Very High; then click OK.
Finds rules with the selected rule overhead.
Metadata Type the metadata key-value pair to filter by, separated by a space; then click OK.
For example, type metadata:”service http” to locate rules with metadata relating to the HTTP application protocol.
Find rules with metadata containing the matching key-value pair.
Table 20-5 Rule Content Filters (continued)
To use this filter, click... Then... Result
20-16ASA FirePOWER Module User Guide
Chapter 20 Tuning Intrusion Policies Using Rules Filtering Rules in an Intrusion Policy
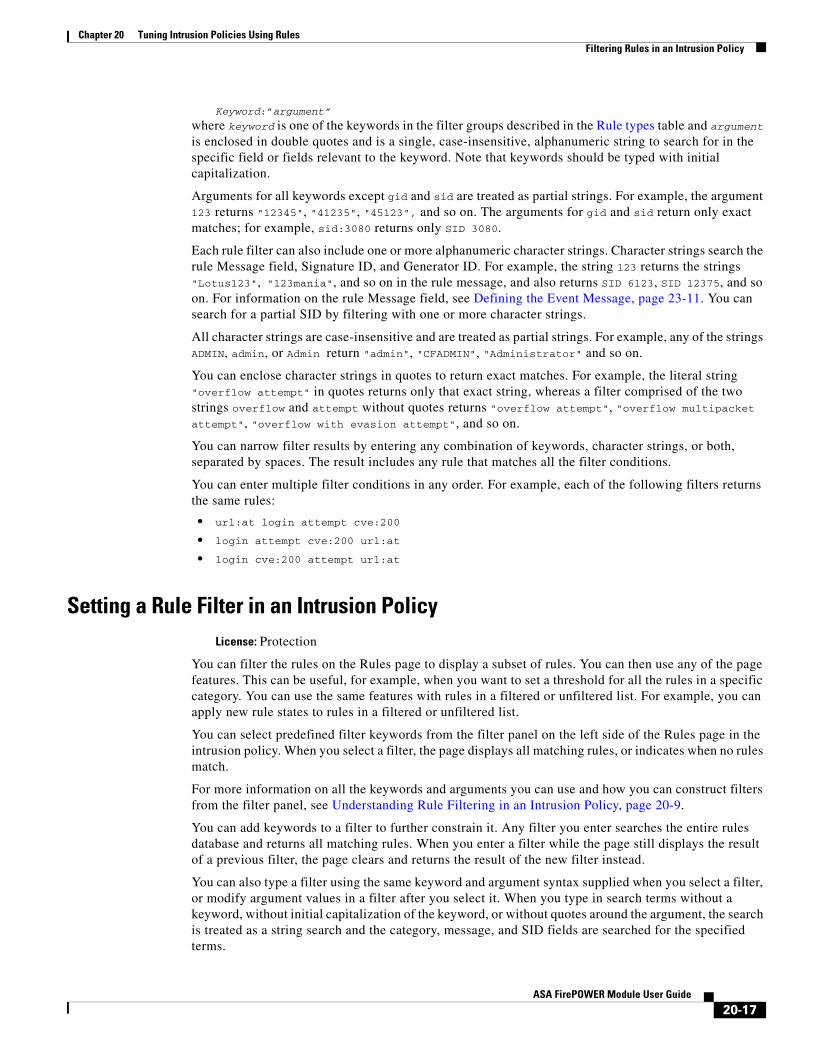
Keyword:”argument”
where keyword is one of the keywords in the filter groups described in the Rule types table and argument is enclosed in double quotes and is a single, case-insensitive, alphanumeric string to search for in the specific field or fields relevant to the keyword. Note that keywords should be typed with initial capitalization.
Arguments for all keywords except gid and sid are treated as partial strings. For example, the argument 123 returns "12345", "41235", "45123", and so on. The arguments for gid and sid return only exact matches; for example, sid:3080 returns only SID 3080.
Each rule filter can also include one or more alphanumeric character strings. Character strings search the rule Message field, Signature ID, and Generator ID. For example, the string 123 returns the strings "Lotus123", "123mania", and so on in the rule message, and also returns SID 6123, SID 12375, and so on. For information on the rule Message field, see Defining the Event Message, page 23-11. You can search for a partial SID by filtering with one or more character strings.
All character strings are case-insensitive and are treated as partial strings. For example, any of the strings ADMIN, admin, or Admin return "admin", "CFADMIN", "Administrator" and so on.
You can enclose character strings in quotes to return exact matches. For example, the literal string "overflow attempt" in quotes returns only that exact string, whereas a filter comprised of the two strings overflow and attempt without quotes returns "overflow attempt", "overflow multipacket attempt", "overflow with evasion attempt", and so on.
You can narrow filter results by entering any combination of keywords, character strings, or both, separated by spaces. The result includes any rule that matches all the filter conditions.
You can enter multiple filter conditions in any order. For example, each of the following filters returns the same rules:
• url:at login attempt cve:200
• login attempt cve:200 url:at
• login cve:200 attempt url:at
Setting a Rule Filter in an Intrusion PolicyLicense: Protection
You can filter the rules on the Rules page to display a subset of rules. You can then use any of the page features. This can be useful, for example, when you want to set a threshold for all the rules in a specific category. You can use the same features with rules in a filtered or unfiltered list. For example, you can apply new rule states to rules in a filtered or unfiltered list.
You can select predefined filter keywords from the filter panel on the left side of the Rules page in the intrusion policy. When you select a filter, the page displays all matching rules, or indicates when no rules match.
For more information on all the keywords and arguments you can use and how you can construct filters from the filter panel, see Understanding Rule Filtering in an Intrusion Policy, page 20-9.
You can add keywords to a filter to further constrain it. Any filter you enter searches the entire rules database and returns all matching rules. When you enter a filter while the page still displays the result of a previous filter, the page clears and returns the result of the new filter instead.
You can also type a filter using the same keyword and argument syntax supplied when you select a filter, or modify argument values in a filter after you select it. When you type in search terms without a keyword, without initial capitalization of the keyword, or without quotes around the argument, the search is treated as a string search and the category, message, and SID fields are searched for the specified terms.
20-17ASA FirePOWER Module User Guide

Chapter 20 Tuning Intrusion Policies Using Rules Filtering Rules in an Intrusion Policy
To filter for specific rules in an intrusion policy:
Step 1 Select Configuration > ASA FirePOWER Configuration > Policies > Intrusion Policy.
The Intrusion Policy page appears.
Step 2 Click the edit icon ( ) next to the policy you want to edit.
If you have unsaved changes in another policy, click OK to discard those changes and continue. See Resolving Conflicts and Committing Policy Changes, page 11-15 for information on saving unsaved changes in another policy.
The Policy Information page appears.
Step 3 Click Rules.
The Rules page appears. By default, the page lists the rules alphabetically by message.
Step 4 Construct a filter by clicking on keywords or arguments in the filter panel on the left. Note that if you click an argument for a keyword already in the filter, it replaces the existing argument. See the following for more information:
• Guidelines for Constructing Intrusion Policy Rule Filters, page 20-10
• Understanding Rule Configuration Filters, page 20-12
• Understanding Rule Content Filters, page 20-14
• Understanding Rule Categories, page 20-16
• Editing a Rule Filter Directly, page 20-16
The page refreshes to display all matching rules, and the number of rules matching the filter is displayed above the filter text box.
Step 5 Select the rule or rules where you want to apply a new setting. You have the following options:
• To select a specific rule, select the check box next to the rule.
• To select all the rules in the current list, select the check box at the top of the column.
Step 6 Optionally, make any changes to the rule that you would normally make on the page. See the following sections for more information:
• See Setting Rule States, page 20-19 for information on enabling and disabling rules on the Rules page.
• See Filtering Intrusion Event Notification Per Policy, page 20-20 for information on adding thresholding and suppression to rules.
• See Adding Dynamic Rule States, page 20-28 for information on setting dynamic rule states that trigger when rate anomalies occur in matching traffic.
• See Adding SNMP Alerts, page 20-31 for information on adding SNMP alerts to specific rules.
• See Adding Rule Comments, page 20-32 for information on adding rule comments to rules.
Step 7 Save your policy, continue editing, discard your changes, or exit while leaving your changes in the system cache.
See Managing Intrusion Policies, page 19-3 and Editing Intrusion Policies, page 19-4 for more information.
20-18ASA FirePOWER Module User Guide

Chapter 20 Tuning Intrusion Policies Using Rules Setting Rule States
Setting Rule StatesLicense: Protection
The Cisco Vulnerability Research Team (VRT) sets the default state of each intrusion and preprocessor rule in each default policy. For example, a rule may be enabled in the Security over Connectivity default policy and disabled in the Connectivity over Security default policy. Intrusion policy rules you create inherit the default states of the rules in the default policy you use to create your policy.
You can set a rule to Generate Events, to Drop and Generate Events, or to Disable individually, or you can filter the rules by a variety of factors to select the rules for which you want to modify the state. In an inline deployment, you can use the Drop and Generate Events rule state in inline intrusion deployments to drop malicious packets. Note that rules with the Drop and Generate Events rule state generate events but do not drop packets in a passive deployment. Setting a rule to Generate Events or to Drop and Generate Events enables the rule; setting the rule to Disable disables it.
Consider two scenarios. In the first scenario, the rule state for a specific rule is set to Generate Events. When a malicious packet crosses your network and triggers the rule, the packet is sent to its destination and the system generates an intrusion event. In the second scenario, assume that the rule state for the same rule is set to Drop and Generate Events in an inline deployment. In this case, when the malicious packet crosses the network, the system drops the malicious packet and generates an intrusion event. The packet never reaches its target.
In an intrusion policy, you can set a rule’s state to one of the following:
• Set the rule state to Generate Events if you want the system to detect a specific intrusion attempt and generate an intrusion event when it finds matching traffic.
• Set the rule state to Drop and Generate Events if you want the system to detect a specific intrusion attempt, then drop the packet containing the attack and generate an intrusion event when it finds matching traffic in an inline deployment, or to generate an intrusion event when it finds matching traffic in a passive deployment.
Note that for the system to drop packets, your intrusion policy must be set to drop rules in an inline deployment; see Setting Drop Behavior in an Inline Deployment, page 19-5 for more information.
• Set the rule state to Disable if you do not want the system to evaluate matching traffic.
To use drop rules, you must:
• Enable the Drop when Inline option in your intrusion policy.
• Set the rule state to Drop and Generate Events for any rules that should drop all packets that match the rule.
• Apply an access control policy that includes an access control rule that is associated with your intrusion policy in an inline deployment.
Filtering rules on the Rules page can help you find the rules you want to set as drop rules. For more information, see Filtering Rules in an Intrusion Policy, page 20-9.
See Understanding and Writing Intrusion Rules, page 23-1 for information about rule anatomy, rule keywords and their options, and rule writing syntax.
The VRT sometimes uses a rule update to change the default state of one or more rules in a default policy. If you allow rule updates to update your base policy, you also allow the rule update to change the default state of a rule in your policy when the default state changes in the default policy you used to create your policy (or in the default policy it is based on). Note, however, that if you have changed the rule state, the rule update does not override your change.
20-19ASA FirePOWER Module User Guide

Chapter 20 Tuning Intrusion Policies Using Rules Filtering Intrusion Event Notification Per Policy
To change the rule state for one or more rules:
Step 1 Select Configuration > ASA FirePOWER Configuration > Policies > Intrusion Policy.
The Intrusion Policy page appears.
Step 2 Click the edit icon ( ) next to the policy you want to edit.
If you have unsaved changes in another policy, click OK to discard those changes and continue. See Resolving Conflicts and Committing Policy Changes, page 11-15 for information on saving unsaved changes in another policy.
The Policy Information page appears.
Note that this page indicates the total number of enabled rules, the total number of enabled rules set to Generate Events, and the total number set to Drop and Generate Events. Note also that in a passive deployment, rules set to Drop and Generate Events only generate events.
Step 3 Click Rules.
The Rules page appears. By default, the page lists the rules alphabetically by message.
Step 4 Locate the rule or rules where you want to set the rule state. You have the following options:
• To sort the current display, click on a column heading or icon. To reverse the sort, click again.
• Construct a filter by clicking on keywords or arguments in the filter panel on the left. For more information, see the following topics: Understanding Rule Filtering in an Intrusion Policy, page 20-9 and Setting a Rule Filter in an Intrusion Policy, page 20-17.
The page refreshes to display all matching rules.
Step 5 Select the rule or rules where you want to set the rule state. You have the following options:
• To select a specific rule, select the check box next to the rule.
• To select all the rules in the current list, select the check box at the top of the column.
Step 6 You have the following options:
• To generate events when traffic matches the selected rules, select Rule State > Generate Events.
• To generate events and drop the traffic in inline deployments when traffic matches the selected rules, select Rule State > Drop and Generate Events.
• To not inspect traffic matching the selected rules, select Rule State > Disable.
Note Cisco strongly recommends that you do not enable all the intrusion rules in an intrusion policy. The performance of your device is likely to degrade if all rules are enabled. Instead, tune your rule set to match your network environment as closely as possible.
Step 7 Save your policy, continue editing, discard your changes, or exit while leaving your changes in the system cache. See Managing Intrusion Policies, page 19-3 and Editing Intrusion Policies, page 19-4 for more information.
Filtering Intrusion Event Notification Per PolicyLicense: Protection
20-20ASA FirePOWER Module User Guide

Chapter 20 Tuning Intrusion Policies Using Rules Filtering Intrusion Event Notification Per Policy
The importance of an intrusion event can be based on frequency of occurrence, or on source or destination IP address. In some cases you may not care about an event until it has occurred a certain number of times. For example, you may not be concerned if someone attempts to log into a server until they fail a certain number of times. In other cases, you may only need to see a few occurrences to know there is a widespread problem. For example, if a DoS attack is launched against your web server, you may only need to see a few occurrences of an intrusion event to know that you need to address the situation. Seeing hundreds of the same event only overwhelms your system.
See the following sections for more information:
• Configuring Event Thresholding, page 20-21 explains how to set thresholds that dictate how often an event is displayed, based on the number of occurrences. You can configure thresholding per event and per policy.
• Configuring Suppression Per Intrusion Policy, page 20-25 explains how to suppress notification of specified events per source or destination IP address, per policy.
Configuring Event ThresholdingLicense: Protection
You can set thresholds for individual rules, per intrusion policy, to limit the number of times the system logs and displays an intrusion event based on how many times the event is generated within a specified time period. This can prevent you from being overwhelmed with a large number of identical events. You can set thresholds per shared object rule, standard text rule, or preprocessor rule.
For more information, see the following sections:
• Understanding Event Thresholding, page 20-21
• Adding and Modifying Intrusion Event Thresholds, page 20-23
• Viewing and Deleting Intrusion Event Thresholds, page 20-24
• Setting a Threshold for a Rule, page 20-6
Understanding Event Thresholding
License: Protection
First, you must specify the thresholding type. You can select from the options discussed in the following table.
20-21ASA FirePOWER Module User Guide

Chapter 20 Tuning Intrusion Policies Using Rules Filtering Intrusion Event Notification Per Policy
Next, you must specify tracking, which determines whether the event threshold is calculated per source or destination IP address. Select one of the options from the following table to specify how the system tracks event instances.
Finally, you must specify the number of instances and time period that define the threshold.
Table 20-6 Thresholding Options
Option Description
Limit Logs and displays events for the specified number of packets (specified by the Count argument) that trigger the rule during the specified time period. For example, if you set the type to Limit, the Count to 10, and the Seconds to 60, and 14 packets trigger the rule, the system stops logging events for the rule after displaying the first 10 that occur within the same minute.
Threshold Logs and displays a single event when the specified number of packets (specified by the Count argument) trigger the rule during the specified time period. Note that the counter for the time restarts after you hit the threshold count of events and the system logs that event. For example, you set the type to Threshold, Count to 10, and Seconds to 60, and the rule triggers 10 times by second 33. The system generates one event, then resets the Seconds and Count counters to 0. The rule then triggers another 10 times in the next 25 seconds. Because the counters reset to 0 at second 33, the system logs another event.
Both Logs and displays an event once per specified time period, after the specified number (count) of packets trigger the rule. For example, if you set the type to Both, Count to two, and Seconds to 10, the following event counts result:
• If the rule is triggered once in 10 seconds, the system does not generate any events (the threshold is not met)
• If the rule is triggered twice in 10 seconds, the system generates one event (the threshold is met when the rule triggers the second time)
• If the rule is triggered four times in 10 seconds, the system generates one event (the threshold is met when the rule triggers the second time, and following events are ignored)
Table 20-7 Thresholding IP Options
Option Description
Source Calculates event instance count per source IP address.
Destination Calculates event instance count per destination IP address.
Table 20-8 Thresholding Instance/Time Options
Option Description
Count The number of event instances per specified time period per tracking IP address required to meet the threshold.
Seconds The number of seconds that elapse before the count resets. If you set the threshold type to limit, the tracking to Source IP, the count to 10, and the seconds to 10, the system logs and displays the first 10 events that occur in 10 seconds from a given source port. If only 7 events occur in the first 10 seconds, the system logs and displays those; if 40 events occur in the first 10 seconds, the system logs and displays 10, then begins counting again when the 10-second time period elapses.
20-22ASA FirePOWER Module User Guide

Chapter 20 Tuning Intrusion Policies Using Rules Filtering Intrusion Event Notification Per Policy
Note that you can use intrusion event thresholding alone or in any combination with rate-based attack prevention, the detection_filter keyword, and intrusion event suppression. See Adding Dynamic Rule States, page 20-28, Filtering Events, page 23-86, and Configuring Suppression Per Intrusion Policy, page 20-25 for more information.
See the following sections for more information:
• Adding and Modifying Intrusion Event Thresholds, page 20-23
• Setting a Threshold for a Rule, page 20-6
• Viewing and Deleting Intrusion Event Thresholds, page 20-24
Adding and Modifying Intrusion Event Thresholds
License: Protection
You can set a threshold for one or more specific rules. You can also separately or simultaneously modify existing threshold settings. You can set a a single threshold for each. Adding a threshold overwrites any existing threshold for the rule.
For more information on viewing and deleting threshold configurations, see Viewing and Deleting Intrusion Event Thresholds, page 20-24.
You can also modify the global threshold that applies by default to all rules and preprocessor-generated events. For more information, see Globally Limiting Intrusion Event Logging, page 22-1.
Note that a revert icon ( ) appears in a field when you type an invalid value; click it to revert to the last valid value for that field or to clear the field if there was no previous value.
To add or modify event thresholds:
Step 1 Select Configuration > ASA FirePOWER Configuration > Policies > Intrusion Policy.
The Intrusion Policy page appears.
Step 2 Click the edit icon ( ) next to the policy you want to edit.
If you have unsaved changes in another policy, click OK to discard those changes and continue. See Resolving Conflicts and Committing Policy Changes, page 11-15 for information on saving unsaved changes in another policy.
The Policy Information page appears.
Step 3 Click Rules.
The Rules page appears. By default, the page lists the rules alphabetically by message.
Step 4 Locate the rule or rules where you want to set a threshold. You have the following options:
• To sort the current display, click on a column heading or icon. To reverse the sort, click again.
• Construct a filter by clicking on keywords or arguments in the filter panel on the left. For more information, see the following topics: Understanding Rule Filtering in an Intrusion Policy, page 20-9 and Setting a Rule Filter in an Intrusion Policy, page 20-17.
The page refreshes to display all matching rules.
Step 5 Select the rule or rules where you want to set a threshold. You have the following options:
• To select a specific rule, select the check box next to the rule.
• To select all the rules in the current list, select the check box at the top of the column.
Step 6 Select Event Filtering > Threshold.
20-23ASA FirePOWER Module User Guide

Chapter 20 Tuning Intrusion Policies Using Rules Filtering Intrusion Event Notification Per Policy
The thresholding pop-up window appears.
Step 7 From the Type drop-down list, select the type of threshold you want to set:
• Select Limit to limit notification to the specified number of event instances per time period.
• Select Threshold to provide notification for each specified number of event instances per time period.
• Select Both to provide notification once per time period after a specified number of event instances.
Step 8 From the Track By drop-down list, select whether you want the event instances tracked by Source or Destination IP address.
Step 9 In the Count field, specify the number of event instances you want to use as your threshold.
Step 10 In the Seconds field, specify the number of seconds that make up the time period for which event instances are tracked.
Step 11 Click OK.
The system adds your threshold and displays an event filter icon ( ) next to the rule in the Event Filtering column. If you add multiple event filters to a rule, a number over the icon indicates the number of event filters.
Step 12 Save your policy, continue editing, discard your changes, or exit while leaving your changes in the system cache.
See Managing Intrusion Policies, page 19-3 and Editing Intrusion Policies, page 19-4 for more information.
Viewing and Deleting Intrusion Event Thresholds
License: Protection
You may want to view or delete an existing threshold setting. You can use the Rules Details view to display the configured settings for a threshold to see if they are appropriate for your system. If they are not, you can add a new threshold to overwrite the existing values.
Note that you can also modify the global threshold that applies by default to all rules and preprocessor-generated events. See Globally Limiting Intrusion Event Logging, page 22-1 for more information.
To view or delete a threshold:
Step 1 Select Configuration > ASA FirePOWER Configuration > Policies > Intrusion Policy.
The Intrusion Policy page appears.
Step 2 Click the edit icon ( ) next to the policy you want to edit.
If you have unsaved changes in another policy, click OK to discard those changes and continue. See Resolving Conflicts and Committing Policy Changes, page 11-15 for information on saving unsaved changes in another policy.
The Policy Information page appears.
Step 3 Click Rules.
The Rules page appears. By default, the page lists the rules alphabetically by message.
Step 4 Locate the rule or rules that have a configured threshold you want to view or delete. You have the following options:
20-24ASA FirePOWER Module User Guide

Chapter 20 Tuning Intrusion Policies Using Rules Filtering Intrusion Event Notification Per Policy
• To sort the current display, click on a column heading or icon. To reverse the sort, click again.
• Construct a filter by clicking on keywords or arguments in the filter panel on the left. For more information, see the following topics: Understanding Rule Filtering in an Intrusion Policy, page 20-9 and Setting a Rule Filter in an Intrusion Policy, page 20-17.
The page refreshes to display all matching rules.
Step 5 Select the rule or rules with a configured threshold you want to view or delete. You have the following options:
• To select a specific rule, select the check box next to the rule.
• To select all the rules in the current list, select the check box at the top of the column.
Step 6 To remove the threshold for each selected rule, select Event Filtering > Remove Thresholds. Click OK in the confirmation pop-up window that appears.
Tip To remove a specific threshold, you can also highlight the rule and click Show details. Expand the threshold settings, then click Delete next to the threshold settings you want to remove. Click OK to confirm that you want to delete the configuration.
The page refreshes and the threshold is deleted.
Step 7 Save your policy, continue editing, discard your changes, or exit while leaving your changes in the system cache. See Managing Intrusion Policies, page 19-3 and Editing Intrusion Policies, page 19-4 for more information.
Configuring Suppression Per Intrusion PolicyLicense: Protection
You can suppress intrusion event notification when a specific IP address or range of IP addresses triggers a specific rule or preprocessor. This is useful for eliminating false positives. For example, if you have a mail server that transmits packets that look like a specific exploit, you might suppress event notification for that event when it is triggered by your mail server. The rule triggers for all packets, but you only see events for legitimate attacks.
Note that you can use intrusion event suppression alone or in any combination with rate-based attack prevention, the detection_filter keyword, and intrusion event thresholding. See Adding Dynamic Rule States, page 20-28, Filtering Events, page 23-86, and Configuring Event Thresholding, page 20-21 for more information.
See the following sections for more information:
• Suppressing Intrusion Events, page 20-25
• Viewing and Deleting Suppression Conditions, page 20-27
Suppressing Intrusion Events
License: Protection
20-25ASA FirePOWER Module User Guide

Chapter 20 Tuning Intrusion Policies Using Rules Filtering Intrusion Event Notification Per Policy
You can suppress intrusion event notification for a rule or rules. When notification is suppressed for a rule, the rule triggers but events are not generated. You can set one or more suppressions for a rule. The first suppression listed has the highest priority. Note that when two suppressions conflict, the action of the first is carried out.
Note that a revert icon ( ) appears in a field when you type an invalid value; click it to revert to the last valid value for that field or to clear the field if there was no previous value.
To suppress event display:
Step 1 Select Configuration > ASA FirePOWER Configuration > Policies > Intrusion Policy.
The Intrusion Policy page appears.
Step 2 Click the edit icon ( ) next to the policy you want to edit.
If you have unsaved changes in another policy, click OK to discard those changes and continue. See Resolving Conflicts and Committing Policy Changes, page 11-15 for information on saving unsaved changes in another policy.
The Policy Information page appears.
Step 3 Click Rules.
The Rules page appears. By default, the page lists the rules alphabetically by message.
Step 4 Locate the rule or rules where you want to set suppression. You have the following options:
• To sort the current display, click on a column heading or icon. To reverse the sort, click again.
• Construct a filter by clicking on keywords or arguments in the filter panel on the left. For more information, see the following topics: Understanding Rule Filtering in an Intrusion Policy, page 20-9 and Setting a Rule Filter in an Intrusion Policy, page 20-17.
The page refreshes to display all matching rules.
Step 5 Select the rule or rules for which you want to configure suppression conditions. You have the following options:
• To select a specific rule, select the check box next to the rule.
• To select all rules in the current list, select the check box at the top of the column.
Step 6 Select Event Filtering > Suppression.
The suppression pop-up window appears.
Step 7 Select one of the following Suppression Type options:
• Select Rule to completely suppress events for a selected rule.
• Select Source to suppress events generated by packets originating from a specified source IP address.
• Select Destination to suppress events generated by packets going to a specified destination IP address.
Step 8 If you selected Source or Destination for the suppression type, in the Network field enter the IP address, address block, or variable you want to specify as the source or destination IP address, or a comma-separated list comprised of any combination of these.
For information on using IPv4 CIDR and IPv6 prefix length address blocks, see IP Address Conventions, page 1-4.
Step 9 Click OK.
20-26ASA FirePOWER Module User Guide

Chapter 20 Tuning Intrusion Policies Using Rules Filtering Intrusion Event Notification Per Policy
The system adds your suppression conditions and displays an event filter icon ( ) next to the rule in the Event Filtering column next the suppressed rule. If you add multiple event filters to a rule, a number over the icon indicates the number of event filters.
Step 10 Save your policy, continue editing, discard your changes, or exit while leaving your changes in the system cache.
See Managing Intrusion Policies, page 19-3 and Editing Intrusion Policies, page 19-4 for more information.
Viewing and Deleting Suppression Conditions
License: Protection
You may want to view or delete an existing suppression condition. For example, you can suppress event notification for packets originating from a mail server IP address because the mail server normally transmits packets that look like exploits. If you then decommission that mail server and reassign the IP address to another host, you should delete the suppression conditions for that source IP address.
To view or delete a defined suppression condition:
Step 1 Select Configuration > ASA FirePOWER Configuration > Policies > Intrusion Policy.
The Intrusion Policy page appears.
Step 2 Click the edit icon ( ) next to the policy you want to edit.
If you have unsaved changes in another policy, click OK to discard those changes and continue. See Resolving Conflicts and Committing Policy Changes, page 11-15 for information on saving unsaved changes in another policy.
The Policy Information page appears.
Step 3 Click Rules.
The Rules page appears. By default, the page lists rules alphabetically by message.
Step 4 Locate the rule or rules where you want to view or delete suppressions. You have the following options:
• To sort the current display, click on a column heading or icon. To reverse the sort, click again.
• Construct a filter by clicking on keywords or arguments in the filter panel on the left. For more information, see the following topics: Understanding Rule Filtering in an Intrusion Policy, page 20-9 and Setting a Rule Filter in an Intrusion Policy, page 20-17.
The page refreshes to display all matching rules.
Step 5 Select the rule or rules for which you want to view or delete suppressions. You have the following options:
• To select a specific rule, select the check box next to the rule.
• To select all rules in the current list, select the check box at the top of the column.
Step 6 You have two options:
• To remove all suppression for a rule, select Event Filtering > Remove Suppressions. Click OK in the confirmation pop-up window that appears.
• To remove a specific suppression setting, highlight the rule and click Show details. Expand the suppression settings and click Delete next to the suppression settings you want to remove. Click OK to confirm that you want to delete your selected settings.
The page refreshes and the suppression settings are deleted.
20-27ASA FirePOWER Module User Guide

Chapter 20 Tuning Intrusion Policies Using Rules Adding Dynamic Rule States
Step 7 Save your policy, continue editing, discard your changes, or exit while leaving your changes in the system cache. See Managing Intrusion Policies, page 19-3 and Editing Intrusion Policies, page 19-4 for more information.
Adding Dynamic Rule StatesLicense: Protection
Rate-based attacks attempt to overwhelm a network or host by sending excessive traffic toward the network or host, causing it to slow down or deny legitimate requests. You can use rate-based prevention to change the action of a rule in response to excessive rule matches for specific rules.
For more information, see the following sections:
• Understanding Dynamic Rule States, page 20-28
• Setting a Dynamic Rule State, page 20-29
Understanding Dynamic Rule StatesLicense: Protection
You can configure your intrusion policies to include a rate-based filter that detects when too many matches for a rule occur in a given time period. You can use this feature on a device deployed inline to block rate-based attacks for a specified time, then revert to a rule state where rule matches only generate events and do not drop traffic.
Rate-based attack prevention identifies abnormal traffic patterns and attempts to minimize the impact of that traffic on legitimate requests. You can identify excessive rule matches in traffic going to a particular destination IP address or addresses or coming from a particular source IP address or addresses. You can also respond to excessive matches for a particular rule across all detected traffic.
In the intrusion policy, you can configure a rate-based filter for any intrusion or preprocessor rule. The rate-based filter contains three components:
• the rule matching rate, which you configure as a count of rule matches within a specific number of seconds
• a new action to be taken when the rate is exceeded, with three available actions: Generate Events, Drop and Generate Events, and Disable
• the duration of the action, which you configure as a timeout value
Note that when started, the new action occurs until the timeout is reached, even if the rate falls below the configured rate during that time period. When the timeout is reached, if the rate has fallen below the threshold, the action for the rule reverts to the action initially configured for the rule.
You can configure rate-based attack prevention in an inline deployment to block attacks, either temporarily or permanently. Without rate-based configuration, rules set to Generate Events do generate events, but the system does not drop packets for those rules. However, if the attack traffic matches rules that have rate-based criteria configured, the rate action may cause packet dropping to occur for the period of time that the rate action is active, even if those rules are not initially set to Drop and Generate Events.
Note Rate-based actions cannot enable disabled rules or drop traffic that matches disabled rules.
20-28ASA FirePOWER Module User Guide

Chapter 20 Tuning Intrusion Policies Using Rules Adding Dynamic Rule States
You can define multiple rate-based filters on the same rule. The first filter listed in the intrusion policy has the highest priority. Note that when two rate-based filter actions conflict, the action of the first rate-based filter is carried out.
The following diagram shows an example where an attacker is attempting to access a host. Repeated attempts to find a password trigger a rule which has rate-based attack prevention configured. The rate-based settings change the rule attribute to Drop and Generate Events after rule matches occur five times in a 10-second span. The new rule attribute times out after 15 seconds.
After the timeout, note that packets are still dropped in the rate-based sampling period that follows. If the sampled rate is above the threshold in the current or previous sampling period, the new action continues. The new action reverts to Generate Events only after a sampling period completes where the sampled rate was below the threshold rate.
Setting a Dynamic Rule StateLicense: Protection
In some cases, you may not want to set a rule to the Drop and Generate Events state because you do not want to drop every packet that matches the rule, but you do want to drop packets matching the rule if a particular rate of matches occurs in a specified time. Dynamic rule states let you configure the rate that should trigger a change in the action for a rule, what the action should change to when the rate is met, and how long the new action should persist.
You set the number of hits for that rule by specifying a count and the number of seconds within which that number of hits should occur to trigger the action change. In addition, you can set a timeout to cause the action to revert to the previous state for the rule when the timeout expires.
You can define multiple dynamic rule state filters for the same rule. The first filter listed in the rule details in the intrusion policy has the highest priority. Note that when two rate-based filter actions conflict, the action of the first rate-based filter is carried out.
Note that a revert icon ( ) appears in a field when you type an invalid value; click it to revert to the last valid value for that field or to clear the field if there was no previous value.
20-29ASA FirePOWER Module User Guide

Chapter 20 Tuning Intrusion Policies Using Rules Adding Dynamic Rule States
Note Dynamic rule states cannot enable disabled rules or drop traffic that matches disabled rules.
To add a dynamic rule state:
Step 1 Select Configuration > ASA FirePOWER Configuration > Policies > Intrusion Policy.
The Intrusion Policy page appears.
Step 2 Click the edit icon ( ) next to the policy you want to edit.
If you have unsaved changes in another policy, click OK to discard those changes and continue. See Resolving Conflicts and Committing Policy Changes, page 11-15 for information on saving unsaved changes in another policy.
The Policy Information page appears.
Step 3 Click Rules.
The Rules page appears.
Step 4 Locate the rule or rules where you want to add a dynamic rule state. You have the following options:
• To sort the current display, click on a column heading or icon. To reverse the sort, click again.
• Construct a filter by clicking on keywords or arguments in the filter panel on the left. For more information, see the following topics: Understanding Rule Filtering in an Intrusion Policy, page 20-9 and Setting a Rule Filter in an Intrusion Policy, page 20-17.
The page refreshes to display all matching rules.
Step 5 Select the rule or rules where you want to add a dynamic rule state. You have the following options:
• To select a specific rule, select the check box next to the rule.
• To select all the rules in the current list, select the check box at the top of the column.
Step 6 Select Dynamic State > Add Rate-Based Rule State.
The Add Rate-Based Rule State dialog box appears.
Step 7 From the Track By drop-down list, select how you want the rule matches tracked:
• Select Source to track the number of hits for that rule from a specific source or set of sources.
• Select Destination to track the number of hits for that rule to a specific destination or set of destinations.
• Select Rule to track all matches for that rule.
Step 8 If you set Track By to Source or Destination, enter the address of each host you want to track in the Network field.
You can specify a single IP address, address block, variable, or a comma-separated list comprised of any combination of these. For information on using IPv4 CIDR and IPv6 prefix length address blocks, see IP Address Conventions, page 1-4.
Step 9 Next to Rate, indicate the number of rule matches per time period to set the attack rate:
• In the Count field, using an integer between 1 and 2147483647, specify the number of rule matches you want to use as your threshold.
• In the Seconds field, using an integer between 1 and 2147483647, specify the number of seconds that make up the time period for which attacks are tracked.
Step 10 From the New State drop-down list, specify the new action to be taken when the conditions are met:
20-30ASA FirePOWER Module User Guide

Chapter 20 Tuning Intrusion Policies Using Rules Adding SNMP Alerts
• Select Generate Events to generate an event.
• Select Drop and Generate Events to generate an event and drop the packet that triggered the event in inline deployments or generate an event in passive deployments.
• Select Disabled to take no action.
Step 11 In the Timeout field, type the number of seconds you want the new action to remain in effect. After the timeout occurs, the rule reverts to its original state. Specify 0 or leave the Timeout field blank to prevent the new action from timing out.
Step 12 Click OK.
The system adds the dynamic rule state and displays a dynamic state icon ( ) next to the rule in the Dynamic State column. If you add multiple dynamic rule state filters to a rule, a number over the icon indicates the number of filters.
If any required fields are blank, you receive an error message indicating which fields you must fill.
Tip To delete all dynamic rule settings for a set of rules, select the rules on the Rules page, then select Dynamic State > Remove Rate-Based States. You can also delete individual rate-based rule state filters from the rule details for the rule by selecting the rule, clicking Show details, then clicking Delete by the rate-based filter you want to remove.
Step 13 Save your policy, continue editing, discard your changes, or exit while leaving your changes in the system cache.
See Managing Intrusion Policies, page 19-3 and Editing Intrusion Policies, page 19-4 for more information.
Adding SNMP AlertsLicense: Protection
If you configure SNMP alerting for your ASA FirePOWER module, you can configure specific rules to provide an SNMP alert when the rule generates an event. For more information, see Using SNMP Responses, page 28-1.
To set an SNMP alert:
Step 1 Select Configuration > ASA FirePOWER Configuration > Policies > Intrusion Policy.
The Intrusion Policy page appears.
Step 2 Click the edit icon ( ) next to the policy you want to edit.
If you have unsaved changes in another policy, click OK to discard those changes and continue. See Resolving Conflicts and Committing Policy Changes, page 11-15 for information on saving unsaved changes in another policy.
The Policy Information page appears.
Step 3 Click Rules.
The Rules page appears.
Step 4 Locate the rule or rules where you want to set SNMP alerts. You have the following options:
20-31ASA FirePOWER Module User Guide

Chapter 20 Tuning Intrusion Policies Using Rules Adding Rule Comments
• To sort the current display, click on a column heading or icon. To reverse the sort, click again.
• Construct a filter by clicking on keywords or arguments in the filter panel on the left. For more information, see the following topics: Understanding Rule Filtering in an Intrusion Policy, page 20-9 and Setting a Rule Filter in an Intrusion Policy, page 20-17.
The page refreshes to display all matching rules.
Step 5 Select the rule or rules where you want to set SNMP alerts:
• To select a specific rule, select the check box next to the rule.
• To select all the rules in the current list, select the check box at the top of the column.
Step 6 Select Alerting > Add SNMP Alert.
The system adds the alert and displays an alert icon ( ) next to the rule in the Alerting column. If you add multiple alert types to a rule, a number over the icon indicates the number of alert types.
Tip To remove an SNMP alert from a rule, click the check box next to the rule and select Alerting > Remove SNMP Alerts, then click OK to confirm the deletion.
Step 7 Save your policy, continue editing, discard your changes, or exit while leaving your changes in the system cache. See Managing Intrusion Policies, page 19-3 and Editing Intrusion Policies, page 19-4 for more information.
Adding Rule CommentsLicense: Protection
You can add comments to a rule. Any comments you add can be seen in the Rule Details view on the Rules page.
After you commit the intrusion policy changes containing the comment, you can also view the comment by clicking Rule Comment on the rule Edit page. For more information on editing rules, see Modifying Existing Rules, page 23-102.
To add a comment to a rule:
Step 1 Select Configuration > ASA FirePOWER Configuration > Policies > Intrusion Policy.
The Intrusion Policy page appears.
Step 2 Click the edit icon ( ) next to the policy you want to edit.
If you have unsaved changes in another policy, click OK to discard those changes and continue. See Resolving Conflicts and Committing Policy Changes, page 11-15 for information on saving unsaved changes in another policy.
The Policy Information page appears.
Step 3 Click Rules.
The Rules page appears.
Step 4 Locate the rule or rules where you want to add a comment to a rule. You have the following options:
• To sort the current display, click on a column heading or icon. To reverse the sort, click again.
20-32ASA FirePOWER Module User Guide

Chapter 20 Tuning Intrusion Policies Using Rules Adding Rule Comments
• Construct a filter by clicking on keywords or arguments in the filter panel on the left. For more information, see the following topics: Understanding Rule Filtering in an Intrusion Policy, page 20-9 and Setting a Rule Filter in an Intrusion Policy, page 20-17.
The page refreshes to display all matching rules.
Step 5 Select the rule or rules where you want to add a comment:
• To select a specific rule, select the check box next to the rule.
• To select all the rules in the current list, select the check box at the top of the column.
Step 6 Select Comments > Add Rule Comment.
The Add Comment dialog box appears.
Step 7 In the Comment field, type the rule comment.
Step 8 Click OK.
The system adds the comment and displays a comment icon ( ) next to the rule in the Comments column. If you add multiple comments to a rule, a number over the icon indicates the number of comments.
Tip To delete a rule comment, highlight the rule and click Show Details, then click Delete in the Comments section. Note that you can only delete a comment if the comment is cached with uncommitted intrusion policy changes. After intrusion policy changes are committed, the rule comment is permanent.
Step 9 Save your policy, continue editing, discard your changes, or exit while leaving your changes in the system cache.
See Managing Intrusion Policies, page 19-3 and Editing Intrusion Policies, page 19-4 for more information.
20-33ASA FirePOWER Module User Guide

Chapter 20 Tuning Intrusion Policies Using Rules Adding Rule Comments
20-34ASA FirePOWER Module User Guide
![Intrusion Detection System Based on Evolving Rules for ...downloads.hindawi.com/journals/js/2018/5948146.pdf · struct intrusion detection systems [7]. SVM was used to ... and quantity](https://img.pdfslide.net/doc/110x75/5f7db7ed884020525f2c94eb/intrusion-detection-system-based-on-evolving-rules-for-struct-intrusion-detection.jpg)