Embed Size (px)
Citation preview

Tutorial 5: Modify ObjectProperties and Layers inAutoCAD 2010
Audience: Users new to AutoCAD
Prerequisites: None
Time to complete: 15 minutes
In This TutorialIn this tutorial, you learn to:
■ Modify the properties of objects
■ Organize drawings with layers
■ Modify object properties by changing layer properties
NOTE For more information on the topics covered in this tutorial, see the AutoCADUser’s Guide.
Tutorial FilesDownload the tutorial files as follows:
1 Download the modify_objects.zip fromhttp://www.autodesk.com/autocad-tutorials.
1
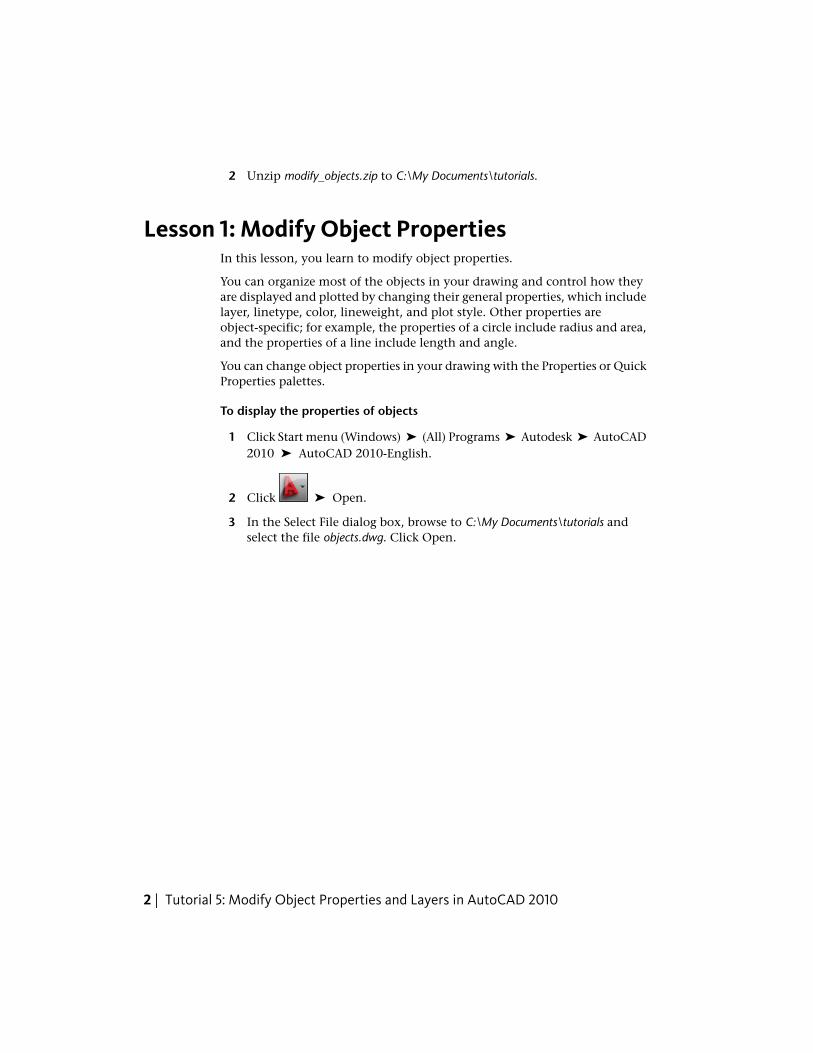
2 Unzip modify_objects.zip to C:\My Documents\tutorials.
Lesson 1: Modify Object PropertiesIn this lesson, you learn to modify object properties.
You can organize most of the objects in your drawing and control how theyare displayed and plotted by changing their general properties, which includelayer, linetype, color, lineweight, and plot style. Other properties areobject-specific; for example, the properties of a circle include radius and area,and the properties of a line include length and angle.
You can change object properties in your drawing with the Properties or QuickProperties palettes.
To display the properties of objects
1 Click Start menu (Windows) ➤ (All) Programs ➤ Autodesk ➤ AutoCAD2010 ➤ AutoCAD 2010-English.
2 Click ➤ Open.
3 In the Select File dialog box, browse to C:\My Documents\tutorials andselect the file objects.dwg. Click Open.
2 | Tutorial 5: Modify Object Properties and Layers in AutoCAD 2010
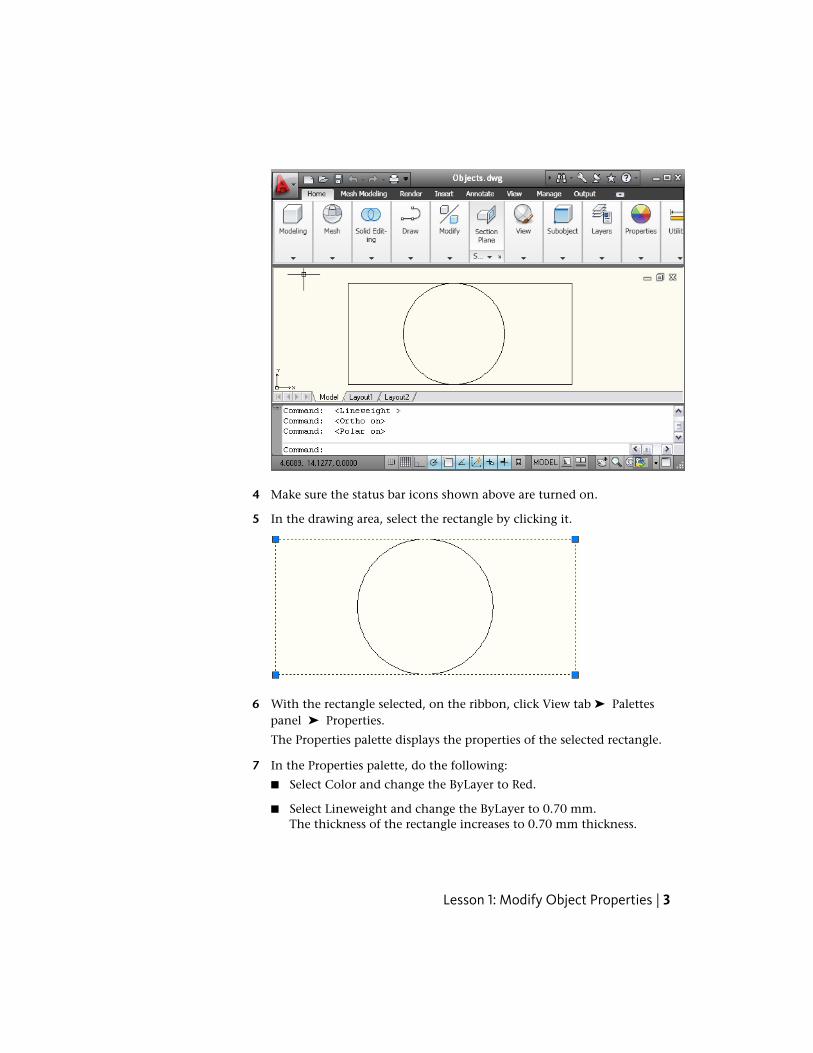
4 Make sure the status bar icons shown above are turned on.
5 In the drawing area, select the rectangle by clicking it.
6 With the rectangle selected, on the ribbon, click View tab ➤ Palettespanel ➤ Properties.
The Properties palette displays the properties of the selected rectangle.
7 In the Properties palette, do the following:
■ Select Color and change the ByLayer to Red.
■ Select Lineweight and change the ByLayer to 0.70 mm.The thickness of the rectangle increases to 0.70 mm thickness.
Lesson 1: Modify Object Properties | 3
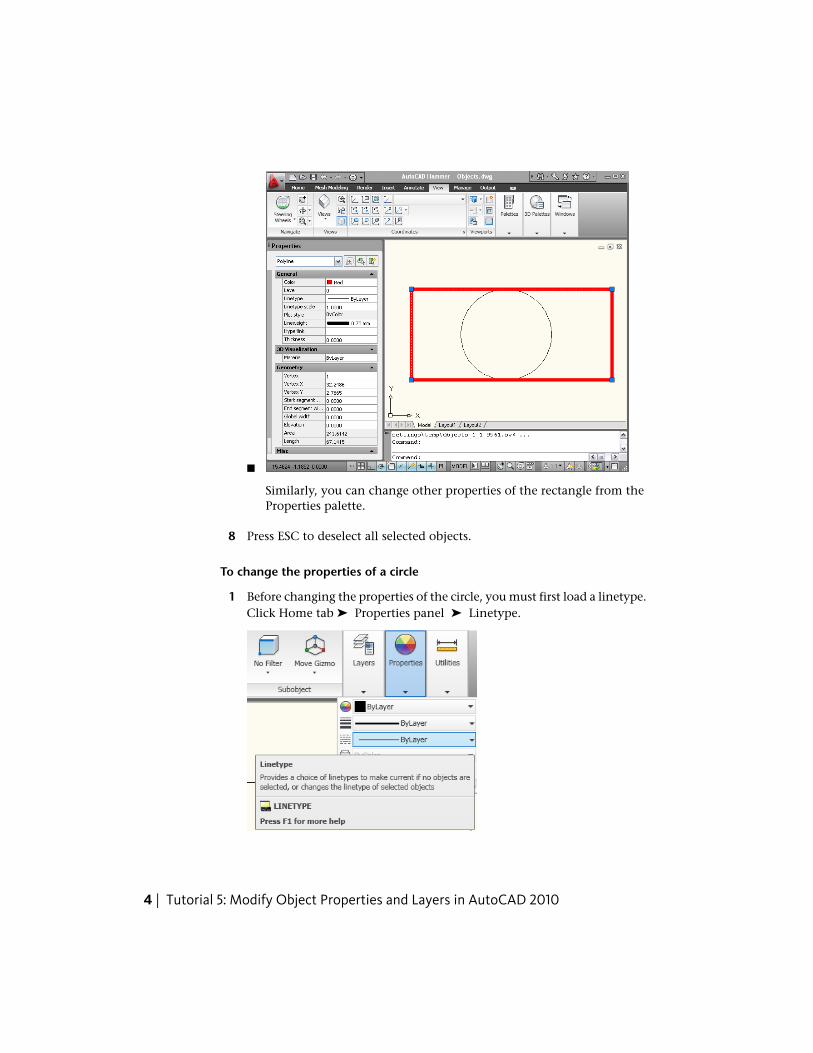
■
Similarly, you can change other properties of the rectangle from theProperties palette.
8 Press ESC to deselect all selected objects.
To change the properties of a circle
1 Before changing the properties of the circle, you must first load a linetype.Click Home tab ➤ Properties panel ➤ Linetype.
4 | Tutorial 5: Modify Object Properties and Layers in AutoCAD 2010
2 In the Linetype drop-down list, click Other. Then, in the LinetypeManager dialog box, click Load.
3 In the Load or Reload dialog box, select the DOT linetype. Click OK.
4 Click OK.
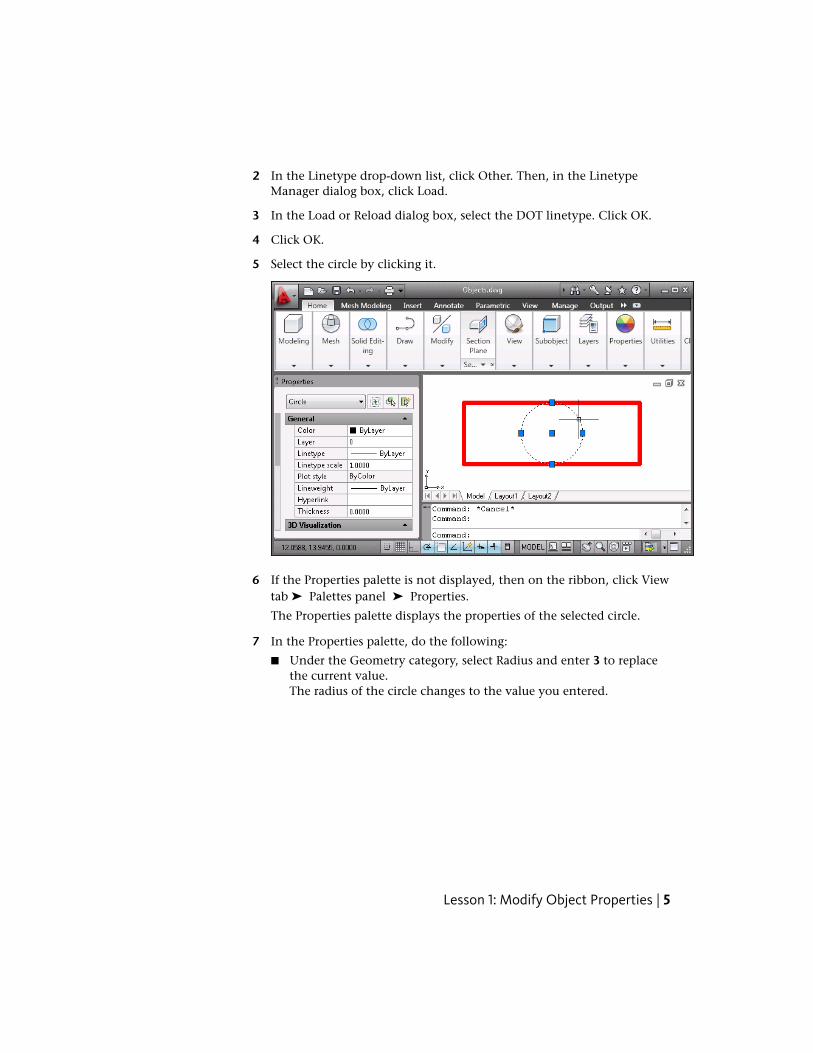
5 Select the circle by clicking it.
6 If the Properties palette is not displayed, then on the ribbon, click Viewtab ➤ Palettes panel ➤ Properties.
The Properties palette displays the properties of the selected circle.
7 In the Properties palette, do the following:
■ Under the Geometry category, select Radius and enter 3 to replacethe current value.The radius of the circle changes to the value you entered.
Lesson 1: Modify Object Properties | 5
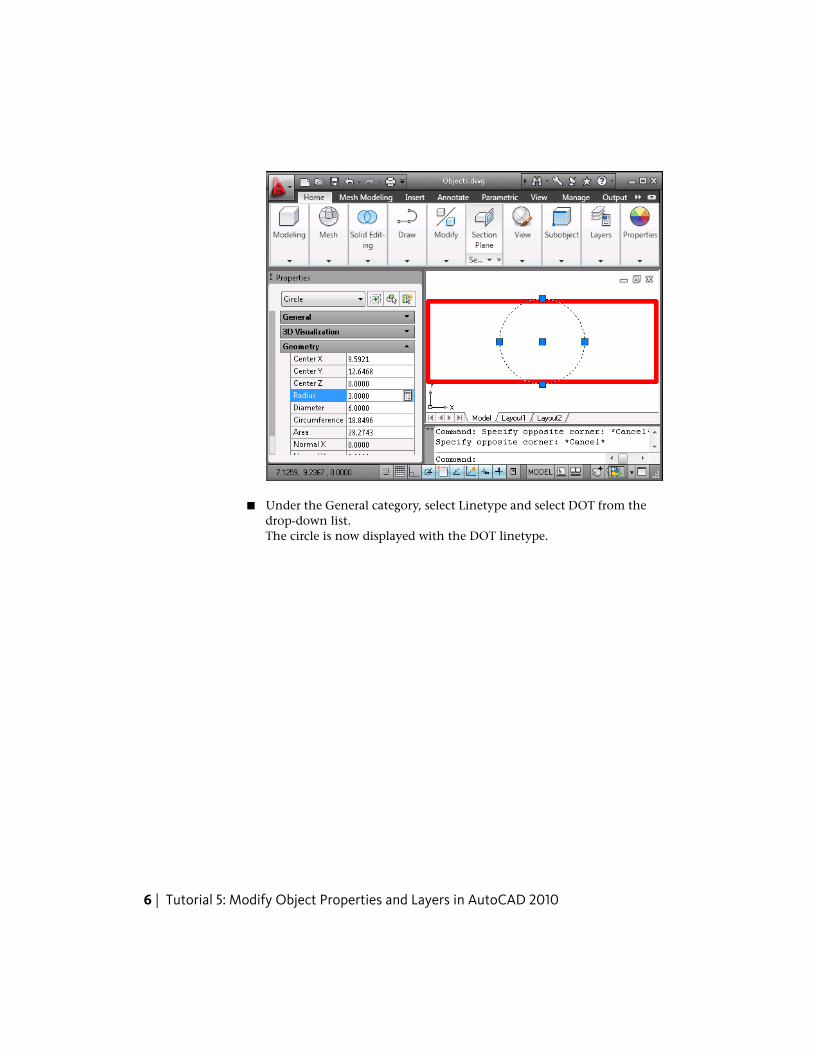
■ Under the General category, select Linetype and select DOT from thedrop-down list.The circle is now displayed with the DOT linetype.
6 | Tutorial 5: Modify Object Properties and Layers in AutoCAD 2010
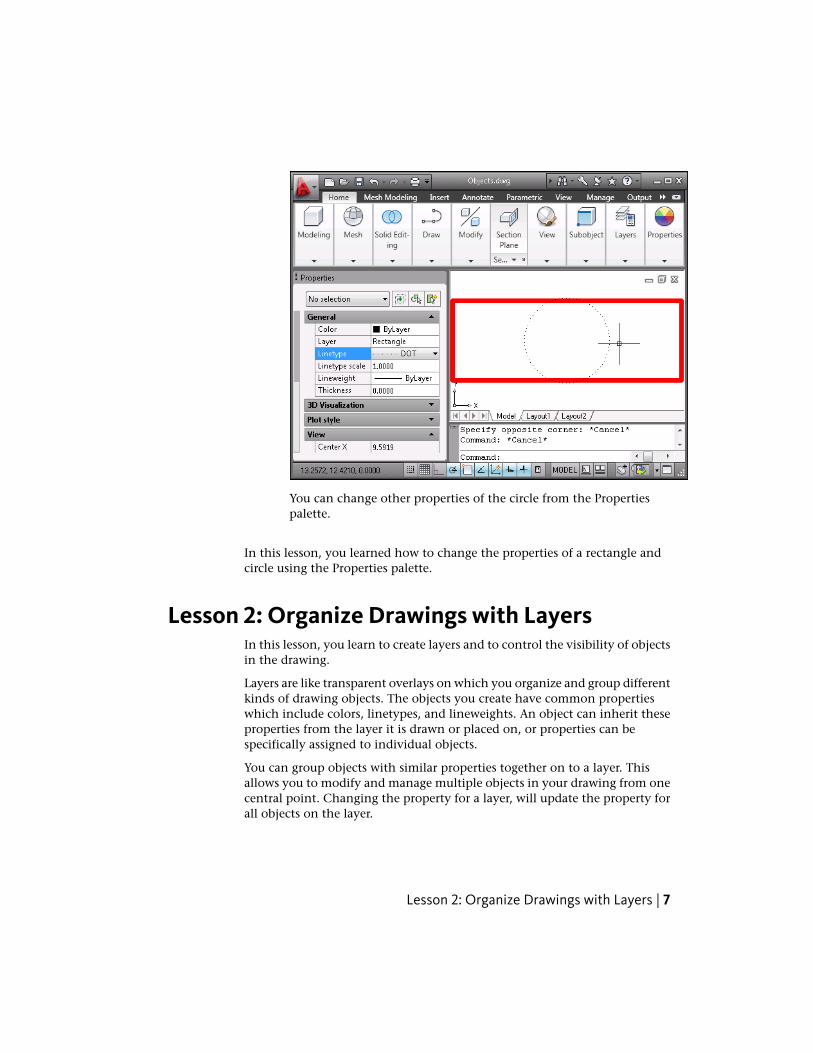
You can change other properties of the circle from the Propertiespalette.
In this lesson, you learned how to change the properties of a rectangle andcircle using the Properties palette.
Lesson 2: Organize Drawings with LayersIn this lesson, you learn to create layers and to control the visibility of objectsin the drawing.
Layers are like transparent overlays on which you organize and group differentkinds of drawing objects. The objects you create have common propertieswhich include colors, linetypes, and lineweights. An object can inherit theseproperties from the layer it is drawn or placed on, or properties can bespecifically assigned to individual objects.
You can group objects with similar properties together on to a layer. Thisallows you to modify and manage multiple objects in your drawing from onecentral point. Changing the property for a layer, will update the property forall objects on the layer.
Lesson 2: Organize Drawings with Layers | 7
To create a new layer
1 Click ➤ New.
2 In the Select Template dialog box, select acad.dwt and click Open.
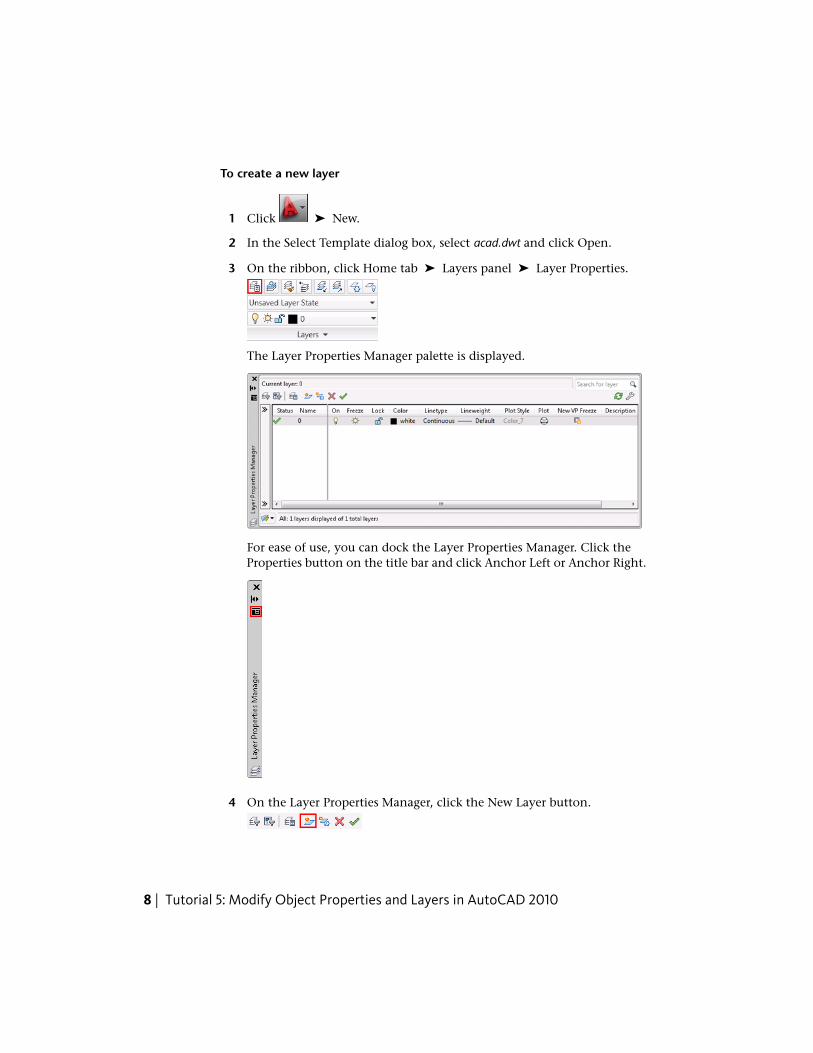
3 On the ribbon, click Home tab ➤ Layers panel ➤ Layer Properties.
The Layer Properties Manager palette is displayed.
For ease of use, you can dock the Layer Properties Manager. Click theProperties button on the title bar and click Anchor Left or Anchor Right.
4 On the Layer Properties Manager, click the New Layer button.
8 | Tutorial 5: Modify Object Properties and Layers in AutoCAD 2010
A new layer named Layer1 is automatically added to the layer list.
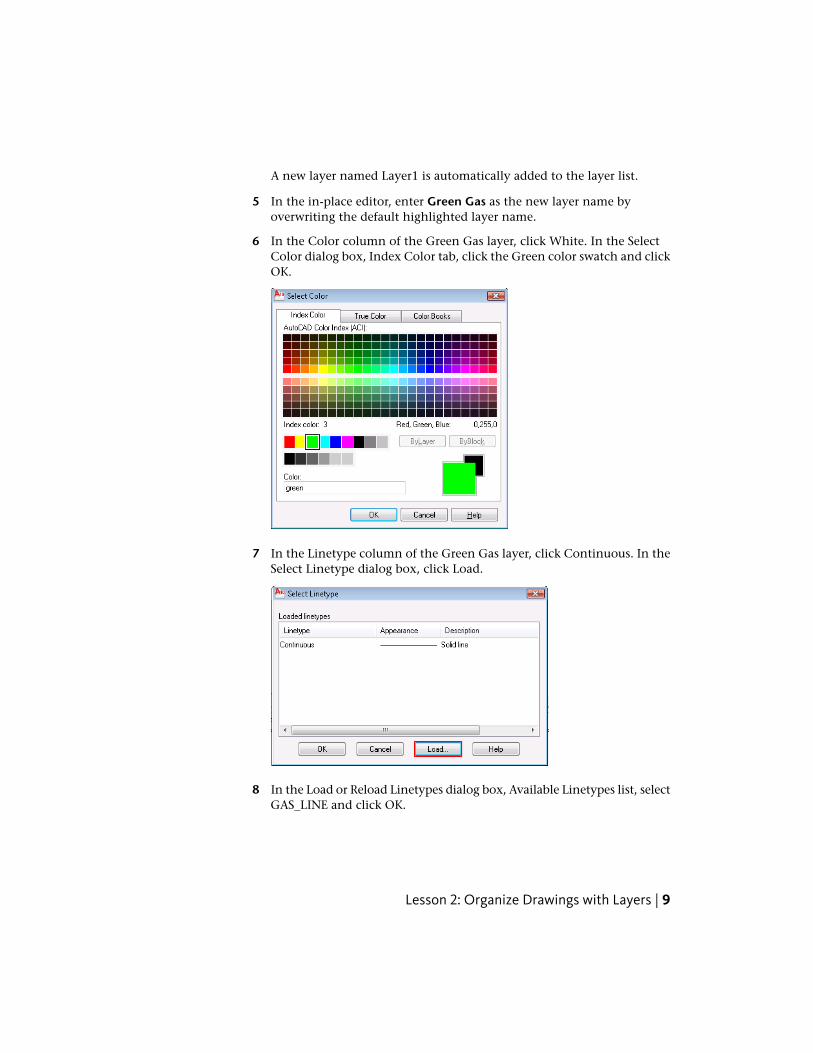
5 In the in-place editor, enter Green Gas as the new layer name byoverwriting the default highlighted layer name.
6 In the Color column of the Green Gas layer, click White. In the SelectColor dialog box, Index Color tab, click the Green color swatch and clickOK.
7 In the Linetype column of the Green Gas layer, click Continuous. In theSelect Linetype dialog box, click Load.
8 In the Load or Reload Linetypes dialog box, Available Linetypes list, selectGAS_LINE and click OK.
Lesson 2: Organize Drawings with Layers | 9
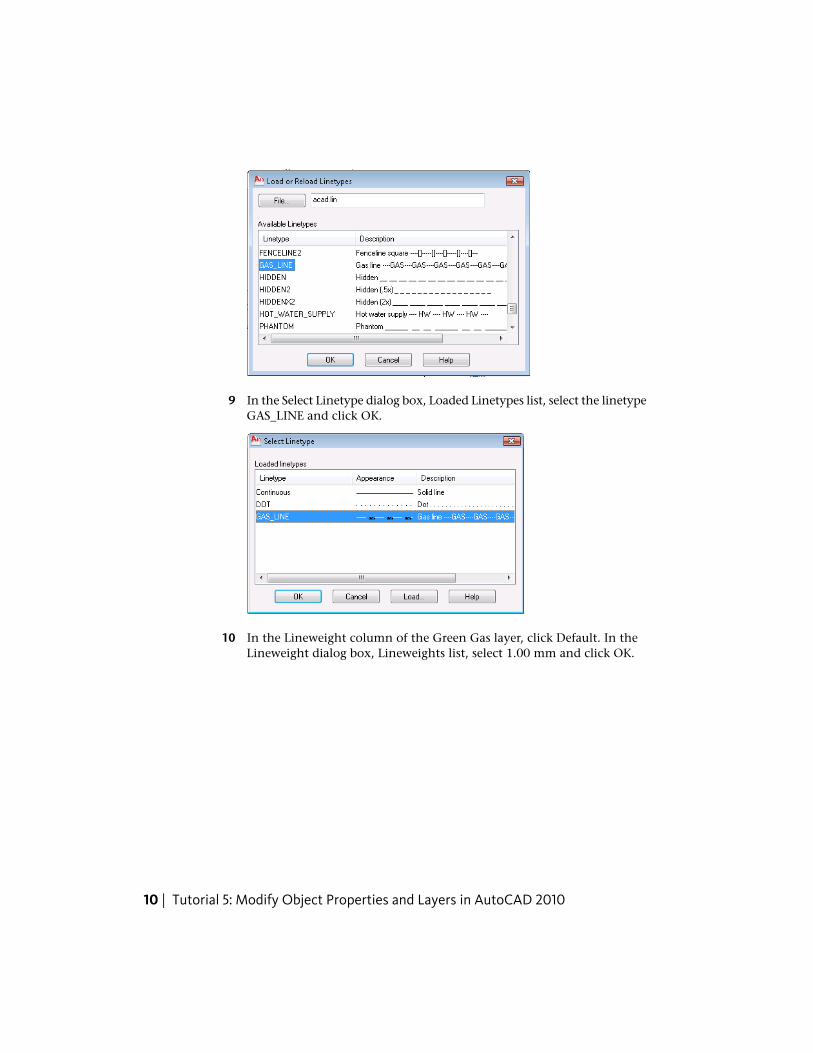
9 In the Select Linetype dialog box, Loaded Linetypes list, select the linetypeGAS_LINE and click OK.
10 In the Lineweight column of the Green Gas layer, click Default. In theLineweight dialog box, Lineweights list, select 1.00 mm and click OK.
10 | Tutorial 5: Modify Object Properties and Layers in AutoCAD 2010

11 Click the Set Current button.
The Green Gas layer is now active. Objects that you draw, with this layeractive, will inherit the properties as you have defined them.
12 On the ribbon, click Home tab ➤ Draw panel ➤ Line. Specify twopoints in the drawing area to create the line and press Enter to end thecommand.
You should see that the line is in green with the GAS_LINE linetype anda thickness of 1.00mm.
TIP To display the lineweights in your drawing, on the status bar, clickShow/Hide Lineweight.
You have drawn a line on the Green Gas layer. All other objects you drawon this layer will inherit the layer properties. To add more layers, followthe same procedure and modify the color, linetype, lineweight propertiesas needed.
To help identify what each layer in your drawing is used for, you can providea description in the Description column of the Layer Properties Manager.
Lesson 2: Organize Drawings with Layers | 11
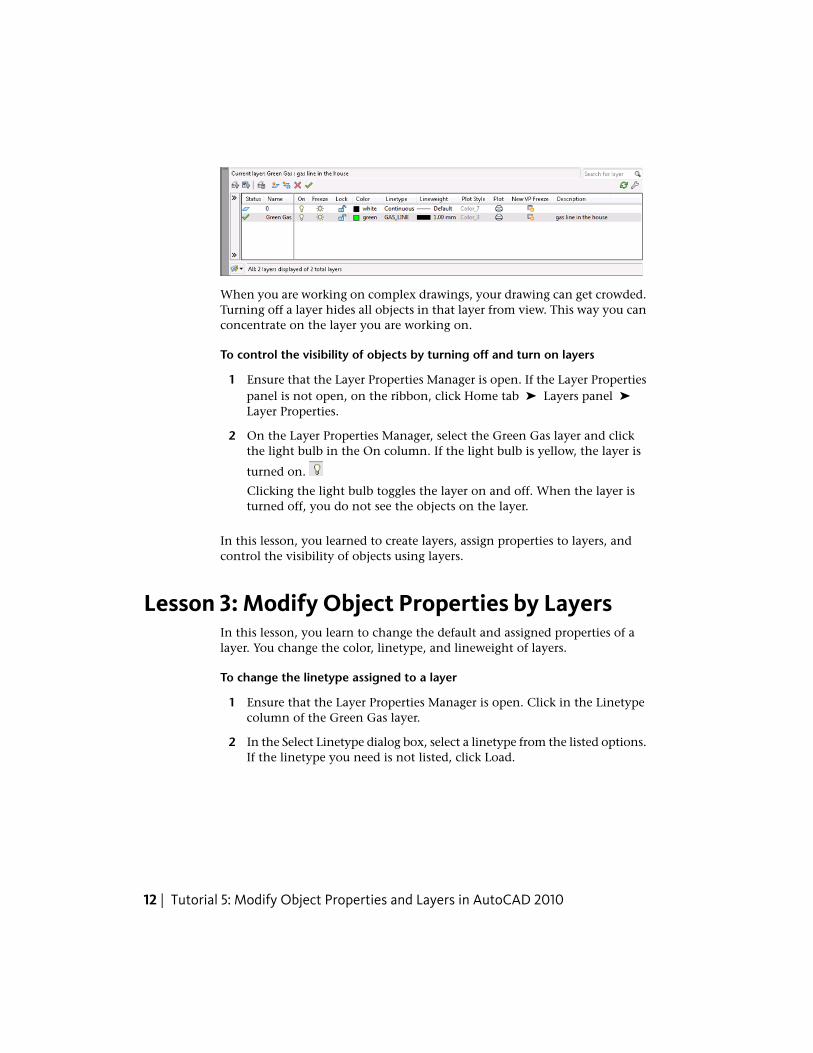
When you are working on complex drawings, your drawing can get crowded.Turning off a layer hides all objects in that layer from view. This way you canconcentrate on the layer you are working on.
To control the visibility of objects by turning off and turn on layers
1 Ensure that the Layer Properties Manager is open. If the Layer Propertiespanel is not open, on the ribbon, click Home tab ➤ Layers panel ➤
Layer Properties.
2 On the Layer Properties Manager, select the Green Gas layer and clickthe light bulb in the On column. If the light bulb is yellow, the layer is
turned on.
Clicking the light bulb toggles the layer on and off. When the layer isturned off, you do not see the objects on the layer.
In this lesson, you learned to create layers, assign properties to layers, andcontrol the visibility of objects using layers.
Lesson 3: Modify Object Properties by LayersIn this lesson, you learn to change the default and assigned properties of alayer. You change the color, linetype, and lineweight of layers.
To change the linetype assigned to a layer
1 Ensure that the Layer Properties Manager is open. Click in the Linetypecolumn of the Green Gas layer.
2 In the Select Linetype dialog box, select a linetype from the listed options.If the linetype you need is not listed, click Load.
12 | Tutorial 5: Modify Object Properties and Layers in AutoCAD 2010
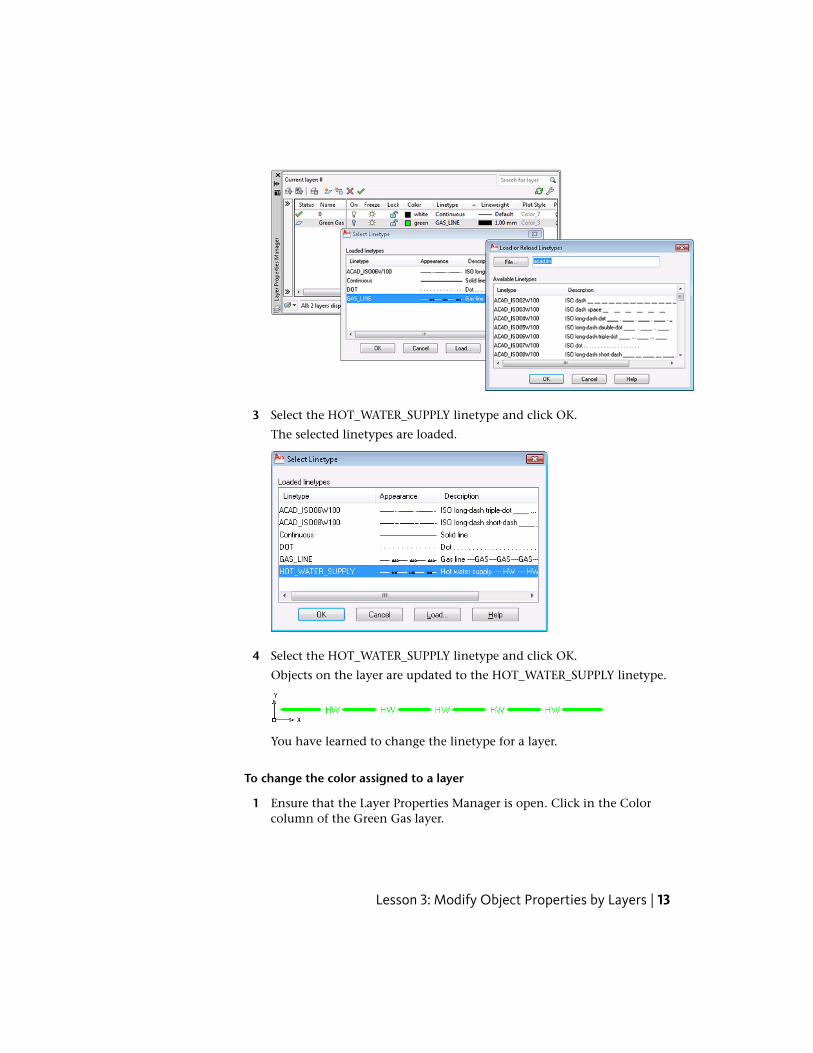
3 Select the HOT_WATER_SUPPLY linetype and click OK.
The selected linetypes are loaded.
4 Select the HOT_WATER_SUPPLY linetype and click OK.
Objects on the layer are updated to the HOT_WATER_SUPPLY linetype.
You have learned to change the linetype for a layer.
To change the color assigned to a layer
1 Ensure that the Layer Properties Manager is open. Click in the Colorcolumn of the Green Gas layer.
Lesson 3: Modify Object Properties by Layers | 13
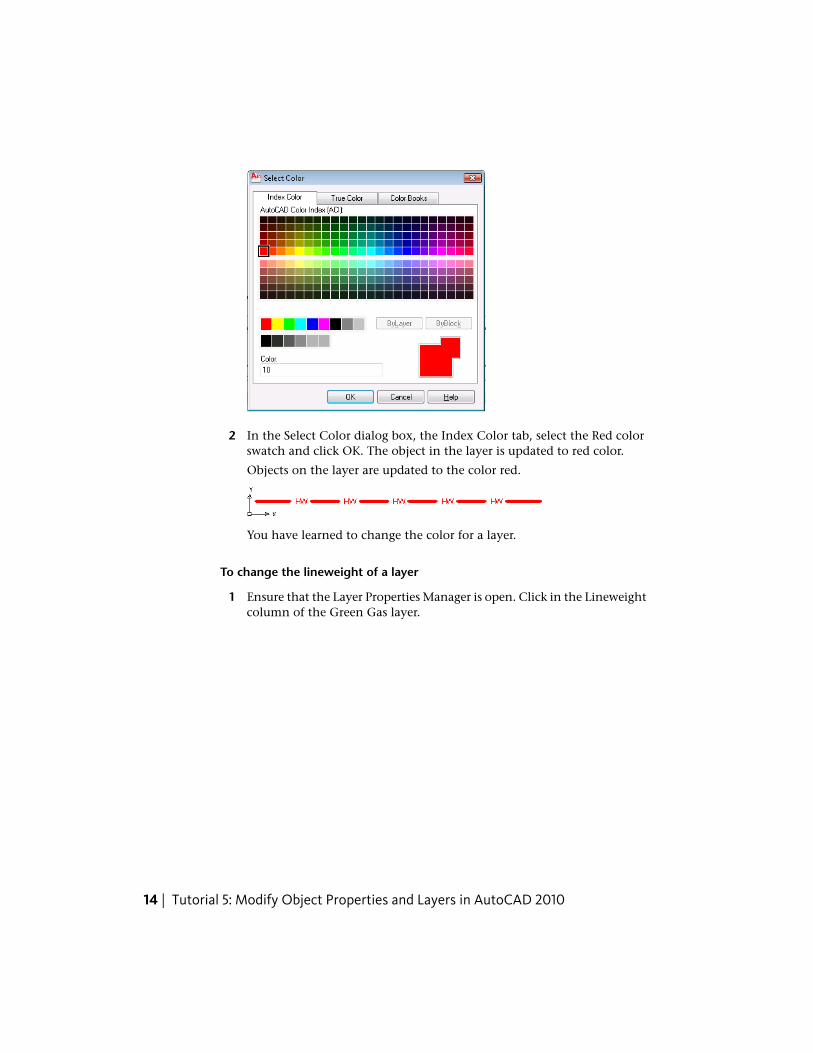
2 In the Select Color dialog box, the Index Color tab, select the Red colorswatch and click OK. The object in the layer is updated to red color.
Objects on the layer are updated to the color red.
You have learned to change the color for a layer.
To change the lineweight of a layer
1 Ensure that the Layer Properties Manager is open. Click in the Lineweightcolumn of the Green Gas layer.
14 | Tutorial 5: Modify Object Properties and Layers in AutoCAD 2010
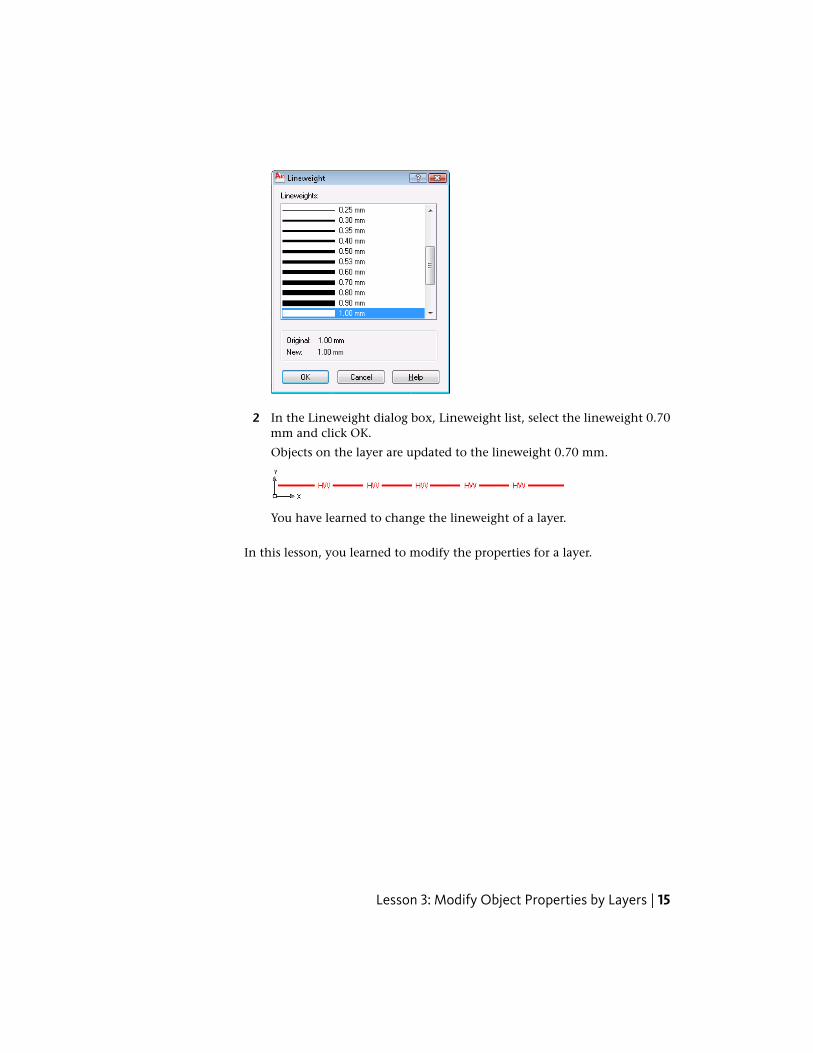
2 In the Lineweight dialog box, Lineweight list, select the lineweight 0.70mm and click OK.
Objects on the layer are updated to the lineweight 0.70 mm.
You have learned to change the lineweight of a layer.
In this lesson, you learned to modify the properties for a layer.
Lesson 3: Modify Object Properties by Layers | 15