Embed Size (px)
Citation preview
Está en la página de internet:
http://typeinmotionblog.fbarrie.org/2012/01/19/tutorial-gif-animado-con-gimp/
TUTORIAL: GIF animado con GIMP ¿Quieres realizar tus propias animaciones?
En 7 capturas de pantalla (screenshots) te enseñamos a realizar animaciones en formato de imagen .gif.
Para empezar hay que tener el programa Gimp 2.6 instalado en el ordenador. Gimp es un programa gratuito y libre (FreeLibreOpenSourceSoftware) que puedes descargar aquí:
GIMP 2.6 http://www.gimp.org/
instalador para windows:
http://downloads.sourceforge.net/gimp-win/gimp-2.6.11-i686-setup-1.exe
Ayuda (para instalar) en español:
http://sourceforge.net/projects/gimp-win/files/GIMP%20Help%202/GIMP%20Help%202.6.0%20(updated%20installer)/gimp-help-2-2.6.0-es-setup.exe Manual de consulta en la web en español: http://docs.gimp.org/2.6/es/
plugins para gimp: http://registry.gimp.org/
Una vez instalado podemos empezar.
Para la animación que usamos de ejemplo en este tutorial realizamos 26 fotografías. Utilizamos un fondo de césped artificial sobre una mesa y letras hechas con una pasta cerámica de receta casera y los mismos moldes que se usan en los talleres para familias, Mi retrato con letras. La cámara compacta sobre un trípode.
Hechas las fotografías (fotogramas) podemos realizar la animación.
Abrimos el programa y en Fichero (Ficheiro) clicamos en Abrir como capas… Seleccionamos los fotogramas de la animación.
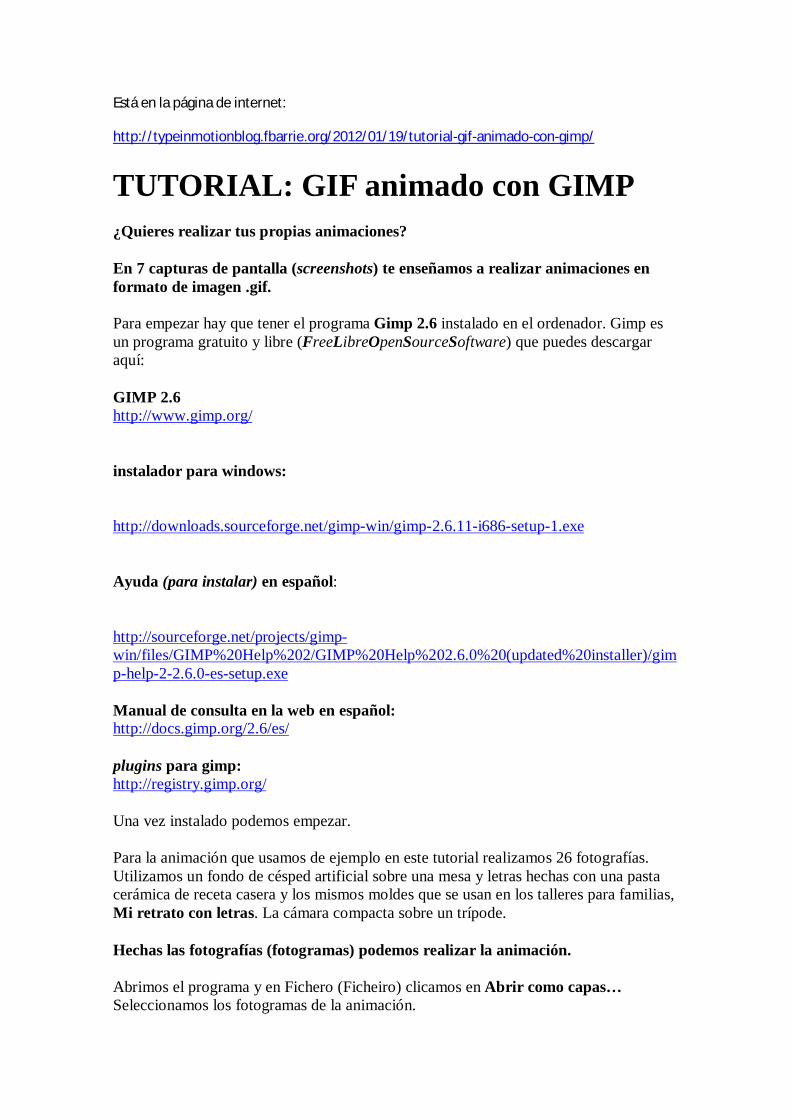
Como veis el tamaño de las imágenes es demasiado grande para una animación en GIF. Creo que es un buen tamaño 480×360 píxeles y 72ppp de resolución. Todo depende del número de imágenes de la animación. Si son muchas y muy grandes el GIF “pesará” demasiado.
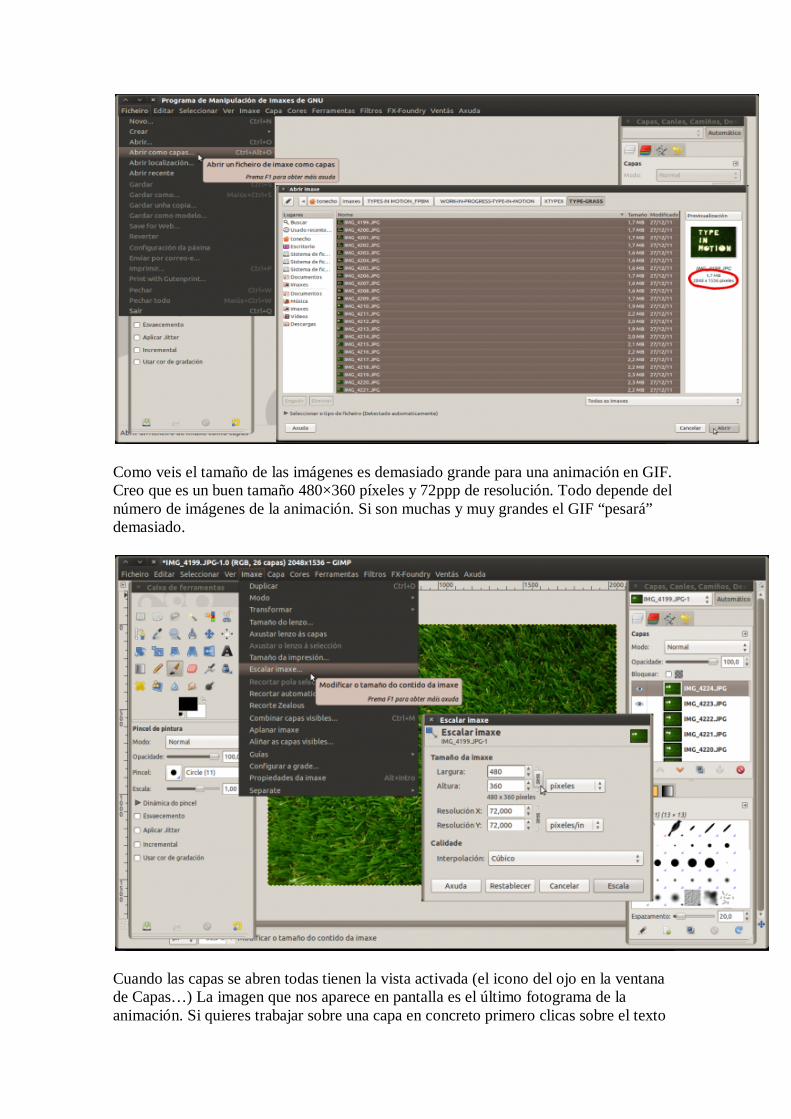
Cuando las capas se abren todas tienen la vista activada (el icono del ojo en la ventana de Capas…) La imagen que nos aparece en pantalla es el último fotograma de la animación. Si quieres trabajar sobre una capa en concreto primero clicas sobre el texto
de la capa (para seleccionarla) y luego colocas el puntero del ratón sobre el icono del ojo y clicas Mayusculas+Botón Izq. ratón. Así podrás ver esa capa en concreto.
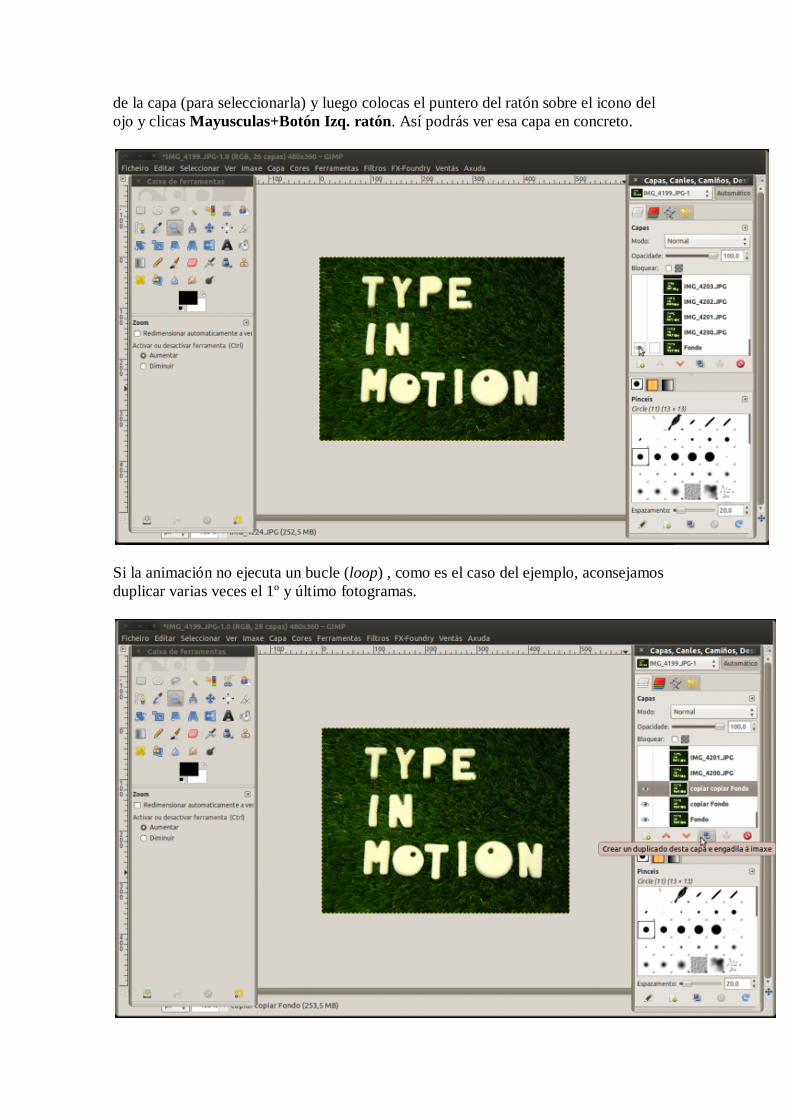
Si la animación no ejecuta un bucle (loop) , como es el caso del ejemplo, aconsejamos duplicar varias veces el 1º y último fotogramas.
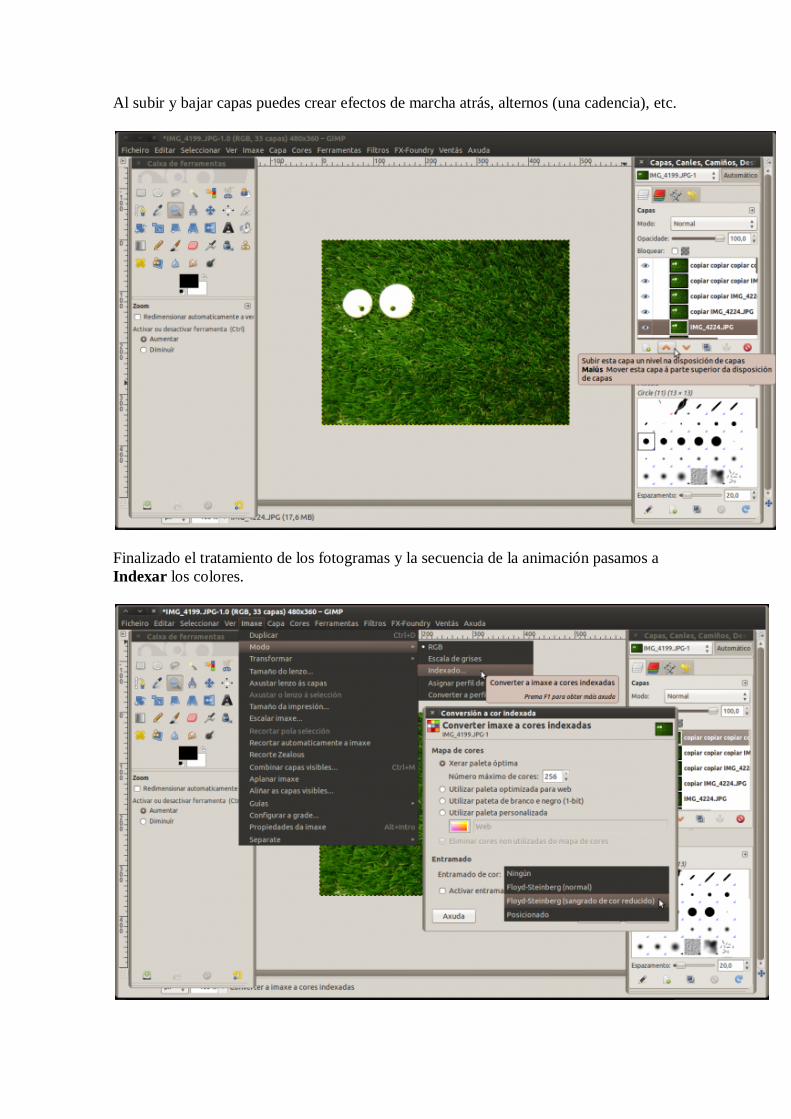
Al subir y bajar capas puedes crear efectos de marcha atrás, alternos (una cadencia), etc.
Finalizado el tratamiento de los fotogramas y la secuencia de la animación pasamos a Indexar los colores.
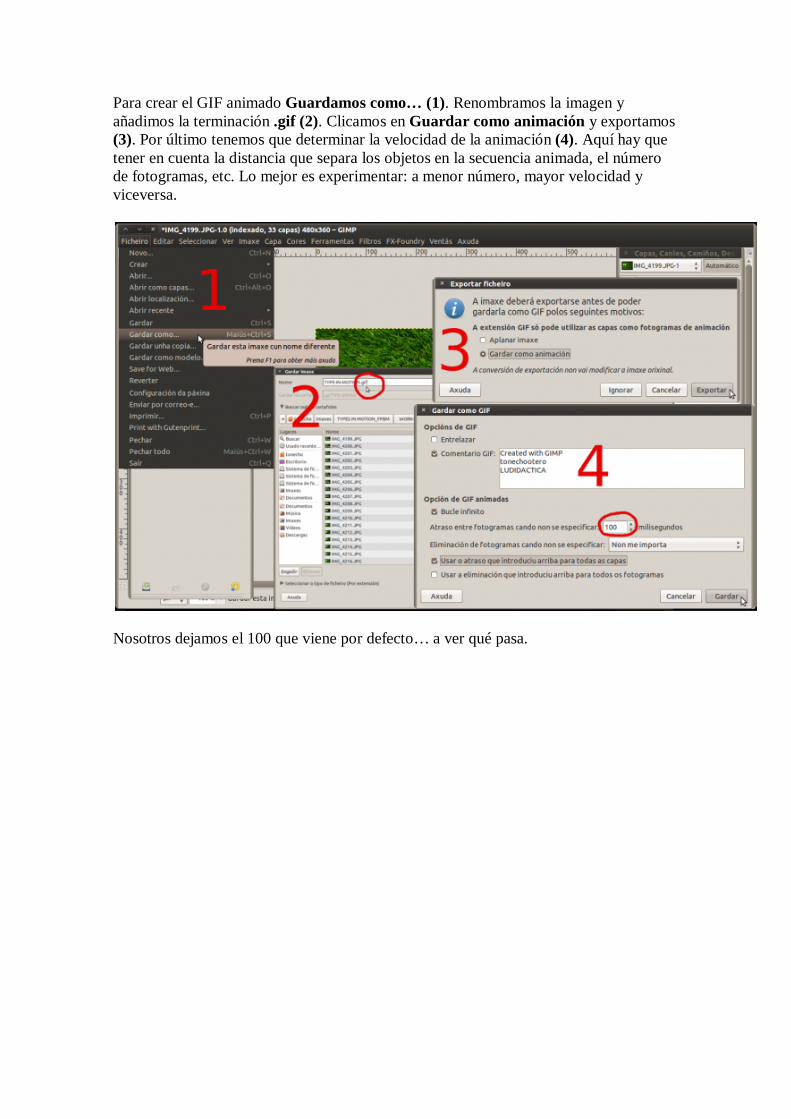
Para crear el GIF animado Guardamos como… (1). Renombramos la imagen y añadimos la terminación .gif (2). Clicamos en Guardar como animación y exportamos (3). Por último tenemos que determinar la velocidad de la animación (4). Aquí hay que tener en cuenta la distancia que separa los objetos en la secuencia animada, el número de fotogramas, etc. Lo mejor es experimentar: a menor número, mayor velocidad y viceversa.
Nosotros dejamos el 100 que viene por defecto… a ver qué pasa.

¡Ya está hecha la animación!
How to Create an Animated GIF in GIMP Have you ever seen those moving pictures on forums? Not the videos, of course, but next to people’s names you’ll sometimes find a picture with repeated motion. These are called animated gifs. They aren’t too hard to make, they look great, and you should try to make your own sometime! This is how you can do it.
Animated GIFs follow the basic principle of videos, but they don’t take it nearly as far. Essentially, they string together several frames to make a simple repeated motion. For example, you might see a horse running, or a plane flying. These are motions that are easy to show by playing the same frames over and over.
To get started, you’ll need an image editing program. You can use Photoshop, but GIMP is free, so that’s what I’m going to show you on. Go to www.gimp.org and download the latest version. It’s free, easy, and actually quite a bit of fun.
Now that you have the GIMP, you need an idea of what you’re going to animate. A very simple idea might be a ball bouncing, or some text glowing. As long as you can understand how the motion works, you’ll be fine.
Once you are in GIMP, you’ll need to create a new file. Go to File->New, and select the size you want. It doesn’t really matter what size you make, but bigger usually better because of the higher quality (and you can always make it smaller later). Under advance options, next to “Fill with:” click transparency. Then click OK.
The next thing you need to do is either draw your first frame, or insert a picture into GIMP to start. I’m going to do a bouncing ball, so I’ll just draw a circle and make it look nice with a bit of polish.
What I’m going to do is use the circle selection tool, on the upper left of the toolbox, and hold down the Shift key while I click and drag. This will create a perfect circle. I’ve only selected the area, though, so I need to fill it in with a color. I can do that by clicking the paint bucket, and clicking inside my selection. I can choose the color I want by clicking the square about halfway down t he toolbox window, and selecting the area of color that I want.
I can make it look a bit more realistic by going to Filters->Light and Shadow->Lighting Effects. This will make it look 3D, which will be all the better for the animation when I’m done.
Now we need to make our object move. We can do that by creating a new frame, or layer, in the current image. In the “Layers Channels and Paths” window, look for the box that displays your layers. There should be one layer already, called Background. That’s the one that you are working on now. Right click on that layer, and click “Duplicate Layer.” Now we have two layers.
Here is the process that you are going to use to make the animation:
1. Create an object (we did that already).
2. Duplicate the layer you’re working on.
3. Click on the original layer.
4. Move the object in the direction you want it to go.
5. Repeat Steps 2-3 until you have a satisfactory range of motion.
Once you are satisfied with your frames, go to File-> Save As. Insert a name for your image, then go down to “Select File Type.” Make it a .gif image, and then click save. GIMP should tell you that you have to export the image, and will ask you to flatten it or create an animated gif. Click the button that says “Save as Animation”, and then click export. You’ll get yet another dialogue box asking you some more specifics. Here you can set the frame rate (a higher number makes the animation go faster), and add a comment. Where it says “Frame Disposal where Unspecified,” click on the “One frame per layer (replace)” option, then click Save.
Once you’ve saved you’re gif image, open it up in your image viewer. If your normal image viewer doesn’t show the animation, try opening it in Firefox or Internet Explorer.
You can do this by right clicking on the file, and selecting “Open With.” Then choose your internet browser, and you’re all set!
Making an animated gif is pretty easy, and really fun. Try experimenting with your favorite animal or even your car. Pretty soon, you’ll get good enough to make some really cool images, like full resolution images of people nodding, blinking, and talking. Have fun!