Embed Size (px)
Citation preview
// Flexible – Virtuemart VM2 Template – CleanMart FOR VIRTUEMART 3.x // version 3.0 // author Flexible Web Design Team // copyright (C) 2014-‐ flexiblewebdesign.com // license GNU/GPLv3 http://www.gnu.org/licenses/gpl-‐3.0.html
FLEXIBLE WEB DESIGN TEAM Flexible Virtuemart Template – CleanMart (for VM3.)
TUTORIAL
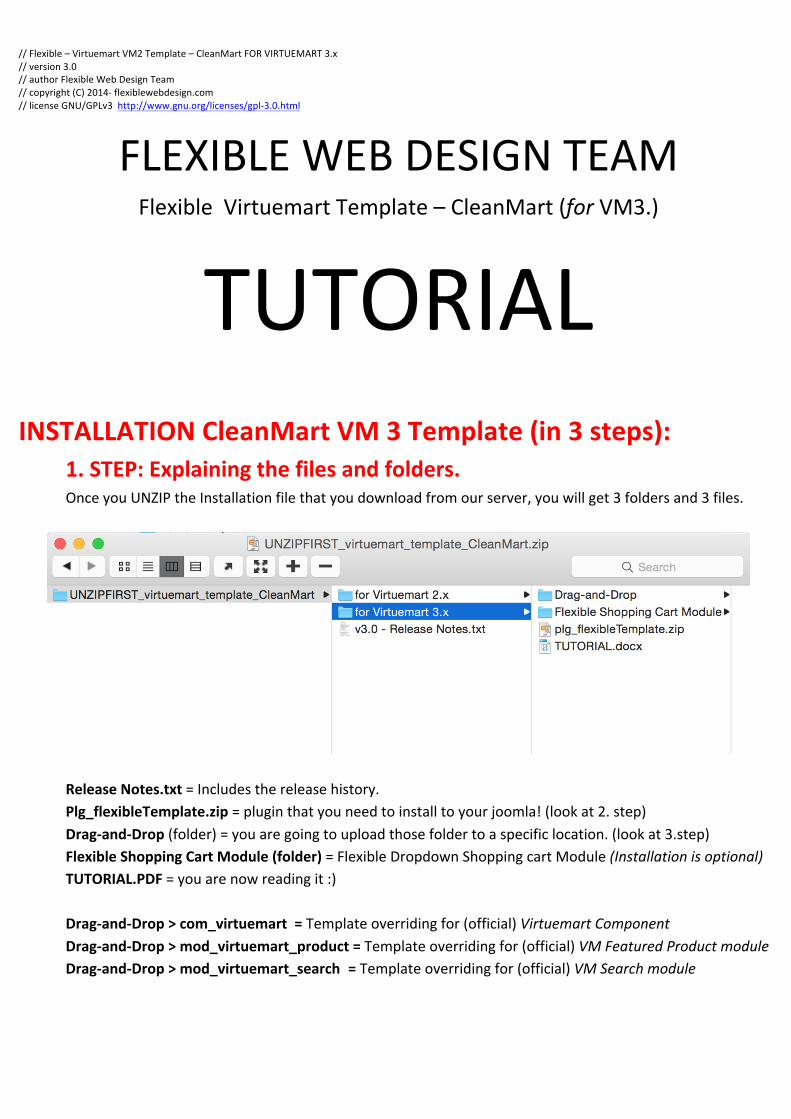
INSTALLATION CleanMart VM 3 Template (in 3 steps): 1. STEP: Explaining the files and folders.
Once you UNZIP the Installation file that you download from our server, you will get 3 folders and 3 files.
Release Notes.txt = Includes the release history. Plg_flexibleTemplate.zip = plugin that you need to install to your joomla! (look at 2. step) Drag-‐and-‐Drop (folder) = you are going to upload those folder to a specific location. (look at 3.step) Flexible Shopping Cart Module (folder) = Flexible Dropdown Shopping cart Module (Installation is optional) TUTORIAL.PDF = you are now reading it :)
Drag-‐and-‐Drop > com_virtuemart = Template overriding for (official) Virtuemart Component Drag-‐and-‐Drop > mod_virtuemart_product = Template overriding for (official) VM Featured Product module Drag-‐and-‐Drop > mod_virtuemart_search = Template overriding for (official) VM Search module
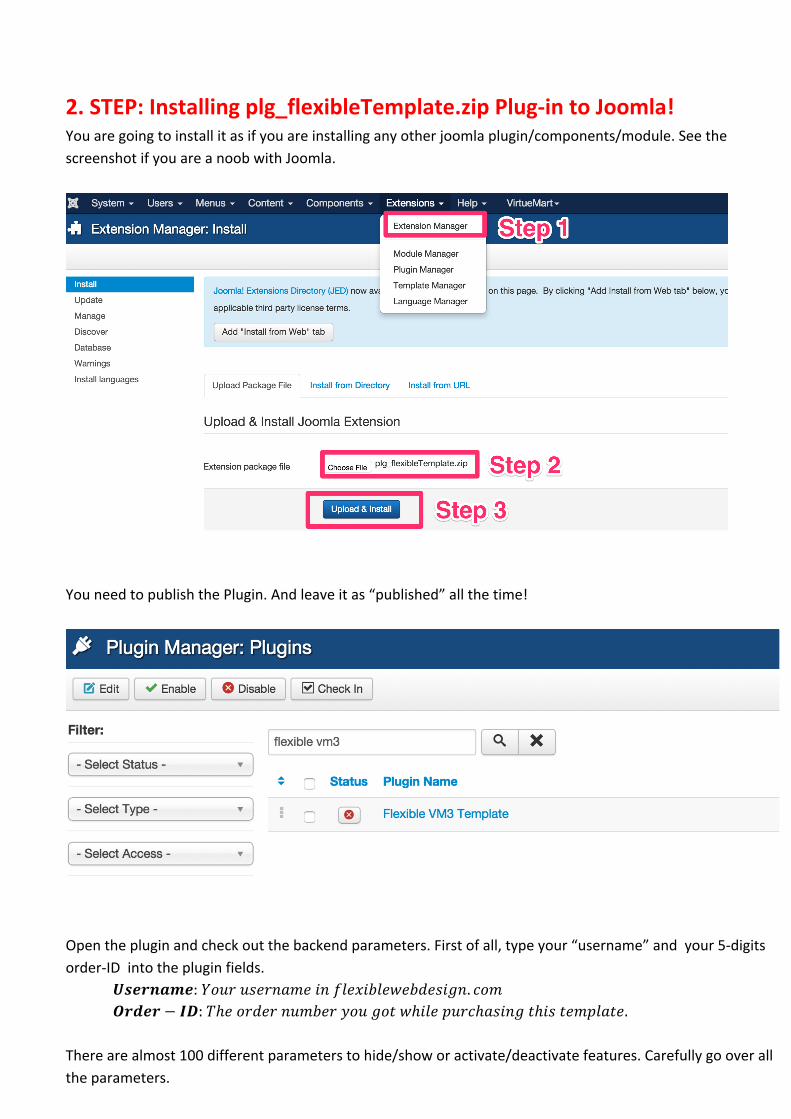
2. STEP: Installing plg_flexibleTemplate.zip Plug-‐in to Joomla! You are going to install it as if you are installing any other joomla plugin/components/module. See the screenshot if you are a noob with Joomla.
You need to publish the Plugin. And leave it as “published” all the time!
Open the plugin and check out the backend parameters. First of all, type your “username” and your 5-‐digits order-‐ID into the plugin fields. 𝑼𝒔𝒆𝒓𝒏𝒂𝒎𝒆: 𝑌𝑜𝑢𝑟 𝑢𝑠𝑒𝑟𝑛𝑎𝑚𝑒 𝑖𝑛 𝑓𝑙𝑒𝑥𝑖𝑏𝑙𝑒𝑤𝑒𝑏𝑑𝑒𝑠𝑖𝑔𝑛. 𝑐𝑜𝑚 𝑶𝒓𝒅𝒆𝒓− 𝑰𝑫: 𝑇ℎ𝑒 𝑜𝑟𝑑𝑒𝑟 𝑛𝑢𝑚𝑏𝑒𝑟 𝑦𝑜𝑢 𝑔𝑜𝑡 𝑤ℎ𝑖𝑙𝑒 𝑝𝑢𝑟𝑐ℎ𝑎𝑠𝑖𝑛𝑔 𝑡ℎ𝑖𝑠 𝑡𝑒𝑚𝑝𝑙𝑎𝑡𝑒. There are almost 100 different parameters to hide/show or activate/deactivate features. Carefully go over all the parameters.

3. STEP: Copying Folders to proper location We have got 3 folders in the “drag-‐and-‐drop” folder. Upload these folders to this path on your server: 𝑗𝑜𝑜𝑚𝑙𝑎𝑅𝑜𝑜𝑡!/templates/𝑦𝑜𝑢𝑟𝑇𝑒𝑚𝑝𝑙𝑎𝑡𝑒!/html/
𝑗𝑜𝑜𝑚𝑙𝑎𝑅𝑜𝑜𝑡! = is the location where your joomla is installed. 𝑦𝑜𝑢𝑟𝑇𝑒𝑚𝑝𝑙𝑎𝑡𝑒! = is the joomla template folder you are using currently. Let’s say you are using beez3 joomla template, then the folders should be dragged and dropped to here:
QUESTION&ANSWER: Q: Under my HTML folder, there is already a folder called “com_virtuemart” or “mod_virtuemart_product” or one of the others, what should I do. A: Looks like your Joomla Template is also using “template overriding” to style the virtuemart related pages. But from now on, our template will take care these stylization. Therefore you should remove the old one and drag-‐and-‐drop ours instead. (Alternatively you can rename the old folder instead of deleting itcompletely. i.e rename the old folder from com_virtuemart to com_virtuemart2 and upload ours instead) Q: I don’t know what joomla template I am using, or I can’t be sure. A: Browse your joomla-‐backend panel. And click Extensions -‐ > Template Manager
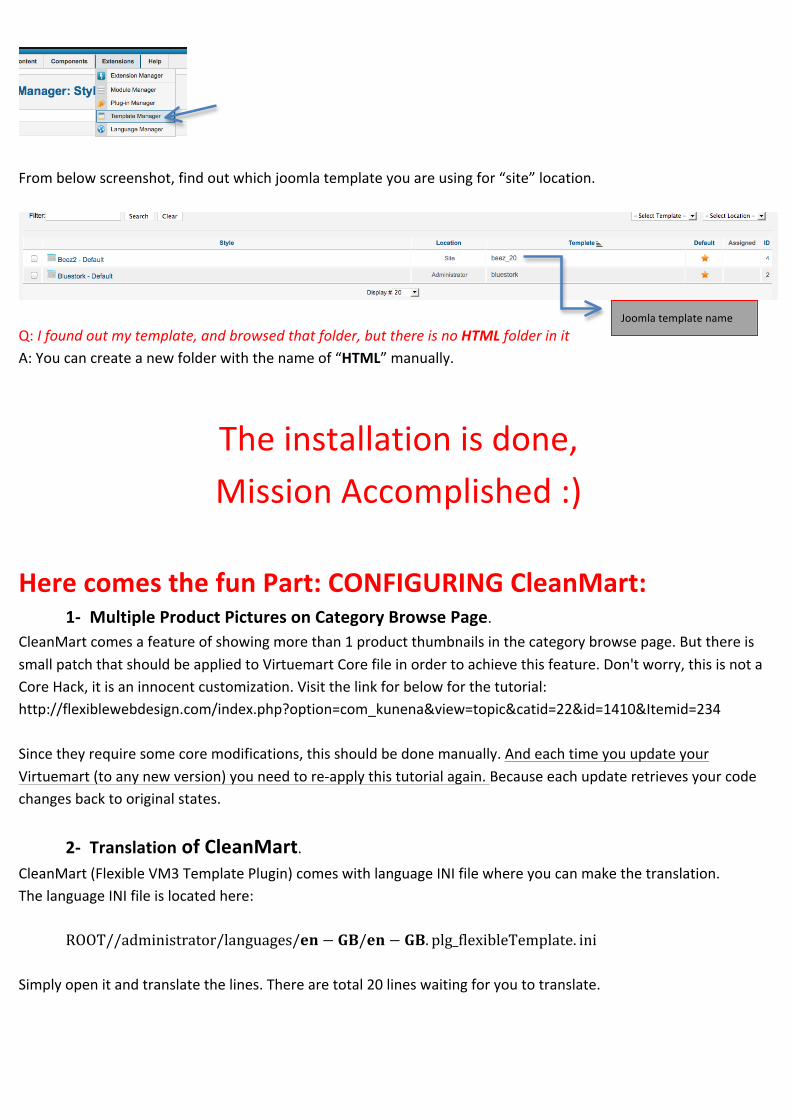
From below screenshot, find out which joomla template you are using for “site” location.
Q: I found out my template, and browsed that folder, but there is no HTML folder in it A: You can create a new folder with the name of “HTML” manually.
The installation is done, Mission Accomplished :)
Here comes the fun Part: CONFIGURING CleanMart: 1-‐ Multiple Product Pictures on Category Browse Page.
CleanMart comes a feature of showing more than 1 product thumbnails in the category browse page. But there is small patch that should be applied to Virtuemart Core file in order to achieve this feature. Don't worry, this is not a Core Hack, it is an innocent customization. Visit the link for below for the tutorial: http://flexiblewebdesign.com/index.php?option=com_kunena&view=topic&catid=22&id=1410&Itemid=234 Since they require some core modifications, this should be done manually. And each time you update your Virtuemart (to any new version) you need to re-‐apply this tutorial again. Because each update retrieves your code changes back to original states.
2-‐ Translation of CleanMart. CleanMart (Flexible VM3 Template Plugin) comes with language INI file where you can make the translation. The language INI file is located here: ROOT//administrator/languages/𝐞𝐧− 𝐆𝐁/𝐞𝐧− 𝐆𝐁.plg_flexibleTemplate. ini Simply open it and translate the lines. There are total 20 lines waiting for you to translate.
Joomla template name

3-‐ If you would like have the same Price layout that you see in our DEMO:
(Basically when there is discount, it overrides the old price and put the “percentage” next to discounted amount):
Then you need to enable those pricing parameters below in your Configuration (see the screenshot below). You can select more options (such as: Tax Amount etc..) , but you should at least choose these options below:
If you would like to change your price labels from; Base price with tax/Base price without tax to “List Price”, Sales Price to “Our Price” Discount to “You Save”. The file you need to modify is this:
yourdomain.com/components/com_virtuemart/language/en-‐GB3/en-‐GB.com_virtuemart.ini en-‐G3 is for English .It will be what ever language you currently have for your Virtuemart. For example; for French, it is fr-‐FR

In this file; look for the text you want to change, and change the text to what ever you would like. This file actually is the translation file for your Virtuemart. You can change/modify any text you would like. For example, you can remove the “No Additional Charge” text from this language INI file that appears in the Custom Field attributes.
4-‐ In the configuration section, click “Templates” tab from the header bar, take a look at the screenshot below;
Make sure you have the same settings as the screenshot above, which are:
Default template for your shop: Use Joomla Default Category Template: Use Joomla Default • Category Layout: (VM Template – CleanMart comes with 2 different category browse page layout versions, each version includes 3 View
options: ListView, GridView, MultiGridView. You can change the Default View (the View option that shows off when visitor open the page) option through Flexilbe VM2 Template plugin. Choose any category layout version that you’d like through Virtuemart Configuration). These layouts come with our VM Template: -‐
a. default b. flexV2 There might be some more in the dropdown list in VM Configuration but only 2 of them are belong to our template.
• Default Number of categories in a row: 3 (recommended value is 3, but try and see how it looks like with 2, 4 or even 5)
• Product Layout: (Choose any product details layout version that you’d like through Virtuemart Configuration). The product details page
layouts come with our template are:
a. default b. flexV2
There might be some more in the dropdown list in VM Configuration but only 2 of them are belong to our template.
3
4 5
6
3
4
5
2
1
1
2
Number of products in a row: 3 (recommended value is 3, but try and see how it looks like with 2, 4 or even 5.)
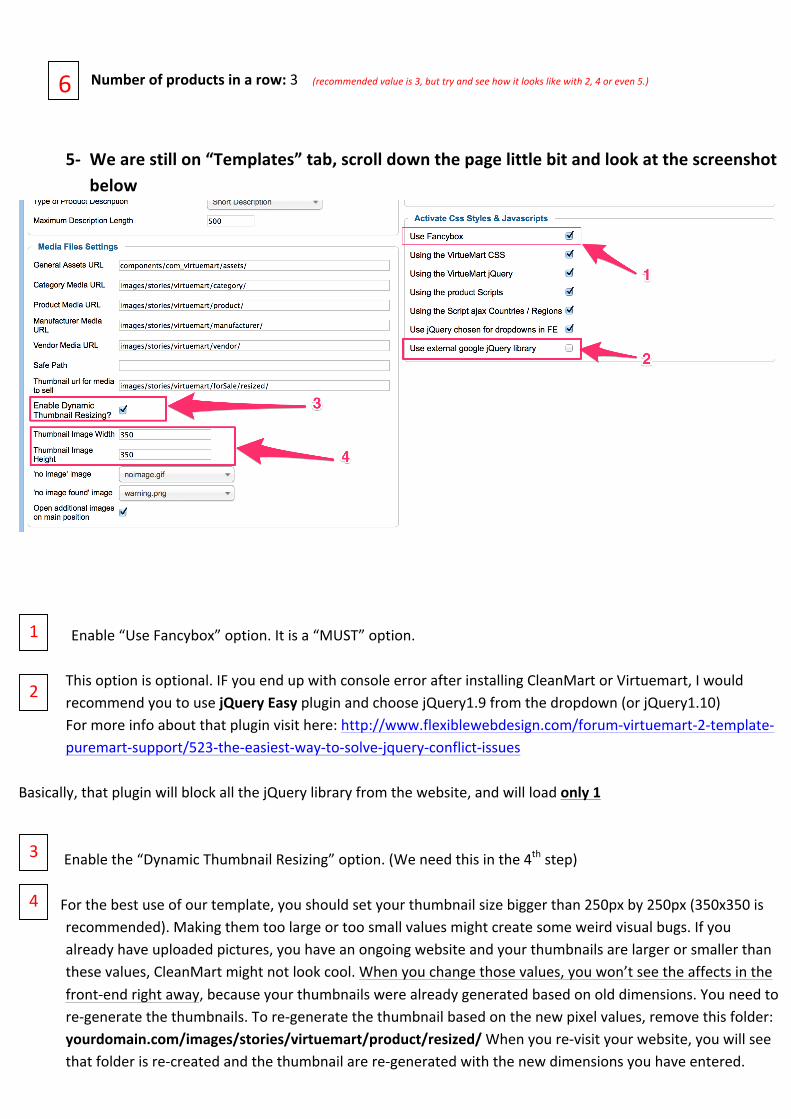
5-‐ We are still on “Templates” tab, scroll down the page little bit and look at the screenshot below
Enable “Use Fancybox” option. It is a “MUST” option. This option is optional. IF you end up with console error after installing CleanMart or Virtuemart, I would recommend you to use jQuery Easy plugin and choose jQuery1.9 from the dropdown (or jQuery1.10) For more info about that plugin visit here: http://www.flexiblewebdesign.com/forum-‐virtuemart-‐2-‐template-‐puremart-‐support/523-‐the-‐easiest-‐way-‐to-‐solve-‐jquery-‐conflict-‐issues
Basically, that plugin will block all the jQuery library from the website, and will load only 1
Enable the “Dynamic Thumbnail Resizing” option. (We need this in the 4th step) For the best use of our template, you should set your thumbnail size bigger than 250px by 250px (350x350 is recommended). Making them too large or too small values might create some weird visual bugs. If you already have uploaded pictures, you have an ongoing website and your thumbnails are larger or smaller than these values, CleanMart might not look cool. When you change those values, you won’t see the affects in the front-‐end right away, because your thumbnails were already generated based on old dimensions. You need to re-‐generate the thumbnails. To re-‐generate the thumbnail based on the new pixel values, remove this folder: yourdomain.com/images/stories/virtuemart/product/resized/ When you re-‐visit your website, you will see that folder is re-‐created and the thumbnail are re-‐generated with the new dimensions you have entered.
6
1
2
3
4
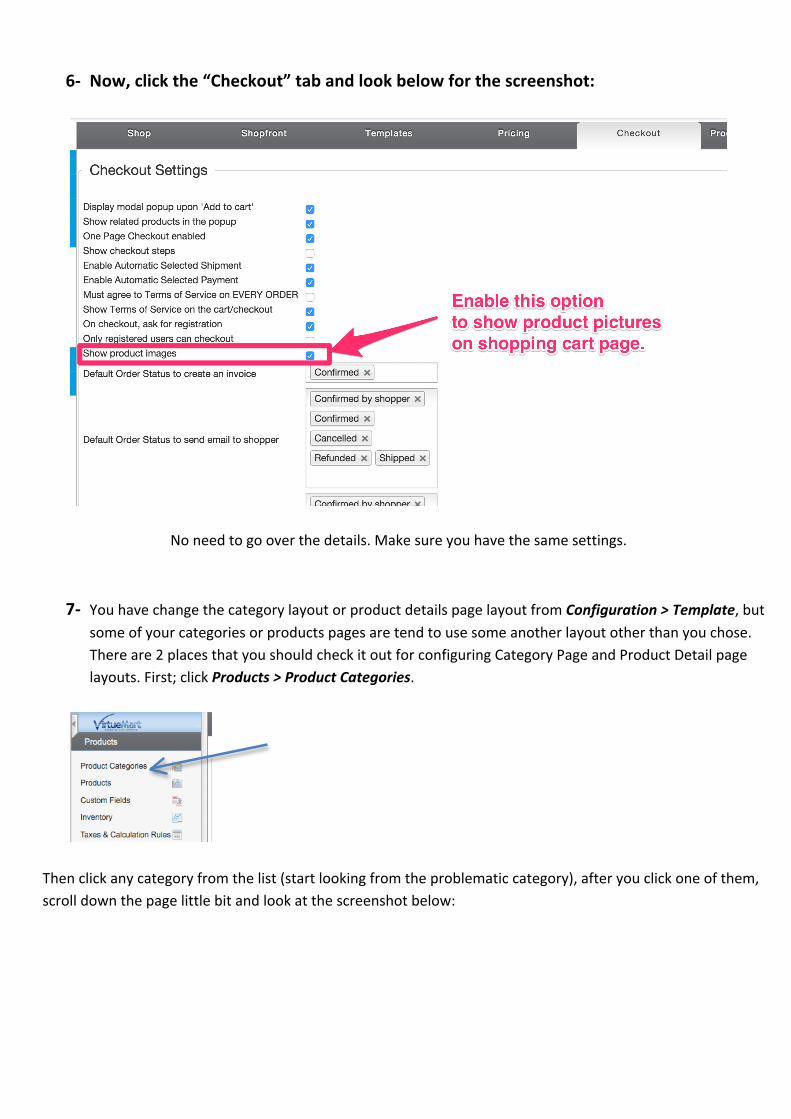
6-‐ Now, click the “Checkout” tab and look below for the screenshot:
No need to go over the details. Make sure you have the same settings.
7-‐ You have change the category layout or product details page layout from Configuration > Template, but
some of your categories or products pages are tend to use some another layout other than you chose. There are 2 places that you should check it out for configuring Category Page and Product Detail page layouts. First; click Products > Product Categories.
Then click any category from the list (start looking from the problematic category), after you click one of them, scroll down the page little bit and look at the screenshot below:
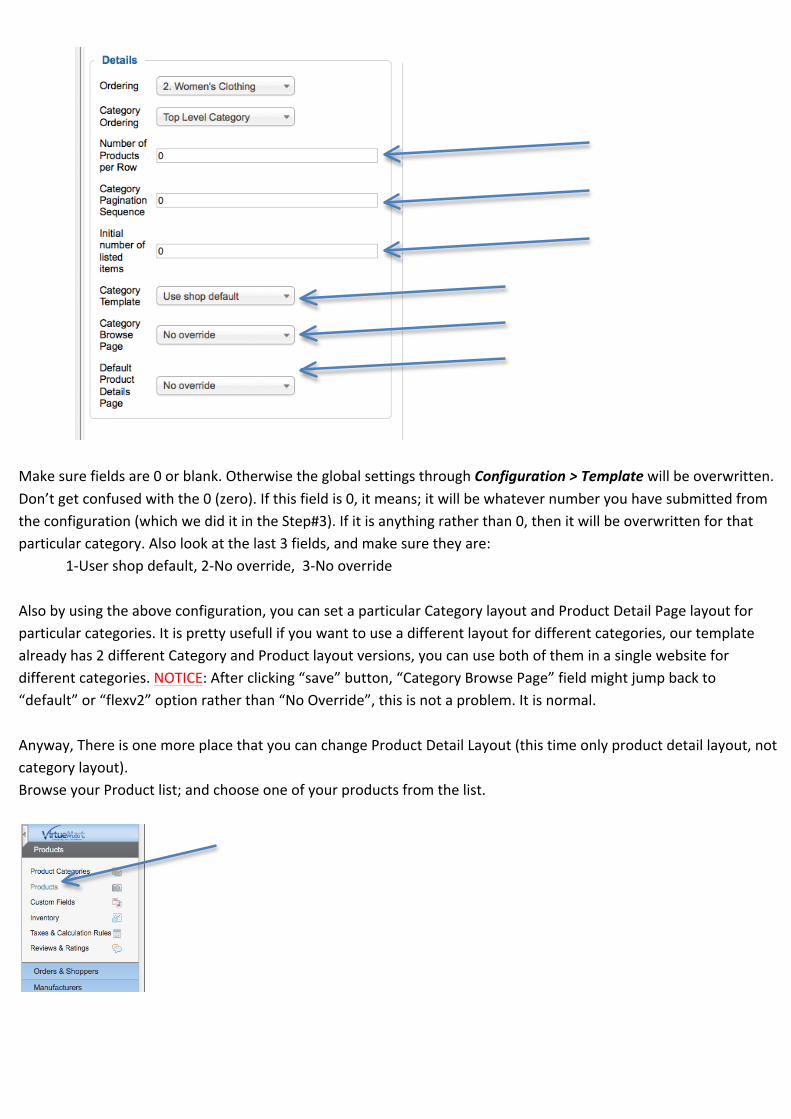
Make sure fields are 0 or blank. Otherwise the global settings through Configuration > Template will be overwritten. Don’t get confused with the 0 (zero). If this field is 0, it means; it will be whatever number you have submitted from the configuration (which we did it in the Step#3). If it is anything rather than 0, then it will be overwritten for that particular category. Also look at the last 3 fields, and make sure they are: 1-‐User shop default, 2-‐No override, 3-‐No override Also by using the above configuration, you can set a particular Category layout and Product Detail Page layout for particular categories. It is pretty usefull if you want to use a different layout for different categories, our template already has 2 different Category and Product layout versions, you can use both of them in a single website for different categories. NOTICE: After clicking “save” button, “Category Browse Page” field might jump back to “default” or “flexv2” option rather than “No Override”, this is not a problem. It is normal. Anyway, There is one more place that you can change Product Detail Layout (this time only product detail layout, not category layout). Browse your Product list; and choose one of your products from the list.
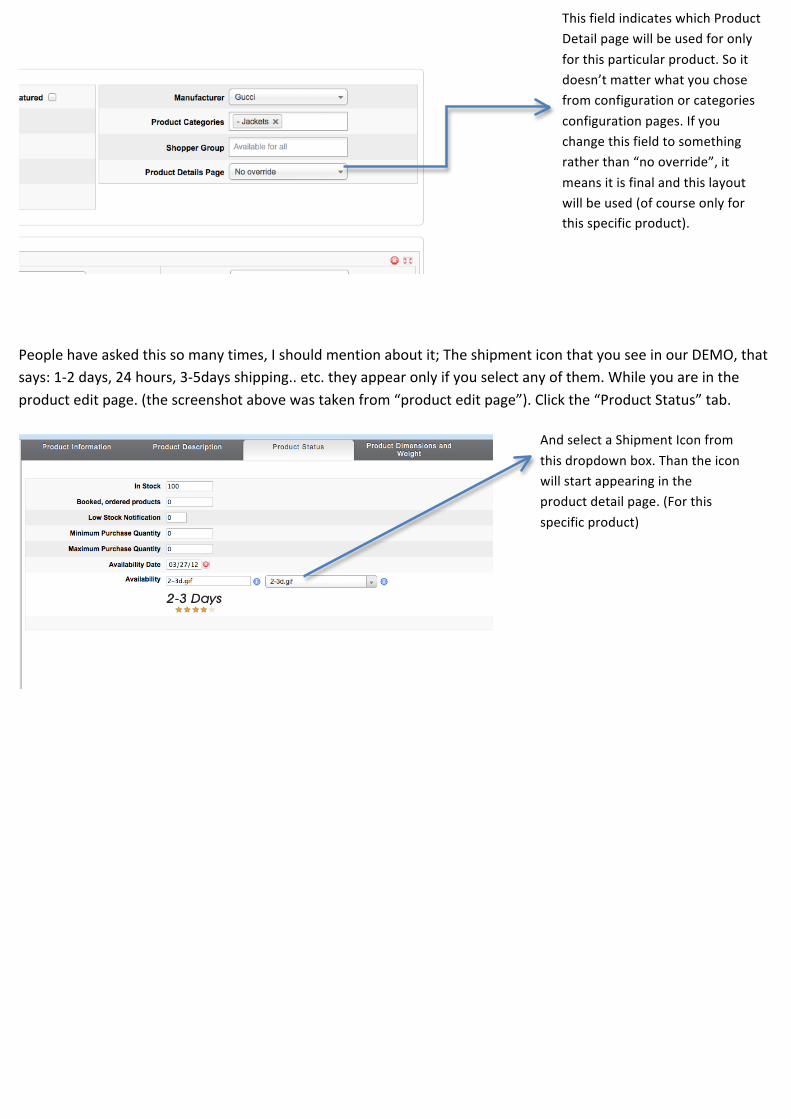
People have asked this so many times, I should mention about it; The shipment icon that you see in our DEMO, that says: 1-‐2 days, 24 hours, 3-‐5days shipping.. etc. they appear only if you select any of them. While you are in the product edit page. (the screenshot above was taken from “product edit page”). Click the “Product Status” tab.
This field indicates which Product Detail page will be used for only for this particular product. So it doesn’t matter what you chose from configuration or categories configuration pages. If you change this field to something rather than “no override”, it means it is final and this layout will be used (of course only for this specific product).
And select a Shipment Icon from this dropdown box. Than the icon will start appearing in the product detail page. (For this specific product)
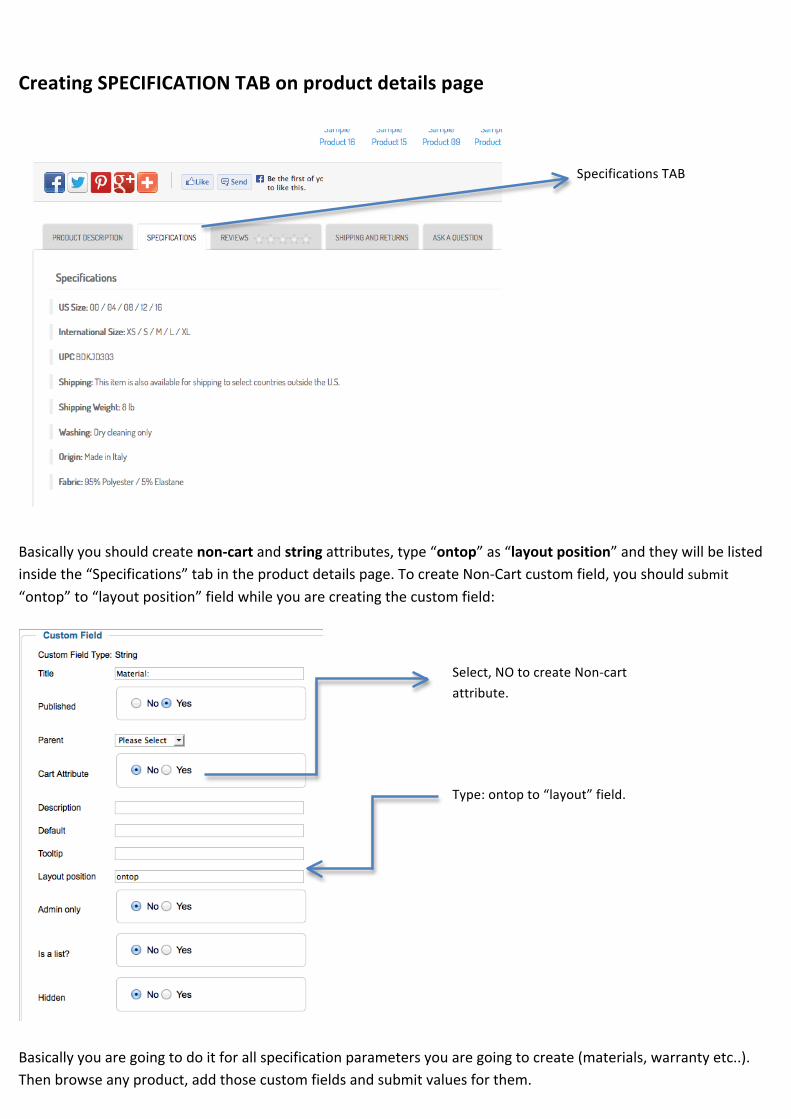
Creating SPECIFICATION TAB on product details page
Basically you should create non-‐cart and string attributes, type “ontop” as “layout position” and they will be listed inside the “Specifications” tab in the product details page. To create Non-‐Cart custom field, you should submit “ontop” to “layout position” field while you are creating the custom field:
Basically you are going to do it for all specification parameters you are going to create (materials, warranty etc..). Then browse any product, add those custom fields and submit values for them.
Select, NO to create Non-‐cart attribute.
Type: ontop to “layout” field.
Specifications TAB
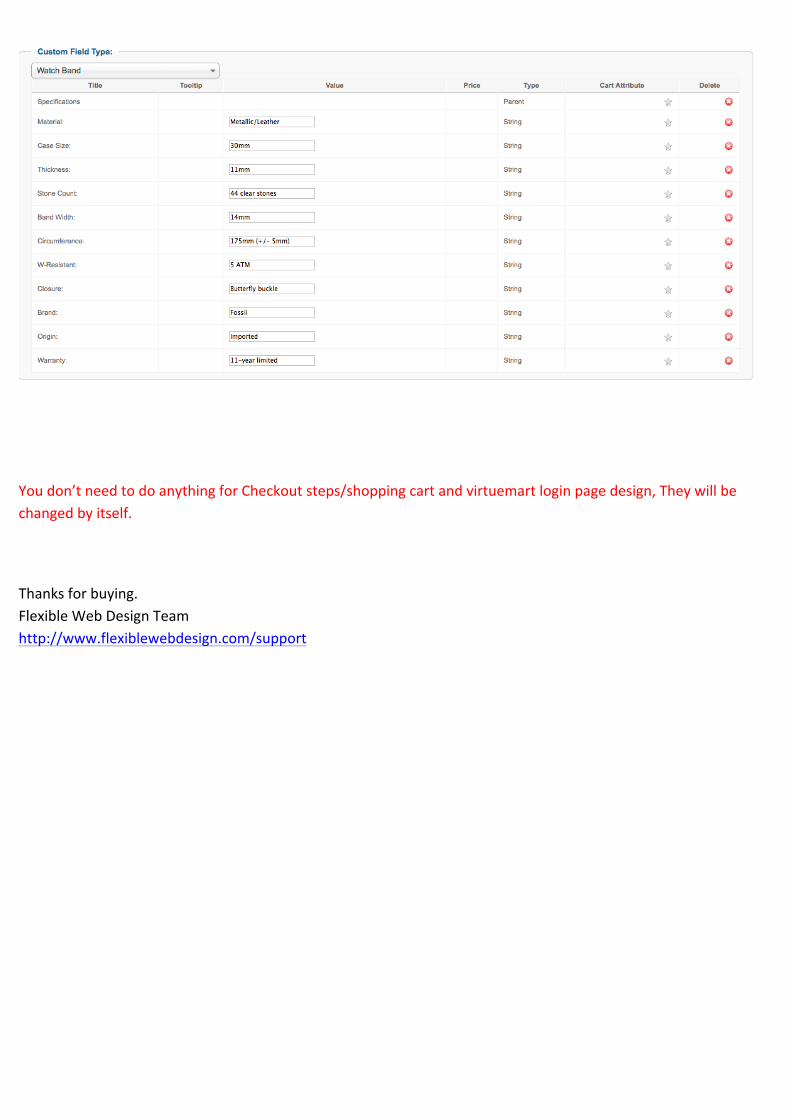
You don’t need to do anything for Checkout steps/shopping cart and virtuemart login page design, They will be changed by itself.
Thanks for buying. Flexible Web Design Team http://www.flexiblewebdesign.com/support