Embed Size (px)
Citation preview
TV Tuner Card/Box
My Cinema-P7131DMy Cinema-P7131My Cinema U3000
i ii ii ii ii i
E2110E2110E2110E2110E2110Revised Edit ion V2Revised Edit ion V2Revised Edit ion V2Revised Edit ion V2Revised Edit ion V2August 2005August 2005August 2005August 2005August 2005
Copyr ight © 2005 ASUSTeK COMPUTER INC . A l l R i ghts Rese rved .Copy r ight © 2005 ASUSTeK COMPUTER INC . A l l R i ghts Rese rved .Copy r ight © 2005 ASUSTeK COMPUTER INC . A l l R i ghts Rese rved .Copy r ight © 2005 ASUSTeK COMPUTER INC . A l l R i ghts Rese rved .Copy r ight © 2005 ASUSTeK COMPUTER INC . A l l R i ghts Rese rved .
No part of this manual, including the products and software described in it, may be reproduced,transmitted, transcribed, stored in a retrieval system, or translated into any language in any formor by any means, except documentation kept by the purchaser for backup purposes, without theexpress written permission of ASUSTeK COMPUTER INC. (“ASUS”).
Product warranty or service will not be extended if: (1) the product is repaired, modified oraltered, unless such repair, modification of alteration is authorized in writing by ASUS; or (2) theserial number of the product is defaced or missing.
ASUS PROVIDES THIS MANUAL “AS IS” WITHOUT WARRANTY OF ANY KIND, EITHER EXPRESS ORIMPLIED, INCLUDING BUT NOT LIMITED TO THE IMPLIED WARRANTIES OR CONDITIONS OFMERCHANTABILITY OR FITNESS FOR A PARTICULAR PURPOSE. IN NO EVENT SHALL ASUS, ITSDIRECTORS, OFFICERS, EMPLOYEES OR AGENTS BE LIABLE FOR ANY INDIRECT, SPECIAL,INCIDENTAL, OR CONSEQUENTIAL DAMAGES (INCLUDING DAMAGES FOR LOSS OF PROFITS, LOSSOF BUSINESS, LOSS OF USE OR DATA, INTERRUPTION OF BUSINESS AND THE LIKE), EVEN IF ASUSHAS BEEN ADVISED OF THE POSSIBILITY OF SUCH DAMAGES ARISING FROM ANY DEFECT ORERROR IN THIS MANUAL OR PRODUCT.
SPECIFICATIONS AND INFORMATION CONTAINED IN THIS MANUAL ARE FURNISHED FORINFORMATIONAL USE ONLY, AND ARE SUBJECT TO CHANGE AT ANY TIME WITHOUT NOTICE, ANDSHOULD NOT BE CONSTRUED AS A COMMITMENT BY ASUS. ASUS ASSUMES NO RESPONSIBILITYOR LIABILITY FOR ANY ERRORS OR INACCURACIES THAT MAY APPEAR IN THIS MANUAL,INCLUDING THE PRODUCTS AND SOFTWARE DESCRIBED IN IT.
Products and corporate names appearing in this manual may or may not be registeredtrademarks or copyrights of their respective companies, and are used only for identification orexplanation and to the owners’ benefit, without intent to infringe.
i i ii i ii i ii i ii i i
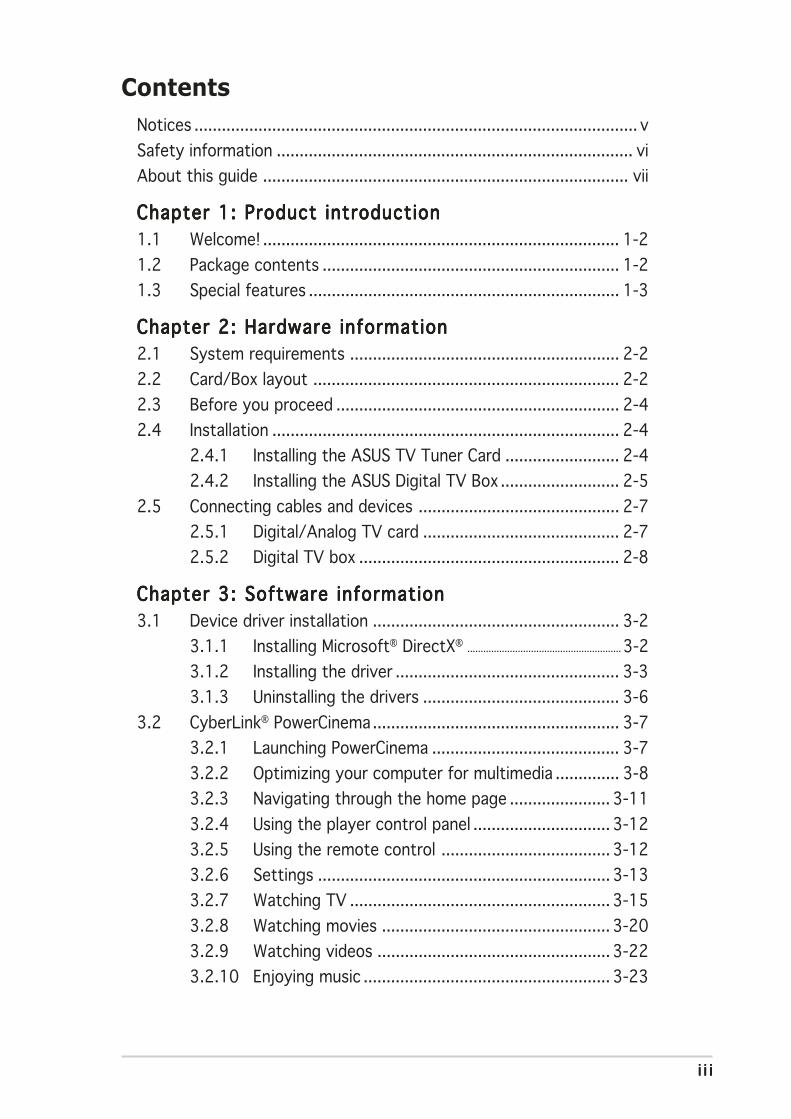
Contents
Notices ................................................................................................. v
Safety information .............................................................................. vi
About this guide ................................................................................ vii
Chapter 1: Product introductionChapter 1: Product introductionChapter 1: Product introductionChapter 1: Product introductionChapter 1: Product introduction
1.1 Welcome! .............................................................................. 1-2
1.2 Package contents ................................................................. 1-2
1.3 Special features .................................................................... 1-3
Chapter 2: Hardware informationChapter 2: Hardware informationChapter 2: Hardware informationChapter 2: Hardware informationChapter 2: Hardware information
2.1 System requirements ........................................................... 2-2
2.2 Card/Box layout ................................................................... 2-2
2.3 Before you proceed .............................................................. 2-4
2.4 Installation ............................................................................ 2-4
2.4.1 Installing the ASUS TV Tuner Card ......................... 2-4
2.4.2 Installing the ASUS Digital TV Box .......................... 2-5
2.5 Connecting cables and devices ............................................ 2-7
2.5.1 Digital/Analog TV card ........................................... 2-7
2.5.2 Digital TV box ......................................................... 2-8
Chapter 3: Software informationChapter 3: Software informationChapter 3: Software informationChapter 3: Software informationChapter 3: Software information
3.1 Device driver installation ...................................................... 3-2
3.1.1 Installing Microsoft® DirectX®.......................................................... 3-2
3.1.2 Installing the driver ................................................. 3-3
3.1.3 Uninstalling the drivers ........................................... 3-6
3.2 CyberLink® PowerCinema...................................................... 3-7
3.2.1 Launching PowerCinema ......................................... 3-7
3.2.2 Optimizing your computer for multimedia .............. 3-8
3.2.3 Navigating through the home page ...................... 3-11
3.2.4 Using the player control panel .............................. 3-12
3.2.5 Using the remote control ..................................... 3-12
3.2.6 Settings ................................................................ 3-13
3.2.7 Watching TV ......................................................... 3-15
3.2.8 Watching movies .................................................. 3-20
3.2.9 Watching videos ................................................... 3-22
3.2.10 Enjoying music ...................................................... 3-23
i vi vi vi vi v
Contents
3.2.11 Viewing pictures ................................................... 3-26
3.2.12 Listening to FM radio ............................................ 3-29
3.2.13 Extras ................................................................... 3-31
3.3 MakeDVD (for Windows® XP only) ...................................... 3-32
3.4 PowerProducer (for Windows® XP only) ............................. 3-32
3.5 PowerDirector (for Windows® XP only) .............................. 3-33
3.6 ASUS Splendid .................................................................... 3-33
3.7 ASUS VideoSecurity Online ................................................. 3-34
Appendix:Appendix:Appendix:Appendix:Appendix: Reference informationReference informationReference informationReference informationReference information
A.1 Remote controller ................................................................. A-2
A.1.1 Analog/digital TV tuner card .................................. A-2
A.1.2 Digital TV tuner box ............................................... A-4
A.2 International TV systems and standards (Analog TV) ......... A-6
A.3 International TV systems and standards (DVB-T) ............... A-8
vvvvv
Notices
Federal Communications Commission StatementFederal Communications Commission StatementFederal Communications Commission StatementFederal Communications Commission StatementFederal Communications Commission Statement
This device complies with Part 15 of the FCC Rules. Operation is subject tothe following two conditions:
• This device may not cause harmful interference, and
• This device must accept any interference received including interferencethat may cause undesired operation.
This equipment has been tested and found to comply with the limits for aClass B digital device, pursuant to Part 15 of the FCC Rules. These limits aredesigned to provide reasonable protection against harmful interference in aresidential installation. This equipment generates, uses and can radiate radiofrequency energy and, if not installed and used in accordance withmanufacturer’s instructions, may cause harmful interference to radiocommunications. However, there is no guarantee that interference will notoccur in a particular installation. If this equipment does cause harmfulinterference to radio or television reception, which can be determined byturning the equipment off and on, the user is encouraged to try to correctthe interference by one or more of the following measures:
• Reorient or relocate the receiving antenna.
• Increase the separation between the equipment and receiver.
• Connect the equipment to an outlet on a circuit different from that towhich the receiver is connected.
• Consult the dealer or an experienced radio/TV technician for help.
Canadian Department of Communications StatementCanadian Department of Communications StatementCanadian Department of Communications StatementCanadian Department of Communications StatementCanadian Department of Communications Statement
This digital apparatus does not exceed the Class B limits for radio noiseemissions from digital apparatus set out in the Radio InterferenceRegulations of the Canadian Department of Communications.
This class B digital apparatus complies with CanadianThis class B digital apparatus complies with CanadianThis class B digital apparatus complies with CanadianThis class B digital apparatus complies with CanadianThis class B digital apparatus complies with CanadianICES-003.ICES-003.ICES-003.ICES-003.ICES-003.
The use of shielded cables for connection of the monitor to the graphicscard is required to assure compliance with FCC regulations. Changes ormodifications to this unit not expressly approved by the partyresponsible for compliance could void the user’s authority to operatethis equipment.
v iv iv iv iv i
Safety information
Electrical safetyElectrical safetyElectrical safetyElectrical safetyElectrical safety
• To prevent electrical shock hazard, disconnect the power cable from theelectrical outlet before relocating the system.
• When adding or removing devices to or from the system, ensure that thepower cables for the devices are unplugged before the signal cables areconnected. If possible, disconnect all power cables from the existingsystem before you add a device.
• Before connecting or removing signal cables from the motherboard,ensure that all power cables are unplugged.
• Seek professional assistance before using an adpater or extension cord.These devices could interrupt the grounding circuit.
• Make sure that your power supply is set to the correct voltage in yourarea. If you are not sure about the voltage of the electrical outlet you areusing, contact your local power company.
• If the power supply is broken, do not try to fix it by yourself. Contact aqualified service technician or your retailer.
Operation safetyOperation safetyOperation safetyOperation safetyOperation safety
• Before installing the motherboard and adding devices on it, carefully readall the manuals that came with the package.
• Before using the product, make sure all cables are correctly connectedand the power cables are not damaged. If you detect any damage,contact your dealer immediately.
• To avoid short circuits, keep paper clips, screws, and staples away fromconnectors, slots, sockets and circuitry.
• Avoid dust, humidity, and temperature extremes. Do not place theproduct in any area where it may become wet.
• Place the product on a stable surface.
• If you encounter technical problems with the product, contact a qualifiedservice technician or your retailer.
v i iv i iv i iv i iv i i
About this guide
This user guide contains the information you need when installing andconfiguring the ASUS TV Tuner Card/Box.
How this guide is organizedHow this guide is organizedHow this guide is organizedHow this guide is organizedHow this guide is organized
This user guide contains the following parts:
••••• Chapter 1: Product introduct ionChapter 1: Product introduct ionChapter 1: Product introduct ionChapter 1: Product introduct ionChapter 1: Product introduct ion
This chapter describes the features of the ASUS TV Tuner Card/Box.
••••• Chapter 2: Hardware informat ionChapter 2: Hardware informat ionChapter 2: Hardware informat ionChapter 2: Hardware informat ionChapter 2: Hardware informat ion
This chapter lists the hardware setup procedures that you have toperform when installing the ASUS TV Tuner Card/Box.
••••• Chapter 3: Software informat ionChapter 3: Software informat ionChapter 3: Software informat ionChapter 3: Software informat ionChapter 3: Software informat ion
This chapter gives information on how to install device drivers andapplications for the ASUS TV Tuner Card/Box.
••••• Appendix: Reference informat ionAppendix: Reference informat ionAppendix: Reference informat ionAppendix: Reference informat ionAppendix: Reference informat ion
This chapter includes information on the remote controller, the keytable, and international TV systems and standards.
Where to find more informationWhere to find more informationWhere to find more informationWhere to find more informationWhere to find more information
Refer to the following sources for additional information and for productand software updates.
1 .1 .1 .1 .1 . ASUS webs itesASUS webs itesASUS webs itesASUS webs itesASUS webs ites
The ASUS website provides updated information on ASUS hardwareand software products. Refer to the ASUS contact information.
2 .2 .2 .2 .2 . Opt ional documentat ionOpt ional documentat ionOpt ional documentat ionOpt ional documentat ionOpt ional documentat ion
Your product package may include optional documentation, such aswarranty flyers, that may have been added by your dealer. Thesedocuments are not part of the standard package.
v i i iv i i iv i i iv i i iv i i i
Conventions used in this guideConventions used in this guideConventions used in this guideConventions used in this guideConventions used in this guide
To make sure that you perform certain tasks properly, take note of thefollowing symbols used throughout this manual.
DANGER/WARNING: DANGER/WARNING: DANGER/WARNING: DANGER/WARNING: DANGER/WARNING: Information to prevent injury to yourselfwhen trying to complete a task.
CAUTION:CAUTION:CAUTION:CAUTION:CAUTION: Information to prevent damage to the componentswhen trying to complete a task.
NOTE: NOTE: NOTE: NOTE: NOTE: Tips and additional information to help you complete atask.
IMPORTANT: IMPORTANT: IMPORTANT: IMPORTANT: IMPORTANT: Instructions that you MUST follow to complete atask.
TypographyTypographyTypographyTypographyTypography
Bold textBo ld textBo ld textBo ld textBo ld text Indicates a menu or an item to select.
Italics Used to emphasize a word or a phrase.
<Key> Keys enclosed in the less-than and greater-thansign means that you must press the enclosed key.
Example: <Enter> means that you must pressthe Enter or Return key.
<Key1+Key2+Key3> If you must press two or more keyssimultaneously, the key names are linked with aplus sign (+).
Example: <Ctrl+Alt+D>

ASUS TV Tuner Card/BoxASUS TV Tuner Card/BoxASUS TV Tuner Card/BoxASUS TV Tuner Card/BoxASUS TV Tuner Card/Box
Chapter 1
Pro
du
ct
intr
od
ucti
onThis chapter describes the features
of the ASUS TV Tuner Card/Box.
1 - 21 - 21 - 21 - 21 - 2 Chapter 1 : Product int roduct ionChapter 1 : Product int roduct ionChapter 1 : Product int roduct ionChapter 1 : Product int roduct ionChapter 1 : Product int roduct ion
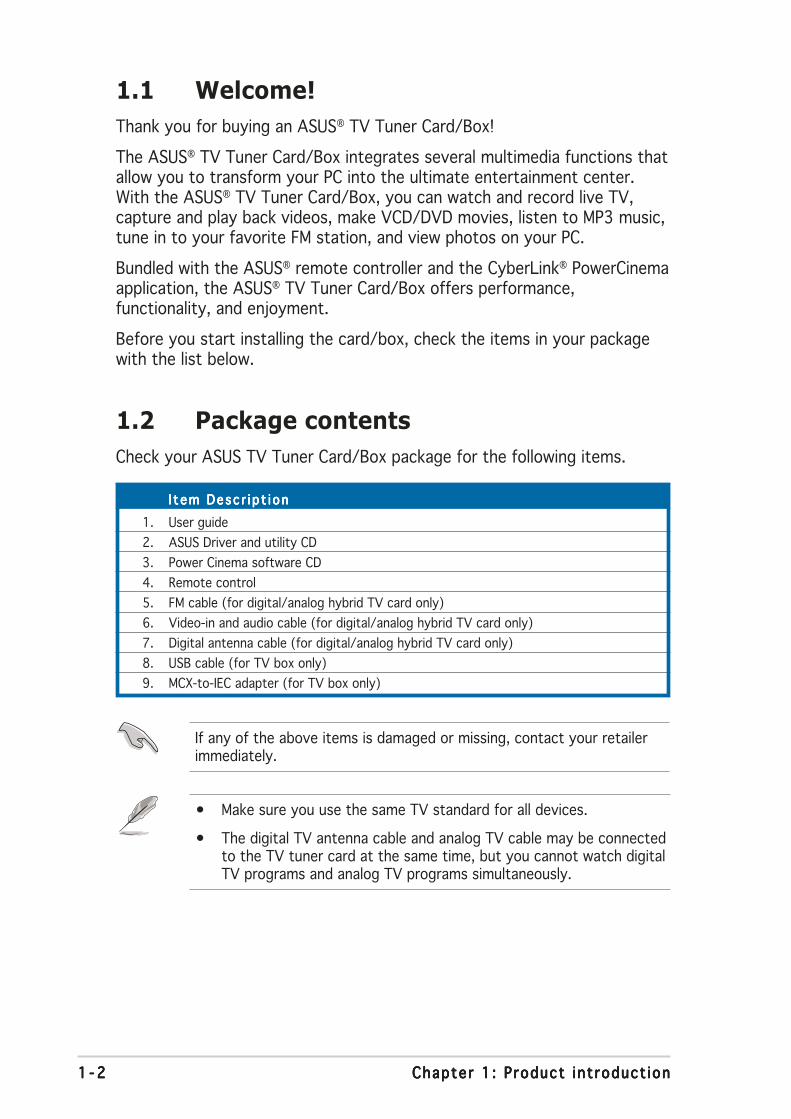
1.1 Welcome!
Thank you for buying an ASUS® TV Tuner Card/Box!
The ASUS® TV Tuner Card/Box integrates several multimedia functions thatallow you to transform your PC into the ultimate entertainment center.With the ASUS® TV Tuner Card/Box, you can watch and record live TV,capture and play back videos, make VCD/DVD movies, listen to MP3 music,tune in to your favorite FM station, and view photos on your PC.
Bundled with the ASUS® remote controller and the CyberLink® PowerCinemaapplication, the ASUS® TV Tuner Card/Box offers performance,functionality, and enjoyment.
Before you start installing the card/box, check the items in your packagewith the list below.
I t em Desc r i p t i onI t em Desc r i p t i onI t em Desc r i p t i onI t em Desc r i p t i onI t em Desc r i p t i on
1. User guide
2. ASUS Driver and utility CD
3. Power Cinema software CD
4. Remote control
5. FM cable (for digital/analog hybrid TV card only)
6. Video-in and audio cable (for digital/analog hybrid TV card only)
7. Digital antenna cable (for digital/analog hybrid TV card only)
8. USB cable (for TV box only)
9. MCX-to-IEC adapter (for TV box only)
If any of the above items is damaged or missing, contact your retailerimmediately.
1.2 Package contents
Check your ASUS TV Tuner Card/Box package for the following items.
• Make sure you use the same TV standard for all devices.
• The digital TV antenna cable and analog TV cable may be connectedto the TV tuner card at the same time, but you cannot watch digitalTV programs and analog TV programs simultaneously.
1 - 31 - 31 - 31 - 31 - 3ASUS TV Tuner Card/BoxASUS TV Tuner Card/BoxASUS TV Tuner Card/BoxASUS TV Tuner Card/BoxASUS TV Tuner Card/Box
1.3 Special features
• Advanced Phillips video/audio decoder with two-bit videoanalog-to-digital converter (ADC) for excellent video quality
• Integrated entertainment package allows you to watch TV, tune in to FMradio, listen to MP3s, view DVD/VCD movies, organize pictures, andwatch videos on your computer
• Provides you with complete TV experience on your computer withautomatic channel scanning, channel surfing, and pre-scheduled recordingin MPEG 1/2 format
• Supports Stereo and Dual modes while watching TV
• Comes with a remote control for ultimate convenience
• Video-in connector for external video stream
• Allows you to capture/edit/author/burn your favorite videos and imagesin one software package
• Allows you to build your own video security and monitoring system

1 - 41 - 41 - 41 - 41 - 4 Chapter 1 : Product int roduct ionChapter 1 : Product int roduct ionChapter 1 : Product int roduct ionChapter 1 : Product int roduct ionChapter 1 : Product int roduct ion
ASUS TV Tuner Card/BoxASUS TV Tuner Card/BoxASUS TV Tuner Card/BoxASUS TV Tuner Card/BoxASUS TV Tuner Card/Box
Chapter 2
Hard
ware
in
form
ati
on
This chapter lists the hardwaresetup procedures that you have toperform when installing the ASUSTV Tuner Card/Box.
2 - 22 - 22 - 22 - 22 - 2 Chapter 2 : Hardware in format ionChapter 2 : Hardware in format ionChapter 2 : Hardware in format ionChapter 2 : Hardware in format ionChapter 2 : Hardware in format ion
2.1 System requirements
Before installing the ASUS TV Tuner Card/Box, make sure your computersystem meets the following requirements:
• Intel® Pentium® 4 or AMD K7 system or higher
• One (1) available PCI slot
• At least 256 MB system memory (512 MB or more is recommended)
• Graphic caard with at leat 32 MB video memory
• Optical drive for driver installation
• At least 1 GB free hard disk space
• Microsoft® DirectX-compatible audio device
• Microsoft® Windows® XP (Home/Professional Edition/Media Center Edition 2005)
• Microsoft® DirectX 9.0 or higher
• Microsoft® Windows® Media Player 9 or higher
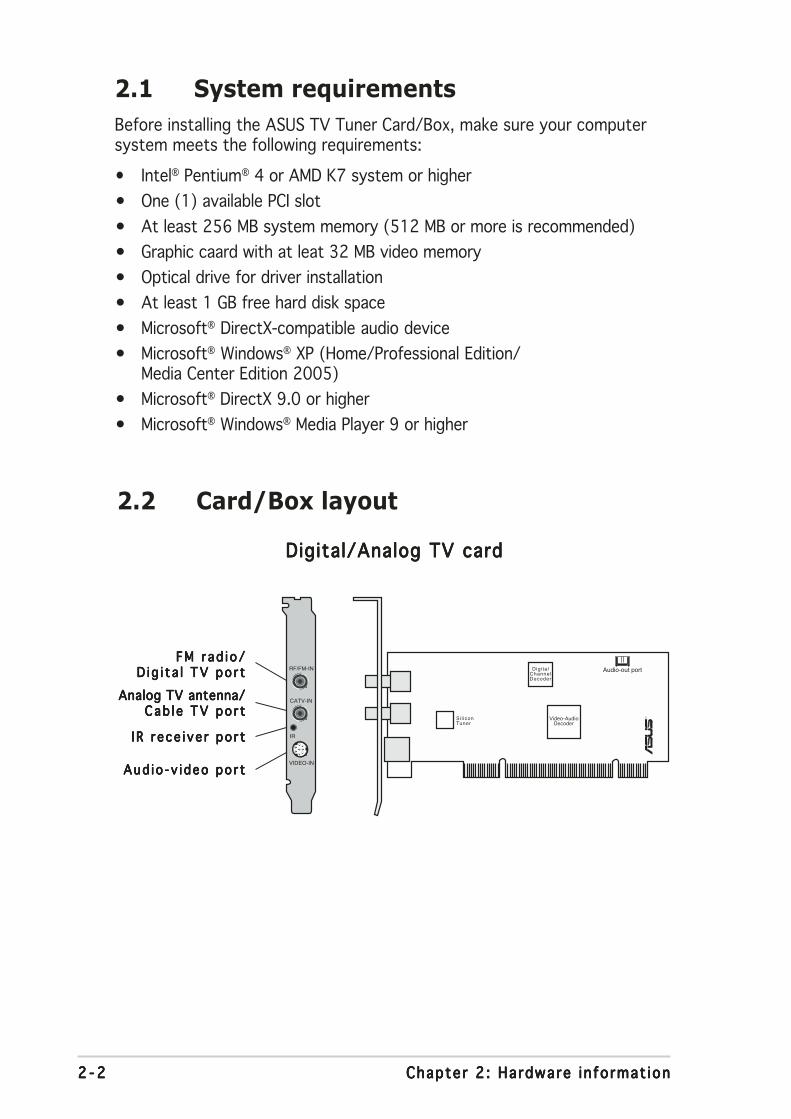
2.2 Card/Box layout
RVideo-AudioDecoder
Audio-out port
Si l iconTuner
DigitalChannelDecoder
RF/FM-IN
CATV-IN
IR
VIDEO-IN
Digital/Analog TV cardDigital/Analog TV cardDigital/Analog TV cardDigital/Analog TV cardDigital/Analog TV card
FM r ad i o /FM r ad i o /FM r ad i o /FM r ad i o /FM r ad i o /D ig i t a l TV po r tD i g i t a l TV po r tD i g i t a l TV po r tD i g i t a l TV po r tD i g i t a l TV po r t
Analog TV antenna/Analog TV antenna/Analog TV antenna/Analog TV antenna/Analog TV antenna/Cab l e TV po r tCab l e TV po r tCab l e TV po r tCab l e TV po r tCab l e TV po r t
I R r ece i ve r po r tI R r ece i ve r po r tI R r ece i ve r po r tI R r ece i ve r po r tI R r ece i ve r po r t
Aud io - v i deo po r tAud io - v i deo po r tAud io - v i deo po r tAud io - v i deo po r tAud io - v i deo po r t
2 - 32 - 32 - 32 - 32 - 3ASUS TV Tuner Card/BoxASUS TV Tuner Card/BoxASUS TV Tuner Card/BoxASUS TV Tuner Card/BoxASUS TV Tuner Card/Box
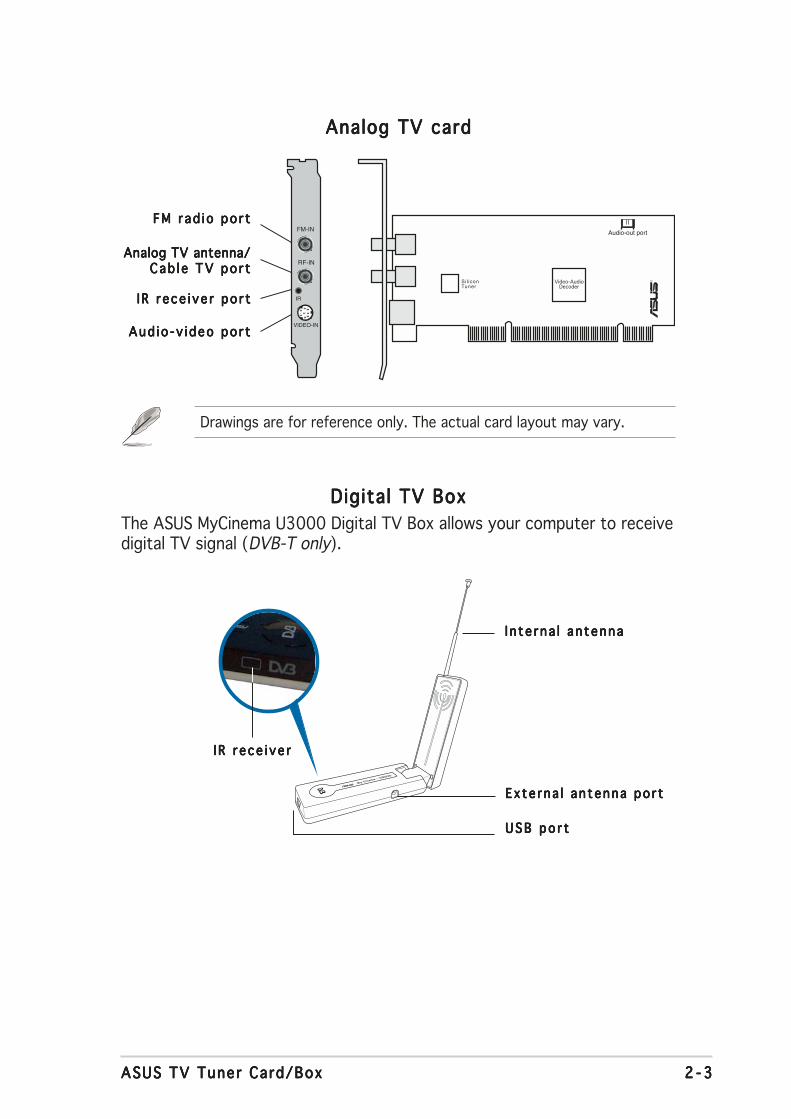
Analog TV cardAnalog TV cardAnalog TV cardAnalog TV cardAnalog TV card
RVideo-AudioDecoder
Audio-out port
Si l iconTuner
FM-IN
RF-IN
VIDEO-IN
IR
Drawings are for reference only. The actual card layout may vary.
FM r ad i o po r tFM r ad i o po r tFM r ad i o po r tFM r ad i o po r tFM r ad i o po r t
Analog TV antenna/Analog TV antenna/Analog TV antenna/Analog TV antenna/Analog TV antenna/Cab l e TV po r tCab l e TV po r tCab l e TV po r tCab l e TV po r tCab l e TV po r t
I R r ece i ve r po r tI R r ece i ve r po r tI R r ece i ve r po r tI R r ece i ve r po r tI R r ece i ve r po r t
Aud io - v i deo po r tAud io - v i deo po r tAud io - v i deo po r tAud io - v i deo po r tAud io - v i deo po r t
Digital TV BoxDigital TV BoxDigital TV BoxDigital TV BoxDigital TV Box
The ASUS MyCinema U3000 Digital TV Box allows your computer to receivedigital TV signal (DVB-T only).
I n te rna l an tennaI n te rna l an tennaI n te rna l an tennaI n te rna l an tennaI n te rna l an tenna
Ex te rna l an tenna po r tEx te rna l an tenna po r tEx te rna l an tenna po r tEx te rna l an tenna po r tEx te rna l an tenna po r t
USB po r tUSB po r tUSB po r tUSB po r tUSB po r t
I R r e ce i ve rI R r e ce i ve rI R r e ce i ve rI R r e ce i ve rI R r e ce i ve r
2 - 42 - 42 - 42 - 42 - 4 Chapter 2 : Hardware in format ionChapter 2 : Hardware in format ionChapter 2 : Hardware in format ionChapter 2 : Hardware in format ionChapter 2 : Hardware in format ion
2.4 Installation
• You can install the ASUS TV Tuner Card only on a motherboard witha PCI slot.
• Illustrations in this section are provided only for reference. Yoursystem chassis and configuration may differ from what is shown.
2.4.12.4.12.4.12.4.12.4.1 InstaInstaInstaInstaInstalling the ASUS TV Tuner Cardlling the ASUS TV Tuner Cardlling the ASUS TV Tuner Cardlling the ASUS TV Tuner Cardlling the ASUS TV Tuner Card
To install the ASUS TV Tuner Card:
1. Unplug the power cord.
2. Remove the system unit cover. Refer to the documentation that camewith your system for detailed instructions.
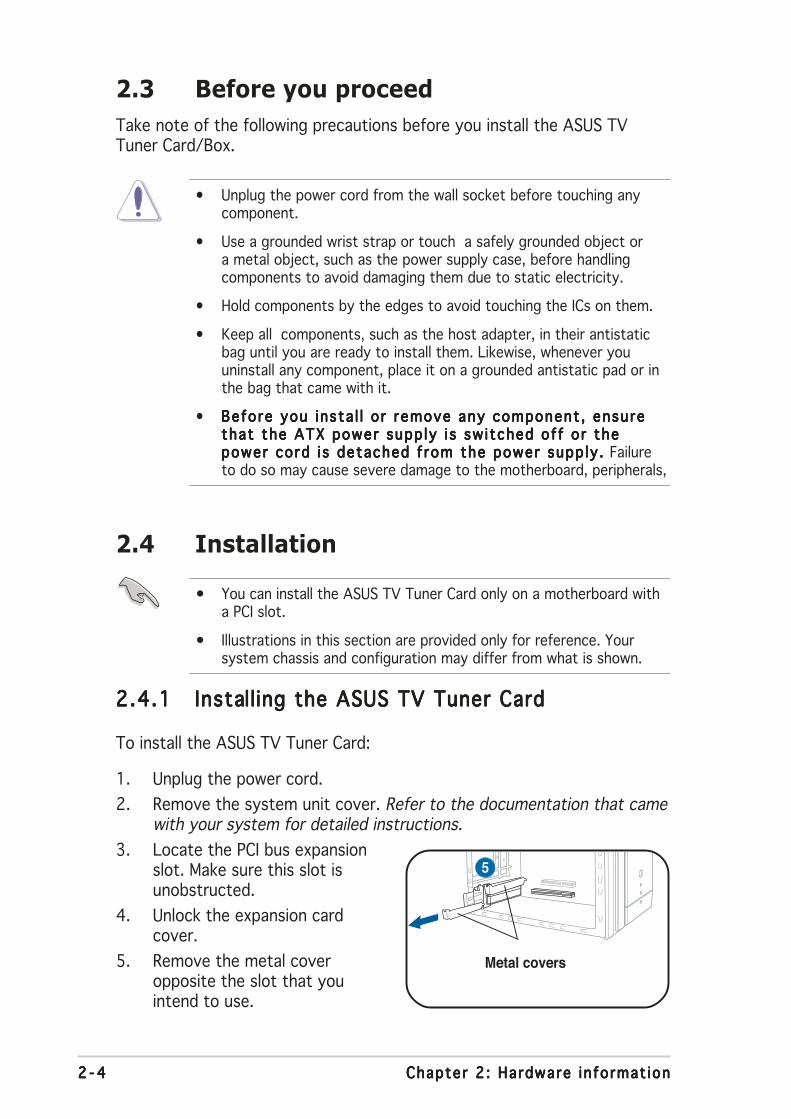
3. Locate the PCI bus expansionslot. Make sure this slot isunobstructed.
4. Unlock the expansion cardcover.
5. Remove the metal coveropposite the slot that youintend to use.
Metal covers
5
2.3 Before you proceed
Take note of the following precautions before you install the ASUS TVTuner Card/Box.
• Unplug the power cord from the wall socket before touching anycomponent.
• Use a grounded wrist strap or touch a safely grounded object ora metal object, such as the power supply case, before handlingcomponents to avoid damaging them due to static electricity.
• Hold components by the edges to avoid touching the ICs on them.
• Keep all components, such as the host adapter, in their antistaticbag until you are ready to install them. Likewise, whenever youuninstall any component, place it on a grounded antistatic pad or inthe bag that came with it.
• Before you insta l l o r remove any component , ensureBefore you insta l l o r remove any component , ensureBefore you insta l l o r remove any component , ensureBefore you insta l l o r remove any component , ensureBefore you insta l l o r remove any component , ensurethat the ATX power supp ly i s sw itched of f or thethat the ATX power supp ly i s sw itched of f or thethat the ATX power supp ly i s sw itched of f or thethat the ATX power supp ly i s sw itched of f or thethat the ATX power supp ly i s sw itched of f or thepower cord i s detached f rom the power supp ly . power cord i s detached f rom the power supp ly . power cord i s detached f rom the power supp ly . power cord i s detached f rom the power supp ly . power cord i s detached f rom the power supp ly . Failureto do so may cause severe damage to the motherboard, peripherals,
2 - 52 - 52 - 52 - 52 - 5ASUS TV Tuner Card/BoxASUS TV Tuner Card/BoxASUS TV Tuner Card/BoxASUS TV Tuner Card/BoxASUS TV Tuner Card/Box
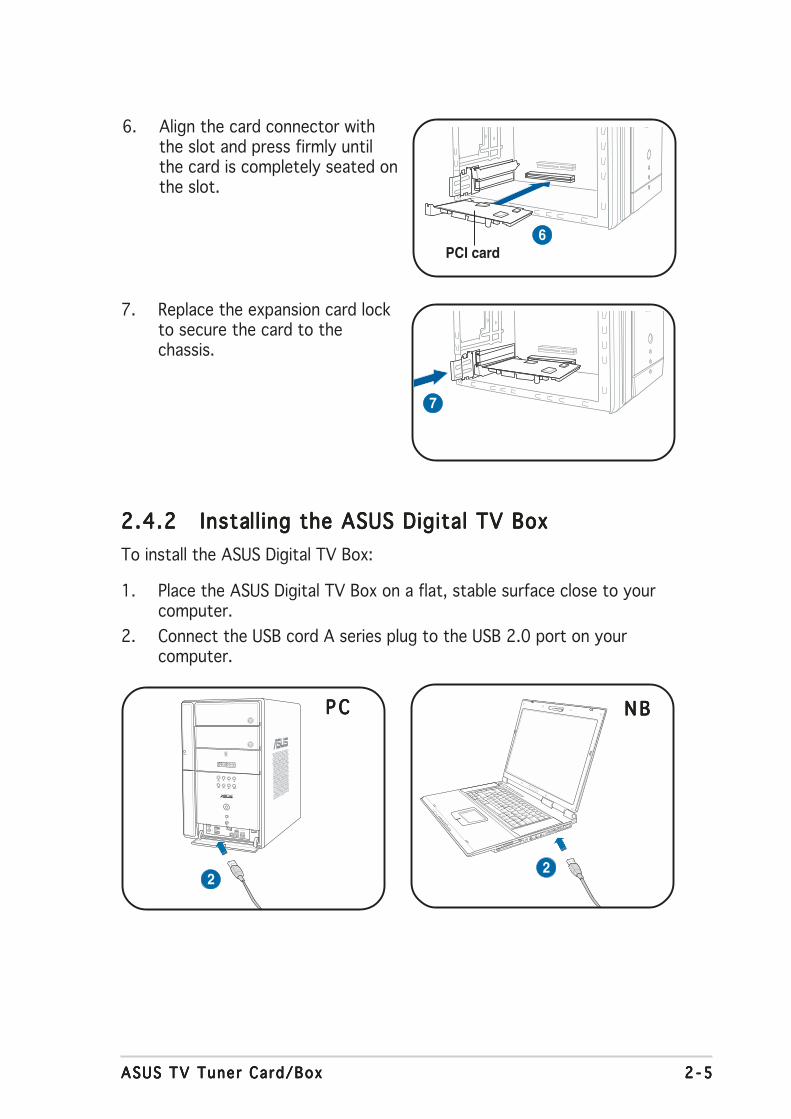
7. Replace the expansion card lockto secure the card to thechassis.
PCI card
6. Align the card connector withthe slot and press firmly untilthe card is completely seated onthe slot.
6
7
2
2.4.22.4.22.4.22.4.22.4.2 InstaInstaInstaInstaInstalling the ASUS Digital TV Boxlling the ASUS Digital TV Boxlling the ASUS Digital TV Boxlling the ASUS Digital TV Boxlling the ASUS Digital TV Box
To install the ASUS Digital TV Box:
1. Place the ASUS Digital TV Box on a flat, stable surface close to yourcomputer.
2. Connect the USB cord A series plug to the USB 2.0 port on yourcomputer.
2
P CP CP CP CP C N BN BN BN BN B
2 - 62 - 62 - 62 - 62 - 6 Chapter 2 : Hardware in format ionChapter 2 : Hardware in format ionChapter 2 : Hardware in format ionChapter 2 : Hardware in format ionChapter 2 : Hardware in format ion
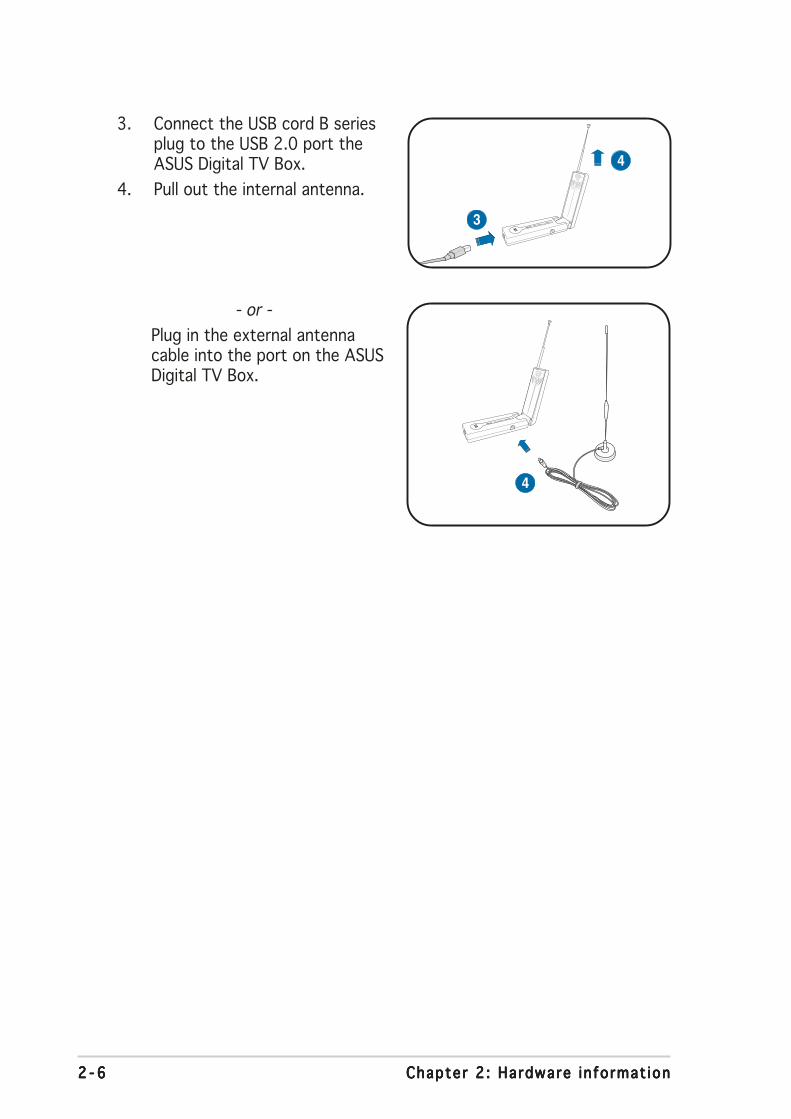
3. Connect the USB cord B seriesplug to the USB 2.0 port theASUS Digital TV Box.
4. Pull out the internal antenna.
- or -
Plug in the external antennacable into the port on the ASUSDigital TV Box.
4
3
4
2 - 72 - 72 - 72 - 72 - 7ASUS TV Tuner Card/BoxASUS TV Tuner Card/BoxASUS TV Tuner Card/BoxASUS TV Tuner Card/BoxASUS TV Tuner Card/Box
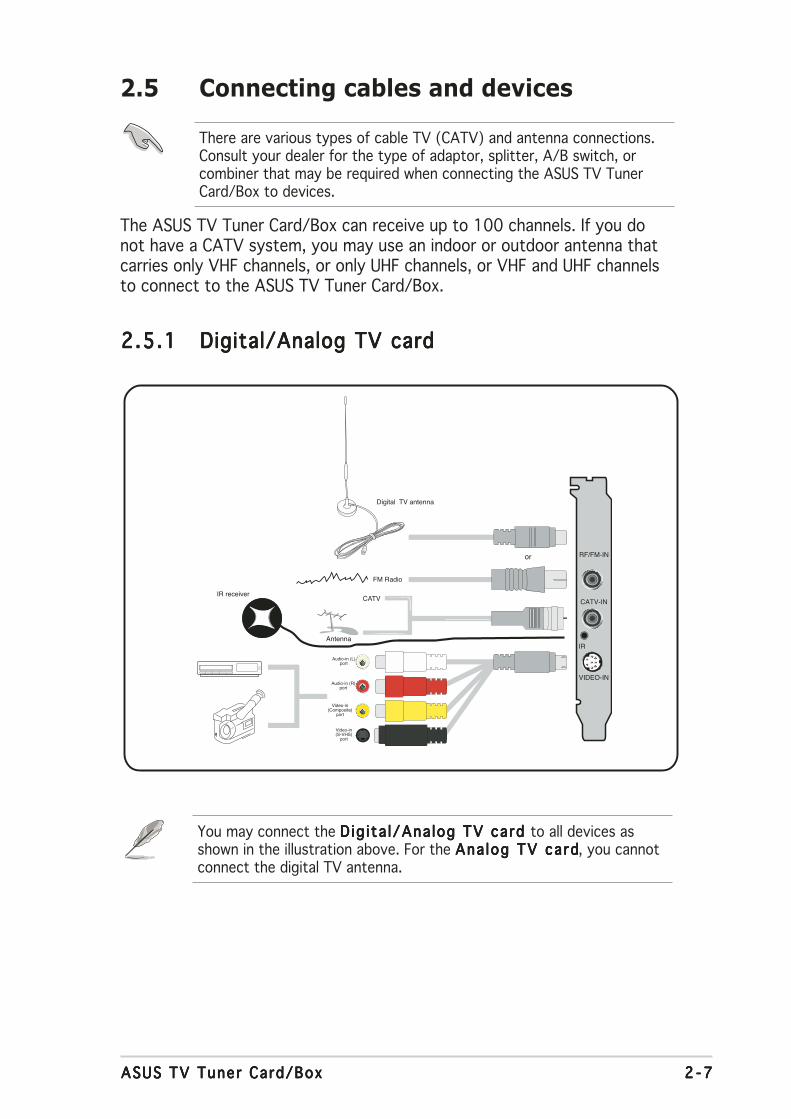
2.5 Connecting cables and devices
There are various types of cable TV (CATV) and antenna connections.Consult your dealer for the type of adaptor, splitter, A/B switch, orcombiner that may be required when connecting the ASUS TV TunerCard/Box to devices.
The ASUS TV Tuner Card/Box can receive up to 100 channels. If you donot have a CATV system, you may use an indoor or outdoor antenna thatcarries only VHF channels, or only UHF channels, or VHF and UHF channelsto connect to the ASUS TV Tuner Card/Box.
or
CATV
Antenna
FM Radio
Video-in(S-VHS)
port
Video-in(Composite)
port
Audio-in (L)port
Audio-in (R)port
RF/FM-IN
CATV-IN
IR
Digital TV antenna
IR receiver
VIDEO-IN
2.5.12.5.12.5.12.5.12.5.1 Digital/Analog TV cardDigital/Analog TV cardDigital/Analog TV cardDigital/Analog TV cardDigital/Analog TV card
You may connect the D ig i ta l/Ana log TV card D ig i ta l/Ana log TV card D ig i ta l/Ana log TV card D ig i ta l/Ana log TV card D ig i ta l/Ana log TV card to all devices asshown in the illustration above. For the Ana log TV cardAna log TV cardAna log TV cardAna log TV cardAna log TV card, you cannotconnect the digital TV antenna.
2 - 82 - 82 - 82 - 82 - 8 Chapter 2 : Hardware in format ionChapter 2 : Hardware in format ionChapter 2 : Hardware in format ionChapter 2 : Hardware in format ionChapter 2 : Hardware in format ion
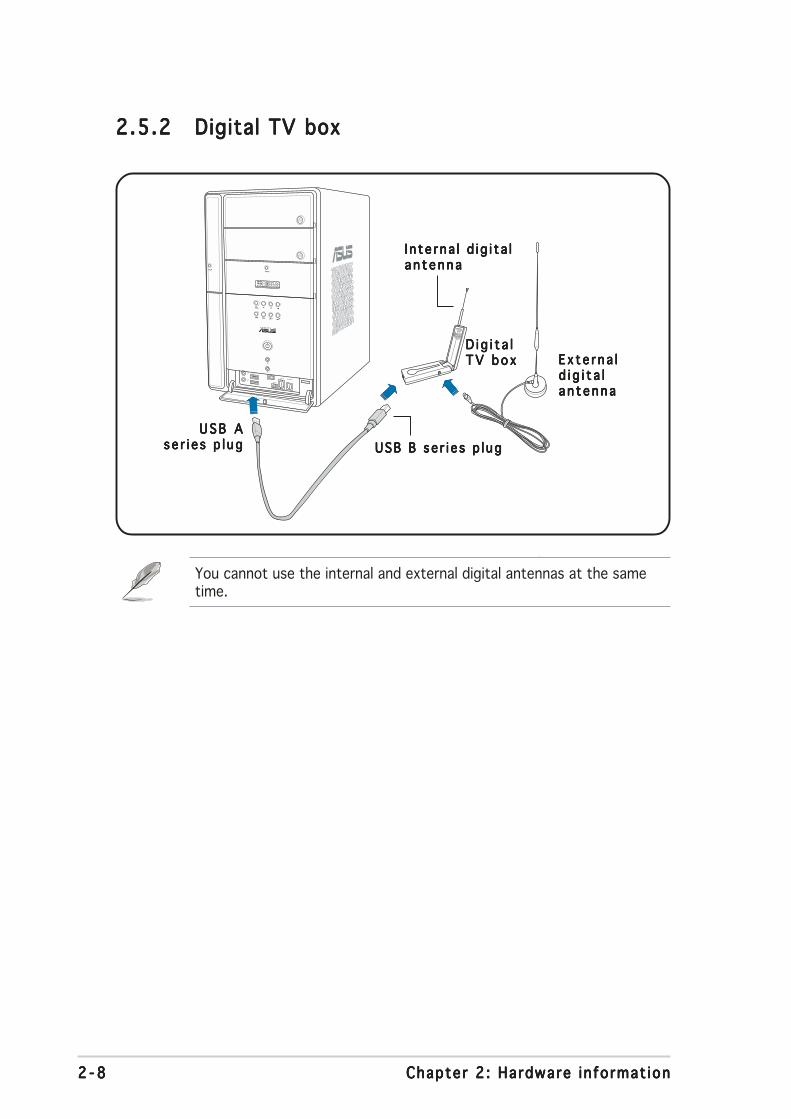
U S B AU S B AU S B AU S B AU S B Ase r i e s p l ugse r i e s p l ugse r i e s p l ugse r i e s p l ugse r i e s p l ug USB B se r i e s p l ugUSB B se r i e s p l ugUSB B se r i e s p l ugUSB B se r i e s p l ugUSB B se r i e s p l ug
D i g i t a lD i g i t a lD i g i t a lD i g i t a lD i g i t a lT V b o xT V b o xT V b o xT V b o xT V b o x Ex t e r n a lE x t e r n a lE x t e r n a lE x t e r n a lE x t e r n a l
d i g i t a ld i g i t a ld i g i t a ld i g i t a ld i g i t a la n t ennaan t ennaan t ennaan t ennaan t enna
2.5.22.5.22.5.22.5.22.5.2 Digital TV boxDigital TV boxDigital TV boxDigital TV boxDigital TV box
You cannot use the internal and external digital antennas at the sametime.
I n te rna l d i g i t a lI n te rna l d i g i t a lI n te rna l d i g i t a lI n te rna l d i g i t a lI n te rna l d i g i t a la n t ennaan t ennaan t ennaan t ennaan t enna
ASUS TV Tuner Card/BoxASUS TV Tuner Card/BoxASUS TV Tuner Card/BoxASUS TV Tuner Card/BoxASUS TV Tuner Card/Box
Chapter 3
Soft
ware
in
form
ati
onThis chapter gives information on
how to install device drivers andapplications for the ASUS TV TunerCard/Box.
3 - 23 - 23 - 23 - 23 - 2 Chapter 3 : Software in format ionChapter 3 : Software in format ionChapter 3 : Software in format ionChapter 3 : Software in format ionChapter 3 : Software in format ion
3.1 Device driver installation
You need to install the device drivers to your computer so you can use theASUS TV Tuner Card/Box. Refer to this section when installing the devicedrivers.
• Make sure that W indowsWindowsWindowsWindowsWindows®®®®® X P X P X P X P X P is installed on your system.
• The screens shown in this section may not exactly match thecontents displayed on your screen. Contents of the support CD maychange any time without notice.
3.1.13.1.13.1.13.1.13.1.1 Installing MicrosoftInstalling MicrosoftInstalling MicrosoftInstalling MicrosoftInstalling Microsoft®®®®® DirectX DirectX DirectX DirectX DirectX®®®®®
Microsoft® Direct® X allows 3D hardware acceleration support in Windows®
98, Windows® 2000, and Windows® XP.
• Make sure you install M ic rosof tM ic rosof tM ic rosof tM ic rosof tM ic rosof t®®®®® D i rectX D i rectX D i rectX D i rectX D i rectX®®®®® be fo rebe fo rebe fo rebe fo rebe fo re installing theASUS TV Tuner Card driver.
• For software MPEG support in Windows® 98, you must first installMicrosoft® Direct® X, then install a MPEG-compliant video player.
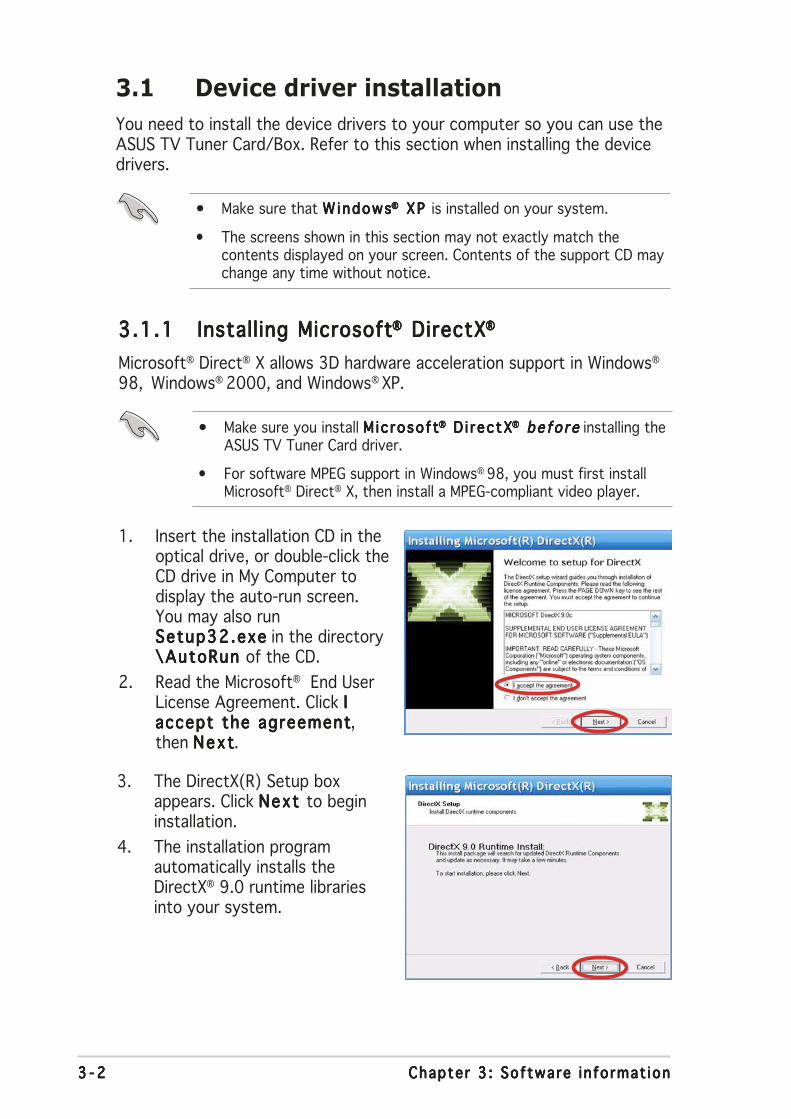
1. Insert the installation CD in theoptical drive, or double-click theCD drive in My Computer todisplay the auto-run screen.You may also runSetup32.exeSetup32.exeSetup32.exeSetup32.exeSetup32.exe in the directory\AutoRun \AutoRun \AutoRun \AutoRun \AutoRun of the CD.
2. Read the Microsoft® End UserLicense Agreement. Click IIIIIaccept the agreementaccept the agreementaccept the agreementaccept the agreementaccept the agreement,then NextNextNextNextNext.
3. The DirectX(R) Setup boxappears. Click Next Next Next Next Next to begininstallation.
4. The installation programautomatically installs theDirectX® 9.0 runtime librariesinto your system.
3 - 33 - 33 - 33 - 33 - 3ASUS TV Tuner Card/BoxASUS TV Tuner Card/BoxASUS TV Tuner Card/BoxASUS TV Tuner Card/BoxASUS TV Tuner Card/Box
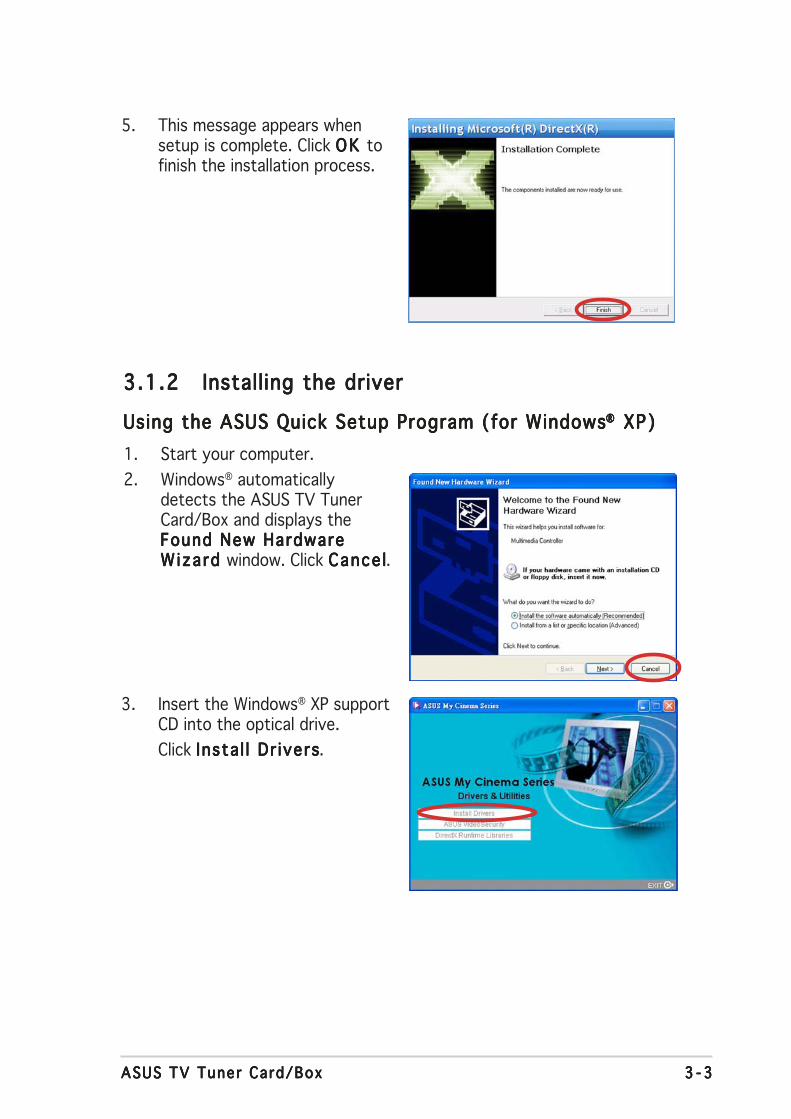
5. This message appears whensetup is complete. Click OK OK OK OK OK tofinish the installation process.
3.1.23.1.23.1.23.1.23.1.2 Installing the driverInstalling the driverInstalling the driverInstalling the driverInstalling the driver
Using the ASUS Quick Setup Program (for WindowsUsing the ASUS Quick Setup Program (for WindowsUsing the ASUS Quick Setup Program (for WindowsUsing the ASUS Quick Setup Program (for WindowsUsing the ASUS Quick Setup Program (for Windows®®®®® XP) XP) XP) XP) XP)
1. Start your computer.
2. Windows® automaticallydetects the ASUS TV TunerCard/Box and displays theFound New HardwareFound New HardwareFound New HardwareFound New HardwareFound New HardwareWizard Wizard Wizard Wizard Wizard window. Click Cance lCance lCance lCance lCance l.
3. Insert the Windows® XP supportCD into the optical drive.
Click Insta l l Dr iversInsta l l Dr iversInsta l l Dr iversInsta l l Dr iversInsta l l Dr ivers.
3 - 43 - 43 - 43 - 43 - 4 Chapter 3 : Software in format ionChapter 3 : Software in format ionChapter 3 : Software in format ionChapter 3 : Software in format ionChapter 3 : Software in format ion
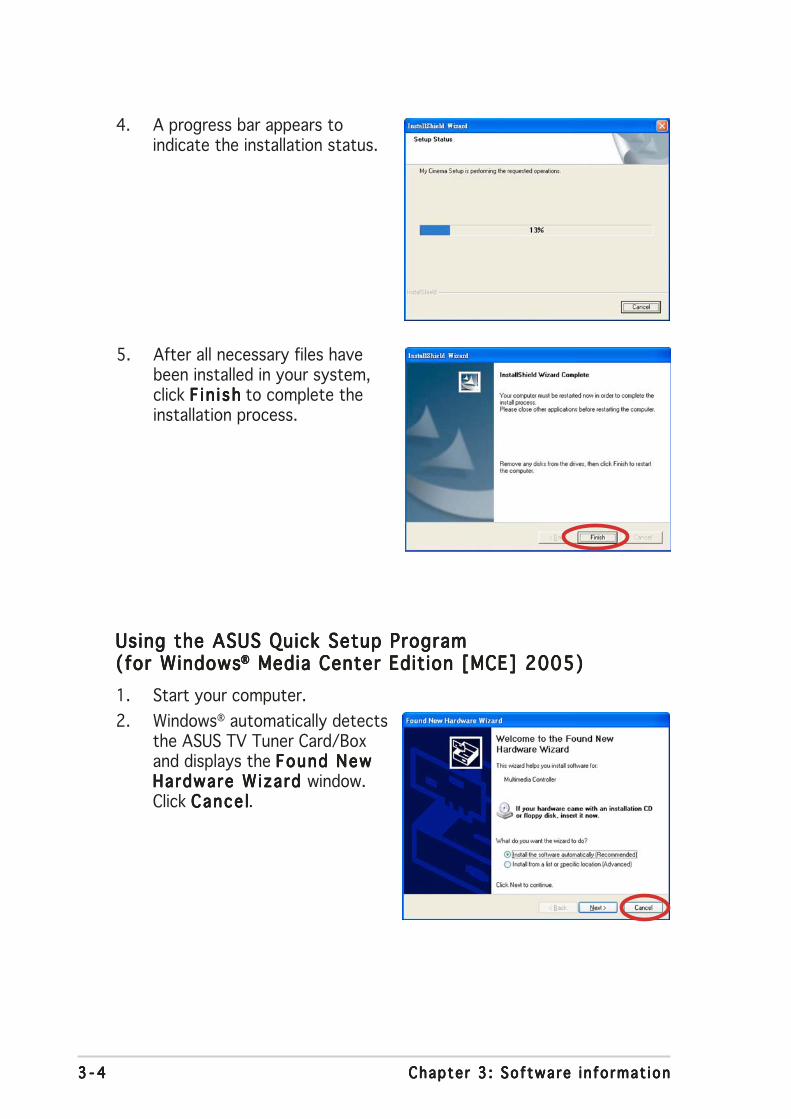
5. After all necessary files havebeen installed in your system,click F in i shF in i shF in i shF in i shF in i sh to complete theinstallation process.
4. A progress bar appears toindicate the installation status.
Using the ASUS Quick Setup ProgramUsing the ASUS Quick Setup ProgramUsing the ASUS Quick Setup ProgramUsing the ASUS Quick Setup ProgramUsing the ASUS Quick Setup Program(for Windows(for Windows(for Windows(for Windows(for Windows®®®®® Media Center Edition [MCE] 2005) Media Center Edition [MCE] 2005) Media Center Edition [MCE] 2005) Media Center Edition [MCE] 2005) Media Center Edition [MCE] 2005)
1. Start your computer.
2. Windows® automatically detectsthe ASUS TV Tuner Card/Boxand displays the Found NewFound NewFound NewFound NewFound NewHardware Wizard Hardware Wizard Hardware Wizard Hardware Wizard Hardware Wizard window.Click Cance lCance lCance lCance lCance l.
3 - 53 - 53 - 53 - 53 - 5ASUS TV Tuner Card/BoxASUS TV Tuner Card/BoxASUS TV Tuner Card/BoxASUS TV Tuner Card/BoxASUS TV Tuner Card/Box
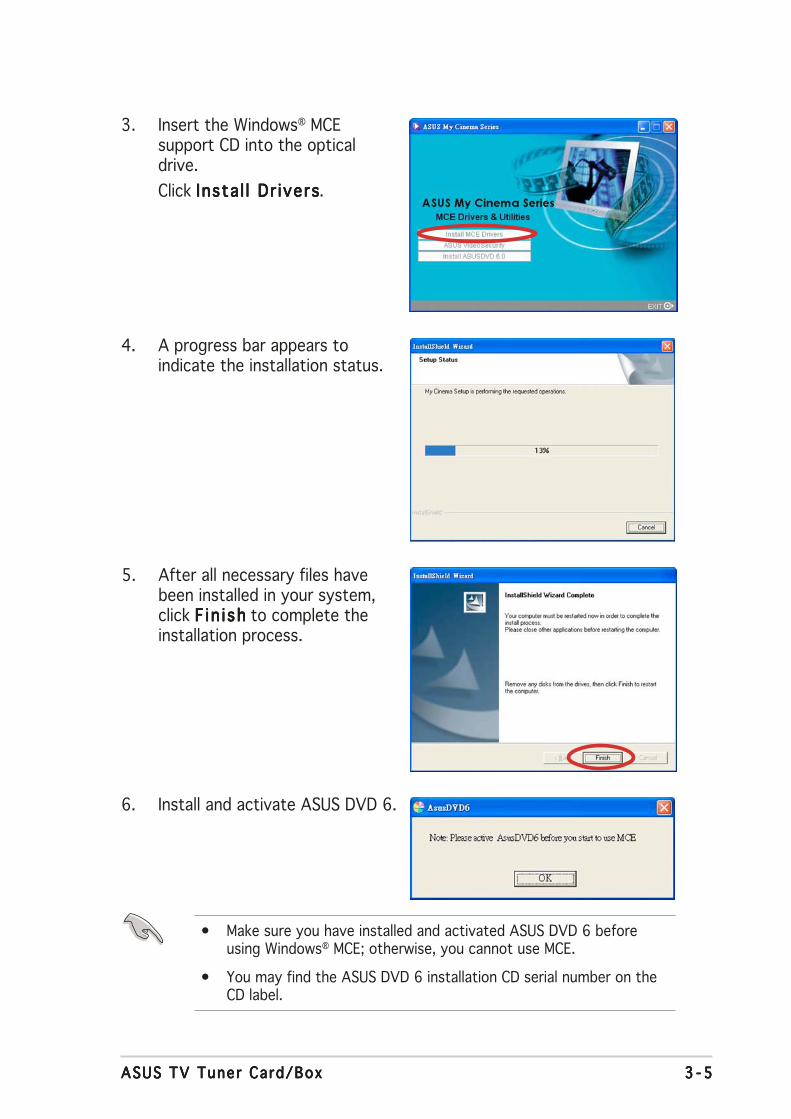
3. Insert the Windows® MCEsupport CD into the opticaldrive.
Click Insta l l Dr iversInsta l l Dr iversInsta l l Dr iversInsta l l Dr iversInsta l l Dr ivers.
5. After all necessary files havebeen installed in your system,click F in i shF in i shF in i shF in i shF in i sh to complete theinstallation process.
4. A progress bar appears toindicate the installation status.
6. Install and activate ASUS DVD 6.
• Make sure you have installed and activated ASUS DVD 6 beforeusing Windows® MCE; otherwise, you cannot use MCE.
• You may find the ASUS DVD 6 installation CD serial number on theCD label.
3 - 63 - 63 - 63 - 63 - 6 Chapter 3 : Software in format ionChapter 3 : Software in format ionChapter 3 : Software in format ionChapter 3 : Software in format ionChapter 3 : Software in format ion
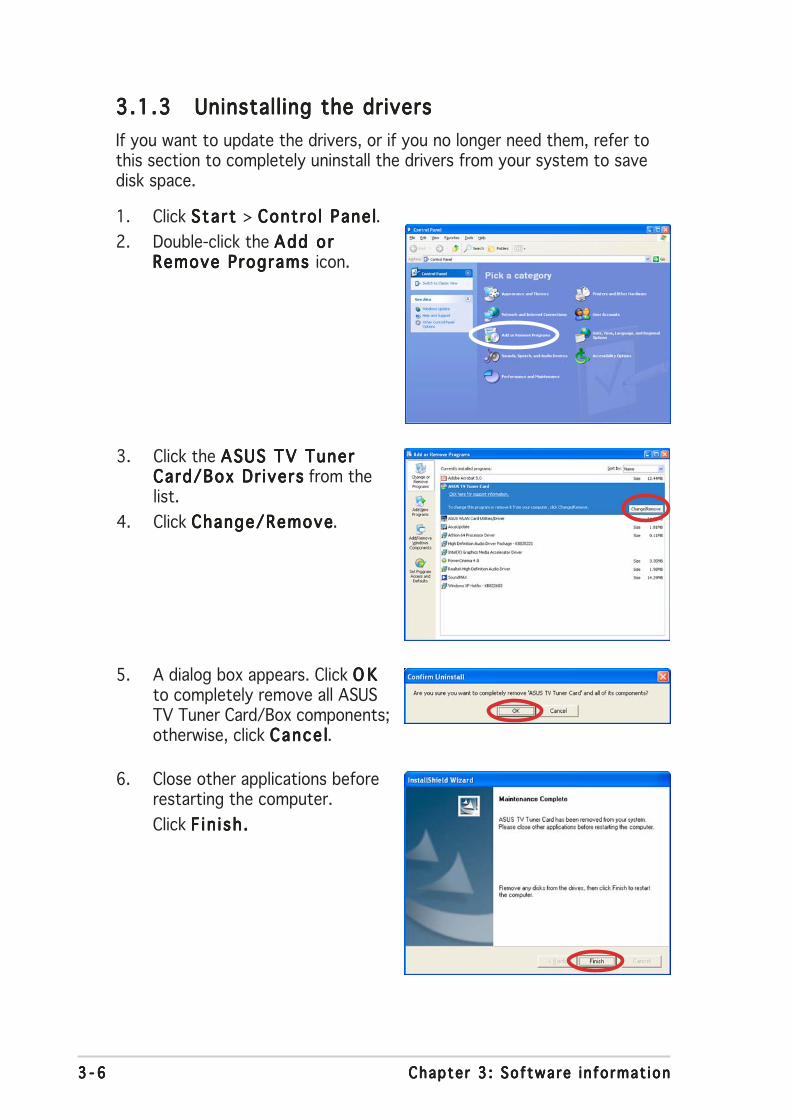
3.1.33.1.33.1.33.1.33.1.3 Uninstalling the driversUninstalling the driversUninstalling the driversUninstalling the driversUninstalling the drivers
If you want to update the drivers, or if you no longer need them, refer tothis section to completely uninstall the drivers from your system to savedisk space.
1. Click Start Start Start Start Start > Contro l Pane lContro l Pane lContro l Pane lContro l Pane lContro l Pane l.
2. Double-click the Add orAdd orAdd orAdd orAdd orRemove Programs Remove Programs Remove Programs Remove Programs Remove Programs icon.
5. A dialog box appears. Click O KO KO KO KO Kto completely remove all ASUSTV Tuner Card/Box components;otherwise, click Cance lCance lCance lCance lCance l.
3. Click the ASUS TV TunerASUS TV TunerASUS TV TunerASUS TV TunerASUS TV TunerCard/Box Dr iversCard/Box Dr iversCard/Box Dr iversCard/Box Dr iversCard/Box Dr ivers from thelist.
4. Click Change/RemoveChange/RemoveChange/RemoveChange/RemoveChange/Remove.
6. Close other applications beforerestarting the computer.
Click F in ish .F in ish .F in ish .F in ish .F in ish .
3 - 73 - 73 - 73 - 73 - 7ASUS TV Tuner Card/BoxASUS TV Tuner Card/BoxASUS TV Tuner Card/BoxASUS TV Tuner Card/BoxASUS TV Tuner Card/Box
3.2 CyberLink® PowerCinema
Install the CyberLink® Power Cinema application only if you are usingWindows® XP operating system. There is no need to install CyberLink®
PowerCinema if you are using Windows® MCE.
The PowerCinema application comes with the ASUS Hybrid TV card supportCD. This application allows you to watch TV and DVDs, listen to FM radio ormusic CDs, or browse pictures stored in your computer. Use the mouse orthe remote controller to navigate through the user interface. For details onthe remote controller, see the Appendix.
For more information on this application, browse and/or print theCyberlink PowerCinema 4.0 User’s Guide in the PowerCinema CD.
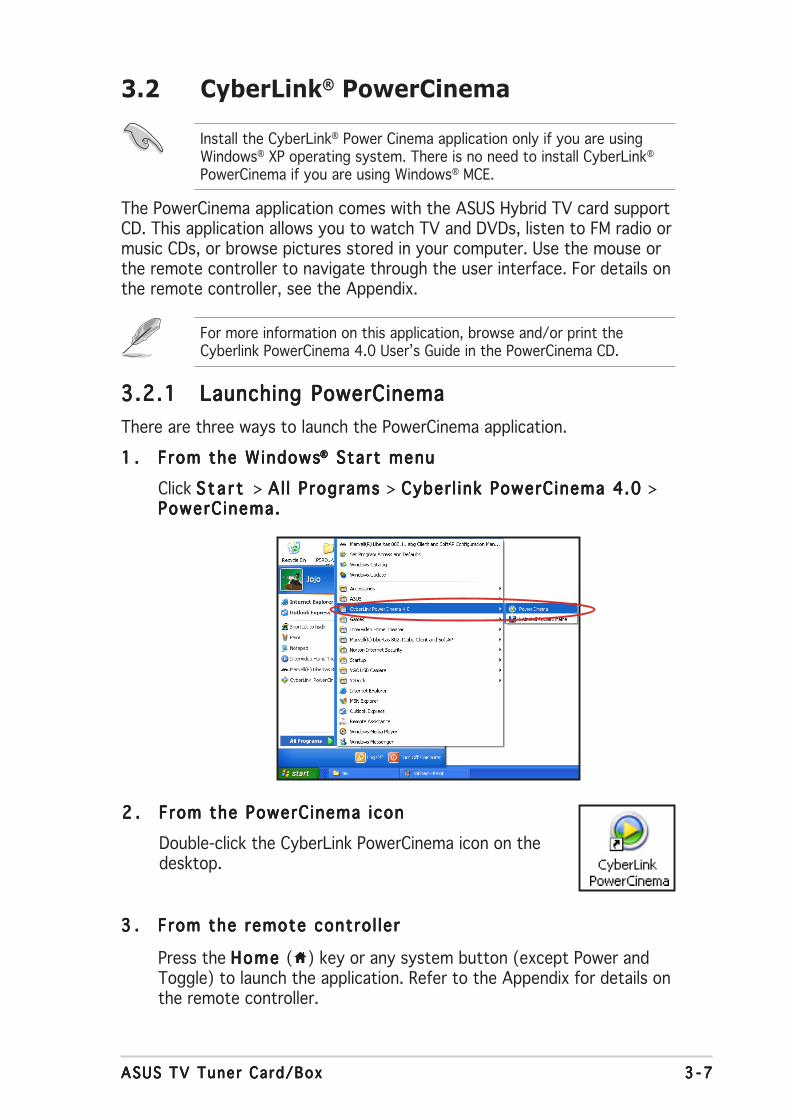
3.2.13.2.13.2.13.2.13.2.1 Launching PowerCinemaLaunching PowerCinemaLaunching PowerCinemaLaunching PowerCinemaLaunching PowerCinema
There are three ways to launch the PowerCinema application.
1 .1 .1 .1 .1 . From the WindowsFrom the WindowsFrom the WindowsFrom the WindowsFrom the Windows®®®®® Start menu Start menu Start menu Start menu Start menu
Click S t a r tS t a r tS t a r tS t a r tS t a r t > Al l Programs Al l Programs Al l Programs Al l Programs Al l Programs > Cyber l ink PowerCinema 4.0 Cyber l ink PowerCinema 4.0 Cyber l ink PowerCinema 4.0 Cyber l ink PowerCinema 4.0 Cyber l ink PowerCinema 4.0 >PowerCinema.PowerCinema.PowerCinema.PowerCinema.PowerCinema.
2 .2 .2 .2 .2 . From the PowerCinema iconFrom the PowerCinema iconFrom the PowerCinema iconFrom the PowerCinema iconFrom the PowerCinema icon
Double-click the CyberLink PowerCinema icon on thedesktop.
3 .3 .3 .3 .3 . From the remote contro l lerFrom the remote contro l lerFrom the remote contro l lerFrom the remote contro l lerFrom the remote contro l ler
Press the Home Home Home Home Home ( ) key or any system button (except Power andToggle) to launch the application. Refer to the Appendix for details onthe remote controller.
3 - 83 - 83 - 83 - 83 - 8 Chapter 3 : Software in format ionChapter 3 : Software in format ionChapter 3 : Software in format ionChapter 3 : Software in format ionChapter 3 : Software in format ion
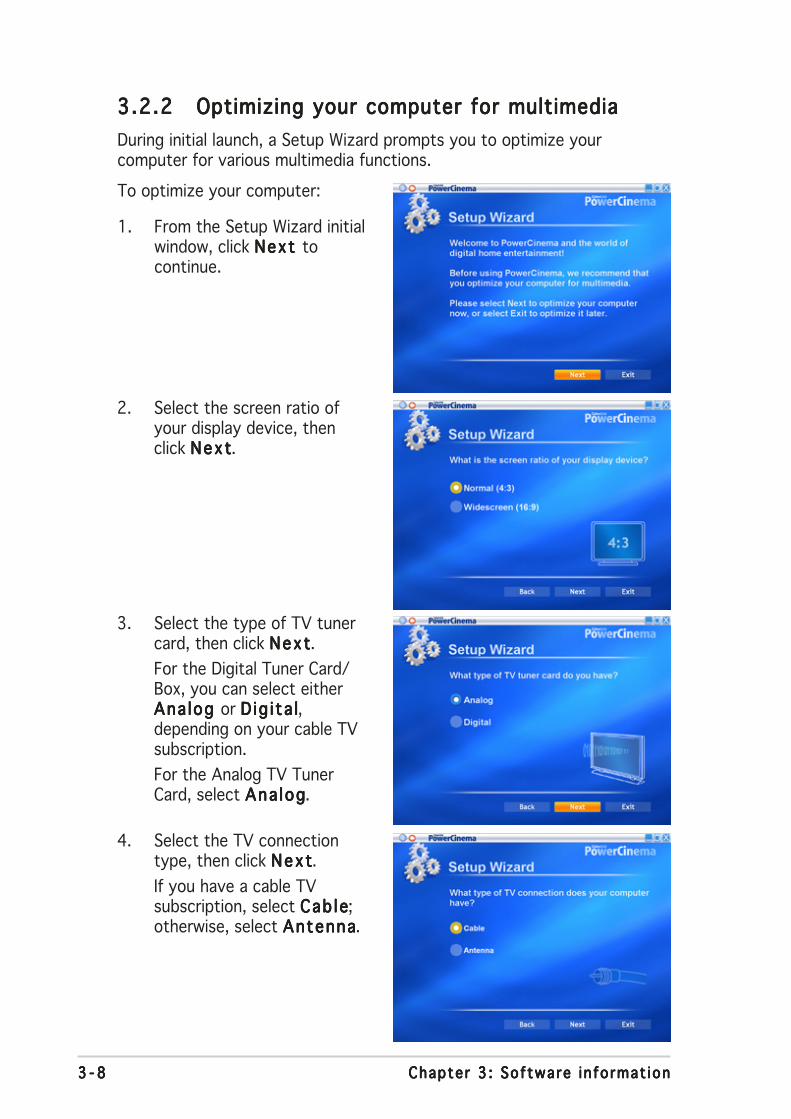
3.2.23.2.23.2.23.2.23.2.2 Optimizing your computer for multimediaOptimizing your computer for multimediaOptimizing your computer for multimediaOptimizing your computer for multimediaOptimizing your computer for multimedia
During initial launch, a Setup Wizard prompts you to optimize yourcomputer for various multimedia functions.
To optimize your computer:
1. From the Setup Wizard initialwindow, click Next Next Next Next Next tocontinue.
2. Select the screen ratio ofyour display device, thenclick NextNextNextNextNext.
3. Select the type of TV tunercard, then click NextNextNextNextNext.
For the Digital Tuner Card/Box, you can select eitherAna log Ana log Ana log Ana log Ana log or D ig i ta lD ig i ta lD ig i ta lD ig i ta lD ig i ta l,depending on your cable TVsubscription.
For the Analog TV TunerCard, select Ana logAna logAna logAna logAna log.
4. Select the TV connectiontype, then click NextNextNextNextNext.
If you have a cable TVsubscription, select Cab leCab leCab leCab leCab le;otherwise, select AntennaAntennaAntennaAntennaAntenna.
3 - 93 - 93 - 93 - 93 - 9ASUS TV Tuner Card/BoxASUS TV Tuner Card/BoxASUS TV Tuner Card/BoxASUS TV Tuner Card/BoxASUS TV Tuner Card/Box
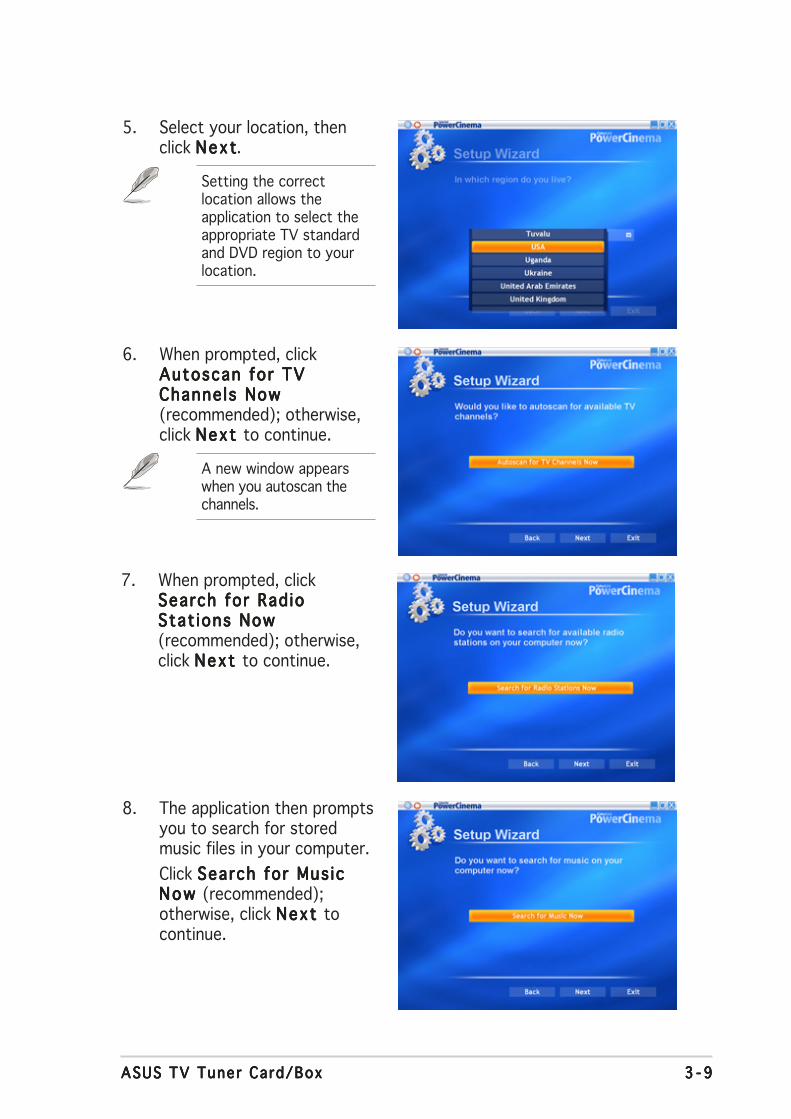
5. Select your location, thenclick NextNextNextNextNext.
Setting the correctlocation allows theapplication to select theappropriate TV standardand DVD region to yourlocation.
6. When prompted, clickAutoscan for TVAutoscan for TVAutoscan for TVAutoscan for TVAutoscan for TVChannels NowChannels NowChannels NowChannels NowChannels Now(recommended); otherwise,click Next Next Next Next Next to continue.
A new window appearswhen you autoscan thechannels.
7. When prompted, clickSearch for RadioSearch for RadioSearch for RadioSearch for RadioSearch for RadioStat ions NowStat ions NowStat ions NowStat ions NowStat ions Now(recommended); otherwise,click Next Next Next Next Next to continue.
8. The application then promptsyou to search for storedmusic files in your computer.
Click Search for Mus icSearch for Mus icSearch for Mus icSearch for Mus icSearch for Mus icNow Now Now Now Now (recommended);otherwise, click Next Next Next Next Next tocontinue.
3 -103 -103 -103 -103 -10 Chapter 3 : Software in format ionChapter 3 : Software in format ionChapter 3 : Software in format ionChapter 3 : Software in format ionChapter 3 : Software in format ion
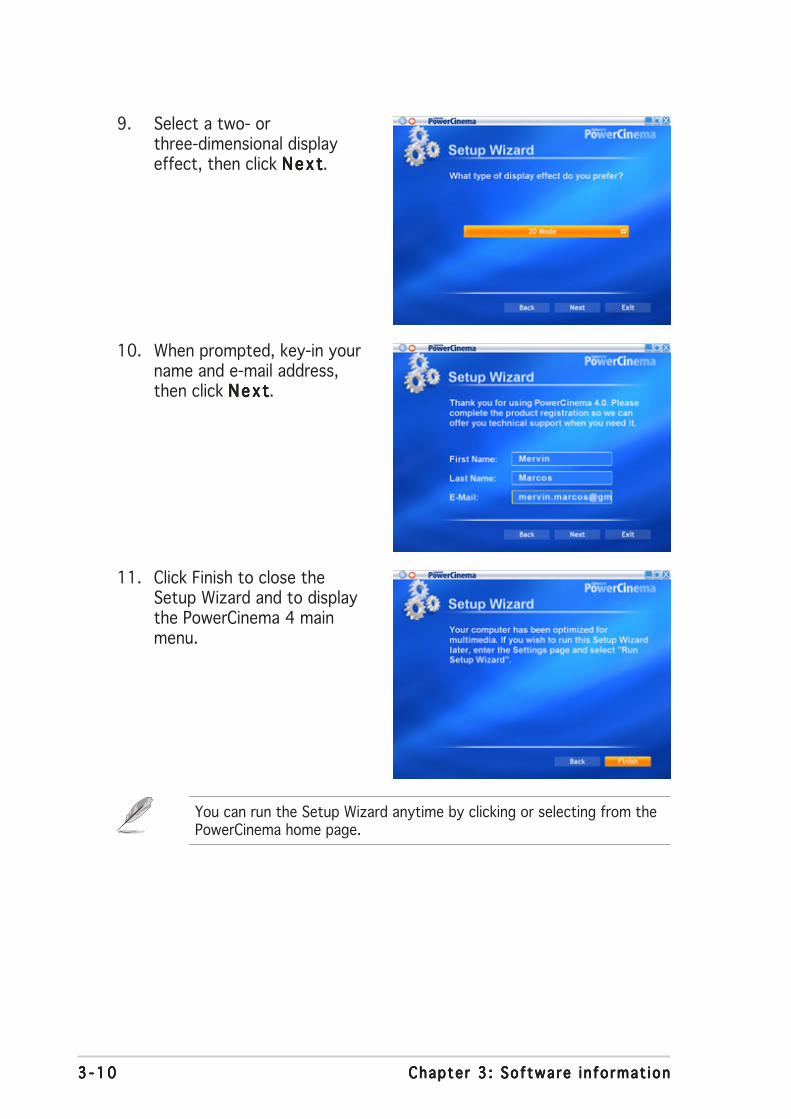
9. Select a two- orthree-dimensional displayeffect, then click NextNextNextNextNext.
10. When prompted, key-in yourname and e-mail address,then click NextNextNextNextNext.
11. Click Finish to close theSetup Wizard and to displaythe PowerCinema 4 mainmenu.
You can run the Setup Wizard anytime by clicking or selecting from thePowerCinema home page.
3 -113 -113 -113 -113 -11ASUS TV Tuner Card/BoxASUS TV Tuner Card/BoxASUS TV Tuner Card/BoxASUS TV Tuner Card/BoxASUS TV Tuner Card/Box
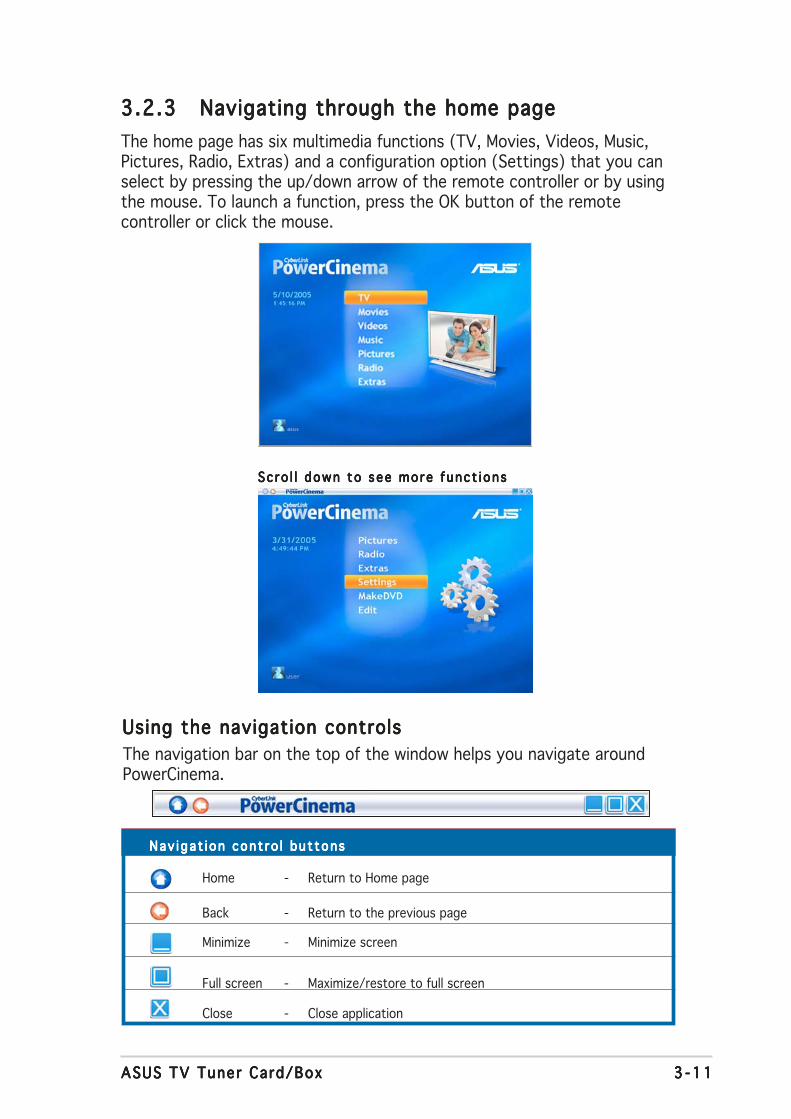
3.2.33.2.33.2.33.2.33.2.3 Navigating through the home pageNavigating through the home pageNavigating through the home pageNavigating through the home pageNavigating through the home page
The home page has six multimedia functions (TV, Movies, Videos, Music,Pictures, Radio, Extras) and a configuration option (Settings) that you canselect by pressing the up/down arrow of the remote controller or by usingthe mouse. To launch a function, press the OK button of the remotecontroller or click the mouse.
Using the navigation controlsUsing the navigation controlsUsing the navigation controlsUsing the navigation controlsUsing the navigation controls
The navigation bar on the top of the window helps you navigate aroundPowerCinema.
Nav iga t i on cont ro l bu t tonsNav iga t i on cont ro l bu t tonsNav iga t i on cont ro l bu t tonsNav iga t i on cont ro l bu t tonsNav iga t i on cont ro l bu t tons
Home - Return to Home page
Back - Return to the previous page
Minimize - Minimize screen
Full screen - Maximize/restore to full screen
Close - Close application
Sc ro l l down to see more funct i onsSc ro l l down to see more funct i onsSc ro l l down to see more funct i onsSc ro l l down to see more funct i onsSc ro l l down to see more funct i ons
3 -123 -123 -123 -123 -12 Chapter 3 : Software in format ionChapter 3 : Software in format ionChapter 3 : Software in format ionChapter 3 : Software in format ionChapter 3 : Software in format ion
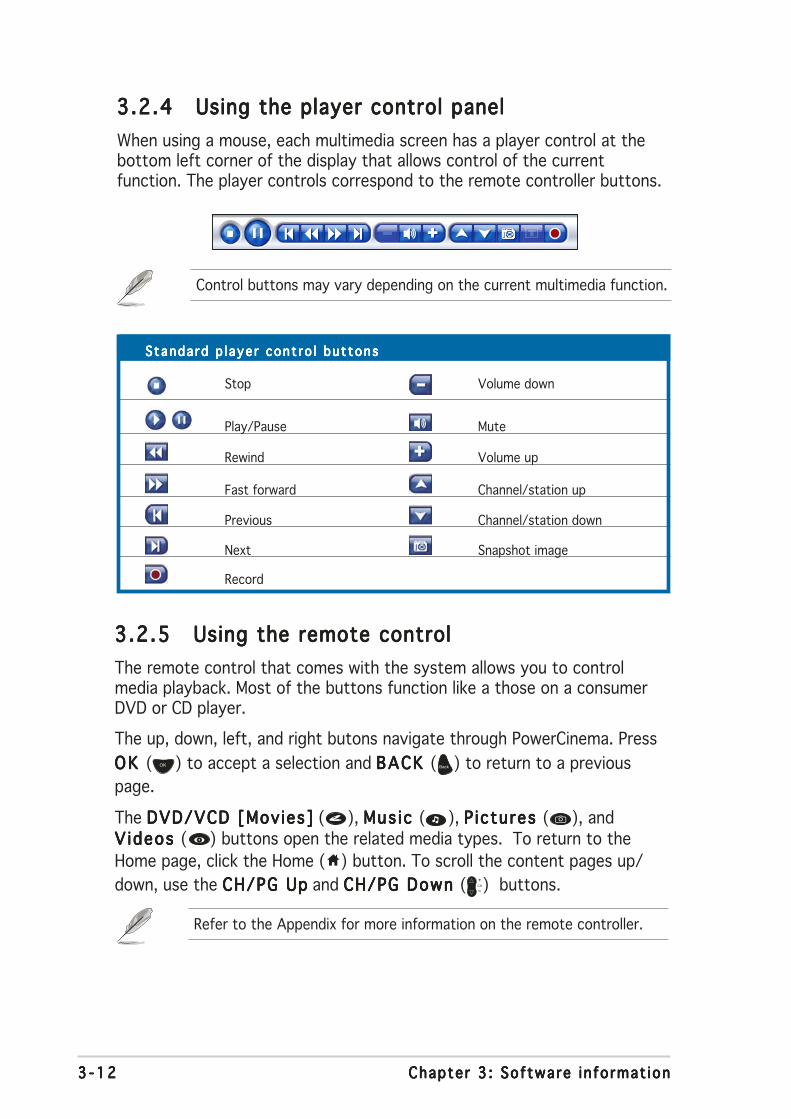
Standa rd p l aye r cont ro l bu t tonsStanda rd p l aye r cont ro l bu t tonsStanda rd p l aye r cont ro l bu t tonsStanda rd p l aye r cont ro l bu t tonsStanda rd p l aye r cont ro l bu t tons
Stop Volume down
Play/Pause Mute
Rewind Volume up
Fast forward Channel/station up
Previous Channel/station down
Next Snapshot image
Record
3.2.43.2.43.2.43.2.43.2.4 Using the player control panelUsing the player control panelUsing the player control panelUsing the player control panelUsing the player control panel
When using a mouse, each multimedia screen has a player control at thebottom left corner of the display that allows control of the currentfunction. The player controls correspond to the remote controller buttons.
Control buttons may vary depending on the current multimedia function.
3.2.53.2.53.2.53.2.53.2.5 Using the remote controlUsing the remote controlUsing the remote controlUsing the remote controlUsing the remote control
The remote control that comes with the system allows you to controlmedia playback. Most of the buttons function like a those on a consumerDVD or CD player.
The up, down, left, and right butons navigate through PowerCinema. Press
OK OK OK OK OK ( ) to accept a selection and BACK BACK BACK BACK BACK ( ) to return to a previous
page.
The DVD/VCD [Movies]DVD/VCD [Movies]DVD/VCD [Movies]DVD/VCD [Movies]DVD/VCD [Movies] ( ), Mus ic Mus ic Mus ic Mus ic Mus ic ( ), P ictures P ictures P ictures P ictures P ictures ( ), andVideos V ideos V ideos V ideos V ideos ( ) buttons open the related media types. To return to the
Home page, click the Home ( ) button. To scroll the content pages up/
down, use the CH/PG UpCH/PG UpCH/PG UpCH/PG UpCH/PG Up and CH/PG Down CH/PG Down CH/PG Down CH/PG Down CH/PG Down ( ) buttons.
Refer to the Appendix for more information on the remote controller.
3 -133 -133 -133 -133 -13ASUS TV Tuner Card/BoxASUS TV Tuner Card/BoxASUS TV Tuner Card/BoxASUS TV Tuner Card/BoxASUS TV Tuner Card/Box
3.2.63.2.63.2.63.2.63.2.6 SettingsSettingsSettingsSettingsSettings
Select Sett ingsSett ingsSett ingsSett ingsSett ings on the Home page to open options for configuringPowerCInema.
General settingsGeneral settingsGeneral settingsGeneral settingsGeneral settings
Power C inema Help. Power C inema Help. Power C inema Help. Power C inema Help. Power C inema Help. Open the Help system.
Disp lay Sett ings. D isp lay Sett ings. D isp lay Sett ings. D isp lay Sett ings. D isp lay Sett ings. Configure your display device.
Audio Sett ings.Audio Sett ings.Audio Sett ings.Audio Sett ings.Audio Sett ings. Configuring your computer’s audio.
Run Setup Wizard.Run Setup Wizard.Run Setup Wizard.Run Setup Wizard.Run Setup Wizard. Run the wizard that appears the first time yourun PowerCinema, allowing you to optimize your computer if you didnot do so after installation, or if you upgrade your computer. You canalso register your copy of PowerCinema using this wizard.
About Power C inema. About Power C inema. About Power C inema. About Power C inema. About Power C inema. Open a page with version and copyrightinformation, as well as your personal registration information.
Restore Default Sett ings. Restore Default Sett ings. Restore Default Sett ings. Restore Default Sett ings. Restore Default Sett ings. Return all settings in PowerCinema totheir original values.
You can find other settings in the function-specific help sections.
Display settingsDisplay settingsDisplay settingsDisplay settingsDisplay settings
Screen Rat io . Screen Rat io . Screen Rat io . Screen Rat io . Screen Rat io . Indicate if you have a standard (4:3) or widescreen(16:9) display.
Movie Disp lay Type.Movie Disp lay Type.Movie Disp lay Type.Movie Disp lay Type.Movie Disp lay Type. Determine how movies and videos areconverted to fit the scereen when they do not match the screen ratio.
Letterbox.Letterbox.Letterbox.Letterbox.Letterbox. Keep the video display undistorted and fill the extraspace with black bars.
CPLVCPLVCPLVCPLVCPLV is a video stretching technology from CyberLink that producesminimal distortion in the center of the picture.
Pan & Scan.Pan & Scan.Pan & Scan.Pan & Scan.Pan & Scan. Display the central portion of DVD titles in widescreenratio. Drag the display area to view different portions of the video.
Color Prof i le .Co lor Prof i le .Co lor Prof i le .Co lor Prof i le .Co lor Prof i le . Change the overall color scheme of video contentduring playback.
Or ig ina l . Or ig ina l . Or ig ina l . Or ig ina l . Or ig ina l . Use the color scheme of the disc you are watching.
V iv idV iv idV iv idV iv idV iv id, B r ightBr ightBr ightBr ightBr ight, and Theater .Theater .Theater .Theater .Theater . Add enhanced color to the videodisplay.
3 -143 -143 -143 -143 -14 Chapter 3 : Software in format ionChapter 3 : Software in format ionChapter 3 : Software in format ionChapter 3 : Software in format ionChapter 3 : Software in format ion
CLEVCLEVCLEVCLEVCLEV is a video enhancement technology from CyberLink thatdynamically adjusts the brightness, contrast, and saturation if themovie you are watching contains scenes that are too dark or bright.
Options other than Or ig ina l Or ig ina l Or ig ina l Or ig ina l Or ig ina l require more system resources to run.
Load Default Sett ings. Load Default Sett ings. Load Default Sett ings. Load Default Sett ings. Load Default Sett ings. Return the settings on this page to theiroriginal values.
App ly . App ly . App ly . App ly . App ly . Effect the changes you made.
Audio settingsAudio settingsAudio settingsAudio settingsAudio settings
Speaker Envi ronment. Speaker Envi ronment. Speaker Envi ronment. Speaker Envi ronment. Speaker Envi ronment. Match the number of speakers you have.
SPDIF . SPDIF . SPDIF . SPDIF . SPDIF . Enable digital audio output.
Output Mode. Output Mode. Output Mode. Output Mode. Output Mode. Determine the special processing used on the audiosignal. Experiment with the available settings to decide which youprefer.
Audio Channel Expander. Audio Channel Expander. Audio Channel Expander. Audio Channel Expander. Audio Channel Expander. Expand the range of sound of four- orsix-speaker output.
CLME I CLME I CLME I CLME I CLME I is an audio channel expansion technology from CyberLink thatconverts stereo audio sound and outputs it to multiple channels.There are three variations: CLMEI - Movie CLMEI - Movie CLMEI - Movie CLMEI - Movie CLMEI - Movie for watching movies,CLMEI - Mus ic CLMEI - Mus ic CLMEI - Mus ic CLMEI - Mus ic CLMEI - Mus ic for regular music output, and CLMEI - Onstage CLMEI - Onstage CLMEI - Onstage CLMEI - Onstage CLMEI - Onstage fora more live sound.
Dynamic Range Compress ion. Dynamic Range Compress ion. Dynamic Range Compress ion. Dynamic Range Compress ion. Dynamic Range Compress ion. Options for different listeningenvironments.
Normal Envi ronment.Normal Envi ronment.Normal Envi ronment.Normal Envi ronment.Normal Envi ronment. Create a standard virtual listeningenvironment.
Quiet Envi ronment.Quiet Envi ronment.Quiet Envi ronment.Quiet Envi ronment.Quiet Envi ronment. Emphasize even the slightest sound effect in amovie.
Noisy Envi ronment.Noisy Envi ronment.Noisy Envi ronment.Noisy Envi ronment.Noisy Envi ronment. Amplify low range audio signals, which areespecially suitable for notebook computers.
Load Default Sett ings. Load Default Sett ings. Load Default Sett ings. Load Default Sett ings. Load Default Sett ings. Return the settings on this page to theiroriginal values.
App ly . App ly . App ly . App ly . App ly . Effect the changes you made.
3 -153 -153 -153 -153 -15ASUS TV Tuner Card/BoxASUS TV Tuner Card/BoxASUS TV Tuner Card/BoxASUS TV Tuner Card/BoxASUS TV Tuner Card/Box
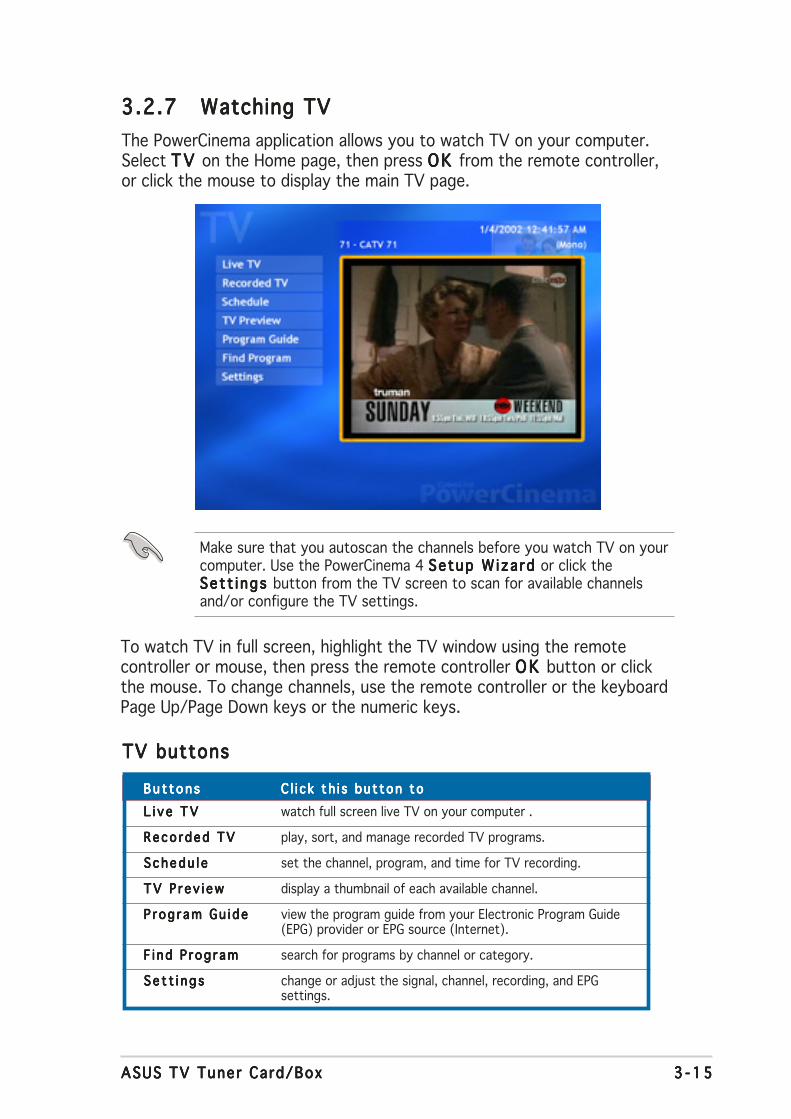
3.2.73.2.73.2.73.2.73.2.7 Watching TVWatching TVWatching TVWatching TVWatching TV
The PowerCinema application allows you to watch TV on your computer.Select TV TV TV TV TV on the Home page, then press OK OK OK OK OK from the remote controller,or click the mouse to display the main TV page.
TV buttonsTV buttonsTV buttonsTV buttonsTV buttons
To watch TV in full screen, highlight the TV window using the remotecontroller or mouse, then press the remote controller OK OK OK OK OK button or clickthe mouse. To change channels, use the remote controller or the keyboardPage Up/Page Down keys or the numeric keys.
Bu t t on sBu t t on sBu t t on sBu t t on sBu t t on s C l i c k th i s bu t ton toC l i c k th i s bu t ton toC l i c k th i s bu t ton toC l i c k th i s bu t ton toC l i c k th i s bu t ton to
L i v e TVL i v e TVL i v e TVL i v e TVL i v e TV watch full screen live TV on your computer .
Reco rded TVReco rded TVReco rded TVReco rded TVReco rded TV play, sort, and manage recorded TV programs.
S chedu l eS chedu l eS chedu l eS chedu l eS chedu l e set the channel, program, and time for TV recording.
TV P r ev i ewTV P r ev i ewTV P r ev i ewTV P r ev i ewTV P r ev i ew display a thumbnail of each available channel.
P r og r am Gu i deP rog ram Gu i deP rog ram Gu i deP rog ram Gu i deP rog ram Gu i de view the program guide from your Electronic Program Guide(EPG) provider or EPG source (Internet).
F i nd P rog r amF i nd P rog r amF i nd P rog r amF i nd P rog r amF i nd P rog r am search for programs by channel or category.
S e t t i n g sSe t t i n g sSe t t i n g sSe t t i n g sSe t t i n g s change or adjust the signal, channel, recording, and EPGsettings.
Make sure that you autoscan the channels before you watch TV on yourcomputer. Use the PowerCinema 4 Setup Wizard Setup Wizard Setup Wizard Setup Wizard Setup Wizard or click theSett ings Sett i ngs Sett i ngs Sett i ngs Sett i ngs button from the TV screen to scan for available channelsand/or configure the TV settings.
3 -163 -163 -163 -163 -16 Chapter 3 : Software in format ionChapter 3 : Software in format ionChapter 3 : Software in format ionChapter 3 : Software in format ionChapter 3 : Software in format ion
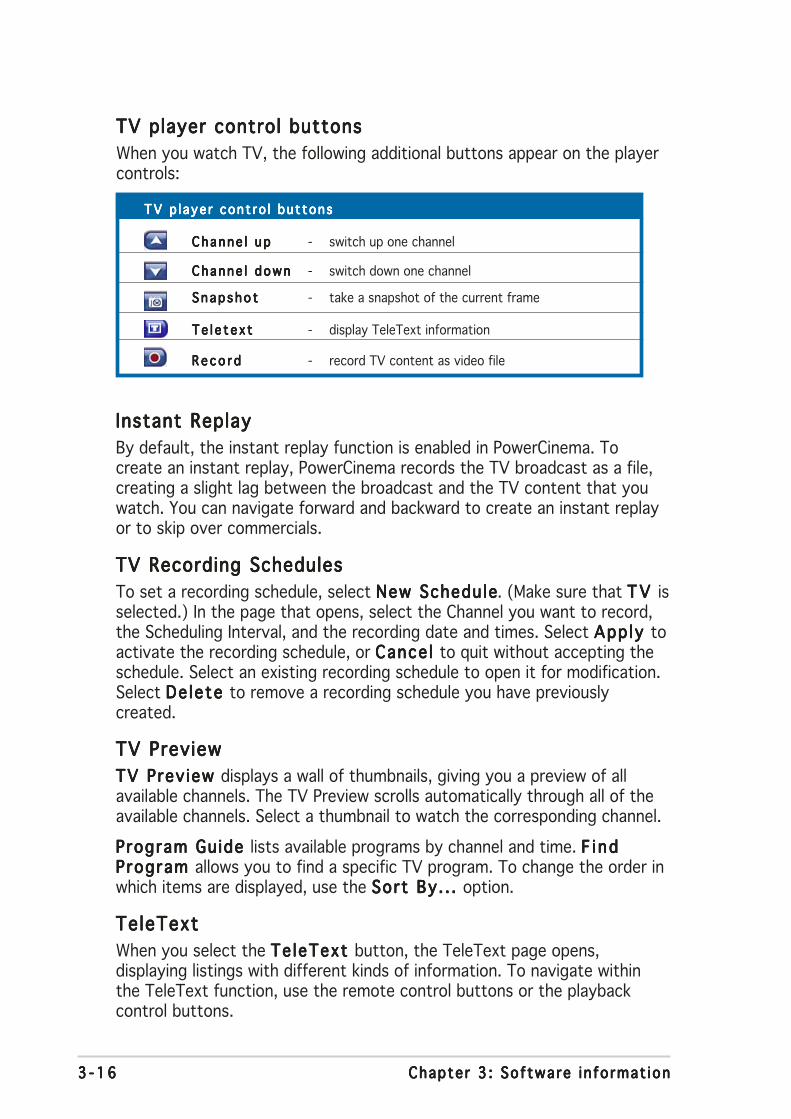
TV player control buttonsTV player control buttonsTV player control buttonsTV player control buttonsTV player control buttons
When you watch TV, the following additional buttons appear on the playercontrols:
TV p l aye r cont ro l bu t tonsTV p l aye r cont ro l bu t tonsTV p l aye r cont ro l bu t tonsTV p l aye r cont ro l bu t tonsTV p l aye r cont ro l bu t tons
Channe l upChanne l upChanne l upChanne l upChanne l up - switch up one channel
Channe l downChanne l downChanne l downChanne l downChanne l down - switch down one channel
S nap sho tSnap sho tSnap sho tSnap sho tSnap sho t - take a snapshot of the current frame
Te l e t e x tTe l e t e x tTe l e t e x tTe l e t e x tTe l e t e x t - display TeleText information
R e c o r dR e c o r dR e c o r dR e c o r dR e c o r d - record TV content as video file
Instant ReplayInstant ReplayInstant ReplayInstant ReplayInstant Replay
By default, the instant replay function is enabled in PowerCinema. Tocreate an instant replay, PowerCinema records the TV broadcast as a file,creating a slight lag between the broadcast and the TV content that youwatch. You can navigate forward and backward to create an instant replayor to skip over commercials.
TV Recording SchedulesTV Recording SchedulesTV Recording SchedulesTV Recording SchedulesTV Recording Schedules
To set a recording schedule, select New ScheduleNew ScheduleNew ScheduleNew ScheduleNew Schedule. (Make sure that TV TV TV TV TV isselected.) In the page that opens, select the Channel you want to record,the Scheduling Interval, and the recording date and times. Select App ly App ly App ly App ly App ly toactivate the recording schedule, or Cance l Cance l Cance l Cance l Cance l to quit without accepting theschedule. Select an existing recording schedule to open it for modification.Select De lete De lete De lete De lete De lete to remove a recording schedule you have previouslycreated.
TV PreviewTV PreviewTV PreviewTV PreviewTV Preview
TV Prev iew TV Prev iew TV Prev iew TV Prev iew TV Prev iew displays a wall of thumbnails, giving you a preview of allavailable channels. The TV Preview scrolls automatically through all of theavailable channels. Select a thumbnail to watch the corresponding channel.
Program Guide Program Guide Program Guide Program Guide Program Guide lists available programs by channel and time. F i ndF i ndF i ndF i ndF i ndProgram Program Program Program Program allows you to find a specific TV program. To change the order inwhich items are displayed, use the Sort By. . . Sort By. . . Sort By. . . Sort By. . . Sort By. . . option.
TeleTextTeleTextTeleTextTeleTextTeleText
When you select the Te leText Te leText Te leText Te leText Te leText button, the TeleText page opens,displaying listings with different kinds of information. To navigate withinthe TeleText function, use the remote control buttons or the playbackcontrol buttons.
3 -173 -173 -173 -173 -17ASUS TV Tuner Card/BoxASUS TV Tuner Card/BoxASUS TV Tuner Card/BoxASUS TV Tuner Card/BoxASUS TV Tuner Card/Box
Select the Te leText Te leText Te leText Te leText Te leText button to scroll through the TeleText, transparent(TeleText+TV), and Live TV pages. Press the Backspace Backspace Backspace Backspace Backspace button on thekeyboard or the BACK BACK BACK BACK BACK button on the remote to return to the main TVpage.
When you use the TeleText function, the following special controls areadded to the pop-up control panel: Red Red Red Red Red (opens TeleText pages marked inred), Green Green Green Green Green (opens TeleText pages marked in green), B lue B lue B lue B lue B lue (opensTeleText pages marked in blue), Ye l low Ye l low Ye l low Ye l low Ye l low (opens TeleText pages marked inyellow). You can also use the corresponding buttons on the remote toperform the same functions.
Prev ious Page Prev ious Page Prev ious Page Prev ious Page Prev ious Page (jumps back one page), Next Page Next Page Next Page Next Page Next Page (jumps forward onepage), Prev ious SubPage Prev ious SubPage Prev ious SubPage Prev ious SubPage Prev ious SubPage (jumps back one subpage), Next SubPageNext SubPageNext SubPageNext SubPageNext SubPage(jumps forward one subpage), and Snapshot Snapshot Snapshot Snapshot Snapshot (captures the TeleTextscreen in BMP format).
TV SettingsTV SettingsTV SettingsTV SettingsTV Settings
Signal Settings
Signa l Type. S igna l Type. S igna l Type. S igna l Type. S igna l Type. Set your TV signal as D ig i ta l D ig i ta l D ig i ta l D ig i ta l D ig i ta l (for digital TV tunercard/box only) or Ana logAna logAna logAna logAna log, depending on your cable TV subscription.
TV Source. TV Source. TV Source. TV Source. TV Source. Select if your TV receives signals from an antenna or acable.
Reg ion. Reg ion. Reg ion. Reg ion. Reg ion. Select the country or region where your cable provider islocated.
Aud io .Aud io .Aud io .Aud io .Aud io . Set your audio output. Options depend on your TV’s signaltype, but may include MonoMonoMonoMonoMono, StereoStereoStereoStereoStereo, or the enhanced signals Dua lDua lDua lDua lDua lAAAAA, Dua l BDua l BDua l BDua l BDua l B, or Dua l AB Dua l AB Dua l AB Dua l AB Dua l AB that augment the main audio, provide anaudio translation, or offer other information.
Enable T ime-Shift ing. Enable T ime-Shift ing. Enable T ime-Shift ing. Enable T ime-Shift ing. Enable T ime-Shift ing. Set to Yes Yes Yes Yes Yes to watch instant replays.
Channel Settings
Scan ChannelsScan ChannelsScan ChannelsScan ChannelsScan Channels. Scan and list the available TV channels.
Dese lectDese lectDese lectDese lectDese lect. Disable a channel in the list. Disabled channels are notavailable for watching when you return to the TV page.
Rename. Rename. Rename. Rename. Rename. Rename a channel in the list.
Recording Settings
Record ing Qual i ty . Record ing Qual i ty . Record ing Qual i ty . Record ing Qual i ty . Record ing Qual i ty . Set the quality of video recorded from TV.Selecting a higher quality results in a larger recorded file.
Recording Dest inat ion. Recording Dest inat ion. Recording Dest inat ion. Recording Dest inat ion. Recording Dest inat ion. Set the destination where files recordedfrom TV are saved.
3 -183 -183 -183 -183 -18 Chapter 3 : Software in format ionChapter 3 : Software in format ionChapter 3 : Software in format ionChapter 3 : Software in format ionChapter 3 : Software in format ion
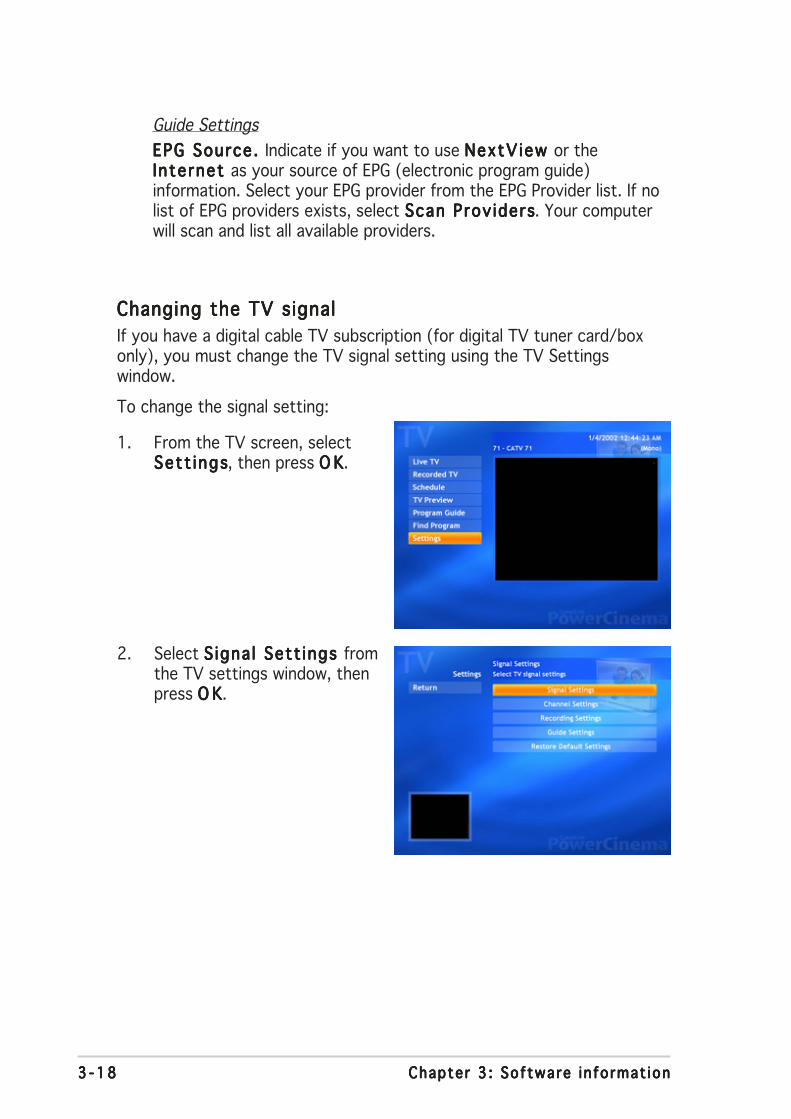
Changing the TV signalChanging the TV signalChanging the TV signalChanging the TV signalChanging the TV signal
If you have a digital cable TV subscription (for digital TV tuner card/boxonly), you must change the TV signal setting using the TV Settingswindow.
To change the signal setting:
1. From the TV screen, selectSett ingsSett ingsSett ingsSett ingsSett ings, then press O KO KO KO KO K.
2. Select S igna l Sett ings S igna l Sett ings S igna l Sett ings S igna l Sett ings S igna l Sett ings fromthe TV settings window, thenpress O KO KO KO KO K.
Guide Settings
EPG Source. EPG Source. EPG Source. EPG Source. EPG Source. Indicate if you want to use NextView NextView NextView NextView NextView or theInternet Internet Internet Internet Internet as your source of EPG (electronic program guide)information. Select your EPG provider from the EPG Provider list. If nolist of EPG providers exists, select Scan Prov idersScan Prov idersScan Prov idersScan Prov idersScan Prov iders. Your computerwill scan and list all available providers.
3 -193 -193 -193 -193 -19ASUS TV Tuner Card/BoxASUS TV Tuner Card/BoxASUS TV Tuner Card/BoxASUS TV Tuner Card/BoxASUS TV Tuner Card/Box
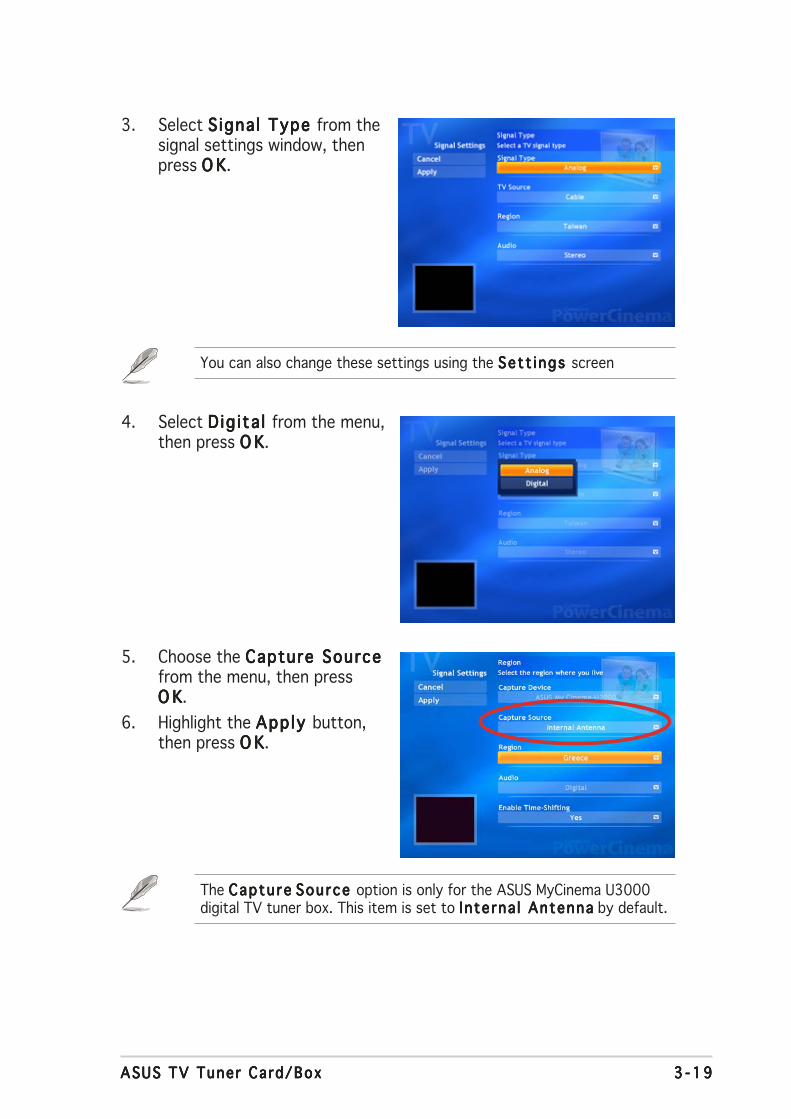
3. Select S igna l Type S igna l Type S igna l Type S igna l Type S igna l Type from thesignal settings window, thenpress O KO KO KO KO K.
You can also change these settings using the Sett i ngs Set t i ngs Set t i ngs Set t i ngs Set t i ngs screen
4. Select D ig i ta l D ig i ta l D ig i ta l D ig i ta l D ig i ta l from the menu,then press O KO KO KO KO K.
5. Choose the Capture SourceCapture SourceCapture SourceCapture SourceCapture Sourcefrom the menu, then pressO KO KO KO KO K.
6. Highlight the App ly App ly App ly App ly App ly button,then press O KO KO KO KO K.
The Captu reCaptu reCaptu reCaptu reCaptu re Sou rce Sou rce Sou rce Sou rce Sou rce option is only for the ASUS MyCinema U3000digital TV tuner box. This item is set to Interna l AntennaInterna l AntennaInterna l AntennaInterna l AntennaInterna l Antenna by default.
3 -203 -203 -203 -203 -20 Chapter 3 : Software in format ionChapter 3 : Software in format ionChapter 3 : Software in format ionChapter 3 : Software in format ionChapter 3 : Software in format ion
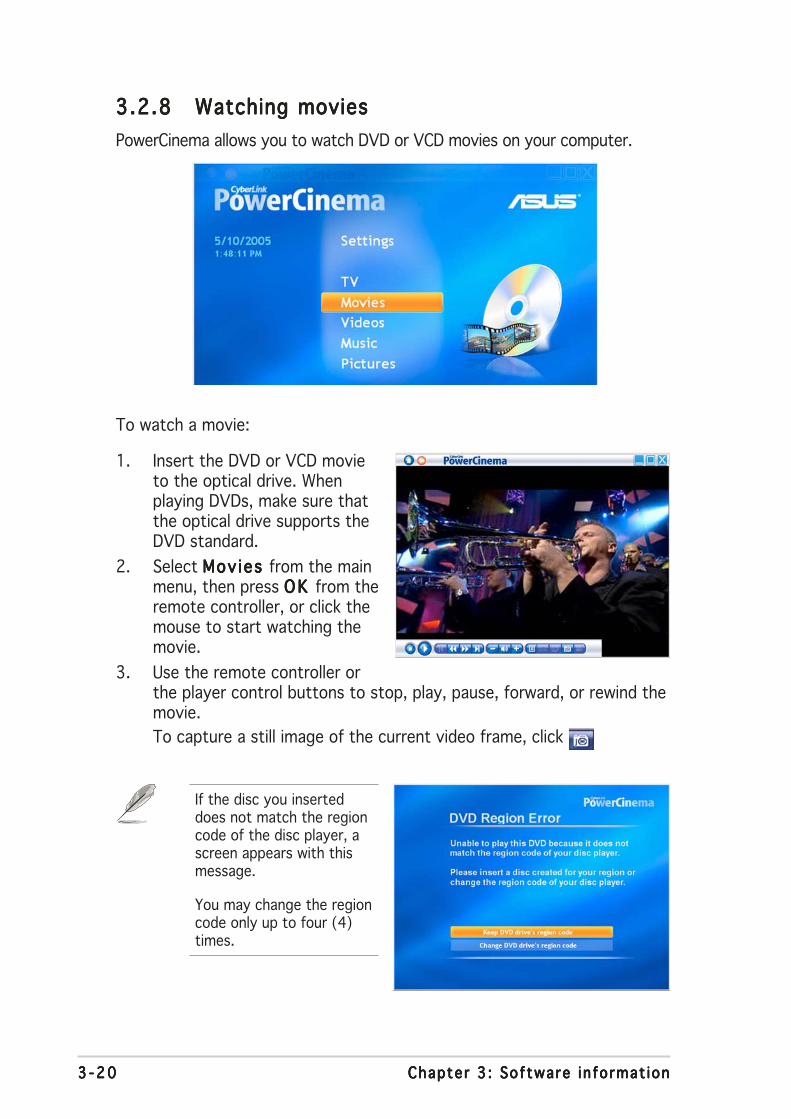
3.2.83.2.83.2.83.2.83.2.8 Watching moviesWatching moviesWatching moviesWatching moviesWatching movies
PowerCinema allows you to watch DVD or VCD movies on your computer.
If the disc you inserteddoes not match the regioncode of the disc player, ascreen appears with thismessage.
You may change the regioncode only up to four (4)times.
To watch a movie:
1. Insert the DVD or VCD movieto the optical drive. Whenplaying DVDs, make sure thatthe optical drive supports theDVD standard.
2. Select Mov ies Mov ies Mov ies Mov ies Mov ies from the mainmenu, then press O K O K O K O K O K from theremote controller, or click themouse to start watching themovie.
3. Use the remote controller orthe player control buttons to stop, play, pause, forward, or rewind themovie.
To capture a still image of the current video frame, click

3 -213 -213 -213 -213 -21ASUS TV Tuner Card/BoxASUS TV Tuner Card/BoxASUS TV Tuner Card/BoxASUS TV Tuner Card/BoxASUS TV Tuner Card/Box
DVD/VCD player control buttonsDVD/VCD player control buttonsDVD/VCD player control buttonsDVD/VCD player control buttonsDVD/VCD player control buttons
When you watch DVD/VCD, the following additional buttons appear on theplayer controls:
DVD/VCD p l aye r cont ro l bu t tonsDVD/VCD p l aye r cont ro l bu t tonsDVD/VCD p l aye r cont ro l bu t tonsDVD/VCD p l aye r cont ro l bu t tonsDVD/VCD p l aye r cont ro l bu t tons
Ma i n menuMa i n menuMa i n menuMa i n menuMa i n menu - display the disc’s menu page
Sub t i t l e sSub t i t l e sSub t i t l e sSub t i t l e sSub t i t l e s - switch among subtitle languages
LanguageLanguageLanguageLanguageLanguage - switch among available overdub languages
Snapsho tSnap sho tSnap sho tSnap sho tSnap sho t - take a snapshot of the current video frame
A n g l eA n g l eA n g l eA n g l eA n g l e - switch among available camera angles
Movie SettingsMovie SettingsMovie SettingsMovie SettingsMovie Settings
Subt it les . Subt it les . Subt it les . Subt it les . Subt it les . Select the default subtitle language, when available.
T it le Defau lt . T it le Defau lt . T it le Defau lt . T it le Defau lt . T it le Defau lt . Use the original language of the disc you arewatching.
C losed Capt ions. C losed Capt ions. C losed Capt ions. C losed Capt ions. C losed Capt ions. Determine the location of the closed captioningfunction. When this option is set to Norma lNorma lNorma lNorma lNorma l, closed captions appearacross the bottom of the screen. When set to E levatedE levatedE levatedE levatedE levated, closedcaptions appear across the top of the screen.
Aud io . Aud io . Aud io . Aud io . Aud io . Select the default language for the movie’s audio track.
Disp lay Upon Mute. D isp lay Upon Mute. D isp lay Upon Mute. D isp lay Upon Mute. D isp lay Upon Mute. Determines the optional display when thevolume is muted. If you enable this option, you can choose to displaysubtitles or closed captions.
Load Default Sett ings. Load Default Sett ings. Load Default Sett ings. Load Default Sett ings. Load Default Sett ings. Return the settings on this page to theiroriginal values.
App ly . App ly . App ly . App ly . App ly . Effect the changes you made.
3 -223 -223 -223 -223 -22 Chapter 3 : Software in format ionChapter 3 : Software in format ionChapter 3 : Software in format ionChapter 3 : Software in format ionChapter 3 : Software in format ion
Video buttonsVideo buttonsVideo buttonsVideo buttonsVideo buttons
Bu t t on sBu t t on sBu t t on sBu t t on sBu t t on s C l i c k th i s bu t ton toC l i c k th i s bu t ton toC l i c k th i s bu t ton toC l i c k th i s bu t ton toC l i c k th i s bu t ton to
So r t by . . .So r t by . . .So r t by . . .So r t by . . .So r t by . . . change the order by which folders or files are displayed.
My V i deosMy V i deosMy V i deosMy V i deosMy V i deos view videos in the My Videos folder in your computer.
Recen t V i deosRecen t V i deosRecen t V i deosRecen t V i deosRecen t V i deos play videos you recently played (playback resumes at the pointyou stopped watching).
Mo re Fo l de r sMo re Fo l de r sMo re Fo l de r sMo re Fo l de r sMo re Fo l de r s locate and view videos stored in other folders.
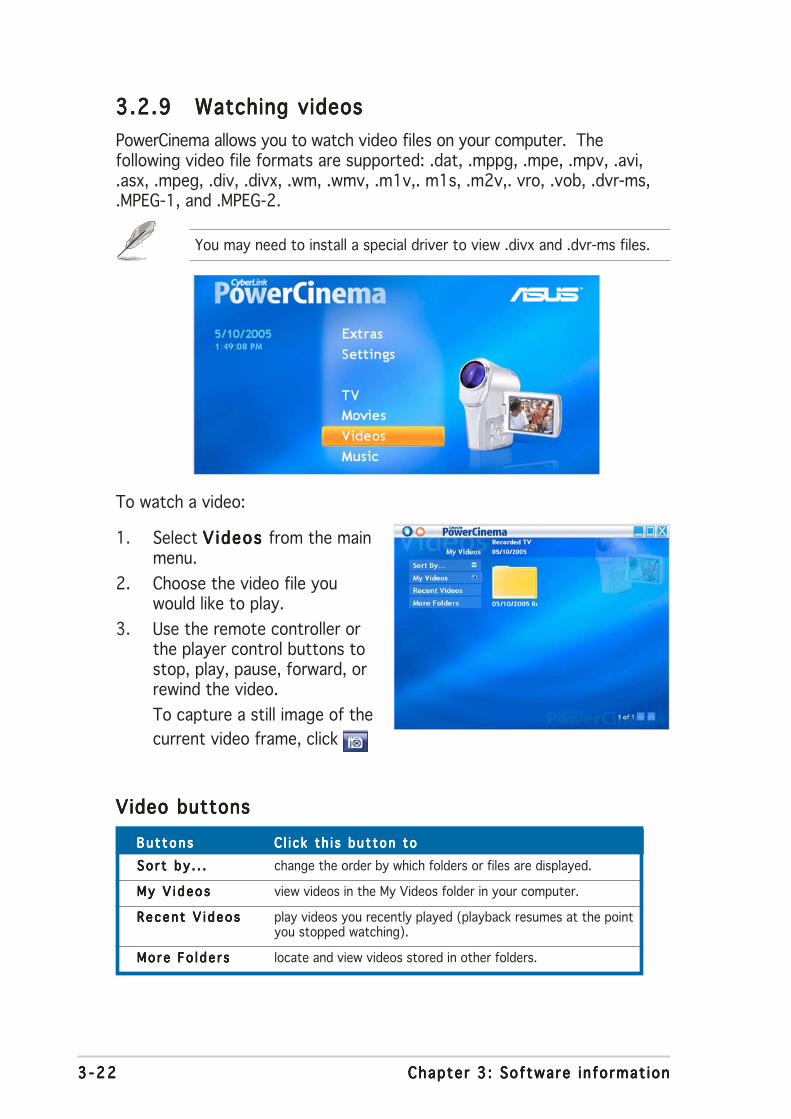
To watch a video:
1. Select V ideos V ideos V ideos V ideos V ideos from the mainmenu.
2. Choose the video file youwould like to play.
3. Use the remote controller orthe player control buttons tostop, play, pause, forward, orrewind the video.
To capture a still image of the
current video frame, click
3.2.93.2.93.2.93.2.93.2.9 Watching videosWatching videosWatching videosWatching videosWatching videos
PowerCinema allows you to watch video files on your computer. Thefollowing video file formats are supported: .dat, .mppg, .mpe, .mpv, .avi,.asx, .mpeg, .div, .divx, .wm, .wmv, .m1v,. m1s, .m2v,. vro, .vob, .dvr-ms,.MPEG-1, and .MPEG-2.
You may need to install a special driver to view .divx and .dvr-ms files.
3 -233 -233 -233 -233 -23ASUS TV Tuner Card/BoxASUS TV Tuner Card/BoxASUS TV Tuner Card/BoxASUS TV Tuner Card/BoxASUS TV Tuner Card/Box
Browsing for VideosBrowsing for VideosBrowsing for VideosBrowsing for VideosBrowsing for Videos
To change the order in which items are displayed, use the Sort By. . .Sort By. . .Sort By. . .Sort By. . .Sort By. . .option. To view videos in the My Videos folder on your computer, selectMy VideosMy VideosMy VideosMy VideosMy Videos. To display videos that you have recently viewed, selectRecent VideosRecent VideosRecent VideosRecent VideosRecent Videos. Playback resumes from the point you stopped watching.
To view videos that are located in other folders, select More Fo ldersMore Fo ldersMore Fo ldersMore Fo ldersMore Fo lders.Browse through the drives and folders to locate the videos you want towatch. Select Network Videos Network Videos Network Videos Network Videos Network Videos to access video files on a UPnP (UniversalPlug and Play) media server.
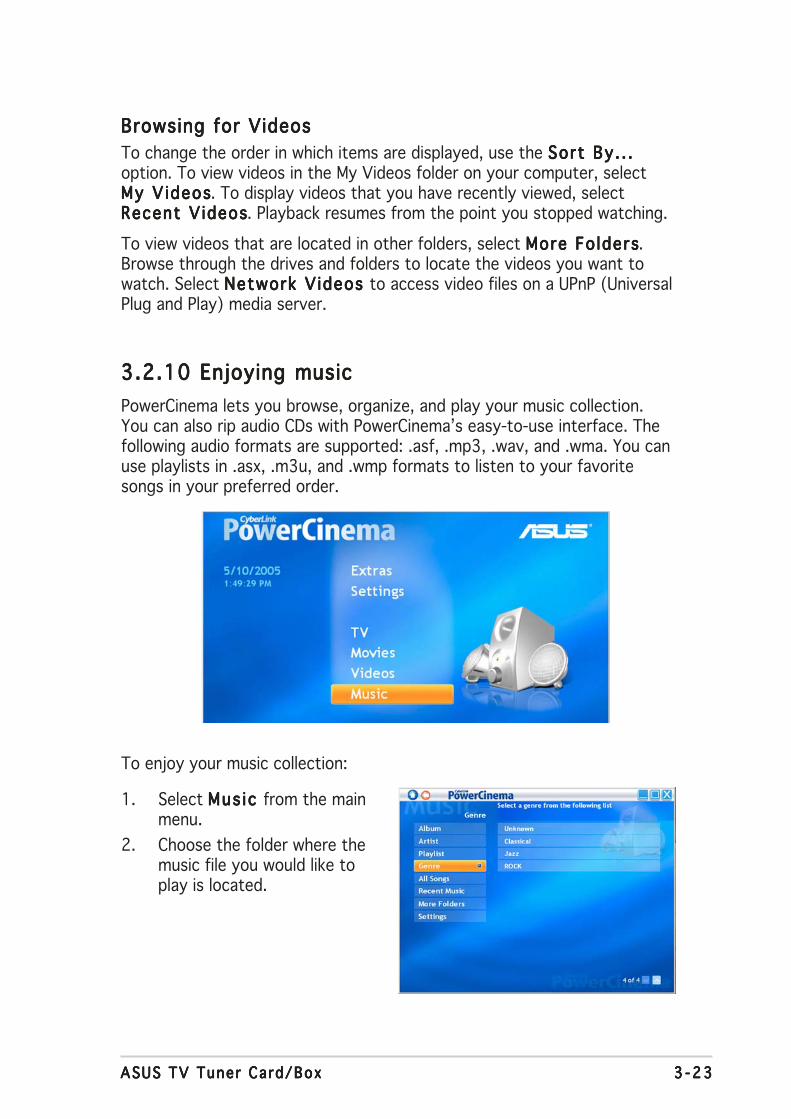
To enjoy your music collection:
1. Select Mus ic Mus ic Mus ic Mus ic Mus ic from the mainmenu.
2. Choose the folder where themusic file you would like toplay is located.
3.2.103.2.103.2.103.2.103.2.10 Enjoying musicEnjoying musicEnjoying musicEnjoying musicEnjoying music
PowerCinema lets you browse, organize, and play your music collection.You can also rip audio CDs with PowerCinema’s easy-to-use interface. Thefollowing audio formats are supported: .asf, .mp3, .wav, and .wma. You canuse playlists in .asx, .m3u, and .wmp formats to listen to your favoritesongs in your preferred order.
3 -243 -243 -243 -243 -24 Chapter 3 : Software in format ionChapter 3 : Software in format ionChapter 3 : Software in format ionChapter 3 : Software in format ionChapter 3 : Software in format ion
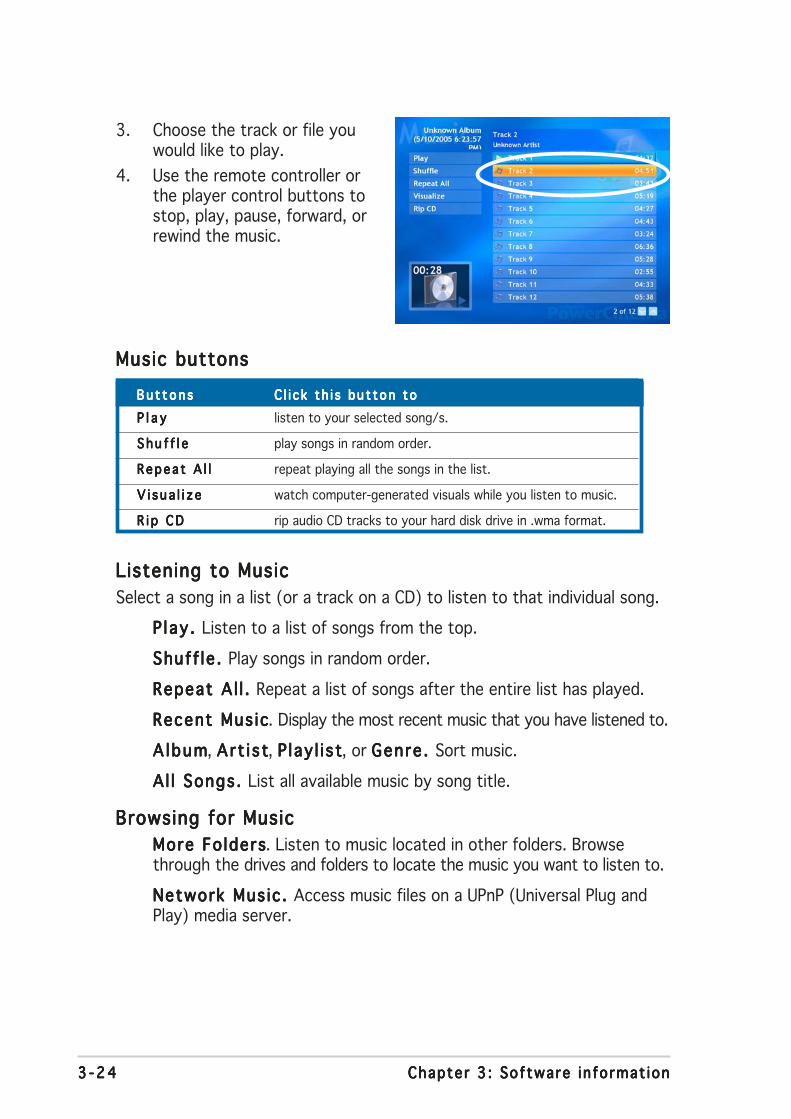
3. Choose the track or file youwould like to play.
4. Use the remote controller orthe player control buttons tostop, play, pause, forward, orrewind the music.
Music buttonsMusic buttonsMusic buttonsMusic buttonsMusic buttons
Bu t t on sBu t t on sBu t t on sBu t t on sBu t t on s C l i c k th i s bu t ton toC l i c k th i s bu t ton toC l i c k th i s bu t ton toC l i c k th i s bu t ton toC l i c k th i s bu t ton to
P l a yP l a yP l a yP l a yP l a y listen to your selected song/s.
S h u f f l eS h u f f l eS h u f f l eS h u f f l eS h u f f l e play songs in random order.
Repea t A l lR epea t A l lR epea t A l lR epea t A l lR epea t A l l repeat playing all the songs in the list.
V i s u a l i z eV i s ua l i z eV i s ua l i z eV i s ua l i z eV i s ua l i z e watch computer-generated visuals while you listen to music.
R i p C DR i p C DR i p C DR i p C DR i p C D rip audio CD tracks to your hard disk drive in .wma format.
Listening to MusicListening to MusicListening to MusicListening to MusicListening to Music
Select a song in a list (or a track on a CD) to listen to that individual song.
P lay . P lay . P lay . P lay . P lay . Listen to a list of songs from the top.
Shuff le . Shuff le . Shuff le . Shuff le . Shuff le . Play songs in random order.
Repeat A l l . Repeat A l l . Repeat A l l . Repeat A l l . Repeat A l l . Repeat a list of songs after the entire list has played.
Recent Mus icRecent Mus icRecent Mus icRecent Mus icRecent Mus ic. Display the most recent music that you have listened to.
A lbumAlbumAlbumAlbumAlbum, Art i s tArt i s tArt i s tArt i s tArt i s t, P lay l i stP lay l i stP lay l i stP lay l i stP lay l i st, or Genre . Genre . Genre . Genre . Genre . Sort music.
A l l Songs. A l l Songs. A l l Songs. A l l Songs. A l l Songs. List all available music by song title.
Browsing for MusicBrowsing for MusicBrowsing for MusicBrowsing for MusicBrowsing for Music
More Fo ldersMore Fo ldersMore Fo ldersMore Fo ldersMore Fo lders. Listen to music located in other folders. Browsethrough the drives and folders to locate the music you want to listen to.
Network Mus ic . Network Mus ic . Network Mus ic . Network Mus ic . Network Mus ic . Access music files on a UPnP (Universal Plug andPlay) media server.
3 -253 -253 -253 -253 -25ASUS TV Tuner Card/BoxASUS TV Tuner Card/BoxASUS TV Tuner Card/BoxASUS TV Tuner Card/BoxASUS TV Tuner Card/Box
Watching VisualizationsWatching VisualizationsWatching VisualizationsWatching VisualizationsWatching Visualizations
Visua l ize V isua l ize V isua l ize V isua l ize V isua l ize allows you to watch computer-generated visualizations whileyou listen to music. To exit the visualization, click anywhere on the screen,press BACK BACK BACK BACK BACK on the remote, or Esc/Backspace Esc/Backspace Esc/Backspace Esc/Backspace Esc/Backspace on the keyboard.
Using Playl istsUsing Playl istsUsing Playl istsUsing Playl istsUsing Playl ists
Playlists are simply lists of songs. Using a playlist, you can sequence songsfrom different sources. PowerCinema allows you to use the playlists youcreate in Windows Media Player.
To create a new playlist in WMP 9:
1. Open Windows Media Player and select File > New Playlist... The NewPlaylist window appears.
2. Click a song to add from your Media Library. Repeat this for each songyou wish to add.
3. In the Playlist window, enter a name for your playlist.
4. Click OK OK OK OK OK to save the playlist.
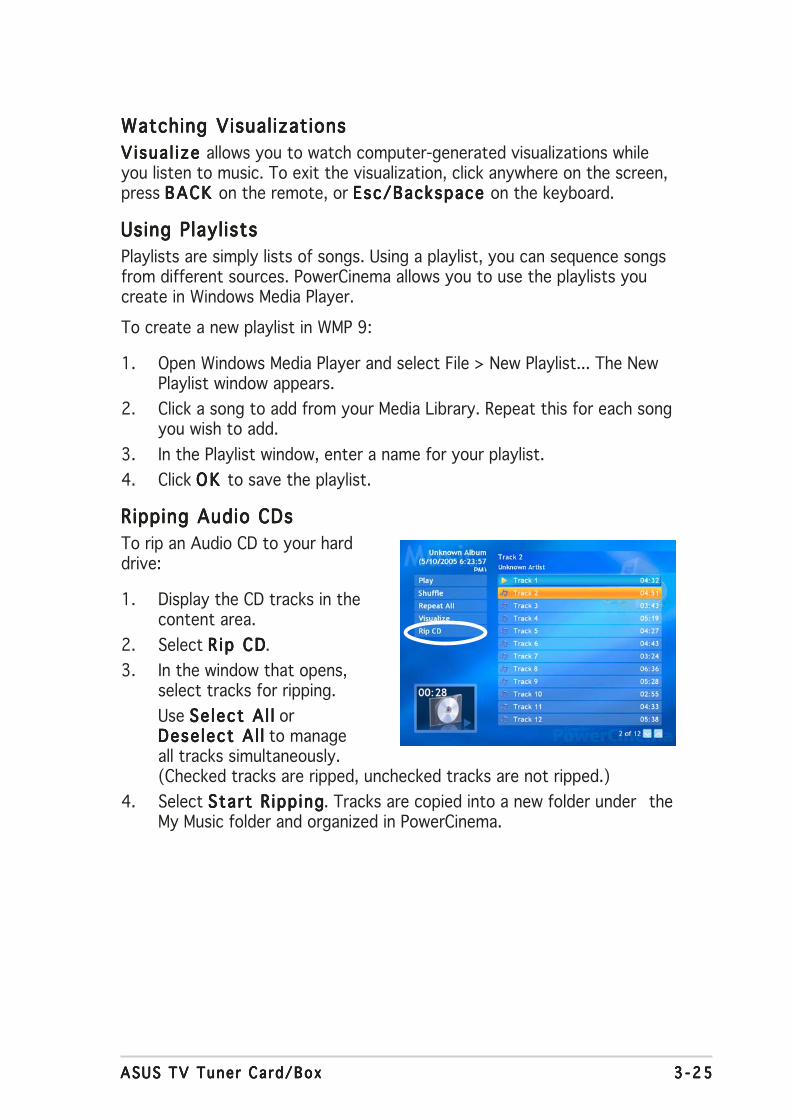
Ripping Audio CDsRipping Audio CDsRipping Audio CDsRipping Audio CDsRipping Audio CDs
To rip an Audio CD to your harddrive:
1. Display the CD tracks in thecontent area.
2. Select R ip CDR ip CDR ip CDR ip CDR ip CD.
3. In the window that opens,select tracks for ripping.
Use Se lect A l lSe lect A l lSe lect A l lSe lect A l lSe lect A l l orDese lect A l lDese lect A l lDese lect A l lDese lect A l lDese lect A l l to manageall tracks simultaneously.(Checked tracks are ripped, unchecked tracks are not ripped.)
4. Select Start R ipp ingStart R ipp ingStart R ipp ingStart R ipp ingStart R ipp ing. Tracks are copied into a new folder under theMy Music folder and organized in PowerCinema.

3 -263 -263 -263 -263 -26 Chapter 3 : Software in format ionChapter 3 : Software in format ionChapter 3 : Software in format ionChapter 3 : Software in format ionChapter 3 : Software in format ion
3.2.113.2.113.2.113.2.113.2.11 Viewing picturesViewing picturesViewing picturesViewing picturesViewing pictures
PowerCinema lets you view and edit digital pictures in the followingformats: .BMP, .JPEG, and .PNG). You may view them individually or as aslide show.
Music SettingsMusic SettingsMusic SettingsMusic SettingsMusic Settings
Default Visua l izat ions. Default Visua l izat ions. Default Visua l izat ions. Default Visua l izat ions. Default Visua l izat ions. Select the computer-generatedvisualizations while you listen to music.
Default R ipping Qual i ty. Default R ipping Qual i ty. Default R ipping Qual i ty. Default R ipping Qual i ty. Default R ipping Qual i ty. Determine the file quality of songs yourip from an Audio CD.
Search for Mus ic . Search for Mus ic . Search for Mus ic . Search for Mus ic . Search for Mus ic . Scan your computer for music files that can beplayed in PowerCinema.
Browsing for PicturesBrowsing for PicturesBrowsing for PicturesBrowsing for PicturesBrowsing for Pictures
Sort By. . . Sort By. . . Sort By. . . Sort By. . . Sort By. . . Change the order in which items are displayed.
My P icturesMy P icturesMy P icturesMy P icturesMy P ictures. View pictures in the My Pictures folder on yourcomputer.
Recent P icturesRecent P icturesRecent P icturesRecent P icturesRecent P ictures. Display pictures that you have viewed recently.
More Fo ldersMore Fo ldersMore Fo ldersMore Fo ldersMore Fo lders. View pictures that are located in other folders.Browse through the drives and folders to locate the pictures you wantto view.
Network P ictures. Network P ictures. Network P ictures. Network P ictures. Network P ictures. Access picture files on a UPnP (Universal Plugand Play) media server.
3 -273 -273 -273 -273 -27ASUS TV Tuner Card/BoxASUS TV Tuner Card/BoxASUS TV Tuner Card/BoxASUS TV Tuner Card/BoxASUS TV Tuner Card/Box
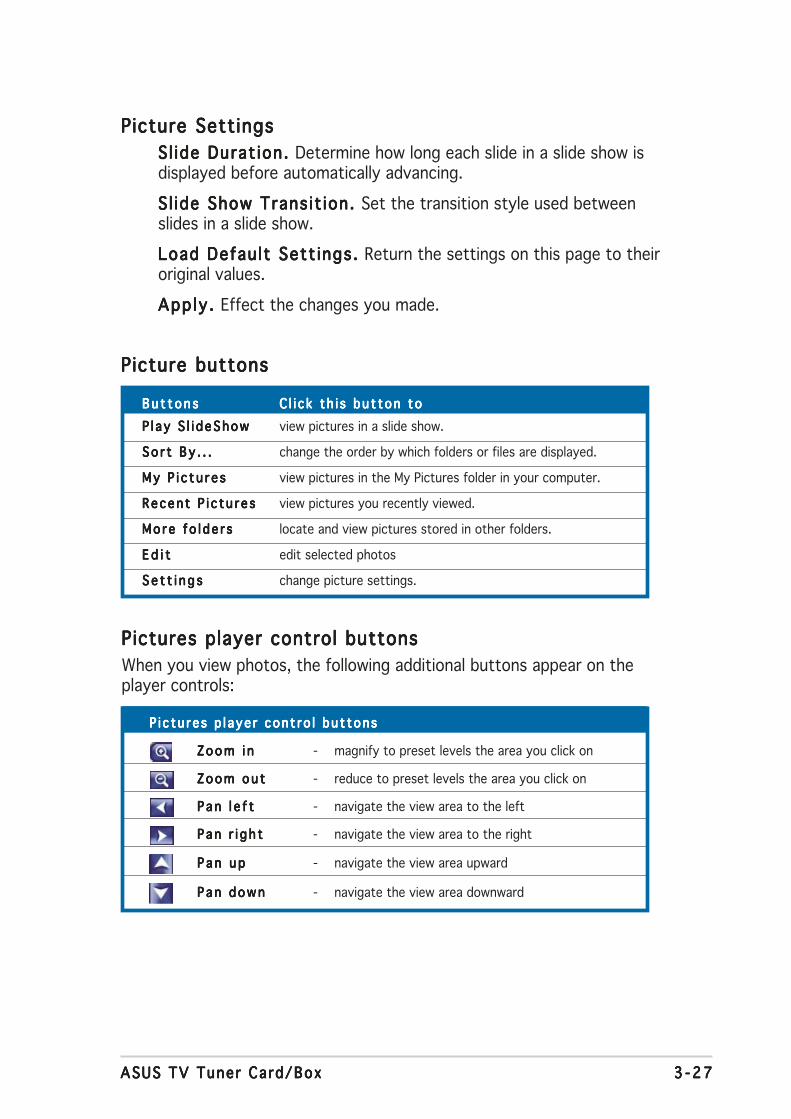
Picture SettingsPicture SettingsPicture SettingsPicture SettingsPicture Settings
Sl ide Durat ion. S l ide Durat ion. S l ide Durat ion. S l ide Durat ion. S l ide Durat ion. Determine how long each slide in a slide show isdisplayed before automatically advancing.
S l ide Show Trans it ion. S l ide Show Trans it ion. S l ide Show Trans it ion. S l ide Show Trans it ion. S l ide Show Trans it ion. Set the transition style used betweenslides in a slide show.
Load Default Sett ings. Load Default Sett ings. Load Default Sett ings. Load Default Sett ings. Load Default Sett ings. Return the settings on this page to theiroriginal values.
App ly . App ly . App ly . App ly . App ly . Effect the changes you made.
Pictures player control buttonsPictures player control buttonsPictures player control buttonsPictures player control buttonsPictures player control buttons
When you view photos, the following additional buttons appear on theplayer controls:
P i c tu res p l aye r cont ro l bu t tonsP i c tu res p l aye r cont ro l bu t tonsP i c tu res p l aye r cont ro l bu t tonsP i c tu res p l aye r cont ro l bu t tonsP i c tu res p l aye r cont ro l bu t tons
Zoom i nZoom i nZoom i nZoom i nZoom i n - magnify to preset levels the area you click on
Zoom ou tZoom ou tZoom ou tZoom ou tZoom ou t - reduce to preset levels the area you click on
Pan l e f tP an l e f tP an l e f tP an l e f tP an l e f t - navigate the view area to the left
P an r i g h tPan r i g h tPan r i g h tPan r i g h tPan r i g h t - navigate the view area to the right
P a n u pP a n u pP a n u pP a n u pP a n u p - navigate the view area upward
Pan downPan downPan downPan downPan down - navigate the view area downward
Picture buttonsPicture buttonsPicture buttonsPicture buttonsPicture buttons
Bu t t on sBu t t on sBu t t on sBu t t on sBu t t on s C l i c k th i s bu t ton toC l i c k th i s bu t ton toC l i c k th i s bu t ton toC l i c k th i s bu t ton toC l i c k th i s bu t ton to
P l ay S l i deShowP l ay S l i deShowP l ay S l i deShowP l ay S l i deShowP l ay S l i deShow view pictures in a slide show.
So r t By . . .So r t By . . .So r t By . . .So r t By . . .So r t By . . . change the order by which folders or files are displayed.
My P i c t u r e sMy P i c t u r e sMy P i c t u r e sMy P i c t u r e sMy P i c t u r e s view pictures in the My Pictures folder in your computer.
Recen t P i c tu resRecent P i c tu resRecent P i c tu resRecent P i c tu resRecent P i c tu res view pictures you recently viewed.
Mo re f o l de r sMo re f o l de r sMo re f o l de r sMo re f o l de r sMo re f o l de r s locate and view pictures stored in other folders.
E d i tE d i tE d i tE d i tE d i t edit selected photos
Se t t i n g sSe t t i n g sSe t t i n g sSe t t i n g sSe t t i n g s change picture settings.
3 -283 -283 -283 -283 -28 Chapter 3 : Software in format ionChapter 3 : Software in format ionChapter 3 : Software in format ionChapter 3 : Software in format ionChapter 3 : Software in format ion
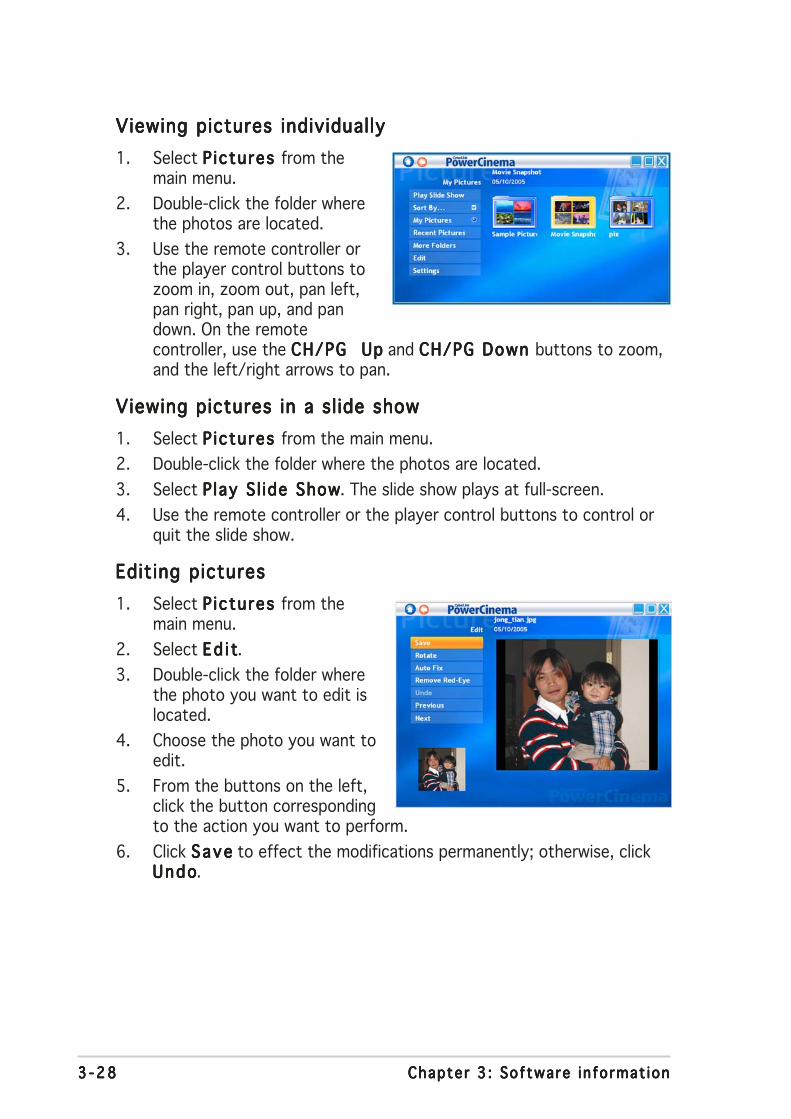
Viewing pictures individuallyViewing pictures individuallyViewing pictures individuallyViewing pictures individuallyViewing pictures individually
1. Select P ictures P ictures P ictures P ictures P ictures from themain menu.
2. Double-click the folder wherethe photos are located.
3. Use the remote controller orthe player control buttons tozoom in, zoom out, pan left,pan right, pan up, and pandown. On the remotecontroller, use the CH/PG UpCH/PG UpCH/PG UpCH/PG UpCH/PG Up and CH/PG Down CH/PG Down CH/PG Down CH/PG Down CH/PG Down buttons to zoom,and the left/right arrows to pan.
Viewing pictures in a sl ide showViewing pictures in a sl ide showViewing pictures in a sl ide showViewing pictures in a sl ide showViewing pictures in a sl ide show
1. Select P ictures P ictures P ictures P ictures P ictures from the main menu.
2. Double-click the folder where the photos are located.
3. Select P lay S l ide ShowPlay S l ide ShowPlay S l ide ShowPlay S l ide ShowPlay S l ide Show. The slide show plays at full-screen.
4. Use the remote controller or the player control buttons to control orquit the slide show.
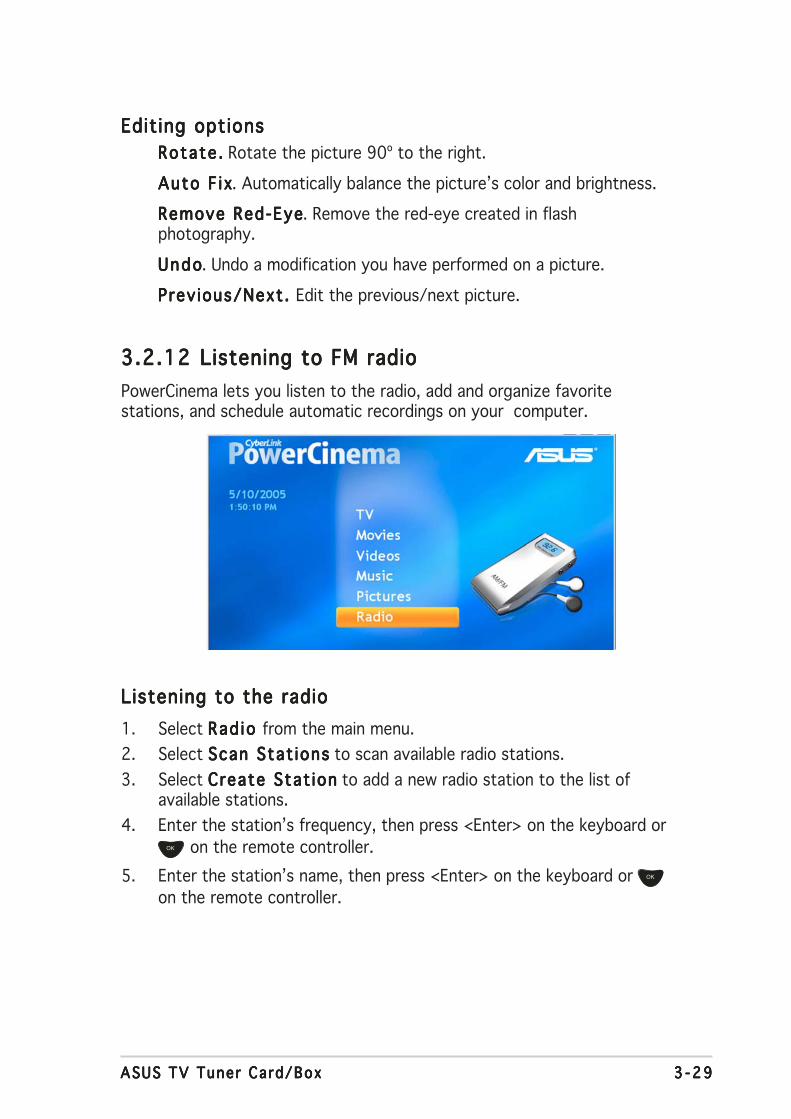
Editing picturesEditing picturesEditing picturesEditing picturesEditing pictures
1. Select P ictures P ictures P ictures P ictures P ictures from themain menu.
2. Select Ed i tEd i tEd i tEd i tEd i t.
3. Double-click the folder wherethe photo you want to edit islocated.
4. Choose the photo you want toedit.
5. From the buttons on the left,click the button correspondingto the action you want to perform.
6. Click SaveSaveSaveSaveSave to effect the modifications permanently; otherwise, clickUndoUndoUndoUndoUndo.
3 -293 -293 -293 -293 -29ASUS TV Tuner Card/BoxASUS TV Tuner Card/BoxASUS TV Tuner Card/BoxASUS TV Tuner Card/BoxASUS TV Tuner Card/Box
Editing optionsEditing optionsEditing optionsEditing optionsEditing options
Rotate .Rotate .Rotate .Rotate .Rotate . Rotate the picture 90º to the right.
Auto F ixAuto F ixAuto F ixAuto F ixAuto F ix. Automatically balance the picture’s color and brightness.
Remove Red-EyeRemove Red-EyeRemove Red-EyeRemove Red-EyeRemove Red-Eye. Remove the red-eye created in flashphotography.
UndoUndoUndoUndoUndo. Undo a modification you have performed on a picture.
Prev ious/Next. Prev ious/Next. Prev ious/Next. Prev ious/Next. Prev ious/Next. Edit the previous/next picture.
3.2.123.2.123.2.123.2.123.2.12 Listening to FM radioListening to FM radioListening to FM radioListening to FM radioListening to FM radio
PowerCinema lets you listen to the radio, add and organize favoritestations, and schedule automatic recordings on your computer.
Listening to the radioListening to the radioListening to the radioListening to the radioListening to the radio
1. Select Rad io Rad io Rad io Rad io Rad io from the main menu.
2. Select Scan Stat ionsScan Stat ionsScan Stat ionsScan Stat ionsScan Stat ions to scan available radio stations.
3. Select Create Stat ionCreate Stat ionCreate Stat ionCreate Stat ionCreate Stat ion to add a new radio station to the list ofavailable stations.
4. Enter the station’s frequency, then press <Enter> on the keyboard or
on the remote controller.
5. Enter the station’s name, then press <Enter> on the keyboard or
on the remote controller.
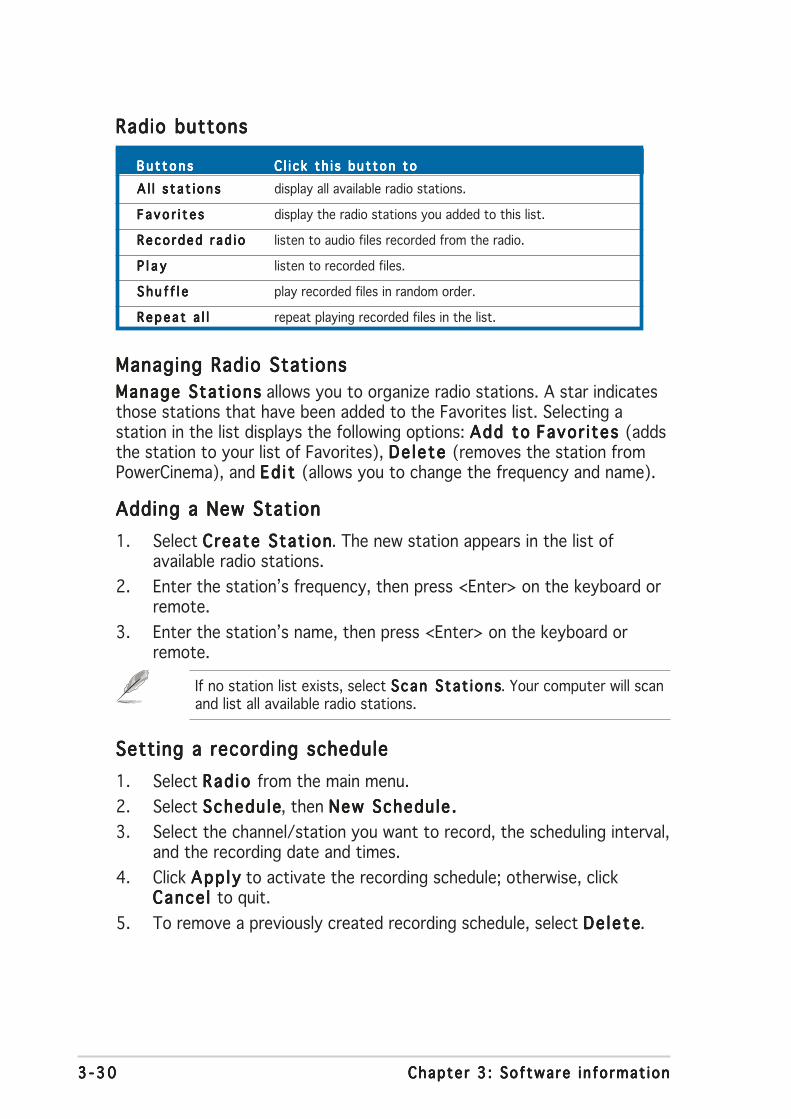
3 -303 -303 -303 -303 -30 Chapter 3 : Software in format ionChapter 3 : Software in format ionChapter 3 : Software in format ionChapter 3 : Software in format ionChapter 3 : Software in format ion
Radio buttonsRadio buttonsRadio buttonsRadio buttonsRadio buttons
Bu t t on sBu t t on sBu t t on sBu t t on sBu t t on s C l i c k th i s bu t ton toC l i c k th i s bu t ton toC l i c k th i s bu t ton toC l i c k th i s bu t ton toC l i c k th i s bu t ton to
A l l s t a t i on sA l l s t a t i on sA l l s t a t i on sA l l s t a t i on sA l l s t a t i on s display all available radio stations.
F avo r i t e sFavo r i t e sFavo r i t e sFavo r i t e sFavo r i t e s display the radio stations you added to this list.
Reco rded r ad i oReco rded r ad i oReco rded r ad i oReco rded r ad i oReco rded r ad i o listen to audio files recorded from the radio.
P l a yP l a yP l a yP l a yP l a y listen to recorded files.
S h u f f l eS h u f f l eS h u f f l eS h u f f l eS h u f f l e play recorded files in random order.
Repea t a l lR epea t a l lR epea t a l lR epea t a l lR epea t a l l repeat playing recorded files in the list.
Managing Radio StationsManaging Radio StationsManaging Radio StationsManaging Radio StationsManaging Radio Stations
Manage Stat ionsManage Stat ionsManage Stat ionsManage Stat ionsManage Stat ions allows you to organize radio stations. A star indicatesthose stations that have been added to the Favorites list. Selecting astation in the list displays the following options: Add to Add to Add to Add to Add to Favor i tes Favor i tes Favor i tes Favor i tes Favor i tes (addsthe station to your list of Favorites), De lete De lete De lete De lete De lete (removes the station fromPowerCinema), and Ed i t Ed i t Ed i t Ed i t Ed i t (allows you to change the frequency and name).
Adding a New StationAdding a New StationAdding a New StationAdding a New StationAdding a New Station
1. Select Create Stat ionCreate Stat ionCreate Stat ionCreate Stat ionCreate Stat ion. The new station appears in the list ofavailable radio stations.
2. Enter the station’s frequency, then press <Enter> on the keyboard orremote.
3. Enter the station’s name, then press <Enter> on the keyboard orremote.
If no station list exists, select Scan Stat ionsScan Stat ionsScan Stat ionsScan Stat ionsScan Stat ions. Your computer will scanand list all available radio stations.
Setting a recording scheduleSetting a recording scheduleSetting a recording scheduleSetting a recording scheduleSetting a recording schedule
1. Select Rad io Rad io Rad io Rad io Rad io from the main menu.
2. Select Schedu leSchedu leSchedu leSchedu leSchedu le, then New Schedule .New Schedule .New Schedule .New Schedule .New Schedule .
3. Select the channel/station you want to record, the scheduling interval,and the recording date and times.
4. Click App lyApp lyApp lyApp lyApp ly to activate the recording schedule; otherwise, clickCance l Cance l Cance l Cance l Cance l to quit.
5. To remove a previously created recording schedule, select De leteDe leteDe leteDe leteDe lete.
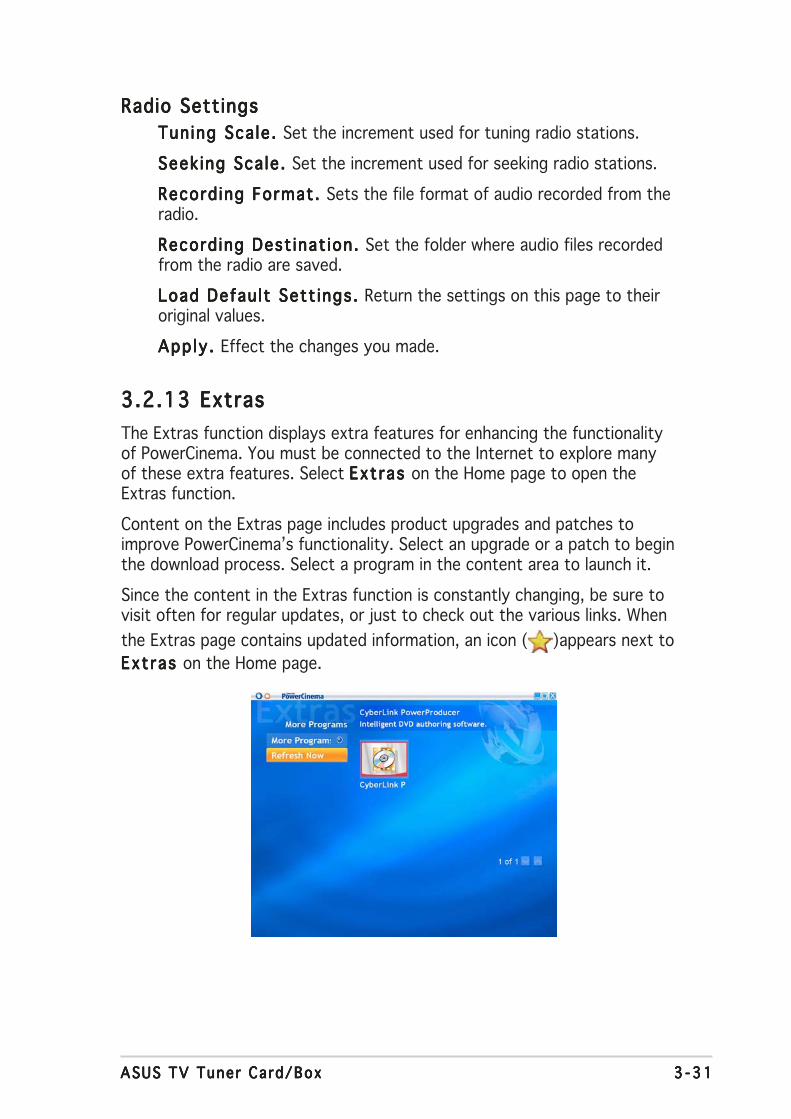
3 -313 -313 -313 -313 -31ASUS TV Tuner Card/BoxASUS TV Tuner Card/BoxASUS TV Tuner Card/BoxASUS TV Tuner Card/BoxASUS TV Tuner Card/Box
Radio SettingsRadio SettingsRadio SettingsRadio SettingsRadio Settings
Tuning Sca le . Tuning Sca le . Tuning Sca le . Tuning Sca le . Tuning Sca le . Set the increment used for tuning radio stations.
Seek ing Sca le . Seek ing Sca le . Seek ing Sca le . Seek ing Sca le . Seek ing Sca le . Set the increment used for seeking radio stations.
Record ing Format. Record ing Format. Record ing Format. Record ing Format. Record ing Format. Sets the file format of audio recorded from theradio.
Recording Dest inat ion. Recording Dest inat ion. Recording Dest inat ion. Recording Dest inat ion. Recording Dest inat ion. Set the folder where audio files recordedfrom the radio are saved.
Load Default Sett ings. Load Default Sett ings. Load Default Sett ings. Load Default Sett ings. Load Default Sett ings. Return the settings on this page to theiroriginal values.
App ly . App ly . App ly . App ly . App ly . Effect the changes you made.
3.2.133.2.133.2.133.2.133.2.13 ExtrasExtrasExtrasExtrasExtras
The Extras function displays extra features for enhancing the functionalityof PowerCinema. You must be connected to the Internet to explore manyof these extra features. Select Extras Extras Extras Extras Extras on the Home page to open theExtras function.
Content on the Extras page includes product upgrades and patches toimprove PowerCinema’s functionality. Select an upgrade or a patch to beginthe download process. Select a program in the content area to launch it.
Since the content in the Extras function is constantly changing, be sure tovisit often for regular updates, or just to check out the various links. When
the Extras page contains updated information, an icon ( )appears next to
Extras Extras Extras Extras Extras on the Home page.
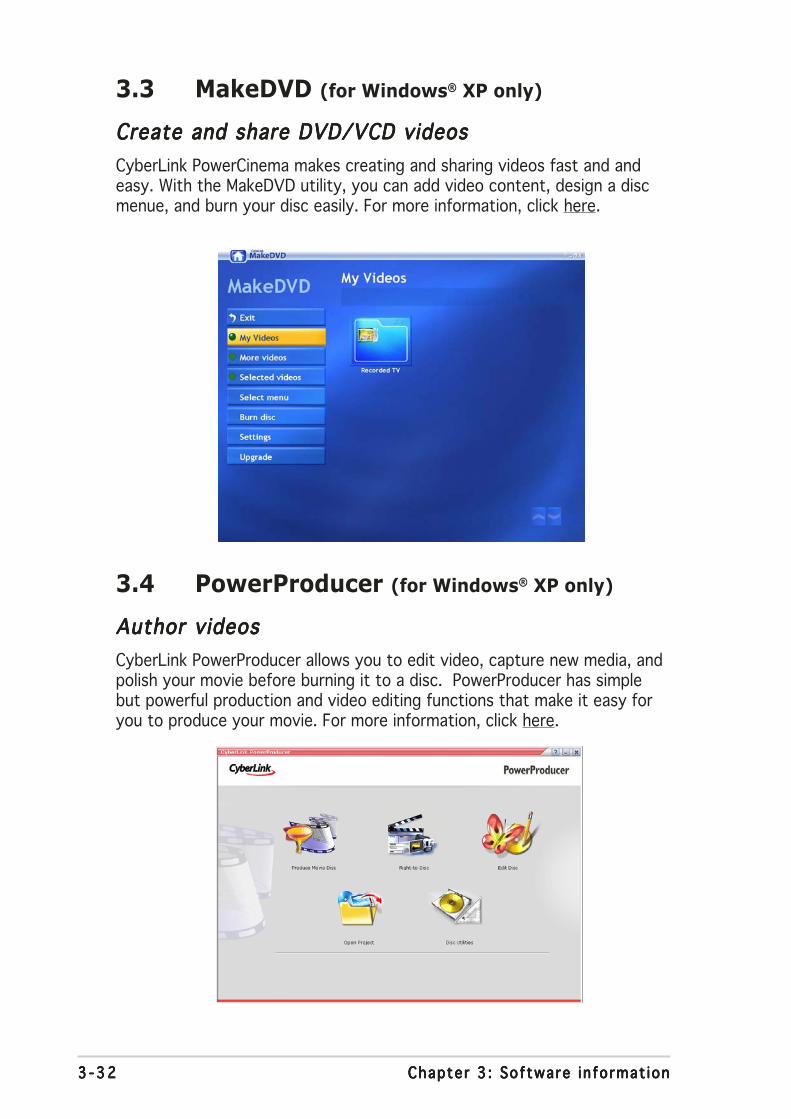
3 -323 -323 -323 -323 -32 Chapter 3 : Software in format ionChapter 3 : Software in format ionChapter 3 : Software in format ionChapter 3 : Software in format ionChapter 3 : Software in format ion
3.4 PowerProducer (for Windows® XP only)
Author videosAuthor videosAuthor videosAuthor videosAuthor videos
CyberLink PowerProducer allows you to edit video, capture new media, andpolish your movie before burning it to a disc. PowerProducer has simplebut powerful production and video editing functions that make it easy foryou to produce your movie. For more information, click here.
3.3 MakeDVD (for Windows® XP only)
Create and share DVD/VCD videosCreate and share DVD/VCD videosCreate and share DVD/VCD videosCreate and share DVD/VCD videosCreate and share DVD/VCD videos
CyberLink PowerCinema makes creating and sharing videos fast and andeasy. With the MakeDVD utility, you can add video content, design a discmenue, and burn your disc easily. For more information, click here.
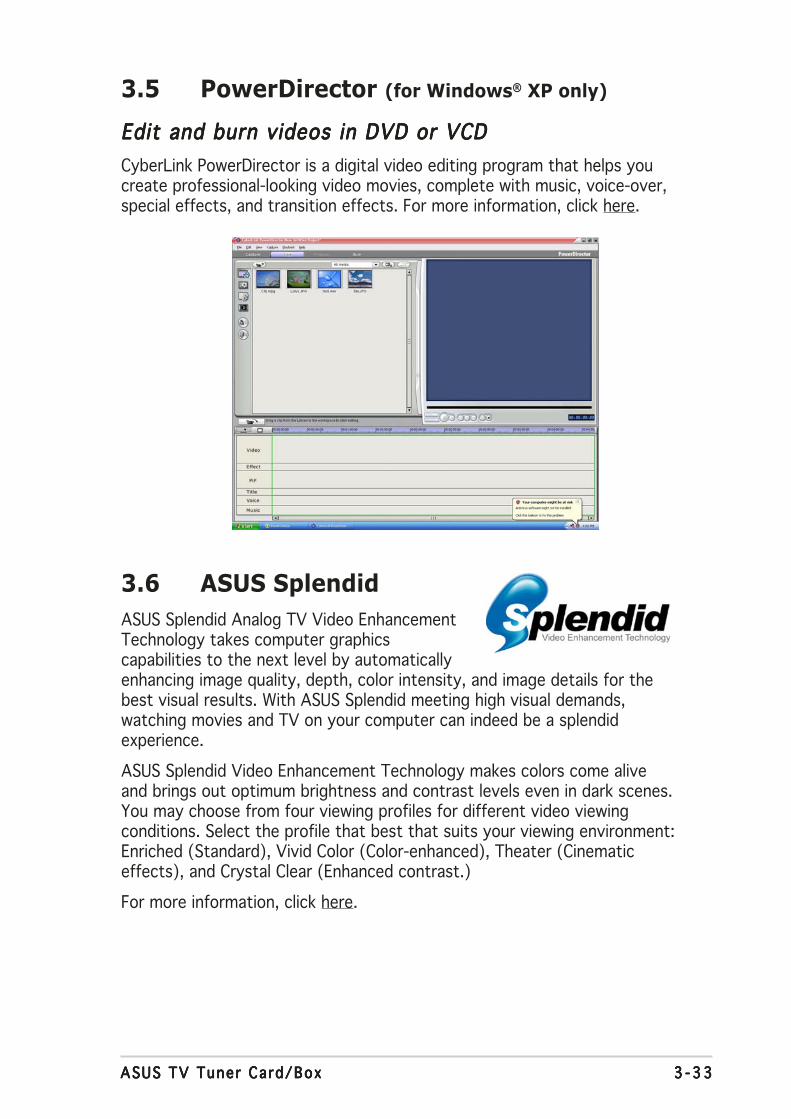
3 -333 -333 -333 -333 -33ASUS TV Tuner Card/BoxASUS TV Tuner Card/BoxASUS TV Tuner Card/BoxASUS TV Tuner Card/BoxASUS TV Tuner Card/Box
3.5 PowerDirector (for Windows® XP only)
Edit and burn videos in DVD or VCDEdit and burn videos in DVD or VCDEdit and burn videos in DVD or VCDEdit and burn videos in DVD or VCDEdit and burn videos in DVD or VCD
CyberLink PowerDirector is a digital video editing program that helps youcreate professional-looking video movies, complete with music, voice-over,special effects, and transition effects. For more information, click here.
3.6 ASUS Splendid
ASUS Splendid Analog TV Video EnhancementTechnology takes computer graphicscapabilities to the next level by automaticallyenhancing image quality, depth, color intensity, and image details for thebest visual results. With ASUS Splendid meeting high visual demands,watching movies and TV on your computer can indeed be a splendidexperience.
ASUS Splendid Video Enhancement Technology makes colors come aliveand brings out optimum brightness and contrast levels even in dark scenes.You may choose from four viewing profiles for different video viewingconditions. Select the profile that best that suits your viewing environment:Enriched (Standard), Vivid Color (Color-enhanced), Theater (Cinematiceffects), and Crystal Clear (Enhanced contrast.)
For more information, click here.
3 -343 -343 -343 -343 -34 Chapter 3 : Software in format ionChapter 3 : Software in format ionChapter 3 : Software in format ionChapter 3 : Software in format ionChapter 3 : Software in format ion
3.7 ASUS VideoSecurity Online
VideoSecurity Online is a powerful monitoring and motion-detectingsoftware. With video capture devices such as CCD, V8, digital Hi-8 andothers, you can use VideoSecurity Online to:
• find intruders
• monitor your environment
• detect changes in a specified location
• know in advance who your visitors are
Upon detection of any variation, whether it is an error or not, VideoSecurityOnline will do the following:
• save the date/time information on when the condition started, andwhen to release tracing to a database file. (watchdog.mdb)
• capture the condition detected and save it into a bitmap file withreference to an image that represents the normal situation beforeVideoSecurity Online started detecting the variation. You may viewany image processing software to view, modify, or distribute theimage.
This database file is saved in the Programs folder.
VideoSecurity Online also lets the user choose from four options on how tohandle the variation or unusual condition detected.
For more information, click here.

ASUS TV Tuner Card/BoxASUS TV Tuner Card/BoxASUS TV Tuner Card/BoxASUS TV Tuner Card/BoxASUS TV Tuner Card/Box
Appendix
Refe
ren
ce i
nfo
rmati
on
This chapter includes informationon the remote controller, the keytable, and international TV systemsand standards.
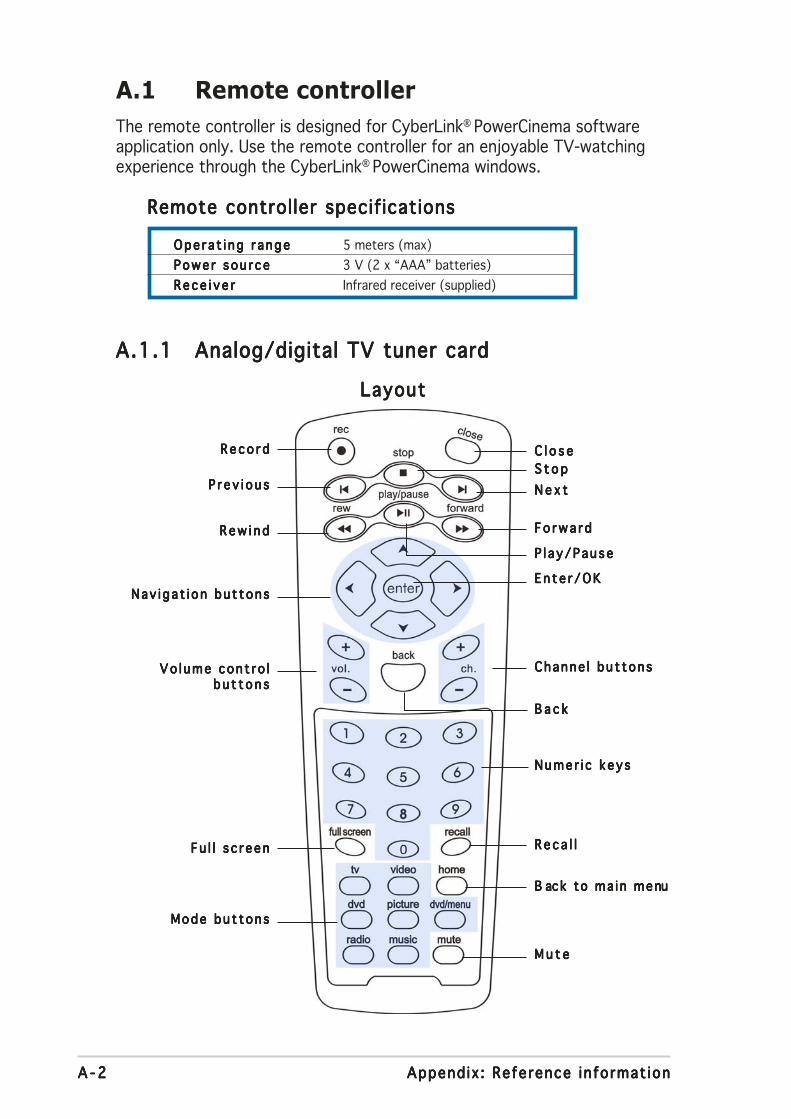
A - 2A - 2A - 2A - 2A - 2 Append ix : Reference in format ionAppend ix : Reference in format ionAppend ix : Reference in format ionAppend ix : Reference in format ionAppend ix : Reference in format ion
A.1 Remote controller
The remote controller is designed for CyberLink® PowerCinema softwareapplication only. Use the remote controller for an enjoyable TV-watchingexperience through the CyberLink® PowerCinema windows.
A.1.1A.1.1A.1.1A.1.1A.1.1 Analog/digital TV tuner cardAnalog/digital TV tuner cardAnalog/digital TV tuner cardAnalog/digital TV tuner cardAnalog/digital TV tuner card
LayoutLayoutLayoutLayoutLayout
Remote controller specificationsRemote controller specificationsRemote controller specificationsRemote controller specificationsRemote controller specifications
Ope ra t i ng r angeOpe ra t i ng r angeOpe ra t i ng r angeOpe ra t i ng r angeOpe ra t i ng r ange 5 meters (max)
Powe r sou r cePowe r sou r cePowe r sou r cePowe r sou r cePowe r sou r ce 3 V (2 x “AAA” batteries)
Rece i v e rRece i v e rRece i v e rRece i v e rRece i v e r Infrared receiver (supplied)
R e c o r dR e c o r dR e c o r dR e c o r dR e c o r d
P r ev i o u sP r ev i o u sP r ev i o u sP r ev i o u sP r ev i o u s
R e w i n dR e w i n dR e w i n dR e w i n dR e w i n d
Nav iga t i on bu t tonsNav iga t i on bu t tonsNav iga t i on bu t tonsNav iga t i on bu t tonsNav iga t i on bu t tons
Vo l ume con t ro lVo l ume con t ro lVo l ume con t ro lVo l ume con t ro lVo l ume con t ro lb u t t on sbu t t on sbu t t on sbu t t on sbu t t on s
Fu l l s c r eenFu l l s c r eenFu l l s c r eenFu l l s c r eenFu l l s c r een
Mode bu t tonsMode bu t tonsMode bu t tonsMode bu t tonsMode bu t tons
C l o s eC l o s eC l o s eC l o s eC l o s e
S t o pS t o pS t o pS t o pS t o p
N e x tN e x tN e x tN e x tN e x t
F o r w a r dF o r w a r dF o r w a r dF o r w a r dF o r w a r d
En t e r /OKEn te r /OKEn te r /OKEn te r /OKEn te r /OK
Channe l bu t tonsChanne l bu t tonsChanne l bu t tonsChanne l bu t tonsChanne l bu t tons
B a c kB a c kB a c kB a c kB a c k
Numer i c keysNumer i c keysNumer i c keysNumer i c keysNumer i c keys
R e c a l lR e c a l lR e c a l lR e c a l lR e c a l l
P l a y /PauseP l a y/PauseP l a y/PauseP l a y/PauseP l a y/Pause
B aB aB aB aB ack to ma in menck to ma in menck to ma in menck to ma in menck to ma in menuuuuu
M u t eM u t eM u t eM u t eM u t e
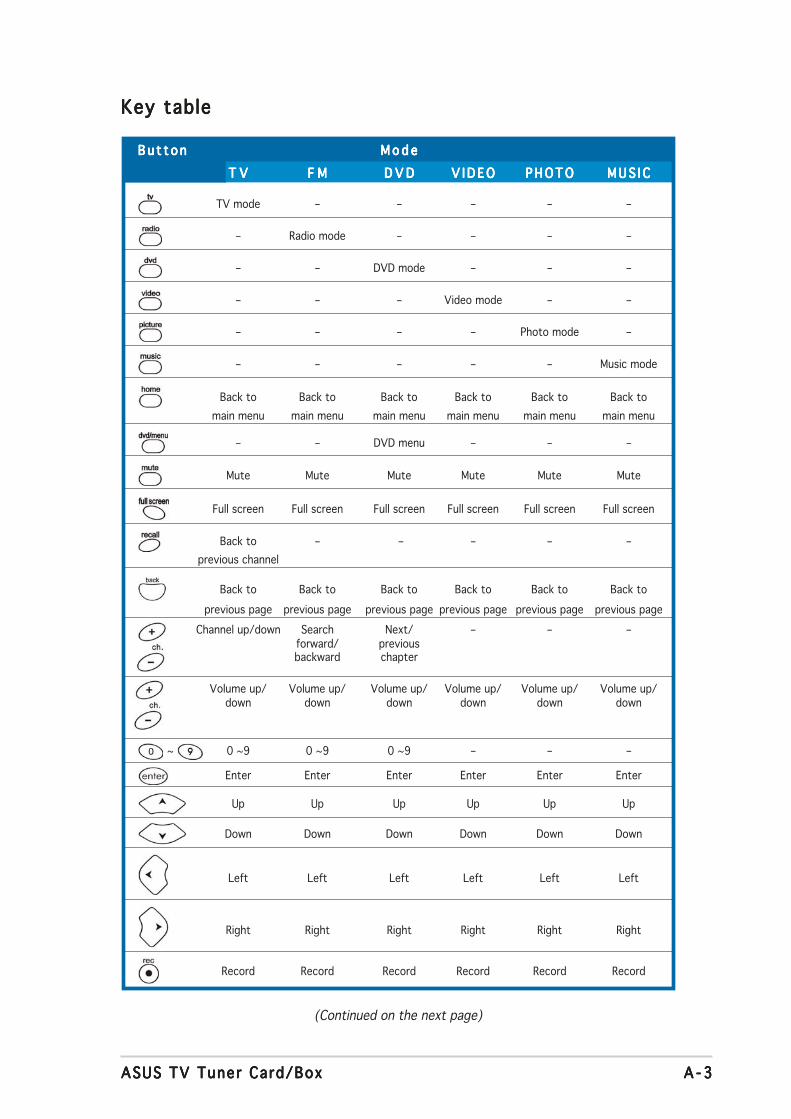
A - 3A - 3A - 3A - 3A - 3ASUS TV Tuner Card/BoxASUS TV Tuner Card/BoxASUS TV Tuner Card/BoxASUS TV Tuner Card/BoxASUS TV Tuner Card/Box
Key tableKey tableKey tableKey tableKey table
(Continued on the next page)
B u t t o nB u t t o nB u t t o nB u t t o nB u t t o n M o d eM o d eM o d eM o d eM o d e
T VT VT VT VT V F MF MF MF MF M D V DD V DD V DD V DD V D V I D E OV I D E OV I D E OV I D E OV I D E O P H O T OP H O T OP H O T OP H O T OP H O T O M U S I CM U S I CM U S I CM U S I CM U S I C
TV mode – – – – –
– Radio mode – – – –
– – DVD mode – – –
– – – Video mode – –
– – – – Photo mode –
– – – – – Music mode
Back to Back to Back to Back to Back to Back to
main menu main menu main menu main menu main menu main menu
– – DVD menu – – –
Mute Mute Mute Mute Mute Mute
Full screen Full screen Full screen Full screen Full screen Full screen
Back to – – – – –
previous channel
Back to Back to Back to Back to Back to Back to
previous page previous page previous page previous page previous page previous page
Channel up/down Search Next/ – – –forward/ previousbackward chapter
Volume up/ Volume up/ Volume up/ Volume up/ Volume up/ Volume up/down down down down down down
~ 0 ~9 0 ~9 0 ~9 – – –
Enter Enter Enter Enter Enter Enter
Up Up Up Up Up Up
Down Down Down Down Down Down
Left Left Left Left Left Left
Right Right Right Right Right Right
Record Record Record Record Record Record
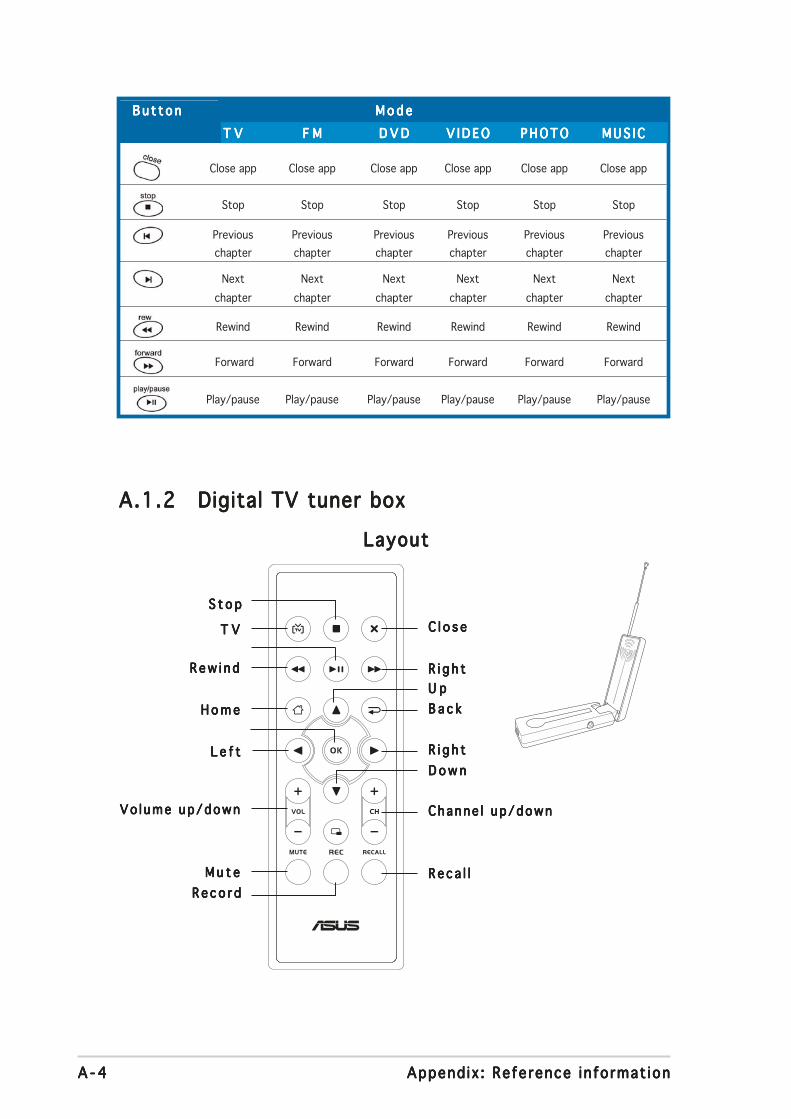
A - 4A - 4A - 4A - 4A - 4 Append ix : Reference in format ionAppend ix : Reference in format ionAppend ix : Reference in format ionAppend ix : Reference in format ionAppend ix : Reference in format ion
B u t t o nB u t t o nB u t t o nB u t t o nB u t t o n M o d eM o d eM o d eM o d eM o d e
T VT VT VT VT V F MF MF MF MF M D V DD V DD V DD V DD V D V I D E OV I D E OV I D E OV I D E OV I D E O P H O T OP H O T OP H O T OP H O T OP H O T O M U S I CM U S I CM U S I CM U S I CM U S I C
Close app Close app Close app Close app Close app Close app
Stop Stop Stop Stop Stop Stop
Previous Previous Previous Previous Previous Previous
chapter chapter chapter chapter chapter chapter
Next Next Next Next Next Next
chapter chapter chapter chapter chapter chapter
Rewind Rewind Rewind Rewind Rewind Rewind
Forward Forward Forward Forward Forward Forward
Play/pause Play/pause Play/pause Play/pause Play/pause Play/pause
A.1.2A.1.2A.1.2A.1.2A.1.2 Digital TV tuner boxDigital TV tuner boxDigital TV tuner boxDigital TV tuner boxDigital TV tuner box
LayoutLayoutLayoutLayoutLayout
T VT VT VT VT V
S t o pS t o pS t o pS t o pS t o p
R e w i n dR e w i n dR e w i n dR e w i n dR e w i n d
H o m eH o m eH o m eH o m eH o m e
L e f tL e f tL e f tL e f tL e f t
Vo l ume up/downVo l ume up/downVo l ume up/downVo l ume up/downVo l ume up/down
M u t eM u t eM u t eM u t eM u t e
C l o s eC l o s eC l o s eC l o s eC l o s e
R i g h tR i g h tR i g h tR i g h tR i g h t
U pU pU pU pU p
B a c kB a c kB a c kB a c kB a c k
R i g h tR i g h tR i g h tR i g h tR i g h t
D o w nD o w nD o w nD o w nD o w n
Channe l up/downChanne l up/downChanne l up/downChanne l up/downChanne l up/down
R e c a l lR e c a l lR e c a l lR e c a l lR e c a l l
R e c o r dR e c o r dR e c o r dR e c o r dR e c o r d
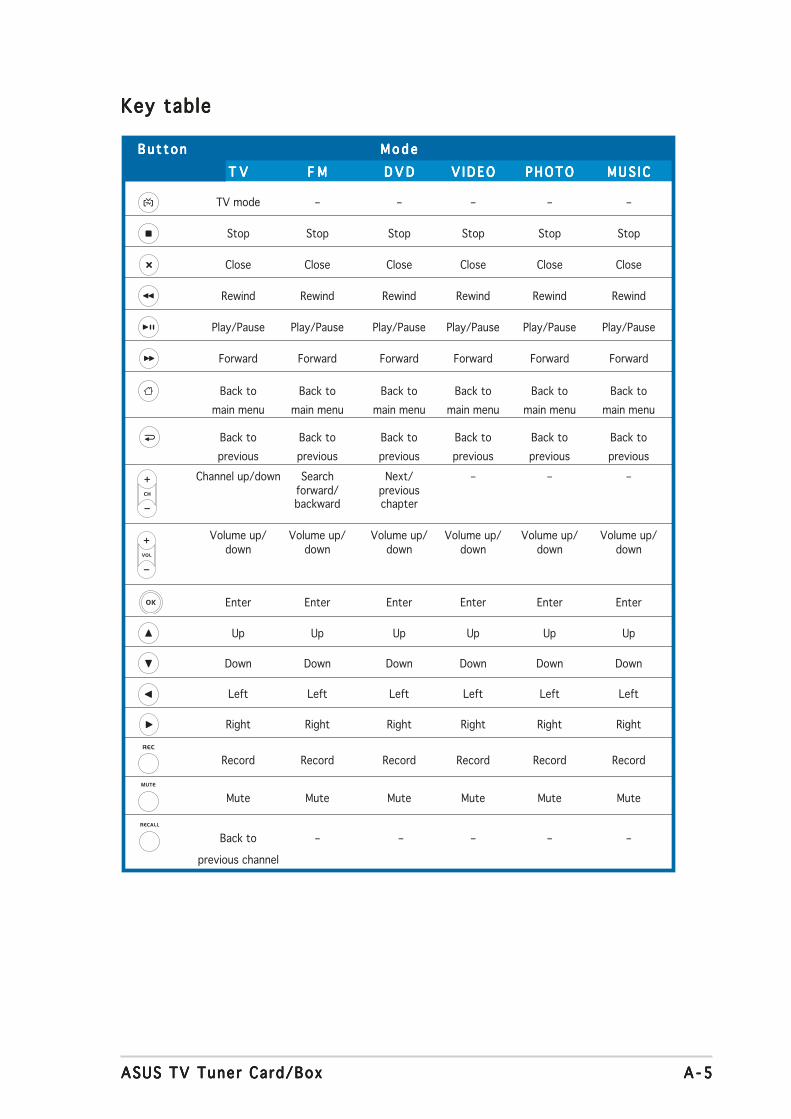
A - 5A - 5A - 5A - 5A - 5ASUS TV Tuner Card/BoxASUS TV Tuner Card/BoxASUS TV Tuner Card/BoxASUS TV Tuner Card/BoxASUS TV Tuner Card/Box
Key tableKey tableKey tableKey tableKey table
B u t t o nB u t t o nB u t t o nB u t t o nB u t t o n M o d eM o d eM o d eM o d eM o d e
T VT VT VT VT V F MF MF MF MF M D V DD V DD V DD V DD V D V I D E OV I D E OV I D E OV I D E OV I D E O P H O T OP H O T OP H O T OP H O T OP H O T O M U S I CM U S I CM U S I CM U S I CM U S I C
TV mode – – – – –
Stop Stop Stop Stop Stop Stop
Close Close Close Close Close Close
Rewind Rewind Rewind Rewind Rewind Rewind
Play/Pause Play/Pause Play/Pause Play/Pause Play/Pause Play/Pause
Forward Forward Forward Forward Forward Forward
Back to Back to Back to Back to Back to Back to
main menu main menu main menu main menu main menu main menu
Back to Back to Back to Back to Back to Back to
previous previous previous previous previous previous
Channel up/down Search Next/ – – –forward/ previousbackward chapter
Volume up/ Volume up/ Volume up/ Volume up/ Volume up/ Volume up/down down down down down down
Enter Enter Enter Enter Enter Enter
Up Up Up Up Up Up
Down Down Down Down Down Down
Left Left Left Left Left Left
Right Right Right Right Right Right
Record Record Record Record Record Record
Mute Mute Mute Mute Mute Mute
Back to – – – – –
previous channel
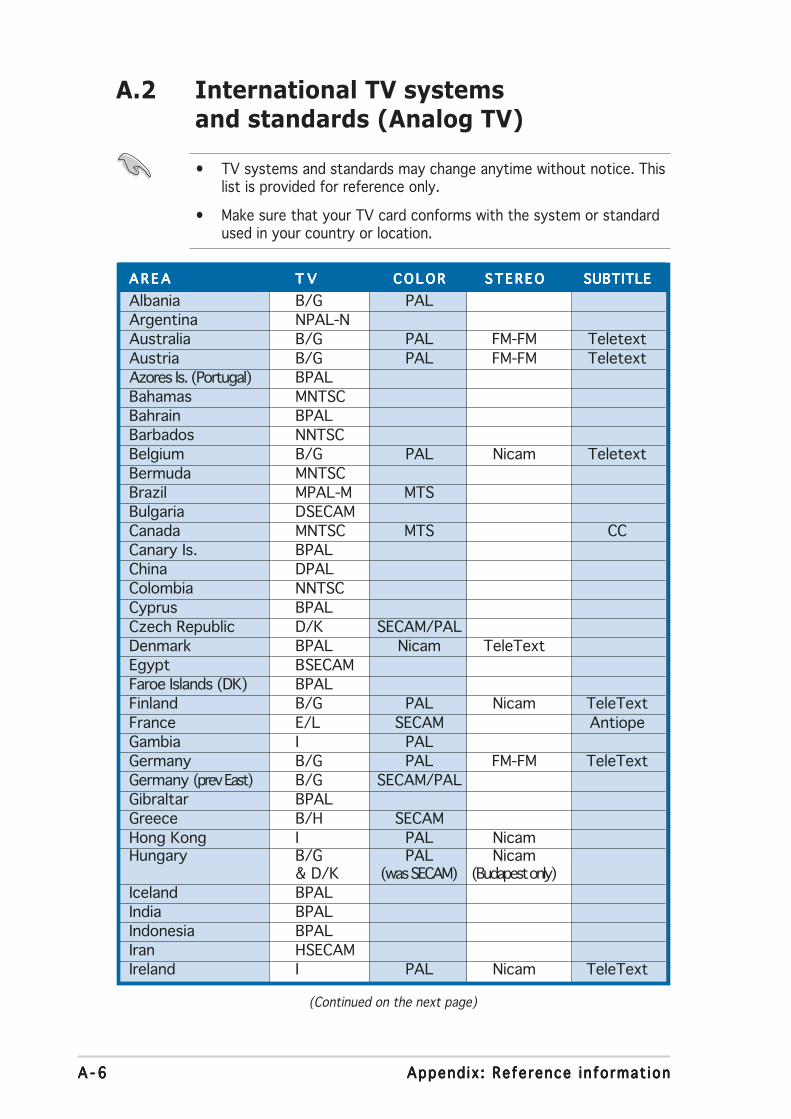
A - 6A - 6A - 6A - 6A - 6 Append ix : Reference in format ionAppend ix : Reference in format ionAppend ix : Reference in format ionAppend ix : Reference in format ionAppend ix : Reference in format ion
A.2 International TV systemsand standards (Analog TV)
• TV systems and standards may change anytime without notice. Thislist is provided for reference only.
• Make sure that your TV card conforms with the system or standardused in your country or location.
A R E AA R E AA R E AA R E AA R E A T VT VT VT VT V C O L O RC O L O RC O L O RC O L O RC O L O R STEREOSTEREOSTEREOSTEREOSTEREO SUBTITLESUBTITLESUBTITLESUBTITLESUBTITLE
Albania B/G PALArgentina NPAL-NAustralia B/G PAL FM-FM Teletext
Austria B/G PAL FM-FM TeletextAzores Is. (Portugal) BPALBahamas MNTSCBahrain BPALBarbados NNTSCBelgium B/G PAL Nicam Teletext
Bermuda MNTSCBrazil MPAL-M MTSBulgaria DSECAMCanada MNTSC MTS CCCanary Is. BPALChina DPALColombia NNTSC
Cyprus BPALCzech Republic D/K SECAM/PALDenmark BPAL Nicam TeleTextEgypt BSECAMFaroe Islands (DK) BPALFinland B/G PAL Nicam TeleText
France E/L SECAM AntiopeGambia I PALGermany B/G PAL FM-FM TeleTextGermany (prev East) B/G SECAM/PALGibraltar BPALGreece B/H SECAM
Hong Kong I PAL NicamHungary B/G PAL Nicam
& D/K (was SECAM) (Budapest only)Iceland BPALIndia BPALIndonesia BPALIran HSECAMIreland I PAL Nicam TeleText
(Continued on the next page)
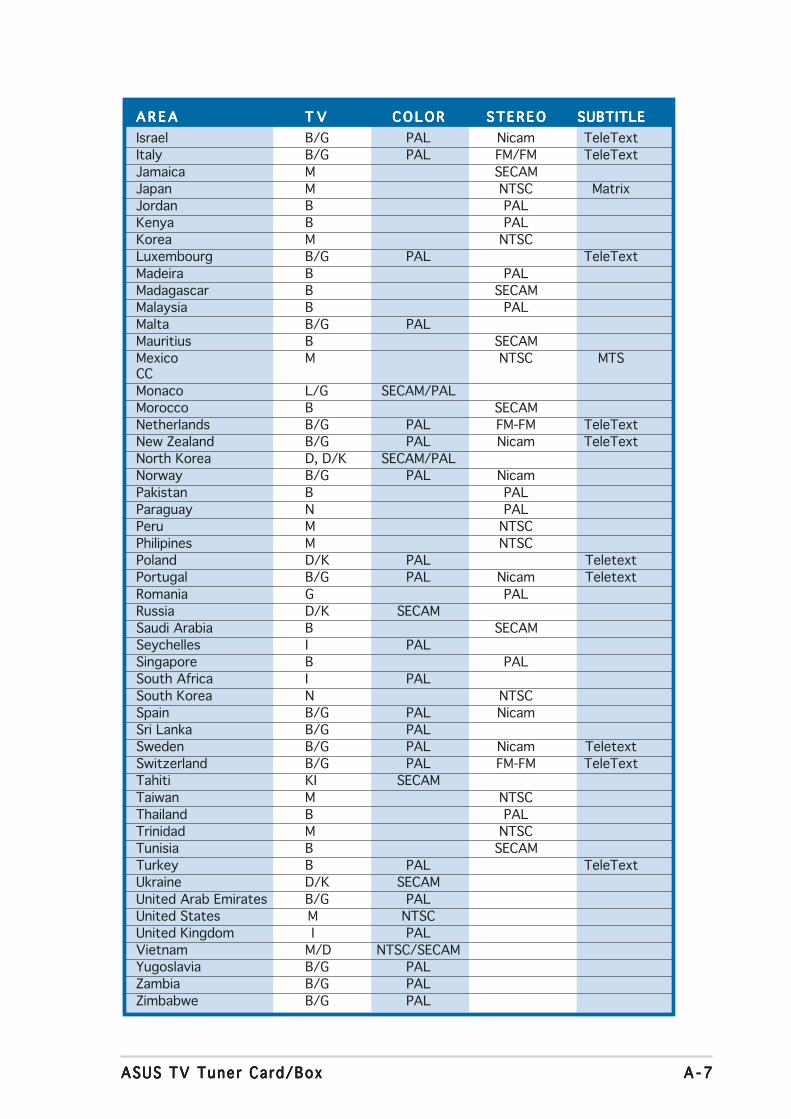
A - 7A - 7A - 7A - 7A - 7ASUS TV Tuner Card/BoxASUS TV Tuner Card/BoxASUS TV Tuner Card/BoxASUS TV Tuner Card/BoxASUS TV Tuner Card/Box
A R E AA R E AA R E AA R E AA R E A T VT VT VT VT V C O L O RC O L O RC O L O RC O L O RC O L O R STEREOSTEREOSTEREOSTEREOSTEREO SUBTITLESUBTITLESUBTITLESUBTITLESUBTITLE
Israel B/G PAL Nicam TeleText
Italy B/G PAL FM/FM TeleText
Jamaica M SECAM
Japan M NTSC Matrix
Jordan B PAL
Kenya B PAL
Korea M NTSC
Luxembourg B/G PAL TeleText
Madeira B PAL
Madagascar B SECAM
Malaysia B PAL
Malta B/G PAL
Mauritius B SECAM
Mexico M NTSC MTSCC
Monaco L/G SECAM/PAL
Morocco B SECAM
Netherlands B/G PAL FM-FM TeleText
New Zealand B/G PAL Nicam TeleText
North Korea D, D/K SECAM/PAL
Norway B/G PAL Nicam
Pakistan B PAL
Paraguay N PAL
Peru M NTSC
Philipines M NTSC
Poland D/K PAL Teletext
Portugal B/G PAL Nicam Teletext
Romania G PAL
Russia D/K SECAM
Saudi Arabia B SECAM
Seychelles I PAL
Singapore B PAL
South Africa I PAL
South Korea N NTSC
Spain B/G PAL Nicam
Sri Lanka B/G PAL
Sweden B/G PAL Nicam Teletext
Switzerland B/G PAL FM-FM TeleText
Tahiti KI SECAM
Taiwan M NTSC
Thailand B PAL
Trinidad M NTSC
Tunisia B SECAM
Turkey B PAL TeleText
Ukraine D/K SECAM
United Arab Emirates B/G PAL
United States M NTSC
United Kingdom I PAL
Vietnam M/D NTSC/SECAM
Yugoslavia B/G PAL
Zambia B/G PAL
Zimbabwe B/G PAL
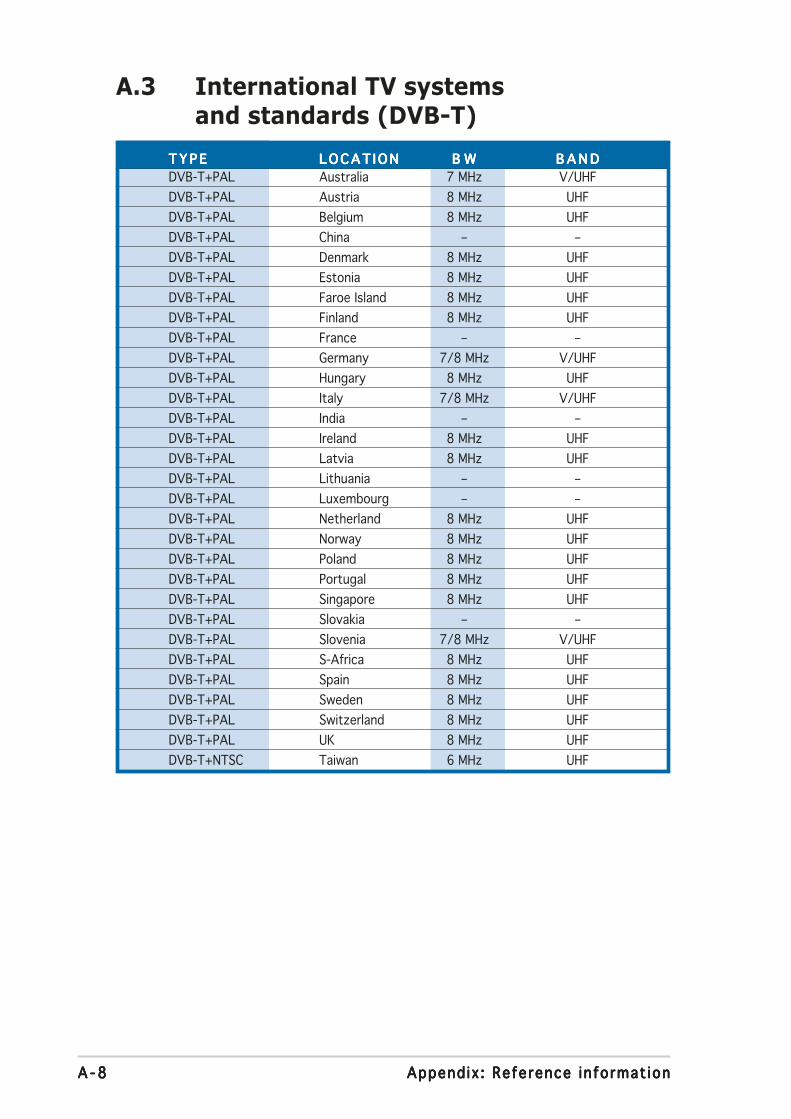
A - 8A - 8A - 8A - 8A - 8 Append ix : Reference in format ionAppend ix : Reference in format ionAppend ix : Reference in format ionAppend ix : Reference in format ionAppend ix : Reference in format ion
A.3 International TV systemsand standards (DVB-T)
T Y P ET Y P ET Y P ET Y P ET Y P E LOCAT IONLOCAT IONLOCAT IONLOCAT IONLOCAT ION B WB WB WB WB W B A N DB A N DB A N DB A N DB A N D
DVB-T+PAL Australia 7 MHz V/UHF
DVB-T+PAL Austria 8 MHz UHF
DVB-T+PAL Belgium 8 MHz UHF
DVB-T+PAL China – –
DVB-T+PAL Denmark 8 MHz UHF
DVB-T+PAL Estonia 8 MHz UHF
DVB-T+PAL Faroe Island 8 MHz UHF
DVB-T+PAL Finland 8 MHz UHF
DVB-T+PAL France – –
DVB-T+PAL Germany 7/8 MHz V/UHF
DVB-T+PAL Hungary 8 MHz UHF
DVB-T+PAL Italy 7/8 MHz V/UHF
DVB-T+PAL India – –
DVB-T+PAL Ireland 8 MHz UHF
DVB-T+PAL Latvia 8 MHz UHF
DVB-T+PAL Lithuania – –
DVB-T+PAL Luxembourg – –
DVB-T+PAL Netherland 8 MHz UHF
DVB-T+PAL Norway 8 MHz UHF
DVB-T+PAL Poland 8 MHz UHF
DVB-T+PAL Portugal 8 MHz UHF
DVB-T+PAL Singapore 8 MHz UHF
DVB-T+PAL Slovakia – –
DVB-T+PAL Slovenia 7/8 MHz V/UHF
DVB-T+PAL S-Africa 8 MHz UHF
DVB-T+PAL Spain 8 MHz UHF
DVB-T+PAL Sweden 8 MHz UHF
DVB-T+PAL Switzerland 8 MHz UHF
DVB-T+PAL UK 8 MHz UHF
DVB-T+NTSC Taiwan 6 MHz UHF