Embed Size (px)
Citation preview
8/8/2019 Twelve Weeks of Christmas 2010 Wk Twelve Framed Countdown to Christmas the Southern Stamper
http://slidepdf.com/reader/full/twelve-weeks-of-christmas-2010-wk-twelve-framed-countdown-to-christmas-the 1/6
Twelve Weeks of Christmas 2010
www.TheSouthernStamper.com
Week Twelve
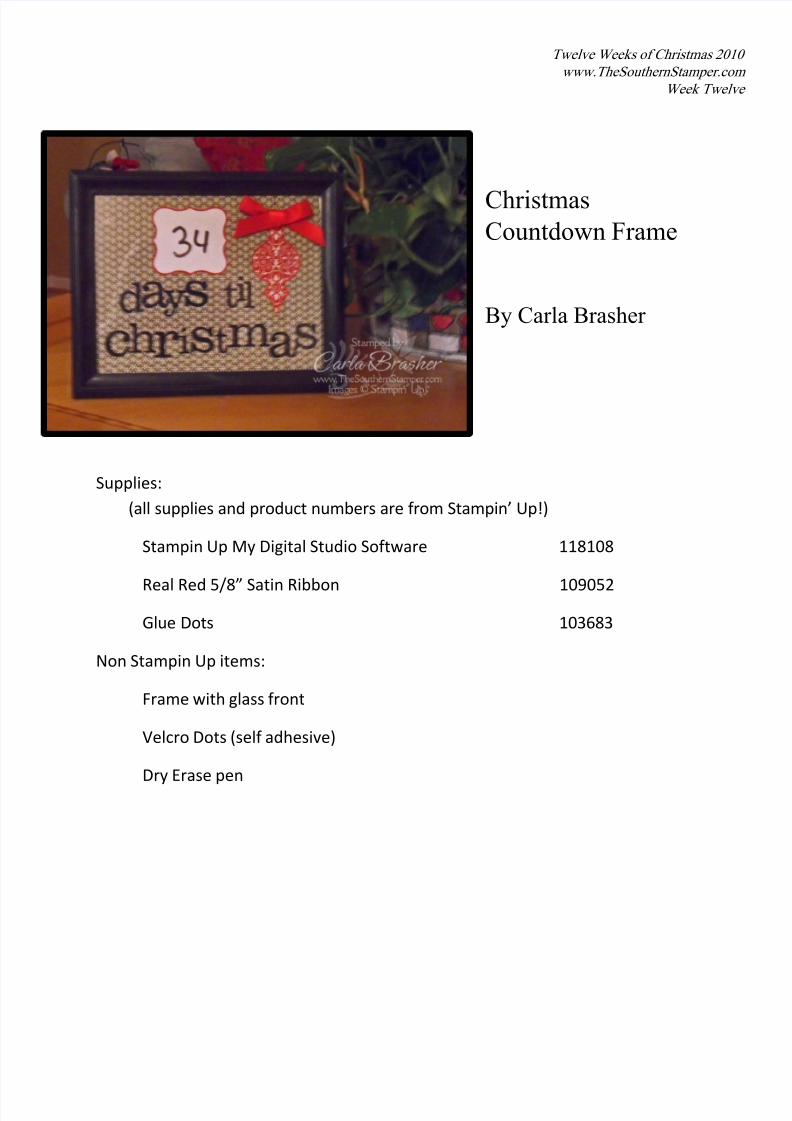
ChristmasCountdown Frame
By Carla Brasher
Supplies:
(all supplies and product numbers are from Stampin’ Up!)
Stampin Up My Digital Studio Software 118108
Real Red 5/8” Satin Ribbon 109052
Glue Dots 103683
Non Stampin Up items:
Frame with glass front
Velcro Dots (self adhesive)
Dry Erase pen
8/8/2019 Twelve Weeks of Christmas 2010 Wk Twelve Framed Countdown to Christmas the Southern Stamper
http://slidepdf.com/reader/full/twelve-weeks-of-christmas-2010-wk-twelve-framed-countdown-to-christmas-the 2/6
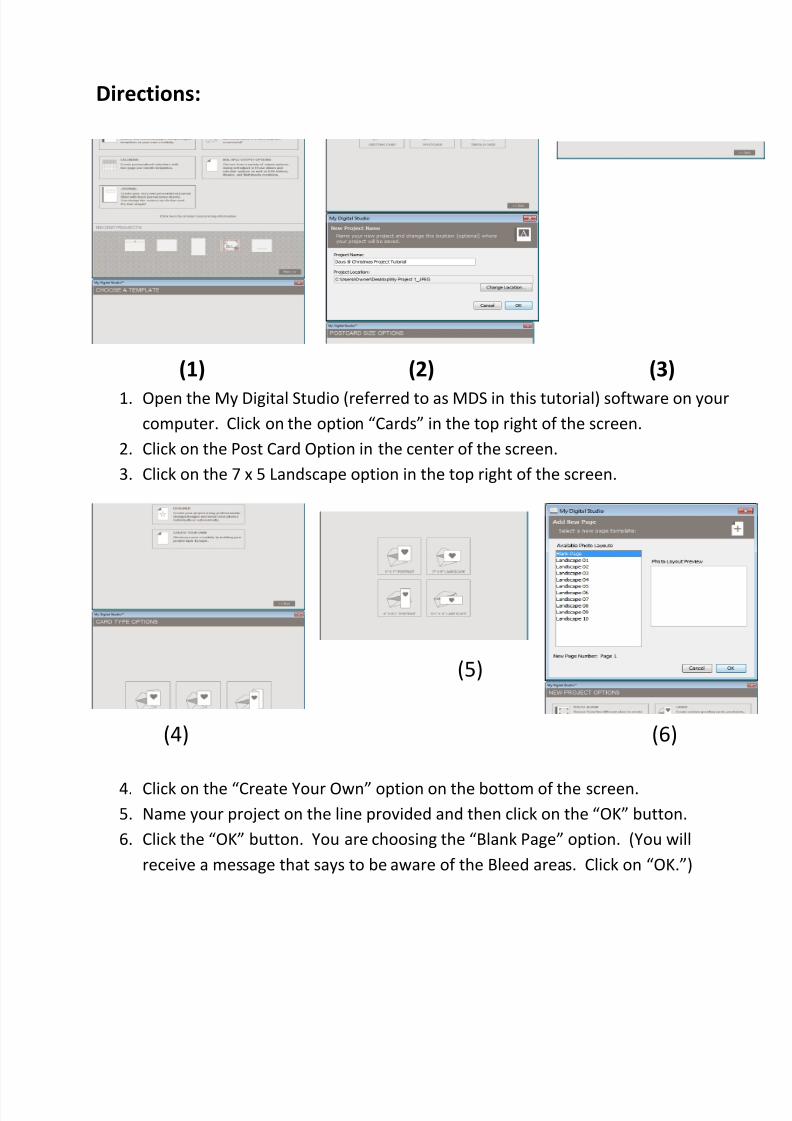
Directions:
(1) (2) (3)
1. Open the My Digital Studio (referred to as MDS in this tutorial) software on your
computer. Click on the option “Cards” in the top right of the screen.
2. Click on the Post Card Option in the center of the screen.
3. Click on the 7 x 5 Landscape option in the top right of the screen.
(5)
(4) (6)
4. Click on the “Create Your Own” option on the bottom of the screen.
5. Name your project on the line provided and then click on the“OK” button.
6. Click the “OK” button. You are choosing the “Blank Page” option. (You will
receive a message that says to be aware of the Bleed areas. Click on “OK.”)

8/8/2019 Twelve Weeks of Christmas 2010 Wk Twelve Framed Countdown to Christmas the Southern Stamper
http://slidepdf.com/reader/full/twelve-weeks-of-christmas-2010-wk-twelve-framed-countdown-to-christmas-the 3/6
(7)
(8)
7. Click on the “Background Papers” tab at the top right of the page. It will open a block
directly underneath it. Click on the “Designer Series Paper” button in the top right of the opened block.
8. Scroll down to “Designer Kits” in the opened window and click on it. Then scroll
down and click on “Christmas Jingle – designer series paper”. Click on “Christmas Jingle
- paper 1”. Click on the “OK button in the bottom right of the open screen
(9)
(10)
9. Click on the “Punches” button on the bottom right of the screen UNDER the box
you opened with the Designer Papers. Click on the“Add a punch” button at the top.
10. Click on the “Labels and Tags” choice in the Category column. Then Click on
“Curly Label Punch” and click on “Apply” in the bottom right of the screen.

8/8/2019 Twelve Weeks of Christmas 2010 Wk Twelve Framed Countdown to Christmas the Southern Stamper
http://slidepdf.com/reader/full/twelve-weeks-of-christmas-2010-wk-twelve-framed-countdown-to-christmas-the 4/6
(11)
(12)
11. A gray Curly Label shape will be on your screen. Double-click on it and it will
bring up a screen like the one pictured. Change the fields to match the ones in the
picture. (You COULD also click and drag it to put it where you want and to change
the size.) Click on the red “X” to close the pop up screen.
12. In the Gray box on the right of the screen, click on the button labeled“Color Fill.”
It will bring up a screen like the one pictured. Choose the Whisper White button and
then click “OK.”
(13) (14) (15)
13. Click on the “Mat” button that looks like a star in the gray box on the right of the
screen.
14. In the pop-up screen, change the size to 10 by dragging the indicator. Then click
on Change in the color option and choose the Real Red square (see pic #12). Close
the screen.
8/8/2019 Twelve Weeks of Christmas 2010 Wk Twelve Framed Countdown to Christmas the Southern Stamper
http://slidepdf.com/reader/full/twelve-weeks-of-christmas-2010-wk-twelve-framed-countdown-to-christmas-the 5/6
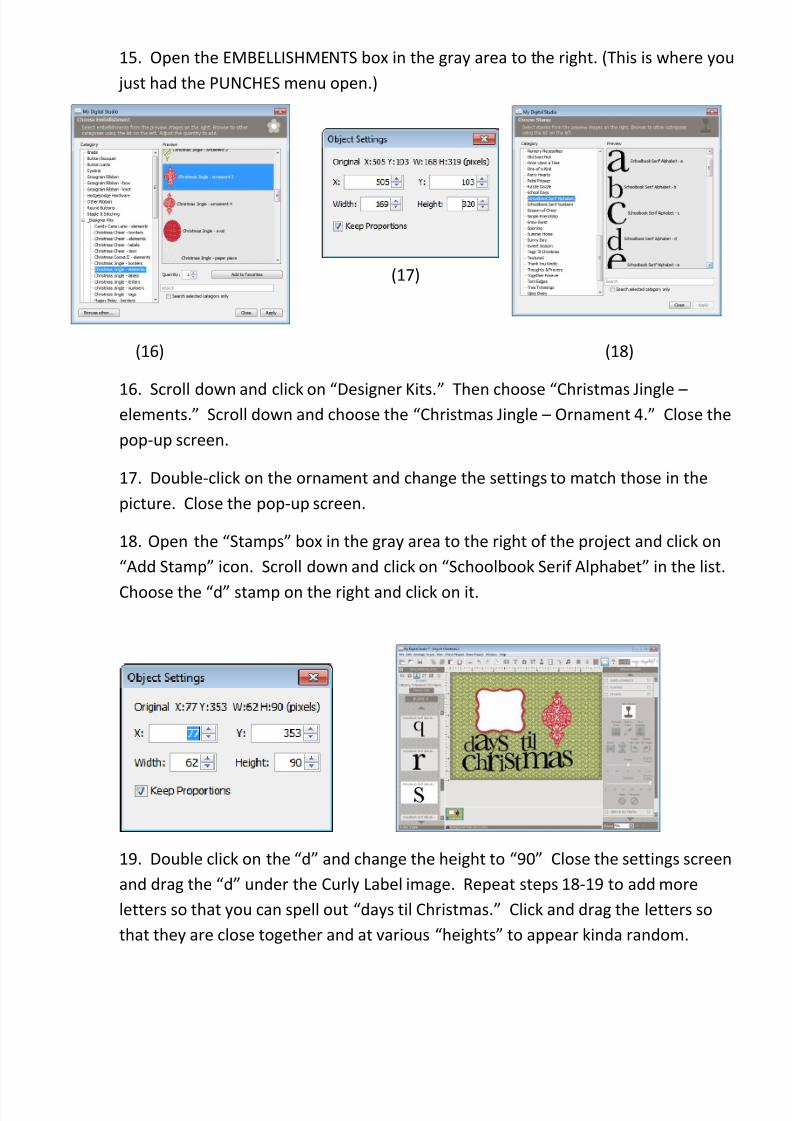
15. Open the EMBELLISHMENTS box in the gray area to the right. (This is where you
just had the PUNCHES menu open.)
(17)
(16) (18)
16. Scroll down and click on “Designer Kits.” Then choose “Christmas Jingle – elements.” Scroll down and choose the “Christmas Jingle – Ornament 4.” Close the
pop-up screen.
17. Double-click on the ornament and change the settings to match those in the
picture. Close the pop-up screen.
18. Open the “Stamps” box in the gray area to the right of the project and click on
“Add Stamp” icon. Scroll down and click on “Schoolbook Serif Alphabet” in the list.
Choose the “d” stamp on the right and click on it.
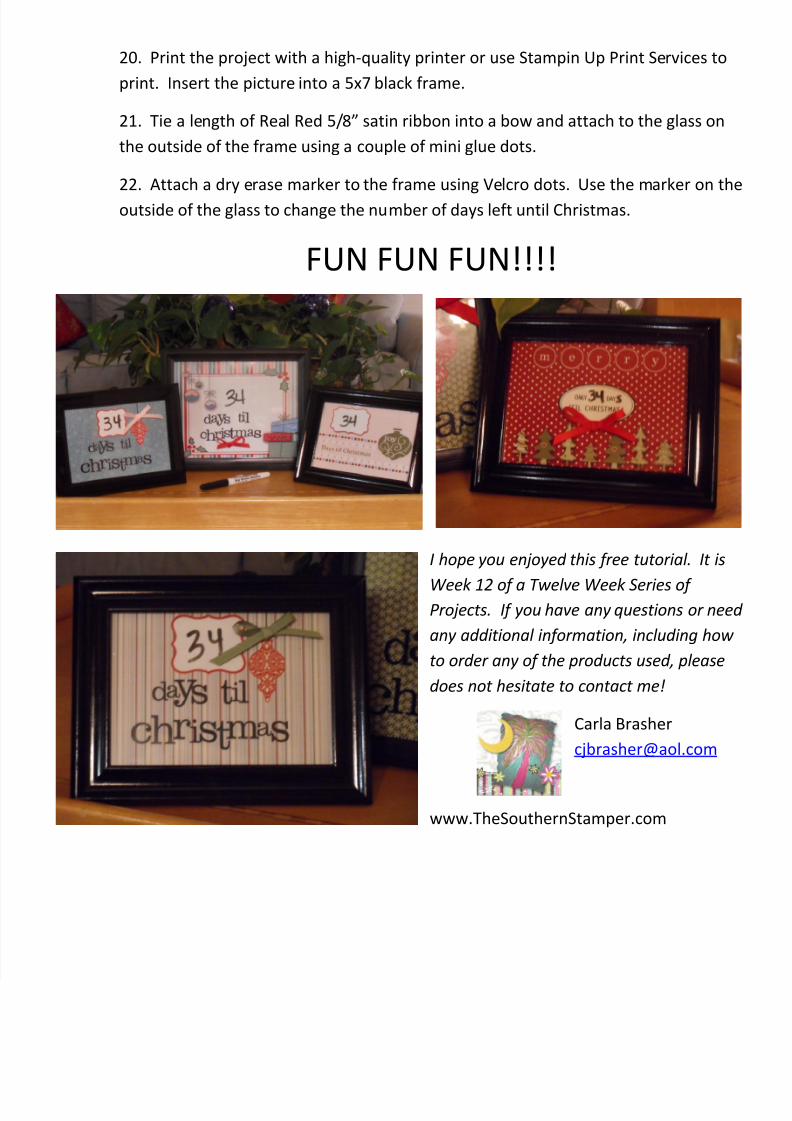
19. Double click on the “d” and change the height to “90” Close the settings screen
and drag the “d” under the Curly Label image. Repeat steps 18-19 to add more
letters so that you can spell out “days til Christmas.” Click and drag the letters so
that they are close together and at various “heights” to appear kinda random.
8/8/2019 Twelve Weeks of Christmas 2010 Wk Twelve Framed Countdown to Christmas the Southern Stamper
http://slidepdf.com/reader/full/twelve-weeks-of-christmas-2010-wk-twelve-framed-countdown-to-christmas-the 6/6
20. Print the project with a high-quality printer or use Stampin Up Print Services to
print. Insert the picture into a 5x7 black frame.
21. Tie a length of Real Red 5/8” satin ribbon into a bow and attach to the glass on
the outside of the frame using a couple of mini glue dots.
22. Attach a dry erase marker to the frame using Velcro dots. Use the marker on the
outside of the glass to change the number of days left until Christmas.
FUN FUN FUN!!!!
I hope you enjoyed this free tutorial. It is
Week 12 of a Twelve Week Series of Projects. If you have any questions or need
any additional information, including how
to order any of the products used, please
does not hesitate to contact me!
Carla Brasher
www.TheSouthernStamper.com


![The Twelve Days of Christmas [Christmas Carol] - free · PDF fileTitle: The Twelve Days of Christmas [Christmas Carol] Composer: Traditional Arranger: Wallace, ... Instrumentation:](https://img.pdfslide.net/doc/110x75/5a787cb17f8b9aa2448cadb3/the-twelve-days-of-christmas-christmas-carol-free-title-the-twelve.jpg)