Embed Size (px)
Citation preview
TWIST Dialogue Annotation ToolUser Guide
Brian [email protected]
July 2012
Contents
1 Overview 2
2 Getting Started 32.1 Running the Annotation Tool . . . . . . . . . . . . . . . . . . 32.2 First Session . . . . . . . . . . . . . . . . . . . . . . . . . . . . 32.3 Annotation Procedure Overview . . . . . . . . . . . . . . . . . 42.4 Support for the Annotation Workflow . . . . . . . . . . . . . . 6
3 Annotating Dialogues 73.1 First Stage: Segmenting Turns . . . . . . . . . . . . . . . . . . 83.2 Second Stage: Annotating Content Features . . . . . . . . . . 10
4 Additional Features 124.1 Converting Dialogues in Text Format to XML . . . . . . . . . 124.2 Changing the Annotation Stage . . . . . . . . . . . . . . . . . 134.3 Modifying the Annotator Profile . . . . . . . . . . . . . . . . . 144.4 Modifying the Annotator Familiarity . . . . . . . . . . . . . . 14
5 Getting Help 15
1

1 Overview
The annotation tool consists of two main windows:
• The Dialogue window (Figure 1) is the main window in the application.It shows the dialogue being annotated, a description of the the contextin which it took place and the annotations for each turn.
• The Turn Annotator window (Figure 2) opens from the main window byclicking on one of the annotation cells. It shows a single dialogue turnand allows adding or removing segments, and creating or modifyingannotations for each segment in the turn.
Figure 1: Main Dialogue Window
2
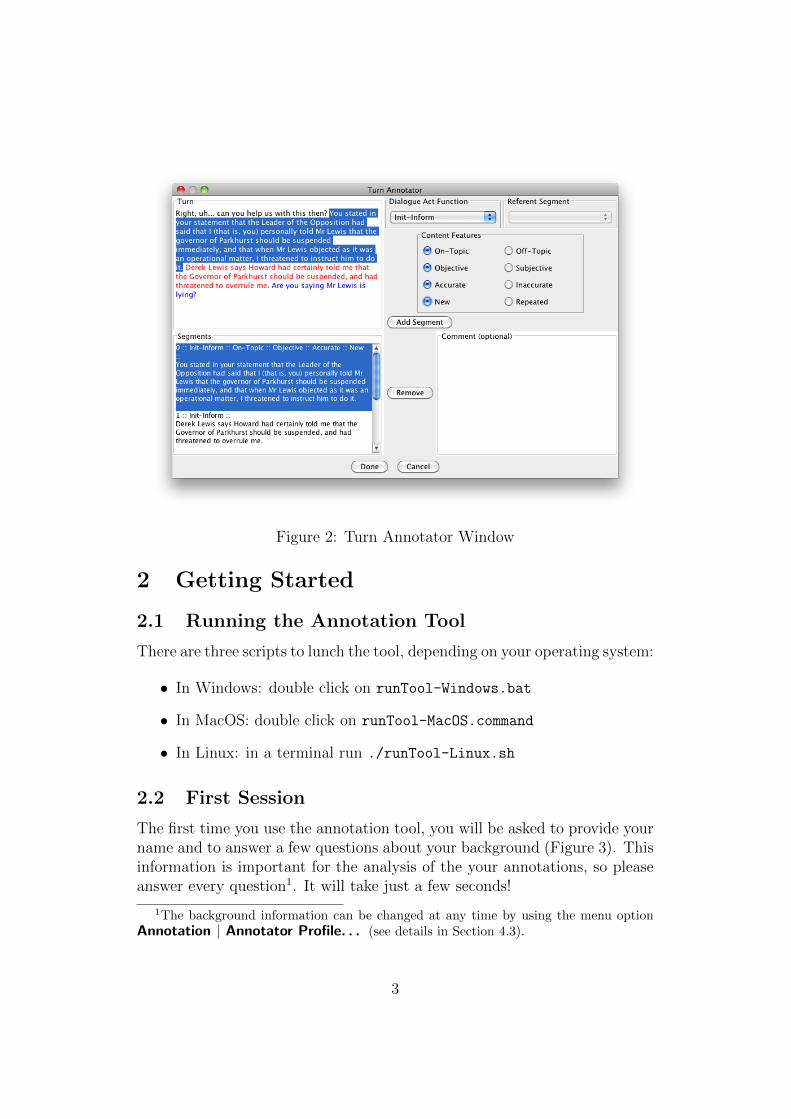
Figure 2: Turn Annotator Window
2 Getting Started
2.1 Running the Annotation Tool
There are three scripts to lunch the tool, depending on your operating system:
• In Windows: double click on runTool-Windows.bat
• In MacOS: double click on runTool-MacOS.command
• In Linux: in a terminal run ./runTool-Linux.sh
2.2 First Session
The first time you use the annotation tool, you will be asked to provide yourname and to answer a few questions about your background (Figure 3). Thisinformation is important for the analysis of the your annotations, so pleaseanswer every question1. It will take just a few seconds!
1The background information can be changed at any time by using the menu optionAnnotation | Annotator Profile. . . (see details in Section 4.3).
3
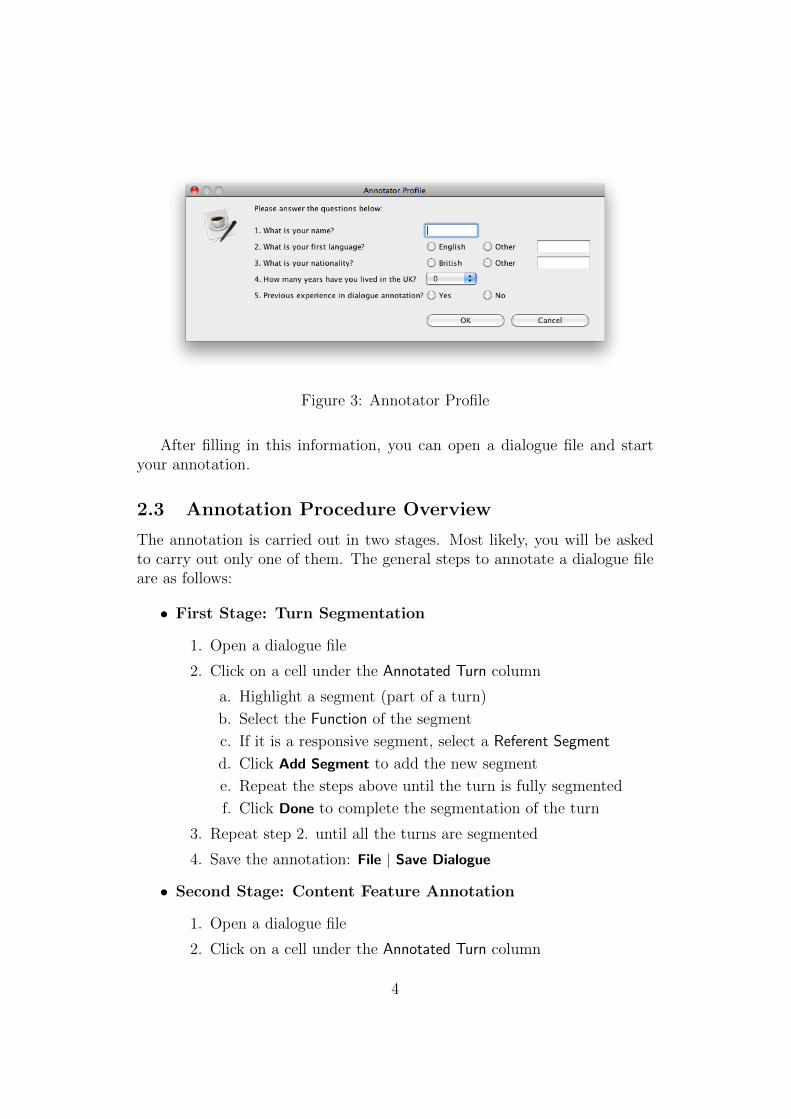
Figure 3: Annotator Profile
After filling in this information, you can open a dialogue file and startyour annotation.
2.3 Annotation Procedure Overview
The annotation is carried out in two stages. Most likely, you will be askedto carry out only one of them. The general steps to annotate a dialogue fileare as follows:
• First Stage: Turn Segmentation
1. Open a dialogue file
2. Click on a cell under the Annotated Turn column
a. Highlight a segment (part of a turn)
b. Select the Function of the segment
c. If it is a responsive segment, select a Referent Segment
d. Click Add Segment to add the new segment
e. Repeat the steps above until the turn is fully segmented
f. Click Done to complete the segmentation of the turn
3. Repeat step 2. until all the turns are segmented
4. Save the annotation: File | Save Dialogue
• Second Stage: Content Feature Annotation
1. Open a dialogue file
2. Click on a cell under the Annotated Turn column
4

a. Click on a segment from the Segments list
b. For each row in Content Features, select the option that applies
c. Repeat the steps above until every segment is annotated
d. Click Done to complete the annotation of the turn
3. Repeat step 2. until all the turns have been annotated
4. Save the annotation: File | Save Dialogue
Regardless of the stage, the first time you open a dialogue file, you will beasked a few questions about your familiarity with the dialogue, its contextand the participants (Figure 4). This will happen only once for each file youannotate2.
Figure 4: Familiarity of the annotator with the dialogue and its context
Dialogue files are found in the folder called “data”. They are named fol-lowing the convention <interviewer>-<interviewee>.xml (e.g. paxman-
howard.xml). The first time you save an annotated dialogue, you will beasked for a new filename. The annotation tool automatically suggests ap-pending the suffix “-annot” to the original name (e.g. paxman-howard-
annot.xml). It is strongly recommended that you follow this convention
2This information can be changed at any time by using the menu option File | An-notator Familiarity. . . (see details in Section 4.4).
5
when first saving annotated files. This preserves the original file in case youneed to start the annotation from scratch.
When annotating longer dialogues, you should save your work often. Onceyou have saved the annotated file with a new name, you can quickly savechanges by using the File | Save Dialogue menu option or the keyboard short-cut Ctrl+S (Command+S in MacOS).
2.4 Support for the Annotation Workflow
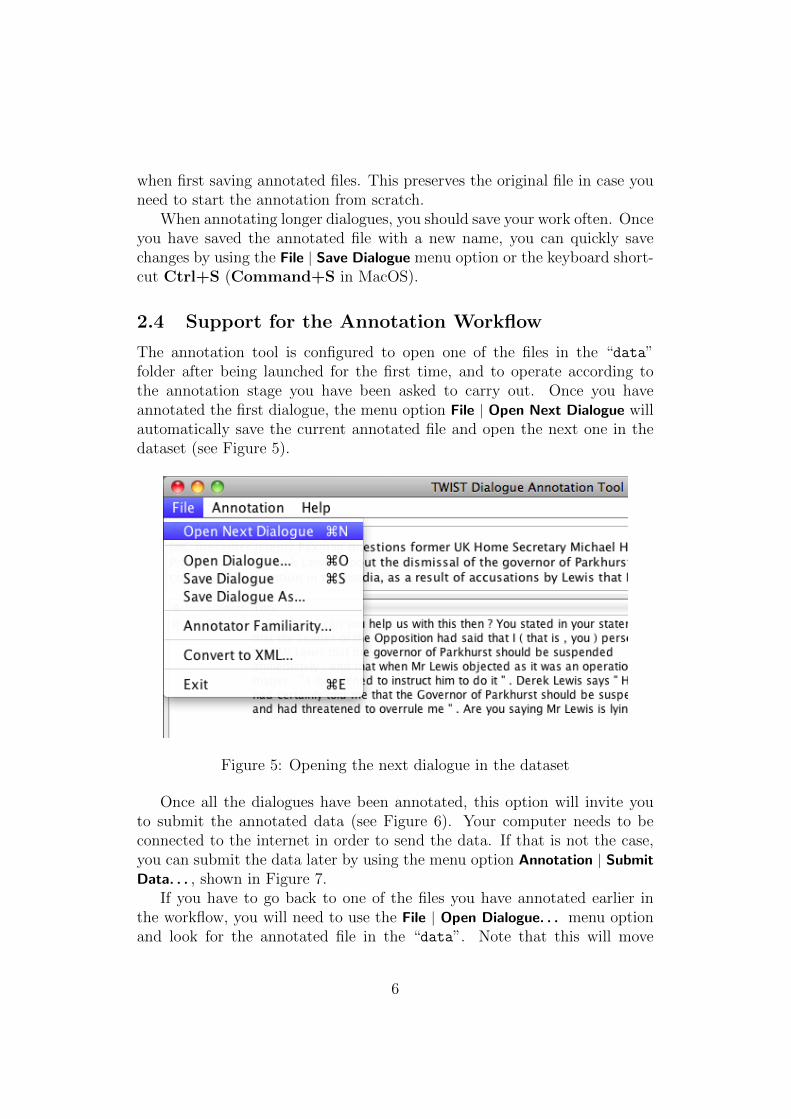
The annotation tool is configured to open one of the files in the “data”folder after being launched for the first time, and to operate according tothe annotation stage you have been asked to carry out. Once you haveannotated the first dialogue, the menu option File | Open Next Dialogue willautomatically save the current annotated file and open the next one in thedataset (see Figure 5).
Figure 5: Opening the next dialogue in the dataset
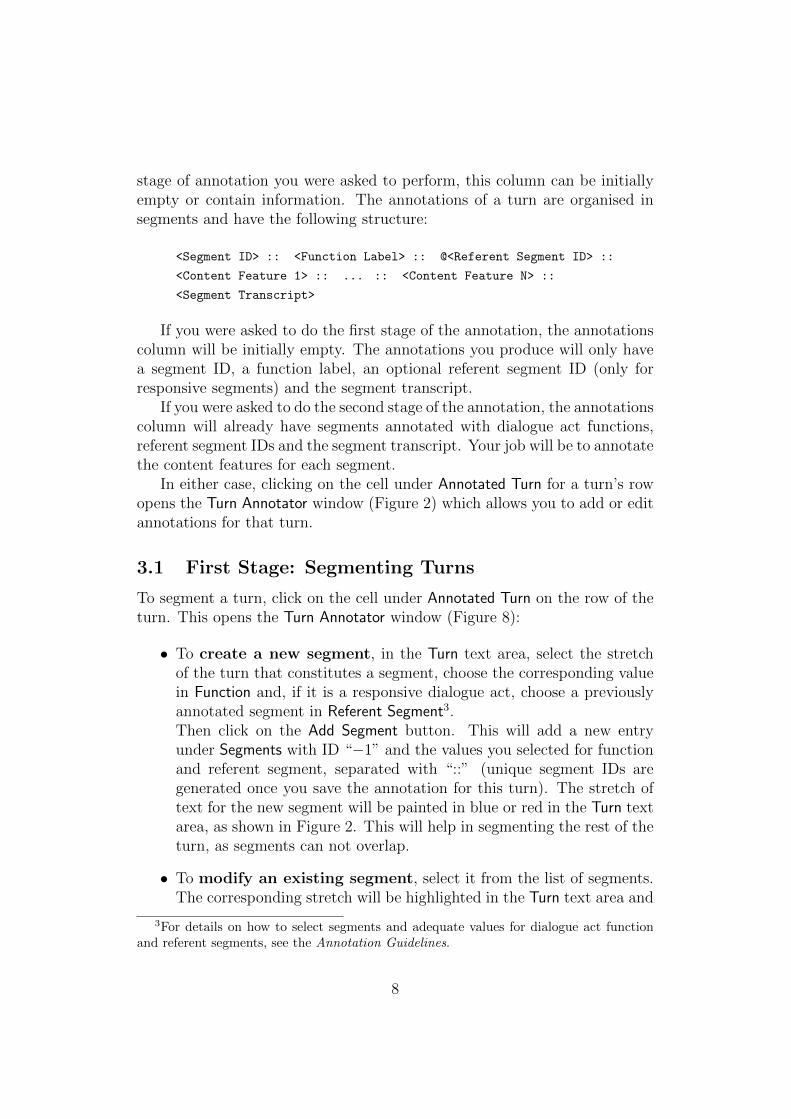
Once all the dialogues have been annotated, this option will invite youto submit the annotated data (see Figure 6). Your computer needs to beconnected to the internet in order to send the data. If that is not the case,you can submit the data later by using the menu option Annotation | Submit
Data. . . , shown in Figure 7.If you have to go back to one of the files you have annotated earlier in
the workflow, you will need to use the File | Open Dialogue. . . menu optionand look for the annotated file in the “data”. Note that this will move
6
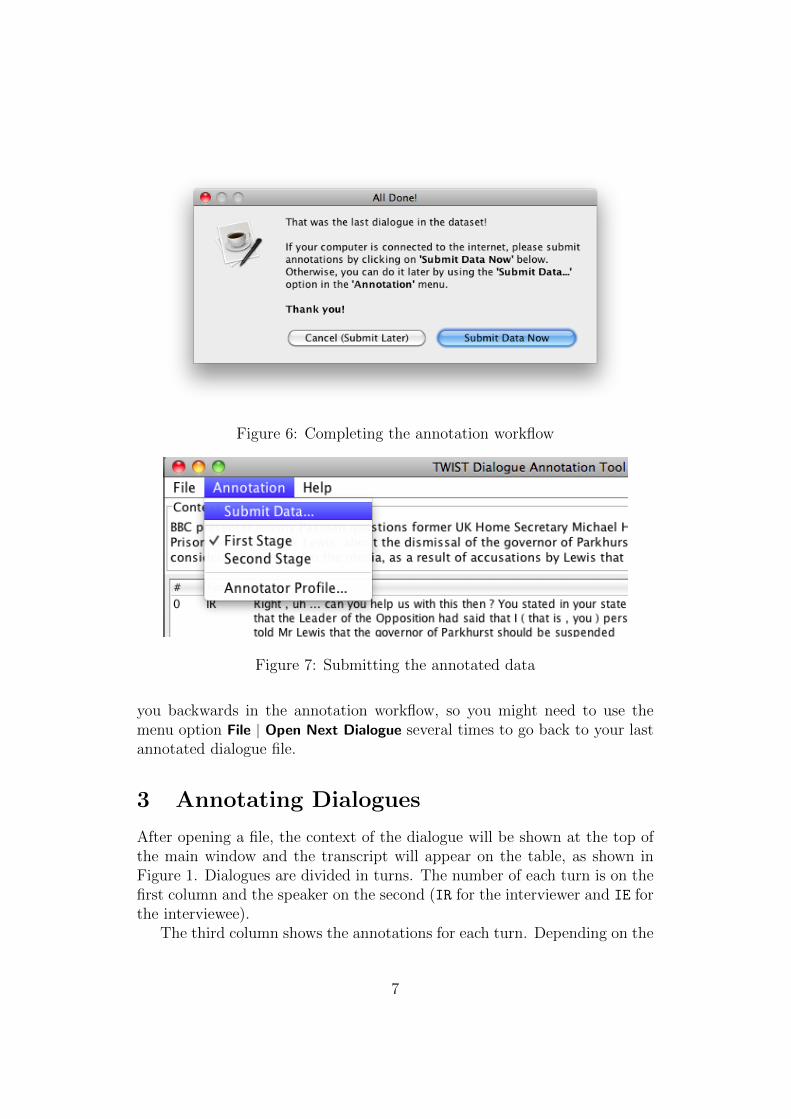
Figure 6: Completing the annotation workflow
Figure 7: Submitting the annotated data
you backwards in the annotation workflow, so you might need to use themenu option File | Open Next Dialogue several times to go back to your lastannotated dialogue file.
3 Annotating Dialogues
After opening a file, the context of the dialogue will be shown at the top ofthe main window and the transcript will appear on the table, as shown inFigure 1. Dialogues are divided in turns. The number of each turn is on thefirst column and the speaker on the second (IR for the interviewer and IE forthe interviewee).
The third column shows the annotations for each turn. Depending on the
7
stage of annotation you were asked to perform, this column can be initiallyempty or contain information. The annotations of a turn are organised insegments and have the following structure:
<Segment ID> :: <Function Label> :: @<Referent Segment ID> ::
<Content Feature 1> :: ... :: <Content Feature N> ::
<Segment Transcript>
If you were asked to do the first stage of the annotation, the annotationscolumn will be initially empty. The annotations you produce will only havea segment ID, a function label, an optional referent segment ID (only forresponsive segments) and the segment transcript.
If you were asked to do the second stage of the annotation, the annotationscolumn will already have segments annotated with dialogue act functions,referent segment IDs and the segment transcript. Your job will be to annotatethe content features for each segment.
In either case, clicking on the cell under Annotated Turn for a turn’s rowopens the Turn Annotator window (Figure 2) which allows you to add or editannotations for that turn.
3.1 First Stage: Segmenting Turns
To segment a turn, click on the cell under Annotated Turn on the row of theturn. This opens the Turn Annotator window (Figure 8):
• To create a new segment, in the Turn text area, select the stretchof the turn that constitutes a segment, choose the corresponding valuein Function and, if it is a responsive dialogue act, choose a previouslyannotated segment in Referent Segment3.Then click on the Add Segment button. This will add a new entryunder Segments with ID “−1” and the values you selected for functionand referent segment, separated with “::” (unique segment IDs aregenerated once you save the annotation for this turn). The stretch oftext for the new segment will be painted in blue or red in the Turn textarea, as shown in Figure 2. This will help in segmenting the rest of theturn, as segments can not overlap.
• To modify an existing segment, select it from the list of segments.The corresponding stretch will be highlighted in the Turn text area and
3For details on how to select segments and adequate values for dialogue act functionand referent segments, see the Annotation Guidelines.
8
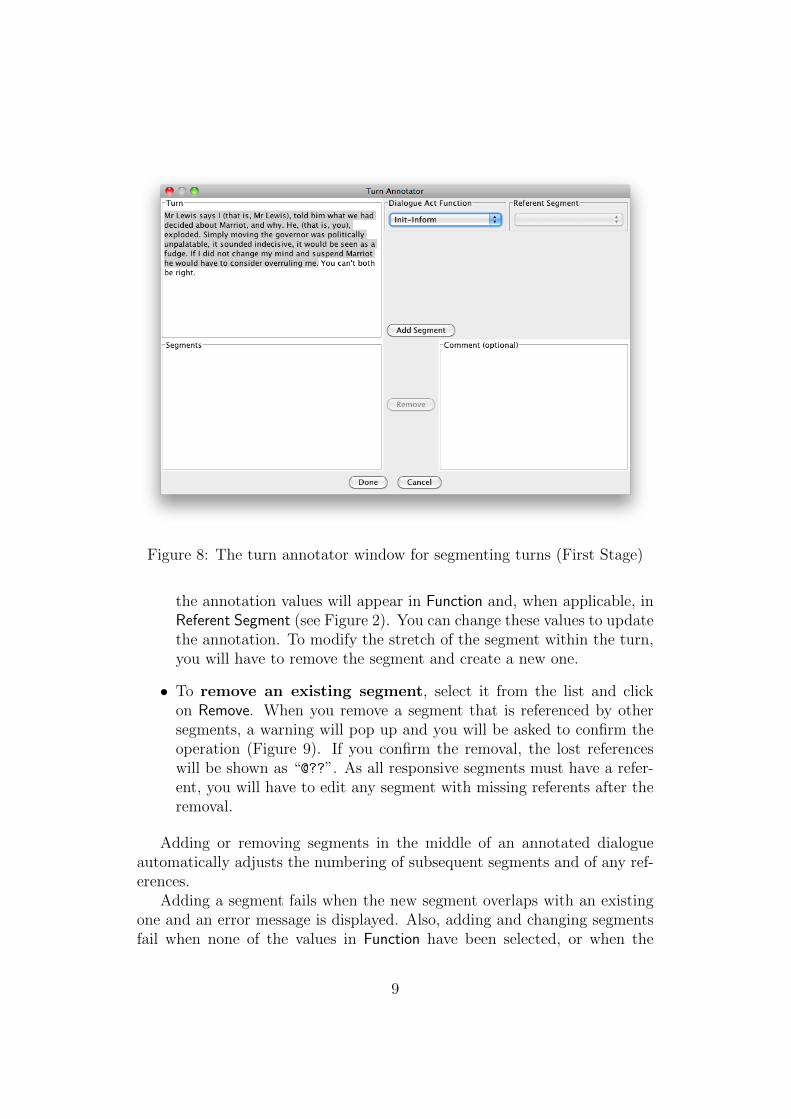
Figure 8: The turn annotator window for segmenting turns (First Stage)
the annotation values will appear in Function and, when applicable, inReferent Segment (see Figure 2). You can change these values to updatethe annotation. To modify the stretch of the segment within the turn,you will have to remove the segment and create a new one.
• To remove an existing segment, select it from the list and clickon Remove. When you remove a segment that is referenced by othersegments, a warning will pop up and you will be asked to confirm theoperation (Figure 9). If you confirm the removal, the lost referenceswill be shown as “@??”. As all responsive segments must have a refer-ent, you will have to edit any segment with missing referents after theremoval.
Adding or removing segments in the middle of an annotated dialogueautomatically adjusts the numbering of subsequent segments and of any ref-erences.
Adding a segment fails when the new segment overlaps with an existingone and an error message is displayed. Also, adding and changing segmentsfail when none of the values in Function have been selected, or when the
9
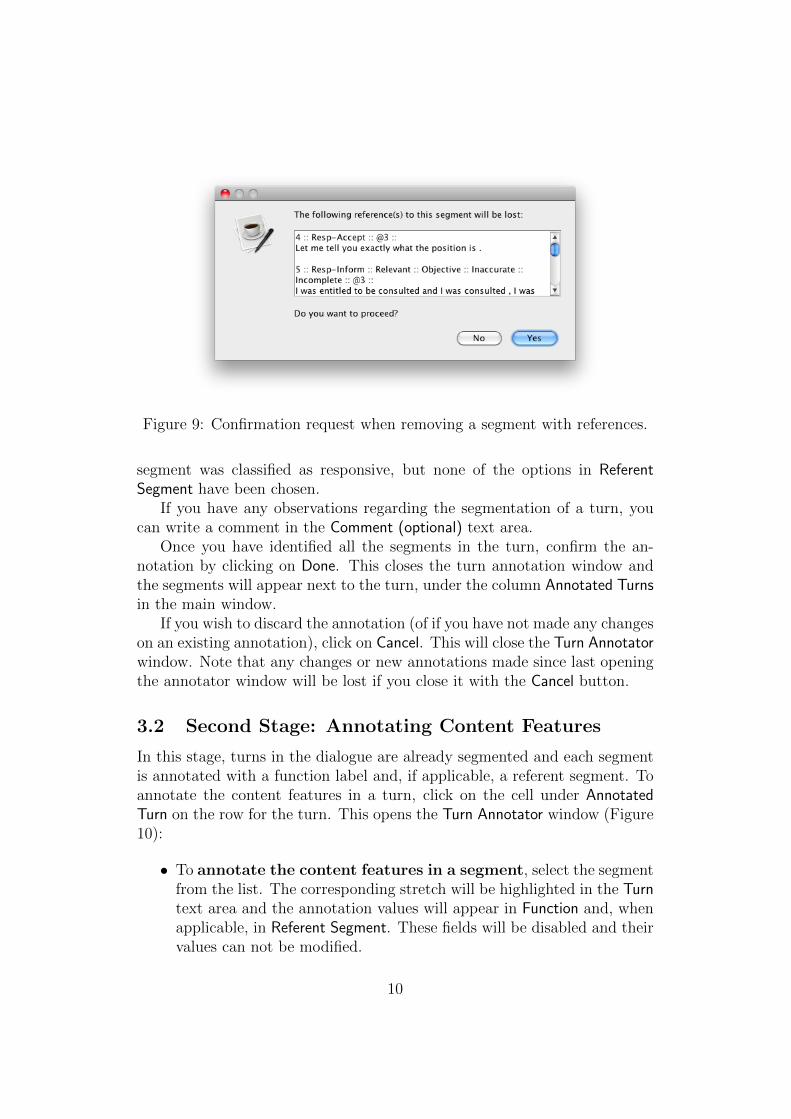
Figure 9: Confirmation request when removing a segment with references.
segment was classified as responsive, but none of the options in ReferentSegment have been chosen.
If you have any observations regarding the segmentation of a turn, youcan write a comment in the Comment (optional) text area.
Once you have identified all the segments in the turn, confirm the an-notation by clicking on Done. This closes the turn annotation window andthe segments will appear next to the turn, under the column Annotated Turnsin the main window.
If you wish to discard the annotation (of if you have not made any changeson an existing annotation), click on Cancel. This will close the Turn Annotatorwindow. Note that any changes or new annotations made since last openingthe annotator window will be lost if you close it with the Cancel button.
3.2 Second Stage: Annotating Content Features
In this stage, turns in the dialogue are already segmented and each segmentis annotated with a function label and, if applicable, a referent segment. Toannotate the content features in a turn, click on the cell under AnnotatedTurn on the row for the turn. This opens the Turn Annotator window (Figure10):
• To annotate the content features in a segment, select the segmentfrom the list. The corresponding stretch will be highlighted in the Turntext area and the annotation values will appear in Function and, whenapplicable, in Referent Segment. These fields will be disabled and theirvalues can not be modified.
10
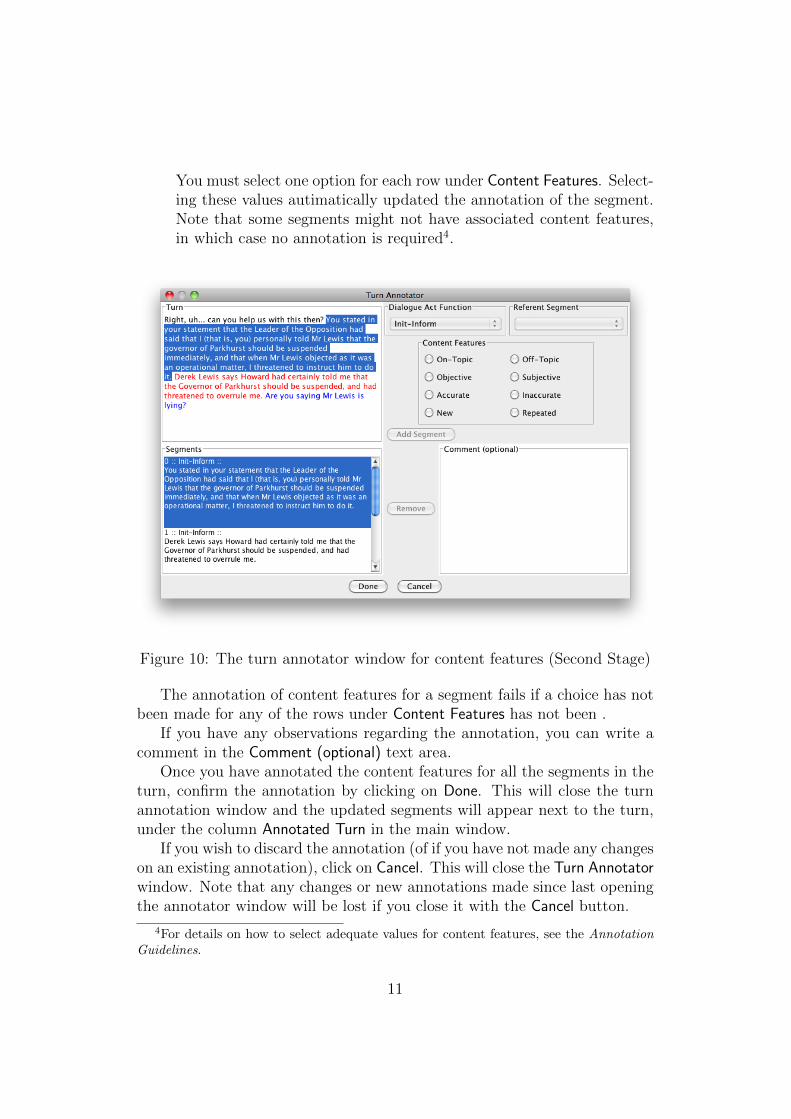
You must select one option for each row under Content Features. Select-ing these values autimatically updated the annotation of the segment.Note that some segments might not have associated content features,in which case no annotation is required4.
Figure 10: The turn annotator window for content features (Second Stage)
The annotation of content features for a segment fails if a choice has notbeen made for any of the rows under Content Features has not been .
If you have any observations regarding the annotation, you can write acomment in the Comment (optional) text area.
Once you have annotated the content features for all the segments in theturn, confirm the annotation by clicking on Done. This will close the turnannotation window and the updated segments will appear next to the turn,under the column Annotated Turn in the main window.
If you wish to discard the annotation (of if you have not made any changeson an existing annotation), click on Cancel. This will close the Turn Annotatorwindow. Note that any changes or new annotations made since last openingthe annotator window will be lost if you close it with the Cancel button.
4For details on how to select adequate values for content features, see the AnnotationGuidelines.
11
4 Additional Features
4.1 Converting Dialogues in Text Format to XML
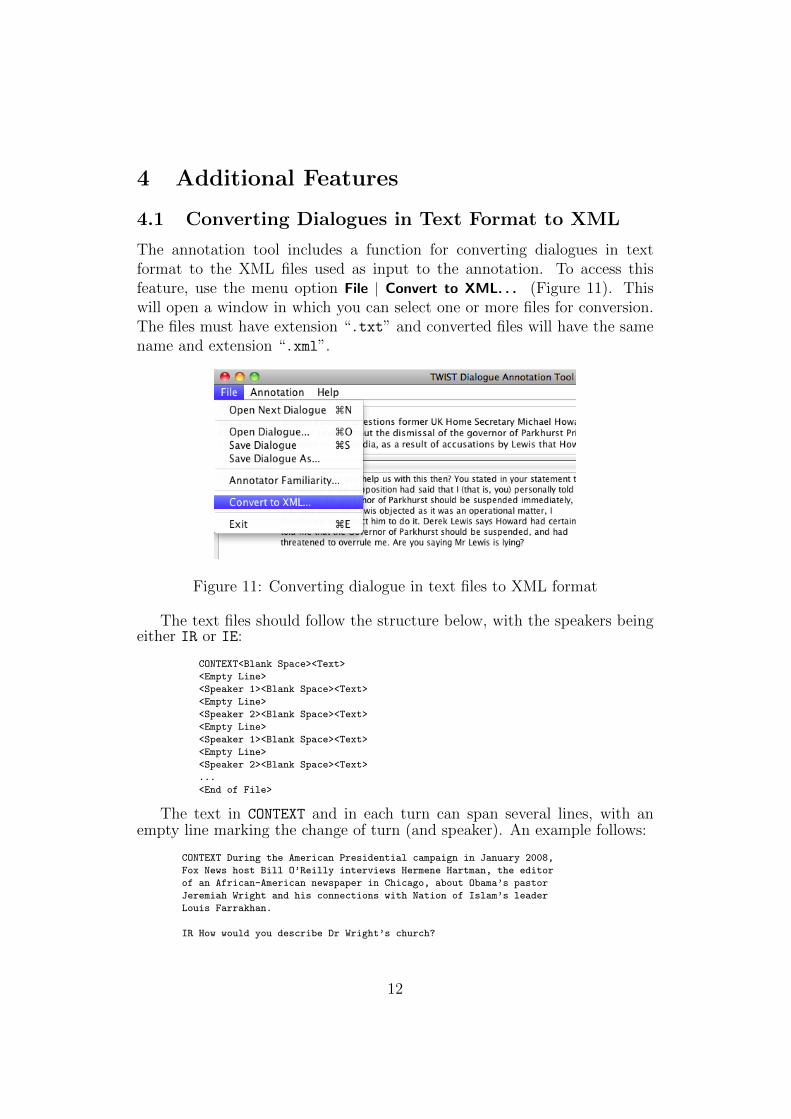
The annotation tool includes a function for converting dialogues in textformat to the XML files used as input to the annotation. To access thisfeature, use the menu option File | Convert to XML. . . (Figure 11). Thiswill open a window in which you can select one or more files for conversion.The files must have extension “.txt” and converted files will have the samename and extension “.xml”.
Figure 11: Converting dialogue in text files to XML format
The text files should follow the structure below, with the speakers beingeither IR or IE:
CONTEXT<Blank Space><Text>
<Empty Line>
<Speaker 1><Blank Space><Text>
<Empty Line>
<Speaker 2><Blank Space><Text>
<Empty Line>
<Speaker 1><Blank Space><Text>
<Empty Line>
<Speaker 2><Blank Space><Text>
...
<End of File>
The text in CONTEXT and in each turn can span several lines, with anempty line marking the change of turn (and speaker). An example follows:
CONTEXT During the American Presidential campaign in January 2008,
Fox News host Bill O’Reilly interviews Hermene Hartman, the editor
of an African-American newspaper in Chicago, about Obama’s pastor
Jeremiah Wright and his connections with Nation of Islam’s leader
Louis Farrakhan.
IR How would you describe Dr Wright’s church?
12
IE It’s a middle-class church. It is a superb church. Reverend
Wright started a church with 87 people; today, has 8,000 in that
particular congregation. United Church of Christ is basically a
white denomination. And I think there’s been just a lot of
miscasting here. Seventy ministries within the church, to include
Girl Scouts, prison outreach, marital counselling, education,
children’s counselling, a lot of Adopt-A-School. They have done a
lot to empower that community and to improve that community.
IR OK. But you could make the same argument about Louis Farrakhan,
that he’s done, you know, some good things, yet you know, he’s
anti-Semitic in his rhetoric and sometimes anti-white or whatever.
And-
IE (Interrupting) But that is, that is not Jeremiah Wright.
IR No, but it is association there. And the association, you can
draw your own conclusion.
The result of the converting this dialogue is an XML file with the followingcontent:
<DIALOGUE>
<!--automatically generated by the TWIST Annotation Tool-->
<CONTEXT DESCRIPTION="During the American Presidential campaign in January
2008, Fox News host Bill O’Reilly interviews Hermene Hartman, the
editor of an African-American newspaper in Chicago, about Obama’s
pastor Jeremiah Wright and his connections with Nation of Islam’s
leader Louis Farrakhan. "/>
<TURN SPEAKER="IR" SPEECH="How would you describe Dr Wright ’ s church ? "/>
<TURN SPEAKER="IE" SPEECH="It ’ s a middle - class church . It is a superb
church . Reverend Wright started a church with 87 people ; today ,
has 8,000 in that particular congregation . United Church of
Christ is basically a white denomination . And I think there ’ s
been just a lot of miscasting here . Seventy ministries within the
church , to include Girl Scouts , prison outreach , marital
counselling , education , children ’ s counselling , a lot of
Adopt - A - School . They have done a lot to empower that
community and to improve that community . "/>
<TURN SPEAKER="IR" SPEECH="OK . But you could make the same argument
about Louis Farrakhan , that he ’ s done , you know , some good
things , yet you know , he ’ s anti - Semitic in his rhetoric and
sometimes anti - white or whatever . And - "/>
<TURN SPEAKER="IE" SPEECH="( Interrupting ) But that is , that is not
Jeremiah Wright . "/>
<TURN SPEAKER="IR" SPEECH="No , but it is association there . And the
association , you can draw your own conclusion . "/>
</DIALOGUE>
4.2 Changing the Annotation Stage
Your version of the annotation tool will come configured by default for theannotation stage you were asked to perform. However, this can be changedby using the options in the Annotation menu (Figure 12):
• Annotation | First Stage allows enabling and disabling turn segmenta-tion and the annotation of dialogue act functions and referents.
13
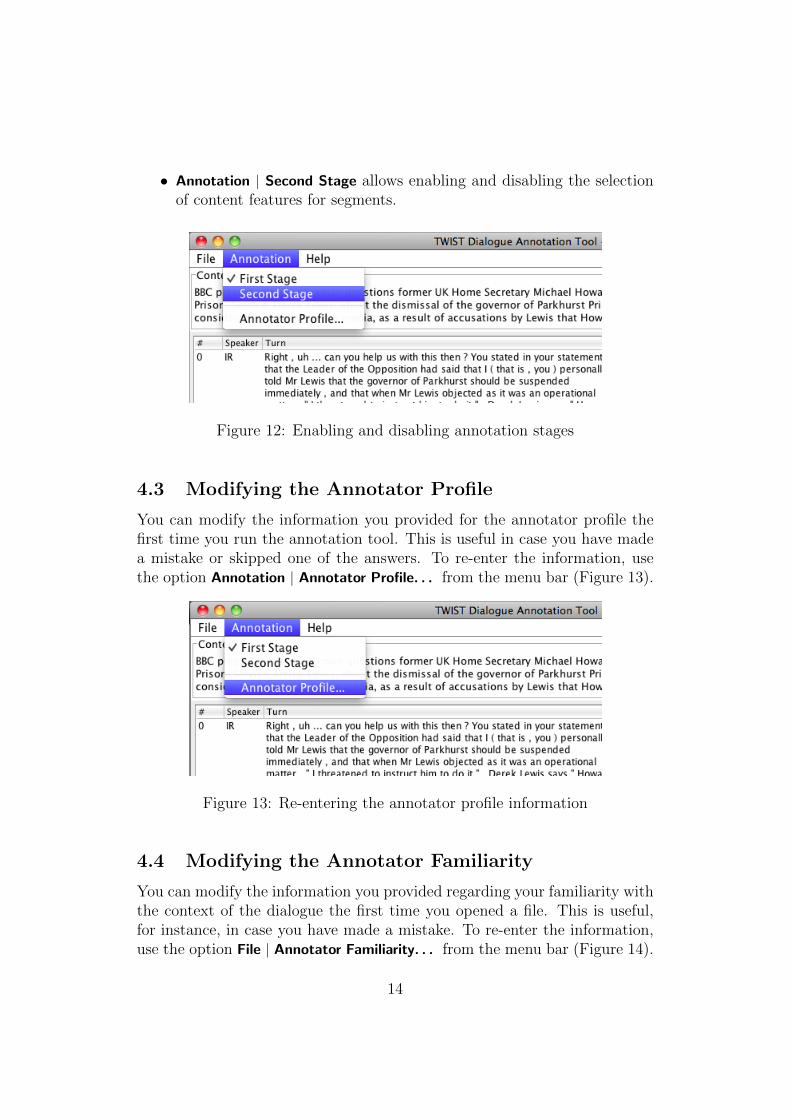
• Annotation | Second Stage allows enabling and disabling the selectionof content features for segments.
Figure 12: Enabling and disabling annotation stages
4.3 Modifying the Annotator Profile
You can modify the information you provided for the annotator profile thefirst time you run the annotation tool. This is useful in case you have madea mistake or skipped one of the answers. To re-enter the information, usethe option Annotation | Annotator Profile. . . from the menu bar (Figure 13).
Figure 13: Re-entering the annotator profile information
4.4 Modifying the Annotator Familiarity
You can modify the information you provided regarding your familiarity withthe context of the dialogue the first time you opened a file. This is useful,for instance, in case you have made a mistake. To re-enter the information,use the option File | Annotator Familiarity. . . from the menu bar (Figure 14).
14
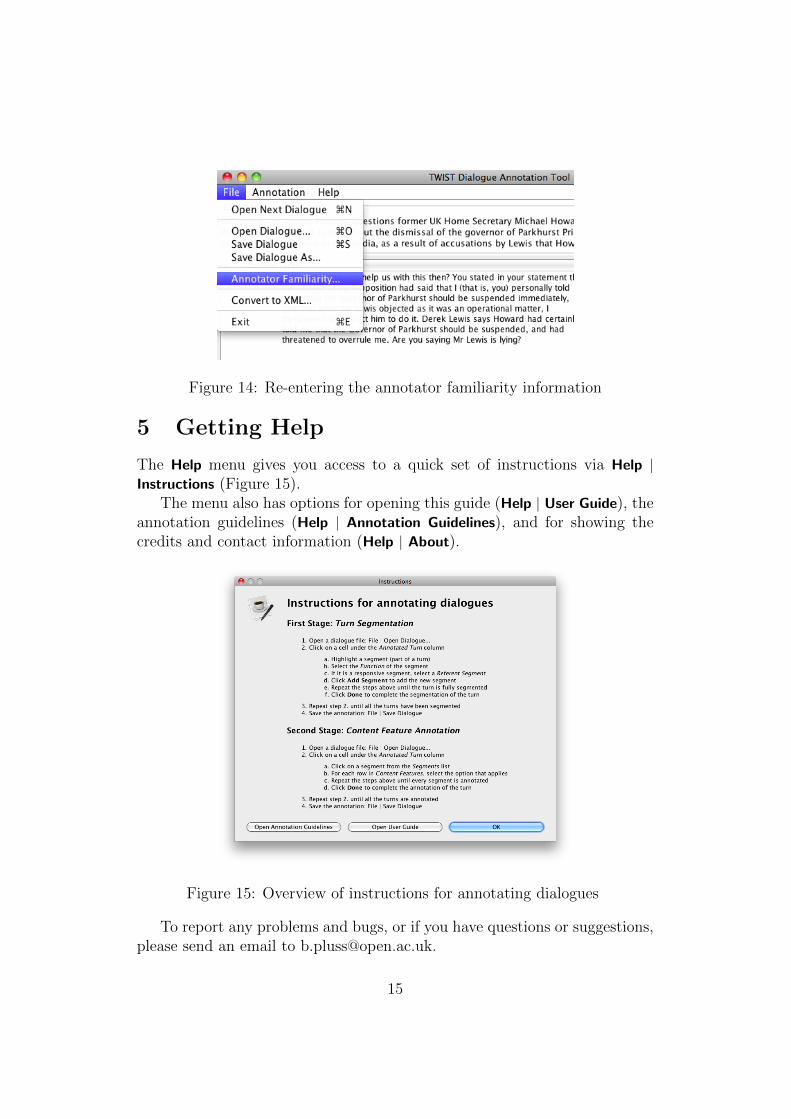
Figure 14: Re-entering the annotator familiarity information
5 Getting Help
The Help menu gives you access to a quick set of instructions via Help |Instructions (Figure 15).
The menu also has options for opening this guide (Help | User Guide), theannotation guidelines (Help | Annotation Guidelines), and for showing thecredits and contact information (Help | About).
Figure 15: Overview of instructions for annotating dialogues
To report any problems and bugs, or if you have questions or suggestions,please send an email to [email protected].
15