Embed Size (px)
Citation preview

++
++
TWOTHE POGLE PANELS
Evolution Panels Version
© Pandora International
2006(20.01)

++
++
The Qwerty keyboard..............................................The Transport panel.................................................The Numeric panel...................................................The Orange sub-panel.............................................The Roller-Ball Panel................................................ The SCC Panel...........................................................
242428323435
CHAPTER 2: THE POGLE PANELS

The POGLE Panels
P 24
+++
+++
+++
THE QWERTY KEYBOARD.
The qwerty keyboard directly enters text intothe system area; there is a limit of 30 characters,they can be a combination of letters, numbersand symbols. Note names (and list labels) canonly contain 20 characters each. Numbers enteredinto the text area will not carry out any commandfunction; the separate numeric keypad, on thetransport panel, must be used to enter valuesinto the numeric window in the system area.There is a system window (called ‘qwerty’) whichopens a virtual keyboard on the vdu, which can beused instead of the actual keyboard if preferred.
THE TRANSPORT PANEL.
Several keys on this panel Fig. 24 require athorough understanding of how the Pogleworks, especially with regard to its use oflists; for this reason, the "Last Trim","Copy", "Shift" and "All" keys are coveredin the section on lists. This also applies tothe advanced options available with the"Auto" key, which are fully covered in thesection on User Setups.
The small black buttons next to knobs androller-balls are usually resets if the functionon the knob is variable; pressing it will returnthe value of that control to its default value. Ifit is not used as a reset with a particularfunction, its use will be described in the text; itis sometimes a switch. The round whitebuttons are Macro keys. There are several keysof different types that are un-named; theseare for possible future use. The black keys willbe described first, starting at the bottom left.
TRIM.
If the Pogle is in ‘Program’ or ‘Live’ mode, andany control that will change the stored datafor the current event is altered, the Pogle willgo into ‘Trim’ mode. This is shown by the word‘Trim’ appearing on a red background in thebottom centre of the vdu. Pressing the "Trim"key will put the Pogle in ‘Trim Off’, and it willnow show the existing, stored values for thecurrent event; press "Trim" again to see themodified version. To store the modifiedversion in the list, press "Enter".
The Pogle must be in ‘Trim’, not ‘Trim Off’, toenter the altered grading. To remove the trimand leave the stored event unchanged, press"Clear". The "Trim" key will always togglebetween the grading information stored forthe current event and any selectedalternatives, be they other events in thecurrent list (or another one), or notes. Themessage at the bottom of the screen will againchange from either ‘Copy’ or ‘Read’ to ‘CopyOff’ or ‘Read Off’, and the settings from themcannot be entered in this mode, as with ‘Trim’.Copied or read information can be trimmeddirectly before being entered, but, in this case,the vdu will not change to ‘Trim’ when the‘Copy’ or ‘Read’ is trimmed. "Trim" works withthe Group keys (described later in this chapter)
If the source transport that the grading list isderived from is in ‘Play’ mode and inside thelist (i.e. the current source code is lower thanthe highest code number in the list), the"Trim" key must be pressed to go into ‘Trim’mode. This is to prevent accidental changesbeing made. It is possible to make it alwaysnecessary to press the "Trim" key to go into"Trim’ mode; this is selected in the User Setupwindow.
CHAPTER 2:The Pogle Panels
Fig. 24Transport Panel

The POGLE Panels
P 25
+++
ENTER.
Stores the currently displayed data in the list.If the Pogle is in ‘Trim’, Copy’ or ‘Read’ whenan event boundary is crossed, the informationas displayed will be carried forward, If"Enter" is then pressed, the data will beentered on the current event, not the one onwhich the displayed mode was selected."Enter" is also used to confirm some othercommands, as mentioned in relevant sections.
ADD.
Will immediately generate an event at thecurrent code, storing the currently displayedgrading, regardless of what mode the Pogle isin. If a (valid) number is entered in the systemnumeric area, "Add" will put an event at thatnumber instead of the current one. If thenumber in the numeric area is preceded by a +or - sign, an event will be entered at that distancefrom the current code. The two "Add" keyshave exactly the same function. In ‘Live’, "Add"only enters points in the list; any existinggrading information will be carried forwardinto the next event. If "Add" is pressed inside alist, the new event generated will take thecurrently displayed grading, and the nextevent will retain the grading previously storedfor the event.
CLEAR.
The extreme bottom left and right-handbuttons are both "Clear". This will discard anytrims, or return to program or live mode from‘Copy’ and ‘Read’ (if either of these are beingtrimmed, "Clear" will return immediately toeither ‘Live’ or ‘Program’). It will also empty thesystem text area, and remove any hostcomputer generated warning messages. Itcarries out these various functions in a fixedorder, so several presses of the key may beneeded to set everything back to normal andremove all messages. It first clears any hostcomputer warnings; then the numeric area(the numeric keypad also has its own "Clear"key, which removes one charater at a time);next any text in the text area and lastly either‘Trim’, ‘Copy’ or ‘Read’. The two lower "Clear"keys have exactly the same function.
Preview and Perform (plus In, Out, Duration,Restore, Recall and Transport) are editingfunctions. Their function is covered in thatsection of this manual.
LAST TRIM. SEE NOTE AT START OF CHAPTER.
AUTO.
If fitted, will turn an external scene detectoron and off; there is a box in the system areathat will highlight when "Auto" is selected. Touse inside an existing list, hold down the"Auto" key until the word ‘Auto’ in the systemarea appears in red. It also works with the"Trim" key to allow automatic entering (andother options) of trimmed gradings. This is coveredin more detail in the section on User Setups.
NOTE.
Will make a snapshot of all the currentprogrammable settings, and store them in thecurrent project. If there is text in the systemtext area, the note will take that as a name.The number of notes that can be made is limitedonly by the host computers available storage.
READ.
Reads notes from the current project, inreverse time order. So the first press reads themost recent note and the next press the secondmost recent, and so forth. If the notes havenames, and there is text in the system textarea, "Read" will look for that text among thenamed notes first. If there are no matches, nonote will be read. It basically conforms to mostsimilar search functions; the more charactersin the search box, the fewer results will bereturned. If the note has a name, reading itand then pressing "Enter" will put the name inthe list (see the chapter on Lists for moredetails) along with the grading. "Read" workswith the group keys (see below).

The POGLE Panels
P 26
+++
+++
+++
CUE.
To send a transport to a selected code or event.If a valid code is entered into the numeric areaand "Cue" is pressed, the currently selectedtransport will shuttle to that code and stop.Thus 01:09:10:20 "Cue" will cause the transportto go to that point. If a + or - sign is enteredbefore a value in the numeric area, thetransport will move by that amount. So if thetransport is already cued to the above point, -10:00 "Cue" will then move the deck to01:09:00:20. There is a second "Cue" key nearthe top of the panel; the two keys have exactlythe same function.
If the source deck is selected, and "Up" or"Down" are pressed to select an event from alist, "Cue" will then send the transport to thepoint in that event that the "Enter" key waspressed on (the trim frame). "Up" "Up" "Up""Cue" will send the transport back threeevents, but "3" "Up’’ "Cue" will send it toevent 3. Although the Pogle doesn’t usuallymind in which order keys are pressed, in thisinstance the correct sequence must be followed.
If there is a number in the system numericarea, that is always used by any subsequentcommands. "3" "Up" "Cue" will send thetransport back 3 events, but "3" "Cue" "Up"will try to send it to code 00:00:00:03, as "3""Cue" is a command; the "Up" will beignored. "47" "Cue" will have no effect,regardless of what keys are pressed next, as 47is not a valid frame number. If the "Alt"button (the bottom white button to the left ofthe transport keys) is held down as "Cue" ispressed, it will park on the last frame of theselected cue event, rather than the trim frame.
So "3" "Up" "Alt"(held down) "Cue" will stopthe transport on the last frame of event 3. Ifan event is selected (say "3" "Up") and then anumber with a + or - sign (say +400) followedby "Cue", the transport will then cue to thatdistance from the event; in this case 4 secondsafter event 3’s trim frame. "Cue" "Cue" will sendthe transport to its last cue point; this is shownin the transports own vdu window. "Cue" alsoworks with "All" and some editing functions;these functions are described in detail in theappropriate sections of this manual.
UP, DOWN and COPY.
To scroll through and display gradings fromthe existing list in the screen direction; thuslower numbered events are reached with the"Up" key. Using either key will put the Pogleinto ‘Copy’ mode. If a valid event number isentered in the system numeric area, "Up" or"Down" will jump straight to that event,regardless or whether it is a higher or lowerevent number than the current one.
They are also used with editing functions, andtheir application in that instance is covered onthe chapter on editing. "Copy" (on the right ofthe panel), is similar to "Up" and "Down", but isused to select the current event. Its use for thatfunction is described in detail in the sectionson editing and lists. Throughout this manual,where ‘Copy’ is mentioned, it includes anyselection with the "Up" and "Down" keys, unlessspecifically mentioned otherwise.
START MIX.
A mix event or dynamic will change the outputfrom one set of values to another over itsduration. The "End Mix" key currently has nospecial function; it works exactly like the"Add" key.
Dynamics consist of 3 events, although itmight be easier to think of the actual dynamicexisting inside another event (see the illustrationopposite, where the long line represents thelength of the shot, and the short one thedynamic itself).The first is the Start Mix point;this should be entered on the frame beforethat that the output needs to start changingon (although often the exact frame is notimportant).
If the Pogle is in ‘Live’, pressing "Start Mix"will immediately enter a dynamic into the list;dynamics are shown by a yellow cross in thevdu list window. If a dynamic is be be madeinside an already existing list, the "Add" keymust be pressed after the "Start Mix" key. Thetransport should then be moved to the pointwhere the output should finish changing, and"Add" pressed again.

The POGLE Panels
P 27
+++
Both the Start Mix and the next Add point arebest entered before any alterations are madeto the grading, Lastly, there needs to be ananother event at the end of the shot to whichthe dynamic has been applied; this is thenormal event point, at which the grading willchange to that for the next shot. Once entered,the Pogle will work out the changes that needto be made over the duration of the dynamicfor the grading to be correct at each end.
The Pogle can program overlapping dynamicsof different lengths in different channels (e.g.Scans and Mega 1); it will sometimes carry outthis function automatically, depending onother factors (for a fuller description, see thechapter on Lists). It is for this reason that it maybe easier to always program the beginningand end point of dynamics, in either ‘Program’ or‘Live’, before making any changes to either end.
In the above example Fig. 25, event 5 ends at01:00:13:09. The longer black line representsthe whole length of the following shot; theshorter one is the dynamic. The dynamic itself(events 6 and 7) occurs between 01:00:13:13and 01:00:16:05, and then the next event (9)starts at 01:00:16:16 (1 frame after the codeshown in the list).
Whatever grading is applied to event 6 or 8,the Pogle will nearly always change graduallybetween the two. The only exception is whena switch control is different at one end of thedynamic event to the other, although this isunusual; where this might occur for particularcontrols, it will be mentioned in the relevant sectionof this manual. If the transport is parked insidethe event (as shown in the picture), any changesmade will be applied as a trim to the end ofthe dynamic (in this case, event 8).
If event 8 (the one following the end dynamicpoint) did not exist, the grading of what iscurrently event 9 would then become that atthe end of the dynamic, which is why the wholeshot with the dynamic in needs to have itsbeginning and end points marked as normal.
ALL.
Used to change more than one event at a time;its use is described in detail in the sections on editingand lists. It has its own box in the system area.
SAVE.
Will save the list as it is in the current project.If there is text in the system text area, the listwill be saved with that text as the name, andthe name will appear at the top of the listwindow. Subsequent presses of the "Save" keywill save the list with the same name; existingversions of the list with the same name willnot be overwritten.
There is also a ‘Save’ icon at the top of the listwindow on the vdu; tapping on that will havethe same effect. If the icon is greyed out, itmeans the current version of the list is alreadysaved; whereas a * symbol next to the name meansit hasn’t been saved in the current version.
VAULT.
If the Vault window is hidden from view, pressing"Vault" will automatically make it visible byputting it in front of all other windows. It is alsoused as a search function; see the full descriptionof the Vault later in this manual.
Fig. 25

The POGLE Panels
P 28
+++
+++
+++
DELETE.
If selected when inside a list, "Delete" and "Enter"will delete the current event. In this instance,the current event will take the grading fromthe next event; this is because it is the existingevent that is being deleted. "Up" "Delete" "Enter" willdelete the previous event, in which case it wouldthen adopt the grading of the current one.
This will only work with one press of the "Up"key; it is not possible to scroll up more than 1event and delete that. "Delete" "All" "Enter"will delete the entire contents of the currentlist, but will not close it or give a warning thatthis action will remove the contents of the listwithout saving it; all controls are set to their defaultvalues if a lists contents are deleted this way. "All""Delete" "Enter" will delete from the currentevent to the end of the list, but leave theevents before the current one. "Delete" willnot work with "Down" at all. ‘Delete’ willappear in a box in the system area whenselected.
SHIFT.
Used to move the position of events. To movethe next event in the list to the current position,press "Shift" then "Enter". To move the previousevent to the current position, press "Up", "Shift","Enter". It is not possible to move one eventpast another one with "Shift"; "Up" "Up""Shift" "Enter" will have no effect. "Shift"also works with "All", and with values enteredon the numeric keypad. Its use is described inmore detail in the section on lists.
THE NUMERIC PANEL.
Numbers entered from this panel Fig. 26 willonly appear in the System numeric area; theyare used when commands involving numericvalues need to be sent to the Pogle. To includea number in a file name, use those on theqwerty keyboard.
When numbers are entered (a maximum of 8)they appear without any separators; ifneeded, + or - signs can be entered before orafter the number. The 00 symbol is the same asentering two 0s one after the other; the"Clear" key at top right clears one number ata time, starting with the last one entered.(Unlike other keys with the same name, thetwo types of "Clear" keys on the Transportpanel behave differently in this respect). Toclear all the numbers in one go, use either ofthe "Clear" keys at the bottom of the panel. Ifan invalid number is entered, any subsequentcommand will be ignored. Thus "+1234" "Cue"will have no effect, because 34 is not a validframe number.
The "·" is used to convert a number to feet andframes, rather than code. Whereas "+ 300""Cue" will cue the transport forward 3 seconds,"+3·00" (which will be displayed as +3+00)"Cue" will move it forward 3 feet. If the "·" keyis pressed before the number is entered, thenumber becomes a frame count (frames arenormally represented by a + sign). Thus "-·257"(which will appear on the vdu as -+257) "Cue"will cue the transport back 257 frames.
Fig. 26

The POGLE Panels
P 29
+++
The * symbol represents fields, and is used whenmoving their position in a list; it is used bothwhen editing, and manipulating lists. See therelevant sections of this manual.
Restore, Recall, Review and Trans Lock are allediting functions, and are covered in that chapter.
BYPASS.
Will bypass all existing settings of the Pogle,and will display one stored setup. The datafrom "Bypass" can be entered into the currentevent by selecting "Bypass" then "Enter"; itwill also work with the group keys. If thePogle is in ‘Live’ mode and ‘Bypass’ is selected,any changes made will be stored as the‘Bypass’ setting if "Enter" is pressed. Thesenew settings can then be recalled at any timeby selecting "Bypass".
SET COUNT.
To set the telecine counter number, enter therequired counter value, press "Set Count" and"Enter". As with many other such commands,"Set Count" can be selected before or afterthe number has been entered in the numericarea. To offset the current value of the counter,enter "+" or "-" followed by the desired offsetvalue in the numeric area, then press "SetCount" and "Enter". If an event in a list isselected with "Copy", "Up" or "Down", "SetCount" "Enter" will take the code from theevent selected as the counter value.
So if, for example, a punch frame or any othereasily recognisable frame is used to set thecounter on, making an event on that framewill allow quick setting of the counter afterwards.
If no number is entered in the numeric area,pressing "Set Count" and "Enter" will set thecounter to 00:00:00:00; the Pogle can countbackwards from this point, and can enterevents into the negative code. This key canonly set the counter for telecines, notmachines that have existing timecode (vtrsetc). The word ‘Preset’ will appear in a box inthe system area when "Set Count" is selected.
The Pogle cannot remember the counterinformation if the film is removed from thetelecine, or lifted out of the gate. If this happens,the counter needs to be checked beforecontinuing, or events may not occur at thecorrect point.
There is one additional black key with nolegend on it; this is for possible future use.
SHUTTLE WHEEL.
In the bottom centre of the panel is theshuttle wheel. If the white button above andto its right is pressed, the wheel acts as ashuttle control, if the button above and to theleft is pressed, it acts as a jog control. How wellany particular transport works with the wheel is dependent on that transports owncharacteristics; discs normally jog well, butshuttle badly, and telecine control from thewheel is sometimes erratic.
MACROS.
There are macro keys (the round whitebuttons) on each panel. These are used tostore sequences of key presses; some of themare pre-programmed. Their use is covered inthe chapter User Setups. Several of those on theTransport panel have dedicated functions assignedto them, and should not be reprogrammed;their use is described here.

The POGLE Panels
P 30
+++
+++
+++
ALT KEY.
The white button nearest to the bottom left ofthe shuttle wheel. When it is held down andeither the play or reverse transport key ispressed, the currently selected transport willthen move at about 20% of its play speed inthat direction; if it is held down and the keypressed twice, the transport will now shuttlein that direction at about 5 times its play speed.
This is useful for tape decks with very highshuttle speeds. The "Alt" key is also used toswitch transports between their variousediting modes. Holding it down and pressing atransport control will step through the differentmodes available. Telecines can be either wild(ignored by any editing commands) or players;tape machines and discs can be either wild,players or recorders; to make a machine arecorder, hold down the "Alt" key and make aquick double press of the transport key for thethat deck (this only works in the machine iscurrently in ‘Wild’ mode).
If a transport that normally moves a field at atime is selected, holding down "Alt" and pressingan inch key will move it one frame in theselected direction. The "Alt" key works withseveral other functions, so its position shouldbe remembered.
CONTROL KEY.
The white button nearest the bottom right ofthe wheel. This works in conjunction with theorange sub-panel (see below) and the transportcontrols; holding it down and selecting atransport button will switch that transportfrom EE to Playback (this depends on the localmachine settings).
RACKING KEYS (Telecine framing and Focus).
The two white buttons near the top of thepanel, between the two sets of larger whitekeys, are the telecine racking (or framing).
The left is rack down and the right is rack up.The Pogle does not store the values set fromthese keys. Generally, they are not neededwith 35mm film; with Spirit and Shadow telecines,they should not be used at all (use the scancontrols to alter the framing if needed).
They are also used as focus controls with sometelecines; holding down the "Shift" key (onthe qwerty keyboard) and a racking key willdrive the mechanical focus of Spirit andShadow telecines. The extremely slow responseof the machine to these controls may make itdifficult to use this way. As above, the value ofthis function is not stored by the Pogle.
THE GROUP KEYS.
These keys are used to select channels for copying; keys with the same name on theSCC Panel are used to select control of thecolour correctors.
Across the middle of the panel are threegroups of small white keys, which can beilluminated. The outer two sets of 6 are thegroup keys. These represent the variouschannels being controlled by the Pogle. Theycan be used to select or deselect groups ofcontrols; they work with "Trim", "Copy","Read" and "Bypass". For instance, imaginetwo events, say 5 and 7, which have differentgrading and scan information. If the list is onevent 7, selecting "Up" "Up" (or "5" "Up")will display all the information from event 5,including the scans; all the group keys will beilluminated.

The POGLE Panels
P 31
+++
By pressing the "Scan" key, it is now selected,so the scan information only from event 5 isdisplayed; alternatively, pressing the "Scan"key again and then the "SCC" keys will nowshow the current grading of event 5 (assumingthat the telecines own controls were not usedfor grading) with the scan information ofevent 7. To store this combination as the newsetting for event 7, press "Enter"; or press "Clear"to return to the current stored parameters.
The groups are (from the left):
PRIMARY: the telecines own colour balancesettings (excluding neg matching);
SCANS: the scan (size and position)information of the telecine.
UTILITY: varies slightly with the telecinetype, but normally contains tk speedand aperture corrector values.
NOISE: the settings for an external noisereducer, if fitted (the ThomsonScream is not supported as anoise reducer).
ALL: to deselect or reselect all the groups.
The six buttons on the right allow selection ordeselection of various Pixi channels, as follows:
SCC: turns all colour channels on or off.P1: Moore Mega1 Primary ;M1: Moore Mega1 secondary;V1: Vignette Card;M2: Mega 2.
Any of the above can be selected or deselectedby pressing the appropriate key. The two blankkeys (1 in each group of 6) are for possiblefuture use.
TRANSPORT CONTROL SELECTOR KEYS.
The five keys across the middle select whichmachine will be controlled by the transportcontrols. If illuminated green, it means a machineis attached to that port, and is either a player orwild. If red, it means the machine is a recorder;see the chapter on editing for a full descriptionof these functions. The currently selected machinewill be more brightly illuminated than the others.
The code type as displayed in the vdu listwindow can be changed (if the source is atelecine) by holding down the telecine transportkey for a couple of seconds. It will toggle toeach type of display in turn. If the User Setupwindow is open when this is done, the ‘ListDisplay’ button will change to show the selectedcode display type, and closing the window willstore that as the default display type.

The POGLE Panels
P 32
+++
+++
+++
THE ORANGE SUB-PANEL.
The 8 large white keys, and the eight blackknobs and reset buttons to their right, will bereferred to as the orange sub-panel Fig. 27, asthe display for the knob functions is orange.To distinguish this from the similar (but positionallyreversed) display on the SCC panel, that willusually be referred to as the the orange display(SCC), except where references to it are obvious.
The 8 white keys are for selecting whichfunctions will be controlled by the knobs; thetop 4 have preset controls assigned to them.They are: Scans (for telecines); when this isilluminated, the telecines scan controls willappear on the display (the actual controlsavailable will vary with the telecine type andoptions). The values displayed in the telecinewindow will also vary with telecine type; thedefault setting may not be 50%.
The same is true of the other 3 keys; the exacttype of control assigned will vary with systemconfiguration. "Noise" is for any external noisereducer (the Thomson Scream is not supported asa Noise Reducer); "Utility" is for various telecinefunctions not included in other control groups,and "Neg" will be different for tube and line arraytypes of telecine.
If the button for any fully variable control istapped on on the vdu, it will then be assignedto one of the knobs by the raised display, andits abbreviated name will appear by the knob.Some functions are part of a group of controls,and tapping one will assign all the controls inthat group to knobs. The small black buttonsnext to each knob will always reset whichevercontrol is assigned to that knob to its defaultvalue. If a control has its own dedicated knob,it can still be assigned to the orange sub-panel, and its own, normal control knob willcontinue to function. This is useful if buildinga group of controls, which can then be stored,as described in the next paragraph.
When a variable control is tapped on in awindow, the lower right white key (4) willbecome illuminated. Position 4 is a temporaryposition for new controls as they are assigned.Each tap on a control will put it in the nextposition on the raised display; when all 8 positionsare full, any new control will then appear atthe top left, overwriting the existing one.
Once groups of controls have been assigned towhite key 4, they can be saved into any of theother positions, by holding down the key untilit blinks. These groups of controls are savedby user, so each user can have 7 sets of presetcontrols on the orange panel. To return thetop 4 keys to their factory presets, hold down"Alt" key and press the appropriate key; thiswill re-assign that key to its normal function. Itcan then be made to always have its presetfunction on it again by holding down theselected key for a couple of seconds.
Fig. 27

The POGLE Panels
P 33
+++
The controls on the orange display can beganged together by use of either the "Alt" or"Control" keys. If the "Alt" key is held downand the rightmost upper or lower knob isturned, all the controls currently on that row(across the display) will be varied by the sameamount. As groups of RGB controls are normallyassigned from the left to the right, the thirdfrom left knob (usually the B channel controlfor RGB groups) will also adjust the threecontrols (itself and the two to its left).
This only works with the rightmost two knobs,and if there is a function assigned to them. Ifthe "Control" key is held down and any knobadjusted, the one above or below it will varyby the same amount. Using these keys is theonly way to gang different controls. Pressingany one of the white keys once willtemporarily remove control from the raiseddisplay; another press will return them towhichever keys function was selected.
All the controls that use knobs, and the roller-balls, are velocity sensitive; the faster they aremoved, the more effect they have. This maysometimes account for apparent differences incontrol sensitivities.
The POGLE Panels
P 34
+++
+++
+++
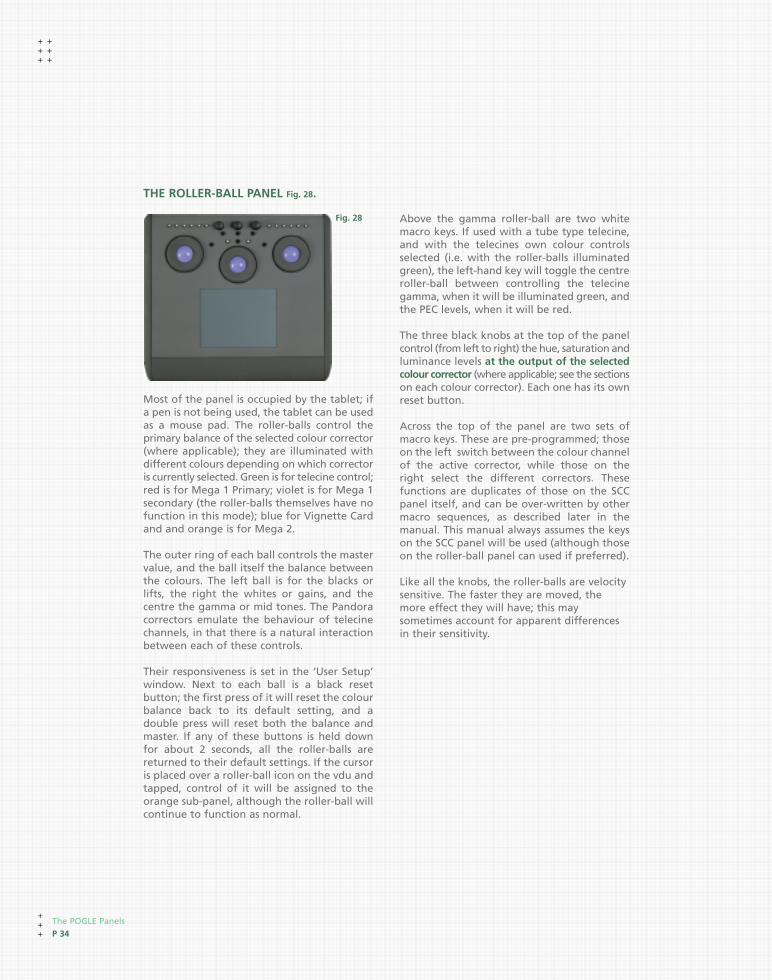
THE ROLLER-BALL PANEL Fig. 28.
Most of the panel is occupied by the tablet; ifa pen is not being used, the tablet can be usedas a mouse pad. The roller-balls control theprimary balance of the selected colour corrector(where applicable); they are illuminated withdifferent colours depending on which correctoris currently selected. Green is for telecine control;red is for Mega 1 Primary; violet is for Mega 1secondary (the roller-balls themselves have nofunction in this mode); blue for Vignette Cardand and orange is for Mega 2.
The outer ring of each ball controls the mastervalue, and the ball itself the balance betweenthe colours. The left ball is for the blacks orlifts, the right the whites or gains, and thecentre the gamma or mid tones. The Pandoracorrectors emulate the behaviour of telecinechannels, in that there is a natural interactionbetween each of these controls.
Their responsiveness is set in the ‘User Setup’window. Next to each ball is a black resetbutton; the first press of it will reset the colourbalance back to its default setting, and adouble press will reset both the balance andmaster. If any of these buttons is held downfor about 2 seconds, all the roller-balls arereturned to their default settings. If the cursoris placed over a roller-ball icon on the vdu andtapped, control of it will be assigned to theorange sub-panel, although the roller-ball willcontinue to function as normal.
Above the gamma roller-ball are two whitemacro keys. If used with a tube type telecine,and with the telecines own colour controlsselected (i.e. with the roller-balls illuminatedgreen), the left-hand key will toggle the centreroller-ball between controlling the telecinegamma, when it will be illuminated green, andthe PEC levels, when it will be red.
The three black knobs at the top of the panelcontrol (from left to right) the hue, saturation andluminance levels at the output of the selectedcolour corrector (where applicable; see the sectionson each colour corrector). Each one has its ownreset button.
Across the top of the panel are two sets ofmacro keys. These are pre-programmed; thoseon the left switch between the colour channelof the active corrector, while those on theright select the different correctors. Thesefunctions are duplicates of those on the SCCpanel itself, and can be over-written by othermacro sequences, as described later in themanual. This manual always assumes the keyson the SCC panel will be used (although thoseon the roller-ball panel can used if preferred).
Like all the knobs, the roller-balls are velocitysensitive. The faster they are moved, themore effect they will have; this maysometimes account for apparent differencesin their sensitivity.
Fig. 28

The POGLE Panels
P 35
+++
THE SCC PANEL Fig. 29.
The track-balls function varies slightly dependingon which colour corrector is active; it will bedescribed in detail in the chapters on eachcorrector. The black button above and to theleft, and white one to the right, are dedicatedto the track-ball, and alter its operationalmode.
The six large white keys across the bottomselect the channel of the active corrector.Although labelled R,G, B, Y, C and M, (for Red,Green ect), these should only be regarded asnames, as any colour correction channel canbe rotated through 360 degrees to work on anycolour. The row of keys above vary in functiondepending on the current colour corrector; theywill be described in detail in the relevant chapters.The basic functions are as follows.
The left-most will switch a colour channel betweenworking inside (not illuminated) or outside(illuminated blue) its shape. The second andthirds keys currently have no function, and arefor possible future use. The fourth key (on theimmediate right of the track-ball) is Mega 2’sMask function; Show, the fifth key, works withall correctors, to show which areas will be affectedby the output controls, and the last key, Expand,will make the current colour channel includeall the picture in its selection.
Above these keys are 6 macro keys. The left-handone (above the R key) is pre-programmed tobe the same as the Shift key on the Qwertykeyboard, which is used for several differentfunctions. The other keys can be programmedas required.
Across the middle of the panel are three setsof smaller, square white keys. At present, onlythe group on the right is used, for switchingbetween the colour correctors. They select,from the left: telecine (for the telecines owninternal controls); Mega 1 Primaries; Mega 1secondaries; Vignette Card; Mega 2 andPrimary 2 (this may not be labelled). The othertwo rows of these keys can be programmed asmacros.
As the different colour correctors are selected,the functions on the knobs at the top of thepanel change accordingly. The eight knobsnext to the raised orange display will have the(usually abbreviated) function name shown onthe display. For some of these functions, thesmall black buttons act as switches, not resetbuttons; these will be mentioned in therelevant chapters.
The three rows of three knobs at the top rightof the panel will have their function displayedin the small panel to their left; the reset foreach knob is the appropriate button belowthat display. The track-ball controls the positionof any shape made by any of the differentchannels, but it works differently with Mega 2to the other correctors. A full description howto use it with Mega 2 is given in the Mega 2chapter. The track-ball will be illuminated thesame colour as the roller-balls as the colourcorrector is changed.
Fig. 29