Embed Size (px)
Citation preview
TWR-KL43Z48M Quick Start Guide Development Kit for Kinetis
KL43/33/27/17 MCU Families
Tower System
Quick Start Guide
2
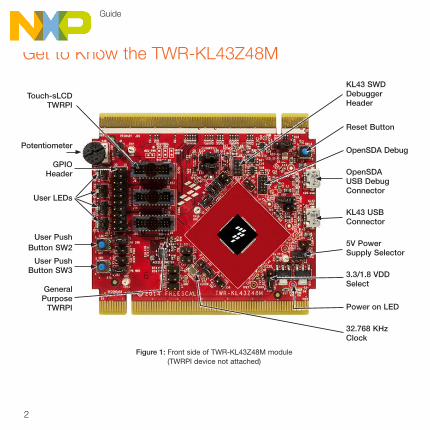
Get to Know the TWR-KL43Z48M
Touch-sLCD TWRPI
Potentiometer
GPIO Header
User LEDs
User Push Button SW2
User Push Button SW3
General Purpose
TWRPI
KL43 SWD Debugger Header
Reset Button
OpenSDA Debug
OpenSDA USB Debug Connector
KL43 USB Connector
5V Power Supply Selector
3.3/1.8 VDD Select
Power on LED
32.768 KHz Clock
Figure 1: Front side of TWR-KL43Z48M module (TWRPI device not attached)
freescale.com
3
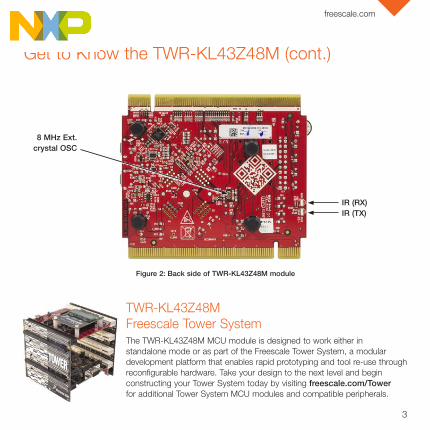
Get to Know the TWR-KL43Z48M (cont.)
8 MHz Ext. crystal OSC
IR (RX) IR (TX)
TWR-KL43Z48M Freescale Tower SystemThe TWR-KL43Z48M MCU module is designed to work either in standalone mode or as part of the Freescale Tower System, a modular development platform that enables rapid prototyping and tool re-use through reconfigurable hardware. Take your design to the next level and begin constructing your Tower System today by visiting freescale.com/Tower for additional Tower System MCU modules and compatible peripherals.
Figure 2: Back side of TWR-KL43Z48M module
4
Quick Start Guide
4
Quick Start Guide
TWR-KL43Z48M Features
• Tower System-compatible MCU module
• TWR-KL43Z48M MCU (48 MHz, 256 KB flash, 32 KB RAM, 16K ROM (KIBBLE), low power, sLCD controller, 64 LQFP package
• Segment LCD module (TWRPI-SLCD)
• Dual role USB interface with Micro-AB USB connector
• Touch Tower plug-in socket (with TSS only)
• General-purpose Tower plug-in (TWRPI) socket
• On-board debug circuit MK20D50 OpenSDA with virtual serial port
• 6-Axis Xtrinsic Sensor with Integrated Linear Accelerometer and Magnetometer (FXOS8700)
• Four (4) user-controllable LEDs
• Two (2) user push buttons switch
• Infrared transmit and receive
• Potentiometer
• General-purpose pin header to directly access MCU signals
Tools
• IAR EWARM 7.10 or higher
• Keil uVision v5.2 or higher
5
freescale.com
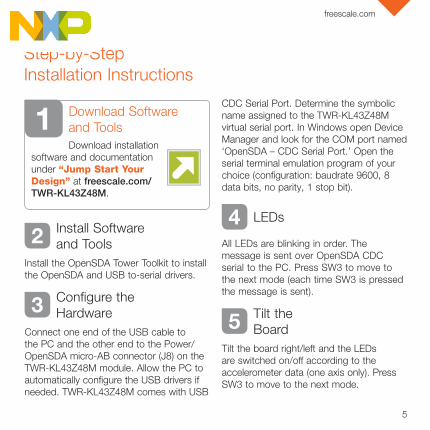
Step-by-Step Installation Instructions
Download Software and ToolsDownload installation
software and documentation under “Jump Start Your Design” at freescale.com/TWR-KL43Z48M.
1
2 Install Software and Tools
Install the OpenSDA Tower Toolkit to install the OpenSDA and USB to-serial drivers.
3 Configure the Hardware
Connect one end of the USB cable to the PC and the other end to the Power/OpenSDA micro-AB connector (J8) on the TWR-KL43Z48M module. Allow the PC to automatically configure the USB drivers if needed. TWR-KL43Z48M comes with USB
CDC Serial Port. Determine the symbolic name assigned to the TWR-KL43Z48M virtual serial port. In Windows open Device Manager and look for the COM port named ‘OpenSDA – CDC Serial Port.’ Open the serial terminal emulation program of your choice (configuration: baudrate 9600, 8 data bits, no parity, 1 stop bit).
4 LEDs
All LEDs are blinking in order. The message is sent over OpenSDA CDC serial to the PC. Press SW3 to move to the next mode (each time SW3 is pressed the message is sent).
5 Tilt the Board
Tilt the board right/left and the LEDs are switched on/off according to the accelerometer data (one axis only). Press SW3 to move to the next mode.
6
Quick Start Guide
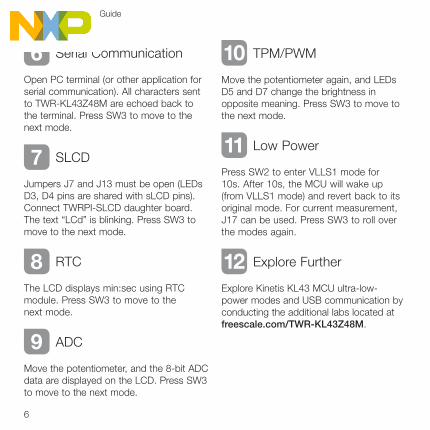
6 Serial Communication
Open PC terminal (or other application for serial communication). All characters sent to TWR-KL43Z48M are echoed back to the terminal. Press SW3 to move to the next mode.
7 SLCD
Jumpers J7 and J13 must be open (LEDs D3, D4 pins are shared with sLCD pins). Connect TWRPI-SLCD daughter board. The text “LCd” is blinking. Press SW3 to move to the next mode.
8 RTC
The LCD displays min:sec using RTC module. Press SW3 to move to the next mode.
9 ADC
Move the potentiometer, and the 8-bit ADC data are displayed on the LCD. Press SW3 to move to the next mode.
10 TPM/PWM
Move the potentiometer again, and LEDs D5 and D7 change the brightness in opposite meaning. Press SW3 to move to the next mode.
11 Low Power
Press SW2 to enter VLLS1 mode for 10s. After 10s, the MCU will wake up (from VLLS1 mode) and revert back to its original mode. For current measurement, J17 can be used. Press SW3 to roll over the modes again.
12 Explore Further
Explore Kinetis KL43 MCU ultra-low-power modes and USB communication by conducting the additional labs located at freescale.com/TWR-KL43Z48M.

7
freescale.com
TWR-KL43Z48M Jumper OptionsThe following is a list of all the jumper options. The default installed jumper settings are indicated by white text within the gray boxes or bold text in the “Signal” column.
Jumper Position Signal KL43 Pin Name
J25 Open BOARD POWER SELECTOR1–2 P5V_TRG_USB2–3 VBUS_ELEVJ28 1-2
J12 1-2 MCU_POWER
J1 1-2Reset1–2 RESET_B2–3 RST_TGTMCU_B
J35 1-2V_BRD Voltage Selection1–2 3.3V2–3 1.8V
VREF
J38 Open 1–2 VREF to VDDA
J17 1-2 V_BRD to MCU_POWER
J10 1-2 VDDA_HDR to MCU_POWER enable
J36 Open VLL3 to VDD enable VLL3
J11 Open VOUT_3V3 to MCU_POWER
J16 1-2 VREG_IN Selector1–2 P5V_TRG_USB2–3 VBUS_ELEV
P5V_VREGIN_KL43J19 Open
8
Quick Start Guide
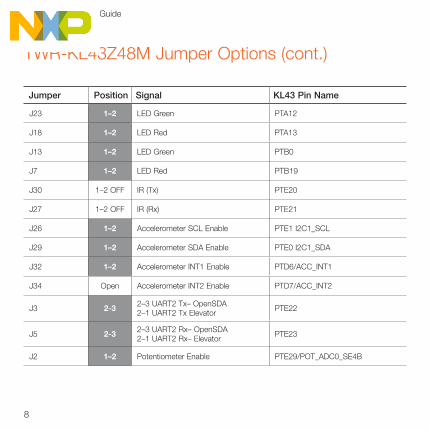
TWR-KL43Z48M Jumper Options (cont.)
Jumper Position Signal KL43 Pin Name
J23 1–2 LED Green PTA12
J18 1–2 LED Red PTA13
J13 1–2 LED Green PTB0
J7 1–2 LED Red PTB19
J30 1–2 OFF IR (Tx) PTE20
J27 1–2 OFF IR (Rx) PTE21
J26 1–2 Accelerometer SCL Enable PTE1 I2C1_SCL
J29 1–2 Accelerometer SDA Enable PTE0 I2C1_SDA
J32 1–2 Accelerometer INT1 Enable PTD6/ACC_INT1
J34 Open Accelerometer INT2 Enable PTD7/ACC_INT2
J3 2-3 2–3 UART2 Tx– OpenSDA 2–1 UART2 Tx Elevator PTE22
J5 2-3 2–3 UART2 Rx– OpenSDA2–1 UART2 Rx– Elevator PTE23
J2 1–2 Potentiometer Enable PTE29/POT_ADC0_SE4B
9
freescale.com
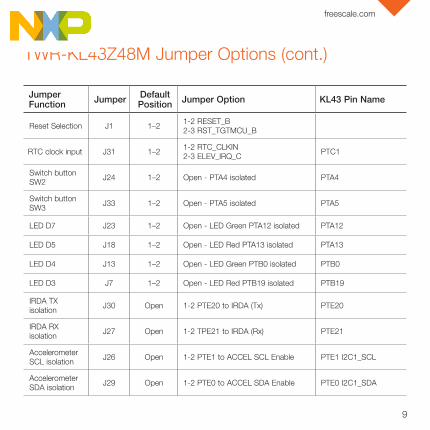
TWR-KL43Z48M Jumper Options (cont.)
Jumper Function Jumper Default
Position Jumper Option KL43 Pin Name
Reset Selection J1 1–2 1-2 RESET_B 2-3 RST_TGTMCU_B
RTC clock input J31 1–2 1-2 RTC_CLKIN 2-3 ELEV_IRQ_C PTC1
Switch button SW2 J24 1–2 Open - PTA4 isolated PTA4
Switch button SW3 J33 1–2 Open - PTA5 isolated PTA5
LED D7 J23 1–2 Open - LED Green PTA12 isolated PTA12
LED D5 J18 1–2 Open - LED Red PTA13 isolated PTA13
LED D4 J13 1–2 Open - LED Green PTB0 isolated PTB0
LED D3 J7 1–2 Open - LED Red PTB19 isolated PTB19
IRDA TX isolation J30 Open 1-2 PTE20 to IRDA (Tx) PTE20
IRDA RX isolation J27 Open 1-2 TPE21 to IRDA (Rx) PTE21
Accelerometer SCL isolation J26 Open 1-2 PTE1 to ACCEL SCL Enable PTE1 I2C1_SCL
Accelerometer SDA isolation J29 Open 1-2 PTE0 to ACCEL SDA Enable PTE0 I2C1_SDA
10
Quick Start Guide
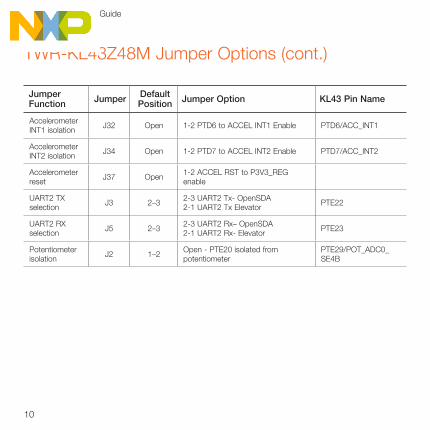
Jumper Function Jumper Default
Position Jumper Option KL43 Pin Name
Accelerometer INT1 isolation J32 Open 1-2 PTD6 to ACCEL INT1 Enable PTD6/ACC_INT1
Accelerometer INT2 isolation J34 Open 1-2 PTD7 to ACCEL INT2 Enable PTD7/ACC_INT2
Accelerometer reset J37 Open 1-2 ACCEL RST to P3V3_REG
enable
UART2 TX selection J3 2–3 2-3 UART2 Tx- OpenSDA
2-1 UART2 Tx Elevator PTE22
UART2 RX selection J5 2–3 2-3 UART2 Rx– OpenSDA
2-1 UART2 Rx- Elevator PTE23
Potentiometer isolation J2 1–2 Open - PTE20 isolated from
potentiometerPTE29/POT_ADC0_SE4B
TWR-KL43Z48M Jumper Options (cont.)

11
freescale.com
Expanded Software and Tools Now Available for Kinetis MCUsAdditional details regarding the Quick Start Demo are included as part of the Kinetis software development kit (SDK).
To take your design to the next level, leverage the Kinetis SDK and other online enablement software and tools for Kinetis MCUs, available for download at the relevant links listed here.
• Kinetis software development kit at freescale.com/ksdk
• MQX™ RTOS at freescale.com/mqx
• Kinetis Design Studio IDE at freescale.com/kds
• Bootloader for Kinetis MCUs at freescale.com/kboot
Get StartedDownload installation software and documentation under “Jump Start Your Design” at freescale.com/TWR-KL43Z48M.

For more information, visit freescale.com/TWR-KL43Z48M, freescale.com/Kinetis or freescale.com/Tower
Join the online Tower community at towergeeks.org
Freescale, the Freescale logo, and Kinetis are trademarks of Freescale Semiconductor, Inc., Reg. U.S. Pat. & Tm. Off. Tower is a trademark of Freescale Semiconductor, Inc. All other product or service names are the property of their respective owners. ARM and Cortex are registered trademarks of ARM Limited. © 2012–2014 Freescale Semiconductor, Inc.
Doc Number: TWRKL43Z48MQSG REV 2 Agile Number: 926-78860 REV B
SupportVisit freescale.com/support for a list of phone numbers within your region.
WarrantyVisit freescale.com/warranty for complete warranty information.