Embed Size (px)
Citation preview
Informatica® PowerExchange for Snowflake10.2 HotFix 2
User Guide for PowerCenter
Informatica PowerExchange for Snowflake User Guide for PowerCenter10.2 HotFix 2April 2019
© Copyright Informatica LLC 2017, 2020
This software and documentation are provided only under a separate license agreement containing restrictions on use and disclosure. No part of this document may be reproduced or transmitted in any form, by any means (electronic, photocopying, recording or otherwise) without prior consent of Informatica LLC.
Informatica, the Informatica logo, PowerCenter, and PowerExchange are trademarks or registered trademarks of Informatica LLC in the United States and many jurisdictions throughout the world. A current list of Informatica trademarks is available on the web at https://www.informatica.com/trademarks.html. Other company and product names may be trade names or trademarks of their respective owners.
U.S. GOVERNMENT RIGHTS Programs, software, databases, and related documentation and technical data delivered to U.S. Government customers are "commercial computer software" or "commercial technical data" pursuant to the applicable Federal Acquisition Regulation and agency-specific supplemental regulations. As such, the use, duplication, disclosure, modification, and adaptation is subject to the restrictions and license terms set forth in the applicable Government contract, and, to the extent applicable by the terms of the Government contract, the additional rights set forth in FAR 52.227-19, Commercial Computer Software License.
Portions of this software and/or documentation are subject to copyright held by third parties. Required third party notices are included with the product.
The information in this documentation is subject to change without notice. If you find any problems in this documentation, report them to us at [email protected].
Informatica products are warranted according to the terms and conditions of the agreements under which they are provided. INFORMATICA PROVIDES THE INFORMATION IN THIS DOCUMENT "AS IS" WITHOUT WARRANTY OF ANY KIND, EXPRESS OR IMPLIED, INCLUDING WITHOUT ANY WARRANTIES OF MERCHANTABILITY, FITNESS FOR A PARTICULAR PURPOSE AND ANY WARRANTY OR CONDITION OF NON-INFRINGEMENT.
Publication Date: 2020-04-02
Table of Contents
Preface . . . . . . . . . . . . . . . . . . . . . . . . . . . . . . . . . . . . . . . . . . . . . . . . . . . . . . . . . . . . . . . . . . . . . . 5Object Missing. . . . . . . . . . . . . . . . . . . . . . . . . . . . . . . . . . . . . . . . . . . . . . . . . . . . . . . . 5
Informatica Network. . . . . . . . . . . . . . . . . . . . . . . . . . . . . . . . . . . . . . . . . . . . . . . . . 5
Informatica Knowledge Base. . . . . . . . . . . . . . . . . . . . . . . . . . . . . . . . . . . . . . . . . . . . 5
Informatica Documentation. . . . . . . . . . . . . . . . . . . . . . . . . . . . . . . . . . . . . . . . . . . . . 5
Informatica Product Availability Matrices. . . . . . . . . . . . . . . . . . . . . . . . . . . . . . . . . . . . 6
Informatica Velocity. . . . . . . . . . . . . . . . . . . . . . . . . . . . . . . . . . . . . . . . . . . . . . . . . . 6
Informatica Marketplace. . . . . . . . . . . . . . . . . . . . . . . . . . . . . . . . . . . . . . . . . . . . . . . 6
Informatica Global Customer Support. . . . . . . . . . . . . . . . . . . . . . . . . . . . . . . . . . . . . . 6
Chapter 1: Introduction to PowerExchange for Snowflake. . . . . . . . . . . . . . . . . . . . . 7PowerExchange for Snowflake Overview. . . . . . . . . . . . . . . . . . . . . . . . . . . . . . . . . . . . . . . . 7
Introduction to Snowflake. . . . . . . . . . . . . . . . . . . . . . . . . . . . . . . . . . . . . . . . . . . . . . . . . 7
Chapter 2: PowerExchange for Snowflake Configuration. . . . . . . . . . . . . . . . . . . . . . 9PowerExchange for Snowflake Configuration Overview. . . . . . . . . . . . . . . . . . . . . . . . . . . . . . 9
Prerequisites . . . . . . . . . . . . . . . . . . . . . . . . . . . . . . . . . . . . . . . . . . . . . . . . . . . . . . . . . 9
Registering the PowerExchange for Snowflake Plug-in . . . . . . . . . . . . . . . . . . . . . . . . . . . . . . 10
Registering the Plug-in from the Administrator Tool. . . . . . . . . . . . . . . . . . . . . . . . . . . . . 10
Registering the Plug-in from the Command Line Interface . . . . . . . . . . . . . . . . . . . . . . . . 10
Java Heap Memory Configuration. . . . . . . . . . . . . . . . . . . . . . . . . . . . . . . . . . . . . . . . . . . 11
Configuring HTTP Proxy Options. . . . . . . . . . . . . . . . . . . . . . . . . . . . . . . . . . . . . . . . . . . . 11
Configuring HTTP Proxy Options for the PowerCenter Client. . . . . . . . . . . . . . . . . . . . . . . 11
Configuring HTTP Proxy Options for the PowerCenter Integration Service. . . . . . . . . . . . . . . 12
Chapter 3: Snowflake Sources and Targets. . . . . . . . . . . . . . . . . . . . . . . . . . . . . . . . . . 13Snowflake Sources and Targets Overview. . . . . . . . . . . . . . . . . . . . . . . . . . . . . . . . . . . . . . 13
Import Snowflake Source and Target Definitions. . . . . . . . . . . . . . . . . . . . . . . . . . . . . . . . . . 13
Configure a Snowflake Source Definition Using a Custom SQL Query . . . . . . . . . . . . . . . . . . . . 16
Defining Primary Keys for Target Tables . . . . . . . . . . . . . . . . . . . . . . . . . . . . . . . . . . . . . . . 18
Chapter 4: Snowflake Mappings. . . . . . . . . . . . . . . . . . . . . . . . . . . . . . . . . . . . . . . . . . . . . 20Snowflake Mappings Overview. . . . . . . . . . . . . . . . . . . . . . . . . . . . . . . . . . . . . . . . . . . . . 20
Source Filter. . . . . . . . . . . . . . . . . . . . . . . . . . . . . . . . . . . . . . . . . . . . . . . . . . . . . . 20
Source Join. . . . . . . . . . . . . . . . . . . . . . . . . . . . . . . . . . . . . . . . . . . . . . . . . . . . . . 22
Rules and Guidelines for Configuring a Filter and Join. . . . . . . . . . . . . . . . . . . . . . . . . . . 25
Snowflake Mapping Example. . . . . . . . . . . . . . . . . . . . . . . . . . . . . . . . . . . . . . . . . . . . . . 26
Chapter 5: Snowflake Sessions. . . . . . . . . . . . . . . . . . . . . . . . . . . . . . . . . . . . . . . . . . . . . . 28Snowflake Sessions Overview. . . . . . . . . . . . . . . . . . . . . . . . . . . . . . . . . . . . . . . . . . . . . . 28
Table of Contents 3
Snowflake Connection Properties. . . . . . . . . . . . . . . . . . . . . . . . . . . . . . . . . . . . . . . . . . . 28
Configuring a Snowflake Connection. . . . . . . . . . . . . . . . . . . . . . . . . . . . . . . . . . . . . . 29
Configure Snowflake Source Session Properties. . . . . . . . . . . . . . . . . . . . . . . . . . . . . . . . . . 30
Filter Override. . . . . . . . . . . . . . . . . . . . . . . . . . . . . . . . . . . . . . . . . . . . . . . . . . . . . 30
Configure Snowflake Target Session Properties. . . . . . . . . . . . . . . . . . . . . . . . . . . . . . . . . . 31
Parameterizable Session Properties. . . . . . . . . . . . . . . . . . . . . . . . . . . . . . . . . . . . . . . . . . 33
Lookups. . . . . . . . . . . . . . . . . . . . . . . . . . . . . . . . . . . . . . . . . . . . . . . . . . . . . . . . . . . 33
Pipeline Lookups. . . . . . . . . . . . . . . . . . . . . . . . . . . . . . . . . . . . . . . . . . . . . . . . . . . 33
Unconnected Lookups. . . . . . . . . . . . . . . . . . . . . . . . . . . . . . . . . . . . . . . . . . . . . . . 34
Example Scenario of a Pipeline Lookup Transformation in a Mapping. . . . . . . . . . . . . . . . . 34
Update Strategy Transformation. . . . . . . . . . . . . . . . . . . . . . . . . . . . . . . . . . . . . . . . . . . . 34
Configuring an Update Strategy Transformation. . . . . . . . . . . . . . . . . . . . . . . . . . . . . . . 36
Partitioning. . . . . . . . . . . . . . . . . . . . . . . . . . . . . . . . . . . . . . . . . . . . . . . . . . . . . . . . . 37
Applying Filter Override Conditions for Partitions. . . . . . . . . . . . . . . . . . . . . . . . . . . . . . 37
Applying SQL Override Conditions for Partitions. . . . . . . . . . . . . . . . . . . . . . . . . . . . . . . 40
Rules and Guidelines for Snowflake Sessions. . . . . . . . . . . . . . . . . . . . . . . . . . . . . . . . . . . . 43
Chapter 6: Snowflake Pushdown Optimization. . . . . . . . . . . . . . . . . . . . . . . . . . . . . . . 44Snowflake Pushdown Optimization Overview. . . . . . . . . . . . . . . . . . . . . . . . . . . . . . . . . . . . 44
Pushdown Optimization Functions. . . . . . . . . . . . . . . . . . . . . . . . . . . . . . . . . . . . . . . . . . . 44
Pushdown Optimization Operators. . . . . . . . . . . . . . . . . . . . . . . . . . . . . . . . . . . . . . . . . . . 46
Pushdown Optimization Transformations. . . . . . . . . . . . . . . . . . . . . . . . . . . . . . . . . . . . . . 46
Add the EXTODBC.DLL Entry. . . . . . . . . . . . . . . . . . . . . . . . . . . . . . . . . . . . . . . . . . . . . . . 47
Configuring the Snowflake ODBC Driver. . . . . . . . . . . . . . . . . . . . . . . . . . . . . . . . . . . . . . . 47
Configuring the Snowflake ODBC Driver on Windows. . . . . . . . . . . . . . . . . . . . . . . . . . . . 47
Configuring a Snowflake ODBC Driver on Linux. . . . . . . . . . . . . . . . . . . . . . . . . . . . . . . . 50
Pushdown Optimization Configuration Tasks. . . . . . . . . . . . . . . . . . . . . . . . . . . . . . . . . 51
Rules and Guidelines for Functions in Pushdown Optimization. . . . . . . . . . . . . . . . . . . . . . . . . 54
Appendix A: Snowflake Data Type Reference. . . . . . . . . . . . . . . . . . . . . . . . . . . . . . . . 56Data Type Reference Overview. . . . . . . . . . . . . . . . . . . . . . . . . . . . . . . . . . . . . . . . . . . . . 56
Snowflake and Transformation Data Types. . . . . . . . . . . . . . . . . . . . . . . . . . . . . . . . . . . . . 56
Index. . . . . . . . . . . . . . . . . . . . . . . . . . . . . . . . . . . . . . . . . . . . . . . . . . . . . . . . . . . . 58
4 Table of Contents
PrefaceThe Informatica PowerExchange for Snowflake User Guide for PowerCenter provides information about extracting data from and loading data to Snowflake. This guide is written for database administrators and developers who are responsible for developing mappings, sessions, and workflows that extract data from and load data to Snowflake. This guide assumes you have knowledge of Snowflake and PowerCenter.
Object MissingThis object is not available in the repository.
Informatica NetworkThe Informatica Network is the gateway to many resources, including the Informatica Knowledge Base and Informatica Global Customer Support. To enter the Informatica Network, visit https://network.informatica.com.
As an Informatica Network member, you have the following options:
• Search the Knowledge Base for product resources.
• View product availability information.
• Create and review your support cases.
• Find your local Informatica User Group Network and collaborate with your peers.
Informatica Knowledge BaseUse the Informatica Knowledge Base to find product resources such as how-to articles, best practices, video tutorials, and answers to frequently asked questions.
To search the Knowledge Base, visit https://search.informatica.com. If you have questions, comments, or ideas about the Knowledge Base, contact the Informatica Knowledge Base team at [email protected].
Informatica DocumentationUse the Informatica Documentation Portal to explore an extensive library of documentation for current and recent product releases. To explore the Documentation Portal, visit https://docs.informatica.com.
Informatica maintains documentation for many products on the Informatica Knowledge Base in addition to the Documentation Portal. If you cannot find documentation for your product or product version on the Documentation Portal, search the Knowledge Base at https://search.informatica.com.
5
If you have questions, comments, or ideas about the product documentation, contact the Informatica Documentation team at [email protected].
Informatica Product Availability MatricesProduct Availability Matrices (PAMs) indicate the versions of the operating systems, databases, and types of data sources and targets that a product release supports. You can browse the Informatica PAMs at https://network.informatica.com/community/informatica-network/product-availability-matrices.
Informatica VelocityInformatica Velocity is a collection of tips and best practices developed by Informatica Professional Services and based on real-world experiences from hundreds of data management projects. Informatica Velocity represents the collective knowledge of Informatica consultants who work with organizations around the world to plan, develop, deploy, and maintain successful data management solutions.
You can find Informatica Velocity resources at http://velocity.informatica.com. If you have questions, comments, or ideas about Informatica Velocity, contact Informatica Professional Services at [email protected].
Informatica MarketplaceThe Informatica Marketplace is a forum where you can find solutions that extend and enhance your Informatica implementations. Leverage any of the hundreds of solutions from Informatica developers and partners on the Marketplace to improve your productivity and speed up time to implementation on your projects. You can find the Informatica Marketplace at https://marketplace.informatica.com.
Informatica Global Customer SupportYou can contact a Global Support Center by telephone or through the Informatica Network.
To find your local Informatica Global Customer Support telephone number, visit the Informatica website at the following link: https://www.informatica.com/services-and-training/customer-success-services/contact-us.html.
To find online support resources on the Informatica Network, visit https://network.informatica.com and select the eSupport option.
6 Preface
C h a p t e r 1
Introduction to PowerExchange for Snowflake
This chapter includes the following topics:
• PowerExchange for Snowflake Overview, 7
• Introduction to Snowflake, 7
PowerExchange for Snowflake OverviewYou can use PowerExchange for Snowflake to extract data from and load data to Snowflake.
You can extract data from other applications, databases, and flat files, and use PowerExchange for Snowflake to load the data to Snowflake. You can also read data from and write data to Snowflake that is enabled for staging data in Azure or Amazon.
You can import Snowflake objects as sources and targets to create mappings, and run a session to extract data from or load data to Snowflake. When you use Snowflake objects in mappings, you must configure properties specific to Snowflake.
Example
An enterprise application uses an Oracle database to store the product transaction details such as transactionID, customerID, productID, quantity, and order date. You need to analyze the completed transactions, pending transactions, and availability of stock. Use PowerExchange for Snowflake to create a mapping to extract all the transaction records from the Oracle source and load the records to a Snowflake target for data analysis.
Introduction to SnowflakeSnowflake is a cloud data warehouse service that organizations can use to store and analyze data.
Snowflake is a Software-as-a-Service (SaaS) application that uses an SQL database engine with an architecture designed for the cloud.
7
The Snowflake architecture comprises the following three layers, which sets Snowflake apart from other data warehouses with its additional functionalities and capabilities:
• Database Storage. When you load data to Snowflake, Snowflake reorganizes and stores the data in the Snowflake database. You can access the data stored in the Snowflake database through SQL query operations.
• Query Processing. Snowflake processes all queries in the query processing layer. The processing layer contains all the compute resources that Snowflake needs to run queries. For example, Snowflake uses CPU, memory, and temporary storage to run queries.
• Cloud Services. The cloud services layer contains all the different components that Snowflake needs to process the user requests. For example, Snowflake uses authentication, infrastructure management, and access control services to process user requests.
8 Chapter 1: Introduction to PowerExchange for Snowflake
C h a p t e r 2
PowerExchange for Snowflake Configuration
This chapter includes the following topics:
• PowerExchange for Snowflake Configuration Overview, 9
• Prerequisites , 9
• Registering the PowerExchange for Snowflake Plug-in , 10
• Java Heap Memory Configuration, 11
• Configuring HTTP Proxy Options, 11
PowerExchange for Snowflake Configuration Overview
PowerExchange for Snowflake installs with PowerCenter. After you install or upgrade Informatica Services, you must register the PowerExchange for Snowflake plug-in with the PowerCenter repository.
PrerequisitesBefore you use PowerExchange for Snowflake, perform the following tasks:
• Install or upgrade PowerCenter.
• Verify that you have read and write permissions on the following directories on each machine that runs the PowerCenter Integration Service and PowerCenter Repository Service:
- <Informatica installation directory>\server\connectors\cci\plugins- <Informatica installation directory>\server\bin\Plugin- <Informatica installation directory>\connectors\thirdparty
• Verify that you have read and write permissions on the following directories on each machine where you installed the PowerCenter Client:
- <Informatica installation directory>\clients\PowerCenterClient- <Informatica installation directory>\clients\PowerCenterClient\bin\Help\<language>
9

For more information about product requirements and supported platforms, see the Product Availability Matrix on Informatica Network: https://network.informatica.com/community/informatica-network/product-availability-matrices.
Registering the PowerExchange for Snowflake Plug-in
After you complete the installation, register the PowerExchange for Snowflake plug-in with the repository.
To register the plug-in, the repository must be running in exclusive mode. Use the Administrator tool or the pmrep RegisterPlugin command line program to register the plug-in. If you do not have the correct privileges to register the plug-in, contact the user who manages the PowerCenter Repository Service.
The plug-in file is an .xml file that defines the functionality of the adapter. When you install the server component, the installer copies the plug-in file to the following directory:
<Informatica installation directory>/server/bin/PluginThe name of the plug-in file for PowerExchange for Snowflake is SnowflakeCloudDataWarehousePlugin.xml.
Registering the Plug-in from the Administrator ToolRegister a repository plug-in to add its functionality to the repository.
1. Run the PowerCenter Repository Service in exclusive mode.
2. In the Navigator, select the PowerCenter Repository Service to which you want to add the plug-in.
3. In the Contents panel, click the Plug-ins view.
4. In the Actions menu of the Domain tab, select Register Plug-in.
5. On the Register Plugin page, click the Browse button to locate the plug-in file.
6. Enter your user name and password.
7. Click OK.
The PowerCenter Repository Service registers the plug-in with the repository. The results of the registration operation appear in the activity log.
8. Run the PowerCenter Repository Service in normal mode.
Registering the Plug-in from the Command Line InterfaceYou can use the pmrep RegisterPlugin command to register the plug-in from the command line interface.
1. Run the PowerCenter Repository Service in exclusive mode.
2. Run the pmrep Connect command to connect to the Repository Service with a user account that has the Administrator Repository privilege.
The RegisterPlugin command uses the following syntax:
pmrep connect -r <repository name> -d <domain_name> -n <domain user name> -x<domain_password>
3. Find <adaptername>.xml in the following directory:
<Informatica installation directory>\server\bin\Plugin
10 Chapter 2: PowerExchange for Snowflake Configuration
4. Run the pmrep RegisterPlugin command to update the repository.
The RegisterPlugin command uses the following syntax:
pmrep registerplugin -i <Informatica installation directory\server\bin\Plugin\SnowflakeCloudDataWarehousePlugin.xml –e
Java Heap Memory ConfigurationFor the Snowflake session to successfully perform the read or write operation, configure the memory for the Java heap size in the node that runs the PowerCenter Integration Service.
To configure the Java heap size, perform the following steps:
1. In the Administrator Console, navigate to the PowerCenter Integration Service for which you want to change the Java heap size.
2. Click the Processes tab.
3. Click Custom Properties. The Edit Custom Properties dialog box appears.
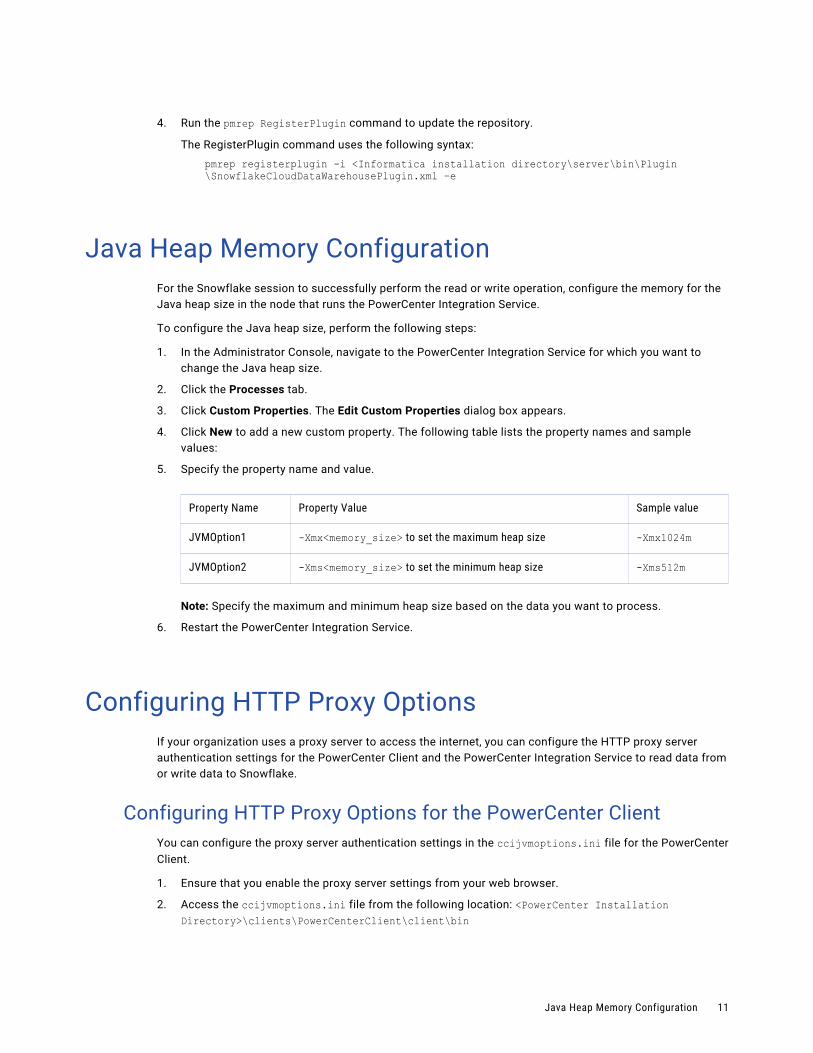
4. Click New to add a new custom property. The following table lists the property names and sample values:
5. Specify the property name and value.
Property Name Property Value Sample value
JVMOption1 -Xmx<memory_size> to set the maximum heap size -Xmx1024m
JVMOption2 -Xms<memory_size> to set the minimum heap size -Xms512m
Note: Specify the maximum and minimum heap size based on the data you want to process.
6. Restart the PowerCenter Integration Service.
Configuring HTTP Proxy OptionsIf your organization uses a proxy server to access the internet, you can configure the HTTP proxy server authentication settings for the PowerCenter Client and the PowerCenter Integration Service to read data from or write data to Snowflake.
Configuring HTTP Proxy Options for the PowerCenter ClientYou can configure the proxy server authentication settings in the ccijvmoptions.ini file for the PowerCenter Client.
1. Ensure that you enable the proxy server settings from your web browser.
2. Access the ccijvmoptions.ini file from the following location: <PowerCenter Installation Directory>\clients\PowerCenterClient\client\bin
Java Heap Memory Configuration 11
3. Add the following properties to the ccijvmoptions.ini file:
-Dhttp.useProxy=true-Dhttps.proxyHost=<Host name of the HTTPS proxy server> -Dhttp.proxyHost=<Host name of the HTTP proxy server> -Dhttps.proxyPort=<Port number of the HTTPS proxy server>-Dhttp.proxyPort=<Port number of the HTTP proxy server>
4. Restart the PowerCenter Client.
Configuring HTTP Proxy Options for the PowerCenter Integration Service
You can configure the proxy server authentication settings for the PowerCenter Integration Service from the Administrator Console.
1. Ensure that you enable the proxy server settings from your web browser.
2. In the Administrator Console, navigate to the PowerCenter Integration Service for which you want to set the proxy server settings and then add the following JVM options in the custom properties section:
JVMOption1=-Dhttp.useProxy=trueJVMOption2=-Dhttps.proxyHost=<Host name of the HTTP proxy server>JVMOption3=-Dhttps.proxyPort=<Port number of the HTTP proxy server>
3. Restart the PowerCenter Integration Service.
For more information about the proxy settings configuration for the JDBC driver, see https://docs.snowflake.net/manuals/user-guide/jdbc-configure.html#connecting-using-a-proxy-server
12 Chapter 2: PowerExchange for Snowflake Configuration
C h a p t e r 3
Snowflake Sources and TargetsThis chapter includes the following topics:
• Snowflake Sources and Targets Overview, 13
• Import Snowflake Source and Target Definitions, 13
• Configure a Snowflake Source Definition Using a Custom SQL Query , 16
• Defining Primary Keys for Target Tables , 18
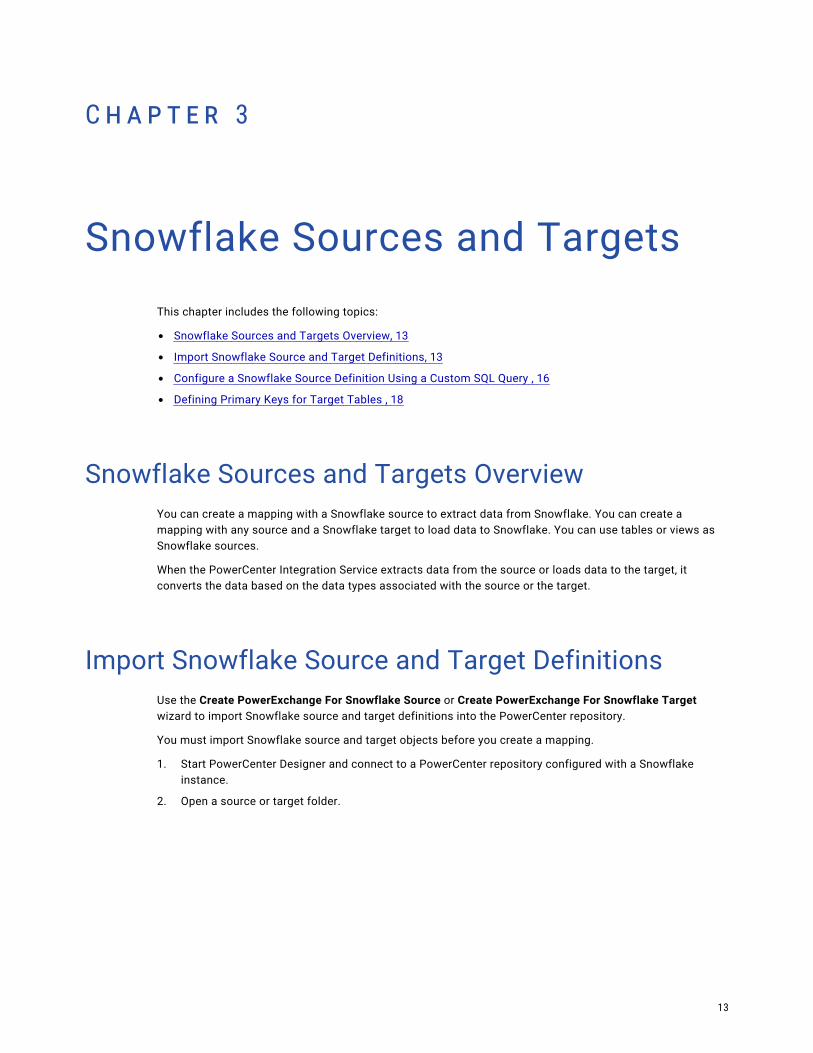
Snowflake Sources and Targets OverviewYou can create a mapping with a Snowflake source to extract data from Snowflake. You can create a mapping with any source and a Snowflake target to load data to Snowflake. You can use tables or views as Snowflake sources.
When the PowerCenter Integration Service extracts data from the source or loads data to the target, it converts the data based on the data types associated with the source or the target.
Import Snowflake Source and Target DefinitionsUse the Create PowerExchange For Snowflake Source or Create PowerExchange For Snowflake Target wizard to import Snowflake source and target definitions into the PowerCenter repository.
You must import Snowflake source and target objects before you create a mapping.
1. Start PowerCenter Designer and connect to a PowerCenter repository configured with a Snowflake instance.
2. Open a source or target folder.
13
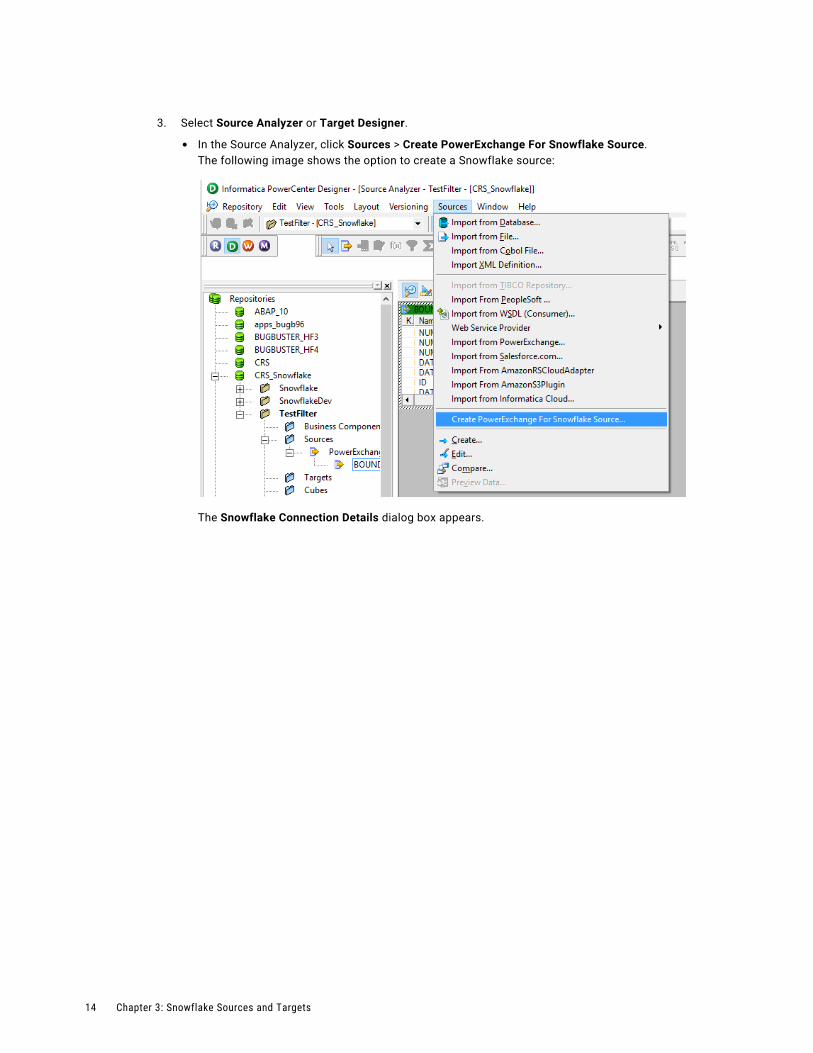
3. Select Source Analyzer or Target Designer.
• In the Source Analyzer, click Sources > Create PowerExchange For Snowflake Source.The following image shows the option to create a Snowflake source:
The Snowflake Connection Details dialog box appears.
14 Chapter 3: Snowflake Sources and Targets
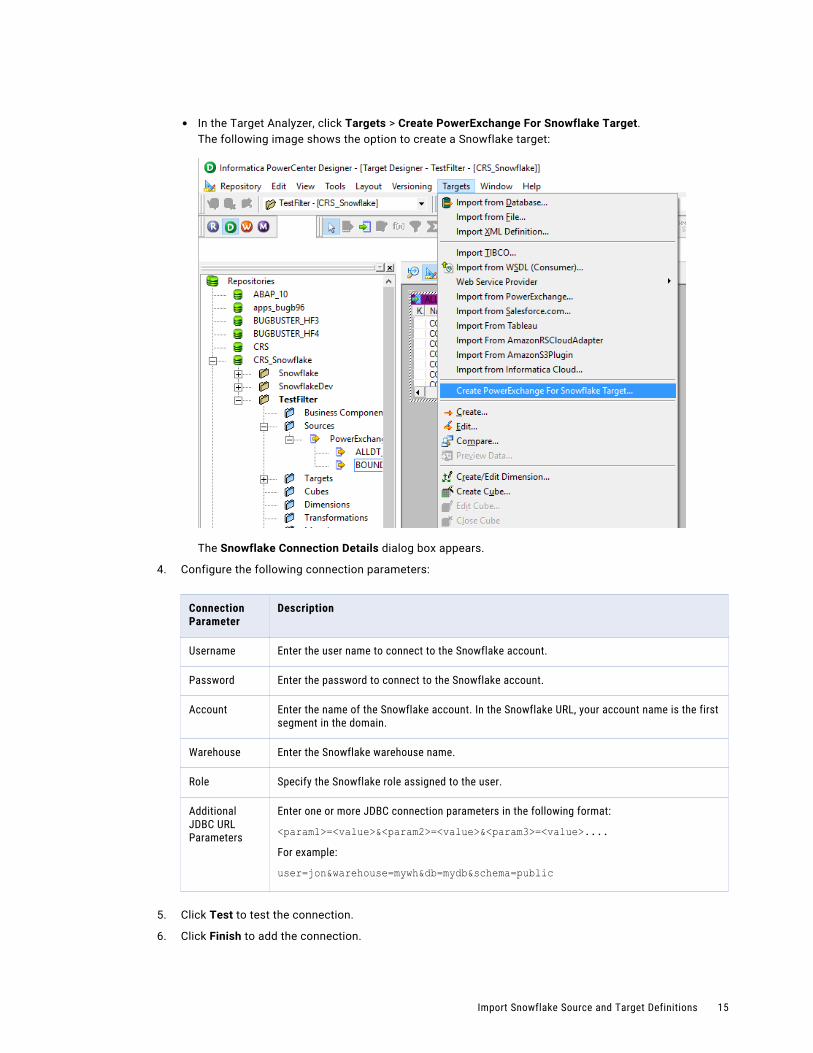
• In the Target Analyzer, click Targets > Create PowerExchange For Snowflake Target.The following image shows the option to create a Snowflake target:
The Snowflake Connection Details dialog box appears.
4. Configure the following connection parameters:
Connection Parameter
Description
Username Enter the user name to connect to the Snowflake account.
Password Enter the password to connect to the Snowflake account.
Account Enter the name of the Snowflake account. In the Snowflake URL, your account name is the first segment in the domain.
Warehouse Enter the Snowflake warehouse name.
Role Specify the Snowflake role assigned to the user.
Additional JDBC URL Parameters
Enter one or more JDBC connection parameters in the following format:
<param1>=<value>&<param2>=<value>&<param3>=<value>....For example:
user=jon&warehouse=mywh&db=mydb&schema=public
5. Click Test to test the connection.
6. Click Finish to add the connection.
Import Snowflake Source and Target Definitions 15
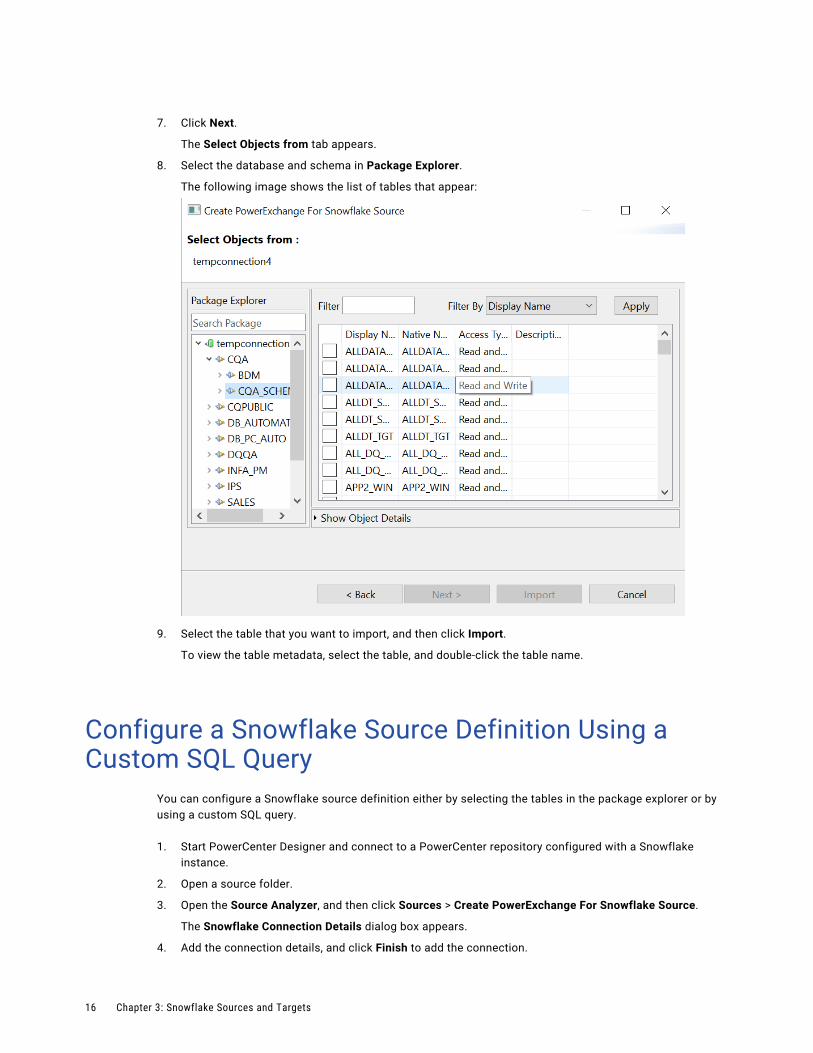
7. Click Next.
The Select Objects from tab appears.
8. Select the database and schema in Package Explorer.
The following image shows the list of tables that appear:
9. Select the table that you want to import, and then click Import.
To view the table metadata, select the table, and double-click the table name.
Configure a Snowflake Source Definition Using a Custom SQL Query
You can configure a Snowflake source definition either by selecting the tables in the package explorer or by using a custom SQL query.
1. Start PowerCenter Designer and connect to a PowerCenter repository configured with a Snowflake instance.
2. Open a source folder.
3. Open the Source Analyzer, and then click Sources > Create PowerExchange For Snowflake Source.
The Snowflake Connection Details dialog box appears.
4. Add the connection details, and click Finish to add the connection.
16 Chapter 3: Snowflake Sources and Targets
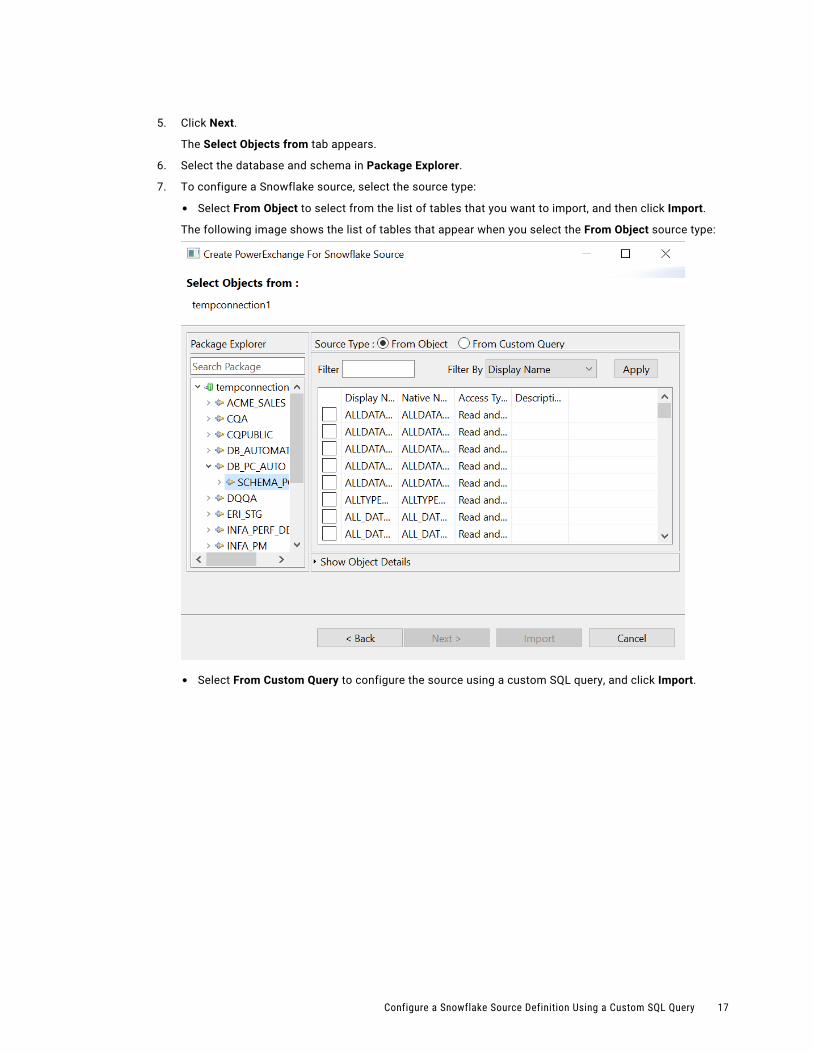
5. Click Next.
The Select Objects from tab appears.
6. Select the database and schema in Package Explorer.
7. To configure a Snowflake source, select the source type:
• Select From Object to select from the list of tables that you want to import, and then click Import.
The following image shows the list of tables that appear when you select the From Object source type:
• Select From Custom Query to configure the source using a custom SQL query, and click Import.
Configure a Snowflake Source Definition Using a Custom SQL Query 17
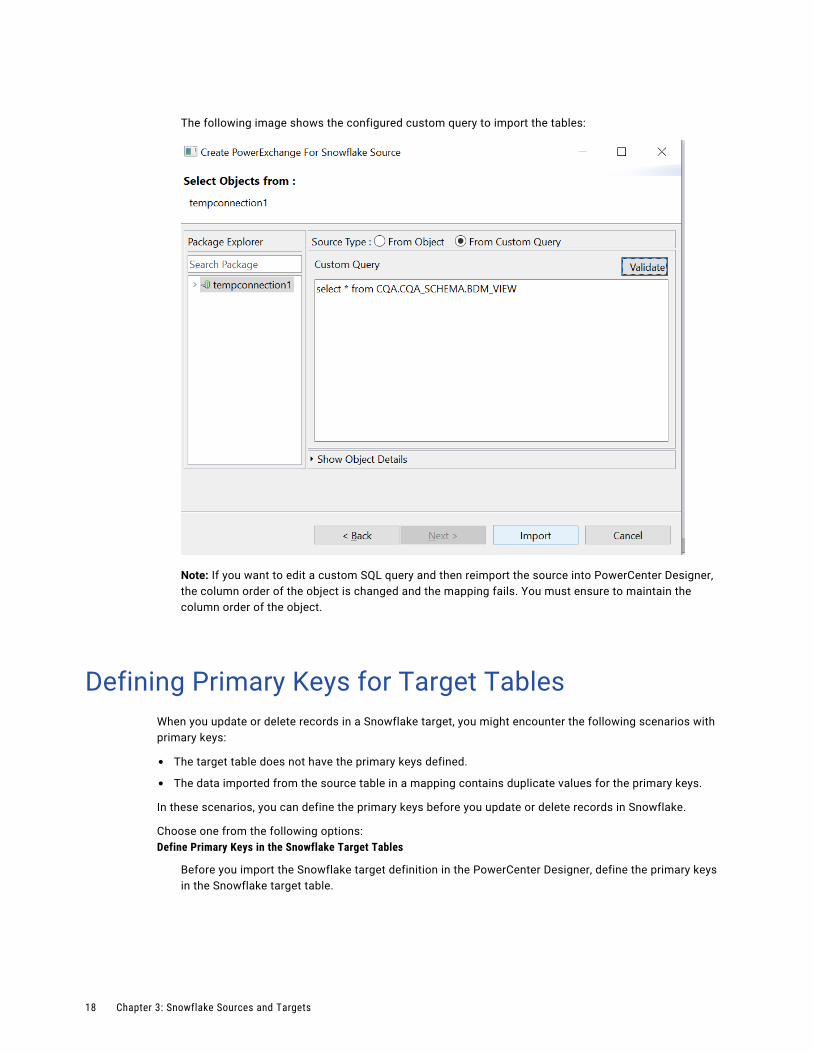
The following image shows the configured custom query to import the tables:
Note: If you want to edit a custom SQL query and then reimport the source into PowerCenter Designer, the column order of the object is changed and the mapping fails. You must ensure to maintain the column order of the object.
Defining Primary Keys for Target TablesWhen you update or delete records in a Snowflake target, you might encounter the following scenarios with primary keys:
• The target table does not have the primary keys defined.
• The data imported from the source table in a mapping contains duplicate values for the primary keys.
In these scenarios, you can define the primary keys before you update or delete records in Snowflake.
Choose one from the following options:Define Primary Keys in the Snowflake Target Tables
Before you import the Snowflake target definition in the PowerCenter Designer, define the primary keys in the Snowflake target table.
18 Chapter 3: Snowflake Sources and Targets
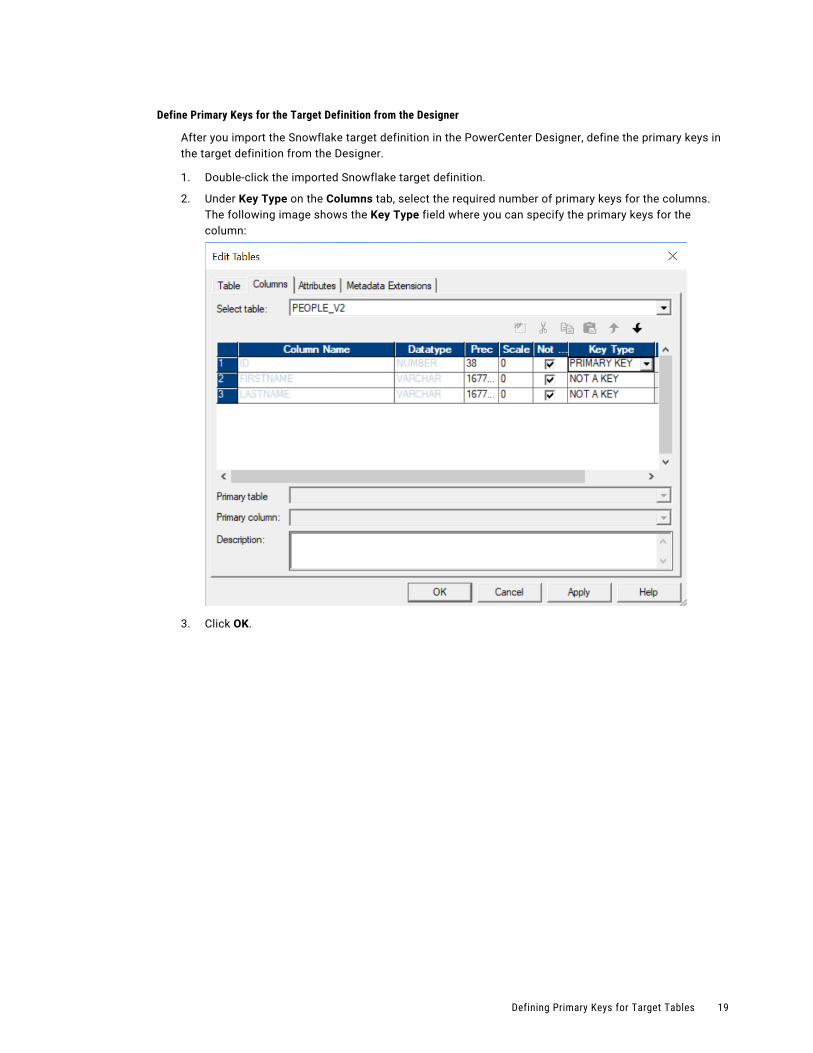
Define Primary Keys for the Target Definition from the Designer
After you import the Snowflake target definition in the PowerCenter Designer, define the primary keys in the target definition from the Designer.
1. Double-click the imported Snowflake target definition.
2. Under Key Type on the Columns tab, select the required number of primary keys for the columns.The following image shows the Key Type field where you can specify the primary keys for the column:
3. Click OK.
Defining Primary Keys for Target Tables 19
C h a p t e r 4
Snowflake MappingsThis chapter includes the following topics:
• Snowflake Mappings Overview, 20
• Snowflake Mapping Example, 26
Snowflake Mappings OverviewAfter you import a Snowflake source or target definition into the PowerCenter repository, you can create a mapping to extract data from a Snowflake source or load data to a Snowflake target.
You can extract data from one or more Snowflake sources, and load data to one or more Snowflake targets. You can join multiple Snowflake tables when you specify a join condition.
You can enter a filter condition to reduce the number of source rows the PowerCenter Integration Service returns from Snowflake sources. You can enter a single filter condition or a series of conditions.
Source FilterYou can enter a filter condition to reduce the number of source rows the PowerCenter Integration Service returns from Snowflake sources. You can enter a single filter condition or a series of conditions.
Use the source filter in the Application Source Qualifier to retrieve rows from an entity that meet a condition.
You can provide a source filter to improve the performance when you read from Snowflake.
Note: You cannot apply a filter on Snowflake data of Binary or Time data type.
20
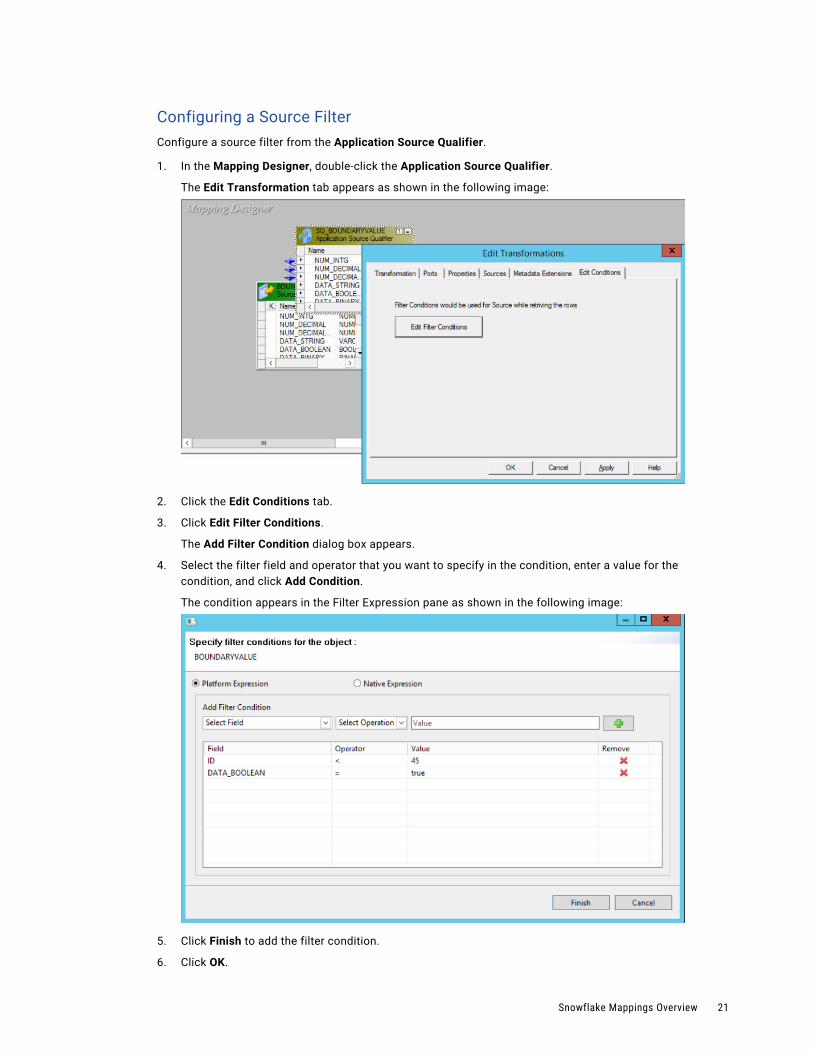
Configuring a Source FilterConfigure a source filter from the Application Source Qualifier.
1. In the Mapping Designer, double-click the Application Source Qualifier.
The Edit Transformation tab appears as shown in the following image:
2. Click the Edit Conditions tab.
3. Click Edit Filter Conditions.
The Add Filter Condition dialog box appears.
4. Select the filter field and operator that you want to specify in the condition, enter a value for the condition, and click Add Condition.
The condition appears in the Filter Expression pane as shown in the following image:
5. Click Finish to add the filter condition.
6. Click OK.
Snowflake Mappings Overview 21
Source JoinYou can enter a join condition to join multiple Snowflake source tables.
Configure the source join from the Application Source Qualifier of the parent table. When you configure the join in the Mapping Designer, retain the source qualifier only of the parent table and then link the fields from the child tables to the parent source qualifier.
Use the Infa Expression or Native Expression type to define the relationship of the tables that you want to join.
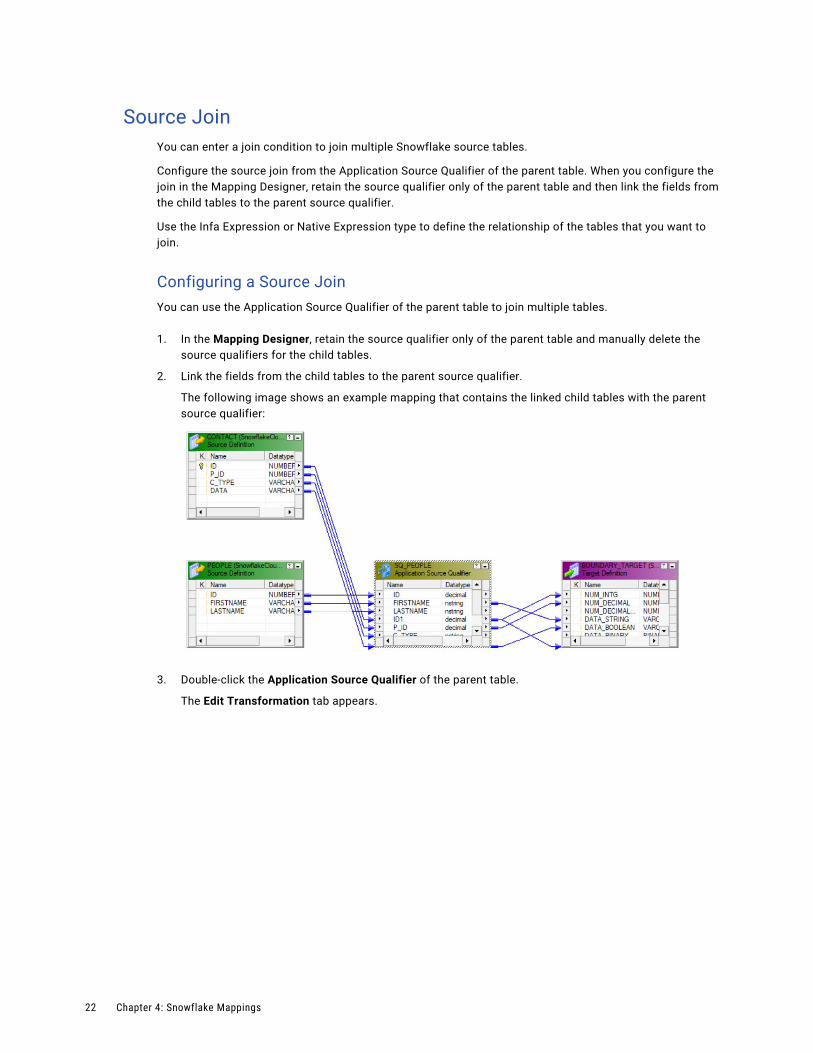
Configuring a Source JoinYou can use the Application Source Qualifier of the parent table to join multiple tables.
1. In the Mapping Designer, retain the source qualifier only of the parent table and manually delete the source qualifiers for the child tables.
2. Link the fields from the child tables to the parent source qualifier.
The following image shows an example mapping that contains the linked child tables with the parent source qualifier:
3. Double-click the Application Source Qualifier of the parent table.
The Edit Transformation tab appears.
22 Chapter 4: Snowflake Mappings
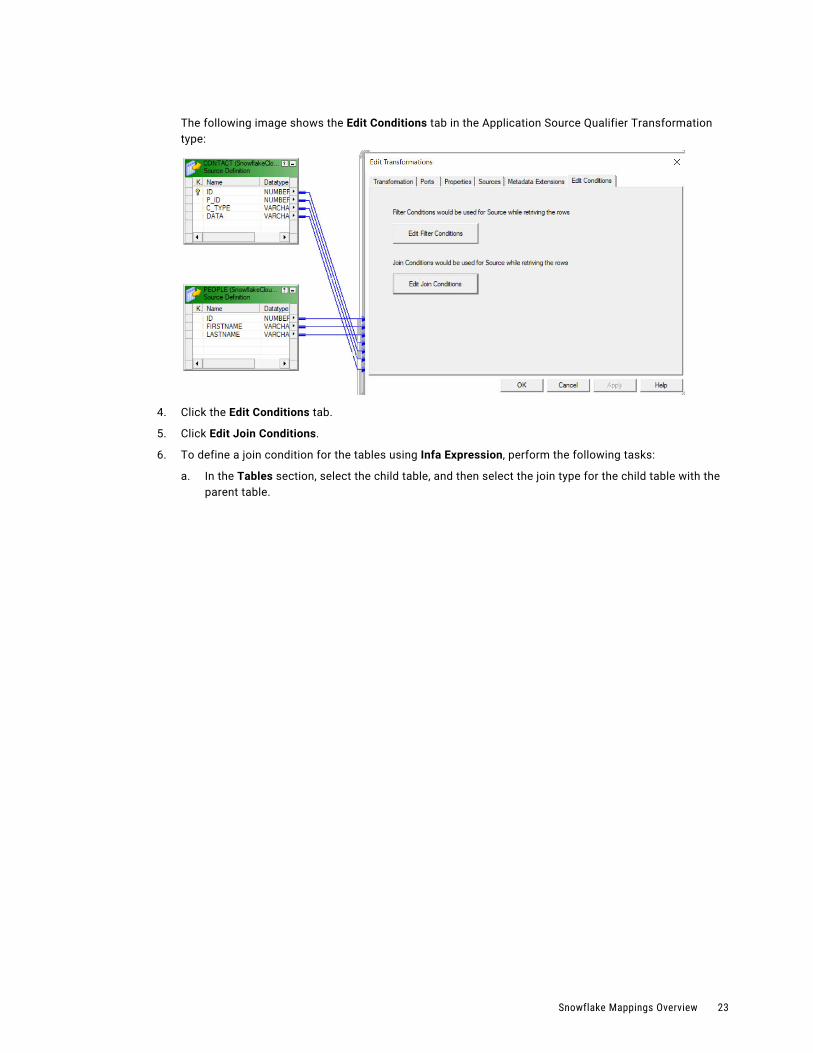
The following image shows the Edit Conditions tab in the Application Source Qualifier Transformation type:
4. Click the Edit Conditions tab.
5. Click Edit Join Conditions.
6. To define a join condition for the tables using Infa Expression, perform the following tasks:
a. In the Tables section, select the child table, and then select the join type for the child table with the parent table.
Snowflake Mappings Overview 23
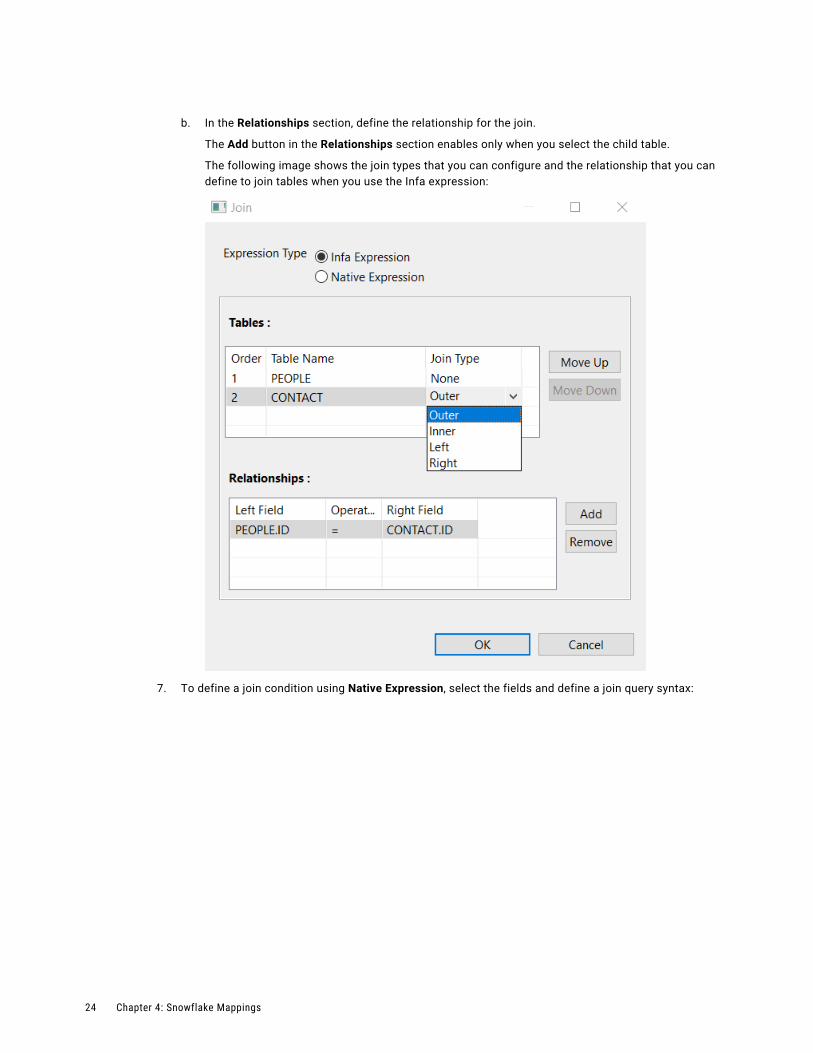
b. In the Relationships section, define the relationship for the join.
The Add button in the Relationships section enables only when you select the child table.
The following image shows the join types that you can configure and the relationship that you can define to join tables when you use the Infa expression:
7. To define a join condition using Native Expression, select the fields and define a join query syntax:
24 Chapter 4: Snowflake Mappings
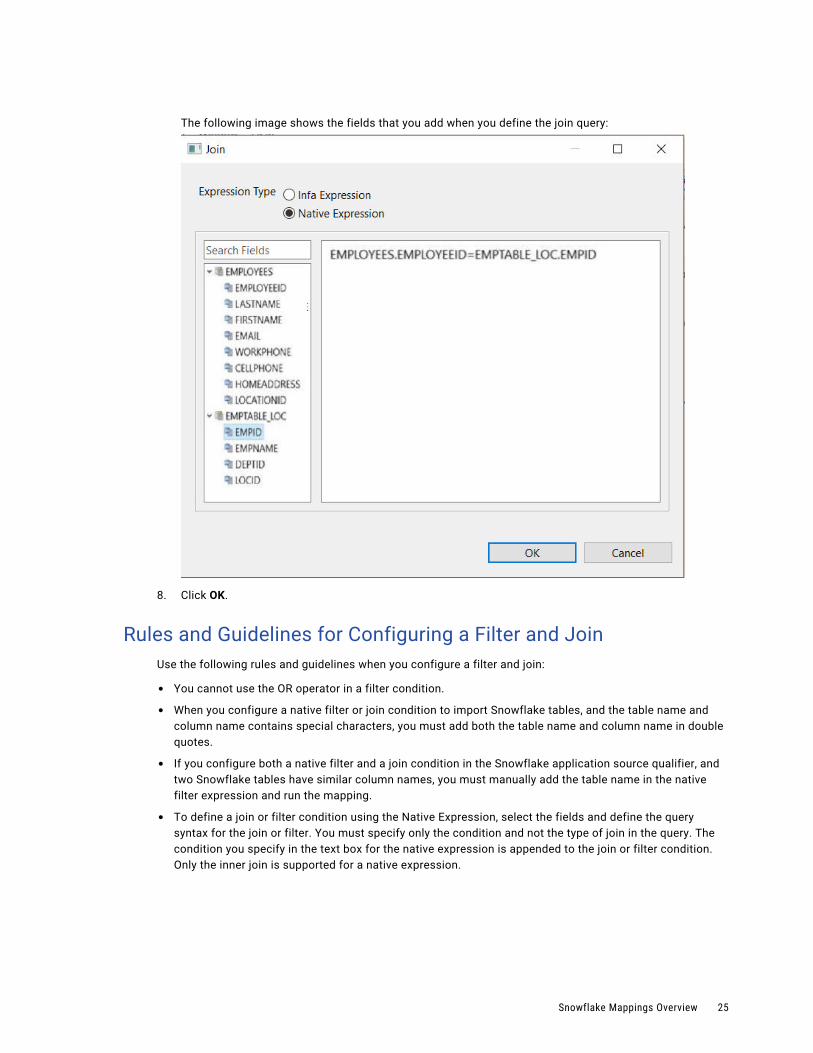
The following image shows the fields that you add when you define the join query:
8. Click OK.
Rules and Guidelines for Configuring a Filter and JoinUse the following rules and guidelines when you configure a filter and join:
• You cannot use the OR operator in a filter condition.
• When you configure a native filter or join condition to import Snowflake tables, and the table name and column name contains special characters, you must add both the table name and column name in double quotes.
• If you configure both a native filter and a join condition in the Snowflake application source qualifier, and two Snowflake tables have similar column names, you must manually add the table name in the native filter expression and run the mapping.
• To define a join or filter condition using the Native Expression, select the fields and define the query syntax for the join or filter. You must specify only the condition and not the type of join in the query. The condition you specify in the text box for the native expression is appended to the join or filter condition. Only the inner join is supported for a native expression.
Snowflake Mappings Overview 25
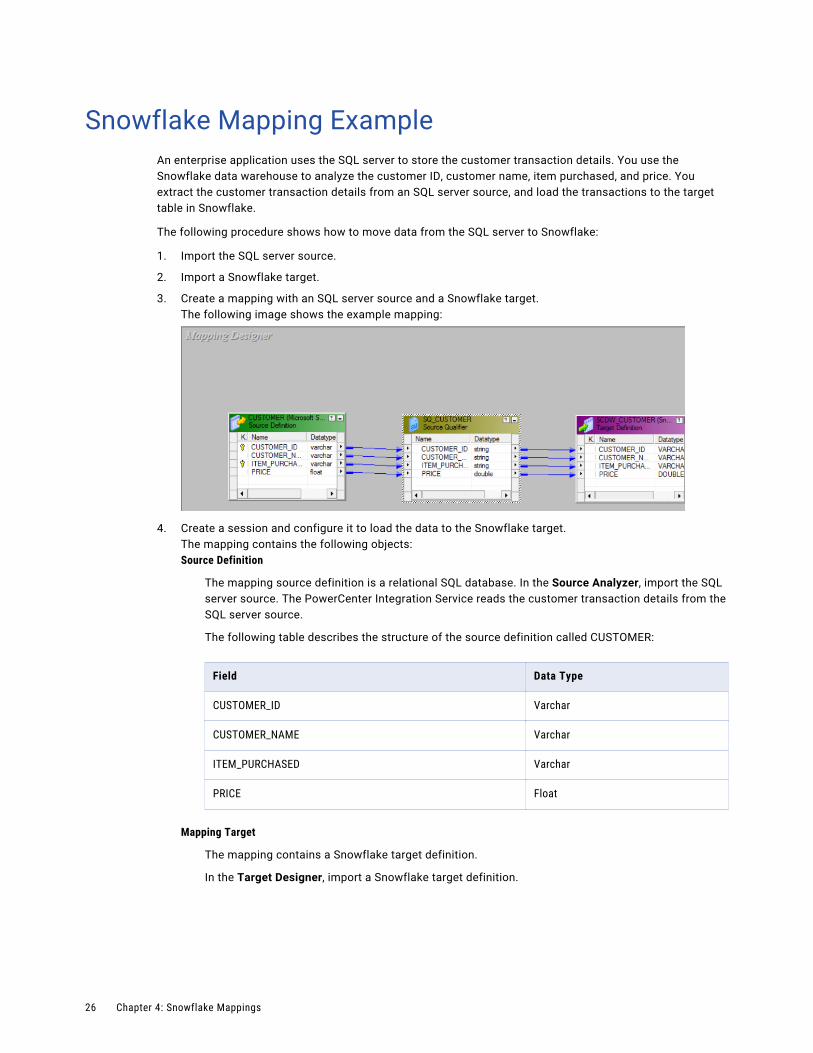
Snowflake Mapping ExampleAn enterprise application uses the SQL server to store the customer transaction details. You use the Snowflake data warehouse to analyze the customer ID, customer name, item purchased, and price. You extract the customer transaction details from an SQL server source, and load the transactions to the target table in Snowflake.
The following procedure shows how to move data from the SQL server to Snowflake:
1. Import the SQL server source.
2. Import a Snowflake target.
3. Create a mapping with an SQL server source and a Snowflake target.The following image shows the example mapping:
4. Create a session and configure it to load the data to the Snowflake target.The mapping contains the following objects:Source Definition
The mapping source definition is a relational SQL database. In the Source Analyzer, import the SQL server source. The PowerCenter Integration Service reads the customer transaction details from the SQL server source.
The following table describes the structure of the source definition called CUSTOMER:
Field Data Type
CUSTOMER_ID Varchar
CUSTOMER_NAME Varchar
ITEM_PURCHASED Varchar
PRICE Float
Mapping Target
The mapping contains a Snowflake target definition.
In the Target Designer, import a Snowflake target definition.
26 Chapter 4: Snowflake Mappings
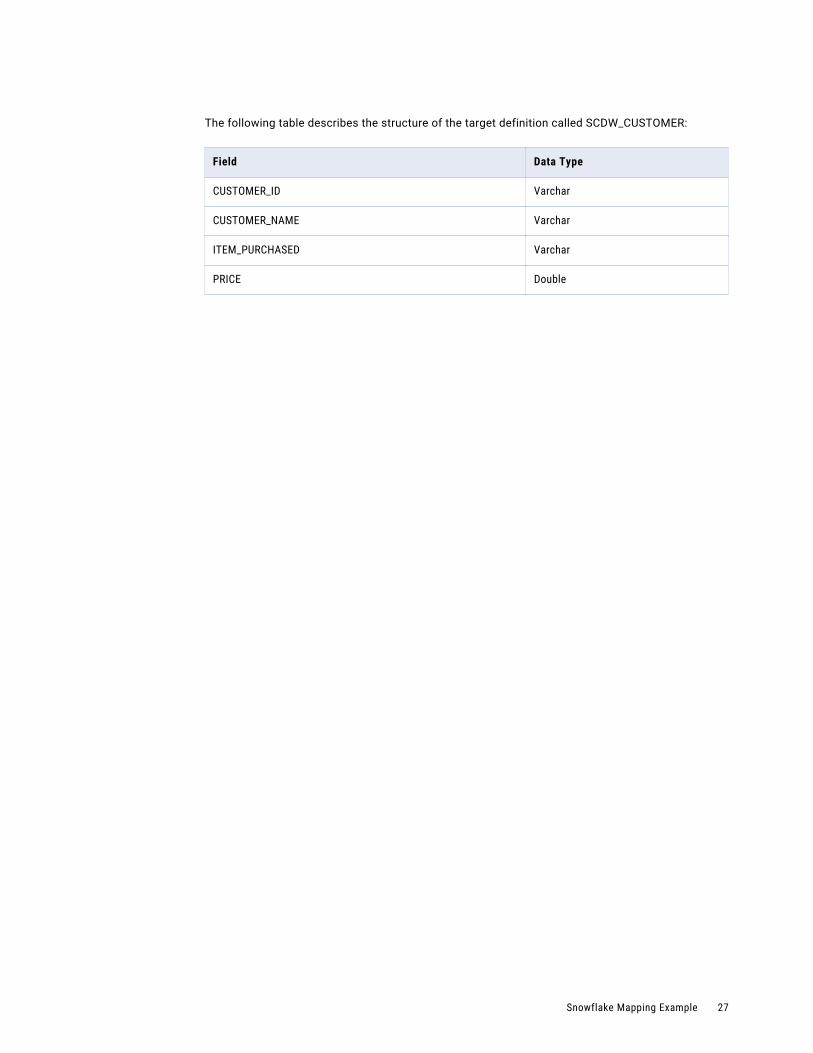
The following table describes the structure of the target definition called SCDW_CUSTOMER:
Field Data Type
CUSTOMER_ID Varchar
CUSTOMER_NAME Varchar
ITEM_PURCHASED Varchar
PRICE Double
Snowflake Mapping Example 27
C h a p t e r 5
Snowflake SessionsThis chapter includes the following topics:
• Snowflake Sessions Overview, 28
• Snowflake Connection Properties, 28
• Configure Snowflake Source Session Properties, 30
• Configure Snowflake Target Session Properties, 31
• Parameterizable Session Properties, 33
• Lookups, 33
• Update Strategy Transformation, 34
• Partitioning, 37
• Rules and Guidelines for Snowflake Sessions, 43
Snowflake Sessions OverviewAfter you create mappings, you can create a session to extract and load data.
You must configure a Snowflake connection in the Workflow Manager to extract data from or load data to a Snowflake table. You can define properties in a session to determine how the PowerCenter Integration Service must extract data from a Snowflake source or load data to a Snowflake target.
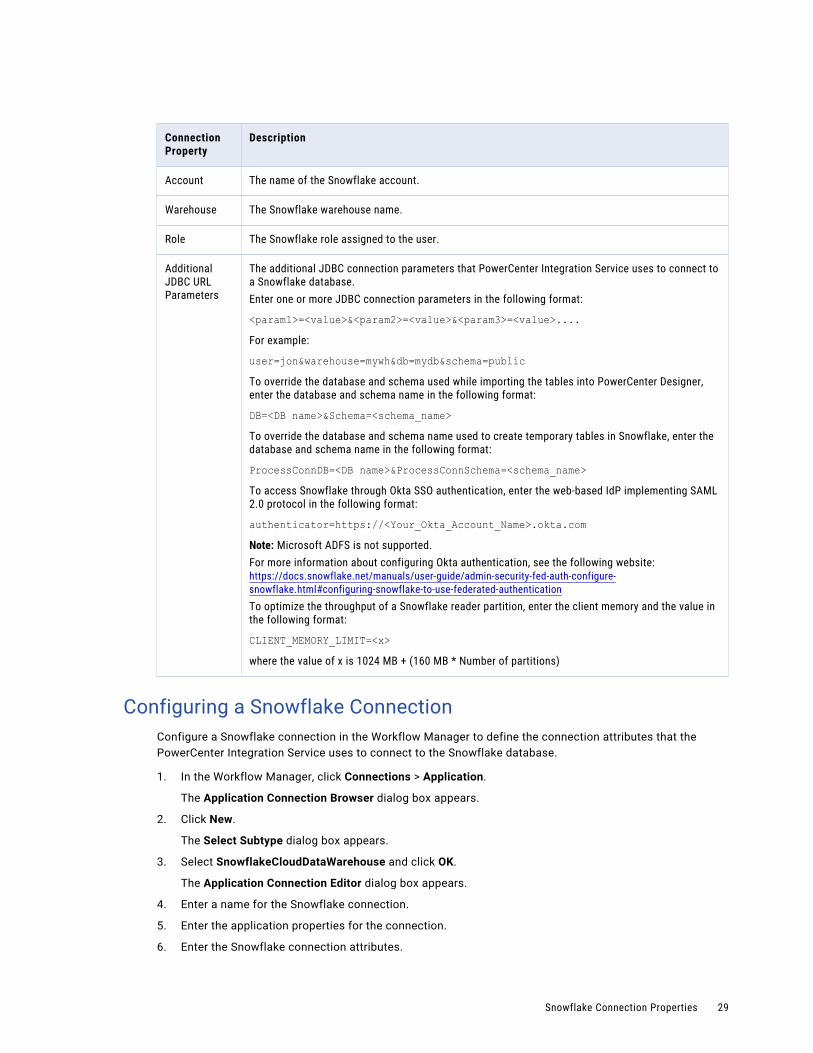
Snowflake Connection PropertiesWhen you configure a Snowflake connection, you define the connection attributes that the PowerCenter Integration Service uses to connect to the Snowflake database.
The following table describes the Snowflake connection properties:
Connection Property
Description
Username The user name to connect to the Snowflake account.
Password The password to connect to the Snowflake account.
28
Connection Property
Description
Account The name of the Snowflake account.
Warehouse The Snowflake warehouse name.
Role The Snowflake role assigned to the user.
Additional JDBC URL Parameters
The additional JDBC connection parameters that PowerCenter Integration Service uses to connect to a Snowflake database.Enter one or more JDBC connection parameters in the following format:
<param1>=<value>&<param2>=<value>&<param3>=<value>....For example:
user=jon&warehouse=mywh&db=mydb&schema=publicTo override the database and schema used while importing the tables into PowerCenter Designer, enter the database and schema name in the following format:
DB=<DB name>&Schema=<schema_name>To override the database and schema name used to create temporary tables in Snowflake, enter the database and schema name in the following format:
ProcessConnDB=<DB name>&ProcessConnSchema=<schema_name>To access Snowflake through Okta SSO authentication, enter the web-based IdP implementing SAML 2.0 protocol in the following format:
authenticator=https://<Your_Okta_Account_Name>.okta.com Note: Microsoft ADFS is not supported.For more information about configuring Okta authentication, see the following website: https://docs.snowflake.net/manuals/user-guide/admin-security-fed-auth-configure-snowflake.html#configuring-snowflake-to-use-federated-authenticationTo optimize the throughput of a Snowflake reader partition, enter the client memory and the value in the following format:
CLIENT_MEMORY_LIMIT=<x>where the value of x is 1024 MB + (160 MB * Number of partitions)
Configuring a Snowflake ConnectionConfigure a Snowflake connection in the Workflow Manager to define the connection attributes that the PowerCenter Integration Service uses to connect to the Snowflake database.
1. In the Workflow Manager, click Connections > Application.
The Application Connection Browser dialog box appears.
2. Click New.
The Select Subtype dialog box appears.
3. Select SnowflakeCloudDataWarehouse and click OK.
The Application Connection Editor dialog box appears.
4. Enter a name for the Snowflake connection.
5. Enter the application properties for the connection.
6. Enter the Snowflake connection attributes.
Snowflake Connection Properties 29
7. Click OK to create a Snowflake connection.
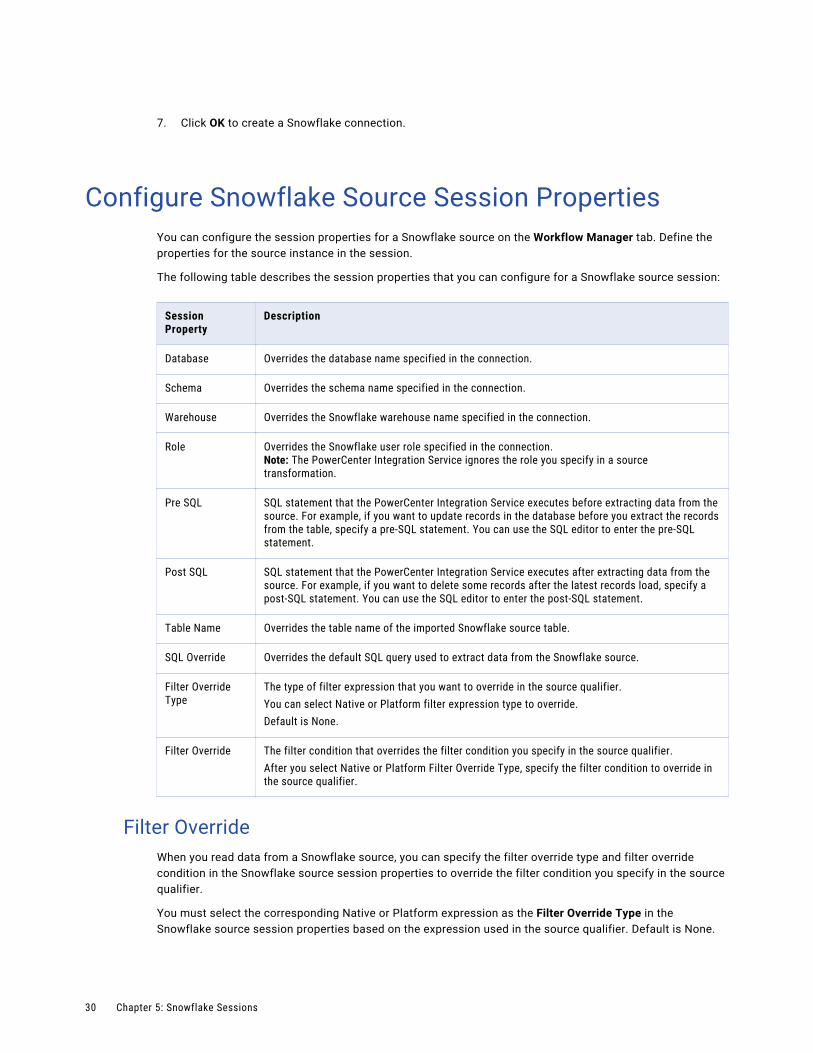
Configure Snowflake Source Session PropertiesYou can configure the session properties for a Snowflake source on the Workflow Manager tab. Define the properties for the source instance in the session.
The following table describes the session properties that you can configure for a Snowflake source session:
Session Property
Description
Database Overrides the database name specified in the connection.
Schema Overrides the schema name specified in the connection.
Warehouse Overrides the Snowflake warehouse name specified in the connection.
Role Overrides the Snowflake user role specified in the connection.Note: The PowerCenter Integration Service ignores the role you specify in a source transformation.
Pre SQL SQL statement that the PowerCenter Integration Service executes before extracting data from the source. For example, if you want to update records in the database before you extract the records from the table, specify a pre-SQL statement. You can use the SQL editor to enter the pre-SQL statement.
Post SQL SQL statement that the PowerCenter Integration Service executes after extracting data from the source. For example, if you want to delete some records after the latest records load, specify a post-SQL statement. You can use the SQL editor to enter the post-SQL statement.
Table Name Overrides the table name of the imported Snowflake source table.
SQL Override Overrides the default SQL query used to extract data from the Snowflake source.
Filter Override Type
The type of filter expression that you want to override in the source qualifier.You can select Native or Platform filter expression type to override.Default is None.
Filter Override The filter condition that overrides the filter condition you specify in the source qualifier.After you select Native or Platform Filter Override Type, specify the filter condition to override in the source qualifier.
Filter OverrideWhen you read data from a Snowflake source, you can specify the filter override type and filter override condition in the Snowflake source session properties to override the filter condition you specify in the source qualifier.
You must select the corresponding Native or Platform expression as the Filter Override Type in the Snowflake source session properties based on the expression used in the source qualifier. Default is None.
30 Chapter 5: Snowflake Sessions
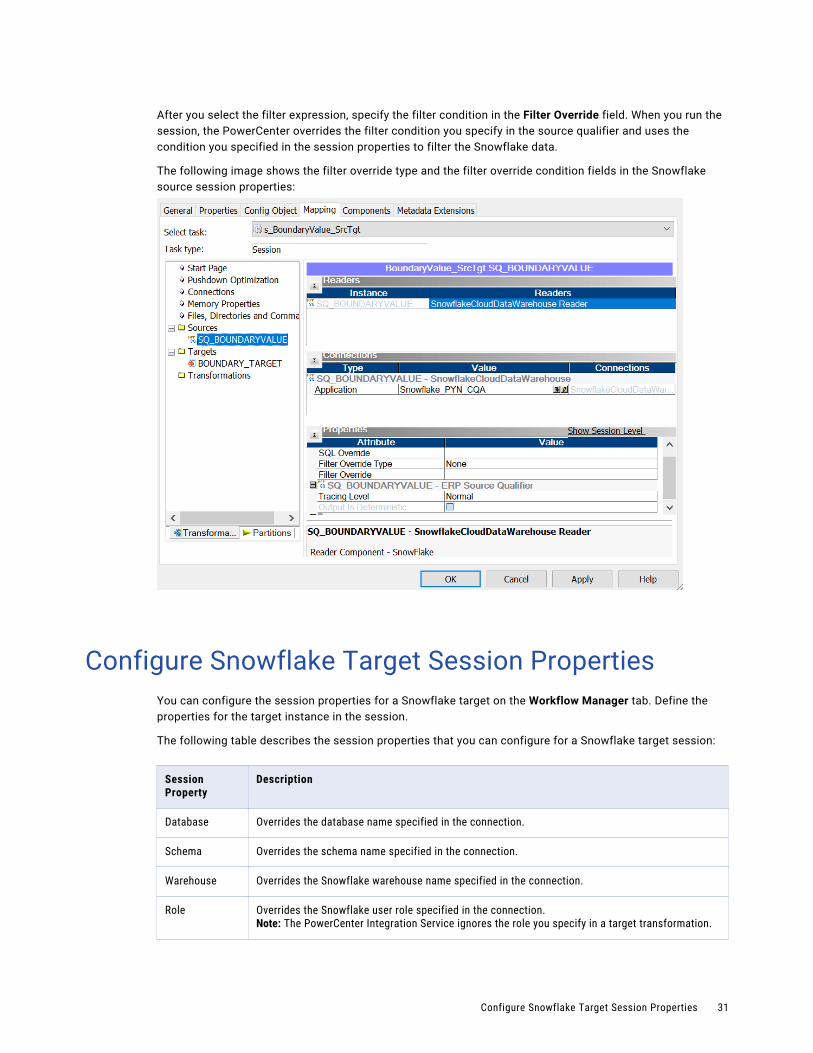
After you select the filter expression, specify the filter condition in the Filter Override field. When you run the session, the PowerCenter overrides the filter condition you specify in the source qualifier and uses the condition you specified in the session properties to filter the Snowflake data.
The following image shows the filter override type and the filter override condition fields in the Snowflake source session properties:
Configure Snowflake Target Session PropertiesYou can configure the session properties for a Snowflake target on the Workflow Manager tab. Define the properties for the target instance in the session.
The following table describes the session properties that you can configure for a Snowflake target session:
Session Property
Description
Database Overrides the database name specified in the connection.
Schema Overrides the schema name specified in the connection.
Warehouse Overrides the Snowflake warehouse name specified in the connection.
Role Overrides the Snowflake user role specified in the connection.Note: The PowerCenter Integration Service ignores the role you specify in a target transformation.
Configure Snowflake Target Session Properties 31
Session Property
Description
Pre SQL SQL statement that the PowerCenter Integration Service executes before extracting data from the source. For example, if you want to assign sequence object to a primary key field of the target table before you load data to the table, specify a pre-SQL statement. You can use the SQL editor to enter the pre-SQL statement.
Post SQL SQL statement that the PowerCenter Integration Service executes after extracting data from the source. For example, if you want to alter the table created by using create target option and assign constraints to the table before you load data to the table, specify a post-SQL query. You can use the SQL editor to enter the post-SQL statement.
Batch Row Size Number of rows that the PowerCenter Integration Service writes in a batch to the Snowflake target.
Number of local staging files
Enter the number of local staging files. The PowerCenter Integration Service writes data to the target after the specified number of local staging files are created.
Truncate Target Table
Truncates the database target table before inserting new rows. Select one of the following options:- True. Truncates the target table before inserting all rows.- False. Inserts new rows without truncating the target table.Default is false.
Additional Write Runtime Parameters
Specify additional run-time parameters.For example:
remoteStage=CQA.CQA_SCHEMA.CQA_STAGESeparate multiple runtime parameters with &.
Table Name Overrides the table name of the Snowflake target table.
INSERT Inserts all rows to the Snowflake target.You must select the INSERT option before you run a session.Default is true.
DELETE Deletes rows from the Snowflake target.If you select DELETE, you need to select Delete for the Treat Source Rows As session property in the Properties page.
UPDATE Updates rows in the Snowflake target.If you select UPDATE, you need to select Update for the Treat Source Rows As session property in the Properties page.Note: You can perform Update as update or Update else insert operation.
32 Chapter 5: Snowflake Sessions
Session Property
Description
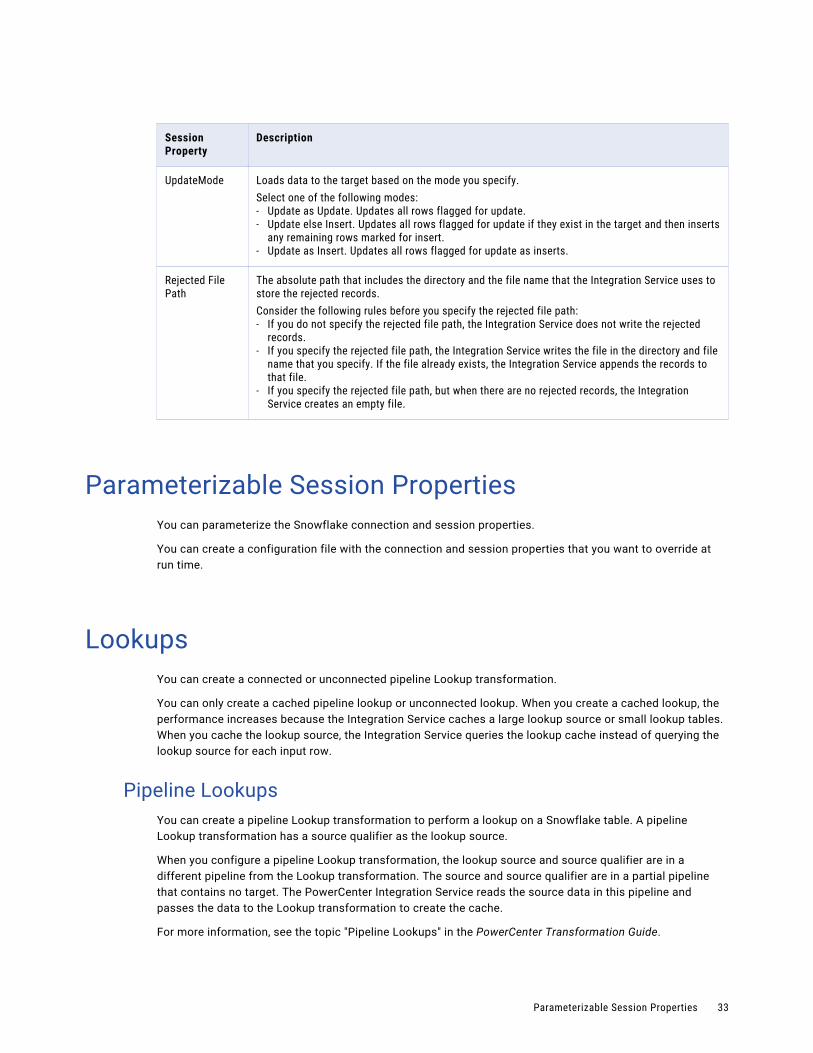
UpdateMode Loads data to the target based on the mode you specify.Select one of the following modes:- Update as Update. Updates all rows flagged for update.- Update else Insert. Updates all rows flagged for update if they exist in the target and then inserts
any remaining rows marked for insert.- Update as Insert. Updates all rows flagged for update as inserts.
Rejected File Path
The absolute path that includes the directory and the file name that the Integration Service uses to store the rejected records.Consider the following rules before you specify the rejected file path:- If you do not specify the rejected file path, the Integration Service does not write the rejected
records.- If you specify the rejected file path, the Integration Service writes the file in the directory and file
name that you specify. If the file already exists, the Integration Service appends the records to that file.
- If you specify the rejected file path, but when there are no rejected records, the Integration Service creates an empty file.
Parameterizable Session PropertiesYou can parameterize the Snowflake connection and session properties.
You can create a configuration file with the connection and session properties that you want to override at run time.
LookupsYou can create a connected or unconnected pipeline Lookup transformation.
You can only create a cached pipeline lookup or unconnected lookup. When you create a cached lookup, the performance increases because the Integration Service caches a large lookup source or small lookup tables. When you cache the lookup source, the Integration Service queries the lookup cache instead of querying the lookup source for each input row.
Pipeline LookupsYou can create a pipeline Lookup transformation to perform a lookup on a Snowflake table. A pipeline Lookup transformation has a source qualifier as the lookup source.
When you configure a pipeline Lookup transformation, the lookup source and source qualifier are in a different pipeline from the Lookup transformation. The source and source qualifier are in a partial pipeline that contains no target. The PowerCenter Integration Service reads the source data in this pipeline and passes the data to the Lookup transformation to create the cache.
For more information, see the topic "Pipeline Lookups" in the PowerCenter Transformation Guide.
Parameterizable Session Properties 33
Unconnected LookupsYou can configure an unconnected lookup transformation for the source qualifier in a mapping.
An unconnected Lookup transformation is a Lookup transformation that is not connected to any source, target, or transformation in the pipeline.
An unconnected Lookup transformation receives input values from the result of a :LKP expression in another transformation. The Integration Service queries the lookup source or cache based on the lookup ports and condition in the Lookup transformation and passes the returned value to the port that contains the :LKP expression. The :LKP expression can pass lookup results to an expression in another transformation.
Example Scenario of a Pipeline Lookup Transformation in a Mapping
A mapping that contains a pipeline Lookup transformation includes a partial pipeline that contains the lookup source and source qualifier. The partial pipeline does not include a target. The Integration Service retrieves the lookup source data in this pipeline and passes the data to the lookup cache.
The partial pipeline is in a separate target load order group in session properties. You can create multiple partitions in the pipeline to improve performance. You can not configure the target load order with the partial pipeline.
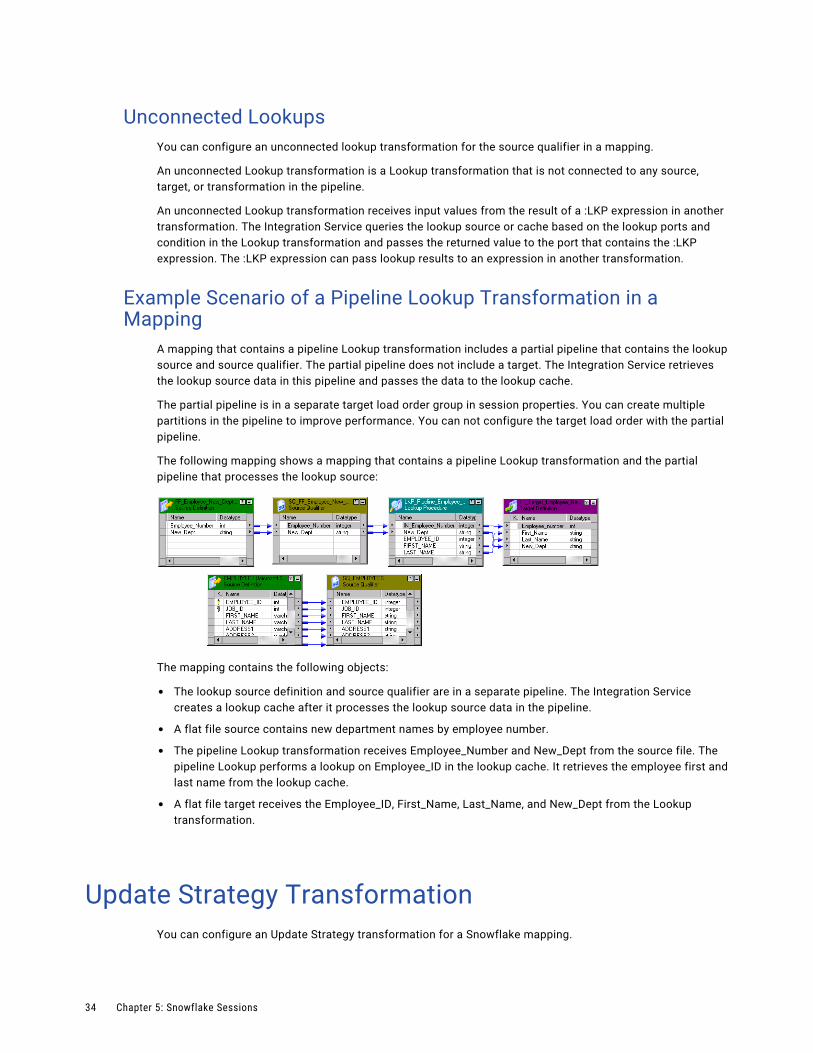
The following mapping shows a mapping that contains a pipeline Lookup transformation and the partial pipeline that processes the lookup source:
The mapping contains the following objects:
• The lookup source definition and source qualifier are in a separate pipeline. The Integration Service creates a lookup cache after it processes the lookup source data in the pipeline.
• A flat file source contains new department names by employee number.
• The pipeline Lookup transformation receives Employee_Number and New_Dept from the source file. The pipeline Lookup performs a lookup on Employee_ID in the lookup cache. It retrieves the employee first and last name from the lookup cache.
• A flat file target receives the Employee_ID, First_Name, Last_Name, and New_Dept from the Lookup transformation.
Update Strategy TransformationYou can configure an Update Strategy transformation for a Snowflake mapping.
34 Chapter 5: Snowflake Sessions
When you configure an Update Strategy transformation, you can flag all rows for insert, delete, update, or reject. The Update Strategy transformation takes precedence over the update strategy you specify in the Snowflake session properties.
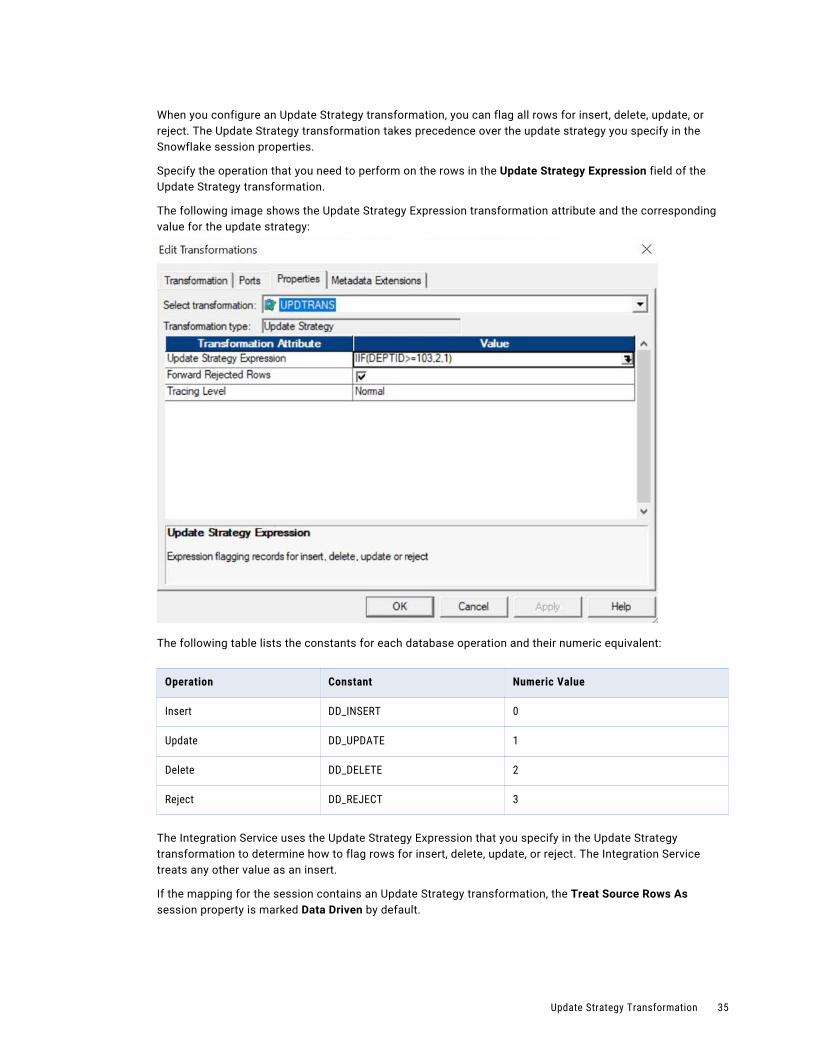
Specify the operation that you need to perform on the rows in the Update Strategy Expression field of the Update Strategy transformation.
The following image shows the Update Strategy Expression transformation attribute and the corresponding value for the update strategy:
The following table lists the constants for each database operation and their numeric equivalent:
Operation Constant Numeric Value
Insert DD_INSERT 0
Update DD_UPDATE 1
Delete DD_DELETE 2
Reject DD_REJECT 3
The Integration Service uses the Update Strategy Expression that you specify in the Update Strategy transformation to determine how to flag rows for insert, delete, update, or reject. The Integration Service treats any other value as an insert.
If the mapping for the session contains an Update Strategy transformation, the Treat Source Rows As session property is marked Data Driven by default.
Update Strategy Transformation 35
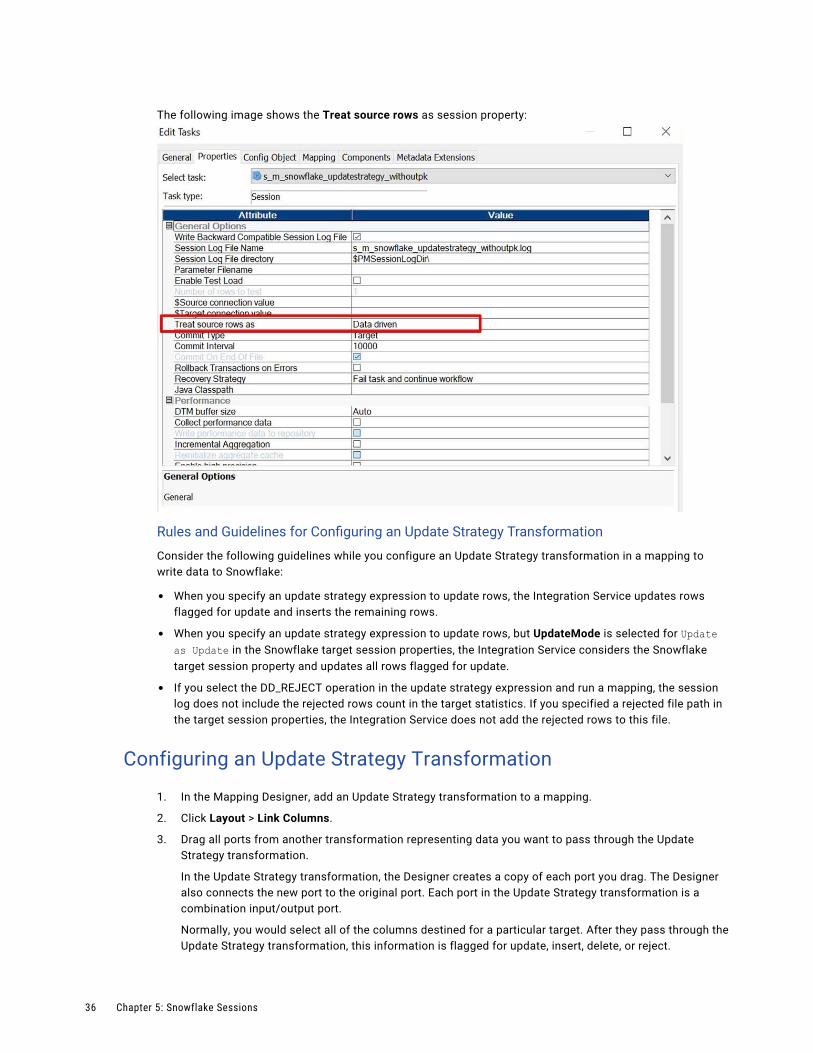
The following image shows the Treat source rows as session property:
Rules and Guidelines for Configuring an Update Strategy Transformation
Consider the following guidelines while you configure an Update Strategy transformation in a mapping to write data to Snowflake:
• When you specify an update strategy expression to update rows, the Integration Service updates rows flagged for update and inserts the remaining rows.
• When you specify an update strategy expression to update rows, but UpdateMode is selected for Update as Update in the Snowflake target session properties, the Integration Service considers the Snowflake target session property and updates all rows flagged for update.
• If you select the DD_REJECT operation in the update strategy expression and run a mapping, the session log does not include the rejected rows count in the target statistics. If you specified a rejected file path in the target session properties, the Integration Service does not add the rejected rows to this file.
Configuring an Update Strategy Transformation
1. In the Mapping Designer, add an Update Strategy transformation to a mapping.
2. Click Layout > Link Columns.
3. Drag all ports from another transformation representing data you want to pass through the Update Strategy transformation.
In the Update Strategy transformation, the Designer creates a copy of each port you drag. The Designer also connects the new port to the original port. Each port in the Update Strategy transformation is a combination input/output port.
Normally, you would select all of the columns destined for a particular target. After they pass through the Update Strategy transformation, this information is flagged for update, insert, delete, or reject.
36 Chapter 5: Snowflake Sessions
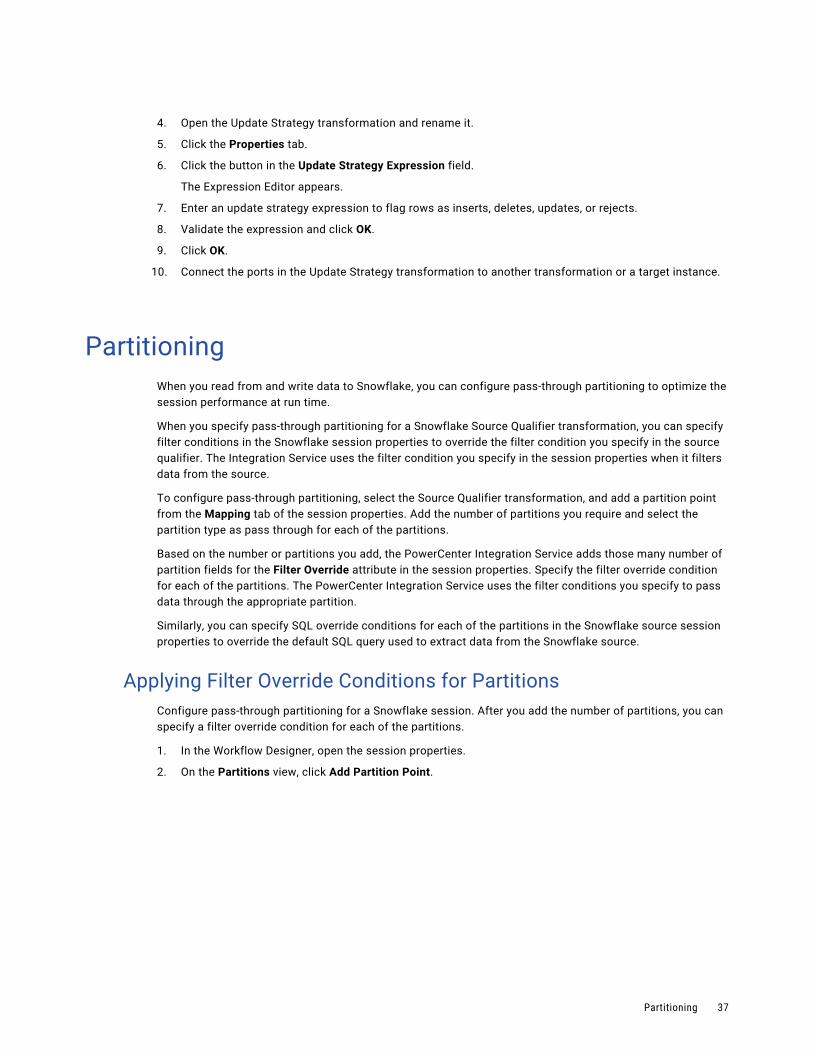
4. Open the Update Strategy transformation and rename it.
5. Click the Properties tab.
6. Click the button in the Update Strategy Expression field.
The Expression Editor appears.
7. Enter an update strategy expression to flag rows as inserts, deletes, updates, or rejects.
8. Validate the expression and click OK.
9. Click OK.
10. Connect the ports in the Update Strategy transformation to another transformation or a target instance.
PartitioningWhen you read from and write data to Snowflake, you can configure pass-through partitioning to optimize the session performance at run time.
When you specify pass-through partitioning for a Snowflake Source Qualifier transformation, you can specify filter conditions in the Snowflake session properties to override the filter condition you specify in the source qualifier. The Integration Service uses the filter condition you specify in the session properties when it filters data from the source.
To configure pass-through partitioning, select the Source Qualifier transformation, and add a partition point from the Mapping tab of the session properties. Add the number of partitions you require and select the partition type as pass through for each of the partitions.
Based on the number or partitions you add, the PowerCenter Integration Service adds those many number of partition fields for the Filter Override attribute in the session properties. Specify the filter override condition for each of the partitions. The PowerCenter Integration Service uses the filter conditions you specify to pass data through the appropriate partition.
Similarly, you can specify SQL override conditions for each of the partitions in the Snowflake source session properties to override the default SQL query used to extract data from the Snowflake source.
Applying Filter Override Conditions for PartitionsConfigure pass-through partitioning for a Snowflake session. After you add the number of partitions, you can specify a filter override condition for each of the partitions.
1. In the Workflow Designer, open the session properties.
2. On the Partitions view, click Add Partition Point.
Partitioning 37
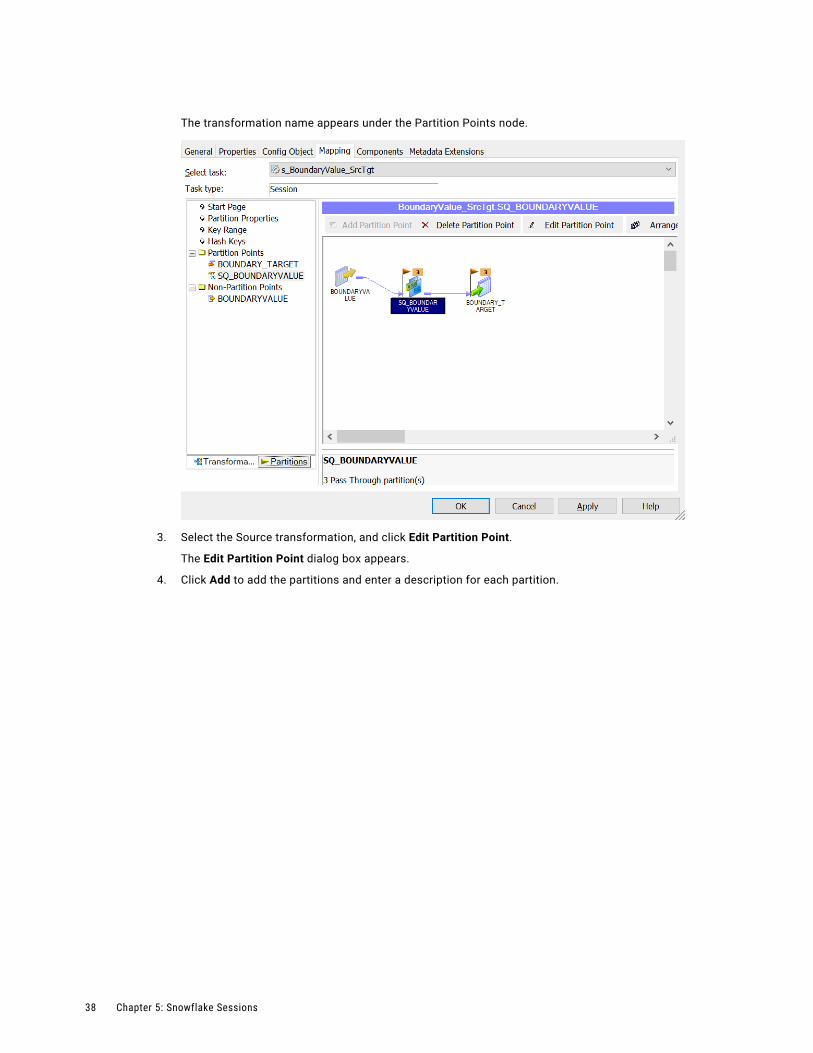
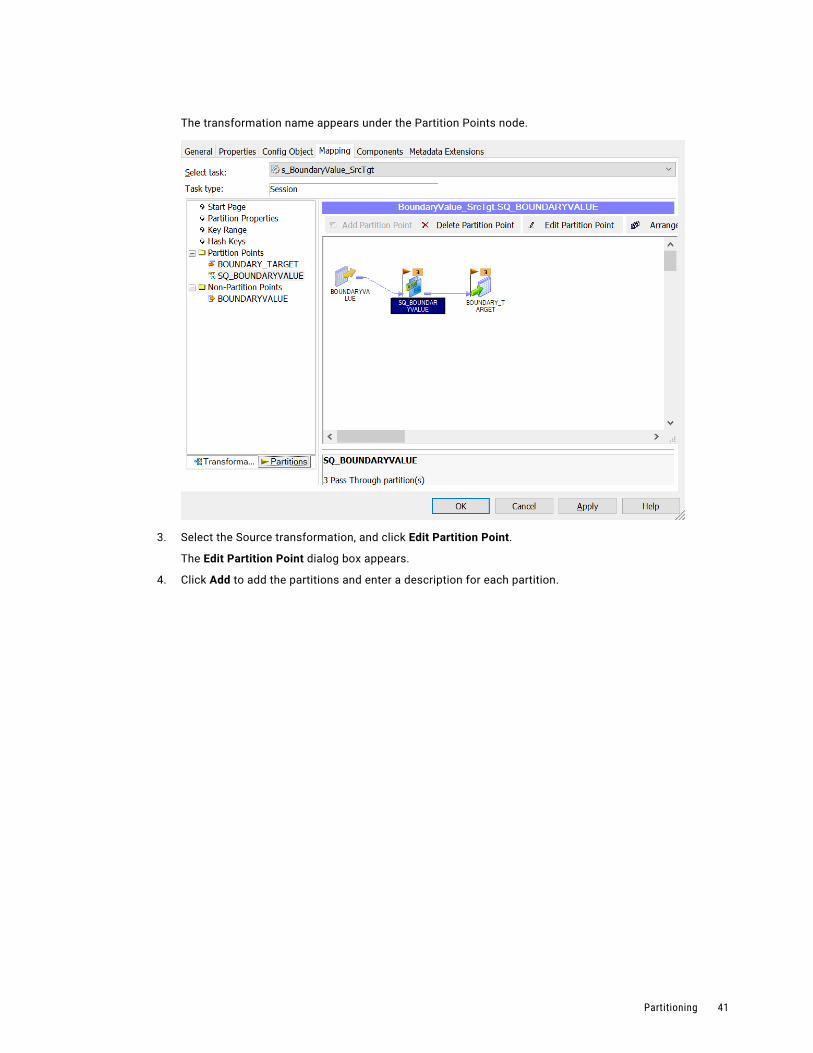
The transformation name appears under the Partition Points node.
3. Select the Source transformation, and click Edit Partition Point.
The Edit Partition Point dialog box appears.
4. Click Add to add the partitions and enter a description for each partition.
38 Chapter 5: Snowflake Sessions
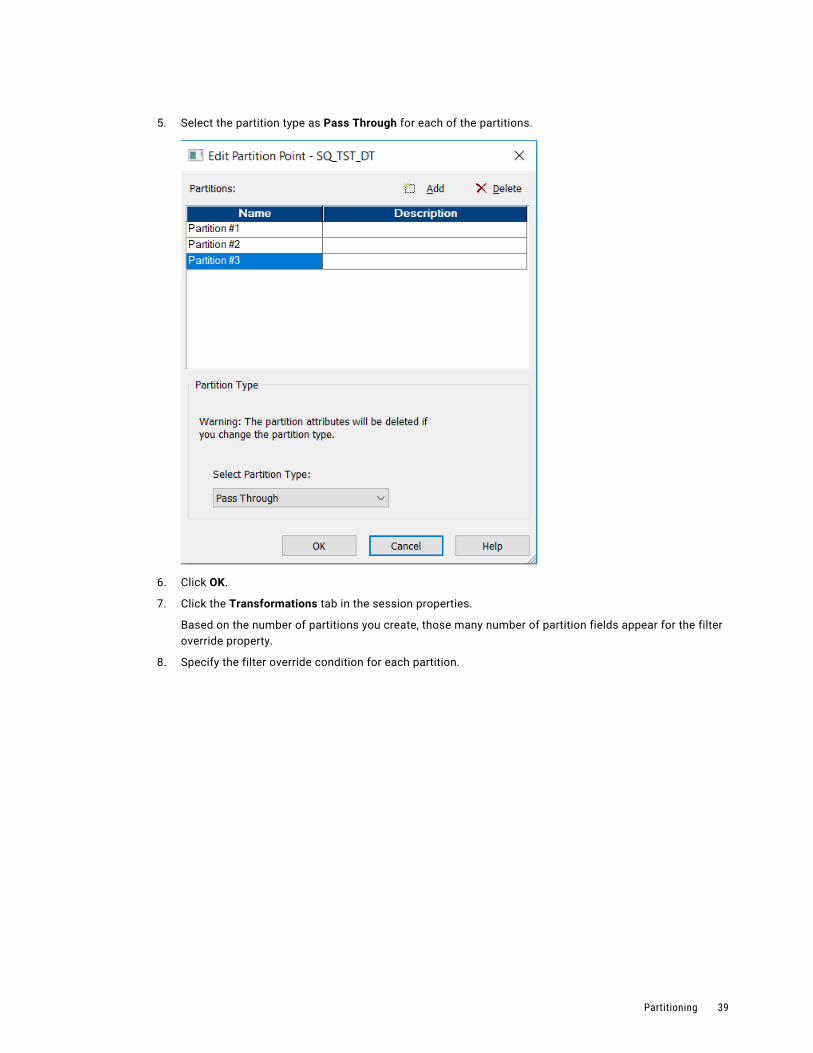
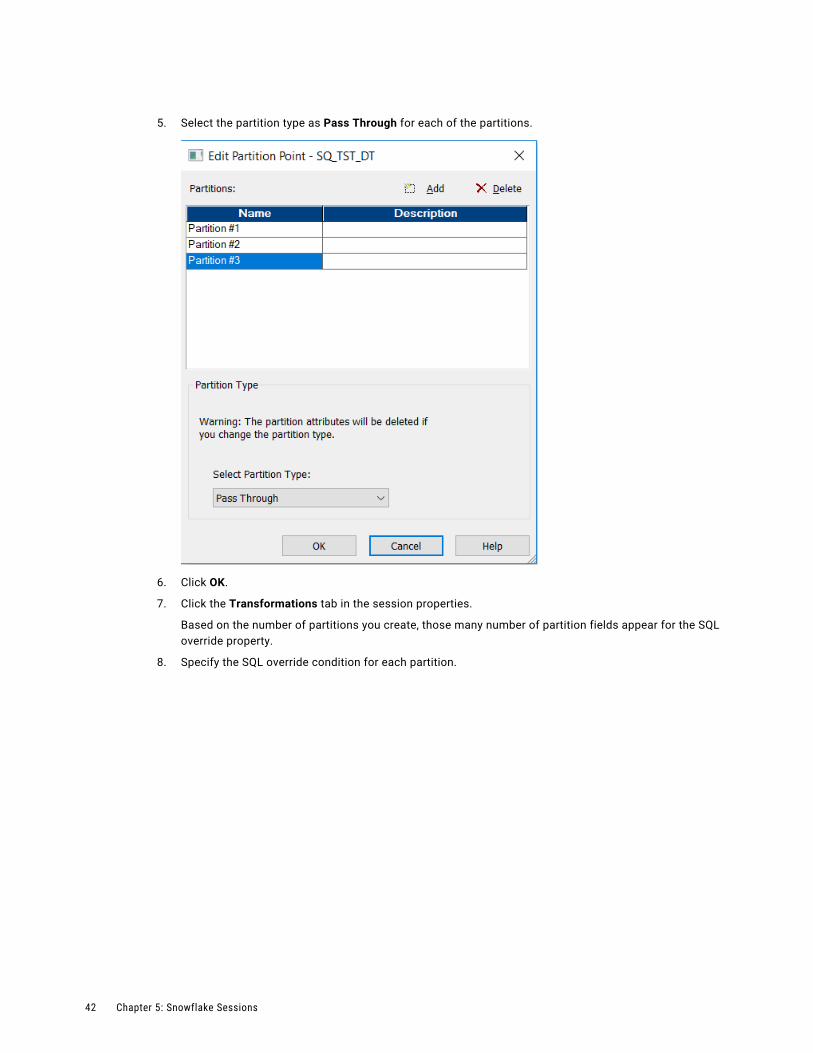
5. Select the partition type as Pass Through for each of the partitions.
6. Click OK.
7. Click the Transformations tab in the session properties.
Based on the number of partitions you create, those many number of partition fields appear for the filter override property.
8. Specify the filter override condition for each partition.
Partitioning 39
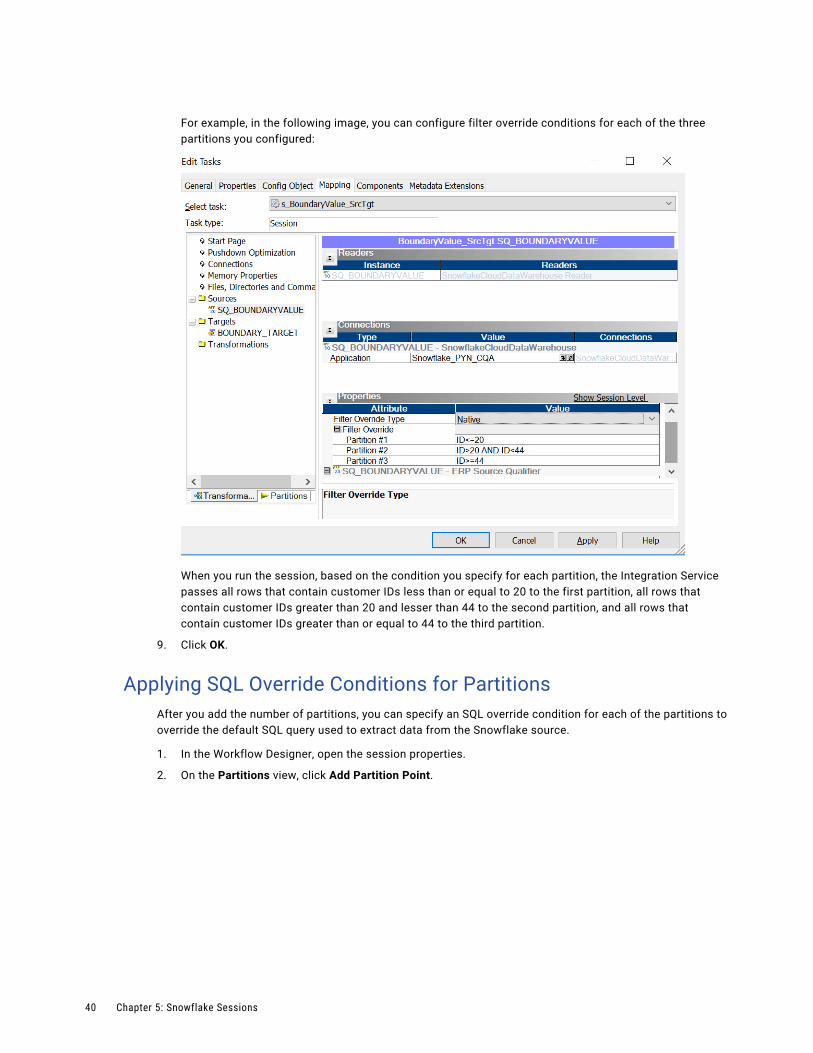
For example, in the following image, you can configure filter override conditions for each of the three partitions you configured:
When you run the session, based on the condition you specify for each partition, the Integration Service passes all rows that contain customer IDs less than or equal to 20 to the first partition, all rows that contain customer IDs greater than 20 and lesser than 44 to the second partition, and all rows that contain customer IDs greater than or equal to 44 to the third partition.
9. Click OK.
Applying SQL Override Conditions for PartitionsAfter you add the number of partitions, you can specify an SQL override condition for each of the partitions to override the default SQL query used to extract data from the Snowflake source.
1. In the Workflow Designer, open the session properties.
2. On the Partitions view, click Add Partition Point.
40 Chapter 5: Snowflake Sessions
The transformation name appears under the Partition Points node.
3. Select the Source transformation, and click Edit Partition Point.
The Edit Partition Point dialog box appears.
4. Click Add to add the partitions and enter a description for each partition.
Partitioning 41
5. Select the partition type as Pass Through for each of the partitions.
6. Click OK.
7. Click the Transformations tab in the session properties.
Based on the number of partitions you create, those many number of partition fields appear for the SQL override property.
8. Specify the SQL override condition for each partition.
42 Chapter 5: Snowflake Sessions
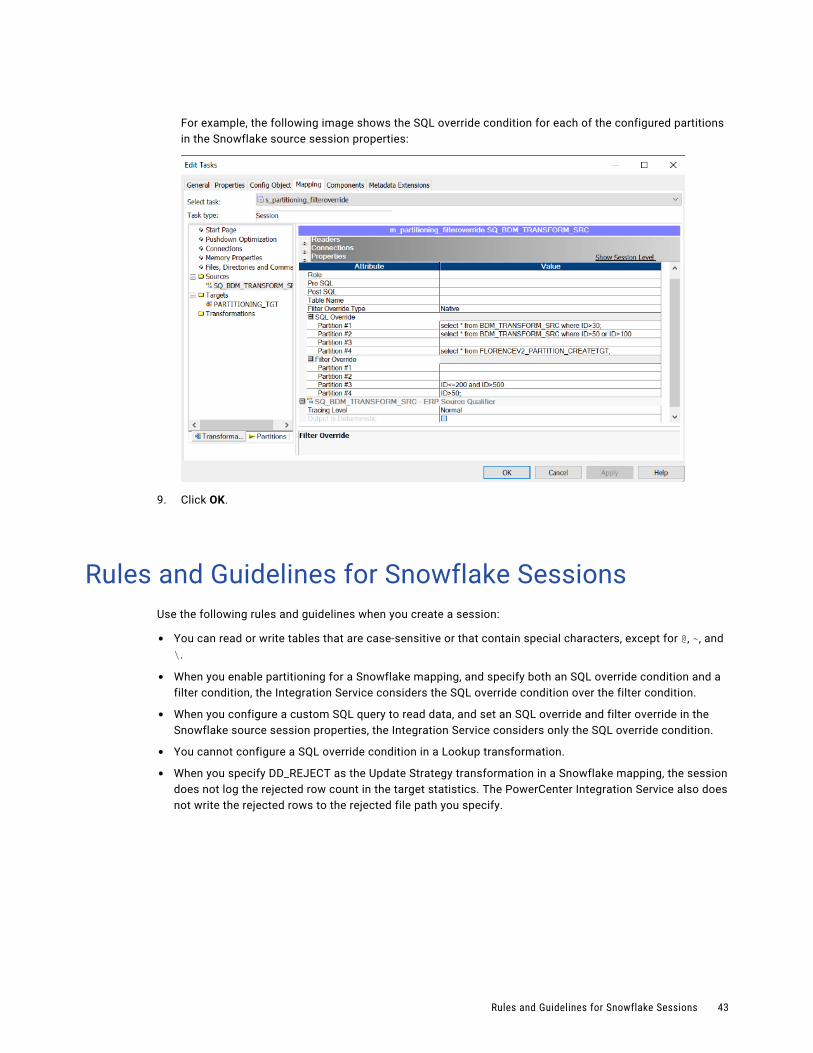
For example, the following image shows the SQL override condition for each of the configured partitions in the Snowflake source session properties:
9. Click OK.
Rules and Guidelines for Snowflake SessionsUse the following rules and guidelines when you create a session:
• You can read or write tables that are case-sensitive or that contain special characters, except for @, ~, and \.
• When you enable partitioning for a Snowflake mapping, and specify both an SQL override condition and a filter condition, the Integration Service considers the SQL override condition over the filter condition.
• When you configure a custom SQL query to read data, and set an SQL override and filter override in the Snowflake source session properties, the Integration Service considers only the SQL override condition.
• You cannot configure a SQL override condition in a Lookup transformation.
• When you specify DD_REJECT as the Update Strategy transformation in a Snowflake mapping, the session does not log the rejected row count in the target statistics. The PowerCenter Integration Service also does not write the rejected rows to the rejected file path you specify.
Rules and Guidelines for Snowflake Sessions 43
C h a p t e r 6
Snowflake Pushdown Optimization
This chapter includes the following topics:
• Snowflake Pushdown Optimization Overview, 44
• Pushdown Optimization Functions, 44
• Pushdown Optimization Operators, 46
• Pushdown Optimization Transformations, 46
• Add the EXTODBC.DLL Entry, 47
• Configuring the Snowflake ODBC Driver, 47
• Rules and Guidelines for Functions in Pushdown Optimization, 54
Snowflake Pushdown Optimization OverviewWhen you use the ODBC connection type in PowerCenter, you can configure pushdown optimization to push transformation logic to the source or target Snowflake database. Use pushdown optimization when you use database resources to improve mapping performance.
When you run a mapping configured for pushdown optimization, the PowerCenter Integration Service converts the transformation logic to an SQL query and sends the query to the Snowflake database. The Snowflake database runs the query.
You can configure full or source pushdown optimization for a Snowflake session that uses the ODBC connection type.
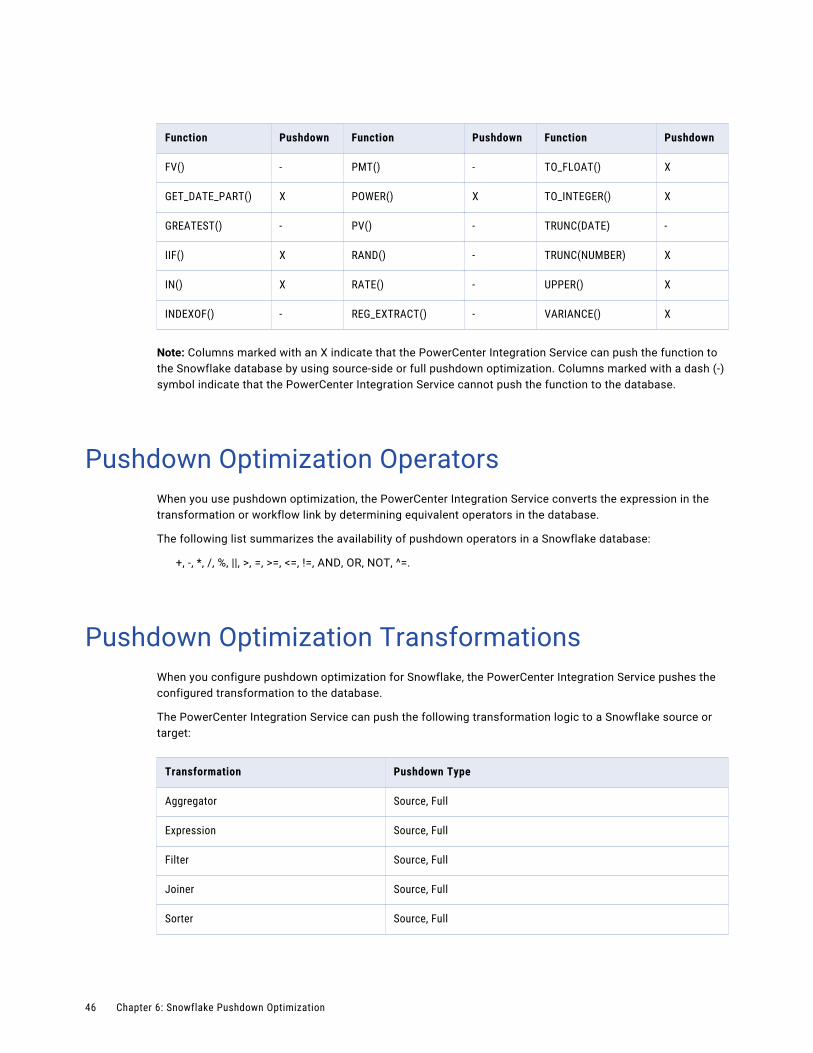
Pushdown Optimization FunctionsWhen you use pushdown optimization, the PowerCenter Integration Service converts the expression in the transformation or workflow link by determining equivalent functions in the database.
44

The following table summarizes the availability of pushdown functions in a Snowflake database:
Function Pushdown Function Pushdown Function Pushdown
ABORT() - INITCAP() X REG_MATCH() -
ABS() X INSTR() X REG_REPLACE -
ADD_TO_DATE() X IS_DATE() - REPLACECHR() X
AES_DECRYPT() - IS_NUMBER() - REPLACESTR() X
AES_ENCRYPT() - IS_SPACES() - REVERSE() -
ASCII() X ISNULL() X ROUND(DATE) -
AVG() X LAST() - ROUND(NUMBER) X
CEIL() X LAST_DAY() X RPAD() X
CHOOSE() - LEAST() - RTRIM() X
CHR() X LENGTH() X SET_DATE_PART() -
CHRCODE() - LN() X SIGN() X
COMPRESS() - LOG() X SIN() X
CONCAT() X LOOKUP - SINH() X
COS() X LOWER() X SOUNDEX() -
COSH() X LPAD() X SQRT() X
COUNT() X LTRIM() X STDDEV() X
CRC32() - MAKE_DATE_TIME() - SUBSTR() X
CUME() - MAX() X SUM() X
DATE_COMPARE() X MD5() - SYSDATE() X
DATE_DIFF() X MEDIAN() X SYSTIMESTAMP() X
DECODE() X METAPHONE() - TAN() X
DECODE_BASE64() - MIN() X TANH() X
DECOMPRESS() - MOD() X TO_BIGINT X
ENCODE_BASE64() - MOVINGAVG() - TO_CHAR(DATE) X
EXP() X MOVINGSUM() - TO_CHAR(NUMBER) X
FIRST() - NPER() - TO_DATE() X
FLOOR() X PERCENTILE() - TO_DECIMAL() X
Pushdown Optimization Functions 45
Function Pushdown Function Pushdown Function Pushdown
FV() - PMT() - TO_FLOAT() X
GET_DATE_PART() X POWER() X TO_INTEGER() X
GREATEST() - PV() - TRUNC(DATE) -
IIF() X RAND() - TRUNC(NUMBER) X
IN() X RATE() - UPPER() X
INDEXOF() - REG_EXTRACT() - VARIANCE() X
Note: Columns marked with an X indicate that the PowerCenter Integration Service can push the function to the Snowflake database by using source-side or full pushdown optimization. Columns marked with a dash (-) symbol indicate that the PowerCenter Integration Service cannot push the function to the database.
Pushdown Optimization OperatorsWhen you use pushdown optimization, the PowerCenter Integration Service converts the expression in the transformation or workflow link by determining equivalent operators in the database.
The following list summarizes the availability of pushdown operators in a Snowflake database:
+, -, *, /, %, ||, >, =, >=, <=, !=, AND, OR, NOT, ^=.
Pushdown Optimization TransformationsWhen you configure pushdown optimization for Snowflake, the PowerCenter Integration Service pushes the configured transformation to the database.
The PowerCenter Integration Service can push the following transformation logic to a Snowflake source or target:
Transformation Pushdown Type
Aggregator Source, Full
Expression Source, Full
Filter Source, Full
Joiner Source, Full
Sorter Source, Full
46 Chapter 6: Snowflake Pushdown Optimization
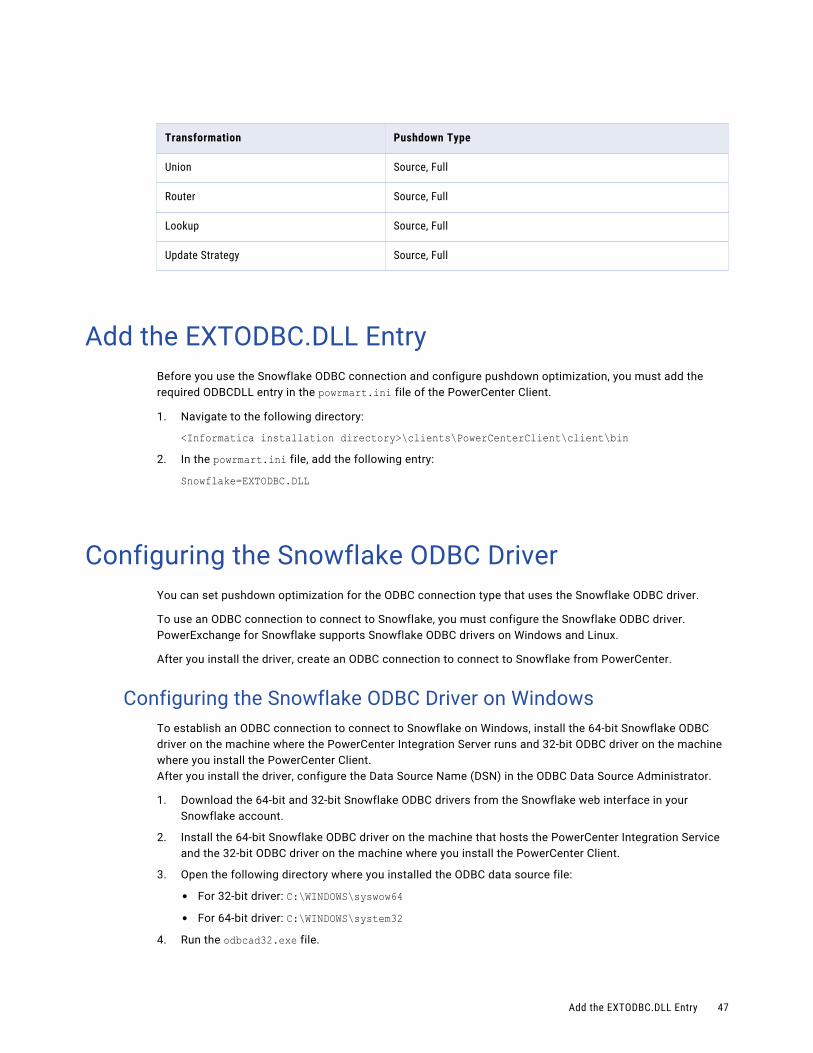
Transformation Pushdown Type
Union Source, Full
Router Source, Full
Lookup Source, Full
Update Strategy Source, Full
Add the EXTODBC.DLL EntryBefore you use the Snowflake ODBC connection and configure pushdown optimization, you must add the required ODBCDLL entry in the powrmart.ini file of the PowerCenter Client.
1. Navigate to the following directory:
<Informatica installation directory>\clients\PowerCenterClient\client\bin2. In the powrmart.ini file, add the following entry:
Snowflake=EXTODBC.DLL
Configuring the Snowflake ODBC DriverYou can set pushdown optimization for the ODBC connection type that uses the Snowflake ODBC driver.
To use an ODBC connection to connect to Snowflake, you must configure the Snowflake ODBC driver. PowerExchange for Snowflake supports Snowflake ODBC drivers on Windows and Linux.
After you install the driver, create an ODBC connection to connect to Snowflake from PowerCenter.
Configuring the Snowflake ODBC Driver on WindowsTo establish an ODBC connection to connect to Snowflake on Windows, install the 64-bit Snowflake ODBC driver on the machine where the PowerCenter Integration Server runs and 32-bit ODBC driver on the machine where you install the PowerCenter Client.After you install the driver, configure the Data Source Name (DSN) in the ODBC Data Source Administrator.
1. Download the 64-bit and 32-bit Snowflake ODBC drivers from the Snowflake web interface in your Snowflake account.
2. Install the 64-bit Snowflake ODBC driver on the machine that hosts the PowerCenter Integration Service and the 32-bit ODBC driver on the machine where you install the PowerCenter Client.
3. Open the following directory where you installed the ODBC data source file:
• For 32-bit driver: C:\WINDOWS\syswow64• For 64-bit driver: C:\WINDOWS\system32
4. Run the odbcad32.exe file.
Add the EXTODBC.DLL Entry 47
The ODBC Data Sources Administrator box appears.
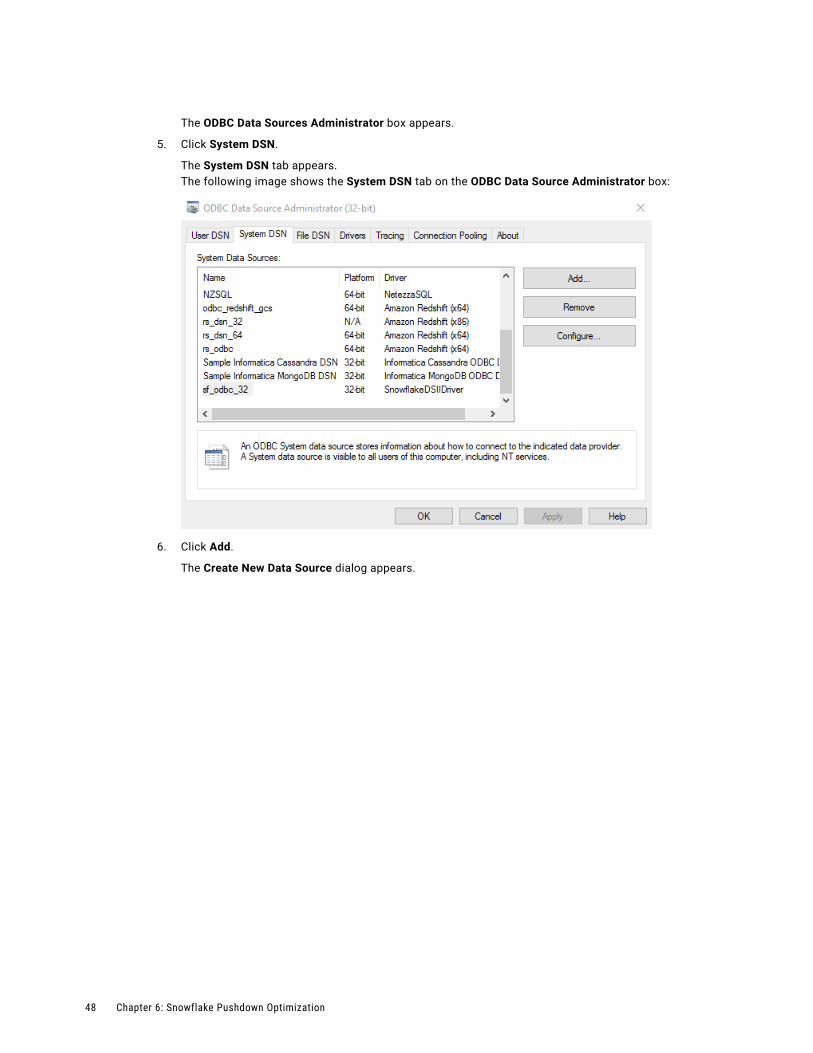
5. Click System DSN.
The System DSN tab appears.The following image shows the System DSN tab on the ODBC Data Source Administrator box:
6. Click Add.
The Create New Data Source dialog appears.
48 Chapter 6: Snowflake Pushdown Optimization
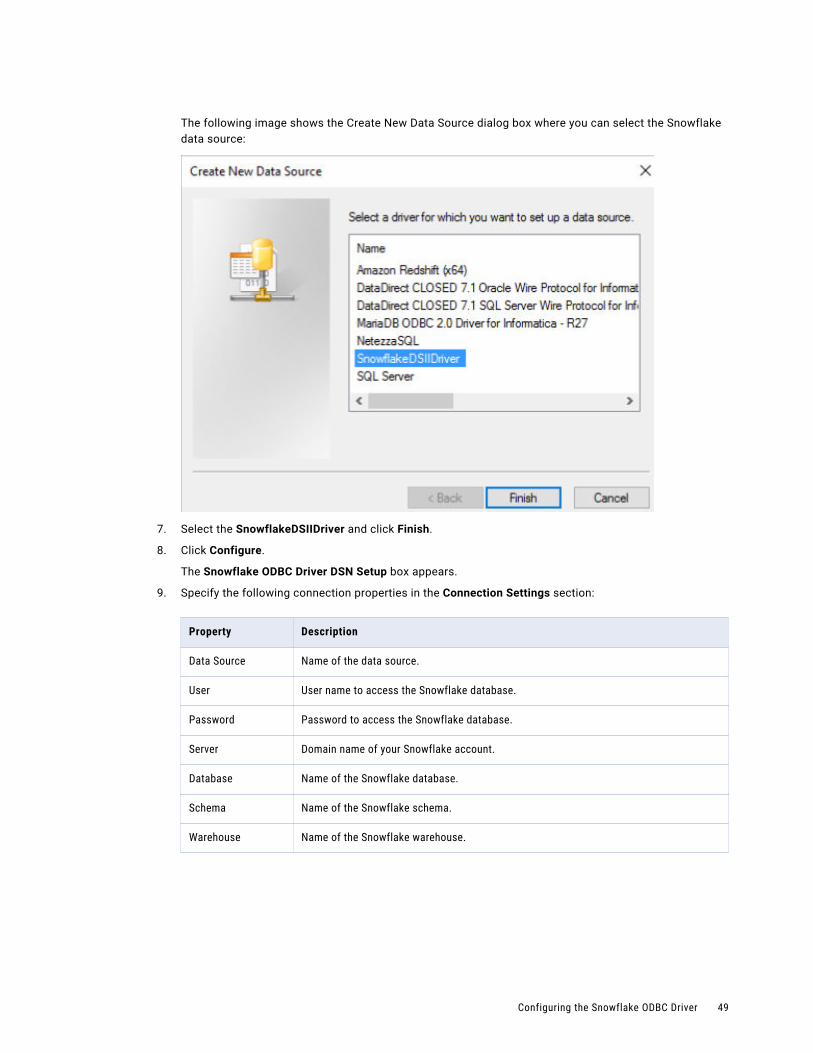
The following image shows the Create New Data Source dialog box where you can select the Snowflake data source:
7. Select the SnowflakeDSIIDriver and click Finish.
8. Click Configure.
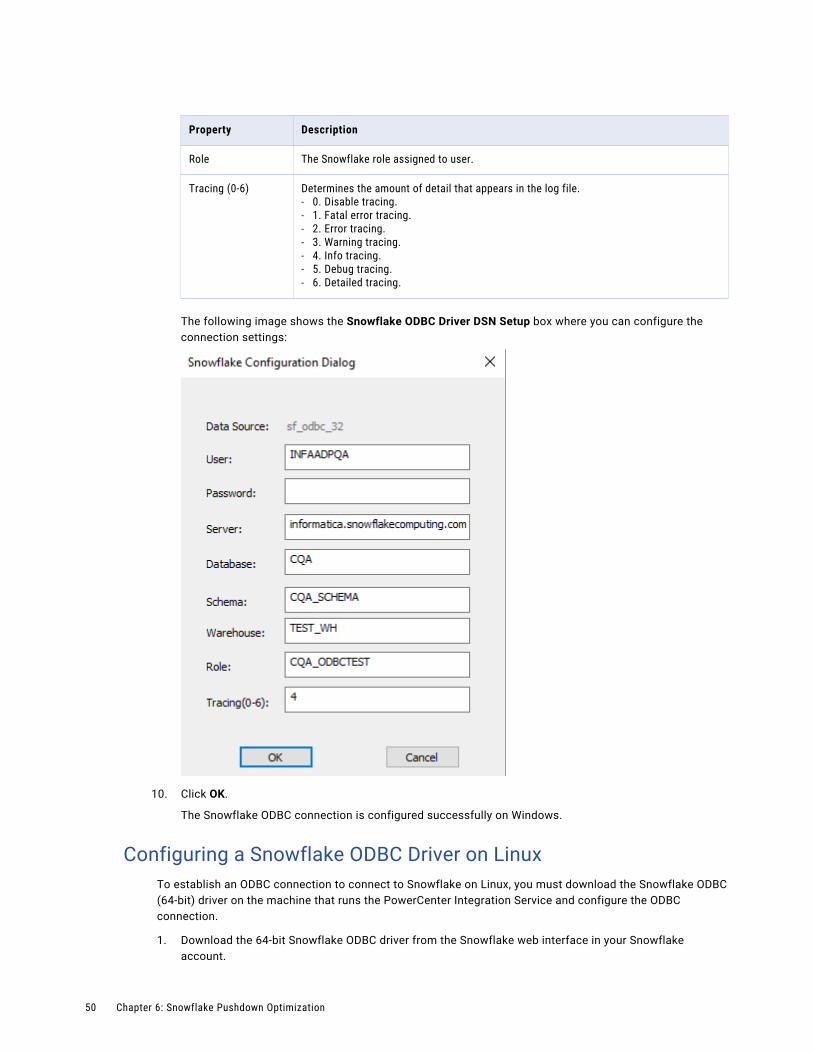
The Snowflake ODBC Driver DSN Setup box appears.
9. Specify the following connection properties in the Connection Settings section:
Property Description
Data Source Name of the data source.
User User name to access the Snowflake database.
Password Password to access the Snowflake database.
Server Domain name of your Snowflake account.
Database Name of the Snowflake database.
Schema Name of the Snowflake schema.
Warehouse Name of the Snowflake warehouse.
Configuring the Snowflake ODBC Driver 49
Property Description
Role The Snowflake role assigned to user.
Tracing (0-6) Determines the amount of detail that appears in the log file.- 0. Disable tracing.- 1. Fatal error tracing.- 2. Error tracing.- 3. Warning tracing.- 4. Info tracing.- 5. Debug tracing.- 6. Detailed tracing.
The following image shows the Snowflake ODBC Driver DSN Setup box where you can configure the connection settings:
10. Click OK.
The Snowflake ODBC connection is configured successfully on Windows.
Configuring a Snowflake ODBC Driver on LinuxTo establish an ODBC connection to connect to Snowflake on Linux, you must download the Snowflake ODBC (64-bit) driver on the machine that runs the PowerCenter Integration Service and configure the ODBC connection.
1. Download the 64-bit Snowflake ODBC driver from the Snowflake web interface in your Snowflake account.
50 Chapter 6: Snowflake Pushdown Optimization
2. Install the driver on the machine where the PowerCenter Integration Service runs.
3. Configure the odbc.ini file properties in the following format:
[ODBC_SF]Driver=/usr/lib64/snowflake/odbc/lib/libSnowflake.soDescription=Server=informatica.snowflakecomputing.comrole=CQA_ODBCTESTdatabase=CQAwarehouse=TEST_WHschema=CQA_SCHEMA
The following table describes each of the properties in the odbc.ini file:
Property Description
ODBC Data Sources Name of the data source.
Driver Location of the Snowflake ODBC driver file.
Description Description of the data source.
Server Domain name of your Snowflake account.
Role The Snowflake role assigned to user.
Database Name of the Snowflake database.
Warehouse Name of the Snowflake warehouse.
Schema Name of the Snowflake schema.
4. In the source file, add the entries that you require to set the ODBCINI environment variable to the location of the odbc.ini file:
setenv ODBCINI <$ODBC_HOME>/odbc.ini5. Restart the PowerCenter Integration Service.
The Snowflake ODBC connection is configured successfully on Linux.
Pushdown Optimization Configuration TasksConfigure pushdown optimization for a PowerCenter session that uses a Snowflake mapping. You can select full or source pushdown optimization.
After you configure the Snowflake ODBC driver, perform the following tasks to configure pushdown optimization:
1. Create a Snowflake ODBC connection.
2. Configure pushdown optimization for a session that uses a Snowflake mapping.
Create a Snowflake ODBC ConnectionUse the configured Snowflake ODBC driver to create an ODBC connection to connect to Snowflake from PowerCenter.
1. In the Workflow Manager, click Connections.
2. Select Relational from the list.
Configuring the Snowflake ODBC Driver 51
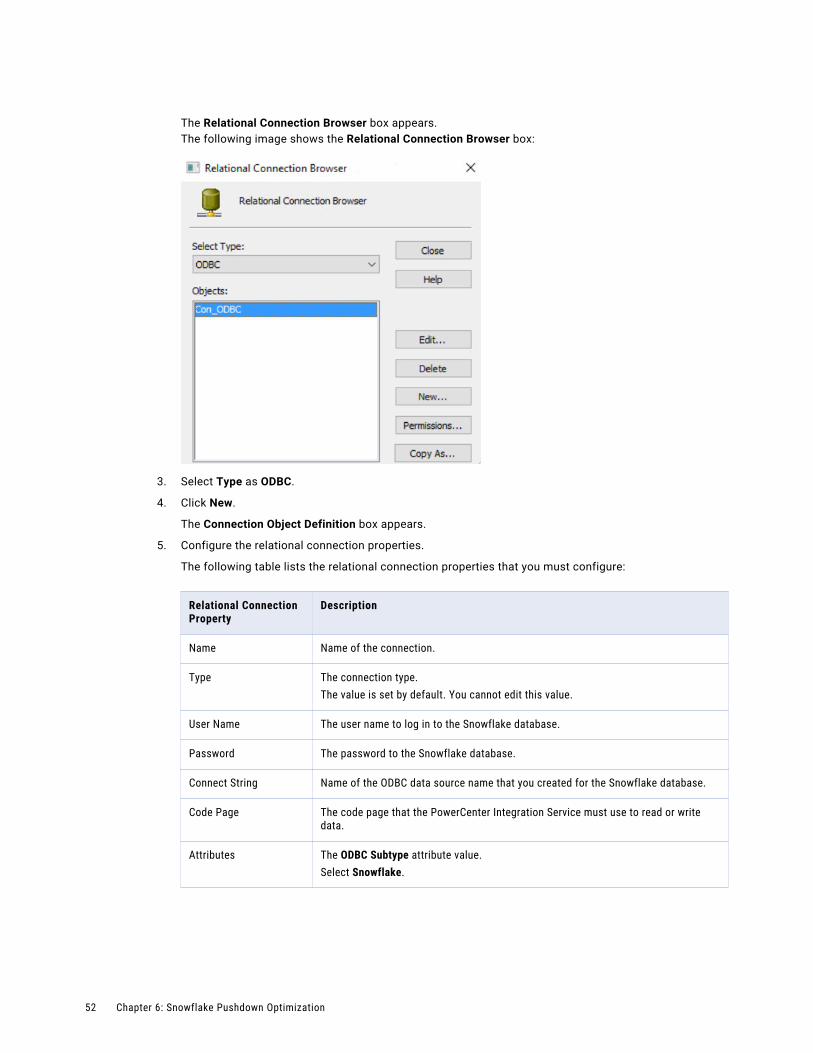
The Relational Connection Browser box appears.The following image shows the Relational Connection Browser box:
3. Select Type as ODBC.
4. Click New.
The Connection Object Definition box appears.
5. Configure the relational connection properties.
The following table lists the relational connection properties that you must configure:
Relational Connection Property
Description
Name Name of the connection.
Type The connection type.The value is set by default. You cannot edit this value.
User Name The user name to log in to the Snowflake database.
Password The password to the Snowflake database.
Connect String Name of the ODBC data source name that you created for the Snowflake database.
Code Page The code page that the PowerCenter Integration Service must use to read or write data.
Attributes The ODBC Subtype attribute value.Select Snowflake.
52 Chapter 6: Snowflake Pushdown Optimization
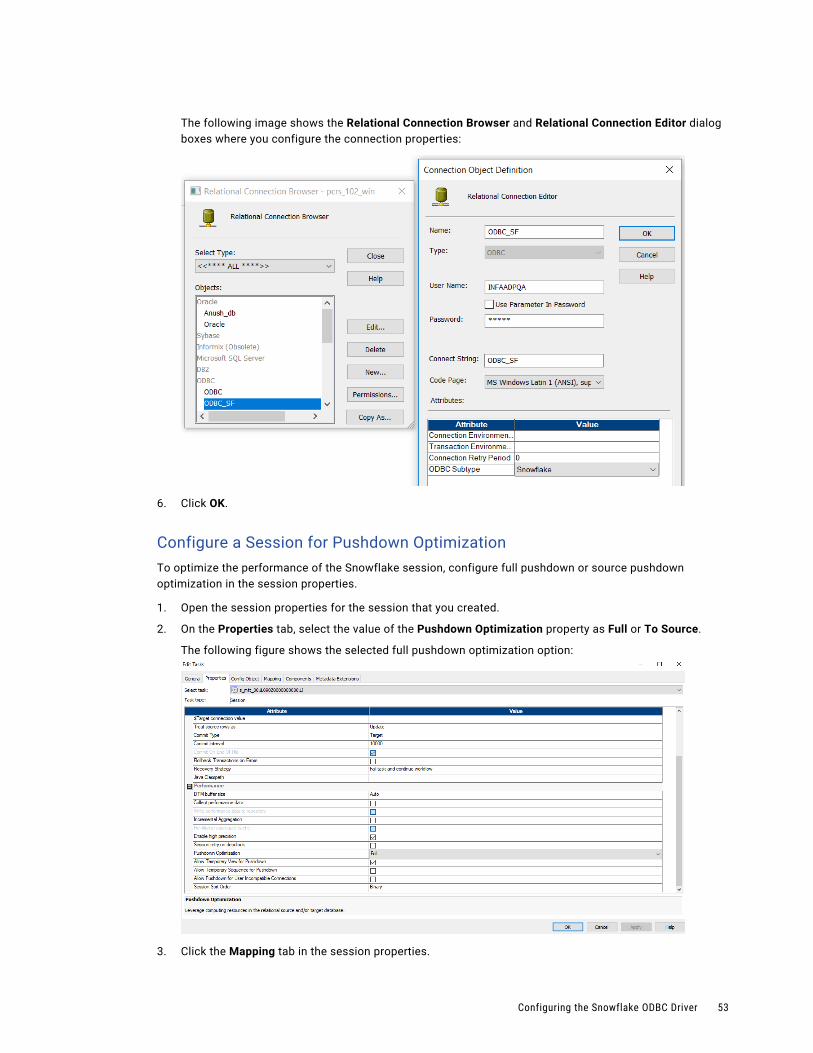
The following image shows the Relational Connection Browser and Relational Connection Editor dialog boxes where you configure the connection properties:
6. Click OK.
Configure a Session for Pushdown OptimizationTo optimize the performance of the Snowflake session, configure full pushdown or source pushdown optimization in the session properties.
1. Open the session properties for the session that you created.
2. On the Properties tab, select the value of the Pushdown Optimization property as Full or To Source.
The following figure shows the selected full pushdown optimization option:
3. Click the Mapping tab in the session properties.
Configuring the Snowflake ODBC Driver 53
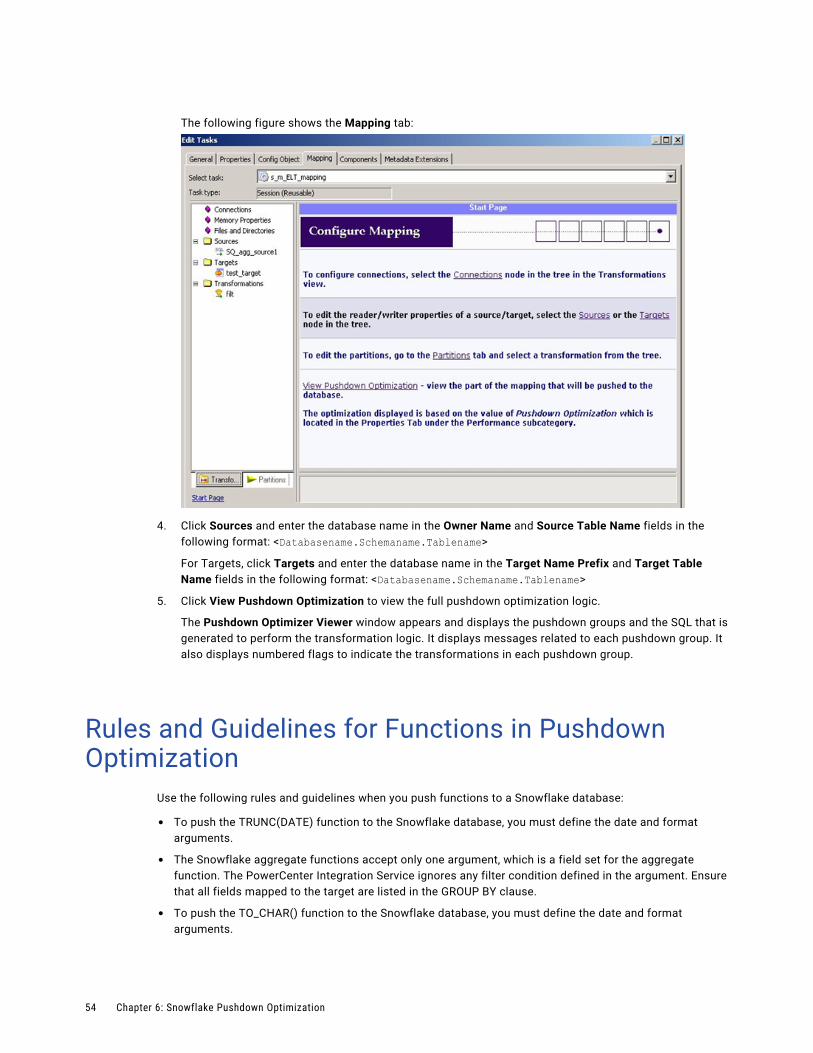
The following figure shows the Mapping tab:
4. Click Sources and enter the database name in the Owner Name and Source Table Name fields in the following format: <Databasename.Schemaname.Tablename>
For Targets, click Targets and enter the database name in the Target Name Prefix and Target Table Name fields in the following format: <Databasename.Schemaname.Tablename>
5. Click View Pushdown Optimization to view the full pushdown optimization logic.
The Pushdown Optimizer Viewer window appears and displays the pushdown groups and the SQL that is generated to perform the transformation logic. It displays messages related to each pushdown group. It also displays numbered flags to indicate the transformations in each pushdown group.
Rules and Guidelines for Functions in Pushdown Optimization
Use the following rules and guidelines when you push functions to a Snowflake database:
• To push the TRUNC(DATE) function to the Snowflake database, you must define the date and format arguments.
• The Snowflake aggregate functions accept only one argument, which is a field set for the aggregate function. The PowerCenter Integration Service ignores any filter condition defined in the argument. Ensure that all fields mapped to the target are listed in the GROUP BY clause.
• To push the TO_CHAR() function to the Snowflake database, you must define the date and format arguments.
54 Chapter 6: Snowflake Pushdown Optimization
• When you push the SYSTIMESTAMP() and SYSDATE() functions to the Snowflake database, do not specify any format. The Snowflake database returns the complete time stamp.
• You cannot push the TO_BIGINT() or TO_INTEGER() function with more than one argument to the Snowflake database.
• When you push the REPLACECHR() or REPLACESTR() function to the Snowflake database, the PowerCenter Integration Service ignores the caseFlag argument.For example, both REPLACECHR(false, in_F_CHAR, 'a', 'b') and REPLACECHR(true, in_F_CHAR, 'a', 'b') return the same value.
• You cannot use millisecond and microsecond values when you push functions to the Snowflake database.
• You can use nanosecond values in the ADD_TO_DATE() and TRUNC(DATE) functions only.
• To push the TRUNC(DATE), GET_DATE_PART(), and DATE_DIFF() functions to the Snowflake database, you must use the following time formats as arguments:
- D
- DDD
- HH
- MI
- MM
- SS
- YYYY
For example, TRUNC(<datefieldname>, 'dd').
For information on date and time related functions, see the following website: https://docs.snowflake.net/manuals/sql-reference/functions-date-time.html#label-supported-date-time-parts
Rules and Guidelines for Functions in Pushdown Optimization 55
A p p e n d i x A
Snowflake Data Type ReferenceThis appendix includes the following topics:
• Data Type Reference Overview, 56
• Snowflake and Transformation Data Types, 56
Data Type Reference OverviewPowerCenter uses the following data types in Snowflake mappings:
• Snowflake native data types. Snowflake data types appear in Snowflake definitions in a mapping.
• Transformation data types. Set of data types that appear in the transformations. They are internal data types based on ANSI SQL-92 generic data types, which the PowerCenter Integration Service uses to move data across platforms. They appear in all transformations in a mapping.
When the PowerCenter Integration Service reads source data, it converts the native data types to the comparable transformation data types before transforming the data. When the PowerCenter Integration Service writes to a target, it converts the transformation data types to the comparable native data types.
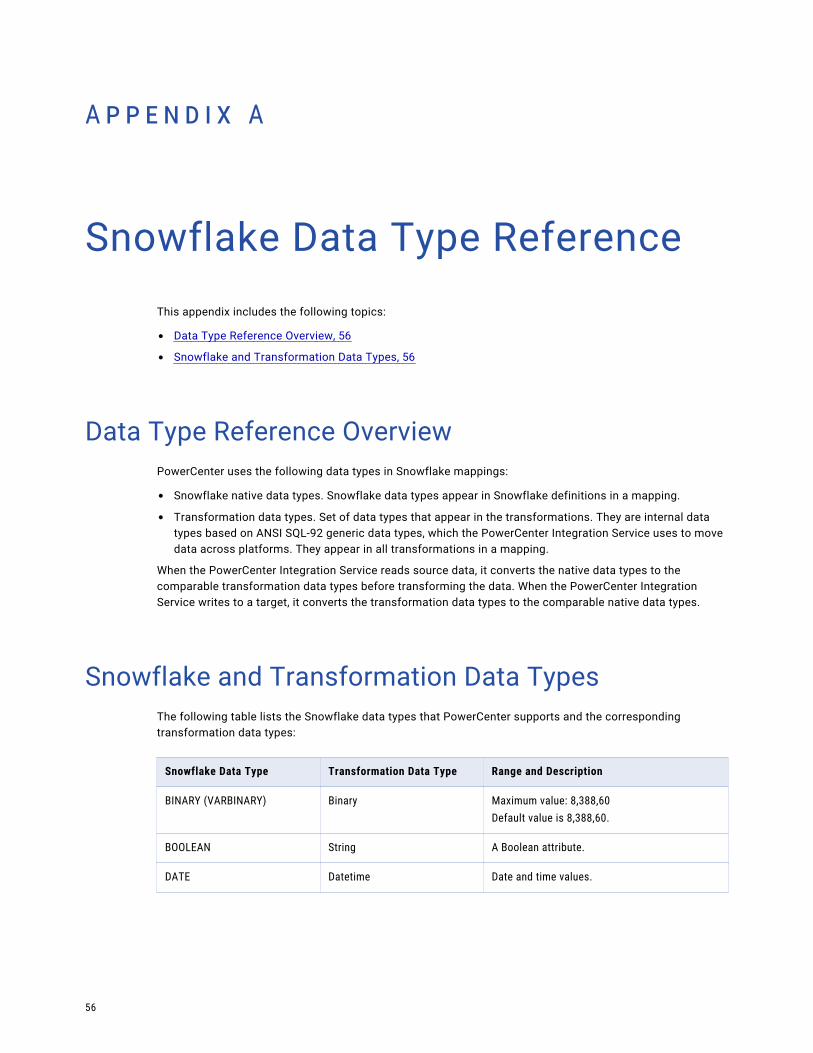
Snowflake and Transformation Data TypesThe following table lists the Snowflake data types that PowerCenter supports and the corresponding transformation data types:
Snowflake Data Type Transformation Data Type Range and Description
BINARY (VARBINARY) Binary Maximum value: 8,388,60Default value is 8,388,60.
BOOLEAN String A Boolean attribute.
DATE Datetime Date and time values.
56
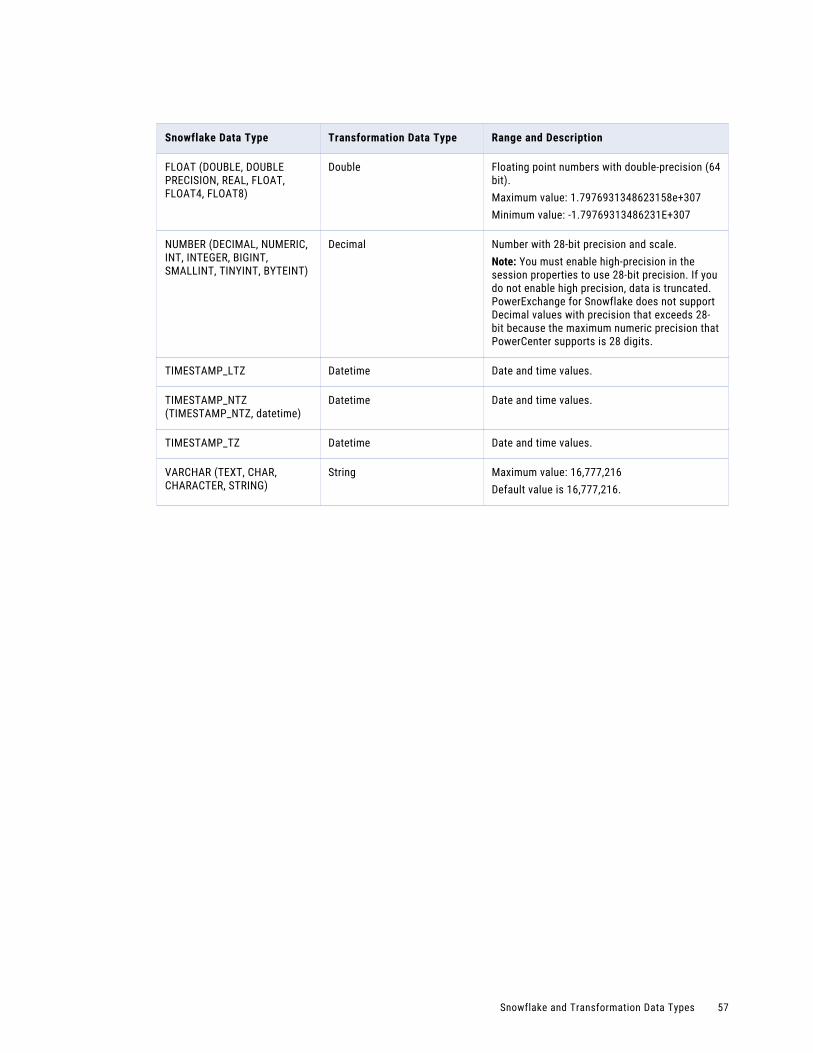
Snowflake Data Type Transformation Data Type Range and Description
FLOAT (DOUBLE, DOUBLE PRECISION, REAL, FLOAT, FLOAT4, FLOAT8)
Double Floating point numbers with double-precision (64 bit).Maximum value: 1.7976931348623158e+307Minimum value: -1.79769313486231E+307
NUMBER (DECIMAL, NUMERIC, INT, INTEGER, BIGINT, SMALLINT, TINYINT, BYTEINT)
Decimal Number with 28-bit precision and scale.Note: You must enable high-precision in the session properties to use 28-bit precision. If you do not enable high precision, data is truncated. PowerExchange for Snowflake does not support Decimal values with precision that exceeds 28-bit because the maximum numeric precision that PowerCenter supports is 28 digits.
TIMESTAMP_LTZ Datetime Date and time values.
TIMESTAMP_NTZ (TIMESTAMP_NTZ, datetime)
Datetime Date and time values.
TIMESTAMP_TZ Datetime Date and time values.
VARCHAR (TEXT, CHAR, CHARACTER, STRING)
String Maximum value: 16,777,216Default value is 16,777,216.
Snowflake and Transformation Data Types 57
I n d e x
Cconfiguration
overview 9prerequisites 9product availability matrix 9
Configuring Snowflake ODBC connections 47
configuring source filter 21configuring source join 22
Ddata types 56
Eexpressions
update strategy 36
Ffilter
application source qualifier 20source filter 20
filter conditions 21
IImport
connection properties 13, 16source definition 13, 16target definition 13
Jjava heap size 11join
application source qualifier 22source join 22
join conditions 22
LLookup transformation
pipeline lookup example 34using pipeline in mapping 34
Mmapping
example 26filter 20source 20target 20
Ppipeline lookup
mapping 34mapping example 34
plug-in registration administrator tool 10command line interface 10
PowerExchange for Snowflake configuration 9EBF 7example 7overview 7plug-in registration 10
pushdown optimization overview 44transformations 46
Ssession
additional JDBC URL parameters 28connection configuration 29connection properties 28database/schema 28overview 28source properties 30target properties 31
snowflake architecture 7cloud data warehouse 7mappings 20source 13target 13
Snowflake data types 56
Ttransformation data types 56transformations
pushdown optimization 46
58

UUpdate Strategy transformation
entering expressions 36
Index 59