Embed Size (px)
DESCRIPTION
U31 software installation guide
Citation preview

NetNumen™ U31 R22Unified Network Management System
Software Installation Guide
Product Version: V12.11.40
ZTE CORPORATIONNO. 55, Hi-tech Road South, ShenZhen, P.R.ChinaPostcode: 518057Tel: +86-755-26771900Fax: +86-755-26770801URL: http://ensupport.zte.com.cnE-mail: [email protected]

LEGAL INFORMATIONCopyright © 2011 ZTE CORPORATION.
The contents of this document are protected by copyright laws and international treaties. Any reproduction or
distribution of this document or any portion of this document, in any form by any means, without the prior written
consent of ZTE CORPORATION is prohibited. Additionally, the contents of this document are protected by
contractual confidentiality obligations.
All company, brand and product names are trade or service marks, or registered trade or service marks, of ZTE
CORPORATION or of their respective owners.
This document is provided “as is”, and all express, implied, or statutory warranties, representations or conditions
are disclaimed, including without limitation any implied warranty of merchantability, fitness for a particular purpose,
title or non-infringement. ZTE CORPORATION and its licensors shall not be liable for damages resulting from the
use of or reliance on the information contained herein.
ZTE CORPORATION or its licensors may have current or pending intellectual property rights or applications
covering the subject matter of this document. Except as expressly provided in any written license between ZTE
CORPORATION and its licensee, the user of this document shall not acquire any license to the subject matter
herein.
ZTE CORPORATION reserves the right to upgrade or make technical change to this product without further notice.
Users may visit ZTE technical support website http://ensupport.zte.com.cn to inquire related information.
The ultimate right to interpret this product resides in ZTE CORPORATION.
Revision History
Revision No. Revision Data Revision Reason
R1.0 2012-01-10 NetNumen™ U31 R22 (V12.11.40) Issued
Serial Number: SJ-20111118090716-003
Publishing Date: 2012-01-10 (R1.0)

About This ManualPurposeThis manual is applicable to NetNumen™ U31 R22(V12.11.40) Unified NetworkManagement System (hereinafter referred to U31 R22).
U31 R22 is a network-level network management system based on the distributed,multi-process and modular design. It can exercise unified management over the CTN,SDH, WDM/OTN, Router, BAS and Switch series of optical transmission equipment fromZTE.
IntroductionThis manual is NetNumen™ U31 R22 (V12.11.40) Unified Network Management SystemSoftware Installation Guide. It contains the following contents:
Chapter Summary
1, Installing U31 R22 Describes how to install the U31 R22 server and U31 R22 client.
2, Starting and Quitting U31 R22 Describes how to start up and shut down U31 R22 server, and
how to log in to or exit U31 R22 client.
3, Uninstalling U31 R22 Describes how to uninstalling the U31 R22 server and U31 R22
client.
Intended AudienceThis manual is intended for:
l Planning Engineersl U31 R22 Monitoring Personnell Maintenance Engineers
ConventionsThe following safety signs may appear in this manual.
Safety Sign Meaning
DangerA serious accident, such as casualties or equipment damage may
occur if you ignore this safety warning.
WarningA major accident, such as casualties or equipment damage may oc-
cur if you ignore this safety warning.
Caution
Equipment damage, data loss, degradation of equipment perfor-
mance, or other unpredictable result may occur if you ignore this
safety warning.
I

Safety Sign Meaning
NoteProvides additional information about a topic.
TipIndicates a suggestion or hint to make things easier or more produc-
tive.
II

Table of ContentsAbout This Manual ......................................................................................... I
Chapter 1 Installing the U31 R22............................................................... 1-11.1 Software Installation Flow ................................................................................... 1-1
1.2 Installing the U31 R22 On the Windows OS ......................................................... 1-2
1.2.1 Installing the U31 R22 Server and Client.................................................... 1-2
1.2.2 Installing the U31 R22 Client ................................................................... 1-13
1.3 Installing the U31 R22 On the Solaris OS........................................................... 1-19
1.3.1 Installation Instructions ........................................................................... 1-19
1.3.2 Server Configuration............................................................................... 1-20
1.3.3 Preparation Before Installation ................................................................ 1-23
1.3.4 Installing the U31 R22 Server.................................................................. 1-27
1.3.5 Installing Licenses.................................................................................. 1-33
1.4 Installing the U31 R22 On the Linux OS............................................................. 1-33
1.4.1 Installation Instruction............................................................................. 1-33
1.4.2 Configuration Requirement for the Server ................................................ 1-34
1.4.3 Preparation Before Installation ................................................................ 1-36
1.4.4 Installing the U31 R22 Server.................................................................. 1-37
1.4.5 Installing License.................................................................................... 1-45
Chapter 2 Starting and Exiting the U31 R22 ............................................ 2-12.1 Starting and exiting the U31 R22 On the Windows OS.......................................... 2-1
2.1.1 Starting the U31 R22 Server ..................................................................... 2-1
2.1.2 Logging in to the U31 R22 Client ............................................................... 2-1
2.1.3 Exiting the U31 R22 Client ........................................................................ 2-2
2.1.4 Exiting the U31 R22 Server....................................................................... 2-3
2.2 Starting and exiting the U31 R22 On the Solaris OS ............................................. 2-4
2.2.1 Starting the U31 R22 Server ..................................................................... 2-4
2.2.2 Exiting the U31 R22 Server....................................................................... 2-4
2.3 Starting and exiting the U31 R22 On the Linux OS ............................................... 2-5
2.3.1 Starting the U31 R22 Server ..................................................................... 2-5
2.3.2 Quitting the U31 R22 Server ..................................................................... 2-6
Chapter 3 Uninstalling the U31 R22.......................................................... 3-13.1 Uninstalling the U31 R22 On the Windows OS ..................................................... 3-1
3.1.1 Uninstalling the U31 R22 Server and Client................................................ 3-1
I

3.1.2 Uninstalling the U31 R22 Client................................................................. 3-2
3.2 Uninstalling the U31 R22 On the Solaris OS ........................................................ 3-3
3.2.1 Uninstalling the U31 R22 Server Software ................................................. 3-3
3.3 Uninstalling the U31 R22 On the Linux OS........................................................... 3-4
3.3.1 Uninstalling the U31 R22 Server Software ................................................. 3-4
Figures............................................................................................................. I
Tables ............................................................................................................ III
Glossary .........................................................................................................V
II

Chapter 1Installing the U31 R22Table of Contents
Software Installation Flow...........................................................................................1-1Installing the U31 R22 On the Windows OS ...............................................................1-2Installing the U31 R22 On the Solaris OS.................................................................1-19Installing the U31 R22 On the Linux OS ...................................................................1-33
1.1 Software Installation FlowThe software installation flow of the U31 R22 system is shown in Figure 1-1.
Figure 1-1 Software Installation Flow of the U31 R22 System
The software installation of the U31 R22 system includes two parts: software installationon the server, and software installation on the client.
l On the server, install the operating system, database, and U31 R22 server software.l On the client, install the operating system and the U31 R22 client software.
1-1
SJ-20111118090716-003|2012-01-10 (R1.0) ZTE Proprietary and Confidential

NetNumen™ U31 R22 Software Installation Guide
1.2 Installing the U31 R22 On the Windows OS
1.2.1 Installing the U31 R22 Server and Client
1.2.1.1 Hardware Configuration Requirement for the U31 R22 ServerOn the Windows OS, the hardware platform of the U31 R22 server software and that ofthe U31 R22 client can be integrated or be separated. For different numbers of NEs tobe managed, the recommended hardware configurations are different. Table 1-1 lists thetypical hardware configurations of the U31 R22 server.
Table 1-1 Hardware Configuration Requirement for the U31 R22 Server
The Number ofEquivalent NEs
MaximumNumber ofClients
Windows Server(For IntegratedConfiguration)
Windows Server (For SeparatedConfiguration)
CPU: dual-core CPU: dual-core
Main frequency ≥ 3 GHz Main frequency ≥ 3 GHz
Memory ≥ 4 GB Memory ≥ 4 GB
300 16
Hard disk ≥200 GB Hard disk ≥ 200 GB
CPU: 2 x dual-core or
four-core
CPU: 2 x dual-core or four-core
CPU frequency ≥ 3 GHz CPU frequency ≥ 3 GHz
Memory ≥ 4 GB Memory ≥ 4 GB
1000 32
Hard disk ≥ 200 GB Hard disk ≥ 200 GB
CPU: 2 x four-core CPU: 2 x four-core
Main frequency ≥ 3 GHz Main frequency ≥ 3 GHz
Memory ≥ 8 GB Memory ≥ 8 GB
3000 64
Hard disk ≥ 200 GB Hard disk≥200 GB
CPU: 4 x four-core
Main frequency ≥ 3 GHz
Memory ≥ 16 GB
Hard disk ≥ 200 GB
Disk array sub-card
8000 128 -
At least three hard disks (SCSI
SAS interfaces) of the same
configuration.
1-2
SJ-20111118090716-003|2012-01-10 (R1.0) ZTE Proprietary and Confidential

Chapter 1 Installing the U31 R22
The Number ofEquivalent NEs
MaximumNumber ofClients
Windows Server(For IntegratedConfiguration)
Windows Server (For SeparatedConfiguration)
CPU: 4 x four-core
CPU frequency ≥ 3 GHz
Memory ≥ 32 GB
Hard disk ≥ 200 GB
Disk array sub-card
At least three hard disks (SCSI
SAS interfaces) of the same
configuration.
20000 200 -
The two servers employ the
distributed mode.
1.2.1.2 Software Configuration of the ServerTable 1-2 lists the software required on the U31 R22 server.
Table 1-2 Software Configuration of the Server
Managed Object Windows Server Configuration
Operating system l Windows 2003 Server (SP2 or above, operating system of 32
bits)/Windows 2008 Server: the SQL Server2005 database is
required.
l Solaris: the Oracle database is required.
Database SQL Server 2005 or Oracle
Redundancy scheme
software
Veritas
1.2.1.3 Preparation Before Installation1. Install the Windows OS according to the requirements in "Software Configuration of
the Server".2. Install the database according to the requirements in "Software Configuration of the
Server".3. Check the network connection to ensure normal network communication.
a. Log in to the Windows operating system as the system administrator.
b. Select Start > Settings > Network Connections. The Network Connectionsdialog box appears.
1-3
SJ-20111118090716-003|2012-01-10 (R1.0) ZTE Proprietary and Confidential

NetNumen™ U31 R22 Software Installation Guide
c. Check whether the status of "Local Area Connection" is normal and whether thenetwork communication is normal.
1.2.1.4 Installing U31 R22 Server and Client SoftwareThis section provides instructions for installing the U31 R22 server and client software on aPC. After this PC is connected to the bearer transmission network, it can manage deviceson the network through the U31 R22 server.
Prerequisite
l The PC hardware meets the requirements described in Typical HardwareConfigurations of the Server section.
l The PC software meets the requirements described in Typical Software Configura-tions of the Server section.
l The database services are terminated.l The FTP publishing service is terminated in the operating system.
Context
If U31 R22 has been installed in the server, please uninstall the program at first and thendelete it. Afterwards, do the following steps.
Steps
1. Log in to the Windows operating system as the administrator role.
2. Get the installation package from the U31 R22 installation CD. Run the setup.batprogram.
3. When prompted to open the unzip path, press the Enter key to unzip the installationfiles under the default path.
4. After the installation files are unzipped, the Select language window appears. SelectEnglish.
1-4
SJ-20111118090716-003|2012-01-10 (R1.0) ZTE Proprietary and Confidential

Chapter 1 Installing the U31 R22
5. Click Next to open the License agreement page.
6. Select I accept the license agreement.
7. Click Next to open the Select installation style page.
8. In Available installation styles, select Normal Installation. In Available installationtypes, select Client And Server Program.
1-5
SJ-20111118090716-003|2012-01-10 (R1.0) ZTE Proprietary and Confidential

NetNumen™ U31 R22 Software Installation Guide
9. Click Next. The Hierarchy Configuration window appears.
10. Keep the default setting, click Next. The Network Scale window appears.
11. Select the network scale in accordance with Table 1-3.
Caution!l Currently, only Scale 2 is supported when U31 R22 is managing BN-xTN
(IPTN&OTN) products.l U31 R22 does not support cross-scale data backup restoration or the incremental
upgrades of different scales.
Table 1-3 Description of Network Scales
Scale Description
Scale 1 l Only BN-IP (IP) products are installed: The installation is applicable
to applicable to computers with 2 G to 3 G physical memory.
l This scale is not applicable to install BN-xTN (IPTN&OTN) products.
Scale 2 l Only BN-IP (IP) products are installed: The installation is applicable
to applicable to computers with 4 G to 7 G physical memory.
l BN-xTN (IPTN&OTN) products are installed: The installation is
applicable to applicable to computers with 8 G or above physical
memory.
1-6
SJ-20111118090716-003|2012-01-10 (R1.0) ZTE Proprietary and Confidential
Chapter 1 Installing the U31 R22
Scale Description
Scale 3 l Only BN-IP (IP) products are installed: The installation is applicable
to applicable to computers with 8 G to 15 G physical memory.
l This scale is not applicable to install BN-xTN (IPTN&OTN) products.
Scale 4 l Only BN-IP (IP) products are installed: The installation is applicable
to applicable to computers with 16 G to 31 G physical memory.
l This scale is not applicable to install BN-xTN (IPTN&OTN) products.
Scale 5 l Only BN-IP (IP) products are installed: The installation is applicable
to applicable to computers with 32 G to 63 G physical memory.
Under the scale, the database must run in 64-bit operating systems,
and server process would be best run in 64-bit operating systems,
otherwise it will affect the network operation performance.
l This scale is not applicable to install BN-xTN (IPTN&OTN) products.
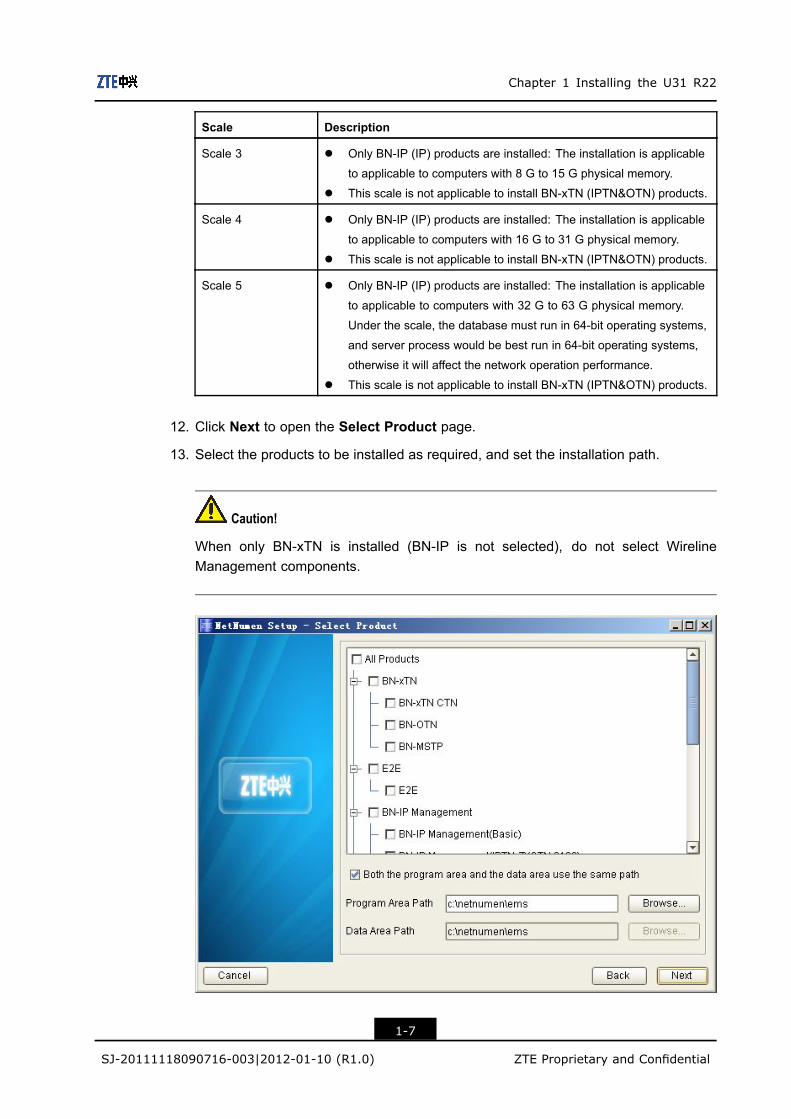
12. Click Next to open the Select Product page.
13. Select the products to be installed as required, and set the installation path.
Caution!
When only BN-xTN is installed (BN-IP is not selected), do not select WirelineManagement components.
1-7
SJ-20111118090716-003|2012-01-10 (R1.0) ZTE Proprietary and Confidential

NetNumen™ U31 R22 Software Installation Guide
14. Click Next to open the Database connection config page.
15. Configure the database connection parameters, which are described in Table 1-4.
Table 1-4 Explanations of Parameters in the Database Connection Config Page
Parameter Explanation
Database typeSelect the database type of the U31 R22 server, options: Oracle
and Microsoft SQL Server.
Database IP or hostnameEnter the IP address or host name of the computer on which the
U31 R22 server database is installed.
Database port
Set the port number of the database instance. The default value
is recommended.
If several database instances have been created, use the port
number of the instance used by the U31 R22 system.
SID(Only for oracle)Enter the System Identifier (SID) of the database. Only applies
to the Oracle database.
Database superuser name Enter the superuser name of the database.
Password Enter the password of the superuser.
16. After configuring the parameters, click Test Database Connection to check if thedatabase can be successfully connected.
1-8
SJ-20111118090716-003|2012-01-10 (R1.0) ZTE Proprietary and Confidential

Chapter 1 Installing the U31 R22
17. If the Message dialog box appears, indicating that the connection is successful, clickOK to return to the Database connection config window. Then click Next to openthe Database config page.
Note:
If the connection fails, remove the database connection fault first, and then continuethe installation of U31 R22.
18. Set the save paths and sizes of database files as needed.
19. Click Next to open the Host information config page.
20. Configure the server host information by referring to Table 1-5.
1-9
SJ-20111118090716-003|2012-01-10 (R1.0) ZTE Proprietary and Confidential

NetNumen™ U31 R22 Software Installation Guide
Table 1-5 Description of Configuring the Host Information
Parameter Description
Main process server address Enter the IP address of the main server.
Main process standby server
address
Enter the IP address of the standby server when configuring
the U31 R22 active/standby servers.
Please input EMS ID The unique ID of the U31 R22 server. Only one EMS ID in
the entire network.
Distributed servers
configuration
When U31 R22 is deployed in distributed mode, you can
click Add to add the IP address of other host deployed in
distributed mode.
21. Click Next to open the System information detection page.
1-10
SJ-20111118090716-003|2012-01-10 (R1.0) ZTE Proprietary and Confidential

Chapter 1 Installing the U31 R22
22. If the detection result of each Detect Item is Pass, click Next to open the InstallationInformation Confirm page.
Note:
If the detection result of any Detect Item is Not Pass, remove the fault according to theindication, and then continue to install U31 R22.
23. After confirming that the installation information is correct, click Install to open theUnzip and copy files page.
24. After all files are unzipped and copied, click Next. The Confirm dialog box appears,asking you whether to execute the SQL scripts now.
25. Click Yes to open the Install database page, and the installation of database starts.
26. After the SQL scripts are executed, click Next to open the Parameter Set page.
1-11
SJ-20111118090716-003|2012-01-10 (R1.0) ZTE Proprietary and Confidential

NetNumen™ U31 R22 Software Installation Guide
Note:
After the installation you may run NetNumen Configuration Center to modify theparameters.
27. Click Next to open the System initialization page. The Confirm dialog box appears,asking you whether to initialize all client scenes.
28. Click Yes.
29. After the system is initialized, click Next to open the Installation finished page.
30. Click Finish.
– End of Steps –
Result
The selected components of U31 R22 are installed on the computer.
1.2.1.5 Installing The License
Prerequisite
l The U31 R22 server has been installed successfully.l You have obtained the License ums-license.LCS authorized by ZTE.
1-12
SJ-20111118090716-003|2012-01-10 (R1.0) ZTE Proprietary and Confidential

Chapter 1 Installing the U31 R22
Context
Caution!
To run U31 R22 server, License must have been installed, while to run U31 R22 clientLicense is not necessary.
Steps
1. Log in the Windows operating system as Administrator.
2. Search the ums-license.LCS file in the U31 R22 directory where the server has beeninstalled.
Note:
During the process for installing U31R22, Licensemay be saved at different directoriesbased on different network scales.
For example, when you select Scale 1 for the network scale, License will be saved inums-server\works\uep\deploy. While, when you select Scale 2/Scale 3/Scale 4/Scale5, License will be saved in ums-server\works\main\deploy.
3. Copy the authorized License ums-license.LCS, and use it to replace the default file ofthe same name.
Note:l License must be named as ums-license.LCS, otherwise, the user cannot use it
properly.l The default ums-license.LCS file does not support any U31 R22 operation.
Therefore, you must replace it with the authorized License.
– End of Steps –
1.2.2 Installing the U31 R22 Client
1.2.2.1 Hardware Configuration of the ClientA Personal Computer (PC) workstation can serve as the U31 R22 client. Table 1-6 liststhe minimal hardware configuration of the client PC workstation.
1-13
SJ-20111118090716-003|2012-01-10 (R1.0) ZTE Proprietary and Confidential

NetNumen™ U31 R22 Software Installation Guide
Table 1-6 Hardware Configuration of U31 R22 Client
The Number of Equivalent NEs Configuration of Independent Client (Workstation)
CPU: dual-core
CPU frequency≥3 GHz
Memory≥1 GB
300
Hard disk≥80 GB
CPU: dual-core
CPU frequency≥3 GHz
Memory≥1 GB
1000
Hard disk≥80 GB
CPU: dual-core
CPU frequency≥3 GHz
Memory≥2 GB
3000
Hard disk≥80 GB
CPU: dual-core
CPU frequency≥3 GHz
Memory≥4 GB
8000
Hard disk≥80 GB
CPU: dual-core
CPU frequency≥3 GHz
Memory≥8 GB
20000
Hard disk≥80 GB
1.2.2.2 Software Configuration of the ClientTable 1-7 lists the software required on the client computer.
Table 1-7 Software Configuration of the Client
Managed Object Configuration
Operating system Windows 2003 Server (SP2 or above, operating system of
32 bits)/Windows 2008 Server/Windows XP/Window 7
Browser Netscape, or Internet Explorer 6.0 or later
Document viewer Microsoft Office 2000 or later
Antivirus software Mcafee VirusScan8.5, Norton, or Trend
1-14
SJ-20111118090716-003|2012-01-10 (R1.0) ZTE Proprietary and Confidential

Chapter 1 Installing the U31 R22
1.2.2.3 Installing the Client SoftwareInstall a U31 R22 client program alone, so you may access the server on another PCthrough this client.
Prerequisite
l The PC hardware meets the requirements described in Hardware Configuration of theClient.
l The PC software meets the requirements described in Software Configuration of theClient.
Steps
1. Log in to the Windows operating system as the administrator role.
2. Get the installation package from the U31 R22 installation CD. Run the setup.batprogram.
3. When prompted to enter the unzip path, press the ENTER key to unzip the installationfiles under the default path.
4. After the installation files are unzipped, the Select language window appears. SelectEnglish.
5. Click Next to enter the License agreement page.
6. Select I accept the license agreement.
1-15
SJ-20111118090716-003|2012-01-10 (R1.0) ZTE Proprietary and Confidential

NetNumen™ U31 R22 Software Installation Guide
7. Click Next to enter the Select installation style page.
8. In Available installation styles, select Normal Installation; In Available installationtypes, select Client Program.
9. Click Next. The Select Product window appears.
10. Select the products to be installed as required, and set the installation path.
1-16
SJ-20111118090716-003|2012-01-10 (R1.0) ZTE Proprietary and Confidential

Chapter 1 Installing the U31 R22
Note:l Select product: Select the device types in the network and the U31 R22 product
components to install. It is recommended to select BN-MSTP, BN-CTN, andBN-OTN below BN-xTN. The user can select BN Northbound Interface(NetNumen T37) according to the needs. It is recommended to select E2E.
l Set the installation path: Select the default path for installing the program, or clickBrowse... to set other installation paths.
11. Click Next to enter the System information detection page.
1-17
SJ-20111118090716-003|2012-01-10 (R1.0) ZTE Proprietary and Confidential

NetNumen™ U31 R22 Software Installation Guide
12. If the detection result of each Detect Item is Pass, click Next to enter the InstallationInformation Confirm page.
Note:
If the detection result of any Detect Item is Not Pass, remove the fault according to theindication, and then continue to install U31 R22.
13. After confirming that the installation information is correct, click Install to enter theUnzip and copy files page.
14. After all files are unzipped and copied, click Next to enter the Parameter Set page.
1-18
SJ-20111118090716-003|2012-01-10 (R1.0) ZTE Proprietary and Confidential

Chapter 1 Installing the U31 R22
15. The default settings are recommended. Click Next to enter the System initializationpage. The Confirm dialog box appears, asking you whether to initialize all clientscenes.
16. Click Yes.
17. After the system is initialized, click Next to enter the Installation finished page.
18. Click Finish.
– End of Steps –
Result
The selected components of the U31 R22 client are installed on the computer.
1.3 Installing the U31 R22 On the Solaris OS
1.3.1 Installation Instructions
Note:
It is recommended that you install the U31 R22 server on the Solaris operating system andinstall a standalone U31 R22 client on the Windows operating system.
1-19
SJ-20111118090716-003|2012-01-10 (R1.0) ZTE Proprietary and Confidential

NetNumen™ U31 R22 Software Installation Guide
1.3.2 Server Configuration
1.3.2.1 Hardware Configuration Requirement for the U31 R22 ServerIt is recommended that you install the U31 R22 server software on the Solaris operatingsystem and install the U31 R22 client software on the Windows operating system. Fordifferent numbers of NEs to be managed, the recommended hardware configurations aredifferent. Table 1-8 lists several typical hardware configurations of the server computer.
Table 1-8 Hardware Configuration Requirement for the U31 R22 Server
Number ofEquivalent NEs
Number of U31 R22Clients That Can BeConnected
Windows Server(For IntegratedConfiguration)
Windows Server (For SeparatedConfiguration)
CPU: dual-core CPU: dual-core
Main frequency ≥ 2
GHz
Main frequency ≥ 2 GHz
Memory ≥ 8 GB Memory ≥ 8 GB
300 16
Hard disk ≥ 200 GB Hard disk ≥ 200 GB
CPU: dual-core or
four-core
CPU: dual-core or four-core
Main frequency ≥ 2
GHz
Main frequency ≥ 2 GHz
Memory ≥ 8 GB Memory ≥ 8 GB
1000 32
l Single computer:
Hard disk ≥
300G
l Local dual
computer: Disk
array
Specification:
SAS hard disk
Quantity:
Four, in RAID
5+SPARE mode
Capacity ≥ 300G
l Remote dual
computer:
Each sever is
configured with
the same hard
disk (SCSI SAS
l Single computer: Hard disk
≥ 300G
l Local dual computer: Disk
array
Specification: SAS hard disk
Quantity: Four, in RAID 5
mode
Capacity ≥ 300G
l Remote dua computer: Each
sever is configured with the
same hard disk (SCSI SAS
interface) ≥ 2 x 300G
1-20
SJ-20111118090716-003|2012-01-10 (R1.0) ZTE Proprietary and Confidential

Chapter 1 Installing the U31 R22
Number ofEquivalent NEs
Number of U31 R22Clients That Can BeConnected
Windows Server(For IntegratedConfiguration)
Windows Server (For SeparatedConfiguration)
interface) ≥ 2 x
300G
CPU: 4 x four-core
Main frequency ≥ 2 GHz
Memory ≥ 16 GB
3000 64 –
Hard disk ≥ 300 GB
l (Optional) Single computer:
Disk array sub-card (The
RAID1 mode requires at
least two hard disks, while
the RAID 0+1 mode requires
at least four hard disks)
l Local dual computer: Disk
array
Specification: SAS hard disk
Quantity: Five, in RAID 5
mode
Capacity ≥ 146G
l Remote dual computer: Each
sever is configured with the
same hard disk (SCSI SAS
interface) ≥ 3 x 300G (RAID
0 mode)
CPU: 4 x four-core
Main frequency ≥ 2 GHz
Memory ≥ 24 GB
Hard disk ≥ 600 GB
8000 128 -
l Single computer: Disk array
sub-card (The RAID 0+1
mode requires at least eight
hard disks)
l Local dual computer: Disk
array
Specification: SAS hard disk
Quantity: Seven, in RAID 5
mode
Capacity ≥ 300G
1-21
SJ-20111118090716-003|2012-01-10 (R1.0) ZTE Proprietary and Confidential

NetNumen™ U31 R22 Software Installation Guide
Number ofEquivalent NEs
Number of U31 R22Clients That Can BeConnected
Windows Server(For IntegratedConfiguration)
Windows Server (For SeparatedConfiguration)
l Remote dual computer: Each
sever is configured with the
same hard disk (SCSI SAS
interface) ≥ 5 x 600G (RAID
0 mode)
CPU: 4 x six-core
Main frequency ≥ 2 GHz
Memory ≥ 48 GB
Hard disk ≥ 600 GB
20000 200 -
Disk array for both single
computer and dual computer
Specification: SAS hard disk
Quantity: 11, in RAID 5 mode
Capacity ≥ 300G
Note:l Standard confutation for the Window server: Windows Server 2008 (64 bits) + SQL
Server 2008 (64 bits).l If the memory of the Windows server is larger than 4G, you need to configure the
enterprise edition operation system and the dual-computer software of the enterpriseedition Veritas.
l For the dual-computer configuration of the EMS server whosemanageable EquivalentNE quantity is 1000 3000 or 8000, the remote dual-computer configuration mode isrecommended.
l For the dual-computer configuration of the EMS server whosemanageable EquivalentNE quantity is 2000, the local dual-computer configuration mode is recommended.
1.3.2.2 Software Configuration Requirement for the U31 R22 ServerTable 1-9 lists the software required on the U31 R22 server.
1-22
SJ-20111118090716-003|2012-01-10 (R1.0) ZTE Proprietary and Confidential

Chapter 1 Installing the U31 R22
Table 1-9 Software Requirement of the U31 R22 Server
Solaris Server ConfigurationManaged object
Product and Version Configuration
Operating
system
Solaris 10 The operating system must meet the following
requirements:
l Capacity of the /export/home directory > 30 GB
l User permission: root user permission
l Language package: en_US.ISO8859-1
Database Oracle 10g -
Other software l FTP client
l X graphical tool
l FTP client: The U31 R22 installation package is
imported into the Solaris 10 operating system through
the FTP client.
l X graphical tool: By using the X graphical tool, you
can install the U31 R22 remotely.
1.3.3 Preparation Before Installation
1.3.3.1 Configuring XmanagerAfter configuring Xmanager, you can install the U31 R22 remotely through the Xmanager.
Prerequisite
The Solaris 10 operating system allows remote login of the root user.
Context
By default, the root user cannot log in to the system in remote login mode. If you want theroot user to log in to the server remotely, you are required to modify the server configurationin the following way:
1. On the desktop of the server PC, navigate to the This Computer > File System > etc> default directory.
2. Open the login file.3. Find theCONSOLE=/dev/console line, and enter “#” at the beginning of the line. That
is, change CONSOLE=/dev/console into #CONSOLE=/dev/console.
The Xmanager mentioned in this section is version 3.0.
Steps
1. On the client PC, select Start > Programs > Xmanager Enterprise 3 > Xbrowser.The Xbrowser dialog box appears.
2. On the Xmanager navigation tree in the left pane, select the static menu.
1-23
SJ-20111118090716-003|2012-01-10 (R1.0) ZTE Proprietary and Confidential

NetNumen™ U31 R22 Software Installation Guide
3. In the address bar, enter the server IP address and press Enter. A dialog box appear,prompting you to enter the user name.
4. Enter the user name, and click OK. A dialog box appears, prompting you to enter thepassword.
5. Enter the password and click OK to log in to the remote server.
– End of Steps –
1.3.3.2 Configuring the Oracle DatabaseDuring the installation of the U31 R22, certain tables and data need to be created in theOracle database. Therefore, the Oracle database should be in the running status so thatit can be configured.
Steps
1. On the server PC, select Launch >Applications >Utilities > Terminal. The Terminaldialog box appears.
2. Enter the ps —ef | grep oracle command, and then press the Enter key.
3. Set the Oracle database based on the command display.
If Then
The command display is empty To start the Oracle database process, enter the following
commands in turn:
i. su - oracle
ii. oracle
iii. lsnrctl start
iv. sqlplus system/password as sysdba
v. startup
The command display is not empty -
Note:
The Oracle database processes start with “ora_”. Oracle monitoring process is/export/home/builder/oracle/product/10.2.0/db_1/bin/tnslsnr LISTENER –inherit.
1-24
SJ-20111118090716-003|2012-01-10 (R1.0) ZTE Proprietary and Confidential

Chapter 1 Installing the U31 R22
4. On the desktop of the server PC, double-click the This Computer icon. The ThisComputer window appears.
5. Select the Edit > Preferences menu.
6. In the Views page of the dialog box that appears, select Show hidden and backupfiles, and then click Close.
7. (Optional) If the .profile file does not exist, create the .profile file.
Note:
If the directory for installing the Oracle database is /export/home/builder/oracle/product/10.2.0/db_1, create the .profile file in the /export/home/builder/oracle/ directory.
8. In the .profile file, add the environment variables of the Oracle database.
1-25
SJ-20111118090716-003|2012-01-10 (R1.0) ZTE Proprietary and Confidential

NetNumen™ U31 R22 Software Installation Guide
Environment Variable Description
ORACLE_HOME=/export/home/builder/ora-
cle/product/10.2.0/db_1
ORACLE_BASE=/export/home/builder/oracle/
Installation directory of the Oracle database
ORACLE_SID=uep SID of the Oracle database
PATH=$PATH:$ORACLE_HOME/bin -
LANG=zh_CN.GBK The language environment of the operating
system. When the language environment is
English, set LANG=en_US.ISO8859-1.
NLS_LANG=AMERICAN_AMER-
ICA.ZHS16GBK
The language environment of the Oracle
database. When the language environment is
English, set NLS_LANG=AMERICAN_AMER-
ICA.WE8ISO8859P1.
9. Save and close the .profile file.
– End of Steps –
1.3.3.3 Uploading the U31 R22 Installation FilesUpload the U31 R22 installation files from the FTP client to the FTP server.
Context
The FTP server refers to the PC on which the U31 R22 server is installed.
The FTP software used in this section is Filezilla.
Steps
1. On the FTP client, start the FTP software.
2. In the FTP window, enter the FTP server IP address, user name, password, and portnumber.
3. Click the Fast Connect button to connect to the FTP server.
4. Drag the U31 R22 installation files from the FTP client to a directory of the FTP server.
– End of Steps –
1.3.3.4 Modifying the FTP Service PortWhile the U31 R22 is installed on the Solaris 10 operating system, the FTP server needsto be installed, occupying TCP port 21. To prevent conflict between the FTP server on theSolaris 10 operating system and the FTP server on the U31 R22, the port number used bythe FTP server on the Solaris 10 operating system needs to be modified.
1-26
SJ-20111118090716-003|2012-01-10 (R1.0) ZTE Proprietary and Confidential

Chapter 1 Installing the U31 R22
Steps
1. On the desktop of the server PC, navigate to the This Computer > File System > etc> inet directory.
2. Open the service file in the directory.
3. Find the row of FTP, and change the port number to another idle port.
For example, you can change the port number to 2121.
4. Save and close the service file.
– End of Steps –
1.3.4 Installing the U31 R22 ServerThis section describes how to install the U31 R22 server.
Steps
1. Navigate to the directory of the U31 R22 installation files, and double-click setup.shto start the U31 R22 installation.
2. In the Selection Language dialog box, set the language to English, and then clickNext.
1-27
SJ-20111118090716-003|2012-01-10 (R1.0) ZTE Proprietary and Confidential

NetNumen™ U31 R22 Software Installation Guide
3. In the License agreement dialog box, select I accept the license agreement, andthen click Next.
4. In the Select installation style dialog box, set Available installation styles toNormal installation, and set Available installation types to Server Program, andthen click Next.
1-28
SJ-20111118090716-003|2012-01-10 (R1.0) ZTE Proprietary and Confidential

Chapter 1 Installing the U31 R22
5. In the Hierarchy configuration dialog box, accept the default settings, and then clickNext.
6. In the Network Scale dialog box, set the required scale according to the network sizeand the hardware configuration of the U31 R22 server, and then click Next.
Caution!l Currently, only Scale 2 is supported when U31 R22 is managing BN-xTN
(IPTN&OTN) products.l U31 R22 does not support cross-scale data backup restoration or the incremental
upgrades of different scales.
Table 1-10 Description of Network Scales
Scale Description
Scale 1 l Only the BN-IP (IP) products are installed: The installation is
applicable to computers with 2 G to 3 G physical memory.
l This scale is not applicable to install BN-xTN (IPTN&OTN) products.
Scale 2 l Only the BN-IP (IP) products are installed: The installation is
applicable to computers with 4 G to 7 G physical memory.
l BN-xTN (IPTN&OTN) products are installed: The installation is
applicable to applicable to computers with 16 G or above physical
memory.
Scale 3 l Only the BN-IP (IP) products are installed: The installation is
applicable to computers with 8 G to 15 G physical memory.
l This scale is not applicable to install BN-xTN (IPTN&OTN) products.
1-29
SJ-20111118090716-003|2012-01-10 (R1.0) ZTE Proprietary and Confidential

NetNumen™ U31 R22 Software Installation Guide
Scale Description
Scale 4 l The installation is applicable to computers with 16 G to 31 G physical
memory.
l This scale is not applicable to install BN-xTN (IPTN&OTN) products.
Scale 5 l The installation is applicable to computers with 32 G to 63 G physical
memory. Under the scale, the database must run in 64-bit operating
systems, server process would be best run in 64-bit operating
systems, otherwise it will affect the network operation performance.
l This scale is not applicable to install BN-xTN (IPTN&OTN) products.
7. In the Select product dialog box, set the functions of the U31 R22 server andinstallation path, and then click Next.
Caution!
When only BN-xTN is installed (BN-IP is not selected), do not select WirelineManagement components.
8. In the Database connection config dialog box, set Database IP or hostname andPassword of the database superuser.
1-30
SJ-20111118090716-003|2012-01-10 (R1.0) ZTE Proprietary and Confidential

Chapter 1 Installing the U31 R22
9. Click the Test Database Connection button to test the status of the connectionbetween the U31 R22 installation program and the database.
10. If the connection to the database is normal, click Next.
Note:
If the connection is abnormal, fix the database connection fault, and then continue theU31 R22 installation.
11. In the Database config dialog box, modify the database saving paths and databasefile sizes, and then click Next.
1-31
SJ-20111118090716-003|2012-01-10 (R1.0) ZTE Proprietary and Confidential

NetNumen™ U31 R22 Software Installation Guide
12. In the Host information config dialog box, enter the master server address, and thenclick Next.
13. When the system information detection succeeds, click Next.
14. Click Install to start the U31 R22 installation.
15. Decompress and copy the files to the required directory, and then click Next. TheConfirm message dialog box appears.
16. Click Yes.
17. After the database script is executed successfully, click Next.
18. Click Next.
1-32
SJ-20111118090716-003|2012-01-10 (R1.0) ZTE Proprietary and Confidential

Chapter 1 Installing the U31 R22
19. After the system initialization is completed, click Next.
20. Click Finish to complete the U31 R22 installation.
– End of Steps –
1.3.5 Installing LicensesLicenses must be installed for the U31 R22 so that users can use the U31 R22.
Steps
1. Install licenses.
If Then
The network scale of the U31 R22 is Scale1 The licenses are installed in the \ums-server\work
s\uep\deploy directory.
The network scale of the U31 R22 is not
Scale1.The licenses are installed in the \ums-server\work
s\main\deploy directory.
Note:
If the network scale is Scale1 and the U31 R22 is installed in the /export/home/builder/U31/ directory, the licenses are installed in the /export/home/builder/U31/ums-server/works/uep/deploy/ directory.
– End of Steps –
1.4 Installing the U31 R22 On the Linux OS
1.4.1 Installation Instruction
Note:
It is recommended to install U31 R22 servers on the Linux operating systems, and installindependent U31 R22 clients on the Windows operating systems.
1-33
SJ-20111118090716-003|2012-01-10 (R1.0) ZTE Proprietary and Confidential

NetNumen™ U31 R22 Software Installation Guide
1.4.2 Configuration Requirement for the Server
1.4.2.1 Hardware Configuration Requirements on the ServerOn the Linux platform, the hardware platforms of U31 R22 server software and clientsoftware can be installed in one computer or in different computers. Because the numbersof NEs managed by different U31 R22s are different, their hardware configurations arerecommended to be different. Refer to Table 1-11 for typical hardware configurations onthe server.
Table 1-11 Hardware Configuration Requirements on the U31 R22 Server
TheNumberof ValidNEs
TheNumber ofAccessibleClients
Linux Server (Server and ClientSoftware in One Computer)
Linux Server (Server and ClientSoftware in Different Computers)
CPU: dual core CPU: dual core
Main frequency ≥ 2GHz Main frequency ≥ 2GHz
Memory ≥ 8G Memory ≥ 8G
300 16
Hard disk ≥ 200G Hard disk ≥ 200G
CPU: 2 * dual core or quad core CPU: 2 * dual core or quad core
Main frequency ≥ 2GHz Main frequency ≥ 2GHz
Memory ≥ 8G Memory ≥ 8G
1000 32
l Single server: hard disk ≥
300G
l Local two-server cluster: disk
array
Specification: SAS hard disk
Quantity: 4 pcs in RAID 5+
SPARE mode
Capacity ≥ 300G
l Remote two-server cluster:
same hard disk of each server
with SCSI SAS interface ≥ 2
* 300G
l Single server: hard disk ≥
300G
l Two-server cluster: disk array
Specification: SAS hard disk
Quantity: 4 pcs in RAID 5
mode
Capacity ≥ 300G
l Remote two-server cluster:
same hard disk of each server
with SCSI SAS interface ≥ 2 *
300G
1-34
SJ-20111118090716-003|2012-01-10 (R1.0) ZTE Proprietary and Confidential

Chapter 1 Installing the U31 R22
TheNumberof ValidNEs
TheNumber ofAccessibleClients
Linux Server (Server and ClientSoftware in One Computer)
Linux Server (Server and ClientSoftware in Different Computers)
CPU: 2* quad core
Main frequency ≥ 2GHz
Memory ≥ 16G
3000 64
Hard disk ≥ 300G
l (Optional) single server: disk
array subcard. A minimum of
two hard disks are required
for the RAID mode, and a
minimum of four for the RAID
0+1 mode
l Two-server cluster: disk array
Specification: SAS hard disk
Quantity: 5 pcs in RAID 5
mode
Capacity ≥ 146G
l Remote two-server cluster:
same hard disk of each server
with SCSI SAS interface ≥ 3 *
300G in RAID 0 mode
CPU: 4* quad core
Main frequency ≥ 2GHz
Memory ≥ 32G
Hard disk ≥ 600G
8000 128 -
l Single server: disk array
subcard. A minimum of eight
hard disks are required for the
RAID 0+1 mode
l Two-server cluster: disk array
Specification: SAS hard disk
Quantity: 7 pieces in RAID 5
mode
Capacity ≥ 300G
l Remote two-server cluster:
same hard disk of each server
with SCSI SAS interface ≥ 5 *
600G in RAID 0 mode
1-35
SJ-20111118090716-003|2012-01-10 (R1.0) ZTE Proprietary and Confidential

NetNumen™ U31 R22 Software Installation Guide
TheNumberof ValidNEs
TheNumber ofAccessibleClients
Linux Server (Server and ClientSoftware in One Computer)
Linux Server (Server and ClientSoftware in Different Computers)
CPU: 4* hex core
Main frequency ≥ 2GHz
Memory ≥ 64G
Hard disk ≥ 600G
20000 200 -
Disk arrays must be configured
for singer servers and two-server
clusters
Specification: SAS hard disk
Quantity: 11 pieces in RAID 5 mode
Capacity ≥ 300G
Note:l If performing cluster configurations on the NM servers, the numbers of valid NEs of
which are 1000, 3000 or 8000, it is recommended to use remote cluster configurationmode.
l If performing cluster configurations on the NM servers, the numbers of valid NEs ofwhich are 20000, it is recommended to use local cluster configuration mode.
1.4.2.2 Software Configuration Requirements on the ServerRefer to XXX for the software configurations on the NMS server.Table 1-12
Table 1-12 Software Configuration Requirements on the Server
ManagementObject
Windows server configurations
Operating system CGS Linux V3.02 64bit
Database Oracle 10g (10.2.0.4 or 10.2.0.5) 64bit
Redundancy
solution software
Veritas Storage Foundation High Availability Solutions 5.1 SP1
1.4.3 Preparation Before InstallationBefore installing the U31 R22 server on the Linux platform, the operator should:
l Upload the installation files by referring to Preparation Before Installation in chapterone.
1-36
SJ-20111118090716-003|2012-01-10 (R1.0) ZTE Proprietary and Confidential

Chapter 1 Installing the U31 R22
l Disable the FTP ports of the operating system.1. Log in to the U31 R22 server as the root user.2. Enter the following command on the terminal: svcadm disable network/ftp.
Note:
If the FTP ports of the operating system are not disabled, conflicts take placebetween FTP ports of the operating system and U31 R22 FTP ports, which results inunavailable U31 R22 FTP functions.
1.4.4 Installing the U31 R22 ServerThis section describes how to install the U31 R22 server on the Linux platform.
Prerequisite
l The U31 R22 disk for installation is available.l The License file is uploaded to the server.l The database is installed and configured.
Steps
1. Log in to the U31 R22 server as the root user.
2. Open the terminal, enter the directory for server installation, execute the followingcommand:# ./setup.sh
The NetNumen Setup-Select Language dialog box is displayed, see Figure 1-2.
1-37
SJ-20111118090716-003|2012-01-10 (R1.0) ZTE Proprietary and Confidential

NetNumen™ U31 R22 Software Installation Guide
Figure 1-2 NetNumen Setup-Select Language Dialog Box
3. Select English, and click Next.The License Agreement screen is displayed.
4. Select I accept the license agreement, and click Next.The NetNumen Setup-Select Installation Style dialog box is displayed, see Figure1-3.
1-38
SJ-20111118090716-003|2012-01-10 (R1.0) ZTE Proprietary and Confidential

Chapter 1 Installing the U31 R22
Figure 1-3 NetNumen Setup-Select Installation Style Dialog Box
5. Select installation style and type, click Next.The NetNumen Setup-Hierarchy Configuration dialog box is displayed, see Figure1-4.
1-39
SJ-20111118090716-003|2012-01-10 (R1.0) ZTE Proprietary and Confidential

NetNumen™ U31 R22 Software Installation Guide
Figure 1-4 NetNumen Setup-Hierarchy Configuration Dialog Box
6. Leave the default configurations unchanged, and click Next.The NetNumen Setup-Network Scale dialog box is displayed, see Figure 1-5.
Figure 1-5 NetNumen Setup-Network Scale Dialog Box
1-40
SJ-20111118090716-003|2012-01-10 (R1.0) ZTE Proprietary and Confidential

Chapter 1 Installing the U31 R22
Note:
Each scale has different requirements for the server configurations. If the currentconfiguration is lower than the configuration requirements of corresponding scale, theU31 R22 performance is affected.
7. Based on the tips in the left pane and current server configurations, select networkscale, and click Next.The NetNumen Setup-Select Product dialog box is displayed, see Figure 1-6.
Figure 1-6 NetNumen Setup-Select Product Dialog Box
Note:
Because BN-xTN CTN and BN-IP Management are incompatible, only one of themcan be installed. When selecting all product, BN-xTN CTN is selected by default.
BN-IP Management and the Wireline Management cannot be installed independently.As a result, they must be both selected if one of them is required to be installed.
The software installation path fails to support the following characters: Chinese, + inEnglish, !, @, # and &.
1-41
SJ-20111118090716-003|2012-01-10 (R1.0) ZTE Proprietary and Confidential

NetNumen™ U31 R22 Software Installation Guide
8. Select the products to be installed, set the installation path, and click Next.TheNetNumen Setup-Database Connection Configuration dialog box is displayed,see Figure 1-7.
Figure 1-7 NetNumen Setup-Database Connection Configuration Dialog Box
Refer to Table 1-13 for parameter descriptions in the NetNumen Setup-DatabaseConnection Configuration dialog box.
Table 1-13 Parameter Descriptions for Database Connection Configuration
Parameter Description
Database type The type of the database to be connected. Options: Oracle
and Microsoft SQL Server.
Oracle connection type The type of Oracle database connection. Default: sid.
Database IP or hostname The IP address or host name of the database server.
Database port: The database instance port ID. The default value is
recommended. In case of multiple instance installation,
enter the instance port ID of the corresponding database.
Oracle SID or service name The SID or network service name of the Oracle database.
Default: uep.
Database superuser name The database user with administrator permissions. Default:
system.
Password The password of the database administrator system.
1-42
SJ-20111118090716-003|2012-01-10 (R1.0) ZTE Proprietary and Confidential

Chapter 1 Installing the U31 R22
9. Set related parameters, click Test Database Connection to verify the connection.l In case of successful connection, proceed the installation.l In case of unsuccessful connection, troubleshoot the database connection and
proceed the connection.
10. Click NextThe NetNumen Setup-Host Information Configuration dialog box is displayed, seeFigure 1-8.
Figure 1-8 NetNumen Setup-Host Information Configuration Dialog Box
11. Set the address of the active server (U31 R22 server), and click Next.The system starts to detect the database and operating system, and later displays thedetection results after completing the detection, see Figure 1-9.
1-43
SJ-20111118090716-003|2012-01-10 (R1.0) ZTE Proprietary and Confidential

NetNumen™ U31 R22 Software Installation Guide
Figure 1-9 NetNumen Setup-System Information Detection
12. Click Next.The NetNumen Setup-Installation Information Confirmation dialog box is dis-played.
13. Click Install, the system start to decompress files.
14. After file decompression, click Next.A Confirm dialog box is displayed, asking whether to initialize the databaseimmediately.
15. Click Yes to initialize the database.
16. After initialization, click Next.The NetNumen Setup-Parameter Set dialog box is displayed, see Figure 1-10.
1-44
SJ-20111118090716-003|2012-01-10 (R1.0) ZTE Proprietary and Confidential

Chapter 1 Installing the U31 R22
Figure 1-10 NetNumen Setup-Parameter Set Dialog Box
17. Click Next.U31 R22 starts running the upgrade program. After upgrade, a message box isdisplayed, asking whether to initialize all client scenes.
18. Click Yes to initialize scenes.
19. After initialization, click Next.The NetNumen Setup-Installation Finished dialog box is displayed.
20. Click Finish to complete the U31 R22 server installation.
– End of Steps –
1.4.5 Installing LicenseIf the License file is not updated or out of date during U31 R22 server installation, refer tothis section for how to install License manually.
Prerequisite
l The U31 R22 server is installed.l The License file is uploaded to the U31 R22 server.
Steps
1. Log in to the U31 R22 server as the root user.
1-45
SJ-20111118090716-003|2012-01-10 (R1.0) ZTE Proprietary and Confidential

NetNumen™ U31 R22 Software Installation Guide
2. Based on the scale selected during U31 R22 installation, copy the License file to acorresponding directory.l If selecting scale 1, copy License to the .../ums-server/works/uep/depl
oy directory.l If selecting other scale, copy License to the .../ums-server/works/main/d
eploy directory.
For example, if selecting scale 1, U31 R22 is installed in the /opt/netnumen
directory, copy the License file to the /opt/netnumen/ums-server/works/uep/deploy directory.
– End of Steps –
1-46
SJ-20111118090716-003|2012-01-10 (R1.0) ZTE Proprietary and Confidential

Chapter 2Starting and Exiting the U31R22Table of Contents
Starting and exiting the U31 R22 On the Windows OS ...............................................2-1Starting and exiting the U31 R22 On the Solaris OS...................................................2-4Starting and exiting the U31 R22 On the Linux OS .....................................................2-5
2.1 Starting and exiting the U31 R22 On the WindowsOS
2.1.1 Starting the U31 R22 Server
Prerequisite
You have installed the U31 R22 server software successfully.
Steps
l On the desktop of the Windows operating system, select Start > All Programs >NetNumen Unified Management System > NetNumen Client, and the Login dialogbox appears.
– End of Steps –
2.1.2 Logging in to the U31 R22 Client
Prerequisite
Make sure that the U31 R22 server is running properly.
Steps
1. On the desktop of the Windows operating system, select Start > Programs >NetNumen Unified Management System > NetNumen Client, and the Login dialogbox appears.
2-1
SJ-20111118090716-003|2012-01-10 (R1.0) ZTE Proprietary and Confidential

NetNumen™ U31 R22 Software Installation Guide
2. Enter User Name, Password, and Server Address in the Login window.
Caution!
In the U31 R22, the default user name is admin, and the password is null. Be sure tomodify the password of the admin user after successful login for the first time to ensurethe account security.
Tip:
In the Login window, click on the right side of the server address to displaythe Config Bureau dialog box. In the Config Bureau dialog box, you can configurebureau name and the corresponding server address. The configuration informationwill be displayed in the drop-down list of the Server Address to facilitate the user toselect.
3. Click OK.
– End of Steps –
2.1.3 Exiting the U31 R22 ClientThis section describes how to close U31 R22 client.
Prerequisite
l The client computer works normally, and the network communication is normal.l The client is connected to the server.
2-2
SJ-20111118090716-003|2012-01-10 (R1.0) ZTE Proprietary and Confidential

Chapter 2 Starting and Exiting the U31 R22
Steps
1. Select System > Exit in the U31 R22 client window.
2. Click OK in the Confirm message box to close the client.
– End of Steps –
2.1.4 Exiting the U31 R22 Server
Prerequisite
l The U31 R22 server computer works normally, and the network communication isnormal.
l Each process of U31 R22 server works normally.l Close all the clients that connect to the server.
Steps
1. You have already logged in to Windows operating system where the U31 R22 serveris installed.
2. Enter the console interface from Windows desktop.
3. Select each process in the console according to the following sequence, and then clickStop.
Sequence Process
1 BN-xTN northbound namingservice process 1
2 BN-xTN northbound notifyservice process 1
3 BN-xTN northbound process 1
4 U31 E2E process 1
5 BN CTN Adapter Proxy process 1
6 BN CTN Adapter process 1
7 BN SDH/OTN Adaptive 1
8 BN main process 1
9 UEP process 1
4. If the following requirements are satisfied at the same time, U31 R22 server is closedsuccessfully:
i. The corresponding icon of each process is .
ii. The information “xxx process - Stopped” is displayed in the bottom of the window.
2-3
SJ-20111118090716-003|2012-01-10 (R1.0) ZTE Proprietary and Confidential

NetNumen™ U31 R22 Software Installation Guide
5. Select System > Exit, and then select OK in the message box that appears.
– End of Steps –
2.2 Starting and exiting the U31 R22 On the Solaris OS
2.2.1 Starting the U31 R22 ServerThis section describes how to start the U31 R22 server so that the U31 R22 client canconnect to the U31 R22 server.
Steps
1. Navigate to the startup directory of the U31 R22 server.
Note:
If the U31 R22 is installed in the /export/home/builder/U31/ directory, thestartup directory of the U31 R22 server is /export/home/builder/U31/ums-server/.
2. Double-click the console.sh file to start the U31 R22 server.
– End of Steps –
2.2.2 Exiting the U31 R22 ServerThis section describes how to exit the U31 R22 server.
Steps
1. In the U31 R22 console window, exit the following U31 R22 processes according tothe sequence in the following table.
Sequence Process
1 BN-xTN northbound namingservice process 1
2 BN-xTN northbound notifyservice process 1
3 BN-xTN northbound process 1
4 U31 E2E process 1
5 BN CTN Adapter Process 1
6 BN CTN Adapter Proxy Process 1
7 BN SDH/OTN Adaptive 1
2-4
SJ-20111118090716-003|2012-01-10 (R1.0) ZTE Proprietary and Confidential

Chapter 2 Starting and Exiting the U31 R22
Sequence Process
8 BN main process 1
9 UEP process 1
a. In the left navigation tree, click the name of the required process.
b. In the right pane, click Stop.
c. If the following requirements are met, repeat the above two steps to stop the otherprocesses in turn.l In the process control operation column, the icon of the process is in the
state.l In the left pane, the icon before the process name is in the state.
2. Select System > Exit. In the message box that appears, click Yes to exit the U31 R22server.
– End of Steps –
2.3 Starting and exiting the U31 R22 On the Linux OS
2.3.1 Starting the U31 R22 ServerThis section describes how to start the U31 R22 server.
Steps
1. Log in to the U31 R22 server as the root user.
2. Open the terminal, enter the ums-server directory in the U31 R22 installation directory,and execute the following commands to start the U31 R22 server.# ./console.sh
During starting the server, the NetNumen U31 Unified Network ManagementSystem-Console dialog box is displayed, see Figure 2-1.
2-5
SJ-20111118090716-003|2012-01-10 (R1.0) ZTE Proprietary and Confidential

NetNumen™ U31 R22 Software Installation Guide
Figure 2-1 Console Dialog Box
3. In the left navigation tree, select Console1.The right pane shows detailed information of all running processes. If Operation result is Successful, the process is started successfully.
– End of Steps –
2.3.2 Quitting the U31 R22 ServerThis section describes how to quit the U31 R22 server.
Steps
1. Log in to the U31 R22 server as the root user.
2. Open the terminal, enter the ums-server directory in the U31 R22 installation directory,and execute the following commands to quit the U31 R22 server.# ./console.sh
– End of Steps –
2-6
SJ-20111118090716-003|2012-01-10 (R1.0) ZTE Proprietary and Confidential

Chapter 3Uninstalling the U31 R22Table of Contents
Uninstalling the U31 R22 On the Windows OS ...........................................................3-1Uninstalling the U31 R22 On the Solaris OS...............................................................3-3Uninstalling the U31 R22 On the Linux OS.................................................................3-4
3.1 Uninstalling the U31 R22 On the Windows OS
3.1.1 Uninstalling the U31 R22 Server and Client
Prerequisite
l The U31 R22 server software has stopped working and the U31 R22 client has beenlogged out.
l You have logged into the Windows operating system as the administrator role.
Steps
1. In the Windows system of the computer installed with the U31 R22 server and clientsoftware, select Start > Programs > NetNumen Unified Management System >NetNumen Unintall Tool. The Uninstall dialog box appears.
2. Select whether to uninstall the database.
3-1
SJ-20111118090716-003|2012-01-10 (R1.0) ZTE Proprietary and Confidential

NetNumen™ U31 R22 Software Installation Guide
l Select Uninstall database: delete all the datum in the database of U31 R22.l Clear Uninstall database: keep the datum in the database of U31 R22.
3. Click Next to open the Uninstall description page.
4. Click Start uninstall.
5. Optional: if you have selected Uninstall database in the previous steps, the Confirmdialog box appears, prompting you to back up the data before uninstallation. ClickYes.
6. The Confirm dialog box appears. Click Yes to display the Start uninstall page.
7. After uninstallation, click Finish.
8. Restart the computer.
– End of Steps –
Result
The U31 R22 server and client are uninstalled from the computer.
3.1.2 Uninstalling the U31 R22 Client
Prerequisite
l The U31 R22 client software has been logged out.l You have logged into the Windows operating system as the administrator role.
3-2
SJ-20111118090716-003|2012-01-10 (R1.0) ZTE Proprietary and Confidential

Chapter 3 Uninstalling the U31 R22
Steps1. In the Windows operating system on which the U31 R22 client software is installed,
select Start > Programs > NetNumen Unified Management System > NetNumenUnintall Tool. The Uninstall dialog box appears.
2. Click Next. The Uninstall description window appears.
3. Click Start uninstall.
4. (Optional) If you have selected Uninstall database in the previous step, the Confirmdialog box appears, prompting you to back up data before uninstallation. Click Yes.
5. The Confirm dialog box appears. Click Yes. The Start uninstall window appears.
6. After uninstallation, click Finish.
– End of Steps –
ResultThe U31 R22 client is uninstalled from the computer.
3.2 Uninstalling the U31 R22 On the Solaris OS
3.2.1 Uninstalling the U31 R22 Server SoftwareThis section describes how to uninstall the U31 R22 server software.
PrerequisiteThe services of the U31 R22 server have stopped and the U31 R22 client has exited.
Steps1. Navigate to the uninstall directory of the U31 R22 server.
Note:
If the U31 R22 is installed in the /export/home/builder/U31/ directory, theuninstall directory of the U31 R22 server is /export/home/builder/U31/uif/.
2. Double-click the uninstalltool.sh file to start uninstall the U31 R22 server.l Select Uninstall database: After the database is uninstalled, the database data
related to the U31 R22 is also deleted.l Do not selectUninstall database: After the database is uninstalled, the database
data related to the U31 R22 is also not deleted.
3. Click Next. The Uninstall description dialog box appears.
3-3
SJ-20111118090716-003|2012-01-10 (R1.0) ZTE Proprietary and Confidential

NetNumen™ U31 R22 Software Installation Guide
4. Click Start uninstall.
5. (Optional) If Uninstall database is selected in Step 2, the Confirm message boxappears, prompting you to back up important data before the uninstall. Click Yes.
6. In the Confirm message box, click Yes.
7. After the uninstall is completed, click Finish.
– End of Steps –
3.3 Uninstalling the U31 R22 On the Linux OS
3.3.1 Uninstalling the U31 R22 Server SoftwareThis section describes how to uninstall the U31 R22 server software on the Linux platform.
Prerequisite
Both the U31 R22 server and clients have quit from the Linux platform.
Steps
1. Log in to the U31 R22 server as the root user.
2. Open the terminal, enter the uif directory in the U31 R22 installation directory, andexecute the following command.# ./uninstalltool.sh
The Uninstall database selection dialog box is displayed, see Figure 3-1.
3-4
SJ-20111118090716-003|2012-01-10 (R1.0) ZTE Proprietary and Confidential

Chapter 3 Uninstalling the U31 R22
Figure 3-1 Uninstall Database Selection Dialog Box
l Select Uninstall database to uninstall the U31 R22 software and the involveddatabase data.
l Do not select Uninstall database to uninstall the U31 R22 software and keep theinvolved database data.
3. Decide whether to uninstall the database based on actual situation, and click Next.U31 R22The Uninstall description dialog box is displayed.
4. Click Start Install.
5. After completing uninstallation, click Finish.
– End of Steps –
3-5
SJ-20111118090716-003|2012-01-10 (R1.0) ZTE Proprietary and Confidential

NetNumen™ U31 R22 Software Installation Guide
This page intentionally left blank.
3-6
SJ-20111118090716-003|2012-01-10 (R1.0) ZTE Proprietary and Confidential

FiguresFigure 1-1 Software Installation Flow of the U31 R22 System ................................... 1-1
Figure 1-2 NetNumen Setup-Select Language Dialog Box...................................... 1-38
Figure 1-3 NetNumen Setup-Select Installation Style Dialog Box ............................ 1-39
Figure 1-4 NetNumen Setup-Hierarchy Configuration Dialog Box ........................... 1-40
Figure 1-5 NetNumen Setup-Network Scale Dialog Box.......................................... 1-40
Figure 1-6 NetNumen Setup-Select Product Dialog Box ......................................... 1-41
Figure 1-7 NetNumen Setup-Database Connection Configuration DialogBox ....................................................................................................... 1-42
Figure 1-8 NetNumen Setup-Host Information Configuration Dialog Box................. 1-43
Figure 1-9 NetNumen Setup-System Information Detection .................................... 1-44
Figure 1-10 NetNumen Setup-Parameter Set Dialog Box........................................ 1-45
Figure 2-1 Console Dialog Box ................................................................................. 2-6
Figure 3-1 Uninstall Database Selection Dialog Box ................................................. 3-5
I

Figures
This page intentionally left blank.

TablesTable 1-1 Hardware Configuration Requirement for the U31 R22 Server................... 1-2
Table 1-2 Software Configuration of the Server ......................................................... 1-3
Table 1-3 Description of Network Scales ................................................................... 1-6
Table 1-4 Explanations of Parameters in the Database Connection ConfigPage ........................................................................................................ 1-8
Table 1-5 Description of Configuring the Host Information....................................... 1-10
Table 1-6 Hardware Configuration of U31 R22 Client .............................................. 1-14
Table 1-7 Software Configuration of the Client ........................................................ 1-14
Table 1-8 Hardware Configuration Requirement for the U31 R22 Server................. 1-20
Table 1-9 Software Requirement of the U31 R22 Server ......................................... 1-23
Table 1-10 Description of Network Scales ............................................................... 1-29
Table 1-11 Hardware Configuration Requirements on the U31 R22 Server ............. 1-34
Table 1-12 Software Configuration Requirements on the Server ............................. 1-36
Table 1-13 Parameter Descriptions for Database Connection Configuration............ 1-42
III
Tables
This page intentionally left blank.

GlossaryPC- Personal Computer
V