Embed Size (px)
Citation preview
UC1000 Universal Controller
KING Quest™ Satellite Antenna SystemMakes the
compatible with
DIRECTV® DISH® Bell TV™
11200 Hampshire Avenue South, Bloomington, MN 55438PH 952.922.6889 || FAX 952.922.8424 || kingconnect.com
®
Please read the
“BEFORE YOU START”
section on the inside of this cover before using the UC1000 Controller.
! !
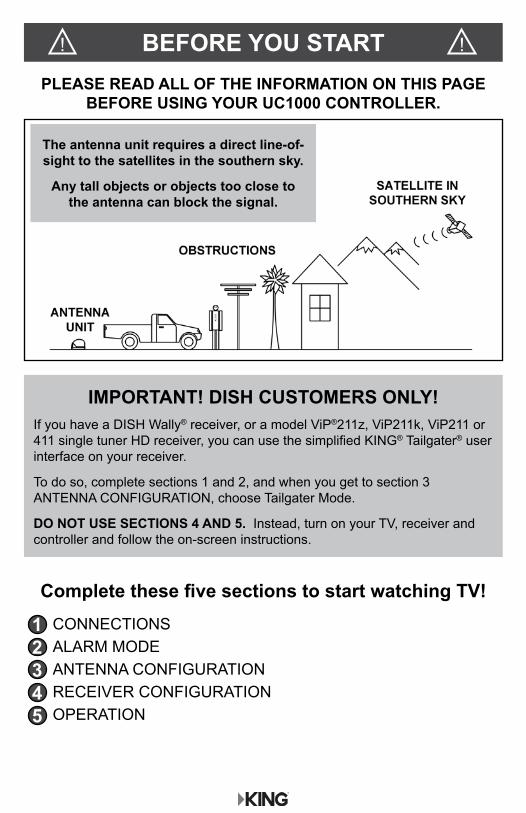
The antenna unit requires a direct line-of-sight to the satellites in the southern sky.
Any tall objects or objects too close to the antenna can block the signal.
BEFORE YOU START
IMPORTANT! DISH CUSTOMERS ONLY! If you have a DISH Wally® receiver, or a model ViP®211z, ViP211k, ViP211 or 411 single tuner HD receiver, you can use the simplified KING® Tailgater® user interface on your receiver.
To do so, complete sections 1 and 2, and when you get to section 3 ANTENNA CONFIGURATION, choose Tailgater Mode.
DO NOT USE SECTIONS 4 AND 5. Instead, turn on your TV, receiver and controller and follow the on-screen instructions.
Complete these five sections to start watching TV! CONNECTIONS ALARM MODE ANTENNA CONFIGURATION RECEIVER CONFIGURATION OPERATION
12345
PLEASE READ ALL OF THE INFORMATION ON THIS PAGE BEFORE USING YOUR UC1000 CONTROLLER.
! !
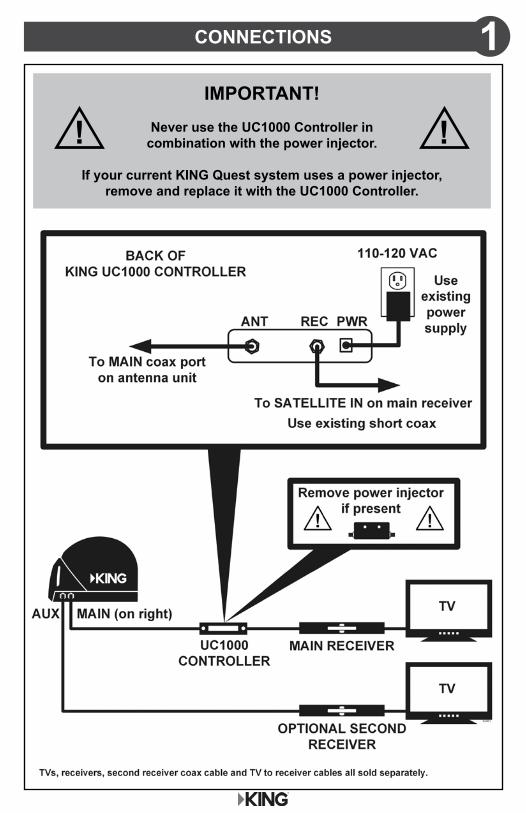
IMPORTANT! Never use the UC1000 Controller in
combination with the power injector.
If your current KING Quest system uses a power injector, remove and replace it with the UC1000 Controller.
CONNECTIONS 1
! !
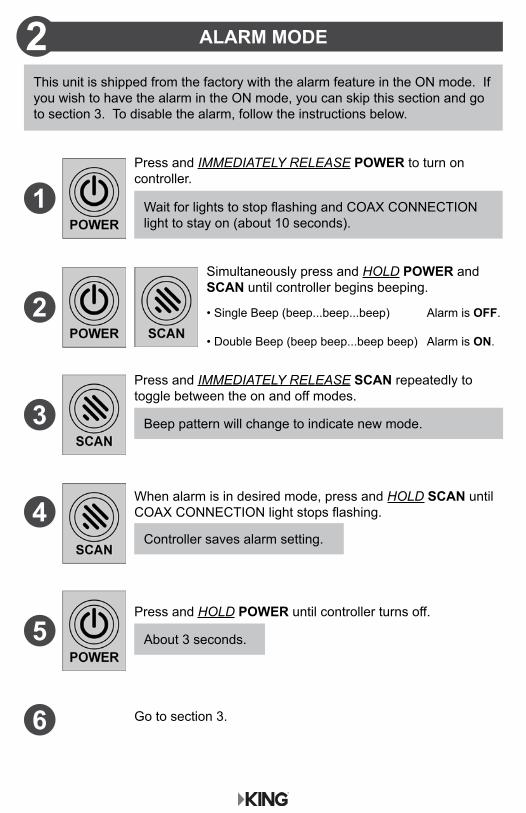
This unit is shipped from the factory with the alarm feature in the ON mode. If you wish to have the alarm in the ON mode, you can skip this section and go to section 3. To disable the alarm, follow the instructions below.
ALARM MODE2
Press and IMMEDIATELY RELEASE POWER to turn on controller.
Wait for lights to stop flashing and COAX CONNECTION light to stay on (about 10 seconds).
1
• Single Beep (beep...beep...beep) Alarm is OFF.
• Double Beep (beep beep...beep beep) Alarm is ON.
Simultaneously press and HOLD POWER and SCAN until controller begins beeping.
2
Press and IMMEDIATELY RELEASE SCAN repeatedly to toggle between the on and off modes.
Beep pattern will change to indicate new mode.3
When alarm is in desired mode, press and HOLD SCAN until COAX CONNECTION light stops flashing.
Controller saves alarm setting.
4
6 Go to section 3.
Press and HOLD POWER until controller turns off.
About 3 seconds.5
ALARM OPERATIONIf the coax cable is disconnected from the antenna unit or the controller while the system is turned on or in standby mode, the controller will sound an alarm. To turn off the alarm when it is sounding, press and HOLD POWER until the controller turns off (about 3 seconds).
You can change the alarm mode at any time by following the steps on the previous page.
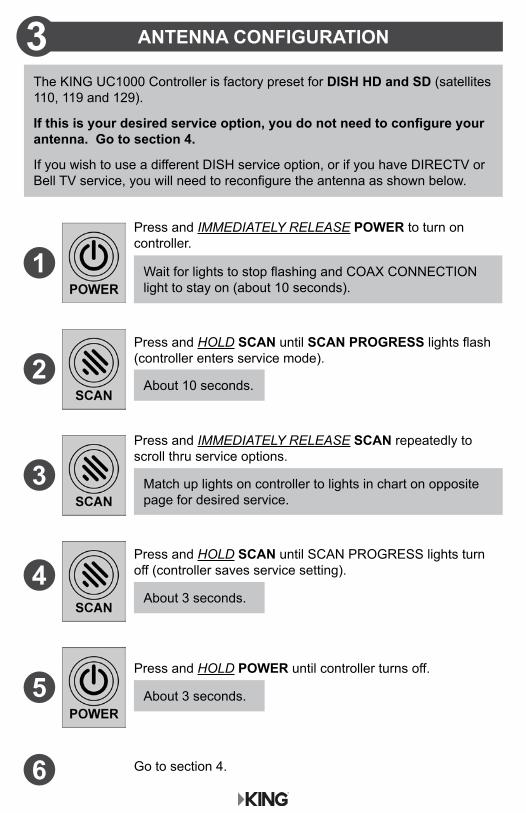
The KING UC1000 Controller is factory preset for DISH HD and SD (satellites 110, 119 and 129).
If this is your desired service option, you do not need to configure your antenna. Go to section 4.
If you wish to use a different DISH service option, or if you have DIRECTV or Bell TV service, you will need to reconfigure the antenna as shown below.
Press and IMMEDIATELY RELEASE POWER to turn on controller.
Wait for lights to stop flashing and COAX CONNECTION light to stay on (about 10 seconds).
1
6
Press and HOLD SCAN until SCAN PROGRESS lights flash (controller enters service mode).
About 10 seconds.2
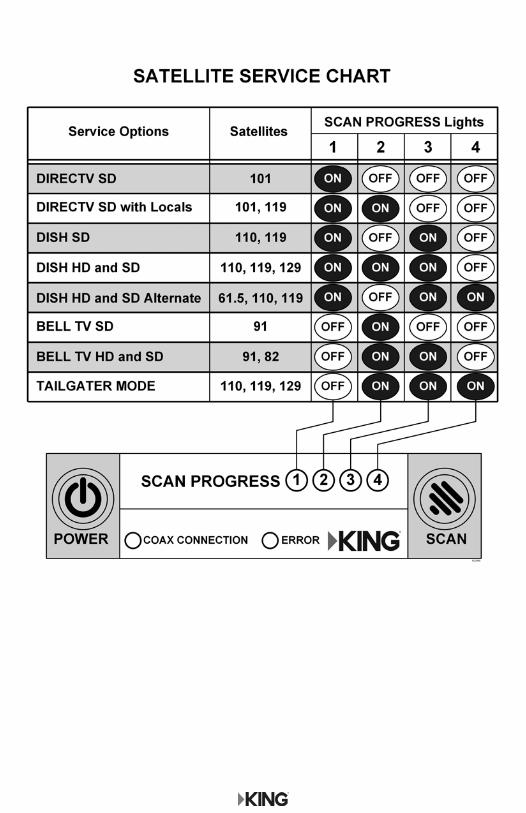
Press and IMMEDIATELY RELEASE SCAN repeatedly to scroll thru service options.
Match up lights on controller to lights in chart on opposite page for desired service.
3
Press and HOLD SCAN until SCAN PROGRESS lights turn off (controller saves service setting).
About 3 seconds.4
Go to section 4.
Press and HOLD POWER until controller turns off.
About 3 seconds.5
ANTENNA CONFIGURATION3
RECEIVER CONFIGURATION
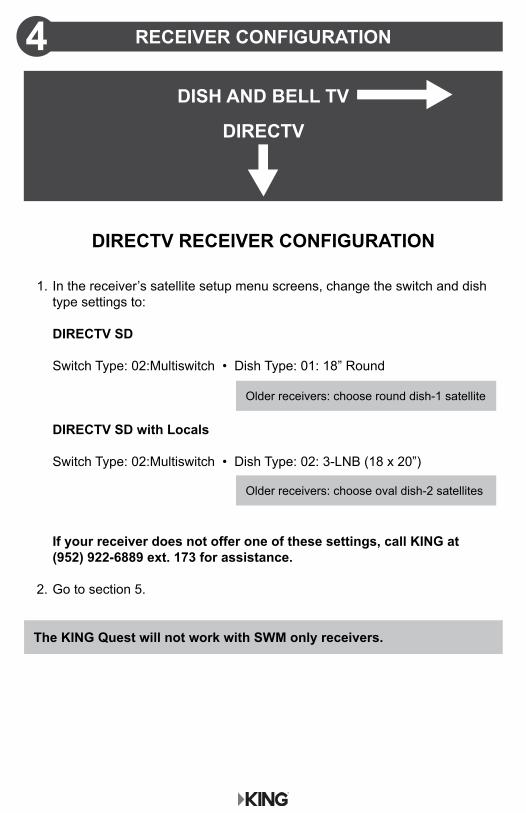
1. In the receiver’s satellite setup menu screens, change the switch and dish type settings to:
DIRECTV SD Switch Type: 02:Multiswitch • Dish Type: 01: 18” Round
DIRECTV SD with Locals
Switch Type: 02:Multiswitch • Dish Type: 02: 3-LNB (18 x 20”)
If your receiver does not offer one of these settings, call KING at (952) 922-6889 ext. 173 for assistance.
2. Go to section 5.
DIRECTV RECEIVER CONFIGURATION
DISH AND BELL TV
DIRECTV
Older receivers: choose round dish-1 satellite
Older receivers: choose oval dish-2 satellites
The KING Quest will not work with SWM only receivers.
4
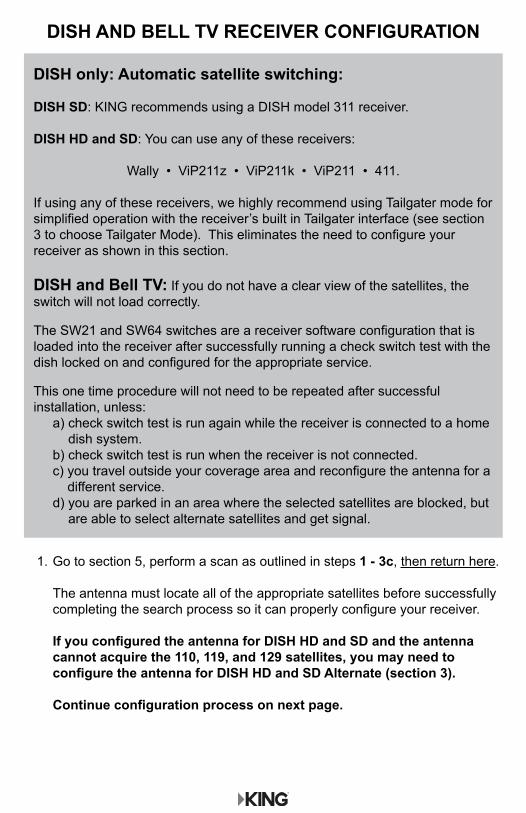
DISH only: Automatic satellite switching:
DISH SD: KING recommends using a DISH model 311 receiver.
DISH HD and SD: You can use any of these receivers:
Wally • ViP211z • ViP211k • ViP211 • 411.
If using any of these receivers, we highly recommend using Tailgater mode for simplified operation with the receiver’s built in Tailgater interface (see section 3 to choose Tailgater Mode). This eliminates the need to configure your receiver as shown in this section. DISH and Bell TV: If you do not have a clear view of the satellites, the switch will not load correctly. The SW21 and SW64 switches are a receiver software configuration that is loaded into the receiver after successfully running a check switch test with the dish locked on and configured for the appropriate service. This one time procedure will not need to be repeated after successful installation, unless: a) check switch test is run again while the receiver is connected to a home
dish system. b) check switch test is run when the receiver is not connected. c) you travel outside your coverage area and reconfigure the antenna for a
different service. d) you are parked in an area where the selected satellites are blocked, but
are able to select alternate satellites and get signal.
1. Go to section 5, perform a scan as outlined in steps 1 - 3c, then return here. The antenna must locate all of the appropriate satellites before successfully completing the search process so it can properly configure your receiver. If you configured the antenna for DISH HD and SD and the antenna cannot acquire the 110, 119, and 129 satellites, you may need to configure the antenna for DISH HD and SD Alternate (section 3). Continue configuration process on next page.
DISH AND BELL TV RECEIVER CONFIGURATION
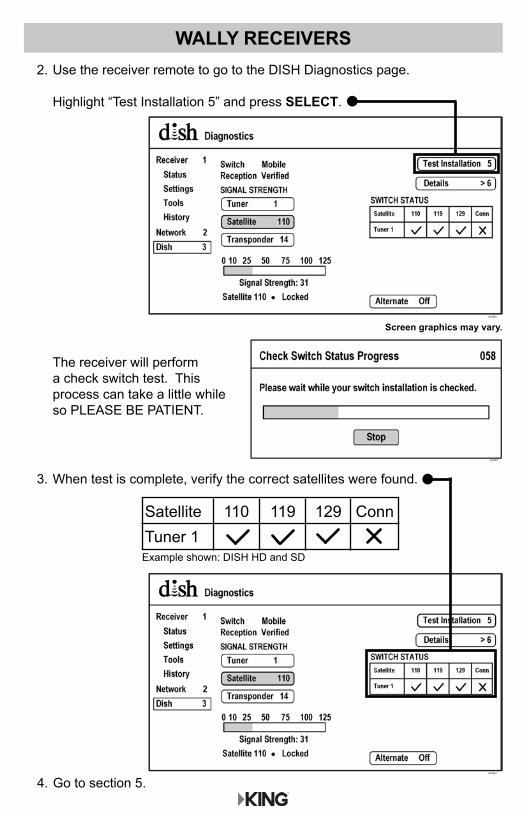
2. Use the receiver remote to go to the DISH Diagnostics page. Highlight “Test Installation 5” and press SELECT.
3. When test is complete, verify the correct satellites were found.
Example shown: DISH HD and SD
The receiver will perform a check switch test. This process can take a little while so PLEASE BE PATIENT.
WALLY RECEIVERS
Satellite 110 119 129 ConnTuner 1
4. Go to section 5.
Screen graphics may vary.
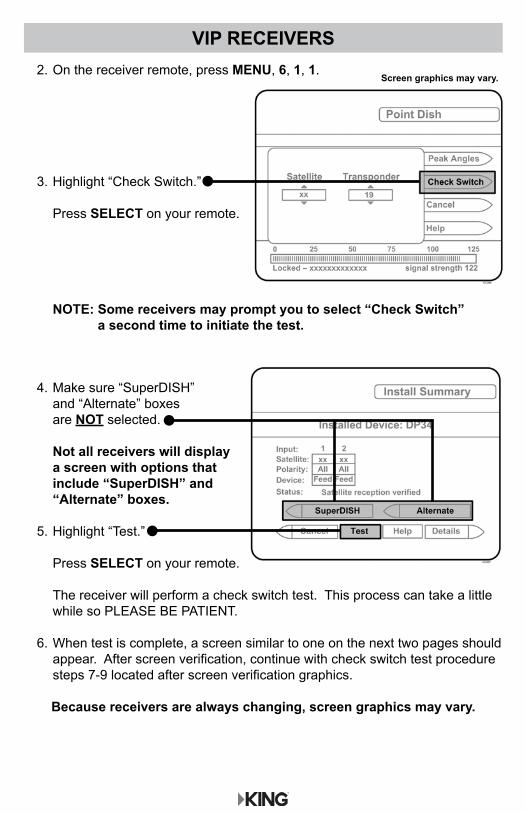
VIP RECEIVERS 2. On the receiver remote, press MENU, 6, 1, 1.
3. Highlight “Check Switch.” Press SELECT on your remote.
NOTE: Some receivers may prompt you to select “Check Switch” a second time to initiate the test.
Screen graphics may vary.
4. Make sure “SuperDISH” and “Alternate” boxes are NOT selected.
Not all receivers will display a screen with options that include “SuperDISH” and “Alternate” boxes.
5. Highlight “Test.” Press SELECT on your remote.
The receiver will perform a check switch test. This process can take a little while so PLEASE BE PATIENT.
6. When test is complete, a screen similar to one on the next two pages should appear. After screen verification, continue with check switch test procedure steps 7-9 located after screen verification graphics.
Because receivers are always changing, screen graphics may vary.
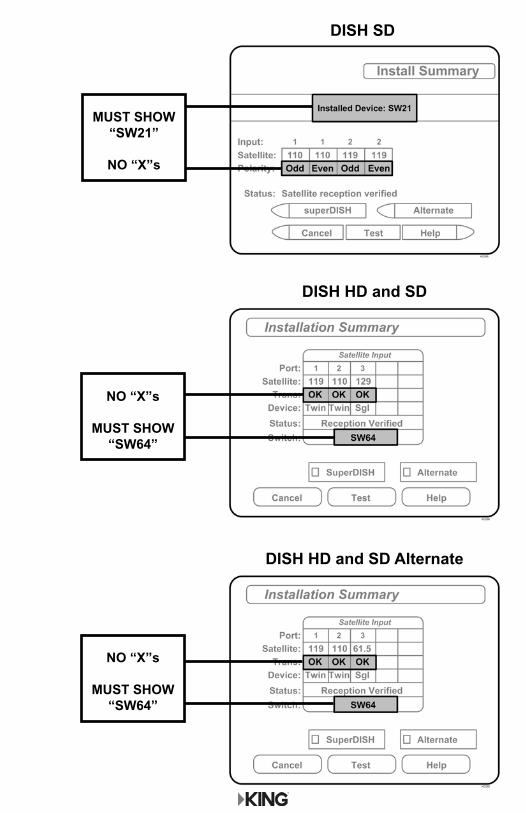
DISH HD and SD Alternate
DISH HD and SD
NO “X”s
MUST SHOW “SW64”
NO “X”s
MUST SHOW “SW64”
DISH SD
MUST SHOW “SW21”
NO “X”s
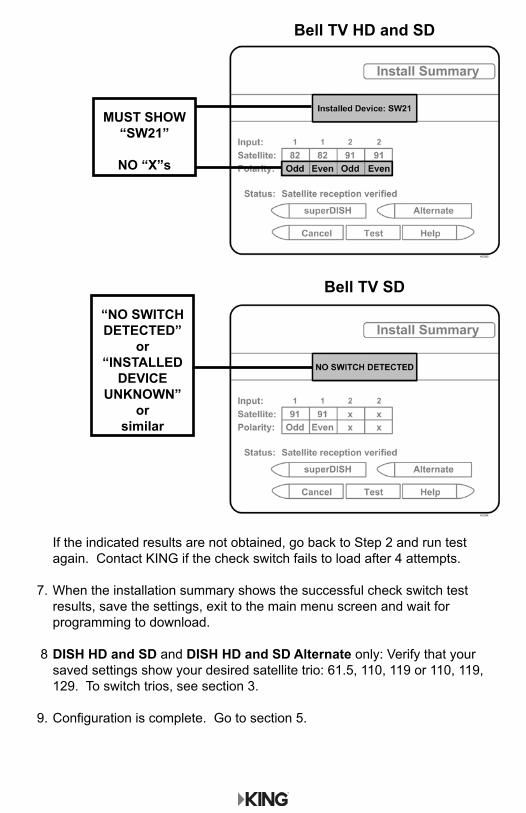
If the indicated results are not obtained, go back to Step 2 and run test again. Contact KING if the check switch fails to load after 4 attempts.
7. When the installation summary shows the successful check switch test results, save the settings, exit to the main menu screen and wait for programming to download.
8 DISH HD and SD and DISH HD and SD Alternate only: Verify that your saved settings show your desired satellite trio: 61.5, 110, 119 or 110, 119, 129. To switch trios, see section 3.
9. Configuration is complete. Go to section 5.
Bell TV SD“NO SWITCH DETECTED”
or “INSTALLED
DEVICE UNKNOWN”
orsimilar
Bell TV HD and SD
MUST SHOW “SW21”
NO “X”s
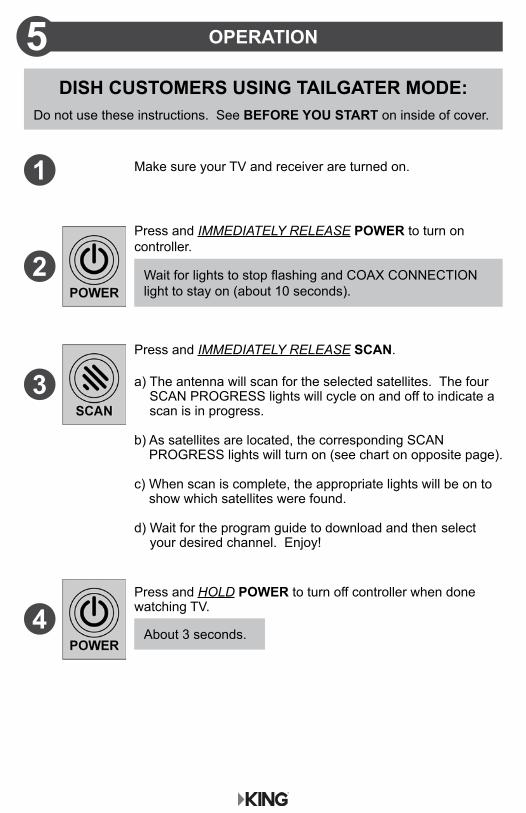
DISH CUSTOMERS USING TAILGATER MODE: Do not use these instructions. See BEFORE YOU START on inside of cover.
Press and IMMEDIATELY RELEASE POWER to turn on controller.
Wait for lights to stop flashing and COAX CONNECTION light to stay on (about 10 seconds).
2
Press and IMMEDIATELY RELEASE SCAN.
3
Make sure your TV and receiver are turned on.
Press and HOLD POWER to turn off controller when done watching TV.
About 3 seconds.4
1
a) The antenna will scan for the selected satellites. The four SCAN PROGRESS lights will cycle on and off to indicate a scan is in progress.
b) As satellites are located, the corresponding SCAN PROGRESS lights will turn on (see chart on opposite page).
c) When scan is complete, the appropriate lights will be on to show which satellites were found.
d) Wait for the program guide to download and then select your desired channel. Enjoy!
OPERATION5

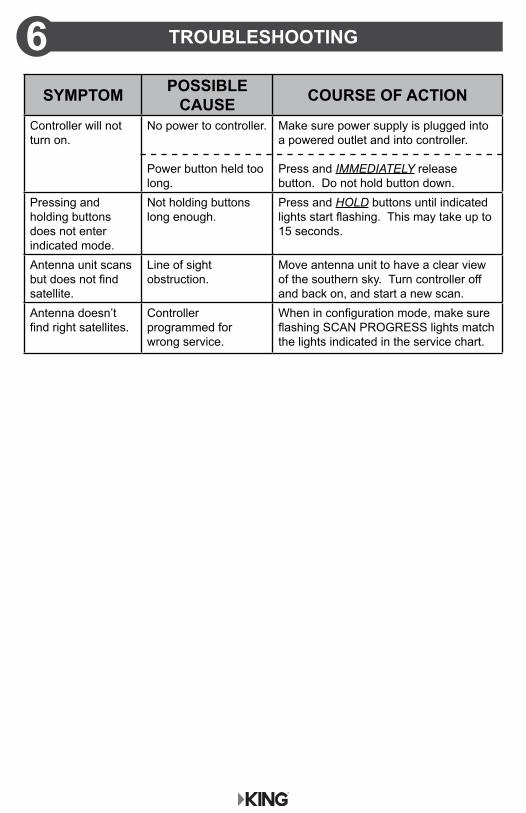
TROUBLESHOOTING6SYMPTOM POSSIBLE
CAUSE COURSE OF ACTION
Controller will not turn on.
No power to controller.
Power button held too long.
Make sure power supply is plugged into a powered outlet and into controller.
Press and IMMEDIATELY release button. Do not hold button down.
Pressing and holding buttons does not enter indicated mode.
Not holding buttons long enough.
Press and HOLD buttons until indicated lights start flashing. This may take up to 15 seconds.
Antenna unit scans but does not find satellite.
Line of sight obstruction.
Move antenna unit to have a clear view of the southern sky. Turn controller off and back on, and start a new scan.
Antenna doesn’t find right satellites.
Controller programmed for wrong service.
When in configuration mode, make sure flashing SCAN PROGRESS lights match the lights indicated in the service chart.
Every new KING UC1000 Controller is thoroughly inspected and tested before leaving the factory, and is covered by the following one-year parts limited warranty from the date of original purchase:
• One-year parts warranty: The customer is not responsible for the cost of replacement parts if the original part is determined to be defective under the terms of the warranty. The customer is responsible for the cost of replacement parts after one year.
Only KING may perform warranty evaluations and repairs. Depending upon the problem, KING may authorize a dealer to perform the necessary repairs. Any warranty labor outside of that performed at the factory is not covered unless 1) the product has been installed by an authorized dealer/installer or OEM manufacturer and 2) the dealer/installer receives prior authorization in writing to perform the repair.
Should any trouble develop during the warranty period, contact KING at (952) 922-6889. You must contact KING before the warranty period expires. The customer must supply proof of purchase (such as a dated sales receipt) when requesting warranty service. If the customer cannot supply proof of purchase, warranty period shall start 30 days after date of manufacture.
If it is determined that the unit needs to be returned to KING, customer must return COMPLETE product, freight prepaid, to: KING, 11200 Hampshire Avenue South, Bloomington, MN 55438-2453.If inspection shows the trouble is caused by defective workmanship or material, KING will repair (or at its option, replace) without charge.
When returning product, KING will supply an RMA number (Return Merchandise Authorization). This number must be clearly written on the box. Failure to clearly write RMA number on box will result in delays in processing claim. Along with product, the customer should include in the box: his/her name, address, daytime phone number, proof of purchase and description of the problem.
This warranty does not cover installation or remanufactured units. This warranty is not transferable from the original owner.
Due to the expanding and changing TV market, KING cannot be held responsible for changes made to satellite services. Software updates to address such issues are not covered under warranty.
This warranty also does not apply where:
• The product has been abused, misused, improperly installed or improperly maintained. • Repairs have been made or attempted by others that are not certified by KING to do such repairs. • Repairs are required because of normal wear and tear. • Alterations have been made to the product. • The unit has been opened without authorization. • Circumstances beyond the control of KING cause the product to no longer operate correctly. • Customer is not the original owner.
In no event shall KING be liable for any indirect, incidental, or consequential damages from the sale or use of the product. This disclaimer applies both during and after the term of the warranty. KING disclaims liability for any implied warranties, including implied warranties of “merchantability” and “fitness for a specific purpose,” after the term of this warranty.
This warranty gives you specific legal rights, and you may also have other rights, which vary from state to state. Some states do not allow the exclusion or limitation of incidental or consequential damages, so the above limitation or exclusion may not apply to you. Some states do not allow limitations on how long an implied warranty lasts, so the above limitation may not apply to you.
LIMITED WARRANTY 7


Simply better, by design.™
©2017 KING
Bell TV is an official trademark of Bell Canada. DIRECTV is a registered trademark of DIRECTV L.L.C.
DISH, Tailgater, Wally and ViP are registered trademarks of DISH Network L.L.C.KING is a registered trademark of Electronic Controlled Systems, Inc.
KING Quest and Simply better, by design. are trademarks of Electronic Controlled Systems, Inc.
21971 Rev D