Embed Size (px)
Citation preview
UI BUILDERTM FOR ACCESS –ENTERPRISE EDITION
VERSION 5
Application Guide Version 1/13/18
This document is copyright © 2007-2018 OpenGate Software. The information
contained in this document is subject to change without notice. If you find any
problems in the documentation, please report them to us in writing. This document is
not warranted to be error-free. Except as may be expressly permitted in your license
agreement for these Programs, no part of these Programs may be reproduced or
transmitted in any form or by any means, electronic or mechanical, for any purpose.
UI Builder is a trademark of OpenGate Software Inc.
Microsoft and the Office logo are trademarks or registered trademarks of Microsoft
Corporation in the United States and/or other countries.
UI BuilderTM for Access – Application Guide
Copyright © 2018 OpenGate Software 2
http://www.opengatesw.net
TABLE OF CONTENTS
1 GENERAL CONCEPTS AND RESOURCES .................................................................................. 4
1.1 USER INTERFACE ........................................................................................................................... 4 1.2 RESOURCES ................................................................................................................................... 4
2 MIGRATING YOUR APPLICATION ............................................................................................. 5
2.1 MIGRATION OPTIONS ..................................................................................................................... 5 2.2 MIGRATION STEPS ......................................................................................................................... 5
2.2.1 Importing your forms, queries, tables, macros, and code modules .......................................... 5 2.2.2 Importing UI Builder Into your Database ................................................................................ 6
2.3 VALIDATE OBJECTS ....................................................................................................................... 8 2.4 OBJECT COMPATABILITY ............................................................................................................... 9
2.4.1 Form References ....................................................................................................................... 9 2.5 CONFIGURING DEFAULT MENUS...................................................................................................10
2.5.1 Configuring the Default Menu .................................................................................................10 2.5.2 Configuring Sub-Menus ...........................................................................................................12 2.5.3 Advanced Menu Configuration ................................................................................................14
2.6 MANAGING ROLES ........................................................................................................................14 2.6.1 Adding roles .............................................................................................................................15 2.6.2 Testing Roles............................................................................................................................15 2.6.3 Removing Roles .......................................................................................................................15 2.6.4 Administrator security .............................................................................................................16
2.7 MANAGING USERS ........................................................................................................................16 2.7.1 Adding users ............................................................................................................................16 2.7.2 Deleting users ..........................................................................................................................17 2.7.3 Anonymous Users ....................................................................................................................17 2.7.4 Restricting users ......................................................................................................................17 2.7.5 Allowing users to switch roles .................................................................................................17
2.8 RIGHT-HAND ACTION PANE .........................................................................................................18 2.9 RESIZE FORMS ..............................................................................................................................19 2.10 UNIVERSAL SEARCH .....................................................................................................................19
3 VBA TOOLBOX .................................................................................................................................20
3.1 PROGRESS BAR .............................................................................................................................20 3.2 EVENT LOGGING ...........................................................................................................................22
3.2.1 Configuring the log ..................................................................................................................22 3.2.2 Initializing the Log ...................................................................................................................23 3.2.3 Writing to the Log ....................................................................................................................23 3.2.4 Closing the Log ........................................................................................................................25 3.2.5 Viewing the Log .......................................................................................................................25
3.3 TABLE RECORD COUNT ................................................................................................................25 3.4 TABLE RECORD SUM ....................................................................................................................26 3.5 TABLE RECORD VALUE ................................................................................................................27 3.6 FILE CHECK ..................................................................................................................................28 3.7 OPERATING SYSTEM NAME ..........................................................................................................29 3.8 NETWORK USERNAME .................................................................................................................29 3.9 MACHINE NAME ...........................................................................................................................29 3.10 CREATE OUTLOOK TASK – DIRECT FUNCTION CALL ....................................................................30 3.11 MAIL MERGE API – DIRECT FUNCTION CALL ...............................................................................30 3.12 NOTE EDITOR ...............................................................................................................................31 3.13 TOAST POPUPS ..............................................................................................................................32
4 DEVELOPER TOOLS AND TIPS ...................................................................................................33
4.1 DEVELOPER MENU .......................................................................................................................33
UI BuilderTM for Access – Application Guide
Copyright © 2018 OpenGate Software 3
http://www.opengatesw.net
4.1.1 Enabling the Developer Menu .................................................................................................33 4.1.2 Form Design ............................................................................................................................33 4.1.3 Form Properties ......................................................................................................................33
4.2 CHANGING THE FORM DISPLAYED IN UI BUILDER FROM CODE .....................................................33 4.3 ADDING MENU BUTTONS ...............................................................................................................34
5 UPGRADING UI BUILDER .............................................................................................................34
6 ONE-CLICK MAIL MERGE ...........................................................................................................34
6.1 MAIL MERGE PROFILES ................................................................................................................35 6.2 OUTLOOK SECURITY WARNINGS ...................................................................................................37 6.3 CONFIGURING MENU COMMANDS ................................................................................................37
7 DYNAMIC USER HELP ...................................................................................................................38
7.1 CREATING USER HELP TOPICS ......................................................................................................38 7.2 ADDING VISUAL BASIC FOR HOTKEYS .........................................................................................39 7.3 ADDING VISUAL BASIC FOR COMMAND BUTTONS .......................................................................39
8 RECORD-LEVEL AUDITING .........................................................................................................40
8.1 AUDIT HISTORY SETUP .................................................................................................................40 8.2 CREATING A NEW AUDIT TABLE ...................................................................................................41
8.2.1 Creating new Audit tables .......................................................................................................41 8.2.2 Creating VB code for your form ..............................................................................................42 8.2.3 Activating auditing for your form ............................................................................................43 8.2.4 Activating auditing for Other forms that use the same table ...................................................43
8.3 MANAGING AUDIT HISTORY TRACKING .......................................................................................44 8.3.1 Enabling/Disabling auditing ...................................................................................................44 8.3.2 Changing audit table names ....................................................................................................44 8.3.3 Changing audit table fields ......................................................................................................45
9 REPORT/QUERY MENU .................................................................................................................45
9.1 REPORT/QUERY SETUP .................................................................................................................45
10 FORM DIRECTORY MENU ............................................................................................................46
10.1 FORM DIRECTORY SETUP .............................................................................................................46
11 MANAGING BACKUPS ...................................................................................................................47
RELEASE HISTORY .................................................................................................................................48
UI BuilderTM for Access – Application Guide
Copyright © 2018 OpenGate Software 4
http://www.opengatesw.net
1 General Concepts and Resources This section describes the general concepts used in this document and when
working with the UI BuilderTM application.
1.1 USER INTERFACE
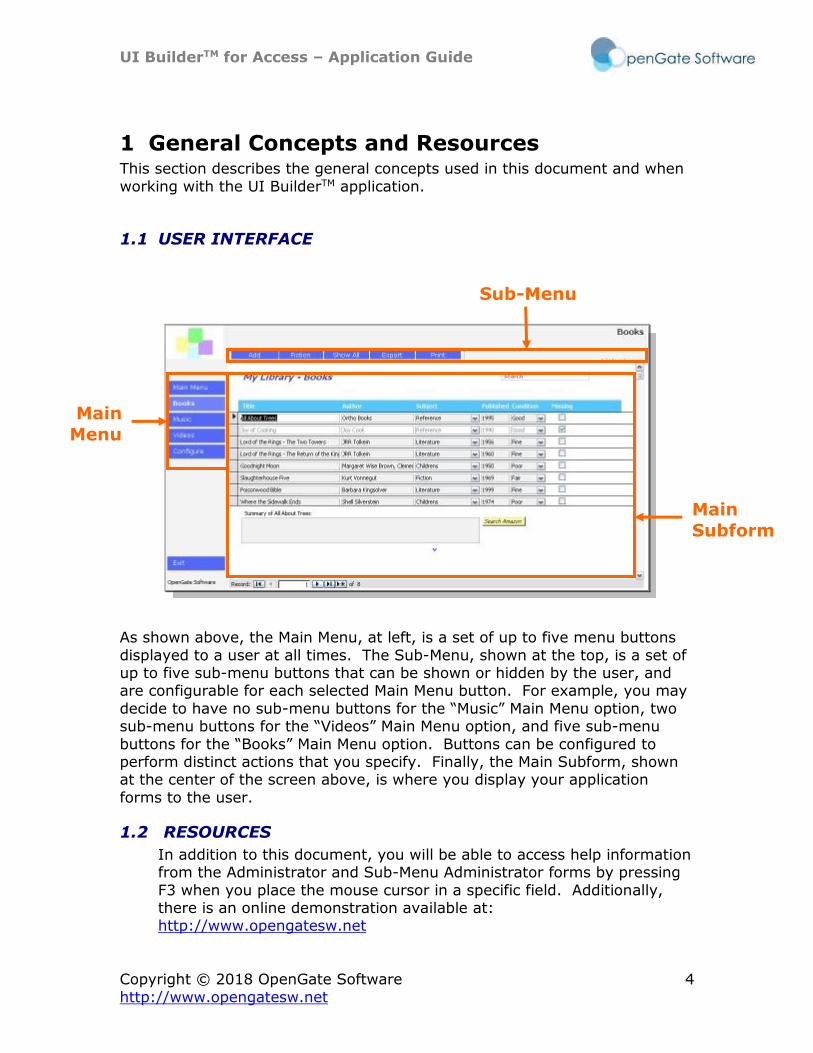
As shown above, the Main Menu, at left, is a set of up to five menu buttons
displayed to a user at all times. The Sub-Menu, shown at the top, is a set of up to five sub-menu buttons that can be shown or hidden by the user, and are configurable for each selected Main Menu button. For example, you may
decide to have no sub-menu buttons for the “Music” Main Menu option, two sub-menu buttons for the “Videos” Main Menu option, and five sub-menu
buttons for the “Books” Main Menu option. Buttons can be configured to perform distinct actions that you specify. Finally, the Main Subform, shown at the center of the screen above, is where you display your application
forms to the user.
1.2 RESOURCES
In addition to this document, you will be able to access help information from the Administrator and Sub-Menu Administrator forms by pressing
F3 when you place the mouse cursor in a specific field. Additionally, there is an online demonstration available at: http://www.opengatesw.net
Main
Menu
Sub-Menu
Main
Subform

UI BuilderTM for Access – Application Guide
Copyright © 2018 OpenGate Software 5
http://www.opengatesw.net
2 Migrating Your Application
2.1 MIGRATION OPTIONS
If you are integrating your own application into the UI Builder framework, you have two methods to chose from:
1. Import your database application forms, queries, tables, macros, and code modules into the UI Builder database file.
2. Import the UI Builder database file forms, queries, tables, macros, and code modules.
Method (1) above is best suited for situations where your database application does not have references to ActiveX or other dynamic link
libraries (DLLs) beyond the Microsoft® AccessTM default references. If you are unsure about whether this is true for your application or not, it is recommended you use method (1). Method (2) is generally easier if
you have many references to ActiveX or other dynamic link libraries (DLLs) beyond the Microsoft Access default references, or if you are
unfamiliar with how to import forms, queries, tables, macros, and code modules into a database.
2.2 MIGRATION STEPS
2.2.1 IMPORTING YOUR FORMS, QUERIES, TABLES, MACROS, AND CODE MODULES
To import your forms, queries, tables, macros, and code modules into
the UI Builder file, follow these steps: 1. Create a copy of the UI Builder database file so that you can
create other database applications using UI Builder in the future. You can then rename one of the copies to the name of your database application to begin importing your forms,
queries, tables, macros, and code modules into the UI Builder framework.
2. Select “Migrate an Application” from the opening menu screen.
3. In the dialog that follows, please read the notification and
select “Next.” 4. In the Import Objects dialog, select all forms, queries, tables,
macros, and code modules you want to migrate. 5. If you have an relationships or import/export specifications,
be sure to select “Options>>” at the bottom right of the
Import Objects dialog and select the corresponding checkboxes.
6. Select OK. 7. You are now ready to proceed to the next step in Section 2.3.
UI BuilderTM for Access – Application Guide
Copyright © 2018 OpenGate Software 6
http://www.opengatesw.net
2.2.2 IMPORTING UI BUILDER INTO YOUR DATABASE
2.2.2.1 Access 2000 and Access 2003 Users
To import UI Builder forms, queries, tables, macros, and code modules into your existing database file, follow these steps:
1. We recommend you first backup your current application. You can
backup your database when it is open by selecting File>>Backup, or by
copying and pasting your database file in Windows Explorer.
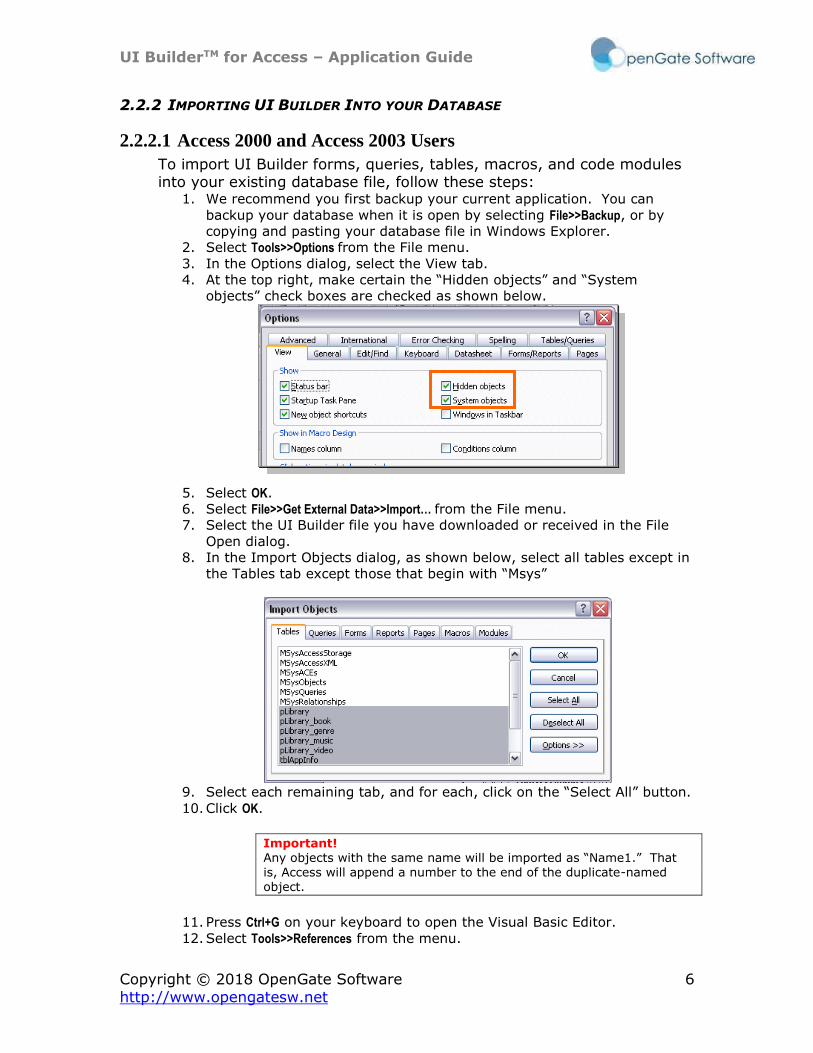
2. Select Tools>>Options from the File menu.
3. In the Options dialog, select the View tab.
4. At the top right, make certain the “Hidden objects” and “System
objects” check boxes are checked as shown below.
5. Select OK.
6. Select File>>Get External Data>>Import… from the File menu.
7. Select the UI Builder file you have downloaded or received in the File
Open dialog.
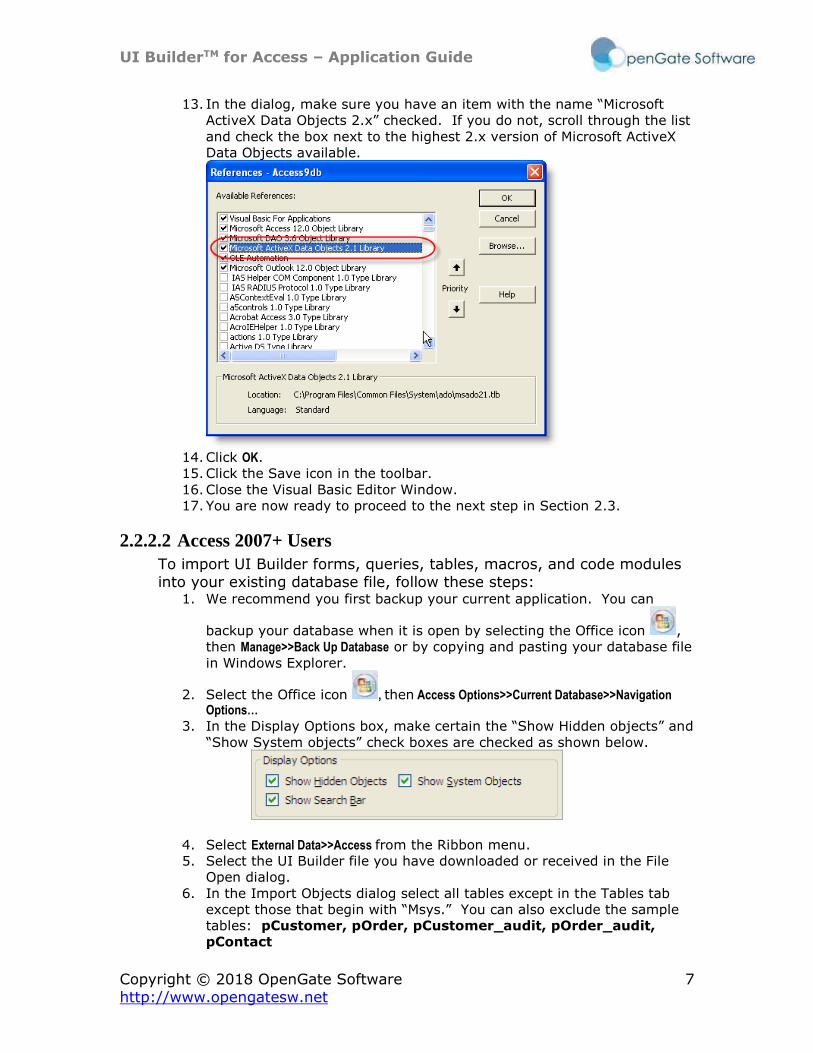
8. In the Import Objects dialog, as shown below, select all tables except in
the Tables tab except those that begin with “Msys”
9. Select each remaining tab, and for each, click on the “Select All” button.
10. Click OK.
Important! Any objects with the same name will be imported as “Name1.” That is, Access will append a number to the end of the duplicate-named object.
11. Press Ctrl+G on your keyboard to open the Visual Basic Editor.
12. Select Tools>>References from the menu.
UI BuilderTM for Access – Application Guide
Copyright © 2018 OpenGate Software 7
http://www.opengatesw.net
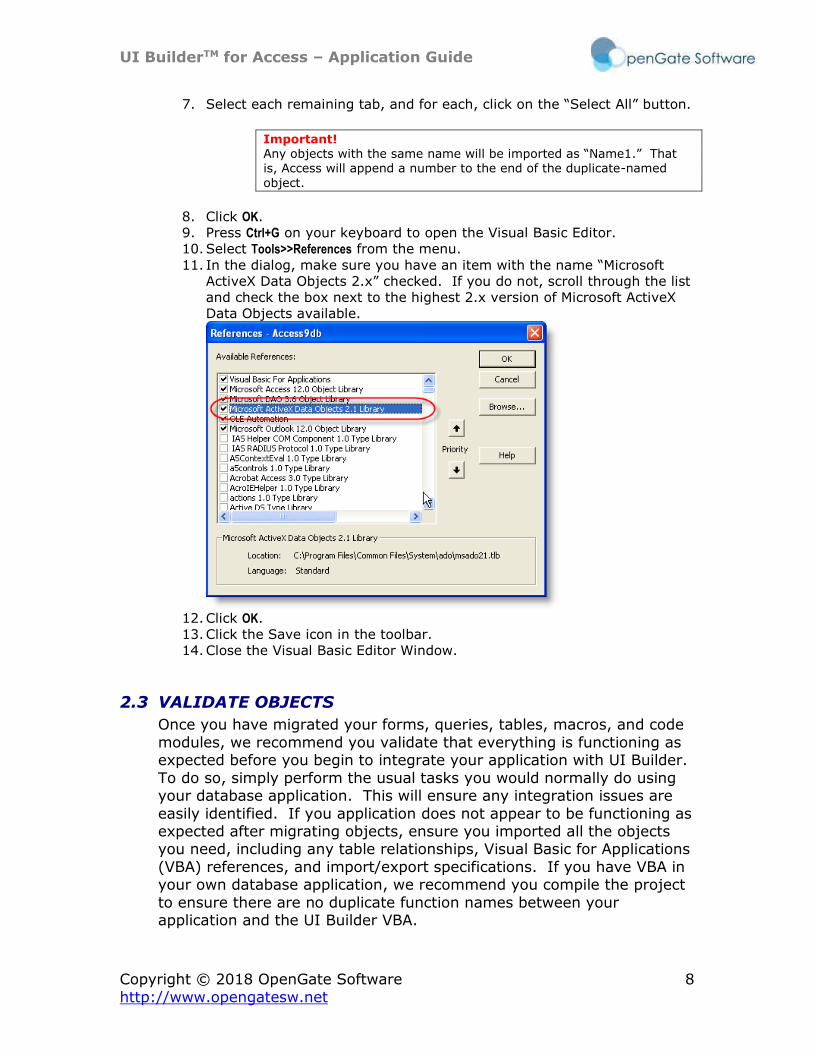
13. In the dialog, make sure you have an item with the name “Microsoft
ActiveX Data Objects 2.x” checked. If you do not, scroll through the list
and check the box next to the highest 2.x version of Microsoft ActiveX
Data Objects available.
14. Click OK.
15. Click the Save icon in the toolbar.
16. Close the Visual Basic Editor Window.
17. You are now ready to proceed to the next step in Section 2.3.
2.2.2.2 Access 2007+ Users
To import UI Builder forms, queries, tables, macros, and code modules
into your existing database file, follow these steps: 1. We recommend you first backup your current application. You can
backup your database when it is open by selecting the Office icon ,
then Manage>>Back Up Database or by copying and pasting your database file
in Windows Explorer.
2. Select the Office icon , then Access Options>>Current Database>>Navigation Options…
3. In the Display Options box, make certain the “Show Hidden objects” and
“Show System objects” check boxes are checked as shown below.
4. Select External Data>>Access from the Ribbon menu.
5. Select the UI Builder file you have downloaded or received in the File
Open dialog.
6. In the Import Objects dialog select all tables except in the Tables tab
except those that begin with “Msys.” You can also exclude the sample
tables: pCustomer, pOrder, pCustomer_audit, pOrder_audit,
pContact
UI BuilderTM for Access – Application Guide
Copyright © 2018 OpenGate Software 8
http://www.opengatesw.net
7. Select each remaining tab, and for each, click on the “Select All” button.
Important! Any objects with the same name will be imported as “Name1.” That is, Access will append a number to the end of the duplicate-named
object.
8. Click OK.
9. Press Ctrl+G on your keyboard to open the Visual Basic Editor.
10. Select Tools>>References from the menu.
11. In the dialog, make sure you have an item with the name “Microsoft
ActiveX Data Objects 2.x” checked. If you do not, scroll through the list
and check the box next to the highest 2.x version of Microsoft ActiveX
Data Objects available.
12. Click OK.
13. Click the Save icon in the toolbar.
14. Close the Visual Basic Editor Window.
2.3 VALIDATE OBJECTS
Once you have migrated your forms, queries, tables, macros, and code
modules, we recommend you validate that everything is functioning as expected before you begin to integrate your application with UI Builder.
To do so, simply perform the usual tasks you would normally do using your database application. This will ensure any integration issues are
easily identified. If you application does not appear to be functioning as expected after migrating objects, ensure you imported all the objects you need, including any table relationships, Visual Basic for Applications
(VBA) references, and import/export specifications. If you have VBA in your own database application, we recommend you compile the project
to ensure there are no duplicate function names between your application and the UI Builder VBA.

UI BuilderTM for Access – Application Guide
Copyright © 2018 OpenGate Software 9
http://www.opengatesw.net
2.4 OBJECT COMPATABILITY
In most cases, you will not need to make significant changes to your forms, queries, tables, macros, and code modules. The largest change will be to resize your forms to take on the appearance you want within
the UI Builder Main Subform.
2.4.1 FORM REFERENCES
If you know your existing application has references to your forms, and those forms to appear in the subform of the main menu, you may need to reconfigure how the forms are referred to.
Example 1 You have subform fields or macros that refer to the parent form
as follows:
You will need to change them to refer to the main form’s
(frmMain) subform (Subform1) as follows:
Note that “[Report Form]” in the original expression has been replaced by “[frmMain]![Subform]” as shown above. This is
because your form (and any subforms within that form) become a subform to the UI Builder’s main window. You will need to replace frmMain as shown above with the name of the
frmMain layout you choose to use, as shown in the table below:
Layout Main Form Name Left buttons, 1024x768 frmMain_left
UI BuilderTM for Access – Application Guide
Copyright © 2018 OpenGate Software 10
http://www.opengatesw.net
Right buttons, 1024x768 frmMain_right
Top buttons, 1024x768 frmMain_top
Left buttons, 1028x 1024 frmMain_leftlg
Right buttons, 1028x 1024 frmMain_rightlg
Top buttons, 1028x 1024 frmMain_toplg
Resizing menu, 1028x 1024 frmMain_expandlg
Example 2 You have VBA code that refers to one of your forms as follows:
Forms!MyFormName.Form.FilterOn = False
Or
[Forms]![MyFormName].Form.FilterOn = False
In this case, you simply need to make the following change:
Forms(gobjMain.Name)!Subform1.Form.FilterOn = False
2.5 CONFIGURING DEFAULT MENUS
2.5.1 CONFIGURING THE DEFAULT MENU
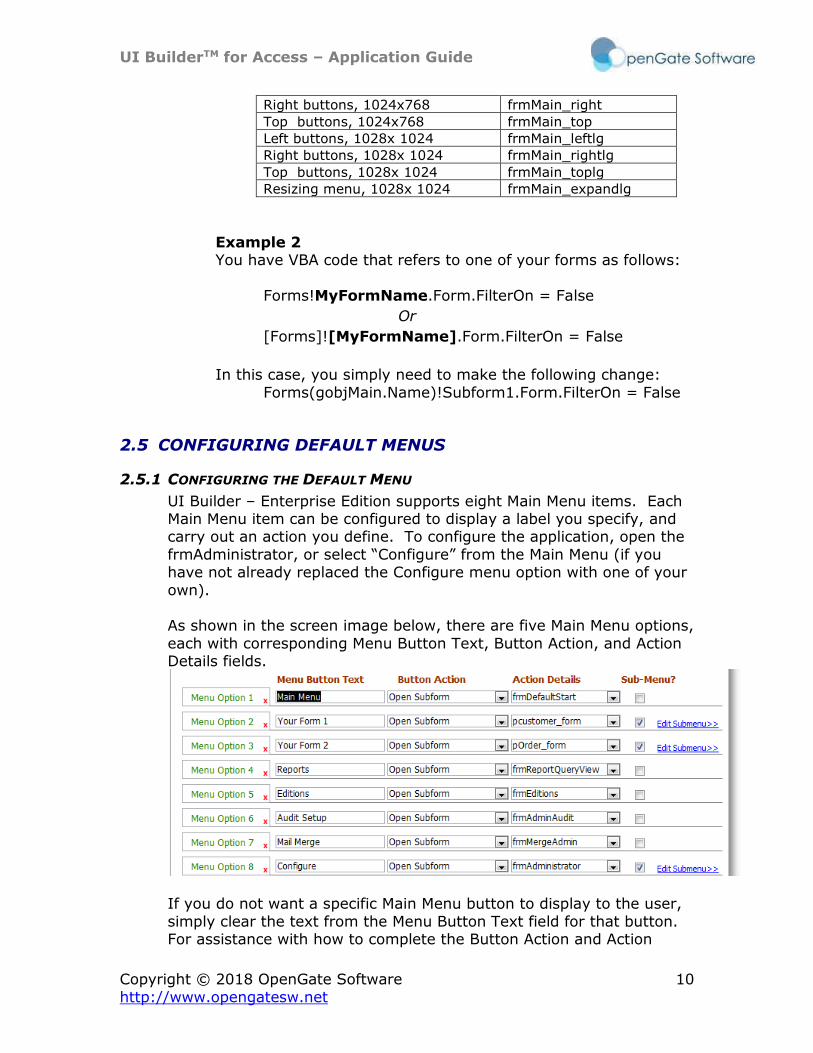
UI Builder – Enterprise Edition supports eight Main Menu items. Each Main Menu item can be configured to display a label you specify, and carry out an action you define. To configure the application, open the
frmAdministrator, or select “Configure” from the Main Menu (if you have not already replaced the Configure menu option with one of your
own). As shown in the screen image below, there are five Main Menu options,
each with corresponding Menu Button Text, Button Action, and Action Details fields.
If you do not want a specific Main Menu button to display to the user,
simply clear the text from the Menu Button Text field for that button. For assistance with how to complete the Button Action and Action
UI BuilderTM for Access – Application Guide
Copyright © 2018 OpenGate Software 11
http://www.opengatesw.net
Details fields, press F3 on any specific field to display the help for that action.
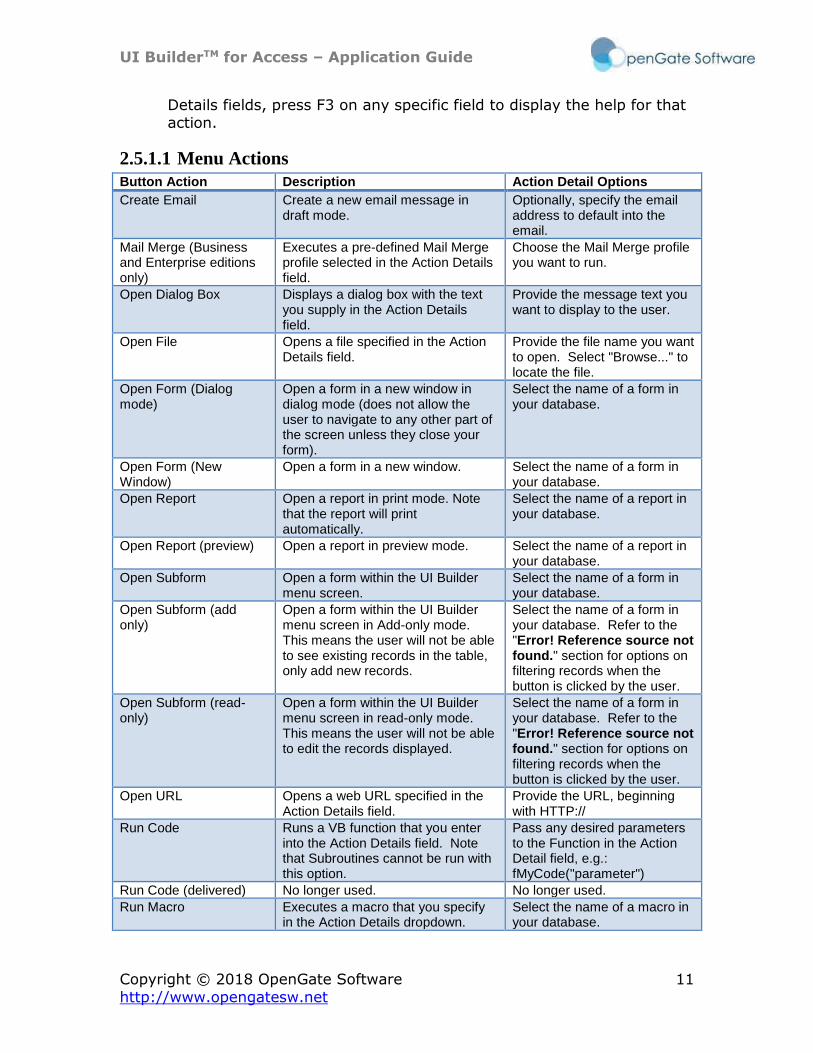
2.5.1.1 Menu Actions
Button Action Description Action Detail Options
Create Email Create a new email message in draft mode.
Optionally, specify the email address to default into the email.
Mail Merge (Business and Enterprise editions only)
Executes a pre-defined Mail Merge profile selected in the Action Details field.
Choose the Mail Merge profile you want to run.
Open Dialog Box Displays a dialog box with the text you supply in the Action Details field.
Provide the message text you want to display to the user.
Open File Opens a file specified in the Action Details field.
Provide the file name you want to open. Select "Browse..." to locate the file.
Open Form (Dialog mode)
Open a form in a new window in dialog mode (does not allow the user to navigate to any other part of the screen unless they close your form).
Select the name of a form in your database.
Open Form (New Window)
Open a form in a new window. Select the name of a form in your database.
Open Report Open a report in print mode. Note that the report will print automatically.
Select the name of a report in your database.
Open Report (preview) Open a report in preview mode. Select the name of a report in your database.
Open Subform Open a form within the UI Builder menu screen.
Select the name of a form in your database.
Open Subform (add only)
Open a form within the UI Builder menu screen in Add-only mode. This means the user will not be able to see existing records in the table, only add new records.
Select the name of a form in your database. Refer to the "Error! Reference source not found." section for options on filtering records when the button is clicked by the user.
Open Subform (read-only)
Open a form within the UI Builder menu screen in read-only mode. This means the user will not be able to edit the records displayed.
Select the name of a form in your database. Refer to the "Error! Reference source not found." section for options on filtering records when the button is clicked by the user.
Open URL Opens a web URL specified in the Action Details field.
Provide the URL, beginning with HTTP://
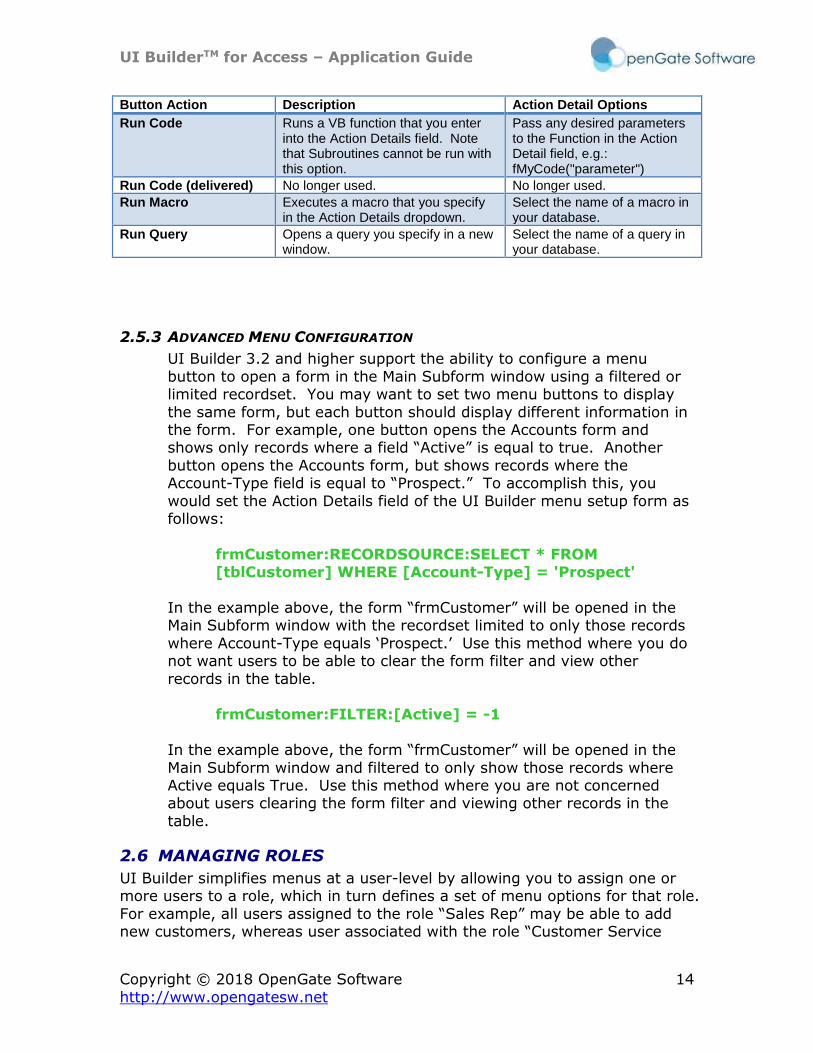
Run Code Runs a VB function that you enter into the Action Details field. Note that Subroutines cannot be run with this option.
Pass any desired parameters to the Function in the Action Detail field, e.g.: fMyCode("parameter")
Run Code (delivered) No longer used. No longer used.
Run Macro Executes a macro that you specify in the Action Details dropdown.
Select the name of a macro in your database.
UI BuilderTM for Access – Application Guide
Copyright © 2018 OpenGate Software 12
http://www.opengatesw.net
2.5.2 CONFIGURING SUB-MENUS
Each Main Menu button can have it’s own Sub-Menu. To activate a
Sub-Menu, simply check the “Sub-Menu?” checkbox in the Administrator form. Select “Edit Submenu>>” to edit the Sub-Menu
for that particular Main Menu item. There are over 18 different actions you can perform for each Sub-
Menu button. For assistance with how to complete the Button Action and Action Details fields, press F3 on any specific field to display the
help for that action. Finally, similar to the Main Menu buttons, if you do not want a specific Sub-Menu button to display to the user, simply clear the text from the Menu Button Text field for that button.
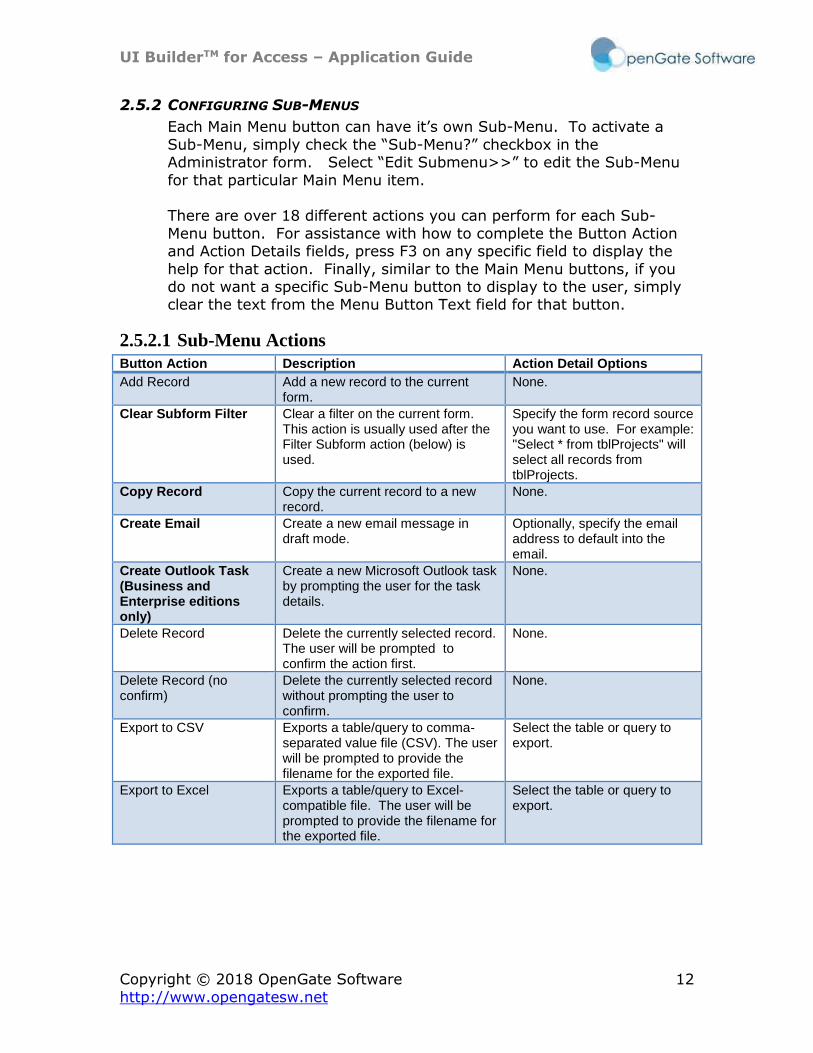
2.5.2.1 Sub-Menu Actions
Button Action Description Action Detail Options
Add Record Add a new record to the current form.
None.
Clear Subform Filter Clear a filter on the current form. This action is usually used after the Filter Subform action (below) is used.
Specify the form record source you want to use. For example: "Select * from tblProjects" will select all records from tblProjects.
Copy Record Copy the current record to a new record.
None.
Create Email Create a new email message in draft mode.
Optionally, specify the email address to default into the email.
Create Outlook Task (Business and Enterprise editions only)
Create a new Microsoft Outlook task by prompting the user for the task details.
None.
Delete Record Delete the currently selected record. The user will be prompted to confirm the action first.
None.
Delete Record (no confirm)
Delete the currently selected record without prompting the user to confirm.
None.
Export to CSV Exports a table/query to comma-separated value file (CSV). The user will be prompted to provide the filename for the exported file.
Select the table or query to export.
Export to Excel Exports a table/query to Excel-compatible file. The user will be prompted to provide the filename for the exported file.
Select the table or query to export.
UI BuilderTM for Access – Application Guide
Copyright © 2018 OpenGate Software 13
http://www.opengatesw.net
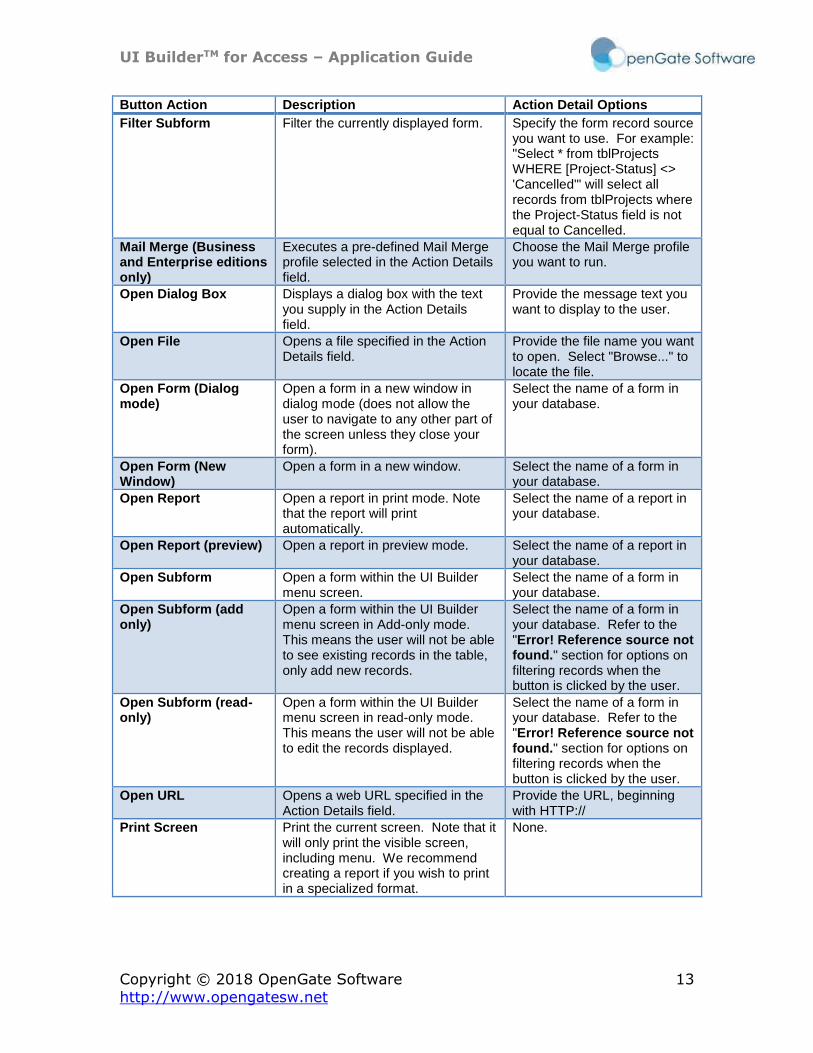
Button Action Description Action Detail Options
Filter Subform Filter the currently displayed form. Specify the form record source you want to use. For example: "Select * from tblProjects WHERE [Project-Status] <> 'Cancelled'" will select all records from tblProjects where the Project-Status field is not equal to Cancelled.
Mail Merge (Business and Enterprise editions only)
Executes a pre-defined Mail Merge profile selected in the Action Details field.
Choose the Mail Merge profile you want to run.
Open Dialog Box Displays a dialog box with the text you supply in the Action Details field.
Provide the message text you want to display to the user.
Open File Opens a file specified in the Action Details field.
Provide the file name you want to open. Select "Browse..." to locate the file.
Open Form (Dialog mode)
Open a form in a new window in dialog mode (does not allow the user to navigate to any other part of the screen unless they close your form).
Select the name of a form in your database.
Open Form (New Window)
Open a form in a new window. Select the name of a form in your database.
Open Report Open a report in print mode. Note that the report will print automatically.
Select the name of a report in your database.
Open Report (preview) Open a report in preview mode. Select the name of a report in your database.
Open Subform Open a form within the UI Builder menu screen.
Select the name of a form in your database.
Open Subform (add only)
Open a form within the UI Builder menu screen in Add-only mode. This means the user will not be able to see existing records in the table, only add new records.
Select the name of a form in your database. Refer to the "Error! Reference source not found." section for options on filtering records when the button is clicked by the user.
Open Subform (read-only)
Open a form within the UI Builder menu screen in read-only mode. This means the user will not be able to edit the records displayed.
Select the name of a form in your database. Refer to the "Error! Reference source not found." section for options on filtering records when the button is clicked by the user.
Open URL Opens a web URL specified in the Action Details field.
Provide the URL, beginning with HTTP://
Print Screen Print the current screen. Note that it will only print the visible screen, including menu. We recommend creating a report if you wish to print in a specialized format.
None.
UI BuilderTM for Access – Application Guide
Copyright © 2018 OpenGate Software 14
http://www.opengatesw.net
Button Action Description Action Detail Options
Run Code Runs a VB function that you enter into the Action Details field. Note that Subroutines cannot be run with this option.
Pass any desired parameters to the Function in the Action Detail field, e.g.: fMyCode("parameter")
Run Code (delivered) No longer used. No longer used.
Run Macro Executes a macro that you specify in the Action Details dropdown.
Select the name of a macro in your database.
Run Query Opens a query you specify in a new window.
Select the name of a query in your database.
2.5.3 ADVANCED MENU CONFIGURATION
UI Builder 3.2 and higher support the ability to configure a menu
button to open a form in the Main Subform window using a filtered or limited recordset. You may want to set two menu buttons to display
the same form, but each button should display different information in the form. For example, one button opens the Accounts form and shows only records where a field “Active” is equal to true. Another
button opens the Accounts form, but shows records where the Account-Type field is equal to “Prospect.” To accomplish this, you
would set the Action Details field of the UI Builder menu setup form as follows:
frmCustomer:RECORDSOURCE:SELECT * FROM [tblCustomer] WHERE [Account-Type] = 'Prospect'
In the example above, the form “frmCustomer” will be opened in the Main Subform window with the recordset limited to only those records
where Account-Type equals ‘Prospect.’ Use this method where you do not want users to be able to clear the form filter and view other
records in the table.
frmCustomer:FILTER:[Active] = -1
In the example above, the form “frmCustomer” will be opened in the
Main Subform window and filtered to only show those records where Active equals True. Use this method where you are not concerned about users clearing the form filter and viewing other records in the
table.
2.6 MANAGING ROLES
UI Builder simplifies menus at a user-level by allowing you to assign one or more users to a role, which in turn defines a set of menu options for that role.
For example, all users assigned to the role “Sales Rep” may be able to add new customers, whereas user associated with the role “Customer Service

UI BuilderTM for Access – Application Guide
Copyright © 2018 OpenGate Software 15
http://www.opengatesw.net
Rep” may only be able to view customers, but not modify the customer records.
2.6.1 ADDING ROLES
To add a new role, or change an existing one, navigate to the Role-
Based Menu Administration screen. The screen is accessible from the main Administrator form, or by opening the hidden form “frmAdminRoles.”
Role-Based Menu Administration screen
Select “Add a New Role>>” at the top right of the screen. In the dialog prompt, enter the name of the role. The new role will appear in
the role list. Then simply configure the menu and submenu button options at the bottom of the screen for the new role.
Note that if the “Read-Only” check box is checked, users associated with this role will be able to open forms you define for their menu
options, but all forms will open as read-only.
2.6.2 TESTING ROLES
UI Builder 3.0 and above include the ability for administrators to test
other roles without logging in as a different Windows NT user. Simply select “Test Role>>” from the list of roles and select the role you want
to switch to in the popup form. You can test the role’s menus and actions, then close the popup form when you want to return to your assigned role. This functionality is only available to administrators.
2.6.3 REMOVING ROLES
To remove a role, select the “Delete Role>>” at the top right of the
screen. If there are users associated with the role, you will not be able to delete the role until you remove the users, or reassign them to another role.
UI BuilderTM for Access – Application Guide
Copyright © 2018 OpenGate Software 16
http://www.opengatesw.net
2.6.4 ADMINISTRATOR SECURITY
When you first open the UI Builder application, the NT login currently in use will be assigned as the default administrator. You can see the
designated default administrator in the main Administration screen. The default administrator is allowed to access and update information in any of the administration screens. All others are not able to open
these forms, unless they are associated with a role where the “Administrator” check box is checked.
2.7 MANAGING USERS
UI Builder Enterprise Editions 3.2 and higher support two user login methods. You can rely on each user’s NT (Windows) Login to authenticate them and automatically log in authorized users, or you can
employ the UI Builder login prompt. If each user will log in from their own machine, we recommend you employ the NT Login method.
However, if you have a shared machine that is used by multiple individuals without logging in separately, the UI Builder login prompt can provide user level menus despite the fact all users are logged in
with the same Windows username.
Please refer to the UI Builder Security Guide for detailed information on how to set up the UI Builder login prompt method.
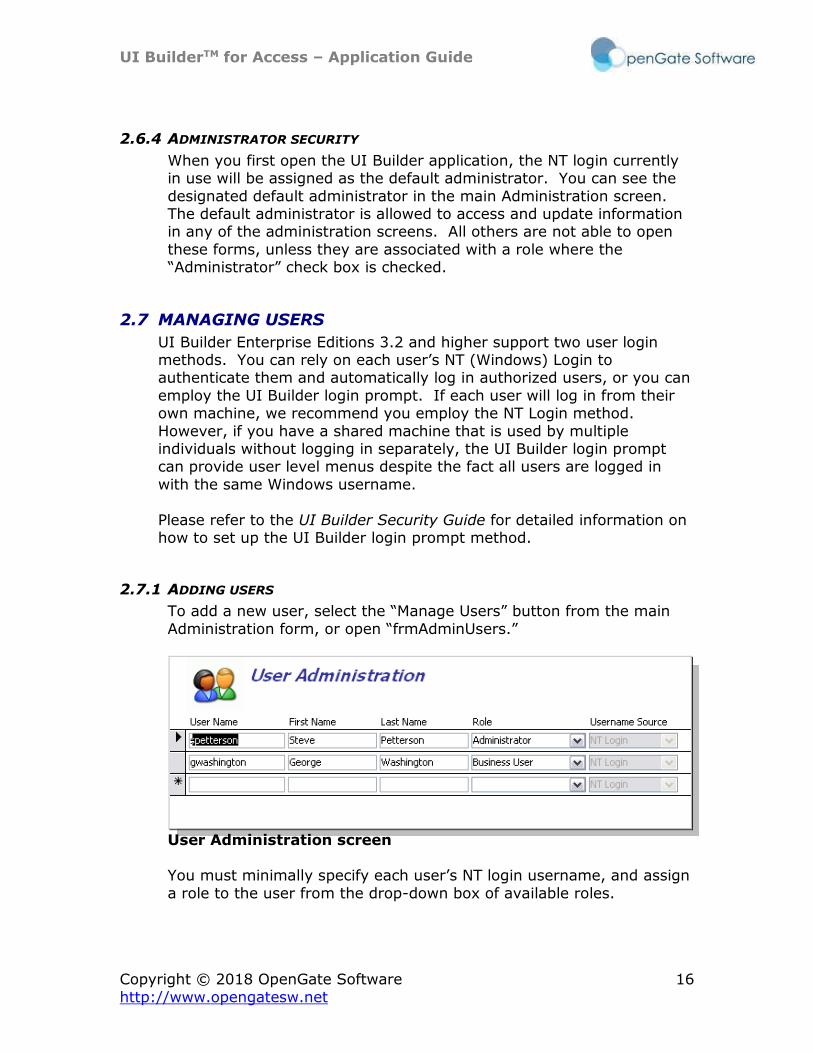
2.7.1 ADDING USERS
To add a new user, select the “Manage Users” button from the main
Administration form, or open “frmAdminUsers.”
User Administration screen You must minimally specify each user’s NT login username, and assign
a role to the user from the drop-down box of available roles.
UI BuilderTM for Access – Application Guide
Copyright © 2018 OpenGate Software 17
http://www.opengatesw.net
2.7.2 DELETING USERS
To delete a user, select the user’s record, and then select “Delete
[username]>>” from the bottom of the User Administration form.
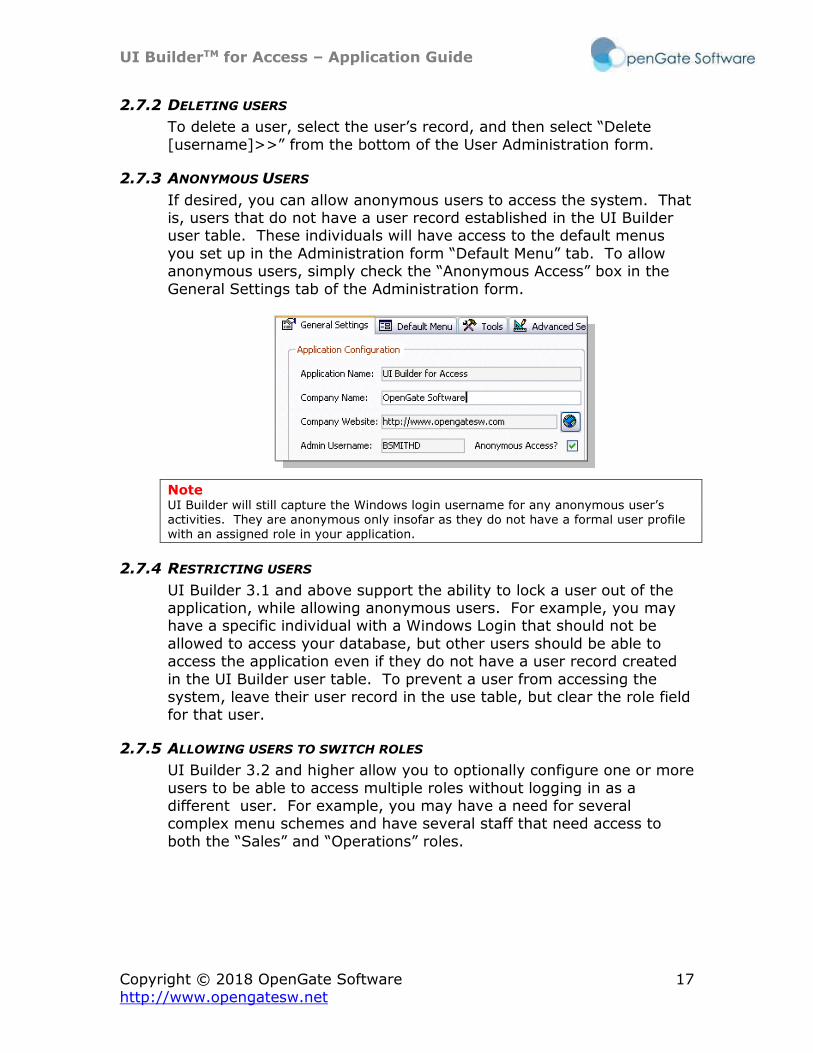
2.7.3 ANONYMOUS USERS
If desired, you can allow anonymous users to access the system. That is, users that do not have a user record established in the UI Builder user table. These individuals will have access to the default menus
you set up in the Administration form “Default Menu” tab. To allow anonymous users, simply check the “Anonymous Access” box in the
General Settings tab of the Administration form.
Note UI Builder will still capture the Windows login username for any anonymous user’s activities. They are anonymous only insofar as they do not have a formal user profile with an assigned role in your application.
2.7.4 RESTRICTING USERS
UI Builder 3.1 and above support the ability to lock a user out of the application, while allowing anonymous users. For example, you may have a specific individual with a Windows Login that should not be
allowed to access your database, but other users should be able to access the application even if they do not have a user record created
in the UI Builder user table. To prevent a user from accessing the system, leave their user record in the use table, but clear the role field for that user.
2.7.5 ALLOWING USERS TO SWITCH ROLES
UI Builder 3.2 and higher allow you to optionally configure one or more
users to be able to access multiple roles without logging in as a different user. For example, you may have a need for several complex menu schemes and have several staff that need access to
both the “Sales” and “Operations” roles.
UI BuilderTM for Access – Application Guide
Copyright © 2018 OpenGate Software 18
http://www.opengatesw.net
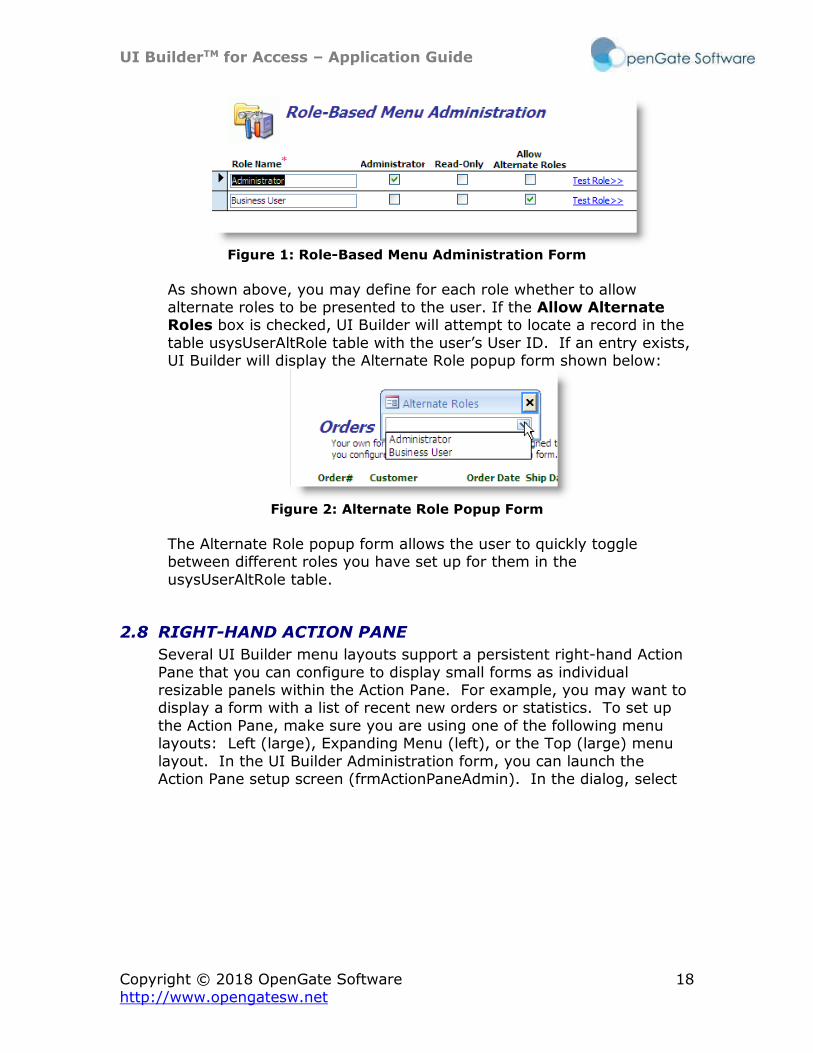
Figure 1: Role-Based Menu Administration Form
As shown above, you may define for each role whether to allow alternate roles to be presented to the user. If the Allow Alternate Roles box is checked, UI Builder will attempt to locate a record in the
table usysUserAltRole table with the user’s User ID. If an entry exists, UI Builder will display the Alternate Role popup form shown below:
Figure 2: Alternate Role Popup Form
The Alternate Role popup form allows the user to quickly toggle between different roles you have set up for them in the
usysUserAltRole table.
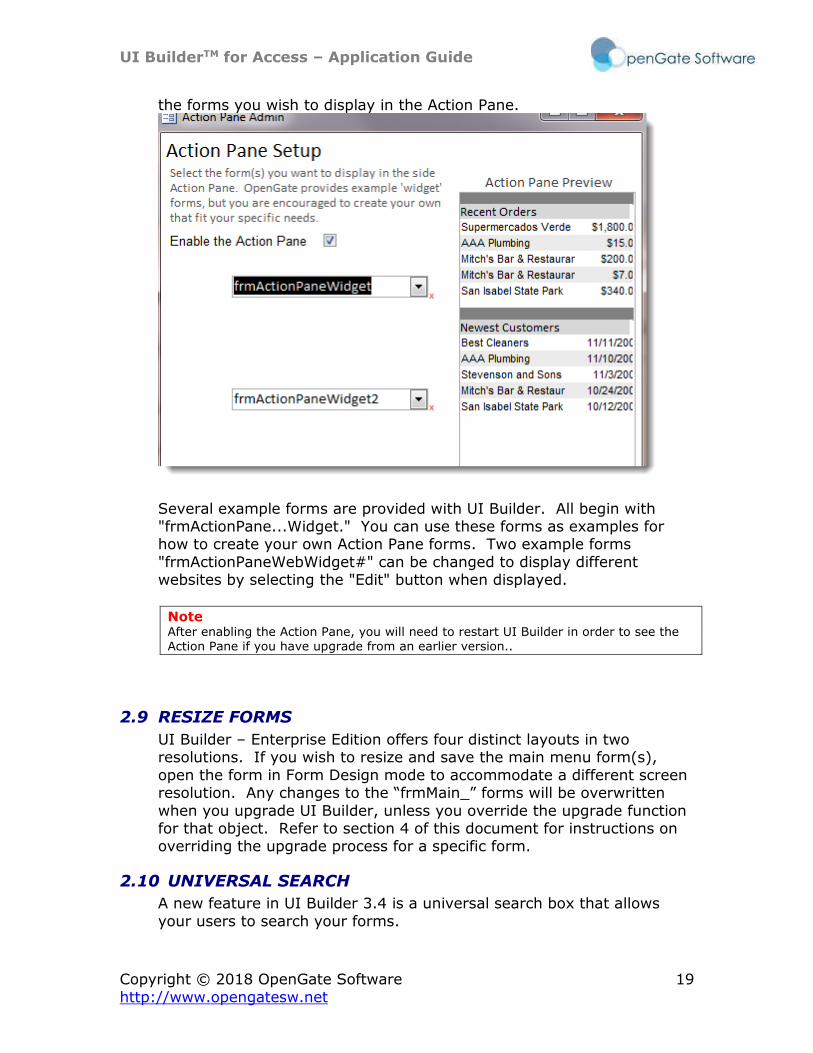
2.8 RIGHT-HAND ACTION PANE
Several UI Builder menu layouts support a persistent right-hand Action
Pane that you can configure to display small forms as individual resizable panels within the Action Pane. For example, you may want to display a form with a list of recent new orders or statistics. To set up
the Action Pane, make sure you are using one of the following menu layouts: Left (large), Expanding Menu (left), or the Top (large) menu
layout. In the UI Builder Administration form, you can launch the Action Pane setup screen (frmActionPaneAdmin). In the dialog, select
UI BuilderTM for Access – Application Guide
Copyright © 2018 OpenGate Software 19
http://www.opengatesw.net
the forms you wish to display in the Action Pane.
Several example forms are provided with UI Builder. All begin with "frmActionPane...Widget." You can use these forms as examples for how to create your own Action Pane forms. Two example forms
"frmActionPaneWebWidget#" can be changed to display different websites by selecting the "Edit" button when displayed.
Note After enabling the Action Pane, you will need to restart UI Builder in order to see the Action Pane if you have upgrade from an earlier version..
2.9 RESIZE FORMS
UI Builder – Enterprise Edition offers four distinct layouts in two resolutions. If you wish to resize and save the main menu form(s),
open the form in Form Design mode to accommodate a different screen resolution. Any changes to the “frmMain_” forms will be overwritten
when you upgrade UI Builder, unless you override the upgrade function for that object. Refer to section 4 of this document for instructions on overriding the upgrade process for a specific form.
2.10 UNIVERSAL SEARCH
A new feature in UI Builder 3.4 is a universal search box that allows
your users to search your forms.
UI BuilderTM for Access – Application Guide
Copyright © 2018 OpenGate Software 20
http://www.opengatesw.net
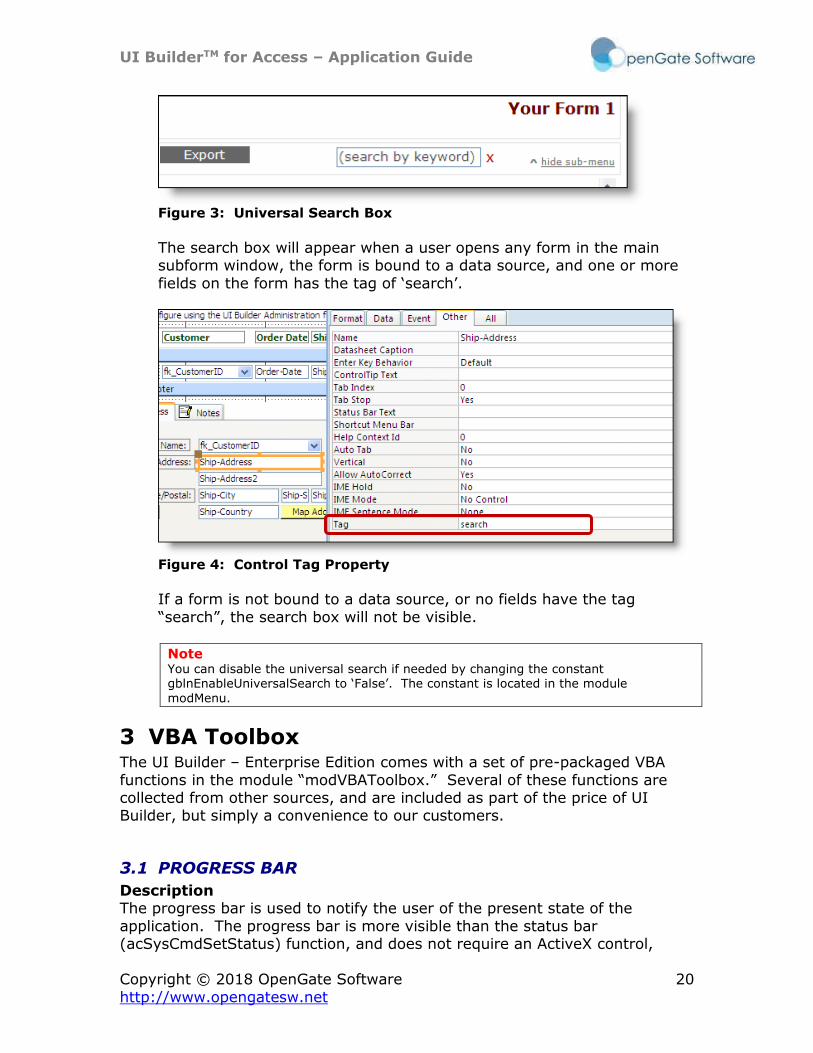
Figure 3: Universal Search Box
The search box will appear when a user opens any form in the main subform window, the form is bound to a data source, and one or more
fields on the form has the tag of ‘search’.
Figure 4: Control Tag Property
If a form is not bound to a data source, or no fields have the tag
“search”, the search box will not be visible.
Note You can disable the universal search if needed by changing the constant gblnEnableUniversalSearch to ‘False’. The constant is located in the module
modMenu.
3 VBA Toolbox The UI Builder – Enterprise Edition comes with a set of pre-packaged VBA
functions in the module “modVBAToolbox.” Several of these functions are collected from other sources, and are included as part of the price of UI Builder, but simply a convenience to our customers.
3.1 PROGRESS BAR
Description The progress bar is used to notify the user of the present state of the
application. The progress bar is more visible than the status bar (acSysCmdSetStatus) function, and does not require an ActiveX control,
UI BuilderTM for Access – Application Guide
Copyright © 2018 OpenGate Software 21
http://www.opengatesw.net
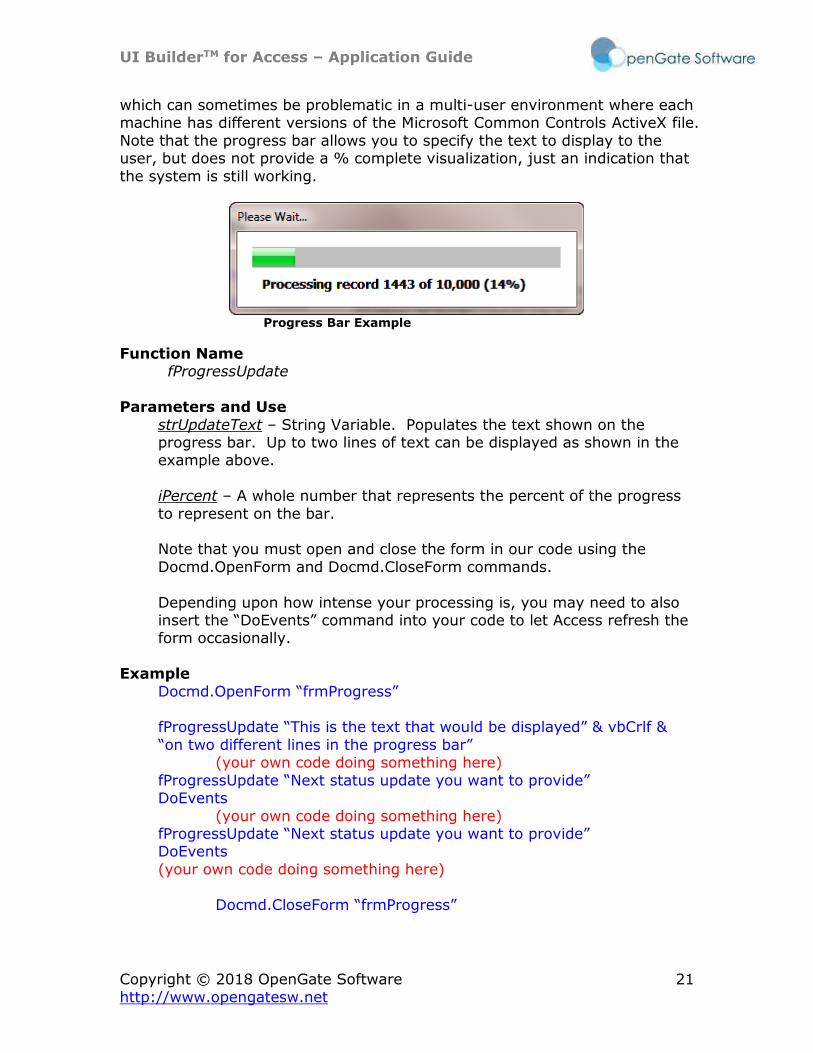
which can sometimes be problematic in a multi-user environment where each machine has different versions of the Microsoft Common Controls ActiveX file.
Note that the progress bar allows you to specify the text to display to the user, but does not provide a % complete visualization, just an indication that
the system is still working.
Progress Bar Example
Function Name fProgressUpdate
Parameters and Use
strUpdateText – String Variable. Populates the text shown on the progress bar. Up to two lines of text can be displayed as shown in the example above.
iPercent – A whole number that represents the percent of the progress
to represent on the bar.
Note that you must open and close the form in our code using the
Docmd.OpenForm and Docmd.CloseForm commands.
Depending upon how intense your processing is, you may need to also insert the “DoEvents” command into your code to let Access refresh the form occasionally.
Example
Docmd.OpenForm “frmProgress” fProgressUpdate “This is the text that would be displayed” & vbCrlf &
“on two different lines in the progress bar” (your own code doing something here)
fProgressUpdate “Next status update you want to provide” DoEvents
(your own code doing something here) fProgressUpdate “Next status update you want to provide” DoEvents
(your own code doing something here)
Docmd.CloseForm “frmProgress”
UI BuilderTM for Access – Application Guide
Copyright © 2018 OpenGate Software 22
http://www.opengatesw.net
3.2 EVENT LOGGING
The Event Log function in UI Builder provides a way for you to log important events to a local or remote table, or to an XML output file in the location you specify. There are three functions that are used for event logging, one to
initialize the log, the second to write to the log, and the third to close the log when finished. To optimize performance, if you are using a table to log
events, the table will remain open for the duration of the user’s session, or until you intentionally close the log with the fCloseLog() function.
If you choose to write to the log table (“tblEventLog”), you can locate the table locally on the PC where your database application is used, or copy the
table to a file server and then link the table back to your user’s database. Similarly, you can choose to store the XML event log on the local PC where
the database is being used, or to a central location such as a file server.
Important!
Each copy of your database application can write to the same remote log
table (linked) or central file. Note that each copy of your database application
will have it’s own settings and if you want to change them universally, you
will need to do so for each copy.
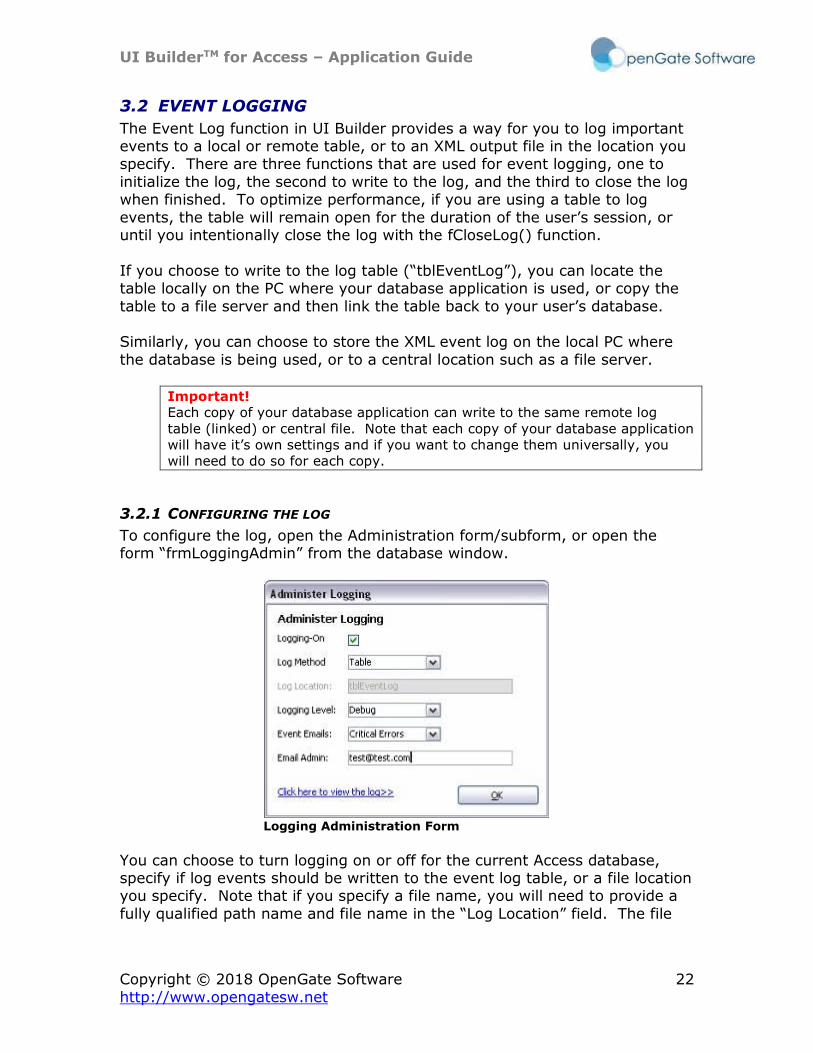
3.2.1 CONFIGURING THE LOG
To configure the log, open the Administration form/subform, or open the form “frmLoggingAdmin” from the database window.
Logging Administration Form
You can choose to turn logging on or off for the current Access database, specify if log events should be written to the event log table, or a file location you specify. Note that if you specify a file name, you will need to provide a
fully qualified path name and file name in the “Log Location” field. The file
UI BuilderTM for Access – Application Guide
Copyright © 2018 OpenGate Software 23
http://www.opengatesw.net
format will be XML (without header/footer), and will not depend upon the file name extension you supply in the “Log Location” field.
The logging level will dictate whether certain events are written to the log or
not. When you define a log event you can indicate if it is a Normal or Debug event. If you have the Logging Level set to “Debug,” all events will be written to the log. If set to “Normal,” only normal events will be written to
the log, Debug events will be ignored.
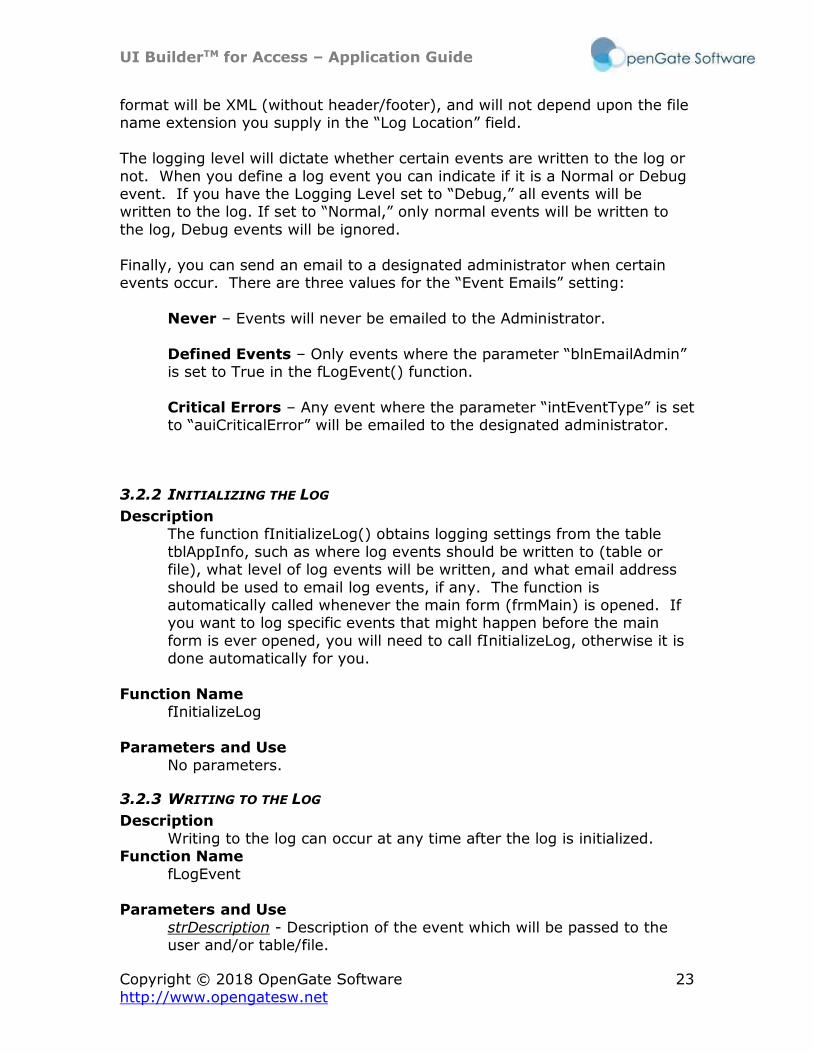
Finally, you can send an email to a designated administrator when certain events occur. There are three values for the “Event Emails” setting:
Never – Events will never be emailed to the Administrator.
Defined Events – Only events where the parameter “blnEmailAdmin” is set to True in the fLogEvent() function.
Critical Errors – Any event where the parameter “intEventType” is set to “auiCriticalError” will be emailed to the designated administrator.
3.2.2 INITIALIZING THE LOG
Description The function fInitializeLog() obtains logging settings from the table
tblAppInfo, such as where log events should be written to (table or file), what level of log events will be written, and what email address
should be used to email log events, if any. The function is automatically called whenever the main form (frmMain) is opened. If you want to log specific events that might happen before the main
form is ever opened, you will need to call fInitializeLog, otherwise it is done automatically for you.
Function Name
fInitializeLog
Parameters and Use
No parameters.
3.2.3 WRITING TO THE LOG
Description
Writing to the log can occur at any time after the log is initialized. Function Name
fLogEvent
Parameters and Use
strDescription - Description of the event which will be passed to the user and/or table/file.
UI BuilderTM for Access – Application Guide
Copyright © 2018 OpenGate Software 24
http://www.opengatesw.net
intEventLevel - Determines if the event will be written to the table/file
based on the application's logging level (normal/debug).
blnAlarmUser - If set to True, the user will see a popup alert with the text of the event.
strSource - The source of the event.
intEventType - Category of the event to help you understand if it is informational, an error, or critical error.
blnEmailAdmin - Determines if the event is emailed to an administrator. There are three modes, the default being only those events where
they blnEmailAdmin is explicitly set to True. Alternatively, you can set the system to email no events, or critical errors, in which case it doesn't matter whether blnEmailAdmin is True or False when passed in.
Note that blank = Never email events.
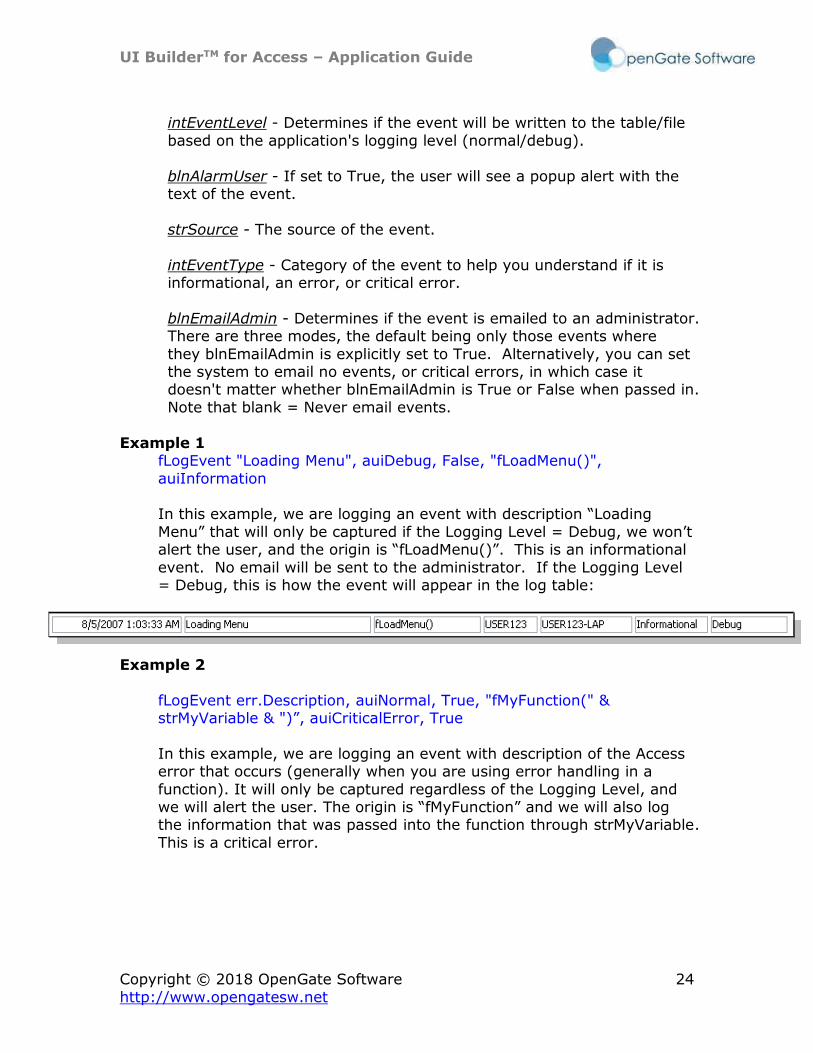
Example 1 fLogEvent "Loading Menu", auiDebug, False, "fLoadMenu()",
auiInformation In this example, we are logging an event with description “Loading
Menu” that will only be captured if the Logging Level = Debug, we won’t alert the user, and the origin is “fLoadMenu()”. This is an informational
event. No email will be sent to the administrator. If the Logging Level = Debug, this is how the event will appear in the log table:
Example 2
fLogEvent err.Description, auiNormal, True, "fMyFunction(" & strMyVariable & ")”, auiCriticalError, True
In this example, we are logging an event with description of the Access error that occurs (generally when you are using error handling in a
function). It will only be captured regardless of the Logging Level, and we will alert the user. The origin is “fMyFunction” and we will also log the information that was passed into the function through strMyVariable.
This is a critical error.

UI BuilderTM for Access – Application Guide
Copyright © 2018 OpenGate Software 25
http://www.opengatesw.net
User Alert Dialog
3.2.4 CLOSING THE LOG
Description The function fCloseLog() simply closes down the log function and, if necessary, the log table recordset as well. The function is
automatically called whenever the main form (frmMain) is closed.
Function Name fCloseLog
Parameters and Use No parameters.
3.2.5 VIEWING THE LOG
If you save log events to the XML output file, you will need to open the file by navigating to the location and opening it. If you write log events to the
event log table, you can view the event records by opening the hidden form frmLogViewer or by selecting “Click Here To View Event Log>>” from the
Logging Administrator form.
3.3 TABLE RECORD COUNT
Description The function fTableRecordCount enables you to quickly obtain a count
of records in a specified table using an SQL string you supply. You can call this function from a form field, or from another VBA function. This function provides a simple alternative to the Access DCount() function,
with embedded error handling and event logging.
For example, you may have a field on a form “Customers” that you want to show the user the number of customers currently in your database. You could insert this function into the read-only field to
display that information to them. Of you may have a function where your processing depends upon whether there are records in a specific
table, or a specific number of records in that table meeting a given criteria.
UI BuilderTM for Access – Application Guide
Copyright © 2018 OpenGate Software 26
http://www.opengatesw.net
Function Name fTableRecordCount
Parameters and Use
strTable –Provide a valid table name (linked or local) for the current database
strSQL – Provide a valid SQL string beginning with “WHERE…” If you want to count all records in the table, simply pass “” in the variable.
blnDisplayErrors– Optional. Set to False if you do not want this function to display an error to the user if something goes wrong. For example, if
you have this function called multiple times, you may not want to alert the user every time an error occurs. If left blank, UI Builder will display
any error messages. Example 1
lngRecords = fTableRecordCount(“tblMyTable”,””)
In this example, a value will be returned to lngRecords for the number of records contained in the table “tblMyTable.” No SQL criteria will be
applied.
Example 2
lngRecords = fTableRecordCount(“tblTableX”,”WHERE [CustomerID] = ” & me.customerid.value)
In this example, a value will be returned to lngRecords for the number of records contained in the table “tblTableX” where the CustomerID field
is equal to a value passed from the current form for the field “customerid.”
3.4 TABLE RECORD SUM
Description
The function fTableRecordSum enables you to quickly obtain a sum of records in a specified table field using an SQL string you supply. You can call this function from a form field, or from another VBA function.
This function provides a simple alternative to the Access DSum() function, with embedded error handling and event logging.
For example, you may have a field on a form “Revenue” that you want to show the user the amount of revenue this month. You could insert
this function into the read-only field to display that information to them. Or you may have a function where your processing depends
upon whether you have generated a specific amount of revenue from orders.
UI BuilderTM for Access – Application Guide
Copyright © 2018 OpenGate Software 27
http://www.opengatesw.net
Function Name fTableRecordSum
Parameters and Use
strTable –Provide a valid table name (linked or local) for the current database
strSumField – Designate the name of the field in strTable that contains the data you want to sum together.
strSQL – Provide a valid SQL string beginning with “WHERE…” If you want to count all records in the table, simply pass “” in the variable.
blnDisplayErrors– Optional. Set to False if you do not want this function
to display an error to the user if something goes wrong. For example, if you have this function called multiple times, you may not want to alert the user every time an error occurs. If left blank, UI Builder will display
any error messages.
Example 1 lngRecords = fTableRecordSum(“tblMyTable”,”MyField”,””)
In this example, a value will be returned to lngRecords for the sum of values contained in the field “MyField” in table “tblMyTable.” No SQL
criteria will be applied.
Example 2 lngRecords = fTableRecordSum (“tblTableX”,”MyField”, ”WHERE [Order-Date] > #1/1/2007#“)
In this example, a value will be returned to lngRecords for the sum of
values contained in the field “MyField” in table “tblTableX” where the Order-Date field is greater than 1/1/2007.
3.5 TABLE RECORD VALUE
Description
The function fTableRecordValue enables you to quickly obtain a value from a field in a specified table field using an SQL string you supply.
You can call this function from a form field, or from another VBA function. This function provides a simple alternative to the Access DLookup() function, with embedded error handling and event logging.
For example, you may have want to fetch the current value of a field
that is in a table other than the one your form uses as the data source. You could insert this function into the read-only field to display that information to them. UI Builder uses this function, as an example, to
change the color scheme on some forms to conform to the color
UI BuilderTM for Access – Application Guide
Copyright © 2018 OpenGate Software 28
http://www.opengatesw.net
scheme you choose. The form load event obtains your currently active color scheme’s menu button color to paint the menu administration
form buttons the same color.
Important!
This function will return the first value found in the data source for the field
you specify. If you happen to have multiple records in the data source that
match your SQL expression, UI Builder will only return the first record found.
Function Name
fTableRecordValue
Parameters and Use
strTable –Provide a valid table name (linked or local) for the current database
strField – Designate the name of the field in strTable that contains the data you want to fetch.
strSQL – Provide a valid SQL string beginning with “WHERE…” If you
want to count all records in the table, simply pass “” in the variable.
blnDisplayErrors– Optional. Set to False if you do not want this function
to display an error to the user if something goes wrong. For example, if you have this function called multiple times, you may not want to alert
the user every time an error occurs. If left blank, UI Builder will display any error messages.
Example 1 lngButtonColor = fTableRecordValue("tblColorScheme", "MenuButtons",
"WHERE [ActiveScheme] = -1", False) In this example, a value will be returned to lngButtonColor for the first
value contained in the field “MenuButtons” in table “tblColorScheme” where the scheme is currently active. Errors will not be displayed to the
user if they occur.
3.6 FILE CHECK
Description The function fFileExists allows you to validate whether a file exists or
not. When you call fFileExists with a filename, it will respond with a True/False to your function to indicate if the file exists or not.
Function Name
fFileExists
Parameters and Use
UI BuilderTM for Access – Application Guide
Copyright © 2018 OpenGate Software 29
http://www.opengatesw.net
strFileName – Supply the name of the file you want to determine if it exists or not.
Example
blnMyVariable = fFileExists(“C:\Win.ini”)
The function will return a True/False value to your calling function for
the file “C:\Win.ini”
3.7 OPERATING SYSTEM NAME
Description
The code for this function is courtesy of Dev Ashish. Call the function within any other function to retrieve the name of the operating system upon which your Access database application is running.
Function Name
fOSName
Parameters and Use
No Parameters.
3.8 NETWORK USERNAME
Description
The code for this function is courtesy of Dev Ashish. Call the function within any other function to retrieve the network username for the machine on which your Access database application is running.
Function Name
fOSUserName
Parameters and Use
No Parameters.
3.9 MACHINE NAME
Description The code for this function is courtesy of Dev Ashish. Call the function
within any other function to retrieve the name of the machine on which your Access database application is running.
Function Name fOSMachineName
Parameters and Use
No Parameters.
UI BuilderTM for Access – Application Guide
Copyright © 2018 OpenGate Software 30
http://www.opengatesw.net
3.10 CREATE OUTLOOK TASK – DIRECT FUNCTION CALL
Description UI Builder helps users create Outlook tasks quickly and efficiently, without ever leaving your database application. Simply configure a menu button to
use the "Create Outlook Task" command, and UI Builder takes care of the rest. When clicked, the user is prompted to add details about the task, click
"Create Task>>", and they continue working on what they were doing without the normal multi-step process. To call the create task function directly, use the fAddOutlookTask function. For example, you might add an
event that automatically creates an Outlook task to confirm an order shipped up five days in the future when a new order is entered.
Function Name
fAddOutlookTask
Parameters and Use
strSubject – The subject of the Outlook Task. strBody – The details for the task created.
dtDueDate – Optional due date. If not supplied, the current date will
be used. Return Value – Yes/No value indicating if the merge was successful or
failed.
Example See the form frmExamples for an example of the methods used to create
Outlook tasks.
3.11 MAIL MERGE API – DIRECT FUNCTION CALL
Description UI Builder provides the ability to let users click a menu or submenu
button and generate a mail merge letter or email based on a predefined Mail Merge Profile. If you want full control over how the mail merge will function, use the fMerge() function call directly.
Function Name
fMerge
Parameters and Use
strMergePath – Provide the full filename for the mail merge template document, or “Prompt User” to have the user select a template when
the mail merge is run.
UI BuilderTM for Access – Application Guide
Copyright © 2018 OpenGate Software 31
http://www.opengatesw.net
strDataSource – Provide the text name of the table or query to be used in the mail merge. Be sure the data source contains all the data
fields that the mail merge template also uses to prevent user error messages from Microsoft Word.
strWhereStatement - Provide a valid SQL statement, beginning with “WHERE “, or leave as “” to select all records from the specified data
source.
strMergeOption - Specify the type of mail merge. Valid values are mrgPrint – Print the merged document immediately mrgPreview– Open the merged document for editing
mrgMail – Send the merged email immediately mrgMailPreview– Open the merged email for editing
strSubject – Email subject line. If the merge option mrgMail or mrgMailPreview is selected, this variable must be populated.
strEmail - Email recipient(s). Use semi-colons for multiple recipients.
If the merge option mrgMail or mrgMailPreview is selected, this variable must be populated.
blnKeepOpen - True/False value that indicates if the document should remain open if using the mrgPrint method.
blnSilentMode - True/False value that indicates if the document should
remain open if using the mrgPrint method. bstrCC - Carbon copy email recipient(s). Use semi-colons for multiple
recipients.
strAttachment - Path of a file to attach with the mail merge. Return Value – Yes/No value indicating if the merge was successful or
failed.
3.12 NOTE EDITOR
Description
Note Editor gives you the ability to condense a memo or long text field on screen, saving valuable form real estate. You place a button next to the field, or create an OnDoubleClick event, that calls the
fNoteEditor function to present a small form that allows users to view and/or edit the contents of the field. The results of the user’s edits are
returned in the function’s return variable.
Function Name
fNoteEditor
UI BuilderTM for Access – Application Guide
Copyright © 2018 OpenGate Software 32
http://www.opengatesw.net
Parameters and Use
strNote - The current text contained in the field, if any.
blnReadOnly- True/False. Specify if the Note Editor should allow the user to edit the notes, or just read them.
Return Value – Text supplied by the user, or original text if no changes were made.
3.13 TOAST POPUPS
Description Toast popups allow you to display an informational message to the user for a short period of time similar to email message notifications
now available in most email clients.
Function Name
fDisplayPopup
Parameters and Use strHeader - The header/title text that will appear at the top of the
popup message in bold. Similar to the title bar of a message box. strText- The main text to display to the user.
iDisplaySeconds- Optional. Indicates how long the popup message
should show. By default, the message will show for 5 seconds. blnLegacyMode- Optional. Indicates that UI Builder should use the
expanding popup mode which was present in UI Builder 3.0.
UI BuilderTM for Access – Application Guide
Copyright © 2018 OpenGate Software 33
http://www.opengatesw.net
4 Developer Tools and Tips
4.1 DEVELOPER MENU
The UI Builder Developer Menu is a tool to help you design and manage your forms within UI Builder with greater ease. The floating menu can
be dismissed at any time, and allows you to configure which users (by username) are authorized to see the Developer Menu.
4.1.1 ENABLING THE DEVELOPER MENU
The Developer Menu is available by default, but can be dismissed at any time by clicking the small red "close" icon in the menu. To restore the
menu, select the "Enable UI Builder Developer's Menu" from the main administration form (frmAdministrator) "Advanced Settings" tab.
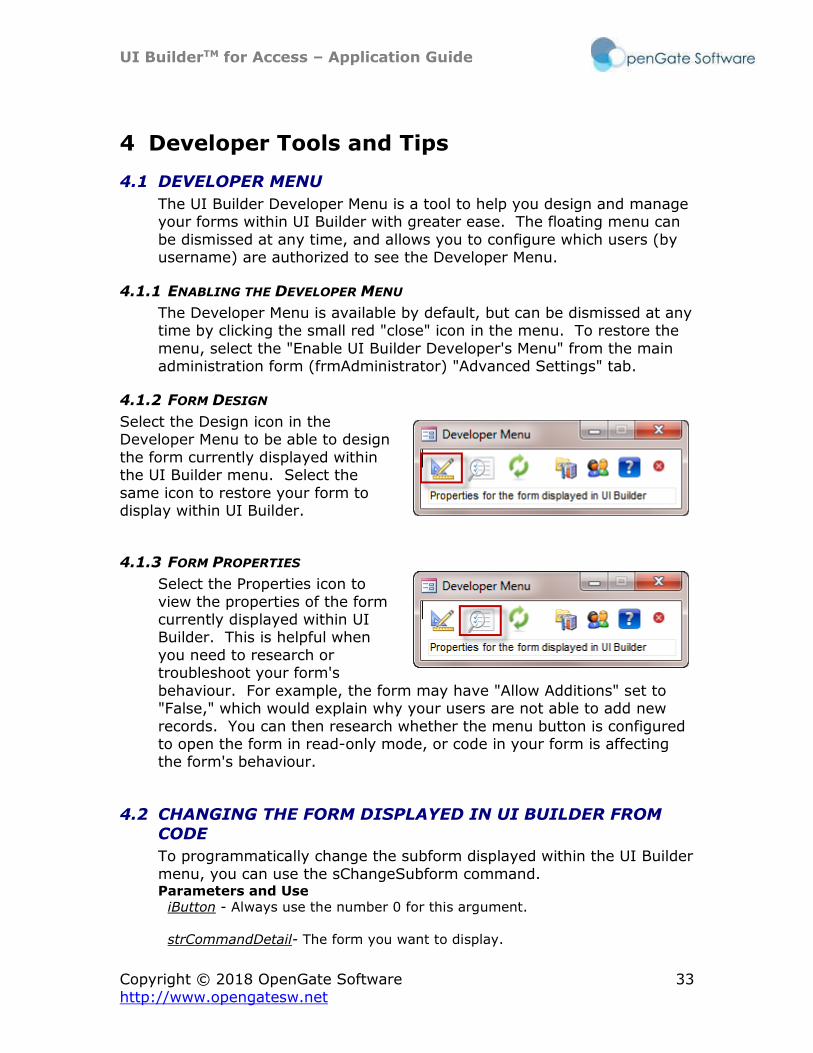
4.1.2 FORM DESIGN
Select the Design icon in the Developer Menu to be able to design
the form currently displayed within the UI Builder menu. Select the
same icon to restore your form to display within UI Builder.
4.1.3 FORM PROPERTIES
Select the Properties icon to
view the properties of the form currently displayed within UI Builder. This is helpful when
you need to research or troubleshoot your form's
behaviour. For example, the form may have "Allow Additions" set to "False," which would explain why your users are not able to add new
records. You can then research whether the menu button is configured to open the form in read-only mode, or code in your form is affecting the form's behaviour.
4.2 CHANGING THE FORM DISPLAYED IN UI BUILDER FROM
CODE
To programmatically change the subform displayed within the UI Builder
menu, you can use the sChangeSubform command. Parameters and Use
iButton - Always use the number 0 for this argument.
strCommandDetail- The form you want to display.
UI BuilderTM for Access – Application Guide
Copyright © 2018 OpenGate Software 34
http://www.opengatesw.net
blnFromSubcommand- Always use True for this argument.
The following example will change the form displayed within UI Builder to the
form "frmMyForm":
sChangeSubform 0, "frmMyForm",True
Advanced Use
You can also tell UI Builder to perform an action after sChangeSubform
changes the subform displayed in UI Builder.
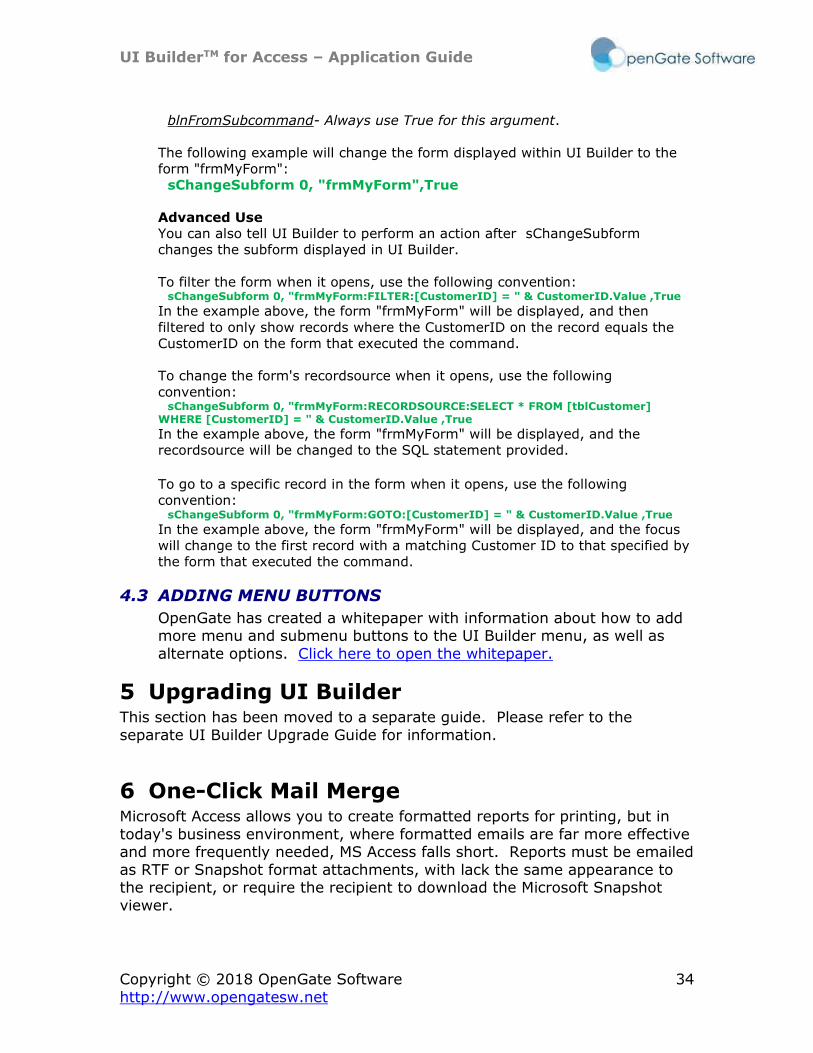
To filter the form when it opens, use the following convention: sChangeSubform 0, "frmMyForm:FILTER:[CustomerID] = " & CustomerID.Value ,True
In the example above, the form "frmMyForm" will be displayed, and then
filtered to only show records where the CustomerID on the record equals the
CustomerID on the form that executed the command.
To change the form's recordsource when it opens, use the following
convention: sChangeSubform 0, "frmMyForm:RECORDSOURCE:SELECT * FROM [tblCustomer] WHERE [CustomerID] = " & CustomerID.Value ,True
In the example above, the form "frmMyForm" will be displayed, and the
recordsource will be changed to the SQL statement provided.
To go to a specific record in the form when it opens, use the following
convention: sChangeSubform 0, "frmMyForm:GOTO:[CustomerID] = " & CustomerID.Value ,True
In the example above, the form "frmMyForm" will be displayed, and the focus
will change to the first record with a matching Customer ID to that specified by
the form that executed the command.
4.3 ADDING MENU BUTTONS
OpenGate has created a whitepaper with information about how to add more menu and submenu buttons to the UI Builder menu, as well as
alternate options. Click here to open the whitepaper.
5 Upgrading UI Builder This section has been moved to a separate guide. Please refer to the
separate UI Builder Upgrade Guide for information.
6 One-Click Mail Merge Microsoft Access allows you to create formatted reports for printing, but in
today's business environment, where formatted emails are far more effective and more frequently needed, MS Access falls short. Reports must be emailed
as RTF or Snapshot format attachments, with lack the same appearance to the recipient, or require the recipient to download the Microsoft Snapshot
viewer.
UI BuilderTM for Access – Application Guide
Copyright © 2018 OpenGate Software 35
http://www.opengatesw.net
UI Builder gives you the ability to offer users One-Click Mail Merge to email. You establish a profile for each Mail Merge button you will let the user choose
from, which includes the location of the mail merge template, the merge data source, what action to take (print, email, display for editing), SQL filters to
apply, and which fields on the displayed form to use to pull merge data. For example, you may want users to be able to view a customer record, click a menu button, and have an email message automatically sent to the customer
displayed on screen. With UI Builder's One-Click Mail merge, you can add that capability to your database applications without a single line of Visual
Basic code.
Important! Due to limitations in Office 2000 and below, One-Click Mail Merge is only supported in Office 2002 and higher.
6.1 MAIL MERGE PROFILES
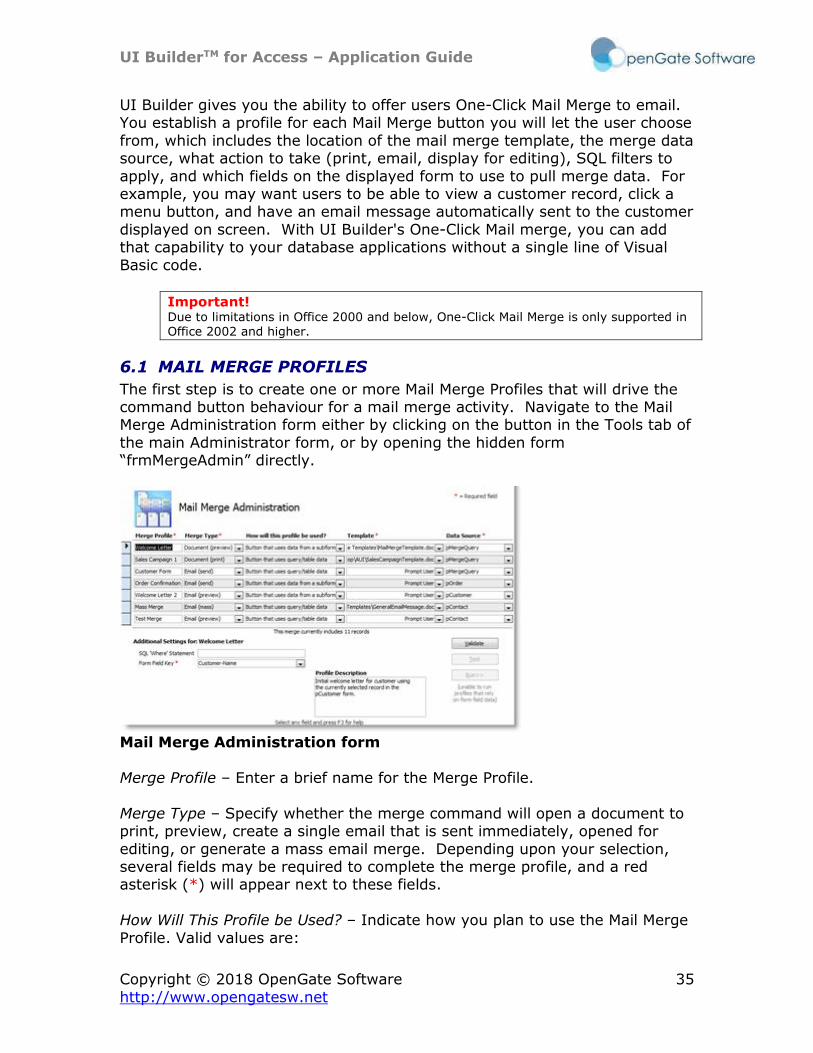
The first step is to create one or more Mail Merge Profiles that will drive the command button behaviour for a mail merge activity. Navigate to the Mail Merge Administration form either by clicking on the button in the Tools tab of
the main Administrator form, or by opening the hidden form “frmMergeAdmin” directly.
Mail Merge Administration form
Merge Profile – Enter a brief name for the Merge Profile.
Merge Type – Specify whether the merge command will open a document to print, preview, create a single email that is sent immediately, opened for
editing, or generate a mass email merge. Depending upon your selection, several fields may be required to complete the merge profile, and a red asterisk (*) will appear next to these fields.
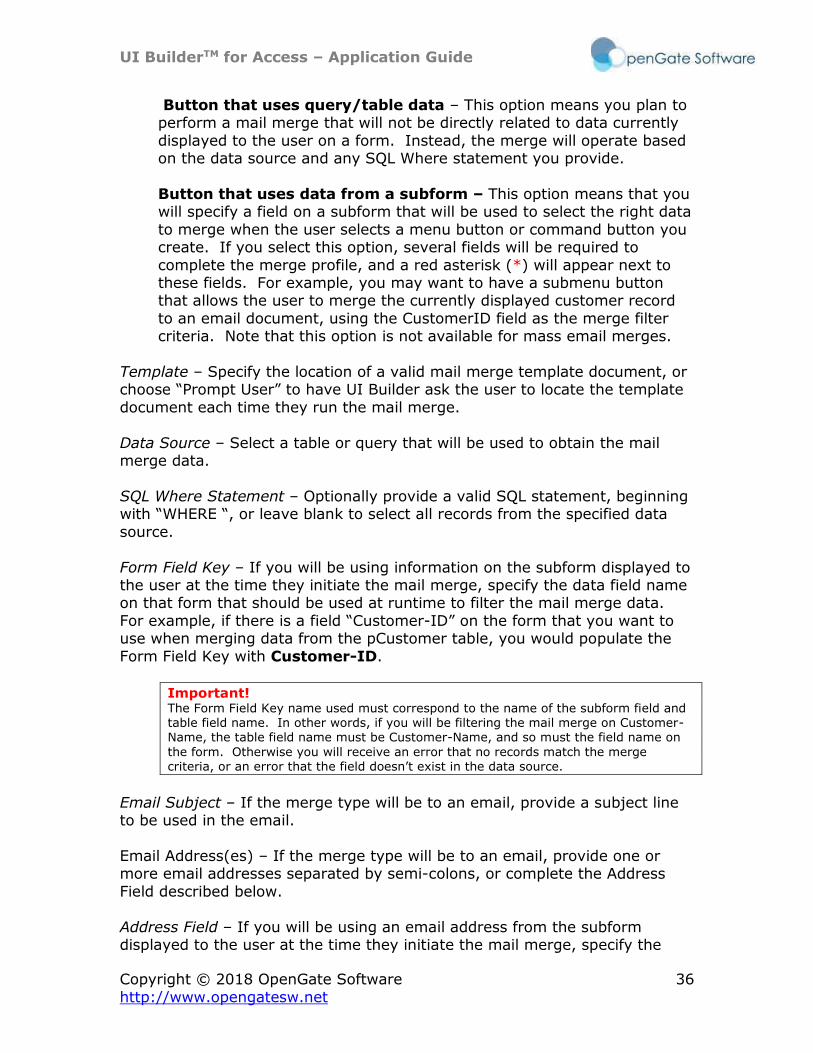
How Will This Profile be Used? – Indicate how you plan to use the Mail Merge
Profile. Valid values are:
UI BuilderTM for Access – Application Guide
Copyright © 2018 OpenGate Software 36
http://www.opengatesw.net
Button that uses query/table data – This option means you plan to perform a mail merge that will not be directly related to data currently
displayed to the user on a form. Instead, the merge will operate based on the data source and any SQL Where statement you provide.
Button that uses data from a subform – This option means that you will specify a field on a subform that will be used to select the right data
to merge when the user selects a menu button or command button you create. If you select this option, several fields will be required to
complete the merge profile, and a red asterisk (*) will appear next to these fields. For example, you may want to have a submenu button that allows the user to merge the currently displayed customer record
to an email document, using the CustomerID field as the merge filter criteria. Note that this option is not available for mass email merges.
Template – Specify the location of a valid mail merge template document, or choose “Prompt User” to have UI Builder ask the user to locate the template
document each time they run the mail merge.
Data Source – Select a table or query that will be used to obtain the mail merge data.
SQL Where Statement – Optionally provide a valid SQL statement, beginning with “WHERE “, or leave blank to select all records from the specified data
source.
Form Field Key – If you will be using information on the subform displayed to the user at the time they initiate the mail merge, specify the data field name on that form that should be used at runtime to filter the mail merge data.
For example, if there is a field “Customer-ID” on the form that you want to use when merging data from the pCustomer table, you would populate the
Form Field Key with Customer-ID.
Important! The Form Field Key name used must correspond to the name of the subform field and table field name. In other words, if you will be filtering the mail merge on Customer-Name, the table field name must be Customer-Name, and so must the field name on
the form. Otherwise you will receive an error that no records match the merge criteria, or an error that the field doesn’t exist in the data source.
Email Subject – If the merge type will be to an email, provide a subject line to be used in the email.
Email Address(es) – If the merge type will be to an email, provide one or more email addresses separated by semi-colons, or complete the Address
Field described below.
Address Field – If you will be using an email address from the subform displayed to the user at the time they initiate the mail merge, specify the

UI BuilderTM for Access – Application Guide
Copyright © 2018 OpenGate Software 37
http://www.opengatesw.net
email address field name on that form that should be used at runtime as the recipient’s email address. If you plan to generate a mass email merge, you
must specify the data field that contains email addresses in the table or query that you specified in the Data Source section of the Merge Profile.
Profile Description – This field can contain any notes you might want to keep about the merge profile for future reference. It is not used in the actual mail
merge process.
6.2 OUTLOOK SECURITY WARNINGS
Microsoft Outlook 2002 and later will display warning messages when another application attempts to send email messages automatically on behalf
of the user. We recommend you review the Microsoft documentation for information on ways to disable the warning, and decide whether doing so makes sense for your organization. For Access 2007 users, you can avoid
receiving the security warning message by ensuring you have an active Anti-Virus client on your PC with email security. Access 2007 will only display the
warning message for each email if your anti-virus is out of date or disabled.
6.3 CONFIGURING MENU COMMANDS
Once you have created a Mail Merge Profile, follow the normal steps to configure a menu or submenu button. In the Button Action field, specify “Mail Merge,” and then select the appropriate Mail Merge Profile in the
“Action Details” field.
UI BuilderTM for Access – Application Guide
Copyright © 2018 OpenGate Software 38
http://www.opengatesw.net
7 Dynamic User Help Dynamic User Help provides a way to create user help topics that can be accessed via a hotkey (such as F3) or by adding a command button to your
form. Once you have created your user help topics, and added the necessary VB code to your form(s), it is easy to change the user help without changing
the VB code on each form. Simply change the user help topic in the User Help Administration screen. For multi-user environments, you can place the table tblUserHelp in a linked database that is centrally located, making it
easy to change help topics once instead of for each user’s database.
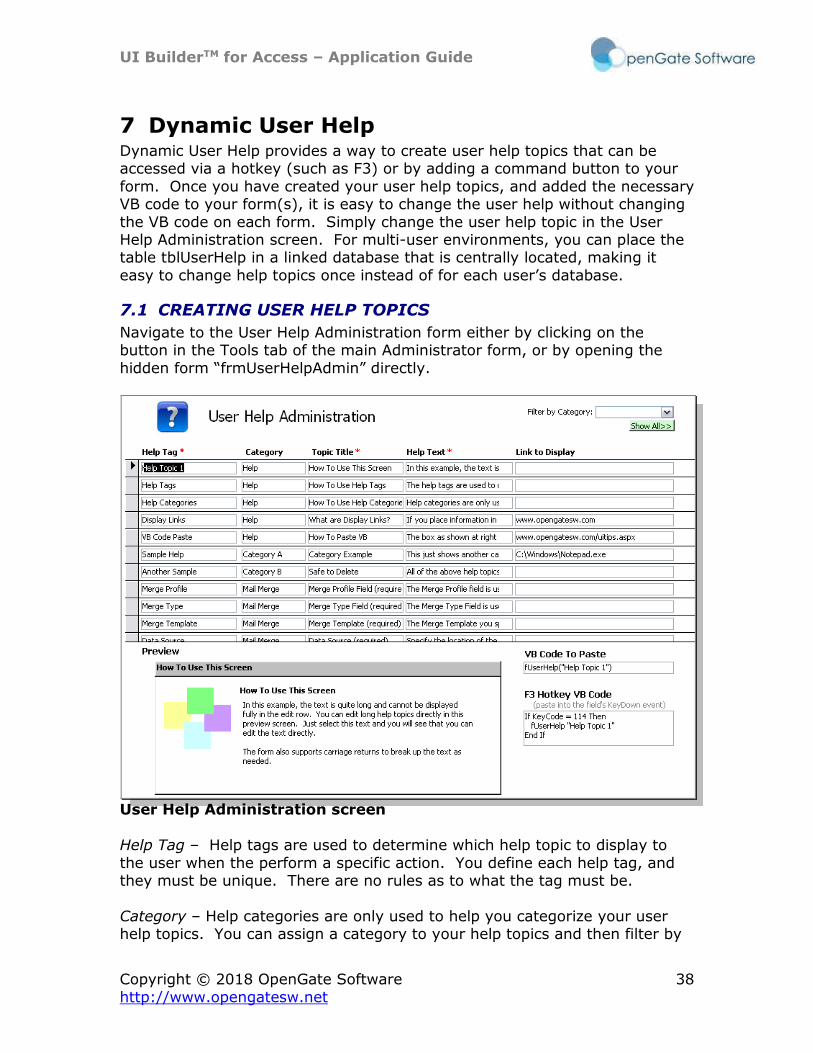
7.1 CREATING USER HELP TOPICS
Navigate to the User Help Administration form either by clicking on the button in the Tools tab of the main Administrator form, or by opening the
hidden form “frmUserHelpAdmin” directly.
User Help Administration screen
Help Tag – Help tags are used to determine which help topic to display to
the user when the perform a specific action. You define each help tag, and they must be unique. There are no rules as to what the tag must be.
Category – Help categories are only used to help you categorize your user help topics. You can assign a category to your help topics and then filter by
UI BuilderTM for Access – Application Guide
Copyright © 2018 OpenGate Software 39
http://www.opengatesw.net
those categories as shown in the top right hand side of the User Help Administration screen.
Topic Title – Dialog box title and help topic title.
Help Text – The actual help text that will be displayed to the user.
Link to Display – Information in the display link field, it will appear to the user at the bottom of the help window. When they click on the link, it will
attempt to open the associated file or website.
7.2 ADDING VISUAL BASIC FOR HOTKEYS
You can enable a hot-key for a field such that if the user selects that key (we suggest F3), it will automatically display your help topic. Paste the text in
the box at the right-hand side of the screen labeled “F3 Hotkey Code” into any fields KeyDown event to have that topic display to the user.
7.3 ADDING VISUAL BASIC FOR COMMAND BUTTONS
Paste the text in the box at the right-hand side of the screen labeled “VB
Code to Paste” into any button’s OnClick event to have that topic display to the user.
UI BuilderTM for Access – Application Guide
Copyright © 2018 OpenGate Software 40
http://www.opengatesw.net
8 Record-Level Auditing UI Builder provides the core functions needed to audit record-level changes in your forms. Using the step-by-step setup process, you can create
individual audit tables that record adds, changes, and deletes made by your users.
It is important to know that the audit history functionality will only work for the forms that you set up audit history tracking. If users have direct access
to tables or queries within your database, UI Builder will not be able to create audit history records for those changes. OpenGate Software recommends
you take all necessary steps to prevent unauthorized users from gaining direct access to tables and queries where their changes cannot be audited.
This includes the following: hiding the database window and preventing the user from using Access Special Keys. Both settings can be located in the Startup Options for your database.1
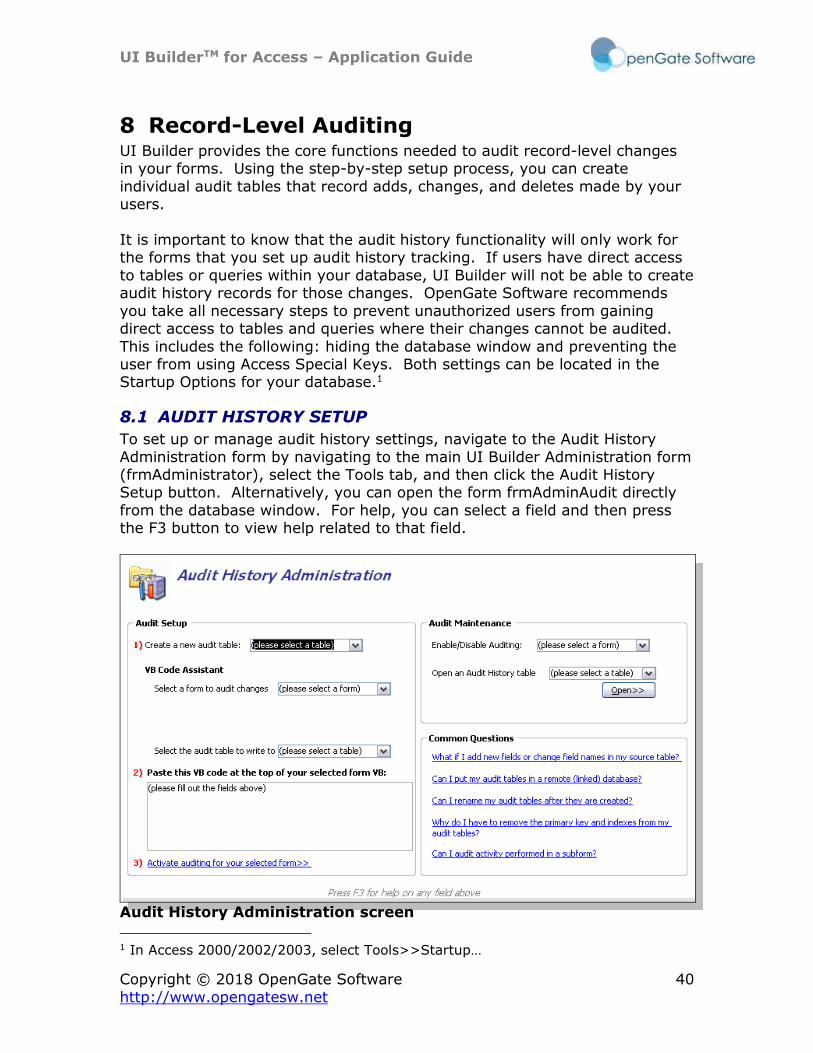
8.1 AUDIT HISTORY SETUP
To set up or manage audit history settings, navigate to the Audit History
Administration form by navigating to the main UI Builder Administration form (frmAdministrator), select the Tools tab, and then click the Audit History Setup button. Alternatively, you can open the form frmAdminAudit directly
from the database window. For help, you can select a field and then press the F3 button to view help related to that field.
Audit History Administration screen
1 In Access 2000/2002/2003, select Tools>>Startup…
UI BuilderTM for Access – Application Guide
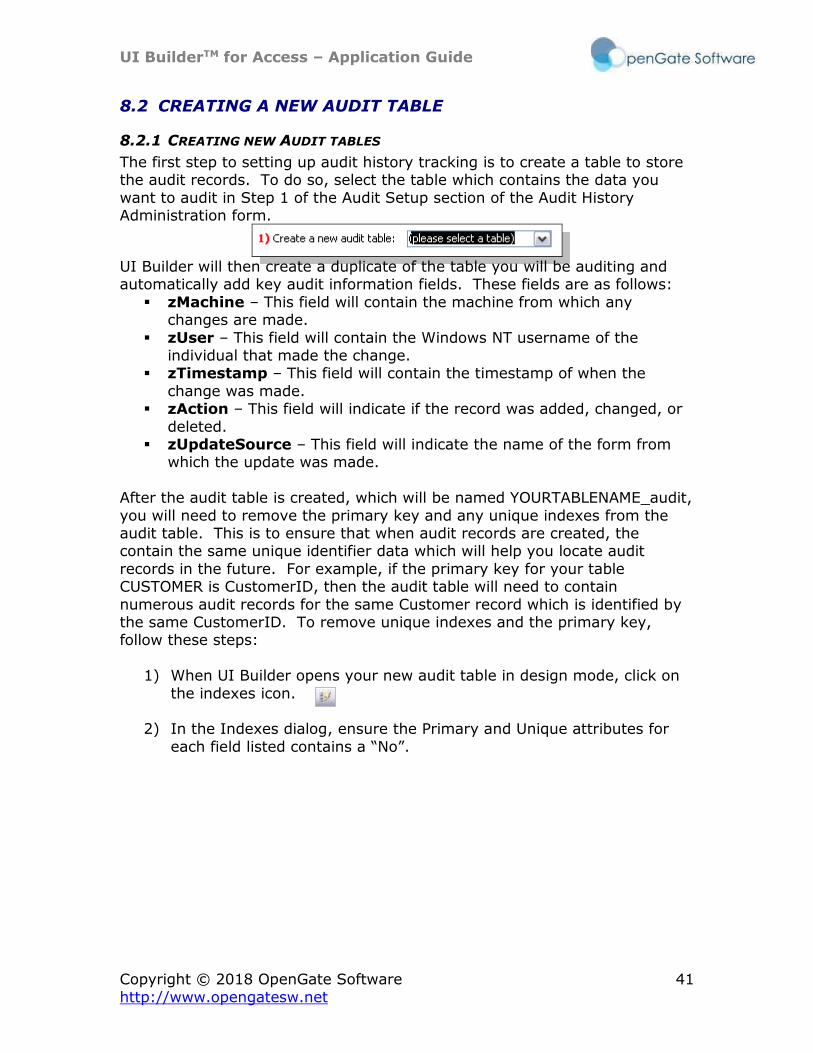
Copyright © 2018 OpenGate Software 41
http://www.opengatesw.net
8.2 CREATING A NEW AUDIT TABLE
8.2.1 CREATING NEW AUDIT TABLES
The first step to setting up audit history tracking is to create a table to store the audit records. To do so, select the table which contains the data you
want to audit in Step 1 of the Audit Setup section of the Audit History Administration form.
UI Builder will then create a duplicate of the table you will be auditing and automatically add key audit information fields. These fields are as follows:
▪ zMachine – This field will contain the machine from which any changes are made.
▪ zUser – This field will contain the Windows NT username of the individual that made the change.
▪ zTimestamp – This field will contain the timestamp of when the
change was made. ▪ zAction – This field will indicate if the record was added, changed, or
deleted. ▪ zUpdateSource – This field will indicate the name of the form from
which the update was made.
After the audit table is created, which will be named YOURTABLENAME_audit,
you will need to remove the primary key and any unique indexes from the audit table. This is to ensure that when audit records are created, the contain the same unique identifier data which will help you locate audit
records in the future. For example, if the primary key for your table CUSTOMER is CustomerID, then the audit table will need to contain
numerous audit records for the same Customer record which is identified by the same CustomerID. To remove unique indexes and the primary key, follow these steps:
1) When UI Builder opens your new audit table in design mode, click on
the indexes icon. 2) In the Indexes dialog, ensure the Primary and Unique attributes for
each field listed contains a “No”.
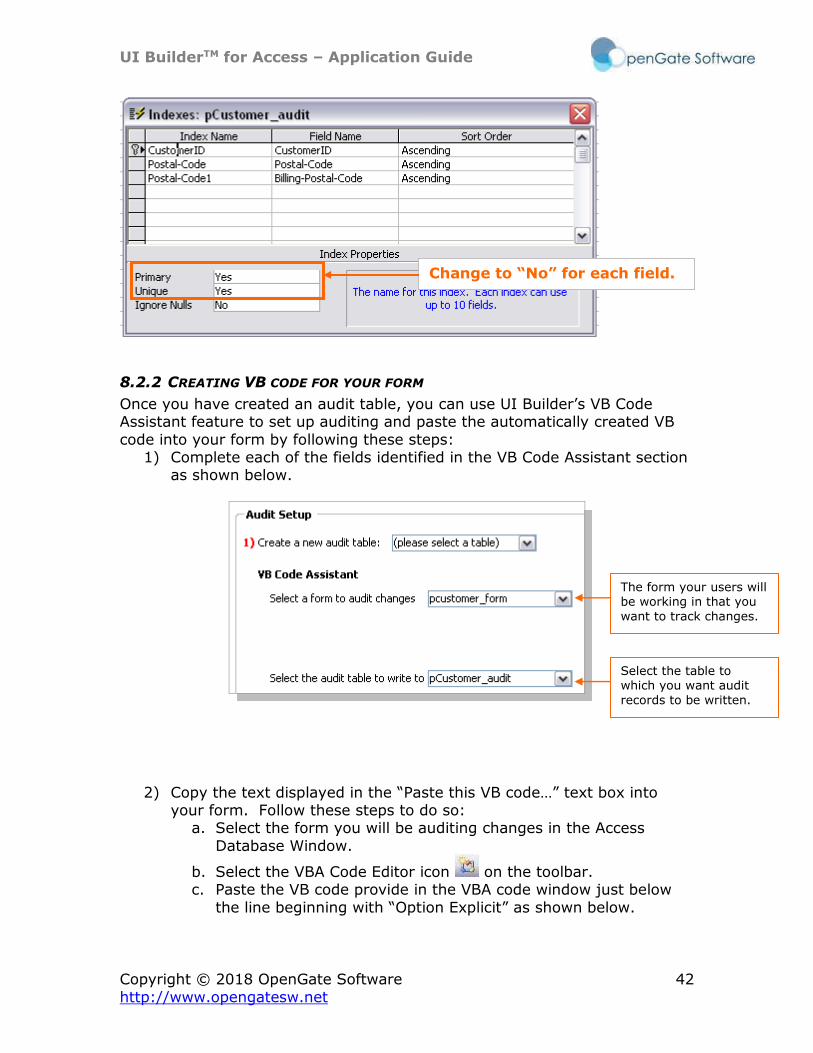
UI BuilderTM for Access – Application Guide
Copyright © 2018 OpenGate Software 42
http://www.opengatesw.net
8.2.2 CREATING VB CODE FOR YOUR FORM
Once you have created an audit table, you can use UI Builder’s VB Code Assistant feature to set up auditing and paste the automatically created VB
code into your form by following these steps: 1) Complete each of the fields identified in the VB Code Assistant section
as shown below.
2) Copy the text displayed in the “Paste this VB code…” text box into your form. Follow these steps to do so:
a. Select the form you will be auditing changes in the Access
Database Window.
b. Select the VBA Code Editor icon on the toolbar. c. Paste the VB code provide in the VBA code window just below
the line beginning with “Option Explicit” as shown below.
Change to “No” for each field.
The form your users will be working in that you
want to track changes.
Select the table to which you want audit
records to be written.
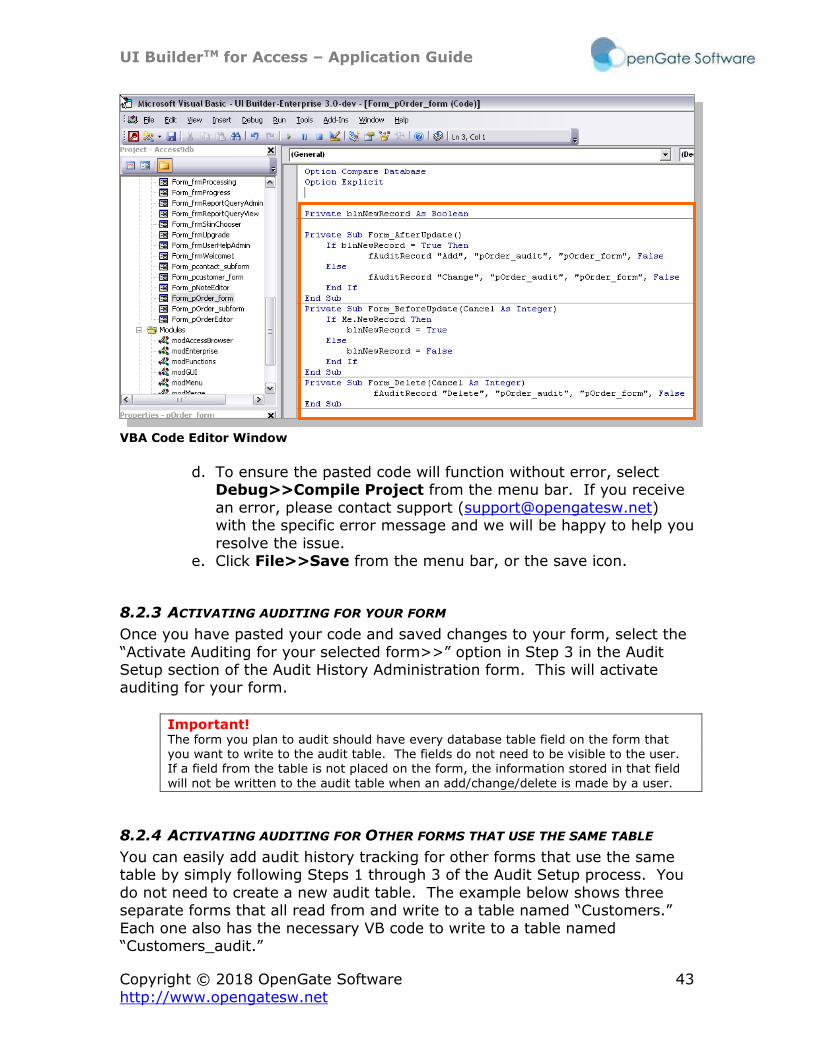
UI BuilderTM for Access – Application Guide
Copyright © 2018 OpenGate Software 43
http://www.opengatesw.net
VBA Code Editor Window
d. To ensure the pasted code will function without error, select
Debug>>Compile Project from the menu bar. If you receive
an error, please contact support ([email protected]) with the specific error message and we will be happy to help you
resolve the issue. e. Click File>>Save from the menu bar, or the save icon.
8.2.3 ACTIVATING AUDITING FOR YOUR FORM
Once you have pasted your code and saved changes to your form, select the
“Activate Auditing for your selected form>>” option in Step 3 in the Audit Setup section of the Audit History Administration form. This will activate auditing for your form.
Important! The form you plan to audit should have every database table field on the form that you want to write to the audit table. The fields do not need to be visible to the user. If a field from the table is not placed on the form, the information stored in that field
will not be written to the audit table when an add/change/delete is made by a user.
8.2.4 ACTIVATING AUDITING FOR OTHER FORMS THAT USE THE SAME TABLE
You can easily add audit history tracking for other forms that use the same table by simply following Steps 1 through 3 of the Audit Setup process. You
do not need to create a new audit table. The example below shows three separate forms that all read from and write to a table named “Customers.”
Each one also has the necessary VB code to write to a table named “Customers_audit.”
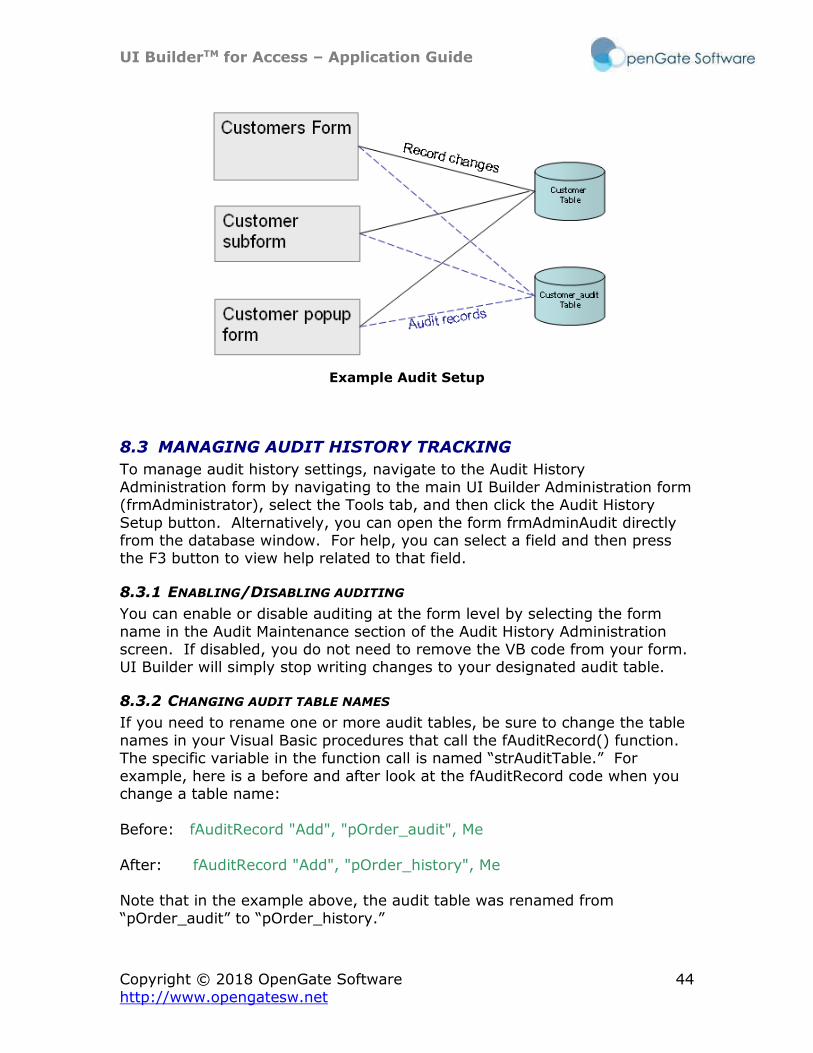
UI BuilderTM for Access – Application Guide
Copyright © 2018 OpenGate Software 44
http://www.opengatesw.net
Example Audit Setup
8.3 MANAGING AUDIT HISTORY TRACKING
To manage audit history settings, navigate to the Audit History
Administration form by navigating to the main UI Builder Administration form (frmAdministrator), select the Tools tab, and then click the Audit History
Setup button. Alternatively, you can open the form frmAdminAudit directly from the database window. For help, you can select a field and then press the F3 button to view help related to that field.
8.3.1 ENABLING/DISABLING AUDITING
You can enable or disable auditing at the form level by selecting the form
name in the Audit Maintenance section of the Audit History Administration screen. If disabled, you do not need to remove the VB code from your form. UI Builder will simply stop writing changes to your designated audit table.
8.3.2 CHANGING AUDIT TABLE NAMES
If you need to rename one or more audit tables, be sure to change the table
names in your Visual Basic procedures that call the fAuditRecord() function. The specific variable in the function call is named “strAuditTable.” For
example, here is a before and after look at the fAuditRecord code when you change a table name:
Before: fAuditRecord "Add", "pOrder_audit", Me
After: fAuditRecord "Add", "pOrder_history", Me Note that in the example above, the audit table was renamed from
“pOrder_audit” to “pOrder_history.”
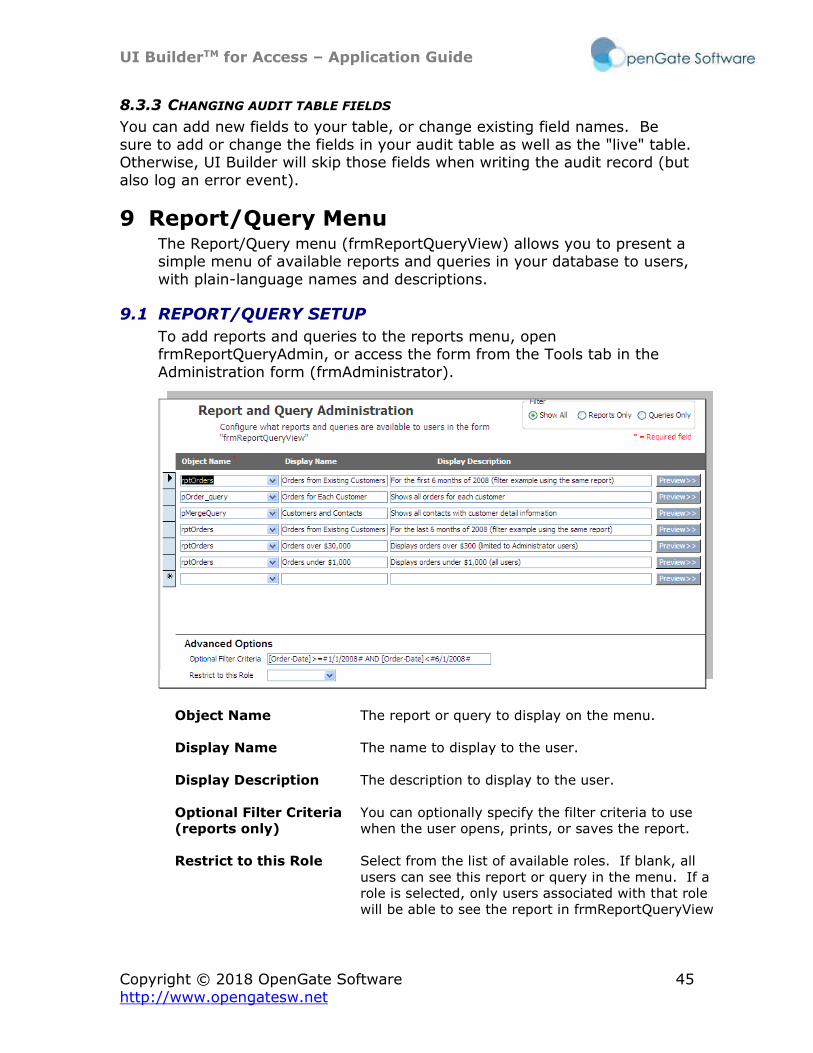
UI BuilderTM for Access – Application Guide
Copyright © 2018 OpenGate Software 45
http://www.opengatesw.net
8.3.3 CHANGING AUDIT TABLE FIELDS
You can add new fields to your table, or change existing field names. Be
sure to add or change the fields in your audit table as well as the "live" table. Otherwise, UI Builder will skip those fields when writing the audit record (but
also log an error event).
9 Report/Query Menu The Report/Query menu (frmReportQueryView) allows you to present a simple menu of available reports and queries in your database to users,
with plain-language names and descriptions.
9.1 REPORT/QUERY SETUP
To add reports and queries to the reports menu, open frmReportQueryAdmin, or access the form from the Tools tab in the
Administration form (frmAdministrator).
Object Name The report or query to display on the menu.
Display Name The name to display to the user.
Display Description The description to display to the user.
Optional Filter Criteria
(reports only)
You can optionally specify the filter criteria to use
when the user opens, prints, or saves the report.
Restrict to this Role Select from the list of available roles. If blank, all
users can see this report or query in the menu. If a
role is selected, only users associated with that role
will be able to see the report in frmReportQueryView
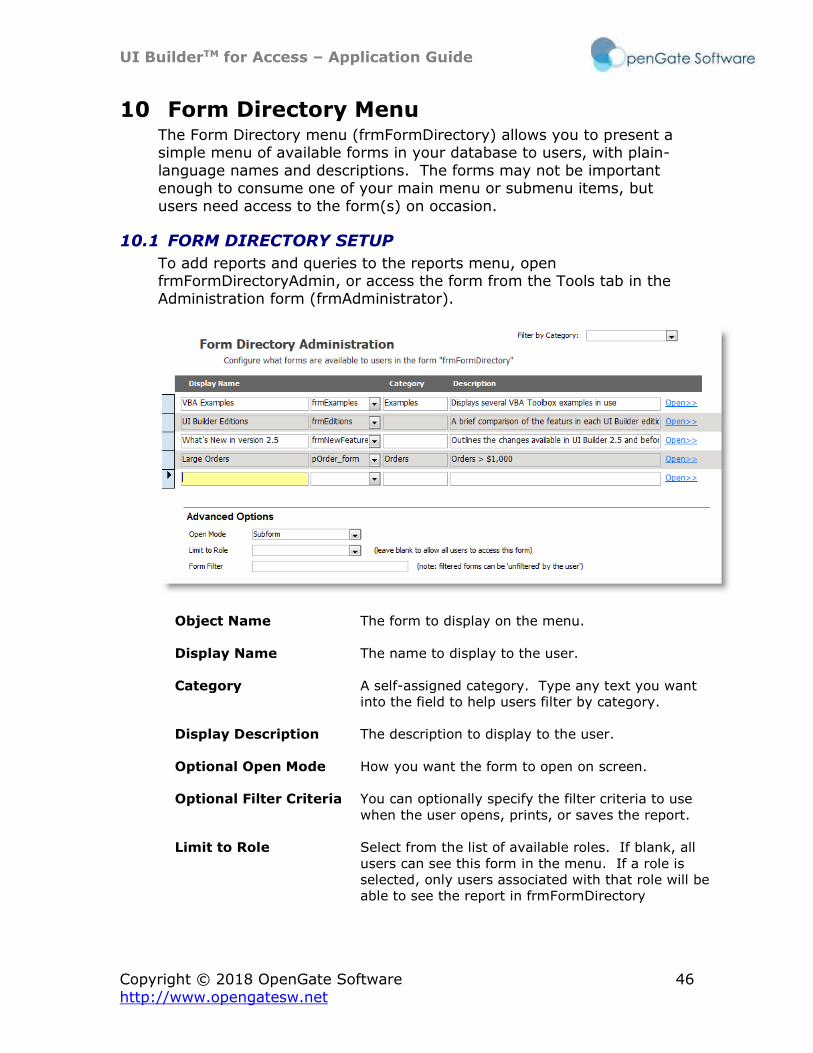
UI BuilderTM for Access – Application Guide
Copyright © 2018 OpenGate Software 46
http://www.opengatesw.net
10 Form Directory Menu The Form Directory menu (frmFormDirectory) allows you to present a simple menu of available forms in your database to users, with plain-
language names and descriptions. The forms may not be important enough to consume one of your main menu or submenu items, but
users need access to the form(s) on occasion.
10.1 FORM DIRECTORY SETUP
To add reports and queries to the reports menu, open frmFormDirectoryAdmin, or access the form from the Tools tab in the Administration form (frmAdministrator).
Object Name The form to display on the menu.
Display Name The name to display to the user.
Category A self-assigned category. Type any text you want
into the field to help users filter by category.
Display Description The description to display to the user.
Optional Open Mode How you want the form to open on screen.
Optional Filter Criteria You can optionally specify the filter criteria to use
when the user opens, prints, or saves the report.
Limit to Role Select from the list of available roles. If blank, all
users can see this form in the menu. If a role is
selected, only users associated with that role will be
able to see the report in frmFormDirectory
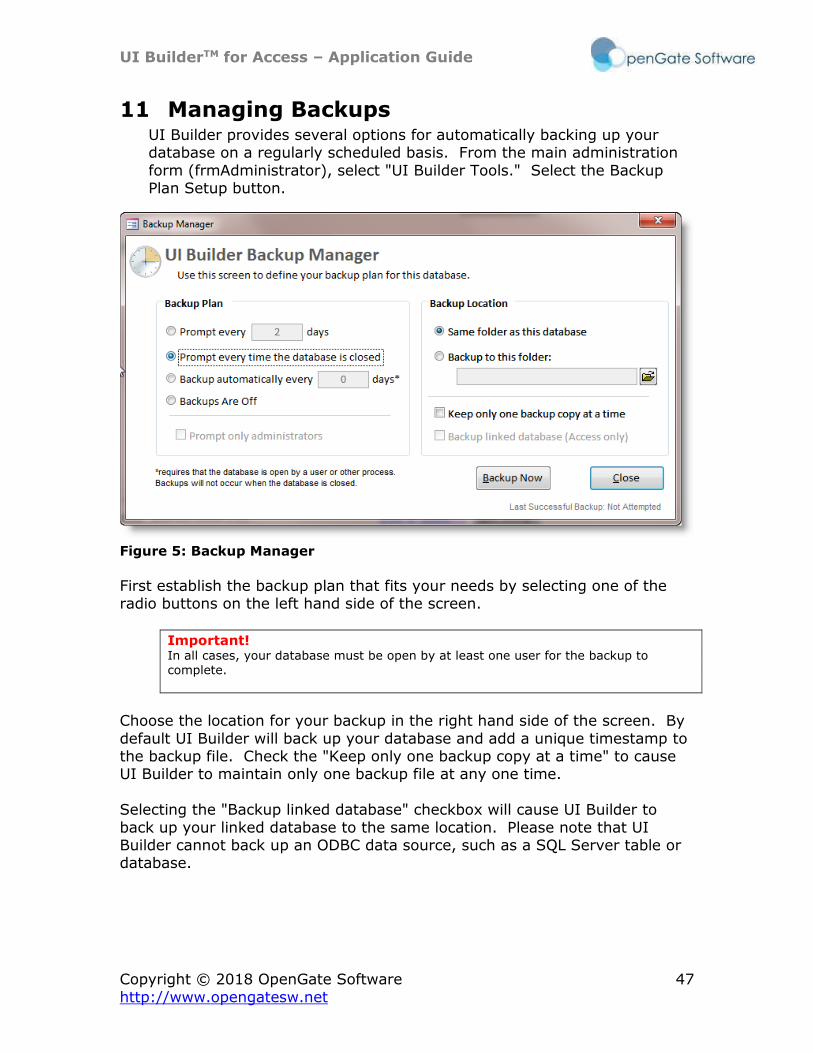
UI BuilderTM for Access – Application Guide
Copyright © 2018 OpenGate Software 47
http://www.opengatesw.net
11 Managing Backups UI Builder provides several options for automatically backing up your database on a regularly scheduled basis. From the main administration
form (frmAdministrator), select "UI Builder Tools." Select the Backup Plan Setup button.
Figure 5: Backup Manager
First establish the backup plan that fits your needs by selecting one of the radio buttons on the left hand side of the screen.
Important! In all cases, your database must be open by at least one user for the backup to complete.
Choose the location for your backup in the right hand side of the screen. By
default UI Builder will back up your database and add a unique timestamp to the backup file. Check the "Keep only one backup copy at a time" to cause UI Builder to maintain only one backup file at any one time.
Selecting the "Backup linked database" checkbox will cause UI Builder to
back up your linked database to the same location. Please note that UI Builder cannot back up an ODBC data source, such as a SQL Server table or database.
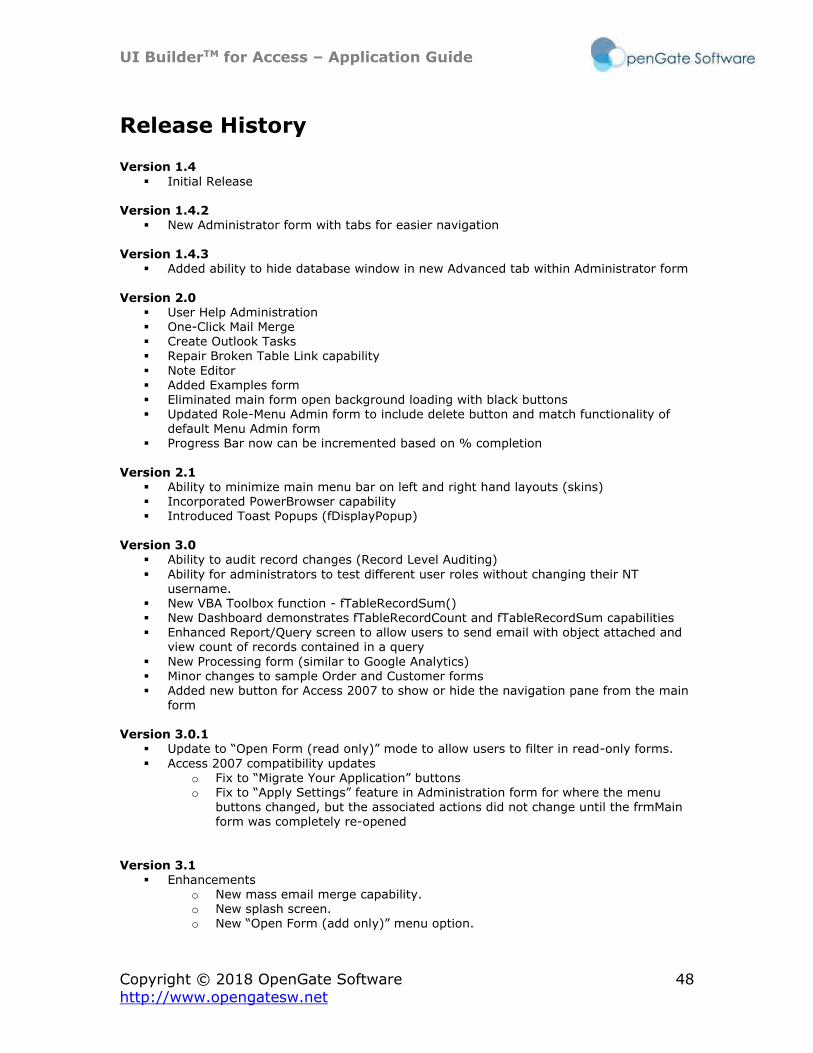
UI BuilderTM for Access – Application Guide
Copyright © 2018 OpenGate Software 48
http://www.opengatesw.net
Release History Version 1.4
▪ Initial Release Version 1.4.2
▪ New Administrator form with tabs for easier navigation Version 1.4.3
▪ Added ability to hide database window in new Advanced tab within Administrator form
Version 2.0
▪ User Help Administration ▪ One-Click Mail Merge
▪ Create Outlook Tasks ▪ Repair Broken Table Link capability
▪ Note Editor ▪ Added Examples form ▪ Eliminated main form open background loading with black buttons ▪ Updated Role-Menu Admin form to include delete button and match functionality of
default Menu Admin form ▪ Progress Bar now can be incremented based on % completion
Version 2.1 ▪ Ability to minimize main menu bar on left and right hand layouts (skins) ▪ Incorporated PowerBrowser capability ▪ Introduced Toast Popups (fDisplayPopup)
Version 3.0
▪ Ability to audit record changes (Record Level Auditing)
▪ Ability for administrators to test different user roles without changing their NT username.
▪ New VBA Toolbox function - fTableRecordSum() ▪ New Dashboard demonstrates fTableRecordCount and fTableRecordSum capabilities ▪ Enhanced Report/Query screen to allow users to send email with object attached and
view count of records contained in a query
▪ New Processing form (similar to Google Analytics) ▪ Minor changes to sample Order and Customer forms ▪ Added new button for Access 2007 to show or hide the navigation pane from the main
form Version 3.0.1
▪ Update to “Open Form (read only)” mode to allow users to filter in read-only forms.
▪ Access 2007 compatibility updates o Fix to “Migrate Your Application” buttons o Fix to “Apply Settings” feature in Administration form for where the menu
buttons changed, but the associated actions did not change until the frmMain form was completely re-opened
Version 3.1 ▪ Enhancements
o New mass email merge capability. o New splash screen. o New “Open Form (add only)” menu option.
UI BuilderTM for Access – Application Guide
Copyright © 2018 OpenGate Software 49
http://www.opengatesw.net
o Add optional parameter to suppress errors in fTableRecordCount,
fTableRecordSum, and fTableRecordValue functions. Suppressing errors ensures user’s aren’t prompted numerous times that an error exists if you create a dashboard or form that uses many invalid fTableRecord*** calls. By
default errors are shown. o New “File Browse…” ability when “Open File” is chosen from the menu
administration screens. o Enhanced user security such that if the user exists but with no role, they don’t
get to access the database (essentially a way to remove access to the database if you allow anonymous users).
o The subform administration (frmAdmin_submenu) form’s “Action Type”
dropdowns now support quick entry without requiring the user to display the full list.
o Table Link verification will no longer run if the database file extension is ADP/ADE. This is because ADP/ADE databases do not technically have linked tables.
o Added improved validation to Mail Merge profiles to test that fields specified
exist in the data source, general usability of the administration form has also been improved.
o Enhanced the Color Scheme functionality support an unlimited number of user-defined color schemes. The color scheme editor also allows you to define the color for the Application Name, Screen Name, and Company Name text on the frmMain screen.
o New Toast Popup form that fades in and out.
▪ Defect Resolutions o Fix to better support upgrade from Business to Enterprise (adds records to
tblSubMenu for each role pre-defined in the Enterprise Edition brought over) o Fixed issue where user was allowed to delete records even when they were in
read-only mode
o Fixed issue where the user was allowed to open a new form window in edit
mode Version 3.2
▪ Enhancements o New UI Builder login prompt enables you to prompt users to provide a
login/password when all users share the same Windows login. o The Report/Query Viewer allows users to email reports as PDF documents in
Access 2007. o New filter by event type feature to the Event Log viewer. o New Upgrade function is faster and more gracefully handles missing objects in
the local database. o New Alternate Role popup allows users to switch to different roles if authorized.
o New feature allows you to configure a menu button to open a form with a filtered or alternate recordset.
o New diagnostics utility to identify menu setup problems if you have manually imported different menu tables from another UI Builder-based database.
o The Upgrade function now prevents a user from attempting to upgrade the database if they are in a locked database (MDE, ACCDR, ACCDE).
▪ Defect Resolutions Fixed issue where menu buttons did not appear if the frmMain form was saved with a button’s Visible property set to False. Fixed issue where submenu buttons for roles may not appear if you import a copy of your tblRoleMenu table from another version of your database.
Version 3.3 ▪ Enhancements
UI BuilderTM for Access – Application Guide
Copyright © 2018 OpenGate Software 50
http://www.opengatesw.net
o The Mail Merge administration screen has been enhanced for greater usability,
with field dropdown lists, a merge record count preview, and the ability to double-click the Merge Path and Data Source fields to open the respective objects.
o The Report/Query Administration screen now allows you to restrict a report or query to a specific role when viewed in the Report/Query Viewer menu (frmReportQueryView).
o The Report/Query Administration screen now allows you to define an SQL Where statement to be used when opening a report, allowing you to list the same report in the Report/Query Viewer menu (frmReportQueryView) with unique filter criteria.
o The Report/Query Viewer can display a record count when a Query is selected. o The progress bar has a new look and feel. o The function sChangeSubform will now open a form in a new window if
frmMain is not open.
▪ Defect Resolutions
o A mail merge profile that uses the email preview method was not closing the FormLetters# document.
o Removed an error message from fFileExists (the function returns the Boolean value, which should be sufficient)
o The popup form (frmPopup) would raise error 2450 if opened in succession too quickly.
o A new “State Loss” message will tell users when frmMain needs to reload.
This occurs when Access enters the Break Mode in VB. o If the Start Form is missing, an unhandled error would occur rather than
displaying a popup message. o The Subform Administration and Role Menu forms’ Action Detail dropdown
boxes were not displaying available forms when a form-related Action was chosen.
o If a user selected “Apply Settings” and frmMain is not open, an unhandled
error would occur.
o If a user changes a color scheme or the menu layout when frmMain is not open, UI Builder will no longer open frmMain or raise an error.
o The function fCheckLinks raised an error if the back end database was not found (it should just prompt the user to re-link the tables instead of raising an error dialog).
o Added popup error messaging to frmReportQueryAdmin and frmReportQueryView when a report or query is not found.
Version 3.4
▪ Enhancements o New Universal Search box allows you to add open text search without any
coding.
Version 3.5
▪ Enhancements o New Form Directory feature allows you to display an unlimited number of
forms in a directory form to users (similar to the Report/Query menu). Each form can be configured to open a specific way (dialog, filtered). The Enterprise Edition enables you to limit visibility for a specific for to a
designated role. o A new menu layout where the main menu buttons expand or collapse to
display submenu buttons below them. o Updated layout selection form. o The main form is now referenced as the object gobjMain. This means rather
than deleting the form "frmMain" and replacing with a copy of the desired
layout (e.g., "frmMain_leftlg"), UI Builder directly opens the form that
UI BuilderTM for Access – Application Guide
Copyright © 2018 OpenGate Software 51
http://www.opengatesw.net
corresponds to the chosen layout. This allows you to let users change the
menu layout even when your database is compiled as an MDE/ACCDE file. o Hidden objects are automatically displayed when migrating your existing
database into UI Builder.
o The function to count records in a table (fTableRecordCount) has been enhanced to provide 10-20% better performance on local tables.
o New setup wizard simplifies the startup process for new UI Builder databases. o The main form area now expands vertically as users resize their Access
window to give even more vertical screen real estate to your forms. o Large format layouts now have wider submenu buttons. o The merge profile administration screen now allows you to send test email
messages. o The audit functionality now uses the "Me" form object reference instead of the
more complicated form name/subform object name reference, allowing you to audit forms regardless of where they are located (open by themselves, or as deeply-nested subforms).
▪ Defect Resolutions o The mail merge profile data source dropdown was corrected to include linked
tables. Version 3.6
▪ Enhancements o The fRefreshLinks function that reconnects a user to their database now
handles ODBC connections where the ODBC connection string is passed in to the function.
o The Audit history setup process now supports linked tables, and automatically removes unique indexes from your table.
o Enhanced the Submenu administration form to allow you to clear a row with a single click. General usability enhancements.
o New function to check if a report is open/loaded (fReportIsLoaded).
o Added new button to add the database path to the Trusted Locations registry.
▪ Defect Resolutions
o Adding multiple new roles would fail to refresh the form. o Increased link table verification performance. Customers reported loading the
database was slow.
Version 4.0
▪ Enhancements o Support for Access 2010 (32-bit). o New Backup feature. o New splash screen to match Office 2010.
Version 4.1
▪ Enhancements o New right-hand Action Pane. o You can now change the menu font family and font sizes in the Color Scheme
editor.
o Mail Merge now supports Carbon Copy (cc) recipients and attachments when using the VB function fMerge().
o New Mail Merge editor screens to simplify managing mail merge profiles. Version 4.1.5
▪ Enhancements
o The forms displayed in the main menu will now have additional horizontal display space if the Access window expands more than the top bar of UI Builder.
o Fields that are marked Visible=False can now be searched.

UI BuilderTM for Access – Application Guide
Copyright © 2018 OpenGate Software 52
http://www.opengatesw.net
o The linked table feature now recognizes ACCD* databases without requiring
the user to change the file dialog to "All Files" o Changed the expand/shrink icons in the UI Builder menu. o Added "Category" to the Report/Query Admin and Viewer.
▪ Defect Resolutions
o Changed the status messages on search errors to provide more detail for troubleshooting.
o Corrected a bug where shrinking the submenu on the top layout would throw an error message to the end user.
o Removed error messages for instances where a main menu form control has
been deleted by customers to change the look of the menu. o Corrected a bug where removing certain main menu objects would cause error
messages to users when they attempt to expand/shrink the menu. We still recommend being careful changing the main menu forms unless you are familiar with VB.
Version 5 ▪ Enhancements
o New fUniqueRecord() function to get count of unique records. o New wizard to help set up buttons to filter or limit the recordsource of a form
displayed within UI Builder. o Improvements to user and role management screens. o Dynamic resizing of the form display frame.
o New options to control logo display, or hide screen logo altogether o New HTML mail merge option
▪ Defect Resolutions o Fixed issue where SQL helper would not display query window o Fixed issue with mail merge window staying above other windows