Embed Size (px)
Citation preview

Access_019 AMS User Guide v2 15th January 2018
UK Biobank Access Management System (AMS) User Guide: Getting Started
Introduction
UK Biobank is a tool for health research and has been set up as an open access Resource. The Resource is available to all bona fide researchers for all types of health-related research that is in the public interest. Researchers can register with UK Biobank, and apply to access the Resource via our Resource Access Management System (AMS).
This User Guide is designed to give you an overview of the Registration and Application process and provide basic instructions on how to navigate your way through the Access Management System.
Suggestions and information for new users: Have a printout of this User Guide to hand when you first use the System.
Read the background information about UK Biobank, and details on our Access Procedures on www.ukbiobank.ac.uk.
Please ensure that you have the following: i. An electronic copy of your Curriculum Vitae / Resume to upload during registration submission.
The UK Biobank Access Management Team needs this to complete the registration checks. ii. Details of up to 5 peer-reviewed publications that you are named on. Students without
publications should upload a letter from their tutor/supervisor confirming they will be supervising on any projects involving UK Biobank data.
Processing of your Application will begin after the initial fee has been paid. Payments are accepted via BACs or credit/debit card (note: we are not able to take credit/debit card payments by phone).
The researcher submitting an application is automatically assigned as Applicant Principal Investigator (PI) to the proposed research project and is required to sign a Material Transfer Agreement (MTA).
If you are assigned the Lead Collaborator on an application you will also be required to sign a Material Transfer Agreement on behalf of your institute.
All documents that are uploaded into the AMS must be in a .pdf format.
If you have any further queries, or you have encountered any problems or faults, please send a Message via AMS to Access Management Team. Prior to registration you can send an email to [email protected]. The Access Management Team can experience a high demand for services but aim to respond to any correspondence as soon as possible but please allow 2-3 weeks before chasing them for a response.

Access_019 AMS User Guide v2 15th January 2018
INDEX Registering and Applying to use the Resource
Creating an Account
Registration
Amending Existing Details
Forgotten Password / Account Locked
Messages
Collaborator Invitations
Submitting an Application o Collaborators tab o Creating an Application Basket o Printing your Application o Payment
Make payment Selecting your payment type Payment / Shipping Information Receipts
o Material Transfer Agreements (MTAs) Ensuring_the_Correct_Point_Of_Contact Accessing_the_MTA_document_once_created Checking_the_status_of_your MTA
o Amending an Application (unlocked by UK Biobank for amendments)
Data Release
Projects Underway o Requesting Changes
Requesting_additional_data-fields Extending_the_scope_of_your_Project Extending_the_duration_of_your_Project Requesting_a_data_refresh
o Project Administration Project Reports Publications Conferences

Access_019 AMS User Guide v2 15th January 2018
Registering and Applying to use the Resource There are 5 stages that must take place before you can access the UK Biobank Resource:
1. Registration: To confirm the identity of each researcher intending to use the Resource, to check their bona fides before registering them as a potential user.
2. Application: To allow UK Biobank to assess: (i) whether the proposed research is likely to be approved; (ii) whether the proposed research meets the required criteria for access (including legal and ethics standards); (iii) whether the Resource contains the data and/or samples required for the proposed research (iv) whether the amount of depletable sample required is scientifically justified; and (vi) the cost of providing such data and/or samples.
3. Access Sub-Committee (ASC) review: The ASC is a sub-committee of the UK Biobank Board, and is responsible for making key access decisions, notably those regarding the use of depletable samples, recontact or potentially contentious research. The ASC meets on a quarterly basis.
4. Material Transfer Agreement (MTA): For approved applications, the MTA needs to be executed and access charges paid before release of data and/or samples to the Applicant Principal Investigator (PI).
5. Sample / Data Release: Materials will only be released after payment and execution of the MTA. Data is typically released on a monthly basis, whereas samples are released to an agreed timetable.
Creating an Account Researchers can register and apply to access the Resource via the UK Biobank website (www.ukbiobank.ac.uk): The page below also allows you to sign in to an existing account or request a password and/or username reset if required:
STEP 1: Click the button marked ‘Sign up to access UK Biobank resources’ in order to start the signing up process.
Below is an example of the sign up screen. You will need to enter your first/last name, a current valid email address and a password that meets our security requirements.
Your email address will automatically be selected as your user name unless you, optionally, choose a new username.
STEP 2: Once you have provided all your details, click on the button marked ‘Sign up’.

Access_019 AMS User Guide v2 15th January 2018
Once you have successfully signed up, you will be navigated the screen below:
The email will be sent to the email address provided in your registration.
STEP 3: Clicking on the ‘Activate my registration’ hyperlink in the email will activate your AMS account.
Please note that your account will not be active until you have confirmed your email address by clicking the link provided in the email (example of email below):

Access_019 AMS User Guide v2 15th January 2018
STEP 4: Following the link within the email bring you to the screen above, which will automatically forward you to the log in screen:
Please also be sure to check your junk email folder.
If you do not receive an email for activation, returning back to the main login page and signing up again will send you a new email for activation.
STEP 5: Log in to the AMS using the email address/password you provided during registration.
When you log in in for the first time, you will need to enter your details on the Registration page.
Access_019 AMS User Guide v2 15th January 2018
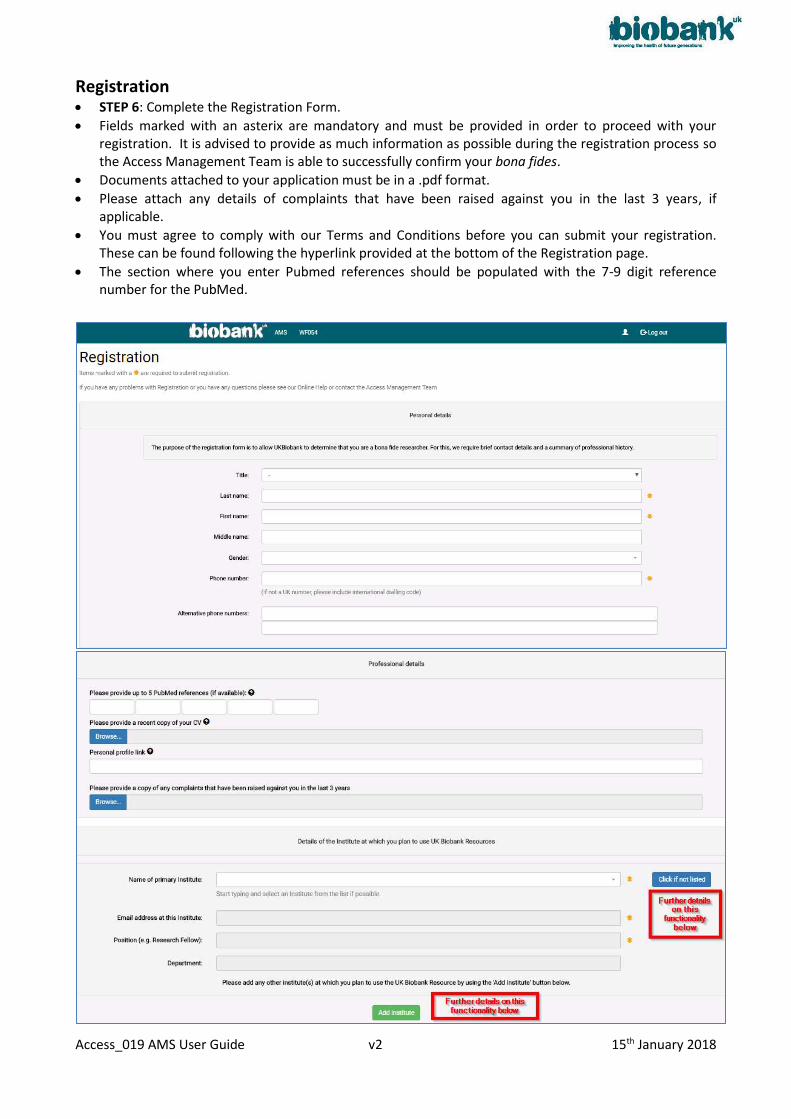
Registration STEP 6: Complete the Registration Form.
Fields marked with an asterix are mandatory and must be provided in order to proceed with your registration. It is advised to provide as much information as possible during the registration process so the Access Management Team is able to successfully confirm your bona fides.
Documents attached to your application must be in a .pdf format.
Please attach any details of complaints that have been raised against you in the last 3 years, if applicable.
You must agree to comply with our Terms and Conditions before you can submit your registration. These can be found following the hyperlink provided at the bottom of the Registration page.
The section where you enter Pubmed references should be populated with the 7-9 digit reference number for the PubMed.

Access_019 AMS User Guide v2 15th January 2018
If your primary institute is not listed as an existing institute you can add it to our system by using the ‘Click if not listed’ button. Again, mandatory fields will be marked with an asterix. Please use your institute’s legal name and provide as much information as possible so the Access Management Team is able to verify your institute.
Note: if you select the ‘Click if not listed’ button by accident, pressing it a second time will enable you to select a pre-existing institute.
All fields in the new institute area are free form entry text fields. Click on the country and start to type the required country and it will be suggested.
If you belong to more than one institute, the ‘Add Institute’ button can be used, which will enable you to enter a second institute. You are able to repeat this step as many times as necessary.

Access_019 AMS User Guide v2 15th January 2018
STEP 7: Click on Submit registration to complete your registration. A message will display stating ‘Your registration is under review’ (example below):
Once your registration has been submitted the Access Management Team will review your details to
confirm you as a bona fide researcher, within 10 working days. If the Access Management Team
requires further information (for example a CV was not provided) this will impact on the time taken to
complete the registration approval.
STEP 8: You will receive a Messages in AMS if the Access Management Team has any questions and/or to inform you of registration approval. Messages can be accessed via the left hand side of the screen (example provided below):
Once you have received confirmation that your Registration has been approved, you will be able to submit an access application. On the left hand menu you will be able to see further sections called Applications, Projects and Showcase which are covered later in this Guide.

Access_019 AMS User Guide v2 15th January 2018
Amending Existing Details After your Registration has been approved, you will be able to amend your contact details if/when necessary.
This can be done using the Profile tab on the left side of the page:
Please be aware that any changes to your details will need validating by the Access Management Team.
You will not have access to any of your current applications until your new details have been approved.
To submit a change of details, select the relevant text box and then press ‘Save changes’.
Below is a redacted example of the profile screen:
This screen can also be used to add/remove an institute or add a new institute.
Click Save changes to save your changes or Cancel to stop your actions.

Access_019 AMS User Guide v2 15th January 2018
Forgotten Password or Username and Change Password If you have forgotten your AMS password or username, you can retrieve these using the buttons
indicated below:
Clicking the Forgot your password? button will redirect you to the page below:
Enter your User Name that you selected at sign up (this will be your email address if you did not specify a username) then the system will send you a reset password link to your registered email address.
Clicking the Forgot your username? button will redirect you to the page below:
Using the email address you provided at sign up, AMS will email you details of your user name.
You are also able to change your password whilst logged in to the AMS. Select the icon highlighted
below, then ‘Change password’:

Access_019 AMS User Guide v2 15th January 2018
Messages UK Biobank would like to encourage researchers to use Messages in AMS rather than sending email.
Clicking ‘Messages’ on the left of the screen will open a list of all of your Messages stored in AMS.
If there are no messages the screen will look like this:
You can also click the link at the top of the screen to open Messages:
Messages default to your ‘Unread’ inbox.
Messages appear with the most recent at the top (as indicated in the Date created column). Further
colums show ‘Created by’ (i.e. the sender), ‘About’ (containing a hyperlink to the relevant application)
and ‘Subject’ (i.e. message title).
To create a Message click the ‘Send message’ button on the right of the screen a blank message box will open – see example below:

Access_019 AMS User Guide v2 15th January 2018
To view a message, click on the relevant drop-down arrow on the right.
Once your message is open, the ‘Read’ tick-box is automatically selected. ‘Untick’ this if you wish for
the message to remain in your ‘Unread’ inbox.
If the ‘Read’ tick remains selected (fig. 1a), your message will automatically be transferred to your
‘Read’ inbox (fig. 2) once you move away from Messages or a reply is sent using (fig. 1b).
fig. 1
fig. 2

Access_019 AMS User Guide v2 15th January 2018
Clicking ‘Reply’ opens the following window where your message can be composed.
‘View Conversation’ allows you to see the entire conversation thread.
The Access Management Team will respond via Messages once your query can be answered – if an attachment is required then an email will be sent from [email protected] referencing the date of your Message.
Access_019 AMS User Guide v2 15th January 2018
Collaborator Invitations If you have been named as a Collaborator on an application you will be notified via Messages when the application is submitted.
The Applicant PI will not be able to add researchers to applications until they are an Approved Researcher i.e. they are registered successfully with UK Biobank.
By opening the Application Number hyperlink you can read the Application but you will not be able to make amendments unless you have been assigned delegate access by the Applicant PI.
Click the UK Biobank logo to return to your AMS Home Page.
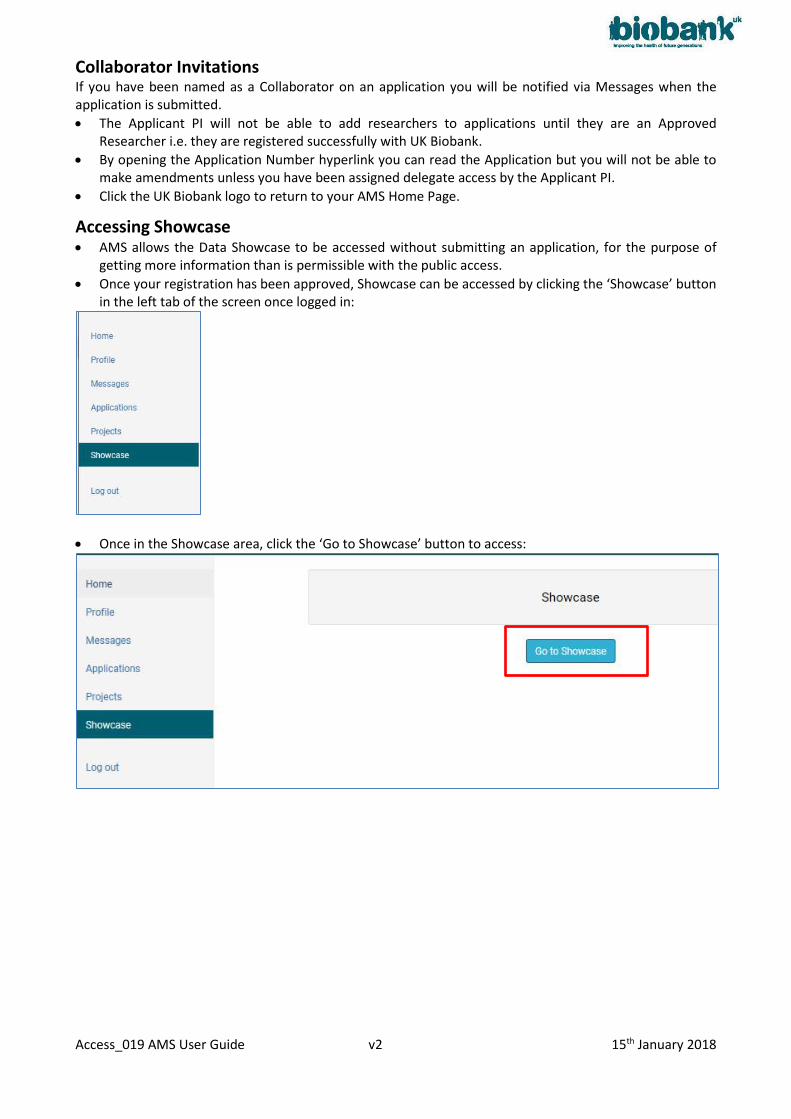
Accessing Showcase AMS allows the Data Showcase to be accessed without submitting an application, for the purpose of
getting more information than is permissible with the public access.
Once your registration has been approved, Showcase can be accessed by clicking the ‘Showcase’ button in the left tab of the screen once logged in:
Once in the Showcase area, click the ‘Go to Showcase’ button to access:

Access_019 AMS User Guide v2 15th January 2018
Submitting an Application Once your Registration has been approved, a number of new tabs will become visible on your AMS
‘Home Page’ (example below):
STEP 1: To start a new application, select the ‘Applications’ tab and ‘Start new application’:
STEP 2: Complete the application form which consists of the following four sections: A. Application details The purpose of providing an application is for UK Biobank to determine whether the proposed research project is health related, feasible and in the public interest. For this, we require a brief synopsis of the research plan (i.e. a description of the aims, methods and intended outputs) rather than a full scientific view.
A1. Project title – This should be a short description of your proposed project and contain no more than 200 characters.
A2. Research question(s) and aim(s) – Summarise the research questions for your project and what you aim to achieve, containing no more than 200 words.
Do you require biological samples? Yes/No – If you select Yes to this question, you will be required to fill out section C as well as three additional questions in section A3. If you select No to this question, these will not be required as part of your application.
Does your project require UK Biobank to re-contact participants? Yes/No - If you select Yes to this question, you will be required to fill out section D. If you select No to this question, these will not be required as part of your application.
A3. The background and scientific rationale of the proposed research project in general (containing no more than 300 words). A3.1. The background and scientific rationale for the use of samples, using no more than 300 words. (This question will not be made available to you if you selected No to requiring biological samples).

Access_019 AMS User Guide v2 15th January 2018
A3.2. The justification as to why UK Biobank samples in participular are needed for your research (i.e. why can’t appropriate samples be sourced from elsewhere or readily recruited by your research group using no more than 150 words. (This question will not be made available to you if you selected No to requiring biological samples). A3.3. If you wish to upload further documentation to support your request for requiring samples, please do so here. (This option will not be made available to you if you selected No to requiring biological samples).
A4. A brief description of the method(s) to be used, containing no more than 300 words.
A5. The type and size of dataset required (e.g., case-control subset, men only, Imaging data only, whole cohort, etc), to contain no more than 100 words.
A6. The expected value of the research (taking into account the public interest requirement, containing no more than 100 words.
A7. Up to six keywords which best summarise your proposed research project. Researchers can search for approved projects via a tag cloud based on the keywords entered, eg. Cancer, cognition, diabeties. The entry fields use predictive type-ahead based on commonly used keywords, but please add your own as required.
A8. Please provide a lay summary of your research project in plain english, stating the aims, scientific rationale, project duration and public health impact (up to 400 words). If your research application is approved, the lay summary will be published on the UK Biobank website.
A9. Will the research project result in the generation of any new data-fields derived from existing complex datasets, such as imaging, accelerometry, electrocardiographic, linked healthcare data, etc, which might be of significant utility to other researchers? Yes/No
A10. What is the estimated duration of your project, in months? If you consider (because for example the project is one involving the generation of hypotheses) that it would be difficult to set a fixed end point, we are prepared to consider a rolling 36 month period (during which annual updates are required).
B. Selection of data-fields This part of the application form asks some general questions relating to required data for your research project. In addition, selecting ‘Create application basket’ allows you to create an application basket within our data showcase and add data-fields needed for your research. B1. Would you like to access an existing copy of the genotyping dataset held at your institute? Yes/No B2. Would you like to access an existing copy of other bulk data files (e.g., imaging and eye scans, accelerometer data, fitness bike ECG, hospital or primary care data) held at your institute? Yes/No B3. Would you like to re-use an existing dataset already held at your institute to conduct your research (i.e. that contains all the data you need fo this new project)? Yes/No
C. Selection of samples (This section only becomes available if you answer yes to requiring biological samples).
The purpose of this section is to clarify precisely which type of samples are required for your application, as well as your intended use for those samples. C1. What are the sample type(s), volume(s) and number(s) of samples required? Please refer to the online help for guidance including, for example, information on how DNA was extracted.
Sample type and collection period can be selected using the dropdowns provided and the remaining criteria can be filled out using free-text.
You can request multiple sample types within the same application and can do so by selecting ‘Request another sample type’.

Access_019 AMS User Guide v2 15th January 2018
C2. If you are intending that an external lab (i.e. not UK Biobank) will conduct the assay, please provide brief details of the proposed lab, the proposed and the related quality control protocol using no more than 150 words. C3. If you wish to upload documentation to support the proposed aassay(s) and quality control, please do so here:
D. Re-contacting participants (This section only becomes available if you answer yes to requiring UK Biobank to re-contact participants). Although our participants have consented to be re-contacted, they have not consented to be re-contacted on demand. As such, decisions on whether re-contact is justifiable and appropriate will be made by UK Biobank, with advice from the Ethics and Governance Council, and such re-contact requires separate approval from a Research Ethics Committee (and UK Biobank will generally also require independent scientific review to help ensure that re-contact is warranted).
D1. Please consult the guidance on the website relating to re-contact applications and provide the scientific justification for and details of the nature of the re-contact using up to 300 words (in order words why does the conduct of your research project require the re-contact of UK Biobank participants) D2. If you wish to upload further documentation to support your request for re-contact, please do so here (.pdf format only).
STEP 3: Once you are happy with your application, you can submit by pressing the appropriate button at either the top or bottom of the screen.
Alternatively, you can save your application as a draft to return to at a later date by pressing ‘Save and continue later’.
If you would like to abandon your application, you can do so by pressing ‘Cancel’ and don’t save changes.
Collaborators tab Once an application is saved from the application screen you will be able to access the Collaborators tab where you can add institutes and colleagues involved in the research. Also, you will be able to select collaborator(s) who you wish to delegate to update the application on behalf of the Applicant PI.
STEP 4: Update the collaborators tab: 1. Click on the collaborators tab.
2. Select the institute where you will be conducting the majority of the research for this project
using the dropdown list provided (this will default to your primary institute, but can be
changed if necessary).
Note: You can only select institutes outlined in your Profile, or your collaborators primary institute.
If your preferred institute is not listed, you need to add it as one of your institutes via your Profile tab.
3. Add collaborators from your own institute by pressing ‘Add another collaborator at this
institute’. This will reveal a dropdown list containing all the active UK Biobank registered
researchers from your institute.
4. Using the tick box next to the collaborator allows you to make them a delegate. Collaborators
with delegate rights are able to edit the application, make edits to the collaborator screen,
make payments and access the data once the application has been approved.

Access_019 AMS User Guide v2 15th January 2018
5. Add another collaborator at your institute, if applicable.
You should add all collaborators that will be working with UK Biobank data. The ‘First Name’,
‘Last Name’ and ‘Email’ fields are mandatory.
You need to use your collaborators email address provided at registration. Incorrectly added
collaborators can be removed by clicking the Remove hyperlink next to the relevant
collaborator.
Click Add Collaborator to add the collaborator to your Application.
6. Add collaborators at another institute, if applicable.
If the collaborator you wish to select is not contained in the dropdown, it is because they are
not yet registered with UK Biobank. Please ask them to submit a registration; once they are an
Approved Researcher you will be able to add them to your application.
7. Add or select Material Transfer Agreement information; specify the legal name of the institute
and select contact.
8. Choose to submit application at this stage. See illustration below:
Colleagues must register with UK Biobank so they can be linked with an application.
STEP 5: Specify the legal name of your institute (this is how the name will appear on the MTA agreement).
STEP 6: Specify the legal name of the collaborating institute (this is how the name will appear on the MTA agreement). Alternatively, you can add new Material Transfer Agreement Contact information or select an existing legal contact. See illustration below:

Access_019 AMS User Guide v2 15th January 2018
Another screen pops up where you can fill out MTA contact details then click on the ‘Add’ button – see illustration below:
Creating an Application Basket STEP 7: Clicking on ‘Create application basket’ takes you to the Data Showcase:
o Under ‘Filter Conditions’ you can add information about case control requirements or request data not available yet.
o ‘Previous baskets’ will be blank for new applications. o If you are subsequently approved to use an existing dataset at your institute, it will be visible
here. o Under ‘List actions’ you can add or remove single data-fields, or add SNPs if you are interested
in genetic data. o The ‘Clear’ tab has a link to ‘Destroy Basket’.
Please do not use this unless you wish to to delete your basket and start again.

Access_019 AMS User Guide v2 15th January 2018
STEP 8: To add data-fields, go to the ‘Browse’ tab at the top of the page or alternatively find the data-field or category using the ‘Search’ tab.
Navigate to the required catoegory then click on the ‘Modify basket’ button – see illustration below:
This brings up a list of data-fields in this cateogry.
STEP 9: Select the data-fields your require, or hit ‘Add all fields’ at the bottom and click ‘OK’ on the pop-up, then click ‘Update’ to add them to the basket.
STEP 10: Repeat for other categories/data-fields until you have eveything you require.

Access_019 AMS User Guide v2 15th January 2018
STEP 11: Click on the ‘Basket’ tab at the top when you are finished to return to the Showcase Basket homepage and check all the required data-fields have been added successfully.
STEP 12: Click on the ‘AMS’ tab to return to your application.
STEP 13: Clicking on Save and continue later if you wish to come back to the application at a later date and by so doing you will be able to:
o View/edit application form
o View documents associated with the application
o Application ID is also generated by AMS
You will only be able to submit the application after confirming that all the information provided in the application is full and correct. If you try to submit the application without checking ‘yes’ a pop-up warning box will appear on screen.
STEP 14: Submit Application – when you are satisfied with all the information supplied in the application click on the ‘Submit’ button.
It is recommended that researchers read the Terms and Conditions of the UK Biobank Material Transfer Agreement (MTA) which can be found within Annex II of our Access Procedures. The Access Procedures can be located via the hyperlink on this page or in the ‘Resources’ tab on the UK Biobank website (www.ukbiobank.ac.uk).
Printing your Application You will be able to print a .pdf version of your application via your AMS Home Page:
a. Click on the Applications tab on the navigation pane to the left of the home page. b. Click on the View/Edit button next to the appropriate application. c. A summary of your application form is displayed which you can print. d. Use the Ctrl + P on your keyboard or right mouse click then click print to print application form.
Payment
Make payment Once you have submitted an Application you will be able to return to the AMS Home Page.
STEP 1: Click on Applications from the navigation pane.
STEP 2: Click on ‘View/Edit’ next to the relevant application, then click on the ‘Payments’ tab where the application ‘Requests for Payment’ and ‘Financial documents’ will be visible.
Please note that the Access Management Team is unable to commence review of your Application until the initial Invoice has been paid.
UK Biobank requires at least two payments for every application: a. An initial payment: due after application submission, before application review begins. b. A main payment: due after the application is approved and before data is released. c. Other payment: another payment may be required if we receive a request for bulk data which was
not originally selected or further work is required after a project is underway.
Selecting your payment type:
For each payment the AMS allows you to select your method of payment: a. Create an Invoice with or without a PO number.

Access_019 AMS User Guide v2 15th January 2018
b. Pay online via SagePay.
Once a payment has been requested by UK Biobank it will be visible in the Payments tab of your application as status ‘Requested’ in the ‘Requests for Payment’ area.
For the main payment, in advance of payment being requested, a quotation will be available on the Payments tab of the application within the ‘Financial documents’ area as type ‘Quote’ for you to review and discuss with your institution or with UK Biobank.
Once the payment becomes due, this quotation will be converted into a Request for Payment and become visible in the ‘Requests for Payment’ area of the Payments tab.
STEP 3: Once you are ready to make an online payment or would like to request an invoice, click the ‘Payment Details’ button that appears in the Requests for Payment that appears next to the Status ‘Requested’.
STEP 4: This section allows you enter a payment address, to submit a VAT number, make an online payment or request an invoice: a. Clicking the ‘Payment details’ button will open up the ‘Payment details’ form with Institute,
Applicant PI name, department and Institute City, County/State and country populated on the form.
b. Tick the checkbox to indicate if your (Applicant) Institute will make payment. c. Untick the checkbox and add details of the Paying Institute if different from the Applicant PI
Institute. See illustration below (only delegate collaborators or delegate collaborating institutes can make payments on behalf of the Applicant PI):

Access_019 AMS User Guide v2 15th January 2018
d. Complete the form as appropriate. e. Add Purchase Order number if relevant. f. Confirm that all details are correct by clicking/inserting a tick in the checkbox. g. Applicant PI (or delegate) may then select on:
a. Request Invoice: where an invoice will be generated in the ‘Financial documents’ area of the ‘Payments’ tab.
b. Pay Online: where the user will be progressed to SagePay to pay online via credit card. c. Save for later: where the details will be saved for later but the Applicant PI or delegate will
be returned to the ‘Payments’ tab and any details entered are saved.
STEP 5: You can choose to click on ‘Request Invoice’ which will generate an invoice and the application payment Status will update to Invoiced:

Access_019 AMS User Guide v2 15th January 2018
The invoice will then be available to download as a .pdf as required:
If you change your mind and decide to pay online, you can click on ‘Payment details’ button to go back to the ‘Payment details’ form where you can choose to ‘Pay Online’ instead. See illustrations below:
STEP 6: Alternatively, you can choose to click ‘Online Payment’ - you will be redirected to SagePay where you can pay by card.
Click on ‘Confirm card details’:

Access_019 AMS User Guide v2 15th January 2018
Payment / Shipping Information
Please note that the section ‘VAT Status’ will only be visible if the Country in the payment section is a member of the EU. Please refer to UK Biobank’s VAT note on the UK Biobank website for further details regarding VAT and the impact on researchers.
The Shipping address will be the same as the billing address unless the ‘Shipping address different than billing address?’ tick box is checked. If checked, new address fields that require populating will become visible.
Please note that the following fields are mandatory: 1. Institute Name 2. Contact first and last names 3. Address line 1 4. Postcode 5. I confirm that all details are correct
STEP 7: To help UK Biobank locate your payment, please send any remittance provided by your Finance Department to [email protected].

Access_019 AMS User Guide v2 15th January 2018
Receipt
STEP 8: Once a payment is confirmed by UK Biobank as ‘Paid’, it will be possible to generate a receipt by clicking the ‘Receipt’ button that appears after a payment is made:
STEP 9: This receipt will then appear in the ‘Financial documents’ area of the ‘Payments’ tab where you
can click on it and download it as a .pdf for your reference:
Access_019 AMS User Guide v2 15th January 2018
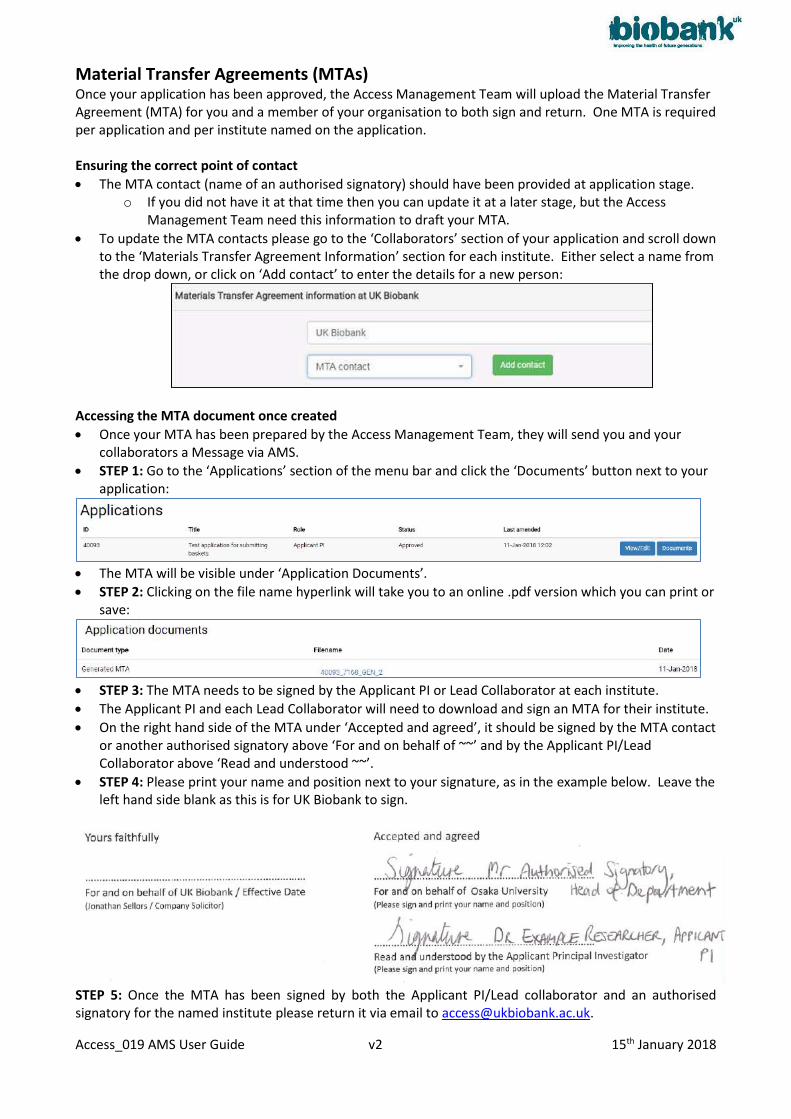
Material Transfer Agreements (MTAs) Once your application has been approved, the Access Management Team will upload the Material Transfer Agreement (MTA) for you and a member of your organisation to both sign and return. One MTA is required per application and per institute named on the application. Ensuring the correct point of contact
The MTA contact (name of an authorised signatory) should have been provided at application stage. o If you did not have it at that time then you can update it at a later stage, but the Access
Management Team need this information to draft your MTA.
To update the MTA contacts please go to the ‘Collaborators’ section of your application and scroll down to the ‘Materials Transfer Agreement Information’ section for each institute. Either select a name from the drop down, or click on ‘Add contact’ to enter the details for a new person:
Accessing the MTA document once created
Once your MTA has been prepared by the Access Management Team, they will send you and your collaborators a Message via AMS.
STEP 1: Go to the ‘Applications’ section of the menu bar and click the ‘Documents’ button next to your application:
The MTA will be visible under ‘Application Documents’.
STEP 2: Clicking on the file name hyperlink will take you to an online .pdf version which you can print or save:
STEP 3: The MTA needs to be signed by the Applicant PI or Lead Collaborator at each institute.
The Applicant PI and each Lead Collaborator will need to download and sign an MTA for their institute.
On the right hand side of the MTA under ‘Accepted and agreed’, it should be signed by the MTA contact or another authorised signatory above ‘For and on behalf of ~~’ and by the Applicant PI/Lead Collaborator above ‘Read and understood ~~’.
STEP 4: Please print your name and position next to your signature, as in the example below. Leave the left hand side blank as this is for UK Biobank to sign.
STEP 5: Once the MTA has been signed by both the Applicant PI/Lead collaborator and an authorised signatory for the named institute please return it via email to [email protected].

Access_019 AMS User Guide v2 15th January 2018
Checking the status of your MTA
To check the status of your MTA agreement, go to the ‘Applications’ area of AMS and click the button marked ‘Documents’ in the relevant row of the particular application/project you are interested in:
In the documents area, you should be able to see all of the versions of the MTA that are currently associated with your application.
o If you do not see a document type labelled ‘Executed MTA’ then your MTA is still in the process of being signed by either UK Biobank or your own institution.
Please contact your legal contact or the Access Management Team for more information on progressing your MTA.
Amending an Application (unlocked by UK Biobank for amendments) The Access Management Team will notify you via Message in AMS if your Application requires amendment.
The application will be locked once review is in progress i.e. it is read only.
When the Access Management Team unlocks your application you (or a delegate collaborator) will be able to amend the information within it.
Once you have made the amendments ensure you re-click the ‘Submit’ button. Please note that clicking the ‘Submit form’ button re-locks your application.
Send the Access Management Team a Message via the application to confirm you have resubmitted along with any other comments you may have.
Please note the system doesn’t notify the Access Management Team when applications are resubmitted.

Access_019 AMS User Guide v2 15th January 2018
Data Release The Access Management Team will notify you via Message in AMS when the dataset has been scheduled for extraction and release.
When the dataset has been released to the Applicant PI (and delegate collaborators) it will be accessible in the ‘Projects’ area of AMS.
The researcher should log-in and select ‘Projects’ on the left side to see their project listed. o If your project is not listed here it means UK Biobank has not progressed it to ‘Project Underway’.
This may be due to outstanding payment or your MTA not being executed yet.
Once your application has been approved and visible, click on the ‘View/Update’ button to the right of the relevant application to access the data on the ‘Data’ tab.
Then click ‘Go to Showcase download page’ to go to the area in Showcase where you can download your data:
If the ‘Data’ tab is not accessible within the project itself (greyed out), this means that the Material
Transfer Agreement (MTA) for your institute has not yet been executed. Please see the MTA section (above) for how to check the status of your MTA.

Access_019 AMS User Guide v2 15th January 2018
Projects Underway Once the dataset has been released for an application it becomes considered a ‘Project Underway’ with UK Biobank.
The original approved application will be visible in the ‘Applications’ area; any changes to the application or other requirements by UK Biobank or the Applicant PI during the lifetime of the project will be handled within the ‘Projects’ area of AMS.
Requesting Changes Under the Requests tab, there are three options to request 1) additional data-fields, 2) extend the
scope of the research (additional analyses or justification for new categories of data) and 3) extend the duration of the project.
Click on the box to select one or more of these:
Requesting additional data-fields
Click on the ‘Do you with to request additional data-fields’ button.
Click the ‘Select data’ button to go to the Data Showcase area:
As with addition data-fields to the basket at application stage, use the Browse or Search functions at
the top of the page to locate the categories that you want, then click ‘Modify Basket’:
Select the data-fields you require or hit ‘Add all fields’ then ‘OK’ on the pop-up to add all data-fields in
that category then hit ‘Update’ to add them to your basket:

Access_019 AMS User Guide v2 15th January 2018
Repeat until you have all the data-fields/categories you require.
Go to Basket at the top to check the data-fields have added to your basket and then click on the AMS tab to return to your project.
Please note, where new raw imaging or accelerometer data has been requested, please also follow the steps below to provide details of what novel data-fields will be returned to UK Biobank. Please be aware that these may be released separately to the other data-fields as part of a phased release.
Extending the scope of your Project
Click on ‘Do you wish to extend the scope of your research’ and some text boxes will drop down:
The current scope is not editable and is for reference only. Copy this into the box below and then
underneath explain what additional work you would like to do, providing detail of additional analyses, etc.
Where new bulk data categories have been requested, please give details of what novel data will be returned to UK Biobank.
In the ‘Please give reason’ box, please provide justification for why you need to extend your project.
For extensions which are quite different from the original project scope, please ensure to explain why this is relevant as a project extension or you may be asked to submit a new project:
Extending the duration of your Project
Click on ‘Do you wish to extend the duration of your project?’ and the current timeline and a text box will drop down:
In the ‘Extend by (months)’ box, add how many months you would like to extend the project by and then provide justification for the extension in the box below.
Once you have finished, hit ‘Save for later’ to save what you have written and continue editing another time, or ‘Submit’ to submit your project extension request:

Access_019 AMS User Guide v2 15th January 2018
Once submitted, the status of the project will change in the ‘Projects’ area to ‘Change Review.’ The status will remain as ‘Change Review’ until the change requested is approved or declined:
Once the change requested has been approved or declined, the project status will revert to ‘Underway.’ If the project change has been approved, you will see the updates visible in the ‘Project Details’ tab or the ‘Data’ tab:
Requesting a data refresh Your data-fields may be subject to updated data being made available during the lifetime of your project.
To update your data, go to the ‘Data’ tab in the ‘Projects’ area and click ‘Refresh data’ next to the relevant basket you would like to refresh.
The date of the last request will appear next to each basket ID.
Within a few days a refreshed data basket should be made available to you in the Showcase download page.
The ‘Refresh data’ button will be greyed out until that data is made available.
If there has not been an update to the Data Showcase in regard to your basket items since the last refresh your data will not be updated.

Access_019 AMS User Guide v2 15th January 2018
UK Biobank would request that you do not request refreshed baskets in a frequency less than 3 months at a time.
Project Administration As part of your agreement with UK Biobank, you are required to advise us of your project progress in an annual Research Project Update Report. You are also required to submit information on publications and conferences at least 2 weeks in advance of their publication.
These items can be submitted in the ‘Admin’ section of your project.
Go to the Projects area and click the ‘View/Update’ button of the relevant project.
Click on the ‘Admin’ tab which will display reports, publications, and conferences already uploaded and allow you to upload new ones:
Project Reports
The Research Project Update Report needs to be uploaded annually and at the end of the project.
The system will display the due date for the next Report in this area.
The Annual Project Report template can be found on UK Biobank’s website here. To upload a file, click the ‘Browse…’ button in the ‘Project Reports’ area.

Access_019 AMS User Guide v2 15th January 2018
Select the file that you would like to upload and click ‘Open’. Please be advised that only .pdf files can be uploaded and there is a limit of 10MB per file:
Once your file appears next to the ‘Browse…’ button, click Upload to upload it to AMS.
Once uploaded, the document will become visible in this area and you can click on the document file name to review it.
If you need to remove a document from this area, click the ‘Remove’ button to the right of the document file name.

Access_019 AMS User Guide v2 15th January 2018
Publications At least 2 weeks prior to a publication using your data, you are required to provide UK Biobank with confirmation of the publication details.
To advise UK Biobank of an upcoming publication that you cannot upload please email [email protected] with an attachment.
Once published, please insert a weblink to the document in the area to the left of ‘Add’ in the ‘Publications’ area of the ‘Admin’ tab:
Then click ‘Add’ to add this to your list of publications:

Access_019 AMS User Guide v2 15th January 2018
Your publication will then become visible. If you need to remove a link click the ‘Remove’ button.
If you cannot provide a link to your article, please upload it in the ‘Conferences’ section of the ‘Admin’ tab, situated below the ‘Publications’ area.
Conferences At least 2 weeks prior to a conference using your data, you are required to provide UK Biobank with confirmation of the conference details.
To advise UK Biobank of an upcoming conference, click the ‘Browse…’ button in the Conferences area of the ‘Admin’ tab:
Select the file to upload and click ‘Open’. Only .pdf files can be uploaded (limit of 10MB per file).
Once the conference document becomes visible in the box to the right of ‘Browse…’ click the ‘Upload’ button to upload the document to AMS.
Once uploaded, the document will become visible in this area and you can click on the document file
name to review it.
If you need to remove a document from this area, click the ‘Remove’ button to the right of the document file name: