Embed Size (px)
Citation preview

www.nicelabel.com
IKEA ULL Manager 2017 User Guide
IKEA
August 29th, 2017 | Revision: 1.0
Prepared for IKEA
Prepared by Izidor Jereb NiceLabel
Index 1 INSTALLATION .................................................................................................................... 3
1.1 Installing Software and Printer Drivers ................................................................................................... 3
1.2 Activating NiceLabel software ................................................................................................................ 4
1.3 Location of Installed files IKEA ULL Manager 2017 Files ...................................................................... 5
1.4 System Requirements ............................................................................................................................ 5
2 PRINTING LABELS FROM IKEA ULL MANAGER 2017 MANUALLY ................................... 6
2.1 IKEA ULL Manager 2017 Main Window ................................................................................................. 6
2.2 Setting multiuser environment ................................................................................................................ 6
2.3 Configuring IKEA ULL Manager ............................................................................................................. 7
2.4 Managing Product Data .......................................................................................................................... 8
2.5 Printing Labels ...................................................................................................................................... 10
2.6 Reprinting Labels and Viewing the Log File ......................................................................................... 11
3 PRINTING LABELS AUTOMATICALLY .............................................................................. 13
3.1 Introduction to NiceLabel Automation .................................................................................................. 13
3.2 Configuring the NiceLabel Automation ................................................................................................. 13
4 TECHNICAL SUPPORT ..................................................................................................... 14
1 Installation IKEA ULL Manager installs as an add-on to NiceLabel software. All necessary IKEA ULL files are packed in
the file OEM.DAT that is enclosed with the installation of NiceLabel software.
The IKEA ULL Manager 2017 contains the following components:
1. NiceLabel PowerForms Suite
2. IKEA ULL Manager 2017 add-on to NiceLabel software containing:
Pre-designed solution for printing labels for IKEA (ULLManager.nsln file)
Sample configuration for NiceLabel Automation (for automatic printing)
3. IKEA ULL Manager 2017 User Guide
4. IKEA ULL Manager 2017 Administration Guide
1.1 Installing Software and Printer Drivers
Install IKEA ULL Manager 2017 with Installation from the Web
Follow these installation steps:
1. Download the installation from the Web.
2. Unpack downloaded file IKEAULLManager2017.zip
3. Double click on the file NiceLabel2017.exe to start the installation of NiceLabel 2017/ IKEA ULL Manager 2017.
4. Follow on-screen instructions.
5. Double-click the shortcut icon on the desktop to start the IKEA ULL Manager.
You can also see the detailed installation procedure in the NiceLabel 2017Installation Guide. Installation of
IKEA ULL Manager 2017 follows the same steps. You can download the Installation Guide from the
NiceLabel product Web site.
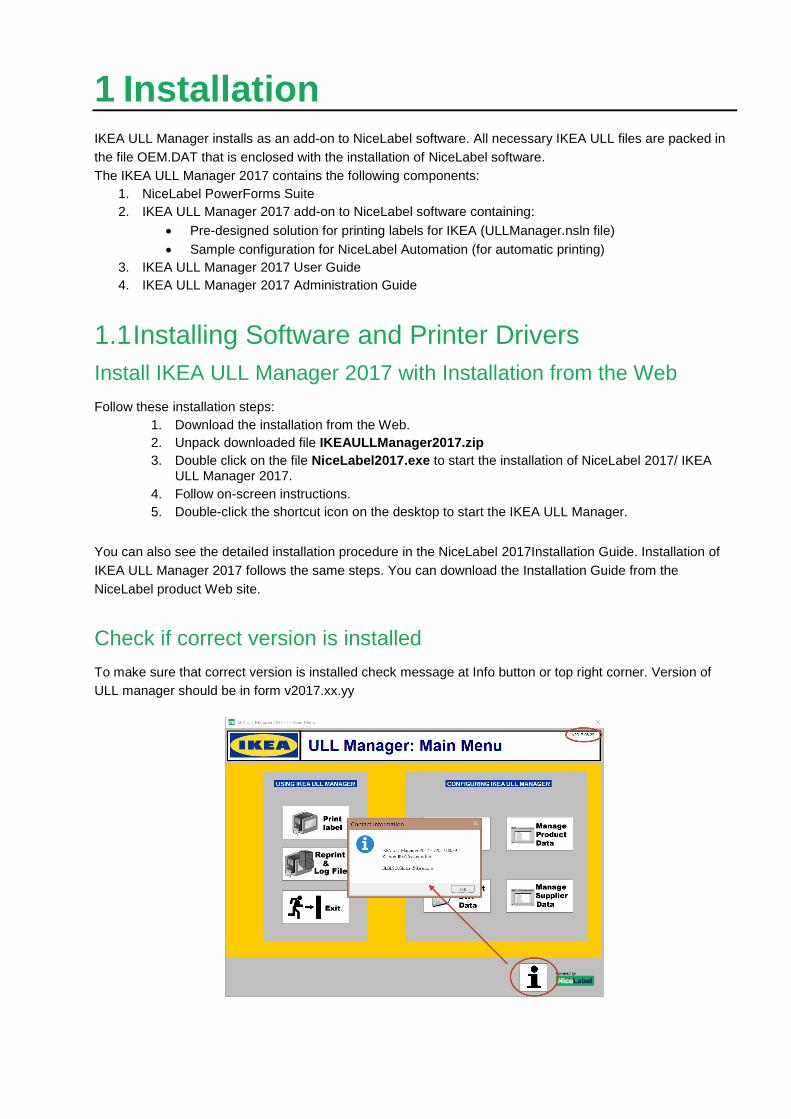
Check if correct version is installed
To make sure that correct version is installed check message at Info button or top right corner. Version of
ULL manager should be in form v2017.xx.yy
Install Printer Drivers
Before the user can print labels, the printer driver for the label printer must be installed on the same PC. The
printer driver will automatically show in the list of available printers in the IKEA ULL Manager 2017.
If you use the thermal printers, install NiceLabel Printer Drivers. You can download them from NiceLabel Web site https://www.nicelabel.com/downloads/printer-drivers
If you use a laser, inkjet or similar printers, the printer drivers are provided with the printer
1.2 Activating NiceLabel software
IKEA ULL Manager 2017 is based on the NiceLabel PowerForms Suite edition. To activate IKEA ULL
Manager 2017, you must follow the procedure for NiceLabel PowerForms Suite activation. Once NiceLabel
is activated, IKEA ULL Manager 2017 will activate as well.
The activation software key has been provided with the IKEA ULL Manager 2017.
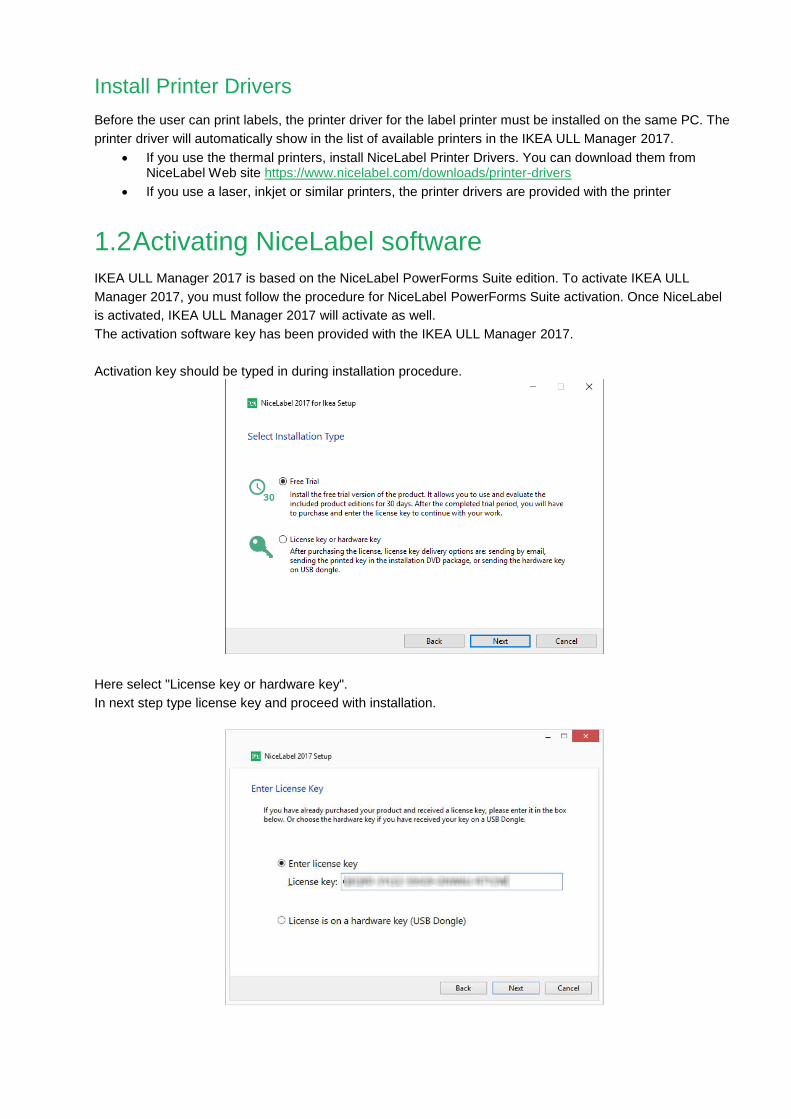
Activation key should be typed in during installation procedure.
Here select "License key or hardware key".
In next step type license key and proceed with installation.
1.3 Location of Installed files IKEA ULL Manager 2017 Files
NiceLabel software (the framework for the IKEA ULL Manager 2017 solution) can be installed to any location
specified during the installation, a default location is:
C:\Program Files\NiceLabel\NiceLabel 2017\
Make sure you have the administrative permissions on the computer where you are installing the software.
Installation of the ULL Manager 2017 software will:
Copy NiceLabel files to C:\Program Files\NiceLabel\ folder
Copy NiceLabel files to C:\Program Data\NiceLabel
Copy the IKEA ULL Manager 2017 files to the c:\IKEAULLManager2017 folder
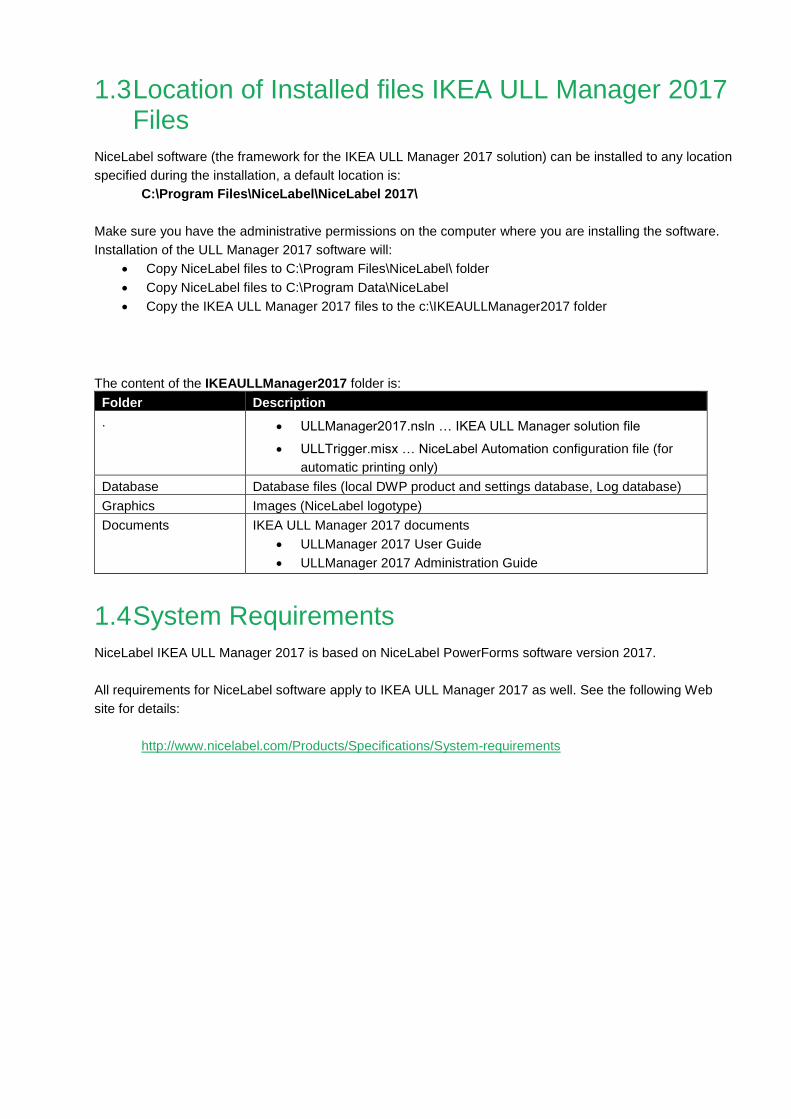
The content of the IKEAULLManager2017 folder is:
Folder Description
. ULLManager2017.nsln … IKEA ULL Manager solution file
ULLTrigger.misx … NiceLabel Automation configuration file (for
automatic printing only)
Database Database files (local DWP product and settings database, Log database)
Graphics Images (NiceLabel logotype)
Documents IKEA ULL Manager 2017 documents
ULLManager 2017 User Guide
ULLManager 2017 Administration Guide
1.4 System Requirements
NiceLabel IKEA ULL Manager 2017 is based on NiceLabel PowerForms software version 2017.
All requirements for NiceLabel software apply to IKEA ULL Manager 2017 as well. See the following Web
site for details:
http://www.nicelabel.com/Products/Specifications/System-requirements
2 Printing Labels from IKEA ULL Manager 2017 Manually
This section provides details for using IKEA ULL Manager 2017 on supplier computers.
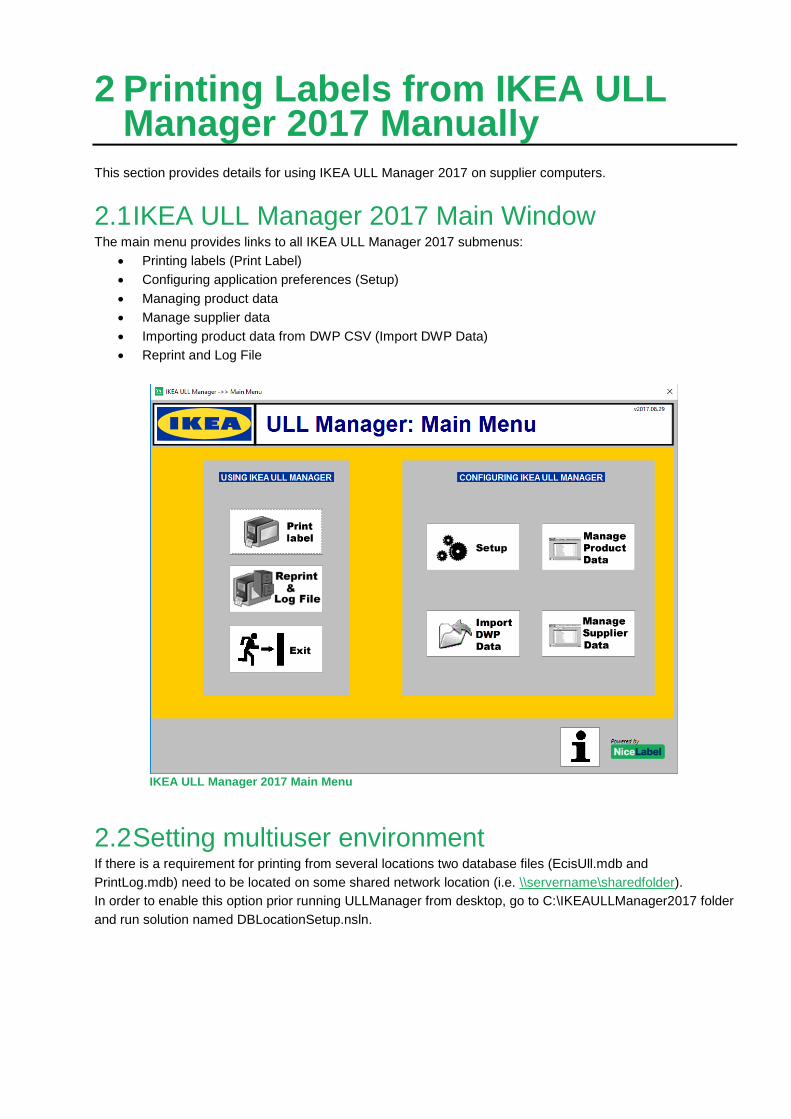
2.1 IKEA ULL Manager 2017 Main Window The main menu provides links to all IKEA ULL Manager 2017 submenus:
Printing labels (Print Label)
Configuring application preferences (Setup)
Managing product data
Manage supplier data
Importing product data from DWP CSV (Import DWP Data)
Reprint and Log File
IKEA ULL Manager 2017 Main Menu
2.2 Setting multiuser environment If there is a requirement for printing from several locations two database files (EcisUll.mdb and
PrintLog.mdb) need to be located on some shared network location (i.e. \\servername\sharedfolder).
In order to enable this option prior running ULLManager from desktop, go to C:\IKEAULLManager2017 folder
and run solution named DBLocationSetup.nsln.
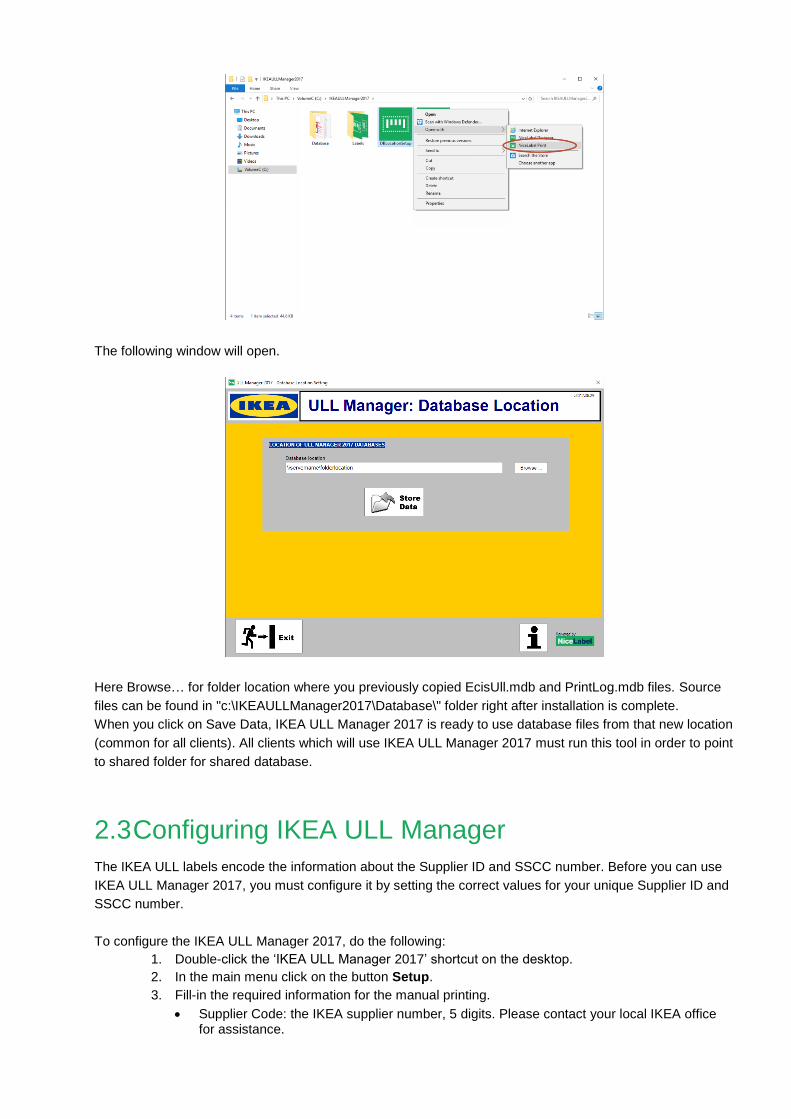
The following window will open.
Here Browse… for folder location where you previously copied EcisUll.mdb and PrintLog.mdb files. Source
files can be found in "c:\IKEAULLManager2017\Database\" folder right after installation is complete.
When you click on Save Data, IKEA ULL Manager 2017 is ready to use database files from that new location
(common for all clients). All clients which will use IKEA ULL Manager 2017 must run this tool in order to point
to shared folder for shared database.
2.3 Configuring IKEA ULL Manager
The IKEA ULL labels encode the information about the Supplier ID and SSCC number. Before you can use
IKEA ULL Manager 2017, you must configure it by setting the correct values for your unique Supplier ID and
SSCC number.
To configure the IKEA ULL Manager 2017, do the following:
1. Double-click the ‘IKEA ULL Manager 2017’ shortcut on the desktop.
2. In the main menu click on the button Setup.
3. Fill-in the required information for the manual printing.
Supplier Code: the IKEA supplier number, 5 digits. Please contact your local IKEA office for assistance.
SSCC Supplier part: the company prefix in the EAN.UCC numbering scheme, up to 13 digits. Please contact your local IKEA office for assistance.
SSCC staring value: Enter the starting value from which you will start identifying packages for IKEA. Each label will have a unique SSCC counter value.
Quantity of identical labels: define how many identical labels for the same product you want to print, max. 3 digits.
4. Fill-in the required information for the automatic printing.
The printer to which labels will print.
The default label template you want to print.
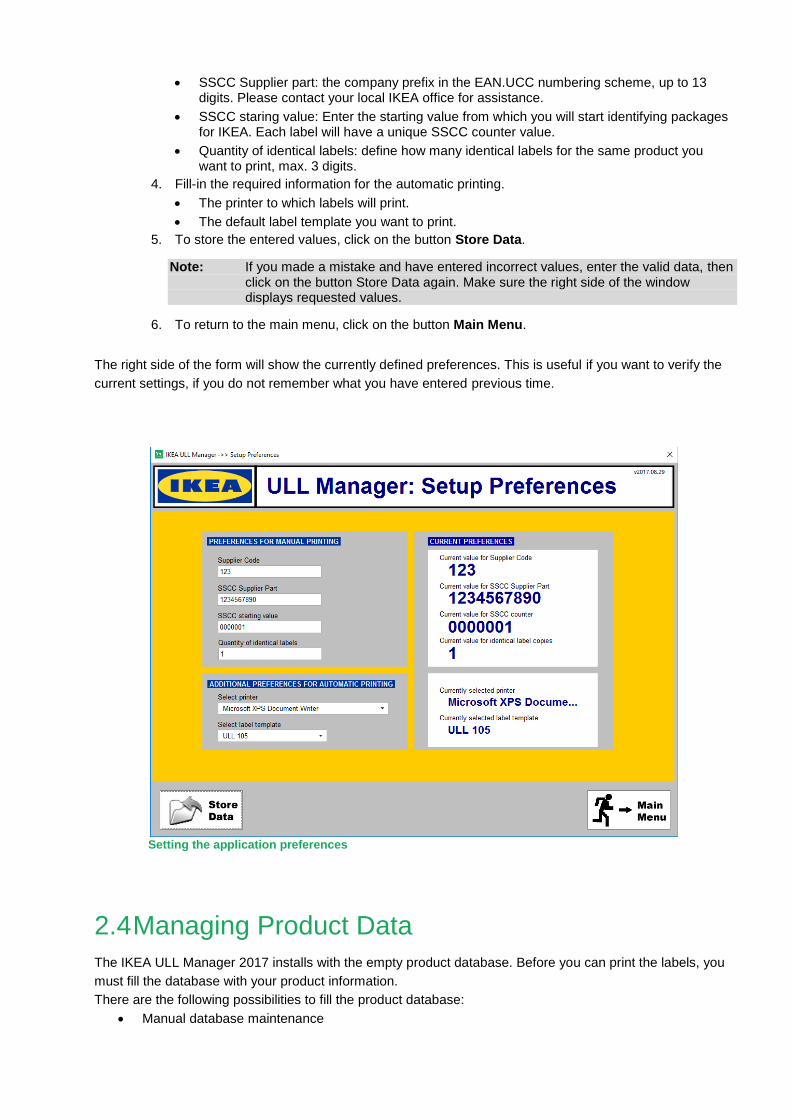
5. To store the entered values, click on the button Store Data.
Note: If you made a mistake and have entered incorrect values, enter the valid data, then click on the button Store Data again. Make sure the right side of the window displays requested values.
6. To return to the main menu, click on the button Main Menu.
The right side of the form will show the currently defined preferences. This is useful if you want to verify the
current settings, if you do not remember what you have entered previous time.
Setting the application preferences
2.4 Managing Product Data
The IKEA ULL Manager 2017 installs with the empty product database. Before you can print the labels, you
must fill the database with your product information.
There are the following possibilities to fill the product database:
Manual database maintenance
Import the product information from DWP CSV file
Manual Database Maintenance
To manually enter the product information, do the following:
1. Double-click the ‘IKEA ULL Manager 2017’ shortcut on the desktop.
2. In the main menu click on the button Manage Product Data. The ‘Database Maintenance’ window will open.
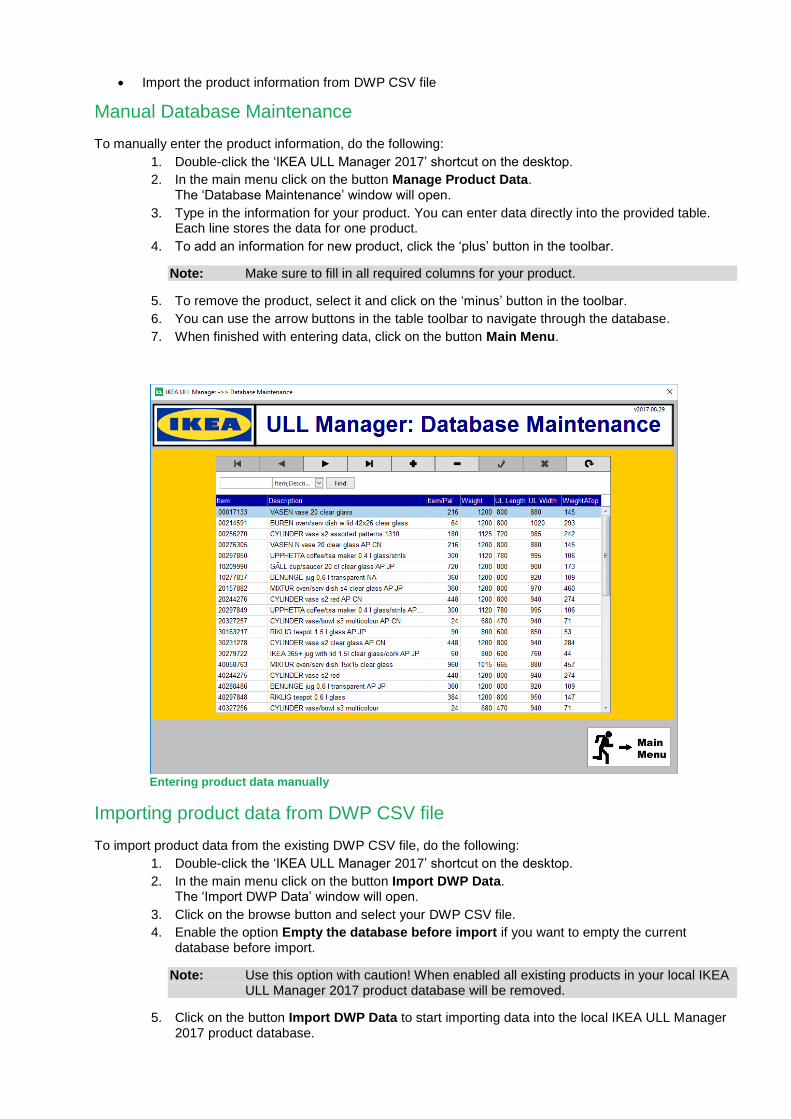
3. Type in the information for your product. You can enter data directly into the provided table. Each line stores the data for one product.
4. To add an information for new product, click the ‘plus’ button in the toolbar.
Note: Make sure to fill in all required columns for your product.
5. To remove the product, select it and click on the ‘minus’ button in the toolbar.
6. You can use the arrow buttons in the table toolbar to navigate through the database.
7. When finished with entering data, click on the button Main Menu.
Entering product data manually
Importing product data from DWP CSV file
To import product data from the existing DWP CSV file, do the following:
1. Double-click the ‘IKEA ULL Manager 2017’ shortcut on the desktop.
2. In the main menu click on the button Import DWP Data. The ‘Import DWP Data’ window will open.
3. Click on the browse button and select your DWP CSV file.
4. Enable the option Empty the database before import if you want to empty the current database before import.
Note: Use this option with caution! When enabled all existing products in your local IKEA ULL Manager 2017 product database will be removed.
5. Click on the button Import DWP Data to start importing data into the local IKEA ULL Manager 2017 product database.
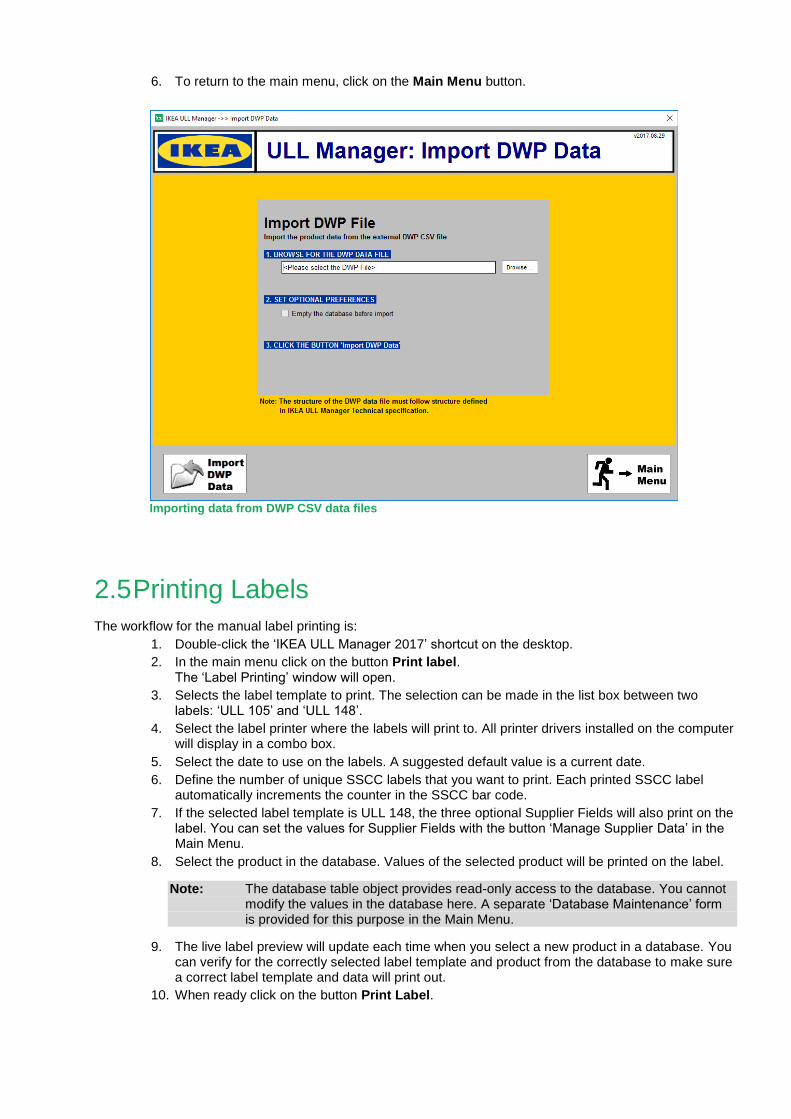
6. To return to the main menu, click on the Main Menu button.
Importing data from DWP CSV data files
2.5 Printing Labels
The workflow for the manual label printing is:
1. Double-click the ‘IKEA ULL Manager 2017’ shortcut on the desktop.
2. In the main menu click on the button Print label. The ‘Label Printing’ window will open.
3. Selects the label template to print. The selection can be made in the list box between two labels: ‘ULL 105’ and ‘ULL 148’.
4. Select the label printer where the labels will print to. All printer drivers installed on the computer will display in a combo box.
5. Select the date to use on the labels. A suggested default value is a current date.
6. Define the number of unique SSCC labels that you want to print. Each printed SSCC label automatically increments the counter in the SSCC bar code.
7. If the selected label template is ULL 148, the three optional Supplier Fields will also print on the label. You can set the values for Supplier Fields with the button ‘Manage Supplier Data’ in the Main Menu.
8. Select the product in the database. Values of the selected product will be printed on the label.
Note: The database table object provides read-only access to the database. You cannot modify the values in the database here. A separate ‘Database Maintenance’ form is provided for this purpose in the Main Menu.
9. The live label preview will update each time when you select a new product in a database. You can verify for the correctly selected label template and product from the database to make sure a correct label template and data will print out.
10. When ready click on the button Print Label.
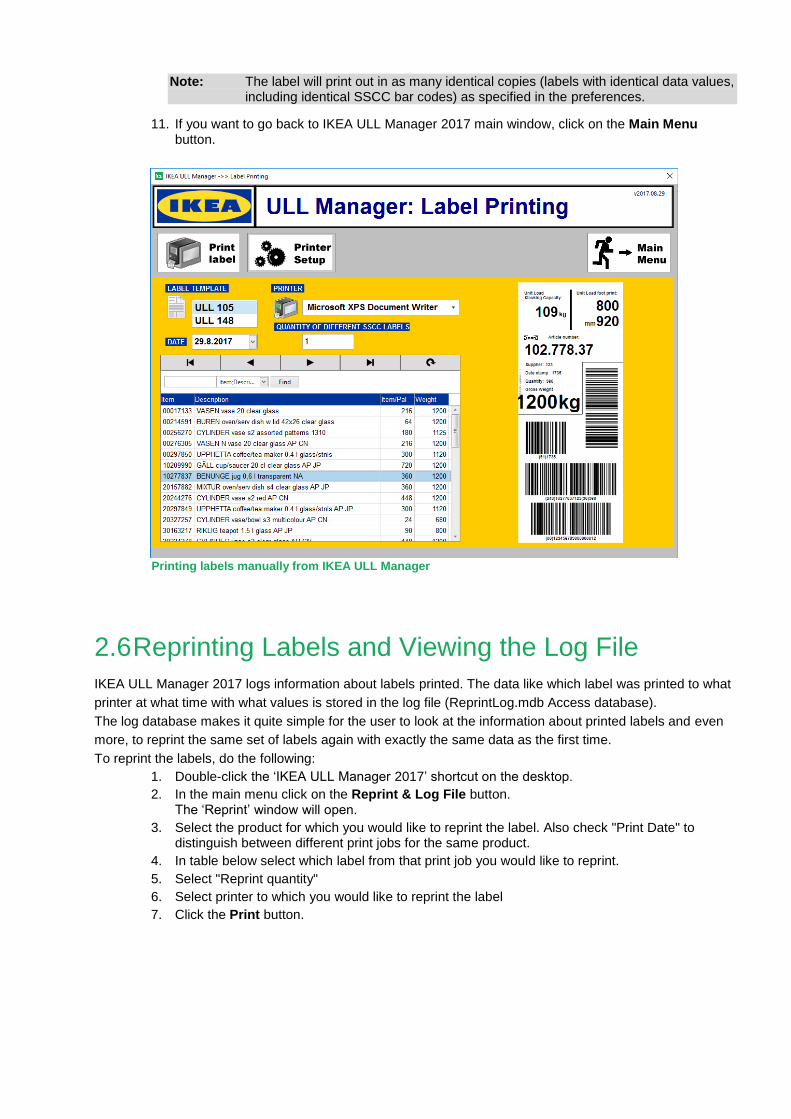
Note: The label will print out in as many identical copies (labels with identical data values, including identical SSCC bar codes) as specified in the preferences.
11. If you want to go back to IKEA ULL Manager 2017 main window, click on the Main Menu button.
Printing labels manually from IKEA ULL Manager
2.6 Reprinting Labels and Viewing the Log File
IKEA ULL Manager 2017 logs information about labels printed. The data like which label was printed to what
printer at what time with what values is stored in the log file (ReprintLog.mdb Access database).
The log database makes it quite simple for the user to look at the information about printed labels and even
more, to reprint the same set of labels again with exactly the same data as the first time.
To reprint the labels, do the following:
1. Double-click the ‘IKEA ULL Manager 2017’ shortcut on the desktop.
2. In the main menu click on the Reprint & Log File button. The ‘Reprint’ window will open.
3. Select the product for which you would like to reprint the label. Also check "Print Date" to distinguish between different print jobs for the same product.
4. In table below select which label from that print job you would like to reprint.
5. Select "Reprint quantity"
6. Select printer to which you would like to reprint the label
7. Click the Print button.
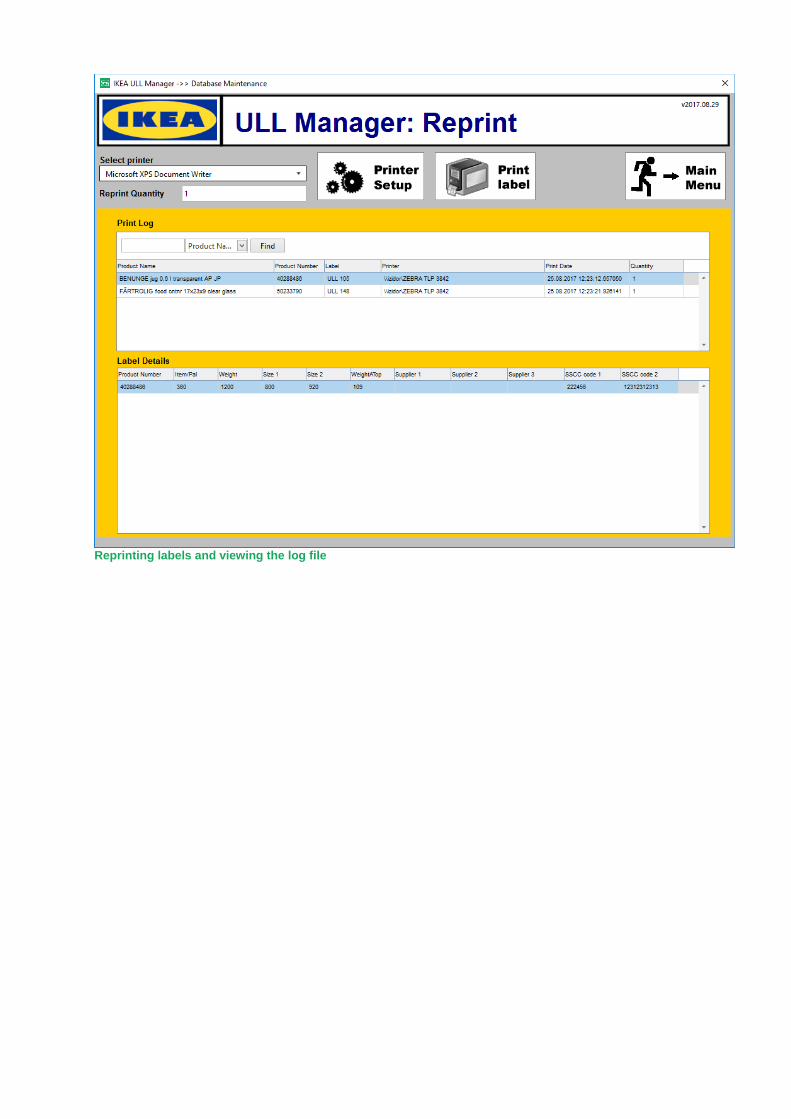
Reprinting labels and viewing the log file
3 Printing Labels Automatically IKEA ULL Manager 2017 also provides automatic label printing functionality.
In the automatic label printing mode the labels do not print based on the user’s activity in the software, but
based on the data received from the hardware device. The bar code scanner connected to the serial port
provides a data that triggers label printing. The scanner must return the Product ID (Item) of the product.
When the data is received the requested label will print out with the correct data for the product. The product
values are returned from the database with a database-lookup (query) based on the Item number.
Note: To successfully print labels in automatic mode, you must first set up product database, IKEA ULL Manager 2017 preferences and bar code scanner communication parameters.
3.1 Introduction to NiceLabel Automation
The automatic label printing is handled by NiceLabel Automation. The application installs automatically with
IKEA ULL Manager 2017. NiceLabel Automation is an event-based application that starts pre-define actions
as soon as the trigger event is detected. For IKEA ULL Manager 2017, the monitored trigger event is data
received from the bar code scanner connected to the serial port.
The sample NiceLabel Automation configuration is provided with the ULL Manager 2017. You can use it as
foundation upon which you build your custom automatic printing solution.
Note: The sample configuration is just that, a sample to help you understand how to properly set up NiceLabel Automation application. The sample configuration cannot be used in your particular environment out-of-the-box. You have to modify it and some NiceLabel Automation knowledge is required to set up a solution.
3.2 Configuring the NiceLabel Automation
To configure NiceLabel Automation, do the following:
1. Start NiceLabel Automation Builder application
2. Select File -> Open.
3. Browse to the sample NiceLabel Automation configuration file C:\IKEAULLManager2017\ULLtrigger.misx
4. Click on Edit button next to “Receive data over the serial port” trigger. Its properties will open in separate tab.
5. Go to the Receive data over the serial port tab.
6. In Settings-General make sure the COM port with connected bar code scanner is selected (COM1 by default).
7. Expand Port Settings on the right and define the connection parameters.
8. The sample NiceLabel Automation configuration is set up to automatically print labels whenever 8 characters are received on the serial port. If your scanner provides different value length, or you want to trigger label printing using some other criteria make sure to adjust the section Data retrieval.
9. When ready with your NiceLabel Automation preferences select File -> Save to store the new trigger configuration to disk.
10. In order to run configuration start NiceLabel Automation Manager and click on +Add button to add saved configuration.
11. When configuration opens click on Start to start monitoring COM port.
Setting up NiceLabel Automation requires some advanced integration knowledge.
For more information about NiceLabel Automation please see the NiceLabel Automation User Guide.
4 Technical Support For any issue or question for the IKEA ULL Manager contact IKEA technical support