Embed Size (px)
Citation preview

Unattended Installation onWindows Server 2008/2012
This document supports the version of each product listedand supports all subsequent versions until the document isreplaced by a new edition.To check for more recent editionsof this document, see http://www.vmware.com/support/pubs.
EN-001238-02

You can find the most up-to-date technical documentation on the VMware Web site at:
http://www.vmware.com/support/
The VMware Web site also provides the latest product updates.
If you have comments about this documentation, submit your feedback to:
Copyright © 2016 VMware, Inc. All rights reserved. This product is protected by U.S. and international copyright andintellectual property laws. VMware products are covered by one or more patents listed athttp://www.vmware.com/go/patents.
VMware is a registered trademark or trademark of VMware, Inc. in the United States and/or other jurisdictions. All othermarks and names mentioned herein may be trademarks of their respective companies.
VMware, Inc.3401 Hillview Ave.Palo Alto, CA 94304www.vmware.com
2 VMware, Inc.
Unattended Installation on Windows Server 2008/2012

Contents
About This Book 5
Introduction 91vCenter Server Heartbeat Concepts 9
vCenter Server Heartbeat Protection 11
vCenter Server Heartbeat Communications 14
vCenter Server Heartbeat Failover Processes 16
Implementation 212vCenter Server Heartbeat Implementation 21
Environmental Prerequisites 22
Pre-install Requirements 23
Server Deployment Architecture Options 24
Cloning Technology Options 26
Application Component Options 26
vCenter Deployment Models 27
vCenter Server Heartbeat Interoperability 28
Network Options 28
Unattended Installation of vCenter Server Heartbeat 353Command Line Usage 35
Parameter File Elements 37
Unattended Setup of the Primary Node 39
Unattended Setup of a Virtual Secondary Node 40
Resulting IP Configuration 41
Post Installation Configuration 434Post Installation Tasks 44
Configuring VirtualCenter Plug-in with the Correct Credentials 44
Firewall Configuration Requirements 44
Registering the Heartbeat Plug-in Manually in vCenter 45
Configuring vCenter Server Heartbeat to Protect SQL Server 45
Configuring the Application Timeout Exception 48
Configuring Orchestrator When Deployed in a WAN With Different Subnets. 48
Installing the View Composer Plug-in Post Installation 49
Upgrading vCenter Components 49
vCenter Server with SQL Server on a Separate Host 49
VMware, Inc. 3

Unattended Installation of vCenter Server Heartbeat Client Tools 515
Unattended Uninstall of vCenter Server Heartbeat 536
Upgrading 557Upgrading vCenter Server Heartbeat 6.5, 6.5 Update 1, 6.6 or 6.6 Update 1 to vCenter Server Heartbeat
6.6 Update 2 55
Upgrading vCenter Server 5.0, 5.1 or 5.5 to vCenter Server 5.5 Update 2 when SQL Database is
Remote and vCenter Server Heartbeat is Installed 57
Upgrading vCenter Server 5.0, 5.1 or 5.5 to vCenter Server 5.5 Update 2 when SQL Database is
Local and vCenter Server Heartbeat is Installed 63
Installation Verification Testing 698Exercise 1 — Auto-failover 69
Exercise 2 - Data Verification 71
Exercise 3 - Manual Failover 72
Pre-Installation Checklist 75A
Setup Error Messages 77B
Installation Troubleshooting 79CPre-Installation Troubleshooting 79
Setup Troubleshooting 80
Post-Installation Troubleshooting 81
Glossary 85
4 VMware, Inc.
Unattended Installation on Windows Server 2008/2012

About This Book
The Installation Guide provides key information about installing VMware vCenter Server Heartbeat, includingimplementation in a Local Area Network (LAN) or Wide Area Network (WAN).To help you protect your VMwarevCenter Server, this book provides an overview of installation procedures and guidance for configuration ofvCenter Server Heartbeat when performing an Unattended Installation.
Intended Audience
This guide is intended for IT Administrators with a working knowledge of networking to include configurationand domain administration on Windows™ 2008 and 2012 platforms, notably in Active Directory and DNS.
VMware Technical Publications Glossary
VMware Technical Publications provides a glossary of terms that might be unfamiliar to you. For definitions ofterms as they are used in VMware technical documentation go to http://www.vmware.com/support/pubs.
Overview of Content
This guide is designed to give guidance on the installation and configuration of vCenter Server Heartbeat, andis organized into the following sections:
■ Preface — About This Book (this chapter) provides an overview of this guide and the conventions usedthroughout.
■ Chapter 1 — Introduction presents an overview of vCenter Server Heartbeat concepts including manualand automatic failover processes.
■ Chapter 2 — vCenter Server Heartbeat Implementation discusses environmental prerequisites andpre-install requirements for installation, server architecture options, cloning technology, applicationcomponents, and network configurations. It also gives guidance on anti-malware solutions and providesa convenient summary of supported configurations as you perform the installation.
■ Chapter 3 — Unattended Installation of vCenter Server Heartbeat describes the unattended installationprocess, guides you through installation on the Primary and Secondary nodes, and provides the commandline procedures to perform the installation.
■ Chapter 4 — Post Installation Configuration provides the procedures to be performed after the installationof vCenter Server Heartbeat to configure specific components for operations.
VMware, Inc. 5

■ Chapter 5 — Unattended Installation of vCenter Server Heartbeat Client Tools describes the installationprocess to install Client Tools on a remote node using a command line procedure.
■ Chapter 6 — Unattended Uninstall of vCenter Server Heartbeat describes the uninstallation and removalof vCenter Server Heartbeat using a command line procedure.
■ Chapter 7 — Upgrading provides the procedures necessary to upgrade vCenter Server Heartbeat andvCenter Server and its components from the previous version to the current version.
■ Chapter 8 — Installation Verification provides a procedure to verify that vCenter Server Heartbeat isproperly installed and initially configured.
■ Appendix A — Setup Error Messages lists error messages that may appear during setup and tests thatwill help you resolve the errors.
■ Appendix B — Setup Troubleshooting describes common issues that may be encountered during installationand provides procedures to resolve them.
Document Feedback
VMware welcomes your suggestions for improving our documentation and invites you to send your feedbackto [email protected].
Abbreviations Used in Figures
DescriptionAbbreviation
VMware ChannelChannel
Network Interface CardNIC
Physical to VirtualP2V
Virtual to VirtualV2V
Technical Support and Education Resources
The following sections describe the technical support resources available to you.To access the current versionof this book and other books, go to www.vmware.com/support/pubs.
Online and Telephone Support
Go to www.vmware.com/support to use online support to submit technical support requests, view your productand contract information, and register your products.
Go to www.vmware.com/support/phone_support.html to find out how to use telephone support for the fastestresponse on priority 1 issues (applies to customers with appropriate support contracts).
Support Offerings
Go to www.vmware.com/support/services to find out how VMware support offerings can help meet your businessneeds.
6 VMware, Inc.
Unattended Installation on Windows Server 2008/2012

VMware Professional Services
Go to www.vmware.com/services to access information about education classes, certification programs, andconsulting services.VMware Education Services courses offer extensive hands-on labs, case study examples,and course materials designed for use as on-the-job reference tools. Courses are available onsite, in theclassroom, and live online. For onsite pilot programs and implementation best practices, VMware ConsultingServices provides offerings to help you assess, plan, build, and manage your virtual environment.
VMware, Inc. 7
About This Book

8 VMware, Inc.
Unattended Installation on Windows Server 2008/2012

1Introduction
This chapter includes the following topics:
■ “vCenter Server Heartbeat Concepts,” on page 9
■ “vCenter Server Heartbeat Protection,” on page 11
■ “vCenter Server Heartbeat Communications,” on page 14
■ “vCenter Server Heartbeat Failover Processes,” on page 16
vCenter Server Heartbeat Concepts
vCenter Server Heartbeat is a Windows based service specifically designed to provide High Availability (HA)or Disaster Recovery (DR) protection for vCenter Server configurations.
Architecture Overview
vCenter Server Heartbeat is deployed in an “Active–Passive” architecture enabling configuration for either“High Availability (HA)” in a Local Area Network (LAN)/Metropolitan Area Network (MAN) or “Disaster Recovery(DR)” in a Wide Area Network (WAN) for vCenter Server, View Composer and/or SQL Server.
Server Identity
vCenter Server Heartbeat software is installed on an existing production server instance (virtual or physical)known as the “Primary” node which runs the protected applications (vCenter Server, View and/or SQL Server).An additional server instance (virtual or physical), known as the “Secondary” node, operates as a ready standbyto provide service in the event of an application, system, or hardware failure.The terms Primary and Secondaryrefer to the “Identity” of each node and do not change over the life of the node.
Active / Passive Roles
The “Role” of a node describes what the node is currently doing.
■ Active Node – If the node is currently running protected applications, the node is said to be “Active”. Theactive node will always host the running instance of protected applications. Only one node can be activeat any one time.
■ Passive Node – The “Passive” node acts as the ready standby for the active node. Protected applicationsare not running on the passive node.
VMware, Inc. 9
IP Addressing
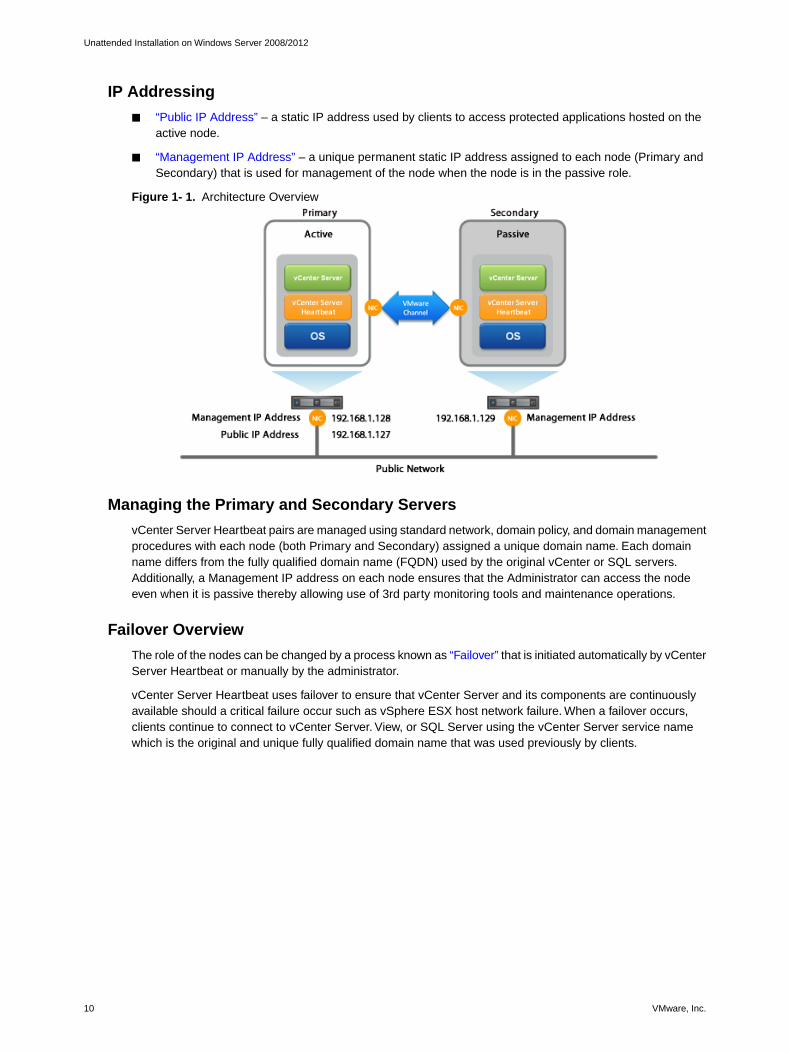
■ “Public IP Address” – a static IP address used by clients to access protected applications hosted on theactive node.
■ “Management IP Address” – a unique permanent static IP address assigned to each node (Primary andSecondary) that is used for management of the node when the node is in the passive role.
Figure 1- 1. Architecture Overview
Managing the Primary and Secondary Servers
vCenter Server Heartbeat pairs are managed using standard network, domain policy, and domain managementprocedures with each node (both Primary and Secondary) assigned a unique domain name. Each domainname differs from the fully qualified domain name (FQDN) used by the original vCenter or SQL servers.Additionally, a Management IP address on each node ensures that the Administrator can access the nodeeven when it is passive thereby allowing use of 3rd party monitoring tools and maintenance operations.
Failover Overview
The role of the nodes can be changed by a process known as “Failover” that is initiated automatically by vCenterServer Heartbeat or manually by the administrator.
vCenter Server Heartbeat uses failover to ensure that vCenter Server and its components are continuouslyavailable should a critical failure occur such as vSphere ESX host network failure. When a failover occurs,clients continue to connect to vCenter Server. View, or SQL Server using the vCenter Server service namewhich is the original and unique fully qualified domain name that was used previously by clients.
10 VMware, Inc.
Unattended Installation on Windows Server 2008/2012

During installation, the service name is configured in vCenter Server Heartbeat which continues to resolve tothe Public IP address in DNS regardless of which node is hosting the Public IP address.
■ Failover in a LAN – When deployed in a LAN environment, the Public IP address is moved between thePrimary and Secondary nodes as roles change from active to passive so that the protected applicationsare available to clients only when the node assumes the active role. When vCenter Server Heartbeat isstarted, the Public IP address is added to the active node. When a failover occurs, the Public IP addressis removed from the active node as it becomes passive and then added to the passive node which is beingmade active. vCenter Server Heartbeat does not require updates to DNS during the failover; however, theDNS server must be preconfigured with the Management IP addresses.
■ Failover in a Stretched VLAN – vCenter Server Heartbeat can also be deployed in a stretched VLAN usingthe same subnet for the production and the disaster recovery site.
Similar to a LAN installation, this configuration requires that both the Primary and Secondary nodes sharethe Public IP address. The active node reveals the Public IP address while the passive node is hiddenfrom the network resulting in vCenter Server Heartbeat being deployed without any changes to DNS duringfailover operations, just as in the LAN deployment.
■ Failover in a WAN – vCenter Server Heartbeat can be deployed in a WAN where each site uses differentsubnets. When deployed in this manner, each site has a different Public IP address. When a failoveroccurs, vCenter Server Heartbeat automatically updates the DNS server with the Public IP address of thenew site thereby allowing clients to connect to the new site.
vCenter Server Heartbeat Protection
vCenter Server Heartbeat provides the following protections:
■ Server Protection – provides continuous availability to end users through an operating system crash orhardware failure scenario ensuring that users are provided with a replica server instance and its IP addressshould the production node fail.
■ Network Protection – proactively monitors the network by polling up to three predefined nodes to ensurethat the active node is visible on the network.
■ Application Protection – monitors the application environment ensuring that protected applications andservices stay alive and are available on the network.
■ Performance Protection – proactively monitors system performance attributes to ensure the systemadministrator is notified of problems and can take pre-emptive action to prevent an outage.
■ Data Protection – intercepts all data written by users and applications, and maintains a copy of the dataon the passive node that can be used in the event of a failure.
vCenter Server Heartbeat provides all five protection levels continuously, ensuring all facets of the userenvironment are maintained at all times, and that vCenter Server and its components continue to operatethrough as many failure scenarios as possible.
Server Protection
The Primary and Secondary nodes regularly send “I’m alive” messages to one another over a dedicated networkconnection referred to as the “VMware Channel” to detect interruptions in responsiveness. If the passive nodedetects that this monitoring process (referred to as the “Heartbeat”) has failed, it initiates an auto-failover asillustrated in Figure 1-2.
VMware, Inc. 11
Chapter 1 Introduction

Figure 1- 2. vCenter Server Heartbeat Initiated Failover
An auto-failover occurs when the passive node detects that the active node is no longer responding. This canoccur when the active node operating system crashes, loses its network connections, host hardware fails, orotherwise becomes unavailable. The failover process is discussed in detail later in this guide.
Network Protection
vCenter Server Heartbeat proactively monitors the network by polling up to three predefined IP addresses toensure that the active node is visible on the network. vCenter Server Heartbeat polls by default the PrimaryDNS server, the Default Gateway, and the Global Catalog server at regular intervals. If all three nodes fail torespond, for example in the case of a network card or switch failure, vCenter Server Heartbeat can initiate afailover, allowing the Secondary node to assume the active role and service clients.
Application Protection
vCenter Server Heartbeat running on the active node locally monitors vCenter Server and its services to verifythat vCenter Server is operational and not in an unresponsive or stopped state. This level of monitoring isfundamental in ensuring that vCenter Server remains available to users.
If vCenter Server should fail, vCenter Server Heartbeat first attempts to restart the application on the activenode (1) in Figure 1-3.
If the application does not successfully restart, vCenter Server Heartbeat initiates an auto-failover (2) in Figure1-3. Refer to “vCenter Server Heartbeat Failover Processes,” on page 16 for further information about thefailover process.
12 VMware, Inc.
Unattended Installation on Windows Server 2008/2012

Figure 1- 3. vCenter Server Heartbeat Initiated Failover
When vCenter Server Heartbeat initiates a failover as a result of a failed application or service, vCenter ServerHeartbeat gracefully closes vCenter Server running on the active node and starts it on the passive node,including the component or service that caused the failure. For example, if the Primary is active and theSecondary is passive, the Primary is demoted to a passive role and is hidden from the network while theSecondary is promoted to an active role and is made visible to the network. The mechanics of a failover arediscussed in more detail later in this guide.
Performance Protection
To ensure that vCenter Server is operational and providing service at an adequate level of performance tomeet user demands, vCenter Server Heartbeat employs the vCenter Server Heartbeat Plug-in which providesperformance monitoring and pre-emptive remediation capabilities. vCenter Server Heartbeat proactively monitorssystem performance attributes and can notify the system administrator in the event of a problem and can alsobe configured to take pre-emptive action to prevent an outage.
In addition to monitoring vCenter Server services, vCenter Server Heartbeat can monitor specific attributes toensure that they remain within normal operating ranges. Similar to application monitoring, various rules canbe configured to trigger specific corrective actions whenever these attributes fall outside of their respectiveranges. vCenter Server Heartbeat provides the ability to define and perform multiple corrective actions in theevent of problems on a service-by- service or even attribute-by-attribute basis.
Data Protection
All data files that users or vCenter Server requires in the application environment are protected and madeavailable should a failure occur. After installation, vCenter Server Heartbeat configures itself to protect files,folders, and registry settings for vCenter Server on the active node by mirroring them in real time to the passivenode. If a failover occurs, all files protected on the failed (Primary) node are available to users after the failover,hosted on the Secondary node.
vCenter Server Heartbeat intercepts all file system operations on the active node. Those write and updateoperations which are part of the protected set are placed in the “Send Queue” of the active node pendingtransmission to the passive node.
With the channel connected, the active node’s send queue is transferred to the passive node, which placesall the requests in the passive node’s “Receive Queue”. The passive node confirms the changes were loggedby sending the active node an acknowledgment. The active node then clears the data from its send queue.The apply process running on the passive node applies all updates thereby creating a duplicate identical setof file operations on the passive node.
VMware, Inc. 13
Chapter 1 Introduction

vCenter Server Heartbeat Communications
The VMware Channel is a crucial component of vCenter Server Heartbeat and can be configured in a numberof ways.
vCenter Server Heartbeat supports use of either multiple NICs or a single NIC. Both the Primary and Secondarymust have the same number of NICs. The Public IP address provides client access and the Management IPaddress provides administrative access, while the VMware Channel provides for data transfer and control.
Multi-NIC Configuration
When installed using multiple NICs, a second pair of NICs can be configured for the VMware Channel to providea degree of redundancy. To provide added resilience, the communications for the second channel should becompletely independent from the first channel. They should not share any switches, routers, or the same WANconnection.
Configuring vCenter Server Heartbeat using multiple NICs (1 for the Public and Management IP and 1 for theVMware Channel IP) prevents a single point of failure in the system. Additionally, it allows vCenter ServerHeartbeat to monitor availability of the nodes independently via the Public network and the VMware Channelnetwork.
Figure 1- 4. Multi-NIC Configuration
Single NIC Configuration
When installing using a single NIC, the Public IP, the Management IP, and the VMware Channel IP addressesare all configured on the same NIC.
Configuring vCenter Server Heartbeat with a single NIC on each node creates a network environment with asingle point of failure where a malfunction of the NIC on either node can cause protection failure.
14 VMware, Inc.
Unattended Installation on Windows Server 2008/2012

Figure 1- 5. Single NIC Configuration
LAN and Stretched vLAN Deployment
When deployed in a LAN, the Public NIC on the active node is configured with both a unique permanentlyassigned Management IP address for administrative access and the Public IP address which allows trafficfrom clients. The Public NIC on the passive node is configured to use its unique permanently assignedManagement IP address. When a failover occurs, the Public IP address assigned to the currently active nodeis removed and reassigned to the new active node.The new passive node remains accessible to administratorsvia the Management IP address but is not visible to clients. The newly active node then starts accepting trafficfrom clients.
The NICs on the active and passive nodes used for the VMware Channel are configured so that their IPaddresses are outside of the subnet range of the Public network. These addresses are referred to as VMwareChannel addresses.
DNS in a LAN or Stretched vLAN
When deployed in a LAN or stretched vLAN configuration, should a failover occur, the Public IP address issimply removed from the currently active server and reassigned to the currently passive server without a needto update DNS. Clients continue to communicate to the same Public IP address that was used before thefailover.
WAN Deployment
When configured for a WAN deployment, configure the VMware Channel to use static routes over switchesand routers to maintain continuous communications independent from corporate or public traffic.
DNS in a WAN Deployment
When deployed in a WAN configuration, should a failover occur, vCenter Server Heartbeat automaticallyupdates DNS with the IP address of the new active server using vCenter Server Heartbeat's own DNSUpdate.exe
utility.
VMware, Inc. 15
Chapter 1 Introduction
vCenter Server Heartbeat Failover Processes
vCenter Server Heartbeat provides for failover from one node to the other node when initiated manually by theadministrator or automatically as a result of hardware, operating system, network communications, protectedapplications, or services failure. Failover changes the role of the active and passive nodes depending on thestatus of the active node.
vCenter Server Heartbeat failovers are categorized by how the failover is initiated.
■ When a failover is initiated manually by an administrator, the failover gracefully changes the roles betweenthe active node and the passive node. This type of failover is frequently used to perform maintenance onthe node or its software.
■ If a failover is initiated automatically due to hardware, operating system, or network communicationsrendering the active node unavailable, vCenter Server Heartbeat considers the active node has failed andimmediately initiates the process to change the role of the passive node to active.
■ Should vCenter Server Heartbeat detect that the active node is alive but that a protected application orservice has failed, it can first attempt to restart the application or service to correct the problem and ifunsuccessful, initiate a failover causing the active and passive nodes to change roles making the passivenode active and the active node passive.
Failover - Manually Initiated by an Administrator
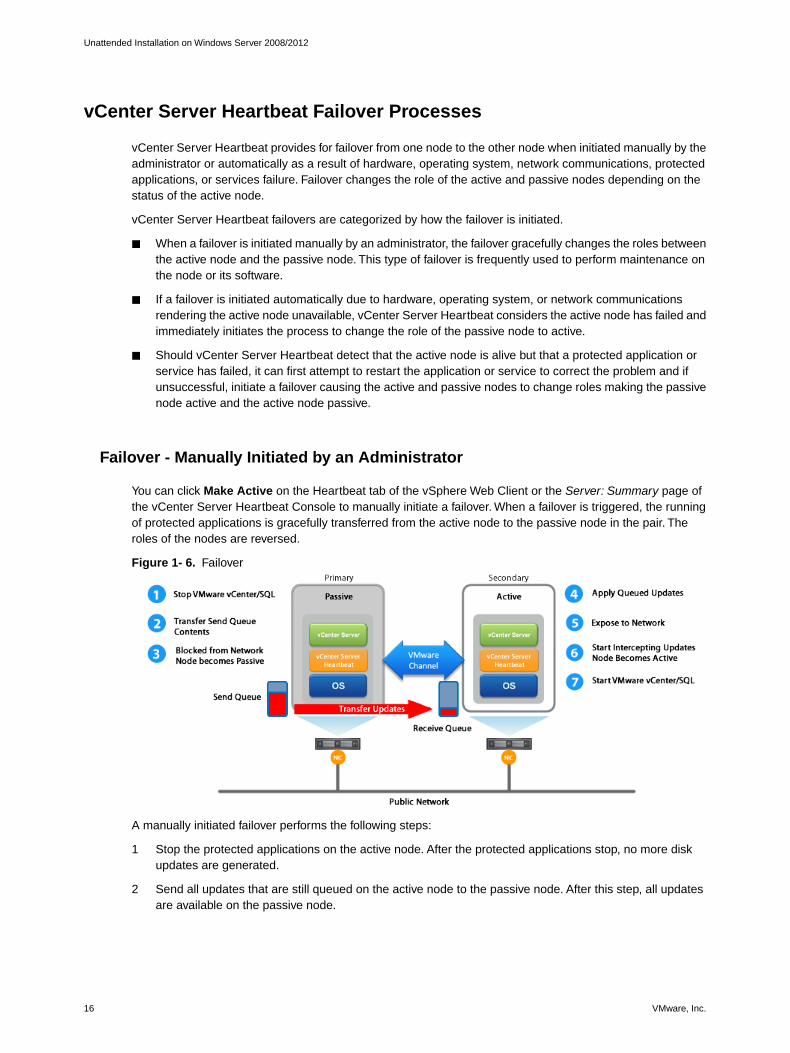
You can click Make Active on the Heartbeat tab of the vSphere Web Client or the Server: Summary page ofthe vCenter Server Heartbeat Console to manually initiate a failover. When a failover is triggered, the runningof protected applications is gracefully transferred from the active node to the passive node in the pair. Theroles of the nodes are reversed.
Figure 1- 6. Failover
A manually initiated failover performs the following steps:
1 Stop the protected applications on the active node. After the protected applications stop, no more diskupdates are generated.
2 Send all updates that are still queued on the active node to the passive node. After this step, all updatesare available on the passive node.
16 VMware, Inc.
Unattended Installation on Windows Server 2008/2012
3 Re-designate the Secondary as the new active node. After this step, vCenter Server Heartbeat:
■ Reassigns the Public IP address to the Secondary in a LAN or updates DNS in a WAN.
■ Makes the newly active node visible on the network. The newly active node begins to intercept andqueue disk I/O operations for the newly passive node.
4 vCenter Server Heartbeat causes the newly passive node to begin accepting updates from the activenode.
5 vCenter Server Heartbeat starts the same protected applications on the new active node. The protectedapplications become accessible to users. The failover is complete
Failover - Automatically Initiated by vCenter Server Heartbeat
Automatic failover (auto-failover) is triggered when system monitoring detects failure of a protected applicationor when the passive node detects that the active node is no longer running properly and assumes the role ofthe active node.
Resulting from a hardware, operating system, or network communications failure
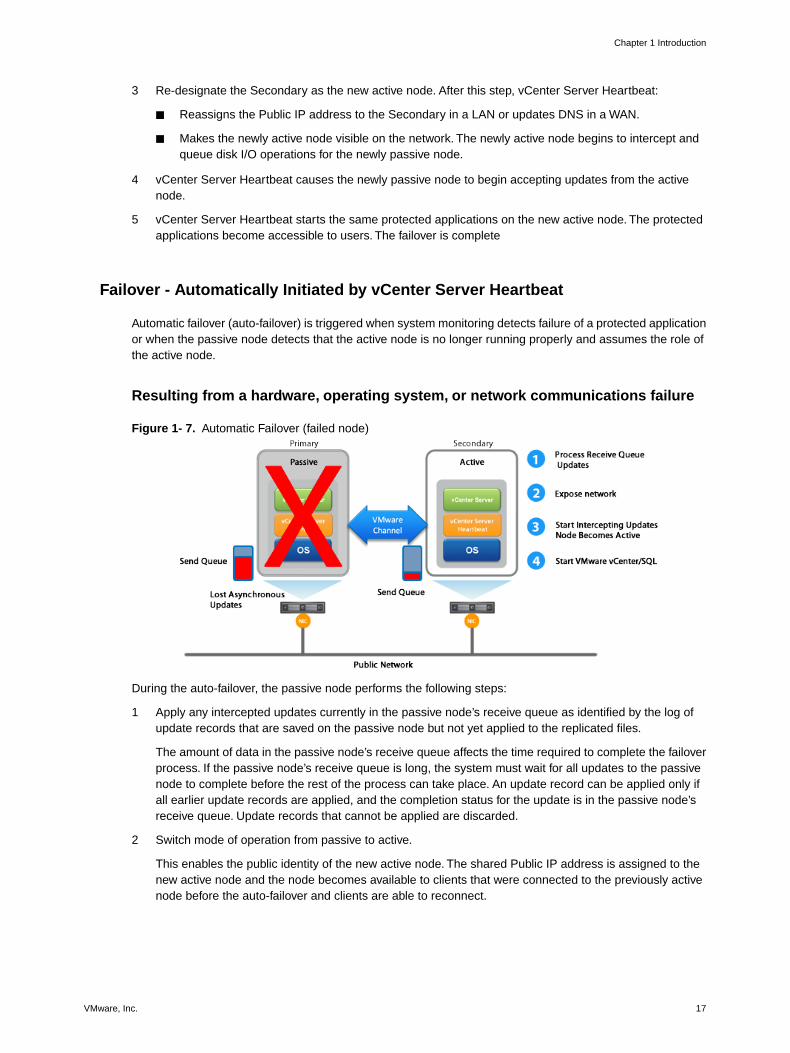
Figure 1- 7. Automatic Failover (failed node)
During the auto-failover, the passive node performs the following steps:
1 Apply any intercepted updates currently in the passive node’s receive queue as identified by the log ofupdate records that are saved on the passive node but not yet applied to the replicated files.
The amount of data in the passive node’s receive queue affects the time required to complete the failoverprocess. If the passive node’s receive queue is long, the system must wait for all updates to the passivenode to complete before the rest of the process can take place. An update record can be applied only ifall earlier update records are applied, and the completion status for the update is in the passive node’sreceive queue. Update records that cannot be applied are discarded.
2 Switch mode of operation from passive to active.
This enables the public identity of the new active node. The shared Public IP address is assigned to thenew active node and the node becomes available to clients that were connected to the previously activenode before the auto-failover and clients are able to reconnect.
VMware, Inc. 17
Chapter 1 Introduction
3 Start intercepting updates to protected data and store the updates in the send queue of the local node.
4 Start all protected applications. The applications use the replicated application data to recover, and thenaccept re-connections from any clients. Any updates that the applications make to the protected data areintercepted and logged.
At this point, the originally active node is offline and the originally passive node is filling the active role andrunning the protected applications. Any updates completed before the auto-failover are retained. Applicationclients can reconnect to the application and continue running as before.
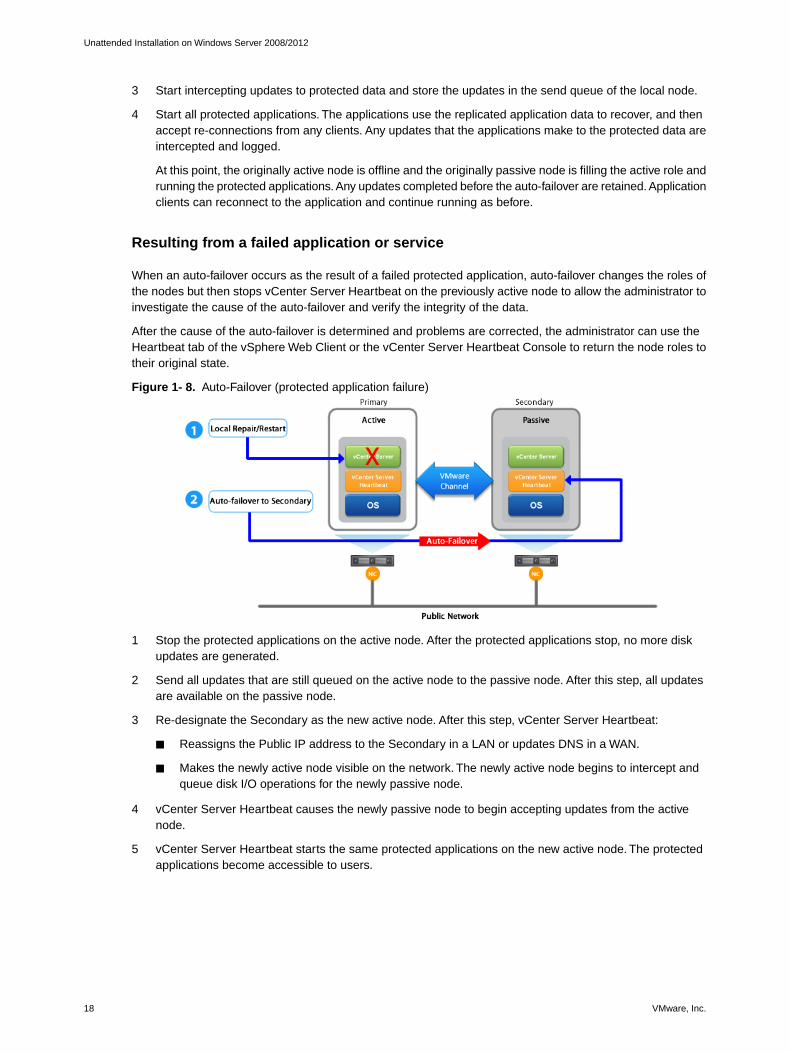
Resulting from a failed application or service
When an auto-failover occurs as the result of a failed protected application, auto-failover changes the roles ofthe nodes but then stops vCenter Server Heartbeat on the previously active node to allow the administrator toinvestigate the cause of the auto-failover and verify the integrity of the data.
After the cause of the auto-failover is determined and problems are corrected, the administrator can use theHeartbeat tab of the vSphere Web Client or the vCenter Server Heartbeat Console to return the node roles totheir original state.
Figure 1- 8. Auto-Failover (protected application failure)
1 Stop the protected applications on the active node. After the protected applications stop, no more diskupdates are generated.
2 Send all updates that are still queued on the active node to the passive node. After this step, all updatesare available on the passive node.
3 Re-designate the Secondary as the new active node. After this step, vCenter Server Heartbeat:
■ Reassigns the Public IP address to the Secondary in a LAN or updates DNS in a WAN.
■ Makes the newly active node visible on the network. The newly active node begins to intercept andqueue disk I/O operations for the newly passive node.
4 vCenter Server Heartbeat causes the newly passive node to begin accepting updates from the activenode.
5 vCenter Server Heartbeat starts the same protected applications on the new active node. The protectedapplications become accessible to users.
18 VMware, Inc.
Unattended Installation on Windows Server 2008/2012

Failover in a WAN Environment
Failover in a WAN environment differs from Failover in a LAN environment due to the nature of the WANconnection. In a WAN environment, auto-failover is disabled by default in the event that the WAN connectionis lost.
Should a condition arise that would normally trigger an auto-failover, the administrator will receive vCenterServer Heartbeat alerts. The administrator must manually click the Make Active button on the Heartbeat tabof the vSphere Web Client or the Server: Summary page of the vCenter Server Heartbeat Console to allowthe roles of the node to switch over the WAN.
VMware, Inc. 19
Chapter 1 Introduction

20 VMware, Inc.
Unattended Installation on Windows Server 2008/2012
2Implementation
This chapter discusses deployment options and prerequisites to successfully implement vCenter ServerHeartbeat and provides a step-by-step process to assist in selecting options required for installation. Thedeployment scenario table at the end of this chapter provides a visual reference to configuration optionssupported by vCenter Server Heartbeat.
This chapter includes the following topics:
■ “vCenter Server Heartbeat Implementation,” on page 21
■ “Environmental Prerequisites,” on page 22
■ “Pre-install Requirements,” on page 23
■ “Server Deployment Architecture Options,” on page 24
■ “Cloning Technology Options,” on page 26
■ “Application Component Options,” on page 26
■ “vCenter Deployment Models,” on page 27
■ “vCenter Server Heartbeat Interoperability,” on page 28
■ “Network Options,” on page 28
vCenter Server Heartbeat Implementation
vCenter Server Heartbeat is a versatile solution that provides complete protection of vCenter Server and SQLServer. It can be deployed in a LAN for high availability or across a WAN to provide disaster recovery. vCenterServer Heartbeat protects vCenter Server and SQL Server installed on the same node or in a distributedconfiguration. This flexibility enables vCenter Server Heartbeat to protect vCenter Server when using remotedatabases other than SQL Server.
During the installation process, vCenter Server Heartbeat performs a variety of checks to ensure the nodemeets the minimum requirements for a successful installation. A critical stop or warning message appears ifthe node fails a check. Refer to the Appendix B, “Setup Error Messages,” on page 77 in this guide for a list ofthe checks and an explanation of the messages.You must resolve critical stops before you can proceed withsetup. Prior to installing vCenter Server Heartbeat, select the deployment options you intend to use. Theinstallation process prompts you to select options throughout the procedure to create the configuration youwant.
VMware, Inc. 21
Environmental Prerequisites
vCenter Server Heartbeat supports multiple versions of vCenter Server and its services.
Supported Environments
■ vCenter Server Heartbeat is supported on the following versions of Windows Server
■ Windows Server 2012 R2 Standard/Datacenter
■ Windows Server 2012 Standard/Datacenter up to SP1
■ Windows Server 2008 R2 Standard/Enterprise/Datacenter up to SP1
■ Windows Server 2008 x64 Standard/Enterprise/Datacenter up to SP2
■ Windows Server 2008 x86 Standard/Enterprise/Datacenter up to SP2 (supporting SQL Server only)
Note vCenter Server Heartbeat supports protection of both standalone instances of vCenter Server andalso when in Linked Mode groups.
■ vCenter Server Heartbeat supports the following versions of vCenter Server
■ vCenter Server 5.0 and its updates
■ vCenter Server 5.1 and its updates
■ vCenter Server 5.5 and its updates
Important Ensure that all VMware services are bound to the Public IP address on the Public networkadapter.
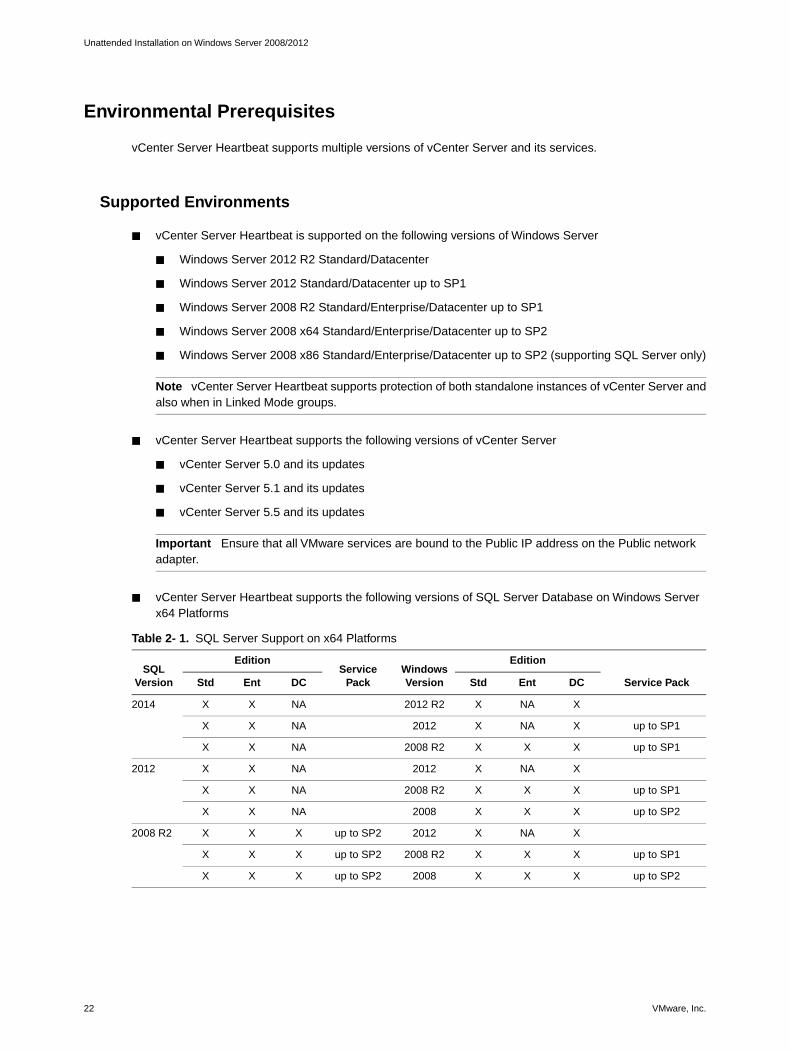
■ vCenter Server Heartbeat supports the following versions of SQL Server Database on Windows Serverx64 Platforms
Table 2- 1. SQL Server Support on x64 Platforms
Service Pack
EditionWindowsVersion
ServicePack
EditionSQL
Version DCEntStdDCEntStd
XNAX2012 R2NAXX2014
up to SP1XNAX2012NAXX
up to SP1XXX2008 R2NAXX
XNAX2012NAXX2012
up to SP1XXX2008 R2NAXX
up to SP2XXX2008NAXX
XNAX2012up to SP2XXX2008 R2
up to SP1XXX2008 R2up to SP2XXX
up to SP2XXX2008up to SP2XXX
22 VMware, Inc.
Unattended Installation on Windows Server 2008/2012

Table 2- 1. SQL Server Support on x64 Platforms
Service Pack
EditionWindowsVersion
ServicePack
EditionSQL
Version DCEntStdDCEntStd
XNAX2012SP2 & SP3NAXX2008
up to SP1XXX2008 R2SP2 & SP3NAXX
up to SP2XXX2008SP2 & SP3NAXX
up to SP2XXX2008SP4NAXX2005
Note This version of vCenter Server Heartbeat also supports 32 bit versions of SQL Server 2005/2008/2012installed on x64 Operating Systems.
Unsupported Environments
■ The following environments are not supported by vCenter Server Heartbeat
■ On a server deployed as a “Domain Controller (DC)”
■ On a server deployed as a “Global Catalog Server” Server
■ On a server deployed as a “DNS (Domain Name System) Server”
■ On an IA-64 Itanium Platform
User Account Control (UAC)
VMware recommends that User Account Control (UAC) be disabled on both the Primary and Secondary nodesprior to initiating installation of vCenter Server Heartbeat on Windows Server 2008, 2008R2, 2012, and 2012R2.Once installation is complete, UAC may be re-enabled.
Attempting to install vCenter Server Heartbeat with UAC enabled may cause multiple issues during Setup thuspreventing vCenter Server Heartbeat from installing properly.
Pre-install Requirements
Prior to installing vCenter Server Heartbeat, the following requirements must be met and are in addition tothose required for vCenter Server and SQL Server.
■ Verify that the Primary node is a member of the domain.The Domain for the Primary node will not changethroughout the installation process although the Primary and Secondary node names will be changed aspart of the installation procedure.
■ vCenter Server Heartbeat only protects the vCenter Server and its components and SQL Server applications.Verify no other critical business applications are installed on the node.
■ Verify that vCenter Guided Consolidation, vCenter Update Manager, vCenter Converter, ESXi DumpCollector, Syslog Collector, Auto Deploy, and Authentication Proxy are configured using Fully QualifiedDomain Names (FQDN) rather than IP addresses.
■ Verify that there is a minimum of 1GB of available RAM (2GB recommended) in addition to any othermemory requirements for the Operating System or vCenter Server.
VMware, Inc. 23
Chapter 2 Implementation

■ Verify that a minimum 2GB of free disk space is available on the installation drive for vCenter ServerHeartbeat.
■ Obtain and use local administrator rights to perform vCenter Server Heartbeat installation. See knowledgebase article 2017529 - Performing a Least Privilege Installation of vCenter Server Heartbeat.
■ Apply the latest Microsoft security updates.
■ All applications that will be protected by vCenter Server Heartbeat must be installed and configured onthe Primary node prior to installing vCenter Server Heartbeat.
■ Verify that both Primary and Secondary nodes have identical system date, time, and time Zone settings.
■ Verify that the Managed IP setting displayed in the Virtual Infrastructure Client is the same IP addressused for the vCenter Server Heartbeat Public IP address.
■ If installing on Windows Server 2008, verify that Windows Server Backup Feature and Command LineTools have been installed on the Primary and Secondary nodes prior to installing vCenter Server Heartbeat.Installation of Windows Server Backup Feature and Command Line Tools will also install WindowsPowerShell.
■ If installing on Windows Server 2012, verify that Windows Server Backup feature is installed on the Primaryand Secondary nodes prior to installing vCenter Server Heartbeat.
■ Verify that all services to be protected are running or set to Automatic prior to installation. During installation,protected services are set to manual to allow vCenter Server Heartbeat to start and stop services dependingon the role of the node.The target state of the services is normally running on the active node and stoppedon the passive.
■ Configure Management IP addresses on the Public NIC on both the Primary and Secondary nodes.
Important Adjacent IP addresses should be reserved and used for the Public IP address and theManagement IP addresses for the Primary and Secondary nodes.
Server Deployment Architecture Options
The selected server architecture affects node requirements and the technique used to clone the Primary node.
24 VMware, Inc.
Unattended Installation on Windows Server 2008/2012

Virtual to Virtual
Virtual to Virtual is the supported architecture if vCenter Server is already installed on the production (Primary)node running on a virtual machine. Benefits to this architecture include reduced hardware cost, shorter installationtime, and use of the Pre-Clone technique for installation.
The Secondary node must meet the minimum requirements.
■ The specifications of the Secondary node must match the specifications of the Primary node as follows:
■ Similar CPU (including resource management settings)
■ Memory configuration (including resource management settings)
■ Appropriate resource pool priorities
■ Each virtual machine used in the Virtual to Virtual pair must be on a separate ESX host to guard againstfailure at the host level.
Important In a vSphere HA and DRS enabled cluster, set VM anti-affinity rules on the pair to ensure theVM's aren't placed on the same host to guard against failure at the host level.
■ If using more than one NIC, each virtual NIC must use a separate virtual switch.
Physical to Virtual
The Physical to Virtual architecture is used when the environment requires a mix of physical and virtualmachines. This architecture is appropriate to avoid adding more physical nodes or if you plan to migrate tovirtual technologies over a period of time.
The Secondary virtual machine must meet the minimum requirements.
■ The specifications of the Secondary virtual machine must match the Primary physical node as follows:
■ Similar CPU
■ Identical Memory
■ The Secondary virtual machine must have sufficient priority in resource management settings so that othervirtual machines do not impact its performance.
■ Each virtual NIC must use a separate virtual switch.
VMware, Inc. 25
Chapter 2 Implementation
Cloning Technology Options
Cloning the Primary node to create a nearly identical Secondary node involves different technologies dependingon the selected server architecture.
Cloning Prior to Installation (Virtual Secondary)
The following cloning technologies are supported for creating cloned images for use as a Secondary nodebefore you begin installing vCenter Server Heartbeat:
■ Use VMware vCenter Converter when cloning in a Physical to Virtual environment.
Important When installing in a Physical to Virtual architecture, VMware Tools must not be installed onthe Secondary node during the vCenter Server Heartbeat installation process. If VMware Tools are currentlyinstalled on the Secondary node, you must fully uninstall VMware Tools prior to initiation of the Setupprocess. Once the installation of vCenter Server Heartbeat has completed, you may reinstall VMwareTools.
■ Use VMware vCenter virtual machine cloning when cloning in a Virtual to Virtual environment.
Important When installing in a Virtual to Virtual architecture, VMware Tools must be installed and runningon the Primary node before starting the vCenter Server Heartbeat installation process.
Application Component Options
vCenter Server Heartbeat supports the following additional VMware vCenter Server components:
■ VMware View Composer 2.7, 5.0, 5.2, and 5.3
Note Remote deployment of View Composer is supported starting with View Composer 3.0
■ VMware Universal File Access
■ vCenter Converter Enterprise
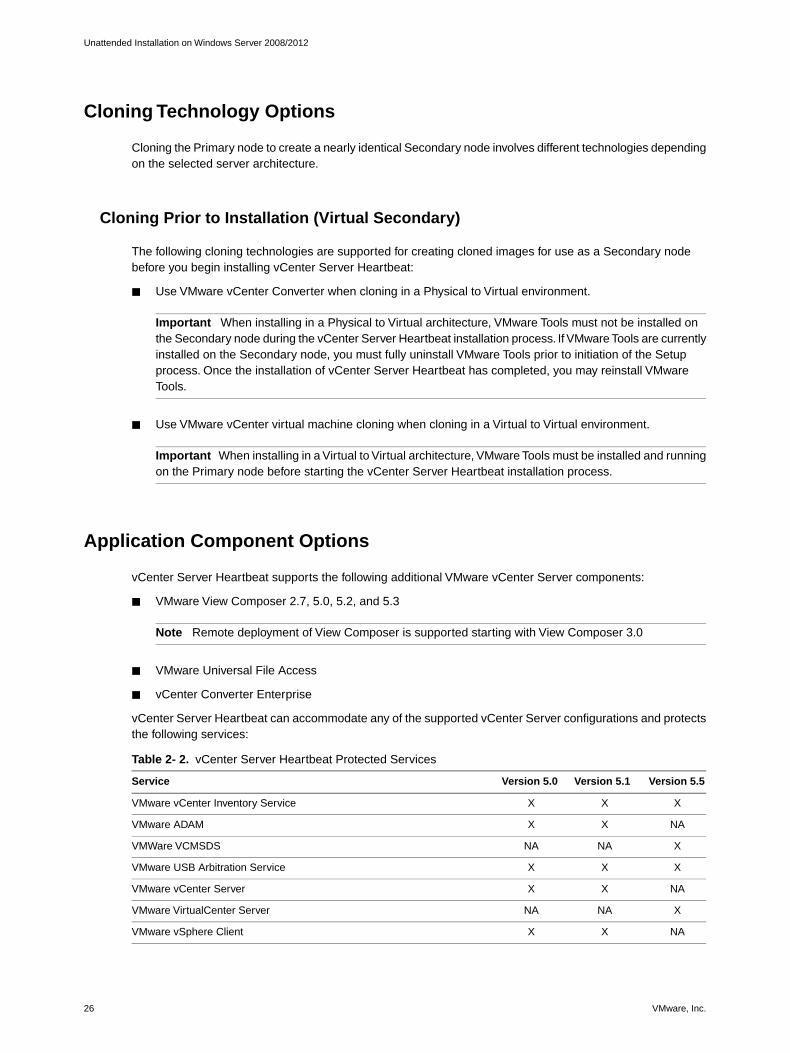
vCenter Server Heartbeat can accommodate any of the supported vCenter Server configurations and protectsthe following services:
Table 2- 2. vCenter Server Heartbeat Protected Services
Version 5.5Version 5.1Version 5.0Service
XXXVMware vCenter Inventory Service
NAXXVMware ADAM
XNANAVMWare VCMSDS
XXXVMware USB Arbitration Service
NAXXVMware vCenter Server
XNANAVMware VirtualCenter Server
NAXXVMware vSphere Client
26 VMware, Inc.
Unattended Installation on Windows Server 2008/2012

Table 2- 2. vCenter Server Heartbeat Protected Services
Version 5.5Version 5.1Version 5.0Service
XXXVMware vSphere Web Client
NAXXVMware vCenter Update Manager
XNANAVMware vSphere Update Manager Service
XXNAVMware vSphere Update Manager Download Service
XNANAVMware vSphere Update Manager UFA Service
XXXVMware vCenter Orchestrator Configuration
XXXVMware vCenter Orchestrator Server
XXXVMware vSphere ESXi Dump Collector
XNAXVMware vSphere ESXi Dump Collector Web Server
XXXVMware Syslog Collector
XNANAVMware vSphere Syslog Collector
NAXNAVMware vSphere Auto Deploy
XNAXVMware vSphere Auto Deploy Waiter
XXXVMware vSphere Authentication Proxy
XNAXVMware vSphere Authentication Proxy Adapter
NANAXVMware vCenter Management Web Server
XNANAVMware VirtualCenter Management Webservices
NANAXVMware vSphere Host Update Utility
XXNAVMware vCenter Host Agent Pre-Upgrade Checker
NAXNAVMware vCenter Single Sign-On
XNANAvCenter Single Sign-On
XNANAVMware Log Browser
XXXVMware vSphere Profile-Driven Storage Service
XXNARSA SSPI Service
Important Ensure that all VMware services are bound to the Public IP address on the Public network adapter.
vCenter Deployment Models
vCenter Server Heartbeat supports protection of vCenter Server in the following deployment models.
vCenter Server with SQL Server on the Same Host
To ensure adequate performance in 20+ host or 200+ virtual machine environments, VMware recommendsthat SQL Server and vCenter Server be installed on separate physical disk drives.VMDKs must be on separatedatastores to avoid potential disk bottlenecks.
VMware, Inc. 27
Chapter 2 Implementation

vCenter Server in a Distributed Environment
In a distributed environment with remote services to be protected, vCenter Server Heartbeat must be installedfor each distributed service at the service site. For example, when installing vCenter Server Heartbeat in anenvironment where SQL Server is on a host, separate from vCenter Server, you must repeat the installationprocess on the SQL Server's Primary and Secondary nodes.
vCenter Server Heartbeat Interoperability
vCenter Server Heartbeat supports interoperability with multiple VMware technologies as indicated below.
■ Linked Mode - vCenter Server Heartbeat supports protection of both Standalone instances of vCenterServer and Linked Mode groups. For more information about Linked Mode groups, see knowledge basearticle 1022869 - Joining or isolating a vCenter Server instance from a Linked Mode Group when protectedby vCenter Server Heartbeat.
■ vSphere HA/DR - vCenter Server Heartbeat supports High Availability for vCenter Server. For moreinformation about configuring vSphere HA/DR, see the VMware vSphere Availability Guide.
■ Site Recovery Manager (SRM) - Site Recovery Manager supports use of vCenter Server Heartbeat. Formore information, see knowledge base article 1014266 - Using vCenter Heartbeat With SRM.
Network Options
Networking requirements are contingent upon how vCenter Server Heartbeat is deployed.To deploy as a HighAvailability (HA) solution, a LAN configuration is required. To deploy vCenter Server Heartbeat for DisasterRecovery (DR), a WAN configuration is required. Each network type has specific configuration requirementsto ensure proper operation.
vCenter Server Heartbeat can be configured to run using either multiple NICs (recommended) or a single NIC.
Multiple NICs
vCenter Server Heartbeat supports use of multiple NICs on each node in the pair. When using multiple NICs,one NIC is configured with the Public IP address for client access and a Management IP address for administratoraccess while a second dedicated NIC is configured with the VMware Channel IP address. Deploying withmultiple NICs provides the advantage of redundancy and also removes the risk of a single point of failure thatexists in single NIC configurations.To configure using multiple NICs on each node, see “Multi-NIC Configuration,”on page 31.
Note vCenter Server Heartbeat does NOT out-of-the-box support teams of NICs but can be configured tosupport teamed NICs with additional configuration steps when installing with teamed NICs present. Seeknowledge base article 1027288 - Installing the Packet Filter Driver while recreating a NIC team with Inteldrivers for more information about teamed NICs.
28 VMware, Inc.
Unattended Installation on Windows Server 2008/2012

Single NIC
vCenter Server Heartbeat also supports use of a single NIC configured to perform all three functions, providingthe Public IP address to users, the Management IP address, and the VMware Channel for data transfer andcontrol. To configure using a single NIC on each node, see “Single NIC Configuration,” on page 32.
Local Area Network (LAN)
When deployed in a LAN environment, vCenter Server Heartbeat requires that both nodes use the same PublicIP address. Each node also requires a VMware Channel IP address and a Management IP address.
Important vCenter Server Heartbeat will not attempt to update DNS and therefore, the Administrator mustpre-populate the DNS server with entries for the new management names and IP addresses that are to beused after installation is complete.
Wide Area Network (WAN)
vCenter Server Heartbeat supports sites with different subnets. In this scenario, the Primary and Secondarynodes in the vCenter Server Heartbeat Pair require unique Public IP addresses, unique VMware Channel IPaddresses for each node in a different subnet, and unique Management IP addresses for each node in thesame subnets as the Public IP addresses. During Setup, select the Use different IP addresses for Secondary(Recommended for DR secondary) and specify the Public IP addresses of both the Secondary node and thePrimary node.
Note vCenter Server Heartbeat requires automatic DNS registration of network connections to be disabled.If the Register this connection's addresses in DNS checkbox is selected, the resulting configuration may causeunexpected results during reverse DNS lookup operations, since the Public address would be registered twicein DNS, first by the network adapter on the currently active server against its machine name, and second viathe static records added manually for the Public Service Name, resulting in an conflict when performing aReverse DNS Lookup on the Public address. As a result, Reverse DNS Lookup may not provide the expectedname.
For example, if a component were to communicate with vCenter Server via the Public Service Name, vCenterServer would respond via the Public IP address. If the component then performed a Reverse DNS Lookup onthe Public IP address to identify the name of the responder, the reverse lookup may provide the active servermachine name rather than the expected Public Service Name.
vCenter Server Heartbeat also supports sites with the same subnet. In this scenario, vCenter Server Heartbeatshares a single Public IP address between the Primary and Secondary nodes assigning it to the active node.When configured in this manner, the VMware Channel addresses should be unique within the same subnet.During Setup, select the Use same IP addresses for Secondary (Recommended for HA secondary) on thePublic IP Address page and specify the IP address to be shared by both nodes.
WAN Requirements
WAN deployments require the following:
■ Persistent static routing configured for the channel connection(s) where routing is required
■ One NIC minimum, two NICs (1 x Public and 1 x Channel) are recommended
■ At least one Domain Controller at the Disaster Recovery (DR) site
VMware, Inc. 29
Chapter 2 Implementation

■ If the Primary and DR site uses the same subnet:
■ During install, follow the steps for a LAN or VLAN on the same subnet
■ Both nodes in the vCenter Server Heartbeat pair use the same Public IP address
■ If the Primary and DR site use different subnets:
■ During install, follow the steps for a WAN
■ Both nodes in the vCenter Server Heartbeat pair require a separate Public IP address and a VMwareChannel IP address
■ Provide a user account with rights to update DNS using the DNSUpdate.exe utility provided as acomponent of vCenter Server Heartbeat through vCenter Server Heartbeat Console Applications >Tasks > User Accounts
■ VMware recommends integrating Microsoft DNS into AD so that DNSUpdate.exe can identify all DNSServers that require updating
■ At least one Domain Controller at the DR site
■ Refer to the following articles in the VMware Knowledge Base:
■ Knowledge base article 1008571 - Configuring DNS with VMware vCenter Server Heartbeat ina WAN Environment
■ Knowledge base article 1008605 - Configuring vCenter Server Heartbeat to Update BIND9 DNSServers Deployed in a WAN
Bandwidth
vCenter Server Heartbeat includes automatic bandwidth optimization in WAN environments. This featurecompresses data transferred over the VMware Channel, optimizing the traffic for low bandwidth connectionscausing some additional CPU load on the active node.
Determine the available bandwidth and estimate the required volume of data throughput to determine acceptablelatency for the throughput. Bandwidth can affect the queue size required to accommodate the estimated volumeof data. VMware recommends making a minimum of 1Mbit of spare bandwidth available to vCenter ServerHeartbeat.
Latency
Latency has a direct effect on data throughput. Latency on the link should not fall below the standard definedfor a T1 connection.
“Heartbeat Diagnostics” can assist in determining the available bandwidth, required bandwidth, and nodeworkload. For more information about Heartbeat Diagnostics, contact VMware Professional Services.
Network Interface Card (NIC) Configuration
vCenter Server Heartbeat supports the use of both a single NIC or multiple NIC configuration on Primary andSecondary nodes. The number of NICs present will determine how the NICs are configured.
Important The Primary and Secondary nodes must have the same number of NICs.
30 VMware, Inc.
Unattended Installation on Windows Server 2008/2012
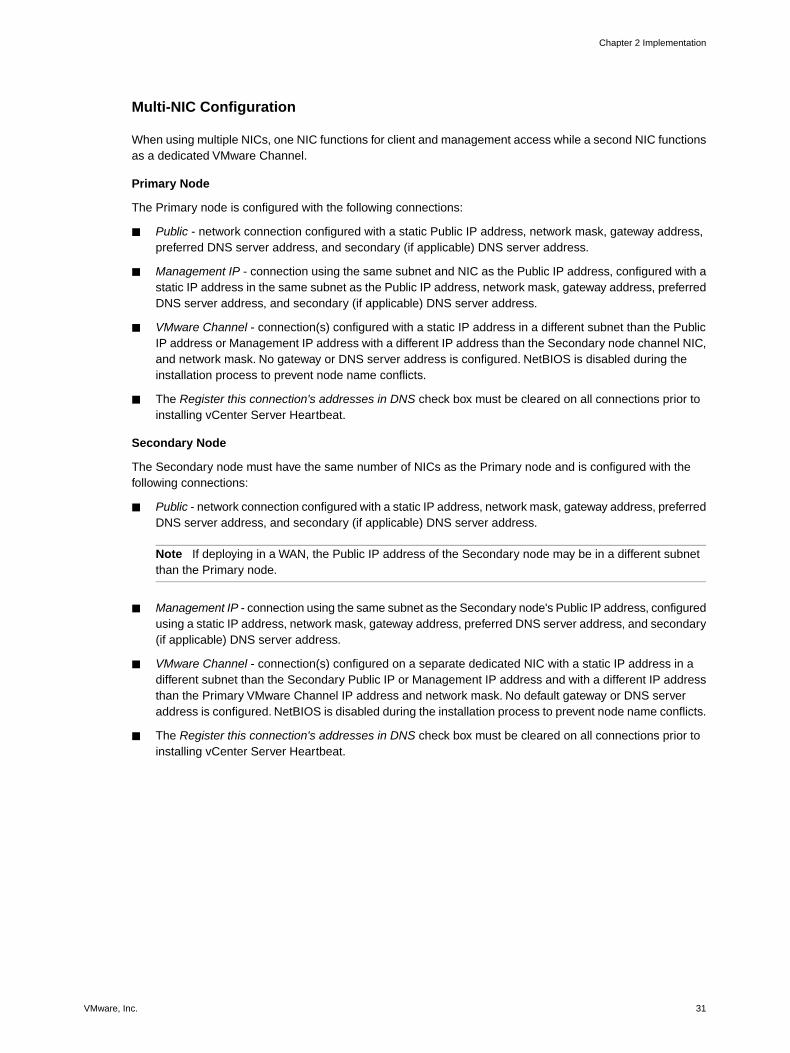
Multi-NIC Configuration
When using multiple NICs, one NIC functions for client and management access while a second NIC functionsas a dedicated VMware Channel.
Primary Node
The Primary node is configured with the following connections:
■ Public - network connection configured with a static Public IP address, network mask, gateway address,preferred DNS server address, and secondary (if applicable) DNS server address.
■ Management IP - connection using the same subnet and NIC as the Public IP address, configured with astatic IP address in the same subnet as the Public IP address, network mask, gateway address, preferredDNS server address, and secondary (if applicable) DNS server address.
■ VMware Channel - connection(s) configured with a static IP address in a different subnet than the PublicIP address or Management IP address with a different IP address than the Secondary node channel NIC,and network mask. No gateway or DNS server address is configured. NetBIOS is disabled during theinstallation process to prevent node name conflicts.
■ The Register this connection's addresses in DNS check box must be cleared on all connections prior toinstalling vCenter Server Heartbeat.
Secondary Node
The Secondary node must have the same number of NICs as the Primary node and is configured with thefollowing connections:
■ Public - network connection configured with a static IP address, network mask, gateway address, preferredDNS server address, and secondary (if applicable) DNS server address.
Note If deploying in a WAN, the Public IP address of the Secondary node may be in a different subnetthan the Primary node.
■ Management IP - connection using the same subnet as the Secondary node's Public IP address, configuredusing a static IP address, network mask, gateway address, preferred DNS server address, and secondary(if applicable) DNS server address.
■ VMware Channel - connection(s) configured on a separate dedicated NIC with a static IP address in adifferent subnet than the Secondary Public IP or Management IP address and with a different IP addressthan the Primary VMware Channel IP address and network mask. No default gateway or DNS serveraddress is configured. NetBIOS is disabled during the installation process to prevent node name conflicts.
■ The Register this connection's addresses in DNS check box must be cleared on all connections prior toinstalling vCenter Server Heartbeat.
VMware, Inc. 31
Chapter 2 Implementation

Single NIC Configuration
Configuring vCenter Server Heartbeat using a single NIC requires that all three functions (Client access,Management access, and Channel operations) use the same physical or virtual NIC.
Primary Node
The Primary node requires a single NIC configured with the following IP addresses:
■ Public IP address - configured using a static IP address, network mask, gateway address, preferred DNSserver address, and secondary (if applicable) DNS server address.
■ Management IP address - configured on the same NIC as the Public IP address with a unique static IPaddress in the same subnet as the Public IP address, network mask, gateway address, preferred DNSserver address, and secondary (if applicable) DNS server address.
■ VMware Channel IP address - configured on the same NIC as the Public IP address and Management IPaddress, configured with a static IP address in the same or different subnet than the Public IP address orManagement IP address, and a network mask. No gateway address or DNS server address is configured.NetBIOS is disabled during the installation process to prevent node name conflicts.
■ The Register this connection's addresses in DNS check box must be cleared prior to installing vCenterServer Heartbeat.
Secondary Node
The Secondary node must have the same number of NICs as the Primary node and be configured as follows:
■ A Management IP address - configured on the same NIC as the VMware Channel address with a uniquestatic IP address in the same subnet as the Public IP address, network mask, gateway address, preferredDNS server address, and secondary (if applicable) DNS server address.
■ A VMware Channel IP address - configured on the same NIC as the Management IP address with a staticIP address in the same or different subnet than the Management IP address, and the network mask. Nogateway or DNS server address is configured. NetBIOS is disabled during the installation process toprevent node name conflicts.
■ The Register this connection's addresses in DNS check box must be cleared prior to installing vCenterServer Heartbeat.
Firewall Configuration Requirements
When firewalls are used to protect networks, they must be configured to allow traffic to pass through both theClient Connection port and the Default Channel port.
VMware recommends that the firewall be configured to allow the Client to connect to the Client Connectionport by process, nfgui.exe, rather than by a specific port. To enable Channel communications between nodes,configure the firewall to allow traffic to pass through on Port 57348, the Default Channel port.
Important When installing on Windows Server 2008, Microsoft Windows may change the connection typefrom a Private network to an Unidentified network after you have configured the firewall port to allow channelcommunications resulting in the previously configured firewall changes to be reset for the new network type(Unidentified).
The firewall rules must be recreated to allow traffic to pass through for the Client Connection port and theDefault Channel port. VMware recommends that you change the Network List Manager Policy so that theVMware Channel network is identified as a Private Network, and not the default Unidentified Network.
32 VMware, Inc.
Unattended Installation on Windows Server 2008/2012
Anti-Malware Recommendations
Consult with and implement the advice of your anti-malware provider as VMware guidelines often follow theserecommendations. Consult the VMware Knowledge Base for up-to-date information on specific anti-malwareproducts.
Do not use file level anti-malware to protect application server databases, such as MS SQL Server databases.The nature of database contents can cause false positives in malware detection, leading to failed databaseapplications, data integrity errors, and performance degradation.
VMware recommends that when implementing vCenter Server Heartbeat, you do not replicate file levelanti-malware temp files using vCenter Server Heartbeat.
The file level anti-malware software running on the Primary node must be the same as the software that runson the Secondary node. In addition, the same file level anti-malware must run during both active and passiveroles.
Configure file level anti-malware to use the Management IP address on the passive node for malware definitionupdates. If this is not possible, manually update malware definitions on the passive node.
Exclude the following VMware directories from file level anti-malware scans (C:\Program Files\VMware\VMware
vCenter Server Heartbeat\ is the default installation directory):
■ C:\Program Files\VMware\VMware vCenter Server Heartbeat\r2\logs
■ C:\Program Files\VMware\VMware vCenter Server Heartbeat\r2\log
Any configuration changes made to a file level anti-malware product on one node (such as exclusions) mustbe made on the other node as well. vCenter Server Heartbeat does not replicate this information.
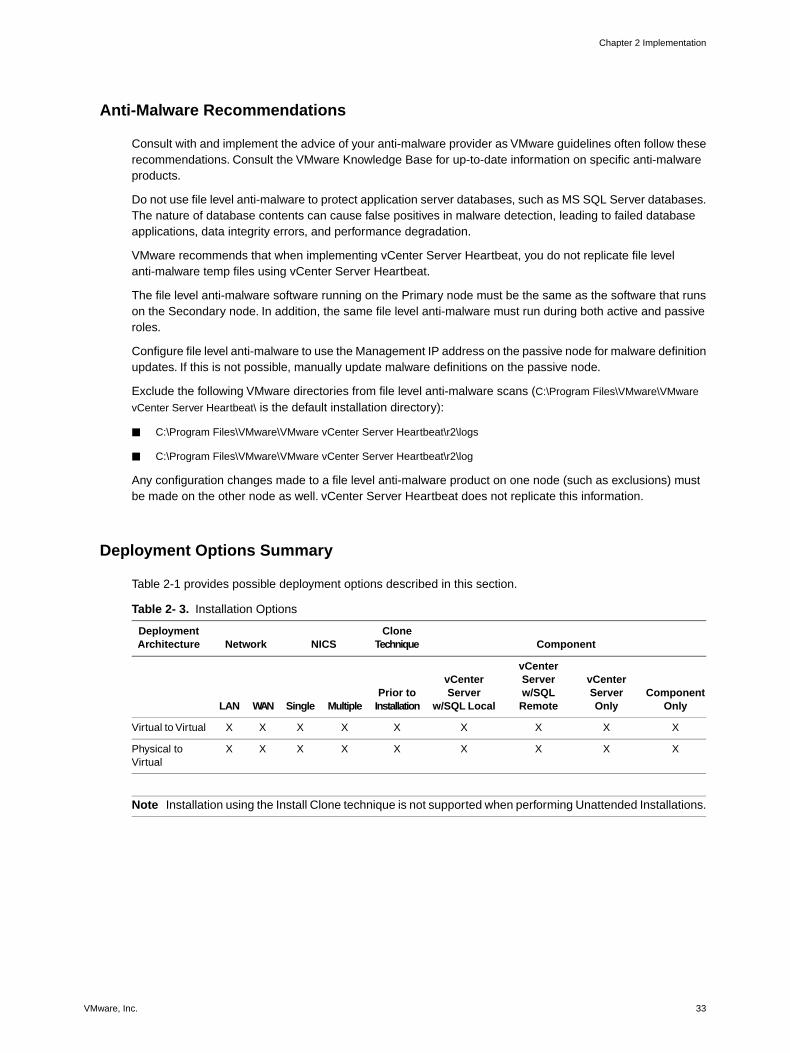
Deployment Options Summary
Table 2-1 provides possible deployment options described in this section.
Table 2- 3. Installation Options
ComponentClone
TechniqueNICSNetworkDeploymentArchitecture
ComponentOnly
vCenterServerOnly
vCenterServerw/SQLRemote
vCenterServer
w/SQL LocalPrior to
InstallationMultipleSingleWANLAN
XXXXXXXXXVirtual to Virtual
XXXXXXXXXPhysical toVirtual
Note Installation using the Install Clone technique is not supported when performing Unattended Installations.
VMware, Inc. 33
Chapter 2 Implementation

34 VMware, Inc.
Unattended Installation on Windows Server 2008/2012

3Unattended Installation of vCenterServer Heartbeat
This chapter discusses the unattended installation process used to implement vCenter Server Heartbeat onWindows Server 2008 and Windows Server 2012 when the Secondary node is virtual.The installation processfor all scenarios follows the same basic procedure.
Important Before initiating the installation of vCenter Server Heartbeat, ensure that the Primary node isassigned the intended Public name.
Unattended installation of vCenter Server Heartbeat requires use of command line options and a configurationparameters file. The configuration parameters file must be created prior to running the unattended installationto provide the configuration parameters for Setup and achieve your configuration goals.
Note Unattended installation of vCenter Server Heartbeat is only supported when using the Pre-Clonetechnique and the Secondary node is virtual.
Setup should only be run after verifying that the node (virtual or physical) has met all of the prerequisites listedin “Pre-install Requirements,” on page 23.
Important Users should not cut-and-paste from this .pdf document but should type the actual commands andparameters.
This chapter includes the following topics:
■ “Command Line Usage,” on page 35
■ “Parameter File Elements,” on page 37
■ “Unattended Setup of the Primary Node,” on page 39
■ “Unattended Setup of a Virtual Secondary Node,” on page 40
■ “Resulting IP Configuration,” on page 41
Command Line Usage
To perform an unattended installation, you must run the start /wait Setup command with the appropriate parametersfrom the command line. Additionally, you must create a .txt file (parameter file) that contains the informationnecessary to provide the intended options to the Setup application. The following information provides detailsabout the parameters and parameter file necessary to successfully perform an unattended installation.
start /wait Setup [-h]
[-f<parameter file>] [-ni [-sp -se -sw -di]]
VMware, Inc. 35
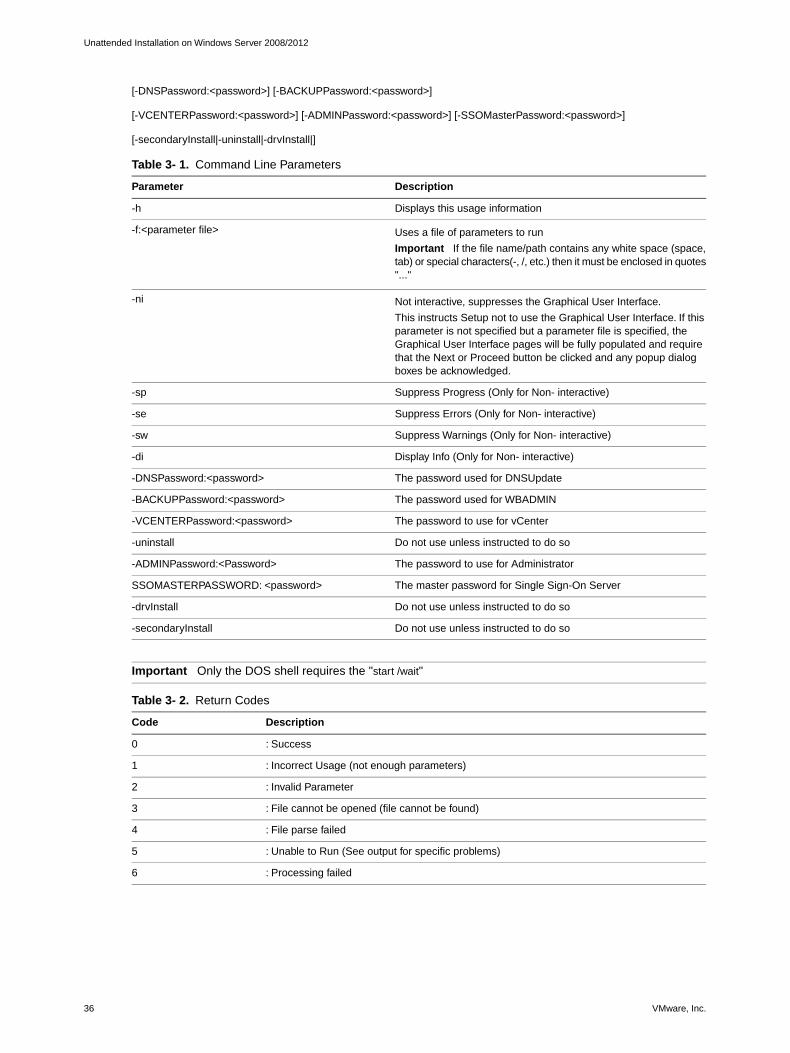
[-DNSPassword:<password>] [-BACKUPPassword:<password>]
[-VCENTERPassword:<password>] [-ADMINPassword:<password>] [-SSOMasterPassword:<password>]
[-secondaryInstall|-uninstall|-drvInstall|]
Table 3- 1. Command Line Parameters
DescriptionParameter
Displays this usage information-h
Uses a file of parameters to run
Important If the file name/path contains any white space (space,tab) or special characters(-, /, etc.) then it must be enclosed in quotes"..."
-f:<parameter file>
Not interactive, suppresses the Graphical User Interface.
This instructs Setup not to use the Graphical User Interface. If thisparameter is not specified but a parameter file is specified, theGraphical User Interface pages will be fully populated and requirethat the Next or Proceed button be clicked and any popup dialogboxes be acknowledged.
-ni
Suppress Progress (Only for Non- interactive)-sp
Suppress Errors (Only for Non- interactive)-se
Suppress Warnings (Only for Non- interactive)-sw
Display Info (Only for Non- interactive)-di
The password used for DNSUpdate-DNSPassword:<password>
The password used for WBADMIN-BACKUPPassword:<password>
The password to use for vCenter-VCENTERPassword:<password>
Do not use unless instructed to do so-uninstall
The password to use for Administrator-ADMINPassword:<Password>
The master password for Single Sign-On ServerSSOMASTERPASSWORD: <password>
Do not use unless instructed to do so-drvInstall
Do not use unless instructed to do so-secondaryInstall
Important Only the DOS shell requires the "start /wait"
Table 3- 2. Return Codes
DescriptionCode
: Success0
: Incorrect Usage (not enough parameters)1
: Invalid Parameter2
: File cannot be opened (file cannot be found)3
: File parse failed4
: Unable to Run (See output for specific problems)5
: Processing failed6
36 VMware, Inc.
Unattended Installation on Windows Server 2008/2012

Parameter File Elements
The parameter file is used to pass setup options to the Setup application and is made up a sequence of taggedlines, where the tag indicates what the data describes.
For example: INSTALLTYPE:Install
Important The parser is case insensitive. Any values containing white space must be enclosed with doublequotes, for example "pre clone". If the file name/path contains any white space (space, tab) or specialcharacters(-, /, etc.) then it must be enclosed in quotes "..."
Table 3- 3. Parameter File Elements
CommentsValuesTag
Used to indicate the Format of the tagslisted after this line. This can be usedmultiple times.
V1_0 (Default)FORMATVERSION:
Install
Install Client Tools Only
Install AM(X)
Install Service Pack
Uninstall
Uninstall Components
INSTALLTYPE:
Not required for vCenter ServerHeartbeat
Valid license keyLICENSEKEY:
Only one per line but can be definedmultiple times
Must be a valid path andinclude the plug-in file name
PLUGINPATH:
Only one per line but can be definedmultiple times
VMware vCenter ServerHeartbeat
FEATUREFORINSTALLATION:
Primary
Secondary
SERVERROLE:
HA
DR
TOPOLOGY:
True
False
ACCEPT_EULA:
Must be an integerDEFAULTCHANNELPORT:
Must be a valid pathDESTINATIONPATH:
Used to indicate where to write thepre-synchronization data
Must be a valid pathBACKUPDESTINATIONPATH:
Used to locate the pre-synchronizationdata for installation of the Secondarynode
Must be a valid pathBCKUPSOURCEPATH:
True
False
INCLUDEPROTECTEDDATAINBACKUP:
Used when the Public IP addresses aredifferent for different nodes (usually fora DR topology)
NETWORKTASKDOMAIN:
Used when the Public IP addresses aredifferent for different nodes (usually fora DR topology)
NETWORKTASKUSER:
VMware, Inc. 37
Chapter 3 Unattended Installation of vCenter Server Heartbeat
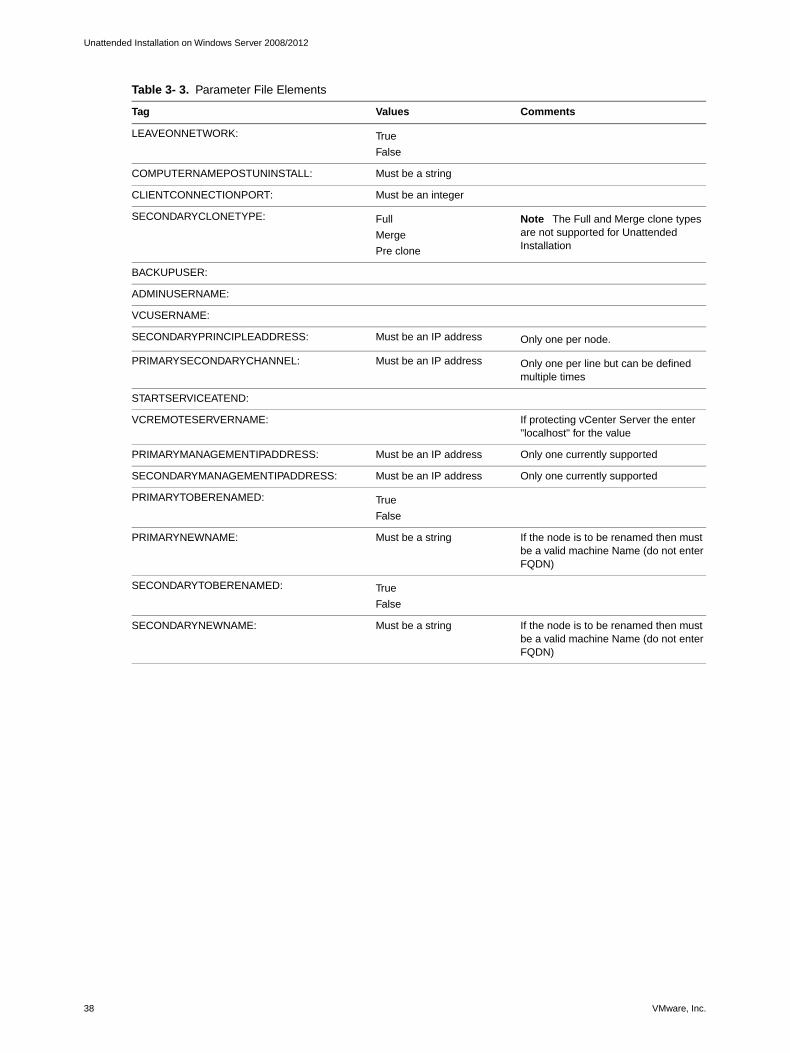
Table 3- 3. Parameter File Elements
CommentsValuesTag
True
False
LEAVEONNETWORK:
Must be a stringCOMPUTERNAMEPOSTUNINSTALL:
Must be an integerCLIENTCONNECTIONPORT:
Note The Full and Merge clone typesare not supported for UnattendedInstallation
Full
Merge
Pre clone
SECONDARYCLONETYPE:
BACKUPUSER:
ADMINUSERNAME:
VCUSERNAME:
Only one per node.Must be an IP addressSECONDARYPRINCIPLEADDRESS:
Only one per line but can be definedmultiple times
Must be an IP addressPRIMARYSECONDARYCHANNEL:
STARTSERVICEATEND:
If protecting vCenter Server the enter"localhost" for the value
VCREMOTESERVERNAME:
Only one currently supportedMust be an IP addressPRIMARYMANAGEMENTIPADDRESS:
Only one currently supportedMust be an IP addressSECONDARYMANAGEMENTIPADDRESS:
True
False
PRIMARYTOBERENAMED:
If the node is to be renamed then mustbe a valid machine Name (do not enterFQDN)
Must be a stringPRIMARYNEWNAME:
True
False
SECONDARYTOBERENAMED:
If the node is to be renamed then mustbe a valid machine Name (do not enterFQDN)
Must be a stringSECONDARYNEWNAME:
38 VMware, Inc.
Unattended Installation on Windows Server 2008/2012

Unattended Setup of the Primary Node
Installation of vCenter Server Heartbeat begins with the Primary node.
Procedure
1 Create a .txt file containing the following configuration parameters:
Important The following is an example of a parameter file (it must be modified before you use it). Thecontent within the characters < and > indicate example text and the actual < and > characters should notbe present in the edited file. Values containing white space must be enclosed with double quotes, forexample "pre clone".
INSTALLTYPE:Install
ACCEPT_EULA:true
LICENSEKEY:<license serial number>
SERVERROLE:PRIMARY
TOPOLOGY:<HA or DR>
SECONDARYCLONETYPE:"pre clone"
DESTINATIONPATH:C:\AutoInstall
PRIMARYSECONDARYCHANNEL:<10.0.1.1,10.0.1.2>
PRIMARYPRINCIPLEADDRESS:<192.168.99.111>
SECONDARYPRINCIPLEADDRESS:<192.168.99.111>
NETWORKTASKDOMAIN:<dnstest.com>
NETWORKTASKUSER:<administrator>
CLIENTCONNECTIONPORT:52267
FEATUREFORINSTALLATION:"VMware vCenter Server Heartbeat"
PLUGINPATH:<extraction path\v6-5-8905-x64\plugins\VMwareVirtualCenter\VirtualCenterNFPlugin.dll>
BACKUPDESTINATIONPATH:\\<10.0.1.1\nf backup>
BACKUPUSER:<Administrator>
INCLUDEPROTECTEDDATAINBACKUP:true
VCUSERNAME:<administrator>
PRIMARYMANAGEMENTIPADDRESS:<192.168.99.121>
SECONDARYMANAGEMENTIPADDRESS:<192.168.99.131>
PRIMARYTOBERENAMED:true
PRIMARYNEWNAME:<PRIMARY10>
SECONDARYTOBERENAMED:true
SECONDARYNEWNAME:<SECONDARY20>
ADMINUSERNAME:<Administrator>
2 Rename the self-extracting file from <name>.exe to <name>.zip
VMware, Inc. 39
Chapter 3 Unattended Installation of vCenter Server Heartbeat

3 Extract the contents of the self-extracting file into a temporary folder.
4 Navigate to Start > Run and type CMD to open a DOS window.
5 Navigate to the location of the self-extracted vCenter Server Heartbeat folder for the appropriateenvironment.
6 Run the following command below for your environment : start /wait setup -f:<parameter file>
-DNSPassword:<DNSPassword> -BACKUPPassword:<backup password> -VCENTERPASSWORD:<vCenterPassword>
-ADMINPASSWORD:<adminPassword> [-SSOMasterPassword:<password>] -ni
Upon completion of the unattended installation, a message instructing to restart the node is displayed.
7 Restart the node
Important Do not start the Secondary node until after the Primary node has completed its renamingprocess.
If installing into an environment that uses Windows Server 2008 R2 for DNS, you must configure a securitylevel on the DNS server that permits changes to DNS.
Unattended Setup of a Virtual Secondary Node
Installation of the Secondary node is similar to installation of the Primary node.
Procedure
1 Verify configuration of the NICs.
Important Before running Setup on the Secondary Server:
■ If deploying with multiple NICs, the Public NIC providing the Public and Management IP addresses,must be disconnected.The VMware Channel NIC must only be configured with the Channel IP addressand the location of the Pre-sync data (backup folder) must be accessible via this IP address.
■ If deploying with a single NIC, the NIC must only be configured with the VMware Channel IP addressand the location of the Pre-sync data (backup folder) must be accessible via this IP address.
2 Create a .txt file containing the following configuration parameters:
Important The following is an example of a parameter file (it must be modified before you use it). Thecontent within the characters < and > indicate example text and the actual < and > characters should notbe present in the edited file. Values containing white space must be enclosed with double quotes, forexample "pre clone".
INSTALLTYPE:Install
SERVERROLE:SECONDARY
BACKUPSOURCEPATH:\\<192.168.15.111\nf backup>
BACKUPUSER:<Administrator>
ADMINUSERNAME:<Administrator>
3 Rename the self-extracting file from <name>.exe to <name>.zip
4 Extract the contents of the self-extracting file into a temporary folder.
5 Navigate to Start > Run and type CMD to open a DOS window.
40 VMware, Inc.
Unattended Installation on Windows Server 2008/2012

6 Navigate to the location of the self-extracted vCenter Server Heartbeat folder for the appropriateenvironment.
7 Run the command: start /wait setup -f:<parameter file> -BACKUPPassword:<backup password>
-ADMINPASSWORD:<adminPassword> -ni
During installation of vCenter Server Heartbeat on the Secondary virtual node, Setup will pause and promptthe user with a dialog box stating "You must now configure the correct IP addresses on the correct networkadapters and reconnect the network cables to all the network adapters that are being used to provide thePrincipal (Public) and Channel IP addresses."
Note If the dialog is not visible and the command window will displays the following text: "Processingpaused, perform the prompted action and press OK. (If the dialog box is not visible use Alt+Tab to revealit)." Use Alt+Tab to display the dialog.
8 Reconfigure all NICs with the appropriate IP addresses (both Public and VMware Channel). Once all NICshave been configured, reconnect all network cables and then click OK.
Setup will continue. Upon completion of the unattended installation, a message instructing to restart thenode is displayed.
9 Verify that the pre-populated management names and IP addresses to be used are configured and availablein the DNS servers before starting vCenter Server Heartbeat for the first time.
Resulting IP Configuration
After installing VMware vCenter Server Heartbeat on both the Primary and Secondary nodes, the IP addressingconfiguration should reflect:
■ When the Primary node is active
■ Primary (active) node - Public IP address and the Primary Management IP address
Note The VMware Channel IP address remains unchanged.
■ Secondary (passive) node - Secondary Management IP address
Note The VMware Channel IP address remains unchanged.
■ When the Secondary node is active
■ Primary (passive) node - Primary Management IP address
Note The VMware Channel IP address remains unchanged.
■ Secondary (active) node - Public IP address and the Secondary Management IP address
Note The VMware Channel IP address remains unchanged.
VMware, Inc. 41
Chapter 3 Unattended Installation of vCenter Server Heartbeat

42 VMware, Inc.
Unattended Installation on Windows Server 2008/2012

4Post Installation Configuration
Upon completion of installation, a series of tasks must be performed to ensure that VMware vCenter ServerHeartbeat is properly configured.
This chapter includes the following topics:
■ “Post Installation Tasks,” on page 44
■ “Configuring VirtualCenter Plug-in with the Correct Credentials,” on page 44
■ “Firewall Configuration Requirements,” on page 44
■ “Registering the Heartbeat Plug-in Manually in vCenter,” on page 45
■ “Configuring vCenter Server Heartbeat to Protect SQL Server,” on page 45
■ “Configuring the Application Timeout Exception,” on page 48
■ “Configuring Orchestrator When Deployed in a WAN With Different Subnets.,” on page 48
■ “Installing the View Composer Plug-in Post Installation,” on page 49
■ “Upgrading vCenter Components,” on page 49
■ “vCenter Server with SQL Server on a Separate Host,” on page 49
VMware, Inc. 43
Post Installation Tasks
Once installation of vCenter Server Heartbeat is complete, use Nslookup to verify configured name resolution.
Procedure
◆ Verify that Nslookup resolves as shown below:
■ Verify that Nslookup resolves Service Name to Public IP
■ Verify that Nslookup resolves Primary Name to Primary Management IP
■ Verify that Nslookup resolves Secondary Name to Secondary Management IP
Configuring VirtualCenter Plug-in with the Correct Credentials
When protecting vCenter Server, after installation is complete you must enter the credentials for an accountwith rights to the Virtual Infrastructure to allow evaluation of rules.
To add the Virtual Infrastructure credentials:
Procedure
1 Using the vCenter Server Heartbeat Console, navigate to the Applications: Plug-ins page.
2 Select the VirtualCenter Plug-in.
3 Click Edit.
4 Type the Username and Password for an account with rights to the Virtual Infrastructure.
Important If vCenter Server 5.1 is installed, you must also enter the MasterPassword for SSO.
5 Click OK.
Firewall Configuration Requirements
When firewalls are used to protect networks, they must be configured to allow traffic to pass through both theClient Connection port and the Default Channel port.
VMware recommends that the firewall be configured to allow the Client to connect to the Client Connectionport by process, nfgui.exe, rather than by a specific port. To enable Channel communications between nodes,configure the firewall to allow traffic to pass through on Port 57348, the Default Channel port.
Important When installing on Windows Server 2008, Microsoft Windows may change the connection typefrom a Private network to an Unidentified network after you have configured the firewall port to allow channelcommunications resulting in the previously configured firewall changes to be reset for the new network type(Unidentified).
The firewall rules must be recreated to allow traffic to pass through for the Client Connection port and theDefault Channel port. VMware recommends that you change the Network List Manager Policy so that theVMware Channel network is identified as a Private Network, and not the default Unidentified Network.
44 VMware, Inc.
Unattended Installation on Windows Server 2008/2012
Registering the Heartbeat Plug-in Manually in vCenter
In the event that the Heartbeat Plug-in did not register successfully during Setup, perform the steps below tomanually register Heartbeat Plug-in once Setup completes.
Procedure
1 With the vCenter Server Heartbeat pair in sync, on the Primary/active node, open an elevated commandprompt and navigate to C:\Program Files\VMware\VMware vCenter Server Heartbeat\tomcat\apache-tomcat-6.0.32\bin
2 Run the following command: RegExt -register vchost[:port] username password hbconf.xml PublicServiceName
vchost – name/IP of the vCenter Server to which you want to register
port – https port on which vCenter is running
username – a valid username with administrator privileges on the vCenter Server
password – password of the user with administrator privileges on the vCenter Server
PublicServiceName – the public name of the vCenter Server Heartbeat pair
3 Copy the hbconf.xml file created at the previous step to C:\Program Files\VMware\VMware vCenter Server
Heartbeat\tomcat\apache-tomcat-6.0.32\webapps\vcshb
4 Perform a manual failover to make the Secondary node active.
5 Repeat steps 1-3 on the Secondary/active node.
Configuring vCenter Server Heartbeat to Protect SQL Server
After successfully installing vCenter Server Heartbeat, perform the following tasks to configure vCenter ServerHeartbeat to protect SQL Server.
Configuring SQL Server Plug-in
When protecting SQL Server 2012 or 2014, after installation is complete you must enter the credentials for anaccount with rights to SQL Server 2012 or 2014.
To add the SQL Server 2012 or 2014 credentials:
Procedure
1 Using the vCenter Server Heartbeat Console, navigate to the Applications: Plug-ins page.
2 Select the SQLServer Plug-in.
3 Click Edit.
4 Type the Username and Password for an account with rights to the SQL Server.
5 Click OK.
VMware, Inc. 45
Chapter 4 Post Installation Configuration

Configuring the SQL Server Instance Account
When protecting SQL Server, the SQL Server instance service must run under an account with administratorrights rather than the Network Service or Local System account. If required, change the Log On As property.
Procedure
1 Navigate to Start > Administrative Tools > Services.
2 Select the SQL Service instance and click Properties.
3 Select the Log On tab and select This account.
4 Provide the new account credentials and click OK.
5 Once complete, restart the SQL Server instance service.
Configuring for SQL Server Running Under the LocalSystem Account
When SQL Server is run under the LocalSystem account, the following additional steps must be performed.
Procedure
1 On the Domain Controller, navigate to Active Directory Users and Computers.
2 Select the computer account of the node running vCenter Server Heartbeat.
3 On the Primary computer account (Primary Management Name):
a Navigate to the Security tab and click Advanced.
b On the Permissions tab click Add.
c Select the user to run the SetSPN command (this can be the same user that runs SQL Server).
d Assign the Allow permission for Write all properties and Apply to this object and all child objects.
e Click OK.
4 On the Secondary computer account (Secondary Management Name):
a Navigate to the Security tab and click Advanced.
b On the Permissions tab click Add.
c Select the user to run the SetSPN command (this can be the same user that runs SQL Server).
d Assign the Allow permission for Write all properties and Apply to this object and all child objects.
e Click OK.
Important At this point, NFSetSPN will not operate properly as it requires SQL Server to be run with adomain user account. The following steps provide a workaround for this issue.
5 On the Primary node, using vCenter Server Heartbeat Console, navigate to the Applications: Tasks tab.
6 Click User Accounts and add the user you want to run the SetSPN command.
7 In the Network Configuration > Sql Server > Set SPN (Primary) click Edit.
8 For Run As, select the user added at Step 7 from the drop-down list and click OK.
9 On the Secondary node, using vCenter Server Heartbeat Console, navigate to the Applications: Taskstab.
46 VMware, Inc.
Unattended Installation on Windows Server 2008/2012

10 In the Network Configuration > Sql Server > Set SPN (Secondary) click Edit.
11 For Run As, select the user added at Step 7 from the drop-down list and click OK.
12 Select the task corresponding to the active node and click Run Now to test the task (The returned statusshould be: Completed with exit code 0)
Configure SetSPN.exe
SetSPN.exe is a Microsoft command-line tool that reads, modifies, or deletes the Service Principal Names (SPN)directory property for an Active Directory service account and is required to be present on both nodes prior tostarting vCenter Server Heartbeat for the first time.
Procedure
1 Verify that the SetSPN.exe tool is present on both the Primary and the Secondary nodes at the followinglocations:
On Windows Server 2008 and 2012 environments, in Windows\System32. This is normally present as acomponent of the Windows 2008 and 2012 operating systems.
Important vCenter Server Heartbeat will not attempt to update DNS and therefore, the Administratormust pre-populate the DNS server with entries for the new management names and IP addresses thatare to be used. Use adjacent IP addresses for the Public IP address and the Management IP address forthe Primary and Secondary Servers when installing vCenter Server Heartbeat on nodes running Windows2008.
2 Launch the vCenter Server Heartbeat Console and navigate to the Applications: Tasks page.
3 Click User Accounts. Verify that the user account under which you installed vCenter Server Heartbeatis present in the list of User Accounts. If it is present and is a member of the Domain Administrators group,Enterprise Administrators group, or has been delegated Administrator rights, go to Step 8.
4 In the User Accounts dialog, click Add.
5 Enter the credentials of a domain account that is a member of the Domain Administrators group, EnterpriseAdministrators group, or one that has been delegated Administrator rights and click OK.
6 Once the account has been successfully added to the list, click Close.
7 In the Task pane, select the Network Configuration task Set SPN (Primary).
8 Click Edit.
9 In the Edit Task dialog, in the Run As: drop-down field, select an account with appropriate rights (theaccount previously added).
10 Click OK.
11 Repeat the procedure for the Network Configuration task Set SPN (Secondary).
12 After successfully configuring the correct credentials, select the Set SPN (Primary) task and click RunNow.
VMware, Inc. 47
Chapter 4 Post Installation Configuration

Configuring the Application Timeout Exception
vCenter Server Heartbeat can alert the Administrator if the time taken to start or stop the entire applicationexceeds the expected time during the following operations:
■ vCenter Server Heartbeat startup
■ Shutdown with protected applications
■ Manual Failover
■ Automated Failover
■ When the Administrator selects Start Application
■ When the Administrator selects Stop Application
Note If there are multiple applications installed, vCenter Server Heartbeat totals the individual timeouts setfor each application and issues a single Application Timeout Exception alert.
Configuring Timeout Settings
Procedure
1 Right-click on the application and select Edit from the menu or select the application and click Edit at thetop of the pane to invoke the Edit Application dialog.
2 Enter new values into the Stop Timeout and Start Timeout text boxes or use the arrow buttons to adjustthe values (seconds). Click OK.
Note The Start Timeout value should be configured according to vCenter inventory size and the StopTimeout value according to inventory size and operational load. For example, if the inventory is large (morethan 500 hosts and 15K Virtual machines, the Start time can be 20-30 minutes. Use the Start Timeoutexperienced as a guide to assist in determining the Stop Timeout value.
Configuring Orchestrator When Deployed in a WAN With DifferentSubnets.
When deployed in a WAN environment with VMware Orchestrator and the Primary and Secondary nodes indifferent subnets, you must configure an Exclusion File Filter following the steps below.
Procedure
1 Launch vCenter Server Heartbeat Console.
2 Select Data: File Filters.
3 Click Add Exclusion Filter.
4 Browse to or enter the following path: $INSTALL_PATH_TO_ORCHESTRATOR/app-server/bin/boot.properties
5 Click OK.
6 Perform a manual failover so that the Secondary node becomes active.
48 VMware, Inc.
Unattended Installation on Windows Server 2008/2012

7 Launch the vCenter Orchestrator Web Configuration wizard and select Network.
8 In the IP address field select the Public IP address of the Secondary node. Click Apply changes. If VMwareOrchestrator Server is configured as a service, then proceed with following steps:
a Launch the vCenter Orchestrator Web Configuration wizard, select Startup Options and click Restartservice.
b From vCenter Server Heartbeat Console, select Applications: Services. Verify that VMware vCenterOrchestrator Server service is included in the protected services. If not, manually run the ProtectedService Discovery task from VMware vCenter Heartbeat Console > Applications > Tasks > VMwareVirtualCenter - Protected Service Discovery.
Installing the View Composer Plug-in Post Installation
Installation of the View Composer Plug-in can occur during installation of vCenter Server Heartbeat or can beinstalled post-installation.
To install the View Composer Plug-in after vCenter Server Heartbeat has been installed:
Procedure
1 Ensure that View Composer has been installed on both the Primary and Secondary nodes with the sameconfiguration settings.
2 Launch the vCenter Server Heartbeat Console.
3 Navigate to Applications: Plug-ins and click Install.
4 Browse to the plug-in file located at:<unzipped_folder>\<vCenterServerHeartbeatVersion-x86/x64>\plugins\ViewComposer\ViewComposerNFPlugin.dll.
5 Click OK to install the View Composer Plug-in.
Upgrading vCenter Components
Should vCenter Server or components of vCenter need to be upgraded when vCenter Server Heartbeat isinstalled, please refer to Chapter 7, “Upgrading,” on page 55.
vCenter Server with SQL Server on a Separate Host
It is not necessary to update ODBC connection information since the Public Service Name is used rather thanthe server name for ODBC calls.
VMware, Inc. 49
Chapter 4 Post Installation Configuration

50 VMware, Inc.
Unattended Installation on Windows Server 2008/2012

5Unattended Installation of vCenterServer Heartbeat Client Tools
vCenter Server Heartbeat allows installation of vCenter Server Heartbeat Client Tools for remote managementof vCenter Server Heartbeat clusters.
Prerequisites
When installing vCenter Server Heartbeat Client Tools on Windows XP, the following Service Pack levels arerequired.
■ Windows XP 32 bit SP3
■ Windows XP 64 bit SP2
Procedure
1 Create a .txt file containing the following configuration parameters:
Important The following is an example of a parameter file (it must be modified before you use it). Thecontent within the characters < and > indicate example text and the actual < and > characters should notbe present in the edited file.
INSTALLTYPE:"Install Client Tools Only"
ACCEPT EULA:true
DESTINATIONPATH:<C:\AutoInstall>
2 Rename the self-extracting file from <name>.exe to <name>.zip
3 Extract the contents of the self-extracting file into a temporary folder.
4 Navigate to Start > Run and type CMD to open a DOS window.
5 Navigate to the location of the self-extracted folder for the appropriate environment.
6 Run the command: start /wait setup -f:<parameter file> -ni
7 Upon completion of the unattended installation, the Manage Server icon will appear on the desktop.
VMware, Inc. 51

52 VMware, Inc.
Unattended Installation on Windows Server 2008/2012

6Unattended Uninstall of vCenter ServerHeartbeat
vCenter Server Heartbeat allows you to uninstall the product from your vCenter Server using the unattendedmethod.
Procedure
1 Ensure all the vCenter Server Heartbeat processes are stopped and close the vCenter Server HeartbeatConsole and System Tray icon.
2 Create a .txt file with the following configuration parameters:
Important The following is an example of a parameter file (it must be modified before you use it). Thecontent within the characters < and > indicate example text and the actual < and > characters should notbe present in the edited file.
INSTALLTYPE:Uninstall
LEAVEONNETWORK:true
3 Rename the self-extracting file from <name>.exe to <name>.zip
4 Extract the contents of the self-extracting file into a temporary folder.
5 Navigate to Start > Run and type CMD to open a DOS window.
6 Navigate to the location of the self-extracted folder for the appropriate environment.
7 Run the command: start /wait setup –f:<parameter file> -ni
After the uninstall process completes, you will be notified of any files that could not be removed and advisedto delete them manually.
Note The SupportLogs directory is also left behind. This is intentional and should not be deleted in theevent you need to submit a support report.
VMware, Inc. 53

54 VMware, Inc.
Unattended Installation on Windows Server 2008/2012

7Upgrading
This Appendix provides instructions to upgrade both vCenter Server Heartbeat and vCenter Server whenvCenter Server Heartbeat is installed as indicated below.
■ Upgrading vCenter Server when vCenter Server Heartbeat is installed
■ vCenter Server 5.0 to vCenter Server 5.5 Update 2
■ vCenter Server 5.1, 5.1 Update 1 or 5.1 Update 2 to vCenter Server 5.5 Update 2
■ vCenter Server 5.5 to vCenter Server 5.5 Update 2
■ Upgrading vCenter Server Heartbeat
■ vCenter Server Heartbeat 6.5 to vCenter Server Heartbeat 6.6 Update 1 or Update 2
■ vCenter Server Heartbeat 6.5 Update 1 to vCenter Server Heartbeat 6.6 Update 1 or Update 2
■ vCenter Server Heartbeat 6.6 to vCenter Server Heartbeat 6.6 Update 1 or Update 2
Note vCenter Server Heartbeat must be upgraded prior to upgrading vCenter Server to allow vCenter ServerHeartbeat to maintain protection of vCenter Server.
This chapter includes the following topics:
■ “Upgrading vCenter Server Heartbeat 6.5, 6.5 Update 1, 6.6 or 6.6 Update 1 to vCenter Server Heartbeat6.6 Update 2,” on page 55
■ “Upgrading vCenter Server 5.0, 5.1 or 5.5 to vCenter Server 5.5 Update 2 when SQL Database is Remoteand vCenter Server Heartbeat is Installed,” on page 57
■ “Upgrading vCenter Server 5.0, 5.1 or 5.5 to vCenter Server 5.5 Update 2 when SQL Database is Localand vCenter Server Heartbeat is Installed,” on page 63
Upgrading vCenter Server Heartbeat 6.5, 6.5 Update 1, 6.6 or 6.6 Update1 to vCenter Server Heartbeat 6.6 Update 2
The following procedure assumes that vCenter Server Heartbeat 6.5, 6.5 Update 1, 6.6, or 6.6 Update 1 iscurrently installed and provides step-by-step instructions to upgrade the currently installed version of vCenterServer Heartbeat to vCenter Server Heartbeat 6.6 Update 2. For information about upgrading from otherversions of vCenter Server Heartbeat to vCenter Server Heartbeat 6.6 Update 1, see knowledge base article1014435 - Upgrading vCenter Server Heartbeat from an earlier version to a later version.
VMware, Inc. 55

Procedure
1 Download the new version of vCenter Server Heartbeat WinZip Self-Extracting file to a desired locationon both the Primary and Secondary nodes.
2 On the Primary/active node, right-click on the System Tray icon and select to Shutdown vCenter ServerHeartbeat opting to leaving protected applications running.
3 Navigate to Start > Administrative Tools > Services and set the VMware vCenter Server Heartbeatservice to Manual.
4 On the Secondary/passive node, navigate to Start > Administrative Tools > Services and set the VMwarevCenter Server Heartbeat service to Manual.
5 On the Secondary/passive node, right-click on the System Tray icon and select to Shutdown vCenterServer Heartbeat.
6 On the Secondary/passive node, disconnect the network cable from the Public NIC.
7 On the Primary/active node, double-click the WinZip Self-Extracting file. The Setup Introduction page isdisplayed. Click OK.
The WinZip Self-Extractor page is displayed.
8 Click Setup to open the VMware vCenter Server Heartbeat Setup window.
9 Select the option to Install Update when the Setup Type page is displayed.
10 Follow the on-screen instructions to install the ServicePack.nfs script. Click Add and use the default pathto the Service Pack. When prompted, reboot the node.
Note During the Service Pack installation, the new vCenter Server Heartbeat plug-ins are copied to<Heartbeat install dir>\R2\<version> plug-ins\<plug-in name>
11 On the Secondary/passive node, double-click the WinZip Self-Extracting file.The Setup Introduction pageis displayed. Click OK.
The WinZip Self-Extractor page is displayed.
12 Click Setup to open the VMware vCenter Server Heartbeat Setup window.
13 Select the option to Install Update when the Setup Type page is displayed.
14 Follow the on-screen instructions to install the ServicePack.nfs script. Click Add and use the default pathto the Service Pack. When prompted, reboot the node.
Note During the Service Pack installation, the new vCenter Server Heartbeat plug-ins are copied to<Heartbeat install dir>\R2\<version> plug-ins\<plug-in name>
15 On both the Primary/active node and the Secondary/passive node, check the configuration of the NICsand make corrections if necessary (the packet filter should be selected on Public NICs and cleared onchannel NICs).
16 On the Primary/active node, right-click on the System Tray icon and select to Start VMware vCenter ServerHeartbeat.
17 Navigate to Start > Administrative Tools > Services and set the VMware vCenter Server Heartbeatservice to Automatic.
18 On Secondary/passive node, right-click on the System Tray icon and select to Start VMware vCenterServer Heartbeat and then reconnect the network cable to the Public NIC.
56 VMware, Inc.
Unattended Installation on Windows Server 2008/2012
19 On the Secondary/passive node, navigate to Start > Administrative Tools > Services and set the VMwarevCenter Server Heartbeat service to Automatic.
20 Reconfigure the run-as account for the SetSPN tasks by performing the following:
a In the Task pane, select the Network Configuration Task Set SPN (Primary).
b Click Edit
c In the Edit Task dialog, in the Run As: drop-down list, select an account with the appropriate rights(the account previously added).
Click OK.
d Repeat the procedure for the Network Configuration Task Set SPN (Secondary)
Upgrading vCenter Server 5.0, 5.1 or 5.5 to vCenter Server 5.5 Update2 when SQL Database is Remote and vCenter Server Heartbeat isInstalled
The following procedure assumes that vCenter Server Heartbeat is installed and protecting vCenter Server5.0, 5.1 or 5.5 using a remote SQL Database. This procedure provides step-by-step instructions to perform anupgrade of vCenter Server 5.0, 5.1 or 5.5 to vCenter Server 5.5 Update 2 with vCenter Server Heartbeatinstalled. For information about upgrading from other versions of vCenter Server with vCenter Server Heartbeatinstalled to vCenter Server 5.5, see knowledge base article 1010479 - Upgrading or applying updates to vCenterServer and its components when protected by vCenter Server Heartbeat with a remote database.
Upgrading the vCenter Server 5.0, 5.1 or 5.5 Secondary Node
Prerequisites
Before attempting to upgrade from vCenter Server 5.0 or vCenter Server 5.1 to vCenter Server 5.5 you mustinstall the VMware vSphere Single Sign-On (SSO) 5.5 Update 2 component separately on a different machine(not on the Primary or Secondary node) and then protect SSO on the separate machine with vCenter ServerHeartbeat. If upgrading from vCenter Server 5.5 to vCenter Server 5.5 Update 2, then proceed straight to thesteps below.
Procedure
1 If the Primary node is active, use vCenter Server Heartbeat Console on the Secondary node to performa manual failover to make the Secondary node active. If the Secondary node is currently active, go to Step2.
2 Shutdown vCenter Server Heartbeat on both the Primary and Secondary nodes, leaving protectedapplications running on Secondary (active) node.
3 Using the Service Control Manager, configure VMware vCenter Server Heartbeat service Startup Typeto Manual on both Primary and Secondary nodes.
4 Before proceeding with the upgrade procedure, perform a backup of the existing vCenter Server database,Single Sign-On database, VMware Update Manager database, and SSL certificates.
VMware, Inc. 57
Chapter 7 Upgrading

5 Upgrade VMware vSphere Web Client
a Start VMware vCenter Installer for the version you want to upgrade to and select VMware vSphereWeb Client from the list.
b Proceed with the installation.
c In the event that errors are encountered during the upgrade process, research the cause of theupgrade. If the issue can be resolved then it is safe to proceed with the upgrade procedure.
6 Start VMware vCenter Installer for the version you want to upgrade to and select VMware vCenter InventoryService from the list.
7 When prompted, select Do not overwrite. Leave my existing database in place.
8 Using the VMware vCenter Installer for the version you want to upgrade to, select vCenter Server fromthe list.
■ If applying an update, when prompted, select Do not overwrite, leave the existing database in place
■ If upgrading, when prompted, select Upgrade existing vCenter Server database
9 Continue with vCenter Server installation and record all configuration settings used.
Note On the vCenter Server service account information page, VMware recommends providing the samecredentials used for the current service (open the Service Control Manager and check the Logon Asaccount for VMware VirtualCenter Server service).
10 If asked, do not reboot the node.
11 You have the following options:
■ If the upgrade on the Secondary node is successful, go to Step 13.
■ If the upgrade on the Secondary node is not successful, research the cause of the upgrade failure.If the issue can be resolved then it is safe to proceed with Step 13, otherwise go to Step 12 to revertto a previous version.
12 To revert to a previous version:
a Uninstall the upgraded components.
b On the Secondary node, launch the vCenter Server Heartbeat Configure Server wizard and click theMachine tab. In the Current Role section, choose Passive and click Finish.
c Reboot the node. vCenter Server Heartbeat starts and vCenter Server is stopped.
d On the Primary node, launch the vCenter Server Heartbeat Configure Server wizard and click theMachine tab. In the Current Role section, choose Active and click Finish.
e Restart vCenter Server Heartbeat on the Primary node and allow the system to synchronize.
f Start the vCenter Server Heartbeat Console and check that the system completes the Full SystemCheck.
13 Once the vCenter Server upgrade process ends successfully, VMware recommends that you upgrade theexisting extensions on the node. Details for each component upgrade can be found below.
Important You must upgrade vCenter Server before upgrading vCenter Support Tools.
58 VMware, Inc.
Unattended Installation on Windows Server 2008/2012

14 Upgrade VMware vSphere ESXi Dump Collector (Optional).
a Start VMware vCenter Installer for the version you want to upgrade to and select VMware vSphereESXi Dump Collector from the list.
b Provide vCenter Server, VMware vSphere ESXi Dump Collector information and record all configurationsettings used.
c In the event that errors are encountered during the upgrade process, research the cause of theupgrade failure. If the issue can be resolved then it is safe to proceed with the upgrade procedure.
15 Upgrade VMware vSphere Syslog Collector (Optional).
a Start VMware vCenter Installer for the version you want to upgrade to and select VMware vSphereSyslog Collector from the list.
b Provide vCenter Server, VMware vSphere Syslog Collector information and record all configurationsettings used.
c In the event that errors are encountered during the upgrade process, research the cause of theupgrade failure. If the issue can be resolved then it is safe to proceed with the upgrade procedure.
16 Upgrade VMware vSphere Auto Deploy (Optional).
a Start VMware vCenter Installer for the version you want to upgrade to and select VMware vSphereAuto Deploy from the list.
b Provide vCenter Server, VMware vSphere Auto Deploy information and record all configuration settingsused.
c In the event that errors are encountered during the upgrade process, research the cause of theupgrade failure. If the issue can be resolved then it is safe to proceed with the upgrade procedure.
17 Upgrade VMware vSphere Authentication Proxy (Optional).
a Start VMware vCenter Installer for the version you want to upgrade to and select VMware AuthenticationProxy from the list.
b Provide vCenter Server, VMware Authentication Proxy information and record all configuration settingsused.
c In the event that errors are encountered during the upgrade process, research the cause of theupgrade failure. If the issue can be resolved then it is safe to proceed with the upgrade procedure.
18 Upgrading Update Manager (Optional).
This procedure assumes you have already upgraded vCenter Server on Secondary node. During thevCenter Update Manager upgrade process, record all configuration settings used (vCenter Serverinformation, Database information, port settings) as these will be required when upgrading the Primarynode.
Note The VMware Update Manager database must be running before attempting to upgrade VMwareUpdate Manager.
a Start VMware vCenter Installer for the version you want to upgrade to and select vCenter UpdateManager from the list.
Important Perform a backup of the existing Update Manager database before proceeding with thenext step.
b On the Database Upgrade page select the option Yes, I want to upgrade the Update Manager database.
c Continue with the install process.
d Once the upgrade is complete, verify that vCenter Update Manager is operational.
VMware, Inc. 59
Chapter 7 Upgrading

19 Verify that vCenter Server and all updated extensions are operational.
20 Change the node's role to Secondary/passive:
a Launch the vCenter Server Heartbeat Configure Server wizard and click the Machine tab.
b In the Active Server section, change the node's role for the Primary node to Active and click Finish.
21 Start VMware vCenter Server Heartbeat on the Secondary node only.
22 Reboot Secondary node.
The upgrade process continues on the Primary node.
Upgrading the vCenter Server 5.0, 5.1 or 5.5 Primary Node
Continuation of the upgrade process assumes the upgrade of the Secondary node completed successfully.
Prerequisites
Before proceeding with the upgrade procedure, perform a restore of the vCenter Server database and SSLcertificates that were backed up at Step 4 on the Secondary node.
Procedure
1 Change the node's role to Primary/active:
a Launch the vCenter Server Heartbeat Configure Server wizard and click the Machine tab. Changethe role for the current (Primary) node to Active and click Finish.
b Using the Service Control Manager, start the VMware vCenter Server Heartbeat service.
c Using the vCenter Server Heartbeat Console, verify that all status icons on the Server: Summarypage are green indicating that the Start process has completed and all protected services are started.
d Using the Service Control Manager, stop the VMware vCenter Server Heartbeat service.
2 Using VMware vCenter Installer for the version you want to upgrade to, select VMware vCenter InventoryService from the list.
3 When prompted, select Do not overwrite. Leave my existing database in place.
4 From the VMware vCenter Installer for the version you want to upgrade to, select vCenter Server from thelist.
■ If applying an update, on the Database re-initialization warning page, select the Do not overwrite,leave my existing database in place option and proceed with the installation process.
■ If applying an upgrade on the Database Upgrade warning page, select Upgrade existing vCenterServer database option and proceed with the installation process.
5 Continue with vCenter Server installation, using the identical configuration settings as used for installationon the Secondary node.
6 Once the vCenter Server upgrade process ends successfully, VMware recommends that you upgrade theexisting extensions on the node. Details for each component upgrade can be found below.
Important You must upgrade vCenter Server before upgrading vCenter Support Tools.
60 VMware, Inc.
Unattended Installation on Windows Server 2008/2012

7 Upgrade VMware vSphere ESXi Dump Collector (Optional).
a Start VMware vCenter Installer for the version you want to upgrade to and select VMware vSphereESXi Dump Collector from the list.
b Provide vCenter Server, VMware vSphere ESXi Dump Collector information and record all configurationsettings used.
c In the event that errors are encountered during the upgrade process, research the cause of theupgrade failure. If the issue can be resolved then it is safe to proceed with the upgrade procedure.
8 Upgrade VMware vSphere Syslog Collector (Optional).
a Start VMware vCenter Installer for the version you want to upgrade to and select VMware vSphereSyslog Collector from the list.
b Provide vCenter Server, VMware vSphere Syslog Collector information and record all configurationsettings used.
c In the event that errors are encountered during the upgrade process, research the cause of theupgrade failure. If the issue can be resolved then it is safe to proceed with the upgrade procedure.
9 Upgrade VMware vSphere Auto Deploy (Optional).
a Start VMware vCenter Installer for the version you want to upgrade to and select VMware vSphereAuto Deploy from the list.
b Provide vCenter Server, VMware vSphere Auto Deploy information and record all configuration settingsused.
c In the event that errors are encountered during the upgrade process, research the cause of theupgrade failure. If the issue can be resolved then it is safe to proceed with the upgrade procedure.
10 Upgrade VMware vSphere Authentication Proxy (Optional).
a Start VMware vCenter Installer for the version you want to upgrade to and select VMware AuthenticationProxy from the list.
b Provide vCenter Server, VMware Authentication Proxy information and record all configuration settingsused.
c In the event that errors are encountered during the upgrade process, research the cause of theupgrade failure. If the issue can be resolved then it is safe to proceed with the upgrade procedure.
11 Upgrade VMware vSphere Web Client (Optional)
a Start VMware vCenter Installer for the version you want to upgrade to and select VMware vSphereWeb Client from the list.
b Proceed with the installation.
c In the event that errors are encountered during the upgrade process, research the cause of theupgrade. If the issue can be resolved then it is safe to proceed with the upgrade procedure.
VMware, Inc. 61
Chapter 7 Upgrading
12 Upgrading Update Manager (Optional)
Note The VMware Update Manager database must be running before attempting to upgrade VMwareUpdate Manager.
a Using the Service Control Manager, start the VMware vCenter Server service.
b Start VMware vCenter Installer for the version you want to upgrade to and select vCenter UpdateManager from the list.
c During the vCenter Update Manager upgrade, provide the same configuration settings used duringthe upgrade process on the Secondary node.
Important Before proceeding with the database upgrade, perform a backup of the existing vCenterUpdate Manager database.
d On the Database re-initialization warning page, select Do not overwrite, leave my existing databasein place option and proceed with the installation process.
e Once the upgrade is complete, verify that vCenter Update Manager is operational.
13 Verify that vCenter Server and all updated extensions are operational.
14 Using the Service Control Manager, configure VMware vCenter Server Heartbeat service Startup Typeto Automatic on both Primary and Secondary nodes.
15 Start vCenter Server Heartbeat on both nodes.
16 Launch the vCenter Server Heartbeat Console and connect to the node pair.
a Check that the system completes the Full System Check and is replicating.
b Navigate to the vCenter Server Heartbeat Console Application: Tasks page and manually run theProtected Service Discovery task.
Troubleshooting
If vCenter Server fails to start on the Secondary node following a manual failover, perform the following steps.
Procedure
1 Shutdown vCenter Server Heartbeat.
2 Launch the Configure Server wizard and set the Secondary node's role to Passive.
3 Start vCenter Server Heartbeat on the Secondary node.
4 Start the Configure Server wizard on the Primary node and set the node's role to Active.
5 Start vCenter Server Heartbeat on the Primary node.
6 Launch the vCenter Server Heartbeat Console and verify that the system completes the Full SystemCheck.
7 Investigate the cause of the vCenter Server failure on the Secondary node.
62 VMware, Inc.
Unattended Installation on Windows Server 2008/2012

Upgrading vCenter Server 5.0, 5.1 or 5.5 to vCenter Server 5.5 Update2 when SQL Database is Local and vCenter Server Heartbeat is Installed
The following procedure assumes that vCenter Server Heartbeat is installed and protecting vCenter Server5.0, 5.1 or 5.5 using a local SQL Database. This procedure provides step-by-step instructions to perform anupgrade of vCenter Server 5.0, 5.1 or 5.5 to vCenter Server 5.5 Update 2 with vCenter Server Heartbeatinstalled. For information about upgrading from other versions of vCenter Server with vCenter Server Heartbeatinstalled to vCenter Server 5.5 Update 2, see knowledge base article 1034131 - Upgrading or applying updatesto vCenter Server 4.0 and later when protected by vCenter Server Heartbeat local SQL database.
Upgrading the vCenter Server 5.0, 5.1 or 5.5 Secondary Node
Prerequisites
Before attempting to upgrade from vCenter Server 5.0 or 5.1 to vCenter Server 5.5 you must install the VMwarevSphere Single Sign-On (SSO) 5.5 Update 2 component separately on a different machine (not on the Primaryor Secondary node) and then protect SSO on the separate machine with vCenter Server Heartbeat. If upgradingfrom vCenter Server 5.5 to vCenter Server 5.5 Update 2 then proceed straight to the steps below.
Procedure
1 If the Primary node is active, use vCenter Server Heartbeat Console on the Secondary node to performa manual failover to make the Secondary node active. If the Secondary node is currently active, go to Step2.
2 Shutdown vCenter Server Heartbeat on both the Primary and Secondary nodes, leaving the protectedapplications running on Secondary (active) node.
3 Using the Service Control Manager, configure VMware vCenter Server Heartbeat service Startup Typeto Manual on both Primary and Secondary nodes.
4 Before proceeding with the upgrade procedure, perform a backup of the existing vCenter Server databaseand SSL certificates.
5 Upgrade VMware vSphere Web Client
a Start VMware vCenter Installer for the version you want to upgrade to and select VMware vSphereWeb Client from the list.
b Proceed with the installation.
c In the event that errors are encountered during the upgrade process, research the cause of theupgrade. If the issue can be resolved then it is safe to proceed with the upgrade procedure.
6 Start VMware vCenter Installer for the version you want to upgrade to and select VMware vCenter InventoryService from the list.
Note If you attempt to upgrade vCenter Server before upgrading the Inventory Service, a warning isdisplayed and the upgrade will not be allowed to proceed.
7 Start VMware vCenter Installer for the version you want to upgrade to and select vCenter Server from thelist.
8 Proceed with the setup, selecting the correct ODBC data source and database server credentials.
If other components are installed, vCenter Server Setup will warn about the need to upgrade them as well.
VMware, Inc. 63
Chapter 7 Upgrading
9 You have the following options: otherwise,
■ If applying an update, when prompted, select the Do not overwrite, leave my existing database inplace option and continue with the update procedure.
■ If this is an upgrade, when prompted, select Upgrade existing vCenter Server Database and chooseto Automatically upgrade the vCenter Agent. Continue with the upgrade procedure.
10 Once the vCenter Server upgrade process ends successfully, VMware recommends that you upgrade theexisting extensions on the node. Details for each component upgrade can be found below.
Important You must upgrade vCenter Server before upgrading vCenter Support Tools. When upgradingcomponents, you must use the Fully Qualified Domain Name (FQDN) and not the Public Service Name.
11 Upgrade VMware vSphere ESXi Dump Collector (Optional).
a Start VMware vCenter Installer for the version you want to upgrade to and select VMware vSphereESXi Dump Collector from the list.
b Provide vCenter Server, VMware vSphere ESXi Dump Collector information and record all configurationsettings used.
c In the event that errors are encountered during the upgrade process, research the cause of theupgrade failure. If the issue can be resolved then it is safe to proceed with the upgrade procedure.
12 Upgrade VMware vSphere Syslog Collector (Optional).
a Start VMware vCenter Installer for the version you want to upgrade to and select VMware vSphereSyslog Collector from the list.
b Provide vCenter Server, VMware vSphere Syslog Collector information and record all configurationsettings used.
c In the event that errors are encountered during the upgrade process, research the cause of theupgrade failure. If the issue can be resolved then it is safe to proceed with the upgrade procedure.
13 Upgrade VMware vSphere Auto Deploy (Optional).
a Start VMware vCenter Installer for the version you want to upgrade to and select VMware vSphereAuto Deploy from the list.
b Provide vCenter Server, VMware vSphere Auto Deploy information and record all configuration settingsused.
c In the event that errors are encountered during the upgrade process, research the cause of theupgrade failure. If the issue can be resolved then it is safe to proceed with the upgrade procedure.
14 Upgrade VMware vSphere Authentication Proxy (Optional).
a Start VMware vCenter Installer for the version you want to upgrade to and select VMware AuthenticationProxy from the list.
b Provide vCenter Server, VMware Authentication Proxy information and record all configuration settingsused.
Note If you encounter an Authentication proxy logon failure or a warning that the specified userdoesn't exist, acknowledge and continue the upgrade procedure.
c In the event that errors are encountered during the upgrade process, research the cause of theupgrade failure. If the issue can be resolved then it is safe to proceed with the upgrade procedure.
64 VMware, Inc.
Unattended Installation on Windows Server 2008/2012

15 Upgrading Update Manager (Optional).
This procedure assumes you have already upgraded vCenter Server on Secondary node. During thevCenter Update Manager upgrade process, record all configuration settings used (vCenter Serverinformation, Database information, port settings) as these will be required when upgrading the Primarynode.
Note The VMware Update Manager database must be running before attempting to upgrade VMwareUpdate Manager.
a Start VMware vCenter Installer for the version you want to upgrade to (should be the same installerused for vCenter Server upgrade) and select vCenter Update Manager from the list.
Important Perform a backup of the existing Update Manager database before proceeding with thenext step.
b Provide vCenter Server and database information, and record all configuration settings used.
c On the Database Upgrade page select the option Yes, I want to upgrade the Update Manager database.
d In the event errors are encountered during the installation, research the cause of the upgrade failure.If the issue can be resolved then it is safe to proceed with the upgrade procedure, otherwise revertto a previous version.
e Once the upgrade is complete, verify that vCenter Update Manager is operational.
16 Verify that vCenter Server and all updated extensions are operational
17 You have the following options:
■ If the upgrade on the Secondary node is successful, go to Step 19.
■ If the upgrade on the Secondary node was not successful, research the cause of the upgrade failure.If the issue can be resolved, then it is safe to proceed with Step 19, otherwise, go to Step 18 to revertto a previous version.
18 To revert to a previous version:
a Uninstall the upgraded components.
b On the Secondary node, launch the vCenter Server Heartbeat Configure Server wizard and click theMachine tab. Change the node's Role to Secondary/passive.
c Reboot the node. vCenter Server Heartbeat starts and vCenter Server is stopped
d On the Primary node, launch the vCenter Server Heartbeat Configure Server wizard and click theMachine tab. Change the node's Role to Primary/active.
e Restart vCenter Server Heartbeat on the Primary node and allow the system to synchronize.
f Start the vCenter Server Heartbeat Console and verify that the system completes the Full SystemCheck.
19 Change the node's role to Secondary/passive:
a Launch the vCenter Server Heartbeat Configure Server wizard and click the Machine tab.
b Change the node's Role to Secondary/passive and click Finish.
20 Start VMware vCenter Server Heartbeat on the Secondary node only.
21 Reboot Secondary node. The upgrade process continues on the Primary node.
VMware, Inc. 65
Chapter 7 Upgrading
Upgrading the vCenter Server 5.0, 5.1 or 5.5 Primary Node
Continuation of the upgrade process assumes the upgrade of the Secondary node completed successfully.
Procedure
1 Change the node's role to Primary/active:
a Launch the vCenter Server Heartbeat Configure Server wizard and click the Machine tab. Changethe node's role for the current (Primary) node to active and click Finish.
b Using the Service Control Manager, start the VMware vCenter Server Heartbeat service.
c Using the vCenter Server Heartbeat Console, verify that all status icons on the Server: Summarypage are green indicating that the Start process has completed.
d Using the Service Control Manager, stop the VMware vCenter Server Heartbeat service.
2 Start VMware vCenter Installer for the version you want to upgrade to and select VMware vCenter InventoryService from the list.
Note If you attempt to upgrade vCenter Server before upgrading the Inventory Service, a warning isdisplayed and the upgrade will not be allowed to proceed.
3 Using the VMware vCenter Installer for the version you want to upgrade to, select vCenter Server fromthe list.
4 Proceed with the setup, selecting the correct ODBC data source and database server credentials.
If other components are installed, vCenter Server Setup warns about the need to upgrade them as well.
5 You have the following options:, otherwise
■ If applying an update, when prompted, select the Do not overwrite, leave my existing database inplace and continue the update procedure.
■ If this is an upgrade, when prompted, select Upgrade existing vCenter Server database and chooseto Automatically upgrade the vCenter Agent. Continue the upgrade procedure.
6 Once the vCenter Server upgrade process ends successfully, VMware recommends that you upgrade theexisting extensions on the node. Details for each component upgrade can be found below.
Important You must upgrade vCenter Server before upgrading vCenter Support Tools. When upgradingcomponents, you must use the Fully Qualified Domain Name (FQDN) and not the Public Service Name.
7 Upgrade VMware vSphere ESXi Dump Collector (Optional).
a Start VMware vCenter Installer for the version you want to upgrade to and select VMware vSphereESXi Dump Collector from the list.
b Provide vCenter Server, VMware vSphere ESXi Dump Collector information and record all configurationsettings used.
c In the event that errors are encountered during the upgrade process, research the cause of theupgrade failure. If the issue can be resolved then it is safe to proceed with the upgrade procedure.
66 VMware, Inc.
Unattended Installation on Windows Server 2008/2012
8 Upgrade VMware vSphere Syslog Collector (Optional).
a Start VMware vCenter Installer for the version you want to upgrade to and select VMware vSphereSyslog Collector from the list.
b Provide vCenter Server, VMware vSphere Syslog Collector information and record all configurationsettings used.
c In the event that errors are encountered during the upgrade process, research the cause of theupgrade failure. If the issue can be resolved then it is safe to proceed with the upgrade procedure.
9 Upgrade VMware vSphere Auto Deploy (Optional).
a Start VMware vCenter Installer for the version you want to upgrade to and select VMware vSphereAuto Deploy from the list.
b Provide vCenter Server, VMware vSphere Auto Deploy information and record all configuration settingsused.
c In the event that errors are encountered during the upgrade process, research the cause of theupgrade failure. If the issue can be resolved then it is safe to proceed with the upgrade procedure.
10 Upgrade VMware vSphere Authentication Proxy (Optional).
a Start VMware vCenter Installer for the version you want to upgrade to and select VMware AuthenticationProxy from the list.
b Provide vCenter Server, VMware Authentication Proxy information and record all configuration settingsused.
c In the event that errors are encountered during the upgrade process, research the cause of theupgrade failure. If the issue can be resolved then it is safe to proceed with the upgrade procedure.
11 Upgrade VMware vSphere Web Client (Optional)
a Start VMware vCenter Installer for the version you want to upgrade to and select VMware vSphereWeb Client from the list.
b Proceed with the installation.
c In the event that errors are encountered during the upgrade process, research the cause of theupgrade. If the issue can be resolved then it is safe to proceed with the upgrade procedure.
VMware, Inc. 67
Chapter 7 Upgrading
12 Upgrading Update Manager (Optional)
Note The VMware Update Manager database must be running before attempting to upgrade VMwareUpdate Manager.
a Using the Service Control Manager, start the VMware vCenter Server service.
b Start VMware vCenter Installer for the version you want to upgrade to and select vCenter UpdateManager from the list.
c During the vCenter Update Manager upgrade, provide the same configuration settings used duringthe upgrade process on the Secondary node.
d On the Database re-initialization warning page, select Do not overwrite, leave my existing databasein place option and proceed with the installation process.
Important Before proceeding with the database upgrade, perform a backup of the existing vCenterUpdate Manager database.
e On the Database Upgrade page, select the option Yes, I want to upgrade my Update Managerdatabase.
f In the event errors are encountered during the installation, research the cause of the upgrade failure.If the issue can be resolved then it is safe to proceed with the upgrade procedure.
g Once the upgrade is complete, verify that vCenter Update Manager is operational.
13 Verify that vCenter Server and all updated extensions are operational.
14 Using the Service Control Manager, configure VMware vCenter Server Heartbeat service Startup Type toAutomatic on both Primary and Secondary nodes.
15 Start vCenter Server Heartbeat on both nodes.
16 Launch the vCenter Server Heartbeat Console and connect to the pair.
a Check that the system completes the Full System Check and is replicating.
b Navigate to the vCenter Server Heartbeat Console Application: Tasks page and manually run theProtected Service Discovery task.
Troubleshooting
If vCenter Server fails to start on the Secondary node following a manual failover, perform the following steps.
Procedure
1 Shutdown vCenter Server Heartbeat.
2 Launch the Configure Server wizard and set the Secondary node's role to Passive.
3 Start vCenter Server Heartbeat on the Secondary node.
4 Start the Configure Server wizard on the Primary node and set the node's role to Active.
5 Start vCenter Server Heartbeat on the Primary node.
6 Launch the vCenter Server Heartbeat Console and verify that the system completes the Full SystemCheck.
7 Investigate the cause of the vCenter Server failure on the Secondary node.
68 VMware, Inc.
Unattended Installation on Windows Server 2008/2012

8Installation Verification Testing
Important The following procedure provides information about performing Installation Verification testing ona vCenter Server Heartbeat Pair to ensure proper installation and configuration. Additionally, this procedureprovides step-by-step procedures to perform a manual failover in the event of an application failure andautomated failover in the event of network or hardware failure resulting in excessive missed heartbeats.
Note In this document, the term “Pair” refers to a vCenter Server Heartbeat Pair. Refer to the “Glossary,” onpage 85 for more information about vCenter Server Heartbeat Pairs.
This chapter includes the following topics:
■ “Exercise 1 — Auto-failover,” on page 69
■ “Exercise 2 - Data Verification,” on page 71
■ “Exercise 3 - Manual Failover,” on page 72
Exercise 1 — Auto-failover
VMware vCenter Server Heartbeat monitors vCenter Server services and the system environment to ensurethat protected services are available for end users. To monitor services and the system environment, vCenterServer Heartbeat uses plug-ins which are designed specially for VMware services and the system.
If a protected service or the system begins to operate outside of preconfigured thresholds, vCenter ServerHeartbeat can automatically failover to and make the passive node active to continuously provide services forend users.
Important These exercises are examples and should be performed in order. VMware recommends againstattempting to test failover on a properly operating pair by methods such as unplugging a power cord. At themoment power is lost, any data not written to the passive node is lost. VMware recommends that all actionsintended to verify operation of the passive node be performed as a manual failover rather than an automatedfailover.
VMware, Inc. 69
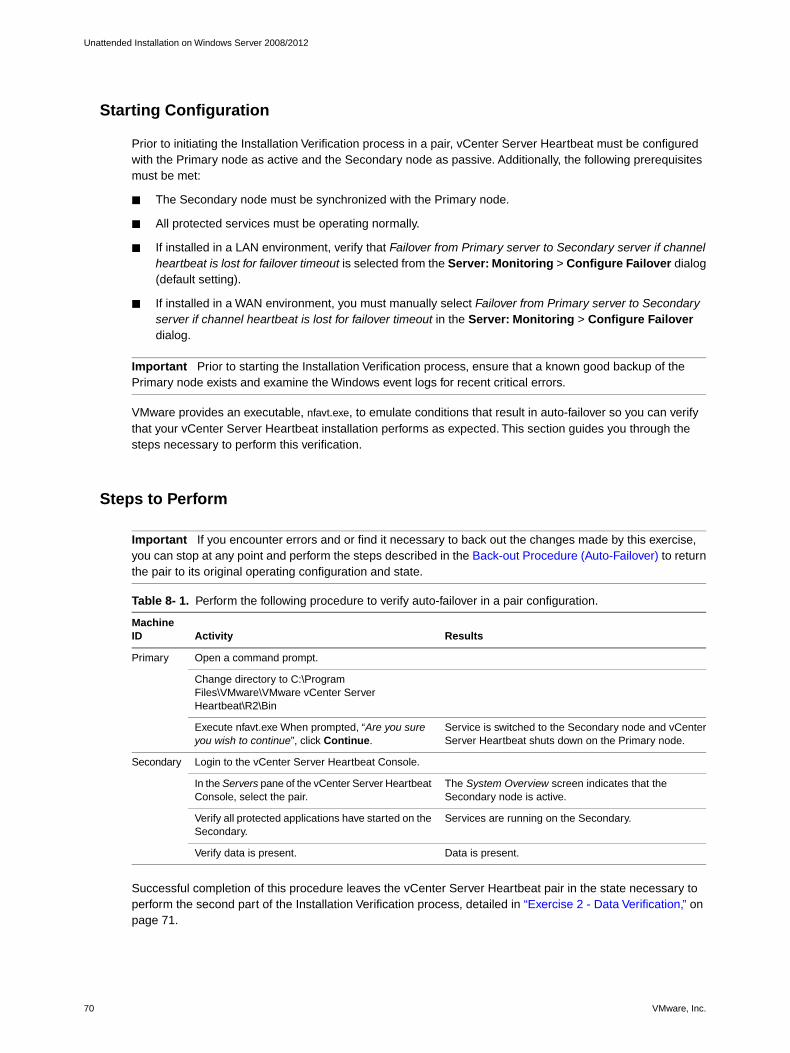
Starting Configuration
Prior to initiating the Installation Verification process in a pair, vCenter Server Heartbeat must be configuredwith the Primary node as active and the Secondary node as passive. Additionally, the following prerequisitesmust be met:
■ The Secondary node must be synchronized with the Primary node.
■ All protected services must be operating normally.
■ If installed in a LAN environment, verify that Failover from Primary server to Secondary server if channelheartbeat is lost for failover timeout is selected from the Server: Monitoring > Configure Failover dialog(default setting).
■ If installed in a WAN environment, you must manually select Failover from Primary server to Secondaryserver if channel heartbeat is lost for failover timeout in the Server: Monitoring > Configure Failoverdialog.
Important Prior to starting the Installation Verification process, ensure that a known good backup of thePrimary node exists and examine the Windows event logs for recent critical errors.
VMware provides an executable, nfavt.exe, to emulate conditions that result in auto-failover so you can verifythat your vCenter Server Heartbeat installation performs as expected. This section guides you through thesteps necessary to perform this verification.
Steps to Perform
Important If you encounter errors and or find it necessary to back out the changes made by this exercise,you can stop at any point and perform the steps described in the Back-out Procedure (Auto-Failover) to returnthe pair to its original operating configuration and state.
Table 8- 1. Perform the following procedure to verify auto-failover in a pair configuration.
ResultsActivityMachineID
Open a command prompt.Primary
Change directory to C:\ProgramFiles\VMware\VMware vCenter ServerHeartbeat\R2\Bin
Service is switched to the Secondary node and vCenterServer Heartbeat shuts down on the Primary node.
Execute nfavt.exe When prompted, “Are you sureyou wish to continue”, click Continue.
Login to the vCenter Server Heartbeat Console.Secondary
The System Overview screen indicates that theSecondary node is active.
In the Servers pane of the vCenter Server HeartbeatConsole, select the pair.
Services are running on the Secondary.Verify all protected applications have started on theSecondary.
Data is present.Verify data is present.
Successful completion of this procedure leaves the vCenter Server Heartbeat pair in the state necessary toperform the second part of the Installation Verification process, detailed in “Exercise 2 - Data Verification,” onpage 71.
70 VMware, Inc.
Unattended Installation on Windows Server 2008/2012

Back-out Procedure (Auto-Failover)
Important Do not perform this back-out procedure if you intend to continue the Installation Verification process.
If for any reason you find it necessary to back out of this exercise, you can stop at any point and return thepair to the state it was in at the beginning of this exercise by performing the following steps:
1 Shut down vCenter Server Heartbeat and protected services on all nodes.
2 Complete the following on both nodes:
a Open the Configure Server wizard.
b Select the Machine tab.
c Select the Primary node as active.
d Click Finish.
3 On the Secondary node, right-click the taskbar icon and select Start vCenter Server Heartbeat.
4 Verify that the Secondary node is passive (S/–).
5 On the Primary node, right-click the taskbar icon and select Start vCenter Server Heartbeat.
6 After vCenter Server Heartbeat starts, login to the vCenter Server Heartbeat Console.
7 Verify that applications have started and replication to the passive node has resumed.
Exercise 2 - Data Verification
The Data Verification exercise validates that data is synchronized between the nodes resulting in current dataon the active node following the auto-failover exercise performed previously. The objective is to take a workingactive node (the Secondary node) and synchronize it with the passive (Primary node). This exercise alsodemonstrates that all the correct services stopped when the Primary node became passive.
Starting Configuration
vCenter Server Heartbeat is running on the Secondary active node. Using the System Tray icon, verify thatthe node status displays S/A. vCenter Server Heartbeat is not running on the Primary node which is set topassive. Using the System Tray icon, verify that the node status displays -/- to indicate that vCenter ServerHeartbeat is not running.
VMware, Inc. 71
Chapter 8 Installation Verification Testing
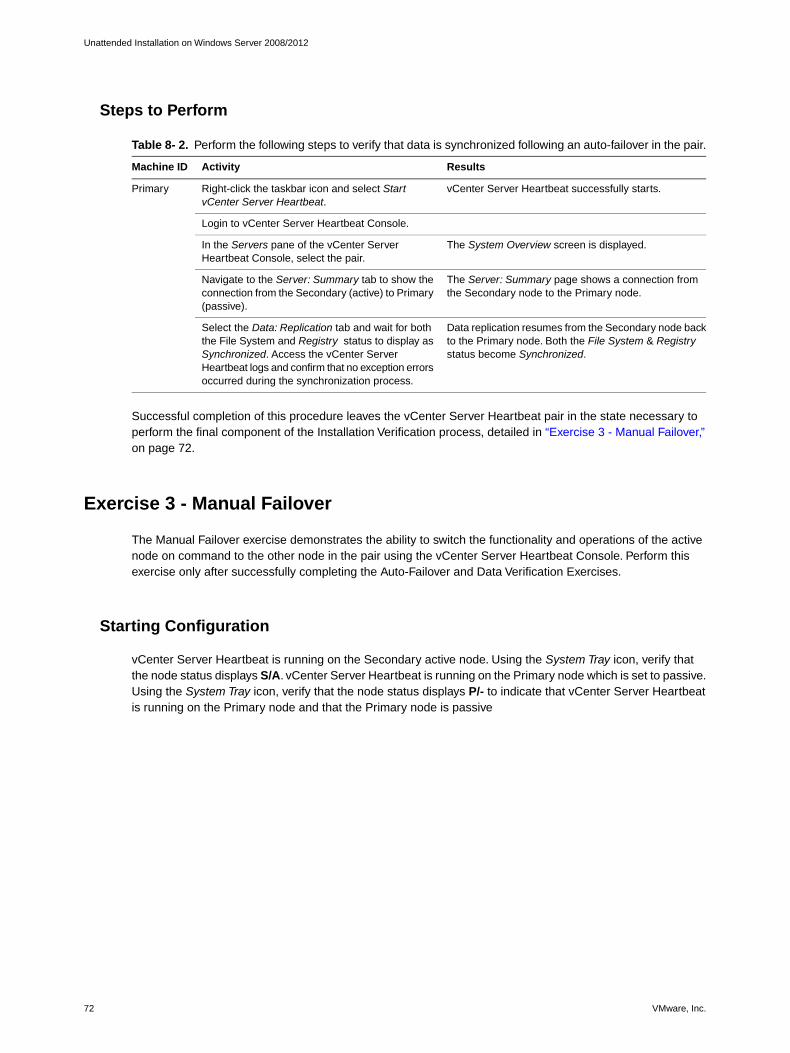
Steps to Perform
Table 8- 2. Perform the following steps to verify that data is synchronized following an auto-failover in the pair.
ResultsActivityMachine ID
vCenter Server Heartbeat successfully starts.Right-click the taskbar icon and select StartvCenter Server Heartbeat.
Primary
Login to vCenter Server Heartbeat Console.
The System Overview screen is displayed.In the Servers pane of the vCenter ServerHeartbeat Console, select the pair.
The Server: Summary page shows a connection fromthe Secondary node to the Primary node.
Navigate to the Server: Summary tab to show theconnection from the Secondary (active) to Primary(passive).
Data replication resumes from the Secondary node backto the Primary node. Both the File System & Registrystatus become Synchronized.
Select the Data: Replication tab and wait for boththe File System and Registry status to display asSynchronized. Access the vCenter ServerHeartbeat logs and confirm that no exception errorsoccurred during the synchronization process.
Successful completion of this procedure leaves the vCenter Server Heartbeat pair in the state necessary toperform the final component of the Installation Verification process, detailed in “Exercise 3 - Manual Failover,”on page 72.
Exercise 3 - Manual Failover
The Manual Failover exercise demonstrates the ability to switch the functionality and operations of the activenode on command to the other node in the pair using the vCenter Server Heartbeat Console. Perform thisexercise only after successfully completing the Auto-Failover and Data Verification Exercises.
Starting Configuration
vCenter Server Heartbeat is running on the Secondary active node. Using the System Tray icon, verify thatthe node status displays S/A. vCenter Server Heartbeat is running on the Primary node which is set to passive.Using the System Tray icon, verify that the node status displays P/- to indicate that vCenter Server Heartbeatis running on the Primary node and that the Primary node is passive
72 VMware, Inc.
Unattended Installation on Windows Server 2008/2012
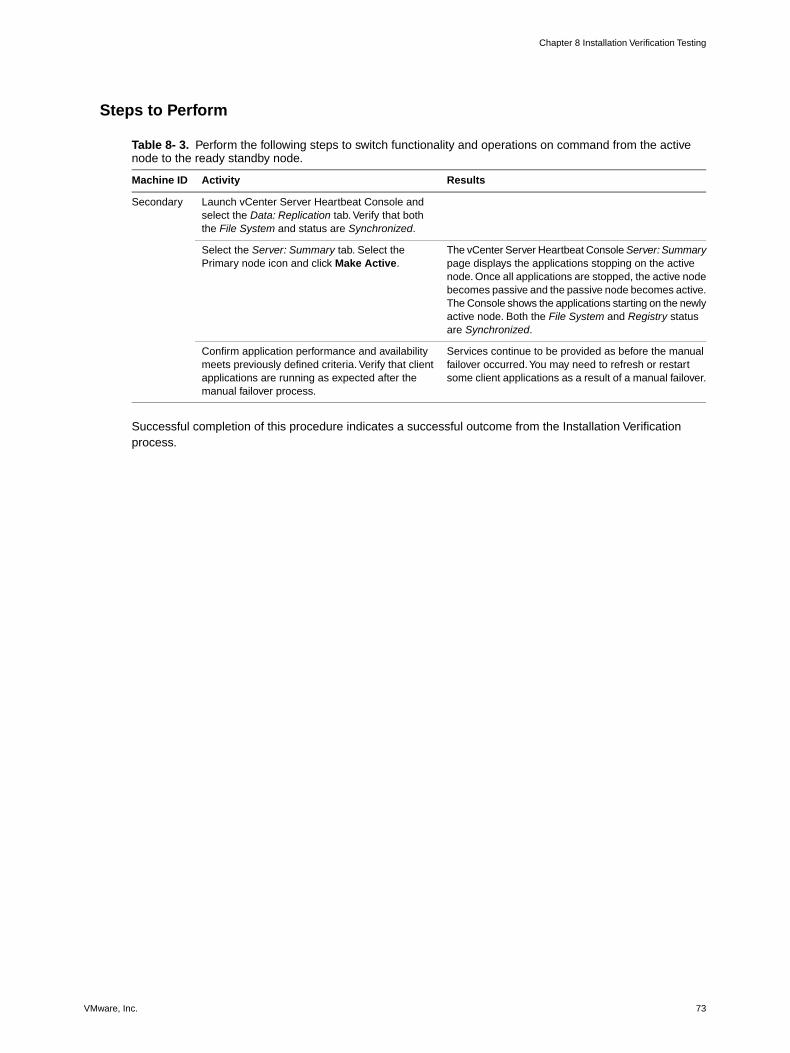
Steps to Perform
Table 8- 3. Perform the following steps to switch functionality and operations on command from the activenode to the ready standby node.
ResultsActivityMachine ID
Launch vCenter Server Heartbeat Console andselect the Data: Replication tab. Verify that boththe File System and status are Synchronized.
Secondary
The vCenter Server Heartbeat Console Server: Summarypage displays the applications stopping on the activenode. Once all applications are stopped, the active nodebecomes passive and the passive node becomes active.The Console shows the applications starting on the newlyactive node. Both the File System and Registry statusare Synchronized.
Select the Server: Summary tab. Select thePrimary node icon and click Make Active.
Services continue to be provided as before the manualfailover occurred.You may need to refresh or restartsome client applications as a result of a manual failover.
Confirm application performance and availabilitymeets previously defined criteria. Verify that clientapplications are running as expected after themanual failover process.
Successful completion of this procedure indicates a successful outcome from the Installation Verificationprocess.
VMware, Inc. 73
Chapter 8 Installation Verification Testing

74 VMware, Inc.
Unattended Installation on Windows Server 2008/2012

APre-Installation Checklist
The following checklist is provided to assist you in preparing for installation of vCenter Server Heartbeat.
Verify that the Primary node is a member of the domain.
Verify that the Primary node is assigned the name to be used for the vCenter Service name (Both the Primary andSecondary nodes will be renamed during installation).
Verify that UAC has been disabled on both the Primary and Secondary nodes.
Verify that other than vCenter Server, its components, and SQL server, no other business critical applications areinstalled on the Primary server.
Verify that vCenter Guided Consolidation, vCenter Update Manager, vCenter Converter, ESXi Dump Collector, SyslogCollector, Auto Deploy, and Authentication Proxy are configured using Fully Qualified Domain Names (FQDN) ratherthan IP addresses
Verify that there is a minimum of 1GB of available RAM (2GB recommended) in addition to any other memoryrequirements for the Operating System or vCenter Server
Verify that a minimum 2GB of free disk space is available on the installation drive for vCenter Server Heartbeat.
Verify that local administrator rights are being used to perform vCenter Server Heartbeat installation.
Verify that the latest Microsoft security updates are installed.
Verify that all applications/components to be protected by vCenter Server Heartbeat are installed and configured onthe Primary node.
Verify that both Primary and Secondary nodes have identical system date, time, and time zone settings.
Verify that the VMware Channel IP addresses have been properly configured on the VMware Channel NICs.
Primary Channel IP _______________
Secondary Channel IP _______________
Verify that the Public IP address has been configured on the Primary Public NICs (LAN) or Primary and SecondaryPublic NICs (WAN).
Primary Public IP _______________
Secondary Public IP (WAN only) _______________
Verify that Management IP addresses have been configured on the Public NICs using the same subnet as the PublicIP and adjacent to the Public IP.
Primary Management IP _______________
Secondary Management IP _______________
Verify that the Managed IP setting displayed in the Virtual Infrastructure Client is the same IP address used for thevCenter Server Heartbeat Public IP address.
VMware, Inc. 75

Verify that Windows Server Backup Feature and Command Line Tools are installed on the Primary and Secondarynodes (V2V only).
Verify that all services to be protected are running or set to Automatic prior to installation.
Configure any firewalls to allow traffic to pass through both the Client Connection port (52267) and the Default Channelport ( 57348).
76 VMware, Inc.
Unattended Installation on Windows Server 2008/2012

BSetup Error Messages
Table B- 1. Setup Error Messages
TestLevelSecPriMessage
Check that the file adheres to thecorrect formatting and structure for usein analysis on the Secondary.
CriticalStop
YesNo10 – ‘The pre install check data file does not havethe correct format. Setup cannot continue’.
Check that the analyzer and collectordlls are compatible.
CriticalStop
YesNoSetup has detected incompatible versions of thecollector version $x and the analyzer version $ydll. This would suggest different versions of Setuphave been run on the Primary and Secondaryservers.
Check file format is correct.CriticalStop
Yes–File $x cannot be analyzed it may be corrupt Setupis unable to continue. If the file has been openedcheck that it has not been saved with Word Wrap.
Test whether the node is a domaincontroller.
CriticalStop
YesYes190 – This server is a #1# domain controller.vCenter Server Heartbeat must not be installedon a domain controller.
Test for /3GB on Windows 2000CriticalStop
YesYes173 – vCenter Server Heartbeat does not supportthe '/3GB' switch on Windows 2000 StandardEdition.
CriticalStop
YesYes175 – vCenter Server Heartbeat requires Windows2003 Standard Edition SP1 or later if '/3GB' switchis on.
WarningYesYes103 - vCenter Server Heartbeat does not support#1#. The following are supported Windows 2000Server SP4 or greater;Windows Server 2003 SP1or greater.
CriticalStop
YesYes200 - Your #1# server uses the Intel ICH7 chipsetand Windows 2000 has been detected. Thiscombination is incompatible with vCenter ServerHeartbeat.
WarningYesYes217 - vCenter Server Heartbeat is not supportedon Windows Storage Server Edition.
Compatibility check on secondary.CriticalStop
Yes–106 - Primary and Secondary OS versions are notidentical, #1# vs. #2#: and require the sameService Pack level.
Compatibility check on secondary.CriticalStop
Yes–208 - You are running a 64-bit version of Windowson one of your servers and a 32-bit version ofWindows on the other. This is not supported.
VMware, Inc. 77
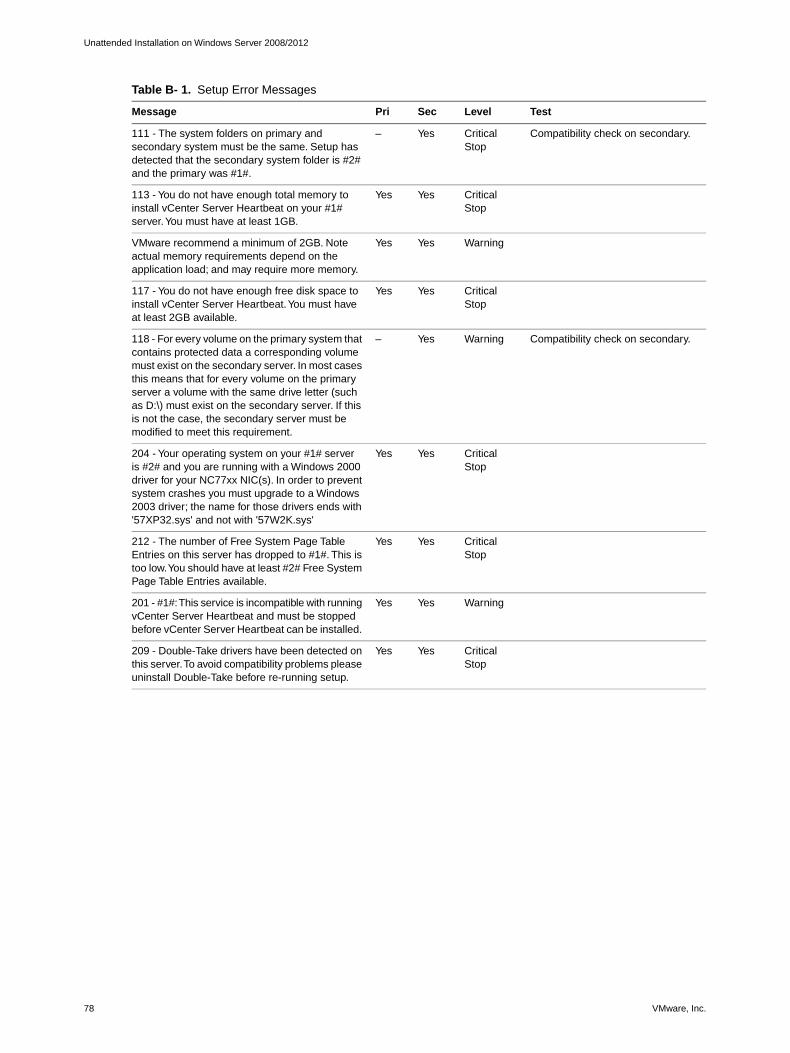
Table B- 1. Setup Error Messages
TestLevelSecPriMessage
Compatibility check on secondary.CriticalStop
Yes–111 - The system folders on primary andsecondary system must be the same. Setup hasdetected that the secondary system folder is #2#and the primary was #1#.
CriticalStop
YesYes113 - You do not have enough total memory toinstall vCenter Server Heartbeat on your #1#server.You must have at least 1GB.
WarningYesYesVMware recommend a minimum of 2GB. Noteactual memory requirements depend on theapplication load; and may require more memory.
CriticalStop
YesYes117 - You do not have enough free disk space toinstall vCenter Server Heartbeat.You must haveat least 2GB available.
Compatibility check on secondary.WarningYes–118 - For every volume on the primary system thatcontains protected data a corresponding volumemust exist on the secondary server. In most casesthis means that for every volume on the primaryserver a volume with the same drive letter (suchas D:\) must exist on the secondary server. If thisis not the case, the secondary server must bemodified to meet this requirement.
CriticalStop
YesYes204 - Your operating system on your #1# serveris #2# and you are running with a Windows 2000driver for your NC77xx NIC(s). In order to preventsystem crashes you must upgrade to a Windows2003 driver; the name for those drivers ends with'57XP32.sys' and not with '57W2K.sys'
CriticalStop
YesYes212 - The number of Free System Page TableEntries on this server has dropped to #1#. This istoo low.You should have at least #2# Free SystemPage Table Entries available.
WarningYesYes201 - #1#:This service is incompatible with runningvCenter Server Heartbeat and must be stoppedbefore vCenter Server Heartbeat can be installed.
CriticalStop
YesYes209 - Double-Take drivers have been detected onthis server.To avoid compatibility problems pleaseuninstall Double-Take before re-running setup.
78 VMware, Inc.
Unattended Installation on Windows Server 2008/2012

CInstallation Troubleshooting
This appendix includes the following topics:
■ “Pre-Installation Troubleshooting,” on page 79
■ “Setup Troubleshooting,” on page 80
■ “Post-Installation Troubleshooting,” on page 81
Pre-Installation Troubleshooting
Display resolution
Problem
The Setup dialogs occupy the entire screen and prevent access to the dialog controls.
Cause
vCenter Server Heartbeat is designed to display at a minimum resolution of 1024 X 768. Lower resolutions willcause the dialogs to occupy the full screen of a monitor.
Solution
Prior to running Setup or launching vCenter Server Heartbeat Console, ensure that screen resolution is set toa minimum of 1024 X 768.
VMware Channel
Problem
Attempts to ping between the Primary and Secondary nodes fail.
VMware, Inc. 79

Cause
The most common VMware Channel configuration errors are as follows:
■ VMware Channel IP addresses are configured in different subnets
■ Firewalls are blocking traffic between the Primary and Secondary nodes
■ In a WAN implementation, no static routes exist between the VMware Channel NICs
Solution
The VMware Channel configuration should be reviewed to verify proper configuration.
1 Configure the VMware Channel IP addresses properly.
2 Verify that firewalls are not blocking traffic on port 57348, the default channel port
3 In a WAN implementation, configure static routes between VMware Channel NICs properly.
4 Disable NetBIOS on the VMware Channel NICs.
Setup Troubleshooting
Setup permissions
Problem
When performing a restart during installation, Setup prompts for elevated permissions.
Cause
Attempting to run Setup without disabling UAC will result in permission elevation prompts anytime the node isrestarted.
Solution
When installing on Windows Server 2012, 2008, or 2008 R2, VMware recommends that UAC be disabled onboth the Primary and Secondary nodes. Once installation is complete, UAC can be re-enabled.
Setup fails to progress
Problem
VMware License Server is installed and Setup fails to progress.
Cause
The Web Client service is not set to either Manual or Automatic.
Solution
Before attempting to run vCenter Server Heartbeat Setup, set the Web Client service to either Manual orAutomatic.
80 VMware, Inc.
Unattended Installation on Windows Server 2008/2012

Packet filter fails to install
Problem
While attempting to install in a Physical to Virtual architecture using the Install Clone technique, the packetfilter fails to install.
Cause
VMware Tools installed on the Secondary node during installation in a Physical to Virtual architecture usingthe Install Clone technique causes installation of the packet filter to fail.
Solution
Uninstall VMware Tools prior to starting the Setup process. Once vCenter Server Heartbeat is installed, youcan reinstall VMware Tools.
During installation, node rename step fails to rename the node
Problem
During installation, the node rename of the Primary and Secondary nodes fail.
Cause
The domain controller for the domain was unable to process the rename request at time of the rename attempt.
Solution
The node rename process is the last step of vCenter Server Heartbeat installation. Should the node renameprocess fail to complete, manually rename the node to complete installation.
Post-Installation Troubleshooting
VMware Channel Fails to Connect After Configuring Firewall Ports
Problem
The VMware Channel fails to connect and does not allow traffic to pass between the Primary and Secondarynodes.
Cause
If Microsoft Windows changed the connection type from Private network to Unidentified network after the userhas configured the firewall port to allow channel communications, this may cause the firewall changes to bereset for the new network type.
VMware, Inc. 81
Appendix C Installation Troubleshooting

Solution
The firewall rules must be recreated to allow traffic to pass through for the Client Connection port and theDefault Channel port. VMware recommends that the firewall be configured to allow the Client to connect to theClient Connection port by process, nfgui.exe, rather than by a specific port.To enable Channel communicationsbetween nodes, change the Network List Manager Policy so that the VMware Channel network is identified asa Private Network, and not the default Unidentified Network, and configure the firewall to allow traffic to passthrough on Port 57348, the Default Channel port.
After installing vCenter Server Heartbeat, the packet filter fails to filter or anoperating system failure (blue screen error) is experienced
Problem
After installing vCenter Server Heartbeat on a node with TCP Offload Engine (TOE) enabled NICs, the followingsymptoms are experienced:
■ Operating system failure (blue screen error)
■ Packet filter installs but cannot filter traffic
■ Packet filter installs but the node is not visible on the network
Cause
vCenter Server Heartbeat is incompatible with TOE, a common feature of 10GB Ethernet cards. Some newermodels of Ethernet cards offer a TOE to help manage TCP/IP communications. vCenter Server Heartbeat isintended to manage the passing or filtering of selected IP addresses, therefore the TOE function must bedisabled to allow vCenter Server Heartbeat to exercise intelligent control of TCP/IP communications, dependingon whether the node is the active or passive node.
Solution
If 10GB Mellanox network cards with TCP Offload Engine (TOE) enabled were present during installation, seeVMware knowledge base article 1024066 - TCP Offload features on all NICs must be disabled before installingvCenter Server Heartbeat for instructions on how to resolve this problem.
vSphere Client Plug-in
Installing vCenter Plug-ins through the vSphere Client requires the vSphere Client to connect and downloadthe plug-ins through the Public IP address.The Public network adapter must be first in the bind order. If vSphereClient is configured with any other IP address first in the bind order, the installation will fail.
Problem
Attempting to install the vSphere Client plug-in fails.
Cause
Installing vCenter Plug-ins through the vSphere Client requires the vSphere Client to connect and downloadthe plug-ins through the Public IP address.To download the plug-in through the Public network adapter, it mustbe first in the bind order.
Solution
Reconfigure the network adapter/IP address bind order to show the Public IP address as first i the bind order.
82 VMware, Inc.
Unattended Installation on Windows Server 2008/2012
DNS resolution
Problem
When deployed in a LAN, DNS fails to resolve the proper node management name and IP address.
Cause
Once installation has completed, vCenter Server Heartbeat nodes deployed in a LAN are assigned differentnode management names but must use the same Public IP address. If DNS has not been manually pre-populatedwith the new node management name and IP addresses, name resolution fails.
Solution
Pre-populate the DNS server with the new node management names and IP addresses to be used in the pairprior to starting vCenter Server Heartbeat to ensure proper resolution.
VMware, Inc. 83
Appendix C Installation Troubleshooting

84 VMware, Inc.
Unattended Installation on Windows Server 2008/2012

Glossary
ActiveThe functional state or role of a node when it is visible to clients through the network, running protectedapplications, and servicing client requests.
AlertA notification provided by vCenter Server Heartbeat sent to a user or entered into the system log indicatingan exceeded threshold.
Active Directory (AD)Presents applications with a single, simplified set of interfaces so users can locate and use directoryresources from a variety of networks while bypassing differences between proprietary services. vCenterServer Heartbeat failovers require no changes to AD resulting in failover times typically measured inseconds.
Active–PassiveThe coupling of two nodes with one node visible to clients on a network and providing application servicewhile the other node is not visible and not providing application service to clients.
Advanced Configuration and Power Interface (ACPI)A specification that dictates how the operating system can interact with the hardware especially wherepower saving schemes are used.The Primary and Secondary nodes must have identical ACPI compliance.
AsynchronousA process whereby replicated data is applied (written) to the passive node independently of the activenode.
Basic Input/Output System (BIOS)
The program a personal computer's microprocessor uses to get the computer system started after youturn it on. It also manages data flow between the computer's operating system and attached devices suchas the hard disk, video adapter, keyboard, mouse, and printer.
Cached CredentialsLocally stored security access credentials used to log into a computer system when a Domain Controlleris not available.
Channel DropAn event in which the dedicated communications link between nodes fails, often resulting in the passivenode becoming active and consequently creating a split-brain syndrome.
Channel NIC (Network Interface Card)A dedicated NIC used by the VMware Channel.
CheckedThe status reported for user account credential (username/password) validation.
VMware, Inc. 85
Cloned ServersServers that have identical configuration settings, names, applications, Security Identifiers (SIDs) and IPaddresses, following the installation of vCenter Server Heartbeat.
Cloning ProcessThe vCenter Server Heartbeat process whereby all installed programs, configuration settings, and themachine name, Security Identifier (SID), and IP address are copied to another node.
ClusterA generic term for a vCenter Server Heartbeat Pair and the set of machines (physical or virtual) involvedin supporting a single protected node.
ConnectionAlso referred to as Cluster Connection. Allows an administrator to communicate with a vCenter ServerHeartbeat Cluster, either on the same machine or remotely.
Crossover CableA network cable that crosses the transmit and receive lines.
Data ReplicationThe transmission of protected data changes (files and registry) from the active to the passive node via theVMware Channel.
DegradedThe status reported for an application or service that has experienced an issue that triggered a Rule.
Device DriverA program that controls a hardware device and links it to the operating system.
Disaster Recovery (DR)A term indicating how you maintain and recover data with vCenter Server Heartbeat in event of a disastersuch as a hurricane or fire. DR protection is achieved by placing the Secondary node (in a Pair) at anoffsite facility, and replicating the data through a WAN link.
DNS (Domain Name System) ServerProvides a centralized resource for clients to resolve NetBIOS names to IP addresses.
DomainA logical grouping of client server based machines where the administration of rights across the networkare maintained in a centralized resource called a domain controller.
Domain Controller (DC)The server responsible for maintaining privileges to domain resources; sometimes called AD controller inWindows 2003 and above domains.
DualedA way to provide higher reliability by dedicating more than one NIC for the VMware Channel on each node.
FailoverA process by which the role of the passive node is changed to active automatically in an “Failover(Automatic)”, or the active node and the passive node switch roles in a “Failover (Manual)” failover.
Failover (Automatic)Failover is the process by which the passive node assumes the active role when it no longer detects thatthe active node is alive as a result of a critical unexpected outage or crash of a node.
Failover (Manual)The graceful transfer of control and application service to the passive node.
Full System Check (FSC)The internal process automatically started at the initial connection or manually triggered through the vCenterServer Heartbeat Console to perform verification on the files and registry keys and then synchronize thedifferences.
86 VMware, Inc.
Unattended Installation on Windows Server 2008/2012
Fully Qualified Domain Name (FQDN)Also known as an absolute domain name, a FQDN specifies its exact location in the tree hierarchy of theDomain Name System (DNS). It specifies all domain levels, including the top-level domain, relative to theroot domain. Example: somehost.example.com., where the trailing dot indicates the root domain.
Global Catalog ServerA global catalog is a domain controller that stores a copy of all Active Directory objects in a forest. Theglobal catalog stores a full copy of all objects in the directory for its host domain and a partial copy of allobjects for all other domains in the forest.
Graceful (Clean) ShutdownA shutdown of vCenter Server Heartbeat based upon completion of replication by use of the vCenterServer Heartbeat Console, resulting in no data loss.
GroupAn arbitrary collection of vCenter Server Heartbeat Clusters used for organization.
Hardware AgnosticA key vCenter Server Heartbeat feature allowing for the use of nodes with different manufacturers, models,and processing power in a single vCenter Server Heartbeat Cluster.
HeartbeatThe packet of information issued by the passive node across the Channel, which the active node respondsto indicating its presence.
Heartbeat DiagnosticsThe umbrella name for the vCenter Server Heartbeat process and tools used to verify the production nodeshealth and suitability for the implementation of a vCenter Server Heartbeat solution.
Heartbeat Diagnostics ReportA report provided upon the completion of the Heartbeat Diagnostics process that provides informationabout the node, system environment, and bandwidth.
High Availability (HA)Keeping users seamlessly connected to their applications regardless of the nature of a failure. LANenvironments are ideally suited for HA.
HotfixA single, cumulative package that includes one or more files that are used to address a problem in aproduct.
IdentityThe position of a given node in the vCenter Server Heartbeat Cluster: Primary or Secondary.
Install CloneThe installation technique used by vCenter Server Heartbeat to create a replica of the Primary node usingNTBackup or Wbadmin and to restore the replica to the Secondary node.
Low Bandwidth Module (LBM)A module that compresses and optimizes data replicated between nodes over a WAN connection. Thisdelivers maximum data throughput and improves application response time on congested WAN links.
Machine NameThe Windows or NETBIOS name of a computer.
Management IP AddressAn additionally assigned unfiltered IP address used for node management purposes only.
Many-to-OneThe ability of one physical node (hosting more than one virtual node) to protect multiple physical nodes.
VMware, Inc. 87
Glossary
Network MonitoringMonitoring the ability of the active node to communicate with the rest of the network by polling definednodes across the network at regular intervals.
PairSee vCenter Server Heartbeat Pair above.
PassiveThe functional state or role of a node when it is not delivering service to clients and is hidden from the restof the network.
PathpingA route-tracing tool that works by sending packets to each router on the way to a final destination anddisplays the results of each hop.
Plug-and-Play (PnP)A standard for peripheral expansion on a PC. On starting the computer, PnP automatically configures thenecessary IRQ, DMA and I/O address settings for the attached peripheral devices.
Plug-inAn application specific module that adds vCenter Server Heartbeat protection for the specific application.
Pre-CloneAn installation technique whereby the user creates an exact replica of the Primary node using VMwarevCenter Converter or other 3rd party utility prior to the initiation of installation and uses the replica as aSecondary node.
Pre-Installation ChecksA set of system and environmental checks performed as a prerequisite to the installation of vCenter ServerHeartbeat.
PrimaryAn identity assigned to a node during the vCenter Server Heartbeat installation process that normally doesnot change during the life of the node and usually represents the production node prior to installation ofvCenter Server Heartbeat.
Protected ApplicationAn application protected by the vCenter Server Heartbeat solution.
Public IP AddressAn IP address used by clients to contact the node through drive mappings, UNC paths, DNS resolvedpaths, etc., to gain access to the node's services and resources.
Public NICThe network card which hosts the Public IP address.
Public NetworkThe network used by clients to connect to node applications protected by vCenter Server Heartbeat.
Quality of Service (QoS)An effort to provide different prioritization levels for different types of traffic over a network. For example,vCenter Server Heartbeat data replication may have a higher priority than ICMP traffic, as the consequencesof interrupting data replication are more obvious than slowing down ICMP traffic.
Receive QueueThe staging area on a node used to store changes received from another node in the replication chainbefore they are applied to the disk/registry on the passive node.
Remote Desktop Protocol (RDP)A multi-channel protocol that allows a user to connect to a computer running Microsoft Terminal Services.
88 VMware, Inc.
Unattended Installation on Windows Server 2008/2012
ReplicationThe generic term given to the process of intercepting changes to data files and registry keys, transportingthe changed data across the Channel, and applying them to the passive node(s) so the nodes aremaintained in a synchronized state.
RoleThe functional state of a node in the vCenter Server Heartbeat Cluster: active or passive.
RuleA set of actions performed by vCenter Server Heartbeat when defined conditions are met.
SecondaryAn identity assigned to a node during the vCenter Server Heartbeat installation process that normally doesnot change during the life of the node and usually represents the standby node prior to installation ofvCenter Server Heartbeat.
Security Identifier (SID)A unique alphanumeric character string that identifies each operating system and each user in a networkof 2008/2012 systems.
Send QueueThe staging area on a node used to store intercepted data changes before being transported across to apassive node in the replication chain.
Server MonitoringMonitoring of the active node by the passive node, using a heartbeat message, to ensure that the activenode is functional.
Shared NothingA key feature of vCenter Server Heartbeat in which no hardware is shared between the Primary andSecondary nodes. This prevents a single point of failure.
SMTPA TCP/IP protocol used in sending and receiving e-mail between nodes.
SNMPSimple Network Management Protocol (SNMP) is an Internet-standard protocol for managing devices onIP networks.
Split-Brain AvoidanceA unique feature of vCenter Server Heartbeat that prevents a scenario in which Primary and Secondarynodes attempt to become active at the same time leading to an active-active rather than an active-passivemodel.
Split-Brain SyndromeA situation in which more than one node in a vCenter Server Heartbeat Cluster are operating in the activemode and attempting to service clients, resulting in the independent application of different data updatesto each node.
SubnetDivision of a network into an interconnected but independent segment or domain, intended to improveperformance and security.
Storage Area Network (SAN)A high-speed special-purpose network or (sub-network) that interconnects different kinds of data storagedevices with associated data servers on behalf of a larger network of users.
SynchronizeThe internal process of transporting 64KB blocks of changed files or registry key data, through the VMwareChannel, from the active node to the passive node to ensure the data on the passive node is a mirrorimage of the protected data on the active node.
VMware, Inc. 89
Glossary
System Center Operations Manager (SCOM)System Center Operations Manager is a cross-platform data center management server for operatingsystems and hypervisors.
System StateData that comprises the registry, COM+ Class Registration database, files under Windows File Protection,and system boot file; other data may be included in the system state data.
TaskAn action performed by vCenter Server Heartbeat when defined conditions are met.
Time-To-Live (TTL)The length of time that a locally cached DNS resolution is valid. The DNS server must be re-queried afterthe TTL expires.
TracerouteA utility that records the route through the Internet between your computer and a specified destinationcomputer.
Ungraceful (Unclean) ShutdownA shutdown of vCenter Server Heartbeat resulting from a critical failure or by shutting down Windowswithout first performing a proper shutdown of vCenter Server Heartbeat, resulting in possible data loss.
Unprotected ApplicationAn application not monitored nor its data replicated by vCenter Server Heartbeat.
vCenter Server HeartbeatThe core replication and system monitoring component of the vCenter Server Heartbeat solution.
vCenter Server Heartbeat Packet FilterThe network component, installed on all nodes, that controls network visibility.
vCenter Server Heartbeat PairDescribes the coupling of the Primary and Secondary node in a vCenter Server Heartbeat solution.
vCenter Server Heartbeat Plug-insOptional modules installed into a vCenter Server Heartbeat node to provide additional protection for specificapplications.
vCenter Server Heartbeat Failover ProcessA process unique to vCenter Server Heartbeat in which the passive node gracefully (manual) orunexpectedly (automatic) assumes the role of the active node providing application services to connectedclients.
Virtual Private Network (VPN)A private data network that makes use of the public telecommunication infrastructure, maintaining privacythrough the use of a tunneling protocol and security procedures.
VMware ChannelThe IP communications link used by the vCenter Server Heartbeat system for the heartbeat and replicationtraffic.
VMware License KeyThe key obtained from the VMware that allows the use of components in vCenter Server Heartbeat; enteredat install time, or through the Configure Server Wizard.
Windows Management Instrumentation (WMI)A management technology allowing scripts to monitor and control managed resources throughout thenetwork. Resources include hard drives, file systems, operating system settings, processes, services,shares, registry settings, networking components, event logs, users, clusters, and groups.
90 VMware, Inc.
Unattended Installation on Windows Server 2008/2012