Embed Size (px)
Citation preview

Unify OpenScape UC Web Client
User Manual

Contents
Introduction ......................................................................................... 1
E164 Numbers .................................................................................. 1
Dialling out ....................................................................................... 1
Logging in to the Unify OpenScape Web Client ......................................... 2
Using the Unify OpenScape Web Client Main Toolbar ................................. 3
Accessing the Pearl Menu .................................................................... 3
Making, receiving and managing calls ..................................................... 5
Dial Field .......................................................................................... 5
Placing a Call..................................................................................... 5
Answering a Call ................................................................................ 6
Disconnecting a Call ........................................................................... 7
Placing a Call on Hold/Retrieving a Held Call ......................................... 7
Using Transfer (Unannounced Transfer) ................................................ 9
Using Transfer (Announced transfer) .................................................. 11
Toggling Between Two Concurrent Calls .............................................. 13
Using Directory Search ........................................................................ 14
Searching the Directory .................................................................... 14
Adding a Contact via Directory Search ................................................ 15
Working With Your Contacts ................................................................. 17
Creating a Contact Manually .............................................................. 17
Editing a Contact Record ................................................................... 19
Deleting a Contact ........................................................................... 21
Creating a Contact Group ................................................................. 22
Adding a Contact to a Contact Group .................................................. 26
Audio Conferencing ............................................................................. 27
Creating an Open Audio Conference ................................................... 27
Create Conference Window Definitions ............................................... 34
Starting the Audio Conference ........................................................... 37
Creating an Ad-Hoc Conference ......................................................... 39
Using Presence Notifications ................................................................ 42
Establishing Your Presence ................................................................ 42
Creating Presence Status Text ........................................................... 43
Managing Devices ............................................................................... 45
Adding a Device ............................................................................... 45
Activating a Device .......................................................................... 50
Creating Rules for Call Handling ......................................................... 50
Operating the Call Journal ................................................................... 51
Sorting the Journal .......................................................................... 52
Managing Journal Entries .................................................................. 53
Managing Presence Automation Rules ................................................. 54
Managing Rules .................................................................................. 56
Creating a Rule ................................................................................ 56
Activating a Rule ............................................................................. 64
Managing Pop-Up Screen Settings ........................................................ 65
Managing Contact Permissions ............................................................. 67
Editing a Permission ......................................................................... 67
Blocking a Contact ........................................................................... 70
Allowing a Contact ........................................................................... 72
Managing Tell-Me-When Notifications .................................................... 74
Creating a Tell-Me-When Notification .................................................. 74
Managing Device or Rollover Lists ...................................................... 76

1
Introduction
This guide is intended to provide you with the skills necessary to use Unify
OpenScape Web Client. The OpenScape Web Client application allows you to
communicate easily with contacts, create conference calls, redirect incoming
calls to a preferred device, view the call journal, all from a convenient web
page view. Whether working in the office, from home or traveling, the
application allows callers to easily reach you using the “One Number Service”
(ONS).
E164 Numbers
OpenScape uses the full E164 (International public telecommunication
numbering plan) for all devices, contacts and all phone numbers. An
example of the numbering plan is:
+441173941002
+44 (The dialing code for the UK)
117 (the locale dialing code for Bristol, users must always remove the first
digit)
39 (Part of the University numbering scheme)
41002 (The actual persons internal extension). The last 5 digits (counting
from the last digit) is your University extension number.
Dialling out
For internal UoB calls, just use the last 5 digits (e.g. 41102)
For outside calls, dial 21 for an outside line, followed by the number.

2
Logging in to the Unify OpenScape Web Client
1. Open your web browser.
2. Type the URL https://onenumber.bris.ac.uk in the address bar.
3. Enter your User Name (this is the same as your University login)
4. Enter your password.

3
Using the Unify OpenScape Web Client Main Toolbar
The Unify OpenScape Web Client Main Toolbar provides quick and easy
access to Unified Communication (UC) functionality. UC enables you to
access telephone, contacts and directory search features in one central
location. As you continue through the user guide, you will learn the basic UC
features of the Unify OpenScape Web Client.
Accessing the Pearl Menu
The Pearl Menu enables you to view a variety of functions in a quick access
view. The Pearl Menu icon rotates to indicate you have new Status
Information such as missed calls.
1. Click the Pearl icon.
The Pearl Menu displays.

4
2. Select the desired function.
Status Information: Notifies you of any new missed calls.
View: Enable you to view some Unified Communications
functionality that is defined in this guide.
Personal Settings: Enables you to access and establish personal
settings, such as device behaviour.
Help: Displays the Siemens OpenScape Web Client Help Guide.
About: Displays information regarding the active version of
Siemens OpenScape Web Client.
5
Making, receiving and managing calls
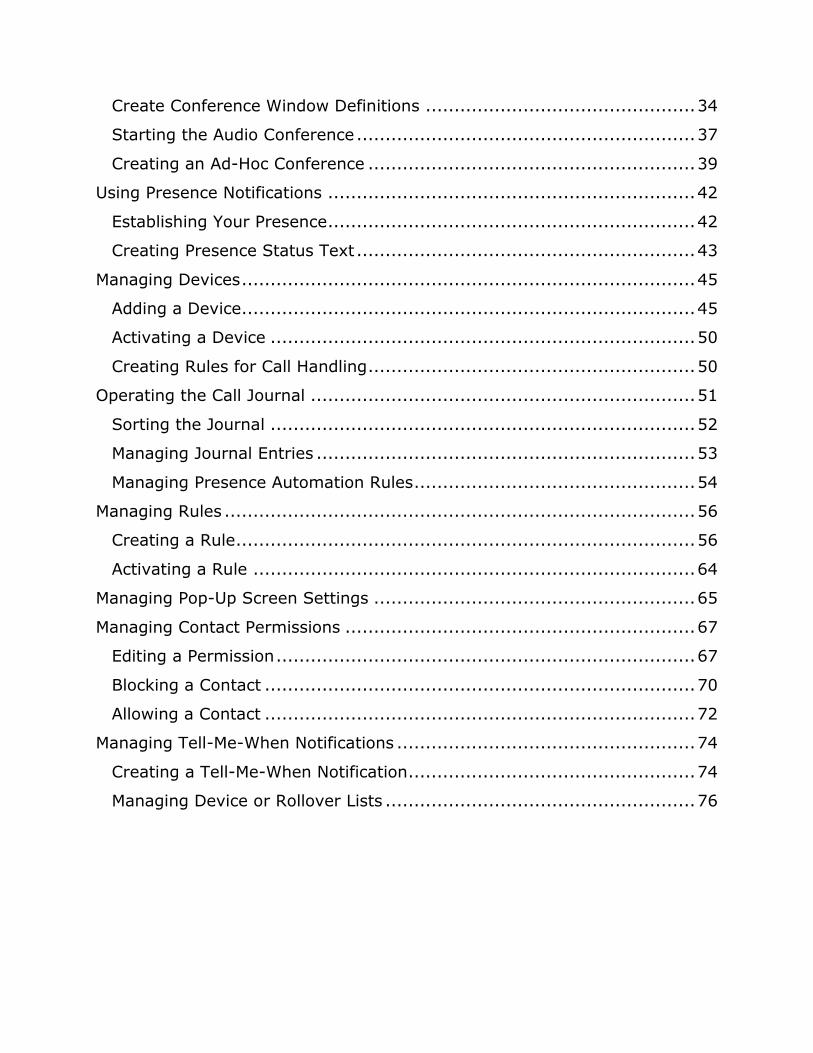
Dial Field
The Dial Field allows you to place calls directly from your computer. When a
call is placed, the telephone on your desk activates and places the call (via
speaker phone on certain handsets). This is the default action. Other devices
may be used, which is covered in the Devices sections of this guide.
Placing a Call
To place a call using the Dial Field:
1. Click in the Dial Field, and then type the telephone number you wish to
call.
2. Click the Make Call icon to place the call or press Enter.
6
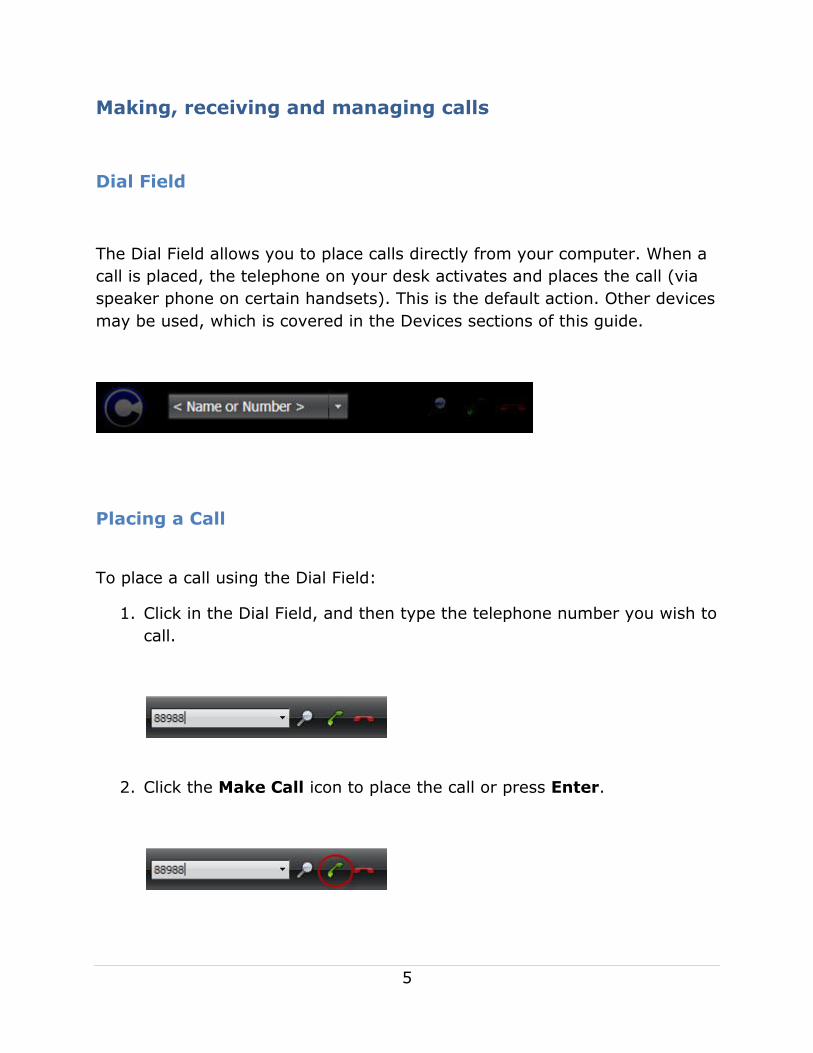
The Call Control window displays the outgoing call.
The Call Control window displays the active call when answered by the other
party or their voicemail.
Note: The Call Control displays a blue background for an active call or a
white background for outgoing, waiting, or held calls.
Answering a Call
Click the Answer icon located in the Call Control window to activate
the speakerphone on your OpenStage phone.

7
Disconnecting a Call
Click the Disconnect icon located in the Call Control window.
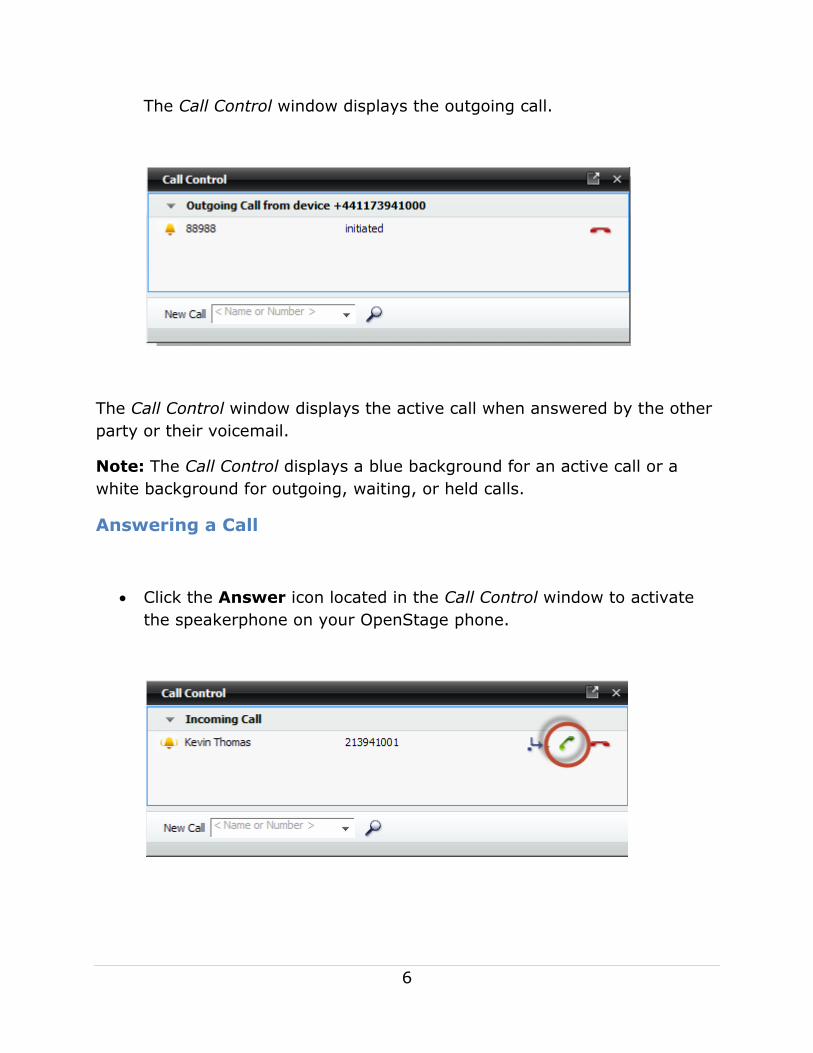
Placing a Call on Hold/Retrieving a Held Call
1. Click the Hold icon in the Call Control window.
2. Click the Retrieve Held Call icon in the Call Control window.
8
9
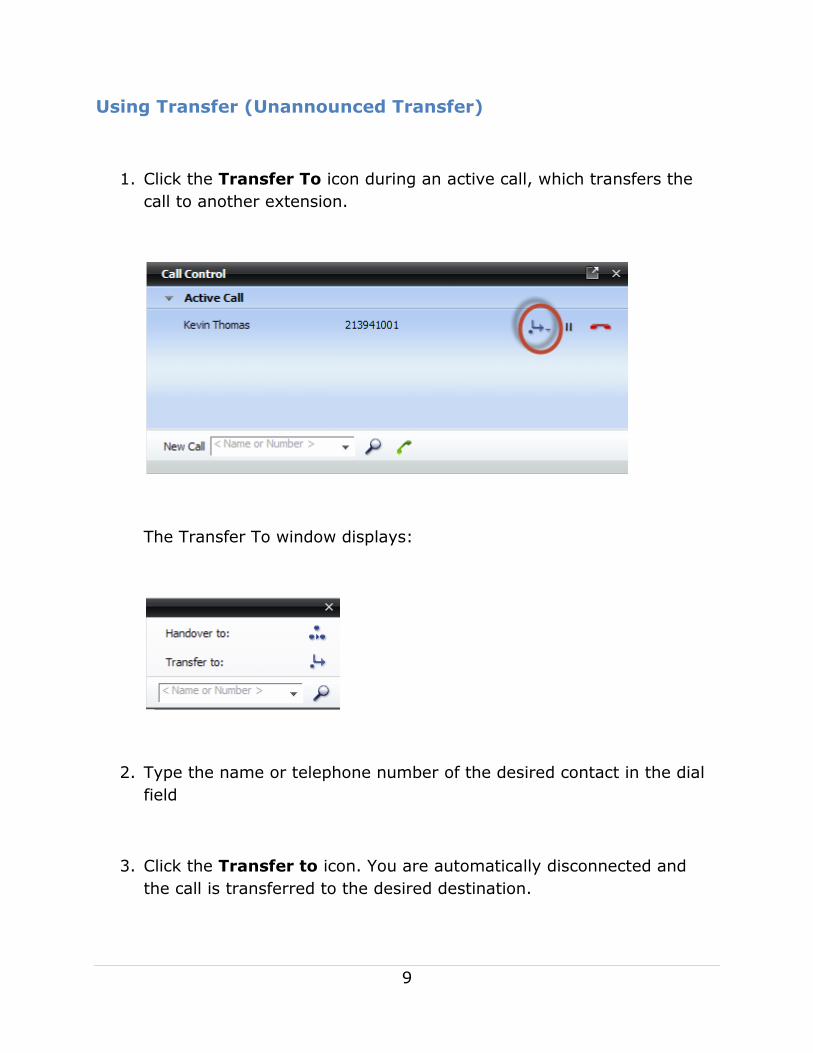
Using Transfer (Unannounced Transfer)
1. Click the Transfer To icon during an active call, which transfers the
call to another extension.
The Transfer To window displays:
2. Type the name or telephone number of the desired contact in the dial
field
3. Click the Transfer to icon. You are automatically disconnected and
the call is transferred to the desired destination.

10
Note: The Handover call to device icon will transfer the existing
connection to another device. This is useful for quickly switching from a desk
phone to mobile phone while still on a call.

11
Using Transfer (Announced transfer)
1. Type a name or telephone number into the dial field during an active
call.
Note: This is the destination where the call will be transferred.
2. Click the green telephone icon to place the call. The active call is
placed on hold.
3. Inform the second party that you are transferring a call and then click
the Transfer icon, which transfers the waiting call to the second party.

12
You are disconnected as the waiting and new calls are connected.

13
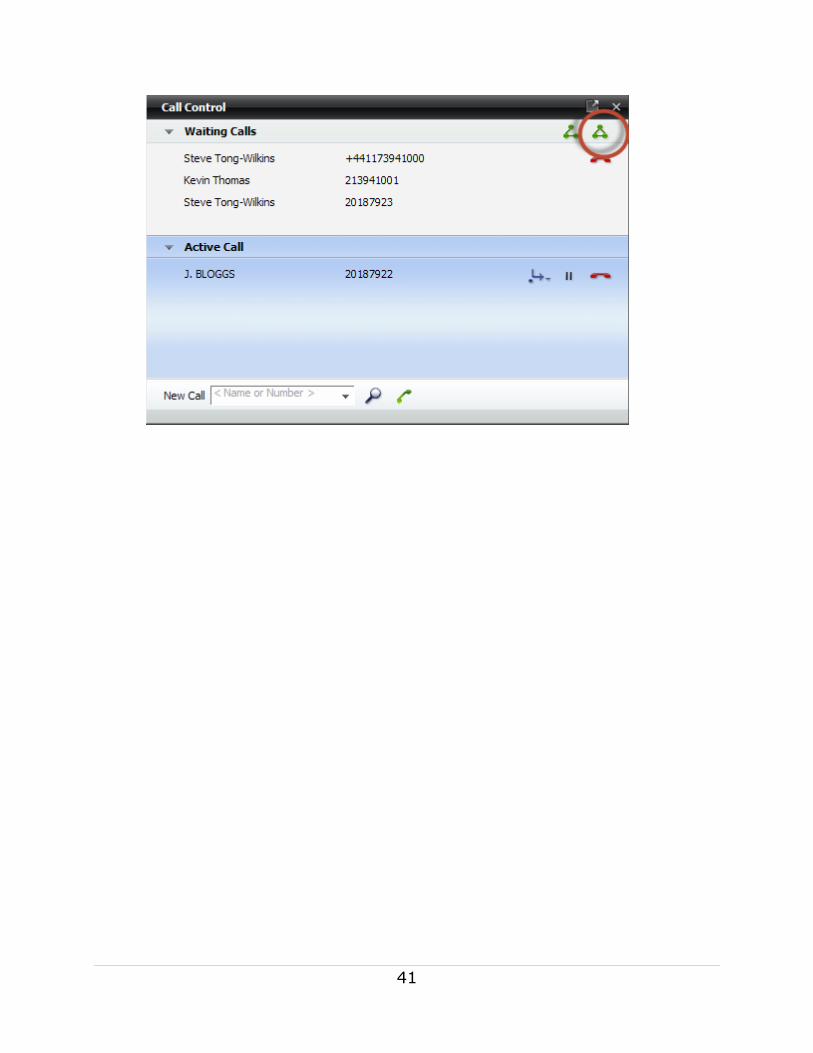
Toggling Between Two Concurrent Calls
When you have two calls in progress at the same time, Toggle allows you to
switch back and forth between the active and held calls.
1. Click the Toggle icon, which switches the active and held calls.
Note: Hold is automatically activated when you click the Toggle icon.

14
Using Directory Search
The Directory Search feature allows you to search for colleagues within the
University using the directory. This provides accurate contact information to
place a call as well as pre-fills the new contact data fields.
Searching the Directory
1. Click Directory Search to search for someone within the University
network directory.
2. Type the name of the contact, then click the Search icon.
The Directory Search window populates.
Note: You may call a contact directly for the Directory Search window
using the icon show.

15
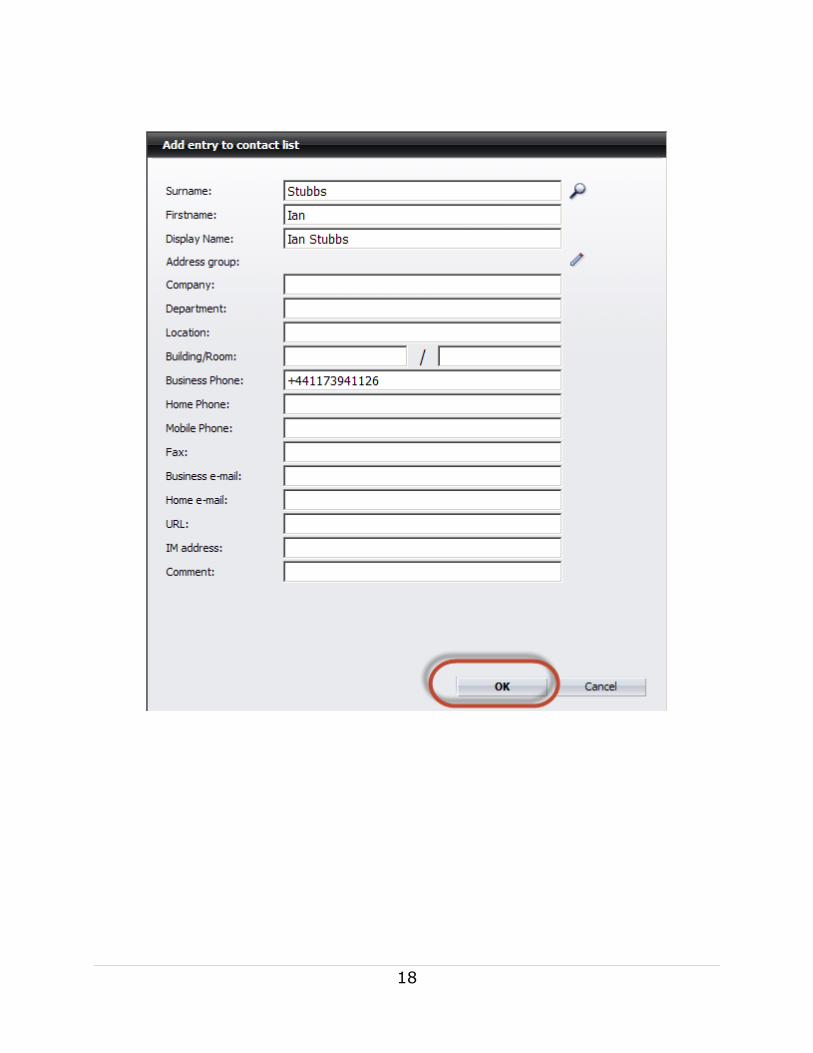
Adding a Contact via Directory Search
You may add a contact form the Directory Search feature. This is useful as
the contact’s information populates from the directory, providing accuracy.
1. Click the box next to the contacts name. This selects the contact you
wish to add.
2. Click the Add Contact icon.
The Contacts - Add Entry to Contact List window displays the directory
information.

16
3. Click OK.
4. Click Contacts. The list displays all your contacts.

17
Working With Your Contacts
Creating a Contact Manually
You may choose to manually create a contact. This method is often used for
external (Non University) contacts, as you are unable to add them via the
directory search.
1. Click Contacts.
2. Click the Create Contact icon.
The Add New Contact window displays.
3. Add the desired contact information, and click OK.
18

19
Editing a Contact Record
You may wish to edit a contact. Editing a contact enables you to update
telephone number and details of contacts.
1. Select the contact you wish to edit, and then click the Edit Contact
icon.
The Contacts - Change entry in contact list window displays.
2. Edit the information as needed, and then click OK.

20

21
Deleting a Contact
You can delete contacts from your Contact list.
1. Select the contact you wish to delete, and then click the Delete
Contact icon.
The Confirm deletion of selected entry window displays.
2. Click OK.
22
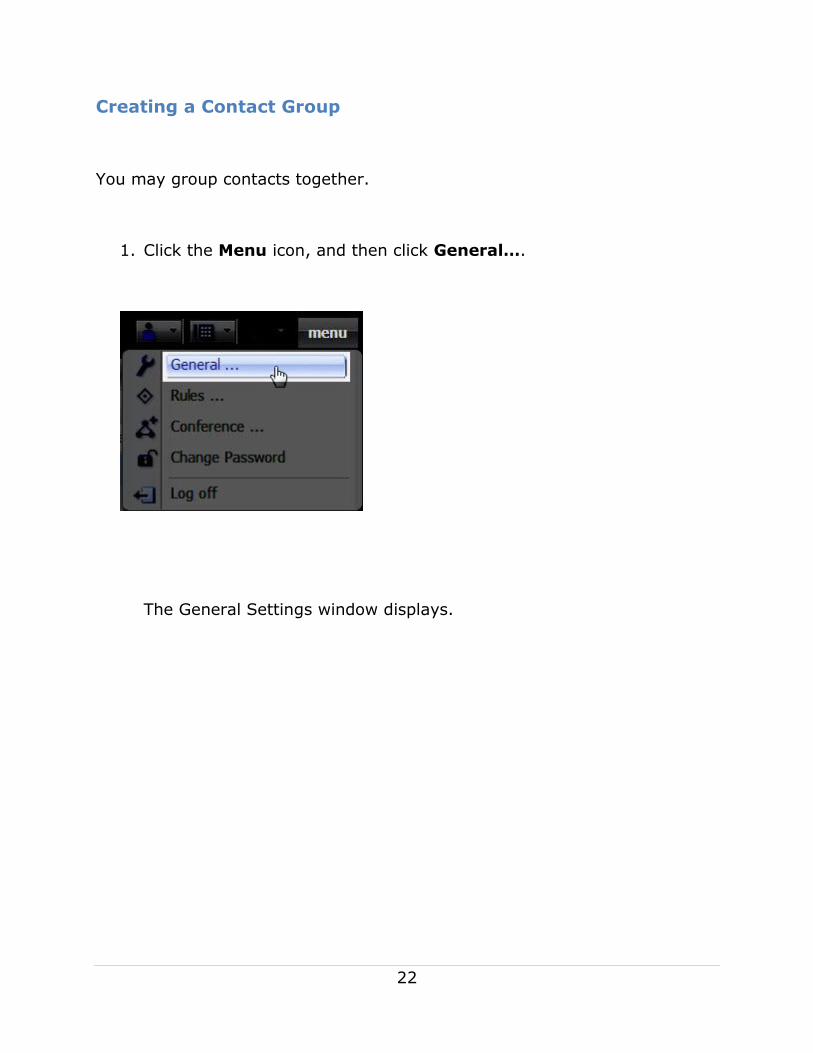
Creating a Contact Group
You may group contacts together.
1. Click the Menu icon, and then click General….
The General Settings window displays.

23
2. Click the Addresses then Address Groups tabs.

24
3. Enter the name of the group.

25
4. Click OK.
26
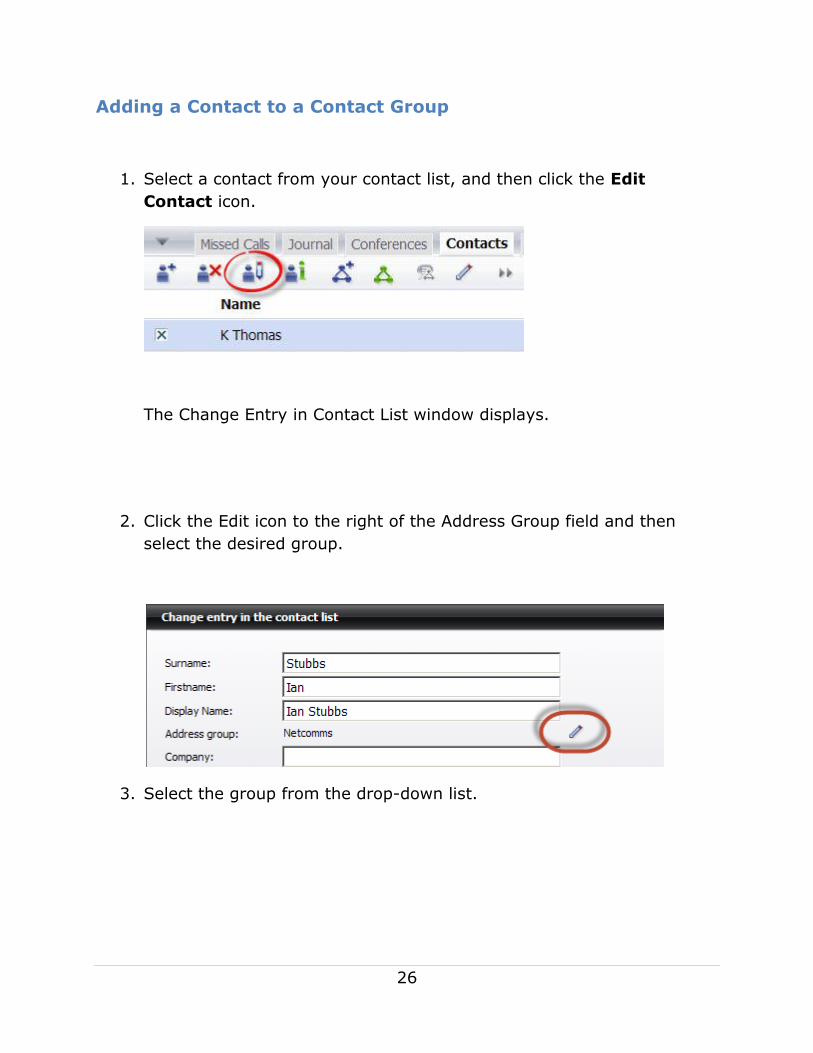
Adding a Contact to a Contact Group
1. Select a contact from your contact list, and then click the Edit
Contact icon.
The Change Entry in Contact List window displays.
2. Click the Edit icon to the right of the Address Group field and then
select the desired group.
3. Select the group from the drop-down list.
27
Audio Conferencing
Audio Conferencing allows you to quickly, easily, and efficiently create and
manage audio conferences with up to 200 participants.
There are two ways you can run an audio conference.
Using this method, you set a time for the conference and give people a
number and PIN to dial in with.
The other method is useful for small, ad hoc conferences, and involves you
calling the participants after starting the conference. Using this method, you
don’t need to give your guests a phone number to call or a PIN to use. This
is detailed under Creating an Ad-Hoc Conference.
Creating an Open Audio Conference
In an Open Audio Conference, all participants have moderator rights, such
as locking the conference bridge, muting microphones, and disconnecting
the conference.
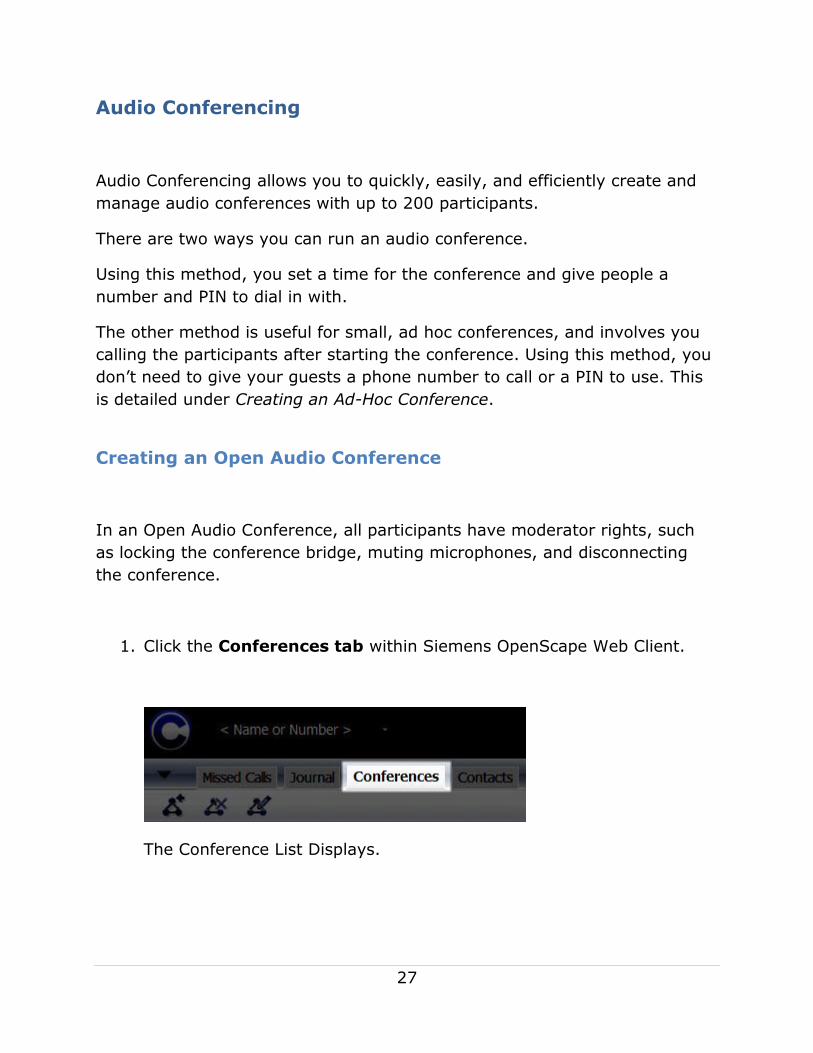
1. Click the Conferences tab within Siemens OpenScape Web Client.
The Conference List Displays.
28
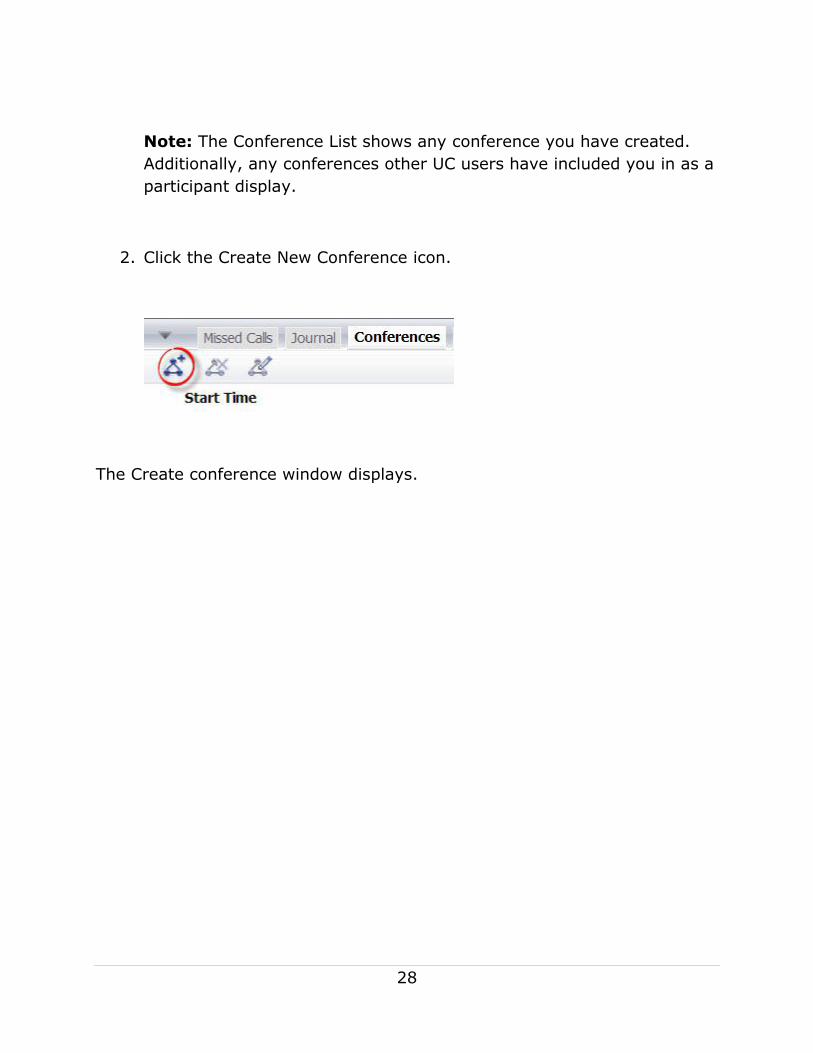
Note: The Conference List shows any conference you have created.
Additionally, any conferences other UC users have included you in as a
participant display.
2. Click the Create New Conference icon.
The Create conference window displays.

29
3. Name the Conference.
4. Select the Start time check box, if applicable. Selecting a Start Time
automatically starts the conference at the given date and time. There
will be an expected End time required which creates a specific meeting
duration that cannot be exceeded.

30
5. Click the Add participant field and enter the participant’s name.
OR
Click the drop-down arrow to select a participant from a previous
conference.
6. Click OK

31
The newly-added participants are displayed in the Participants section.

32
7. Check the boxes for Open Conference and Record Name based on
Join Option preference.
8. Click Apply.
The Conference Bridge numbers and PINs populate.
9. Click OK. The Create Conference window closes.
The conference is saved.
Note: The Regenerate button, located to the right of the PIN, can be used to
generate a new PIN.
10. Skip the Other number field as it is not available.

33
34
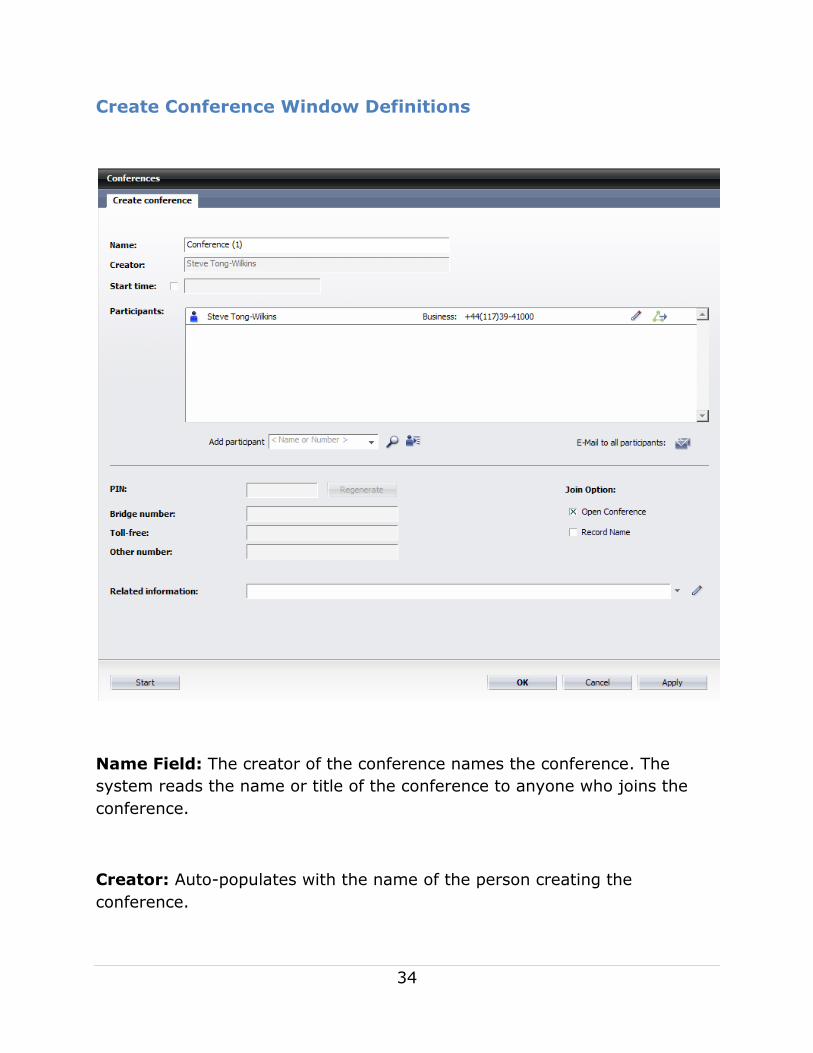
Create Conference Window Definitions
Name Field: The creator of the conference names the conference. The
system reads the name or title of the conference to anyone who joins the
conference.
Creator: Auto-populates with the name of the person creating the
conference.

35
Start Time: Allows the creator to set a specific start time and date. The
conference activates at the specified date and time.
Participants: The conference creator can add participants by clicking
Participants to add the participants shown
PIN: A unique identifier that allows participants to access the conference.
The PIN is generated when you click Apply.
Note: You can click Regenerate to get a new PIN.
Bridge Number & Toll-free: These numbers are generated when you click
Apply. These numbers cannot be changed.
Other Number: Not applicable.
Web Conference: The creator may select OpenScape Web Collaboration
from this drop-down menu. This will allow the creator to promote the Audio
Conference to a Siemens OpenScape Web Collaboration.
Related Information: The creator may type any conference-related
information in this box.
Open Conference: Allows participants to use the bridge immediately
without waiting for the conference creator to open the bridge. It is a good
idea to remove this option for larger conferences.
36
Note: Open Conference also grants participants moderator rights, such as
locking the conference bridge, muting microphones, and disconnecting other
participants.
Record Name: When checked, this option requires participants to record
their name prior to entering the conference. This is not recommended for
larger conferences.

37
Starting the Audio Conference
Click the Join to conference green triangle icon to access the desired
conference.
Note: The cons indicated in red below apply to everyone on the
conference bridge and are defined below.
Note: The four icons indicated in red above apply to everyone on the
conference bridge and are defined below.

38
Lock Conference:
Locking the conference will not allow any other participants to join. If this is
an Open conference bridge, that means a participant could lock the
moderator out if they select this function.
Mute Conference or Mute Connection:
The microphone can be used to mute all participants. To mute an individual,
click the microphone icon next to their name.
Drop Conference:
This will disconnect the entire conference bridge.
Handover Existing Connection and Continue:
This allows the participant to handover (transfer) the conference bridge
connection to another device such as a cell phone.

39
Creating an Ad-Hoc Conference
Ad-Hoc Conferencing quickly and easily joins parties together. You may join
up to 250 parties using this method.
The following method allows you to call each participant individually. This
removes the need for your guests to remember phone or PIN numbers. It
also allows you to invite other individuals to join in a conversation you’re
already having with someone.
1. Type a name or telephone number in the Dial Field during an active
call.
2. Click the telephone icon to place the call to the party you want to join
to the conference.
The Call Control window displays the active and waiting calls.
3. Click the Set Conference icon to join all parties together.
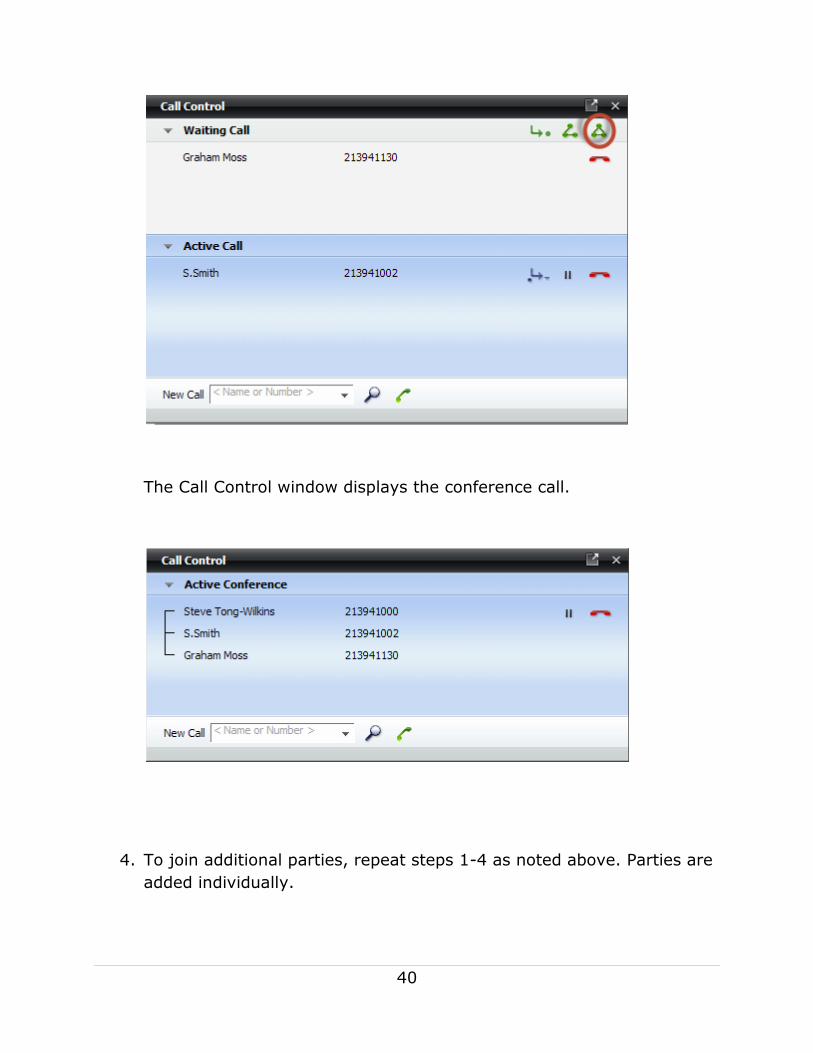
40
The Call Control window displays the conference call.
4. To join additional parties, repeat steps 1-4 as noted above. Parties are
added individually.
41

42
Using Presence Notifications
Establishing Your Presence
Presence is your way to communicate your availability to your co-workers.
For example, select the Available presence status when you are at your
desk or In meeting when you go into a meeting. This notification of
Presence can streamline business and enhance communication. To set your
personal status:
1. Click Presence.
2. Click the desired Presence Status.

43
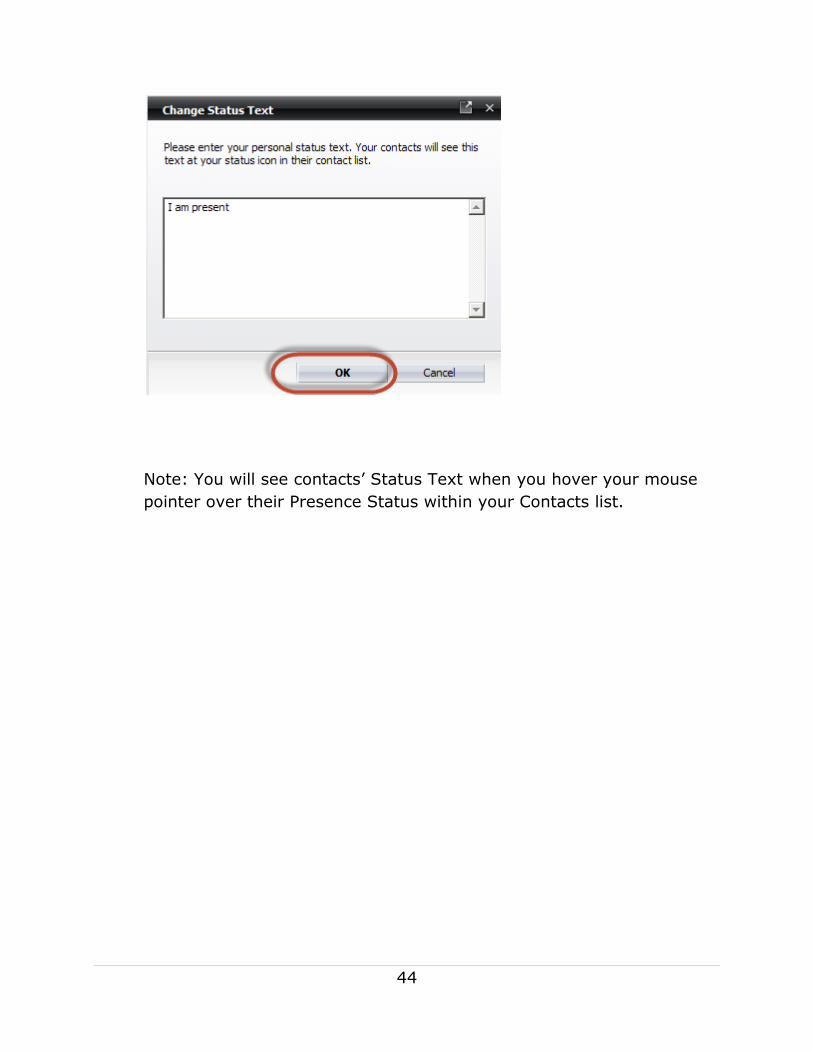
Creating Presence Status Text
Each Presence status contains a default text. For example, Available
presence contains a default text of, “I’m Available.” The default text is
editable, so you may customize your Status Text to provide additional
information to your co-workers.
1. Click Presence, and then click Change Status Text.
The Change Status Text window displays.
2. Type the desired Status Text, and then click OK to apply changes.
44
Note: You will see contacts’ Status Text when you hover your mouse
pointer over their Presence Status within your Contacts list.

45
Managing Devices
Devices enable you to create a One Number Service (ONS), which forwards
calls to a specified device. For example, the default device is the phone at
your desk, which is the only contact number that you need to provide to co-
workers or clients. You may create additional devices, such as a mobile
phone, which are used as a forwarding destination from your default phone.
Adding a Device
1. Click Devices.
2. Click Change Setting.
The General Settings window displays.
3. Select Devices tab.
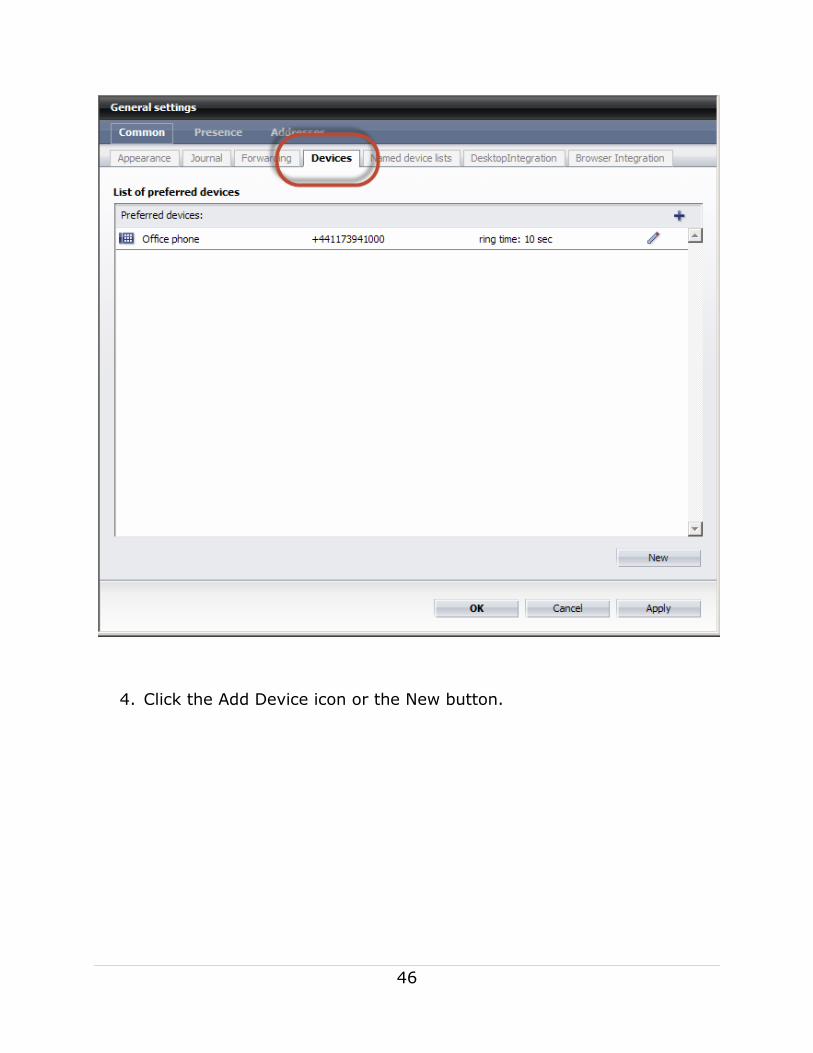
46
4. Click the Add Device icon or the New button.

47
The Edit Device window displays.

48
5. Enter the name of the device, for example Mobile Phone, and then
enter the telephone number of the Mobile Phone.
6. Click OK.
The new device displays within the List of Preferred Devices.

49
7. Click OK.
You have now created a new device to be able to use for incoming and
outgoing calls.

50
Activating a Device
1. Click Devices, and then click the desired device from the list.
The selected device displays.
Note: Upon activation of another device, all calls to the primary
telephone number will automatically route to the new device.
Creating Rules for Call Handling
Rules enable you to set guidelines for call handling. For example, a rule can
be created to forward calls to a device on certain days of the week, as
specified by you. Rule creation instructions are found in the Super User
Guide.

51
Operating the Call Journal
The Journal enables you to view, search, sort, call, or creates contacts using
the 250 most recent calls pertaining to your telephone number. This is a
great way to find a missed call from a certain date and time.
1. Click Journal.
The Journal window displays 250 previous calls. Calls are stored on a
First In, First Out basis.

52
Sorting the Journal
Sorting the Journal allows you to display entries based on the selected
parameter.
1. Click the drop-down arrow, and select the desired list parameter.
The results display within the Journal window.
53
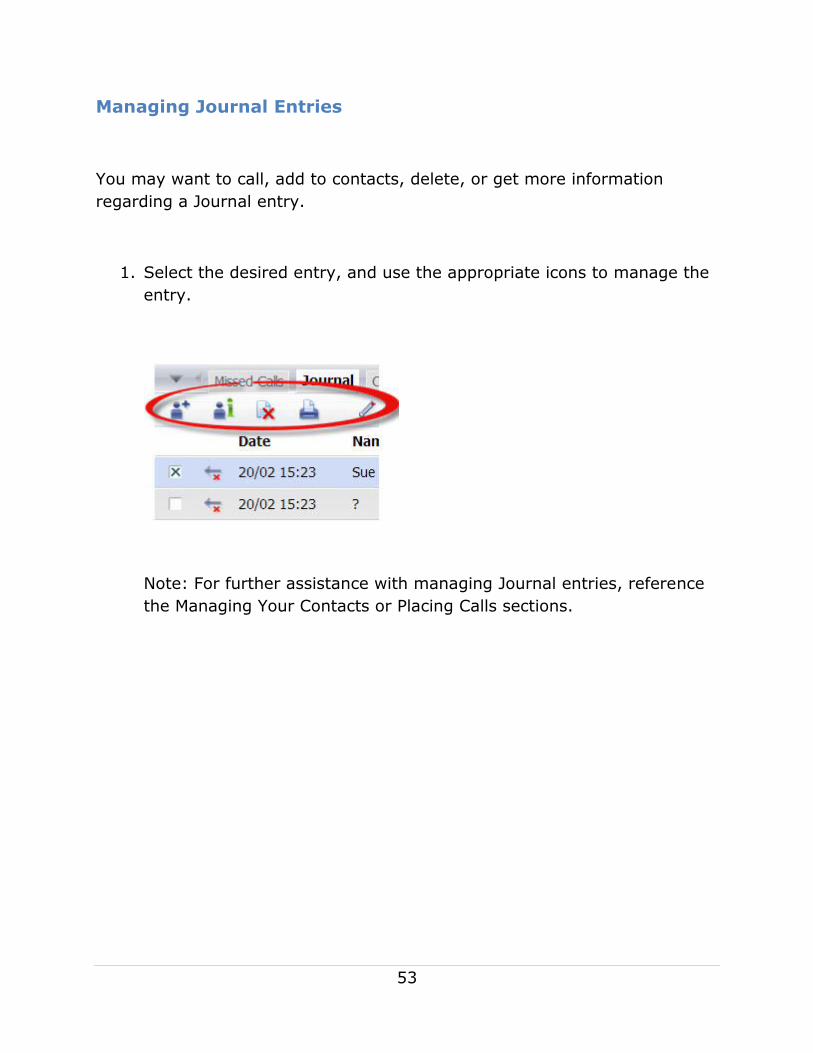
Managing Journal Entries
You may want to call, add to contacts, delete, or get more information
regarding a Journal entry.
1. Select the desired entry, and use the appropriate icons to manage the
entry.
Note: For further assistance with managing Journal entries, reference
the Managing Your Contacts or Placing Calls sections.

54
Managing Presence Automation Rules
Using Presence Automation rules, you can forward calls to your work phone,
mobile phone, or another phone of your choosing.
1. Click the Pearl icon.
2. Select Personal Settings.
3. Select Presence/Device Mapping. The Presence window appears.
4. Select the Preferences tab.
5. In the Behavior after Presence status changes area, select the
status you want to edit.

55
6. In the Set preferred device to area, enter the preferred device.
7. Click Apply.
8. Click OK.

56
Managing Rules
You can create a rule to establish call handling guidelines. For example, you
can create a rule to forward calls to a specific device on certain days of the
week.
Creating a Rule
1. Locate the Rules drop-down list.
2. Select Add/Edit Profile from the drop-down list. The rules display
under Active Profile.
3. Click New to create a new profile.
57
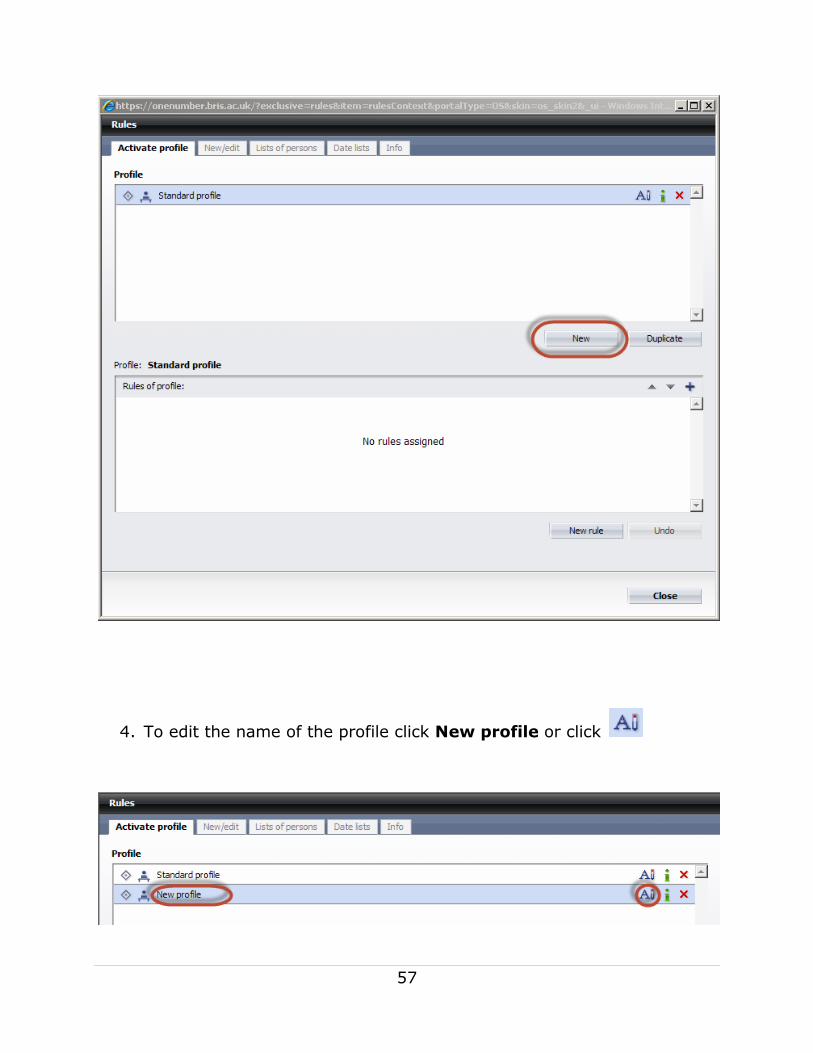
4. To edit the name of the profile click New profile or click

58
5. Rename the profile.
6. Click New Rule to create a rule within the new profile. The Rules
window appears.
7. Rename the new rule.
59
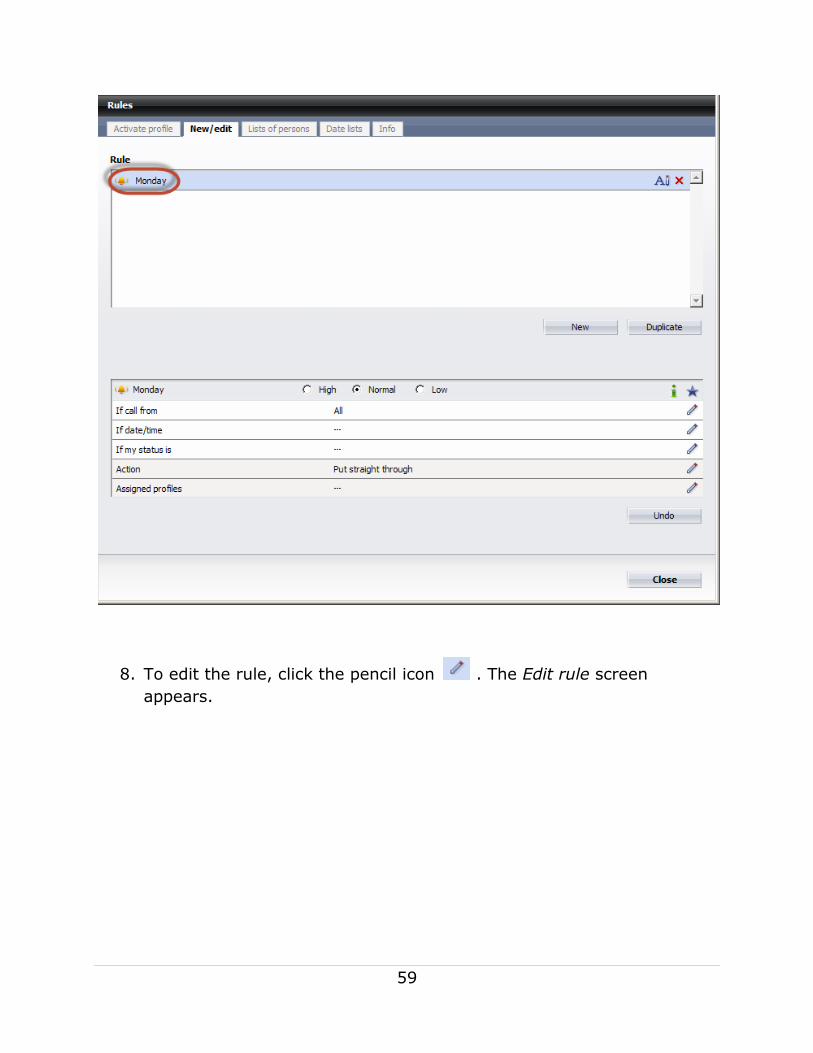
8. To edit the rule, click the pencil icon . The Edit rule screen
appears.

60
9. Click the add icon to select a number.
10. Click OK.
11. Click the add icon to edit the date range.
12. Select the day you want to edit.
13. Click the add icon to edit the time.
14. Enter the time in 24-hour format in the Time Range field.
15. Click OK.

61
16. Click the pencil icon to create a rule associated with your Presence
status. The Presence window appears.

62
17. Click the pencil icon to edit the action. The Action window appears.

63
18. Select an Action.
a. Select Put straight through to put the call through.
b. Select Redirect to and enter a phone number.
c. Select Use preferred device and enter a device.
19. Click OK.
20. To assign the Rule to a profile click the pencil icon next to the
Assigned profile. The Edit rule window appears.
21. Add rules to each profile, if applicable.
22. Click OK when you are done.

64
Activating a Rule
1. Locate the Rules drop-down list.
2. Select the rule you want to activate from the Rules drop-down list.

65
Managing Pop-Up Screen Settings
You can edit the pop-up screen settings. For example, you can have the Web
Client window open in front of all other windows while you are on an active
call.
1. Click Menu -> General. The General settings window appears.
2. Click the Common tab.
3. Click the Appearance tab.
4. Select Try to start in a separate window, if applicable.
5. Select Pop up on incoming call, if applicable.

66
6. Click Apply. A message indicates that the data was successfully
saved.
7. Click OK.

67
Managing Contact Permissions
When someone adds you as a contact, or when you add someone as a
contact, a notification is sent asking if you want to allow that contact to see
your Presence status. You can edit your Contact Permissions at any time.
Editing a Permission
1. Click the Pearl menu icon .
2. Click Personal Settings.
3. Click Presence Access Control.
The General settings window appears.

68
4. Select the Presence tab.
5. Select the Access Control List tab.
69
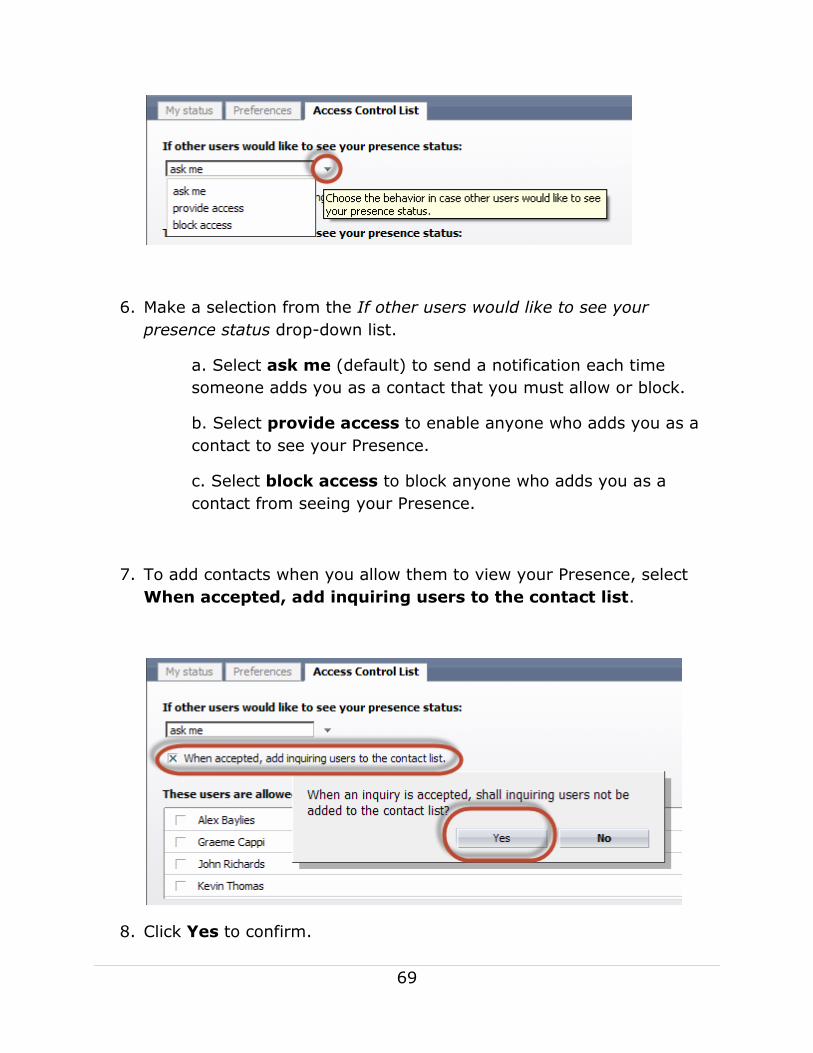
6. Make a selection from the If other users would like to see your
presence status drop-down list.
a. Select ask me (default) to send a notification each time
someone adds you as a contact that you must allow or block.
b. Select provide access to enable anyone who adds you as a
contact to see your Presence.
c. Select block access to block anyone who adds you as a
contact from seeing your Presence.
7. To add contacts when you allow them to view your Presence, select
When accepted, add inquiring users to the contact list.
8. Click Yes to confirm.
70
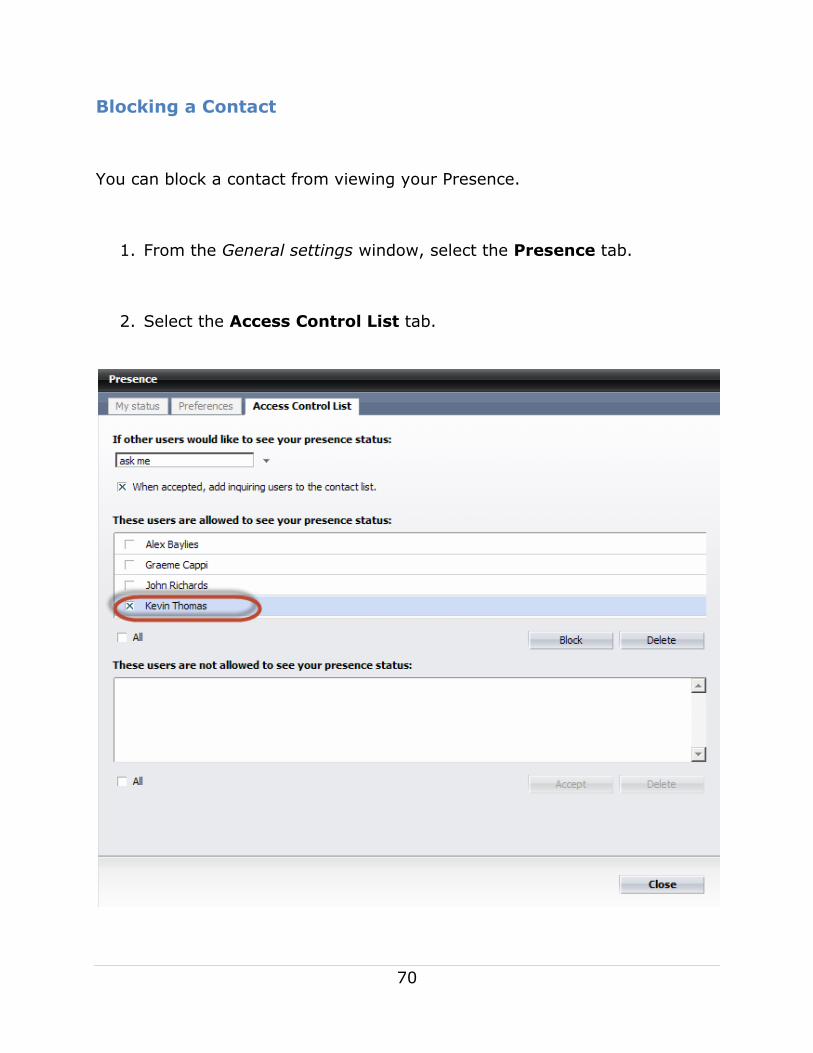
Blocking a Contact
You can block a contact from viewing your Presence.
1. From the General settings window, select the Presence tab.
2. Select the Access Control List tab.

71
3. In the These users are allowed to see your presence status area, select the contact you want to block.
4. Click Block. A confirmation pop-up appears.
5. Click Yes. The contact now appears in the These users are not allowed to see your presence status area.

72
Allowing a Contact
You can allow a contact to view your Presence even after you blocked them.
1. From the General settings window, select the Presence tab.
2. Select the Access Control List tab.
3. In the These users are not allowed to see your presence status area,
select the contacts you want to allow to view your Presence.
4. Click Accept. A pop-up confirmation appears.

73
5. Click Yes to confirm the change. The contact now appears in the These users are allowed to see your presence status area.

74
Managing Tell-Me-When Notifications
You can create a Tell-Me-When notification to alert you when someone becomes available on the phone or in their office, or edits their Presence
settings.
Creating a Tell-Me-When Notification
1. Click the Contacts tab. A list of contacts will appear.
2. Select the contact for which you want to set a notification.
3. Click the double arrow icon to display the drop-down menu.
4. Select Set Tell-Me-When. The Tell-Me-When pop-up appears.

75
5. Make a When selection.
6. Make an Action selection.
7. Make an Expires in selection.
8. Click OK.

76
Managing Device or Rollover Lists
You can set up a device list or rollover list to handle incoming calls. For
example, if your desk office phone rings and you do not answer it, the call can roll over to another device.
Note: You need to add devices before you can create a device list or rollover
list.
1. From the home page, select Menu | General. The General settings window appears.
2. Select the Devices tab.
3. Add the devices you want to make available for rollover purposes.
4. Enter the Name and Number of the device.

77
5. Click OK.
6. Select the Named Device Lists tab.
7. Click New and name the device list.

78
8. Click Add to display the devices previously created.
9. Select the devices to be included in the device or rollover list.
10. Click Add when finished. The Settings window closes.

79
11. Click OK.
12. Click the Device drop-down list and select the device list you just
created.