Embed Size (px)
Citation preview
hardware and software1_11.docx 1.1
Unit 1
Introduction to the Computer:
Hardware and Software
Unit Goals
1. To appreciate the distinction between micro, mini, and mainframe computers and to understand our emphasis on the micro-computer;
2. To gain a lay understanding of selected hardware components (e.g. cpu, ram, modem, etc);
3. To gain a lay understanding of ways information is stored on a microcomputer;
4. To become skilled in the use of a “window”; and
5. To appreciate the importance of organization, backup, and virus protection.
Many of us have learned about computers and learned to use them in a very haphazard manner. We pick up tips and shortcuts from friends and co-workers, learning what we need to know to accomplish the task at hand. While this approach can keep you functioning, there are often frustrating moments (or days) when the system isn’t working, or you find yourself with strange results or formatting that seems out of control.
My goal for this introductory unit is to fill in a few of the gaps you may have on computer terminology, the function of various components, and understanding of how information is stored on micro-computers. This information may help you diagnose a problem when something does go wrong – or at least make it easier for you to talk with the technician you call for assistance. Shared terminology can work wonders in communicating your concerns and understanding the “techie”.
As a data manager, you may also be responsible for ordering new computer equipment – and you should know what you need so that your software works efficiently and you have the correct features for internet access and for ensuring data security and integrity.
hardware and software1_11.docx 1.2
Outline
Section Topic Page 1.
Micro versus Mini versus Mainframe Computers ………..
1.3
2.
Hardware Components …………………………………….
2.1 The CPU …………………………………………. 2.2 The Display (Monitor) …………………………… 2.3 Printers and Scanners…………………………… 2.4 Bits – How the Computer Stores Information … 2.5 ASCII, Unicode and Hexadecimal Codes……… 2.6 Computer Storage Terminology ……………….. 2.7 ROM, RAM, and Read/Write Storage………….. 2.8 The Hard Drive …………………………………… 2.9 CD’s, Diskettes, and Zip Disks …………………. 2.10 Modem and Ethernet ……………………………. 2.11 Ports and Cables ………………………………… 2.12 Care of Computers, Storage Devices, and
Printers……………………………………………..
1.4 1.5 1.5 1.7 1.9 1.9
1.13 1.13 1.15 1.16 1.18 1.18
1.19
3.
Software ……………………………………………………..
3.1 Disk Operating System ………………………….. 3.2 Windows …………………………………………… 3.3 The Mouse ………………………………………… 3.4 The Anatomy of a Window ………………………. 3.5 Managing Files in Windows …………………….. 3.6 Some General Tips for Working on a PC……….
1.20 1.20 1.20 1.21 1.24 1.26 1.29
4.
The Internet and the World Wide Web (WWW) ………… 4.1 Browser Windows ………………………………… 4.2 Uploading and Downloading Files ………………
1.32 1.33 1.34
hardware and software1_11.docx 1.3
1. Micro versus Mini versus Mainframe Computers
In this course we will focus on the use of PC or IBM-compatible microcomputers.
The three types of computers – micro-, mini- and mainframe differ basically in size and speed. As computers get larger, they usually get faster and better able to handle large files and programs. The distinction between micro- mini- and mainframe computers has blurred over time. More mini-computer type power is available on micros, often called Work Stations, that are networked together. Networking of microcomputers (linking of computers through cable systems) allows for a distributed software environment, formerly available only on mini and mainframe computers. One computer is designated as a “server” that stores distributed software and licensing, and houses shared “network” drives for shared access to files, as well as secure back-up. The three types of computers differ in maintenance. Maintenance of mainframe computers usually requires full time staff. Mini computers usually need a part-time or full time operator. Microcomputers often have no operator other than the current user, and the maintenance responsibility falls on the user. A computer network typically requires part- or full-time staff. Micro-computers encompass everything from a PDA (personal digital assistant), a smartphone, or a tablet PC, to laptops, desktops, and “towers” that allow for more drives and cables. There are two common types of microcomputers: MAC and PC type (or IBM-compatible) computers. MAC computers have had traditional strengths in ease of use with a graphics interface. MAC computers popularized the mouse, with point and click instructions, and the pull-down menu, and more recently the touch screen. MACs were also the first to run more than one application at the same time – known as multi-tasking. The popularity and ease of use of these features prompted software manufacturers to develop products that mimic their features on other computer systems. The ability to do multi-tasking using the UNIX operating system developed by AT&T computers and other competitors prompted IBM to develop its own multi-tasking operating system, OS2. However, none of these operating systems had the same market share as DOS, the original operating system for IBM compatible computers. Although each computer type has strengths and weaknesses, the same issues may not prevail in the future. The personal computer industry is competitive, and one brand's advantage is often another brand's target for future development. Of special note in computing is the current market share and software usage. MAC’s are often felt to have advantages and superior software for music, photo and film editing as well as fewer problems with viruses; while PC’s have the reputation of stronger computational functioning. Our focus in this course is use of software on a conventional laptop, desktop and or networked PC environment.
hardware and software1_11.docx 1.4
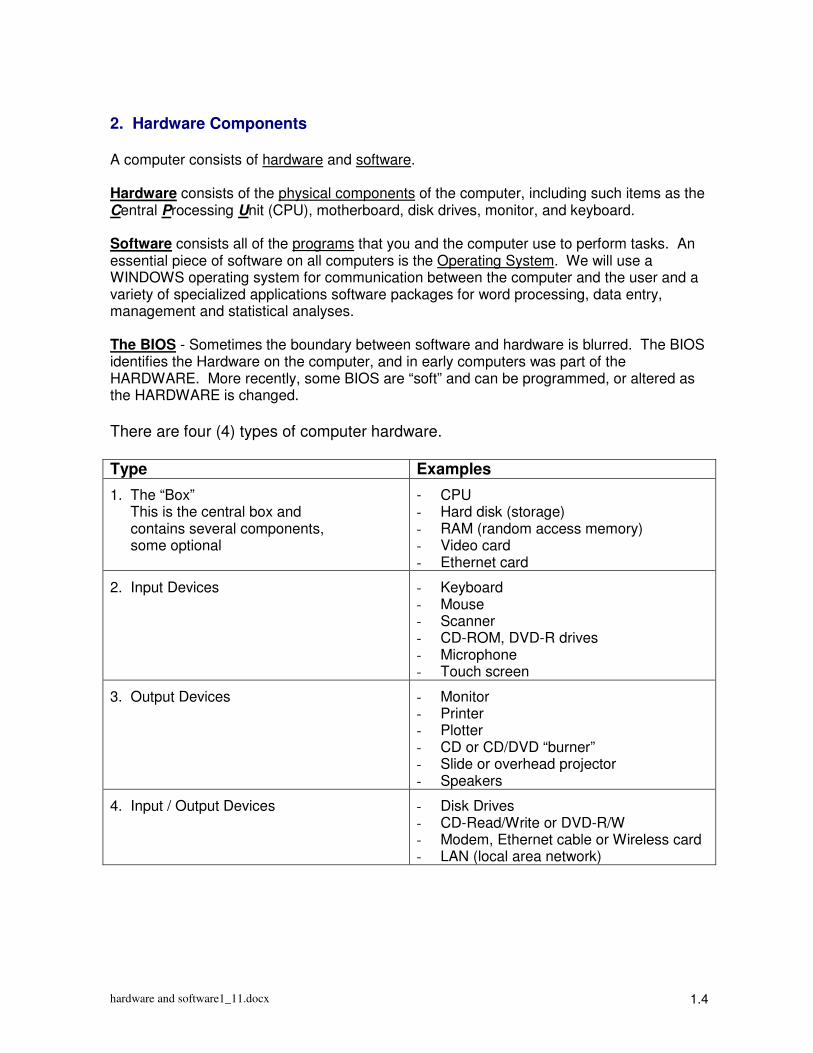
2. Hardware Components
A computer consists of hardware and software. Hardware consists of the physical components of the computer, including such items as the Central Processing Unit (CPU), motherboard, disk drives, monitor, and keyboard. Software consists all of the programs that you and the computer use to perform tasks. An essential piece of software on all computers is the Operating System. We will use a WINDOWS operating system for communication between the computer and the user and a variety of specialized applications software packages for word processing, data entry, management and statistical analyses. The BIOS - Sometimes the boundary between software and hardware is blurred. The BIOS identifies the Hardware on the computer, and in early computers was part of the HARDWARE. More recently, some BIOS are “soft” and can be programmed, or altered as the HARDWARE is changed.
There are four (4) types of computer hardware.
Type Examples
1. The “Box” This is the central box and contains several components, some optional
- CPU - Hard disk (storage) - RAM (random access memory) - Video card - Ethernet card
2. Input Devices
- Keyboard - Mouse - Scanner - CD-ROM, DVD-R drives - Microphone - Touch screen
3. Output Devices
- Monitor - Printer - Plotter - CD or CD/DVD “burner” - Slide or overhead projector - Speakers
4. Input / Output Devices
- Disk Drives - CD-Read/Write or DVD-R/W - Modem, Ethernet cable or Wireless card - LAN (local area network)
hardware and software1_11.docx 1.5
2.1 The CPU
CPU stands for “central processing unit” and is actually a microprocessor. Microprocessors have evolved over time with a tremendous impact on the speed of processing. Associated with the microprocessor is a clock speed in mega-Hertz. This represents the number of calculations that can be processed per second; one mega-Hertz corresponds to the processing of 1 million calculations in one second. (1 MHz = 1,000,000 = 1 MIP processes/sec). Clock speeds of early PCs were slow, and have increased dramatically. Clock speed does not provide a true measure of processing time. Benchmarks have been established, consisting of certain tasks performed by specific software to establish a machine’s speed. Different CPU’s can be compared with respect to the time taken to perform the benchmark task.
2.2 The Display (Monitor)
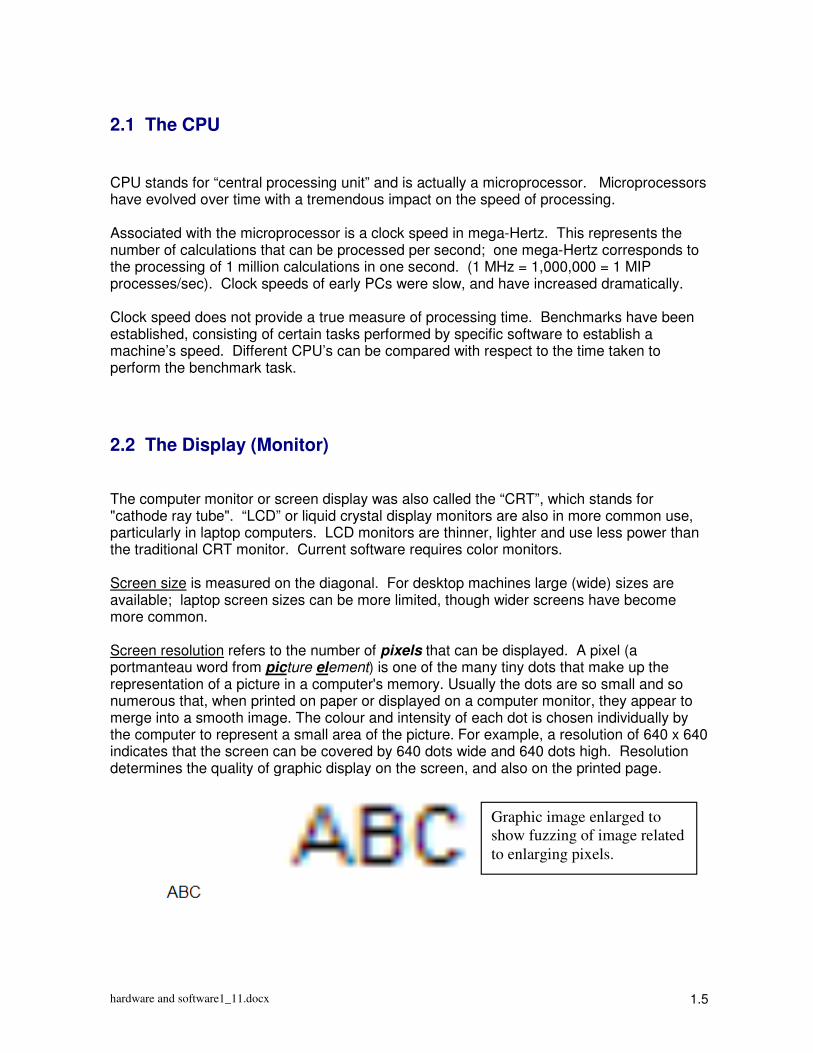
The computer monitor or screen display was also called the “CRT”, which stands for "cathode ray tube". “LCD” or liquid crystal display monitors are also in more common use, particularly in laptop computers. LCD monitors are thinner, lighter and use less power than the traditional CRT monitor. Current software requires color monitors. Screen size is measured on the diagonal. For desktop machines large (wide) sizes are available; laptop screen sizes can be more limited, though wider screens have become more common. Screen resolution refers to the number of pixels that can be displayed. A pixel (a portmanteau word from picture element) is one of the many tiny dots that make up the representation of a picture in a computer's memory. Usually the dots are so small and so numerous that, when printed on paper or displayed on a computer monitor, they appear to merge into a smooth image. The colour and intensity of each dot is chosen individually by the computer to represent a small area of the picture. For example, a resolution of 640 x 640 indicates that the screen can be covered by 640 dots wide and 640 dots high. Resolution determines the quality of graphic display on the screen, and also on the printed page.
Graphic image enlarged to
show fuzzing of image related
to enlarging pixels.

hardware and software1_11.docx 1.6
Display settings for your monitor, including resolution, can be controlled through the Control Panel. Your hardware and commonly used software will determine the optimal settings. Higher resolution means more pixels in the same area – and can be important for detailed
graphic images. To check or modify your settings, go to …
(Start����Settings����Control Panel and select Display. Use the Settings Tab to control screen resolution and color settings. Recommendations for optimal settings typically come with the original hardware and operating system setup. Many software application packages have suggested settings for optimal display of graphics.
Only limited combinations are available for screen resolution. Higher resolution often results in smaller icons and print on your desktop.
Color quality selection depends upon software and hardware.
hardware and software1_11.docx 1.7
2.3 Printers and Scanners
2.3.1 Printers The most common types of printers in current use are InkJet and Laser printers. InkJet Printers Inkjet printers transfer an image via magnetic charge. High quality graphics and a large variety of fonts are available. Inkjet printers tend to be relatively inexpensive to purchase, but more costly to maintain (ink cartridges are pricey!). High quality color graphics and photo printing are available. Inkjet printers are often a good choice for home use. Print speeds are moderate, and color photo printing options are an advantage. Inexpensive printers that include a scanner/copier are also available.
Laser Printer On a laser printer, the image is produced by scanning a laser beam across an electronically charged drum. Toner, or ink, having an opposite charge and stuck to the drum, is then transferred to the paper by pressure and heat. High quality graphics and multiple font printing are readily available. Laser printers tend to be more expensive to purchase and relatively expensive to maintain. These are the best choice for high speed and large volume printing. Color laser printers are also available and in more common use – again, these tend to be costly. Printer supplies (paper, ink cartridges, toner, etc) are often considered to be a part of a data management budget. Keep this in mind! Some commonly used printing terms:
Buffer Size refers to the size of the storage device inside the printer. The buffer stores a portion of the document prior to printing.
PPM (pages per minute) describes print speed for inkjet or laser printers (8-12 is good).
PCL stands for "printer control language". Developed by Hewlett-Packard, it is a set of fonts and layout instructions.
Postscript is a set of fonts and layout instructions originally defined for MacIntosh computers only.
Computers and printers communicate using a set of codes (see section 2.5). When you purchase a new printer and first attach it to your machine you may need an accompanying disk to load information on the printer so that it is available to your software programs. Printers require PRINT DRIVERs. A PRINT DRIVER consists of a program that recodes output from the Software Program to suitable patterns of dots on the paper. Print drivers are written by the software manufacturers (not Printer manufacturers), since the software manufacturers determine the coding table for the output. You typically need to select a default printer to use with WORD and other software – this sets up the correct print drivers.
hardware and software1_11.docx 1.8
2.3.1 Scanners
Scanners have become an important method of transferring printed information into digital format in recent years. Scanner technology has been improving rapidly and systems are available everywhere and used in many ways. The basic principle of a scanner is to analyze an image and process it in some way. Scanning of images and text (using Optical Character Recognition or OCR) allow you to save information to a file on your computer. You can then alter or enhance the image, or edit text, and incorporate it into a document or print it out.
Types of Scanners:
• Flatbed scanners, also called desktop scanners, are the most versatile and commonly used home scanners.
• Sheet-fed scanners are similar to flatbed scanners except the document is moved and the scan head is immobile. This model is useful in situations with large volumes of pages to be scanned.
• Handheld scanners rely on the user to move them instead of a motorized belt. This type of scanner typically does not provide good image quality. However, it can be useful for quickly capturing text. These are most commonly seen for scanning bar codes, and can be useful in research studies for processing of samples.
• Drum scanners are used to capture incredibly detailed images, and are most commonly used in the publishing industry.
Quality of scanned images and text depends upon a combination of factors:
• Sharpness is a function of the quality of the optics used to make the lens and the brightness of the light source.
• Resolution is defined by the number of dots per inch (dpi). The scanner's dpi is determined by the number of sensors in a single row (x-direction sampling rate) by the precision of the stepper motor (y-direction sampling rate).
• Software is then used to enhance images. Interpolation is a software process used to increase the perceived resolution of an image. Extra pixels are created in between the ones actually scanned. These extra pixels are an average of the adjacent pixels.
Once a document is scanned, you need software on your computer, called a driver, that knows how to communicate with the scanner – analogous to printer drivers. Most scanners speak a common language, TWAIN, that can be interpreted by standard image editing software packages. In addition to the driver, most scanners come with other a scanning utility and some type of image editing application. Many scanners include Optical Character Recognition (OCR) software. OCR allows you to scan in words from a document and convert them into computer-based text. It uses an averaging process to determine what the shape of a character is and match it to the correct letter or number. This is a tremendous aid in scan data entry systems, which we will be discussing later in the course, though there are issues in recognition of handwritten characters which must be accounted for.
hardware and software1_11.docx 1.9
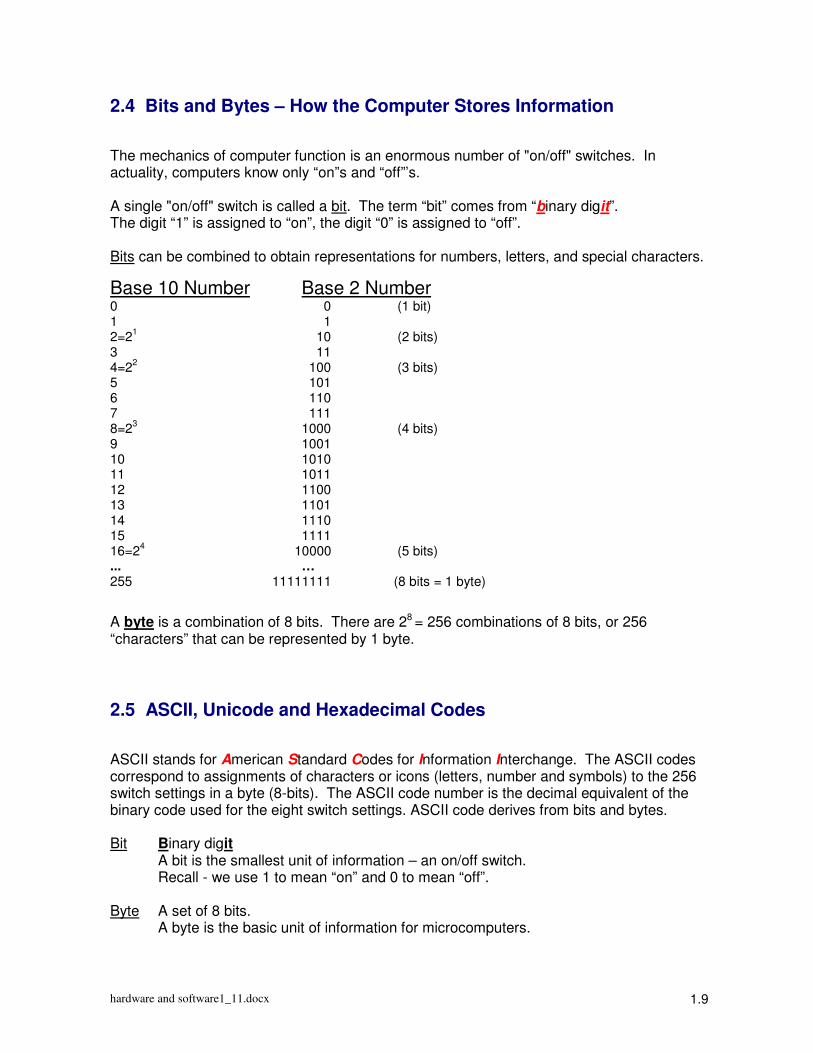
2.4 Bits and Bytes – How the Computer Stores Information
The mechanics of computer function is an enormous number of "on/off" switches. In actuality, computers know only “on”s and “off”’s. A single "on/off" switch is called a bit. The term “bit” comes from “binary digit”. The digit “1” is assigned to “on”, the digit “0” is assigned to “off”. Bits can be combined to obtain representations for numbers, letters, and special characters.
Base 10 Number Base 2 Number 0 0 (1 bit) 1 1 2=2
1 10 (2 bits)
3 11 4=2
2 100 (3 bits)
5 101 6 110 7 111 8=2
3 1000 (4 bits)
9 1001 10 1010 11 1011 12 1100 13 1101 14 1110 15 1111 16=2
4 10000 (5 bits)
... … 255 11111111 (8 bits = 1 byte)
A byte is a combination of 8 bits. There are 28 = 256 combinations of 8 bits, or 256 “characters” that can be represented by 1 byte.
2.5 ASCII, Unicode and Hexadecimal Codes
ASCII stands for American Standard Codes for Information Interchange. The ASCII codes correspond to assignments of characters or icons (letters, number and symbols) to the 256 switch settings in a byte (8-bits). The ASCII code number is the decimal equivalent of the binary code used for the eight switch settings. ASCII code derives from bits and bytes. Bit Binary digit
A bit is the smallest unit of information – an on/off switch. Recall - we use 1 to mean “on” and 0 to mean “off”.
Byte A set of 8 bits.
A byte is the basic unit of information for microcomputers.
hardware and software1_11.docx 1.10
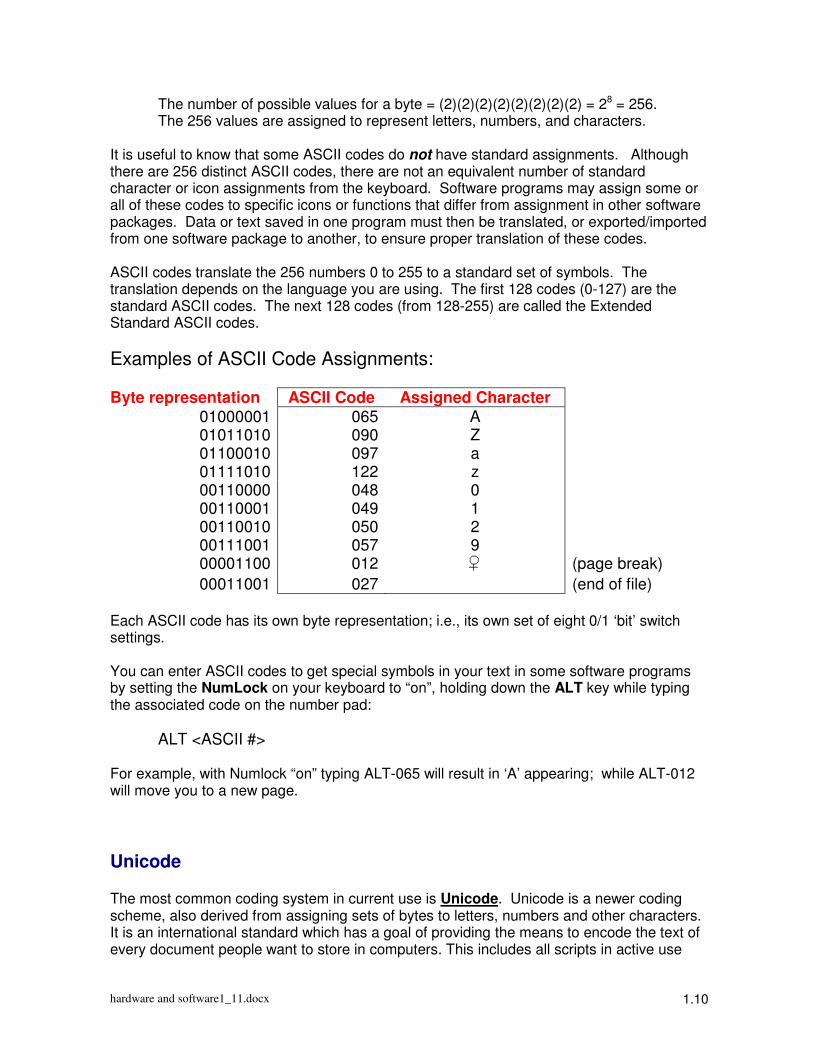
The number of possible values for a byte = (2)(2)(2)(2)(2)(2)(2)(2) = 28 = 256. The 256 values are assigned to represent letters, numbers, and characters.
It is useful to know that some ASCII codes do not have standard assignments. Although there are 256 distinct ASCII codes, there are not an equivalent number of standard character or icon assignments from the keyboard. Software programs may assign some or all of these codes to specific icons or functions that differ from assignment in other software packages. Data or text saved in one program must then be translated, or exported/imported from one software package to another, to ensure proper translation of these codes.
ASCII codes translate the 256 numbers 0 to 255 to a standard set of symbols. The translation depends on the language you are using. The first 128 codes (0-127) are the standard ASCII codes. The next 128 codes (from 128-255) are called the Extended Standard ASCII codes.
Examples of ASCII Code Assignments: Byte representation ASCII Code Assigned Character
01000001 065 A 01011010 090 Z 01100010 097 a 01111010 122 z 00110000 048 0 00110001 049 1 00110010 050 2 00111001 057 9 00001100 012
(page break)
00011001 027 � (end of file) Each ASCII code has its own byte representation; i.e., its own set of eight 0/1 ‘bit’ switch settings. You can enter ASCII codes to get special symbols in your text in some software programs by setting the NumLock on your keyboard to “on”, holding down the ALT key while typing the associated code on the number pad:
ALT <ASCII #> For example, with Numlock “on” typing ALT-065 will result in ‘A’ appearing; while ALT-012 will move you to a new page.
Unicode
The most common coding system in current use is Unicode. Unicode is a newer coding scheme, also derived from assigning sets of bytes to letters, numbers and other characters. It is an international standard which has a goal of providing the means to encode the text of every document people want to store in computers. This includes all scripts in active use
hardware and software1_11.docx 1.11
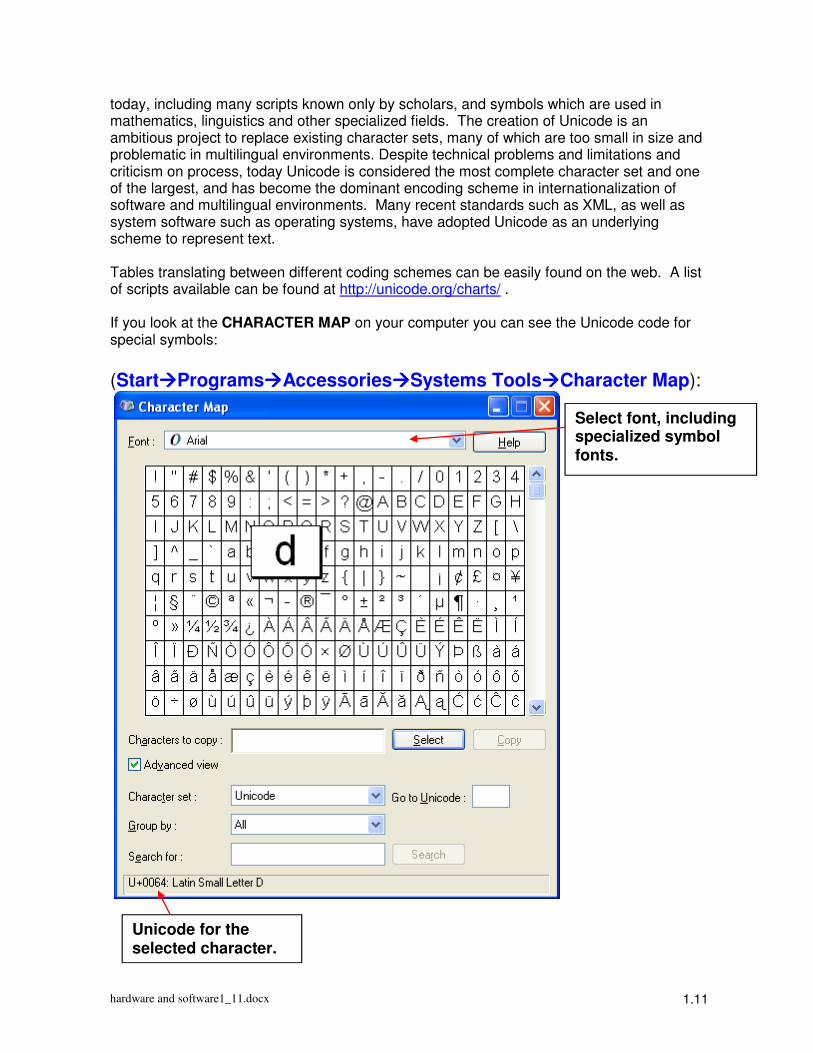
today, including many scripts known only by scholars, and symbols which are used in mathematics, linguistics and other specialized fields. The creation of Unicode is an ambitious project to replace existing character sets, many of which are too small in size and problematic in multilingual environments. Despite technical problems and limitations and criticism on process, today Unicode is considered the most complete character set and one of the largest, and has become the dominant encoding scheme in internationalization of software and multilingual environments. Many recent standards such as XML, as well as system software such as operating systems, have adopted Unicode as an underlying scheme to represent text. Tables translating between different coding schemes can be easily found on the web. A list of scripts available can be found at http://unicode.org/charts/ . If you look at the CHARACTER MAP on your computer you can see the Unicode code for special symbols:
(Start����Programs����Accessories����Systems Tools����Character Map):
Unicode for the selected character.
Select font, including specialized symbol fonts.
hardware and software1_11.docx 1.12
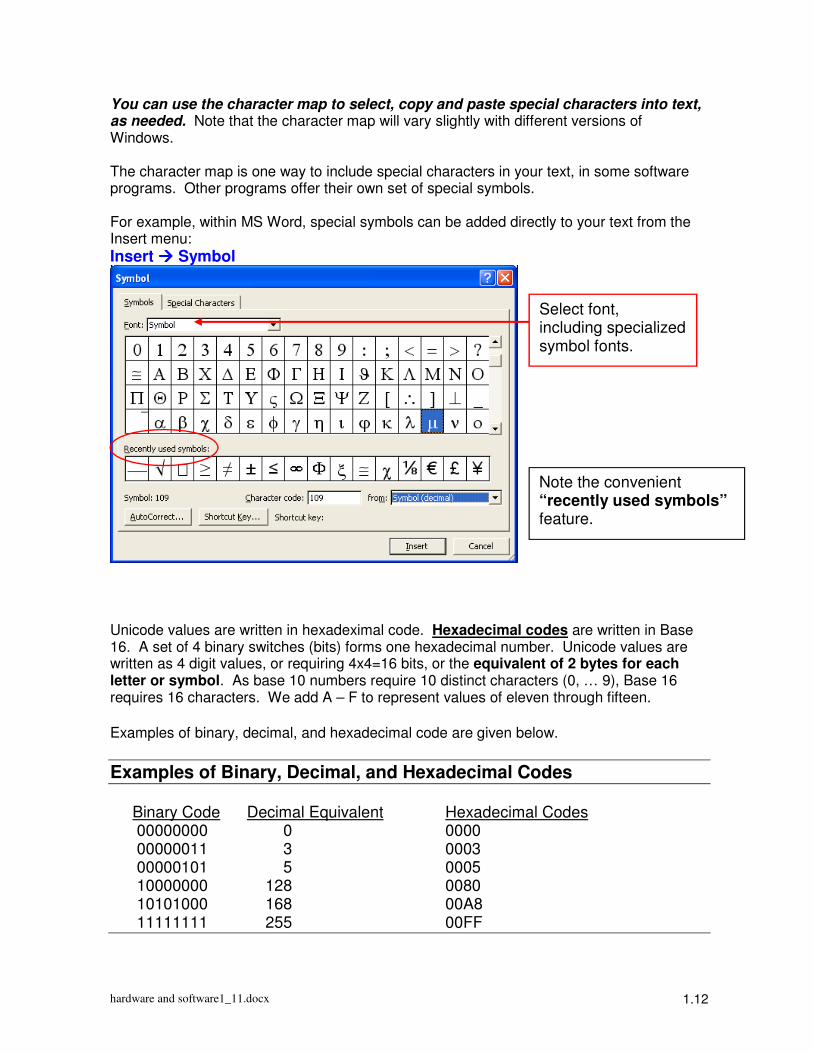
You can use the character map to select, copy and paste special characters into text, as needed. Note that the character map will vary slightly with different versions of Windows. The character map is one way to include special characters in your text, in some software programs. Other programs offer their own set of special symbols. For example, within MS Word, special symbols can be added directly to your text from the Insert menu:
Insert ���� Symbol
Unicode values are written in hexadeximal code. Hexadecimal codes are written in Base 16. A set of 4 binary switches (bits) forms one hexadecimal number. Unicode values are written as 4 digit values, or requiring 4x4=16 bits, or the equivalent of 2 bytes for each letter or symbol. As base 10 numbers require 10 distinct characters (0, … 9), Base 16 requires 16 characters. We add A – F to represent values of eleven through fifteen.
Examples of binary, decimal, and hexadecimal code are given below.
Examples of Binary, Decimal, and Hexadecimal Codes
Binary Code Decimal Equivalent Hexadecimal Codes 00000000 0 0000 00000011 3 0003 00000101 5 0005 10000000 128 0080 10101000 168 00A8 11111111 255 00FF
Select font, including specialized symbol fonts.
Note the convenient “recently used symbols” feature.
hardware and software1_11.docx 1.13
2.6 Computer Storage Terminology
We consider next how units of bits and bytes of information are used to define storage space on a computer. One bit represents one "0/1" switch. One byte represents 23 bits = 8 bits. After that, we increment bytes by powers of 10. One Kilobyte (KB) = 210 Bytes = 1024 Bytes
= 213 Bits = 8192 Bits One Megabyte (MB) = 210 Kilobytes = 1024 Kilobytes
= 220 Bytes = 1048576 Bytes = 223 Bits = 8388608 Bits
One Gigabyte (GB) = 210 Megabytes = 1024 Megabytes
= 220 Kilobytes = 1048576 Kilobytes = 230 Bytes = 1073741824 Bytes = 233 Bits = 8589934592 Bits
The amount of storage space available on a disk is usually described in terms of bits, bytes, KB, MB, or GB.
2.7 RAM, ROM, and Read/Write Storage
A major component of the microcomputer is the storage device(s). All microcomputers have systems for getting data into the computer, saving information on the computer, and getting data back out of the computer. Data are stored on disks that may be removable or fixed in the computer. There are different kinds of storage:
(1) Random Access Memory (RAM) (2) Read Only Memory (ROM) (3) Read/Write storage: Hard Disk, Floppy Disk, CD, DVD, Zip disk, plug-in
drives
Random Access Memory (RAM) is a major component of personal computers. RAM is the fastest storage device, and is accessed at the speed of the microprocessor. Most software has a minimum RAM requirement.
Random Access Memory can be installed on the motherboard (the motherboard is the CPU), or installed in expansion slots in a computer.
hardware and software1_11.docx 1.14
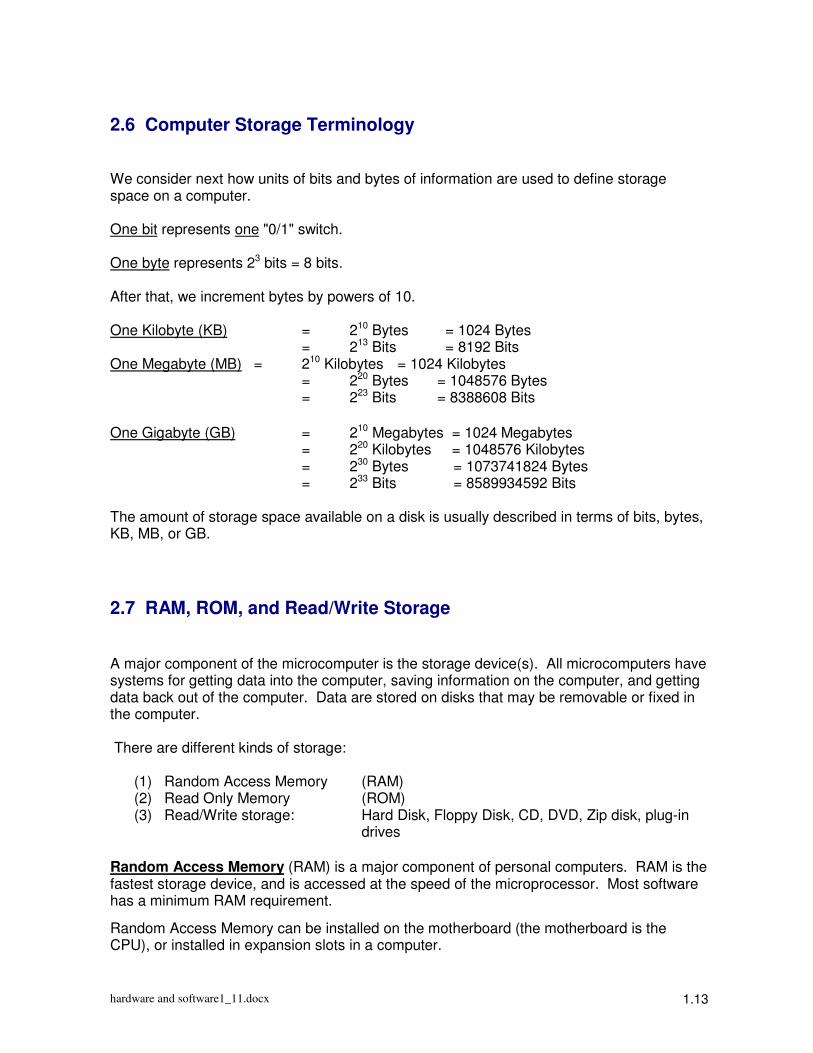
Special software is needed to access RAM. WINDOWS serves this purpose, allowing access to as much RAM as is available. Most WINDOWS programs require 16 or more MB of RAM. SAS 9.x recommends minimally 32 MB of RAM for operation. WINDOWS XP suggests that it be operated with at least 128 MB of RAM and 1.5 GB of hard drive space and a computer speed of minimally 300 MHz.
To check on your system:
Start ���� Settings ���� Control Panel ���� Performance and Maintenance���� System
Physically, RAM is a chip installed on a circuit board inside the computer box. You can purchase additional RAM for your computer if required for newer software you are using, or to improve operating speed and multi-tasking. A major limitation of RAM is that it is temporary. When the computer is turned off, the information stored in RAM is lost.
Every time you run an application (e.g., MSWord or SAS), the CPU uses RAM for retrieval and storage of information as the application is running. This is efficient because RAM is accessed at a high clock speed, usually close to the same clock speed as the CPU. However, until you hit SAVE, any work that is only current in RAM will be lost if you lose power or have some other glitch or malfunction.
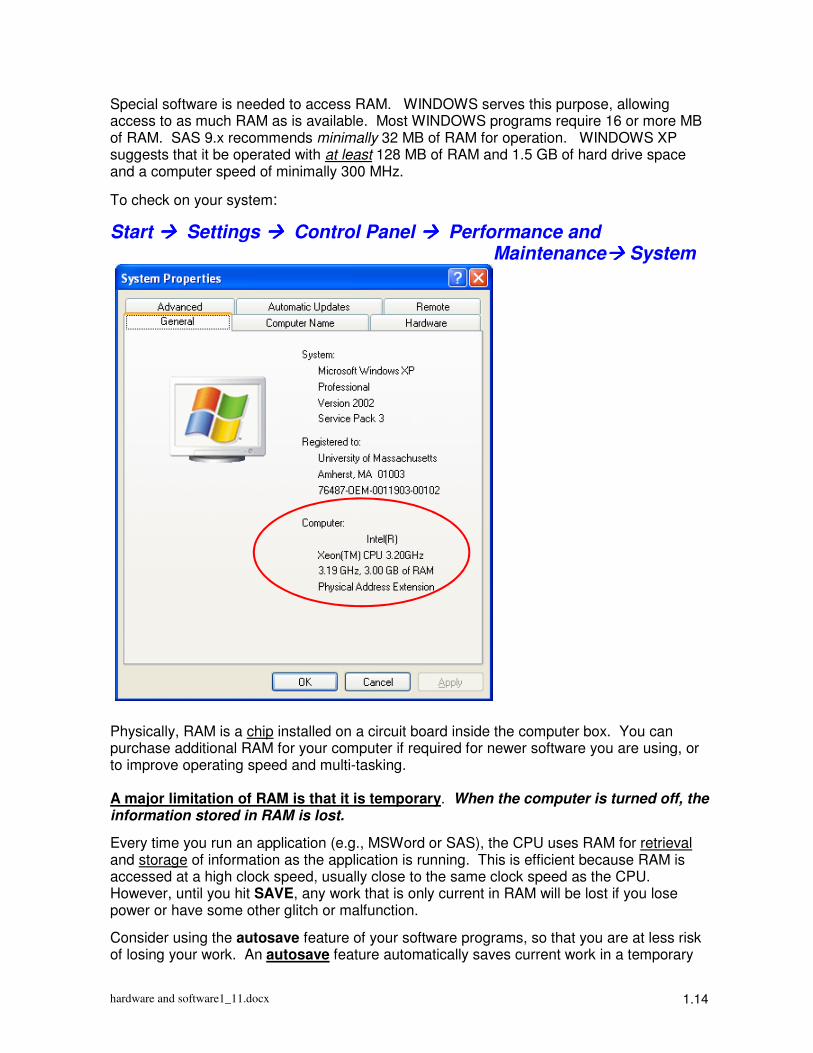
Consider using the autosave feature of your software programs, so that you are at less risk of losing your work. An autosave feature automatically saves current work in a temporary
hardware and software1_11.docx 1.15
file at regular intervals, which can be recovered after a power loss. You can set the frequency with which automatic saves occur:
Example – using the autosave feature in MS Word 2010 …
File ���� Options ���� Save
Too frequent auto saves can interfere with smooth workflow, but too infrequent (e.g., set at 1 hour) can mean drastic loss of work. When you do lose power or a program shuts down on you, as you restart the software application, the “auto-saved” version of the file with most of your recent work can be accessed.
2.8 The Hard Drive
In contrast to RAM, information can be stored “permanently” on a hard disk. Physically, a hard disk is a magnetic medium and can be either:
� a device inside the computer box (most common) � a card in an expansion slot � an external device
You will find an option to set the frequency of auto saves, under: “Save AutoRecovery info every: ”
hardware and software1_11.docx 1.16
The amount of information that can be stored on a hard disk has increased substantially over time:
Machine (Year) Storage Capacity of Hard Drive 80286 (1982) 10-20 MB 80486 (1990) 200-540 MB P5 (1995) Gigabyte+ Current PC’s Many many GB
Note that I say “permanently” in quotes – disks can be broken or destroyed; data can be destroyed or rendered inaccessible by “viruses” or “worms”; additionally magnetic storage may deteriorate over time.
2.9 CD’s, Diskettes, and Zip Disks
CD-ROM stands for "Compact Disk-Read Only Memory. CD-ROM is a storage medium based on laser technology. The storage capacity is large, on the order of one or more gigabytes. Read only means that the hardware to write, or save, to a CD is not included. It is not possible to write to a CD without special hardware, a CD writer, popularly known as a “CD burner”. CD-R/W stands for Compact Disk-Read/Write. However, once you have written to a CD, it cannot be erased and overwritten like a diskette, unless you buy CD’s designed for re-writing. Even re-writable CD’s are not designed for continual saving and overwriting
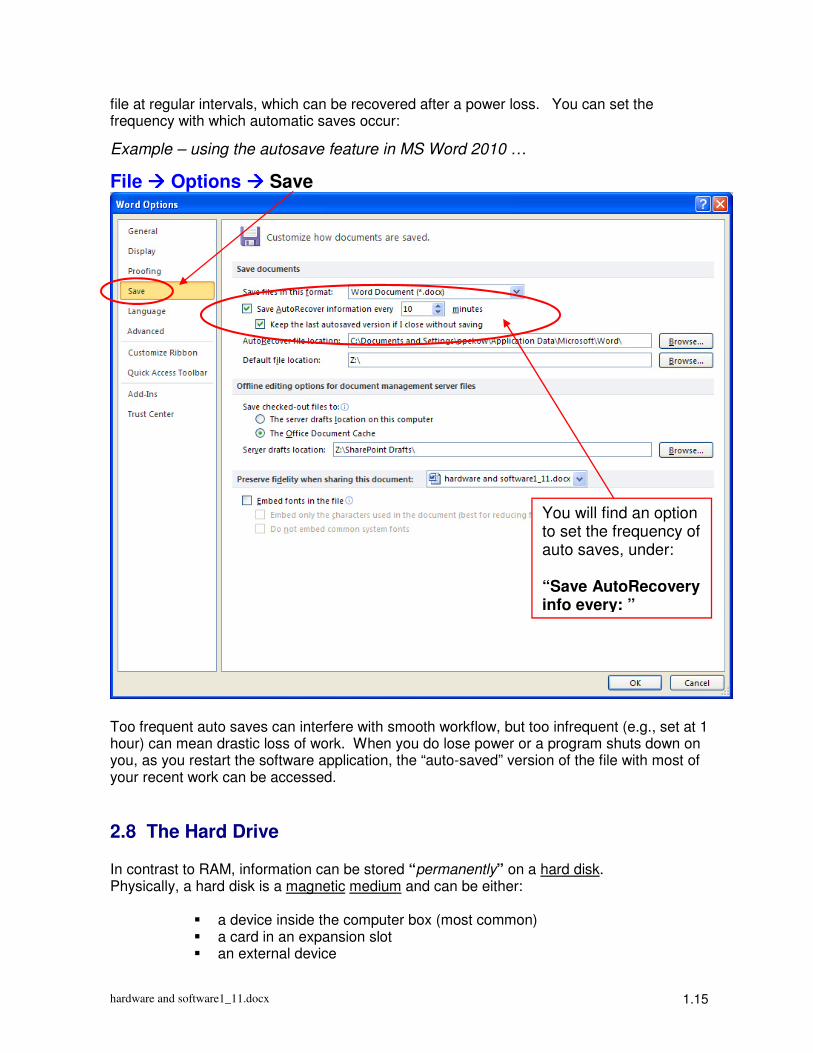
Use “My Computer”
To look at total, used and free storage on your local hard drive. (Right-click on C: and select “Properties” from the menu). This computer has 74.4 GB total storage for software and other files.
hardware and software1_11.docx 1.17
as you are in the process of editing and updating files. They are more suited to saving final copies of data files and reports, especially those you don’t want re-edited.
DVD (Digital Video Display) drives are a common option on computers. They are commonly read only drives, often in combination with a CD-R/W drive; DVD-R/W drives are also available. More and more software, especially with complex graphics (particularly games) is distributed on DVD.
Other removable storage devices are known as diskettes or floppy disks have been pretty much phased out.
5-¼ " Floppy Diskette (Pretty much phased out) An electronic medium storage device. Reading from and writing to are both possible. Storage capacity 360K - 1.2 MB.
3.5" Diskette (Typically referred to as the “a:” drive) – also pretty much phased out. An electronic medium storage device. Reading from and writing to are both possible. Storage capacity 720K - 1.44 MB. Less easily damaged than 5.25" floppy diskette. Zip Disks – 100 or 250 MB ZIP disks, designed for use in 100 or 250 MB ZIP drives, which can be an external drive, or part of the box. Note that the device size (100 or 250 MB) and disk size (100 or 250 MB) must be compatible.
Other Options
Compact Flash (USB drives), memory sticks and other compact media (e.g., micro SD cards) are increasing versatile and vary in capacity. They are very useful to have and can fit in your wallet or on a keychain. These attach through USB or special drives. Prices vary with the capacity (amount of storage space); you can get a relatively inexpensive one that can hold a lot of data. Infra-red communication and wireless interfaces are increasingly valuable and available.
(Tip: I recommend using USB flash drives – you can fit most of your coursework on
a single, inexpensive flash drive, and back-up your work to the U: drive.)
Access Time is the time required by the CPU of the computer to access one byte of information on a device. It is good to have fast access time. The access time is measured in milliseconds.
� Early machines (e.g., 80286) had access times of 88 msec. � Today, hard disk drives have access times of 14 msec or less. � In general, the higher the storage device, the faster the access time.
hardware and software1_11.docx 1.18
2.10 Modem and Ethernet
"Modem" is shorthand for Modulate and Demodulate. It enables two computers to exchange data over standard telephone lines. Use of a modem requires communications software, which performs several functions, among them:
� Dialing and redialing � Logging on (connecting) to system being called � Transmission of information.
The transmission speed of a modem is expressed as the baud rate. Baud rate = # bits that can be transferred in 1 second. The standard for a good, high-speed modem is 56K. An Ethernet connection is a cable connection to a system, rather than a phone line. MIPS = Million Instructions per Second. Ethernet wiring – connection through a “hardwire” or cable system, transmits at 10 MIPS. The backbone fiber optics network at UMASS transmits at 100 MIPS. Wireless connection is increasingly available, and requires the appropriate “card” in your computer, as well as working within a wireless environment. Many buildings and areas on campus have been established as wireless zones, which means that if your laptop has the capability, you can establish an internet connection when in those areas. Check on the OIT website for wireless zones on campus.
2.11 Ports and Cables
Port. A port is a physical location through which the computer exchanges information with an external device (e.g., printer or modem). A port has an address so that the computer knows where to send or receive information. There are three types of ports and associated cables: parallel and serial ports, and USB ports.
1. Parallel � 8 bits are simultaneously transmitted over 8 wires (or transmitted in parallel). � Most commonly used for printers. � Also commonly used for external disk drives.
2. Serial
� Each bit is transmitted one after the other (in serial) over a single wire. � Most commonly used for modems.
hardware and software1_11.docx 1.19
3. USB – Universal Serial Bus Port � Currently most common method of attaching peripheral hardware; these are
the standard method for most current laptop computers, and increasingly on newer desktop computers, also.
� Ports are typically available on rear and front (for easy access) of box, as well as on the side of monitors.
� USB supplies power to the peripherals, reducing the need for additional power sources.
� Full speed devices communicate with the PC at 12Mbps. Mice and keyboards etc. can communicate at a lower 1.5Mbps rate.
� PlugNPlay - The PC recognizes each device that is plugged in and loads the appropriate driver. If it's a new device for which it has no driver, and doesn't run with a generic driver, it prompts for a driver to be loaded.
� No confusing special cables required for USB connections – no null modem cables, handshaking lines to mess with etc.
� Supports 4 different data transfer types:- Isochronous, Control, Interrupt, Bulk
Attaching Peripheral Hardware
When you first attach new hardware (a modem, printer, disk drive, …) to your computer, you need to set up the communications systems for the new hardware component. While much of this has been automated – a disk which steps you through the process is typically included with new hardware – you are occasionally asked to make choices, and unless you are using a USB port, you will need to know which port you are using. When you attach hardware to a serial or parallel port, or hook-up your computer cable or modem connection, you typically need to restart the computer – until you restart, the newly attached component is not recognized or “not found.” However hardware that can be attached through a USB port does not require restarting the computer; it will be recognized without a reboot. Note that it is recommended that you take time to “Safely Remove Hardware” that is connected through a USB port, before switching to another piece of equipment on the USB drive. There is a chance for lost or non-readable files; or your computer may not appropriately ‘recognize’ another drive or piece of hardware that you subsequently attach to that port.
2.12 Care of Computers, Storage Devices, and Printers
Micro computer and storage disks (both hard disks and floppy disks) will perform better, require less maintenance, and last longer if several simple rules are followed.
� First, computers must be kept clean. This means insisting on no food or drink near the computer, and regular cleaning of dust and debris.
� Second, computers should be kept at moderate temperature (between 45 and 85 degrees F). High or low temperatures may damage motherboard memory and disk drive memory.
hardware and software1_11.docx 1.20
� Third, computers and disks must be kept clear of static. Since information is stored via magnetic fields, static electricity can destroy stored information. Similarly, static electricity can destroy RAM prior to installation in a computer. Computer memory, when shipped, comes packed in static proof wrap. Special care and grounding will minimize the chance that memory will be destroyed during installation. Low static carpeting may be a good investment.
� Finally, all computers should be connected to surge protectors. The surge protector will prevent voltage surges from damaging the system.
3. Software
3.1 Disk Operating System
The CPU, storage devices, and other devices in a personal computer communicate with each other via an operating system. Examples of IBM compatible operating systems include UNIX, DOS, and OS2. The DOS operating system was basic for most IBM compatible computers. In the past, as recently as 1996, learning DOS commands to manage files and access to application software was important. Originally, WINDOWS functioned as a layer “above” the disk operating system, though in new versions Windows serves as the operating system.
3.2 Windows
Windows is a Graphical User Interface (GUI) – a more intuitive way to interact with a computer. Instead of typing a command in DOS, tasks can be performed in an intuitive, visual manner via point and click, with the help of a “mouse” or other input device. Tasks such as copying a file from one disk to another can be accomplished by “dragging” an icon representing the file from the icon representing one disk to the icon of another. A GUI acts as a translator allowing the user and the computer to communicate with each other in a way that is easy for both to understand.
hardware and software1_11.docx 1.21
3.3 The Mouse
The mouse is a pointing and selecting device. It plays a major role in a graphical user interface. Everything that can be done with the mouse can also be done with the keyboard, although this defeats the purpose of the GUI.
Common terms used with mouse directions:
• Point: placing the cursor (arrow) on top of a screen object by moving the mouse.
• Click: pointing at an object and quickly clicking/pressing the (left) mouse button; then letting go.
• Double Click: pointing at an object and (left) clicking twice rapidly.
• Drag: pointing at an object pressing and holding down the mouse button; moving the mouse to “drag” the object and releasing the button when the object is in a new place.
• Select: pulling down a menu by clicking on the menu name; moving the pointer down to the command you want and then releasing.
• Rollover: Move the pointer over an object without clicking. This allows “rollover text” if available, which describes the function of the object or give additional information, to appear.
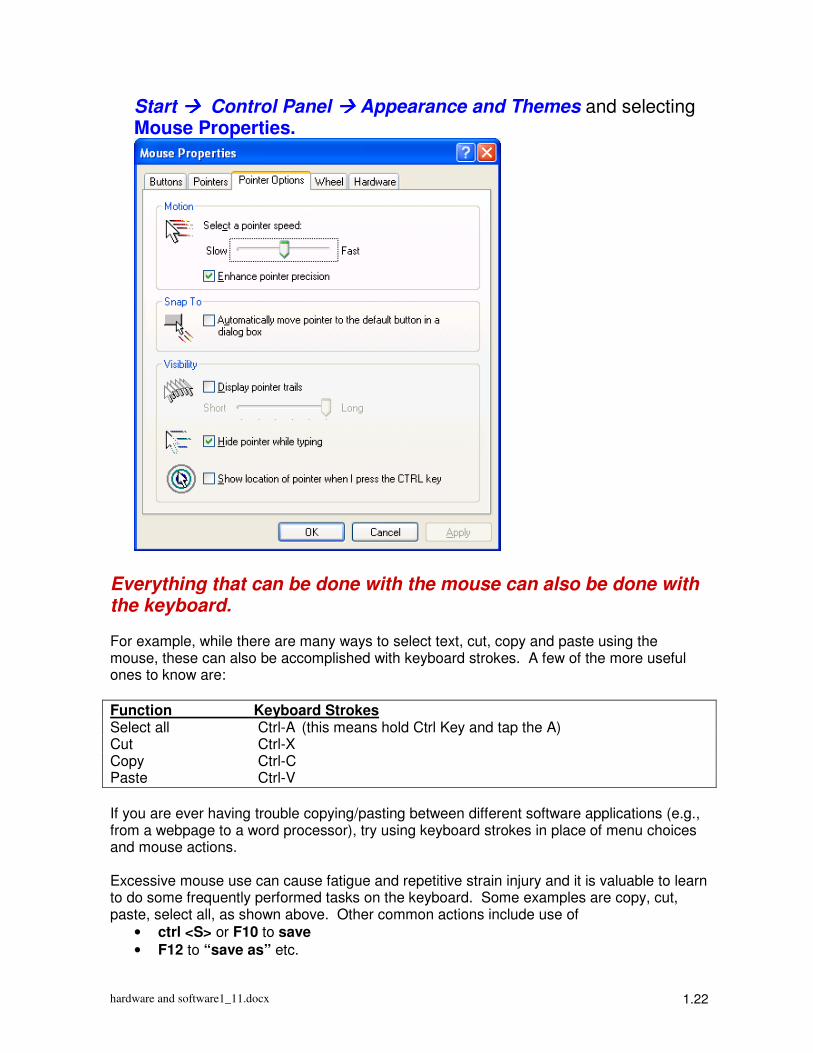
Most current models of the PC mouse have left and right buttons. Different menus become available if you “left-click” or “right-click” on a file or pull-down menu. The user has options to set which menu appears with a left or right click, as well as the appearance of the pointer on the screen, the speed of scrolling, etc. The cursor typically takes the shape of an arrow when you use it to point and click, and an hourglass to indicate a program is loading or operating. The cursor returns to an arrow when you can take the next step. Again, the user has the option of resetting the shape of the mouse pointer. Mouse properties, including speed of action, type of movement and screen appearance can be reset using:
hardware and software1_11.docx 1.22
Start ���� Control Panel ���� Appearance and Themes and selecting Mouse Properties.
Everything that can be done with the mouse can also be done with the keyboard. For example, while there are many ways to select text, cut, copy and paste using the mouse, these can also be accomplished with keyboard strokes. A few of the more useful ones to know are:
Function Keyboard Strokes Select all Ctrl-A (this means hold Ctrl Key and tap the A) Cut Ctrl-X Copy Ctrl-C Paste Ctrl-V
If you are ever having trouble copying/pasting between different software applications (e.g., from a webpage to a word processor), try using keyboard strokes in place of menu choices and mouse actions. Excessive mouse use can cause fatigue and repetitive strain injury and it is valuable to learn to do some frequently performed tasks on the keyboard. Some examples are copy, cut, paste, select all, as shown above. Other common actions include use of
• ctrl <S> or F10 to save
• F12 to “save as” etc.
hardware and software1_11.docx 1.23
Within a software program you can often customize these commands by creating MACROS, or programs to assign functions to keyboard strokes. Many operations are faster and sometimes more precise with the keyboard than with a mouse. You can also use mouse actions and keyboard controls together – some examples:
• Selecting a section of a document to copy can be done with the Shift key and the mouse. Use the mouse to position the cursor at the start of the section you wish to copy. Hold down the shift key, and use the mouse to move the cursor to the point in the document that marks the end of the section you wish to copy and click on it.
• Select columns of text to cut or copy by positioning the cursor at the start of the columns to be selected; holding down the Alt key, and dragging the mouse over the section of text you wish to select. This is particularly useful when editing computer output into Word documents.
Special electronic ‘pads’ and ‘pens’ are available for those with wrist or other problems making a mouse difficult to use; in addition voice recognition systems are in use and further development to give commands and enter information orally.
hardware and software1_11.docx 1.24
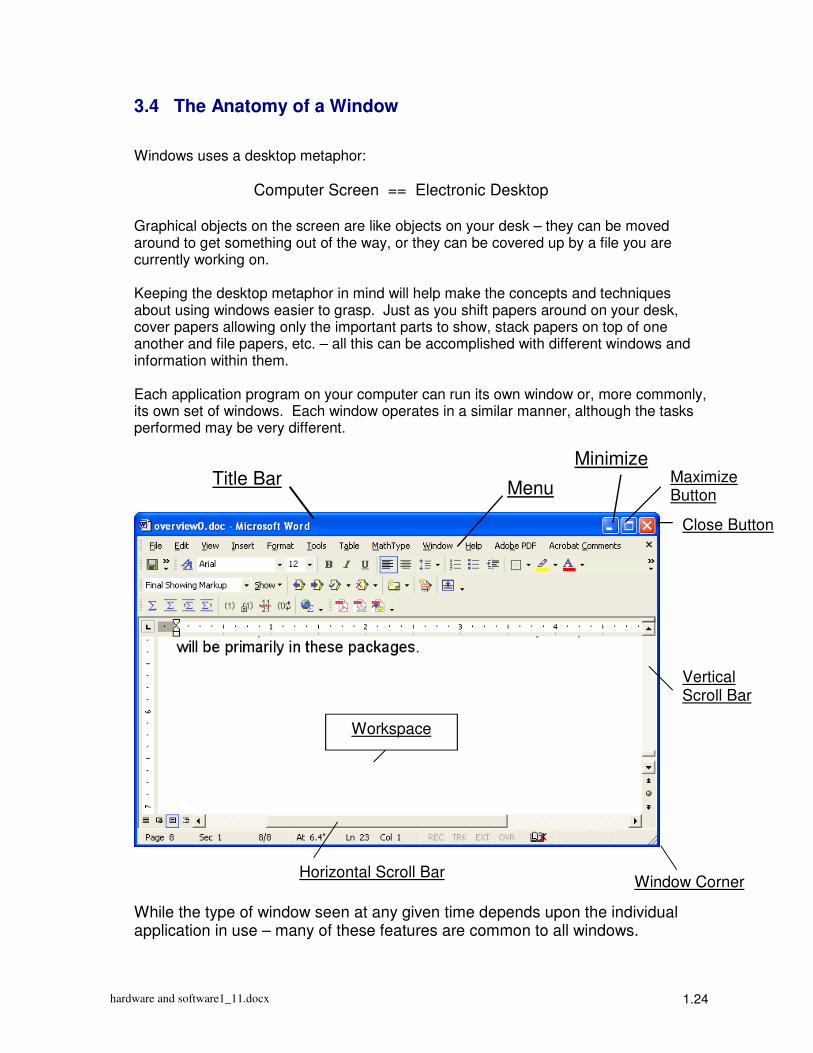
3.4 The Anatomy of a Window
Windows uses a desktop metaphor:
Computer Screen == Electronic Desktop Graphical objects on the screen are like objects on your desk – they can be moved around to get something out of the way, or they can be covered up by a file you are currently working on. Keeping the desktop metaphor in mind will help make the concepts and techniques about using windows easier to grasp. Just as you shift papers around on your desk, cover papers allowing only the important parts to show, stack papers on top of one another and file papers, etc. – all this can be accomplished with different windows and information within them. Each application program on your computer can run its own window or, more commonly, its own set of windows. Each window operates in a similar manner, although the tasks performed may be very different.
While the type of window seen at any given time depends upon the individual application in use – many of these features are common to all windows.
Title Bar
Menu Bar
Minimize Button Maximize
Button
Close Button
Workspace
Vertical Scroll Bar
Horizontal Scroll Bar Window Corner
hardware and software1_11.docx 1.25
• Title Bar – at the top of the window, this shows the name of the program and type of window or software.
o This is highlighted in color (usually in blue with white text)– when the window is active.
o The title bar appears in gray (or a gray-blue) when the window is inactive – when another document or program window is currently in front, and active.
• Menu Bar – the horizontal bar below the title bar listing the available categories of commands or actions which can be performed in this window.
• Scroll Bars – vertical and horizontal bars along the right hand and bottom edge of a window: buttons on the scroll bar move you quickly through a window.
• Minimize Button – The leftmost of 3 boxes in the upper right-hand corner of a window. The Minimize button effectively hides the window – the window appears only on the task bar at the bottom of the screen when minimized. Note this does not close the window – the program and/or document are still open and held in active memory, just folded up, out of the way.
• Maximize/Restore Button – the middle of the 3 buttons in the upper right-hand corner of a window. This shifts between maximizing a window (filling the whole screen) and shrinking the window to fill only part of the screen so that other open windows or the desktop may be viewed.
• Close Button – the button with the X – used to close a window. This actually closes the document and/or application program, and removes it from active memory (from RAM).
• Window Corner – can be used to resize/reshape a window by dragging to the desired size/shape.
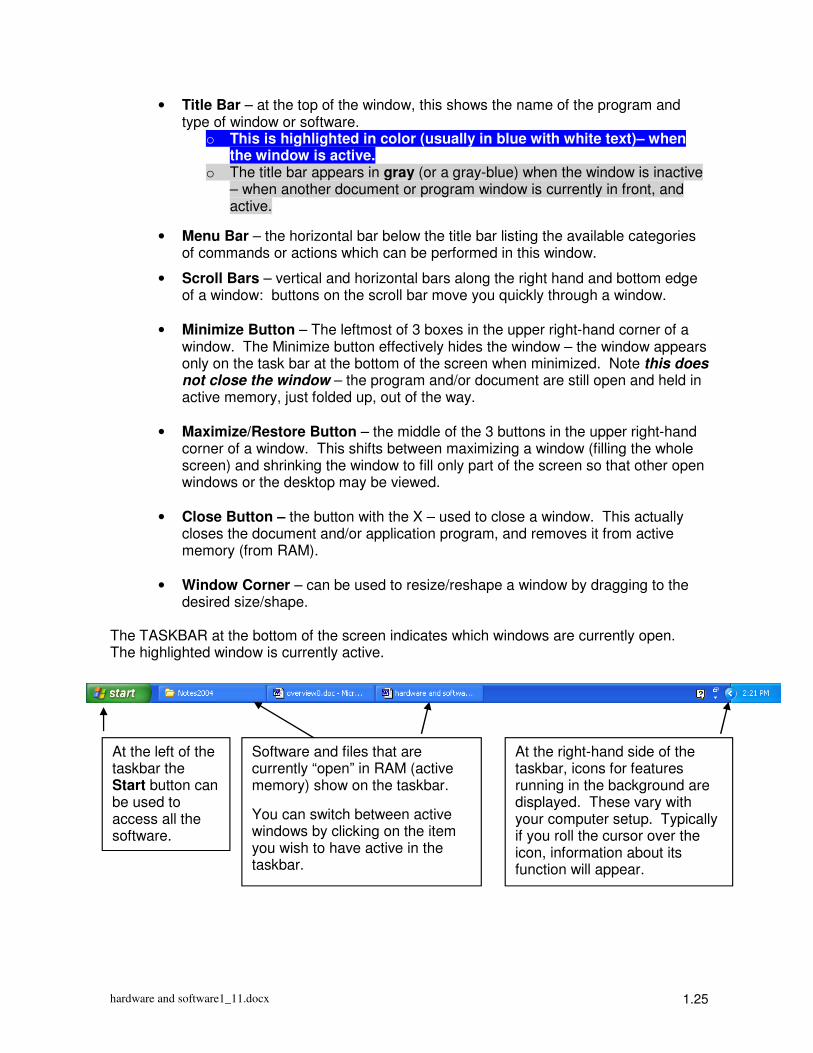
The TASKBAR at the bottom of the screen indicates which windows are currently open. The highlighted window is currently active.
At the left of the taskbar the Start button can be used to access all the software.
At the right-hand side of the taskbar, icons for features running in the background are displayed. These vary with your computer setup. Typically if you roll the cursor over the icon, information about its function will appear.
Software and files that are currently “open” in RAM (active memory) show on the taskbar.
You can switch between active windows by clicking on the item you wish to have active in the taskbar.
hardware and software1_11.docx 1.26
3.5 Managing Files in Windows
Two key programs for file management are available with windows:
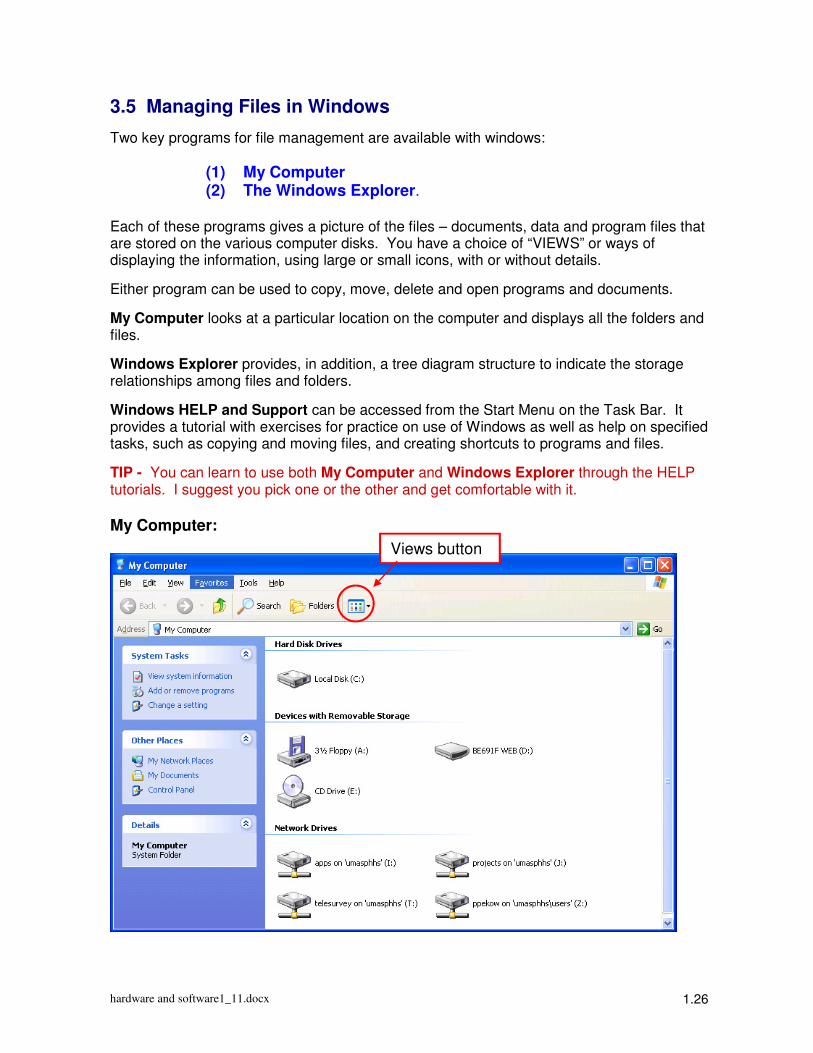
(1) My Computer (2) The Windows Explorer. Each of these programs gives a picture of the files – documents, data and program files that are stored on the various computer disks. You have a choice of “VIEWS” or ways of displaying the information, using large or small icons, with or without details.
Either program can be used to copy, move, delete and open programs and documents.
My Computer looks at a particular location on the computer and displays all the folders and files.
Windows Explorer provides, in addition, a tree diagram structure to indicate the storage relationships among files and folders.
Windows HELP and Support can be accessed from the Start Menu on the Task Bar. It provides a tutorial with exercises for practice on use of Windows as well as help on specified tasks, such as copying and moving files, and creating shortcuts to programs and files.
TIP - You can learn to use both My Computer and Windows Explorer through the HELP tutorials. I suggest you pick one or the other and get comfortable with it.
My Computer:
Views button
hardware and software1_11.docx 1.27
In this example of My Computer, the disks and folders are displayed as large icons. You can switch the type of display using the “VIEWS” button on the menu bar.
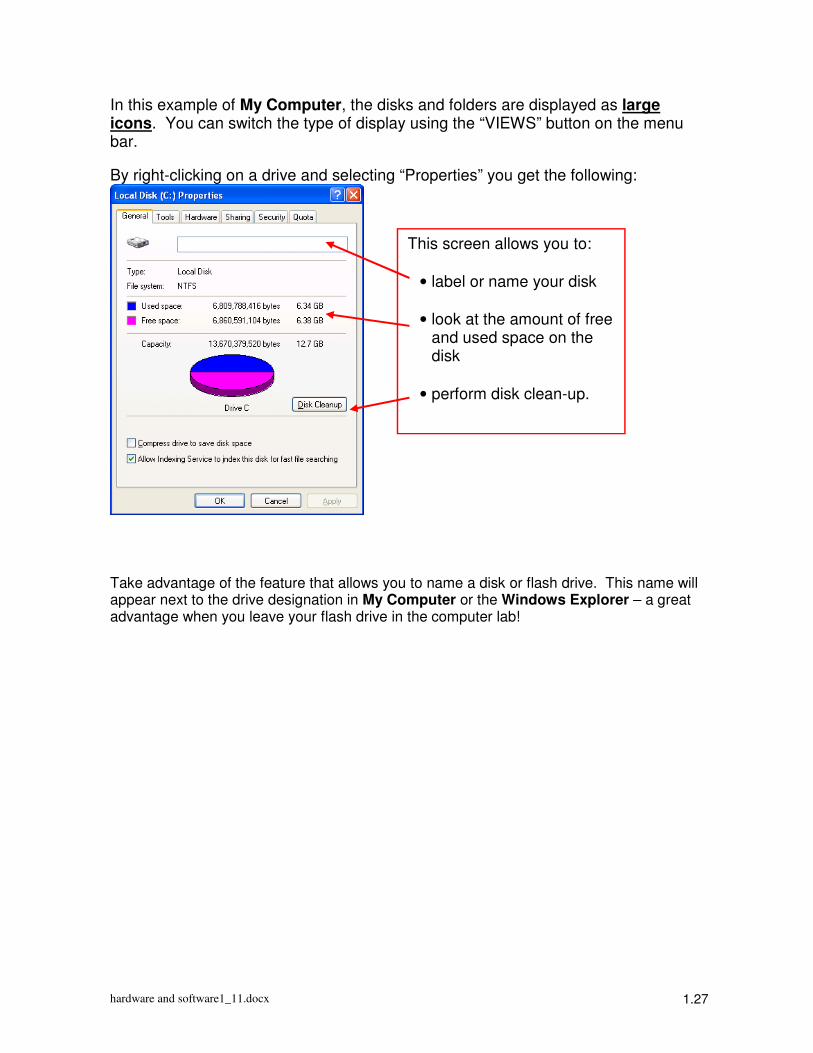
By right-clicking on a drive and selecting “Properties” you get the following:
Take advantage of the feature that allows you to name a disk or flash drive. This name will appear next to the drive designation in My Computer or the Windows Explorer – a great advantage when you leave your flash drive in the computer lab!
This screen allows you to:
• label or name your disk
• look at the amount of free and used space on the disk
• perform disk clean-up.
hardware and software1_11.docx 1.28
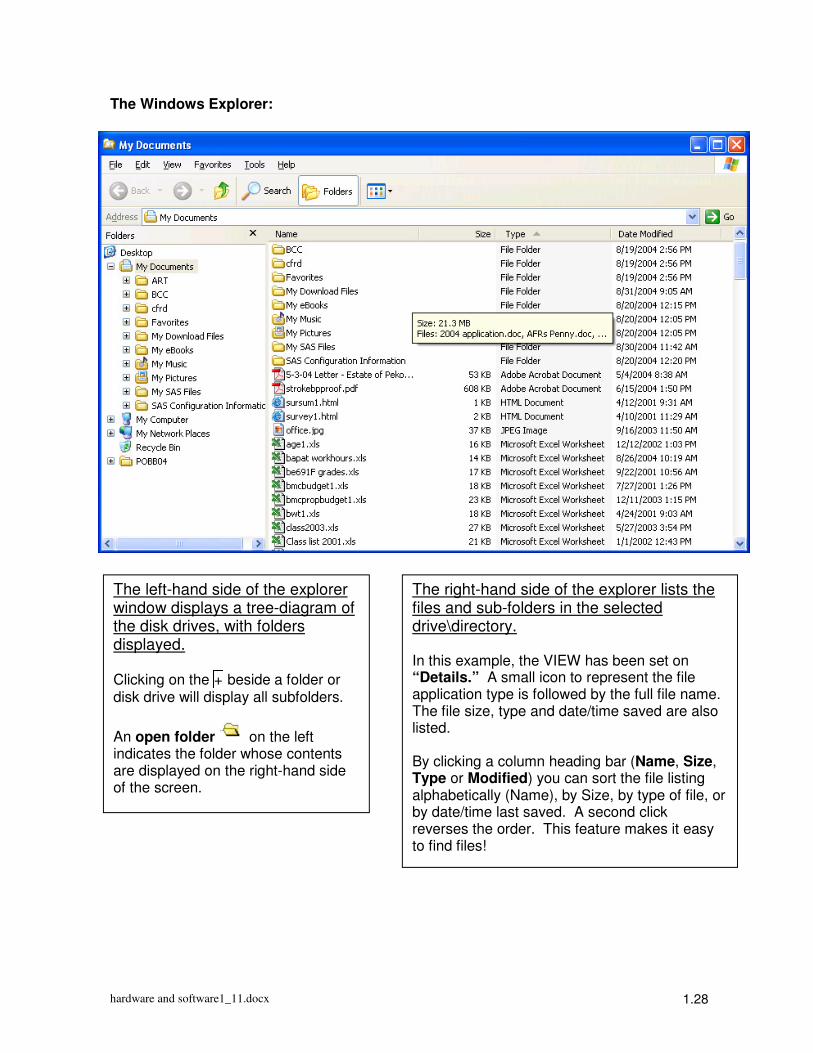
The Windows Explorer:
The left-hand side of the explorer window displays a tree-diagram of the disk drives, with folders displayed. Clicking on the + beside a folder or disk drive will display all subfolders.
An open folder on the left indicates the folder whose contents are displayed on the right-hand side of the screen.
The right-hand side of the explorer lists the files and sub-folders in the selected drive\directory. In this example, the VIEW has been set on “Details.” A small icon to represent the file application type is followed by the full file name. The file size, type and date/time saved are also listed. By clicking a column heading bar (Name, Size, Type or Modified) you can sort the file listing alphabetically (Name), by Size, by type of file, or by date/time last saved. A second click reverses the order. This feature makes it easy to find files!
hardware and software1_11.docx 1.29
3.6 Some General Tips for Working on a PC
Naming Files
Filenames have 2 levels in DOS and Windows, separated by a dot (.) or period.
• The first level before the dot can be a long descriptive title including most of the keyboard characters (exceptions include / * ? > < and perhaps others).
• The 3+ letter “extension” after the dot is determined by the file type. For example MS Word files all have the extension “.doc”, while MS Excel files use the extension “.xls” and text files have the extension “.txt”.
• Each software package has one or more extensions used to indicate the type of file.
The type of file is also indicated by the icon. For example:
is used for Word files, for Excel, and for text files.
Other icons and extensions are used for other software packages, many packages having different icons for each type of file the package recognizes. These icons are recognized by the computer once that software is installed on your machine. On rare occasion you will have a conflict – 2 software packages use the same extension with different meaning. You’ll have to choose a default.
Be careful when you rename a file; do NOT change the file extension (the part of the name after the dot). If you rename a file and change the extension, then the software package will not recognize the file type, and you will not be able to access the file properly.
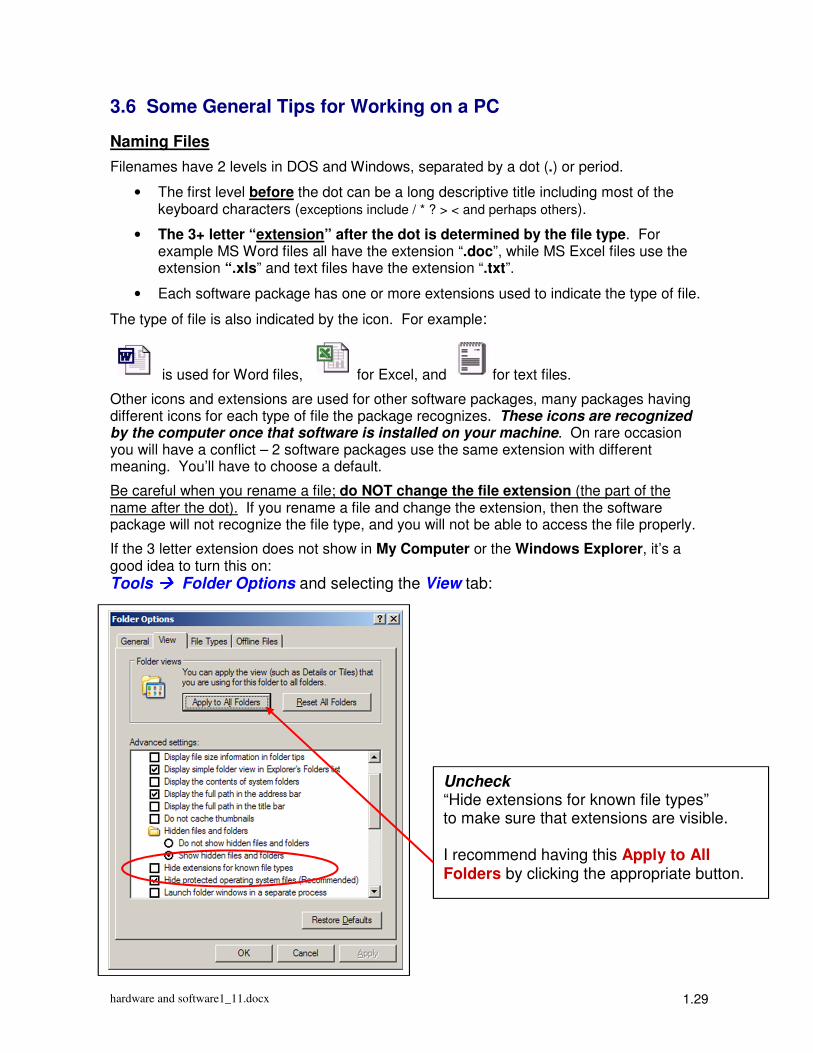
If the 3 letter extension does not show in My Computer or the Windows Explorer, it’s a good idea to turn this on:
Tools ���� Folder Options and selecting the View tab:
Uncheck “Hide extensions for known file types” to make sure that extensions are visible. I recommend having this Apply to All Folders by clicking the appropriate button.
hardware and software1_11.docx 1.30
The first part of a file name is up to you, as the user. I recommend keeping it short and simple. Occasionally part of a long name is lost when you send a file as an email attachment – it depends on both your email system and the recipient’s system. This was a greater problem a few years ago, but you may still run into it.
Take care when naming files that you will be posting to the Web:
• Web file names are CASE SENSITIVE (UPPER vs. lower case). While capitalization is ignored in filenames in Windows, UPPER and lower case letters are read as different characters in Web-file names.
This means that “CASE” and “Case” and “case” would all be read as different file names in a web environment; on a PC they are equivalent.
• In naming files to be posted on the web, use only letters, numbers, the underscore (_), and NO SPACES. Once a space is encountered in a name on a file posted to the web, the rest of the name is lost (so use an underscore in place of a space). For example in place of “Personal Page.html” which contains a space (allowed in Windows!) use the name “Personal_Page.html” when creating a personal webpage.
Deleting Files When you delete files or folders from the hard drive (by dragging to the Recycle Bin or using the delete button on the keyboard or on a menu), the file (all the bits of info) is not deleted from the disk, but information on its physical location is “moved” to the Recycle Bin. This gives you the chance to retrieve the file if you have deleted it in error. Until you empty the recycle bin, files are retrievable – simply click to open the recycle bin and drag the file icon back to another location. Note: files deleted from a removable disk, USB drive or network drive are deleted from the list of files, and location information is NOT moved to the recycle bin – and therefore these files are not readily retrievable. However, even when a file has been “deleted” and the recycle bin emptied, it may still be retrievable. Deleting a file merely removes its name from the directory, and indicates that the space is available for re-use, but the information is still stored on disk until it is over-written by another file. Programs such as Norton Utilities can be used to recover deleted files, as long as new files haven’t overwritten the old files. This is both good and bad news:
� Good news for the day you make that awful mistake and delete something important – you may be able to find and retrieve it;
� Bad news when you think you have deleted confidential information from a computer. You must take some other action, such as reformatting an empty disk, or “cleaning up” a hard disk, so deleted data is no longer accessible, even by specialized software.
hardware and software1_11.docx 1.31
Opening Application Programs and Files
Application programs can be opened by using the Start Menu, e.g.,
Start ���� Programs ���� Microsoft Office ���� Microsoft Word 2010
This opens the program to a blank document or empty file. You can then open a stored file from within the software package from the File menu or a toolbar icon, or create a new file.
An alternative way to open both a particular file and a software application simultaneously is to double click on a previously saved file in either Windows Explorer or My Computer. Additional files can be opened from within the software package using the menu or toolbar options; or additional files can be opened from the Windows Explorer or My Computer.
File Management It is always a good idea to have some organized structure to storing files, otherwise you can end up with endless lists of files to look through to find the one you want. You can – and should – create FOLDERS on your disks, analogous to file folders for storing actual papers that you are filing. Depending upon the scope of your project you may want to organize folders by file type, date, user, or topic – and various combinations of the above. While you are allowed by the system to give folders and files long, descriptive multi-word titles in Windows, it is a good idea to be brief. Some applications have limits internally to file name lengths, so part of a name can get lost. If you will be sharing a file with other users, think about using a name that clearly identifies you and/or the project. E.g., rather than a using name like “draft1.doc” a name such as “Pekow_691f_v1.doc” is much more informative, and less likely to be overwritten by another document with an identical name.
Shutting Down the Computer Microcomputers should not be turned off without first “shutting down” the computer. This is a process that closes down shared files and programs that are running in the background before the computer is turned off. Failing to shut down will leave unnecessary temporary files on your computer that can hamper effective operation over the long term. In addition, if you fail to “shut-down” and simply turn off the power, the start-up will take longer when you next turn on the machine, as the system works through a scan for disk errors. It is a good idea to shut down your computer at least occasionally so that this clean-up of temporary files will take place.
hardware and software1_11.docx 1.32
Virus Protection A computer virus or worm is a file or segment of computer code that is designed to “infect” files or systems – by destroying required system files, copying endlessly and clogging up systems or various other methods.
Virus protection software is particularly important in an environment where files are shared through the web, email, and use of common computers in a lab. McAfee Virus protection software is available to the UMass community – once you have an OIT account. This is distributed by CD when you obtain your account, or can be downloaded from the OIT website. PLEASE TAKE ADVANTAGE of the availability of the software, and update regularly.
4. The Internet and the World Wide Web
“The Internet” is the vast collection of inter-connected computer networks that use a specified set of protocols for transmission known as the TCP/IP (Transmission Control Protocol/Internet Protocol). Any set of computers connected together form an internet, also known as a network. We typically speak of a local area network (LAN) for a set of computers connected within a company or organization. Such an “intranet” may also be connected to “The Internet.” The “World Wide Web” is a system of Internet servers that support specially formatted documents. A Web Server is a computer connected to the Internet that has a specified IP (Internet Protocol) address, so that it can be located to provide documents via the Web. Web documents are formatted in HyperText Markup Language (HTML). HTML is a standardized language of computer code that lies behind all Web documents, containing the text you see, images, links to other documents, as well as formatting instructions for display on the screen. If you copy or save material from a web page, and try to edit it in a word processing package such as MS Word, you might find strange things happening with formats and spacing, and also find occasional unusual characters in the document. These are remnants from the HTML coding. While Word has features that allow you to create an HTML version of a document you are writing, there are specialized software packages designed for creating and managing web pages and websites. In addition to the World Wide Web, there are other systems using the Internet. Email is one example of another type of connection made through the Internet that allows you to send messages and files. Another example is FTP or “File Transfer Protocols” for moving files from one computer to another without an email connection. To connect your PC to the Internet, you need a either a modem (for a phone line connection), an Ethernet card (for a cable connection), or wireless capability, along with software to make the connection, an ISP (Internet Service Provider), and a web browser.
hardware and software1_11.docx 1.33
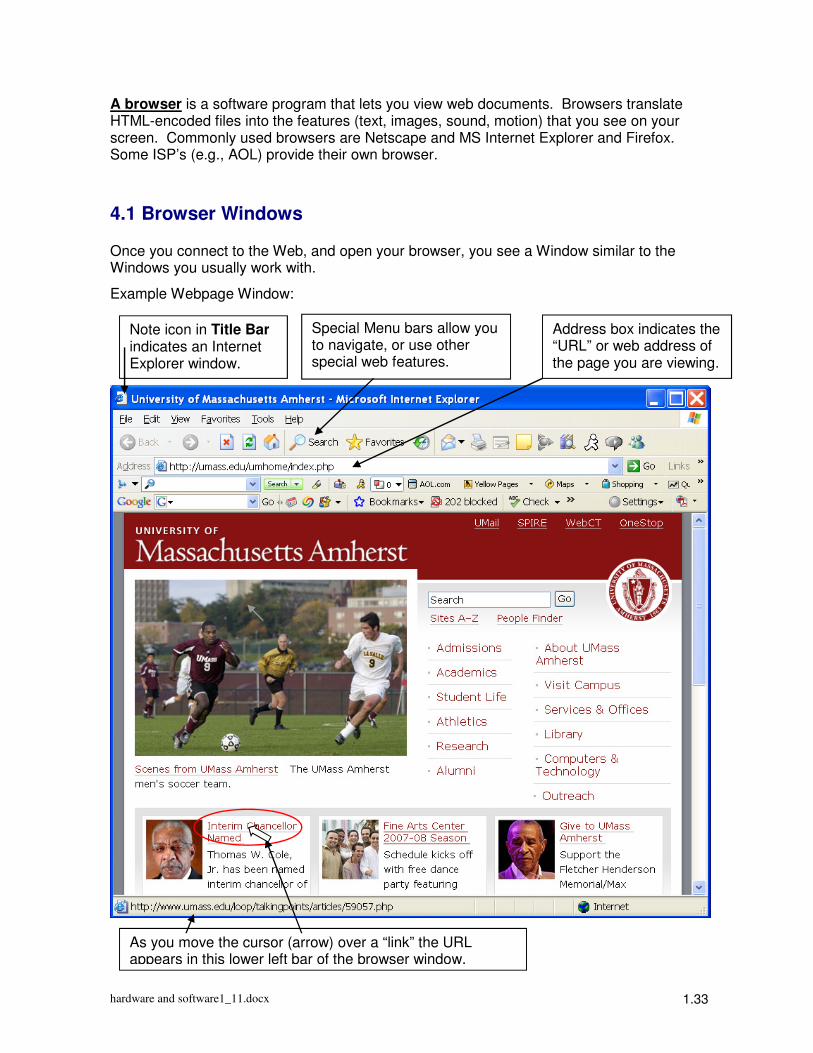
A browser is a software program that lets you view web documents. Browsers translate HTML-encoded files into the features (text, images, sound, motion) that you see on your screen. Commonly used browsers are Netscape and MS Internet Explorer and Firefox. Some ISP’s (e.g., AOL) provide their own browser.
4.1 Browser Windows Once you connect to the Web, and open your browser, you see a Window similar to the Windows you usually work with.
Example Webpage Window:
Note icon in Title Bar indicates an Internet Explorer window.
Special Menu bars allow you to navigate, or use other special web features.
Address box indicates the “URL” or web address of the page you are viewing.
As you move the cursor (arrow) over a “link” the URL appears in this lower left bar of the browser window.
hardware and software1_11.docx 1.34
Each “web page” is a single document on the World Wide Web. This means it is an HTML document stored on a web server, with an “address”. Every Web page address is identified by a unique URL (Uniform Resource Locator). This provides the unique address of the web page. You may type a URL into the address box and hit the enter key to access a page. Or, more often, you will click on a Link provided in another web page. A link is a URL imbedded in another document that allows you move directly to the new page.
A “website” is a set of interconnected web pages.
4.2 Uploading and Downloading Files
Each time you access a new page (identified by a new URL) this page must be read and transferred to your local PC through your connection – by phone line or cable or wireless transmission. A web page can take from a fraction of a second to many, many minutes to be read. Images or graphics tend to use many bytes – and make pages load much more slowly. The time of transfer depends upon both the size of the file, and the “speed” of your connection. A cable connection seems instantaneous, while a slow modem (phone connection) can seem interminable.
You will often want to download information from the web. This is the process of copying a file or part of a file from an online server to your own computer. When you have downloaded a file you have saved it, and made it available to use on your own computer, without taking the time to connect to the web to locate and read the file again. You can also edit and cut and paste from your saved file into reports or other documents you are creating.
You will also want to upload files to the web. This is the process of taking a file or part of a file that you have stored on your own computer, and loading it onto a server or bulletin board, so that it becomes available to other users of The Internet.
Using the UMass U: drive
Once you activate your UMass email account, in addition to email access you have space available for use on a webserver for storing files, referred to as the U: drive. Information for using this space is available at http://www.oit.umass.edu/udrive/index.html .
A few words of caution on use of the U: drive: Do not try to open files directly from the U: drive, do not edit/save files while working from the U: drive. Errors related to brief loss of connections can render files unusable; some file types (such as .mdb database files) are not directly usable and will give you an error message. Always download files to your local computer; work, edit, save – then close the file and upload to the U: drive for use at another time, another computer.