Embed Size (px)
Citation preview

United Nations Department of Safety and Security
__________________________________________________________________
UN Security Officers’ Emergency Trauma Bag / Basic First Aid
(ETB/BFA)
“Medicus curat, natura sanat.”
“Medicine cures, nature heals.”

UN Security Field Trauma Module: “Medicus curat, natura sanat”. Rev.1
- 2 -
Notes on the authors: Dr. Sergio Arena FAO/WFP Medical Officer – AFDM Emergency Surgery and First Aid Specialist FAO: Room B167; WFP: Room 1Y36 Viale delle Terme di Caracalla 00100 – Rome – Italy E-mail: [email protected] Nurse Jennifer Wykes FAO Senior Nurse – AFDM ALS Course Director – Italian & European Resuscitation Councils Room: B162 Viale delle Terme di Caracalla 00100 – Rome – Italy E-mail: [email protected]
Nurse Gloria Denton WFP Nurse – WFP Medical Service – ADHS Nurse Practitioner WFP: Room 1Y34 Via C. G. Viola 68/70 00148 – Rome – Italy E-mail: [email protected] Dr. Jean Gael Ruyffelaere Chief, DSS Mobile Medical Training Team Emergency Physician and First Aid Specialist Room FF-1424 304 East 45th Street New York, NY 10017 E-mail: [email protected] Dewaine Farria Security Training Officer Emergency Medical Technician DSS Mobile Medical Training Team Room FF-1425 304 East 45th Street New York, NY 10017 E-mail: [email protected]

UN Security Field Trauma Module: “Medicus curat, natura sanat”. Rev.1
- 3 -
Table of Contents Chapter 1 Course Overview page 5 Chapter 2 Casualty General Assessment and Management page 8
• Safety, Scene and Situation (SSS) Page 8 • Vehicle Accidents Page 9 • Landmines and Explosive Remnants of War Page 10 • Gunshot Wounds Page 12 • Drowning Page 14 • Snake Bites Page 15
Chapter 3 Primary Survey (A B &C) – Basic Life Support - CPR Page 16
• Barrier Devices Page 24 • Foreign Body Airway Obstruction Page 26 • Oralpharyngeal Airways/Guedel Airways Page 29
Chapter 4 Primary Survey (D & E) Page 30 Chapter 5 Secondary Survey Page 31 Chapter 6 Vital Signs Page 33
• Pulse Page 33 • Respirations Page 34 • Blood Pressure Page 35
Chapter 7 Shock/Hypoperfusioin Page 38 Chapter 8 Bleeding Control Page 41
• Internal Bleeding Page 44
Chapter 9 Burns Page 47 Chapter 10 Special Wounds Page 53
• Closed Chest Injuries Page 53

UN Security Field Trauma Module: “Medicus curat, natura sanat”. Rev.1
- 4 -
• Open/Penetrating Chest Injuries Page 55 • Open Abdominal Wounds Page 57 • Amputation Page 58 • Impaled Objects Page 59
Blast Injuries Page 60
Chapter 11 Intervenus Fluids Page 63 Chapter 12 Fractures Page 67 Handling and Transport Page 73
• The Recovery Position Page 73 • Cervical Collars Page 75 • The Log Roll Technique Page 77 • Emergent Moves Page 80 • Rautek’s Take Page 82 • Two First Aider Emergent Moves Page 83
Chapter 13 Triage Page 84 Chapter 14 Medical Conditions Page 86
• Anaphylaxis Page 86 • Disorders of the Heart Page 86 • Heat and Cold Injuries Page 88 • Altitude Sickness Page 89 • Malaria Page 89 • Child Birth Page 92
References Page 94
APPENDICES Page 95
• ETB-ST Procurement and Maintenance Page 95 • ETB-ST Item Master List Page 97 • ETB-ST Revision Memorandum Page 102

UN Security Field Trauma Module: “Medicus curat, natura sanat”. Rev.1
- 5 -
Overview The primary purpose of the Emergency Trauma Bag – Security Team (ETB-ST) and its associated training is to ensure that proper first responder care, life-saving tools and supplies are readily available to provide adequate emergency medical treatment to UN personnel. As UN security officers are usually among the first to arrive at the scene of traumatic incidents involving staff members, it is logical that the organization equip and train security officers to effectively take or support first response actions. It is with this mind that all DSS professional security officers will be issued, trained and required to maintain an ETB-ST. The ETB-ST is an essential life-saving tool, which has been standardized for use by all UN professional security officers. The ETB-ST is specifically designed for a field security officer and contains the appropriate equipment needed to provide first aid treatment to three moderately injured or one seriously injured victim. Work on the ETB-ST was begun by the World Food Programme Medical Team has since been established as an operational requirement for all UN field security personnel by the DSS Medical Team. The target audience for this training is UN Security personnel. Other personnel can receive training in the use of the ETB-ST upon specific request. However, the overall objective is not to train all UN personnel in the use of the ETB-ST, but a select group of first responders. All DSS Security Advisers (SA) and Field Security Coordination Officers (FSCO) will be provided training to employ the ETB-ST independently and to assist qualified medical personnel in its use as approved by the chief of the DSS Medical Team. The ETB-ST course is four-five days long and consists of:
• A written pre-test • Theoretical • Practical application • A written final test • A practical application final test
Chapter 1 OVERVIEW, OBJECTIVES AND INTRODUCTION

UN Security Field Trauma Module: “Medicus curat, natura sanat”. Rev.1
- 6 -
Objectives The objectives of this course are to:
• Train participants as emergency medical first responders. • Familiarize participants with the ETB-ST. • Impart participants with the baseline skills necessary to respond to a mass
casualty incident. Approaches to Emergency Medical Care Pre-hospital care has traditionally been an overlooked function in the UN system. In many UN duty stations it is a void that has been filled by the UN security personnel. To better understand this role we will briefly explicate approaches to emergency medical care and levels of medical training. There are two distinct approaches to civilian emergency medical care:
• Stay and Play: is the practice of treating as many ailments as possible in the field. A good example of this is the Service Mobile d’Urgence et de Reanimation (SMUR) system utilized in France and Germany.
• Scoop and Run: is the practice of immediately transporting patients to a medical facility, the implication being that any delay in arriving at secondary care will be severely detrimental. A good example of this is the Emergency Medical Service (EMS) in the United States.
The UN Approach to pre-hospital care is essentially an amalgamation of these two systems. While utilizing the U.S. level of emergency medical training (see below), the UN approach recognizes that in many remote locations security personnel are required to have some “stay and play” type medical skills. Level of Emergency Medical Training:
1. Emergency Medical Technician – Paramedic (EMT-P): between 1,000 and 1,200 hours of training. The EMT-P can perform Advanced Life Support (ALS) and Basic Life Support (BLS) skills, administer a wide variety of medications, interpret and shock specific heart rhythms, insert advanced airway devices and perform a variety of other advanced procedures.
2. Emergency Medical Technician – Intermediate (EMT-I): between 300 and 400 hours of training. The EMT-I can perform ALS and BLS skills, administer certain medications, interpret and shock certain heart rhythms and provide more advanced airway management.
3. Emergency Medical Technician – Basic (EMT-B): approximately 110 hours of training. The EMT-B can perform BLS skills, administer a very limited amount of medications and provides patient at the scene and during transport to an appropriate receiving facility.
4. Emergency Medical First Responder: approximately 40 hours of training. Emergency Medical Responders are most often the first people on the scene of an emergency and are trained to identify potential hazards, identify and treat immediate life threats and assist other medical personnel at the scene.

UN Security Field Trauma Module: “Medicus curat, natura sanat”. Rev.1
- 7 -
While the aim of this course is to train personnel to the Emergency Medical First Responder level, in recognition of the unique requirements of UN security personnel in remote locations, participants also receive instructions on more invasive procedures such as intravenous fluid resuscitation and basic airway maintenance (oral pharyngeal airways and suction devices).
The Equipment in the ETB-ST The ETB-ST is the product of continual research in the field of pre-hospital medical care. The DSS Medical Team strives to ensure that only the most cutting edge equipment and materials are contained in the ETB-ST. In addition to refreshing the psychomotor skills, bi-annual refresher training also serves to keep security personnel abreast of the latest equipment added to the ETB-ST. Responding to Mass Casualty Incidents The ETB-ST course imparts participants with the baseline skills – recognition of hypovolumic shock, triage, and familiarity with the incident command structure – necessary to respond to and manage mass casualty incidents. command structure – necessary to respond to and manage mass casualty incidents.
UN Security Field Trauma Module: “Medicus curat, natura sanat”. Rev.1
- 8 -
When arriving on a scene the first responder should first evaluate the three Ss: • Safety • Scene • Situation
1. Safety: As a professional UN security officer you will be responding to a wide variety of situations and environments. Remaining safe must be your top priority. Ensure that the conditions that caused the accident are not presenting further danger. You cannot provide care until both you and the victim(s) are in a safe area.
• One of the most important aspects of personal safety is ensuring that you are taking appropriate body substance isolation (BSI) precautions. Body fluids can contain organisms known as pathogens. Pathogens are organisms such as viruses and bacteria that are capable of causing disease. At the core of proper BSI precautions is appropriate personal protective equipment (PPE), which includes:
o Gloves o Eye protection o Masks o Disposable clothing
While eye protection, masks and disposable clothing may not always be available in field environments, medical gloves are contained in both Wound Dressing Kits of the ETB-ST. BSI precautions should be taken as early as possible.
2. Scene: Survey the scene to whether the victim is a trauma or medical case: • Trauma: trauma casualties are the result of external force. The 5 most
common causes of trauma death in UN system are (all of these are discussed at length in the following section):
o Vehicle Accidents o Landmines and Explosive Remnants of War o Gunshots
Chapter 2 CASUALTY GENERAL ASSESSMENT
AND MANAGEMENT

UN Security Field Trauma Module: “Medicus curat, natura sanat”. Rev.1
- 9 -
o Drowning o Snakebites
• Medical: medical casualties are the result of a patient suffering from internal difficulties. Some of the more common problems covered in this course include:
o Disorders of consciousness – seizures o Disorders of respiration – panic attacks o Disorders of the heart – angina pectoris, cardiac arrest
The distinction between trauma and medical casualties is an important one and will dictate how you will approach the casualty. Always assume that trauma casualties have sustained injuries to the neck and spine and treat accordingly (see transports below). Other distinctions in care between trauma and medical casualties will come to light throughout the course of this text. Alert Message: Generally an alert message should be given immediately for trauma incidents and when appropriate for medical incidents (but always before starting CPR). The quality of the first information that is passed from the scene will be important in determining the speed and adequacy of the subsequent response. The acronym METHANE is recommended as a reminder of the key information to be passed: M – Major Incident E – Exact Location T – Type of Incident/Time H – Hazards A – Access/Egress N – Number of Casualties E – Emergency Services Present and Required
3. Situation: Assess how many casualties you must treat and in what order – these decisions are traditionally known as triage. Triage is discussed at length later in this text.
The 5 most common causes of trauma death in the UN system: 1. Vehicle Accidents Personal safety is the first and foremost concern at the scene of a vehicle accident. If you are in a different vehicle, park safely, well clear of the accident site. Obviously, situations vary, but what follows are general rules of thumb for rendering care at a vehicle accident scene: 1. Set your hazard lights flashing. 2. Do not run across a busy road to reach the other
side.
UN Security Field Trauma Module: “Medicus curat, natura sanat”. Rev.1
- 10 -
3. At night, wear a reflective vest or carry some kind of light/torch. 12 hour “snap-lights” can be found on the inside flap of the ETB-ST.
4. Send bystanders, if any, to warn other drivers. 5. Set up warning signals or lights 200 meters in each direction. 6. Switch off the ignition of any damaged vehicle and, if you know how, disconnect
the battery. Switch off the fuel supply on diesel vehicles and motorcycles. 7. Stabilize vehicles. If a vehicle is up-right, apply the hand brake and put it in gear,
or put blocks at the wheels. If a vehicle is on its side, do not right it up, but try to prevent it from rolling over.
8. Look out for physical dangers. Is anyone smoking? Are there vehicles displaying Hazchem Symbols? Are there damaged power lines or spilt fuel?
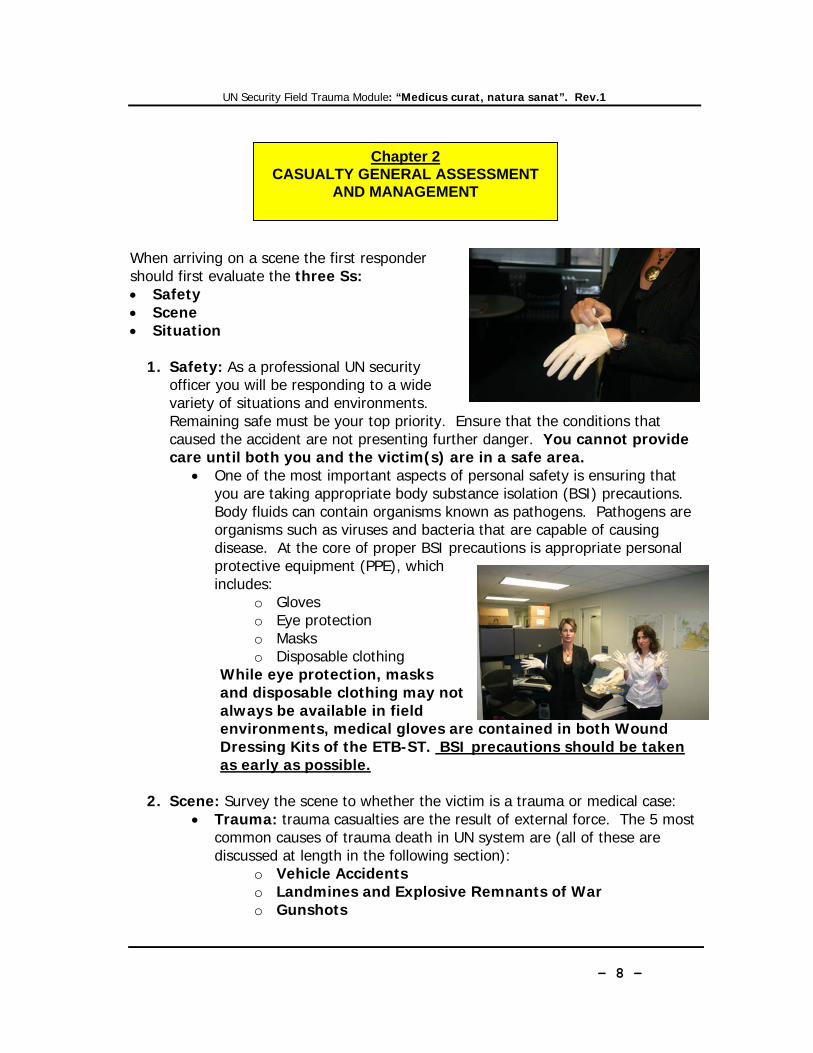
As with all trauma cases, assume that all victims in a vehicle accident have sustained neck and/or spinal injury and treat accordingly (see transports for a more detailed explanation of vehicle accidents). 2. Landmines and Explosive Remnants of War When in areas of unexploded and abandoned ordinance, “not approaching and never touching” are basic safety principles that should help keep you safe. If you spot a mine warning clue, you should assume you are in a minefield unless certain you are on a safe road or path. The two most likely ways you will discover that you are in a mined area are either that there is an explosion, or that you see a mine or a mine sign. Once in a minefield there is very little a non-specialist can do and the skills required to deal with the devices and situations of a minefield cannot be taught or learned on a casual basis. While waiting for help may seem an inadequate response, if you have followed proper safety procedures regarding travel, it will only be a matter of time before qualified personnel come to assist you. The alternative may be death or serious injury. Be careful of non-specialists offering help. They may be unaware of the full extent of the danger or overconfident in the limited knowledge they may have. What follows are general emergency procedures: M – Movement stops immediately. If on foot do not move your feet. If in a vehicle do not move the steering wheel or reverse the vehicle – if possible stay in the vehicle. I – Inform and warn people around you. Call for help, but keep others away. If in a vehicle use the car horn to summon help. N – Note the area. What else can you see: mines, tripwires, mine signs. Visually locate the nearest safe area: the last place you knew you were on a safe surface, such as a paved road or well used path.

UN Security Field Trauma Module: “Medicus curat, natura sanat”. Rev.1
- 11 -
E – Evaluate your course of action. Be prepared to take control. D – Do not move, if there is no indication of a safe area, or you can’t reach it without stepping on unknown ground. Wait for help to arrive. On Foot: It is almost always best to wait in place for professional demining assistance. In the highly unlikely event this is not possible one might consider:
1. Retrace Footsteps - this procedure involves walking back the way you entered the mined area. As it is highly unlikely that the true outline of your footprint will be visible unless you are walking in mud or snow, this procedure is considered highly dangerous.
2. Prodding - involves locating safe ground to walk on by prodding the ground
with a knife or other similar object to locate ground free of mines. Prodding is an extremely risky and difficult technique, taught to professional deminers and requires substantial practice.
In a Vehicle: 1. When a vehicle strikes a mine, the first instinct of survivors may be to rush
out. However, unless the vehicle is on fire or has ended up in a life-threatening position, stay in the vehicle. It is very likely that there will be more mines, including anti-personnel mines, in the area. If you can, give first-aid assistance to other passengers in the vehicle who require it.
2. If the procedures regarding route cards have been followed it will only be a matter of time before qualified personnel come to assist you. Even if you are in areas outside radio contact – and you are unable to keep to the agreed schedule for radio checks, due to injury or damage to the equipment, an evacuation team should be on its way to assist you if you have the proper emergency procedures in place.
3. In situation where you must leave the vehicle (if your vehicle is on fire, for example), exit in such a way that you do not have to touch the ground until you are in your wheel tracks facing back the way you came. Walk in the tracks of the vehicle until you reach safe ground. If there are other people in the vehicle, leave the vehicle one at a time allowing at least five meters between each person.
4. Reversing in Your Tracks – This is a procedure to get a vehicle out of a mined area by reversing it exactly over tracks made when you entered the area. This method is extremely risky if you are unable to steer the vehicle precisely or if the tracks are not clear; it may not be possible if other vehicles or obstacles are in the way or if you have a flat tire. This method has practiced in cases where vehicles have struck anti-personnel mine and there are no anti-vehicle mines.

UN Security Field Trauma Module: “Medicus curat, natura sanat”. Rev.1
- 12 -
Action Chamber
Barrel
Muzzl
Hammer Magazine(Clip)
Casualty Recovery In the unlikely event that you witness a mine accident and no professional demining assistance is available:
1. Stay calm. 2. Do not rush to the victim. 3. Do not try to rescue the victim in what
may be a minefield. 4. Talk to the victim; warn them not to
move; advise how to self-administer first aid; advise that help is on the way.
5. Note time and location and the number of injured. 6. Call for help. Arrange for both mine clearance assistance and medical
evacuation. 7. Prepare the ETB. 8. Wait for assistance to arrive.
3. Gunshot Wounds Again, always ensure that you are personally safe before providing care. If you are able to reach a casualty, do not begin providing care until you have him/her in a safe place. An ideal safe place is one that provides both cover and concealment. Cover is generally considered those things that will provide ballistic protection. Concealment is something that is meant to hide one from view. Once you are in a safe area quickly proceed to the Primary Survey. What follows is a very brief description of firearms, cartridges and firearm wounds: All Firearms fall into one the following basic categories:
1. Handguns a. Single Shot weapons b. Revolvers c. Semi-automatic pistols
2. Rifles 3. Shotguns 4. Fully Automatic Weapons

UN Security Field Trauma Module: “Medicus curat, natura sanat”. Rev.1
- 13 -
What happens when the trigger is pulled? 1. Primer ignites 2. Intense flame created by the primer fills the chamber 3. Powder burns 4. Pressure created by the burning powder pushes out the bullet (or shot).
What damage do bullets cause? Bullets that enter the body can cause injury in a number of ways. The bullet itself enters the body and destroys any tissue in its path. The energy of the bullet also causes cavitation, that is, it causes expansion greater than the size of the bullet. Tissue injury may also occur from the bullet’s shockwaves. Cavitation and shockwaves can stretch and tear tissue and may cause damage – or the tissue may simply return to its place without injury.
ShotguHandgun Rifl
PrimeFlash Hole Powder
bullet
Prime
Wad
Sho

UN Security Field Trauma Module: “Medicus curat, natura sanat”. Rev.1
- 14 -
4. Drowning Drowning is a term commonly used to describe those submerged in water, but actually it refers to those who have died as a result of submersion. The term near-drowning refers to those who have been submerged, but who either have vital signs or are resuscitated from a submersion event. There are a variety of factors involved in drowning that ultimately lead to the death of the patient. See illustration below:
When a rescue is attempted around water, safety, of course, is the first concern. Emotion may cause rescuers to jump in and become victims themselves. It is always safer to try to rescue the victim without getting into the water. Even a strong swimmer, when faced with a panicked victim, very cold water or fast currents can succumb to the same hazards faced by the victim. Swim to the casualty and tow (swim and tow) only if you are a trained life-saver, or if the casualty is unconscious. The following are methods for of rescuing near-drowning victims:
1. Reach 2. Throw and Tow 3. Row

UN Security Field Trauma Module: “Medicus curat, natura sanat”. Rev.1
- 15 -
4. Swim and Tow (see warning above) When assessing near drowning victims remember:
• Consider the possibility of neck and/or spinal injury • Suction, if necessary (see The Manual Suction Unit below) • Identify cold water submersions. These patients may be successfully
revived even if the time submerged exceeds the limits we would place on normothermic patients in cardiac arrest.
• When carrying victims out of the water keep the head lower than the chest to minimize the dangers of aspiration from vomiting.
5. Snake Bites While a snake bite is often a minor wound, it can be very frightening: reassurance is vital, for if the casualty keeps still and calm, the spread of venom may be delayed. Some common rules for all snake bites include:
1. Keep the snake or record its appearance so that, if necessary, the right antivenom.
2. Wash the area gently. 3. Remove jewelry from around the area of the bite – before swelling begins if
possible. 4. Place the site below the level of the patient’s heart.

UN Security Field Trauma Module: “Medicus curat, natura sanat”. Rev.1
- 16 -
"Are you alright? Are you okay?” A fully unconscious victim will not respond at
all.
Primary Survey – Basic Life Support Basic life support (BLS) refers to maintaining airway patency, supporting breathing and circulation. That is Airway, Breathing and Circulation - A,B and C of the ABCDE method. The following cardio pulmonary resuscitation (CPR) guidelines are in keeping with the 2005 European Resuscitation Council (ERC) guidelines.
Make sure you, the victim and any bystanders are safe. Evaluate the three S’s: Safety, Scene, Situation (See Casualty General Assessment above).
1. Remember, during Scene survey you must decide whether you suspect a victim is a trauma or medical casualty. This decision will affect how you approach the casualty.
2. Call Medical assistance immediately for suspected trauma victims. 3. Proceed to check for consciousness (see below).
Gently shake the casualty’s shoulders and speak loudly and clearly in each ear – ask the casualty what happened and where he/she is hurting. If the victim is unresponsive: 1. Shout for help. 2. Scan the victim from head to toe for signs
of hemorrhage. 3. If you note major external bleeding,
attempt to stop the bleeding before proceeding with the primary survey (see bleeding control).
4. If you do not note any major external bleeding (or after the bleeding is controlled) realign the victim in the resuscitation position – that is supine (on his/her back), on a hard surface. Always assume trauma victims have neck and/or spinal injuries.
SSS Consciousness BreathingAirway Circulation
SSS Consciousness Breathing Airway Circulation
Chapter 3 PRIMARY SURVEY
BASIC LIFE SUPPPORT (BLS)

UN Security Field Trauma Module: “Medicus curat, natura sanat”. Rev.1
- 17 -
5. Proceed to Airway below.
A casualty in a serious state of altered consciousness may mumble, groan or make slight movements. If the victim is responsive:
1. Always suspect neck and/or spinal injuries in trauma casualties. 2. If he/she is a medical casualty place him/her in the recovery position (see
below). 3. Provide care for medical/trauma victims in keeping with the scope your
training. 4. Contact medical direction.
For Medical Casualties Head tilt and chin lift: 1. Place your hand on his forehead and gently tilt his head back keeping your thumb
and index finger free to close his nose if rescue breathing is required. 2. With your fingertips under the point of the victim’s chin, lift the chin to open the
airway
Head tilt and chin lift
SSS Consciousness Breathing Airway Circulation

UN Security Field Trauma Module: “Medicus curat, natura sanat”. Rev.1
- 18 -
For Trauma Casualties Jaw thrust maneuver: Again, always suspect neck/spinal injuries in trauma casualties – the jaw thrust maneuver keeps the cervical spine in a neutral in-line position while opening the airway.
1. The jaw is thrust forward by placing the thumbs on each zygoma (cheekbone), placing the index and long fingers on the mandible and at the same angle, pushing the mandible forward.
Both of these techniques result in movement of the lower jaw anteriorly (toward the front of the body, opposite of posterior) and slightly forward pulling the tongue upwards, away from the airway.
SSS Consciousness Breathing Airway Circulation
The jaw thrust maneuver

UN Security Field Trauma Module: “Medicus curat, natura sanat”. Rev.1
- 19 -
Check the victim’s mouth and remove any visible obstructions with your finger (avoid use of a blind finger sweep). Keeping the airway open, put your face close to the casualty’s mouth, and look, listen and feel for 10 seconds for normal breathing
• Look for chest movements. • Listen for sounds of breathing. • Feel for breath on your cheek.
Look, Listen and Feel 10 sec
In the first few minutes after cardiac arrest, a victim may be barely breathing, or taking infrequent, noisy gasps – this occurs shortly after the heart stops in up to 40% of cardiac arrest cases – do not confuse this with normal breathing. Look, listen, and feel for no more than 10 seconds to determine whether the victim is breathing normally. If you have any doubt whether breathing is normal, act as if it is not. If the victim is breathing normally:
1. Place in the recovery position (see below)
SSS Consciousness BreathingAirway Circulation

UN Security Field Trauma Module: “Medicus curat, natura sanat”. Rev.1
- 20 -
2. Contact medical direction 3. Monitor vital signs
If the victim is not breathing normally
1. Direct someone to contact medical direction or, if you are on your own contact medical direction
2. Begin Cardio Pulmonary Resuscitation (CPR) a. Chest Compressions – 30 b. Respirations – 2 c. 30:2 = one cycle
1. Kneel by the side of the victim place the heel of one hand in the centre of the
victim’s chest. 2. Place the heel of your other hand on top of the first hand. 3. Interlock the fingers of your hands and ensure that pressure is not applied over
the victim’s ribs. 4. Interlock the fingers of your hands and ensure that pressure is not applied over
the victim’s ribs. 5. Do not apply any pressure over the upper abdomen or the bottom end of the
bony sternum (breastbone). 6. Position yourself vertically above the victim’s chest and, with your arms straight. 7. Each time compressions are resumed, the rescuer should place his hands
without delay ‘‘in the centre of the chest’’.
SSS Consciousness Breathing Airway Circulation
Chest compression - Hand placement

UN Security Field Trauma Module: “Medicus curat, natura sanat”. Rev.1
- 21 -
• Compress the chest at a rate of about 100 times per minute
• Pay attention to achieving the full compression depth of 4—5 cm (for an
adult).
• Allow the chest to recoil completely after each compression. • Take approximately the same amount of time for compression and
relaxation.
• Minimize interruptions in chest compression.
• Do not rely on a palpable carotid or femoral pulse as a gauge of effective arterial flow.
8. After 30 compressions reopen the airway again using the head tilt, chin lift. 9. Deliver two rescue breaths
• Pinch the soft part of the nose closed, using the index finger and thumb of your hand on the forehead.
• Allow the mouth to open, but maintain chin lift. • Take a normal breath and place your lips around his the mouth, making
sure that you have a good seal.

UN Security Field Trauma Module: “Medicus curat, natura sanat”. Rev.1
- 22 -
• Blow steadily into the mouth while watching for the chest to rise, taking about 1 second as in normal breathing; this is an effective respiration.
• If the chest does not rise and fall as in normal breathing, then ensure that the
airway is open by adjusting head tilt, chin lift (or jaw thrust). Attempt to give respirations two times before returning to chest compressions.
10. 30 compressions and 2 respirations (30:2) is one cycle of CPR. Continue
with CPR at a ratio of 30:2.
CPR – Special Notes • Two Rescuer CPR is delivered with the same compression to respiration ratio
(30:2) as one rescuer CPR. CPR for extended periods of time is exhausting; frequent switching of positions – chest compressions/respirations – is recommended.
• In order to utilize the jaw thrust technique for CPR there must be two rescuers and a CPR Pocket Mask (see barrier devices below).
• The Bag-Valve Mask can only be utilized for CPR when there are two rescuers (see barrier devices below).
• CPR begins with chest compressions except in the following situations: 1. Drowning victims 2. Children and infants
In these situations begin with five rescue breaths (regular respirations), then (if victim remains unresponsive) proceed to the regular CPR sequence.

UN Security Field Trauma Module: “Medicus curat, natura sanat”. Rev.1
- 23 -
The Chain of Survival The Chain of Survival summarizes the vital steps needed for successful resuscitation:
1. Early recognition of the emergency and calling for help: activate local emergency response procedures. An early, effective response may prevent cardiac arrest.
2. Early bystander CPR: immediate CPR can double or triple odds of surivival.
3. Early defibrillation: CPR plus defibrillation within 3—5 min of collapse can produce survival rates as high as 49—75%. Each minute of delay in defibrillation reduces the probability of survival by 10 -15%.
4. Early advanced life support and post resuscitation care: the quality of treatment during the post-resuscitation phase is crucial.
Victims of cardiac arrest need immediate CPR. This provides a small, but immediate flow of oxygen rich blood to the heart and brain.

UN Security Field Trauma Module: “Medicus curat, natura sanat”. Rev.1
- 24 -
The CPR pocket mask The CPR Pocket Mask is Personnel Protective Equipment (PPE) against communicable disease; it combines a low-resistance, one-way valve with a disposable hydrophobic filter to help prevent the passage of liquids and secretions while performing CPR. The valve and filter act as barriers separating the rescuer from the victim to help prevent any cross-contamination. As the rescuer does not have to make direct mouth-to-mouth contact with the victim; the rescuer does not inhale the victim's exhaled air; and saliva is not exchanged between the victim and the rescuer. The transparent dome allows rescuer to check victim's lip color and secretions and the durable plastic seals easily to fit the facial contours of an adult, child, and infant. The pocket mask is located in the ETB-ST and should be placed in the outside pocket for immediate access. When used without supplemental oxygen the CPR Pocket Mask can allow for the delivery of between 10% and 15% oxygen to the patient (the amount of oxygen that remains in an exhaled breath).
Barrier Devices
The CPR Pocket Mask

UN Security Field Trauma Module: “Medicus curat, natura sanat”. Rev.1
- 25 -
CPR Pocket Mask - Special Note: In order to utilize the jaw thrust technique for CPR there must be two rescuers and a CPR Pocket Mask. If a single rescuer must perform CPR on a trauma victim they will have to utilize the head tilt, chin lift technique to deliver respirations. While this may cause damage to the neck and spine, if the victim is not breathing and circulating he/she will die. The Bag-Valve Mask (BVM) A Bag-Valve Mask consists of a self inflating bag, a one-way valve, and a face mask. Most BVMs have the capacity to be connected to supplemental oxygen and have an external oxygen reservoir. Regardless of configuration, all BVMs are most effective when connected to any oxygen source. Used without oxygen, the BVM will deliver room air that is approximately 21% oxygen. The adult-size BVM has a bag capacity (or volume) of between 1,000 and 1,600 milliliters. If used improperly the BVM has the potential to deliver smaller volumes than a pocket mask. Be sure to watch the chest for adequate rise and fall with each respiration. The BVM can be found inside the ETB-ST.
BVM – Special Note: A single rescuer attempting to use a BVM will most likely struggle with trying to maintain an adequate seal while squeezing the bag – for this reason this device can only be utilized for CPR when there are two rescuers.
Adult, Child and Infant BVMs
Jaw-Thrust with the CPR Pocket Mask

UN Security Field Trauma Module: “Medicus curat, natura sanat”. Rev.1
- 26 -
The most common cause of choking in adults is airway obstruction caused by food. In infants and children, half the reported episodes of choking occur while eating and the remaining episodes occur with non-food items such as coins or toys. Recognition Because recognition of airway obstruction is the key to successful outcome, it is important not to confuse this emergency with fainting, heart attack, seizure or other conditions that may cause sudden respiratory distress, cyanosis or loss of consciousness. Foreign bodies may cause either mild or severe airway obstruction. The signs and symptoms enabling differentiation between mild and severe airway obstruction are summarized in the table below:
2005 ERC Guidelines Adult FBAO Treatment (this sequence is also suitable for children over the age of 1)
1. Ask the victim if he/she is choking. 2. If the victim shows signs of mild airway obstruction encourage him to continue
coughing. 3. If the victim shows signs of severe airway obstruction and is conscious –
deliver five back blows as follows: • Stand to side and slightly behind the victim. • Support the chest with one hand and lean the victim well forwards so that
when the obstructing object is dislodged it comes out of the mouth rather than goes further down the airway.
• Give up to five sharp blows between the shoulder blades with the heel of your other hand
• Check after each back blow to see if the airway obstruction has been relieved. The aim is to relieve the obstruction with each slap rather than necessarily to give all five.
4. If the five back blows fail to relieve the airway obstruction, deliver up to five
Foreign-Body Airway Obstruction (FBAO)
UN Security Field Trauma Module: “Medicus curat, natura sanat”. Rev.1
- 27 -
abdominal thrusts as follows: • Stand behind the victim and put both arms round the upper part of
his/her abdomen. • Lean the victim forwards. • Clench your fist and place it between the umbilicus (navel) and xiphod
process. • Grasp this hand with your other hand and pull sharply inwards and
upwards. • Repeat up to five times.
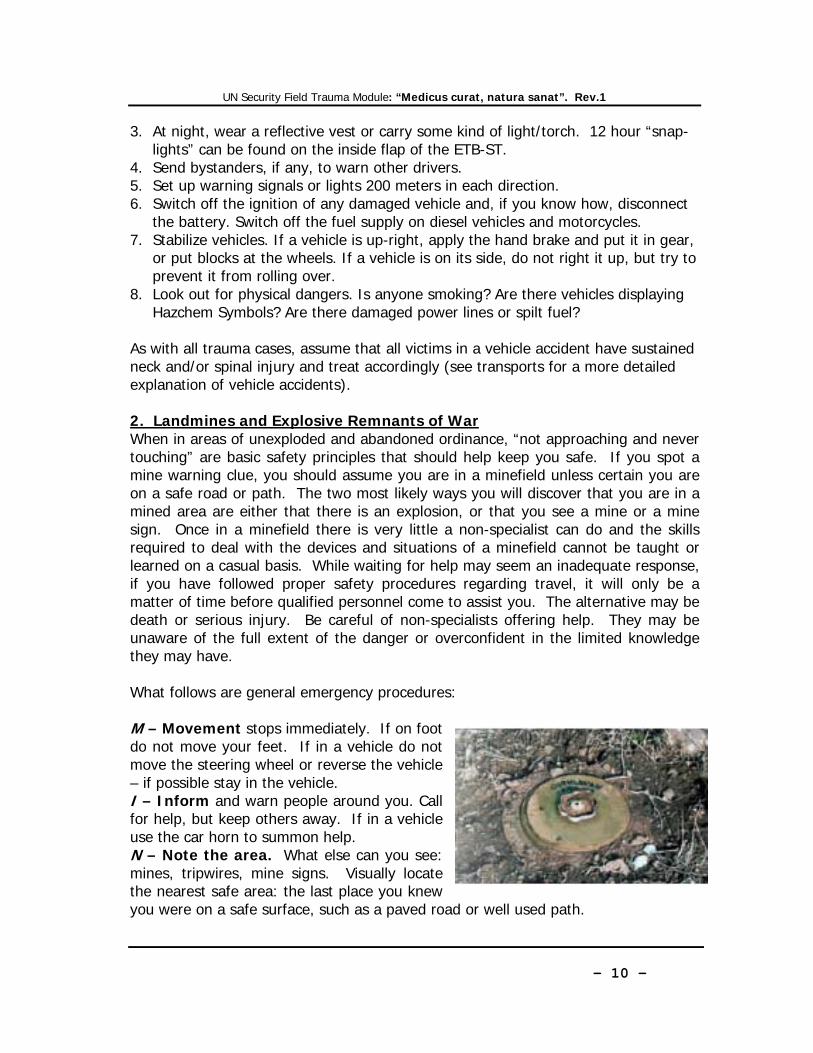
5. If the obstruction is still not relieved, continue alternating five back blows with five abdominal thrusts.
6. If, at any time, the victim becomes unconscious: • Immediately activate your emergency medical system. • Look, listen and feel for sounds of breathing • Deliver two rescue breaths • Look, listen and feel for sounds of breathing • If breathing is still absent - begin CPR

UN Security Field Trauma Module: “Medicus curat, natura sanat”. Rev.1
- 28 -
The Finger Sweep Manually remove solid materials in the airway only if they can be seen: avoid use of a blind finger sweep. The Manual Suction Unit This device is located inside the main compartment of the ETB-ST and includes the handle, 2 Replacement Cartridges, Short Suction Catheter w/Adapter Tip, Double Male Connector and Directions for Use. Suctioning is used to help maintain a patent airway that is at risk of becoming blocked by materials such as blood, vomit and saliva. Noisy respirations are almost always a sign of upper airway obstruction caused by fluids. During manual ventilations some of the air enters the stomach and may eventually cause the patient to vomit. You will use suction to minimize the chances that the vomit could enter the lungs. Keep the manual suction unit ready when caring for unresponsive patients or when manually ventilating a patient. Oral Suctioning
1. Attach the catheter to the suction tubing and confirm that the suction tubing is securely attached to the device.
2. Place the tip of the catheter into the mouth as far to one side as possible and only as far as you can see.
3. Suction as you move the tip of the catheter around in small circles on one side of the tongue.
4. Suction in the same manner on the other side of the patient’s mouth. 5. Repeat the procedure. 6. For adult patients suction no more than 15 seconds at a time, child patients
10 seconds and infants 5 seconds. Nasal Suctioning
1. Attach the catheter to the suction tubing and confirm that the suction tubing is securely attached to the device.
2. Suction the nostril, but do not insert the device beyond the nostrils. 3. Repeat the procedures for the other nostril. 4. For adult patients suction no more than 15 seconds at a time, child patients
10 seconds and infants 5 seconds.

UN Security Field Trauma Module: “Medicus curat, natura sanat”. Rev.1
- 29 -
OPA (also referred to as Guedel Airways) are made of hard plastic and are designed to minimize the chances that the airway will become blocked by the tongue. UN Security Officers will only use OPAs in the following circumstances: 1. Patient is unresponsive 2. Patient displays no gag reflex 3. Patient has a swollen upper airway as the result of either anaphylaxis or burns.
Follow these steps to insert and OPA: 1. Manually open the airway using the appropriate method (head-tilt chin lift for
medical victims, jaw thrust for trauma victims).
Oralpharyngeal Airway (OPA) / Guedel Airway
2. Select the appropriate size airway by measuring from the corner of the patient's mouth to the earlobe or angle of the jaw.
3. Open the patient's mouth and insert the airway upside down (with the tip facing the roof of the mouth) until it is approximately halfway in, then rotate it 180 degrees as you insert it the rest of the way in.
4. Allow the flange of the airway to come to rest against the outside of the patient's lips. It is okay to allow the flange to rest no further than the patient's teeth. After proper insertion the patient is ready for ventilation.

UN Security Field Trauma Module: “Medicus curat, natura sanat”. Rev.1
- 30 -
D. DISABILITY This step is a direct measurement of cerebral function, and more important, an indirect measurement of cerebral oxygenation. The object is to determine the casualty’s level of consciousness (LOC). The LOC can be accurately described by assigning one letter of the simple acronym A.V.P.U. which stands for:
A. - Alert V. - Responds to Verbal stimulus P. - Responds to Painful stimulus U. - Unresponsive
A decreased LOC should alert the rescuer to other possible problems. E. EXPOSURE Protect the casualty from the environment and keep his core temperature elevated. Despite the environmental temperature, if the casualty is going into shock his/her circulating blood may not be able to maintain the normal body temperature. To avoid such complication, cover the casualty with a thermal blanket. Thermal blankets are located in both wound dressing kits of the ETB-ST.
Chapter 4 PRIMARY SURVEY
Disability and Exposure (D & E)

UN Security Field Trauma Module: “Medicus curat, natura sanat”. Rev.1
- 31 -
While carrying out the head to toe evaluation use both hands and always compare one side of the body with the other this will help reveal swelling and deformity. Skull and scalp: run your hands over the scalp to find bleeding, swelling, or any soft area or indentation that might indicate a fracture. Eyes: examine both eyes together, noting the size of the dark circular centers (the pupils), and whether they are equal in size. Look for any foreign body, wound or bruising in the whites of the eyes. Nose: check for any sign of blood or clear fluid (or a mixture of both) that might indicate damage inside the skull. Mouth: record the rate, depth, and nature (easy or difficult, noisy or quiet) of breathing. Note any odor on the breath. Look and feel inside the mouth for anything that might endanger the airway. If dentures are intact and fit firmly, leave them in place. Examine the lips for burns or discoloration. Ears: speak to the casualty. Ask him/her if he/she can hear in both ears. Look for blood or clear fluid (or a mixture of both) coming from either ear canal that might indicate damage inside the skull. Neck: loosen clothing around the neck. Check if any medical alert medallion is being worn. Take the carotid pulse, run your fingers down the spine from the base of the skull to between the shoulders checking for irregularities or tenderness. Apply a cervical collar if you have not yet done so (see handling and transports below). Trunk: ask the casualty to breathe deeply, and observe whether the chest expands evenly, easily and equally on either sides. Check both collar bones and shoulders for deformity, irregularity or tenderness. Feel the ribcage for similar abnormalities, and inspect the chest for any wound, rigidity or tenderness. Feel both sides of the pelvic bone and gently “rock” the pelvis to discover any sign of fracture. Note any incontinence or bleeding from the orifices. Upper limbs: check movement and sensation in both arms. Ask the casualty to bend and straighten the fingers and elbows. Take his/her hands: can he/she feel normally? Look for bruising, swelling, or deformity on the forearm. Look for a warning bracelet.
Chapter 5 SECONDARY SURVEY: HEAD TO TOE
EVALUATION

UN Security Field Trauma Module: “Medicus curat, natura sanat”. Rev.1
- 32 -
Lower limbs: ask the casualty to raise each leg in turn, and to bend and straighten ankles and knees. Look and feel for any wounds, swelling or deformity. Back and spine: if you have noted impaired movements or sensation in the limbs, you should not move the casualty to examine the spine. Otherwise, without causing undue disturbance, gently pass your hand under the hollow of the back and feel along the spine, checking for swelling and tenderness.

UN Security Field Trauma Module: “Medicus curat, natura sanat”. Rev.1
- 33 -
This course places emphasis on the following vital signs:
1. Respirations 2. Pulse 3. Blood Pressure
Baseline vital signs is a term used to describe the very first set of vital signs obtained on the patient during a call. Baseline vital signs are very important because they establish a standard (baseline) to which all subsequent vital signs will be compared A single set of vital signs is an observation. Looking at two sets of vital signs is a comparison. Being able to compare multiple sets of vital signs can reveal a trend in the patient’s condition. Be careful not to jump to conclusions after obtaining your baseline vitals. A single set of vital gives us nothing more than a quick “snapshot” of a patient’s condition. The exact order in which you take and/or record patient vital signs is not all that important. What is important is that you obtain and record accurate and complete vital signs in a way that will allow for easy comparison. When calling for medical direction, doctors/nurses/paramedics will always ask for vital signs. The following format allow for easy comparison of multiple sets of vital signs: Pulse A pulse can be thought of as a remote heartbeat. It is the pulsation of the artery as it swells under the pressure of the rushing blood each time the heart pumps. There are several pulse points throughout the body, some more easily palpated than others: • Carotid – located in the anterior of the neck • Brachial – felt in two locations: on the inside of the upper arm and over the
medial aspect of the anterior elbow
Chapter 6 VITAL SIGNS

UN Security Field Trauma Module: “Medicus curat, natura sanat”. Rev.1
- 34 -
• Radial – located over the lateral aspect of the anterior wrist • Femoral – located deep in the groin between the hip and the inside of the upper
leg • Popliteal – located over the posterior aspect of the knee • Dorsalis pedis – located over the anterior (dorsal) foot • Posterior tibial – located over the medial ankle just posterior to the ankle bone
1. The most common pulse point used on a responsive patient is the radial pulse. 2. For unresponsive patients older than one year the carotid pulse is preferred. 3. For patients less than one year old the brachial pulse is preferred.
Becoming proficient at palpating pulse requires practice. When assessing a patient’s pulse try to identify rate and quality. Below is a chart of normal pulse rates: Respirations Breathing is typically the first vital sign you will be able to assess as you approach a conscious patient. It can reveal a great deal about a patient in less time and with less effort than other signs; if a patient is breathing it is fairly safe to assume he has a pulse and therefore blood pressure. For unresponsive patients, the assessment is not so easy from a distance. You may have to actually open the airway and place your ear next to the patient’s nose and mouth to adequately assess breathing. Below is a chart of normal breathing rates:

UN Security Field Trauma Module: “Medicus curat, natura sanat”. Rev.1
- 35 -
Blood Pressure Blood pressure is a measure of the pressure inside the arterial system. It is a dynamic value and changes constantly according to factors like blood loss, stress, ambient temperature and exertion. Blood pressure is measured in millimeters of mercury (mmHG) and is usually recorded as two numbers separated by a horizontal line such as 120/80 (spoken as “120 over 80”). These two numbers represent two different pressures within the arterial system. Systolic Pressure – Is the top number in a blood pressure reading – the 120 in 120/80. The systolic reading reflects the pressure inside the artery each time the heart’s left ventricle contracts. Diastolic Pressure – Is the bottom number in a blood pressure reading – the 80 in 120/80. The diastolic reading reflects the pressure inside the artery each time the heart rests between beats. In order to measure blood pressure you will need:
1. Sphygmomanometer (blood pressure cuff) 2. Stethoscope (not necessary if measuring blood pressure by palpation)
Measuring Blood Pressure by Auscultation

UN Security Field Trauma Module: “Medicus curat, natura sanat”. Rev.1
- 36 -
This is the more accurate of the two ways of measuring blood pressure. Learning to take blood pressures using this method can be frustrating at first. Measuring blood pressure (BP) by auscultation requires a relatively quiet environment.
1. Place the BP cuff appropriately on the upper arm. Ensure that the gauge remains visible.
2. Ask the patient if he knows what his BP is normally – take note of this. 3. Locate the brachial artery on the anterior elbow and place the
stethoscope over it. 4. Ensure that the valve is closed and inflate the cuff to approximately 30
mmHG above where the patient indicated his systolic pressure is normally. If in doubt inflate to 160 mmHG.
5. Open the valve and deflate the cuff slowly, while listening for the pulse sounds. • At some post as you release the pressure in the cuff the blood will
begin rushing past the cuff with each beat of the heart. This flow of blood past the cuff can be heard through the stethoscope.
6. Note where the need on the gauge is when you hear the first significant sound (systolic) and the last significant sound (diastolic).
7. Note the time and record your findings. Measuring Blood Pressure by Palpation This is the preferred method of measuring blood pressure for UN Security Officers. Blood pressures taken by palpation are not as accurate as those taken with a stethoscope, but works better than auscultation in noisy environments or when you want to take multiple vital signs as quickly as possible. You will record a BP taken by palpation as the number over the letter P, such as 120/P.
1. Place the BP cuff appropriately on the upper arm. Ensure that the gauge remains visible.
2. Ask the patient if he knows what his BP is normally – take note of this. 3. Locate the radial pulse in the same arm where you placed the cuff. 4. Ensure that the valve is closed and inflate the cuff to approximately 30
mmHG above where you last feel a radial pulse. 5. Open the valve and deflate the cuff slowly while feeling for the radial
pulse to return. • At some post as you release the pressure in the cuff the blood will
begin rushing past the cuff with each beat of the heart. The radial pulse will return once this happens.
6. Note the location of the needle on the gauge when you feel the first beat return at the radial pulse. This is the approximate systolic blood

UN Security Field Trauma Module: “Medicus curat, natura sanat”. Rev.1
- 37 -
pressure. 7. Note the time and record your findings.
Below is a chart of normal BP rates:
It is difficult to discuss shock without first discussing perfusion. Perfusion is the adequate flow of well-oxygenated blood throughout the entire body, especially the vital organs. When the circulatory system is functioning properly, a patient is said to be perfusing well. Signs and symptoms of adequate perfusion include: • Normal skin signs • Normal capillary refill time – a fingernail, when pressed will regain its color
almost immediately. • Normal mental status • Normal vital signs – For adults:
o Pulse 60 to 100 and regular o Blood pressure: 120/90
Systolic 90 – 100 + age in years to 40 Diastolic 60 – 90
o Respirations: 12 – 20 per minute

UN Security Field Trauma Module: “Medicus curat, natura sanat”. Rev.1
- 38 -
Inadequate perfusion is frequently the result of malfunction of one or more of the components of the circulatory system: the heart, the blood or the blood vessels. Adequate perfusion is dependant on a properly functioning respiratory and circulatory system with adequate blood pressure. A patient who is not perfusing well is said to be suffering from hypo-perfusion or shock. As a direct result of poor perfusion, the cells of the various organs (liver, kidneys, brain, heart,lungs) begin to starve for oxygen and suffer from the effects of unremoved wastes. When enough cells within a particular organ have failed the entire system will begin to malfunction and eventually shut down. Below is a list of some of the most common forms of shock: • Anaphylactic shock – caused by an overreaction of the immune system
when exposed to an allergen. The severe allergic response causes the blood
Chapter 7 SHOCK/HYPOPERFUSIOIN

UN Security Field Trauma Module: “Medicus curat, natura sanat”. Rev.1
- 39 -
vessels to dilate, resulting in a decrease in blood pressure and a corresponding decrease in perfusion.
• Cardiogenic shock – caused when the heart can no longer pump adequately, resulting in a decrease in cardiac output and thus a decrease in perfusion.
• Hemorrhagic shock – caused by loss of blood. • Hypovolumic shock – caused by a sudden decrease in body fluids (blood
or other body fluids (i.e. severe diarrhea)). The decrease in fluid volume causes a decrease in blood pressure and a corresponding decrease in perfusion.
• Neurogenic shock – caused by the vessels dilating abnormally in response to injury to the spinal cord. The dilation of the blood vessels results in a decrease in blood pressure and a corresponding decrease in perfusion.
• Septic shock – caused by severe infections that abnormally dilate the blood vessels. The dilation of the blood vessels results in a decrease in blood pressure and a corresponding decrease in perfusion.
Signs and symptoms of inadequate perfusion - shock: • Abnormal skins signs: pale, cool and moist • Altered mental status: aggressiveness, restlessness, sluggishness, confusion
or decreased responsiveness • Pupils: dilated, sluggish and not reactive to light • Increased capillary refill time > 2 seconds • Abnormal vitals:
o Rapid, weak pulse (>100 beats/min, if >120 beats/min almost definitely shock). If the heart is beating properly, it will generate a pulse in the neck (the carotid pulse) where the main carotid arteries pass to the head. These arteries lie on either side of the larynx, between the Adam’s apple and the “strap muscle” that runs from behind the ear across the neck to the top of the breastbone. How to check the carotid pulse: feel for the Adam’s apple with two fingers; slide your fingers back towards you into the gap between the Adam’s apple and the strap muscle, and feel for the carotid pulse for 1 minute or a fraction.
o Increased (early sign) and then deceased (late sign) respiratory rate.
Above 24 (early sign) Below 10 (late sign)
o Decreased blood pressure systolic (top number) below 100 mm HG (late sign)
• Thirst • Nausea and/or vomiting
The speed at which signs and symptoms develop will depend on the extent of the fluid loss and the care the patient receives. Early signs of shock, such as

UN Security Field Trauma Module: “Medicus curat, natura sanat”. Rev.1
- 40 -
increased pulse rate, increased breathing rate are indications that the body is working to compensate for the fluid loss. This is referred to as compensated shock. If the fluid loss is allowed to continue the body’s compensatory mechanisms will begin to shut down and the patient will enter decompensated shock. A major indication of decompensated shock is a significant drop in blood pressure. Once the body has lost the ability to compensate for the fluid loss it has lost, it will go into cardiac arrest; the likelihood of surviving cardiac arrest resulting from decompensated shock is almost nonexistent.
Compensated vs. Decompensated Shock
Sign / Symptom Compensated Shock (early signs)
Decompensated Shock(late signs)
Respirations Increased rate Decreasing ratePulse Increased rate Becomes weak (periphery
pulses not palpable)Blood pressure -Normal to low systolic
-Normal to elevated diastolic
Decreasing to absent
Skin Pale, cool, clammy Pale, cool, clammyPupils Sluggish, but responsive Sluggish to fixed and
dilatedMental Status Altered (aggressive,
anxious, etc..) Unresponsive
Treatment: 1. Treat any cause of shock you can remedy. In most trauma situations
this usually means controlling external bleeding (See bleeding control below).
2. Lay the casualty down, keeping his/her head low, raise and support legs (be careful if you suspect a fracture) - this will force more blood to the patient’s torso and vital organs.
3. Loosen tight clothing, braces, straps, or belts to reduce constriction at the neck, chest and waist.
4. Conserve body heat by covering him/her with a thermal blanket (located in the pouch B-Bandages of the Trauma Kit).
5. Establish intravenous fluid treatment (see intravenous fluid treatment below) (2 liters of normal saline (NaCl 0.9%) located in the orange Infusion Kit II + administration sets and IV cannulae located in the navy-blue Infusion Kit I stored in the main compartment). Always contact medical direction for specific information regarding amount of fluid to be administered.
6. Monitor vital signs (consciousness, respirations, pulse, blood pressure) during transport or while awaiting evacuation. Record vital signs every 5 – 10 minutes.

UN Security Field Trauma Module: “Medicus curat, natura sanat”. Rev.1
- 41 -
The Blood: Blood travels through the circulatory system as the “vehicle” that carries oxygen and nutrients (e.g. glucose) to the cells and that carries waste products away from the cells. There are four basic components in the blood.
1. Red blood cells (Erythrocytes) – In addition to giving the blood its characteristic red color, the red blood cells contain hemoglobin. Hemoglobin is the molecule within the red blood cell that carries oxygen to the cells and carbon dioxide away from the cells.
2. White blood cells (leukocytes) –
The white cells provide the body’s primary defense against infection.
3. Plasma – plasma is the fluid carries the red and white cells as well as other
nutrients.
4. Platelets – platelets play a vital role in the body’s ability to form blood clots. As was discussed in Chapter 7, pressure is required to move blood to all parts of the body. The delicate balance of pressure is maintained by the amount of blood in the body, the pumping of the heart and the size of the blood vessels. Bleeding is classified according to the type of blood vessel that is damaged: artery, vein, or capillary. Arterial bleeding: Arteries are the vessels that carry oxygenated blood from the heart to the tissues and organs of the body. Blood in arteries is under more pressure than other vessels, for that reasons a large quantity of blood can be lost in a short period of time. Blood from arteries is generally bright red, due to higher oxygen content and often can be seen spurting from an open wound with each beat of the heart. You will not always see arterial blood spurting from a wound, because as a
Chapter 8 BLEEDING CONTROL

UN Security Field Trauma Module: “Medicus curat, natura sanat”. Rev.1
- 42 -
patient goes into decompensated shock his/her blood pressure will drop. Venous bleeding: Veins are the vessels that carry blood back to the heart. Venous flow is under much less pressure than arterial flow and, for this reason, does not spurt from the wound but instead flows steadily. The steady, flowing blood from veins may appear darker in color than arterial blood. While it is possible to die from external venous blood loss, it is less likely because lower pressure make it easier to control than arterial bleeding. Capillary bleeding: Capillaries are the tiny vessels that connect arterioles and venules (respectively the smallest arteries and veins). The most commons causes of capillary bleeding are scrapes and abrasions. Capillary bleeding will almost always stop spontaneously and is never life threatening. Severe External Bleeding Massive external bleeding is dramatic and may distract you from the control of the A-B-C priorities. Bleeding at the face or neck may obstruct the airway. Rarely blood loss is so great that the heart stops. Your order of operations is:
1. To control the bleeding 2. To prevent shock 3. To minimize the risk of infection
TREATMENT: 1. Remove or cut clothing to expose the wound. Watch out for sharp objects,
such as glass. 2. Apply direct pressure over the wound with your gloved fingers or palm,
preferably over a sterile dressing or clean pad – but do not waste time hunting for a dressing. If you cannot apply direct pressure – i.e. if an object is protruding – press down firmly on either side or squeeze the wound edges together around an object.
3. Apply a compressing bandage to extremity wounds. It is comprised of either triangular bandages or roller gauze that is wrapped tightly around a wound. The placement of a compressing bandage allows the rescuer to us her/his hands for other important tasks (elevating the limb, applying indirect pressure, etc..). Care must be taken not to secure the bandage too tightly and cut off all circulation to the extremity. The objective of the pressure bandage is to slow the flow of blood enough to allow for the formation of a clot at the site of the injury. It is not designed to cut off all circulation as with a tourniquet. In order to provide both direct pressure and a sterile compression field a good quality trauma dressing should be used that will apply pressure directly over the wound. The Emergency Bandage – found in the wound dressing kit of the ETB-ST
The Emergency Bandage

UN Security Field Trauma Module: “Medicus curat, natura sanat”. Rev.1
- 43 -
should be used for this purpose.
4. If the wounding body (knife, screwdriver etc.) is still incarcerated in the wound, do not extract it, but fix it firmly to the tissues in order not to let it move within the wound during transport.
5. Raise and support an injured limb above the level of the casualty’s heart. Handle limbs very gently if the limb involves a fracture.
6. If possible place the casualty in the anti-shock position – lying down with feet elevated.
7. Periodically check circulation beyond the bandage.
8. Rarely, direct pressure is impossible to apply, or is insufficient to stop the bleeding from a limb. In these cases indirect pressure may be applied to a “pressure point”, where a main artery runs close to a bone. Pressure at these points will cut off the blood supply to the limb. It must not be applied for longer than 10 minutes. The brachial pressure point runs along the inner side of the upper arm. Press your fingertips in between the muscles to compress the artery against the bone. Follow the line of a jacket sleeve seam to find the brachial pressure point. The femoral pressure point is situated in the center of the groin crease. Lay the casualty down with the knee bent to locate the groin fold, and press very firmly with your clenched fist. The femoral pressure point lies where a trouser crease crosses the bottom edge of a pair of briefs.
Direct pressure Compressing Indirect pressure To an elevated limb Bandage on the brachial artery

UN Security Field Trauma Module: “Medicus curat, natura sanat”. Rev.1
- 44 -
9. As a last resort to control severe bleeding
apply a tourniquet made from a folded triangular bandage on the arm/leg, over the elbow/knee (over meaning proximal or closer to the torso). It is very rare indeed that external bleeding cannot be effectively controlled with the techniques described above and a
tourniquet may itself lead to a significant injury. When you apply a tourniquet, then, you must accept the risk that you may be sacrificing the extremity involved. Wrap the triangular bandage on itself in a way to produce a belt 5 cm wide. Bend the belt in two halves and fasten it on the chosen point by inserting the loose ends into the hollow of the mid belt and knotting them around the arm. Tighten the tourniquet and record the application time/date and your name. A properly applied tourniquet is designed to stop all blood flow past the point which it is applied.
10. Additional bandaging can be used to: a. To support a wound b. To immobilize a wound c. To secure a dressing to a wound d. To retain splints e. To retain warmth
After applying additional bandaging check for: • Assess skin for pallor or cyanosis (blue colour) • Assess surrounding skin for swelling • Assess surrounding area for temperature with your hand –feels warm
or cool
Wounds at joint creases: Blood vessels crossing the inside of the elbow and knee run beneath the skin surface and, if severed, will bleed copiously.
1. Press a clean pad over the injury. Bend the joint as firmly as possible. 2. Keeping the joint firmly bent to exert pressure over the pad.
Internal bleeding: Most external bleeding is fairly obvious and gets the immediate attention of rescuers. In the case of internal bleeding, the blood being lost from the circulatory system is contained within the body and cannot be easily detected by rescuers. Even when
The Combat Application Tourniquet (CAT) - can be
found in both Wound Dressing Kits.

UN Security Field Trauma Module: “Medicus curat, natura sanat”. Rev.1
- 45 -
internal bleeding is suspected there is little that can be done to stop it in the field. Patients with internal bleeding generally require surgical intervention. For this reason, early recognition and rapid transport are essential.
The numerous organs contained within the torso and the many vessels that supply them with blood present a great potential for life-threatening internal bleeding. The areas of greatest concern for internal blood loss are the chest, abdomen and pelvis. Suspect internal bleeding in the following situations:
• Falls from a height • Motorcycle collisions • Vehicle vs. pedestrian
impacts • Automobile accidents • Blast injuries • Penetrating trauma • Significant blunt trauma
RECOGNITION Some of the more common signs and symptoms of internal bleeding:
• Rigid, and/or distended abdomen or pelvic region
• Pain, tenderness, swelling, or discoloration on or near the suspected site of the injury
• Bleeding from the mouth, rectum or vagina • Vomiting bright red blood or dark coffee-ground colored blood (old blood) • Bleeding during a bowel movement or stools that are bloody, dark and tarry in
color • Signs and symptoms of shock without external bleeding
TREATMENT: 1. Note the type, amount and source of any blood loss from orifices. 2. Treat as hypovolumic (hypoperfusion) shock (see above)
Bleeding from the ear Bleeding from inside the ear generally follows a rupture of the eardrum. Causes include a foreign body pushed into the ear, a blow to the side of the head or an explosion. The casualty may experience a sharp pain as the eardrum ruptures, followed by earache and deafness. If bleeding follows a head injury, the blood may appear thin and watery. This is very serious, as it indicates that fluid is leaking from

UN Security Field Trauma Module: “Medicus curat, natura sanat”. Rev.1
- 46 -
around the brain. 1. Help the casualty into a half sitting position, with the head inclined to the
injured side to let the blood drain. 2. Do not plug the ear, but cover it with a sterile dressing or clean pad, lightly
held in place. 3. If bleeding follows a head injury and the blood appears thin and watery, you
are in presence of a skull fracture: the casualty will need to be intubated and heavily resuscitated the soonest.
4. Send the casualty to the hospital in the treatment position. Haemostatic Agents There are an increasing number of products available in the commercial setting that are aimed at providing increased ability for the blood to form into a clot around large, potentially uncontrollable hemorrhage. Examples of these include QuikClot, Haemcon, Celox and ExcelArrest. Most of these products are inert and have no chemical action and work due to their ability to absorb water molecules (plasma) from the blood enabling rapid localized coagulation and the formation of a stable blood clot in a variety of wounds. For the UN Field Security Officer the most significant use of haemostatic agents is to stop traumatic bleeding. The ETB-ST contains several ExcelArrest bandages (in wound dressing kits I & II), a low cost haemostatic agents, which, when applied with direct pressure rapidly stops bleeding in many situations.
The ExcelArrest Haemostatic bandage – can
be found in both Wound Dressing Kits

UN Security Field Trauma Module: “Medicus curat, natura sanat”. Rev.1
- 47 -
It is difficult to discuss burns without first addressing the role of the skin. The skin is the outer layer of the body. It covers our bones, muscles and organs. It is a first line of defense against bacteria and the environment. It helps regulate our temperature. Our skin contains nerve endings and is used as a sensory organ for heat and cold, touch, pressure and pain. There are three layers to the skin: • Epidermis: the outermost layer of the skin. • Dermis: lies below the epidermis and contains the sweat and contains oil gland,
hair follicles, nerve endings and some blood vessels. • Subcutaneous layer: the deepest layer. It is fatty tissues and provides shock
absorption and insulation for the body. A burn is a progressive process. The skin nearest the heat source suffers the most profound changes. Cell membranes rupture and are destroyed, blood coagulates and structural proteins begin to breakdown. The greater the heat transmitted the deeper the wound. The body’s response to burns occurs both at the injury site itself and in areas of the body distant from the injury. While the systemic response is not likely to be seen in the pre-hospital environment, a simple understanding of it will improve overall patient management. The body’s response to burns can be usefully classified into four phases:
1. Emergency Phase: The body’s initial reaction to the burn – pain response and outpouring of amino acids.
2. Fluid Shift Phase: can last for up to 18 – 24 hours. The fluid shift phase begins shortly after the burn and peaks in 6 – 8 hours. In this phase, damaged cells release agents that initiate an inflammatory response in the body. This increases blood flow to the capillaries surrounding the burn and increases the permeability of the capillaries to fluid. The response results in a large shift of fluid away from the intravascular space into the extravascular space resulting in edema (swelling and blisters) and hypovolumic shock.
3. Hypermetabolic Phase: This phase is characterized by a large increase in the body’s demand for nutrients as it begins the long process of repairing damaged tissue. This phase may last for days or weeks depending on the severity of the burns.
4. Resolution Phase: In this phase scare tissues is generated.
Chapter 9 BURNS

UN Security Field Trauma Module: “Medicus curat, natura sanat”. Rev.1
- 48 -
Body Systems’ Responses to Burns It is important to note that burn victims are almost always conscious at the scene, if a burn victim is unconscious it is the result of some other factor – smoke inhalation, blast effects, internal bleeding etc… Cardiovascular Response: includes decreased blood flow to tissues and organs. Hypovolaemia (shock) may develop following the increase in capillary permeability and fluid and protein loss into the extravascular space. Within minutes of the burn, cardiac output falls as a result of the significant decrease in blood volume. Pulmonary Response: is one of the major causes of death after a burn injury. The damage to the lung tissue may be as a direct result of thermal injury and/or smoke inhalation. Respiratory complications from smoke inhalation vary based on amount of smoke, chemicals involved duration, available oxygen, health status, etc… Renal Response: decreased cardiac output results in a reduced flow of blood to the kidneys. Systemic vasoconstriction, decreased blood volume (as a result of fluid shift) and elevated hormones (antidiuretic hormone (ADH)) further contribute to renal complications. Immune Response: damage to the epidermis allows bacteria to easily enter the body. Additionally, coagulated skin and the exudate (puss, ooze) that results from the burn provide an excellent environment for bacteria to grow. This may ultimately lead to septic shock. Common Sources of Burns • Thermal (heat) burn – most commonly caused by exposure to fire, steam, hot
objects and hot liquids. • Chemical burn – caused by the skin coming into contact with substances such as
acids or caustics (bleach, chlorine). • Electrical burn – when the body becomes exposed to an electrical current and
that current passes through the body, it can cause burns along its path. Electrical burns can cause both entrance and exit wounds as the current passes through the body. These burns can be caused by household current, downed power lines and lighting; normally these burns occur deep inside the body.
• Radiation / Light burn – a common cause of these burns is sunlight (sunburn). This category also includes somewhat less common burns from nuclear fallout or radioactive materials. High intensity light sources are a common source of burns and often affect the eyes. High intensity lasers and welding are common sources of intense light that can damage the eyes and the skin if exposed.

UN Security Field Trauma Module: “Medicus curat, natura sanat”. Rev.1
- 49 -
There are a number of factors to consider when assessing the severity of a burn and how best to treat it. These include: • Source – what caused the injury • Depth – how deeply the burn has penetrated • Body surface area (BSA) – the amount of body surface area affected • Location and Coexisting conditions Depth of burns: 1. Superficial burns (1st degree) involve only the epidermis and are characterized by
redness, swelling and tenderness. These burns present mild to moderate pain and are frequently caused by the sun. These burns require no immediate emergency care and will heal completely on their own in about a week. Cooling the burn with tap water or a moistened towel will help to ease the pain.
2. Partial-thickness burns (2nd degree) these burns extend beyond the epidermis and into the dermis. These burns are characterized by severe pain, mottled skin color, blisters and swelling. Blisters are formed by the accumulation of fluids that are released from damaged cells and may take several hours to appear. If blisters burst the risk of infection is great. It is also important to note that superficial burns may also be present on the perimeter of partial thickness burns. If extensive these burns can be serious and even fatal. With appropriate medical treatment these burns can heal within 10 day to 3 weeks;
3. Full-thickness burns (3rd degree) these burns extend beyond all layers and can even cause damage to underlying muscle, bone and vital organs. While there may be little or no pain associated directly with full-thickness burns (because of nerve damage) partial-thickness and superficial burns around the perimeter may cause severe pain. Full-thickness burns are characterized by a white, dark brown or charred color and may appear dry and leathery. The color of the burns is affected by the source. There is a very high risk for infection with full thickness burns. Full-thickness burns never recover by themselves; the only treatment available is skin graph.

UN Security Field Trauma Module: “Medicus curat, natura sanat”. Rev.1
- 50 -
Body Surface Area (BSA) Affected: Extent is expressed in terms of a percentage of the body’s total surface area. Wallace’s rule of nines, which divides the surface area of the body into areas of approximately 9%, is used to calculate BSA. The rule of nines allows one to quickly estimate BSA affected. Another useful tool is the rule of palm, which is based on the principle that a patient’s palm is equal to approximately 1% of her/his BSA. For Adults: • Head and neck: 9% • Each upper extremity: 9% (front of arm 4½%, back of arm 4½%) • Anterior (front) trunk: 18% • Posterior (rear) trunk: 18% • Each lower extremity: 18% (front of leg 9%, back of leg 9%) • Genitals: 1% For an otherwise healthy adult: • Any partial thickness burn of 1% or more (covering an area approximating to that
of the casualty’s hand) must be seen by a doctor. • A partial thickness burn of 9 % or more will cause shock to develop; the casualty
needs hospital treatment and rapid fluid resuscitation on scene. • A full thickness burn of any size requires hospital treatment. Location: Specific areas of the body are considered more significant than others when affected by burns. Burns to the following areas are considered serious injuries: • Face: Burns to the face can affect the eyes and air passages. If the airways
become exposed to heated smoke, steam or flames they can swell, causing respiratory arrest. Indicators:
o Soot in the mouth and/or nose o Singed nasal hair o Redness, swelling, or actual burning of the tongue o Damaged skin around the mouth o Hoarse voice o Breathing difficulty
Inhalation Injury: A patient who is unconscious or trapped in a smoke filled

UN Security Field Trauma Module: “Medicus curat, natura sanat”. Rev.1
- 51 -
area eventually inhales gases, heated air, flames or steam. The inhalation results in airway and respiratory injury.
o Dry air: a poor conductor of heat, these injuries are limited to the upper airway.
o Steam: has 4,000 times more heat carrying capacity than dry heat, and can cause significant damage to the lower airway. Steam injuries are relatively rare.
o Asphyxiation: Carbon monoxide (CO): causes cell death by hypoxia or
asphyxia – inadequate delivery of oxygen (O2) to tissues. CO binds to hemoglobin with greater affinity than O2.
Cyanide gas (CN): disrupts body’s ability to use O2 as energy. Released by plastics.
o Delayed-Toxin-Induced Lung Injury: may take several days to manifest. Severity relative to components of the inhaled gas and duration of exposure.
• Hands and Feet: Burns to these areas are considered serious due to the
potential for loss of function if not cared for properly. • Genitalia: Burns to this area are considered serious because they may affect
both the form and function if not cared for properly. Burns to the inner thighs and buttocks are more prone to infection.
• Circumferential Burns: These are burns that completely surround a body part such as a finger, arm, leg or the chest. Burns that completely encircle a body part can cause swelling that restricts blood flow similar to a tourniquet. Circumferential burns of the chest can severely restrict a patient’s ability to breath adequately. An escharotomy is a medical procedure in which the burned tissue is incised in order to prevent compartment syndrome.
Coexisting Conditions: • Age/Gender: skin is thinner in children, women and the elderly. • Chronic Disease: additional complications, longer healing process. • Distracting injury: secondary trauma. • Immune system: difficulty combating infection.

UN Security Field Trauma Module: “Medicus curat, natura sanat”. Rev.1
- 52 -
TREATMENT: 1. Lay the casualty down, if possible protecting the burned area from contact with
the ground. 2. Extinguish the burn (with a blanket if available) or remove whatever substance is
causing the burn. Thorough cooling may take 10 minutes or more, but this must not delay the casualty’s removal to hospital. Cool the burn, do not cool the patient (particularly if the BSA affected is over 9%). Cover the patient with the thermal blanket (Wound Dressing Kit I or II) to keep core body temperature up and prevent hypothermia. For victims of chemical burns: • Remove the chemical from the patient. If it is a powder chemical, brush it off
before flushing the patient with water. Remove the patient’s clothing. Flush burned area with large amounts of water for 15 to 20 minutes after the patient says that the burning pain has stopped.
• For the eyes: Flush with sterile saline (using an IV fluid administration set (found in infusion kit I). Hold the eyelid open. Bandage the eyes after flushing.
3. Do not drain blisters. 4. While cooling the burn, check airway, breathing, and pulse and be prepared to
resuscitate if necessary. 5. If burn involves the airway, try to keep it open by inserting an oro-pharingeal
cannula (casualty must be fully unconscious and not present a gag reflex). 6. Initiate fluid resuscitation by intravenous administration of 2 liters of normal
saline1 (NaCl 0.9%) (2 liters of normal saline (NaCl 0.9%) located in Infusion Kit II + administration sets and IV cannulae located in Infusion Kit I). Always contact medical direction for specific information regarding amount of fluid to be administered. The generally accepted rule of thumb for IV fluid administration for burn victims for the first 24 hours is the Parkland Formula: • Patient’s weight in kg * 4ml of Ringer’s Lactate or Normal Saline * BSA% =
the amount of fluid to be delivered in the first 24 hours. Half of this amount should be delivered within the first 8 hours. The other half is delivered in the remaining 16 hours.
• Example: a 110 kg woman with burns over 28% of her body should receive 12 liters (12,000ml) of fluid in 24 hours, 6 liters of which she should receive in the first 8 hours.
7. Gently remove any rings, watches, belts, shoes, or smoldering clothing from the injured area, before it begins to swell. Carefully remove burned clothing unless it is sticking to the burn.
8. Cover the injury with a sterile burns sheets (found in Wound Dressing Kit I or II).
1 Many medical authorities prefer Ringer’s Lactate to Normal Saline for burn victims due to the potassium content.

UN Security Field Trauma Module: “Medicus curat, natura sanat”. Rev.1
- 53 -
Closed Chest Injuries Closed chest injuries are usually the result of blunt trauma, such a fall or a vehicle collision. With enough force, blunt trauma can cause major damage to the organs and vessels of the chest. It is important to thoroughly palpate all areas of the chest for tenderness and deformity. Chest injuries may be relatively superficial or more serious, involving the organs and structures underneath. Even minor injuries can have serious consequences. For example, bruising can cause pain that prevents a patient from taking a deep breath. This can cause hypoxia in early stages. A lung that does not expand normally with each breath can eventually develop pneumonia, or infection of the lung tissue. 1. Rib fracture is most commonly caused by blunt trauma. Signs and symptoms of
a rib fracture include: • Pain made worse by breathing • Deformity • Crepitus – the grating sound or feeling of broken bones rubbing together (also
called crepitation – a sound like crunching snow). • Tenderness to palpation
2. Flail Chest occurs when the chest has sustained two or more broken ribs in two or more places. Signs and symptoms of a flail chest include: • Extreme pain • Soft or spongy feeling upon palpation • Paradoxical motion – the flail segment will move
in the opposite direction to the motion of the non-fractured ribs (this is often a late sign – indicating
that the muscles of the chest wall have tired). Again, injuries to the chest wall can cause injuries to the organs underneath. Broken ribs may lacerate or puncture chest or abdominal organs, causing internal bleeding or escape of air from the lungs in the pleural space. A few of the more common of these types of injuries are the pneumothorax (pneumo referring to air or gas and thorax referring to the chest cavity) – spontaneous or otherwise, tension pneumothorax, hemothorax (hemo reffering to blood). These wounds can also be the result of open chest injuries (see penetrating chest wounds below).
Chapter 10 SPECIAL WOUNDS
Flail Chest

UN Security Field Trauma Module: “Medicus curat, natura sanat”. Rev.1
- 54 -
3. Hemothorax – blood leaks into the chest cavity from lacerated
vessels or the lung itself and the lung compresses. 4. Pneumothorax – air enters the chest cavity through a sucking
wound or leaks from a lacerated lung. The lung cannot expand.
5. Tension Pneumothorax – Air continuously leaks out
the lung (an untreated pneumothorax). Eventually the lung collapses, pressure rises and the collapsed lung is forced against the heart and other lung.
6. Spontaneous Pneumothorax – this is a condition where a pneumothorax develops without a traumatic cause. This can happen because of chronic obstructive pulmonary disease or from no apparent reason at all (often in tall, thin individuals). Air leaks into the chest from a weak area in the (non-trauma) lung surface and the lung collapses. Important note: this condition often develops in young, fit individuals with no past medical history of such conditions.
7. Hemopneumothorax – air and blood leak into the chest cavity from an
injured lung putting pressure on the heart and uninjured lung.
Hemothorax
Pneumothorax
Tension Pneumothorax
Spontaneous Pneumothorax
Hemopneumothorax

UN Security Field Trauma Module: “Medicus curat, natura sanat”. Rev.1
- 55 -
Treatment (Closed Chest Injuries): 1. Always assume injury to the neck and spine in trauma cases - stabilize the
cervical spine and prevent movement of the head, neck and spin. 2. Attempt to splint the injury by placing a bulky dressing (large trauma dressing,
folded towels, or a blanket) firmly over the site. This will help splint the injury, thereby reducing pain and allowing the patient to breathe more easily.
3. Establish IV Fluids and call medical direction. 4. Casualties with closed chest injuries need professional medical direction as soon
as possible. Open/Penetrating Chest Injuries Open chest injuries are caused by penetration, as from a knife, a bullet, or any mechanism that pierces the chest wall. Open chest injuries frequently allow air to enter the chest cavity (the space surrounding the lung or pleural space) causing one or more lobes of a lung to collapse. This condition is known as a pneumothorax, as discussed above for closed chest injuries (see illustrations above). With a penetrating injury, air and enters through the open wound during inhalation. Also, when trauma to the chest wall or lungs themselves causes bleeding, a certain amount of this blood enters the pleural space. These conditions can result in tension pneumothorax and/or hemopneumothorax (see illustrations and explanations above). Signs and symptoms include:
• An open wound to the chest – some of these wounds make bubble or make a sucking noise
• Signs of shock, including rapid pulse and respirations, restlessness, anxiety and decreased blood pressure (late sign)
• “Narrowing” blood pressure – the difference between the systolic and diastolic pressures
• Difficult and painful breathing (rapid, shallow and/or uneven) • Coughing up frothy red blood
Pericardial Tamponade is another condition which may be experienced by victims with open chest injuries (knife, gunshot and impaled objects). This condition involves a collection of blood in the sac surrounding the heart, which prevents blood from filling the heart’s chambers, resulting in reduced cardiac output. Treatment: 1. Immediately cover the wound by using the palm of your hand or, if the casualty
is conscious, his/her hand. 2. If the patient is responsive, ask him/her to cough. At the end of the cough
apply an airtight or occlusive dressing to the wound. Sealing the dressing this way, prevents air entering the wound and allows excesses of internal air pressure to be equalized. This can be done in two ways:

UN Security Field Trauma Module: “Medicus curat, natura sanat”. Rev.1
- 56 -
• Cover the wound with a sterile dressing or clean
pad, then cover the pad with a plastic bag, kitchen film, or foil, secured with adhesive strapping on three of the four corners, in order to create a “flutter” type dressing.
• Apply an Asherman’s Chest Seal (located in both Wound Dressing Kits in the ETB-ST). The Asherman Chest seal consists of a large flange covered with an aggressive skin adhesive, a gauze dressing, and a one way valve. It is available for use not to waste time trying to construct a "flutter dressing" with tape and occlusive or in case of multiple penetrating chest wounds. Simply peel off the protective paper and apply the seal to the wound
3. IV Fluid resuscitation is no longer recommended in the treatment of penetrating wounds given the following conditions:
• Evacuation time is not expected to be prolonged. • Bleeding from the wound has been controlled and there is no other obvious
bleeding. Always consult medical direction before establishing IV fluid resuscitation on patients’ with penetrating chest wounds.
On inspiration, dressing seals wound preventing air entry.
Expiration allows trapped air to escape through un-taped section of dressing.

UN Security Field Trauma Module: “Medicus curat, natura sanat”. Rev.1
- 57 -
4. Support a conscious casualty in a comfortable position – half seated, inclined
towards the injured side. 5. Should the casualty fall unconscious, place him/her in the recovery position
(see recovery position above) lying on the injured side, and be prepared to provide life support to the scope of your training.
Open abdominal wounds You should treat a superficial open wound to the abdomen as you would any other open injury, including direct pressure with a sterile dressing to control bleeding. Some rare but serious injuries to the abdomen result in the protrusion of the intestinal organs through the abdominal wall. This is known as an evisceration and must be handled carefully to minimize further damage and infection. DO NOT, under any circumstances, attempt to insert protruding organs back into the abdomen. Obviously all injuries of this nature require prompt surgical intervention. Treatment:
1. Manage ABC as appropriate / control external bleeding. 2. Do not touch the protruding organs with your hands if it can be avoided.
Do not attempt to reinsert the organs into the abdomen. 3. Protect the organs by covering them with a large sterile dressing
moistened with sterile (bottled) water or saline. 4. If appropriate, place the patient in a supine (lying on his/her back) position
with the knees bent. This will reduce pressure on the abdominal muscles. 5. Treat for shock. 6. IV Fluid resuscitation is no longer recommended in the treatment
of penetrating wounds given the following conditions: • Evacuation time is not expected to be prolonged. • Bleeding from the wound has been controlled and there is no other
obvious bleeding. • Always consult medical direction before establishing IV fluid
resuscitation on patients’ with penetrating chest wounds. Crush Injuries Also called crush force trauma, are typically caused when a patient or a part of their body becomes trapped between two surfaces and the pressure from both sides causes damage to the soft tissues. For example this can occur when a patient is pinned between a wall and a vehicle, when run over by a vehicle or when an extremity gets trapped in a

UN Security Field Trauma Module: “Medicus curat, natura sanat”. Rev.1
- 58 -
piece of machinery. While breakage of the skin is common with crush injuries, they can also occur without damage to the outer layers of the skin. Crush injuries can cause significant organ damage. Additionally a crushing article may act as a tourniquet, so once it is removed excessive bleeding may occur and toxic substance, which have built up in the tissues, will be released suddenly into circulation causing kidney failure (septic shock). TREATMENT (FOR A CASUALTY CRUSHED LESS THAN 10 MINUTES):
1. Release the casualty as quickly as possible 2. Control any external bleeding and cover any wounds 3. Secure and support any suspected fractures (see fracture immbolization
below) 4. Establish early fluid resuscitation: this will help prevent kidney damage.
Consult guidelines for penetrating chest injuries above if the chest is crushed.
5. Treat for shock 6. Take note of the duration of crushing and time of release
TREATMENT (FOR A CASUALTY CRUSHED MORE THAN 10 MINUTES): 1. If specialized medical team may be available in reasonable time, do not
release the casualty. 2. If emergency facilities are too far away, apply a tourniquet at the
involved limb root (see bleeding control above). 3. Establish early fluid resuscitation: this will prevent kidney damage.
(contact medical direction). 4. Treat for shock – monitor vital signs.
Amputation When a limb or part of it is completely or partially severed, it is sometimes possible, using microsurgical techniques, to “re-plant” amputated parts. Of course this can only be done if the patient reaches the right hospital as soon as possible. Depending on the mechanism of injury, the bleeding associated with an amputation can be minor or severe. With traumatic amputations, where there is a significant tearing mechanism, the tissues and vessels are pulled to the point of failure. For this reason, the blood vessels have a tendency to retract into the wound and bleeding may be minimal. TREATMENT (for the casualty):
1. Control blood loss by applying direct pressure and raising the injured part; avoid using a tourniquet unless absolutely necessary to stop bleeding.
2. Apply a sterile dressing, or non-fluffy clean pad secured with a bandage. 3. Look for help stating that the accident involves amputation.
TREATMENT (for the severed part):

UN Security Field Trauma Module: “Medicus curat, natura sanat”. Rev.1
- 59 -
1. Do not wash the severed part; do not apply cotton wool to any raw surface; do not allow the severed part to come into direct contact with ice.
2. Place the severed part in a plastic bag or wrap in kitchen film. 3. Wrap again in gauze or soft material, then place the package in another
container (i.e. another plastic bag) filled with crushed ice. Chilling will help preserve the part.
4. Mark the package with the time of injury and the casualty’s name. Hand it over (no pun intended) personally when help arrives.
Impaled Objects An object that has penetrated the skin and remains embedded in the wound is referred to as an impaled object. These objects are typically sharp, piercing objects such as knives, steel rods, sharp sticks, etc… In most cases, a portion of the object remains visible outside the wound. In almost all situations involving an impaled object you will leave the impaled object in the wound and stabilize the object prior to transport. Removing an impaled object will likely result in an increase in both internal and external bleeding. This is especially true if the object has penetrated an organ or major blood vessel. In exceptionally rare cases, the object may be too long to allow for proper transport, or its position may prevent your from performing appropriate airway care (items embedded in the cheek or trachea for example) or chest compressions. In these cases you should first attempt to shorten the object. If this does not work you may have to remove the object prior to transport. Treatment:
1. Manage ABC as appropriate. 2. Manually stabilize the object with your gloved hands to minimize
movement. 3. Cut away clothing to expose the wound and help control any external
bleeding. 4. Attempt to stabilize the object for transport by securing with bulky
dressings. 5. Treat for shock.
Stabilize the item with gloved hands and cut away
clothing
Immobilize the item in place with bulky dressings

UN Security Field Trauma Module: “Medicus curat, natura sanat”. Rev.1
- 60 -
What to Expect The injuries and damage associated with a blast are directly related to the type of explosive used. A conventional (non-nuclear) explosion involves the chemical conversion of a solid or liquid into gas. Explosives can be grouped into two general categories: low-order explosives and high-order explosives - each produce unique damage and injury patterns. Low-order explosives are normally made up of a combustible substance and an oxidant. These explosives are designed to burn and subsequently release energy in a relatively “controlled” manner – this process is called deflagration. Specifically, deflagration refers to a substance decomposing (converting from a solid or liquid into a gas) at a rate of less than 400 meters per second, this produces an effect that “pushes” more than it shatters. The most common military application of deflagration is as a propellant and in fuses. Examples of Low-order Explosives include pipe bombs, gunpowder and petroleum based bombs such as “Molotov” Cocktails or gasoline tankers. High-order explosives are chemical materials that decompose at an extremely fast rate – converting almost instantaneously into a highly pressurized gas. This rapid process of decomposition (between 1000 to 9000 meters per second) is called detonation. The highly pressured gases released by a detonation generate a “blast wave” (also called “over pressure”) that results in a sudden shattering blow. This shattering ability is referred to as brisance (if a low-order explosive is confined, the speed of decomposition can be markedly increased producing some shattering force). Examples of high-order explosives include nitroglycerine, dynamite, Trinitrotoluene (TNT), C-4 and Semtex. A “blast wave” transfers energy to objects or bodies in its path. Injuries and damage due to this energy transfer are referred to as primary injuries, their severity is dependant on:
• The peak of the initial positive pressure wave • The duration of the “blast wave” • The medium in which the device detonates (a blast wave that would cause
only modest injury in an open area can be lethal in a confined area). • Distance from the incident blast wave
Injury Patterns There are four major groupings of injuries associated with blasts:
BLAST INJURIES

UN Security Field Trauma Module: “Medicus curat, natura sanat”. Rev.1
- 61 -
Primary injuries are a direct effect of the “blast wave” on the human body and are therefore caused only by high-order explosives. Much research has been devoted to the recognition and treatment of primary injury patterns. These patterns will be discussed in a very cursory manner below. It is important to remember that clinical presentation of the associated signs and symptoms can be immediate or delayed. It is therefore imperative that all victims of an IED attack, even the apparently uninjured, be seen by medical personnel. • Ear damage: rupture of the tympanic membrane can cause pain, hearing loss
and tinnitus. Medical personnel often use tympanic damage as a marker of possible gastrointestinal and pulmonary injury.
• Pulmonary Damage: commonly referred to as “blast lung.” As this type of injury is often not apparent immediately and externally, it is the most common cause of fatality among initial survivors of an IED attack. Damage to the lungs due to primary injuries is highly complex and can include pulmonary contusions, pneumothorax and subcutaneous emphysema.
• Gastrointestinal damage: injury patterns are highly complex and include damage to the colon, liver, spleen and kidneys. Signs and symptoms of injury may only become present after a delay of up to 48 hours.
• Brain Injury: Injuries patterns include concussions and traumatic brain injury. Again, signs and symptoms of such injuries can be immediate or delayed.
Secondary Injuries are caused by bomb fragments and other debris propelled by the intense energy release of the explosion – this includes glass and items packed into the device (i.e. screws, nails, ball bearings). Such fragments and debris can produce both penetrating and blunt trauma, depending on the projectile’s size and speed. The bulk of injuries associated with improvised explosive device (IED) attacks are from secondary objects. Obviously, it is clinically impossible to tell whether fragment wounds have occurred because of the deflagration of a low-order explosive or the detonation of a high-order explosive. Tertiary Injuries occur when a victim’s body is propelled into another object. These injuries are most common close to the point of explosion and include fractures, amputations, impalements and head injuries. Miscellaneous blast effect (quaternary and quinary injuries) include burns, crush injury associated with structural collapse, poisoning from toxic products and inhalation of dust or chemicals from the explosion.

UN Security Field Trauma Module: “Medicus curat, natura sanat”. Rev.1
- 62 -
Diagram used with permission of LTC John McManus, Jr., MD, FACEP
Secondary injuries
Primary Blast Force -Lungs, Tympanic, G.I.
Tertiary Impact -Multiple Injury Patterns

UN Security Field Trauma Module: “Medicus curat, natura sanat”. Rev.1
- 63 -
In order to give fluid intravenously you will need: 1. I.V. Giving Set 2. I.V. Fluid 3. Canula 4. Tourniquet 5. Medical Tape 6. Gloves 7. Alcohol Swabs In order to give an I.V. follow these steps: 1. First get all of the materials above handy. 2. If possible have the casualty sit down. 3. Put on your gloves.
Chapter 11 INTRAVENOUS FLUIDS
4. Insert the I.V. giving set into the I.V. fluid (Ringer's Lactate or Normal Saline)

UN Security Field Trauma Module: “Medicus curat, natura sanat”. Rev.1
- 64 -
6. Apply tourniquet to the victim’s arm (above the elbow – proximal to the heart). You may ask the victim to pump his fist several times to make veins appear more prominently.
5. Open up the I.V. giving set (roll knob up to open, down to close) and let fluid run through the giving set. Run fluid through the I.V. Giving Set until there are no bubbles in the tubing.
7. Open Canula. Wipe the most prominent vein (i.e. fattest) with an alcohol swab.
8. Insert canula into most prominent vein with the “window” of the needle facing up.

UN Security Field Trauma Module: “Medicus curat, natura sanat”. Rev.1
- 65 -
9. Once you see a “flash” of blood in the Canula continue to insert the canula into the vein, while simultaneously withdrawing the needle.
12. Insert I.V. Giving Set into the canula – some screw into place, others snap into place.
10. Withdrawn the needle and leave the canula in place in the vein; place your finger on the vein to stop the flow of blood.
11. Release the tourniquet. Maintain pressure on the vein to stop the flow of blood.
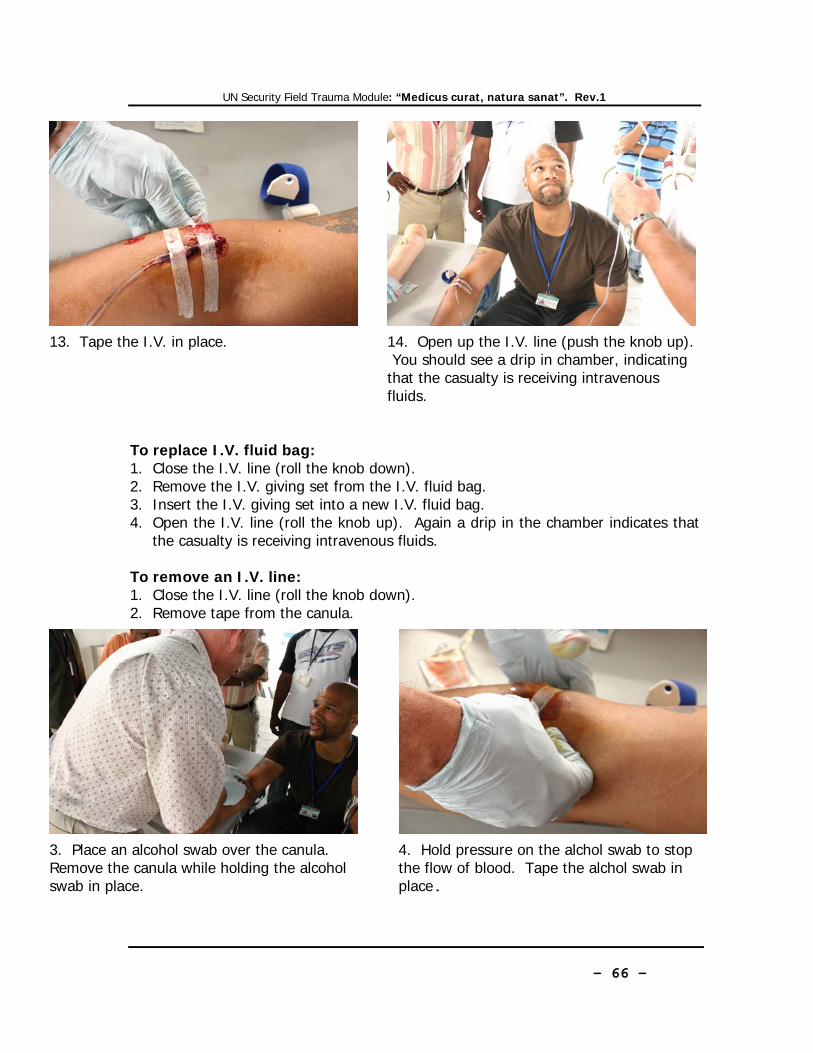
UN Security Field Trauma Module: “Medicus curat, natura sanat”. Rev.1
- 66 -
To replace I.V. fluid bag: 1. Close the I.V. line (roll the knob down). 2. Remove the I.V. giving set from the I.V. fluid bag. 3. Insert the I.V. giving set into a new I.V. fluid bag. 4. Open the I.V. line (roll the knob up). Again a drip in the chamber indicates that
the casualty is receiving intravenous fluids. To remove an I.V. line: 1. Close the I.V. line (roll the knob down). 2. Remove tape from the canula.
13. Tape the I.V. in place. 14. Open up the I.V. line (push the knob up). You should see a drip in chamber, indicating that the casualty is receiving intravenous fluids.
3. Place an alcohol swab over the canula. Remove the canula while holding the alcohol swab in place.
4. Hold pressure on the alchol swab to stop the flow of blood. Tape the alchol swab in place.

UN Security Field Trauma Module: “Medicus curat, natura sanat”. Rev.1
- 67 -
A fracture is a break or crack in a bone. Bones are tough and resilient structures that behave like the branches of a healthy tree when struck or twisted. Generally considerable force is required to break a bone, but old and diseased bones become brittle and can easily break under stress. The most common symptom of a skeletal fracture is pain. For this reason, you should consider all complaints of skeletal pain to be suspected fractures and provide the appropriate care. Fractures are further classified as open or closed. A closed factures is one that is not associated with any break in the overlying skin. An open fracture occurs when the skin is damaged, causing an open soft tissue wound in connection with the skeletal injury. Signs and Symptoms
1. A recent violent blow, or a fall; 2. Pain and tenderness 3. Deformity (swelling or
angulation) 4. Open wounds and external
bleeding 5. exposed bone 6. Crepitation (grating) 7. Locked joint (unable to move) 8. Shortening or twisting of the
limb, compared to the opposite one;
9. Signs of shock.
Patients with skeletal injuries will need more advanced care than can be provided for them in the field. Obviously, the process of transporting a patient from the field to a hospital setting involves movement. Movement of injury site may result in more damage and certainly more pain for the patient. It is for this reason that immobilizing the injury site is an essential element of proper care for these patients. Proper immobilization (manual stabilization and/or splinting) can minimize the following complications:
• Paralysis caused from a damaged spinal column • Further damage to soft tissues, nerves, and blood vessels • Creation of an open injury from an existing closed injury • Unnecessary pain • Additional bleeding
Chapter 12 FRACTURES

UN Security Field Trauma Module: “Medicus curat, natura sanat”. Rev.1
- 68 -
TREATMENT – General Guidelines for Splinting: Just about anything can be used to splint a suspected fracture. The important thing is that you become familiar with the specific tools that will be available to you (the ETB-ST contains Sam Splints, in various sizes, in the outside pocket and triangular bandages in both Wound Dressing Kits).
1. Properly asses the injury site by exposing it as appropriate. 2. Control any bleeding and
bandage wounds. 3. Assess distal circulation,
sensation, and motor function before and after splinting.
4. Immobilize the injury site. 5. Immobilize the joint above and
below the injury site 6. Pad all splinting material as
appropriate for patient comfort. 7. For long bone fractures
(humerus, femur, tibia, ulna, etc…) with severe deformity, distal cyanosis or absent distal pulse align to the normal anatomical position with gentle traction before splinting. • Handle the joints above and
below the fracture site • Pull gently and steadily in
the line of the bone until the limb is securely immobilized
8. Do not intentionally replace any protruding bones. 9. Establish fluid resuscitation as soon as possible.
TREATMENT – For Upper Limb Fractures:
In case of a fractured upper arm, injuries around the elbow and to the forearm and/or wrist support the injured limb against the trunk with a sling and swathe. 1. Sit the casualty down; gently steady and support the injured site across
his/her chest in the position that is most comfortable 2. Ask him/her to support the arm 3. Use a triangular bandage as a sling

UN Security Field Trauma Module: “Medicus curat, natura sanat”. Rev.1
- 69 -
4. Position the sling over the top of the patient's chest - fold the injured arm across his chest.
5. Extend one point of the triangle beyond the elbow on the injured side. Take the bottom point and bring it up over the patient's arm. Then take it over the top of the shoulder.
6. Draw up the ends of the sling so that the patient’s hand is in a pain free position.
7. Twist the excess material and tie at a knot in the point.
8. Form a swathe from a second piece of material. Tie it around the chest and the injured arm. Tie the knot under the arm on the uninjured side.
9. Reassess distal circulation, sensation and motor function. Treat for shock.

UN Security Field Trauma Module: “Medicus curat, natura sanat”. Rev.1
- 70 -
TREATMENT – For Upper Limb Fractures: Shoulder and collar bone In case of a injured collar bone or shoulder you will need to stabilize the shoulder and clavicle prior to applying a sling and swathe. Stabilize the shoulder and clavicle by:
5. Apply a sling and swathe (see above) to the affected limb.
1. Sit the casualty down; gently steady and support the affected limb across his/her chest in the position that is most comfortable.
2. Place a triangular bandage over the back of the neck.
3. Run the ends of the triangular bandage under the victim's armpits.
4. Have the victim take a deep breath and tie the ends of the triangular bandage in between his/her shoulder blades.

UN Security Field Trauma Module: “Medicus curat, natura sanat”. Rev.1
- 71 -
TREATMENT – For Lower Limb Fractures:
In case of injury to the hip, thigh and lower leg immobilize the injured limb against the uninjured limb.
1. Lay the casualty down.
2. Apply traction: Handle the joint at the knee and ankle. Pull gently and steadily in the line of the bone until the limb is securely immobilized
3. Applying traction bring the injured limb in line with the uninjured limb.
4. Slide a triangular bandage under the ankles.
5. Slide a triangular bandage above the suspected fracture, below the suspected fracture and (if the fracture is above the knee) below the knee or (if the fracture is below the knee) above the knee. Here the rescuer is pointing to the fracture.

UN Security Field Trauma Module: “Medicus curat, natura sanat”. Rev.1
- 72 -
Note: in most field medical environments all garments and shoes are removed from the patient, prior to treatment.
6. Tie the triangular bandage at the ankles in a "figure 8" with a double knot over the soles.
7. Tie the remaining triangular bandages over the uninjured leg. Here the rescuer is pointing to the suspected fracture site.
8. Place padding between the thighs, knees and ankles to further prevent movement. Assess distal circulation, sensation and motor function before and after splinting.

UN Security Field Trauma Module: “Medicus curat, natura sanat”. Rev.1
- 73 -
The Recovery Position: The ERC recommends the following sequence of actions to place a victim in the recovery position:
1. Remove the victim’s spectacles. 2. Kneel beside the victim and make sure that both legs are straight. 3. Place the arm nearest to you out at right angles to the body, elbow bent with
the hand palm uppermost.
4. Bring the far arm across the chest, and hold the back of the hand against the victim’s cheek nearest to you.
5. With your other hand, grasp the far leg just above the knee and pull it up, keeping the foot on the ground.
6. Keeping his hand pressed against his cheek, pull on the far leg to roll the victim towards you onto his side.
Handling and Transport

UN Security Field Trauma Module: “Medicus curat, natura sanat”. Rev.1
- 74 -
7. Adjust the upper leg so that both hip and knee are bent at right angles. 8. Tilt the head back to make sure the airway remains open. Adjust the hand
under the cheek, if necessary, to keep the head tilted. 9. Check breathing regularly.
If the victim has to be kept in the recovery position for more than 30 min turn him to the opposite side to relieve the pressure on the lower arm.

UN Security Field Trauma Module: “Medicus curat, natura sanat”. Rev.1
- 75 -
Cervical Collars We should always assume trauma casualties have sustained injuries to the neck and spine. It is for this reason trauma casualties should not be moved, unless absolutely necessary. For this reason it is best to apply a cervical collar and practice caution when forced to reposition victims. One of the biggest challenges of on-scene emergency medicine is proper immobilization of a patient’s head and neck. When there is a suspected spinal injury, this becomes a very high priority. Properly immobilizing a patient’s head and neck can minimize further injury and may even keep him/her from becoming paralyzed. One of the best ways to immobilize a patient’s head and neck in the field is though manual stabilization. Firmly grasp the patient’s head with both hands and attempt to keep it from moving while another rescuer assesses and cares for the patient. The next step in the immobilization process is to add a device known as a cervical collar. A cervical collar is indicated for any patient suspected of having a spinal injury based on the assessment of mechanism of injury and signs and symptoms. To be maximally effective, a cervical collar must fit properly. A collar that is too small can restrict the airway. A collar that is too large will allow excess movement of the head and neck, increasing the potential for further injury. Each cervical collar manufacturer has specific guidelines for properly sizing the collar to the patient. Follow the guidelines for the specific device you will be using. To apply a cervical collar on a seated patient: 1. Stabilize the head and
neck from the rear. 2. Size the collar according
to the instructions on your particular collar.
3. Properly angle the collar for placement.
4. Position the bottom of the collar.
5. Set the collar in place around the neck.
6. Secure the collar 7. Maintain manual stabilization of the head and neck.

UN Security Field Trauma Module: “Medicus curat, natura sanat”. Rev.1
- 76 -
To apply a cervical collar on a supine patient: 1. Kneel at the patient’s head and
stabilize the head and neck. 2. Size the collar according to the
instructions on your particular collar. 3. Set the collar in place 4. Secure the collar 5. Continue to manually stabilize the
head and neck. Hasty Collars: If you do not have a standard cervical collar (or have already used it) you may use the following method to make a hasty collar:
1. Fold a newspaper and wrap it in a triangular sling or bandage or scarf, or insert it into a stocking or leg of a pair of tights;
2. Bend the wrapped newspaper over your thigh. Position the center of the collar at the front of the casualty’s neck, below the chin;
3. Pass the loose ends around the casualty’s neck and tie in position at the front. Ensure that breathing is not impeded.
Here the instructor has removed his gloves to illustrate a point - in a real life situation gloves are ALWAYS worn
when touching a patient.

UN Security Field Trauma Module: “Medicus curat, natura sanat”. Rev.1
- 77 -
Urgent Moves Urgent moves are performed when the patient’s condition is serious or is deteriorating and the patient must be moved promptly for treatment and transportation. Examples include: • Moving a patient to position him/her for airway care. • Performing a rapid extrication of a patient The Log Roll Technique When the victim is laying on his/her face to the ground (prone) and you need to proceed to the Primary Survey, he/she has to be rolled over safeguarding the alignment of his/her back and neck spine. Depending on the conditions, this maneuver can be carried out by one to four first aiders:
ONE FIRST AIDER LOG ROLL TECHNIQUE
1. Straighten the legs and position the closest arm above the head; 2. Cradle the head and neck. Grasp over the distant shoulder.
3. Move the victim as a unit onto his/her side. 4. Move the victim onto his/her back and reposition the extended arm.

UN Security Field Trauma Module: “Medicus curat, natura sanat”. Rev.1
- 78 -
FOUR FIRST AIDER LOG ROLL TECHNIQUE 1. Four rescuers are needed to perform this log-rolling procedure:
• Rescuer A to maintain manual in-line immobilization of the casualty’s head and neck.
• Rescuer B for the shoulder and wrist. • Rescuer C for the hips and ankles. • Rescuer D to assist with stretcher placement.
2. Rescuer D places the stretcher on the casualty’s side. 3. Rescuer A applies gentle in-line manual immobilization to the casualty’s head. 4. Rescuer B gently straightens the casualty’s arm and places them (palm in) next to
the trunk. 5. Rescuer C carefully straightens the casualty’s legs, placing them in neutral
alignment with the casualty’s spine. Gently, yet firmly, tie the casualty’s ankles with a folded triangular bandage in figure 8 (see lower limb fractures above).
6. Rescuer A maintains the alignment of the casualty’s head and neck. 7. Rescuer B reaches across the casualty grasping him/her at the shoulder and wrist. 8. Rescuer C reaches across the casualty grasping him/her at the hips just below the
wrist with one hand and with the other hand firmly grasps the roller bandage or folded sling that is securing the ankles together.
9. On Rescuer A’s command the casualty is cautiously log-rolled as a unit toward the two rescuers at his/her side, but only to the minimal degree necessary to position casualty on the stretcher. • Rescuer A (at the casualty’s head) closely observes the log-rolling process and
maintains neutral alignment of the patient’s head and neck with the trunk, avoiding any flexion or hyperextension of his/her neck;
• Rescuer B controls movements of the casualty’s torso and maintains neutral alignment of the thoraco-lumbar spine;
• Rescuer C helps to maintain neutral alignment of the casualty’s thoraco-lumbar spine with his hand on the casualty’s hip. Additionally, the legs are maintained in neutral alignment with the trunk, by firmly grasping the cravat securing the casualty’s ankles together with the other hand and elevating them approximately 4 to 6 inches (10-15 cm.). This latter maneuver helps maintain neutral alignment of the lumbar spine and avoid pelvic tilt.
• Rescuer D ensures the stretcher is properly placed beneath the casualty. 10. Carefully log-roll the casualty as a unit onto the stretcher. Extreme care is
exercised by all rescuers during this step to avoid untoward movements and maintain neutral alignment of the casualty’s spine.
11. While Rescuer A keeps the head in neutral in line position, Rescuer D immediately applies a cervical collar (see applying a cervical collar to a supine patient above).

UN Security Field Trauma Module: “Medicus curat, natura sanat”. Rev.1
- 79 -
FOUR FIRST AIDER LOG ROLL TECHNIQUE

UN Security Field Trauma Module: “Medicus curat, natura sanat”. Rev.1
- 80 -
Emergent Moves Emergent moves are performed when there is an immediate risk of death to the patient, when injuries may occur that outweigh any harm that may come to the patient by moving her, or when the patient must be moved to access another patient who needs lifesaving care. Examples include: • Fire or threat of fire • Explosives or other hazardous material • Inability to protect the patient from hazards at the scene (falling debris at a
construction site or oncoming traffic) • Moving one patient in a motor vehicle collision to access a critically injured
patient. Emergent moves do not offer extensive protection for injuries to the spine or other bones. Emergent moves should not, however, be performed recklessly. ONE FIRST AIDER EMERGENT MOVES: Human crutch: 1. Stand on the casualty’s injured or weaker side;
pass his arm around your neck and grasp his hand or wrist with your hand.
2. Pass your other arm around the casualty’s waist. Grasp his waist-band, or clothing, to support him.
3. Move off on the inside foot. Take small steps, and walk at the casualty’s pace. A walking stick or staff may give him additional support. Reassure the casualty throughout.
Drag method: 1. Place the casualty’s arms across her
chest. Crouch behind her, grasp her armpits, and pull.
2. If the casualty can sit up, cross her arms across her chest, pass your arms under her armpits, grasp her wrists, and pull.
3. If the casualty is wearing a jacket, unbutton it and pull it up under her head. Grasp the jacket under the shoulders, and pull.

UN Security Field Trauma Module: “Medicus curat, natura sanat”. Rev.1
- 81 -
Fireman’s Carry: 1. Place your feet against the patient’s feet and pull the
him/her towards you. 2. Bend at the waist and flex your knees. 3. Duck and pull him/her across your shoulder, keeping hold
of one wrist. 4. Use your free arm to reach between his/her legs and
grasp the thigh. 5. The patient’s weight should fall on your shoulders. 6. Stand up. 7. Transfer your grip on thigh to patient’s wrist.

UN Security Field Trauma Module: “Medicus curat, natura sanat”. Rev.1
- 82 -
Rautek’s Take: This maneuver can be used extricate a victim in a vehicle accident. While a rescuer can perform it alone it works best if done in conjunction with several other rescuers:
1. Follow the general rules associated with a vehicle accident: a. Park safely b. Turn on hazard lights c. Turn off the incapacitated vehicle d. Pull up the handbrake
2. If possible it is best to place a cervical or hasty collar on the victim before moving.
3. Remove the victims seatbelt. 4. Place a stretcher near the vehicle door. 5. Accessing the vehicle from the driver’s door, slide your right arm behind the
casualty shoulders grasping his left wrist; 6. Slide your left arm under the casualty left armpit and grasp with your left
hand well open his lower jaw (mandible). In this way the victim’s head back will be firmly applied to the rescuer’s right shoulder;
7. To stabilize the grasp, apply your chin over the victim’s left shoulder keeping your cheek pressing his.
8. Rotate the casualty on his major axis presenting the exit to his back and pull him/her out checking his/her legs.
9. Position the casualty on the stretcher that you placed in advance. 10. In case the victim is accessible from the right door of the vehicle, the
maneuver is the same, but it is carried out using the opposite hands/arms.
ONE TWO

UN Security Field Trauma Module: “Medicus curat, natura sanat”. Rev.1
- 83 -
TWO FIRST AIDER EMERGENT MOVES: The Pope’s throne. 1. Squat facing each other on either side of the casualty. Each first aider grasps his
own left elbow with the right hand and then grasps the right elbow of the other with his left hand.
2. The casualty, conscious, but not able to walk, seats on the so crossed first aider’s arms passing his forearms around their necks.
The Pope’s throne w/ back support. 1. Squat facing each other on either side of the casualty. Each first aider grasps his
own left elbow with the right hand and then grasps the right elbow of the other with his left hand. The second first aider, grasps the right elbow of the other with his right hand, and passes his left hand around his colleague neck (the back support).
2. The casualty, conscious, but not able to walk, seats on the so crossed first aiders’ arms passing his forearms around their necks.

UN Security Field Trauma Module: “Medicus curat, natura sanat”. Rev.1
- 84 -
Triage is a French word that means “to sort.” Triage ensures that:
• The disaster is not “relocated” • The most good is done for the most patients
There are several different triage systems. The UN system utilizes the Simple Triage and Rapid Transport (START) system. The colors associated with this system are red, yellow, green and black as summarized in the boxed copy. Triage should start with the first on-scene unit using a public-address or other system to ask those patients who can move to go to a designated area where another person from the unit can start to treat and identify them. When these patients move they do several things for your incident, one of which is to tell you by their actions that they are “walking wounded” and have minor injuries. Below is the START triage protocol:
Chapter 13 TRIAGE
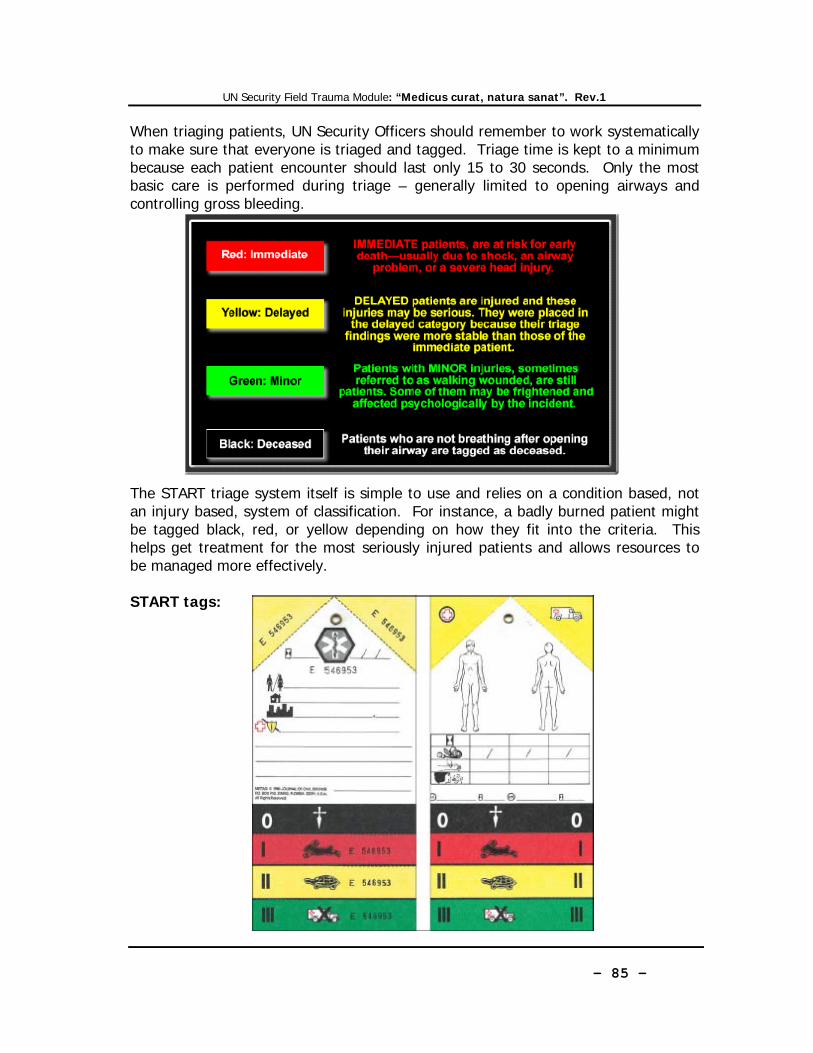
UN Security Field Trauma Module: “Medicus curat, natura sanat”. Rev.1
- 85 -
When triaging patients, UN Security Officers should remember to work systematically to make sure that everyone is triaged and tagged. Triage time is kept to a minimum because each patient encounter should last only 15 to 30 seconds. Only the most basic care is performed during triage – generally limited to opening airways and controlling gross bleeding. The START triage system itself is simple to use and relies on a condition based, not an injury based, system of classification. For instance, a badly burned patient might be tagged black, red, or yellow depending on how they fit into the criteria. This helps get treatment for the most seriously injured patients and allows resources to be managed more effectively. START tags:

UN Security Field Trauma Module: “Medicus curat, natura sanat”. Rev.1
- 86 -
As this course is chiefly concerned with response to trauma conditions, its coverage of medical ones is somewhat cursory. Bearing this in mind below is a short list of some of the more common medical conditions that might be encountered by the UN Security Officer. ANAPHALYXIS Anaphylaxis is the medical term for a severe allergic reaction. Substances that cause sensitivities are called allergens and can be just about anything. Common allergens include: • Insect bites/stings • Foods (particularly nuts and shell fish) • Plants (poison oak, poison ivy, pollen) • Medications • Others – latex, mold, dust, chemical Most reactions occur within seconds or minutes after exposure to the allergen, but some can occur after several hours, particularly if the allergen causes a reacton only after it is partially digested. In very rare cases, reactions develop after 24 hours. RECOGNITION: • Anxiety; • Widespread red, blotchy skin eruption; • Swelling of the face and neck; • Puffiness around the eyes; • Impaired breathing, ranging from a tight chest to severe difficulty; the casualty
may wheeze and gasp for air. • A rapid pulse. TREATMENT:
1. Arrange urgent removal to hospital. 2. Help a conscious casualty sit up in the position which most relieves any
breathing difficulty. 3. If he becomes unconscious, check breathing and pulse, and be prepared to
resuscitate if necessary. Place him/her in the recovery position. 4. Assist with the administration of the patient’s own epinephrine auto-injector if
available. DISORDERS OF THE HEART The heart is a very specialized muscular pump which “beats” throughout our lives in a continuous smooth and coordinated way, controlled by an electrical impulse. Angina Pectoris - Latin name describing the pain experienced when narrowed coronary arteries are unable to deliver sufficient blood to the heart muscle to meet the extra demands of exertion or, sometimes, of excitement .
Chapter 14 MEDICAL CONDITIONS

UN Security Field Trauma Module: “Medicus curat, natura sanat”. Rev.1
- 87 -
RECOGNITION: • Gripping chest pain, often spreading to the left arm and jaw. • Pain or tingling in the left hand. • Shortness of breath. • Weakness, often sudden and extreme. TREATMENT: 1. Help the casualty sit down. Reassure him/her and make him/her comfortable. 2. If the casualty has medicine for angina, help him/her to take it. 3. Let the casualty rest. The attack should settle within a few minutes, or in
response to the drug. 4. If you are at work, call the UN Doctor immediately; if on the road or out of office
hours, call for an ambulance. While waiting monitor breathing and pulse, and be prepared to resuscitate if necessary.
Heart attack - a heart attack most commonly occurs when the blood supply to part of the heart muscle is suddenly cut off. RECOGNITION: • Persistent crushing, vice-like pain, often radiating from the heart. Unlike the pain
of angina it does not ease with rest, and indeed may occur at rest. • Breathlessness and discomfort high in the abdomen, like severe indigestion. • Sudden faintness or giddiness. • A sense of impending doom. • “Ashen” skin and blueness at the lips. • A rapid pulse, becoming weaker. • Collapse, often without any warning. TREATMENT: 1. To minimize the work of the heart, make the casualty comfortable. A half sitting
position, with head and shoulders supported and knees bent, is often best. 2. If you are at work, call the UN Doctor immediately; if on the road or out of office
hours, call for an ambulance. While waiting monitor breathing and pulse, and be prepared to resuscitate if necessary.
3. If you have ordinary aspirin and the casualty is conscious, give him one tablet: this may help to limit the damage to the heart. If the casualty has medication for chest pain assist him/her in taking that.
Cardiac arrest: this term describes any stoppage of the heart. It may be the result of a heart attack; other causes include severe blood loss, suffocation, electric shock etc. RECOGNITION: • Unconsciousness • Absence of breathing • Absence of pulse TREATMENT: 1. Begin Primary Survey (see Primary Survey / Basic Life Support above).
UN Security Field Trauma Module: “Medicus curat, natura sanat”. Rev.1
- 88 -
HEAT AND COLD INJURIES Heat and humidity Excessive heat and humidity, or overexertion in these conditions, may lead to exhaustion from loss of water and salts and to severe heat stroke requiring emergency medical attention. Tea and drinks rich in mineral salts (fruit and vegetables juices, clear soups, etc.) are recommended in cases of exhaustion. Taking salt tablets may be advisable depending on level of activity. Heat Stroke Excessive exertion or exposure to hot climate (especially with high humidity) may cause the body to sweat copiously. Prolonged sweating may deplete the body of salts and cause rapid dehydration. When the body stops producing sweat and is unable to cool itself, the next step may be heat stroke. Heat stroke can be prevented by seeking shelter from the sun, refraining from exercise in the heat of the day and drinking plenty of fluids (water with re-hydration salts). RECOGNITION: • Red face and skin • Dizziness • Hot, dry skin • High temperature • Weak rapid pulse • Severe shock • Loss of consciousness TREATMENT: • Ingestion of fluids (if conscious) • Rapid cooling of the body. • The victim must be sheltered from the sun. • Loosen or strip off clothing • Pour water (any liquid) on the victim and/or soaking their clothes. • Monitor vital signs, and treat for shock. • Transport to medical care as soon as possible. Hypothermia This is the sudden loss of body core temperature coupled with the body’s inability to re-warm itself. It can be fatal. Hypothermia can be prevented by dressing properly (layering), always wearing head protection and keeping clothes dry. RECOGNITION: • Slurred speech • Violent shivering • Cold clammy skin TREATMENT: • Drink warm fluids. • Replace wet clothing. • Share body heat.

UN Security Field Trauma Module: “Medicus curat, natura sanat”. Rev.1
- 89 -
• Take warm bath (extreme cases). • Closely observe the casualty as severe shock is possible, even during warming. Frostbite This is the freezing of skin and muscle tissues. It can result from exposure to cold temperatures or bare skin coming into contact with very cold objects. It can be prevented by keeping body extremities (fingers, toes, nose, ears,) and skin protected. Wear gloves or mittens, keep ears, nose and face covered, especially in extreme cold and wind. RECOGNITION: • Pale or white “dead looking” skin • Numbness at the site of the injury • In cases of extreme frostbite the effected part may begin to turn black as tissue
dies. TREATMENT: • Slow thawing of the effected part. • Use body heat, warm (not hot) water . • Do not rub the effected part with anything as this will cause tissue
damage. • Expect extreme pain as thawing occurs. ATLTITUDE SICKNESS Travelling and staying at high altitudes may initially give raise to insomnia and may be distressing and even dangerous for people with cardiac or pulmonary conditions. RECOGNITION: • Extreme faintness • Difficulty breathing • Dizziness, headaches • Vomiting TREATMENT: • Gradual adjustment to high altitude by stages • Treatment with diamox may sometimes be beneficial. • Drink plenty of fluids. MALARIA Types: Plasmodium Falciparum Plasmodium Vivax Plasmodium Ovale Plasmodium Malariae Malaria is transmitted by the bite of an infected anopheles female mosquito in

UN Security Field Trauma Module: “Medicus curat, natura sanat”. Rev.1
- 90 -
evening or night time. The parasites are injected into humans, through the saliva, before sucking up the blood from a vein. These parasites migrate quickly to the liver where they slowly mature and then they rupture. After rupturing, the new structure called a merozite, returns into the blood stream and invades red blood cells.Here they multiply and feed on the contents of the red blood cells, causing destruction of the cell.Eventually they divide and grow (trophozoite) and then break out of the red blood cell and invade other erythrocytes to continue the process. The infected red blood cells is what the laboratory technician is looking for to diagnose malaria. The parasites are seen on peripheral blood films ( taken from finger) and it may be difficult to find these parasites because the multiplication process occurs only in the deep capillaries within the body. The breaking out of the red blood cells coincides with fever in the person affected. Plasmodium Falciparum is also known as MALIGNANT MALARIA, due to the lethal potential compared to the other 3 types. The time from infection to signs and symptoms ( appearance of parasites in blood), ranges from 3 days to over 12 months. Plasmodium Falciparum can present from 3 – 30 days ( usually around 10 days) Plasmodium Vivax and P.Ovale can present after many months or even 1 year Signs and Symptoms-
• Fever • Headache • Joint Pains • Diarrhoea • Vomiting / Nausea • Tiredness / Lethargy • Anaemia / Enlarged Spleen / Jaundice in severe cases
Stages of Fever-
• Cold Fever – person shivers or has a rigor, temperature rises sharply. • Hot Stage – person is flushed, rapid pulse, high temperature for several hours. • Sweating Stage – person sweats freely, temperature falls rapidly.
Plasmodium Falciparum – Following a single exposure to infection, the person can die in acute attack (common) or survive with development of some immunity and anaemia which will persist with repeated infections of the parasite.Resistance is soon lost when no infections occur. Cerebral malaria can occur rapidly. The first symptoms are reduced level of consciousness, fits, which then lead to coma and death. This is caused by the

UN Security Field Trauma Module: “Medicus curat, natura sanat”. Rev.1
- 91 -
clogging up of the microcirculation of the brain with parasites. Hypoglycaemia occurs due to the great metabolic activity of the parasites and the brain cells become deprived of oxygen and sugar leading to death. Malaria in pregnancy can lead to abortion, fetal death, underdeveloped babies, prematurity. Diagnosis – Examine 2 blood films – thick and thin on slides One cannot exclude malaria by a single negative blood film – at least 3 over a period of 2 days. Prevention –
• Cover up in evening time – long sleeves and trousers and thick socks • Use repellants on skin of exposed areas – face , hands etc • Wear light coloured clothing in evening instead of dark colours • Do not use perfumes/ after shave on skin in evening • Use air conditioning when available • Use bednets impregnated with permethrin and in good condition ( no holes) • Spray sleeping areas with knock down sprays at dusk to kill any mosquitoes
present Chemical Prophylaxis –
• Chloroquine 300 mg once weekly • Chloroquine 300 mg once weekly + Proguanil 200mg daily • Mefloquine 250 mg once weekly • Doxycycline 100 mg daily • Atovaquone + Proguanil combination once daily
Treatment –
• Chloroquine – 25mg base / kg divided doses for 3 days • Mefloquine - 4 tabs together in one dose • Halofantrine – 8 mg base / kg in 3 doses at 6 hour intervals.Repeat full
course in 1 week • Quinine – 8 mg base / kg 3 times daily for 7 days • Fansidar – 3 tablets together once only • Artemether / Lumefantrine combination – 3 day course of 6 doses total at 0,
8, 24, 36, 48, 60 hours • Artemisinin and derivatives - 10mg / kg daily for 7 days
Remember – NO BITE – NO MALARIA

UN Security Field Trauma Module: “Medicus curat, natura sanat”. Rev.1
- 92 -
CHILD BIRTH (i) First stage: the labor. The first stage of labor begins when the neck of the womb opens and begins to enlarge. The mother will be experiencing contractions which are waves of intense pain that peak and fade away. This stage can last 12-14 hours. RECOGNITION:
• Mucoous plug, protecting the womb from infection, maybe expelled. • “Waters” break as the need for protection ends. • Contractions with an average interval of 10-20 minutes start. • Blood stained discharge when the mucous plug is expelled.
ACTIONS: 1. Summon a midwife or doctor. 2. Allow the mother to assume the most comfortable position. 3. Reassure the mother and relieve her pain by massaging her lower back
with the heel of your hand. (ii) Second stage: the delivery. The delivery begins when the cervix (neck of the womb) is fully dilated and may take up to two hours. Baby descends from the womb towards the vaginal entrance, with his/her head turned down. RECOGNITION:
• Mother feels the need to “evacuate” and an involuntary urge to push. • Pressure on the muscle of the womb stimulates stronger, more frequent
contractions (every 5 to 1 minutes). • Stinging or burning sensation may occur in the vagina as it stretches. • Baby’s head emerges as he/she is pushed out rapidly.
ACTIONS: 1. Get ready by covering the bed, sofa or floor with plastic sheeting or
newspapers and towels for warmth and to absorb mess. 2. Make sure that the mother’s back and shoulders are well supported. 3. Check that the mother has removed any clothing that might interfere
with the birth. 4. Do not allow the mother to drink. 5. Once the widest part of the baby’s head is visible, make sure that the
mother stops pushing and starts panting. 6. If any membrane is covering the baby’s face, tear it away so that
he/she can breathe. 7. Do not pull on the baby’s head and shoulders. 8. If the umbilical cord is wrapped around the baby’s neck, you should
first check if it is loose and then very carefully pull it over the head to protect the baby from strangulation.
9. Cut the umbilical cord: to do that the baby has to be spontaneously breathing and the cord should have stopped pulsating. Place one

UN Security Field Trauma Module: “Medicus curat, natura sanat”. Rev.1
- 93 -
arterial clamp (located in the pouch C- Circulation of the Trauma Kit) or a tie 8-10 inches from the baby’s abdomen and another one 2 to 3 inches closer to the baby. Cut the cord between the clamps knots using sterile blades or scissors. WARNING: do not tie, clamp or cut the cord of a baby who is not breathing on is own, unless you have to do so to remove the cord from around the baby’s neck during birth.
10. Gently pass the baby to the mother and lay him/her on her stomach. 11. At this point, the baby should start to cry; if this does not happen,
immediately carry out the ABC. 12. Wrap the baby in a clean cloth or blanket.
(iii) Third stage: Afterbirth. Placenta and umbilical cord are naturally expelled about 10-30 minutes after the baby is born
RECOGNITION • Mild contractions before the afterbirth is expelled are normally experienced
by the mother. • Some bleeding occurs once the afterbirth is delivered. • More severe bleeding can occur if the womb does not contract sufficiently.
ACTIONS 1. Within 20 to 30 minutes from delivery, the mother will experience
womb contractions again. This will allow her to expel the afterbirth. 2. Do not pull on the umbilical cord. 3. When expelled, keep the afterbirth intact, preferably in a plastic bag
until a midwife examines it. Even a small piece of the afterbirth left inside the mother can be dangerous.
4. It is normal for the mother to bleed slightly; gently massage her abdomen, just below the navel to help the womb contract spontaneously and stop the bleeding.

UN Security Field Trauma Module: “Medicus curat, natura sanat”. Rev.1
- 94 -
Bombing Injury Patterns and Care (2006); Brinsfield, K., et. al., avvailable at: http://www.acep.org/blastinjury Blast Injuries (2006); Day, M., et al., available at: http://www.nwmedstar.org/uploads/documents/ems%20live/2007/blasts%20august%2007/blast%20injuries%20-%20ems.pdf Blast Injuries in New England Journal of Medicine (2005); DePalma, R., et al., pp. 352 – 410. Blast Injuries, “True Weapons of Mass Destruction” (2007); Stewart C. Chasing the Flame, Sergio Vieira de Mello and the Fight to Save the World (2008); Power, S., pp 451-516.
EMT Complete – A Basic Worktext (2007); Limmer, D., et. al. Major Incident Medical Management and Support – Second Edition (2002); Hodgetts, T., et al. Medical Guidelines for Peacekeeping Operations, Revision O (2003); Medical Support Unit, Office of Mission Support, Department of Peacekeeping Operations, Chapter 3, annex B. Medicine in Remote Areas Course Manual – Edition 1 (2004); Connell, D., et. al
Pre-Hospital Trauma Life Support - Sixth Edition (2007); Salomone, J., et al. Scoop and Run or Stay and Play in The Internet Journal of Rescue and Disaster Medicine (1998), available at: http://www.ispub.com/ostia/index.php?xmlFilePath=journals/ijrdm/vol1n1/scoop.xml
REFERENCES

UN Security Field Trauma Module: “Medicus curat, natura sanat”. Rev.1
- 95 -
Proper stocking and maintenance of the ETB-ST is critical for it to be an effective tool. A portion of the ETB-ST training programme will address stocking and maintenance procedures and requirements, specifically addressing the following:
a. Expiration dates – the ETB-ST does not contain drugs, but many items are perishable and will require replacement b. Functionality checks c. Storage d. Procurement / Restocking
The best way to obtain an ETB is through E-procurement for both initial purchase and replenishment of used or expired items through a UN System contract with the Fleischhacker Company which is accessible to all UN Agencies, Funds, Programmes and organizations. The following outlines the steps necessary to access the Fleischhacker ETB-ST specific website and place an order:
1. Go to: https://www.shop.fleischhacker.biz/php/katalog/traumabag.php 2. Here you will contact information for the company and the purchase order
form (to be faxed to the company) for procurement/restocking.
Appendix 1 ETB-ST
PROCUREMENT AND MAINTENANCE

UN Security Field Trauma Module: “Medicus curat, natura sanat”. Rev.1
- 96 -
All security officers assigned an ETB-ST are responsible for its restocking and maintenance. The ETB-ST Item master list below can be used to keep track of perishable items. Unused perishable items should be replaced approximately every other year; SAs/FSCOs should utilize their standard field budget for this purpose. Expired perishable items are to be utilized in training.

UN Security Field Trauma Module: “Medicus curat, natura sanat”. Rev.1
- 97 -
Key - colors match those in ETB Underlined – Complete Trauma Kit Bold – Reanimation Kit Grey - Instrumentation Kit Dark Blue – Infusion Kit I Orange2– Infusion Kit II Tan3- Injection Kit Light blue – Wound Dressing Kit I Red – Wound Dressing Kit II Black - Additional
UNCCS – Code QTY per Kit
Ind. Price
Total Price
Description Module Expiration date
Qty on hand
Item 147: 481981-0146 000005
631.45€
Emergency Trauma Bag – Security Team (complete - fully stocked)
481981 0146 000001.002
1 25.83€ 25.83€ The Bag Reanimation Kit
481981 0146 000001.003
1 12.50€ 12.50€ Pocket-Mask for adult and children
Reanimation Kit
481981 0146 000001.004
1 .85€ .85€ Guedel airway 0 Reanimation Kit
481981 0146 000001.005
1 .85€ .85€ Guedel airway 2 Reanimation Kit
481981 0146 000001.006
1 .85€ .85€ Guedel airway 4 Reanimation Kit
481981 0146 000001.007
1 20.00€ 20.00€ Sphygmomanometerincluding cuff
Instrumentation Kit
2The NaC1 solution containers are in the two orange Infusion kits. The other Infusion items are in the two dark blue kits. 3The Injection kit is yellow in the ETB-ST.
Appendix 2
EMERGENCY TRAUMA BAG - SECURITY TEAM (ETB-ST) ITEM MASTER LIST

UN Security Field Trauma Module: “Medicus curat, natura sanat”. Rev.1
- 98 -
UNCCS – Code QTY per Kit
Ind. Price
Total Price
Description Module Expiration date
Qty on hand
481981 0146 000001.008
1 2.95€ 2.95€ Stethoscope Instrumentation Kit
481981 0146 000001.010
1 1.99€ 1.99€ Diagnostic light Instrumentation Kit
481981 0146 000001.011
1 1.12€ 1.12€ Bandage scissors, Lister, 145mm
Instrumentation Kit
481981 0146 000001.014
1 6.14€ 6.14€ Cloth scissors 185mm
Instrumentation Kit
481981 0146 000001.015
1 .72€ .72€ Splinter forceps Instrumentation Kit
481981 0146 000001.016
1 5.88€ 5.88€ Digital thermometer, individual in plastic
Instrumentation Kit
481981 0146 000001.017
5 1.50€ 7.50€ Surgical scissors blunt/sharp
Instrumentation Kit
481981 0146 000001.034
4 1.20€ 7.20€ NaCl 0,9% infusions solution
Infusion Kit II
Yes
481981 0146 000001.032
2 1.28€ 2.56€ Plaster Infusion Kit I
Yes
481981 0146 000001.033
2 2.95€ 5.90€ Tourniquet Infusion Kit I
481981 0146 000001.035
6 1.69€ 10.14€ Intravenous cannula 16G
Infusion Kit I
Yes
481981 0146 000001.036
6 1.69€ 10.14€ Intravenous cannula 18G
Infusion Kit I
Yes
481981 0146 000001.037
6 1.69€ 10.14€ Intravenous cannula 20G
Infusion Kit I
Yes
481981 0146 000001.038
6 .22€ 1.32€ Adhesive bandage for I.V. cannula
Infusion Kit I
481981 0146 000001.039
6 1.00€ 6.00€ Infusion sets Infusion Kit I
481981 0146 000001.040
8 .02€ .16€ Alcohol swabs Infusion Kit I
Yes
481981 0146 000001.041
20 .75€ 15.00€ Tube Infusion Kit I
481981 0146 000001.046
5 .05€ .25€ Syringes, disposable, 5ml
Injection Kit
Yes
481981 0146 000001.047
2 .05€ .25€ Syringes, disposable, 10ml
Injection Kit
Yes
481981 0146 000001.048
10 .02€ .20€ Cannula, disposable, No.1, yellow
Injection Kit
Yes
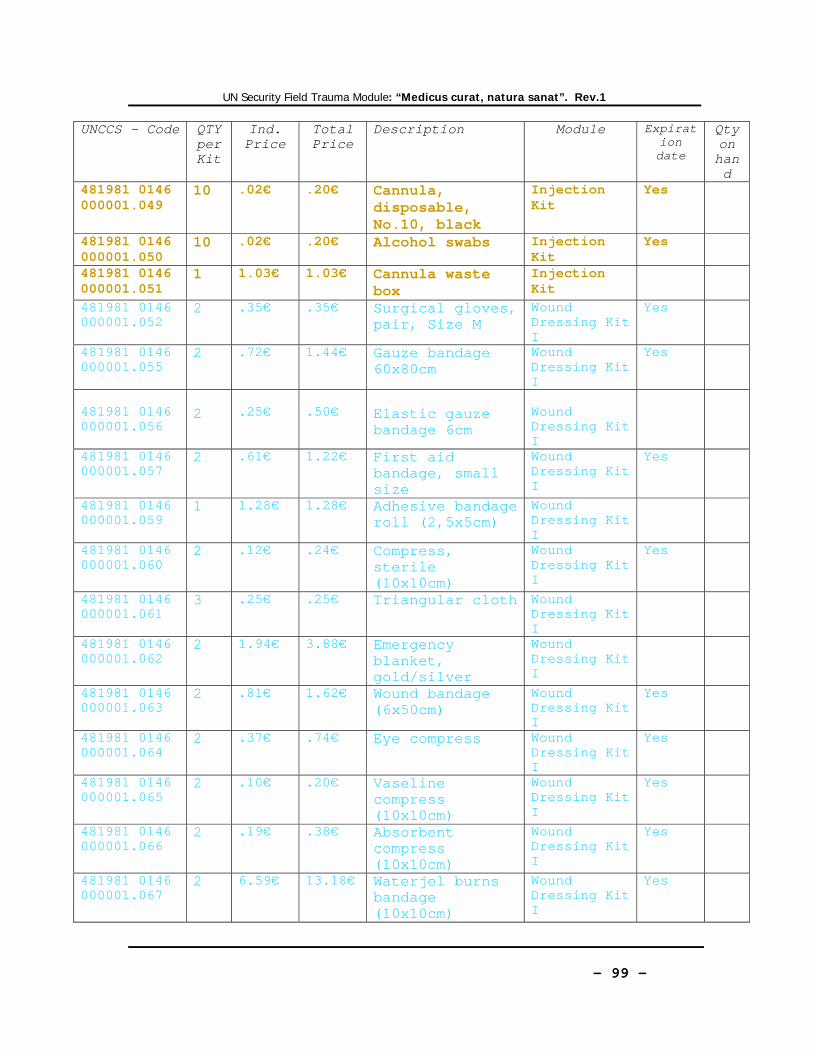
UN Security Field Trauma Module: “Medicus curat, natura sanat”. Rev.1
- 99 -
UNCCS – Code QTY per Kit
Ind. Price
Total Price
Description Module Expiration date
Qty on hand
481981 0146 000001.049
10 .02€ .20€ Cannula, disposable, No.10, black
Injection Kit
Yes
481981 0146 000001.050
10 .02€ .20€ Alcohol swabs Injection Kit
Yes
481981 0146 000001.051
1 1.03€ 1.03€ Cannula waste box
Injection Kit
481981 0146 000001.052
2 .35€ .35€ Surgical gloves, pair, Size M
Wound Dressing Kit I
Yes
481981 0146 000001.055
2 .72€ 1.44€ Gauze bandage 60x80cm
Wound Dressing Kit I
Yes
481981 0146 000001.056
2
.25€
.50€
Elastic gauze bandage 6cm
Wound Dressing Kit I
481981 0146 000001.057
2 .61€ 1.22€ First aid bandage, small size
Wound Dressing Kit I
Yes
481981 0146 000001.059
1 1.28€ 1.28€ Adhesive bandage roll (2,5x5cm)
Wound Dressing Kit I
481981 0146 000001.060
2 .12€
.24€ Compress, sterile (10x10cm)
Wound Dressing Kit I
Yes
481981 0146 000001.061
3 .25€ .25€ Triangular cloth Wound Dressing Kit I
481981 0146 000001.062
2 1.94€ 3.88€ Emergency blanket, gold/silver
Wound Dressing Kit I
481981 0146 000001.063
2 .81€ 1.62€ Wound bandage (6x50cm)
Wound Dressing Kit I
Yes
481981 0146 000001.064
2 .37€ .74€ Eye compress Wound Dressing Kit I
Yes
481981 0146 000001.065
2 .10€ .20€ Vaseline compress (10x10cm)
Wound Dressing Kit I
Yes
481981 0146 000001.066
2 .19€ .38€ Absorbent compress (10x10cm)
Wound Dressing Kit I
Yes
481981 0146 000001.067
2 6.59€ 13.18€ Waterjel burns bandage (10x10cm)
Wound Dressing Kit I
Yes

UN Security Field Trauma Module: “Medicus curat, natura sanat”. Rev.1
- 100 -
UNCCS – Code QTY per Kit
Ind. Price
Total Price
Description Module Expiration date
Qty on hand
481981 0146 000001.068
2 6.59€ 13.18€ Waterjel burns bandage (10x10cm)
Wound Dressing Kit I
Yes
481981 0146 000001.052
1 .35€ .35€ Surgical gloves, pair, Size M
Wound Dressing Kit II
Yes
481981 0146 000001.056
2 .25€ .50€ Elastic gauze bandage 6cm
Wound Dressing Kit II
481981 0146 000001.058
2 .61€ 1.22€ First aid bandage, large size
Wound Dressing Kit II
Yes
481981 0146 000001.059
1 1.28€ 1.28€ Adhesive bandage roll (2,5x5cm)
Wound Dressing Kit II
481981 0146 000001.060
2 .12€
.24€ Compress, sterile (10x10cm)
Wound Dressing Kit II
Yes
481981 0146 000001.061
3 .25€ .25€ Triangular cloth Wound Dressing Kit II
481981 0146 000001.062
2 1.94€ 3.88€ Emergency blanket, gold/silver
Wound Dressing Kit II
481981 0146 000001.064
2 .37€ .74€ Eye compress Wound Dressing Kit II
Yes
481981 0146 000001.065
2 .10€ .20€ Vaseline compress (10x10cm)
Wound Dressing Kit II
Yes
481981 0146 000001.066
2 .19€ .38€ Absorbent compress (10x10cm)
Wound Dressing Kit II
Yes
481981 0146 000001.002
2 18.10€
36.20€
Asherman Chest Seal
Wound Dressing Kit II
Yes
481981 0145 000005.001
1 131.38€
131.38€
Emergency Bag, black including UN logo
Additional
481981 0146 000009
1 13.66€ 13.66€ Stiffneck adjustable collar
Additional
481981 0146 000008
1 25.81€ 25.81€ Manual hand suction unit, transparent plastic bag
Additional
481981 0146 6 1.50€ 9.00€ Luminous sticks Additional Yes

UN Security Field Trauma Module: “Medicus curat, natura sanat”. Rev.1
- 101 -
UNCCS – Code QTY per Kit
Ind. Price
Total Price
Description Module Expiration date
Qty on hand
000001.072 481981 0146 000001.073
1 4.99€ 4.99€ Typing set: Additional
481981 0146 000001.074
1 23.00€ 23.00€ Splint set Additional
481981 0146 000001.075
1 9.90€ 9.90€ Headlamp Additional
2 CAT Tourniquets 2 Emergency
Elastic Bandages
10 Opsite IV Tape 1 Kendrick
Traction Device
20 METTAG Triage Cards
5 Personal Protective Surgical Mask
1 Goggles 1 Additional large
burn dressing kit
Yes
2 ExcelArrest XT Hemostatic Bandage
Yes

UN Security Field Trauma Module: “Medicus curat, natura sanat”. Rev.1
- 102 -
Appendix 3
EMERGENCY TRAUMA BEG – SECURITY TEAM REVISION MEMORANDUM