Embed Size (px)
Citation preview
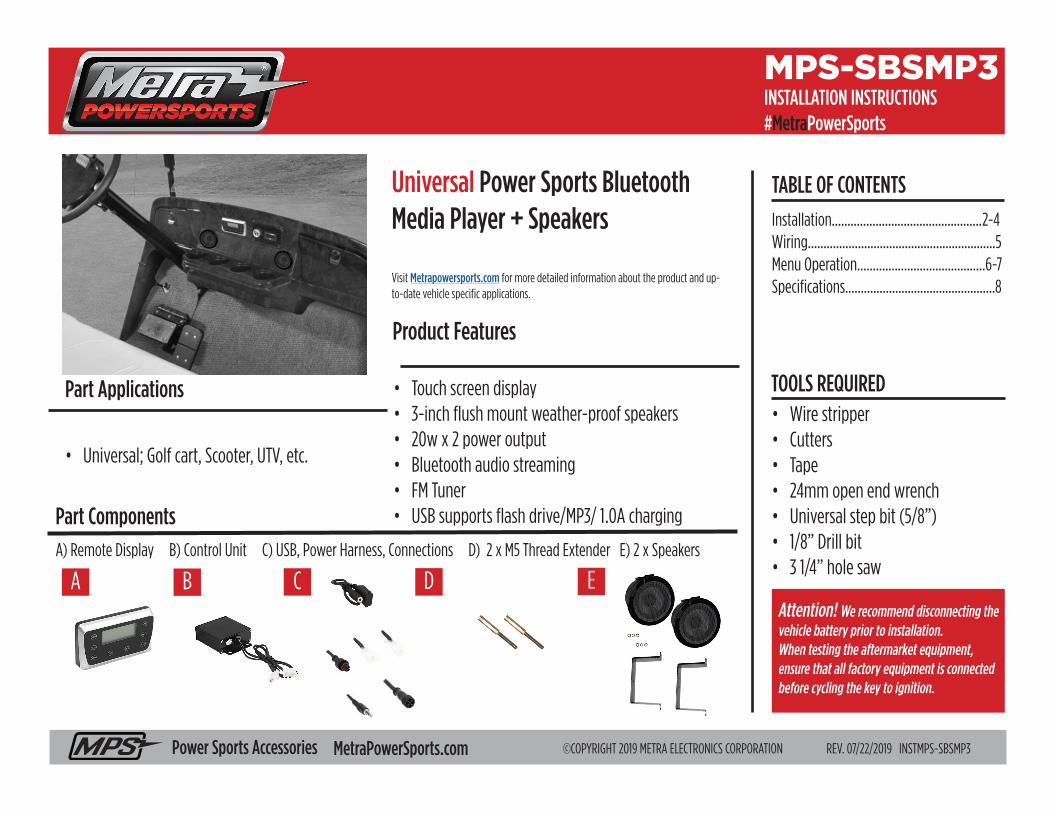
Universal Power Sports Bluetooth Media Player + Speakers
Visit Metrapowersports.com for more detailed information about the product and up-to-date vehicle specific applications.
• Touch screen display• 3-inch flush mount weather-proof speakers• 20w x 2 power output• Bluetooth audio streaming• FM Tuner• USB supports flash drive/MP3/ 1.0A charging
Installation................................................2-4Wiring............................................................5Menu Operation.........................................6-7Specifications................................................8
TABLE OF CONTENTS
Attention! We recommend disconnecting the vehicle battery prior to installation. When testing the aftermarket equipment, ensure that all factory equipment is connected before cycling the key to ignition.
TOOLS REQUIRED• Wire stripper• Cutters• Tape • 24mm open end wrench• Universal step bit (5/8”)• 1/8” Drill bit• 3 1/4” hole saw
Part Components
A) Remote Display B) Control Unit C) USB, Power Harness, Connections D) 2 x M5 Thread Extender E) 2 x Speakers
A B C
MPS-SBSMP3INSTALLATION INSTRUCTIONS#MetraPowerSports
MetraPowerSports.com Power Sports Accessories ©COPYRIGHT 2019 METRA ELECTRONICS CORPORATION REV. 07/22/2019 INSTMPS-SBSMP3
Part Applications
• Universal; Golf cart, Scooter, UTV, etc.
D
Product Features
E

2 1.800.221.0932 MetraPowerSports.com
INSTALLATION
Mounting Holes• Using the diagram as a guide (Figure A), find a good location to mount
the remote display. • The ideal thickness of the mounting surface should be 1/8” to 1/4”. Anything more and you may not have enough threads to tighten the plastic retaining nut to the display. • Check the clearance behind the drilling location. Make sure you are not
going to drill through and damage any wiring harness and components in the vehicle.
• Mark out your drill pattern. Take note of the smaller guide hole. *Note: the smaller guide hole MUST be above the larger hole otherwise the display will install upside down.• Drill the hole with the appropriate sized bit.
(Figure A )
Mounting Display• Insert the threaded stud and guide tab through the holes, then tighten
down. *Note: Use a 24mm wrench to tighten the nut. (Figure B) Over-tightening may result in damage to the threads, and or nut • Route the wiring away from any moving parts so as not to hinder the turning movement of the vehicle.• Proceed to Speaker Mounting.
(Figure B )

• The ideal thickness of the mounting surface should be between 1/8” to 1/4” thickness. Anything more and you may not have enough threads to tighten the retaining nut.
• Check to make sure the wires are long enough to mount the speakers in the desired location.
*Note: You can extend the speaker wires. Cutting and splicing is required.• Check the clearance behind the drilling location. Make sure you are not going to drill
through and damage any wiring harness and components in the vehicle.• Once you decide where to flush mount the speakers, mark out the drill location. • Drill the hole with a 3 1/4” hole-saw, or appropriate cutting tool.• Proceed to Wiring Installation
3REV. 07/22/2019 INSTMPS-SBSMP3
INSTALLATION
Speaker Mounting
(Figure C .1 )
Option One
1. Flush mount
• There are two different mounting options provided within the MPS-SBSMP3;
1. Flush mount 2. Cup holder mount (Golf cart).
4 1.800.221.0932 MetraPowerSports.com
INSTALLATION
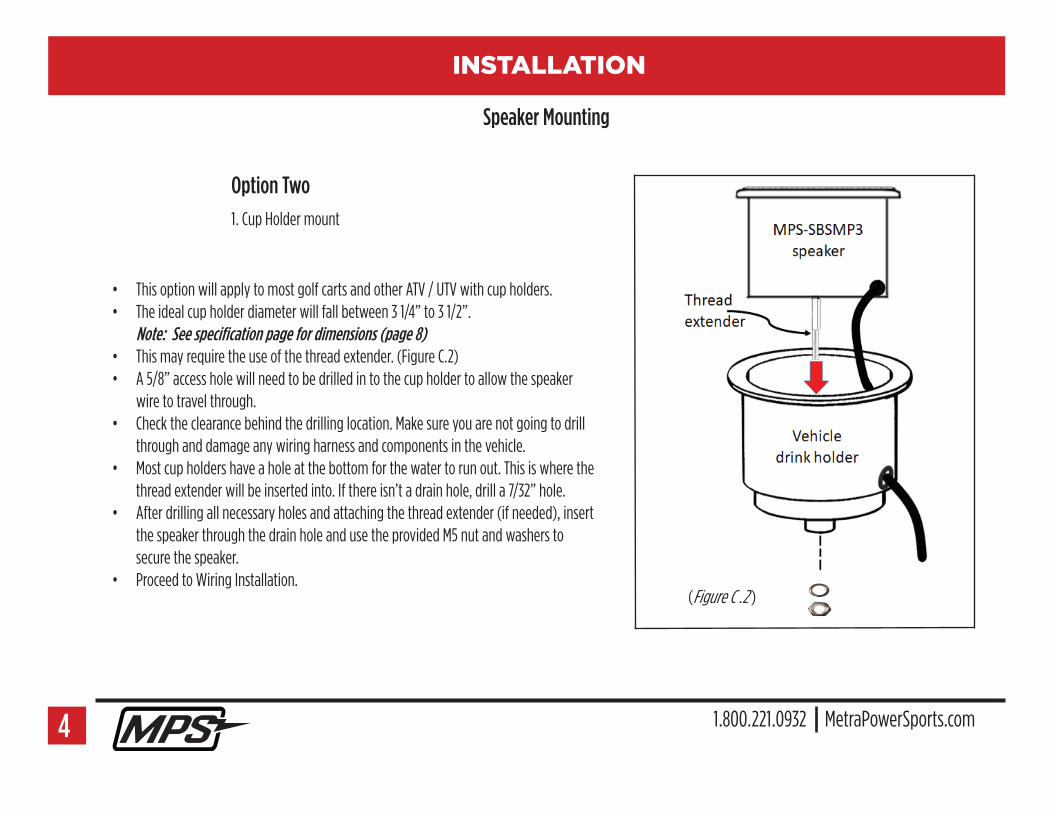
• This option will apply to most golf carts and other ATV / UTV with cup holders.• The ideal cup holder diameter will fall between 3 1/4” to 3 1/2”. Note: See specification page for dimensions (page 8)• This may require the use of the thread extender. (Figure C.2)• A 5/8” access hole will need to be drilled in to the cup holder to allow the speaker
wire to travel through.• Check the clearance behind the drilling location. Make sure you are not going to drill
through and damage any wiring harness and components in the vehicle.• Most cup holders have a hole at the bottom for the water to run out. This is where the
thread extender will be inserted into. If there isn’t a drain hole, drill a 7/32” hole.• After drilling all necessary holes and attaching the thread extender (if needed), insert
the speaker through the drain hole and use the provided M5 nut and washers to secure the speaker.
• Proceed to Wiring Installation.(Figure C .2 )
Speaker Mounting
Option Two
1. Cup Holder mount

(Figure D .1 )
Wire ConnectionsRed Wire• It is recommended to connect this wire to the vehicles +12v accessory
or ignition circuit. (Figure D.1)
Black Wire• It is recommended to connect this wire to the chassis ground or the
negative terminal of the vehicles battery. (Figure D.1)
USB Plug• Route the USB plug into a secure and protected location. (Figure D.2)
*Note: it is not water resistant.
DIN Plug• The IP68 5-pin DIN plug connects to the remote display. (Figure D.2)
Speaker Connections• Gray - Right +• Gray/Black - Right -• White - Left +
• White/Black - Left -
*Note: Mount the control unit in a protected location as it is not as water resistant as the touch display
Verify Operation• Once all connections and installation is complete, check the operation
of the MPS-SBSMP3, before reassembling the vehicle. (Figure D .2 )
5REV. 07/22/2019 INSTMPS-SBSMP3
INSTALLATION

6 1.800.221.0932 MetraPowerSports.com
OPERATION
1. Volume UP +2. Volume Down -3. Automatic Memory Search4. Power / Pause5. LCD Readout
Display6. Mode / Source7. Clock8. Track Down / Seek Down / Jump Down9. Track Up / Seek UP / Jump Up
General1. Touch “VOL+” to increase volume.
2. Touch “VOL-” to decrease volume.
3. Touch “AMS” button to seek and automatically save (up to 10) FM, strongest stations. Touch “ ” or “ ” to select the saved stations.
4. Touch “PWR” to turn the MPS-SBSMP3 on. Touch “PWR” and hold to turn off. FM mode: Touch “PWR” to mute the audio. Touch “PWR” again to restore audio. MP3/Bluetooth mode: Touch “PWR” to pause audio. Touch “PWR” again to resume.
5. Display info, i.e. FM frequency; Mode, Clock, Track / Time. (track in USB only)
6. Touch “MOD” to change sources; (FM—BT—USB)
7. Touch “CLK” to display the time (Displays in 24 hour format only). To adjust the time touch “CLK”, then again touch “CLK” and hold for 2 seconds. The hour will start flashing. Within 3 seconds use “VOL+” or “VOL+” to select the correct value. Touch “CLK” again to change to minutes, then use “VOL+” and “VOL-” to select the correct value. Upon completion, touch and hold “CLK” to set the time. *Note: If you pause for more then 3 sec during the time adjust, you will time out and have to
start over.”
8. FM mode Touch “ ” to manually seek down and play the next station. Touch “ ” hold to search down / save / and play the next station.
8. MP3/Bluetooth mode Touch “ ” to select the previous song. Touch “ ” and hold to jump back 10 songs.(excluding Bluetooth mode) If less then 10 songs, the first song will play.
9. FM mode Touch “ ” to manually seek up and play the next station. Touch “ ” hold to search up / save / and play the next station.
9. MP3/Bluetooth mode Touch “ ” to select the next song. Touch “ ” and hold to jump up 10 songs. (not in Bluetooth mode) If less then 10 songs, the first song will play.
(Figure E )

7REV. 07/22/2019 INSTMPS-SBSMP3
Bluetooth Pairing
• Enter Bluetooth mode, the screen will display “BLUE” with a “ ” in the upper right corner. (Fig. F)• With a device connected via Bluetooth “ ” will not flash; with no device connected via Bluetooth the “ ” will flash. Within one minute the MPS-SBSMP3 will
automatically default back to USB mode. If no USB is connected, it will default to FM mode. • Open the Bluetooth menu of the device, search for MPS-SBSMP3, then select.• The password for pairing is “0000”. After the pairing is successful, the MPS-SBSMP3 will announce “DEVICE IS CONNECTED”. You are now ready to stream music.• If at any time the Bluetooth connection is terminated the MPS-SBSMP3 will play a noticeable high-low tone “DEVICE IS DISCONNECTED”• While in Bluetooth mode, if a different source is selected Bluetooth will automatically disconnect. When disconnected from Bluetooth, the MPS-SBSMP3 will emit
a high-low tone. *Note: The screen will always display “BLUE” while Bluetooth mode is connected to an active device, playing or not.
OPERATION

MPS-SBSMP3INSTALLATION INSTRUCTIONS#MetraPowerSports
©COPYRIGHT 2019 METRA ELECTRONICS CORPORATIONMetraPowerSports.com Power Sports Accessories REV. 07/22/2019 INSTMPS-SBSMP3
KNOWLEDGE IS POWEREnhance your installation and fabrication skills by enrolling in the most recognized and respected mobile electronics school in our industry.Log onto www.installerinstitute.com or call 800-354-6782 for more information and take steps toward a better tomorrow.
®
Metra Recommends MECP certified technicians
Having difficulties? We’re here to help.
Contact our Tech Support line at: 1-386-257-1187 Or via email at: [email protected]
Tech Support Hours (Eastern Standard Time)Monday - Friday: 9:00 AM - 7:00 PMSaturday: 10:00 AM - 7:00 PMSunday: 10:00 AM - 4:00 PM
SPECIFICATIONS
FM Frequency range: 88.0 - 108.0 MHz Intermediate frequency: 10. 7 MHz SNR: 40dB Noise sensitivity ≤ 37dB
Media playerSNR: 40dB Channel isolation (at 1 KHz): 23dBHarmonic distortion (at 1 KHz) ≤ 5% Frequency response: l00Hz - l0KHz ±6dB
Power amplifier Output: Speaker output Speaker impedance: 4 - 8ΩRMS output power: 9Wx2 Max output power: 12Wx2Power supply: DC12V


![Untitled-2 [suntracbatteries.com]suntracbatteries.com/suntrac.pdf · capacity 12v 20ah 12v 40ah 12v 60ah 12v b40ah 12v b60ah 12v b80ah 12v biooah 12v 80ah 12v iooah 12v 130ah 12v](https://img.pdfslide.net/doc/110x75/603efb7aa12c32391f5484d1/untitled-2-capacity-12v-20ah-12v-40ah-12v-60ah-12v-b40ah-12v-b60ah-12v-b80ah.jpg)