Embed Size (px)
Citation preview
Universal Print Driver
Technical White Paper Revision 10c
January 2016 www.lexmark.com
ContentsIntroduction................................................................................................... 4
What is the Universal Print Driver?..................................................................................................................4
Benefits...................................................................................................................................................................4
New Features........................................................................................................................................................5
Change history......................................................................................................................................................7
Before you begin......................................................................................... 14Operating system support............................................................................................................................... 14
Device compatibility.......................................................................................................................................... 15
Connectivity......................................................................................................................................................... 19
Travel Print.......................................................................................................................................................... 20
Paper sizes and types supported by the Universal Print Driver........................................................... 20Supported paper sizes...............................................................................................................................................20Supported paper types............................................................................................................................................... 21
Language support.............................................................................................................................................22
Installing the Universal Print Driver.........................................................23Updating previous versions of the Universal Print Driver...................................................................... 23
Downloading the Universal Print Driver...................................................................................................... 23
Updating installed options.............................................................................................................................. 23
What is a Package Creation Utility?..............................................................................................................23
Using Travel Print...............................................................................................................................................24
Enabling the Travel Print feature................................................................................................................... 24
Understanding the Universal Print Driver...............................................25Using the Layout tab........................................................................................................................................ 25
Using the Paper/Finishing tab........................................................................................................................26
Using the Quality tab........................................................................................................................................ 27
Using the Fax preferences tab....................................................................................................................... 31
Using the Watermark tab.................................................................................................................................32
Using the Overlays tab.................................................................................................................................... 32
Using the Print and Hold tab.......................................................................................................................... 32
Using the Other Options tab.......................................................................................................................... 33
Contents 2

Frequently asked questions...................................................................... 37
Notices......................................................................................................... 40
Index.............................................................................................................42
Contents 3
IntroductionThis document introduces the LexmarkTM Universal Print Driver (UPD), describes its capabilities, and providesan overview of the devices it supports. This edition applies to the Lexmark Universal Print Drivers version 2 forWindows.
Notes:
• The Universal Print Driver version 2 can be installed along with Universal Print Driver version 1.0 or later.
• To obtain a copy of the documentation for the Universal Print Driver version 1.0 or later, visit our Web site.
• For more information on the driver version numbering format, see “What is the UPD version numberingformat?” on page 37.
What is the Universal Print Driver?The Lexmark Universal Print Driver provides users and administrators with a standardized, one‑driver solutionfor their printing needs. Instead of installing and managing individual drivers for each printer model,administrators can install the Lexmark Universal Print Drivers for use with a variety of both mono and colorprinters.
Benefits
Allows versatilityThe Lexmark Universal Print Driver is available in more than 20 languages, supporting more than 60 printermodels, whether attached locally or over a network. All packages have been tested in cluster serverenvironments, Microsoft Terminal Servers, and Citrix Presentation ServerTM environments, and are Microsoftcertified (digitally signed). PCL 5, PCL XL, and PostScript 3 emulations are available for Microsoft Windows XPoperating system or later.
Enables bidirectional communicationBidirectional capability automatically detects and updates the installed options both at install time and uponuser request. This allows the driver to adapt to the various capabilities of our different printers, but unlike otheruniversal print drivers, the network traffic is minimal.
Reduces cost for system supportWith only one package to manage, testing and internal certification of print drivers is simplified by the use ofthe Lexmark Universal Print Drivers. Time spent on installation, both on servers and workstations, is greatlyreduced, and hard drive space formerly occupied by many product-specific drivers is now diminishedsignificantly.
Introduction 4
Enables increased user efficiencyThe Lexmark Universal Print Drivers use the same graphical user interface as the product-specific drivers theusers are accustomed to. Now all queues will share that same interface, decreasing calls to the help desk. Userscan create and save profiles for their most frequently used settings, or use profiles that were created for themby system support.
Facilitates corporate sustainability initiativesAdministrators can use the Lexmark Universal Print Drivers to promote their organization’s environmentalpolicies. The default queue settings can be modified to include two‑sided printing, multiple‑page printing (N-Up), toner darkness, and other resource-saving measures.
New Features
Global print supportLexmark Universal Print Driver (UPD) is now capable of providing print support to other manufacturers’ devicesthat support compliant PostScript® and PCL® emulation page description languages (PDLs). This capabilityreduces the overhead of administrators and enables a single Lexmark UPD to work with all Lexmark andcompatible non‑Lexmark devices in an enterprise environment.
Two new models are available in the model list in the driver properties:
• Basic Color Laser—Allows compatible non‑Lexmark devices to use the Lexmark UPD for basic color printing.
• Basic Mono Laser—Allows compatible non‑Lexmark devices to use the Lexmark UPD for basicblack‑and‑white printing.
Not all Lexmark printer and non‑Lexmark device features, functions, and capabilities are available with the useof Basic Color Laser and Basic Mono Laser models. Depending on the capabilities of the specific non‑Lexmarkdevice, only basic features are supported. These features include, but are not limited to, the following:
• Some paper sizes and types
• Some source selections
• Two‑sided printing
• Paper layout options
New user interfaceThe new user interface of the UPD provides a more consistent look and feel across all printer models. Thecontrols and settings have been modified to provide better language support and overall customer experience.
The UPD is available in more languages. The user interface matches the language of your operating system.Administrators can also manually choose a specific language from the Configuration tab in the Printer Propertiesdialog.
Custom installation packageWith the new UPD installer, administrators can choose to create preconfigured installation packages that includeonly the software and drivers that meet their needs. Combining the custom installation package with DriverConfiguration Files (DCFs) lets administrators create a deployment package that best suits their environment.
Introduction 5
Job AccountingThe Job Accounting option lets you track print and fax jobs for accounting purposes by associating the printand fax job with specific account information. This information includes a user name or ID, an account code,and a department code. This option lets you track the number of print and fax jobs from different users ordepartments and bill those jobs to a specific account. By associating print and fax jobs with specific accountinformation, you can enforce quotas on the print and fax jobs that users can submit. Quotas can be set on theprinter, and then associated with a specific account.
Note: This feature is available only in some printer models.
Dynamic driver configurationThe UPD version 2 can update itself to reflect the features and options of any supported printer model. Whenconnected to a printer through USB or over a network, the driver automatically updates its configuration. Thedriver settings then show only the paper sizes, trays, types, finishing options, and other options that the printersupports.
You can configure the driver to determine a printer model automatically. Administrators can also manuallychoose a specific printer model from the Configuration tab in the Printer Properties dialog.
Citrix Ready®Starting in October 2012, the UPD has participated in the Citrix Ready Program as a Certified Product. Testingwas conducted using the following:
• Citrix XenAppTM 7.6 and Citrix XenApp 7.5 on Microsoft Windows Server® 2012 R2 x64 operating system
• Citrix XenDesktopTM 7.6 and Citrix XenDesktop 7.5 on Microsoft Windows Server® 2012 R2 x64 operatingsystem
• Citrix XenApp 7.6 and Citrix XenApp 7.5 on Microsoft Windows Server® 2012 x64 operating system
• Citrix XenDesktop 7.6 and Citrix XenDesktop 7.5 on Microsoft Windows Server® 2012 x64 operating system
• Citrix XenApp 7.6, Citrix XenApp 7.5, Citrix XenApp 6.5, and Citrix XenApp 6.0 on Microsoft WindowsServer® 2008 R2 x64 operating system
Printer Driver Configuration UtilityUse the Printer Driver Configuration Utility to create driver configurations. A driver configuration is a group ofsaved print driver settings and other data that is stored in a Driver Configuration File (DCF). A driver configurationcontains settings such as orientation and pages per sheet (Document Settings), and installation status of aduplex unit or bin (Printer Options). You can also create driver configurations that work across printer models.
The Printer Driver Configuration lets you do the following:
• Configure a printer when installing it.
• Configure multiple printers, each with unique settings, for the same print driver (also referred to as thecreation of virtual printers).
• View or edit an existing configuration.
Note: The DCF name must have an extension of .ldc.
Introduction 6
Change history
Lexmark Universal Print Driver version 2.10.0.0Note: If you are not using status monitor applications, then you can upgrade to UPD 2.10. If you are usingstatus monitor applications, then use only UPD 2.6.0.0.
• Addition of smart two‑sided printing support—Added the “Other paper size with different orientation”setting in the Paper/Finishing tab. This setting allows users to select a different paper size that is loaded ina different orientation when doing two‑sided printing or using finishing options.
• Image compression improvement—Added the image compression feature in PostScript print drivers.
For PostScript print drivers, the following image compression options are available:
– NONE—Disable image compression.
– Lossless—Use Lempel‑Ziv‑Welch (LZW) compression to reduce the file size without reducing the imagequality. Sometimes, the image may not be compressed to retain the image quality.
– High—Use JPEG compression to reduce the file size by reducing the image quality. To adjust the imagequality and compression level, use the Quality slider. Increasing the image quality decreases the imagecompression.
• Display actual print speed—Added feature to show the actual print speed. You can see the print speed inthe General tab of the Printer Properties dialog box.
– If the print driver is installed and is connected to the printer, then the actual print speed is shown. If theprinter is disconnected, then the print model is set to Universal Mono Laser or Universal Color Laser,and the print speed is 20 ppm.
– If the print driver is installed and the printer is selected using Set Print Model, then the actual print speedis shown. If the printer is disconnected, then the minimum print speed is shown.
• Removal of Windows Server 2003 support—Removed support for Windows Server 2003 operatingsystems. For a complete list of supported operating systems, see “Operating system support” on page 14.
• Addition of color laser printers—Added support for color laser printers. For more information, see “Devicecompatibility” on page 15.
– Lexmark CS820 Series (CS820de, CS820dte, CS820dtfe)
– Lexmark C6100 Series (C6160de)
– Lexmark CX820 Series (CX820de, CX820dtfe)
– Lexmark XC6100 Series (XC6152de, XC6152dtfe)
– Lexmark CX825 Series (CX825de, CX825dte, CX825dtpe, CX825dtfe)
– Lexmark CX860 Series (CX860de, CX860dte, CX860dtpe, CX860dtfe)
– Lexmark XC8100 Series (XC8155de, XC8155dte, XC8160de, XC8160dte)
– Lexmark CS720 Series (CS720de)
– Lexmark CS725 Series (CS725de)
– Lexmark C4100 Series (C4150)
– Lexmark CX725 Series (CX725de, CX725dhe, CX725dthe)
– Lexmark XC4100 Series (XC4150)
Introduction 7
• Addition of support for Citrix Ready XenApp 7.6—Certification support for Citrix XenApp 7.6. For a completelist of supported Citrix implementations, see “Operating system support” on page 14.
• Continued support for Citrix Ready XenApp 7.5, 6.5 and 6.0 certifications—Continued certificationsupport for Citrix XenApp 7.5, Citrix XenApp 6.5, and Citrix XenApp 6.0. For a complete list of supportedCitrix implementations, see “Operating system support” on page 14.
Lexmark Universal Print Driver version 2.9.1Note: If you are not using status monitor applications, then you can upgrade to UPD 2.9.1.0. If you are usingstatus monitor applications, then use only UPD 2.6.0.0.
• Addition of supported operating systems—Added support for Microsoft Windows 10. For a complete listof supported operating systems, see “Operating system support” on page 14.
• Continued support for Citrix Ready XenApp 7.5, 6.5 and 6.0 certifications—Continued certificationsupport for Citrix XenApp 7.5, Citrix XenApp 6.5, and Citrix XenApp 6.0. For a complete list of supportedCitrix implementations, see “Operating system support” on page 14.
Lexmark Universal Print Driver version 2.9Note: If you are not using status monitor applications, then you can upgrade to UPD 2.9.0.0. If you are usingstatus monitor applications, then use only UPD 2.6.0.0.
• Application of a driver configuration file to printers on a cluster or remote environment—Added supportfor the Printer Driver Configuration Utility to apply a configuration file to printers on a cluster or remoteenvironment. The configuration file can be applied using the Printer Driver Configuration Utility or from thecommand line using ConfigUtil. For more information, see the Printer Driver Configuration Utility Help.
• JPEG image compression improvement—Improved JPEG image compression by using the LIBJPEG libraryin rendering JPEG images, and removing GPL2 and GPL3 licensed files.
• Enabled JPEG pass‑through—Added the option to allow the host application to send JPEG data as it is,without converting it to a bitmap image file. This option is available in the Configuration tab of the PrinterProperties window.
Note: This feature is available only in PCL XL emulation drivers.
• Removal of available presets in the Print Quality tab—Removed the following print quality presets for colorand monochrome printers:
For color printers
– Text
– Text/Photo
– Photo
– Custom
For monochrome printers
– Draft
– Normal
– Best
– Custom
• Addition of Print Quality Defaults—Added a predefined setting for print quality. This option is available inthe Print Settings menu.
• Replaced the "Enhance fine lines" feature with the "Halftone" feature
Introduction 8
• User interface (UI) performance improvement—Improved the performance when opening the PrintingPreferences and Printer Properties windows in a Point and Print with a network latency scenario.
• Job accounting support for fax—Added job accounting support for tracking fax jobs.
• Google Cloud PrintTM support—Added support for printing documents from Google Cloud Print usingLexmark UPD. The following print driver features do not work when printing from Google Cloud Print:
Features in all print driver emulations
– Multiple pages per side (N‑Up)
– Use full printable area
Features in PostScript drivers
– Poster
– Booklet
– Multiple input options (MIO)
– PostScript Language level (PS)
Features in PCL XL emulation drivers
– Send color to printer
• Print driver user interface (UI) compatibility with the European Accessibility Mandate 376 (EN 301 549)
• Restriction of color printing when setting the printer model to Universal Mono Laser—If Universal MonoLaser is selected as the printer model from the Configuration tab in the Printer Properties window, then theprint output is always in gray scale.
• Continued support for Citrix Ready XenApp 7.5, 6.5 and 6.0 certifications—Continued certificationsupport for Citrix XenApp 7.5, Citrix XenApp 6.5, and Citrix XenApp 6.0. For a complete list of supportedCitrix implementations, see “Operating system support” on page 14.
Lexmark Universal Print Driver version 2.8Note: If you are not using status monitor applications, then you can upgrade to UPD 2.8.0.0. If you are usingstatus monitor applications, then use only UPD 2.6.0.0.
• User interface (UI) performance improvement—Improved the performance of the Printing Preferences andPrinter Properties windows.
• Removal of default two‑sided printing support—Removed support for enabling two-sided printing bydefault in the print driver during installation. For printers that support two‑sided printing, the feature can beenabled manually. For a complete list of printers that support two‑sided printing, see “Device compatibility”on page 15.
• Global print support—Added print support for non‑Lexmark devices that support compliant PostScript andPCL emulation page description languages (PDLs).
Two new models are available in the model list in the print properties:
– Basic Color Laser—Allows compatible non‑Lexmark devices to use the Lexmark UPD for basic colorprinting
– Basic Mono Laser—Allows compatible non‑Lexmark devices to use the Lexmark UPD for basicblack‑and‑white printing
Introduction 9
Not all Lexmark printer and non‑Lexmark device features, functions, and capabilities are available with theuse of Basic Color Laser and Basic Mono Laser models. Depending on the capabilities of the specificnon‑Lexmark device, only basic features are supported. These features include, but are not limited to, thefollowing:
– Some paper sizes and types
– Some source selections
– Two‑sided printing
– Paper layout options
• Image compression improvement—Improved the image compression feature to reduce the spool file size.
• Improved printing—Fixed printing issues, including the following:
– Delayed print driver response when updating the printer configuration using the Update Now‑Ask Printeroption
– Incorrect staple and hole punch location when printing using a PostScript 3 driver
– Problems printing watermarks when using a Microsoft Word® plug‑in– Problems printing Microsoft Word documents containing embedded PCL5 macros using PCL XL
emulation and PostScript drivers
– Problems in Microsoft PowerPoint print preview when using a PostScript 3 driver
– Problems when printing from a Windows 8.1 computer using PCL XL emulation and PostScript 3 drivers
• Addition of supported Novell operating system—Added support for Novell® 2 and Novell 11 operatingsystems. For a complete list of supported operating systems, see “Operating system support” on page 14.
• Addition of support for Citrix Ready XenApp 7.5—Certification support for Citrix XenApp 7.5. For a completelist of supported Citrix implementations, see “Operating system support” on page 14.
• Continued support for Citrix Ready XenApp 6.5 and 6.0 certifications—Continued certification supportfor Citrix XenApp 6.5 and Citrix XenApp 6.0. For a complete list of supported Citrix implementations, see“Operating system support” on page 14.
Lexmark Universal Print Driver version 2.7.2
Notes:
• If you are not using status monitor applications, then you can upgrade to UPD 2.7.2.0. If you are usingstatus monitor applications, then use only UPD 2.6.0.0.
• This version of the driver contains only bug fixes. If you are using a private print driver, then check theupdates before installing this version to avoid losing specific fixes for your private print driver.
• Removal of Windows XP support—Removed support for Windows XP operating systems. For a completelist of supported operating systems, see “Operating system support” on page 14.
• Improved printing documents with JPEG images—Fixed issues in PCL XL emulation drivers when printingMicrosoft Word documents with JPEG images. We recommend using image compression when printingthese documents to avoid generating large print spools.
• Improved printing Microsoft Excel file formats—Fixed thumbnail print output when printing Microsoft Excelfiles using PCL XL emulation drivers.
• Continued support for Citrix Ready XenApp 6.5 and 6.0 certifications—Continued certification supportfor Citrix XenApp 6.5 and Citrix XenApp 6.0. For a complete list of supported Citrix implementations, see“Operating system support” on page 14.
Introduction 10
Lexmark Universal Print Driver version 2.7.1Note: If you are not using status monitor applications, then you can upgrade to UPD 2.7.1.0. If you are usingstatus monitor applications, then use only UPD 2.6.0.0.
• Microsoft Device Stage support—Added support to use Device Stage when installing Lexmark UPD on aTCP/IP port.
• Enhanced image resolutions—Added support for applications to use enhanced resolutions (1200 IQ,2400 IQ, 4800 CQ) to match the capability of Lexmark printers.
Note: This feature is available only in PCL5 and PCL XL emulation drivers.
• Image compression—Added the option to compress image data in documents to improve printingperformance.
Note: This option is available only in PCL XL emulation drivers.
• Trifold support—Added the option to fold paper in thirds automatically. This option is available in the Foldmenu.
• Default two‑sided printing support—Added support to enable two-sided printing in the print driver duringinstallation if a printer supports two-sided printing. For a complete list of printers that support this feature,see “Device compatibility” on page 15.
• Client installation improvement in a Novell environment—Improved installation by using bidirectionalcommunication when installing UPD on a client using a Novell IPP port.
• Addition of color and mono laser printers—Added support for mono laser printers. For a complete list ofsupported printers, see “Device compatibility” on page 15.
• Continued support for Citrix Ready XenApp 6.5 and 6.0 certifications—Continued certification supportfor Citrix XenApp 6.5 and Citrix XenApp 6.0. For a complete list of supported Citrix implementations, see“Operating system support” on page 14.
Lexmark Universal Print Driver version 2.6.1• Communication improvement in a server environment—Removed the language monitor component.
A language monitor is an optional print driver component that provides extra functionality. In Lexmark UPD,the language monitor provides the following functions:
– It coordinates status requests to the printer to ensure that these requests do not interfere with printing.
– It provides True End‑of‑Job support.
These functions are required for status monitor applications, such as the Lexmark Status Messenger andthe Lexmark Print Monitor Agent.
Note: If you are not using status monitor applications, then you can upgrade to UPD 2.6.1.0. If you areusing status monitor applications, then use only UPD 2.6.0.0.
• Continued support for Citrix Ready XenApp 6.5 and 6.0 certifications—Continued certification supportfor Citrix XenApp 6.5 and Citrix XenApp 6.0. For a complete list of supported Citrix implementations, see“Operating system support” on page 14.
Lexmark Universal Print Driver version 2.6• Driver version numbering updated—Updated the driver version numbering schema. For more information,
see “What is the UPD version numbering format?” on page 37.
• Addition of color and mono laser printers—Added support for color and mono laser printers. For a completelist of supported printers, see “Device compatibility” on page 15.
Introduction 11
• Addition of supported operating systems—Added support for Microsoft Windows 8.1, and WindowsServer 2012 R2 operating systems. For a complete list of supported operating systems, see “Operatingsystem support” on page 14.
• Paper size support update—Updated the list of supported paper sizes. For a complete list of supportedpaper sizes, see “Supported paper sizes” on page 20.
• Continued support for Citrix Ready XenApp 6.5 and 6.0 certifications—Continued certification supportfor Citrix XenApp 6.5 and Citrix XenApp 6.0. For a complete list of supported Citrix implementations, see“Operating system support” on page 14.
Lexmark Universal Print Driver version 2.x.5• Addition of color and mono laser printers—Added support for color and mono laser printers. For a complete
list of supported printers, see “Device compatibility” on page 15.
• Addition of supported operating systems—Added support for Microsoft Windows 8 and WindowsServer 2012 operating systems. For a complete list of supported operating systems, see “Operating systemsupport” on page 14.
• Addition of support for Citrix Ready XenApp 6.5 and 6.0 certifications—Added certification support forCitrix XenApp 6.5 and Citrix XenApp 6.0. For a complete list of supported Citrix implementations, see“Operating system support” on page 14.
• Addition of supported language—Added Arabic in the supported languages. For a complete list ofsupported languages, see “Language support” on page 22.
• Package Creation Utility—Use the utility to create customized installer packages that you can launchwithout user input, and integrate into your deployment solution.
Lexmark Universal Print Driver version 2.x.4• Addition of color laser printers—Added support for color laser printers. For a complete list of supported
printers, see “Device compatibility” on page 15.
• Addition of supported operating system—Added operating system support. For a complete list ofsupported operating systems, see “Operating system support” on page 14.
Lexmark Universal Print Driver version 2.x.3• Addition of color inkjet printers—Added support for color inkjet printers. For a complete list of supported
printers, see “Device compatibility” on page 15.
• Addition of paper sizes supported in inkjet printers—Added supported paper sizes for borderless printingin some inkjet printers. For more information, see “Supported paper sizes” on page 20.
Lexmark Universal Print Driver version 2• Driver version numbering—The driver version number increments whenever there are major or minor
functional modifications.
• New user interface—The new user interface of UPD provides a more consistent look and feel across allprinter models.
• Custom installation package—Administrators can now choose to create preconfigured installationpackages that include only the software and drivers that meet their needs.
• Job Accounting—The Job Accounting option lets you track print jobs for accounting purposes byassociating the print job with specific account information. The account information includes a user nameor ID, an account code, and a department code.
Introduction 12

• Dynamic driver configuration—UPD can now update itself to reflect the features and options of any specificprinter model.
• Printer Driver Configuration Utility—Use the utility to create driver configurations. Driver configurationsare saved print driver settings and other data stored in a Driver Configuration File (DCF).
Introduction 13
Before you begin
Operating system supportThe Lexmark Universal Print Drivers are compatible with the following Microsoft Windows operating systemsin 32‑bit and 64‑bit versions (where available):
• Windows® 10
• Windows 8.1
• Windows Server® 2012 R2
• Windows Server 2012
• Windows 7
• Windows Server 2008 R2
• Windows Server 2008
• Windows Vista®
Notes:
• As of April 8, 2014, Lexmark no longer provides patches or updates for Lexmark software available forMicrosoft Windows XP (32-bit and 64-bit versions) operating systems. UPD 2.7.1.0 is the last release thatsupports Windows XP operating systems.
• Lexmark follows Microsoft Products Support Lifecycle Policy in providing software support for Windowsoperating systems. For more information on Microsoft Products Support Lifecycle Policy, go tohttp://support.microsoft.com/gp/lifeselect.
The Universal Print Drivers are also compatible with the following Citrix implementations in 32‑bit and 64‑bitversions (where available):
• Citrix XenAppTM 7.6 for Microsoft Server 2012 R2 operating system
• Citrix XenDesktopTM 7.6 for Microsoft Server 2012 R2 operating system
• Citrix XenApp 7.6 for Microsoft Server 2012 operating system
• Citrix XenDesktop 7.6 for Microsoft Server 2012 operating system
• Citrix XenApp 7.6 for Microsoft Server 2008 R2 operating system
• Citrix XenDesktop 7.6 for Microsoft Server 2008 R2 operating system
• Citrix XenApp 7.5 for Microsoft Server 2008 R2 operating system
• Citrix XenDesktop 7.5 for Microsoft Server 2008 R2 operating system
• Citrix XenApp 7.5 for Microsoft Windows Server 2012 R2 operating system
• Citrix XenDesktop 7.5 for Microsoft Windows Server 2012 R2 operating system
• Citrix XenApp 6.5 for Microsoft Windows Server 2008 R2 operating system
• Citrix XenApp 6.0 for Microsoft Windows Server 2008 R2 operating system
• Citrix XenApp 5.0 for Microsoft Windows Server 2008 operating system
The Universal Print Drivers are also compatible with the following Microsoft Windows Clustered Servers in 32‑bitand 64‑bit versions (where available):
• Windows Server 2012 R2
• Windows Server 2012
Before you begin 14
• Windows Server 2008 R2
• Windows Server 2008
The Universal Print Drivers are compatible with the following Novell® operating systems:
• Novell NetWare 6.5 Open Enterprise Server
• Novell NetWare 5.1
• Novell Open Enterprise Server on SUSE Linux Enterprise Server with the following configurations in 32‑bitand 64‑bit versions (where available):
– NOES 11 SP2 on SLES 11 SP3
– NOES 11 SP1 on SLES 11 SP2
– NOES 2 SP2 on SLES 10 SP4
– NOES 2 SP2 on SLES 10 SP3
– NOES on SLES 9 SP4
Note: These configurations support only Windows iPrint clients for Windows XP, Windows Vista, Windows7, and Windows 8 operating systems.
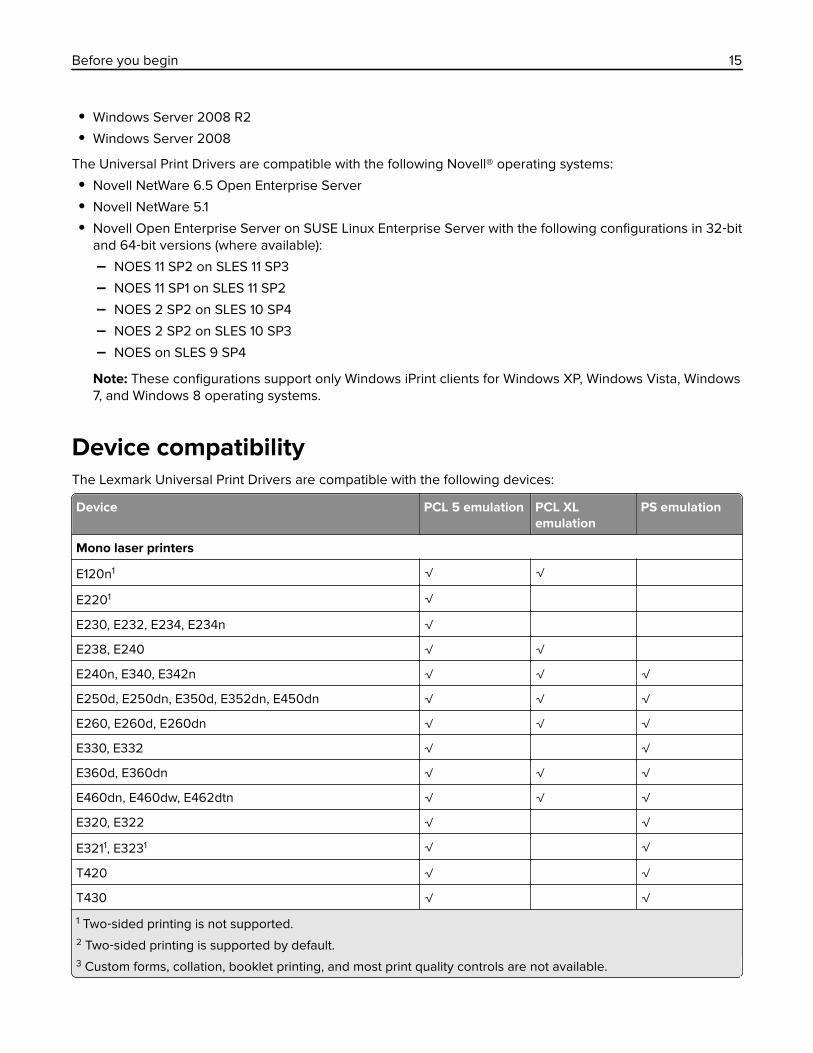
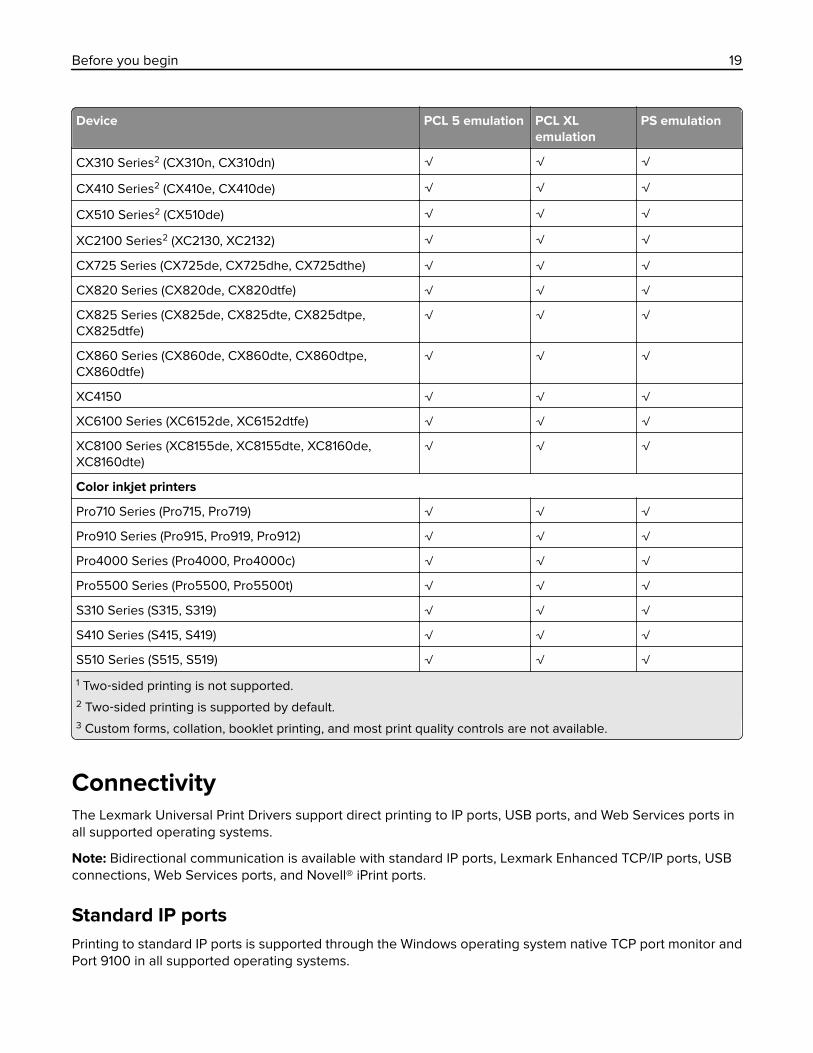
Device compatibilityThe Lexmark Universal Print Drivers are compatible with the following devices:
Device PCL 5 emulation PCL XLemulation
PS emulation
Mono laser printers
E120n1 √ √
E2201 √
E230, E232, E234, E234n √
E238, E240 √ √
E240n, E340, E342n √ √ √
E250d, E250dn, E350d, E352dn, E450dn √ √ √
E260, E260d, E260dn √ √ √
E330, E332 √ √
E360d, E360dn √ √ √
E460dn, E460dw, E462dtn √ √ √
E320, E322 √ √
E3211, E3231 √ √
T420 √ √
T430 √ √
1 Two‑sided printing is not supported.2 Two‑sided printing is supported by default.3 Custom forms, collation, booklet printing, and most print quality controls are not available.
Before you begin 15
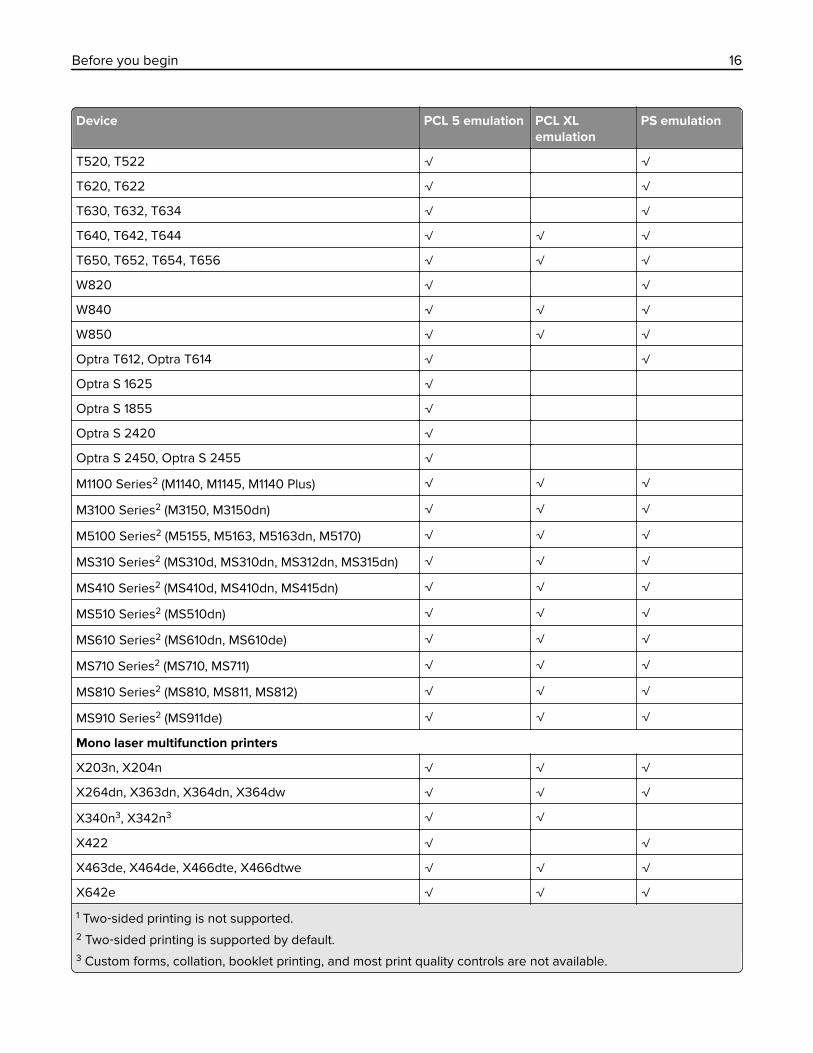
Device PCL 5 emulation PCL XLemulation
PS emulation
T520, T522 √ √
T620, T622 √ √
T630, T632, T634 √ √
T640, T642, T644 √ √ √
T650, T652, T654, T656 √ √ √
W820 √ √
W840 √ √ √
W850 √ √ √
Optra T612, Optra T614 √ √
Optra S 1625 √
Optra S 1855 √
Optra S 2420 √
Optra S 2450, Optra S 2455 √
M1100 Series2 (M1140, M1145, M1140 Plus) √ √ √
M3100 Series2 (M3150, M3150dn) √ √ √
M5100 Series2 (M5155, M5163, M5163dn, M5170) √ √ √
MS310 Series2 (MS310d, MS310dn, MS312dn, MS315dn) √ √ √
MS410 Series2 (MS410d, MS410dn, MS415dn) √ √ √
MS510 Series2 (MS510dn) √ √ √
MS610 Series2 (MS610dn, MS610de) √ √ √
MS710 Series2 (MS710, MS711) √ √ √
MS810 Series2 (MS810, MS811, MS812) √ √ √
MS910 Series2 (MS911de) √ √ √
Mono laser multifunction printers
X203n, X204n √ √ √
X264dn, X363dn, X364dn, X364dw √ √ √
X340n3, X342n3 √ √
X422 √ √
X463de, X464de, X466dte, X466dtwe √ √ √
X642e √ √ √
1 Two‑sided printing is not supported.2 Two‑sided printing is supported by default.3 Custom forms, collation, booklet printing, and most print quality controls are not available.
Before you begin 16
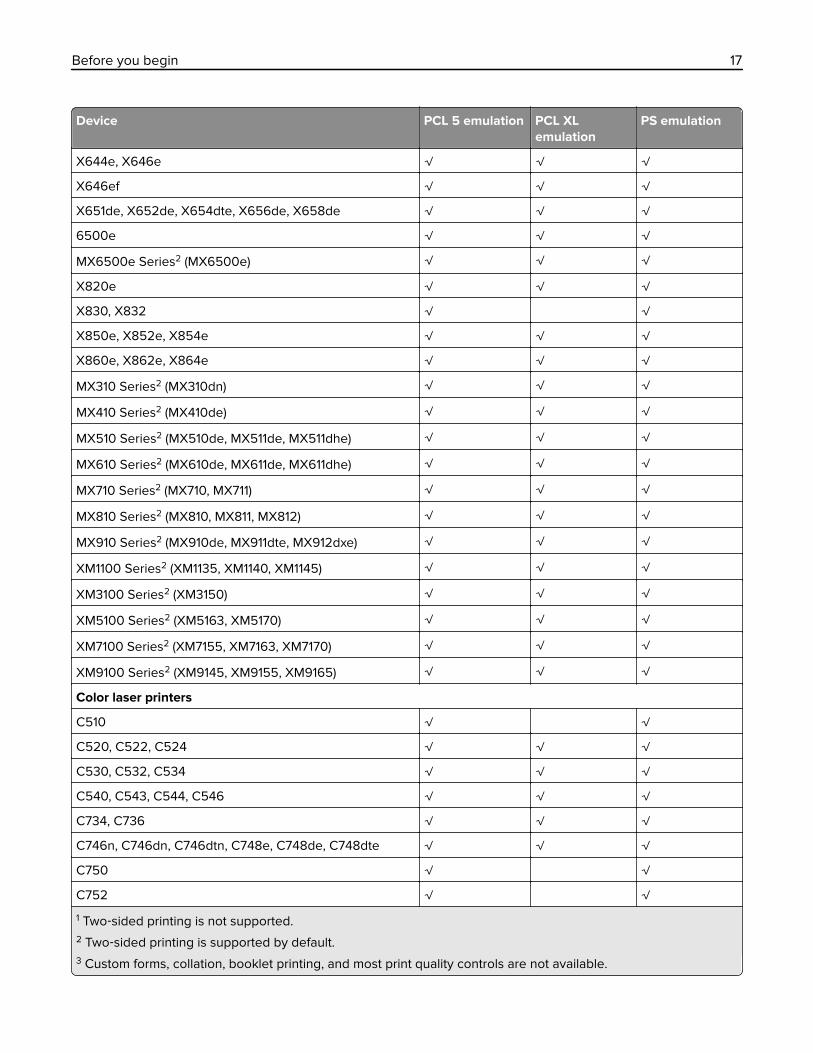
Device PCL 5 emulation PCL XLemulation
PS emulation
X644e, X646e √ √ √
X646ef √ √ √
X651de, X652de, X654dte, X656de, X658de √ √ √
6500e √ √ √
MX6500e Series2 (MX6500e) √ √ √
X820e √ √ √
X830, X832 √ √
X850e, X852e, X854e √ √ √
X860e, X862e, X864e √ √ √
MX310 Series2 (MX310dn) √ √ √
MX410 Series2 (MX410de) √ √ √
MX510 Series2 (MX510de, MX511de, MX511dhe) √ √ √
MX610 Series2 (MX610de, MX611de, MX611dhe) √ √ √
MX710 Series2 (MX710, MX711) √ √ √
MX810 Series2 (MX810, MX811, MX812) √ √ √
MX910 Series2 (MX910de, MX911dte, MX912dxe) √ √ √
XM1100 Series2 (XM1135, XM1140, XM1145) √ √ √
XM3100 Series2 (XM3150) √ √ √
XM5100 Series2 (XM5163, XM5170) √ √ √
XM7100 Series2 (XM7155, XM7163, XM7170) √ √ √
XM9100 Series2 (XM9145, XM9155, XM9165) √ √ √
Color laser printers
C510 √ √
C520, C522, C524 √ √ √
C530, C532, C534 √ √ √
C540, C543, C544, C546 √ √ √
C734, C736 √ √ √
C746n, C746dn, C746dtn, C748e, C748de, C748dte √ √ √
C750 √ √
C752 √ √
1 Two‑sided printing is not supported.2 Two‑sided printing is supported by default.3 Custom forms, collation, booklet printing, and most print quality controls are not available.
Before you begin 17

Device PCL 5 emulation PCL XLemulation
PS emulation
C760, C762 √ √ √
C770, C772 √ √ √
C780, C782, C782 XL √ √ √
C790, C792 √ √ √
C912 √ √
C920 √ √ √
C925 √ √ √
C935 √ √ √
C950de √ √ √
CS310 Series2 (CS310n, CS310dn) √ √ √
CS410 Series2 (CS410n, CS410dn) √ √ √
CS510 Series2 (CS510de) √ √ √
C2100 Series2 (C2132) √ √ √
CS720de √ √ √
CS725de √ √ √
CS820 Series (CS820de, CS820dte, CS820dtfe) √ √ √
CS4150 √ √ √
CS6160de √ √ √
Color laser multifunction printers
X543, X544, X546 √ √ √
X548, X548e √ √ √
X734de, X736de, X738de √ √ √
X746de, X748de, X748dte √ √ √
X762e √ √ √
X772e √ √ √
X782e, X782e XL √ √ √
X790, X792 √ √ √
X912 √ √
X925, XS925 √ √ √
X940e, X945e √ √ √
X950de, X952de, X954de √ √ √
1 Two‑sided printing is not supported.2 Two‑sided printing is supported by default.3 Custom forms, collation, booklet printing, and most print quality controls are not available.
Before you begin 18
Device PCL 5 emulation PCL XLemulation
PS emulation
CX310 Series2 (CX310n, CX310dn) √ √ √
CX410 Series2 (CX410e, CX410de) √ √ √
CX510 Series2 (CX510de) √ √ √
XC2100 Series2 (XC2130, XC2132) √ √ √
CX725 Series (CX725de, CX725dhe, CX725dthe) √ √ √
CX820 Series (CX820de, CX820dtfe) √ √ √
CX825 Series (CX825de, CX825dte, CX825dtpe,CX825dtfe)
√ √ √
CX860 Series (CX860de, CX860dte, CX860dtpe,CX860dtfe)
√ √ √
XC4150 √ √ √
XC6100 Series (XC6152de, XC6152dtfe) √ √ √
XC8100 Series (XC8155de, XC8155dte, XC8160de,XC8160dte)
√ √ √
Color inkjet printers
Pro710 Series (Pro715, Pro719) √ √ √
Pro910 Series (Pro915, Pro919, Pro912) √ √ √
Pro4000 Series (Pro4000, Pro4000c) √ √ √
Pro5500 Series (Pro5500, Pro5500t) √ √ √
S310 Series (S315, S319) √ √ √
S410 Series (S415, S419) √ √ √
S510 Series (S515, S519) √ √ √
1 Two‑sided printing is not supported.2 Two‑sided printing is supported by default.3 Custom forms, collation, booklet printing, and most print quality controls are not available.
ConnectivityThe Lexmark Universal Print Drivers support direct printing to IP ports, USB ports, and Web Services ports inall supported operating systems.
Note: Bidirectional communication is available with standard IP ports, Lexmark Enhanced TCP/IP ports, USBconnections, Web Services ports, and Novell® iPrint ports.
Standard IP portsPrinting to standard IP ports is supported through the Windows operating system native TCP port monitor andPort 9100 in all supported operating systems.
Before you begin 19

Lexmark Enhanced TCP/IP portsLexmark Enhanced TCP/IP ports are not included in the Lexmark Universal Print Driver package.
If enhanced port capability is installed separately on the host system, then printing to an enhanced port issupported in Lexmark Universal Print Drivers.
LPR portsLPR ports are supported if available in the operating system.
USB portsUSB ports are supported.
Web Services portsWeb Services ports are supported if available in the operating system.
Travel PrintThe Travel Print feature allows users who travel frequently or change printers on a regular basis to switch easilybetween multiple devices. Users can then designate up to 10 frequently used printers as favorites, providingeasy access to the ones they use most.
Travel Print users can also search for printers using the printer host name or IP address, or by searching asubnet. The printer search results include essential information about each printer, including, among otherthings, its model name, current operational state, IP address, and color and two‑sided printing capabilities.
Users can also use the Travel Print feature to access the Embedded Web Server for a selected device, allowingaccess to even more detailed printer information and configuration options.
Paper sizes and types supported by the Universal PrintDriverAvailable paper sizes and types may vary, depending on printers and print drivers.
Supported paper sizes• 12 x 18 inches
• A3 (297 x 420 mm)
• A4 (210 x 297 mm)
• A5 (148 x 210 mm)
• A6 (105 x 148 mm)
• B4 (257 x 364 mm
• B5 (182 x 257 mm)
• Banner 1 (216 x 914 mm)
• Banner 2 (216 x 1219 mm)
Before you begin 20
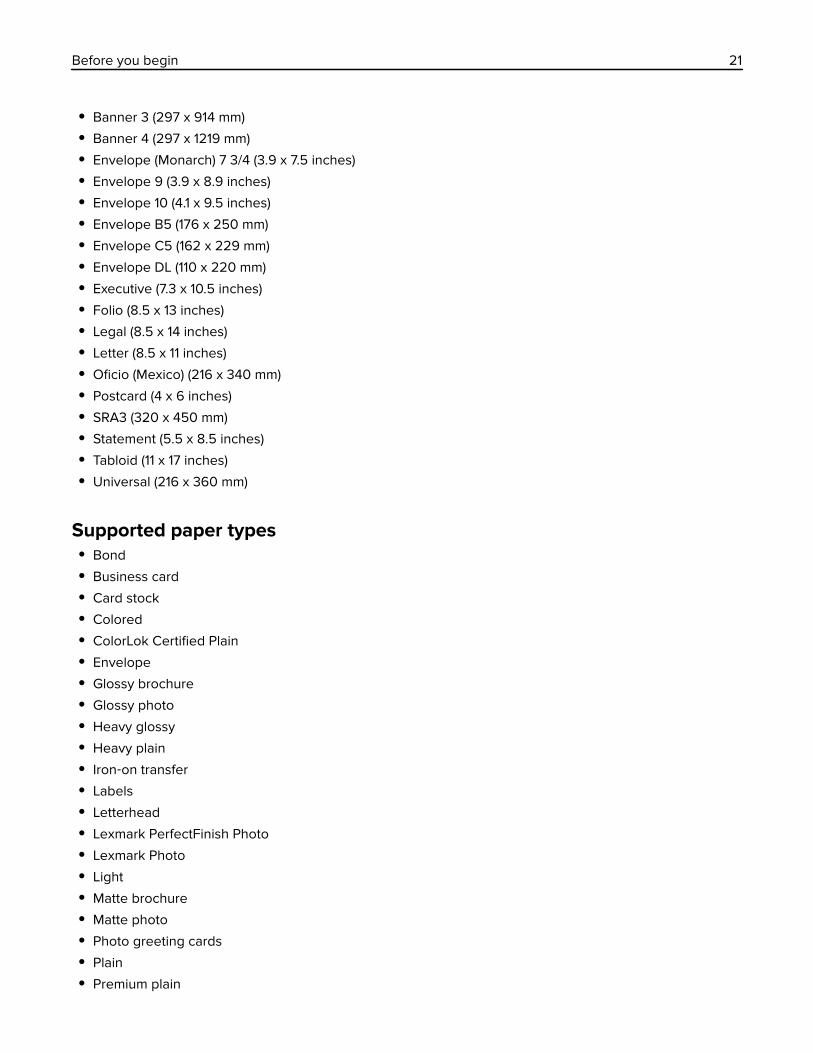
• Banner 3 (297 x 914 mm)
• Banner 4 (297 x 1219 mm)
• Envelope (Monarch) 7 3/4 (3.9 x 7.5 inches)
• Envelope 9 (3.9 x 8.9 inches)
• Envelope 10 (4.1 x 9.5 inches)
• Envelope B5 (176 x 250 mm)
• Envelope C5 (162 x 229 mm)
• Envelope DL (110 x 220 mm)
• Executive (7.3 x 10.5 inches)
• Folio (8.5 x 13 inches)
• Legal (8.5 x 14 inches)
• Letter (8.5 x 11 inches)
• Oficio (Mexico) (216 x 340 mm)
• Postcard (4 x 6 inches)
• SRA3 (320 x 450 mm)
• Statement (5.5 x 8.5 inches)
• Tabloid (11 x 17 inches)
• Universal (216 x 360 mm)
Supported paper types• Bond
• Business card
• Card stock
• Colored
• ColorLok Certified Plain
• Envelope
• Glossy brochure
• Glossy photo
• Heavy glossy
• Heavy plain
• Iron‑on transfer
• Labels
• Letterhead
• Lexmark PerfectFinish Photo
• Lexmark Photo
• Light
• Matte brochure
• Matte photo
• Photo greeting cards
• Plain
• Premium plain
Before you begin 21
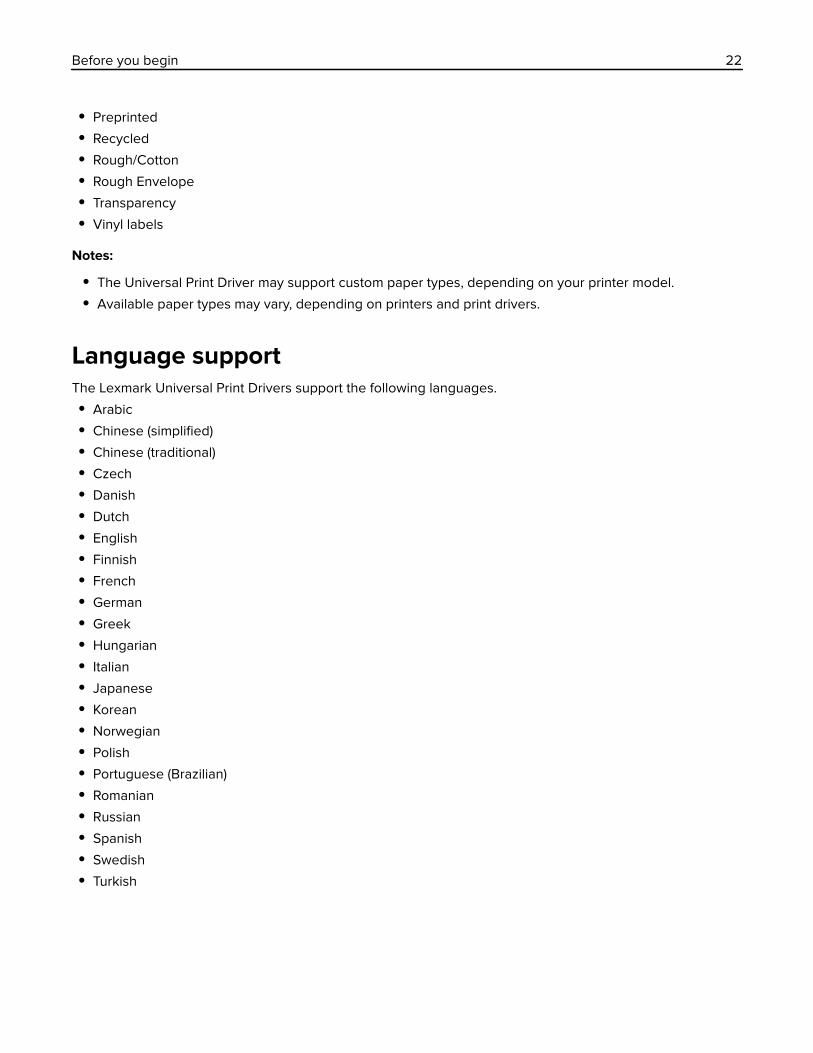
• Preprinted
• Recycled
• Rough/Cotton
• Rough Envelope
• Transparency
• Vinyl labels
Notes:
• The Universal Print Driver may support custom paper types, depending on your printer model.
• Available paper types may vary, depending on printers and print drivers.
Language supportThe Lexmark Universal Print Drivers support the following languages.
• Arabic
• Chinese (simplified)
• Chinese (traditional)
• Czech
• Danish
• Dutch
• English
• Finnish
• French
• German
• Greek
• Hungarian
• Italian
• Japanese
• Korean
• Norwegian
• Polish
• Portuguese (Brazilian)
• Romanian
• Russian
• Spanish
• Swedish
• Turkish
Before you begin 22
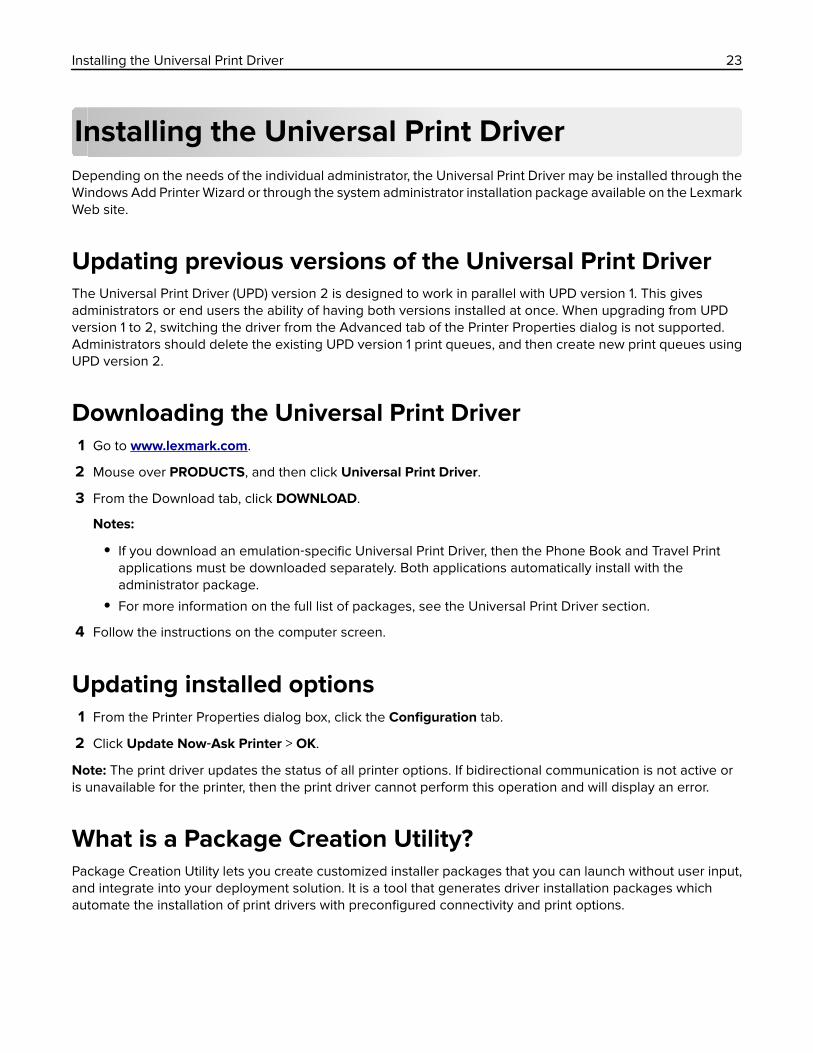
Installing the Universal Print DriverDepending on the needs of the individual administrator, the Universal Print Driver may be installed through theWindows Add Printer Wizard or through the system administrator installation package available on the LexmarkWeb site.
Updating previous versions of the Universal Print DriverThe Universal Print Driver (UPD) version 2 is designed to work in parallel with UPD version 1. This givesadministrators or end users the ability of having both versions installed at once. When upgrading from UPDversion 1 to 2, switching the driver from the Advanced tab of the Printer Properties dialog is not supported.Administrators should delete the existing UPD version 1 print queues, and then create new print queues usingUPD version 2.
Downloading the Universal Print Driver1 Go to www.lexmark.com.
2 Mouse over PRODUCTS, and then click Universal Print Driver.
3 From the Download tab, click DOWNLOAD.
Notes:
• If you download an emulation‑specific Universal Print Driver, then the Phone Book and Travel Printapplications must be downloaded separately. Both applications automatically install with theadministrator package.
• For more information on the full list of packages, see the Universal Print Driver section.
4 Follow the instructions on the computer screen.
Updating installed options1 From the Printer Properties dialog box, click the Configuration tab.
2 Click Update Now‑Ask Printer > OK.
Note: The print driver updates the status of all printer options. If bidirectional communication is not active oris unavailable for the printer, then the print driver cannot perform this operation and will display an error.
What is a Package Creation Utility?Package Creation Utility lets you create customized installer packages that you can launch without user input,and integrate into your deployment solution. It is a tool that generates driver installation packages whichautomate the installation of print drivers with preconfigured connectivity and print options.
Installing the Universal Print Driver 23
Using Travel PrintThe Travel Print feature lets you search and select a network printer when printing or faxing from the hostcomputer.
If you travel frequently and must regularly change printers, then you no longer need to install several printqueues to support printers at multiple locations.
When Travel Print is used, a printer selection dialog appears when you:
• Send a print job to the print driver from a Windows print dialog.
• Access Printing Preferences from a Windows print dialog.
• Access either Printing Preferences or Printer Properties from the print driver.
From the printer selection dialog box, you can designate up to 10 frequently used printers in the Favorites tab.You can also search for printers in the Search tab using the printer host name or IP address, or by searching asubnet. The search results display important printer information, such as the printer status, IP address, and colorand two‑sided printing capabilities. You can also access the embedded Web page for a selected printer to viewmore detailed printer information and configuration options.
Notes:
• You must have administrator rights to be able to install and enable Travel Print. To install, run the TravelPrint installation package or the Universal Print Driver system administrator installation package. Forinformation on obtaining a copy of the installation packages, visit our Web site.
• Travel Print is not intended for server‑based printing. The print driver and Travel Print should be installedlocally on host computers.
• If you want Travel Print to update the printer model and configuration options, then enable the "UpdateConfiguration from Printer" feature.
Enabling the Travel Print featureTravel Print is enabled by associating the print driver with the Travel Print port.
Note: The Travel Print port will be available only if Travel Print is installed. To install Travel Print, run the TravelPrint installation package or the Universal Print Driver system administrator installation package. Forinformation on obtaining a copy of the installation packages, contact your printer manufacturer.
To associate the print driver with the Travel Print port:
1 Open the Printer Properties for the print driver.
2 Select the Ports tab.
3 Select Travel Print port as the port for the print driver.
To disable the Travel Print feature, change the print driver port to any other printer port.
Installing the Universal Print Driver 24
Understanding the Universal Print Driver
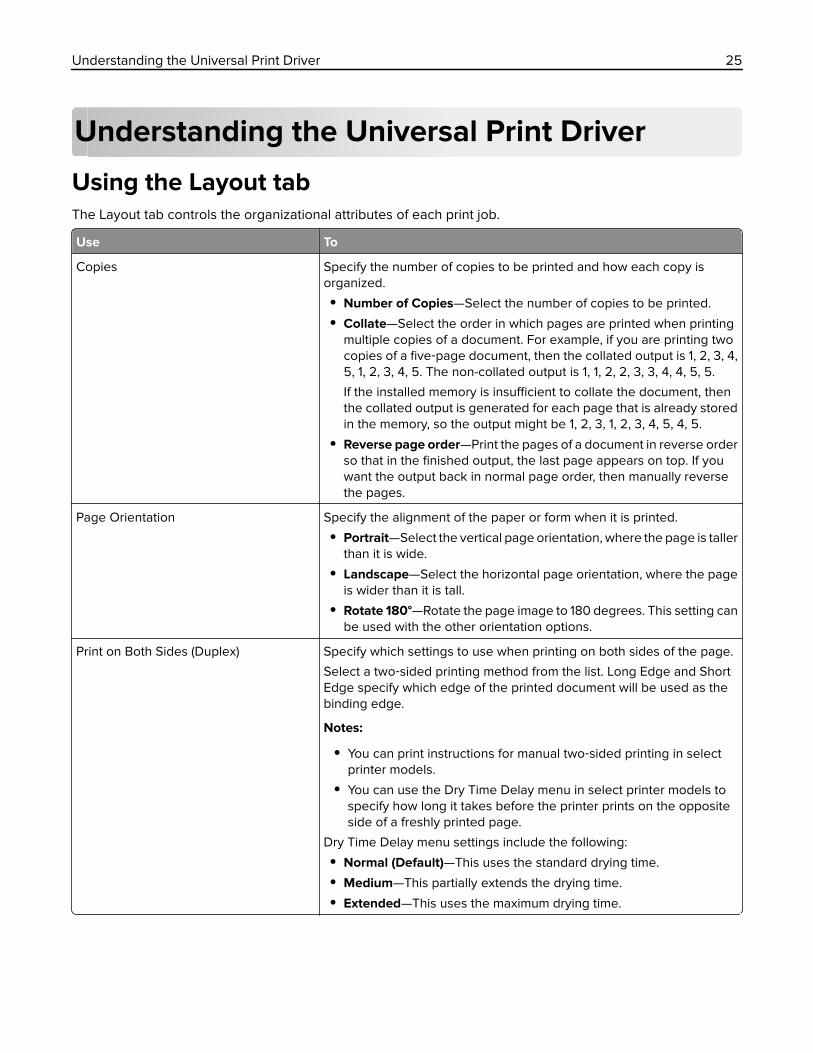
Using the Layout tabThe Layout tab controls the organizational attributes of each print job.
Use To
Copies Specify the number of copies to be printed and how each copy isorganized.
• Number of Copies—Select the number of copies to be printed.
• Collate—Select the order in which pages are printed when printingmultiple copies of a document. For example, if you are printing twocopies of a five‑page document, then the collated output is 1, 2, 3, 4,5, 1, 2, 3, 4, 5. The non-collated output is 1, 1, 2, 2, 3, 3, 4, 4, 5, 5.
If the installed memory is insufficient to collate the document, thenthe collated output is generated for each page that is already storedin the memory, so the output might be 1, 2, 3, 1, 2, 3, 4, 5, 4, 5.
• Reverse page order—Print the pages of a document in reverse orderso that in the finished output, the last page appears on top. If youwant the output back in normal page order, then manually reversethe pages.
Page Orientation Specify the alignment of the paper or form when it is printed.
• Portrait—Select the vertical page orientation, where the page is tallerthan it is wide.
• Landscape—Select the horizontal page orientation, where the pageis wider than it is tall.
• Rotate 180°—Rotate the page image to 180 degrees. This setting canbe used with the other orientation options.
Print on Both Sides (Duplex) Specify which settings to use when printing on both sides of the page.
Select a two‑sided printing method from the list. Long Edge and ShortEdge specify which edge of the printed document will be used as thebinding edge.
Notes:
• You can print instructions for manual two‑sided printing in selectprinter models.
• You can use the Dry Time Delay menu in select printer models tospecify how long it takes before the printer prints on the oppositeside of a freshly printed page.
Dry Time Delay menu settings include the following:
• Normal (Default)—This uses the standard drying time.
• Medium—This partially extends the drying time.
• Extended—This uses the maximum drying time.
Understanding the Universal Print Driver 25
Use To
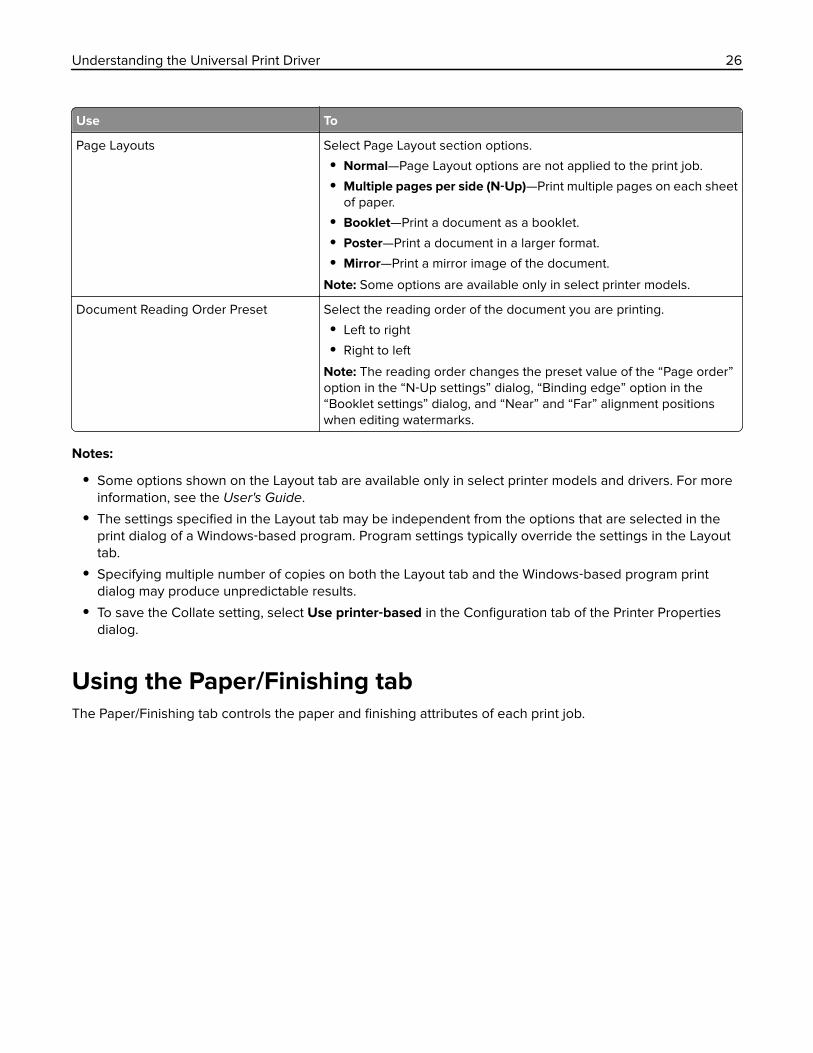
Page Layouts Select Page Layout section options.
• Normal—Page Layout options are not applied to the print job.
• Multiple pages per side (N‑Up)—Print multiple pages on each sheetof paper.
• Booklet—Print a document as a booklet.
• Poster—Print a document in a larger format.
• Mirror—Print a mirror image of the document.
Note: Some options are available only in select printer models.
Document Reading Order Preset Select the reading order of the document you are printing.
• Left to right
• Right to left
Note: The reading order changes the preset value of the “Page order”option in the “N‑Up settings” dialog, “Binding edge” option in the“Booklet settings” dialog, and “Near” and “Far” alignment positionswhen editing watermarks.
Notes:
• Some options shown on the Layout tab are available only in select printer models and drivers. For moreinformation, see the User's Guide.
• The settings specified in the Layout tab may be independent from the options that are selected in theprint dialog of a Windows‑based program. Program settings typically override the settings in the Layouttab.
• Specifying multiple number of copies on both the Layout tab and the Windows‑based program printdialog may produce unpredictable results.
• To save the Collate setting, select Use printer‑based in the Configuration tab of the Printer Propertiesdialog.
Using the Paper/Finishing tabThe Paper/Finishing tab controls the paper and finishing attributes of each print job.
Understanding the Universal Print Driver 26
Use To
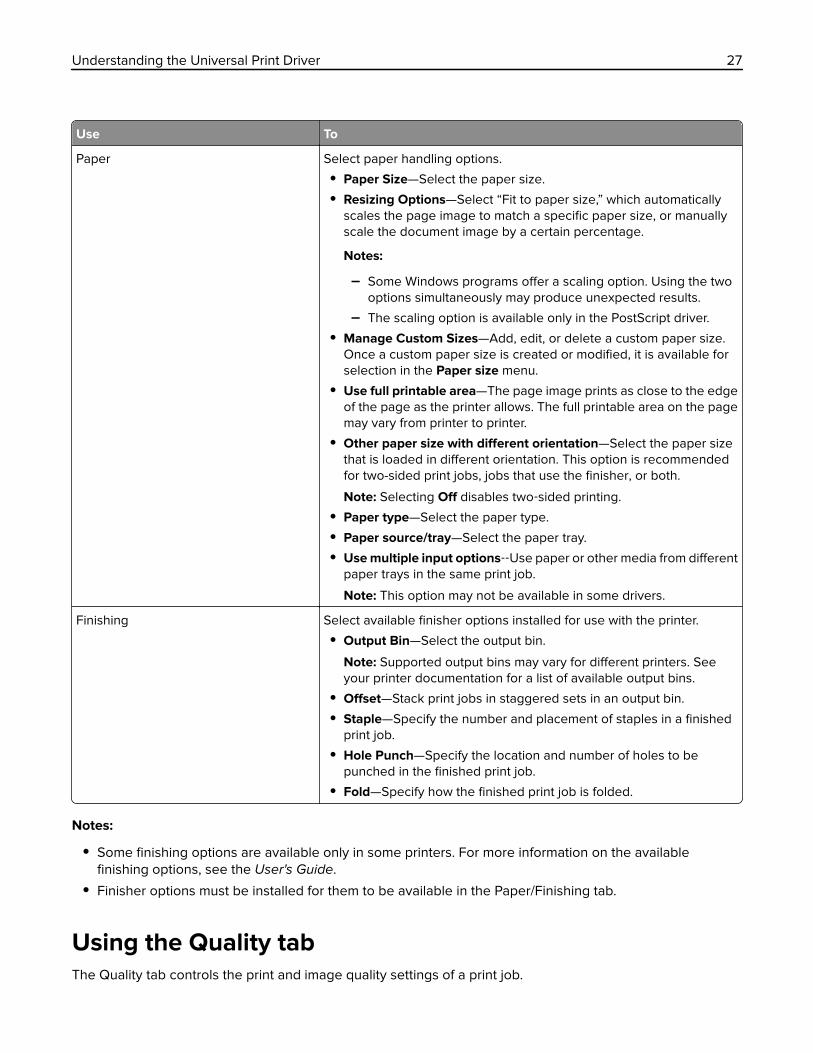
Paper Select paper handling options.
• Paper Size—Select the paper size.
• Resizing Options—Select “Fit to paper size,” which automaticallyscales the page image to match a specific paper size, or manuallyscale the document image by a certain percentage.
Notes:
– Some Windows programs offer a scaling option. Using the twooptions simultaneously may produce unexpected results.
– The scaling option is available only in the PostScript driver.
• Manage Custom Sizes—Add, edit, or delete a custom paper size.Once a custom paper size is created or modified, it is available forselection in the Paper size menu.
• Use full printable area—The page image prints as close to the edgeof the page as the printer allows. The full printable area on the pagemay vary from printer to printer.
• Other paper size with different orientation—Select the paper sizethat is loaded in different orientation. This option is recommendedfor two-sided print jobs, jobs that use the finisher, or both.
Note: Selecting Off disables two‑sided printing.
• Paper type—Select the paper type.
• Paper source/tray—Select the paper tray.
• Use multiple input options‑‑Use paper or other media from differentpaper trays in the same print job.
Note: This option may not be available in some drivers.
Finishing Select available finisher options installed for use with the printer.
• Output Bin—Select the output bin.
Note: Supported output bins may vary for different printers. Seeyour printer documentation for a list of available output bins.
• Offset—Stack print jobs in staggered sets in an output bin.
• Staple—Specify the number and placement of staples in a finishedprint job.
• Hole Punch—Specify the location and number of holes to bepunched in the finished print job.
• Fold—Specify how the finished print job is folded.
Notes:
• Some finishing options are available only in some printers. For more information on the availablefinishing options, see the User's Guide.
• Finisher options must be installed for them to be available in the Paper/Finishing tab.
Using the Quality tabThe Quality tab controls the print and image quality settings of a print job.
Understanding the Universal Print Driver 27

Use To
Print Quality settings Optimize the print quality of the print job.
• Draft—Print the document using the lowest resolution for fasterprinting.
• Normal—Print the document using the standard print quality settings.
• Best—Print the document using the best possible resolution.
• Custom—Print the document using the settings specified by the user.
Notes:
• These settings are available only for inkjet printers.
• To let the printer automatically select the appropriate printresolution settings, select Auto.
Sharpen Sharpen the detail of the print image by increasing the contrast aroundthe edges of text and images.
Notes:
• This option is available only in inkjet printers.
• When printing images that have already had a sharpening effectapplied by another application, using the Sharpen feature in thedriver can produce unintended results.
Resolution Specify the printed output resolution in dots per inch, in image quality(IQ), or in color quality (CQ).
Note: This option is available only in laser printers.
Halftone Select alternate halftone screens.
• Use printer settings—Apply the settings specified in the printer.
• Normal—Use standard halftone screens.
• Detail—Use alternate halftone screens designed for thin color linesand text rather than uniformity and smoothness.
Color Preference Change the intensity of the colors on the printed page.
• Auto—The printer automatically selects the color preference.
• Natural—Apply a moderate degree of intensity to printed colors.
• Vivid—Apply the highest degree of intensity to the printed colors.
Note: This option is available only in inkjet printers.
Advanced Color Options Determine the print mode for the job.
• Auto—The printer automatically determines the print mode.
• Use ICC test Chart Process—Use a special print mode based on ICCprofiles.
Note: This option is available only in inkjet printers.
Gray Correction Control the brightness and contrast of the printed output.
• Use printer settings—Apply the setting specified in the printer.
• Off—Disable gray correction.
• Manual—Customize the brightness and contrast of the printedoutput. This setting enables the brightness and contrast sliders.
Note: This option is available only in monochrome printers.
Understanding the Universal Print Driver 28
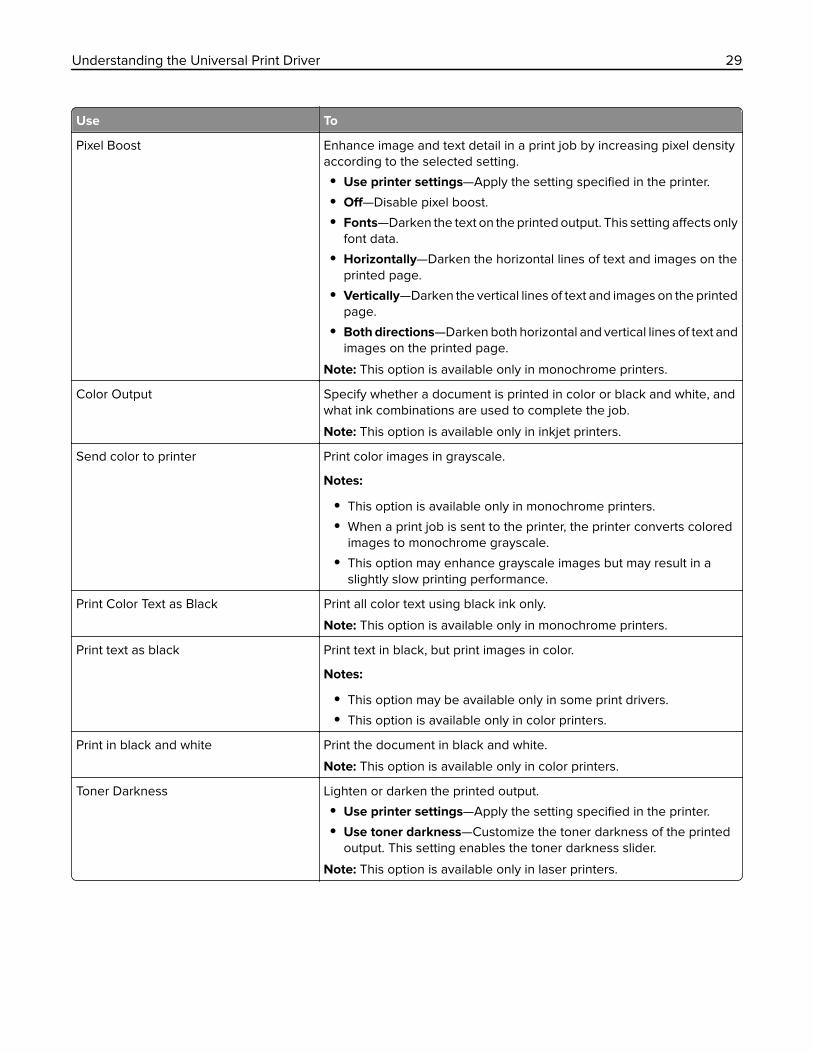
Use To
Pixel Boost Enhance image and text detail in a print job by increasing pixel densityaccording to the selected setting.
• Use printer settings—Apply the setting specified in the printer.
• Off—Disable pixel boost.
• Fonts—Darken the text on the printed output. This setting affects onlyfont data.
• Horizontally—Darken the horizontal lines of text and images on theprinted page.
• Vertically—Darken the vertical lines of text and images on the printedpage.
• Both directions—Darken both horizontal and vertical lines of text andimages on the printed page.
Note: This option is available only in monochrome printers.
Color Output Specify whether a document is printed in color or black and white, andwhat ink combinations are used to complete the job.
Note: This option is available only in inkjet printers.
Send color to printer Print color images in grayscale.
Notes:
• This option is available only in monochrome printers.
• When a print job is sent to the printer, the printer converts coloredimages to monochrome grayscale.
• This option may enhance grayscale images but may result in aslightly slow printing performance.
Print Color Text as Black Print all color text using black ink only.
Note: This option is available only in monochrome printers.
Print text as black Print text in black, but print images in color.
Notes:
• This option may be available only in some print drivers.
• This option is available only in color printers.
Print in black and white Print the document in black and white.
Note: This option is available only in color printers.
Toner Darkness Lighten or darken the printed output.
• Use printer settings—Apply the setting specified in the printer.
• Use toner darkness—Customize the toner darkness of the printedoutput. This setting enables the toner darkness slider.
Note: This option is available only in laser printers.
Understanding the Universal Print Driver 29
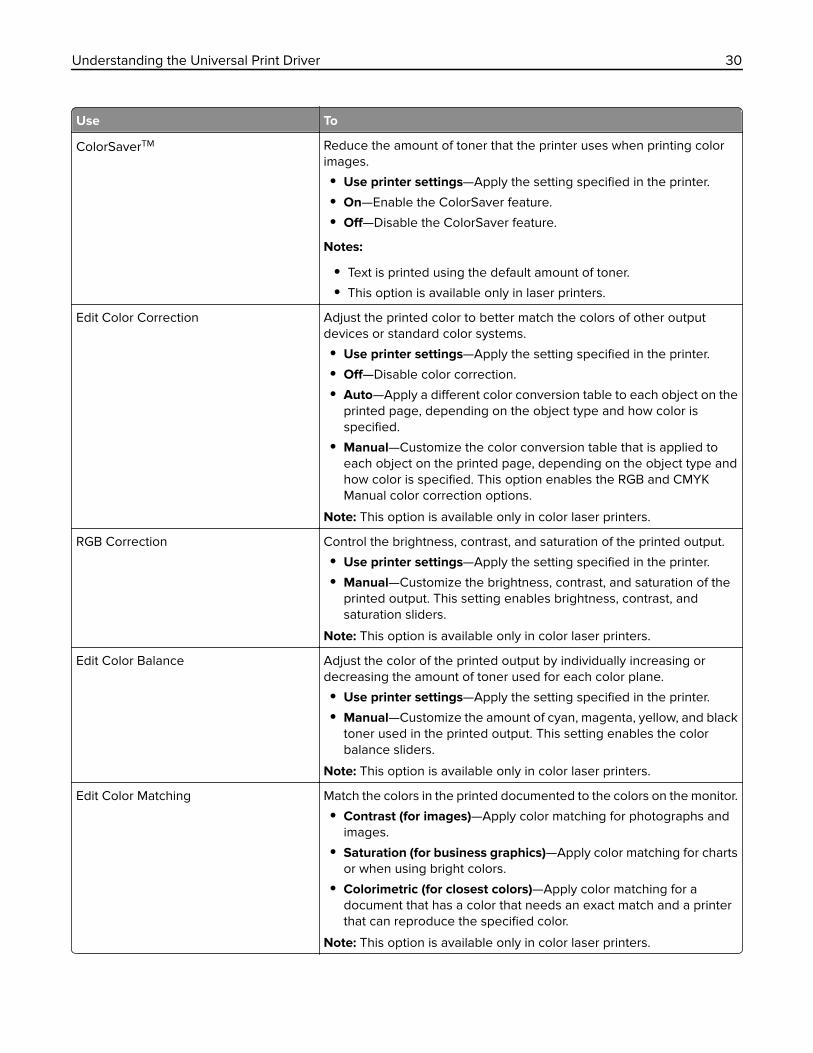
Use To
ColorSaverTM Reduce the amount of toner that the printer uses when printing colorimages.
• Use printer settings—Apply the setting specified in the printer.
• On—Enable the ColorSaver feature.
• Off—Disable the ColorSaver feature.
Notes:
• Text is printed using the default amount of toner.
• This option is available only in laser printers.
Edit Color Correction Adjust the printed color to better match the colors of other outputdevices or standard color systems.
• Use printer settings—Apply the setting specified in the printer.
• Off—Disable color correction.
• Auto—Apply a different color conversion table to each object on theprinted page, depending on the object type and how color isspecified.
• Manual—Customize the color conversion table that is applied toeach object on the printed page, depending on the object type andhow color is specified. This option enables the RGB and CMYKManual color correction options.
Note: This option is available only in color laser printers.
RGB Correction Control the brightness, contrast, and saturation of the printed output.
• Use printer settings—Apply the setting specified in the printer.
• Manual—Customize the brightness, contrast, and saturation of theprinted output. This setting enables brightness, contrast, andsaturation sliders.
Note: This option is available only in color laser printers.
Edit Color Balance Adjust the color of the printed output by individually increasing ordecreasing the amount of toner used for each color plane.
• Use printer settings—Apply the setting specified in the printer.
• Manual—Customize the amount of cyan, magenta, yellow, and blacktoner used in the printed output. This setting enables the colorbalance sliders.
Note: This option is available only in color laser printers.
Edit Color Matching Match the colors in the printed documented to the colors on the monitor.
• Contrast (for images)—Apply color matching for photographs andimages.
• Saturation (for business graphics)—Apply color matching for chartsor when using bright colors.
• Colorimetric (for closest colors)—Apply color matching for adocument that has a color that needs an exact match and a printerthat can reproduce the specified color.
Note: This option is available only in color laser printers.
Understanding the Universal Print Driver 30
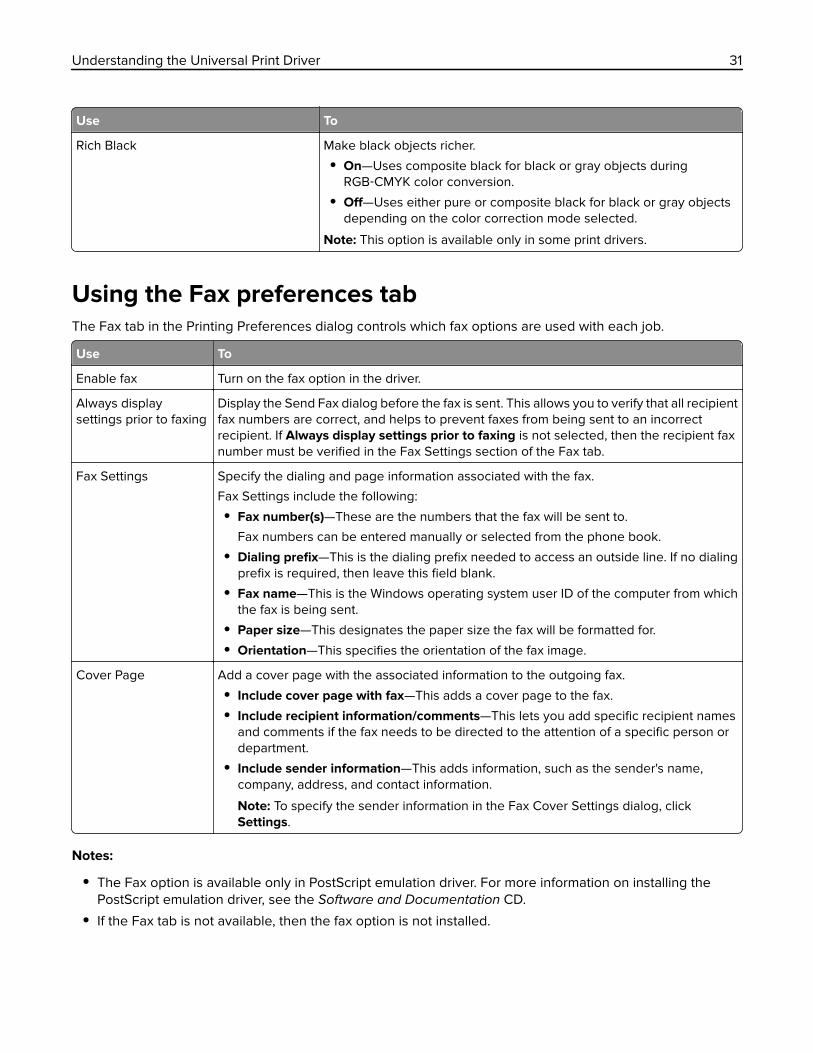
Use To
Rich Black Make black objects richer.
• On—Uses composite black for black or gray objects duringRGB‑CMYK color conversion.
• Off—Uses either pure or composite black for black or gray objectsdepending on the color correction mode selected.
Note: This option is available only in some print drivers.
Using the Fax preferences tabThe Fax tab in the Printing Preferences dialog controls which fax options are used with each job.
Use To
Enable fax Turn on the fax option in the driver.
Always displaysettings prior to faxing
Display the Send Fax dialog before the fax is sent. This allows you to verify that all recipientfax numbers are correct, and helps to prevent faxes from being sent to an incorrectrecipient. If Always display settings prior to faxing is not selected, then the recipient faxnumber must be verified in the Fax Settings section of the Fax tab.
Fax Settings Specify the dialing and page information associated with the fax.
Fax Settings include the following:
• Fax number(s)—These are the numbers that the fax will be sent to.
Fax numbers can be entered manually or selected from the phone book.
• Dialing prefix—This is the dialing prefix needed to access an outside line. If no dialingprefix is required, then leave this field blank.
• Fax name—This is the Windows operating system user ID of the computer from whichthe fax is being sent.
• Paper size—This designates the paper size the fax will be formatted for.
• Orientation—This specifies the orientation of the fax image.
Cover Page Add a cover page with the associated information to the outgoing fax.
• Include cover page with fax—This adds a cover page to the fax.
• Include recipient information/comments—This lets you add specific recipient namesand comments if the fax needs to be directed to the attention of a specific person ordepartment.
• Include sender information—This adds information, such as the sender's name,company, address, and contact information.
Note: To specify the sender information in the Fax Cover Settings dialog, clickSettings.
Notes:
• The Fax option is available only in PostScript emulation driver. For more information on installing thePostScript emulation driver, see the Software and Documentation CD.
• If the Fax tab is not available, then the fax option is not installed.
Understanding the Universal Print Driver 31
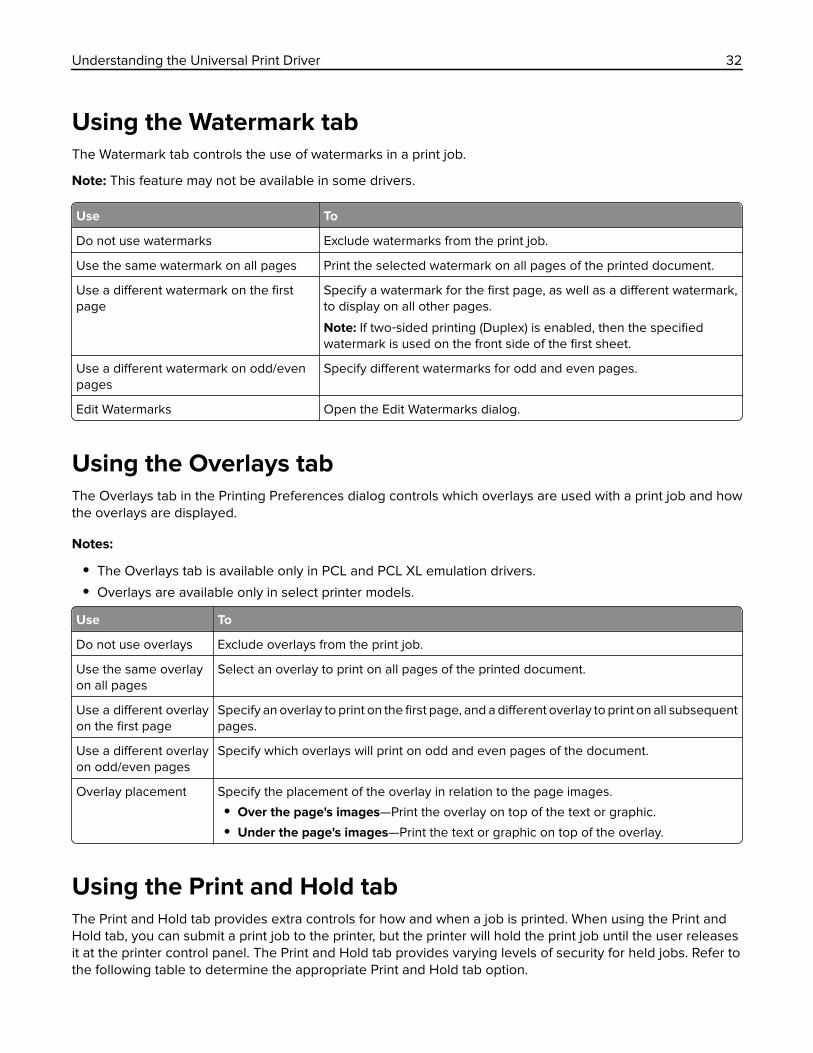
Using the Watermark tabThe Watermark tab controls the use of watermarks in a print job.
Note: This feature may not be available in some drivers.
Use To
Do not use watermarks Exclude watermarks from the print job.
Use the same watermark on all pages Print the selected watermark on all pages of the printed document.
Use a different watermark on the firstpage
Specify a watermark for the first page, as well as a different watermark,to display on all other pages.
Note: If two‑sided printing (Duplex) is enabled, then the specifiedwatermark is used on the front side of the first sheet.
Use a different watermark on odd/evenpages
Specify different watermarks for odd and even pages.
Edit Watermarks Open the Edit Watermarks dialog.
Using the Overlays tabThe Overlays tab in the Printing Preferences dialog controls which overlays are used with a print job and howthe overlays are displayed.
Notes:
• The Overlays tab is available only in PCL and PCL XL emulation drivers.
• Overlays are available only in select printer models.
Use To
Do not use overlays Exclude overlays from the print job.
Use the same overlayon all pages
Select an overlay to print on all pages of the printed document.
Use a different overlayon the first page
Specify an overlay to print on the first page, and a different overlay to print on all subsequentpages.
Use a different overlayon odd/even pages
Specify which overlays will print on odd and even pages of the document.
Overlay placement Specify the placement of the overlay in relation to the page images.
• Over the page's images—Print the overlay on top of the text or graphic.
• Under the page's images—Print the text or graphic on top of the overlay.
Using the Print and Hold tabThe Print and Hold tab provides extra controls for how and when a job is printed. When using the Print andHold tab, you can submit a print job to the printer, but the printer will hold the print job until the user releasesit at the printer control panel. The Print and Hold tab provides varying levels of security for held jobs. Refer tothe following table to determine the appropriate Print and Hold tab option.
Understanding the Universal Print Driver 32
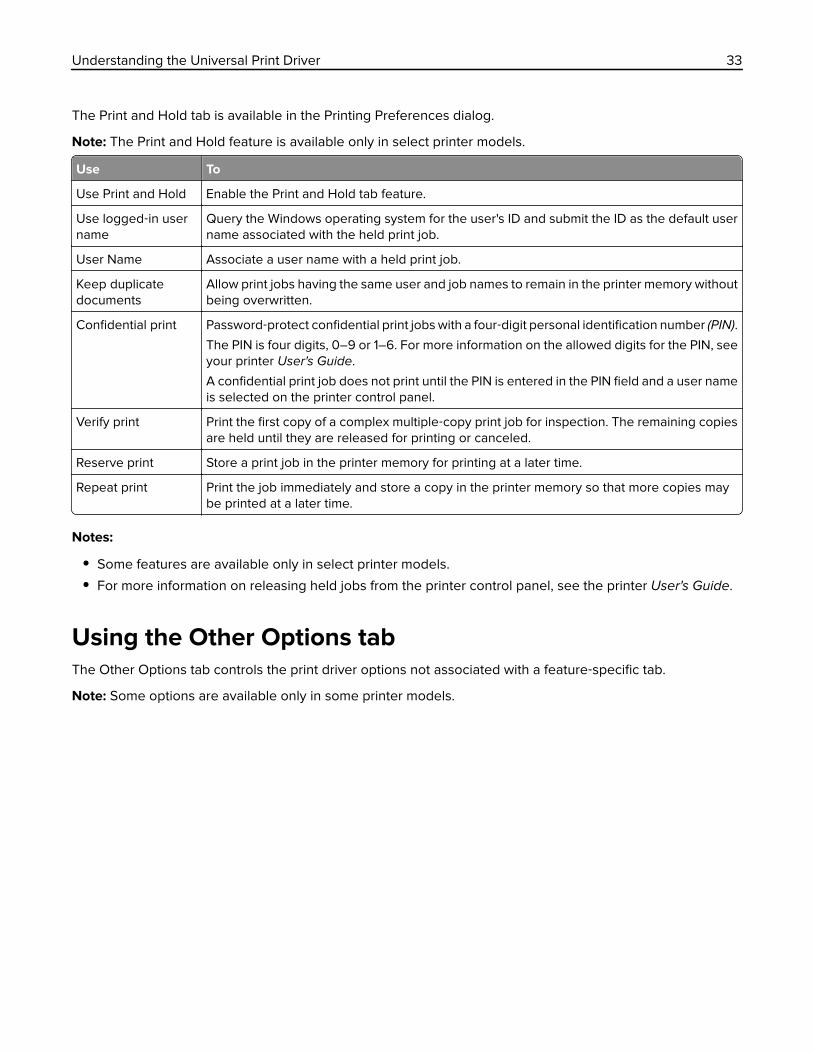
The Print and Hold tab is available in the Printing Preferences dialog.
Note: The Print and Hold feature is available only in select printer models.
Use To
Use Print and Hold Enable the Print and Hold tab feature.
Use logged‑in username
Query the Windows operating system for the user's ID and submit the ID as the default username associated with the held print job.
User Name Associate a user name with a held print job.
Keep duplicatedocuments
Allow print jobs having the same user and job names to remain in the printer memory withoutbeing overwritten.
Confidential print Password‑protect confidential print jobs with a four‑digit personal identification number (PIN).
The PIN is four digits, 0–9 or 1–6. For more information on the allowed digits for the PIN, seeyour printer User's Guide.
A confidential print job does not print until the PIN is entered in the PIN field and a user nameis selected on the printer control panel.
Verify print Print the first copy of a complex multiple‑copy print job for inspection. The remaining copiesare held until they are released for printing or canceled.
Reserve print Store a print job in the printer memory for printing at a later time.
Repeat print Print the job immediately and store a copy in the printer memory so that more copies maybe printed at a later time.
Notes:
• Some features are available only in select printer models.
• For more information on releasing held jobs from the printer control panel, see the printer User's Guide.
Using the Other Options tabThe Other Options tab controls the print driver options not associated with a feature‑specific tab.
Note: Some options are available only in some printer models.
Understanding the Universal Print Driver 33
Use To
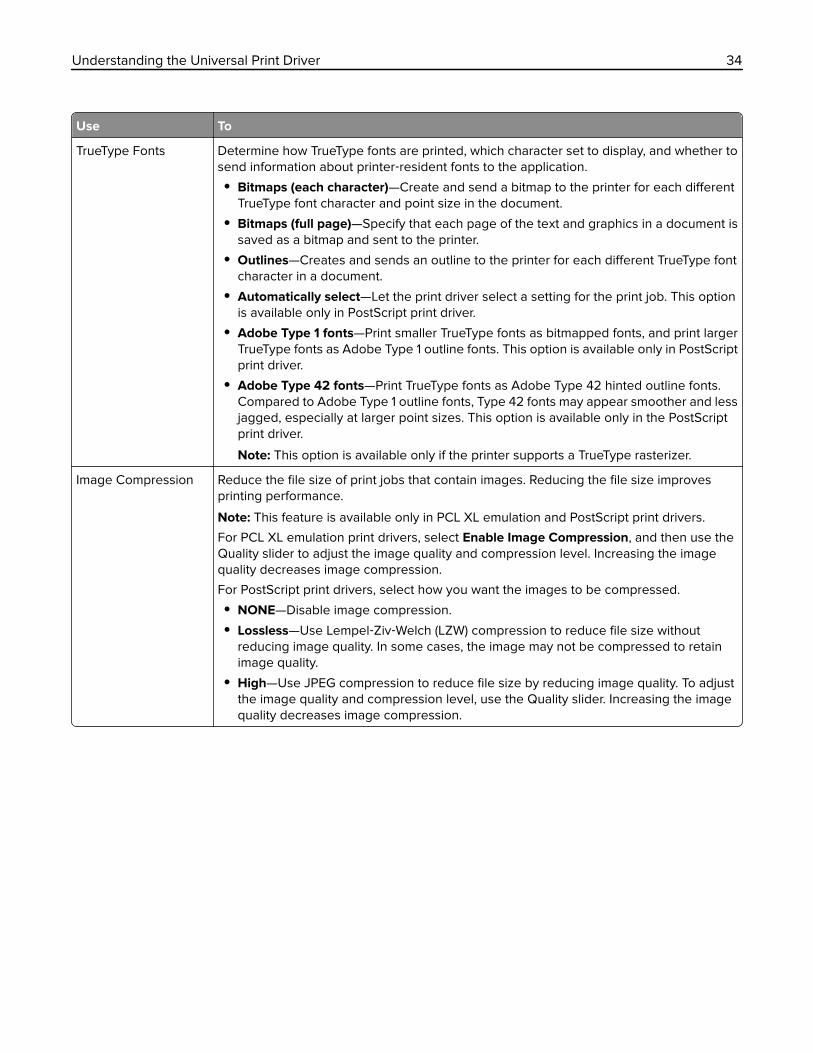
TrueType Fonts Determine how TrueType fonts are printed, which character set to display, and whether tosend information about printer‑resident fonts to the application.
• Bitmaps (each character)—Create and send a bitmap to the printer for each differentTrueType font character and point size in the document.
• Bitmaps (full page)—Specify that each page of the text and graphics in a document issaved as a bitmap and sent to the printer.
• Outlines—Creates and sends an outline to the printer for each different TrueType fontcharacter in a document.
• Automatically select—Let the print driver select a setting for the print job. This optionis available only in PostScript print driver.
• Adobe Type 1 fonts—Print smaller TrueType fonts as bitmapped fonts, and print largerTrueType fonts as Adobe Type 1 outline fonts. This option is available only in PostScriptprint driver.
• Adobe Type 42 fonts—Print TrueType fonts as Adobe Type 42 hinted outline fonts.Compared to Adobe Type 1 outline fonts, Type 42 fonts may appear smoother and lessjagged, especially at larger point sizes. This option is available only in the PostScriptprint driver.
Note: This option is available only if the printer supports a TrueType rasterizer.
Image Compression Reduce the file size of print jobs that contain images. Reducing the file size improvesprinting performance.
Note: This feature is available only in PCL XL emulation and PostScript print drivers.
For PCL XL emulation print drivers, select Enable Image Compression, and then use theQuality slider to adjust the image quality and compression level. Increasing the imagequality decreases image compression.
For PostScript print drivers, select how you want the images to be compressed.
• NONE—Disable image compression.
• Lossless—Use Lempel‑Ziv‑Welch (LZW) compression to reduce file size withoutreducing image quality. In some cases, the image may not be compressed to retainimage quality.
• High—Use JPEG compression to reduce file size by reducing image quality. To adjustthe image quality and compression level, use the Quality slider. Increasing the imagequality decreases image compression.
Understanding the Universal Print Driver 34

Use To
Edit Job Accounting Open the Job Accounting preferences dialog box and modify the Job Accounting settingsthat are associated with the print job.
• Keep history for last 5 entries—Retain the last five unique entries for each JobAccounting setting. The settings are available in a drop‑down menu under each settingin the Job Accounting dialog box during printing.
• Prompt for account information at print time—Prompt the user for job accountinginformation during printing.
• Do not prompt at print time. Use the following job accounting settings—Use the JobAccounting settings specified in the following fields:
– Use logged‑in user name—Use the Windows login ID of the current user andupdates the User Name/ID field with the retrieved information.
– User Name/ID—The user name or user ID associated with the print job.
– Account Code—The account code associated with the print job.
– Department Code—The department code associated with the print job.
Note: Some settings are available only in some printer models.
Metafile spooling Specify the format in which to store printing information on your disk while a print job iswaiting to be printed.
• Automatic—The print driver determines which format results in the fastest overall printtime for each job.
• On—The print driver spools all jobs in metafile format.
• Off—All print processor functions are disabled and the print driver no longer spools jobsin metafile (emf) format.
PostScript Control how the print driver produces the PostScript data that is sent to the printer.
• Optimize output format—Optimize the PostScript data stream that the print driverproduces based on the selected format. Output formats include Speed, Portability,Encapsulated PostScript, and Archive.
• Language level—Specify the level of PostScript to be used for the print job. Levels 1, 2,and 3 are available.
• Print error information—Print information about any PostScript language errorsencountered during printing.
• Generate PostScript in driver—The print driver generates the PostScript language forthe print job, rather than the program from which the document is printed.
Notes:
• These options are available only in PostScript drivers.
• Some functions are not available for use with the Encapsulated PostScript option inthe PostScript driver when Fax is enabled.
• If Encapsulated PostScript is selected as the output format, then any printer-specificsetting is removed. The output file can then be easily imported into other PostScriptapplications.
PCL emulation Access the PCL emulation options for both PCL 5 and PCL XL printer emulations.
• Graphic Mode—Control how the printer processes and prints text and graphics in adocument.
Note: This option is available only in the PCL 5 emulation driver.
Understanding the Universal Print Driver 35

Use To
Continuous Image Print pages without any space in between. The pages look like one continuous page.
Note: This option is available only in some print drivers.
Understanding the Universal Print Driver 36
Frequently asked questions
What are the benefits of using the Universal Print Driver(UPD)?The main benefit is the amount of time saved in deploying and administering a large fleet of printers. The UPDcan be used to print to multiple devices, therefore minimizing the number of drivers in the network environment.
Does the UPD support Plug'n'Play with devices?Plug'n'Play is available on all supported devices. For a list of supported devices, see “Device compatibility” onpage 15.
Is the UPD Microsoft certified?The UPD version 2 for Microsoft Windows XP operating system or later is certified for all Windows operatingsystems for which Microsoft offers certification programs.
Is Point and Print available with this driver?Point and Print works the same way with the UPD as with any other product‑specific driver.
What is a version number?A version number is a unique number or set of numbers assigned to a specific release of a program, file,firmware, hardware, driver, or software.
What is the UPD version numbering format?The UPD version number is divided into sets of numbers, separated by decimal points.
UPD 2.6.0.0 and later versioning schemaExample: 2.6.1.0where:2 is the major version.6 is the minor version.1 is the revision of the minor version.0 is the private version.
Frequently asked questions 37
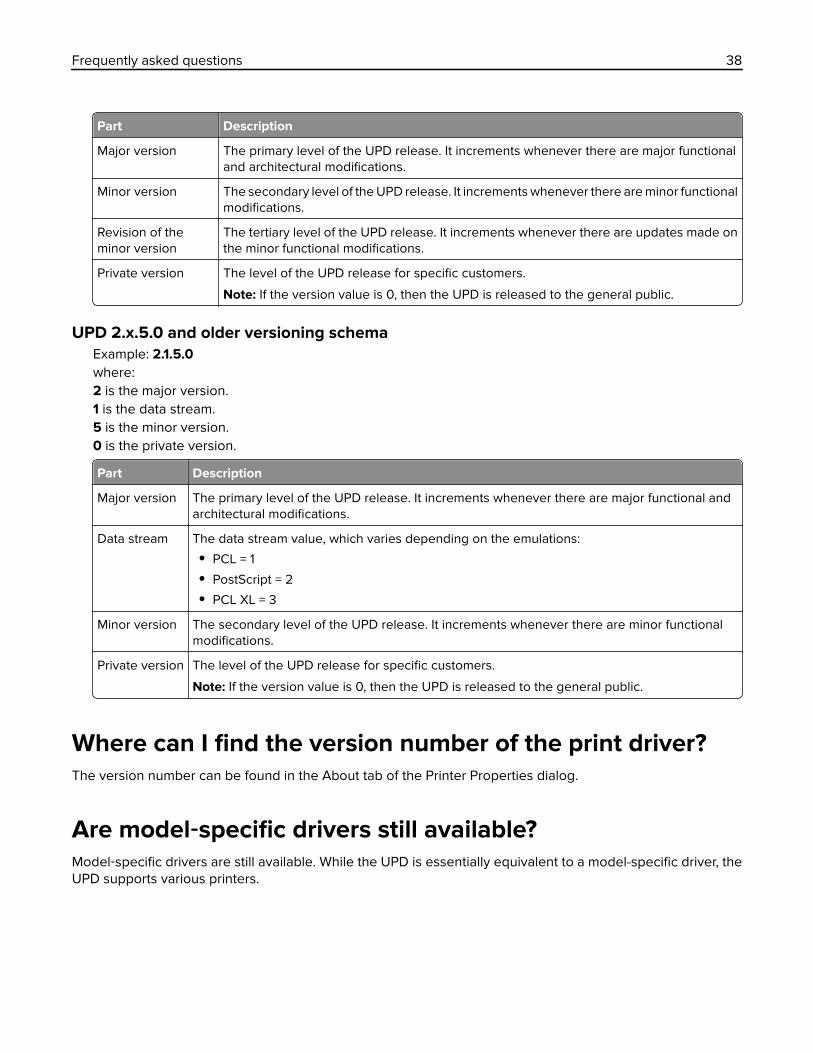
Part Description
Major version The primary level of the UPD release. It increments whenever there are major functionaland architectural modifications.
Minor version The secondary level of the UPD release. It increments whenever there are minor functionalmodifications.
Revision of theminor version
The tertiary level of the UPD release. It increments whenever there are updates made onthe minor functional modifications.
Private version The level of the UPD release for specific customers.
Note: If the version value is 0, then the UPD is released to the general public.
UPD 2.x.5.0 and older versioning schemaExample: 2.1.5.0where:2 is the major version.1 is the data stream.5 is the minor version.0 is the private version.
Part Description
Major version The primary level of the UPD release. It increments whenever there are major functional andarchitectural modifications.
Data stream The data stream value, which varies depending on the emulations:
• PCL = 1
• PostScript = 2
• PCL XL = 3
Minor version The secondary level of the UPD release. It increments whenever there are minor functionalmodifications.
Private version The level of the UPD release for specific customers.
Note: If the version value is 0, then the UPD is released to the general public.
Where can I find the version number of the print driver?The version number can be found in the About tab of the Printer Properties dialog.
Are model‑specific drivers still available?Model‑specific drivers are still available. While the UPD is essentially equivalent to a model-specific driver, theUPD supports various printers.
Frequently asked questions 38

When should I use a model‑specific print driver instead ofthe UPD?Use a model‑specific driver if your printer is not in the list of supported printers.
What printing modes are supported with the PCLEmulation UPD?Raster and GL/2 modes are supported. Host‑based printing is not supported.
Why is the Resource Administration tab missing in PrinterProperties?The Resource Administration tab is available in the previous versions of UPD. The functionality of this tab forthe UPD version 2 is now available in the Printer Driver Configuration Utility.
Is the Printer Driver Configuration Utility supported?The Printer Driver Configuration Utility is supported when using the Lexmark Universal Print Driver SystemInstallation package. The Lexmark Universal Print Driver System Administrator package is available atwww.lexmark.com.
Is the UPD based on Microsoft system driver technology?The UPD version 2 for Microsoft Windows XP operating system or later is based on Microsoft system drivertechnology.
Frequently asked questions 39

Notices
Edition noticeJanuary 2016
The following paragraph does not apply to any country where such provisions are inconsistent with locallaw: LEXMARK INTERNATIONAL, INC., PROVIDES THIS PUBLICATION “AS IS” WITHOUT WARRANTY OF ANYKIND, EITHER EXPRESS OR IMPLIED, INCLUDING, BUT NOT LIMITED TO, THE IMPLIED WARRANTIES OFMERCHANTABILITY OR FITNESS FOR A PARTICULAR PURPOSE. Some states do not allow disclaimer ofexpress or implied warranties in certain transactions; therefore, this statement may not apply to you.
This publication could include technical inaccuracies or typographical errors. Changes are periodically madeto the information herein; these changes will be incorporated in later editions. Improvements or changes in theproducts or the programs described may be made at any time.
References in this publication to products, programs, or services do not imply that the manufacturer intends tomake these available in all countries in which it operates. Any reference to a product, program, or service isnot intended to state or imply that only that product, program, or service may be used. Any functionallyequivalent product, program, or service that does not infringe any existing intellectual property right may beused instead. Evaluation and verification of operation in conjunction with other products, programs, or services,except those expressly designated by the manufacturer, are the user’s responsibility.
For Lexmark technical support, visit http://support.lexmark.com.
For information on supplies and downloads, visit www.lexmark.com.
© 2016 Lexmark International, Inc.
All rights reserved.
GOVERNMENT END USERSThe Software Program and any related documentation are "Commercial Items," as that term is defined in 48C.F.R. 2.101, "Computer Software" and "Commercial Computer Software Documentation," as such terms areused in 48 C.F.R. 12.212 or 48 C.F.R. 227.7202, as applicable. Consistent with 48 C.F.R. 12.212 or 48 C.F.R.227.7202-1 through 227.7207-4, as applicable, the Commercial Computer Software and Commercial SoftwareDocumentation are licensed to the U.S. Government end users (a) only as Commercial Items and (b) with onlythose rights as are granted to all other end users pursuant to the terms and conditions herein.
TrademarksLexmark and the Lexmark logo are trademarks of Lexmark International, Inc., registered in the United Statesand/or other countries.
Citrix Ready®, Citrix XenAppTM, and Citrix Presentation ServerTM are trademarks of Citrix Systems, Inc., and/orone or more of its subsidiaries, and may be registered in the United States Patent and Trademark Office andin other countries.
Microsoft, Windows, Windows Server, and Windows Vista are either registered trademarks or trademarks ofthe Microsoft group of companies in the United States and other countries.
Notices 40

PCL® is a registered trademark of the Hewlett-Packard Company. PCL is Hewlett-Packard Company’sdesignation of a set of printer commands (language) and functions included in its printer products. This printeris intended to be compatible with the PCL language. This means the printer recognizes PCL commands usedin various application programs, and that the printer emulates the functions corresponding to the commands.
PostScript is a registered trademark of Adobe Systems Incorporated in the United States and/or other countries.
All other trademarks are the property of their respective owners.
Notices 41
IndexBbenefits 37
Cchange history 7confidential print jobs 32
PIN 32connectivity 19
Ddevice compatibility 15downloading the Universal PrintDriver 23
Eenabling Travel Print 24
Ffax preference tab
using 31fax settings
using 31Fax tab 31
Hholding print jobs 32
Iinstalled options
updating 23
Llanguage support 22Layout tab
using 25
MMicrosoft certified 37model‑specific print driver 37
Ooperating system support 14options
updating 23
Other Options tab using 33
overlays tab 32overview 4
PPackage Creation Utility 23paper sizes
supported by the Universal PrintDriver 20
paper types supported by the Universal Print
Driver 21Paper/Finishing tab 26PCL emulation support 37Plug and play support 37Plug’N’Play 37Point and Print support 37Printer Driver Configuration Utilitysupport 37printing
confidential and other heldjobs 32
secure 32
QQuality tab
using 27
Rrepeating print jobs 32reserving print jobs 32Resource Administration tabmissing 37
Ssecure printing 32supported paper sizes 20
TTravel Print 20, 24
enabling 24
UUniversal Print Driver
downloading 23
Universal Print Drivers overview 4
updating installed options 23updating previous versions 23using fax preference tab 31using fax settings 31using Travel Print 24
Vverifying print jobs 32versioning schema 37
WWatermark tab 32
Index 42