Embed Size (px)
Citation preview
Universal Verification Methodology SystemVerilog (UVM-SV) Workshop Product Version KITSOCV 13.1 June 2013

Cadence Confidential 2
© 2007-2013 Cadence Design Systems, Inc. All rights reserved worldwide.
Printed in the United States of America.
Cadence Design Systems, Inc., 2655 Seely Avenue, San Jose, CA 95134, USA
Trademarks: Trademarks and service marks of Cadence Design Systems, Inc. (Cadence) contained in this document are attributed to Cadence with the appropriate symbol. For queries regarding Cadence's trademarks, contact the corporate legal department at the address shown above or call 800.862.4522.
Open SystemC, Open SystemC Initiative, OSCI, SystemC, and SystemC Initiative are trademarks or registered trademarks of Open SystemC Initiative, Inc. in the United States and other countries and are used with permission.
All other trademarks are the property of their respective holders.
Restricted Permission: This publication is protected by copyright law and international treaties and contains trade secrets and proprietary information owned by Cadence. Unauthorized reproduction or distribution of this publication, or any portion of it, may result in civil and criminal penalties. Except as specified in this permission statement, this publication may not be copied, reproduced, modified, published, uploaded, posted, transmitted, or distributed in any way, without prior written permission from Cadence. Unless otherwise agreed to by Cadence in writing, this statement grants Cadence customers permission to print one (1) hard copy of this publication subject to the following conditions:
• The publication may be used only in accordance with a written agreement between Cadence and its customer;
• The publication may not be modified in any way; • Any authorized copy of the publication or portion thereof must include all original copyright,
trademark, and other proprietary notices and this permission statement; • The information contained in this document cannot be used in the development of like products or
software, whether for internal or external use, and shall not be used for the benefit of any other party, whether or not for consideration
Disclaimer: Information in this publication is subject to change without notice and does not represent a commitment on the part of Cadence. The information contained herein is the proprietary and confidential information of Cadence or its licensors, and is supplied subject to, and may be used only by Cadence's customer in accordance with, a written agreement between Cadence and its customer. Except as may be explicitly set forth in such agreement, Cadence does not make, and expressly disclaims, any representations or warranties as to the completeness, accuracy or usefulness of the information contained in this document. Cadence does not warrant that use of such information will not infringe any third party rights, nor does Cadence assume any liability for damages or costs of any kind that may result from use of such information.
Restricted Rights: Use, duplication, or disclosure by the Government is subject to restrictions as set forth in FAR52.227-14 and DFAR252.227-7013 et seq. or its successor.
Cadence Confidential 3
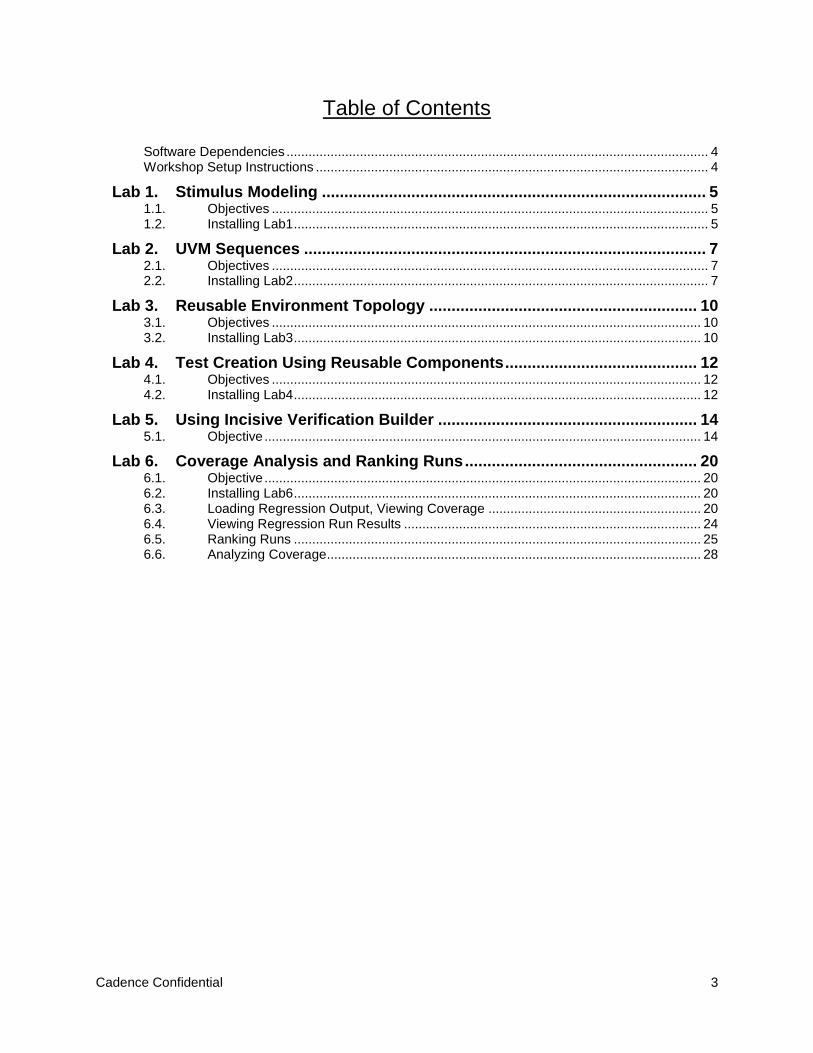
Table of Contents
Software Dependencies ................................................................................................................... 4 Workshop Setup Instructions ........................................................................................................... 4
Lab 1. Stimulus Modeling ...................................................................................... 5 1.1. Objectives ....................................................................................................................... 5 1.2. Installing Lab1 ................................................................................................................. 5
Lab 2. UVM Sequences .......................................................................................... 7 2.1. Objectives ....................................................................................................................... 7 2.2. Installing Lab2 ................................................................................................................. 7
Lab 3. Reusable Environment Topology ............................................................ 10 3.1. Objectives ..................................................................................................................... 10 3.2. Installing Lab3 ............................................................................................................... 10
Lab 4. Test Creation Using Reusable Components ........................................... 12 4.1. Objectives ..................................................................................................................... 12 4.2. Installing Lab4 ............................................................................................................... 12
Lab 5. Using Incisive Verification Builder .......................................................... 14 5.1. Objective ....................................................................................................................... 14
Lab 6. Coverage Analysis and Ranking Runs .................................................... 20 6.1. Objective ....................................................................................................................... 20 6.2. Installing Lab6 ............................................................................................................... 20 6.3. Loading Regression Output, Viewing Coverage .......................................................... 20 6.4. Viewing Regression Run Results ................................................................................. 24 6.5. Ranking Runs ............................................................................................................... 25 6.6. Analyzing Coverage ...................................................................................................... 28
Cadence Confidential 4
Software Dependencies • IES-XL 13.1
Workshop Setup Instructions This workshop uses the following three environment variables that you must ensure are set.
• SOCV_KIT_HOME - Points to the install location of the kit and is used to refer to examples contained inside the kit.It is used by both the full SoC Verification Kit and the reduced version known as the IP Kit. The following illustrates how it should be set:
setenv SOCV_KIT_HOME <INCISIV_install_dir>/kits/VerificationKit
• MY_WORK_AREA - Points to general purpose working directory that the user is required to create. This is where all the workshop labs should be run from and kit navigator launched. The user is free to have this work area located where ever they want. An example suggestion is:
mkdir <path_to_local_work_area>/work setenv MY_WORK_AREA <path_to_local_work_area>/work
• MY_REGRESSION_AREA - Points to the directory Incisive Manager stores its regression content into and must be created by the user. This folder can and should be cleaned periodically. It is used to retain regression data between runs. This directory can be located anywhere but an example suggestion is:
mkdir $MY_WORK_AREA/sessions setenv MY_REGRESSION_AREA $MY_WORK_AREA/sessions
After setting up the environment variables type:
source $SOCV_KIT_HOME/env.csh source $SOCV_KIT_HOME/bin/set_uvmhome.csh
Cadence Confidential 5
Lab 1. Stimulus Modeling 1.1. Objectives Use the UVM class library to:
• Generate random stimulus and layer constraints • Explore the UVM automation provided in the library • Use the UVM messaging capability to control verbosity from the command-line
1.2. Installing Lab1 To install lab1, do the following
% $SOCV_KIT_HOME/bin/install_uvm –lab1 % cd lab1
For this lab, you can work in the following directory: lab1
Lab 1a: UVM Automation and Messaging 1. Review the UART frame definition: uart_frame.sv
Notes:
o uart_frame is derived from the uvm_sequence_item base class (ref - lab1_note1) o Default constraints are specified (lab1_note2). o The `uvm_object_utils and `uvm_field_* macros are used for built-in automation (lab1_note3). o The constructor, new (), is included in the class definition (lab1_note4). o Parity is calculated in the post_randomize() method (not a random variable) (lab1_note5).
2. Review the simple frame generator and top-level module: lab1_top.sv
This file instantiates a generator class that randomizes frames and sends them to the DUT via a send_to_dut() task.
Notes:
• uvm_pkg::* is imported at the top level to import the UVM library (lab1_note1). • uart_frame.sv is included to import the frame definition (lab1_note2). • A frame_generator class loops through “count” times to randomize a frame and send it to the
DUT. • The top module instantiates the frame_generator, constructs and randomizes it and calls the
gen_and_push() method to start generating stimulus. • In the send_to_dut () task (lab1_note3) we explore the UVM built-in automation: copy(), clone(),
sprint(), set_name().
3. Run a simulation and review the results:
% irun –f run.f
Review the results in the irun.log file.
4. Use the UVM messaging capability:
The default UVM_VERBOSITY value is LOW, so only UVM_LOW and UVM_NONE messages are printed.
% irun –f run.f +UVM_VERBOSITY=UVM_HIGH (lots of data is displayed) % irun –f run.f +UVM_VERBOSITY=UVM_NONE (minimal data is displayed)
Cadence Confidential 6
Note: IES-XL does not recompile/re-elaborate the design/testbench for these changes.
5. Run with multiple random seeds to get different results:
% irun –f run.f +svseed=RANDOM
Lab 1b: Constraint Layering 1. Adding constraints via layering: lab1b_top.sv
Note:
• Create a test1_frame class by extending from uart_frame. • Add a constraint to limit the payload value to less than 8’h3F. • Modify the frame_generator class to use test1_frame. • Run a simulation and review the results:
% irun –f run1b.f
Make sure that the new constraint took effect and no frames with payload >8’h3f are generated.
1. (Optional) Use the random seed to get different results:
% irun –f run1b.f +svseed=RANDOM
Lab 1c: Default Tree Printer Explore built-in print option: uvm_default_tree_printer.
Note:
• Review the lab1c_top.sv file and look for lab1c_note1. When printing the frame data, the default tree printer format is used (instead of the table printer).
• Run a simulation and review the results:
% irun –f run1c.f
Review the irun.log file to see how the tree printer formats output data.
Cadence Confidential 7
Lab 2. UVM Sequences 2.1. Objectives
• Explore the driver and sequencer interaction • Review the sequencer default behavior • Execute a specific sequence • Write a new sequence
2.2. Installing Lab2 To install lab2, do the following:
% $SOCV_KIT_HOME/bin/install_uvm –lab2 % cd lab2
For this lab, work in the following directory: lab2/
Note: In this lab, we included the driver, sequencer and top-level module in the same file. In a real verification environment these files would be separated out.
Lab 2a: The Driver and Sequencer Interaction 1. Review the sequencer: lab2_top.sv:
• uart_sequencer is derived from the uvm_sequencer base class (lab2_note1). This provides UVM built-in fields and automation.
• uvm_component_utils (lab2_note2) ) is a macro, used for registering a uvm_component or any of its sub-class.
2. Review the Driver:
• uart_tx_driver is derived from uvm_driver (lab2_note3). • `uvm_component_utils (lab2_note4) ) is a macro, used for registering a uvm_component or any
of its sub-class. • run_phase () task – called during simulation run time. Loops through and gets an item from the
sequencer, sends the item to the DUT and calls sequencer item_done() method. • For this lab, send_to_dut () delays prints the data item for this simple driver.
3. Review the Simple Sequence Definition: (Starting at lab2_note5):
• This simple sequence will generate random UART frames as they are requested from the driver. The pre_body()task raises an objection for the sequence, the body()task will execute five UART frames in a loop – each frame is generated when the driver requests through the get_next_item()call. The post_body()task drops an objection for the sequence so that the simulation can gracefully end.
4. Review the top-level test: (Starting at lab2_note6)
• Before creating the driver and sequencer, the UVM configuration mechanism is used to specify the sequence to be executed in the run_phase (lab2_note7). This sets the default sequence to the simple_sequence.
• The sequencer and driver are declared and created (lab2_note7). Then they are connected using a TLM connection. (lab2_note8)
• Finally, a global run_test () task is called to start the simulation. run_test() is part of the UVM library and will start the simulation (lab2_note9)
Cadence Confidential 8
5. Run a simulation and review the results (results are in the irun.log file):
% irun –f run.f
Review the frame printed out by the driver:
o How many frames were executed? o Which sequence(s) were executed during the simulation? (hint: look at the value of “parent
sequence” in each frame) o How did the sequencer know what sequence to execute?
6. Run with different random seeds and get different results:
% irun –f run.f +svseed=RANDOM
7. One way to view the transactions was in the irun.log file. With built-in transaction recording, SimVision allows you to view the transactions graphically. Invoke Simvision and load up the transaction database:
% simvision –input lab2a.svcf
• The SimVision Waveform window displays the five transactions generated during the simulation run. You should be able to see the transactions generated by the simple sequence, and those captured in the driver’s send_to_dut() task. The fields of the uart_frame are captured and the timing of the task matches the delay value.
• The Transaction Stripe Chart window displays the same data in a different format. You can see the frame field values in either stripe-chart or table format.
• Select a transaction in the stripe chart (or Table) and you will see the same transaction highlighted in the waveform window.
Lab 2b: User-Defined Sequences
1. Review the sequence library: uart_seq_lib.sv A base sequence, uart_base_seq (lab2_note2) incorporates the objection mechanism so any ACTIVE sequences should extend from this class and will automatically incorporate setting/dropping objections.
Four user-defined sequences are included: uart_incr_payload_seq, uart_bad_parity_seq, uart_transmit_seq, and uart_nested_seq (hint: search for SEQEUENCE in the file).
The uart_nested_seq (lab2_note3) is a sequence that executes other sequences.
2. Modify the lab2_top.sv file to include the sequence library (lab2_note10)
3. Modify the top-level test: lab2_top.sv • Specify the uart_nested _seq as the new default sequence.
• Uncomment the two lines containing lab2_note11 and comment out the lines above it.
4. Run another simulation and review the results:
% irun –f run.f
o Which sequence(s) were executed during the simulation? (Hint: look at the value of “parent sequence” in each frame). Because this is a nested sequence, you will see that the nested sequence executed multiple sub-sequences
o Do the values look correct? o How did the sequencer know what sequence to execute?
Cadence Confidential 9
5. Invoke Simvision and load up the new transaction database:
% simvision –input lab2b.svcf
• The SimVision Waveform window displays the sequencer and driver transactions. If you expand the uart_nested_seq (the [+] sign next to the name in the Waveform) it shows the top-level sequence (uart_nested_seq), the sub-sequences (incr_payload_seq, bad_parity_seq, and transmit-seq), and the individual uart frame transactions (req) that were generated.
• The Transaction Stripe Chart window can also expand/collapse to show the sequence and transaction data.
Lab 2c: Creating Your Own Sequence (OPTIONAL) 1. Modify the sequence library: uart_seq_lib.sv:
• Go to line containing lab2_note3 and add your own sequence:
o You can do a decrementing payload sequence o You can nest two of the existing sequences o Go wild!
2. Modify lab2_top.sv to set your new sequence as the default sequence.
3. Run another simulation and review the results:
% irun –f run.f +svseed=RANDOM

Cadence Confidential 10
Lab 3. Reusable Environment Topology 3.1. Objectives
• Review and understand the correct structure of a reusable component.
3.2. Installing Lab3 To install lab3, please do the following:
% $SOCV_KIT_HOME/bin/install_uvm –lab3 % cd lab3
For this lab, work in the following directory: lab3/
1. Review the files in the UVC directory: uart/
All of the reusable files that comprise the UART UVC are located in the uart/sv directory. Look at some of the files to understand the UVC component architecture. A list of these files is `included into uart_pkg.sv file which is imported into the top-level module.
uart/sv/uart_tx_driver.sv:
o uart_tx_driver extends from uvm_driver. The driver includes code to represent protocol for send_tx_frame () task. The uart_tx_driver interacts with the DUT signals via a virtual interface.
uart/sv/uart_tx_agent.sv:
o uart_tx_agent extends from uvm_agent. The agent includes instances of a monitor, driver and sequencer.
o Look at the build_phase() method
The monitor is created (lab3_note1). Its build_phase() method will be automatically called.
If the is_active flag is UVM_ACTIVE, the driver and sequencer are created and their configurations are set to the uart_config.
uart/sv/uart_env.sv:
o uart_env extends from uvm_env. It contains instances of the Rx and Tx agents. These are created in the env’s build_phase() method.
Review some of the other files in this (lab3) directory if you have time.
1. Review the top-level module: uart_top.sv:
• An instance of the uart_env is placed into the testbench (lab3_note1), along with a configuration class instance that specifies the DUT/test configuration.
• The test environment is created and invoked in an initial block (lab3_note2)
o First, the factory is used to create the uart_env component instance (lab3_note3) o The configuration is created, randomized and assigned. This configuration is UVC specific
(lab3_note4, lab3_note5) o Next, the virtual interface assignments are made, using the uvm_config_db (lab3_note6) o Then we “instruct” the sequencer in the TX agent to execute the uart_trafffic_seq in the
run_phase (lab3_note7) o Finally, the global UVM task: run_test() is called to start the test and run the simulation to
completion.
Cadence Confidential 11
2. Run a simulation and review the irun.log file:
% irun –f run.f
o Search for SVSEED in irun.log file o The first thing you see printed in the log file is the UART topology. This capability is provided
with the UVM built-in automation when the test called uart0.print() in the second initial block (lab3_note3d); note that the uart.print() was called after #1 to ensure that the build_phase has completed and the uart and all its sub-components have been built.
o Notice that the Tx agent is UVM_ACTIVE and Rx agent is UVM_PASSIVE. The Tx agent contains driver, monitor and sequencer, while the Rx agent only contains a monitor.
3. Reviewing the results in SimVision:
% simvision –input lab3a.svcf
o This time, the transaction data is captured along with the signal data. The txd signal transmits the payload, so you can easily see the payload because it is captured in the uart_frame transaction. The Transaction Stripe Chart is also available for exploring the simulation results
4. Controlling the Topology: uart_top.sv:
• Now we are going to see what happens when we make a component UVM_PASSIVE.
o Modify the uart_top.sv file – go to line containing lab3_note4 and uncomment the lines that configure the Tx Agent as UVM_PASSIVE.
5. Run a simulation and review the results:
% irun –f run.f
Note that the Rx and Tx agents are now UVM_PASSIVE, and no stimulus is generated or sent to the DUT. This is how a UVC would be used as a monitoring device at the system level.
Cadence Confidential 12
Lab 4. Test Creation Using Reusable Components 4.1. Objectives
• Explore test creation and control using a UVM Testbench • Examine an existing test and observe how it creates a verification environment • Control environment behavior from the testbench and the test • Control test execution and execute multiple tests without recompiling/re-elaborating the design • Controlling the test exit using objection handling mechanism
4.2. Installing Lab4 To install lab4, do the following:
% $SOCV_KIT_HOME/bin/install_uvm –lab4 % cd lab4
For this lab, work in the following directory: lab4/
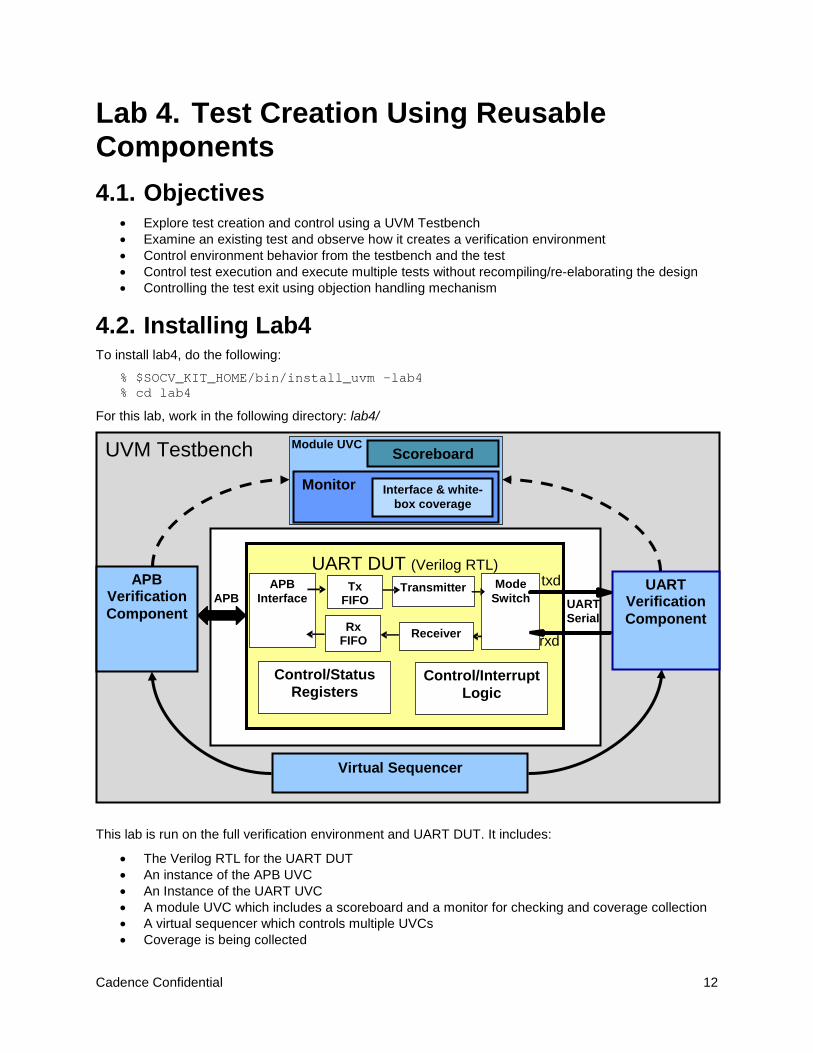
This lab is run on the full verification environment and UART DUT. It includes:
• The Verilog RTL for the UART DUT • An instance of the APB UVC • An Instance of the UART UVC • A module UVC which includes a scoreboard and a monitor for checking and coverage collection • A virtual sequencer which controls multiple UVCs • Coverage is being collected
UVM Testbench
Monitor
Scoreboard
Virtual Sequencer
APB Verification Component
UART DUT (Verilog RTL)
APB Interface
Mode Switch
Control/Interrupt Logic
Rx FIFO Receiver
Transmitter
Tx
FIFO
Control/Status Registers
txd
rxd
UART Verification Component APB UART
Serial
Interface & white-box coverage
Module UVC
Cadence Confidential 13
• Transaction recording is also enabled
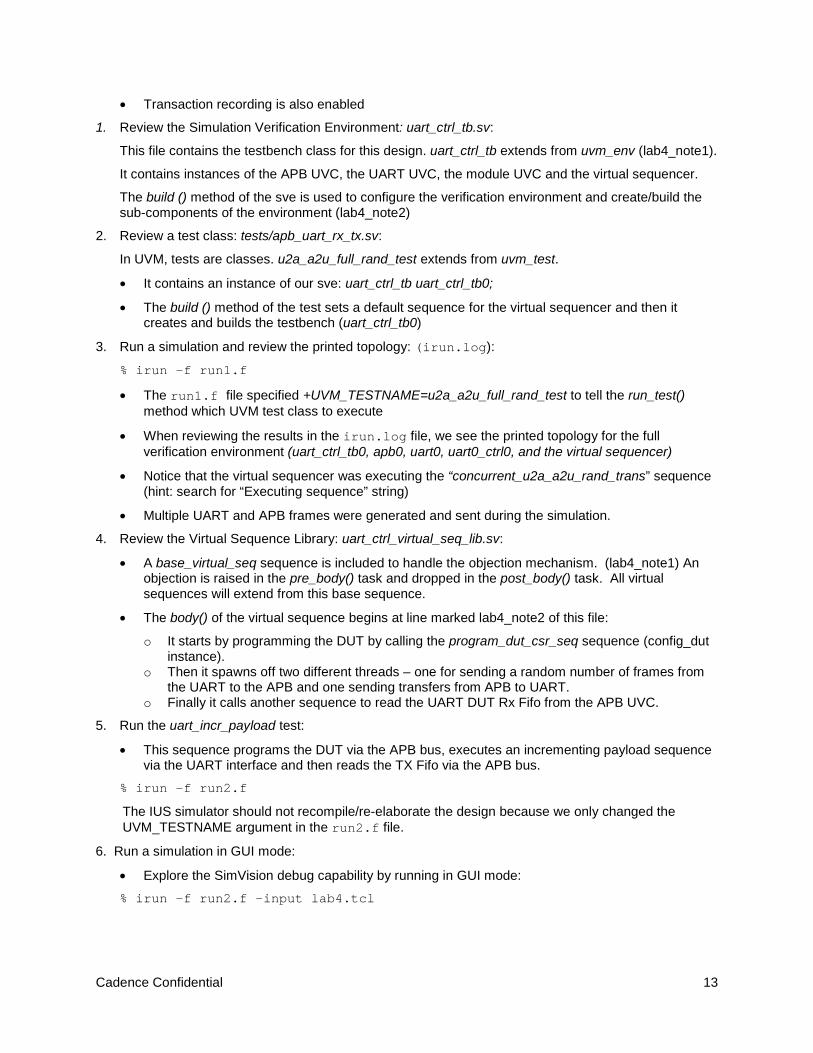
1. Review the Simulation Verification Environment: uart_ctrl_tb.sv:
This file contains the testbench class for this design. uart_ctrl_tb extends from uvm_env (lab4_note1).
It contains instances of the APB UVC, the UART UVC, the module UVC and the virtual sequencer.
The build () method of the sve is used to configure the verification environment and create/build the sub-components of the environment (lab4_note2)
2. Review a test class: tests/apb_uart_rx_tx.sv:
In UVM, tests are classes. u2a_a2u_full_rand_test extends from uvm_test.
• It contains an instance of our sve: uart_ctrl_tb uart_ctrl_tb0;
• The build () method of the test sets a default sequence for the virtual sequencer and then it creates and builds the testbench (uart_ctrl_tb0)
3. Run a simulation and review the printed topology: (irun.log):
% irun –f run1.f
• The run1.f file specified +UVM_TESTNAME=u2a_a2u_full_rand_test to tell the run_test() method which UVM test class to execute
• When reviewing the results in the irun.log file, we see the printed topology for the full verification environment (uart_ctrl_tb0, apb0, uart0, uart0_ctrl0, and the virtual sequencer)
• Notice that the virtual sequencer was executing the “concurrent_u2a_a2u_rand_trans” sequence (hint: search for “Executing sequence” string)
• Multiple UART and APB frames were generated and sent during the simulation.
4. Review the Virtual Sequence Library: uart_ctrl_virtual_seq_lib.sv:
• A base_virtual_seq sequence is included to handle the objection mechanism. (lab4_note1) An objection is raised in the pre_body() task and dropped in the post_body() task. All virtual sequences will extend from this base sequence.
• The body() of the virtual sequence begins at line marked lab4_note2 of this file:
o It starts by programming the DUT by calling the program_dut_csr_seq sequence (config_dut instance).
o Then it spawns off two different threads – one for sending a random number of frames from the UART to the APB and one sending transfers from APB to UART.
o Finally it calls another sequence to read the UART DUT Rx Fifo from the APB UVC.
5. Run the uart_incr_payload test:
• This sequence programs the DUT via the APB bus, executes an incrementing payload sequence via the UART interface and then reads the TX Fifo via the APB bus.
% irun –f run2.f
The IUS simulator should not recompile/re-elaborate the design because we only changed the UVM_TESTNAME argument in the run2.f file.
6. Run a simulation in GUI mode:
• Explore the SimVision debug capability by running in GUI mode:
% irun –f run2.f –input lab4.tcl
Cadence Confidential 14
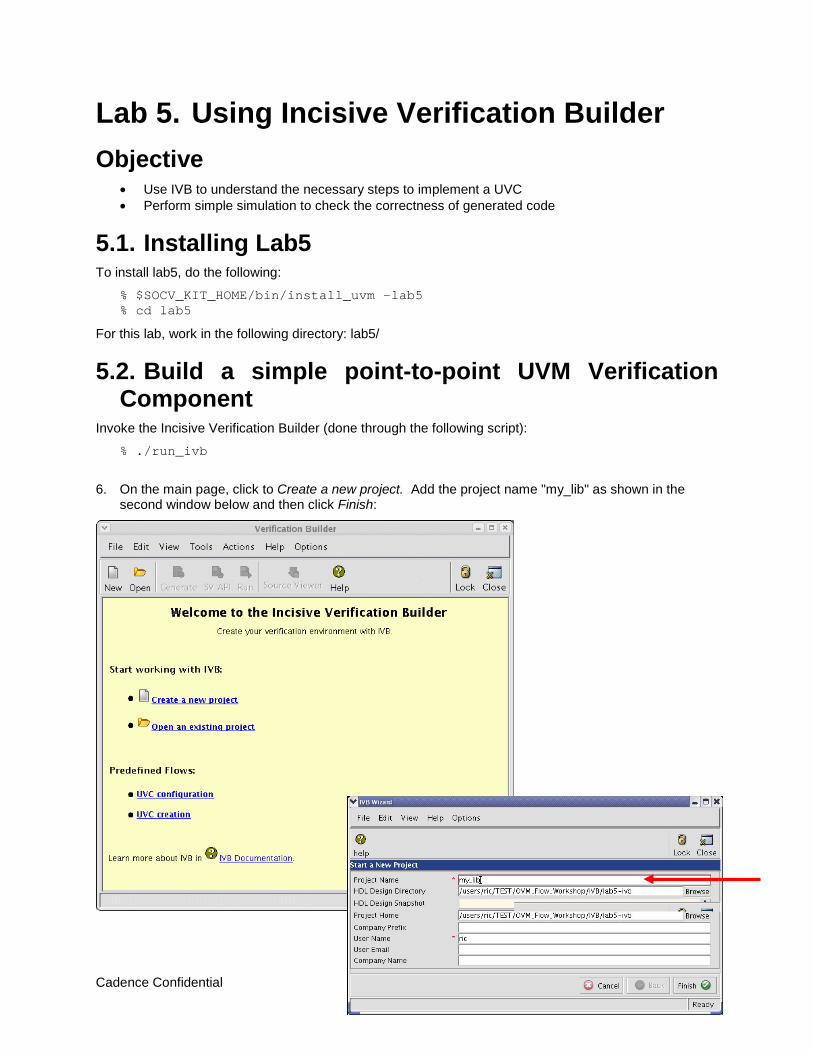
Lab 5. Using Incisive Verification Builder Objective
• Use IVB to understand the necessary steps to implement a UVC • Perform simple simulation to check the correctness of generated code
5.1. Installing Lab5 To install lab5, do the following:
% $SOCV_KIT_HOME/bin/install_uvm -lab5 % cd lab5
For this lab, work in the following directory: lab5/
5.2. Build a simple point-to-point UVM Verification Component
Invoke the Incisive Verification Builder (done through the following script):
% ./run_ivb
6. On the main page, click to Create a new project. Add the project name "my_lib" as shown in the second window below and then click Finish:
Cadence Confidential 15
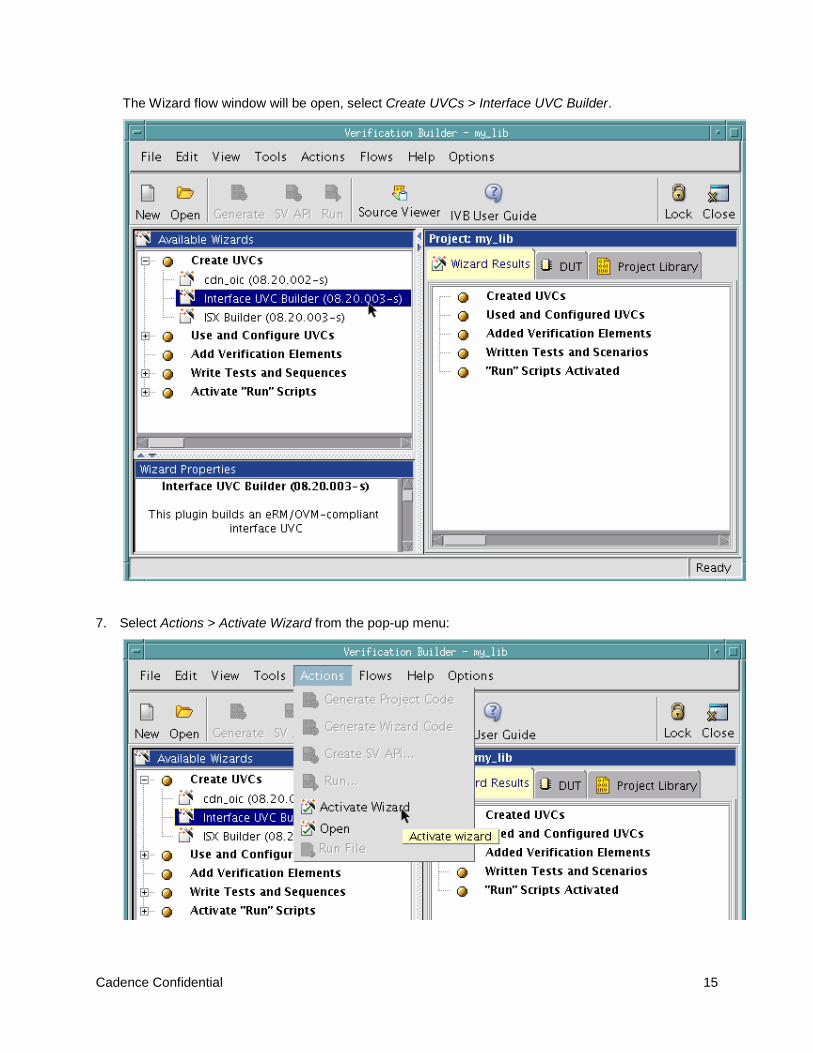
The Wizard flow window will be open, select Create UVCs > Interface UVC Builder.
7. Select Actions > Activate Wizard from the pop-up menu:

Cadence Confidential 16
8. The IVB Building Wizard will start with the following windows, keep the default values unless otherwise indicated:
9. On General UVC Options window, type 'my_uvc' as package name and select 'SystemVerilog –
Accellera UVM'.
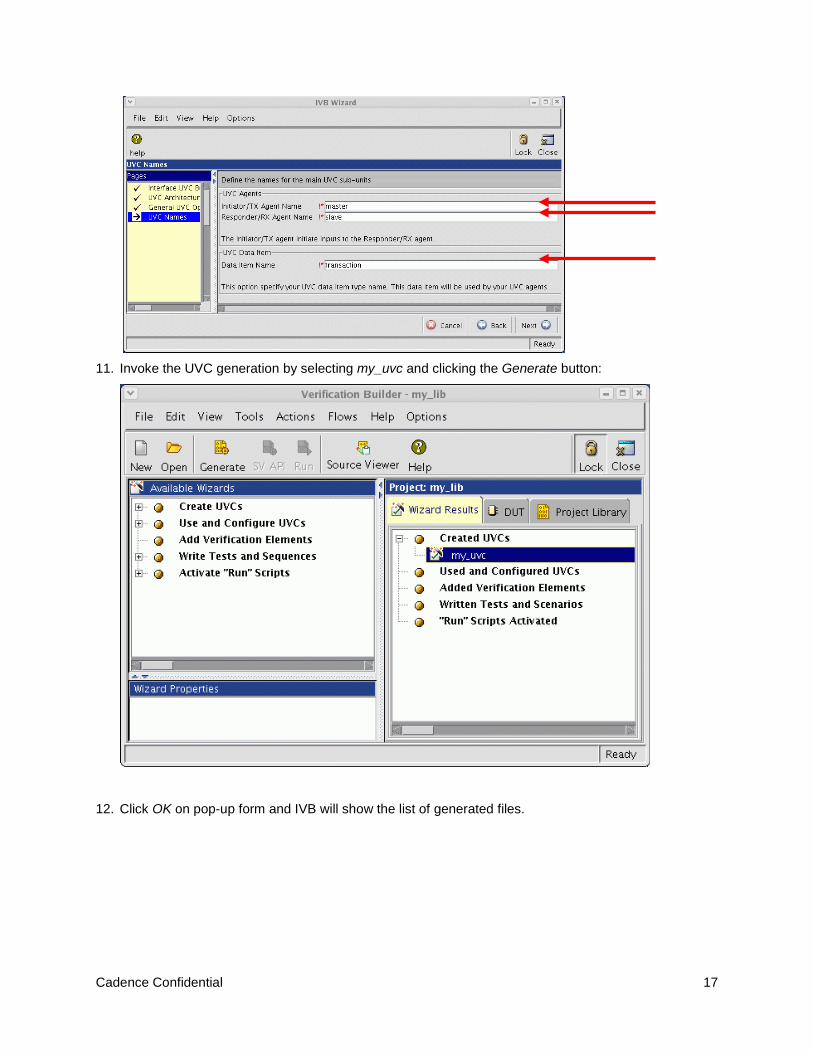
10. Continue filling in names for the initiator, responder, and data item names say master, slave, and transaction respectively.
Cadence Confidential 17
11. Invoke the UVC generation by selecting my_uvc and clicking the Generate button:
12. Click OK on pop-up form and IVB will show the list of generated files.

Cadence Confidential 18
13. Exit from IVB and cd to my_lib_lib/my_uvc/sv: Analyze:
• my_uvc_transaction.sv - for data items generation • my_uvc_master_agent.sv, my_uvc_master_driver.sv, my_uvc_master_monitor.sv,
my_uvc_master_sequencer.sv to understand the generated agent structure
14. cd ../examples and review the files:
• test_lib.sv, check how test has been implemented • examine the sequence lib
15. cd ../, execute ./demo.sh, simulation will start with graphical interface. Run the simulation by clicking the run button:
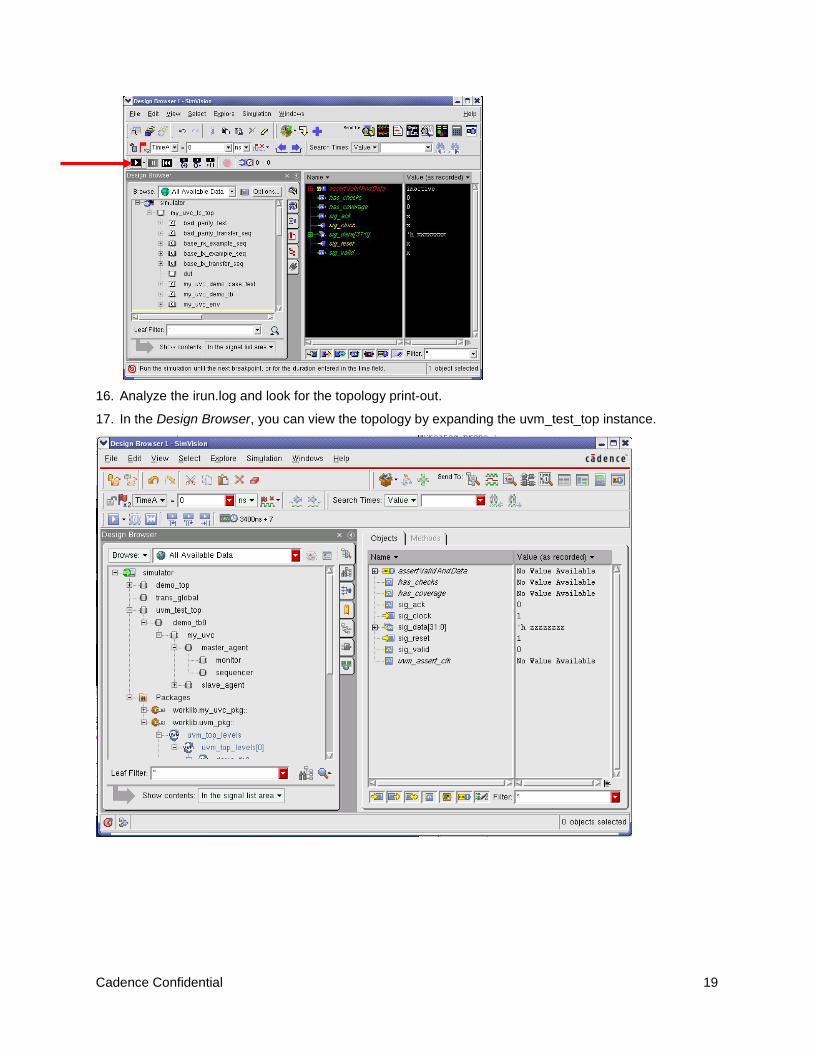
Cadence Confidential 19
16. Analyze the irun.log and look for the topology print-out.
17. In the Design Browser, you can view the topology by expanding the uvm_test_top instance.
Cadence Confidential 20
Lab 6. Coverage Analysis and Ranking Runs In this section, we use Enterprise Manager to view regression results and do test case ranking.
To save time in this section we load an already-executed regression result.
6.1. Objective • Use an executable verification plan to analyze test runs. • Analyze the relative contribution of each run to the total coverage.
6.2. Installing Lab6 To install lab6, do the following:
% $SOCV_KIT_HOME/bin/install_uvm –lab6 % cd lab6
For this lab, work in the following directory: lab6/
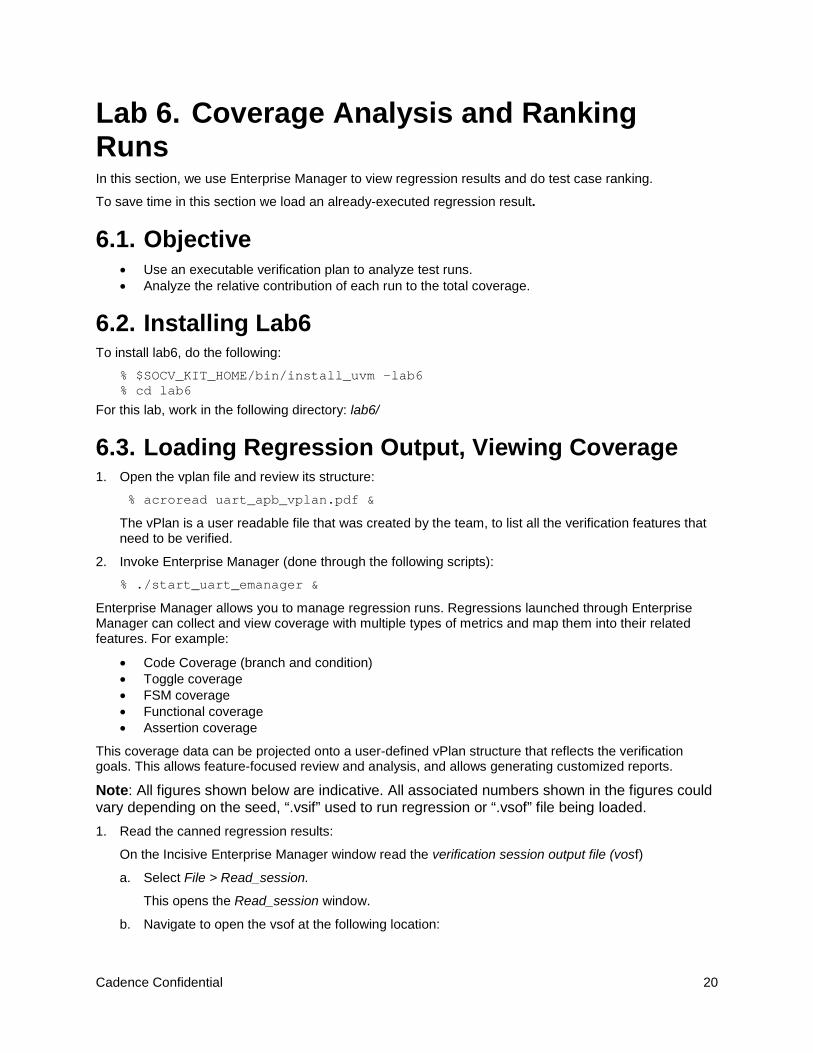
6.3. Loading Regression Output, Viewing Coverage 1. Open the vplan file and review its structure:
% acroread uart_apb_vplan.pdf &
The vPlan is a user readable file that was created by the team, to list all the verification features that need to be verified.
2. Invoke Enterprise Manager (done through the following scripts):
% ./start_uart_emanager &
Enterprise Manager allows you to manage regression runs. Regressions launched through Enterprise Manager can collect and view coverage with multiple types of metrics and map them into their related features. For example:
• Code Coverage (branch and condition) • Toggle coverage • FSM coverage • Functional coverage • Assertion coverage
This coverage data can be projected onto a user-defined vPlan structure that reflects the verification goals. This allows feature-focused review and analysis, and allows generating customized reports.
Note: All figures shown below are indicative. All associated numbers shown in the figures could vary depending on the seed, “.vsif” used to run regression or “.vsof” file being loaded. 1. Read the canned regression results:
On the Incisive Enterprise Manager window read the verification session output file (vosf)
a. Select File > Read_session.
This opens the Read_session window.
b. Navigate to open the vsof at the following location:
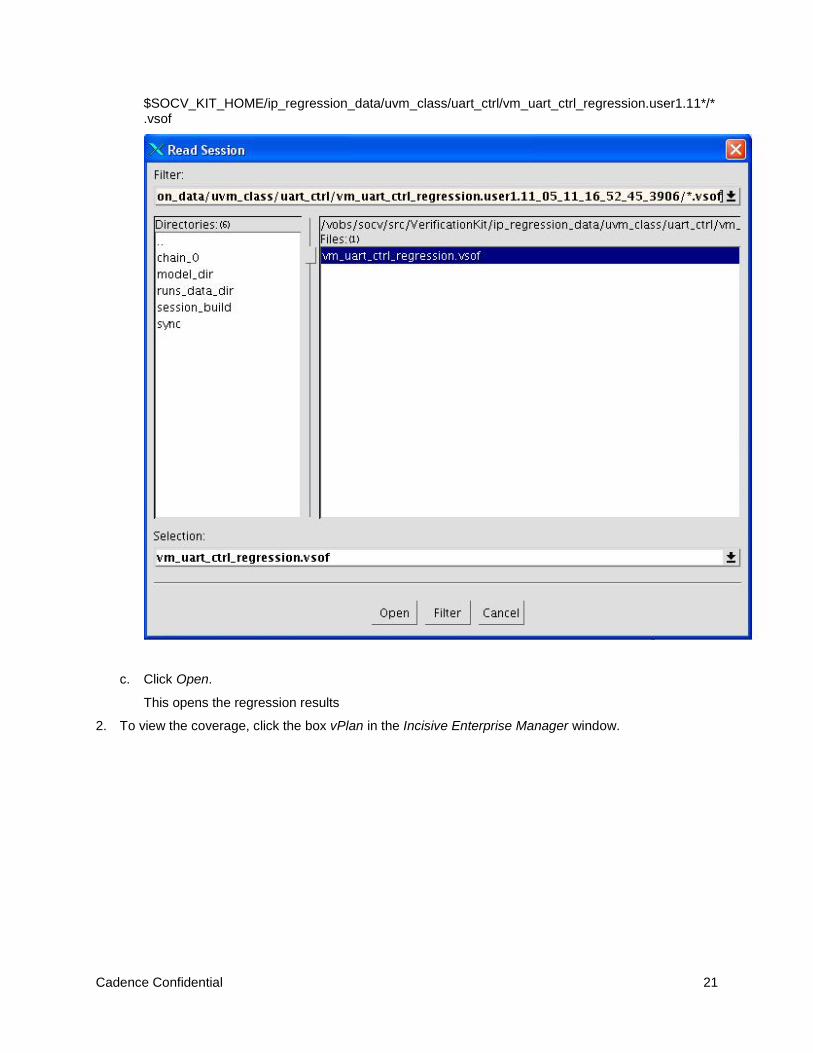
Cadence Confidential 21
$SOCV_KIT_HOME/ip_regression_data/uvm_class/uart_ctrl/vm_uart_ctrl_regression.user1.11*/*.vsof
c. Click Open.
This opens the regression results
2. To view the coverage, click the box vPlan in the Incisive Enterprise Manager window.
Cadence Confidential 22
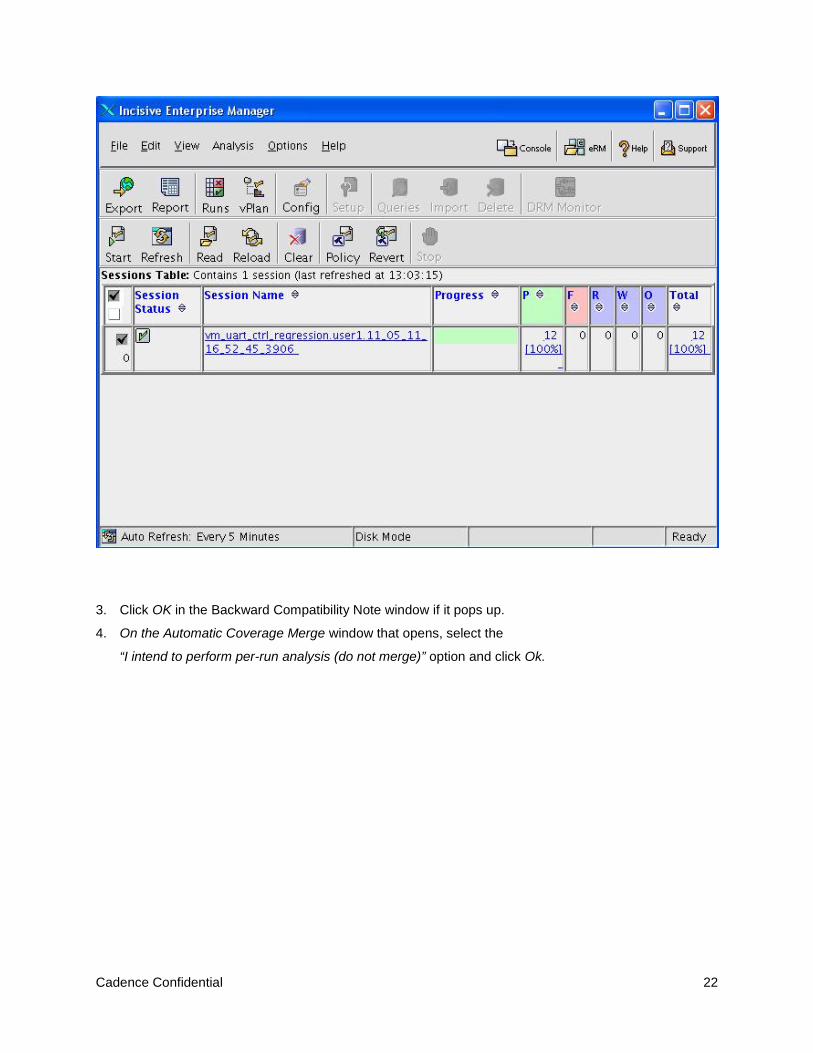
3. Click OK in the Backward Compatibility Note window if it pops up.
4. On the Automatic Coverage Merge window that opens, select the
“I intend to perform per-run analysis (do not merge)” option and click Ok.
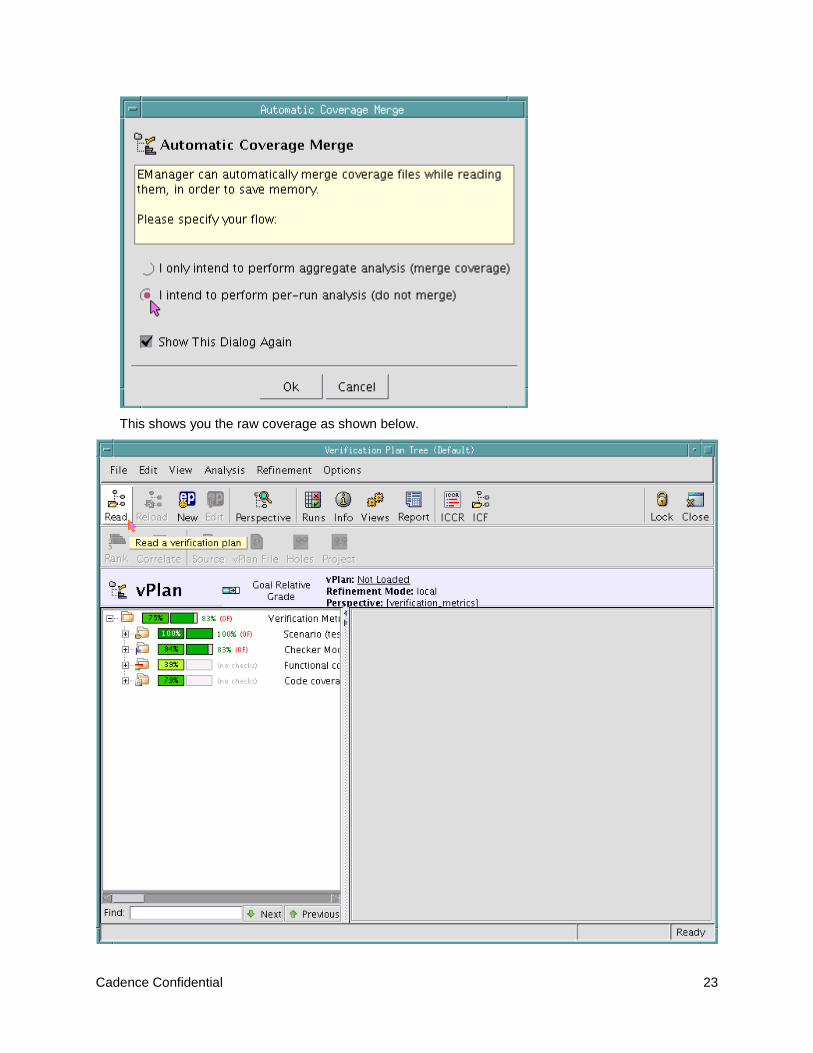
Cadence Confidential 23
This shows you the raw coverage as shown below.
Cadence Confidential 24
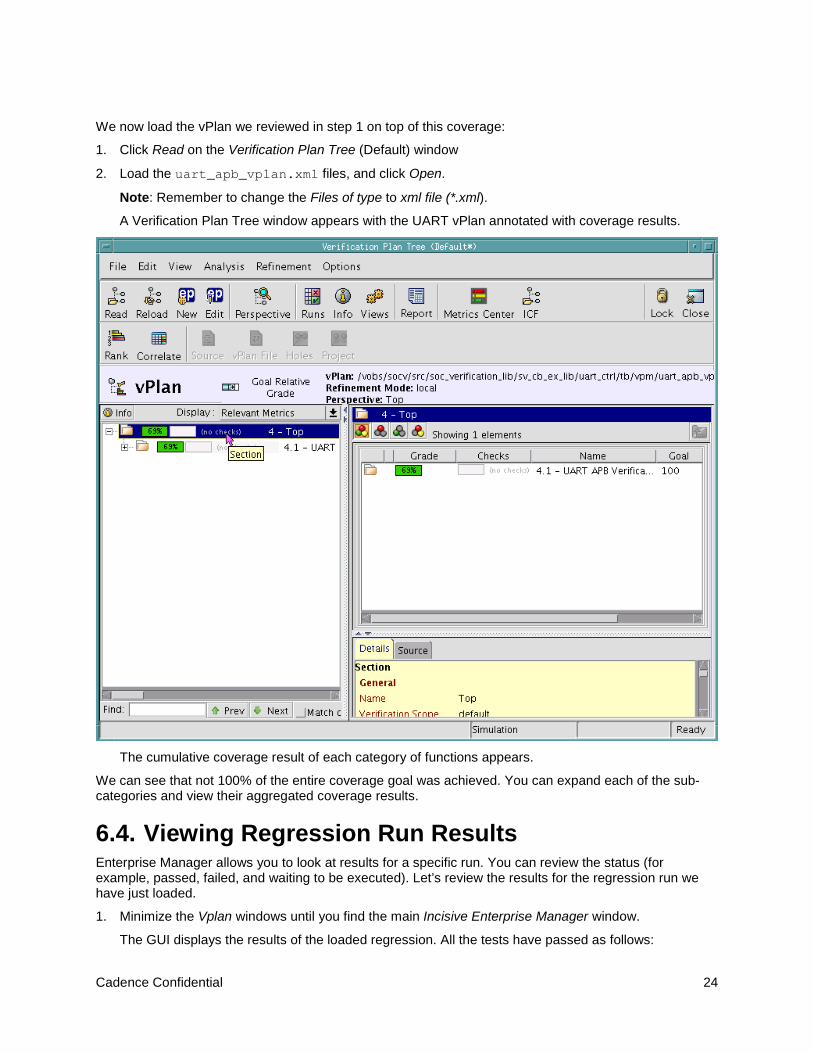
We now load the vPlan we reviewed in step 1 on top of this coverage:
1. Click Read on the Verification Plan Tree (Default) window
2. Load the uart_apb_vplan.xml files, and click Open.
Note: Remember to change the Files of type to xml file (*.xml).
A Verification Plan Tree window appears with the UART vPlan annotated with coverage results.
The cumulative coverage result of each category of functions appears.
We can see that not 100% of the entire coverage goal was achieved. You can expand each of the sub-categories and view their aggregated coverage results.
6.4. Viewing Regression Run Results Enterprise Manager allows you to look at results for a specific run. You can review the status (for example, passed, failed, and waiting to be executed). Let’s review the results for the regression run we have just loaded.
1. Minimize the Vplan windows until you find the main Incisive Enterprise Manager window.
The GUI displays the results of the loaded regression. All the tests have passed as follows:
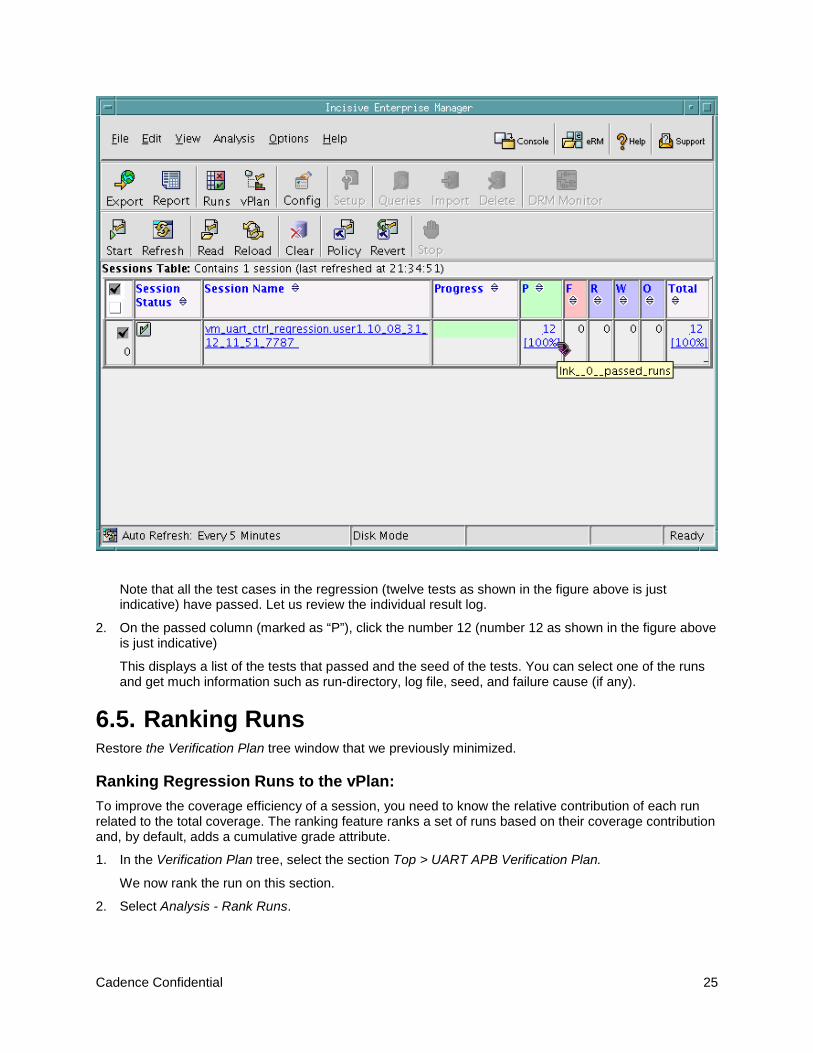
Cadence Confidential 25
Note that all the test cases in the regression (twelve tests as shown in the figure above is just indicative) have passed. Let us review the individual result log.
2. On the passed column (marked as “P”), click the number 12 (number 12 as shown in the figure above is just indicative)
This displays a list of the tests that passed and the seed of the tests. You can select one of the runs and get much information such as run-directory, log file, seed, and failure cause (if any).
6.5. Ranking Runs Restore the Verification Plan tree window that we previously minimized.
Ranking Regression Runs to the vPlan: To improve the coverage efficiency of a session, you need to know the relative contribution of each run related to the total coverage. The ranking feature ranks a set of runs based on their coverage contribution and, by default, adds a cumulative grade attribute.
1. In the Verification Plan tree, select the section Top > UART APB Verification Plan.
We now rank the run on this section.
2. Select Analysis - Rank Runs.
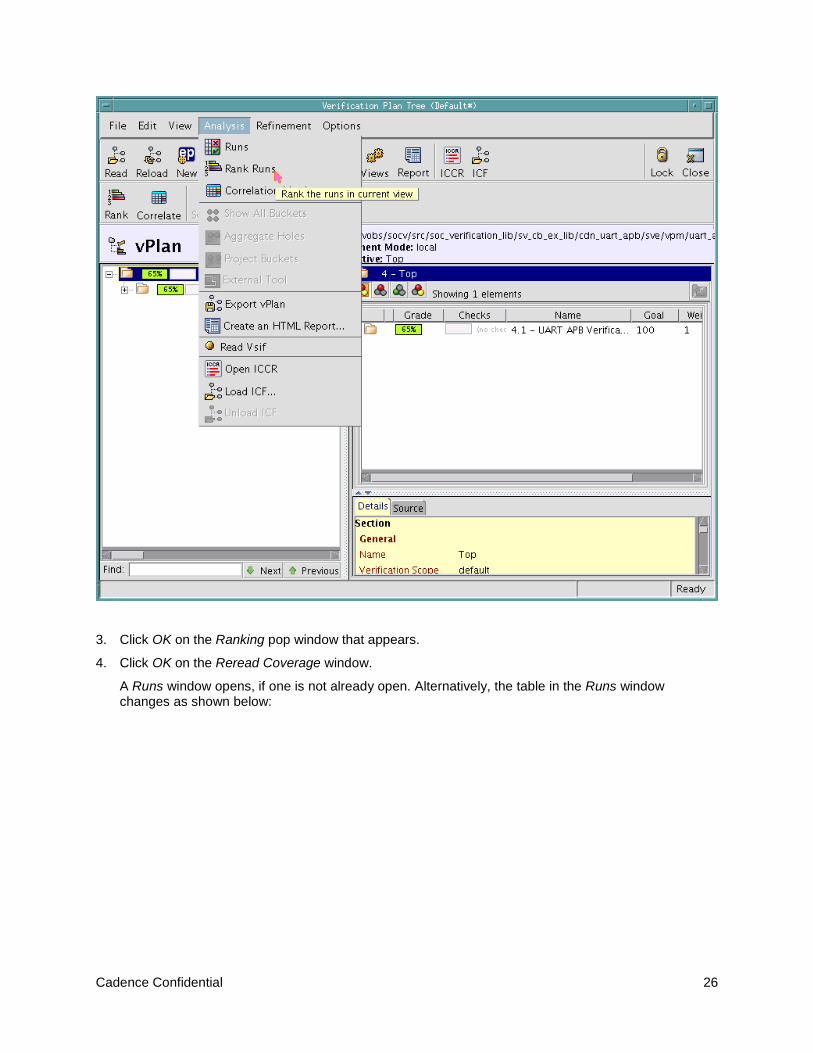
Cadence Confidential 26
3. Click OK on the Ranking pop window that appears.
4. Click OK on the Reread Coverage window.
A Runs window opens, if one is not already open. Alternatively, the table in the Runs window changes as shown below:
Cadence Confidential 27
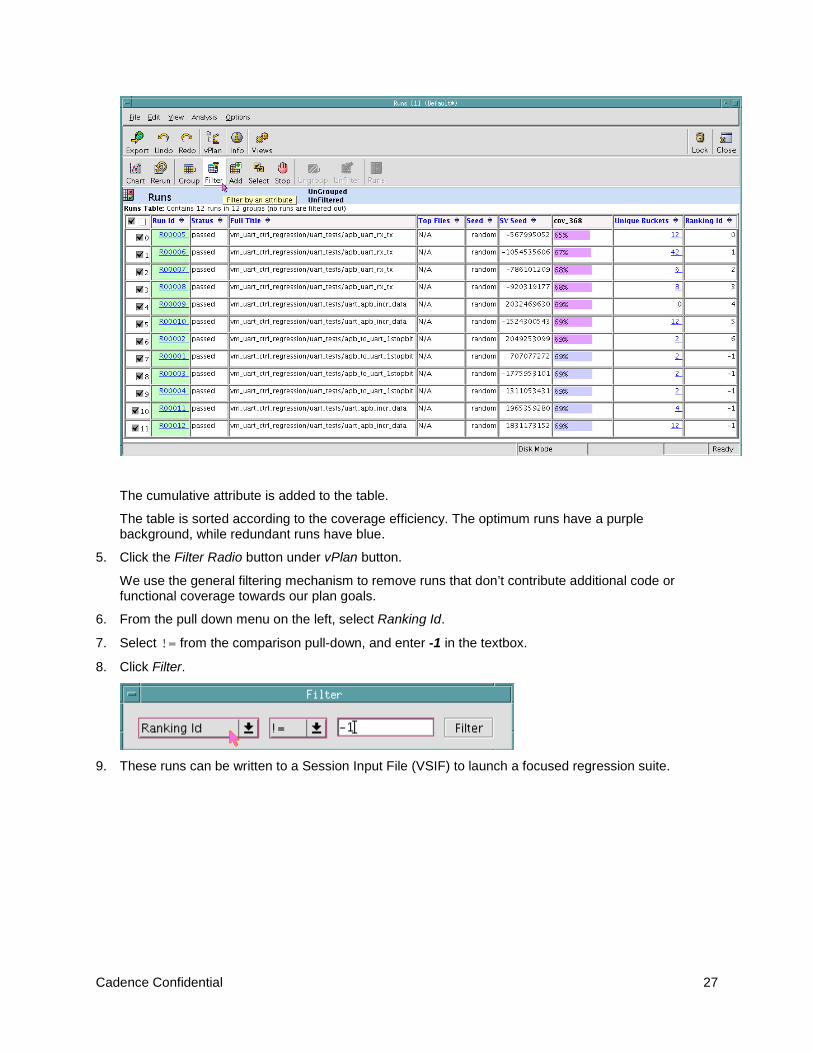
The cumulative attribute is added to the table.
The table is sorted according to the coverage efficiency. The optimum runs have a purple background, while redundant runs have blue.
5. Click the Filter Radio button under vPlan button.
We use the general filtering mechanism to remove runs that don’t contribute additional code or functional coverage towards our plan goals.
6. From the pull down menu on the left, select Ranking Id.
7. Select != from the comparison pull-down, and enter -1 in the textbox.
8. Click Filter.
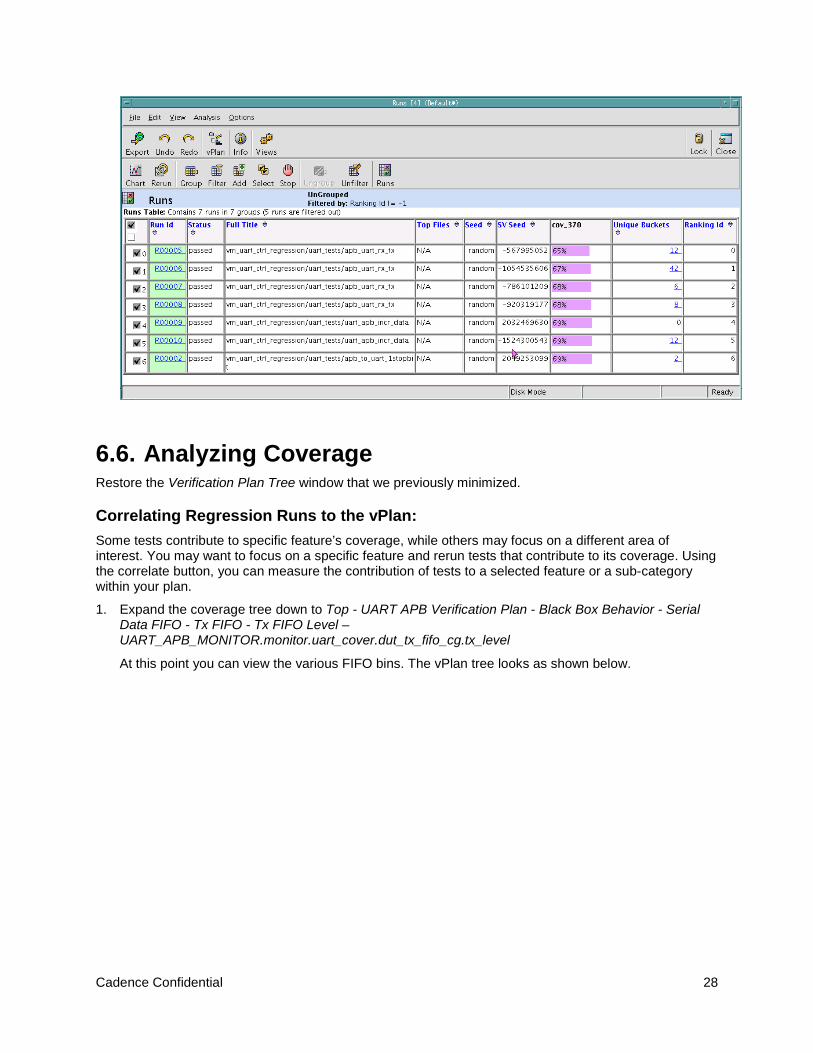
9. These runs can be written to a Session Input File (VSIF) to launch a focused regression suite.
Cadence Confidential 28
6.6. Analyzing Coverage Restore the Verification Plan Tree window that we previously minimized.
Correlating Regression Runs to the vPlan: Some tests contribute to specific feature’s coverage, while others may focus on a different area of interest. You may want to focus on a specific feature and rerun tests that contribute to its coverage. Using the correlate button, you can measure the contribution of tests to a selected feature or a sub-category within your plan.
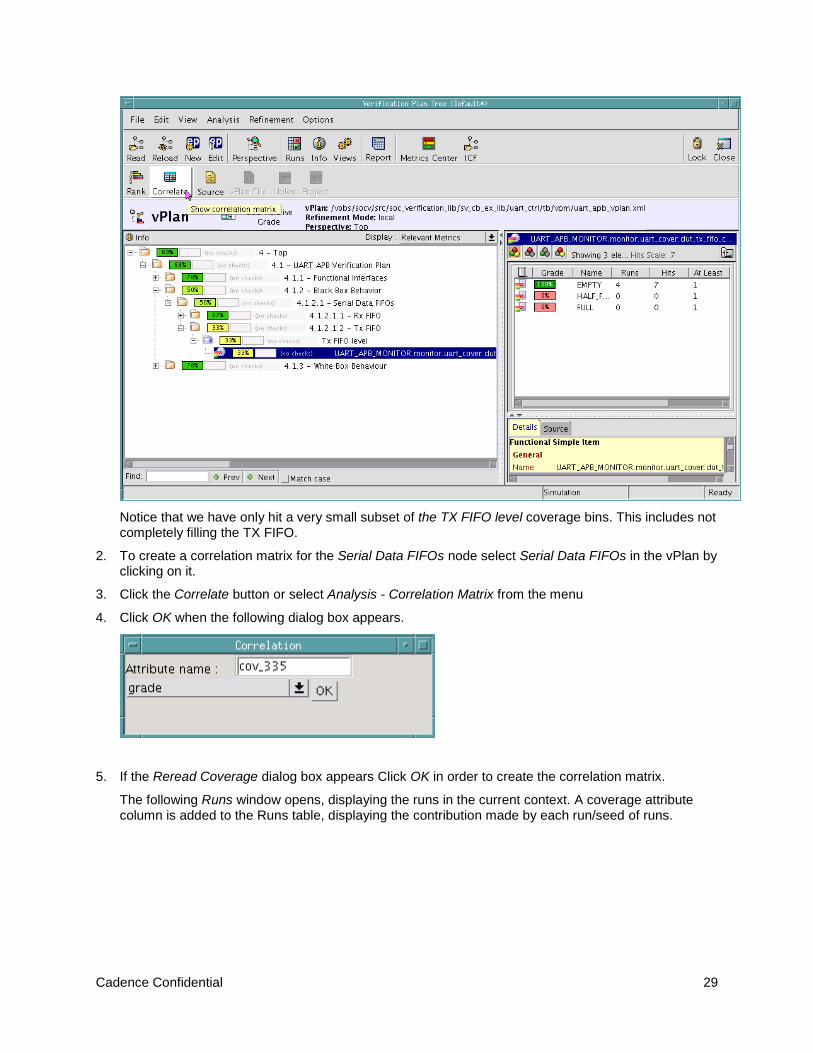
1. Expand the coverage tree down to Top - UART APB Verification Plan - Black Box Behavior - Serial Data FIFO - Tx FIFO - Tx FIFO Level – UART_APB_MONITOR.monitor.uart_cover.dut_tx_fifo_cg.tx_level
At this point you can view the various FIFO bins. The vPlan tree looks as shown below.
Cadence Confidential 29
Notice that we have only hit a very small subset of the TX FIFO level coverage bins. This includes not completely filling the TX FIFO.
2. To create a correlation matrix for the Serial Data FIFOs node select Serial Data FIFOs in the vPlan by clicking on it.
3. Click the Correlate button or select Analysis - Correlation Matrix from the menu
4. Click OK when the following dialog box appears.
5. If the Reread Coverage dialog box appears Click OK in order to create the correlation matrix.
The following Runs window opens, displaying the runs in the current context. A coverage attribute column is added to the Runs table, displaying the contribution made by each run/seed of runs.
Cadence Confidential 30
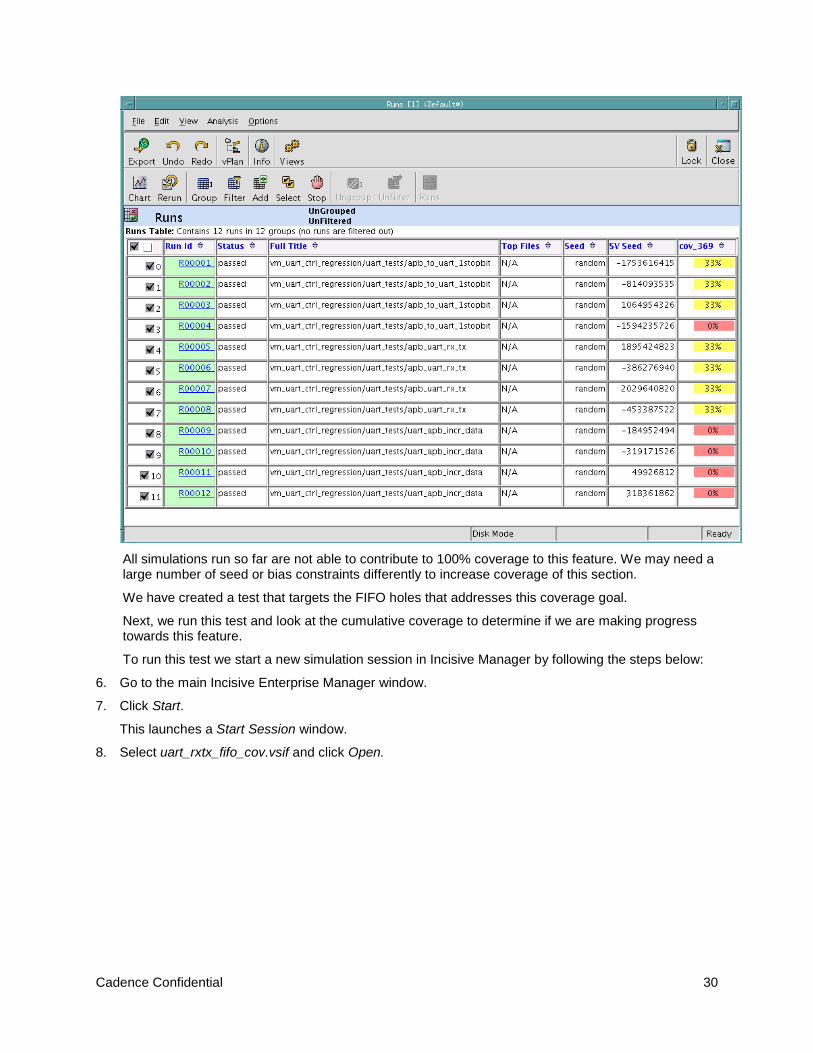
All simulations run so far are not able to contribute to 100% coverage to this feature. We may need a large number of seed or bias constraints differently to increase coverage of this section.
We have created a test that targets the FIFO holes that addresses this coverage goal.
Next, we run this test and look at the cumulative coverage to determine if we are making progress towards this feature.
To run this test we start a new simulation session in Incisive Manager by following the steps below:
6. Go to the main Incisive Enterprise Manager window.
7. Click Start.
This launches a Start Session window.
8. Select uart_rxtx_fifo_cov.vsif and click Open.
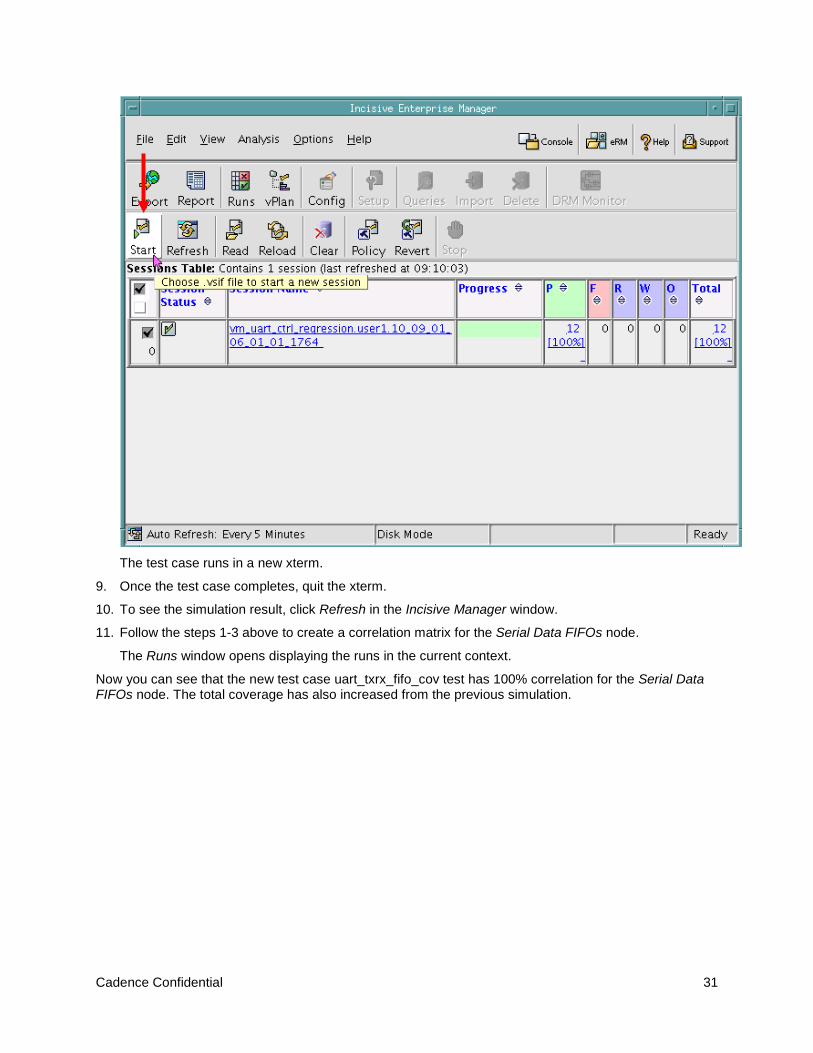
Cadence Confidential 31
The test case runs in a new xterm.
9. Once the test case completes, quit the xterm.
10. To see the simulation result, click Refresh in the Incisive Manager window.
11. Follow the steps 1-3 above to create a correlation matrix for the Serial Data FIFOs node.
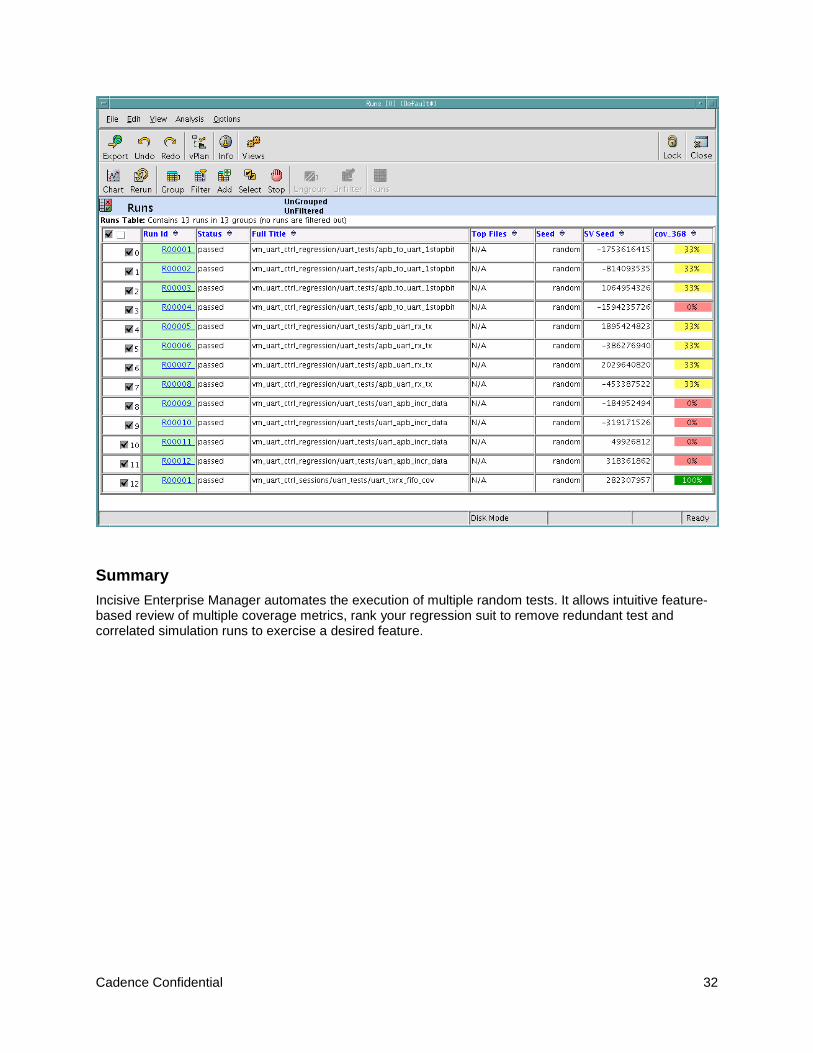
The Runs window opens displaying the runs in the current context.
Now you can see that the new test case uart_txrx_fifo_cov test has 100% correlation for the Serial Data FIFOs node. The total coverage has also increased from the previous simulation.
Cadence Confidential 32
Summary Incisive Enterprise Manager automates the execution of multiple random tests. It allows intuitive feature-based review of multiple coverage metrics, rank your regression suit to remove redundant test and correlated simulation runs to exercise a desired feature.