Embed Size (px)
Citation preview
UPDATE 4.0
1
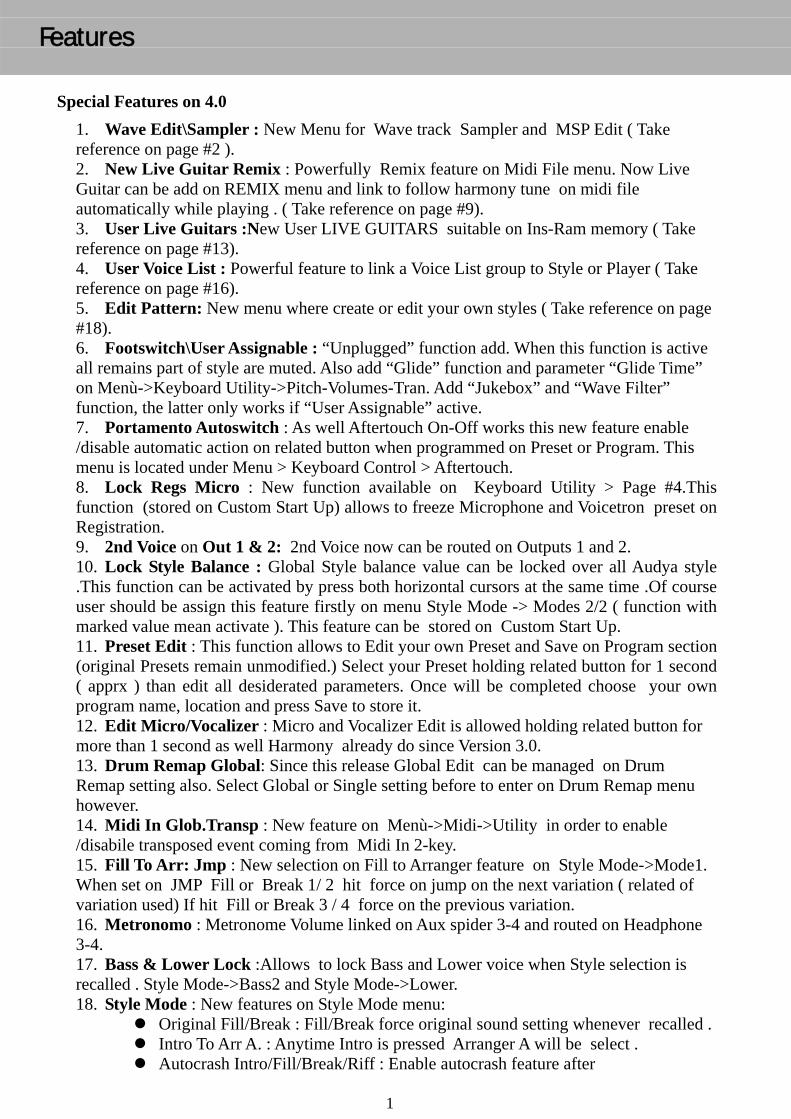
Special Features on 4.0
1. Wave Edit\Sampler : New Menu for Wave track Sampler and MSP Edit ( Take reference on page #2 ). 2. New Live Guitar Remix : Powerfully Remix feature on Midi File menu. Now Live Guitar can be add on REMIX menu and link to follow harmony tune on midi file automatically while playing . ( Take reference on page #9). 3. User Live Guitars :New User LIVE GUITARS suitable on Ins-Ram memory ( Take reference on page #13). 4. User Voice List : Powerful feature to link a Voice List group to Style or Player ( Take reference on page #16). 5. Edit Pattern: New menu where create or edit your own styles ( Take reference on page #18). 6. Footswitch\User Assignable : “Unplugged” function add. When this function is active all remains part of style are muted. Also add “Glide” function and parameter “Glide Time” on Menù->Keyboard Utility->Pitch-Volumes-Tran. Add “Jukebox” and “Wave Filter” function, the latter only works if “User Assignable” active. 7. Portamento Autoswitch : As well Aftertouch On-Off works this new feature enable /disable automatic action on related button when programmed on Preset or Program. This menu is located under Menu > Keyboard Control > Aftertouch. 8. Lock Regs Micro : New function available on Keyboard Utility > Page #4.This function (stored on Custom Start Up) allows to freeze Microphone and Voicetron preset on Registration. 9. 2nd Voice on Out 1 & 2: 2nd Voice now can be routed on Outputs 1 and 2. 10. Lock Style Balance : Global Style balance value can be locked over all Audya style .This function can be activated by press both horizontal cursors at the same time .Of course user should be assign this feature firstly on menu Style Mode -> Modes 2/2 ( function with marked value mean activate ). This feature can be stored on Custom Start Up. 11. Preset Edit : This function allows to Edit your own Preset and Save on Program section (original Presets remain unmodified.) Select your Preset holding related button for 1 second ( apprx ) than edit all desiderated parameters. Once will be completed choose your own program name, location and press Save to store it. 12. Edit Micro/Vocalizer : Micro and Vocalizer Edit is allowed holding related button for more than 1 second as well Harmony already do since Version 3.0. 13. Drum Remap Global: Since this release Global Edit can be managed on Drum Remap setting also. Select Global or Single setting before to enter on Drum Remap menu however. 14. Midi In Glob.Transp : New feature on Menù->Midi->Utility in order to enable /disabile transposed event coming from Midi In 2-key. 15. Fill To Arr: Jmp : New selection on Fill to Arranger feature on Style Mode->Mode1. When set on JMP Fill or Break 1/ 2 hit force on jump on the next variation ( related of variation used) If hit Fill or Break 3 / 4 force on the previous variation. 16. Metronomo : Metronome Volume linked on Aux spider 3-4 and routed on Headphone 3-4. 17. Bass & Lower Lock :Allows to lock Bass and Lower voice when Style selection is recalled . Style Mode->Bass2 and Style Mode->Lower. 18. Style Mode : New features on Style Mode menu:
Original Fill/Break : Fill/Break force original sound setting whenever recalled . Intro To Arr A. : Anytime Intro is pressed Arranger A will be select . Autocrash Intro/Fill/Break/Riff : Enable autocrash feature after
Features
2
Intro/Fill/Break/Riff. Inversion : User can set Chord tablet on manage Parallel mode recycled Bassist Expert : New enhancement on Bassist feature with advanced chord recognize
Fixed Bug : Several improvement on Harmony, Display, Filter on Expression Midi out, metronome outputs, Mixdown on Audio recording, Lower hold midi trasmission.
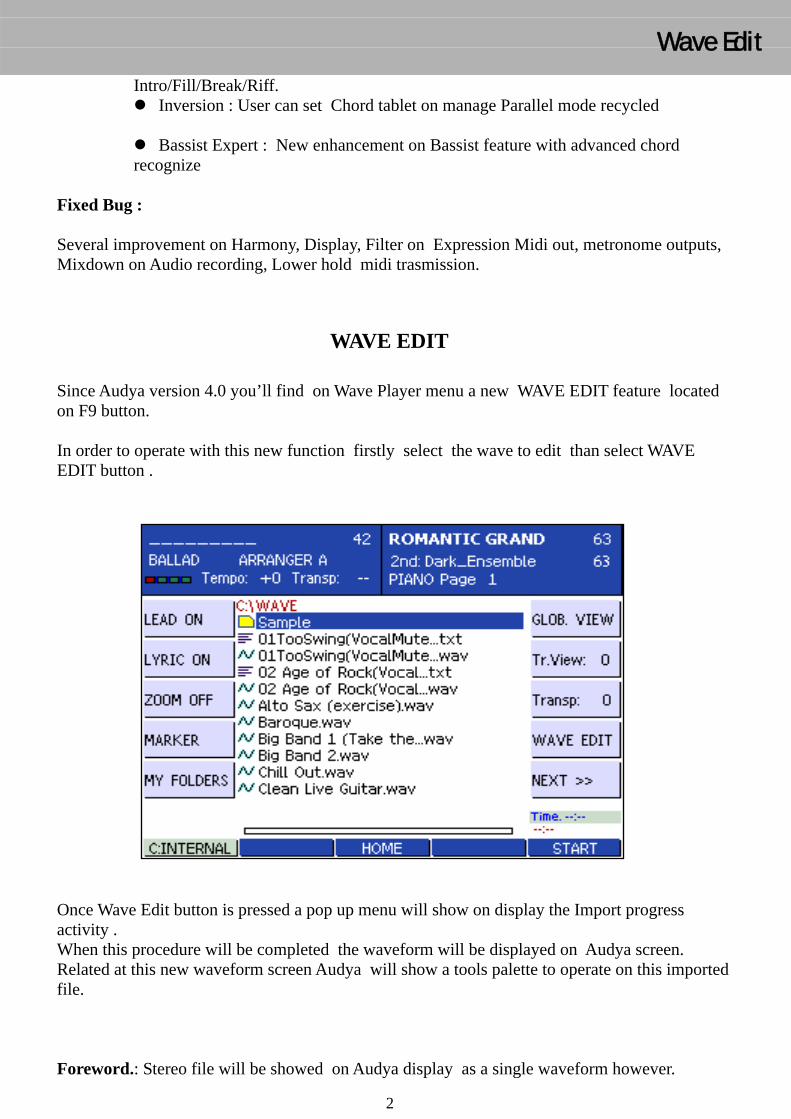
WAVE EDIT Since Audya version 4.0 you’ll find on Wave Player menu a new WAVE EDIT feature located on F9 button. In order to operate with this new function firstly select the wave to edit than select WAVE EDIT button .
Once Wave Edit button is pressed a pop up menu will show on display the Import progress activity . When this procedure will be completed the waveform will be displayed on Audya screen. Related at this new waveform screen Audya will show a tools palette to operate on this imported file. Foreword.: Stereo file will be showed on Audya display as a single waveform however.
Wave Edit
3
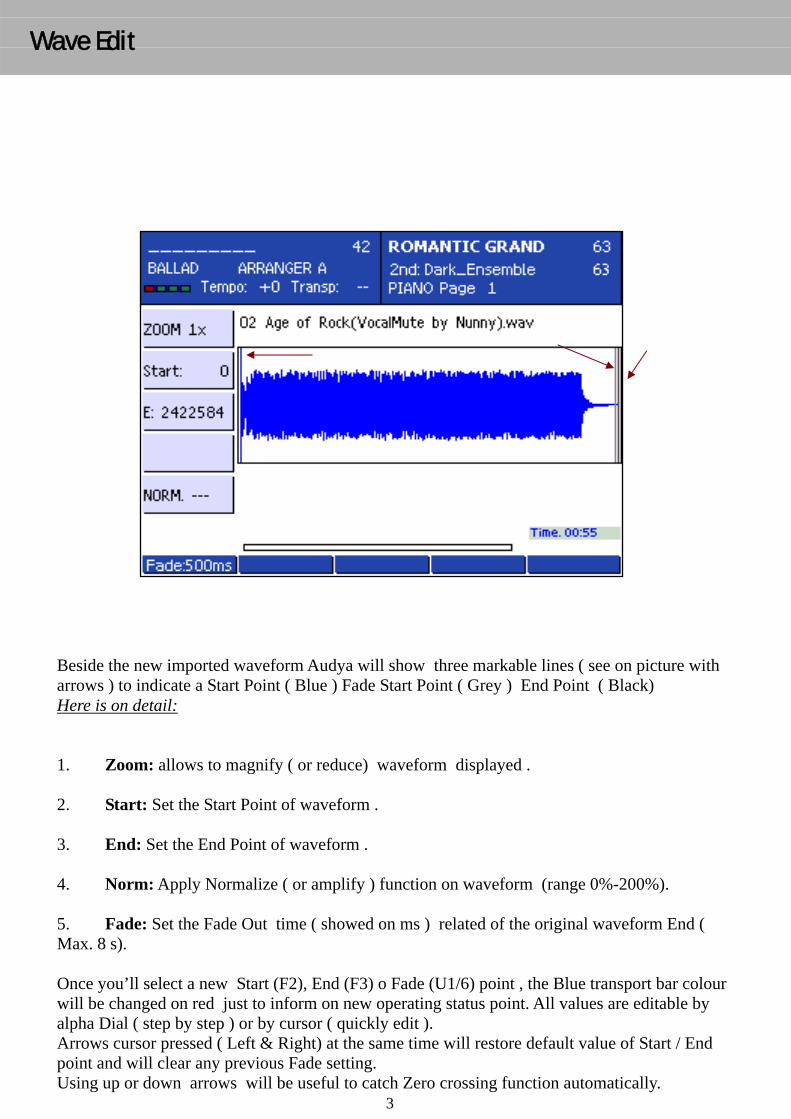
Beside the new imported waveform Audya will show three markable lines ( see on picture with arrows ) to indicate a Start Point ( Blue ) Fade Start Point ( Grey ) End Point ( Black) Here is on detail: 1. Zoom: allows to magnify ( or reduce) waveform displayed . 2. Start: Set the Start Point of waveform . 3. End: Set the End Point of waveform . 4. Norm: Apply Normalize ( or amplify ) function on waveform (range 0%-200%). 5. Fade: Set the Fade Out time ( showed on ms ) related of the original waveform End ( Max. 8 s). Once you’ll select a new Start (F2), End (F3) o Fade (U1/6) point , the Blue transport bar colour will be changed on red just to inform on new operating status point. All values are editable by alpha Dial ( step by step ) or by cursor ( quickly edit ). Arrows cursor pressed ( Left & Right) at the same time will restore default value of Start / End point and will clear any previous Fade setting. Using up or down arrows will be useful to catch Zero crossing function automatically.
Wave Edit
4
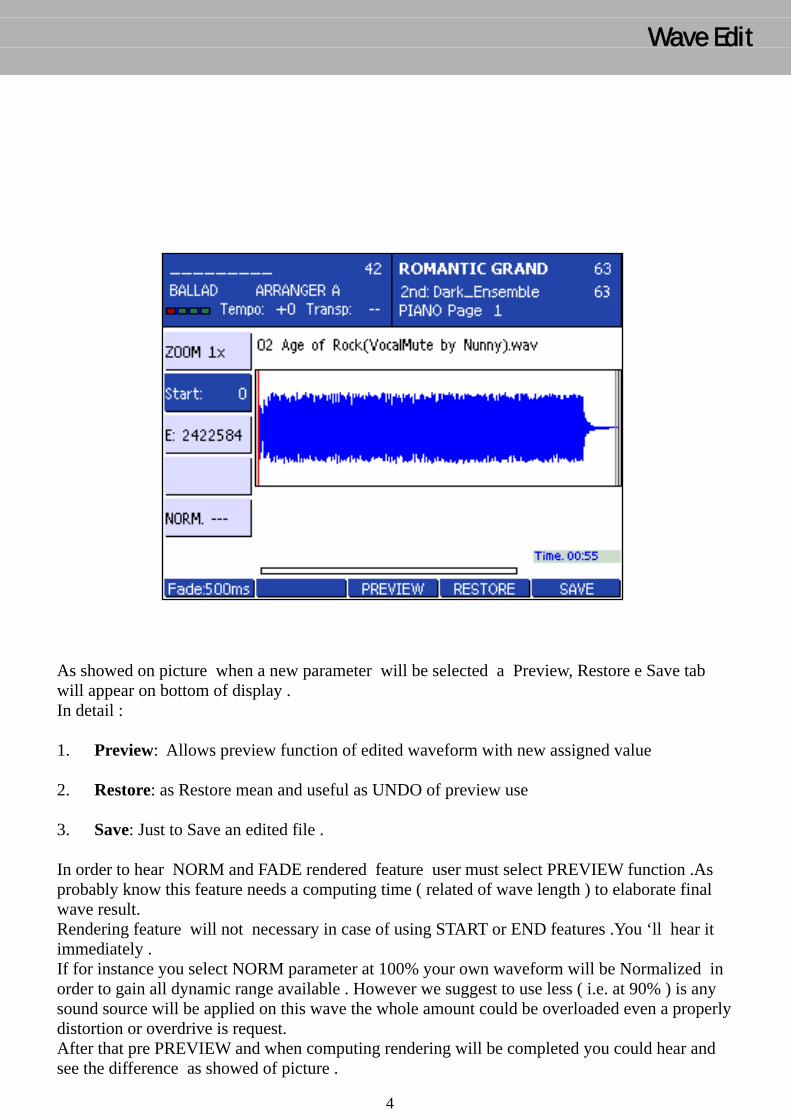
As showed on picture when a new parameter will be selected a Preview, Restore e Save tab will appear on bottom of display . In detail : 1. Preview: Allows preview function of edited waveform with new assigned value 2. Restore: as Restore mean and useful as UNDO of preview use 3. Save: Just to Save an edited file . In order to hear NORM and FADE rendered feature user must select PREVIEW function .As probably know this feature needs a computing time ( related of wave length ) to elaborate final wave result. Rendering feature will not necessary in case of using START or END features .You ‘ll hear it immediately . If for instance you select NORM parameter at 100% your own waveform will be Normalized in order to gain all dynamic range available . However we suggest to use less ( i.e. at 90% ) is any sound source will be applied on this wave the whole amount could be overloaded even a properly distortion or overdrive is request. After that pre PREVIEW and when computing rendering will be completed you could hear and see the difference as showed of picture .
Wave Edit

5
If you would catch the right START ( or else ) Point will be really useful manage with ZOOM feature Here is the ZOOM value to use : 1x, 8x, 16x, 32x, 1:8, 1:4, 1:2, 1:1. The first (1x, 8x, 16x, 32x, ) set value allows to magnify waveform in a traditional way . The others will be useful as a Sample windows to analyze waveform as block of 1:8, 1:4, 1:2, 1:1. In detail: 1. Move a Start Point ahead just focused in a better way your waveform ( i.e. put value to 24040). 2. Select ZOOM feature and assign 16x value. 3. Select START feature again. If everything will done as suggest display will show as below :
Wave Edit
6
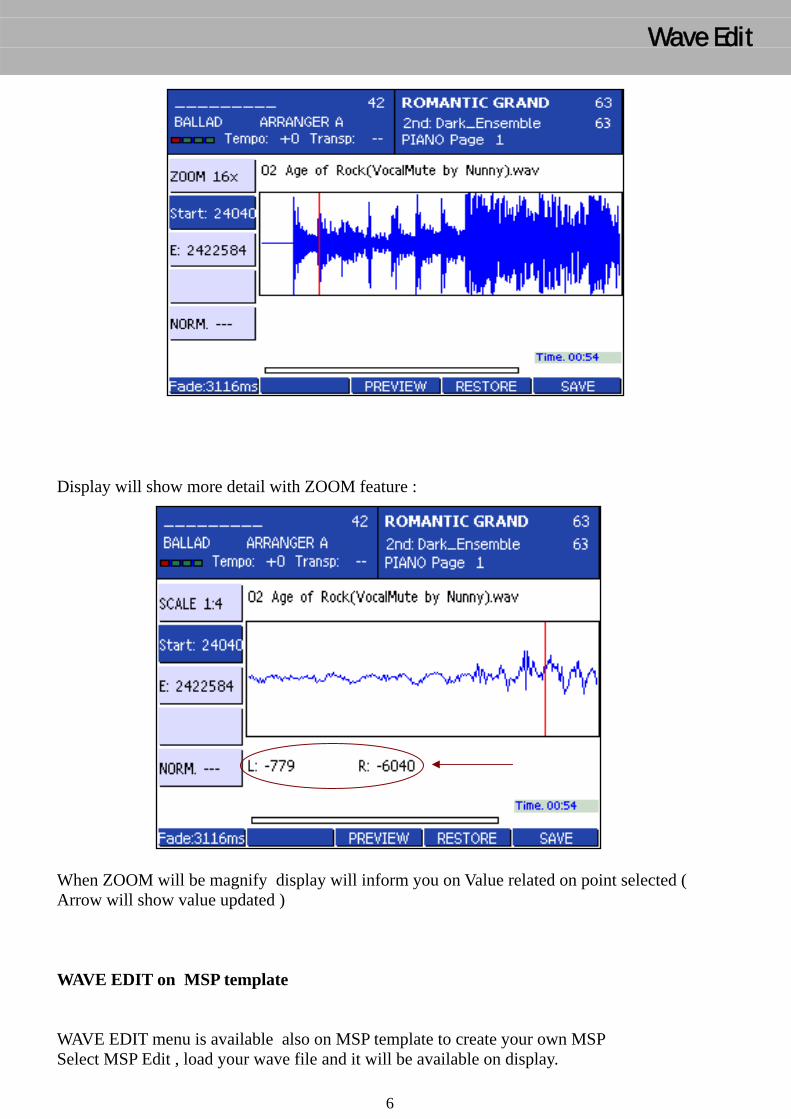
Display will show more detail with ZOOM feature :
When ZOOM will be magnify display will inform you on Value related on point selected ( Arrow will show value updated ) WAVE EDIT on MSP template WAVE EDIT menu is available also on MSP template to create your own MSP Select MSP Edit , load your wave file and it will be available on display.
Wave Edit
7
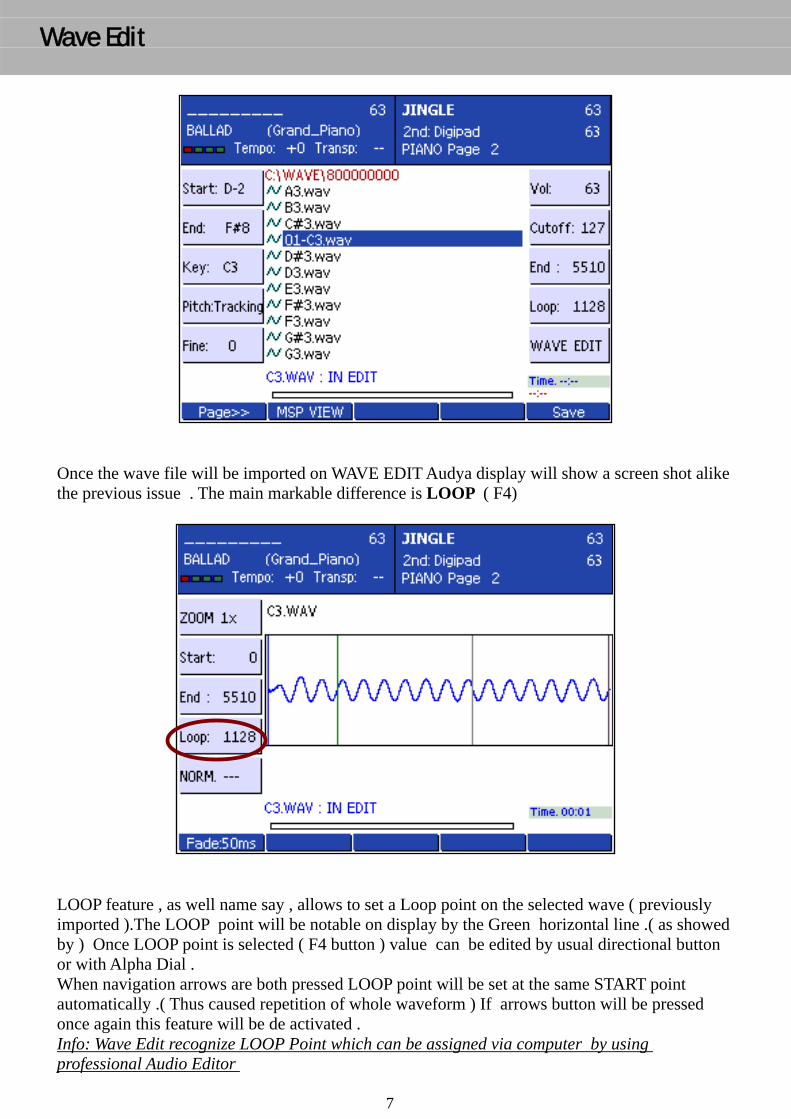
Once the wave file will be imported on WAVE EDIT Audya display will show a screen shot alike the previous issue . The main markable difference is LOOP ( F4)
LOOP feature , as well name say , allows to set a Loop point on the selected wave ( previously imported ).The LOOP point will be notable on display by the Green horizontal line .( as showed by ) Once LOOP point is selected ( F4 button ) value can be edited by usual directional button or with Alpha Dial . When navigation arrows are both pressed LOOP point will be set at the same START point automatically .( Thus caused repetition of whole waveform ) If arrows button will be pressed once again this feature will be de activated . Info: Wave Edit recognize LOOP Point which can be assigned via computer by using professional Audio Editor
Wave Edit
8
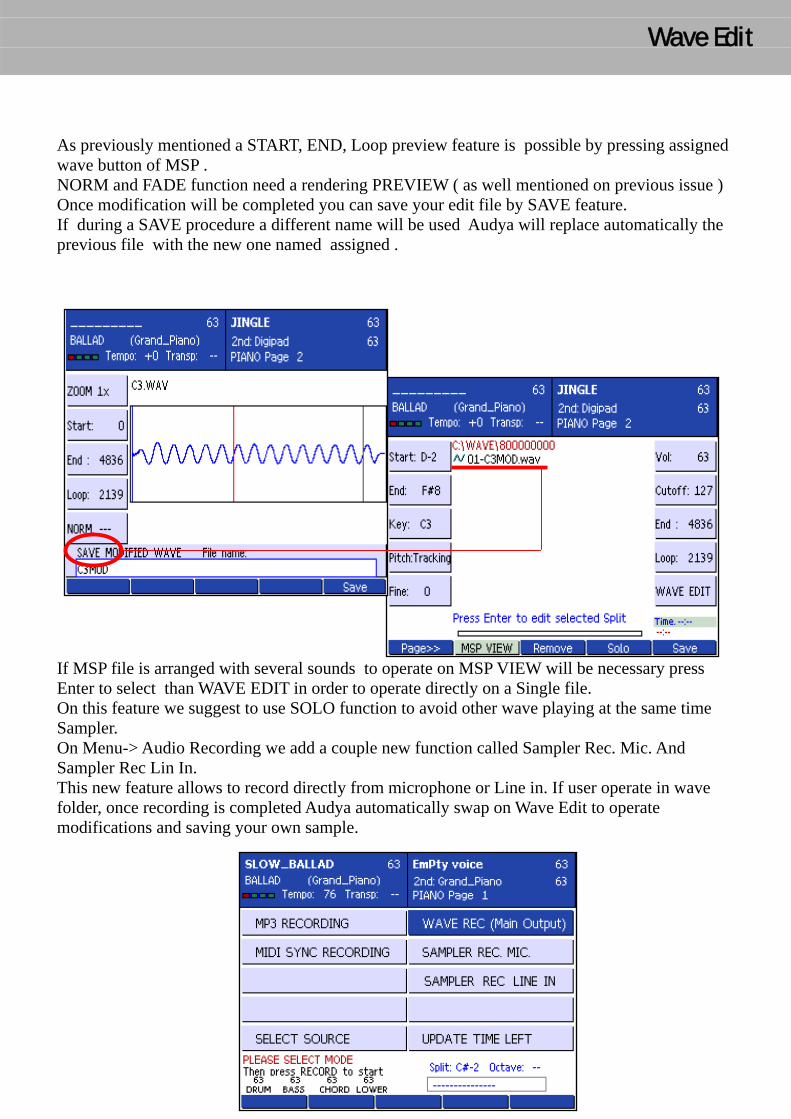
As previously mentioned a START, END, Loop preview feature is possible by pressing assigned wave button of MSP . NORM and FADE function need a rendering PREVIEW ( as well mentioned on previous issue ) Once modification will be completed you can save your edit file by SAVE feature. If during a SAVE procedure a different name will be used Audya will replace automatically the previous file with the new one named assigned .
If MSP file is arranged with several sounds to operate on MSP VIEW will be necessary press Enter to select than WAVE EDIT in order to operate directly on a Single file. On this feature we suggest to use SOLO function to avoid other wave playing at the same time Sampler. On Menu-> Audio Recording we add a couple new function called Sampler Rec. Mic. And Sampler Rec Lin In. This new feature allows to record directly from microphone or Line in. If user operate in wave folder, once recording is completed Audya automatically swap on Wave Edit to operate modifications and saving your own sample.
Wave Edit

9
MIDI REMIX
On Version 4.0 Audya bring a MIDI REMIX feature which allows to replace original midi file drum track ( usually on track #10 ) with a Drum part of Audya Style ( Audio Drum or else ) .
Here how create your own MIDI DRUM REMIX:
1. Press MIDI button on Player Section than select your own Midi file. ( As showed on picture #1 we have select “Raindrops_Keep_Falli.mid” (metronome tempo as 123 BPM).
2. Press F9 button to activate REMIX ON feature (Picture # 1).
3. Select your favourite Style with a same ( more or less) metronome BPM of midi file previously select. If the BPM tempo will be too different between Style and midi file a warning message will inform you to select another style more suitable.
On Picture #2 we select ( i.e.) a “SWING_2”style.
By using STYLE VIEW menu and than F1 button will be possible replace Drum kit with your own Audio Drum. As well you can see on Picture #3 we select Audio Drum SWING2_120
(120 as 120 BPM).
4. Press USER 5 button (START) to activate REMIX Feature .
5. After a while START led button will flash and will be possible play midi file with your new own Audio Drum track .
6. While REMIX playing will be possible select A, B, C, D Variation and also Fill on style ( as well showed on picture #4) .Moreover arranger variations will be recordable and playable automatically ( see in detail Automation Issue ).
7. Press Save to store your own REMIX file while midi file and Remix are running.
8. Digit a name for your own file than press Save again. (For further information please refer from Saving Section).
9. Select REMIX file from disk list by using Alpha Dial or cursor button . Wait until RMX file will be loaded than press USER 5 ( START ).When led button will flashing press REMIX button.
Midi Remix
picture 1
picture 2
picture 3
picture 4
10
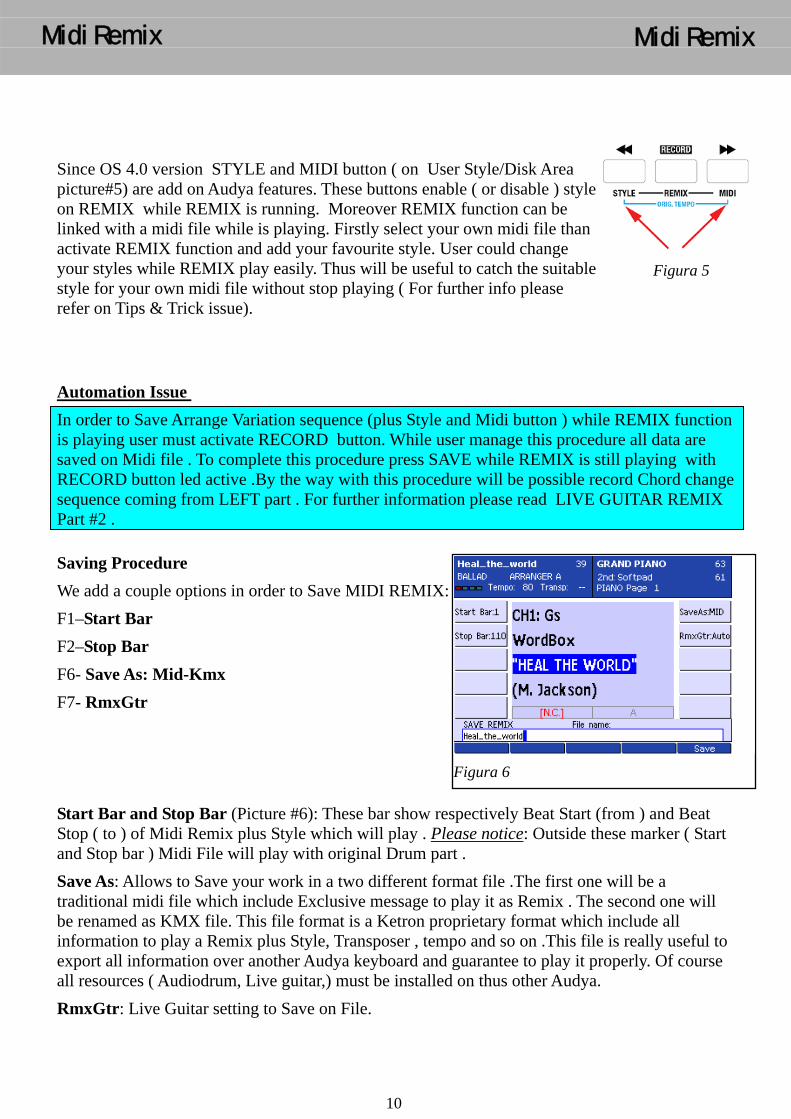
Since OS 4.0 version STYLE and MIDI button ( on User Style/Disk Area picture#5) are add on Audya features. These buttons enable ( or disable ) style on REMIX while REMIX is running. Moreover REMIX function can be linked with a midi file while is playing. Firstly select your own midi file than activate REMIX function and add your favourite style. User could change your styles while REMIX play easily. Thus will be useful to catch the suitable style for your own midi file without stop playing ( For further info please refer on Tips & Trick issue).
Automation Issue
In order to Save Arrange Variation sequence (plus Style and Midi button ) while REMIX function is playing user must activate RECORD button. While user manage this procedure all data are saved on Midi file . To complete this procedure press SAVE while REMIX is still playing with RECORD button led active .By the way with this procedure will be possible record Chord change sequence coming from LEFT part . For further information please read LIVE GUITAR REMIX Part #2 .
Saving Procedure We add a couple options in order to Save MIDI REMIX:
F1–Start Bar
F2–Stop Bar
F6- Save As: Mid-Kmx
F7- RmxGtr
Start Bar and Stop Bar (Picture #6): These bar show respectively Beat Start (from ) and Beat Stop ( to ) of Midi Remix plus Style which will play . Please notice: Outside these marker ( Start and Stop bar ) Midi File will play with original Drum part .
Save As: Allows to Save your work in a two different format file .The first one will be a traditional midi file which include Exclusive message to play it as Remix . The second one will be renamed as KMX file. This file format is a Ketron proprietary format which include all information to play a Remix plus Style, Transposer , tempo and so on .This file is really useful to export all information over another Audya keyboard and guarantee to play it properly. Of course all resources ( Audiodrum, Live guitar,) must be installed on thus other Audya.
RmxGtr: Live Guitar setting to Save on File.
Figura 5
Midi Remix
Figura 6
Midi Remix
11
LIVE GUITAR REMIX
On Midi Remix feature is also possible add Live Guitar ( coming from selected style ) beside drum part.
Live Guitar could be played manually or automatically by Live Guitar REMIX which will extract harmony tune directly from midi file .
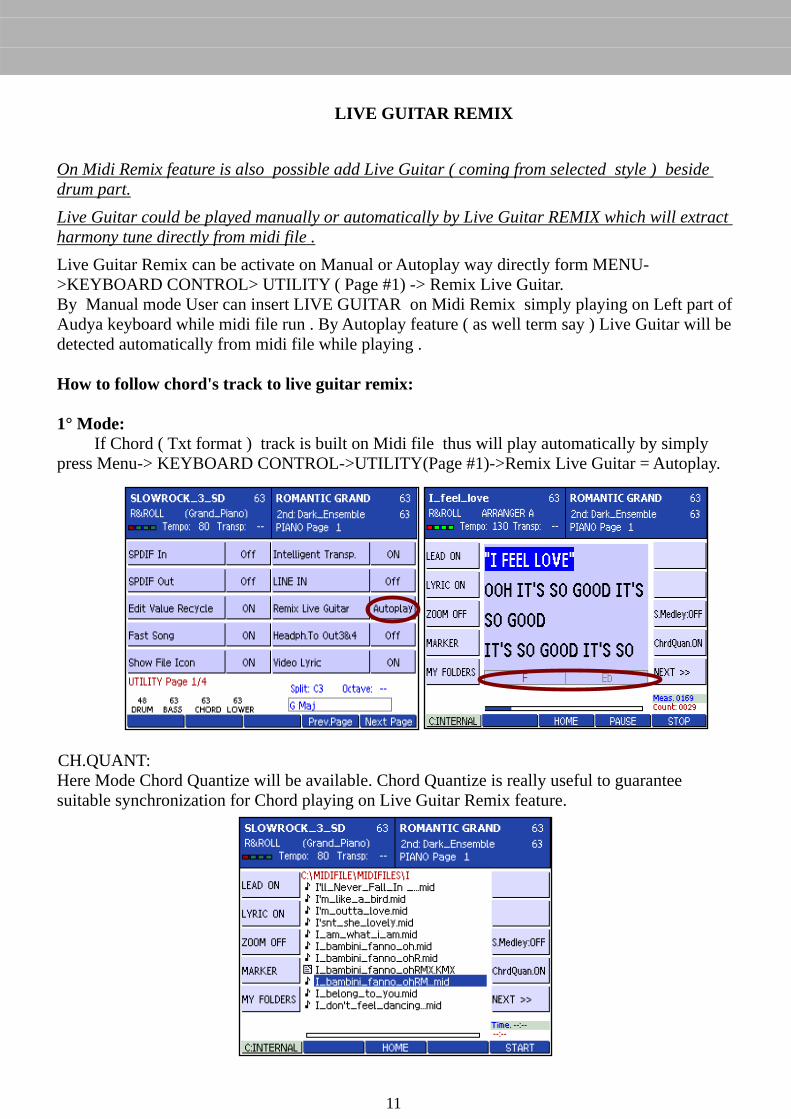
Live Guitar Remix can be activate on Manual or Autoplay way directly form MENU->KEYBOARD CONTROL> UTILITY ( Page #1) -> Remix Live Guitar. By Manual mode User can insert LIVE GUITAR on Midi Remix simply playing on Left part of Audya keyboard while midi file run . By Autoplay feature ( as well term say ) Live Guitar will be detected automatically from midi file while playing . How to follow chord's track to live guitar remix: 1° Mode: If Chord ( Txt format ) track is built on Midi file thus will play automatically by simply press Menu-> KEYBOARD CONTROL->UTILITY(Page #1)->Remix Live Guitar = Autoplay.
CH.QUANT: Here Mode Chord Quantize will be available. Chord Quantize is really useful to guarantee suitable synchronization for Chord playing on Live Guitar Remix feature.
12
2° Mode: Here you could set your own midi track to assign on Left Part: 1. Set on Menu KEYBOARD CONTROL->UTILITY(Page #1)->Remix Live Guitar = Autoplay. 2. On selected Midi File record or locate Chord Part. Set on GM PART “Chan TX” : Left. Save Song Set up with F3 flag Part & MIX to On. 3. Select your own Style with more suitable Live Guitar pattern built in to assign on current Midi file . 4. Insert REMIX function to ON ( Midi Player page selection). 5. Once Midi file will play press SAVE button to store Remix feature recorded. 6. Play again Midi file just saved.
3° Mode: How to Record Chord Track:
1. Set on Menu KEYBOARD CONTROL->UTILITY(Page #1)->RemixLiveGuitar = Manual 2. Activate Remix feature. 3. Press RECORD while midi file playing. 4. Play Chord on Left part of keyboard following harmony tune. Chord played will be record as is. 5. Press Save to store all data .
Tips & Tricks: In order to get the “Best Deal “ between Midi File and Style select firstly Midi File and play it. Now activate Remix feature than select style to link on ! Go ahead until the best Style will be catch! Please unaware if Live Guitar will be unsuitable during this procedure. You’ll replace it on next step . Once the Audio Drum will be selected ( while Drum Remix is playing ) you could assign your own Live Guitar on different arranger from Style View Menu and than Save it as usual. Accordingly Internal or User Style selection we suggest once Remix feature will be completed to Stop and Play it again in order to check procedure done . Of course you could create your own Remix by using User Audio Drum also specially designed for Remix feature purpose.
Midi Remix

13
USER LIVE GUITAR USER LIVE GUITAR , since Version 3.0, are on Audya ready to load as well Ram Ins works. In this new release this feature is still more powerful and exciting. User Live Guitar are located on DISK menu on USER LIVE GUITAR Folder.
Once you’ll select this folder display menu’ will inform you on related operating menu . On the left part of display you ‘ll assign 4 available Ins bank of selection. On the right part you’ll operate with followed features:
User Live Guitar
14
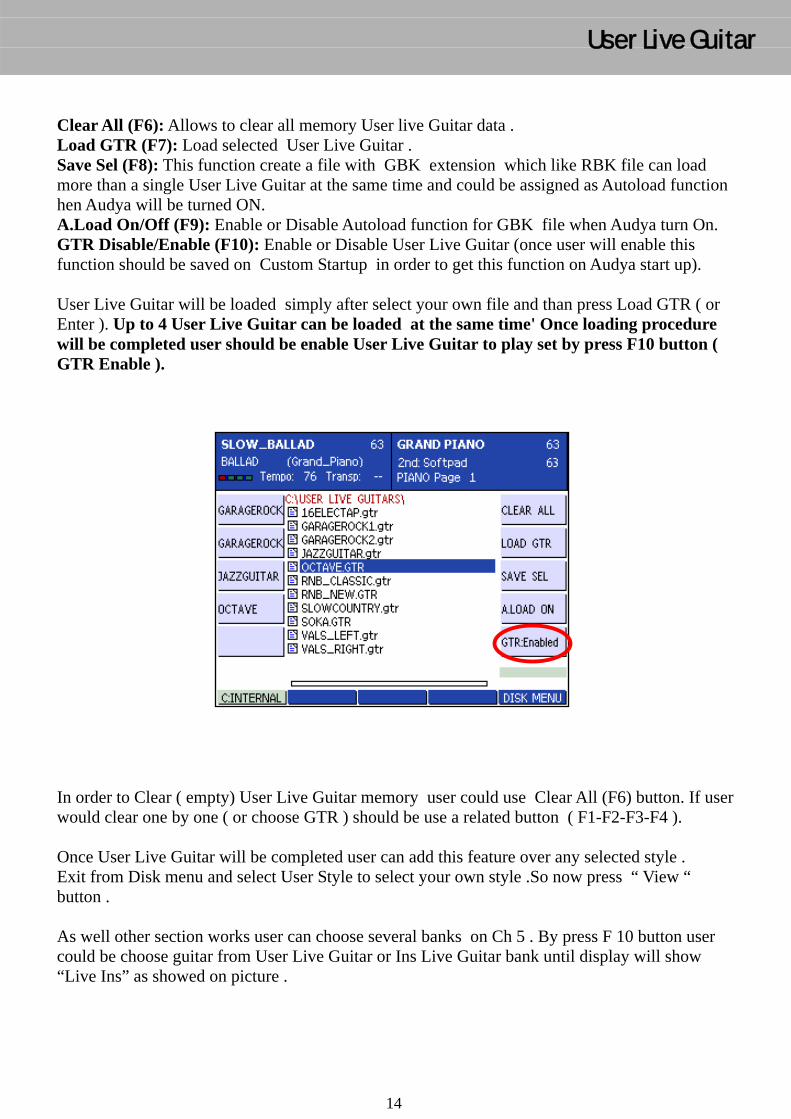
Clear All (F6): Allows to clear all memory User live Guitar data . Load GTR (F7): Load selected User Live Guitar . Save Sel (F8): This function create a file with GBK extension which like RBK file can load more than a single User Live Guitar at the same time and could be assigned as Autoload function hen Audya will be turned ON. A.Load On/Off (F9): Enable or Disable Autoload function for GBK file when Audya turn On. GTR Disable/Enable (F10): Enable or Disable User Live Guitar (once user will enable this function should be saved on Custom Startup in order to get this function on Audya start up). User Live Guitar will be loaded simply after select your own file and than press Load GTR ( or Enter ). Up to 4 User Live Guitar can be loaded at the same time' Once loading procedure will be completed user should be enable User Live Guitar to play set by press F10 button ( GTR Enable ).
In order to Clear ( empty) User Live Guitar memory user could use Clear All (F6) button. If user would clear one by one ( or choose GTR ) should be use a related button ( F1-F2-F3-F4 ). Once User Live Guitar will be completed user can add this feature over any selected style . Exit from Disk menu and select User Style to select your own style .So now press “ View “ button . As well other section works user can choose several banks on Ch 5 . By press F 10 button user could be choose guitar from User Live Guitar or Ins Live Guitar bank until display will show “Live Ins” as showed on picture .
User Live Guitar
15
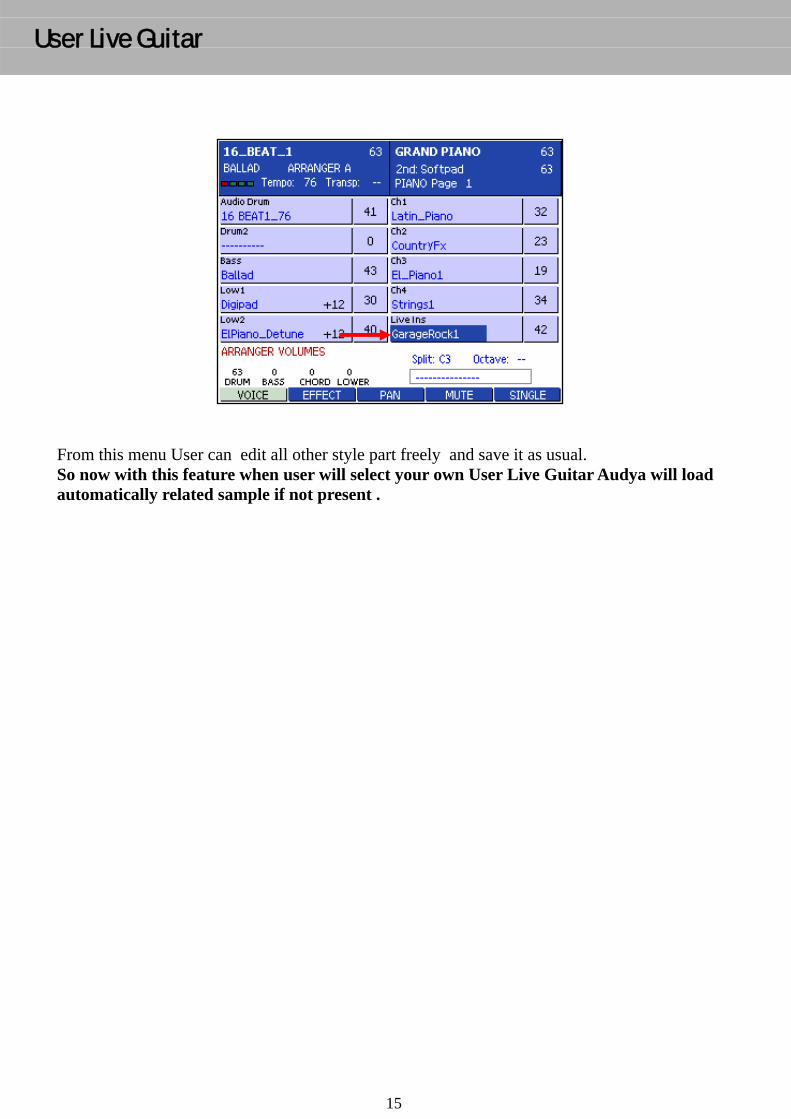
From this menu User can edit all other style part freely and save it as usual. So now with this feature when user will select your own User Live Guitar Audya will load automatically related sample if not present .
User Live Guitar
16
USER VOICE LIST
What is a User Voice List
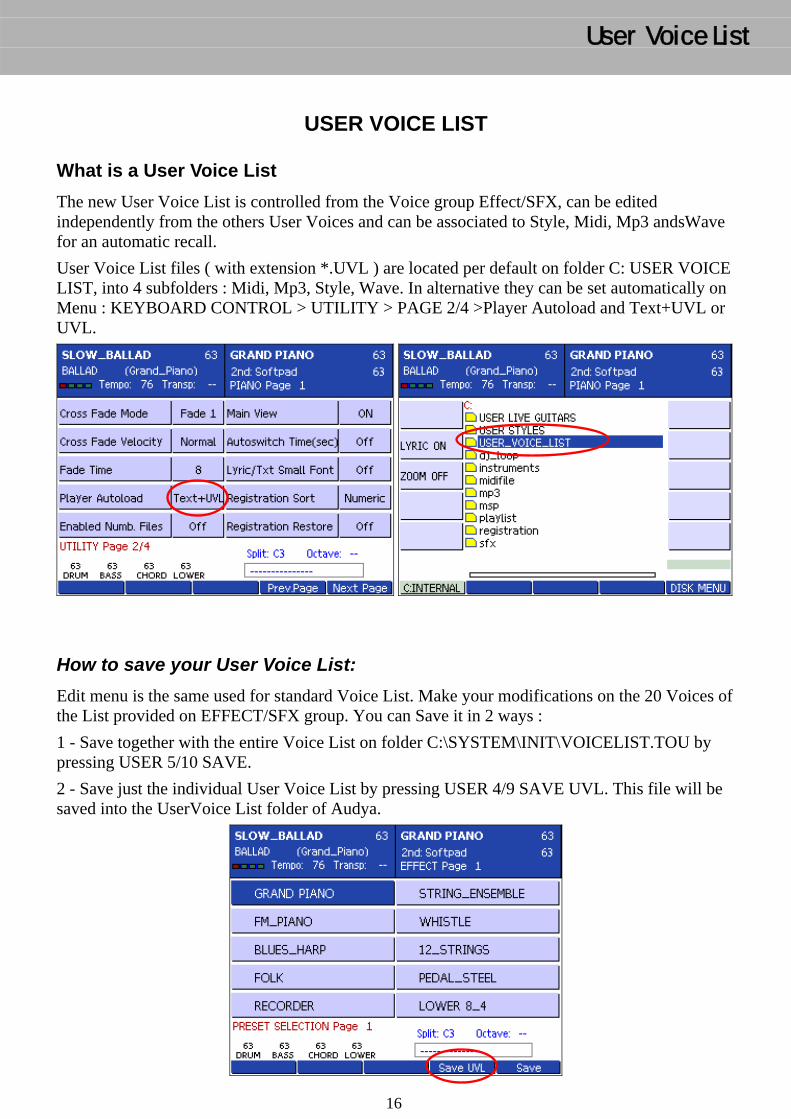
The new User Voice List is controlled from the Voice group Effect/SFX, can be edited independently from the others User Voices and can be associated to Style, Midi, Mp3 andsWave for an automatic recall.
User Voice List files ( with extension *.UVL ) are located per default on folder C: USER VOICE LIST, into 4 subfolders : Midi, Mp3, Style, Wave. In alternative they can be set automatically on Menu : KEYBOARD CONTROL > UTILITY > PAGE 2/4 >Player Autoload and Text+UVL or UVL.
How to save your User Voice List:
Edit menu is the same used for standard Voice List. Make your modifications on the 20 Voices of the List provided on EFFECT/SFX group. You can Save it in 2 ways :
1 - Save together with the entire Voice List on folder C:\SYSTEM\INIT\VOICELIST.TOU by pressing USER 5/10 SAVE.
2 - Save just the individual User Voice List by pressing USER 4/9 SAVE UVL. This file will be saved into the UserVoice List folder of Audya.
User Voice List
17
How to assign a User Voice List to Style, Midifile, Wave, Mp3
STYLE
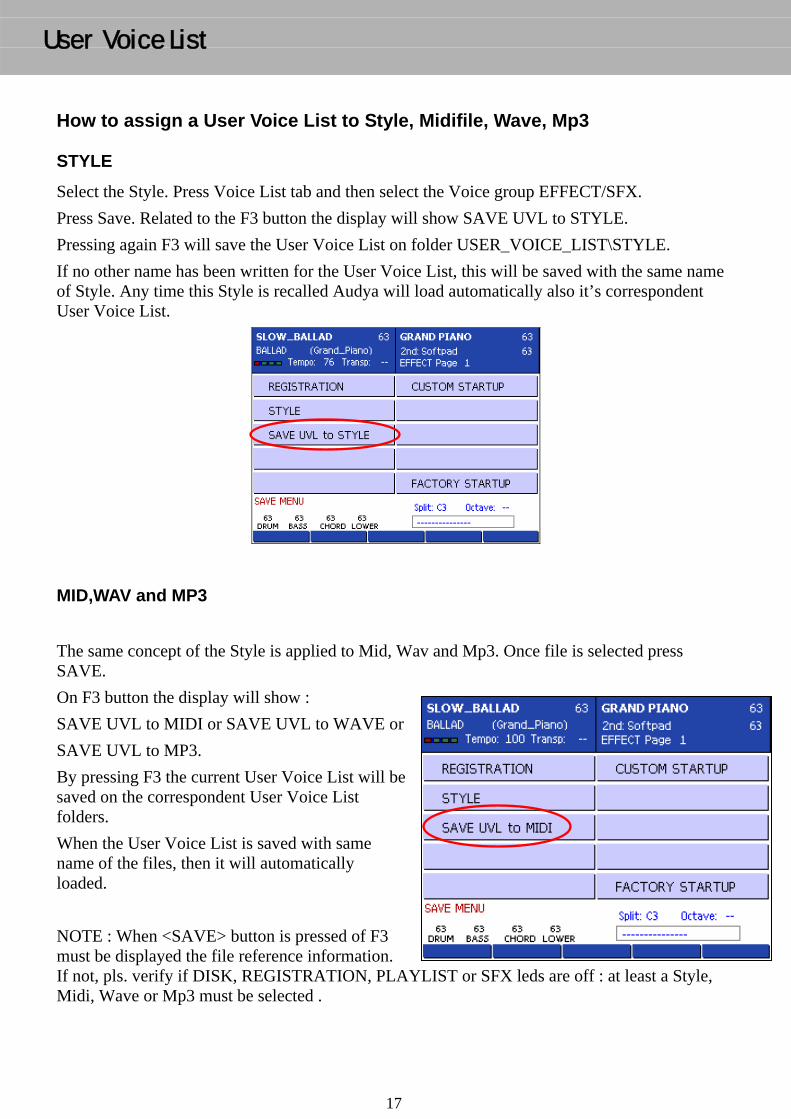
Select the Style. Press Voice List tab and then select the Voice group EFFECT/SFX.
Press Save. Related to the F3 button the display will show SAVE UVL to STYLE.
Pressing again F3 will save the User Voice List on folder USER_VOICE_LIST\STYLE.
If no other name has been written for the User Voice List, this will be saved with the same name of Style. Any time this Style is recalled Audya will load automatically also it’s correspondent User Voice List.
MID,WAV and MP3
The same concept of the Style is applied to Mid, Wav and Mp3. Once file is selected press SAVE.
On F3 button the display will show :
SAVE UVL to MIDI or SAVE UVL to WAVE or
SAVE UVL to MP3.
By pressing F3 the current User Voice List will be saved on the correspondent User Voice List folders.
When the User Voice List is saved with same name of the files, then it will automatically loaded.
NOTE : When <SAVE> button is pressed of F3 must be displayed the file reference information. If not, pls. verify if DISK, REGISTRATION, PLAYLIST or SFX leds are off : at least a Style, Midi, Wave or Mp3 must be selected .
User Voice List
18
PATTERN EDITOR As a follow up to our Style Compiler software (found at www.ketron.it) used to Create and
Edit styles on a computer for Audya, and teaming up with the Advanced Audio Style Morphing feature (which gave AUDYA the capability to EDIT styles using existing style parts), a new PATTERN Editor now brings all the necessary features needed to Create and in great detail, Edit your own Styles directly on the Ketron AUDYA !
Copyright information:- Although all Ketron styles have been copyrighted, please feel free (as a Ketron owner) to use any of our styles in your performances or production.
How to use the Pattern Editor to Create or Edit Styles
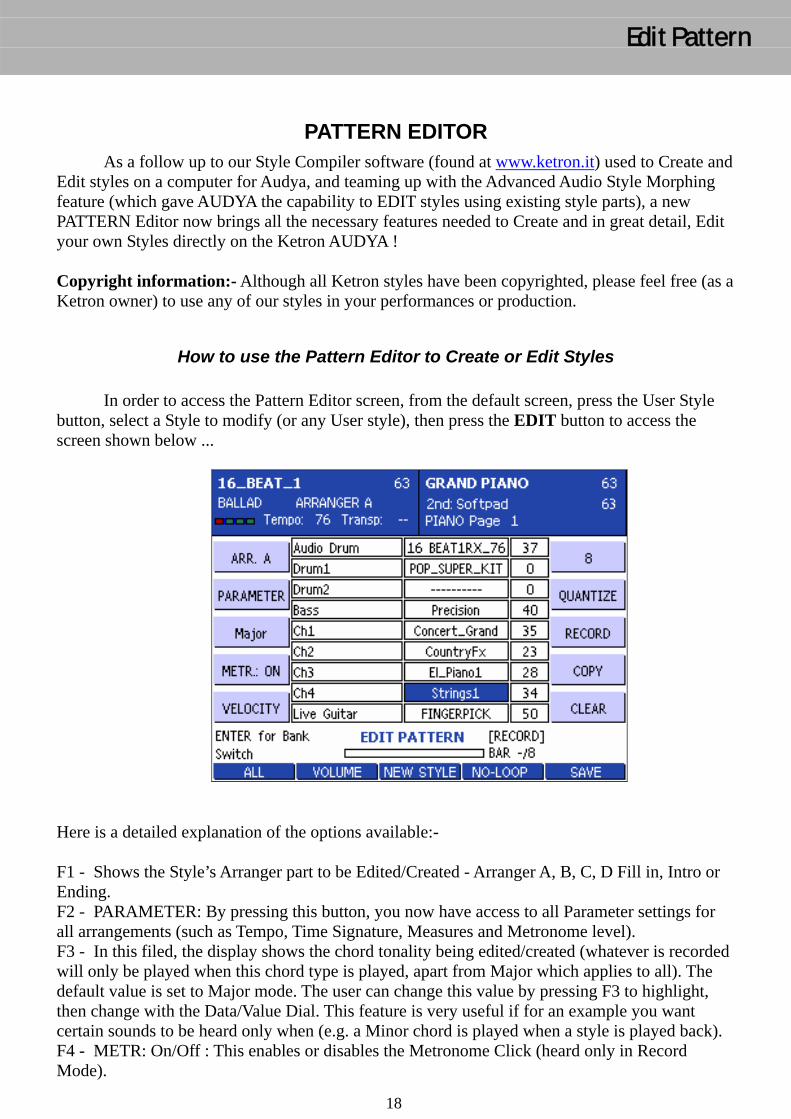
In order to access the Pattern Editor screen, from the default screen, press the User Style button, select a Style to modify (or any User style), then press the EDIT button to access the screen shown below ...
Here is a detailed explanation of the options available:-
F1 - Shows the Style’s Arranger part to be Edited/Created - Arranger A, B, C, D Fill in, Intro or Ending. F2 - PARAMETER: By pressing this button, you now have access to all Parameter settings for all arrangements (such as Tempo, Time Signature, Measures and Metronome level). F3 - In this filed, the display shows the chord tonality being edited/created (whatever is recorded will only be played when this chord type is played, apart from Major which applies to all). The default value is set to Major mode. The user can change this value by pressing F3 to highlight, then change with the Data/Value Dial. This feature is very useful if for an example you want certain sounds to be heard only when (e.g. a Minor chord is played when a style is played back). F4 - METR: On/Off : This enables or disables the Metronome Click (heard only in Record Mode).
Edit Pattern
19
F5 - VELOCITY : This function allows one to edit the velocity value on note / event played (very useful when you want to go and increase or reduce the volume of an independent note/part without changing the volume to the entire recording). F6 - Displays the current Quantize Value. Press F6 to highlight and change with the Data Value wheel. F7 - Q UANTIZE: Quantizes the current recording data/notes when pressed. F6 displays the quantize value. F8 - RECORD: Used to start recording. F9 - COPY: Used to access the COPY menu where you can copy from one style part to another. F10 -CLEAR : Allows one to Clear a note / event programmed. Press and hold down to display corresponding parts that can be cleared (e.g. to clear all notes, as you hold down CLEAR, press ALL NOTES (F2). To Clear everything, press GLOBAL (F5) ). User Buttons: User 1/6 - ALL/SOLO: This function allows to “isolate” /solo selected tracks so you can better hear what is currently being recorded. When “ALL” is selected, you can ‘test’ how your current style will sound with all parts playing. User 2/7 - VOLUME/OCTAVE : Allows you to toggle between the Volume or Octave values in the far right column. It’s value can be changed for the selected track by selecting it first with the cursor buttons and turning the Data wheel. User 3/8 – NEW STYLE : Allows you to create your own style from scratch. User 4/9 – LOOP/NO-LOOP (OFF) : Enable or Disable Arrangement loop during Recording. With LOOP, you can have AUDYA continuously loop through the measures of the style as you record more parts and build the style all together. With NO-LOOP, Audya will stop recording at the end of the designated length of the current part being recorded. User 5/10- SAVE: Used to Save the current style. You can name the Style in the display that follows and then press SAVE to save it. The Style will be saved in the USER STYLE folder of the Hard Disk. Arrangement (F1): The Arrangement selection is selected by pressing F1 then by using the Dial to change or by pressing directly the A/B/C/D, Fill in, Break or Intro/Ending Style button to access the Arranger part you want to edit/record.
Edit Pattern
20
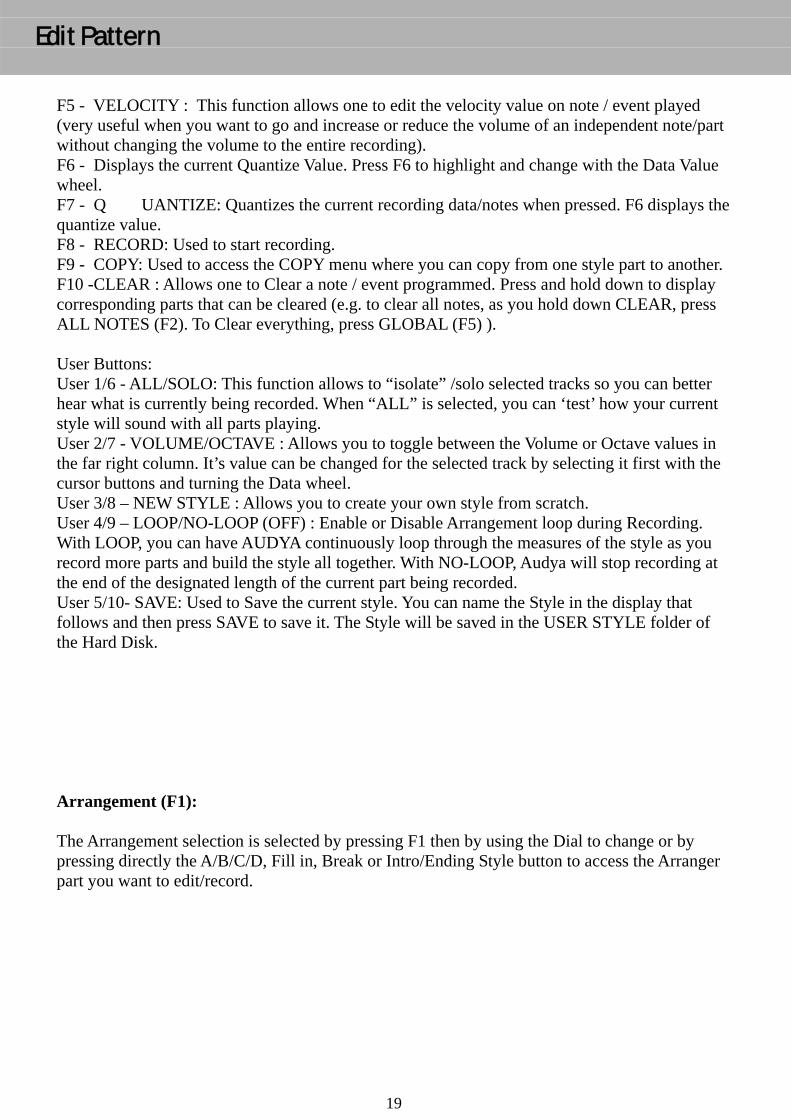
Parameter (F2): Here you can set Parameter values for Tempo (BPM), Time Signature and Arrangement Measure length. These parameters (except Tempo) can be modified only when the arrangement is empty (i.e. nothing has been recorded yet). Furthermore in this section, the user can set their own Metronome Volume value. EXIT button (now displayed in it’s place) allows you to exit from this menu when pressed.
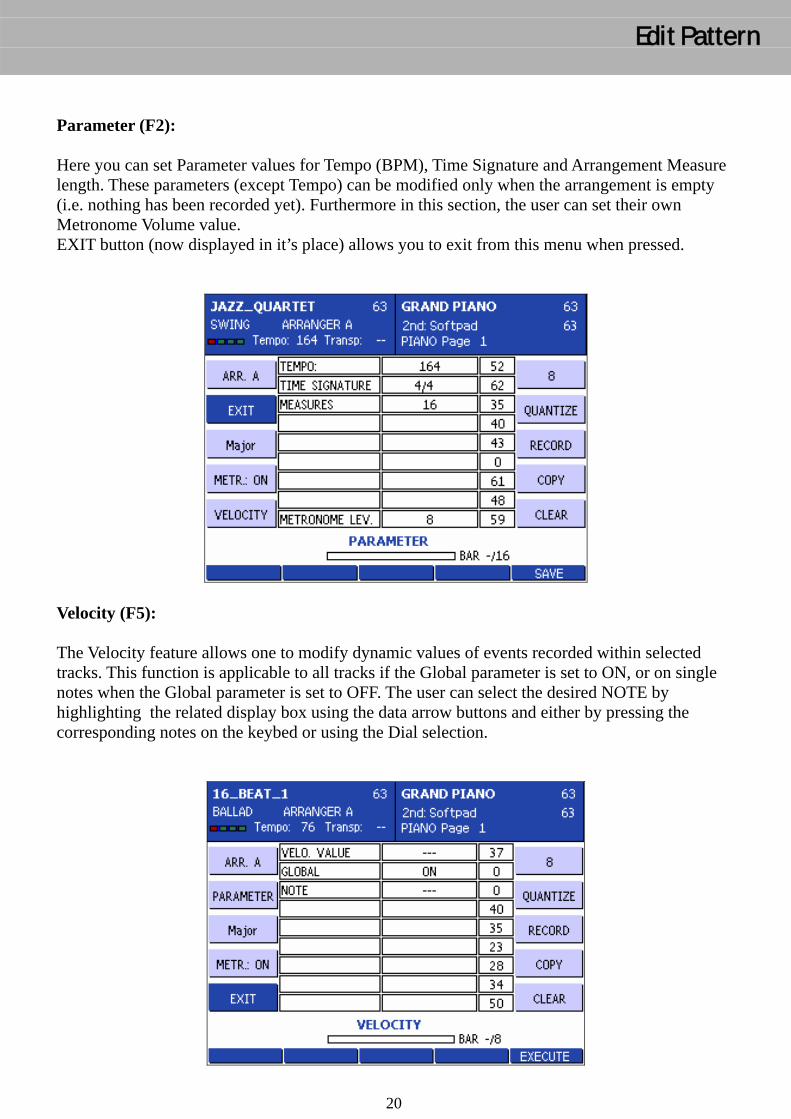
Velocity (F5): The Velocity feature allows one to modify dynamic values of events recorded within selected tracks. This function is applicable to all tracks if the Global parameter is set to ON, or on single notes when the Global parameter is set to OFF. The user can select the desired NOTE by highlighting the related display box using the data arrow buttons and either by pressing the corresponding notes on the keybed or using the Dial selection.
Edit Pattern
21
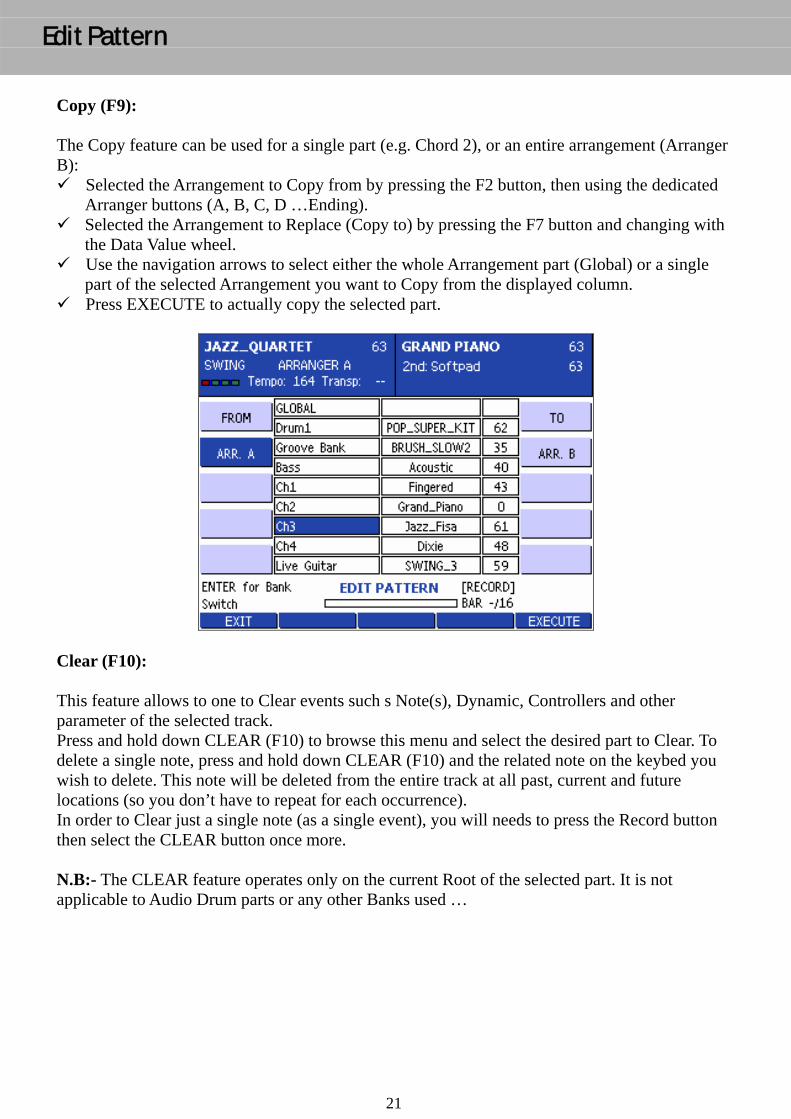
Copy (F9): The Copy feature can be used for a single part (e.g. Chord 2), or an entire arrangement (Arranger B): Selected the Arrangement to Copy from by pressing the F2 button, then using the dedicated
Arranger buttons (A, B, C, D …Ending). Selected the Arrangement to Replace (Copy to) by pressing the F7 button and changing with
the Data Value wheel. Use the navigation arrows to select either the whole Arrangement part (Global) or a single
part of the selected Arrangement you want to Copy from the displayed column. Press EXECUTE to actually copy the selected part.
Clear (F10): This feature allows to one to Clear events such s Note(s), Dynamic, Controllers and other parameter of the selected track. Press and hold down CLEAR (F10) to browse this menu and select the desired part to Clear. To delete a single note, press and hold down CLEAR (F10) and the related note on the keybed you wish to delete. This note will be deleted from the entire track at all past, current and future locations (so you don’t have to repeat for each occurrence). In order to Clear just a single note (as a single event), you will needs to press the Record button then select the CLEAR button once more. N.B:- The CLEAR feature operates only on the current Root of the selected part. It is not applicable to Audio Drum parts or any other Banks used …
Edit Pattern

22
How to EDIT/MODIFY an existing Style
In order to modify an existing style simply select it (after you have pressed the USER STYLE button to display the user styles), then press EDIT to access the Pattern Editor as shown below
By using the navigation arrows, highlight the Voice of the arrangement part to be modified (for our example we’re using the Bass line). Use the Dial to change the voice for this track. You can use any of the Voice Group buttons (Piano, El.Piano, Chrom … etc) to select the group from which you want to access a voice with the Data Value wheel. To switch to a different Bank, highlight the part (e.g. Bass) and turn the Data Value wheel to access a different bank (e.g. Bass Bank) – then move back to the voice column and use the wheel to select a voice within the new bank. .
Edit Pattern
23
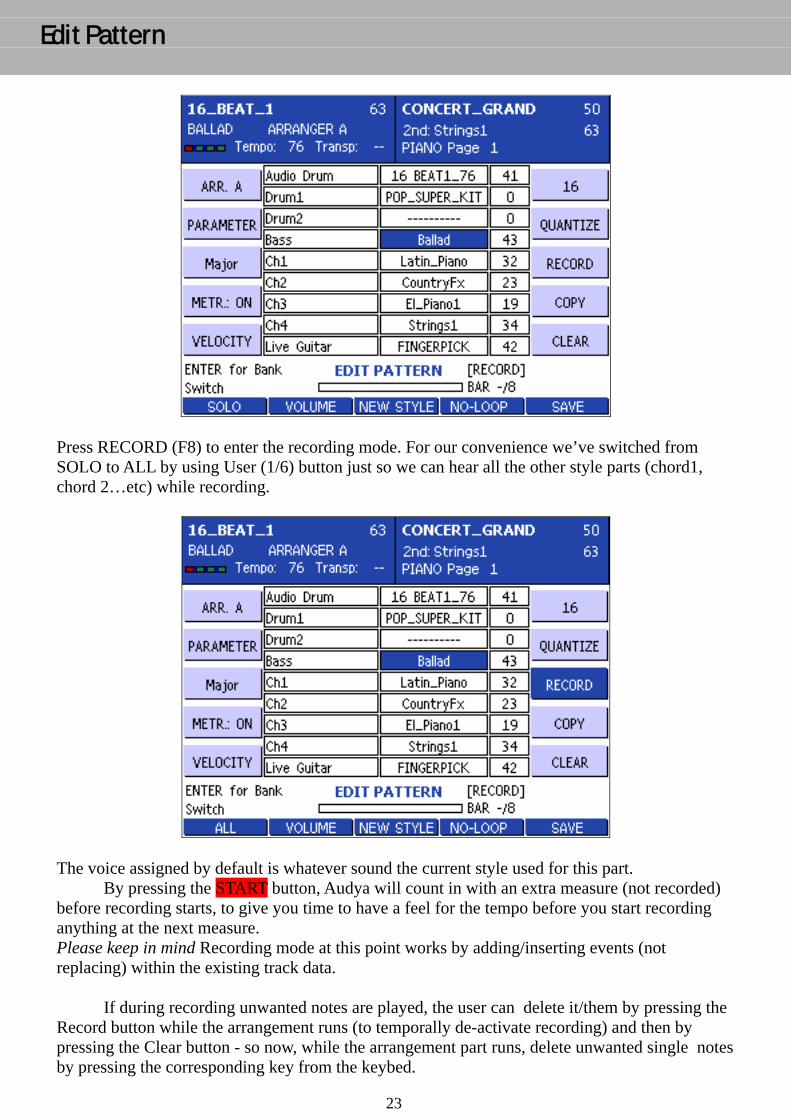
Press RECORD (F8) to enter the recording mode. For our convenience we’ve switched from SOLO to ALL by using User (1/6) button just so we can hear all the other style parts (chord1, chord 2…etc) while recording.
The voice assigned by default is whatever sound the current style used for this part. By pressing the START button, Audya will count in with an extra measure (not recorded)
before recording starts, to give you time to have a feel for the tempo before you start recording anything at the next measure. Please keep in mind Recording mode at this point works by adding/inserting events (not replacing) within the existing track data.
If during recording unwanted notes are played, the user can delete it/them by pressing the Record button while the arrangement runs (to temporally de-activate recording) and then by pressing the Clear button - so now, while the arrangement part runs, delete unwanted single notes by pressing the corresponding key from the keybed.
Edit Pattern
24
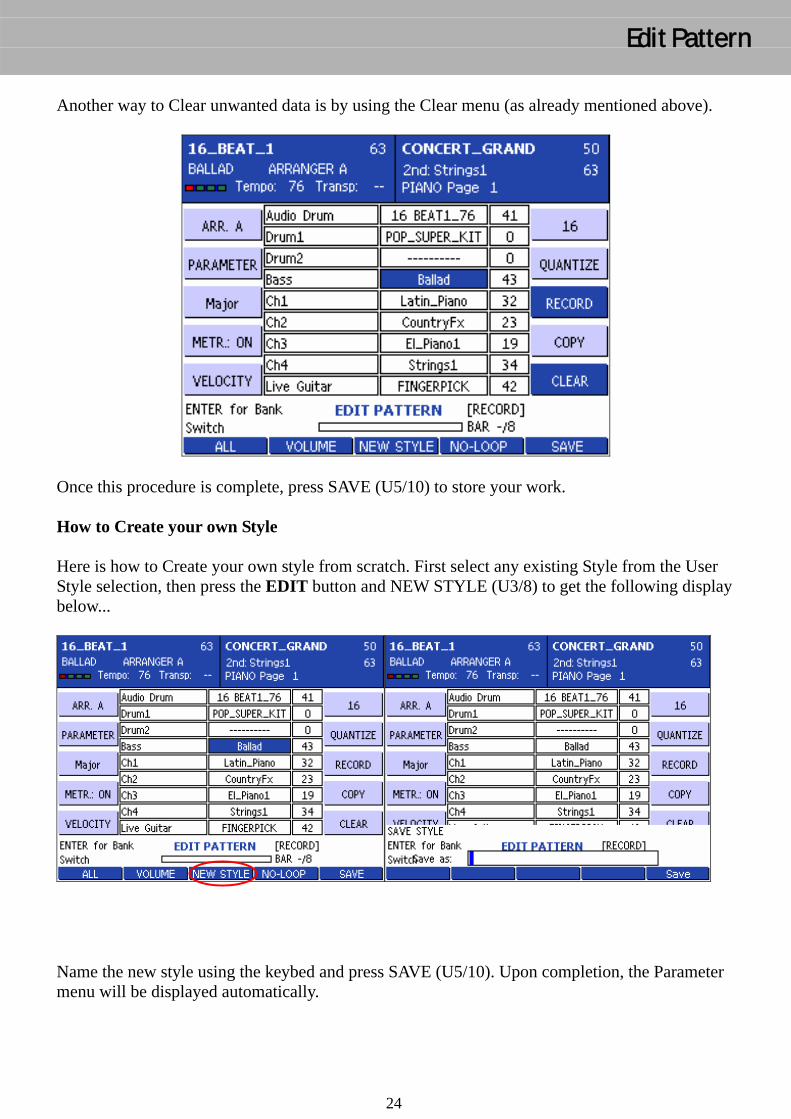
Another way to Clear unwanted data is by using the Clear menu (as already mentioned above).
Once this procedure is complete, press SAVE (U5/10) to store your work. How to Create your own Style Here is how to Create your own style from scratch. First select any existing Style from the User Style selection, then press the EDIT button and NEW STYLE (U3/8) to get the following display below...
Name the new style using the keybed and press SAVE (U5/10). Upon completion, the Parameter menu will be displayed automatically.
Edit Pattern

25
In this menu, you can set the Tempo ( BPM ) Time Signature, Arrangement Measures and metronome level for your new style, using the data cursor buttons to navigate and changing the value with the Data Value wheel.
When all of these parameters have been set, press the Exit button to return to the main Style Creation page. From this point, you can now proceed to recording your Style as usual (Record the Drums, Bass, Chords …). As you might already be aware of, if the tonality is set to Major root (displayed in the corresponding F3 box), before recording, Audya will automatically convert the data recorded regardless of tonality and apply to all other chord types played (such as minor , 7 , dim … etc) ~ just remember to program in the key of ‘C’ for best results. To obtain specific notes that should/will be heard only when say a Minor or 7 chord is played, simply set the tonality to the part requested before recording the notes. If you want to use this Editor as a partial Sequencer, you may as well, in which case you don’t have to focus on recording in a particular key (C) but record freely as you would do with a Sequencer – just remember that during playback you won’t play the arranger, but simply one chord and let the ‘sequencer’ take over and play what you recorded. You can record partial sequences into Arrangement A, B, C, D, Intro …etc. with each being 48 Measures long (Max.). When done with the recording, simply press SAVE (U5/10) to save it.
Edit Pattern
26
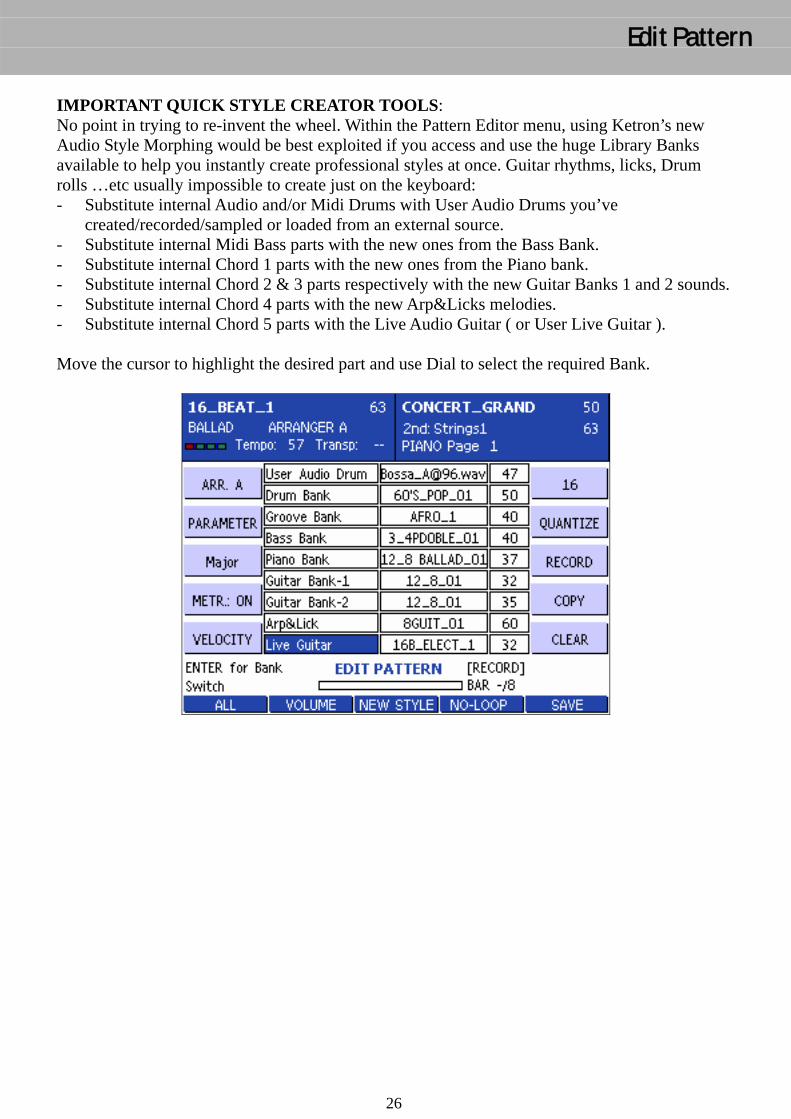
IMPORTANT QUICK STYLE CREATOR TOOLS: No point in trying to re-invent the wheel. Within the Pattern Editor menu, using Ketron’s new Audio Style Morphing would be best exploited if you access and use the huge Library Banks available to help you instantly create professional styles at once. Guitar rhythms, licks, Drum rolls …etc usually impossible to create just on the keyboard: - Substitute internal Audio and/or Midi Drums with User Audio Drums you’ve
created/recorded/sampled or loaded from an external source. - Substitute internal Midi Bass parts with the new ones from the Bass Bank. - Substitute internal Chord 1 parts with the new ones from the Piano bank. - Substitute internal Chord 2 & 3 parts respectively with the new Guitar Banks 1 and 2 sounds. - Substitute internal Chord 4 parts with the new Arp&Licks melodies. - Substitute internal Chord 5 parts with the Live Audio Guitar ( or User Live Guitar ). Move the cursor to highlight the desired part and use Dial to select the required Bank.
Edit Pattern
27
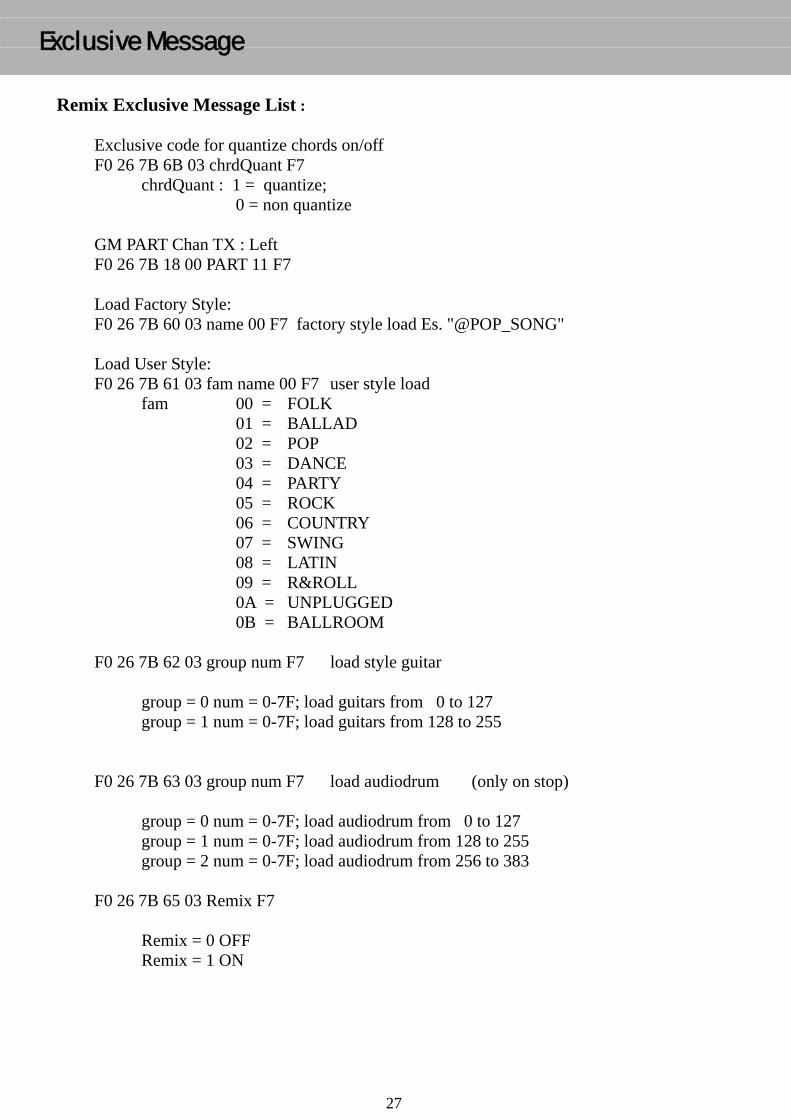
Remix Exclusive Message List : Exclusive code for quantize chords on/off F0 26 7B 6B 03 chrdQuant F7 chrdQuant : 1 = quantize; 0 = non quantize GM PART Chan TX : Left F0 26 7B 18 00 PART 11 F7 Load Factory Style: F0 26 7B 60 03 name 00 F7 factory style load Es. "@POP_SONG" Load User Style: F0 26 7B 61 03 fam name 00 F7 user style load fam 00 = FOLK 01 = BALLAD 02 = POP 03 = DANCE 04 = PARTY 05 = ROCK 06 = COUNTRY 07 = SWING 08 = LATIN 09 = R&ROLL 0A = UNPLUGGED 0B = BALLROOM F0 26 7B 62 03 group num F7 load style guitar group = 0 num = 0-7F; load guitars from 0 to 127 group = 1 num = 0-7F; load guitars from 128 to 255 F0 26 7B 63 03 group num F7 load audiodrum (only on stop) group = 0 num = 0-7F; load audiodrum from 0 to 127 group = 1 num = 0-7F; load audiodrum from 128 to 255 group = 2 num = 0-7F; load audiodrum from 256 to 383 F0 26 7B 65 03 Remix F7 Remix = 0 OFF Remix = 1 ON
Exclusive Message
28
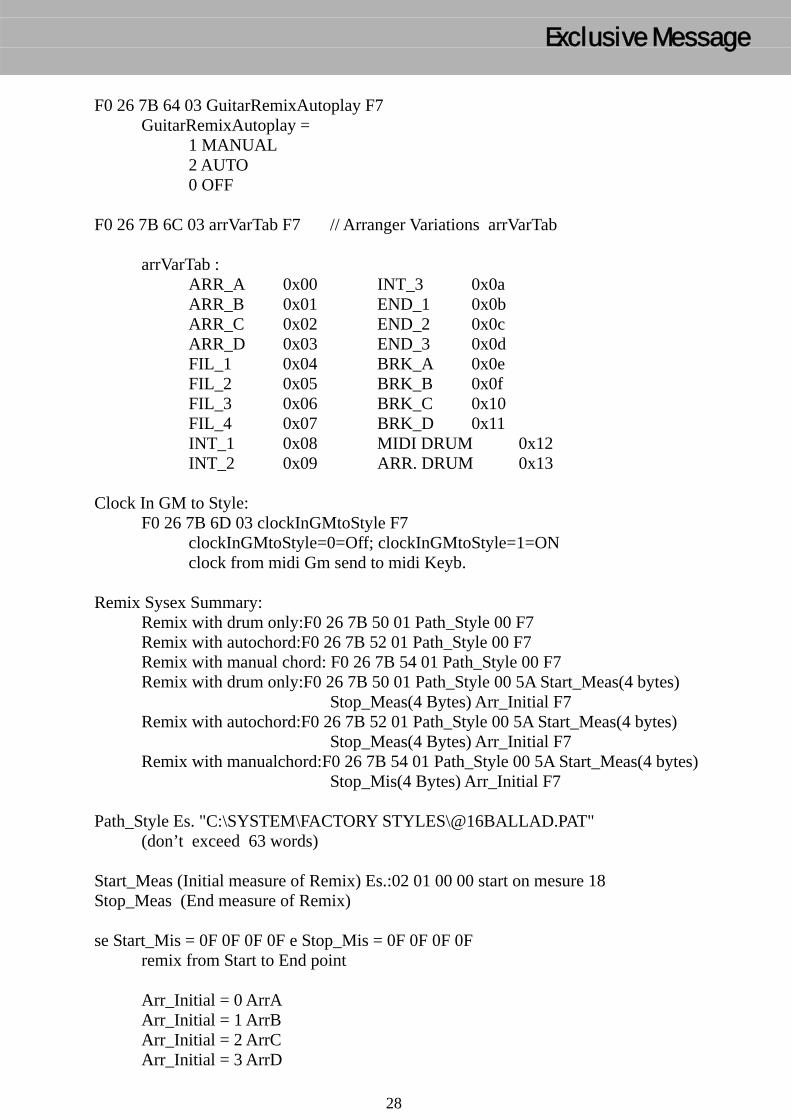
F0 26 7B 64 03 GuitarRemixAutoplay F7
GuitarRemixAutoplay = 1 MANUAL 2 AUTO 0 OFF F0 26 7B 6C 03 arrVarTab F7 // Arranger Variations arrVarTab arrVarTab : ARR_A 0x00 INT_3 0x0a ARR_B 0x01 END_1 0x0b ARR_C 0x02 END_2 0x0c ARR_D 0x03 END_3 0x0d FIL_1 0x04 BRK_A 0x0e FIL_2 0x05 BRK_B 0x0f FIL_3 0x06 BRK_C 0x10 FIL_4 0x07 BRK_D 0x11 INT_1 0x08 MIDI DRUM 0x12 INT_2 0x09 ARR. DRUM 0x13 Clock In GM to Style: F0 26 7B 6D 03 clockInGMtoStyle F7 clockInGMtoStyle=0=Off; clockInGMtoStyle=1=ON clock from midi Gm send to midi Keyb. Remix Sysex Summary: Remix with drum only:F0 26 7B 50 01 Path_Style 00 F7 Remix with autochord:F0 26 7B 52 01 Path_Style 00 F7 Remix with manual chord: F0 26 7B 54 01 Path_Style 00 F7 Remix with drum only:F0 26 7B 50 01 Path_Style 00 5A Start_Meas(4 bytes) Stop_Meas(4 Bytes) Arr_Initial F7 Remix with autochord:F0 26 7B 52 01 Path_Style 00 5A Start_Meas(4 bytes) Stop_Meas(4 Bytes) Arr_Initial F7 Remix with manualchord:F0 26 7B 54 01 Path_Style 00 5A Start_Meas(4 bytes) Stop_Mis(4 Bytes) Arr_Initial F7 Path_Style Es. "C:\SYSTEM\FACTORY STYLES\@16BALLAD.PAT" (don’t exceed 63 words) Start_Meas (Initial measure of Remix) Es.:02 01 00 00 start on mesure 18 Stop_Meas (End measure of Remix) se Start_Mis = 0F 0F 0F 0F e Stop_Mis = 0F 0F 0F 0F remix from Start to End point Arr_Initial = 0 ArrA Arr_Initial = 1 ArrB Arr_Initial = 2 ArrC Arr_Initial = 3 ArrD
Exclusive Message

KETRON s.r.l.Via Giuseppe Taliercio n. 7
60131 Ancona (Italy)Tel. +39 071 285771
Tel. +39 071 2857748www.ketron.it
email: [email protected]