Embed Size (px)
Citation preview
Oracle® Fusion MiddlewareUpgrading Oracle Identity and AccessManagement
12c (12.2.1.3.0)E95500-04January 2020
Oracle Fusion Middleware Upgrading Oracle Identity and Access Management, 12c (12.2.1.3.0)
E95500-04
Copyright © 2017, 2020, Oracle and/or its affiliates. All rights reserved.
This software and related documentation are provided under a license agreement containing restrictions onuse and disclosure and are protected by intellectual property laws. Except as expressly permitted in yourlicense agreement or allowed by law, you may not use, copy, reproduce, translate, broadcast, modify,license, transmit, distribute, exhibit, perform, publish, or display any part, in any form, or by any means.Reverse engineering, disassembly, or decompilation of this software, unless required by law forinteroperability, is prohibited.
The information contained herein is subject to change without notice and is not warranted to be error-free. Ifyou find any errors, please report them to us in writing.
If this is software or related documentation that is delivered to the U.S. Government or anyone licensing it onbehalf of the U.S. Government, then the following notice is applicable:
U.S. GOVERNMENT END USERS: Oracle programs, including any operating system, integrated software,any programs installed on the hardware, and/or documentation, delivered to U.S. Government end users are"commercial computer software" pursuant to the applicable Federal Acquisition Regulation and agency-specific supplemental regulations. As such, use, duplication, disclosure, modification, and adaptation of theprograms, including any operating system, integrated software, any programs installed on the hardware,and/or documentation, shall be subject to license terms and license restrictions applicable to the programs.No other rights are granted to the U.S. Government.
This software or hardware is developed for general use in a variety of information management applications.It is not developed or intended for use in any inherently dangerous applications, including applications thatmay create a risk of personal injury. If you use this software or hardware in dangerous applications, then youshall be responsible to take all appropriate fail-safe, backup, redundancy, and other measures to ensure itssafe use. Oracle Corporation and its affiliates disclaim any liability for any damages caused by use of thissoftware or hardware in dangerous applications.
Oracle and Java are registered trademarks of Oracle and/or its affiliates. Other names may be trademarks oftheir respective owners.
Intel and Intel Xeon are trademarks or registered trademarks of Intel Corporation. All SPARC trademarks areused under license and are trademarks or registered trademarks of SPARC International, Inc. AMD, Opteron,the AMD logo, and the AMD Opteron logo are trademarks or registered trademarks of Advanced MicroDevices. UNIX is a registered trademark of The Open Group.
This software or hardware and documentation may provide access to or information about content, products,and services from third parties. Oracle Corporation and its affiliates are not responsible for and expresslydisclaim all warranties of any kind with respect to third-party content, products, and services unless otherwiseset forth in an applicable agreement between you and Oracle. Oracle Corporation and its affiliates will not beresponsible for any loss, costs, or damages incurred due to your access to or use of third-party content,products, or services, except as set forth in an applicable agreement between you and Oracle.
Contents
Preface
Audience x
Documentation Accessibility x
Related Documents x
Conventions xi
1 Introduction to Upgrading Oracle Identity and Access Managementto 12c (12.2.1.3.0)
About the Starting Points for a Oracle Identity and Access Management Upgrade 1-2
About the Oracle Identity and Access Management Upgrade Scenarios 1-2
About the New Features for Oracle Identity and Access Management 12c 1-3
About Upgrade Restrictions 1-3
How to Use This Guide 1-4
2 Pre-Upgrade Requirements
Oracle Fusion Middleware Pre-Upgrade Checklist 2-2
Creating a Complete Backup 2-4
Backing Up the Schema Version Registry Table 2-4
Maintaining Customized Domain and Environment Settings 2-4
Cloning Your Production Environment for Testing 2-5
Verifying Certification and System Requirements 2-6
Verify Your Environment Meets Certification Requirements 2-7
Verify System Requirements and Specifications 2-7
Migrating from a 32-Bit to a 64-Bit Operating System 2-8
Verify That the Database Hosting Oracle Fusion Middleware is Supported 2-11
Verify That the JDK Is Certified for This Release of Oracle Fusion Middleware 2-11
Updating Policy Files when Using Enhanced Encryption (AES 256) 2-12
Purging Unused Data 2-12
Creating an Edition on the Server for Edition-Based Redefinition 2-13
Creating a Non-SYSDBA User to Run the Upgrade Assistant 2-13
Identifying Existing Schemas Available for Upgrade 2-16
iii
Updating Database Parameters for Oracle Identity Manager 2-17
Part I Upgrading Oracle Identity and Access Management Single NodeEnvironments
3 Upgrading Oracle Access Management Single Node Environments
About the Oracle Access Management Single Node Upgrade Process 3-2
Completing the Pre-Upgrade Tasks for Oracle Access Management 3-3
Checking the Supported Starting Point for Oracle Access Management Upgrade3-4
Checking if OAM and OAAM is in the Same Domain in an OAM-OAAM-OIMIntegrated Setup 3-4
Removing the IAMSuiteAgent Deployment 3-5
Upgrading Java JSE Policy 3-6
Disabling Deprecated Services in OAM 3-6
Installing Product Distributions 3-7
Creating the Required 12c Schemas Using RCU 3-9
Running a Pre-Upgrade Readiness Check 3-13
About Running a Pre-Upgrade Readiness Check 3-14
Starting the Upgrade Assistant in Readiness Mode 3-14
Upgrade Assistant Parameters 3-15
Performing a Readiness Check with the Upgrade Assistant 3-17
Understanding the Readiness Report 3-18
Stopping Servers and Processes 3-23
Upgrading Product Schemas 3-24
Identifying Existing Schemas Available for Upgrade 3-24
Starting the Upgrade Assistant 3-25
Upgrade Assistant Parameters 3-26
Upgrading Oracle Access Management Schemas Using the Upgrade Assistant 3-29
Verifying the Schema Upgrade 3-32
About Reconfiguring the Domain 3-33
Backing Up the Domain 3-35
Starting the Reconfiguration Wizard 3-36
Reconfiguring the Oracle Access Management Domain 3-37
Upgrading Domain Component Configurations 3-39
Starting the Upgrade Assistant 3-40
Upgrade Assistant Parameters 3-41
Upgrading Oracle Access Management Domain Component Configurations 3-43
Removing Oracle Mobile Security Manager Servers From the Domain 3-45
Post-Upgrade Task 3-45
iv
Starting Servers and Processes 3-46
Verifying the Domain-Specific-Component Configurations Upgrade 3-47
Enabling WebGates to Work With Oracle Access Management 12c 3-48
Updating the java.security File 3-48
4 Upgrading Oracle Identity Manager Single Node Environments
About the Oracle Identity Manager Single Node Upgrade Process 4-2
Generating and Analyzing Pre-Upgrade Report for Oracle Identity Manager 4-5
Obtaining the Pre-Upgrade Report Utility 4-5
Generating the Pre-Upgrade Report 4-6
Analyzing the Pre-Upgrade Report 4-8
Completing the Pre-Upgrade Tasks for Oracle Identity Manager 4-9
Updating Server Wallets to Remove MD5 Algorithm 4-9
Updating DB Wallets to Remove MD5 Algorithm (For SSL Enabled Setup) 4-12
Verifying the Memory Settings 4-15
Opening the Non-SSL Ports for SSL Enabled Setup 4-15
Installing Product Distributions 4-15
Running a Pre-Upgrade Readiness Check 4-18
About Running a Pre-Upgrade Readiness Check 4-18
Starting the Upgrade Assistant in Readiness Mode 4-19
Upgrade Assistant Parameters 4-19
Performing a Readiness Check with the Upgrade Assistant 4-21
Understanding the Readiness Report 4-23
Creating the Required 12c Schemas Using RCU (Optional) 4-27
Tuning Database Parameters for Oracle Identity Manager 4-31
Stopping Servers and Processes 4-31
Upgrading Product Schemas 4-32
Identifying Existing Schemas Available for Upgrade 4-33
Starting the Upgrade Assistant 4-34
Upgrading Oracle Identity Manager Schemas Using the Upgrade Assistant 4-35
Verifying the Schema Upgrade 4-39
Tuning Application Module for User Interface 4-40
About Reconfiguring the Domain 4-40
Backing Up the Domain 4-42
Starting the Reconfiguration Wizard 4-43
Reconfiguring the Oracle Identity Manager Domain 4-44
Upgrading Domain Component Configurations 4-47
Starting the Upgrade Assistant 4-47
Upgrade Assistant Parameters 4-48
Upgrading Oracle Identity Manager Domain Component Configurations 4-50
v
Verifying the Domain-Specific-Component Configurations Upgrade 4-52
Post-Upgrade Task 4-53
Copying folders to the 12c home directory 4-53
Starting the Servers 4-53
Starting Servers and Processes 4-54
Upgrading Oracle Identity Manager Design Console 4-55
Completing the Post-Upgrade Tasks for SSL Enabled Setup 4-56
Installing Standalone Oracle BI Publisher 4-56
Part II Upgrading Oracle Identity and Access Management HighlyAvailable Environments
5 Upgrading Oracle Access Management Highly AvailableEnvironments
About the Oracle Access Management Multinode Upgrade Process 5-2
Disabling Deprecated Services in OAM 5-3
Creating 12c Middleware Home Folder on OAMHOST1 and OAMHOST2 5-4
Installing Product Distributions on OAMHOST1 and OAMHOST2 5-4
Upgrading Schemas on OAMHOST1 5-4
Reconfiguring the Domain on OAMHOST1 5-4
Replicating the Domain Configurations on OAMHOST2 5-4
Upgrading Domain Component Configurations on OAMHOST1 and OAMHOST2 5-5
Starting the Servers on OAMHOST1 and OAMHOST2 5-5
Enabling WebGates to Work With Oracle Access Management 12c 5-6
Updating the java.security File 5-6
6 Upgrading Oracle Identity Manager Highly Available Environments
About the Oracle Identity Manager Multinode Upgrade Process 6-2
Stopping Servers and Processes 6-4
Creating 12c Middleware Home Folder on OIMHOST1 and OIMHOST2 6-6
Installing Product Distributions on OIMHOST1 and OIMHOST2 6-6
Upgrading Schemas on OIMHOST1 6-6
Reconfiguring the Domain on OIMHOST1 6-6
Upgrading Domain Component Configurations on OIMHOST1 6-7
Replicating the Domain Configurations on OIMHOST2 6-7
Copying oracle.iam.ui.custom-dev-starter-pack.war from 11g Middleware Home 6-8
Starting the Servers on OIMHOST1 and OIMHOST2 6-8
vi
7 Upgrading Oracle Access Management Multi-Data CenterEnvironments
About the Oracle Access Management Multi-Data Center Topology 7-2
Roadmap for Upgrading Oracle Access Management MDC Setup 7-3
Backing Up the Existing MDC Environment 7-4
Disabling Deprecated Services in OAM 7-4
Enabling Write Permission to Master and Clones (If Necessary) 7-5
Disabling and Deleting All Replication Agreements Between Master and Clone 7-5
Redirecting Traffic to Master Data Center 7-5
Upgrading Oracle Access Management on Clone Data Center 7-5
Redirecting Traffic to Clone Data Center 7-5
Upgrading Oracle Access Management on Master Data Center 7-6
Freezing all Changes to Clones (if Necessary) 7-6
Syncing Access Metadata 7-6
Creating Replication Agreement 7-6
Updating the java.security File 7-7
Bringing up the Master and Clone Data Centers Online 7-7
8 Upgrading OIM-OAM Integrated Environments set up Manually
About the OIM-OAM Integrated HA Topology Set Up Manually 8-1
Supported Starting Points for Integrated HA Upgrade 8-3
Roadmap for Upgrading OIM-OAM Integrated Highly Available Environments SetUp Manually 8-3
Enabling Oracle Identity Governance 12c to Work With Oracle Access Management11g 8-4
9 Upgrading OIM-OAM Integrated Environments set up Using LifeCycle Management Tool
About the OIM-OAM Integrated HA Topology Set Up Using LCM Tool 9-1
Supported Starting Points 9-3
Roadmap for Upgrading OIM-OAM Integrated Environments set up Using Life CycleManagement Tool 9-3
Part III Troubleshooting the Oracle Identity and Access ManagementUpgrade
vii
10
Troubleshooting the Oracle Access Management Upgrade
Activation State is set as FAILED when Restarting the Admin Server 10-2
AMInitServlet Fails to Preload when Restarting OAM Managed Server 10-3
CFGFWK-60928: Invalid Existing Node Manager Home Directory 10-3
File Not Found Exception when Starting the OAM Managed Server 10-3
Internal Server Error: The Server Encountered an Unknown Error 10-4
Invalid OAM Keystore Configuration 10-5
Upgrade Assistant Readiness Check Fails: Common Infrastructure Services(DEV_STB) 10-5
Upgrade Assistant Readiness Check Fails: Missing System and Object Privileges 10-5
Upgrade Assistant Readiness Check Fails: Oracle WSM Datasource ConnectionDetails 10-6
Readiness Check for OAM Configuration Upgrade Fails 10-6
Error When Starting SSL Enabled OAM Managed Server After Upgrade 10-7
Readiness Check for OPSS Schema Fails 10-8
OAM Upgrade Fails With InvalidKeyException 10-8
OWSM Error Messages in the Reconfiguration Logs 10-8
OAM Console Shows No Application Domains After Upgrade 10-9
Troubleshooting Security Policy Issues When Upgrading 10-10
Modifying the Java Security Posture 10-10
Upgrade Scenarios for OAM 10-10
11
Troubleshooting the Oracle Identity Manager Upgrade
Upgrading Product Schemas Error: OIMR2PS2_OIM.UK_ENTITY_TYPE 11-3
KeystoreService Exception in the Logs After Reconfiguring the OIM Domain 11-3
Warning when Generating the Pre-Upgrade Report for OIM 11-4
Domain Reconfiguration Error 11-5
OIM Bootstrap for DEPLOYSOACOMPOSITES Task Fails After Upgrade 11-6
Authorization Policy Merge Issue 11-8
MAR Update or Metadata Merge Issue 11-10
Error When Opening ADF DI Excel Sheet After Upgrade 11-11
Complilation Error When Starting the SOA Server After Upgrade 11-11
Warning in Oracle Identity Manager Server Logs After Upgrade 11-12
Default Challenges Questions are not Updated After Upgrade 11-13
OPSS Processing Error When Reconfiguring the Domain 11-13
EditFailedException When Releasing Configuration From WebLogic Console 11-14
OIM Application Deployment Fails Intermittently 11-14
soa-infra Application is in ‘Prepared’ State Post Upgrade 11-14
Oracle Identity Manager Server Throws OutOfMemoryError 11-15
SOA Fails to Join Coherence Cluster During the First Start After Upgrade 11-16
viii
LDAP User Create and Update Reconciliation Job Fails 11-16
BI Managed Server is Seen on WebLogic Console After Upgrade 11-17
Empty Pages or Panels After Upgrade 11-17
A Updating the JDK After Installing and Configuring an Oracle FusionMiddleware Product
About Updating the JDK Location After Installing an Oracle Fusion MiddlewareProduct A-1
Updating the JDK Location in an Existing Oracle Home A-3
Updating the JDK Location in an Existing Domain Home A-3
ix

Preface
This document describes how to upgrade an existing Oracle Identity and AccessManagement environment to 12c (12.2.1.3.0).
• AudienceIdentify the target audience for your book and learn more about this documentintended for.
• Documentation Accessibility
• Related Documents
• ConventionsLearn about the conventions used in this document.
AudienceIdentify the target audience for your book and learn more about this documentintended for.
This document is intended for system administrators who are responsible for installing,maintaining, and upgrading Oracle Identity and Access Management. It is assumedthat readers have knowledge of the following:
• Oracle Fusion Middleware system administration and configuration.
• Configuration parameters and expected behavior of the system being upgraded.
Documentation AccessibilityFor information about Oracle's commitment to accessibility, visit the OracleAccessibility Program website at http://www.oracle.com/pls/topic/lookup?ctx=acc&id=docacc.
Access to Oracle Support
Oracle customers that have purchased support have access to electronic supportthrough My Oracle Support. For information, visit http://www.oracle.com/pls/topic/lookup?ctx=acc&id=info or visit http://www.oracle.com/pls/topic/lookup?ctx=acc&id=trsif you are hearing impaired.
Related DocumentsRefer to the Oracle Fusion Middleware Library for additional information.
• For installation information, see Fusion Middleware Installation Documentation.
• For upgrade information, see Fusion Middleware Upgrade Documentation.
Preface
x
• For administration-related information, see Fusion Middleware AdministrationDocumentation.
• For release-related information, see Fusion Middleware Release Notes.
ConventionsLearn about the conventions used in this document.
This document uses the following text conventions:
Convention Meaning
boldface Boldface type indicates graphical user interface elements associatedwith an action, or terms defined in text or the glossary.
italic Italic type indicates book titles, emphasis, or placeholder variables forwhich you supply particular values.
monospace Monospace type indicates commands within a paragraph, URLs, codein examples, text that appears on the screen, or text that you enter.
Preface
xi
1Introduction to Upgrading Oracle Identityand Access Management to 12c(12.2.1.3.0)
Before you begin, review all introductory information to understand the standardupgrade topologies and upgrade paths for Oracle Identity and Access Management12c (12.2.1.3.0).
Note:
The product Oracle Identity Manager is referred to as Oracle IdentityManager (OIM) and Oracle Identity Governance (OIG) interchangeably in theguide.
Note:
For general information about Fusion Middleware upgrade planning andother upgrade concepts and resources, see the following sections inPlanning an Upgrade of Oracle Fusion Middleware:
• Planning an Upgrade to Oracle Fusion Middleware 12c (12.2.1.3.0)
• Understanding In-Place versus Out-of-Place Upgrades
• Understanding the Basic 12c Upgrade Tasks
The following topics describe the concepts related to upgrading Oracle Identity andAccess Management:
• About the Starting Points for a Oracle Identity and Access Management UpgradeYou can upgrade to Oracle Identity and Access Management 12c (12.2.1.3.0) froma supported 11g release.
• About the Oracle Identity and Access Management Upgrade ScenariosThe steps to upgrade Oracle Identity and Access Management to 12c (12.2.1.3.0)depend on the existing 11g Release 2 (11.1.2.3.0) production topology.
• About the New Features for Oracle Identity and Access Management 12cSeveral changes have been made to Oracle Identity and Access Managementbetween 11g and 12c.
• About Upgrade RestrictionsIf you are using two or more Oracle Fusion Middleware products of the same ordifferent versions in a single, supported, Oracle Fusion Middleware configuration,you must consider the interoperability and compatibility factors before planning theupgrade.
1-1
• How to Use This GuideThis guide covers various upgrade scenarios.
About the Starting Points for a Oracle Identity and AccessManagement Upgrade
You can upgrade to Oracle Identity and Access Management 12c (12.2.1.3.0) from asupported 11g release.
Supported starting point for is upgrading Oracle Identity and Access Management to12c (12.2.1.3.0) is Oracle Identity and Access Management 11g Release 2(11.1.2.3.0).
If you are not using the 11.1.2.3.0 version of Oracle Identity and Access Management,you must upgrade to 11.1.2.3.0 before you move to 12c (12.2.1.3.0).
For information about upgrading Oracle Identity and Access Management to 11gRelease 2 (11.1.2.3.0), see Introduction to Oracle Identity and Access ManagementUpgrade in the Upgrade Guide for Oracle Identity and Access Management for 11gRelease 2 (11.1.2.3.0).
The upgrade procedures in this guide explain how to upgrade an existing OracleIdentity and Access Management 11g domain to Oracle Identity and AccessManagement 12c (12.2.1.3.0). If your domain contains other components, you willhave to upgrade those components as well. Links to supporting documentation areprovided wherever necessary.
About the Oracle Identity and Access Management UpgradeScenarios
The steps to upgrade Oracle Identity and Access Management to 12c (12.2.1.3.0)depend on the existing 11g Release 2 (11.1.2.3.0) production topology.
As a result, it is difficult to provide exact upgrade instructions for every possible OracleIdentity and Access Management installation. Therefore, this upgrade documentationprovides instructions for upgrading several typical Oracle Identity and AccessManagement topologies.
Your actual topology may vary, but the topologies described here provide an examplethat can be used as a guide to upgrade other similar Oracle Identity and AccessManagement topologies.
Note:
For additional information about the upgrade process and planning resourcesto ensure your upgrade is successful, see Preparing to Upgrade in Planningan Upgrade of Oracle Fusion Middleware.
You can upgrade the following topologies or deployments using the proceduredescribed in this guide:
• Oracle Identity and Access Management single node environments
Chapter 1About the Starting Points for a Oracle Identity and Access Management Upgrade
1-2
• Oracle Identity and Access Management highly available (multinode)environments
• Oracle Identity Manager and Oracle Access Management integrated environmentsthat are set up manually in 11.1.2.3.0
• Oracle Identity Manager and Oracle Access Management integrated environmentsthat are set up using Life Cycle Management (LCM) tool in 11.1.2.3.0
• Oracle Access Management Multi-data center setup
Note:
If you are using Oracle Access Management Mobile and Social, do NOTupgrade to 12c (12.2.1.3.0). Contact Oracle support for more details on theupgrade path for Mobile and Social.
About the New Features for Oracle Identity and AccessManagement 12c
Several changes have been made to Oracle Identity and Access Managementbetween 11g and 12c.
To understand what's new in general in 12c, see New and Changed Features inUnderstanding Oracle Fusion Middleware.
If your environment includes Oracle WebLogic Server with Oracle ADF, see KeyDifferences Between Application Developer 11g and Infrastructure 12c.
For information about Oracle Access Management 12c (12.2.1.3.0), and it’s features,refer to the following topics in the Administrator's Guide for Oracle AccessManagement:
• Features of Access Manager 12.2.1.3.0
• Features Not Supported in Access Manager 12.2.1.3.0
• Understanding Oracle Access Management Services
• Understanding Oracle Access Management Access Manager
For more information about Oracle Identity Governance 12c (12.2.1.3.0), refer to thefollowing topics in the Administering Oracle Identity Governance:
• New and Changed Features for 12c (12.2.1.3.0)
• What is Oracle Identity Governance?
• What are the Different Modes of Oracle Identity Governance?
About Upgrade RestrictionsIf you are using two or more Oracle Fusion Middleware products of the same ordifferent versions in a single, supported, Oracle Fusion Middleware configuration, you
Chapter 1About the New Features for Oracle Identity and Access Management 12c
1-3
must consider the interoperability and compatibility factors before planning theupgrade.
Interoperability
In the context of Oracle Fusion Middleware products, Interoperability is defined as theability of two Oracle Fusion Middleware products or components of the same version(or release) to work together (interoperate) in a supported Oracle Fusion Middlewareconfiguration. Specifically, interoperability applies when the first 4 digits of the releaseor version number are the same. For example, Oracle Fusion Middleware12c (12.2.1.0) components are generally interoperable with other 12c (12.2.1.0)components.
Compatibility
In the context of Oracle Fusion Middleware products, Compatibility is defined as theability of two Oracle Fusion Middleware components of different versions (or releases)to interoperate.
For a list of products and features available in Oracle Fusion Middleware Release12.2.1.3.0, see Products and Features Available in Oracle Fusion Middleware 12c(12.2.1.3.0) in Understanding Interoperability and Compatibility.
How to Use This GuideThis guide covers various upgrade scenarios.
Depending on your existing 11.1.2.3.0 deployment, refer to the respective topics forupgrading Oracle Identity and Access Management to 12c (12.2.1.3.0):
• Single Node Environments
– For upgrading single node Oracle Access Management (OAM) setup, see Upgrading Oracle Access Management Single Node Environments.
– For upgrading single node Oracle Identity Manager (OIM) setup, see Upgrading Oracle Identity Manager Single Node Environments.
• Multi-node or Highly Available Environments
– For upgrading multi-node Oracle Access Management setup, see UpgradingOracle Access Management Highly Available Environments.
– For upgrading multi-node Oracle Identity Manager setup, see UpgradingOracle Identity Manager Highly Available Environments.
– For upgrading Oracle Access Management multi-data center setup, see Upgrading Oracle Access Management Multi-Data Center Environments.
• OIM-OAM Integrated Highly Available Environments
– For upgrading OIM-OAM integrated highly available deployment, that was setup manually in 11g, see Upgrading OIM-OAM Integrated Environments set upManually.
– For upgrading OIM-OAM integrated highly available deployment, that was setup using Life Cycle Management (LCM) tool in 11g, see Upgrading OIM-OAMIntegrated Environments set up Using Life Cycle Management Tool.
Chapter 1How to Use This Guide
1-4
Note:
Before you begin the upgrade, ensure that you review the Pre-UpgradeRequirements and perform necessary pre-upgrade tasks.
Chapter 1How to Use This Guide
1-5

2Pre-Upgrade Requirements
Before you begin to upgrade Oracle Identity and Access Management 12c(12.2.1.3.0), you must perform pre-upgrade tasks such as backing up, cloning yourcurrent environment, and verifying that your system meets certified requirements.
• Oracle Fusion Middleware Pre-Upgrade ChecklistPerform the tasks in this checklist before you begin any upgrade to ensure youhave a successful upgrade and limited downtime.
• Creating a Complete BackupBefore you start an upgrade, back up all system-critical files, including thedatabases that host your Oracle Fusion Middleware schemas.
• Cloning Your Production Environment for TestingCreate a copy of your actual production environment, upgrade the clonedenvironment, verify that the upgraded components work as expected, and then(and only then) upgrade your production environment.
• Verifying Certification and System RequirementsReview the certification matrix and system requirements documents to verify thatyour environment meets the necessary requirements for installation.
• Updating Policy Files when Using Enhanced Encryption (AES 256)If you plan to use enhanced encryption, such as Advanced Encryption Standard(AES) 256, in your upgraded environment, Oracle recommends that you apply thelatest required policy files to the JDK before you upgrade.
• Purging Unused DataPurging unused data and maintaining a purging methodology before an upgradecan optimize the upgrade process.
• Creating an Edition on the Server for Edition-Based RedefinitionBefore upgrading an Edition-Based Redefinition (EBR) enabled schema, you mustconnect to the database server and create an edition on the database server for12c.
• Creating a Non-SYSDBA User to Run the Upgrade AssistantOracle recommends that you create a non-SYSDBA user called FMW to run theUpgrade Assistant. This user has the privileges required to modify schemas, butdoes not have full administrator privileges.
• Identifying Existing Schemas Available for UpgradeThis optional task enables you to review the list of available schemas before youbegin the upgrade by querying the schema version registry. The registry containsschema information such as version number, component name and ID, date ofcreation and modification, and custom prefix.
• Updating Database Parameters for Oracle Identity ManagerYou need to verify and update a few database parameters before upgrading theOracle Identity Manager to 12c (12.2.1.3.0).
2-1
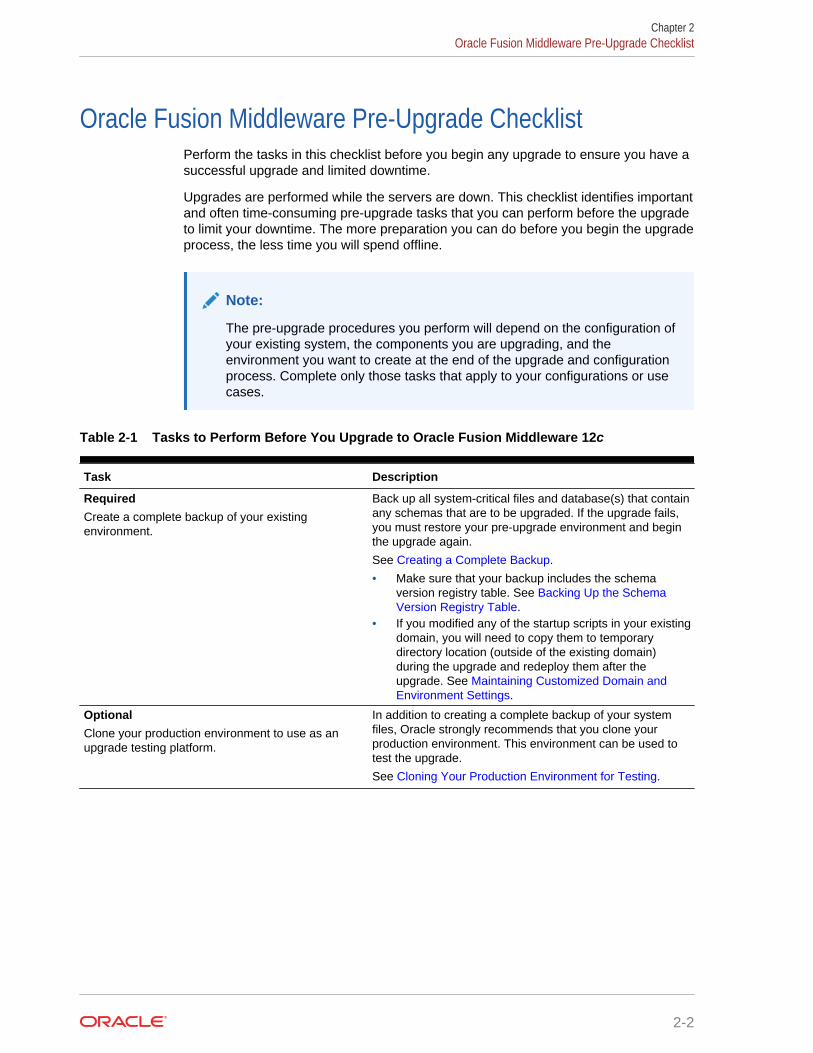
Oracle Fusion Middleware Pre-Upgrade ChecklistPerform the tasks in this checklist before you begin any upgrade to ensure you have asuccessful upgrade and limited downtime.
Upgrades are performed while the servers are down. This checklist identifies importantand often time-consuming pre-upgrade tasks that you can perform before the upgradeto limit your downtime. The more preparation you can do before you begin the upgradeprocess, the less time you will spend offline.
Note:
The pre-upgrade procedures you perform will depend on the configuration ofyour existing system, the components you are upgrading, and theenvironment you want to create at the end of the upgrade and configurationprocess. Complete only those tasks that apply to your configurations or usecases.
Table 2-1 Tasks to Perform Before You Upgrade to Oracle Fusion Middleware 12c
Task Description
RequiredCreate a complete backup of your existingenvironment.
Back up all system-critical files and database(s) that containany schemas that are to be upgraded. If the upgrade fails,you must restore your pre-upgrade environment and beginthe upgrade again.
See Creating a Complete Backup.
• Make sure that your backup includes the schemaversion registry table. See Backing Up the SchemaVersion Registry Table.
• If you modified any of the startup scripts in your existingdomain, you will need to copy them to temporarydirectory location (outside of the existing domain)during the upgrade and redeploy them after theupgrade. See Maintaining Customized Domain andEnvironment Settings.
OptionalClone your production environment to use as anupgrade testing platform.
In addition to creating a complete backup of your systemfiles, Oracle strongly recommends that you clone yourproduction environment. This environment can be used totest the upgrade.
See Cloning Your Production Environment for Testing.
Chapter 2Oracle Fusion Middleware Pre-Upgrade Checklist
2-2
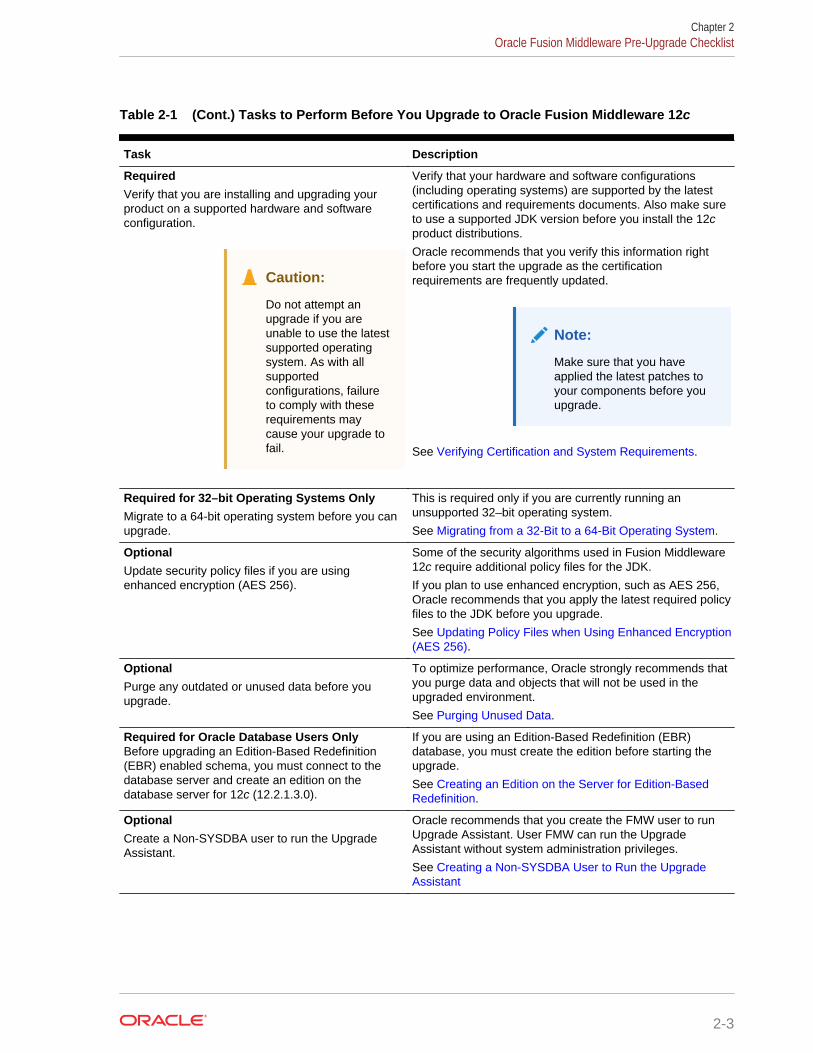
Table 2-1 (Cont.) Tasks to Perform Before You Upgrade to Oracle Fusion Middleware 12c
Task Description
RequiredVerify that you are installing and upgrading yourproduct on a supported hardware and softwareconfiguration.
Caution:
Do not attempt anupgrade if you areunable to use the latestsupported operatingsystem. As with allsupportedconfigurations, failureto comply with theserequirements maycause your upgrade tofail.
Verify that your hardware and software configurations(including operating systems) are supported by the latestcertifications and requirements documents. Also make sureto use a supported JDK version before you install the 12cproduct distributions.
Oracle recommends that you verify this information rightbefore you start the upgrade as the certificationrequirements are frequently updated.
Note:
Make sure that you haveapplied the latest patches toyour components before youupgrade.
See Verifying Certification and System Requirements.
Required for 32–bit Operating Systems OnlyMigrate to a 64-bit operating system before you canupgrade.
This is required only if you are currently running anunsupported 32–bit operating system.
See Migrating from a 32-Bit to a 64-Bit Operating System.
OptionalUpdate security policy files if you are usingenhanced encryption (AES 256).
Some of the security algorithms used in Fusion Middleware12c require additional policy files for the JDK.
If you plan to use enhanced encryption, such as AES 256,Oracle recommends that you apply the latest required policyfiles to the JDK before you upgrade.
See Updating Policy Files when Using Enhanced Encryption(AES 256).
OptionalPurge any outdated or unused data before youupgrade.
To optimize performance, Oracle strongly recommends thatyou purge data and objects that will not be used in theupgraded environment.
See Purging Unused Data.
Required for Oracle Database Users OnlyBefore upgrading an Edition-Based Redefinition(EBR) enabled schema, you must connect to thedatabase server and create an edition on thedatabase server for 12c (12.2.1.3.0).
If you are using an Edition-Based Redefinition (EBR)database, you must create the edition before starting theupgrade.
See Creating an Edition on the Server for Edition-BasedRedefinition.
OptionalCreate a Non-SYSDBA user to run the UpgradeAssistant.
Oracle recommends that you create the FMW user to runUpgrade Assistant. User FMW can run the UpgradeAssistant without system administration privileges.
See Creating a Non-SYSDBA User to Run the UpgradeAssistant
Chapter 2Oracle Fusion Middleware Pre-Upgrade Checklist
2-3
Creating a Complete BackupBefore you start an upgrade, back up all system-critical files, including the databasesthat host your Oracle Fusion Middleware schemas.
The backup must include the SYSTEM.SCHEMA_VERSION_REGISTRY$ table so that youcan restore the contents back to its pre-upgrade state if the upgrade fails.
The Upgrade Assistant Prerequisites screen prompts you to acknowledge thatbackups have been performed before you proceed with the actual upgrade. However,note that the Upgrade Assistant does not verify that a backup has been created.
See:
• Backing Up Your Environment in Administering Oracle Fusion Middleware
• Upgrading and Preparing Your Oracle Databases for 12c in Planning an Upgradeof Oracle Fusion Middleware
• Backing Up the Schema Version Registry TableYour system backup must include the SYSTEM.SCHEMA_VERSION_REGISTRY$ table orthe FMWREGISTRY.SCHEMA_VERSION_REGISTRY$ table.
• Maintaining Customized Domain and Environment SettingsIf you have modified any domain-generated, server startup scripts, or configurationfiles in your pre-upgrade environment, it is important to note that these changesare overwritten during the installation, domain upgrade, and reconfigurationoperations. Save your customized files to a shared library location so that you cancontinue to use them after the upgrade.
Backing Up the Schema Version Registry TableYour system backup must include the SYSTEM.SCHEMA_VERSION_REGISTRY$ table or theFMWREGISTRY.SCHEMA_VERSION_REGISTRY$ table.
Each Fusion Middleware schema has a row in the SYSTEM.SCHEMA_VERSION_REGISTRY$table. If you run the Upgrade Assistant to update an existing schema and it does notsucceed, you must restore the original schema before you can try again. Before yourun the Upgrade Assistant, make sure you back up your existing database schemasand the schema version registry.
Note:
Before you upgrade a schema using the Upgrade Assistant, you mustperform a complete database backup. During the upgrade, you are requiredto acknowledge that backups have been performed.
Maintaining Customized Domain and Environment SettingsIf you have modified any domain-generated, server startup scripts, or configurationfiles in your pre-upgrade environment, it is important to note that these changes areoverwritten during the installation, domain upgrade, and reconfiguration operations.
Chapter 2Creating a Complete Backup
2-4
Save your customized files to a shared library location so that you can continue to usethem after the upgrade.
Every domain installation includes dynamically-generated domain and server startupscripts, such as setDomainEnv. These files are replaced by newer versions during theinstallation and upgrade process. To maintain your custom domain-level environmentsettings, Oracle recommends that you create a separate file to store the customdomain information before you upgrade, instead of modifying the scripts directly.
For example, if you want to customize server startup parameters that apply to allservers in a domain, you can create a file called setUserOverrides.cmd (Windows) orsetUserOverrides.sh (UNIX) and configure it to add custom libraries to the WebLogicServer classpath, specify additional command-line options for running the servers, orspecify additional environment variables. When using the pack and unpack commands,any custom settings that you add to this file are preserved during the domain upgradeoperation and are carried over to the remote servers.
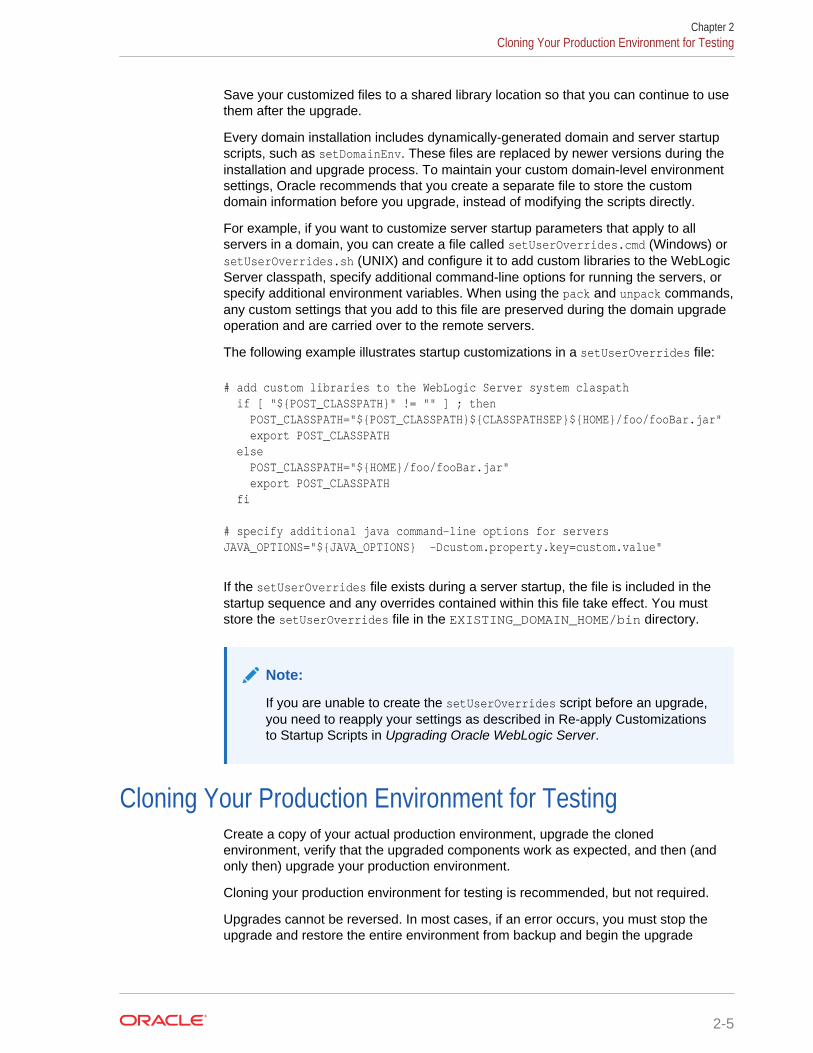
The following example illustrates startup customizations in a setUserOverrides file:
# add custom libraries to the WebLogic Server system claspath if [ "${POST_CLASSPATH}" != "" ] ; then POST_CLASSPATH="${POST_CLASSPATH}${CLASSPATHSEP}${HOME}/foo/fooBar.jar" export POST_CLASSPATH else POST_CLASSPATH="${HOME}/foo/fooBar.jar" export POST_CLASSPATH fi # specify additional java command-line options for serversJAVA_OPTIONS="${JAVA_OPTIONS} -Dcustom.property.key=custom.value"
If the setUserOverrides file exists during a server startup, the file is included in thestartup sequence and any overrides contained within this file take effect. You muststore the setUserOverrides file in the EXISTING_DOMAIN_HOME/bin directory.
Note:
If you are unable to create the setUserOverrides script before an upgrade,you need to reapply your settings as described in Re-apply Customizationsto Startup Scripts in Upgrading Oracle WebLogic Server.
Cloning Your Production Environment for TestingCreate a copy of your actual production environment, upgrade the clonedenvironment, verify that the upgraded components work as expected, and then (andonly then) upgrade your production environment.
Cloning your production environment for testing is recommended, but not required.
Upgrades cannot be reversed. In most cases, if an error occurs, you must stop theupgrade and restore the entire environment from backup and begin the upgrade
Chapter 2Cloning Your Production Environment for Testing
2-5
process from the beginning. Identifying potential upgrade issues in a developmentenvironment can eliminate unnecessary downtime.
Note:
It is beyond the scope of this document to describe the cloning proceduresfor all components and operating systems. Cloning procedures arecomponent and operating system-specific. At a high level, you install the pre-upgrade version of your component domain on a test machine, create therequired schemas using the Repository Creation Utility (RCU), and performthe upgrade.
Additional benefits of running an upgrade in a cloned production environment includethe following:
• Uncover and correct any upgrade issues.
• Practice completing an end-to-end upgrade.
• Understand the upgrade performance and how purge scripts can help.
• Understand the time required to complete the upgrade.
• Understand the database resource usage (such as temporary tablespace; PGA,and so on).
Note:
You can run the pre-upgrade Readiness Check on the cloned productionenvironment to help identify potential upgrade issues with your data, but youmust perform a complete test upgrade on a cloned environment to ensure asuccessful upgrade.
Verifying Certification and System RequirementsReview the certification matrix and system requirements documents to verify that yourenvironment meets the necessary requirements for installation.
Note:
When checking the certification, system requirements, and interoperabilityinformation, be sure to check specifically for any 32-bit or 64-bit systemrequirements. It is important for you to download software specificallydesigned for the 32-bit or 64-bit environment, explicitly.
Chapter 2Verifying Certification and System Requirements
2-6
WARNING:
Make sure that your current environment has been patched to the latestpatch set before you begin the upgrade. Certifications are based on fullypatched environments, unless stated otherwise.
• Verify Your Environment Meets Certification RequirementsOracle has tested and verified the performance of your product on all certifiedsystems and environments. Make sure that you are installing your product on asupported hardware or software configuration.
• Verify System Requirements and SpecificationsIt is important to verify that the system requirements such as disk space, availablememory, specific platform packages and patches, and other operating system-specific items are met.
• Verify That the Database Hosting Oracle Fusion Middleware is SupportedYou must have a supported Oracle database configured with the requiredschemas before you run Oracle Fusion Middleware 12c.
• Verify That the JDK Is Certified for This Release of Oracle Fusion MiddlewareAt the time this document was published, the certified JDK for 12c (12.2.1.3.0) was1.8.0_131.
Verify Your Environment Meets Certification RequirementsOracle has tested and verified the performance of your product on all certified systemsand environments. Make sure that you are installing your product on a supportedhardware or software configuration.
Whenever new certifications occur, they are added to the appropriate certificationdocument right away. New certifications can occur at any time, and for this reason thecertification documents are kept outside of the documentation libraries and areavailable on Oracle Technology Network. See the Certification Matrix for 12c(12.2.1.3.0).
Verify System Requirements and SpecificationsIt is important to verify that the system requirements such as disk space, availablememory, specific platform packages and patches, and other operating system-specificitems are met.
Use the Oracle Fusion Middleware System Requirements and Specificationsdocument to verify that the requirements of the certification are met. For example, ifthe Certification Matrix for 12c (12.2.1.3.0) indicates that your product is certified forinstallation on 64-Bit Oracle Linux 7, the System Requirements and Specificationsdocument should be used to verify that your Oracle Linux 7 system has met therequired minimum specifications such as disk space, available memory, specificplatform packages and patches, and other operating system-specific items. Thisdocument is updated as needed and resides outside of the documentation libraries onthe Oracle Technology Network (OTN).
Chapter 2Verifying Certification and System Requirements
2-7
Note:
When you install the Oracle Fusion Middleware Release 12c software inpreparation for upgrade, you should use the same user account that youused to install and configure the existing, pre-upgrade Oracle FusionMiddleware software. On UNIX operating systems, this ensures that theproper owner and group is applied to new Oracle Fusion Middleware 12cfiles and directories.
If you are running a 32–bit environment, you will need to perform an additional set ofsteps:
• Migrating from a 32-Bit to a 64-Bit Operating SystemIf you have a 32–bit operating system, then you must migrate your 32-bitenvironment to a 64-bit software environment before you upgrade.
Migrating from a 32-Bit to a 64-Bit Operating SystemIf you have a 32–bit operating system, then you must migrate your 32-bit environmentto a 64-bit software environment before you upgrade.
Make sure to validate the migration to ensure all your Oracle Fusion Middleware 11gsoftware is working properly on the 64-bit machine, and only then perform the upgradeto Oracle Fusion Middleware 12c.
In these tasks, host refers to the 32-bit source machine and target refers to the new64-bit target machine.
Note:
These steps assume that your database is located on a separate host andwill not be moved.
Upgrading an operating system typically involves the following:
Caution:
These steps are provided as an example of the operating system upgradeprocess and may or may not include all of the procedures you must performto update your specific operating system. Consult your operating system'supgrade documentation for more information.
• Procure the Hardware That Supports the Upgrade's 64-bit Software RequirementMake sure that you have supported target hardware in place before you begin theupgrade process.
• Stop All ProcessesBefore upgrading, you must stop all processes, including Managed Servers, theAdministration Server, and Node Manager, if they are started on the host.
Chapter 2Verifying Certification and System Requirements
2-8
• Back Up All Files from the 32-bit Host MachineMake sure that you have created a complete backup of your entire 11gdeployment before you begin the upgrade process. These files can be used ifthere is an issue during the migration and you have to restart the process.
• Set Up the Target 64-bit Machine with the 11g Host Name and IP AddressThe host name and IP address of the target machine must be made identical tothe host. This requires you to change the IP address and name of the sourcemachine or decommission the source machine to avoid conflicts in the network.
• Restore the 11g Backup from 32-bit Host to 64-bit HostRestore the files you backed from the 32-bit host using the same directorystructure that was used in 11g. The directory structure on the target machine mustbe identical to the structure of the host machine.
• Install the 12c Product Distributions on the Target MachineOracle recommends an Out-of-Place approach for upgrade. Therefore, you mustinstall the 12c product distributions in a new Oracle home on the target machine.
• Upgrade the Target 64-bit Environment Using the Standard Upgrade ProcedureAfter installing the product on the target machine, you must upgrade each productcomponent individually using an Upgrade Utility specified in the component-specific upgrade guide and complete any post-upgrade tasks.
Procure the Hardware That Supports the Upgrade's 64-bit Software RequirementMake sure that you have supported target hardware in place before you begin theupgrade process.
Stop All ProcessesBefore upgrading, you must stop all processes, including Managed Servers, theAdministration Server, and Node Manager, if they are started on the host.
Note:
Ensure that the Database is up and running, during the upgrade.
Stop the Managed Servers
To stop a WebLogic Server Managed Server, use the stopManagedWebLogic script:
• (UNIX) EXISTING_DOMAIN_HOME/bin/stopManagedWebLogic.shmanaged_server_name admin_url
• (Windows) EXISTING_DOMAIN_HOME\bin\stopManagedWebLogic.cmdmanaged_server_name admin_url
When prompted, enter your user name and password.
Stop the Administration Server
When you stop the Administration Server, you also stop the processes running in theAdministration Server, including the WebLogic Server Administration Console andFusion Middleware Control.
To stop the Administration Server, use the stopWebLogic script:
Chapter 2Verifying Certification and System Requirements
2-9
• (UNIX) EXISTING_DOMAIN_HOME/bin/stopWebLogic.sh
• (Windows) EXISTING_DOMAIN_HOME\bin\stopWebLogic.cmd
When prompted, enter your user name, password, and the URL of the AdministrationServer.
Stop Node Manager
To stop Node Manager, close the command shell in which it is running.
Alternatively, after having set the nodemanager.properties attribute QuitEnabled totrue (the default is false), you can use WLST to connect to Node Manager and shut itdown. See stopNodeManager in WLST Command Reference for WebLogic Server.
Back Up All Files from the 32-bit Host MachineMake sure that you have created a complete backup of your entire 11g deploymentbefore you begin the upgrade process. These files can be used if there is an issueduring the migration and you have to restart the process.
Note:
If the upgrade from 32-bit to 64-bit takes place on the same machine, there isa risk of corrupting the source environment if the upgrade fails.
See Backing Up Your Environment in Oracle Fusion Middleware Administrator'sGuide.
During the upgrade you must have access to the contents of the following:
• 11g_DOMAIN_HOME
• 11g/nodemanager directory located in 11g_ORACLE_HOME/wlserver/common/
Some of the backup and recovery procedures described in Backing Up YourEnvironment in Oracle Fusion Middleware Administrator's Guide are product-specific.Do not proceed with the upgrade until you have a complete backup.
Set Up the Target 64-bit Machine with the 11g Host Name and IP AddressThe host name and IP address of the target machine must be made identical to thehost. This requires you to change the IP address and name of the source machine ordecommission the source machine to avoid conflicts in the network.
The process of changing an IP address and host name vary by operating system.Consult your operating system's administration documentation for more information.
Restore the 11g Backup from 32-bit Host to 64-bit HostRestore the files you backed from the 32-bit host using the same directory structurethat was used in 11g. The directory structure on the target machine must be identicalto the structure of the host machine.
See Recovering Your Environment in Oracle Fusion Middleware Administrator'sGuide.
Chapter 2Verifying Certification and System Requirements
2-10
Install the 12c Product Distributions on the Target MachineOracle recommends an Out-of-Place approach for upgrade. Therefore, you mustinstall the 12c product distributions in a new Oracle home on the target machine.
Refer to the component-specific installation guides for the component(s) you areinstalling.
Upgrade the Target 64-bit Environment Using the Standard Upgrade ProcedureAfter installing the product on the target machine, you must upgrade each productcomponent individually using an Upgrade Utility specified in the component-specificupgrade guide and complete any post-upgrade tasks.
If you are upgrading additional components, see the component-specific upgradeguide.
Note:
The Node Manager upgrade procedure requires access to the original NodeManager files. Use the 11g Node Manger files that you backed up from the32-bit source machine as part of Back Up All Files from the 32-bit HostMachine.
Verify That the Database Hosting Oracle Fusion Middleware isSupported
You must have a supported Oracle database configured with the required schemasbefore you run Oracle Fusion Middleware 12c.
Review the Fusion Middleware database requirements before starting the upgrade toensure that the database hosting Oracle Fusion Middleware is supported and hassufficient space to perform an upgrade. See the Certification Matrix for 12c(12.2.1.3.0).
Note:
If your database version is no longer supported, you must upgrade to asupported version before starting an upgrade. See Upgrading and PreparingYour Oracle Databases for 12c in Planning an Upgrade of Oracle FusionMiddleware.
Verify That the JDK Is Certified for This Release of Oracle FusionMiddleware
At the time this document was published, the certified JDK for 12c (12.2.1.3.0) was1.8.0_131.
Chapter 2Verifying Certification and System Requirements
2-11
Refer to the Oracle Fusion Middleware Supported System Configurations informationon the Oracle Technology Network (OTN) to verify that the JDK you are using issupported.
If your JDK is not supported, or you do not have a JDK installed, you must downloadthe required Java SE JDK, from the following website:
http://www.oracle.com/technetwork/java/javase/downloads/index.html
Make sure that the JDK is installed outside of the Oracle home. The Oracle UniversalInstaller validates that the designated Oracle home directory is empty, and the installdoes not progress until an empty directory is specified. If you install JDK under Oraclehome, you may experience issues in future operations. Therefore, Oraclerecommends that you use install the JDK in the following directory: /home/oracle/products/jdk.
For more information on the difference between generic and platform-specificinstallers, see Understanding the Difference Between Generic and Platform-SpecificDistributions in the Oracle Fusion Middleware Download, Installation, andConfiguration Readme Files.
Updating Policy Files when Using Enhanced Encryption(AES 256)
If you plan to use enhanced encryption, such as Advanced Encryption Standard (AES)256, in your upgraded environment, Oracle recommends that you apply the latestrequired policy files to the JDK before you upgrade.
The Java platform defines a set of APIs spanning major security areas, includingcryptography, public key infrastructure, authentication, secure communication, andaccess control. These APIs allow developers to easily integrate security mechanismsinto their application code.
Some of the security algorithms used in Fusion Middleware 12c require additionalpolicy files for the JDK. See Java Cryptography Architecture Oracle ProvidersDocumentation.
Note:
If you attempt to use enhanced encryption without applying these policy filesto the JDK before you begin the upgrade, the upgrade can fail and you mustrestore the entire pre-upgrade environment and start the upgrade from thebeginning.
Purging Unused DataPurging unused data and maintaining a purging methodology before an upgrade canoptimize the upgrade process.
Some components have automated purge scripts. If you are using purge scripts, waituntil the purge is complete before starting the upgrade process. The upgrade may failif the purge scripts are running while using the Upgrade Assistant to upgrade yourschemas.
Chapter 2Updating Policy Files when Using Enhanced Encryption (AES 256)
2-12
Creating an Edition on the Server for Edition-BasedRedefinition
Before upgrading an Edition-Based Redefinition (EBR) enabled schema, you mustconnect to the database server and create an edition on the database server for 12c.
Edition-based redefinition enables you to upgrade an application's database objectswhile the application is in use, thus minimizing or eliminating downtime. This isaccomplished by changing (redefining) database objects in a private environmentknown as an edition. Only when all the changes have been made and tested, youmake the new version of the application available to users.
Note:
This task must be completed by an Oracle Database User with DBAprivileges.
Before upgrading an Edition-Based Redefinition (EBR) enabled schema, you mustconnect to the database server and create an edition on the database server for 12c.The new edition for 12c must be a child of your existing 11g or 12c edition.
To create an edition on the database server, sign in as an SYS user (or anotherOracle user that has DBA privileges) and enter the following command:
create edition Oracle_FMW_12_2_1_1 as child ofOracle_FMW_11_1_1_7_0;
where Oracle_FMW_11_1_1_7_0 is an example of the edition name you specified inRCU 11.1.1.7 when the 11.1.1.7 schemas were created. Be sure to provide the actualname used when creating the edition.
The following message notifies you that the edition is created successfully:
Edition created.
During the upgrade, you are prompted to launch the Reconfiguration Wizard toreconfigure your existing domain. Before running the Reconfiguration Wizard, youmust specify the database default edition. Use the following SQL command tomanually set up the default edition name for the database, for example:
ALTER DATABASE DEFAULT EDITION = Oracle_FMW_12_2_1_1;
Creating a Non-SYSDBA User to Run the UpgradeAssistant
Oracle recommends that you create a non-SYSDBA user called FMW to run theUpgrade Assistant. This user has the privileges required to modify schemas, but doesnot have full administrator privileges.
SYSDBA is an administrative privilege that is required to perform high-leveladministrative operations such as creating, starting up, shutting down, backing up, or
Chapter 2Creating an Edition on the Server for Edition-Based Redefinition
2-13
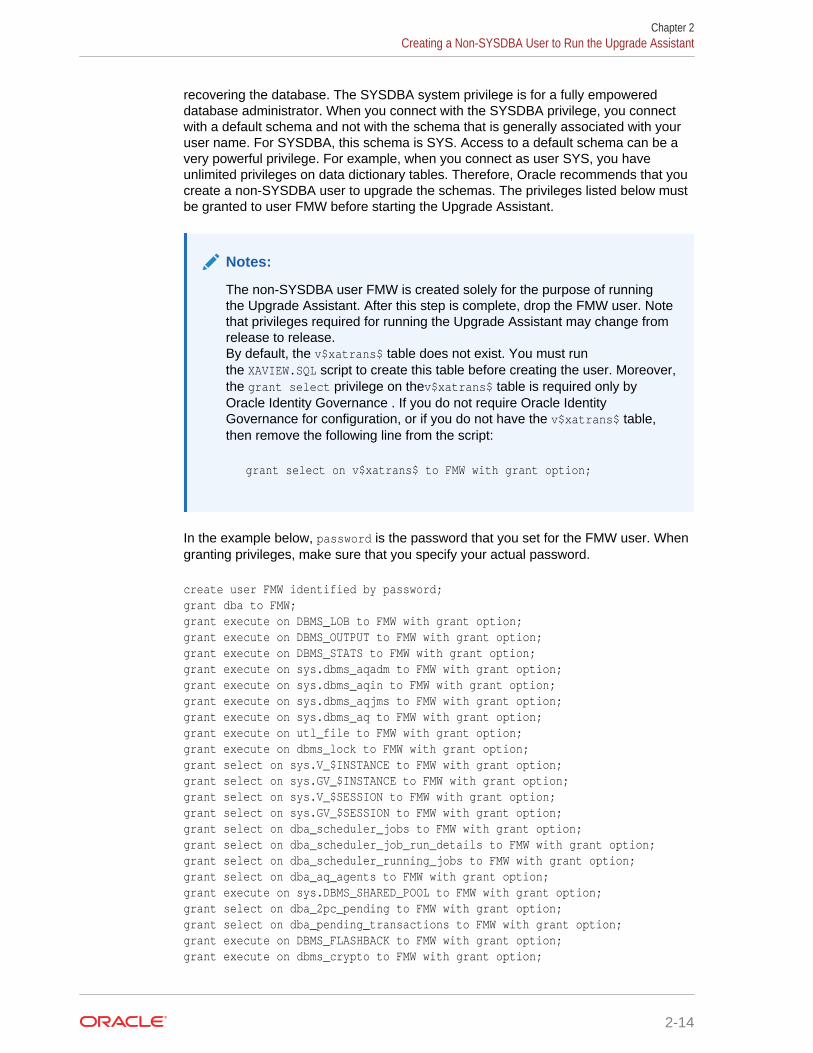
recovering the database. The SYSDBA system privilege is for a fully empowereddatabase administrator. When you connect with the SYSDBA privilege, you connectwith a default schema and not with the schema that is generally associated with youruser name. For SYSDBA, this schema is SYS. Access to a default schema can be avery powerful privilege. For example, when you connect as user SYS, you haveunlimited privileges on data dictionary tables. Therefore, Oracle recommends that youcreate a non-SYSDBA user to upgrade the schemas. The privileges listed below mustbe granted to user FMW before starting the Upgrade Assistant.
Notes:
The non-SYSDBA user FMW is created solely for the purpose of runningthe Upgrade Assistant. After this step is complete, drop the FMW user. Notethat privileges required for running the Upgrade Assistant may change fromrelease to release. By default, the v$xatrans$ table does not exist. You must runthe XAVIEW.SQL script to create this table before creating the user. Moreover,the grant select privilege on thev$xatrans$ table is required only byOracle Identity Governance . If you do not require Oracle IdentityGovernance for configuration, or if you do not have the v$xatrans$ table,then remove the following line from the script:
grant select on v$xatrans$ to FMW with grant option;
In the example below, password is the password that you set for the FMW user. Whengranting privileges, make sure that you specify your actual password.
create user FMW identified by password;grant dba to FMW;grant execute on DBMS_LOB to FMW with grant option;grant execute on DBMS_OUTPUT to FMW with grant option;grant execute on DBMS_STATS to FMW with grant option;grant execute on sys.dbms_aqadm to FMW with grant option;grant execute on sys.dbms_aqin to FMW with grant option;grant execute on sys.dbms_aqjms to FMW with grant option;grant execute on sys.dbms_aq to FMW with grant option;grant execute on utl_file to FMW with grant option;grant execute on dbms_lock to FMW with grant option;grant select on sys.V_$INSTANCE to FMW with grant option;grant select on sys.GV_$INSTANCE to FMW with grant option;grant select on sys.V_$SESSION to FMW with grant option;grant select on sys.GV_$SESSION to FMW with grant option;grant select on dba_scheduler_jobs to FMW with grant option;grant select on dba_scheduler_job_run_details to FMW with grant option;grant select on dba_scheduler_running_jobs to FMW with grant option;grant select on dba_aq_agents to FMW with grant option;grant execute on sys.DBMS_SHARED_POOL to FMW with grant option;grant select on dba_2pc_pending to FMW with grant option;grant select on dba_pending_transactions to FMW with grant option;grant execute on DBMS_FLASHBACK to FMW with grant option;grant execute on dbms_crypto to FMW with grant option;
Chapter 2Creating a Non-SYSDBA User to Run the Upgrade Assistant
2-14
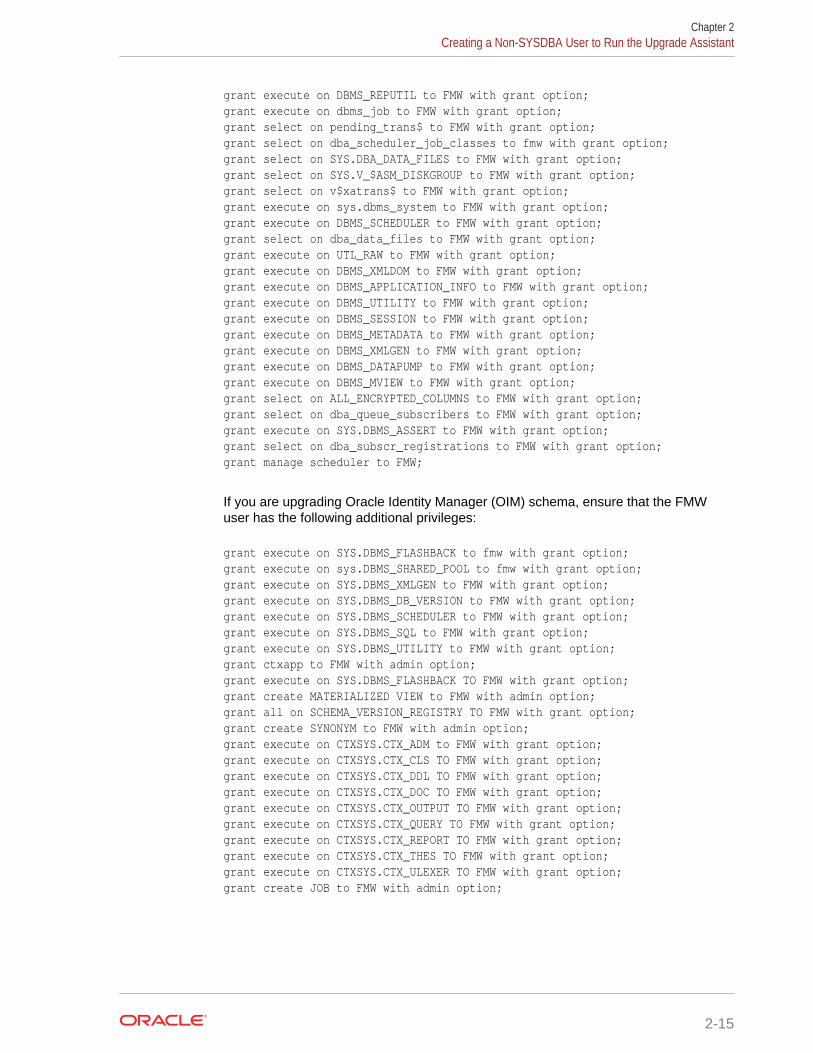
grant execute on DBMS_REPUTIL to FMW with grant option;grant execute on dbms_job to FMW with grant option;grant select on pending_trans$ to FMW with grant option;grant select on dba_scheduler_job_classes to fmw with grant option;grant select on SYS.DBA_DATA_FILES to FMW with grant option;grant select on SYS.V_$ASM_DISKGROUP to FMW with grant option;grant select on v$xatrans$ to FMW with grant option;grant execute on sys.dbms_system to FMW with grant option;grant execute on DBMS_SCHEDULER to FMW with grant option;grant select on dba_data_files to FMW with grant option;grant execute on UTL_RAW to FMW with grant option;grant execute on DBMS_XMLDOM to FMW with grant option;grant execute on DBMS_APPLICATION_INFO to FMW with grant option;grant execute on DBMS_UTILITY to FMW with grant option;grant execute on DBMS_SESSION to FMW with grant option;grant execute on DBMS_METADATA to FMW with grant option;grant execute on DBMS_XMLGEN to FMW with grant option;grant execute on DBMS_DATAPUMP to FMW with grant option;grant execute on DBMS_MVIEW to FMW with grant option;grant select on ALL_ENCRYPTED_COLUMNS to FMW with grant option;grant select on dba_queue_subscribers to FMW with grant option; grant execute on SYS.DBMS_ASSERT to FMW with grant option;grant select on dba_subscr_registrations to FMW with grant option;grant manage scheduler to FMW;
If you are upgrading Oracle Identity Manager (OIM) schema, ensure that the FMWuser has the following additional privileges:
grant execute on SYS.DBMS_FLASHBACK to fmw with grant option;grant execute on sys.DBMS_SHARED_POOL to fmw with grant option;grant execute on SYS.DBMS_XMLGEN to FMW with grant option;grant execute on SYS.DBMS_DB_VERSION to FMW with grant option;grant execute on SYS.DBMS_SCHEDULER to FMW with grant option;grant execute on SYS.DBMS_SQL to FMW with grant option;grant execute on SYS.DBMS_UTILITY to FMW with grant option;grant ctxapp to FMW with admin option;grant execute on SYS.DBMS_FLASHBACK TO FMW with grant option;grant create MATERIALIZED VIEW to FMW with admin option;grant all on SCHEMA_VERSION_REGISTRY TO FMW with grant option;grant create SYNONYM to FMW with admin option;grant execute on CTXSYS.CTX_ADM to FMW with grant option;grant execute on CTXSYS.CTX_CLS TO FMW with grant option;grant execute on CTXSYS.CTX_DDL TO FMW with grant option;grant execute on CTXSYS.CTX_DOC TO FMW with grant option;grant execute on CTXSYS.CTX_OUTPUT TO FMW with grant option;grant execute on CTXSYS.CTX_QUERY TO FMW with grant option;grant execute on CTXSYS.CTX_REPORT TO FMW with grant option;grant execute on CTXSYS.CTX_THES TO FMW with grant option;grant execute on CTXSYS.CTX_ULEXER TO FMW with grant option;grant create JOB to FMW with admin option;
Chapter 2Creating a Non-SYSDBA User to Run the Upgrade Assistant
2-15
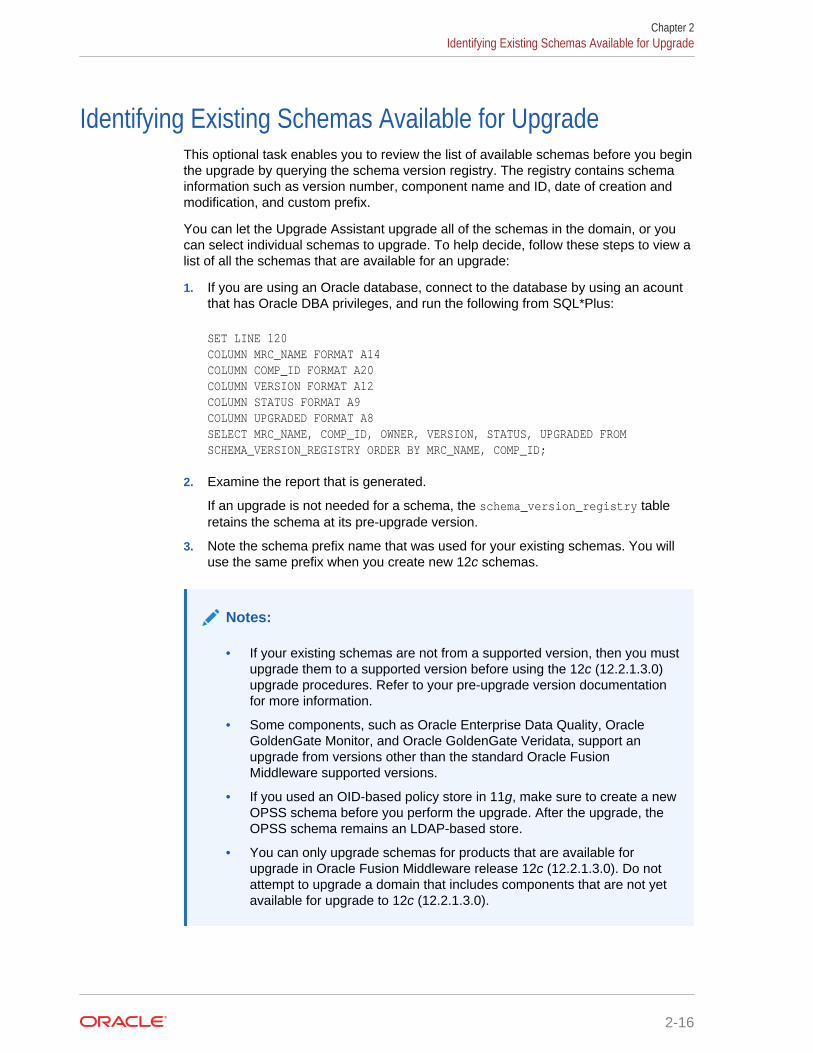
Identifying Existing Schemas Available for UpgradeThis optional task enables you to review the list of available schemas before you beginthe upgrade by querying the schema version registry. The registry contains schemainformation such as version number, component name and ID, date of creation andmodification, and custom prefix.
You can let the Upgrade Assistant upgrade all of the schemas in the domain, or youcan select individual schemas to upgrade. To help decide, follow these steps to view alist of all the schemas that are available for an upgrade:
1. If you are using an Oracle database, connect to the database by using an acountthat has Oracle DBA privileges, and run the following from SQL*Plus:
SET LINE 120COLUMN MRC_NAME FORMAT A14COLUMN COMP_ID FORMAT A20COLUMN VERSION FORMAT A12COLUMN STATUS FORMAT A9COLUMN UPGRADED FORMAT A8SELECT MRC_NAME, COMP_ID, OWNER, VERSION, STATUS, UPGRADED FROM SCHEMA_VERSION_REGISTRY ORDER BY MRC_NAME, COMP_ID;
2. Examine the report that is generated.
If an upgrade is not needed for a schema, the schema_version_registry tableretains the schema at its pre-upgrade version.
3. Note the schema prefix name that was used for your existing schemas. You willuse the same prefix when you create new 12c schemas.
Notes:
• If your existing schemas are not from a supported version, then you mustupgrade them to a supported version before using the 12c (12.2.1.3.0)upgrade procedures. Refer to your pre-upgrade version documentationfor more information.
• Some components, such as Oracle Enterprise Data Quality, OracleGoldenGate Monitor, and Oracle GoldenGate Veridata, support anupgrade from versions other than the standard Oracle FusionMiddleware supported versions.
• If you used an OID-based policy store in 11g, make sure to create a newOPSS schema before you perform the upgrade. After the upgrade, theOPSS schema remains an LDAP-based store.
• You can only upgrade schemas for products that are available forupgrade in Oracle Fusion Middleware release 12c (12.2.1.3.0). Do notattempt to upgrade a domain that includes components that are not yetavailable for upgrade to 12c (12.2.1.3.0).
Chapter 2Identifying Existing Schemas Available for Upgrade
2-16
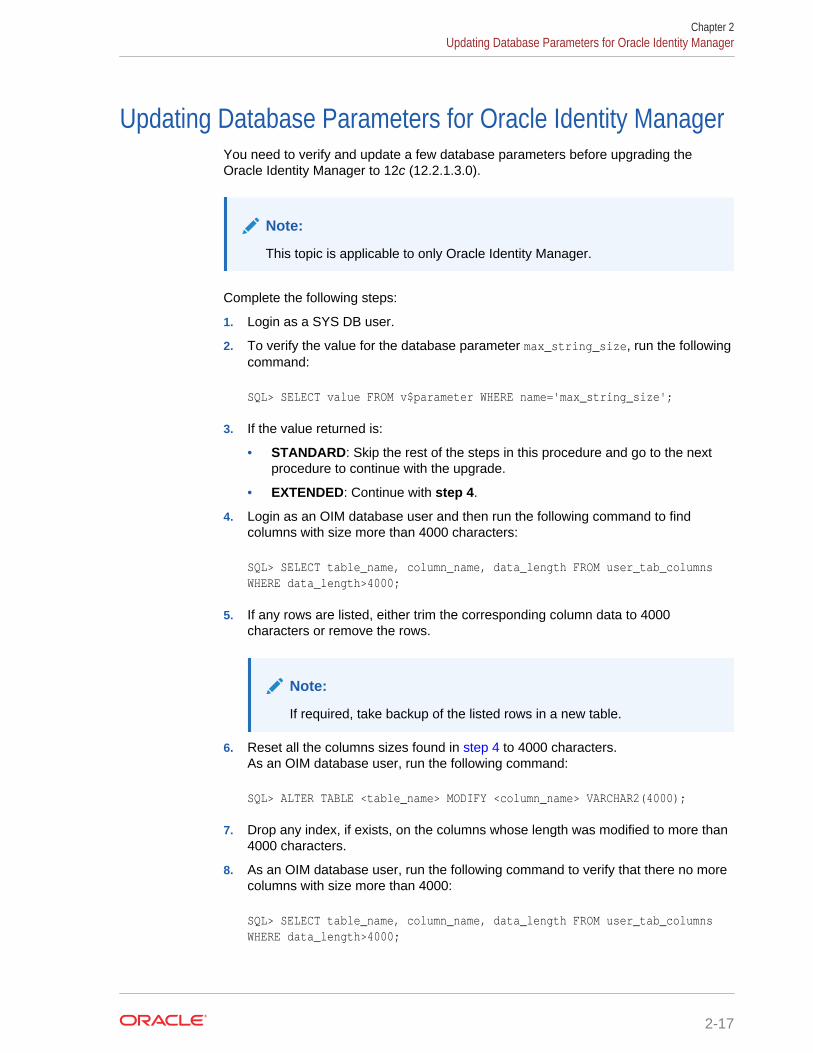
Updating Database Parameters for Oracle Identity ManagerYou need to verify and update a few database parameters before upgrading theOracle Identity Manager to 12c (12.2.1.3.0).
Note:
This topic is applicable to only Oracle Identity Manager.
Complete the following steps:
1. Login as a SYS DB user.
2. To verify the value for the database parameter max_string_size, run the followingcommand:
SQL> SELECT value FROM v$parameter WHERE name='max_string_size';
3. If the value returned is:
• STANDARD: Skip the rest of the steps in this procedure and go to the nextprocedure to continue with the upgrade.
• EXTENDED: Continue with step 4.
4. Login as an OIM database user and then run the following command to findcolumns with size more than 4000 characters:
SQL> SELECT table_name, column_name, data_length FROM user_tab_columns WHERE data_length>4000;
5. If any rows are listed, either trim the corresponding column data to 4000characters or remove the rows.
Note:
If required, take backup of the listed rows in a new table.
6. Reset all the columns sizes found in step 4 to 4000 characters.As an OIM database user, run the following command:
SQL> ALTER TABLE <table_name> MODIFY <column_name> VARCHAR2(4000);
7. Drop any index, if exists, on the columns whose length was modified to more than4000 characters.
8. As an OIM database user, run the following command to verify that there no morecolumns with size more than 4000:
SQL> SELECT table_name, column_name, data_length FROM user_tab_columns WHERE data_length>4000;
Chapter 2Updating Database Parameters for Oracle Identity Manager
2-17
9. If required, gather table and index stats for the identified columns.
Chapter 2Updating Database Parameters for Oracle Identity Manager
2-18
Part IUpgrading Oracle Identity and AccessManagement Single Node Environments
You can upgrade the Oracle Identity and Access Management 11g Release 2(11.1.2.3.0) single node environments using the procedure described in this part.
Topics
• Upgrading Oracle Access Management Single Node EnvironmentsYou can upgrade Oracle Access Management from Release 11g Release 2(11.1.2.3.0) to Oracle Access Management 12c (12.2.1.3.0) .
• Upgrading Oracle Identity Manager Single Node EnvironmentsYou can upgrade Oracle Identity Manager from Release 11g Release 2(11.1.2.3.0) to Oracle Identity Governance 12c (12.2.1.3.0) .
3Upgrading Oracle Access ManagementSingle Node Environments
You can upgrade Oracle Access Management from Release 11g Release 2(11.1.2.3.0) to Oracle Access Management 12c (12.2.1.3.0) .
Complete the steps in the following topics to perform the upgrade:
• About the Oracle Access Management Single Node Upgrade ProcessReview the roadmap for an overview of the upgrade process for Oracle AccessManagement single node deployments.
• Completing the Pre-Upgrade Tasks for Oracle Access ManagementComplete the pre-upgrade tasks described in this section before you upgradeOracle Access Management.
• Installing Product DistributionsBefore beginning your upgrade, download Oracle Fusion MiddlewareInfrastructure and Oracle Identity and Access Management 12c (12.2.1.3.0)distributions on the target system and install them using Oracle Universal Installer.
• Creating the Required 12c Schemas Using RCUWhen upgrading from 11g, you must create the required 12c schemas. You canuse the Repository Creation Utility (RCU) to create customized schemas or,optionally, you can use the Upgrade Assistant to create schemas using the defaultschema settings. This procedure describes how to create schemas using theRCU. Information about using the Upgrade Assistant to create schemas is coveredin the upgrade procedures.
• Running a Pre-Upgrade Readiness CheckTo identify potential issues with the upgrade, Oracle recommends that you run areadiness check before you start the upgrade process. Be aware that thereadiness check may not be able to discover all potential issues with yourupgrade. An upgrade may still fail, even if the readiness check reports success.
• Stopping Servers and ProcessesBefore you run the Upgrade Assistant to upgrade your schemas andconfigurations, you must shut down all of the pre-upgrade processes and servers,including the Administration Server and any managed servers.
• Upgrading Product SchemasAfter stopping servers and processes, use the Upgrade Assistant to upgradesupported product schemas to the current release of Oracle Fusion Middleware.
• About Reconfiguring the DomainRun the Reconfiguration Wizard to reconfigure your domain componentconfigurations to 12c (12.2.1.3.0).
• Upgrading Domain Component ConfigurationsAfter reconfiguring the domain, use the Upgrade Assistant to upgrade the domaincomponent configurations inside the domain to match the updated domainconfiguration.
3-1
• Enabling WebGates to Work With Oracle Access Management 12cAfter upgrading to Oracle Access Management 12.2.1.3, the earlier version ofWebGates continues to work with Oracle Access Management 12c. However, toleverage the latest security features of Oracle Access Management andWebGates 12c (12.2.1.3.0), you must upgrade the WebGates to 12c (12.2.1.3.0),and register the agent's profile with the Oracle Access Management Server 12c.
• Updating the java.security FileIf you have multiple components of Oracle Identity and Access Management(Oracle Access Management, Oracle Identity Manager, WebGates and so on)deployed, until you upgrade all of the components to 12c (12.2.1.3.0), you mustupdate the java.security file with the changes described in this section.
About the Oracle Access Management Single NodeUpgrade Process
Review the roadmap for an overview of the upgrade process for Oracle AccessManagement single node deployments.
The steps you take to upgrade your existing domain will vary depending on how yourdomain is configured and which components are being upgraded. Follow only thosesteps that are applicable to your deployment.
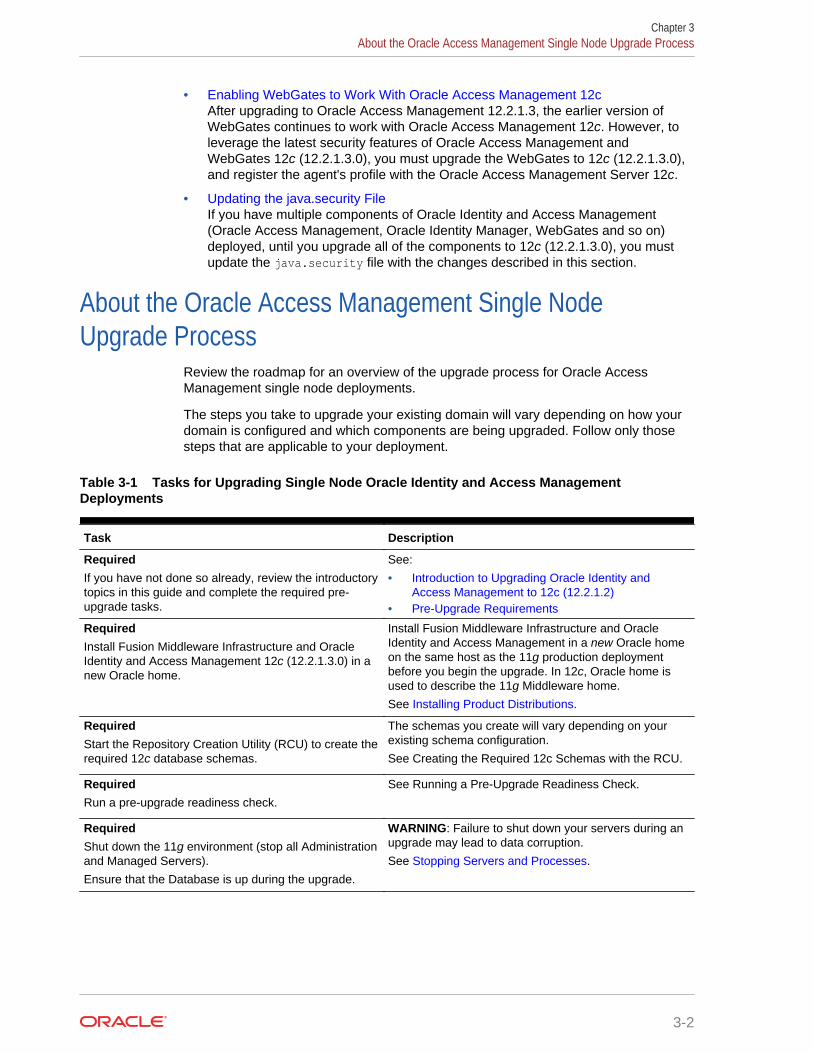
Table 3-1 Tasks for Upgrading Single Node Oracle Identity and Access ManagementDeployments
Task Description
RequiredIf you have not done so already, review the introductorytopics in this guide and complete the required pre-upgrade tasks.
See:
• Introduction to Upgrading Oracle Identity andAccess Management to 12c (12.2.1.2)
• Pre-Upgrade Requirements
RequiredInstall Fusion Middleware Infrastructure and OracleIdentity and Access Management 12c (12.2.1.3.0) in anew Oracle home.
Install Fusion Middleware Infrastructure and OracleIdentity and Access Management in a new Oracle homeon the same host as the 11g production deploymentbefore you begin the upgrade. In 12c, Oracle home isused to describe the 11g Middleware home.
See Installing Product Distributions.
RequiredStart the Repository Creation Utility (RCU) to create therequired 12c database schemas.
The schemas you create will vary depending on yourexisting schema configuration.
See Creating the Required 12c Schemas with the RCU.
RequiredRun a pre-upgrade readiness check.
See Running a Pre-Upgrade Readiness Check.
RequiredShut down the 11g environment (stop all Administrationand Managed Servers).
Ensure that the Database is up during the upgrade.
WARNING: Failure to shut down your servers during anupgrade may lead to data corruption.
See Stopping Servers and Processes.
Chapter 3About the Oracle Access Management Single Node Upgrade Process
3-2
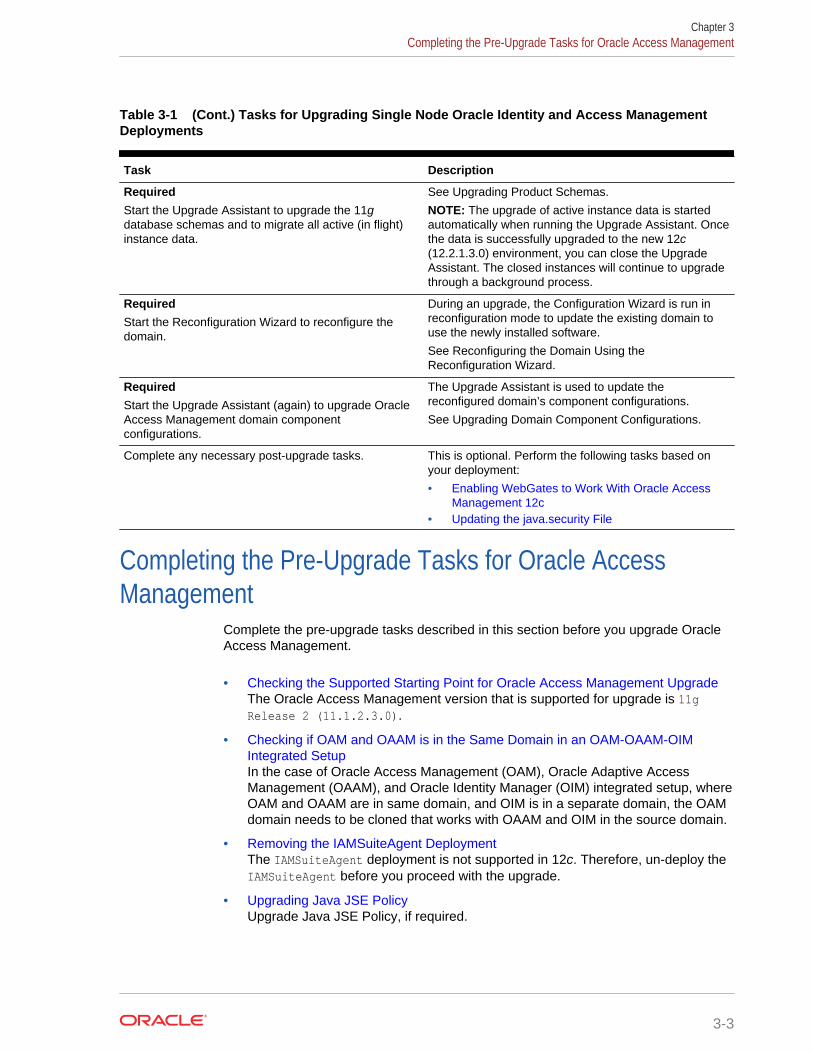
Table 3-1 (Cont.) Tasks for Upgrading Single Node Oracle Identity and Access ManagementDeployments
Task Description
RequiredStart the Upgrade Assistant to upgrade the 11gdatabase schemas and to migrate all active (in flight)instance data.
See Upgrading Product Schemas.
NOTE: The upgrade of active instance data is startedautomatically when running the Upgrade Assistant. Oncethe data is successfully upgraded to the new 12c(12.2.1.3.0) environment, you can close the UpgradeAssistant. The closed instances will continue to upgradethrough a background process.
RequiredStart the Reconfiguration Wizard to reconfigure thedomain.
During an upgrade, the Configuration Wizard is run inreconfiguration mode to update the existing domain touse the newly installed software.
See Reconfiguring the Domain Using theReconfiguration Wizard.
RequiredStart the Upgrade Assistant (again) to upgrade OracleAccess Management domain componentconfigurations.
The Upgrade Assistant is used to update thereconfigured domain’s component configurations.
See Upgrading Domain Component Configurations.
Complete any necessary post-upgrade tasks. This is optional. Perform the following tasks based onyour deployment:
• Enabling WebGates to Work With Oracle AccessManagement 12c
• Updating the java.security File
Completing the Pre-Upgrade Tasks for Oracle AccessManagement
Complete the pre-upgrade tasks described in this section before you upgrade OracleAccess Management.
• Checking the Supported Starting Point for Oracle Access Management UpgradeThe Oracle Access Management version that is supported for upgrade is 11gRelease 2 (11.1.2.3.0).
• Checking if OAM and OAAM is in the Same Domain in an OAM-OAAM-OIMIntegrated SetupIn the case of Oracle Access Management (OAM), Oracle Adaptive AccessManagement (OAAM), and Oracle Identity Manager (OIM) integrated setup, whereOAM and OAAM are in same domain, and OIM is in a separate domain, the OAMdomain needs to be cloned that works with OAAM and OIM in the source domain.
• Removing the IAMSuiteAgent DeploymentThe IAMSuiteAgent deployment is not supported in 12c. Therefore, un-deploy theIAMSuiteAgent before you proceed with the upgrade.
• Upgrading Java JSE PolicyUpgrade Java JSE Policy, if required.
Chapter 3Completing the Pre-Upgrade Tasks for Oracle Access Management
3-3
• Disabling Deprecated Services in OAMApplies only to Mobile and Social, Security Token Service, and Mobile SecurityService users.
Checking the Supported Starting Point for Oracle Access ManagementUpgrade
The Oracle Access Management version that is supported for upgrade is 11g Release2 (11.1.2.3.0).
If you are using an earlier version of Oracle Access Management, you must upgradeto Oracle Access Management 11g Release 2 (11.1.2.3.0) first, and then to 12c.
Checking if OAM and OAAM is in the Same Domain in an OAM-OAAM-OIM Integrated Setup
In the case of Oracle Access Management (OAM), Oracle Adaptive AccessManagement (OAAM), and Oracle Identity Manager (OIM) integrated setup, whereOAM and OAAM are in same domain, and OIM is in a separate domain, the OAMdomain needs to be cloned that works with OAAM and OIM in the source domain.
To separate the OAM and OAAM domain, do the following:
1. Perform the test-to-production of the source environment (machine-1) where OAMand OAAM is in the same domain, so as to form the 11.1.2.3.0 OAM-OAAMenvironment on machine-2. This machine-2 acts as the production machine.
2. On machine-1, open the DOMAIN_HOME/config/fmwconfig/oam-config.xml file ina text editor, and search for the parameter HOST_ALIAS_1.
3. Update the serverhost parameter to reflect the name of production machine, sothat it knows the target (OAAM) machine to which it has to point to render theOAAM authentication page.
4. Search for the parameter Version, and increment its value by one.
5. Restart only the Administration Server and the OAM Server of source machine(machine-1) to reflect the changes.
Ensure that the oaam_admin_server1 and oaam_server_server1 on the sourcemachine are stopped.
6. Start the oaam_admin_server1 and oaam_server_server1 on production machine(machine-2). The Administration Server on the production machine will be inRunning state after the T2P.
7. Access the tapscheme protected resource of machine-1. Make sure that therequest gets redirected to OAAM server of machine—2 and subsequenttaspscheme login is successful.
Note:
Ensure that the date and time on source and production machine are insync. If they are not, the authentication fails.
Chapter 3Completing the Pre-Upgrade Tasks for Oracle Access Management
3-4
If OIM is installed in a separate domain, and is integrated with OAM and OAAM, do thefollowing:
1. Update the following Oracle Identity Manager properties to contain the details ofthe new OAAM host:
OIM.ChangePasswordURL
OIM.ChallengeQuestionModificationURL
For information about setting the Oracle Identity Manager properties for OAAM,see Setting Oracle Identity Manager Properties for Oracle Adaptive AccessManager in the Integration Guide for Oracle Identity Management Suite for 11gRelease 2 (11.1.2.3.0).
2. Restart the Oracle Identity Manager server.
Note:
You must upgrade the OAM domain whose Managed Server is in the runningstate after the domain separation.
For example, if you have followed the steps in this section, you will have toupgrade OAM that resides on machine-1, to 12c.
Removing the IAMSuiteAgent DeploymentThe IAMSuiteAgent deployment is not supported in 12c. Therefore, un-deploy theIAMSuiteAgent before you proceed with the upgrade.
To remove the IAMSuiteAgent deployment, complete the following steps:
1. Log in to the WebLogic Administration Console using the following URL:
http://hostname:port/console
where hostname is the DNS name or IP address of the Administration Server andport is the listen port on which the Administration Server is listening for requests(port 7001 by default). If you have configured a domain-wide administration port,use that port number. If you configured the Administration Server to use SecureSocket Layer (SSL) you must add s after http as follows:
https://hostname:port/console
Note:
A domain-wide administration port always uses SSL.
2. Click Security Realms.
3. Click myrealm.
4. Click Provider, and then select IAMSuiteAgent.
5. Click Delete.
6. Restart the servers.
Chapter 3Completing the Pre-Upgrade Tasks for Oracle Access Management
3-5
Upgrading Java JSE PolicyUpgrade Java JSE Policy, if required.
Note:
This is required if any of the Identity Management components like OracleAccess Management (OAM), Oracle Identity Manager (OIM), OracleAdaptive Access Manager (OAAM), or Oracle Access Manager Webgates ofa data center are yet to be upgraded to 12c (12.2.1.3.0). This is for thephased transition to 12c (12.2.1.3.0).
For a Multi Data Center setup, this is required if any of the data centers has11.1.2.3.0 components (OAM, OIM, OAAM, OAM Webgates).
The jar files local_policy.jar and US_export_policy.jar are present in thedirectory $JAVA_HOME/jre/lib/security. You can upgrade Java JSE policy byoverwriting these jar files with the specified versions. To do this, complete the followingsteps:
1. Download the local_policy.jar and US_export_policy.jar files from thefollowing location:
http://www.oracle.com/technetwork/java/javase/downloads/jce8-download-2133166.html
2. Copy the jar files to the location $JAVA_HOME/jre/lib/security. Thisoverwrites the existing files.
This completes the Java JSE policy upgrade.
Disabling Deprecated Services in OAMApplies only to Mobile and Social, Security Token Service, and Mobile SecurityService users.
Mobile and Social, Security Token Service, and Mobile Security Service can’t be usedin OAM 12c. If your current installation makes use of any of these services, you mustdisable them before attempting to perform this upgrade. If any of these services areactive during the upgrade, the upgrade will fail with an “upgrade not feasible” errormessage. You can find additional information about these features in the OracleMobile Security Suite Statement Of Direction support document.
Chapter 3Completing the Pre-Upgrade Tasks for Oracle Access Management
3-6
Installing Product DistributionsBefore beginning your upgrade, download Oracle Fusion Middleware Infrastructureand Oracle Identity and Access Management 12c (12.2.1.3.0) distributions on thetarget system and install them using Oracle Universal Installer.
Note:
When Infrastructure is required for the upgrade, you must install the OracleFusion Middleware distribution first before you install other FusionMiddleware products.
To install the 12c (12.2.1.3.0) distributions:
1. Sign in to the target system.
2. Download the following from Oracle Technology Network or Oracle SoftwareDelivery Cloud to your target system:
• Oracle Fusion Middleware Infrastructure(fmw_12.2.1.3.0_infrastructure_generic.jar)
• Oracle Identity and Access Management (fmw_12.2.1.3.0_idm_generic.jar)
• Any additional distributions for your pre-upgrade environment
Note:
If you are upgrading an integrated environment that was set up usingLife Cycle Management (LCM) tool, that includes Oracle AccessManagement, Oracle Identity Manager, and WebGates, then you mustinstall the respective 12c Web Server (Oracle HTTP Server or OracleTraffic Director) binaries in the same Oracle Home.
3. Change to the directory where you downloaded the 12c (12.2.1.3.0) productdistribution.
4. Start the installation program for Oracle Fusion Middleware Infrastructure:
• (UNIX) JDK_HOME/bin/java -jarfmw_12.2.1.3.0_infrastructure_generic.jar
• (Windows) JDK_HOME\bin\java -jarfmw_12.2.1.3.0_infrastructure_generic.jar
5. On UNIX operating systems, the Installation Inventory Setup screen appears if thisis the first time you are installing an Oracle product on this host.
Specify the location where you want to create your central inventory. Make surethat the operating system group name selected on this screen has writepermissions to the central inventory location, and click Next.
Chapter 3Installing Product Distributions
3-7
Note:
The Installation Inventory Setup screen does not appear on Windowsoperating systems.
6. On the Welcome screen, review the information to make sure that you have metall the prerequisites. Click Next.
7. On the Auto Updates screen, select an option:
• Skip Auto Updates: If you do not want your system to check for softwareupdates at this time.
• Select patches from directory: To navigate to a local directory if youdownloaded patch files.
• Search My Oracle Support for Updates: To automatically download softwareupdates if you have a My Oracle Support account. You must enter OracleSupport credentials then click Search. To configure a proxy server for theinstaller to access My Oracle Support, click Proxy Settings. Click TestConnection to test the connection.
Click Next.
8. On the Installation Location screen, specify the location for the Oracle homedirectory and click Next.
For more information about Oracle Fusion Middleware directory structure, see Understanding Directories for Installation and Configuration in Oracle FusionMiddleware Planning an Installation of Oracle Fusion Middleware.
9. On the Installation Type screen, select the following:
• For Infrastructure, select Fusion Middleware Infrastructure
• For Oracle Identity and Access Management, select Standalone OracleIdentity and Access Manager or Collocated Oracle Identity and AccessManager based on your requirement.
Click Next.
10. The Prerequisite Checks screen analyzes the host computer to ensure that thespecific operating system prerequisites have been met.
To view the list of tasks that are verified, select View Successful Tasks. To viewlog details, select View Log. If any prerequisite check fails, then an error messageappears at the bottom of the screen. Fix the error and click Rerun to try again. Toignore the error or the warning message and continue with the installation, clickSkip (not recommended).
11. On the Installation Summary screen, verify the installation options that youselected.
If you want to save these options to a response file, click Save Response File andenter the response file location and name. The response file collects and stores allthe information that you have entered, and enables you to perform a silentinstallation (from the command line) at a later time.Click Install to begin the installation.
12. On the Installation Progress screen, when the progress bar displays 100%, clickFinish to dismiss the installer, or click Next to see a summary.
Chapter 3Installing Product Distributions
3-8
13. The Installation Complete screen displays the Installation Location and theFeature Sets that are installed. Review this information and click Finish to closethe installer.
14. After you have installed Oracle Fusion Middleware Infrastructure, enter thefollowing command to start the installer for your product distribution and repeat thesteps above to navigate through the installer screens:
(UNIX) JDK_HOME/bin/java -jar fmw_12.2.1.3.0_idm_generic.jar
(Windows) JDK_HOME\bin\java -jar fmw_12.2.1.3.0_idm_generic.jar
Note:
If your 11.1.2.3.0 setup was deployed using Life Cycle Management (LCM)tool, you must install Oracle HTTP Server 12c (12.2.1.3.0) in the 12cMiddleware home. See Preparing to Install and Configure Oracle HTTPServer in Installing and Configuring Oracle HTTP Server.
Creating the Required 12c Schemas Using RCUWhen upgrading from 11g, you must create the required 12c schemas. You can usethe Repository Creation Utility (RCU) to create customized schemas or, optionally, youcan use the Upgrade Assistant to create schemas using the default schema settings.This procedure describes how to create schemas using the RCU. Information aboutusing the Upgrade Assistant to create schemas is covered in the upgrade procedures.
Note:
You must use the 12c Repository Creation Utility (RCU) to create the 12cschemas. 12c RCU is located at ORACLE_HOME/oracle_common/bin directory,where ORACLE_HOME is the 12c Oracle Home.
You must create the following schemas using 12c RCU:
• Common Infrastructure Services Service Table (prefix_STB)
• WebLogic Services (prefix_WLS)
• User Messaging Service (prefix_UMS)
The existing schemas such as Oracle Access Manager (OAM), Oracle PlatformSecurity Services (OPSS) will be upgraded, and therefore, you do not have to createnew ones.
The following schemas must exist before you upgrade to 12c. If you are upgradingfrom 11g, and you are not sure which schemas you currently have, refer to the stepsbelow to identify the existing schemas in your domain. You do not need to re-createthese schemas if they already exist.
• Service Table schema (prefix_STB). This schema is new in 12c and is requiredfor domain-based upgrades. It stores basic schema configuration information (forexample, schema prefixes and passwords) that can be accessed and used byother Oracle Fusion Middleware components during the domain creation. This
Chapter 3Creating the Required 12c Schemas Using RCU
3-9
schema is automatically created when you run the Repository Creation Utility(RCU), where you specify the existing schema owner prefix that you used for yourother 11g schemas.
Note:
If the Service Table schema does not exist, you may encounter the errormessage UPGAST-00328 : The schema version registry table doesnot exist on this database. If that happens it is necessary tocreate the service table schema in order to run UpgradeAssistant
• Oracle Platform Security Services (OPSS) schema (prefix_OPSS). This schemais required if you are using an OID-based security store in 11g. This schema isautomatically created when you run the Repository Creation Utility (RCU). Theonly supported LDAP-based OPSS security store is Oracle Internet Directory(OID). An LDAP-based policy store is typically used in production environments.You do not need to reassociate an OID-based security store before upgrade.While the Upgrade Assistant is running, you can select the OPSS schema. TheUpgrade Assistant upgrades the OID-based security store automatically.
Note:
The 12c OPSS database schema is required so that you can referencethe 12c schema during the reconfiguration of the domain. Your domaincontinues to use the OID-based security store after the upgrade iscomplete.
To create the 12c schemas with the RCU:
1. (Optional) If you are upgrading from 11g, and you wish to confirm the schemaswhich are present in your existing domain, then connect to the database as a userwith DBA privileges, and run the following code from SQL*Plus:
SET LINE 120COLUMN MRC_NAME FORMAT A14COLUMN COMP_ID FORMAT A20COLUMN VERSION FORMAT A12COLUMN STATUS FORMAT A9COLUMN UPGRADED FORMAT A8SELECT MRC_NAME, COMP_ID, OWNER, VERSION, STATUS, UPGRADED FROM SCHEMA_VERSION_REGISTRY ORDER BY MRC_NAME, COMP_ID ;
2. Verify that a certified JDK already exists on your system by running java -version from the command line. For 12c (12.2.1.3.0), the certified JDK is1.8.0_131 and later.
Ensure that the JAVA_HOME environment variable is set to the location of thecertified JDK. For example:
• (UNIX) setenv JAVA_HOME /home/Oracle/Java/jdk1.8.0_131
• (Windows) set JAVA_HOME=C:\home\Oracle\Java\jdk1.8.0_131
Chapter 3Creating the Required 12c Schemas Using RCU
3-10
Add $JAVA_HOME/bin to $PATH.
3. Go to the oracle_common/bin directory:
• (UNIX) NEW_ORACLE_HOME/oracle_common/bin
• (Windows) NEW_ORACLE_HOME\oracle_common\bin
4. Start the RCU:
• (UNIX) ./rcu
• (Windows) rcu.bat
5. On the Welcome screen, click Next.
6. On the Create Repository screen, select Create Repository and then selectSystem Load and Product Load.
If you do not have DBA privileges, select Prepare Scripts for System Load. Thiswill generate a SQL script containing all the same SQL statements and blocks thatwould have been called if the RCU were to execute the actions for the selectedcomponents. After the script is generated, a user with the necessary SYS orSYSDBA privileges can execute the script to complete the system load phase.Click Next.
7. On the Database Connection Details screen, select the Database Type and enterthe connection information for the database that hosts the 11g schemas. See thepertinent table below.
Table 3-2 Connection Credentials for Oracle Databases and Oracle Databases with Edition-Based Redefinition
Option Description and Example
Host Name Specify the name of the server where your database isrunning in the following format:
examplehost.exampledomain.com
For Oracle RAC databases, specify the VIP name orone of the node names in this field.
Port Specify the port number for your database. The defaultport number for Oracle databases is 1521.
Service Name Specify the service name for the database. Typically, theservice name is the same as the global database name.
For Oracle RAC databases, specify the service name ofone of the nodes in this field. For example:
examplehost.exampledomain.com
Username Enter the user name for your database. The default username is SYS.
Password Enter the password for your database user.
Role Select the database user's role from the drop-down list:
Normal or SYSDBA
Chapter 3Creating the Required 12c Schemas Using RCU
3-11
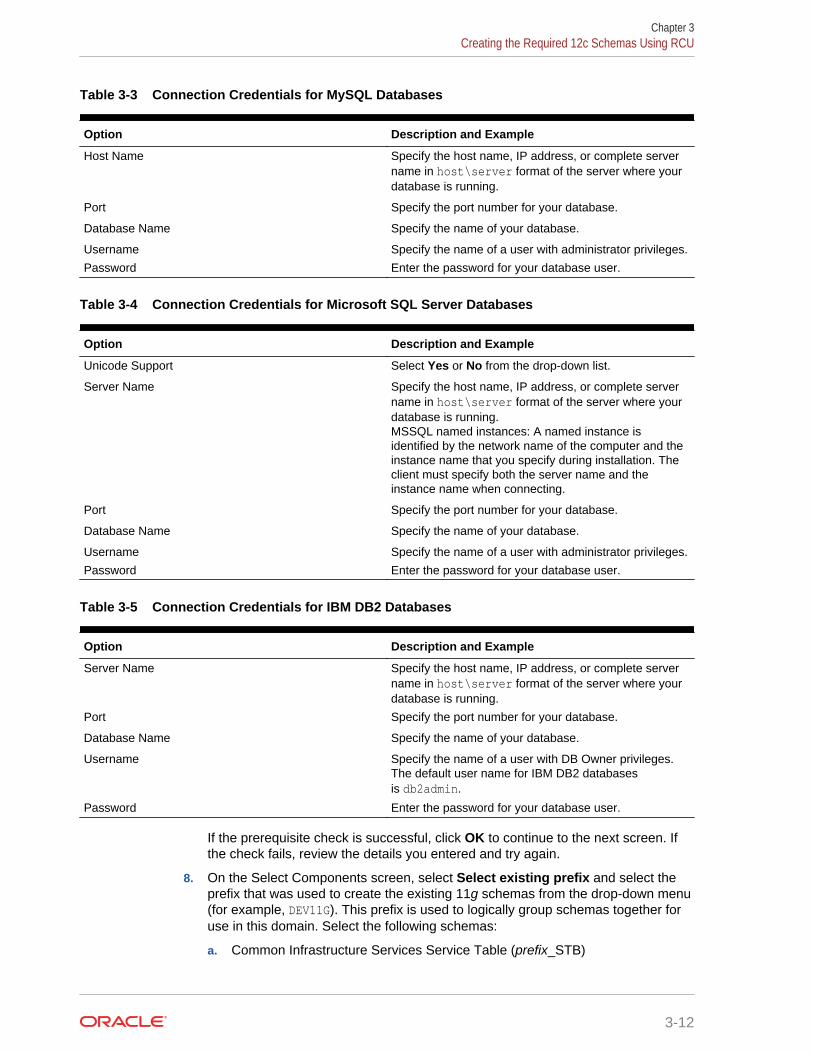
Table 3-3 Connection Credentials for MySQL Databases
Option Description and Example
Host Name Specify the host name, IP address, or complete servername in host\server format of the server where yourdatabase is running.
Port Specify the port number for your database.
Database Name Specify the name of your database.
Username Specify the name of a user with administrator privileges.
Password Enter the password for your database user.
Table 3-4 Connection Credentials for Microsoft SQL Server Databases
Option Description and Example
Unicode Support Select Yes or No from the drop-down list.
Server Name Specify the host name, IP address, or complete servername in host\server format of the server where yourdatabase is running.MSSQL named instances: A named instance isidentified by the network name of the computer and theinstance name that you specify during installation. Theclient must specify both the server name and theinstance name when connecting.
Port Specify the port number for your database.
Database Name Specify the name of your database.
Username Specify the name of a user with administrator privileges.
Password Enter the password for your database user.
Table 3-5 Connection Credentials for IBM DB2 Databases
Option Description and Example
Server Name Specify the host name, IP address, or complete servername in host\server format of the server where yourdatabase is running.
Port Specify the port number for your database.
Database Name Specify the name of your database.
Username Specify the name of a user with DB Owner privileges.The default user name for IBM DB2 databasesis db2admin.
Password Enter the password for your database user.
If the prerequisite check is successful, click OK to continue to the next screen. Ifthe check fails, review the details you entered and try again.
8. On the Select Components screen, select Select existing prefix and select theprefix that was used to create the existing 11g schemas from the drop-down menu(for example, DEV11G). This prefix is used to logically group schemas together foruse in this domain. Select the following schemas:
a. Common Infrastructure Services Service Table (prefix_STB)
Chapter 3Creating the Required 12c Schemas Using RCU
3-12
b. WebLogic Services (prefix_WLS)
c. User Messaging Service (prefix_UMS)
Note:
The Common Infrastructure Services (prefix_STB) and Oracle PlatformSecurity Services (prefix_OPSS) schemas are selected by default if theyhave not yet been created.
Make a note of the prefix and schema names for the components you areinstalling as you will need this information when you configure the installation.Click Next.
9. In the Checking Prerequisites dialog, verify that the prerequisites check issuccessful, then click OK.
10. On the Schema Passwords screen, specify the passwords for your schemaowners.
Make a note of the passwords you enter on this screen as you will need thisinformation while configuring your product installation.
11. On the Map Tablespaces screen, configure the required tablespace mapping forthe schemas you want to create.
Click Next, then click OK in the confirmation dialog. When the progress dialogshows the tablespace creation is complete, click OK.
You see the Encrypt Tablespace check box only if you have enabled TransparentData Encryption (TDE) in the database (Oracle or Oracle EBR) when you start theRCU. Select the Encrypt Tablespace check box on the Map Tablespaces screento encrypt all new tablespaces that the RCU creates.
12. Verify the information on the Summary screen and click Create to begin schemacreation.
This screen contains information about the log files that were created from thisRCU operation. Click on the name of a particular log file to view the contents ofthat file.
13. Review the information on the Completion Summary screen to verify that theoperation is completed successfully. Click Close to complete the schema creation.
Running a Pre-Upgrade Readiness CheckTo identify potential issues with the upgrade, Oracle recommends that you run areadiness check before you start the upgrade process. Be aware that the readinesscheck may not be able to discover all potential issues with your upgrade. An upgrademay still fail, even if the readiness check reports success.
• About Running a Pre-Upgrade Readiness CheckYou can run the Upgrade Assistant in -readiness mode to detect issues beforeyou perform the actual upgrade. You can run the readiness check in GUI modeusing the Upgrade Assistant or in silent mode using a response file.
Chapter 3Running a Pre-Upgrade Readiness Check
3-13
• Starting the Upgrade Assistant in Readiness ModeUse the -readiness parameter to start the Upgrade Assistant in readiness mode.
• Performing a Readiness Check with the Upgrade AssistantNavigate through the screens in the Upgrade Assistant to complete the pre-upgrade readiness check.
• Understanding the Readiness ReportAfter performing a readiness check for your domain, review the report to determinewhether you need to take any action for a successful upgrade.
About Running a Pre-Upgrade Readiness CheckYou can run the Upgrade Assistant in -readiness mode to detect issues before youperform the actual upgrade. You can run the readiness check in GUI mode using theUpgrade Assistant or in silent mode using a response file.
The Upgrade Assistant readiness check performs a read-only, pre-upgrade review ofyour Fusion Middleware schemas and WebLogic domain configurations that are at asupported starting point. The review is a read-only operation.
The readiness check generates a formatted, time-stamped readiness report so youcan address potential issues before you attempt the actual upgrade. If no issues aredetected, you can begin the upgrade process. Oracle recommends that you read thisreport thoroughly before performing an upgrade.
You can run the readiness check while your existing Oracle Fusion Middlewaredomain is online (while other users are actively using it) or offline.
You can run the readiness check any number of times before performing any actualupgrade. However, do not run the readiness check after an upgrade has beenperformed, as the report results may differ from the result of pre-upgrade readinesschecks.
Note:
To prevent performance from being affected, Oracle recommends that yourun the readiness check during off-peak hours.
Starting the Upgrade Assistant in Readiness ModeUse the -readiness parameter to start the Upgrade Assistant in readiness mode.
To perform a readiness check on your pre-upgrade environment with the UpgradeAssistant:
1. Go to the oracle_common/upgrade/bin directory:
• (UNIX) NEW_ORACLE_HOME/oracle_common/upgrade/bin
• (Windows) NEW_ORACLE_HOME\oracle_common\upgrade\bin
2. Start the Upgrade Assistant.
• (UNIX) ./ua -readiness
• (Windows) ua.bat -readiness
Chapter 3Running a Pre-Upgrade Readiness Check
3-14
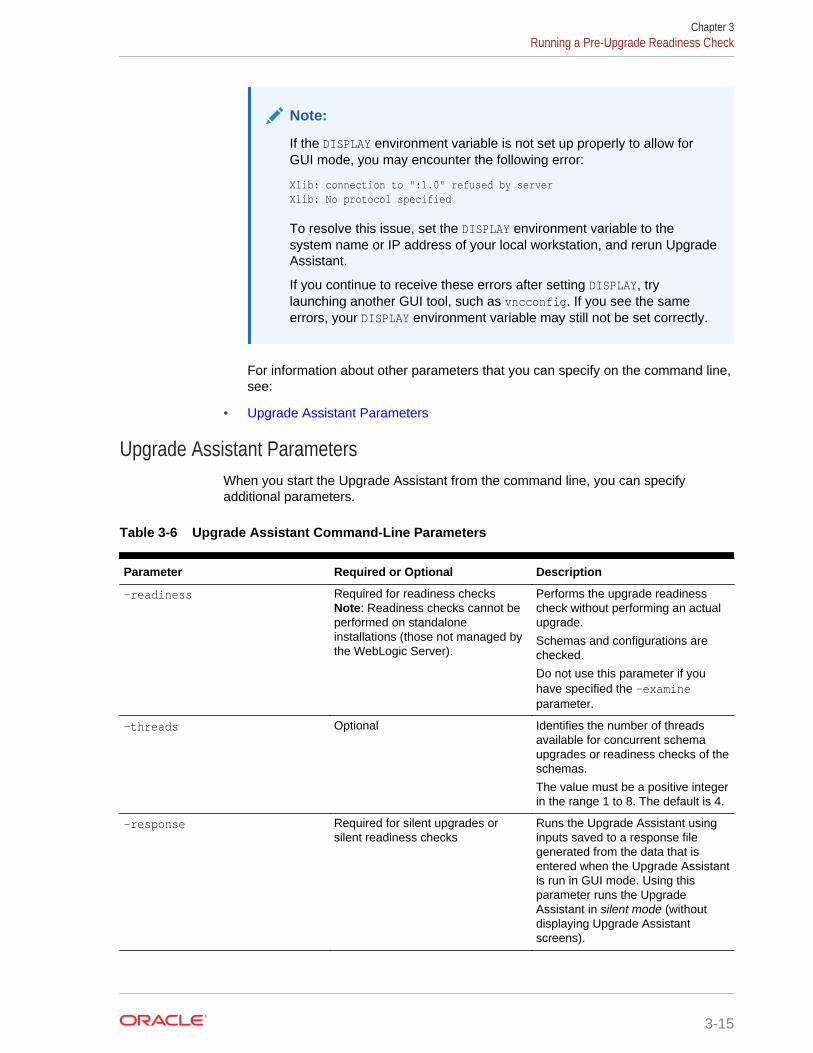
Note:
If the DISPLAY environment variable is not set up properly to allow forGUI mode, you may encounter the following error:
Xlib: connection to ":1.0" refused by serverXlib: No protocol specified
To resolve this issue, set the DISPLAY environment variable to thesystem name or IP address of your local workstation, and rerun UpgradeAssistant.
If you continue to receive these errors after setting DISPLAY, trylaunching another GUI tool, such as vncconfig. If you see the sameerrors, your DISPLAY environment variable may still not be set correctly.
For information about other parameters that you can specify on the command line,see:
• Upgrade Assistant Parameters
Upgrade Assistant ParametersWhen you start the Upgrade Assistant from the command line, you can specifyadditional parameters.
Table 3-6 Upgrade Assistant Command-Line Parameters
Parameter Required or Optional Description
-readiness Required for readiness checksNote: Readiness checks cannot beperformed on standaloneinstallations (those not managed bythe WebLogic Server).
Performs the upgrade readinesscheck without performing an actualupgrade.
Schemas and configurations arechecked.
Do not use this parameter if youhave specified the -examineparameter.
-threads Optional Identifies the number of threadsavailable for concurrent schemaupgrades or readiness checks of theschemas.
The value must be a positive integerin the range 1 to 8. The default is 4.
-response Required for silent upgrades orsilent readiness checks
Runs the Upgrade Assistant usinginputs saved to a response filegenerated from the data that isentered when the Upgrade Assistantis run in GUI mode. Using thisparameter runs the UpgradeAssistant in silent mode (withoutdisplaying Upgrade Assistantscreens).
Chapter 3Running a Pre-Upgrade Readiness Check
3-15
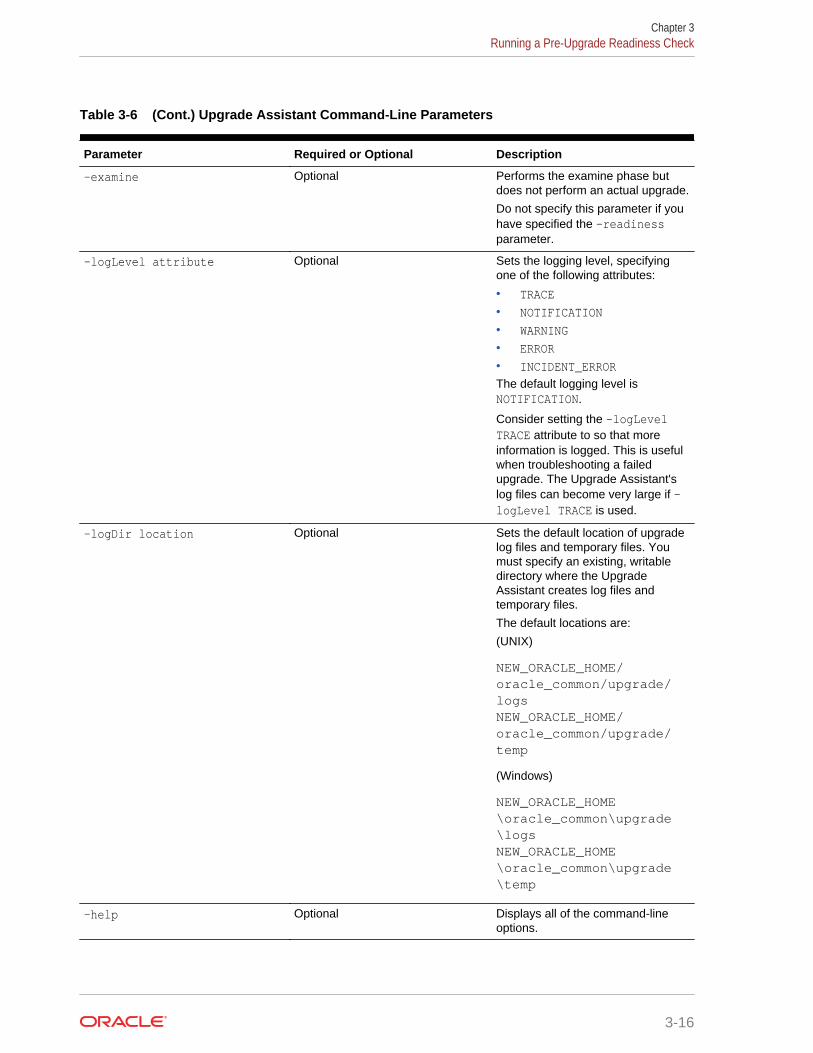
Table 3-6 (Cont.) Upgrade Assistant Command-Line Parameters
Parameter Required or Optional Description
-examine Optional Performs the examine phase butdoes not perform an actual upgrade.
Do not specify this parameter if youhave specified the -readinessparameter.
-logLevel attribute Optional Sets the logging level, specifyingone of the following attributes:
• TRACE• NOTIFICATION• WARNING• ERROR• INCIDENT_ERRORThe default logging level isNOTIFICATION.
Consider setting the -logLevelTRACE attribute to so that moreinformation is logged. This is usefulwhen troubleshooting a failedupgrade. The Upgrade Assistant'slog files can become very large if -logLevel TRACE is used.
-logDir location Optional Sets the default location of upgradelog files and temporary files. Youmust specify an existing, writabledirectory where the UpgradeAssistant creates log files andtemporary files.
The default locations are:
(UNIX)
NEW_ORACLE_HOME/oracle_common/upgrade/logs NEW_ORACLE_HOME/oracle_common/upgrade/temp
(Windows)
NEW_ORACLE_HOME\oracle_common\upgrade\logs NEW_ORACLE_HOME\oracle_common\upgrade\temp
-help Optional Displays all of the command-lineoptions.
Chapter 3Running a Pre-Upgrade Readiness Check
3-16
Performing a Readiness Check with the Upgrade AssistantNavigate through the screens in the Upgrade Assistant to complete the pre-upgradereadiness check.
Readiness checks are performed only on schemas or component configurations thatare at a supported upgrade starting point.
To complete the readiness check:
1. On the Welcome screen, review information about the readiness check. ClickNext.
2. On the Readiness Check Type screen, select the readiness check that you want toperform:
• Individually Selected Schemas allows you to select individual schemas forreview before upgrade. The readiness check reports whether a schema issupported for an upgrade or where an upgrade is needed.When you select this option, the screen name changes to Selected Schemas.
• Domain Based allows the Upgrade Assistant to discover and select allupgrade-eligible schemas or component configurations in the domain specifiedin the Domain Directory field.When you select this option, the screen name changes to Schemas andConfiguration.
Leave the default selection if you want the Upgrade Assistant to check allschemas and component configurations at the same time, or select a specificoption:
– Include checks for all schemas to discover and review all componentsthat have a schema available to upgrade.
– Include checks for all configurations to review componentconfigurations for a managed WebLogic Server domain.
Click Next.
3. If you selected Individually Selected Schemas: On the Available Componentsscreen, select the components that have a schema available to upgrade for whichyou want to perform a readiness check.
If you selected Domain Based: On the Component List screen, review the list ofcomponents that are present in your domain for which you want to perform areadiness check.
If you select a component that has dependent components, those components areautomatically selected. For example, if you select Oracle Platform SecurityServices, Oracle Audit Services is automatically selected.
Depending on the components you select, additional screens may display. Forexample, you may need to:
• Specify the domain directory.
Ensure that you specify the 11.1.2.3.0 domain directory.
• Specify schema credentials to connect to the selected schema: DatabaseType, DBA User Name, and DBA Password. Then click Connect.
Chapter 3Running a Pre-Upgrade Readiness Check
3-17
Note:
Oracle database is the default database type. Make sure that youselect the correct database type before you continue. If you discoverthat you selected the wrong database type, do not go back to thisscreen to change it to the correct type. Instead, close the UpgradeAssistant and restart the readiness check with the correct databasetype selected to ensure that the correct database type is applied toall schemas.
• Select the Schema User Name option and specify the Schema Password.
Click Next to start the readiness check.
4. On the Readiness Summary screen, review the summary of the readiness checksthat will be performed based on your selections.
If you want to save your selections to a response file to run the Upgrade Assistantagain later in response (or silent) mode, click Save Response File and providethe location and name of the response file. A silent upgrade performs exactly thesame function that the Upgrade Assistant performs, but you do not have tomanually enter the data again.
For a detailed report, click View Log.
Click Next.
5. On the Readiness Check screen, review the status of the readiness check. Theprocess can take several minutes.
If you are checking multiple components, the progress of each componentdisplays in its own progress bar in parallel.
When the readiness check is complete, click Continue.
6. On the End of Readiness screen, review the results of the readiness check(Readiness Success or Readiness Failure):
• If the readiness check is successful, click View Readiness Report to reviewthe complete report. Oracle recommends that you review the ReadinessReport before you perform the actual upgrade even when the readiness checkis successful. Use the Find option to search for a particular word or phrasewithin the report. The report also indicates where the completed ReadinessCheck Report file is located.
• If the readiness check encounters an issue or error, click View Log to reviewthe log file, identify and correct the issues, and then restart the readinesscheck. The log file is managed by the command-line options you set.
Understanding the Readiness ReportAfter performing a readiness check for your domain, review the report to determinewhether you need to take any action for a successful upgrade.
The format of the readiness report file is:
readiness_timestamp.txt
where timestamp indicates the date and time of when the readiness check was run.
Chapter 3Running a Pre-Upgrade Readiness Check
3-18
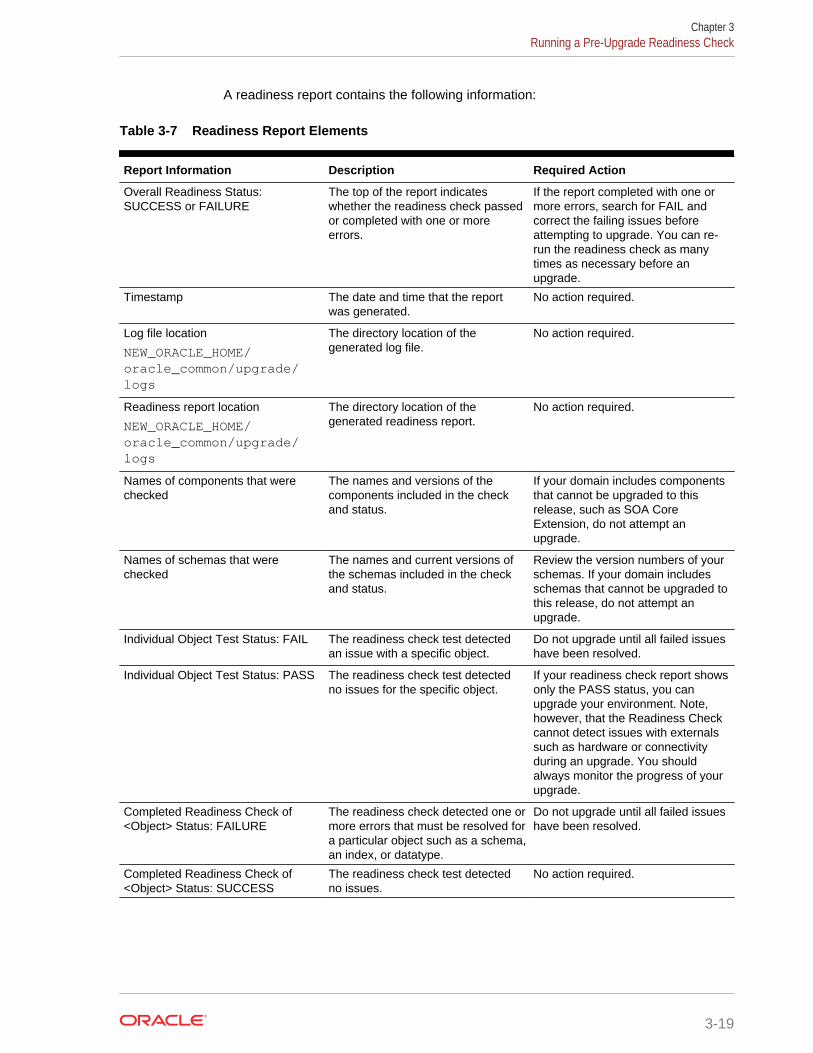
A readiness report contains the following information:
Table 3-7 Readiness Report Elements
Report Information Description Required Action
Overall Readiness Status:SUCCESS or FAILURE
The top of the report indicateswhether the readiness check passedor completed with one or moreerrors.
If the report completed with one ormore errors, search for FAIL andcorrect the failing issues beforeattempting to upgrade. You can re-run the readiness check as manytimes as necessary before anupgrade.
Timestamp The date and time that the reportwas generated.
No action required.
Log file location
NEW_ORACLE_HOME/oracle_common/upgrade/logs
The directory location of thegenerated log file.
No action required.
Readiness report location
NEW_ORACLE_HOME/oracle_common/upgrade/logs
The directory location of thegenerated readiness report.
No action required.
Names of components that werechecked
The names and versions of thecomponents included in the checkand status.
If your domain includes componentsthat cannot be upgraded to thisrelease, such as SOA CoreExtension, do not attempt anupgrade.
Names of schemas that werechecked
The names and current versions ofthe schemas included in the checkand status.
Review the version numbers of yourschemas. If your domain includesschemas that cannot be upgraded tothis release, do not attempt anupgrade.
Individual Object Test Status: FAIL The readiness check test detectedan issue with a specific object.
Do not upgrade until all failed issueshave been resolved.
Individual Object Test Status: PASS The readiness check test detectedno issues for the specific object.
If your readiness check report showsonly the PASS status, you canupgrade your environment. Note,however, that the Readiness Checkcannot detect issues with externalssuch as hardware or connectivityduring an upgrade. You shouldalways monitor the progress of yourupgrade.
Completed Readiness Check of<Object> Status: FAILURE
The readiness check detected one ormore errors that must be resolved fora particular object such as a schema,an index, or datatype.
Do not upgrade until all failed issueshave been resolved.
Completed Readiness Check of<Object> Status: SUCCESS
The readiness check test detectedno issues.
No action required.
Chapter 3Running a Pre-Upgrade Readiness Check
3-19
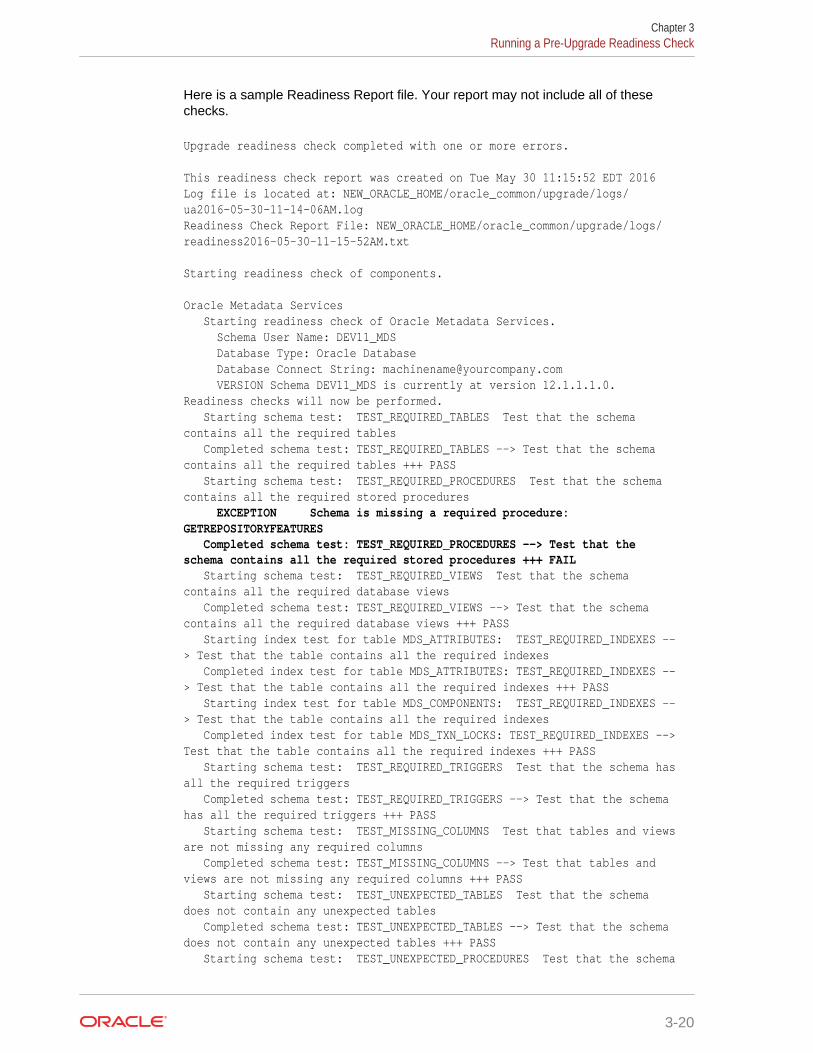
Here is a sample Readiness Report file. Your report may not include all of thesechecks.
Upgrade readiness check completed with one or more errors.
This readiness check report was created on Tue May 30 11:15:52 EDT 2016Log file is located at: NEW_ORACLE_HOME/oracle_common/upgrade/logs/ua2016-05-30-11-14-06AM.logReadiness Check Report File: NEW_ORACLE_HOME/oracle_common/upgrade/logs/readiness2016-05-30-11-15-52AM.txt
Starting readiness check of components.
Oracle Metadata Services Starting readiness check of Oracle Metadata Services. Schema User Name: DEV11_MDS Database Type: Oracle Database Database Connect String: [email protected] VERSION Schema DEV11_MDS is currently at version 12.1.1.1.0. Readiness checks will now be performed. Starting schema test: TEST_REQUIRED_TABLES Test that the schema contains all the required tables Completed schema test: TEST_REQUIRED_TABLES --> Test that the schema contains all the required tables +++ PASS Starting schema test: TEST_REQUIRED_PROCEDURES Test that the schema contains all the required stored procedures EXCEPTION Schema is missing a required procedure: GETREPOSITORYFEATURES Completed schema test: TEST_REQUIRED_PROCEDURES --> Test that the schema contains all the required stored procedures +++ FAIL Starting schema test: TEST_REQUIRED_VIEWS Test that the schema contains all the required database views Completed schema test: TEST_REQUIRED_VIEWS --> Test that the schema contains all the required database views +++ PASS Starting index test for table MDS_ATTRIBUTES: TEST_REQUIRED_INDEXES --> Test that the table contains all the required indexes Completed index test for table MDS_ATTRIBUTES: TEST_REQUIRED_INDEXES --> Test that the table contains all the required indexes +++ PASS Starting index test for table MDS_COMPONENTS: TEST_REQUIRED_INDEXES --> Test that the table contains all the required indexes Completed index test for table MDS_TXN_LOCKS: TEST_REQUIRED_INDEXES --> Test that the table contains all the required indexes +++ PASS Starting schema test: TEST_REQUIRED_TRIGGERS Test that the schema has all the required triggers Completed schema test: TEST_REQUIRED_TRIGGERS --> Test that the schema has all the required triggers +++ PASS Starting schema test: TEST_MISSING_COLUMNS Test that tables and views are not missing any required columns Completed schema test: TEST_MISSING_COLUMNS --> Test that tables and views are not missing any required columns +++ PASS Starting schema test: TEST_UNEXPECTED_TABLES Test that the schema does not contain any unexpected tables Completed schema test: TEST_UNEXPECTED_TABLES --> Test that the schema does not contain any unexpected tables +++ PASS Starting schema test: TEST_UNEXPECTED_PROCEDURES Test that the schema
Chapter 3Running a Pre-Upgrade Readiness Check
3-20
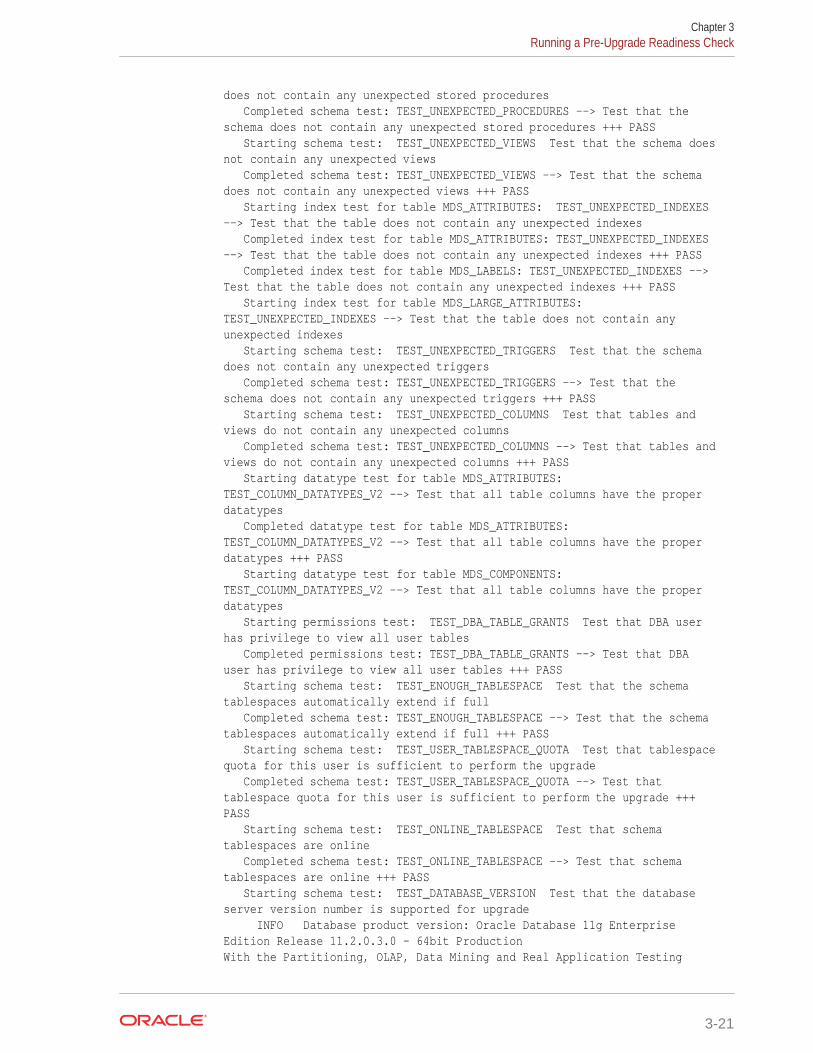
does not contain any unexpected stored procedures Completed schema test: TEST_UNEXPECTED_PROCEDURES --> Test that the schema does not contain any unexpected stored procedures +++ PASS Starting schema test: TEST_UNEXPECTED_VIEWS Test that the schema does not contain any unexpected views Completed schema test: TEST_UNEXPECTED_VIEWS --> Test that the schema does not contain any unexpected views +++ PASS Starting index test for table MDS_ATTRIBUTES: TEST_UNEXPECTED_INDEXES --> Test that the table does not contain any unexpected indexes Completed index test for table MDS_ATTRIBUTES: TEST_UNEXPECTED_INDEXES --> Test that the table does not contain any unexpected indexes +++ PASS Completed index test for table MDS_LABELS: TEST_UNEXPECTED_INDEXES --> Test that the table does not contain any unexpected indexes +++ PASS Starting index test for table MDS_LARGE_ATTRIBUTES: TEST_UNEXPECTED_INDEXES --> Test that the table does not contain any unexpected indexes Starting schema test: TEST_UNEXPECTED_TRIGGERS Test that the schema does not contain any unexpected triggers Completed schema test: TEST_UNEXPECTED_TRIGGERS --> Test that the schema does not contain any unexpected triggers +++ PASS Starting schema test: TEST_UNEXPECTED_COLUMNS Test that tables and views do not contain any unexpected columns Completed schema test: TEST_UNEXPECTED_COLUMNS --> Test that tables and views do not contain any unexpected columns +++ PASS Starting datatype test for table MDS_ATTRIBUTES: TEST_COLUMN_DATATYPES_V2 --> Test that all table columns have the proper datatypes Completed datatype test for table MDS_ATTRIBUTES: TEST_COLUMN_DATATYPES_V2 --> Test that all table columns have the proper datatypes +++ PASS Starting datatype test for table MDS_COMPONENTS: TEST_COLUMN_DATATYPES_V2 --> Test that all table columns have the proper datatypes Starting permissions test: TEST_DBA_TABLE_GRANTS Test that DBA user has privilege to view all user tables Completed permissions test: TEST_DBA_TABLE_GRANTS --> Test that DBA user has privilege to view all user tables +++ PASS Starting schema test: TEST_ENOUGH_TABLESPACE Test that the schema tablespaces automatically extend if full Completed schema test: TEST_ENOUGH_TABLESPACE --> Test that the schema tablespaces automatically extend if full +++ PASS Starting schema test: TEST_USER_TABLESPACE_QUOTA Test that tablespace quota for this user is sufficient to perform the upgrade Completed schema test: TEST_USER_TABLESPACE_QUOTA --> Test that tablespace quota for this user is sufficient to perform the upgrade +++ PASS Starting schema test: TEST_ONLINE_TABLESPACE Test that schema tablespaces are online Completed schema test: TEST_ONLINE_TABLESPACE --> Test that schema tablespaces are online +++ PASS Starting schema test: TEST_DATABASE_VERSION Test that the database server version number is supported for upgrade INFO Database product version: Oracle Database 11g Enterprise Edition Release 11.2.0.3.0 - 64bit ProductionWith the Partitioning, OLAP, Data Mining and Real Application Testing
Chapter 3Running a Pre-Upgrade Readiness Check
3-21
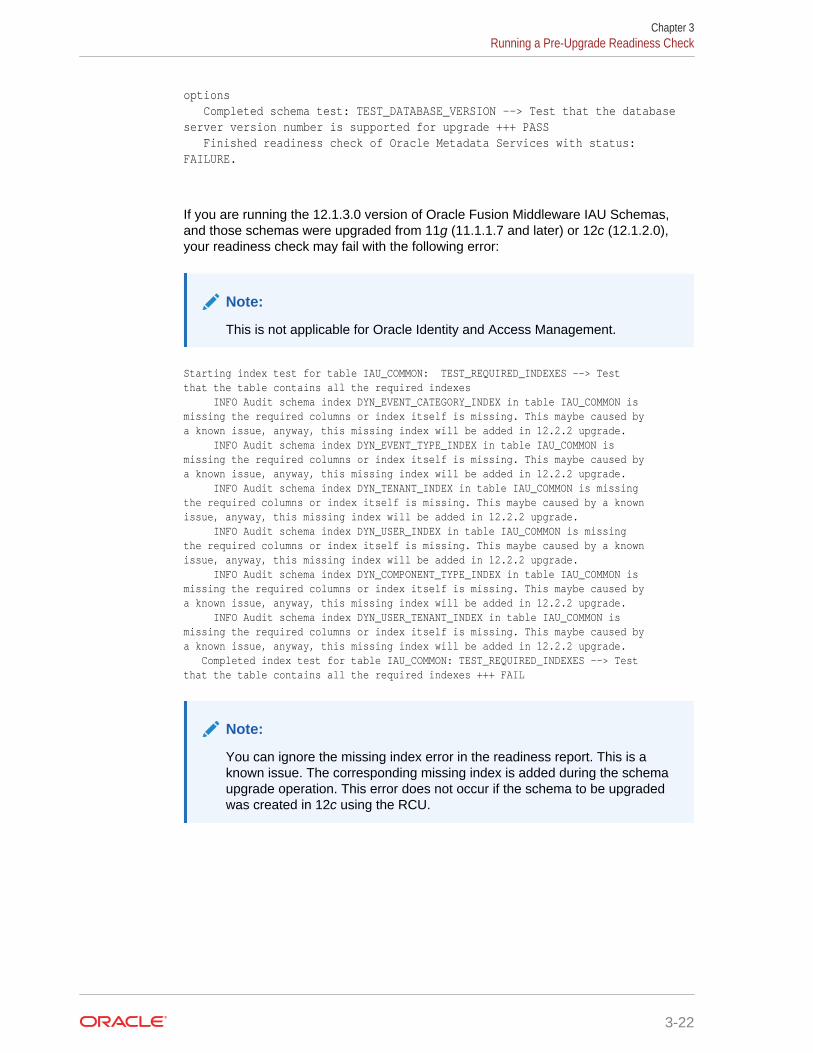
options Completed schema test: TEST_DATABASE_VERSION --> Test that the database server version number is supported for upgrade +++ PASS Finished readiness check of Oracle Metadata Services with status: FAILURE.
If you are running the 12.1.3.0 version of Oracle Fusion Middleware IAU Schemas,and those schemas were upgraded from 11g (11.1.1.7 and later) or 12c (12.1.2.0),your readiness check may fail with the following error:
Note:
This is not applicable for Oracle Identity and Access Management.
Starting index test for table IAU_COMMON: TEST_REQUIRED_INDEXES --> Test that the table contains all the required indexes INFO Audit schema index DYN_EVENT_CATEGORY_INDEX in table IAU_COMMON is missing the required columns or index itself is missing. This maybe caused by a known issue, anyway, this missing index will be added in 12.2.2 upgrade. INFO Audit schema index DYN_EVENT_TYPE_INDEX in table IAU_COMMON is missing the required columns or index itself is missing. This maybe caused by a known issue, anyway, this missing index will be added in 12.2.2 upgrade. INFO Audit schema index DYN_TENANT_INDEX in table IAU_COMMON is missing the required columns or index itself is missing. This maybe caused by a known issue, anyway, this missing index will be added in 12.2.2 upgrade. INFO Audit schema index DYN_USER_INDEX in table IAU_COMMON is missing the required columns or index itself is missing. This maybe caused by a known issue, anyway, this missing index will be added in 12.2.2 upgrade. INFO Audit schema index DYN_COMPONENT_TYPE_INDEX in table IAU_COMMON is missing the required columns or index itself is missing. This maybe caused by a known issue, anyway, this missing index will be added in 12.2.2 upgrade. INFO Audit schema index DYN_USER_TENANT_INDEX in table IAU_COMMON is missing the required columns or index itself is missing. This maybe caused by a known issue, anyway, this missing index will be added in 12.2.2 upgrade. Completed index test for table IAU_COMMON: TEST_REQUIRED_INDEXES --> Test that the table contains all the required indexes +++ FAIL
Note:
You can ignore the missing index error in the readiness report. This is aknown issue. The corresponding missing index is added during the schemaupgrade operation. This error does not occur if the schema to be upgradedwas created in 12c using the RCU.
Chapter 3Running a Pre-Upgrade Readiness Check
3-22
Stopping Servers and ProcessesBefore you run the Upgrade Assistant to upgrade your schemas and configurations,you must shut down all of the pre-upgrade processes and servers, including theAdministration Server and any managed servers.
An Oracle Fusion Middleware environment can consist of an Oracle WebLogic Serverdomain, an Administration Server, multiple managed servers, Java components,system components such as Identity Management components, and a database usedas a repository for metadata. The components may be dependent on each other, sothey must be stopped in the correct order.
Note:
The procedures in this section describe how to stop the existing, pre-upgradeservers and processes using the WLST command-line utility or a script. Youcan also use the Oracle Fusion Middleware Control and the OracleWebLogic Server Administration Console. See Starting and StoppingAdministration and Managed Servers and Node Manager.
Note:
Stop all of the servers in your deployment, except for the Database. TheDatabase must be up during the upgrade process.
To stop your pre-upgrade Fusion Middleware environment, navigate to the pre-upgrade domain and follow the steps below.
Step 1: Stop System Components
To stop system components, such as Oracle HTTP Server, use the opmnctl script:
• (UNIX) OHS_INSTANCE_HOME/bin/opmnctl stopall
• (Windows) OHS_INSTANCE_HOME\bin\opmnctl stopall
You can stop system components in any order.
Step 2: Stop the Managed Servers
To stop a WebLogic Server Managed Server, use the stopManagedWebLogic script:
• (UNIX) EXISTING_DOMAIN_HOME/bin/stopManagedWebLogic.shmanaged_server_name admin_url
• (Windows) EXISTING_DOMAIN_HOME\bin\stopManagedWebLogic.cmdmanaged_server_name admin_url
When prompted, enter your user name and password.
Chapter 3Stopping Servers and Processes
3-23

Step 3: Stop the Administration Server
When you stop the Administration Server, you also stop the processes running in theAdministration Server, including the WebLogic Server Administration Console andFusion Middleware Control.
To stop the Administration Server, use the stopWebLogic script:
• (UNIX) EXISTING_DOMAIN_HOME/bin/stopWebLogic.sh
• (Windows) EXISTING_DOMAIN_HOME\bin\stopWebLogic.cmd
When prompted, enter your user name, password, and the URL of the AdministrationServer.
Step 4: Stop Node Manager
To stop Node Manager, close the command shell in which it is running.
Alternatively, after having set the nodemanager.properties attribute QuitEnabled totrue (the default is false), you can use WLST to connect to Node Manager and shut itdown. See stopNodeManager in WLST Command Reference for WebLogic Server.
Upgrading Product SchemasAfter stopping servers and processes, use the Upgrade Assistant to upgradesupported product schemas to the current release of Oracle Fusion Middleware.
The Upgrade Assistant allows you to upgrade individually selected schemas or allschemas associated with a domain. The option you select determines which UpgradeAssistant screens you will use.
• Identifying Existing Schemas Available for UpgradeThis optional task enables you to review the list of available schemas before youbegin the upgrade by querying the schema version registry. The registry containsschema information such as version number, component name and ID, date ofcreation and modification, and custom prefix.
• Starting the Upgrade AssistantRun the Upgrade Assistant to upgrade product schemas, domain componentconfigurations, or standalone system components to 12c (12.2.1.3.0). Oraclerecommends that you run the Upgrade Assistant as a non-SYSDBA user,completing the upgrade for one domain at a time.
• Upgrading Oracle Access Management Schemas Using the Upgrade AssistantNavigate through the screens in the Upgrade Assistant to upgrade the productschemas.
• Verifying the Schema UpgradeAfter completing all the upgrade steps, verify that the upgrade was successful bychecking that the schema version in schema_version_registry has been properlyupdated.
Identifying Existing Schemas Available for UpgradeThis optional task enables you to review the list of available schemas before you beginthe upgrade by querying the schema version registry. The registry contains schema
Chapter 3Upgrading Product Schemas
3-24
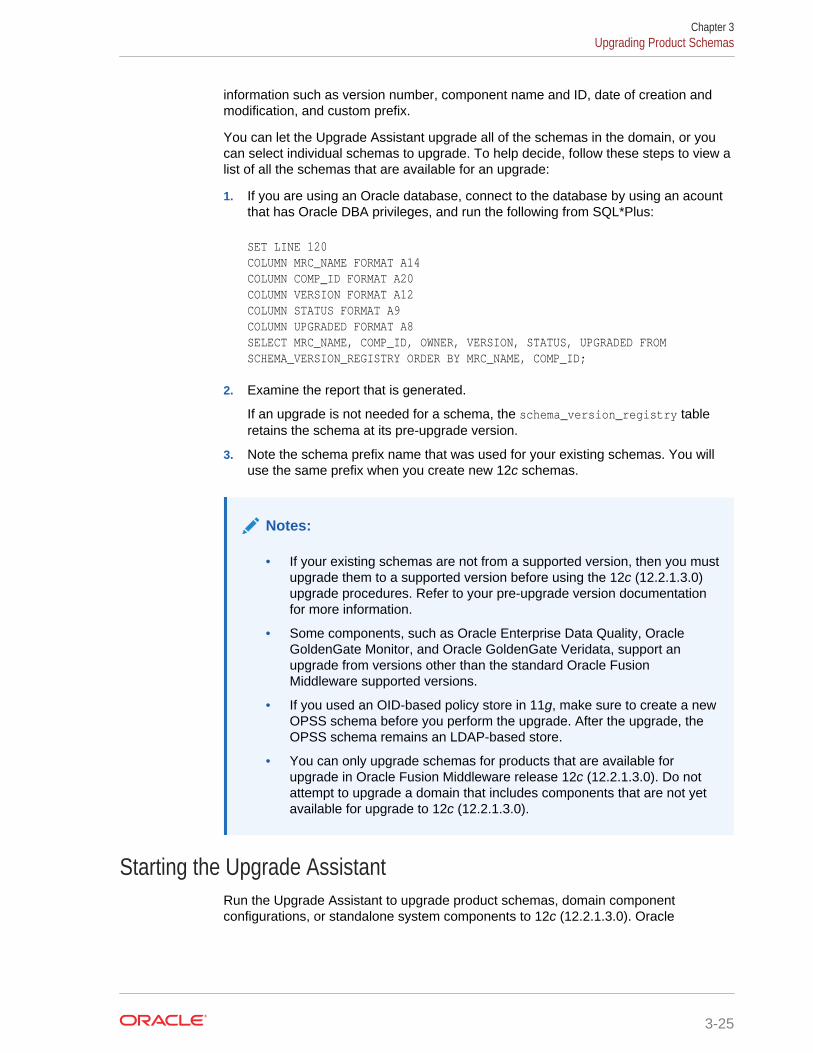
information such as version number, component name and ID, date of creation andmodification, and custom prefix.
You can let the Upgrade Assistant upgrade all of the schemas in the domain, or youcan select individual schemas to upgrade. To help decide, follow these steps to view alist of all the schemas that are available for an upgrade:
1. If you are using an Oracle database, connect to the database by using an acountthat has Oracle DBA privileges, and run the following from SQL*Plus:
SET LINE 120COLUMN MRC_NAME FORMAT A14COLUMN COMP_ID FORMAT A20COLUMN VERSION FORMAT A12COLUMN STATUS FORMAT A9COLUMN UPGRADED FORMAT A8SELECT MRC_NAME, COMP_ID, OWNER, VERSION, STATUS, UPGRADED FROM SCHEMA_VERSION_REGISTRY ORDER BY MRC_NAME, COMP_ID;
2. Examine the report that is generated.
If an upgrade is not needed for a schema, the schema_version_registry tableretains the schema at its pre-upgrade version.
3. Note the schema prefix name that was used for your existing schemas. You willuse the same prefix when you create new 12c schemas.
Notes:
• If your existing schemas are not from a supported version, then you mustupgrade them to a supported version before using the 12c (12.2.1.3.0)upgrade procedures. Refer to your pre-upgrade version documentationfor more information.
• Some components, such as Oracle Enterprise Data Quality, OracleGoldenGate Monitor, and Oracle GoldenGate Veridata, support anupgrade from versions other than the standard Oracle FusionMiddleware supported versions.
• If you used an OID-based policy store in 11g, make sure to create a newOPSS schema before you perform the upgrade. After the upgrade, theOPSS schema remains an LDAP-based store.
• You can only upgrade schemas for products that are available forupgrade in Oracle Fusion Middleware release 12c (12.2.1.3.0). Do notattempt to upgrade a domain that includes components that are not yetavailable for upgrade to 12c (12.2.1.3.0).
Starting the Upgrade AssistantRun the Upgrade Assistant to upgrade product schemas, domain componentconfigurations, or standalone system components to 12c (12.2.1.3.0). Oracle
Chapter 3Upgrading Product Schemas
3-25

recommends that you run the Upgrade Assistant as a non-SYSDBA user, completingthe upgrade for one domain at a time.
To start the Upgrade Assistant:
Note:
Before you start the Upgrade Assistant, make sure that the JVM characterencoding is set to UTF-8 for the platform on which the Upgrade Assistant isrunning. If the character encoding is not set to UTF-8, then you will not beable to download files containing Unicode characters in their names. Thiscan cause the upgrade to fail.
To ensure that UTF-8 is used by the JVM, use the JVM option -Dfile.encoding=UTF-8.
1. Go to the oracle_common/upgrade/bin directory:
• (UNIX) NEW_ORACLE_HOME/oracle_common/upgrade/bin
• (Windows) NEW_ORACLE_HOME\oracle_common\upgrade\bin
2. Start the Upgrade Assistant:
• (UNIX) ./ua
• (Windows) ua.bat
Note:
In the above command, NEW_ORACLE_HOME refers to the 12c Oracle Home.
For information about other parameters that you can specify on the command line,such as logging parameters, see:
• Upgrade Assistant Parameters
Upgrade Assistant ParametersWhen you start the Upgrade Assistant from the command line, you can specifyadditional parameters.
Chapter 3Upgrading Product Schemas
3-26
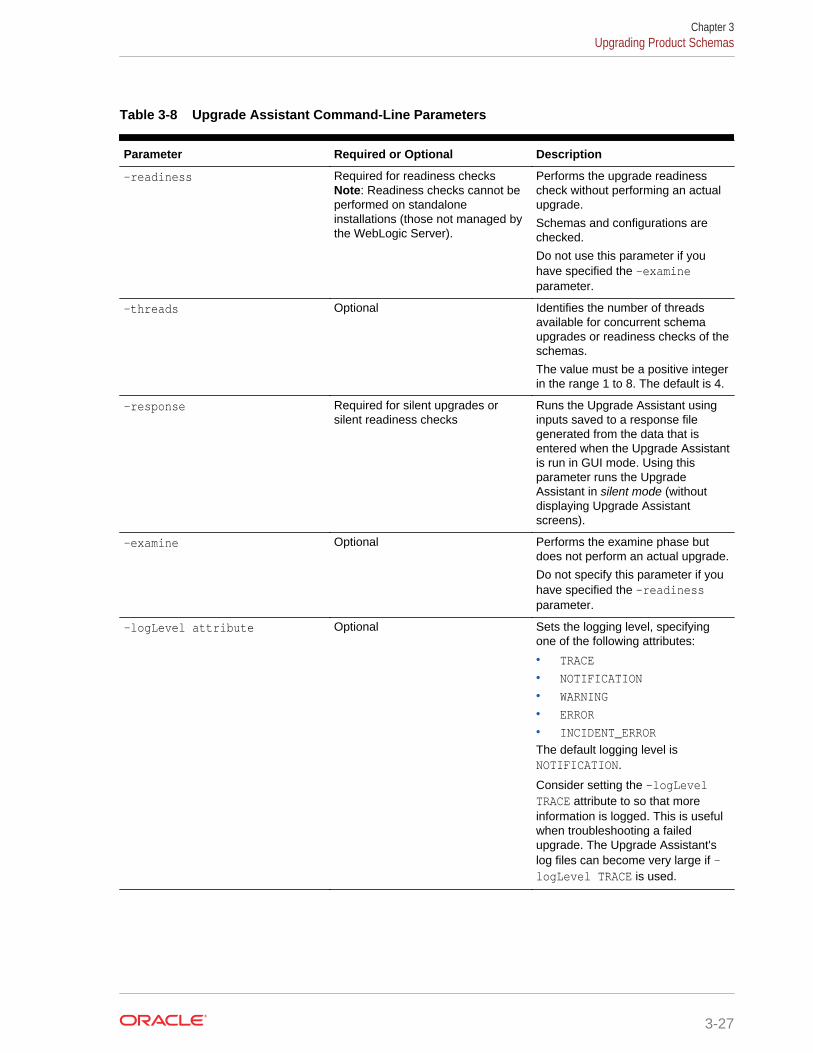
Table 3-8 Upgrade Assistant Command-Line Parameters
Parameter Required or Optional Description
-readiness Required for readiness checksNote: Readiness checks cannot beperformed on standaloneinstallations (those not managed bythe WebLogic Server).
Performs the upgrade readinesscheck without performing an actualupgrade.
Schemas and configurations arechecked.
Do not use this parameter if youhave specified the -examineparameter.
-threads Optional Identifies the number of threadsavailable for concurrent schemaupgrades or readiness checks of theschemas.
The value must be a positive integerin the range 1 to 8. The default is 4.
-response Required for silent upgrades orsilent readiness checks
Runs the Upgrade Assistant usinginputs saved to a response filegenerated from the data that isentered when the Upgrade Assistantis run in GUI mode. Using thisparameter runs the UpgradeAssistant in silent mode (withoutdisplaying Upgrade Assistantscreens).
-examine Optional Performs the examine phase butdoes not perform an actual upgrade.
Do not specify this parameter if youhave specified the -readinessparameter.
-logLevel attribute Optional Sets the logging level, specifyingone of the following attributes:
• TRACE• NOTIFICATION• WARNING• ERROR• INCIDENT_ERRORThe default logging level isNOTIFICATION.
Consider setting the -logLevelTRACE attribute to so that moreinformation is logged. This is usefulwhen troubleshooting a failedupgrade. The Upgrade Assistant'slog files can become very large if -logLevel TRACE is used.
Chapter 3Upgrading Product Schemas
3-27

Table 3-8 (Cont.) Upgrade Assistant Command-Line Parameters
Parameter Required or Optional Description
-logDir location Optional Sets the default location of upgradelog files and temporary files. Youmust specify an existing, writabledirectory where the UpgradeAssistant creates log files andtemporary files.
The default locations are:
(UNIX)
NEW_ORACLE_HOME/oracle_common/upgrade/logs NEW_ORACLE_HOME/oracle_common/upgrade/temp
(Windows)
NEW_ORACLE_HOME\oracle_common\upgrade\logs NEW_ORACLE_HOME\oracle_common\upgrade\temp
-help Optional Displays all of the command-lineoptions.
Chapter 3Upgrading Product Schemas
3-28
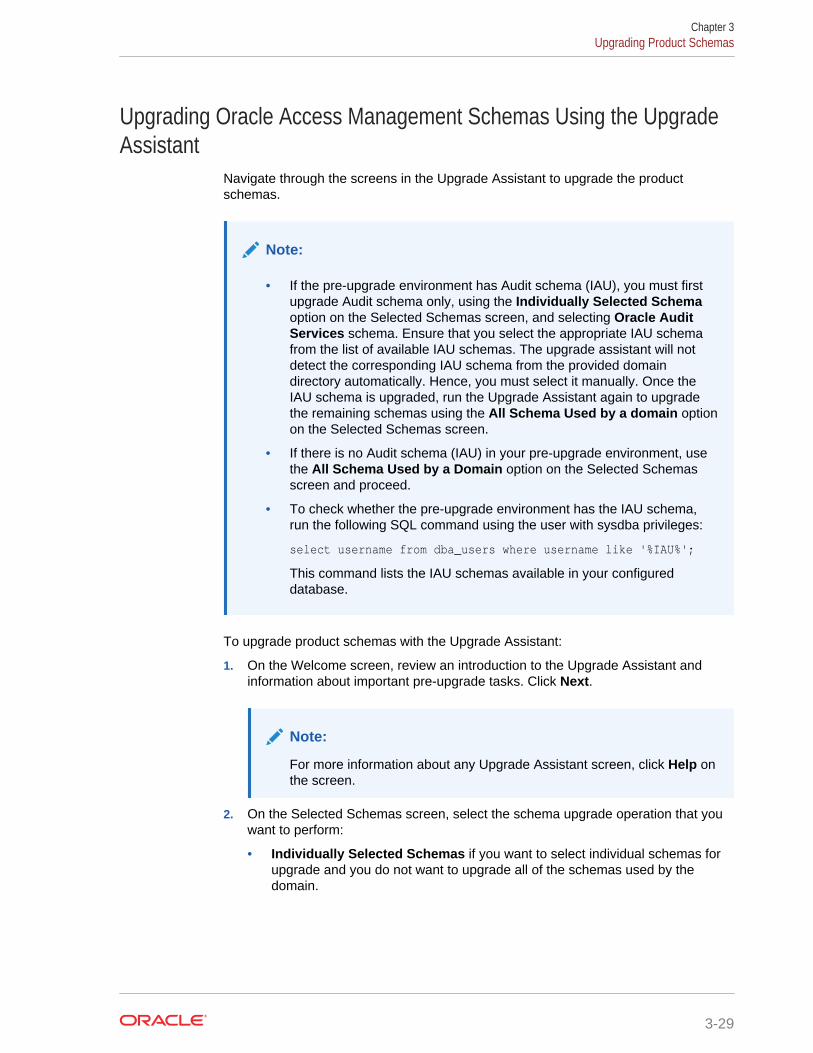
Upgrading Oracle Access Management Schemas Using the UpgradeAssistant
Navigate through the screens in the Upgrade Assistant to upgrade the productschemas.
Note:
• If the pre-upgrade environment has Audit schema (IAU), you must firstupgrade Audit schema only, using the Individually Selected Schemaoption on the Selected Schemas screen, and selecting Oracle AuditServices schema. Ensure that you select the appropriate IAU schemafrom the list of available IAU schemas. The upgrade assistant will notdetect the corresponding IAU schema from the provided domaindirectory automatically. Hence, you must select it manually. Once theIAU schema is upgraded, run the Upgrade Assistant again to upgradethe remaining schemas using the All Schema Used by a domain optionon the Selected Schemas screen.
• If there is no Audit schema (IAU) in your pre-upgrade environment, usethe All Schema Used by a Domain option on the Selected Schemasscreen and proceed.
• To check whether the pre-upgrade environment has the IAU schema,run the following SQL command using the user with sysdba privileges:
select username from dba_users where username like '%IAU%';
This command lists the IAU schemas available in your configureddatabase.
To upgrade product schemas with the Upgrade Assistant:
1. On the Welcome screen, review an introduction to the Upgrade Assistant andinformation about important pre-upgrade tasks. Click Next.
Note:
For more information about any Upgrade Assistant screen, click Help onthe screen.
2. On the Selected Schemas screen, select the schema upgrade operation that youwant to perform:
• Individually Selected Schemas if you want to select individual schemas forupgrade and you do not want to upgrade all of the schemas used by thedomain.
Chapter 3Upgrading Product Schemas
3-29

Caution:
Upgrade only those schemas that are used to support your 12c(12.2.1.3.0) components. Do not upgrade schemas that are currentlybeing used to support components that are not included in OracleFusion Middleware 12c (12.2.1.3.0).
• All Schemas Used by a Domain to allow the Upgrade Assistant to discoverand select all components that have a schema available to upgrade in thedomain specified in the Domain Directory field. This is also known as adomain assisted schema upgrade. Additionally, the Upgrade Assistant pre-populates connection information on the schema input screens.
Note:
Oracle recommends that you select All Schemas Used by aDomain for most upgrades to ensure all of the required schemas areincluded in the upgrade.
Note:
If your 11g domain contains Oracle Identity Navigator, chooseIndividually Selected Schemas and select only the Oracle AccessManagement (OAM) and the OAM-related schemas.
Do NOT select Oracle Identity Navigator (OIN) and OIN-relatedschemas, as Oracle Identity Navigator is not supported in 12c.
Click Next.
3. If you selected Individually Selected Schemas: On the Available Componentsscreen, select the components for which you want to upgrade schemas. When youselect a component, the schemas and any dependencies are automaticallyselected.
If you selected All schemas used by a domain: On the Create Schema screen,enter the necessary Database details. This retrieves all of the schemas in thedomain.
Click Next.
4. On the Prerequisites screen, acknowledge that the prerequisites have been metby selecting all the check boxes. Click Next.
Note:
The Upgrade Assistant does not verify whether the prerequisites havebeen met.
Chapter 3Upgrading Product Schemas
3-30
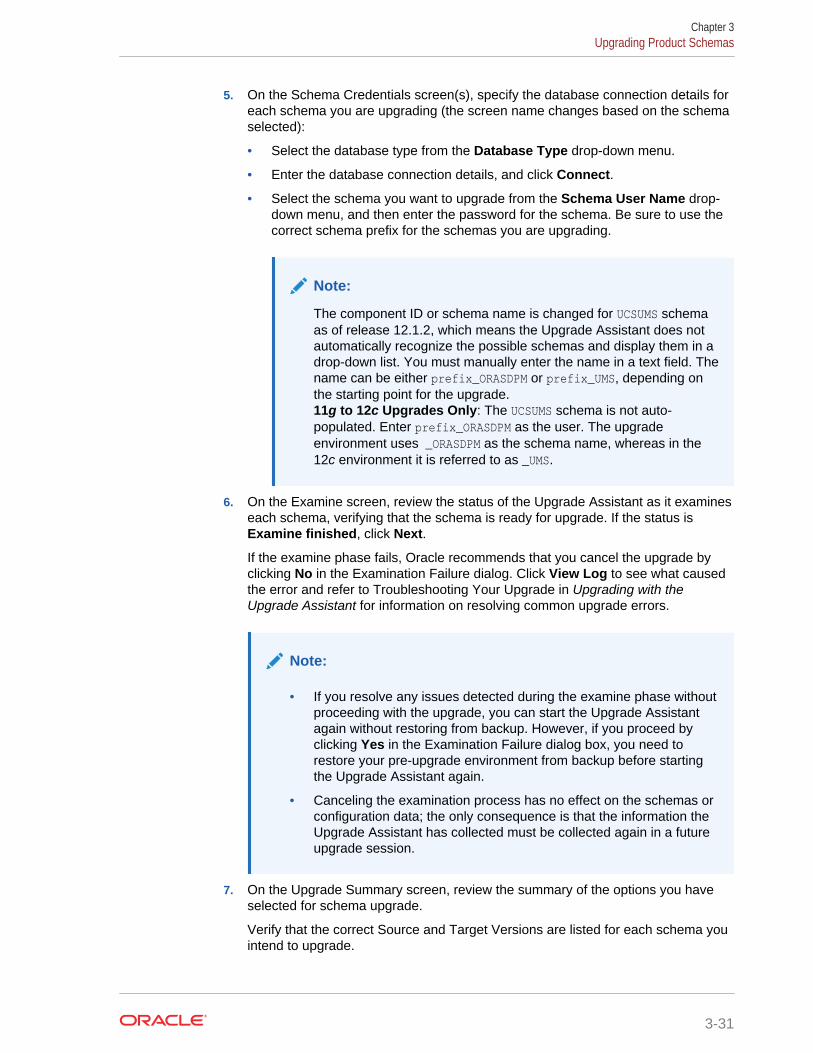
5. On the Schema Credentials screen(s), specify the database connection details foreach schema you are upgrading (the screen name changes based on the schemaselected):
• Select the database type from the Database Type drop-down menu.
• Enter the database connection details, and click Connect.
• Select the schema you want to upgrade from the Schema User Name drop-down menu, and then enter the password for the schema. Be sure to use thecorrect schema prefix for the schemas you are upgrading.
Note:
The component ID or schema name is changed for UCSUMS schemaas of release 12.1.2, which means the Upgrade Assistant does notautomatically recognize the possible schemas and display them in adrop-down list. You must manually enter the name in a text field. Thename can be either prefix_ORASDPM or prefix_UMS, depending onthe starting point for the upgrade.11g to 12c Upgrades Only: The UCSUMS schema is not auto-populated. Enter prefix_ORASDPM as the user. The upgradeenvironment uses _ORASDPM as the schema name, whereas in the12c environment it is referred to as _UMS.
6. On the Examine screen, review the status of the Upgrade Assistant as it examineseach schema, verifying that the schema is ready for upgrade. If the status isExamine finished, click Next.
If the examine phase fails, Oracle recommends that you cancel the upgrade byclicking No in the Examination Failure dialog. Click View Log to see what causedthe error and refer to Troubleshooting Your Upgrade in Upgrading with theUpgrade Assistant for information on resolving common upgrade errors.
Note:
• If you resolve any issues detected during the examine phase withoutproceeding with the upgrade, you can start the Upgrade Assistantagain without restoring from backup. However, if you proceed byclicking Yes in the Examination Failure dialog box, you need torestore your pre-upgrade environment from backup before startingthe Upgrade Assistant again.
• Canceling the examination process has no effect on the schemas orconfiguration data; the only consequence is that the information theUpgrade Assistant has collected must be collected again in a futureupgrade session.
7. On the Upgrade Summary screen, review the summary of the options you haveselected for schema upgrade.
Verify that the correct Source and Target Versions are listed for each schema youintend to upgrade.
Chapter 3Upgrading Product Schemas
3-31
If you want to save these options to a response file to run the Upgrade Assistantagain later in response (or silent) mode, click Save Response File and providethe location and name of the response file. A silent upgrade performs exactly thesame function that the Upgrade Assistant performs, but you do not have tomanually enter the data again.
Click Upgrade to start the upgrade process.
8. On the Upgrade Progress screen, monitor the status of the upgrade.
Caution:
Allow the Upgrade Assistant enough time to perform the upgrade. Do notcancel the upgrade operation unless absolutely necessary. Doing somay result in an unstable environment.
If any schemas are not upgraded successfully, refer to the Upgrade Assistant logfiles for more information.
Note:
The progress bar on this screen displays the progress of the currentupgrade procedure. It does not indicate the time remaining for theupgrade.
Click Next.
9. If the upgrade is successful: On the Upgrade Success screen, click Close tocomplete the upgrade and close the wizard.
If the upgrade fails: On the Upgrade Failure screen, click View Log to view andtroubleshoot the errors. The logs are available at ORACLE_HOME/oracle_common/upgrade/logs.
Note:
If the upgrade fails, you must restore your pre-upgrade environment frombackup, fix the issues, then restart the Upgrade Assistant.
Verifying the Schema UpgradeAfter completing all the upgrade steps, verify that the upgrade was successful bychecking that the schema version in schema_version_registry has been properlyupdated.
If you are using an Oracle database, connect to the database as a user having OracleDBA privileges, and run the following from SQL*Plus to get the current versionnumbers:
SET LINE 120COLUMN MRC_NAME FORMAT A14COLUMN COMP_ID FORMAT A20
Chapter 3Upgrading Product Schemas
3-32

COLUMN VERSION FORMAT A12COLUMN STATUS FORMAT A9COLUMN UPGRADED FORMAT A8SELECT MRC_NAME, COMP_ID, OWNER, VERSION, STATUS, UPGRADED FROM SCHEMA_VERSION_REGISTRY ORDER BY MRC_NAME, COMP_ID ;
In the query result:
• Check that the number in the VERSION column matches the latest version numberfor that schema. For example, verify that the schema version number is 12.2.1.3.0.
Note:
However, that not all schema versions will be updated. Some schemasdo not require an upgrade to this release and will retain their pre-upgrade version number.
• The STATUS field will be either UPGRADING or UPGRADED during the schema patchingoperation, and will become VALID when the operation is completed.
• If the status appears as INVALID, the schema update failed. You should examinethe logs files to determine the reason for the failure.
• Synonym objects owned by IAU_APPEND and IAU_VIEWER will appear as INVALID,but that does not indicate a failure.
They become invalid because the target object changes after the creation of thesynonym. The synonyms objects will become valid when they are accessed. Youcan safely ignore these INVALID objects.
About Reconfiguring the DomainRun the Reconfiguration Wizard to reconfigure your domain component configurationsto 12c (12.2.1.3.0).
When you reconfigure a WebLogic Server domain, the following items areautomatically updated, depending on the applications in the domain:
• WebLogic Server core infrastructure
• Domain version
Chapter 3About Reconfiguring the Domain
3-33
Note:
Before you begin the domain reconfiguration, note the following limitations:
• The Reconfiguration Wizard does not update any of your ownapplications that are included in the domain.
• Transforming a non-dynamic cluster domain to a dynamic cluster domainduring the upgrade process is not supported.
The dynamic cluster feature is available when running theReconfiguration Wizard, but Oracle only supports upgrading a non-dynamic cluster upgrade and then adding dynamic clusters. You cannotadd dynamic cluster during the upgrade process.
• If the installation that you’re upgrading does not use Oracle AccessManagement (OAM), then you must edit two files to prevent theReconfiguration Wizard from attempting to update the nonexistent OAMInfrastructure schema, which causes the upgrade to fail.
Comment out the lines in your $DOMAIN/init-info/domain-info.xmlthat are similar to this example:
<!--extention-template-ref name="Oracle Identity Navigator" version="11.1.1.3.0" location="/u01/app/oracle/product/fmw/iam111130/common/templates/applications/oracle.oinav_11.1.1.3.0_template.jar" symbol=""/-->
<!--install-comp-ref name="oracle.idm.oinav" version="11.1.1.3.0" symbol="oracle.idm.oinav_11.1.1.3.0_iam111130_ORACLE_HOME" product_home="/u01/app/oracle/product/fmw/iam111130"/-->
and similarly comment out the lines in $DOMAIN/config/config.xml thatare similar to this example:
<!--app-deployment> <name>oinav#11.1.1.3.0</name> <target>AdminServer</target> <module-type>ear</module-type>
<source-path>/u01/app/oracle/product/fmw/iam111130/oinav/modules/oinav.ear_11.1.1.3.0/oinav.ear</source-path> <deployment-order>500</deployment-order> <security-dd-model>DDOnly</security-dd-model> <staging-mode>nostage</staging-mode></app-deployment-->
Specifically, when you reconfigure a domain, the following occurs:
• The domain version number in the config.xml file for the domain is updated to theAdministration Server's installed WebLogic Server version.
Chapter 3About Reconfiguring the Domain
3-34
• Reconfiguration templates for all installed Oracle products are automaticallyselected and applied to the domain. These templates define any reconfigurationtasks that are required to make the WebLogic domain compatible with the currentWebLogic Server version.
• Start scripts are updated.
If you want to preserve your modified start scripts, be sure to back them up beforestarting the Reconfiguration Wizard.
Note:
When the domain reconfiguration process starts, you can’t undo the changesthat it makes. Before running the Reconfiguration Wizard, ensure that youhave backed up the domain as covered in the pre-upgrade checklist. If anerror or other interruption occurs while running the Reconfiguration Wizard,you must restore the domain by copying the files and directories from thebackup location to the original domain directory. This is the only way toensure that the domain has been returned to its original state beforereconfiguration.
Follow these instructions to reconfigure the existing domain using the ReconfigurationWizard. See Reconfiguring WebLogic Domains in Upgrading Oracle WebLogic Server.
• Backing Up the Domain
• Starting the Reconfiguration Wizard
• Reconfiguring the Oracle Access Management DomainNavigate through the screens in the Reconfiguration Wizard to reconfigure yourexisting 11g domain.
Backing Up the DomainBefore running the Reconfiguration Wizard, create a backup copy of the domaindirectory.
To create a backup of the domain directory:
1. Copy the source domain to a separate location to preserve the contents.
(Windows) copy C:\domains\mydomain to C:\domains\mydomain_backup.
(UNIX) cp mydomain /domains/mydomain_backup
2. Before updating the domain on each remote Managed Server, create a backupcopy of the domain directory on each remote machine.
3. Verify that the backed up versions of the domain are complete.
If domain reconfiguration fails for any reason, you must copy all files and directoriesfrom the backup directory into the original domain directory to ensure that the domainis returned entirely to its original state before reconfiguration.
Chapter 3About Reconfiguring the Domain
3-35
Starting the Reconfiguration Wizard
Note:
Shut down the administration server and all collocated managed serversbefore starting the reconfiguration process. See Stopping Servers andProcesses.
To start the Reconfiguration Wizard in graphical mode:
1. Sign in to the system on which the domain resides.
2. Open the command shell (on UNIX operating systems) or open a commandprompt window (on Windows operating systems).
3. Edition Based Database Users Only: If your schemas are configured with EBRdatabase, a default edition name must be manually supplied before you run theReconfiguration Wizard.
Run the following SQL command to set the default edition:ALTER DATABASE DEFAULT EDITION = edition_name;
where edition_name is the child edition name.
4. Go to the oracle_common/common/bin directory:
• (UNIX) NEW_ORACLE_HOME/oracle_common/common/bin
• (Windows) NEW_ORACLE_HOME\oracle_common\commom\bin
5. Start the Reconfiguration Wizard with the following logging options:
• (UNIX) ./reconfig.sh -log=log_file -log_priority=ALL
• (Windows) reconfig.cmd -log=log_file -log_priority=ALL
where log_file is the absolute path of the log file you'd like to create for thedomain reconfiguration session. This can be helpful if you need to troubleshoot thereconfiguration process.
The parameter -log_priority=ALL ensures that logs are logged in fine mode.
Note:
When you run this command, the following error message might appearto indicate that the default cache directory is not valid:
*sys-package-mgr*: can't create package cache dir
You can change the cache directory by setting the environment variableCONFIG_JVM_ARGS. For example:
CONFIG_JVM_ARGS=-Dpython.cachedir=valid_directory
Chapter 3About Reconfiguring the Domain
3-36
Note:
In this section, NEW_ORACLE_HOME refers to the 12c Oracle Home.
Reconfiguring the Oracle Access Management DomainNavigate through the screens in the Reconfiguration Wizard to reconfigure yourexisting 11g domain.
Note:
If the source is a clustered environment, run the Reconfiguration Wizard onthe primary node only. Use the pack/unpack utility to apply the changes toother cluster members in the domain.
To reconfigure the domain with the Reconfiguration Wizard:
1. On the Select Domain screen, specify the location of the domain you want toupgrade or click Browse to navigate and select the domain directory. Click Next.
2. On the Reconfiguration Setup Progress screen, view the progress of the setupprocess. When complete, click Next.
During this process:
• The reconfiguration templates for your installed products, including FusionMiddleware products, are automatically applied. This updates various domainconfiguration files such as config.xml, config-groups.xml,and security.xml (among others).
• Schemas, scripts, and other such files that support your Fusion Middlewareproducts are updated.
• The domain upgrade is validated.
3. On the Domain Mode and JDK screen, select the JDK to use in the domain or clickBrowse to navigate to the JDK you want to use. The supported JDK version for12c (12.2.1.3.0) is 1.8.0_131 and later. Click Next.
Note:
You cannot change the Domain Mode at this stage.
For a list of JDKs that are supported for a specific platform, see Oracle FusionMiddleware Supported System Configurations.
4. On the Database Configuration Type screen, select RCU Data to connect to theServer Table (_STB) schema.
Enter the database connection details using the RCU service table (_STB)schema credentials and click Get RCU Configuration.
Chapter 3About Reconfiguring the Domain
3-37
The Reconfiguration Wizard uses this connection to automatically configure thedata sources required for components in your domain.
Note:
By default Oracle’s Driver (Thin) for Service connections; Versions:Any is the selected driver. If you specified an instance name in yourconnection details — instead of the service name — you must selectOracle’s Driver (Thin) for pooled instance connections; Versions:Any If you do not change the driver type, then the connection will fail.
Note:
For any existing 11g datasource, the reconfiguration will preserve theexisting values. For new datasources where the schema was created for12c by the RCU, the default connection data will be retrieved from the_STB schema. If no connection data for a given schema is found in the_STB schema, then the default connection data is used.
If the check is successful, click Next. If the check fails, reenter the connectiondetails correctly and try again.
Note:
If you are upgrading from 11g, and your database has _OPSS or _IAU11g database schemas, you must manually enter database connectiondetails for those schemas. These schemas were not required in 11g andhad to be created manually. Users could assign any name to theseschemas, therefore the Reconfiguration Wizard does not recognizethem. When providing connection information for _IAU, use theIAU_APPEND user information.
5. On the JDBC Component Schema screen, verify that the DBMS/Service and theHost name is correct for the following component schemas:
• OPSS Audit schema
• OPSS Audit viewer schema
• OPSS schema
Click Next.
6. On the JDBC Component Schema Test screen, select all the component schemasand click Test Selected Connections to test the connection for each schema.The result of the test is indicated in the Status column.
When the check is complete, click Next.
7. On the Node Manager screen, select the appropriate Node Manager Type basedon your requirements, specify the details, and click Next.
Chapter 3About Reconfiguring the Domain
3-38
8. On the Advanced Configuration screen, select Administration Server, Topology,and Deployments and Services. Select Domain Frontend Host Capture ifrequired.
For each of the categories you select, the appropriate configuration screen isdisplayed to allow you to perform advanced configuration.
Note:
Ensure that you assign oam_server1 to the server groupOAM_MDG_SVRS, and oam_policy_mgr1 to the server group OAM-POLICY-MANAGED-SERVER.
9. On the Configuration Summary screen, review the detailed configuration settingsof the domain before continuing.
You can limit the items that are displayed in the right-most panel by selecting afilter option from the View drop-down list.
To change the configuration, click Back to return to the appropriate screen. Toreconfigure the domain, click Reconfig.
Note:
The location of the domain does not change when you reconfigure it.
10. The Reconfiguration Progress screen displays the progress of the reconfigurationprocess.
During this process:
• Domain information is extracted, saved, and updated.
• Schemas, scripts, and other such files that support your Fusion Middlewareproducts are updated.
When the progress bar shows 100%, click Next.
11. The End of Configuration screen indicates whether the reconfiguration processcompleted successfully or failed. It also displays the location of the domain thatwas reconfigured as well as the Administration Server URL (including the listenport). If the reconfiguration is successful, it displays Oracle WebLogic ServerReconfiguration Succeeded.
If the reconfiguration process did not complete successfully, an error message isdisplayed indicates the reason. Take appropriate action to resolve the issue. If youcannot resolve the issue, contact My Oracle Support.
Note the Domain Location and the Admin Server URL for further operations.
Upgrading Domain Component ConfigurationsAfter reconfiguring the domain, use the Upgrade Assistant to upgrade the domaincomponent configurations inside the domain to match the updated domainconfiguration.
Chapter 3Upgrading Domain Component Configurations
3-39

• Starting the Upgrade AssistantRun the Upgrade Assistant to upgrade product schemas, domain componentconfigurations, or standalone system components to 12c (12.2.1.3.0). Oraclerecommends that you run the Upgrade Assistant as a non-SYSDBA user,completing the upgrade for one domain at a time.
• Upgrading Oracle Access Management Domain Component ConfigurationsNavigate through the screens in the Upgrade Assistant to upgrade componentconfigurations in the WebLogic domain.
• Removing Oracle Mobile Security Manager Servers From the DomainRemove the Oracle Mobile Security Manager (MSM) servers from the upgradeddomain, as they are not supported in 12c (12.2.1.3.0).
• Post-Upgrade TaskAfter upgrading from 11g to 12c, you need to copy any custom configurationpresent in your 11g Middleware home to the 12c Middleware home.
• Starting Servers and ProcessesAfter a successful upgrade, start all processes and servers, including theAdministration Server and any Managed Servers.
• Verifying the Domain-Specific-Component Configurations UpgradeTo verify that the domain-specific-component configurations upgrade wassuccessful, sign in to the Administration console and the Oracle EnterpriseManager Fusion Middleware Control and verify that the version numbers for eachcomponent is 12.2.1.3.0.
Starting the Upgrade AssistantRun the Upgrade Assistant to upgrade product schemas, domain componentconfigurations, or standalone system components to 12c (12.2.1.3.0). Oraclerecommends that you run the Upgrade Assistant as a non-SYSDBA user, completingthe upgrade for one domain at a time.
To start the Upgrade Assistant:
Note:
Before you start the Upgrade Assistant, make sure that the JVM characterencoding is set to UTF-8 for the platform on which the Upgrade Assistant isrunning. If the character encoding is not set to UTF-8, then you will not beable to download files containing Unicode characters in their names. Thiscan cause the upgrade to fail.
To ensure that UTF-8 is used by the JVM, use the JVM option -Dfile.encoding=UTF-8.
1. Go to the oracle_common/upgrade/bin directory:
• (UNIX) NEW_ORACLE_HOME/oracle_common/upgrade/bin
• (Windows) NEW_ORACLE_HOME\oracle_common\upgrade\bin
2. Start the Upgrade Assistant:
• (UNIX) ./ua
Chapter 3Upgrading Domain Component Configurations
3-40
• (Windows) ua.bat
Note:
In the above command, NEW_ORACLE_HOME refers to the 12c Oracle Home.
For information about other parameters that you can specify on the command line,such as logging parameters, see:
• Upgrade Assistant Parameters
Upgrade Assistant ParametersWhen you start the Upgrade Assistant from the command line, you can specifyadditional parameters.
Table 3-9 Upgrade Assistant Command-Line Parameters
Parameter Required or Optional Description
-readiness Required for readiness checksNote: Readiness checks cannot beperformed on standaloneinstallations (those not managed bythe WebLogic Server).
Performs the upgrade readinesscheck without performing an actualupgrade.
Schemas and configurations arechecked.
Do not use this parameter if youhave specified the -examineparameter.
-threads Optional Identifies the number of threadsavailable for concurrent schemaupgrades or readiness checks of theschemas.
The value must be a positive integerin the range 1 to 8. The default is 4.
-response Required for silent upgrades orsilent readiness checks
Runs the Upgrade Assistant usinginputs saved to a response filegenerated from the data that isentered when the Upgrade Assistantis run in GUI mode. Using thisparameter runs the UpgradeAssistant in silent mode (withoutdisplaying Upgrade Assistantscreens).
-examine Optional Performs the examine phase butdoes not perform an actual upgrade.
Do not specify this parameter if youhave specified the -readinessparameter.
Chapter 3Upgrading Domain Component Configurations
3-41
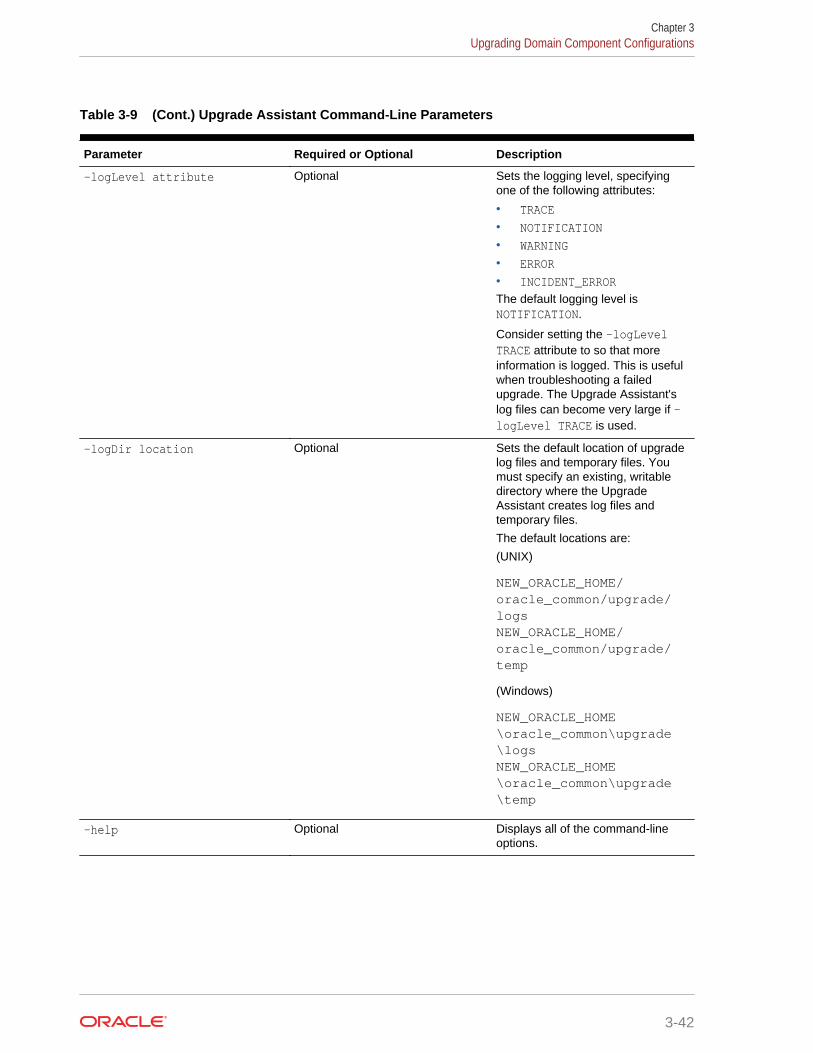
Table 3-9 (Cont.) Upgrade Assistant Command-Line Parameters
Parameter Required or Optional Description
-logLevel attribute Optional Sets the logging level, specifyingone of the following attributes:
• TRACE• NOTIFICATION• WARNING• ERROR• INCIDENT_ERRORThe default logging level isNOTIFICATION.
Consider setting the -logLevelTRACE attribute to so that moreinformation is logged. This is usefulwhen troubleshooting a failedupgrade. The Upgrade Assistant'slog files can become very large if -logLevel TRACE is used.
-logDir location Optional Sets the default location of upgradelog files and temporary files. Youmust specify an existing, writabledirectory where the UpgradeAssistant creates log files andtemporary files.
The default locations are:
(UNIX)
NEW_ORACLE_HOME/oracle_common/upgrade/logs NEW_ORACLE_HOME/oracle_common/upgrade/temp
(Windows)
NEW_ORACLE_HOME\oracle_common\upgrade\logs NEW_ORACLE_HOME\oracle_common\upgrade\temp
-help Optional Displays all of the command-lineoptions.
Chapter 3Upgrading Domain Component Configurations
3-42
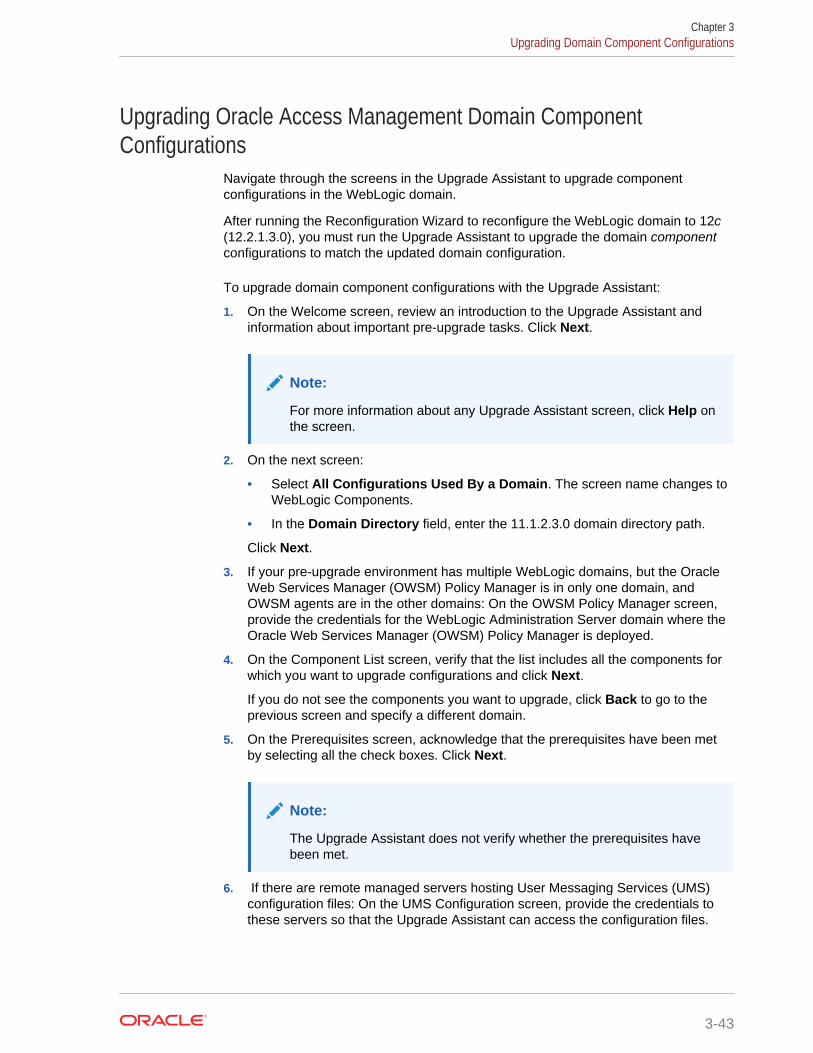
Upgrading Oracle Access Management Domain ComponentConfigurations
Navigate through the screens in the Upgrade Assistant to upgrade componentconfigurations in the WebLogic domain.
After running the Reconfiguration Wizard to reconfigure the WebLogic domain to 12c(12.2.1.3.0), you must run the Upgrade Assistant to upgrade the domain componentconfigurations to match the updated domain configuration.
To upgrade domain component configurations with the Upgrade Assistant:
1. On the Welcome screen, review an introduction to the Upgrade Assistant andinformation about important pre-upgrade tasks. Click Next.
Note:
For more information about any Upgrade Assistant screen, click Help onthe screen.
2. On the next screen:
• Select All Configurations Used By a Domain. The screen name changes toWebLogic Components.
• In the Domain Directory field, enter the 11.1.2.3.0 domain directory path.
Click Next.
3. If your pre-upgrade environment has multiple WebLogic domains, but the OracleWeb Services Manager (OWSM) Policy Manager is in only one domain, andOWSM agents are in the other domains: On the OWSM Policy Manager screen,provide the credentials for the WebLogic Administration Server domain where theOracle Web Services Manager (OWSM) Policy Manager is deployed.
4. On the Component List screen, verify that the list includes all the components forwhich you want to upgrade configurations and click Next.
If you do not see the components you want to upgrade, click Back to go to theprevious screen and specify a different domain.
5. On the Prerequisites screen, acknowledge that the prerequisites have been metby selecting all the check boxes. Click Next.
Note:
The Upgrade Assistant does not verify whether the prerequisites havebeen met.
6. If there are remote managed servers hosting User Messaging Services (UMS)configuration files: On the UMS Configuration screen, provide the credentials tothese servers so that the Upgrade Assistant can access the configuration files.
Chapter 3Upgrading Domain Component Configurations
3-43
Note:
You may need to manually copy the UMS configuration files if theUpgrade Assistant is unable to locate them. See Error while CopyingUser Messaging Service (UMS) Configuration Files.
7. On the Examine screen, review the status of the Upgrade Assistant as it examineseach component, verifying that the component configuration is ready for upgrade.If the status is Examine finished, click Next.
If the examine phase fails, Oracle recommends that you cancel the upgrade byclicking No in the Examination Failure dialog. Click View Log to see what causedthe error and refer to Troubleshooting Your Upgrade in Upgrading with theUpgrade Assistant for information on resolving common upgrade errors.
Note:
• If you resolve any issues detected during the examine phase withoutproceeding with the upgrade, you can start the Upgrade Assistantagain without restoring from backup. However, if you proceed byclicking Yes in the Examination Failure dialog box, you need torestore your pre-upgrade environment from backup before startingthe Upgrade Assistant again.
• Canceling the examination process has no effect on theconfiguration data; the only consequence is that the information theUpgrade Assistant has collected must be collected again in a futureupgrade session.
8. On the Upgrade Summary screen, review the summary of the options you haveselected for component configuration upgrade.
The response file collects and stores all the information that you have entered, andenables you to perform a silent upgrade at a later time. The silent upgradeperforms exactly the same function that the Upgrade Assistant performs, but youdo not have to manually enter the data again. If you want to save these options toa response file, click Save Response File and provide the location and name ofthe response file.
Click Upgrade to start the upgrade process.
9. On the Upgrade Progress screen, monitor the status of the upgrade.
Caution:
Allow the Upgrade Assistant enough time to perform the upgrade. Do notcancel the upgrade operation unless absolutely necessary. Doing somay result in an unstable environment.
If any components are not upgraded successfully, refer to the Upgrade Assistantlog files for more information.
Chapter 3Upgrading Domain Component Configurations
3-44
Note:
The progress bar on this screen displays the progress of the currentupgrade procedure. It does not indicate the time remaining for theupgrade.
Click Next.
10. If the upgrade is successful: On the Upgrade Success screen, click Close tocomplete the upgrade and close the wizard. The Post-Upgrade Actions windowdescribes the manual tasks you must perform to make components functional inthe new installation. This window appears only if a component has post-upgradesteps.
If the upgrade fails: On the Upgrade Failure screen, click View Log to view andtroubleshoot the errors. The logs are available at NEW_ORACLE_HOME/oracle_common/upgrade/logs.
Note:
If the upgrade fails you must restore your pre-upgrade environment frombackup, fix the issues, then restart the Upgrade Assistant.
Removing Oracle Mobile Security Manager Servers From the DomainRemove the Oracle Mobile Security Manager (MSM) servers from the upgradeddomain, as they are not supported in 12c (12.2.1.3.0).
To do this, complete the following steps
1. Go to the location DOMAIN_HOME/servers.
2. Run the following command to remove the Oracle Mobile Security Managerserver(s):
rm MSM_Server
In the above command, MSM_Server is the name of the Oracle Mobile SecurityManager (MSM) server.
For example:
rm wls_msm1
3. Repeat the step for all of the Oracle Mobile Security Manager servers in thedomain.
Post-Upgrade TaskAfter upgrading from 11g to 12c, you need to copy any custom configuration present inyour 11g Middleware home to the 12c Middleware home.
• If you have scheduled jobs with parameters referring to the 11g Middleware home,then you need to update them to the corresponding 12c Middleware home.
Chapter 3Upgrading Domain Component Configurations
3-45
• To preserve customized configuration data (if present), copy the contents fromstandard directories such as XLIntegrations and connectorResourcesunder the 11g Middleware home to the corresponding directories under the 12cMiddleware home.
Starting Servers and ProcessesAfter a successful upgrade, start all processes and servers, including theAdministration Server and any Managed Servers.
The components may be dependent on each other so they must be started in thecorrect order.
Note:
The procedures in this section describe how to start servers and processusing the WLST command line or a script. You can also use the OracleFusion Middleware Control and the Oracle WebLogic Server AdministrationConsole. See Starting and Stopping Administration and Managed Serversand Node Manager in Administering Oracle Fusion Middleware.
To start your Fusion Middleware environment, follow the steps below.
Step 1: Start the Administration Server
When you start the Administration Server, you also start the processes running in theAdministration Server, including the WebLogic Server Administration Console andFusion Middleware Control.
To start the Administration Server, use the startWebLogic script:
• (UNIX) EXISTING_DOMAIN_HOME/bin/startWebLogic.sh
• (Windows) EXISTING_DOMAIN_HOME\bin\startWebLogic.cmd
When prompted, enter your user name, password, and the URL of the AdministrationServer.
Step 2: Start Node Manager
To start Node Manager, use the startNodeManager script:
• (UNIX) EXISTING_DOMAIN_HOME/bin/startNodeManager.sh
• (Windows) EXISTING_DOMAIN_HOME\bin\startNodeManager.cmd
Step 4: Start the Managed Servers
To start a WebLogic Server Managed Server, use the startManagedWebLogic script:
• (UNIX) EXISTING_DOMAIN_HOME/bin/startManagedWebLogic.shmanaged_server_name admin_url
• (Windows) EXISTING_DOMAIN_HOME\bin\startManagedWebLogic.cmdmanaged_server_name admin_url
When prompted, enter your user name and password.
Chapter 3Upgrading Domain Component Configurations
3-46
Note:
• The startup of a Managed Server will typically start the applications thatare deployed to it. Therefore, it should not be necessary to manuallystart applications after the Managed Server startup.
• The Mobile Security Manager (MSM) servers are not supported in 12c.After restarting the servers, the 11g configurations of MSM servers, likeomsm_server1 or WLS_MSM1, might remain. Ignore these configurationsand do not restart the MSM servers.
Step 5: Start System Components
To start system components, such as Oracle HTTP Server, use the startComponentscript:
• (UNIX) OHS_INSTANCE_HOME/bin opmnctl startall
• (Windows) OHS_INSTANCE_HOME\bin opmnctl startall
You can start system components in any order.
Verifying the Domain-Specific-Component Configurations UpgradeTo verify that the domain-specific-component configurations upgrade was successful,sign in to the Administration console and the Oracle Enterprise Manager FusionMiddleware Control and verify that the version numbers for each component is12.2.1.3.0.
To sign in to the Administration Console, go to: http://administration_server_host:administration_server_port/console
To sign in to Oracle Enterprise Manager Fusion Middleware Control Console, go to:http://administration_server_host:administration_server_port/em
Note:
After upgrade, make sure you run the administration tools from the new 12cOracle home directory and not from the previous Oracle home directory.
During the upgrade process, some OWSM documents, including policy setsand predefined documents such as policies and assertion templates, mayneed to be upgraded. If a policy set or a predefined document is upgraded,its version number is incremented by 1.
If you created the FMW user to run the Upgrade Assistant, ensure that youdelete the account after verifying your upgrade was successful.
Chapter 3Upgrading Domain Component Configurations
3-47
Enabling WebGates to Work With Oracle AccessManagement 12c
After upgrading to Oracle Access Management 12.2.1.3, the earlier version ofWebGates continues to work with Oracle Access Management 12c. However, toleverage the latest security features of Oracle Access Management and WebGates12c (12.2.1.3.0), you must upgrade the WebGates to 12c (12.2.1.3.0), and register theagent's profile with the Oracle Access Management Server 12c.
Note:
If you have any other components of Oracle Identity and AccessManagement deployed, then all of the components must to be upgraded to12c (12.2.1.3.0) to leverage the new security features of 12c (12.2.1.3.0).
To upgrade the WebGates, you must upgrade the respective Web Servers to 12c(12.2.1.3.0).To upgrade the Oracle HTTP Server WebGates, upgrade Oracle HTTP Server to 12c(12.2.1.3.0). See Upgrading a Standalone Oracle HTTP Server from 11g to 12c in theUpgrading Oracle HTTP Server.
To upgrade the Oracle Traffic Directory WebGates, upgrade Oracle Traffic Directory to12c (12.2.1.3.0). See Upgrading Oracle Traffic Director from 11g in the UpgradingOracle Traffic Director.
After you upgrade the Web Servers, do the following:
1. Register or edit the WebGate profile and copy the WebGate artifacts to theWebGate config folder. See Upgrading to OHS/OTD 12c WebGate in the InstallingWebGates for Oracle Access Manager.
2. Start and stop the WebGates.
Updating the java.security FileIf you have multiple components of Oracle Identity and Access Management (OracleAccess Management, Oracle Identity Manager, WebGates and so on) deployed, untilyou upgrade all of the components to 12c (12.2.1.3.0), you must update thejava.security file with the changes described in this section.
To do this:
1. Open the java.security file located at JAVA_HOME/jre/lib/security/ in aneditor.
2. Remove TLSv1, TLSv1.1, MD5withRSA from the following key:
key - jdk.tls.disabledAlgorithms
3. Remove MD5 from the following key:
key - jdk.certpath.disabledAlgorithms
Chapter 3Enabling WebGates to Work With Oracle Access Management 12c
3-48

For more information on possible upgrade scenarios, see Troubleshooting SecurityPolicy Issues When Upgrading.
Chapter 3Updating the java.security File
3-49
4Upgrading Oracle Identity Manager SingleNode Environments
You can upgrade Oracle Identity Manager from Release 11g Release 2 (11.1.2.3.0) toOracle Identity Governance 12c (12.2.1.3.0) .
Note:
The product Oracle Identity Manager is referred to as Oracle IdentityManager (OIM) and Oracle Identity Governance (OIG) interchangeably in theguide.
Complete the steps in the following topics to perform the upgrade:
• About the Oracle Identity Manager Single Node Upgrade ProcessReview the roadmap for an overview of the upgrade process for Oracle IdentityManager single node deployments.
• Generating and Analyzing Pre-Upgrade Report for Oracle Identity ManagerRun the pre-upgrade report utility before you begin the upgrade process for OracleIdentity Manager, and address all of the issues using the solution provided in thereport.
• Completing the Pre-Upgrade Tasks for Oracle Identity ManagerComplete the pre-upgrade tasks described in this section before you upgradeOracle Identity Manager.
• Installing Product DistributionsBefore beginning your upgrade, download Oracle Fusion MiddlewareInfrastructure, Oracle SOA Suite, and Oracle Identity and Access Management12c (12.2.1.3.0) distributions on the target system and install them using OracleUniversal Installer.
• Running a Pre-Upgrade Readiness CheckTo identify potential issues with the upgrade, Oracle recommends that you run areadiness check before you start the upgrade process. Be aware that thereadiness check may not be able to discover all potential issues with yourupgrade. An upgrade may still fail, even if the readiness check reports success.
• Creating the Required 12c Schemas Using RCU (Optional)When upgrading from 11g, you must create the required 12c schemas. You canuse the Repository Creation Utility (RCU) to create customized schemas or,optionally, you can use the Upgrade Assistant to create schemas using the defaultschema settings. This procedure describes how to create schemas using theRCU. Information about using the Upgrade Assistant to create schemas is coveredin the upgrade procedures.
4-1
• Tuning Database Parameters for Oracle Identity ManagerBefore you upgrade the schemas, you must tune the Database parameters forOracle Identity Manager.
• Stopping Servers and ProcessesBefore you run the Upgrade Assistant to upgrade your schemas andconfigurations, you must shut down all of the pre-upgrade processes and servers,including the Administration Server and any managed servers.
• Upgrading Product SchemasAfter stopping servers and processes, use the Upgrade Assistant to upgradesupported product schemas to the current release of Oracle Fusion Middleware.
• Tuning Application Module for User InterfaceAfter you upgrade the Oracle Identity Manager middle tier successfully, tune theApplication Module (AM) for user interface.
• About Reconfiguring the DomainRun the Reconfiguration Wizard to reconfigure your domain componentconfigurations to 12c (12.2.1.3.0).
• Upgrading Domain Component ConfigurationsAfter reconfiguring the domain, use the Upgrade Assistant to upgrade the domaincomponent configurations inside the domain to match the updated domainconfiguration.
• Post-Upgrade TaskAfter upgrading from 11g to 12c, you need to copy any custom configurationpresent in your 11g Middleware home to the 12c Middleware home.
• Copying folders to the 12c home directoryWhen upgrading to 12c, you must manually some folders to the 12c homedirectory.
• Starting the ServersAfter you upgrade Oracle Identity Manager, start the servers.
• Upgrading Oracle Identity Manager Design ConsoleUpgrade the Oracle Identity Manager Design Console after you upgrade theOracle Identity Manager (OIM) domain component configurations.
• Completing the Post-Upgrade Tasks for SSL Enabled SetupIf you are upgrading Oracle Identity Manager SSL enabled sertup, you mustperform the required post-upgrade tasks to complete the upgrade process.
• Installing Standalone Oracle BI PublisherWhen you upgrade Oracle Identity Manager 11.1.2.3.0 to Oracle IdentityGovernance 12c (12.2.1.3.0), the embedded Oracle BI Publisher present in the11.1.2.3.0 deployment, is removed. Therefore, you must install a new standaloneOracle BI Publisher 12c (12.2.1.3.0) post upgrade, for configuring the OracleIdentity Governance reports.
About the Oracle Identity Manager Single Node UpgradeProcess
Review the roadmap for an overview of the upgrade process for Oracle IdentityManager single node deployments.
Chapter 4About the Oracle Identity Manager Single Node Upgrade Process
4-2
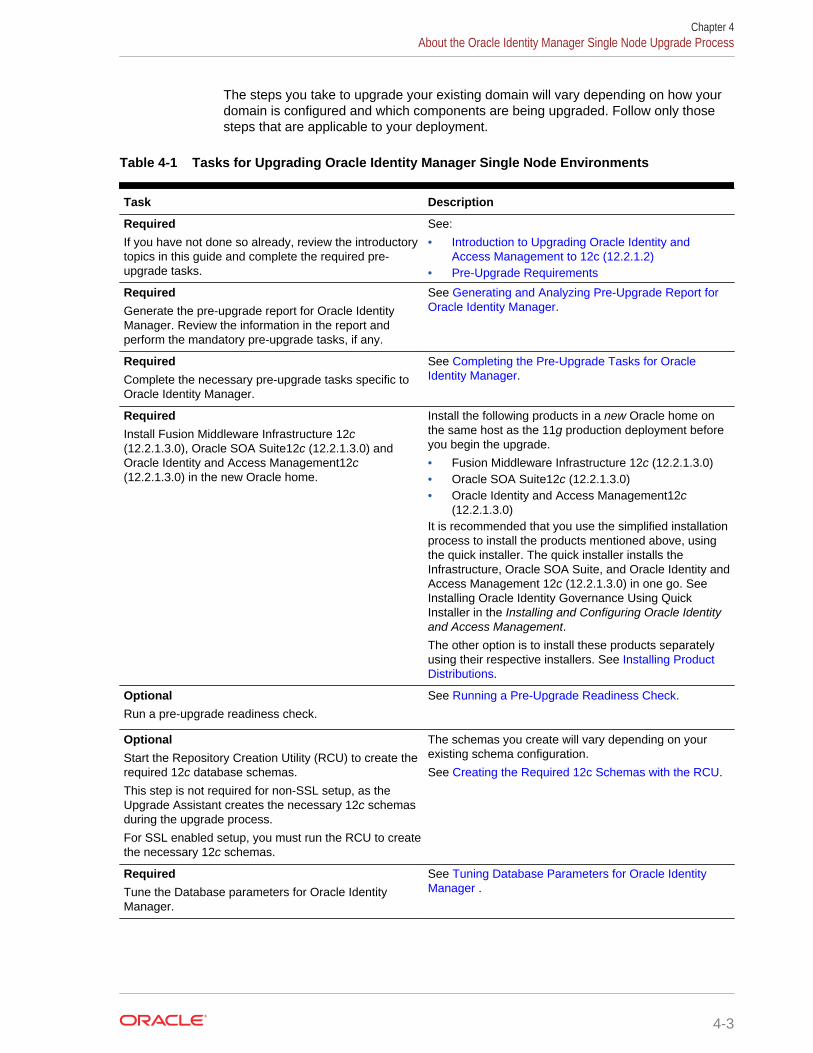
The steps you take to upgrade your existing domain will vary depending on how yourdomain is configured and which components are being upgraded. Follow only thosesteps that are applicable to your deployment.
Table 4-1 Tasks for Upgrading Oracle Identity Manager Single Node Environments
Task Description
RequiredIf you have not done so already, review the introductorytopics in this guide and complete the required pre-upgrade tasks.
See:
• Introduction to Upgrading Oracle Identity andAccess Management to 12c (12.2.1.2)
• Pre-Upgrade Requirements
RequiredGenerate the pre-upgrade report for Oracle IdentityManager. Review the information in the report andperform the mandatory pre-upgrade tasks, if any.
See Generating and Analyzing Pre-Upgrade Report forOracle Identity Manager.
RequiredComplete the necessary pre-upgrade tasks specific toOracle Identity Manager.
See Completing the Pre-Upgrade Tasks for OracleIdentity Manager.
RequiredInstall Fusion Middleware Infrastructure 12c(12.2.1.3.0), Oracle SOA Suite12c (12.2.1.3.0) andOracle Identity and Access Management12c(12.2.1.3.0) in the new Oracle home.
Install the following products in a new Oracle home onthe same host as the 11g production deployment beforeyou begin the upgrade.
• Fusion Middleware Infrastructure 12c (12.2.1.3.0)• Oracle SOA Suite12c (12.2.1.3.0)• Oracle Identity and Access Management12c
(12.2.1.3.0)It is recommended that you use the simplified installationprocess to install the products mentioned above, usingthe quick installer. The quick installer installs theInfrastructure, Oracle SOA Suite, and Oracle Identity andAccess Management 12c (12.2.1.3.0) in one go. See Installing Oracle Identity Governance Using QuickInstaller in the Installing and Configuring Oracle Identityand Access Management.The other option is to install these products separatelyusing their respective installers. See Installing ProductDistributions.
OptionalRun a pre-upgrade readiness check.
See Running a Pre-Upgrade Readiness Check.
OptionalStart the Repository Creation Utility (RCU) to create therequired 12c database schemas.
This step is not required for non-SSL setup, as theUpgrade Assistant creates the necessary 12c schemasduring the upgrade process.
For SSL enabled setup, you must run the RCU to createthe necessary 12c schemas.
The schemas you create will vary depending on yourexisting schema configuration.
See Creating the Required 12c Schemas with the RCU.
RequiredTune the Database parameters for Oracle IdentityManager.
See Tuning Database Parameters for Oracle IdentityManager .
Chapter 4About the Oracle Identity Manager Single Node Upgrade Process
4-3
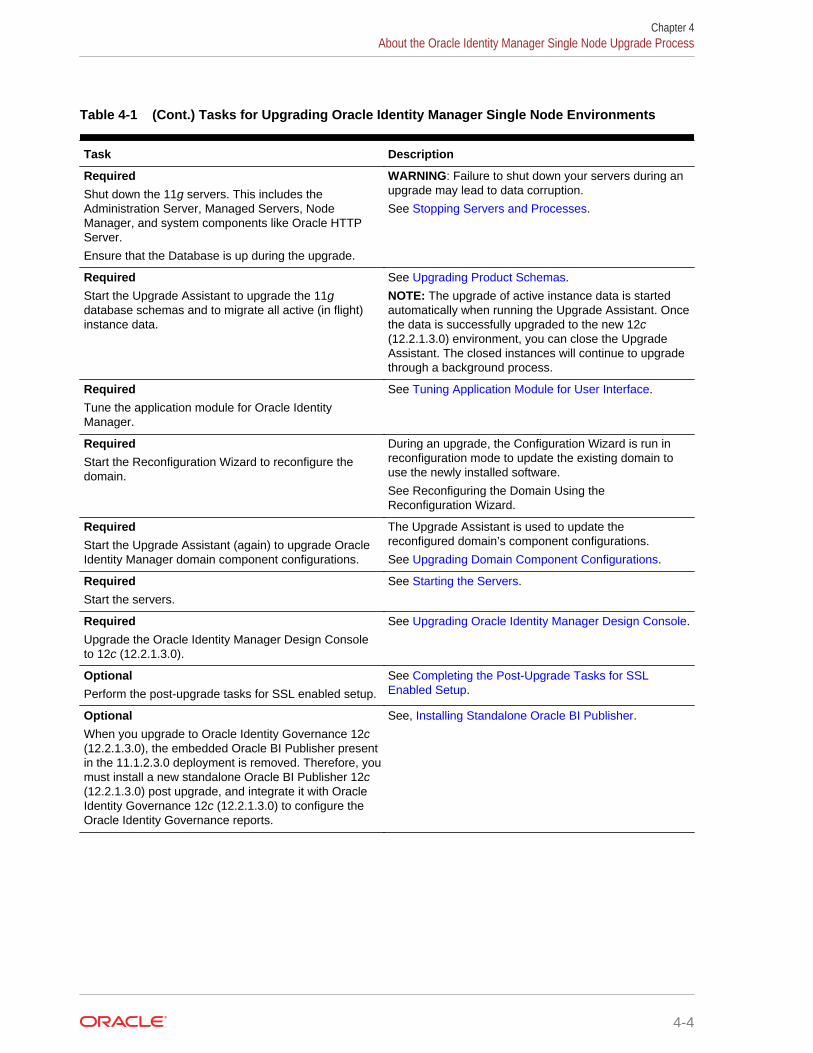
Table 4-1 (Cont.) Tasks for Upgrading Oracle Identity Manager Single Node Environments
Task Description
RequiredShut down the 11g servers. This includes theAdministration Server, Managed Servers, NodeManager, and system components like Oracle HTTPServer.
Ensure that the Database is up during the upgrade.
WARNING: Failure to shut down your servers during anupgrade may lead to data corruption.
See Stopping Servers and Processes.
RequiredStart the Upgrade Assistant to upgrade the 11gdatabase schemas and to migrate all active (in flight)instance data.
See Upgrading Product Schemas.
NOTE: The upgrade of active instance data is startedautomatically when running the Upgrade Assistant. Oncethe data is successfully upgraded to the new 12c(12.2.1.3.0) environment, you can close the UpgradeAssistant. The closed instances will continue to upgradethrough a background process.
RequiredTune the application module for Oracle IdentityManager.
See Tuning Application Module for User Interface.
RequiredStart the Reconfiguration Wizard to reconfigure thedomain.
During an upgrade, the Configuration Wizard is run inreconfiguration mode to update the existing domain touse the newly installed software.
See Reconfiguring the Domain Using theReconfiguration Wizard.
RequiredStart the Upgrade Assistant (again) to upgrade OracleIdentity Manager domain component configurations.
The Upgrade Assistant is used to update thereconfigured domain’s component configurations.
See Upgrading Domain Component Configurations.
RequiredStart the servers.
See Starting the Servers.
RequiredUpgrade the Oracle Identity Manager Design Consoleto 12c (12.2.1.3.0).
See Upgrading Oracle Identity Manager Design Console.
OptionalPerform the post-upgrade tasks for SSL enabled setup.
See Completing the Post-Upgrade Tasks for SSLEnabled Setup.
OptionalWhen you upgrade to Oracle Identity Governance 12c(12.2.1.3.0), the embedded Oracle BI Publisher presentin the 11.1.2.3.0 deployment is removed. Therefore, youmust install a new standalone Oracle BI Publisher 12c(12.2.1.3.0) post upgrade, and integrate it with OracleIdentity Governance 12c (12.2.1.3.0) to configure theOracle Identity Governance reports.
See, Installing Standalone Oracle BI Publisher.
Chapter 4About the Oracle Identity Manager Single Node Upgrade Process
4-4
Generating and Analyzing Pre-Upgrade Report for OracleIdentity Manager
Run the pre-upgrade report utility before you begin the upgrade process for OracleIdentity Manager, and address all of the issues using the solution provided in thereport.
The pre-upgrade report utility analyzes your existing Oracle Identity Managerenvironment, and provides information about the mandatory prerequisites that youmust complete before you begin the upgrade.
Note:
Run this report until no pending issues are listed in the report. It is importantto address all of the issues listed in the pre-upgrade report before youproceed with the upgrade, as the upgrade might fail if the issues are notresolved.
Ensure that the Database and the 11.1.2.3.0 Oracle Identity Managerservers are up and running before you run the pre-upgrade report utility.
• Obtaining the Pre-Upgrade Report UtilityDownload the pre-upgrade report utility for Oracle Identity Manager from OracleTechnology Network (OTN).
• Generating the Pre-Upgrade ReportGenerate the pre-upgrade report before you start the upgrade process for OracleIdentity Manager, and resolve any issues listed in the report.
• Analyzing the Pre-Upgrade ReportAfter you generate the pre-upgrade report for Oracle Identity Manager, revieweach of the reports, and perform all of the tasks described in them. If you do notperform the mandatory tasks described in the report, the upgrade might fail.
Obtaining the Pre-Upgrade Report UtilityDownload the pre-upgrade report utility for Oracle Identity Manager from OracleTechnology Network (OTN).
The utility is available in a zip file named PreUpgradeReport.zip alongwith ReadMe.doc at the following location on My Oracle Support:My Oracle Support document ID 2308933.1
The ReadMe.doc contains information about how to generate and analyze the pre-upgrade reports.
Chapter 4Generating and Analyzing Pre-Upgrade Report for Oracle Identity Manager
4-5
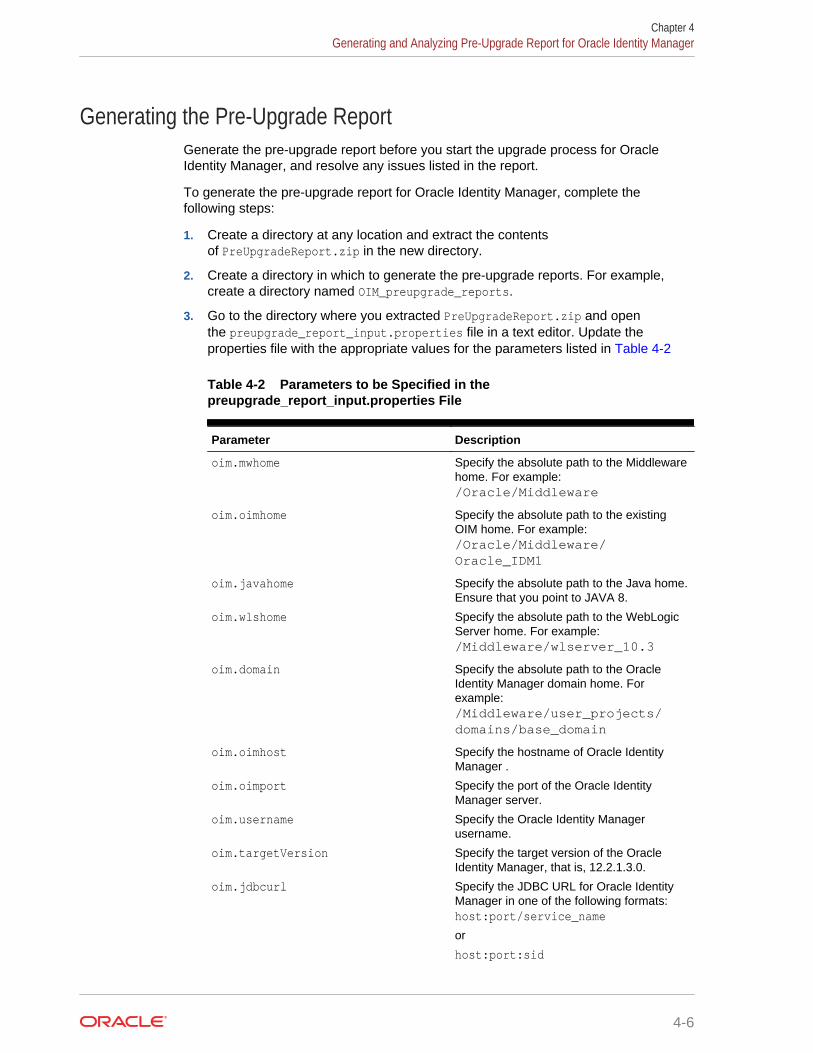
Generating the Pre-Upgrade ReportGenerate the pre-upgrade report before you start the upgrade process for OracleIdentity Manager, and resolve any issues listed in the report.
To generate the pre-upgrade report for Oracle Identity Manager, complete thefollowing steps:
1. Create a directory at any location and extract the contentsof PreUpgradeReport.zip in the new directory.
2. Create a directory in which to generate the pre-upgrade reports. For example,create a directory named OIM_preupgrade_reports.
3. Go to the directory where you extracted PreUpgradeReport.zip and openthe preupgrade_report_input.properties file in a text editor. Update theproperties file with the appropriate values for the parameters listed in Table 4-2
Table 4-2 Parameters to be Specified in thepreupgrade_report_input.properties File
Parameter Description
oim.mwhome Specify the absolute path to the Middlewarehome. For example:/Oracle/Middleware
oim.oimhome Specify the absolute path to the existingOIM home. For example:/Oracle/Middleware/Oracle_IDM1
oim.javahome Specify the absolute path to the Java home.Ensure that you point to JAVA 8.
oim.wlshome Specify the absolute path to the WebLogicServer home. For example:/Middleware/wlserver_10.3
oim.domain Specify the absolute path to the OracleIdentity Manager domain home. Forexample:/Middleware/user_projects/domains/base_domain
oim.oimhost Specify the hostname of Oracle IdentityManager .
oim.oimport Specify the port of the Oracle IdentityManager server.
oim.username Specify the Oracle Identity Managerusername.
oim.targetVersion Specify the target version of the OracleIdentity Manager, that is, 12.2.1.3.0.
oim.jdbcurl Specify the JDBC URL for Oracle IdentityManager in one of the following formats:host:port/service_name
or
host:port:sid
Chapter 4Generating and Analyzing Pre-Upgrade Report for Oracle Identity Manager
4-6
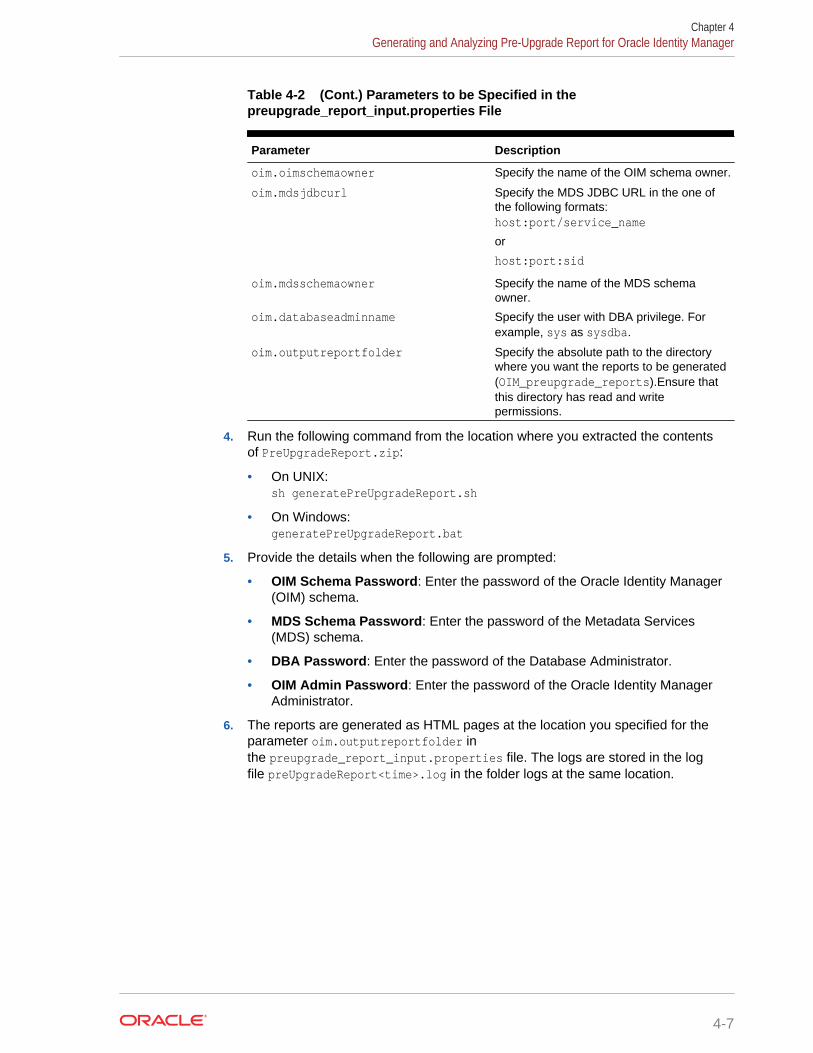
Table 4-2 (Cont.) Parameters to be Specified in thepreupgrade_report_input.properties File
Parameter Description
oim.oimschemaowner Specify the name of the OIM schema owner.
oim.mdsjdbcurl Specify the MDS JDBC URL in the one ofthe following formats:host:port/service_name
or
host:port:sid
oim.mdsschemaowner Specify the name of the MDS schemaowner.
oim.databaseadminname Specify the user with DBA privilege. Forexample, sys as sysdba.
oim.outputreportfolder Specify the absolute path to the directorywhere you want the reports to be generated(OIM_preupgrade_reports).Ensure thatthis directory has read and writepermissions.
4. Run the following command from the location where you extracted the contentsof PreUpgradeReport.zip:
• On UNIX:sh generatePreUpgradeReport.sh
• On Windows:generatePreUpgradeReport.bat
5. Provide the details when the following are prompted:
• OIM Schema Password: Enter the password of the Oracle Identity Manager(OIM) schema.
• MDS Schema Password: Enter the password of the Metadata Services(MDS) schema.
• DBA Password: Enter the password of the Database Administrator.
• OIM Admin Password: Enter the password of the Oracle Identity ManagerAdministrator.
6. The reports are generated as HTML pages at the location you specified for theparameter oim.outputreportfolder inthe preupgrade_report_input.properties file. The logs are stored in the logfile preUpgradeReport<time>.log in the folder logs at the same location.
Chapter 4Generating and Analyzing Pre-Upgrade Report for Oracle Identity Manager
4-7
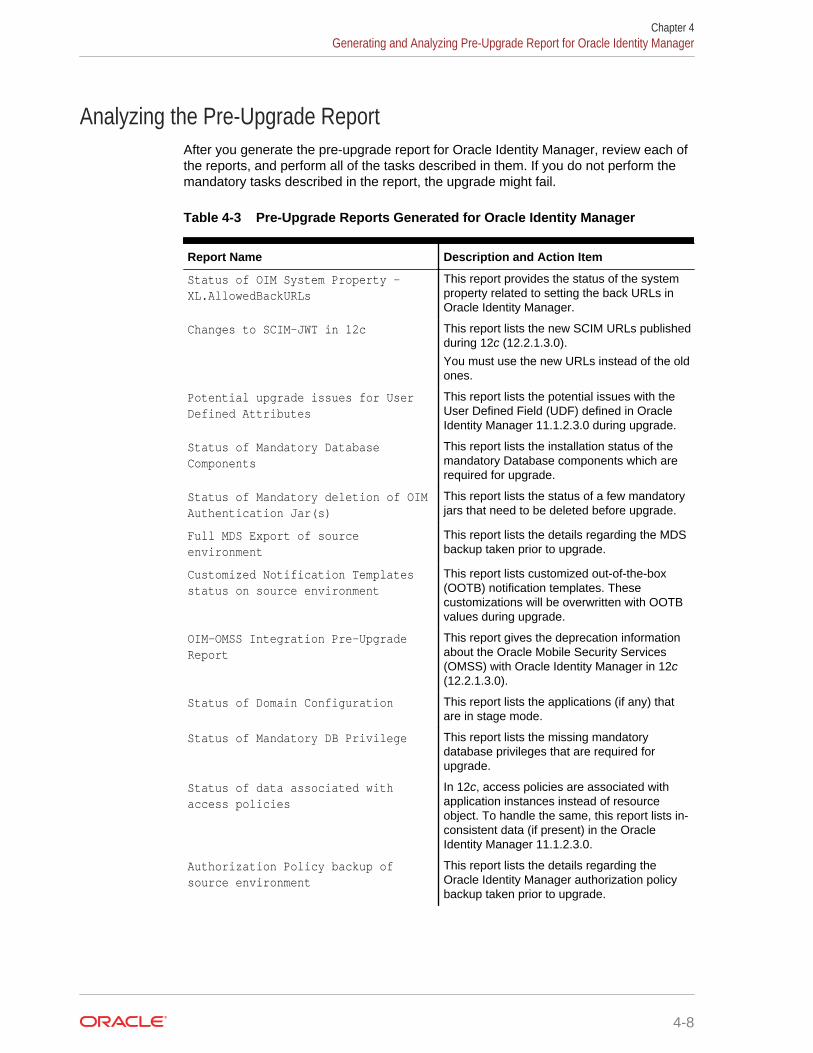
Analyzing the Pre-Upgrade ReportAfter you generate the pre-upgrade report for Oracle Identity Manager, review each ofthe reports, and perform all of the tasks described in them. If you do not perform themandatory tasks described in the report, the upgrade might fail.
Table 4-3 Pre-Upgrade Reports Generated for Oracle Identity Manager
Report Name Description and Action Item
Status of OIM System Property —XL.AllowedBackURLs
This report provides the status of the systemproperty related to setting the back URLs inOracle Identity Manager.
Changes to SCIM-JWT in 12c This report lists the new SCIM URLs publishedduring 12c (12.2.1.3.0).
You must use the new URLs instead of the oldones.
Potential upgrade issues for UserDefined Attributes
This report lists the potential issues with theUser Defined Field (UDF) defined in OracleIdentity Manager 11.1.2.3.0 during upgrade.
Status of Mandatory DatabaseComponents
This report lists the installation status of themandatory Database components which arerequired for upgrade.
Status of Mandatory deletion of OIMAuthentication Jar(s)
This report lists the status of a few mandatoryjars that need to be deleted before upgrade.
Full MDS Export of sourceenvironment
This report lists the details regarding the MDSbackup taken prior to upgrade.
Customized Notification Templatesstatus on source environment
This report lists customized out-of-the-box(OOTB) notification templates. Thesecustomizations will be overwritten with OOTBvalues during upgrade.
OIM-OMSS Integration Pre-UpgradeReport
This report gives the deprecation informationabout the Oracle Mobile Security Services(OMSS) with Oracle Identity Manager in 12c(12.2.1.3.0).
Status of Domain Configuration This report lists the applications (if any) thatare in stage mode.
Status of Mandatory DB Privilege This report lists the missing mandatorydatabase privileges that are required forupgrade.
Status of data associated withaccess policies
In 12c, access policies are associated withapplication instances instead of resourceobject. To handle the same, this report lists in-consistent data (if present) in the OracleIdentity Manager 11.1.2.3.0.
Authorization Policy backup ofsource environment
This report lists the details regarding theOracle Identity Manager authorization policybackup taken prior to upgrade.
Chapter 4Generating and Analyzing Pre-Upgrade Report for Oracle Identity Manager
4-8
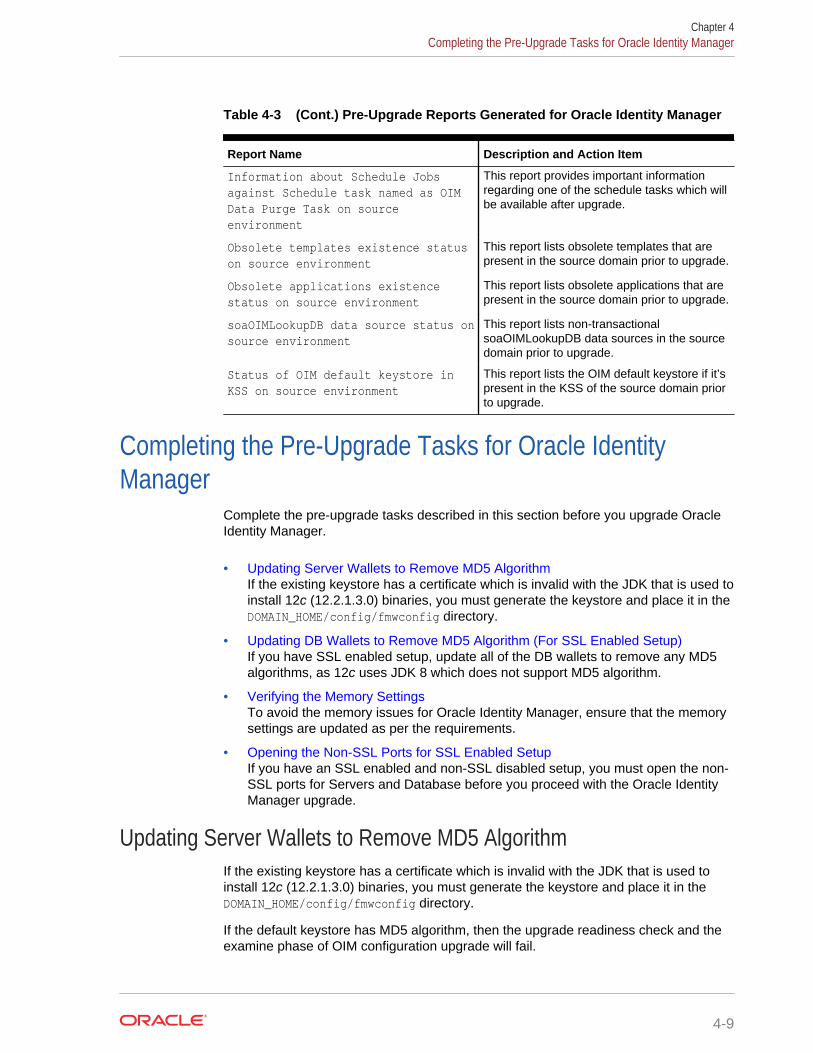
Table 4-3 (Cont.) Pre-Upgrade Reports Generated for Oracle Identity Manager
Report Name Description and Action Item
Information about Schedule Jobsagainst Schedule task named as OIMData Purge Task on sourceenvironment
This report provides important informationregarding one of the schedule tasks which willbe available after upgrade.
Obsolete templates existence statuson source environment
This report lists obsolete templates that arepresent in the source domain prior to upgrade.
Obsolete applications existencestatus on source environment
This report lists obsolete applications that arepresent in the source domain prior to upgrade.
soaOIMLookupDB data source status onsource environment
This report lists non-transactionalsoaOIMLookupDB data sources in the sourcedomain prior to upgrade.
Status of OIM default keystore inKSS on source environment
This report lists the OIM default keystore if it’spresent in the KSS of the source domain priorto upgrade.
Completing the Pre-Upgrade Tasks for Oracle IdentityManager
Complete the pre-upgrade tasks described in this section before you upgrade OracleIdentity Manager.
• Updating Server Wallets to Remove MD5 AlgorithmIf the existing keystore has a certificate which is invalid with the JDK that is used toinstall 12c (12.2.1.3.0) binaries, you must generate the keystore and place it in theDOMAIN_HOME/config/fmwconfig directory.
• Updating DB Wallets to Remove MD5 Algorithm (For SSL Enabled Setup)If you have SSL enabled setup, update all of the DB wallets to remove any MD5algorithms, as 12c uses JDK 8 which does not support MD5 algorithm.
• Verifying the Memory SettingsTo avoid the memory issues for Oracle Identity Manager, ensure that the memorysettings are updated as per the requirements.
• Opening the Non-SSL Ports for SSL Enabled SetupIf you have an SSL enabled and non-SSL disabled setup, you must open the non-SSL ports for Servers and Database before you proceed with the Oracle IdentityManager upgrade.
Updating Server Wallets to Remove MD5 AlgorithmIf the existing keystore has a certificate which is invalid with the JDK that is used toinstall 12c (12.2.1.3.0) binaries, you must generate the keystore and place it in theDOMAIN_HOME/config/fmwconfig directory.
If the default keystore has MD5 algorithm, then the upgrade readiness check and theexamine phase of OIM configuration upgrade will fail.
Chapter 4Completing the Pre-Upgrade Tasks for Oracle Identity Manager
4-9
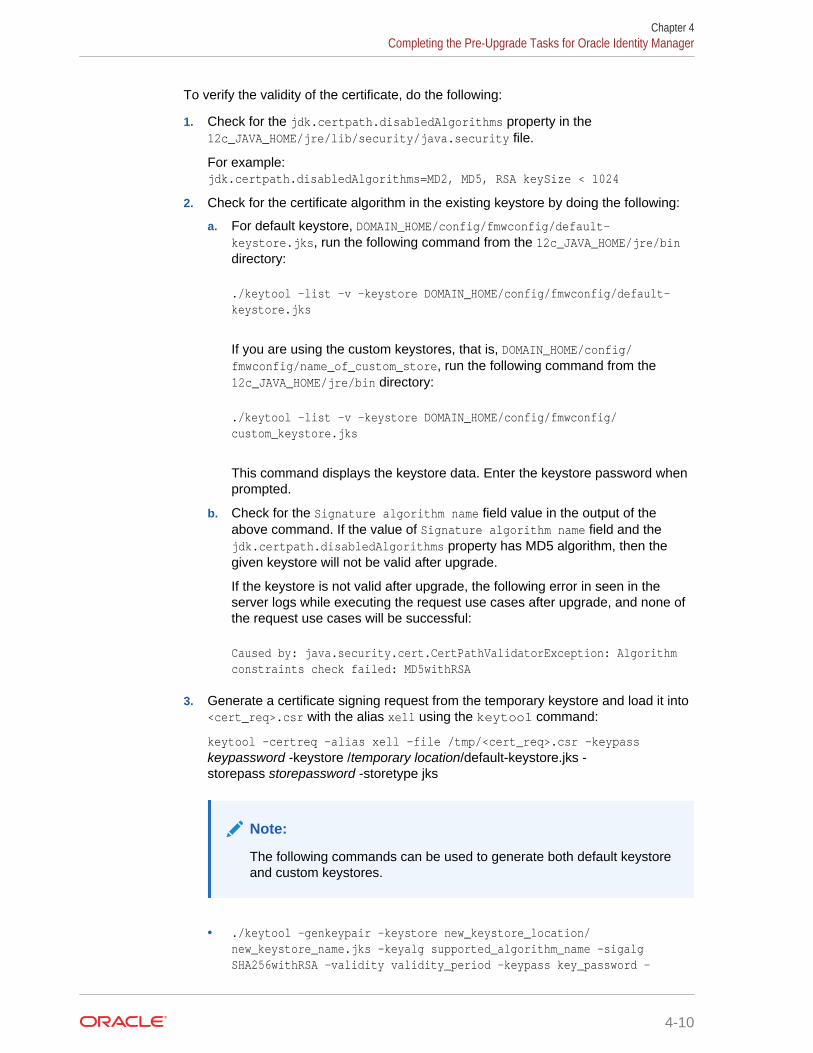
To verify the validity of the certificate, do the following:
1. Check for the jdk.certpath.disabledAlgorithms property in the12c_JAVA_HOME/jre/lib/security/java.security file.
For example:jdk.certpath.disabledAlgorithms=MD2, MD5, RSA keySize < 1024
2. Check for the certificate algorithm in the existing keystore by doing the following:
a. For default keystore, DOMAIN_HOME/config/fmwconfig/default-keystore.jks, run the following command from the 12c_JAVA_HOME/jre/bindirectory:
./keytool -list -v -keystore DOMAIN_HOME/config/fmwconfig/default-keystore.jks
If you are using the custom keystores, that is, DOMAIN_HOME/config/fmwconfig/name_of_custom_store, run the following command from the12c_JAVA_HOME/jre/bin directory:
./keytool -list -v -keystore DOMAIN_HOME/config/fmwconfig/custom_keystore.jks
This command displays the keystore data. Enter the keystore password whenprompted.
b. Check for the Signature algorithm name field value in the output of theabove command. If the value of Signature algorithm name field and thejdk.certpath.disabledAlgorithms property has MD5 algorithm, then thegiven keystore will not be valid after upgrade.
If the keystore is not valid after upgrade, the following error in seen in theserver logs while executing the request use cases after upgrade, and none ofthe request use cases will be successful:
Caused by: java.security.cert.CertPathValidatorException: Algorithm constraints check failed: MD5withRSA
3. Generate a certificate signing request from the temporary keystore and load it into<cert_req>.csr with the alias xell using the keytool command:
keytool -certreq -alias xell -file /tmp/<cert_req>.csr -keypass keypassword -keystore /temporary location/default-keystore.jks -storepass storepassword -storetype jks
Note:
The following commands can be used to generate both default keystoreand custom keystores.
• ./keytool —genkeypair —keystore new_keystore_location/new_keystore_name.jks —keyalg supported_algorithm_name -sigalg SHA256withRSA —validity validity_period —keypass key_password —
Chapter 4Completing the Pre-Upgrade Tasks for Oracle Identity Manager
4-10
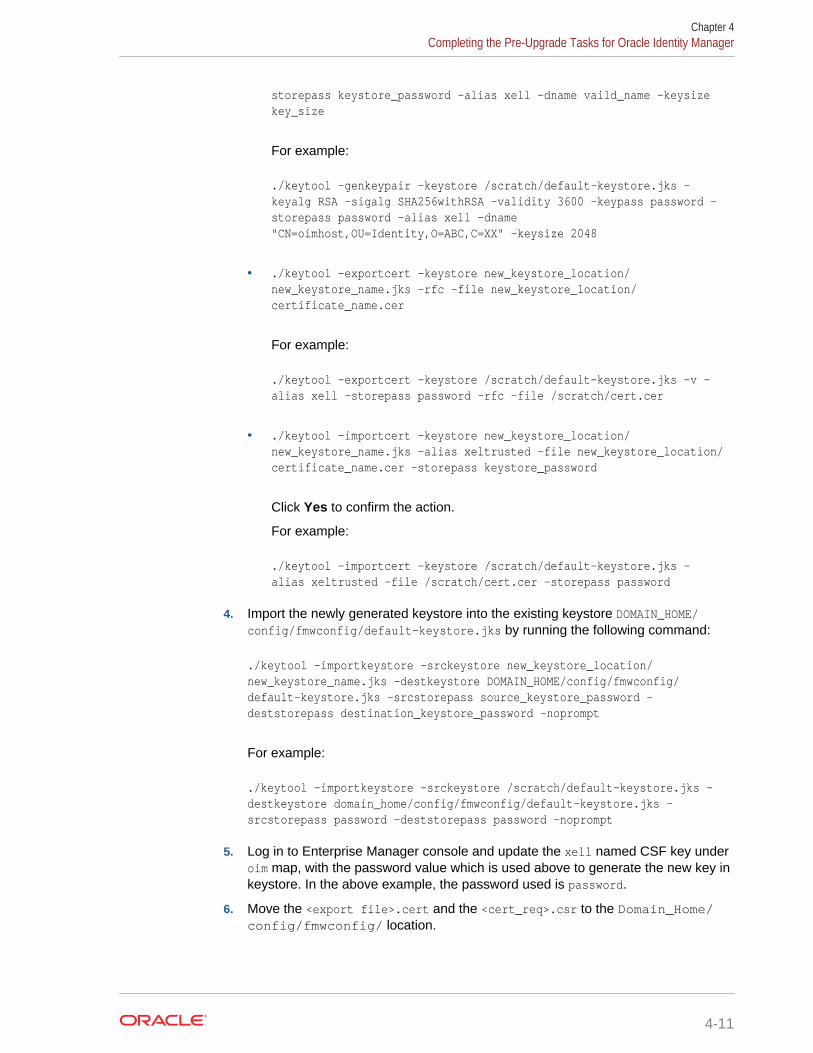
storepass keystore_password —alias xell —dname vaild_name —keysize key_size
For example:
./keytool -genkeypair -keystore /scratch/default-keystore.jks -keyalg RSA -sigalg SHA256withRSA -validity 3600 -keypass password -storepass password -alias xell -dname "CN=oimhost,OU=Identity,O=ABC,C=XX" -keysize 2048
• ./keytool —exportcert —keystore new_keystore_location/new_keystore_name.jks -rfc -file new_keystore_location/certificate_name.cer
For example:
./keytool -exportcert -keystore /scratch/default-keystore.jks -v -alias xell -storepass password -rfc -file /scratch/cert.cer
• ./keytool —importcert —keystore new_keystore_location/new_keystore_name.jks -alias xeltrusted -file new_keystore_location/certificate_name.cer -storepass keystore_password
Click Yes to confirm the action.
For example:
./keytool -importcert -keystore /scratch/default-keystore.jks -alias xeltrusted -file /scratch/cert.cer -storepass password
4. Import the newly generated keystore into the existing keystore DOMAIN_HOME/config/fmwconfig/default-keystore.jks by running the following command:
./keytool —importkeystore —srckeystore new_keystore_location/new_keystore_name.jks -destkeystore DOMAIN_HOME/config/fmwconfig/default-keystore.jks -srcstorepass source_keystore_password -deststorepass destination_keystore_password -noprompt
For example:
./keytool -importkeystore -srckeystore /scratch/default-keystore.jks -destkeystore domain_home/config/fmwconfig/default-keystore.jks -srcstorepass password -deststorepass password -noprompt
5. Log in to Enterprise Manager console and update the xell named CSF key underoim map, with the password value which is used above to generate the new key inkeystore. In the above example, the password used is password.
6. Move the <export file>.cert and the <cert_req>.csr to the Domain_Home/config/fmwconfig/ location.
Chapter 4Completing the Pre-Upgrade Tasks for Oracle Identity Manager
4-11
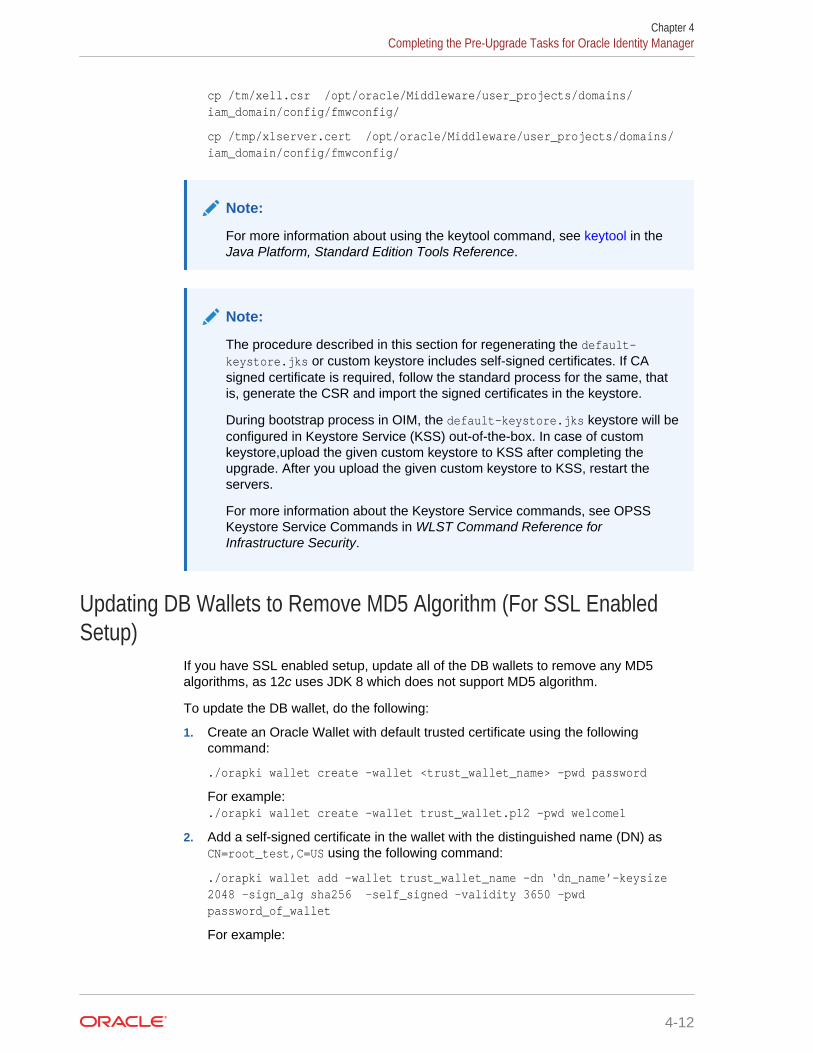
cp /tm/xell.csr /opt/oracle/Middleware/user_projects/domains/iam_domain/config/fmwconfig/
cp /tmp/xlserver.cert /opt/oracle/Middleware/user_projects/domains/iam_domain/config/fmwconfig/
Note:
For more information about using the keytool command, see keytool in theJava Platform, Standard Edition Tools Reference.
Note:
The procedure described in this section for regenerating the default-keystore.jks or custom keystore includes self-signed certificates. If CAsigned certificate is required, follow the standard process for the same, thatis, generate the CSR and import the signed certificates in the keystore.
During bootstrap process in OIM, the default-keystore.jks keystore will beconfigured in Keystore Service (KSS) out-of-the-box. In case of customkeystore,upload the given custom keystore to KSS after completing theupgrade. After you upload the given custom keystore to KSS, restart theservers.
For more information about the Keystore Service commands, see OPSSKeystore Service Commands in WLST Command Reference forInfrastructure Security.
Updating DB Wallets to Remove MD5 Algorithm (For SSL EnabledSetup)
If you have SSL enabled setup, update all of the DB wallets to remove any MD5algorithms, as 12c uses JDK 8 which does not support MD5 algorithm.
To update the DB wallet, do the following:
1. Create an Oracle Wallet with default trusted certificate using the followingcommand:
./orapki wallet create -wallet <trust_wallet_name> -pwd password
For example:./orapki wallet create -wallet trust_wallet.p12 -pwd welcome1
2. Add a self-signed certificate in the wallet with the distinguished name (DN) asCN=root_test,C=US using the following command:
./orapki wallet add -wallet trust_wallet_name -dn ‘dn_name’-keysize2048 -sign_alg sha256 -self_signed -validity 3650 -pwdpassword_of_wallet
For example:
Chapter 4Completing the Pre-Upgrade Tasks for Oracle Identity Manager
4-12
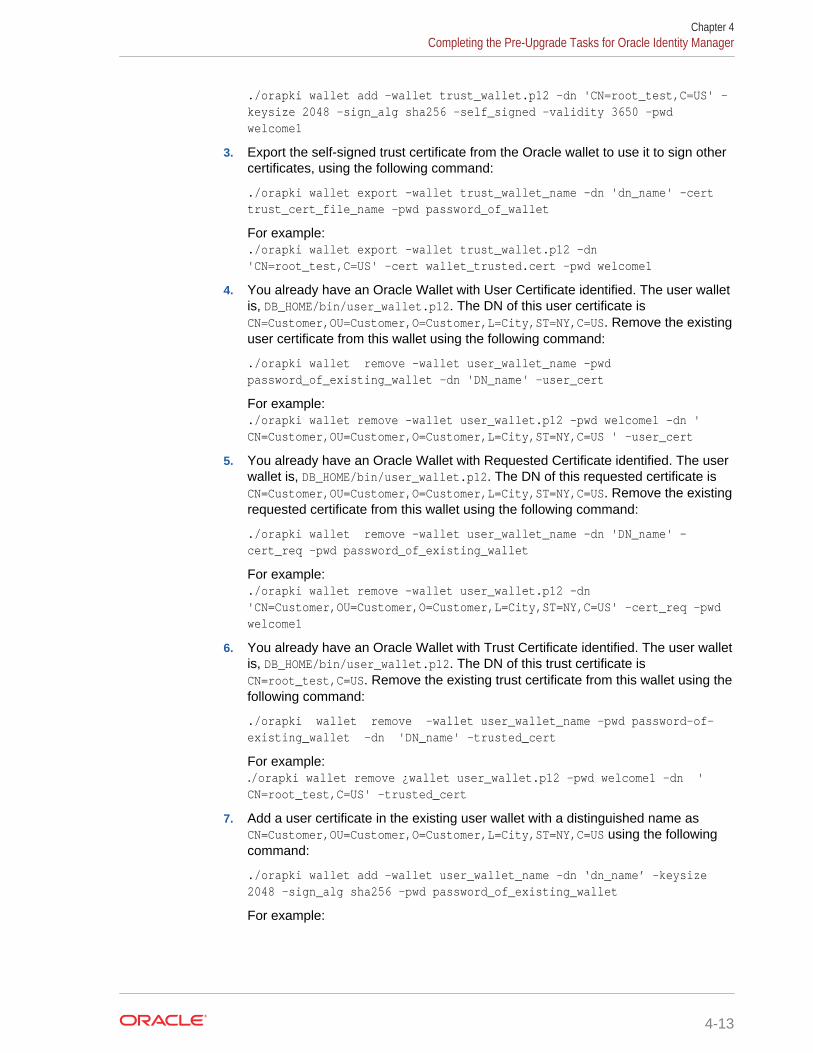
./orapki wallet add -wallet trust_wallet.p12 -dn 'CN=root_test,C=US' -keysize 2048 -sign_alg sha256 -self_signed -validity 3650 -pwdwelcome1
3. Export the self-signed trust certificate from the Oracle wallet to use it to sign othercertificates, using the following command:
./orapki wallet export -wallet trust_wallet_name -dn 'dn_name' -certtrust_cert_file_name -pwd password_of_wallet
For example:./orapki wallet export -wallet trust_wallet.p12 -dn'CN=root_test,C=US' -cert wallet_trusted.cert -pwd welcome1
4. You already have an Oracle Wallet with User Certificate identified. The user walletis, DB_HOME/bin/user_wallet.p12. The DN of this user certificate isCN=Customer,OU=Customer,O=Customer,L=City,ST=NY,C=US. Remove the existinguser certificate from this wallet using the following command:
./orapki wallet remove -wallet user_wallet_name -pwdpassword_of_existing_wallet -dn 'DN_name' -user_cert
For example:./orapki wallet remove -wallet user_wallet.p12 -pwd welcome1 -dn 'CN=Customer,OU=Customer,O=Customer,L=City,ST=NY,C=US ' -user_cert
5. You already have an Oracle Wallet with Requested Certificate identified. The userwallet is, DB_HOME/bin/user_wallet.p12. The DN of this requested certificate isCN=Customer,OU=Customer,O=Customer,L=City,ST=NY,C=US. Remove the existingrequested certificate from this wallet using the following command:
./orapki wallet remove -wallet user_wallet_name -dn 'DN_name' —cert_req -pwd password_of_existing_wallet
For example:./orapki wallet remove -wallet user_wallet.p12 -dn'CN=Customer,OU=Customer,O=Customer,L=City,ST=NY,C=US' -cert_req -pwdwelcome1
6. You already have an Oracle Wallet with Trust Certificate identified. The user walletis, DB_HOME/bin/user_wallet.p12. The DN of this trust certificate isCN=root_test,C=US. Remove the existing trust certificate from this wallet using thefollowing command:
./orapki wallet remove -wallet user_wallet_name -pwd password-of-existing_wallet -dn 'DN_name' -trusted_cert
For example:./orapki wallet remove ¿wallet user_wallet.p12 -pwd welcome1 -dn 'CN=root_test,C=US' -trusted_cert
7. Add a user certificate in the existing user wallet with a distinguished name asCN=Customer,OU=Customer,O=Customer,L=City,ST=NY,C=US using the followingcommand:
./orapki wallet add -wallet user_wallet_name -dn ‘dn_name’ -keysize2048 -sign_alg sha256 -pwd password_of_existing_wallet
For example:
Chapter 4Completing the Pre-Upgrade Tasks for Oracle Identity Manager
4-13
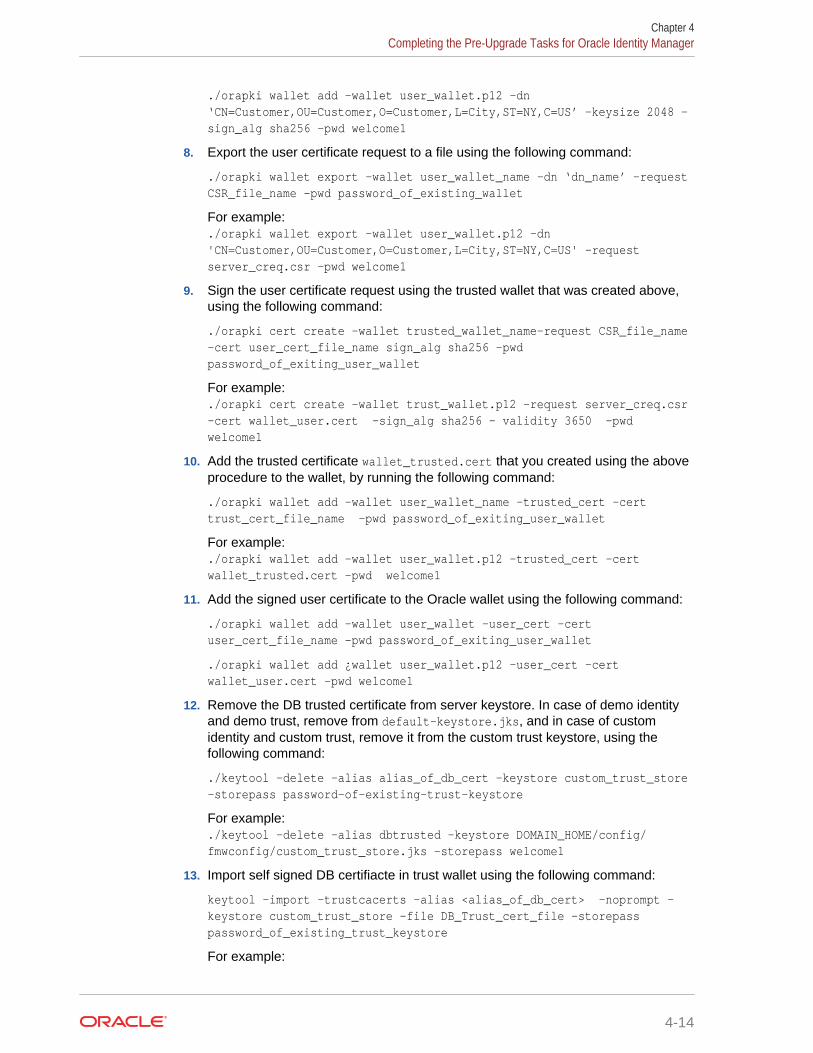
./orapki wallet add —wallet user_wallet.p12 -dn‘CN=Customer,OU=Customer,O=Customer,L=City,ST=NY,C=US’ -keysize 2048 -sign_alg sha256 -pwd welcome1
8. Export the user certificate request to a file using the following command:
./orapki wallet export -wallet user_wallet_name -dn ‘dn_name’ —requestCSR_file_name -pwd password_of_existing_wallet
For example:./orapki wallet export -wallet user_wallet.p12 -dn'CN=Customer,OU=Customer,O=Customer,L=City,ST=NY,C=US' -requestserver_creq.csr -pwd welcome1
9. Sign the user certificate request using the trusted wallet that was created above,using the following command:
./orapki cert create -wallet trusted_wallet_name-request CSR_file_name-cert user_cert_file_name sign_alg sha256 -pwdpassword_of_exiting_user_wallet
For example:./orapki cert create -wallet trust_wallet.p12 -request server_creq.csr-cert wallet_user.cert -sign_alg sha256 - validity 3650 -pwdwelcome1
10. Add the trusted certificate wallet_trusted.cert that you created using the aboveprocedure to the wallet, by running the following command:
./orapki wallet add -wallet user_wallet_name -trusted_cert -certtrust_cert_file_name -pwd password_of_exiting_user_wallet
For example:./orapki wallet add -wallet user_wallet.p12 -trusted_cert -certwallet_trusted.cert -pwd welcome1
11. Add the signed user certificate to the Oracle wallet using the following command:
./orapki wallet add -wallet user_wallet -user_cert -certuser_cert_file_name -pwd password_of_exiting_user_wallet
./orapki wallet add ¿wallet user_wallet.p12 -user_cert -certwallet_user.cert -pwd welcome1
12. Remove the DB trusted certificate from server keystore. In case of demo identityand demo trust, remove from default-keystore.jks, and in case of customidentity and custom trust, remove it from the custom trust keystore, using thefollowing command:
./keytool -delete -alias alias_of_db_cert -keystore custom_trust_store-storepass password-of-existing-trust-keystore
For example:./keytool -delete -alias dbtrusted -keystore DOMAIN_HOME/config/fmwconfig/custom_trust_store.jks -storepass welcome1
13. Import self signed DB certifiacte in trust wallet using the following command:
keytool -import -trustcacerts -alias <alias_of_db_cert> -noprompt -keystore custom_trust_store -file DB_Trust_cert_file —storepasspassword_of_existing_trust_keystore
For example:
Chapter 4Completing the Pre-Upgrade Tasks for Oracle Identity Manager
4-14

keytool -import -trustcacerts -alias dbtrusted -noprompt -keystoreDOMAIN_HOME/config/fmwconfig/custom_trust_store.jks -file /DB_HOME/bin/wallet_trusted.cert -storepass welcome
Verifying the Memory SettingsTo avoid the memory issues for Oracle Identity Manager, ensure that the memorysettings are updated as per the requirements.
On Linux, do the following:
1. Ensure that you set the following parameters in the /etc/security/limits.conffile, to the specified values:
FUSION_USER_ACCOUNT soft nofile 32767FUSION_USER_ACCOUNT hard nofile 327679
2. Ensure that you set UsePAM to Yes in the /etc/ssh/sshd_config file.
3. Restart sshd.
4. Log out (or reboot) and log in to the system again.
Note:
Before you start the Oracle Identity Governance 12c Server, post upgrade,run the following command to increase the limit of open files, so that you donot run into memory issues:limit maxproc 16384
Opening the Non-SSL Ports for SSL Enabled SetupIf you have an SSL enabled and non-SSL disabled setup, you must open the non-SSLports for Servers and Database before you proceed with the Oracle Identity Managerupgrade.
Installing Product DistributionsBefore beginning your upgrade, download Oracle Fusion Middleware Infrastructure,Oracle SOA Suite, and Oracle Identity and Access Management 12c (12.2.1.3.0)distributions on the target system and install them using Oracle Universal Installer.
Note:
When Infrastructure is required for the upgrade, you must install the OracleFusion Middleware distribution first before you install other FusionMiddleware products.
It is recommended that you use the simplified installation process to install theproducts mentioned above, using the quick installer
Chapter 4Installing Product Distributions
4-15
(fmw_12.2.1.3.0_idmquickstart_generic.jar). The quick installer installs theInfrastructure, Oracle SOA Suite, and Oracle Identity and Access Management 12c(12.2.1.3.0) in one go.
See Installing Oracle Identity Governance Using Quick Installer in the Installing andConfiguring Oracle Identity and Access Management.
The other option is to install the required product distributions — Infrastructure, OracleSOA Suite, and OraOracle Identity and Access Management 12c (12.2.1.3.0)separately. To do this, complete the following steps:
1. Sign in to the target system.
2. Download the following from Oracle Technology Network or Oracle SoftwareDelivery Cloud to your target system:
• Oracle Fusion Middleware Infrastructure(fmw_12.2.1.3.0_infrastructure_generic.jar)
• Oracle SOA Suite (fmw_12.2.1.3.0_soa_generic.jar)
• Oracle Identity and Access Management (fmw_12.2.1.3.0_idm_generic.jar)
3. Change to the directory where you downloaded the 12c (12.2.1.3.0) productdistribution.
4. Start the installation program for Oracle Fusion Middleware Infrastructure:
• (UNIX) JDK_HOME/bin/java -jarfmw_12.2.1.3.0_infrastructure_generic.jar
• (Windows) JDK_HOME\bin\java -jarfmw_12.2.1.3.0_infrastructure_generic.jar
5. On UNIX operating systems, the Installation Inventory Setup screen appears if thisis the first time you are installing an Oracle product on this host.
Specify the location where you want to create your central inventory. Make surethat the operating system group name selected on this screen has writepermissions to the central inventory location, and click Next.
Note:
The Installation Inventory Setup screen does not appear on Windowsoperating systems.
6. On the Welcome screen, review the information to make sure that you have metall the prerequisites. Click Next.
7. On the Auto Updates screen, select an option:
• Skip Auto Updates: If you do not want your system to check for softwareupdates at this time.
• Select patches from directory: To navigate to a local directory if youdownloaded patch files.
• Search My Oracle Support for Updates: To automatically download softwareupdates if you have a My Oracle Support account. You must enter OracleSupport credentials then click Search. To configure a proxy server for the
Chapter 4Installing Product Distributions
4-16
installer to access My Oracle Support, click Proxy Settings. Click TestConnection to test the connection.
Click Next.
8. On the Installation Location screen, specify the location for the Oracle homedirectory and click Next.
For more information about Oracle Fusion Middleware directory structure, see Understanding Directories for Installation and Configuration in Oracle FusionMiddleware Planning an Installation of Oracle Fusion Middleware.
9. On the Installation Type screen, select the following:
• For Infrastructure, select Fusion Middleware Infrastructure
• For Oracle SOA Suite, select Oracle SOA Suite
• For Oracle Identity and Access Management, select Oracle Identity andAccess Management
Click Next.
10. The Prerequisite Checks screen analyzes the host computer to ensure that thespecific operating system prerequisites have been met.
To view the list of tasks that are verified, select View Successful Tasks. To viewlog details, select View Log. If any prerequisite check fails, then an error messageappears at the bottom of the screen. Fix the error and click Rerun to try again. Toignore the error or the warning message and continue with the installation, clickSkip (not recommended).
11. On the Installation Summary screen, verify the installation options that youselected.
If you want to save these options to a response file, click Save Response File andenter the response file location and name. The response file collects and stores allthe information that you have entered, and enables you to perform a silentinstallation (from the command line) at a later time.Click Install to begin the installation.
12. On the Installation Progress screen, when the progress bar displays 100%, clickFinish to dismiss the installer, or click Next to see a summary.
13. The Installation Complete screen displays the Installation Location and theFeature Sets that are installed. Review this information and click Finish to closethe installer.
14. After you have installed Oracle Fusion Middleware Infrastructure, enter thefollowing command to start the installer for your product distribution and repeat thesteps above to navigate through the installer screens:
For installing Oracle SOA Suite 12c (12.2.1.3.0), run the following installer:
• (UNIX) JDK_HOME/bin/java —jar fmw_12.2.1.3.0_soa_generic.jar
• (Windows) JDK_HOME\bin\java -jar fmw_12.2.1.3.0_soa_generic.jar
For installing Oracle Identity and Access Management 12c (12.2.1.3.0), run thefollowing installer:
• (UNIX) JDK_HOME/bin/java -jar fmw_12.2.1.3.0_idm_generic.jar
• (Windows) JDK_HOME\bin\java -jar fmw_12.2.1.3.0_idm_generic.jar
Chapter 4Installing Product Distributions
4-17
Note:
For more information about installing Oracle Identity and AccessManagement 12c (12.2.1.3.0), see Installing the Oracle Identity andAccess Management Software in the Installing and Configuring OracleIdentity and Access Management.
Running a Pre-Upgrade Readiness CheckTo identify potential issues with the upgrade, Oracle recommends that you run areadiness check before you start the upgrade process. Be aware that the readinesscheck may not be able to discover all potential issues with your upgrade. An upgrademay still fail, even if the readiness check reports success.
• About Running a Pre-Upgrade Readiness CheckYou can run the Upgrade Assistant in -readiness mode to detect issues beforeyou perform the actual upgrade. You can run the readiness check in GUI modeusing the Upgrade Assistant or in silent mode using a response file.
• Starting the Upgrade Assistant in Readiness ModeUse the -readiness parameter to start the Upgrade Assistant in readiness mode.
• Performing a Readiness Check with the Upgrade AssistantNavigate through the screens in the Upgrade Assistant to complete the pre-upgrade readiness check.
• Understanding the Readiness ReportAfter performing a readiness check for your domain, review the report to determinewhether you need to take any action for a successful upgrade.
About Running a Pre-Upgrade Readiness CheckYou can run the Upgrade Assistant in -readiness mode to detect issues before youperform the actual upgrade. You can run the readiness check in GUI mode using theUpgrade Assistant or in silent mode using a response file.
The Upgrade Assistant readiness check performs a read-only, pre-upgrade review ofyour Fusion Middleware schemas and WebLogic domain configurations that are at asupported starting point. The review is a read-only operation.
The readiness check generates a formatted, time-stamped readiness report so youcan address potential issues before you attempt the actual upgrade. If no issues aredetected, you can begin the upgrade process. Oracle recommends that you read thisreport thoroughly before performing an upgrade.
You can run the readiness check while your existing Oracle Fusion Middlewaredomain is online (while other users are actively using it) or offline.
You can run the readiness check any number of times before performing any actualupgrade. However, do not run the readiness check after an upgrade has beenperformed, as the report results may differ from the result of pre-upgrade readinesschecks.
Chapter 4Running a Pre-Upgrade Readiness Check
4-18
Note:
To prevent performance from being affected, Oracle recommends that yourun the readiness check during off-peak hours.
Starting the Upgrade Assistant in Readiness ModeUse the -readiness parameter to start the Upgrade Assistant in readiness mode.
To perform a readiness check on your pre-upgrade environment with the UpgradeAssistant:
1. Go to the oracle_common/upgrade/bin directory:
• (UNIX) NEW_ORACLE_HOME/oracle_common/upgrade/bin
• (Windows) NEW_ORACLE_HOME\oracle_common\upgrade\bin
2. Start the Upgrade Assistant.
• (UNIX) ./ua -readiness
• (Windows) ua.bat -readiness
Note:
If the DISPLAY environment variable is not set up properly to allow forGUI mode, you may encounter the following error:
Xlib: connection to ":1.0" refused by serverXlib: No protocol specified
To resolve this issue, set the DISPLAY environment variable to thesystem name or IP address of your local workstation, and rerun UpgradeAssistant.
If you continue to receive these errors after setting DISPLAY, trylaunching another GUI tool, such as vncconfig. If you see the sameerrors, your DISPLAY environment variable may still not be set correctly.
For information about other parameters that you can specify on the command line,see:
• Upgrade Assistant Parameters
Upgrade Assistant ParametersWhen you start the Upgrade Assistant from the command line, you can specifyadditional parameters.
Chapter 4Running a Pre-Upgrade Readiness Check
4-19
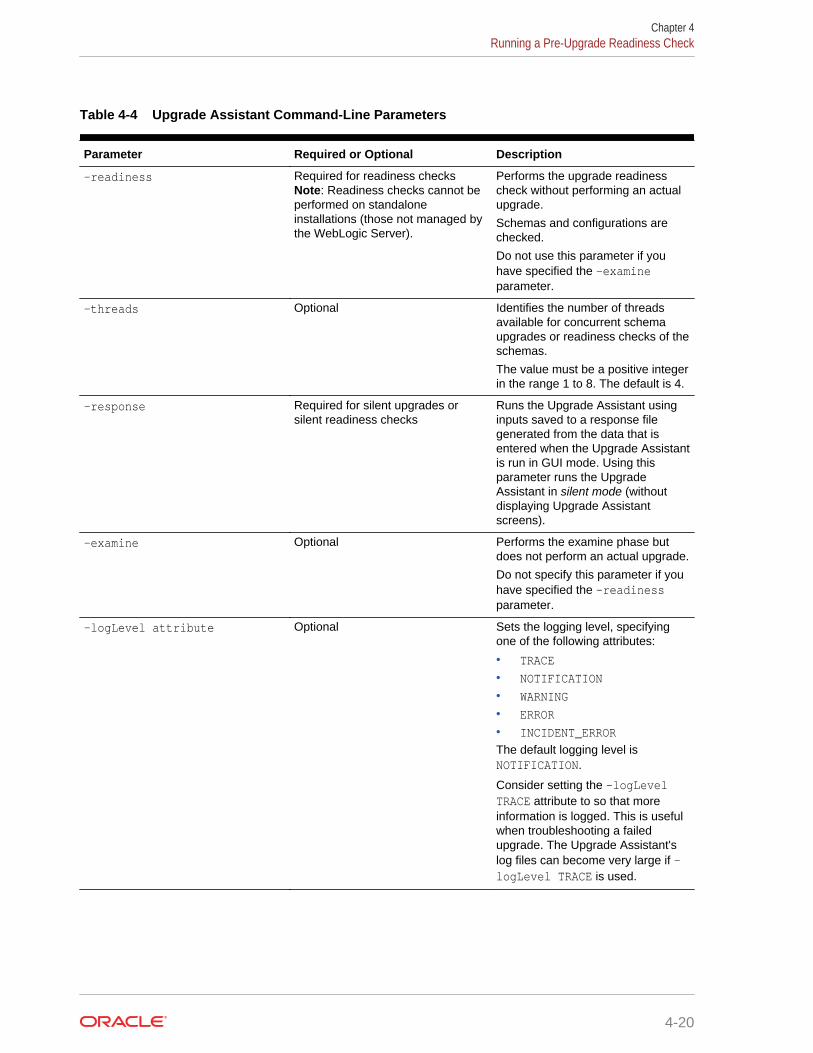
Table 4-4 Upgrade Assistant Command-Line Parameters
Parameter Required or Optional Description
-readiness Required for readiness checksNote: Readiness checks cannot beperformed on standaloneinstallations (those not managed bythe WebLogic Server).
Performs the upgrade readinesscheck without performing an actualupgrade.
Schemas and configurations arechecked.
Do not use this parameter if youhave specified the -examineparameter.
-threads Optional Identifies the number of threadsavailable for concurrent schemaupgrades or readiness checks of theschemas.
The value must be a positive integerin the range 1 to 8. The default is 4.
-response Required for silent upgrades orsilent readiness checks
Runs the Upgrade Assistant usinginputs saved to a response filegenerated from the data that isentered when the Upgrade Assistantis run in GUI mode. Using thisparameter runs the UpgradeAssistant in silent mode (withoutdisplaying Upgrade Assistantscreens).
-examine Optional Performs the examine phase butdoes not perform an actual upgrade.
Do not specify this parameter if youhave specified the -readinessparameter.
-logLevel attribute Optional Sets the logging level, specifyingone of the following attributes:
• TRACE• NOTIFICATION• WARNING• ERROR• INCIDENT_ERRORThe default logging level isNOTIFICATION.
Consider setting the -logLevelTRACE attribute to so that moreinformation is logged. This is usefulwhen troubleshooting a failedupgrade. The Upgrade Assistant'slog files can become very large if -logLevel TRACE is used.
Chapter 4Running a Pre-Upgrade Readiness Check
4-20
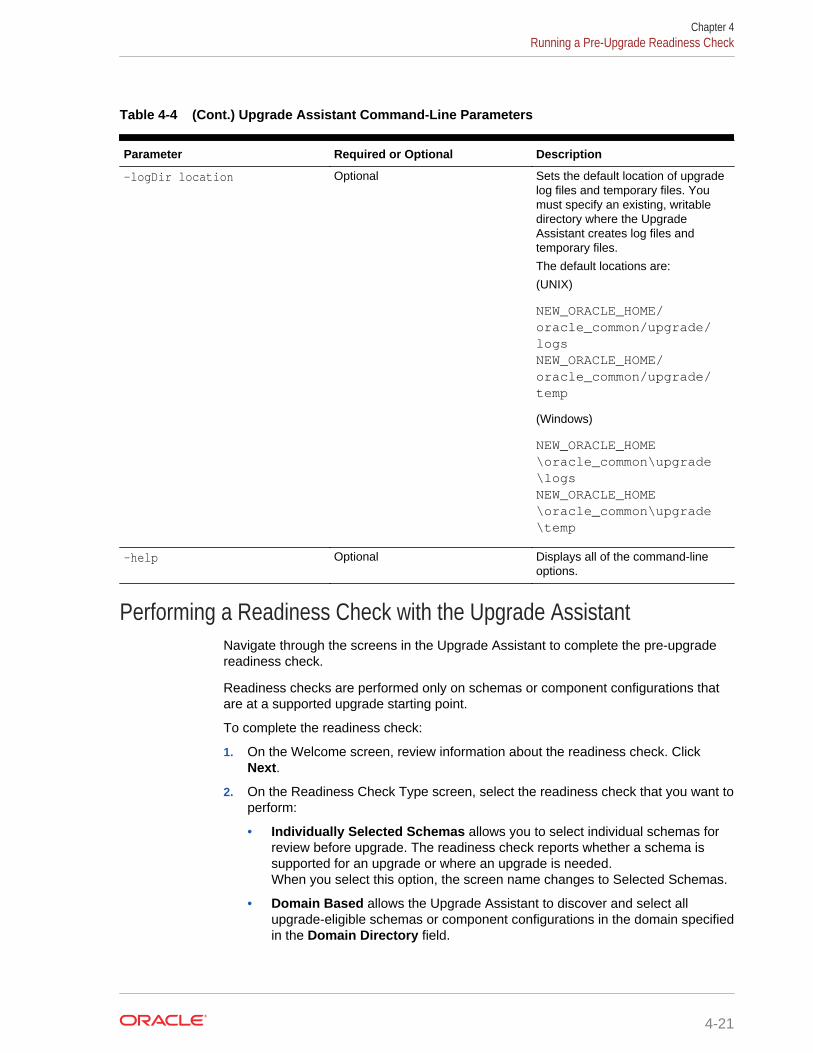
Table 4-4 (Cont.) Upgrade Assistant Command-Line Parameters
Parameter Required or Optional Description
-logDir location Optional Sets the default location of upgradelog files and temporary files. Youmust specify an existing, writabledirectory where the UpgradeAssistant creates log files andtemporary files.
The default locations are:
(UNIX)
NEW_ORACLE_HOME/oracle_common/upgrade/logs NEW_ORACLE_HOME/oracle_common/upgrade/temp
(Windows)
NEW_ORACLE_HOME\oracle_common\upgrade\logs NEW_ORACLE_HOME\oracle_common\upgrade\temp
-help Optional Displays all of the command-lineoptions.
Performing a Readiness Check with the Upgrade AssistantNavigate through the screens in the Upgrade Assistant to complete the pre-upgradereadiness check.
Readiness checks are performed only on schemas or component configurations thatare at a supported upgrade starting point.
To complete the readiness check:
1. On the Welcome screen, review information about the readiness check. ClickNext.
2. On the Readiness Check Type screen, select the readiness check that you want toperform:
• Individually Selected Schemas allows you to select individual schemas forreview before upgrade. The readiness check reports whether a schema issupported for an upgrade or where an upgrade is needed.When you select this option, the screen name changes to Selected Schemas.
• Domain Based allows the Upgrade Assistant to discover and select allupgrade-eligible schemas or component configurations in the domain specifiedin the Domain Directory field.
Chapter 4Running a Pre-Upgrade Readiness Check
4-21
When you select this option, the screen name changes to Schemas andConfiguration.
Leave the default selection if you want the Upgrade Assistant to check allschemas and component configurations at the same time, or select a specificoption:
– Include checks for all schemas to discover and review all componentsthat have a schema available to upgrade.
– Include checks for all configurations to review componentconfigurations for a managed WebLogic Server domain.
Click Next.
3. If you selected Individually Selected Schemas: On the Available Componentsscreen, select the components that have a schema available to upgrade for whichyou want to perform a readiness check.
If you selected Domain Based: On the Component List screen, review the list ofcomponents that are present in your domain for which you want to perform areadiness check.
If you select a component that has dependent components, those components areautomatically selected. For example, if you select Oracle Platform SecurityServices, Oracle Audit Services is automatically selected.
Depending on the components you select, additional screens may display. Forexample, you may need to:
• Specify the domain directory.
Ensure that you specify the 11.1.2.3.0 domain directory.
• Specify schema credentials to connect to the selected schema: DatabaseType, DBA User Name, and DBA Password. Then click Connect.
Note:
Oracle database is the default database type. Make sure that youselect the correct database type before you continue. If you discoverthat you selected the wrong database type, do not go back to thisscreen to change it to the correct type. Instead, close the UpgradeAssistant and restart the readiness check with the correct databasetype selected to ensure that the correct database type is applied toall schemas.
• Select the Schema User Name option and specify the Schema Password.
Click Next to start the readiness check.
4. On the Readiness Summary screen, review the summary of the readiness checksthat will be performed based on your selections.
If you want to save your selections to a response file to run the Upgrade Assistantagain later in response (or silent) mode, click Save Response File and providethe location and name of the response file. A silent upgrade performs exactly thesame function that the Upgrade Assistant performs, but you do not have tomanually enter the data again.
For a detailed report, click View Log.
Chapter 4Running a Pre-Upgrade Readiness Check
4-22
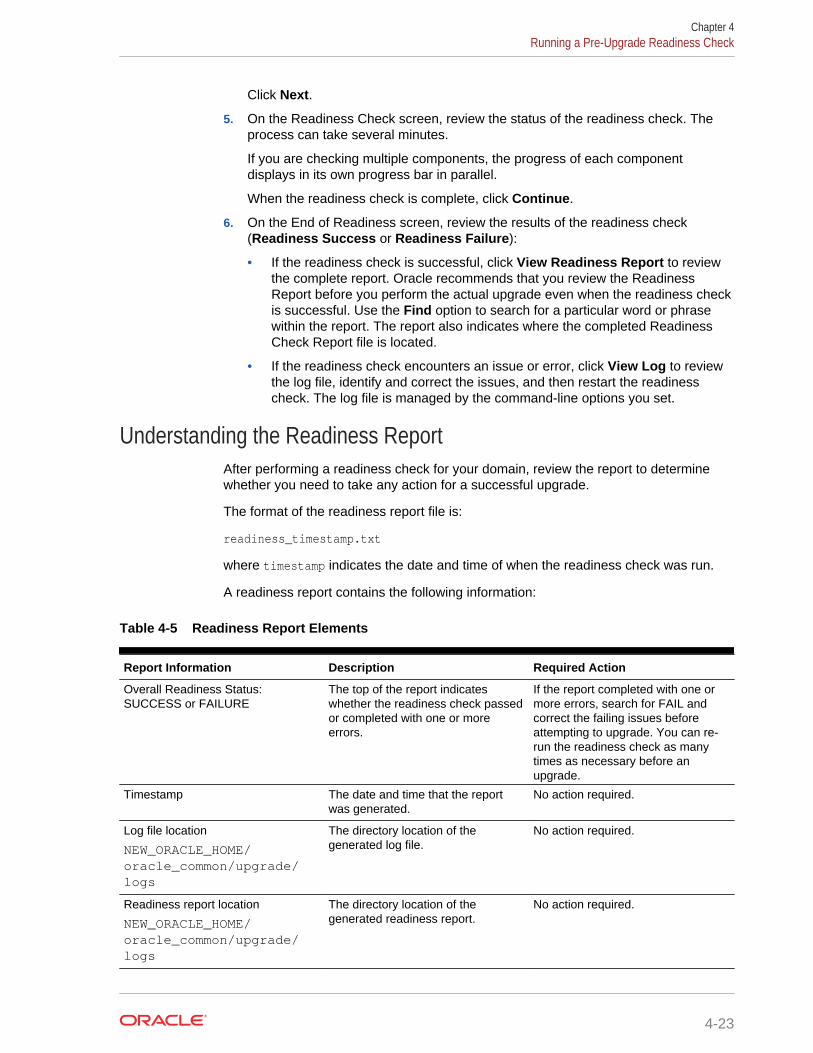
Click Next.
5. On the Readiness Check screen, review the status of the readiness check. Theprocess can take several minutes.
If you are checking multiple components, the progress of each componentdisplays in its own progress bar in parallel.
When the readiness check is complete, click Continue.
6. On the End of Readiness screen, review the results of the readiness check(Readiness Success or Readiness Failure):
• If the readiness check is successful, click View Readiness Report to reviewthe complete report. Oracle recommends that you review the ReadinessReport before you perform the actual upgrade even when the readiness checkis successful. Use the Find option to search for a particular word or phrasewithin the report. The report also indicates where the completed ReadinessCheck Report file is located.
• If the readiness check encounters an issue or error, click View Log to reviewthe log file, identify and correct the issues, and then restart the readinesscheck. The log file is managed by the command-line options you set.
Understanding the Readiness ReportAfter performing a readiness check for your domain, review the report to determinewhether you need to take any action for a successful upgrade.
The format of the readiness report file is:
readiness_timestamp.txt
where timestamp indicates the date and time of when the readiness check was run.
A readiness report contains the following information:
Table 4-5 Readiness Report Elements
Report Information Description Required Action
Overall Readiness Status:SUCCESS or FAILURE
The top of the report indicateswhether the readiness check passedor completed with one or moreerrors.
If the report completed with one ormore errors, search for FAIL andcorrect the failing issues beforeattempting to upgrade. You can re-run the readiness check as manytimes as necessary before anupgrade.
Timestamp The date and time that the reportwas generated.
No action required.
Log file location
NEW_ORACLE_HOME/oracle_common/upgrade/logs
The directory location of thegenerated log file.
No action required.
Readiness report location
NEW_ORACLE_HOME/oracle_common/upgrade/logs
The directory location of thegenerated readiness report.
No action required.
Chapter 4Running a Pre-Upgrade Readiness Check
4-23
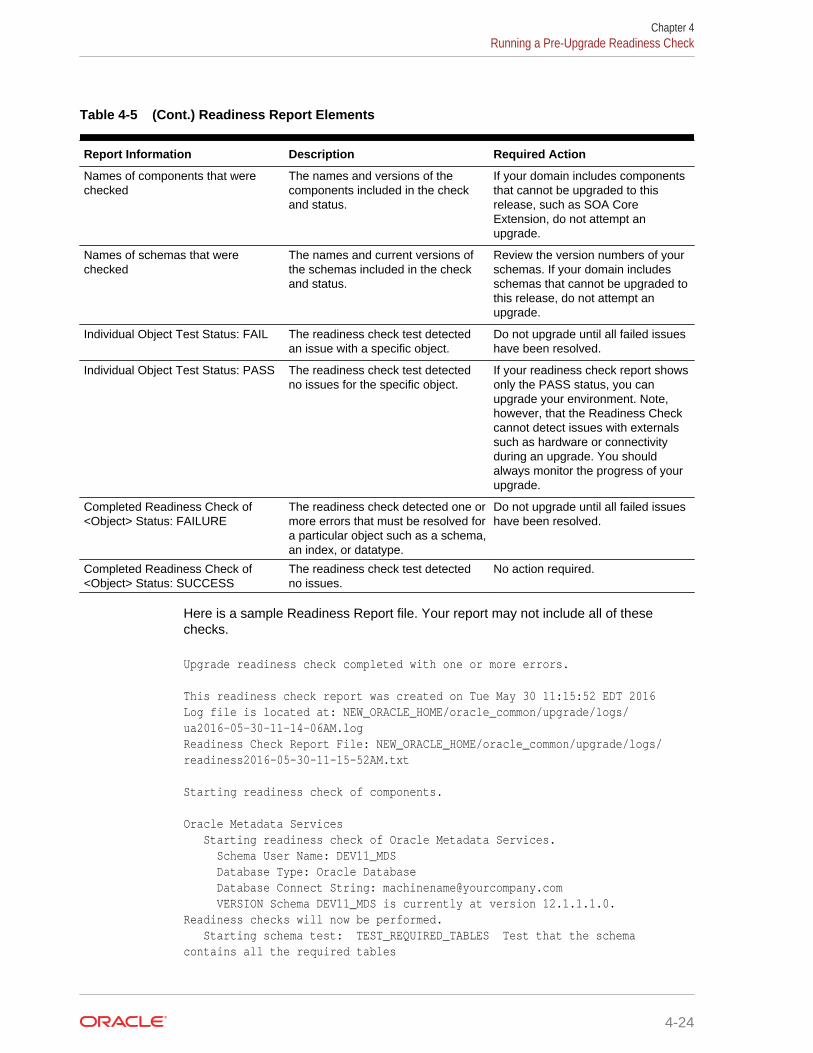
Table 4-5 (Cont.) Readiness Report Elements
Report Information Description Required Action
Names of components that werechecked
The names and versions of thecomponents included in the checkand status.
If your domain includes componentsthat cannot be upgraded to thisrelease, such as SOA CoreExtension, do not attempt anupgrade.
Names of schemas that werechecked
The names and current versions ofthe schemas included in the checkand status.
Review the version numbers of yourschemas. If your domain includesschemas that cannot be upgraded tothis release, do not attempt anupgrade.
Individual Object Test Status: FAIL The readiness check test detectedan issue with a specific object.
Do not upgrade until all failed issueshave been resolved.
Individual Object Test Status: PASS The readiness check test detectedno issues for the specific object.
If your readiness check report showsonly the PASS status, you canupgrade your environment. Note,however, that the Readiness Checkcannot detect issues with externalssuch as hardware or connectivityduring an upgrade. You shouldalways monitor the progress of yourupgrade.
Completed Readiness Check of<Object> Status: FAILURE
The readiness check detected one ormore errors that must be resolved fora particular object such as a schema,an index, or datatype.
Do not upgrade until all failed issueshave been resolved.
Completed Readiness Check of<Object> Status: SUCCESS
The readiness check test detectedno issues.
No action required.
Here is a sample Readiness Report file. Your report may not include all of thesechecks.
Upgrade readiness check completed with one or more errors.
This readiness check report was created on Tue May 30 11:15:52 EDT 2016Log file is located at: NEW_ORACLE_HOME/oracle_common/upgrade/logs/ua2016-05-30-11-14-06AM.logReadiness Check Report File: NEW_ORACLE_HOME/oracle_common/upgrade/logs/readiness2016-05-30-11-15-52AM.txt
Starting readiness check of components.
Oracle Metadata Services Starting readiness check of Oracle Metadata Services. Schema User Name: DEV11_MDS Database Type: Oracle Database Database Connect String: [email protected] VERSION Schema DEV11_MDS is currently at version 12.1.1.1.0. Readiness checks will now be performed. Starting schema test: TEST_REQUIRED_TABLES Test that the schema contains all the required tables
Chapter 4Running a Pre-Upgrade Readiness Check
4-24
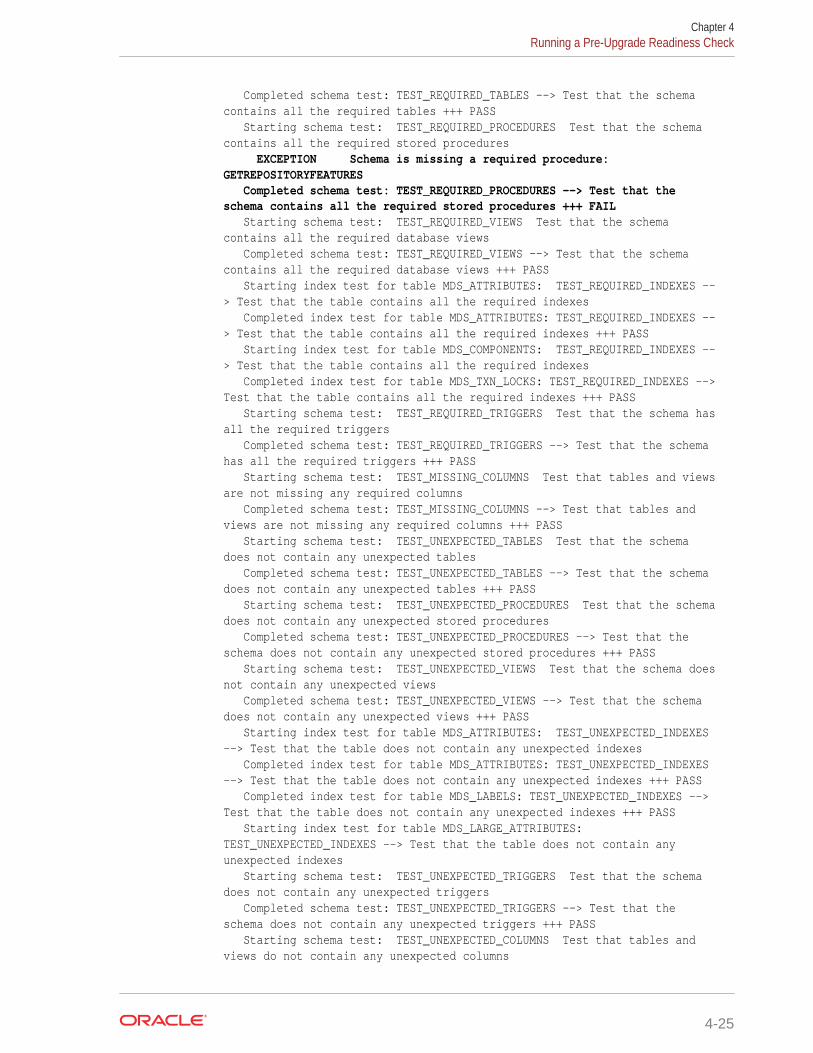
Completed schema test: TEST_REQUIRED_TABLES --> Test that the schema contains all the required tables +++ PASS Starting schema test: TEST_REQUIRED_PROCEDURES Test that the schema contains all the required stored procedures EXCEPTION Schema is missing a required procedure: GETREPOSITORYFEATURES Completed schema test: TEST_REQUIRED_PROCEDURES --> Test that the schema contains all the required stored procedures +++ FAIL Starting schema test: TEST_REQUIRED_VIEWS Test that the schema contains all the required database views Completed schema test: TEST_REQUIRED_VIEWS --> Test that the schema contains all the required database views +++ PASS Starting index test for table MDS_ATTRIBUTES: TEST_REQUIRED_INDEXES --> Test that the table contains all the required indexes Completed index test for table MDS_ATTRIBUTES: TEST_REQUIRED_INDEXES --> Test that the table contains all the required indexes +++ PASS Starting index test for table MDS_COMPONENTS: TEST_REQUIRED_INDEXES --> Test that the table contains all the required indexes Completed index test for table MDS_TXN_LOCKS: TEST_REQUIRED_INDEXES --> Test that the table contains all the required indexes +++ PASS Starting schema test: TEST_REQUIRED_TRIGGERS Test that the schema has all the required triggers Completed schema test: TEST_REQUIRED_TRIGGERS --> Test that the schema has all the required triggers +++ PASS Starting schema test: TEST_MISSING_COLUMNS Test that tables and views are not missing any required columns Completed schema test: TEST_MISSING_COLUMNS --> Test that tables and views are not missing any required columns +++ PASS Starting schema test: TEST_UNEXPECTED_TABLES Test that the schema does not contain any unexpected tables Completed schema test: TEST_UNEXPECTED_TABLES --> Test that the schema does not contain any unexpected tables +++ PASS Starting schema test: TEST_UNEXPECTED_PROCEDURES Test that the schema does not contain any unexpected stored procedures Completed schema test: TEST_UNEXPECTED_PROCEDURES --> Test that the schema does not contain any unexpected stored procedures +++ PASS Starting schema test: TEST_UNEXPECTED_VIEWS Test that the schema does not contain any unexpected views Completed schema test: TEST_UNEXPECTED_VIEWS --> Test that the schema does not contain any unexpected views +++ PASS Starting index test for table MDS_ATTRIBUTES: TEST_UNEXPECTED_INDEXES --> Test that the table does not contain any unexpected indexes Completed index test for table MDS_ATTRIBUTES: TEST_UNEXPECTED_INDEXES --> Test that the table does not contain any unexpected indexes +++ PASS Completed index test for table MDS_LABELS: TEST_UNEXPECTED_INDEXES --> Test that the table does not contain any unexpected indexes +++ PASS Starting index test for table MDS_LARGE_ATTRIBUTES: TEST_UNEXPECTED_INDEXES --> Test that the table does not contain any unexpected indexes Starting schema test: TEST_UNEXPECTED_TRIGGERS Test that the schema does not contain any unexpected triggers Completed schema test: TEST_UNEXPECTED_TRIGGERS --> Test that the schema does not contain any unexpected triggers +++ PASS Starting schema test: TEST_UNEXPECTED_COLUMNS Test that tables and views do not contain any unexpected columns
Chapter 4Running a Pre-Upgrade Readiness Check
4-25
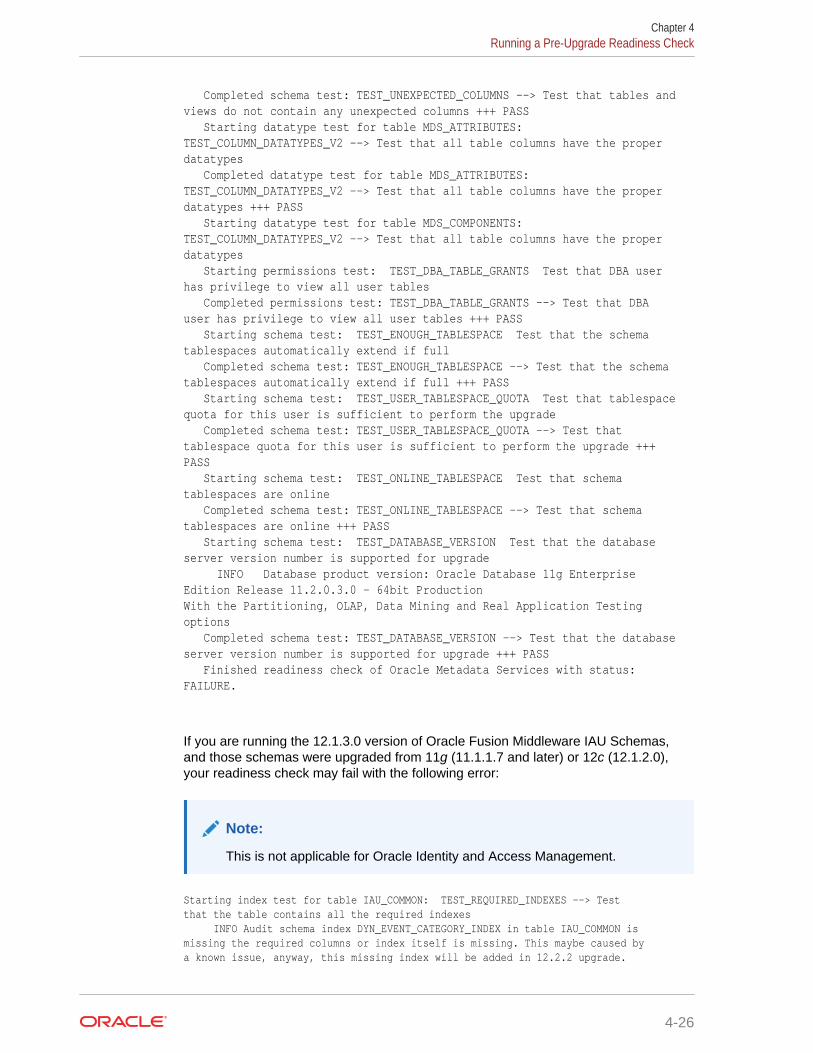
Completed schema test: TEST_UNEXPECTED_COLUMNS --> Test that tables and views do not contain any unexpected columns +++ PASS Starting datatype test for table MDS_ATTRIBUTES: TEST_COLUMN_DATATYPES_V2 --> Test that all table columns have the proper datatypes Completed datatype test for table MDS_ATTRIBUTES: TEST_COLUMN_DATATYPES_V2 --> Test that all table columns have the proper datatypes +++ PASS Starting datatype test for table MDS_COMPONENTS: TEST_COLUMN_DATATYPES_V2 --> Test that all table columns have the proper datatypes Starting permissions test: TEST_DBA_TABLE_GRANTS Test that DBA user has privilege to view all user tables Completed permissions test: TEST_DBA_TABLE_GRANTS --> Test that DBA user has privilege to view all user tables +++ PASS Starting schema test: TEST_ENOUGH_TABLESPACE Test that the schema tablespaces automatically extend if full Completed schema test: TEST_ENOUGH_TABLESPACE --> Test that the schema tablespaces automatically extend if full +++ PASS Starting schema test: TEST_USER_TABLESPACE_QUOTA Test that tablespace quota for this user is sufficient to perform the upgrade Completed schema test: TEST_USER_TABLESPACE_QUOTA --> Test that tablespace quota for this user is sufficient to perform the upgrade +++ PASS Starting schema test: TEST_ONLINE_TABLESPACE Test that schema tablespaces are online Completed schema test: TEST_ONLINE_TABLESPACE --> Test that schema tablespaces are online +++ PASS Starting schema test: TEST_DATABASE_VERSION Test that the database server version number is supported for upgrade INFO Database product version: Oracle Database 11g Enterprise Edition Release 11.2.0.3.0 - 64bit ProductionWith the Partitioning, OLAP, Data Mining and Real Application Testing options Completed schema test: TEST_DATABASE_VERSION --> Test that the database server version number is supported for upgrade +++ PASS Finished readiness check of Oracle Metadata Services with status: FAILURE.
If you are running the 12.1.3.0 version of Oracle Fusion Middleware IAU Schemas,and those schemas were upgraded from 11g (11.1.1.7 and later) or 12c (12.1.2.0),your readiness check may fail with the following error:
Note:
This is not applicable for Oracle Identity and Access Management.
Starting index test for table IAU_COMMON: TEST_REQUIRED_INDEXES --> Test that the table contains all the required indexes INFO Audit schema index DYN_EVENT_CATEGORY_INDEX in table IAU_COMMON is missing the required columns or index itself is missing. This maybe caused by a known issue, anyway, this missing index will be added in 12.2.2 upgrade.
Chapter 4Running a Pre-Upgrade Readiness Check
4-26
INFO Audit schema index DYN_EVENT_TYPE_INDEX in table IAU_COMMON is missing the required columns or index itself is missing. This maybe caused by a known issue, anyway, this missing index will be added in 12.2.2 upgrade. INFO Audit schema index DYN_TENANT_INDEX in table IAU_COMMON is missing the required columns or index itself is missing. This maybe caused by a known issue, anyway, this missing index will be added in 12.2.2 upgrade. INFO Audit schema index DYN_USER_INDEX in table IAU_COMMON is missing the required columns or index itself is missing. This maybe caused by a known issue, anyway, this missing index will be added in 12.2.2 upgrade. INFO Audit schema index DYN_COMPONENT_TYPE_INDEX in table IAU_COMMON is missing the required columns or index itself is missing. This maybe caused by a known issue, anyway, this missing index will be added in 12.2.2 upgrade. INFO Audit schema index DYN_USER_TENANT_INDEX in table IAU_COMMON is missing the required columns or index itself is missing. This maybe caused by a known issue, anyway, this missing index will be added in 12.2.2 upgrade. Completed index test for table IAU_COMMON: TEST_REQUIRED_INDEXES --> Test that the table contains all the required indexes +++ FAIL
Note:
You can ignore the missing index error in the readiness report. This is aknown issue. The corresponding missing index is added during the schemaupgrade operation. This error does not occur if the schema to be upgradedwas created in 12c using the RCU.
Creating the Required 12c Schemas Using RCU (Optional)When upgrading from 11g, you must create the required 12c schemas. You can usethe Repository Creation Utility (RCU) to create customized schemas or, optionally, youcan use the Upgrade Assistant to create schemas using the default schema settings.This procedure describes how to create schemas using the RCU. Information aboutusing the Upgrade Assistant to create schemas is covered in the upgrade procedures.
Note:
This step is not required for non-SSL setup, as the Upgrade Assistantcreates the necessary 12c schemas during the upgrade process.
For SSL enabled setup, you must run the RCU to create the necessary 12cschemas.
Note:
If you are upgrading from a previous 12c release of Oracle FusionMiddleware, you do not need to re-create these schemas if they alreadyexist. Refer to the steps below to identify the existing schemas in yourdomain.
The following schemas must exist before you upgrade to 12c. If you are upgradingfrom 11g, and you are not sure which schemas you currently have, refer to the steps
Chapter 4Creating the Required 12c Schemas Using RCU (Optional)
4-27
below to identify the existing schemas in your domain. You do not need to re-createthese schemas if they already exist.
• Service Table schema (prefix_STB). This schema is new in 12c and is requiredfor domain-based upgrades. It stores basic schema configuration information (forexample, schema prefixes and passwords) that can be accessed and used byother Oracle Fusion Middleware components during the domain creation. Thisschema is automatically created when you run the Repository Creation Utility(RCU), where you specify the existing schema owner prefix that you used for yourother 11g schemas.
Note:
If the Service Table schema does not exist, you may encounter the errormessage UPGAST-00328 : The schema version registry table doesnot exist on this database. If that happens it is necessary tocreate the service table schema in order to run UpgradeAssistant
• Oracle Platform Security Services (OPSS) schema (prefix_OPSS). This schemais required if you are using an OID-based security store in 11g. This schema isautomatically created when you run the Repository Creation Utility (RCU). Theonly supported LDAP-based OPSS security store is Oracle Internet Directory(OID). An LDAP-based policy store is typically used in production environments.You do not need to reassociate an OID-based security store before upgrade.While the Upgrade Assistant is running, you can select the OPSS schema. TheUpgrade Assistant upgrades the OID-based security store automatically.
Note:
The 12c OPSS database schema is required so that you can referencethe 12c schema during the reconfiguration of the domain. Your domaincontinues to use the OID-based security store after the upgrade iscomplete.
To create the 12c schemas with the RCU:
1. (Optional) If you are upgrading from 11g, and you wish to confirm the schemaswhich are present in your existing domain, then connect to the database as a userwith DBA privileges, and run the following code from SQL*Plus:
SET LINE 120COLUMN MRC_NAME FORMAT A14COLUMN COMP_ID FORMAT A20COLUMN VERSION FORMAT A12COLUMN STATUS FORMAT A9COLUMN UPGRADED FORMAT A8SELECT MRC_NAME, COMP_ID, OWNER, VERSION, STATUS, UPGRADED FROM SCHEMA_VERSION_REGISTRY ORDER BY MRC_NAME, COMP_ID ;
2. Verify that a certified JDK already exists on your system by running java -version from the command line. For 12c (12.2.1.3.0), the certified JDK is1.8.0_131 and later.
Chapter 4Creating the Required 12c Schemas Using RCU (Optional)
4-28
Ensure that the JAVA_HOME environment variable is set to the location of thecertified JDK. For example:
• (UNIX) setenv JAVA_HOME /home/Oracle/Java/jdk1.8.0_131
• (Windows) set JAVA_HOME=C:\home\Oracle\Java\jdk1.8.0_131
Add $JAVA_HOME/bin to $PATH.
3. Go to the oracle_common/bin directory:
• (UNIX) NEW_ORACLE_HOME/oracle_common/bin
• (Windows) NEW_ORACLE_HOME\oracle_common\bin
4. Start the RCU:
• (UNIX) ./rcu
• (Windows) rcu.bat
5. On the Welcome screen, click Next.
6. On the Create Repository screen, select Create Repository and then selectSystem Load and Product Load.
If you do not have DBA privileges, select Prepare Scripts for System Load. Thiswill generate a SQL script containing all the same SQL statements and blocks thatwould have been called if the RCU were to execute the actions for the selectedcomponents. After the script is generated, a user with the necessary SYS orSYSDBA privileges can execute the script to complete the system load phase.Click Next.
7. On the Database Connection Details screen, select the Database Type and enterthe connection information for the database that hosts the 11g schemas. See thepertinent table below.
Table 4-6 Connection Credentials for Oracle Databases and Oracle Databases with Edition-Based Redefinition
Option Description and Example
Host Name Specify the name of the server where your database isrunning in the following format:
examplehost.exampledomain.com
For Oracle RAC databases, specify the VIP name orone of the node names in this field.
Port Specify the port number for your database. The defaultport number for Oracle databases is 1521.
Service Name Specify the service name for the database. Typically, theservice name is the same as the global database name.
For Oracle RAC databases, specify the service name ofone of the nodes in this field. For example:
orcl.mydomain.com
Username Enter the user name for your database. The default username is SYS.
Password Enter the password for your database user.
Role Select the database user's role from the drop-down list:
Normal or SYSDBA
Chapter 4Creating the Required 12c Schemas Using RCU (Optional)
4-29
8. On the Select Components screen, select Select existing prefix and select theprefix that was used to create the existing 11g schemas from the drop-down menu(for example, DEV11G). This prefix is used to logically group schemas together foruse in this domain. Select the following schemas:
• If you are upgrading an SSL enabled setup, select the following schemas:
– User Messaging Service (prefix_UMS)
– Weblogic Services (prefix_WLS)
– Audit services (prefix_IAU_APPEND and prefix_IAU_VIEWER)
Note:
The Common Infrastructure Services (prefix_STB) is selected bydefault. IAU is greyed out if 11g is configured for Audit Data Store).
• If you are upgrading a non-SSL enabled setup, select the following schemas:
– Weblogic Services (prefix_WLS)
– Audit services (prefix_IAU_APPEND and prefix_IAU_VIEWER)
Note:
The Common Infrastructure Services (prefix_STB) is selected bydefault. IAU is greyed out if 11g is configured for Audit Data Store).
Note:
The Common Infrastructure Services (prefix_STB) and Oracle PlatformSecurity Services (prefix_OPSS) schemas are selected by default if theyhave not yet been created.
Make a note of the prefix and schema names for the components you areinstalling as you will need this information when you configure the installation.Click Next.
9. In the Checking Prerequisites dialog, verify that the prerequisites check issuccessful, then click OK.
10. On the Schema Passwords screen, specify the passwords for your schemaowners.
Make a note of the passwords you enter on this screen as you will need thisinformation while configuring your product installation.
11. On the Map Tablespaces screen, configure the required tablespace mapping forthe schemas you want to create.
Click Next, then click OK in the confirmation dialog. When the progress dialogshows the tablespace creation is complete, click OK.
Chapter 4Creating the Required 12c Schemas Using RCU (Optional)
4-30
You see the Encrypt Tablespace check box only if you have enabled TransparentData Encryption (TDE) in the database (Oracle or Oracle EBR) when you start theRCU. Select the Encrypt Tablespace check box on the Map Tablespaces screento encrypt all new tablespaces that the RCU creates.
12. Verify the information on the Summary screen and click Create to begin schemacreation.
This screen contains information about the log files that were created from thisRCU operation. Click on the name of a particular log file to view the contents ofthat file.
13. Review the information on the Completion Summary screen to verify that theoperation is completed successfully. Click Close to complete the schema creation.
Tuning Database Parameters for Oracle Identity ManagerBefore you upgrade the schemas, you must tune the Database parameters for OracleIdentity Manager.
See Tuning Database Parameters for Oracle Identity Governance in Oracle FusionMiddleware Tuning Performance.
Stopping Servers and ProcessesBefore you run the Upgrade Assistant to upgrade your schemas and configurations,you must shut down all of the pre-upgrade processes and servers, including theAdministration Server and any managed servers.
An Oracle Fusion Middleware environment can consist of an Oracle WebLogic Serverdomain, an Administration Server, multiple managed servers, Java components,system components such as Identity Management components, and a database usedas a repository for metadata. The components may be dependent on each other, sothey must be stopped in the correct order.
Note:
The procedures in this section describe how to stop the existing, pre-upgradeservers and processes using the WLST command-line utility or a script. Youcan also use the Oracle Fusion Middleware Control and the OracleWebLogic Server Administration Console. See Starting and StoppingAdministration and Managed Servers and Node Manager.
Note:
Stop all of the servers in your deployment, except for the Database. TheDatabase must be up during the upgrade process.
To stop your pre-upgrade Fusion Middleware environment, navigate to the pre-upgrade domain and follow the steps below.
Chapter 4Tuning Database Parameters for Oracle Identity Manager
4-31
Step 1: Stop System Components
To stop system components, such as Oracle HTTP Server, use the opmnctl script:
• (UNIX) OHS_INSTANCE_HOME/bin/opmnctl stopall
• (Windows) OHS_INSTANCE_HOME\bin\opmnctl stopall
You can stop system components in any order.
Step 2: Stop the Managed Servers
To stop a WebLogic Server Managed Server, use the stopManagedWebLogic script:
• (UNIX) EXISTING_DOMAIN_HOME/bin/stopManagedWebLogic.shmanaged_server_name admin_url
• (Windows) EXISTING_DOMAIN_HOME\bin\stopManagedWebLogic.cmdmanaged_server_name admin_url
When prompted, enter your user name and password.
Step 3: Stop the Administration Server
When you stop the Administration Server, you also stop the processes running in theAdministration Server, including the WebLogic Server Administration Console andFusion Middleware Control.
To stop the Administration Server, use the stopWebLogic script:
• (UNIX) EXISTING_DOMAIN_HOME/bin/stopWebLogic.sh
• (Windows) EXISTING_DOMAIN_HOME\bin\stopWebLogic.cmd
When prompted, enter your user name, password, and the URL of the AdministrationServer.
Step 4: Stop Node Manager
To stop Node Manager, close the command shell in which it is running.
Alternatively, after having set the nodemanager.properties attribute QuitEnabled totrue (the default is false), you can use WLST to connect to Node Manager and shut itdown. See stopNodeManager in WLST Command Reference for WebLogic Server.
Upgrading Product SchemasAfter stopping servers and processes, use the Upgrade Assistant to upgradesupported product schemas to the current release of Oracle Fusion Middleware.
The Upgrade Assistant allows you to upgrade individually selected schemas or allschemas associated with a domain. The option you select determines which UpgradeAssistant screens you will use.
• Identifying Existing Schemas Available for UpgradeThis optional task enables you to review the list of available schemas before youbegin the upgrade by querying the schema version registry. The registry containsschema information such as version number, component name and ID, date ofcreation and modification, and custom prefix.
Chapter 4Upgrading Product Schemas
4-32
• Starting the Upgrade AssistantRun the Upgrade Assistant to upgrade product schemas, domain componentconfigurations, or standalone system components to 12c (12.2.1.3.0). Oraclerecommends that you run the Upgrade Assistant as a non-SYSDBA user,completing the upgrade for one domain at a time.
• Upgrading Oracle Identity Manager Schemas Using the Upgrade AssistantNavigate through the screens in the Upgrade Assistant to upgrade the productschemas.
• Verifying the Schema UpgradeAfter completing all the upgrade steps, verify that the upgrade was successful bychecking that the schema version in schema_version_registry has been properlyupdated.
Identifying Existing Schemas Available for UpgradeThis optional task enables you to review the list of available schemas before you beginthe upgrade by querying the schema version registry. The registry contains schemainformation such as version number, component name and ID, date of creation andmodification, and custom prefix.
You can let the Upgrade Assistant upgrade all of the schemas in the domain, or youcan select individual schemas to upgrade. To help decide, follow these steps to view alist of all the schemas that are available for an upgrade:
1. If you are using an Oracle database, connect to the database by using an acountthat has Oracle DBA privileges, and run the following from SQL*Plus:
SET LINE 120COLUMN MRC_NAME FORMAT A14COLUMN COMP_ID FORMAT A20COLUMN VERSION FORMAT A12COLUMN STATUS FORMAT A9COLUMN UPGRADED FORMAT A8SELECT MRC_NAME, COMP_ID, OWNER, VERSION, STATUS, UPGRADED FROM SCHEMA_VERSION_REGISTRY ORDER BY MRC_NAME, COMP_ID;
2. Examine the report that is generated.
If an upgrade is not needed for a schema, the schema_version_registry tableretains the schema at its pre-upgrade version.
3. Note the schema prefix name that was used for your existing schemas. You willuse the same prefix when you create new 12c schemas.
Chapter 4Upgrading Product Schemas
4-33
Notes:
• If your existing schemas are not from a supported version, then you mustupgrade them to a supported version before using the 12c (12.2.1.3.0)upgrade procedures. Refer to your pre-upgrade version documentationfor more information.
• Some components, such as Oracle Enterprise Data Quality, OracleGoldenGate Monitor, and Oracle GoldenGate Veridata, support anupgrade from versions other than the standard Oracle FusionMiddleware supported versions.
• If you used an OID-based policy store in 11g, make sure to create a newOPSS schema before you perform the upgrade. After the upgrade, theOPSS schema remains an LDAP-based store.
• You can only upgrade schemas for products that are available forupgrade in Oracle Fusion Middleware release 12c (12.2.1.3.0). Do notattempt to upgrade a domain that includes components that are not yetavailable for upgrade to 12c (12.2.1.3.0).
Starting the Upgrade AssistantRun the Upgrade Assistant to upgrade product schemas, domain componentconfigurations, or standalone system components to 12c (12.2.1.3.0). Oraclerecommends that you run the Upgrade Assistant as a non-SYSDBA user, completingthe upgrade for one domain at a time.
To start the Upgrade Assistant:
Note:
Before you start the Upgrade Assistant, make sure that the JVM characterencoding is set to UTF-8 for the platform on which the Upgrade Assistant isrunning. If the character encoding is not set to UTF-8, then you will not beable to download files containing Unicode characters in their names. Thiscan cause the upgrade to fail.
To ensure that UTF-8 is used by the JVM, use the JVM option -Dfile.encoding=UTF-8.
1. Go to the oracle_common/upgrade/bin directory:
• (UNIX) NEW_ORACLE_HOME/oracle_common/upgrade/bin
• (Windows) NEW_ORACLE_HOME\oracle_common\upgrade\bin
2. Start the Upgrade Assistant:
• (UNIX) ./ua
• (Windows) ua.bat
Chapter 4Upgrading Product Schemas
4-34
Note:
In the above command, NEW_ORACLE_HOME refers to the 12c Oracle Home.
For information about other parameters that you can specify on the command line,such as logging parameters, see:
Upgrading Oracle Identity Manager Schemas Using the UpgradeAssistant
Navigate through the screens in the Upgrade Assistant to upgrade the productschemas.
Note:
• If the pre-upgrade environment has Audit schema (IAU), you must firstupgrade Audit schema only, using the Individually Selected Schemaoption on the Selected Schemas screen, and selecting Oracle AuditServices schema. Ensure that you select the appropriate IAU schemafrom the list of available IAU schemas. The upgrade assistant will notdetect the corresponding IAU schema from the provided domaindirectory automatically. Hence, you must select it manually. Once theIAU schema is upgraded, run the Upgrade Assistant again to upgradethe remaining schemas using the All Schema Used by a domain optionon the Selected Schemas screen.
• If there is no Audit schema (IAU) in your pre-upgrade environment, usethe All Schema Used by a Domain option on the Selected Schemasscreen and proceed.
• To check whether the pre-upgrade environment has the IAU schema,run the following SQL command using the user with sysdba privileges:
select username from dba_users where username like '%IAU%';
This command lists the IAU schemas available in your configureddatabase.
Note:
For SSL enabled setup, it is mandatory to run the Repository Creation Utility(RCU) to upgrade the existing schemas. For non-SSL enabled setup,running RCU to upgrade schemas is optional.
To upgrade product schemas with the Upgrade Assistant:
1. On the Welcome screen, review an introduction to the Upgrade Assistant andinformation about important pre-upgrade tasks. Click Next.
Chapter 4Upgrading Product Schemas
4-35
Note:
For more information about any Upgrade Assistant screen, click Help onthe screen.
2. On the Selected Schemas screen, select the schema upgrade operation that youwant to perform:
• Individually Selected Schemas if you want to select individual schemas forupgrade and you do not want to upgrade all of the schemas used by thedomain.
Caution:
Upgrade only those schemas that are used to support your 12c(12.2.1.3.0) components. Do not upgrade schemas that are currentlybeing used to support components that are not included in OracleFusion Middleware 12c (12.2.1.3.0).
• All Schemas Used by a Domain to allow the Upgrade Assistant to discoverand select all components that have a schema available to upgrade in thedomain specified in the Domain Directory field. This is also known as adomain assisted schema upgrade. Additionally, the Upgrade Assistant pre-populates connection information on the schema input screens.
Note:
Oracle recommends that you select All Schemas Used by aDomain for most upgrades to ensure all of the required schemas areincluded in the upgrade.
Note:
If you are upgrading SSL enabled Oracle Identity Manager setup, selectIndividually Selected Schemas option, and then select Oracle IdentityManager schema only. This automatically selects the dependantschemas. For upgrading SSL enabled setup, you must provide the non-SSL Database connection details on the Schema Credentials screen.
Click Next.
3. If you selected Individually Selected Schemas: On the Available Componentsscreen, select the components for which you want to upgrade schemas. When youselect a component, the schemas and any dependencies are automaticallyselected.
Chapter 4Upgrading Product Schemas
4-36
Note:
For the individual schema option, the domain configuration is notaccessed, and therefore password values are carried forward from theprevious screen. If you encounter any connection failure, check thecause and fix it.
4. On the Prerequisites screen, acknowledge that the prerequisites have been metby selecting all the check boxes. Click Next.
Note:
The Upgrade Assistant does not verify whether the prerequisites havebeen met.
5. On the Schema Credentials screen(s), specify the database connection details foreach schema you are upgrading (the screen name changes based on the schemaselected):
• Select the database type from the Database Type drop-down menu.
• Enter the database connection details, and click Connect.
• Select the schema you want to upgrade from the Schema User Name drop-down menu, and then enter the password for the schema. Be sure to use thecorrect schema prefix for the schemas you are upgrading.
Note:
The component ID or schema name is changed for UCSUMS schemaas of release 12.1.2, which means the Upgrade Assistant does notautomatically recognize the possible schemas and display them in adrop-down list. You must manually enter the name in a text field. Thename can be either prefix_ORASDPM or prefix_UMS, depending onthe starting point for the upgrade.11g to 12c Upgrades Only: The UCSUMS schema is not auto-populated. Enter prefix_ORASDPM as the user. The upgradeenvironment uses _ORASDPM as the schema name, whereas in the12c environment it is referred to as _UMS.
6. On the Examine screen, review the status of the Upgrade Assistant as it examineseach schema, verifying that the schema is ready for upgrade. If the status isExamine finished, click Next.
If the examine phase fails, Oracle recommends that you cancel the upgrade byclicking No in the Examination Failure dialog. Click View Log to see what causedthe error and refer to Troubleshooting Your Upgrade in Upgrading with theUpgrade Assistant for information on resolving common upgrade errors.
Chapter 4Upgrading Product Schemas
4-37
Note:
• If you resolve any issues detected during the examine phase withoutproceeding with the upgrade, you can start the Upgrade Assistantagain without restoring from backup. However, if you proceed byclicking Yes in the Examination Failure dialog box, you need torestore your pre-upgrade environment from backup before startingthe Upgrade Assistant again.
• Canceling the examination process has no effect on the schemas orconfiguration data; the only consequence is that the information theUpgrade Assistant has collected must be collected again in a futureupgrade session.
7. On the Upgrade Summary screen, review the summary of the options you haveselected for schema upgrade.
Verify that the correct Source and Target Versions are listed for each schema youintend to upgrade.
If you want to save these options to a response file to run the Upgrade Assistantagain later in response (or silent) mode, click Save Response File and providethe location and name of the response file. A silent upgrade performs exactly thesame function that the Upgrade Assistant performs, but you do not have tomanually enter the data again.
Click Upgrade to start the upgrade process.
8. On the Upgrade Progress screen, monitor the status of the upgrade.
Caution:
Allow the Upgrade Assistant enough time to perform the upgrade. Do notcancel the upgrade operation unless absolutely necessary. Doing somay result in an unstable environment.
If any schemas are not upgraded successfully, refer to the Upgrade Assistant logfiles for more information.
Note:
The progress bar on this screen displays the progress of the currentupgrade procedure. It does not indicate the time remaining for theupgrade.
Click Next.
9. If the upgrade is successful: On the Upgrade Success screen, click Close tocomplete the upgrade and close the wizard.
Chapter 4Upgrading Product Schemas
4-38
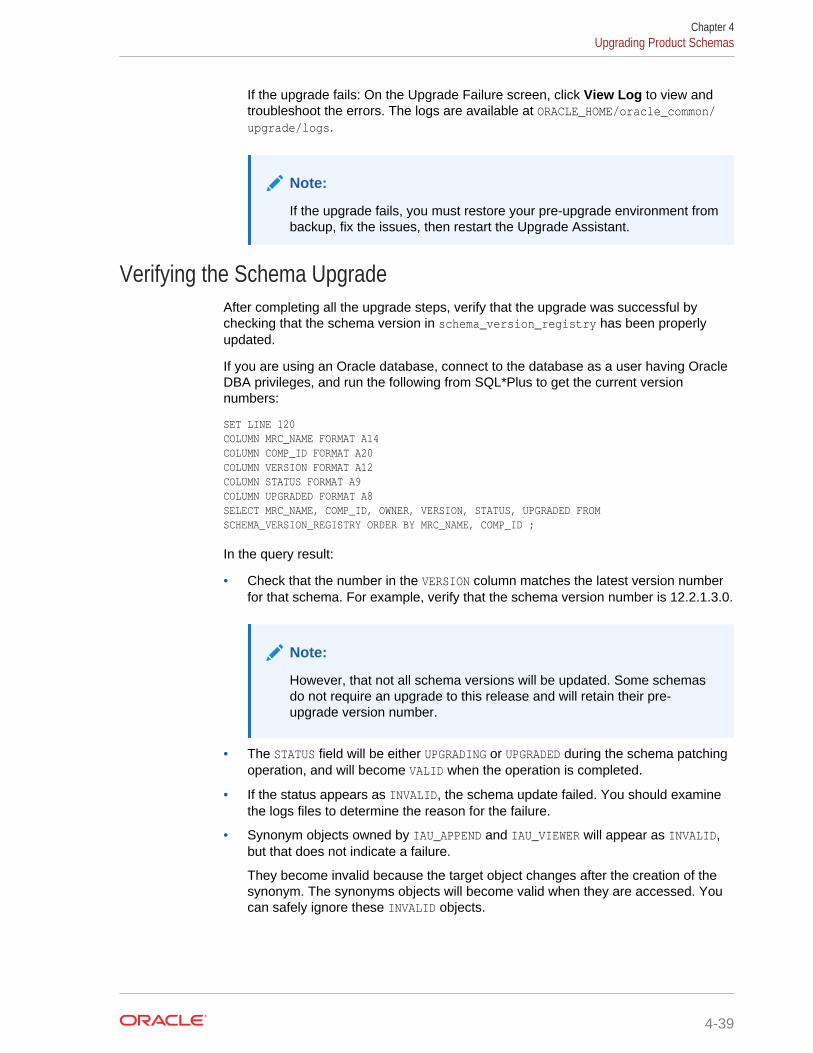
If the upgrade fails: On the Upgrade Failure screen, click View Log to view andtroubleshoot the errors. The logs are available at ORACLE_HOME/oracle_common/upgrade/logs.
Note:
If the upgrade fails, you must restore your pre-upgrade environment frombackup, fix the issues, then restart the Upgrade Assistant.
Verifying the Schema UpgradeAfter completing all the upgrade steps, verify that the upgrade was successful bychecking that the schema version in schema_version_registry has been properlyupdated.
If you are using an Oracle database, connect to the database as a user having OracleDBA privileges, and run the following from SQL*Plus to get the current versionnumbers:
SET LINE 120COLUMN MRC_NAME FORMAT A14COLUMN COMP_ID FORMAT A20COLUMN VERSION FORMAT A12COLUMN STATUS FORMAT A9COLUMN UPGRADED FORMAT A8SELECT MRC_NAME, COMP_ID, OWNER, VERSION, STATUS, UPGRADED FROM SCHEMA_VERSION_REGISTRY ORDER BY MRC_NAME, COMP_ID ;
In the query result:
• Check that the number in the VERSION column matches the latest version numberfor that schema. For example, verify that the schema version number is 12.2.1.3.0.
Note:
However, that not all schema versions will be updated. Some schemasdo not require an upgrade to this release and will retain their pre-upgrade version number.
• The STATUS field will be either UPGRADING or UPGRADED during the schema patchingoperation, and will become VALID when the operation is completed.
• If the status appears as INVALID, the schema update failed. You should examinethe logs files to determine the reason for the failure.
• Synonym objects owned by IAU_APPEND and IAU_VIEWER will appear as INVALID,but that does not indicate a failure.
They become invalid because the target object changes after the creation of thesynonym. The synonyms objects will become valid when they are accessed. Youcan safely ignore these INVALID objects.
Chapter 4Upgrading Product Schemas
4-39

Tuning Application Module for User InterfaceAfter you upgrade the Oracle Identity Manager middle tier successfully, tune theApplication Module (AM) for user interface.
See Tuning Application Module (AM) for User Interface in Oracle Fusion MiddlewareTuning Performance.
About Reconfiguring the DomainRun the Reconfiguration Wizard to reconfigure your domain component configurationsto 12c (12.2.1.3.0).
When you reconfigure a WebLogic Server domain, the following items areautomatically updated, depending on the applications in the domain:
• WebLogic Server core infrastructure
• Domain version
Chapter 4Tuning Application Module for User Interface
4-40
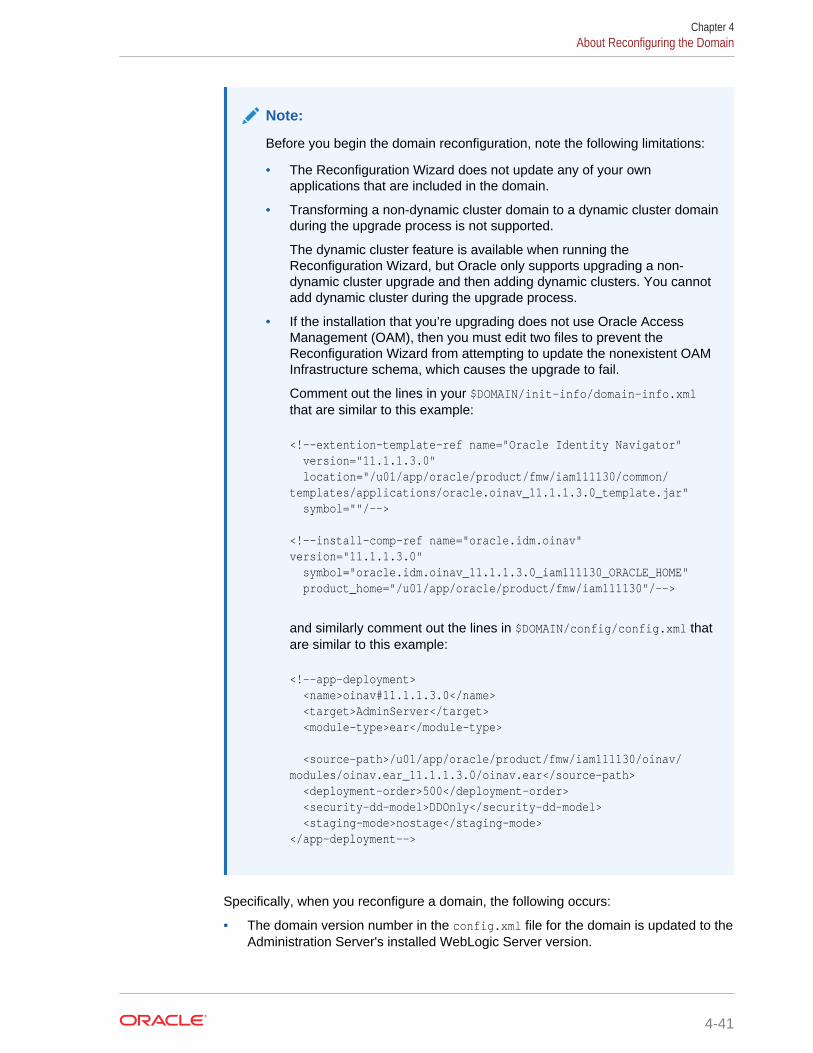
Note:
Before you begin the domain reconfiguration, note the following limitations:
• The Reconfiguration Wizard does not update any of your ownapplications that are included in the domain.
• Transforming a non-dynamic cluster domain to a dynamic cluster domainduring the upgrade process is not supported.
The dynamic cluster feature is available when running theReconfiguration Wizard, but Oracle only supports upgrading a non-dynamic cluster upgrade and then adding dynamic clusters. You cannotadd dynamic cluster during the upgrade process.
• If the installation that you’re upgrading does not use Oracle AccessManagement (OAM), then you must edit two files to prevent theReconfiguration Wizard from attempting to update the nonexistent OAMInfrastructure schema, which causes the upgrade to fail.
Comment out the lines in your $DOMAIN/init-info/domain-info.xmlthat are similar to this example:
<!--extention-template-ref name="Oracle Identity Navigator" version="11.1.1.3.0" location="/u01/app/oracle/product/fmw/iam111130/common/templates/applications/oracle.oinav_11.1.1.3.0_template.jar" symbol=""/-->
<!--install-comp-ref name="oracle.idm.oinav" version="11.1.1.3.0" symbol="oracle.idm.oinav_11.1.1.3.0_iam111130_ORACLE_HOME" product_home="/u01/app/oracle/product/fmw/iam111130"/-->
and similarly comment out the lines in $DOMAIN/config/config.xml thatare similar to this example:
<!--app-deployment> <name>oinav#11.1.1.3.0</name> <target>AdminServer</target> <module-type>ear</module-type>
<source-path>/u01/app/oracle/product/fmw/iam111130/oinav/modules/oinav.ear_11.1.1.3.0/oinav.ear</source-path> <deployment-order>500</deployment-order> <security-dd-model>DDOnly</security-dd-model> <staging-mode>nostage</staging-mode></app-deployment-->
Specifically, when you reconfigure a domain, the following occurs:
• The domain version number in the config.xml file for the domain is updated to theAdministration Server's installed WebLogic Server version.
Chapter 4About Reconfiguring the Domain
4-41
• Reconfiguration templates for all installed Oracle products are automaticallyselected and applied to the domain. These templates define any reconfigurationtasks that are required to make the WebLogic domain compatible with the currentWebLogic Server version.
• Start scripts are updated.
If you want to preserve your modified start scripts, be sure to back them up beforestarting the Reconfiguration Wizard.
Note:
When the domain reconfiguration process starts, you can’t undo the changesthat it makes. Before running the Reconfiguration Wizard, ensure that youhave backed up the domain as covered in the pre-upgrade checklist. If anerror or other interruption occurs while running the Reconfiguration Wizard,you must restore the domain by copying the files and directories from thebackup location to the original domain directory. This is the only way toensure that the domain has been returned to its original state beforereconfiguration.
Follow these instructions to reconfigure the existing domain using the ReconfigurationWizard. See Reconfiguring WebLogic Domains in Upgrading Oracle WebLogic Server.
• Backing Up the Domain
• Starting the Reconfiguration Wizard
• Reconfiguring the Oracle Identity Manager DomainNavigate through the screens in the Reconfiguration Wizard to reconfigure yourexisting domain.
Backing Up the DomainBefore running the Reconfiguration Wizard, create a backup copy of the domaindirectory.
To create a backup of the domain directory:
1. Copy the source domain to a separate location to preserve the contents.
(Windows) copy C:\domains\mydomain to C:\domains\mydomain_backup.
(UNIX) cp mydomain /domains/mydomain_backup
2. Before updating the domain on each remote Managed Server, create a backupcopy of the domain directory on each remote machine.
3. Verify that the backed up versions of the domain are complete.
If domain reconfiguration fails for any reason, you must copy all files and directoriesfrom the backup directory into the original domain directory to ensure that the domainis returned entirely to its original state before reconfiguration.
Chapter 4About Reconfiguring the Domain
4-42
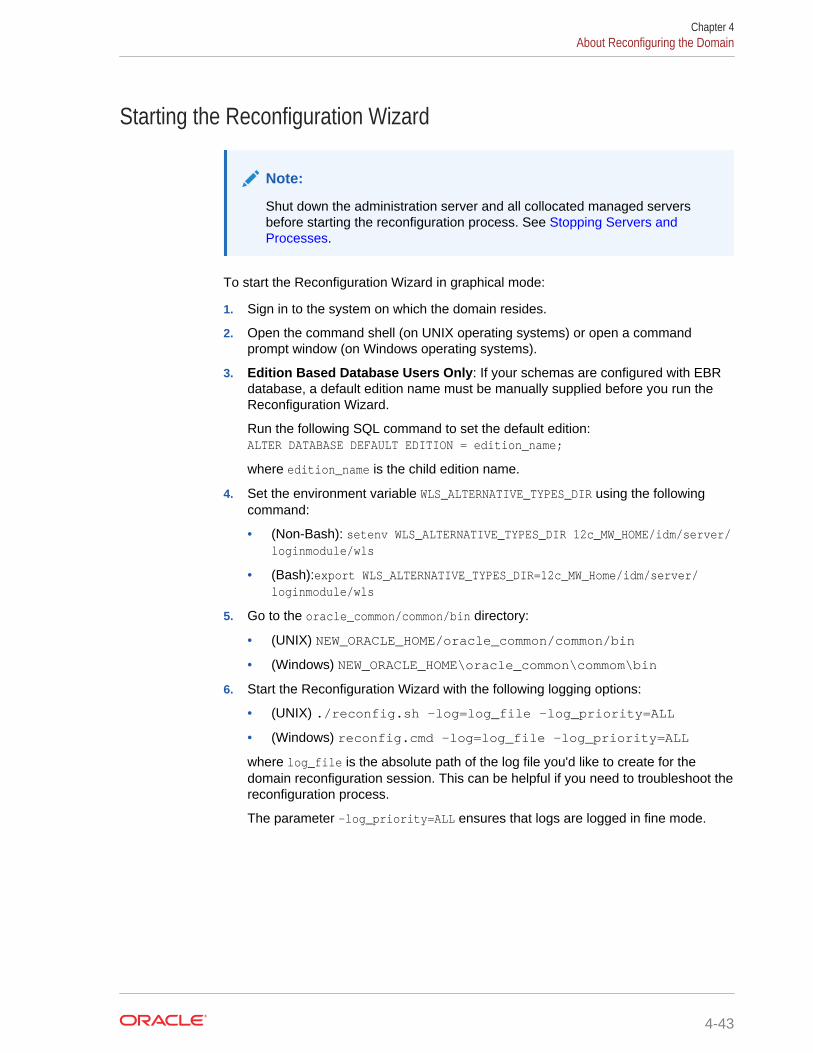
Starting the Reconfiguration Wizard
Note:
Shut down the administration server and all collocated managed serversbefore starting the reconfiguration process. See Stopping Servers andProcesses.
To start the Reconfiguration Wizard in graphical mode:
1. Sign in to the system on which the domain resides.
2. Open the command shell (on UNIX operating systems) or open a commandprompt window (on Windows operating systems).
3. Edition Based Database Users Only: If your schemas are configured with EBRdatabase, a default edition name must be manually supplied before you run theReconfiguration Wizard.
Run the following SQL command to set the default edition:ALTER DATABASE DEFAULT EDITION = edition_name;
where edition_name is the child edition name.
4. Set the environment variable WLS_ALTERNATIVE_TYPES_DIR using the followingcommand:
• (Non-Bash): setenv WLS_ALTERNATIVE_TYPES_DIR 12c_MW_HOME/idm/server/loginmodule/wls
• (Bash):export WLS_ALTERNATIVE_TYPES_DIR=12c_MW_Home/idm/server/loginmodule/wls
5. Go to the oracle_common/common/bin directory:
• (UNIX) NEW_ORACLE_HOME/oracle_common/common/bin
• (Windows) NEW_ORACLE_HOME\oracle_common\commom\bin
6. Start the Reconfiguration Wizard with the following logging options:
• (UNIX) ./reconfig.sh -log=log_file -log_priority=ALL
• (Windows) reconfig.cmd -log=log_file -log_priority=ALL
where log_file is the absolute path of the log file you'd like to create for thedomain reconfiguration session. This can be helpful if you need to troubleshoot thereconfiguration process.
The parameter -log_priority=ALL ensures that logs are logged in fine mode.
Chapter 4About Reconfiguring the Domain
4-43
Note:
When you run this command, the following error message might appearto indicate that the default cache directory is not valid:
*sys-package-mgr*: can't create package cache dir
You can change the cache directory by setting the environment variableCONFIG_JVM_ARGS. For example:
CONFIG_JVM_ARGS=-Dpython.cachedir=valid_directory
Note:
In this section, NEW_ORACLE_HOME refers to the 12c Oracle Home.
Reconfiguring the Oracle Identity Manager DomainNavigate through the screens in the Reconfiguration Wizard to reconfigure yourexisting domain.
Note:
If the source is a clustered environment, run the Reconfiguration Wizard onthe primary node only. Use the pack/unpack utility to apply the changes toother cluster members in the domain.
To reconfigure the domain with the Reconfiguration Wizard:
1. On the Select Domain screen, specify the location of the domain you want toupgrade or click Browse to navigate and select the domain directory. Click Next.
2. On the Reconfiguration Setup Progress screen, view the progress of the setupprocess. When complete, click Next.
During this process:
• The reconfiguration templates for your installed products, including FusionMiddleware products, are automatically applied. This updates various domainconfiguration files such as config.xml, config-groups.xml,and security.xml (among others).
• Schemas, scripts, and other such files that support your Fusion Middlewareproducts are updated.
• The domain upgrade is validated.
3. On the Domain Mode and JDK screen, select the JDK to use in the domain or clickBrowse to navigate to the JDK you want to use. The supported JDK version for12c (12.2.1.3.0) is 1.8.0_131 and later. Click Next.
Chapter 4About Reconfiguring the Domain
4-44
Note:
You cannot change the Domain Mode at this stage.
For a list of JDKs that are supported for a specific platform, see Oracle FusionMiddleware Supported System Configurations.
4. On the Database Configuration Type screen, select RCU Data to connect to theServer Table (_STB) schema.
Enter the database connection details using the RCU service table (_STB)schema credentials and click Get RCU Configuration.
The Reconfiguration Wizard uses this connection to automatically configure thedata sources required for components in your domain.
Note:
By default Oracle’s Driver (Thin) for Service connections; Versions:Any is the selected driver. If you specified an instance name in yourconnection details — instead of the service name — you must selectOracle’s Driver (Thin) for pooled instance connections; Versions:Any If you do not change the driver type, then the connection will fail.
Note:
For any existing 11g datasource, the reconfiguration will preserve theexisting values. For new datasources where the schema was created for12c by the RCU, the default connection data will be retrieved from the_STB schema. If no connection data for a given schema is found in the_STB schema, then the default connection data is used.
If the check is successful, click Next. If the check fails, reenter the connectiondetails correctly and try again.
Note:
If you are upgrading from 11g, and your database has _OPSS or _IAU11g database schemas, you must manually enter database connectiondetails for those schemas. These schemas were not required in 11g andhad to be created manually. Users could assign any name to theseschemas, therefore the Reconfiguration Wizard does not recognizethem. When providing connection information for _IAU, use theIAU_APPEND user information.
5. On the JDBC Component Schema screen, verify that the DBMS/Service and theHost name is correct for each component schema and click Next.
Chapter 4About Reconfiguring the Domain
4-45
Note:
For all of the schemas except for OPSS, the host, port, and servicedetails will be auto-populated. You must enter the OPSS schemacredentials manually.
6. On the JDBC Component Schema Test screen, the component schemaconnections are testes. The result of the test is indicated in the Status column.
When the check is complete, click Next.
7. On the Node Manager screen, go for the default option or select Create NewConfiguration for configuring Node Manager per your requirement. In both thecases, specify the WebLogic Administration user credentials for Node Managerdetails.
8. On the Advanced Configuration screen, you can select all categories for which youwant to perform advanced configuration. For each category you select, theappropriate configuration screen is displayed to allow you to perform advancedconfiguration.
Note:
The categories that are listed on the Advanced Configuration screendepend on the resources defined in the templates you selected for thedomain.
For this upgrade, select none of the options and click Next.
9. On the Configuration Summary screen, review the detailed configuration settingsof the domain before continuing.
You can limit the items that are displayed in the right-most panel by selecting afilter option from the View drop-down list.
To change the configuration, click Back to return to the appropriate screen. Toreconfigure the domain, click Reconfig.
Note:
The location of the domain does not change when you reconfigure it.
10. The Reconfiguration Progress screen displays the progress of the reconfigurationprocess.
During this process:
• Domain information is extracted, saved, and updated.
• Schemas, scripts, and other such files that support your Fusion Middlewareproducts are updated.
When the progress bar shows 100%, click Next.
11. The End of Configuration screen indicates whether the reconfiguration processcompleted successfully or failed. It also displays the location of the domain that
Chapter 4About Reconfiguring the Domain
4-46
was reconfigured as well as the Administration Server URL (including the listenport). If the reconfiguration is successful, it displays Oracle WebLogic ServerReconfiguration Succeeded.
If the reconfiguration process did not complete successfully, an error message isdisplayed indicates the reason. Take appropriate action to resolve the issue. If youcannot resolve the issue, contact My Oracle Support.
Note the Domain Location and the Admin Server URL for further operations.
Upgrading Domain Component ConfigurationsAfter reconfiguring the domain, use the Upgrade Assistant to upgrade the domaincomponent configurations inside the domain to match the updated domainconfiguration.
• Starting the Upgrade AssistantRun the Upgrade Assistant to upgrade product schemas, domain componentconfigurations, or standalone system components to 12c (12.2.1.3.0). Oraclerecommends that you run the Upgrade Assistant as a non-SYSDBA user,completing the upgrade for one domain at a time.
• Upgrading Oracle Identity Manager Domain Component ConfigurationsNavigate through the screens in the Upgrade Assistant to upgrade componentconfigurations in the WebLogic domain.
• Verifying the Domain-Specific-Component Configurations UpgradeTo verify that the domain-specific-component configurations upgrade wassuccessful, sign in to the Administration console and the Oracle EnterpriseManager Fusion Middleware Control and verify that the version numbers for eachcomponent is 12.2.1.3.0.
Starting the Upgrade AssistantRun the Upgrade Assistant to upgrade product schemas, domain componentconfigurations, or standalone system components to 12c (12.2.1.3.0). Oraclerecommends that you run the Upgrade Assistant as a non-SYSDBA user, completingthe upgrade for one domain at a time.
To start the Upgrade Assistant:
Note:
Before you start the Upgrade Assistant, make sure that the JVM characterencoding is set to UTF-8 for the platform on which the Upgrade Assistant isrunning. If the character encoding is not set to UTF-8, then you will not beable to download files containing Unicode characters in their names. Thiscan cause the upgrade to fail.
To ensure that UTF-8 is used by the JVM, use the JVM option -Dfile.encoding=UTF-8.
1. Go to the oracle_common/upgrade/bin directory:
• (UNIX) NEW_ORACLE_HOME/oracle_common/upgrade/bin
Chapter 4Upgrading Domain Component Configurations
4-47
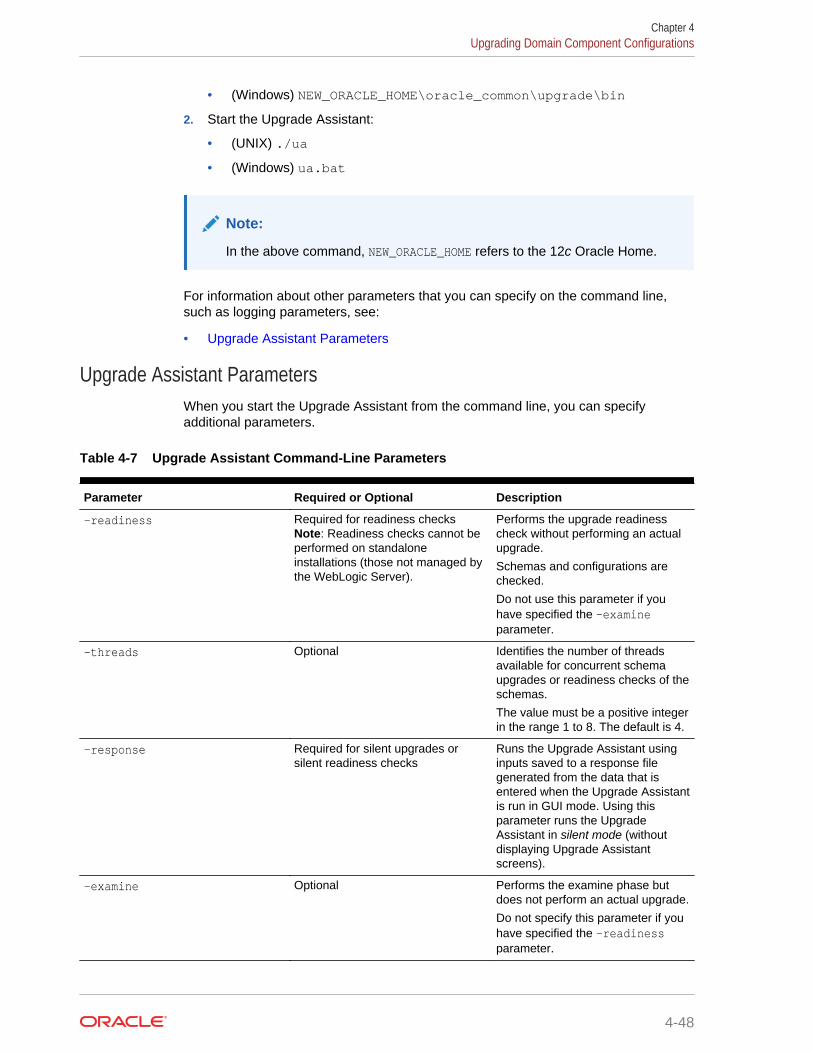
• (Windows) NEW_ORACLE_HOME\oracle_common\upgrade\bin
2. Start the Upgrade Assistant:
• (UNIX) ./ua
• (Windows) ua.bat
Note:
In the above command, NEW_ORACLE_HOME refers to the 12c Oracle Home.
For information about other parameters that you can specify on the command line,such as logging parameters, see:
• Upgrade Assistant Parameters
Upgrade Assistant ParametersWhen you start the Upgrade Assistant from the command line, you can specifyadditional parameters.
Table 4-7 Upgrade Assistant Command-Line Parameters
Parameter Required or Optional Description
-readiness Required for readiness checksNote: Readiness checks cannot beperformed on standaloneinstallations (those not managed bythe WebLogic Server).
Performs the upgrade readinesscheck without performing an actualupgrade.
Schemas and configurations arechecked.
Do not use this parameter if youhave specified the -examineparameter.
-threads Optional Identifies the number of threadsavailable for concurrent schemaupgrades or readiness checks of theschemas.
The value must be a positive integerin the range 1 to 8. The default is 4.
-response Required for silent upgrades orsilent readiness checks
Runs the Upgrade Assistant usinginputs saved to a response filegenerated from the data that isentered when the Upgrade Assistantis run in GUI mode. Using thisparameter runs the UpgradeAssistant in silent mode (withoutdisplaying Upgrade Assistantscreens).
-examine Optional Performs the examine phase butdoes not perform an actual upgrade.
Do not specify this parameter if youhave specified the -readinessparameter.
Chapter 4Upgrading Domain Component Configurations
4-48
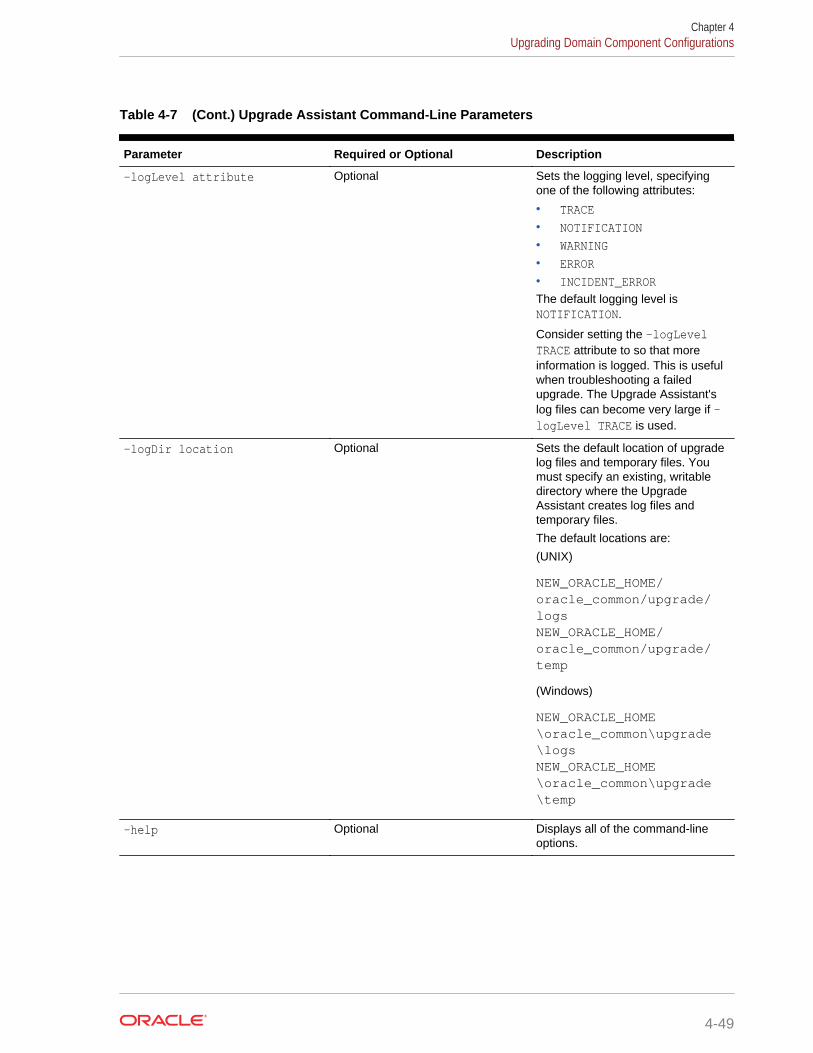
Table 4-7 (Cont.) Upgrade Assistant Command-Line Parameters
Parameter Required or Optional Description
-logLevel attribute Optional Sets the logging level, specifyingone of the following attributes:
• TRACE• NOTIFICATION• WARNING• ERROR• INCIDENT_ERRORThe default logging level isNOTIFICATION.
Consider setting the -logLevelTRACE attribute to so that moreinformation is logged. This is usefulwhen troubleshooting a failedupgrade. The Upgrade Assistant'slog files can become very large if -logLevel TRACE is used.
-logDir location Optional Sets the default location of upgradelog files and temporary files. Youmust specify an existing, writabledirectory where the UpgradeAssistant creates log files andtemporary files.
The default locations are:
(UNIX)
NEW_ORACLE_HOME/oracle_common/upgrade/logs NEW_ORACLE_HOME/oracle_common/upgrade/temp
(Windows)
NEW_ORACLE_HOME\oracle_common\upgrade\logs NEW_ORACLE_HOME\oracle_common\upgrade\temp
-help Optional Displays all of the command-lineoptions.
Chapter 4Upgrading Domain Component Configurations
4-49
Upgrading Oracle Identity Manager Domain ComponentConfigurations
Navigate through the screens in the Upgrade Assistant to upgrade componentconfigurations in the WebLogic domain.
After running the Reconfiguration Wizard to reconfigure the WebLogic domain to 12c(12.2.1.3.0), you must run the Upgrade Assistant to upgrade the domain componentconfigurations to match the updated domain configuration.
To upgrade domain component configurations with the Upgrade Assistant:
1. On the Welcome screen, review an introduction to the Upgrade Assistant andinformation about important pre-upgrade tasks. Click Next.
Note:
For more information about any Upgrade Assistant screen, click Help onthe screen.
2. On the next screen:
• Select All Configurations Used By a Domain. The screen name changes toWebLogic Components.
• In the Domain Directory field, enter the WebLogic domain directory path.
Click Next.
3. If your pre-upgrade environment has multiple WebLogic domains, but the OracleWeb Services Manager (OWSM) Policy Manager is in only one domain, andOWSM agents are in the other domains: On the OWSM Policy Manager screen,provide the credentials for the WebLogic Administration Server domain where theOracle Web Services Manager (OWSM) Policy Manager is deployed.
4. On the Component List screen, verify that the list includes all the components forwhich you want to upgrade configurations and click Next.
If you do not see the components you want to upgrade, click Back to go to theprevious screen and specify a different domain.
5. On the Prerequisites screen, acknowledge that the prerequisites have been metby selecting all the check boxes. Click Next.
Note:
The Upgrade Assistant does not verify whether the prerequisites havebeen met.
6. If there are remote managed servers hosting User Messaging Services (UMS)configuration files: On the UMS Configuration screen, provide the credentials tothese servers so that the Upgrade Assistant can access the configuration files.
Chapter 4Upgrading Domain Component Configurations
4-50
Note:
You may need to manually copy the UMS configuration files if theUpgrade Assistant is unable to locate them. See Error while CopyingUser Messaging Service (UMS) Configuration Files.
7. On the Old(i.e 11g) OIM Home Location screen, select 11g Source, and specifythe absolute path to the 11.1.2.3.0 OIM Oracle Home.
Click Next.
8. On the Examine screen, review the status of the Upgrade Assistant as it examineseach component, verifying that the component configuration is ready for upgrade.If the status is Examine finished, click Next.
If the examine phase fails, Oracle recommends that you cancel the upgrade byclicking No in the Examination Failure dialog. Click View Log to see what causedthe error and refer to Troubleshooting Your Upgrade in Upgrading with theUpgrade Assistant for information on resolving common upgrade errors.
Note:
• If you resolve any issues detected during the examine phase withoutproceeding with the upgrade, you can start the Upgrade Assistantagain without restoring from backup. However, if you proceed byclicking Yes in the Examination Failure dialog box, you need torestore your pre-upgrade environment from backup before startingthe Upgrade Assistant again.
• Canceling the examination process has no effect on theconfiguration data; the only consequence is that the information theUpgrade Assistant has collected must be collected again in a futureupgrade session.
9. On the Upgrade Summary screen, review the summary of the options you haveselected for component configuration upgrade.
The response file collects and stores all the information that you have entered, andenables you to perform a silent upgrade at a later time. The silent upgradeperforms exactly the same function that the Upgrade Assistant performs, but youdo not have to manually enter the data again. If you want to save these options toa response file, click Save Response File and provide the location and name ofthe response file.
Click Upgrade to start the upgrade process.
10. On the Upgrade Progress screen, monitor the status of the upgrade.
Caution:
Allow the Upgrade Assistant enough time to perform the upgrade. Do notcancel the upgrade operation unless absolutely necessary. Doing somay result in an unstable environment.
Chapter 4Upgrading Domain Component Configurations
4-51
If any components are not upgraded successfully, refer to the Upgrade Assistantlog files for more information.
Note:
The progress bar on this screen displays the progress of the currentupgrade procedure. It does not indicate the time remaining for theupgrade.
Click Next.
11. If the upgrade is successful: On the Upgrade Success screen, click Close tocomplete the upgrade and close the wizard. The Post-Upgrade Actions windowdescribes the manual tasks you must perform to make components functional inthe new installation. This window appears only if a component has post-upgradesteps.
If the upgrade fails: On the Upgrade Failure screen, click View Log to view andtroubleshoot the errors. The logs are available at NEW_ORACLE_HOME/oracle_common/upgrade/logs.
Note:
If the upgrade fails you must restore your pre-upgrade environment frombackup, fix the issues, then restart the Upgrade Assistant.
Verifying the Domain-Specific-Component Configurations UpgradeTo verify that the domain-specific-component configurations upgrade was successful,sign in to the Administration console and the Oracle Enterprise Manager FusionMiddleware Control and verify that the version numbers for each component is12.2.1.3.0.
To sign in to the Administration Console, go to: http://administration_server_host:administration_server_port/console
To sign in to Oracle Enterprise Manager Fusion Middleware Control Console, go to:http://administration_server_host:administration_server_port/em
Chapter 4Upgrading Domain Component Configurations
4-52
Note:
After upgrade, make sure you run the administration tools from the new 12cOracle home directory and not from the previous Oracle home directory.
During the upgrade process, some OWSM documents, including policy setsand predefined documents such as policies and assertion templates, mayneed to be upgraded. If a policy set or a predefined document is upgraded,its version number is incremented by 1.
If you created the FMW user to run the Upgrade Assistant, ensure that youdelete the account after verifying your upgrade was successful.
Post-Upgrade TaskAfter upgrading from 11g to 12c, you need to copy any custom configuration present inyour 11g Middleware home to the 12c Middleware home.
• If you have scheduled jobs with parameters referring to the 11g Middleware home,then you need to update them to the corresponding 12c Middleware home.
• To preserve customized configuration data (if present), copy the contents fromstandard directories such as XLIntegrations and connectorResourcesunder the 11g Middleware home to the corresponding directories under the 12cMiddleware home.
Copying folders to the 12c home directoryWhen upgrading to 12c, you must manually some folders to the 12c home directory.
Complete the following steps:
1. Go to the 11g home directory: MW_HOME
2. Copy the following folders.
• plugins
• JavaTasks
3. Paste the copied folders in the 12c home directory: ORACLE_HOME
Starting the ServersAfter you upgrade Oracle Identity Manager, start the servers.
You must start the servers in the following order:
1. Start the Administration Server.
2. Start the Oracle SOA Suite Managed Server with the Administration Server URL,and the BPM property set to TRUE. For example:
./startManagedWebLogic.sh soa_server1 t3://weblogic_admin_host:weblogic_admin_port —Dbpm.enabled=true
Chapter 4Post-Upgrade Task
4-53

3. Once the SOA server is in running state, start the Oracle Identity ManagerManaged Server with the Administration Server URL.
This time, OIM bootstrap process will be executed, and after successful bootstrap,OIM Managed Server will be shut down automatically.
4. Shut down the SOA Managed Server and the Administration Server.
5. Start the Node Manager.
6. Start the Administration Server.
7. Start the Oracle SOA Suite Managed Server (without BPM property) and OracleIdentity Manager Managed Servers.
For more information about starting the servers and processes, see Starting Serversand Processes.
For more information about stopping the servers and processes, see Stopping Serversand Processes.
• Starting Servers and ProcessesAfter a successful upgrade, start all processes and servers, including theAdministration Server and any Managed Servers.
Starting Servers and ProcessesAfter a successful upgrade, start all processes and servers, including theAdministration Server and any Managed Servers.
The components may be dependent on each other so they must be started in thecorrect order.
Note:
The procedures in this section describe how to start servers and processusing the WLST command line or a script. You can also use the OracleFusion Middleware Control and the Oracle WebLogic Server AdministrationConsole. See Starting and Stopping Administration and Managed Serversand Node Manager in Administering Oracle Fusion Middleware.
To start your Fusion Middleware environment, follow the steps below.
Step 1: Start the Administration Server
When you start the Administration Server, you also start the processes running in theAdministration Server, including the WebLogic Server Administration Console andFusion Middleware Control.
To start the Administration Server, use the startWebLogic script:
• (UNIX) EXISTING_DOMAIN_HOME/bin/startWebLogic.sh
• (Windows) EXISTING_DOMAIN_HOME\bin\startWebLogic.cmd
When prompted, enter your user name, password, and the URL of the AdministrationServer.
Chapter 4Starting the Servers
4-54
Step 2: Start Node Manager
To start Node Manager, use the startNodeManager script:
• (UNIX) EXISTING_DOMAIN_HOME/bin/startNodeManager.sh
• (Windows) EXISTING_DOMAIN_HOME\bin\startNodeManager.cmd
Step 4: Start the Managed Servers
To start a WebLogic Server Managed Server, use the startManagedWebLogic script:
• (UNIX) EXISTING_DOMAIN_HOME/bin/startManagedWebLogic.shmanaged_server_name admin_url
• (Windows) EXISTING_DOMAIN_HOME\bin\startManagedWebLogic.cmdmanaged_server_name admin_url
When prompted, enter your user name and password.
Note:
• The startup of a Managed Server will typically start the applications thatare deployed to it. Therefore, it should not be necessary to manuallystart applications after the Managed Server startup.
• The Mobile Security Manager (MSM) servers are not supported in 12c.After restarting the servers, the 11g configurations of MSM servers, likeomsm_server1 or WLS_MSM1, might remain. Ignore these configurationsand do not restart the MSM servers.
Step 5: Start System Components
To start system components, such as Oracle HTTP Server, use the startComponentscript:
• (UNIX) OHS_INSTANCE_HOME/bin opmnctl startall
• (Windows) OHS_INSTANCE_HOME\bin opmnctl startall
You can start system components in any order.
Upgrading Oracle Identity Manager Design ConsoleUpgrade the Oracle Identity Manager Design Console after you upgrade the OracleIdentity Manager (OIM) domain component configurations.
To upgrade the Oracle Identity Manager Design Console, complete the followingsteps:
1. Replace the 11.1.2.3.0 designconsole/config/xlconfig.xml with the 12c(12.2.1.3.0) designconsole/config/xlconfig.xml file.
2. If the host name and the port of the OIM Managed Server has changed, updatethe URL in the Design Console’s start window accordingly.
Chapter 4Upgrading Oracle Identity Manager Design Console
4-55
Completing the Post-Upgrade Tasks for SSL Enabled SetupIf you are upgrading Oracle Identity Manager SSL enabled sertup, you must performthe required post-upgrade tasks to complete the upgrade process.
Complete the following tasks if you have upgraded an SSL enabled setup:
1. Changes done for SSL settings in setDomainEnv.sh, startWeblogic.sh,startManagedWeblogic.sh, and datasources are lost after upgrade. Re-do all ofthe changes.
2. Start the WebLogic Administration Server. To start the Administration Server, usethe startWebLogic script:
• (UNIX) EXISTING_DOMAIN_HOME/bin/startWebLogic.sh
• (Windows) EXISTING_DOMAIN_HOME\bin\startWebLogic.cmd
When prompted, enter your user name, password, and the URL of theAdministration Server.
3. Make necessary changes to the following newly created datasources, for SSLsettings:
• LocalSvcTblDataSource
• opss-audit-DBDS
• opss-audit-viewDS
• opss-data-source
• WLSSchemaDataSource
4. In case of Customer Identity and Java Standard Trust, import your identity trustcertificate to the new JDK home. The 12c (12.2.1.3.0) uses jdk1.8.0_131. Toimport the identity trust certificate to the new JDK home, use the followingcommand:
./keytool -importcert -alias startssl -keystore JAVA_HOME/jre/lib/security/cacerts -storepass changeit -file supportcert.pem
5. Verify that all of the SSL configuration changes including the SSL port relatedchanges done in 11g (pre upgrade), are present post upgrade. If the changes arelost, you must redo them post upgrade. Some of the SSL configuration changesinclude:
• OimFrontEndURL
• backOfficeURL
• SOA Server URL
• ForeignJNDIProvider-SOA
For more information about configuring SSL for Oracle Identity Goverenance, see Updating Oracle Identity Governance in Administering Oracle Identity Governance.
Installing Standalone Oracle BI PublisherWhen you upgrade Oracle Identity Manager 11.1.2.3.0 to Oracle Identity Governance12c (12.2.1.3.0), the embedded Oracle BI Publisher present in the 11.1.2.3.0
Chapter 4Completing the Post-Upgrade Tasks for SSL Enabled Setup
4-56
deployment, is removed. Therefore, you must install a new standalone Oracle BIPublisher 12c (12.2.1.3.0) post upgrade, for configuring the Oracle IdentityGovernance reports.
For information about installing and configuring Oracle BI Publisher 12c (12.2.1.3.0),see Installing and Configuring Oracle BI Publisher in Developing and CustomizingApplications for Oracle Identity Governance.
For information about integrating standalone Oracle BI Publisher with Oracle IdentityGovernance 12c (12.2.1.3.0), see Integrating Standalone BI Publisher with OracleIdentity Governance in Developing and Customizing Applications for Oracle IdentityGovernance.
Chapter 4Installing Standalone Oracle BI Publisher
4-57
Part IIUpgrading Oracle Identity and AccessManagement Highly AvailableEnvironments
You can upgrade Oracle Identity and Access Management highly available 11gRelease 2(11.1.2.3.0) environments to 12c (12.2.1.3.0) using the procedure describedin this part.
Topics
• Upgrading Oracle Access Management Highly Available EnvironmentsDescribes the process of upgrading an Oracle Access Management highlyavailable environments from 11g Release 2 (11.1.2.3.0) to 12c (12.2.1.3.0).
• Upgrading Oracle Identity Manager Highly Available EnvironmentsDescribes the process of upgrading an Oracle Identity Manager highly availableenvironment from 11g Release 2 (11.1.2.3.0) to Oracle Identity Governance 12c(12.2.1.3.0).
• Upgrading Oracle Access Management Multi-Data Center EnvironmentsYou can upgrade Oracle Access Management deployed across multi-data centers(MDC) from 11g Release 2 (11.1.2.3.0) to 12c (12.2.1.3.0).
• Upgrading OIM-OAM Integrated Environments set up ManuallyYou can upgrade Oracle Identity Manager (OIM), Oracle Access Management(OAM) integrated split domain highly available environments that are set upmanually, from 11g Release 2 (11.1.2.3.0) to 12c (12.2.1.3.0) using the upgradeprocedure described in this section.
• Upgrading OIM-OAM Integrated Environments set up Using Life CycleManagement ToolIf you had set up an Oracle Identity Manager – Oracle Access Managementintegrated environment in 11g Release 2 (11.1.2.3.0) using the Life CycleManagement (LCM) tool, follow the instructions in this chapter to upgrade thesame to 12c (12.2.1.3.0).
5Upgrading Oracle Access ManagementHighly Available Environments
Describes the process of upgrading an Oracle Access Management highly availableenvironments from 11g Release 2 (11.1.2.3.0) to 12c (12.2.1.3.0).
Topics
• About the Oracle Access Management Multinode Upgrade ProcessReview the topology and the roadmap for an overview of the upgrade process forOracle Access Management highly available environments.
• Disabling Deprecated Services in OAMApplies only to Mobile and Social, Security Token Service, and Mobile SecurityService users.
• Creating 12c Middleware Home Folder on OAMHOST1 and OAMHOST2Create a folder for 12c Middleware Home on both OAMHOST1 and OAMHOST2.
• Installing Product Distributions on OAMHOST1 and OAMHOST2Install the 12c binaries on both OAMHOST1 and OAMHOST2.
• Upgrading Schemas on OAMHOST1Upgrade all of the necessary schemas for Oracle Access Management, onOAMHOST1 by using the Upgrade Assistant.
• Reconfiguring the Domain on OAMHOST1Run the Reconfiguration Wizard on OAMHOST1 to reconfigure your domaincomponent configurations to 12c (12.2.1.3.0).
• Replicating the Domain Configurations on OAMHOST2Replicate the domain configurations on OAMHOST2. This involves packing theupgraded domain on OAMHOST1 and unpacking it on OAMHOST2.
• Upgrading Domain Component Configurations on OAMHOST1 and OAMHOST2After reconfiguring the domain, use the Upgrade Assistant to upgrade thedomain component configurations inside the domain to match the updated domainconfiguration.
• Starting the Servers on OAMHOST1 and OAMHOST2After you upgrade Oracle Access Management on both OAMHOST1 andOAMHOST2, start the servers.
• Enabling WebGates to Work With Oracle Access Management 12cAfter upgrading to Oracle Access Management 12.2.1.3, the earlier version ofWebGates continues to work with Oracle Access Management 12c. However, toleverage the latest security features of Oracle Access Management andWebGates 12c (12.2.1.3.0), you must upgrade the WebGates to 12c (12.2.1.3.0),and register the agent's profile with the Oracle Access Management Server 12c.
• Updating the java.security FileIf you have multiple components of Oracle Identity and Access Management(Oracle Access Management, Oracle Identity Manager, WebGates and so on)
5-1
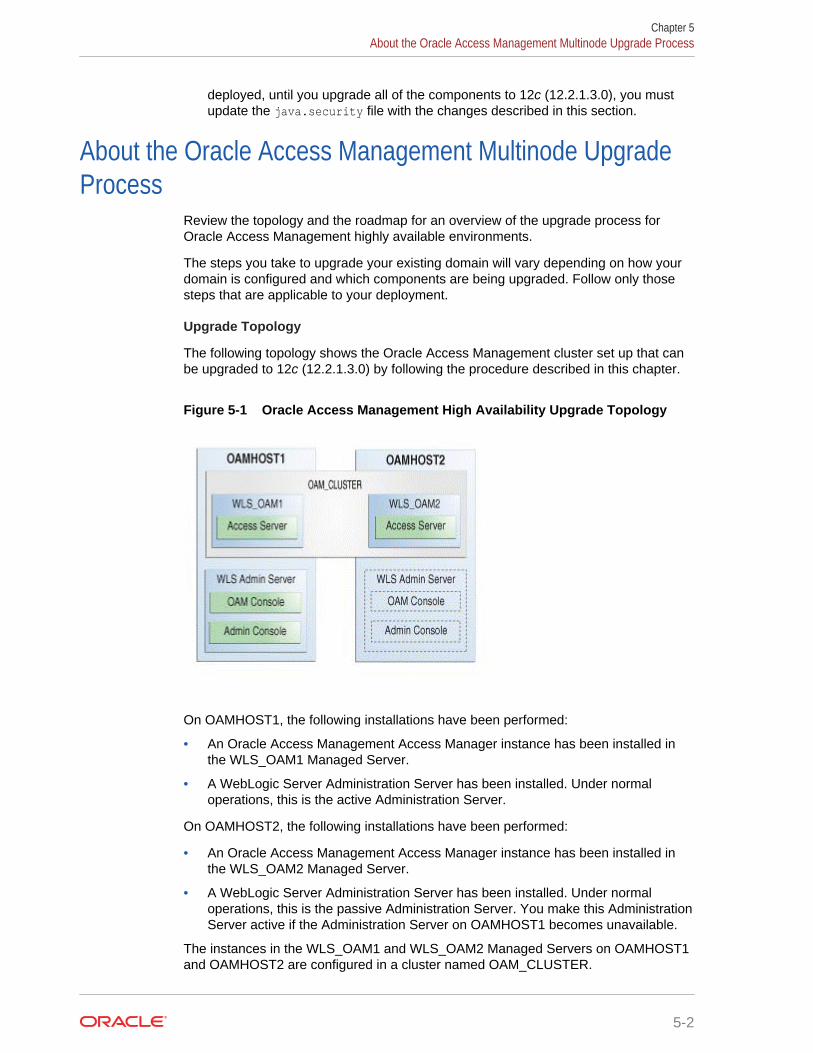
deployed, until you upgrade all of the components to 12c (12.2.1.3.0), you mustupdate the java.security file with the changes described in this section.
About the Oracle Access Management Multinode UpgradeProcess
Review the topology and the roadmap for an overview of the upgrade process forOracle Access Management highly available environments.
The steps you take to upgrade your existing domain will vary depending on how yourdomain is configured and which components are being upgraded. Follow only thosesteps that are applicable to your deployment.
Upgrade Topology
The following topology shows the Oracle Access Management cluster set up that canbe upgraded to 12c (12.2.1.3.0) by following the procedure described in this chapter.
Figure 5-1 Oracle Access Management High Availability Upgrade Topology
On OAMHOST1, the following installations have been performed:
• An Oracle Access Management Access Manager instance has been installed inthe WLS_OAM1 Managed Server.
• A WebLogic Server Administration Server has been installed. Under normaloperations, this is the active Administration Server.
On OAMHOST2, the following installations have been performed:
• An Oracle Access Management Access Manager instance has been installed inthe WLS_OAM2 Managed Server.
• A WebLogic Server Administration Server has been installed. Under normaloperations, this is the passive Administration Server. You make this AdministrationServer active if the Administration Server on OAMHOST1 becomes unavailable.
The instances in the WLS_OAM1 and WLS_OAM2 Managed Servers on OAMHOST1and OAMHOST2 are configured in a cluster named OAM_CLUSTER.
Chapter 5About the Oracle Access Management Multinode Upgrade Process
5-2
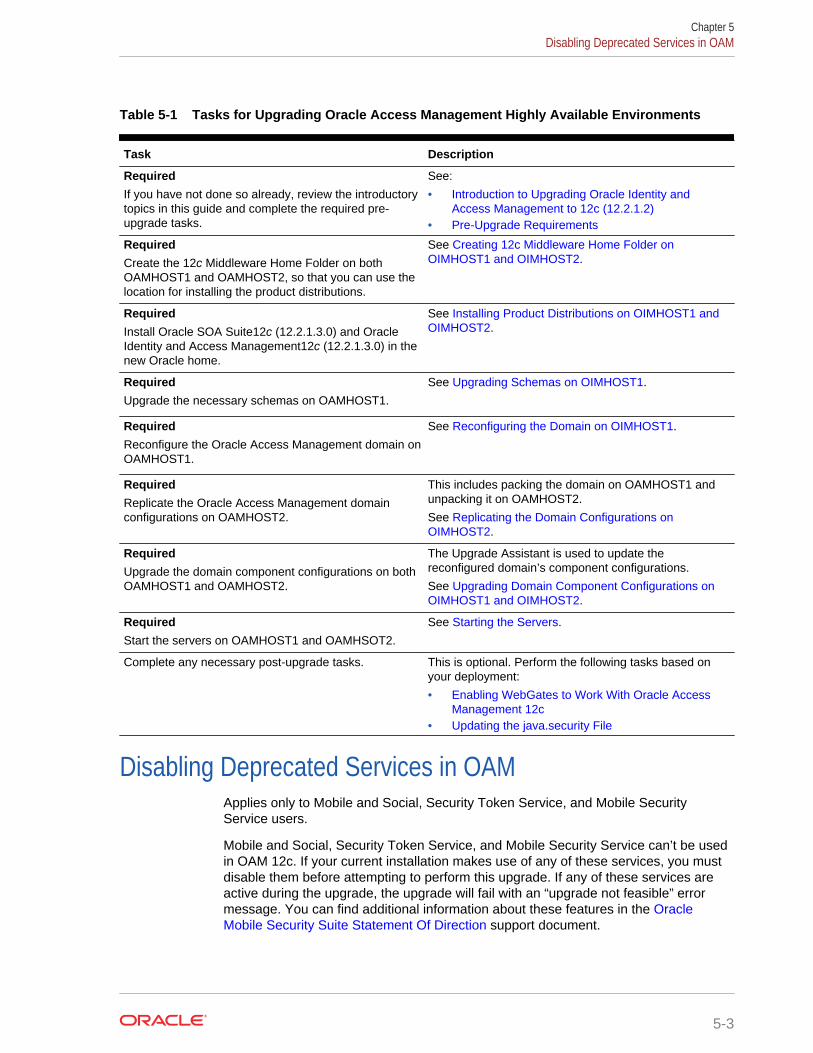
Table 5-1 Tasks for Upgrading Oracle Access Management Highly Available Environments
Task Description
RequiredIf you have not done so already, review the introductorytopics in this guide and complete the required pre-upgrade tasks.
See:
• Introduction to Upgrading Oracle Identity andAccess Management to 12c (12.2.1.2)
• Pre-Upgrade Requirements
RequiredCreate the 12c Middleware Home Folder on bothOAMHOST1 and OAMHOST2, so that you can use thelocation for installing the product distributions.
See Creating 12c Middleware Home Folder onOIMHOST1 and OIMHOST2.
RequiredInstall Oracle SOA Suite12c (12.2.1.3.0) and OracleIdentity and Access Management12c (12.2.1.3.0) in thenew Oracle home.
See Installing Product Distributions on OIMHOST1 andOIMHOST2.
RequiredUpgrade the necessary schemas on OAMHOST1.
See Upgrading Schemas on OIMHOST1.
RequiredReconfigure the Oracle Access Management domain onOAMHOST1.
See Reconfiguring the Domain on OIMHOST1.
RequiredReplicate the Oracle Access Management domainconfigurations on OAMHOST2.
This includes packing the domain on OAMHOST1 andunpacking it on OAMHOST2.
See Replicating the Domain Configurations onOIMHOST2.
RequiredUpgrade the domain component configurations on bothOAMHOST1 and OAMHOST2.
The Upgrade Assistant is used to update thereconfigured domain’s component configurations.
See Upgrading Domain Component Configurations onOIMHOST1 and OIMHOST2.
RequiredStart the servers on OAMHOST1 and OAMHSOT2.
See Starting the Servers.
Complete any necessary post-upgrade tasks. This is optional. Perform the following tasks based onyour deployment:
• Enabling WebGates to Work With Oracle AccessManagement 12c
• Updating the java.security File
Disabling Deprecated Services in OAMApplies only to Mobile and Social, Security Token Service, and Mobile SecurityService users.
Mobile and Social, Security Token Service, and Mobile Security Service can’t be usedin OAM 12c. If your current installation makes use of any of these services, you mustdisable them before attempting to perform this upgrade. If any of these services areactive during the upgrade, the upgrade will fail with an “upgrade not feasible” errormessage. You can find additional information about these features in the OracleMobile Security Suite Statement Of Direction support document.
Chapter 5Disabling Deprecated Services in OAM
5-3

Creating 12c Middleware Home Folder on OAMHOST1 andOAMHOST2
Create a folder for 12c Middleware Home on both OAMHOST1 and OAMHOST2.
It is recommended that you have the similar directory structure on OAMHOST1 andOAMHOST2.For example:
/scratch/work/u01/mw12c
Installing Product Distributions on OAMHOST1 andOAMHOST2
Install the 12c binaries on both OAMHOST1 and OAMHOST2.
Install the following products on both OAMHOST1 and OAMHOSt2:
• Oracle Fusion Middleware Infrastructure 12c (12.2.1.3.0)
• Oracle Identity and Access Management 12c (12.2.1.3.0)
• Any additional distributions for your pre-upgrade environment
For more information, see Installing Product Distributions.
Upgrading Schemas on OAMHOST1Upgrade all of the necessary schemas for Oracle Access Management, onOAMHOST1 by using the Upgrade Assistant.
See, Upgrading Product Schemas.
Reconfiguring the Domain on OAMHOST1Run the Reconfiguration Wizard on OAMHOST1 to reconfigure your domaincomponent configurations to 12c (12.2.1.3.0).
See, About Reconfiguring the Domain.
Replicating the Domain Configurations on OAMHOST2Replicate the domain configurations on OAMHOST2. This involves packing theupgraded domain on OAMHOST1 and unpacking it on OAMHOST2.
To do this, complete the following steps:
1. On OAMHOST1, run the following command from the location $MW_HOME/oracle_common/common/bin to pack the upgraded domain:
• On UNIX:
Chapter 5Creating 12c Middleware Home Folder on OAMHOST1 and OAMHOST2
5-4
sh pack.sh -domain=<Location_of_OAM_domain> -template=<Location_where_domain_configuration_jar_to_be_created> -template_name="OAM Domain" -managed=true
• On Windows:pack.cmd -domain=<Location_of_OAM_domain> -template=<Location_where_domain_configuration_jar_to_be_created> -template_name="OAM Domain" -managed=true
2. Copy the domain configuration jar file created by the pack commandon OAMHOST1 to any accessible location on OAMHOST2.
3. On OAMHOST2, run the following command from the location $MW_HOME/oracle_common/common/bin to unpack the domain:
• On UNIX:sh unpack.sh -domain=<Location_of_OAM_domain> -template=<absolute_path_tothe_location_of_domain_configuration_jar_file> -overwrite_domain=true
• On Windows:unpack.cmd -domain=<Location_of_OAM_domain> -template=<absolute_path_tothe_location_of_domain_configuration_jar_file> -overwrite_domain=true
Upgrading Domain Component Configurations onOAMHOST1 and OAMHOST2
After reconfiguring the domain, use the Upgrade Assistant to upgrade thedomain component configurations inside the domain to match the updated domainconfiguration.
Upgrade the domain configurations on both OAMHOST1 and OAMHOST2 using theinstructions described in Upgrading Domain Component Configurations.
Starting the Servers on OAMHOST1 and OAMHOST2After you upgrade Oracle Access Management on both OAMHOST1 andOAMHOST2, start the servers.
You must start the servers in the following order:
1. Start the Node Manager on both OAMHOST1 and OAMHOST2.
2. Start the Administration Server on OAMHOST1.
3. Start the Oracle Access Management Managed Servers on OAMHOST1.
4. Start the Oracle Access Management Managed Servers on OAMHOST2.
Chapter 5Upgrading Domain Component Configurations on OAMHOST1 and OAMHOST2
5-5
Enabling WebGates to Work With Oracle AccessManagement 12c
After upgrading to Oracle Access Management 12.2.1.3, the earlier version ofWebGates continues to work with Oracle Access Management 12c. However, toleverage the latest security features of Oracle Access Management and WebGates12c (12.2.1.3.0), you must upgrade the WebGates to 12c (12.2.1.3.0), and register theagent's profile with the Oracle Access Management Server 12c.
Note:
If you have any other components of Oracle Identity and AccessManagement deployed, then all of the components must to be upgraded to12c (12.2.1.3.0) to leverage the new security features of 12c (12.2.1.3.0).
To upgrade the WebGates, you must upgrade the respective Web Servers to 12c(12.2.1.3.0).To upgrade the Oracle HTTP Server WebGates, upgrade Oracle HTTP Server to 12c(12.2.1.3.0). See Upgrading a Standalone Oracle HTTP Server from 11g to 12c in theUpgrading Oracle HTTP Server.
To upgrade the Oracle Traffic Directory WebGates, upgrade Oracle Traffic Directory to12c (12.2.1.3.0). See Upgrading Oracle Traffic Director from 11g in the UpgradingOracle Traffic Director.
After you upgrade the Web Servers, do the following:
1. Register or edit the WebGate profile and copy the WebGate artifacts to theWebGate config folder. See Upgrading to OHS/OTD 12c WebGate in the InstallingWebGates for Oracle Access Manager.
2. Start and stop the WebGates.
Updating the java.security FileIf you have multiple components of Oracle Identity and Access Management (OracleAccess Management, Oracle Identity Manager, WebGates and so on) deployed, untilyou upgrade all of the components to 12c (12.2.1.3.0), you must update thejava.security file with the changes described in this section.
To do this:
1. Open the java.security file located at JAVA_HOME/jre/lib/security/ in aneditor.
2. Remove TLSv1, TLSv1.1, MD5withRSA from the following key:
key - jdk.tls.disabledAlgorithms
3. Remove MD5 from the following key:
key - jdk.certpath.disabledAlgorithms
Chapter 5Enabling WebGates to Work With Oracle Access Management 12c
5-6
For more information on possible upgrade scenarios, see Troubleshooting SecurityPolicy Issues When Upgrading.
Chapter 5Updating the java.security File
5-7
6Upgrading Oracle Identity Manager HighlyAvailable Environments
Describes the process of upgrading an Oracle Identity Manager highly availableenvironment from 11g Release 2 (11.1.2.3.0) to Oracle Identity Governance 12c(12.2.1.3.0).
Note:
The product Oracle Identity Manager is referred to as Oracle IdentityManager (OIM) and Oracle Identity Governance (OIG) interchangeably in theguide.
Topics
• About the Oracle Identity Manager Multinode Upgrade ProcessReview the topology and the roadmap for an overview of the upgrade process forOracle Identity Manager highly available environments.
• Stopping Servers and ProcessesBefore you run the Upgrade Assistant to upgrade your schemas andconfigurations, you must shut down all of the pre-upgrade processes and servers,including the Administration Server and any managed servers.
• Creating 12c Middleware Home Folder on OIMHOST1 and OIMHOST2Create a folder for 12c Middleware Home on both OIMHOST1 and OIMHOST2.
• Installing Product Distributions on OIMHOST1 and OIMHOST2Install the 12c binaries on both OIMHOST1 and OIMHOST2.
• Upgrading Schemas on OIMHOST1Upgrade all of the necessary schemas for Oracle Identity Manager, on OIMHOST1by using the Upgrade Assistant.
• Reconfiguring the Domain on OIMHOST1Run the Reconfiguration Wizard on OIMHOST1 to reconfigure your domaincomponent configurations to 12c (12.2.1.3.0).
• Upgrading Domain Component Configurations on OIMHOST1After reconfiguring the domain, use the Upgrade Assistant to upgrade thedomain component’s configurations inside the domain to match the updateddomain configuration.
• Replicating the Domain Configurations on OIMHOST2Replicate the domain configurations on OIMHOST2. This involves packing theupgraded domain on OIMHOST1 and unpacking it on OIMHOST2.
6-1
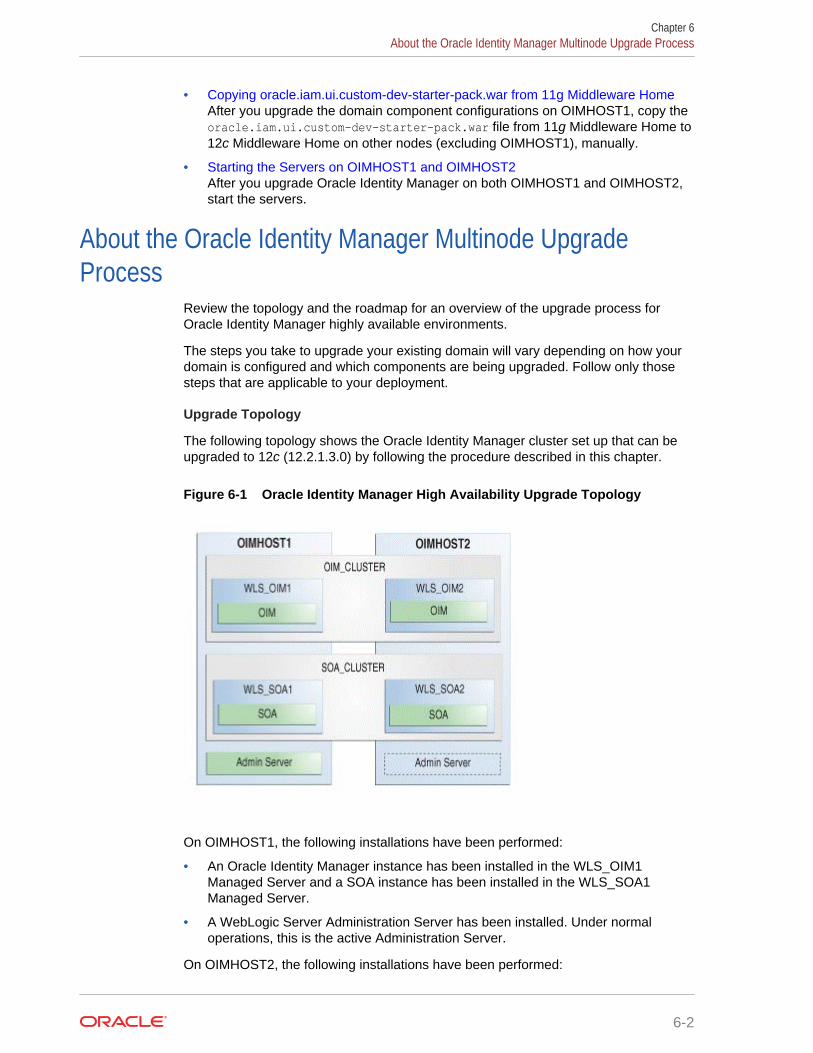
• Copying oracle.iam.ui.custom-dev-starter-pack.war from 11g Middleware HomeAfter you upgrade the domain component configurations on OIMHOST1, copy theoracle.iam.ui.custom-dev-starter-pack.war file from 11g Middleware Home to12c Middleware Home on other nodes (excluding OIMHOST1), manually.
• Starting the Servers on OIMHOST1 and OIMHOST2After you upgrade Oracle Identity Manager on both OIMHOST1 and OIMHOST2,start the servers.
About the Oracle Identity Manager Multinode UpgradeProcess
Review the topology and the roadmap for an overview of the upgrade process forOracle Identity Manager highly available environments.
The steps you take to upgrade your existing domain will vary depending on how yourdomain is configured and which components are being upgraded. Follow only thosesteps that are applicable to your deployment.
Upgrade Topology
The following topology shows the Oracle Identity Manager cluster set up that can beupgraded to 12c (12.2.1.3.0) by following the procedure described in this chapter.
Figure 6-1 Oracle Identity Manager High Availability Upgrade Topology
On OIMHOST1, the following installations have been performed:
• An Oracle Identity Manager instance has been installed in the WLS_OIM1Managed Server and a SOA instance has been installed in the WLS_SOA1Managed Server.
• A WebLogic Server Administration Server has been installed. Under normaloperations, this is the active Administration Server.
On OIMHOST2, the following installations have been performed:
Chapter 6About the Oracle Identity Manager Multinode Upgrade Process
6-2
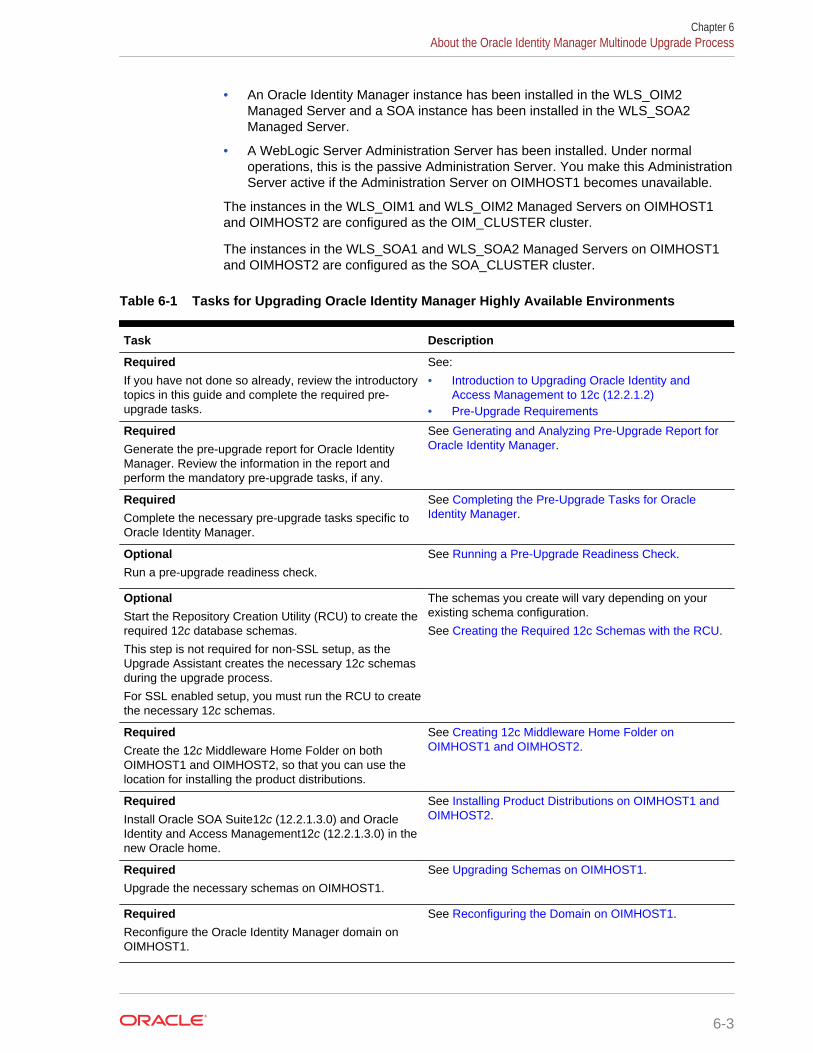
• An Oracle Identity Manager instance has been installed in the WLS_OIM2Managed Server and a SOA instance has been installed in the WLS_SOA2Managed Server.
• A WebLogic Server Administration Server has been installed. Under normaloperations, this is the passive Administration Server. You make this AdministrationServer active if the Administration Server on OIMHOST1 becomes unavailable.
The instances in the WLS_OIM1 and WLS_OIM2 Managed Servers on OIMHOST1and OIMHOST2 are configured as the OIM_CLUSTER cluster.
The instances in the WLS_SOA1 and WLS_SOA2 Managed Servers on OIMHOST1and OIMHOST2 are configured as the SOA_CLUSTER cluster.
Table 6-1 Tasks for Upgrading Oracle Identity Manager Highly Available Environments
Task Description
RequiredIf you have not done so already, review the introductorytopics in this guide and complete the required pre-upgrade tasks.
See:
• Introduction to Upgrading Oracle Identity andAccess Management to 12c (12.2.1.2)
• Pre-Upgrade Requirements
RequiredGenerate the pre-upgrade report for Oracle IdentityManager. Review the information in the report andperform the mandatory pre-upgrade tasks, if any.
See Generating and Analyzing Pre-Upgrade Report forOracle Identity Manager.
RequiredComplete the necessary pre-upgrade tasks specific toOracle Identity Manager.
See Completing the Pre-Upgrade Tasks for OracleIdentity Manager.
OptionalRun a pre-upgrade readiness check.
See Running a Pre-Upgrade Readiness Check.
OptionalStart the Repository Creation Utility (RCU) to create therequired 12c database schemas.
This step is not required for non-SSL setup, as theUpgrade Assistant creates the necessary 12c schemasduring the upgrade process.
For SSL enabled setup, you must run the RCU to createthe necessary 12c schemas.
The schemas you create will vary depending on yourexisting schema configuration.
See Creating the Required 12c Schemas with the RCU.
RequiredCreate the 12c Middleware Home Folder on bothOIMHOST1 and OIMHOST2, so that you can use thelocation for installing the product distributions.
See Creating 12c Middleware Home Folder onOIMHOST1 and OIMHOST2.
RequiredInstall Oracle SOA Suite12c (12.2.1.3.0) and OracleIdentity and Access Management12c (12.2.1.3.0) in thenew Oracle home.
See Installing Product Distributions on OIMHOST1 andOIMHOST2.
RequiredUpgrade the necessary schemas on OIMHOST1.
See Upgrading Schemas on OIMHOST1.
RequiredReconfigure the Oracle Identity Manager domain onOIMHOST1.
See Reconfiguring the Domain on OIMHOST1.
Chapter 6About the Oracle Identity Manager Multinode Upgrade Process
6-3
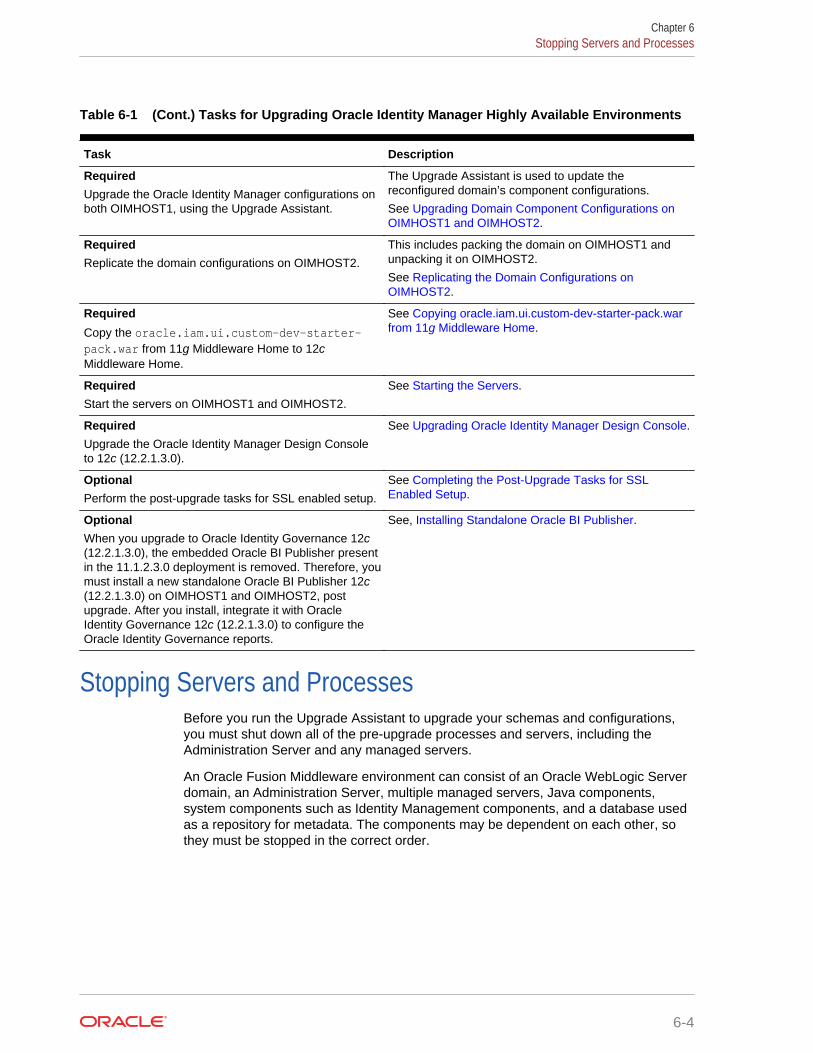
Table 6-1 (Cont.) Tasks for Upgrading Oracle Identity Manager Highly Available Environments
Task Description
RequiredUpgrade the Oracle Identity Manager configurations onboth OIMHOST1, using the Upgrade Assistant.
The Upgrade Assistant is used to update thereconfigured domain’s component configurations.
See Upgrading Domain Component Configurations onOIMHOST1 and OIMHOST2.
RequiredReplicate the domain configurations on OIMHOST2.
This includes packing the domain on OIMHOST1 andunpacking it on OIMHOST2.
See Replicating the Domain Configurations onOIMHOST2.
RequiredCopy the oracle.iam.ui.custom-dev-starter-pack.war from 11g Middleware Home to 12cMiddleware Home.
See Copying oracle.iam.ui.custom-dev-starter-pack.warfrom 11g Middleware Home.
RequiredStart the servers on OIMHOST1 and OIMHOST2.
See Starting the Servers.
RequiredUpgrade the Oracle Identity Manager Design Consoleto 12c (12.2.1.3.0).
See Upgrading Oracle Identity Manager Design Console.
OptionalPerform the post-upgrade tasks for SSL enabled setup.
See Completing the Post-Upgrade Tasks for SSLEnabled Setup.
OptionalWhen you upgrade to Oracle Identity Governance 12c(12.2.1.3.0), the embedded Oracle BI Publisher presentin the 11.1.2.3.0 deployment is removed. Therefore, youmust install a new standalone Oracle BI Publisher 12c(12.2.1.3.0) on OIMHOST1 and OIMHOST2, postupgrade. After you install, integrate it with OracleIdentity Governance 12c (12.2.1.3.0) to configure theOracle Identity Governance reports.
See, Installing Standalone Oracle BI Publisher.
Stopping Servers and ProcessesBefore you run the Upgrade Assistant to upgrade your schemas and configurations,you must shut down all of the pre-upgrade processes and servers, including theAdministration Server and any managed servers.
An Oracle Fusion Middleware environment can consist of an Oracle WebLogic Serverdomain, an Administration Server, multiple managed servers, Java components,system components such as Identity Management components, and a database usedas a repository for metadata. The components may be dependent on each other, sothey must be stopped in the correct order.
Chapter 6Stopping Servers and Processes
6-4
Note:
The procedures in this section describe how to stop the existing, pre-upgradeservers and processes using the WLST command-line utility or a script. Youcan also use the Oracle Fusion Middleware Control and the OracleWebLogic Server Administration Console. See Starting and StoppingAdministration and Managed Servers and Node Manager.
Note:
Stop all of the servers in your deployment, except for the Database. TheDatabase must be up during the upgrade process.
To stop your pre-upgrade Fusion Middleware environment, navigate to the pre-upgrade domain and follow the steps below.
Step 1: Stop System Components
To stop system components, such as Oracle HTTP Server, use the opmnctl script:
• (UNIX) OHS_INSTANCE_HOME/bin/opmnctl stopall
• (Windows) OHS_INSTANCE_HOME\bin\opmnctl stopall
You can stop system components in any order.
Step 2: Stop the Managed Servers
To stop a WebLogic Server Managed Server, use the stopManagedWebLogic script:
• (UNIX) EXISTING_DOMAIN_HOME/bin/stopManagedWebLogic.shmanaged_server_name admin_url
• (Windows) EXISTING_DOMAIN_HOME\bin\stopManagedWebLogic.cmdmanaged_server_name admin_url
When prompted, enter your user name and password.
Step 3: Stop the Administration Server
When you stop the Administration Server, you also stop the processes running in theAdministration Server, including the WebLogic Server Administration Console andFusion Middleware Control.
To stop the Administration Server, use the stopWebLogic script:
• (UNIX) EXISTING_DOMAIN_HOME/bin/stopWebLogic.sh
• (Windows) EXISTING_DOMAIN_HOME\bin\stopWebLogic.cmd
When prompted, enter your user name, password, and the URL of the AdministrationServer.
Step 4: Stop Node Manager
To stop Node Manager, close the command shell in which it is running.
Chapter 6Stopping Servers and Processes
6-5
Alternatively, after having set the nodemanager.properties attribute QuitEnabled totrue (the default is false), you can use WLST to connect to Node Manager and shut itdown. See stopNodeManager in WLST Command Reference for WebLogic Server.
Creating 12c Middleware Home Folder on OIMHOST1 andOIMHOST2
Create a folder for 12c Middleware Home on both OIMHOST1 and OIMHOST2.
It is recommended that you have the similar directory structure on OIMHOST1 andOIMHOST2.For example:
/scratch/work/u01/mw12c
Installing Product Distributions on OIMHOST1 andOIMHOST2
Install the 12c binaries on both OIMHOST1 and OIMHOST2.
Install the following products on both OIMHOST1 and OIMHOST2:
• Oracle Fusion Middleware Infrastructure 12c (12.2.1.3.0)
• Oracle SOA Suite 12c (12.2.1.3.0)
• Oracle Identity and Access Management 12c (12.2.1.3.0)
For more information about installing the product distributions, see Installing ProductDistributions.
Upgrading Schemas on OIMHOST1Upgrade all of the necessary schemas for Oracle Identity Manager, on OIMHOST1 byusing the Upgrade Assistant.
See, Upgrading Product Schemas.
Reconfiguring the Domain on OIMHOST1Run the Reconfiguration Wizard on OIMHOST1 to reconfigure your domaincomponent configurations to 12c (12.2.1.3.0).
See, About Reconfiguring the Domain.
Chapter 6Creating 12c Middleware Home Folder on OIMHOST1 and OIMHOST2
6-6
Upgrading Domain Component Configurations onOIMHOST1
After reconfiguring the domain, use the Upgrade Assistant to upgrade thedomain component’s configurations inside the domain to match the updated domainconfiguration.
To upgrade the domain configurations in a highly available setup, follow theinstructions described in Upgrading Domain Component Configurations onOIMHOST1.
Replicating the Domain Configurations on OIMHOST2Replicate the domain configurations on OIMHOST2. This involves packing theupgraded domain on OIMHOST1 and unpacking it on OIMHOST2.
To do this, complete the following steps:
1. On OIMHOST1, run the following command from the location $MW_HOME/oracle_common/common/bin to pack the upgraded domain:
• On UNIX:sh pack.sh -domain=<Location_of_OIM_domain> -template=<Location_where_domain_configuration_jar_to_be_created> -template_name="OIM Domain" -managed=true
• On Windows:pack.cmd -domain=<Location_of_OIM_domain> -template=<Location_where_domain_configuration_jar_to_be_created> -template_name="OIM Domain" -managed=true
2. Copy the domain configuration jar file created by the pack commandon OIMHOST1 to any accessible location on OIMHOST2.
3. On OIMHOST2, run the following command from the location $MW_HOME/oracle_common/common/bin to unpack the domain:
• On UNIX:sh unpack.sh -domain=<Location_of_OIM_domain> -template=<Location_where_domain_configuration_jar_to_be_created> -overwrite_domain=true
• On Windows:unpack.cmd -domain=<Location_of_OIM_domain> -template=<Location_where_domain_configuration_jar_to_be_created> -overwrite_domain=true
Chapter 6Upgrading Domain Component Configurations on OIMHOST1
6-7
Copying oracle.iam.ui.custom-dev-starter-pack.war from 11gMiddleware Home
After you upgrade the domain component configurations on OIMHOST1, copy theoracle.iam.ui.custom-dev-starter-pack.war file from 11g Middleware Home to 12cMiddleware Home on other nodes (excluding OIMHOST1), manually.
In 11g, the file is located at The file is located at OIM_ORACLE_HOME/idm/server/apps/.
Copy this file to the 12c_Middleware_Home/idm/server/apps/ location.
Starting the Servers on OIMHOST1 and OIMHOST2After you upgrade Oracle Identity Manager on both OIMHOST1 and OIMHOST2, startthe servers.
You must start the servers in the following order:
1. Start the Administration Server on OIMHOST1.
2. Start the Oracle SOA Suite Managed Server on OIMHOST1 with AdministrationServer URL, and the BPM property set to TRUE. For example:
./startManagedWebLogic.sh soa_server1 t3://weblogic_admin_host:weblogic_admin_port -Dbpm.enabled=true
3. Once the SOA server is in running state, start the Oracle Identity GovernanceManaged Server with Administration Server URL, on OIMHOST1.
This time, OIM bootstrap process will be executed, and after successful bootstrap,OIM Managed Server will be shut down automatically.
4. Shut down the SOA Managed Server and the Administration Server onOIMHOST1.
5. Start the Node Manager on both OIMHOST1 and OIMHOST2.
6. Start the Administration Server on OIMHOST1.
7. Start the Oracle SOA Suite Managed Server (without BPM property) and OracleIdentity Manager Managed Servers on OIMHOST1.
8. Start the Oracle SOA Suite Managed Server (without BPM property) and OracleIdentity Manager Managed Servers on OIMHOST2.
For more information about starting the servers and processes, see Starting theServers.
For more information about stopping the servers and processes, see Stopping Serversand Processes.
Chapter 6Copying oracle.iam.ui.custom-dev-starter-pack.war from 11g Middleware Home
6-8
7Upgrading Oracle Access ManagementMulti-Data Center Environments
You can upgrade Oracle Access Management deployed across multi-data centers(MDC) from 11g Release 2 (11.1.2.3.0) to 12c (12.2.1.3.0).
Note:
To upgrade Oracle Access Management MDC environments to 12c(12.2.1.3.0), ensure that all of the data centers (DC) are at the same PatchSet level.
When you plan to upgrade to 12c (12.2.1.3.0), you can choose to have zero down timeby stopping the data center that needs to be upgraded, and routing all the traffic to theother data centers. Once the upgrade has been completed on one data center, it canstart and function as an independent data center. You can then redirect all the traffic tothe upgraded data center. MDC Single Sign-On works between 11g and 12c Servers ifbackward compatibility flag is enabled. Therefore, all of the servers (upgraded andnon-upgraded ones) can continue to participate in MDC.
Note:
For information about enabling the backward compatibility flag, see Modifying Backward Compatibility Flag in Administering Oracle AccessManagement.
• About the Oracle Access Management Multi-Data Center TopologyThe sample Oracle Access Management Multi-Data Center topology has two datacenters — Master data center and Clone data center.
• Roadmap for Upgrading Oracle Access Management MDC SetupUse the upgrade roadmap to upgrade your Oracle Access Management multi-datacenter setup to 12c (12.2.1.3.0).
• Backing Up the Existing MDC EnvironmentBefore you begin with the upgrade, take a back up of your existing environment.
• Disabling Deprecated Services in OAMApplies only to Mobile and Social, Security Token Service, and Mobile SecurityService users.
• Enabling Write Permission to Master and Clones (If Necessary)Before you start the upgrade, you must enable modifications to the system andpolicy configurations on both Master and Clones.
7-1
• Disabling and Deleting All Replication Agreements Between Master and CloneDisable all replication agreements between the Master and the Clone datacenters.
• Redirecting Traffic to Master Data CenterAn in-line upgrade procedure is used to upgrade the Clone data center whichrequires downtime. Therefore, all traffic must be rerouted to the Master datacenter.
• Upgrading Oracle Access Management on Clone Data CenterUpgrade Oracle Access Management on Clone data center to 12c (12.2.1.3.0)after you redirect the traffic to Master data center.
• Redirecting Traffic to Clone Data CenterAn in-line upgrade procedure is used to upgrade the Master data center whichrequires downtime. Therefore, all traffic must be rerouted to the Clone datacenters (also referred to as, the backup data centers or the secondary datacenters).
• Upgrading Oracle Access Management on Master Data CenterUpgrade Oracle Access Management on Master data center to 12c (12.2.1.3.0)after you redirect the traffic to clone data center.
• Freezing all Changes to Clones (if Necessary)After you upgrade Oracle Access Management on all of the Clone data center(s),it is recommended that you freeze the changes to the Clone data center(s). This isto avoid any inadvertent writes.
• Syncing Access MetadataOracle Access Management metadata stored in Unified Data Model (UDM) needsto be synced from Master to Clone.
• Creating Replication AgreementCreate the replication agreement again after upgrading the Master and the Clonedata centers.
• Updating the java.security FileIf you have multiple components of Oracle Identity and Access Management(Oracle Access Management, Oracle Identity Manager, WebGates and so on)deployed, until you upgrade all of the components to 12c (12.2.1.3.0), you mustupdate the java.security file with the changes described in this section.
• Bringing up the Master and Clone Data Centers OnlineAfter successful upgrade, both Master and Clone data centers can be brought uponline. Traffic can be routed to both data centers based on existing routing rules.
About the Oracle Access Management Multi-Data CenterTopology
The sample Oracle Access Management Multi-Data Center topology has two datacenters — Master data center and Clone data center.
The procedure in this chapter describes how to upgrade Oracle Access Managementin a MDC setup similar to the reference topology provided in this section. You can usethis upgrade procedure to upgrade your environment with any number of data centers.
Chapter 7About the Oracle Access Management Multi-Data Center Topology
7-2
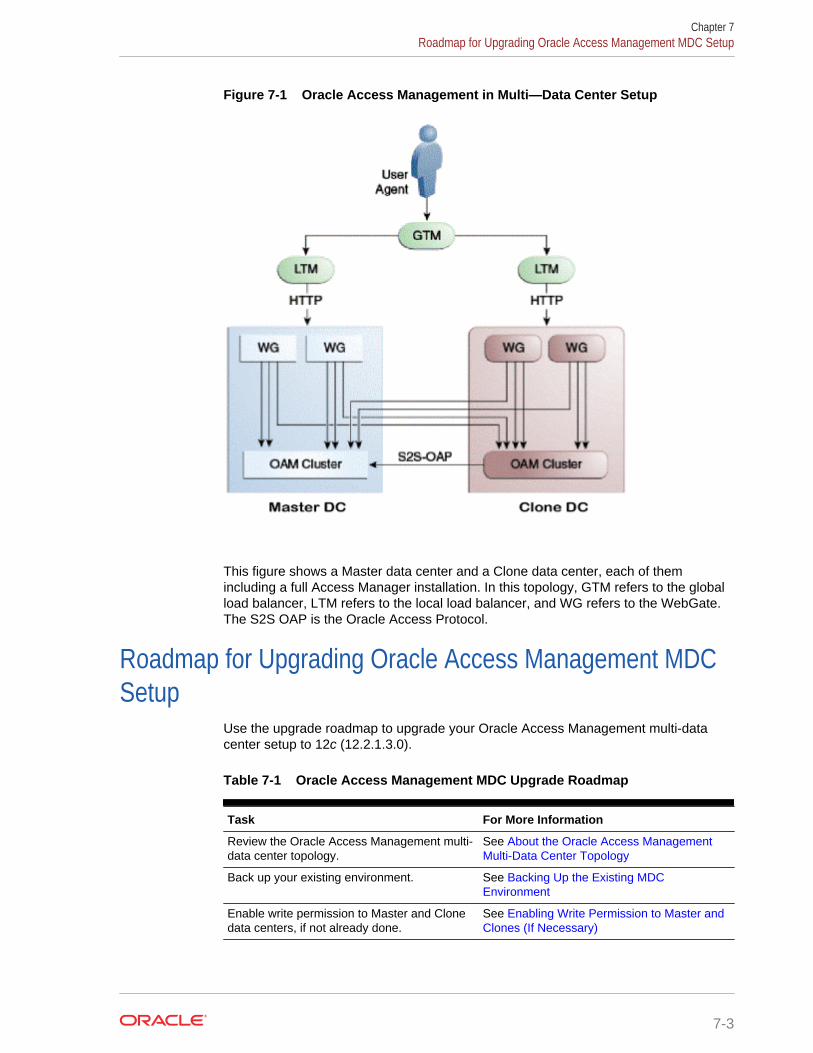
Figure 7-1 Oracle Access Management in Multi—Data Center Setup
This figure shows a Master data center and a Clone data center, each of themincluding a full Access Manager installation. In this topology, GTM refers to the globalload balancer, LTM refers to the local load balancer, and WG refers to the WebGate.The S2S OAP is the Oracle Access Protocol.
Roadmap for Upgrading Oracle Access Management MDCSetup
Use the upgrade roadmap to upgrade your Oracle Access Management multi-datacenter setup to 12c (12.2.1.3.0).
Table 7-1 Oracle Access Management MDC Upgrade Roadmap
Task For More Information
Review the Oracle Access Management multi-data center topology.
See About the Oracle Access ManagementMulti-Data Center Topology
Back up your existing environment. See Backing Up the Existing MDCEnvironment
Enable write permission to Master and Clonedata centers, if not already done.
See Enabling Write Permission to Master andClones (If Necessary)
Chapter 7Roadmap for Upgrading Oracle Access Management MDC Setup
7-3

Table 7-1 (Cont.) Oracle Access Management MDC Upgrade Roadmap
Task For More Information
Disable and delete all replication agreementsbetween Master and Clone data centers.
See Disabling and Deleting All ReplicationAgreements Between Master and Clone
Redirect the traffic to the Master data center. See Redirecting Traffic to Master Data Center
Upgrade Oracle Access Management onClone data center.
See Upgrading Oracle Access Managementon Clone Data Center
Redirect the traffic to the Clone data center. See Redirecting Traffic to Clone Data Center
Upgrade Oracle Access Management onMaster data center.
See Upgrading Oracle Access Managementon Master Data Center
Freeze all changes to the Master and Clones,if required.
See Freezing all Changes to Clones (ifNecessary)
Sync the access UDM data by exporting theaccess store data from Master data center andimporting it on the Clone data center.
See Syncing Access Metadata
Create the replication agreement again. See Creating Replication Agreement
Upgrade the java.security file. See Updating the java.security File
Bring up the Master and Clone data centersonline.
See Bringing up the Master and Clone DataCenters Online
Backing Up the Existing MDC EnvironmentBefore you begin with the upgrade, take a back up of your existing environment.
After stopping all the servers, you must back up the following on every data centerbefore proceeding with the upgrade process:
• MW_HOME directory (Middleware home directory), including the Oracle Homedirectories inside Middleware home.
• Oracle Access Management Domain Home directory on all OAM hosts.
• Following Database schemas:
– Oracle Access Manager schema
– Audit and any other dependent schema
For more information about backing up schemas, see Oracle Database Backup andRecovery User's Guide.
Disabling Deprecated Services in OAMApplies only to Mobile and Social, Security Token Service, and Mobile SecurityService users.
Mobile and Social, Security Token Service, and Mobile Security Service can’t be usedin OAM 12c. If your current installation makes use of any of these services, you mustdisable them before attempting to perform this upgrade. If any of these services areactive during the upgrade, the upgrade will fail with an “upgrade not feasible” error
Chapter 7Backing Up the Existing MDC Environment
7-4
message. You can find additional information about these features in the OracleMobile Security Suite Statement Of Direction support document.
Enabling Write Permission to Master and Clones (IfNecessary)
Before you start the upgrade, you must enable modifications to the system and policyconfigurations on both Master and Clones.
To do this, run the following command on Master and Clone data centers:setMultiDataCenterWrite(WriteEnableFlag="true")
Disabling and Deleting All Replication Agreements BetweenMaster and Clone
Disable all replication agreements between the Master and the Clone data centers.
See Disabling Automated Policy Synchronization in the Administrator's Guide forOracle Access Management.
Redirecting Traffic to Master Data CenterAn in-line upgrade procedure is used to upgrade the Clone data center which requiresdowntime. Therefore, all traffic must be rerouted to the Master data center.
Consult your network infrastructure team or refer to the network infrastructuredocumentation to accomplish the traffic re-routing.
Upgrading Oracle Access Management on Clone DataCenter
Upgrade Oracle Access Management on Clone data center to 12c (12.2.1.3.0) afteryou redirect the traffic to Master data center.
To upgrade Oracle Access Management on Master data center, follow the instructionsdescribed in Upgrading Oracle Access Management Highly Available Environments.
Redirecting Traffic to Clone Data CenterAn in-line upgrade procedure is used to upgrade the Master data center whichrequires downtime. Therefore, all traffic must be rerouted to the Clone data centers(also referred to as, the backup data centers or the secondary data centers).
Consult your network infrastructure team or refer to the network infrastructuredocumentation to accomplish the traffic re-routing.
Chapter 7Enabling Write Permission to Master and Clones (If Necessary)
7-5
Upgrading Oracle Access Management on Master DataCenter
Upgrade Oracle Access Management on Master data center to 12c (12.2.1.3.0) afteryou redirect the traffic to clone data center.
To upgrade Oracle Access Management on Master data center, follow the instructionsdescribed in Upgrading Oracle Access Management Highly Available Environments.
Freezing all Changes to Clones (if Necessary)After you upgrade Oracle Access Management on all of the Clone data center(s), it isrecommended that you freeze the changes to the Clone data center(s). This is to avoidany inadvertent writes.
To freeze the changes, run the following command on the Clone data center(s):SetMultiDataCenterWrite(WriteEnableFlag="false")
Syncing Access MetadataOracle Access Management metadata stored in Unified Data Model (UDM) needs tobe synced from Master to Clone.
You can sync the access metadata using the WLST commands - exportAccessStoreand importAccessStore. These commands need to be executed after you upgrade allof the data centers and before creating the new replication agreement. This exportsthe UDM artifacts created till that point, from the Master data center and imports themin the Clone data center(s).To sync the UDM metadata, complete the following steps:
1. Run the following WLST command on the Master data center to create a ZIP filecontaining the UDM metadata:
exportAccessStore(toFile="/master/location/dc1metadata.zip",namePath="/")
2. Copy dc1metadata.zip to each of the upgraded Clone data centers.
3. Run the following WLST command on the each of the Clone data centers to importthe UDM metadata:
importAccessStore(fromFile="/clone/location/dc1metadata.zip",namePath="/")
Creating Replication AgreementCreate the replication agreement again after upgrading the Master and the Clone datacenters.
To create the replication agreement, run the following command:
Chapter 7Upgrading Oracle Access Management on Master Data Center
7-6
Note:
Ensure that Master & Clone data centers REST endpoints are up andrunning, before you run this command.
curl -u <repluser> -H 'Content-Type: application/json' -X POST 'https://supplier.example.com/oam/services/rest/_replication/setup' -d'{"name":"DC12DC2","source":"DC1","target":"DC2","documentType":"ENTITY"}'
For more information about creating a replication agreement, see Creating aReplication Agreement in the Administrator's Guide for Oracle Access Management.
Updating the java.security FileIf you have multiple components of Oracle Identity and Access Management (OracleAccess Management, Oracle Identity Manager, WebGates and so on) deployed, untilyou upgrade all of the components to 12c (12.2.1.3.0), you must update thejava.security file with the changes described in this section.
To do this:
1. Open the java.security file located at JAVA_HOME/jre/lib/security/ in aneditor.
2. Remove TLSv1, TLSv1.1, MD5withRSA from the following key:
key - jdk.tls.disabledAlgorithms
3. Remove MD5 from the following key:
key - jdk.certpath.disabledAlgorithms
For more information on possible upgrade scenarios, see Troubleshooting SecurityPolicy Issues When Upgrading.
Bringing up the Master and Clone Data Centers OnlineAfter successful upgrade, both Master and Clone data centers can be brought uponline. Traffic can be routed to both data centers based on existing routing rules.
Consult your network infrastructure team or refer to the network infrastructuredocumentation to accomplish the traffic re-routing.
Chapter 7Updating the java.security File
7-7
8Upgrading OIM-OAM IntegratedEnvironments set up Manually
You can upgrade Oracle Identity Manager (OIM), Oracle Access Management (OAM)integrated split domain highly available environments that are set up manually, from11g Release 2 (11.1.2.3.0) to 12c (12.2.1.3.0) using the upgrade procedure describedin this section.
Note:
The product Oracle Identity Manager is referred to as Oracle IdentityManager (OIM) and Oracle Identity Governance (OIG) interchangeably in theguide.
Topics
• About the OIM-OAM Integrated HA Topology Set Up ManuallyThe sample topology is based on the split domain four node topology described inthe Enterprise Deployment Guide for Oracle Identity and Access Management 11gRelease 2 (11.1.2.3.0), that is deployed manually.
• Supported Starting Points for Integrated HA UpgradeReview the supported starting points for each of the components in your integratedenvironment in order to upgrade to 12c (12.2.1.3.0). If the components are inearlier versions, upgrade them to the version that is supported for 12c upgrade.
• Roadmap for Upgrading OIM-OAM Integrated Highly Available Environments SetUp ManuallyRefer to the roadmap for upgrading Oracle Identity Manager and Oracle AccessManagement integrated highly available 11.1.2.3.0 environments that was set upmanually, to 12c (12.2.1.3.0).
• Enabling Oracle Identity Governance 12c to Work With Oracle AccessManagement 11gIf Oracle Access Management is still in 11.1.2.3.0 and if Oracle Identity Manager isupgraded to 12c (12.2.1.3.0), the OIM-OAM integration breaks down due to themismatch in JDK version.
About the OIM-OAM Integrated HA Topology Set UpManually
The sample topology is based on the split domain four node topology described in theEnterprise Deployment Guide for Oracle Identity and Access Management 11gRelease 2 (11.1.2.3.0), that is deployed manually.
8-1

This topology and the accompanying procedures in this chapter are provided to serveas an example for upgrading a highly available, integrated Oracle Identity and AccessManagement environment. Your specific Oracle Identity and Access Managementinstallation will vary, but this topology and upgrade procedure demonstrates the keyelements of the upgrade process, which can be applied to your specific environment.
For a complete description of the topology diagram, refer to the Enterprise DeploymentGuide in the Oracle Identity and Access Management in the 11g Release 2(11.1.2.3.0) Documentation Library.
Figure 8-1 OIM-OAM Integrated Topology Set Up Manually
Chapter 8About the OIM-OAM Integrated HA Topology Set Up Manually
8-2
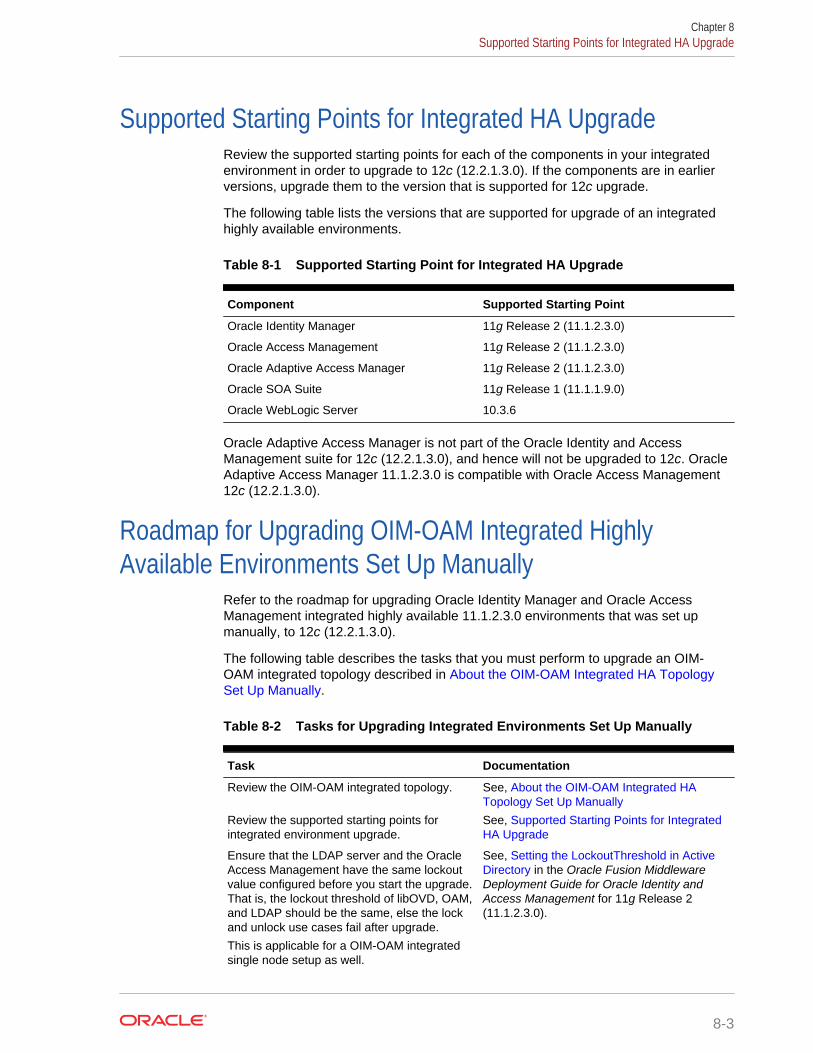
Supported Starting Points for Integrated HA UpgradeReview the supported starting points for each of the components in your integratedenvironment in order to upgrade to 12c (12.2.1.3.0). If the components are in earlierversions, upgrade them to the version that is supported for 12c upgrade.
The following table lists the versions that are supported for upgrade of an integratedhighly available environments.
Table 8-1 Supported Starting Point for Integrated HA Upgrade
Component Supported Starting Point
Oracle Identity Manager 11g Release 2 (11.1.2.3.0)
Oracle Access Management 11g Release 2 (11.1.2.3.0)
Oracle Adaptive Access Manager 11g Release 2 (11.1.2.3.0)
Oracle SOA Suite 11g Release 1 (11.1.1.9.0)
Oracle WebLogic Server 10.3.6
Oracle Adaptive Access Manager is not part of the Oracle Identity and AccessManagement suite for 12c (12.2.1.3.0), and hence will not be upgraded to 12c. OracleAdaptive Access Manager 11.1.2.3.0 is compatible with Oracle Access Management12c (12.2.1.3.0).
Roadmap for Upgrading OIM-OAM Integrated HighlyAvailable Environments Set Up Manually
Refer to the roadmap for upgrading Oracle Identity Manager and Oracle AccessManagement integrated highly available 11.1.2.3.0 environments that was set upmanually, to 12c (12.2.1.3.0).
The following table describes the tasks that you must perform to upgrade an OIM-OAM integrated topology described in About the OIM-OAM Integrated HA TopologySet Up Manually.
Table 8-2 Tasks for Upgrading Integrated Environments Set Up Manually
Task Documentation
Review the OIM-OAM integrated topology. See, About the OIM-OAM Integrated HATopology Set Up Manually
Review the supported starting points forintegrated environment upgrade.
See, Supported Starting Points for IntegratedHA Upgrade
Ensure that the LDAP server and the OracleAccess Management have the same lockoutvalue configured before you start the upgrade.That is, the lockout threshold of libOVD, OAM,and LDAP should be the same, else the lockand unlock use cases fail after upgrade.
This is applicable for a OIM-OAM integratedsingle node setup as well.
See, Setting the LockoutThreshold in ActiveDirectory in the Oracle Fusion MiddlewareDeployment Guide for Oracle Identity andAccess Management for 11g Release 2(11.1.2.3.0).
Chapter 8Supported Starting Points for Integrated HA Upgrade
8-3
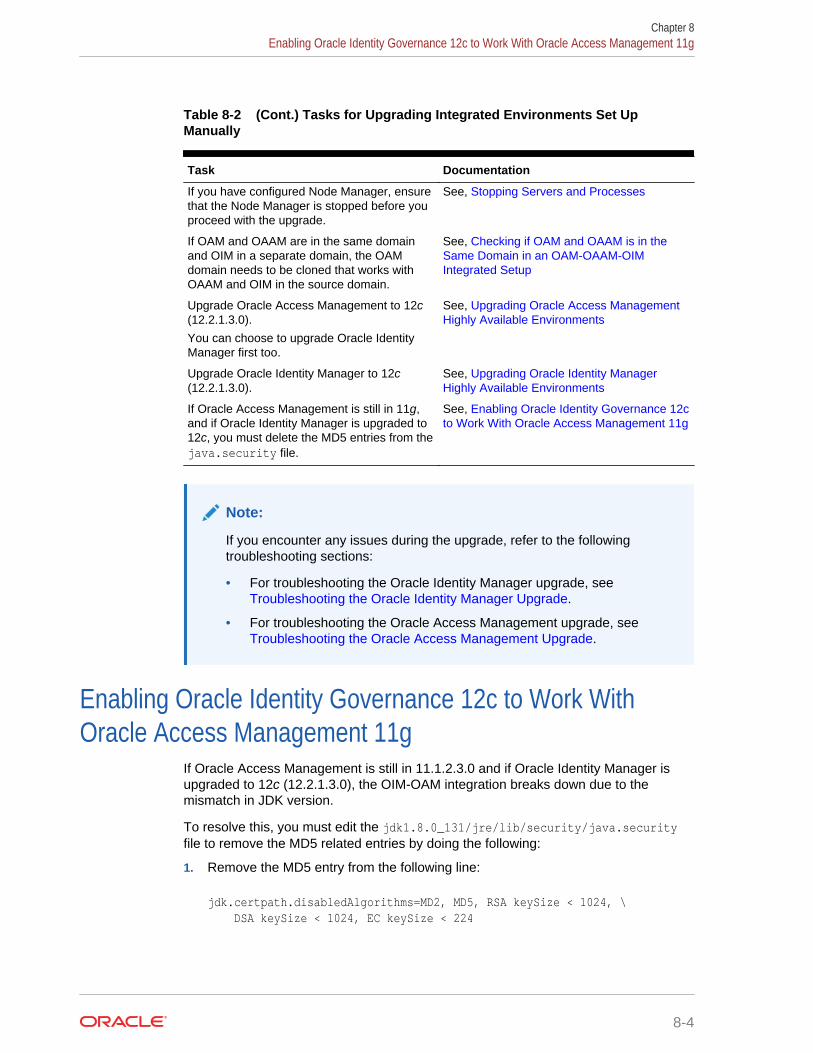
Table 8-2 (Cont.) Tasks for Upgrading Integrated Environments Set UpManually
Task Documentation
If you have configured Node Manager, ensurethat the Node Manager is stopped before youproceed with the upgrade.
See, Stopping Servers and Processes
If OAM and OAAM are in the same domainand OIM in a separate domain, the OAMdomain needs to be cloned that works withOAAM and OIM in the source domain.
See, Checking if OAM and OAAM is in theSame Domain in an OAM-OAAM-OIMIntegrated Setup
Upgrade Oracle Access Management to 12c(12.2.1.3.0).
You can choose to upgrade Oracle IdentityManager first too.
See, Upgrading Oracle Access ManagementHighly Available Environments
Upgrade Oracle Identity Manager to 12c(12.2.1.3.0).
See, Upgrading Oracle Identity ManagerHighly Available Environments
If Oracle Access Management is still in 11g,and if Oracle Identity Manager is upgraded to12c, you must delete the MD5 entries from thejava.security file.
See, Enabling Oracle Identity Governance 12cto Work With Oracle Access Management 11g
Note:
If you encounter any issues during the upgrade, refer to the followingtroubleshooting sections:
• For troubleshooting the Oracle Identity Manager upgrade, see Troubleshooting the Oracle Identity Manager Upgrade.
• For troubleshooting the Oracle Access Management upgrade, see Troubleshooting the Oracle Access Management Upgrade.
Enabling Oracle Identity Governance 12c to Work WithOracle Access Management 11g
If Oracle Access Management is still in 11.1.2.3.0 and if Oracle Identity Manager isupgraded to 12c (12.2.1.3.0), the OIM-OAM integration breaks down due to themismatch in JDK version.
To resolve this, you must edit the jdk1.8.0_131/jre/lib/security/java.securityfile to remove the MD5 related entries by doing the following:
1. Remove the MD5 entry from the following line:
jdk.certpath.disabledAlgorithms=MD2, MD5, RSA keySize < 1024, \ DSA keySize < 1024, EC keySize < 224
Chapter 8Enabling Oracle Identity Governance 12c to Work With Oracle Access Management 11g
8-4
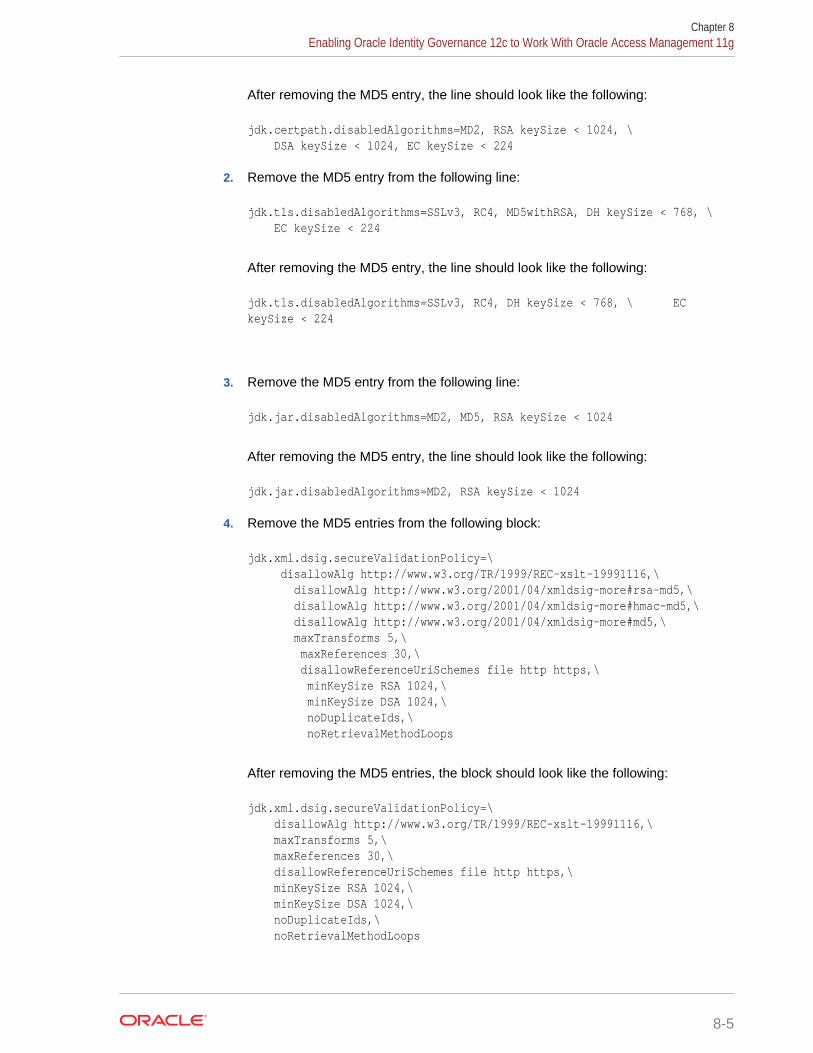
After removing the MD5 entry, the line should look like the following:
jdk.certpath.disabledAlgorithms=MD2, RSA keySize < 1024, \ DSA keySize < 1024, EC keySize < 224
2. Remove the MD5 entry from the following line:
jdk.tls.disabledAlgorithms=SSLv3, RC4, MD5withRSA, DH keySize < 768, \ EC keySize < 224
After removing the MD5 entry, the line should look like the following:
jdk.tls.disabledAlgorithms=SSLv3, RC4, DH keySize < 768, \ EC keySize < 224
3. Remove the MD5 entry from the following line:
jdk.jar.disabledAlgorithms=MD2, MD5, RSA keySize < 1024
After removing the MD5 entry, the line should look like the following:
jdk.jar.disabledAlgorithms=MD2, RSA keySize < 1024
4. Remove the MD5 entries from the following block:
jdk.xml.dsig.secureValidationPolicy=\ disallowAlg http://www.w3.org/TR/1999/REC-xslt-19991116,\ disallowAlg http://www.w3.org/2001/04/xmldsig-more#rsa-md5,\ disallowAlg http://www.w3.org/2001/04/xmldsig-more#hmac-md5,\ disallowAlg http://www.w3.org/2001/04/xmldsig-more#md5,\ maxTransforms 5,\ maxReferences 30,\ disallowReferenceUriSchemes file http https,\ minKeySize RSA 1024,\ minKeySize DSA 1024,\ noDuplicateIds,\ noRetrievalMethodLoops
After removing the MD5 entries, the block should look like the following:
jdk.xml.dsig.secureValidationPolicy=\ disallowAlg http://www.w3.org/TR/1999/REC-xslt-19991116,\ maxTransforms 5,\ maxReferences 30,\ disallowReferenceUriSchemes file http https,\ minKeySize RSA 1024,\ minKeySize DSA 1024,\ noDuplicateIds,\ noRetrievalMethodLoops
Chapter 8Enabling Oracle Identity Governance 12c to Work With Oracle Access Management 11g
8-5
5. Reboot the OIM domain.
Chapter 8Enabling Oracle Identity Governance 12c to Work With Oracle Access Management 11g
8-6
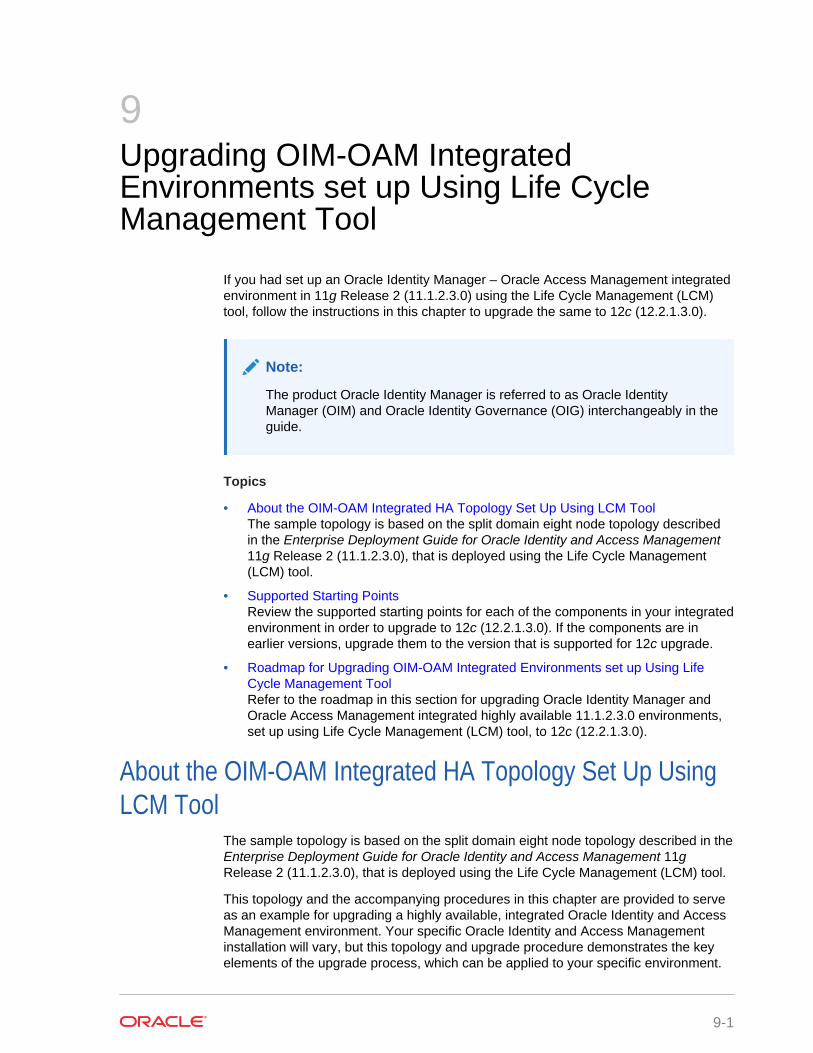
9Upgrading OIM-OAM IntegratedEnvironments set up Using Life CycleManagement Tool
If you had set up an Oracle Identity Manager – Oracle Access Management integratedenvironment in 11g Release 2 (11.1.2.3.0) using the Life Cycle Management (LCM)tool, follow the instructions in this chapter to upgrade the same to 12c (12.2.1.3.0).
Note:
The product Oracle Identity Manager is referred to as Oracle IdentityManager (OIM) and Oracle Identity Governance (OIG) interchangeably in theguide.
Topics
• About the OIM-OAM Integrated HA Topology Set Up Using LCM ToolThe sample topology is based on the split domain eight node topology describedin the Enterprise Deployment Guide for Oracle Identity and Access Management11g Release 2 (11.1.2.3.0), that is deployed using the Life Cycle Management(LCM) tool.
• Supported Starting PointsReview the supported starting points for each of the components in your integratedenvironment in order to upgrade to 12c (12.2.1.3.0). If the components are inearlier versions, upgrade them to the version that is supported for 12c upgrade.
• Roadmap for Upgrading OIM-OAM Integrated Environments set up Using LifeCycle Management ToolRefer to the roadmap in this section for upgrading Oracle Identity Manager andOracle Access Management integrated highly available 11.1.2.3.0 environments,set up using Life Cycle Management (LCM) tool, to 12c (12.2.1.3.0).
About the OIM-OAM Integrated HA Topology Set Up UsingLCM Tool
The sample topology is based on the split domain eight node topology described in theEnterprise Deployment Guide for Oracle Identity and Access Management 11gRelease 2 (11.1.2.3.0), that is deployed using the Life Cycle Management (LCM) tool.
This topology and the accompanying procedures in this chapter are provided to serveas an example for upgrading a highly available, integrated Oracle Identity and AccessManagement environment. Your specific Oracle Identity and Access Managementinstallation will vary, but this topology and upgrade procedure demonstrates the keyelements of the upgrade process, which can be applied to your specific environment.
9-1
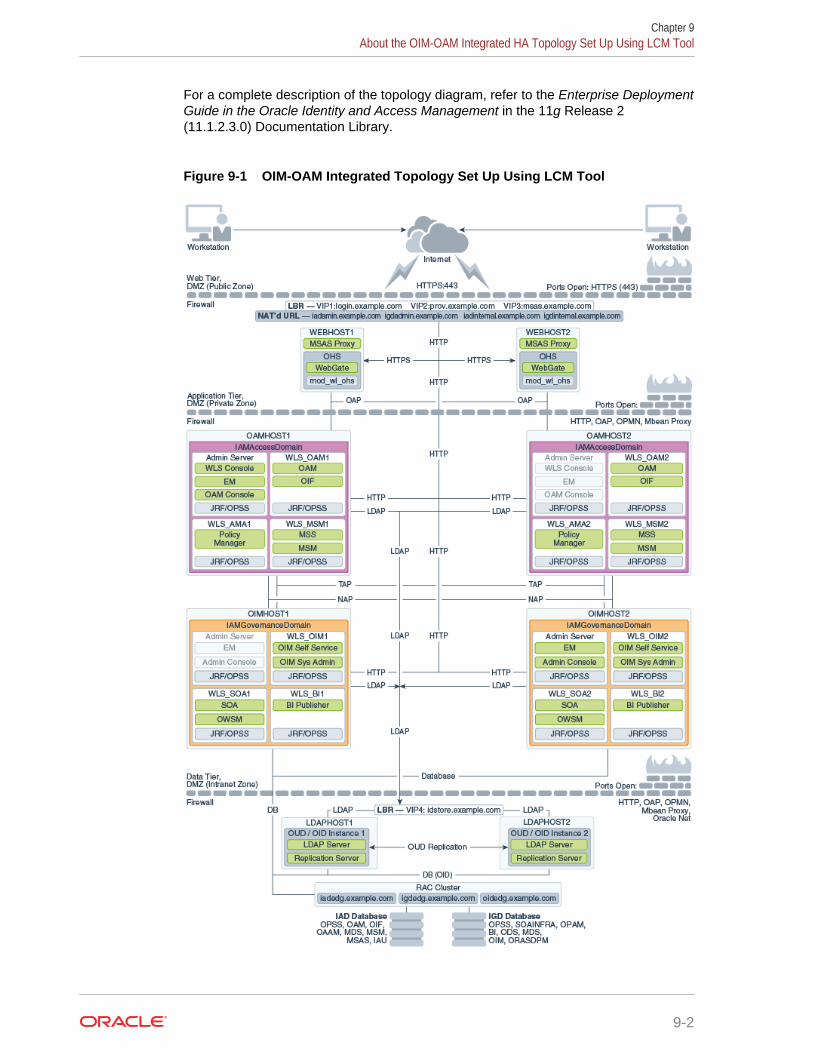
For a complete description of the topology diagram, refer to the Enterprise DeploymentGuide in the Oracle Identity and Access Management in the 11g Release 2(11.1.2.3.0) Documentation Library.
Figure 9-1 OIM-OAM Integrated Topology Set Up Using LCM Tool
Chapter 9About the OIM-OAM Integrated HA Topology Set Up Using LCM Tool
9-2
Supported Starting PointsReview the supported starting points for each of the components in your integratedenvironment in order to upgrade to 12c (12.2.1.3.0). If the components are in earlierversions, upgrade them to the version that is supported for 12c upgrade.
The following table lists the versions that are supported for upgrade of an integratedhighly available environments.
Table 9-1 Supported Starting Points for Integrated HA Upgrade
Component Supported Starting Point
Oracle Identity Manager 11g Release 2 (11.1.2.3.0)
Oracle Access Management 11g Release 2 (11.1.2.3.0)
Oracle Adaptive Access Manager 11g Release 2 (11.1.2.3.0)
Oracle SOA Suite 11g Release 1 (11.1.1.9.0)
Oracle WebLogic Server 10.3.6
Oracle Adaptive Access Manager is not part of the Oracle Identity and AccessManagement suite for 12c (12.2.1.3.0), and hence will not be upgraded to 12c. OracleAdaptive Access Manager 11.1.2.3.0 is compatible with Oracle Access Management12c (12.2.1.3.0).
Roadmap for Upgrading OIM-OAM Integrated Environmentsset up Using Life Cycle Management Tool
Refer to the roadmap in this section for upgrading Oracle Identity Manager and OracleAccess Management integrated highly available 11.1.2.3.0 environments, set up usingLife Cycle Management (LCM) tool, to 12c (12.2.1.3.0).
The following table describes the tasks that you must perform to upgrade an integratedtopology described in About the OIM-OAM Integrated HA Topology Set Up Using LCMTool.
Table 9-2 Tasks for Upgrading Integrated Environments Set Up Using LCMTool
Task Documentation
Review the OIM-OAM integrated topology. See, About the OIM-OAM Integrated HATopology Set Up Using LCM Tool.
Review the supported starting points forintegrated environment upgrade.
See, Supported Starting Points.
Chapter 9Supported Starting Points
9-3
Table 9-2 (Cont.) Tasks for Upgrading Integrated Environments Set Up UsingLCM Tool
Task Documentation
Ensure that the LDAP server and the OracleAccess Management have the same lockoutvalue configured before you start the upgrade.That is, the lockout threshold of libOVD, OAM,and LDAP should be the same, else the lockand unlock use cases fail after upgrade.
This is applicable for a OIM-OAM integratedsingle node setup as well.
See, Setting the LockoutThreshold in ActiveDirectory in the Oracle Fusion MiddlewareDeployment Guide for Oracle Identity andAccess Management for 11g Release 2(11.1.2.3.0).
If you have configured Node Manager, ensurethat the Node Manager is stopped before youproceed with the upgrade.
See, Stopping Servers and Processes
Check if Oracle Access Management (OAM) isintegrated with Oracle Adaptive AccessManagement (OAAM) and/or Oracle IdentityManager (OIM) in a single domain.Check.
If Oracle Access Management is integratedwith either Oracle Adaptive AccessManagement (OAAM) or Oracle IdentityManager (OIM), and if both the products are ina same domain, a separate OAM domainneeds to be cloned that works with OAAM orOIM in the source domain. It is the clonedOAM domain that needs to be upgraded to12c.
See, Checking if OAM and OAAM is in theSame Domain in an OAM-OAAM-OIMIntegrated SetupAlso, complete any necessary pre-upgradetasks for Oracle Access Management.
See, Completing the Pre-Upgrade Tasks forOracle Access Management
Upgrade the Oracle Identity Manager onOIMHOST1 shared domain to 12c(12.2.1.3.0).
Do NOT start the servers after you upgrade.
See, Upgrading Oracle Identity ManagerSingle Node Environments.
Take a backup and delete the contents of theprivate domain.
It is recommended that you perform this step,or the soa-infra application continues to bein Prepared state instead of active state,post upgrade.
See, soa-infra Application is in ‘Prepared’State Post Upgrade.
Chapter 9Roadmap for Upgrading OIM-OAM Integrated Environments set up Using Life Cycle Management Tool
9-4
Table 9-2 (Cont.) Tasks for Upgrading Integrated Environments Set Up UsingLCM Tool
Task Documentation
Pack the Oracle Identity Manager shareddomain and unpack it into the private domainon OIMHOST1 and OIMHOST2.
See, Replicating the Domain Configurationson OIMHOST2.
Note:
Use the packand unpackcommands asdescribed in theabove section topack the OIMshared domainand unpack it tothe privatedomain onOIMHOST1 andOIMHOST2.
Start the Oracle SOA Suite Managed Serversand Oracle Identity Manager servers onOIMHOST1.
You must start the Administration Server fromthe shared domain and the Managed Serversfrom the private domain.
When you start the Oracle SOA SuiteManaged Servers for the first time afterupgrade, ensure that you do it with BusinessProcess Management (BPM) property andAdministration Server URL.
See, Starting the Servers.If bootstrapping fails when you start the OracleIdentity Manager servers for the first time,follow the instructions described in OIMBootstrap for DEPLOYSOACOMPOSITESTask Fails After Upgradeto resolve this, andthen start the servers,
Restart the Administration Server, Oracle SOASuite Managed Servers, and the OracleIdentity Manager Managed Servers onOIMHOST1 and start the Oracle SOA SuiteManaged Servers, and the Oracle IdentityManager Managed Servers on OIMHOST2.
When you restart the Oracle SOA SuiteManaged Servers for the second time afterupgrade, ensure that you do it withoutBusiness Process Management (BPM)property.
See, Stopping Servers and Processes forstopping the servers.See, Starting the Servers for starting theservers.
Upgrade the Oracle Access Management onOAMHOST1 shared domain to 12c(12.2.1.3.0).
Do not start the servers after you upgrade.
See, Upgrading Oracle Access ManagementSingle Node Environments.
Chapter 9Roadmap for Upgrading OIM-OAM Integrated Environments set up Using Life Cycle Management Tool
9-5
Table 9-2 (Cont.) Tasks for Upgrading Integrated Environments Set Up UsingLCM Tool
Task Documentation
Pack the Oracle Access Management shareddomain and unpack it to the private domain onOAMHOST1 and OAMHOST2.
See, Replicating the Domain Configurationson OIMHOST2.
Note:
Use the packand unpackcommands asdescribed in theabove section topack the OAMshared domainand unpack it tothe privatedomain onOAMHOST1 andOAMHOST2.
Start the Administration Server and the OracleAccess Management Managed Servers.
See, Starting Servers and Processes .
Note:
If you encounter any issues when upgrading Oracle Identity Manager , see Troubleshooting the Oracle Identity Manager Upgrade for troubleshootingtips.
If you encounter any issues when upgrading Oracle Access Management,see Troubleshooting the Oracle Access Management Upgrade fortroubleshooting tips.
Chapter 9Roadmap for Upgrading OIM-OAM Integrated Environments set up Using Life Cycle Management Tool
9-6
Part IIITroubleshooting the Oracle Identity andAccess Management Upgrade
If you encounter any issue when upgrading the Oracle Identity and AccessManagement components to 12c (12.2.1.3.0), follow the workaround described in therespective troubleshooting topics.
Topics
• Troubleshooting the Oracle Access Management UpgradeIf you encounter errors while upgrading Oracle Access Management upgrade,review the following troubleshooting procedures.
• Troubleshooting the Oracle Identity Manager UpgradeIf you encounter errors while upgrading Oracle Identity Manager, review thefollowing troubleshooting procedures.
10Troubleshooting the Oracle AccessManagement Upgrade
If you encounter errors while upgrading Oracle Access Management upgrade, reviewthe following troubleshooting procedures.
• Activation State is set as FAILED when Restarting the Admin ServerAfter you upgrade the domain component configurations and start the Adminserver, the activation state is set as FAILED.
• AMInitServlet Fails to Preload when Restarting OAM Managed ServerAfter you upgrade the domain component configurations and start the OAMmanaged server, AMInitServlet fails to preload.
• CFGFWK-60928: Invalid Existing Node Manager Home DirectoryWhen you reconfigure the domain, an invalid existing node manager homedirectory error is displayed.
• File Not Found Exception when Starting the OAM Managed ServerAfter you upgrade the domain component configurations and start the server aFile Not Found exception is displayed.
• Internal Server Error: The Server Encountered an Unknown ErrorWhen you perform an upgrade and access a protected resource, an InternalServer Error is displayed.
• Invalid OAM Keystore ConfigurationAfter you upgrade the domain component configurations and start the adminserver, the oam_admin deployment state is displayed as fail.
• Upgrade Assistant Readiness Check Fails: Common Infrastructure Services(DEV_STB)When you reconfigure the domain, the upgrade assistant readiness check failsbecause of the common infrastructure services (DEV_STB).
• Upgrade Assistant Readiness Check Fails: Missing System and Object PrivilegesWhen you reconfigure the domain, the upgrade assistant readiness check failsbecause of missing system and object privileges for OPSS Schema (DEV_IAU).
• Upgrade Assistant Readiness Check Fails: Oracle WSM Datasource ConnectionDetailsWhen you reconfigure the domain, the upgrade assistant readiness check failswith the exception Failed to read the Oracle WSM datasource connectiondetails.
• Readiness Check for OAM Configuration Upgrade FailsBefore you run the readiness check for Oracle Access Management for the firsttime, ensure that you have removed the IAMSuiteAgent security provider.
• Error When Starting SSL Enabled OAM Managed Server After UpgradeIf SSL is enabled for Oracle Access Management Managed Servers, the SSL portfor the Administration Server must be changed manually before starting theservers.
10-1
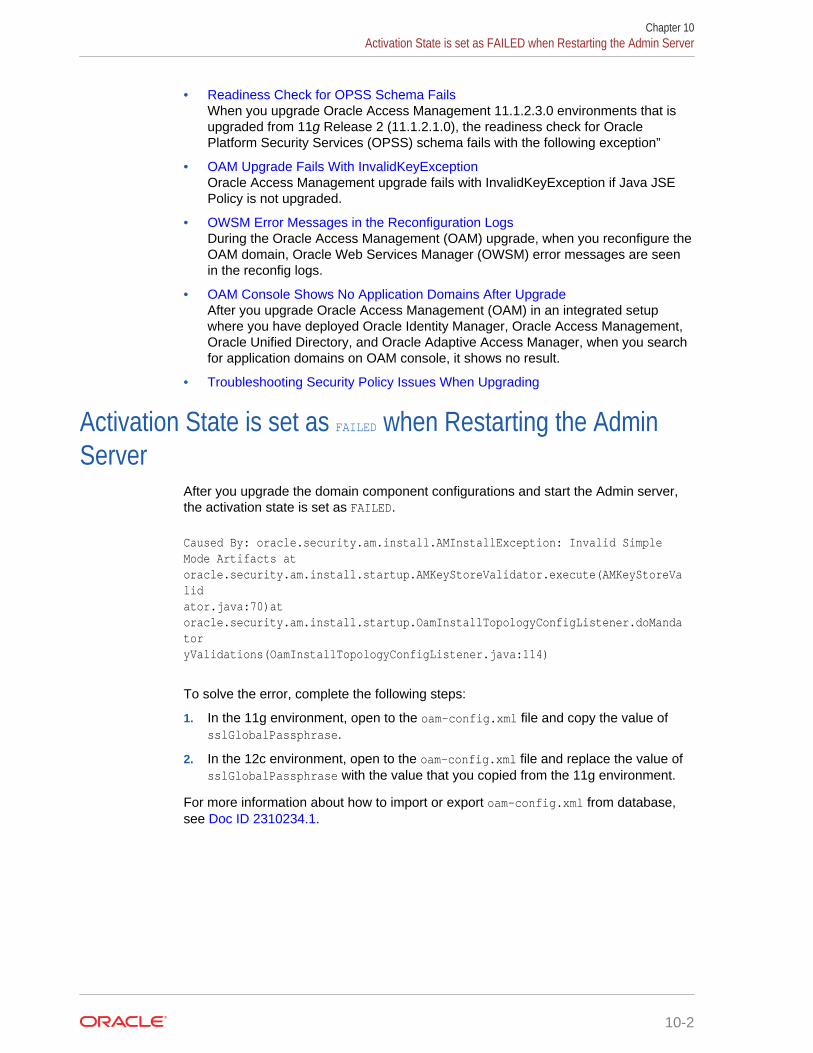
• Readiness Check for OPSS Schema FailsWhen you upgrade Oracle Access Management 11.1.2.3.0 environments that isupgraded from 11g Release 2 (11.1.2.1.0), the readiness check for OraclePlatform Security Services (OPSS) schema fails with the following exception”
• OAM Upgrade Fails With InvalidKeyExceptionOracle Access Management upgrade fails with InvalidKeyException if Java JSEPolicy is not upgraded.
• OWSM Error Messages in the Reconfiguration LogsDuring the Oracle Access Management (OAM) upgrade, when you reconfigure theOAM domain, Oracle Web Services Manager (OWSM) error messages are seenin the reconfig logs.
• OAM Console Shows No Application Domains After UpgradeAfter you upgrade Oracle Access Management (OAM) in an integrated setupwhere you have deployed Oracle Identity Manager, Oracle Access Management,Oracle Unified Directory, and Oracle Adaptive Access Manager, when you searchfor application domains on OAM console, it shows no result.
• Troubleshooting Security Policy Issues When Upgrading
Activation State is set as FAILED when Restarting the AdminServer
After you upgrade the domain component configurations and start the Admin server,the activation state is set as FAILED.
Caused By: oracle.security.am.install.AMInstallException: Invalid SimpleMode Artifacts atoracle.security.am.install.startup.AMKeyStoreValidator.execute(AMKeyStoreValidator.java:70)atoracle.security.am.install.startup.OamInstallTopologyConfigListener.doMandatoryValidations(OamInstallTopologyConfigListener.java:114)
To solve the error, complete the following steps:
1. In the 11g environment, open to the oam-config.xml file and copy the value ofsslGlobalPassphrase.
2. In the 12c environment, open to the oam-config.xml file and replace the value ofsslGlobalPassphrase with the value that you copied from the 11g environment.
For more information about how to import or export oam-config.xml from database,see Doc ID 2310234.1.
Chapter 10Activation State is set as FAILED when Restarting the Admin Server
10-2
AMInitServlet Fails to Preload when Restarting OAM ManagedServer
After you upgrade the domain component configurations and start the OAM managedserver, AMInitServlet fails to preload.
The following error message is displayed:
Caused By: oracle.security.am.common.utilities.exception.AmRuntimeException:Fail to decrypt oamkeystore data with cipher key from OAM config(/DeployedComponent/Server/NGAMServer/Profile/ssoengine/CipherKey)at oracle.security.am.engines.sso.adapter.OAMSessionConfiguration$ConfigListener.configurationChanged(OAMSessionConfiguration.java:295)
To solve the error, complete the following steps:
1. In the 11g environment, open to the oam-config.xml file and copy the value ofcipherKey.
2. In the 12c environment, open to the oam-config.xml file and replace the value ofcipherKey with the value that you copied from the 11g environment.
For more information about how to import or export oam-config.xml from database,see Doc ID 2310234.1.
CFGFWK-60928: Invalid Existing Node Manager HomeDirectory
When you reconfigure the domain, an invalid existing node manager home directoryerror is displayed.
The following message is displayed:
CFGFWK-60928: Invalid existing node manager home directory.Existing node manager home directory does not exist or is not accessible.
To solve the issue, select Create New Configuration in the Node Manager screen.
File Not Found Exception when Starting the OAM ManagedServer
After you upgrade the domain component configurations and start the server a FileNot Found exception is displayed.
This is a known issue. Ignore the following File Not Found exception:
[2019-09-04T05:52:24.349+00:00] [wls_oam1] [WARNING] [J2EE JMX-46714][oracle.as.jmx.framework.wls.spi.ComponentMBeans] [tid:
Chapter 10AMInitServlet Fails to Preload when Restarting OAM Managed Server
10-3
[ACTIVE].ExecuteThread: '4' for queue: 'weblogic.kernel.Default(self-tuning)'] [userId: <WLS Kernel>] [ecid:ab946520-e9e8-498c-89f6-5e9e0f055f40-00000007,0] [partition-name: DOMAIN][tenant-name: GLOBAL] Error parsing MBean descriptor file"fmwconfig/mbeans/oamconfig_mbeans.xml".[[java.io.FileNotFoundException: The Config MBean jar file"C:\Oracle\Middleware_IAM\user_projects\domains\oam_domain\config\fmwconfig\mbeans\${OAM_ORACLE_HOME}\server\lib\jmx\configmgmt.jar" does not exist.
[2019-09-04T05:52:26.693+00:00] [wls_oam1] [WARNING] [J2EE JMX-46714][oracle.as.jmx.framework.wls.spi.ComponentMBeans] [tid:[ACTIVE].ExecuteThread: '4' for queue: 'weblogic.kernel.Default(self-tuning)'] [userId: <WLS Kernel>] [ecid:ab946520-e9e8-498c-89f6-5e9e0f055f40-00000007,0] [partition-name: DOMAIN][tenant-name: GLOBAL] Error parsing MBean descriptor file"fmwconfig/mbeans/t2p_mbeans.xml".[[java.io.FileNotFoundException: The Config MBean jar file"C:\Oracle\Middleware_IAM\user_projects\domains\oam_domain\config\fmwconfig\mbeans\${OAM_ORACLE_HOME}\server\lib\jmx\was-t2p.jar" does not exist.
Internal Server Error: The Server Encountered an UnknownError
When you perform an upgrade and access a protected resource, an Internal ServerError is displayed.
When accessing a protected resource, the following error is displayed:
Internal Server Error. The server encountered an unknown error, possibly dueto misconfiguration.Contact the server administrator:[no address given]
To solve the issue, complete the following steps:
1. Validate OAM instance name, host, port, and proxy port. If incorrect values aredisplayed, then update the values.
2. Validate LBR host and port. If incorrect values are displayed, then update thevalues.
3. Delete OAM admin and managed server cache.
4. Restart the admin and managed servers.
5. Copy the artifacts to webgate and restart the OHS instance.
Chapter 10Internal Server Error: The Server Encountered an Unknown Error
10-4
Invalid OAM Keystore ConfigurationAfter you upgrade the domain component configurations and start the admin server,the oam_admin deployment state is displayed as fail.
This configuration change is applicable only if all the following are true:
• oam_admin deployment state is displayed as fail.
• ProductRelease version in oam-config, stored in db, is not updated to 12.2.1.3.0.
• OAM admin logs does not contain the following info level log message:
First Time startup after upgrade detected. Starting upgrade.
To solve the issue, complete the following steps:
1. Go to the upgradeStatus.properties file located at <domain_home>/config/fmwconfig/.
2. Change the isUpgrade value to True.
3. Save and close the file.
Upgrade Assistant Readiness Check Fails: CommonInfrastructure Services (DEV_STB)
When you reconfigure the domain, the upgrade assistant readiness check failsbecause of the common infrastructure services (DEV_STB).
The following error message is displayed:
STBUPG-05610: Exception thrown while testing the readiness ofcie schema upgrade :java.lang.NullPointerException
To solve the issue, apply patch 27428926.
Upgrade Assistant Readiness Check Fails: Missing Systemand Object Privileges
When you reconfigure the domain, the upgrade assistant readiness check failsbecause of missing system and object privileges for OPSS Schema (DEV_IAU).
To solve the issue, provide the SCHEMA_VERSION_REGISTRY grant to following auditschemas:
• DEV_IAU
• DEV_IAU_APPEND
• DEV_IAU_VIEWER
Chapter 10Invalid OAM Keystore Configuration
10-5
Upgrade Assistant Readiness Check Fails: Oracle WSMDatasource Connection Details
When you reconfigure the domain, the upgrade assistant readiness check fails withthe exception Failed to read the Oracle WSM datasource connection details.
The following exception is displayed:
[2019-09-22T23:14:50.828-04:00] [WSM] [INCIDENT_ERROR] [][upgrade.WSM.WSMPLUGIN] [tid: 105] [ecid:33feff0a-000a-49d1-88c7-2ae23c9712d9-00000002,0] [[oracle.ias.update.exception.UpgradeException: WSMERROR-00015:Failed to read the Oracle WSM datasource connection details.at oracle.wsm.lifecycle.upgrade.impl.WSMUpgradePlugin.initializePluginData(WSMUpgradePlugin.java:386)at oracle.wsm.lifecycle.upgrade.impl.WSMUpgradePlugin.readiness(WSMUpgradePlugin.java:150)at oracle.ias.update.plugin.Plugin.readiness(Plugin.java:595)
To solve this error, complete the steps mentioned in Doc ID 2289605.1.
Readiness Check for OAM Configuration Upgrade FailsBefore you run the readiness check for Oracle Access Management for the first time,ensure that you have removed the IAMSuiteAgent security provider.
When you run the readiness check for the first time, the check fails for OAMconfiguration upgrade with the following error:
Remove the IAMSuiteAgent security provider as per EDG guide
To remove the IAMSuiteAgent security provider, do the following:
1. Log in to the Oracle WebLogic Server Administration Console using the followingURL: http://host.mycompany.com/console
2. Select Security Realmsfrom the Domian Structuremenu.
3. Click Myrealm.
4. Go to the Providerstab.
5. Click Lock and Edit from the Change Center menu.
6. From the list of authentication providers, select IAMSuiteAgent.
7. Click Delete.
8. Click Yes to confirm the deletion.
9. Click Activate Changes from the Change Center menu to apply the changes.
Chapter 10Upgrade Assistant Readiness Check Fails: Oracle WSM Datasource Connection Details
10-6
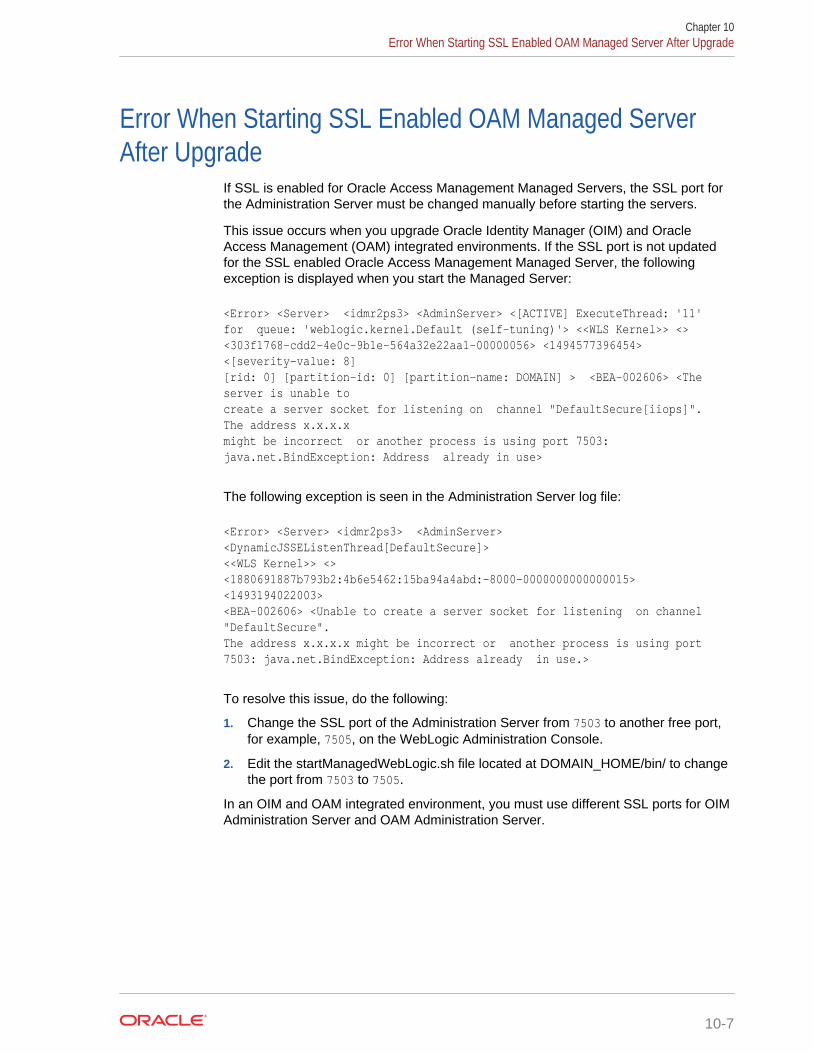
Error When Starting SSL Enabled OAM Managed ServerAfter Upgrade
If SSL is enabled for Oracle Access Management Managed Servers, the SSL port forthe Administration Server must be changed manually before starting the servers.
This issue occurs when you upgrade Oracle Identity Manager (OIM) and OracleAccess Management (OAM) integrated environments. If the SSL port is not updatedfor the SSL enabled Oracle Access Management Managed Server, the followingexception is displayed when you start the Managed Server:
<Error> <Server> <idmr2ps3> <AdminServer> <[ACTIVE] ExecuteThread: '11' for queue: 'weblogic.kernel.Default (self-tuning)'> <<WLS Kernel>> <> <303f1768-cdd2-4e0c-9b1e-564a32e22aa1-00000056> <1494577396454> <[severity-value: 8] [rid: 0] [partition-id: 0] [partition-name: DOMAIN] > <BEA-002606> <The server is unable to create a server socket for listening on channel "DefaultSecure[iiops]". The address x.x.x.x might be incorrect or another process is using port 7503: java.net.BindException: Address already in use>
The following exception is seen in the Administration Server log file:
<Error> <Server> <idmr2ps3> <AdminServer> <DynamicJSSEListenThread[DefaultSecure]> <<WLS Kernel>> <> <1880691887b793b2:4b6e5462:15ba94a4abd:-8000-0000000000000015> <1493194022003> <BEA-002606> <Unable to create a server socket for listening on channel "DefaultSecure". The address x.x.x.x might be incorrect or another process is using port 7503: java.net.BindException: Address already in use.>
To resolve this issue, do the following:
1. Change the SSL port of the Administration Server from 7503 to another free port,for example, 7505, on the WebLogic Administration Console.
2. Edit the startManagedWebLogic.sh file located at DOMAIN_HOME/bin/ to changethe port from 7503 to 7505.
In an OIM and OAM integrated environment, you must use different SSL ports for OIMAdministration Server and OAM Administration Server.
Chapter 10Error When Starting SSL Enabled OAM Managed Server After Upgrade
10-7
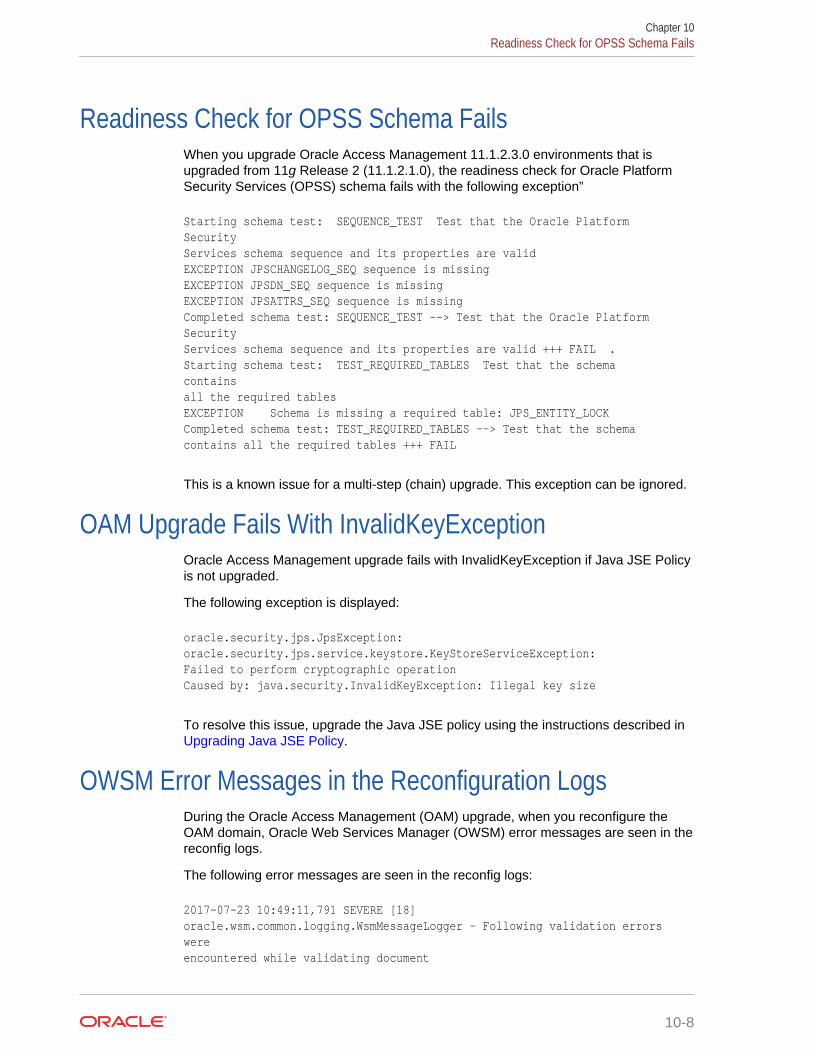
Readiness Check for OPSS Schema FailsWhen you upgrade Oracle Access Management 11.1.2.3.0 environments that isupgraded from 11g Release 2 (11.1.2.1.0), the readiness check for Oracle PlatformSecurity Services (OPSS) schema fails with the following exception”
Starting schema test: SEQUENCE_TEST Test that the Oracle Platform Security Services schema sequence and its properties are valid EXCEPTION JPSCHANGELOG_SEQ sequence is missing EXCEPTION JPSDN_SEQ sequence is missing EXCEPTION JPSATTRS_SEQ sequence is missing Completed schema test: SEQUENCE_TEST --> Test that the Oracle Platform Security Services schema sequence and its properties are valid +++ FAIL . Starting schema test: TEST_REQUIRED_TABLES Test that the schema contains all the required tables EXCEPTION Schema is missing a required table: JPS_ENTITY_LOCK Completed schema test: TEST_REQUIRED_TABLES --> Test that the schema contains all the required tables +++ FAIL
This is a known issue for a multi-step (chain) upgrade. This exception can be ignored.
OAM Upgrade Fails With InvalidKeyExceptionOracle Access Management upgrade fails with InvalidKeyException if Java JSE Policyis not upgraded.
The following exception is displayed:
oracle.security.jps.JpsException: oracle.security.jps.service.keystore.KeyStoreServiceException: Failed to perform cryptographic operationCaused by: java.security.InvalidKeyException: Illegal key size
To resolve this issue, upgrade the Java JSE policy using the instructions described in Upgrading Java JSE Policy.
OWSM Error Messages in the Reconfiguration LogsDuring the Oracle Access Management (OAM) upgrade, when you reconfigure theOAM domain, Oracle Web Services Manager (OWSM) error messages are seen in thereconfig logs.
The following error messages are seen in the reconfig logs:
2017-07-23 10:49:11,791 SEVERE [18] oracle.wsm.common.logging.WsmMessageLogger - Following validation errors were encountered while validating document
Chapter 10Readiness Check for OPSS Schema Fails
10-8
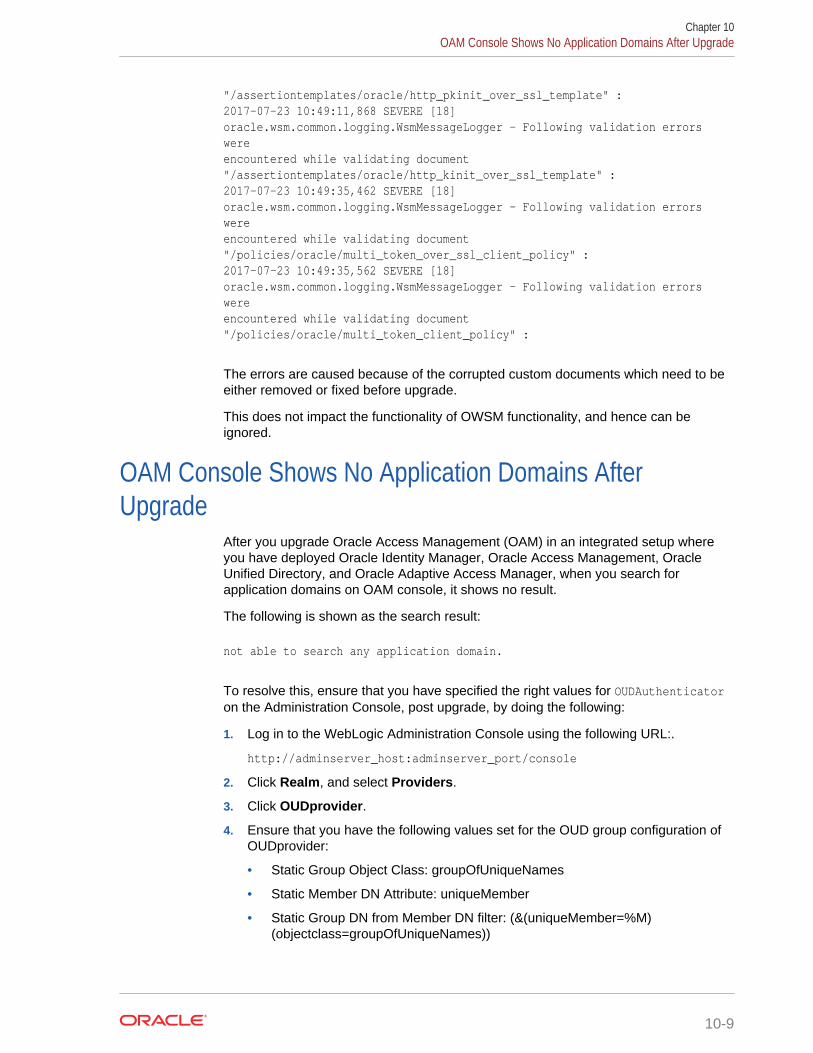
"/assertiontemplates/oracle/http_pkinit_over_ssl_template" : 2017-07-23 10:49:11,868 SEVERE [18] oracle.wsm.common.logging.WsmMessageLogger - Following validation errors were encountered while validating document "/assertiontemplates/oracle/http_kinit_over_ssl_template" : 2017-07-23 10:49:35,462 SEVERE [18] oracle.wsm.common.logging.WsmMessageLogger - Following validation errors were encountered while validating document "/policies/oracle/multi_token_over_ssl_client_policy" : 2017-07-23 10:49:35,562 SEVERE [18] oracle.wsm.common.logging.WsmMessageLogger - Following validation errors were encountered while validating document "/policies/oracle/multi_token_client_policy" :
The errors are caused because of the corrupted custom documents which need to beeither removed or fixed before upgrade.
This does not impact the functionality of OWSM functionality, and hence can beignored.
OAM Console Shows No Application Domains AfterUpgrade
After you upgrade Oracle Access Management (OAM) in an integrated setup whereyou have deployed Oracle Identity Manager, Oracle Access Management, OracleUnified Directory, and Oracle Adaptive Access Manager, when you search forapplication domains on OAM console, it shows no result.
The following is shown as the search result:
not able to search any application domain.
To resolve this, ensure that you have specified the right values for OUDAuthenticatoron the Administration Console, post upgrade, by doing the following:
1. Log in to the WebLogic Administration Console using the following URL:.
http://adminserver_host:adminserver_port/console
2. Click Realm, and select Providers.
3. Click OUDprovider.
4. Ensure that you have the following values set for the OUD group configuration ofOUDprovider:
• Static Group Object Class: groupOfUniqueNames
• Static Member DN Attribute: uniqueMember
• Static Group DN from Member DN filter: (&(uniqueMember=%M)(objectclass=groupOfUniqueNames))
Chapter 10OAM Console Shows No Application Domains After Upgrade
10-9
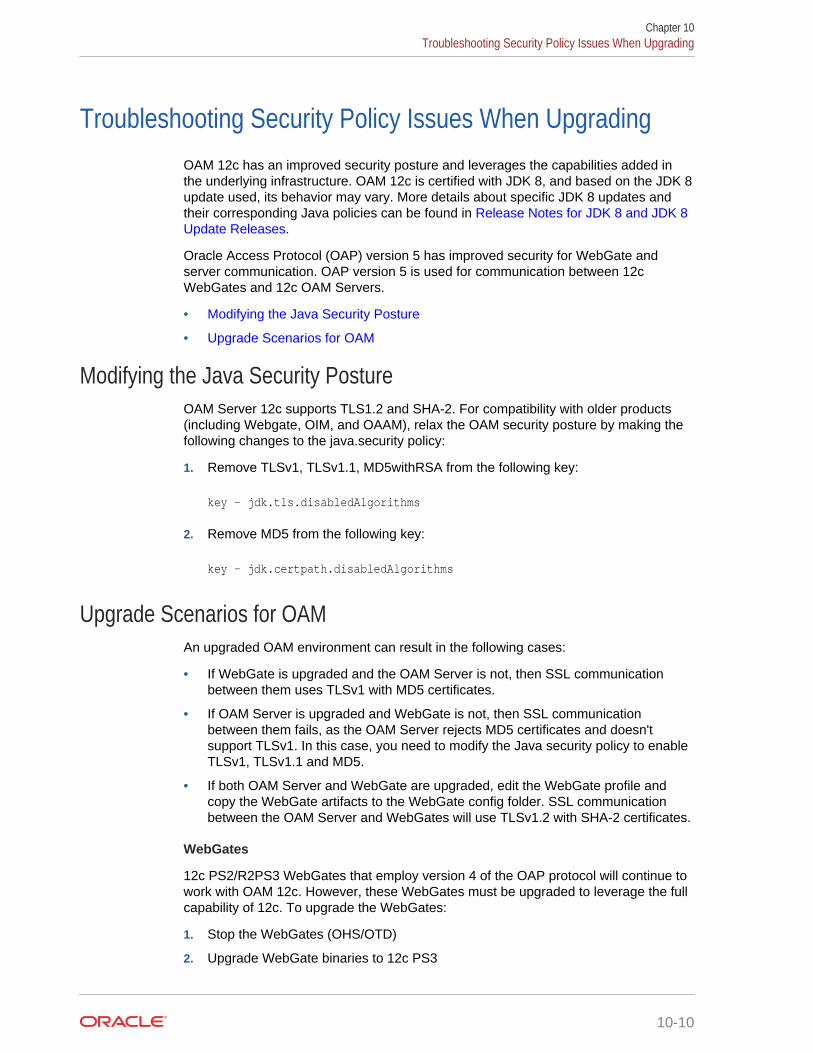
Troubleshooting Security Policy Issues When UpgradingOAM 12c has an improved security posture and leverages the capabilities added inthe underlying infrastructure. OAM 12c is certified with JDK 8, and based on the JDK 8update used, its behavior may vary. More details about specific JDK 8 updates andtheir corresponding Java policies can be found in Release Notes for JDK 8 and JDK 8Update Releases.
Oracle Access Protocol (OAP) version 5 has improved security for WebGate andserver communication. OAP version 5 is used for communication between 12cWebGates and 12c OAM Servers.
• Modifying the Java Security Posture
• Upgrade Scenarios for OAM
Modifying the Java Security PostureOAM Server 12c supports TLS1.2 and SHA-2. For compatibility with older products(including Webgate, OIM, and OAAM), relax the OAM security posture by making thefollowing changes to the java.security policy:
1. Remove TLSv1, TLSv1.1, MD5withRSA from the following key:
key - jdk.tls.disabledAlgorithms
2. Remove MD5 from the following key:
key - jdk.certpath.disabledAlgorithms
Upgrade Scenarios for OAMAn upgraded OAM environment can result in the following cases:
• If WebGate is upgraded and the OAM Server is not, then SSL communicationbetween them uses TLSv1 with MD5 certificates.
• If OAM Server is upgraded and WebGate is not, then SSL communicationbetween them fails, as the OAM Server rejects MD5 certificates and doesn'tsupport TLSv1. In this case, you need to modify the Java security policy to enableTLSv1, TLSv1.1 and MD5.
• If both OAM Server and WebGate are upgraded, edit the WebGate profile andcopy the WebGate artifacts to the WebGate config folder. SSL communicationbetween the OAM Server and WebGates will use TLSv1.2 with SHA-2 certificates.
WebGates
12c PS2/R2PS3 WebGates that employ version 4 of the OAP protocol will continue towork with OAM 12c. However, these WebGates must be upgraded to leverage the fullcapability of 12c. To upgrade the WebGates:
1. Stop the WebGates (OHS/OTD)
2. Upgrade WebGate binaries to 12c PS3
Chapter 10Troubleshooting Security Policy Issues When Upgrading
10-10
3. Edit WebGate profile and register the updated profile
4. Copy the WebGate artifacts to the WebGate config folder
5. Start the WebGates (OHS/OTD)
Multi-Data Center
If an upgrade results in a 12c Master server and an 11g clone server (or vice versa),then SSL communication between the servers fails. To enable communicationbetween these servers, modify the java.security policy to enable TLSv1, TLSv1.1, andMD5 as suggested above.
Client Certificates
OAM Server 12c rejects older client/user X.509 certificates that don't adhere to JDK 8security requirements. See Release Notes for JDK 8 and JDK 8 Update Releases forMD5- and TLS-related restrictions for the JDK 8 update specific to the system. Thisbehavior is governed by the JDK 8 java.security policy. To ensure acceptance of olderclient/user X.509 certificates, modify the java.security policy to enable TLSv1,TLSv1.1, and MD5 as described above.
Federation
For scenarios that involve Service Provider (SP) or Identity Provider (IDP) registration,the certificates used may undergo the same limitations as that for Client Certificateslisted above.
Note that federation agreements will break if the Token Signing Certificate is changed.As a result, the 11g security posture is carried forward after upgrading, which mayrequire enabling the legacy algorithms (TLSv1, TLSv1.1, and MD5), as describedabove. The use of SHA-2 certificates is supported.
OIC
Similar to Federation, changing the OAuth Token Signing Certificate breaks existingtrust relationships. As a result, the 11g security posture is carried forward afterupgrading, which may require enabling the legacy algorithms (TLSv1, TLSv1.1, andMD5), as described above. The use of SHA-2 certificates is supported.
Chapter 10Troubleshooting Security Policy Issues When Upgrading
10-11
11Troubleshooting the Oracle IdentityManager Upgrade
If you encounter errors while upgrading Oracle Identity Manager, review the followingtroubleshooting procedures.
Note:
The product Oracle Identity Manager is referred to as Oracle IdentityManager (OIM) and Oracle Identity Governance (OIG) interchangeably in theguide.
• Upgrading Product Schemas Error: OIMR2PS2_OIM.UK_ENTITY_TYPEWhen you are upgrading the product schemas, theOIMR2PS2_OIM.UK_ENTITY_TYPE violated error is displayed.
• KeystoreService Exception in the Logs After Reconfiguring the OIM DomainAfter you reconfigure the Oracle Identity Manager (OIM) domain, the logs showsome exceptions which can be ignored.
• Warning when Generating the Pre-Upgrade Report for OIMWhen you run the pre-upgrade report utility to generate the pre-upgrade report forOracle Identity Manager, the audit store instantiation failure warning is seen on theconsole, which can be ignored.
• Domain Reconfiguration ErrorWhen using the reconfiguration utility you might notice a Domain reconfig error. Tofix this error, you need to manually delete the related applications and references.
• OIM Bootstrap for DEPLOYSOACOMPOSITES Task Fails After UpgradeAfter you complete the Oracle Identity Manager upgrade, when you start theOracle Identity Manager Managed Servers for the first time, bootstrappinghappens. If the OIM bootstrap fails for DEPLOYSOACOMPOSITES task, use theworkaround described in this section to resolve the issue.
• Authorization Policy Merge Issue
• MAR Update or Metadata Merge IssueWhen you start the Oracle Identity Manager Managed Severs for the first timeafter upgrade, if you encounter any error during the bootstrap process which isrelated to MARUPDATE bootstrap task, run the external utilitymergeMDSDataAfterUpgrade.sh from the 12c Middleware Home to re-trigger theMetadata Services (MDS) merge process.
• Error When Opening ADF DI Excel Sheet After UpgradeThe ADFDI functionality will not work after you upgrade Oracle Identity Manager to12c (12.2.1.3.0).
11-1
• Complilation Error When Starting the SOA Server After UpgradeWhen you start the Oracle SOA Suite for the first time after upgrade, you may seethe compilation error in the SOA server logs.
• Warning in Oracle Identity Manager Server Logs After UpgradeAfter upgrade, the Oracle Identity Manager (OIM) Server logs show NPE warning,which can be ignored.
• Default Challenges Questions are not Updated After UpgradeAfter you upgrade Oracle Identity Manager 11.1.2.3.0 to 12c, the default challengequestions are not updated. It still shows the old or existing challenge questions.
• OPSS Processing Error When Reconfiguring the DomainWhen you upgrade a Oracle Identity Manager in an integrated environment, theOPSS processing error is encountered.
• EditFailedException When Releasing Configuration From WebLogic ConsoleAfter you upgrade Oracle Identity Manager to 12c (12.2.1.3.0), when you clickRelease Configuration on Oracle WebLogic Console, the following error is seen:
• OIM Application Deployment Fails IntermittentlyAfter you upgrade Oracle Identity Manager to 12c (12.2.1.3.0), the oim applicationdeployment may fail with the following error:
• soa-infra Application is in ‘Prepared’ State Post UpgradeAfter you upgrade Oracle Identity Manager (OIM) and Oracle Access Management(OAM) integrated environment that was set up using Life Cycle Management(LCM) tool, the soa-infra application continues to be in Prepared mode, insteadof showing active mode.
• Oracle Identity Manager Server Throws OutOfMemoryErrorWhen you start the servers post upgrade, OutOfMemoryError is thrown.
• SOA Fails to Join Coherence Cluster During the First Start After UpgradeAfter you upgrade Oracle Identity Manager (OIM) and Oracle Access Management(OAM) integrated environment, when you start the Oracle SOA Suite Server forthe first time, the coherence cluster fails to start with the following error:
• LDAP User Create and Update Reconciliation Job FailsLDAP User Create and Update Reconciliation job fails to run with the followingexception:
• BI Managed Server is Seen on WebLogic Console After UpgradeIf your 11g Release 2 (11.1.2.3.0) domain had a custom name for BI ManagedServer, that is, the name other than bi_server1, then this Managed Server will notbe deleted during the upgrade.
• Empty Pages or Panels After UpgradeAfter you complete the upgrade, the Applications tile in the OIM Self Serviceconsole and the Import/Export links in the Admin console may be rendered asempty pages or panels.
Chapter 11
11-2
Upgrading Product Schemas Error: OIMR2PS2_OIM.UK_ENTITY_TYPEWhen you are upgrading the product schemas, the OIMR2PS2_OIM.UK_ENTITY_TYPEviolated error is displayed.
The following error message is displayed:
ORA-00001: unique constraint (OIMR2PS2_OIM.UK_ENTITY_TYPE) violatedORA-06512: at line 23
To solve the error, see Doc ID 2412393.1.
KeystoreService Exception in the Logs After Reconfiguringthe OIM Domain
After you reconfigure the Oracle Identity Manager (OIM) domain, the logs show someexceptions which can be ignored.
The following exceptions are seen in the logs after you reconfigure the OIM domain:
oracle.security.jps.upgrade.tools.KeyStoreUpgrade - Exception in checking for jdk cacert storeoracle.security.jps.service.keystore.KeyStoreServiceException: Failed to loadthe keystore. at oracle.security.jps.internal.keystore.ldap.KeyStoreDataManager.getKeyStore(KeyStoreDataManager.java:987) at oracle.security.jps.internal.keystore.ldap.LdapKeyStoreServiceImpl.getKeyStore (LdapKeyStoreServiceImpl.java:279) at oracle.security.jps.upgrade.tools.KeyStoreUpgrade.importJdkCacerts(KeyStoreUpg rade.java:313)at oracle.security.jps.upgrade.tools.KeyStoreUpgrade.upgradeDITAndData(KeyStoreUp grade.java:266) at oracle.security.jps.upgrade.tools.utility.Upgrade.upgradeOPSSDITAndData(Upgrad e.java:1078)at oracle.security.jps.upgrade.tools.utility.Upgrade.upgradeOPSS(Upgrade.java:772)at oracle.security.opss.tools.lifecycle.OpssDomainConfigImpl.reconfigSubsyste
Chapter 11Upgrading Product Schemas Error: OIMR2PS2_OIM.UK_ENTITY_TYPE
11-3
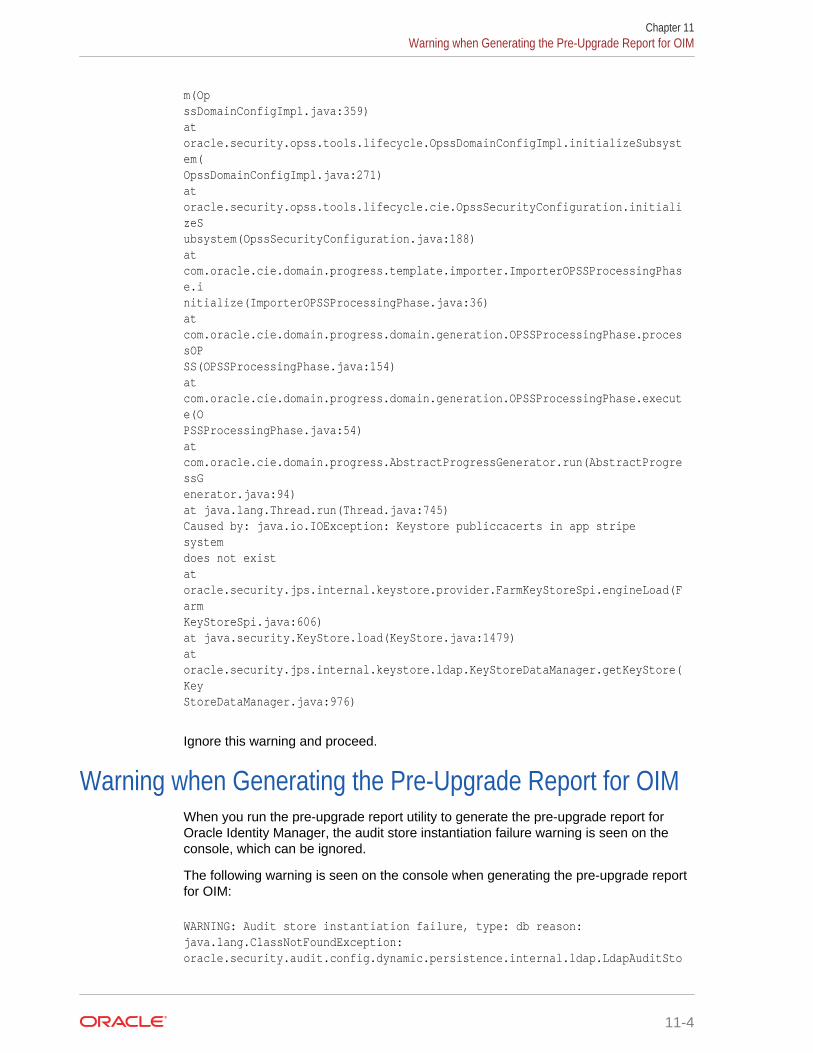
m(Op ssDomainConfigImpl.java:359)at oracle.security.opss.tools.lifecycle.OpssDomainConfigImpl.initializeSubsystem(OpssDomainConfigImpl.java:271)at oracle.security.opss.tools.lifecycle.cie.OpssSecurityConfiguration.initializeS ubsystem(OpssSecurityConfiguration.java:188) at com.oracle.cie.domain.progress.template.importer.ImporterOPSSProcessingPhase.i nitialize(ImporterOPSSProcessingPhase.java:36) at com.oracle.cie.domain.progress.domain.generation.OPSSProcessingPhase.processOP SS(OPSSProcessingPhase.java:154) at com.oracle.cie.domain.progress.domain.generation.OPSSProcessingPhase.execute(OPSSProcessingPhase.java:54)at com.oracle.cie.domain.progress.AbstractProgressGenerator.run(AbstractProgressGenerator.java:94)at java.lang.Thread.run(Thread.java:745) Caused by: java.io.IOException: Keystore publiccacerts in app stripe system does not existat oracle.security.jps.internal.keystore.provider.FarmKeyStoreSpi.engineLoad(Farm KeyStoreSpi.java:606)at java.security.KeyStore.load(KeyStore.java:1479) at oracle.security.jps.internal.keystore.ldap.KeyStoreDataManager.getKeyStore(KeyStoreDataManager.java:976)
Ignore this warning and proceed.
Warning when Generating the Pre-Upgrade Report for OIMWhen you run the pre-upgrade report utility to generate the pre-upgrade report forOracle Identity Manager, the audit store instantiation failure warning is seen on theconsole, which can be ignored.
The following warning is seen on the console when generating the pre-upgrade reportfor OIM:
WARNING: Audit store instantiation failure, type: db reason:java.lang.ClassNotFoundException: oracle.security.audit.config.dynamic.persistence.internal.ldap.LdapAuditSto
Chapter 11Warning when Generating the Pre-Upgrade Report for OIM
11-4

reJul 28, 2016 10:26:05 PM oracle.security.jps.az.internal.runtime.service.PDPServiceImpl oracle.security.jps.az.internal.runtime.service.PDPServiceImpl SEVERE: Cannot read the default policy store.oracle.security.jps.service.policystore.PolicyStoreException:oracle.security.jps.az.internal.management.pd.PD at oracle.security.jps.az.common.pd.service.PDServiceFinder.getPolicyDistributionService(PDServiceFinder.java:65)at oracle.security.jps.az.internal.runtime.service.PDPServiceImpl.initializeMixedMode(PDPServiceImpl.java:714) at oracle.security.jps.az.internal.runtime.service.PDPServiceImpl.initial(PDPServiceImpl.java:685)
Ignore this warning and proceed.
Domain Reconfiguration ErrorWhen using the reconfiguration utility you might notice a Domain reconfig error. To fixthis error, you need to manually delete the related applications and references.
During upgrade from 11g to 12c (12.2.1.3.0), the upgrade wizard displays the followingerror in the domain reconfiguration step:
Domain reconfig failed with:CFGFWK-40951: Correct source path of the applications to refer to the newinstallation.2017-11-09 03:53:00,804 SEVERE [42]com.oracle.cie.domain.progress.AbstractProgressGenerator - Error occurred inphase {Validating Domain} execution.com.oracle.cie.domain.ValidateException: CFGFWK-60953: An application orlibrary was not relocated to the new MW home.CFGFWK-60953: An error in the reconfiguration templates resulted in thefollowing deployments being left in the original MW home:OIMMetadata#11.1.1.3.0oim#11.1.1.3.0oracle.webcenter.skin#[email protected]#[email protected]#[email protected]#[email protected]
CFGFWK-60953: Correct the reconfiguration templates atcom.oracle.cie.domain.progress.domain.reconfig.wlscore.ValidateDomainPhase.val
idateDeployments(ValidateDomainPhase.java:124)
Chapter 11Domain Reconfiguration Error
11-5
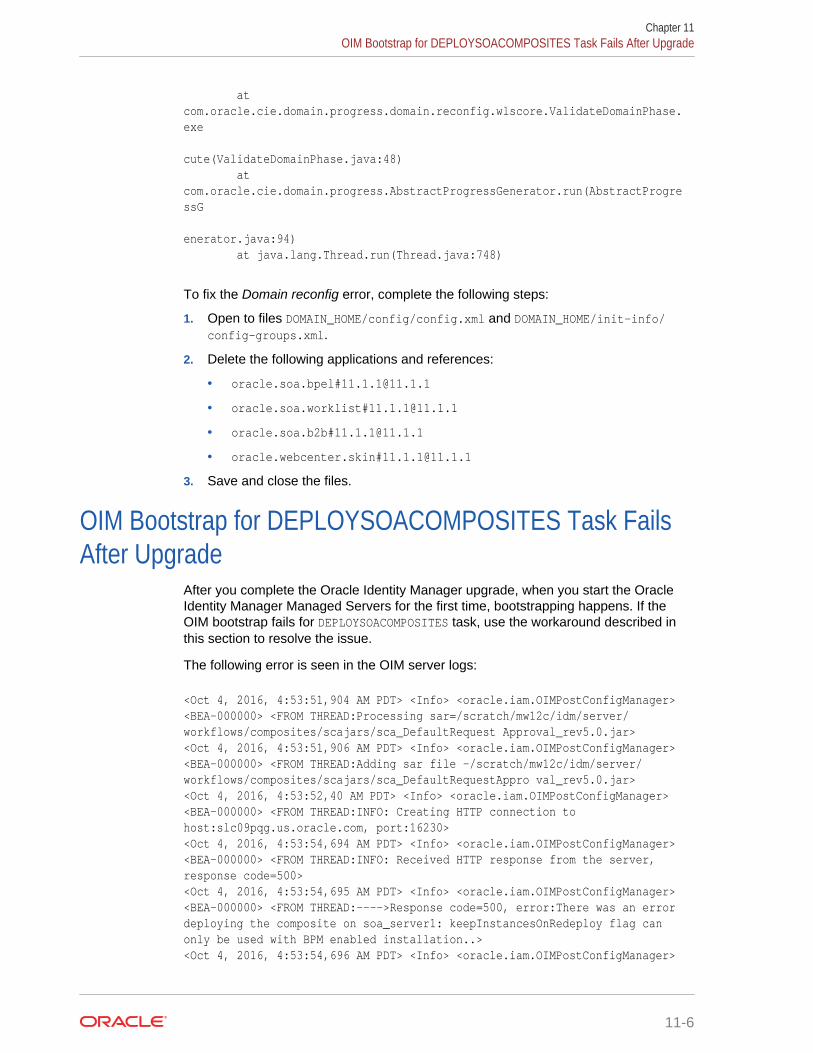
atcom.oracle.cie.domain.progress.domain.reconfig.wlscore.ValidateDomainPhase.exe
cute(ValidateDomainPhase.java:48) atcom.oracle.cie.domain.progress.AbstractProgressGenerator.run(AbstractProgressG
enerator.java:94) at java.lang.Thread.run(Thread.java:748)
To fix the Domain reconfig error, complete the following steps:
1. Open to files DOMAIN_HOME/config/config.xml and DOMAIN_HOME/init-info/config-groups.xml.
2. Delete the following applications and references:
• oracle.soa.bpel#[email protected]
• oracle.soa.worklist#[email protected]
• oracle.soa.b2b#[email protected]
• oracle.webcenter.skin#[email protected]
3. Save and close the files.
OIM Bootstrap for DEPLOYSOACOMPOSITES Task FailsAfter Upgrade
After you complete the Oracle Identity Manager upgrade, when you start the OracleIdentity Manager Managed Servers for the first time, bootstrapping happens. If theOIM bootstrap fails for DEPLOYSOACOMPOSITES task, use the workaround described inthis section to resolve the issue.
The following error is seen in the OIM server logs:
<Oct 4, 2016, 4:53:51,904 AM PDT> <Info> <oracle.iam.OIMPostConfigManager><BEA-000000> <FROM THREAD:Processing sar=/scratch/mw12c/idm/server/workflows/composites/scajars/sca_DefaultRequest Approval_rev5.0.jar><Oct 4, 2016, 4:53:51,906 AM PDT> <Info> <oracle.iam.OIMPostConfigManager><BEA-000000> <FROM THREAD:Adding sar file -/scratch/mw12c/idm/server/workflows/composites/scajars/sca_DefaultRequestAppro val_rev5.0.jar><Oct 4, 2016, 4:53:52,40 AM PDT> <Info> <oracle.iam.OIMPostConfigManager><BEA-000000> <FROM THREAD:INFO: Creating HTTP connection to host:slc09pqg.us.oracle.com, port:16230><Oct 4, 2016, 4:53:54,694 AM PDT> <Info> <oracle.iam.OIMPostConfigManager><BEA-000000> <FROM THREAD:INFO: Received HTTP response from the server, response code=500><Oct 4, 2016, 4:53:54,695 AM PDT> <Info> <oracle.iam.OIMPostConfigManager><BEA-000000> <FROM THREAD:---->Response code=500, error:There was an error deploying the composite on soa_server1: keepInstancesOnRedeploy flag can only be used with BPM enabled installation..><Oct 4, 2016, 4:53:54,696 AM PDT> <Info> <oracle.iam.OIMPostConfigManager>
Chapter 11OIM Bootstrap for DEPLOYSOACOMPOSITES Task Fails After Upgrade
11-6
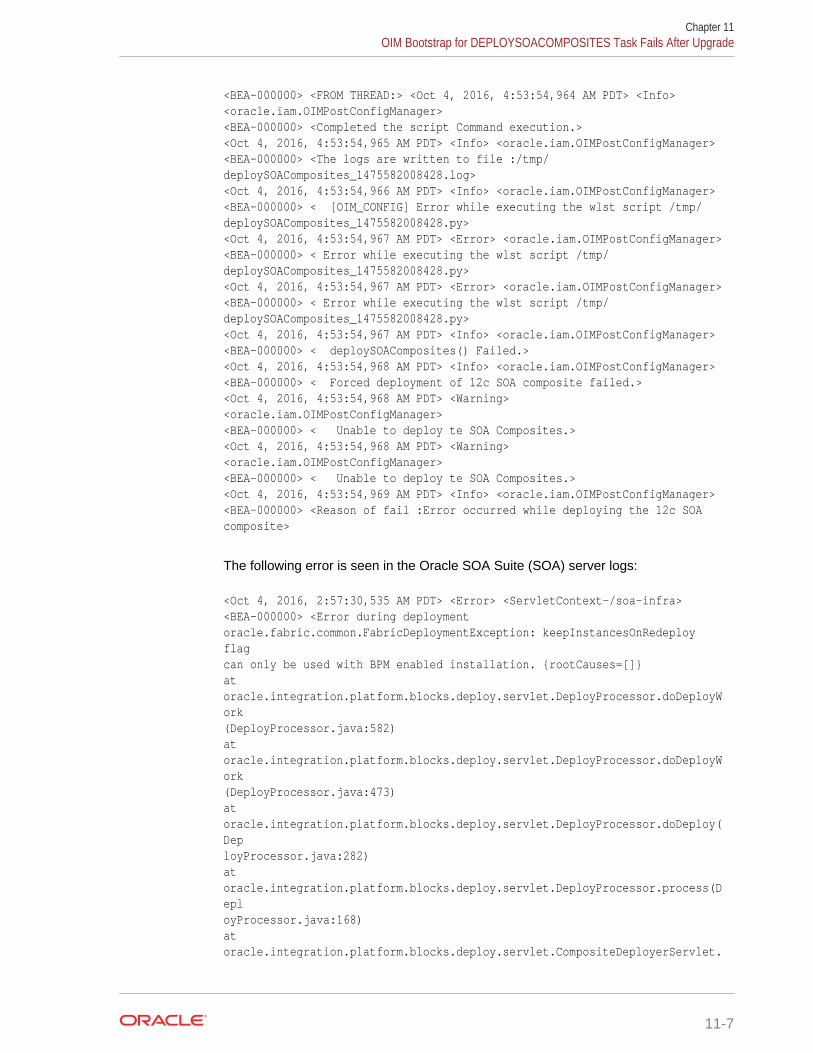
<BEA-000000> <FROM THREAD:> <Oct 4, 2016, 4:53:54,964 AM PDT> <Info> <oracle.iam.OIMPostConfigManager><BEA-000000> <Completed the script Command execution.><Oct 4, 2016, 4:53:54,965 AM PDT> <Info> <oracle.iam.OIMPostConfigManager><BEA-000000> <The logs are written to file :/tmp/deploySOAComposites_1475582008428.log><Oct 4, 2016, 4:53:54,966 AM PDT> <Info> <oracle.iam.OIMPostConfigManager><BEA-000000> < [OIM_CONFIG] Error while executing the wlst script /tmp/deploySOAComposites_1475582008428.py><Oct 4, 2016, 4:53:54,967 AM PDT> <Error> <oracle.iam.OIMPostConfigManager><BEA-000000> < Error while executing the wlst script /tmp/deploySOAComposites_1475582008428.py><Oct 4, 2016, 4:53:54,967 AM PDT> <Error> <oracle.iam.OIMPostConfigManager><BEA-000000> < Error while executing the wlst script /tmp/deploySOAComposites_1475582008428.py><Oct 4, 2016, 4:53:54,967 AM PDT> <Info> <oracle.iam.OIMPostConfigManager><BEA-000000> < deploySOAComposites() Failed.><Oct 4, 2016, 4:53:54,968 AM PDT> <Info> <oracle.iam.OIMPostConfigManager><BEA-000000> < Forced deployment of 12c SOA composite failed.><Oct 4, 2016, 4:53:54,968 AM PDT> <Warning> <oracle.iam.OIMPostConfigManager> <BEA-000000> < Unable to deploy te SOA Composites.><Oct 4, 2016, 4:53:54,968 AM PDT> <Warning> <oracle.iam.OIMPostConfigManager> <BEA-000000> < Unable to deploy te SOA Composites.><Oct 4, 2016, 4:53:54,969 AM PDT> <Info> <oracle.iam.OIMPostConfigManager><BEA-000000> <Reason of fail :Error occurred while deploying the 12c SOA composite>
The following error is seen in the Oracle SOA Suite (SOA) server logs:
<Oct 4, 2016, 2:57:30,535 AM PDT> <Error> <ServletContext-/soa-infra><BEA-000000> <Error during deployment oracle.fabric.common.FabricDeploymentException: keepInstancesOnRedeploy flag can only be used with BPM enabled installation. {rootCauses=[]} at oracle.integration.platform.blocks.deploy.servlet.DeployProcessor.doDeployWork (DeployProcessor.java:582) at oracle.integration.platform.blocks.deploy.servlet.DeployProcessor.doDeployWork (DeployProcessor.java:473) at oracle.integration.platform.blocks.deploy.servlet.DeployProcessor.doDeploy(Dep loyProcessor.java:282) at oracle.integration.platform.blocks.deploy.servlet.DeployProcessor.process(Depl oyProcessor.java:168) at oracle.integration.platform.blocks.deploy.servlet.CompositeDeployerServlet.
Chapter 11OIM Bootstrap for DEPLOYSOACOMPOSITES Task Fails After Upgrade
11-7
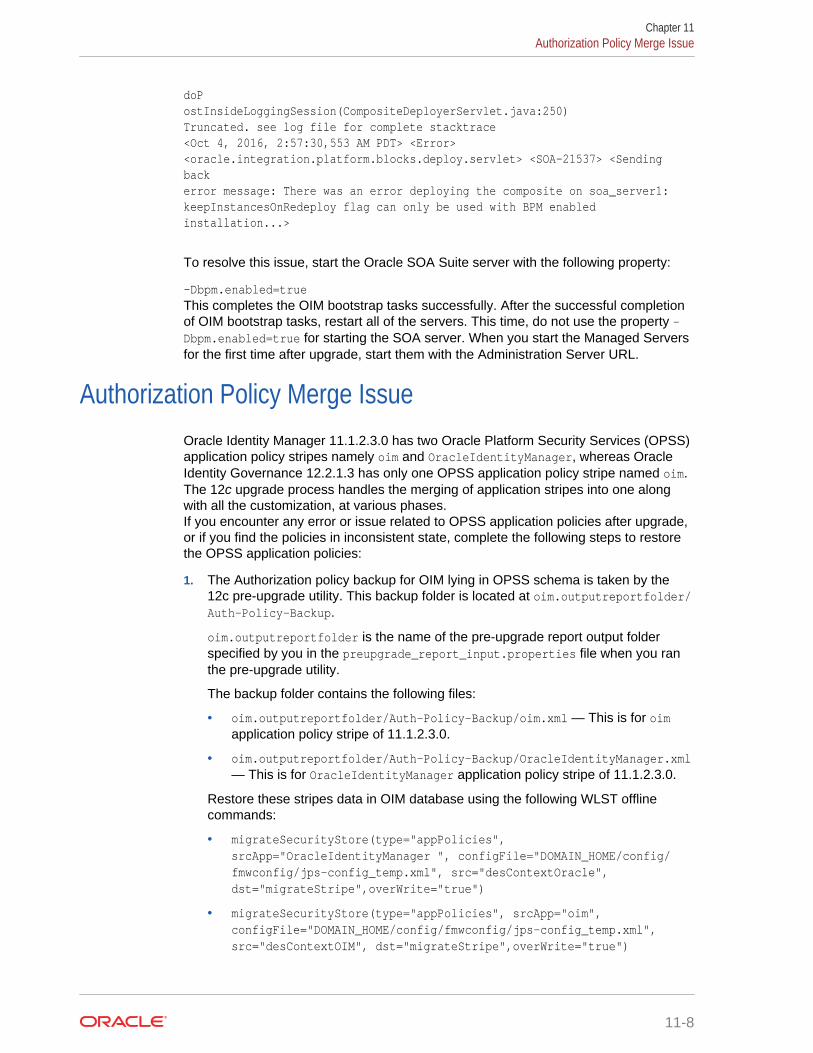
doP ostInsideLoggingSession(CompositeDeployerServlet.java:250) Truncated. see log file for complete stacktrace <Oct 4, 2016, 2:57:30,553 AM PDT> <Error> <oracle.integration.platform.blocks.deploy.servlet> <SOA-21537> <Sending back error message: There was an error deploying the composite on soa_server1: keepInstancesOnRedeploy flag can only be used with BPM enabledinstallation...>
To resolve this issue, start the Oracle SOA Suite server with the following property:
-Dbpm.enabled=trueThis completes the OIM bootstrap tasks successfully. After the successful completionof OIM bootstrap tasks, restart all of the servers. This time, do not use the property -Dbpm.enabled=true for starting the SOA server. When you start the Managed Serversfor the first time after upgrade, start them with the Administration Server URL.
Authorization Policy Merge IssueOracle Identity Manager 11.1.2.3.0 has two Oracle Platform Security Services (OPSS)application policy stripes namely oim and OracleIdentityManager, whereas OracleIdentity Governance 12.2.1.3 has only one OPSS application policy stripe named oim.The 12c upgrade process handles the merging of application stripes into one alongwith all the customization, at various phases.If you encounter any error or issue related to OPSS application policies after upgrade,or if you find the policies in inconsistent state, complete the following steps to restorethe OPSS application policies:
1. The Authorization policy backup for OIM lying in OPSS schema is taken by the12c pre-upgrade utility. This backup folder is located at oim.outputreportfolder/Auth-Policy-Backup.
oim.outputreportfolder is the name of the pre-upgrade report output folderspecified by you in the preupgrade_report_input.properties file when you ranthe pre-upgrade utility.
The backup folder contains the following files:
• oim.outputreportfolder/Auth-Policy-Backup/oim.xml — This is for oimapplication policy stripe of 11.1.2.3.0.
• oim.outputreportfolder/Auth-Policy-Backup/OracleIdentityManager.xml— This is for OracleIdentityManager application policy stripe of 11.1.2.3.0.
Restore these stripes data in OIM database using the following WLST offlinecommands:
• migrateSecurityStore(type="appPolicies",srcApp="OracleIdentityManager ", configFile="DOMAIN_HOME/config/fmwconfig/jps-config_temp.xml", src="desContextOracle",dst="migrateStripe",overWrite="true")
• migrateSecurityStore(type="appPolicies", srcApp="oim",configFile="DOMAIN_HOME/config/fmwconfig/jps-config_temp.xml",src="desContextOIM", dst="migrateStripe",overWrite="true")
Chapter 11Authorization Policy Merge Issue
11-8
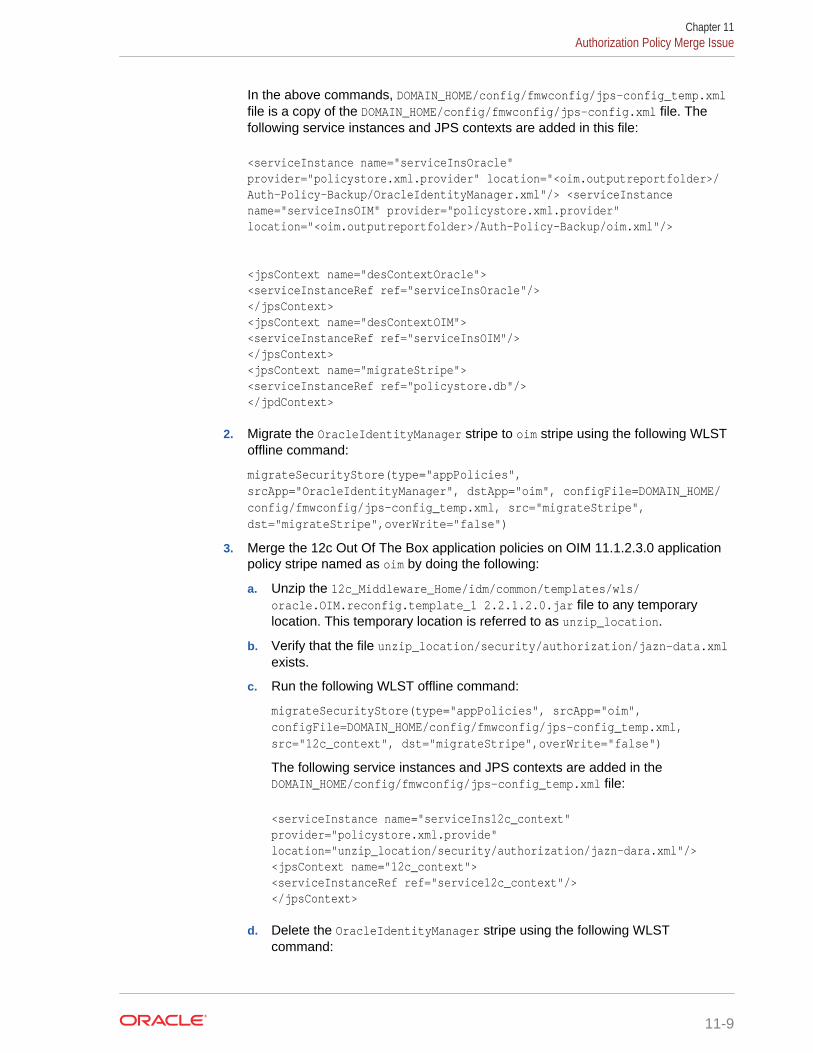
In the above commands, DOMAIN_HOME/config/fmwconfig/jps-config_temp.xmlfile is a copy of the DOMAIN_HOME/config/fmwconfig/jps-config.xml file. Thefollowing service instances and JPS contexts are added in this file:
<serviceInstance name="serviceInsOracle" provider="policystore.xml.provider" location="<oim.outputreportfolder>/Auth-Policy-Backup/OracleIdentityManager.xml"/> <serviceInstance name="serviceInsOIM" provider="policystore.xml.provider" location="<oim.outputreportfolder>/Auth-Policy-Backup/oim.xml"/>
<jpsContext name="desContextOracle"><serviceInstanceRef ref="serviceInsOracle"/></jpsContext><jpsContext name="desContextOIM"><serviceInstanceRef ref="serviceInsOIM"/></jpsContext><jpsContext name="migrateStripe"><serviceInstanceRef ref="policystore.db"/></jpdContext>
2. Migrate the OracleIdentityManager stripe to oim stripe using the following WLSToffline command:
migrateSecurityStore(type="appPolicies",srcApp="OracleIdentityManager", dstApp="oim", configFile=DOMAIN_HOME/config/fmwconfig/jps-config_temp.xml, src="migrateStripe",dst="migrateStripe",overWrite="false")
3. Merge the 12c Out Of The Box application policies on OIM 11.1.2.3.0 applicationpolicy stripe named as oim by doing the following:
a. Unzip the 12c_Middleware_Home/idm/common/templates/wls/oracle.OIM.reconfig.template_1 2.2.1.2.0.jar file to any temporarylocation. This temporary location is referred to as unzip_location.
b. Verify that the file unzip_location/security/authorization/jazn-data.xmlexists.
c. Run the following WLST offline command:
migrateSecurityStore(type="appPolicies", srcApp="oim",configFile=DOMAIN_HOME/config/fmwconfig/jps-config_temp.xml,src="12c_context", dst="migrateStripe",overWrite="false")
The following service instances and JPS contexts are added in theDOMAIN_HOME/config/fmwconfig/jps-config_temp.xml file:
<serviceInstance name="serviceIns12c_context" provider="policystore.xml.provide" location="unzip_location/security/authorization/jazn-dara.xml"/><jpsContext name="12c_context"><serviceInstanceRef ref="service12c_context"/></jpsContext>
d. Delete the OracleIdentityManager stripe using the following WLSTcommand:
Chapter 11Authorization Policy Merge Issue
11-9
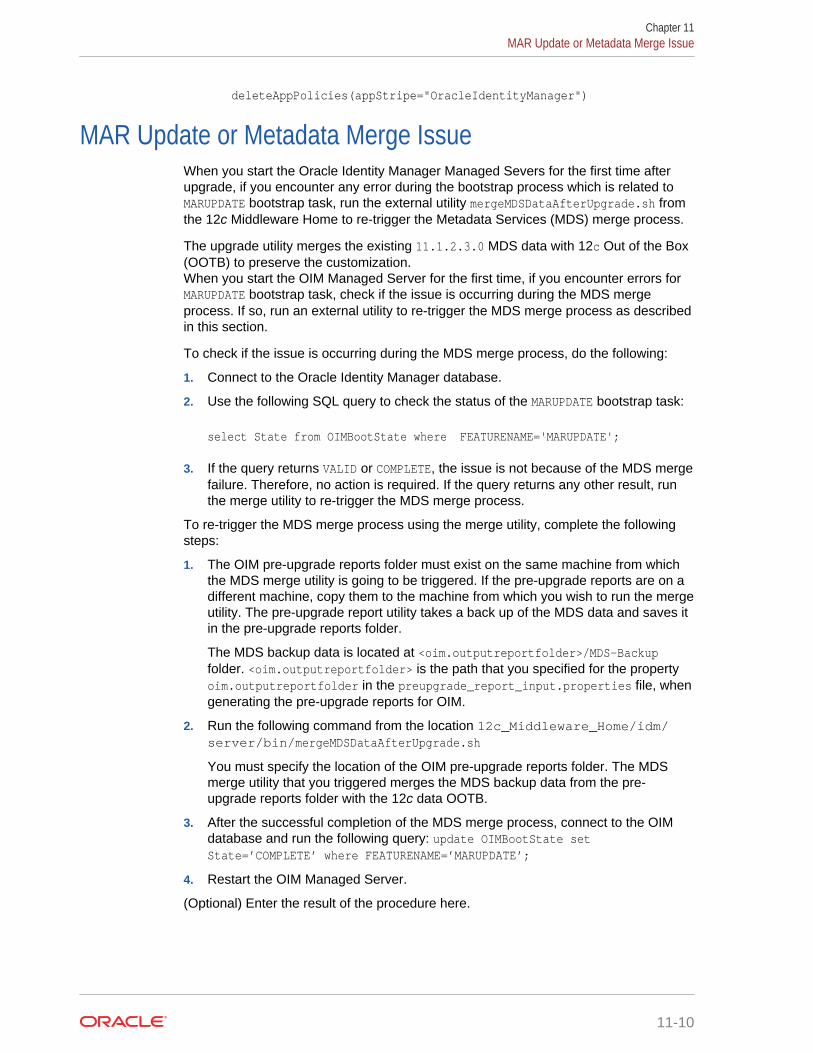
deleteAppPolicies(appStripe="OracleIdentityManager")
MAR Update or Metadata Merge IssueWhen you start the Oracle Identity Manager Managed Severs for the first time afterupgrade, if you encounter any error during the bootstrap process which is related toMARUPDATE bootstrap task, run the external utility mergeMDSDataAfterUpgrade.sh fromthe 12c Middleware Home to re-trigger the Metadata Services (MDS) merge process.
The upgrade utility merges the existing 11.1.2.3.0 MDS data with 12c Out of the Box(OOTB) to preserve the customization.When you start the OIM Managed Server for the first time, if you encounter errors forMARUPDATE bootstrap task, check if the issue is occurring during the MDS mergeprocess. If so, run an external utility to re-trigger the MDS merge process as describedin this section.
To check if the issue is occurring during the MDS merge process, do the following:
1. Connect to the Oracle Identity Manager database.
2. Use the following SQL query to check the status of the MARUPDATE bootstrap task:
select State from OIMBootState where FEATURENAME='MARUPDATE';
3. If the query returns VALID or COMPLETE, the issue is not because of the MDS mergefailure. Therefore, no action is required. If the query returns any other result, runthe merge utility to re-trigger the MDS merge process.
To re-trigger the MDS merge process using the merge utility, complete the followingsteps:
1. The OIM pre-upgrade reports folder must exist on the same machine from whichthe MDS merge utility is going to be triggered. If the pre-upgrade reports are on adifferent machine, copy them to the machine from which you wish to run the mergeutility. The pre-upgrade report utility takes a back up of the MDS data and saves itin the pre-upgrade reports folder.
The MDS backup data is located at <oim.outputreportfolder>/MDS-Backupfolder. <oim.outputreportfolder> is the path that you specified for the propertyoim.outputreportfolder in the preupgrade_report_input.properties file, whengenerating the pre-upgrade reports for OIM.
2. Run the following command from the location 12c_Middleware_Home/idm/server/bin/mergeMDSDataAfterUpgrade.sh
You must specify the location of the OIM pre-upgrade reports folder. The MDSmerge utility that you triggered merges the MDS backup data from the pre-upgrade reports folder with the 12c data OOTB.
3. After the successful completion of the MDS merge process, connect to the OIMdatabase and run the following query: update OIMBootState setState=’COMPLETE’ where FEATURENAME=’MARUPDATE’;
4. Restart the OIM Managed Server.
(Optional) Enter the result of the procedure here.
Chapter 11MAR Update or Metadata Merge Issue
11-10
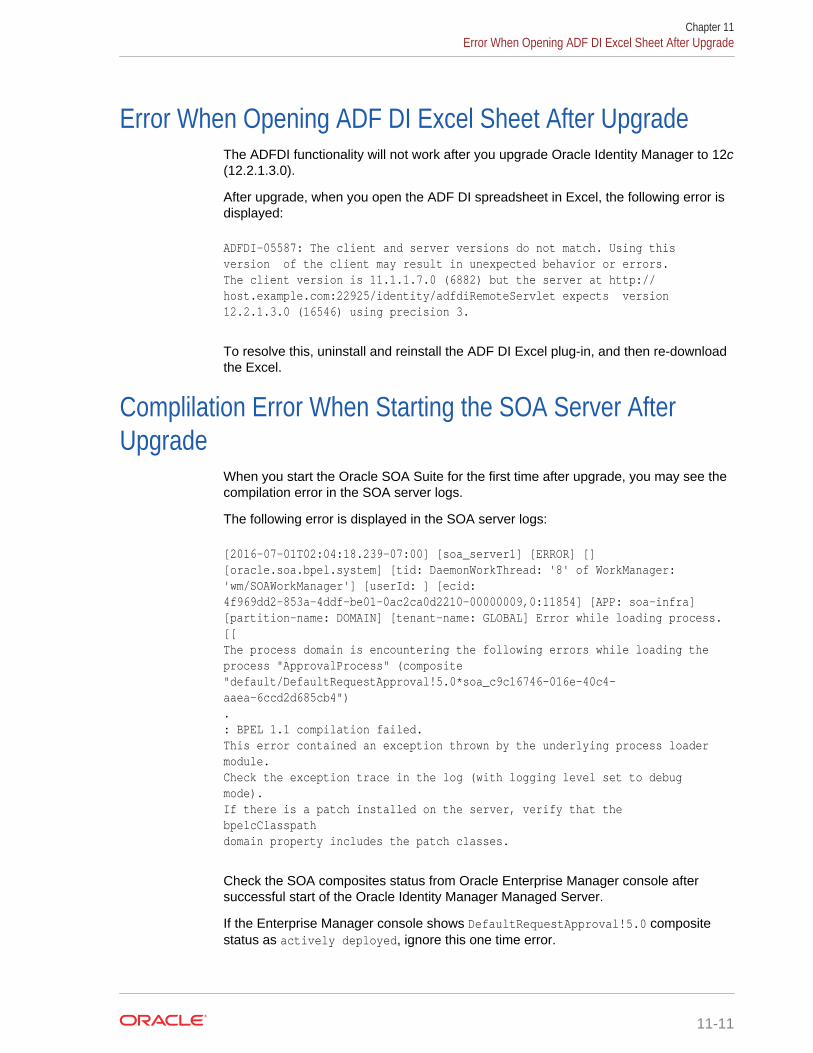
Error When Opening ADF DI Excel Sheet After UpgradeThe ADFDI functionality will not work after you upgrade Oracle Identity Manager to 12c(12.2.1.3.0).
After upgrade, when you open the ADF DI spreadsheet in Excel, the following error isdisplayed:
ADFDI-05587: The client and server versions do not match. Using this version of the client may result in unexpected behavior or errors.The client version is 11.1.1.7.0 (6882) but the server at http://host.example.com:22925/identity/adfdiRemoteServlet expects version 12.2.1.3.0 (16546) using precision 3.
To resolve this, uninstall and reinstall the ADF DI Excel plug-in, and then re-downloadthe Excel.
Complilation Error When Starting the SOA Server AfterUpgrade
When you start the Oracle SOA Suite for the first time after upgrade, you may see thecompilation error in the SOA server logs.
The following error is displayed in the SOA server logs:
[2016-07-01T02:04:18.239-07:00] [soa_server1] [ERROR] [] [oracle.soa.bpel.system] [tid: DaemonWorkThread: '8' of WorkManager: 'wm/SOAWorkManager'] [userId: ] [ecid: 4f969dd2-853a-4ddf-be01-0ac2ca0d2210-00000009,0:11854] [APP: soa-infra] [partition-name: DOMAIN] [tenant-name: GLOBAL] Error while loading process.[[ The process domain is encountering the following errors while loading the process "ApprovalProcess" (composite "default/DefaultRequestApproval!5.0*soa_c9c16746-016e-40c4-aaea-6ccd2d685cb4") . : BPEL 1.1 compilation failed. This error contained an exception thrown by the underlying process loader module. Check the exception trace in the log (with logging level set to debug mode). If there is a patch installed on the server, verify that the bpelcClasspath domain property includes the patch classes.
Check the SOA composites status from Oracle Enterprise Manager console aftersuccessful start of the Oracle Identity Manager Managed Server.
If the Enterprise Manager console shows DefaultRequestApproval!5.0 compositestatus as actively deployed, ignore this one time error.
Chapter 11Error When Opening ADF DI Excel Sheet After Upgrade
11-11
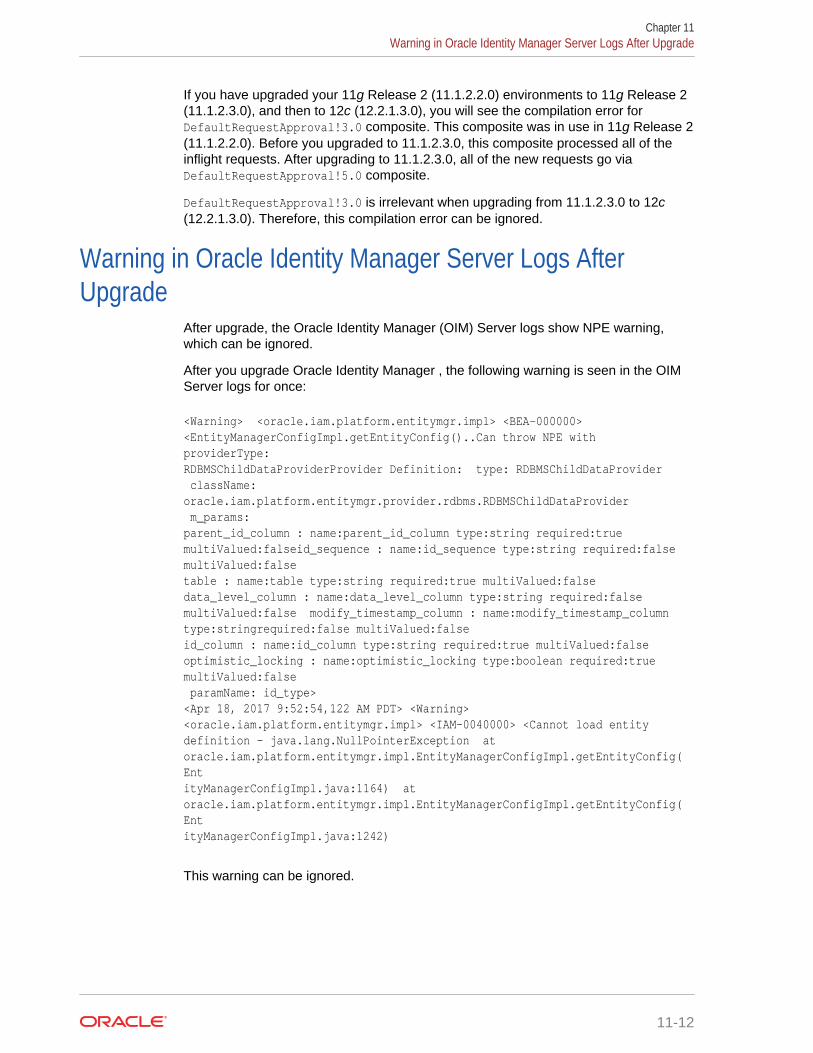
If you have upgraded your 11g Release 2 (11.1.2.2.0) environments to 11g Release 2(11.1.2.3.0), and then to 12c (12.2.1.3.0), you will see the compilation error forDefaultRequestApproval!3.0 composite. This composite was in use in 11g Release 2(11.1.2.2.0). Before you upgraded to 11.1.2.3.0, this composite processed all of theinflight requests. After upgrading to 11.1.2.3.0, all of the new requests go viaDefaultRequestApproval!5.0 composite.
DefaultRequestApproval!3.0 is irrelevant when upgrading from 11.1.2.3.0 to 12c(12.2.1.3.0). Therefore, this compilation error can be ignored.
Warning in Oracle Identity Manager Server Logs AfterUpgrade
After upgrade, the Oracle Identity Manager (OIM) Server logs show NPE warning,which can be ignored.
After you upgrade Oracle Identity Manager , the following warning is seen in the OIMServer logs for once:
<Warning> <oracle.iam.platform.entitymgr.impl> <BEA-000000><EntityManagerConfigImpl.getEntityConfig()..Can throw NPE with providerType: RDBMSChildDataProviderProvider Definition: type: RDBMSChildDataProvider className:oracle.iam.platform.entitymgr.provider.rdbms.RDBMSChildDataProvider m_params: parent_id_column : name:parent_id_column type:string required:true multiValued:falseid_sequence : name:id_sequence type:string required:false multiValued:false table : name:table type:string required:true multiValued:false data_level_column : name:data_level_column type:string required:false multiValued:false modify_timestamp_column : name:modify_timestamp_column type:stringrequired:false multiValued:false id_column : name:id_column type:string required:true multiValued:false optimistic_locking : name:optimistic_locking type:boolean required:true multiValued:false paramName: id_type> <Apr 18, 2017 9:52:54,122 AM PDT> <Warning> <oracle.iam.platform.entitymgr.impl> <IAM-0040000> <Cannot load entity definition - java.lang.NullPointerException at oracle.iam.platform.entitymgr.impl.EntityManagerConfigImpl.getEntityConfig(Ent ityManagerConfigImpl.java:1164) at oracle.iam.platform.entitymgr.impl.EntityManagerConfigImpl.getEntityConfig(Ent ityManagerConfigImpl.java:1242)
This warning can be ignored.
Chapter 11Warning in Oracle Identity Manager Server Logs After Upgrade
11-12

Default Challenges Questions are not Updated AfterUpgrade
After you upgrade Oracle Identity Manager 11.1.2.3.0 to 12c, the default challengequestions are not updated. It still shows the old or existing challenge questions.
If you are using default password policy with default challenge questions, you mustmodify them manually post upgrade per your organization needs to have a bettersecurity.
OPSS Processing Error When Reconfiguring the DomainWhen you upgrade a Oracle Identity Manager in an integrated environment, the OPSSprocessing error is encountered.
The following exception is seen when you run reconfig.sh command to reconfigurethe Oracle Identity Manager domain:
SEVERE [93] com.oracle.cie.domain.progress.AbstractProgressGenerator - Error occurred in phase {OPSS Processing} execution. java.lang.IllegalStateException: SecurityContext: Domain Name: IAMGovernanceDomain JDBC URL: opss-audit-DBDS:jdbc:oracle:thin:@//slc03rmj.us.oracle.com:1521/IDMDB.US.ORACLE.COM JDBC URL: opss-data-source:jdbc:oracle:thin:@//slc03rmj.us.oracle.com:1521/idmdb.us.orac le.com Caused by: java.security.InvalidKeyException: Illegal key size at javax.crypto.Cipher.checkCryptoPerm(Cipher.java:1039) at javax.crypto.Cipher.implInit(Cipher.java:805) at javax.crypto.Cipher.chooseProvider(Cipher.java:864) at javax.crypto.Cipher.init(Cipher.java:1396) at javax.crypto.Cipher.init(Cipher.java:1327)
To resolve this issue, do the following:
1. Install the Java Cryptography Extension (JCE) Unlimited Strength JurisdictionPolicy Files from the following location:
http://www.oracle.com/technetwork/java/javase/downloads/jce8-download-2133166.html
2. Copy local_policy.jar and US_export_policy.jar files to the locationJAVA_HOME/jre/lib/security/. If the files already exist in the destination folder,overwrite them.
Chapter 11Default Challenges Questions are not Updated After Upgrade
11-13
EditFailedException When Releasing Configuration FromWebLogic Console
After you upgrade Oracle Identity Manager to 12c (12.2.1.3.0), when you clickRelease Configuration on Oracle WebLogic Console, the following error is seen:
weblogic.management.provider.EditFailedException: Error loading jdbc/OIMMDS-jdbc.xml
This error does not have any functional impact on the WebLogic configuration. Toresolve this, open the following DataSource configurations, make any changes, save,and activate the changes:
• ApplicationDB
• mds-oim
• OIMJMSStoreDS
• OIMOperationsDB
• soaOIMLookupDB
OIM Application Deployment Fails IntermittentlyAfter you upgrade Oracle Identity Manager to 12c (12.2.1.3.0), the oim applicationdeployment may fail with the following error:
<Error> <Deployer> <BEA-149231> <Unable to set the activation state to true for the application "oim". weblogic.application.ModuleException: java.lang.NoClassDefFoundError: Could not initialize class oracle.iam.platform.utils.cache.Cache
To resolve this, restart the Oracle Identity Manager Server.
soa-infra Application is in ‘Prepared’ State Post UpgradeAfter you upgrade Oracle Identity Manager (OIM) and Oracle Access Management(OAM) integrated environment that was set up using Life Cycle Management (LCM)tool, the soa-infra application continues to be in Prepared mode, instead of showingactive mode.
To resolve this issue, do the following:
1. Stop all of the managed servers in the private domain. See Stopping Servers andProcesses.
2. Take a back up and delete the contents of the private domain.
3. Pack the shared domain and unpack it on the private domain.
4. Start the managed servers in private domain. See Starting the Servers.
Chapter 11EditFailedException When Releasing Configuration From WebLogic Console
11-14
Verify that the soa-infra application comes up in active state.
Oracle Identity Manager Server Throws OutOfMemoryErrorWhen you start the servers post upgrade, OutOfMemoryError is thrown.
The following error is seen in the OIM server logs for this issue:
[oim_server1] [NOTIFICATION] [] [oracle.iam.oimdataproviders.impl] [tid: [ACTIVE].ExecuteThread: '9' for queue: 'weblogic.kernel.Default (self-tuning)'] [userId: xelsysadm] [ecid: 5679ce10-f0df-457f-88f1-6bc04e10aa13-000013b1,0] [APP: oim-runtime] [partition-name: DOMAIN] [tenant-name: GLOBAL] [DSID: 0000Lg0PPYTBd5I_Ipt1if1OpGGi00000U] RM_DEBUG_PERF - 2017-03-24 06:09:51.087 - search criteria = arg1 = (usr_key) EQUAL arg2 = (1)[[ query = Select usr.usr_key, usr.usr_status from usr where usr.usr_key = ? time = 1 ]] [2017-03-24T06:09:52.286-07:00] [oim_server1] [NOTIFICATION] [] [oracle.iam.oimdataproviders.impl] [tid: [ACTIVE].ExecuteThread: '9' for queue: 'weblogic.kernel.Default (self-tuning)'] [userId: xelsysadm] [ecid: 5679ce10-f0df-457f-88f1-6bc04e10aa13-000013b1,0] [APP: oim-runtime] [partition-name: DOMAIN] [tenant-name: GLOBAL] [DSID: 0000Lg0PPYTBd5I_Ipt1if1OpGGi00000U] oracle.iam.oimdataproviders.impl.OIMUserDataProvider [2017-03-24T06:11:52.171-07:00] [oim_server1] [ERROR] [ADFC-50018] [oracle.adfinternal.controller.application.AdfcExceptionHandler] [tid: [ACTIVE].ExecuteThread: '27' for queue: 'weblogic.kernel.Default (self-tuning)'] [userId: xelsysadm] [ecid: 5679ce10-f0df-457f-88f1-6bc04e10aa13-000013e0,0] [APP: oracle.iam.console.identity.self-service.ear] [partition-name: DOMAIN] [tenant-name: GLOBAL] [DSID: 0000Lg0RtM9Bd5I_Ipt1if1OpGGi00000V] ADFc: No exception handler was found for an application exception.[[ java.lang.OutOfMemoryError: GC overhead limit exceeded ]
To resolve this issue, do the following (on Linux):
1. Ensure that you set the following parameters in the /etc/security/limits.conffile, to the specified values:
FUSION_USER_ACCOUNT soft nofile 32767FUSION_USER_ACCOUNT hard nofile 327679
2. Ensure that you set UsePAM to Yes in the /etc/ssh/sshd_config file.
3. Restart sshd.
4. Log out (or reboot) and log in to the system again.
Before you start the Oracle Identity Manager 12c Server, run the following commandto increase the limit of open files, so that you do not hit into memory issues:limit maxproc 16384
Chapter 11Oracle Identity Manager Server Throws OutOfMemoryError
11-15
SOA Fails to Join Coherence Cluster During the First StartAfter Upgrade
After you upgrade Oracle Identity Manager (OIM) and Oracle Access Management(OAM) integrated environment, when you start the Oracle SOA Suite Server for thefirst time, the coherence cluster fails to start with the following error:
<Error> <com.oracle.coherence> <BEA-000000> <2017-08-03 15:49:14.010/123.585 Oracle Coherence GE 12.2.1.3.0 <Error> (thread=Cluster, member=n/a): This member could not join the cluster because of a mismatch between Coherence license types. This member was attempting to run in dev mode. Rejected by Member(Id=1, Timestamp=2017-08-03 15:36:20.874, Address=10.241.57.43:57023, MachineId=8125, Location=process:19490,member:oam_policy_mgr1, Role=WeblogicServer).> <Aug 3, 2017 3:49:14,017 PM UTC> <Error> <com.oracle.coherence> <BEA-000000> <2017-08-03 15:49:14.017/123.592 Oracle Coherence GE 12.2.1.3.0 <Error> (thread=[ACTIVE] ExecuteThread: '10' for queue: 'weblogic.kernel.Default (self-tuning)', member=n/a): Error while starting cluster: java.lang.RuntimeException: Failed to start Service "Cluster" (ServiceState=SERVICE_STOPPED, STATE_JOINING) at com.tangosol.coherence.component.util.daemon.queueProcessor.Service.start(Serv ice.CDB:38)
This occurs if both the OIM and OAM WebLogic domains have the same defaultcoherence cluster port. To resolve this issue, change the cluster port for either OAM orOIM by doing the following, pre-upgrade:
1. Log in to the WebLogic Administration console using following URL:
http://weblogic_admin_host:weblogic_admin_port/console
2. Click Environments on the left navigation pane.
3. Click Coherence Clusters, and then click defaultCoherenceCluster.
4. Change the port from 7574 to 7575 for either OIM or OAM .
LDAP User Create and Update Reconciliation Job FailsLDAP User Create and Update Reconciliation job fails to run with the followingexception:
java.lang.Exception: Full resync required. Reason: The provided cookie is older than the start of historical in the server for the replicated domain : dc=us,dc=oracle,dc=com
Chapter 11SOA Fails to Join Coherence Cluster During the First Start After Upgrade
11-16
To resolve this issue, you must update the parameter Last Change Number of the job.to do this, complete the following steps:
1. Get the value from Oracle Unified Directory using the following command:
./ldapsearch -h <OUDHOST>-p 1389 -D "cn=oudadmin" -w Fusionapps1 --control "1.3.6.1.4.1.26027.1.5.4:false:;" -b "cn=changelog""(objectclass=*)" "*" +
2. Search for the following line in the output of the above command:
changeLogCookie: dc=us,dc=oracle,dc=com:0000015dcefd65a3000100000102;
3. Fill in dc=us,dc=oracle,dc=com:0000015dcefd65a3000100000102; in to the LastChange Number parameter of the job.
BI Managed Server is Seen on WebLogic Console AfterUpgrade
If your 11g Release 2 (11.1.2.3.0) domain had a custom name for BI Managed Server,that is, the name other than bi_server1, then this Managed Server will not be deletedduring the upgrade.
Post upgrade, the BI managed server lying in Oracle Identity Governance domain is ofno use. You can delete this BI server manually by doing the following:
1. Log in to the WebLogic Administration Console using the following URL:
http://weblogic_admin_host:weblogic_admin_port/console
2. Click Environments on the left navigation pane.
3. Click Servers.
4. Select the check box against BI Managed Server, and click Delete.
Empty Pages or Panels After UpgradeAfter you complete the upgrade, the Applications tile in the OIM Self Service consoleand the Import/Export links in the Admin console may be rendered as empty pages orpanels.
This can occur if the following URIs are being filtered by a proxy:
• /OIGUI/
• /FacadeWebApp/
• /iam/
To avoid this issue, update your proxy rules to allow access to these URIs.
Chapter 11BI Managed Server is Seen on WebLogic Console After Upgrade
11-17
AUpdating the JDK After Installing andConfiguring an Oracle Fusion MiddlewareProduct
Consider that you have a JDK version jdk1.8.0_121 installed on your machine. Whenyou install and configure an Oracle Fusion Middleware product, the utilities, such asConfiguration Wizard (config.sh|exe), OPatch, or RCU point to a default JDK, forexample, jdk1.8.0_121. After some time, Oracle releases a new version of the JDK,say jdk1.8.0_131 that carries security enhancements and bug fixes.From 12c (12.2.1.3.0) onwards, you can upgrade the existing JDK to a newer version,and can have the complete product stack point to the newer version of the JDK.
You can maintain multiple versions of JDK and switch to the required version on needbasis.
• About Updating the JDK Location After Installing an Oracle Fusion MiddlewareProductThe binaries and other metadata and utility scripts in the Oracle home and Domainhome, such as RCU or Configuration Wizard, use a JDK version that was usedwhile installing the software and continue to refer to the same version of the JDK.The JDK path is stored in a variable called JAVA_HOME which is centrally locatedin .globalEnv.properties file inside the ORACLE_HOME/oui directory.
About Updating the JDK Location After Installing an OracleFusion Middleware Product
The binaries and other metadata and utility scripts in the Oracle home and Domainhome, such as RCU or Configuration Wizard, use a JDK version that was used whileinstalling the software and continue to refer to the same version of the JDK. The JDKpath is stored in a variable called JAVA_HOME which is centrally locatedin .globalEnv.properties file inside the ORACLE_HOME/oui directory.
The utility scripts such as config.sh|cmd, launch.sh, or opatch reside in theORACLE_HOME, and when you invoke them, they refer to the JAVA_HOME variablelocated in .globalEnv.properties file. To point these scripts and utilities to the newerversion of JDK, you must update the value of the JAVA_HOME variable inthe .globalEnv.properties file by following the directions listed in Updating the JDKLocation in an Existing Oracle Home .
To make the scripts and files in your Domain home directory point to the newer versionof the JDK, you can follow one of the following approaches:
• Specify the path to the newer JDK on the Domain Mode and JDK screen whilerunning the Configuration Wizard.
For example, consider that you installed Oracle Fusion Middleware Infrastructurewith the JDK version 8u121. So while configuring the WebLogic domain with theConfiguration Assistant, you can select the path to the newer JDK on the Domain
A-1
Mode and JDK screen of the Configuration Wizard. Example: /scratch/jdk/jdk1.8.0_131.
• Manually locate the files that have references to the JDK using grep (UNIX) orfindstr (Windows) commands and update each reference. See Updating theJDK Location in an Existing Domain Home.
Note:
If you install the newer version of the JDK in the same location as theexisting JDK by overwriting the files, then you don’t need to take any action.
When you upgrade Oracle Identity Manager in an integrated environment, you mayencounter the OPSS processing error. The following exception is seen when yourun reconfig.sh command to reconfigure the Oracle Identity Manager domain:
SEVERE [93] com.oracle.cie.domain.progress.AbstractProgressGenerator - Error occurred in phase {OPSS Processing} execution. java.lang.IllegalStateException: SecurityContext: Domain Name: IAMGovernanceDomain JDBC URL: opss-audit-DBDS:jdbc:oracle:thin:@//slc03rmj.us.oracle.com:1521/IDMDB.US.ORACLE.COM JDBC URL: opss-data-source:jdbc:oracle:thin:@//slc03rmj.us.oracle.com:1521/idmdb.us.orac le.com Caused by: java.security.InvalidKeyException: Illegal key size at javax.crypto.Cipher.checkCryptoPerm(Cipher.java:1039) at javax.crypto.Cipher.implInit(Cipher.java:805) at javax.crypto.Cipher.chooseProvider(Cipher.java:864) at javax.crypto.Cipher.init(Cipher.java:1396) at javax.crypto.Cipher.init(Cipher.java:1327)
To resolve this issue:
1. Install the Java Cryptography Extension (JCE) Unlimited Strength JurisdictionPolicy Files from the following location: Java Cryptography Extension (JCE)Unlimited Strength Jurisdiction Policy Files 8 Download.
2. Copy the local_policy.jar and the US_export_policy.jar files to thelocation JAVA_HOME/jre/lib/security/. If the files already exist in thedestination folder, overwrite them.
• Updating the JDK Location in an Existing Oracle HomeThe getProperty.sh|cmd script displays the value of a variable, such asJAVA_HOME, from the .globalEnv.properties file. The setProperty.sh|cmd scriptis used to set the value of variables, such as OLD_JAVA_HOME or JAVA_HOMEthat contain the locations of old and new JDKs in the .globalEnv.properties file.
• Updating the JDK Location in an Existing Domain HomeYou must search the references to the current JDK, for example jdk1.8.0_121manually, and replace those instances with the location of the new JDK.
Appendix AAbout Updating the JDK Location After Installing an Oracle Fusion Middleware Product
A-2
Updating the JDK Location in an Existing Oracle HomeThe getProperty.sh|cmd script displays the value of a variable, such asJAVA_HOME, from the .globalEnv.properties file. The setProperty.sh|cmd script isused to set the value of variables, such as OLD_JAVA_HOME or JAVA_HOME thatcontain the locations of old and new JDKs in the .globalEnv.properties file.
The getProperty.sh|cmd and setProperty.sh|cmd scripts are located in the followinglocation:
(UNIX) ORACLE_HOME/oui/bin(Windows) ORACLE_HOME\oui\binWhere, ORACLE_HOME is the directory that contains the products using the currentversion of the JDK, such as jdk1.8.0_121.
To update the JDK location in the .globalEnv.properties file:
1. Use the getProperty.sh|cmd script to display the path of the current JDK from theJAVA_HOME variable. For example:
(UNIX) ORACLE_HOME/oui/bin/getProperty.sh JAVA_HOME(Windows) ORACLE_HOME\oui\bin\getProperty.cmd JAVA_HOMEecho JAVA_HOMEWhere JAVA_HOME is the variable in the .globalEnv.properties file that containsthe location of the JDK.
2. Back up the path of the current JDK to another variable such asOLD_JAVA_HOME in the .globalEnv.properties file by entering the followingcommands:
(UNIX) ORACLE_HOME/oui/bin/setProperty.sh -name OLD_JAVA_HOME-value specify_the_path_of_current_JDK(Windows) ORACLE_HOME\oui\bin\setProperty.cmd -nameOLD_JAVA_HOME -value specify_the_path_of_current_JDK
This command creates a new variable called OLD_JAVA_HOME inthe .globalEnv.properties file, with a value that you have specified.
3. Set the new location of the JDK in the JAVA_HOME variable ofthe .globalEnv.properties file, by entering the following commands:
(UNIX) ORACLE_HOME/oui/bin/setProperty.sh -name JAVA_HOME -value specify_the_location_of_new_JDK(Windows) ORACLE_HOME\oui\bin\setProperty.cmd -name JAVA_HOME-value specify_the_location_of_new_JDK
After you run this command, the JAVA_HOME variable inthe .globalEnv.properties file now contains the path to the new JDK, such asjdk1.8.0_131.
Updating the JDK Location in an Existing Domain HomeYou must search the references to the current JDK, for example jdk1.8.0_121manually, and replace those instances with the location of the new JDK.
You can use the grep (UNIX) or findstr (Windows) commands to search for thejdk-related references.
Appendix AAbout Updating the JDK Location After Installing an Oracle Fusion Middleware Product
A-3
You’ll likely be required to update the location of JDK in the following three files:
(UNIX) DOMAIN_HOME/bin/setNMJavaHome.sh(Windows) DOMAIN_HOME\bin\setNMJavaHome.cmd
(UNIX) DOMAIN_HOME/nodemanager/nodemanager.properties(Windows) DOMAIN_HOME\nodemanager\nodemanager.properties
(UNIX) DOMAIN_HOME/bin/setDomainEnv.sh(Windows) DOMAIN_HOME\bin\setDomainEnv.cmd
Appendix AAbout Updating the JDK Location After Installing an Oracle Fusion Middleware Product
A-4
![Oracle GoldenGate Upgrading Oracle GoldenGate for Windows ... · [1]Oracle® GoldenGate Upgrading Oracle GoldenGate for Windows and UNIX 12c (12.1.2) E40011-05 May 2015 Describes](https://img.pdfslide.net/doc/110x75/5af3429c7f8b9a8c3090e2d0/oracle-goldengate-upgrading-oracle-goldengate-for-windows-1oracle-goldengate.jpg)


![Oracle Fusion Middleware Upgrading Oracle Forms … · [1]Oracle® Fusion Middleware Upgrading Oracle Forms 6i to Oracle Forms 12c 12c (12.2.1.1) E71740-01 June 2016 This document](https://img.pdfslide.net/doc/110x75/5b733ad57f8b9a58028e3c96/oracle-fusion-middleware-upgrading-oracle-forms-1oracle-fusion-middleware.jpg)

![[1]Oracle® GoldenGate Installing, Configuring, and Upgrading ......[1]Oracle® GoldenGate Installing, Configuring, and Upgrading Oracle GoldenGate Monitor Agent 12c (12.1.3) E52750-05](https://img.pdfslide.net/doc/110x75/60c90954ec44dc58de0605a3/1oracle-goldengate-installing-configuring-and-upgrading-1oracle.jpg)