Embed Size (px)
Citation preview
8/9/2019 US ARMY FM 3-25.150 - Combatives (hand-to-hand combat).pdf
http://slidepdf.com/reader/full/us-army-fm-3-25150-combatives-hand-to-hand-combatpdf 1/265
FM 3-25.150 (FM 21-150)
COMBATIVES
HEADQUARTERSDEPARTMENT OF THE ARMY
DISTRIBUTION RESTRICTION: Approved for public release; distribution is unlimited.

8/9/2019 US ARMY FM 3-25.150 - Combatives (hand-to-hand combat).pdf
http://slidepdf.com/reader/full/us-army-fm-3-25150-combatives-hand-to-hand-combatpdf 2/265
FM 3-25.150
PREFACE
This field manual contains information and guidance pertaining to rifle-bayonet fightingand hand-to-hand combat. The hand-to-hand combat portion of this manual is dividedinto basic and advanced training. This manual serves as a guide for instructors, trainers,and soldiers in the art of instinctive rifle-bayonet fighting.
The proponent for this publication is the United States Army Infantry School. Sendcomments and recommendations on DA Form 2028 (Recommended Changes toPublications and Blank Forms) directly to Commandant, United States Army InfantrySchool, ATTN: ATSH-RB, Fort Benning, GA, 31905-5430.
Unless this publication states otherwise, masculine nouns and pronouns do not referexclusively to men.
iv
8/9/2019 US ARMY FM 3-25.150 - Combatives (hand-to-hand combat).pdf
http://slidepdf.com/reader/full/us-army-fm-3-25150-combatives-hand-to-hand-combatpdf 3/265
FM 3-25.150 (FM 21-150)
FIELD MANUAL HEADQUARTERSNo. 3-25.150 DEPARTMENT OF THE ARMY
WASHINGTON, DC, 18 January 2002
COMBATIVES
TABLE OF CONTENTS
PagePREFACE ......................................................................................................................... iv
CHAPTER 1. INTRODUCTION 1-1. Definition of Combatives..........................................................1-11-2. Purposes of Combative Training...............................................1-11-3. Basic Principles.........................................................................1-11-4. Safety.........................................................................................1-2
CHAPTER 2. TRAINING Section I. Train-the-Trainer...................................................................................2-1
2-1. Responsibilities of Trainers ......................................................2-12-2. Safety Precautions.....................................................................2-1
Section II. Unit Training......................................................................................... 2-22-3. Basic or One-Station Unit Training .......................................... 2-32-4. Unit Sustainment Training Program ......................................... 2-4
Section III. Training Areas....................................................................................... 2-42-5. Training Formations.................................................................. 2-42-6. Matted Room............................................................................. 2-52-7. Pit Construction......................................................................... 2-52-8. Bayonet Assault Course ............................................................2-6
Section IV. Teaching Techniques .......................................................................... 2-122-9. Warm-Ups and Stretches.........................................................2-122-10. Crawl, Walk, and Run.............................................................2-182-11. Demonstrations .......................................................................2-182-12. Execution by the Numbers ......................................................2-192-13. Execution at Combat Speed ....................................................2-192-14. Drills........................................................................................2-192-15. Training Pads and Other Protective Equipment......................2-19
DISTRIBUTION RESTRICTION: Approved for public release; distribution is unlimited. __________________________*This publication supersedes FM 21-150, 30 September 1992.
i
8/9/2019 US ARMY FM 3-25.150 - Combatives (hand-to-hand combat).pdf
http://slidepdf.com/reader/full/us-army-fm-3-25150-combatives-hand-to-hand-combatpdf 4/265
FM 3-25.150
PageCHAPTER 3. BASIC GROUND-FIGHTING TECHNIQUES Section I. Dominant Body Position .......................................................................3-1
3-1. Back Mount............................................................................... 3-13-2. Front Mount .............................................................................. 3-2
3-3. Guard.........................................................................................3-33-4. Side Control .............................................................................. 3-4Section II. Basic Techniques .................................................................................. 3-4
3-5. Body Positioning Moves ...........................................................3-43-6. Finishing Moves...................................................................... 3-243-7. Drills........................................................................................3-403-8. Defense Against Headlocks ....................................................3-41
CHAPTER 4. ADVANCED GROUND-FIGHTING TECHNIQUES Section I. Advanced Attacks ................................................................................. 4-1
4-1. Advanced Body Positions .........................................................4-1
4-2. Pass the Guard...........................................................................4-24-3. Attacks from the Mount ..........................................................4-144-4. Attacks from the Back Mount .................................................4-254-5. Attacks from the Guard...........................................................4-304-6. Knee Mount............................................................................. 4-414-7. Leg Attacks ............................................................................. 4-52
Section II. Strikes..................................................................................................4-574-8. Pass the Guard......................................................................... 4-574-9. Striking from Side Control......................................................4-634-10. Defending Against Strikes in the Guard ................................. 4-65
CHAPTER 5. TAKEDOWNS AND THROWS 5-1. Breakfalls .................................................................................. 5-15-2. Closing the Distance and Achieving the Clinch ....................... 5-45-3. Throw and Takedown Techniques ............................................ 5-65-4. Defending Against Headlocks.................................................5-135-5. Takedowns from Against a Wall.............................................5-215-6. Double Leg Attack ..................................................................5-245-7. Single Leg Attacks ..................................................................5-285-8. Attacks from the Rear .............................................................5-31
CHAPTER 6. STRIKES
6-1. Arm Strikes ............................................................................... 6-16-2. Punching Combinations ............................................................6-66-3. Kicks..........................................................................................6-66-4. Transition Between Ranges....................................................... 6-9
ii
8/9/2019 US ARMY FM 3-25.150 - Combatives (hand-to-hand combat).pdf
http://slidepdf.com/reader/full/us-army-fm-3-25150-combatives-hand-to-hand-combatpdf 5/265
FM 3-25.150
PageCHAPTER 7. HANDHELD WEAPONS Section I. Offensive Techniques............................................................................ 7-1
7-1. Angles of Attack........................................................................7-17-2. Rifle with Fixed Bayonet ..........................................................7-2
7-3. Bayonet/Knife .........................................................................7-237-4. Knife-Against-Rifle Sequence ................................................7-247-5. Advanced Weapons Techniques and Training........................7-28
Section II. Field-Expedient Weapons ................................................................... 7-297-6. Entrenching Tool.....................................................................7-297-7. Three-Foot Stick...................................................................... 7-337-8. Six-Foot Pole...........................................................................7-36
CHAPTER 8. STANDING DEFENSE Section I. Unarmed Opponent ............................................................................... 8-1
8-1. Defense Against Chokes ...........................................................8-1
8-2. Defense Against Bear Hugs ......................................................8-7Section II. Armed Opponent ................................................................................. 8-138-3. Defense Against Armed Opponent ......................................... 8-138-4. Defense Against a Knife .........................................................8-148-5. Unarmed Defense Against a Rifle with Fixed Bayonet ..........8-22
CHAPTER 9. GROUP TACTICS Section I. Lethal Force Scenarios.......................................................................... 9-1
9-1. Range.........................................................................................9-19-2. Control.......................................................................................9-19-3. Finishing....................................................................................9-1
Section II. Restrictive Force Scenarios................................................................... 9-29-4. Two Against One ......................................................................9-29-5. Three Against Two....................................................................9-29-6. Parity ......................................................................................... 9-29-7. One Against Two ......................................................................9-29-8. Two Against Three....................................................................9-3
APPENDIX A. SITUATIONAL TRAINING ............................................................A-1APPENDIX B. COMPETITIONS .............................................................................. B-1GLOSSARY ........................................................................................................Glossary-1REFERENCES ............................................................................................... References-1
INDEX ......................................................................................................................Index-1
iii
8/9/2019 US ARMY FM 3-25.150 - Combatives (hand-to-hand combat).pdf
http://slidepdf.com/reader/full/us-army-fm-3-25150-combatives-hand-to-hand-combatpdf 6/265
FM 3-25.150(FM 21-150)
CHAPTER 1
INTRODUCTION
Very few people have ever been killed with the bayonet or saber, butthe fear of having their guts explored with cold steel in the hands of
battle-maddened men has won many a fight. -PATTON
1-1. DEFINITION OF COMBATIVESHand-to-hand combat is an engagement between two or more persons in anempty-handed struggle or with hand-held weapons such as knives, sticks, or projectileweapons that cannot be fired. Proficiency in hand-to-hand combat is one of thefundamental building blocks for training the modern soldier.
1-2. PURPOSES OF COMBATIVES TRAINING Soldiers must be prepared to use different levels of force in an environment where
conflict may change from low intensity to high intensity over a matter of hours. Manymilitary operations, such as peacekeeping missions or noncombatant evacuation, mayrestrict the use of deadly weapons. Hand-to-hand combatives training will save liveswhen an unexpected confrontation occurs.
More importantly, combatives training helps to instill courage and self-confidence.With competence comes the understanding of controlled aggression and the ability toremain focused while under duress. Training in combatives includes hard and arduous
physical training that is, at the same time, mentally demanding and carries over to othermilitary pursuits. The overall effect of combatives training is—
• The culmination of a successful physical fitness program, enhancingindividual and unit strength, flexibility, balance, and cardiorespiratory fitness.
•
Building personal courage, self confidence, self-discipline, and esprit decorps.
1-3. BASIC PRINCIPLESUnderlying all combatives techniques are principles the hand-to-hand fighter must applyto successfully defeat an opponent. The natural progression of techniques, as presented inthis manual, will instill these principles into the soldier.
a. Mental Calm . During a fight a soldier must keep his ability to think. He must notallow fear or anger to control his actions.
b. Situational Awareness. Things are often going on around the fighters that couldhave a direct impact on the outcome of the fight such as opportunity weapons or other
personnel joining the fight.c. Suppleness . A soldier cannot always count on being bigger and stronger than theenemy. He should, therefore, never try to oppose the enemy in a direct test of strength.Supple misdirection of the enemy’s strength allows superior technique and fight strategyto overcome superior strength.
d. Base . Base refers to the posture that allows a soldier to gain leverage from theground. Generally, a soldier must keep his center of gravity low and his base wide— much like a pyramid.
1-1
8/9/2019 US ARMY FM 3-25.150 - Combatives (hand-to-hand combat).pdf
http://slidepdf.com/reader/full/us-army-fm-3-25150-combatives-hand-to-hand-combatpdf 7/265
FM 3-25.150
e. Dominant Body Position . Position refers to the location of the fighter’s body inrelation to his opponent’s. A vital principle when fighting is to gain control of the enemy
by controlling this relationship. Before any killing or disabling technique can be applied,the soldier must first gain and maintain one of the dominant body positions (Chapter 3,Section I).
f. Distance . Each technique has a window of effectiveness based upon the amountof space between the two combatants. The fighter must control the distance betweenhimself and the enemy in order to control the fight.
g. Physical Balance. Balance refers to the ability to maintain equilibrium and toremain in a stable upright position.
h. Leverage. A fighter uses the parts of his body to create a natural mechanicaladvantage over the parts of the enemy’s body. By using leverage, a fighter can have agreater effect on a much larger enemy.
1-4. SAFETYThe Army’s combatives program has been specifically designed to train the most
competent fighters in the shortest possible time in the safest possible manner.a. General Safety Precautions. The techniques of Army combatives should betaught in the order presented in this manual. They are arranged to not only give thenatural progression of techniques, but to present the more dangerous techniques after thesoldiers have established a familiarity with the dynamics of combative techniques ingeneral. This will result in fewer serious injuries from the more dynamic moves.
b. Supervision. The most important safety consideration is proper supervision.Because of the potentially dangerous nature of the techniques involved, combativestraining must always be conducted under the supervision of qualified leaders.
c. Training Areas. Most training should be conducted in an area with soft footingsuch as a grassy or sandy area. If training mats are available, they should be used. A hardsurface area is not appropriate for combatives training.
d. Chokes. Chokes are the best way to end a fight. They are the most effective wayto incapacitate an enemy and, with supervision, are also safe enough to apply in trainingexactly as on the battlefield.
e. Joint Locks. In order to incapacitate an enemy, attacks should be directed againstlarge joints such as the elbow, shoulder, or knee. Attacks on most of these joints are very
painful long before causing any injury, which allows full-force training to be conductedwithout significant risk of injury. The exceptions are wrist attacks and twisting kneeattacks. The wrist is very easily damaged, and twisting the knee does not become painfuluntil it is too late. Therefore, these attacks should be taught with great care and should not
be allowed in sparring or competitions.f. Striking. Striking is an inefficient way to incapacitate an enemy. Strikes are,
however, an important part of an overall fight strategy and can be very effective inmanipulating the opponent into unfavorable positions. Striking can be practiced withvarious types of protective padding such as boxing gloves. Defense can be practicedusing reduced force blows. Training should be continuously focused on the realities offighting.
1-2
8/9/2019 US ARMY FM 3-25.150 - Combatives (hand-to-hand combat).pdf
http://slidepdf.com/reader/full/us-army-fm-3-25150-combatives-hand-to-hand-combatpdf 8/265
FM 3-25.150(FM 21-150)
CHAPTER 2
TRAINING
This chapter discusses the trainer’s role in teaching and sustainingeffective hand-to-hand combat. It also discusses unit training, training
areas, teaching techniques, and safety precautions that must beconsidered before conducting combatives training.
Section I. TRAIN-THE-TRAINERProfessional instruction is the key to success in combatives training. Instructors must be
physically fit and highly proficient in the demonstration and practical application of theskills. They must review and be familiar with this manual. Confidence, enthusiasm, andtechnical expertise are essential for success in teaching hand-to-hand combat. Assistantinstructors must also be properly trained to help supervise and demonstrate maneuvers.Selecting the trainers is the first step in establishing an effective program.
2-1. RESPONSIBILITIES OF TRAINERSDiligent effort is needed to perfect the various hand-to-hand combat techniques, to applythem instinctively, and to teach others to safely master them. The following instructorresponsibilities are the core of planning and executing combatives training.
a. Seek maximum efficiency with minimum effort. Continually strive to reduce allunnecessary explanations, movement, and activity. Streamline the training withoutcompromising content, efficiency, or safety.
b. Stress cooperation and technical mastery. Promote suppleness and controllingaggression.
c. Reinforce the details of each technique and provide positive feedback when
warranted. Use occasional humor to motivate soldiers, but avoid degrading or insultingthem.d. Ensure serviceable training aids are present in sufficient quantities for all soldiers
being trained. Ensure training areas are well maintained and free of dangerousobstructions.
e. Ensure instructors and assistant instructors are well-rehearsed and prepared beforeall training sessions. Conduct instructor training at least five hours weekly to maintain ahigh skill level.
f. Develop as many skilled combatives instructors for each unit as possible.Instructor-to-soldier ratios should not exceed 1 instructor for 20 soldiers. Encourageafter-duty training and education for instructors.
g. Require strict discipline of all soldiers.
2-2. SAFETY PRECAUTIONSTo prevent injuries, the instructor must consider the following safety precautions beforeconducting combatives training.
a. Supervise all practical work closely and constantly. Never leave a groupunsupervised.
2-1
8/9/2019 US ARMY FM 3-25.150 - Combatives (hand-to-hand combat).pdf
http://slidepdf.com/reader/full/us-army-fm-3-25150-combatives-hand-to-hand-combatpdf 9/265
FM 3-25.150
b. Familiarize the soldiers with each maneuver by a complete explanation anddemonstration before they attempt the moves.
c. Do not allow the soldiers to get ahead of the instruction.d. Ensure the training partner offers no resistance, but allows the maneuver to be
freely executed during the learning stages and while perfecting the techniques.
e. Ensure there is adequate space between soldiers during all practical work −
forexample, allow at least an 8-foot square for each pair of soldiers.f. Ensure that soldiers empty their pockets, and remove their jewelry, and
identification tags before training.g. Stress that only simulated strikes to vital points, such as the head, neck, and groin
area are to be executed. Soldiers may use light blows to other vulnerable areas; however,they must exercise caution at all times.
h. Ensure that soldiers understand the use of both physical tapping and verbal signalsto indicate to the partner when to stop the pressure in grappling and choking techniques.
i. Make sure soldiers warm up and stretch properly before practical work. j. Teach and practice falls before conducting throws.
k. Ensure that the soldier to be disarmed does not place his finger in the triggerguard during rifle and bayonet disarming.l. Make sure soldiers keep scabbards on knives and bayonets firmly attached to
rifles while learning bayonet disarming methods.m. Use bayonet scabbards or rubber knives during knife disarming training.n. If utilizing a sawdust pit, inspect all sandbags on retaining wall before conduct of
training to ensure that all bags are serviceable, at least 75 percent full, and that the entireretaining wall is covered with sandbags. Any bag placed where personnel are likely tofall will be filled with the same consistency filler as the sawdust in the pit and will also
provide a minimum of 6 inches of sawdust.o. Maintain a buffer zone of 6 feet from retainer wall and demonstration area during
all training, especially training requiring throws and takedowns by students. p. Rake the training pit to loosen sawdust and remove all sharp objects. Properlyinspect the pit so that all safety hazards are removed before instruction or demonstrationsare executed.
q. Perform inspections of the depth of sawdust with enough time before training toresurface the pit. Remember that new sawdust will need to be raked and inspected forforeign objects that may cause injuries.
Section II. UNIT TRAININGEntry-level soldiers receive a training base in combatives during basic training andone-station unit training (OSUT). Advanced individual training (AIT) commandersshould review the training presented during basic training and, as time permits, expandinto the more advanced techniques discussed in this manual. For soldiers to achieve andsustain proficiency levels regular units must incorporate combatives into an organizedtraining program to include situational training exercises (Appendix A).
2-2
8/9/2019 US ARMY FM 3-25.150 - Combatives (hand-to-hand combat).pdf
http://slidepdf.com/reader/full/us-army-fm-3-25150-combatives-hand-to-hand-combatpdf 10/265
FM 3-25.150
2-3. BASIC OR ONE-STATION UNIT TRAININGThis is a suggested training program for basic training or OSUT. It is based on ten hoursof available training time, divided into five periods of two hours each. Training shouldstart with ground grappling, which is not only easier both to teach and to learn, but also
provides a sound base for the more difficult standing techniques. A program should not
begin with techniques that will take a long time to master. The result would be almostuniform disillusionment with combatives in general.a. Period 1 (2 hours).
• Introduction to combatives safety.• Combat demonstration performed by instructors or trainers to gain attention
and to motivate soldiers.• Warm-ups and stretches.• Stand up in base.• Escape the mount by trap and roll.• Pass the guard.• Achieve the mount.• Drill No. 1, 10 to 15 repetitions; escape the mount, pass the guard, achieve the
mount, in sequence.• Escape the mount by shrimp to the guard.• Escape the mount drill.
b. Period 2 (2 hours). • Warm-ups and stretches.• Drill No. 1, ten repetitions.• Arm push and roll to the rear mount.• Escape the rear mount.• Drill No. 2: Arm push and roll to the back mount, escape the back mount.• Grappling for position, five minutes and then change partners. Repeat for
duration of class.c. Period 3 (2 hours).
• Warm-ups and stretches.• Drill No. 1, ten repetitions.• Drill No. 2, ten repetitions.• Introduction to choking.• Rear naked choke.• Cross collar choke from the mount and guard.• Front guillotine choke.
d. Period 4 (2 hours).• Warm-ups and stretches.• Drill No. 1, ten repetitions.• Drill No. 2, ten repetitions.• Bent arm bar from the mount and cross mount.• Straight arm bar from the mount.• Straight arm bar from the guard.• Sweep from straight arm bar attempt.
2-3
8/9/2019 US ARMY FM 3-25.150 - Combatives (hand-to-hand combat).pdf
http://slidepdf.com/reader/full/us-army-fm-3-25150-combatives-hand-to-hand-combatpdf 11/265
FM 3-25.150
e. Period 5 (2 hours).• Warm-ups and stretches.• Drill No. 1, ten repetitions.• Drill No. 2, ten repetitions.• Review.• Rules introduction.• Competition.
2-4. UNIT SUSTAINMENT TRAINING PROGRAMCommand emphasis is the key to a successful combatives program. Combatives trainingsessions should be regular, and should be included on unit training schedules at companyand platoon level.
a. Successful unit combatives programs continue to focus on the core techniquestaught in the basic training or OSUT program. Mastery of these moves will result in more
proficient fighters than exposure to a large number of techniques will. b. As the level of proficiency rises the natural progression of moves is as follows:
• Advanced ground grappling.• Takedowns.• Strikes and kicks.• Fight strategy.• Situational training.
c. Primary trainers should be designated at all levels. Regular training sessions withthese trainers will ensure the quality of training at the small unit level.
d. Primary trainers should be of the appropriate rank; for instance, a platoon primarytrainer should be a squad leader or the platoon sergeant to ensure that the training actuallyoccurs.
e. Modern combatives allow soldiers to compete safely. To inspire the pursuit ofexcellence, individual soldiers may compete during organizational day. Leaders may alsocall squads, sections, or individuals to compete randomly as a method of inspectingtraining levels. All combatives competitions should be conducted IAW rules establishedin Appendix B of this manual. However, competition should not become the focus ofcombatives training, but remain a tool to inspire further training.
Section III. TRAINING AREASAn advantage of combatives training is that it can be conducted almost anywhere withlittle preparation of the training area.
2-5. TRAINING FORMATIONSFormations used for physical training may also be used for combatives training(FM 21-20). If the extended rectangular formation is used, the first and third ranks shouldface the second and fourth ranks so that each soldier is directly across him a partner.
A large, grassy, outdoor area free of obstructions is suitable for training. Each pair ofsoldiers should have an 8-foot square training space. When practicing throws ordisarming techniques, soldiers need twice the normal interval between ranks. Instructorsalso pair soldiers according to height and weight.
2-4
8/9/2019 US ARMY FM 3-25.150 - Combatives (hand-to-hand combat).pdf
http://slidepdf.com/reader/full/us-army-fm-3-25150-combatives-hand-to-hand-combatpdf 12/265
FM 3-25.150
2-6. MATTED ROOMBecause inclement weather can be a training distracter, the best training area is an indoor,climate-controlled facility with both padded floor and walls. Mats should be sufficientlyfirm to allow free movement, but provide enough impact absorption to allow safe throws
and takedowns.
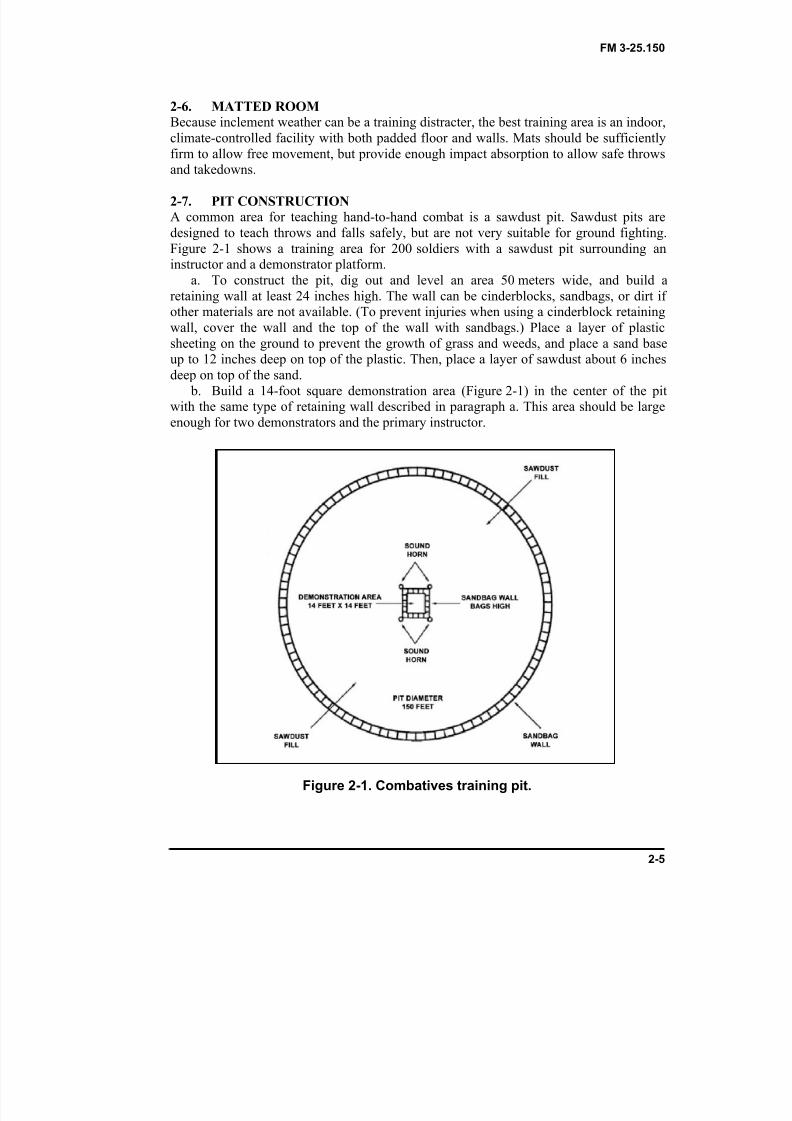
2-7. PIT CONSTRUCTIONA common area for teaching hand-to-hand combat is a sawdust pit. Sawdust pits aredesigned to teach throws and falls safely, but are not very suitable for ground fighting.Figure 2-1 shows a training area for 200 soldiers with a sawdust pit surrounding aninstructor and a demonstrator platform.
a. To construct the pit, dig out and level an area 50 meters wide, and build aretaining wall at least 24 inches high. The wall can be cinderblocks, sandbags, or dirt ifother materials are not available. (To prevent injuries when using a cinderblock retainingwall, cover the wall and the top of the wall with sandbags.) Place a layer of plastic
sheeting on the ground to prevent the growth of grass and weeds, and place a sand baseup to 12 inches deep on top of the plastic. Then, place a layer of sawdust about 6 inchesdeep on top of the sand.
b. Build a 14-foot square demonstration area (Figure 2-1) in the center of the pitwith the same type of retaining wall described in paragraph a. This area should be largeenough for two demonstrators and the primary instructor.
Figure 2-1. Combatives training pit.
2-5
8/9/2019 US ARMY FM 3-25.150 - Combatives (hand-to-hand combat).pdf
http://slidepdf.com/reader/full/us-army-fm-3-25150-combatives-hand-to-hand-combatpdf 13/265
FM 3-25.150
2-8. BAYONET ASSAULT COURSE The bayonet assault course provides the commander a unique training opportunity byallowing soldiers to employ rifle-bayonet fighting skills under simulated combatconditions. The course can be built and negotiated so that demands placed on thesoldiers’ abilities and on their endurance approach those experienced under combat
conditions. Realistic sights and sounds of battle—fire, smoke, confusion, and pyrotechnics—can also be created to enhance realism. The training objectives of the bayonet assault course include:
• Improving rifle-bayonet fighting skills.• Improving physical fitness and aggressiveness.• Improving speed, strength, coordination, and accuracy.• Providing realistic rifle-bayonet fighting under near combat conditions.• Challenging the soldiers’ determination and stamina, which are needed in
combat.• Providing an opportunity for team and squad leaders to develop their
leadership and control measures.
a. Safety. The safety of the soldiers should be the primary concern of the instructorand his assistants. The best safety aids are constant control and supervision. In addition,instructors should brief soldiers at the beginning of each class on the requirements forsafety during rifle-bayonet training. Instructors use the following safety measures:
(1) Bayonets must be fixed and unfixed only on command.(2) Rifles should be grounded near the targets when the soldiers are ordered to move
to the instructor’s platform for explanations or demonstrations.(3) A level surface that does not become slippery when wet should be provided for
the training area.(4) Left-handed soldiers should be positioned so they are opposite another
left-handed soldier when working against the targets. This type of arrangement prevents
possible injury when executing a series of movements.(5) When using the M16 rifle against a target, the force of contact during the thrust
movement may drive the hand gripping the small of the stock into the forward assistassembly (on the right-hand side of the weapon near the stock). To prevent injury to thehand, the soldier must maintain a firm grip on the small of the stock. Gloves should beworn as part of the training uniform when weather dictates.
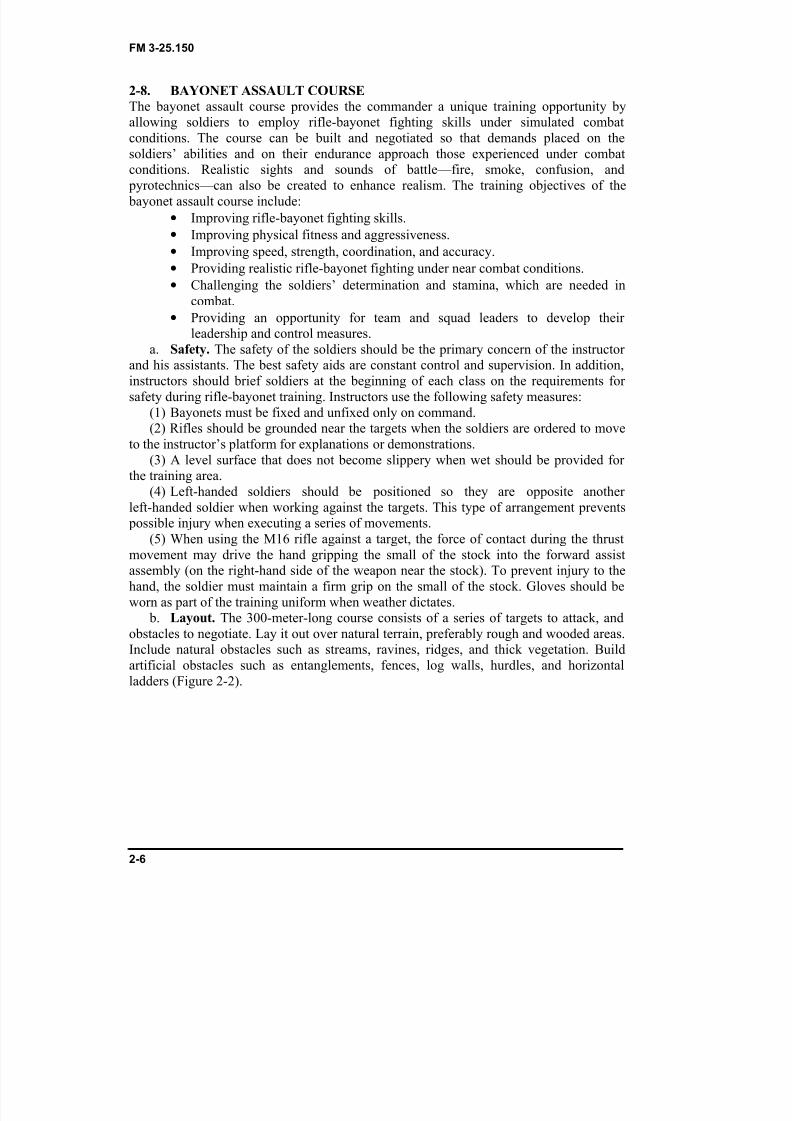
b. Layout. The 300-meter-long course consists of a series of targets to attack, andobstacles to negotiate. Lay it out over natural terrain, preferably rough and wooded areas.Include natural obstacles such as streams, ravines, ridges, and thick vegetation. Buildartificial obstacles such as entanglements, fences, log walls, hurdles, and horizontalladders (Figure 2-2).
2-6

8/9/2019 US ARMY FM 3-25.150 - Combatives (hand-to-hand combat).pdf
http://slidepdf.com/reader/full/us-army-fm-3-25150-combatives-hand-to-hand-combatpdf 14/265
FM 3-25.150
Figure 2-2. Example of nine-lane, 300-meter bayonet assault course.
c. Targets . Use a variety of targets to provide experience in different attacks. Thelocal Training and Support Center (TSC) can build the targets. Targets composed of oldtires are appropriate as well as the Ivan-type targets used by range control—that is, theE-type silhouette, three-dimensional personnel target (large), FSN 6920-01-164-9625 orthe F-type silhouette, three-dimensional personnel target (small), FSN 6920-00-T33-8777.
2-7
8/9/2019 US ARMY FM 3-25.150 - Combatives (hand-to-hand combat).pdf
http://slidepdf.com/reader/full/us-army-fm-3-25150-combatives-hand-to-hand-combatpdf 15/265
FM 3-25.150
Targets should be durable but should not damage weapons. Place a sign near each targetto indicate the type of attack to be used.
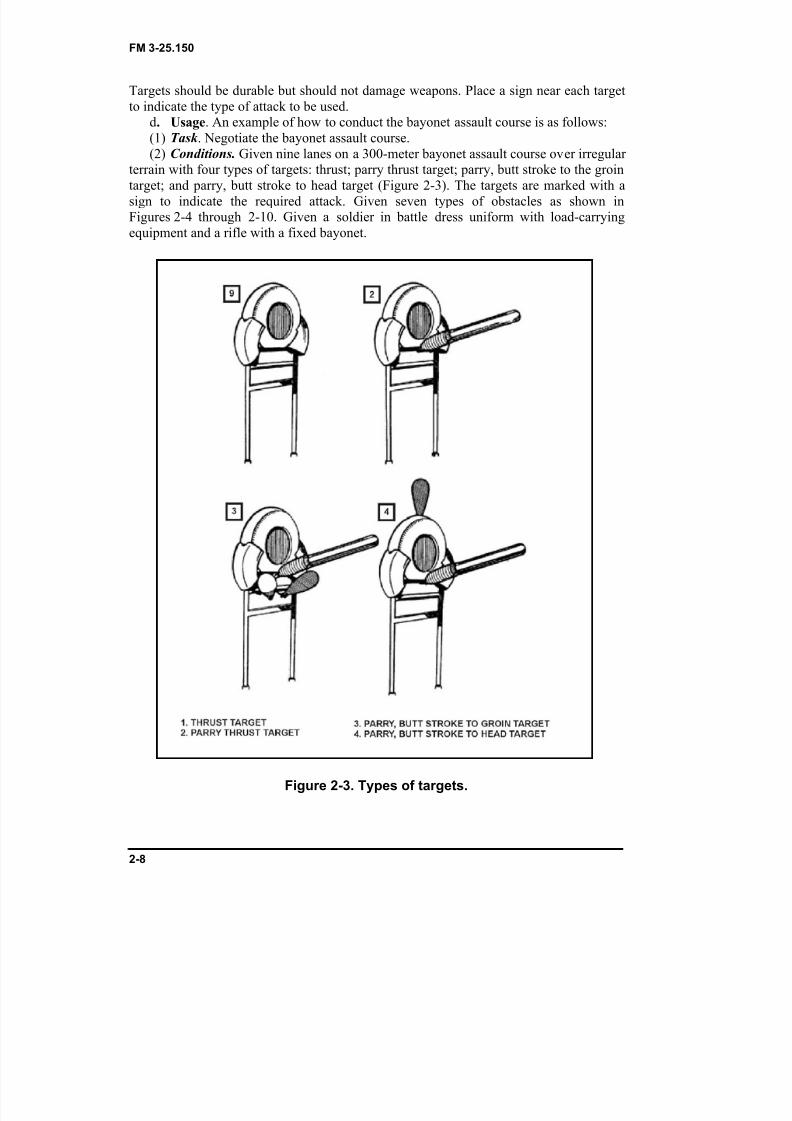
d. Usage . An example of how to conduct the bayonet assault course is as follows:(1) Task . Negotiate the bayonet assault course.(2) Conditions. Given nine lanes on a 300-meter bayonet assault course over irregular
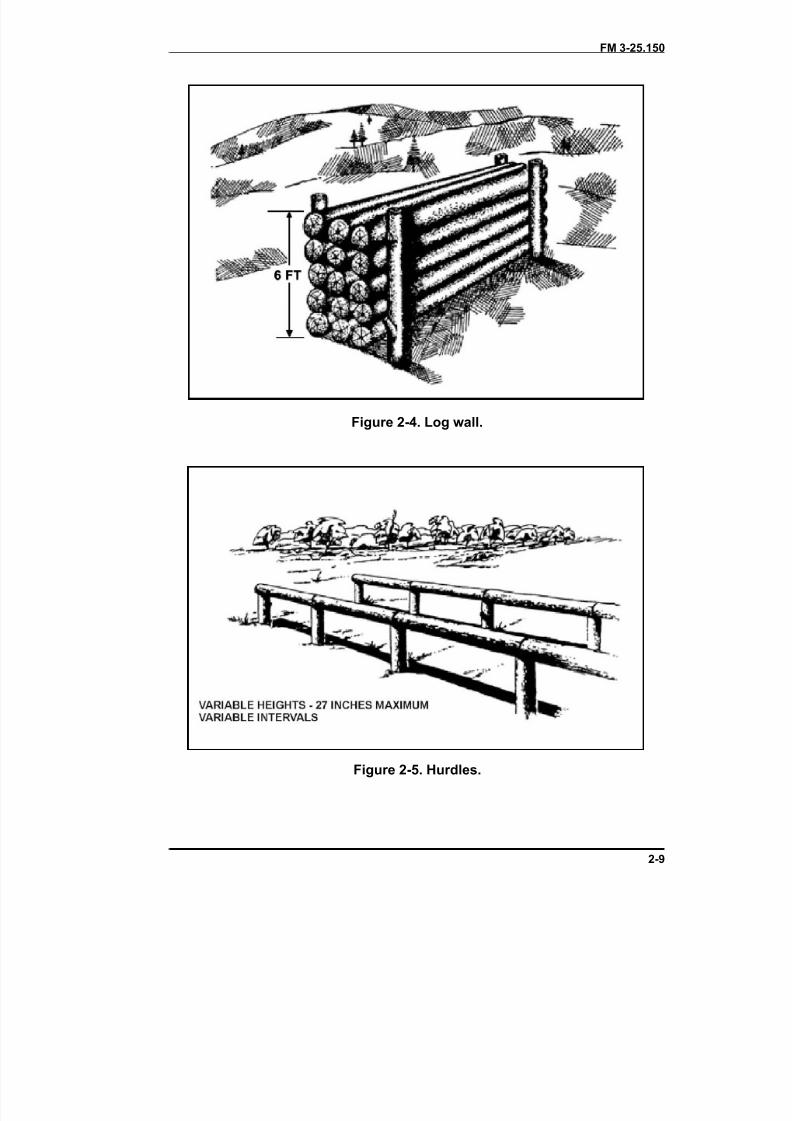
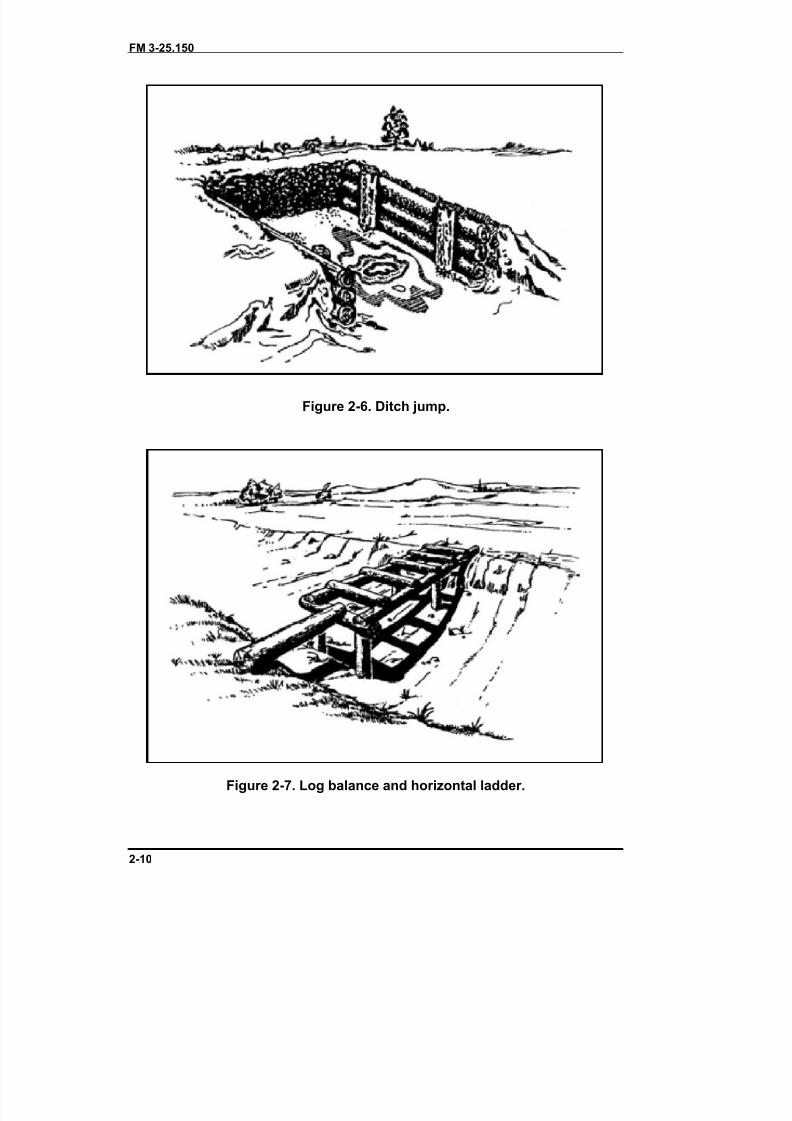
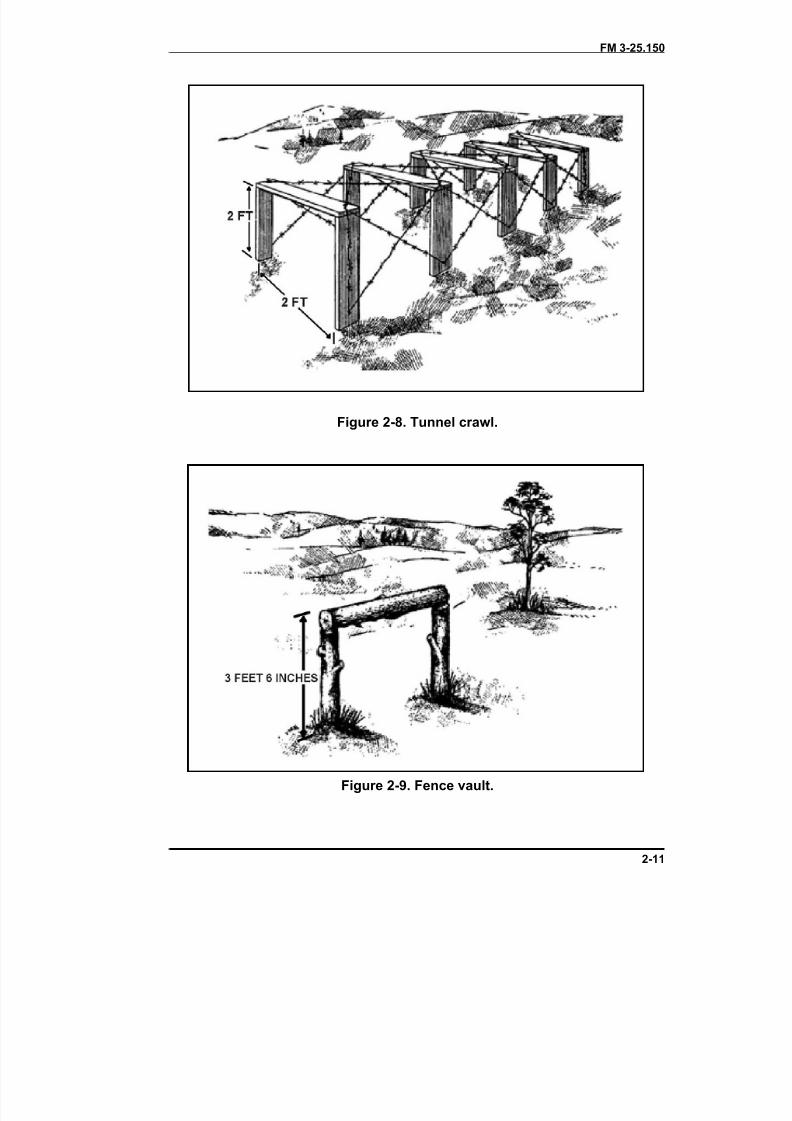
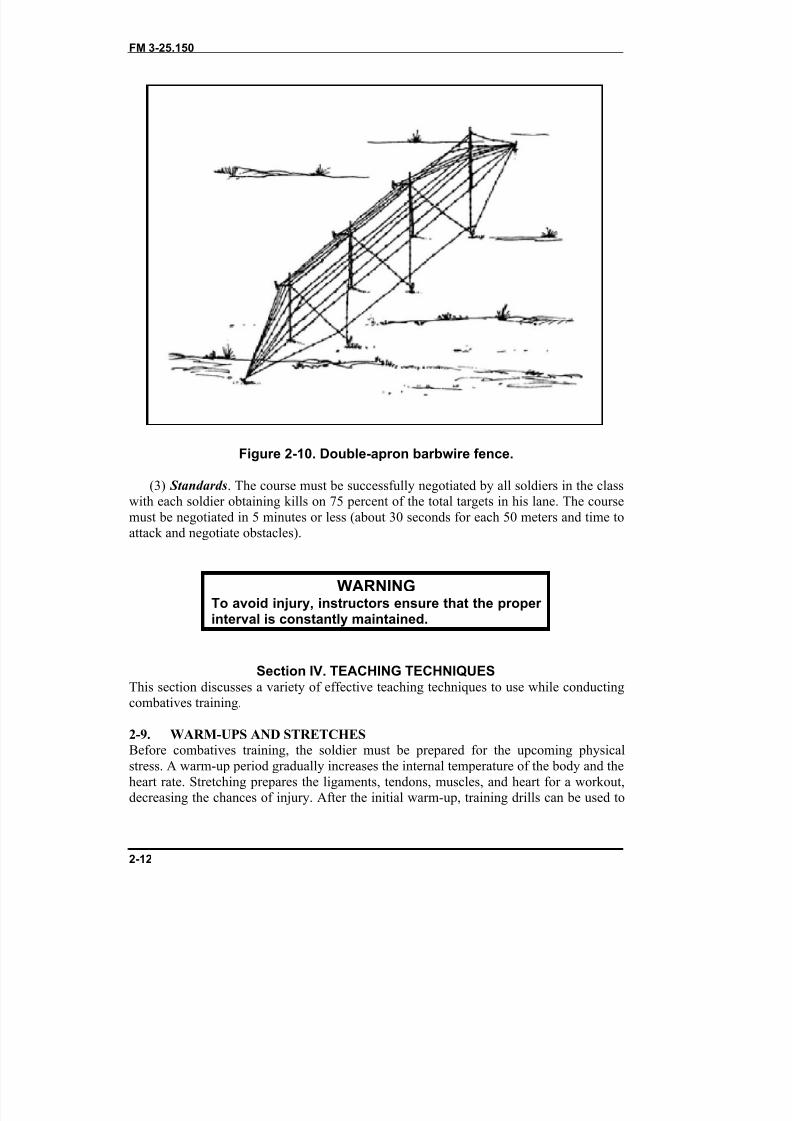
terrain with four types of targets: thrust; parry thrust target; parry, butt stroke to the grointarget; and parry, butt stroke to head target (Figure 2-3). The targets are marked with asign to indicate the required attack. Given seven types of obstacles as shown inFigures 2-4 through 2-10. Given a soldier in battle dress uniform with load-carryingequipment and a rifle with a fixed bayonet.
Figure 2-3. Types of targets.
2-8
8/9/2019 US ARMY FM 3-25.150 - Combatives (hand-to-hand combat).pdf
http://slidepdf.com/reader/full/us-army-fm-3-25150-combatives-hand-to-hand-combatpdf 16/265
FM 3-25.150
Figure 2-4. Log wall.
Figure 2-5. Hurdles.
2-9
8/9/2019 US ARMY FM 3-25.150 - Combatives (hand-to-hand combat).pdf
http://slidepdf.com/reader/full/us-army-fm-3-25150-combatives-hand-to-hand-combatpdf 17/265
FM 3-25.150
Figure 2-6. Ditch jump.
Figure 2-7. Log balance and horizontal ladder.
2-10
8/9/2019 US ARMY FM 3-25.150 - Combatives (hand-to-hand combat).pdf
http://slidepdf.com/reader/full/us-army-fm-3-25150-combatives-hand-to-hand-combatpdf 18/265
FM 3-25.150
Figure 2-8. Tunnel crawl.
Figure 2-9. Fence vault.
2-11
8/9/2019 US ARMY FM 3-25.150 - Combatives (hand-to-hand combat).pdf
http://slidepdf.com/reader/full/us-army-fm-3-25150-combatives-hand-to-hand-combatpdf 19/265
FM 3-25.150
Figure 2-10. Double-apron barbwire fence.
(3) Standards . The course must be successfully negotiated by all soldiers in the classwith each soldier obtaining kills on 75 percent of the total targets in his lane. The coursemust be negotiated in 5 minutes or less (about 30 seconds for each 50 meters and time toattack and negotiate obstacles).
WARNINGTo avoid injury, instructors ensure that the properinterval is constantly maintained.
Section IV. TEACHING TECHNIQUESThis section discusses a variety of effective teaching techniques to use while conductingcombatives training.
2-9. WARM-UPS AND STRETCHESBefore combatives training, the soldier must be prepared for the upcoming physicalstress. A warm-up period gradually increases the internal temperature of the body and theheart rate. Stretching prepares the ligaments, tendons, muscles, and heart for a workout,decreasing the chances of injury. After the initial warm-up, training drills can be used to
2-12
8/9/2019 US ARMY FM 3-25.150 - Combatives (hand-to-hand combat).pdf
http://slidepdf.com/reader/full/us-army-fm-3-25150-combatives-hand-to-hand-combatpdf 20/265
FM 3-25.150
further warm up. This allows for the maximum use of training time combining a portionof the warm up with building muscle memory, and refining the basic techniques.
a. Warm-up Exercises . To begin warm-up exercises, rotate the major joints neck,shoulders, hips, and knees. The warm-up should include at least 7 to 10 minutes ofstretching, running in place or jogging around the training area, and calisthenics. Grass
drills and guerrilla exercises are good to use as a warm-up for combatives training. Theycondition the body through motion in all ranges, accustom the soldiers to contact with theground, and promote aggressiveness.
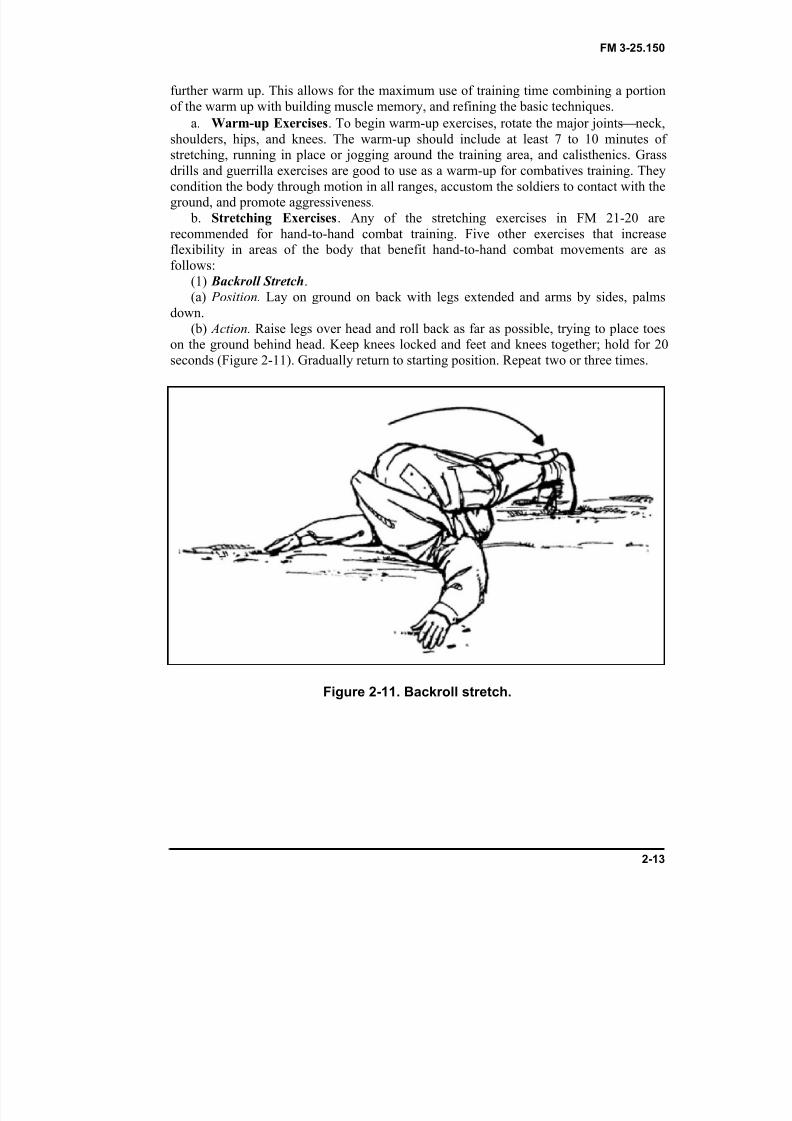
b. Stretching Exercises . Any of the stretching exercises in FM 21-20 arerecommended for hand-to-hand combat training. Five other exercises that increaseflexibility in areas of the body that benefit hand-to-hand combat movements are asfollows:
(1) Backroll Stretch .(a) Position. Lay on ground on back with legs extended and arms by sides, palms
down.(b) Action. Raise legs over head and roll back as far as possible, trying to place toes
on the ground behind head. Keep knees locked and feet and knees together; hold for 20seconds (Figure 2-11). Gradually return to starting position. Repeat two or three times.
Figure 2-11. Backroll stretch.
2-13
8/9/2019 US ARMY FM 3-25.150 - Combatives (hand-to-hand combat).pdf
http://slidepdf.com/reader/full/us-army-fm-3-25150-combatives-hand-to-hand-combatpdf 21/265
FM 3-25.150
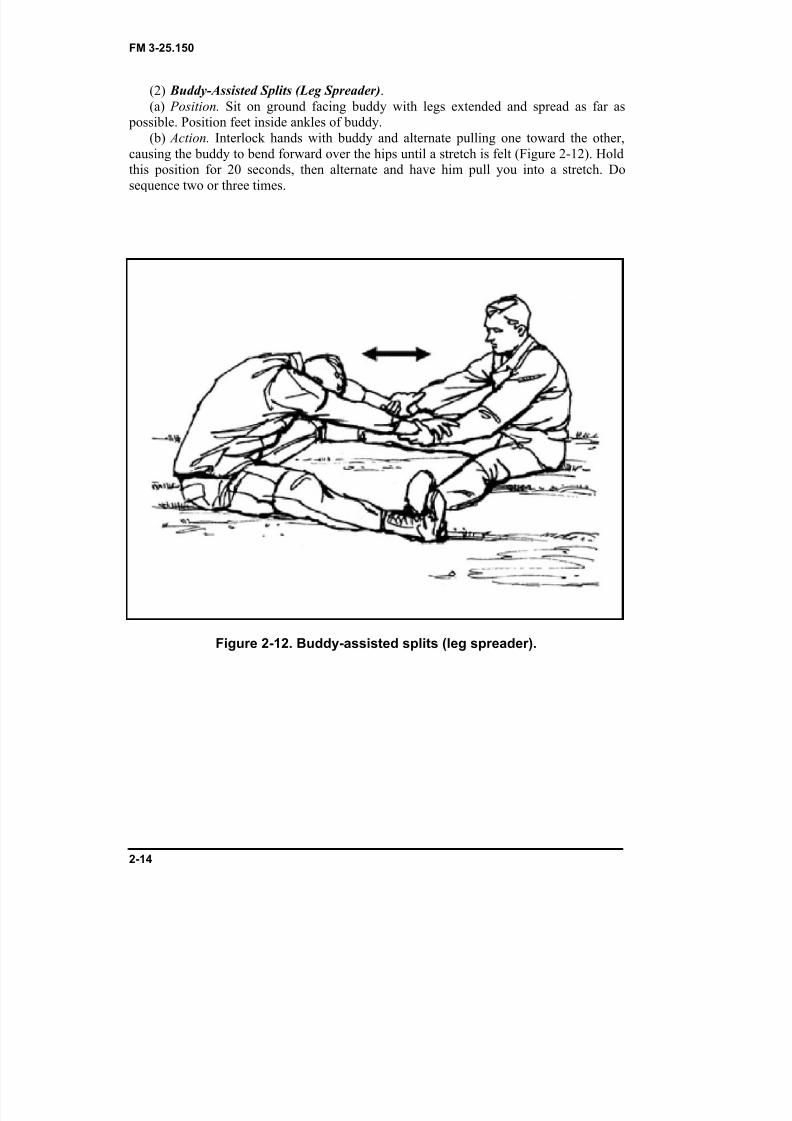
(2) Buddy-Assisted Splits (Leg Spreader) .(a) Position. Sit on ground facing buddy with legs extended and spread as far as
possible. Position feet inside ankles of buddy.(b) Action. Interlock hands with buddy and alternate pulling one toward the other,
causing the buddy to bend forward over the hips until a stretch is felt (Figure 2-12). Hold
this position for 20 seconds, then alternate and have him pull you into a stretch. Dosequence two or three times.
Figure 2-12. Buddy-assisted splits (leg spreader).
2-14
8/9/2019 US ARMY FM 3-25.150 - Combatives (hand-to-hand combat).pdf
http://slidepdf.com/reader/full/us-army-fm-3-25150-combatives-hand-to-hand-combatpdf 22/265
FM 3-25.150
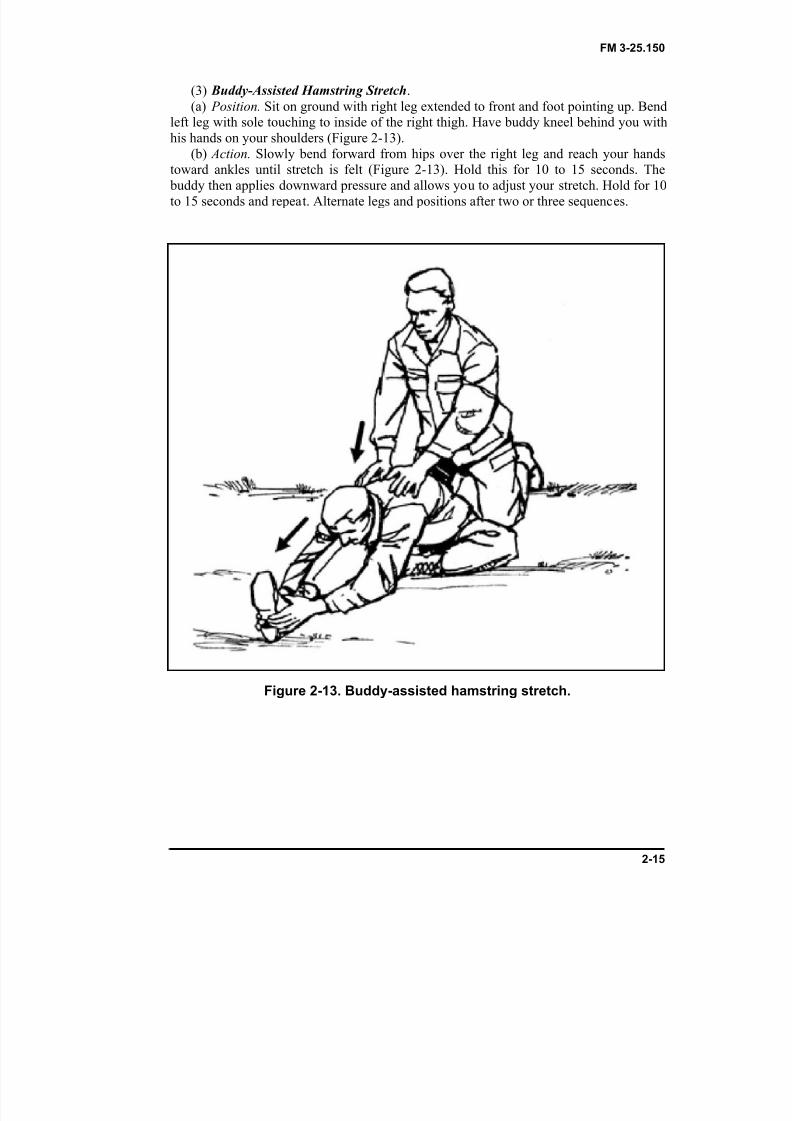
(3) Buddy-Assisted Hamstring Stretch .(a) Position. Sit on ground with right leg extended to front and foot pointing up. Bend
left leg with sole touching to inside of the right thigh. Have buddy kneel behind you withhis hands on your shoulders (Figure 2-13).
(b) Action. Slowly bend forward from hips over the right leg and reach your hands
toward ankles until stretch is felt (Figure 2-13). Hold this for 10 to 15 seconds. The buddy then applies downward pressure and allows you to adjust your stretch. Hold for 10to 15 seconds and repeat. Alternate legs and positions after two or three sequences.
Figure 2-13. Buddy-assisted hamstring stretch.
2-15
8/9/2019 US ARMY FM 3-25.150 - Combatives (hand-to-hand combat).pdf
http://slidepdf.com/reader/full/us-army-fm-3-25150-combatives-hand-to-hand-combatpdf 23/265
FM 3-25.150
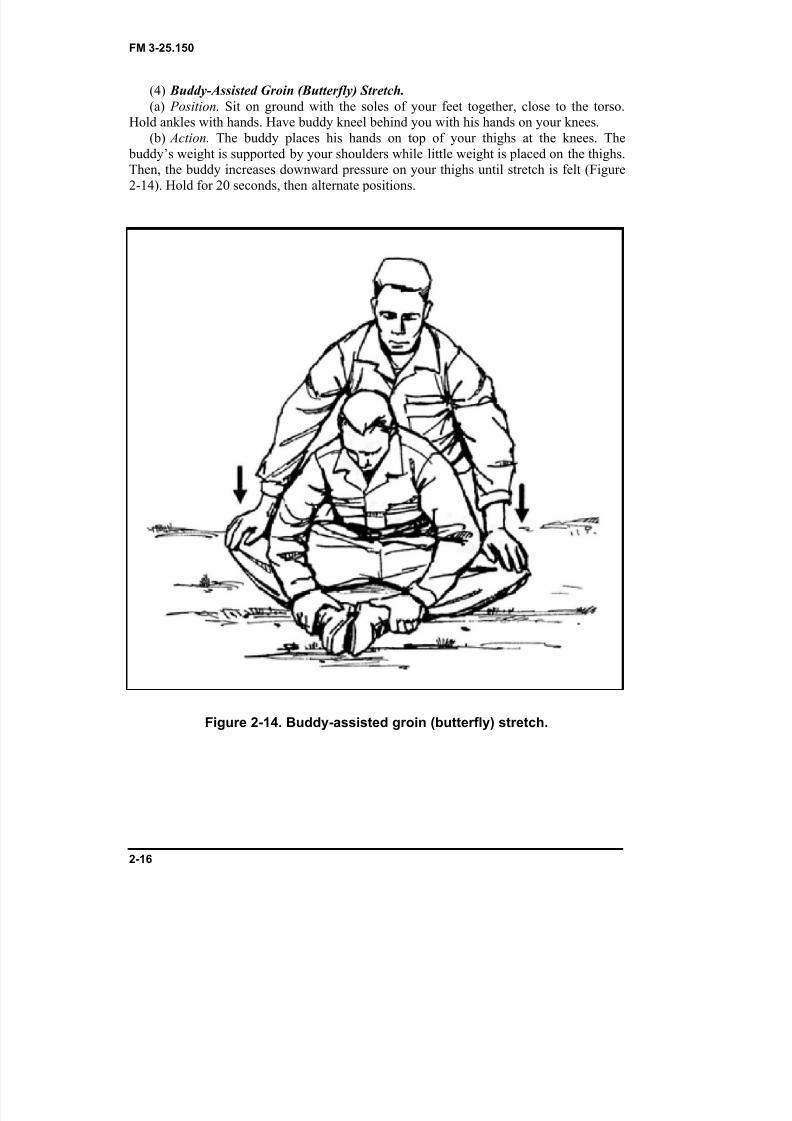
(4) Buddy-Assisted Groin (Butterfly) Stretch.(a) Position. Sit on ground with the soles of your feet together, close to the torso.
Hold ankles with hands. Have buddy kneel behind you with his hands on your knees.(b) Action. The buddy places his hands on top of your thighs at the knees. The
buddy’s weight is supported by your shoulders while little weight is placed on the thighs.
Then, the buddy increases downward pressure on your thighs until stretch is felt (Figure2-14). Hold for 20 seconds, then alternate positions.
Figure 2-14. Buddy-assisted groin (butterfly) stretch.
2-16
8/9/2019 US ARMY FM 3-25.150 - Combatives (hand-to-hand combat).pdf
http://slidepdf.com/reader/full/us-army-fm-3-25150-combatives-hand-to-hand-combatpdf 24/265
FM 3-25.150
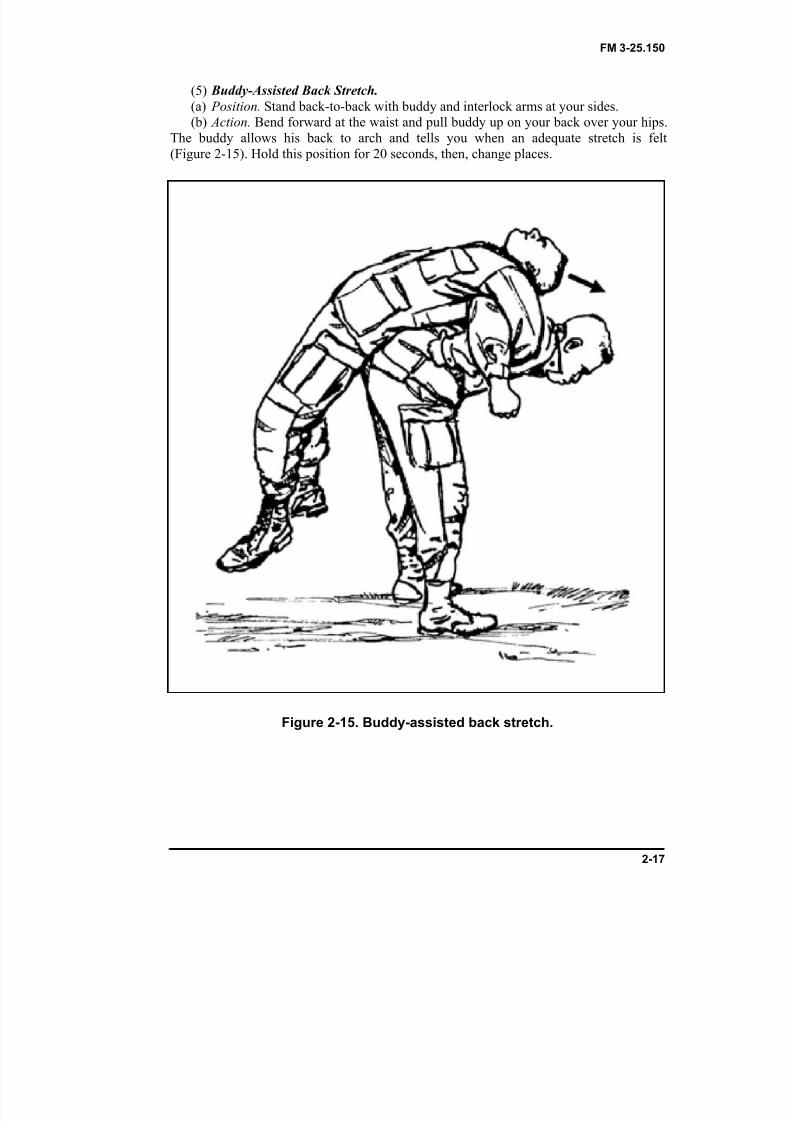
(5) Buddy-Assisted Back Stretch. (a) Position. Stand back-to-back with buddy and interlock arms at your sides.(b) Action. Bend forward at the waist and pull buddy up on your back over your hips.
The buddy allows his back to arch and tells you when an adequate stretch is felt(Figure 2-15). Hold this position for 20 seconds, then, change places.
Figure 2-15. Buddy-assisted back stretch.
2-17
8/9/2019 US ARMY FM 3-25.150 - Combatives (hand-to-hand combat).pdf
http://slidepdf.com/reader/full/us-army-fm-3-25150-combatives-hand-to-hand-combatpdf 25/265
FM 3-25.150
2-10. CRAWL, WALK, AND RUNTraining can be conducted using the crawl, walk, and run techniques, which may beapplied on two levels.
a. First Level . The instructors use these techniques during each initial trainingsession.
(1) Crawl Phase . New techniques are introduced, taught, demonstrated, and executed by the numbers.(2) Walk Phase . During this phase, soldiers practice the new techniques by the
numbers, but with more fluid movement and less instructor guidance.(3) Run Phase . Soldiers execute the techniques at combat speed with supervision.
b. Second Level . The instructors use these techniques when developing unitcombatives programs. Before conducting combatives training, the instructor considers theabilities and experience level of the soldiers to be trained. During training, those soldierswith prior martial arts experience can be a great asset; they may be used as demonstratorsor as assistant instructors. The crawl, walk, run approach to unit training ensures a highskill level throughout the unit and minimizes the risk of training injuries.
(1) Crawl Phase . During the crawl phase, the instructor introduces combatives to theunit. Here, the basic skills that set the standards for advancement to other levels aremastered. Emphasis is placed on the basic ground fighting techniques, graduallyintroducing standup fighting and fight strategy. Studying the new techniques in thismethod ensures that the movements are correctly programmed into the soldiers’subconscious after a few repetitions.
(2) Walk Phase . Once a unit has developed a sufficient proficiency level in basicskills, begin the walk phase. Instructors introduce soldiers to more advanced groundfighting techniques and begin serious training on closing with the enemy and takedowns.Soldiers engage in full sparring and competitive matches.
(3) Run Phase . In the run phase, soldiers spar using slaps to represent striking duringground fighting, takedowns are practiced against an opponent with boxing gloves, andscenario driven training such as multiple opponent or restrictive equipment is used.
2-11. DEMONSTRATIONSA well-coordinated demonstration and professional demonstrators are crucial forsuccessful learning by soldiers. Unrehearsed presentations or inadequately traineddemonstrators can immediately destroy the credibility of the training. Two methods areappropriate for demonstrating combative techniques based on the size of the group to betaught.
a. Company-Size Formation or Larger . The instructor or demonstrator uses thetalk-through method. The primary instructor talks the demonstrators through thetechniques by the numbers, and then the demonstrators execute at combat speed. Thesoldiers can see how to apply the move being taught in relation to the instructor ordemonstrator. The primary instructor is free to control the rate of the demonstration andto stress key teaching points. The demonstrators must be skilled in properly applying thetechniques so soldiers can adequately grasp the intended concepts.
b. Platoon-Size Formation or Smaller. A good method for demonstrating to asmaller formation is for the primary instructor to apply the technique being taught to an
2-18
8/9/2019 US ARMY FM 3-25.150 - Combatives (hand-to-hand combat).pdf
http://slidepdf.com/reader/full/us-army-fm-3-25150-combatives-hand-to-hand-combatpdf 26/265
FM 3-25.150
assistant instructor. The primary instructor talks himself through the demonstration. Hestresses correct body movement and key teaching points as he does them.
2-12. EXECUTION BY THE NUMBERSInstructors use execution by the numbers to break techniques down into step-by-step
phases so soldiers can clearly see how the movements are developed from start to finish.Execution by the numbers also provides soldiers a way to see the mechanics of eachtechnique. This teaching method allows the instructor to explain in detail the sequence ofeach movement. For example, on the command PHASE ONE, MOVE, the attackerthrows a right-hand punch to the defender’s face. At the same time, the defender steps tothe inside of the attacker off the line of attack and moves into position for the right-hipthrow. Assistant instructors are able to move freely throughout the training formation andmake on-the-spot corrections.
2-13. EXECUTION AT COMBAT SPEEDWhen the instructor is confident that the soldiers being trained are skilled at executing a
technique by the numbers, he has them execute it at combat speed. Executing movementsat combat speed enables soldiers to see how effective a technique is. This builds thesoldier’s confidence in the technique, allows him to develop a clear mental picture of the
principles behind the technique, and gives him confidence in his ability to perform thetechnique during an actual attack. For example, the command is, PASS THE GUARDAT COMBAT SPEED, MOVE. The soldiers then execute this technique from start tofinish. It is important to remember that combat speed does not always mean very quickly.Speed requires space and space often favors the defender.
2-14. DRILLSDrills are used to warm up, to reinforce the importance of dominant body position, and to
perfect soldiers’ basic skills through repetition. During these drills, basic positionaltechniques are repeated at the beginning of each training session with a different detailemphasized each session. In this way the emphasis is kept on perfecting the basictechniques, while at the same time making the best use of limited training time.
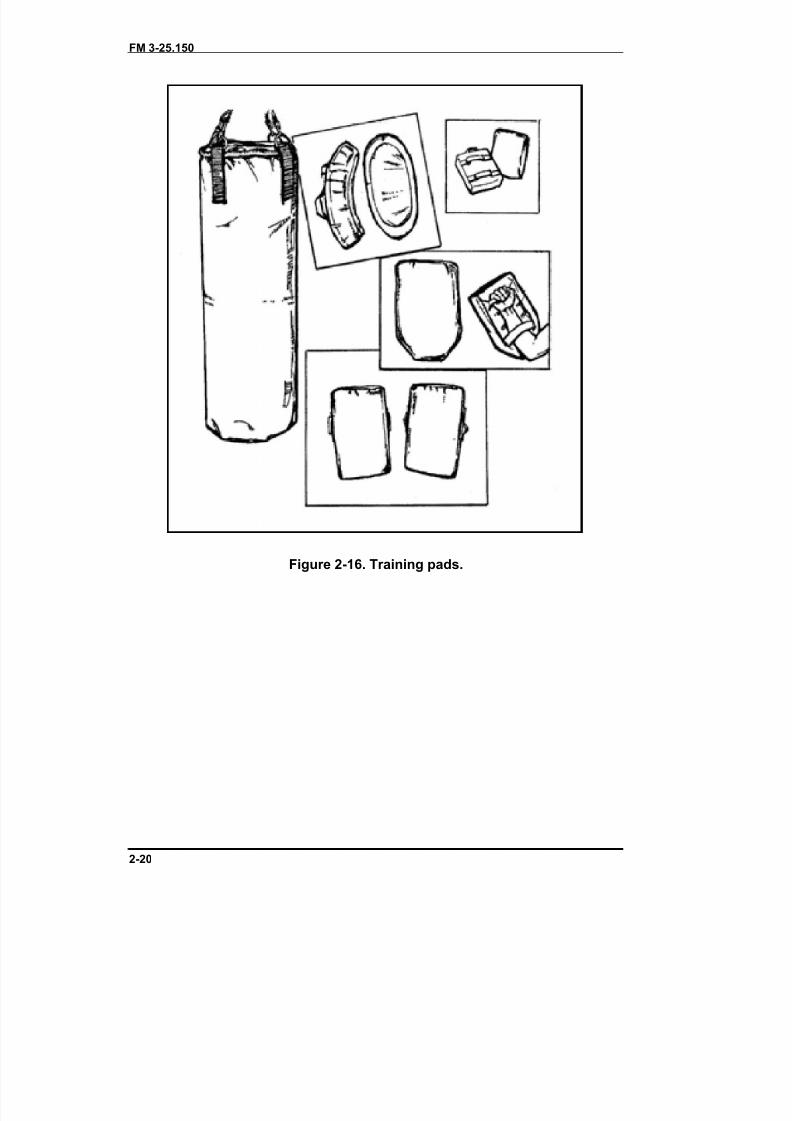
2-15. TRAINING PADS AND OTHER PROTECTIVE EQUIPMENTTraining pads are highly recommended to enhance training (Figure 2-16, page 2-20).They allow full-forced strikes by soldiers and protect their training partners. Althoughstriking is a inefficient way to end a fight, it is a very important part of a fight. Padsenable soldiers to feel the effectiveness of striking techniques and to develop power intheir striking. Instructors should encourage spirited aggressiveness. Pads can be tackledummy pads or martial arts striking pads. Training pads can be requisitioned throughsupply channels or purchased locally.
a. The use of pads is especially recommended for knee-strike practice drills, andkicking drills. Ideally, the pad is placed on the outside of the training partner’s thigh,
protecting the common perennial nerve. Pads can also be held against the forearms infront of the head and face to allow practice of knee or elbow strikes to this area.
b. Other protective equipment, such as shin guards, can also be useful to practicewith improvised weapons.
2-19
8/9/2019 US ARMY FM 3-25.150 - Combatives (hand-to-hand combat).pdf
http://slidepdf.com/reader/full/us-army-fm-3-25150-combatives-hand-to-hand-combatpdf 27/265
FM 3-25.150
Figure 2-16. Training pads.
2-20
8/9/2019 US ARMY FM 3-25.150 - Combatives (hand-to-hand combat).pdf
http://slidepdf.com/reader/full/us-army-fm-3-25150-combatives-hand-to-hand-combatpdf 28/265
FM 3-25.150(FM 21-150)
3-1
CHAPTER 3
BASIC GROUND-FIGHTING TECHNIQUES
Basic ground-fighting techniques build a fundamental understanding of dominant body position, which should be the focus of most combatives
training before moving on to the more difficult standing techniques.Ground fighting is also where technique can most easily be used toovercome size and strength.
Section I. DOMINANT BODY POSITIONBefore any killing or disabling technique can be applied, the soldier must first gain andmaintain dominant body position. The leverage gained from dominant body positionallows the fighter to defeat a stronger opponent. An appreciation for dominant position isfundamental to becoming a proficient fighter because it ties together what wouldotherwise be a long confusing list of unrelated techniques. If a finishing technique is
attempted from dominant position and fails, the fighter can simply try again. If, on theother hand, a finishing technique is attempted from other than dominant position andfails, it will usually mean defeat. The dominant body positions will be introduced in order of precedence.
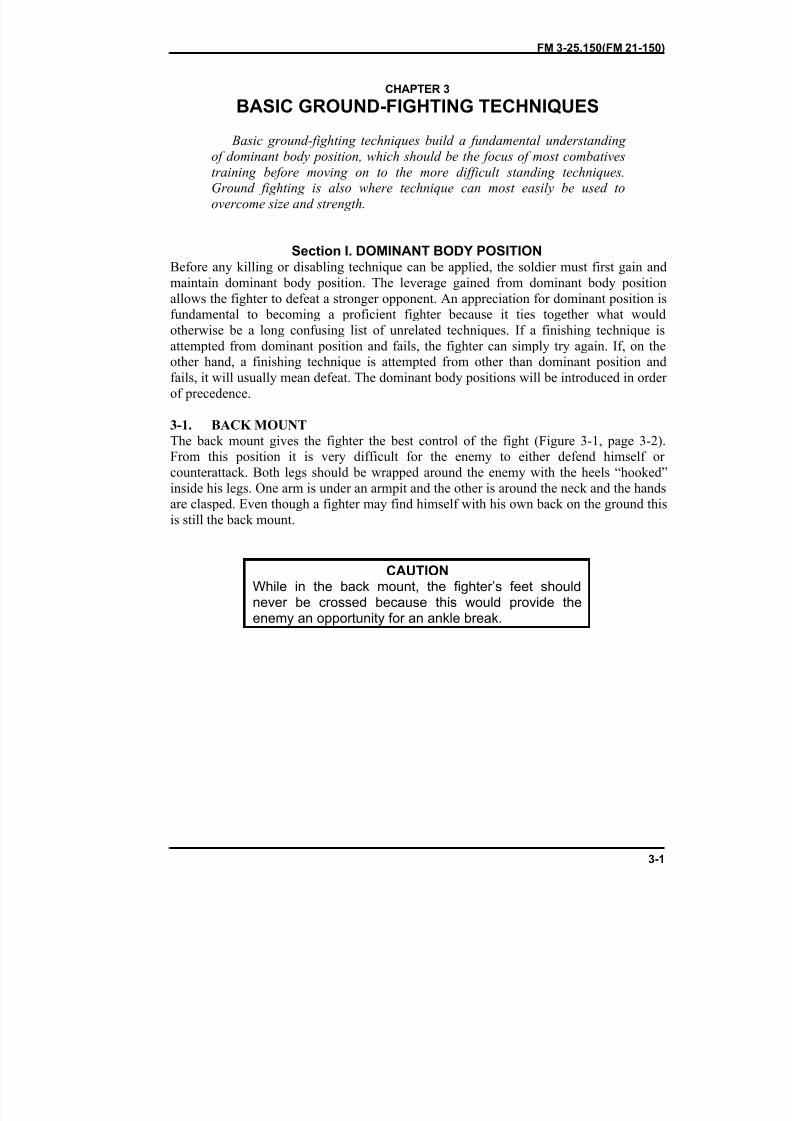
3-1. BACK MOUNTThe back mount gives the fighter the best control of the fight (Figure 3-1, page 3-2).From this position it is very difficult for the enemy to either defend himself or counterattack. Both legs should be wrapped around the enemy with the heels “hooked”inside his legs. One arm is under an armpit and the other is around the neck and the handsare clasped. Even though a fighter may find himself with his own back on the ground this
is still the back mount.
CAUTIONWhile in the back mount, the fighter’s feet shouldnever be crossed because this would provide theenemy an opportunity for an ankle break.
8/9/2019 US ARMY FM 3-25.150 - Combatives (hand-to-hand combat).pdf
http://slidepdf.com/reader/full/us-army-fm-3-25150-combatives-hand-to-hand-combatpdf 29/265
FM 3-25.150
3-2
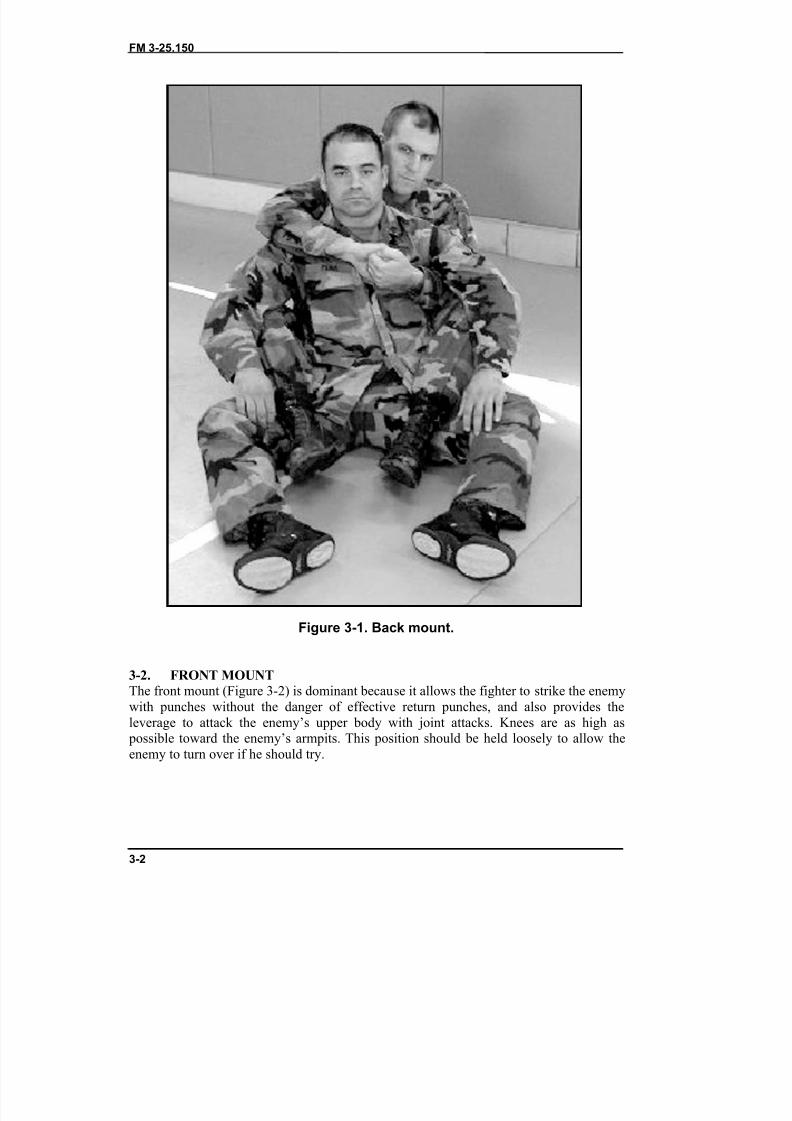
Figure 3-1. Back mount.
3-2. FRONT MOUNTThe front mount (Figure 3-2) is dominant because it allows the fighter to strike the enemywith punches without the danger of effective return punches, and also provides theleverage to attack the enemy’s upper body with joint attacks. Knees are as high as
possible toward the enemy’s armpits. This position should be held loosely to allow theenemy to turn over if he should try.
8/9/2019 US ARMY FM 3-25.150 - Combatives (hand-to-hand combat).pdf
http://slidepdf.com/reader/full/us-army-fm-3-25150-combatives-hand-to-hand-combatpdf 30/265
FM 3-25.150
3-3
Figure 3-2. Front mount.
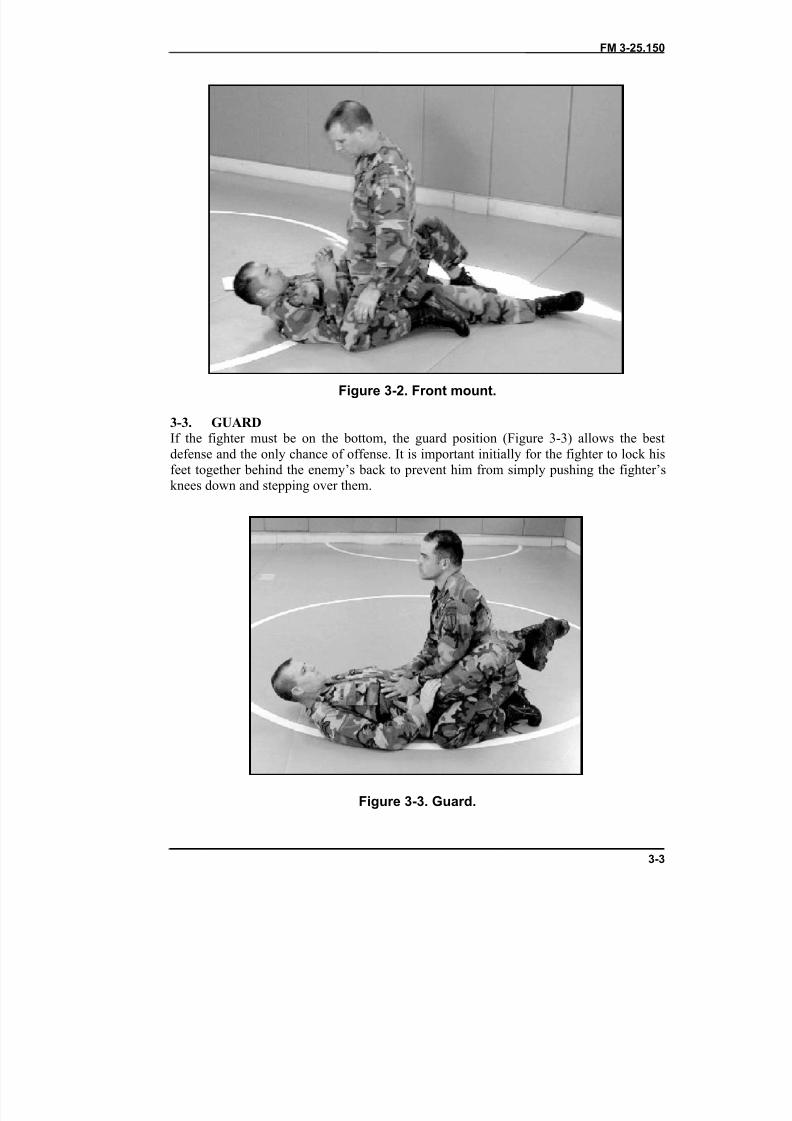
3-3. GUARDIf the fighter must be on the bottom, the guard position (Figure 3-3) allows the bestdefense and the only chance of offense. It is important initially for the fighter to lock hisfeet together behind the enemy’s back to prevent him from simply pushing the fighter’sknees down and stepping over them.
Figure 3-3. Guard.
8/9/2019 US ARMY FM 3-25.150 - Combatives (hand-to-hand combat).pdf
http://slidepdf.com/reader/full/us-army-fm-3-25150-combatives-hand-to-hand-combatpdf 31/265
FM 3-25.150
3-4
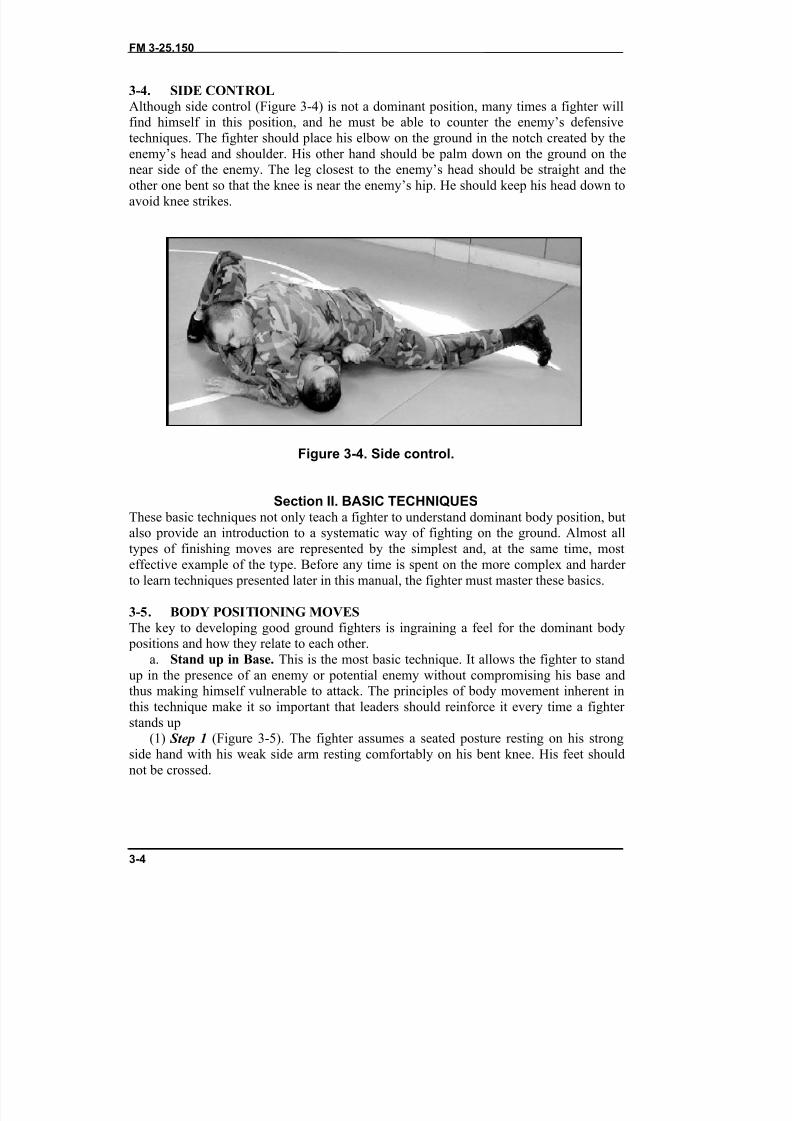
3-4. SIDE CONTROLAlthough side control (Figure 3-4) is not a dominant position, many times a fighter willfind himself in this position, and he must be able to counter the enemy’s defensivetechniques. The fighter should place his elbow on the ground in the notch created by theenemy’s head and shoulder. His other hand should be palm down on the ground on the
near side of the enemy. The leg closest to the enemy’s head should be straight and theother one bent so that the knee is near the enemy’s hip. He should keep his head down toavoid knee strikes.
Figure 3-4. Side control.
Section II. BASIC TECHNIQUESThese basic techniques not only teach a fighter to understand dominant body position, butalso provide an introduction to a systematic way of fighting on the ground. Almost alltypes of finishing moves are represented by the simplest and, at the same time, mosteffective example of the type. Before any time is spent on the more complex and harder to learn techniques presented later in this manual, the fighter must master these basics.
3-5. BODY POSITIONING MOVESThe key to developing good ground fighters is ingraining a feel for the dominant body
positions and how they relate to each other.a. Stand up in Base. This is the most basic technique. It allows the fighter to stand
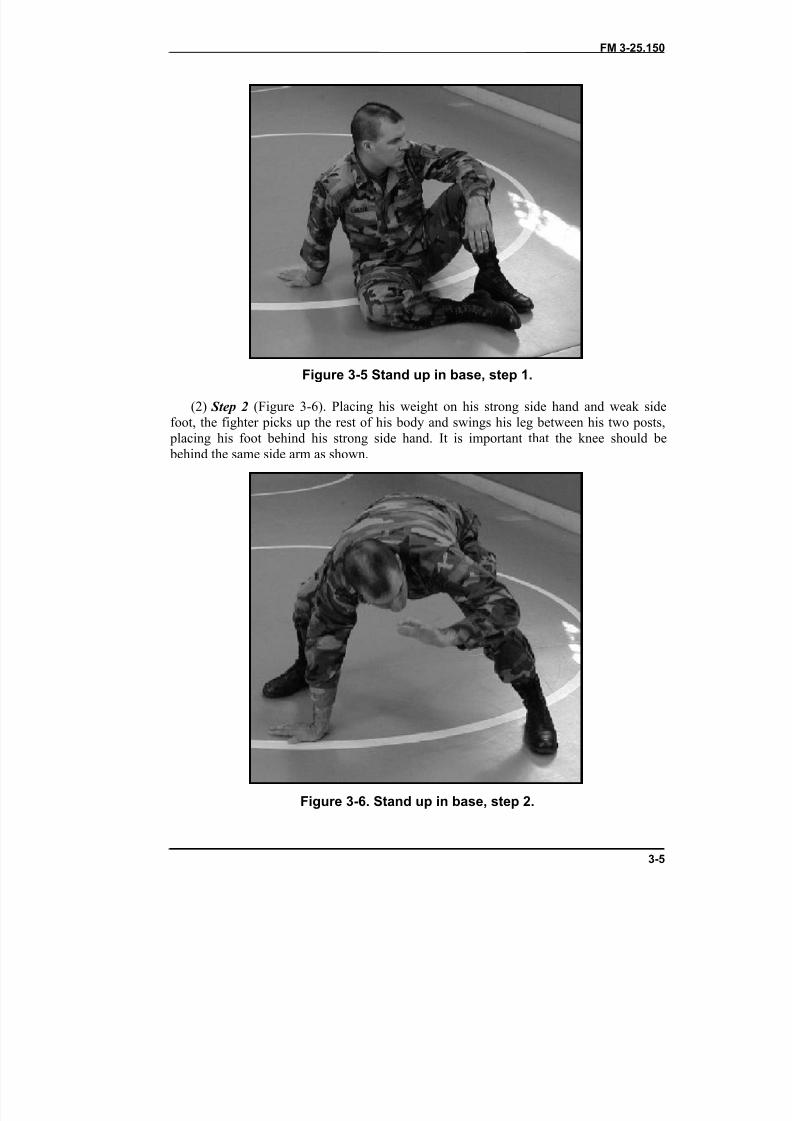
up in the presence of an enemy or potential enemy without compromising his base andthus making himself vulnerable to attack. The principles of body movement inherent inthis technique make it so important that leaders should reinforce it every time a fighter stands up
(1) Step 1 (Figure 3-5). The fighter assumes a seated posture resting on his strongside hand with his weak side arm resting comfortably on his bent knee. His feet shouldnot be crossed.
8/9/2019 US ARMY FM 3-25.150 - Combatives (hand-to-hand combat).pdf
http://slidepdf.com/reader/full/us-army-fm-3-25150-combatives-hand-to-hand-combatpdf 32/265
FM 3-25.150
3-5
Figure 3-5 Stand up in base, step 1.
(2) Step 2 (Figure 3-6). Placing his weight on his strong side hand and weak sidefoot, the fighter picks up the rest of his body and swings his leg between his two posts,
placing his foot behind his strong side hand. It is important that the knee should be behind the same side arm as shown.
Figure 3-6. Stand up in base, step 2.
8/9/2019 US ARMY FM 3-25.150 - Combatives (hand-to-hand combat).pdf
http://slidepdf.com/reader/full/us-army-fm-3-25150-combatives-hand-to-hand-combatpdf 33/265
FM 3-25.150
3-6
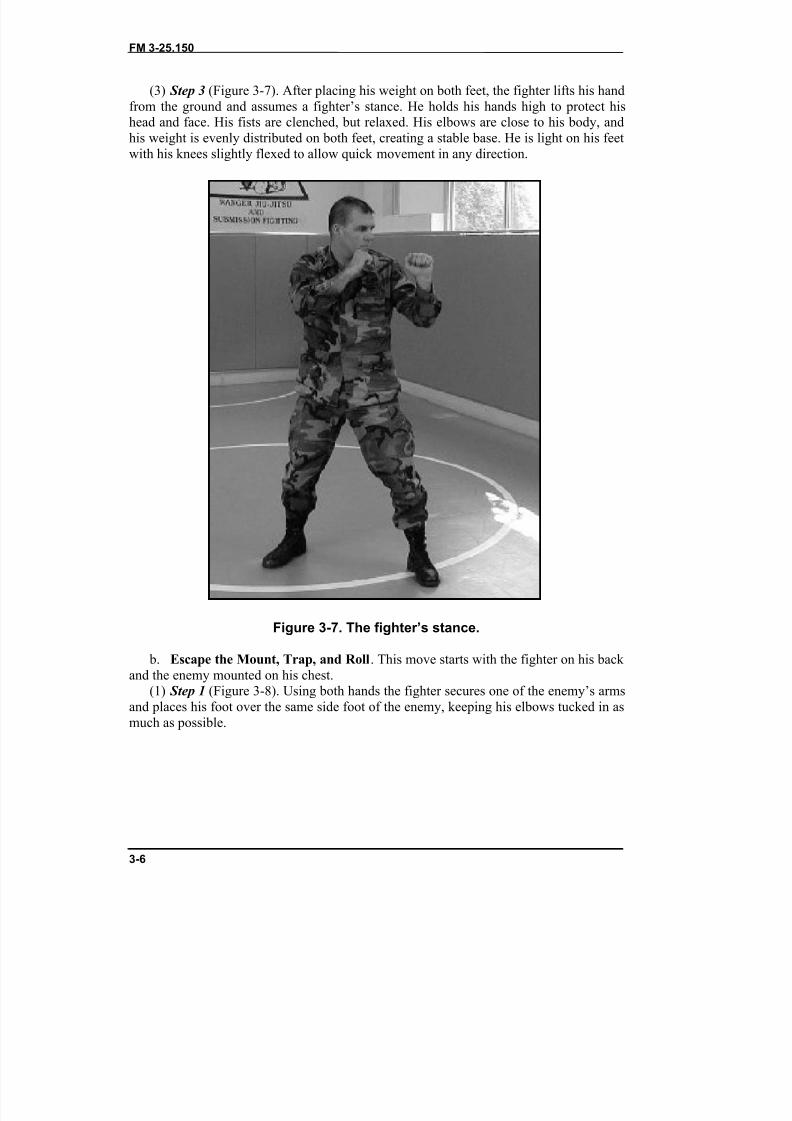
(3) Step 3 (Figure 3-7). After placing his weight on both feet, the fighter lifts his handfrom the ground and assumes a fighter’s stance. He holds his hands high to protect hishead and face. His fists are clenched, but relaxed. His elbows are close to his body, andhis weight is evenly distributed on both feet, creating a stable base. He is light on his feetwith his knees slightly flexed to allow quick movement in any direction.
Figure 3-7. The fighter’s stance.
b. Escape the Mount, Trap, and Roll . This move starts with the fighter on his back and the enemy mounted on his chest.
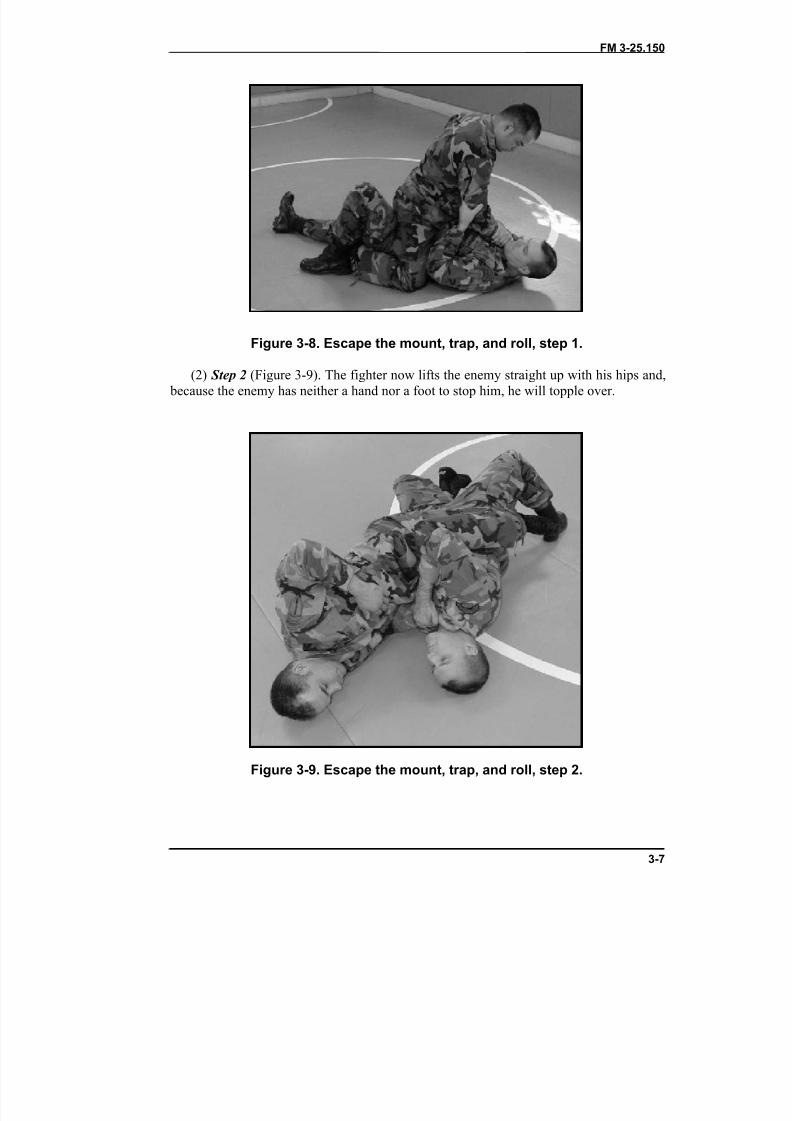
(1) Step 1 (Figure 3-8). Using both hands the fighter secures one of the enemy’s armsand places his foot over the same side foot of the enemy, keeping his elbows tucked in asmuch as possible.
8/9/2019 US ARMY FM 3-25.150 - Combatives (hand-to-hand combat).pdf
http://slidepdf.com/reader/full/us-army-fm-3-25150-combatives-hand-to-hand-combatpdf 34/265
FM 3-25.150
3-7
Figure 3-8. Escape the mount, trap, and roll, step 1.(2) Step 2 (Figure 3-9). The fighter now lifts the enemy straight up with his hips and,
because the enemy has neither a hand nor a foot to stop him, he will topple over.
Figure 3-9. Escape the mount, trap, and roll, step 2.
8/9/2019 US ARMY FM 3-25.150 - Combatives (hand-to-hand combat).pdf
http://slidepdf.com/reader/full/us-army-fm-3-25150-combatives-hand-to-hand-combatpdf 35/265
FM 3-25.150
3-8
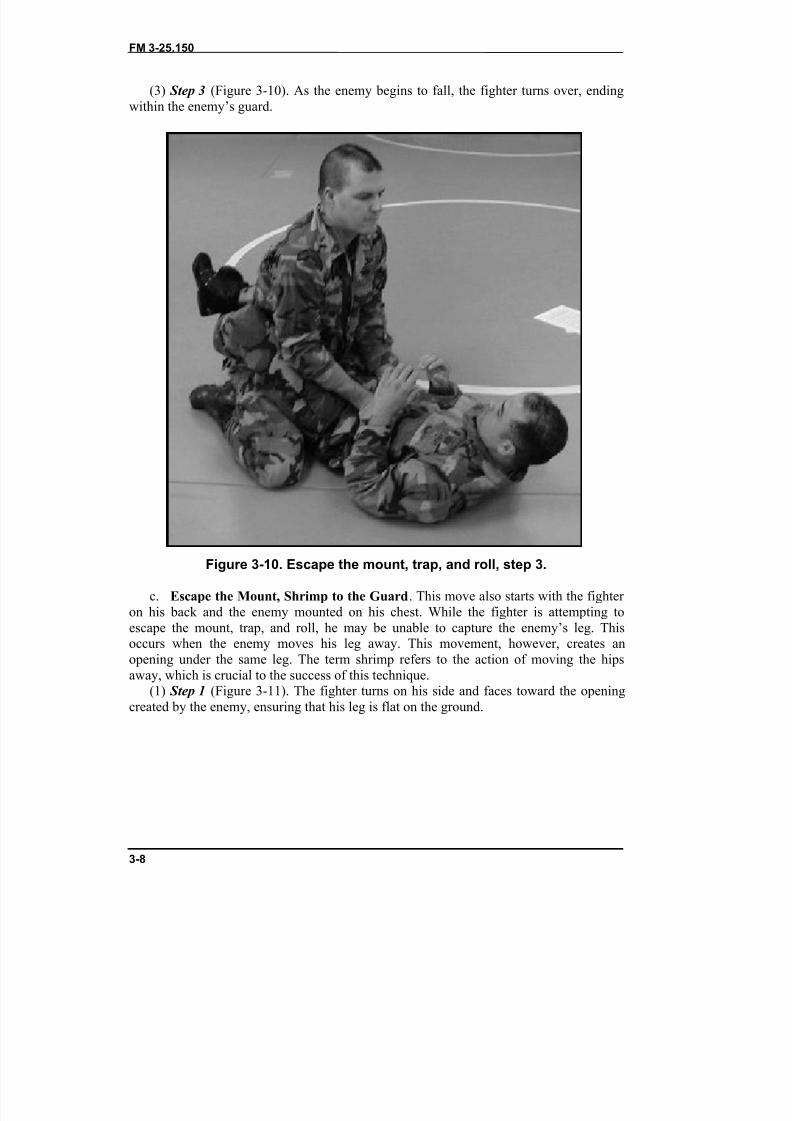
(3) Step 3 (Figure 3-10). As the enemy begins to fall, the fighter turns over, endingwithin the enemy’s guard.
Figure 3-10. Escape the mount, trap, and roll, step 3.
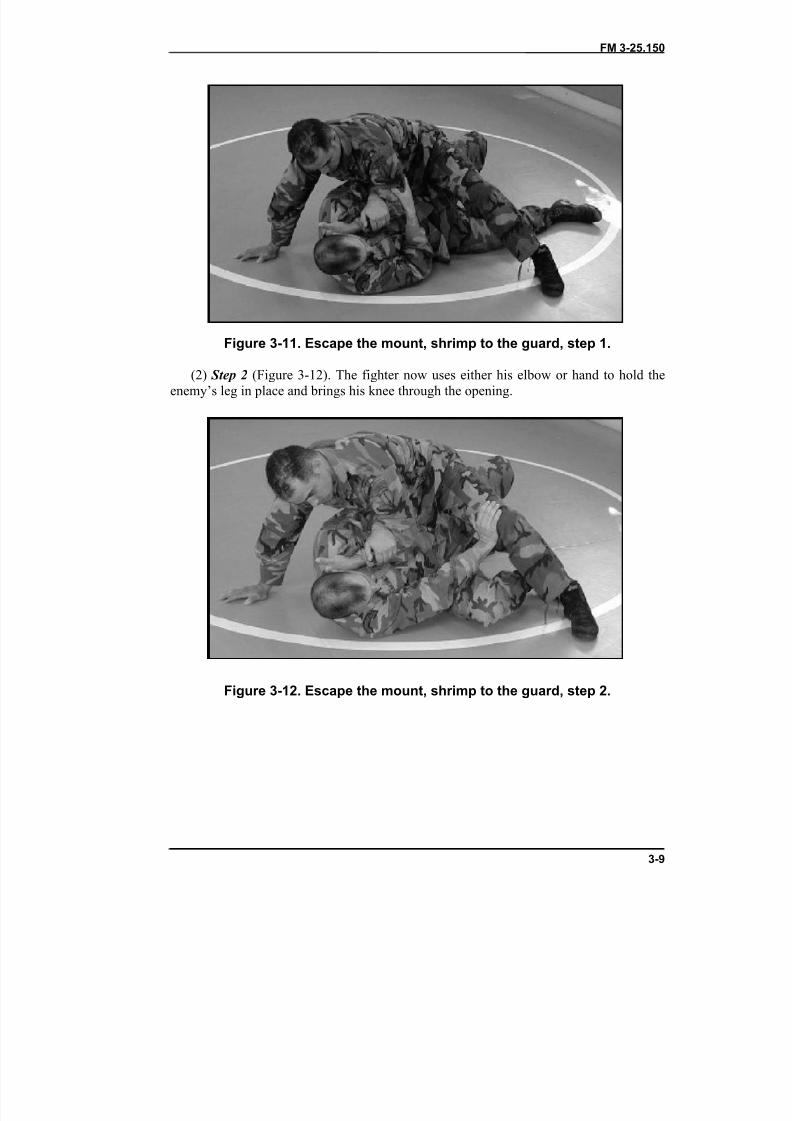
c. Escape the Mount, Shrimp to the Guard . This move also starts with the fighter on his back and the enemy mounted on his chest. While the fighter is attempting toescape the mount, trap, and roll, he may be unable to capture the enemy’s leg. Thisoccurs when the enemy moves his leg away. This movement, however, creates anopening under the same leg. The term shrimp refers to the action of moving the hipsaway, which is crucial to the success of this technique.
(1) Step 1 (Figure 3-11). The fighter turns on his side and faces toward the openingcreated by the enemy, ensuring that his leg is flat on the ground.
8/9/2019 US ARMY FM 3-25.150 - Combatives (hand-to-hand combat).pdf
http://slidepdf.com/reader/full/us-army-fm-3-25150-combatives-hand-to-hand-combatpdf 36/265
FM 3-25.150
3-9
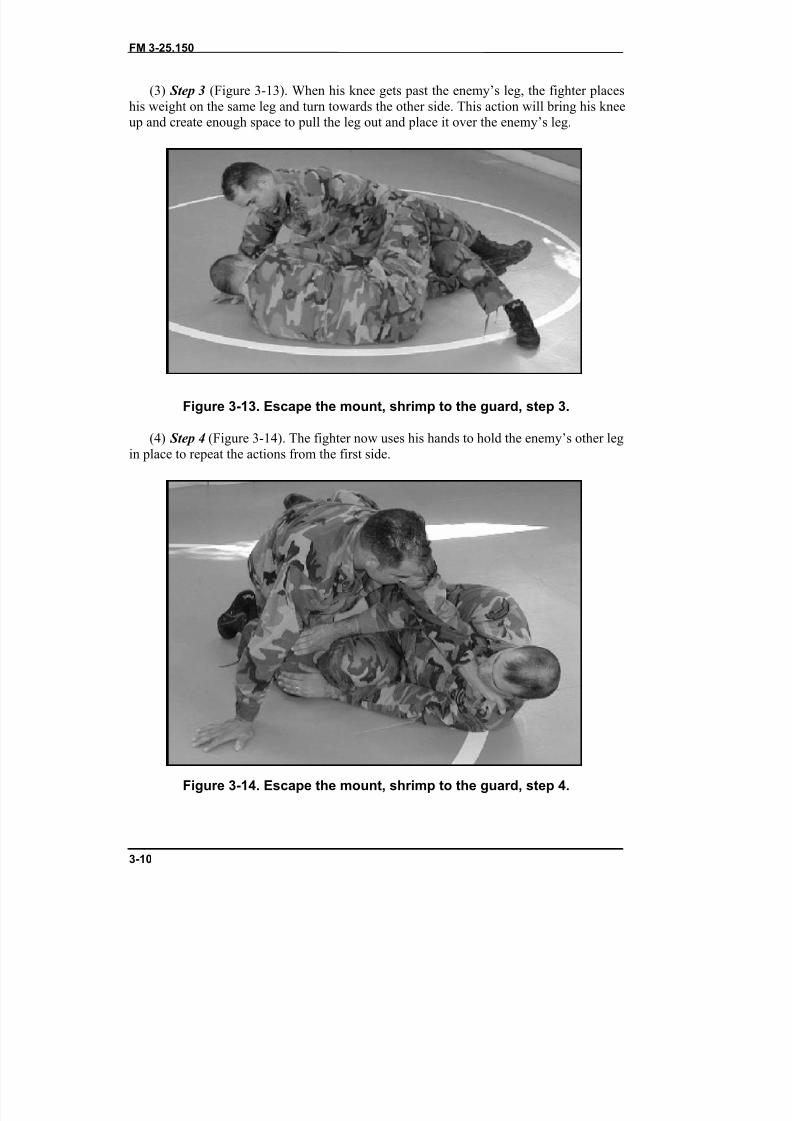
Figure 3-11. Escape the mount, shrimp to the guard, step 1.(2) Step 2 (Figure 3-12). The fighter now uses either his elbow or hand to hold the
enemy’s leg in place and brings his knee through the opening.
Figure 3-12. Escape the mount, shrimp to the guard, step 2.
8/9/2019 US ARMY FM 3-25.150 - Combatives (hand-to-hand combat).pdf
http://slidepdf.com/reader/full/us-army-fm-3-25150-combatives-hand-to-hand-combatpdf 37/265
FM 3-25.150
3-10
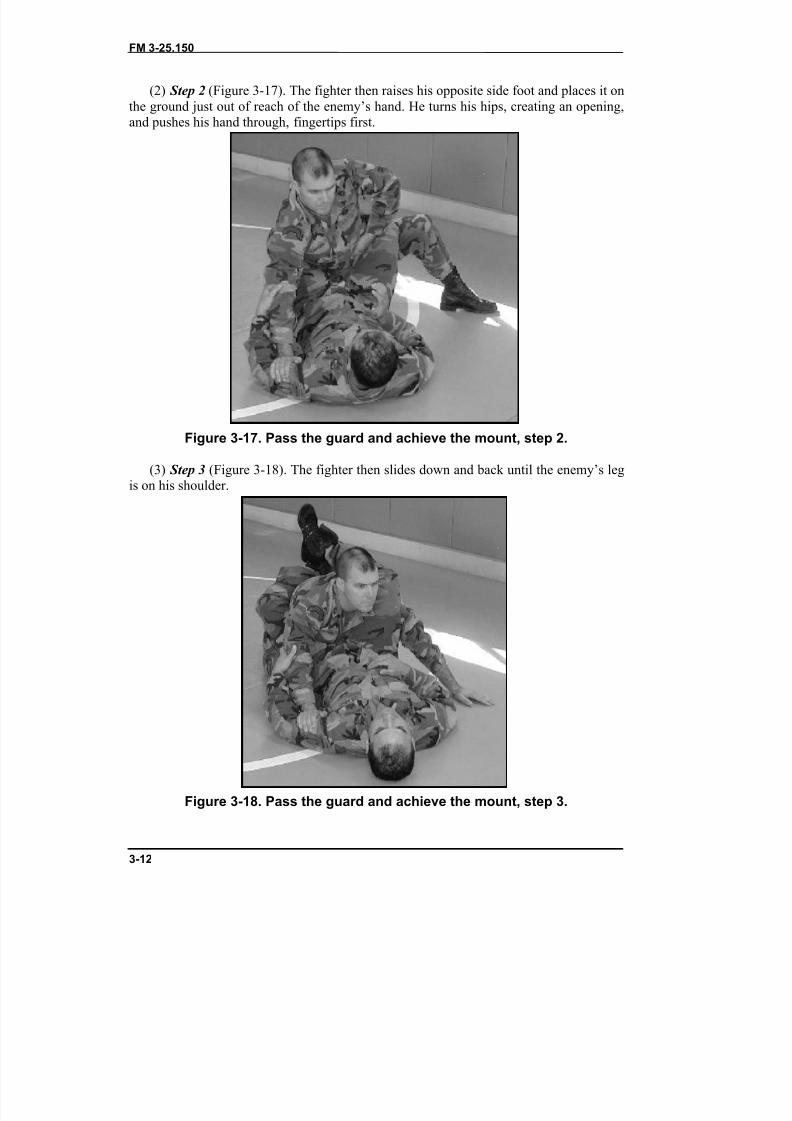
(3) Step 3 (Figure 3-13). When his knee gets past the enemy’s leg, the fighter placeshis weight on the same leg and turn towards the other side. This action will bring his kneeup and create enough space to pull the leg out and place it over the enemy’s leg.
Figure 3-13. Escape the mount, shrimp to the guard, step 3.
(4) Step 4 (Figure 3-14). The fighter now uses his hands to hold the enemy’s other legin place to repeat the actions from the first side.
Figure 3-14. Escape the mount, shrimp to the guard, step 4.

8/9/2019 US ARMY FM 3-25.150 - Combatives (hand-to-hand combat).pdf
http://slidepdf.com/reader/full/us-army-fm-3-25150-combatives-hand-to-hand-combatpdf 38/265
FM 3-25.150
3-11
(5) Step 5 (Figure 3-15). It is important that the fighter lock his feet together aroundthe enemy, placing him in the open guard.
Figure 3-15. Escape the mount, shrimp to the guard, step 5.
d. Pass the Guard and Achieve the Mount . The fighter is in base within theenemy’s guard. From this position, the fighter must escape from within the enemy’s legs.This action is called passing the guard.
(1) Step 1 (Figure 3-16). The first thing the fighter must do is defend against the frontchoke by using one hand to pin one of the enemy’s arms to the ground at the biceps. Healso keeps an upright posture.
Figure 3-16. Pass the guard and achieve the mount, step 1.
8/9/2019 US ARMY FM 3-25.150 - Combatives (hand-to-hand combat).pdf
http://slidepdf.com/reader/full/us-army-fm-3-25150-combatives-hand-to-hand-combatpdf 39/265
FM 3-25.150
3-12
(2) Step 2 (Figure 3-17). The fighter then raises his opposite side foot and places it onthe ground just out of reach of the enemy’s hand. He turns his hips, creating an opening,and pushes his hand through, fingertips first.
Figure 3-17. Pass the guard and achieve the mount, step 2.
(3) Step 3 (Figure 3-18). The fighter then slides down and back until the enemy’s legis on his shoulder.
Figure 3-18. Pass the guard and achieve the mount, step 3.
8/9/2019 US ARMY FM 3-25.150 - Combatives (hand-to-hand combat).pdf
http://slidepdf.com/reader/full/us-army-fm-3-25150-combatives-hand-to-hand-combatpdf 40/265
FM 3-25.150
3-13
(4) Step 4 (Figure 3-19). With the same hand, the fighter grasps the enemy’s collar with his thumb on the inside and drives the enemy’s knee straight past his head. Pressureon the enemy’s spine forces him to release his legs.
Figure 3-19. Pass the guard and achieve the mount, step 4.
Figure 3-19. Pass the guard and achieve the mount, step 4 (continued).
8/9/2019 US ARMY FM 3-25.150 - Combatives (hand-to-hand combat).pdf
http://slidepdf.com/reader/full/us-army-fm-3-25150-combatives-hand-to-hand-combatpdf 41/265
FM 3-25.150
3-17
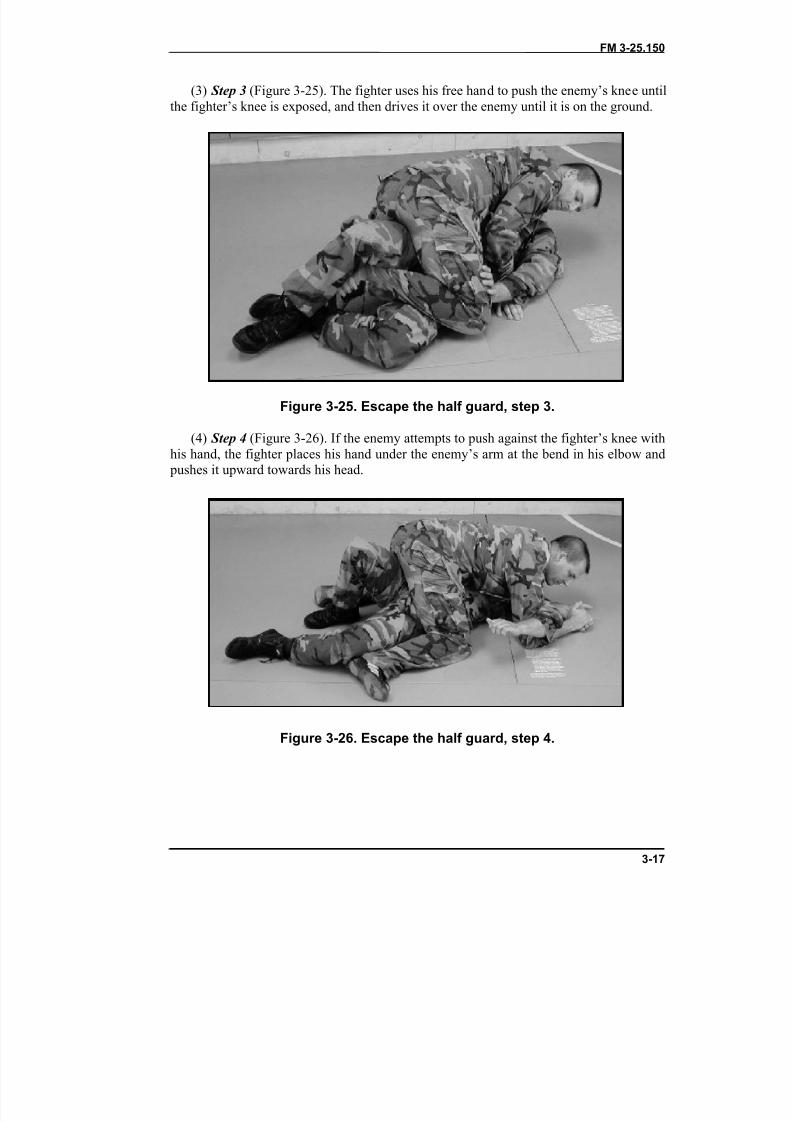
(3) Step 3 (Figure 3-25). The fighter uses his free hand to push the enemy’s knee untilthe fighter’s knee is exposed, and then drives it over the enemy until it is on the ground.
Figure 3-25. Escape the half guard, step 3.
(4) Step 4 (Figure 3-26). If the enemy attempts to push against the fighter’s knee withhis hand, the fighter places his hand under the enemy’s arm at the bend in his elbow and
pushes it upward towards his head.
Figure 3-26. Escape the half guard, step 4.

8/9/2019 US ARMY FM 3-25.150 - Combatives (hand-to-hand combat).pdf
http://slidepdf.com/reader/full/us-army-fm-3-25150-combatives-hand-to-hand-combatpdf 42/265

8/9/2019 US ARMY FM 3-25.150 - Combatives (hand-to-hand combat).pdf
http://slidepdf.com/reader/full/us-army-fm-3-25150-combatives-hand-to-hand-combatpdf 43/265

8/9/2019 US ARMY FM 3-25.150 - Combatives (hand-to-hand combat).pdf
http://slidepdf.com/reader/full/us-army-fm-3-25150-combatives-hand-to-hand-combatpdf 44/265
8/9/2019 US ARMY FM 3-25.150 - Combatives (hand-to-hand combat).pdf
http://slidepdf.com/reader/full/us-army-fm-3-25150-combatives-hand-to-hand-combatpdf 45/265
FM 3-25.150
3-18
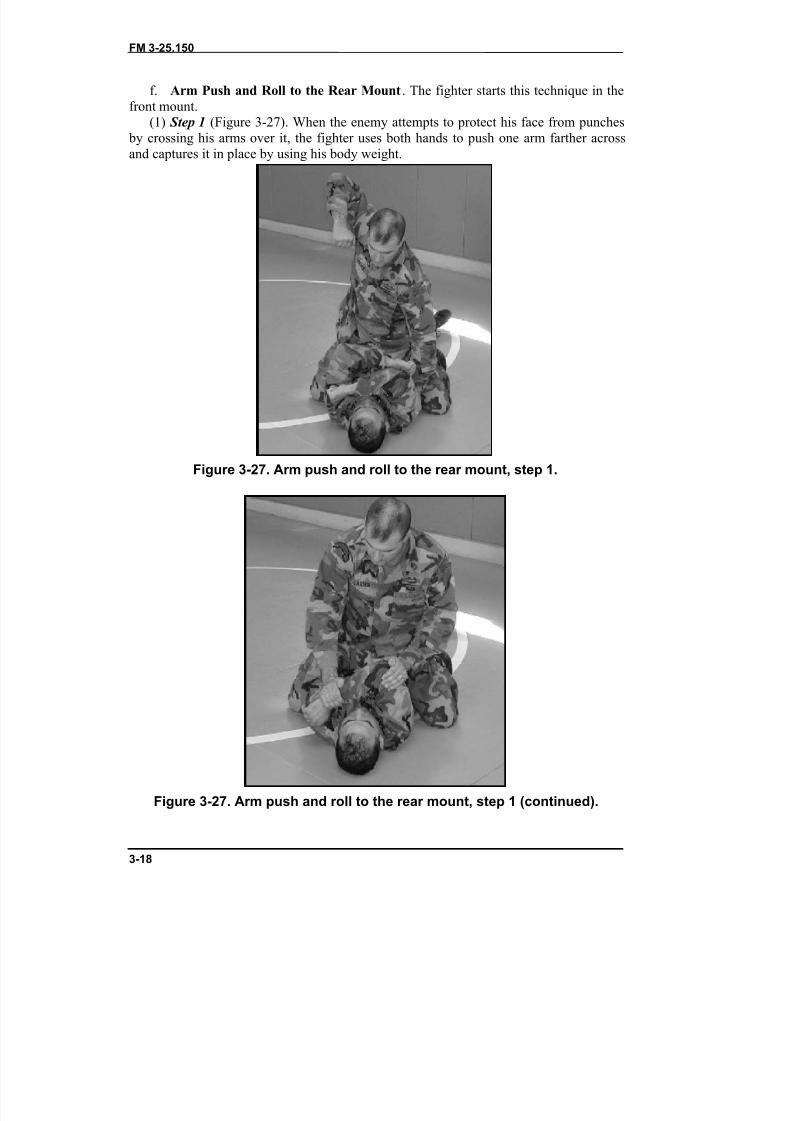
f. Arm Push and Roll to the Rear Mount . The fighter starts this technique in thefront mount.
(1) Step 1 (Figure 3-27). When the enemy attempts to protect his face from punches by crossing his arms over it, the fighter uses both hands to push one arm farther acrossand captures it in place by using his body weight.
Figure 3-27. Arm push and roll to the rear mount, step 1.
Figure 3-27. Arm push and roll to the rear mount, step 1 (continued).
8/9/2019 US ARMY FM 3-25.150 - Combatives (hand-to-hand combat).pdf
http://slidepdf.com/reader/full/us-army-fm-3-25150-combatives-hand-to-hand-combatpdf 46/265
FM 3-25.150
3-19
Figure 3-27. Arm push and roll to the rear mount, step 1 (continued).
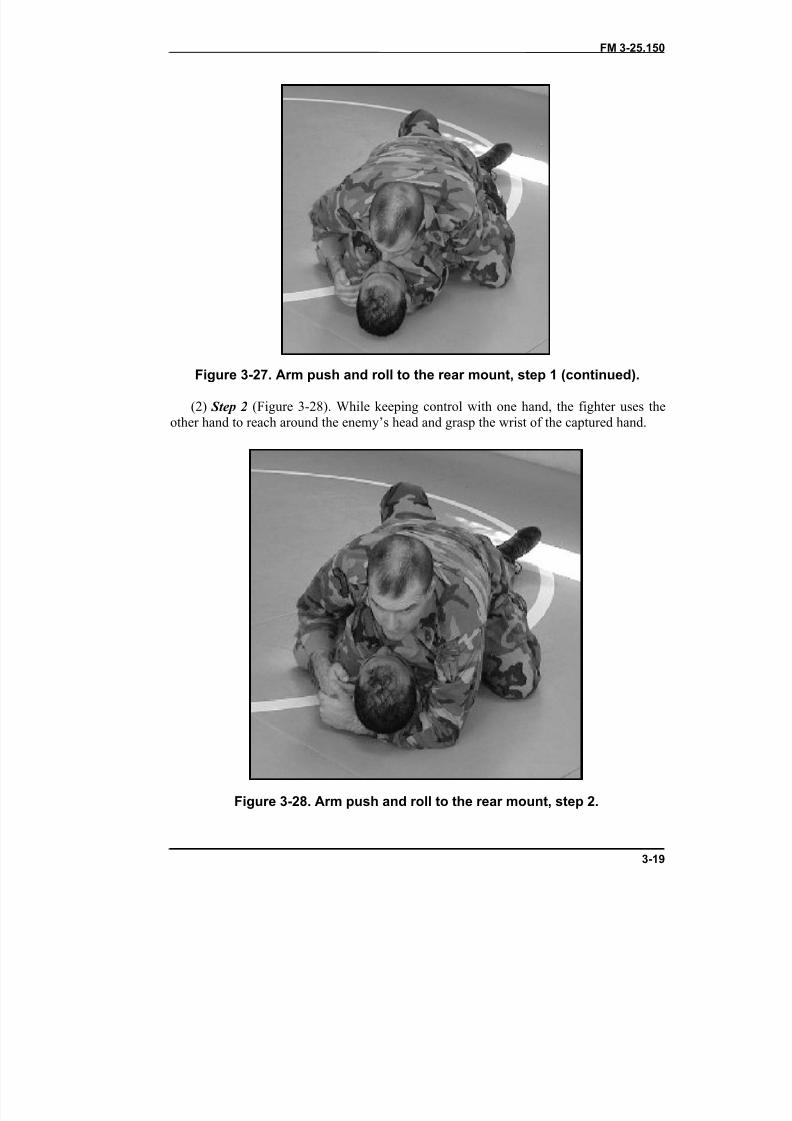
(2) Step 2 (Figure 3-28). While keeping control with one hand, the fighter uses theother hand to reach around the enemy’s head and grasp the wrist of the captured hand.
Figure 3-28. Arm push and roll to the rear mount, step 2.
8/9/2019 US ARMY FM 3-25.150 - Combatives (hand-to-hand combat).pdf
http://slidepdf.com/reader/full/us-army-fm-3-25150-combatives-hand-to-hand-combatpdf 47/265
FM 3-25.150
3-20
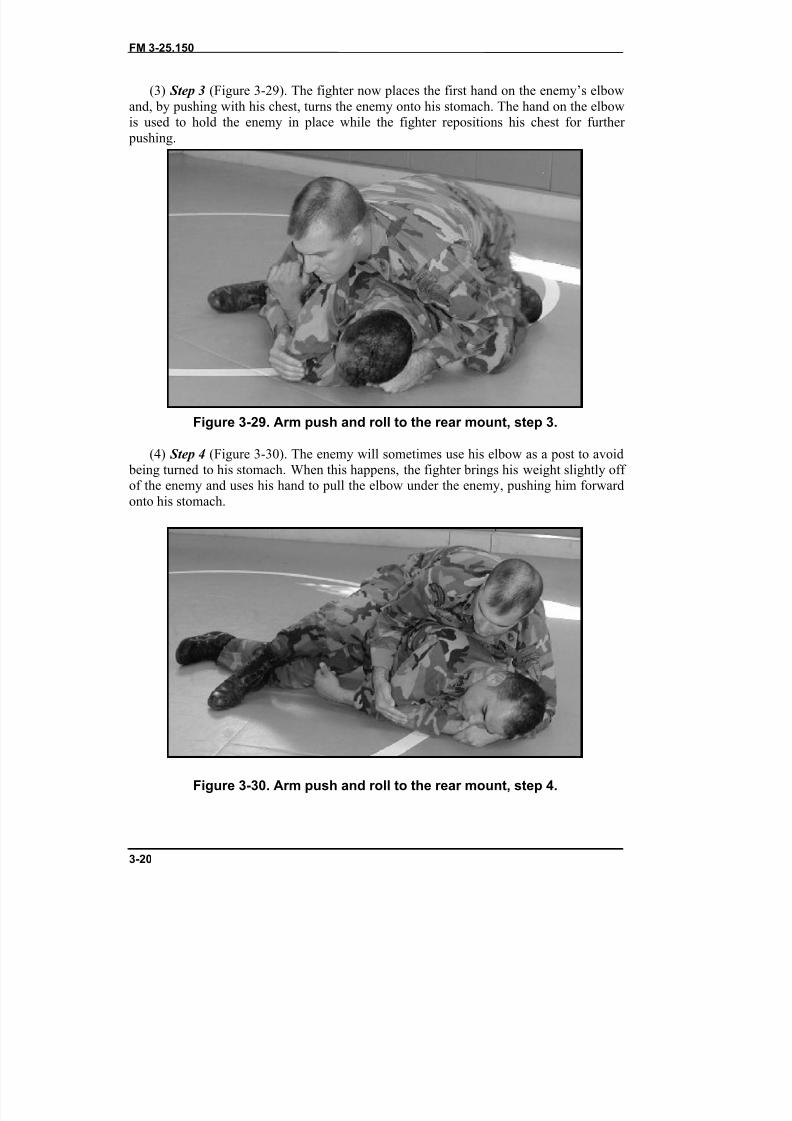
(3) Step 3 (Figure 3-29). The fighter now places the first hand on the enemy’s elbowand, by pushing with his chest, turns the enemy onto his stomach. The hand on the elbowis used to hold the enemy in place while the fighter repositions his chest for further
pushing.
Figure 3-29. Arm push and roll to the rear mount, step 3.
(4) Step 4 (Figure 3-30). The enemy will sometimes use his elbow as a post to avoid being turned to his stomach. When this happens, the fighter brings his weight slightly off of the enemy and uses his hand to pull the elbow under the enemy, pushing him forwardonto his stomach.
Figure 3-30. Arm push and roll to the rear mount, step 4.
8/9/2019 US ARMY FM 3-25.150 - Combatives (hand-to-hand combat).pdf
http://slidepdf.com/reader/full/us-army-fm-3-25150-combatives-hand-to-hand-combatpdf 48/265
FM 3-25.150
3-21
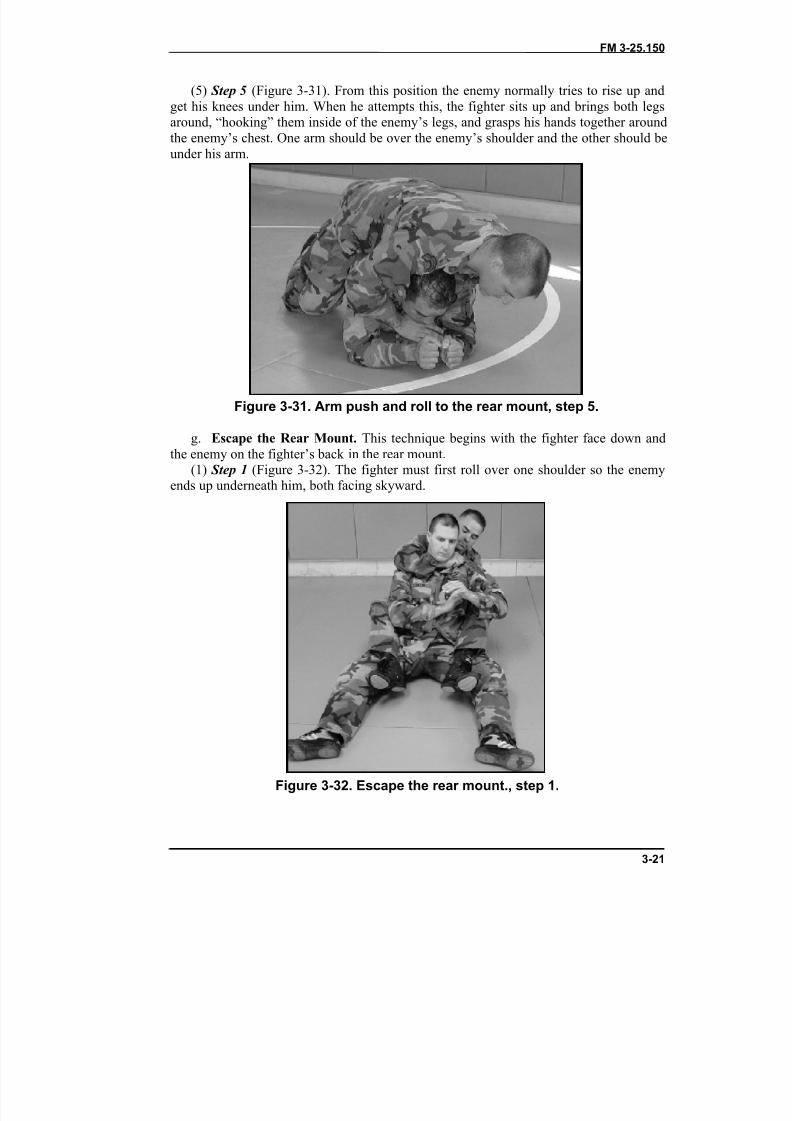
(5) Step 5 (Figure 3-31). From this position the enemy normally tries to rise up andget his knees under him. When he attempts this, the fighter sits up and brings both legsaround, “hooking” them inside of the enemy’s legs, and grasps his hands together aroundthe enemy’s chest. One arm should be over the enemy’s shoulder and the other should beunder his arm.
Figure 3-31. Arm push and roll to the rear mount, step 5.
g. Escape the Rear Mount. This technique begins with the fighter face down andthe enemy on the fighter’s back in the rear mount.
(1) Step 1 (Figure 3-32). The fighter must first roll over one shoulder so the enemyends up underneath him, both facing skyward.
Figure 3-32. Escape the rear mount., step 1.

8/9/2019 US ARMY FM 3-25.150 - Combatives (hand-to-hand combat).pdf
http://slidepdf.com/reader/full/us-army-fm-3-25150-combatives-hand-to-hand-combatpdf 49/265
FM 3-25.150
3-22
(2) Step 2 (Figure 3-33). He now places one arm beside his own ear as shown and theother across his body in his armpit. This will prevent the enemy from securing a choke.
Figure 3-33. Escape the rear mount. step 2.
(3) Step 3 (Figure 3-34). Falling toward the side of his own raised arm, the fighter pushes himself toward his own shoulders using the ground to “scrape “ the enemy off his back.
Figure 3-34. Escape the rear mount, step 3.
8/9/2019 US ARMY FM 3-25.150 - Combatives (hand-to-hand combat).pdf
http://slidepdf.com/reader/full/us-army-fm-3-25150-combatives-hand-to-hand-combatpdf 50/265
FM 3-25.150
3-23
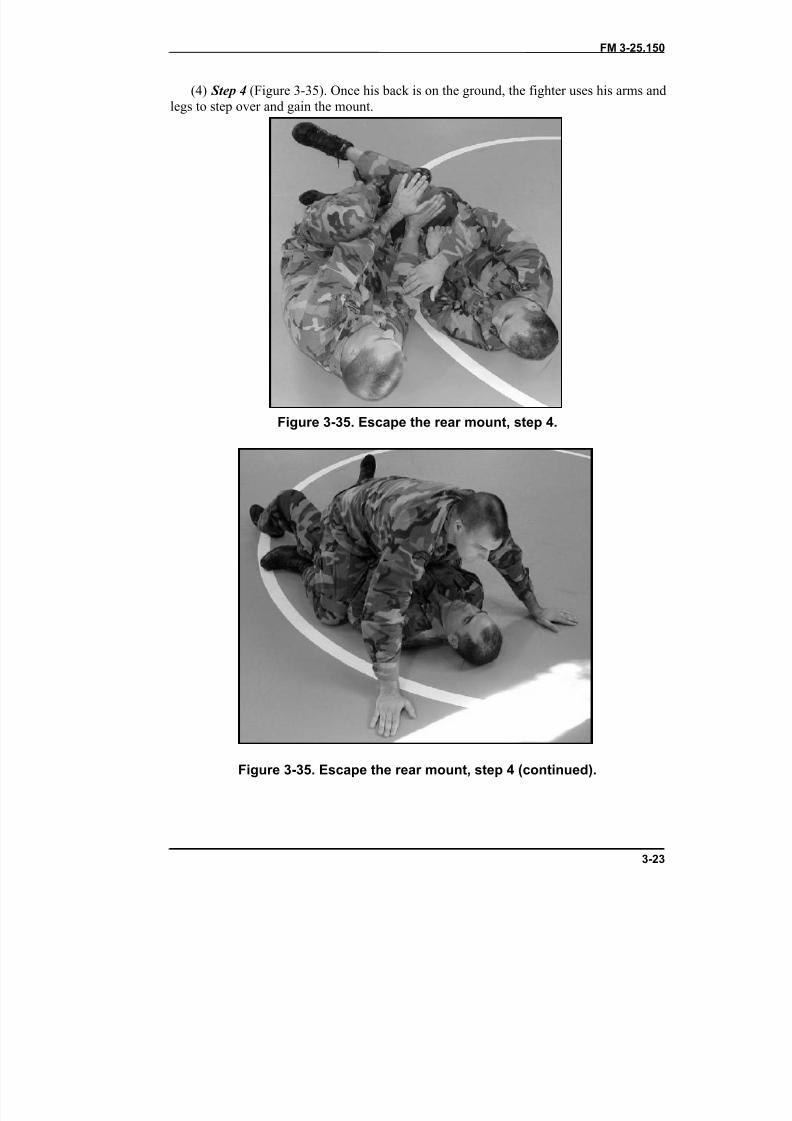
(4) Step 4 (Figure 3-35). Once his back is on the ground, the fighter uses his arms andlegs to step over and gain the mount.
Figure 3-35. Escape the rear mount, step 4.
Figure 3-35. Escape the rear mount, step 4 (continued).
8/9/2019 US ARMY FM 3-25.150 - Combatives (hand-to-hand combat).pdf
http://slidepdf.com/reader/full/us-army-fm-3-25150-combatives-hand-to-hand-combatpdf 51/265

8/9/2019 US ARMY FM 3-25.150 - Combatives (hand-to-hand combat).pdf
http://slidepdf.com/reader/full/us-army-fm-3-25150-combatives-hand-to-hand-combatpdf 52/265
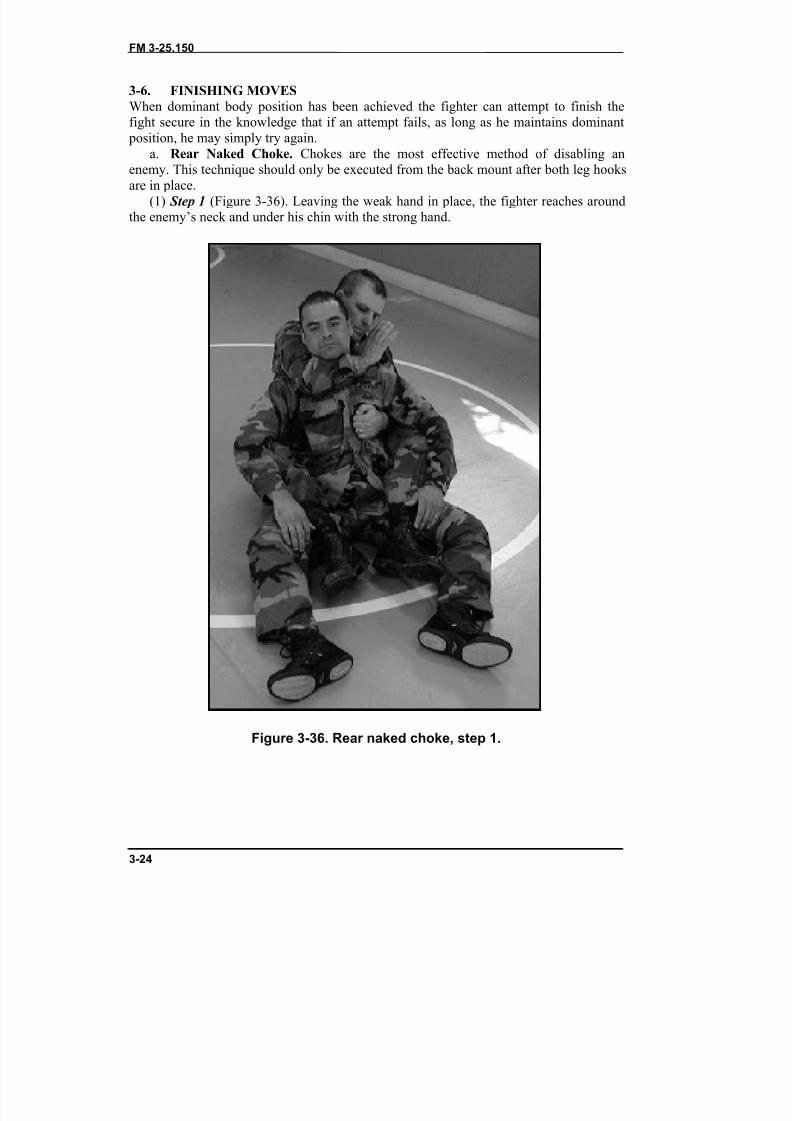
FM 3-25.150
3-25
(2) Step 2 (Figure 3-37). The fighter now places the biceps of the weak hand under the strong hand, moves the weak hand to the back of the enemy’s head, and completes thechoke by expanding his chest.
Figure 3-37. Rear naked choke, step 2.
8/9/2019 US ARMY FM 3-25.150 - Combatives (hand-to-hand combat).pdf
http://slidepdf.com/reader/full/us-army-fm-3-25150-combatives-hand-to-hand-combatpdf 53/265
FM 3-25.150
3-26
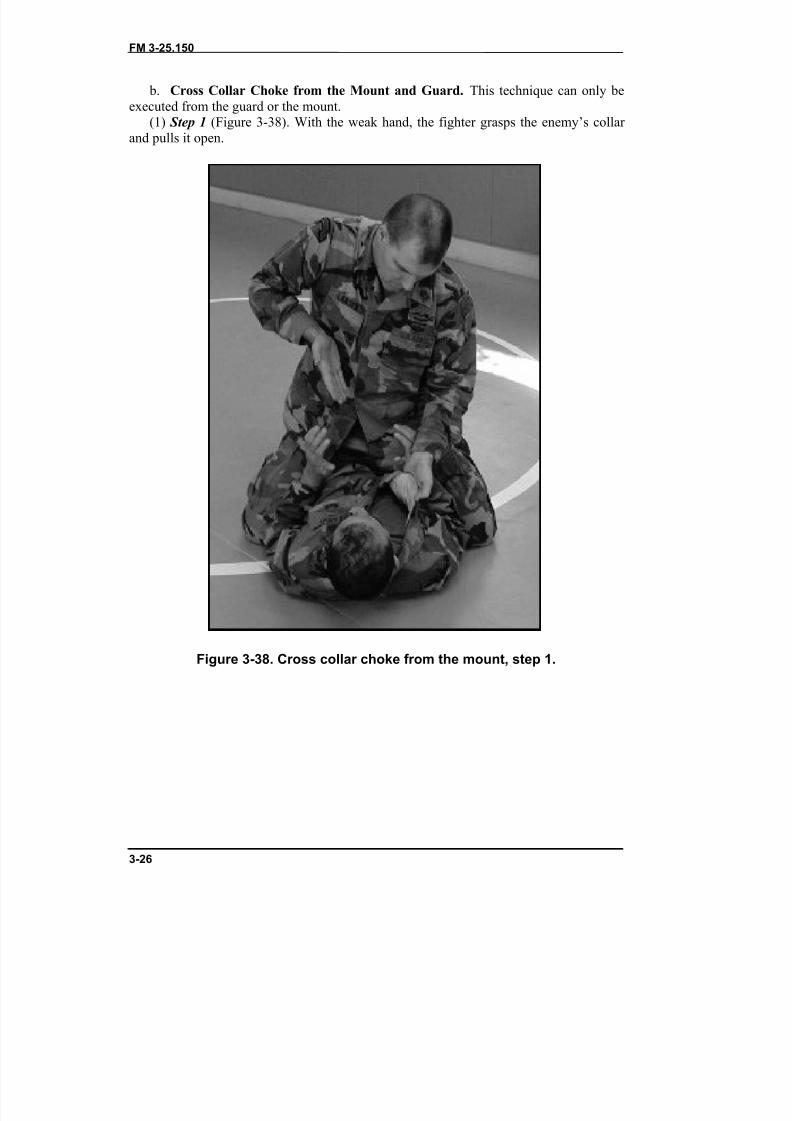
b. Cross Collar Choke from the Mount and Guard. This technique can only beexecuted from the guard or the mount.
(1) Step 1 (Figure 3-38). With the weak hand, the fighter grasps the enemy’s collar and pulls it open.
Figure 3-38. Cross collar choke from the mount, step 1.
8/9/2019 US ARMY FM 3-25.150 - Combatives (hand-to-hand combat).pdf
http://slidepdf.com/reader/full/us-army-fm-3-25150-combatives-hand-to-hand-combatpdf 54/265
FM 3-25.150
3-27
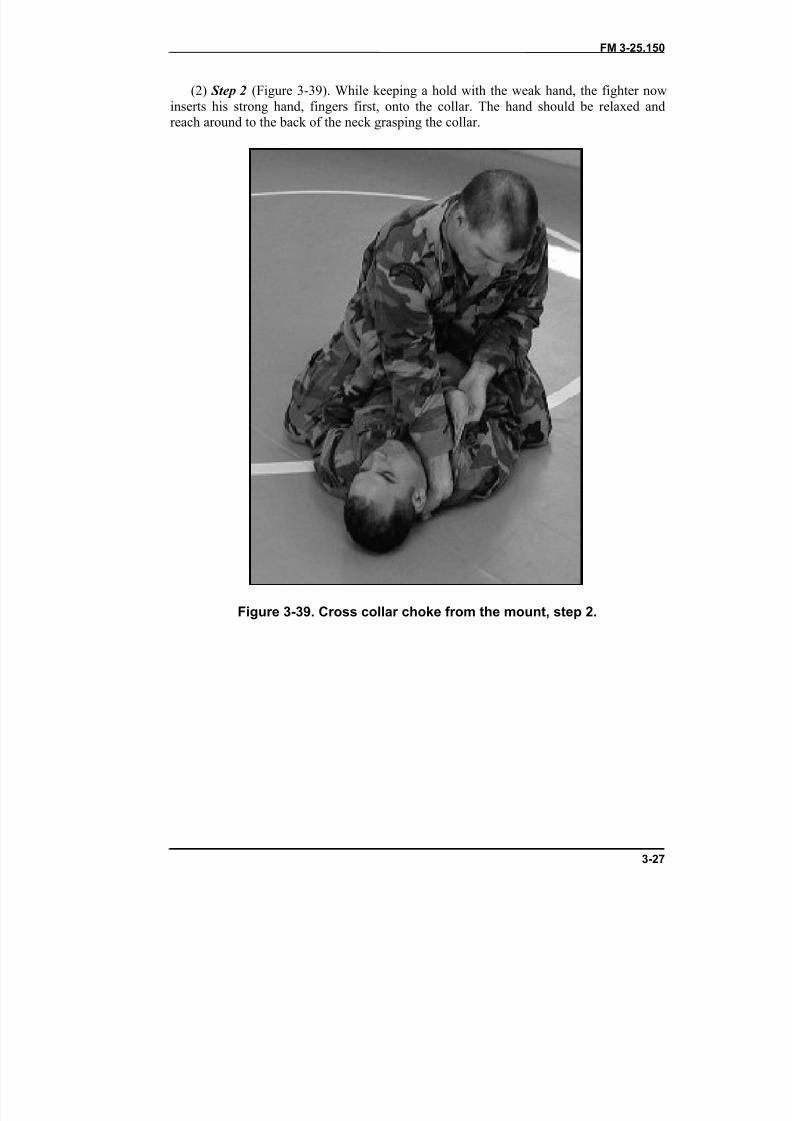
(2) Step 2 (Figure 3-39). While keeping a hold with the weak hand, the fighter nowinserts his strong hand, fingers first, onto the collar. The hand should be relaxed andreach around to the back of the neck grasping the collar.
Figure 3-39. Cross collar choke from the mount, step 2.
8/9/2019 US ARMY FM 3-25.150 - Combatives (hand-to-hand combat).pdf
http://slidepdf.com/reader/full/us-army-fm-3-25150-combatives-hand-to-hand-combatpdf 55/265
FM 3-25.150
3-28
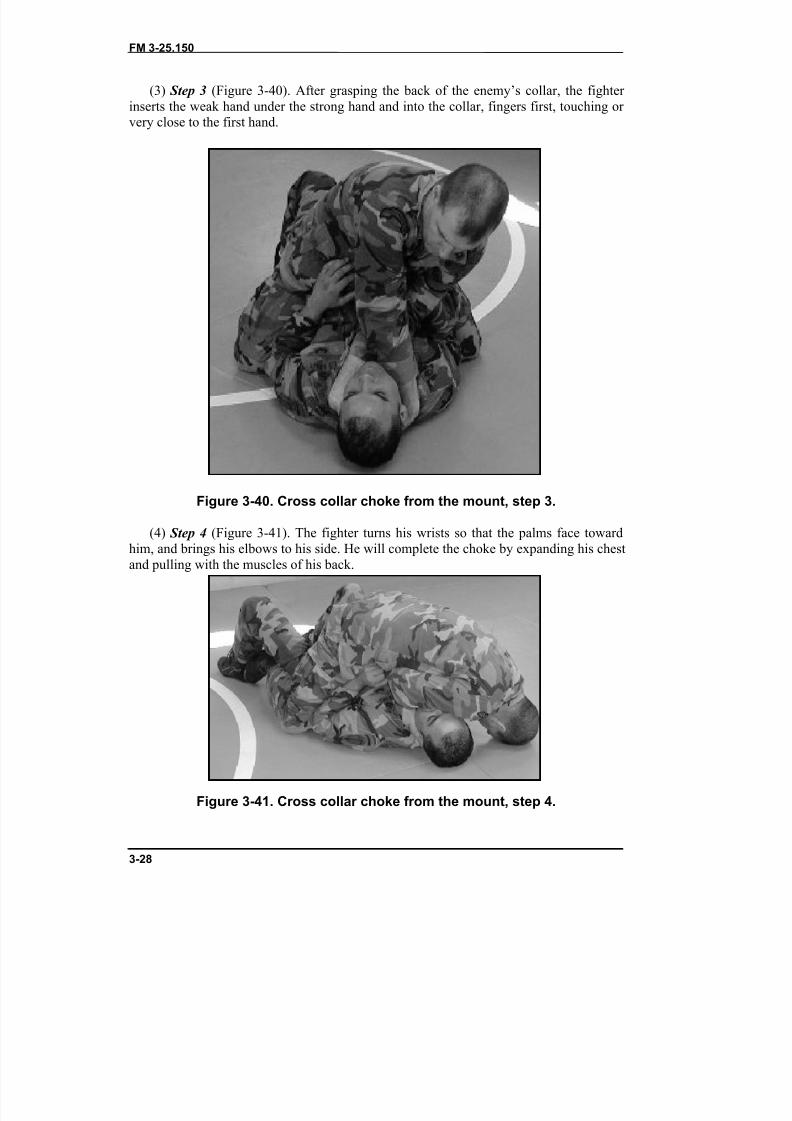
(3) Step 3 (Figure 3-40). After grasping the back of the enemy’s collar, the fighter inserts the weak hand under the strong hand and into the collar, fingers first, touching or very close to the first hand.
Figure 3-40. Cross collar choke from the mount, step 3.
(4) Step 4 (Figure 3-41). The fighter turns his wrists so that the palms face towardhim, and brings his elbows to his side. He will complete the choke by expanding his chestand pulling with the muscles of his back.
Figure 3-41. Cross collar choke from the mount, step 4.
8/9/2019 US ARMY FM 3-25.150 - Combatives (hand-to-hand combat).pdf
http://slidepdf.com/reader/full/us-army-fm-3-25150-combatives-hand-to-hand-combatpdf 56/265
FM 3-25.150
3-29
Note: If the fighter is applying this choke from the mount, he should put his head on theground on the side of the top hand and relax into the choke.
c. Front Guillotine Choke. Many times this technique may be used as a counter tothe double leg takedown.
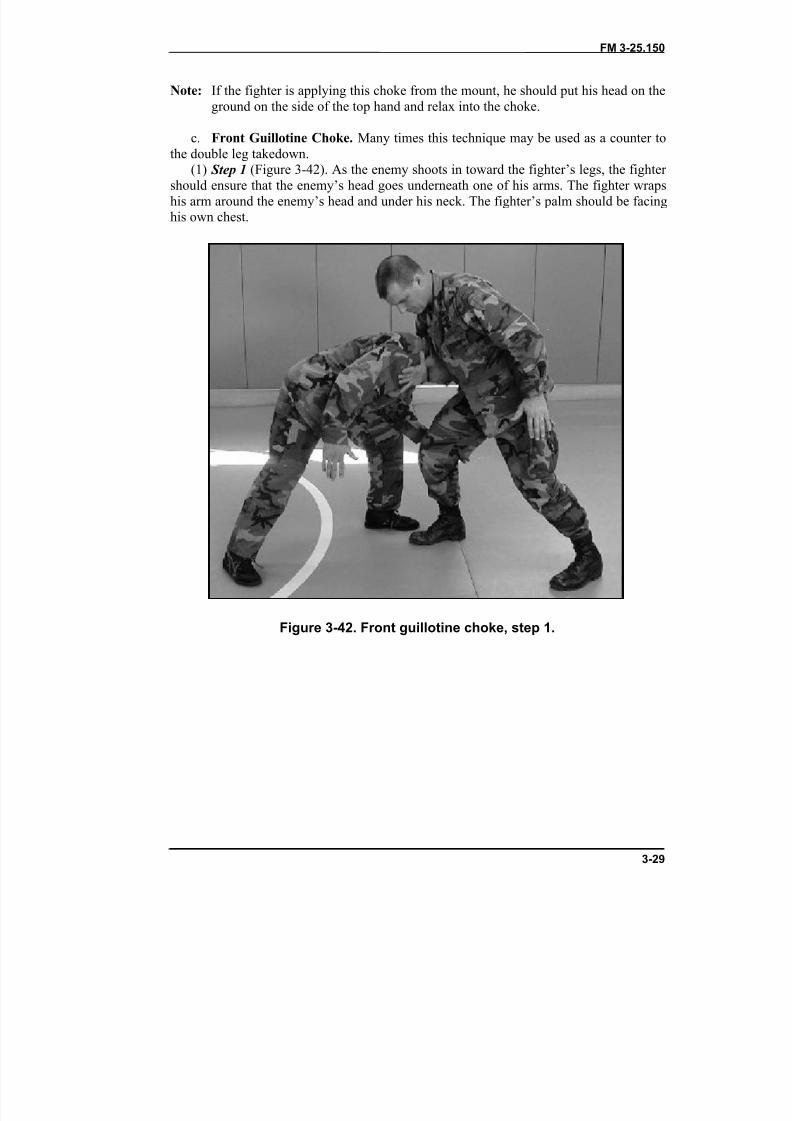
(1) Step 1 (Figure 3-42). As the enemy shoots in toward the fighter’s legs, the fighter should ensure that the enemy’s head goes underneath one of his arms. The fighter wrapshis arm around the enemy’s head and under his neck. The fighter’s palm should be facinghis own chest.
Figure 3-42. Front guillotine choke, step 1.
8/9/2019 US ARMY FM 3-25.150 - Combatives (hand-to-hand combat).pdf
http://slidepdf.com/reader/full/us-army-fm-3-25150-combatives-hand-to-hand-combatpdf 57/265
FM 3-25.150
3-30
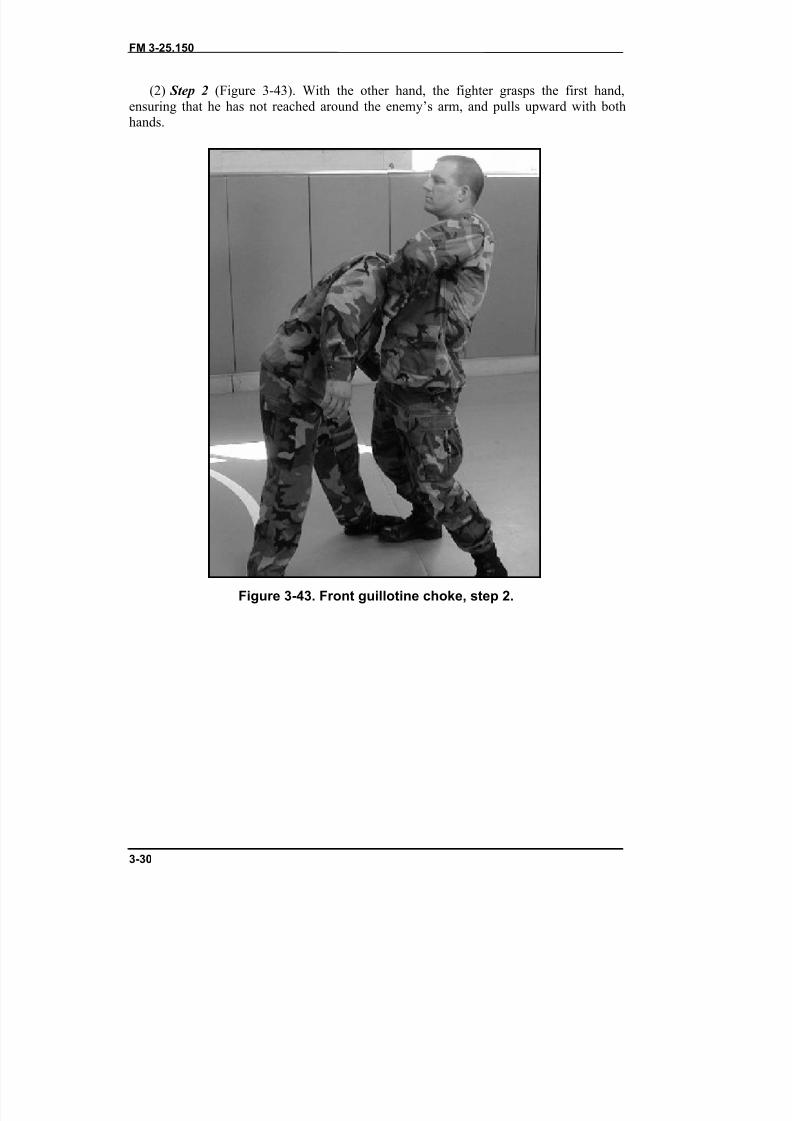
(2) Step 2 (Figure 3-43). With the other hand, the fighter grasps the first hand,ensuring that he has not reached around the enemy’s arm, and pulls upward with bothhands.
Figure 3-43. Front guillotine choke, step 2.
8/9/2019 US ARMY FM 3-25.150 - Combatives (hand-to-hand combat).pdf
http://slidepdf.com/reader/full/us-army-fm-3-25150-combatives-hand-to-hand-combatpdf 58/265
FM 3-25.150
3-31
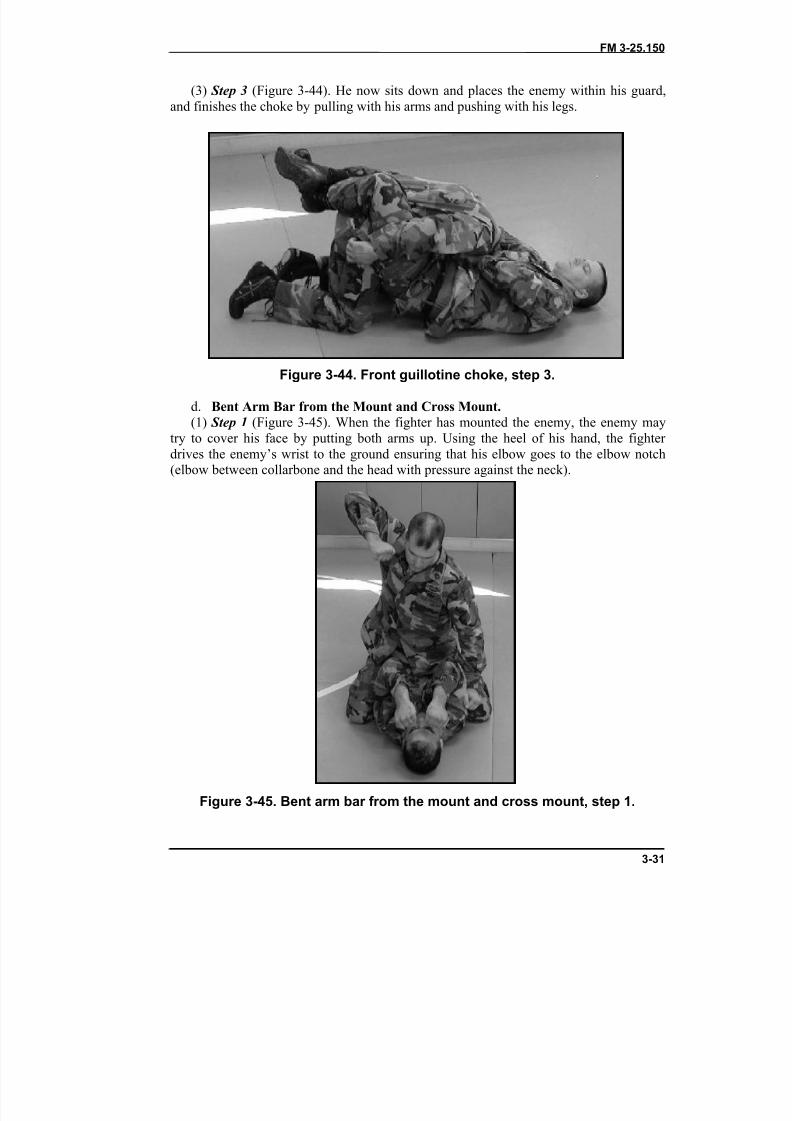
(3) Step 3 (Figure 3-44). He now sits down and places the enemy within his guard,and finishes the choke by pulling with his arms and pushing with his legs.
Figure 3-44. Front guillotine choke, step 3.
d. Bent Arm Bar from the Mount and Cross Mount.(1) Step 1 (Figure 3-45). When the fighter has mounted the enemy, the enemy may
try to cover his face by putting both arms up. Using the heel of his hand, the fighter drives the enemy’s wrist to the ground ensuring that his elbow goes to the elbow notch(elbow between collarbone and the head with pressure against the neck).
Figure 3-45. Bent arm bar from the mount and cross mount, step 1.

8/9/2019 US ARMY FM 3-25.150 - Combatives (hand-to-hand combat).pdf
http://slidepdf.com/reader/full/us-army-fm-3-25150-combatives-hand-to-hand-combatpdf 59/265
FM 3-25.150
3-32
Figure 3-45. Bent arm bar from the mount and cross mount, step 1(continued).
(2) Step 2 (Figure 3-46). With the other hand, the fighter reaches under the enemy’s bent arm and grasps his own wrist.
Figure 3-46. Bent arm bar from the mount and cross mount, step 2.
8/9/2019 US ARMY FM 3-25.150 - Combatives (hand-to-hand combat).pdf
http://slidepdf.com/reader/full/us-army-fm-3-25150-combatives-hand-to-hand-combatpdf 60/265
FM 3-25.150
3-33
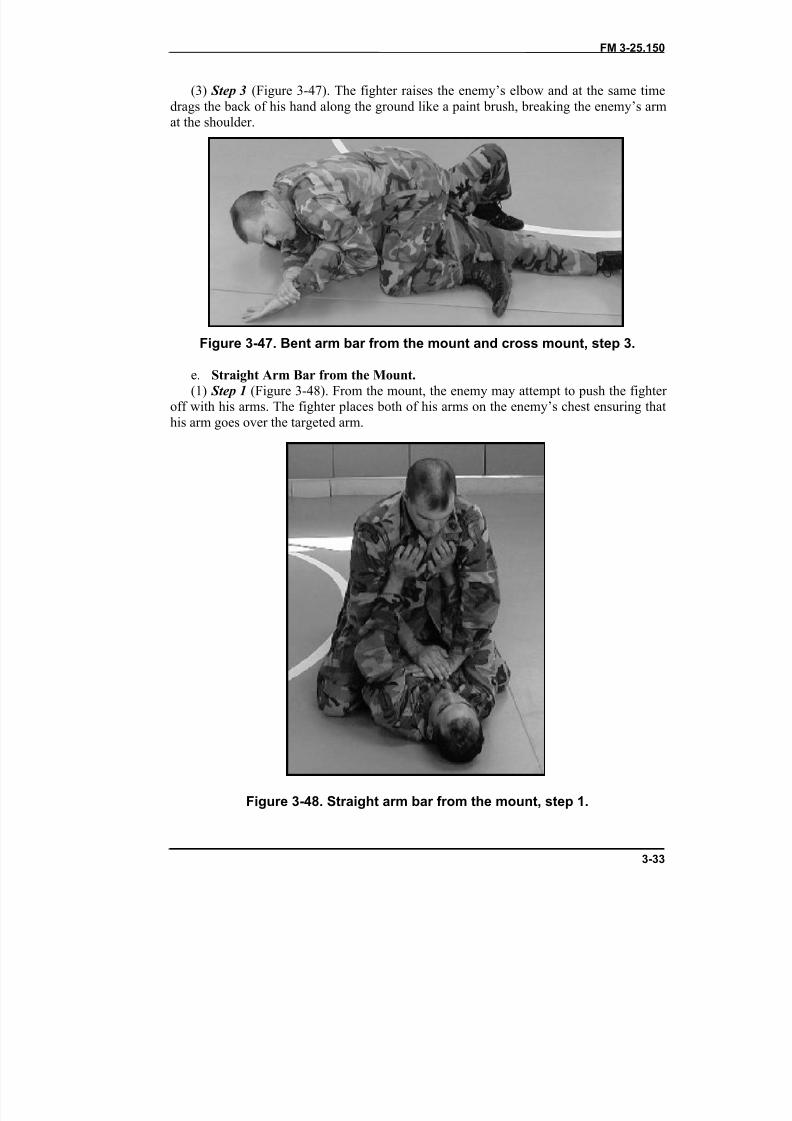
(3) Step 3 (Figure 3-47). The fighter raises the enemy’s elbow and at the same timedrags the back of his hand along the ground like a paint brush, breaking the enemy’s armat the shoulder.
Figure 3-47. Bent arm bar from the mount and cross mount, step 3.e. Straight Arm Bar from the Mount.(1) Step 1 (Figure 3-48). From the mount, the enemy may attempt to push the fighter
off with his arms. The fighter places both of his arms on the enemy’s chest ensuring thathis arm goes over the targeted arm.
Figure 3-48. Straight arm bar from the mount, step 1.
8/9/2019 US ARMY FM 3-25.150 - Combatives (hand-to-hand combat).pdf
http://slidepdf.com/reader/full/us-army-fm-3-25150-combatives-hand-to-hand-combatpdf 61/265
FM 3-25.150
3-34
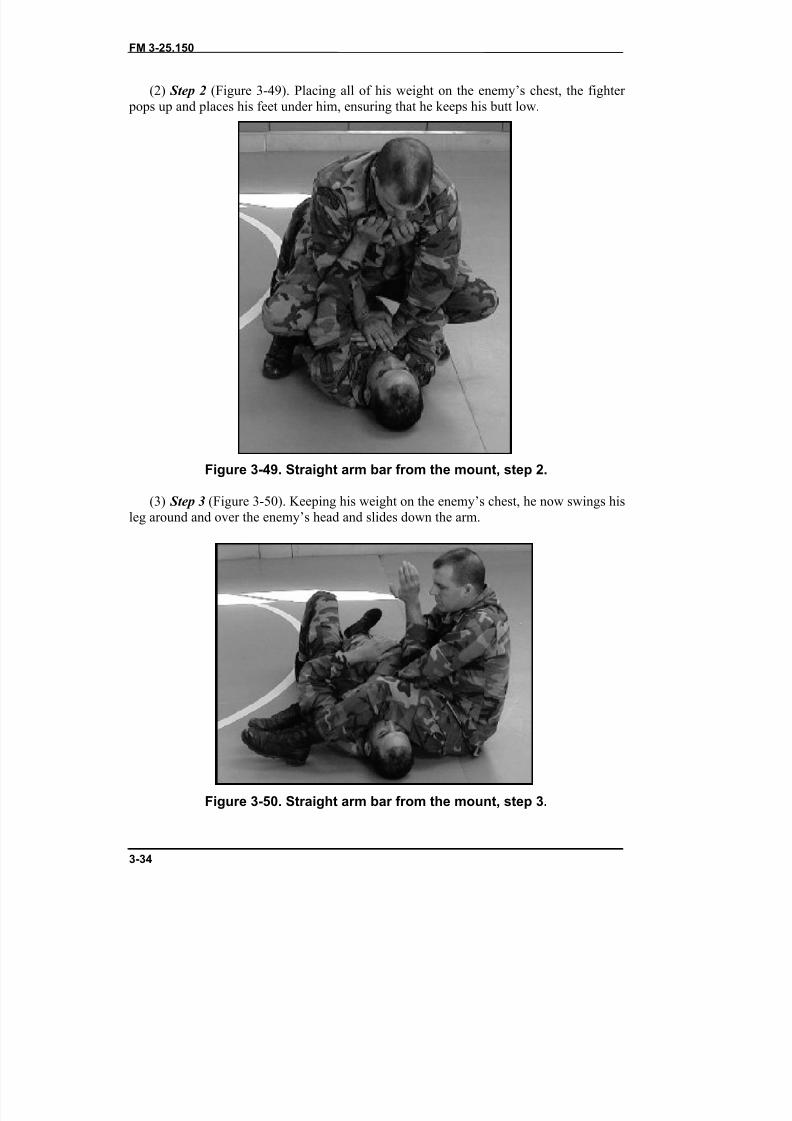
(2) Step 2 (Figure 3-49). Placing all of his weight on the enemy’s chest, the fighter pops up and places his feet under him, ensuring that he keeps his butt low.
Figure 3-49. Straight arm bar from the mount, step 2.
(3) Step 3 (Figure 3-50). Keeping his weight on the enemy’s chest, he now swings hisleg around and over the enemy’s head and slides down the arm.
Figure 3-50. Straight arm bar from the mount, step 3.
8/9/2019 US ARMY FM 3-25.150 - Combatives (hand-to-hand combat).pdf
http://slidepdf.com/reader/full/us-army-fm-3-25150-combatives-hand-to-hand-combatpdf 62/265
FM 3-25.150
3-35
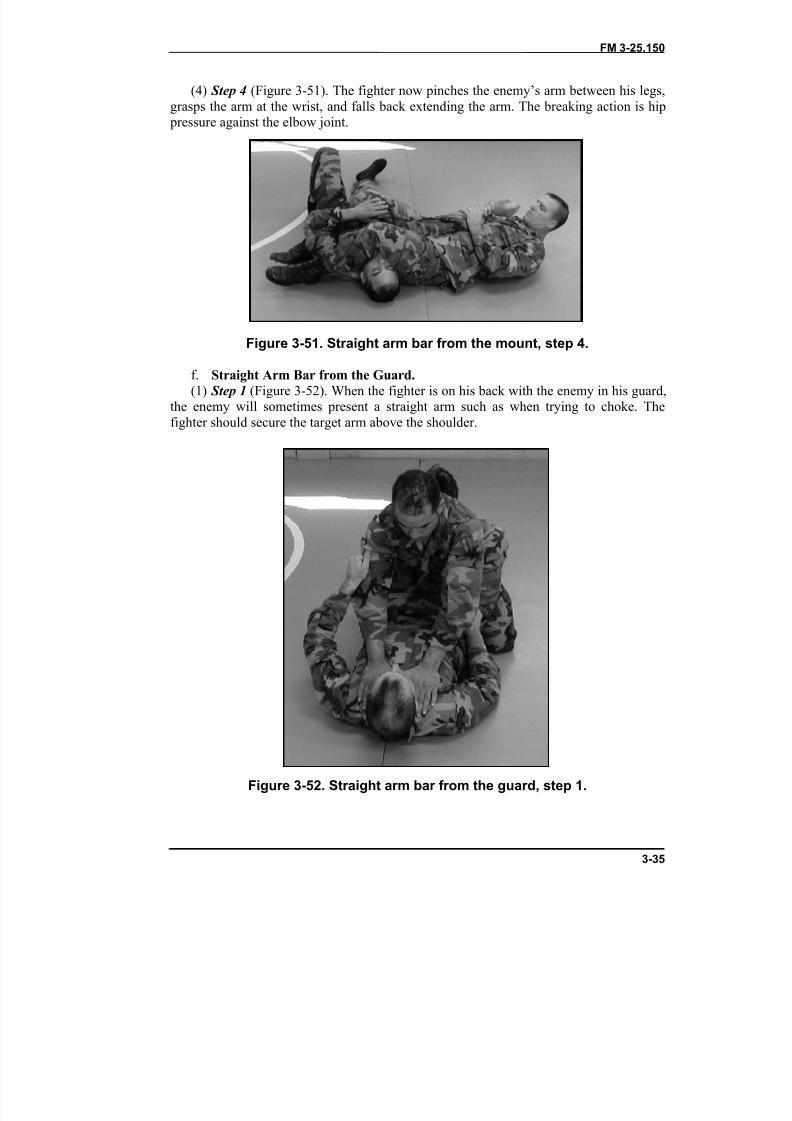
(4) Step 4 (Figure 3-51). The fighter now pinches the enemy’s arm between his legs,grasps the arm at the wrist, and falls back extending the arm. The breaking action is hip
pressure against the elbow joint.
Figure 3-51. Straight arm bar from the mount, step 4.f. Straight Arm Bar from the Guard.(1) Step 1 (Figure 3-52). When the fighter is on his back with the enemy in his guard,
the enemy will sometimes present a straight arm such as when trying to choke. Thefighter should secure the target arm above the shoulder.
Figure 3-52. Straight arm bar from the guard, step 1.
8/9/2019 US ARMY FM 3-25.150 - Combatives (hand-to-hand combat).pdf
http://slidepdf.com/reader/full/us-army-fm-3-25150-combatives-hand-to-hand-combatpdf 63/265
FM 3-25.150
3-36
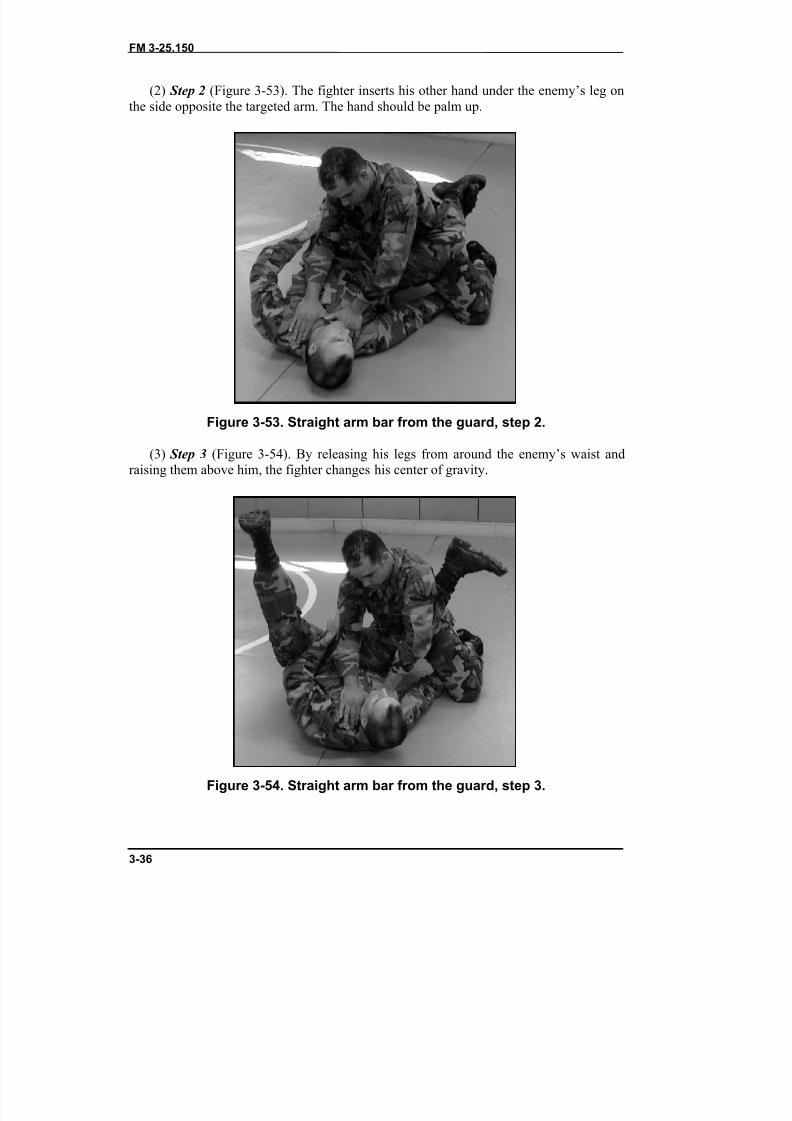
(2) Step 2 (Figure 3-53). The fighter inserts his other hand under the enemy’s leg onthe side opposite the targeted arm. The hand should be palm up.
Figure 3-53. Straight arm bar from the guard, step 2.
(3) Step 3 (Figure 3-54). By releasing his legs from around the enemy’s waist andraising them above him, the fighter changes his center of gravity.
Figure 3-54. Straight arm bar from the guard, step 3.
8/9/2019 US ARMY FM 3-25.150 - Combatives (hand-to-hand combat).pdf
http://slidepdf.com/reader/full/us-army-fm-3-25150-combatives-hand-to-hand-combatpdf 64/265
FM 3-25.150
3-37
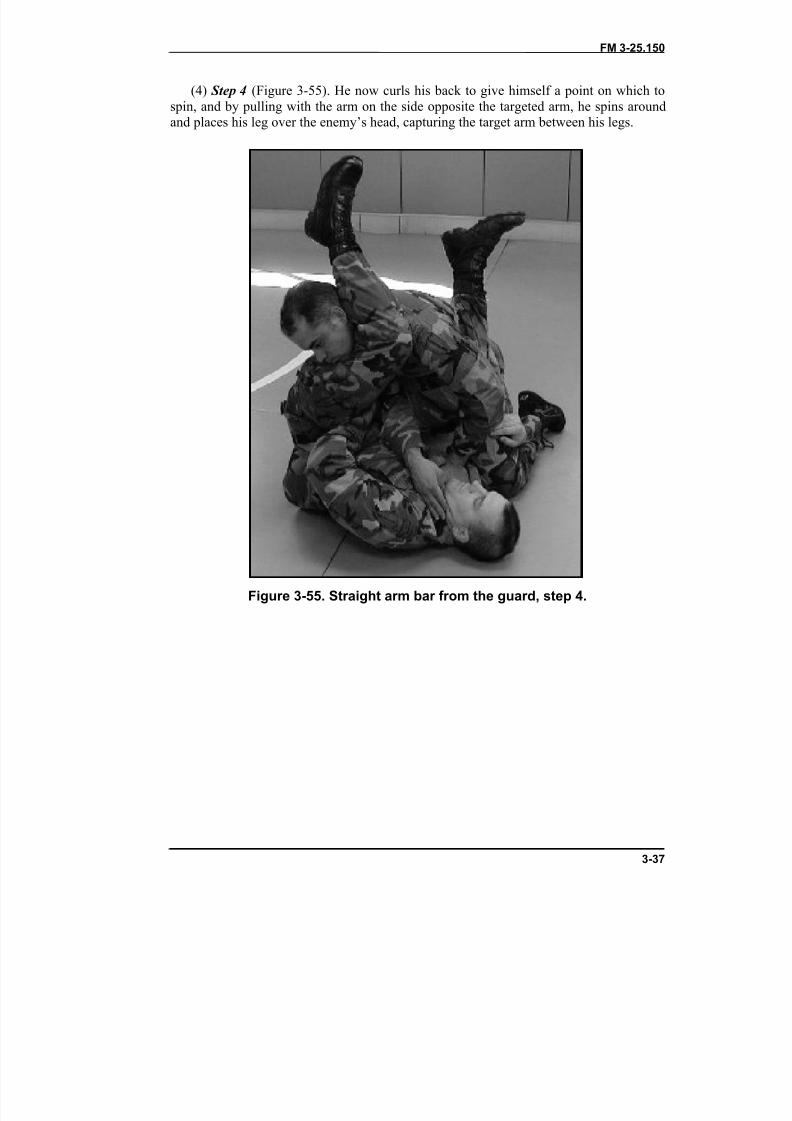
(4) Step 4 (Figure 3-55). He now curls his back to give himself a point on which tospin, and by pulling with the arm on the side opposite the targeted arm, he spins aroundand places his leg over the enemy’s head, capturing the target arm between his legs.
Figure 3-55. Straight arm bar from the guard, step 4.
8/9/2019 US ARMY FM 3-25.150 - Combatives (hand-to-hand combat).pdf
http://slidepdf.com/reader/full/us-army-fm-3-25150-combatives-hand-to-hand-combatpdf 65/265
FM 3-25.150
3-38
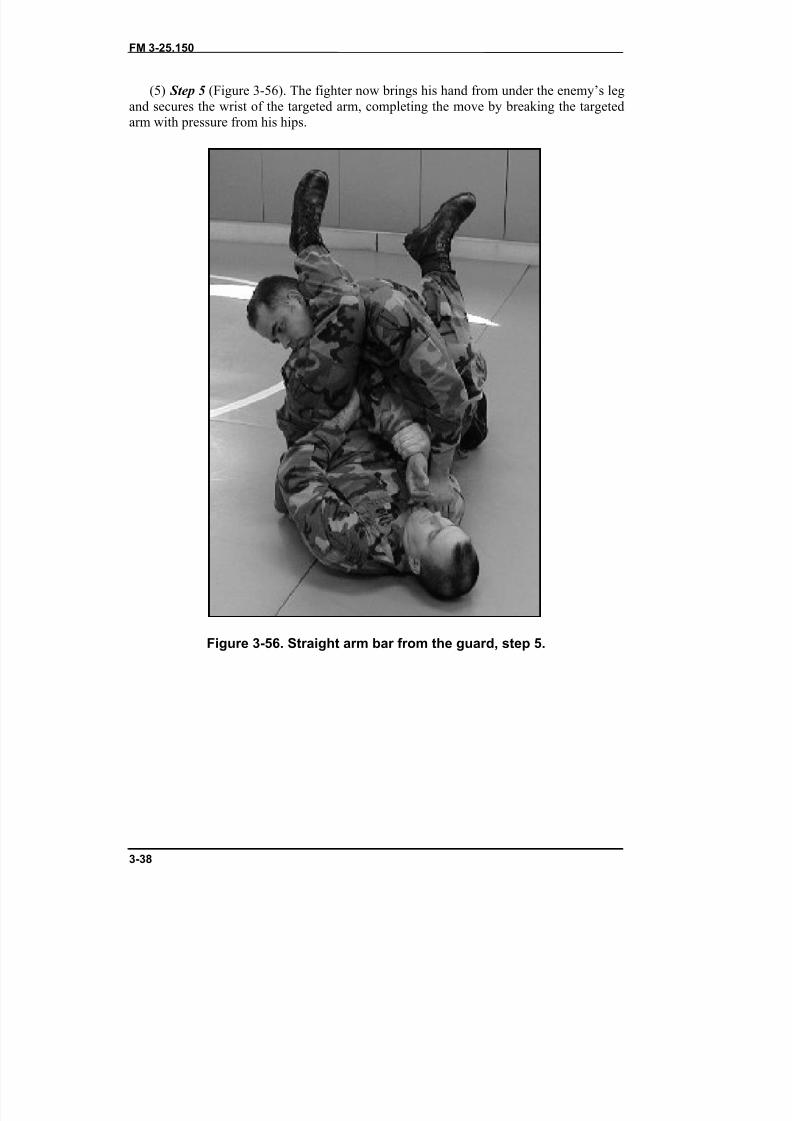
(5) Step 5 (Figure 3-56). The fighter now brings his hand from under the enemy’s legand secures the wrist of the targeted arm, completing the move by breaking the targetedarm with pressure from his hips.
Figure 3-56. Straight arm bar from the guard, step 5.
8/9/2019 US ARMY FM 3-25.150 - Combatives (hand-to-hand combat).pdf
http://slidepdf.com/reader/full/us-army-fm-3-25150-combatives-hand-to-hand-combatpdf 66/265
FM 3-25.150
3-39
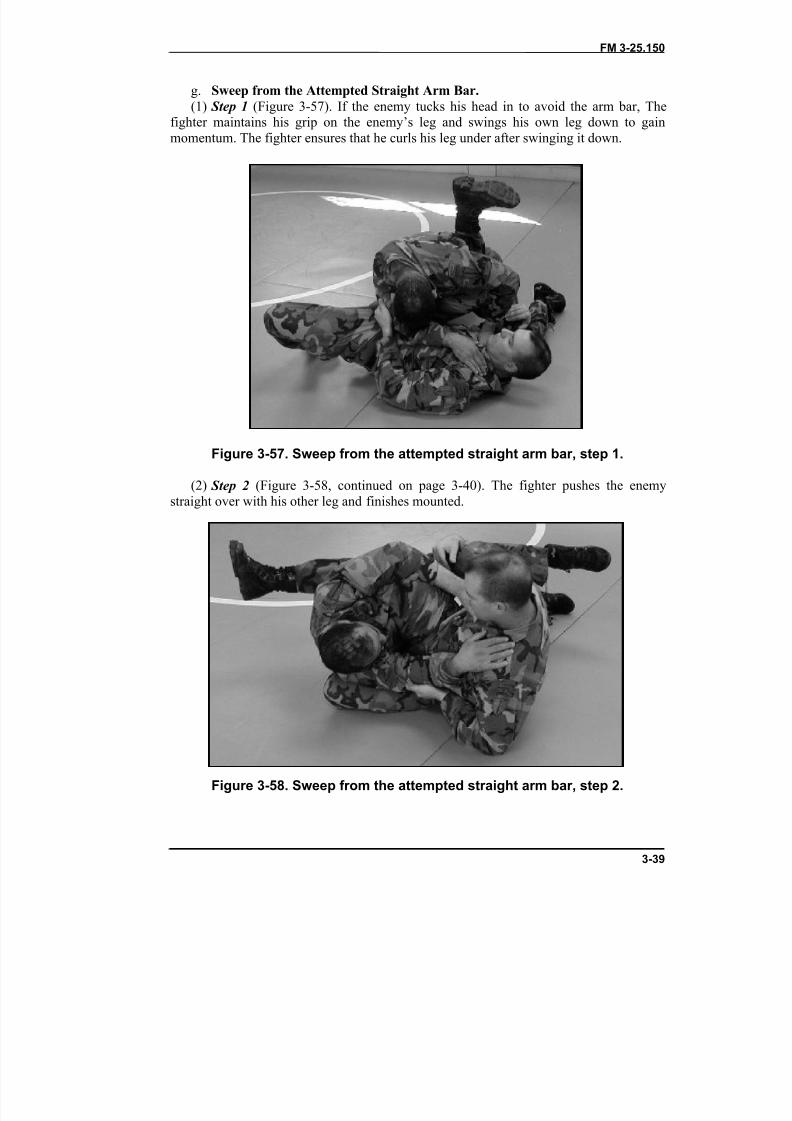
g. Sweep from the Attempted Straight Arm Bar.(1) Step 1 (Figure 3-57). If the enemy tucks his head in to avoid the arm bar, The
fighter maintains his grip on the enemy’s leg and swings his own leg down to gainmomentum. The fighter ensures that he curls his leg under after swinging it down.
Figure 3-57. Sweep from the attempted straight arm bar, step 1.
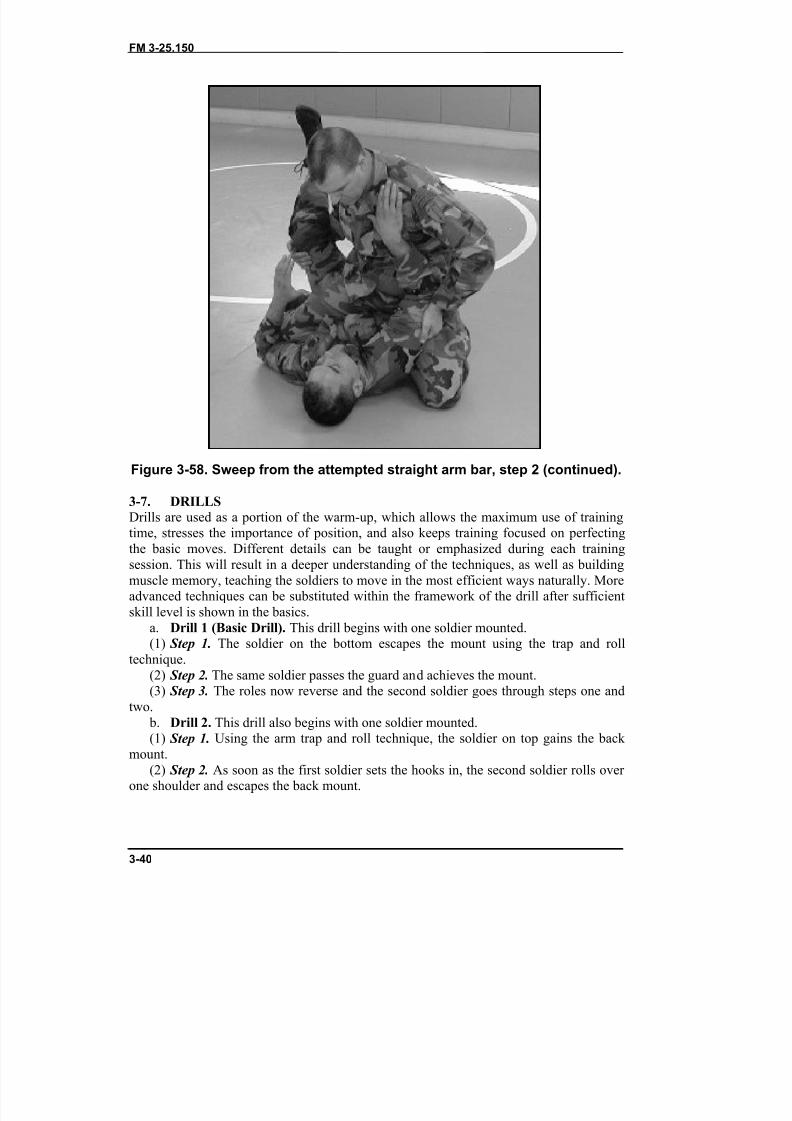
(2) Step 2 (Figure 3-58, continued on page 3-40). The fighter pushes the enemystraight over with his other leg and finishes mounted.
Figure 3-58. Sweep from the attempted straight arm bar, step 2.
8/9/2019 US ARMY FM 3-25.150 - Combatives (hand-to-hand combat).pdf
http://slidepdf.com/reader/full/us-army-fm-3-25150-combatives-hand-to-hand-combatpdf 67/265
FM 3-25.150
3-40
Figure 3-58. Sweep from the attempted straight arm bar, step 2 (continued).
3-7. DRILLSDrills are used as a portion of the warm-up, which allows the maximum use of trainingtime, stresses the importance of position, and also keeps training focused on perfectingthe basic moves. Different details can be taught or emphasized during each trainingsession. This will result in a deeper understanding of the techniques, as well as buildingmuscle memory, teaching the soldiers to move in the most efficient ways naturally. Moreadvanced techniques can be substituted within the framework of the drill after sufficientskill level is shown in the basics.
a. Drill 1 (Basic Drill). This drill begins with one soldier mounted.(1) Step 1. The soldier on the bottom escapes the mount using the trap and roll
technique.(2) Step 2. The same soldier passes the guard and achieves the mount.(3) Step 3. The roles now reverse and the second soldier goes through steps one and
two. b. Drill 2. This drill also begins with one soldier mounted.(1) Step 1. Using the arm trap and roll technique, the soldier on top gains the back
mount.(2) Step 2. As soon as the first soldier sets the hooks in, the second soldier rolls over
one shoulder and escapes the back mount.
8/9/2019 US ARMY FM 3-25.150 - Combatives (hand-to-hand combat).pdf
http://slidepdf.com/reader/full/us-army-fm-3-25150-combatives-hand-to-hand-combatpdf 68/265
FM 3-25.150
3-41
(3) Step 3. When the second soldier is mounted, the roles will reverse, and they willgo back through steps one and two.
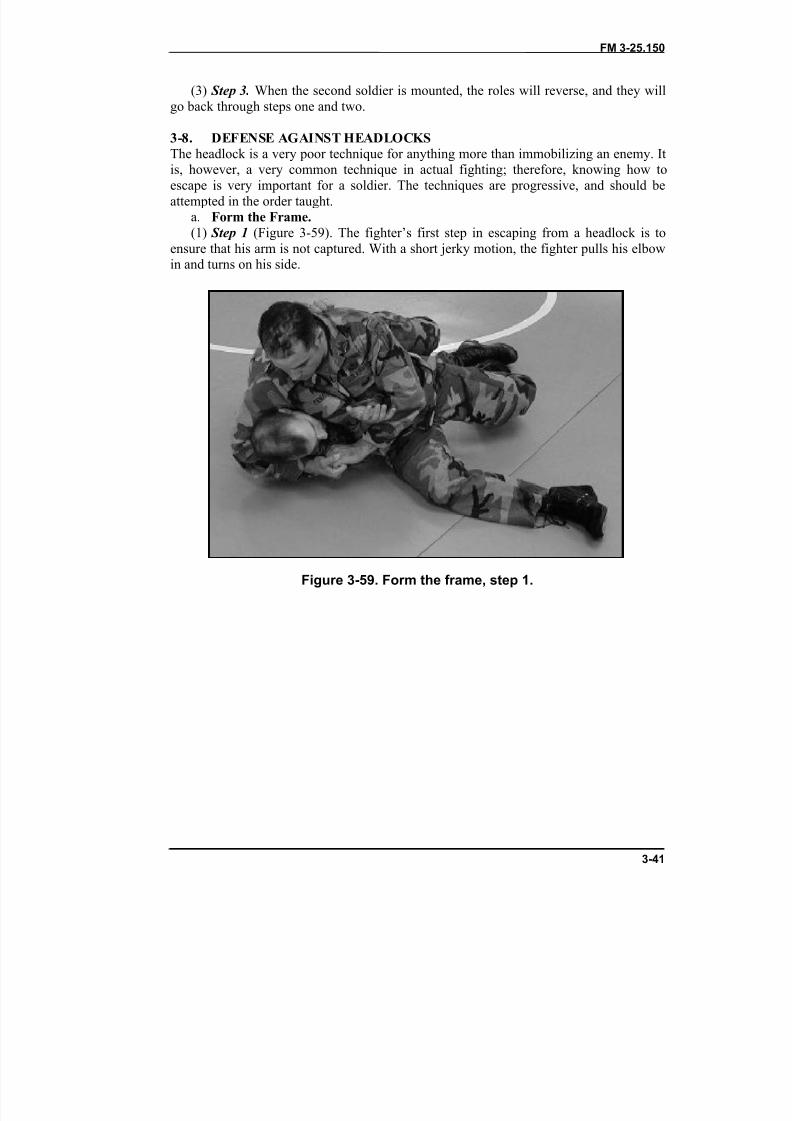
3-8. DEFENSE AGAINST HEADLOCKSThe headlock is a very poor technique for anything more than immobilizing an enemy. It
is, however, a very common technique in actual fighting; therefore, knowing how toescape is very important for a soldier. The techniques are progressive, and should beattempted in the order taught.
a. Form the Frame.(1) Step 1 (Figure 3-59). The fighter’s first step in escaping from a headlock is to
ensure that his arm is not captured. With a short jerky motion, the fighter pulls his elbowin and turns on his side.
Figure 3-59. Form the frame, step 1.
8/9/2019 US ARMY FM 3-25.150 - Combatives (hand-to-hand combat).pdf
http://slidepdf.com/reader/full/us-army-fm-3-25150-combatives-hand-to-hand-combatpdf 69/265
FM 3-25.150
3-42
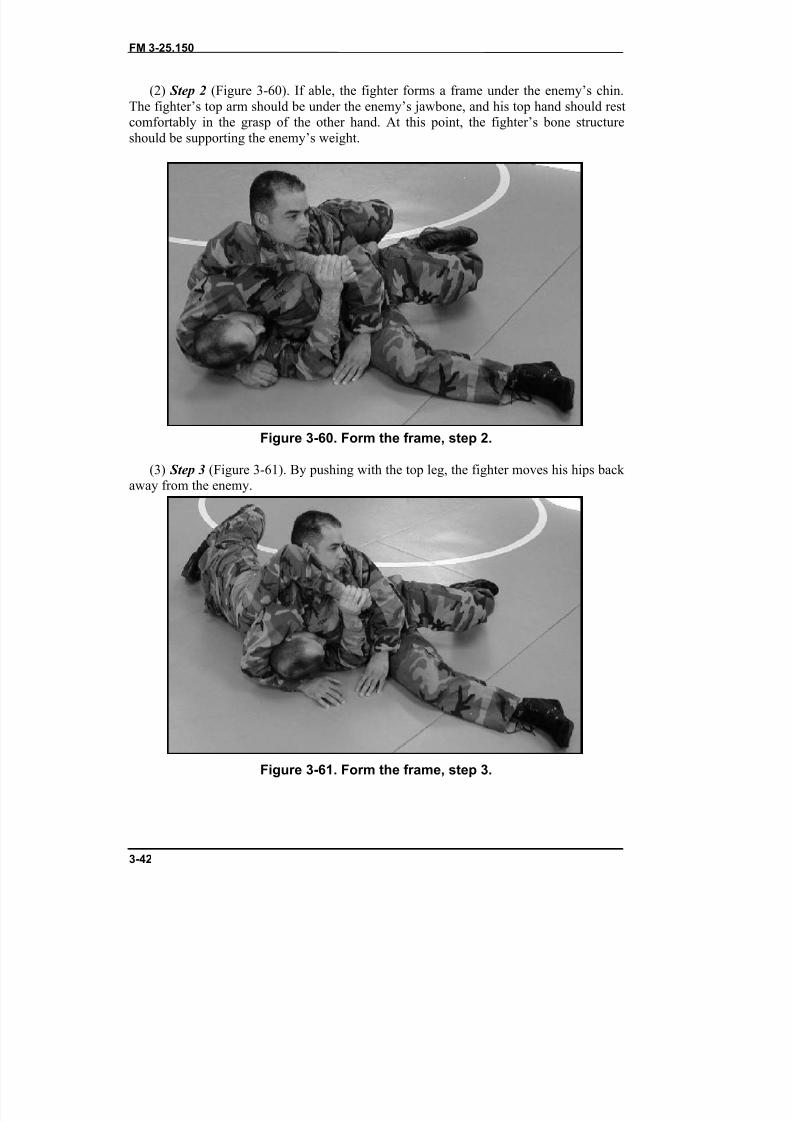
(2) Step 2 (Figure 3-60). If able, the fighter forms a frame under the enemy’s chin.The fighter’s top arm should be under the enemy’s jawbone, and his top hand should restcomfortably in the grasp of the other hand. At this point, the fighter’s bone structureshould be supporting the enemy’s weight.
Figure 3-60. Form the frame, step 2.
(3) Step 3 (Figure 3-61). By pushing with the top leg, the fighter moves his hips back away from the enemy.
Figure 3-61. Form the frame, step 3.
8/9/2019 US ARMY FM 3-25.150 - Combatives (hand-to-hand combat).pdf
http://slidepdf.com/reader/full/us-army-fm-3-25150-combatives-hand-to-hand-combatpdf 70/265
FM 3-25.150
3-43
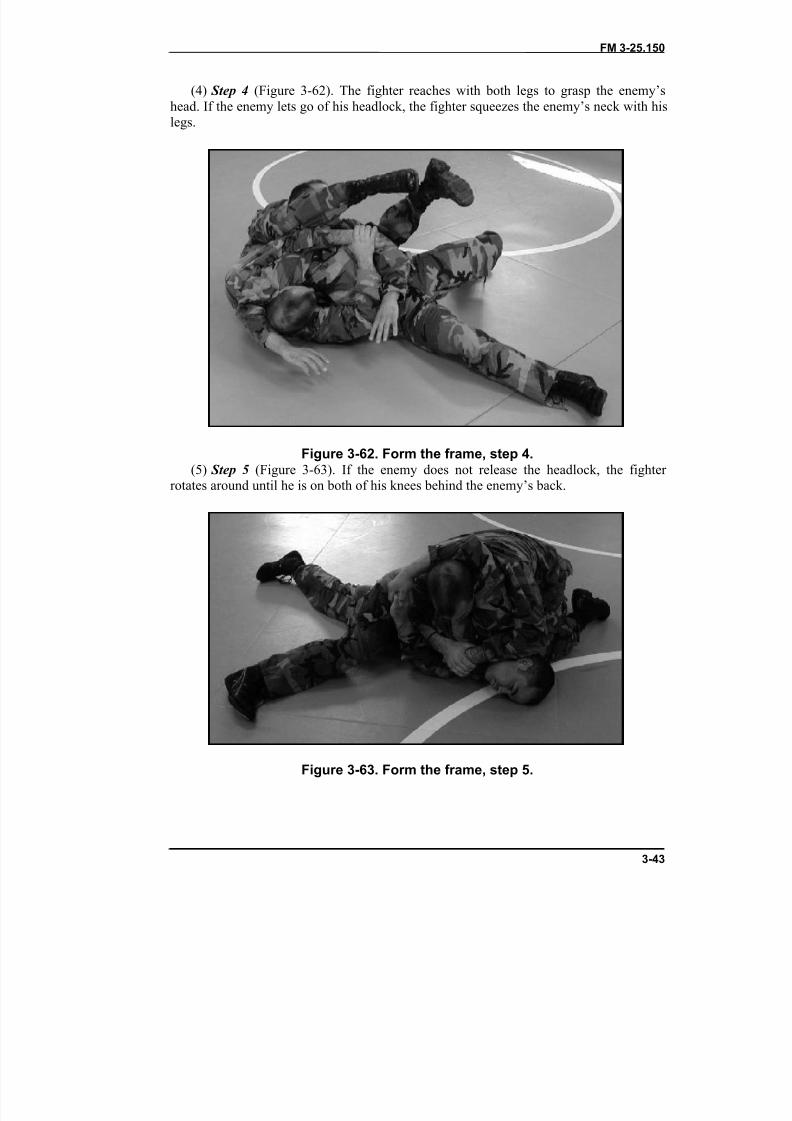
(4) Step 4 (Figure 3-62). The fighter reaches with both legs to grasp the enemy’shead. If the enemy lets go of his headlock, the fighter squeezes the enemy’s neck with hislegs.
Figure 3-62. Form the frame, step 4.(5) Step 5 (Figure 3-63). If the enemy does not release the headlock, the fighter
rotates around until he is on both of his knees behind the enemy’s back.
Figure 3-63. Form the frame, step 5.
8/9/2019 US ARMY FM 3-25.150 - Combatives (hand-to-hand combat).pdf
http://slidepdf.com/reader/full/us-army-fm-3-25150-combatives-hand-to-hand-combatpdf 71/265
FM 3-25.150
3-44
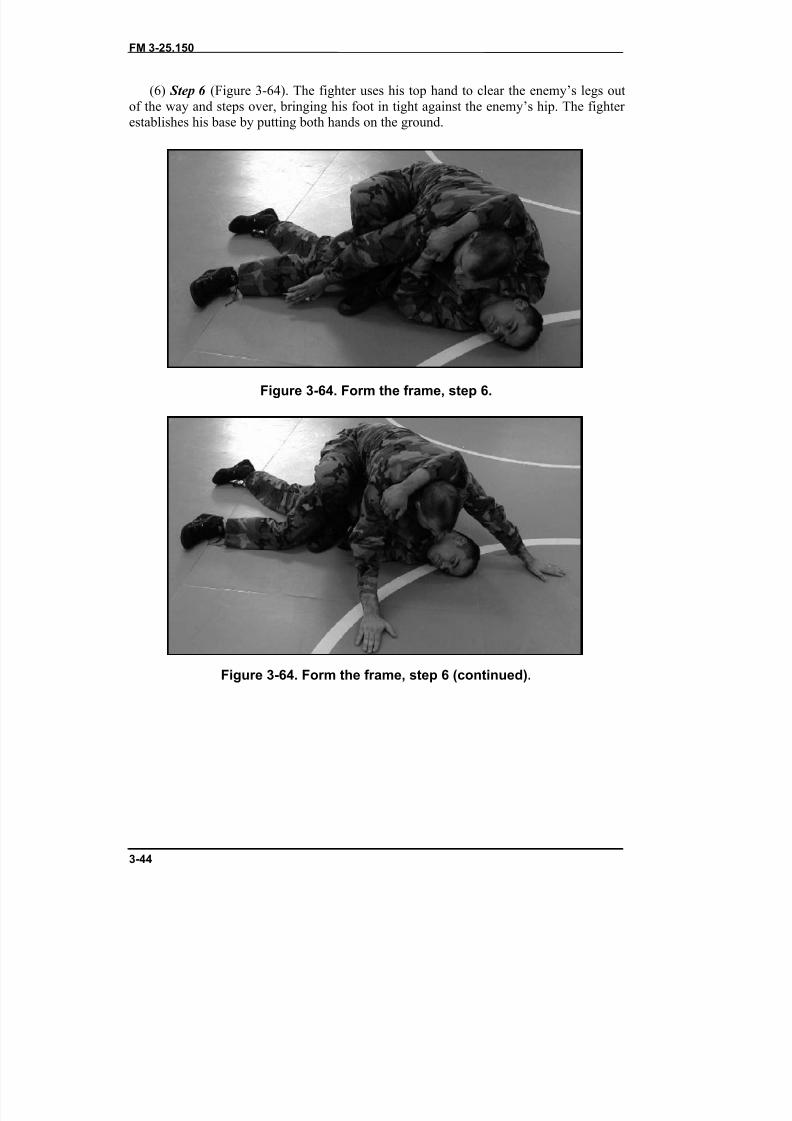
(6) Step 6 (Figure 3-64). The fighter uses his top hand to clear the enemy’s legs outof the way and steps over, bringing his foot in tight against the enemy’s hip. The fighter establishes his base by putting both hands on the ground.
Figure 3-64. Form the frame, step 6.
Figure 3-64. Form the frame, step 6 (continued).
8/9/2019 US ARMY FM 3-25.150 - Combatives (hand-to-hand combat).pdf
http://slidepdf.com/reader/full/us-army-fm-3-25150-combatives-hand-to-hand-combatpdf 72/265
FM 3-25.150
3-45
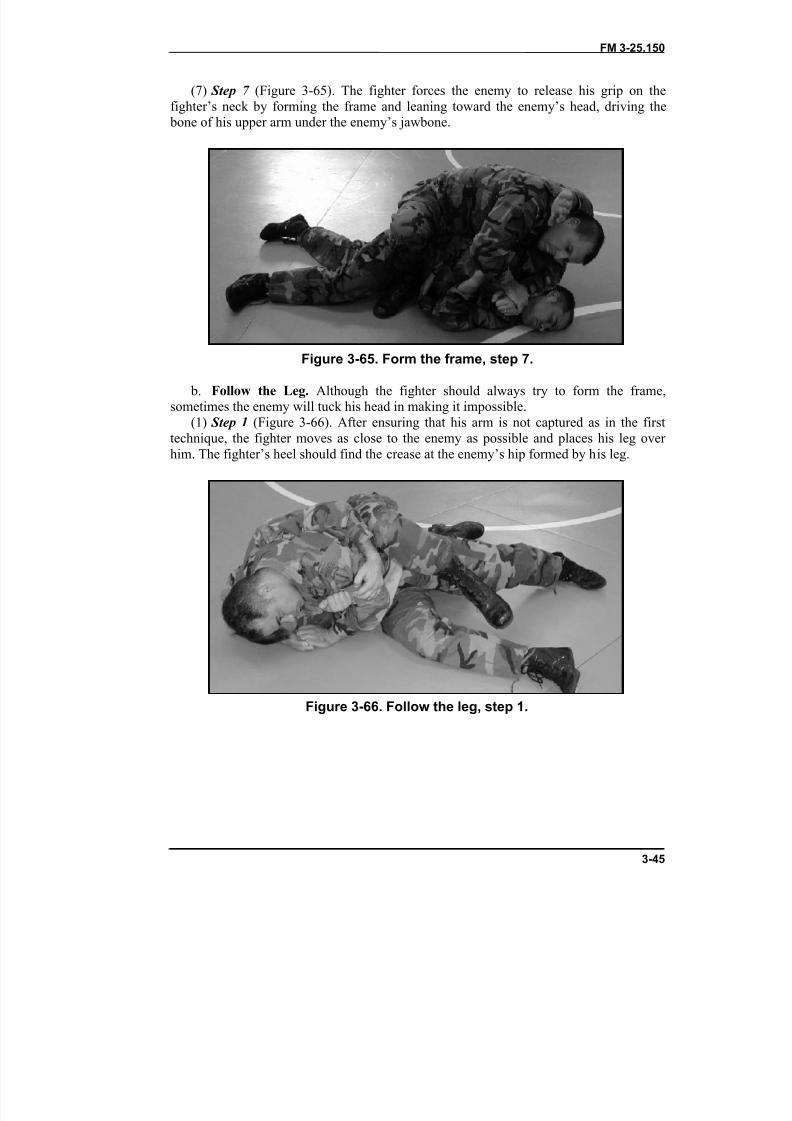
(7) Step 7 (Figure 3-65). The fighter forces the enemy to release his grip on thefighter’s neck by forming the frame and leaning toward the enemy’s head, driving the
bone of his upper arm under the enemy’s jawbone.
Figure 3-65. Form the frame, step 7.
b. Follow the Leg. Although the fighter should always try to form the frame,sometimes the enemy will tuck his head in making it impossible.
(1) Step 1 (Figure 3-66). After ensuring that his arm is not captured as in the firsttechnique, the fighter moves as close to the enemy as possible and places his leg over him. The fighter’s heel should find the crease at the enemy’s hip formed by his leg.
Figure 3-66. Follow the leg, step 1.
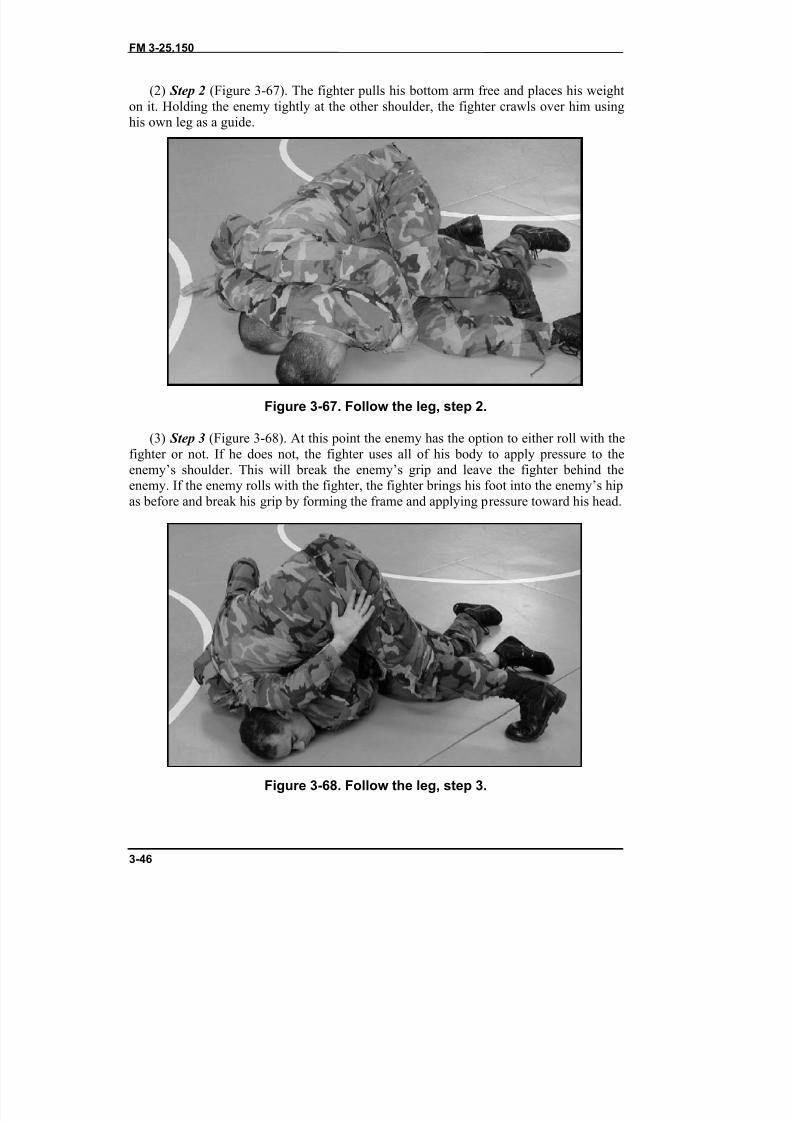
8/9/2019 US ARMY FM 3-25.150 - Combatives (hand-to-hand combat).pdf
http://slidepdf.com/reader/full/us-army-fm-3-25150-combatives-hand-to-hand-combatpdf 73/265
FM 3-25.150
3-46
(2) Step 2 (Figure 3-67). The fighter pulls his bottom arm free and places his weighton it. Holding the enemy tightly at the other shoulder, the fighter crawls over him usinghis own leg as a guide.
Figure 3-67. Follow the leg, step 2.
(3) Step 3 (Figure 3-68). At this point the enemy has the option to either roll with thefighter or not. If he does not, the fighter uses all of his body to apply pressure to theenemy’s shoulder. This will break the enemy’s grip and leave the fighter behind theenemy. If the enemy rolls with the fighter, the fighter brings his foot into the enemy’s hipas before and break his grip by forming the frame and applying pressure toward his head.
Figure 3-68. Follow the leg, step 3.
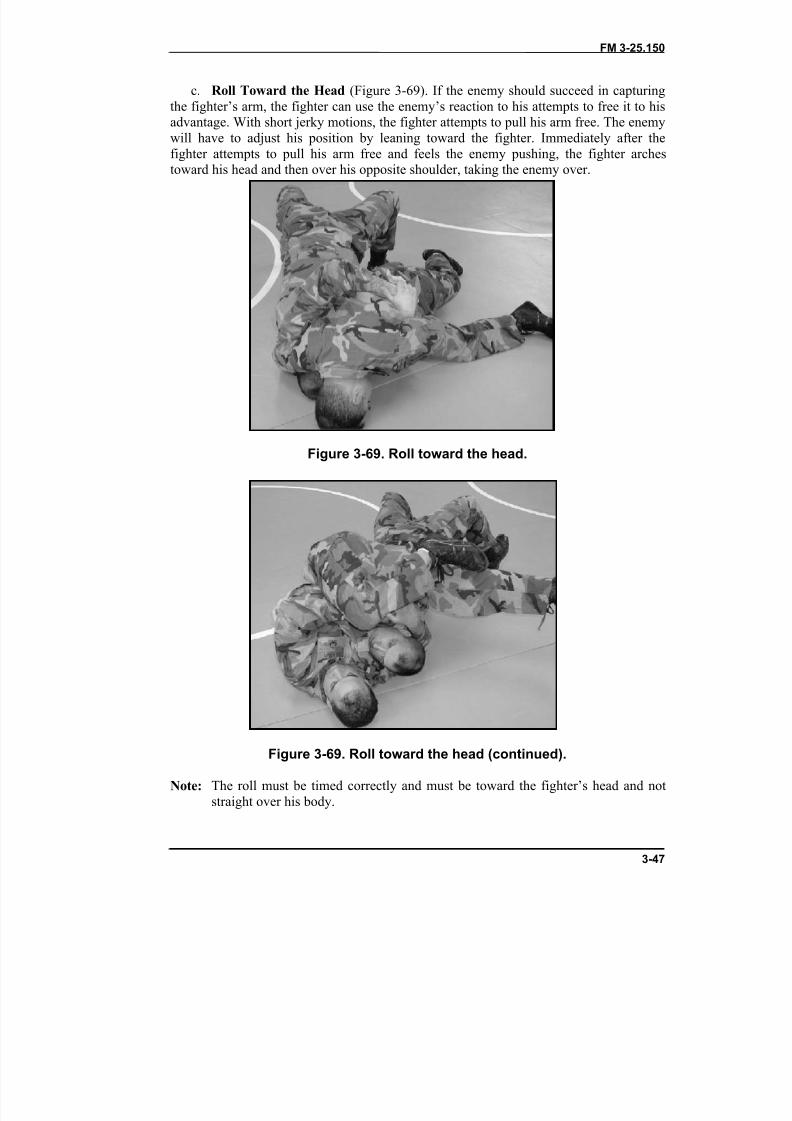
8/9/2019 US ARMY FM 3-25.150 - Combatives (hand-to-hand combat).pdf
http://slidepdf.com/reader/full/us-army-fm-3-25150-combatives-hand-to-hand-combatpdf 74/265
FM 3-25.150
3-47
c. Roll Toward the Head (Figure 3-69). If the enemy should succeed in capturingthe fighter’s arm, the fighter can use the enemy’s reaction to his attempts to free it to hisadvantage. With short jerky motions, the fighter attempts to pull his arm free. The enemywill have to adjust his position by leaning toward the fighter. Immediately after thefighter attempts to pull his arm free and feels the enemy pushing, the fighter arches
toward his head and then over his opposite shoulder, taking the enemy over.
Figure 3-69. Roll toward the head.
Figure 3-69. Roll toward the head (continued).
Note: The roll must be timed correctly and must be toward the fighter’s head and notstraight over his body.
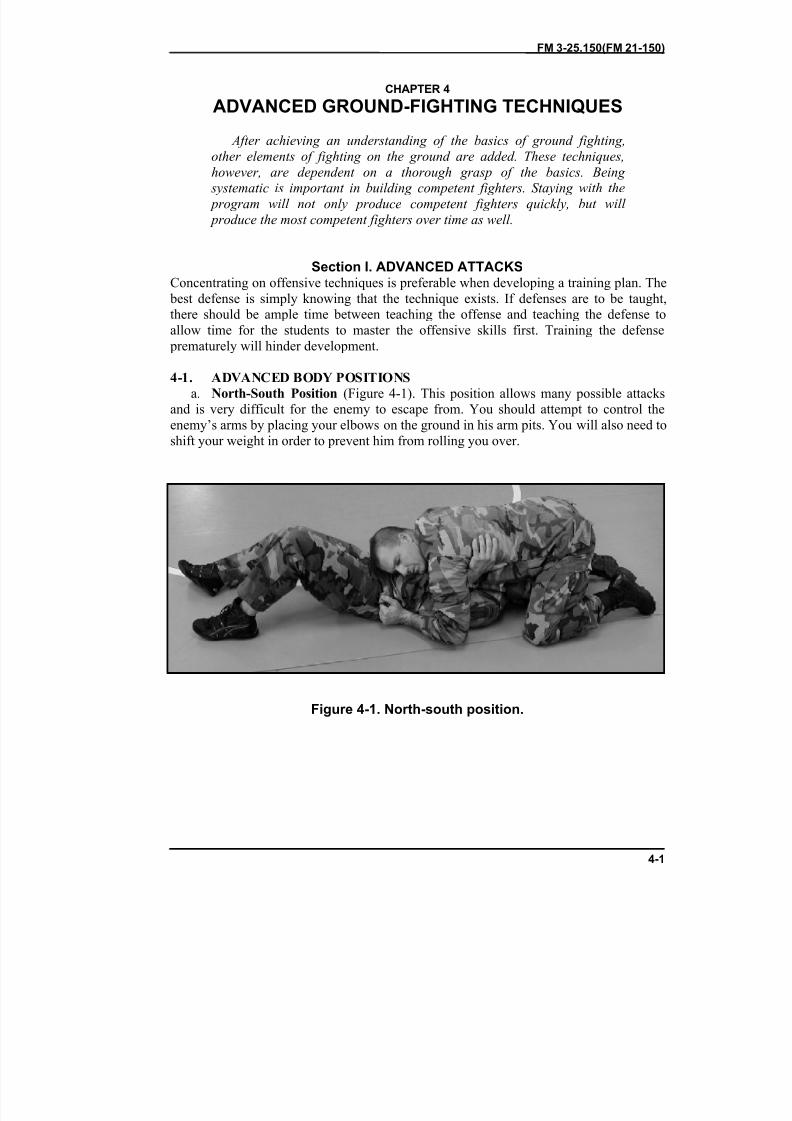
8/9/2019 US ARMY FM 3-25.150 - Combatives (hand-to-hand combat).pdf
http://slidepdf.com/reader/full/us-army-fm-3-25150-combatives-hand-to-hand-combatpdf 75/265
FM 3-25.150(FM 21-150)
4-1
CHAPTER 4
ADVANCED GROUND-FIGHTING TECHNIQUES
After achieving an understanding of the basics of ground fighting,other elements of fighting on the ground are added. These techniques,
however, are dependent on a thorough grasp of the basics. Being systematic is important in building competent fighters. Staying with the program will not only produce competent fighters quickly, but will produce the most competent fighters over time as well.
Section I. ADVANCED ATTACKSConcentrating on offensive techniques is preferable when developing a training plan. The
best defense is simply knowing that the technique exists. If defenses are to be taught,there should be ample time between teaching the offense and teaching the defense toallow time for the students to master the offensive skills first. Training the defense
prematurely will hinder development.
4-1. ADVANCED BODY POSITIONSa. North-South Position (Figure 4-1). This position allows many possible attacks
and is very difficult for the enemy to escape from. You should attempt to control theenemy’s arms by placing your elbows on the ground in his arm pits. You will also need toshift your weight in order to prevent him from rolling you over.
Figure 4-1. North-south position.
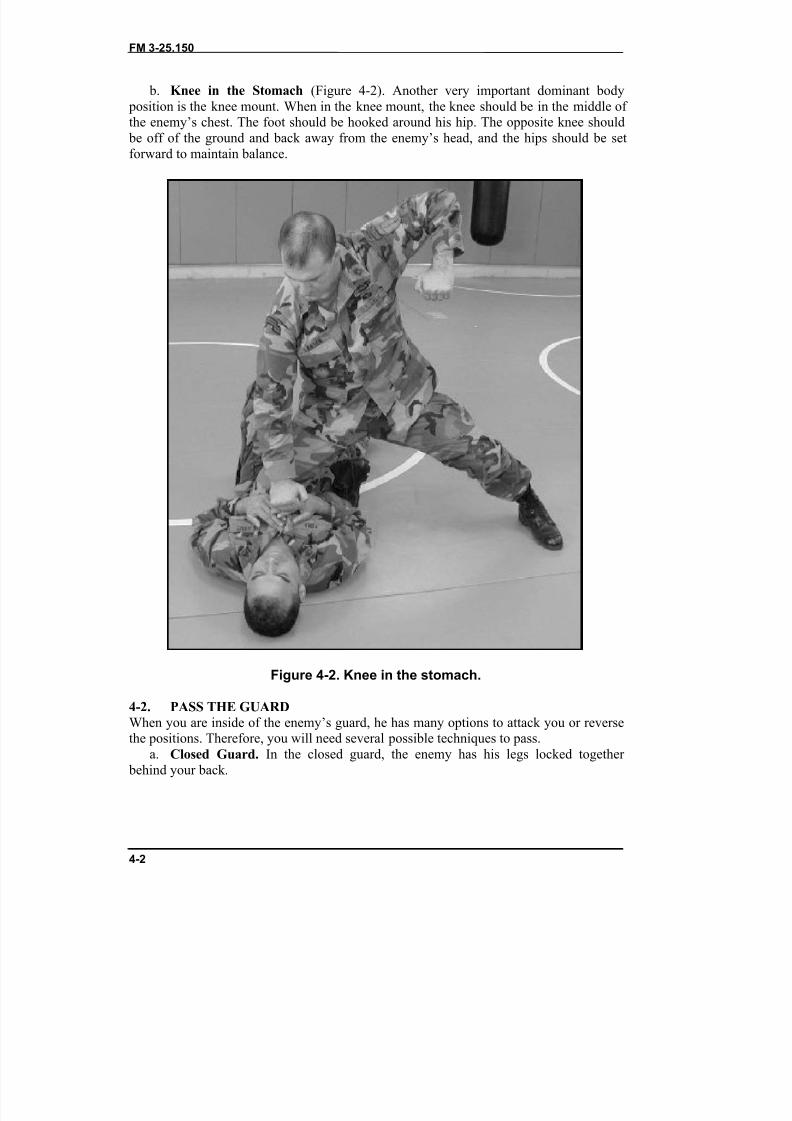
8/9/2019 US ARMY FM 3-25.150 - Combatives (hand-to-hand combat).pdf
http://slidepdf.com/reader/full/us-army-fm-3-25150-combatives-hand-to-hand-combatpdf 76/265
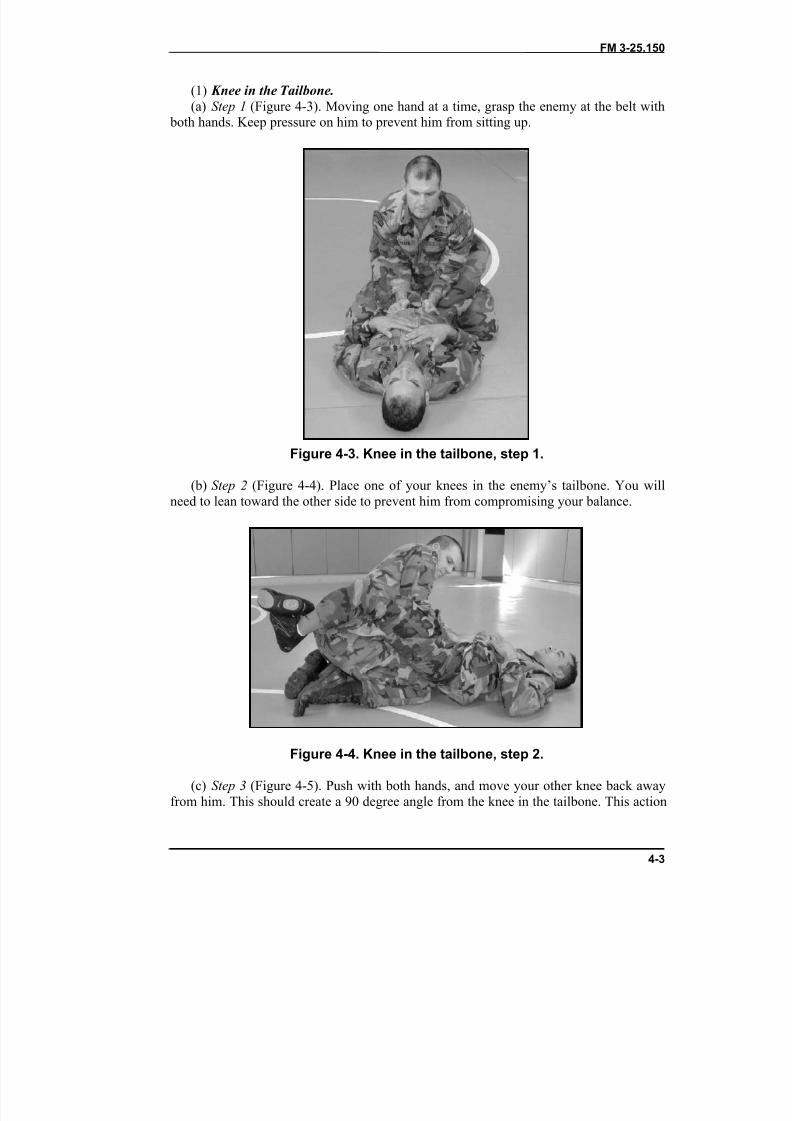
8/9/2019 US ARMY FM 3-25.150 - Combatives (hand-to-hand combat).pdf
http://slidepdf.com/reader/full/us-army-fm-3-25150-combatives-hand-to-hand-combatpdf 77/265
FM 3-25.150
4-3
(1) Knee in the Tailbone.(a) Step 1 (Figure 4-3). Moving one hand at a time, grasp the enemy at the belt with
both hands. Keep pressure on him to prevent him from sitting up.
Figure 4-3. Knee in the tailbone, step 1.
(b) Step 2 (Figure 4-4). Place one of your knees in the enemy’s tailbone. You willneed to lean toward the other side to prevent him from compromising your balance.
Figure 4-4. Knee in the tailbone, step 2.
(c) Step 3 (Figure 4-5). Push with both hands, and move your other knee back awayfrom him. This should create a 90 degree angle from the knee in the tailbone. This action
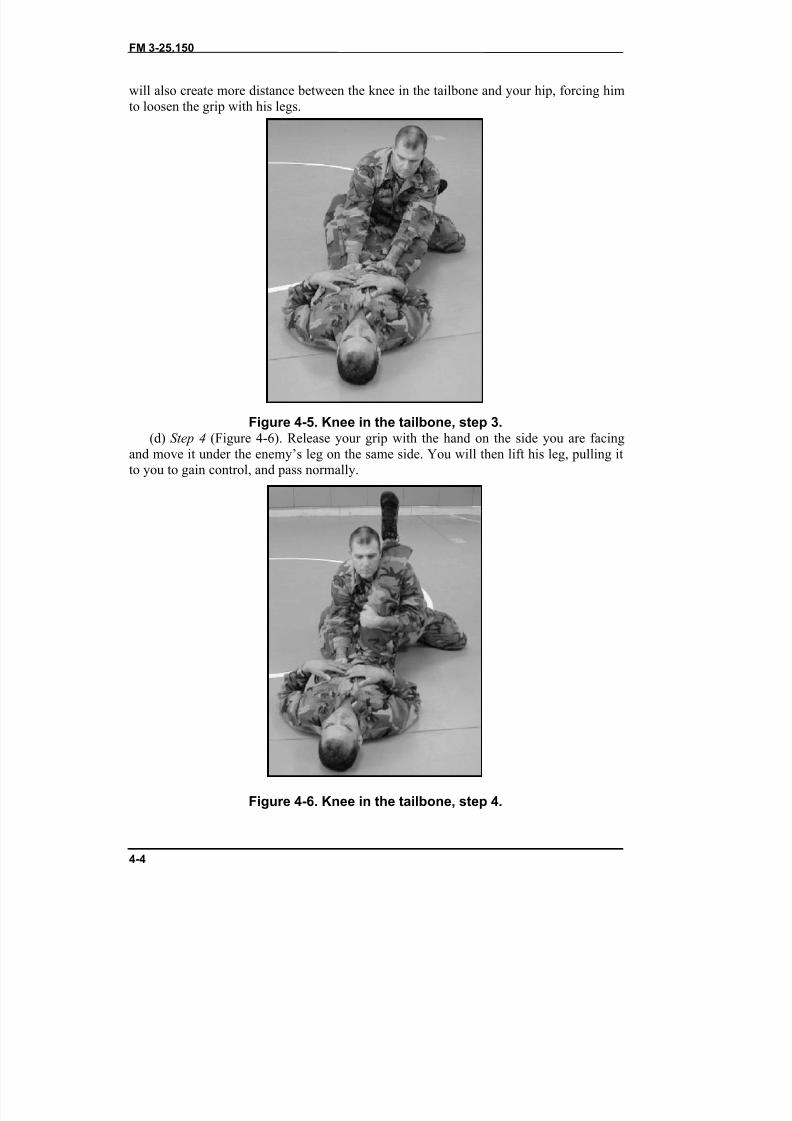
8/9/2019 US ARMY FM 3-25.150 - Combatives (hand-to-hand combat).pdf
http://slidepdf.com/reader/full/us-army-fm-3-25150-combatives-hand-to-hand-combatpdf 78/265
FM 3-25.150
4-4
will also create more distance between the knee in the tailbone and your hip, forcing himto loosen the grip with his legs.
Figure 4-5. Knee in the tailbone, step 3.(d) Step 4 (Figure 4-6). Release your grip with the hand on the side you are facing
and move it under the enemy’s leg on the same side. You will then lift his leg, pulling itto you to gain control, and pass normally.
Figure 4-6. Knee in the tailbone, step 4.
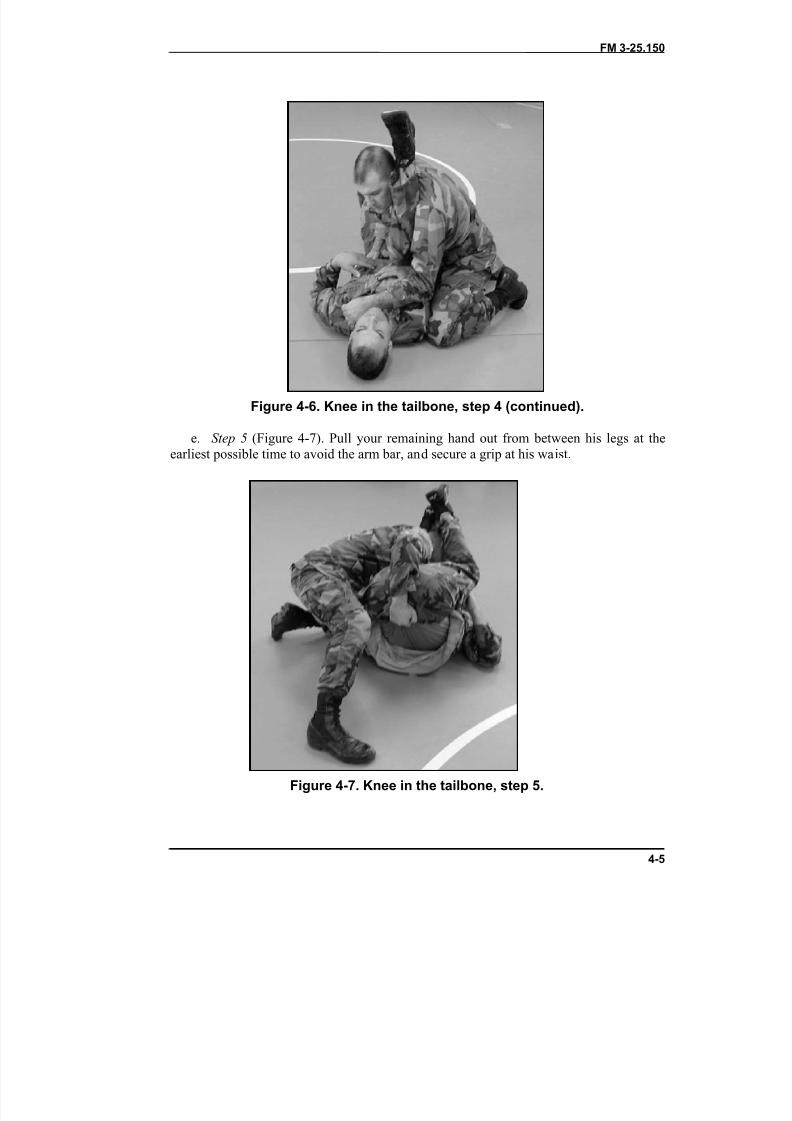
8/9/2019 US ARMY FM 3-25.150 - Combatives (hand-to-hand combat).pdf
http://slidepdf.com/reader/full/us-army-fm-3-25150-combatives-hand-to-hand-combatpdf 79/265
FM 3-25.150
4-5
Figure 4-6. Knee in the tailbone, step 4 (continued).
e. Step 5 (Figure 4-7). Pull your remaining hand out from between his legs at theearliest possible time to avoid the arm bar, and secure a grip at his waist.
Figure 4-7. Knee in the tailbone, step 5.
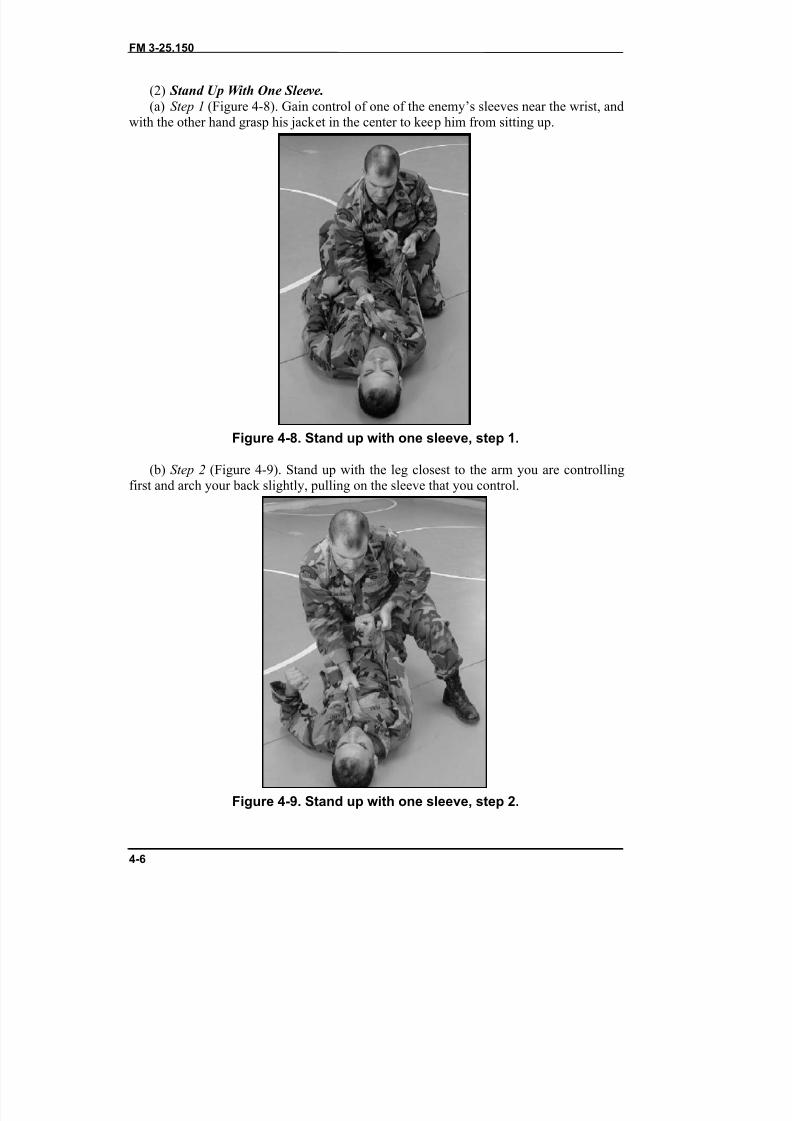
8/9/2019 US ARMY FM 3-25.150 - Combatives (hand-to-hand combat).pdf
http://slidepdf.com/reader/full/us-army-fm-3-25150-combatives-hand-to-hand-combatpdf 80/265
FM 3-25.150
4-6
(2) Stand Up With One Sleeve.(a) Step 1 (Figure 4-8). Gain control of one of the enemy’s sleeves near the wrist, and
with the other hand grasp his jacket in the center to keep him from sitting up.
Figure 4-8. Stand up with one sleeve, step 1.
(b) Step 2 (Figure 4-9). Stand up with the leg closest to the arm you are controllingfirst and arch your back slightly, pulling on the sleeve that you control.
Figure 4-9. Stand up with one sleeve, step 2.
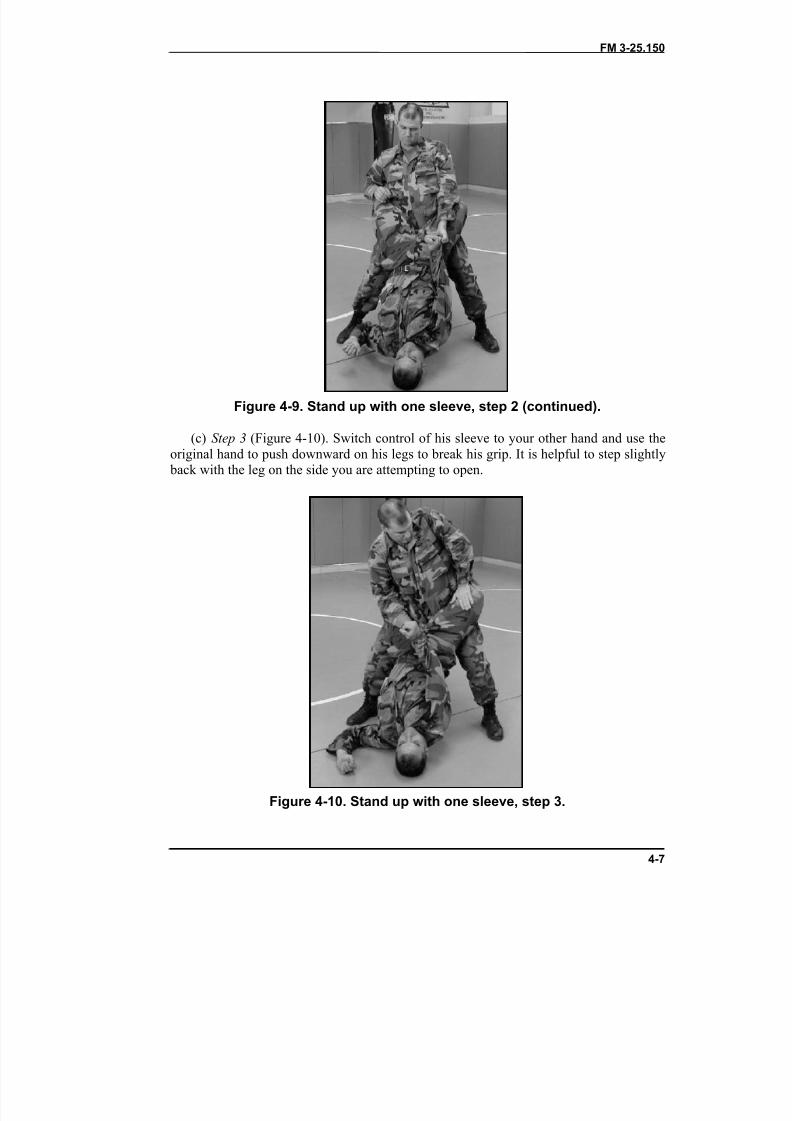
8/9/2019 US ARMY FM 3-25.150 - Combatives (hand-to-hand combat).pdf
http://slidepdf.com/reader/full/us-army-fm-3-25150-combatives-hand-to-hand-combatpdf 81/265
FM 3-25.150
4-7
Figure 4-9. Stand up with one sleeve, step 2 (continued).
(c) Step 3 (Figure 4-10). Switch control of his sleeve to your other hand and use theoriginal hand to push downward on his legs to break his grip. It is helpful to step slightly
back with the leg on the side you are attempting to open.
Figure 4-10. Stand up with one sleeve, step 3.
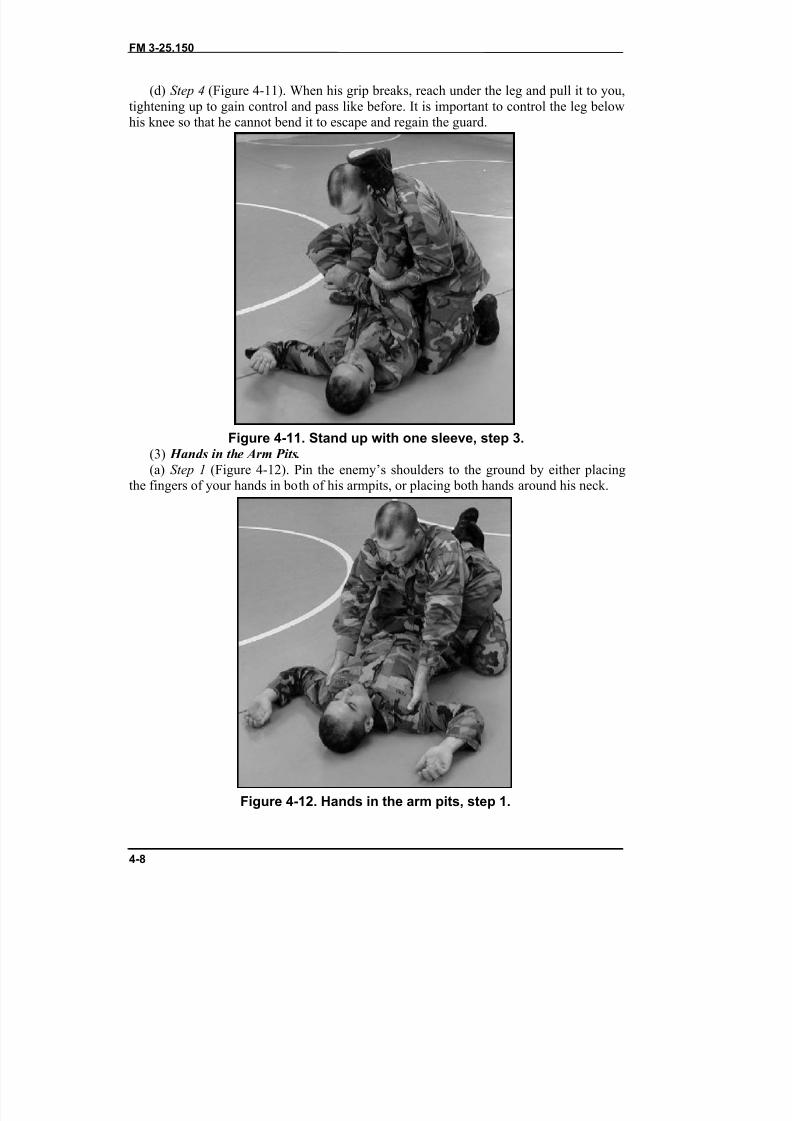
8/9/2019 US ARMY FM 3-25.150 - Combatives (hand-to-hand combat).pdf
http://slidepdf.com/reader/full/us-army-fm-3-25150-combatives-hand-to-hand-combatpdf 82/265
FM 3-25.150
4-8
(d) Step 4 (Figure 4-11). When his grip breaks, reach under the leg and pull it to you,tightening up to gain control and pass like before. It is important to control the leg belowhis knee so that he cannot bend it to escape and regain the guard.
Figure 4-11. Stand up with one sleeve, step 3.(3) Hands in the Arm Pits.(a) Step 1 (Figure 4-12). Pin the enemy’s shoulders to the ground by either placing
the fingers of your hands in both of his armpits, or placing both hands around his neck.
Figure 4-12. Hands in the arm pits, step 1.
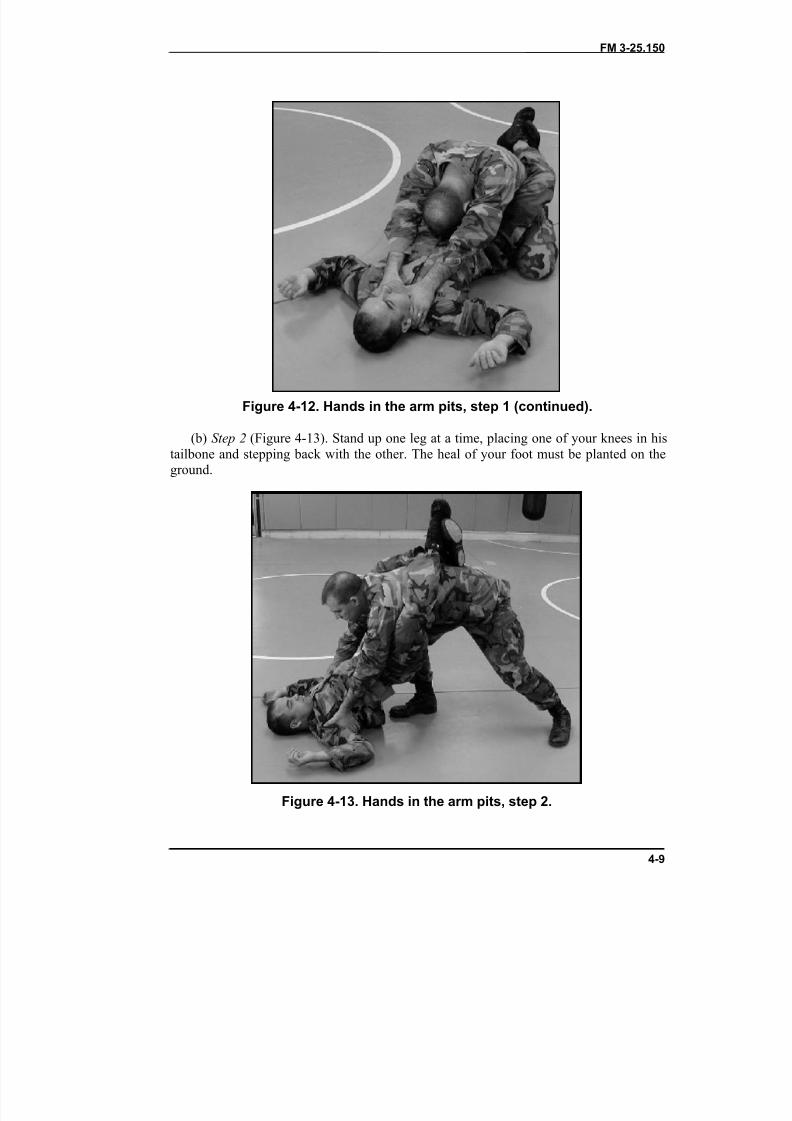
8/9/2019 US ARMY FM 3-25.150 - Combatives (hand-to-hand combat).pdf
http://slidepdf.com/reader/full/us-army-fm-3-25150-combatives-hand-to-hand-combatpdf 83/265
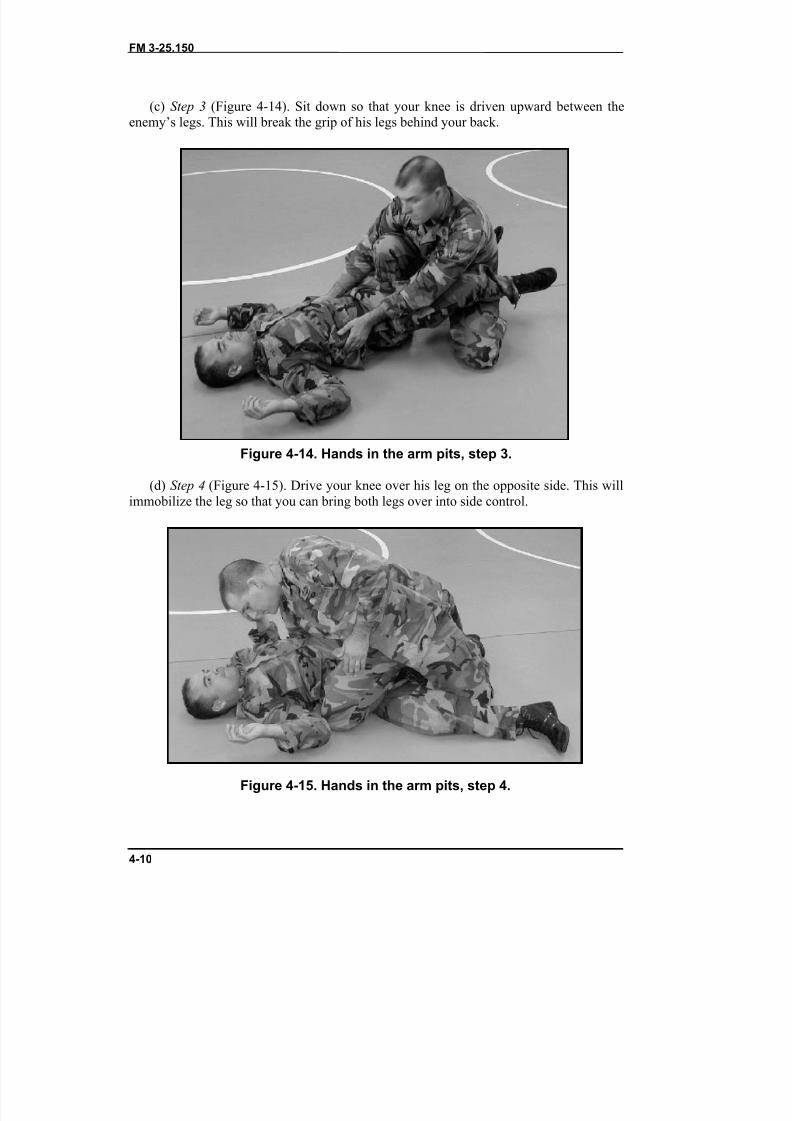
8/9/2019 US ARMY FM 3-25.150 - Combatives (hand-to-hand combat).pdf
http://slidepdf.com/reader/full/us-army-fm-3-25150-combatives-hand-to-hand-combatpdf 84/265
FM 3-25.150
4-10
(c) Step 3 (Figure 4-14). Sit down so that your knee is driven upward between theenemy’s legs. This will break the grip of his legs behind your back.
Figure 4-14. Hands in the arm pits, step 3.
(d) Step 4 (Figure 4-15). Drive your knee over his leg on the opposite side. This willimmobilize the leg so that you can bring both legs over into side control.
Figure 4-15. Hands in the arm pits, step 4.
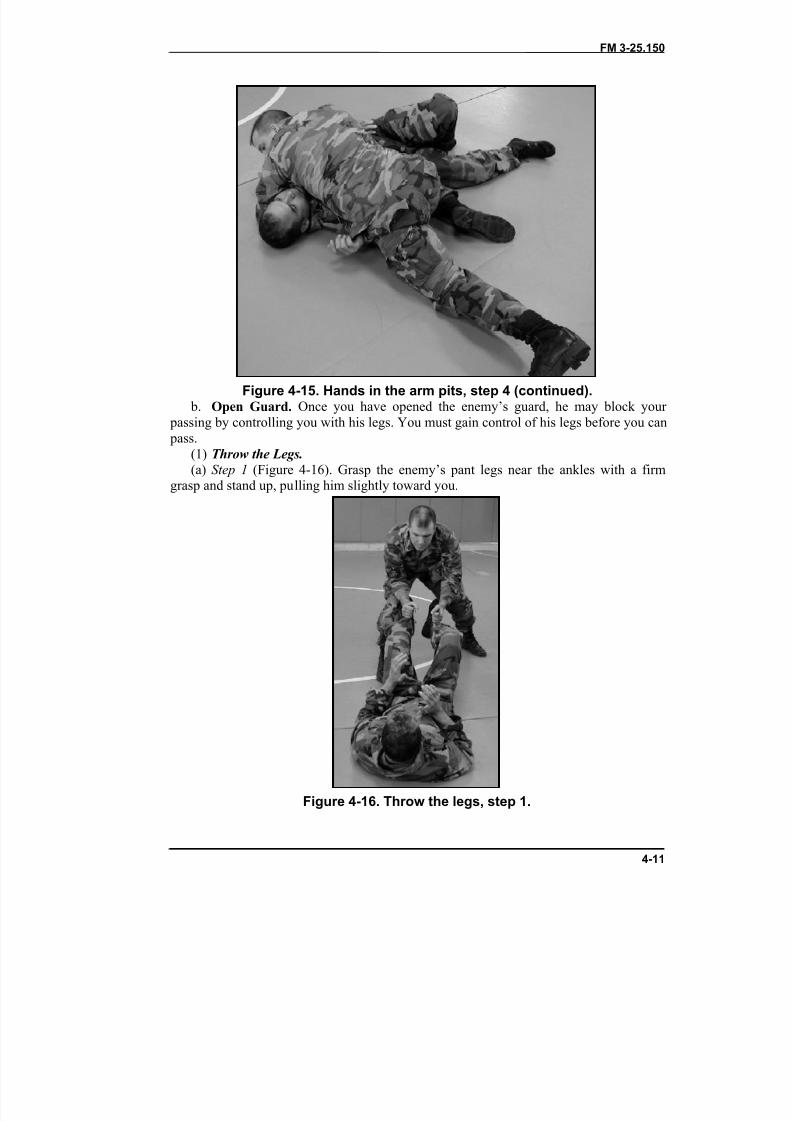
8/9/2019 US ARMY FM 3-25.150 - Combatives (hand-to-hand combat).pdf
http://slidepdf.com/reader/full/us-army-fm-3-25150-combatives-hand-to-hand-combatpdf 85/265
FM 3-25.150
4-11
Figure 4-15. Hands in the arm pits, step 4 (continued). b. Open Guard. Once you have opened the enemy’s guard, he may block your
passing by controlling you with his legs. You must gain control of his legs before you can pass.
(1) Throw the Legs.(a) Step 1 (Figure 4-16). Grasp the enemy’s pant legs near the ankles with a firm
grasp and stand up, pulling him slightly toward you.
Figure 4-16. Throw the legs, step 1.
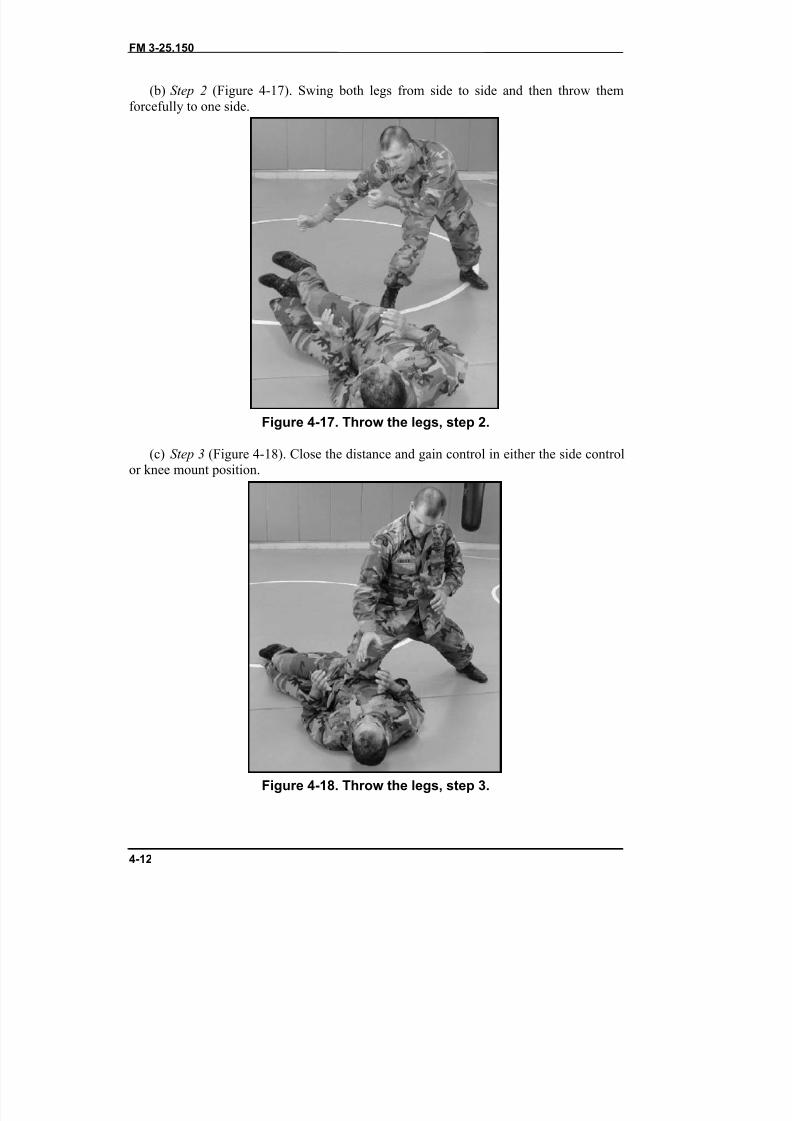
8/9/2019 US ARMY FM 3-25.150 - Combatives (hand-to-hand combat).pdf
http://slidepdf.com/reader/full/us-army-fm-3-25150-combatives-hand-to-hand-combatpdf 86/265
FM 3-25.150
4-12
(b) Step 2 (Figure 4-17). Swing both legs from side to side and then throw themforcefully to one side.
Figure 4-17. Throw the legs, step 2.
(c) Step 3 (Figure 4-18). Close the distance and gain control in either the side controlor knee mount position.
Figure 4-18. Throw the legs, step 3.
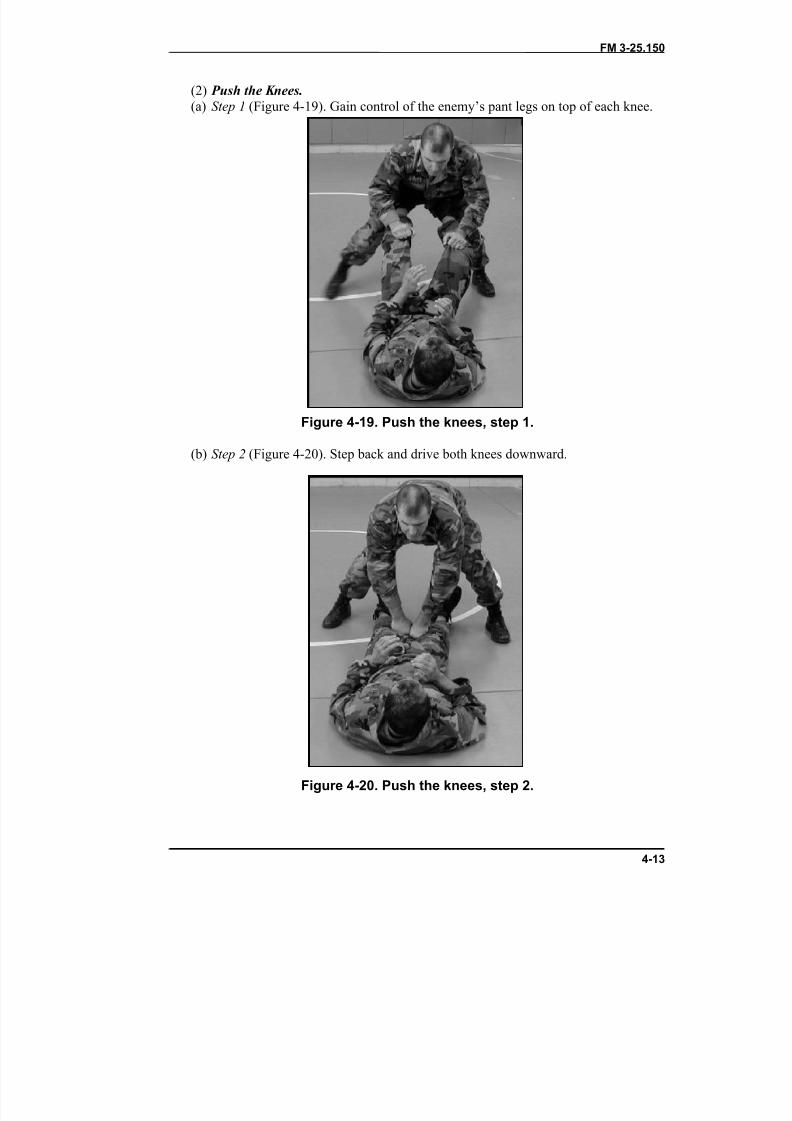
8/9/2019 US ARMY FM 3-25.150 - Combatives (hand-to-hand combat).pdf
http://slidepdf.com/reader/full/us-army-fm-3-25150-combatives-hand-to-hand-combatpdf 87/265
FM 3-25.150
4-13
(2) Push the Knees.(a) Step 1 (Figure 4-19). Gain control of the enemy’s pant legs on top of each knee.
Figure 4-19. Push the knees, step 1.
(b) Step 2 (Figure 4-20). Step back and drive both knees downward.
Figure 4-20. Push the knees, step 2.
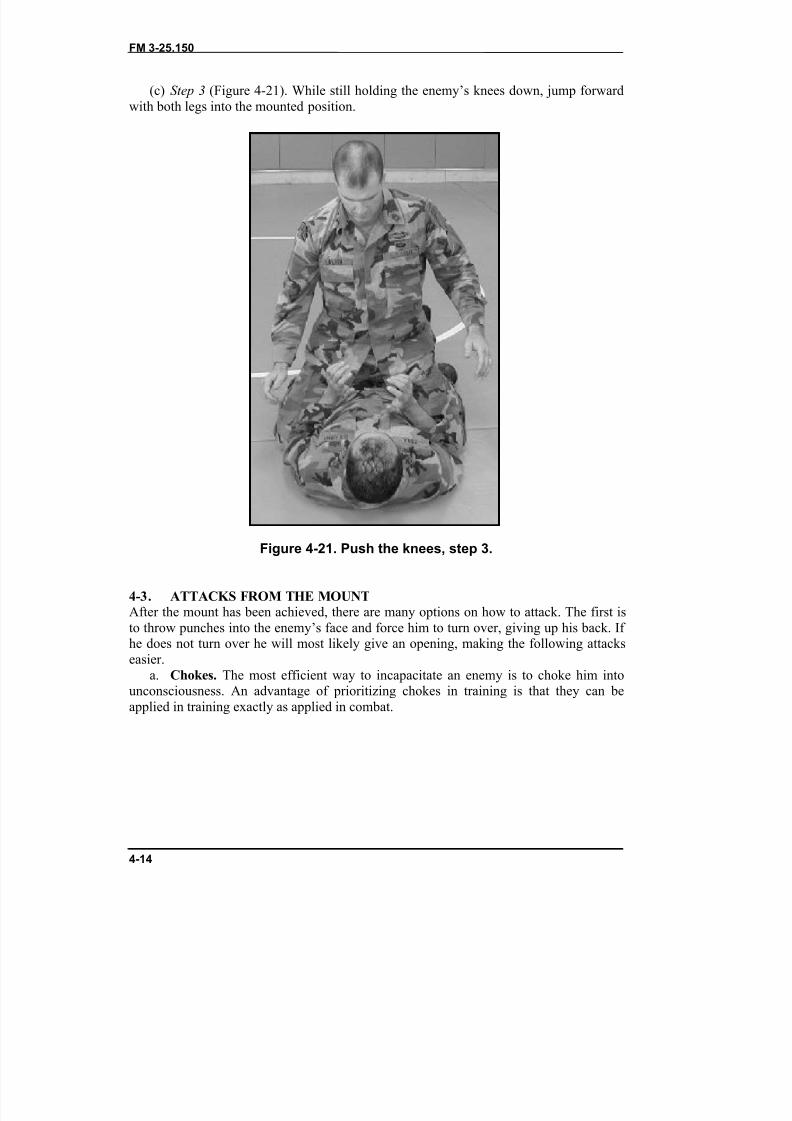
8/9/2019 US ARMY FM 3-25.150 - Combatives (hand-to-hand combat).pdf
http://slidepdf.com/reader/full/us-army-fm-3-25150-combatives-hand-to-hand-combatpdf 88/265
FM 3-25.150
4-14
(c) Step 3 (Figure 4-21). While still holding the enemy’s knees down, jump forwardwith both legs into the mounted position.
Figure 4-21. Push the knees, step 3.
4-3. ATTACKS FROM THE MOUNTAfter the mount has been achieved, there are many options on how to attack. The first isto throw punches into the enemy’s face and force him to turn over, giving up his back. If he does not turn over he will most likely give an opening, making the following attackseasier.
a. Chokes. The most efficient way to incapacitate an enemy is to choke him intounconsciousness. An advantage of prioritizing chokes in training is that they can beapplied in training exactly as applied in combat.
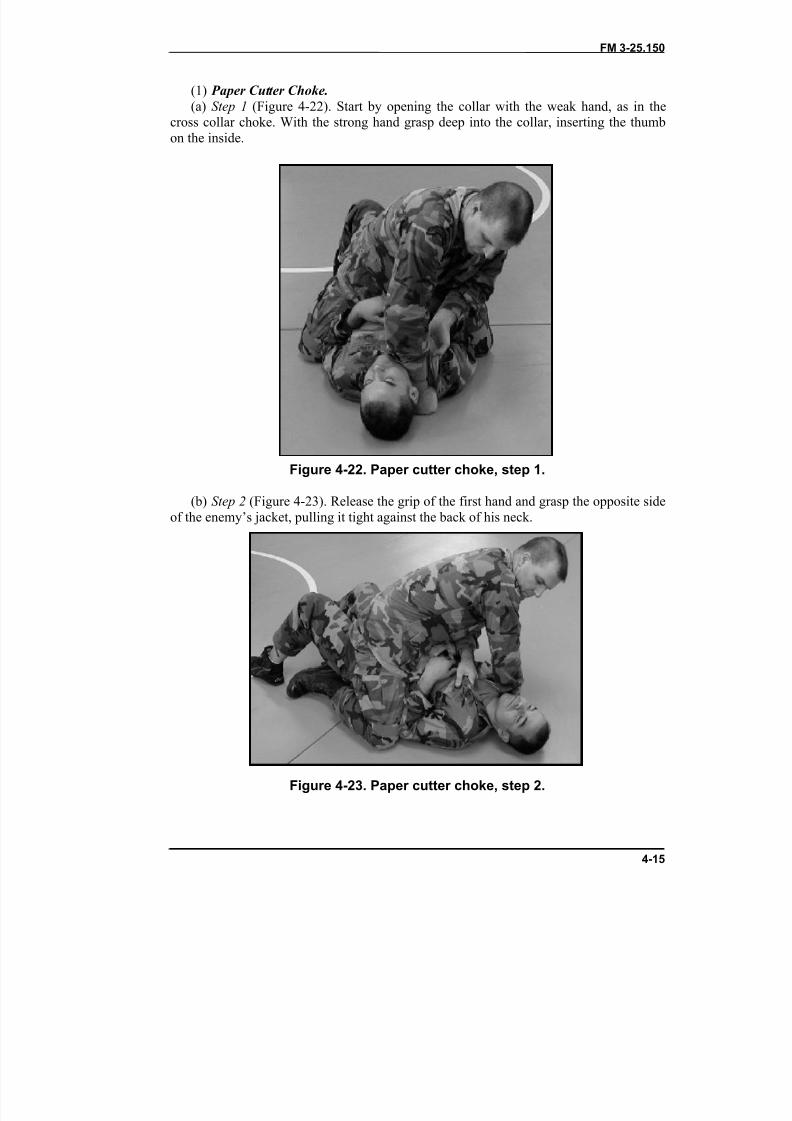
8/9/2019 US ARMY FM 3-25.150 - Combatives (hand-to-hand combat).pdf
http://slidepdf.com/reader/full/us-army-fm-3-25150-combatives-hand-to-hand-combatpdf 89/265
FM 3-25.150
4-15
(1) Paper Cutter Choke.(a) Step 1 (Figure 4-22). Start by opening the collar with the weak hand, as in the
cross collar choke. With the strong hand grasp deep into the collar, inserting the thumbon the inside.
Figure 4-22. Paper cutter choke, step 1.
(b) Step 2 (Figure 4-23). Release the grip of the first hand and grasp the opposite sideof the enemy’s jacket, pulling it tight against the back of his neck.
Figure 4-23. Paper cutter choke, step 2.
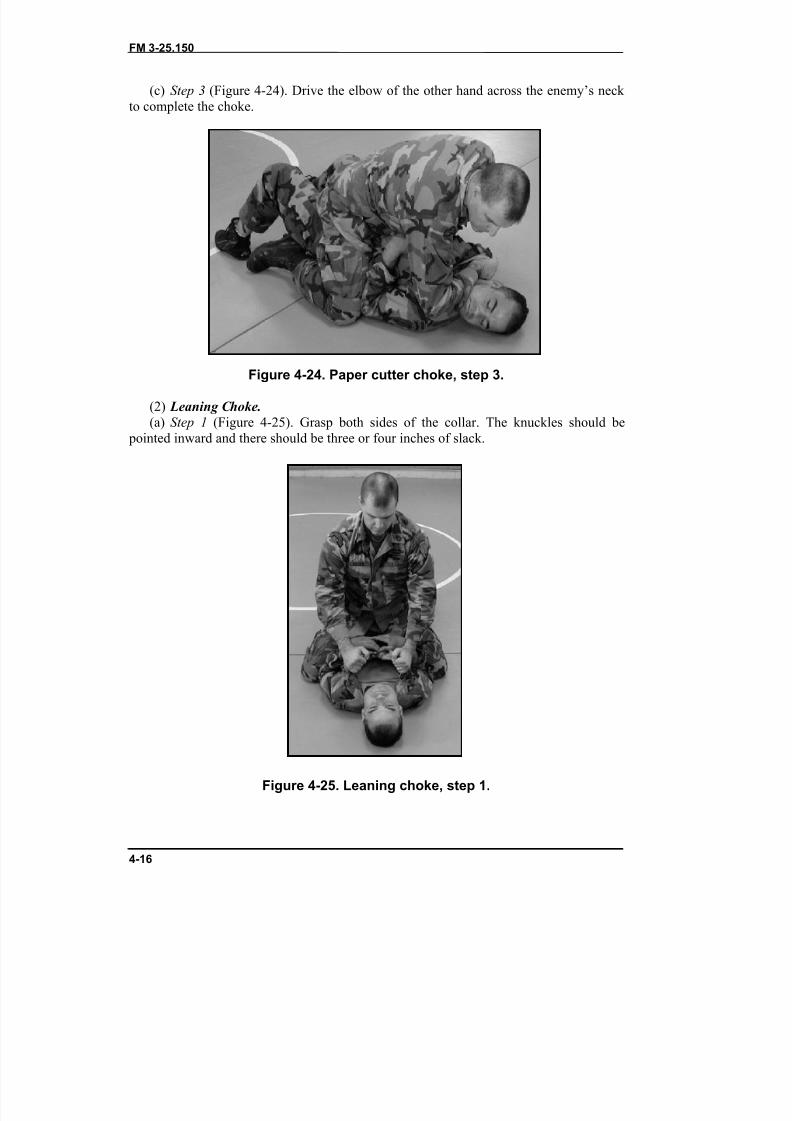
8/9/2019 US ARMY FM 3-25.150 - Combatives (hand-to-hand combat).pdf
http://slidepdf.com/reader/full/us-army-fm-3-25150-combatives-hand-to-hand-combatpdf 90/265
FM 3-25.150
4-16
(c) Step 3 (Figure 4-24). Drive the elbow of the other hand across the enemy’s neck to complete the choke.
Figure 4-24. Paper cutter choke, step 3.
(2) Leaning Choke.(a) Step 1 (Figure 4-25). Grasp both sides of the collar. The knuckles should be
pointed inward and there should be three or four inches of slack.
Figure 4-25. Leaning choke, step 1.
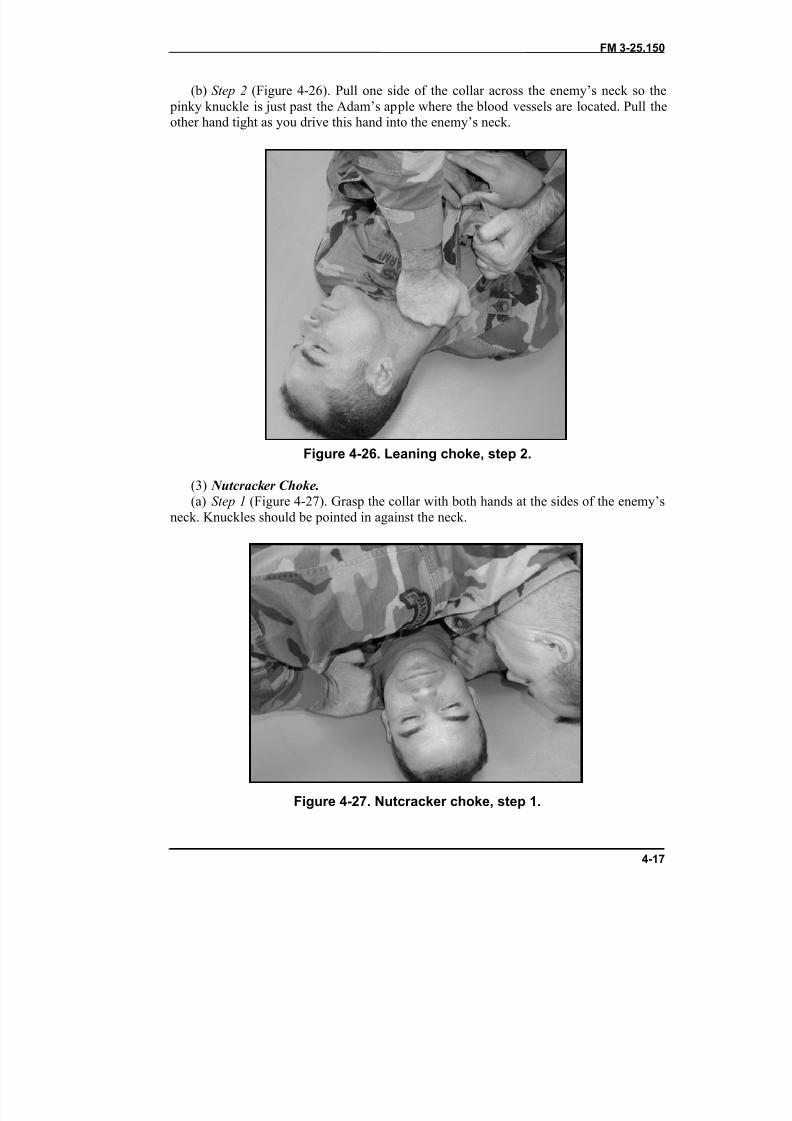
8/9/2019 US ARMY FM 3-25.150 - Combatives (hand-to-hand combat).pdf
http://slidepdf.com/reader/full/us-army-fm-3-25150-combatives-hand-to-hand-combatpdf 91/265
FM 3-25.150
4-17
(b) Step 2 (Figure 4-26). Pull one side of the collar across the enemy’s neck so the pinky knuckle is just past the Adam’s apple where the blood vessels are located. Pull theother hand tight as you drive this hand into the enemy’s neck.
Figure 4-26. Leaning choke, step 2.
(3) Nutcracker Choke.(a) Step 1 (Figure 4-27). Grasp the collar with both hands at the sides of the enemy’s
neck. Knuckles should be pointed in against the neck.
Figure 4-27. Nutcracker choke, step 1.
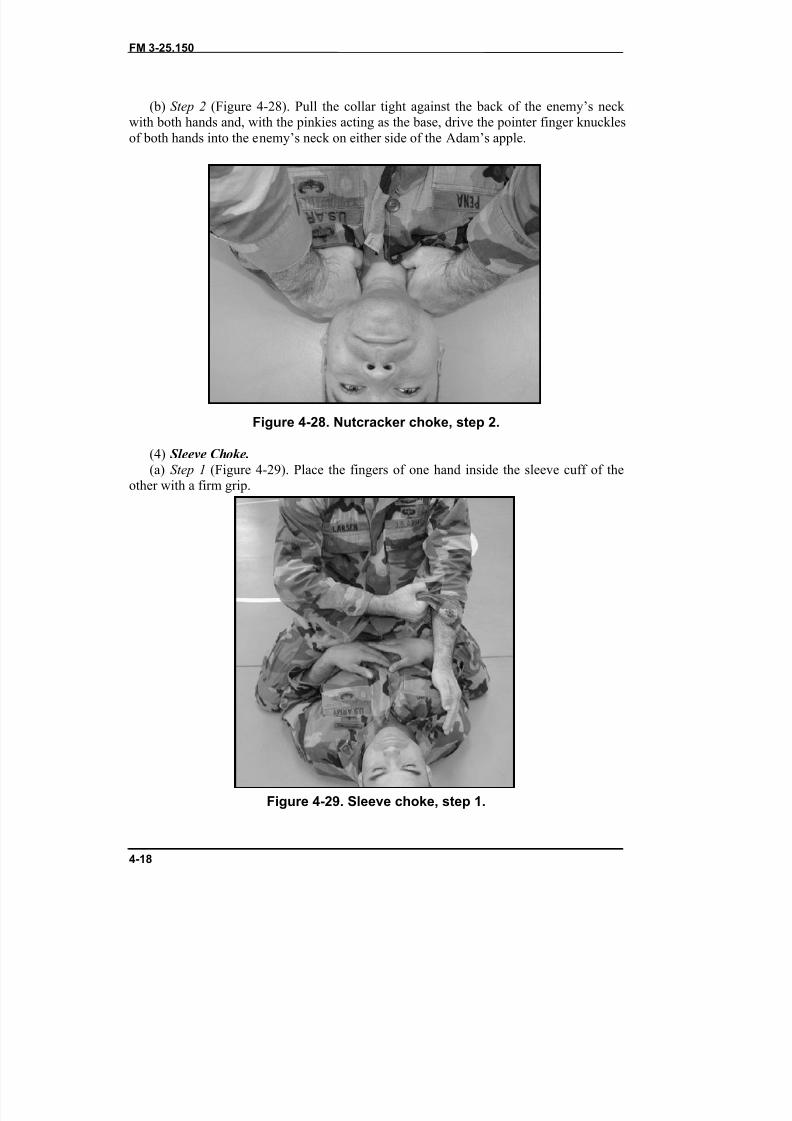
8/9/2019 US ARMY FM 3-25.150 - Combatives (hand-to-hand combat).pdf
http://slidepdf.com/reader/full/us-army-fm-3-25150-combatives-hand-to-hand-combatpdf 92/265
FM 3-25.150
4-18
(b) Step 2 (Figure 4-28). Pull the collar tight against the back of the enemy’s neck with both hands and, with the pinkies acting as the base, drive the pointer finger knucklesof both hands into the enemy’s neck on either side of the Adam’s apple.
Figure 4-28. Nutcracker choke, step 2.
(4) Sleeve Choke.(a) Step 1 (Figure 4-29). Place the fingers of one hand inside the sleeve cuff of the
other with a firm grip.
Figure 4-29. Sleeve choke, step 1.
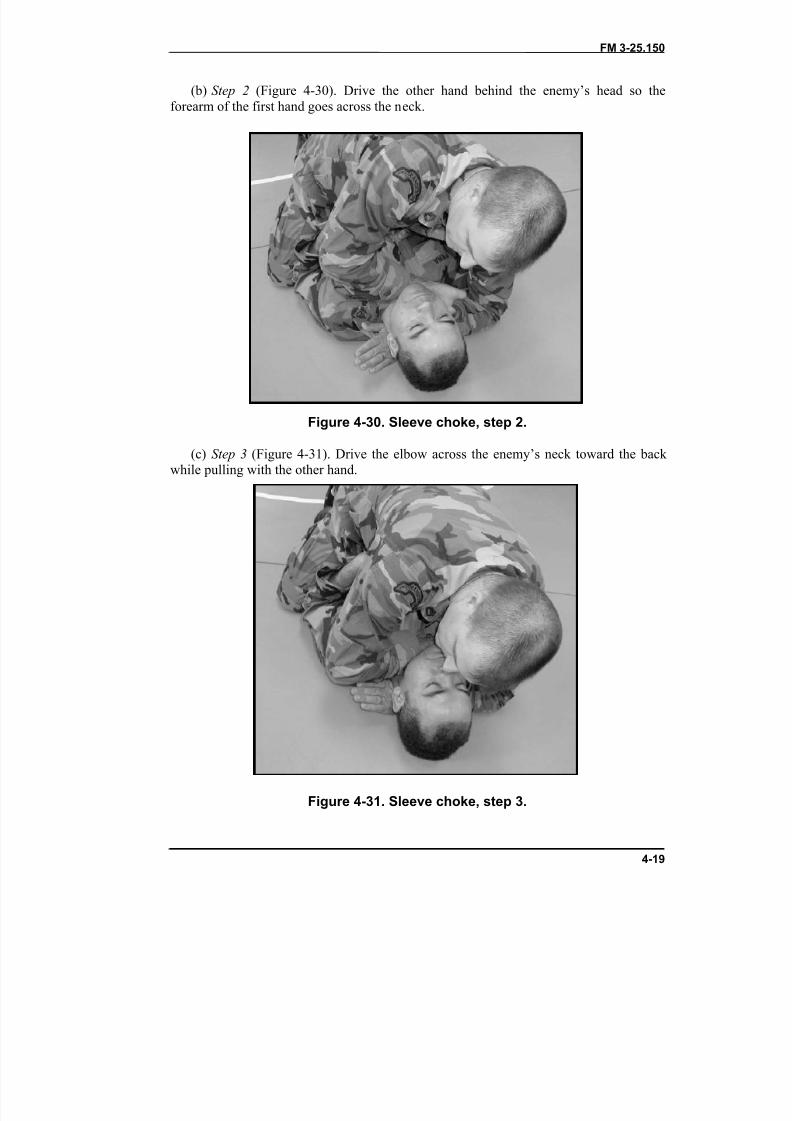
8/9/2019 US ARMY FM 3-25.150 - Combatives (hand-to-hand combat).pdf
http://slidepdf.com/reader/full/us-army-fm-3-25150-combatives-hand-to-hand-combatpdf 93/265
FM 3-25.150
4-19
(b) Step 2 (Figure 4-30). Drive the other hand behind the enemy’s head so theforearm of the first hand goes across the neck.
Figure 4-30. Sleeve choke, step 2.
(c) Step 3 (Figure 4-31). Drive the elbow across the enemy’s neck toward the back while pulling with the other hand.
Figure 4-31. Sleeve choke, step 3.
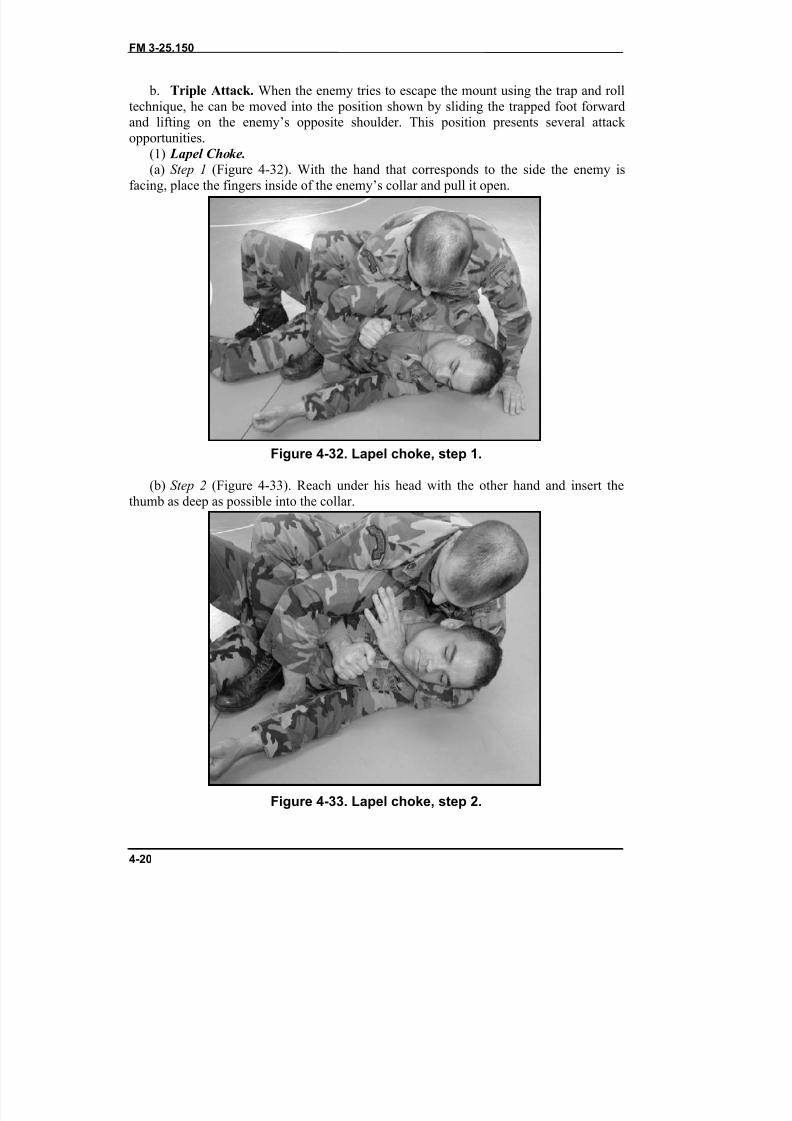
8/9/2019 US ARMY FM 3-25.150 - Combatives (hand-to-hand combat).pdf
http://slidepdf.com/reader/full/us-army-fm-3-25150-combatives-hand-to-hand-combatpdf 94/265
FM 3-25.150
4-20
b. Triple Attack. When the enemy tries to escape the mount using the trap and rolltechnique, he can be moved into the position shown by sliding the trapped foot forwardand lifting on the enemy’s opposite shoulder. This position presents several attack opportunities.
(1) Lapel Choke.
(a) Step 1 (Figure 4-32). With the hand that corresponds to the side the enemy isfacing, place the fingers inside of the enemy’s collar and pull it open.
Figure 4-32. Lapel choke, step 1.
(b) Step 2 (Figure 4-33). Reach under his head with the other hand and insert thethumb as deep as possible into the collar.
Figure 4-33. Lapel choke, step 2.
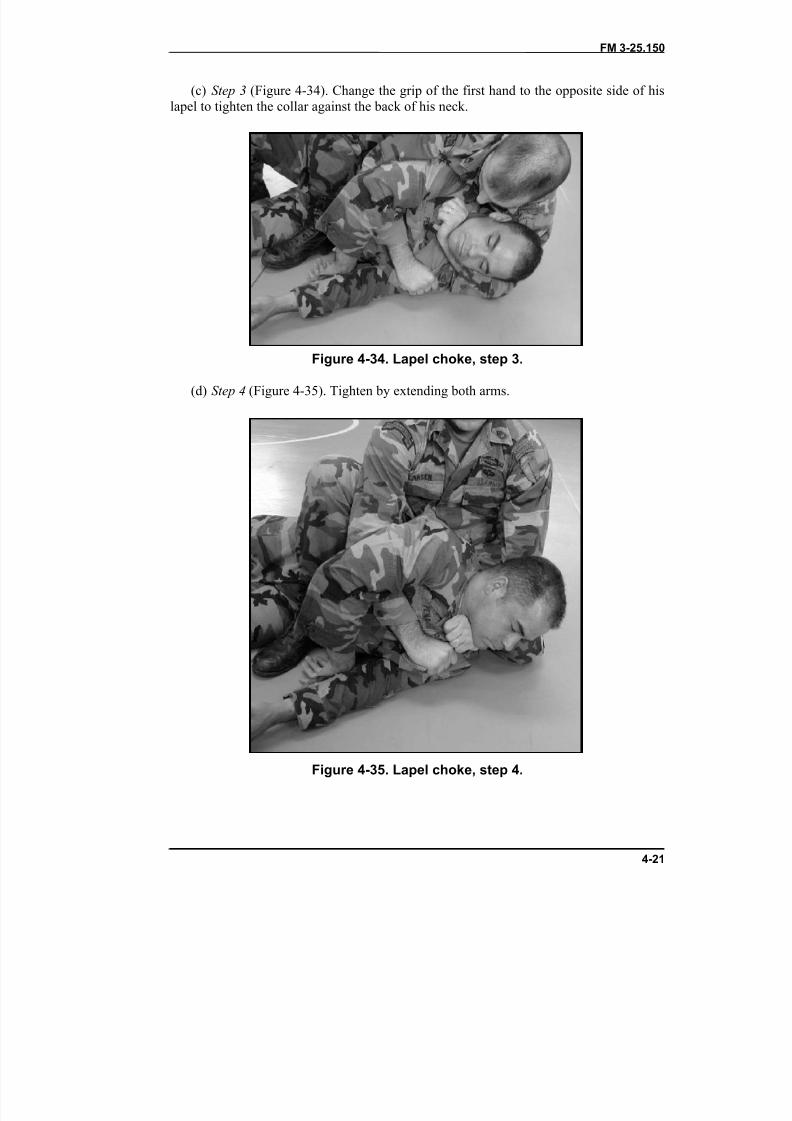
8/9/2019 US ARMY FM 3-25.150 - Combatives (hand-to-hand combat).pdf
http://slidepdf.com/reader/full/us-army-fm-3-25150-combatives-hand-to-hand-combatpdf 95/265
FM 3-25.150
4-21
(c) Step 3 (Figure 4-34). Change the grip of the first hand to the opposite side of hislapel to tighten the collar against the back of his neck.
Figure 4-34. Lapel choke, step 3.
(d) Step 4 (Figure 4-35). Tighten by extending both arms.
Figure 4-35. Lapel choke, step 4.
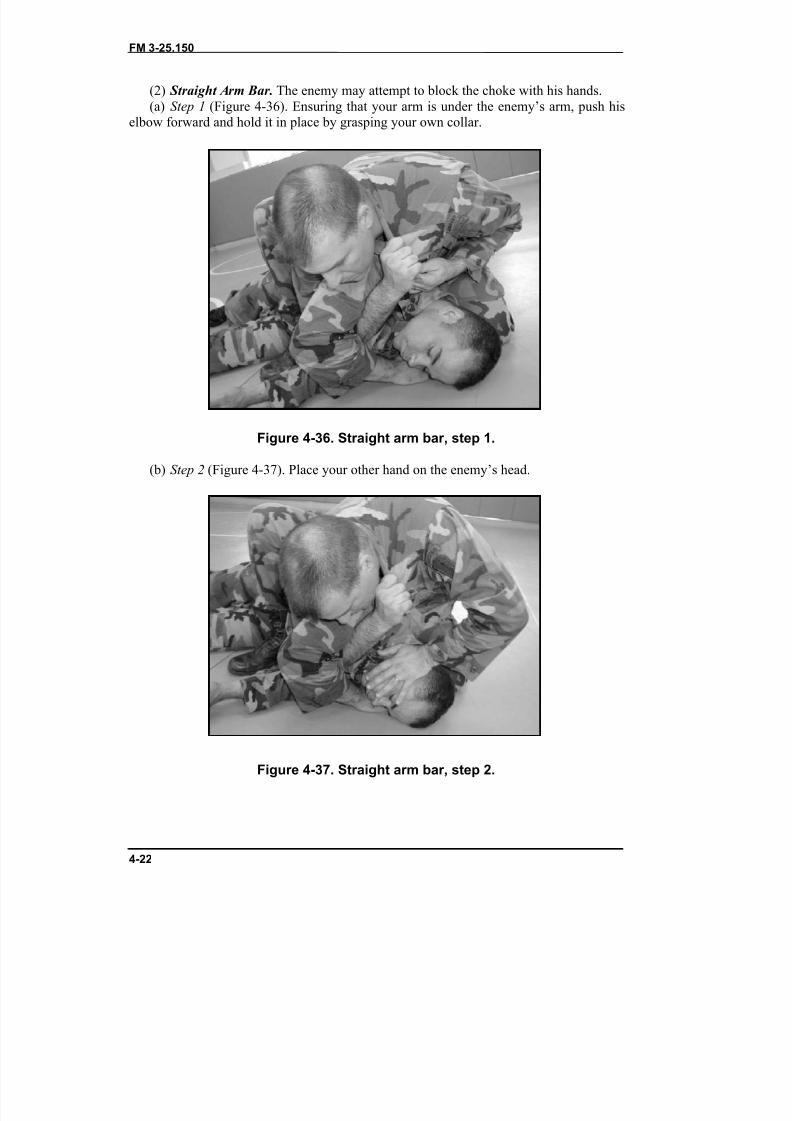
8/9/2019 US ARMY FM 3-25.150 - Combatives (hand-to-hand combat).pdf
http://slidepdf.com/reader/full/us-army-fm-3-25150-combatives-hand-to-hand-combatpdf 96/265
FM 3-25.150
4-22
(2) Straight Arm Bar. The enemy may attempt to block the choke with his hands.(a) Step 1 (Figure 4-36). Ensuring that your arm is under the enemy’s arm, push his
elbow forward and hold it in place by grasping your own collar.
Figure 4-36. Straight arm bar, step 1.
(b) Step 2 (Figure 4-37). Place your other hand on the enemy’s head.
Figure 4-37. Straight arm bar, step 2.
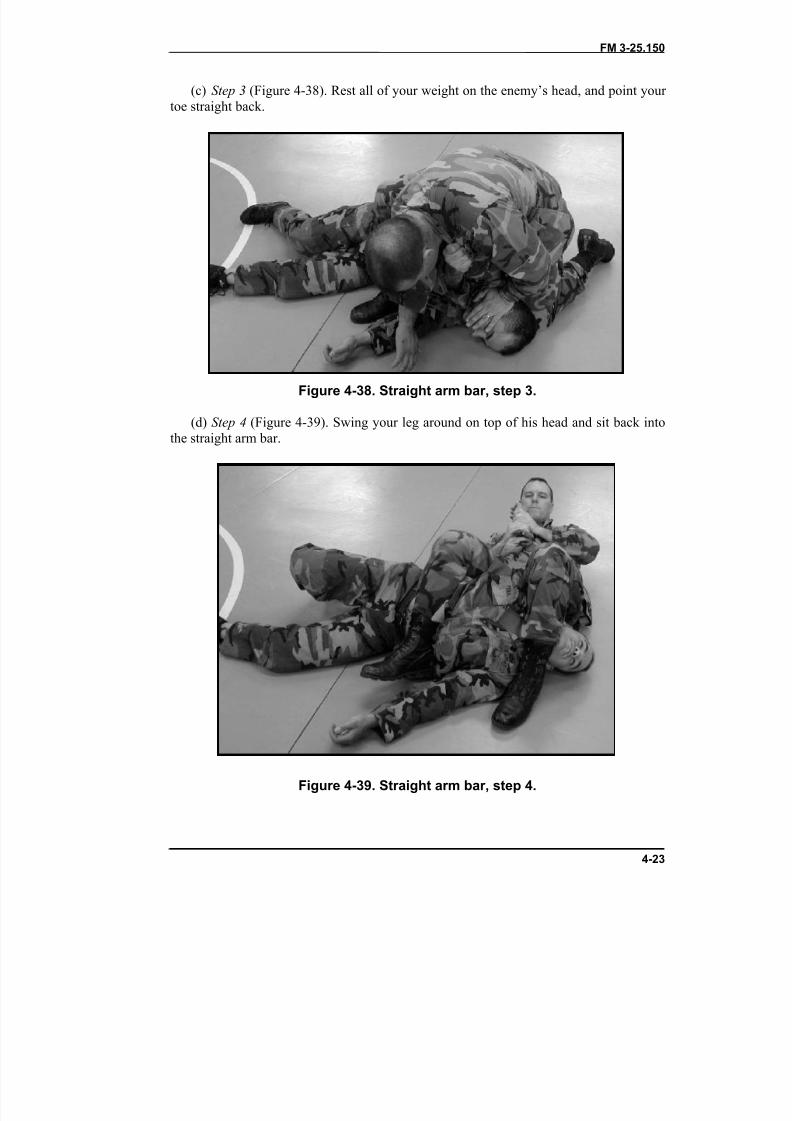
8/9/2019 US ARMY FM 3-25.150 - Combatives (hand-to-hand combat).pdf
http://slidepdf.com/reader/full/us-army-fm-3-25150-combatives-hand-to-hand-combatpdf 97/265
FM 3-25.150
4-23
(c) Step 3 (Figure 4-38). Rest all of your weight on the enemy’s head, and point your toe straight back.
Figure 4-38. Straight arm bar, step 3.
(d) Step 4 (Figure 4-39). Swing your leg around on top of his head and sit back intothe straight arm bar.
Figure 4-39. Straight arm bar, step 4.
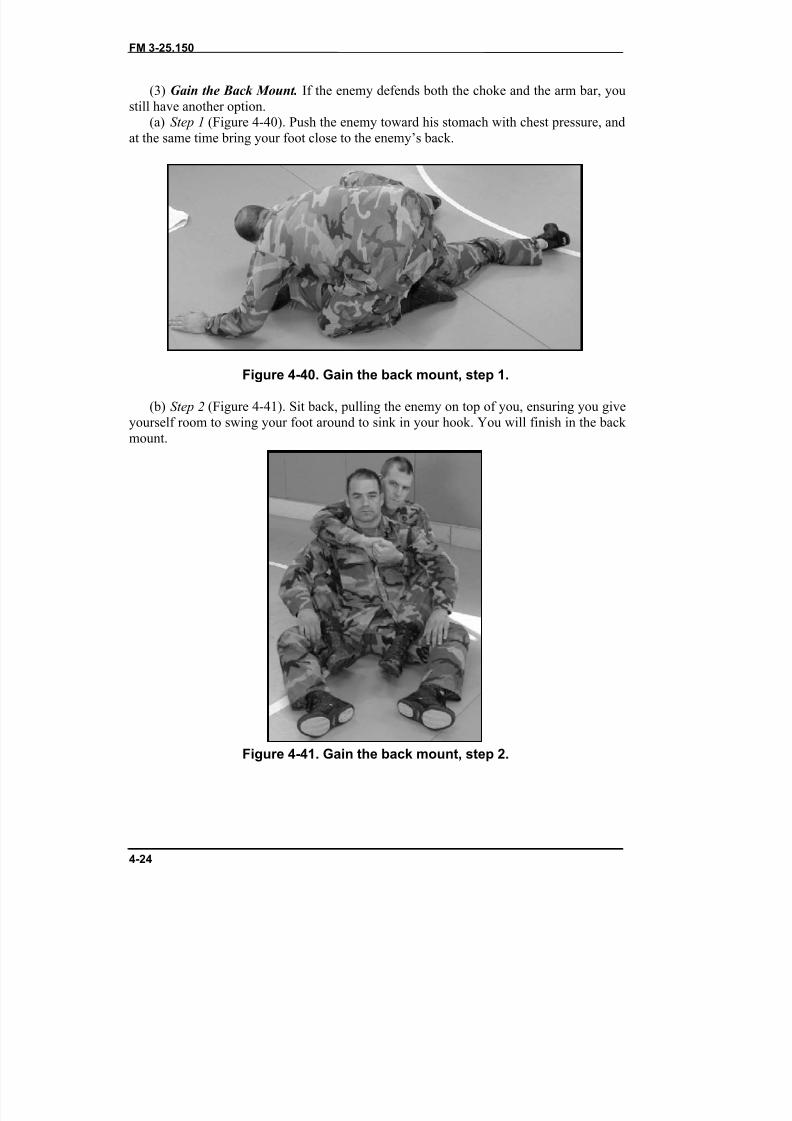
8/9/2019 US ARMY FM 3-25.150 - Combatives (hand-to-hand combat).pdf
http://slidepdf.com/reader/full/us-army-fm-3-25150-combatives-hand-to-hand-combatpdf 98/265
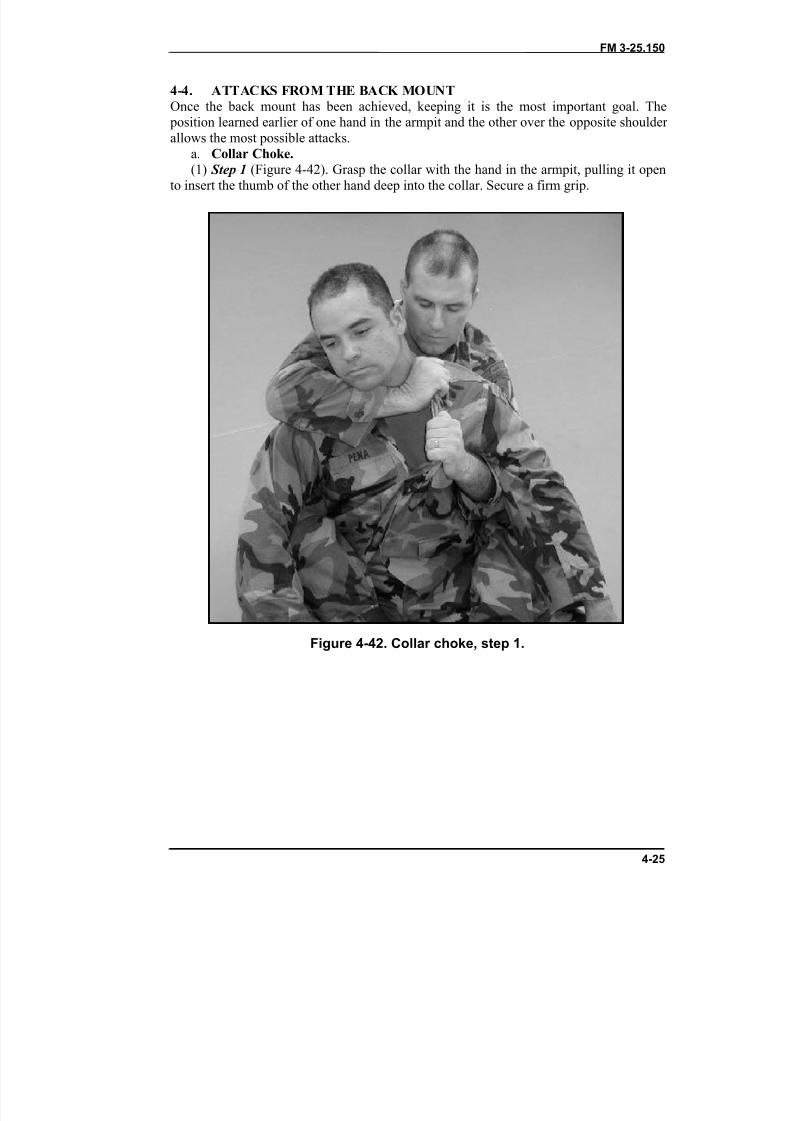
8/9/2019 US ARMY FM 3-25.150 - Combatives (hand-to-hand combat).pdf
http://slidepdf.com/reader/full/us-army-fm-3-25150-combatives-hand-to-hand-combatpdf 99/265
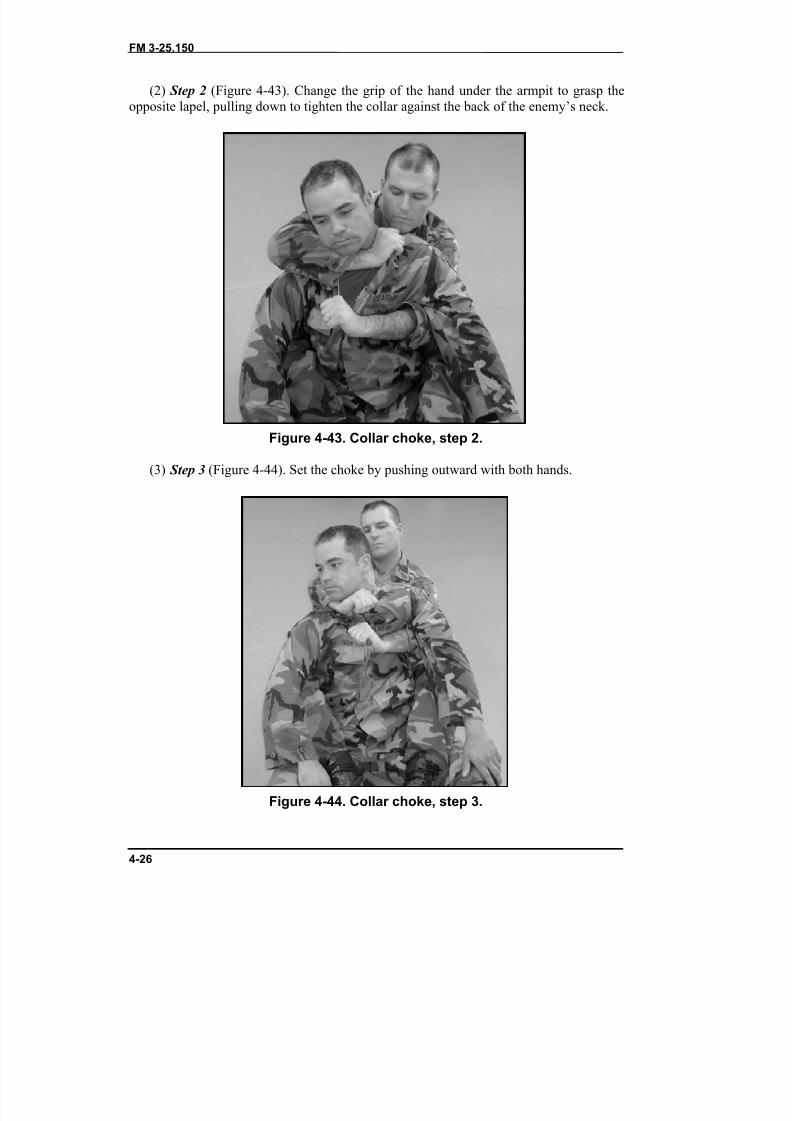
8/9/2019 US ARMY FM 3-25.150 - Combatives (hand-to-hand combat).pdf
http://slidepdf.com/reader/full/us-army-fm-3-25150-combatives-hand-to-hand-combatpdf 100/265
FM 3-25.150
4-26
(2) Step 2 (Figure 4-43). Change the grip of the hand under the armpit to grasp theopposite lapel, pulling down to tighten the collar against the back of the enemy’s neck.
Figure 4-43. Collar choke, step 2.
(3) Step 3 (Figure 4-44). Set the choke by pushing outward with both hands.
Figure 4-44. Collar choke, step 3.
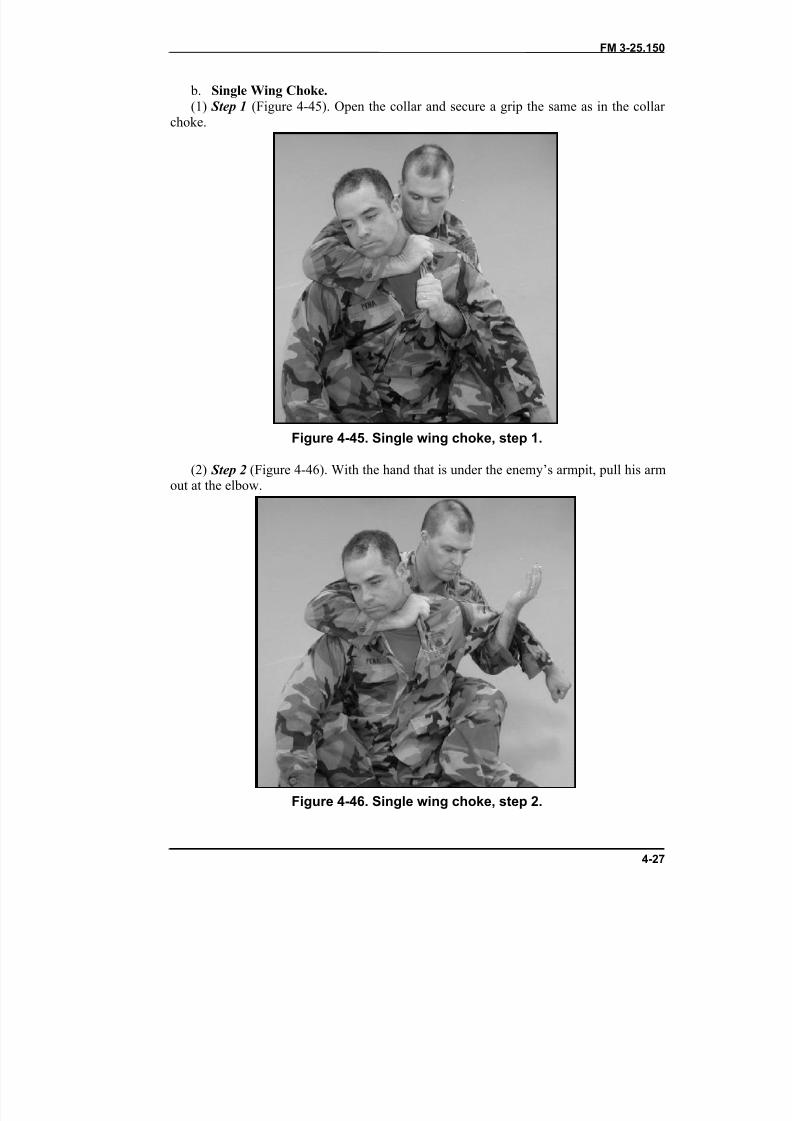
8/9/2019 US ARMY FM 3-25.150 - Combatives (hand-to-hand combat).pdf
http://slidepdf.com/reader/full/us-army-fm-3-25150-combatives-hand-to-hand-combatpdf 101/265
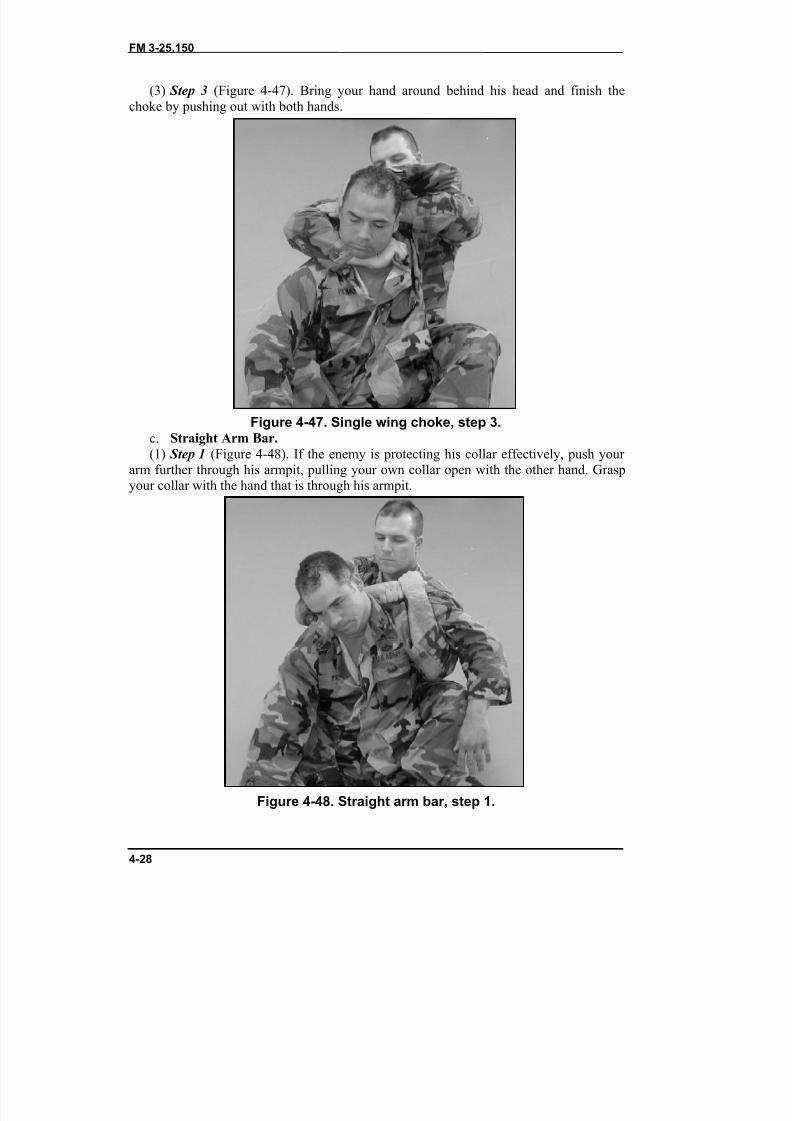
8/9/2019 US ARMY FM 3-25.150 - Combatives (hand-to-hand combat).pdf
http://slidepdf.com/reader/full/us-army-fm-3-25150-combatives-hand-to-hand-combatpdf 102/265
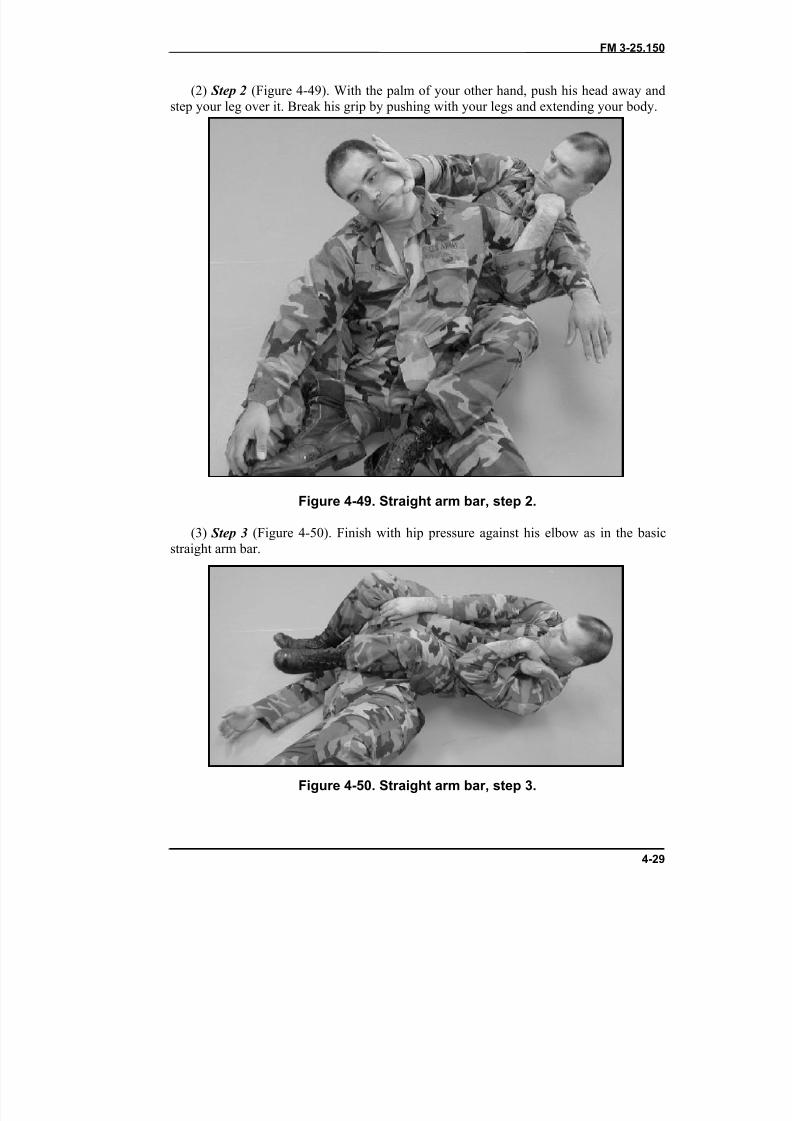
8/9/2019 US ARMY FM 3-25.150 - Combatives (hand-to-hand combat).pdf
http://slidepdf.com/reader/full/us-army-fm-3-25150-combatives-hand-to-hand-combatpdf 103/265
FM 3-25.150
4-29
(2) Step 2 (Figure 4-49). With the palm of your other hand, push his head away andstep your leg over it. Break his grip by pushing with your legs and extending your body.
Figure 4-49. Straight arm bar, step 2.
(3) Step 3 (Figure 4-50). Finish with hip pressure against his elbow as in the basicstraight arm bar.
Figure 4-50. Straight arm bar, step 3.
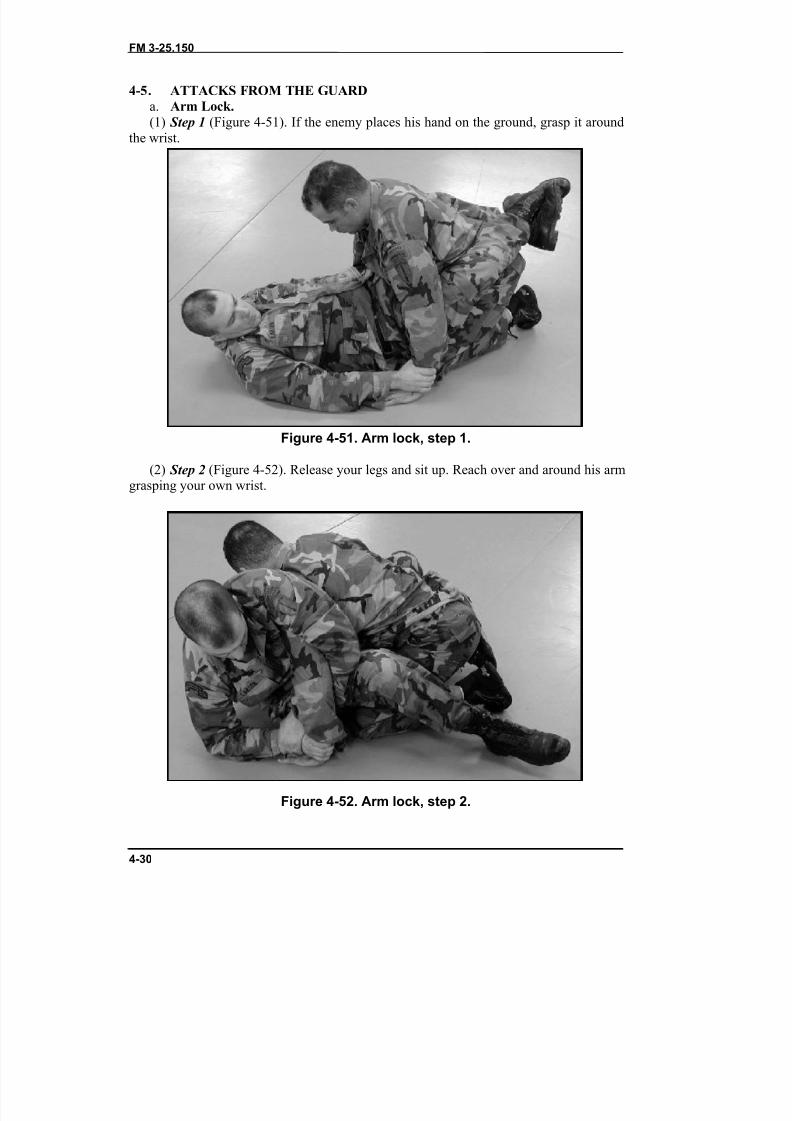
8/9/2019 US ARMY FM 3-25.150 - Combatives (hand-to-hand combat).pdf
http://slidepdf.com/reader/full/us-army-fm-3-25150-combatives-hand-to-hand-combatpdf 104/265
FM 3-25.150
4-30
4-5. ATTACKS FROM THE GUARDa. Arm Lock.(1) Step 1 (Figure 4-51). If the enemy places his hand on the ground, grasp it around
the wrist.
Figure 4-51. Arm lock, step 1.
(2) Step 2 (Figure 4-52). Release your legs and sit up. Reach over and around his armgrasping your own wrist.
Figure 4-52. Arm lock, step 2.
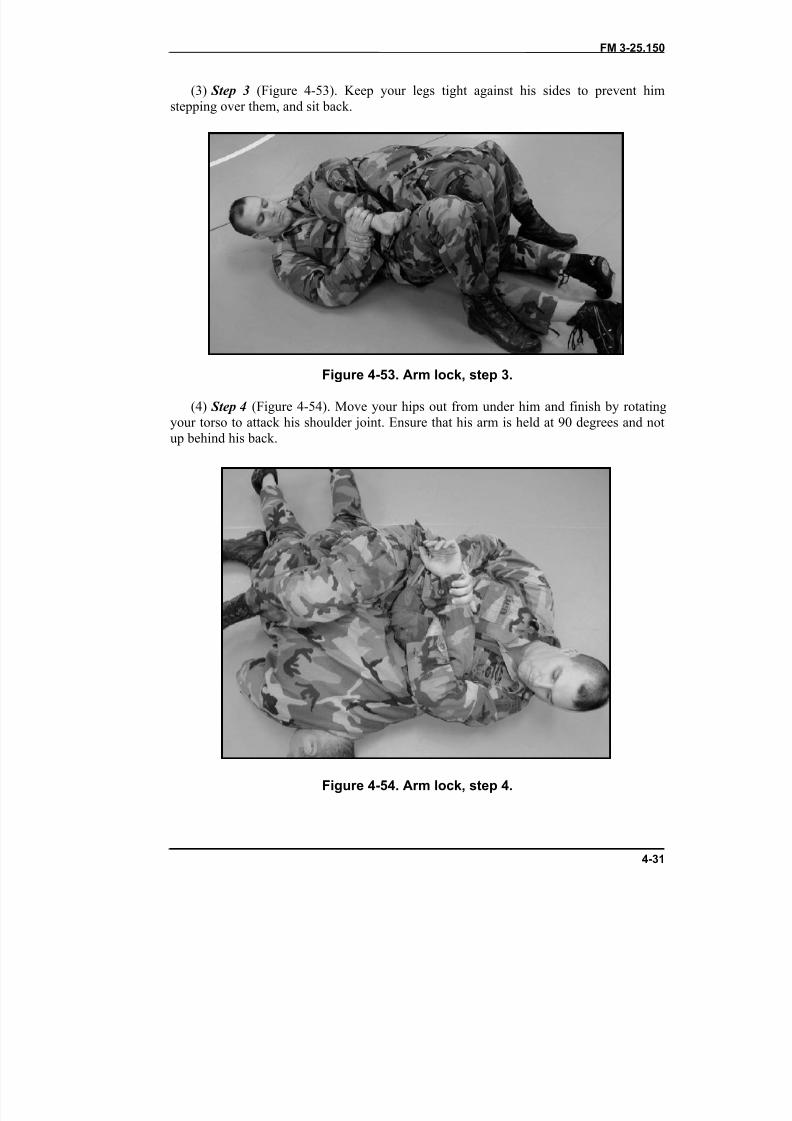
8/9/2019 US ARMY FM 3-25.150 - Combatives (hand-to-hand combat).pdf
http://slidepdf.com/reader/full/us-army-fm-3-25150-combatives-hand-to-hand-combatpdf 105/265
FM 3-25.150
4-31
(3) Step 3 (Figure 4-53). Keep your legs tight against his sides to prevent himstepping over them, and sit back.
Figure 4-53. Arm lock, step 3.
(4) Step 4 (Figure 4-54). Move your hips out from under him and finish by rotatingyour torso to attack his shoulder joint. Ensure that his arm is held at 90 degrees and notup behind his back.
Figure 4-54. Arm lock, step 4.
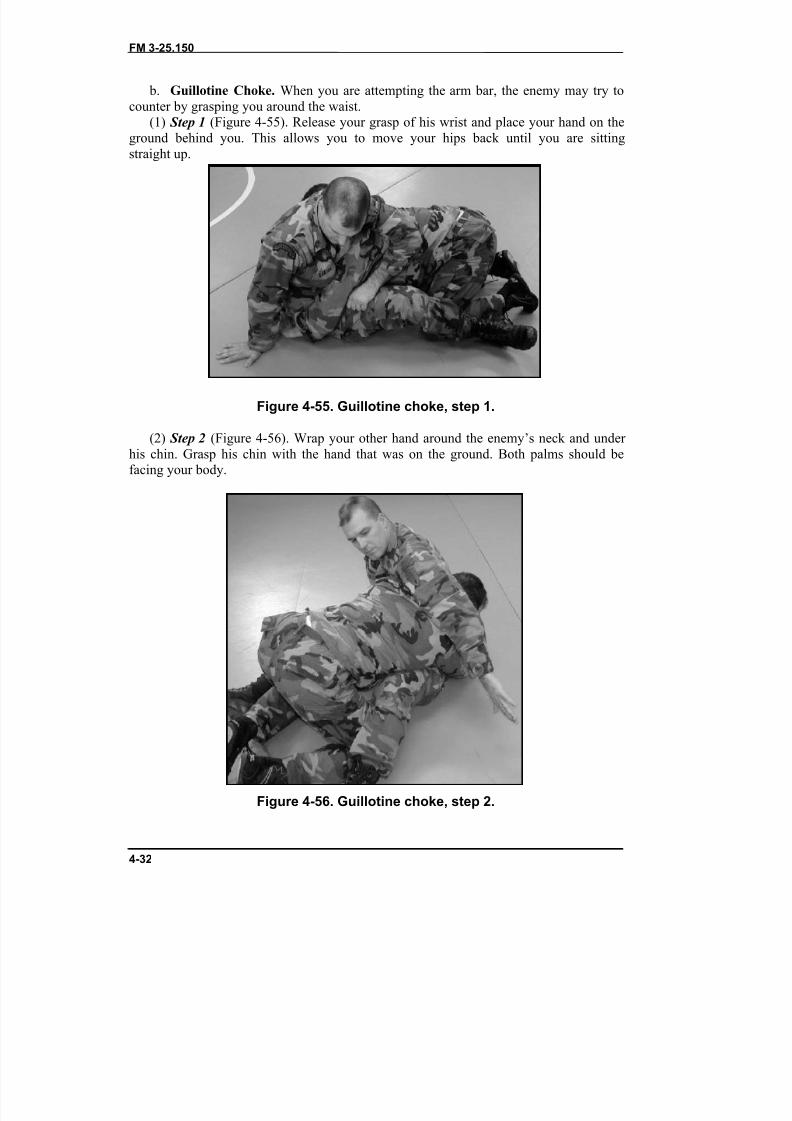
8/9/2019 US ARMY FM 3-25.150 - Combatives (hand-to-hand combat).pdf
http://slidepdf.com/reader/full/us-army-fm-3-25150-combatives-hand-to-hand-combatpdf 106/265
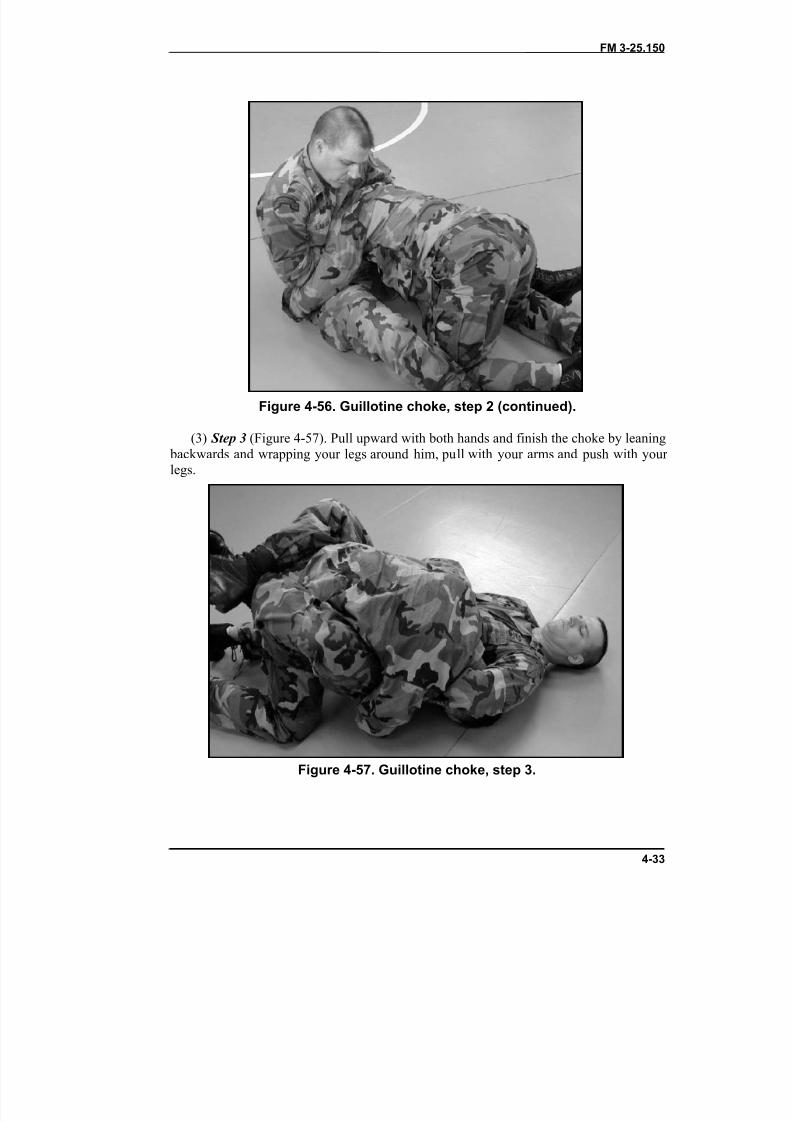
8/9/2019 US ARMY FM 3-25.150 - Combatives (hand-to-hand combat).pdf
http://slidepdf.com/reader/full/us-army-fm-3-25150-combatives-hand-to-hand-combatpdf 107/265
FM 3-25.150
4-33
Figure 4-56. Guillotine choke, step 2 (continued).
(3) Step 3 (Figure 4-57). Pull upward with both hands and finish the choke by leaning backwards and wrapping your legs around him, pull with your arms and push with your legs.
Figure 4-57. Guillotine choke, step 3.
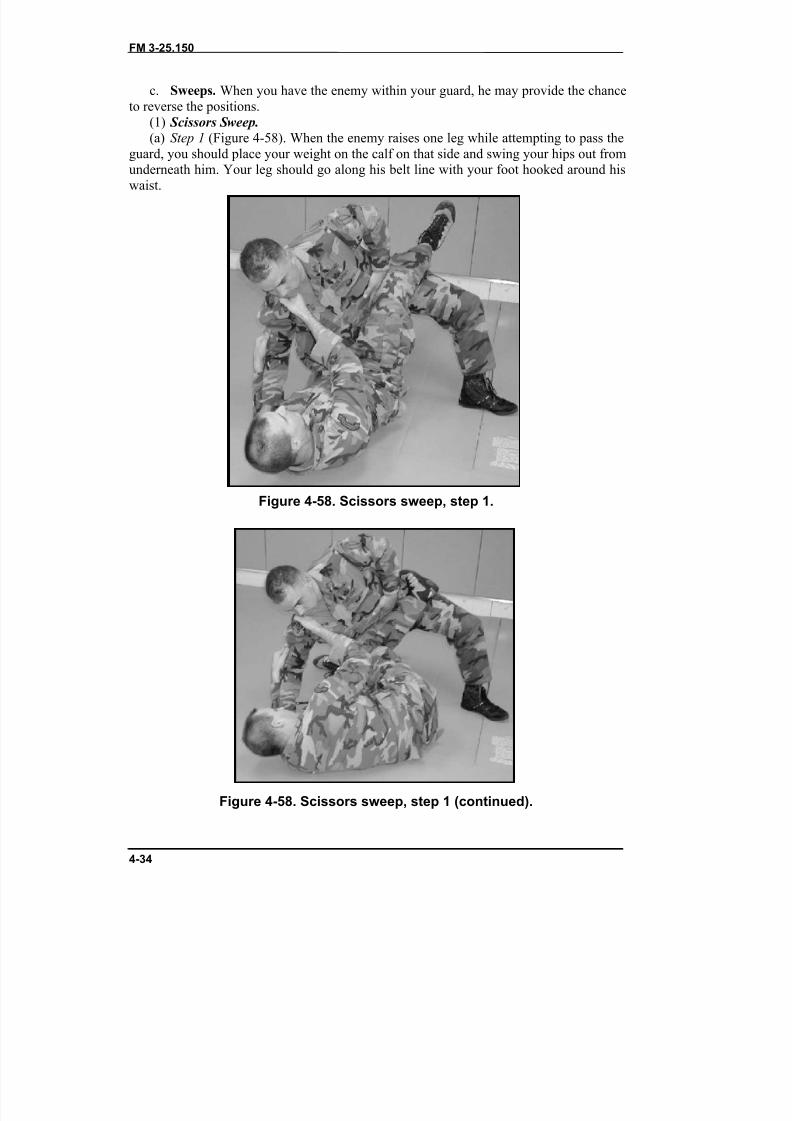
8/9/2019 US ARMY FM 3-25.150 - Combatives (hand-to-hand combat).pdf
http://slidepdf.com/reader/full/us-army-fm-3-25150-combatives-hand-to-hand-combatpdf 108/265
FM 3-25.150
4-34
c. Sweeps. When you have the enemy within your guard, he may provide the chanceto reverse the positions.
(1) Scissors Sweep.(a) Step 1 (Figure 4-58). When the enemy raises one leg while attempting to pass the
guard, you should place your weight on the calf on that side and swing your hips out from
underneath him. Your leg should go along his belt line with your foot hooked around hiswaist.
Figure 4-58. Scissors sweep, step 1.
Figure 4-58. Scissors sweep, step 1 (continued).

8/9/2019 US ARMY FM 3-25.150 - Combatives (hand-to-hand combat).pdf
http://slidepdf.com/reader/full/us-army-fm-3-25150-combatives-hand-to-hand-combatpdf 109/265
FM 3-25.150
4-35
(b) Step 2 (Figure 4-59). Move your chest away and kick him over with a scissorsaction from your legs, ending up mounted.
Figure 4-59. Scissors sweep, step 2.
Figure 4-59. Scissors sweep, step 2 (continued).

8/9/2019 US ARMY FM 3-25.150 - Combatives (hand-to-hand combat).pdf
http://slidepdf.com/reader/full/us-army-fm-3-25150-combatives-hand-to-hand-combatpdf 110/265
FM 3-25.150
4-36
(2) Captain Kirk. The enemy may attempt to pass by standing up. When he does he isvery susceptible to being swept.
(a) Step 1 (Figure 4-60). When the enemy stands up, maintain control with your armsand let your feet slide naturally down until they are on his hips.
Figure 4-60. Captain Kirk, step 1.
(b) Step 2 (Figure 4-61). If his weight gets too far forward, pick him up with your legs and throw him over one of your shoulders. Ensure that you move your head to theopposite side to prevent him landing on you. Finish mounted.
Figure 4-61. Captain Kirk, step 2.
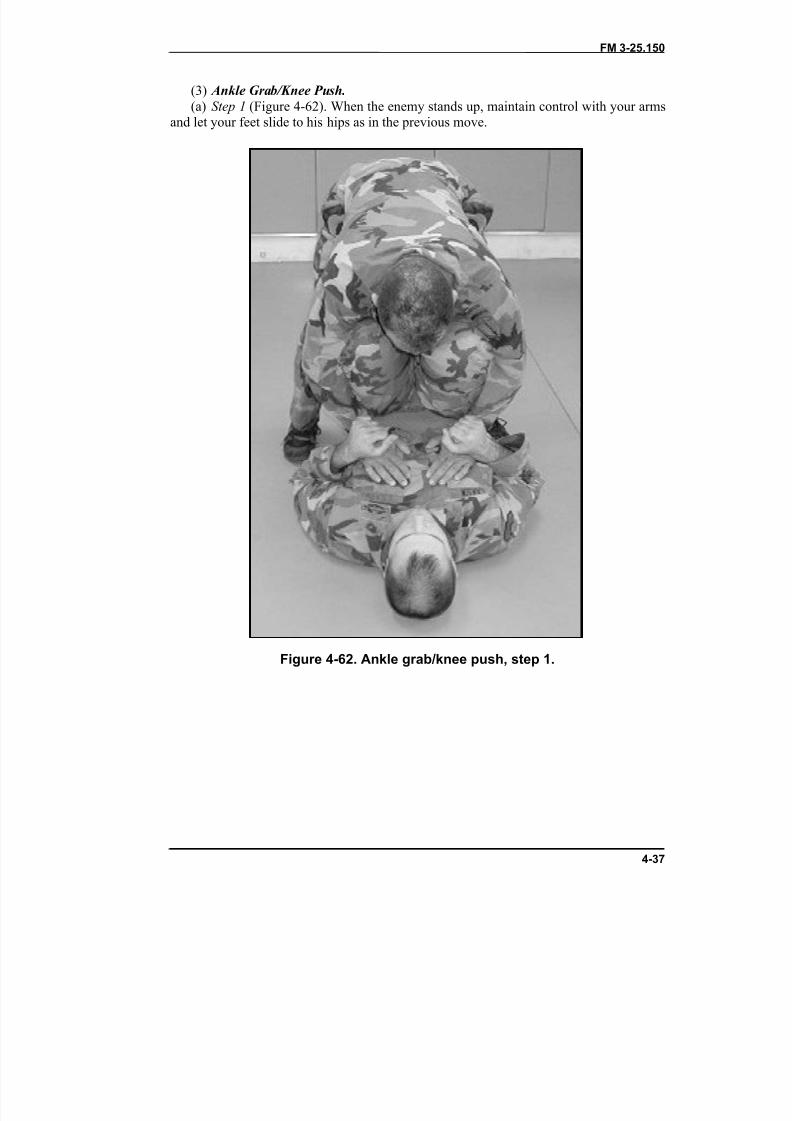
8/9/2019 US ARMY FM 3-25.150 - Combatives (hand-to-hand combat).pdf
http://slidepdf.com/reader/full/us-army-fm-3-25150-combatives-hand-to-hand-combatpdf 111/265
FM 3-25.150
4-37
(3) Ankle Grab/Knee Push.(a) Step 1 (Figure 4-62). When the enemy stands up, maintain control with your arms
and let your feet slide to his hips as in the previous move.
Figure 4-62. Ankle grab/knee push, step 1.
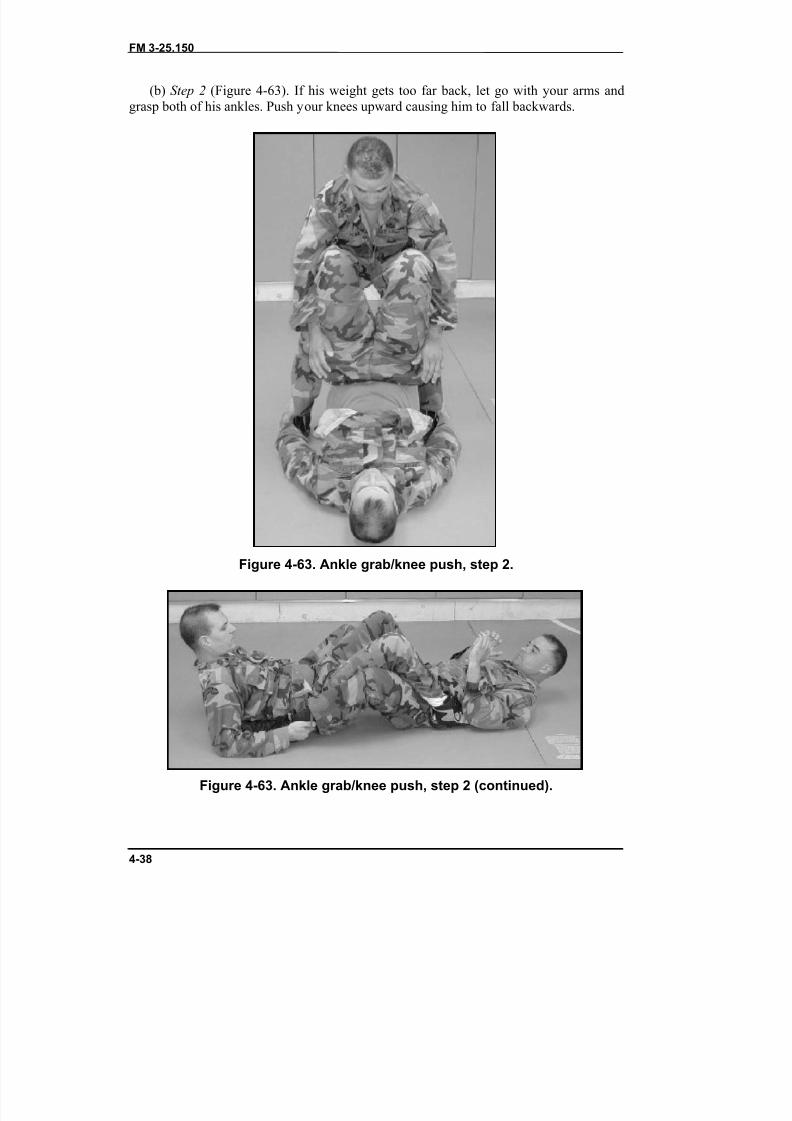
8/9/2019 US ARMY FM 3-25.150 - Combatives (hand-to-hand combat).pdf
http://slidepdf.com/reader/full/us-army-fm-3-25150-combatives-hand-to-hand-combatpdf 112/265
FM 3-25.150
4-38
(b) Step 2 (Figure 4-63). If his weight gets too far back, let go with your arms andgrasp both of his ankles. Push your knees upward causing him to fall backwards.
Figure 4-63. Ankle grab/knee push, step 2.
Figure 4-63. Ankle grab/knee push, step 2 (continued).
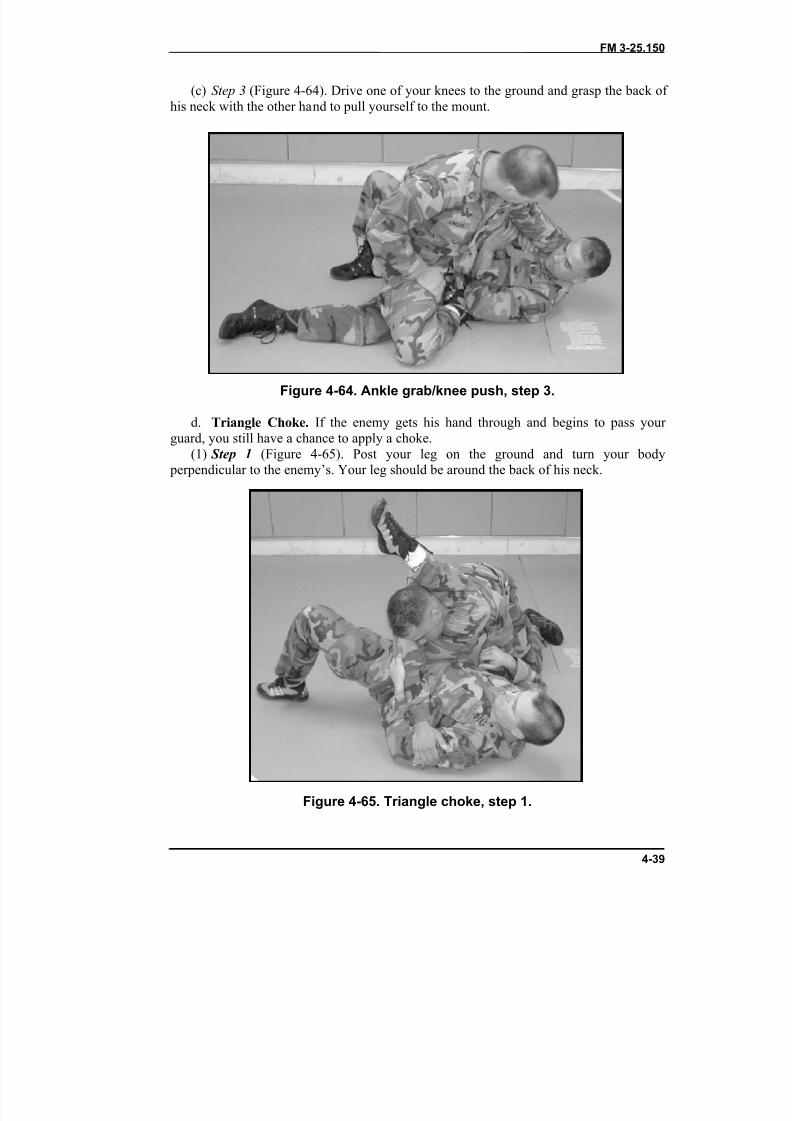
8/9/2019 US ARMY FM 3-25.150 - Combatives (hand-to-hand combat).pdf
http://slidepdf.com/reader/full/us-army-fm-3-25150-combatives-hand-to-hand-combatpdf 113/265
FM 3-25.150
4-39
(c) Step 3 (Figure 4-64). Drive one of your knees to the ground and grasp the back of his neck with the other hand to pull yourself to the mount.
Figure 4-64. Ankle grab/knee push, step 3.
d. Triangle Choke. If the enemy gets his hand through and begins to pass your guard, you still have a chance to apply a choke.
(1) Step 1 (Figure 4-65). Post your leg on the ground and turn your body perpendicular to the enemy’s. Your leg should be around the back of his neck.
Figure 4-65. Triangle choke, step 1.
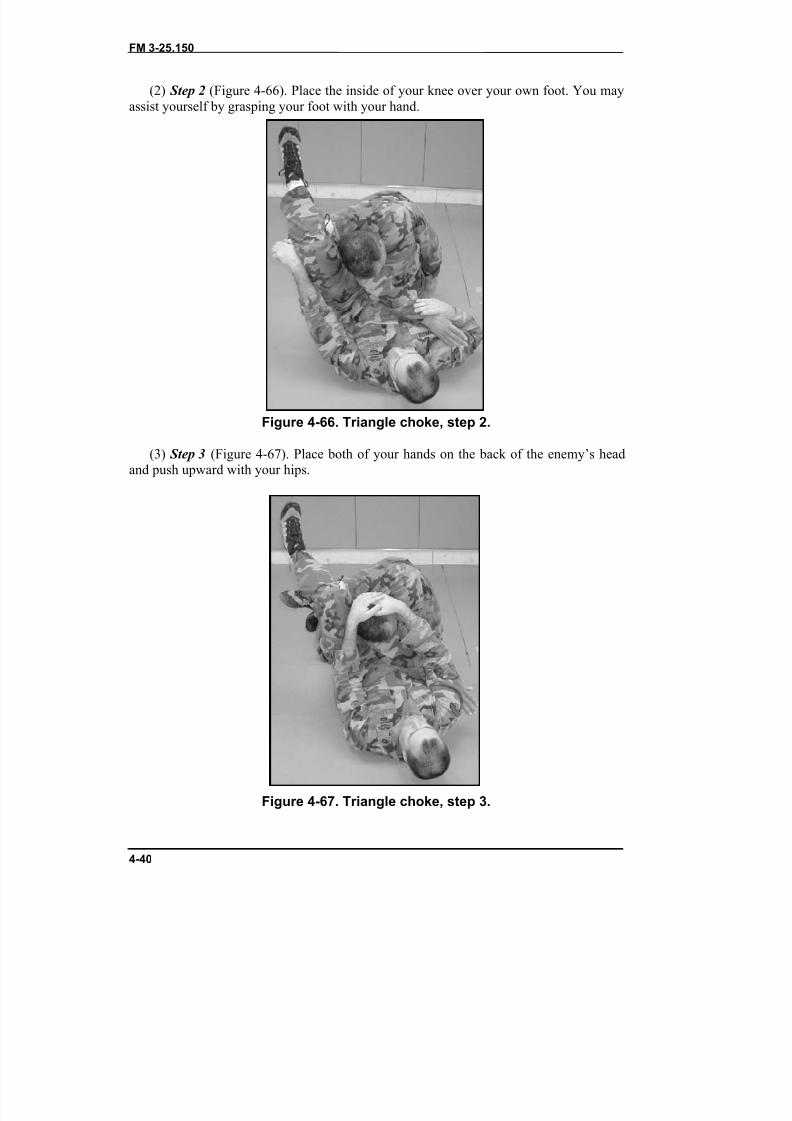
8/9/2019 US ARMY FM 3-25.150 - Combatives (hand-to-hand combat).pdf
http://slidepdf.com/reader/full/us-army-fm-3-25150-combatives-hand-to-hand-combatpdf 114/265
FM 3-25.150
4-40
(2) Step 2 (Figure 4-66). Place the inside of your knee over your own foot. You mayassist yourself by grasping your foot with your hand.
Figure 4-66. Triangle choke, step 2.
(3) Step 3 (Figure 4-67). Place both of your hands on the back of the enemy’s headand push upward with your hips.
Figure 4-67. Triangle choke, step 3.
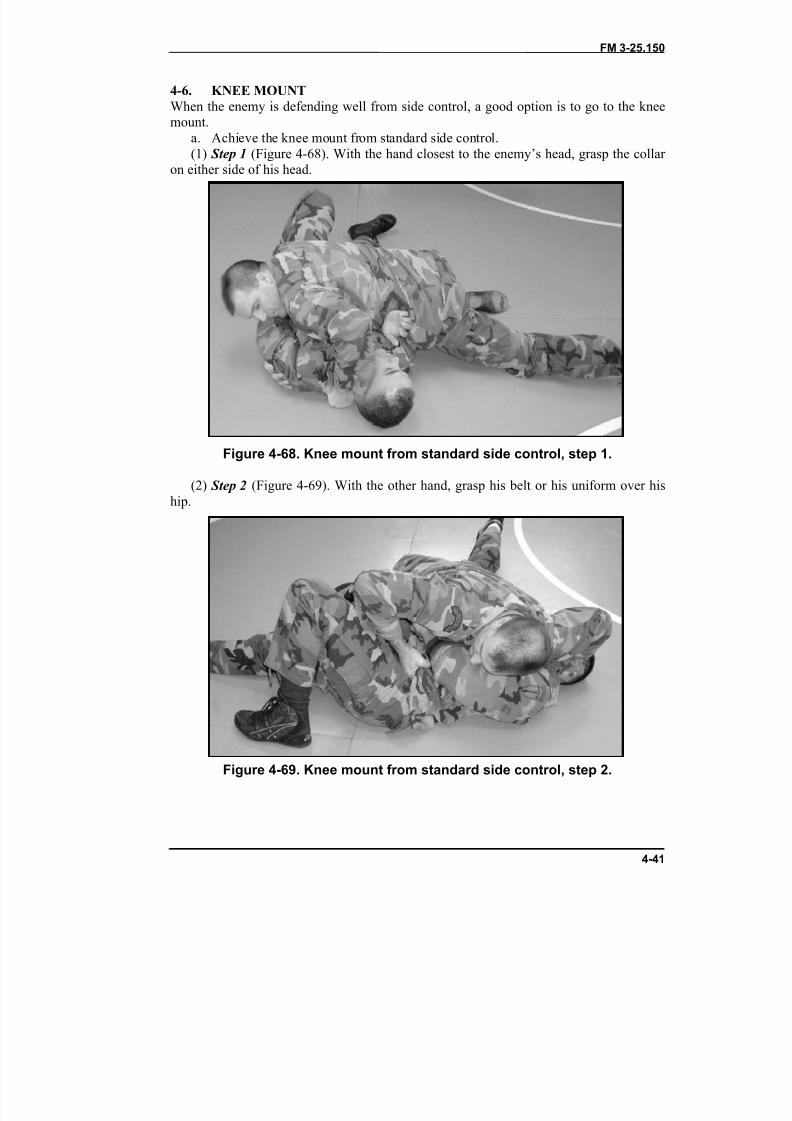
8/9/2019 US ARMY FM 3-25.150 - Combatives (hand-to-hand combat).pdf
http://slidepdf.com/reader/full/us-army-fm-3-25150-combatives-hand-to-hand-combatpdf 115/265
FM 3-25.150
4-41
4-6. KNEE MOUNTWhen the enemy is defending well from side control, a good option is to go to the kneemount.
a. Achieve the knee mount from standard side control.(1) Step 1 (Figure 4-68). With the hand closest to the enemy’s head, grasp the collar
on either side of his head.
Figure 4-68. Knee mount from standard side control, step 1.
(2) Step 2 (Figure 4-69). With the other hand, grasp his belt or his uniform over hiship.
Figure 4-69. Knee mount from standard side control, step 2.
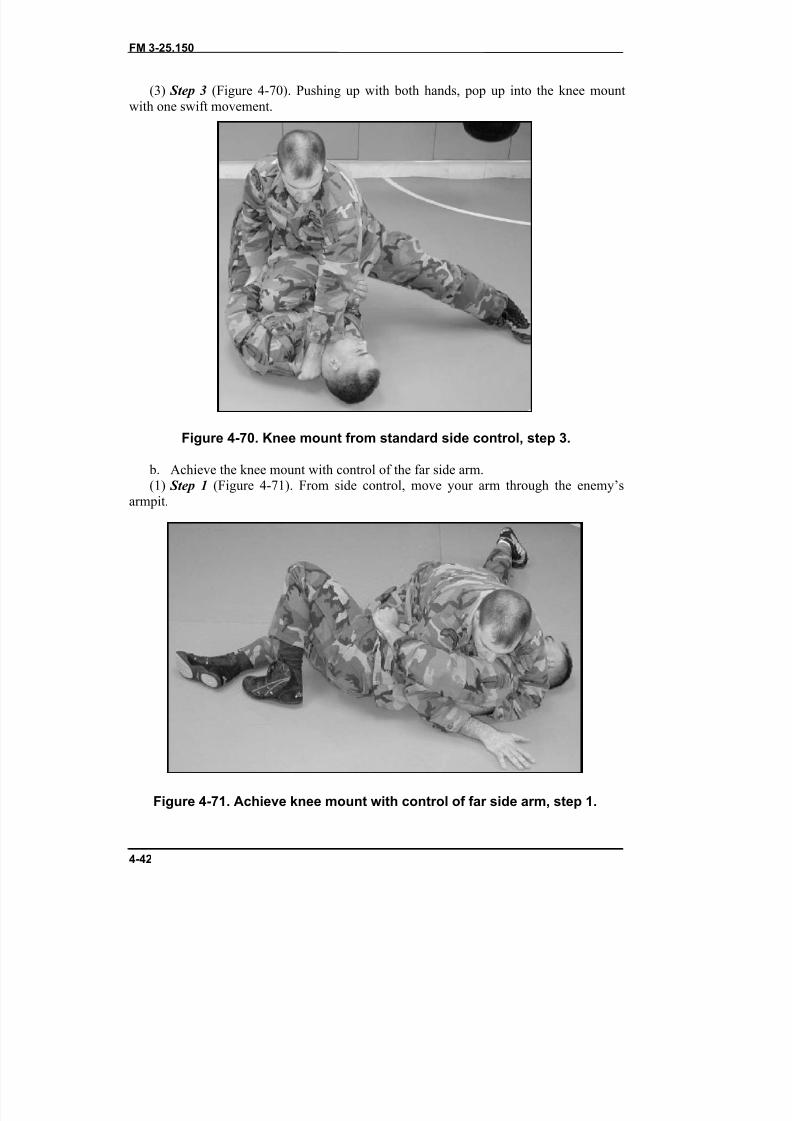
8/9/2019 US ARMY FM 3-25.150 - Combatives (hand-to-hand combat).pdf
http://slidepdf.com/reader/full/us-army-fm-3-25150-combatives-hand-to-hand-combatpdf 116/265
FM 3-25.150
4-42
(3) Step 3 (Figure 4-70). Pushing up with both hands, pop up into the knee mountwith one swift movement.
Figure 4-70. Knee mount from standard side control, step 3.
b. Achieve the knee mount with control of the far side arm.(1) Step 1 (Figure 4-71). From side control, move your arm through the enemy’s
armpit.
Figure 4-71. Achieve knee mount with control of far side arm, step 1.
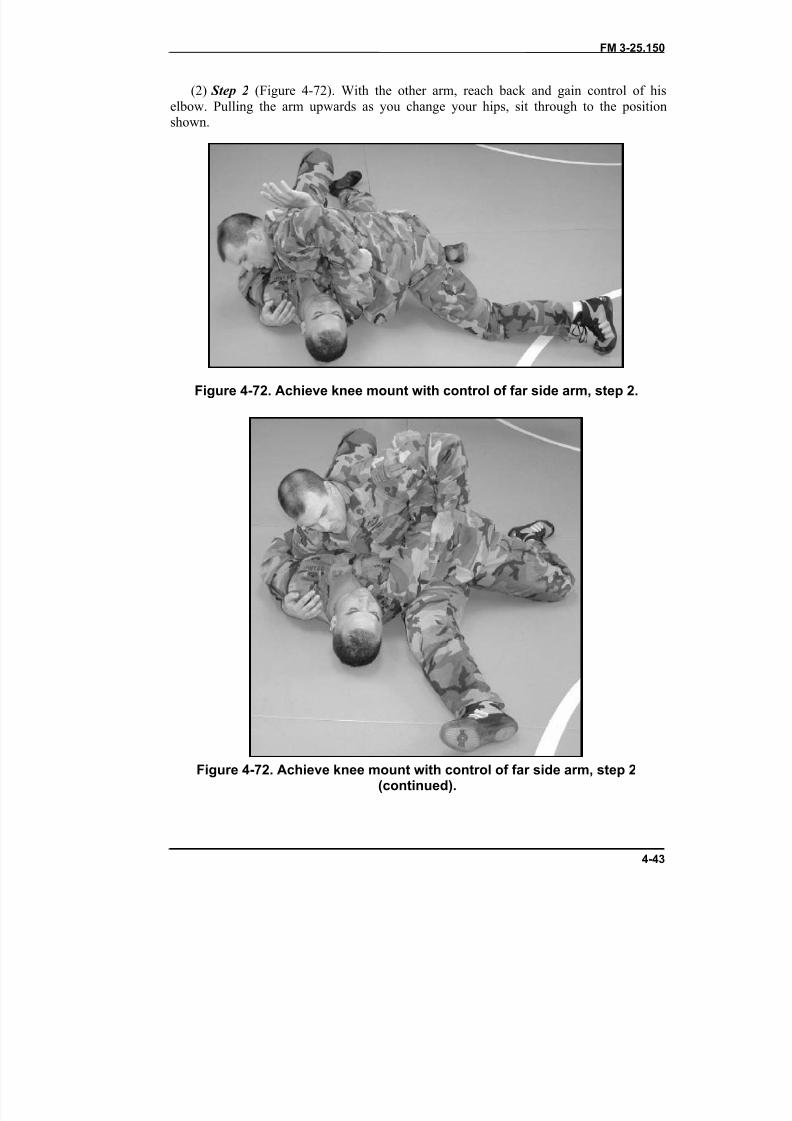
8/9/2019 US ARMY FM 3-25.150 - Combatives (hand-to-hand combat).pdf
http://slidepdf.com/reader/full/us-army-fm-3-25150-combatives-hand-to-hand-combatpdf 117/265
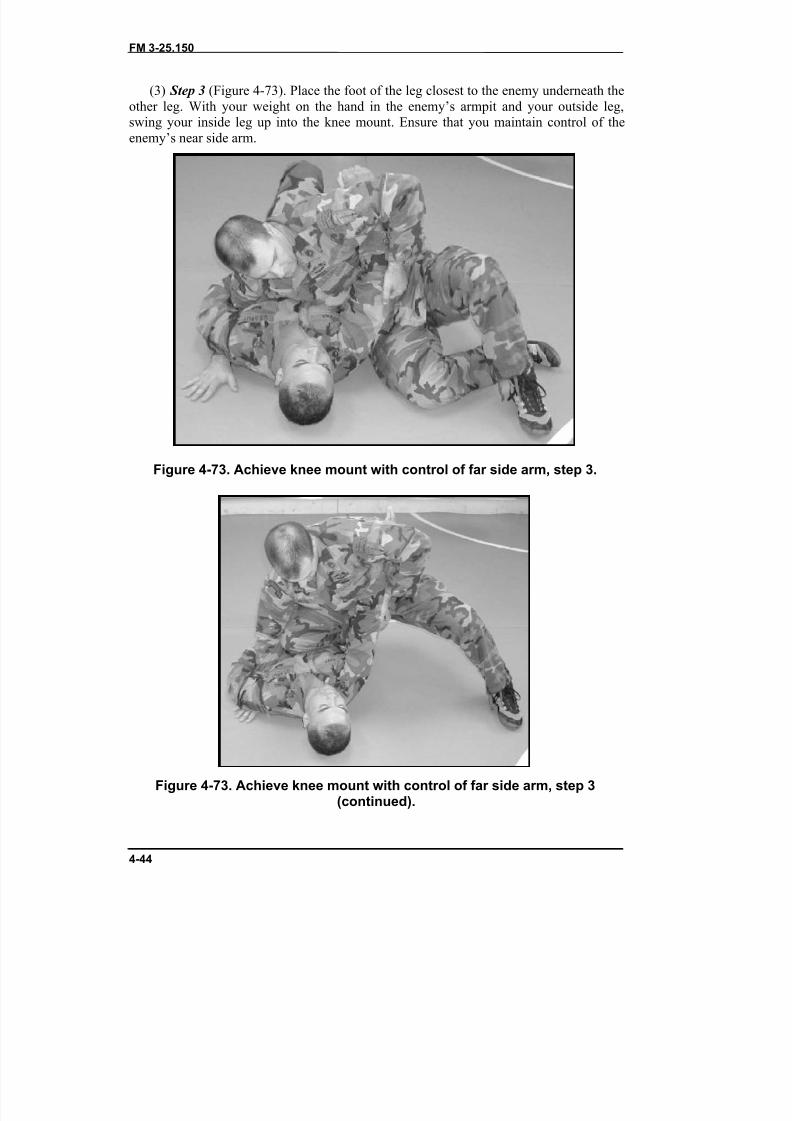
8/9/2019 US ARMY FM 3-25.150 - Combatives (hand-to-hand combat).pdf
http://slidepdf.com/reader/full/us-army-fm-3-25150-combatives-hand-to-hand-combatpdf 118/265
FM 3-25.150
4-44
(3) Step 3 (Figure 4-73). Place the foot of the leg closest to the enemy underneath theother leg. With your weight on the hand in the enemy’s armpit and your outside leg,swing your inside leg up into the knee mount. Ensure that you maintain control of theenemy’s near side arm.
Figure 4-73. Achieve knee mount with control of far side arm, step 3.
Figure 4-73. Achieve knee mount with control of far side arm, step 3(continued).
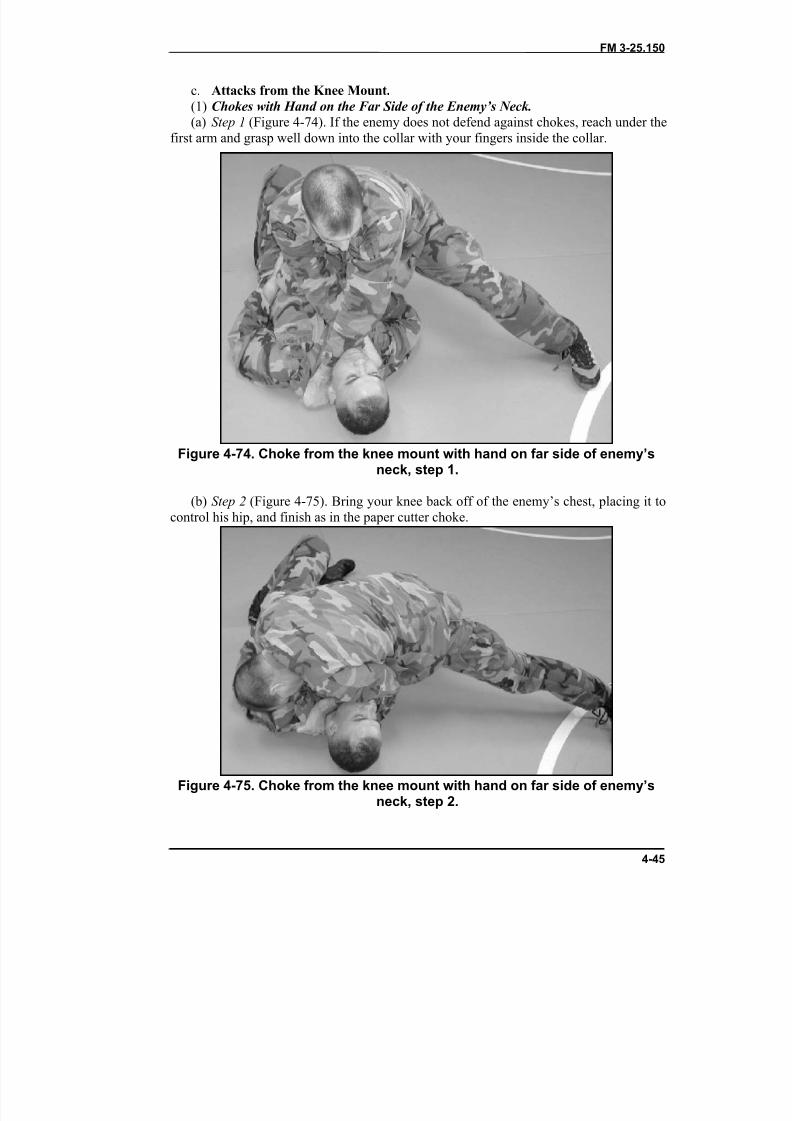
8/9/2019 US ARMY FM 3-25.150 - Combatives (hand-to-hand combat).pdf
http://slidepdf.com/reader/full/us-army-fm-3-25150-combatives-hand-to-hand-combatpdf 119/265
FM 3-25.150
4-45
c. Attacks from the Knee Mount.(1) Chokes with Hand on the Far Side of the Enemy’s Neck.(a) Step 1 (Figure 4-74). If the enemy does not defend against chokes, reach under the
first arm and grasp well down into the collar with your fingers inside the collar.
Figure 4-74. Choke from the knee mount with hand on far side of enemy’sneck, step 1.
(b) Step 2 (Figure 4-75). Bring your knee back off of the enemy’s chest, placing it tocontrol his hip, and finish as in the paper cutter choke.
Figure 4-75. Choke from the knee mount with hand on far side of enemy’sneck, step 2.
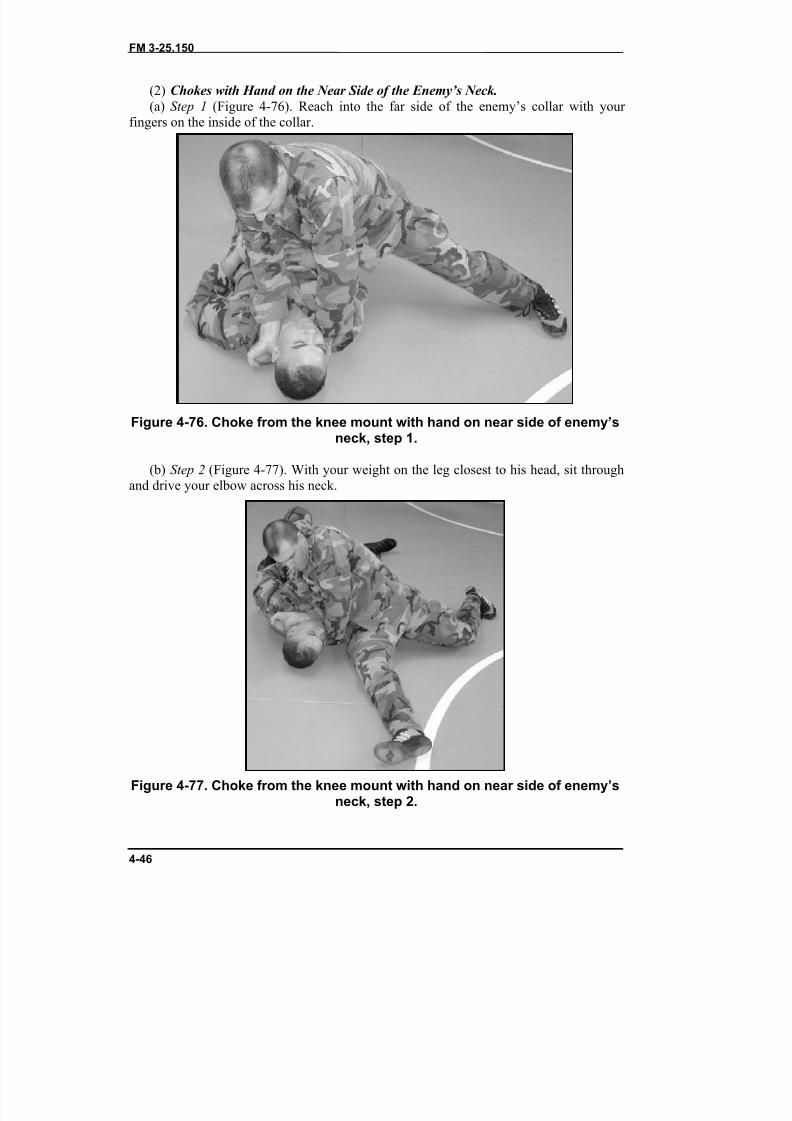
8/9/2019 US ARMY FM 3-25.150 - Combatives (hand-to-hand combat).pdf
http://slidepdf.com/reader/full/us-army-fm-3-25150-combatives-hand-to-hand-combatpdf 120/265
FM 3-25.150
4-46
(2) Chokes with Hand on the Near Side of the Enemy’s Neck.(a) Step 1 (Figure 4-76). Reach into the far side of the enemy’s collar with your
fingers on the inside of the collar.
Figure 4-76. Choke from the knee mount with hand on near side of enemy’sneck, step 1.
(b) Step 2 (Figure 4-77). With your weight on the leg closest to his head, sit throughand drive your elbow across his neck.
Figure 4-77. Choke from the knee mount with hand on near side of enemy’sneck, step 2.
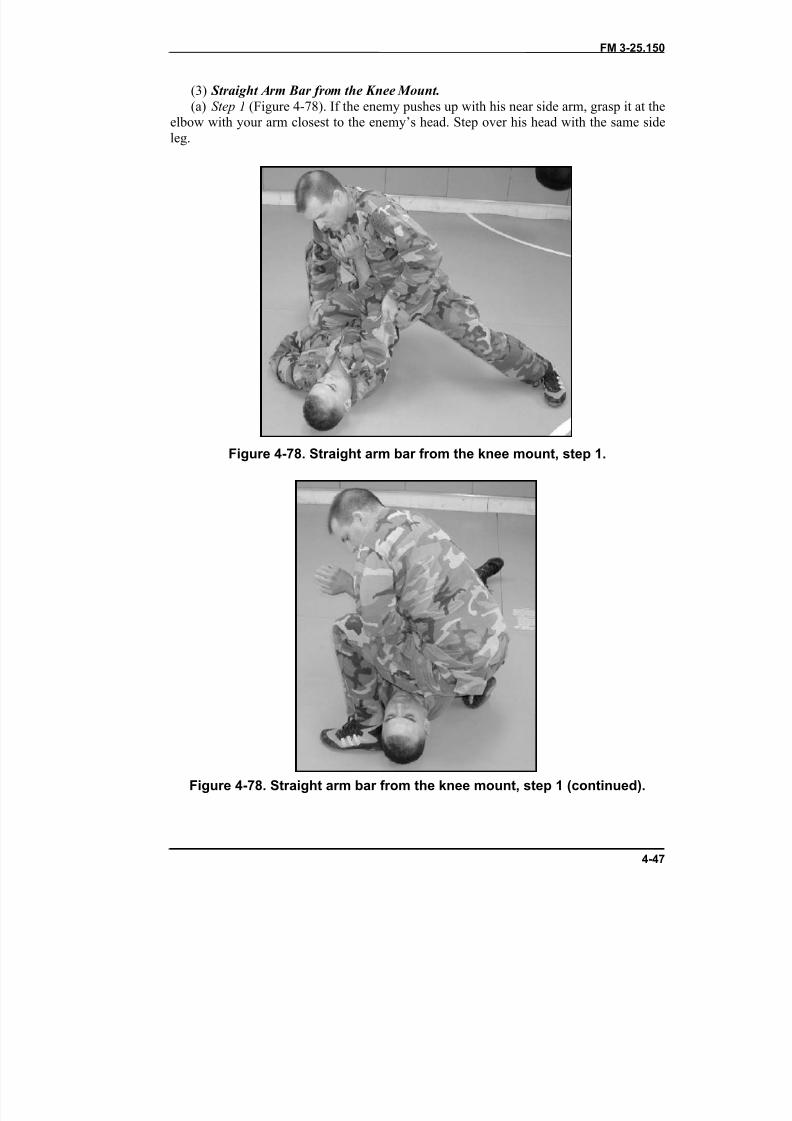
8/9/2019 US ARMY FM 3-25.150 - Combatives (hand-to-hand combat).pdf
http://slidepdf.com/reader/full/us-army-fm-3-25150-combatives-hand-to-hand-combatpdf 121/265
FM 3-25.150
4-47
(3) Straight Arm Bar from the Knee Mount.(a) Step 1 (Figure 4-78). If the enemy pushes up with his near side arm, grasp it at the
elbow with your arm closest to the enemy’s head. Step over his head with the same sideleg.
Figure 4-78. Straight arm bar from the knee mount, step 1.
Figure 4-78. Straight arm bar from the knee mount, step 1 (continued).
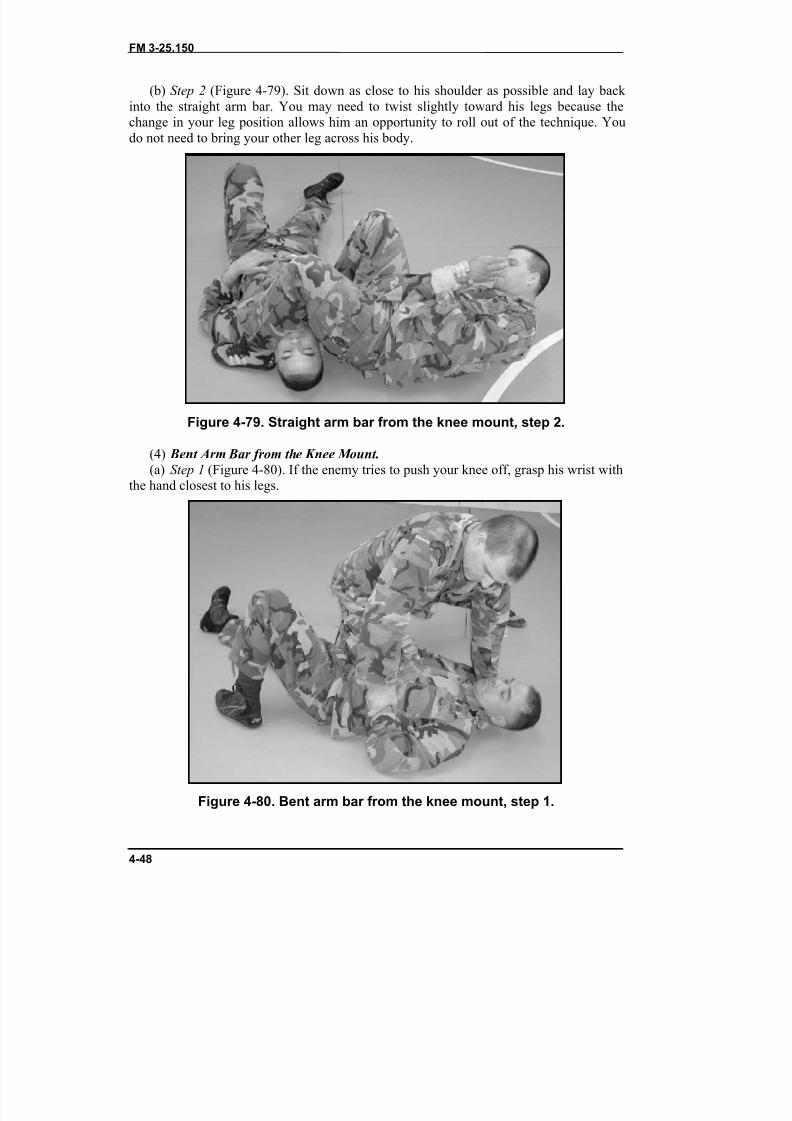
8/9/2019 US ARMY FM 3-25.150 - Combatives (hand-to-hand combat).pdf
http://slidepdf.com/reader/full/us-army-fm-3-25150-combatives-hand-to-hand-combatpdf 122/265
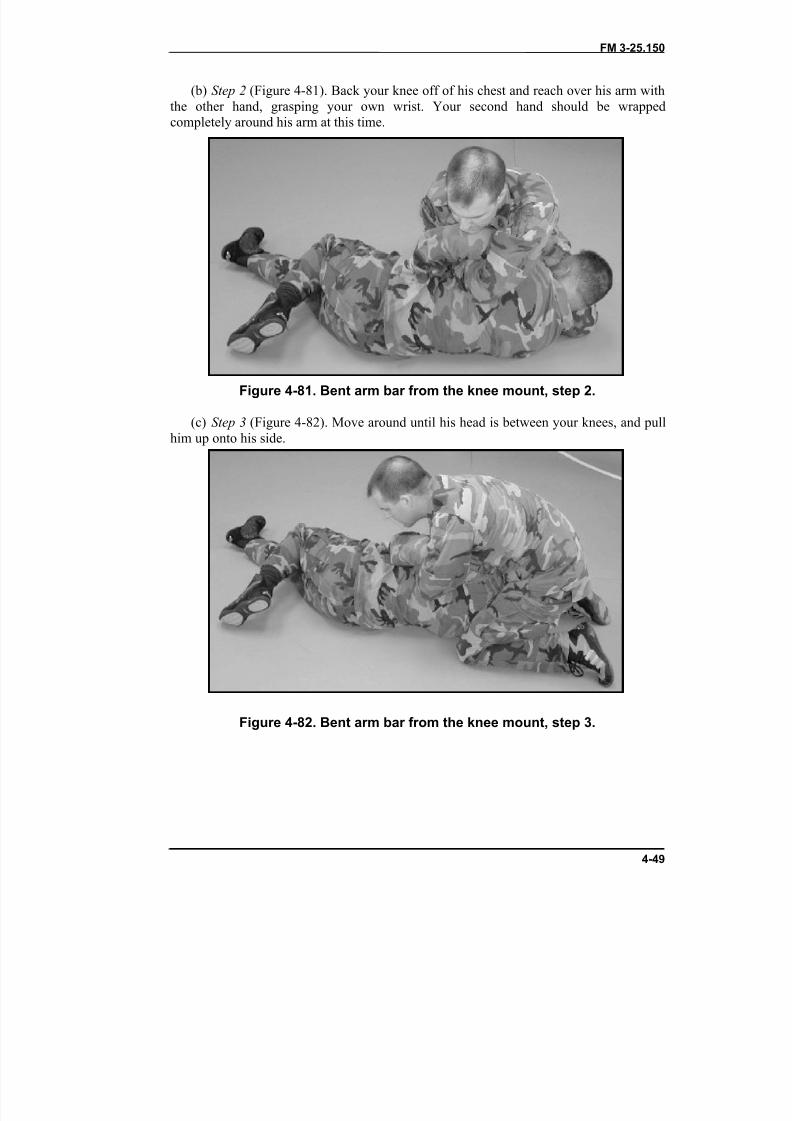
8/9/2019 US ARMY FM 3-25.150 - Combatives (hand-to-hand combat).pdf
http://slidepdf.com/reader/full/us-army-fm-3-25150-combatives-hand-to-hand-combatpdf 123/265
FM 3-25.150
4-49
(b) Step 2 (Figure 4-81). Back your knee off of his chest and reach over his arm withthe other hand, grasping your own wrist. Your second hand should be wrappedcompletely around his arm at this time.
Figure 4-81. Bent arm bar from the knee mount, step 2.
(c) Step 3 (Figure 4-82). Move around until his head is between your knees, and pullhim up onto his side.
Figure 4-82. Bent arm bar from the knee mount, step 3.

8/9/2019 US ARMY FM 3-25.150 - Combatives (hand-to-hand combat).pdf
http://slidepdf.com/reader/full/us-army-fm-3-25150-combatives-hand-to-hand-combatpdf 124/265
FM 3-25.150
4-50
(d) Step 4 (Figure 4-83). Break his grip by pulling his arm quickly toward his head.
Figure 4-83. Bent arm bar from the knee mount, step 4.
(e) Step 5 (Figure 4-84). Step your foot into the small of his back, and break hisshoulder by rotating your torso towards his back.
Figure 4-84. Bent arm bar from the knee mount, step 5.
Note: It is important to keep the enemy’s elbow tight to your chest to keep him fromescaping.
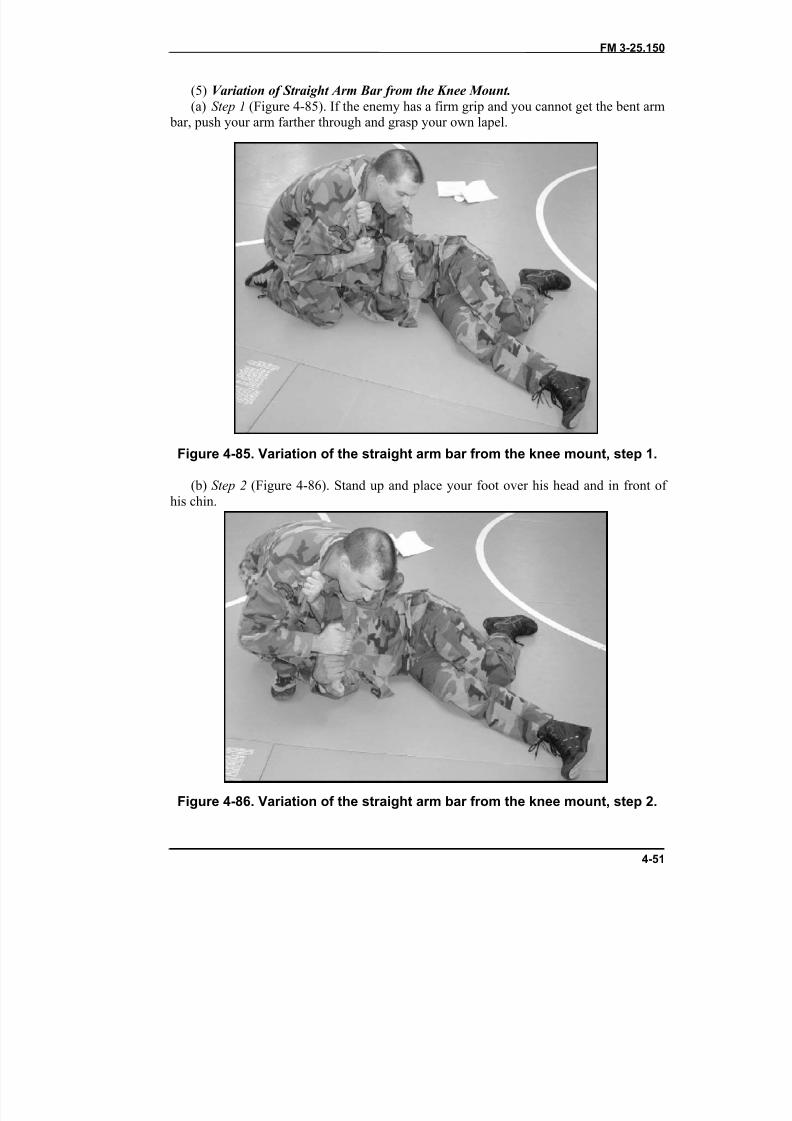
8/9/2019 US ARMY FM 3-25.150 - Combatives (hand-to-hand combat).pdf
http://slidepdf.com/reader/full/us-army-fm-3-25150-combatives-hand-to-hand-combatpdf 125/265
FM 3-25.150
4-51
(5) Variation of Straight Arm Bar from the Knee Mount.(a) Step 1 (Figure 4-85). If the enemy has a firm grip and you cannot get the bent arm
bar, push your arm farther through and grasp your own lapel.
Figure 4-85. Variation of the straight arm bar from the knee mount, step 1.
(b) Step 2 (Figure 4-86). Stand up and place your foot over his head and in front of his chin.
Figure 4-86. Variation of the straight arm bar from the knee mount, step 2.
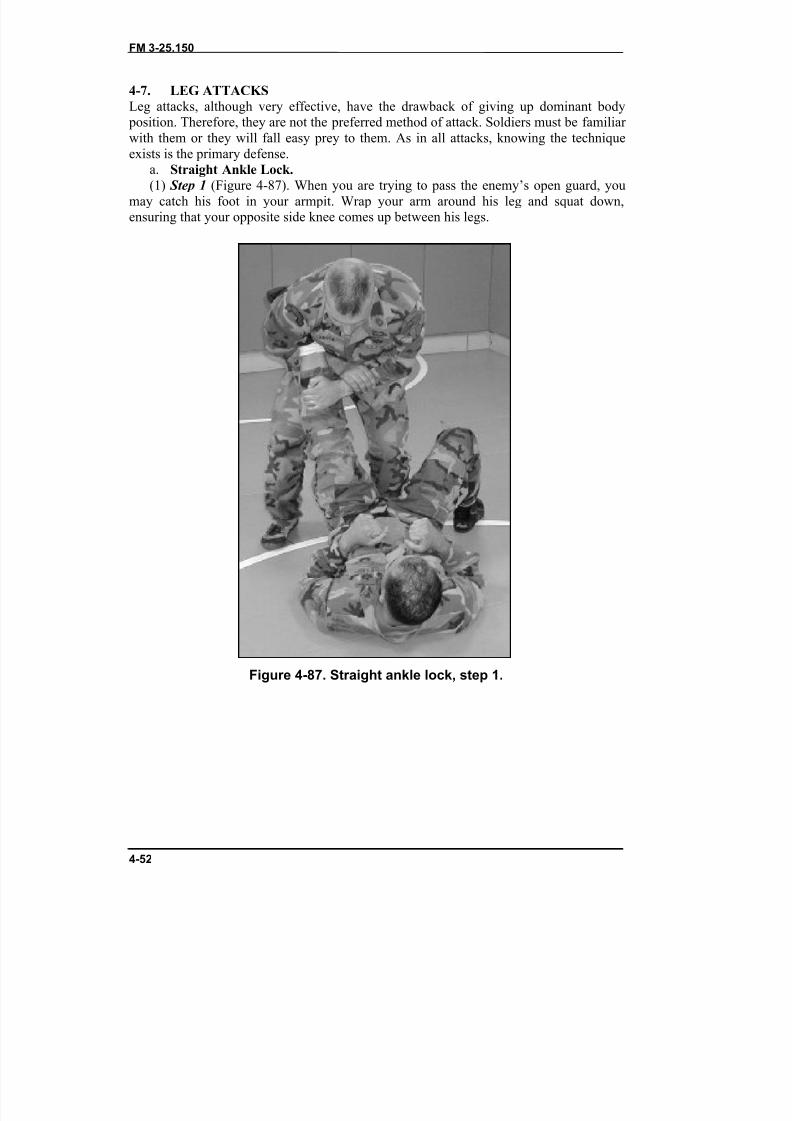
8/9/2019 US ARMY FM 3-25.150 - Combatives (hand-to-hand combat).pdf
http://slidepdf.com/reader/full/us-army-fm-3-25150-combatives-hand-to-hand-combatpdf 126/265
FM 3-25.150
4-52
4-7. LEG ATTACKSLeg attacks, although very effective, have the drawback of giving up dominant body
position. Therefore, they are not the preferred method of attack. Soldiers must be familiar with them or they will fall easy prey to them. As in all attacks, knowing the techniqueexists is the primary defense.
a. Straight Ankle Lock.(1) Step 1 (Figure 4-87). When you are trying to pass the enemy’s open guard, youmay catch his foot in your armpit. Wrap your arm around his leg and squat down,ensuring that your opposite side knee comes up between his legs.
Figure 4-87. Straight ankle lock, step 1.
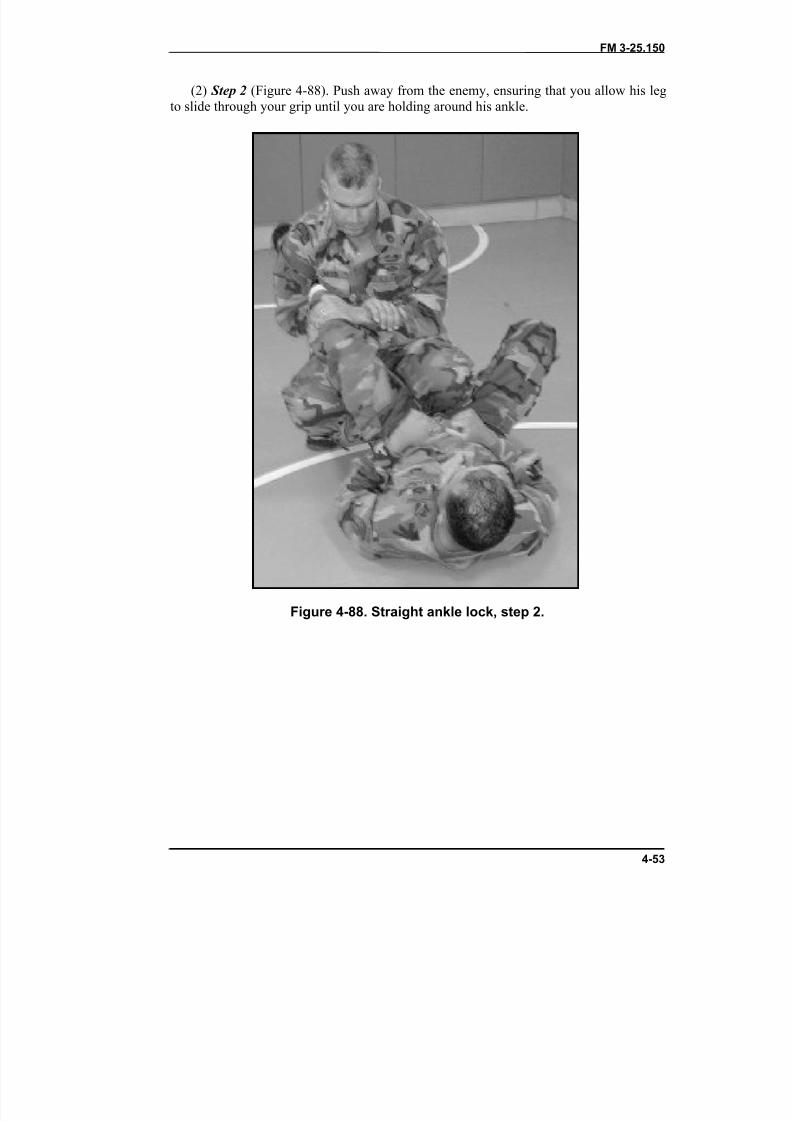
8/9/2019 US ARMY FM 3-25.150 - Combatives (hand-to-hand combat).pdf
http://slidepdf.com/reader/full/us-army-fm-3-25150-combatives-hand-to-hand-combatpdf 127/265
FM 3-25.150
4-53
(2) Step 2 (Figure 4-88). Push away from the enemy, ensuring that you allow his legto slide through your grip until you are holding around his ankle.
Figure 4-88. Straight ankle lock, step 2.
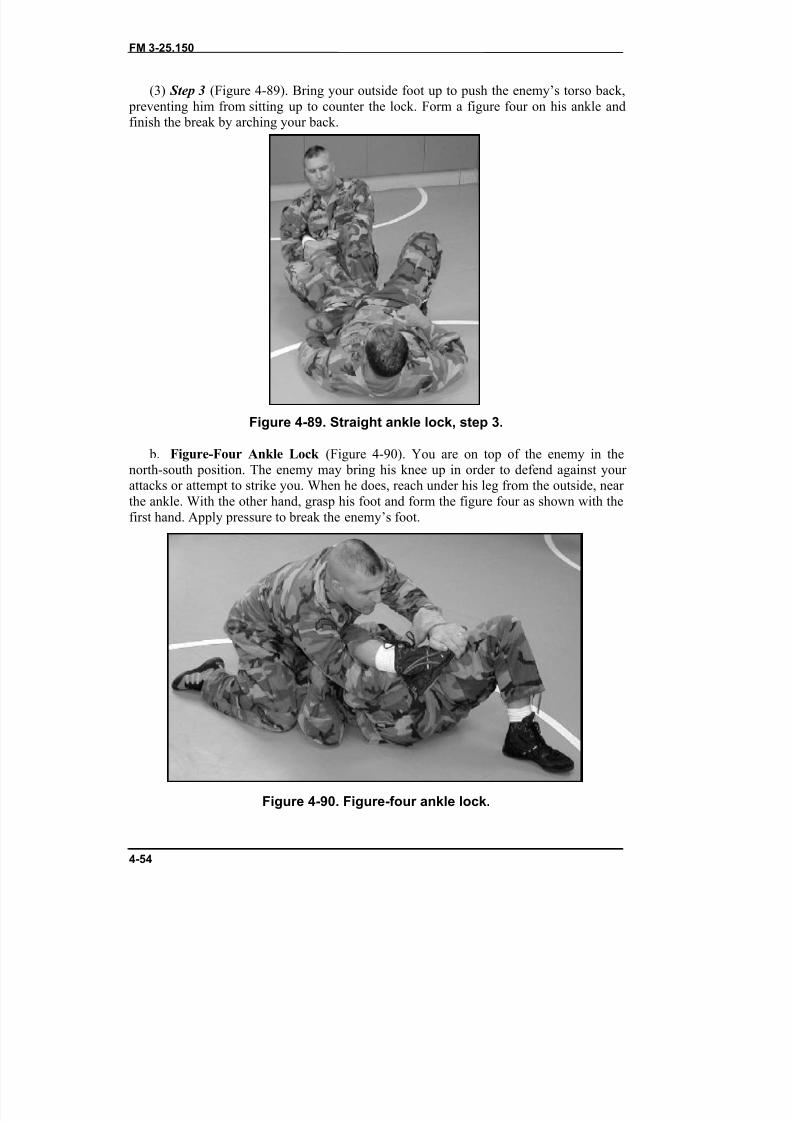
8/9/2019 US ARMY FM 3-25.150 - Combatives (hand-to-hand combat).pdf
http://slidepdf.com/reader/full/us-army-fm-3-25150-combatives-hand-to-hand-combatpdf 128/265
FM 3-25.150
4-54
(3) Step 3 (Figure 4-89). Bring your outside foot up to push the enemy’s torso back, preventing him from sitting up to counter the lock. Form a figure four on his ankle andfinish the break by arching your back.
Figure 4-89. Straight ankle lock, step 3.
b. Figure-Four Ankle Lock (Figure 4-90). You are on top of the enemy in thenorth-south position. The enemy may bring his knee up in order to defend against your attacks or attempt to strike you. When he does, reach under his leg from the outside, near the ankle. With the other hand, grasp his foot and form the figure four as shown with thefirst hand. Apply pressure to break the enemy’s foot.
Figure 4-90. Figure-four ankle lock.
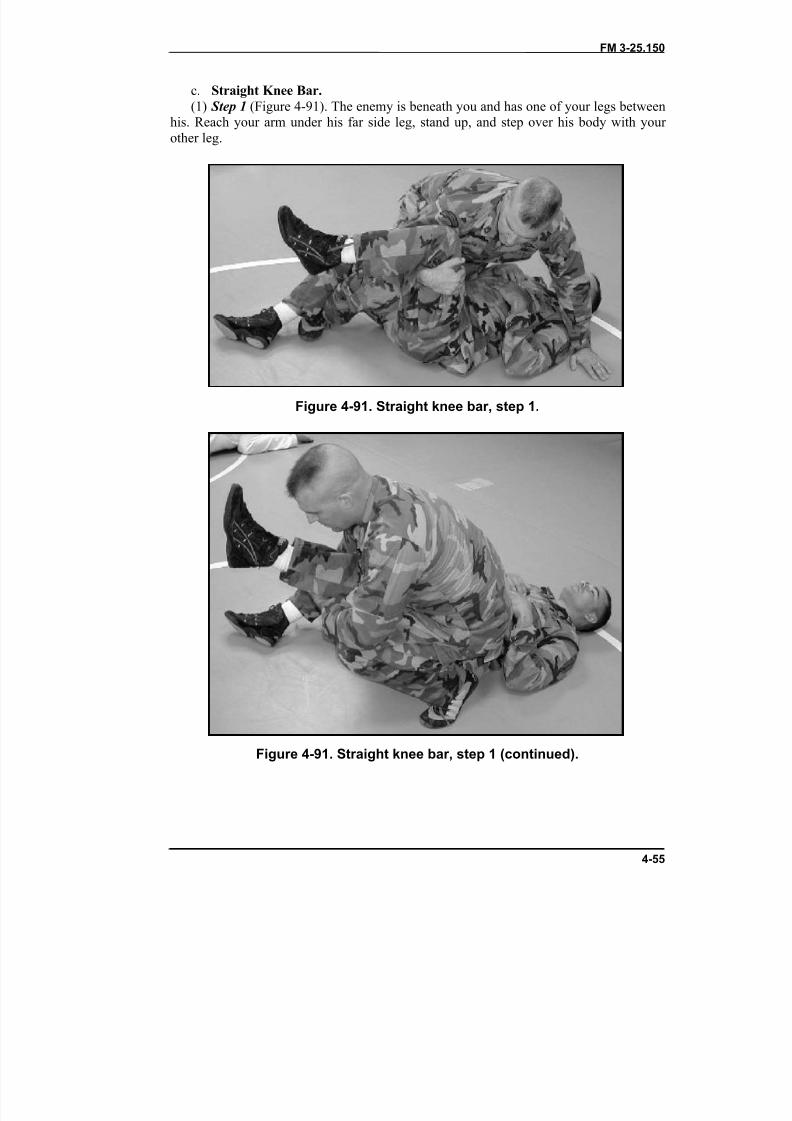
8/9/2019 US ARMY FM 3-25.150 - Combatives (hand-to-hand combat).pdf
http://slidepdf.com/reader/full/us-army-fm-3-25150-combatives-hand-to-hand-combatpdf 129/265
FM 3-25.150
4-55
c. Straight Knee Bar.(1) Step 1 (Figure 4-91). The enemy is beneath you and has one of your legs between
his. Reach your arm under his far side leg, stand up, and step over his body with your other leg.
Figure 4-91. Straight knee bar, step 1.
Figure 4-91. Straight knee bar, step 1 (continued).
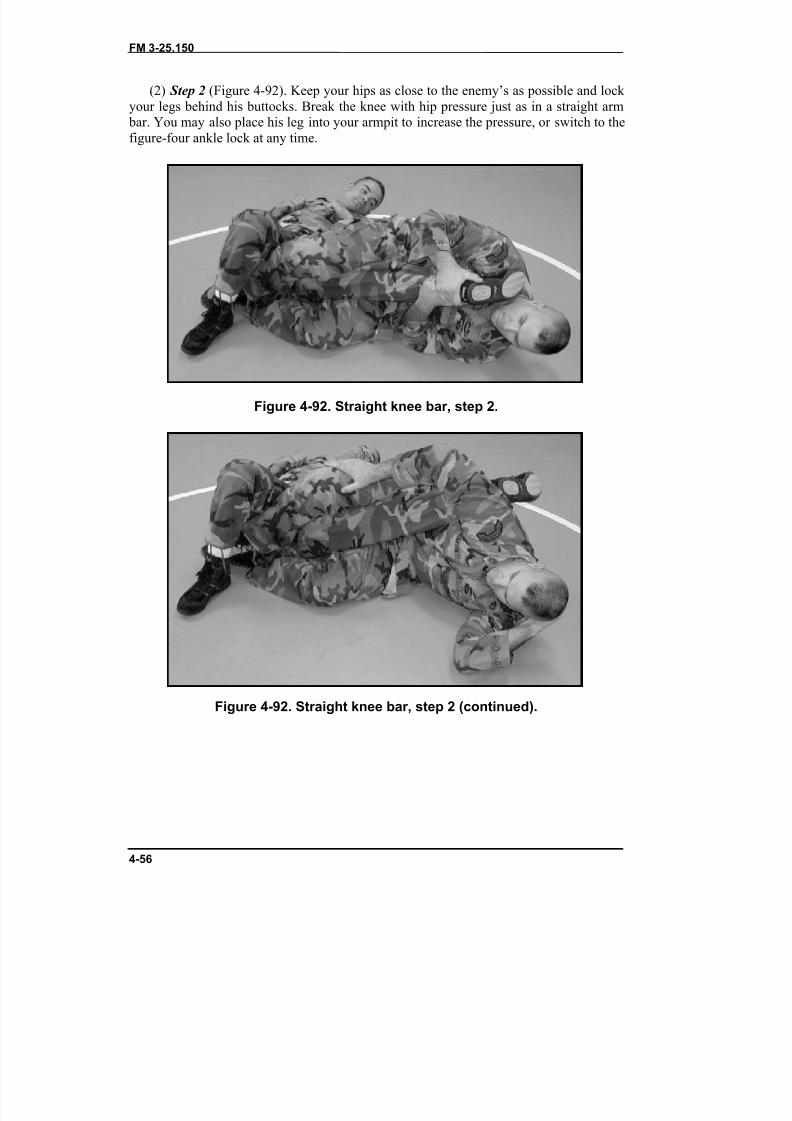
8/9/2019 US ARMY FM 3-25.150 - Combatives (hand-to-hand combat).pdf
http://slidepdf.com/reader/full/us-army-fm-3-25150-combatives-hand-to-hand-combatpdf 130/265
FM 3-25.150
4-56
(2) Step 2 (Figure 4-92). Keep your hips as close to the enemy’s as possible and lock your legs behind his buttocks. Break the knee with hip pressure just as in a straight arm
bar. You may also place his leg into your armpit to increase the pressure, or switch to thefigure-four ankle lock at any time.
Figure 4-92. Straight knee bar, step 2.
Figure 4-92. Straight knee bar, step 2 (continued).
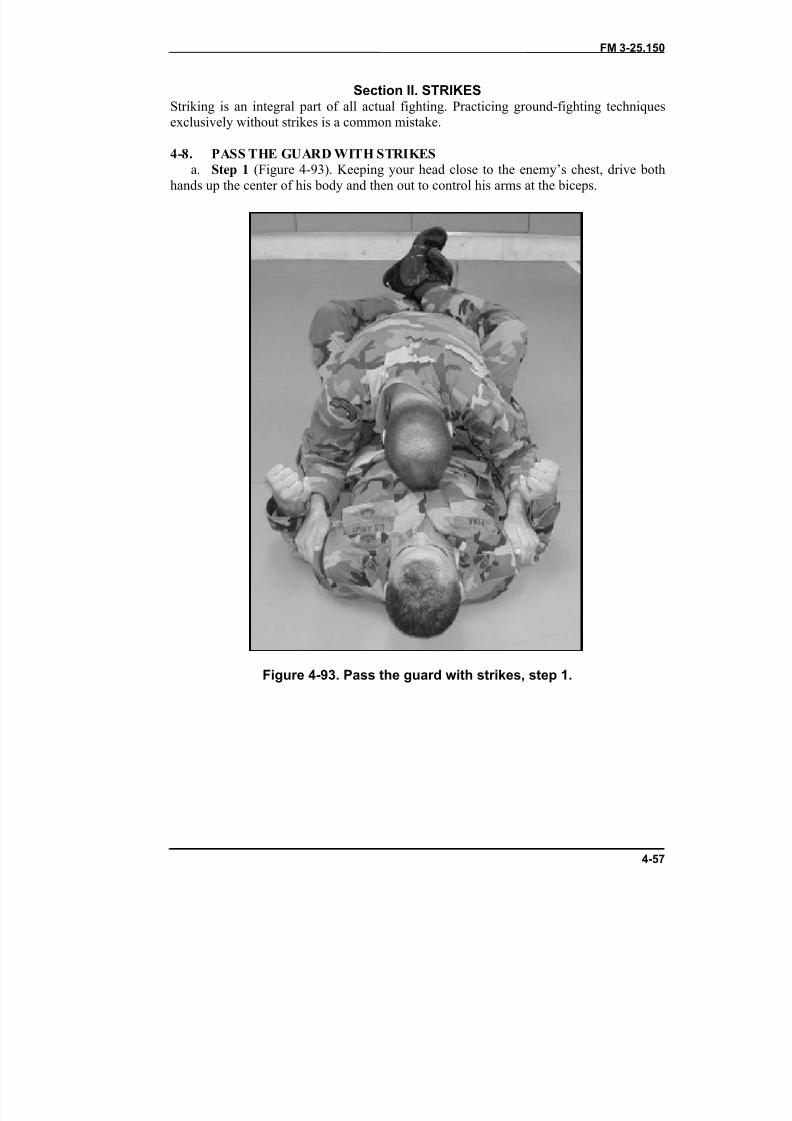
8/9/2019 US ARMY FM 3-25.150 - Combatives (hand-to-hand combat).pdf
http://slidepdf.com/reader/full/us-army-fm-3-25150-combatives-hand-to-hand-combatpdf 131/265
FM 3-25.150
4-57
Section II. STRIKESStriking is an integral part of all actual fighting. Practicing ground-fighting techniquesexclusively without strikes is a common mistake.
4-8. PASS THE GUARD WITH STRIKES
a. Step 1 (Figure 4-93). Keeping your head close to the enemy’s chest, drive bothhands up the center of his body and then out to control his arms at the biceps.
Figure 4-93. Pass the guard with strikes, step 1.
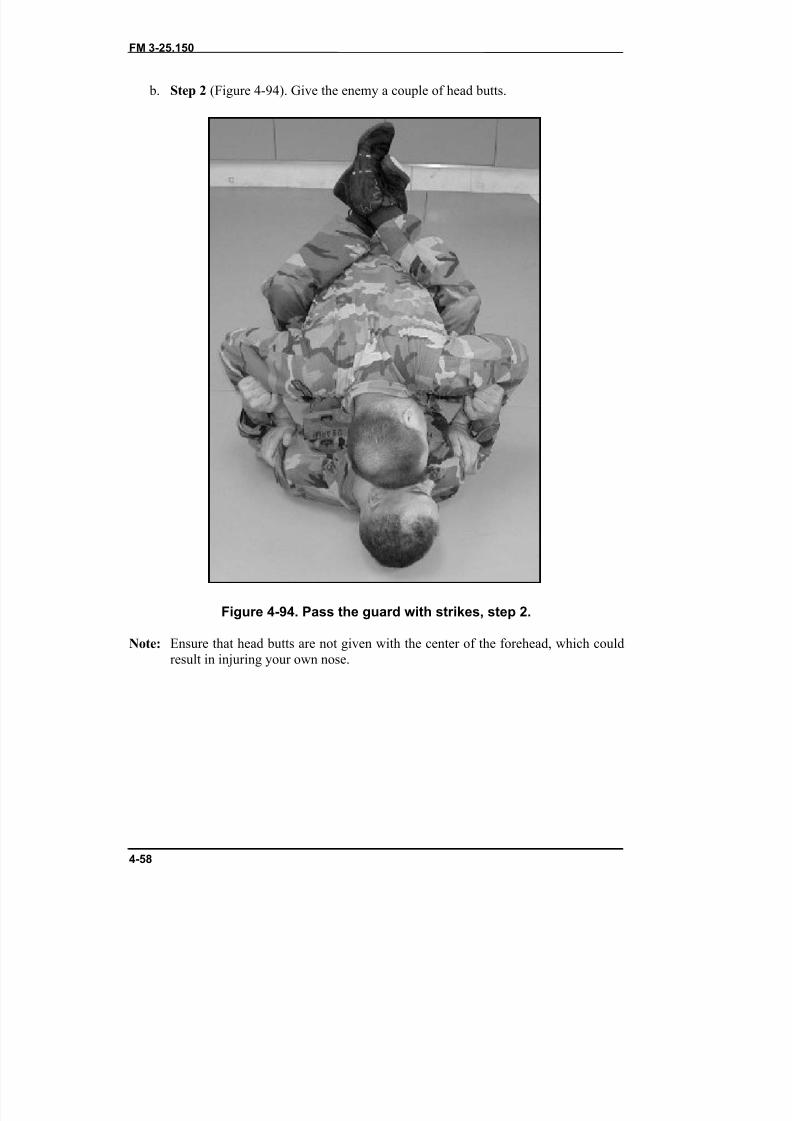
8/9/2019 US ARMY FM 3-25.150 - Combatives (hand-to-hand combat).pdf
http://slidepdf.com/reader/full/us-army-fm-3-25150-combatives-hand-to-hand-combatpdf 132/265
FM 3-25.150
4-58
b. Step 2 (Figure 4-94). Give the enemy a couple of head butts.
Figure 4-94. Pass the guard with strikes, step 2.
Note: Ensure that head butts are not given with the center of the forehead, which couldresult in injuring your own nose.
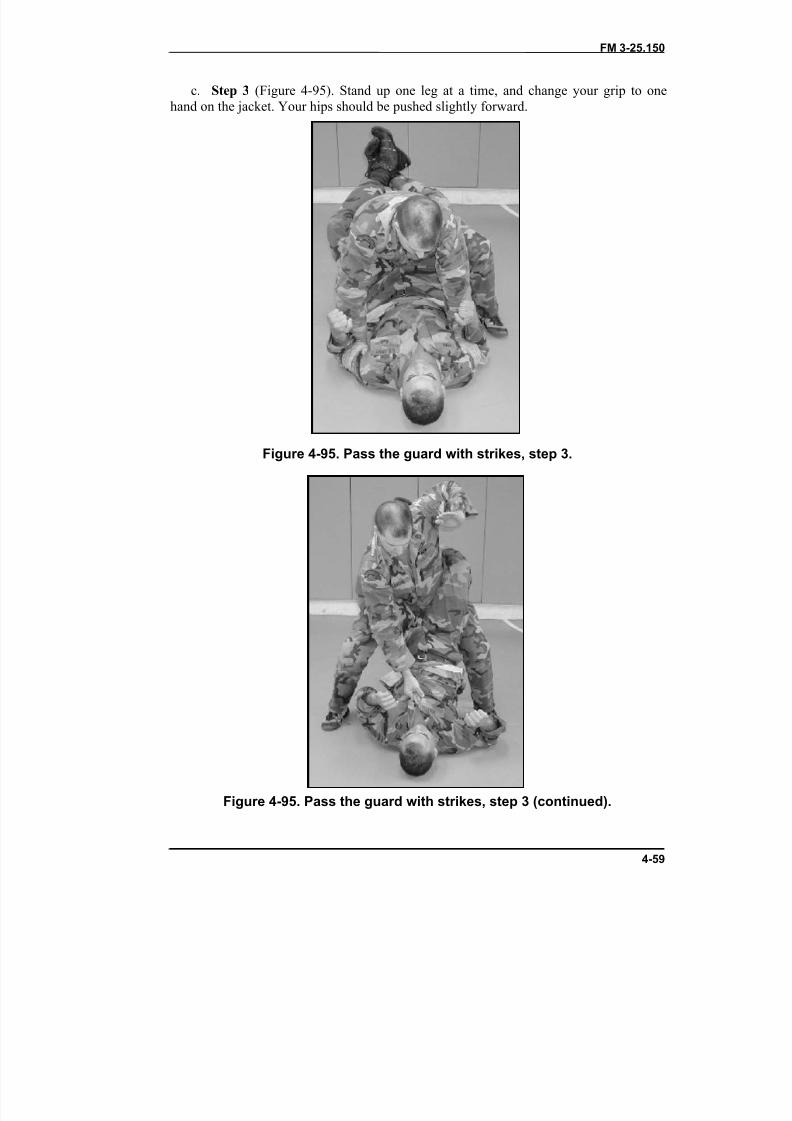
8/9/2019 US ARMY FM 3-25.150 - Combatives (hand-to-hand combat).pdf
http://slidepdf.com/reader/full/us-army-fm-3-25150-combatives-hand-to-hand-combatpdf 133/265
FM 3-25.150
4-59
c. Step 3 (Figure 4-95). Stand up one leg at a time, and change your grip to onehand on the jacket. Your hips should be pushed slightly forward.
Figure 4-95. Pass the guard with strikes, step 3.
Figure 4-95. Pass the guard with strikes, step 3 (continued).
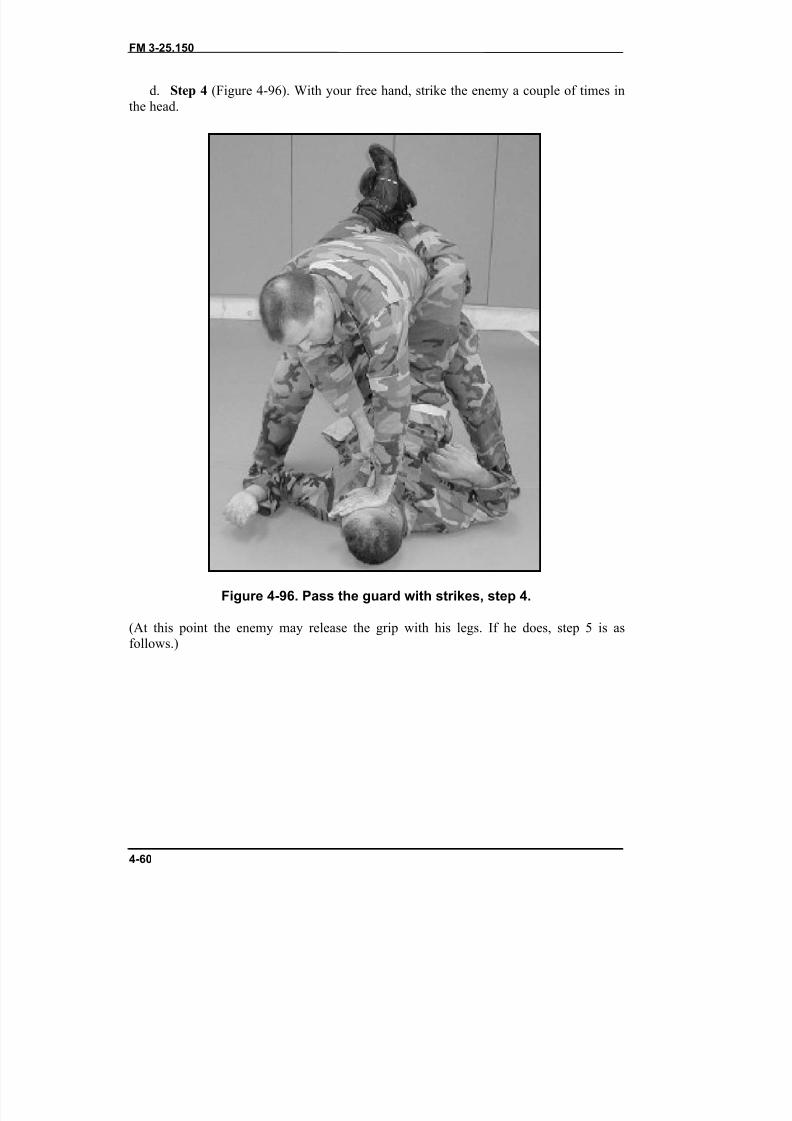
8/9/2019 US ARMY FM 3-25.150 - Combatives (hand-to-hand combat).pdf
http://slidepdf.com/reader/full/us-army-fm-3-25150-combatives-hand-to-hand-combatpdf 134/265
FM 3-25.150
4-60
d. Step 4 (Figure 4-96). With your free hand, strike the enemy a couple of times inthe head.
Figure 4-96. Pass the guard with strikes, step 4.
(At this point the enemy may release the grip with his legs. If he does, step 5 is asfollows.)
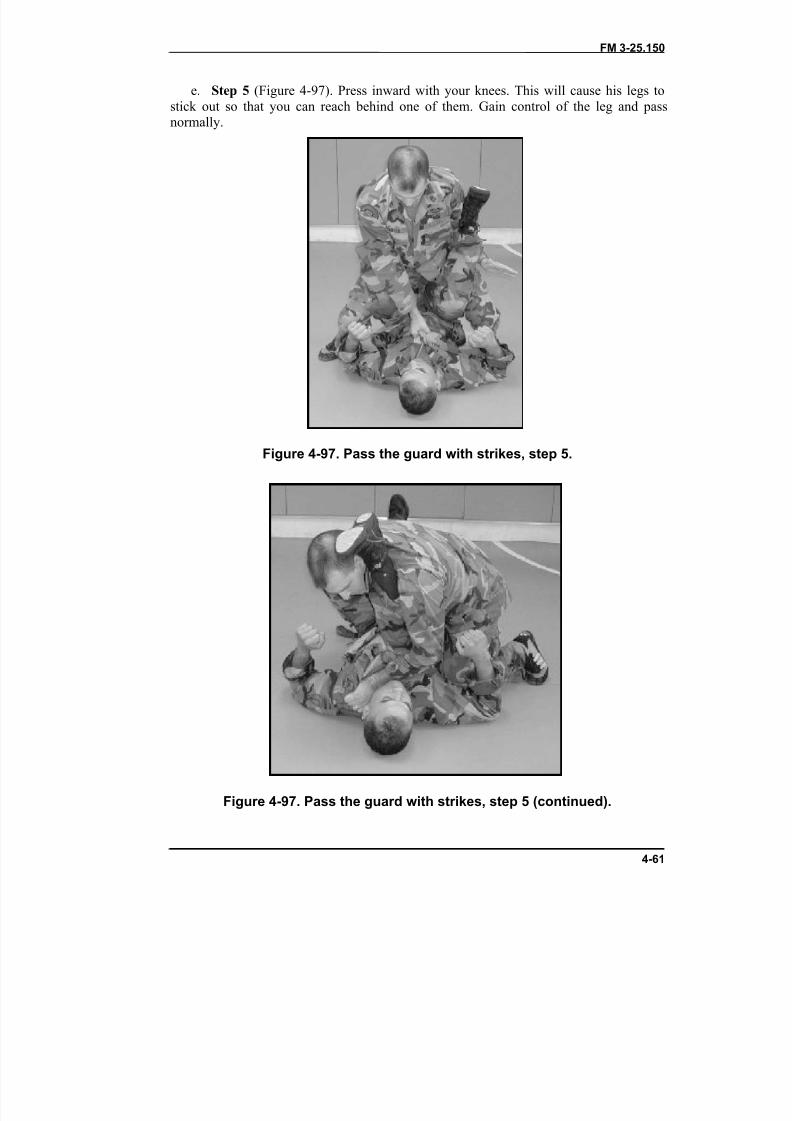
8/9/2019 US ARMY FM 3-25.150 - Combatives (hand-to-hand combat).pdf
http://slidepdf.com/reader/full/us-army-fm-3-25150-combatives-hand-to-hand-combatpdf 135/265

8/9/2019 US ARMY FM 3-25.150 - Combatives (hand-to-hand combat).pdf
http://slidepdf.com/reader/full/us-army-fm-3-25150-combatives-hand-to-hand-combatpdf 136/265
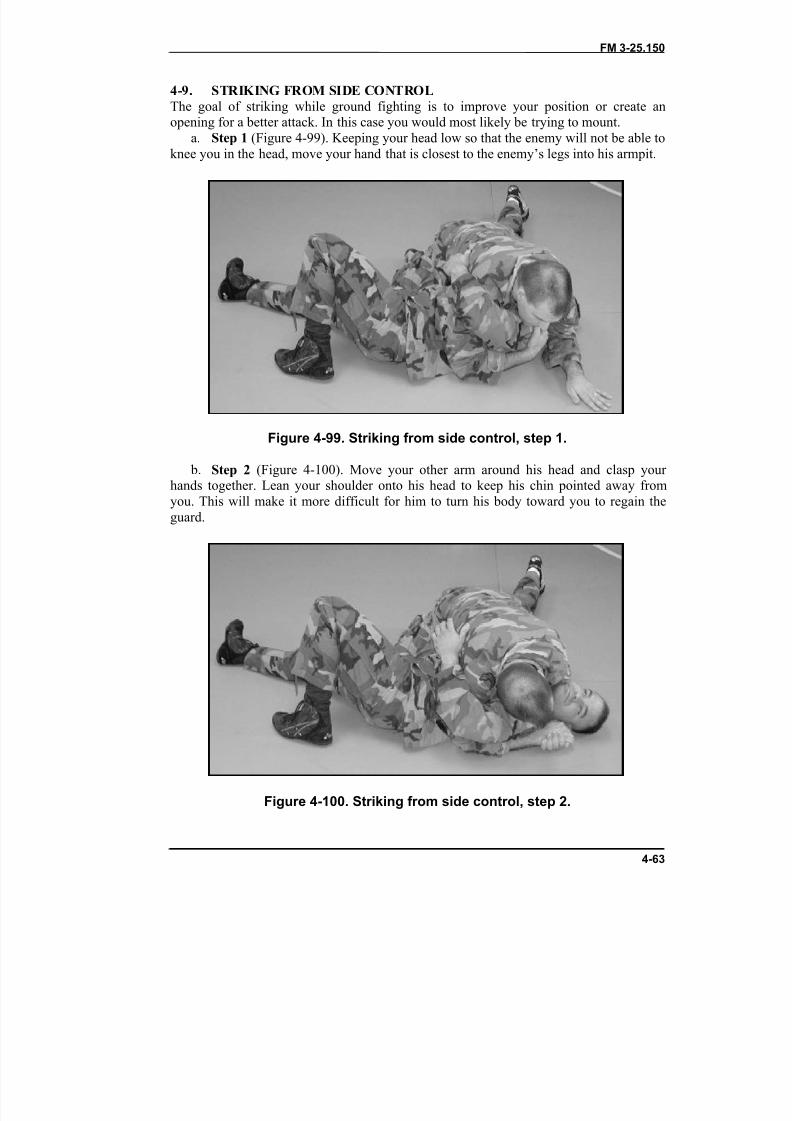
8/9/2019 US ARMY FM 3-25.150 - Combatives (hand-to-hand combat).pdf
http://slidepdf.com/reader/full/us-army-fm-3-25150-combatives-hand-to-hand-combatpdf 137/265
FM 3-25.150
4-63
4-9. STRIKING FROM SIDE CONTROLThe goal of striking while ground fighting is to improve your position or create anopening for a better attack. In this case you would most likely be trying to mount.
a. Step 1 (Figure 4-99). Keeping your head low so that the enemy will not be able toknee you in the head, move your hand that is closest to the enemy’s legs into his armpit.
Figure 4-99. Striking from side control, step 1.
b. Step 2 (Figure 4-100). Move your other arm around his head and clasp your hands together. Lean your shoulder onto his head to keep his chin pointed away fromyou. This will make it more difficult for him to turn his body toward you to regain theguard.
Figure 4-100. Striking from side control, step 2.
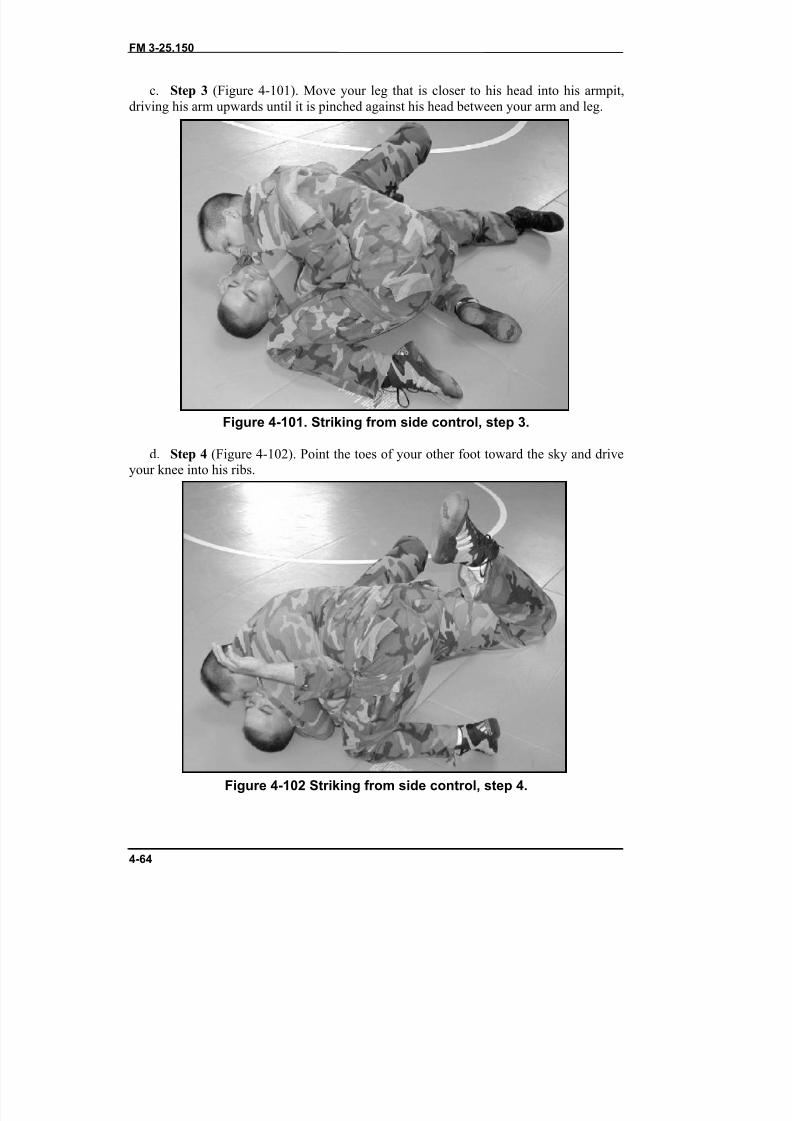
8/9/2019 US ARMY FM 3-25.150 - Combatives (hand-to-hand combat).pdf
http://slidepdf.com/reader/full/us-army-fm-3-25150-combatives-hand-to-hand-combatpdf 138/265
FM 3-25.150
4-64
c. Step 3 (Figure 4-101). Move your leg that is closer to his head into his armpit,driving his arm upwards until it is pinched against his head between your arm and leg.
Figure 4-101. Striking from side control, step 3.
d. Step 4 (Figure 4-102). Point the toes of your other foot toward the sky and driveyour knee into his ribs.
Figure 4-102 Striking from side control, step 4.
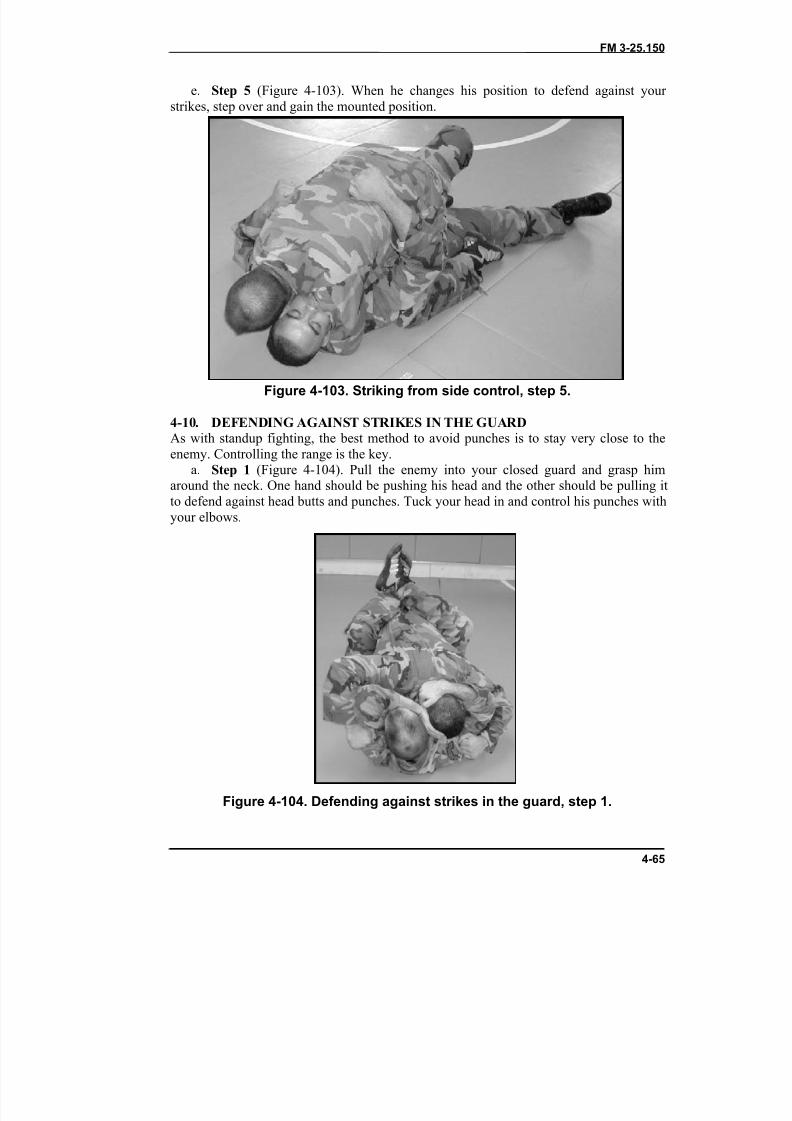
8/9/2019 US ARMY FM 3-25.150 - Combatives (hand-to-hand combat).pdf
http://slidepdf.com/reader/full/us-army-fm-3-25150-combatives-hand-to-hand-combatpdf 139/265
FM 3-25.150
4-65
e. Step 5 (Figure 4-103). When he changes his position to defend against your strikes, step over and gain the mounted position.
Figure 4-103. Striking from side control, step 5.
4-10. DEFENDING AGAINST STRIKES IN THE GUARDAs with standup fighting, the best method to avoid punches is to stay very close to theenemy. Controlling the range is the key.
a. Step 1 (Figure 4-104). Pull the enemy into your closed guard and grasp himaround the neck. One hand should be pushing his head and the other should be pulling itto defend against head butts and punches. Tuck your head in and control his punches withyour elbows.
Figure 4-104. Defending against strikes in the guard, step 1.

8/9/2019 US ARMY FM 3-25.150 - Combatives (hand-to-hand combat).pdf
http://slidepdf.com/reader/full/us-army-fm-3-25150-combatives-hand-to-hand-combatpdf 140/265
FM 3-25.150
4-66
b. Step 2 (Figure 4-105). The enemy will eventually become frustrated by hisinability to land solid blows and will attempt to pull away. When he does so, slide your arms over his triceps and your feet to his hips. Control his punches with your knees. Ashe struggles to gain a position to strike from, you will have to continuously regain this
position.
Figure 4-105. Defending against strikes in the guard, step 2.
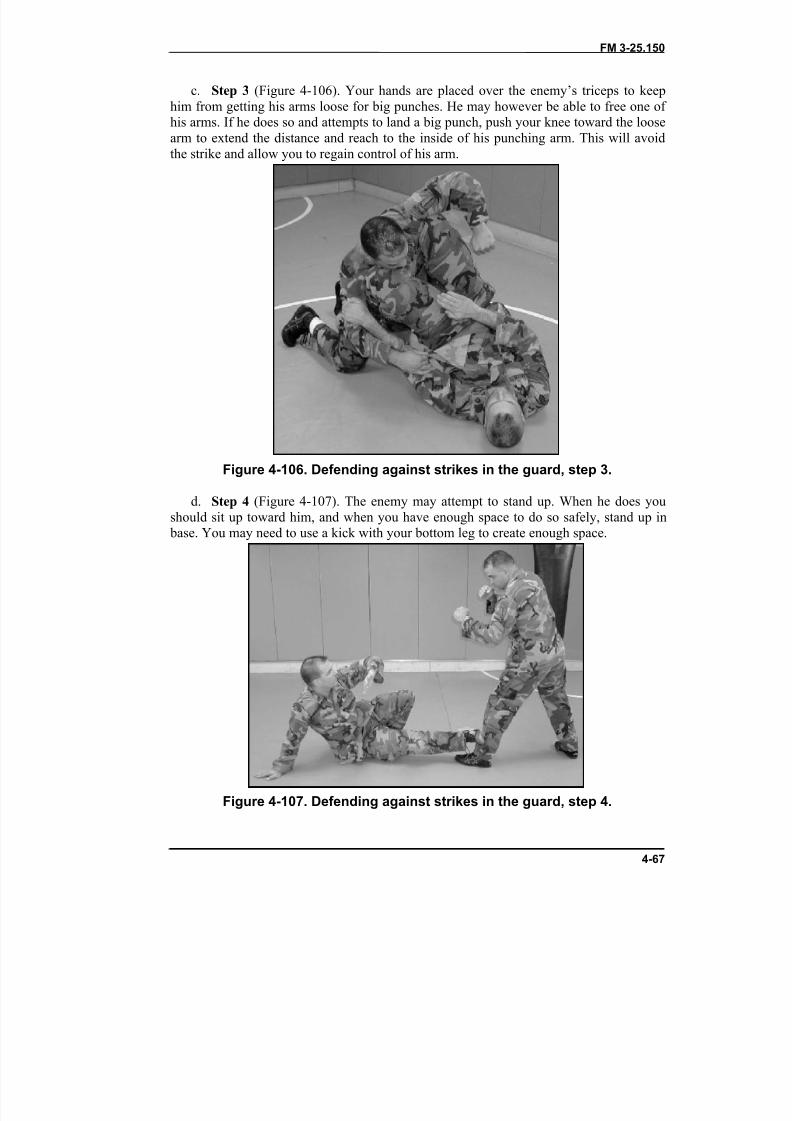
8/9/2019 US ARMY FM 3-25.150 - Combatives (hand-to-hand combat).pdf
http://slidepdf.com/reader/full/us-army-fm-3-25150-combatives-hand-to-hand-combatpdf 141/265
FM 3-25.150
4-67
c. Step 3 (Figure 4-106). Your hands are placed over the enemy’s triceps to keephim from getting his arms loose for big punches. He may however be able to free one of his arms. If he does so and attempts to land a big punch, push your knee toward the loosearm to extend the distance and reach to the inside of his punching arm. This will avoidthe strike and allow you to regain control of his arm.
Figure 4-106. Defending against strikes in the guard, step 3.
d. Step 4 (Figure 4-107). The enemy may attempt to stand up. When he does youshould sit up toward him, and when you have enough space to do so safely, stand up in
base. You may need to use a kick with your bottom leg to create enough space.
Figure 4-107. Defending against strikes in the guard, step 4.
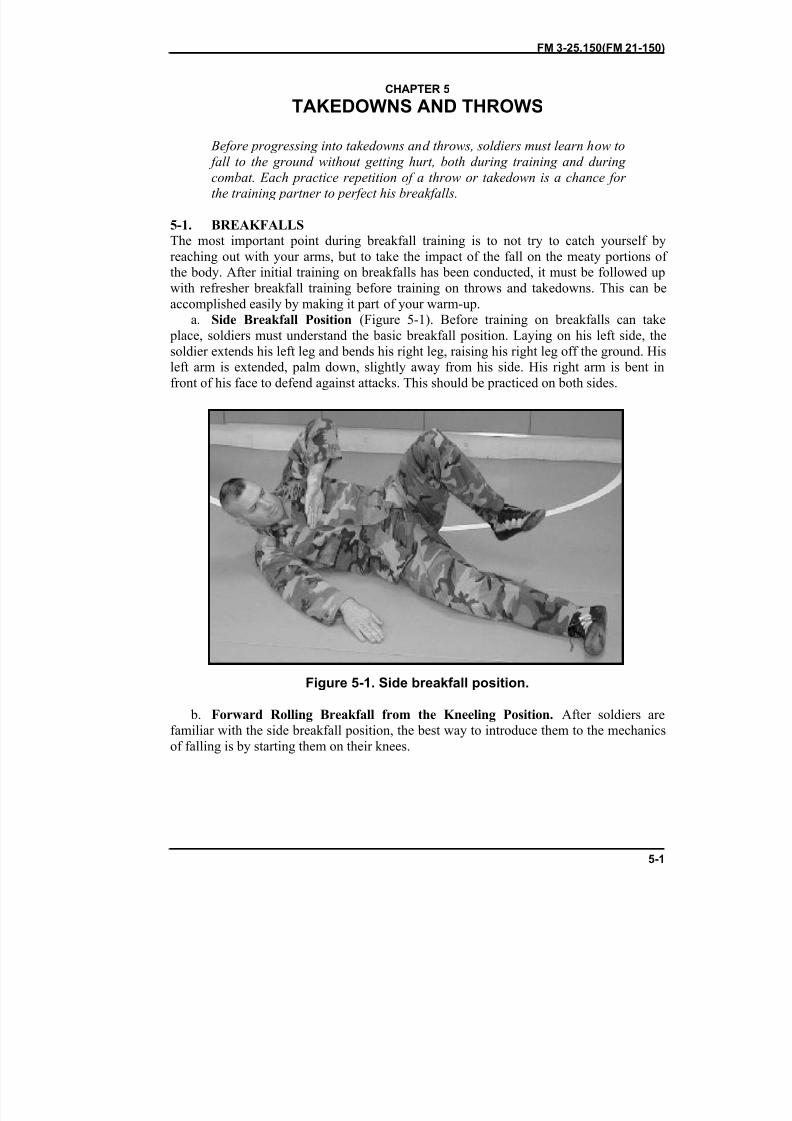
8/9/2019 US ARMY FM 3-25.150 - Combatives (hand-to-hand combat).pdf
http://slidepdf.com/reader/full/us-army-fm-3-25150-combatives-hand-to-hand-combatpdf 142/265
FM 3-25.150(FM 21-150)
5-1
CHAPTER 5
TAKEDOWNS AND THROWS
Before progressing into takedowns and throws, soldiers must learn how to fall to the ground without getting hurt, both during training and during combat. Each practice repetition of a throw or takedown is a chance for the training partner to perfect his breakfalls.
5-1. BREAKFALLSThe most important point during breakfall training is to not try to catch yourself byreaching out with your arms, but to take the impact of the fall on the meaty portions of the body. After initial training on breakfalls has been conducted, it must be followed upwith refresher breakfall training before training on throws and takedowns. This can beaccomplished easily by making it part of your warm-up.
a. Side Breakfall Position (Figure 5-1). Before training on breakfalls can take place, soldiers must understand the basic breakfall position. Laying on his left side, thesoldier extends his left leg and bends his right leg, raising his right leg off the ground. Hisleft arm is extended, palm down, slightly away from his side. His right arm is bent infront of his face to defend against attacks. This should be practiced on both sides.
Figure 5-1. Side breakfall position.
b. Forward Rolling Breakfall from the Kneeling Position. After soldiers arefamiliar with the side breakfall position, the best way to introduce them to the mechanicsof falling is by starting them on their knees.

8/9/2019 US ARMY FM 3-25.150 - Combatives (hand-to-hand combat).pdf
http://slidepdf.com/reader/full/us-army-fm-3-25150-combatives-hand-to-hand-combatpdf 143/265
FM 3-25.150
5-2
(1) Step 1 (Figure 5-2). The fighter assumes a kneeling posture with his left armraised in the air. He places his left arm across the front of his body, palm down, outsideof his right knee.
Figure 5-2. Forward rolling breakfall from the kneeling position, step 1.
Figure 5-2. Forward rolling breakfall from the kneeling position, step 1(continued).
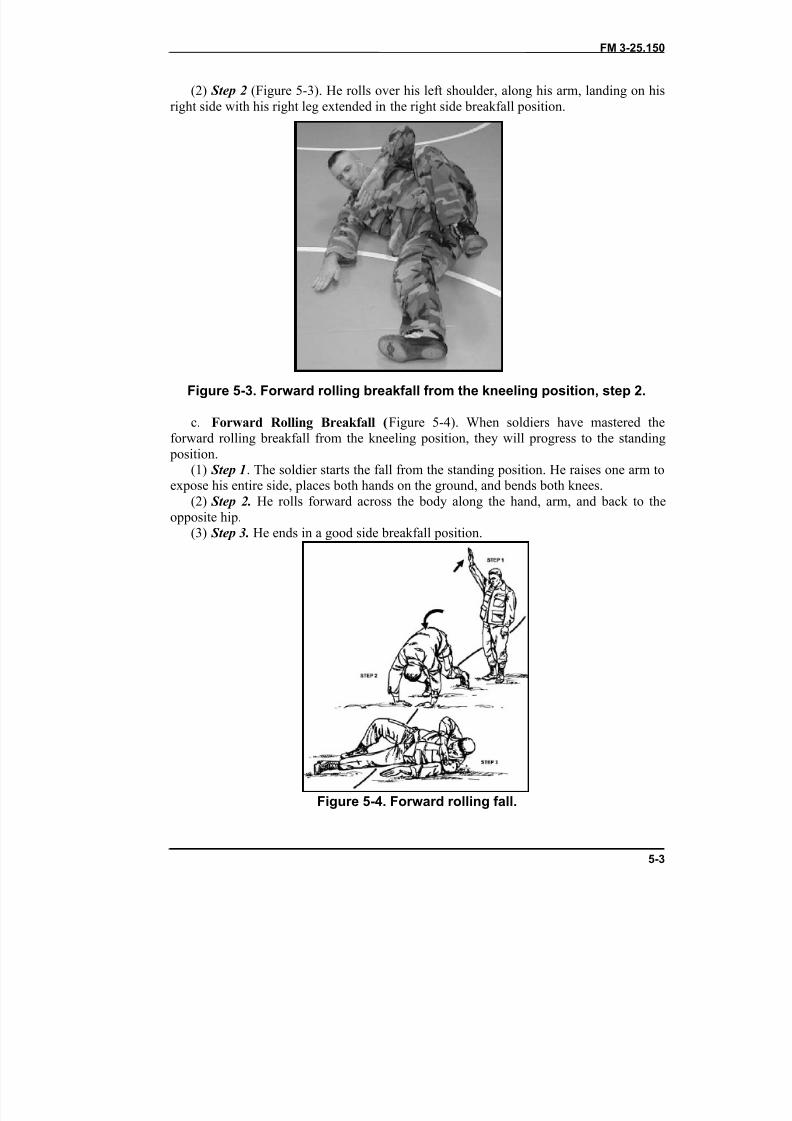
8/9/2019 US ARMY FM 3-25.150 - Combatives (hand-to-hand combat).pdf
http://slidepdf.com/reader/full/us-army-fm-3-25150-combatives-hand-to-hand-combatpdf 144/265
FM 3-25.150
5-3
(2) Step 2 (Figure 5-3). He rolls over his left shoulder, along his arm, landing on hisright side with his right leg extended in the right side breakfall position.
Figure 5-3. Forward rolling breakfall from the kneeling position, step 2.
c. Forward Rolling Breakfall ( Figure 5-4). When soldiers have mastered theforward rolling breakfall from the kneeling position, they will progress to the standing
position.(1) Step 1 . The soldier starts the fall from the standing position. He raises one arm to
expose his entire side, places both hands on the ground, and bends both knees.(2) Step 2. He rolls forward across the body along the hand, arm, and back to the
opposite hip.(3) Step 3. He ends in a good side breakfall position.
Figure 5-4. Forward rolling fall.
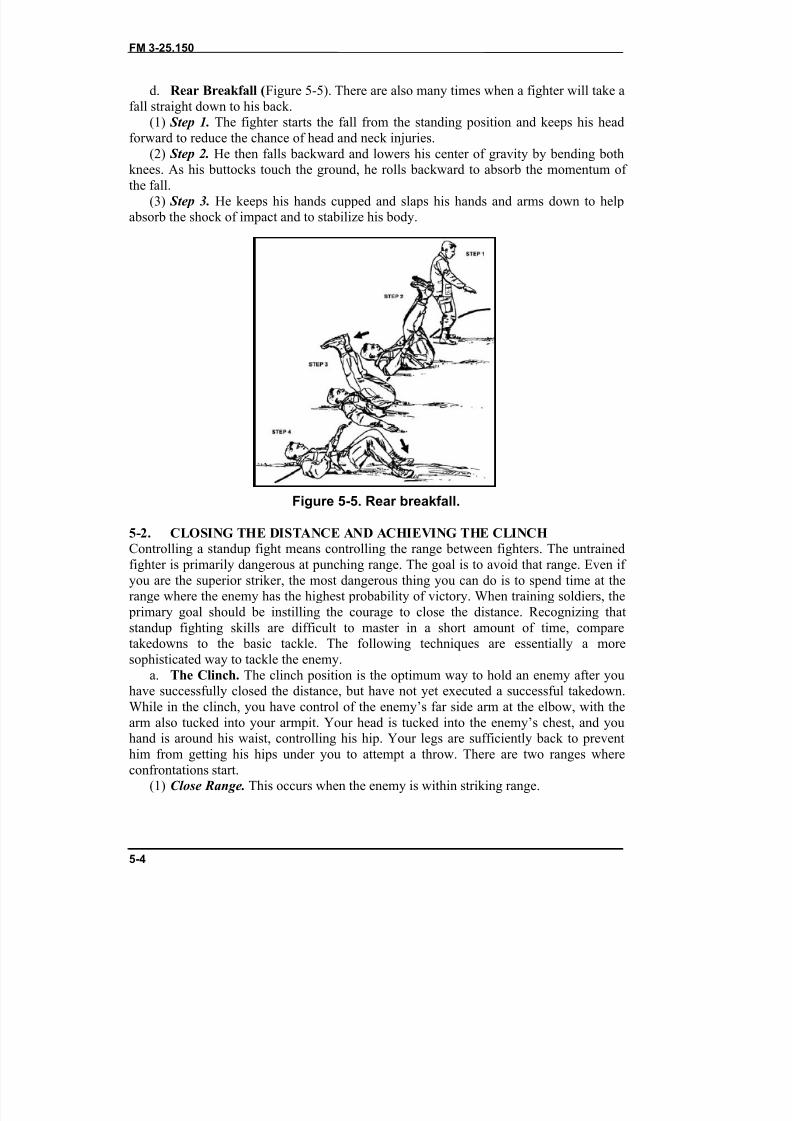
8/9/2019 US ARMY FM 3-25.150 - Combatives (hand-to-hand combat).pdf
http://slidepdf.com/reader/full/us-army-fm-3-25150-combatives-hand-to-hand-combatpdf 145/265
FM 3-25.150
5-4
d. Rear Breakfall ( Figure 5-5). There are also many times when a fighter will take afall straight down to his back.
(1) Step 1. The fighter starts the fall from the standing position and keeps his headforward to reduce the chance of head and neck injuries.
(2) Step 2. He then falls backward and lowers his center of gravity by bending both
knees. As his buttocks touch the ground, he rolls backward to absorb the momentum of the fall.(3) Step 3. He keeps his hands cupped and slaps his hands and arms down to help
absorb the shock of impact and to stabilize his body.
Figure 5-5. Rear breakfall.
5-2. CLOSING THE DISTANCE AND ACHIEVING THE CLINCHControlling a standup fight means controlling the range between fighters. The untrainedfighter is primarily dangerous at punching range. The goal is to avoid that range. Even if you are the superior striker, the most dangerous thing you can do is to spend time at therange where the enemy has the highest probability of victory. When training soldiers, the
primary goal should be instilling the courage to close the distance. Recognizing thatstandup fighting skills are difficult to master in a short amount of time, comparetakedowns to the basic tackle. The following techniques are essentially a moresophisticated way to tackle the enemy.
a. The Clinch. The clinch position is the optimum way to hold an enemy after youhave successfully closed the distance, but have not yet executed a successful takedown.While in the clinch, you have control of the enemy’s far side arm at the elbow, with thearm also tucked into your armpit. Your head is tucked into the enemy’s chest, and youhand is around his waist, controlling his hip. Your legs are sufficiently back to preventhim from getting his hips under you to attempt a throw. There are two ranges whereconfrontations start.
(1) Close Range. This occurs when the enemy is within striking range.
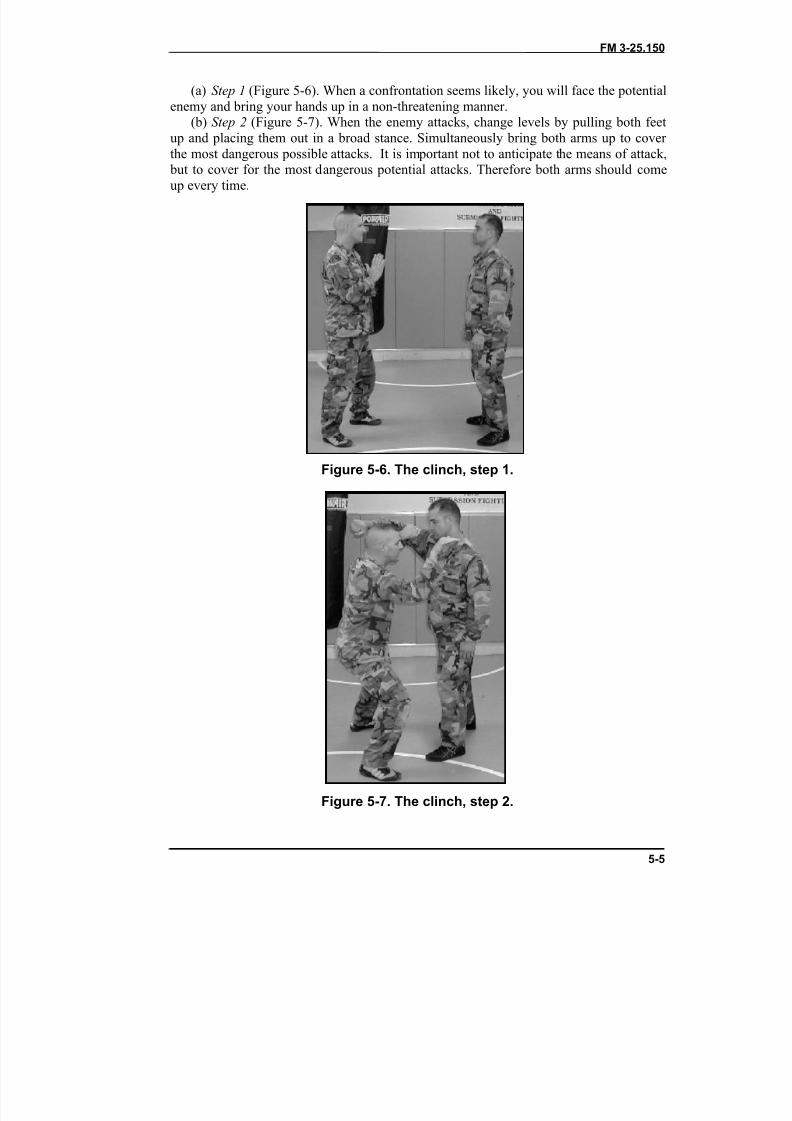
8/9/2019 US ARMY FM 3-25.150 - Combatives (hand-to-hand combat).pdf
http://slidepdf.com/reader/full/us-army-fm-3-25150-combatives-hand-to-hand-combatpdf 146/265
FM 3-25.150
5-5
(a) Step 1 (Figure 5-6). When a confrontation seems likely, you will face the potentialenemy and bring your hands up in a non-threatening manner.
(b) Step 2 (Figure 5-7). When the enemy attacks, change levels by pulling both feetup and placing them out in a broad stance. Simultaneously bring both arms up to cover the most dangerous possible attacks. It is important not to anticipate the means of attack,
but to cover for the most dangerous potential attacks. Therefore both arms should comeup every time.
Figure 5-6. The clinch, step 1.
Figure 5-7. The clinch, step 2.
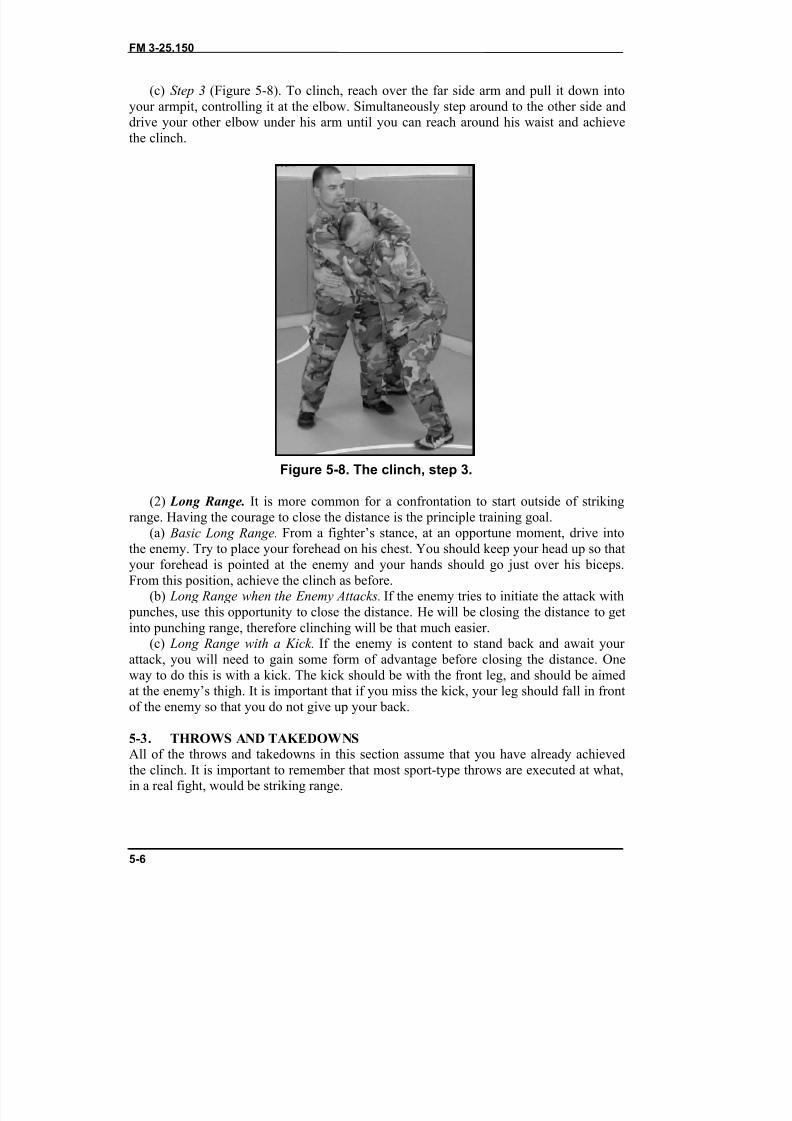
8/9/2019 US ARMY FM 3-25.150 - Combatives (hand-to-hand combat).pdf
http://slidepdf.com/reader/full/us-army-fm-3-25150-combatives-hand-to-hand-combatpdf 147/265
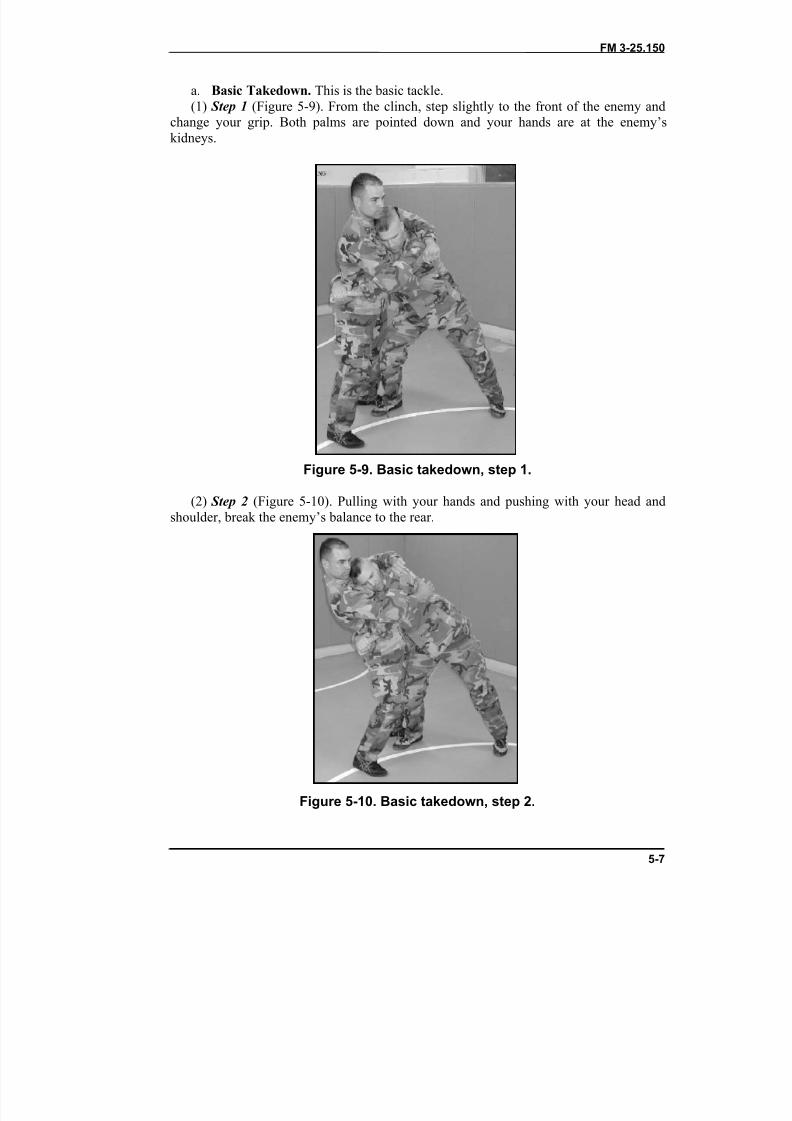
8/9/2019 US ARMY FM 3-25.150 - Combatives (hand-to-hand combat).pdf
http://slidepdf.com/reader/full/us-army-fm-3-25150-combatives-hand-to-hand-combatpdf 148/265
FM 3-25.150
5-7
a. Basic Takedown. This is the basic tackle.(1) Step 1 (Figure 5-9). From the clinch, step slightly to the front of the enemy and
change your grip. Both palms are pointed down and your hands are at the enemy’skidneys.
Figure 5-9. Basic takedown, step 1.
(2) Step 2 (Figure 5-10). Pulling with your hands and pushing with your head andshoulder, break the enemy’s balance to the rear.
Figure 5-10. Basic takedown, step 2.

8/9/2019 US ARMY FM 3-25.150 - Combatives (hand-to-hand combat).pdf
http://slidepdf.com/reader/full/us-army-fm-3-25150-combatives-hand-to-hand-combatpdf 149/265
FM 3-25.150
5-8
(3) Step 3 (Figure 5-11). Step over the enemy and release your grip, ending in themounted position.
Figure 5-11. Basic takedown, step 3.
Note: It is very important to release your hands to avoid landing on them.
b. Hook the Leg (Figure 5-12). If the enemy attempts to pull away, use your legclosest to his back to hook his leg. When he begins to fall, release the leg and finish as
before.
Figure 5-12. Hook the leg.
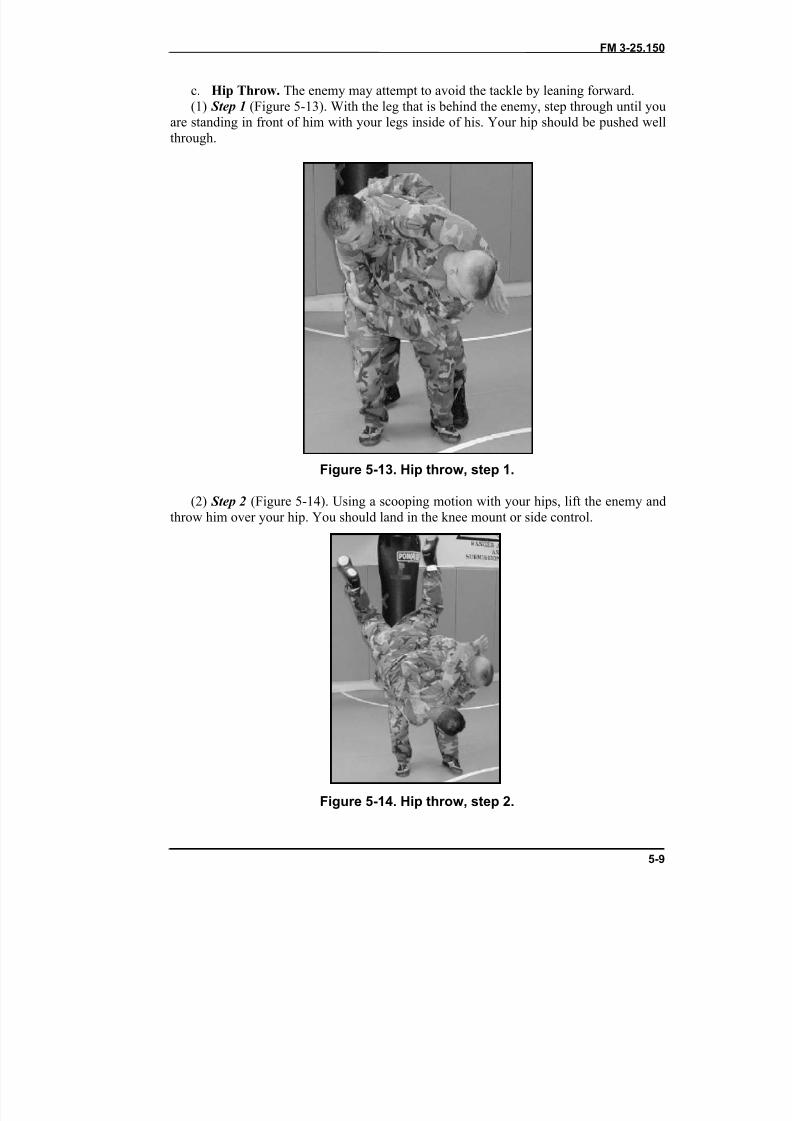
8/9/2019 US ARMY FM 3-25.150 - Combatives (hand-to-hand combat).pdf
http://slidepdf.com/reader/full/us-army-fm-3-25150-combatives-hand-to-hand-combatpdf 150/265
FM 3-25.150
5-9
c. Hip Throw. The enemy may attempt to avoid the tackle by leaning forward.(1) Step 1 (Figure 5-13). With the leg that is behind the enemy, step through until you
are standing in front of him with your legs inside of his. Your hip should be pushed wellthrough.
Figure 5-13. Hip throw, step 1.
(2) Step 2 (Figure 5-14). Using a scooping motion with your hips, lift the enemy andthrow him over your hip. You should land in the knee mount or side control.
Figure 5-14. Hip throw, step 2.
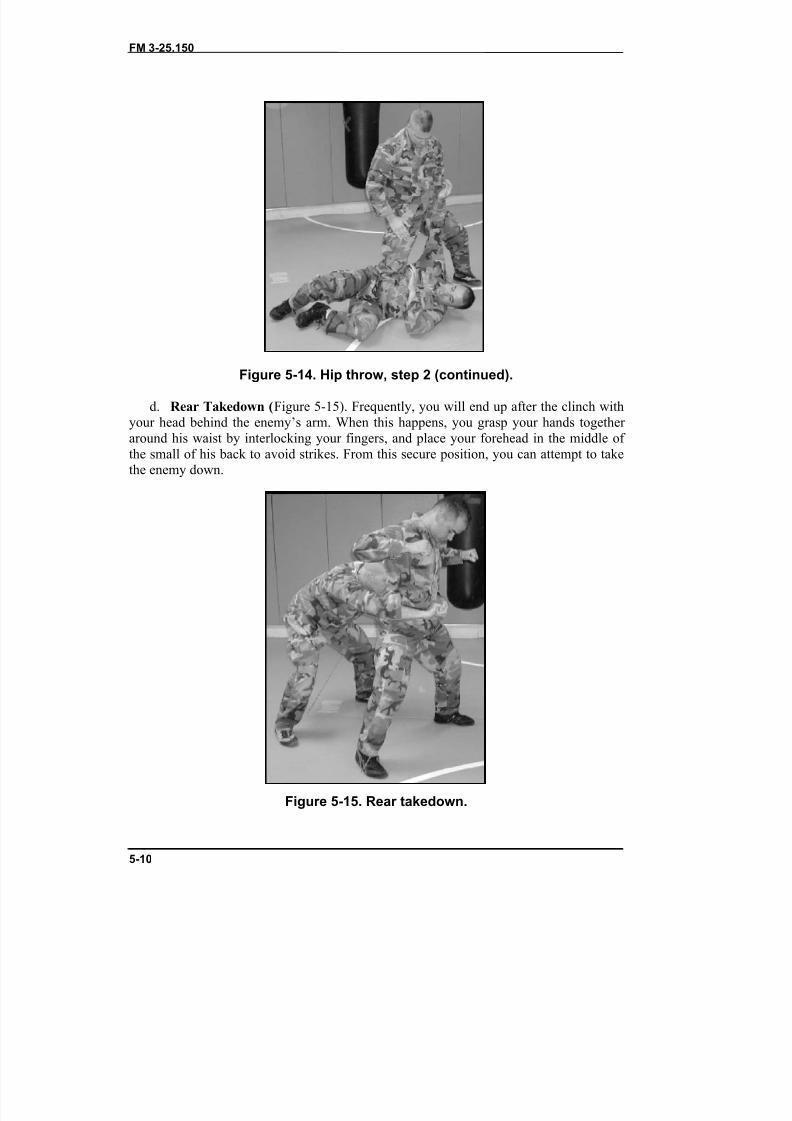
8/9/2019 US ARMY FM 3-25.150 - Combatives (hand-to-hand combat).pdf
http://slidepdf.com/reader/full/us-army-fm-3-25150-combatives-hand-to-hand-combatpdf 151/265
FM 3-25.150
5-10
Figure 5-14. Hip throw, step 2 (continued).
d. Rear Takedown ( Figure 5-15). Frequently, you will end up after the clinch withyour head behind the enemy’s arm. When this happens, you grasp your hands together around his waist by interlocking your fingers, and place your forehead in the middle of the small of his back to avoid strikes. From this secure position, you can attempt to takethe enemy down.
Figure 5-15. Rear takedown.

8/9/2019 US ARMY FM 3-25.150 - Combatives (hand-to-hand combat).pdf
http://slidepdf.com/reader/full/us-army-fm-3-25150-combatives-hand-to-hand-combatpdf 152/265
FM 3-25.150
5-11
(1) Step 1 (Figure 5-16). Step to one side so that you are behind the enemy at anangle.
Figure 5-16. Rear takedown, step 1.
(2) Step 2 (Figure 5-17). With the leg that is behind the enemy, reach out and placethe instep of your foot behind the enemy’s far side foot so that he cannot step backward.Sit down as close to your other foot as possible and hang your weight from the enemy’swaist.
Figure 5-17. Rear takedown, step 2
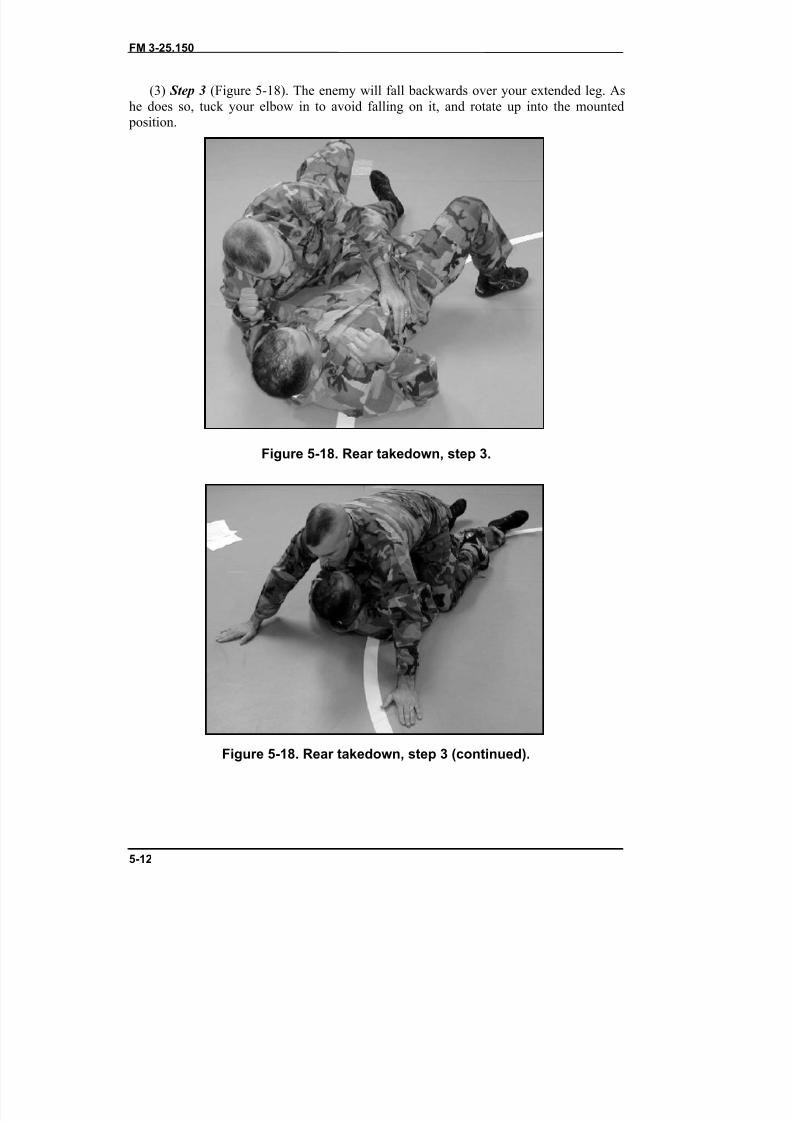
8/9/2019 US ARMY FM 3-25.150 - Combatives (hand-to-hand combat).pdf
http://slidepdf.com/reader/full/us-army-fm-3-25150-combatives-hand-to-hand-combatpdf 153/265
FM 3-25.150
5-12
(3) Step 3 (Figure 5-18). The enemy will fall backwards over your extended leg. Ashe does so, tuck your elbow in to avoid falling on it, and rotate up into the mounted
position.
Figure 5-18. Rear takedown, step 3.
Figure 5-18. Rear takedown, step 3 (continued).
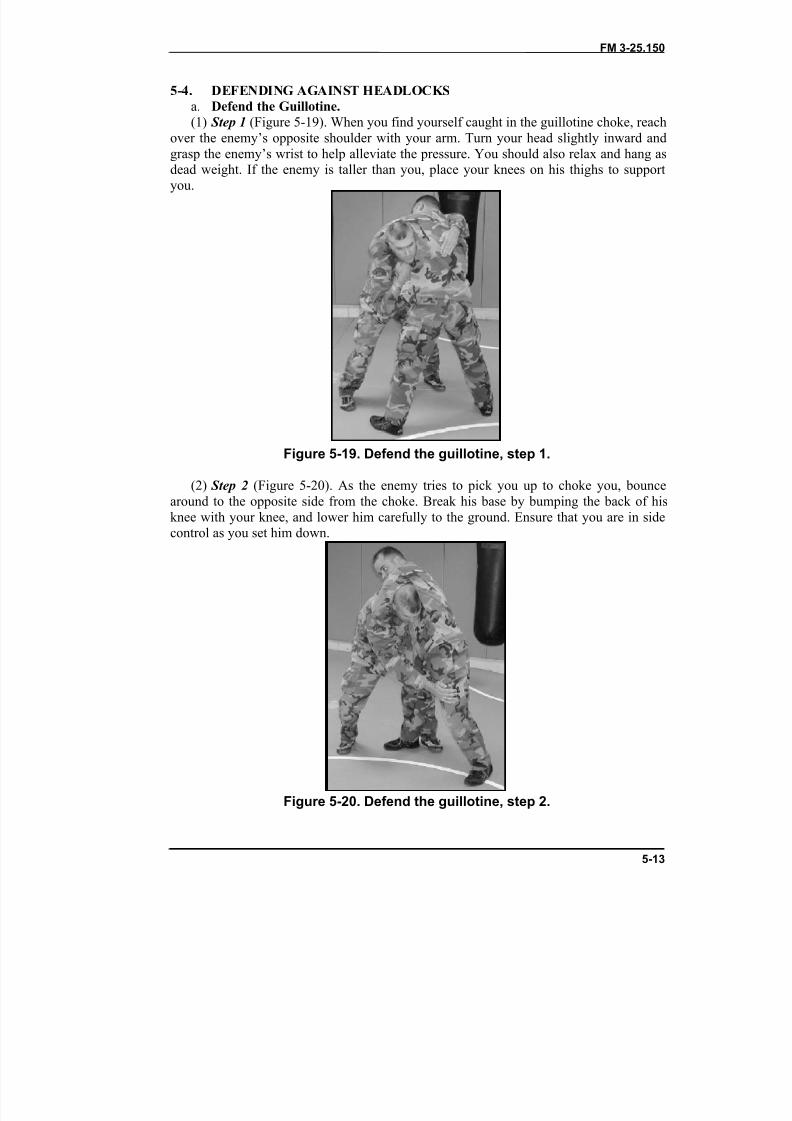
8/9/2019 US ARMY FM 3-25.150 - Combatives (hand-to-hand combat).pdf
http://slidepdf.com/reader/full/us-army-fm-3-25150-combatives-hand-to-hand-combatpdf 154/265
FM 3-25.150
5-13
5-4. DEFENDING AGAINST HEADLOCKSa. Defend the Guillotine.(1) Step 1 (Figure 5-19). When you find yourself caught in the guillotine choke, reach
over the enemy’s opposite shoulder with your arm. Turn your head slightly inward andgrasp the enemy’s wrist to help alleviate the pressure. You should also relax and hang as
dead weight. If the enemy is taller than you, place your knees on his thighs to supportyou.
Figure 5-19. Defend the guillotine, step 1.
(2) Step 2 (Figure 5-20). As the enemy tries to pick you up to choke you, bouncearound to the opposite side from the choke. Break his base by bumping the back of hisknee with your knee, and lower him carefully to the ground. Ensure that you are in sidecontrol as you set him down.
Figure 5-20. Defend the guillotine, step 2.
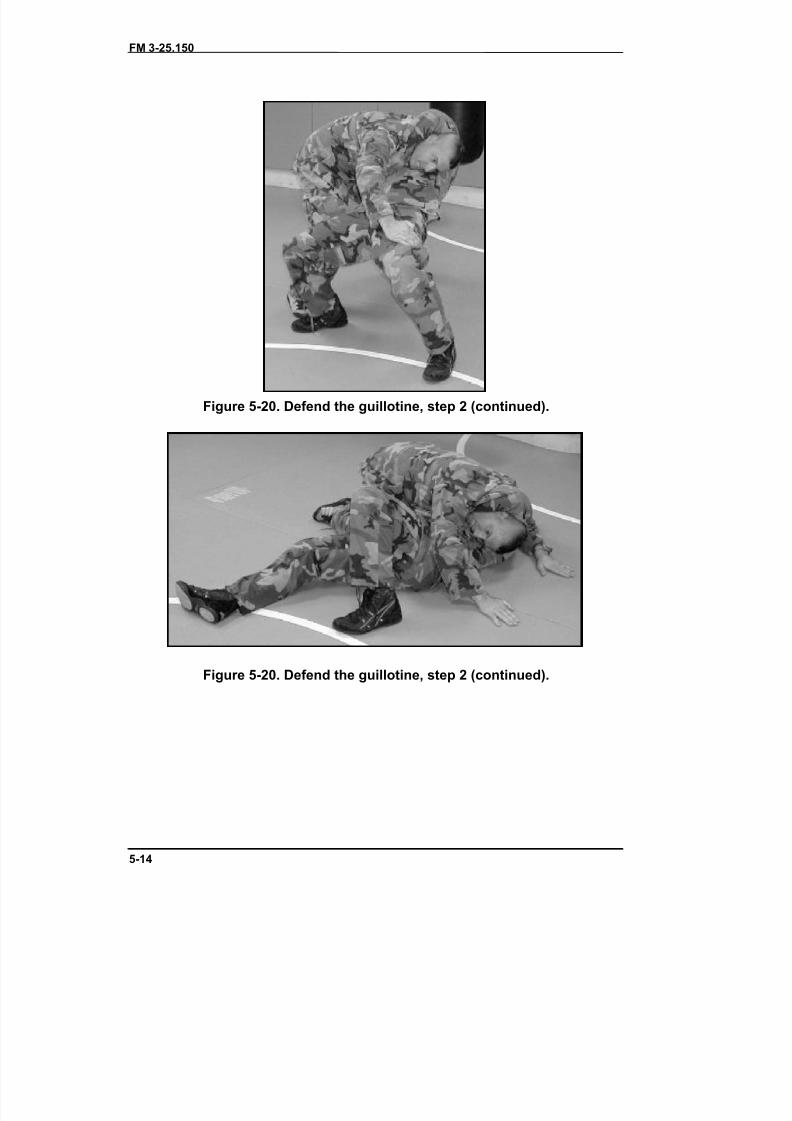
8/9/2019 US ARMY FM 3-25.150 - Combatives (hand-to-hand combat).pdf
http://slidepdf.com/reader/full/us-army-fm-3-25150-combatives-hand-to-hand-combatpdf 155/265
FM 3-25.150
5-14
Figure 5-20. Defend the guillotine, step 2 (continued).
Figure 5-20. Defend the guillotine, step 2 (continued).
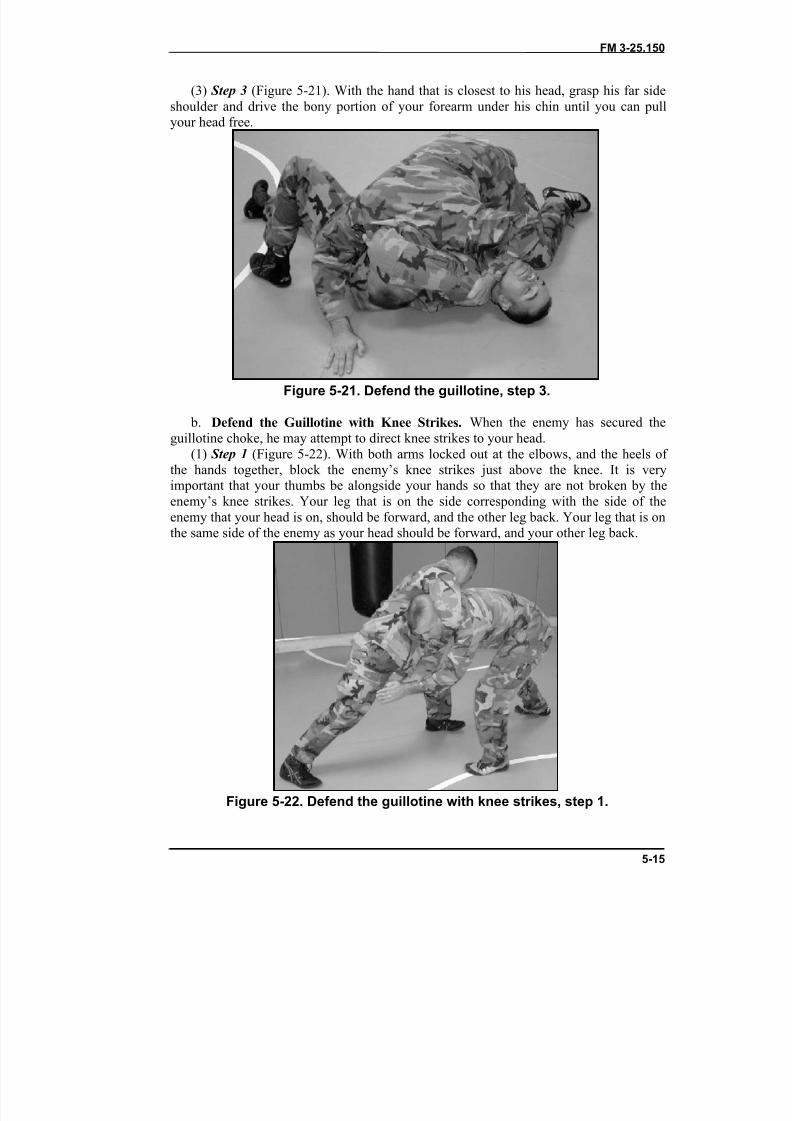
8/9/2019 US ARMY FM 3-25.150 - Combatives (hand-to-hand combat).pdf
http://slidepdf.com/reader/full/us-army-fm-3-25150-combatives-hand-to-hand-combatpdf 156/265
FM 3-25.150
5-15
(3) Step 3 (Figure 5-21). With the hand that is closest to his head, grasp his far sideshoulder and drive the bony portion of your forearm under his chin until you can pullyour head free.
Figure 5-21. Defend the guillotine, step 3.
b. Defend the Guillotine with Knee Strikes. When the enemy has secured theguillotine choke, he may attempt to direct knee strikes to your head.
(1) Step 1 (Figure 5-22). With both arms locked out at the elbows, and the heels of the hands together, block the enemy’s knee strikes just above the knee. It is veryimportant that your thumbs be alongside your hands so that they are not broken by theenemy’s knee strikes. Your leg that is on the side corresponding with the side of theenemy that your head is on, should be forward, and the other leg back. Your leg that is onthe same side of the enemy as your head should be forward, and your other leg back.
Figure 5-22. Defend the guillotine with knee strikes, step 1.
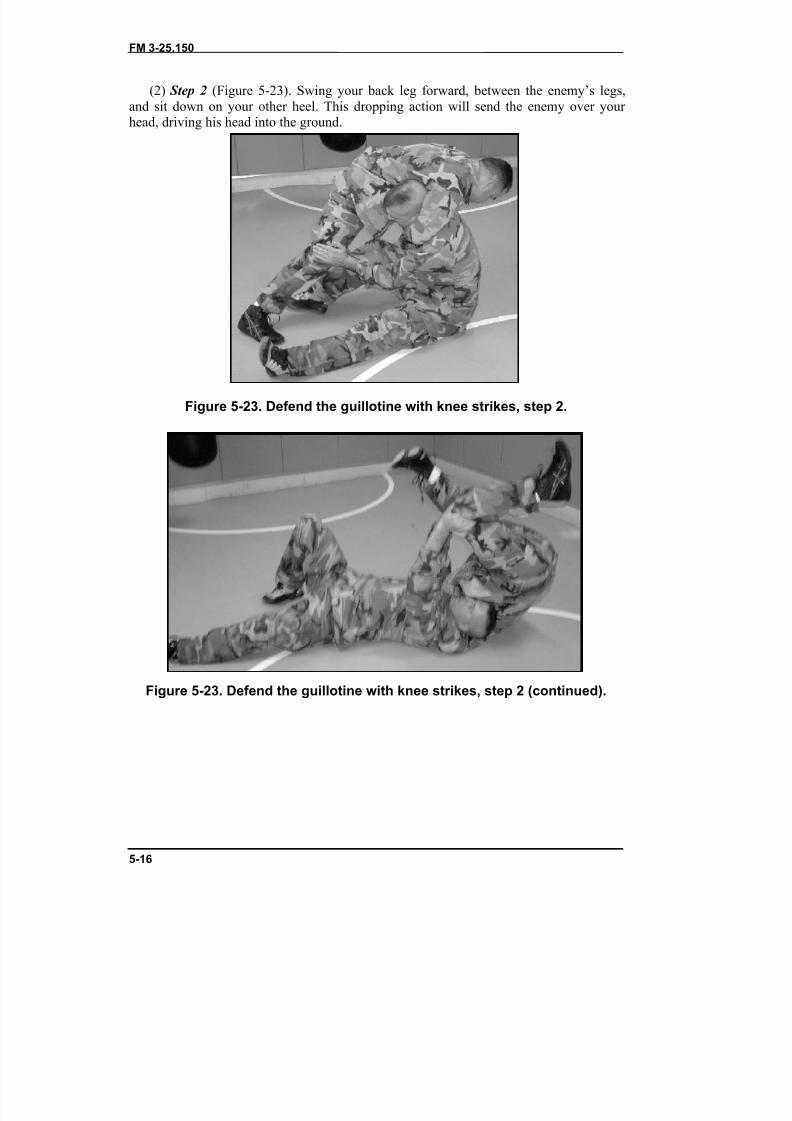
8/9/2019 US ARMY FM 3-25.150 - Combatives (hand-to-hand combat).pdf
http://slidepdf.com/reader/full/us-army-fm-3-25150-combatives-hand-to-hand-combatpdf 157/265
FM 3-25.150
5-16
(2) Step 2 (Figure 5-23). Swing your back leg forward, between the enemy’s legs,and sit down on your other heel. This dropping action will send the enemy over your head, driving his head into the ground.
Figure 5-23. Defend the guillotine with knee strikes, step 2.
Figure 5-23. Defend the guillotine with knee strikes, step 2 (continued).
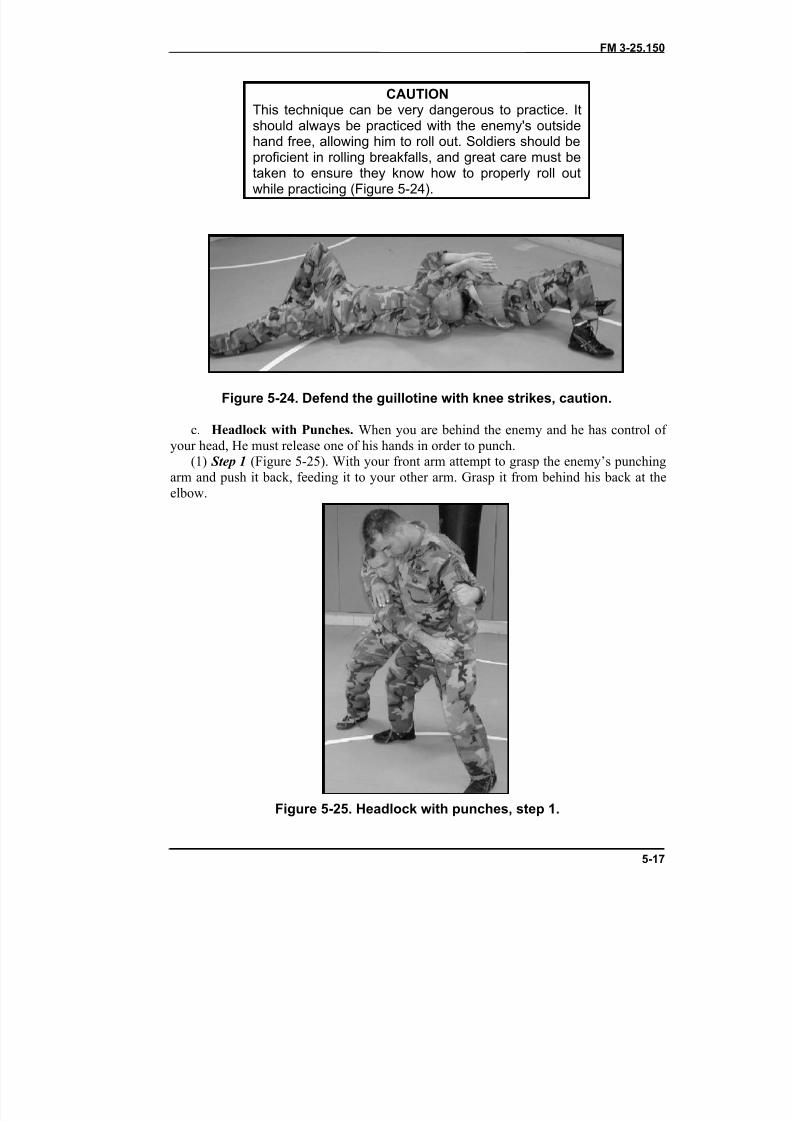
8/9/2019 US ARMY FM 3-25.150 - Combatives (hand-to-hand combat).pdf
http://slidepdf.com/reader/full/us-army-fm-3-25150-combatives-hand-to-hand-combatpdf 158/265
FM 3-25.150
5-17
CAUTIONThis technique can be very dangerous to practice. Itshould always be practiced with the enemy's outsidehand free, allowing him to roll out. Soldiers should beproficient in rolling breakfalls, and great care must be
taken to ensure they know how to properly roll outwhile practicing (Figure 5-24).
Figure 5-24. Defend the guillotine with knee strikes, caution.
c. Headlock with Punches. When you are behind the enemy and he has control of your head, He must release one of his hands in order to punch.
(1) Step 1 (Figure 5-25). With your front arm attempt to grasp the enemy’s punchingarm and push it back, feeding it to your other arm. Grasp it from behind his back at theelbow.
Figure 5-25. Headlock with punches, step 1.
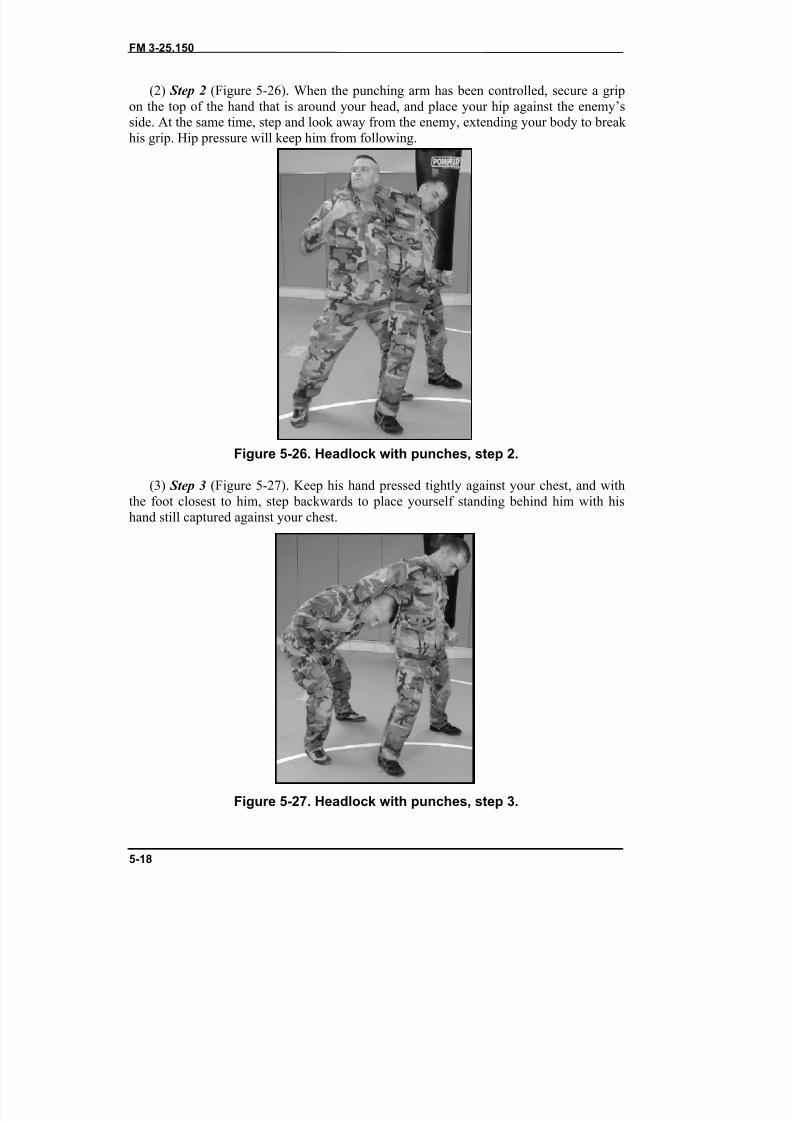
8/9/2019 US ARMY FM 3-25.150 - Combatives (hand-to-hand combat).pdf
http://slidepdf.com/reader/full/us-army-fm-3-25150-combatives-hand-to-hand-combatpdf 159/265
FM 3-25.150
5-18
(2) Step 2 (Figure 5-26). When the punching arm has been controlled, secure a gripon the top of the hand that is around your head, and place your hip against the enemy’sside. At the same time, step and look away from the enemy, extending your body to break his grip. Hip pressure will keep him from following.
Figure 5-26. Headlock with punches, step 2.
(3) Step 3 (Figure 5-27). Keep his hand pressed tightly against your chest, and withthe foot closest to him, step backwards to place yourself standing behind him with hishand still captured against your chest.
Figure 5-27. Headlock with punches, step 3.
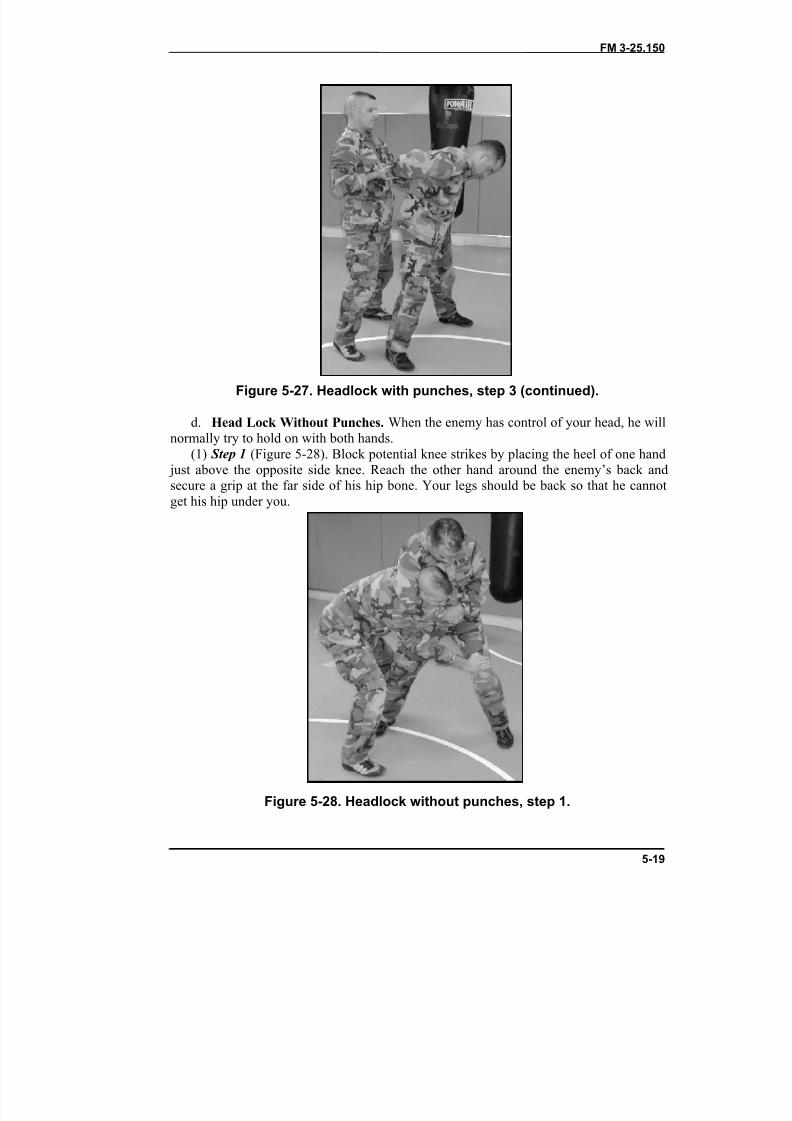
8/9/2019 US ARMY FM 3-25.150 - Combatives (hand-to-hand combat).pdf
http://slidepdf.com/reader/full/us-army-fm-3-25150-combatives-hand-to-hand-combatpdf 160/265
FM 3-25.150
5-19
Figure 5-27. Headlock with punches, step 3 (continued).
d. Head Lock Without Punches. When the enemy has control of your head, he willnormally try to hold on with both hands.
(1) Step 1 (Figure 5-28). Block potential knee strikes by placing the heel of one hand just above the opposite side knee. Reach the other hand around the enemy’s back andsecure a grip at the far side of his hip bone. Your legs should be back so that he cannotget his hip under you.
Figure 5-28. Headlock without punches, step 1.
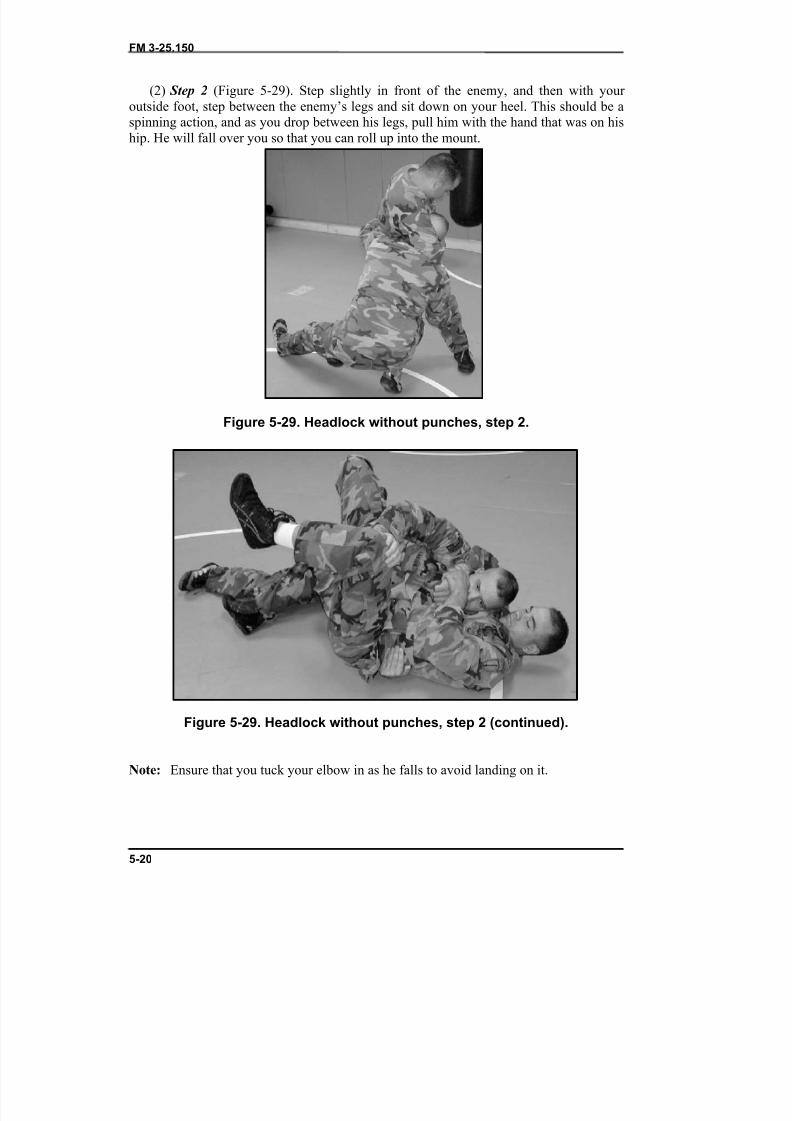
8/9/2019 US ARMY FM 3-25.150 - Combatives (hand-to-hand combat).pdf
http://slidepdf.com/reader/full/us-army-fm-3-25150-combatives-hand-to-hand-combatpdf 161/265
FM 3-25.150
5-20
(2) Step 2 (Figure 5-29). Step slightly in front of the enemy, and then with your outside foot, step between the enemy’s legs and sit down on your heel. This should be aspinning action, and as you drop between his legs, pull him with the hand that was on hiship. He will fall over you so that you can roll up into the mount.
Figure 5-29. Headlock without punches, step 2.
Figure 5-29. Headlock without punches, step 2 (continued).
Figure 5-29. Headlock without punches, step 2 (continued).
Note: Ensure that you tuck your elbow in as he falls to avoid landing on it.
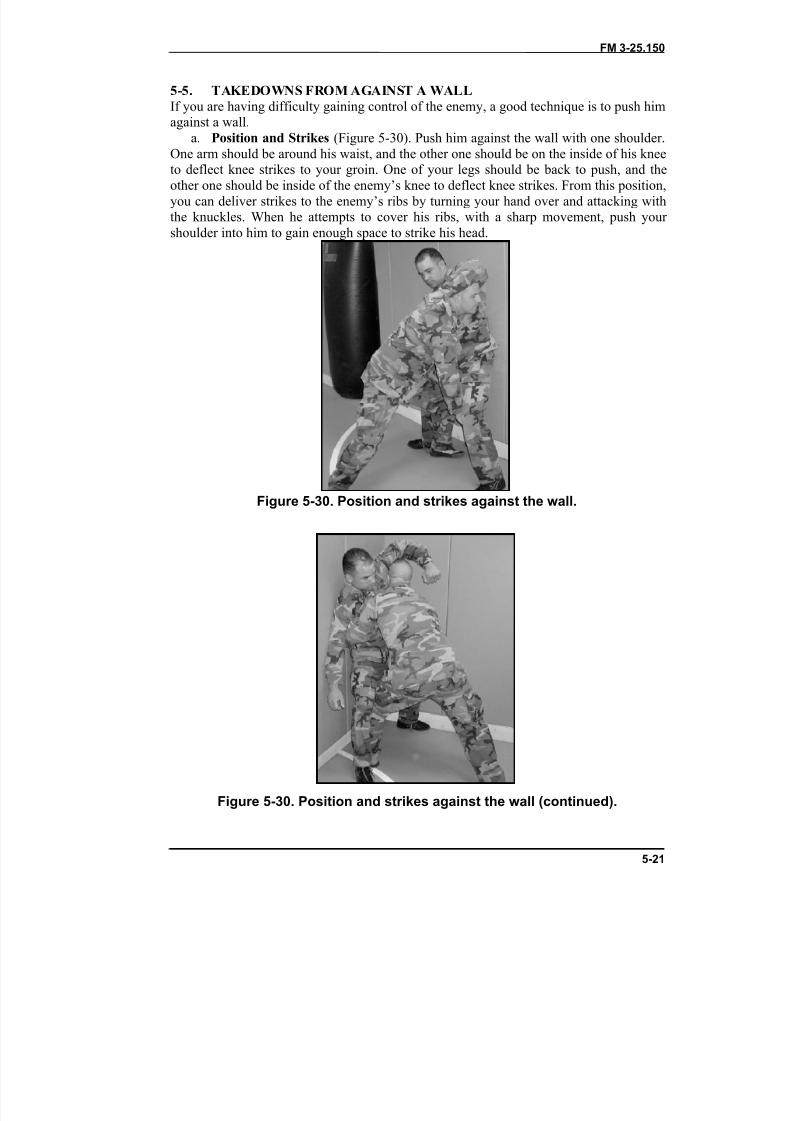
8/9/2019 US ARMY FM 3-25.150 - Combatives (hand-to-hand combat).pdf
http://slidepdf.com/reader/full/us-army-fm-3-25150-combatives-hand-to-hand-combatpdf 162/265
FM 3-25.150
5-21
5-5. TAKEDOWNS FROM AGAINST A WALLIf you are having difficulty gaining control of the enemy, a good technique is to push himagainst a wall.
a. Position and Strikes (Figure 5-30). Push him against the wall with one shoulder.One arm should be around his waist, and the other one should be on the inside of his knee
to deflect knee strikes to your groin. One of your legs should be back to push, and theother one should be inside of the enemy’s knee to deflect knee strikes. From this position,you can deliver strikes to the enemy’s ribs by turning your hand over and attacking withthe knuckles. When he attempts to cover his ribs, with a sharp movement, push your shoulder into him to gain enough space to strike his head.
Figure 5-30. Position and strikes against the wall.
Figure 5-30. Position and strikes against the wall (continued).
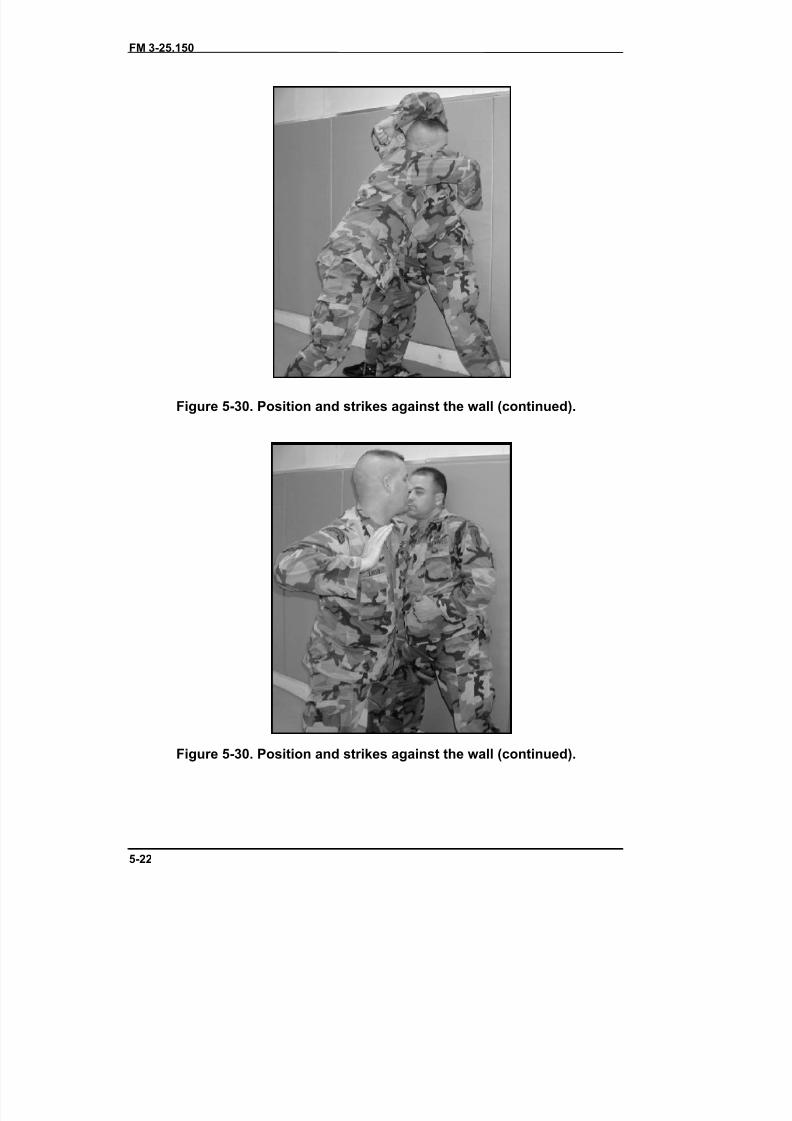
8/9/2019 US ARMY FM 3-25.150 - Combatives (hand-to-hand combat).pdf
http://slidepdf.com/reader/full/us-army-fm-3-25150-combatives-hand-to-hand-combatpdf 163/265
FM 3-25.150
5-22
Figure 5-30. Position and strikes against the wall (continued).
Figure 5-30. Position and strikes against the wall (continued).
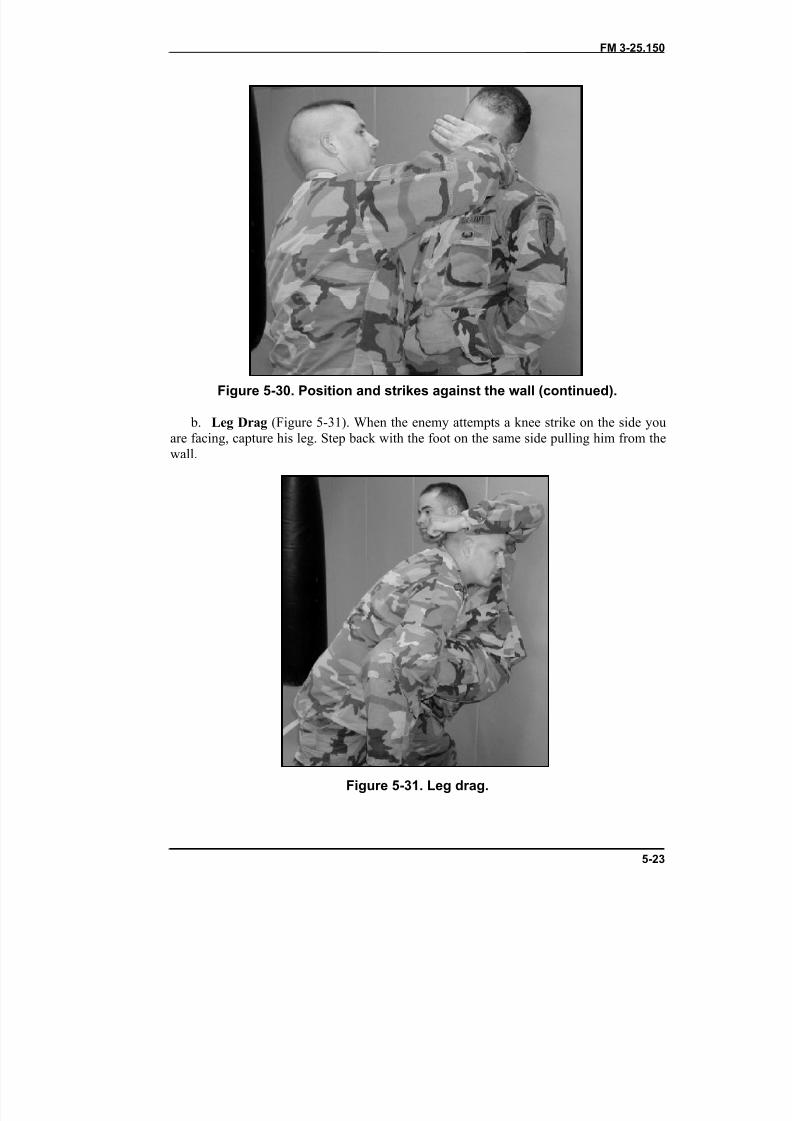
8/9/2019 US ARMY FM 3-25.150 - Combatives (hand-to-hand combat).pdf
http://slidepdf.com/reader/full/us-army-fm-3-25150-combatives-hand-to-hand-combatpdf 164/265
FM 3-25.150
5-23
Figure 5-30. Position and strikes against the wall (continued).
b. Leg Drag (Figure 5-31). When the enemy attempts a knee strike on the side youare facing, capture his leg. Step back with the foot on the same side pulling him from thewall.
Figure 5-31. Leg drag.
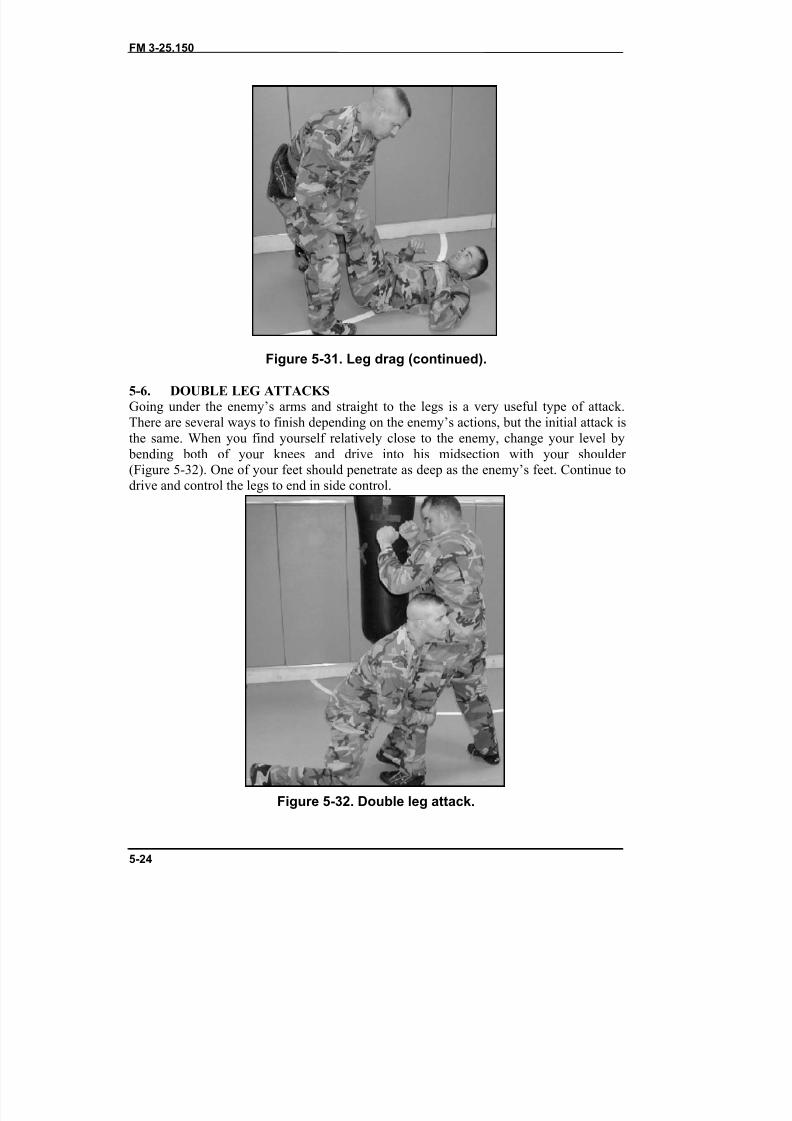
8/9/2019 US ARMY FM 3-25.150 - Combatives (hand-to-hand combat).pdf
http://slidepdf.com/reader/full/us-army-fm-3-25150-combatives-hand-to-hand-combatpdf 165/265
FM 3-25.150
5-24
Figure 5-31. Leg drag (continued).
5-6. DOUBLE LEG ATTACKSGoing under the enemy’s arms and straight to the legs is a very useful type of attack.There are several ways to finish depending on the enemy’s actions, but the initial attack isthe same. When you find yourself relatively close to the enemy, change your level by
bending both of your knees and drive into his midsection with your shoulder (Figure 5-32). One of your feet should penetrate as deep as the enemy’s feet. Continue todrive and control the legs to end in side control.
Figure 5-32. Double leg attack.
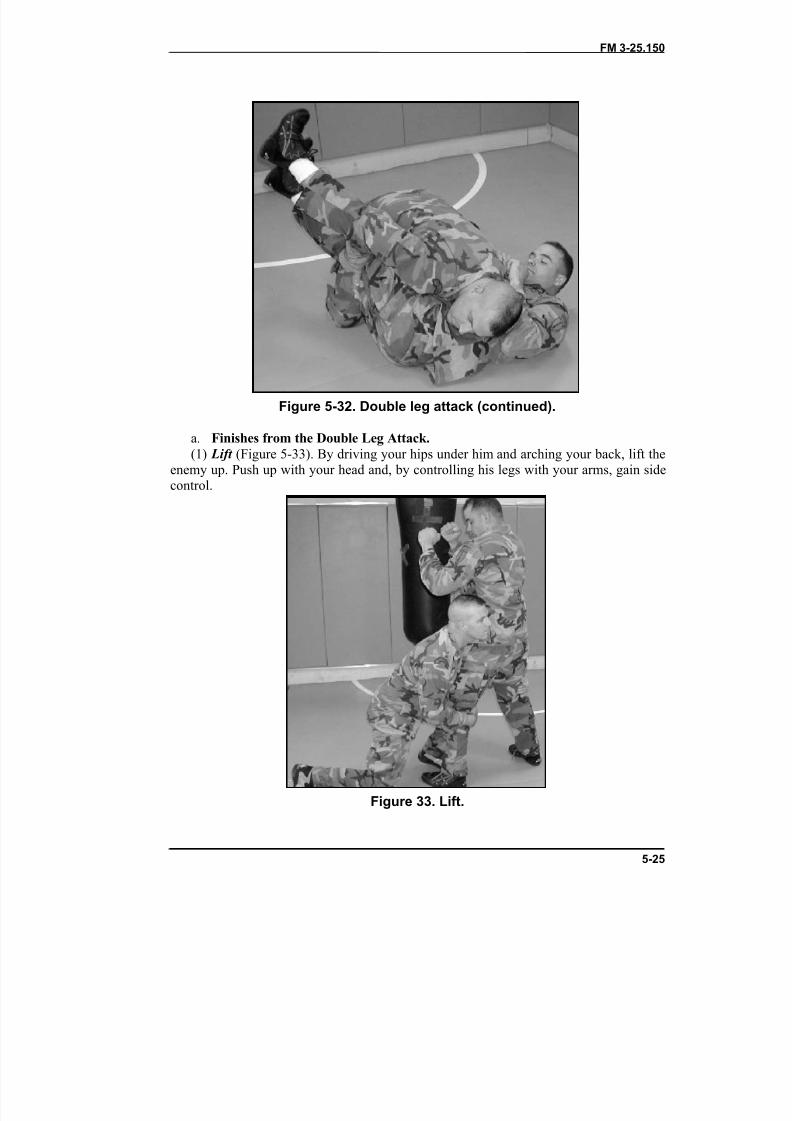
8/9/2019 US ARMY FM 3-25.150 - Combatives (hand-to-hand combat).pdf
http://slidepdf.com/reader/full/us-army-fm-3-25150-combatives-hand-to-hand-combatpdf 166/265
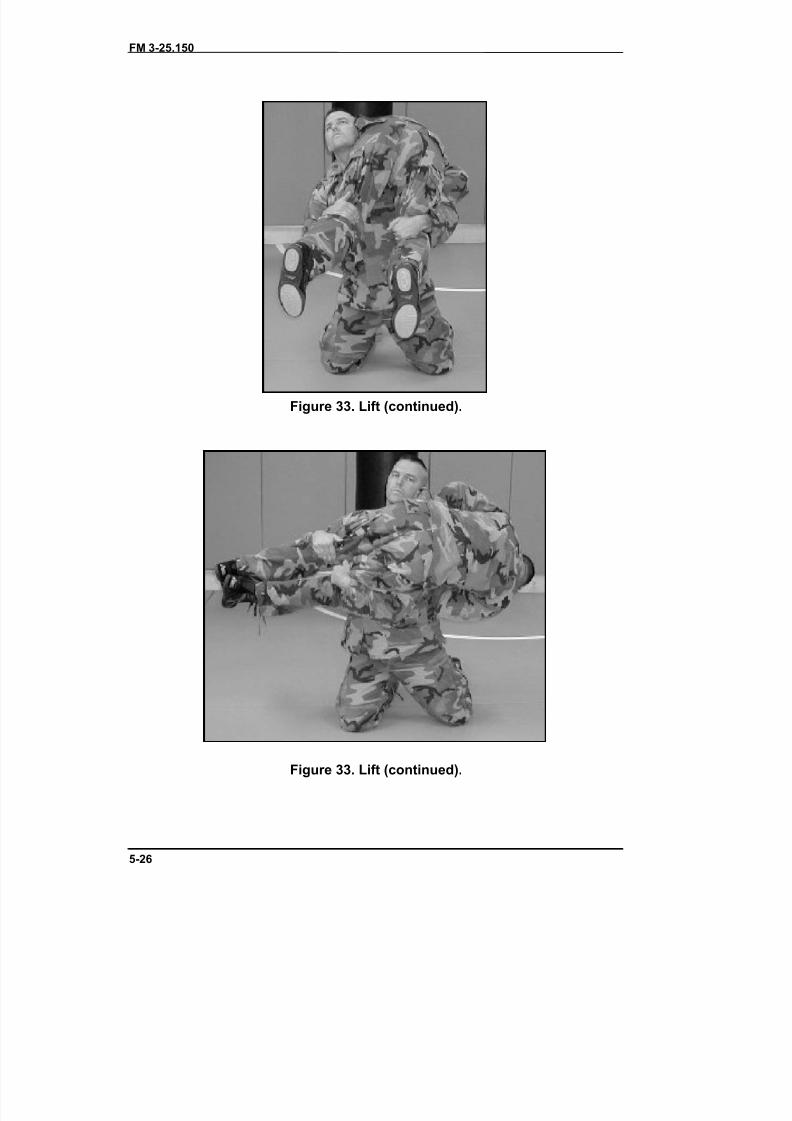
8/9/2019 US ARMY FM 3-25.150 - Combatives (hand-to-hand combat).pdf
http://slidepdf.com/reader/full/us-army-fm-3-25150-combatives-hand-to-hand-combatpdf 167/265
FM 3-25.150
5-26
Figure 33. Lift (continued).
Figure 33. Lift (continued).
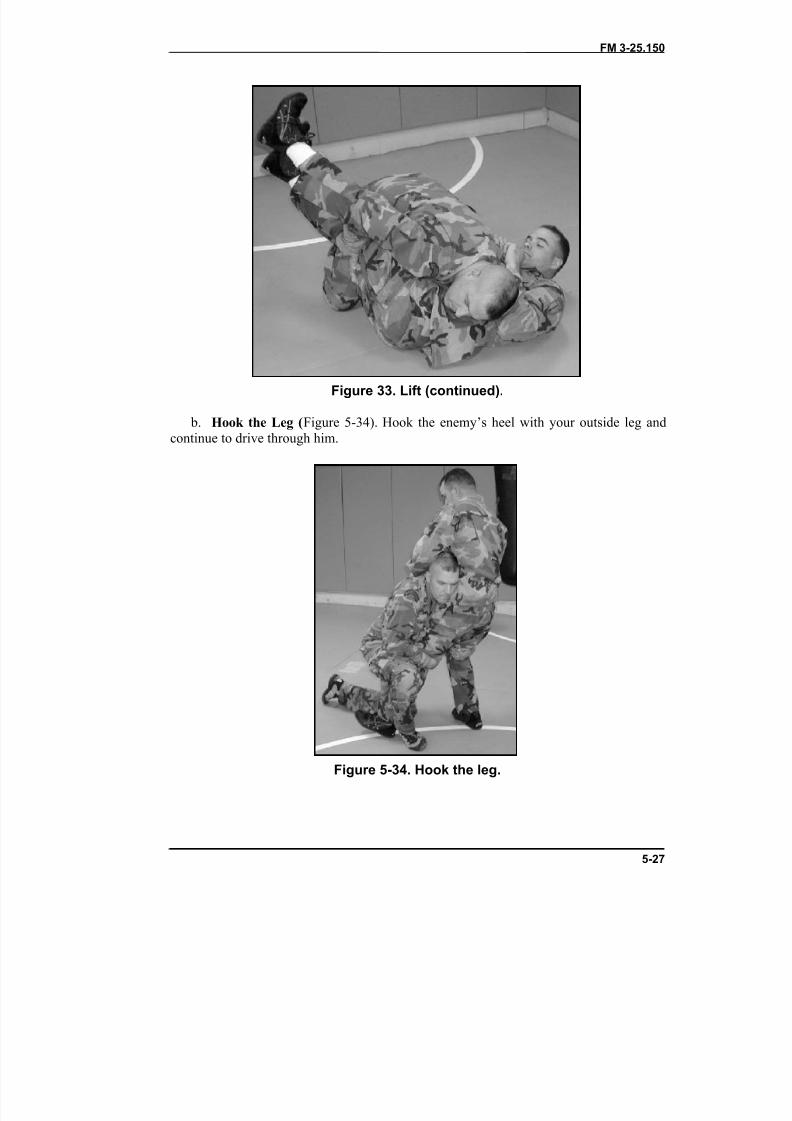
8/9/2019 US ARMY FM 3-25.150 - Combatives (hand-to-hand combat).pdf
http://slidepdf.com/reader/full/us-army-fm-3-25150-combatives-hand-to-hand-combatpdf 168/265
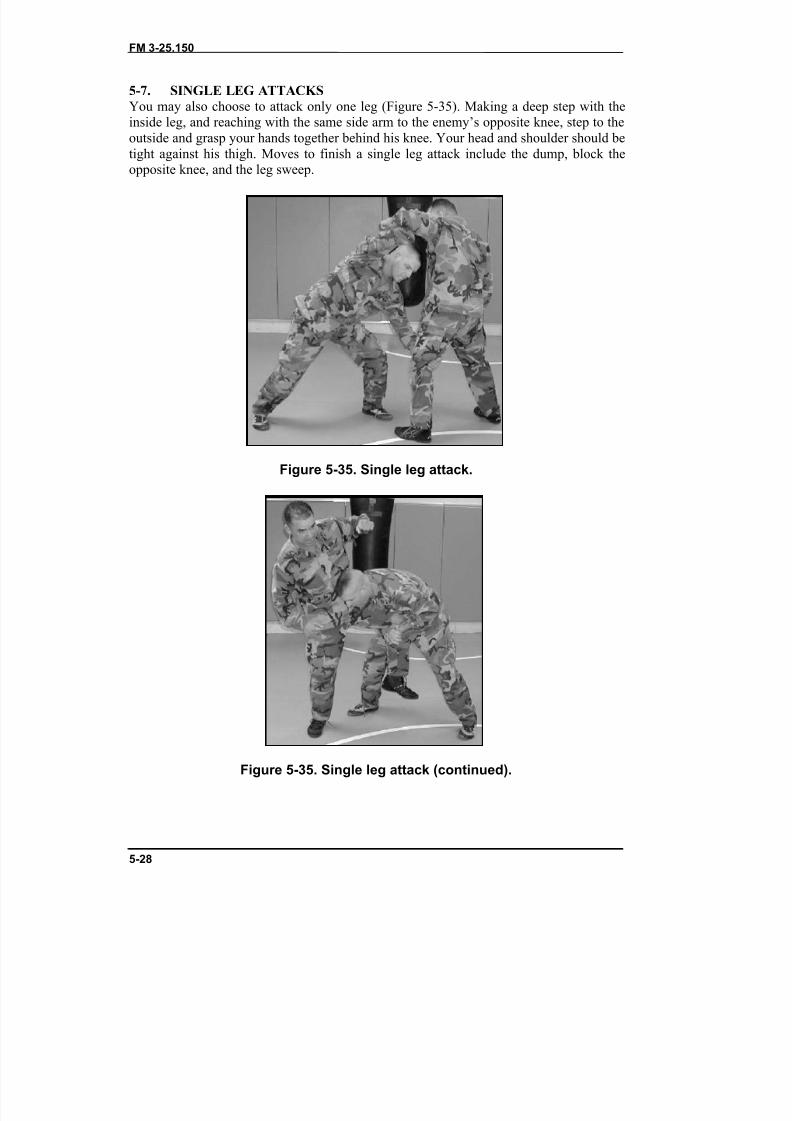
8/9/2019 US ARMY FM 3-25.150 - Combatives (hand-to-hand combat).pdf
http://slidepdf.com/reader/full/us-army-fm-3-25150-combatives-hand-to-hand-combatpdf 169/265
FM 3-25.150
5-28
5-7. SINGLE LEG ATTACKSYou may also choose to attack only one leg (Figure 5-35). Making a deep step with theinside leg, and reaching with the same side arm to the enemy’s opposite knee, step to theoutside and grasp your hands together behind his knee. Your head and shoulder should betight against his thigh. Moves to finish a single leg attack include the dump, block the
opposite knee, and the leg sweep.
Figure 5-35. Single leg attack.
Figure 5-35. Single leg attack (continued).
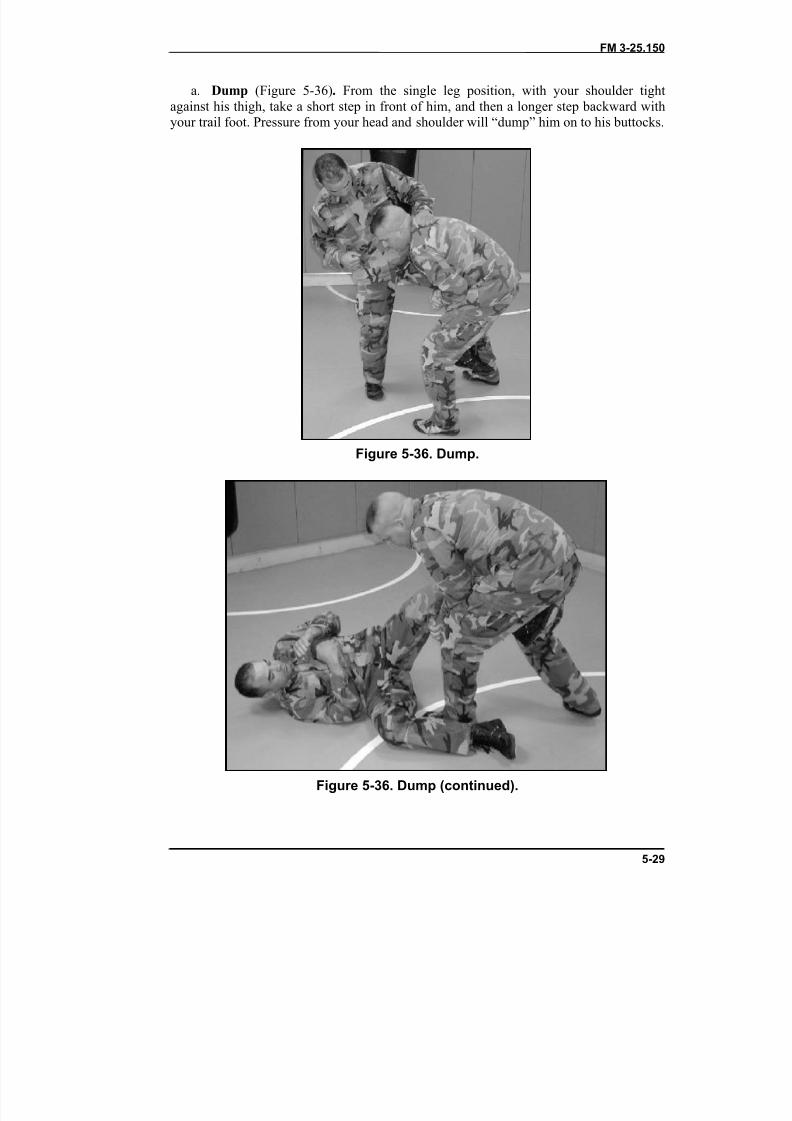
8/9/2019 US ARMY FM 3-25.150 - Combatives (hand-to-hand combat).pdf
http://slidepdf.com/reader/full/us-army-fm-3-25150-combatives-hand-to-hand-combatpdf 170/265
FM 3-25.150
5-29
a. Dump (Figure 5-36) . From the single leg position, with your shoulder tightagainst his thigh, take a short step in front of him, and then a longer step backward withyour trail foot. Pressure from your head and shoulder will “dump” him on to his buttocks.
Figure 5-36. Dump.
Figure 5-36. Dump (continued).
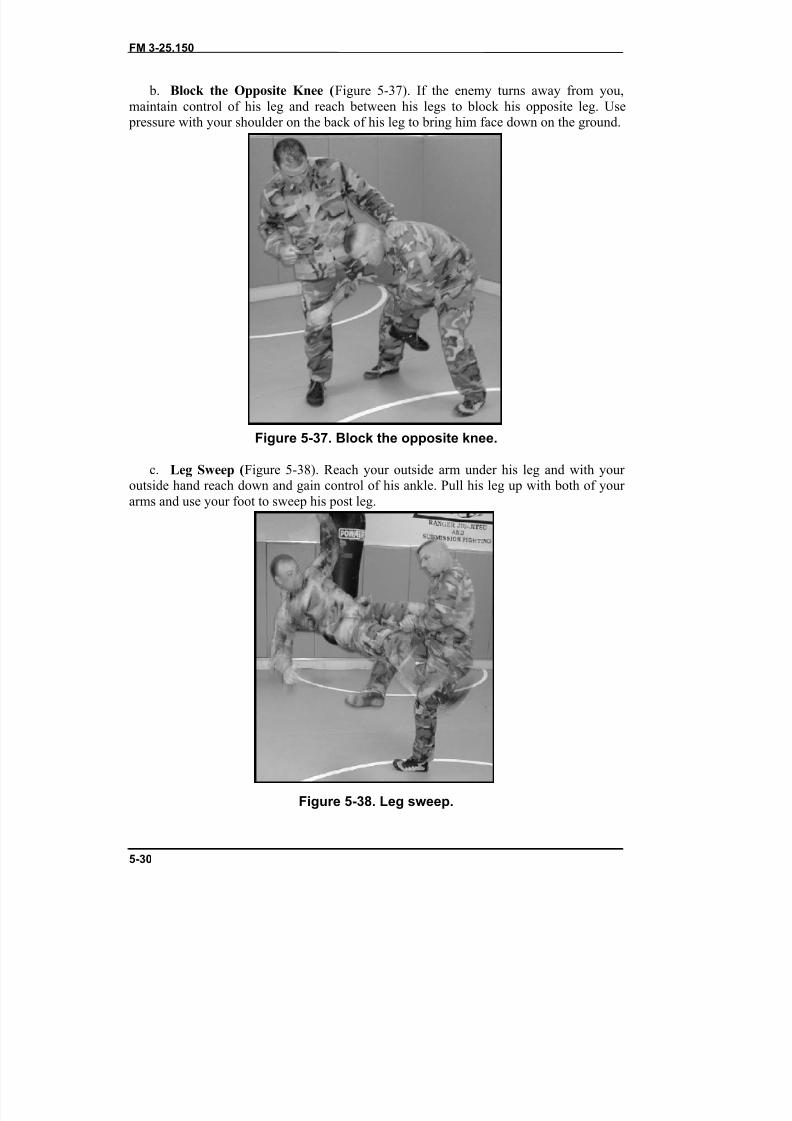
8/9/2019 US ARMY FM 3-25.150 - Combatives (hand-to-hand combat).pdf
http://slidepdf.com/reader/full/us-army-fm-3-25150-combatives-hand-to-hand-combatpdf 171/265
FM 3-25.150
5-30
b. Block the Opposite Knee ( Figure 5-37). If the enemy turns away from you,maintain control of his leg and reach between his legs to block his opposite leg. Use
pressure with your shoulder on the back of his leg to bring him face down on the ground.
Figure 5-37. Block the opposite knee.
c. Leg Sweep ( Figure 5-38). Reach your outside arm under his leg and with your outside hand reach down and gain control of his ankle. Pull his leg up with both of your arms and use your foot to sweep his post leg.
Figure 5-38. Leg sweep.
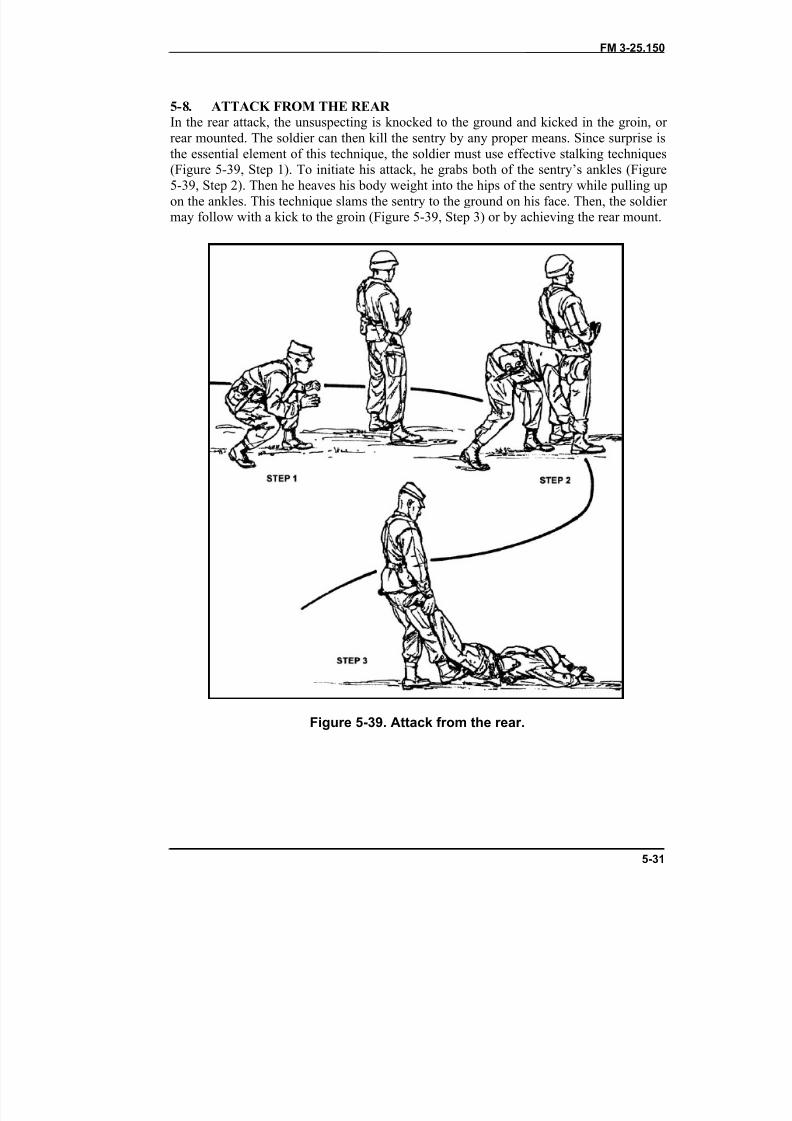
8/9/2019 US ARMY FM 3-25.150 - Combatives (hand-to-hand combat).pdf
http://slidepdf.com/reader/full/us-army-fm-3-25150-combatives-hand-to-hand-combatpdf 172/265
FM 3-25.150
5-31
5-8. ATTACK FROM THE REAR In the rear attack, the unsuspecting is knocked to the ground and kicked in the groin, or rear mounted. The soldier can then kill the sentry by any proper means. Since surprise isthe essential element of this technique, the soldier must use effective stalking techniques
(Figure 5-39, Step 1). To initiate his attack, he grabs both of the sentry’s ankles (Figure5-39, Step 2). Then he heaves his body weight into the hips of the sentry while pulling upon the ankles. This technique slams the sentry to the ground on his face. Then, the soldier may follow with a kick to the groin (Figure 5-39, Step 3) or by achieving the rear mount.
Figure 5-39. Attack from the rear.
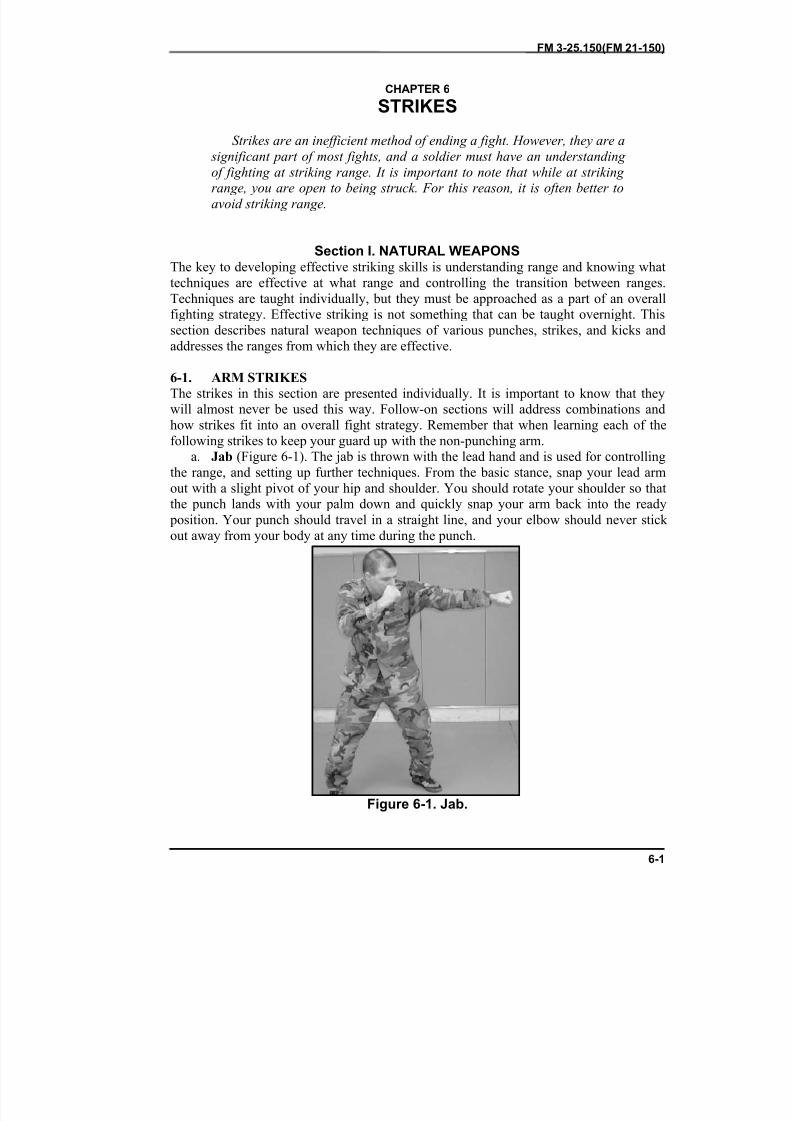
8/9/2019 US ARMY FM 3-25.150 - Combatives (hand-to-hand combat).pdf
http://slidepdf.com/reader/full/us-army-fm-3-25150-combatives-hand-to-hand-combatpdf 173/265
FM 3-25.150(FM 21-150)
6-1
CHAPTER 6
STRIKES
Strikes are an inefficient method of ending a fight. However, they are a significant part of most fights, and a soldier must have an understanding
of fighting at striking range. It is important to note that while at striking range, you are open to being struck. For this reason, it is often better toavoid striking range.
Section I. NATURAL WEAPONSThe key to developing effective striking skills is understanding range and knowing whattechniques are effective at what range and controlling the transition between ranges.Techniques are taught individually, but they must be approached as a part of an overallfighting strategy. Effective striking is not something that can be taught overnight. Thissection describes natural weapon techniques of various punches, strikes, and kicks and
addresses the ranges from which they are effective.
6-1. ARM STRIKESThe strikes in this section are presented individually. It is important to know that theywill almost never be used this way. Follow-on sections will address combinations andhow strikes fit into an overall fight strategy. Remember that when learning each of thefollowing strikes to keep your guard up with the non-punching arm.
a. Jab (Figure 6-1). The jab is thrown with the lead hand and is used for controllingthe range, and setting up further techniques. From the basic stance, snap your lead armout with a slight pivot of your hip and shoulder. You should rotate your shoulder so thatthe punch lands with your palm down and quickly snap your arm back into the ready
position. Your punch should travel in a straight line, and your elbow should never stick out away from your body at any time during the punch.
Figure 6-1. Jab.
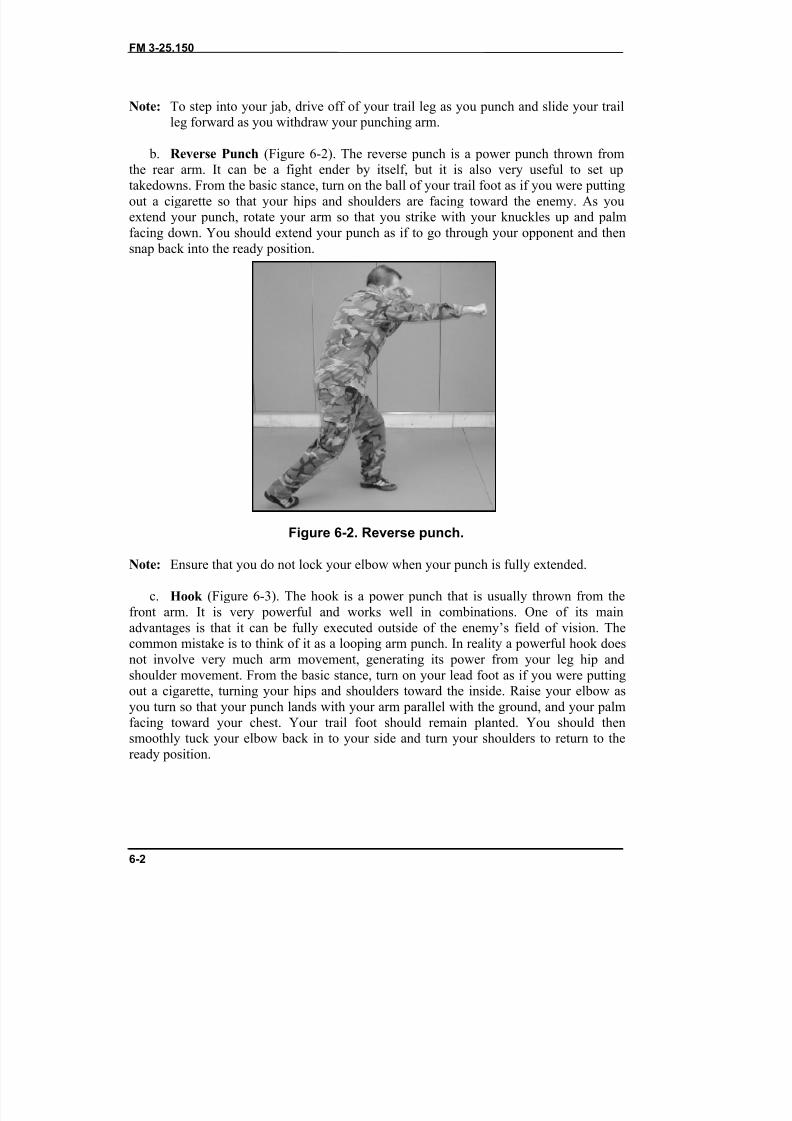
8/9/2019 US ARMY FM 3-25.150 - Combatives (hand-to-hand combat).pdf
http://slidepdf.com/reader/full/us-army-fm-3-25150-combatives-hand-to-hand-combatpdf 174/265
FM 3-25.150
6-2
Note: To step into your jab, drive off of your trail leg as you punch and slide your trailleg forward as you withdraw your punching arm.
b. Reverse Punch (Figure 6-2). The reverse punch is a power punch thrown from
the rear arm. It can be a fight ender by itself, but it is also very useful to set uptakedowns. From the basic stance, turn on the ball of your trail foot as if you were puttingout a cigarette so that your hips and shoulders are facing toward the enemy. As youextend your punch, rotate your arm so that you strike with your knuckles up and palmfacing down. You should extend your punch as if to go through your opponent and thensnap back into the ready position.
Figure 6-2. Reverse punch.
Note: Ensure that you do not lock your elbow when your punch is fully extended.
c. Hook (Figure 6-3). The hook is a power punch that is usually thrown from thefront arm. It is very powerful and works well in combinations. One of its mainadvantages is that it can be fully executed outside of the enemy’s field of vision. Thecommon mistake is to think of it as a looping arm punch. In reality a powerful hook doesnot involve very much arm movement, generating its power from your leg hip andshoulder movement. From the basic stance, turn on your lead foot as if you were puttingout a cigarette, turning your hips and shoulders toward the inside. Raise your elbow asyou turn so that your punch lands with your arm parallel with the ground, and your palmfacing toward your chest. Your trail foot should remain planted. You should thensmoothly tuck your elbow back in to your side and turn your shoulders to return to theready position.
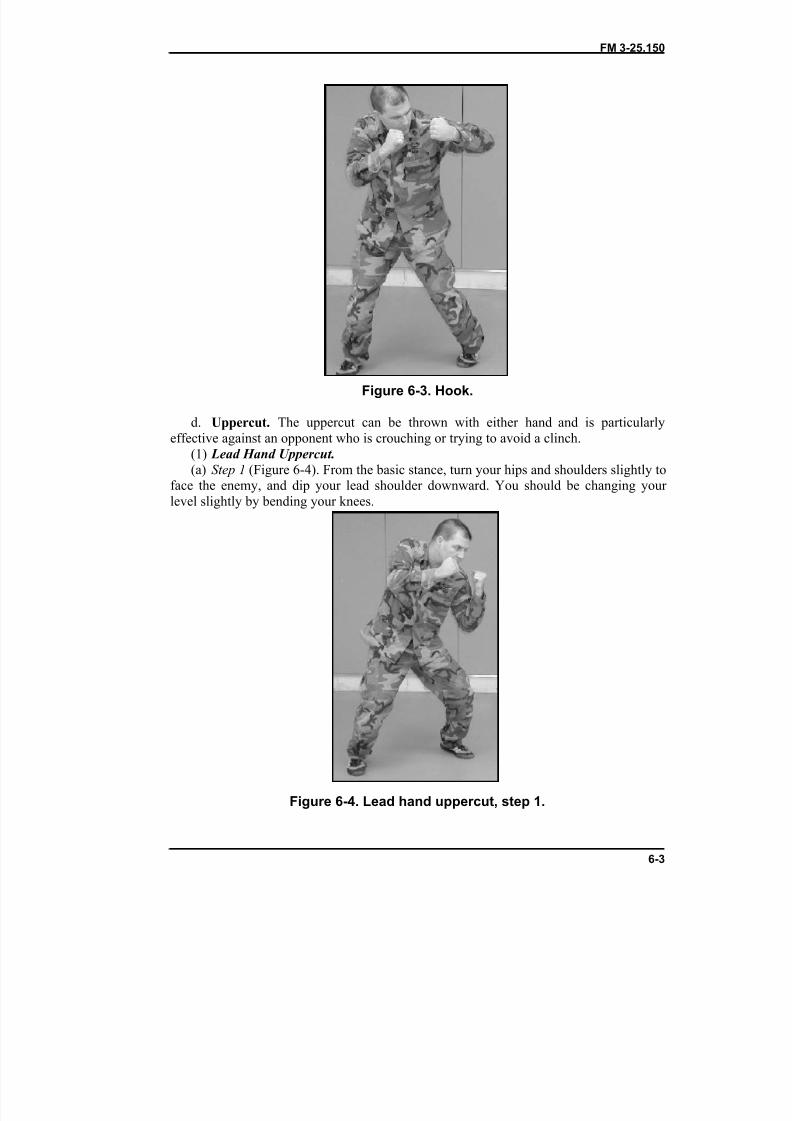
8/9/2019 US ARMY FM 3-25.150 - Combatives (hand-to-hand combat).pdf
http://slidepdf.com/reader/full/us-army-fm-3-25150-combatives-hand-to-hand-combatpdf 175/265
FM 3-25.150
6-3
Figure 6-3. Hook.
d. Uppercut. The uppercut can be thrown with either hand and is particularlyeffective against an opponent who is crouching or trying to avoid a clinch.
(1) Lead Hand Uppercut.(a) Step 1 (Figure 6-4). From the basic stance, turn your hips and shoulders slightly to
face the enemy, and dip your lead shoulder downward. You should be changing your level slightly by bending your knees.
Figure 6-4. Lead hand uppercut, step 1.
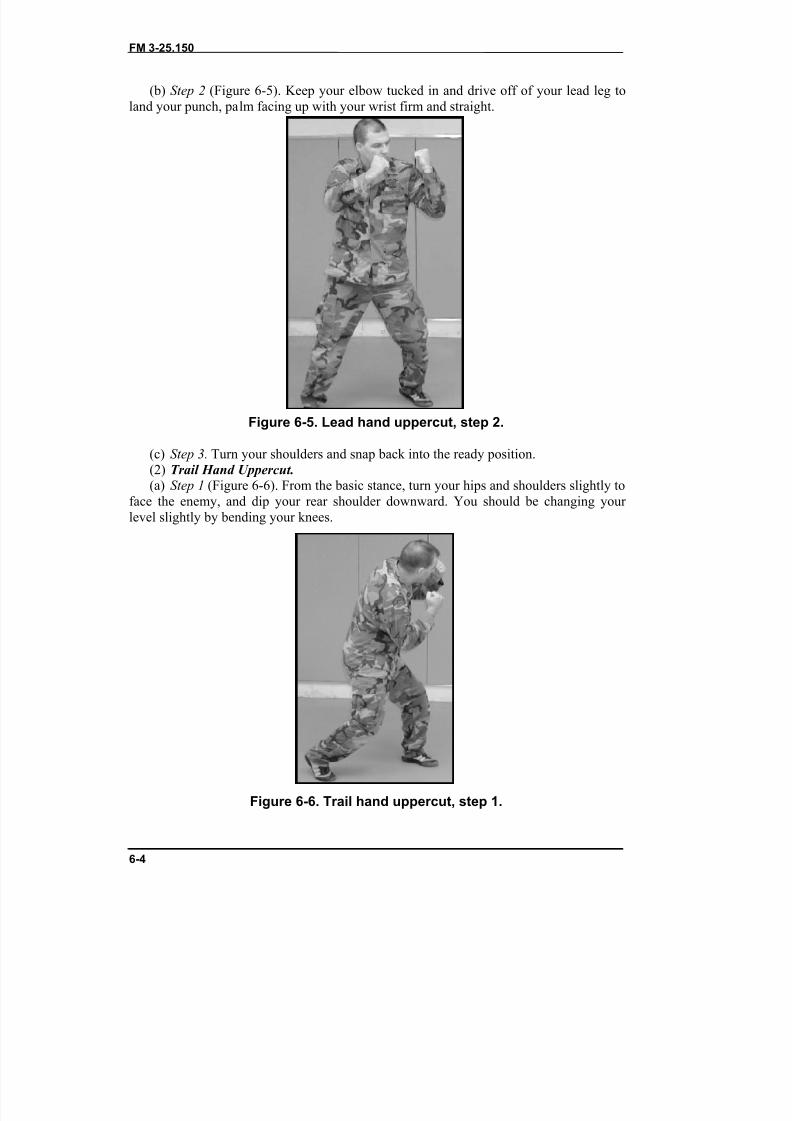
8/9/2019 US ARMY FM 3-25.150 - Combatives (hand-to-hand combat).pdf
http://slidepdf.com/reader/full/us-army-fm-3-25150-combatives-hand-to-hand-combatpdf 176/265
FM 3-25.150
6-4
(b) Step 2 (Figure 6-5). Keep your elbow tucked in and drive off of your lead leg toland your punch, palm facing up with your wrist firm and straight.
Figure 6-5. Lead hand uppercut, step 2.
(c) Step 3. Turn your shoulders and snap back into the ready position.(2) Trail Hand Uppercut.(a) Step 1 (Figure 6-6). From the basic stance, turn your hips and shoulders slightly to
face the enemy, and dip your rear shoulder downward. You should be changing your level slightly by bending your knees.
Figure 6-6. Trail hand uppercut, step 1.
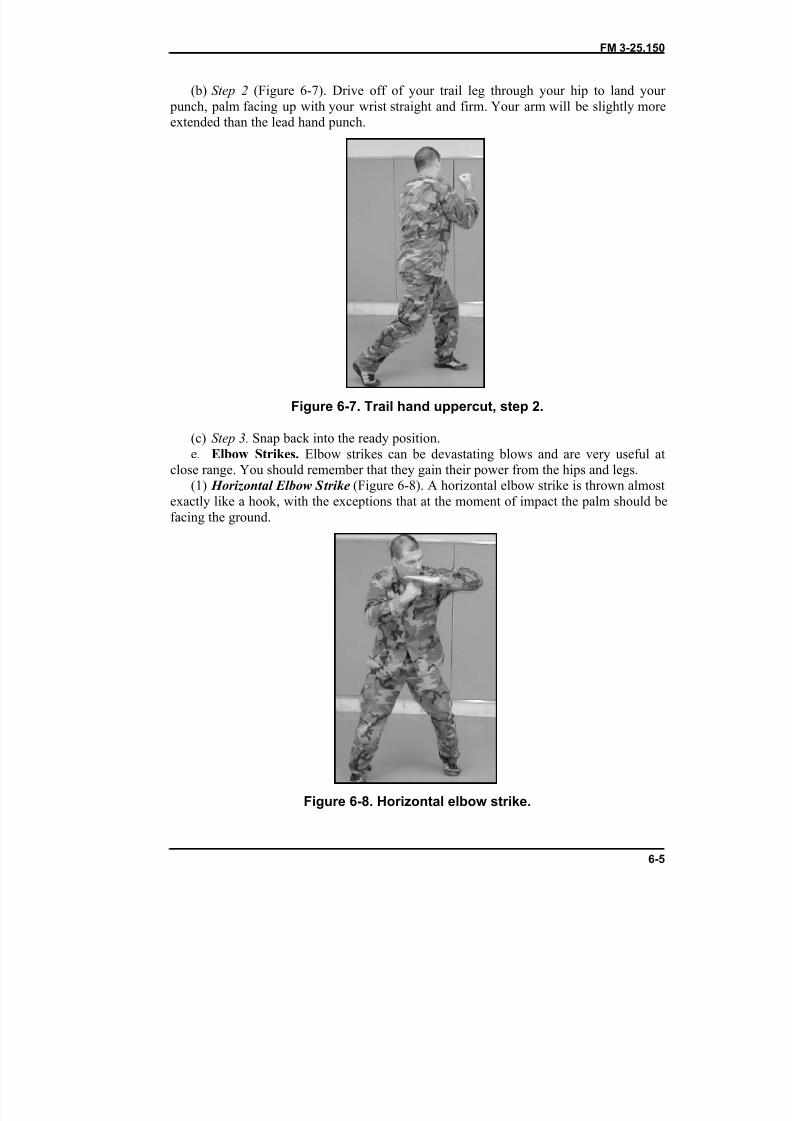
8/9/2019 US ARMY FM 3-25.150 - Combatives (hand-to-hand combat).pdf
http://slidepdf.com/reader/full/us-army-fm-3-25150-combatives-hand-to-hand-combatpdf 177/265
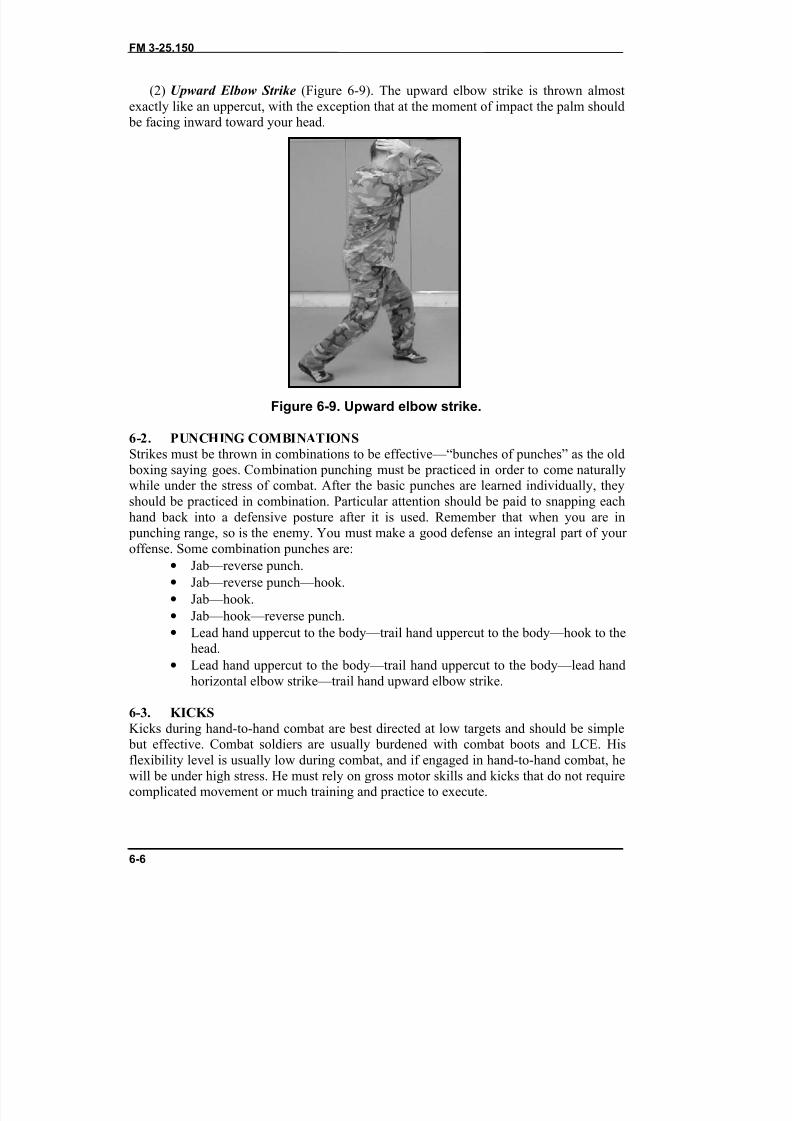
8/9/2019 US ARMY FM 3-25.150 - Combatives (hand-to-hand combat).pdf
http://slidepdf.com/reader/full/us-army-fm-3-25150-combatives-hand-to-hand-combatpdf 178/265
FM 3-25.150
6-6
(2) Upward Elbow Strike (Figure 6-9). The upward elbow strike is thrown almostexactly like an uppercut, with the exception that at the moment of impact the palm should
be facing inward toward your head.
Figure 6-9. Upward elbow strike.
6-2. PUNCHING COMBINATIONSStrikes must be thrown in combinations to be effective—“bunches of punches” as the old
boxing saying goes. Combination punching must be practiced in order to come naturallywhile under the stress of combat. After the basic punches are learned individually, theyshould be practiced in combination. Particular attention should be paid to snapping eachhand back into a defensive posture after it is used. Remember that when you are in
punching range, so is the enemy. You must make a good defense an integral part of your offense. Some combination punches are:
• Jab—reverse punch.• Jab—reverse punch—hook.• Jab—hook.• Jab—hook—reverse punch.• Lead hand uppercut to the body—trail hand uppercut to the body—hook to the
head.• Lead hand uppercut to the body—trail hand uppercut to the body—lead hand
horizontal elbow strike—trail hand upward elbow strike.
6-3. KICKSKicks during hand-to-hand combat are best directed at low targets and should be simple
but effective. Combat soldiers are usually burdened with combat boots and LCE. Hisflexibility level is usually low during combat, and if engaged in hand-to-hand combat, hewill be under high stress. He must rely on gross motor skills and kicks that do not requirecomplicated movement or much training and practice to execute.
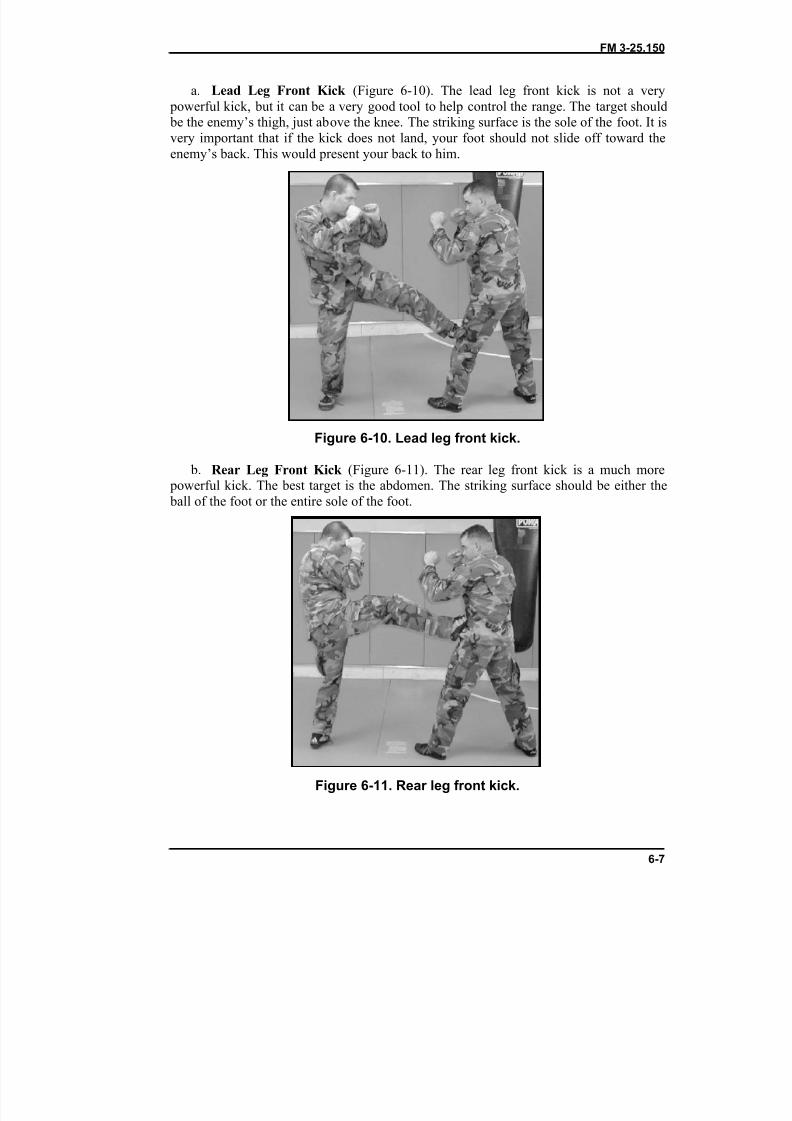
8/9/2019 US ARMY FM 3-25.150 - Combatives (hand-to-hand combat).pdf
http://slidepdf.com/reader/full/us-army-fm-3-25150-combatives-hand-to-hand-combatpdf 179/265
FM 3-25.150
6-7
a. Lead Leg Front Kick (Figure 6-10). The lead leg front kick is not a very powerful kick, but it can be a very good tool to help control the range. The target should be the enemy’s thigh, just above the knee. The striking surface is the sole of the foot. It isvery important that if the kick does not land, your foot should not slide off toward theenemy’s back. This would present your back to him.
Figure 6-10. Lead leg front kick.
b. Rear Leg Front Kick (Figure 6-11). The rear leg front kick is a much more powerful kick. The best target is the abdomen. The striking surface should be either the ball of the foot or the entire sole of the foot.
Figure 6-11. Rear leg front kick.
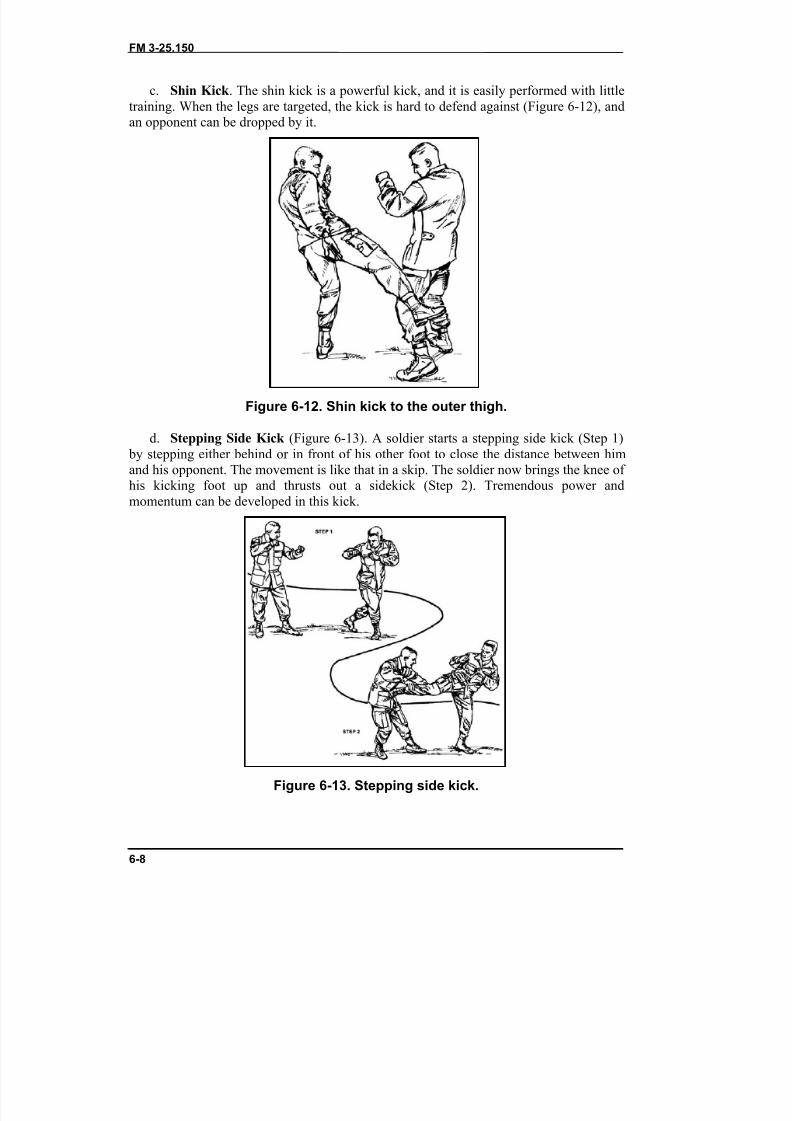
8/9/2019 US ARMY FM 3-25.150 - Combatives (hand-to-hand combat).pdf
http://slidepdf.com/reader/full/us-army-fm-3-25150-combatives-hand-to-hand-combatpdf 180/265
FM 3-25.150
6-8
c. Shin Kick . The shin kick is a powerful kick, and it is easily performed with littletraining. When the legs are targeted, the kick is hard to defend against (Figure 6-12), andan opponent can be dropped by it.
Figure 6-12. Shin kick to the outer thigh.
d. Stepping Side Kick (Figure 6-13). A soldier starts a stepping side kick (Step 1) by stepping either behind or in front of his other foot to close the distance between himand his opponent. The movement is like that in a skip. The soldier now brings the knee of his kicking foot up and thrusts out a sidekick (Step 2). Tremendous power andmomentum can be developed in this kick.
Figure 6-13. Stepping side kick.
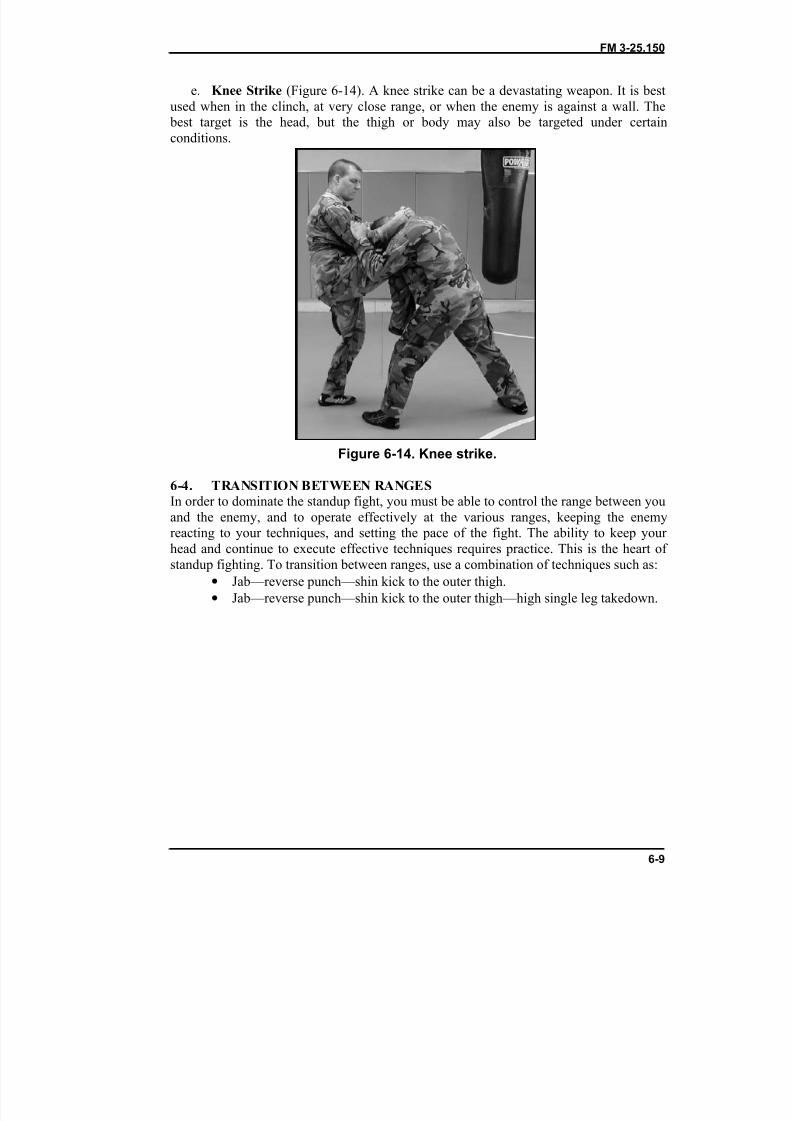
8/9/2019 US ARMY FM 3-25.150 - Combatives (hand-to-hand combat).pdf
http://slidepdf.com/reader/full/us-army-fm-3-25150-combatives-hand-to-hand-combatpdf 181/265
FM 3-25.150
6-9
e. Knee Strike (Figure 6-14). A knee strike can be a devastating weapon. It is bestused when in the clinch, at very close range, or when the enemy is against a wall. The
best target is the head, but the thigh or body may also be targeted under certainconditions.
Figure 6-14. Knee strike.
6-4. TRANSITION BETWEEN RANGESIn order to dominate the standup fight, you must be able to control the range between youand the enemy, and to operate effectively at the various ranges, keeping the enemyreacting to your techniques, and setting the pace of the fight. The ability to keep your head and continue to execute effective techniques requires practice. This is the heart of standup fighting. To transition between ranges, use a combination of techniques such as:
• Jab—reverse punch—shin kick to the outer thigh.• Jab—reverse punch—shin kick to the outer thigh—high single leg takedown.
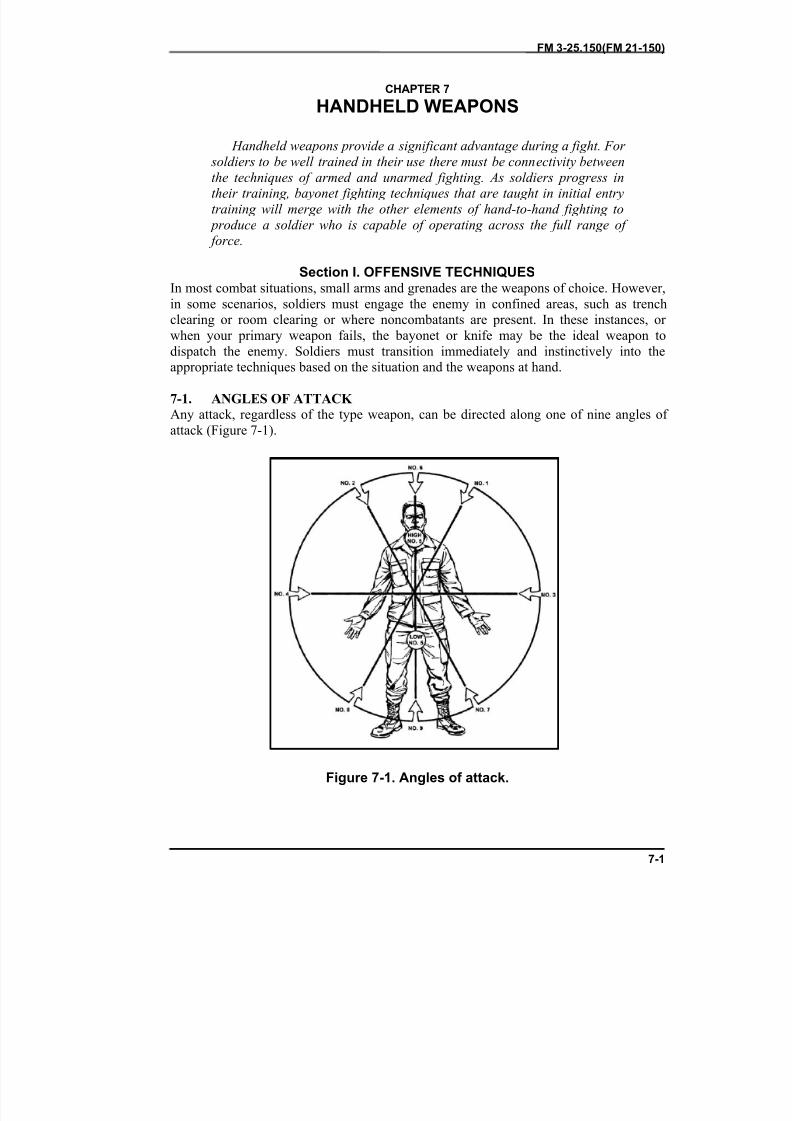
8/9/2019 US ARMY FM 3-25.150 - Combatives (hand-to-hand combat).pdf
http://slidepdf.com/reader/full/us-army-fm-3-25150-combatives-hand-to-hand-combatpdf 182/265
FM 3-25.150(FM 21-150)
7-1
CHAPTER 7
HANDHELD WEAPONS
Handheld weapons provide a significant advantage during a fight. For soldiers to be well trained in their use there must be connectivity betweenthe techniques of armed and unarmed fighting. As soldiers progress intheir training, bayonet fighting techniques that are taught in initial entrytraining will merge with the other elements of hand-to-hand fighting to
produce a soldier who is capable of operating across the full range of force.
Section I. OFFENSIVE TECHNIQUESIn most combat situations, small arms and grenades are the weapons of choice. However,in some scenarios, soldiers must engage the enemy in confined areas, such as trenchclearing or room clearing or where noncombatants are present. In these instances, or when your primary weapon fails, the bayonet or knife may be the ideal weapon todispatch the enemy. Soldiers must transition immediately and instinctively into theappropriate techniques based on the situation and the weapons at hand.
7-1. ANGLES OF ATTACK Any attack, regardless of the type weapon, can be directed along one of nine angles of attack (Figure 7-1).
Figure 7-1. Angles of attack.
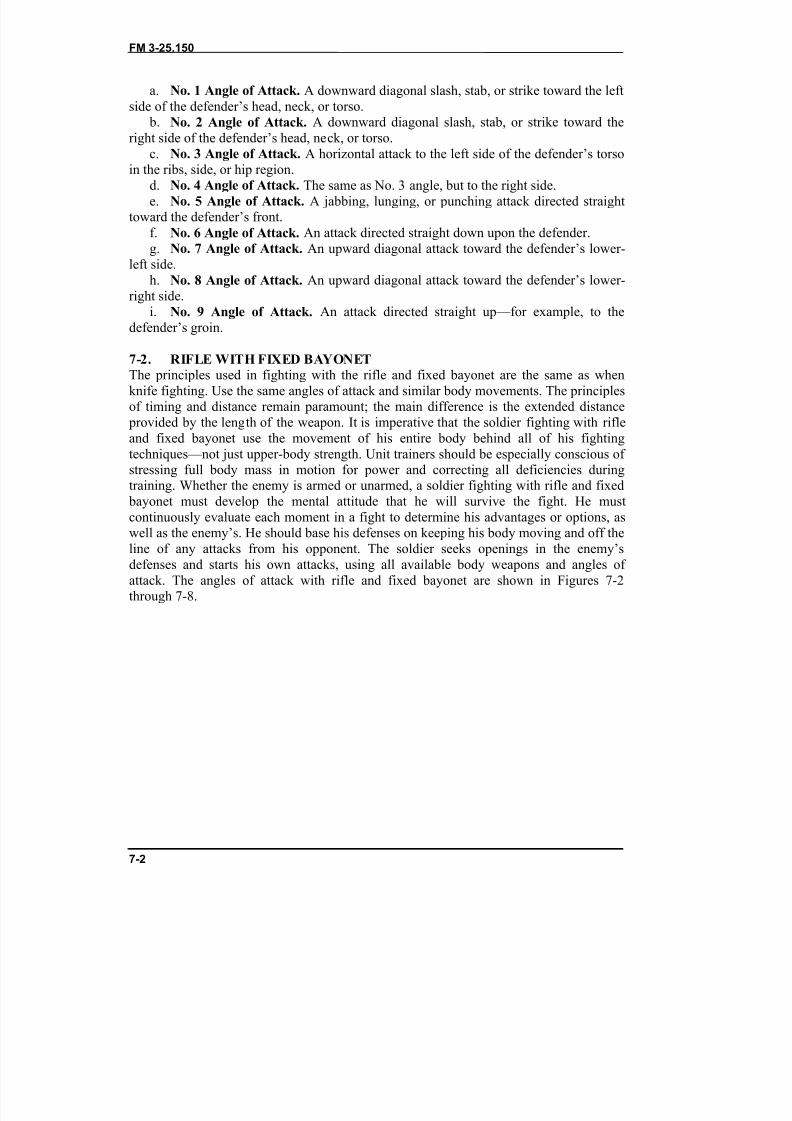
8/9/2019 US ARMY FM 3-25.150 - Combatives (hand-to-hand combat).pdf
http://slidepdf.com/reader/full/us-army-fm-3-25150-combatives-hand-to-hand-combatpdf 183/265
FM 3-25.150
7-2
a. No. 1 Angle of Attack. A downward diagonal slash, stab, or strike toward the leftside of the defender’s head, neck, or torso.
b. No. 2 Angle of Attack. A downward diagonal slash, stab, or strike toward theright side of the defender’s head, neck, or torso.
c. No. 3 Angle of Attack. A horizontal attack to the left side of the defender’s torso
in the ribs, side, or hip region.d. No. 4 Angle of Attack. The same as No. 3 angle, but to the right side.e. No. 5 Angle of Attack. A jabbing, lunging, or punching attack directed straight
toward the defender’s front.f. No. 6 Angle of Attack. An attack directed straight down upon the defender.g. No. 7 Angle of Attack. An upward diagonal attack toward the defender’s lower-
left side.h. No. 8 Angle of Attack. An upward diagonal attack toward the defender’s lower-
right side.i. No. 9 Angle of Attack. An attack directed straight up—for example, to the
defender’s groin.
7-2. RIFLE WITH FIXED BAYONETThe principles used in fighting with the rifle and fixed bayonet are the same as whenknife fighting. Use the same angles of attack and similar body movements. The principlesof timing and distance remain paramount; the main difference is the extended distance
provided by the length of the weapon. It is imperative that the soldier fighting with rifleand fixed bayonet use the movement of his entire body behind all of his fightingtechniques—not just upper-body strength. Unit trainers should be especially conscious of stressing full body mass in motion for power and correcting all deficiencies duringtraining. Whether the enemy is armed or unarmed, a soldier fighting with rifle and fixed
bayonet must develop the mental attitude that he will survive the fight. He mustcontinuously evaluate each moment in a fight to determine his advantages or options, aswell as the enemy’s. He should base his defenses on keeping his body moving and off theline of any attacks from his opponent. The soldier seeks openings in the enemy’sdefenses and starts his own attacks, using all available body weapons and angles of attack. The angles of attack with rifle and fixed bayonet are shown in Figures 7-2through 7-8.
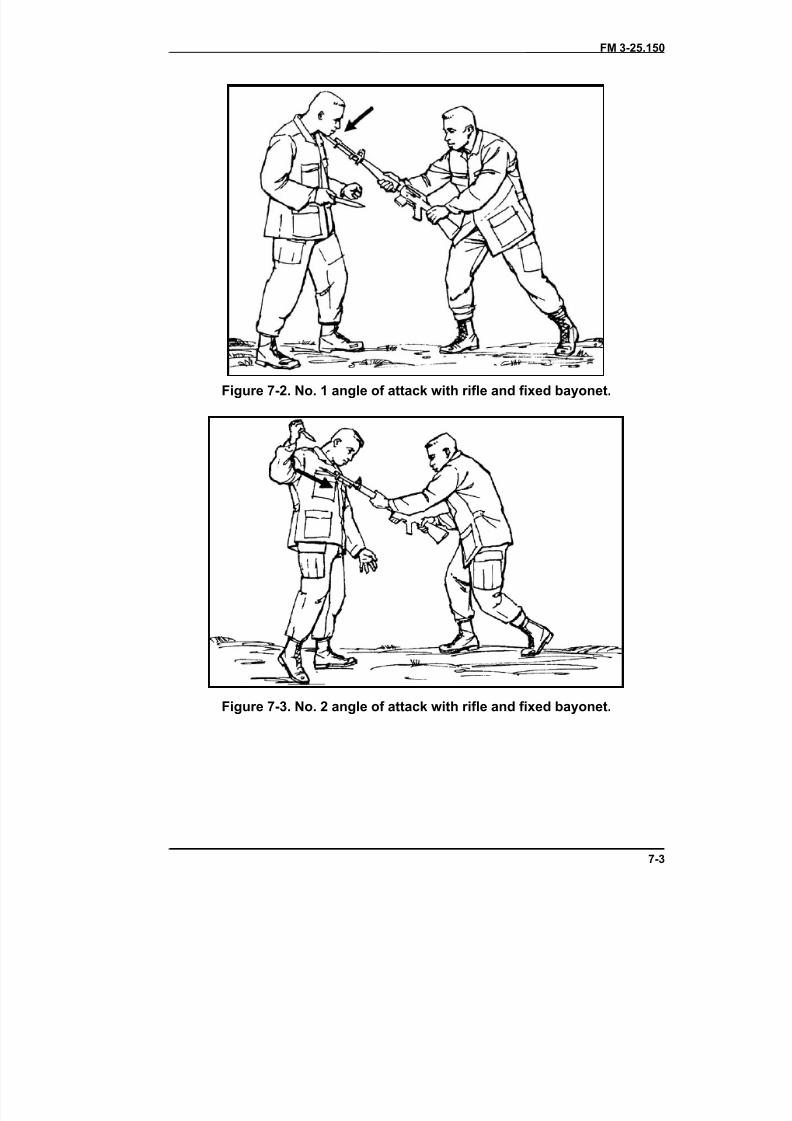
8/9/2019 US ARMY FM 3-25.150 - Combatives (hand-to-hand combat).pdf
http://slidepdf.com/reader/full/us-army-fm-3-25150-combatives-hand-to-hand-combatpdf 184/265
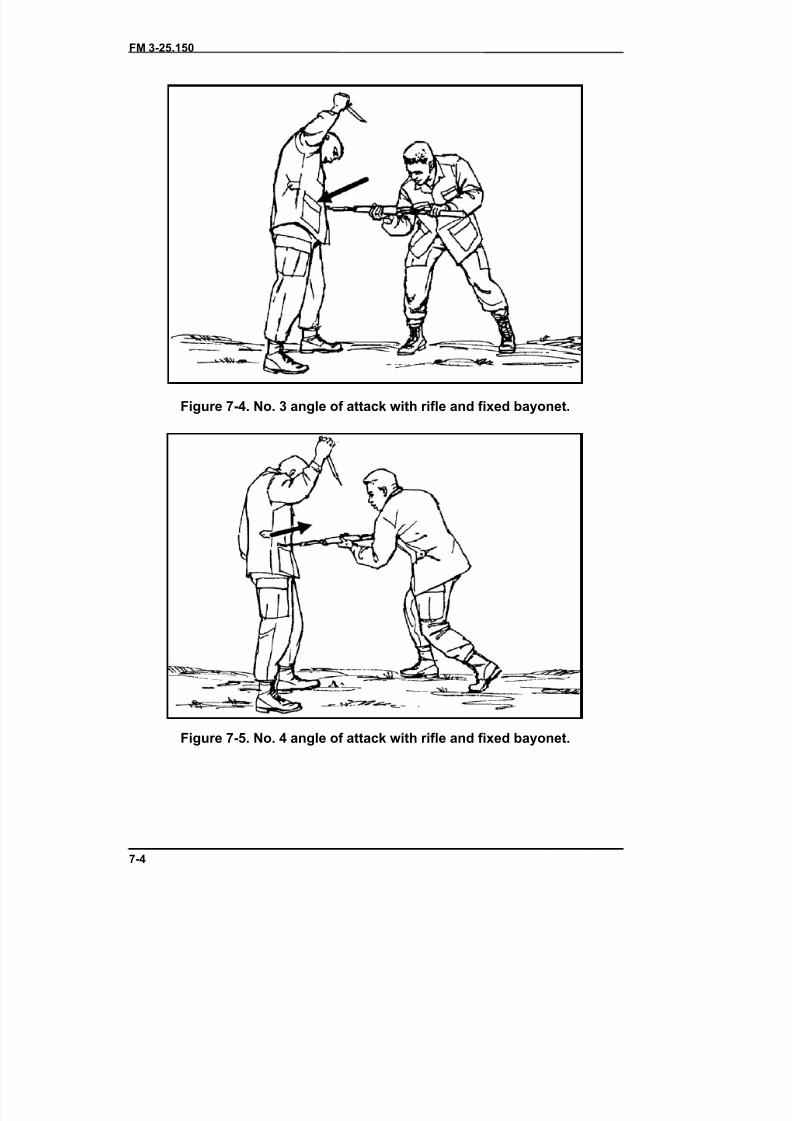
8/9/2019 US ARMY FM 3-25.150 - Combatives (hand-to-hand combat).pdf
http://slidepdf.com/reader/full/us-army-fm-3-25150-combatives-hand-to-hand-combatpdf 185/265
FM 3-25.150
7-4
Figure 7-4. No. 3 angle of attack with rifle and fixed bayonet.
Figure 7-5. No. 4 angle of attack with rifle and fixed bayonet.

8/9/2019 US ARMY FM 3-25.150 - Combatives (hand-to-hand combat).pdf
http://slidepdf.com/reader/full/us-army-fm-3-25150-combatives-hand-to-hand-combatpdf 186/265
FM 3-25.150
7-5
Figure 7-6. Low No. 5 angle of attack with rifle and fixed bayonet.
Figure 7-7. High No. 5 angle of attack with rifle and fixed bayonet.
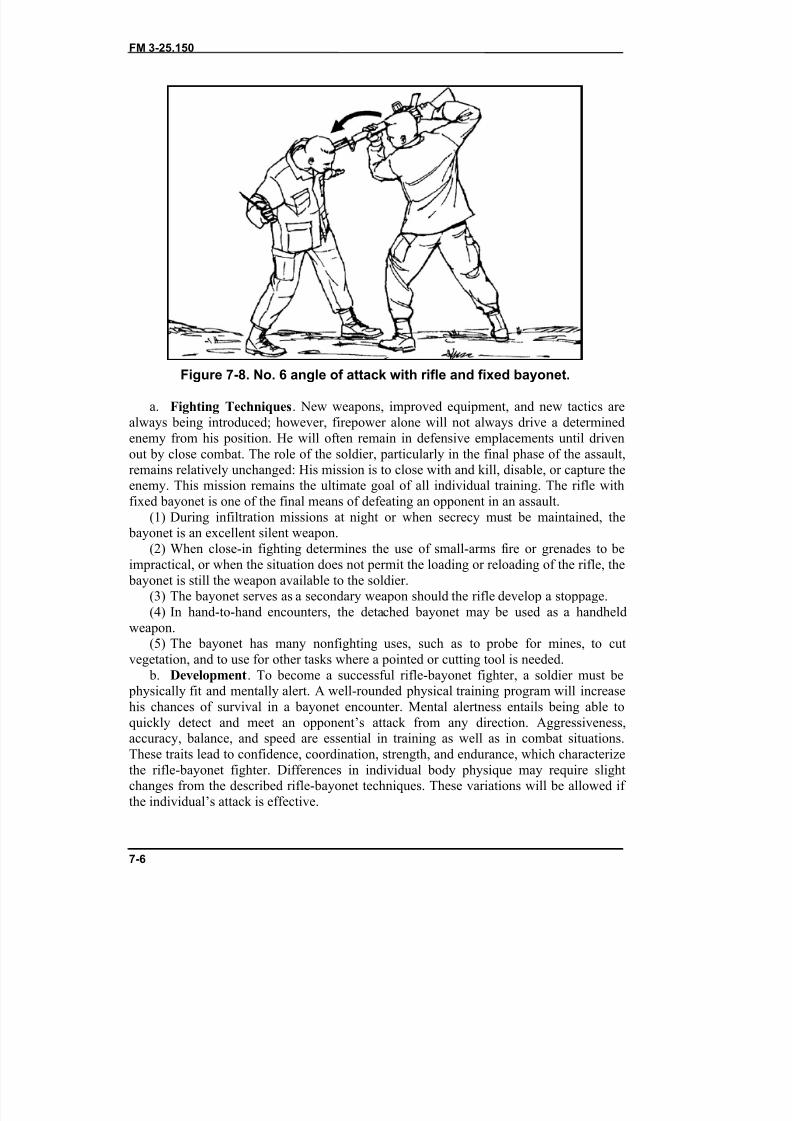
8/9/2019 US ARMY FM 3-25.150 - Combatives (hand-to-hand combat).pdf
http://slidepdf.com/reader/full/us-army-fm-3-25150-combatives-hand-to-hand-combatpdf 187/265
FM 3-25.150
7-6
Figure 7-8. No. 6 angle of attack with rifle and fixed bayonet.
a. Fighting Techniques . New weapons, improved equipment, and new tactics arealways being introduced; however, firepower alone will not always drive a determinedenemy from his position. He will often remain in defensive emplacements until drivenout by close combat. The role of the soldier, particularly in the final phase of the assault,remains relatively unchanged: His mission is to close with and kill, disable, or capture theenemy. This mission remains the ultimate goal of all individual training. The rifle withfixed bayonet is one of the final means of defeating an opponent in an assault.
(1) During infiltration missions at night or when secrecy must be maintained, the bayonet is an excellent silent weapon.
(2) When close-in fighting determines the use of small-arms fire or grenades to beimpractical, or when the situation does not permit the loading or reloading of the rifle, the
bayonet is still the weapon available to the soldier.(3) The bayonet serves as a secondary weapon should the rifle develop a stoppage.(4) In hand-to-hand encounters, the detached bayonet may be used as a handheld
weapon.(5) The bayonet has many nonfighting uses, such as to probe for mines, to cut
vegetation, and to use for other tasks where a pointed or cutting tool is needed. b. Development . To become a successful rifle-bayonet fighter, a soldier must be
physically fit and mentally alert. A well-rounded physical training program will increasehis chances of survival in a bayonet encounter. Mental alertness entails being able toquickly detect and meet an opponent’s attack from any direction. Aggressiveness,accuracy, balance, and speed are essential in training as well as in combat situations.These traits lead to confidence, coordination, strength, and endurance, which characterizethe rifle-bayonet fighter. Differences in individual body physique may require slightchanges from the described rifle-bayonet techniques. These variations will be allowed if the individual’s attack is effective.
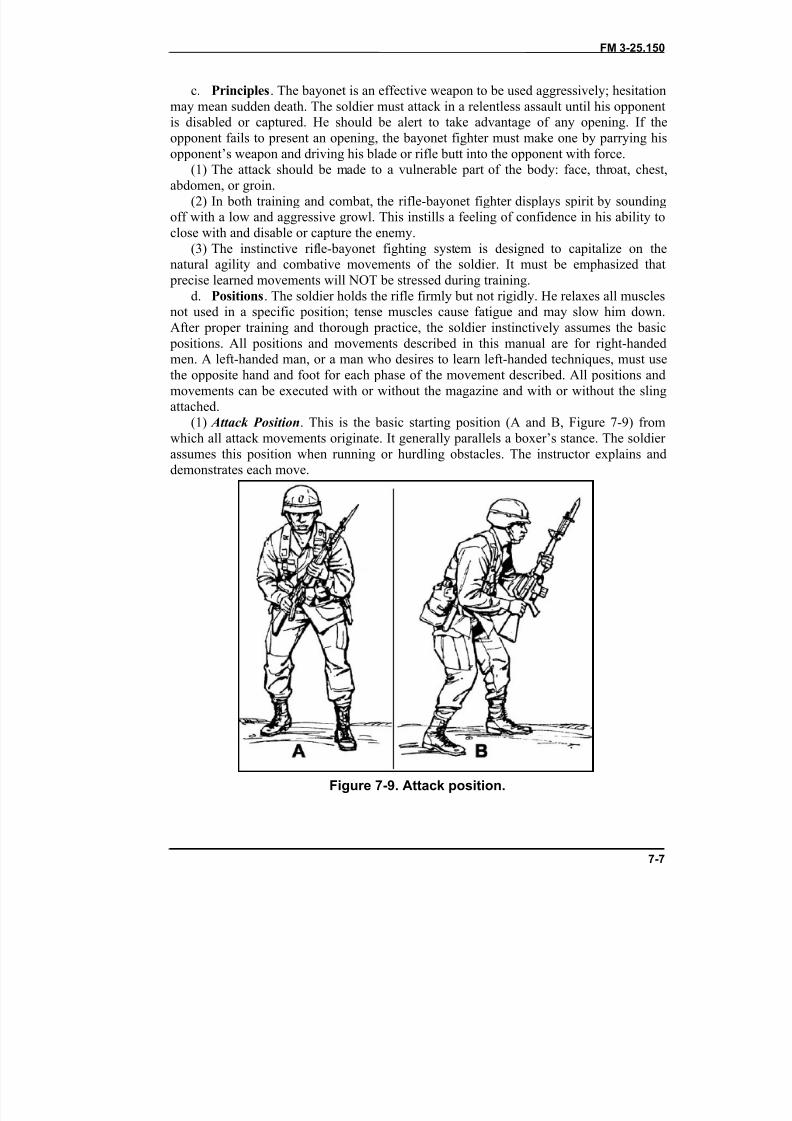
8/9/2019 US ARMY FM 3-25.150 - Combatives (hand-to-hand combat).pdf
http://slidepdf.com/reader/full/us-army-fm-3-25150-combatives-hand-to-hand-combatpdf 188/265
FM 3-25.150
7-7
c. Principles . The bayonet is an effective weapon to be used aggressively; hesitationmay mean sudden death. The soldier must attack in a relentless assault until his opponentis disabled or captured. He should be alert to take advantage of any opening. If theopponent fails to present an opening, the bayonet fighter must make one by parrying hisopponent’s weapon and driving his blade or rifle butt into the opponent with force.
(1) The attack should be made to a vulnerable part of the body: face, throat, chest,abdomen, or groin.(2) In both training and combat, the rifle-bayonet fighter displays spirit by sounding
off with a low and aggressive growl. This instills a feeling of confidence in his ability toclose with and disable or capture the enemy.
(3) The instinctive rifle-bayonet fighting system is designed to capitalize on thenatural agility and combative movements of the soldier. It must be emphasized that
precise learned movements will NOT be stressed during training.d. Positions . The soldier holds the rifle firmly but not rigidly. He relaxes all muscles
not used in a specific position; tense muscles cause fatigue and may slow him down.After proper training and thorough practice, the soldier instinctively assumes the basic
positions. All positions and movements described in this manual are for right-handedmen. A left-handed man, or a man who desires to learn left-handed techniques, must usethe opposite hand and foot for each phase of the movement described. All positions andmovements can be executed with or without the magazine and with or without the slingattached.
(1) Attack Position . This is the basic starting position (A and B, Figure 7-9) fromwhich all attack movements originate. It generally parallels a boxer’s stance. The soldier assumes this position when running or hurdling obstacles. The instructor explains anddemonstrates each move.
Figure 7-9. Attack position.
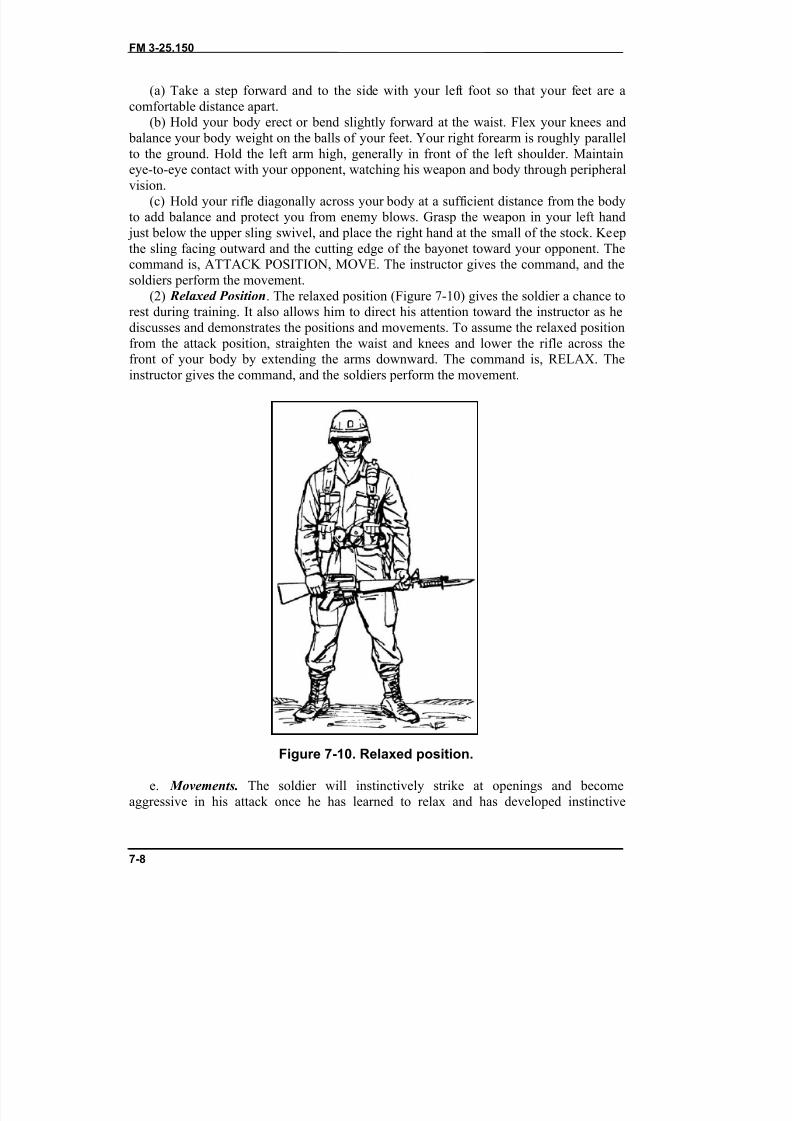
8/9/2019 US ARMY FM 3-25.150 - Combatives (hand-to-hand combat).pdf
http://slidepdf.com/reader/full/us-army-fm-3-25150-combatives-hand-to-hand-combatpdf 189/265
FM 3-25.150
7-8
(a) Take a step forward and to the side with your left foot so that your feet are acomfortable distance apart.
(b) Hold your body erect or bend slightly forward at the waist. Flex your knees and balance your body weight on the balls of your feet. Your right forearm is roughly parallelto the ground. Hold the left arm high, generally in front of the left shoulder. Maintain
eye-to-eye contact with your opponent, watching his weapon and body through peripheralvision.(c) Hold your rifle diagonally across your body at a sufficient distance from the body
to add balance and protect you from enemy blows. Grasp the weapon in your left hand just below the upper sling swivel, and place the right hand at the small of the stock. Keepthe sling facing outward and the cutting edge of the bayonet toward your opponent. Thecommand is, ATTACK POSITION, MOVE. The instructor gives the command, and thesoldiers perform the movement.
(2) Relaxed Position . The relaxed position (Figure 7-10) gives the soldier a chance torest during training. It also allows him to direct his attention toward the instructor as hediscusses and demonstrates the positions and movements. To assume the relaxed position
from the attack position, straighten the waist and knees and lower the rifle across thefront of your body by extending the arms downward. The command is, RELAX. Theinstructor gives the command, and the soldiers perform the movement.
Figure 7-10. Relaxed position.
e. Movements. The soldier will instinctively strike at openings and becomeaggressive in his attack once he has learned to relax and has developed instinctive
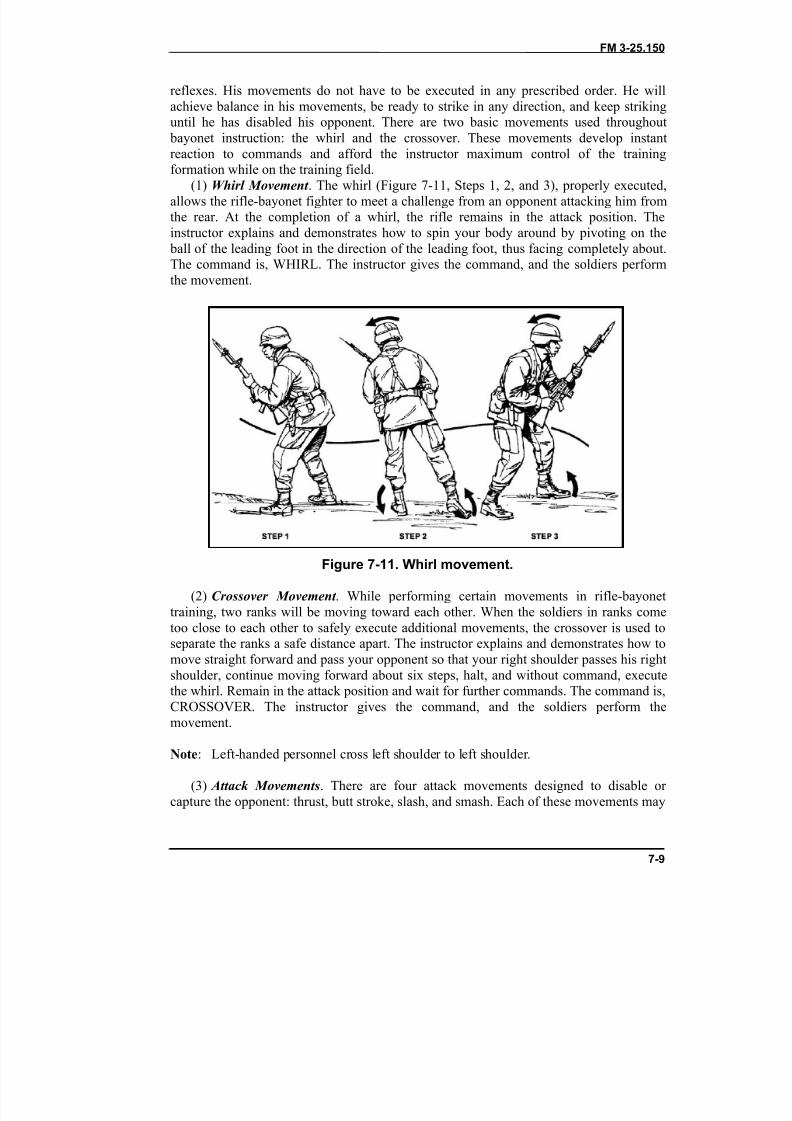
8/9/2019 US ARMY FM 3-25.150 - Combatives (hand-to-hand combat).pdf
http://slidepdf.com/reader/full/us-army-fm-3-25150-combatives-hand-to-hand-combatpdf 190/265
FM 3-25.150
7-9
reflexes. His movements do not have to be executed in any prescribed order. He willachieve balance in his movements, be ready to strike in any direction, and keep strikinguntil he has disabled his opponent. There are two basic movements used throughout
bayonet instruction: the whirl and the crossover. These movements develop instantreaction to commands and afford the instructor maximum control of the training
formation while on the training field.(1) Whirl Movement . The whirl (Figure 7-11, Steps 1, 2, and 3), properly executed,allows the rifle-bayonet fighter to meet a challenge from an opponent attacking him fromthe rear. At the completion of a whirl, the rifle remains in the attack position. Theinstructor explains and demonstrates how to spin your body around by pivoting on the
ball of the leading foot in the direction of the leading foot, thus facing completely about.The command is, WHIRL. The instructor gives the command, and the soldiers performthe movement.
Figure 7-11. Whirl movement.
(2) Crossover Movement . While performing certain movements in rifle-bayonettraining, two ranks will be moving toward each other. When the soldiers in ranks cometoo close to each other to safely execute additional movements, the crossover is used toseparate the ranks a safe distance apart. The instructor explains and demonstrates how tomove straight forward and pass your opponent so that your right shoulder passes his rightshoulder, continue moving forward about six steps, halt, and without command, executethe whirl. Remain in the attack position and wait for further commands. The command is,CROSSOVER. The instructor gives the command, and the soldiers perform themovement.
Note : Left-handed personnel cross left shoulder to left shoulder.
(3) Attack Movements . There are four attack movements designed to disable or capture the opponent: thrust, butt stroke, slash, and smash. Each of these movements may
8/9/2019 US ARMY FM 3-25.150 - Combatives (hand-to-hand combat).pdf
http://slidepdf.com/reader/full/us-army-fm-3-25150-combatives-hand-to-hand-combatpdf 191/265
FM 3-25.150
7-10
be used for the initial attack or as a follow-up should the initial movement fail to find itsmark. The soldiers learn these movements separately. They will learn to execute thesemovements in a swift and continuous series during subsequent training. During alltraining, the emphasis will be on conducting natural, balanced movements to effectivelydamage the target. Precise, learned movements will not be stressed.
(a) Thrust . The objective is to disable or capture an opponent by thrusting the bayonet blade into a vulnerable part of his body. The thrust is especially effective in areas wheremovement is restricted—for example, trenches, wooded areas, or built-up areas. It is alsoeffective when an opponent is lying on the ground or in a fighting position. The instructor explains and demonstrates how to lunge forward on your leading foot without losing your
balance (Figure 7-12, Step 1) and, at the same time, drive the bayonet with great forceinto any unguarded part of your opponent’s body.
• To accomplish this, grasp the rifle firmly with both hands and pull the stock inclose to the right hip; partially extend the left arm, guiding the point of the
bayonet in the general direction of the opponent’s body (Figure 7-12, Step 2).• Quickly complete the extension of the arms and body as the leading foot
strikes the ground so that the bayonet penetrates the target (Figure 7-12, Step3).• To withdraw the bayonet, keep your feet in place, shift your body weight to
the rear, and pull rearward along the same line of penetration (Figure 7-12,Step 4).
• Next, assume the attack position in preparation to continue the assault (Figure7-12, Step 5). This movement is taught by the numbers in three phases:
1. THRUST AND HOLD, MOVE .2. WITHDRAW AND HOLD, MOVE .3. ATTACK POSITION, MOVE .
• At combat speed, the command is, THRUST SERIES, MOVE. Trainingemphasis will be placed on movement at combat speed. The instructor givesthe commands, and the soldiers perform the movements.
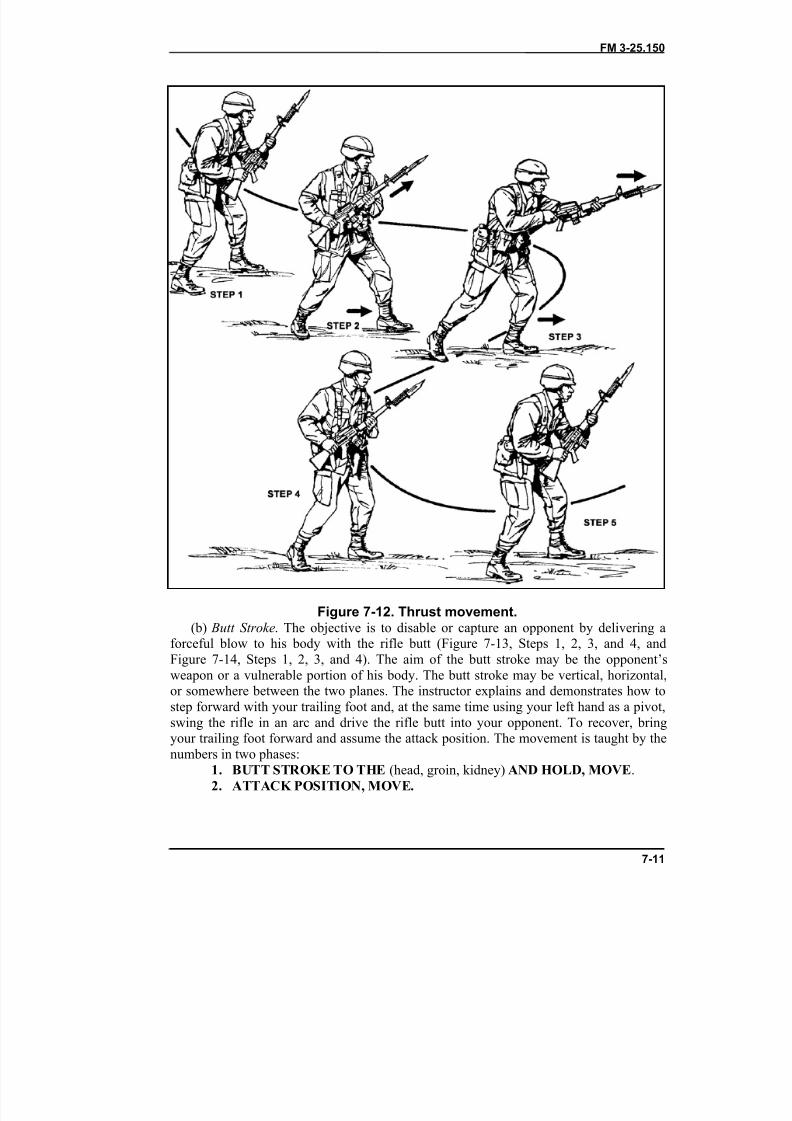
8/9/2019 US ARMY FM 3-25.150 - Combatives (hand-to-hand combat).pdf
http://slidepdf.com/reader/full/us-army-fm-3-25150-combatives-hand-to-hand-combatpdf 192/265
FM 3-25.150
7-11
Figure 7-12. Thrust movement.(b) Butt Stroke . The objective is to disable or capture an opponent by delivering a
forceful blow to his body with the rifle butt (Figure 7-13, Steps 1, 2, 3, and 4, andFigure 7-14, Steps 1, 2, 3, and 4). The aim of the butt stroke may be the opponent’sweapon or a vulnerable portion of his body. The butt stroke may be vertical, horizontal,or somewhere between the two planes. The instructor explains and demonstrates how tostep forward with your trailing foot and, at the same time using your left hand as a pivot,swing the rifle in an arc and drive the rifle butt into your opponent. To recover, bringyour trailing foot forward and assume the attack position. The movement is taught by thenumbers in two phases:
1. BUTT STROKE TO THE (head, groin, kidney) AND HOLD, MOVE .2. ATTACK POSITION, MOVE.
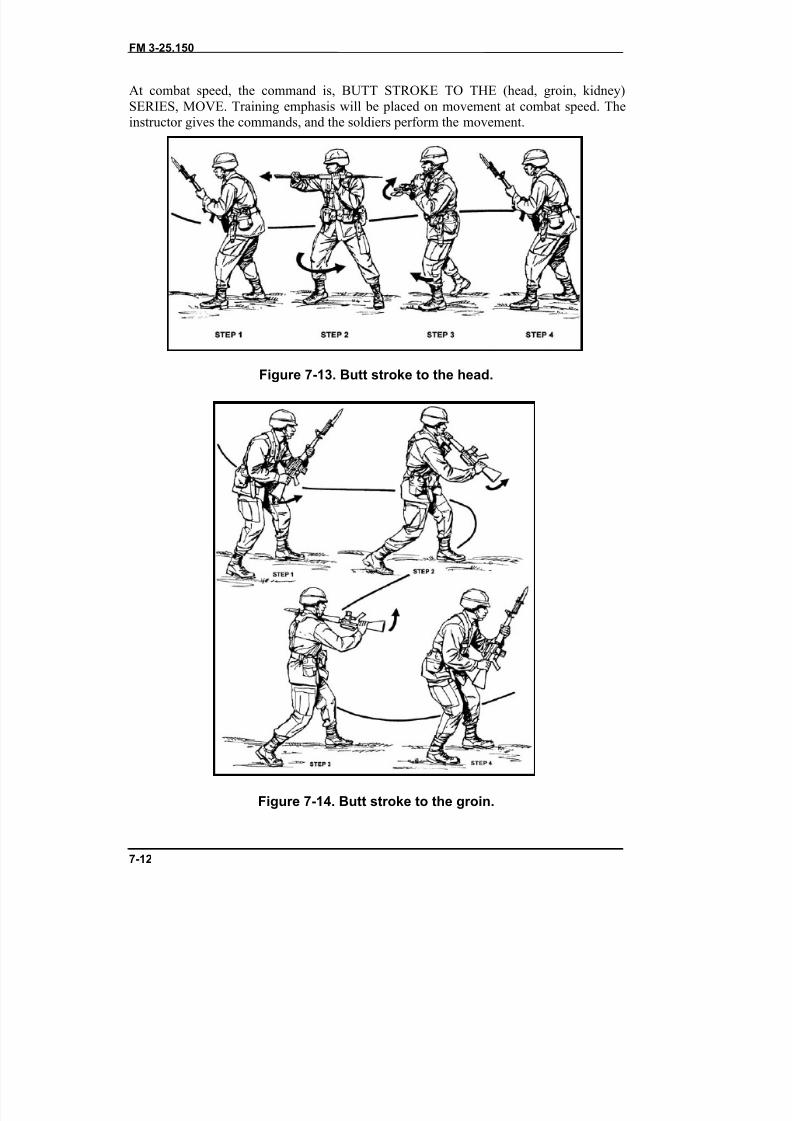
8/9/2019 US ARMY FM 3-25.150 - Combatives (hand-to-hand combat).pdf
http://slidepdf.com/reader/full/us-army-fm-3-25150-combatives-hand-to-hand-combatpdf 193/265
FM 3-25.150
7-12
At combat speed, the command is, BUTT STROKE TO THE (head, groin, kidney)SERIES, MOVE. Training emphasis will be placed on movement at combat speed. Theinstructor gives the commands, and the soldiers perform the movement.
Figure 7-13. Butt stroke to the head.
Figure 7-14. Butt stroke to the groin.
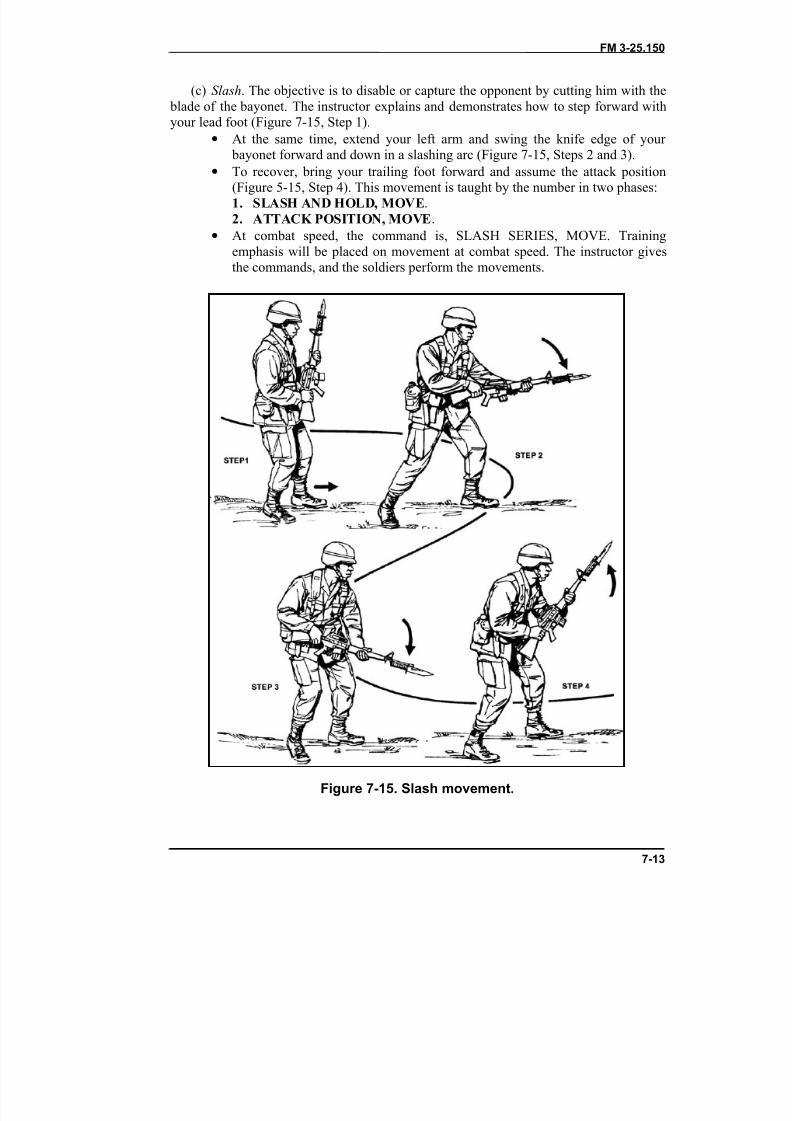
8/9/2019 US ARMY FM 3-25.150 - Combatives (hand-to-hand combat).pdf
http://slidepdf.com/reader/full/us-army-fm-3-25150-combatives-hand-to-hand-combatpdf 194/265
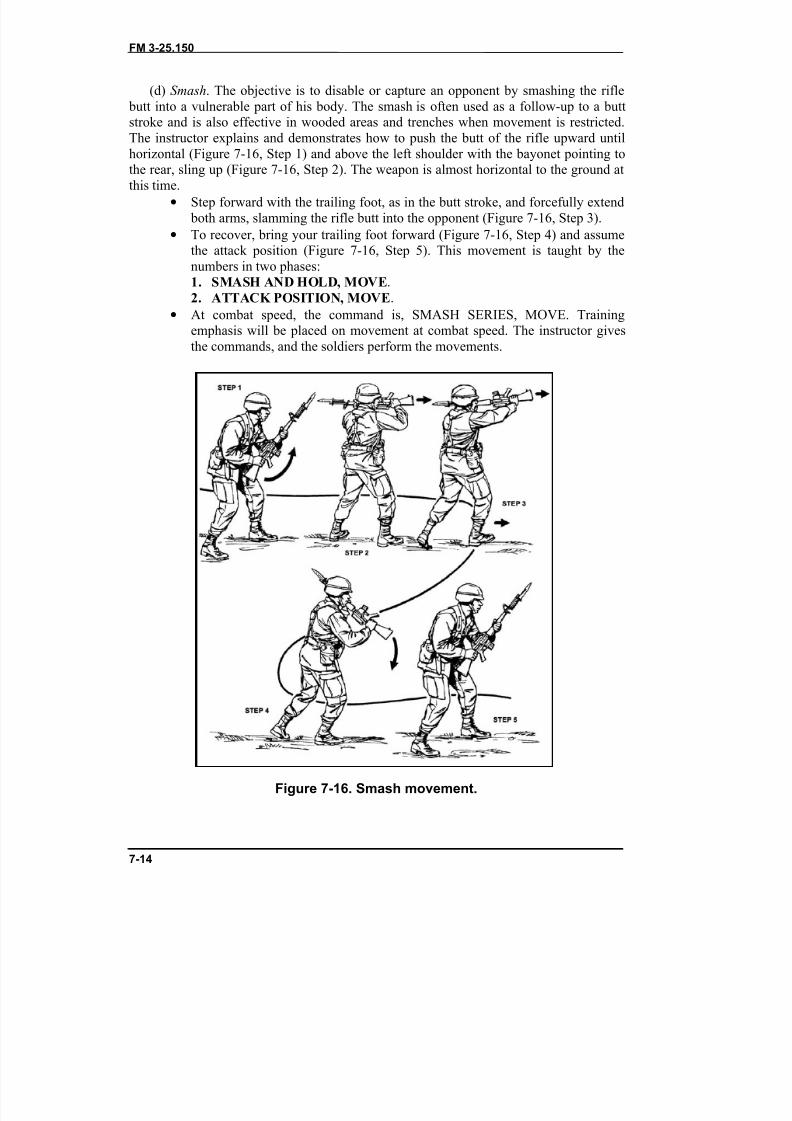
8/9/2019 US ARMY FM 3-25.150 - Combatives (hand-to-hand combat).pdf
http://slidepdf.com/reader/full/us-army-fm-3-25150-combatives-hand-to-hand-combatpdf 195/265
FM 3-25.150
7-14
(d) Smash . The objective is to disable or capture an opponent by smashing the rifle butt into a vulnerable part of his body. The smash is often used as a follow-up to a buttstroke and is also effective in wooded areas and trenches when movement is restricted.The instructor explains and demonstrates how to push the butt of the rifle upward untilhorizontal (Figure 7-16, Step 1) and above the left shoulder with the bayonet pointing to
the rear, sling up (Figure 7-16, Step 2). The weapon is almost horizontal to the ground atthis time.• Step forward with the trailing foot, as in the butt stroke, and forcefully extend
both arms, slamming the rifle butt into the opponent (Figure 7-16, Step 3).• To recover, bring your trailing foot forward (Figure 7-16, Step 4) and assume
the attack position (Figure 7-16, Step 5). This movement is taught by thenumbers in two phases:1. SMASH AND HOLD, MOVE .2. ATTACK POSITION, MOVE .
• At combat speed, the command is, SMASH SERIES, MOVE. Trainingemphasis will be placed on movement at combat speed. The instructor gives
the commands, and the soldiers perform the movements.
Figure 7-16. Smash movement.
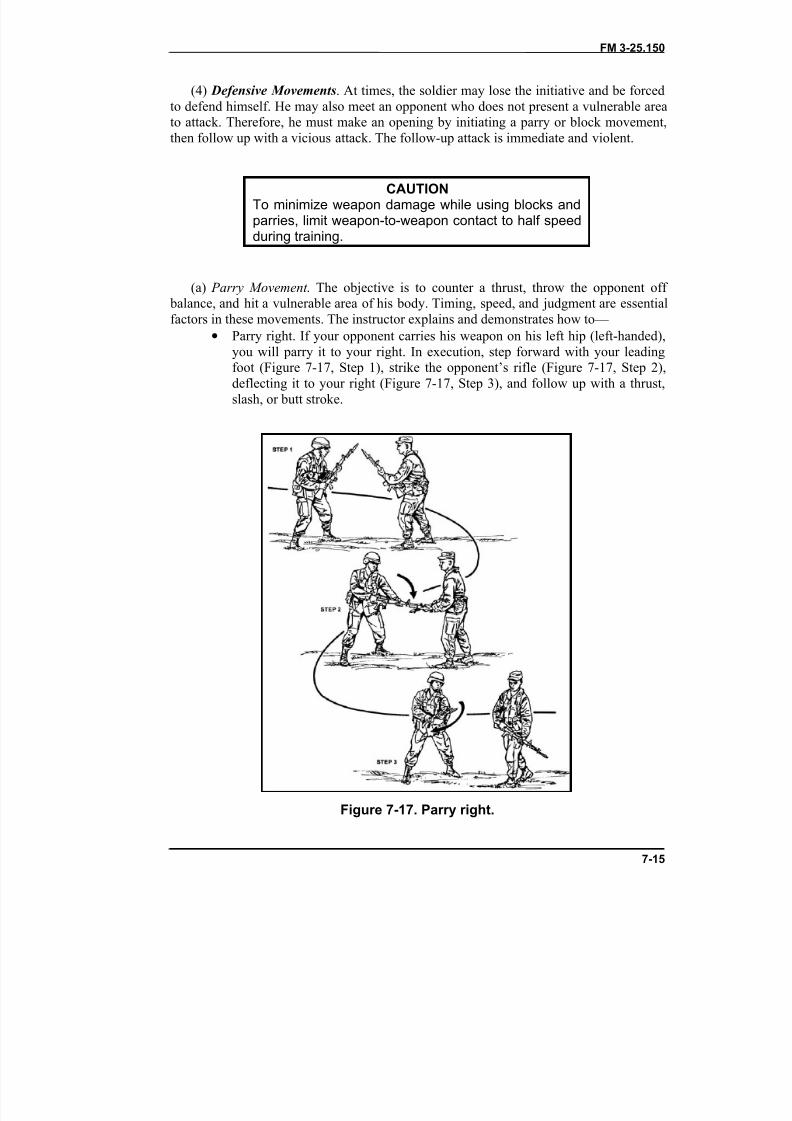
8/9/2019 US ARMY FM 3-25.150 - Combatives (hand-to-hand combat).pdf
http://slidepdf.com/reader/full/us-army-fm-3-25150-combatives-hand-to-hand-combatpdf 196/265
FM 3-25.150
7-15
(4) Defensive Movements . At times, the soldier may lose the initiative and be forcedto defend himself. He may also meet an opponent who does not present a vulnerable areato attack. Therefore, he must make an opening by initiating a parry or block movement,then follow up with a vicious attack. The follow-up attack is immediate and violent.
CAUTIONTo minimize weapon damage while using blocks andparries, limit weapon-to-weapon contact to half speedduring training.
(a) Parry Movement . The objective is to counter a thrust, throw the opponent off balance, and hit a vulnerable area of his body. Timing, speed, and judgment are essentialfactors in these movements. The instructor explains and demonstrates how to—
• Parry right. If your opponent carries his weapon on his left hip (left-handed),you will parry it to your right. In execution, step forward with your leadingfoot (Figure 7-17, Step 1), strike the opponent’s rifle (Figure 7-17, Step 2),deflecting it to your right (Figure 7-17, Step 3), and follow up with a thrust,slash, or butt stroke.
Figure 7-17. Parry right.
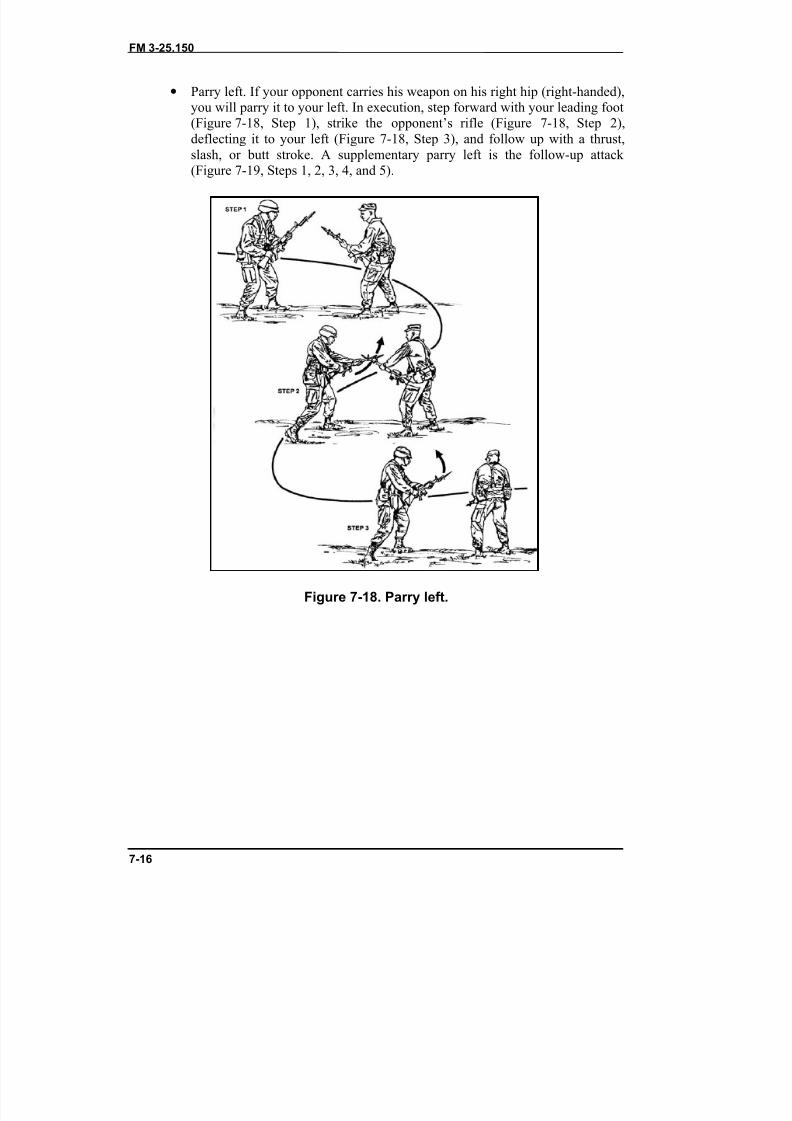
8/9/2019 US ARMY FM 3-25.150 - Combatives (hand-to-hand combat).pdf
http://slidepdf.com/reader/full/us-army-fm-3-25150-combatives-hand-to-hand-combatpdf 197/265
FM 3-25.150
7-16
• Parry left. If your opponent carries his weapon on his right hip (right-handed),you will parry it to your left. In execution, step forward with your leading foot(Figure 7-18, Step 1), strike the opponent’s rifle (Figure 7-18, Step 2),deflecting it to your left (Figure 7-18, Step 3), and follow up with a thrust,slash, or butt stroke. A supplementary parry left is the follow-up attack
(Figure 7-19, Steps 1, 2, 3, 4, and 5).
Figure 7-18. Parry left.
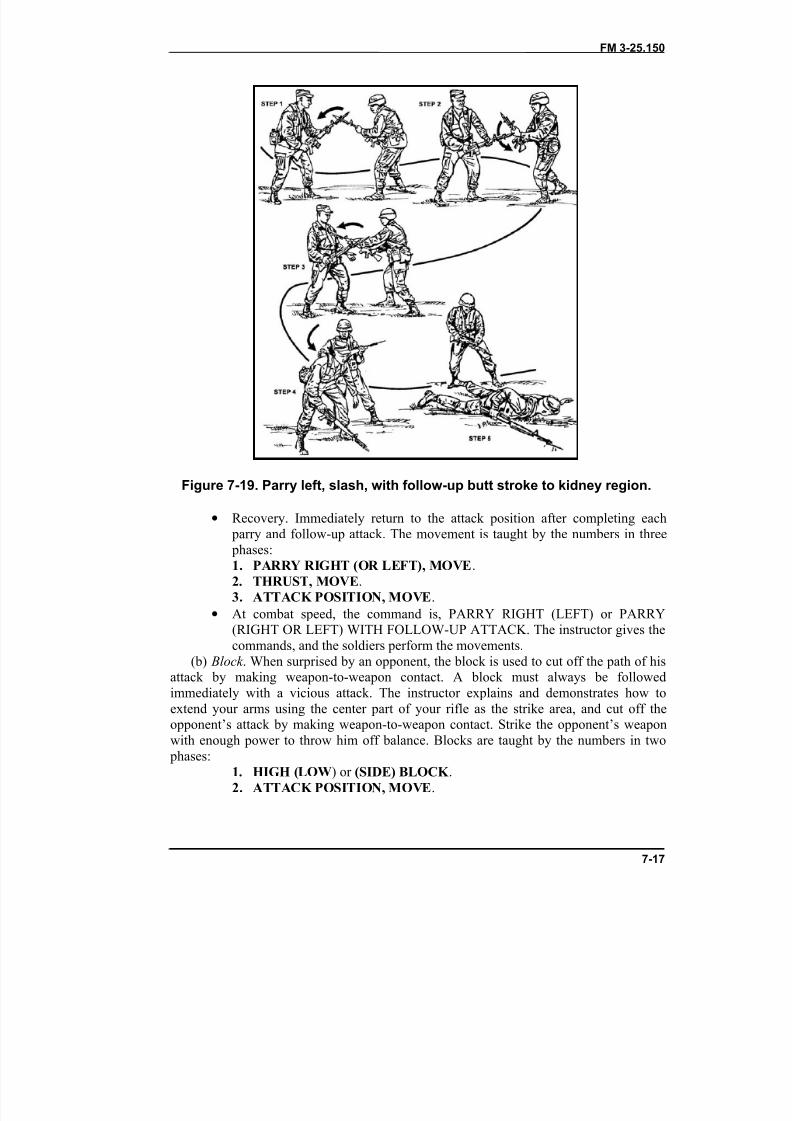
8/9/2019 US ARMY FM 3-25.150 - Combatives (hand-to-hand combat).pdf
http://slidepdf.com/reader/full/us-army-fm-3-25150-combatives-hand-to-hand-combatpdf 198/265
FM 3-25.150
7-17
Figure 7-19. Parry left, slash, with follow-up butt stroke to kidney region.
•
Recovery. Immediately return to the attack position after completing each parry and follow-up attack. The movement is taught by the numbers in three phases:1. PARRY RIGHT (OR LEFT), MOVE .2. THRUST, MOVE .3. ATTACK POSITION, MOVE .
• At combat speed, the command is, PARRY RIGHT (LEFT) or PARRY(RIGHT OR LEFT) WITH FOLLOW-UP ATTACK. The instructor gives thecommands, and the soldiers perform the movements.
(b) Block . When surprised by an opponent, the block is used to cut off the path of hisattack by making weapon-to-weapon contact. A block must always be followed
immediately with a vicious attack. The instructor explains and demonstrates how toextend your arms using the center part of your rifle as the strike area, and cut off theopponent’s attack by making weapon-to-weapon contact. Strike the opponent’s weaponwith enough power to throw him off balance. Blocks are taught by the numbers in two
phases:1. HIGH (LOW ) or (SIDE) BLOCK .2. ATTACK POSITION, MOVE .
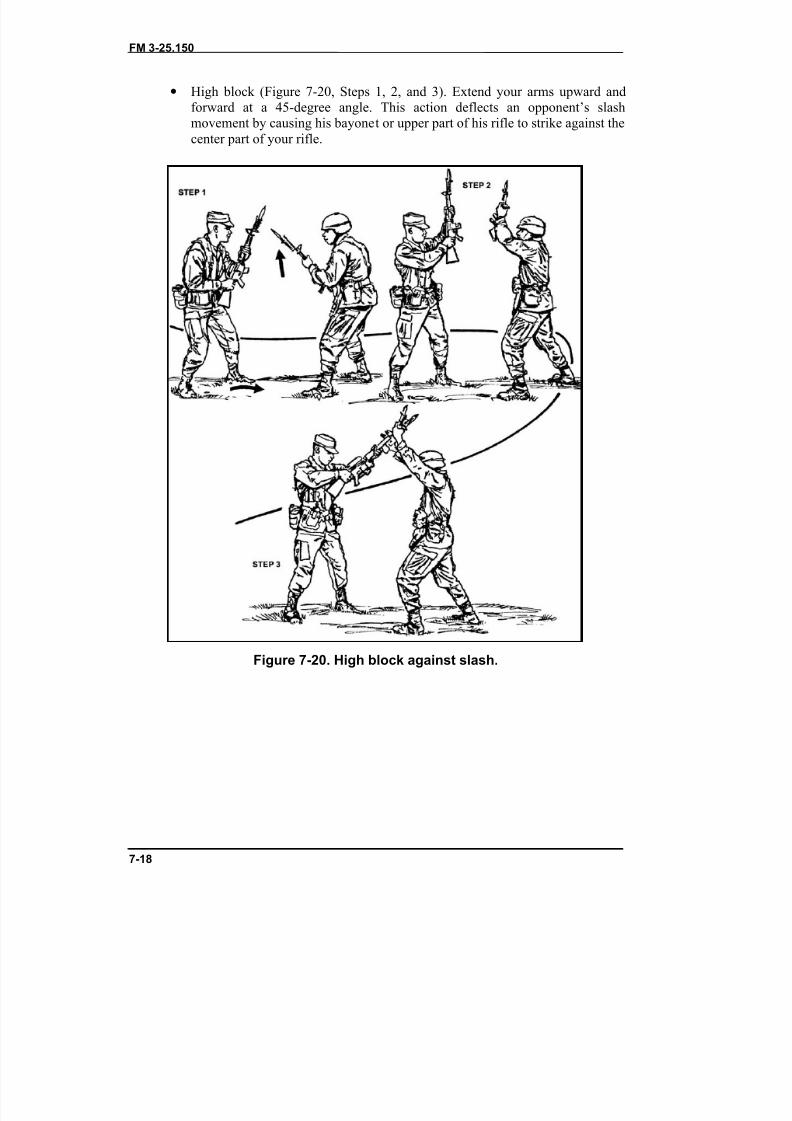
8/9/2019 US ARMY FM 3-25.150 - Combatives (hand-to-hand combat).pdf
http://slidepdf.com/reader/full/us-army-fm-3-25150-combatives-hand-to-hand-combatpdf 199/265
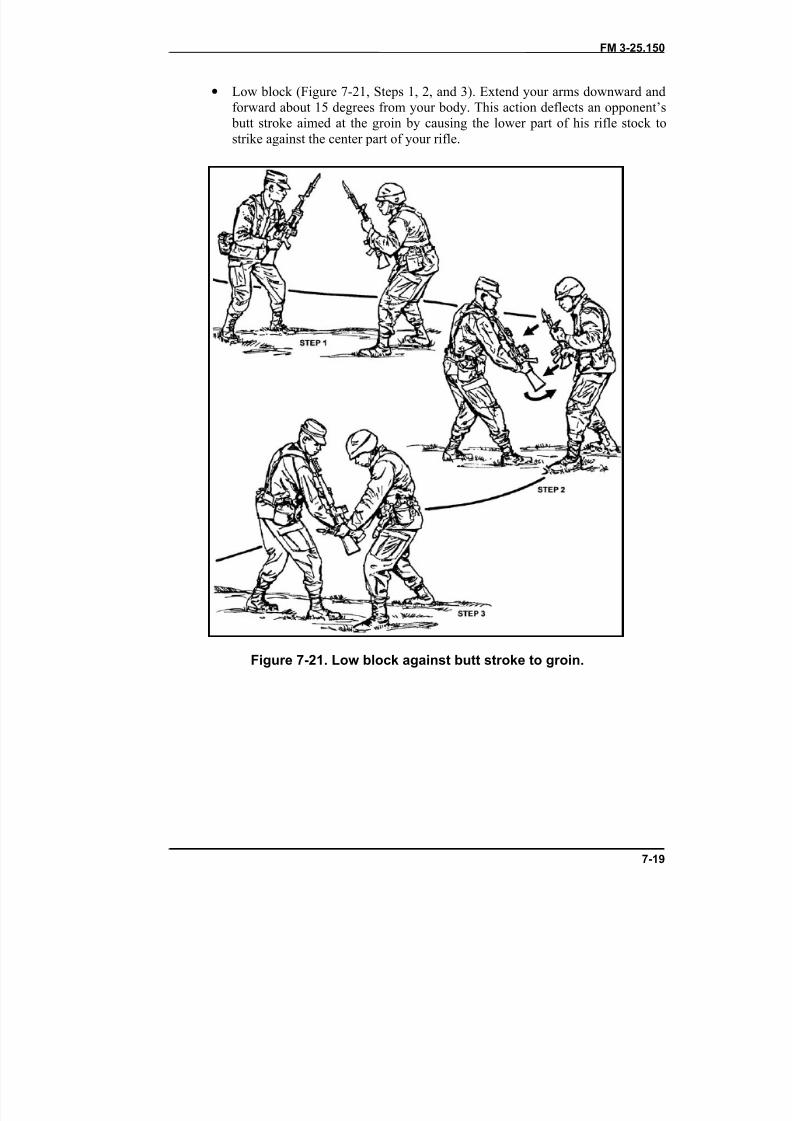
8/9/2019 US ARMY FM 3-25.150 - Combatives (hand-to-hand combat).pdf
http://slidepdf.com/reader/full/us-army-fm-3-25150-combatives-hand-to-hand-combatpdf 200/265
FM 3-25.150
7-19
• Low block (Figure 7-21, Steps 1, 2, and 3). Extend your arms downward andforward about 15 degrees from your body. This action deflects an opponent’s
butt stroke aimed at the groin by causing the lower part of his rifle stock tostrike against the center part of your rifle.
Figure 7-21. Low block against butt stroke to groin.
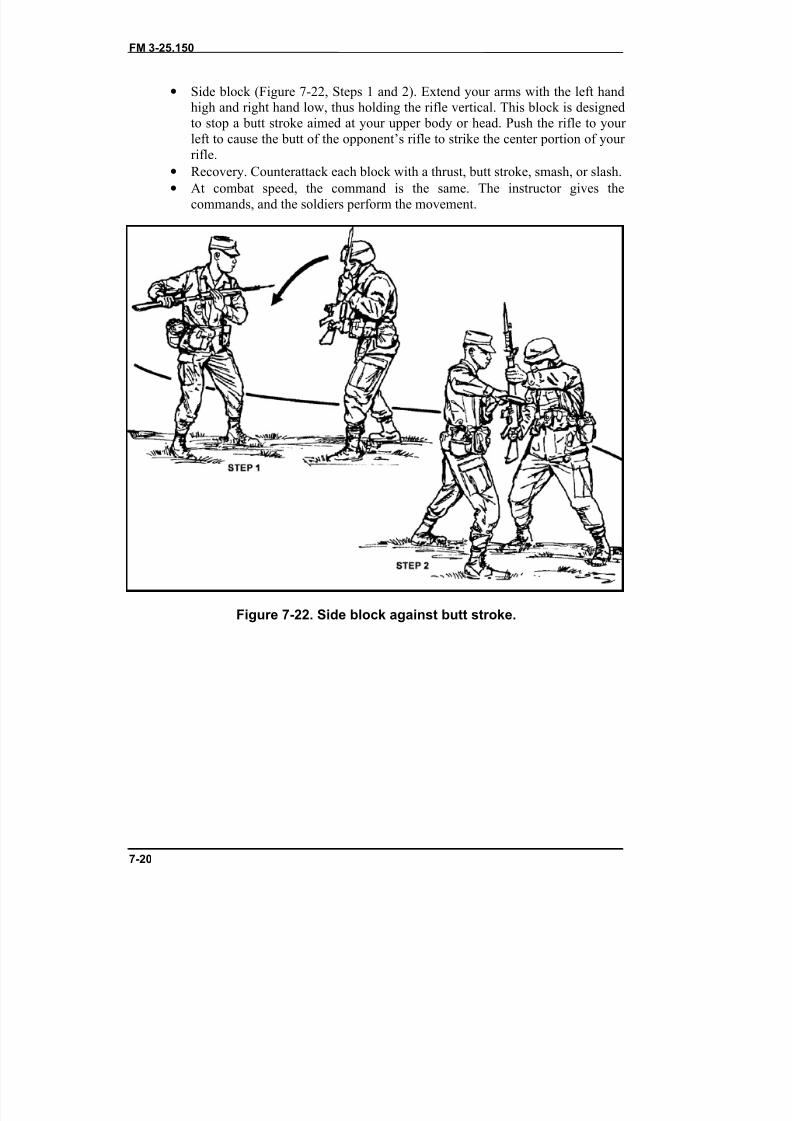
8/9/2019 US ARMY FM 3-25.150 - Combatives (hand-to-hand combat).pdf
http://slidepdf.com/reader/full/us-army-fm-3-25150-combatives-hand-to-hand-combatpdf 201/265
FM 3-25.150
7-20
• Side block (Figure 7-22, Steps 1 and 2). Extend your arms with the left handhigh and right hand low, thus holding the rifle vertical. This block is designedto stop a butt stroke aimed at your upper body or head. Push the rifle to your left to cause the butt of the opponent’s rifle to strike the center portion of your rifle.
•
Recovery. Counterattack each block with a thrust, butt stroke, smash, or slash.• At combat speed, the command is the same. The instructor gives the
commands, and the soldiers perform the movement.
Figure 7-22. Side block against butt stroke.
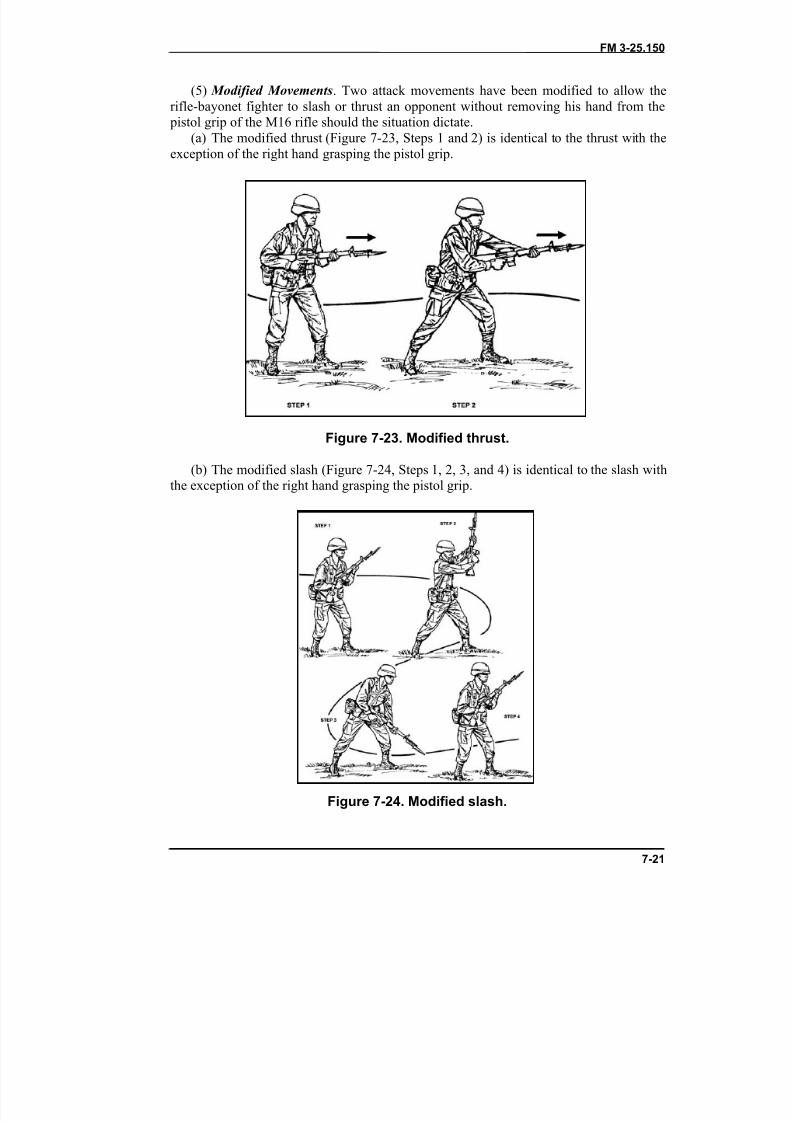
8/9/2019 US ARMY FM 3-25.150 - Combatives (hand-to-hand combat).pdf
http://slidepdf.com/reader/full/us-army-fm-3-25150-combatives-hand-to-hand-combatpdf 202/265
FM 3-25.150
7-21
(5) Modified Movements . Two attack movements have been modified to allow therifle-bayonet fighter to slash or thrust an opponent without removing his hand from the
pistol grip of the M16 rifle should the situation dictate.(a) The modified thrust (Figure 7-23, Steps 1 and 2) is identical to the thrust with the
exception of the right hand grasping the pistol grip.
Figure 7-23. Modified thrust.
(b) The modified slash (Figure 7-24, Steps 1, 2, 3, and 4) is identical to the slash withthe exception of the right hand grasping the pistol grip.
Figure 7-24. Modified slash.
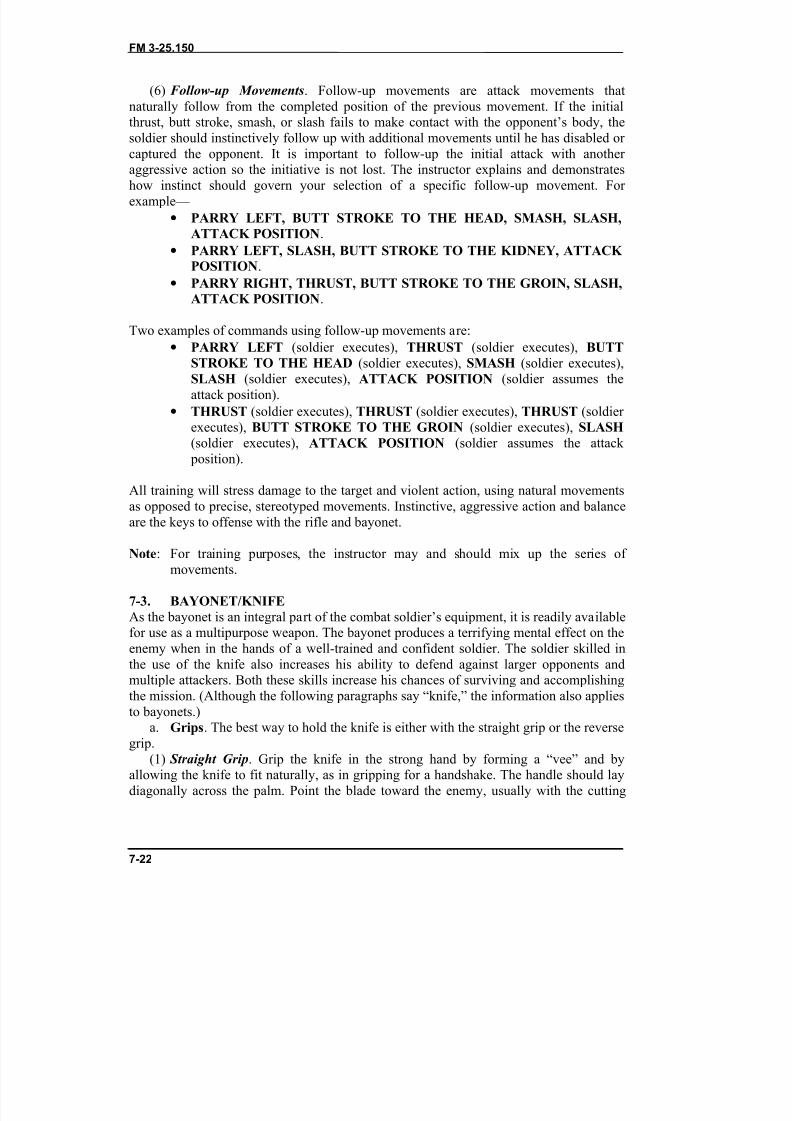
8/9/2019 US ARMY FM 3-25.150 - Combatives (hand-to-hand combat).pdf
http://slidepdf.com/reader/full/us-army-fm-3-25150-combatives-hand-to-hand-combatpdf 203/265
FM 3-25.150
7-22
(6) Follow-up Movements . Follow-up movements are attack movements thatnaturally follow from the completed position of the previous movement. If the initialthrust, butt stroke, smash, or slash fails to make contact with the opponent’s body, thesoldier should instinctively follow up with additional movements until he has disabled or captured the opponent. It is important to follow-up the initial attack with another
aggressive action so the initiative is not lost. The instructor explains and demonstrateshow instinct should govern your selection of a specific follow-up movement. For example—
• PARRY LEFT, BUTT STROKE TO THE HEAD, SMASH, SLASH,ATTACK POSITION .
• PARRY LEFT, SLASH, BUTT STROKE TO THE KIDNEY, ATTACK POSITION .
• PARRY RIGHT, THRUST, BUTT STROKE TO THE GROIN, SLASH,ATTACK POSITION .
Two examples of commands using follow-up movements are:•
PARRY LEFT (soldier executes), THRUST (soldier executes), BUTTSTROKE TO THE HEAD (soldier executes), SMASH (soldier executes),SLASH (soldier executes), ATTACK POSITION (soldier assumes theattack position).
• THRUST (soldier executes), THRUST (soldier executes), THRUST (soldier executes), BUTT STROKE TO THE GROIN (soldier executes), SLASH(soldier executes), ATTACK POSITION (soldier assumes the attack
position).
All training will stress damage to the target and violent action, using natural movementsas opposed to precise, stereotyped movements. Instinctive, aggressive action and balance
are the keys to offense with the rifle and bayonet.
Note : For training purposes, the instructor may and should mix up the series of movements.
7-3. BAYONET/KNIFEAs the bayonet is an integral part of the combat soldier’s equipment, it is readily availablefor use as a multipurpose weapon. The bayonet produces a terrifying mental effect on theenemy when in the hands of a well-trained and confident soldier. The soldier skilled inthe use of the knife also increases his ability to defend against larger opponents andmultiple attackers. Both these skills increase his chances of surviving and accomplishing
the mission. (Although the following paragraphs say “knife,” the information also appliesto bayonets.)a. Grips . The best way to hold the knife is either with the straight grip or the reverse
grip.(1) Straight Grip . Grip the knife in the strong hand by forming a “vee” and by
allowing the knife to fit naturally, as in gripping for a handshake. The handle should laydiagonally across the palm. Point the blade toward the enemy, usually with the cutting
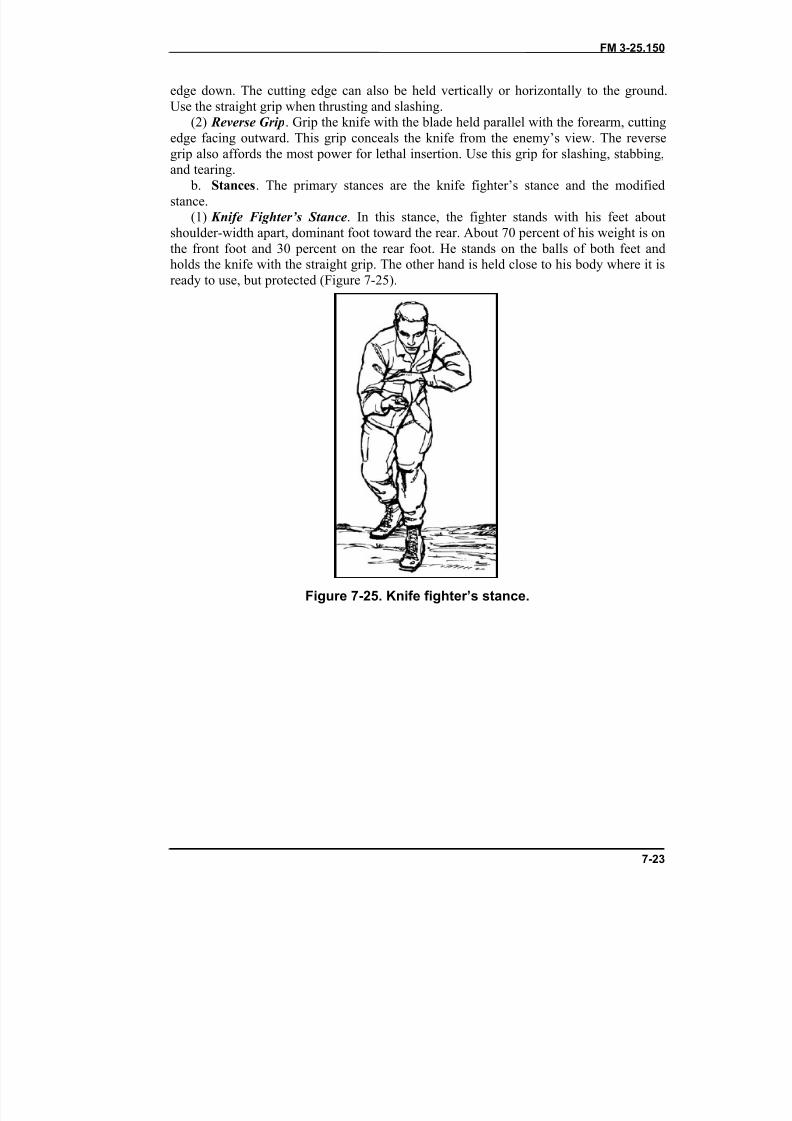
8/9/2019 US ARMY FM 3-25.150 - Combatives (hand-to-hand combat).pdf
http://slidepdf.com/reader/full/us-army-fm-3-25150-combatives-hand-to-hand-combatpdf 204/265
FM 3-25.150
7-23
edge down. The cutting edge can also be held vertically or horizontally to the ground.Use the straight grip when thrusting and slashing.
(2) Reverse Grip . Grip the knife with the blade held parallel with the forearm, cuttingedge facing outward. This grip conceals the knife from the enemy’s view. The reversegrip also affords the most power for lethal insertion. Use this grip for slashing, stabbing,
and tearing. b. Stances . The primary stances are the knife fighter’s stance and the modifiedstance.
(1) Knife Fighter’s Stance . In this stance, the fighter stands with his feet aboutshoulder-width apart, dominant foot toward the rear. About 70 percent of his weight is onthe front foot and 30 percent on the rear foot. He stands on the balls of both feet andholds the knife with the straight grip. The other hand is held close to his body where it isready to use, but protected (Figure 7-25).
Figure 7-25. Knife fighter’s stance.
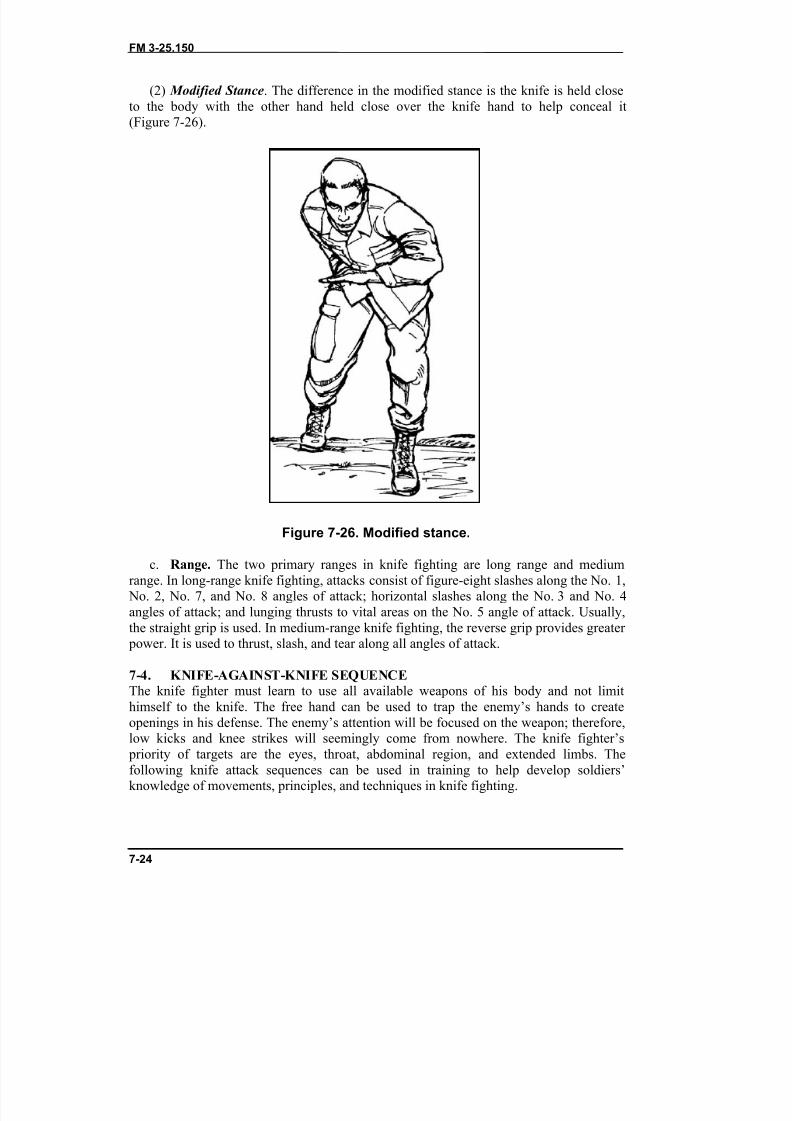
8/9/2019 US ARMY FM 3-25.150 - Combatives (hand-to-hand combat).pdf
http://slidepdf.com/reader/full/us-army-fm-3-25150-combatives-hand-to-hand-combatpdf 205/265
FM 3-25.150
7-24
(2) Modified Stance . The difference in the modified stance is the knife is held closeto the body with the other hand held close over the knife hand to help conceal it(Figure 7-26).
Figure 7-26. Modified stance.
c. Range. The two primary ranges in knife fighting are long range and mediumrange. In long-range knife fighting, attacks consist of figure-eight slashes along the No. 1,
No. 2, No. 7, and No. 8 angles of attack; horizontal slashes along the No. 3 and No. 4angles of attack; and lunging thrusts to vital areas on the No. 5 angle of attack. Usually,the straight grip is used. In medium-range knife fighting, the reverse grip provides greater
power. It is used to thrust, slash, and tear along all angles of attack.
7-4. KNIFE-AGAINST-KNIFE SEQUENCEThe knife fighter must learn to use all available weapons of his body and not limithimself to the knife. The free hand can be used to trap the enemy’s hands to createopenings in his defense. The enemy’s attention will be focused on the weapon; therefore,low kicks and knee strikes will seemingly come from nowhere. The knife fighter’s
priority of targets are the eyes, throat, abdominal region, and extended limbs. Thefollowing knife attack sequences can be used in training to help develop soldiers’knowledge of movements, principles, and techniques in knife fighting.
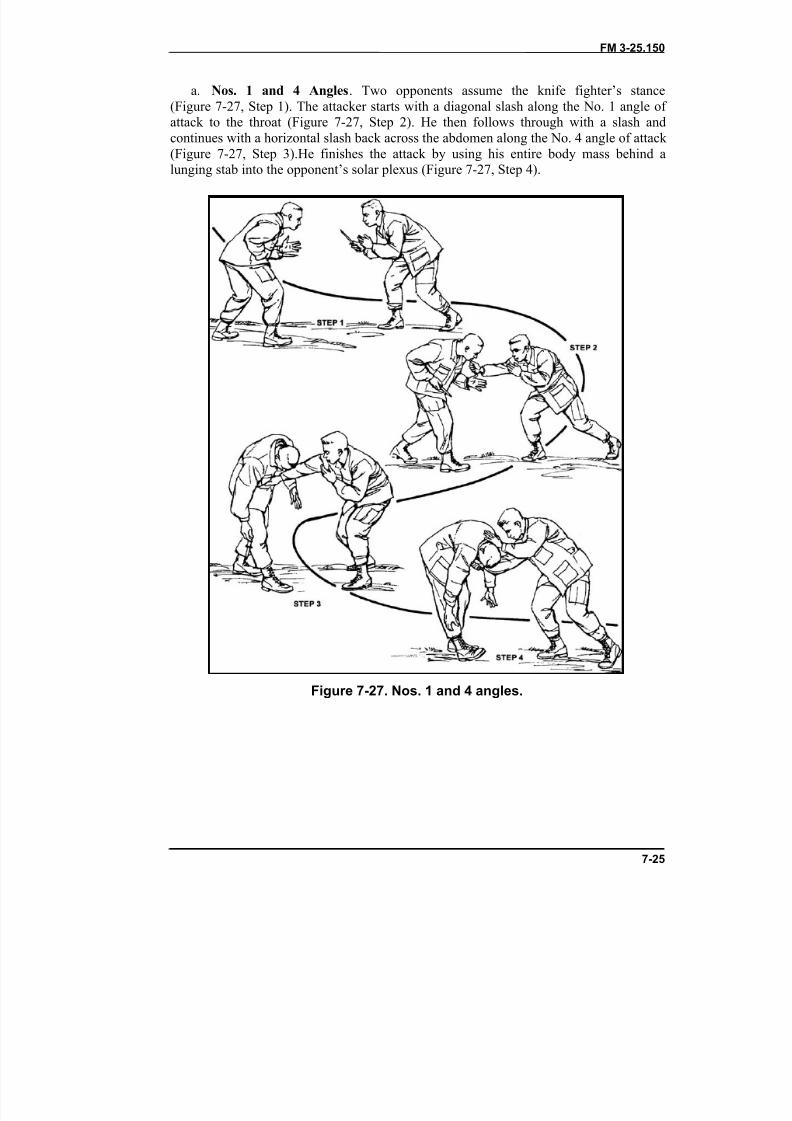
8/9/2019 US ARMY FM 3-25.150 - Combatives (hand-to-hand combat).pdf
http://slidepdf.com/reader/full/us-army-fm-3-25150-combatives-hand-to-hand-combatpdf 206/265
FM 3-25.150
7-25
a. Nos. 1 and 4 Angles . Two opponents assume the knife fighter’s stance(Figure 7-27, Step 1). The attacker starts with a diagonal slash along the No. 1 angle of attack to the throat (Figure 7-27, Step 2). He then follows through with a slash andcontinues with a horizontal slash back across the abdomen along the No. 4 angle of attack (Figure 7-27, Step 3).He finishes the attack by using his entire body mass behind a
lunging stab into the opponent’s solar plexus (Figure 7-27, Step 4).
Figure 7-27. Nos. 1 and 4 angles.
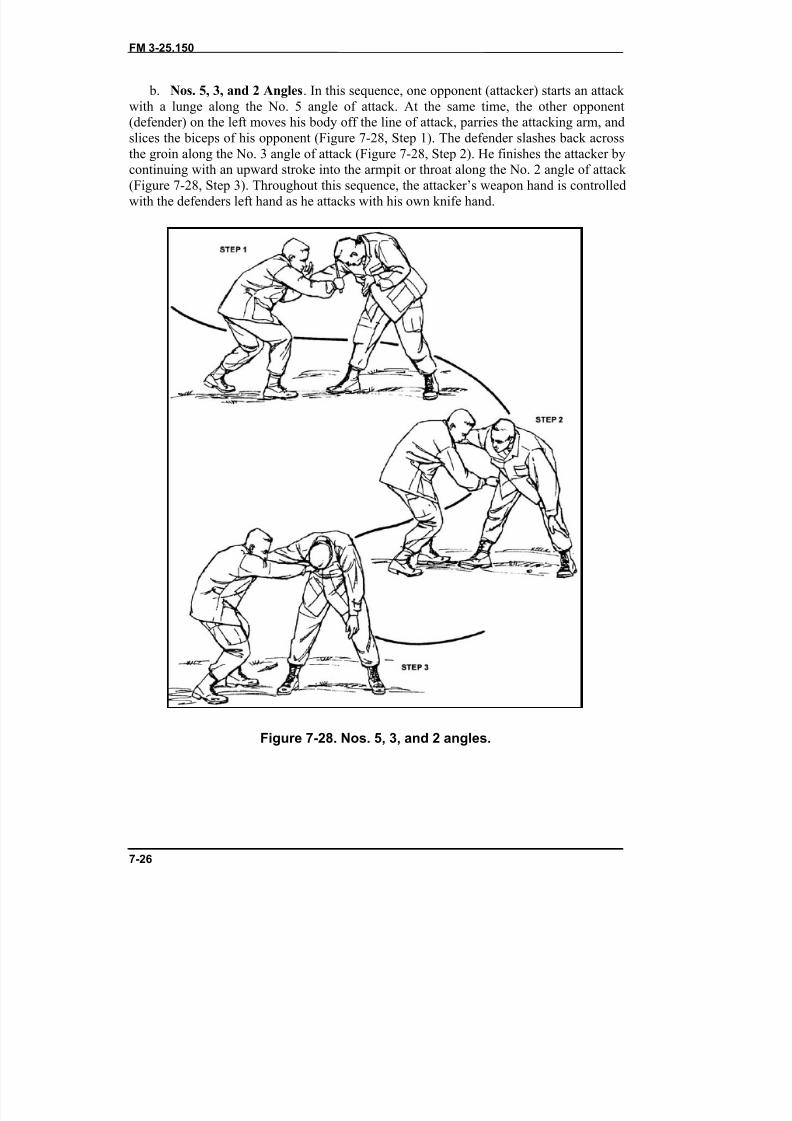
8/9/2019 US ARMY FM 3-25.150 - Combatives (hand-to-hand combat).pdf
http://slidepdf.com/reader/full/us-army-fm-3-25150-combatives-hand-to-hand-combatpdf 207/265
FM 3-25.150
7-26
b. Nos. 5, 3, and 2 Angles . In this sequence, one opponent (attacker) starts an attack with a lunge along the No. 5 angle of attack. At the same time, the other opponent(defender) on the left moves his body off the line of attack, parries the attacking arm, andslices the biceps of his opponent (Figure 7-28, Step 1). The defender slashes back acrossthe groin along the No. 3 angle of attack (Figure 7-28, Step 2). He finishes the attacker by
continuing with an upward stroke into the armpit or throat along the No. 2 angle of attack (Figure 7-28, Step 3). Throughout this sequence, the attacker’s weapon hand is controlledwith the defenders left hand as he attacks with his own knife hand.
Figure 7-28. Nos. 5, 3, and 2 angles.
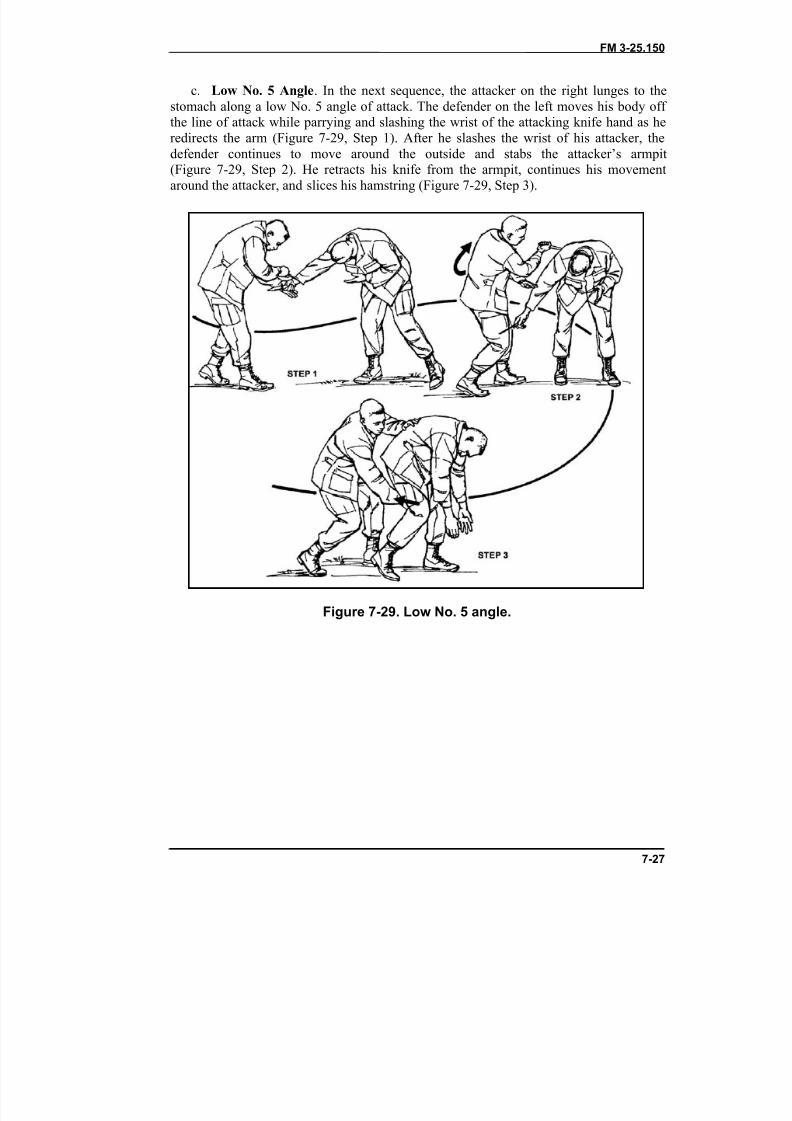
8/9/2019 US ARMY FM 3-25.150 - Combatives (hand-to-hand combat).pdf
http://slidepdf.com/reader/full/us-army-fm-3-25150-combatives-hand-to-hand-combatpdf 208/265
FM 3-25.150
7-27
c. Low No. 5 Angle . In the next sequence, the attacker on the right lunges to thestomach along a low No. 5 angle of attack. The defender on the left moves his body off the line of attack while parrying and slashing the wrist of the attacking knife hand as heredirects the arm (Figure 7-29, Step 1). After he slashes the wrist of his attacker, thedefender continues to move around the outside and stabs the attacker’s armpit
(Figure 7-29, Step 2). He retracts his knife from the armpit, continues his movementaround the attacker, and slices his hamstring (Figure 7-29, Step 3).
Figure 7-29. Low No. 5 angle.
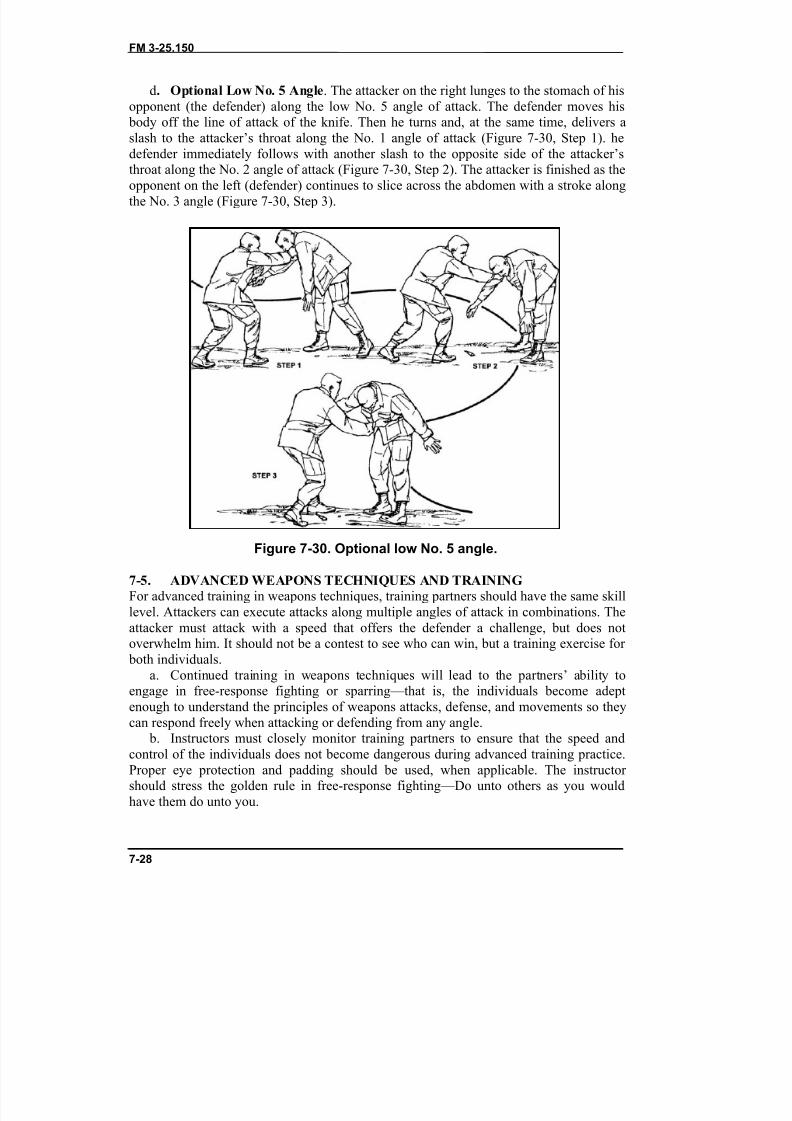
8/9/2019 US ARMY FM 3-25.150 - Combatives (hand-to-hand combat).pdf
http://slidepdf.com/reader/full/us-army-fm-3-25150-combatives-hand-to-hand-combatpdf 209/265
FM 3-25.150
7-28
d. Optional Low No. 5 Angle . The attacker on the right lunges to the stomach of hisopponent (the defender) along the low No. 5 angle of attack. The defender moves his
body off the line of attack of the knife. Then he turns and, at the same time, delivers aslash to the attacker’s throat along the No. 1 angle of attack (Figure 7-30, Step 1). hedefender immediately follows with another slash to the opposite side of the attacker’s
throat along the No. 2 angle of attack (Figure 7-30, Step 2). The attacker is finished as theopponent on the left (defender) continues to slice across the abdomen with a stroke alongthe No. 3 angle (Figure 7-30, Step 3).
Figure 7-30. Optional low No. 5 angle.
7-5. ADVANCED WEAPONS TECHNIQUES AND TRAININGFor advanced training in weapons techniques, training partners should have the same skilllevel. Attackers can execute attacks along multiple angles of attack in combinations. Theattacker must attack with a speed that offers the defender a challenge, but does notoverwhelm him. It should not be a contest to see who can win, but a training exercise for
both individuals.a. Continued training in weapons techniques will lead to the partners’ ability to
engage in free-response fighting or sparring—that is, the individuals become adeptenough to understand the principles of weapons attacks, defense, and movements so theycan respond freely when attacking or defending from any angle.
b. Instructors must closely monitor training partners to ensure that the speed andcontrol of the individuals does not become dangerous during advanced training practice.Proper eye protection and padding should be used, when applicable. The instructor should stress the golden rule in free-response fighting—Do unto others as you wouldhave them do unto you.
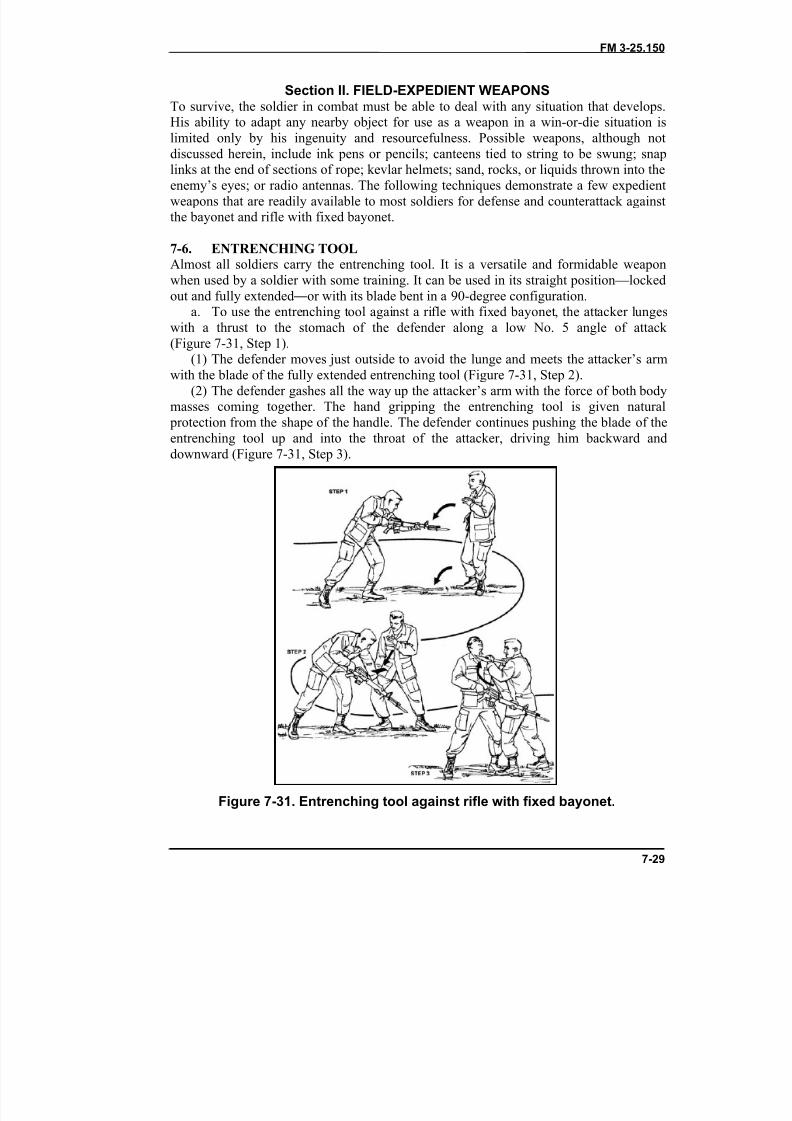
8/9/2019 US ARMY FM 3-25.150 - Combatives (hand-to-hand combat).pdf
http://slidepdf.com/reader/full/us-army-fm-3-25150-combatives-hand-to-hand-combatpdf 210/265
FM 3-25.150
7-29
Section II. FIELD-EXPEDIENT WEAPONSTo survive, the soldier in combat must be able to deal with any situation that develops.His ability to adapt any nearby object for use as a weapon in a win-or-die situation islimited only by his ingenuity and resourcefulness. Possible weapons, although notdiscussed herein, include ink pens or pencils; canteens tied to string to be swung; snap
links at the end of sections of rope; kevlar helmets; sand, rocks, or liquids thrown into theenemy’s eyes; or radio antennas. The following techniques demonstrate a few expedientweapons that are readily available to most soldiers for defense and counterattack againstthe bayonet and rifle with fixed bayonet.
7-6. ENTRENCHING TOOLAlmost all soldiers carry the entrenching tool. It is a versatile and formidable weaponwhen used by a soldier with some training. It can be used in its straight position—lockedout and fully extended ―or with its blade bent in a 90-degree configuration.
a. To use the entrenching tool against a rifle with fixed bayonet, the attacker lungeswith a thrust to the stomach of the defender along a low No. 5 angle of attack
(Figure 7-31, Step 1).(1) The defender moves just outside to avoid the lunge and meets the attacker’s armwith the blade of the fully extended entrenching tool (Figure 7-31, Step 2).
(2) The defender gashes all the way up the attacker’s arm with the force of both bodymasses coming together. The hand gripping the entrenching tool is given natural
protection from the shape of the handle. The defender continues pushing the blade of theentrenching tool up and into the throat of the attacker, driving him backward anddownward (Figure 7-31, Step 3).
Figure 7-31. Entrenching tool against rifle with fixed bayonet.
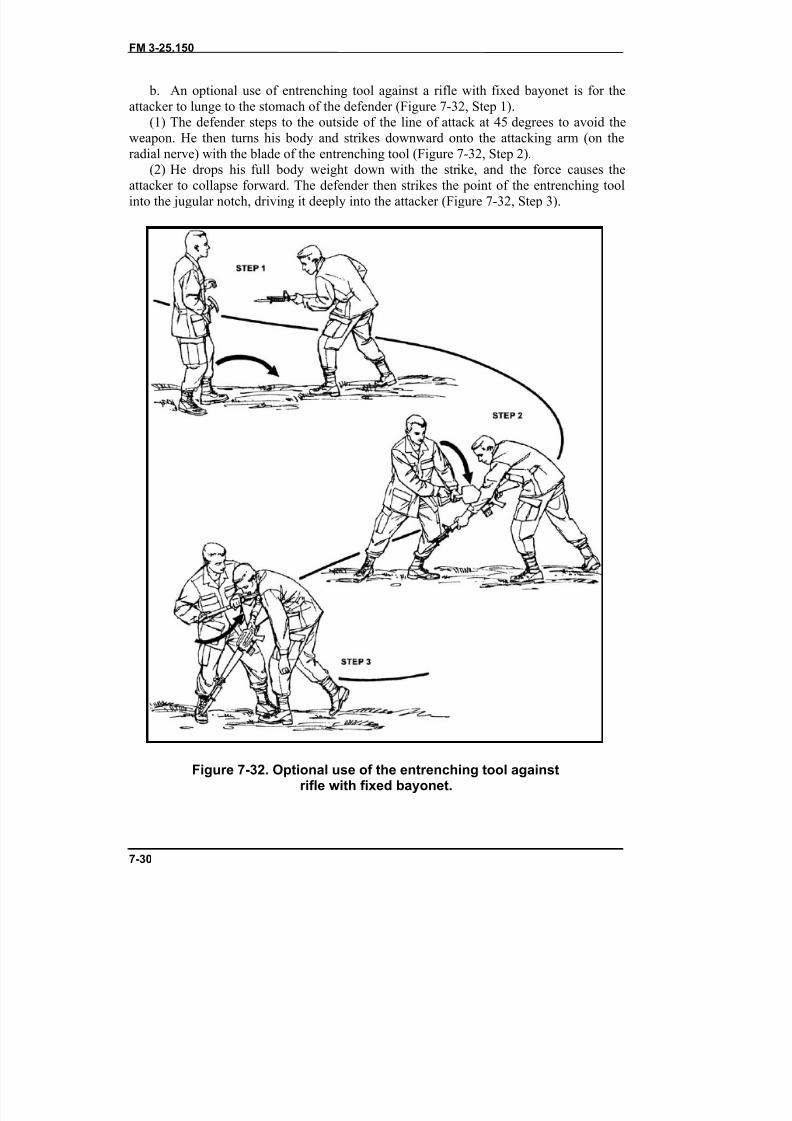
8/9/2019 US ARMY FM 3-25.150 - Combatives (hand-to-hand combat).pdf
http://slidepdf.com/reader/full/us-army-fm-3-25150-combatives-hand-to-hand-combatpdf 211/265
FM 3-25.150
7-30
b. An optional use of entrenching tool against a rifle with fixed bayonet is for theattacker to lunge to the stomach of the defender (Figure 7-32, Step 1).
(1) The defender steps to the outside of the line of attack at 45 degrees to avoid theweapon. He then turns his body and strikes downward onto the attacking arm (on theradial nerve) with the blade of the entrenching tool (Figure 7-32, Step 2).
(2) He drops his full body weight down with the strike, and the force causes theattacker to collapse forward. The defender then strikes the point of the entrenching toolinto the jugular notch, driving it deeply into the attacker (Figure 7-32, Step 3).
Figure 7-32. Optional use of the entrenching tool againstrifle with fixed bayonet.
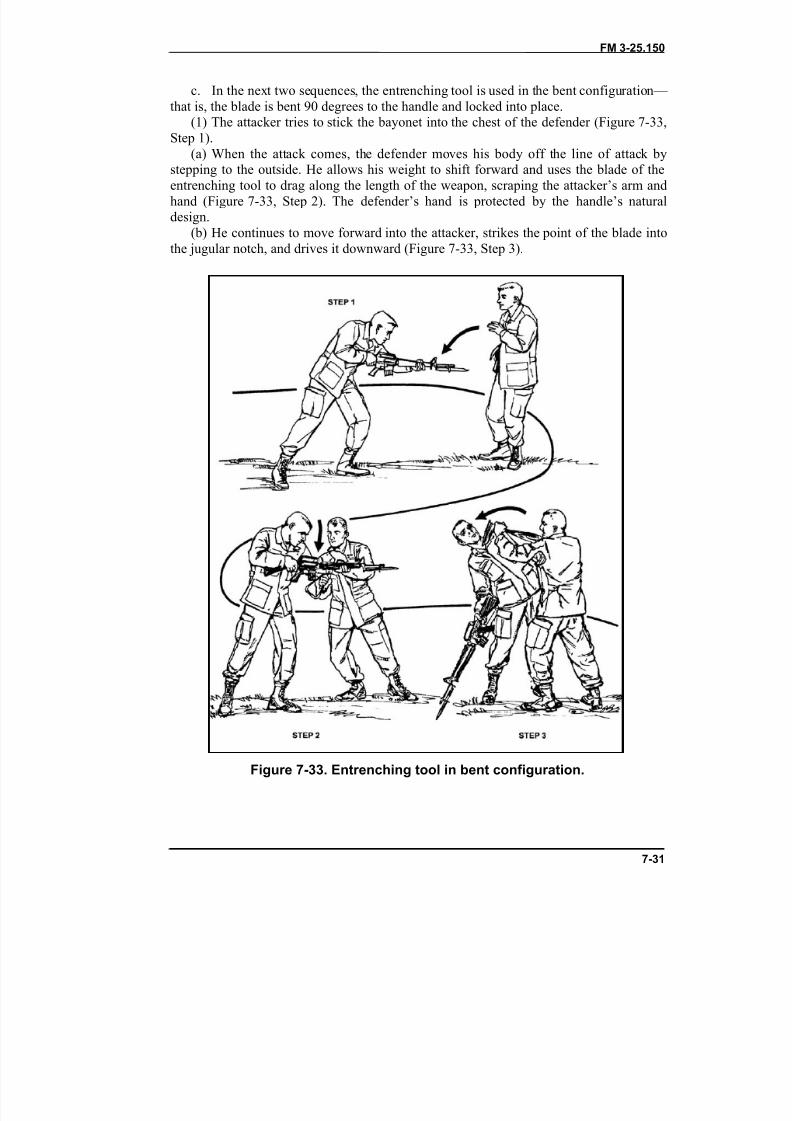
8/9/2019 US ARMY FM 3-25.150 - Combatives (hand-to-hand combat).pdf
http://slidepdf.com/reader/full/us-army-fm-3-25150-combatives-hand-to-hand-combatpdf 212/265
FM 3-25.150
7-31
c. In the next two sequences, the entrenching tool is used in the bent configuration— that is, the blade is bent 90 degrees to the handle and locked into place.
(1) The attacker tries to stick the bayonet into the chest of the defender (Figure 7-33,Step 1).
(a) When the attack comes, the defender moves his body off the line of attack by
stepping to the outside. He allows his weight to shift forward and uses the blade of theentrenching tool to drag along the length of the weapon, scraping the attacker’s arm andhand (Figure 7-33, Step 2). The defender’s hand is protected by the handle’s naturaldesign.
(b) He continues to move forward into the attacker, strikes the point of the blade intothe jugular notch, and drives it downward (Figure 7-33, Step 3).
Figure 7-33. Entrenching tool in bent configuration.
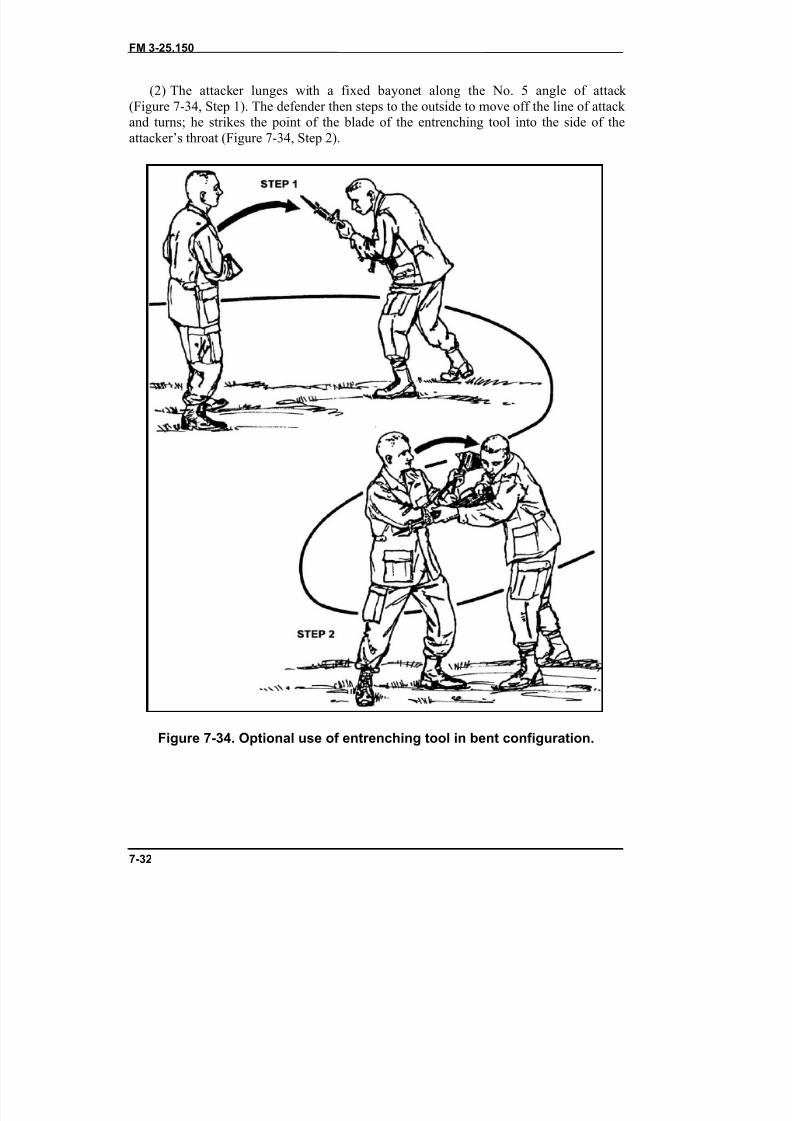
8/9/2019 US ARMY FM 3-25.150 - Combatives (hand-to-hand combat).pdf
http://slidepdf.com/reader/full/us-army-fm-3-25150-combatives-hand-to-hand-combatpdf 213/265
FM 3-25.150
7-32
(2) The attacker lunges with a fixed bayonet along the No. 5 angle of attack (Figure 7-34, Step 1). The defender then steps to the outside to move off the line of attack and turns; he strikes the point of the blade of the entrenching tool into the side of theattacker’s throat (Figure 7-34, Step 2).
Figure 7-34. Optional use of entrenching tool in bent configuration.
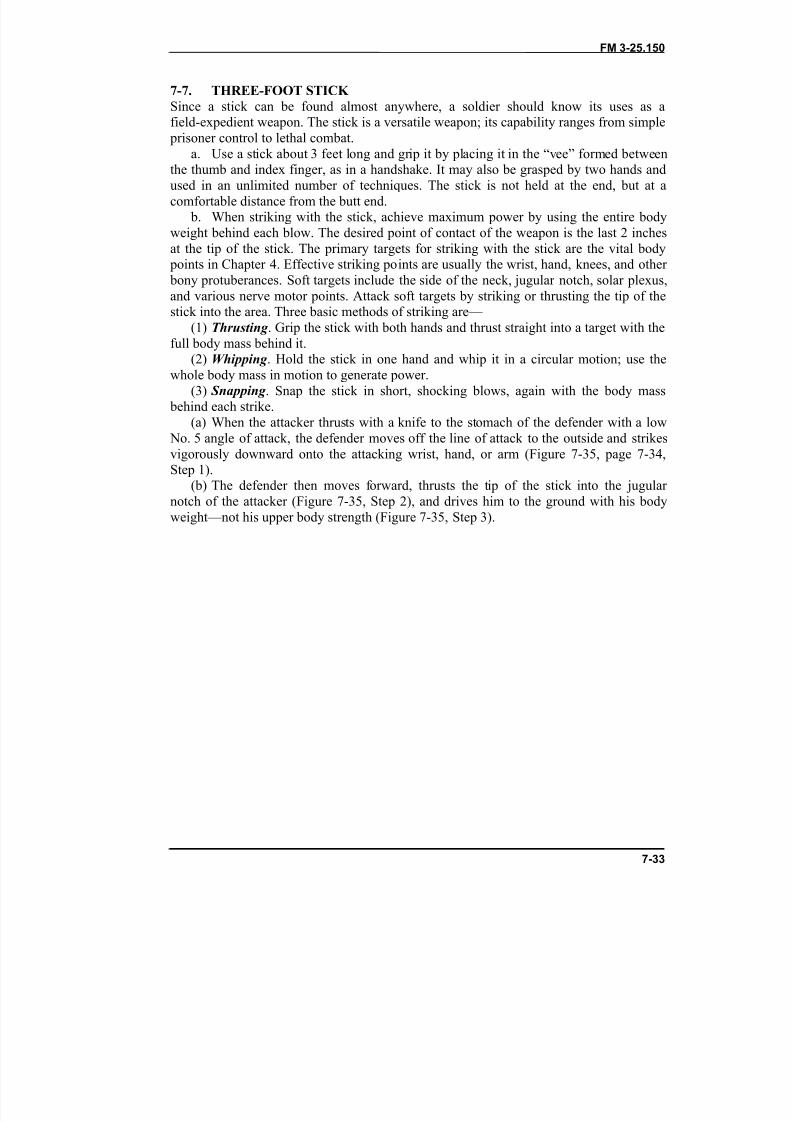
8/9/2019 US ARMY FM 3-25.150 - Combatives (hand-to-hand combat).pdf
http://slidepdf.com/reader/full/us-army-fm-3-25150-combatives-hand-to-hand-combatpdf 214/265
FM 3-25.150
7-33
7-7. THREE-FOOT STICK Since a stick can be found almost anywhere, a soldier should know its uses as afield-expedient weapon. The stick is a versatile weapon; its capability ranges from simple
prisoner control to lethal combat.a. Use a stick about 3 feet long and grip it by placing it in the “vee” formed between
the thumb and index finger, as in a handshake. It may also be grasped by two hands andused in an unlimited number of techniques. The stick is not held at the end, but at acomfortable distance from the butt end.
b. When striking with the stick, achieve maximum power by using the entire bodyweight behind each blow. The desired point of contact of the weapon is the last 2 inchesat the tip of the stick. The primary targets for striking with the stick are the vital body
points in Chapter 4. Effective striking points are usually the wrist, hand, knees, and other bony protuberances. Soft targets include the side of the neck, jugular notch, solar plexus,and various nerve motor points. Attack soft targets by striking or thrusting the tip of thestick into the area. Three basic methods of striking are—
(1) Thrusting . Grip the stick with both hands and thrust straight into a target with the
full body mass behind it.(2) Whipping . Hold the stick in one hand and whip it in a circular motion; use thewhole body mass in motion to generate power.
(3) Snapping . Snap the stick in short, shocking blows, again with the body mass behind each strike.
(a) When the attacker thrusts with a knife to the stomach of the defender with a low No. 5 angle of attack, the defender moves off the line of attack to the outside and strikesvigorously downward onto the attacking wrist, hand, or arm (Figure 7-35, page 7-34,Step 1).
(b) The defender then moves forward, thrusts the tip of the stick into the jugular notch of the attacker (Figure 7-35, Step 2), and drives him to the ground with his bodyweight—not his upper body strength (Figure 7-35, Step 3).
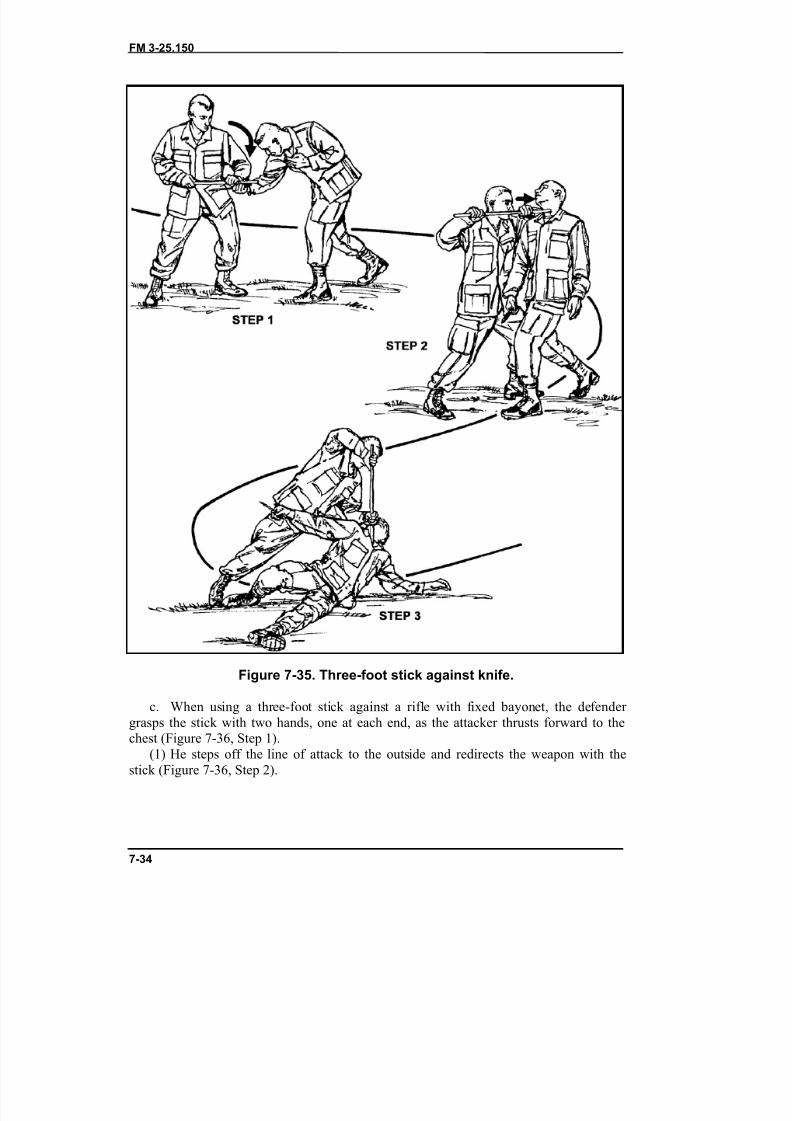
8/9/2019 US ARMY FM 3-25.150 - Combatives (hand-to-hand combat).pdf
http://slidepdf.com/reader/full/us-army-fm-3-25150-combatives-hand-to-hand-combatpdf 215/265
FM 3-25.150
7-34
Figure 7-35. Three-foot stick against knife.
c. When using a three-foot stick against a rifle with fixed bayonet, the defender grasps the stick with two hands, one at each end, as the attacker thrusts forward to thechest (Figure 7-36, Step 1).
(1) He steps off the line of attack to the outside and redirects the weapon with thestick (Figure 7-36, Step 2).
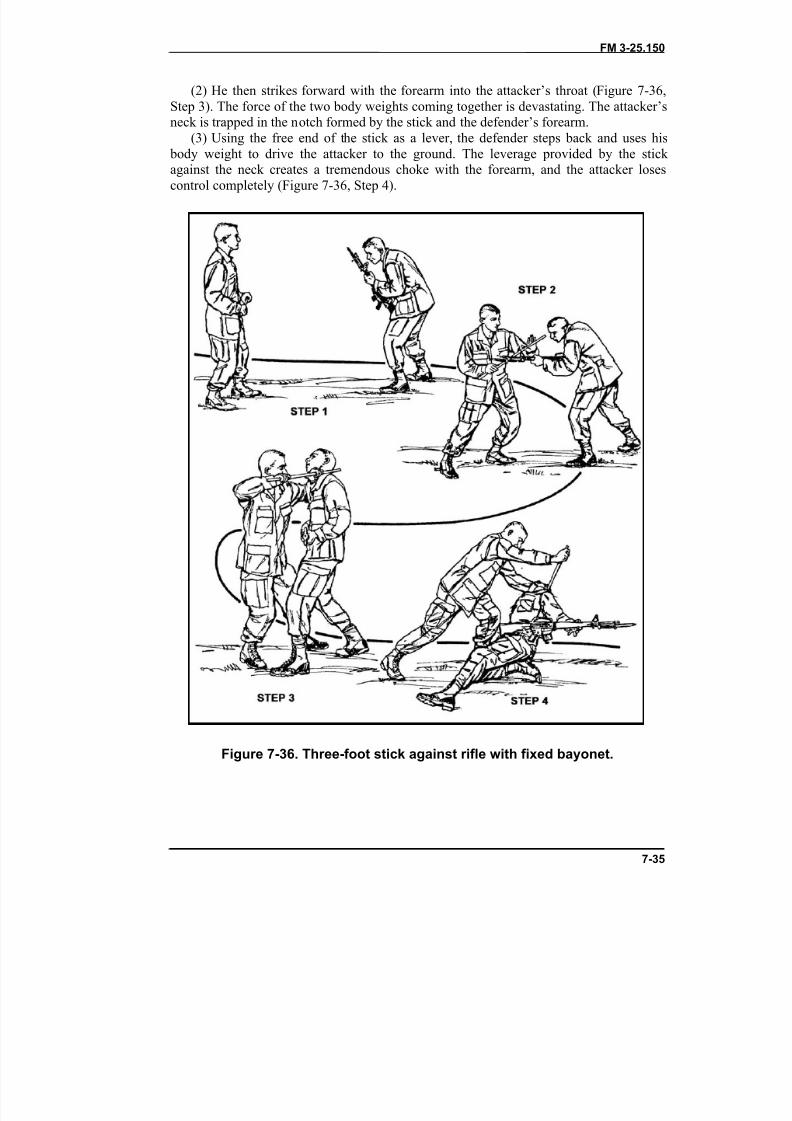
8/9/2019 US ARMY FM 3-25.150 - Combatives (hand-to-hand combat).pdf
http://slidepdf.com/reader/full/us-army-fm-3-25150-combatives-hand-to-hand-combatpdf 216/265
FM 3-25.150
7-35
(2) He then strikes forward with the forearm into the attacker’s throat (Figure 7-36,Step 3). The force of the two body weights coming together is devastating. The attacker’sneck is trapped in the notch formed by the stick and the defender’s forearm.
(3) Using the free end of the stick as a lever, the defender steps back and uses his body weight to drive the attacker to the ground. The leverage provided by the stick
against the neck creates a tremendous choke with the forearm, and the attacker losescontrol completely (Figure 7-36, Step 4).
Figure 7-36. Three-foot stick against rifle with fixed bayonet.
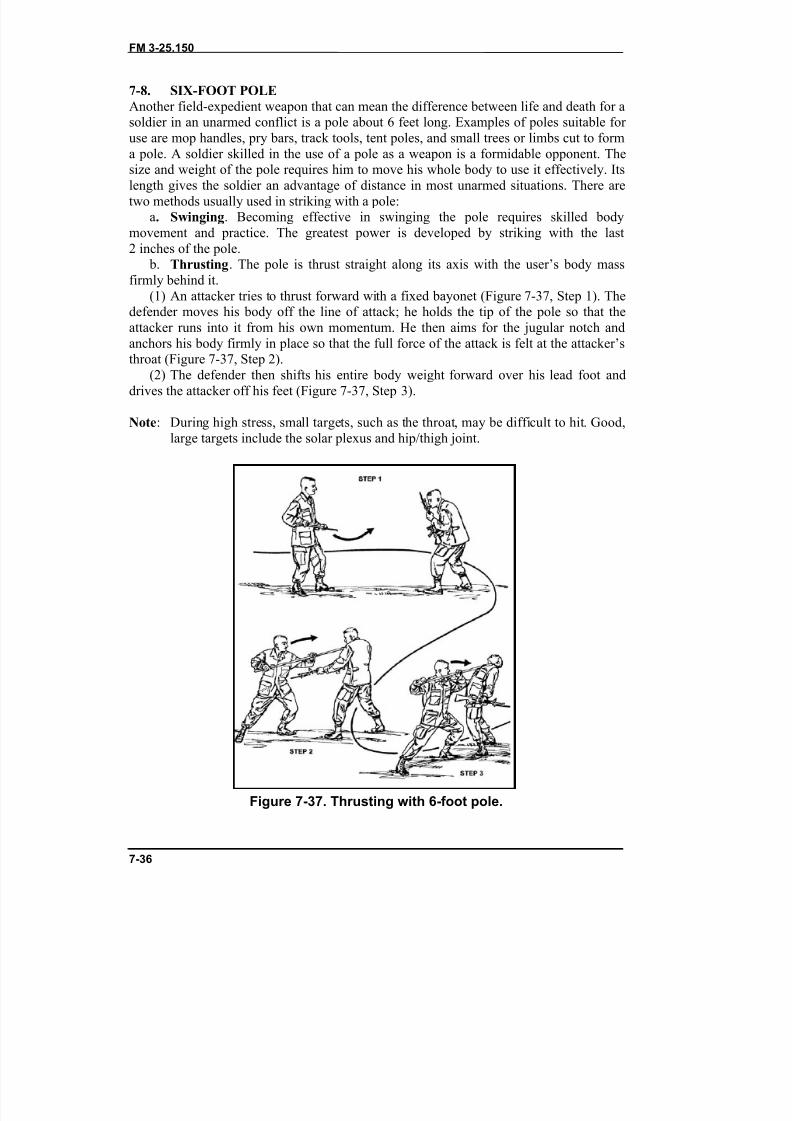
8/9/2019 US ARMY FM 3-25.150 - Combatives (hand-to-hand combat).pdf
http://slidepdf.com/reader/full/us-army-fm-3-25150-combatives-hand-to-hand-combatpdf 217/265
FM 3-25.150
7-36
7-8. SIX-FOOT POLEAnother field-expedient weapon that can mean the difference between life and death for asoldier in an unarmed conflict is a pole about 6 feet long. Examples of poles suitable for use are mop handles, pry bars, track tools, tent poles, and small trees or limbs cut to forma pole. A soldier skilled in the use of a pole as a weapon is a formidable opponent. The
size and weight of the pole requires him to move his whole body to use it effectively. Itslength gives the soldier an advantage of distance in most unarmed situations. There aretwo methods usually used in striking with a pole:
a. Swinging . Becoming effective in swinging the pole requires skilled bodymovement and practice. The greatest power is developed by striking with the last2 inches of the pole.
b. Thrusting . The pole is thrust straight along its axis with the user’s body massfirmly behind it.
(1) An attacker tries to thrust forward with a fixed bayonet (Figure 7-37, Step 1). Thedefender moves his body off the line of attack; he holds the tip of the pole so that theattacker runs into it from his own momentum. He then aims for the jugular notch and
anchors his body firmly in place so that the full force of the attack is felt at the attacker’sthroat (Figure 7-37, Step 2).(2) The defender then shifts his entire body weight forward over his lead foot and
drives the attacker off his feet (Figure 7-37, Step 3).
Note : During high stress, small targets, such as the throat, may be difficult to hit. Good,large targets include the solar plexus and hip/thigh joint.
Figure 7-37. Thrusting with 6-foot pole.
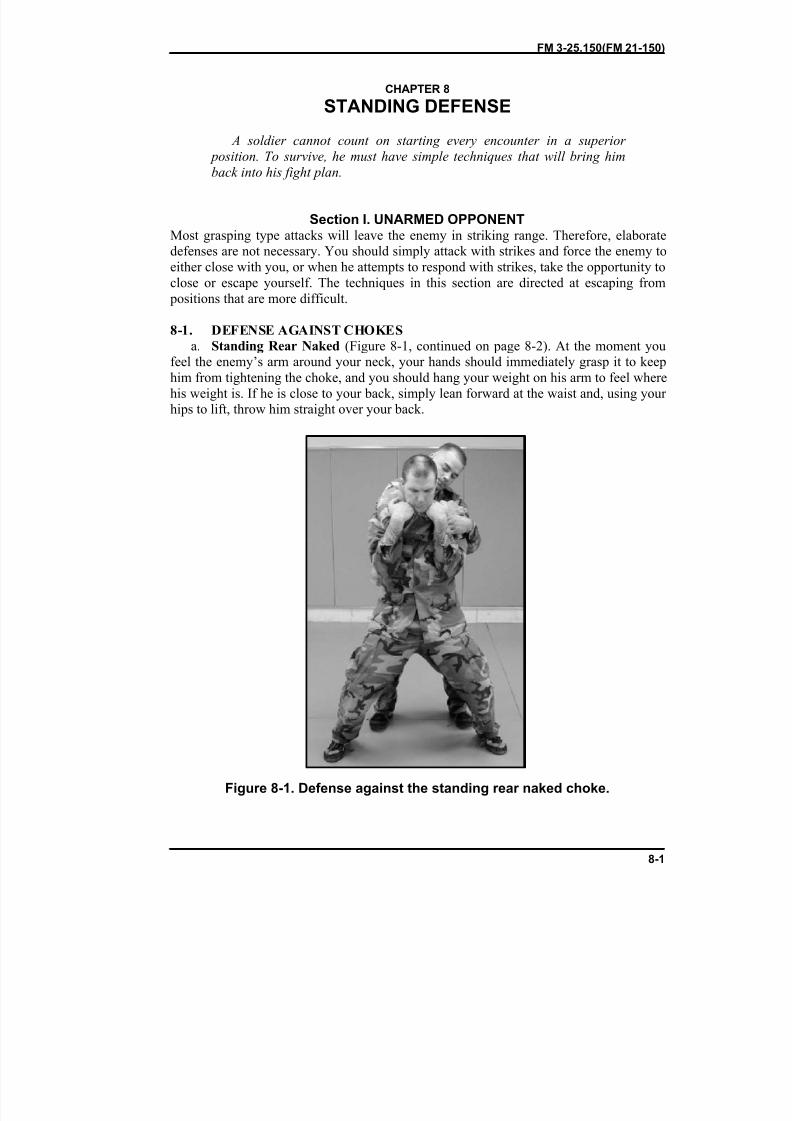
8/9/2019 US ARMY FM 3-25.150 - Combatives (hand-to-hand combat).pdf
http://slidepdf.com/reader/full/us-army-fm-3-25150-combatives-hand-to-hand-combatpdf 218/265
FM 3-25.150(FM 21-150)
8-1
CHAPTER 8
STANDING DEFENSE
A soldier cannot count on starting every encounter in a superior position. To survive, he must have simple techniques that will bring him
back into his fight plan.
Section I. UNARMED OPPONENTMost grasping type attacks will leave the enemy in striking range. Therefore, elaboratedefenses are not necessary. You should simply attack with strikes and force the enemy toeither close with you, or when he attempts to respond with strikes, take the opportunity toclose or escape yourself. The techniques in this section are directed at escaping from
positions that are more difficult.
8-1. DEFENSE AGAINST CHOKES
a. Standing Rear Naked (Figure 8-1, continued on page 8-2). At the moment youfeel the enemy’s arm around your neck, your hands should immediately grasp it to keephim from tightening the choke, and you should hang your weight on his arm to feel wherehis weight is. If he is close to your back, simply lean forward at the waist and, using your hips to lift, throw him straight over your back.
Figure 8-1. Defense against the standing rear naked choke.
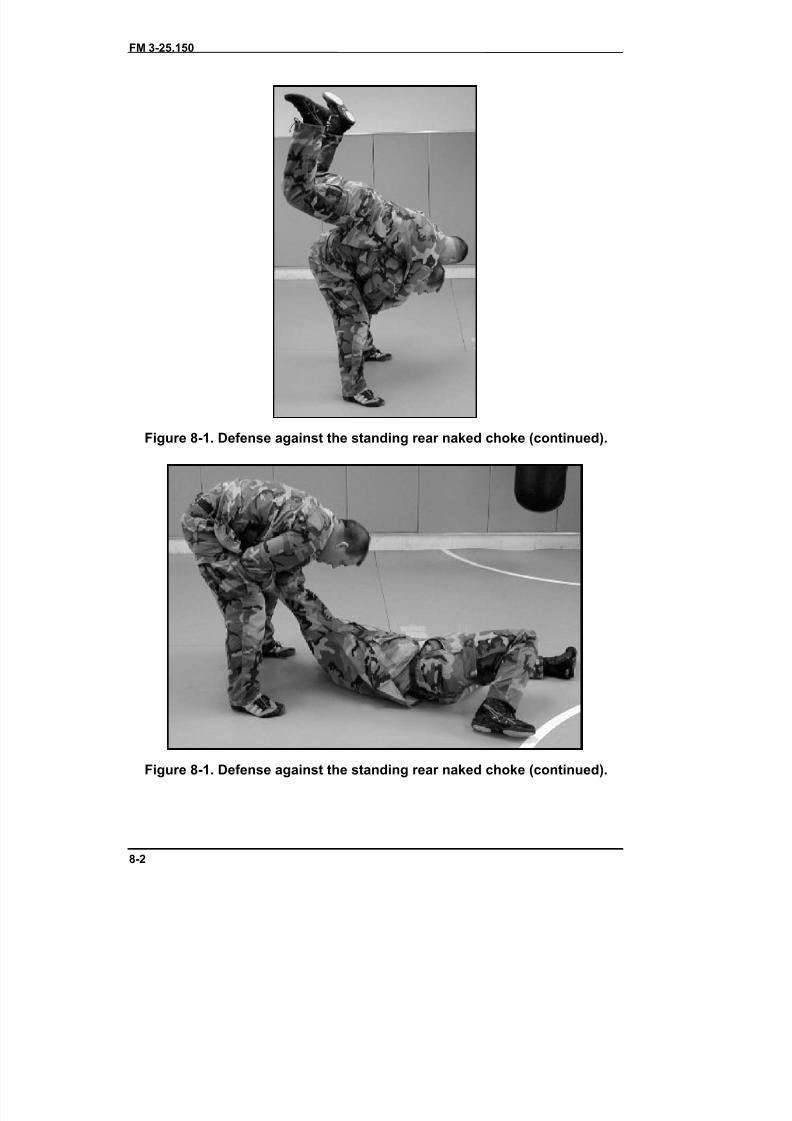
8/9/2019 US ARMY FM 3-25.150 - Combatives (hand-to-hand combat).pdf
http://slidepdf.com/reader/full/us-army-fm-3-25150-combatives-hand-to-hand-combatpdf 219/265
FM 3-25.150
8-2
Figure 8-1. Defense against the standing rear naked choke (continued).
Figure 8-1. Defense against the standing rear naked choke (continued).
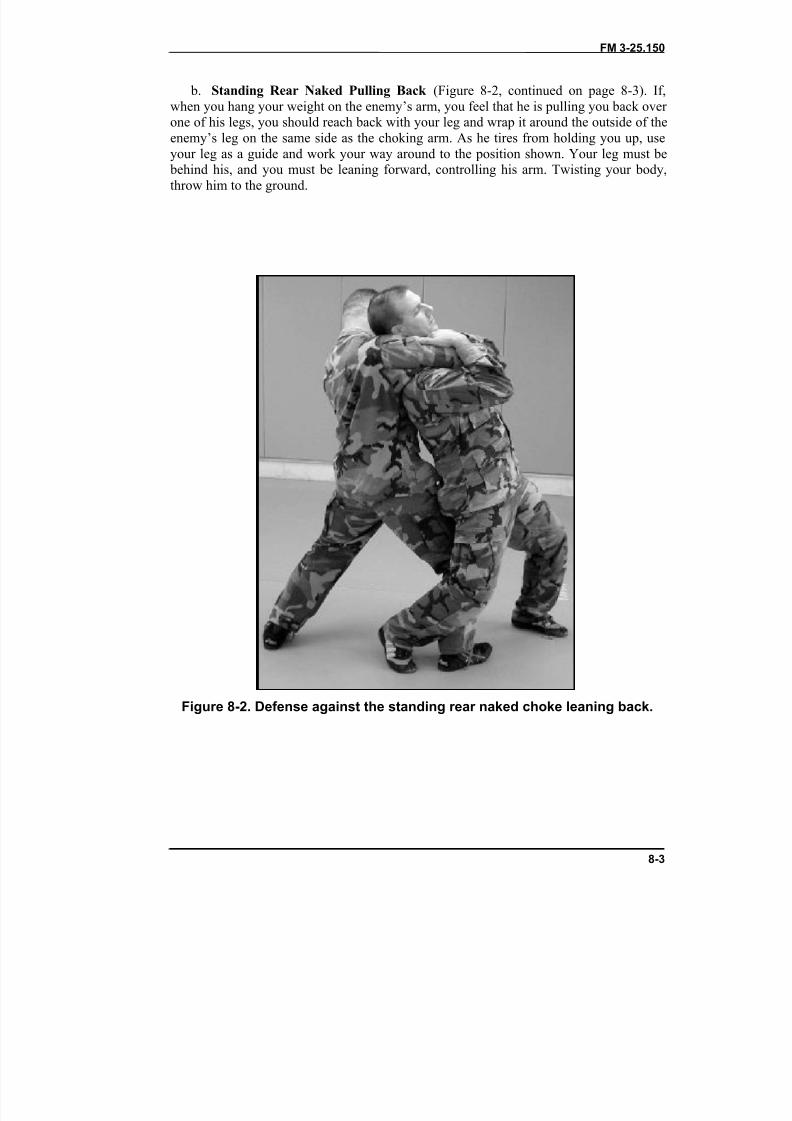
8/9/2019 US ARMY FM 3-25.150 - Combatives (hand-to-hand combat).pdf
http://slidepdf.com/reader/full/us-army-fm-3-25150-combatives-hand-to-hand-combatpdf 220/265
FM 3-25.150
8-3
b. Standing Rear Naked Pulling Back (Figure 8-2, continued on page 8-3). If,when you hang your weight on the enemy’s arm, you feel that he is pulling you back over one of his legs, you should reach back with your leg and wrap it around the outside of theenemy’s leg on the same side as the choking arm. As he tires from holding you up, useyour leg as a guide and work your way around to the position shown. Your leg must be
behind his, and you must be leaning forward, controlling his arm. Twisting your body,throw him to the ground.
Figure 8-2. Defense against the standing rear naked choke leaning back.
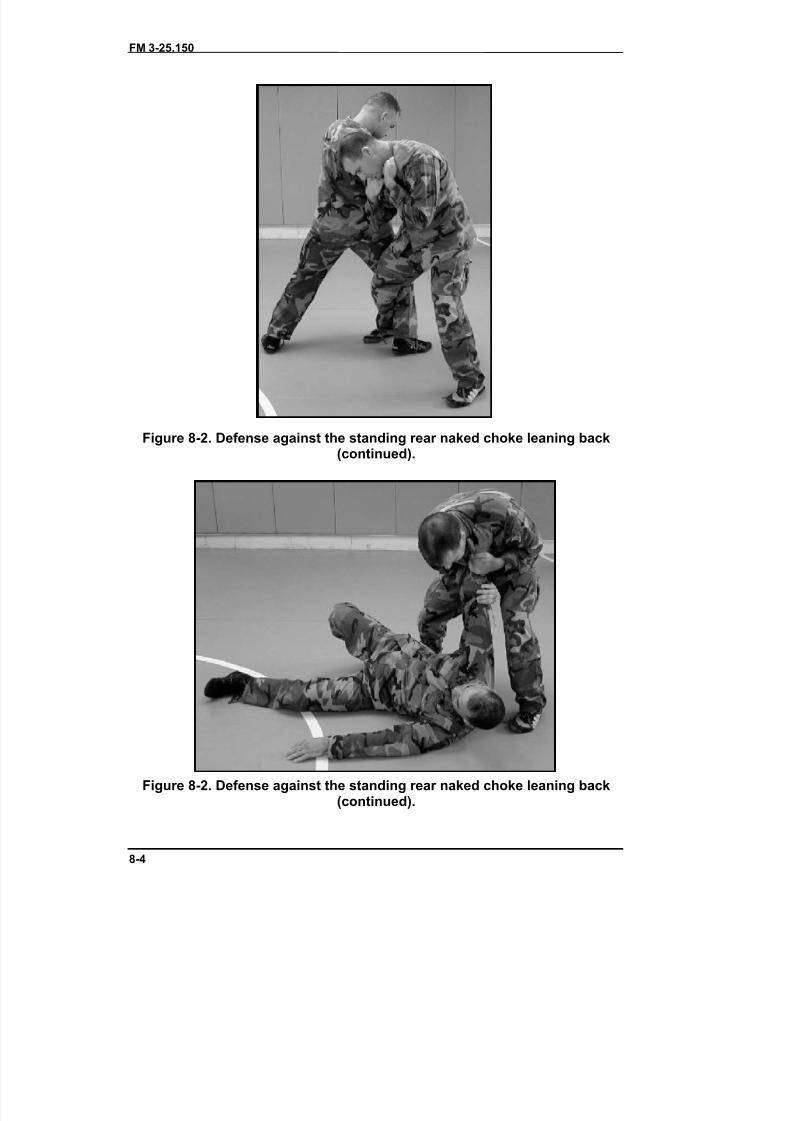
8/9/2019 US ARMY FM 3-25.150 - Combatives (hand-to-hand combat).pdf
http://slidepdf.com/reader/full/us-army-fm-3-25150-combatives-hand-to-hand-combatpdf 221/265
FM 3-25.150
8-4
Figure 8-2. Defense against the standing rear naked choke leaning back(continued).
Figure 8-2. Defense against the standing rear naked choke leaning back(continued).
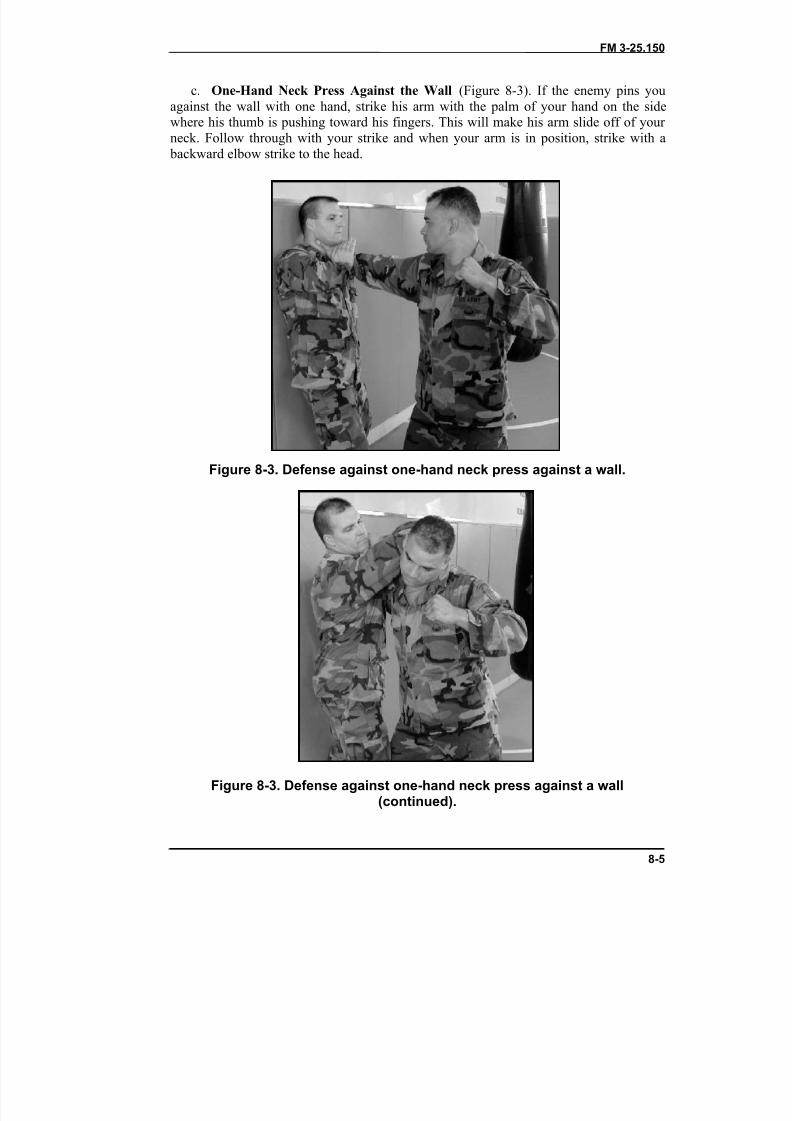
8/9/2019 US ARMY FM 3-25.150 - Combatives (hand-to-hand combat).pdf
http://slidepdf.com/reader/full/us-army-fm-3-25150-combatives-hand-to-hand-combatpdf 222/265
FM 3-25.150
8-5
c. One-Hand Neck Press Against the Wall (Figure 8-3). If the enemy pins youagainst the wall with one hand, strike his arm with the palm of your hand on the sidewhere his thumb is pushing toward his fingers. This will make his arm slide off of your neck. Follow through with your strike and when your arm is in position, strike with a
backward elbow strike to the head.
Figure 8-3. Defense against one-hand neck press against a wall.
Figure 8-3. Defense against one-hand neck press against a wall(continued).
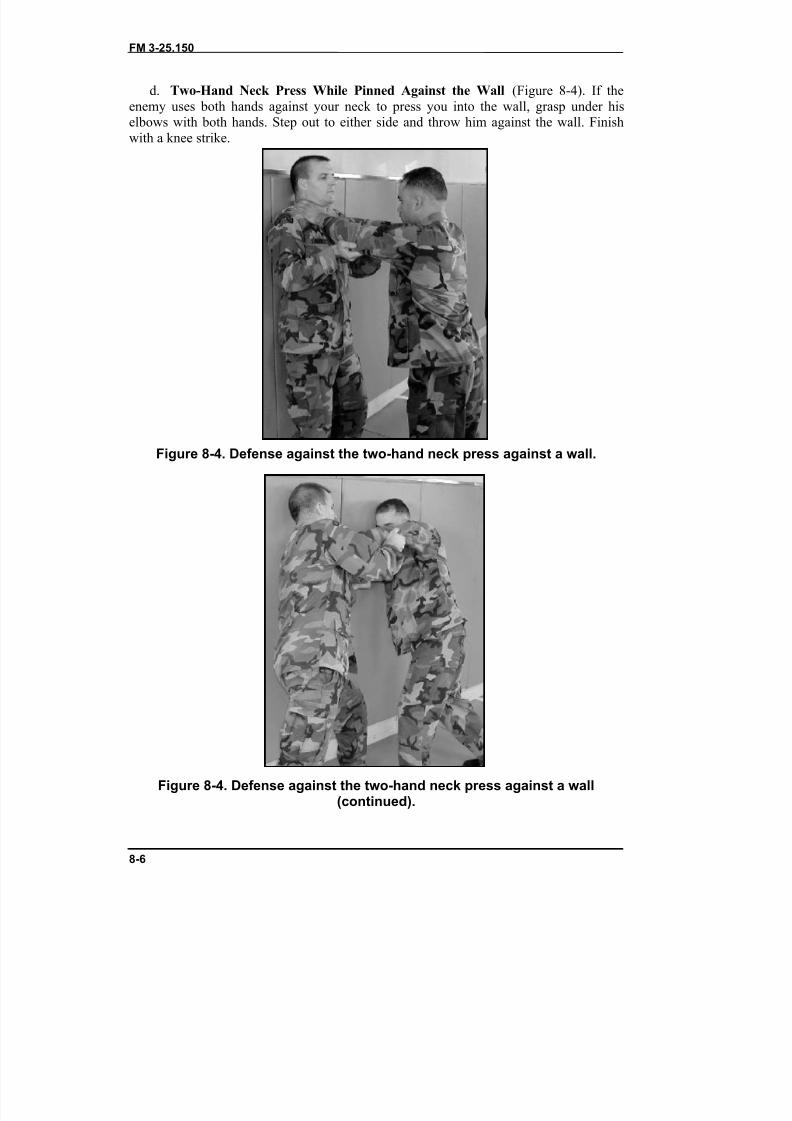
8/9/2019 US ARMY FM 3-25.150 - Combatives (hand-to-hand combat).pdf
http://slidepdf.com/reader/full/us-army-fm-3-25150-combatives-hand-to-hand-combatpdf 223/265
FM 3-25.150
8-6
d. Two-Hand Neck Press While Pinned Against the Wall (Figure 8-4). If theenemy uses both hands against your neck to press you into the wall, grasp under hiselbows with both hands. Step out to either side and throw him against the wall. Finishwith a knee strike.
Figure 8-4. Defense against the two-hand neck press against a wall.
Figure 8-4. Defense against the two-hand neck press against a wall(continued).
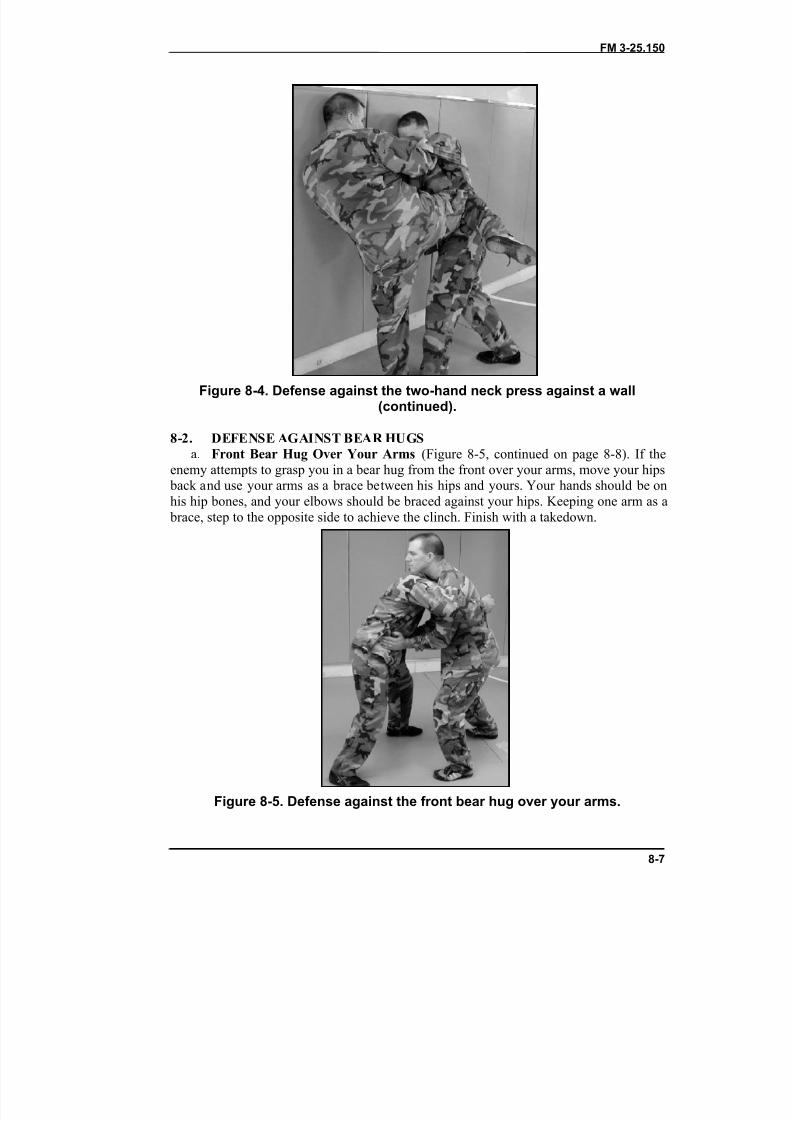
8/9/2019 US ARMY FM 3-25.150 - Combatives (hand-to-hand combat).pdf
http://slidepdf.com/reader/full/us-army-fm-3-25150-combatives-hand-to-hand-combatpdf 224/265
FM 3-25.150
8-7
Figure 8-4. Defense against the two-hand neck press against a wall(continued).
8-2. DEFENSE AGAINST BEAR HUGSa. Front Bear Hug Over Your Arms (Figure 8-5, continued on page 8-8). If the
enemy attempts to grasp you in a bear hug from the front over your arms, move your hips back and use your arms as a brace between his hips and yours. Your hands should be onhis hip bones, and your elbows should be braced against your hips. Keeping one arm as a
brace, step to the opposite side to achieve the clinch. Finish with a takedown.
Figure 8-5. Defense against the front bear hug over your arms.
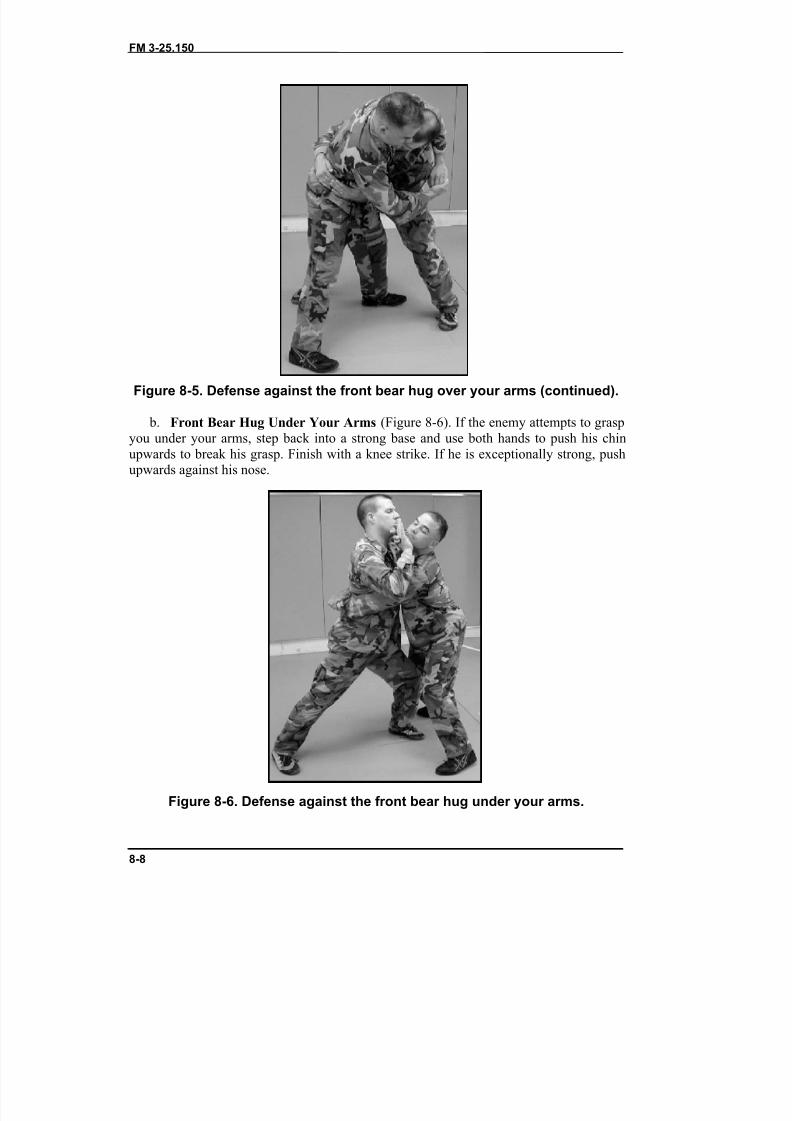
8/9/2019 US ARMY FM 3-25.150 - Combatives (hand-to-hand combat).pdf
http://slidepdf.com/reader/full/us-army-fm-3-25150-combatives-hand-to-hand-combatpdf 225/265
FM 3-25.150
8-8
Figure 8-5. Defense against the front bear hug over your arms (continued).
b. Front Bear Hug Under Your Arms (Figure 8-6). If the enemy attempts to graspyou under your arms, step back into a strong base and use both hands to push his chinupwards to break his grasp. Finish with a knee strike. If he is exceptionally strong, pushupwards against his nose.
Figure 8-6. Defense against the front bear hug under your arms.
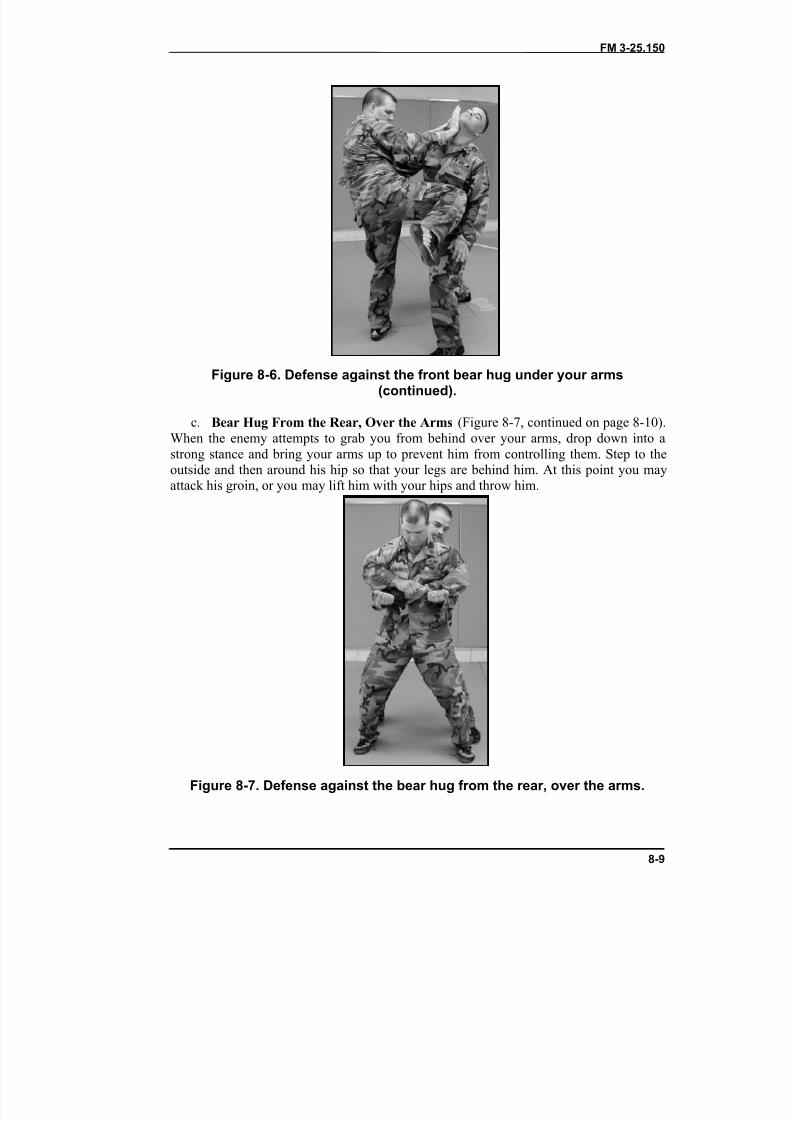
8/9/2019 US ARMY FM 3-25.150 - Combatives (hand-to-hand combat).pdf
http://slidepdf.com/reader/full/us-army-fm-3-25150-combatives-hand-to-hand-combatpdf 226/265
FM 3-25.150
8-9
Figure 8-6. Defense against the front bear hug under your arms(continued).
c. Bear Hug From the Rear, Over the Arms (Figure 8-7, continued on page 8-10).When the enemy attempts to grab you from behind over your arms, drop down into astrong stance and bring your arms up to prevent him from controlling them. Step to theoutside and then around his hip so that your legs are behind him. At this point you mayattack his groin, or you may lift him with your hips and throw him.
Figure 8-7. Defense against the bear hug from the rear, over the arms.
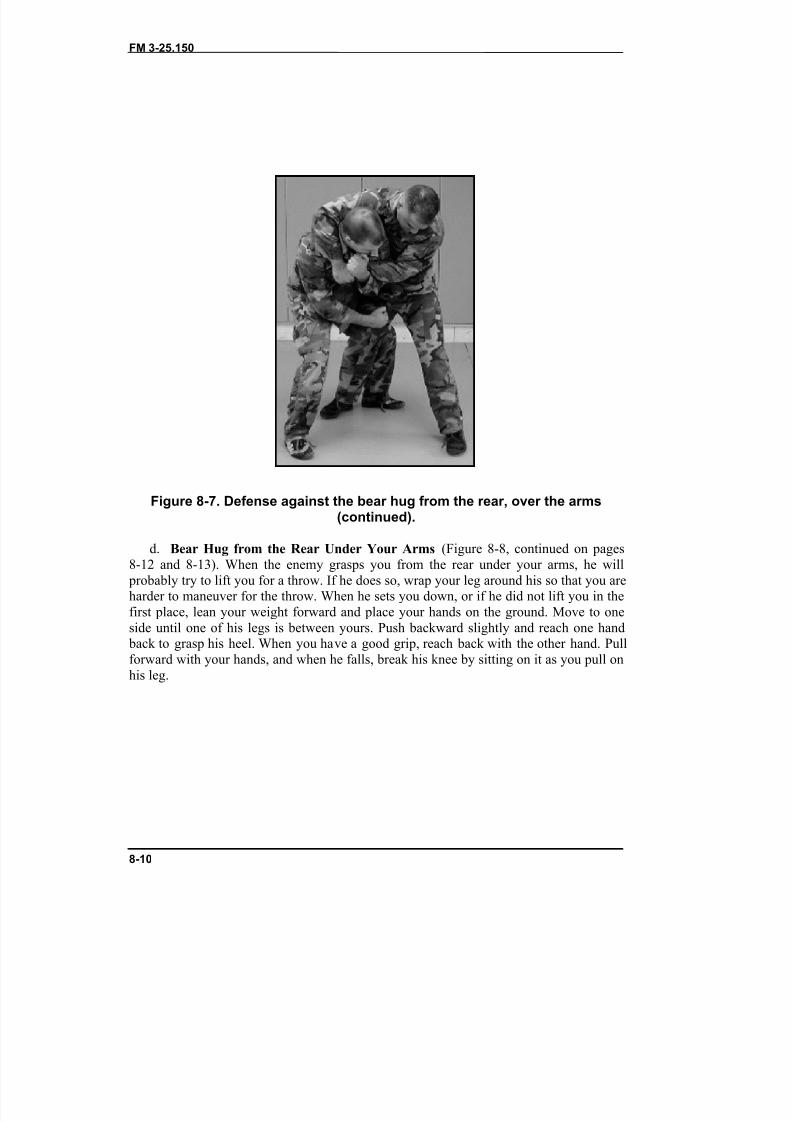
8/9/2019 US ARMY FM 3-25.150 - Combatives (hand-to-hand combat).pdf
http://slidepdf.com/reader/full/us-army-fm-3-25150-combatives-hand-to-hand-combatpdf 227/265
FM 3-25.150
8-10
Figure 8-7. Defense against the bear hug from the rear, over the arms(continued).
d. Bear Hug from the Rear Under Your Arms (Figure 8-8, continued on pages8-12 and 8-13). When the enemy grasps you from the rear under your arms, he will
probably try to lift you for a throw. If he does so, wrap your leg around his so that you areharder to maneuver for the throw. When he sets you down, or if he did not lift you in thefirst place, lean your weight forward and place your hands on the ground. Move to oneside until one of his legs is between yours. Push backward slightly and reach one hand
back to grasp his heel. When you have a good grip, reach back with the other hand. Pullforward with your hands, and when he falls, break his knee by sitting on it as you pull onhis leg.
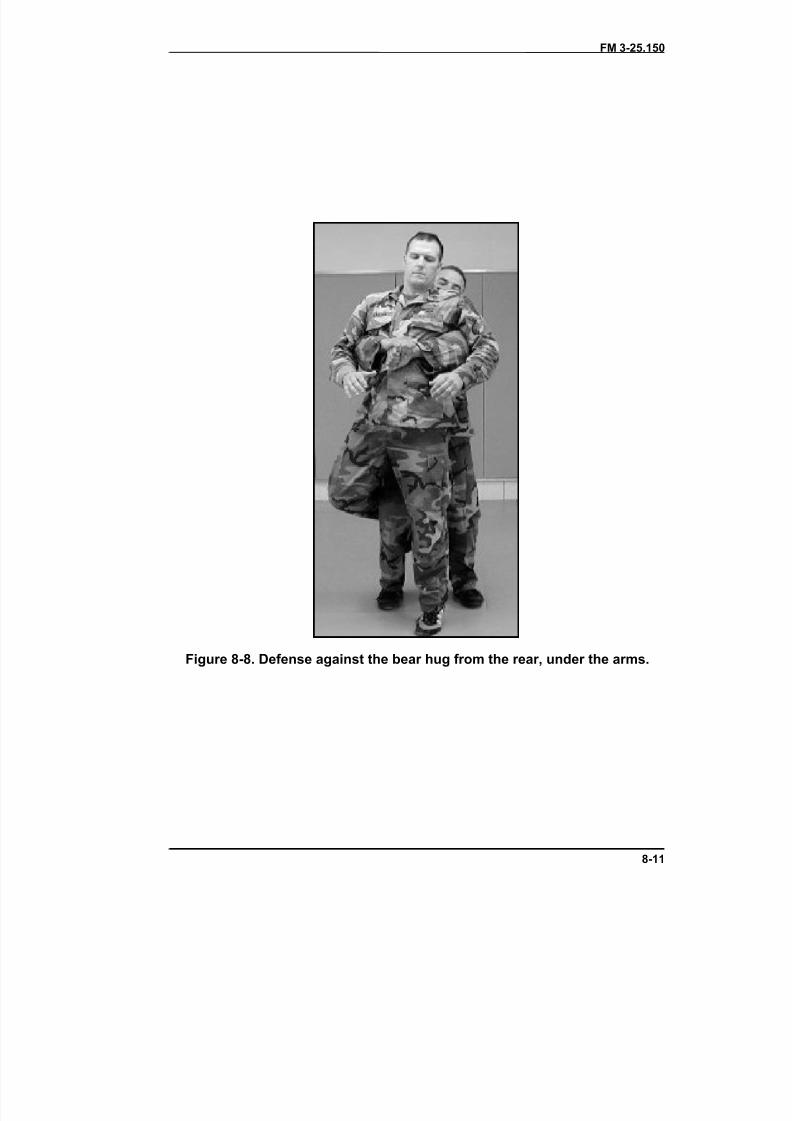
8/9/2019 US ARMY FM 3-25.150 - Combatives (hand-to-hand combat).pdf
http://slidepdf.com/reader/full/us-army-fm-3-25150-combatives-hand-to-hand-combatpdf 228/265
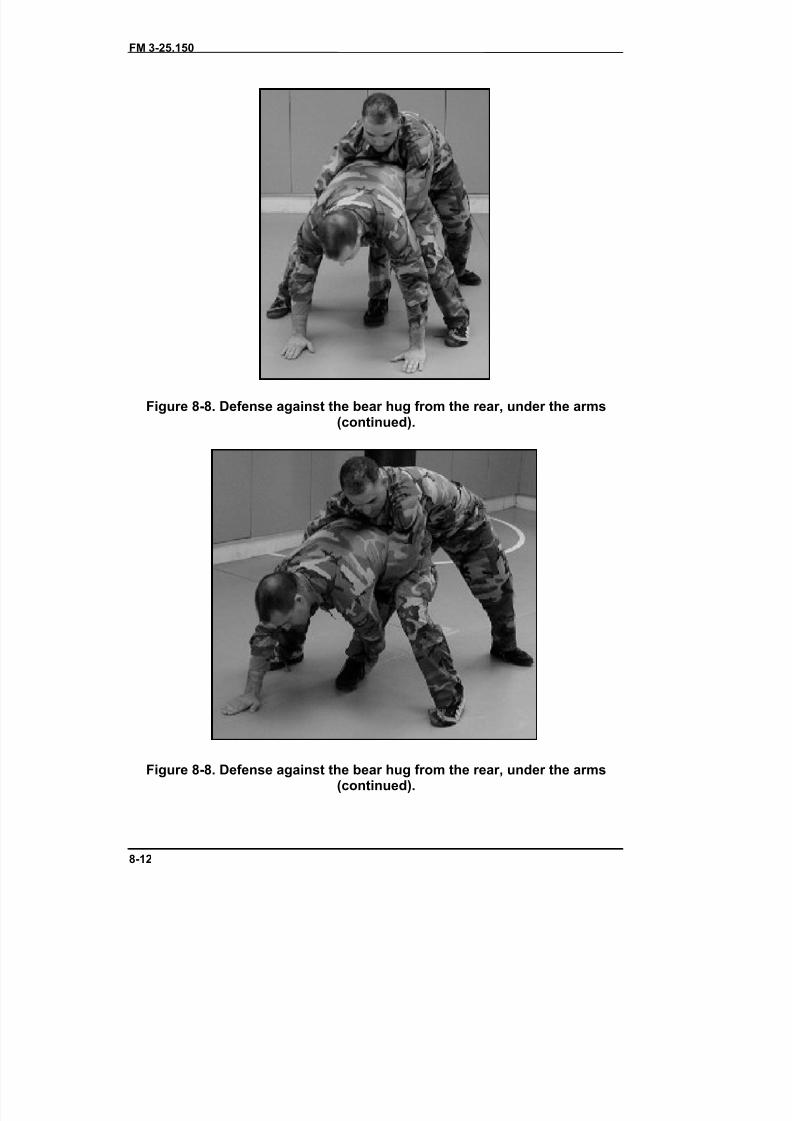
8/9/2019 US ARMY FM 3-25.150 - Combatives (hand-to-hand combat).pdf
http://slidepdf.com/reader/full/us-army-fm-3-25150-combatives-hand-to-hand-combatpdf 229/265
FM 3-25.150
8-12
Figure 8-8. Defense against the bear hug from the rear, under the arms(continued).
Figure 8-8. Defense against the bear hug from the rear, under the arms(continued).
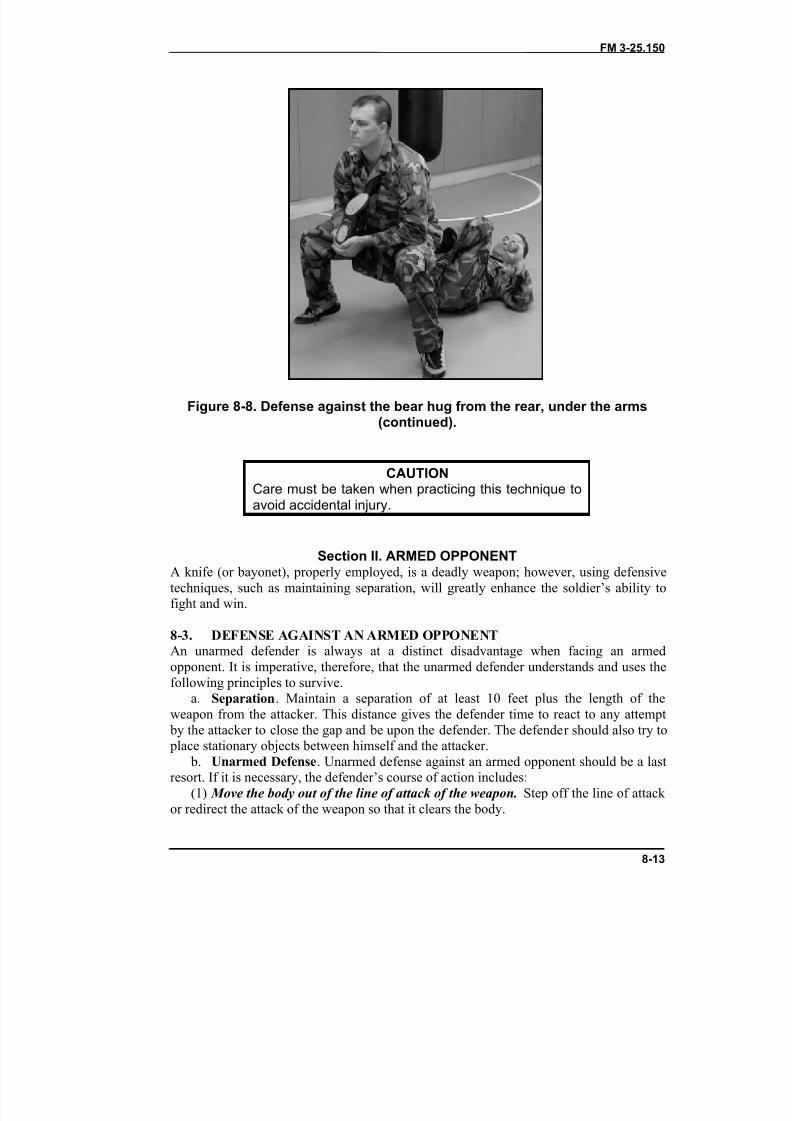
8/9/2019 US ARMY FM 3-25.150 - Combatives (hand-to-hand combat).pdf
http://slidepdf.com/reader/full/us-army-fm-3-25150-combatives-hand-to-hand-combatpdf 230/265
FM 3-25.150
8-13
Figure 8-8. Defense against the bear hug from the rear, under the arms(continued).
CAUTIONCare must be taken when practicing this technique toavoid accidental injury.
Section II. ARMED OPPONENTA knife (or bayonet), properly employed, is a deadly weapon; however, using defensivetechniques, such as maintaining separation, will greatly enhance the soldier’s ability tofight and win.
8-3. DEFENSE AGAINST AN ARMED OPPONENTAn unarmed defender is always at a distinct disadvantage when facing an armedopponent. It is imperative, therefore, that the unarmed defender understands and uses thefollowing principles to survive.
a. Separation . Maintain a separation of at least 10 feet plus the length of theweapon from the attacker. This distance gives the defender time to react to any attempt
by the attacker to close the gap and be upon the defender. The defender should also try to place stationary objects between himself and the attacker.
b. Unarmed Defense . Unarmed defense against an armed opponent should be a lastresort. If it is necessary, the defender’s course of action includes:
(1) Move the body out of the line of attack of the weapon. Step off the line of attack or redirect the attack of the weapon so that it clears the body.
8/9/2019 US ARMY FM 3-25.150 - Combatives (hand-to-hand combat).pdf
http://slidepdf.com/reader/full/us-army-fm-3-25150-combatives-hand-to-hand-combatpdf 231/265
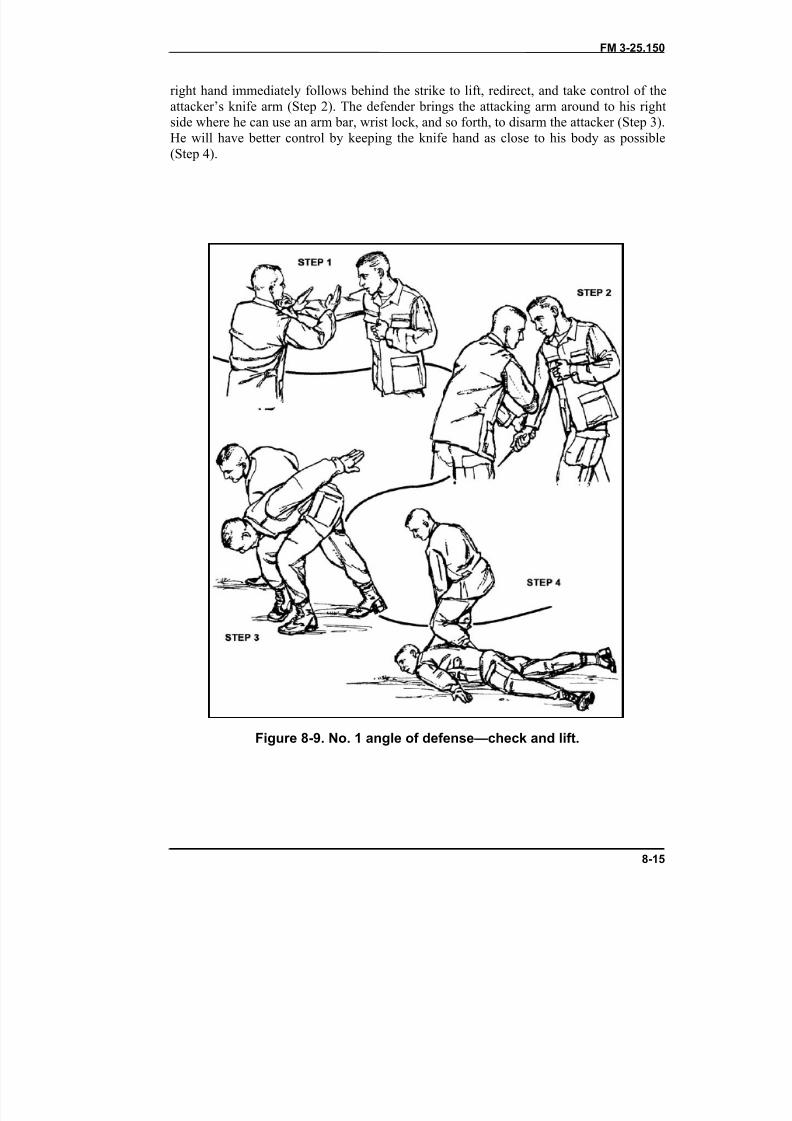
8/9/2019 US ARMY FM 3-25.150 - Combatives (hand-to-hand combat).pdf
http://slidepdf.com/reader/full/us-army-fm-3-25150-combatives-hand-to-hand-combatpdf 232/265
FM 3-25.150
8-15
right hand immediately follows behind the strike to lift, redirect, and take control of theattacker’s knife arm (Step 2). The defender brings the attacking arm around to his rightside where he can use an arm bar, wrist lock, and so forth, to disarm the attacker (Step 3).He will have better control by keeping the knife hand as close to his body as possible(Step 4).
Figure 8-9. No. 1 angle of defense—check and lift.
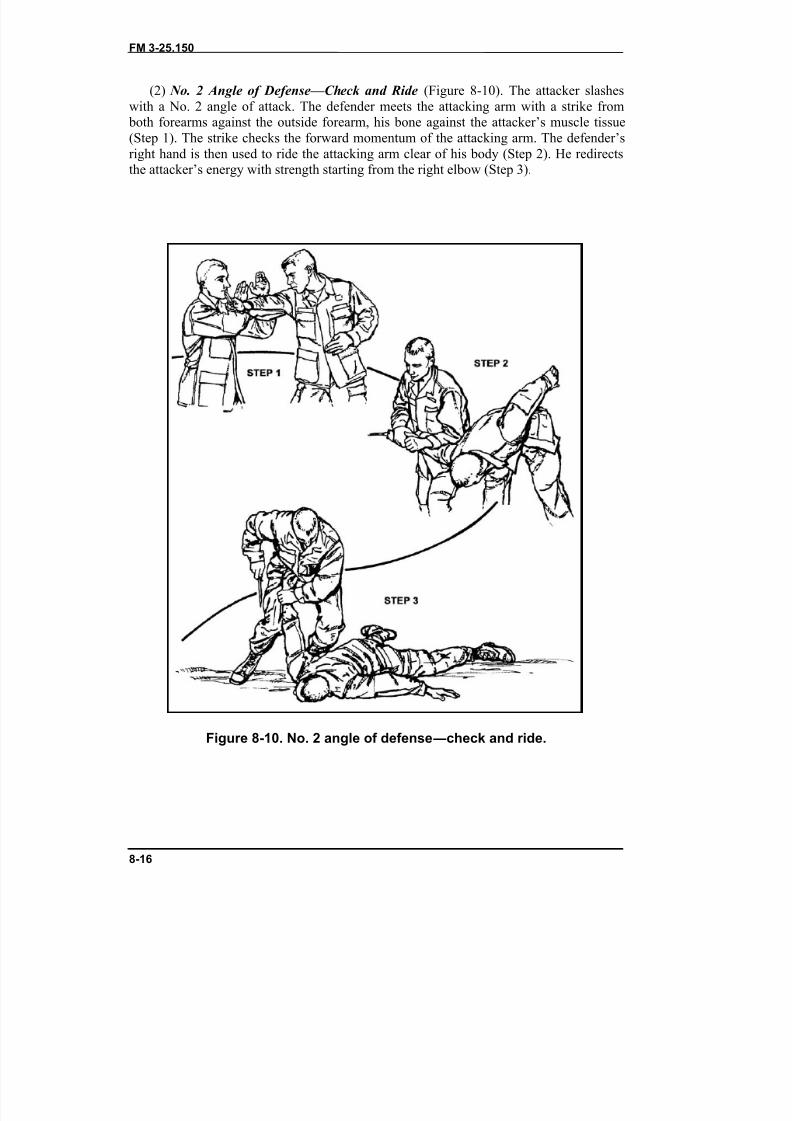
8/9/2019 US ARMY FM 3-25.150 - Combatives (hand-to-hand combat).pdf
http://slidepdf.com/reader/full/us-army-fm-3-25150-combatives-hand-to-hand-combatpdf 233/265
FM 3-25.150
8-16
(2) No. 2 Angle of Defense—Check and Ride (Figure 8-10). The attacker slasheswith a No. 2 angle of attack. The defender meets the attacking arm with a strike from
both forearms against the outside forearm, his bone against the attacker’s muscle tissue(Step 1). The strike checks the forward momentum of the attacking arm. The defender’sright hand is then used to ride the attacking arm clear of his body (Step 2). He redirects
the attacker’s energy with strength starting from the right elbow (Step 3).
Figure 8-10. No. 2 angle of defense ―check and ride.

8/9/2019 US ARMY FM 3-25.150 - Combatives (hand-to-hand combat).pdf
http://slidepdf.com/reader/full/us-army-fm-3-25150-combatives-hand-to-hand-combatpdf 234/265
FM 3-25.150
8-17
(3) No. 3 Angle of Defense—Check and Lift (Figure 8-11). The attacker delivers ahorizontal slash to the defender’s ribs, kidneys, or hip on the left side (Step 1). Thedefender meets and checks the attacking arm on the left side of his body with adownward circular motion across the front of his own body. At the same time, he moveshis body off the line of attack. He should meet the attacker’s forearm with a strike
forceful enough to check its momentum (Step 2). The defender then rides the energy of the attacking arm by wiping downward along the outside of his own left forearm with hisright hand. He then redirects the knife hand around to his right side where he can controlor disarm the weapon (Step 3).
Figure 8-11. No. 3 angle of defense—check and lift.
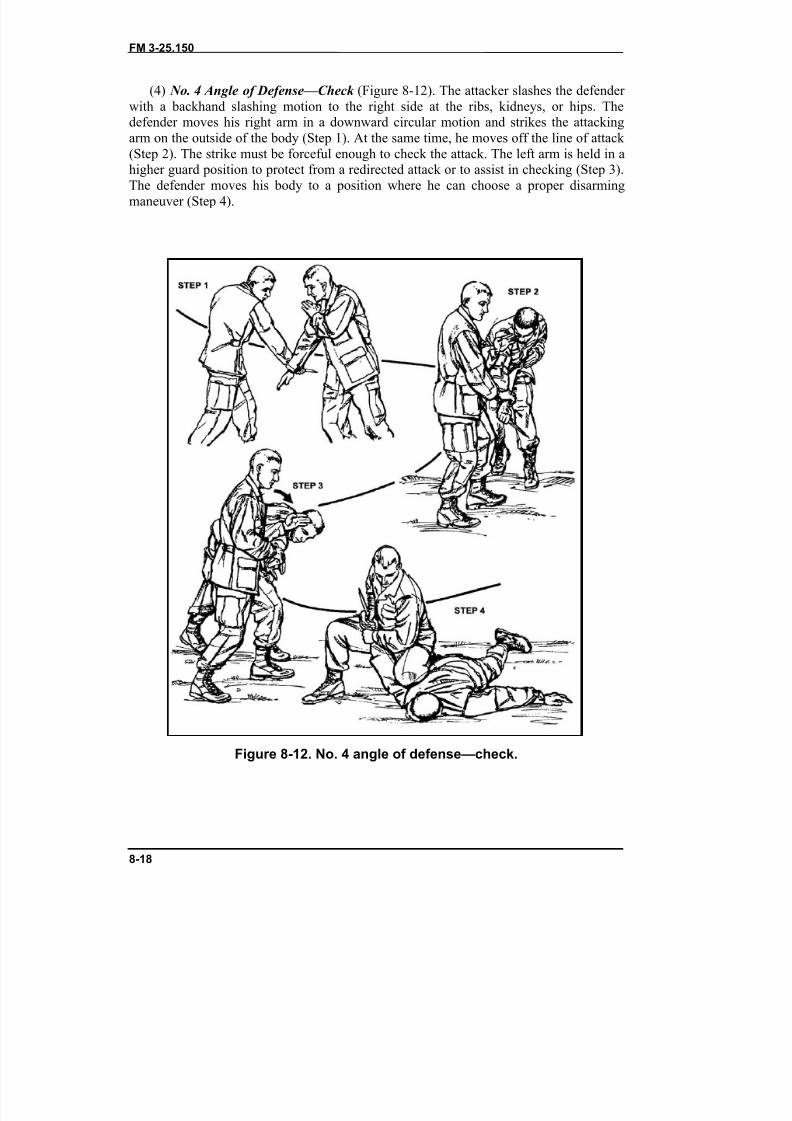
8/9/2019 US ARMY FM 3-25.150 - Combatives (hand-to-hand combat).pdf
http://slidepdf.com/reader/full/us-army-fm-3-25150-combatives-hand-to-hand-combatpdf 235/265
FM 3-25.150
8-18
(4) No. 4 Angle of Defense—Check (Figure 8-12). The attacker slashes the defender with a backhand slashing motion to the right side at the ribs, kidneys, or hips. Thedefender moves his right arm in a downward circular motion and strikes the attackingarm on the outside of the body (Step 1). At the same time, he moves off the line of attack (Step 2). The strike must be forceful enough to check the attack. The left arm is held in a
higher guard position to protect from a redirected attack or to assist in checking (Step 3).The defender moves his body to a position where he can choose a proper disarmingmaneuver (Step 4).
Figure 8-12. No. 4 angle of defense—check.
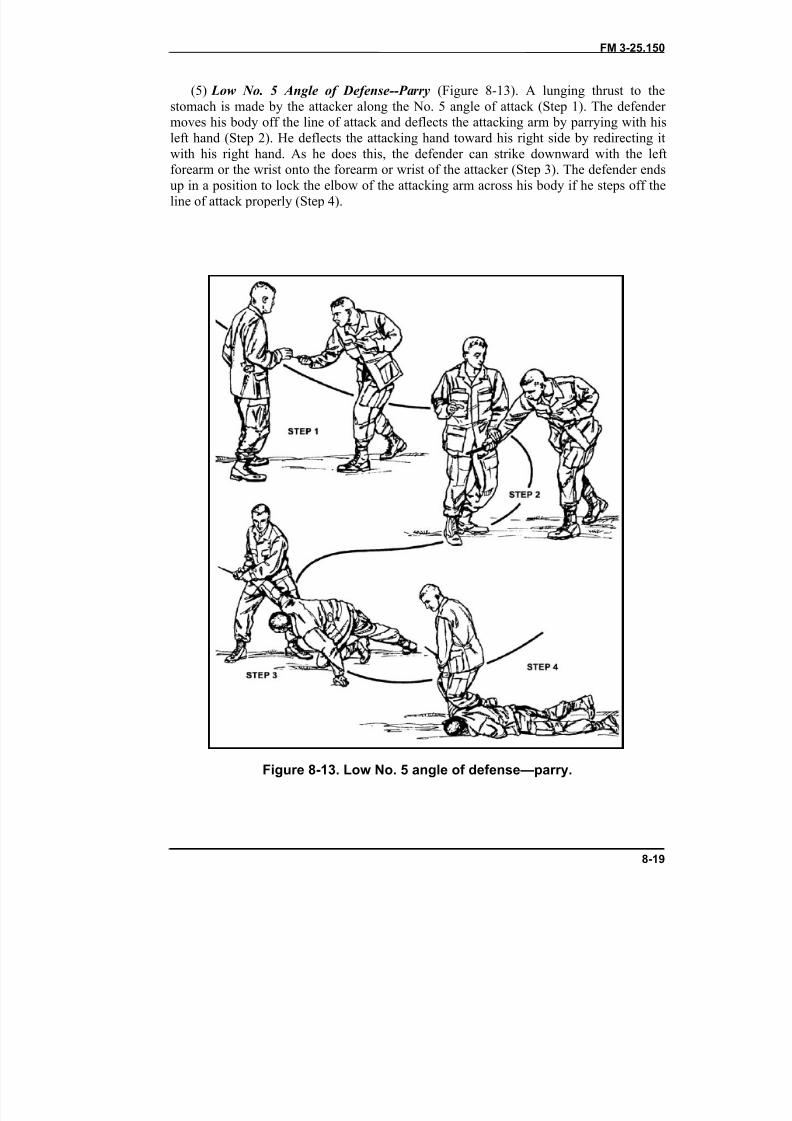
8/9/2019 US ARMY FM 3-25.150 - Combatives (hand-to-hand combat).pdf
http://slidepdf.com/reader/full/us-army-fm-3-25150-combatives-hand-to-hand-combatpdf 236/265
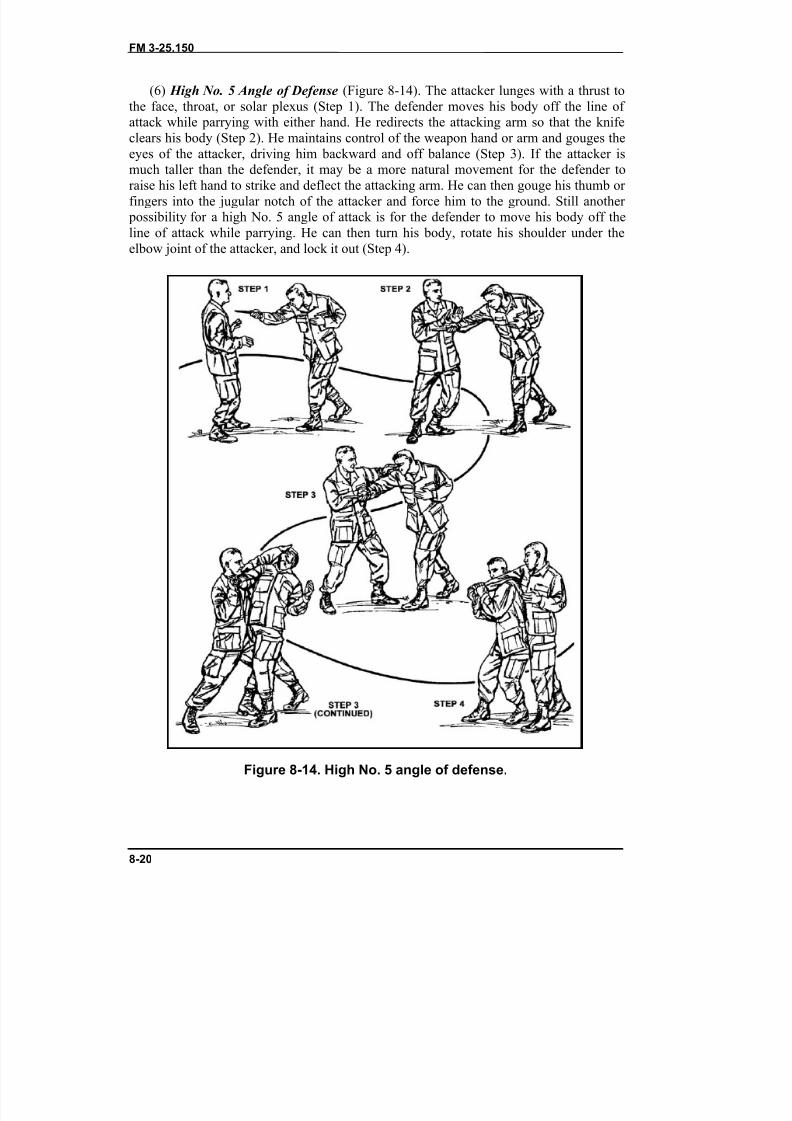
8/9/2019 US ARMY FM 3-25.150 - Combatives (hand-to-hand combat).pdf
http://slidepdf.com/reader/full/us-army-fm-3-25150-combatives-hand-to-hand-combatpdf 237/265
FM 3-25.150
8-20
(6) High No. 5 Angle of Defense (Figure 8-14). The attacker lunges with a thrust tothe face, throat, or solar plexus (Step 1). The defender moves his body off the line of attack while parrying with either hand. He redirects the attacking arm so that the knifeclears his body (Step 2). He maintains control of the weapon hand or arm and gouges theeyes of the attacker, driving him backward and off balance (Step 3). If the attacker is
much taller than the defender, it may be a more natural movement for the defender toraise his left hand to strike and deflect the attacking arm. He can then gouge his thumb or fingers into the jugular notch of the attacker and force him to the ground. Still another
possibility for a high No. 5 angle of attack is for the defender to move his body off theline of attack while parrying. He can then turn his body, rotate his shoulder under theelbow joint of the attacker, and lock it out (Step 4).
Figure 8-14. High No. 5 angle of defense.
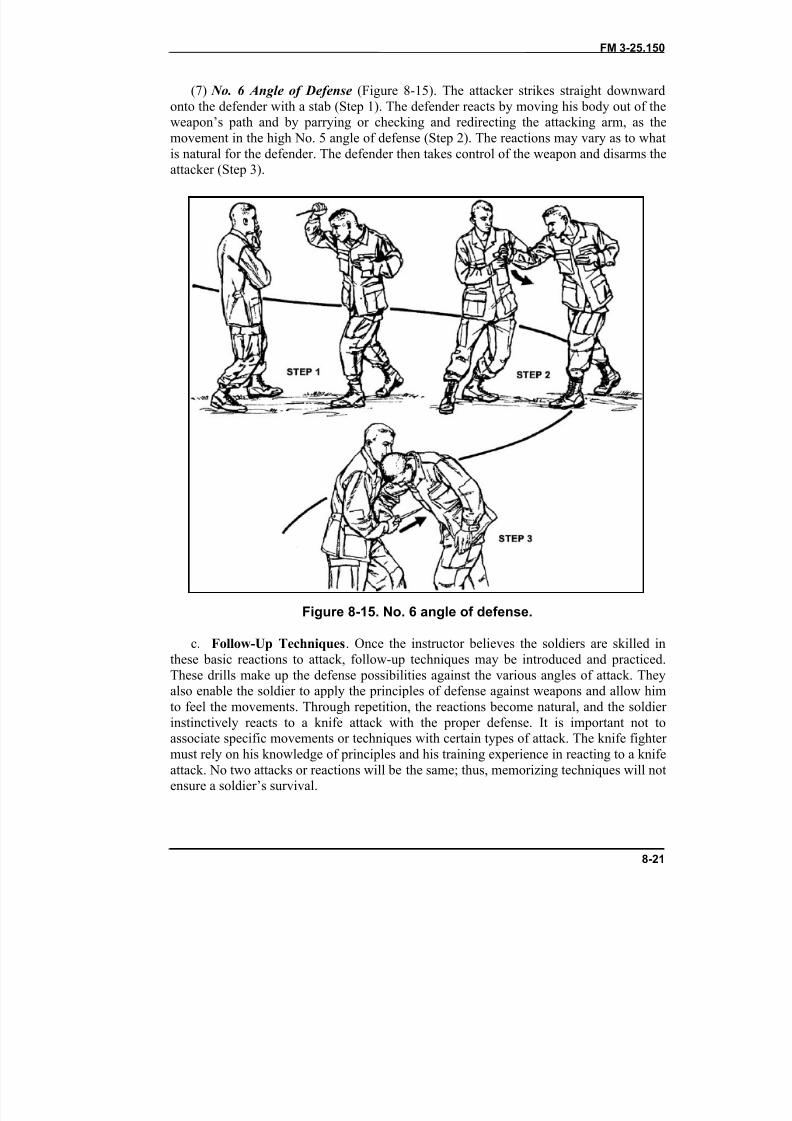
8/9/2019 US ARMY FM 3-25.150 - Combatives (hand-to-hand combat).pdf
http://slidepdf.com/reader/full/us-army-fm-3-25150-combatives-hand-to-hand-combatpdf 238/265
FM 3-25.150
8-21
(7) No. 6 Angle of Defense (Figure 8-15). The attacker strikes straight downwardonto the defender with a stab (Step 1). The defender reacts by moving his body out of theweapon’s path and by parrying or checking and redirecting the attacking arm, as themovement in the high No. 5 angle of defense (Step 2). The reactions may vary as to whatis natural for the defender. The defender then takes control of the weapon and disarms the
attacker (Step 3).
Figure 8-15. No. 6 angle of defense.
c. Follow-Up Techniques . Once the instructor believes the soldiers are skilled inthese basic reactions to attack, follow-up techniques may be introduced and practiced.These drills make up the defense possibilities against the various angles of attack. Theyalso enable the soldier to apply the principles of defense against weapons and allow himto feel the movements. Through repetition, the reactions become natural, and the soldier instinctively reacts to a knife attack with the proper defense. It is important not toassociate specific movements or techniques with certain types of attack. The knife fighter must rely on his knowledge of principles and his training experience in reacting to a knifeattack. No two attacks or reactions will be the same; thus, memorizing techniques will notensure a soldier’s survival.
8/9/2019 US ARMY FM 3-25.150 - Combatives (hand-to-hand combat).pdf
http://slidepdf.com/reader/full/us-army-fm-3-25150-combatives-hand-to-hand-combatpdf 239/265
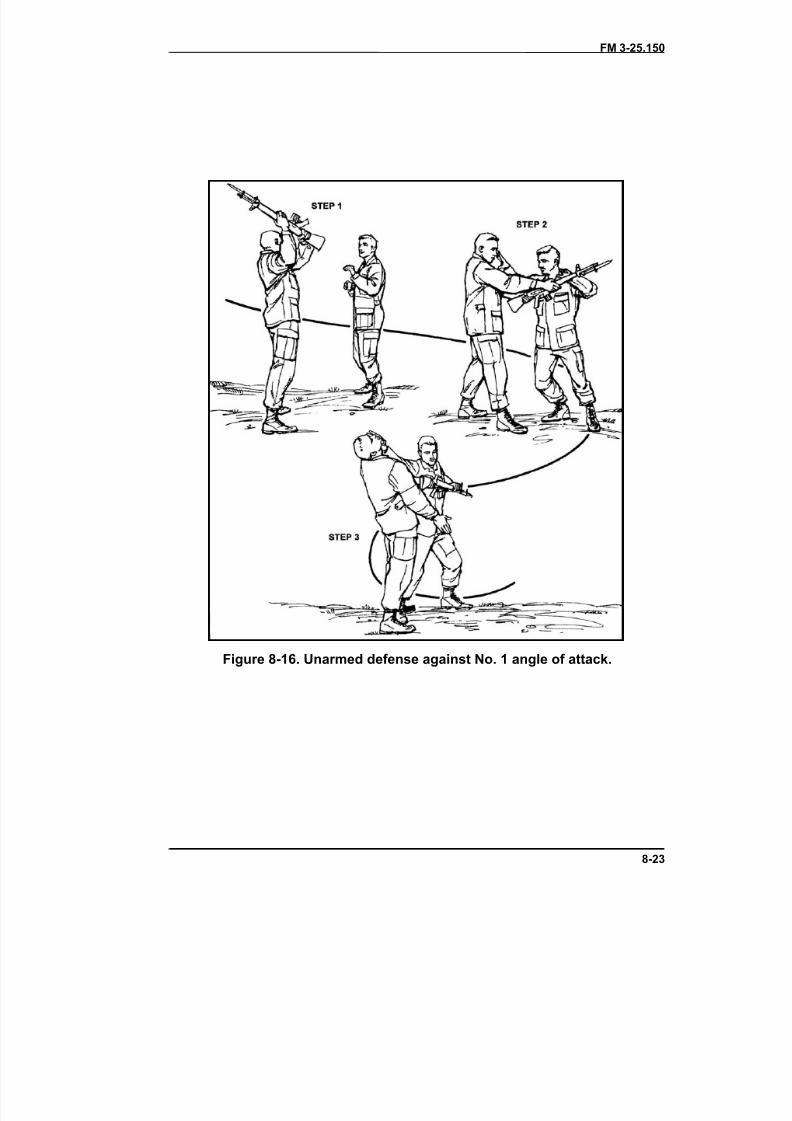
8/9/2019 US ARMY FM 3-25.150 - Combatives (hand-to-hand combat).pdf
http://slidepdf.com/reader/full/us-army-fm-3-25150-combatives-hand-to-hand-combatpdf 240/265

8/9/2019 US ARMY FM 3-25.150 - Combatives (hand-to-hand combat).pdf
http://slidepdf.com/reader/full/us-army-fm-3-25150-combatives-hand-to-hand-combatpdf 241/265
FM 3-25.150
8-24
(2) Unarmed Defense Against No. 2 Angle of Attack (Figure 8-17). The attacker makes a diagonal slash along the No. 2 angle of attack (Step 1). Again, the defender waitsuntil he is sure of the attack before moving. The defender then moves to the outside of theattacker and counterattacks with a thumb jab into the right armpit (Step 2). He receivesthe momentum of the attacking weapon and controls it with his free hand. He uses the
attacker’s momentum against him by pulling the weapon in the direction it is going withone hand and pushing with his thumb of the other hand (Step 3). The attacker iscompletely off balance, and the defender can gain control of the weapon.
Figure 8-17. Unarmed defense against No. 2 angle of attack.
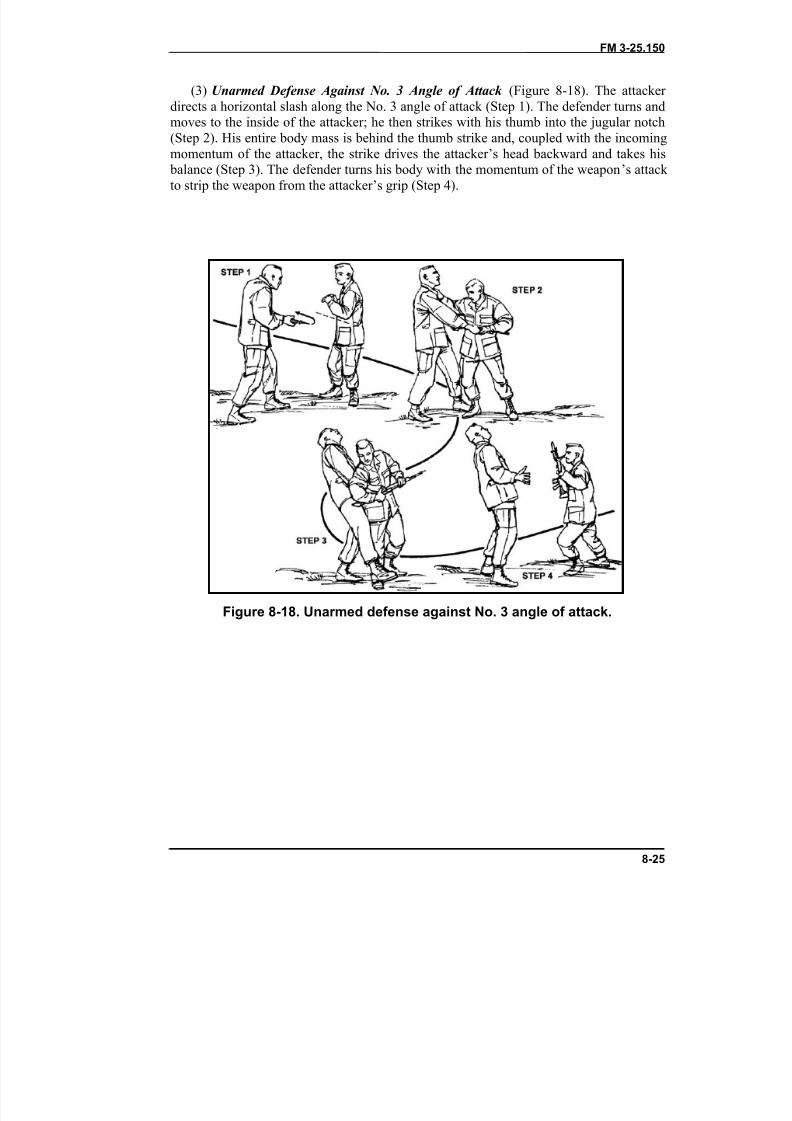
8/9/2019 US ARMY FM 3-25.150 - Combatives (hand-to-hand combat).pdf
http://slidepdf.com/reader/full/us-army-fm-3-25150-combatives-hand-to-hand-combatpdf 242/265
FM 3-25.150
8-25
(3) Unarmed Defense Against No. 3 Angle of Attack (Figure 8-18). The attacker directs a horizontal slash along the No. 3 angle of attack (Step 1). The defender turns andmoves to the inside of the attacker; he then strikes with his thumb into the jugular notch(Step 2). His entire body mass is behind the thumb strike and, coupled with the incomingmomentum of the attacker, the strike drives the attacker’s head backward and takes his
balance (Step 3). The defender turns his body with the momentum of the weapon’s attack to strip the weapon from the attacker’s grip (Step 4).
Figure 8-18. Unarmed defense against No. 3 angle of attack.

8/9/2019 US ARMY FM 3-25.150 - Combatives (hand-to-hand combat).pdf
http://slidepdf.com/reader/full/us-army-fm-3-25150-combatives-hand-to-hand-combatpdf 243/265
FM 3-25.150
8-26
(4) Unarmed Defense Against No. 4 Angle of Attack (Figure 8-19). The attack is ahorizontal slash along the No. 4 angle of attack (Step 1). The defender moves in to theoutside of the attacker (Step 2). He then turns with the attack, delivering an elbow striketo the throat (Step 3). At the same time, the defender’s free hand controls the weapon and
pulls it from the attacker as he is knocked off balance from the elbow strike.
Figure 8-19. Unarmed defense against No. 4 angle of attack.
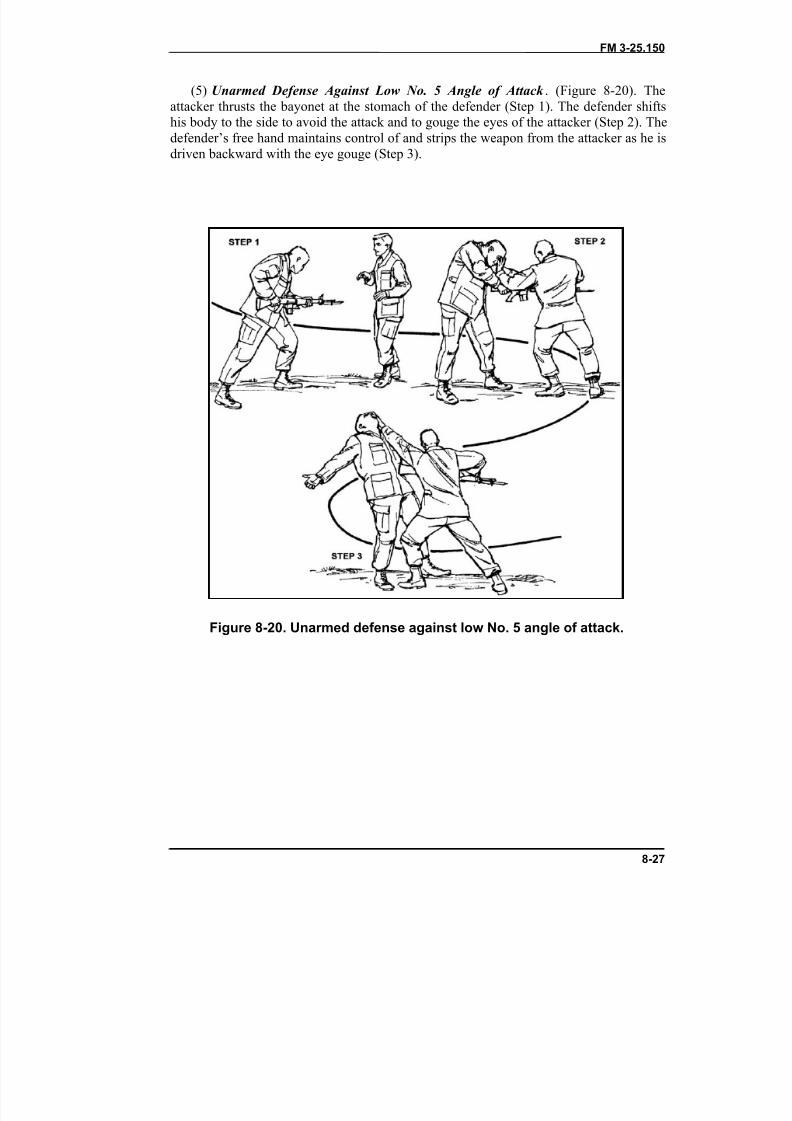
8/9/2019 US ARMY FM 3-25.150 - Combatives (hand-to-hand combat).pdf
http://slidepdf.com/reader/full/us-army-fm-3-25150-combatives-hand-to-hand-combatpdf 244/265
FM 3-25.150
8-27
(5) Unarmed Defense Against Low No. 5 Angle of Attack . (Figure 8-20). Theattacker thrusts the bayonet at the stomach of the defender (Step 1). The defender shiftshis body to the side to avoid the attack and to gouge the eyes of the attacker (Step 2). Thedefender’s free hand maintains control of and strips the weapon from the attacker as he isdriven backward with the eye gouge (Step 3).
Figure 8-20. Unarmed defense against low No. 5 angle of attack.
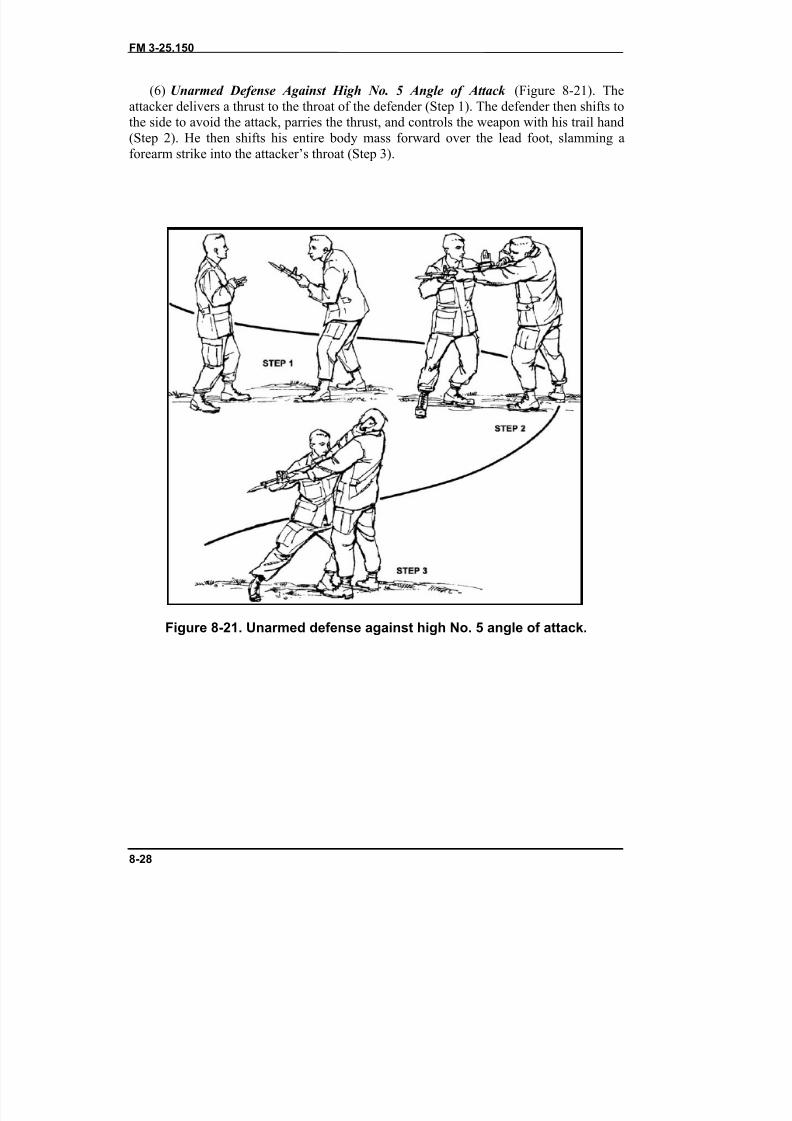
8/9/2019 US ARMY FM 3-25.150 - Combatives (hand-to-hand combat).pdf
http://slidepdf.com/reader/full/us-army-fm-3-25150-combatives-hand-to-hand-combatpdf 245/265
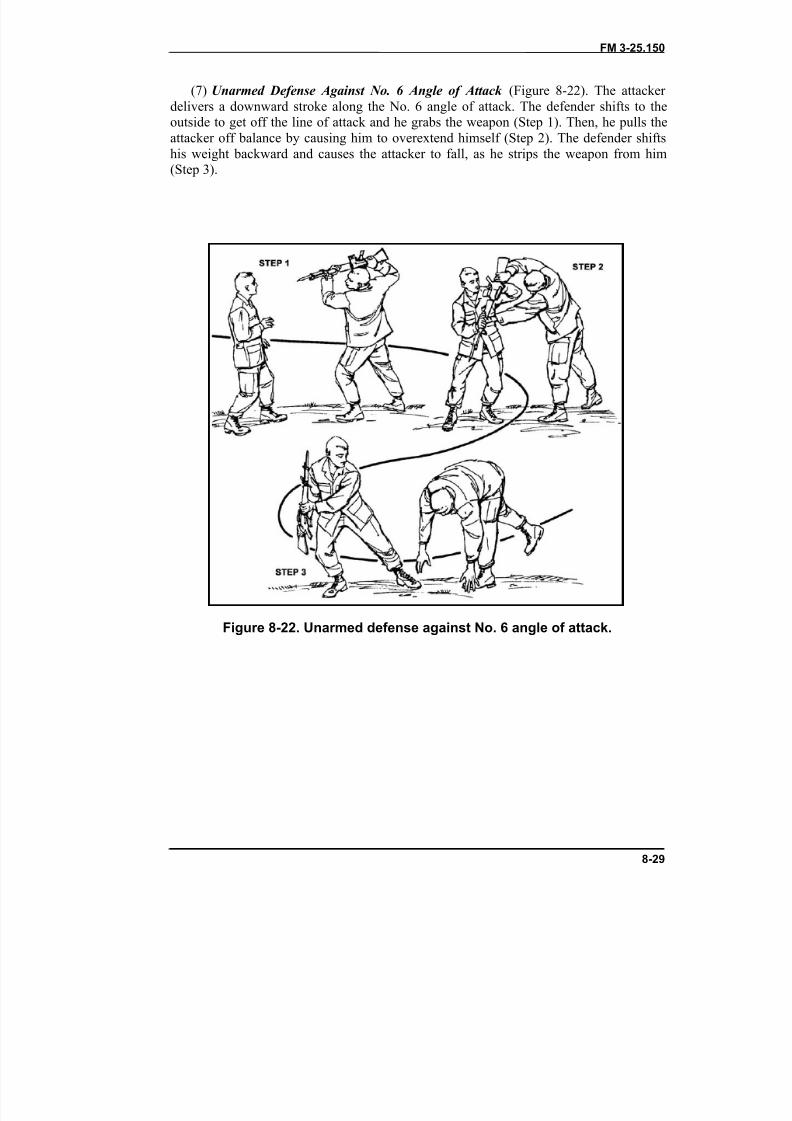
8/9/2019 US ARMY FM 3-25.150 - Combatives (hand-to-hand combat).pdf
http://slidepdf.com/reader/full/us-army-fm-3-25150-combatives-hand-to-hand-combatpdf 246/265
FM 3-25.150
8-29
(7) Unarmed Defense Against No. 6 Angle of Attack (Figure 8-2 2 ). The attacker delivers a downward stroke along the No. 6 angle of attack. The defender shifts to theoutside to get off the line of attack and he grabs the weapon (Step 1). Then, he pulls theattacker off balance by causing him to overextend himself (Step 2). The defender shiftshis weight backward and causes the attacker to fall, as he strips the weapon from him
(Step 3).
Figure 8-22. Unarmed defense against No. 6 angle of attack.
8/9/2019 US ARMY FM 3-25.150 - Combatives (hand-to-hand combat).pdf
http://slidepdf.com/reader/full/us-army-fm-3-25150-combatives-hand-to-hand-combatpdf 247/265
FM 3-25.150(FM 21-150)
9-1
CHAPTER 9
GROUP TACTICS
Most hand-to-hand situations on the battlefield will involve several people. Varying levels of force will be appropriate based on the situation
and rules of engagement. Whether there are more friendlies or enemies, or whether or not some of the parties are armed, soldiers should enter a fight with a well-rehearsed plan and an overall fight strategy.
Section I. LETHAL FORCE SCENARIOSThe fundamental truth of hand-to-hand fighting is that the winner will be the one whose
buddies show up first with a weapon. Given modern equipment, complicated scenarios,and the split seconds available to make life and death decisions, soldiers must be armedwith practical and workable solutions.
9-1. RANGEYou will usually find yourself in a hand-to-hand situation unexpectedly; for example,your weapon jams when entering a room during MOUT. The first thing you must do isdetermine the appropriate actions to take, which will primarily be based on the range tothe enemy. Against an armed enemy, the deciding factor of range is whether or not youcan close the gap before the enemy can bring his weapon to bear.
a. Close Range. If you are near enough to the enemy to close before he can bringhis weapon to bear, you should immediately close the distance and gain control of him.
b. Long Range. If the range is too great, or the enemy has sufficient time to bringhis weapon to bear, the only options are to escape or take cover. Give your buddy a clear shot or get where you can clear your weapon to get yourself back in the fight.
9-2. CONTROLIf you have closed the distance, your primary goal is to control the enemy. This meanscontrolling his ability to influence the rest of the fight, and controlling his ability todamage you. You are essentially stalling until someone can come to your aid.
a. Body Control. You must control the enemy’s ability to move, which can done bygaining and maintaining a dominant body position. This can also be accomplished by
pinning the enemy in place (for example, against the wall). b. Weapon Control. You must immobilize the enemy’s weapon. For example, use
your weight to pin his rifle to his chest while you are mounted, or keep him from drawinga side arm by controlling it in the holster. You must also keep your weapons away from
the enemy. It does you no good to immobilize the enemy if he can reach your side arm.
9-3. FINISHINGA very conservative approach should be taken to finishing moves. You must remember that the primary means of winning the fight is with the aid of your buddy. Any move that,if unsuccessful, would compromise your ability to control the situation should not beattempted.
8/9/2019 US ARMY FM 3-25.150 - Combatives (hand-to-hand combat).pdf
http://slidepdf.com/reader/full/us-army-fm-3-25150-combatives-hand-to-hand-combatpdf 248/265
FM 3-25.150
9-2
Section II. RESTRICTIVE FORCE SCENARIOSThe most common error when fighting in groups is to enter the fight without a plan. Thisresults in uncoordinated actions, and often in working against each other. Only practicegives soldiers the necessary confidence in themselves and their comrades and the abilityto think and act together under the stress of hand-to-hand combat.
9-4. TWO AGAINST ONEWhen fighting two against one, use the following procedures.
a. Angles of Attack. The fighters should advance together, spreading out so that if the enemy turns to face either soldier he will expose his flank to the other.
b. Communication. One soldier should attack the enemy’s legs and the other shouldconcentrate on his upper body. This can be done by signal, or the soldier attacking theflank can automatically go low. After the enemy is on the ground, good communication isnecessary so that you can control and then finish him.
9-5. THREE AGAINST TWO
When fighting three against two, use the following procedures.a. Angles of Attack. The fighters should advance so that the outside two are outsideof the enemy. One of the enemies will have to make a choice to face either the outside or inside man. When he does, he will expose his flank to the other one. The fighter who isfacing his opponent alone will stall until the other two have finished and can come to hisaid.
b. Communication. Not only must the two who are fighting the same opponentcommunicate with each other, but also the fighter who is alone must keep them abreast of his situation. If he is in trouble, it may be necessary for one of them to disengage andcome to his aid.
9-6. PARITYIf both groups have the same number of fighters, one fighter stays in reserve until theenemy has committed their entire force. When they have committed, the reserved fighter will attack the exposed back of the enemy.
9-7. ONE AGAINST TWOWhen fighting one against two, use the following procedures.
a. Remain Standing. Defeating two opponents simultaneously is very difficult.When outnumbered, you should usually try to remain standing—mobility is critical to aneffective defense or escape. It is very important not to expose your back. You must usethe obstacles around you to restrict the enemies’ movements so that you face only one ata time, or maneuver yourself to the flank of the one nearest to you and use him to block the other one. Attack the first enemy using strikes or field-expedient weapons, and thendeal with the remaining one.
b. Defense on the Ground. If you should lose your footing or be taken to theground, you must protect your back. Your best defense is to move into a corner or againsta wall. Use a modified guard, so that your legs are not exposed, to limit the enemies’ability to attack simultaneously.

8/9/2019 US ARMY FM 3-25.150 - Combatives (hand-to-hand combat).pdf
http://slidepdf.com/reader/full/us-army-fm-3-25150-combatives-hand-to-hand-combatpdf 249/265
FM 3-25.150
9-3
9-8. TWO AGAINST THREEWhen fighting two against three, you should maneuver to the flanks either together or separately.
a. Together. If you can get to one flank together, with the help of restrictive terrainif possible, use strikes to attack one opponent at a time until you have defeated all three.
b. Separately. If you are separated, one of you defends as in one against two whilethe other attacks the remaining enemy with strikes and then comes to the aid of the first.
8/9/2019 US ARMY FM 3-25.150 - Combatives (hand-to-hand combat).pdf
http://slidepdf.com/reader/full/us-army-fm-3-25150-combatives-hand-to-hand-combatpdf 250/265
FM 3-25.150(FM 21-150)
APPENDIX A
SITUATIONAL TRAINING
A successful combatives program cannot stand alone. The transition tothe appropriate techniques must be natural, which can only be
accomplished by integrating combatives into scenario training. This ishard and arduous training; soldiers should know that war is harsh, andthe reality of training for war is equally harsh.
Section I. PLANNING CONSIDERATIONSTraining soldiers in the appropriate use of combatives requires expertise and detailed
planning. As in live-fire training, the potential for accidents must be mitigated by controlof both the scenario and the conduct of the exercise itself.
A-1. PLANNING
When planning a hand-to-hand scenario many factors must be addressed. A detailed andwell thought out scenario tells the soldiers what type of techniques are appropriate. Forexample, very different techniques are appropriate when clearing a building in an enemyoccupied city, such as when U.S. forces cleared Hue City, Vietnam, than when clearing a
building during a noncombatant evacuation operation.a. Scenario. Scenarios must be explained to soldiers in detail so that the appropriate
actions come to them naturally. This should include an explanation of the events leadingup to the scenario as well as the immediate tactical situation.
b. Rules of Engagement . Rules of engagement must be given that provide soldiers aclear understanding of what actions are appropriate.
A-2. CONDUCTDuring the conduct of an exercise, leaders must maintain control throughout. It is veryeasy for undisciplined troops to go beyond the bounds of the exercise when they getfrustrated at their own poor training. Soldiers and subordinate leaders must know what isexpected of them, and what the repercussions are for inappropriate actions.
a. Opposing Force. There is always a tendency for soldiers playing the opposingforce (OPFOR) to lose track of the training goals and get carried away. OPFOR must bewell rehearsed and stay within the bounds of the scenario. The safety of the OPFOR must
be considered even in small details of the situation. For example:• Should they wear their canteens on their LBE knowing they will be knocked
down?•
Are there any dangerous objects for them to fall on, such as the pointed cornerof a table or a picket in the ground? b. Safety Measures. The most important control measure that a leader can have
after the scenario begins is a means to stop the action. This can be as simple as a whistle, but it must be clear and easily heard over the action.
A-1
8/9/2019 US ARMY FM 3-25.150 - Combatives (hand-to-hand combat).pdf
http://slidepdf.com/reader/full/us-army-fm-3-25150-combatives-hand-to-hand-combatpdf 251/265
FM 3-25.150
Section II. EXAMPLE SCENARIOSThere are as many different possible scenarios as there are potential missions.Commanders must evaluate their own METL to come up with realistic scenarios for theirunits. One of the primary learning objectives is the thought that must go into usingtechniques and tactics that are appropriate to the situation.
A-3. ROOM CLEARINGClearing buildings during MOUT can confront soldiers at the lowest level with life anddeath decisions at every turn.
a. Situation. The battalion has been deployed to the island nation of Cortina to helpstabilize the political situation long enough for the recently elected democraticgovernment to gain control of the country. Platoons are being sent out to search forsuspected weapons cached by the former armed forces, who recently lost power. Your
platoon has been tasked to search and clear a small village. b. Rules of Engagement. Deadly force is only authorized for self-defense, defense
of others, or defense of property that could create a substantial risk to others.
A-4. TRENCH CLEARINGSoldiers must always be trained and ready to execute their principal wartime missions.
a. Situation. The platoon is attacking an enemy-held bunker complex. b. Rules of Engagement. Deadly force is authorized in keeping with the law of war.
A-5. ROADBLOCKSoldiers may be used in increasingly more complex scenarios short of war.
a. Situation. The platoon is manning roadblocks that divide the two hostile factionsof Cortina. Hostile crowds are known to appear, threatening U.S. soldiers.
b. Rules of Engagement. Soldiers will use the minimum amount of force necessaryto control the situation.
A-2
8/9/2019 US ARMY FM 3-25.150 - Combatives (hand-to-hand combat).pdf
http://slidepdf.com/reader/full/us-army-fm-3-25150-combatives-hand-to-hand-combatpdf 252/265
FM 3-25.150(FM 21-150)
APPENDIX B
COMPETITIONS
A look at the history of combatives systems reveals two fundamental mistakes, bothof which are related to competition. The first mistake is having no form of competition,
which is generally due to the thought that the techniques are “too dangerous” forcompetitions. Although many techniques are too dangerous for live competition, many benefits can be gained by competing even in a limited set of techniques. The boxer is a better puncher than the traditional martial artist not because of the mechanics of punching, but because his technique has been refined through competition.
Competitions are useful for military units for many other reasons. The problem ofdeveloping is really the problem of how to Competitions can motivate subordinate unitleaders to emphasize combatives training, which leads to a strong unit program.Competitions also encourage the pursuit of excellence in soldiers.
The other mistake is that once a method of competition has been selected, trainingwill naturally become focused on winning at competition rather than on winning in
combat. To gain the benefits from competition without falling into the trap of acompetitive focus, the unit must have a graduated system of competition rules. In thisway there will be no competitive advantage to training specifically for competitions.Those who do will find themselves unprepared for the additional techniques that areallowed at the next level of competition. This also allows for a very safe subset oftechniques to be used at the lower levels without loosing the combat focus.
Three sets of rules govern combatives competition—basic, standard, and special.Although other combative sports are encouraged, they sometimes reinforce badcombative habits.
B-1. BASIC COMPETITIONS
The basic competition rules are designed for entry-level soldiers, or soldiers with alimited knowledge base. Soldiers will begin with a handshake, face each other on theirknees, and fight until submission or for a designated time limit. On reaching the timelimit, a winner will be designated by the referee based upon aggressiveness and displayof superior technique.
B-2. STANDARD COMPETITIONSStandard competitions are conducted using the following guidelines.
a. Uniform . Soldiers compete wearing BDUs and PT shoes. For ease in scoring, onesoldier may wear a DBDU top.
b. Duration . Matches last six to ten minutes. Specific match duration is decided in
advance.
B-1
8/9/2019 US ARMY FM 3-25.150 - Combatives (hand-to-hand combat).pdf
http://slidepdf.com/reader/full/us-army-fm-3-25150-combatives-hand-to-hand-combatpdf 253/265
8/9/2019 US ARMY FM 3-25.150 - Combatives (hand-to-hand combat).pdf
http://slidepdf.com/reader/full/us-army-fm-3-25150-combatives-hand-to-hand-combatpdf 254/265
FM 3-25.150
first fighter to reach that limit is the winner. A victory by submission is far preferable to a point victory.
B-3. SPECIAL COMPETITIONSpecial competitions are conducted using the following guidelines.
a. Required Safety Gear and Uniform Safety Gear. • Approved shin and instep pads (pull on type), approved knee pads, cup, mouthguard.
• Optional—Neoprene or cloth ankle supports can be worn to support a previous injury but the injury must be verified by the ringside physician andthe supports must be approved. Taping of previously injured areas will beunder the same condition as stated above.
b. Uniform. (1) Fighters will fight bare top, or with approved athletic top for females.(2) Full-length tights or bicycle-length tights will be worn on the lower half of the
body.
(3) Kneepads are required and must be of approved thickness and density.(4) Shin and instep (pull on type) pads must be approved for thickness and density aswell as proper fit. They must provide maximum softness with enough density so that theshin and knee bones cannot be felt when strong pressure is applied. Pads must fit snuglyso they will not easily pull down or move around during competition.
(5) Fighters must wear a cup. If the fighter wears an outer cup it must cover only thegroin and lower bladder area; it cannot extend out around the hip area. Outer cups must
be approved.c. Illegal Techniques.
• Head butts.• Closed fist strikes to the head.•
Striking with the elbows.• Groin strikes.• Straight palm strikes to the face.• Kicks and knee strikes to a downed opponent.• Striking the throat.• Pulling hair.• Poking or gouging eyes.• Biting.• Throwing an opponent onto their head or neck.• Heel hooks.• Grabbing the ring ropes.• Pinching (intentional).• Scratching (intentional).• Striking the side and or front of the knee.• Knee strikes to the face.• Finger and toe submissions.
d. Additional Illegal Acts. Fighters may not use any slippery substance on their body such as petroleum jelly or liniment.
B-3
8/9/2019 US ARMY FM 3-25.150 - Combatives (hand-to-hand combat).pdf
http://slidepdf.com/reader/full/us-army-fm-3-25150-combatives-hand-to-hand-combatpdf 255/265
FM 3-25.150
e. Legal Techniques. • Slapping with the open hand palm side only.• Kicking the legs, body, or head (when both fighters are standing).• Punching the body.• Takedowns with the exceptions noted above.• Submission, joint locks, chokes, and pressure point techniques except as
noted.• Knee strikes to both the legs and body (while both fighters are standing).
f. Length of Matches. Matches will be at least five minutes. Longer matches may be coordinated.
g. Methods of Victory. • Win by knockout (KO).• Win by technical knockout (TKO).• Win by “tap out.”• Win by verbal submission.• Win by choke out.• Win by referee stoppage.• Win by judges’ decision.• Win by disqualification.
h. Disqualification.• Use of any illegal joint technique will result in immediate disqualification.• Intentional use of any illegal technique will result in immediate
disqualification.• Any unsportsman-like conduct may result in disqualification.
i. Definitions of Methods of Victory. The methods of victory are defined asfollows:
(1) Knockout (KO) . If one fighter goes down from the impact of a blow (not from a push, slip, or throw), the referee will send the fighter who struck the blow to a neutralcorner and begin a 10 count. If the downed fighter cannot return to his feet before 10 isreached, a knockout is awarded.
(2) Technical Knockout (TKO). A TKO is registered when the referee deems thatone fighter cannot defend himself and is in danger of receiving excessive damage if thematch continues. In this case, the referee will award the other fighter a TKO victory.
(3) “Tap Out.” A fighter may give up at any time during the match by “tapping out.”This is done by slapping their open palm several times (a minimum of twice) on the mat,The referee acknowledges a victory for the opponent and ends the match immediately.
(4) Verbal Submission. A fighter may give up at any time during the match by saying“stop” loud enough for the referee to hear. The referee will stop the fight and award thevictory to the other fighter.
(5) Choke Out. When a choke has been applied, the referee will watch for any sign ofunconsciousness, including failure to respond to verbal questions, and immediately stopthe match, awarding the victory to the fighter who applied the choke.
(6) Referee Stoppage. The referee will consider both combatants’ safety at all times.He may stop the match if he thinks that a fighter’s safety is in danger and or an injury iseminent. This is especially important when a joint lock is being applied and the “locked”
B-4
8/9/2019 US ARMY FM 3-25.150 - Combatives (hand-to-hand combat).pdf
http://slidepdf.com/reader/full/us-army-fm-3-25150-combatives-hand-to-hand-combatpdf 256/265
FM 3-25.150
fighter refuses to “tap out” or verbally submit. The referee will award the victory to theappropriate fighter.
(7) Judges’ Decision. The match will be judged by three judges. When a match goesto the time limit, the judges will make a decision based on the following point system.
(a) Standing Superiority. The fighter who shows superior skills on his feet will be
awarded one point and the opponent no points. In the case of equal display of standingskills, both fighters will be awarded one point.(b) Takedown Superiority. The fighter who shows superiority in takedowns will be
awarded one point and the opponent no points. In the case of equal display of takedownskills, both fighters will be awarded one point.
(c) Ground Superiority. The fighter who shows superiority in ground fighting will beawarded one point and the opponent no points. In the case that neither fighter displayssuperiority during ground fighting, both fighters will be awarded one point.
(d) Total Superiority. The fighter who controls most of the action during the matchwill be awarded two points. In the case that neither fighter controls most of the action,
both fighters will be awarded no points.
The points will be totaled and the fighter with the most points will be judged as thewinner by each individual judge. The judges will turn in their scorecard with their nameon it at the end of the match. The referee will award a decision based on the decision ofthe judges as follows:
• Unanimous decision. All three judges awarded victory to the same fighter.• Majority decision. Two judges award a victory to the same fighter and the
third judge scores the fight a draw, or one judge awards a victory to onefighter and the other two score the fight a draw.
• Split decision. Two judges award a decision to the same fighter and the third judge awards a decision to the other fighter.
• Draw. All three judges score the match a draw or one judge scores the fight a
draw and the other two judges are split. j. Stalemate. When the combatants are on the ground and neither is attempting togain an advantage position or submission, the referee will start a 30-second count. Ifneither fighter attempts to improve his position or gain a submission, a stalemate existsand the referee will break the fighters and restart them on their feet. When the fighters gounder the ropes or become entangled with the ropes the referee calls “STOP” and dragsthem into the center of the ring. The referee will ensure that neither fighter gainsadvantage from this movement before restarting with the command “FIGHT.”
B-5

8/9/2019 US ARMY FM 3-25.150 - Combatives (hand-to-hand combat).pdf
http://slidepdf.com/reader/full/us-army-fm-3-25150-combatives-hand-to-hand-combatpdf 257/265
FM 3-25.150
k. Weigh-In Procedures and Weight Classes. Fighters may weigh in the evening before or up to one hour before the fight. No fighter should weigh in more than 24 hours before the fight. Fighters will be paired by weight class. Sponsoring units may createtheir own weight classes. Suggested weight classes are as follows:
Super Heavyweight Over 220 pounds
Heavyweight 220 and underSuper Light Heavyweight 205 and underLight Heavyweight 195 and underCruiser Weight 185 and underSuper Middleweight 175 and underMiddleweight 165 and underLight Middleweight 155 and underSuper Welterweight 145 and underWelterweight 135 and underSuper Lightweight 125 and underLightweight 115 and under
Bantamweight 105 and under
B-6
8/9/2019 US ARMY FM 3-25.150 - Combatives (hand-to-hand combat).pdf
http://slidepdf.com/reader/full/us-army-fm-3-25150-combatives-hand-to-hand-combatpdf 258/265
FM 3-25.150(FM 21-150)
Glossary-1
GLOSSARY
AIT advanced infantry training
BDU basic duty uniform
DBDU desert basic duty uniform
FSN Federal stock number
IAW in accordance with
KO knockout
LBE load-bearing equipmentLCE load-carrying equipment
METL mission-essential task listMOUT military operations on urban terrain
OPFOR opposing forceOSUT one-station unit training
PT physical training
TKO technical knockoutTSC Training Support Center
U.S. United States
8/9/2019 US ARMY FM 3-25.150 - Combatives (hand-to-hand combat).pdf
http://slidepdf.com/reader/full/us-army-fm-3-25150-combatives-hand-to-hand-combatpdf 259/265
8/9/2019 US ARMY FM 3-25.150 - Combatives (hand-to-hand combat).pdf
http://slidepdf.com/reader/full/us-army-fm-3-25150-combatives-hand-to-hand-combatpdf 260/265
8/9/2019 US ARMY FM 3-25.150 - Combatives (hand-to-hand combat).pdf
http://slidepdf.com/reader/full/us-army-fm-3-25150-combatives-hand-to-hand-combatpdf 261/265
FM 3-25.150
Index-2
pass the guard and achieve themount, 3-11 (illus, 3-11 thru 3-15)stand up in base, 3-1 (illus, 3-5, 3-6)
body positionsadvanced, 4-1
knee in the stomach, 4-2 (illus)north-south position, 4-1 (illus)dominant, 3-1
back mount, 3-1 (illus, 3-2)front mount, 3-2 (illus, 3-3)guard, 3-3 (illus)side control, 3-4 (illus)
breakfall , 5-1forward rolling, 5-3 (illus)forward rolling from the kneeling
position, 5-1 (illus, 5-2, 5-3)
rear, 5-4 (illus)side position, 5-1 (illus)
chokescollar, 4-22 (illus, 4-25, 4-26)cross collar, 3-26 (illus, 3-26 thru3-28)front guillotine, 3-29 (illus, 3-29 thru3-31)from knee mount, 4-45 (illus, 4-45,4-46)guillotine, 4-32 (illus, 4-32, 4-33)
defend, 5-13 (illus, 5-13 thru5-15)
with knee strikes, 5-15 (illus,5-15, 5-16)
lapel, 4-20 (illus, 4-20, 4-21)leaning, 4-16 (illus, 4-16, 4-17)nutcracker, 4-17 (illus, 4-17, 4-18)
paper cutter, 4-15 (illus, 4-15, 4-16)rear naked, 3-24 (illus, 3-24, 3-25)single wing, 4-27 (illus, 4-27, 4-28)sleeve, 4-18 (illus, 4-18, 4-19)triangle, 4-39 (illus, 4-39, 4-40)
clinch , 5-4close range, 5-4 (illus, 5-5, 5-6)long range, 5-6
combativesformations, 2-4
matted rooms, 2-5
sawdust pit, 2-5construction, 2-5 (illus)
principles, 1-1, 1-2safety, 1-2
bayonet assault course, 2-6
chokes, 1-2general, 1-2 joint locks, 1-2supervision, 1-2striking, 1-2training areas, 1-2
trainers, 2-1responsibilities, 2-1
training, 1-1, 2-1 basic, 2-3effects, 1-1
one-station unit, 2-3 purpose, 1-1sustainment, 2-4
competitions , B-1 basic, B-1standard, B-1
duration, B-1illegal techniques, B-2
judging, B-2scoring, B-2tie-breaking, B-2time limits, B-2uniform, B-1
special, B-3disqualification, B-4illegal techniques, B-3legal techniques, B-4length, B-4methods of victory, B-4
definitions, B-4, B-5safety gear, B-3stalemate, B-5uniform, B-3weigh-in, B-6
finishing moves , 3-24 bent arm bar from the mount, 3-31(illus, 3-31 thru 3-33)cross collar choke, 3-26 (illus, 3-26thru 3-28)
8/9/2019 US ARMY FM 3-25.150 - Combatives (hand-to-hand combat).pdf
http://slidepdf.com/reader/full/us-army-fm-3-25150-combatives-hand-to-hand-combatpdf 262/265
FM 3-25.150
Index-3
front guillotine choke, 3-29 (illus,3-29 thru 3-31)rear naked choke, 3-24 (illus, 3-24,3-25)straight arm bar from the guard, 3-35
(illus, 3-35 thru 3-38)straight arm bar from the mount,3-33 (illus, 3-33 thru 3-35)sweep from attempted straight arm
bar, 3-39 (illus, 3-39, 3-40)
ground-fighting techniques basic, 3-1advanced, 4-1
handheld weapons , 7-1
angles of attack, 7-1 (illus 7-1 thru7-6) bayonet/knife, 7-22
knife-against-knife sequence,straight grip, 7-22
knife fighter’s stance, 7-23 (illus)modified stance, 7-24 (illus)range, 7-24reverse grip, 7-23, 7-25 (illus,7-25 thru 7-28)
development, 7-6field-expedient, 7-29
entrenching tool, 7-29 (illus, 7-29thru 7-32)six-foot pole, 7-36 (illus)three-foot stick, 7-33 (illus, 7-34,7-35)
fighting techniques, 7-6fixed bayonet, 7-2movements, 7-8
attack, 7-9 butt stroke, 7-11 (illus, 7-12)slash, 7-13 (illus)smash, 7-14 (illus)thrust, 7-10 (illus, 7-11)
crossover, 7-9 (illus)defensive, 7-15
block, 7-17 (illus, 7-18 thru7-22)
parry, 7-15 (illus, 7-15, 7-16)
modified, 7-21 (illus)whirl, 7-9 (illus)follow-up, 7-22
position, 7-7attack, 7-7 (illus)
relaxed, 7-8 (illus) principles, 7-7hand-to-hand combat , iv
definition, 1-1headlocks , 3-41, 5-13
defense against, 3-41 (illus, 3-41 thru3-47), 5-13with punches, 5-17 (illus, 5-17 thru5-19)without punches, 5-19 (illus, 5-19thru 5-20)
scenarios , 9-1examples, A-2lethal force, 9-1
control, 9-1finishing, 9-1range, 9-1
restrictive force, 9-2situational training , A-1
conduct, A-1 planning, A-1
standing defense , 8-1against bear hugs, 8-7 thru 8-13
(illus, 8-7 thru 8-13)against chokes, 8-1
standing rear naked, 8-1 (illus,8-1 thru 8-2)standing rear naked pulling back,8-3 (illus, 8-3, 8-4)
against one-hand neck press, 8-5(illus)against two-hand neck press, 8-6
(illus, 8-6, 8-7)strikes , 4-57
arm, 6-1hook, 6-2 (illus, 6-3)
jab, 6-1 (illus)reverse punch, 6-2 (illus)

8/9/2019 US ARMY FM 3-25.150 - Combatives (hand-to-hand combat).pdf
http://slidepdf.com/reader/full/us-army-fm-3-25150-combatives-hand-to-hand-combatpdf 263/265
FM 3-25.150
Index-4
uppercut, 6-3lead hand, 6-3 (illus, 6-3, 6-4)trail hand, 6-4 (illus, 6-4, 6-5)
defending against, 4-65 (illus, 4-65thru 4-67)
elbow, 6-5horizontal, 6-5 (illus)upward, 6-6 (illus)
from side control, 4-63 (illus, 4-63thru 4-65)kicks, 6-6
lead leg front, 6-7 (illus)rear leg front, 6-7 (illus)shin, 6-8 (illus)stepping side, 6-8 (illus)
knee, 6-9 (illus)
pass the guard with, 4-57 (illus, 4-57thru 4-62) punching combinations, 6-6
takedowns , 5-1 basic, 5-7 (illus, 5-7, 5-8)from against a wall, 5-21
leg drag, 5-23 (illus, 5-23, 5-24) position and strikes, 5-21 (illus,5-21 thru 5-23)
hip throw, 5-9 (illus, 5-9, 5-10)hook the leg, 5-8 (illus)rear, 5-10 (illus, 5-10 thru 5-12)
teaching techniques , 2-12crawl, walk, run, 2-18
first level, 2-18second level, 2-18
demonstrations, 2-18company-size formation or larger, 2-18
platoon-size formation or smaller, 2-18
drills, 2-19, 3-40execution, 2-19
at combat speed, 2-19 by-the-numbers, 2-19
protective equipment, 2-19other, 2-19
pads, 2-19 (illus, 2-20)
stretches, 2-12, 2-13 back-roll stretch, 2-13 (illus) buddy-assisted back stretch, 2-17(illus)
buddy-assisted groin (butterfly)
stretch, 2-16 (illus) buddy-assisted hamstring stretch,2-15 (illus)
buddy-assisted splits, 2-14 (illus)warm-ups, 2-12, 2-13
unarmed defense , 8-13against a knife, 8-14 thru 8-21 (illus,8-15 thru 8-21)against a rifle with fixed bayonet,8-22 thru 8-29 (illus, 8-23 thru 8-29)
against an armed opponent, 8-13
8/9/2019 US ARMY FM 3-25.150 - Combatives (hand-to-hand combat).pdf
http://slidepdf.com/reader/full/us-army-fm-3-25150-combatives-hand-to-hand-combatpdf 264/265
FM 3-25.150 (FM 21-150)18 JANUARY 2002
By Order of the Secretary of the Army:
Official:
ERIC K. SHINSEKIGeneral, United States Army
Chief of Staff
Administrative Assistant to the
Secretary of the Army 0202404
DISTRIBUTION:
Active Army, Army National Guard, and U.S. Army Reserve : To be distributed inaccordance with the initial distribution number 110176, requirements for FM 3-25.150.

8/9/2019 US ARMY FM 3-25.150 - Combatives (hand-to-hand combat).pdf
http://slidepdf.com/reader/full/us-army-fm-3-25150-combatives-hand-to-hand-combatpdf 265/265