Embed Size (px)
Citation preview
Manual Revision: 07/03/2012
For the most up-to-date information, please visit: www.startech.com
DE: Bedienungsanleitung - de.startech.comFR: Guide de l'utilisateur - fr.startech.comES: Guía del usuario - es.startech.comIT: Guida per l'uso - it.startech.comNL: Gebruiksaanwijzing - nl.startech.comPT: Guia do usuário - pt.startech.com
USB300WN2X2D
USB 802.11n Dual Band WiFi Adapter
*actual product may vary from photos

Instruction Manual
FCC Compliance StatementThis equipment has been tested and found to comply with the limits for a Class B digital device, pursuant to part 15 of the FCC Rules. These limits are designed to provide reasonable protection against harmful interference in a residential installation. This equipment generates, uses and can radiate radio frequency energy and, if not installed and used in accordance with the instructions, may cause harmful interference to radio communications. However, there is no guarantee that interference will not occur in a particular installation. If this equipment does cause harmful interference to radio or television reception, which can be determined by turning the equipment off and on, the user is encouraged to try to correct the interference by one or more of the following measures:
• Reorient or relocate the receiving antenna.
• Increase the separation between the equipment and receiver.
• Connect the equipment into an outlet on a circuit different from that to which the receiver is connected.
• Consult the dealer or an experienced radio/TV technician for help.
Use of Trademarks, Registered Trademarks, and other Protected Names and SymbolsThis manual may make reference to trademarks, registered trademarks, and other protected names and/or symbols of third-party companies not related in any way to StarTech.com. Where they occur these references are for illustrative purposes only and do not represent an endorsement of a product or service by StarTech.com, or an endorsement of the product(s) to which this manual applies by the third-party company in question. Regardless of any direct acknowledgement elsewhere in the body of this document, StarTech.com hereby acknowledges that all trademarks, registered trademarks, service marks, and other protected names and/or symbols contained in this manual and related documents are the property of their respective holders.
Instruction Manuali
Table of ContentsIntroduction ............................................................................................1
Packaging Contents ................................................................................................................................. 1
System Requirements .............................................................................................................................. 1
USB300WN2X2D.....................................................................................2
Installation ..............................................................................................3Windows XP/Server 2003 ....................................................................................................................... 3
Windows Vista/7/8 .................................................................................................................................... 4
Windows Server 2008 R2 Note: ............................................................................................................ 5
How to Use ..............................................................................................6Windows XP ................................................................................................................................................ 6
Windows Vista/7/8 .................................................................................................................................... 7
Ralink WLAN Utility ................................................................................8Connecting to an available network: ................................................................................................. 9
Manually Creating a Profile.................................................................................................................... 10
Wi-Fi Protected Setup (WPS) ................................................................................................................. 11
Wireless Mode.........................................................................................12
Specifications ..........................................................................................13
Technical Support ..................................................................................14
Warranty Information ............................................................................14
Instruction Manual1
IntroductionThe USB300WN2X2D dual-band Wireless-N USB Network Adapter allows a USB-enabled computer to connect to a WiFi network on the 2.4GHz or 5GHz frequency. The adapter can be used for connecting to Wireless-A, B, G or N networks, and features dual 5dBi high gain antennas, as well as powered amplifiers to ensure optimized reception capable of supporting up to 300Mbps of data bandwidth over distances up to 3 times greater than a standard WiFi adapter.
This versatile dual band network adapter features a 2T2R (2 transmitter, 2 receiver), Multiple Input/Multiple Output (MIMO) design, and can connect to older wireless access points (that may only operate on a 2.4GHz frequeny), as well as newer WAPs that support the less congested 5 GHz range.
Backed by a StarTech.com 2-year warranty, with free lifetime technical support, the USB300WN2X2D is designed to provide a dependable, long-lasting wireless access solution
Packaging Contents• 1x USB WiFi Adapter
• 1x Mini USB Y Cable
• 2x Dual Band Antenna
• 1x Monitor Clip
• 1x Driver CD
• 1x Instruction Manual
System Requirements• USB 2.0 enabled computer system with available USB port
• Microsoft® Windows® XP/Vista/Server 2003/Server 2008 R2/7/ 8 (32/64-bit), or Linux® kernel 2.6.32 or later
Instruction Manual2
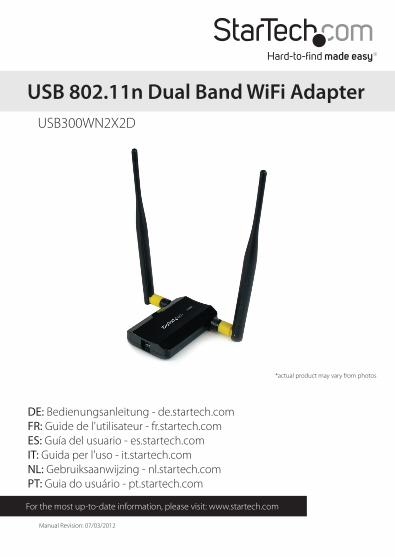
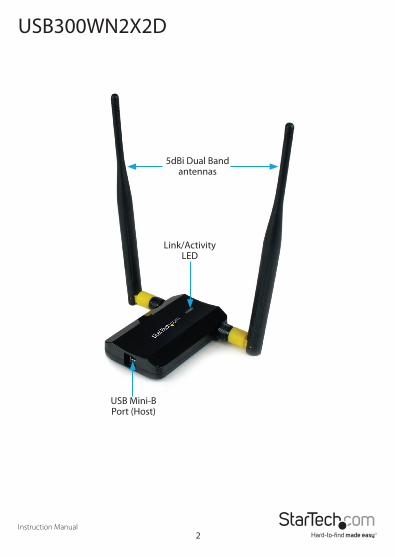
Link/Activity LED
USB Mini-B Port (Host)
5dBi Dual Band antennas
USB300WN2X2D
Instruction Manual3
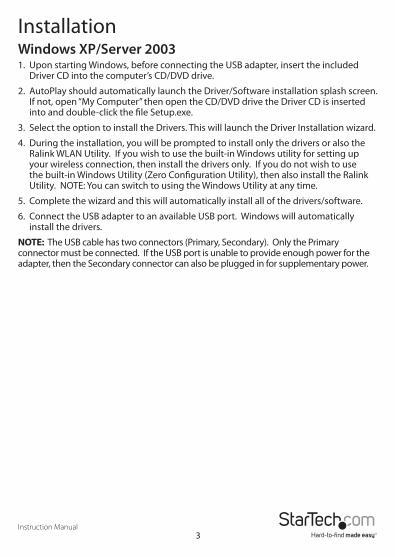
InstallationWindows XP/Server 20031. Upon starting Windows, before connecting the USB adapter, insert the included
Driver CD into the computer’s CD/DVD drive.
2. AutoPlay should automatically launch the Driver/Software installation splash screen. If not, open “My Computer” then open the CD/DVD drive the Driver CD is inserted into and double-click the file Setup.exe.
3. Select the option to install the Drivers. This will launch the Driver Installation wizard.
4. During the installation, you will be prompted to install only the drivers or also the Ralink WLAN Utility. If you wish to use the built-in Windows utility for setting up your wireless connection, then install the drivers only. If you do not wish to use the built-in Windows Utility (Zero Configuration Utility), then also install the Ralink Utility. NOTE: You can switch to using the Windows Utility at any time.
5. Complete the wizard and this will automatically install all of the drivers/software.
6. Connect the USB adapter to an available USB port. Windows will automatically install the drivers.
NOTE: The USB cable has two connectors (Primary, Secondary). Only the Primary connector must be connected. If the USB port is unable to provide enough power for the adapter, then the Secondary connector can also be plugged in for supplementary power.
Instruction Manual4
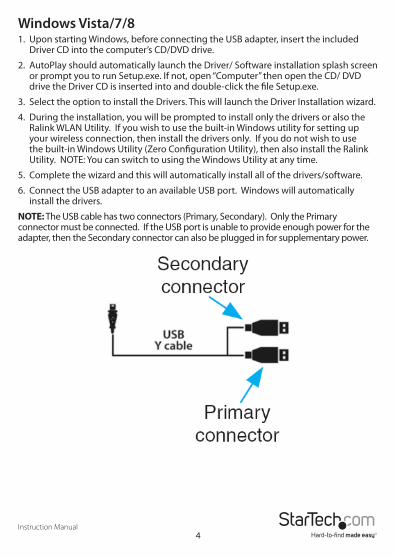
Windows Vista/7/81. Upon starting Windows, before connecting the USB adapter, insert the included
Driver CD into the computer’s CD/DVD drive.
2. AutoPlay should automatically launch the Driver/ Software installation splash screen or prompt you to run Setup.exe. If not, open “Computer” then open the CD/ DVD drive the Driver CD is inserted into and double-click the file Setup.exe.
3. Select the option to install the Drivers. This will launch the Driver Installation wizard.
4. During the installation, you will be prompted to install only the drivers or also the Ralink WLAN Utility. If you wish to use the built-in Windows utility for setting up your wireless connection, then install the drivers only. If you do not wish to use the built-in Windows Utility (Zero Configuration Utility), then also install the Ralink Utility. NOTE: You can switch to using the Windows Utility at any time.
5. Complete the wizard and this will automatically install all of the drivers/software.
6. Connect the USB adapter to an available USB port. Windows will automatically install the drivers.
NOTE: The USB cable has two connectors (Primary, Secondary). Only the Primary connector must be connected. If the USB port is unable to provide enough power for the adapter, then the Secondary connector can also be plugged in for supplementary power.
Instruction Manual5
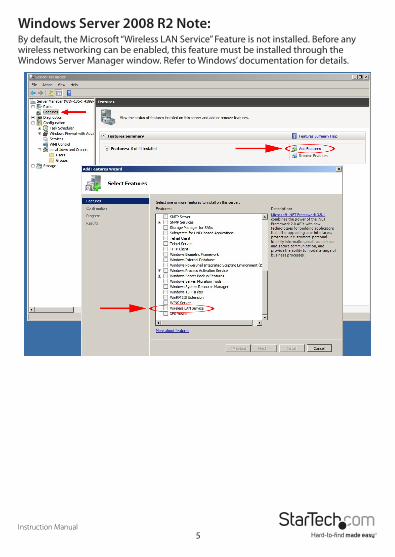
Windows Server 2008 R2 Note:By default, the Microsoft “Wireless LAN Service” Feature is not installed. Before any wireless networking can be enabled, this feature must be installed through the Windows Server Manager window. Refer to Windows’ documentation for details.
Instruction Manual6
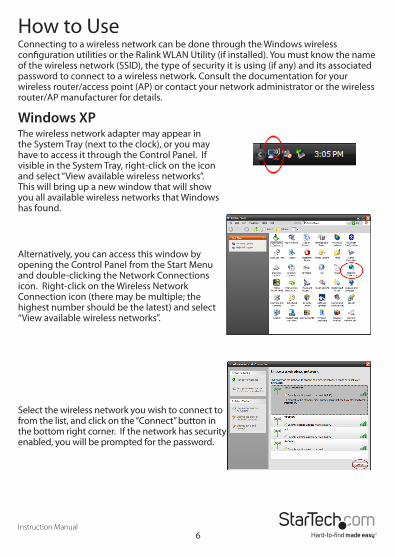
How to UseConnecting to a wireless network can be done through the Windows wireless configuration utilities or the Ralink WLAN Utility (if installed). You must know the name of the wireless network (SSID), the type of security it is using (if any) and its associated password to connect to a wireless network. Consult the documentation for your wireless router/access point (AP) or contact your network administrator or the wireless router/AP manufacturer for details.
Windows XPThe wireless network adapter may appear in the System Tray (next to the clock), or you may have to access it through the Control Panel. If visible in the System Tray, right-click on the icon and select “View available wireless networks”. This will bring up a new window that will show you all available wireless networks that Windows has found.
Alternatively, you can access this window by opening the Control Panel from the Start Menu and double-clicking the Network Connections icon. Right-click on the Wireless Network Connection icon (there may be multiple; the highest number should be the latest) and select “View available wireless networks”.
Select the wireless network you wish to connect to from the list, and click on the “Connect” button in the bottom right corner. If the network has security enabled, you will be prompted for the password.
Instruction Manual7
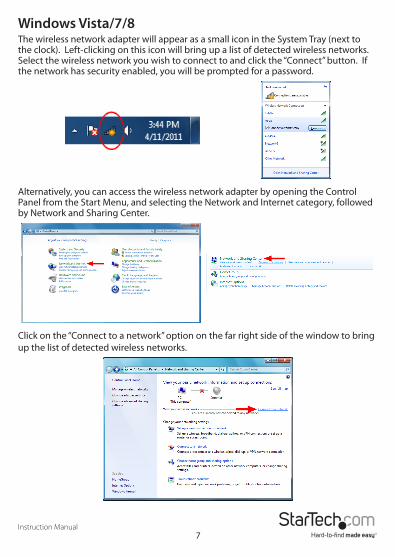
Windows Vista/7/8The wireless network adapter will appear as a small icon in the System Tray (next to the clock). Left-clicking on this icon will bring up a list of detected wireless networks. Select the wireless network you wish to connect to and click the “Connect” button. If the network has security enabled, you will be prompted for a password.
Alternatively, you can access the wireless network adapter by opening the Control Panel from the Start Menu, and selecting the Network and Internet category, followed by Network and Sharing Center.
Click on the “Connect to a network” option on the far right side of the window to bring up the list of detected wireless networks.
Instruction Manual8
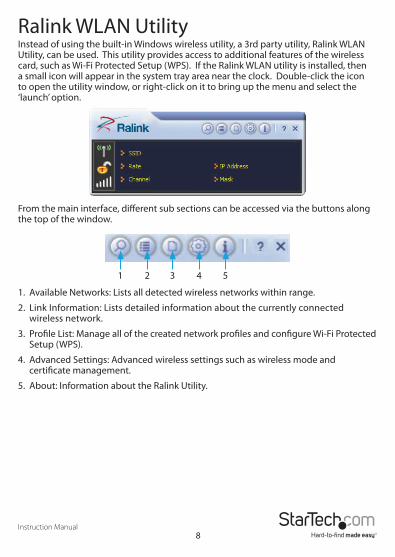
Ralink WLAN UtilityInstead of using the built-in Windows wireless utility, a 3rd party utility, Ralink WLAN Utility, can be used. This utility provides access to additional features of the wireless card, such as Wi-Fi Protected Setup (WPS). If the Ralink WLAN utility is installed, then a small icon will appear in the system tray area near the clock. Double-click the icon to open the utility window, or right-click on it to bring up the menu and select the ‘launch’ option.
From the main interface, different sub sections can be accessed via the buttons along the top of the window.
1. Available Networks: Lists all detected wireless networks within range.
2. Link Information: Lists detailed information about the currently connected wireless network.
3. Profile List: Manage all of the created network profiles and configure Wi-Fi Protected Setup (WPS).
4. Advanced Settings: Advanced wireless settings such as wireless mode and certificate management.
5. About: Information about the Ralink Utility.
1 2 3 4 5
Instruction Manual9
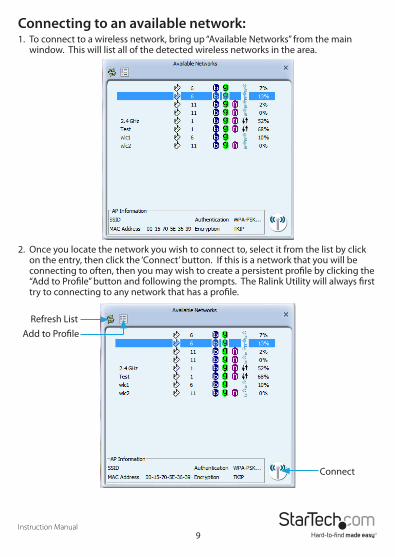
Connecting to an available network:1. To connect to a wireless network, bring up “Available Networks” from the main
window. This will list all of the detected wireless networks in the area.
2. Once you locate the network you wish to connect to, select it from the list by click on the entry, then click the ‘Connect’ button. If this is a network that you will be connecting to often, then you may wish to create a persistent profile by clicking the “Add to Profile” button and following the prompts. The Ralink Utility will always first try to connecting to any network that has a profile.
Refresh ListAdd to Profile
Connect
Instruction Manual10
3. If the network uses encryption, a window will popup where you will need to enter the proper authentication information (i.e. password/passphrase).
4. Once successfully connected to the network, information about the wireless router/access point will be listed in the main window and the “AP Information” section of the Available Networks window.
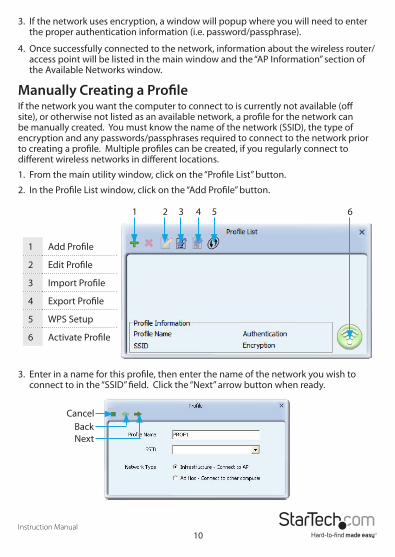
Manually Creating a ProfileIf the network you want the computer to connect to is currently not available (off site), or otherwise not listed as an available network, a profile for the network can be manually created. You must know the name of the network (SSID), the type of encryption and any passwords/passphrases required to connect to the network prior to creating a profile. Multiple profiles can be created, if you regularly connect to different wireless networks in different locations.
1. From the main utility window, click on the “Profile List” button.
2. In the Profile List window, click on the “Add Profile” button.
3. Enter in a name for this profile, then enter the name of the network you wish to connect to in the “SSID” field. Click the “Next” arrow button when ready.
1 2 3 4 5 6
1 Add Profile
2 Edit Profile
3 Import Profile
4 Export Profile
5 WPS Setup
6 Activate Profile
CancelBackNext
Instruction Manual11
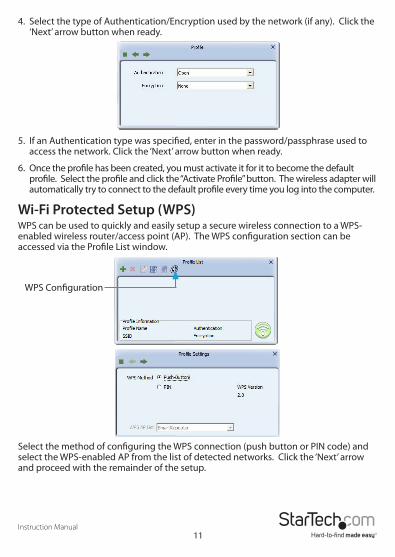
4. Select the type of Authentication/Encryption used by the network (if any). Click the ‘Next’ arrow button when ready.
5. If an Authentication type was specified, enter in the password/passphrase used to access the network. Click the ‘Next’ arrow button when ready.
6. Once the profile has been created, you must activate it for it to become the default profile. Select the profile and click the “Activate Profile” button. The wireless adapter will automatically try to connect to the default profile every time you log into the computer.
Wi-Fi Protected Setup (WPS)WPS can be used to quickly and easily setup a secure wireless connection to a WPS-enabled wireless router/access point (AP). The WPS configuration section can be accessed via the Profile List window.
Select the method of configuring the WPS connection (push button or PIN code) and select the WPS-enabled AP from the list of detected networks. Click the ‘Next’ arrow and proceed with the remainder of the setup.
WPS Configuration

Instruction Manual12
Wireless ModeIn the Advanced Settings window, accessible from the main interface window, you can select which wireless frequency range the dual band wireless adapter should use. You can select between 2.4GHz only, 5GHz only or 2.4 + 5 GHz.
Instruction Manual13
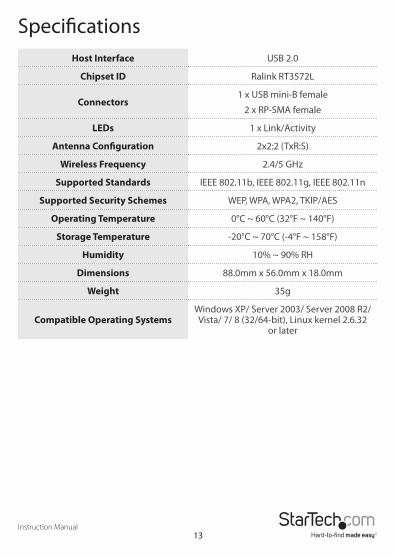
SpecificationsHost Interface USB 2.0
Chipset ID Ralink RT3572L
Connectors1 x USB mini-B female
2 x RP-SMA female
LEDs 1 x Link/Activity
Antenna Configuration 2x2:2 (TxR:S)
Wireless Frequency 2.4/5 GHz
Supported Standards IEEE 802.11b, IEEE 802.11g, IEEE 802.11n
Supported Security Schemes WEP, WPA, WPA2, TKIP/AES
Operating Temperature 0°C ~ 60°C (32°F ~ 140°F)
Storage Temperature -20°C ~ 70°C (-4°F ~ 158°F)
Humidity 10% ~ 90% RH
Dimensions 88.0mm x 56.0mm x 18.0mm
Weight 35g
Compatible Operating SystemsWindows XP/ Server 2003/ Server 2008 R2/ Vista/ 7/ 8 (32/64-bit), Linux kernel 2.6.32
or later

Instruction Manual14
Technical SupportStarTech.com’s lifetime technical support is an integral part of our commitment to provide industry-leading solutions. If you ever need help with your product, visit www.startech.com/support and access our comprehensive selection of online tools, documentation, and downloads.For the latest drivers/software, please visit www.startech.com/downloads
Warranty InformationThis product is backed by a two year warranty. In addition, StarTech.com warrants its products against defects in materials and workmanship for the periods noted, following the initial date of purchase. During this period, the products may be returned for repair, or replacement with equivalent products at our discretion. The warranty covers parts and labor costs only. StarTech.com does not warrant its products from defects or damages arising from misuse, abuse, alteration, or normal wear and tear.
Limitation of LiabilityIn no event shall the liability of StarTech.com Ltd. and StarTech.com USA LLP (or their officers, directors, employees or agents) for any damages (whether direct or indirect, special, punitive, incidental, consequential, or otherwise), loss of profits, loss of business, or any pecuniary loss, arising out of or related to the use of the product exceed the actual price paid for the product. Some states do not allow the exclusion or limitation of incidental or consequential damages. If such laws apply, the limitations or exclusions contained in this statement may not apply to you.

Hard-to-find made easy. At StarTech.com, that isn’t a slogan. It’s a promise.
StarTech.com is your one-stop source for every connectivity part you need. From the latest technology to legacy products — and all the parts that bridge the old and new — we can help you find the parts that connect your solutions.
We make it easy to locate the parts, and we quickly deliver them wherever they need to go. Just talk to one of our tech advisors or visit our website. You’ll be connected to the products you need in no time.
Visit www.startech.com for complete information on all StarTech.com products and to access exclusive resources and time-saving tools.
StarTech.com is an ISO 9001 Registered manufacturer of connectivity and technology parts. StarTech.com was founded in 1985 and has operations in the United States, Canada, the United Kingdom and Taiwan servicing a worldwide market.


![Wireless USB Adapter User Guide1] WiFi USB adapter/AWUS036EAC/QIG... · Starting the Wireless LAN Utility ... The ALFA WiFi indoor USB adapter provides users to launch IEEE 802.11n/b/g](https://img.pdfslide.net/doc/110x75/5c97966909d3f20d198c5b55/wireless-usb-adapter-user-guide-1-wifi-usb-adapterawus036eacqig-starting.jpg)


![Wireless USB Adapter User Guide - ALFA1] WiFi USB adapter... · The ALFA WiFi indoor USB adapter provides users to launch IEEE 802.11n/b/g or IEEE 802.11a/an/ac wireless network (depends](https://img.pdfslide.net/doc/110x75/608a1bcd6dac481beb7a6823/wireless-usb-adapter-user-guide-alfa-1-wifi-usb-adapter-the-alfa-wifi-indoor.jpg)