Embed Size (px)
Citation preview
-1-
Safety PrecautionsThis guide contains a variety of safety markings related to the safe and correctoperation of the USB Data Transfer Cable. Be sure to read this guide and anyrelated manuals carefully to fully understand how to correctly use this cable.
Safety Symbol
This guide uses the following safety-related symbol. Please pay attention to thissymbol and follow the instructions given.Safety symbol and its meaning:
A potentially hazardous situation that could result inserious injury or death and cause major equipment dam-age if instructions are not followed.
WARNINGS• Do not disassemble or remodel this cable in any way. Doing so may cause
an electric shock or fire.• Do not use this cable in areas where flammable gases are present. Doing
so may cause an explosion.
WARNING
To Prevent USB Data Transfer Cable Damage
• Do not use the USB Data Transfer Cable at temperatures outside the rangespecified in this guide.
• Do not use or store this cable at very high temperatures.• Do not use or store this cable in direct sunlight or excessively dusty or dirty
environments.• Do not use or store this cable in an environment where it may be exposed to
chemical vapors or fumes.• Do not allow water to enter the connector. Also, do not touch the connector if your
hands are wet. Doing so may cause an electric shock.• Do not connect or disconnect the USB Data Transfer Cable during data transfer.
Doing so may cause a data communication error.
-2-
Package Contents
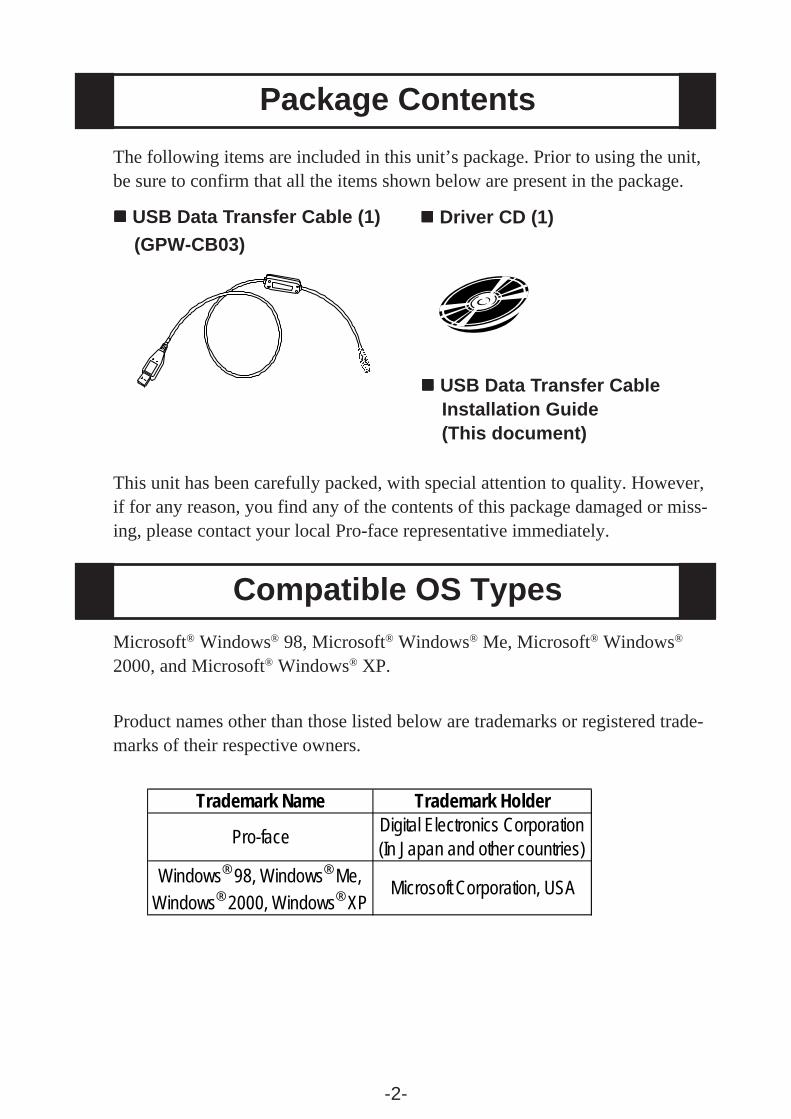
USB Data Transfer Cable (1) (GPW-CB03)
Driver CD (1)
This unit has been carefully packed, with special attention to quality. However,if for any reason, you find any of the contents of this package damaged or miss-ing, please contact your local Pro-face representative immediately.
The following items are included in this unit’s package. Prior to using the unit,be sure to confirm that all the items shown below are present in the package.
USB Data Transfer Cable Installation Guide (This document)
Compatible OS TypesMicrosoft® Windows® 98, Microsoft® Windows® Me, Microsoft® Windows®
2000, and Microsoft® Windows® XP.
Product names other than those listed below are trademarks or registered trade-marks of their respective owners.
Trademark Name Trademark Holder
Pro-face Digital Electronics Corporation(In Japan and other countries)
Windows® 98, Windows® Me,Windows® 2000, Windows® XP
Microsoft Corporation, USA
-3-
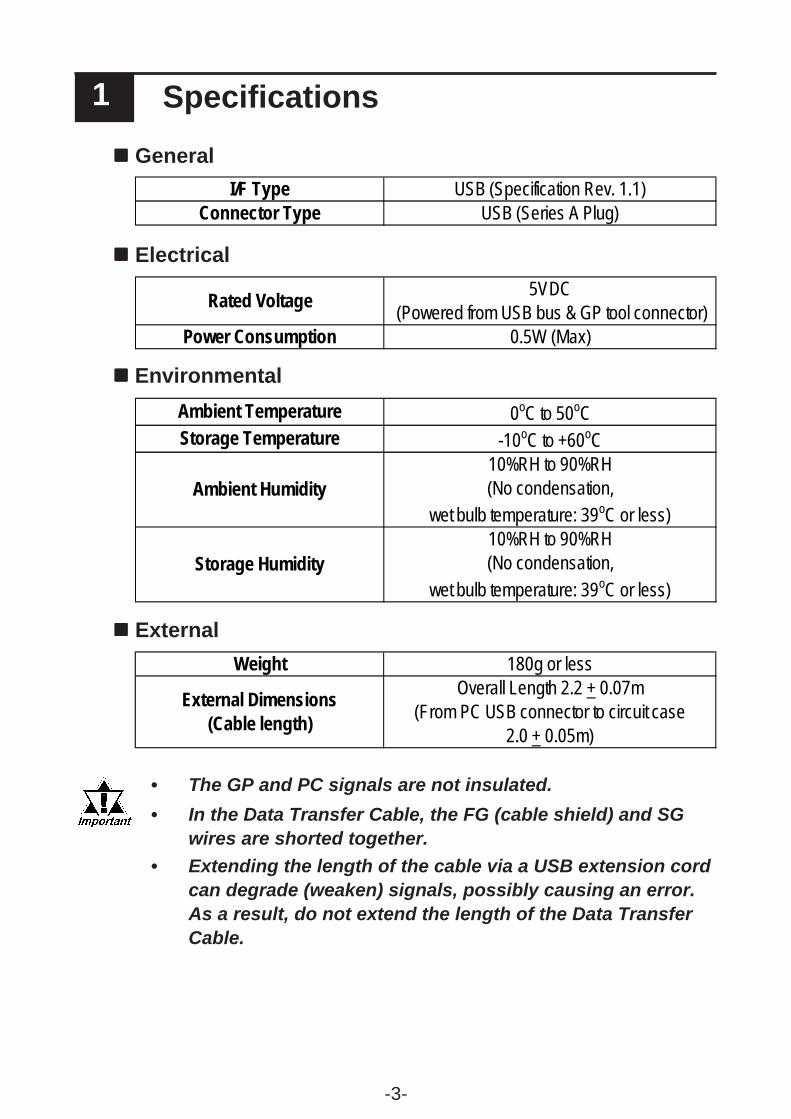
Electrical
Rated Voltage 5VDC (Powered from USB bus & GP tool connector)
Power Consumption 0.5W (Max)
EnvironmentalAmbient Temperature 0oC to 50oCStorage Temperature -10oC to +60oC
Ambient Humidity10%RH to 90%RH(No condensation,
wet bulb temperature: 39oC or less)
Storage Humidity10%RH to 90%RH(No condensation,
wet bulb temperature: 39oC or less)
ExternalWeight 180g or less
External Dimensions(Cable length)
Overall Length 2.2 + 0.07m(From PC USB connector to circuit case
2.0 + 0.05m)
Specifications1
GeneralI/F Type USB (Specification Rev. 1.1)
Connector Type USB (Series A Plug)
• The GP and PC signals are not insulated.• In the Data Transfer Cable, the FG (cable shield) and SG
wires are shorted together.• Extending the length of the cable via a USB extension cord
can degrade (weaken) signals, possibly causing an error.As a result, do not extend the length of the Data TransferCable.
-4-
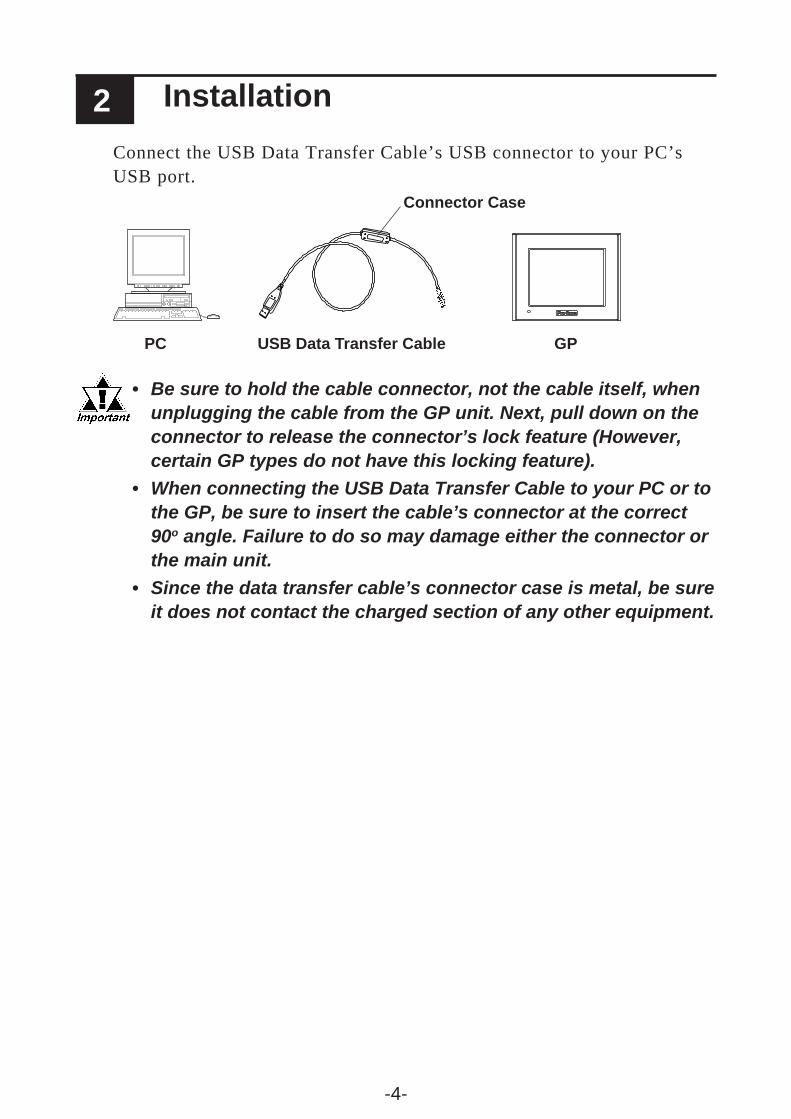
Installation2Connect the USB Data Transfer Cable’s USB connector to your PC’sUSB port.
• Be sure to hold the cable connector, not the cable itself, whenunplugging the cable from the GP unit. Next, pull down on theconnector to release the connector’s lock feature (However,certain GP types do not have this locking feature).
• When connecting the USB Data Transfer Cable to your PC or tothe GP, be sure to insert the cable’s connector at the correct90o angle. Failure to do so may damage either the connector orthe main unit.
• Since the data transfer cable’s connector case is metal, be sureit does not contact the charged section of any other equipment.
PC USB Data Transfer Cable GP
Connector Case
-5-
Installation Procedure3 Windows® 98
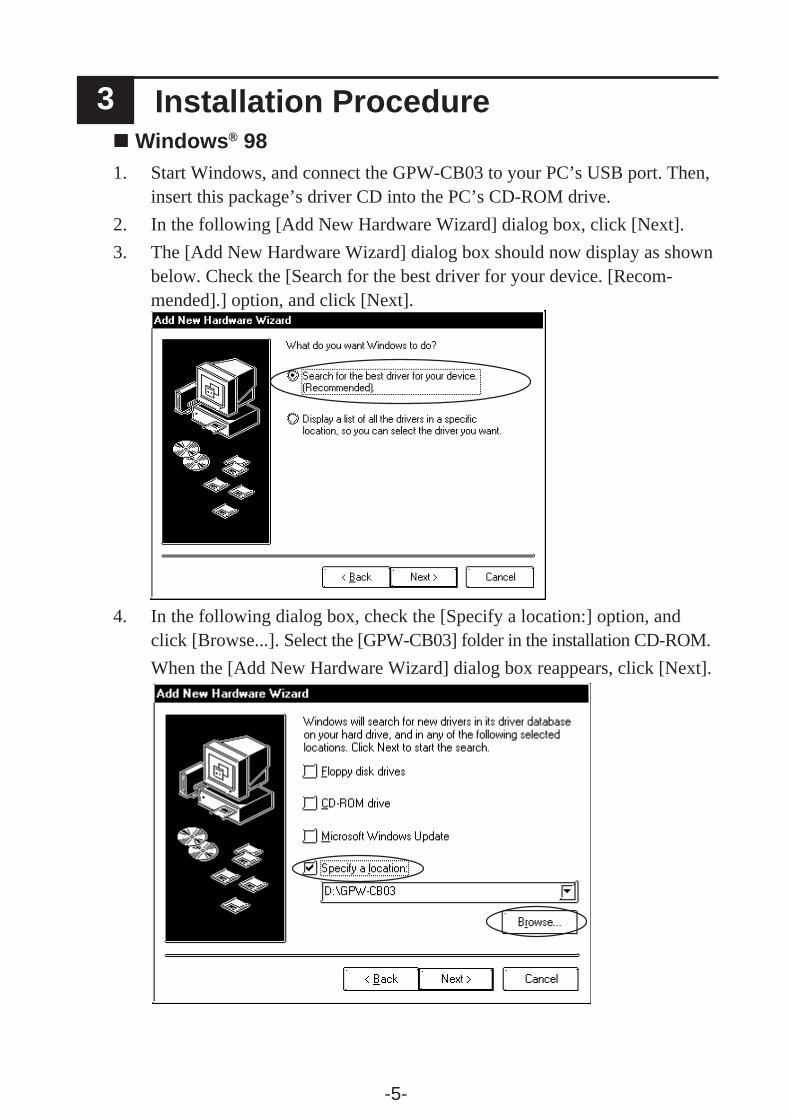
1. Start Windows, and connect the GPW-CB03 to your PC’s USB port. Then,insert this package’s driver CD into the PC’s CD-ROM drive.
2. In the following [Add New Hardware Wizard] dialog box, click [Next].3. The [Add New Hardware Wizard] dialog box should now display as shown
below. Check the [Search for the best driver for your device. [Recom-mended].] option, and click [Next].
4. In the following dialog box, check the [Specify a location:] option, andclick [Browse...]. Select the [GPW-CB03] folder in the installation CD-ROM.When the [Add New Hardware Wizard] dialog box reappears, click [Next].
-6-
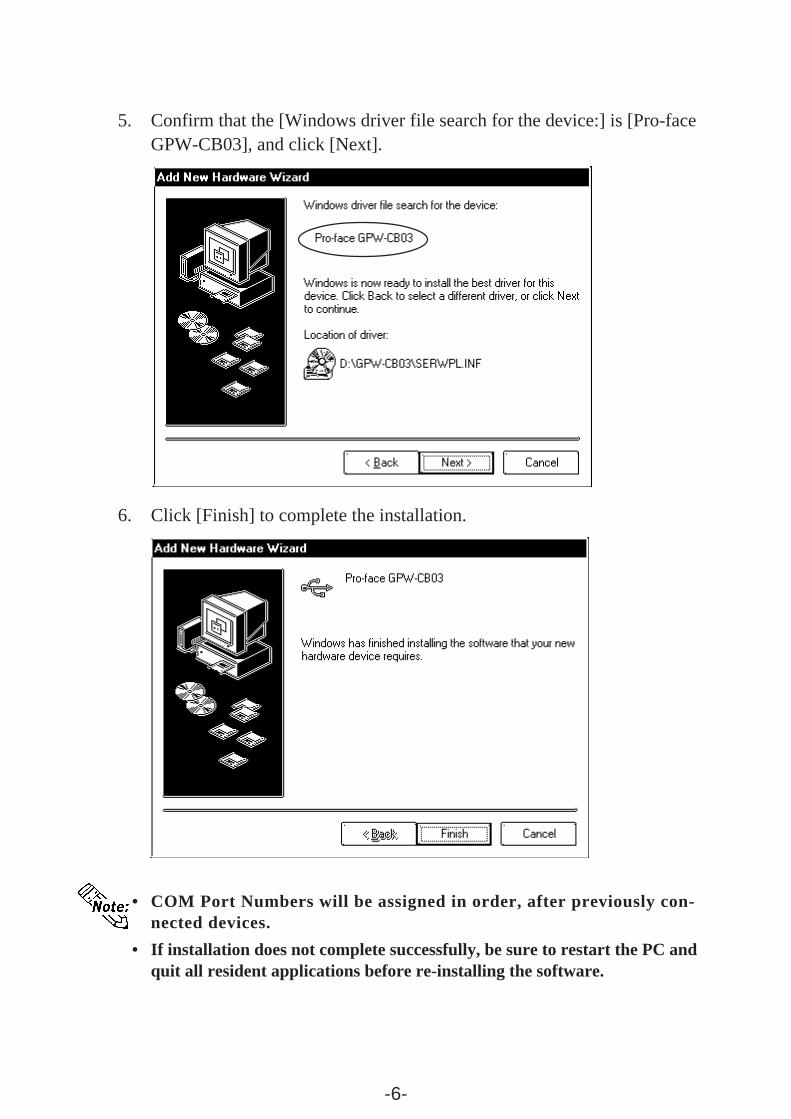
5. Confirm that the [Windows driver file search for the device:] is [Pro-faceGPW-CB03], and click [Next].
6. Click [Finish] to complete the installation.
• COM Port Numbers will be assigned in order, after previously con-nected devices.
• If installation does not complete successfully, be sure to restart the PC andquit all resident applications before re-installing the software.
-7-
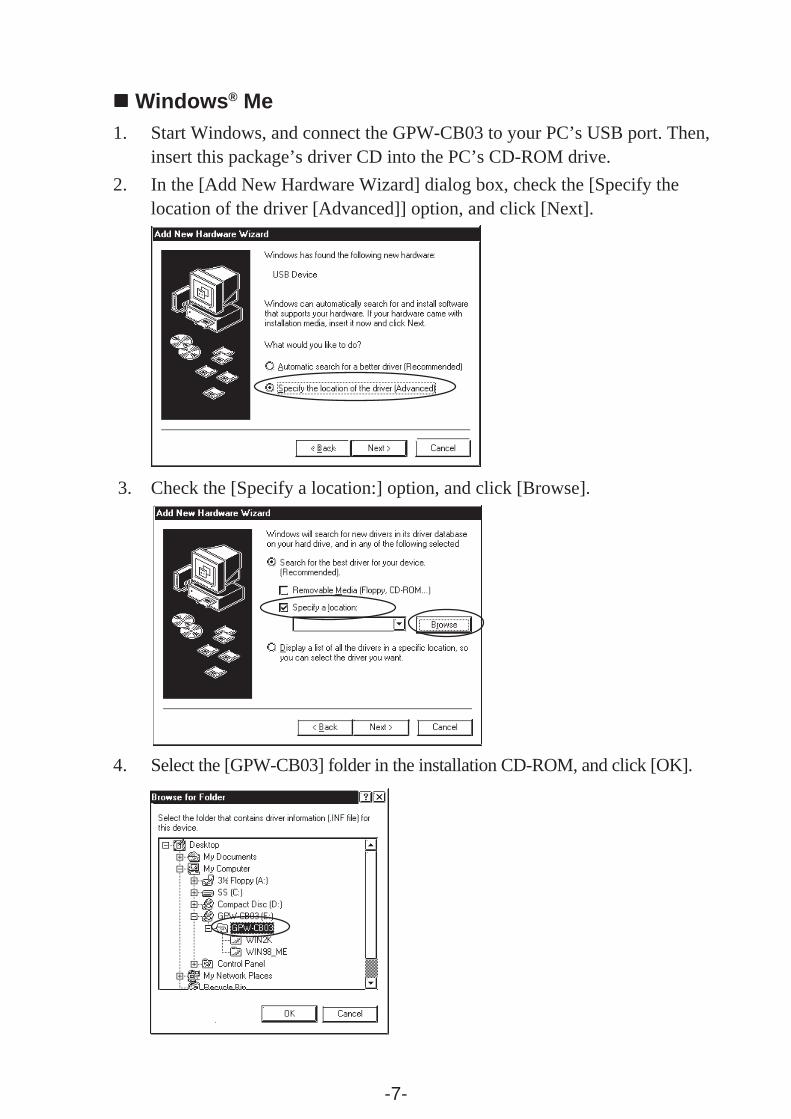
3. Check the [Specify a location:] option, and click [Browse].
Windows® Me1. Start Windows, and connect the GPW-CB03 to your PC’s USB port. Then,
insert this package’s driver CD into the PC’s CD-ROM drive.2. In the [Add New Hardware Wizard] dialog box, check the [Specify the
location of the driver [Advanced]] option, and click [Next].
4. Select the [GPW-CB03] folder in the installation CD-ROM, and click [OK].
-8-
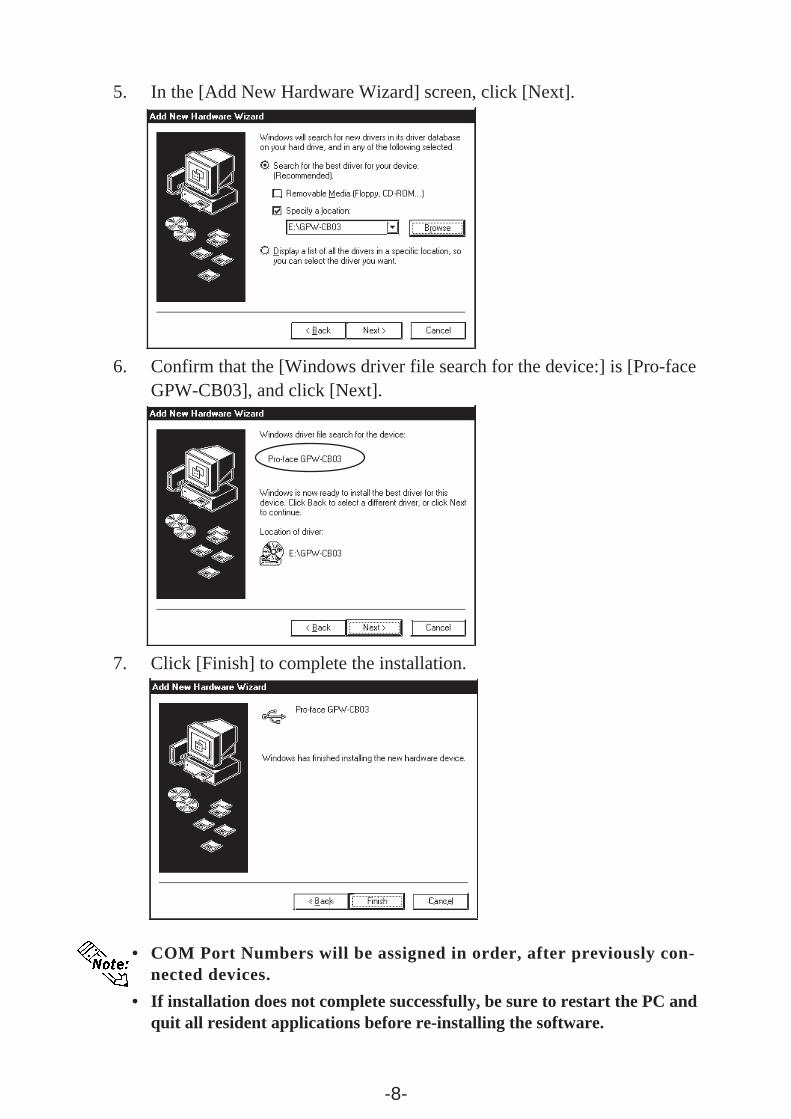
5. In the [Add New Hardware Wizard] screen, click [Next].
6. Confirm that the [Windows driver file search for the device:] is [Pro-faceGPW-CB03], and click [Next].
7. Click [Finish] to complete the installation.
• COM Port Numbers will be assigned in order, after previously con-nected devices.
• If installation does not complete successfully, be sure to restart the PC andquit all resident applications before re-installing the software.
-9-
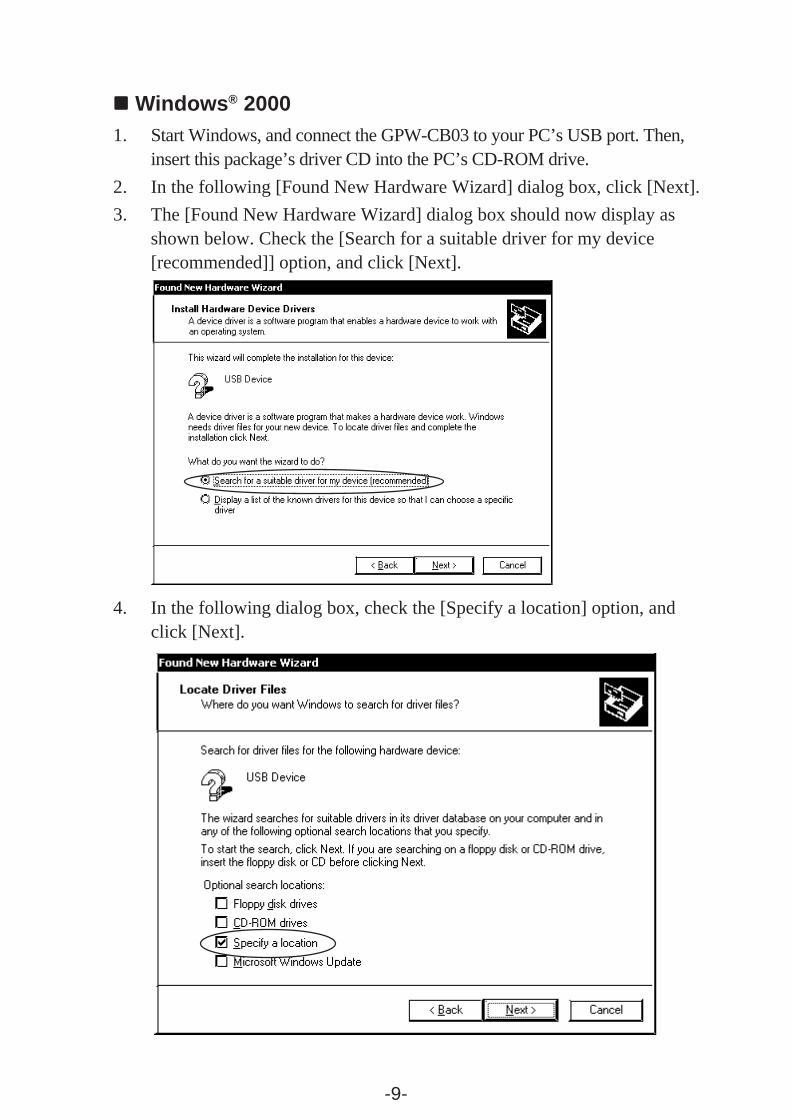
Windows® 20001. Start Windows, and connect the GPW-CB03 to your PC’s USB port. Then,
insert this package’s driver CD into the PC’s CD-ROM drive.2. In the following [Found New Hardware Wizard] dialog box, click [Next].3. The [Found New Hardware Wizard] dialog box should now display as
shown below. Check the [Search for a suitable driver for my device[recommended]] option, and click [Next].
4. In the following dialog box, check the [Specify a location] option, andclick [Next].
-10-
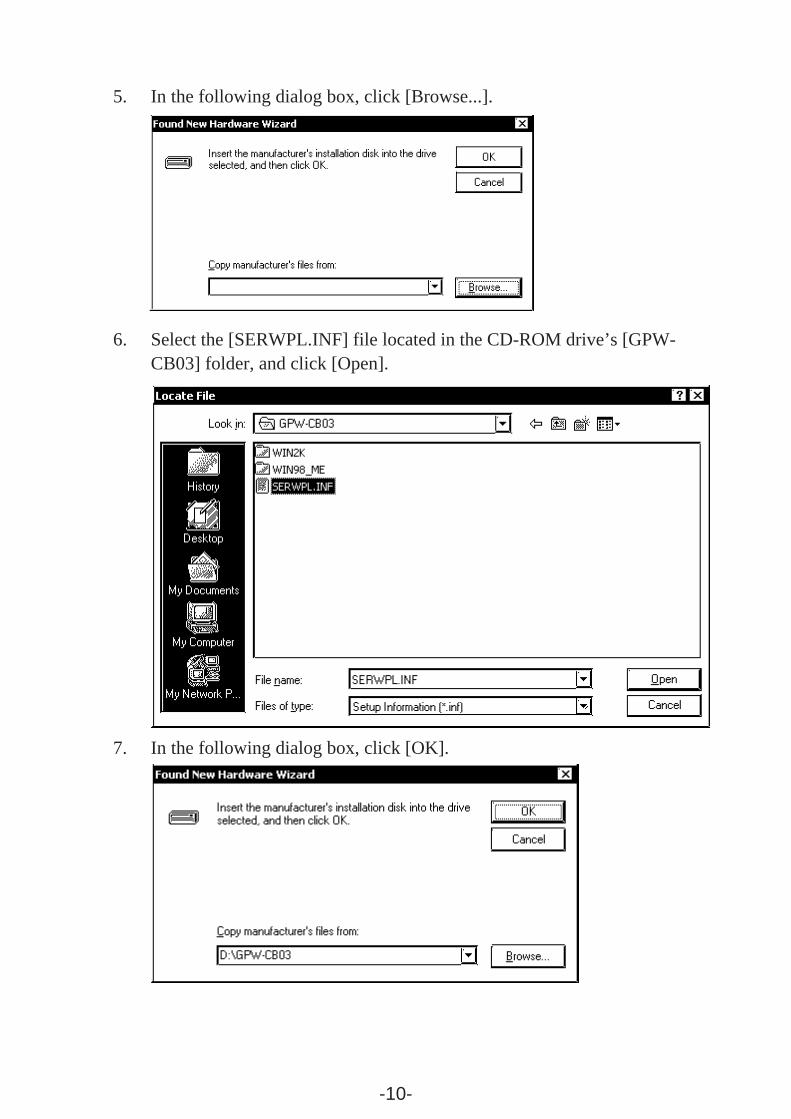
5. In the following dialog box, click [Browse...].
6. Select the [SERWPL.INF] file located in the CD-ROM drive’s [GPW-CB03] folder, and click [Open].
7. In the following dialog box, click [OK].
-11-
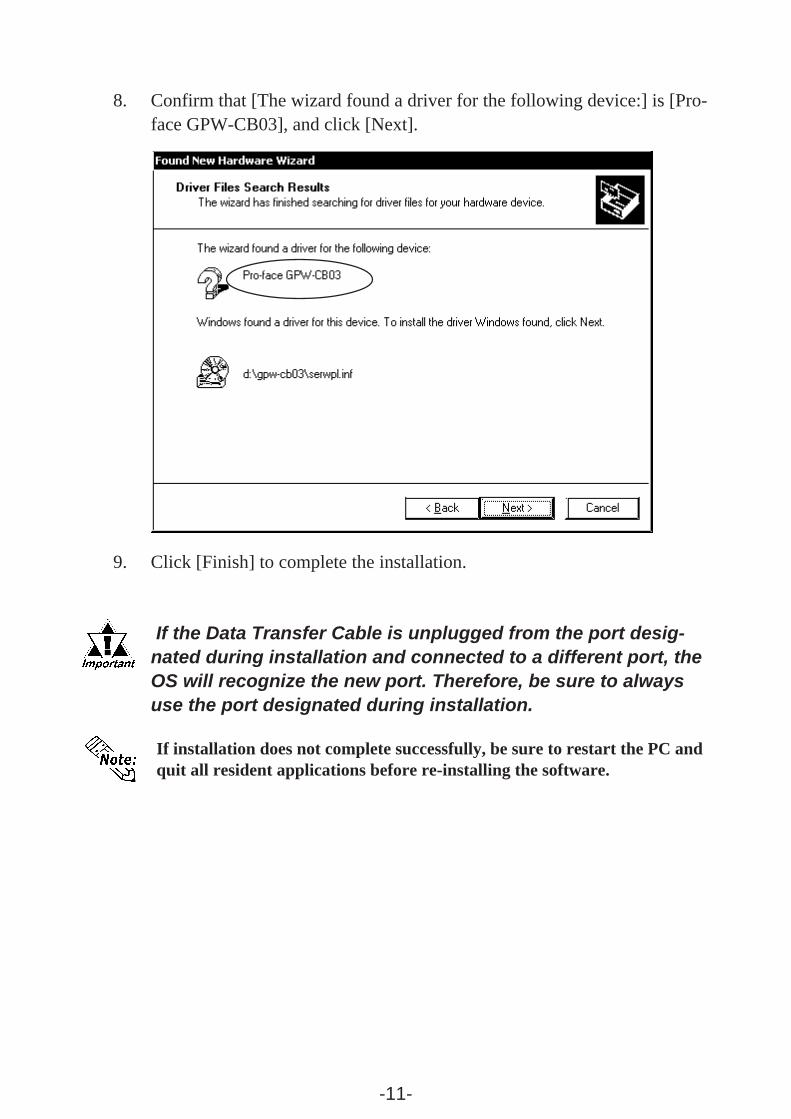
8. Confirm that [The wizard found a driver for the following device:] is [Pro-face GPW-CB03], and click [Next].
9. Click [Finish] to complete the installation.
If the Data Transfer Cable is unplugged from the port desig-nated during installation and connected to a different port, theOS will recognize the new port. Therefore, be sure to alwaysuse the port designated during installation.
If installation does not complete successfully, be sure to restart the PC andquit all resident applications before re-installing the software.
-12-
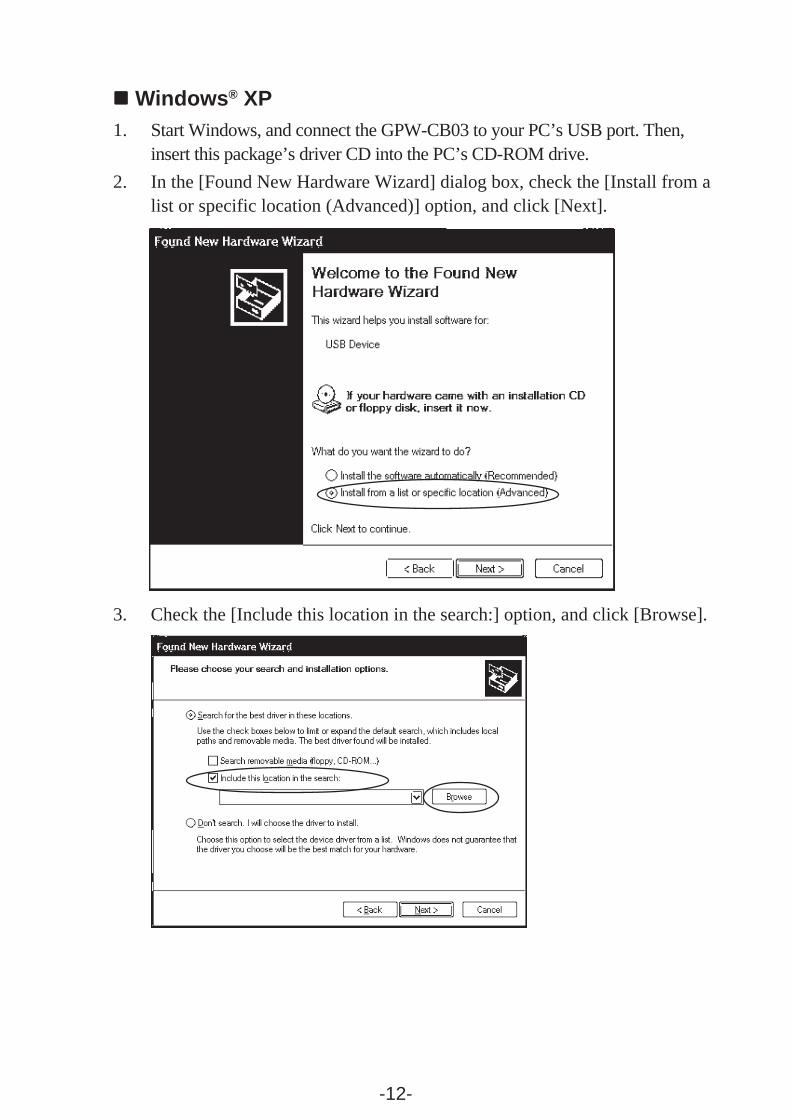
Windows® XP1. Start Windows, and connect the GPW-CB03 to your PC’s USB port. Then,
insert this package’s driver CD into the PC’s CD-ROM drive.2. In the [Found New Hardware Wizard] dialog box, check the [Install from a
list or specific location (Advanced)] option, and click [Next].
3. Check the [Include this location in the search:] option, and click [Browse].
-13-
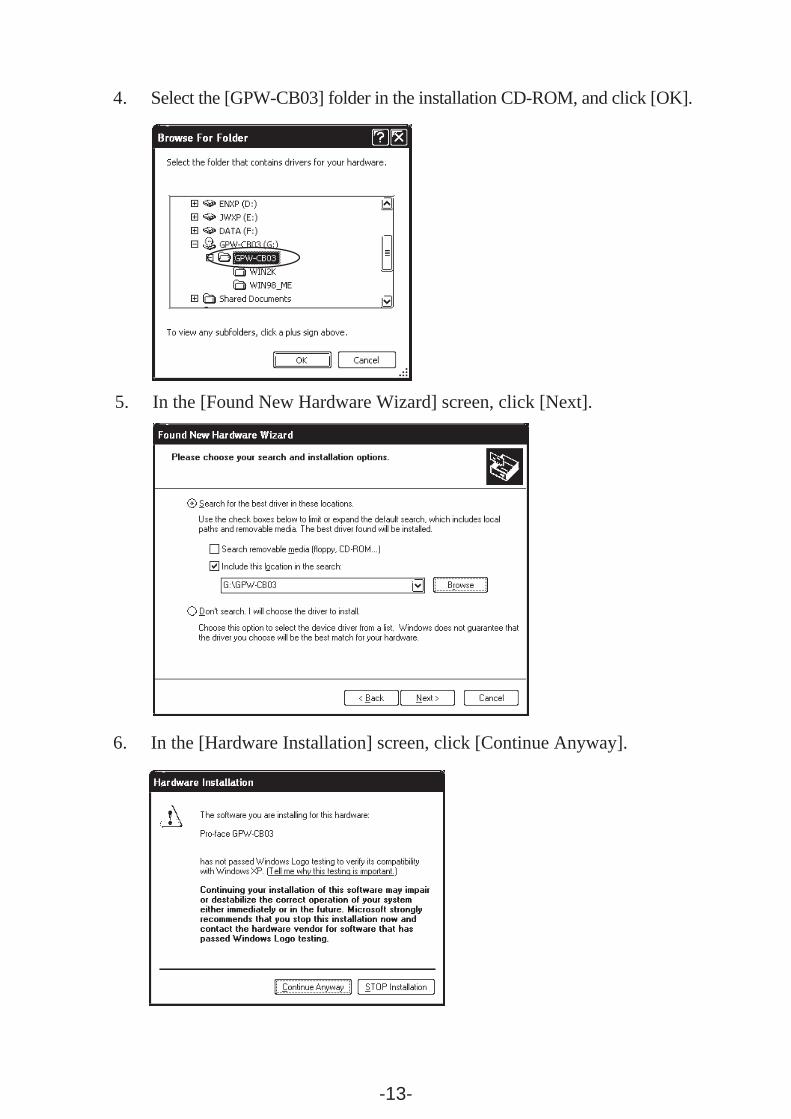
4. Select the [GPW-CB03] folder in the installation CD-ROM, and click [OK].
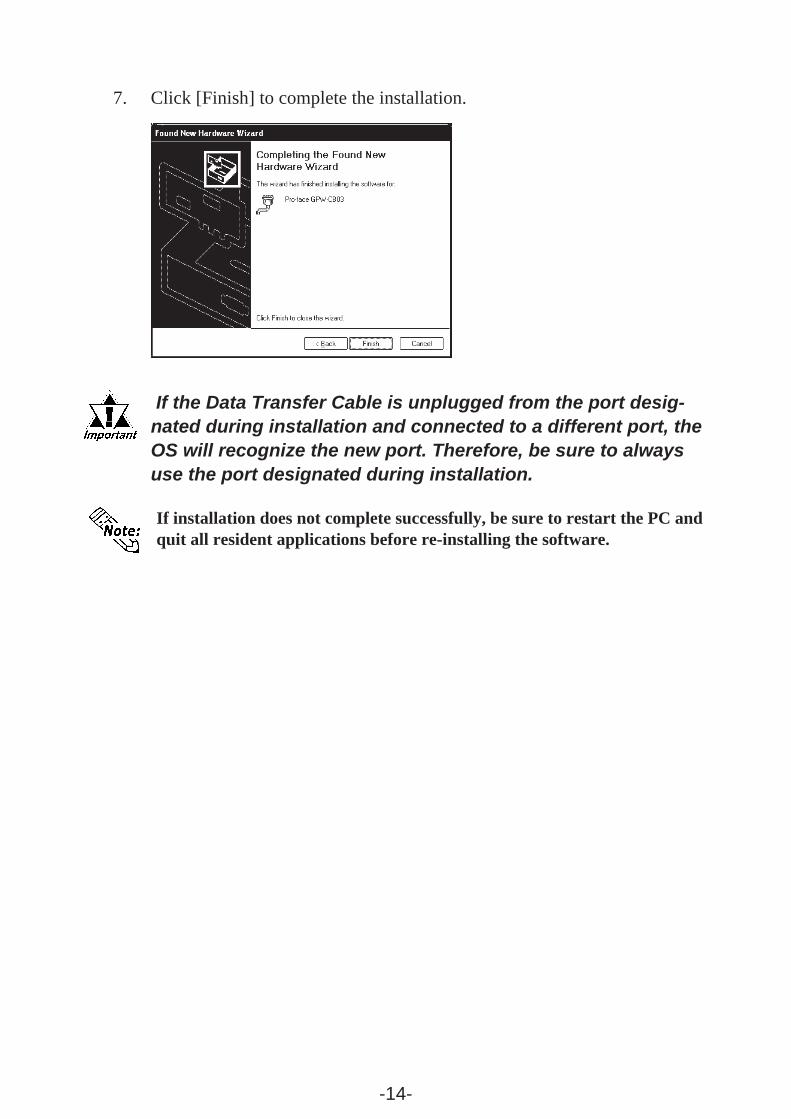
5. In the [Found New Hardware Wizard] screen, click [Next].
6. In the [Hardware Installation] screen, click [Continue Anyway].
-14-
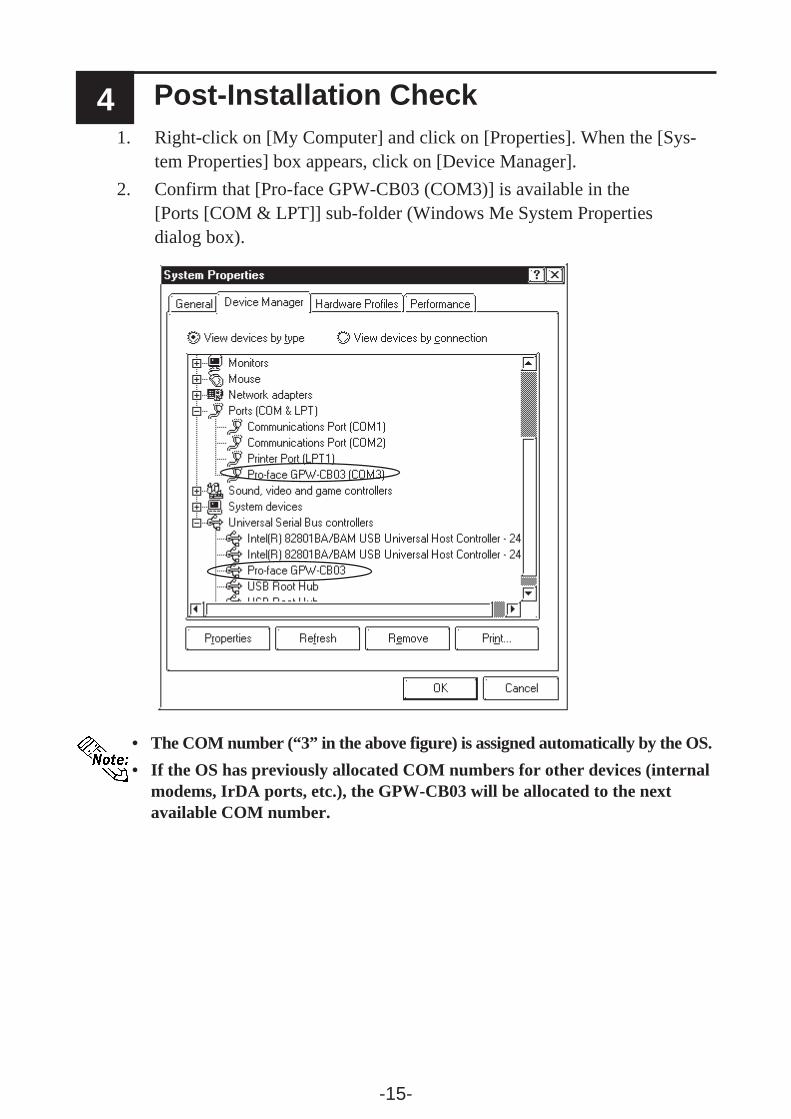
If the Data Transfer Cable is unplugged from the port desig-nated during installation and connected to a different port, theOS will recognize the new port. Therefore, be sure to alwaysuse the port designated during installation.
7. Click [Finish] to complete the installation.
If installation does not complete successfully, be sure to restart the PC andquit all resident applications before re-installing the software.
-15-
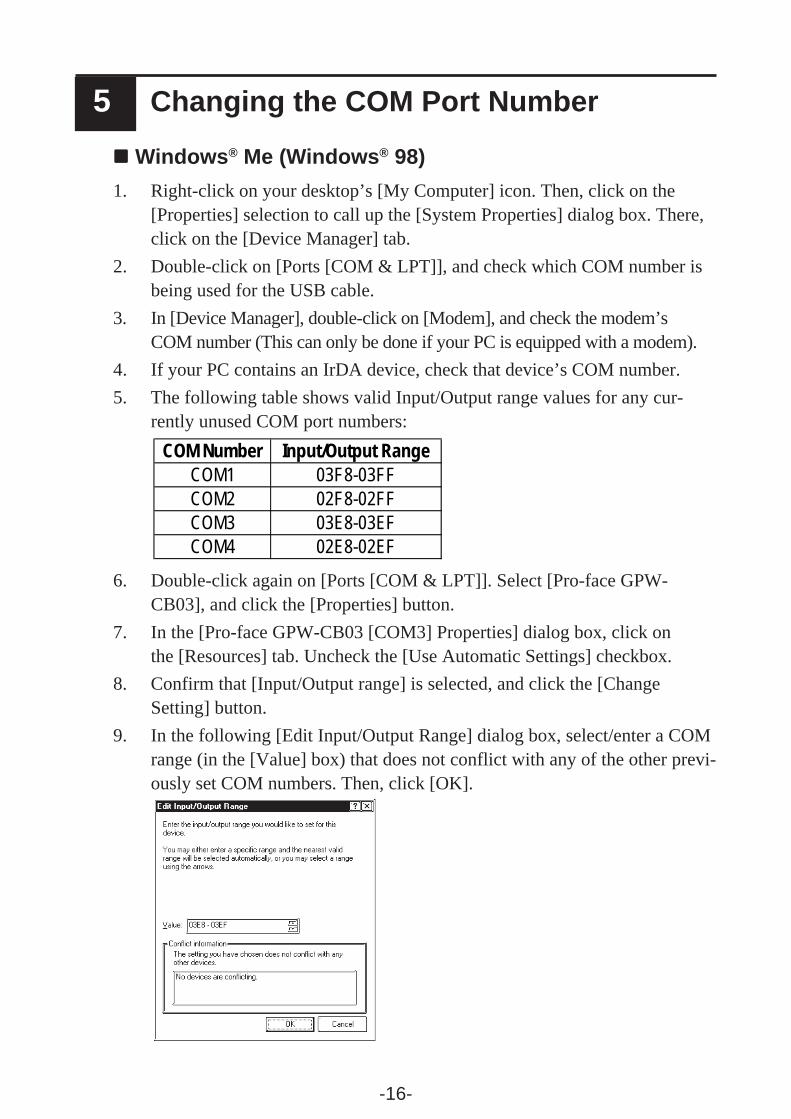
41. Right-click on [My Computer] and click on [Properties]. When the [Sys-
tem Properties] box appears, click on [Device Manager].2. Confirm that [Pro-face GPW-CB03 (COM3)] is available in the
[Ports [COM & LPT]] sub-folder (Windows Me System Propertiesdialog box).
• The COM number (“3” in the above figure) is assigned automatically by the OS.• If the OS has previously allocated COM numbers for other devices (internal
modems, IrDA ports, etc.), the GPW-CB03 will be allocated to the nextavailable COM number.
Post-Installation Check
-16-
COM Number Input/Output RangeCOM1 03F8-03FFCOM2 02F8-02FFCOM3 03E8-03EFCOM4 02E8-02EF
6. Double-click again on [Ports [COM & LPT]]. Select [Pro-face GPW-CB03], and click the [Properties] button.
7. In the [Pro-face GPW-CB03 [COM3] Properties] dialog box, click onthe [Resources] tab. Uncheck the [Use Automatic Settings] checkbox.
8. Confirm that [Input/Output range] is selected, and click the [ChangeSetting] button.
9. In the following [Edit Input/Output Range] dialog box, select/enter a COMrange (in the [Value] box) that does not conflict with any of the other previ-ously set COM numbers. Then, click [OK].
Changing the COM Port Number5 Windows® Me (Windows® 98)
1. Right-click on your desktop’s [My Computer] icon. Then, click on the[Properties] selection to call up the [System Properties] dialog box. There,click on the [Device Manager] tab.
2. Double-click on [Ports [COM & LPT]], and check which COM number isbeing used for the USB cable.
3. In [Device Manager], double-click on [Modem], and check the modem’sCOM number (This can only be done if your PC is equipped with a modem).
4. If your PC contains an IrDA device, check that device’s COM number.5. The following table shows valid Input/Output range values for any cur-
rently unused COM port numbers:
-17-
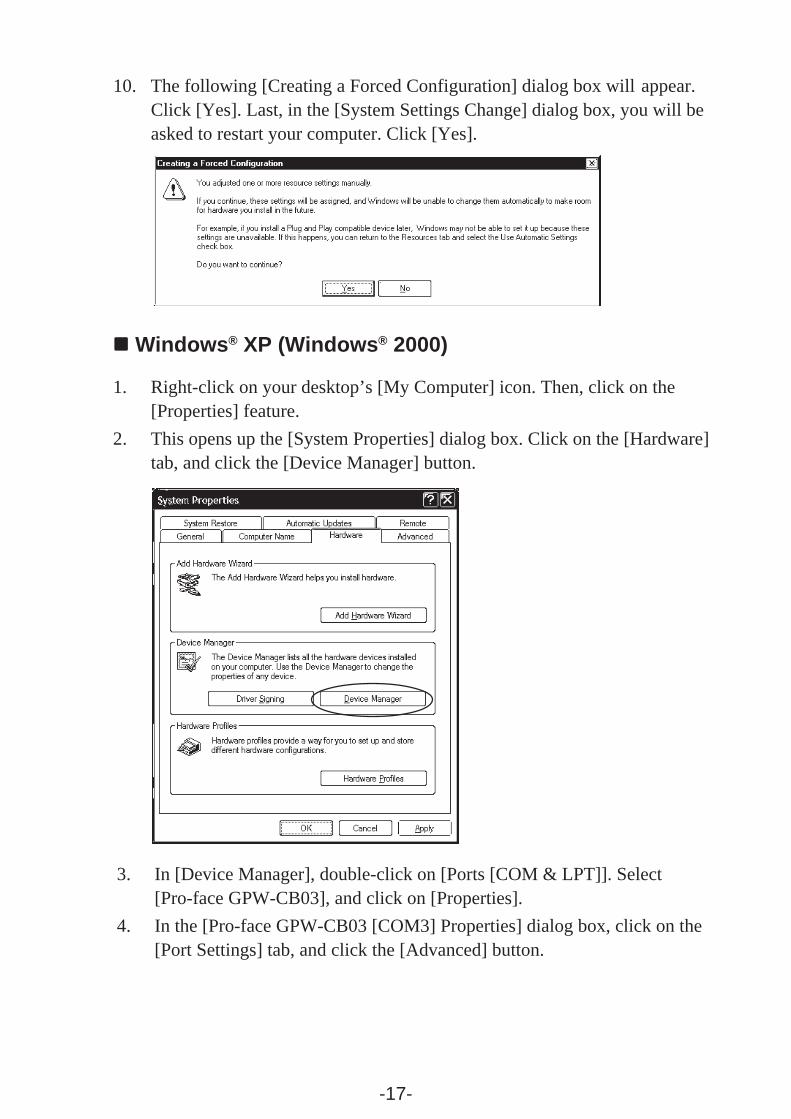
Windows® XP (Windows® 2000)
1. Right-click on your desktop’s [My Computer] icon. Then, click on the[Properties] feature.
2. This opens up the [System Properties] dialog box. Click on the [Hardware]tab, and click the [Device Manager] button.
10. The following [Creating a Forced Configuration] dialog box will appear.Click [Yes]. Last, in the [System Settings Change] dialog box, you will beasked to restart your computer. Click [Yes].
3. In [Device Manager], double-click on [Ports [COM & LPT]]. Select[Pro-face GPW-CB03], and click on [Properties].
4. In the [Pro-face GPW-CB03 [COM3] Properties] dialog box, click on the[Port Settings] tab, and click the [Advanced] button.

-18-
6. When the following [Communication Port Properties] dialog box appears,click [Yes].
Uninstalling the Driver6Unplug the USB Data Transfer Cable from your PC’s USB port. Double-clickthe CD-ROM’s “DRemover_2k.exe” file to start the uninstallation process.
5. In the following [Advanced Settings for COM1] dialog box, select an un-used number for the [COM Port Number], and click [OK].
-19-
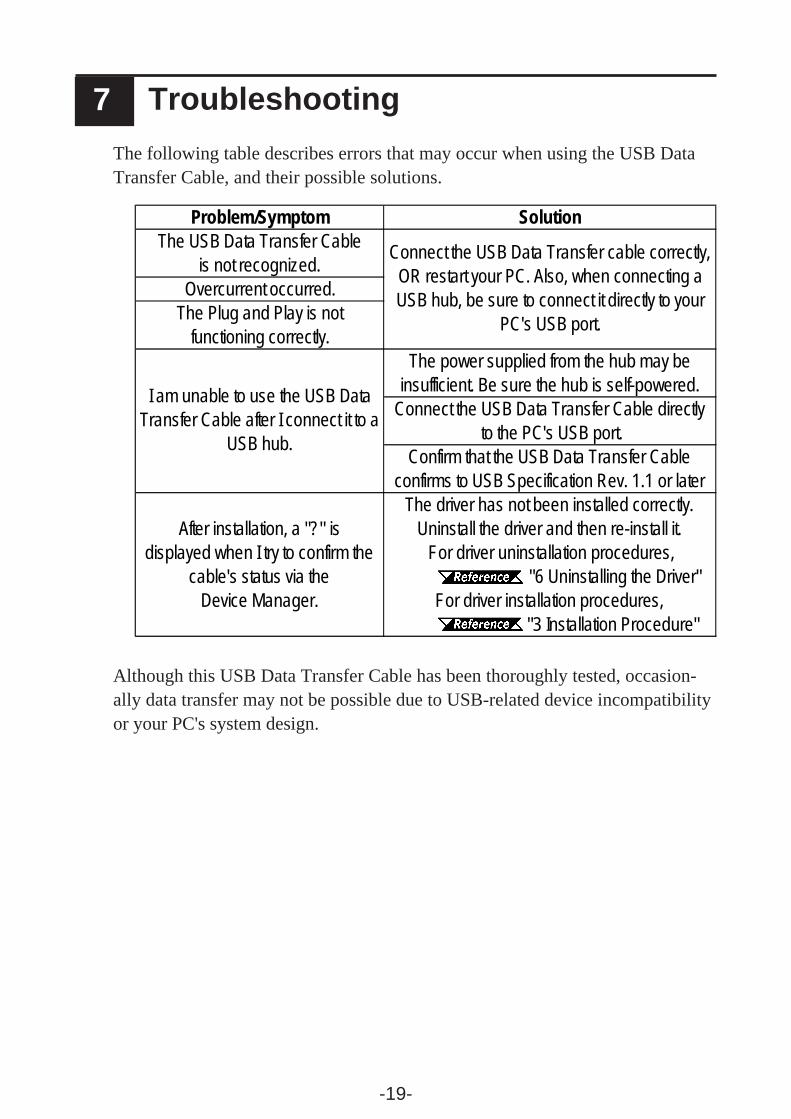
Troubleshooting7The following table describes errors that may occur when using the USB DataTransfer Cable, and their possible solutions.
Problem/Symptom SolutionThe USB Data Transfer Cable
is not recognized.Overcurrent occurred.
The Plug and Play is notfunctioning correctly.
The power supplied from the hub may beinsufficient. Be sure the hub is self-powered.
Connect the USB Data Transfer Cable directly to the PC's USB port.
Confirm that the USB Data Transfer Cableconfirms to USB Specification Rev. 1.1 or later
After installation, a "?" isdisplayed when I try to confirm the
cable's status via theDevice Manager.
The driver has not been installed correctly.Uninstall the driver and then re-install it. For driver uninstallation procedures,
"6 Uninstalling the Driver"For driver installation procedures,
"3 Installation Procedure"
Connect the USB Data Transfer cable correctly,OR restart your PC. Also, when connecting aUSB hub, be sure to connect it directly to your
PC's USB port.
I am unable to use the USB DataTransfer Cable after I connect it to a
USB hub.
Although this USB Data Transfer Cable has been thoroughly tested, occasion-ally data transfer may not be possible due to USB-related device incompatibilityor your PC's system design.

-20-
Memo