Embed Size (px)
Citation preview

Programming andActivating User Codes
User Codes

Contents
If you wish to setup user codes to restrict copying only on your MFD, follow steps1&2. If you wish to restrict printing also, follow the steps in the sectionshighlighted in light grey.
Note, that you will need to enter the user codes in your printer driver to print.Please be aware that secure print is a separate feature called ‘Locked Print’ andhas no link to user codes whatsoever.
STEP 1: Programming User Codes (COPIER)………………...Page 3
Explains how to add user code accounts to the device address book torestrict individual access to the copier function. This includes naming theaccount, adding a code and choosing whether users have access to colour.
Only if you wish to restrict printing. (Otherwise, go to step 2.)
Programming User Codes (PRINTER).....................................Page 6
Details how to add printing to a user code account.
Adding a User Code into the Printer Driver……………….…..Page 7
Shows how to add a user code into printing preferences as a defaultsetting to enable monitoring of printing.
STEP 2: Activating User Codes (COPIER)……………………..Page 10
Explains how to turn on the user code login prompt to require users to loginbefore they can use the copier function.
Only if you wish to restrict printing.
Activating User Codes (PRINTER)……………………………....Page 13
Shows how to add a user code into printing preferences as a de
Printing Counter Readings….……………….…………………....Page 14
Shows how to print counter readings to give an accurate breakdown ofcopy/print/scan/fax usage for each individual code.
Troubleshooting….……………….……………...………………....Page 16
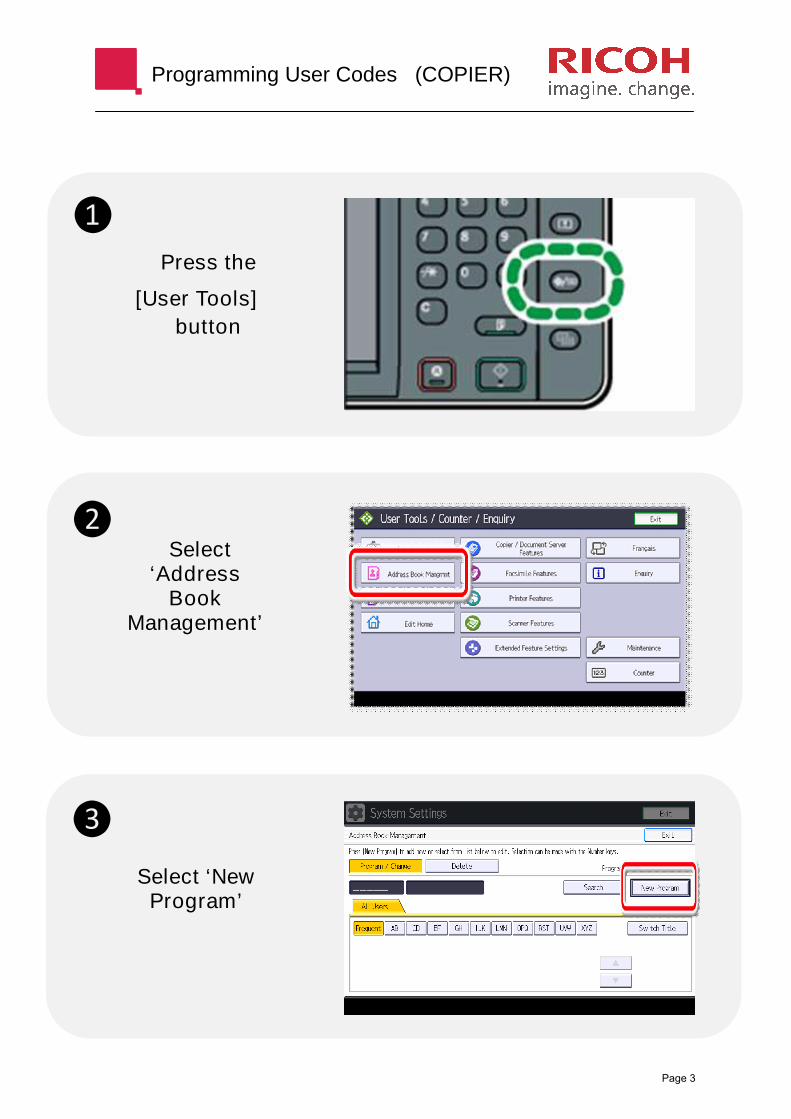
Programming User Codes (COPIER)
Press the
[User Tools]
button
Select‘Address
BookManagement’
Select ‘NewProgram’
❶
❷
❸
Page 3

Programming User Codes (COPIER)
Select‘Change’. Usethe keypad toenter a namefor the user
and thenselect ‘OK’
Select‘Auth. Info’
Enter anumber foryour user
code and thenpress ‘#’
❹
❺
❻
Page 4

Programming User Codes (COPIER)
Select ‘Next’until page 4/5
To allow fullaccess to thecopier, select
‘Full Colour/TwoColour/Single Col-our/Black&White’.
OPTIONAL
Select ‘Black & WhiteOnly’ for users with no
colour privileges.
Go to nextpage to allow
printing
OR
Select ‘OK’ tofinish
❼
❽
❾
Page 5

Programming User Codes (PRINTER)
To allow
printing,
Select
‘Next’
Select‘Colour/Black
& White’
Select ‘OK’ tofinish.
❶
❷
❸
If only restricting copying, please skip to page 10
Page 6

Adding a User Code into the Printer Driver
Click on the
start menu
button.
Select‘Devices &Printers’
You will see alist of printers.Right click on
the Ricoh MFD.Select ‘Printing
Preferences’
❶
❷
❸
If only restricting copying, please skip to page 10
Page 7

Adding a User Code into the Printer Driver
Select‘DetailedSettings’
Then‘Job Setup’
Enter youruser code into
the ‘UserCode’ field
❹
❺
❻
If only restricting copying, please skip to page 10
Page 8

Adding a User Code into the Printer Driver
Select ‘Apply’
Then ‘OK’.
The user code willnow be set asdefault in yourprinter driver.Whenever you
print, the numberof pages, and
whether it’s col-our/mono, will berecorded underyour user code.
❼
❽
If only restricting copying, please skip to page 10
Page 9

Activating User Codes (COPIER)
Press the
[User Tools]
button
Select‘SystemSettings’
Select‘Administrator
Tools’
❶
❷
❸
Page 10

Activating User Codes (COPIER)
Select ‘Next’
Select‘User
AuthenticationManagement’
Select ‘UserCode Auth.’
❹
❺
❻
Page 11

Activating User Codes (COPIER)
Select ‘Next’until page 2/3
To restrict allaccess to the copier,
select ‘Restrict All(B&W/Single Colour/
Two-Colour/FullColour)’
OPTIONAL
Select ‘Full Colour’ toonly restrict colour
copying.
Go to nextpage to restrict
printing
OR
Select ‘OK’ tofinish
❼
❽
❾
Page 12

Activating User Codes (PRINTER)
To restrict
printing,
select
‘Next’ until
page 3/3
Select‘Black &
White/Colour’
OPTIONAL
Select ‘Colour’ to onlyrestrict colour
printing.
Select ‘OK’ tofinish.
❶
❷
❸
If only restricting copying, please skip this section
Page 13

Printing Counter Readings
Press the
[User Tools]
button
Select‘SystemSettings’
Select‘Administrator
Tools’
❶
❷
❸
Page 14

Printing Counter Readings
Select‘Display/
Clear/PrintCounter per
User’
Select‘Print CounterList’ to print
out a list
OPTIONAL
Select ‘Clear’to reset
counters backto zero.
❹
❺
❻
Page 15

Troubleshooting
Why can’t I see the user codes when I go into the Address Book?
Administrator login may have been activated. Press the [<>/123] button. There
will be a ‘Login’ option at the top left of the screen for you to select. The standard
login details are Username: ’admin’. With no password. Once you have entered
these details, carry on as normal. Don’t forget to ‘Logout’ when you are finished.
Why can’t I use the ‘Full Colour’ option on the MFD?
‘Limit to Auto Colour’ is selected (see Page 5, step 8). Using ‘Auto Select’ on the
screen will still allow colour copying. This mode automatically uses Black toner
when it registers a black and white page.
How do I set up a Black & White Only code?
Use the ‘Black & White Only’ option (see Page 5, step 8).
How do I allow access to black & white copying, but require a user code for
colour?
Use the ‘Full Colour’ option in the authentication settings (See Page 12, step 8).
A user code that I have registered is not working.
Check the available functions for that code. (See Page 5, step 8). Check that the
‘#’ key has been pressed. (see Page 4, step 6). If it hasn’t there will be no user
code showing in the account.
It was working, but now my print jobs have stopped printing from the MFD!
Check the code is still in the printer driver settings. Your IT provider may not
allow you to set your own printing defaults. You will have to type this in each time
you print. (see Printer Driver editor tool section)
Printer Driver Editor Tool.
Enables IT support to customise the Printer Driver. A user code ‘pop-up’ field can be enabled to appear
ǁ ŚĞŶ�Ă�ƵƐĞƌ�ƉƌŝŶƚƐ͕ �ƉƌŽŵƉƟŶŐ�ƚŚĞŵ�ƚŽ�ĞŶƚĞƌ�ƚŚĞŝƌ�ƵƐĞƌ�ĐŽĚĞ�ĞĂĐŚ�ƟŵĞ͘
ŚƩ Ɖ͗ ͬ ͬ ƐƵƉƉŽƌƚ͘ ƌŝĐŽŚ ͘ ĐŽŵͬ Śƚŵůͅ ŐĞŶͬ ƵƟůͬW��ͬ W��͘ Śƚŵů
Web Image Monitor
Enter the IP address of the device in internet explorer to access the Address Book remotely and view and
amend your user codes.
Page 16