Embed Size (px)
Citation preview

User Guide
Administration Station. Batch Rules
www.artsyltech.com
docAlpha 5.0

2www.artsyltech.com
docAlpha Administration. Batch Rules
Contents
1. Rule Creation and Editing Wizard 3
1.1. Setting up “Table Row Arithmetic Check” Rules 5
1.2. Setting up “Table Column Arithmetic Check” Rules 6
1.3. Setting up “Auto-Fill with Meta Data” Rules 6
1.4. Setting up “Field Sum” Rules 7
1.5. Setting up “Field Merge” Rules 8
1.6. Setting up “Validation Against DB” 9
1.7. Setting up “Validate Line Item Details Against DB” Rules 12 1.8. Setting up Substring Replacement Rule 14
1.9. Setting up Character Replacement Rule 16
1.10. Setting up Text Field Value Match Rule 17
1.11. Setting up Remove Empty Rows Rule 17
1.12. Setting up Date Transformer Rule 18
1.13. Setting up Custom Rules 18
1.14. 2-Way Header-Footer Matching Rule 19
1.15. 2-Way Line Items Matching Rule 21
1.16. 3-Way Matching Rule 23
1.17. Setting up “Regular Expression” Rule 25
1.18. Setting up “Column Merge” Rules 27
1.19. Average Confidence Rule 27
1.20. Currency Lookup 28
1.21. Setting up “Late Payment Check” Rule 30
1.22. Vendor Lookup 32
1.23. Suspicious Document Merge Detection Rule 34

3 www.artsyltech.com
docAlpha Administration. Batch Rules
1. Rule Creation and Editing Wizard
When used to create a new rule, the wizard first prompts you to select rule type.
Next, the wizard guides you through choosing general rule properties.
You must specify the rule’s name in the Rule Name box.
In the Rule Status box, set rule status. Error-type rules will not allow exporting data until the problem is solved. A Warning-type message can be suppressed by the oper-ator, and data exported ignoring the Warning message.
A very popular option is to do Auto-Confirm of Low Confidence Characters if the rule confirms they are correct (for example, based on a cross-check against a database, or a reconciliation rule). If your rule validated the characters to be correct based on the business logic validation, you can decrease the amount of human labor and auto-confirm low confident characters in the fields checked by the rule automatically, instead of reviewing them by the operator.

4www.artsyltech.com
docAlpha Administration. Batch Rules
1.1. Setting up “Table Row Arithmetic Check” Rules
This rule allows performing the most typical validation of table row arithmetic for the Invoice-like documents:
Check rule on event drop-down list: If your rule is very slow (for example, a live connect to a remote database with millions of records) then you can optimize the speed by applying that rule at full validation and export only (versus applying it over and over again when the operator introduces changes to any fields that are used in the rule).
The events to which the rule can react include:
• Change in value of selected fields: this is a more op-timized approach. The rule probably doesn’t need to re-act to ANY field change on the form, but only to selected field changes. Select those and minimize the quantity of the rule execution during data entry and validation.
• After Data First Loaded – The rule will execute only once, right after the document data is loaded. Use this event to do lookups or calculations before all other events and rules. The event fires both in Recognition Station and Verification Station.
• After Data First Loaded to SC Station: this option provides ability to check the rule when the data is loaded to the verification interface but before the operator has a chance to touch it. Use this event if you need to prepare the data prior to the original review by the operator. The event fires only in Verification Station and is not fired at Recognition Station.
• Only at full validation and export: use this option for the slowest rules. The rule will not be called at any field-level edits, but only when the operator calls for the full validation (F8 or Ctrl + F8) or exporting of the batch.
Next you should set rule type-specific properties. The next screen in the Wizard is different for each type of rule, and is described below separately per rule type.

5 www.artsyltech.com
docAlpha Administration. Batch Rules
From the Checked Table drop-down list, select a table for which you wish to set the rule.
Next, specify the names of the columns Quantity, Price, and Total to be checked (your profile allows nam-ing columns in any way you like, so here specify which of your custom-named columns is considered Quantity, which one is Price, and which one is Total).
If there is a discount, check the Discount checkbox and specify a field or column. Additional discount settings can be specified in the Discount radio button group, which provides a choice of three options:
• Discount amount listed in a column;
• Discount percent listed in a column;
• Discount percent listed in a header field.
If there is a tax column in the line item details section, check the Tax checkbox and specify a field or column. Additional tax settings can be specified in the Tax radio button group, which provides a choice of three options:
• Tax amount listed in a column;
• Tax percent listed in a column;
• Tax percent listed in a header field.
The rule is then automatically checked for all table rows coming from all pages.
This rule only works if all fields used for validation are filled. Therefore, settings for these fields should specify that their filling is required.
1.2. Setting up “Table Column Arithmetic Check” Rules
This rule allows comparing a total calculated across a column with a certain value taken from a field. The column can span multiple pages of the document. This makes it a very popular rule to reconcile columns in long tables against the totals printed on the last page, and thus easily detect double-feed or missing pages that did not contribute to the total column amount:
From the Checked Table drop-down list, select a table for which you wish to set the rule. From the Checked Col-umn list, select a column you wish to check.
Next, specify a Comparison Field whose value will be compared with column total.
Rule Mode specifies if the rule is to check the math on the column, or to actually perform a calculation of the to-tal for the column across all pages:
• If Rule Mode is set to “Compare”, this rule only works if all fields used for validation are filled. Therefore, settings for these fields must specify that their filling is required. The sum of all values in the selected col-umn, across all pages, is compared to the grand total field in the document footer that is selected in the “Comparison Field”.
• If the Rule Mode is set to “Calculate”, then the “Com-parison Field” will be calculated and filled in with the value of the sum of all column values across all pages.

6www.artsyltech.com
docAlpha Administration. Batch Rules
1.3. Setting up “Auto-Fill with Meta Data” Rules
Rules of this type allow users to auto-complete fields with one of the possible kinds of meta-data.
Available meta-data:
• “Profile Name” – name of the current profile.
• “Input Image File Name” – name of the input docu-ment image file.
• “Source Image File Name” – the name of the image after splitting and renaming based on the document structure but before applying the export naming convention (this is the name of the document im-age that the Verification Operator sees on the screen during the verification). This meta-data is safe to use when there are only splitting and renaming applied to the batch documents (no merging).
• “Source Image File Name Collection” – the name of all images after splitting, merging and renaming based on the document structure but before apply-ing the export naming convention (the names of the document images that the Verification Operator sees on the screen during the verification). This meta-da-ta is safe to use with any batch structure operations, even merging, when one resulting document has a whole collection of parent documents that supplied at least one page to the resulting document.
• “User Name” – Windows user name.
• “Machine” – Windows computer name.
• “Current Date” – current date.
• “Date Time” – current date and time.
• “DefinitionName” – the name of the definition (fixed form or semi-structured document definition) that matched to this image document
• “DefinitionCaption” – The Document Classification Caption assigned to the document during the ad-vanced classification
• “Classification Type Doc Name” – The Document Name assigned to the image document during the advanced classification
• “Is Confirmed Classification Type” – a flag showing if the classification results were confirmed by the op-erator in the Classification Confirmation Mode or if the document taxonomy was accepted automatical-ly without the classification verification by operator
• “Processing Start Time SC” – the time-stamp show-ing when the document started processing by the operator. Meta-data used to create document-level reports on operator activity within the docAlpha Ver-ification Station.
• “Batch ID” – the unique ID of the batch to which this document belongs.
•“User ID” – the ID under which the user logged in to the docAlpha Verification Station to review and mod-ify the capture results for this document.
Like other types of rules, Auto-Fill with Meta Data rules are created and edited using the Rules Wizard.
To start the Rules Wizard, navigate to Rules tab in Profile Editor Window, and then click on “New”.
In the first wizard screen, give your rule a name. Then, in the second wizard screen, from the first drop-down list se-lect a profile field to be auto-completed. From the second drop-down list, select the meta-data to fill the field with:

7 www.artsyltech.com
docAlpha Administration. Batch Rules
In the example below, when a sample image docu-ment is opened with the “Basic Invoice MetaData” profile selected, the field Profile Name is auto-filled with the ver-ification profile name:
To distinguish between the data automatically cap-tured on the server side and/or entered in click-entry window by docAlpha Verification Station operator, and meta-data populated by the Auto-Fill with Meta-Data rule, the meta-data are displayed in grey text color as you can see in the screenshot above.
1.4. Setting up “Field Sum” Rules
This rule enables checking the sum for selected fields against a comparison field. Select the fields to sum up from the left list, they will be added to the right list. If you accidentally selected a wrong field, delete it with “Delete” button. Select the comparison field in the drop-down list and the rule is completed.
The screenshot below shows the rule applied to verify that Sub Total plus Tax fields together equal to the Bal-ance Due field value:
1.5. Setting up “Field Merge” Rules
This rule enables concatenation of two or more fields in a set order with delimiter string in between each concate-nated field value, and then placing the concatenated string into the destination field. For example, concatenate “Day” field containing “17”, “Month” field containing “11” and “Year” field containing “2010” in the order Month - Day - Year with
delimiter “/” and result placed into “Date” field will yield a val-ue “11/17/2010” in the field “Date” after the rule executes.
A user can change/update the source fields and when the rule fires again the concatenated result field will be updated as well.

8www.artsyltech.com
docAlpha Administration. Batch Rules
The rule takes in three parameters:
• Source fields: A list of all fields is provided to pick up the source fields. The order of fields is import-ant: the merge will be done in the order the fields are selected and listed in the “Selected Fields” sec-tion. The number of selected fields is not limited.
• Resulting merged field: a drop-down of all fields al-lows picking up the field where the merged result is placed after concatenation.
• Delimiter: a string of characters (may contain none, one or more characters) to place in between each concatenated field value. By default the delimiter is blank (empty) which means the fields are merged without any separation. To use “space” character for fields separation during merging, just type in one space in that field.
1.6. Setting up “Validation Against DB”
The “Validation Against DB” rules provide database look-up, cross-check and substitution capabilities. One or more fields can be validated against a DB table. Fields can be cross-checked to see if there are records in the DB with such pa-rameters combination. Based on matching of one or more fields in the record the rest of the fields can be populated automatically from the database (such as a lookup for the vendor by phone number or lookup of customer’s address by the customer name).
The rule takes in three parameters:
• Connection name: the connection name is selected from the drop-down of the DB connections regis-tered in the current workflow:
DB connection registration is performed on the Defini-tions node of the Workflow Version in the Administration Station, in the “Named Rules Connections” section. The administrator first selects what type of the connection is to be created – direct MS SQL connection, direct MS Ac-cess connection, or an ODBC/OLE DB connection:

9 www.artsyltech.com
docAlpha Administration. Batch Rules
And then based on the selection set all the necessary parameters to establish and test the connection:
Refer to the Named Rules Connections chapter of this man-
ual for the detailed description of creating the named connec-tions that can be used then by any DB lookup rules within the workflow.
• Table name: the name of the table that will be used to do the rule validation. Selected from a drop-down list of all tables belonging to the database selected in the “Connec-tion name” parameter.
• List of field-by-field comparisons: comparisons that have to be done between the fields on the processed docu-ments and the column cells in the database table selected in the “Table name” parameter. That list defines interaction that the rule has to do: lookup and auto-complete, cross-check and validate, fuzzy comparison check, etc.
Use “Add” and “Delete” buttons to add or delete additional field-to-field comparison pairs. The number of the comparison pairs is not limited, one rule can operate with multiple fields and there can be multiple DB lookups within one document definition as well.
When a new field comparison is added, the “New com-parison” dialogue allows picking up the fields from the form and from the database to compare and the type of comparison to be used:
The following comparison types are allowed:
• Exact comparison: requires an exact match between the field in the DB and the field in the form.
• Exact comparison with suggestions: requires an ex-act match between the field in the DB and the field in the form but creates a drop-down list of possible sug-gestions for the operator based on the found values.
• Fuzzy comparison (LIKE): requires matching of the beginning of the field in the DB with the beginning of the field in the form (LIKE type comparison in da-tabase terms).
• Fuzzy comparison (one character difference): re-quires matching of the field in the DB and the field in the form with only one character (any character, including the first one) difference. The difference be-tween this and the LIKE comparison is that only one character deviation is allowed, where as LIKE allows for more, and that the deviated character can be any-where in the field, where as LIKE allows deviations only at the end of the field and not in the beginning.
• Database substitution: the value for that field will be pulled from the database and replaced on the

10www.artsyltech.com
docAlpha Administration. Batch Rules
processed document. That is the connection type used to auto-populate fields on the form based on the values found by a database lookup. An exact comparison or a fuzzy comparison (or several) may be used to locate the record, and then one or more database substitution comparisons would populate one or more fields based on the looked up record.
Note: any rule must contain at least one exact com-parison or fuzzy comparison (LIKE) type comparison.
When a “Validation Against DB” rule executes, docAlpha first selects from the database the records that conform to the search criteria, using the comparisons of the type “Exact comparison” or “Fuzzy comparison (LIKE)”. If no such records are found in the database, the rule re-turns the message “None found in database”, which can be an error or a warning (depending on the type of rule selected on the second screen of the Rule Wizard). Other-wise, the program returns the records selected from the database using the other comparison types, for example the fields that will be populated on the form could use the “Database substitution” comparison type.
If the rule contains an “Exact search with sugges-tions” comparison, the set of records received from the database is analyzed to find the records for which the database table field value is equal to the form field val-ue. If such records are found, the rule returns a collection of them and presents it to the operator to select which one he or she wants to use; otherwise, it returns all en-tries selected from the database and an error or warning (depending on the type of rule selected on the second screen of the Rule Wizard).
If the rule contains a “Fuzzy comparison (one char-acter difference)” comparison, the rule compares the records retrieved from the DB to find those that conform to this condition. If such records are found, the program returns them; otherwise, it returns all entries selected from the database and an error or warning (depending on the type of rule selected on the second screen of the Rule Wizard).
If several records were returned as a result of validating the rule, the operator can select the appropriate one and the selected record will be used by the rule:
The following Advanced Settings are available if
clicked on “Advanced Settings” button:
• Clear the fields if no match is found: By default, if the DB lookup does not find a match in the data-base, but the fields that it was supposed to populate already contain a value (for example, located by ad-vanced document definition, or found by Auto-Find self-learning, or repeated using “Sticky” parameter from the previous document, or click-entered or manually entered by an operator), then the value for the fields for which “Database Substitution” compar-ison type is selected is preserved as it was before the DB lookup. Only if the DB lookup finds a match, the value is replaced using the substitution found in the database. However, if this checkmark is turned on,

11 www.artsyltech.com
docAlpha Administration. Batch Rules
and no match is found in the database, the fields that were supposed to be filled in by database substitu-tion will be cleaned up, their current values deleted.
• Is Distinct: The match against the database uses “Dis-tinct” keyword when formulating the query. Note: may not be supported by some of the databases.
• Ignore Case: The matching is done case-insensitive. Note: may not be supported by some of the databas-es.
• Ignore Spaces: The spaces are ignored, including in-ternal spaces inside the field value and the DB entries values. Note: may not be supported by some of the databases.
• Ignore Symbols: This option allows listing all the symbols that should be ignored when formulating the query. This is the most flexible setting, which
allows doing comparisons with directly controlled symbol sensitivity.
Note: may not be supported by some of the databases.
• Input Values / Formatted Values / Strongly Typed Values: this is a switch that allows using one of the three types of field value for the DB query. Originally, the field is recognized as printed, using the OCR or ICR technology. This is the “Input Value”. Then, if the field is assigned a specific data type, for example a “date” or “currency” type, the “Input Value” is parsed and represented according to that data type. This be-comes known as the “Strongly Typed Value”. Finally, the administrator can enforce Field Formatting to the strongly typed value to give it a specific look, using currency value signs, separators, etc. This is the “For-matted Value”. This selection box allows telling docAl-pha which of the values should be used to formulate the DB query.
1.7. Setting up “Validate Line Item Details Against DB” Rules
The “Validate Line Item Details Against DB” rules pro-vide the operator with the ability to lookup, cross-check and auto-populate, auto-confirm or correct the fields based on the results of database lookups for the line item details in table part of the document. The table part of the document presents specific challenges that the reg-ular “Validate Against DB” rules cannot resolve, such as the ability to check the rule repeatedly for each line item in the table part and the ability to pre-filter the line item details looked up from a database or accounting system based on 2-way matching on the filtering field such as a PO number on an invoice. That is the area where “Validate Line Item Details Against DB” rules are used.
The rule takes in three parameters:
• Connection name: the connection name is selected from the drop-down of the DB connections regis-tered in the current workflow. DB connection regis-tration is performed on the Definitions node of the Workflow Version in the Administration Station.
• Table name: the name of the table that will be used to do the rule validation. Selected from a drop-down
list of all tables that belong to the database selected in the “Connection name” parameter.
• List of field-by-field comparisons: comparisons that have to be done between the fields on the processed documents and the column cells in the database ta-ble selected in the “Table name” parameter. The list contains header-level and line item details-level com-

12www.artsyltech.com
docAlpha Administration. Batch Rules
parisons that pre-filter the records from the database and then compare repeatedly for each line item in the table part the matching of fields in the document to the fields in the DB. That list defines interaction that the rule has to do: lookup and auto-complete, cross-check and validate, fuzzy comparison check, etc.
Use “Add” and “Delete” buttons to add or delete ad-ditional field-to-field comparison pairs. The number of the comparison pairs is not limited, one rule can operate with multiple fields and there can be multiple DB lookups within one document definition as well.
When a new field comparison is added, the “New com-parison” dialogue allows picking up the fields from the form and from the database to compare and determine the type of comparison to be used:
The following comparison types are allowed:
• Exact comparison (header/footer): requires an exact match between the field in the header or in the foot-er of the document with the filtering document-level parameter in the DB, for example a PO number for an invoice to then validate invoice line item details against PO line item details from the database.
• Exact comparison (line item row parameter): re-quires an exact match between the field in the DB and the cell in the table part of the entered docu-ment. This field is going to be used to retrieve the necessary comparison records from the database.
• Fuzzy comparison (LIKE): requires matching of the beginning of the field in the DB with the beginning of the cell in the table part of the entered document (LIKE type comparison in database terms). This field is going to be used to retrieve the necessary compari-son records from the database.
• Check cell against DB: requires an exact match be-tween the field in the DB and the cell in the table part of entered document. That field is not going to be used to retrieve the necessary records from the da-tabase, but instead, after the records are already re-trieved, will be checked for the exact match of values.
• Replacement from DB: the value for that field will be pulled from the database and replaced on the pro-cessed document. That is the connection type used to auto-populate fields on the form based on the val-ues found by a database lookup. An exact compari-son or a fuzzy comparison (or several) may be used to locate the record, and then one or more database substitution comparisons would populate one or more fields based on the looked up record.
Note: any rule must contain at least one exact compari-son or fuzzy comparison (LIKE) type comparison.
To showcase the use of the rule, below follow a step-by-step example of setting up verification of line items in incoming invoices against a table of purchase orders in the database.
First, we want to make sure we verify the line items that belong to the correct purchase order, so we start by set-ting a verification of PO number, a parameter of a header level, against the database, and we require that to match exactly to the PO number found in the DB.
Second, we need to specify one or more columns on the captured invoice document that need to match ex-actly to the data on our PO in the database, for example,

13 www.artsyltech.com
docAlpha Administration. Batch Rules
we will do that with the “Item No” column in our invoice profile.
The last step is to select what other columns (if any) we want to compare once we find the correct line in the PO in the database for our line item number. In our exam-ple, we will verify the description, the price, the quanti-ty and the total amount for the line item against the PO data in the database. Other options for this step include ability to do fuzzy comparison (Fuzzy Comparison (LIKE)) or substitute the value on the document from the value found in the database (Replacement from DB):
Several results are possible then when the rule is being executed on the scanned invoices with line item details:
• According to the comparison type “Exact comparison (header/footer parameter)”, the database contains rows that are not present in the scanned document. You will see “...” rows in the DB table are not found in the captured table!” message telling you how many
rows from the DB are not found on the scanned doc-ument.
• Checking row data is not possible for some rows be-cause several rows have been found in the database according to the comparison type “Exact comparison (Line Item)” that allows only one exact match. You will see “More than one row in the DB match to this row!” message in this case.
• A discrepancy in values is found for some rows. You will see “Row found in the DB but data does not match!” message in this case for each row that is found to be not matching to the information in the database.
• No correspondence is found in the database for some rows in the scanned document. You will see “No matching row in DB found for this row!” message for each row that is found on your scanned image but are not found in the DB.
1.8. Setting up Substring Replacement Rule
It is a flexible substring replacing rule that allows working with both text fields and table blocks.
The rule is an equivalent to a popu-lar MID (start, length) function: it al-lows cutting the “length” number of characters from any string, starting at the “start” position of that string. The result can be returned to the same field where the source was taken from or to another field. The rule can also be applied to a table column; then it will repeat such operation for each cell of that column.
The Substring Replacement Rule takes the following configuration pa-rameters:

14www.artsyltech.com
docAlpha Administration. Batch Rules
• Source Block switch allows applying the rule either to text fields or to columns of tables. If the rule should be applied to a text field, select the “Field” switch. If it should be applied to a table column, select “Table Column” switch.
• If the “Source Block” switch is in the “Table Column” position, then the “Table” drop-down list allows se-lecting the name of the table that contains the col-umn to be filtered, and the “Source Field/Column” shows all columns of any profile table that you se-lect. If the “Source Block” switch is in the “Field” posi-tion, then the “Table” drop-down is disabled, and the “Source Field/Column” drop-down list contains all text fields of the profile. Using the “Table” and “Source Field/Column” you can select any text field or text col-umn in any table where the rule needs to be applied.
• Destination Field/Column: if working with tables, the Destination Field/Column contains the list of col-umns of the table selected in the “Table” list; if work-ing with fields, the Destination Field/Column con-tains the list of all profile fields. Using this setting you can select where the filtered results should be placed. Note: it is possible to return the filtered result back to the same field or table column if desired. For that, make the “Source Field/Column” and the “Destination Field/Column” point to the same column or text field.
• Search the Source Block In: allows selecting at what format of data the search should be performed. The
fields in Verification Profiles often use formatting (for example, the “raw” value coming from OCR engine might read “January 7, 1985”, while the “formatted” value for the field may be set to use format “MM/dd/yy” and so would read “01/07/85”. Depending on the selection in this drop-down, “Raw Data Format” or “Formatted Data Format”, the search can be done on both variants.
The “Substring Search Settings” section allows set-ting the search direction, starting character index and the length of sub-string to be searched:
• Start Index sets the index of the first character in the
sub-string. The index is zero-based, so to cut starting from first character, select “0”; to cut starting from the 3rd character, select “2”.
• Length dictates the number of characters to cut. Zero (default value) means “no limit” and will include all characters through the end of the string.
• Search Backwards flag allows starting the indexes count and length count from the end of the string.
1.9. Setting up Character Replacement Rule
This was a new rule introduced in docAlpha 4.5. It is a flexible character/substring replacing rule that allows working with both text fields and table blocks. The rule allows setting one or more replacement “source”- “result” pairs and then applying them to a text field or to a table column. For line items, the rule will repeat its action for each member cell of that table column.
The Character Replacement Rule takes the following configuration parameters:

15 www.artsyltech.com
docAlpha Administration. Batch Rules
• Source Block switch allows applying the rule either to text fields or to columns of tables. If the rule should be applied to a text field, select the “Field” switch. If it should be applied to a table column, select “Table Column” switch.
• If the “Source Block” switch is in the “Table Col-umn” position, then the “Table” drop-down list al-lows selecting the name of the table that contains the column to be filtered, and the “Source Field/Column” shows all columns of any profile table that you select. If the “Source Block” switch is in the “Field” position, then the “Table” drop-down is disabled, and the “Source Field/Column” drop-down list contains all text fields of the profile. Using the “Table” and “Source Field/Column” you can select any text field or text column in any table where the rule needs to be applied.
• Destination Field/Column: if working with tables, the Destination Field/Column contains the list of columns of the table selected in the “Table” list; if working with fields, the Destination Field/Column contains the list of all profile fields. Using this setting you can select where the filtered results should be placed. Note: it is possible to return the filtered result back to the same field or table column if desired. For
that, make the “Source Field/Column” and the “Des-tination Field/Column” point to the same column or text field.
• Search the Source Block In: allows selecting at what format of data the search should be performed. The fields in Verification Profiles often use formatting (for example, the “raw” value coming from OCR engine might read “January 7, 1985”, while the “formatted” value for the field may be set to use format “MM/dd/yy” and so would read “01/07/85”. Depending on the selection in this drop-down, “Raw Data Format” or “Formatted Data Format”, the search can be done on both variants.
• Search Substring – Replacement Substring pairs: The lower section of the rule window allows setting up pairs of “search substring” – “replacement sub-string”. There is no limitation how many pairs may be set: as soon as a pair is added, a new blank entry line is automatically created, ready for the next pair entry.
When the Character Replacement Rule executes, all “Search Substrings” are searched in the designated field or table column and if found replaced with the values set in “Replacement Substrings”.
1.10. Setting up Text Field Value Match Rule
This was a new rule introduced in docAlpha 4.5. It allows text-to-text matching of two fields. During the matching, it allows ignoring the case and ignoring spaces (includ-ing internal spaces). The rule takes the following configu-ration parameters:
• Match Field 1 and Match Field 2: Select here the
fields that you want to compare.
• Ignore Case: Select if the matching should ignore the letter case.
• Ignore Spaces: Select if the matching should ignore the spaces, including internal spaces in the matched fields.

16www.artsyltech.com
docAlpha Administration. Batch Rules
1.11. Setting up Remove Empty Rows Rule
This was a new rule introduced in docAlpha 4.5. It al-lows removing empty rows that were captured in the ta-ble block to which this rule is applied. Depending on how the Document Definition is created in Designer Station, and how the real-life scanned documents look, the defi-nition may return empty rows at the end of the table if the designer did not take special steps to avoid that. The quick and easy remedy is using this rule to truncate the table to only contain non-empty rows. It is a very simple rule, just select which table blocks the rule should apply to and click “Finish”:
1.12. Setting up Date Transformer Rule
This was a new rule introduced in docAlpha 4.5. It al-lows parsing the sections of dates (day, month or year out of a complete date) and returning them to other fields or columns. The rule can be applied to a field, with parsed result placed to another field. Or it can be applied to a table column, with every cell in that column parsed and result placed in another column in the table.
The Date Transformer Rule takes the following configu-ration parameters:
• Source Block: A selector that allows applying the rule to an individual field or to a whole column in a table block.
• Table: If the “Source Block” is switched to be a “Ta-ble Column”, this drop-down becomes enabled and displays the list of all table blocks in the Verification Profile. Select the table that contains the necessary column to parse the dates.
• Source Field/Column: The drop-down list contains either the list of all standalone fields (if the “Source Block” is set to be a “Field”) or the list of all columns of the table selected in the “Table” drop-down above it (if the “Source Block” is set to be a “Table Column”). Select the field or table column that you want to parse the date from here.
• Fill Value: This switcher tells what part of the date should be returned – the Year, the Month or the Day. It dictates the action of the rule, what it parses out of the source field or column.
• Fill Field/Column: Select here the destination, where the parsed portion of the date should be placed. If the original parsed location was a standalone field, the drop-down list here will display the list of all standalone fields. If it was a column of a table, the list here will display all columns of that table. Select the destination here and click “Finish” to complete the Rule Wizard setup.

17 www.artsyltech.com
docAlpha Administration. Batch Rules
1.13. Setting up Custom Rules
The custom validation rules provide an open .NET API to the rules validation. That allows a developer to add custom-built rules and implement in them the necessary verification logic. The rules may display cus-tom user interface screens during the execution. Any rule can return error message related to one field, or a whole group of fields or table cells. The rules also can modify the values in the fields and table cells, thus providing maximum control for the ease of custom-ization.
To connect the custom rule created in any .NET lan-guage and compiled to the DLL format, the following pa-rameters are required:
• Custom rule DLL that implements the rule logic. Re-fer to the “docAlpha Custom API Rules and Custom API Export Developer’s Guide” manual for the details of the custom rules API and samples of implement-ed rules of different complexity. This parameter is re-quired. Click on “...” button to browse for the DLL file.
• Optional Rule Class (entry point of the library). It may be used to specify the name of the class that imple-ments the rule. That becomes important if the library contains more than one rule class. If the library con-tains only one rule class, then the field may be left blank, and the necessary rule class will be selected automatically.
• Optional Configuration INI-file. The configuration parameters for the rule can be provided in INI file (in XML or other formats as selected by the rule devel-oper). Alternatively, the configuration parameters for the rule may be hard-coded in the rule source code instead of configurable in the INI file - if so, the INI file name parameter may be blank. Click on “...” button to browse for the configuration file.
Note: all files from the folder containing the Custom
rule DLL are copied to server. That is very convenient for rule deployment if your rule uses resource files, data files and other associated auxiliary files, but make sure there are no unnecessary files in the folder as they would be picked up and copied to the server as well.
1.14. 2-Way Header-Footer Matching Rule
Described rule is necessary when you compare the value both for “PO Number” and the “Amount” using verification fields and the same fields in the “DataBase” table. The “2-Way Header-Footer Matching Rule” is acceptable only for blocks. Use “Invoice Action 2-Way Line Items Matching rule” only for table values. The option of “Deviation Allowance” is available for the described rule (read below for more details).
1.1. In order to create the rule, please run profile prop-erties of the opened window for the relevant workflow and choose the “InvoiceAction 2-Way Header-Footer from the list of rules:

18www.artsyltech.com
docAlpha Administration. Batch Rules
Then, press the “Next” button to go to the next settings window.
1.2. The first setting window is standard for all rules and allows to choose the general window of “Validation Rule Properties” (please, refer to section “Rule Creation and Editing Wizard” for detailed info):
1.3. The second settings window allows adjusting the database source – select among “Connection name” drop-down list. Also there is “Table name” option block that allows choosing the database table that contains the necessary fields for matching.
Provide the required settings in the image above and
click to the “next” button in order to get an access to the next settings window.
1.4. The settings window allows to set the exact names of matching fields for both columns of “PO Number (DB Column name)” equals “PO Number (Capture Field Name)” and “Amount (DB Column name)” equals “Amount (Cap-ture Field Name)”:
Also, you can see above “Deviation Allowance” sub win-dow:
It allows to set 3 types of deviation:
1) “Maximum Percent” – this kind of deviation de-termines that both “PO Number” and “Amount” values for the capture fields should have an acceptable rate of deviation from the corresponding fields in the database by no more than the percentage indicated in block of “Deviation value”. If the deviation number exceeds the specified percent number, the rule will give a “Warning” or “Error”.
2) “Maximum value” – the difference between the “Maximum Percent” (described in point 1) and the pres-ent point is that the Deviation`s value is presented as an integer number.
3) “No Deviation Allowed” – deactivate the setting block “Deviation value”. If “No Deviation Allowed” block is active therefore “Deviation value” is inactive only if the in-teger number values have exact matching in the fields of “PO Number” (“DB Column Name” equals “Capture Field Name”) and in the fields of “Amount” (“DB Column Name” equals “Capture Field Name”)
1.5. The final settings window combines selected ac-tions items of the settings windows adjusted in “2-Way Header-Footer Matching Rule”:

19 www.artsyltech.com
docAlpha Administration. Batch Rules
“Settings” window eases the correction of mistakes. Change setting option available that was provided in set-ting windows (except the rule name) earlier.
The code of automatically generated SQL query could be found here:
To save all the settings provided above, click the “Finish” button.
1.15. 2-Way Line Items Matching Rule
Described rule is necessary when you compare the val-ue both for “PO Number” and the “Amount” using verifica-tion fields and the same fields in the “DataBase” table. The “2-Way Line Items Matching Rule” is acceptable only for blocks. Use “Invoice Action 2-Way Line Items Match-ing rule” only for table values. The option of “Deviation Allowance” is available for the described rule (read below for more details).
2.1. In order to create the rule, please run profile properties of the opened window for the relevant work-flow and choose the “InvoiceAction 2-Way Line Items Matching Rule” from the list of rules:
Then, press the “Next” button to go to the next settings window.
2.2. The first setting window is standard for all rules and allows to choose the general window of “Validation Rule Properties” (please, refer to section “Rule Creation and Editing Wizard” for detailed info):
2.3. The second settings window allows adjusting the database source – select among “Connection name” drop-down list. Also there is a “Table name” option block that allows choosing the DataBase table that contains the necessary fields for matching.
Provide the required settings in the image above and click the “next” button in order to get an access to the next settings window.
2.4. The settings window allows to set the exact names of matching fields for:
• “PO Number”: for “(DB Column Name)” and “(Capture Field Name)” select the field blocks using the same val-ues. The setting will determine the exact document of the table whose values will be taken for comparison. For the “Checked table” – choose the value of V-profile table where you want to compare its field values.

20www.artsyltech.com
docAlpha Administration. Batch Rules
• “Row key”: for “(DB Column Name)” and “(Capture Column Name)” select the field blocks using the same values. Based on the name of the same values for “(DB Column Name)” and “(Capture Column Name)”, in future table columns will be used to take values for comparison.
• “Price”: Choose the column [both for “(DB Column Name)” and “(Capture Column Name)”] values that should be used for comparison of “Deviation Allowance” (for “Row Key” and “PO Number“. “No Deviation Allowed” option is set as default).
Note!“PO Number“ and “Row Key” settings are used to find
the exact document and the exact table where the column`s fields comparison will be done.
Also, you can see above “Deviation Allowance” sub win-dow:
It allows to set 3 types of deviation:
4) “Maximum Percent” – this kind of deviation de-termines that the both the “PO Number” and “Amount” values for the capture fields should have an acceptable rate of deviation from the corresponding fields in the
database by no more than the percentage indicated in the “Deviation value” block. If the deviation number ex-ceeds the specified percent number, the rule will give the “Warning” or “Error”.
5) “Maximum value” – the difference between the “Maximum Percent” (described in point 1) and the pres-ent point is that the Deviation`s value is presented as an integer number.
6) “No Deviation Allowed – deactivate the setting block “Deviation value”. If “No Deviation Allowed” block is active therefore “Deviation value” is inactive only in case when integer number values have the exact match in the fields of “PO Number” (“DB Column Name” equals “Capture Field Name”) and in the fields of “Amount” (“DB Column Name” equals “Capture Field Name”)
2.5. The final settings window combines selected ac-tions items of the settings windows adjusted in “2-Way Line Items Matching Rule”:
The window above eases the correction of mistakes. The setting changes and corrections are allowed for all previous rule`s nodes. Add one more comparing table column and press “Add button” providing all the neces-sary settings in the appeared window.
The code of automatically generated SQL query could be found here:

21 www.artsyltech.com
docAlpha Administration. Batch Rules
To save all the settings provided above, click the “Finish” button.
1.16. 3-Way Matching Rule
This rule is widely used for Invoice Action but could also be used separately from it. It provides matching of invoice line item details against the PO line item details and Delivery Slip line item data. The rule makes sure that we are not asked to pay for more items than we ordered, and that we are not asked to pay for any items that have not been delivered yet. It also monitors the invoice item prices making sure that they are the same or less than the original PO prices listed on the PO side.
1.1. To create the rule, run the profile properties win-dow for the necessary workflow and choose the “Invoice-Action 3-Way Matching Rule” from the list of rules:
Press the “Next” button to go the next setting window.
1.2. The first setting window allow to set the general rule properties (refer to “Rule Creation and Editing Wiz-ard” section for detailed info):
1.3. The next setting window allows to select the source database which would be used for 3-Way Match-ing Rule. The existing database could be selected using Connection name option string and should consist in PO table. Also there is a “Table name” option block that al-lows choosing the DB table that contains the necessary fields for matching. This connection is needed to detect the Databases` Order table:

22www.artsyltech.com
docAlpha Administration. Batch Rules
Provide the necessary setting and click onto the “next” button to get access to the next setting window.
1.4. The settings for this node allow to detect the data-bases` table for Deliveries:
Provide the necessary setting and click on the “next” button to get access to the next setting window.
1.5. This setting node allows to select the comparing fields for Databases` Order table both for DB fields and docAlpha`s fields. The fields will be taken from the Orders tables both for DB and docAlpha :
“PO Number”: for “(DB Column Name)” and “(Capture Field Name)” select the field blocks using the same val-ues. The setting will determine the exact document of the table which values will be taken for comparison. For the “Checked table” – choose the value of the V-profile ta-ble where you want to compare its field values.
“Row key”: for “(DB Column Name)” and “(Capture Column Name)” select the field blocks using the same values. Based on the name of the same values for “(DB Column Name)” and “(Capture Column Name)”, the data available in that table col-umns will be used to take values for comparison.
“Quantity” for “(DB Column Name)” and “(Capture Col-umn Name)” – the item` s quantity value for Orders table.
“Price”: Choose the column [both for “(DB Column Name)” and “(Capture Column Name)”] values that should be used for comparison of “Deviation Allowance” (for “Row Key” and “PO Number“. “No Deviation Allowed” option is set as default).
Also as you can see in the picture below there is a “De-viation Allowance” sub window:
It allows setting one any of 3 types of deviation for the “Price” fields:
7) “Maximum Percent” – this kind of deviation de-termines that both “PO Number” and “Amount” values for the capture fields should have an acceptable rate of deviation from the corresponding fields in the database by no more than the percentage indicated in the “Devi-ation value” block. If the deviation number exceeds the specified percent number, the rule will give a “Warning” or “Error”.
8) “Maximum value” – the difference between the “Maximum Percent” (described in point 1) and the pres-ent point is that the Deviation`s value is presented as an integer number.
9) “No Deviation Allowed – deactivate the setting block “Deviation value”. If “No Deviation Allowed” block is active therefore “Deviation value” is inactive only in case when integer number values have exact matching in the fields of “PO Number” (“DB Column Name” equals “Capture Field Name”) and in the fields of “Amount” (“DB Column Name” equals “Capture Field Name”)
23 www.artsyltech.com
docAlpha Administration. Batch Rules
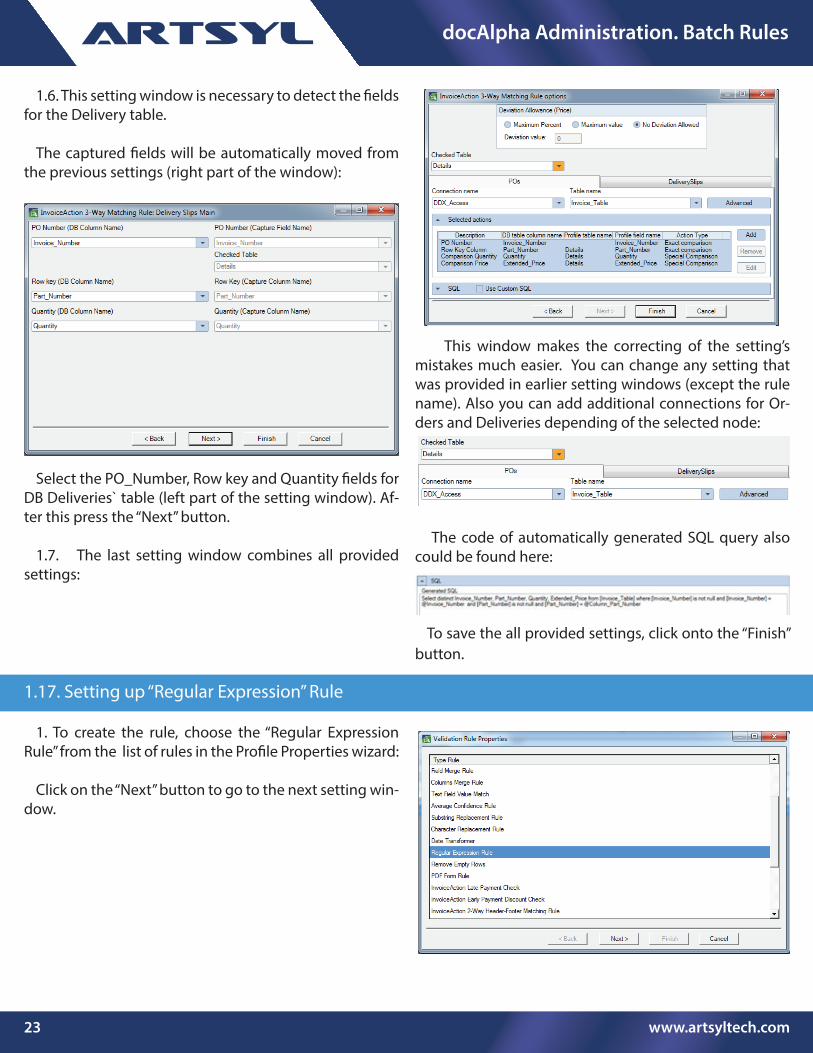
1.6. This setting window is necessary to detect the fields for the Delivery table.
The captured fields will be automatically moved from the previous settings (right part of the window):
Select the PO_Number, Row key and Quantity fields for DB Deliveries` table (left part of the setting window). Af-ter this press the “Next” button.
1.7. The last setting window combines all provided settings:
This window makes the correcting of the setting’s mistakes much easier. You can change any setting that was provided in earlier setting windows (except the rule name). Also you can add additional connections for Or-ders and Deliveries depending of the selected node:
The code of automatically generated SQL query also could be found here:
To save the all provided settings, click onto the “Finish” button.
1.17. Setting up “Regular Expression” Rule
1. To create the rule, choose the “Regular Expression Rule” from the list of rules in the Profile Properties wizard:
Click on the “Next” button to go to the next setting win-dow.

24www.artsyltech.com
docAlpha Administration. Batch Rules
2. The next node allows to set general rule`s settings: enter the rule name, choose the necessary “Check rule on event” action from the drop-down list etc:
Refer to the Rule Creation and Editing Wizard for ad-ditional information.
After all necessary settings have been provided click on the “Next” button.
The next node is the main setting node. It consists in the next steps:
3.1. Source Block: can be set to “Field” or “Table Col-umn”.
3.2. Table: this block becomes an active if the “Table Column” has been checked. In case if the Source Block is checked as “Field” the Table`s drop down list became inactive. For “Table Column” selection the drop-down list would display all existing V-profile`s tables.
3.3. Source Field/Column: allows to choose the block (if the Source block is “Field”) or column (if the Source block is “Table Column”) name that will be used for the regular expression check.
3.4. Expression: this option block is used to set the reg-ular expression that would be used for the “source field/column” value check. The syntax of the regular expres-sions that should be used for the “Expression” box could be found at the Creating Custom Search Types section.
3.5. Test Text: the “Test Text” area allows you to pro-vide a sample text fragment and see if the expression that you have built matches to any section of that test text fragment. Click on “Test” button on the right of the test text fragment to apply your search expression to the test text fragment. If it cannot be found within your test text, the “Test Result” will return “No”. If it can be located within the texting text string, then the “Test Result” will return “Yes”, and the first found match in Test Text will be highlighted in green
4. Click on the “Finish” button after all settings have been provided.

25 www.artsyltech.com
docAlpha Administration. Batch Rules
1.18. Setting up “Column Merge” Rules
Described rule enables two or more columns to merge in a set order with a delimiter in between each concate-nated column value, and then placing the concatenated value into the destination column. For example:
Table: the table name which is going to be used for the
column`s merge (“Line_Items” for the current example);
Available Columns: all available columns for the se-lected table (all available columns for “Line_Items” table for the current example);
Selected Columns: the columns of the current ta-ble that are going to be merged (“Quantity”, “Price” and “Amount” columns for the provided example);
Merged Column: the column name which is used as a result column of merging. It means that the values for all columns that are set for “Selected Columns” option will be merged to the “Merged Column” column (“QuantityPr-iceAmount” column for the current example);
Delimiter: the delimiter that is going to be used be-tween “Selected Columns” values after they would be merged to “Merged Column” column (delimiter is set to “|” for the current example);
The resulting sample for the currents setting at the do-cAlpha`s Verification Station:
1.19. Average Confidence Rule
The rule calculates the average confidence of the document and matches it with the con-fidence that is set in the rule options.
1.6. To create the rule run the profile prop-erties window for the necessary workflow and choose the “Average Confidence Rule” from the rules list:
Press the “Next” button to go to the next set-ting window.

26www.artsyltech.com
docAlpha Administration. Batch Rules
1.7. The first setting window is standard as for all oth-er rules and allows to choose the general rule properties (refer to “Rule Creation and Editing Wizard” section for de-tailed info):
1.8. The next window shows the value for the “Con-fidence Threshold” field. This value ranges from 50 to 100:
1.9. Click on the “Finish” button to create the rule.
1.20. Currency Lookup
The rule allows for the automatic determination of the payment currency for the vendor invoice being pro-cessed. It allows to define multiple steps of logic if neces-sary. The steps mentioned above are pre-configured and can be further adjusted by the administrator for the auto-matic determination of the currency payment.
1.1. To create the rule, run the profile properties win-dow for the necessary workflow and choose the “Invoice-Action Currency Lookup” from the list of rules:
Press the “Next” button to go to the next setting window.
1.2. The first rule`s node allows to set general rule`s properties (refer to “Rule Creation and Editing Wizard” section for detailed info):

27 www.artsyltech.com
docAlpha Administration. Batch Rules
1.3. The first checking step checks the extracted data in the Currency field. If that field was extracted successfully from the original document, and the field`s content com-plies with the ISO 4217 standard for the payment currency codes, then the extracted data from the Currency field is used. This is the settings example for the 1st step:
Select the “Currency” field from the drop down list of all existing V-profile fields.
Turn on the “Match captured Currency against ISO 4217” option.
1.4. Next, if the first step fails, you can set on the addi-tional step. This rule tries to look up the default payment currency code for the vendor, as set in the accounting back-end. It allows checking one or more locations, for the cases with multiple Master Vendor ID lists, for the po-tential matches on the Vendor ID and extraction of the Currency ID that is set as the default currency for that vendor on the accounting back-end side. To set on the additional steps next settings should be provided:
- Turn on the “Checked in the database option”:
- Choose the “Vendor ID” verification`s profile field from the drop-down list:
- Turn on the “Forced Database Substitution” option if it needs to replace the extracted values with the values from DB:
- The search can be done from one DB table or from the
list of DB tables. To enable the search from the list of ta-bles expand the window under the “Vendor ID” option-> turn on the “Apply the same settings to each connec-tion” option -> choose the necessary DBs from where the search would be done:
Note! The names of comparing DB columns should be
the same for all selected DBs.
- Each step is configured to search currency in the se-lected database using the Vendor search. For example, operator provide Vendor ID at verification and the rule automatically extract the Currency to the other field ac-cordingly to the settings.
“Connection name” and “Table name” – detect the name of the DB and the specific table name of this DB from which the search would be provided (if the search is happening from one specific DB).
“DB table column” – the rows of this column are used to de-fine the necessary Vendor in the database using one or more indicators (Vendor_ID for the current example) and then ex-tract the currency value accordingly to the defined Vendor.
“Profile field name” – this column allows to set the V-pro-file`s fields which would be used for vendor identification and currency extracted value storage accordingly. They are automatically grabbed from the setting for the step 1.
“Action type” – allows to select the comparison type for “DB table column” and “Profile field name”:

28www.artsyltech.com
docAlpha Administration. Batch Rules
The additional steps for step 2 are necessary if the names of DB tables/columns are different.
1.5. If the first two steps fail, the 3rd step allows to con-figure the rule which tries to determine the country of the vendor from the vendor’s address section fields and looks up the default currency for that country based on the built-in “Default Currency per Country” table. To configure the 3rd step , the following settings should be provided:
- turn on the “Select currency by country” option:
- Choose the field which corresponds with the coun-try’s name.
- Turn on the “Forced Database Substitution” option if it needs to replace the extracted values with the values from the DB:
1.6. Click on the “Finish” button to create the rule (the rule creation can be done after the 1st step configuration or 2 step configuration or after all 3 steps have been con-figured, it is all depended on your needs).
1.21.Setting up “Late Payment Check” Rule
1. In order to create the rule, choose the “InvoiceAction Late Payment Check” from the rules list node of the Pro-file Properties main window Go to “Rules” bookmark Click the “New” button to open the “Validation Rule Properties” wizard:
Click on the “Next” button to go to the next setting win-dow.
2. Set the general settings rule. Enter the rule name, choose the relevant rule in the “Check rule on event” from the drop-down list etc. :
Refer to the 4.6.3.3. Rule Creation and Editing Wiz-ard for additional information.
After all settings have been provided click on the “Next” button.

29 www.artsyltech.com
docAlpha Administration. Batch Rules
3. The next setting node involves next setting steps:
3.1. Invoice Data Field (Capture Field Name): the fol-lowing field is filled with data only if the invoice has in-come.
3.2. Check by Terms: select the V-profile fields field that are filled with the allowed payment period – this field could be selected using drop-down list for Vendor ID (Capture Field Name) setting string.
3.3. Due In Days: the number of days left before the specified term expires. The rule warning message will be sent to the user`s verification station.
The rule can also be set to Check payment using the Database. To set this type:
- Turn on “Check in the database” option.
- Select the V-profile field which is used for Vendor ID.
The step configuration conists next settings that should be provided in order to use it:
• Connection name – valid DB connection
• Table name – DB table that consist necessary infor-mation
• Payment Terms – select the proper DB column with payment Terms
• Vendor ID – DB column which would be used to detected necessary vendor comparing value in Vendor ID (profile name) at verification and Ven-dor ID value in DB.
For Vendor ID comparison Exact or Fuzzy comparison can be used by simple selection from the drop-down list.
Click the “Next” button after all necessary settings have been provided.
4. The “Rule Messages” window consists of three parts and allow to change the default “error/warning rule” messages:
1.22. Vendor Lookup
This rule recognizes the typical complexities of finding the proper Vendor ID in large InvoiceAction solution deploy-ments. It allows the Administrator to select a sequence of steps to specify how the Vendor ID is to be determined. For further flexibility, each step allows to point the rule to the same or different data source as the previous step. So if the rule needs to check several different back-ends for possible matches, this is quick and easy to setup with the Cascading Vendor Lookup Rule.
1.1. To create the rule run the profile properties window for the necessary workflow and choose the “InvoiceAction Ven-dor Lookup” from the rules list:
30www.artsyltech.com
docAlpha Administration. Batch Rules
Press the “Next” button to go to the next setting win-dow.
1.2. The first setting window is standard as for all oth-er rules and allows to choose the general rule properties (refer to the “Rule Creation and Editing Wizard” sec-tion for detailed info):
1.3. To set on the rule next steps should be provided:
1.3.1. Select the V-profile’s field from the drop-down list which matches the Vendor ID value:
If this field will be empty at the verification station the rule will start searching by steps.
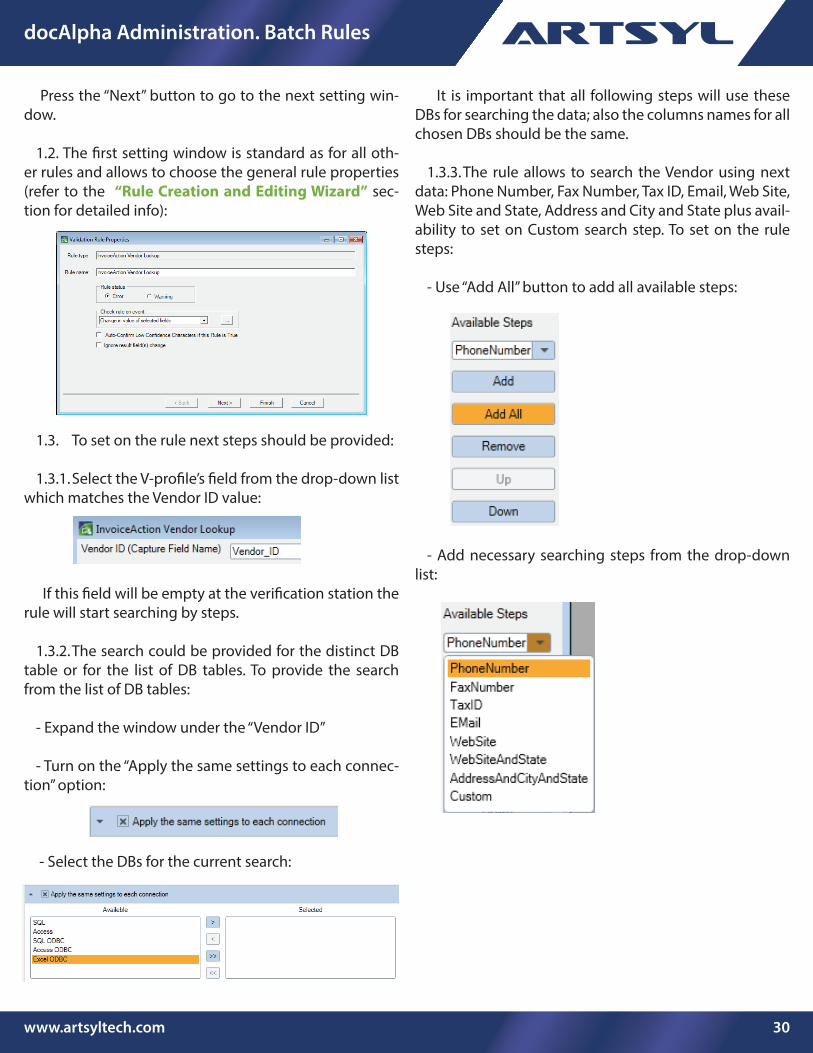
1.3.2. The search could be provided for the distinct DB table or for the list of DB tables. To provide the search from the list of DB tables:
- Expand the window under the “Vendor ID”
- Turn on the “Apply the same settings to each connec-tion” option:
- Select the DBs for the current search:
It is important that all following steps will use these DBs for searching the data; also the columns names for all chosen DBs should be the same.
1.3.3. The rule allows to search the Vendor using next data: Phone Number, Fax Number, Tax ID, Email, Web Site, Web Site and State, Address and City and State plus avail-ability to set on Custom search step. To set on the rule steps:
- Use “Add All” button to add all available steps:
- Add necessary searching steps from the drop-down list:

31 www.artsyltech.com
docAlpha Administration. Batch Rules
1.3.4. Every step has the standard list of the setting fields, for example:
“Connection name” and “Table name” - detect the name of the DB and the specific table name of this DB from which the search would be provided (if the search is happening from one specific DB).
“DB table column” and “Profile field name” – in the first row, the column name for the Vendor ID search should be provided for both DB table column and profile field name. In the second row the same data should be pro-vided for the Available Step search (telephone number for the current example).
“Action type” – allows to select the comparison type for “DB table column” and “Profile field name”:
1.3.5. The additional steps that were set could be turned on/off, changed, deleted. If the step was turned off the search will not include it while using the rule. The exam-ple of configured rule consisting in all searched steps is provided below:
1.3.6. Click the “Finish” button to create the rule.
1.23. Suspicious Document Merge Detection Rule
The rule allows to check the suspicious values for the document`s pages. If the searching value for the estab-lished fields is different for any page of the document the rule will get error/warning status at the docAlpha Verifi-cation status.
1.1. To create the rule, run the profile properties window for the necessary workflow and choose the “Suspicious Document Merge Detection Rule” from the rules list:

32www.artsyltech.com
docAlpha Administration. Batch Rules
Press the “Next” button to go to the next setting win-dow.
1.2. The first setting window is standard as for all oth-er rules and allows to choose the general rule properties (refer to “Rule Creation and Editing Wizard” section for de-tailed info):
1.3. In the next window select the fields that would be checked for all pages of the documents. If the data for this field will be different for any page of the document the rule gets error/warning status. Here’s an example:
“VendorNo” is the field for the current example which was selected from all available fields to check every doc-ument`s page.
Note! If the “Ignore Empty Value” option is turned off and there is no value for the checked field at any docu-ment`s page, then the document will get error/warning status.
1.4. Click on the “Finish” button to create the rule.
1.24 Duplicate Invoice Detection Rule
Rule checks the provided Invoice Number value at the Verification and in database. If the match has been found - gives a message that such invoice is already exist in Data-base, if there are multiple matches - shows a window of multi-selection.
1.1. To create the rule run the profile properties win-dow for the necessary workflow and choose the “Dupli-cate Invoice Detection Rule” from the rules list:
Press the “Next” button to go the next setting window.
1.2. The first setting window is standard as for the all other rules and allow to choose the general rule proper-ties (refer to “Rule Creation and Editing Wizard” section for detailed info):

33 www.artsyltech.com
docAlpha Administration. Batch Rules
1.3. This step allows to configure the database con-nection and determine which fields and columns would participate in the matching process. The main UI of this window is next:
Provide next options to configure the rule:
Connection name – select the valid database connec-tion existing for the current verification profile.
Table name – define the table of the selected database which stored all information about existing Vendors.
Add – using this button, add the blocks that should be compared:
Description – not necessary field. It could be used to simplify the further changes to the rule by other person.
DB table column list – the DB table column that would be used to match the Invoice Number value existing in the selected column (Invoice Number is the widest used identification parameter, but if need it could be other: PO Number, Invoice Date, Vendor Name etc.)
Profile Block – the block of the Verification Profile which data is used for comparison with the value exist-ing in database`s column provided in DB table column list section.
After the all settings have been provided click on “OK” button.
The ready example of configured rule could be seen below:
Note! If necessary, the additional comparison condi-tions could be added using “Add” button.
1.4. Click onto the Finish button to create the rule.