Embed Size (px)
Citation preview
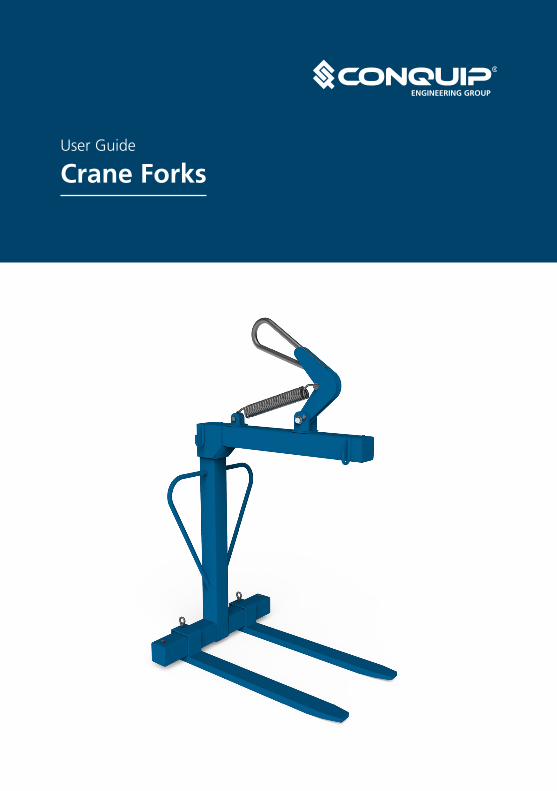
User Guide
Crane Forks
3User Guide - Crane Forks
Product InformationOverview
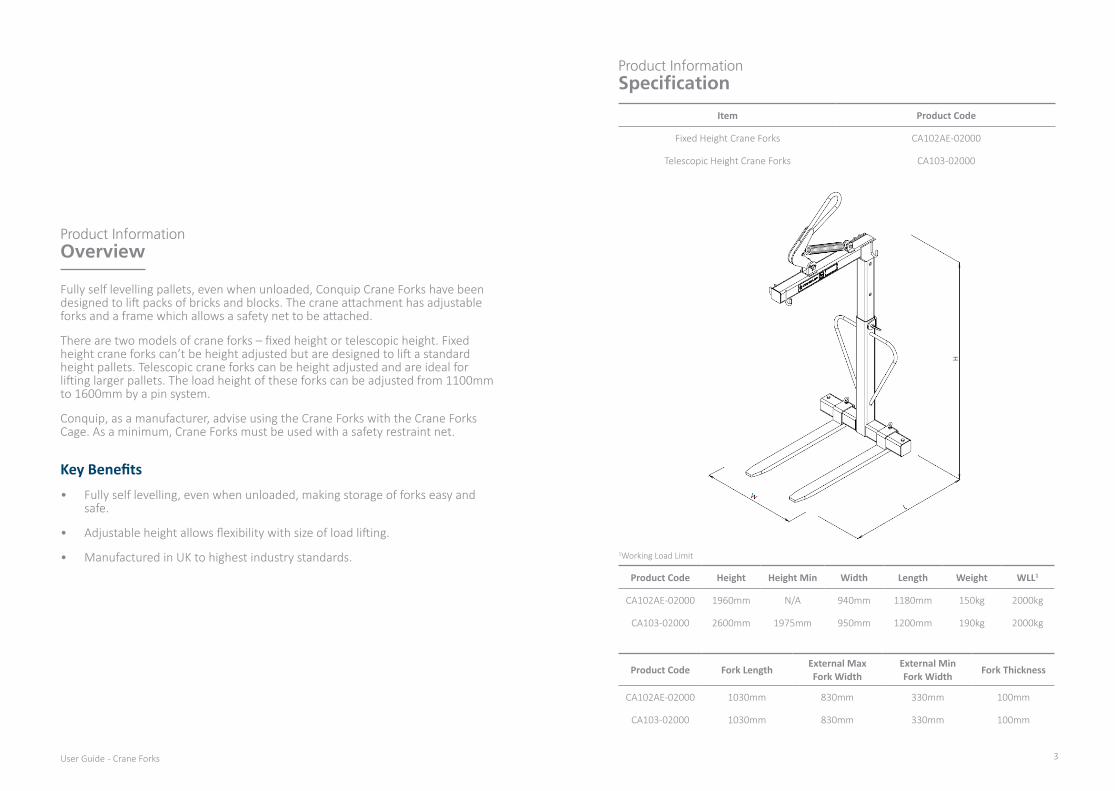
Fully self levelling pallets, even when unloaded, Conquip Crane Forks have been designed to lift packs of bricks and blocks. The crane attachment has adjustable forks and a frame which allows a safety net to be attached.
There are two models of crane forks – fixed height or telescopic height. Fixed height crane forks can’t be height adjusted but are designed to lift a standard height pallets. Telescopic crane forks can be height adjusted and are ideal for lifting larger pallets. The load height of these forks can be adjusted from 1100mm to 1600mm by a pin system.
Conquip, as a manufacturer, advise using the Crane Forks with the Crane Forks Cage. As a minimum, Crane Forks must be used with a safety restraint net.
Key Benefits• Fully self levelling, even when unloaded, making storage of forks easy and
safe.
• Adjustable height allows flexibility with size of load lifting.
• Manufactured in UK to highest industry standards.
Product InformationSpecification
Item Product Code
Fixed Height Crane Forks CA102AE-02000
Telescopic Height Crane Forks CA103-02000
Product Code Height Height Min Width Length Weight WLL1
CA102AE-02000 1960mm N/A 940mm 1180mm 150kg 2000kg
CA103-02000 2600mm 1975mm 950mm 1200mm 190kg 2000kg
Product Code Fork Length External Max Fork Width
External Min Fork Width Fork Thickness
CA102AE-02000 1030mm 830mm 330mm 100mm
CA103-02000 1030mm 830mm 330mm 100mm
1Working Load Limit
5User Guide - Crane Forks
Product InformationParts Diagram
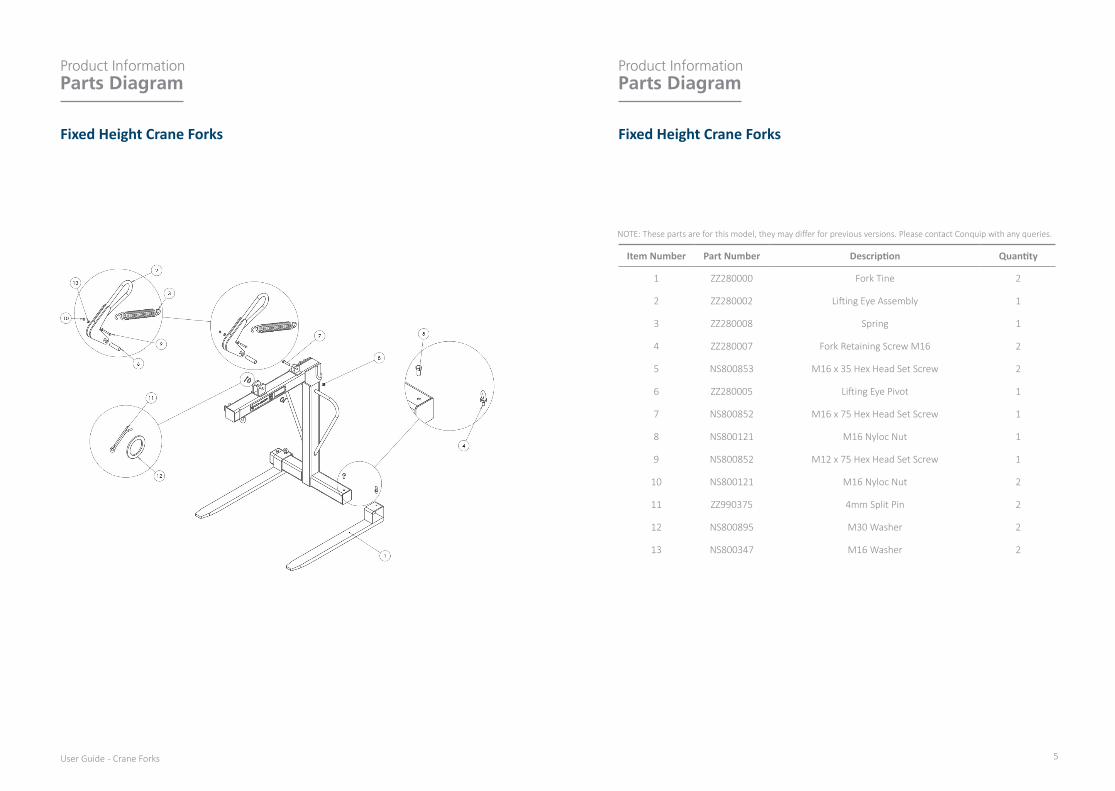
Fixed Height Crane Forks
Product InformationParts Diagram
Fixed Height Crane Forks
NOTE: These parts are for this model, they may differ for previous versions. Please contact Conquip with any queries.
Item Number Part Number Description Quantity
1 ZZ280000 Fork Tine 2
2 ZZ280002 Lifting Eye Assembly 1
3 ZZ280008 Spring 1
4 ZZ280007 Fork Retaining Screw M16 2
5 NS800853 M16 x 35 Hex Head Set Screw 2
6 ZZ280005 Lifting Eye Pivot 1
7 NS800852 M16 x 75 Hex Head Set Screw 1
8 NS800121 M16 Nyloc Nut 1
9 NS800852 M12 x 75 Hex Head Set Screw 1
10 NS800121 M16 Nyloc Nut 2
11 ZZ990375 4mm Split Pin 2
12 NS800895 M30 Washer 2
13 NS800347 M16 Washer 2
7User Guide - Crane Forks
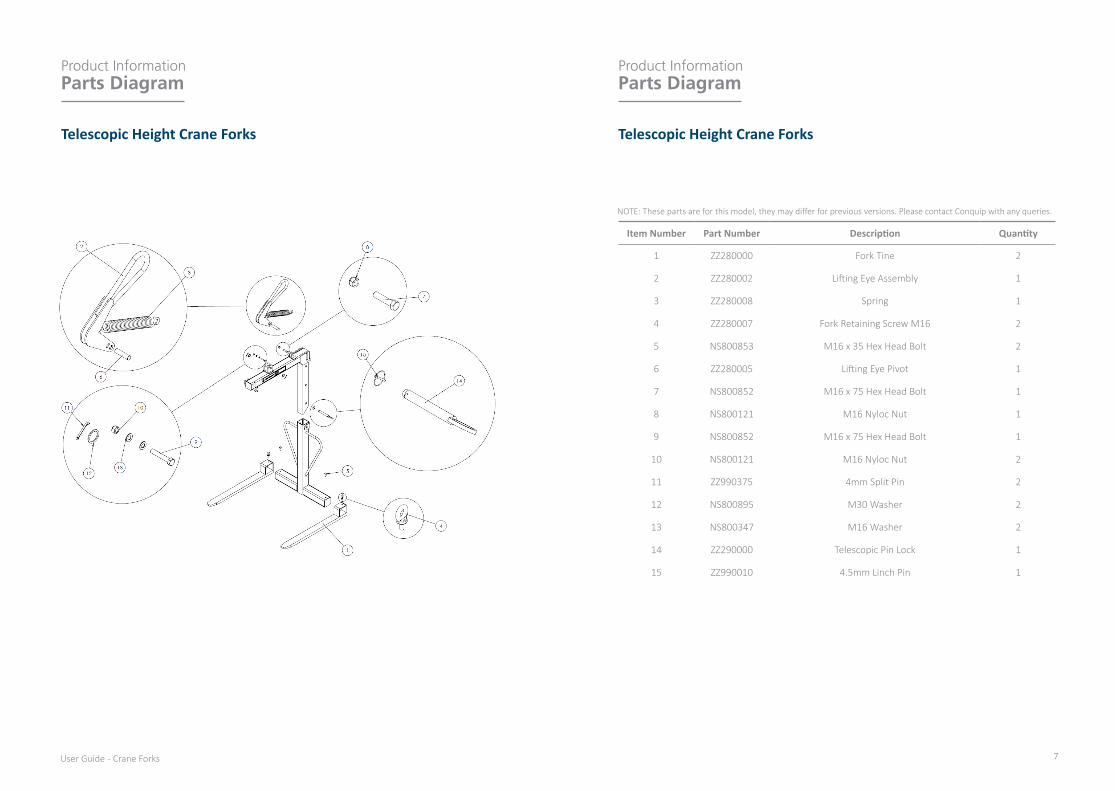
Product InformationParts Diagram
Telescopic Height Crane Forks
Product InformationParts Diagram
Telescopic Height Crane Forks
NOTE: These parts are for this model, they may differ for previous versions. Please contact Conquip with any queries.
Item Number Part Number Description Quantity
1 ZZ280000 Fork Tine 2
2 ZZ280002 Lifting Eye Assembly 1
3 ZZ280008 Spring 1
4 ZZ280007 Fork Retaining Screw M16 2
5 NS800853 M16 x 35 Hex Head Bolt 2
6 ZZ280005 Lifting Eye Pivot 1
7 NS800852 M16 x 75 Hex Head Bolt 1
8 NS800121 M16 Nyloc Nut 1
9 NS800852 M16 x 75 Hex Head Bolt 1
10 NS800121 M16 Nyloc Nut 2
11 ZZ990375 4mm Split Pin 2
12 NS800895 M30 Washer 2
13 NS800347 M16 Washer 2
14 ZZ290000 Telescopic Pin Lock 1
15 ZZ990010 4.5mm Linch Pin 1
9User Guide - Crane Forks
Original Working InstructionsUsage Instructions
Important Usage Notes• Do not drag the load; this equipment is for lifting the load clear of the
ground.
• The Crane Forks unique design ensures that the load will always be kept level by the automatic self levelling suspension arm.
• Do not allow hands or feet to come between, or below, the forks and the load.
• When not being used, store the unit in a clean condition and in a safe place where it will be protected from thieves and unauthorised users.
• Never use without some method of restraint. Conquip recommend the use of the Conquip Crane Forks Cage.
PreparationEnsure the work area is clear of all obstructions. Check that the crane forks are suitably rated to lift the load and are of the correct size. Ensure there is adequate room around the unit for the operator to work safely.
Usage Instructions1. Attach the lifting equipment’s hook to the suspension arm’s lifting eye.
Always ensure that the hook’s gate is correctly closed.
2. Now adjust the position of the forks so that they will align with the particular size pallet that you will be lifting. To adjust the fork position, release the collared eye bolt by turning anticlockwise. Re-position the fork then secure by turning the eye bolt clockwise.
3. Make sure that the forks are positioned at an equal distance from the centre line to prevent the load being unbalanced. Space the forks at the outermost point that the pallet allows, to give maximum stability as the load is lifted.
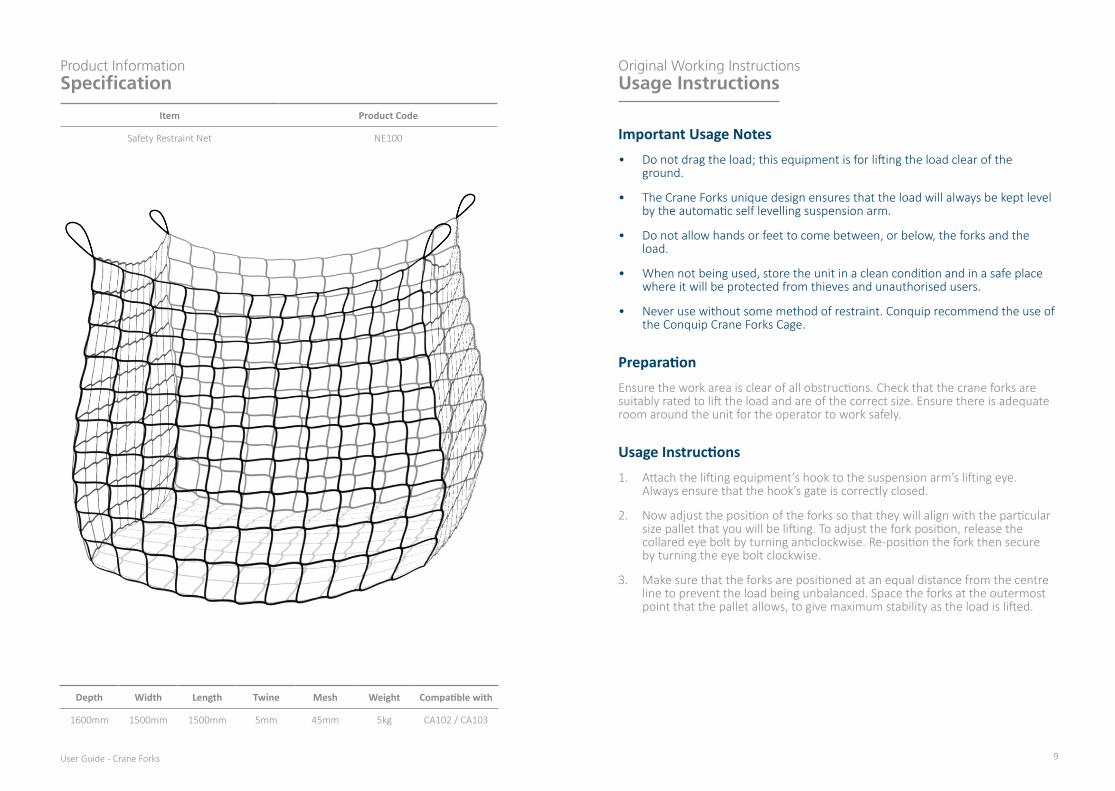
Product InformationSpecification
Item Product Code
Safety Restraint Net NE100
Depth Width Length Twine Mesh Weight Compatible with
1600mm 1500mm 1500mm 5mm 45mm 5kg CA102 / CA103
11User Guide - Crane Forks
Original Working InstructionsUsage Instructions
Adjusting Height (applies to Telescopic Height model)The telescopic height model can be adjusted to accommodate heights between 1100mm and 1600mm. It is always mandatory to adjust the forks to suit the load rather than keeping them at the highest setting. To adjust the height, the unit must be attached to the lifting equipment.
1. Raise the lifting hook so that it is supporting, but not lifting, the suspension arm.
2. Remove the ‘R’ clip then the main locking pin.
3. Have the lifting equipment raised, or lower the telescopic lifting frame, so that it is positioned at the height required.
4. Carefully insert the locking pin to the nearest locating hole then replace the ‘R’ clip. Note: Only operate the forks with the original locking pin or ‘R’ clip fitted.
5. Make sure that the forks are positioned at an equal distance from the centre line to prevent the load being unbalanced.
6. The crane forks are now ready to use.
Lifting & Lowering a Load (with Conquip Crane Forks Cage)Conquip Engineering Group advise using the Conquip Crane Forks Cage in conjunction with the Crane Forks. Refer to our website or contact Conquip for more information.
Lifting & Lowering a Load (with a Safety Restraint Net)1. Set the forks to the correct width to suit the size of the pallet.
2. Secure any palletised load to the pallet, not simply sitting on it. The load must not be lifted without being secure.
3. Carefully manoeuvre the unit under the pallet with the forks inserted as far as they will go. The loads length must not be greater than the forks.
4. Raise the load just above the ground and check that the load is central to the forks and correctly balanced.
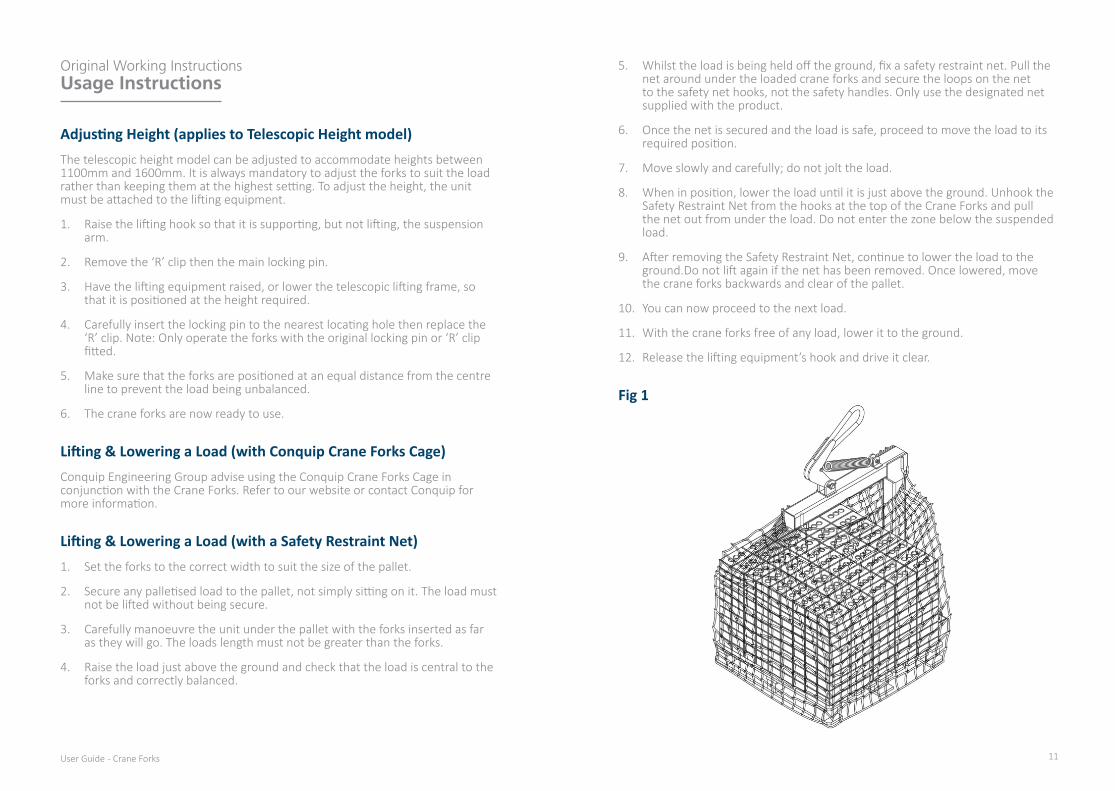
5. Whilst the load is being held off the ground, fix a safety restraint net. Pull the net around under the loaded crane forks and secure the loops on the net to the safety net hooks, not the safety handles. Only use the designated net supplied with the product.
6. Once the net is secured and the load is safe, proceed to move the load to its required position.
7. Move slowly and carefully; do not jolt the load.
8. When in position, lower the load until it is just above the ground. Unhook the Safety Restraint Net from the hooks at the top of the Crane Forks and pull the net out from under the load. Do not enter the zone below the suspended load.
9. After removing the Safety Restraint Net, continue to lower the load to the ground.Do not lift again if the net has been removed. Once lowered, move the crane forks backwards and clear of the pallet.
10. You can now proceed to the next load.
11. With the crane forks free of any load, lower it to the ground.
12. Release the lifting equipment’s hook and drive it clear.
Fig 1
13User Guide - Crane Forks
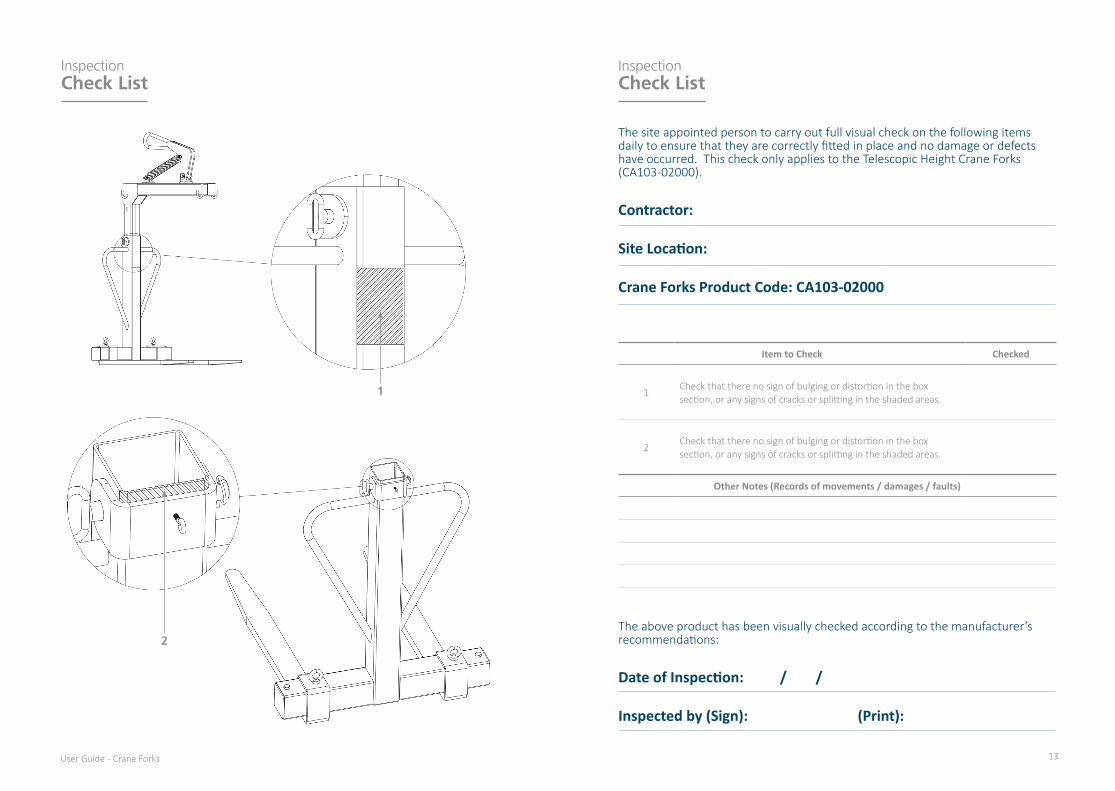
InspectionCheck List
InspectionCheck List
The site appointed person to carry out full visual check on the following items daily to ensure that they are correctly fitted in place and no damage or defects have occurred. This check only applies to the Telescopic Height Crane Forks (CA103-02000).
Contractor:
Site Location:
Crane Forks Product Code: CA103-02000
Item to Check Checked
1Check that there no sign of bulging or distortion in the box section, or any signs of cracks or splitting in the shaded areas.
2Check that there no sign of bulging or distortion in the box section, or any signs of cracks or splitting in the shaded areas.
Other Notes (Records of movements / damages / faults)
The above product has been visually checked according to the manufacturer’s recommendations:
Date of Inspection: / /
Inspected by (Sign): (Print):
1
2
15User Guide - Crane Forks
Original Working InstructionsSafety Instructions
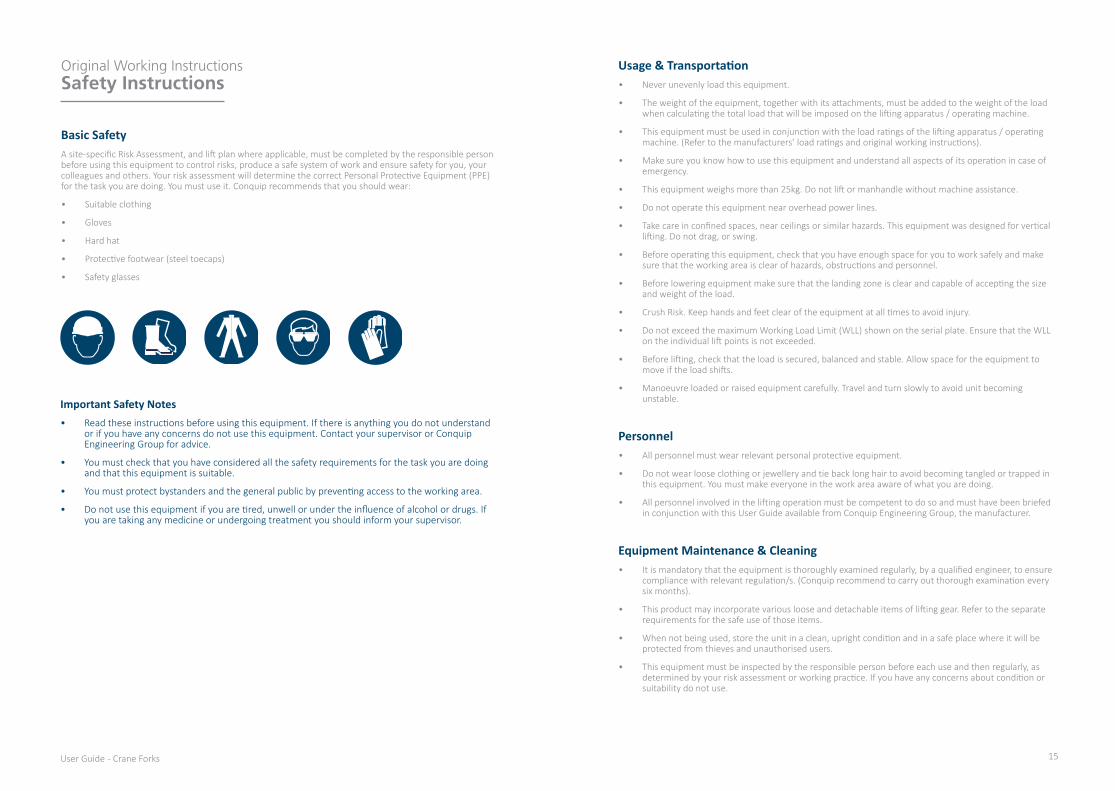
Basic Safety A site-specific Risk Assessment, and lift plan where applicable, must be completed by the responsible person before using this equipment to control risks, produce a safe system of work and ensure safety for you, your colleagues and others. Your risk assessment will determine the correct Personal Protective Equipment (PPE) for the task you are doing. You must use it. Conquip recommends that you should wear:
• Suitable clothing
• Gloves
• Hard hat
• Protective footwear (steel toecaps)
• Safety glasses
Important Safety Notes• Read these instructions before using this equipment. If there is anything you do not understand
or if you have any concerns do not use this equipment. Contact your supervisor or Conquip Engineering Group for advice.
• You must check that you have considered all the safety requirements for the task you are doing and that this equipment is suitable.
• You must protect bystanders and the general public by preventing access to the working area.
• Do not use this equipment if you are tired, unwell or under the influence of alcohol or drugs. If you are taking any medicine or undergoing treatment you should inform your supervisor.
Usage & Transportation• Never unevenly load this equipment.
• The weight of the equipment, together with its attachments, must be added to the weight of the load when calculating the total load that will be imposed on the lifting apparatus / operating machine.
• This equipment must be used in conjunction with the load ratings of the lifting apparatus / operating machine. (Refer to the manufacturers’ load ratings and original working instructions).
• Make sure you know how to use this equipment and understand all aspects of its operation in case of emergency.
• This equipment weighs more than 25kg. Do not lift or manhandle without machine assistance.
• Do not operate this equipment near overhead power lines.
• Take care in confined spaces, near ceilings or similar hazards. This equipment was designed for vertical lifting. Do not drag, or swing.
• Before operating this equipment, check that you have enough space for you to work safely and make sure that the working area is clear of hazards, obstructions and personnel.
• Before lowering equipment make sure that the landing zone is clear and capable of accepting the size and weight of the load.
• Crush Risk. Keep hands and feet clear of the equipment at all times to avoid injury.
• Do not exceed the maximum Working Load Limit (WLL) shown on the serial plate. Ensure that the WLL on the individual lift points is not exceeded.
• Before lifting, check that the load is secured, balanced and stable. Allow space for the equipment to move if the load shifts.
• Manoeuvre loaded or raised equipment carefully. Travel and turn slowly to avoid unit becoming unstable.
Personnel• All personnel must wear relevant personal protective equipment.
• Do not wear loose clothing or jewellery and tie back long hair to avoid becoming tangled or trapped in this equipment. You must make everyone in the work area aware of what you are doing.
• All personnel involved in the lifting operation must be competent to do so and must have been briefed in conjunction with this User Guide available from Conquip Engineering Group, the manufacturer.
Equipment Maintenance & Cleaning• It is mandatory that the equipment is thoroughly examined regularly, by a qualified engineer, to ensure
compliance with relevant regulation/s. (Conquip recommend to carry out thorough examination every six months).
• This product may incorporate various loose and detachable items of lifting gear. Refer to the separate requirements for the safe use of those items.
• When not being used, store the unit in a clean, upright condition and in a safe place where it will be protected from thieves and unauthorised users.
• This equipment must be inspected by the responsible person before each use and then regularly, as determined by your risk assessment or working practice. If you have any concerns about condition or suitability do not use.
17User Guide - Crane Forks
Disclaimer
WarrantyThe products supplied by Conquip Engineering Group are all guaranteed by a 12 month warranty.
Apart from where exceptions apply, Conquip Engineering Group promises to repair or replace any fault which the Company considers to be due to defective material or workmanship within 12 months of the date of sale, at no additional cost.
• Faults arising from unauthorised alterations (see modifications section below for full details).
• Damage caused by abuse, neglect, misuse or falling.
• Damage caused because of failure to follow transportation, storage, loading, cleaning or operating instructions.
• Replacement or repair of components due to fair wear and tear.
• Any consequential damage or wear arising from the use or fitting of additional or non-standard parts.
ModificationsIf any third-party modifications or alterations, involving drilling, welding, cutting or distortion of materials in any form, are to be carried out on the product, Conquip Engineering Group must provide full written approval prior to the work being carried out.
Alterations, modifications, additions or repairs must be carried out by Conquip Engineering Group’s recognised distributors, if they are not carrying out the work themselves.
Conquip Engineering Group operate a continuous improvement policy and therefore reserve the right to alter technical specifications and user guide details at any point without notice.
Conquip Engineering Group will not cover or reimburse any transportation and/or shipment costs to and from their premises or their recognised agents, or any material and/or labour costs for repair, replacement or assessment against a warranty claim.
Conquip Engineering Group and/or their directors, employees, insurers or recognised agents will not be held liable for consequential damages, losses or expenses relating to the inability to use the product correctly for its purpose.
EC Declaration of Conformity
In accordance with EN ISO 17050-1:2004Declaration: As defined by the Machinery Directive 2006/42/EC and subsequent amendments
We, CONQUIP ENGINEERING GROUP, herewith declare that the following indicated equipment meets the fundamental health and safety requirements concerning the EU guide line(s), due to their design and manufacture.
This declaration will be rendered null and void if the machine is changed without our approval.
Signed: Dated: 2019
Garry Critchley, Managing Director
Product Code(s):
CA102AE-02000 / CA103-02000
EC Directive/Regulation:
2006/42/EC,
Lifting Operations and Lifting Equipment Regulations 1998
Harmonised Standards:
BS EN ISO 12100:2010
BS EN 13155
General Description/ Designation:
Fixed Height Crane Fork – CA102AE-02000
Telescopic Height Crane Fork – CA103-02000
WLL: CA102AE-02000 / CA103-02000 = 2000kg
Important Notes• This User Guide is for this Conquip product only.
• Any movements of the product must be thoroughly planned before the work commences to identify potential hazards and assess risk.
• All personnel involved in lifting and transportation of this product must have read this User Guide and must be properly briefed.
• You must be competent, alert and medically fit when using this equipment. If you have a medical condition, a mental or physical disability, you must seek advice from a medical professional before using this equipment.
Talking to us is easy
We’re here to help
Call us on 0845 520 1101Email us at [email protected]
Conquip Engineering GroupWaterbrook Estate, Alton, Hampshire, GU34 2UD
Copyright © 2019 Conquip Engineering Group. All Rights Reserved. Crane Forks User Guide - Issue 3


![Grand Forks herald (Grand Forks, N.D.). 1917-12-01 [p ]. · Grand Forks herald (Grand Forks, N.D.). 1917-12-01 [p ]](https://img.pdfslide.net/doc/110x75/5e9b4cea4169af71771cee98/grand-forks-herald-grand-forks-nd-1917-12-01-p-grand-forks-herald-grand.jpg)