Embed Size (px)
Citation preview
Elastic Load Balance
User Guide
Issue 01
Date 2016-12-30
Contents
1 Overview......................................................................................................................................... 11.1 What Is ELB?................................................................................................................................................................. 11.2 Functions........................................................................................................................................................................ 11.3 Application Scenarios.....................................................................................................................................................11.4 ELB Relationships with Other Services......................................................................................................................... 2
2 Getting Started............................................................................................................................... 3
3 Operation Guide..........................................................................................................................103.1 ELB Management.........................................................................................................................................................103.2 Listener Management................................................................................................................................................... 143.3 Backend ECS Management.......................................................................................................................................... 213.4 Certificate Management............................................................................................................................................... 21
4 FAQs...............................................................................................................................................244.1 What Is ELB?............................................................................................................................................................... 244.2 Can I Adjust ELB Bandwidth?.....................................................................................................................................244.3 Which Forwarding Rules Does ELB Support?.............................................................................................................244.4 Does ELB Support ECSs Running Different OSs?...................................................................................................... 244.5 How Many ELB Instances Can I Have?.......................................................................................................................254.6 Do I Need to Manually Apply for an IP Address?....................................................................................................... 254.7 What Functions Do Listeners Provide?........................................................................................................................ 254.8 What Are ELB Protocols and Ports?............................................................................................................................ 254.9 What Are ECS Protocols and Ports?............................................................................................................................ 254.10 Is the Public IP Address Assigned to the ELB Service Used Exclusively?............................................................... 254.11 Will There Be Any Adverse Impact If I Delete My ELB Service?............................................................................ 254.12 How Do I Configure Health Check Parameters?........................................................................................................264.13 How Do I Rectify a Health Check Failure?................................................................................................................264.14 Why Can I Not Access an ELB Instance from Its Backend ECS?.............................................................................274.15 Why Do Many IP Addresses Accessing the Backend ECSs of an ELB Instance Begin with 100.125?....................274.16 How Can I Obtain the Real IP Address of a Visitor?................................................................................................. 284.17 How Can I Enable the Sticky Session Feature?......................................................................................................... 284.18 What Types of Sticky Sessions Does ELB Support?..................................................................................................284.19 How Can I Handle Backend ECSs in the Abnormal [Deleted] State?....................................................................... 284.20 What Is Private Network ELB?.................................................................................................................................. 29
Elastic Load BalanceUser Guide Contents
Issue 01 (2016-12-30) ii

4.21 What Are the Application Scenarios of Private Network ELB?................................................................................ 294.22 What Are the Precautions of Using UDP?................................................................................................................. 29
A Appendix......................................................................................................................................30A.1 Configuring the TOA Plug-in...................................................................................................................................... 30
B Change History............................................................................................................................33
C Glossary........................................................................................................................................ 34
Elastic Load BalanceUser Guide Contents
Issue 01 (2016-12-30) iii
1 Overview
1.1 What Is ELB?Elastic Load Balance (ELB) is a service that automatically distributes access traffic tomultiple Elastic Cloud Servers (ECSs) to balance their service load. ELB enables you toachieve higher levels of fault tolerance in your applications and expand application servicecapabilities.
You can create an ELB service on a web-based console, configure monitoring ports requiredby the ELB service, and configure ECSs associated with the ELB service. The ELB servicehelps to eliminate single points of failure (SPOFs), improving availability of the wholesystem.
1.2 FunctionsELB allows you to control load balancing. A self-service, web-based console is provided foryou to easily configure the ELB service and quickly add service resources to implement loadbalancing.
The ELB service provides the following functions:
l Elastic, automatic scaling based on traffic demandsl Linear capacity expansion, eliminating SPOFsl Layer-4 and layer-7 load balancingl Compatibility with Auto Scaling (AS) based on service load
1.3 Application ScenariosIf cloud services have high reliability and performance requirements, you can use ELB todistribute traffic to multiple backend ECSs. This ensures that only healthy ECSs receivetraffic and that services are not interrupted if an ECS is faulty, thereby maintaining cloudservice availability.
Elastic Load BalanceUser Guide 1 Overview
Issue 01 (2016-12-30) 1
1.4 ELB Relationships with Other Servicesl Virtual Private Cloud
ELB requires elastic IP addresses and bandwidth allocated using the Virtual PrivateCloud (VPC) service.
l Identity and Access ManagementELB requires Identity and Access Management (IAM) to provide authentication.
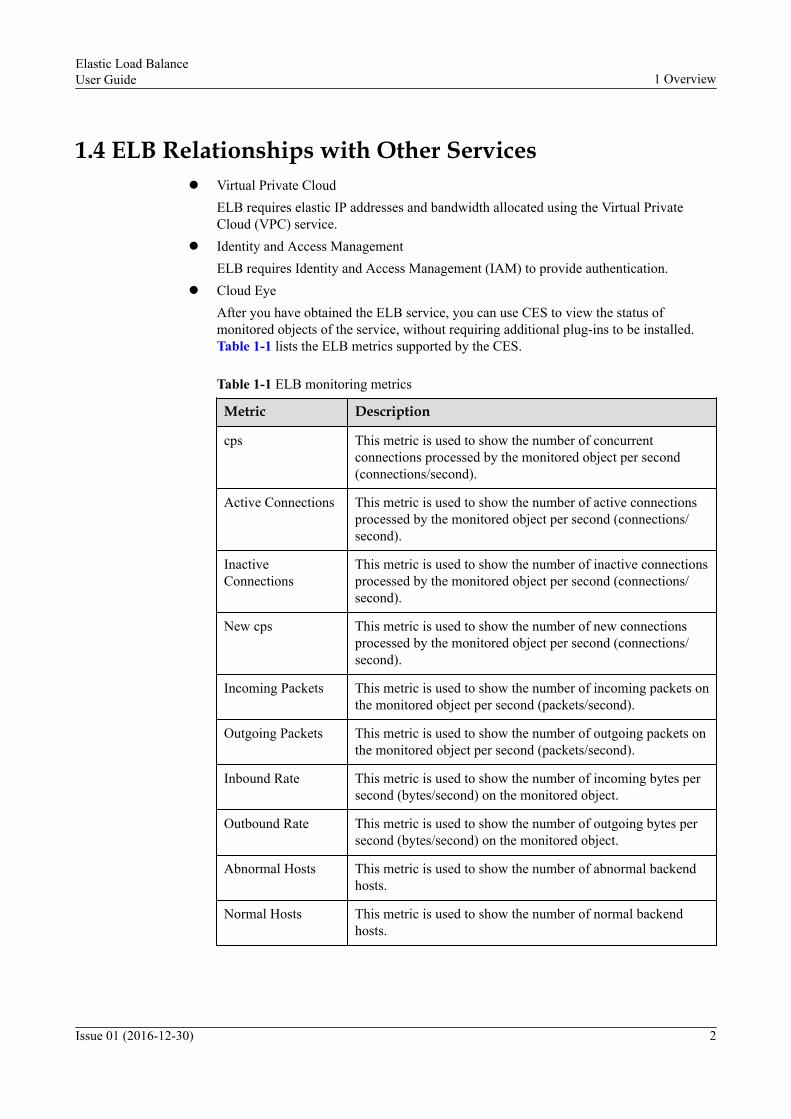
l Cloud EyeAfter you have obtained the ELB service, you can use CES to view the status ofmonitored objects of the service, without requiring additional plug-ins to be installed.Table 1-1 lists the ELB metrics supported by the CES.
Table 1-1 ELB monitoring metrics
Metric Description
cps This metric is used to show the number of concurrentconnections processed by the monitored object per second(connections/second).
Active Connections This metric is used to show the number of active connectionsprocessed by the monitored object per second (connections/second).
InactiveConnections
This metric is used to show the number of inactive connectionsprocessed by the monitored object per second (connections/second).
New cps This metric is used to show the number of new connectionsprocessed by the monitored object per second (connections/second).
Incoming Packets This metric is used to show the number of incoming packets onthe monitored object per second (packets/second).
Outgoing Packets This metric is used to show the number of outgoing packets onthe monitored object per second (packets/second).
Inbound Rate This metric is used to show the number of incoming bytes persecond (bytes/second) on the monitored object.
Outbound Rate This metric is used to show the number of outgoing bytes persecond (bytes/second) on the monitored object.
Abnormal Hosts This metric is used to show the number of abnormal backendhosts.
Normal Hosts This metric is used to show the number of normal backendhosts.
Elastic Load BalanceUser Guide 1 Overview
Issue 01 (2016-12-30) 2
2 Getting Started
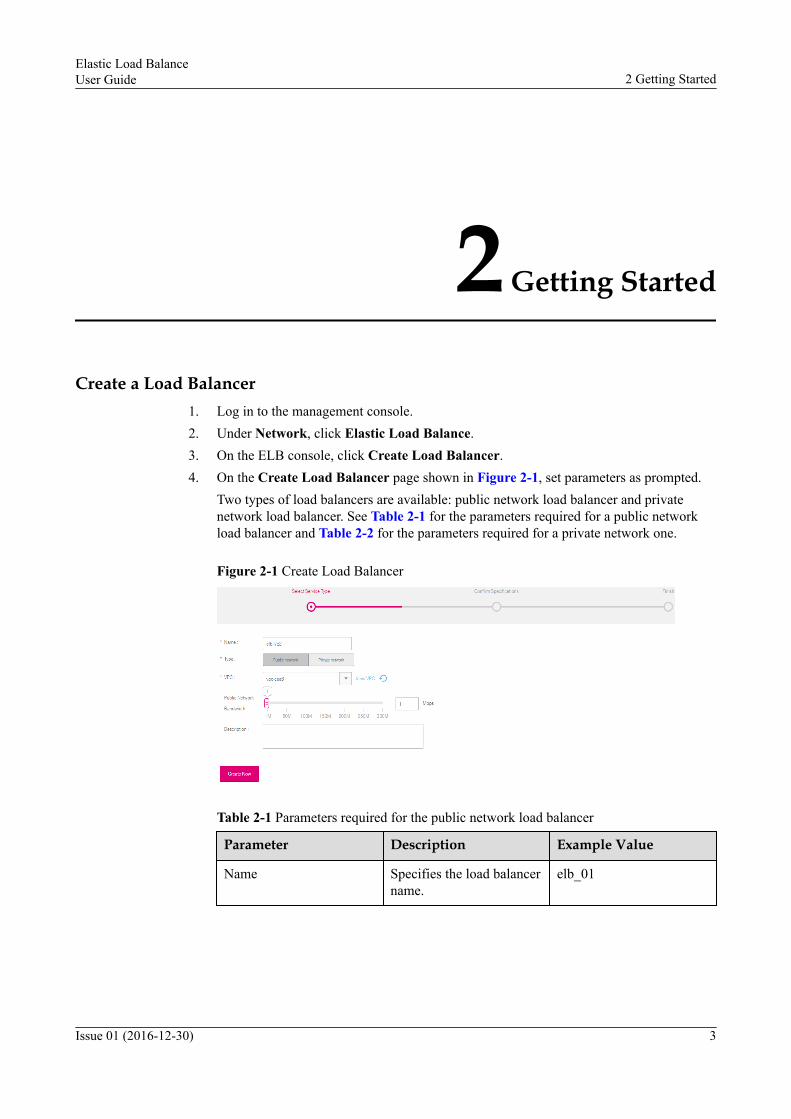
Create a Load Balancer1. Log in to the management console.2. Under Network, click Elastic Load Balance.3. On the ELB console, click Create Load Balancer.4. On the Create Load Balancer page shown in Figure 2-1, set parameters as prompted.
Two types of load balancers are available: public network load balancer and privatenetwork load balancer. See Table 2-1 for the parameters required for a public networkload balancer and Table 2-2 for the parameters required for a private network one.
Figure 2-1 Create Load Balancer
Table 2-1 Parameters required for the public network load balancer
Parameter Description Example Value
Name Specifies the load balancername.
elb_01
Elastic Load BalanceUser Guide 2 Getting Started
Issue 01 (2016-12-30) 3

Parameter Description Example Value
Type You can select Publicnetwork or Privatenetwork.l Public network:
indicates that the loadbalancer is used in thepublic network.
l Private network:indicates that the loadbalancer is used in theprivate network.
Select Public network.
Public network
VPC Specifies the VPC towhich the elastic loadbalancer belongs.
VPC_01
Public NetworkBandwidth
Specifies the publicnetwork bandwidth whenType is set to Publicnetwork.
100
Elastic IP If you select Publicnetwork for Type, youcan select an existingelastic IP address to createthe load balancer.
10.154.56.194
Description Provides description of theload balancer.
None
Table 2-2 Parameters required for the private network load balancer
Parameter Description Example Value
Name Specifies the load balancername.
elb_01
Elastic Load BalanceUser Guide 2 Getting Started
Issue 01 (2016-12-30) 4
Parameter Description Example Value
Type You can select Publicnetwork or Privatenetwork.l Public network:
indicates that the loadbalancer is used in thepublic network.
l Private network:indicates that the loadbalancer is used in theprivate network.
Select Private network.
Private network
VPC Specifies the VPC towhich the elastic loadbalancer belongs.
VPC_01
AZ Specifies the AZinformation. The ECSassociated with the loadbalancer will be created inthe specified AZ.
None
Subnet Specifies the subnet towhich the load balancerbelongs when you selectPrivate network forType.
subnet01
Security Group Specifies the securitygroup to which the loadbalancer belongs whenType is set to Privatenetwork.
sg-1
Description Provides description of theload balancer.
None
5. Click Create Now.6. Confirm the configuration and click Submit.7. After the task is successfully issued, close the page.
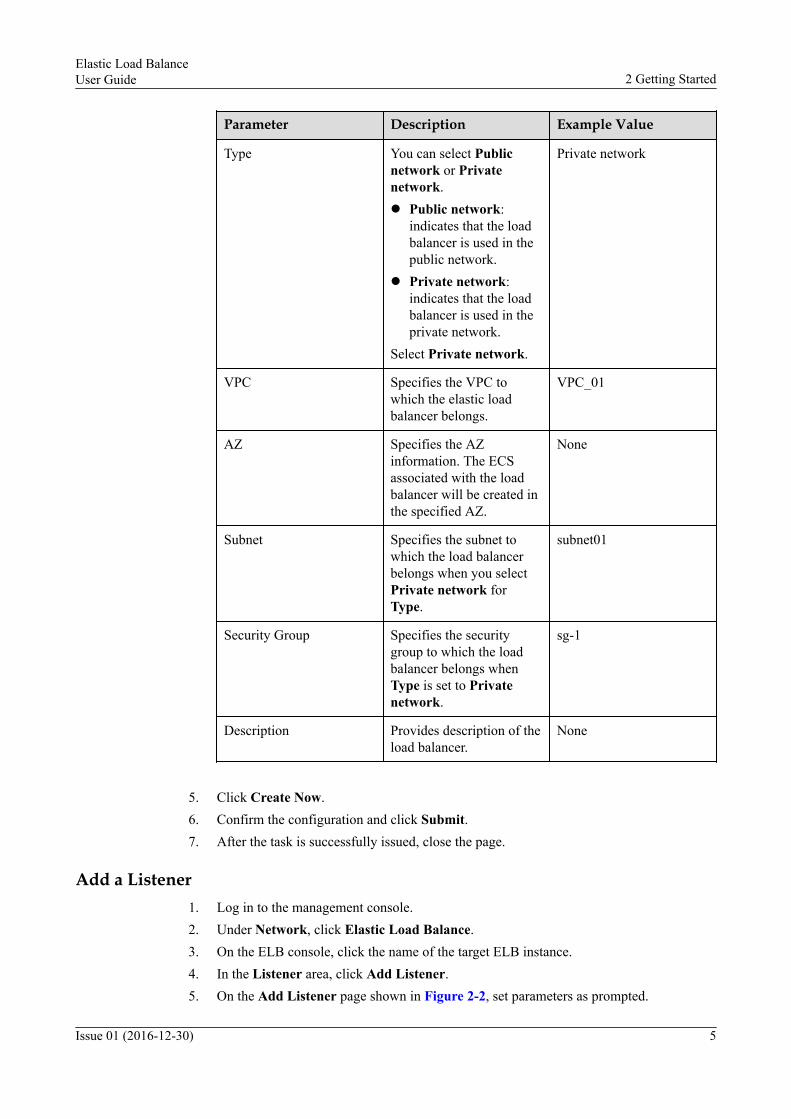
Add a Listener1. Log in to the management console.2. Under Network, click Elastic Load Balance.3. On the ELB console, click the name of the target ELB instance.4. In the Listener area, click Add Listener.5. On the Add Listener page shown in Figure 2-2, set parameters as prompted.
Elastic Load BalanceUser Guide 2 Getting Started
Issue 01 (2016-12-30) 5
Figure 2-2 Add Listener
Table 2-3 Parameter description
Parameter Description ExampleValue
Name Specifies the listener name. listener01
Elastic Load BalanceUser Guide 2 Getting Started
Issue 01 (2016-12-30) 6
Parameter Description ExampleValue
LB Protocol/Port Specifies the load distribution protocol/port. If a public network load balancer isenabled, the following four protocols aresupported:l TCP: layer-4 load balance servicel UDP: layer-4 load balance servicel HTTP: layer-7 load balance servicel HTTPS: encrypted layer 7 load
balance serviceIf a private network load balancer isenabled, the following three protocols aresupported:l TCP: layer-4 load balance servicel HTTP: layer-7 load balance servicel HTTPS: encrypted layer-7 load
balance service
TCP/22UDP/53HTTPS/443
ECS Protocol/Port Specifies the enabled protocol/port.l TCP: layer-4 load balance servicel UDP: layer-4 load balance service.
When LB Protocol is set to UDP,ECS Protocol is UDP by default.
l HTTP: layer-7 load balance service
TCP/22HTTP/80
LB Mode Specifies the algorithm that the loadbalance uses.l Polling Algorithm: Each connection
request is distributed to the next ECSin sequence so that all requests aredistributed evenly to all ECSs.
l Least Connections: New connectionsare distributed to the ECS processingthe least connections.
l Source IP Address Algorithm: Thesource IP address of the request isused as the HashKey to identify theECS in the static fragment table.
You can choose an appropriate algorithmbased on your requirement to distributeaccess traffic and improve load balancecapabilities.
PollingAlgorithm
Elastic Load BalanceUser Guide 2 Getting Started
Issue 01 (2016-12-30) 7
Parameter Description ExampleValue
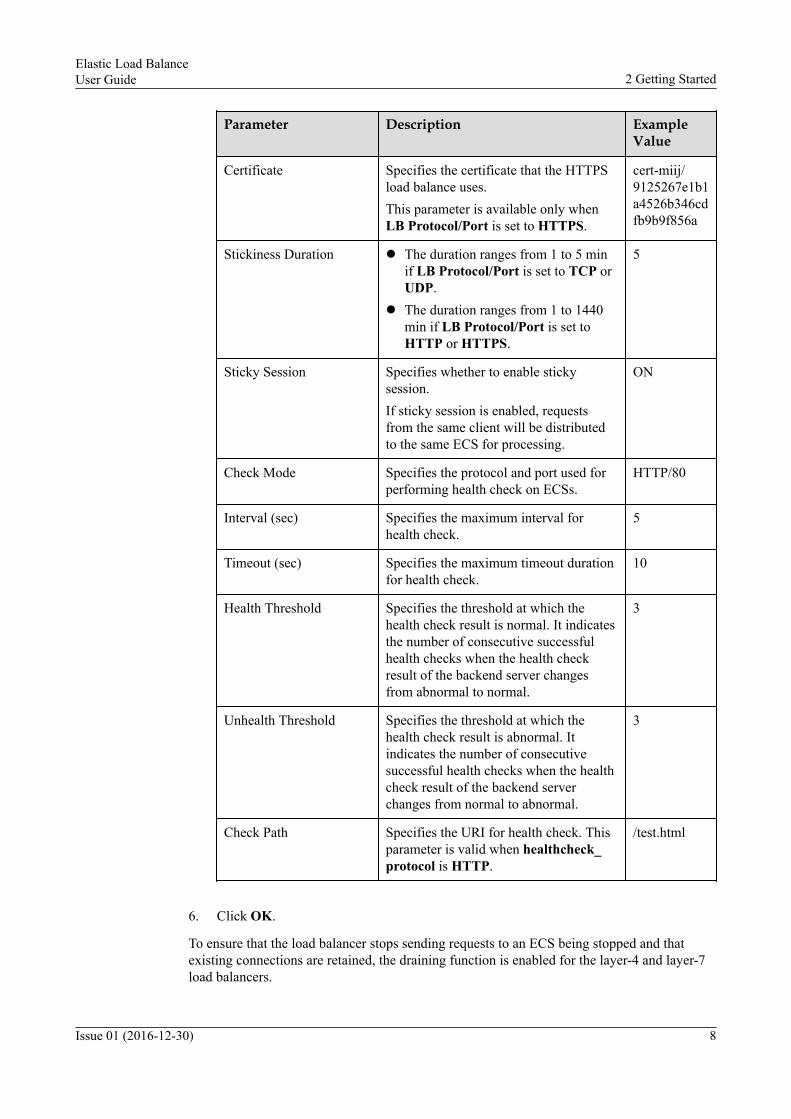
Certificate Specifies the certificate that the HTTPSload balance uses.This parameter is available only whenLB Protocol/Port is set to HTTPS.
cert-miij/9125267e1b1a4526b346cdfb9b9f856a
Stickiness Duration l The duration ranges from 1 to 5 minif LB Protocol/Port is set to TCP orUDP.
l The duration ranges from 1 to 1440min if LB Protocol/Port is set toHTTP or HTTPS.
5
Sticky Session Specifies whether to enable stickysession.If sticky session is enabled, requestsfrom the same client will be distributedto the same ECS for processing.
ON
Check Mode Specifies the protocol and port used forperforming health check on ECSs.
HTTP/80
Interval (sec) Specifies the maximum interval forhealth check.
5
Timeout (sec) Specifies the maximum timeout durationfor health check.
10
Health Threshold Specifies the threshold at which thehealth check result is normal. It indicatesthe number of consecutive successfulhealth checks when the health checkresult of the backend server changesfrom abnormal to normal.
3
Unhealth Threshold Specifies the threshold at which thehealth check result is abnormal. Itindicates the number of consecutivesuccessful health checks when the healthcheck result of the backend serverchanges from normal to abnormal.
3
Check Path Specifies the URI for health check. Thisparameter is valid when healthcheck_protocol is HTTP.
/test.html
6. Click OK.
To ensure that the load balancer stops sending requests to an ECS being stopped and thatexisting connections are retained, the draining function is enabled for the layer-4 and layer-7load balancers.
Elastic Load BalanceUser Guide 2 Getting Started
Issue 01 (2016-12-30) 8
When the ECS of a load balancer is deleted, connections scheduled to the ECS will beretained during the configured duration. After the duration is exceeded, connections to theECS will be stopped.
The duration is 5 min for the layer-4 load balancer, and 60 min for the layer-7 load balancer.
You can use interfaces to enable or disable layer-4 load balance, and configure the connectionretention duration. For details, see section "Creating a Listener" in the Elastic Load BalanceAPI Reference.
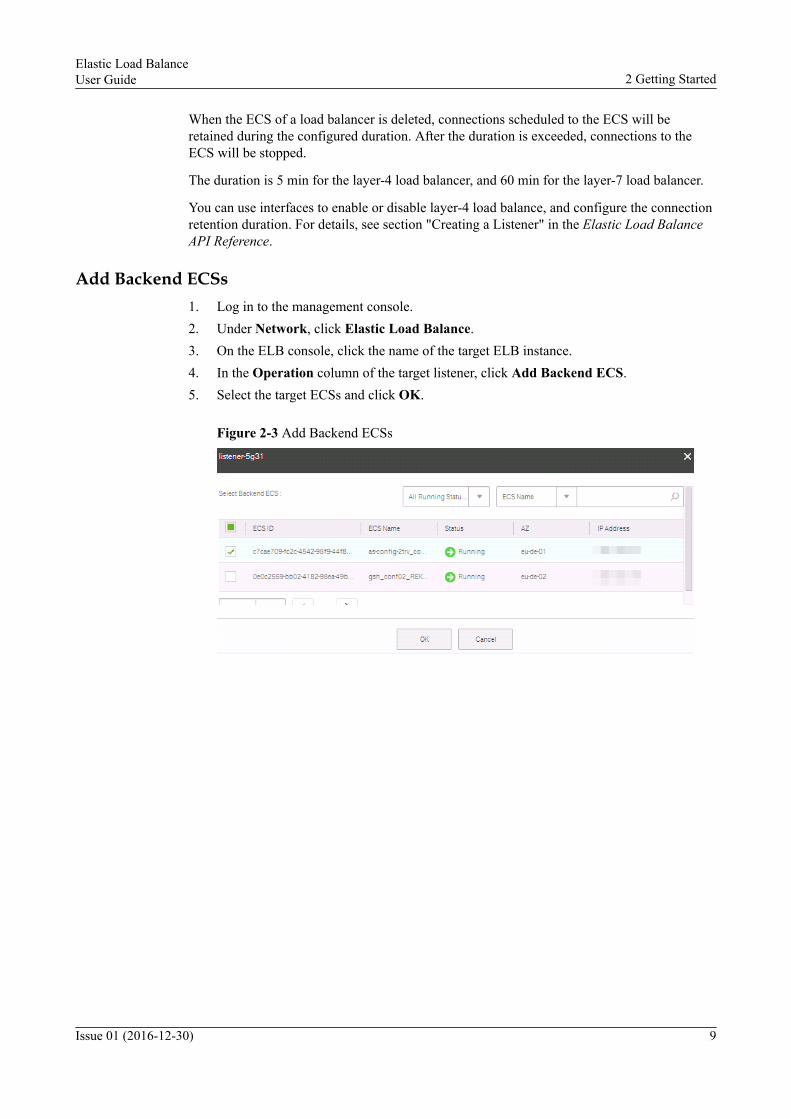
Add Backend ECSs1. Log in to the management console.2. Under Network, click Elastic Load Balance.3. On the ELB console, click the name of the target ELB instance.4. In the Operation column of the target listener, click Add Backend ECS.5. Select the target ECSs and click OK.
Figure 2-3 Add Backend ECSs
Elastic Load BalanceUser Guide 2 Getting Started
Issue 01 (2016-12-30) 9
3 Operation Guide
3.1 ELB Management
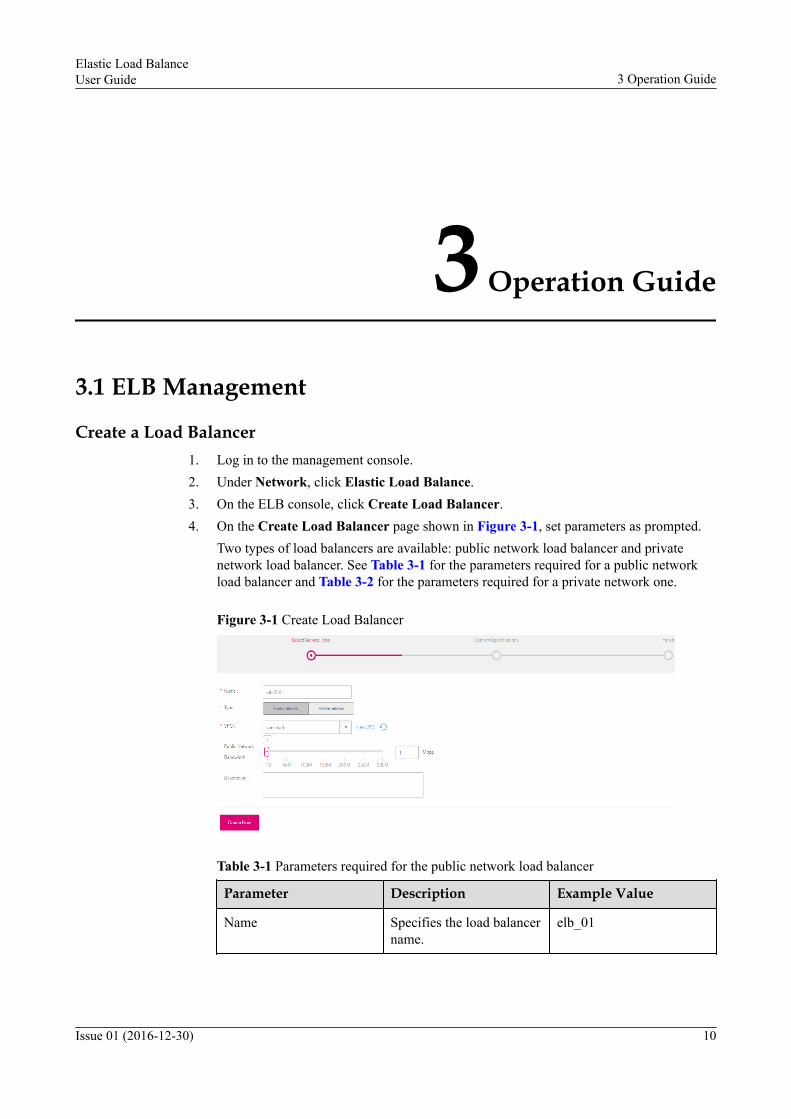
Create a Load Balancer1. Log in to the management console.2. Under Network, click Elastic Load Balance.3. On the ELB console, click Create Load Balancer.4. On the Create Load Balancer page shown in Figure 3-1, set parameters as prompted.
Two types of load balancers are available: public network load balancer and privatenetwork load balancer. See Table 3-1 for the parameters required for a public networkload balancer and Table 3-2 for the parameters required for a private network one.
Figure 3-1 Create Load Balancer
Table 3-1 Parameters required for the public network load balancer
Parameter Description Example Value
Name Specifies the load balancername.
elb_01
Elastic Load BalanceUser Guide 3 Operation Guide
Issue 01 (2016-12-30) 10
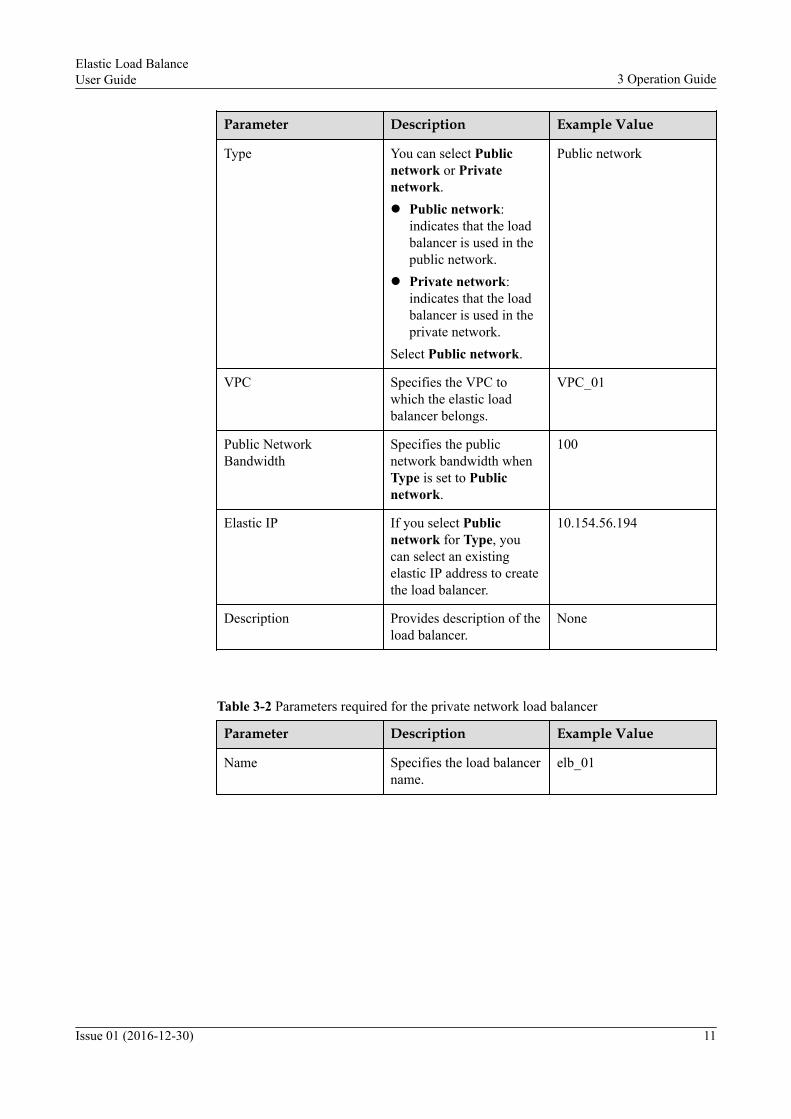
Parameter Description Example Value
Type You can select Publicnetwork or Privatenetwork.l Public network:
indicates that the loadbalancer is used in thepublic network.
l Private network:indicates that the loadbalancer is used in theprivate network.
Select Public network.
Public network
VPC Specifies the VPC towhich the elastic loadbalancer belongs.
VPC_01
Public NetworkBandwidth
Specifies the publicnetwork bandwidth whenType is set to Publicnetwork.
100
Elastic IP If you select Publicnetwork for Type, youcan select an existingelastic IP address to createthe load balancer.
10.154.56.194
Description Provides description of theload balancer.
None
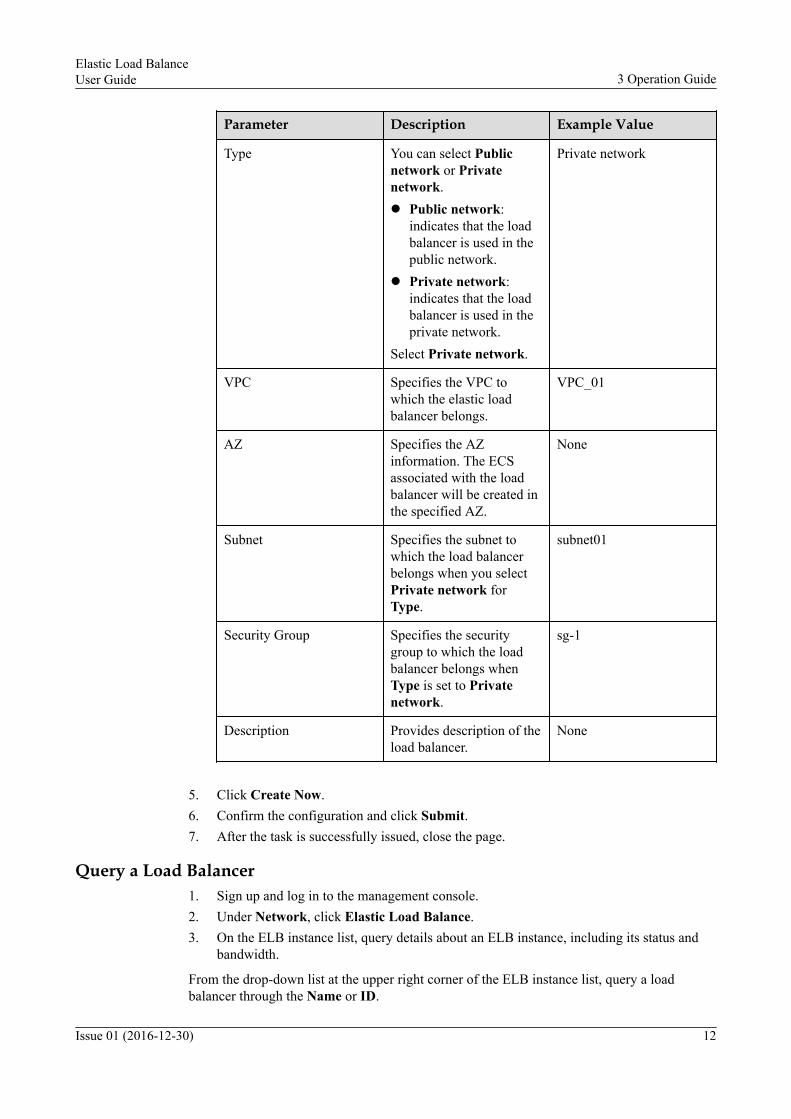
Table 3-2 Parameters required for the private network load balancer
Parameter Description Example Value
Name Specifies the load balancername.
elb_01
Elastic Load BalanceUser Guide 3 Operation Guide
Issue 01 (2016-12-30) 11
Parameter Description Example Value
Type You can select Publicnetwork or Privatenetwork.l Public network:
indicates that the loadbalancer is used in thepublic network.
l Private network:indicates that the loadbalancer is used in theprivate network.
Select Private network.
Private network
VPC Specifies the VPC towhich the elastic loadbalancer belongs.
VPC_01
AZ Specifies the AZinformation. The ECSassociated with the loadbalancer will be created inthe specified AZ.
None
Subnet Specifies the subnet towhich the load balancerbelongs when you selectPrivate network forType.
subnet01
Security Group Specifies the securitygroup to which the loadbalancer belongs whenType is set to Privatenetwork.
sg-1
Description Provides description of theload balancer.
None
5. Click Create Now.6. Confirm the configuration and click Submit.7. After the task is successfully issued, close the page.
Query a Load Balancer1. Sign up and log in to the management console.2. Under Network, click Elastic Load Balance.3. On the ELB instance list, query details about an ELB instance, including its status and
bandwidth.
From the drop-down list at the upper right corner of the ELB instance list, query a loadbalancer through the Name or ID.
Elastic Load BalanceUser Guide 3 Operation Guide
Issue 01 (2016-12-30) 12
Disable a Load Balancer1. To disable the public network load balancer, on the Elastic Load Balance page of the
management console, locate the row that contains the target load balancer, click More,and then select Disable. To disable the private network load balancer, locate the row thatcontains the target load balancer and click Disable.
2. In the dialog box displayed, click OK.
Enable a Load Balancer1. To enable the public network load balancer, on the Elastic Load Balance page of the
management console, locate the row that contains the target load balancer, click More,and then select Enable. To enable the private network load balancer, locate the row thatcontains the target load balancer and click Enable.
2. In the dialog box displayed, click OK.
Adjust the Bandwidth1. Sign up and log in to the management console.2. Under Network, click Elastic Load Balance.3. Locate the row that contains the target ELB instance, and click Adjust Bandwidth.4. Adjust the bandwidth as required and click OK.
Delete a Load Balancer1. On the Elastic Load Balance page of the management console, locate the row that
contains the target load balancer, and click Delete.2. In the dialog box displayed, click OK.
NOTE
If ECSs are associated with the load balancer, it cannot be deleted.
Configure Access LogsAccess logs record the HTTP and HTTPS requests for layer-7 load balance and are stored inan OBS bucket. Only logs for public network load balancers are supported.
1. On the Elastic Load Balance page of the management console, locate the row thatcontains the target load balancer, and click More.
2. Select Configure Access Log.3. In the displayed dialog box, set Start log backup to ON.4. Specify required information shown in Figure 3-2.
Elastic Load BalanceUser Guide 3 Operation Guide
Issue 01 (2016-12-30) 13
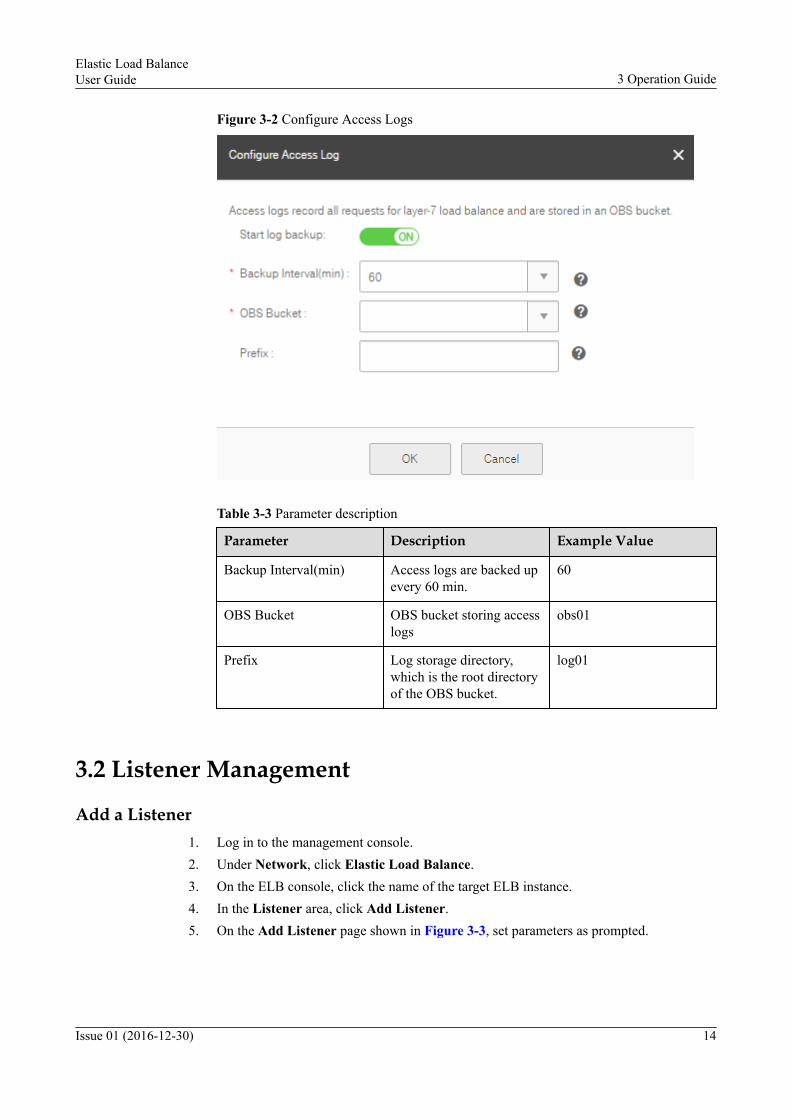
Figure 3-2 Configure Access Logs
Table 3-3 Parameter description
Parameter Description Example Value
Backup Interval(min) Access logs are backed upevery 60 min.
60
OBS Bucket OBS bucket storing accesslogs
obs01
Prefix Log storage directory,which is the root directoryof the OBS bucket.
log01
3.2 Listener Management
Add a Listener1. Log in to the management console.2. Under Network, click Elastic Load Balance.3. On the ELB console, click the name of the target ELB instance.4. In the Listener area, click Add Listener.5. On the Add Listener page shown in Figure 3-3, set parameters as prompted.
Elastic Load BalanceUser Guide 3 Operation Guide
Issue 01 (2016-12-30) 14

Figure 3-3 Add Listener
Table 3-4 Parameter description
Parameter Description ExampleValue
Name Specifies the listener name. listener01
Elastic Load BalanceUser Guide 3 Operation Guide
Issue 01 (2016-12-30) 15

Parameter Description ExampleValue
LB Protocol/Port Specifies the load distribution protocol/port. If a public network load balancer isenabled, the following four protocols aresupported:l TCP: layer-4 load balance servicel UDP: layer-4 load balance servicel HTTP: layer-7 load balance servicel HTTPS: encrypted layer 7 load
balance serviceIf a private network load balancer isenabled, the following three protocols aresupported:l TCP: layer-4 load balance servicel HTTP: layer-7 load balance servicel HTTPS: encrypted layer-7 load
balance service
TCP/22UDP/53HTTPS/443
ECS Protocol/Port Specifies the enabled protocol/port.l TCP: layer-4 load balance servicel UDP: layer-4 load balance service.
When LB Protocol is set to UDP,ECS Protocol is UDP by default.
l HTTP: layer-7 load balance service
TCP/22HTTP/80
LB Mode Specifies the algorithm that the loadbalance uses.l Polling Algorithm: Each connection
request is distributed to the next ECSin sequence so that all requests aredistributed evenly to all ECSs.
l Least Connections: New connectionsare distributed to the ECS processingthe least connections.
l Source IP Address Algorithm: Thesource IP address of the request isused as the HashKey to identify theECS in the static fragment table.
You can choose an appropriate algorithmbased on your requirement to distributeaccess traffic and improve load balancecapabilities.
PollingAlgorithm
Elastic Load BalanceUser Guide 3 Operation Guide
Issue 01 (2016-12-30) 16

Parameter Description ExampleValue
Certificate Specifies the certificate that the HTTPSload balance uses.This parameter is available only whenLB Protocol/Port is set to HTTPS.
cert-miij/9125267e1b1a4526b346cdfb9b9f856a
Stickiness Duration l The duration ranges from 1 to 5 minif LB Protocol/Port is set to TCP orUDP.
l The duration ranges from 1 to 1440min if LB Protocol/Port is set toHTTP or HTTPS.
5
Sticky Session Specifies whether to enable stickysession.If sticky session is enabled, requestsfrom the same client will be distributedto the same ECS for processing.
ON
Check Mode Specifies the protocol and port used forperforming health check on ECSs.
HTTP/80
Interval (sec) Specifies the maximum interval forhealth check.
5
Timeout (sec) Specifies the maximum timeout durationfor health check.
10
Health Threshold Specifies the threshold at which thehealth check result is normal. It indicatesthe number of consecutive successfulhealth checks when the health checkresult of the backend server changesfrom abnormal to normal.
3
Unhealth Threshold Specifies the threshold at which thehealth check result is abnormal. Itindicates the number of consecutivesuccessful health checks when the healthcheck result of the backend serverchanges from normal to abnormal.
3
Check Path Specifies the URI for health check. Thisparameter is valid when healthcheck_protocol is HTTP.
/test.html
6. Click OK.
To ensure that the load balancer stops sending requests to an ECS being stopped and thatexisting connections are retained, the draining function is enabled for the layer-4 and layer-7load balancers.
Elastic Load BalanceUser Guide 3 Operation Guide
Issue 01 (2016-12-30) 17
When the ECS of a load balancer is deleted, connections scheduled to the ECS will beretained during the configured duration. After the duration is exceeded, connections to theECS will be stopped.
The duration is 5 min for the layer-4 load balancer, and 60 min for the layer-7 load balancer.
You can use interfaces to enable or disable layer-4 load balance, and configure the connectionretention duration. For details, see section "Creating a Listener" in the Elastic Load BalanceAPI Reference.
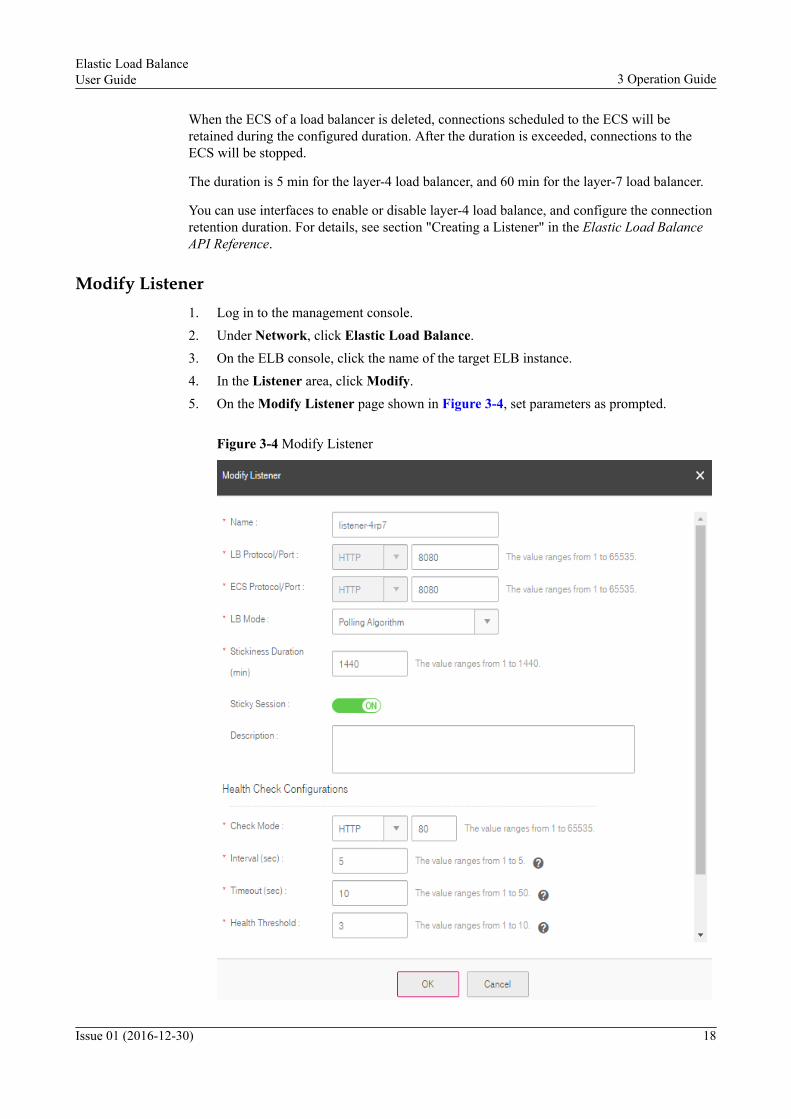
Modify Listener1. Log in to the management console.2. Under Network, click Elastic Load Balance.3. On the ELB console, click the name of the target ELB instance.4. In the Listener area, click Modify.5. On the Modify Listener page shown in Figure 3-4, set parameters as prompted.
Figure 3-4 Modify Listener
Elastic Load BalanceUser Guide 3 Operation Guide
Issue 01 (2016-12-30) 18
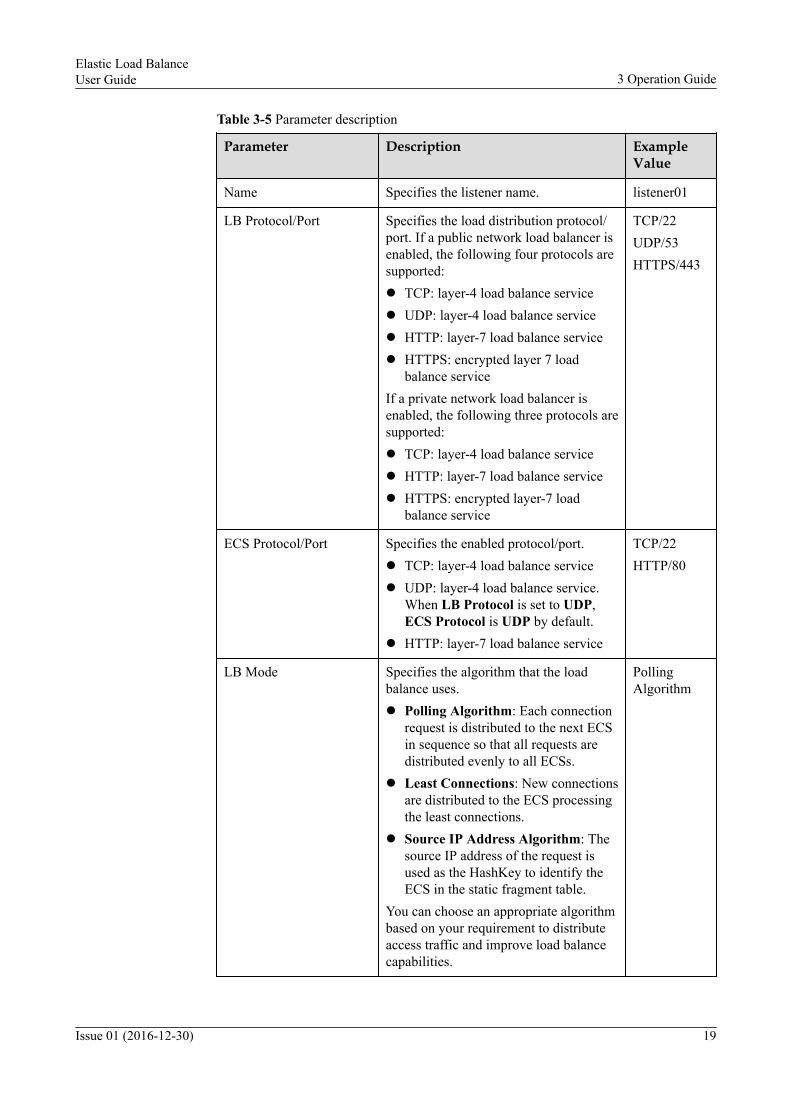
Table 3-5 Parameter description
Parameter Description ExampleValue
Name Specifies the listener name. listener01
LB Protocol/Port Specifies the load distribution protocol/port. If a public network load balancer isenabled, the following four protocols aresupported:l TCP: layer-4 load balance servicel UDP: layer-4 load balance servicel HTTP: layer-7 load balance servicel HTTPS: encrypted layer 7 load
balance serviceIf a private network load balancer isenabled, the following three protocols aresupported:l TCP: layer-4 load balance servicel HTTP: layer-7 load balance servicel HTTPS: encrypted layer-7 load
balance service
TCP/22UDP/53HTTPS/443
ECS Protocol/Port Specifies the enabled protocol/port.l TCP: layer-4 load balance servicel UDP: layer-4 load balance service.
When LB Protocol is set to UDP,ECS Protocol is UDP by default.
l HTTP: layer-7 load balance service
TCP/22HTTP/80
LB Mode Specifies the algorithm that the loadbalance uses.l Polling Algorithm: Each connection
request is distributed to the next ECSin sequence so that all requests aredistributed evenly to all ECSs.
l Least Connections: New connectionsare distributed to the ECS processingthe least connections.
l Source IP Address Algorithm: Thesource IP address of the request isused as the HashKey to identify theECS in the static fragment table.
You can choose an appropriate algorithmbased on your requirement to distributeaccess traffic and improve load balancecapabilities.
PollingAlgorithm
Elastic Load BalanceUser Guide 3 Operation Guide
Issue 01 (2016-12-30) 19

Parameter Description ExampleValue
Certificate Specifies the certificate that the HTTPSload balance uses.This parameter is available only whenLB Protocol/Port is set to HTTPS.
cert-miij/9125267e1b1a4526b346cdfb9b9f856a
Stickiness Duration l The duration ranges from 1 to 5 minif LB Protocol/Port is set to TCP orUDP.
l The duration ranges from 1 to 1440min if LB Protocol/Port is set toHTTP or HTTPS.
5
Sticky Session Specifies whether to enable stickysession.If sticky session is enabled, requestsfrom the same client will be distributedto the same ECS for processing.
ON
Check Mode Specifies the protocol and port used forperforming health check on ECSs.
HTTP/80
Interval (sec) Specifies the maximum interval forhealth check.
5
Timeout (sec) Specifies the maximum timeout durationfor health check.
10
Health Threshold Specifies the threshold at which thehealth check result is normal. It indicatesthe number of consecutive successfulhealth checks when the health checkresult of the backend server changesfrom abnormal to normal.
3
Unhealth Threshold Specifies the threshold at which thehealth check result is abnormal. Itindicates the number of consecutivesuccessful health checks when the healthcheck result of the backend serverchanges from normal to abnormal.
3
Check Path Specifies the URI for health check. Thisparameter is valid when healthcheck_protocol is HTTP.
/test.html
6. Click OK.
To modify parameters of the draining function of the layer-4 load balancer, see section"Modifying Information About a Listener" in the Elastic Load Balance API Reference.
Elastic Load BalanceUser Guide 3 Operation Guide
Issue 01 (2016-12-30) 20
Delete a Listener1. Log in to the management console.2. Under Network, click Elastic Load Balance.3. On the ELB console, click the name of the target ELB instance.4. In the Listener area, click Delete.5. In the dialog box displayed, click OK.
NOTE
If ECSs are associated with the listener, it cannot be deleted.
3.3 Backend ECS Management
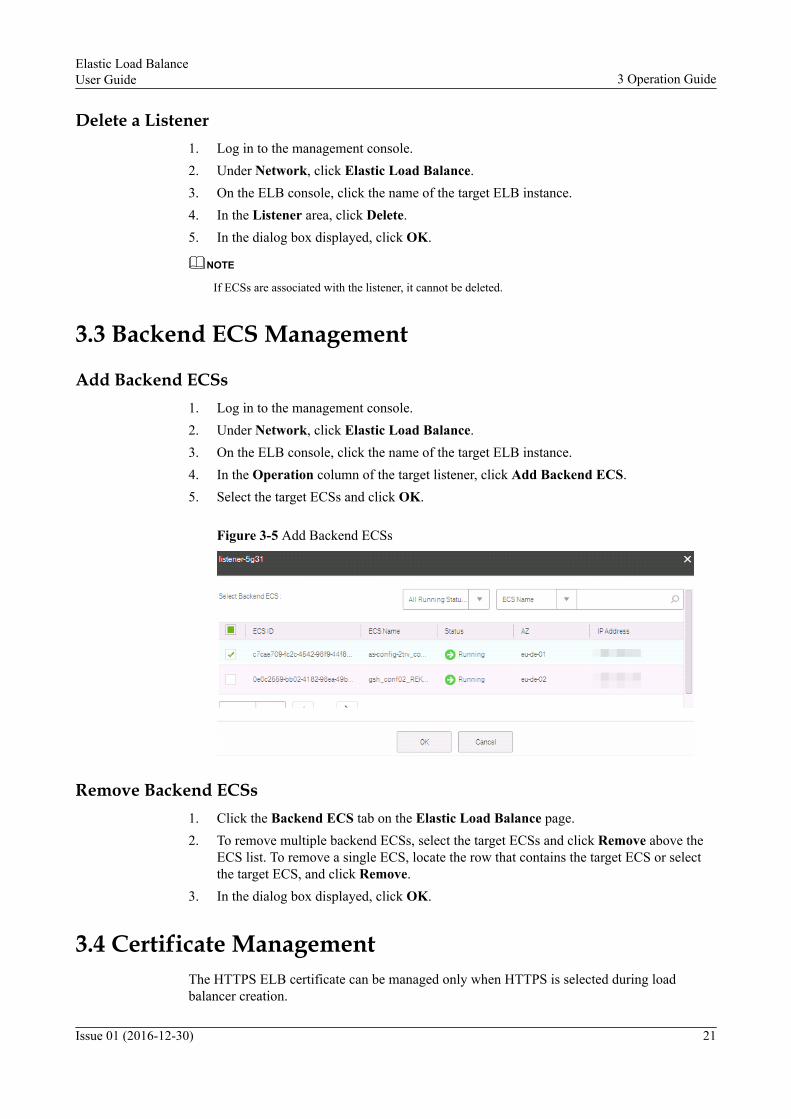
Add Backend ECSs1. Log in to the management console.2. Under Network, click Elastic Load Balance.3. On the ELB console, click the name of the target ELB instance.4. In the Operation column of the target listener, click Add Backend ECS.5. Select the target ECSs and click OK.
Figure 3-5 Add Backend ECSs
Remove Backend ECSs1. Click the Backend ECS tab on the Elastic Load Balance page.2. To remove multiple backend ECSs, select the target ECSs and click Remove above the
ECS list. To remove a single ECS, locate the row that contains the target ECS or selectthe target ECS, and click Remove.
3. In the dialog box displayed, click OK.
3.4 Certificate ManagementThe HTTPS ELB certificate can be managed only when HTTPS is selected during loadbalancer creation.
Elastic Load BalanceUser Guide 3 Operation Guide
Issue 01 (2016-12-30) 21

Create a Certificate1. Log in to the management console.2. Under Network, click Elastic Load Balance.3. Click the Certificate tab. Figure 3-6 shows the Create Certificate page.
Figure 3-6 Certificate
4. Click Create Certificate.5. On the Create Certificate page, specify Certificate Name, Certificate Content, and
Private Key. Figure 3-7 shows the Create Certificate page.
Figure 3-7 Create Certificate
6. Click OK.
Elastic Load BalanceUser Guide 3 Operation Guide
Issue 01 (2016-12-30) 22
Delete a Certificate1. Log in to the management console.2. Under Network, click Elastic Load Balance.3. Click the Certificate tab.4. Locate the row that contains the target certificate and click Delete.5. In the dialog box displayed, click OK.
Modify a Certificate1. Log in to the management console.2. Under Network, click Elastic Load Balance.3. Click the Certificate tab.4. Locate the row that contains the target certificate and click Modify.5. On the Modify page, modify the certificate information.6. Click OK.
Elastic Load BalanceUser Guide 3 Operation Guide
Issue 01 (2016-12-30) 23
4 FAQs
4.1 What Is ELB?Elastic Load Balance (ELB) is a service that automatically distributes access traffic tomultiple Elastic Cloud Servers (ECSs) to balance their service load. ELB enables you toachieve higher levels of fault tolerance in your applications and expand application servicecapabilities.
You can create an ELB service on a web-based console, configure monitoring ports requiredby the ELB service, and configure ECSs associated with the ELB service. The ELB servicehelps to eliminate single points of failure (SPOFs), improving availability of the wholesystem.
4.2 Can I Adjust ELB Bandwidth?l Can I Adjust ELB Bandwidth?l ELB bandwidth can range from 1 to 300 Mbit/s.
4.3 Which Forwarding Rules Does ELB Support?ELB supports the following forwarding rules:
l Polling: sends requests to backend ECSs in polling mode. This forwarding rule applies toshort-connection services, such as the HTTP service.
l Least Connections: preferentially sends requests to the backend ECS with the leastconnections. This forwarding rule applies to long-connection services, such as thedatabase service.
l Source IP Address: calculates the hash value of the request source IP address and sendsrequests to a matched ECS. This forwarding rule ensures that requests initiated from thesame source IP addresses are sent to a fixed ECS. This rule applies to TCP connectionsof ELB instances that do not use cookies.
4.4 Does ELB Support ECSs Running Different OSs?ELB has no requirements for the OSs used on backend ECSs.
Elastic Load BalanceUser Guide 4 FAQs
Issue 01 (2016-12-30) 24
ELB instances will work correctly if your ECSs have consistent data and the sameapplications deployed. Although there are no specific requirements for backend OSs, it isrecommended that you install the same OS on all of your ECSs to simplify operation andmaintenance (O&M).
4.5 How Many ELB Instances Can I Have?You can have a maximum of five ELB instances by default.
If you need more ELB instances, please Contact Us to apply for a higher quota. However,you can apply for a maximum of 255 ELB instances.
4.6 Do I Need to Manually Apply for an IP Address?You do not need to manually apply for an IP address when using ELB. IP addresses areautomatically assigned during ELB creation.
4.7 What Functions Do Listeners Provide?Listeners provide the following functions:
l ELB protocol and port configurationl ECS protocol and port configurationl Listening policy configuration
4.8 What Are ELB Protocols and Ports?The system supports ELB instances using TCP (layer 4) and HTTP (layer 7) protocols. Thesystem can select a protocol and default port based on the service provided.
4.9 What Are ECS Protocols and Ports?Backend ECSs provide network service protocols and ports. For example, if InternetInformation Services (IIS) is installed on a Windows ECS, the default protocol is HTTP, andthe default port is 80.
4.10 Is the Public IP Address Assigned to the ELB ServiceUsed Exclusively?
During the life cycle of your ELB service, the assigned public IP address is exclusively usedby your ELB.
4.11 Will There Be Any Adverse Impact If I Delete MyELB Service?
If your ELB IP address has been correctly resolved to the domain name and provides servicesproperly, do not delete the ELB service. If the ELB service is deleted, its IP address and
Elastic Load BalanceUser Guide 4 FAQs
Issue 01 (2016-12-30) 25

service configuration will be released, and deleted data cannot be restored. If you createanother ELB service, the system will automatically assign a new IP address to your ELB.
4.12 How Do I Configure Health Check Parameters?Configure health check parameters as follows:
l Interval: specifies the duration between two health check events. Set it to 2 seconds.l Timeout: specifies the wait time of a health check event. Set it to 5 seconds.l Health Threshold: specifies the number of passed health checks required to determine
that the service is healthy. Set it to 3.l Unhealth Threshold: specifies the number of failed health checks required to determine
that the service is unhealthy. Set it to 3.Setting this parameter helps optimize user service and application status.
l Failure Response Time: Set it to 11 seconds (2 x 3 + 5 = 11)If you require a faster failure response, set this parameter to a smaller value. Ensure thatthe normal service processing time of your ELB is shorter than the failure response timeset.
l Success Response Time: Set it to 6 seconds (2 x 3 = 6)
4.13 How Do I Rectify a Health Check Failure?The ELB health check is implemented by detecting the heartbeat communication between theELB service and backend ECSs. The ELB service communicates with backend ECSs over anintranet. Therefore, to achieve a successful health check, ensure that your ECSs are routablefrom the intranet. You can perform the following steps to rectify a health check failure.
1. On the listener page, locate the row that contains the listener with health checkexceptions and click View in the Health Check column. A dialog box shown in Figure4-1 is displayed.– Check Check Mode: Ensure that the protocol has been configured and port has
been enabled for the ECS to be checked.– Check Check Path: If HTTP is used for the health check, check whether the health
check path for the ECS is correct.
Elastic Load BalanceUser Guide 4 FAQs
Issue 01 (2016-12-30) 26
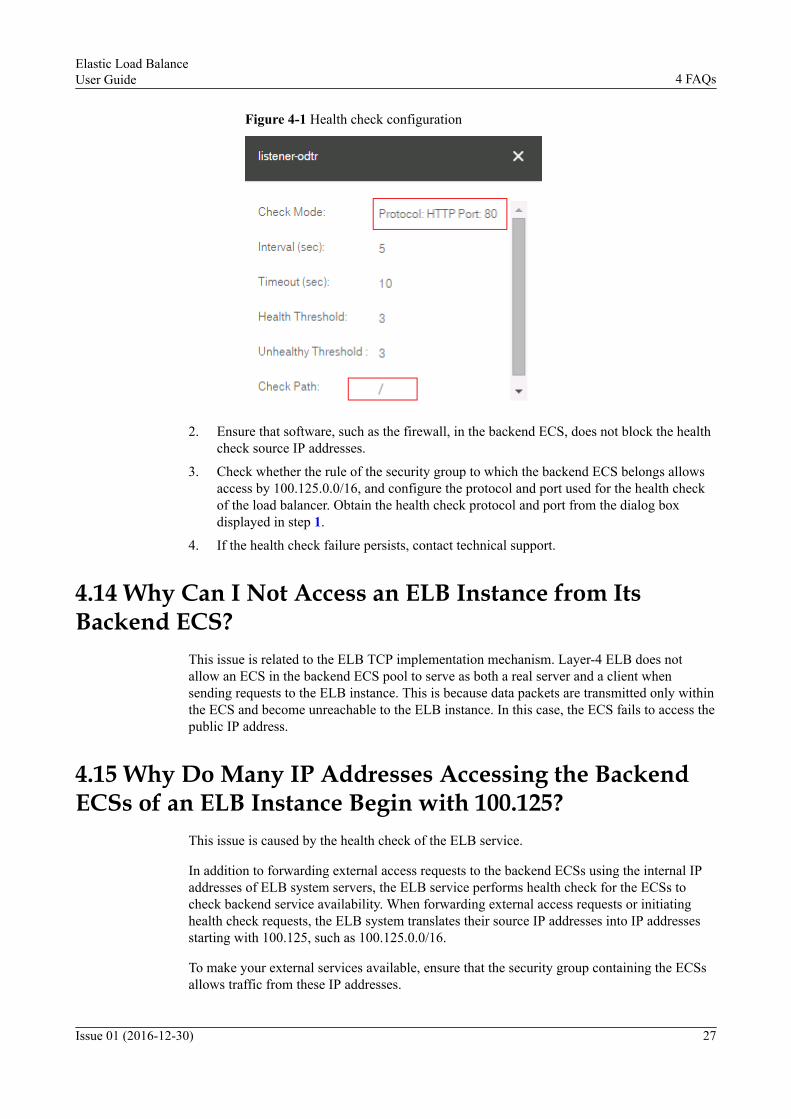
Figure 4-1 Health check configuration
2. Ensure that software, such as the firewall, in the backend ECS, does not block the healthcheck source IP addresses.
3. Check whether the rule of the security group to which the backend ECS belongs allowsaccess by 100.125.0.0/16, and configure the protocol and port used for the health checkof the load balancer. Obtain the health check protocol and port from the dialog boxdisplayed in step 1.
4. If the health check failure persists, contact technical support.
4.14 Why Can I Not Access an ELB Instance from ItsBackend ECS?
This issue is related to the ELB TCP implementation mechanism. Layer-4 ELB does notallow an ECS in the backend ECS pool to serve as both a real server and a client whensending requests to the ELB instance. This is because data packets are transmitted only withinthe ECS and become unreachable to the ELB instance. In this case, the ECS fails to access thepublic IP address.
4.15 Why Do Many IP Addresses Accessing the BackendECSs of an ELB Instance Begin with 100.125?
This issue is caused by the health check of the ELB service.
In addition to forwarding external access requests to the backend ECSs using the internal IPaddresses of ELB system servers, the ELB service performs health check for the ECSs tocheck backend service availability. When forwarding external access requests or initiatinghealth check requests, the ELB system translates their source IP addresses into IP addressesstarting with 100.125, such as 100.125.0.0/16.
To make your external services available, ensure that the security group containing the ECSsallows traffic from these IP addresses.
Elastic Load BalanceUser Guide 4 FAQs
Issue 01 (2016-12-30) 27

4.16 How Can I Obtain the Real IP Address of a Visitor?The layer-7 ELB service automatically obtains the real IP addresses of visitors using HttpHeader:X-Forwarded-For. This function cannot be disabled.
The layer-4 ELB service requires the TOA plug-in to obtain real IP addresses. For how toconfigure the TOA plug-in, see section A.1 Configuring the TOA Plug-in.
4.17 How Can I Enable the Sticky Session Feature?The sticky session feature is enabled by default after your ELB listener is created and remainsenabled throughout the listener life cycle.
4.18 What Types of Sticky Sessions Does ELB Support?ELB supports the following types of sticky sessions:
l IP address–based sticky sessions for layer-4 servicesl Cookie-based sticky sessions for layer-7 services
4.19 How Can I Handle Backend ECSs in the Abnormal[Deleted] State?
If the status of a backend ECS is Abnormal [Deleted], this means that the ECS has beendeleted from the ECS service.
To better manage backend ECSs, optimize resource utilization, and prevent distributionexceptions, it is recommended that you remove the ECS to release resources.
Figure 4-2 Backend ECS status
Elastic Load BalanceUser Guide 4 FAQs
Issue 01 (2016-12-30) 28
4.20 What Is Private Network ELB?Private network ELB enables ECSs in a VPC to access each other. Access traffic of ECSs in aVPC is distributed to backend ECSs by the private network ELB service IP address and port.
4.21 What Are the Application Scenarios of PrivateNetwork ELB?
A system with a complete architecture usually consists of multiple subsystems orcomponents. Subsystems communicate with each other using the internal network. Forinstance, in scenarios where service nodes access database nodes, and subsystems orcomponents make API calls, private network ELB provides high availability (HA) functions,including traffic distribution, horizontal expansion, and disaster recovery.
4.22 What Are the Precautions of Using UDP?l In the health check of a load balancer, the UDP and Ping packets are used to obtain the
status of the backend ECS. You must ensure that ICMP is enabled on the backend ECS.Log in to the backend ECS and run the following command as user root:cat /proc/sys/net/ipv4/icmp_echo_ignore_allIf the returned value is 1, ICMP is disabled. If the returned value is 0, ICMP is enabled.
l If UDP is used, the health check result may be different from the actual status of the ELBservice.If the backend ECS runs Linux, the sending rate of ICMP packets on the ECS will berestricted due to the anti-ICMP attack protection mechanism. In this case, even when aservice exception has occurred, ELB does not receive the error message "port XXunreachable" and still determines that the health check is successful. This results in aninconsistency between the health check result and the actual ELB status.
l A listener using UDP is not allowed for a private network load balancer.
Elastic Load BalanceUser Guide 4 FAQs
Issue 01 (2016-12-30) 29
A Appendix
A.1 Configuring the TOA Plug-in
Scenarios
ELB provides customized service management strategies for customers. Before customizingthe management strategies, ELB needs to obtain the IP address contained in the originalaccess request. TOA is such a plug-in used to obtain the IP address contained in the originalaccess request other than the IP address translated by ELB. This plug-in is installed on theELB backend server and supports OSs with 2.6.32-xx kernel. This section describes how toinstall TOA.
Procedure1. Obtain the kernel code containing the TOA module.
Download the kernel source code package containing the TOA module from thefollowing website: http://kb.linuxvirtualserver.org/images/3/34/Linux-2.6.32-220.23.1.el6.x86_64.rs.src.tar.gz
2. Decompress the kernel source code packageLinux-2.6.32-220.23.1.el6.x86_64.rs.src.tar.gz of the TOA module.
3. Change parameter values.
a. Switch to the linux-2.6.32-220.23.1.el6.x86_64.rs folder.b. Edit the net/toa/toa.h file.
Change configuration item#define TCPOPT_TOA 200to#define TCPOPT_TOA 254
c. Run the following command on the shell page:sed -i 's/CONFIG_IPV6=m/CONFIG_IPV6=y/g' .configecho -e '\n# toa\nCONFIG_TOA=m' >> .configAfter configuration, the IPV6 module is compiled into the kernel, and TOA iscompiled to an independent kernel module which starts and stops independently.
d. Edit Makefile.
Elastic Load BalanceUser Guide A Appendix
Issue 01 (2016-12-30) 30

You can add self-defined description after EXTRAVERSION =. The description isdisplayed in uname -r, such as -toa.
4. Run the following command to compile the software package:make -j n
NOTE
You can configure the value of n based on system CPU cores. For example, if the CPU has fourcores, set n to 4 to speed up the compilation.
5. Run the following command to install the kernel module:make modules_installFigure A-1 shows the command output.
Figure A-1 Installing the kernel module
6. Run the following command to install the kernel:make installFigure A-2 shows the command output.
Figure A-2 Installing the kernel
7. Open the /boot/grub/grub.conf file to enable TOA to start upon the VM startup.
a. Change the default startup kernel from 1 to 0, that is, change default=1 todefault=0.
b. Add nohz=off to the end of the newly added vmlinuz-2.6.32-toa kernel containingthe TOA module. If you do not set nohz to off, more CPU0 resources will beconsumed under high pressure, leading to imbalanced CPU resource consumption.Figure A-3 shows the configuration file screenshot.
Elastic Load BalanceUser Guide A Appendix
Issue 01 (2016-12-30) 31

Figure A-3 Configuration file
c. Save the configuration and quit. Restart the operating system.The system loads the vmlinuz-2.6.32-toa kernel when the system restarts.
8. After the system is restarted, run the following command to load the TOA module:modprobe toaYou are recommended to add the modprobe toa command to startup scripts and systemscheduled monitoring scripts as shown in Figure A-4.
Figure A-4 modprobe toa command
After the TOA module is loaded, query kernel information. Figure A-5 shows the kernelinformation.
Figure A-5 Kernel information
Elastic Load BalanceUser Guide A Appendix
Issue 01 (2016-12-30) 32
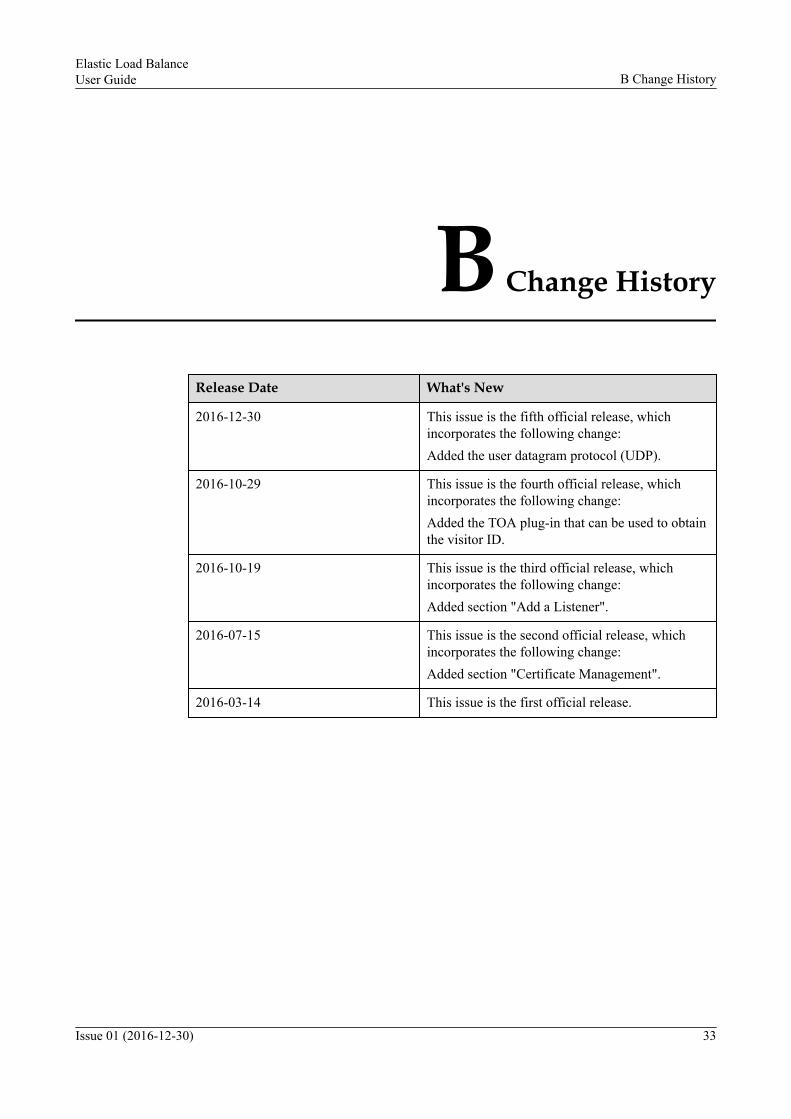
B Change History
Release Date What's New
2016-12-30 This issue is the fifth official release, whichincorporates the following change:Added the user datagram protocol (UDP).
2016-10-29 This issue is the fourth official release, whichincorporates the following change:Added the TOA plug-in that can be used to obtainthe visitor ID.
2016-10-19 This issue is the third official release, whichincorporates the following change:Added section "Add a Listener".
2016-07-15 This issue is the second official release, whichincorporates the following change:Added section "Certificate Management".
2016-03-14 This issue is the first official release.
Elastic Load BalanceUser Guide B Change History
Issue 01 (2016-12-30) 33
C Glossary
For details about the terms involved in this document, see Glossary.
Elastic Load BalanceUser Guide C Glossary
Issue 01 (2016-12-30) 34


![[AWSマイスターシリーズ]Amazon Elastic Load Balancing (ELB)](https://img.pdfslide.net/doc/110x75/547ce53f5906b552378b45ad/awsamazon-elastic-load-balancing-elb.jpg)