Embed Size (px)
Citation preview
Version 1.0 (draft)
- 1 -
User Guide for the Prognosis Models of RODOS PRTY 6.0L
Irmgard Hasemann, Claudia Landman, Jürgen Päsler-Sauer
STATUS: 8. November 2007
RODOS Version: PRTY 6.0L
Contents
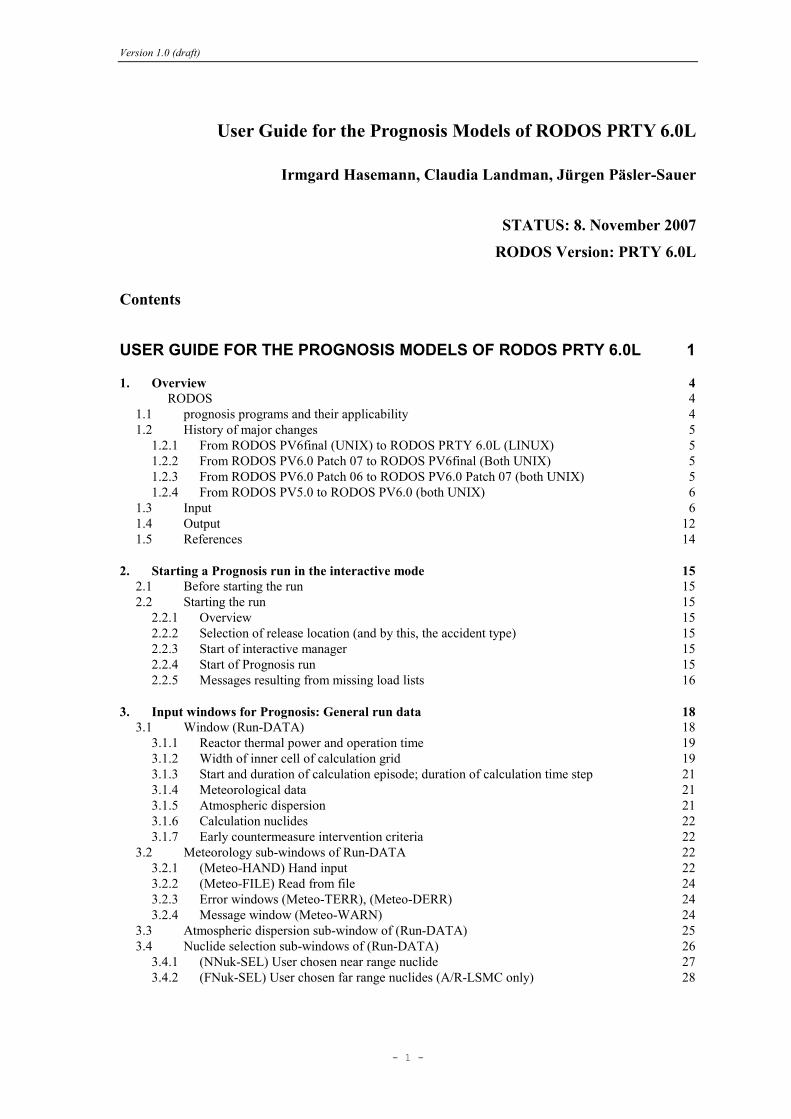
USER GUIDE FOR THE PROGNOSIS MODELS OF RODOS PRTY 6.0L 1
1. Overview 4 RODOS 4 1.1 prognosis programs and their applicability 4 1.2 History of major changes 5
1.2.1 From RODOS PV6final (UNIX) to RODOS PRTY 6.0L (LINUX) 5 1.2.2 From RODOS PV6.0 Patch 07 to RODOS PV6final (Both UNIX) 5 1.2.3 From RODOS PV6.0 Patch 06 to RODOS PV6.0 Patch 07 (both UNIX) 5 1.2.4 From RODOS PV5.0 to RODOS PV6.0 (both UNIX) 6
1.3 Input 6 1.4 Output 12 1.5 References 14
2. Starting a Prognosis run in the interactive mode 15 2.1 Before starting the run 15 2.2 Starting the run 15
2.2.1 Overview 15 2.2.2 Selection of release location (and by this, the accident type) 15 2.2.3 Start of interactive manager 15 2.2.4 Start of Prognosis run 15 2.2.5 Messages resulting from missing load lists 16
3. Input windows for Prognosis: General run data 18 3.1 Window (Run-DATA) 18
3.1.1 Reactor thermal power and operation time 19 3.1.2 Width of inner cell of calculation grid 19 3.1.3 Start and duration of calculation episode; duration of calculation time step 21 3.1.4 Meteorological data 21 3.1.5 Atmospheric dispersion 21 3.1.6 Calculation nuclides 22 3.1.7 Early countermeasure intervention criteria 22
3.2 Meteorology sub-windows of Run-DATA 22 3.2.1 (Meteo-HAND) Hand input 22 3.2.2 (Meteo-FILE) Read from file 24 3.2.3 Error windows (Meteo-TERR), (Meteo-DERR) 24 3.2.4 Message window (Meteo-WARN) 24
3.3 Atmospheric dispersion sub-window of (Run-DATA) 25 3.4 Nuclide selection sub-windows of (Run-DATA) 26
3.4.1 (NNuk-SEL) User chosen near range nuclide 27 3.4.2 (FNuk-SEL) User chosen far range nuclides (A/R-LSMC only) 28
Version 1.0 (draft
- 2 -
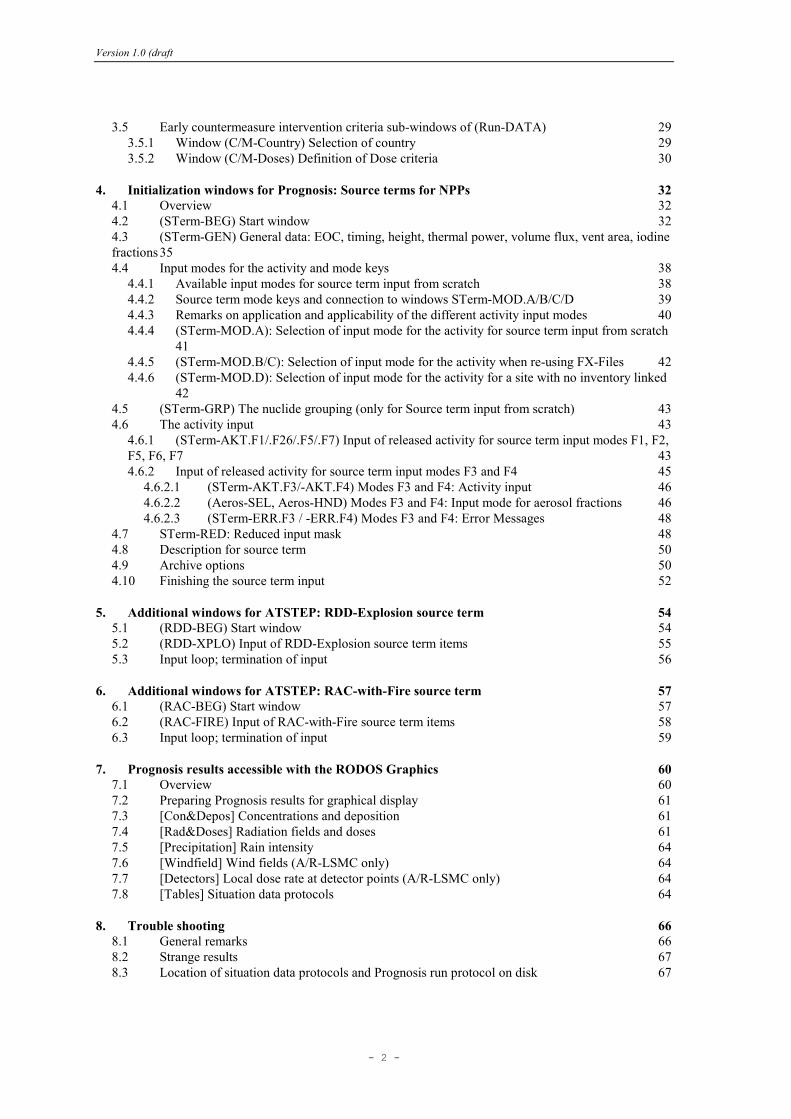
3.5 Early countermeasure intervention criteria sub-windows of (Run-DATA) 29 3.5.1 Window (C/M-Country) Selection of country 29 3.5.2 Window (C/M-Doses) Definition of Dose criteria 30
4. Initialization windows for Prognosis: Source terms for NPPs 32 4.1 Overview 32 4.2 (STerm-BEG) Start window 32 4.3 (STerm-GEN) General data: EOC, timing, height, thermal power, volume flux, vent area, iodine
fractions 35 4.4 Input modes for the activity and mode keys 38
4.4.1 Available input modes for source term input from scratch 38 4.4.2 Source term mode keys and connection to windows STerm-MOD.A/B/C/D 39 4.4.3 Remarks on application and applicability of the different activity input modes 40 4.4.4 (STerm-MOD.A): Selection of input mode for the activity for source term input from scratch
41 4.4.5 (STerm-MOD.B/C): Selection of input mode for the activity when re-using FX-Files 42 4.4.6 (STerm-MOD.D): Selection of input mode for the activity for a site with no inventory linked
42 4.5 (STerm-GRP) The nuclide grouping (only for Source term input from scratch) 43 4.6 The activity input 43
4.6.1 (STerm-AKT.F1/.F26/.F5/.F7) Input of released activity for source term input modes F1, F2,
F5, F6, F7 43 4.6.2 Input of released activity for source term input modes F3 and F4 45
4.6.2.1 (STerm-AKT.F3/-AKT.F4) Modes F3 and F4: Activity input 46 4.6.2.2 (Aeros-SEL, Aeros-HND) Modes F3 and F4: Input mode for aerosol fractions 46 4.6.2.3 (STerm-ERR.F3 / -ERR.F4) Modes F3 and F4: Error Messages 48
4.7 STerm-RED: Reduced input mask 48 4.8 Description for source term 50 4.9 Archive options 50 4.10 Finishing the source term input 52
5. Additional windows for ATSTEP: RDD-Explosion source term 54 5.1 (RDD-BEG) Start window 54 5.2 (RDD-XPLO) Input of RDD-Explosion source term items 55 5.3 Input loop; termination of input 56
6. Additional windows for ATSTEP: RAC-with-Fire source term 57 6.1 (RAC-BEG) Start window 57 6.2 (RAC-FIRE) Input of RAC-with-Fire source term items 58 6.3 Input loop; termination of input 59
7. Prognosis results accessible with the RODOS Graphics 60 7.1 Overview 60 7.2 Preparing Prognosis results for graphical display 61 7.3 [Con&Depos] Concentrations and deposition 61 7.4 [Rad&Doses] Radiation fields and doses 61 7.5 [Precipitation] Rain intensity 64 7.6 [Windfield] Wind fields (A/R-LSMC only) 64 7.7 [Detectors] Local dose rate at detector points (A/R-LSMC only) 64 7.8 [Tables] Situation data protocols 64
8. Trouble shooting 66 8.1 General remarks 66 8.2 Strange results 67 8.3 Location of situation data protocols and Prognosis run protocol on disk 67

Version 1.0 (draft
- 3 -
Document History 69
Version 1.0 (draft
- 4 -
1. Overview
1.1 RODOS prognosis programs and their applicability
RODOS version PRTY 6.0L contains three atmospheric dispersion
models (ADMs):
• The elongated Gauß-puff model ATSTEP
Uses elongated (i.e. time step integrated) puffs, and therefore is fast.
By default, ATSTEP employs modified1 Karlsruhe-Jülich/Mol
dispersion parameters applicable for different types of land-use
until a distance of about 100 km to the release point. For special
purposes, the user may request ATSTEP to operate with Doury-
Parameters or with the German-French (DFK) model.
• The Gauß-puff model RIMPUFFFehler! Textmarke nicht definiert.
With Carruthers sigma-parameters for near range, and a sigma-
parameterisation for medium range calculations.
• The particle model DIPCOTFehler! Textmarke nicht definiert.
For complex terrain and dispersion. Highest resolution when used
with many 1000s of particles, but slowest on computer.
The Local Scale Model Chain (LSMC) program of RODOS consists
of a meteorological pre-processor and a wind-field model coupled to
one of the RODOS ADMs (RODOS modules ALSMC with ATSTEP,
RLSMC with RIMPUFF, or DLSMC with DIPCOT). The
meteorological pre-processor calculates the meteorological parameters
required by the atmospheric dispersion models by interpolation or by
specific models, taking into account the topography and the roughness
of the area. The wind field model either calculates a three-dimensional
flow-field in a layer above the calculation grid from wind vectors at
given heights and space points (either measured at meteorological
towers or by sodars, or specified via user input), or by using numerical
weather prediction (NWP) data from some provider, e.g. a national
weather service.
Furthermore, RODOS provides a simpler-to-use and faster atmospheric
dispersion program QuickPro with ATSTEP as ADM but without the
coupling to the meteorological pre-processor and the wind field model.
In each time step QuickPro employs meteorological information
1 The original Karlsruhe-Jülich/Mol dispersion parameters apply only to the distances covered by the
dispersion experiments they are basing on, which is generally 10 km but can be lower in special cases.
Beyond those distances, ATSTEP steadily extends σy with a square root of trajectory length
parameterisation; σz remains unchanged.
Version 1.0 (draft
- 5 -
provided by the user via hand-input or data files for the location of the
release, assuming that the specified meteorological conditions apply
everywhere on the calculation grid. QuickPro is well suited for use in
demonstrations or training if neither weather nor terrain is too
complex.
For interactive calculations with LSMC for up to 100 km distance to
the release point and not complex terrain, both ALSMC and RLSMC
are suitable and the results do not differ significantly; however,
ALSMC needs less computing time. For calculations beyond 100 km
distance, RLSMC has to be used. For complex terrain calculations
DIPCOT is to be used.
The LSMCs and QuickPro allow for prognoses of the radiological
situation as well as for calculations of past episodes. For the sake of
simplicity, both ways of use are referred to as "prognosis" in the text.
1.2 History of major changes
1.2.1 From RODOS PV6final (UNIX) to RODOS PRTY 6.0L (LINUX)
(a) PRTY 6.0L runs with the operation system LINUX.
(b) The ADM puff model RIMPUFF is included.
(c) The ADM particle model DIPCOT is included.
1.2.2 From RODOS PV6.0 Patch 07 to RODOS PV6final (Both UNIX)
(a) The maximum number of nuclides for near range calculations
increased from 15 to 25.
(b) It is now possible considering a radiological accident associated
with a fire, for example, an accident with the inflammation of gasoline
during road transport of radiological sources for industrial, medicinal,
scientific, or public, purposes, of radioactive waste, of fissile materials
for the nuclear fuel cycle, or of nuclear weapons (RAC-with-Fire). The
selection of the accident type is made via the site selection, see Chapter
2.2.2.
1.2.3 From RODOS PV6.0 Patch 06 to RODOS PV6.0 Patch 07 (both UNIX)
(a) Before, the duration of the ADM time step was always fixed to 30
minutes. Now, there is also the possibility to choose a time step length
of either 10 minutes or 60 minutes.
(b) It is now possible to apply country-specific intervention criteria for
the early countermeasures sheltering, evacuation, and iodine tablets.
(c) It is now possible to consider not only nuclear accidents, but also
the explosion of a radiological dispersion device (RDD-Explosion).
The selection of the accident type is made via the site selection, see
Chapter 2.2.2.
Version 1.0 (draft
- 6 -
1.2.4 From RODOS PV5.0 to RODOS PV6.0 (both UNIX)
(a) There is now the possibility to perform prognostic calculations for
more than one month. The upper bound is set at the moment to 47
days. However, in case of LSMC, prognostic calculations are in general
limited to the extent numerical weather prognosis (NWP) data are
available. In case the user is interested to re-calculate events from the
past, NWP data have to be collected in the data base or user defined
meteorological input has to be applied. Performing a prognosis over a
long time, the user has to be aware of the amount of data which is
generated and the computing time of the particular run.
(b) There are no static initialisation windows any more in the LSMC
programs and QuickPro. Instead, dynamic initialisation windows will
open automatically after the start of the prognosis program for the user
input of data.
1.3 Input
For an interactive Prognosis run with RODOS, the data depending on
the actual situation and problem cannot be made available by the
system in a-priori manner. Such data are in the following referred to as
situation data; they have to be introduced into the system by the user
with the RODOS Initialization windows.
The Prognosis situation data and the hierarchy of the windows are
shown in Tab. 1. Explanations follow after the Table.
With few exceptions in the meteorology part the windows apply to all
three Prognoses programs; the exceptions are indicated in the Table.
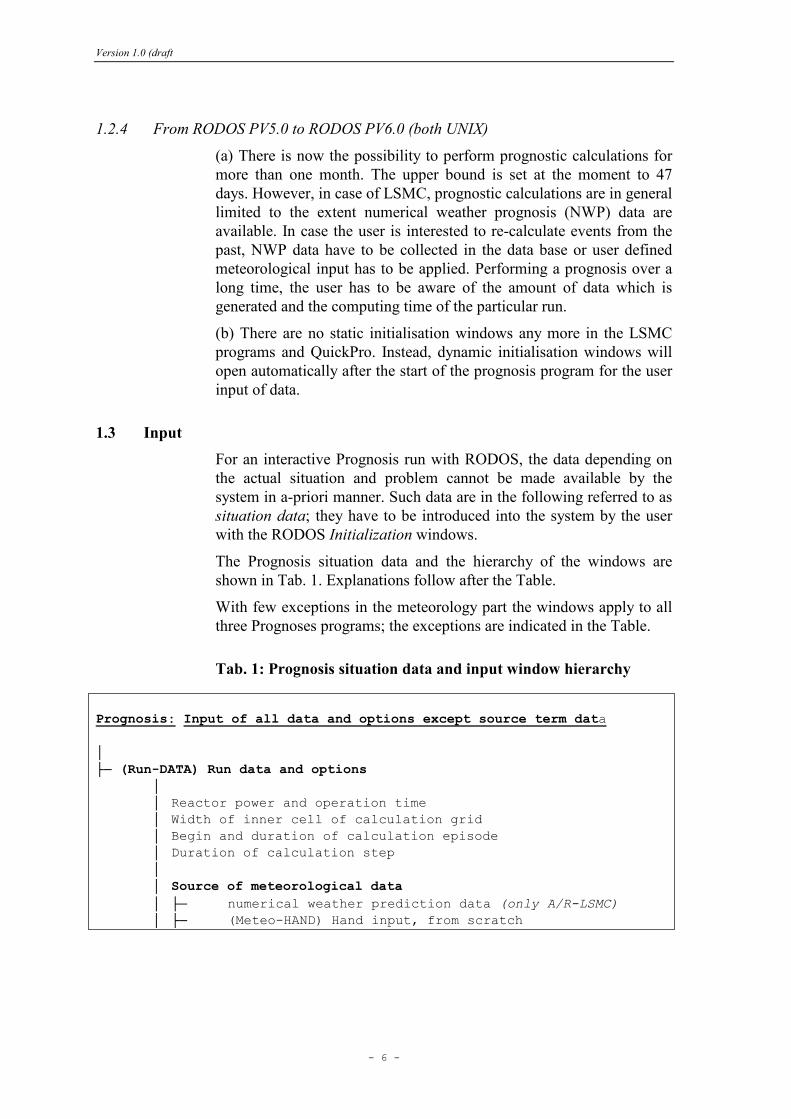
Tab. 1: Prognosis situation data and input window hierarchy
Prognosis: Input of all data and options except source term data │ ├─ (Run-DATA) Run data and options │ │ Reactor power and operation time │ Width of inner cell of calculation grid │ Begin and duration of calculation episode │ Duration of calculation step │ │ Source of meteorological data │ ├─ numerical weather prediction data (only A/R-LSMC) │ ├─ (Meteo-HAND) Hand input, from scratch

Version 1.0 (draft
- 7 -
│ ├─ (Meteo-HAND) Hand input, modify last input │ ├─ (Meteo-FILE) Read from file │ │ Atmospherical dispersion │ ├─ Default setup │ ├─ (AtDis-SEL) Setup by user │ ├─ Initial broadening of plume by building │ ├─ Turbulence parameterisation (only A/R-LSMC) │ ├─ Land use data (only A/R-LSMC) │ ├─ Calculation nuclides │ ├─ Default calculation nuclides │ ├─ Calculation nuclides by user │ ├─ (NNuk-SEL) Near range nuclides │ ├─ (FNuk-SEL) Far range nuclides (only A/R-LSMC) │ ├─ Early countermeasure intervention criteria ├─ Calculation with the national intervention criteria ├─ Calculation user-defined intervention criteria ├─ (CM-Country) Selection of country ├─ (CM-Doses) Definition of dose criteria Prognosis situation data and input window hierarchy (Continuation of Table)
Prognosis: Input of source terms for NPPs
│ ├─(STerm-BEG) Start window │ │..... Source term from scratch (detailed) │ ├─(STerm-GEN) End of chain reaction, release height, │ │ time intervals, thermal power, │ │ released iodine fractions │ ├─(STerm-MOD.A) Input mode for the activity │ │ ├─(STerm-AKT.F1) Activity input (mode F1) │ │ │ ├─ (STerm-GRP) │ │ ├─(STerm-AKT.F26) Activity input (mode F2) │ │ │ ├─ (STerm-GRP) │ │ ├─(STerm-AKT.F3) Activity input (mode F3) │ │ │ ├─ (Aeros-SEL, Aeros-HND) │ │ ├─(STerm-AKT.F4) Activity input (mode F4) │ │ │ ├─ (Aeros-SEL, Aeros-HND) │ │ ├─(STerm-AKT.F5) Activity input (mode F5) │ │ │ ├─ (STerm-GRP) │ │ ├─(STerm-AKT.F26a/b) Activity input (mode F6) │ │ │ ├─ (F2: STerm-GRP) │ │ ├─(STerm-AKT.F7a/b) Activity input (mode F7) │ │ │ │ ├─(STerm-COM) Brief description │ ├─(STerm-FOU.1) Archive options

Version 1.0 (draft
- 8 -
│ │ ├─ (STerm-FOU.2) Additional archiving │ ├─(STerm-LOOP) Input loop │ ├─ (STerm-END) Input completed, continue run │ ├─ (STerm-BEG) Start from beginning │ ├─ (STerm-GEN) Further modification of input │ ├─ (RUN-STOP) Program stop │ │ │..... Source term from scratch (reduced) │ ├─(STerm-RED) End of chain reaction, release height, │ │ time intervals, thermal power, │ │ released iodine fractions, │ │ activity input for mode F8 │ │ ├─ (Aeros.DFL, Aeros.HND) │ │ │..... Source term from RODOS library ├─(STerm-ROLIB) Select source term from library ├─(STerm-LOOP) Input loop (see above) │ │ │ │ ... view/modify data │ ├─(STerm-GEN) End of chain reaction, release height, │ │ time intervals, thermal power, │ │ released iodine fractions │ ├─(STerm-MOD.A/B/C) Input mode for the activity │ ├─(STerm-AKT.Fn) Activity input (mode Fn) │ ├─(STerm-COM) Brief description │ ├─(STerm-FOU.1) Archive options │ │ ├─ (STerm-FOU.2) Additional archiving │ ├─(STerm-LOOP) Input loop │ ├─ (STerm-END) Input completed, continue run │ ├─ (STerm-BEG) Start from beginning │ ├─ (STerm-GEN) Further modification of input │ ├─ (RUN-STOP) Program stop │ │ │..... Source term from public library │ AS FOR "SOURCE TERM FROM RODOS LIBRARY" │ │ │..... Source term from private library │ AS FOR "SOURCE TERM FROM RODOS LIBRARY" │ │ │.... Re-use last applied source term without any modification

Version 1.0 (draft
- 9 -
Prognosis situation data and input window hierarchy (Continuation of Table)
Prognosis: Input of RDD-Explosion source terms (ATSTEP only)
│ ├─(RDD-BEG) Start window │..... Input of source from scratch; modification of s.term │ ├─(RDD-XPLO) Input/modification of RDD source term │..... Source term from private library │ ├─(RDD-PRLIB) Select source term from library ├─(STerm-COM) Brief description ├─(STerm-FOU.1) Archive options │ │ ├─ (STerm-FOU.2) Additional archiving ├─(STerm-LOOP) Input loop ├─ (STerm-END) Input completed, continue run ├─ (STerm-BEG) Start from beginning ├─ (STerm-GEN) Further modification of input ├─ (RUN-STOP) Program stop
Prognosis situation data and input window hierarchy (Continuation of Table)
Prognosis: Input of RAC-with_Fire source terms (ATSTEP only)
│ ├─(RAC-BEG) Start window │..... Input of source from scratch; modification of s.term │ ├─(RAC-FIRE) Input/modification of RAC source term │..... Source term from private library │ ├─(RAC-PRLIB) Select source term from library ├─(STerm-COM) Brief description ├─(STerm-FOU.1) Archive options │ │ ├─ (STerm-FOU.2) Additional archiving ├─(STerm-LOOP) Input loop ├─ (STerm-END) Input completed, continue run ├─ (STerm-BEG) Start from beginning ├─ (STerm-GEN) Further modification of input ├─ (RUN-STOP) Program stop
As can be seen from Tab. 1, the Prognosis situation data fall into
several different data categories that are outlined below.
• Reactor power and operation time
As default values for the selected site, the thermal power (in MW) and
the operation time (in days) as they are stored in the RODOS Database
are taken. If necessary, other values can be applied for the current run.
• Width of inner grid cell of calculation grid
RODOS version PRTY 6.0L calculates on a non-uniform Cartesian
grid. Fig. 1 on page 22 shows the structure of such a non-uniform grid.
By default, the size of the inner grid cells is 1x1 km2. For special
Version 1.0 (draft
- 10 -
applications, in particular for exercises, it can be useful to vary the size
of the inner cells.
• Start and duration of calculation episode; duration of ADM
time step
As default, the actual date and time are the start time of the calculation
episode, and the duration is 24 hours.
The default duration of each ADM calculation time step is 60 Minutes.
Alternatively, there is the possibility to choose a time step length of
either 10 minutes or 30 minutes.
• Meteorology
Prognostic meteorological data can be taken either from a national
weather service, which is the default for the LSMCs, or can be put in
by the user via the input windows. The user input mode the
meteorological data is cogent when running with QuickPro; in this case
also the roughness length has to be put in. Please note: If the user
specifies rain in a given time period, wet deposition is assumed to act
on the whole cloud in the calculation area.
With the LSMCs one may choose the user input mode for instance if
the meteorological conditions are pre-defined (for instance in
exercises), or if by some reason prognosis data from a national weather
service are not available.
• Atmospheric dispersion
This input section covers items such as initial plume broadening,
turbulence parameterisation, and land use.
• Calculation nuclides
RODOS can perform the near range calculations with 1 to 25
"calculation nuclides".
In calculations for nuclear power plants3, the following 25 default
nuclides are considered:
Kr-85, Kr-85m, Kr-88, Xe-133, Xe-135, I–131, I–132, I–133, I–134, I–
135, Rb-88, Sr- 89, Sr- 90, Zr-95, Ru-103, Ru-106, Te-131m, Te-132,
Cs-134, Cs-136, Cs-137, Ba-140, Pu-238, Pu-241, Am-242, Am-244.
The user may choose other nuclides in the corresponding nuclide input
windows.
• Early countermeasure intervention criteria
3 There is no default setting for non-NPP calculations.
Version 1.0 (draft
- 11 -
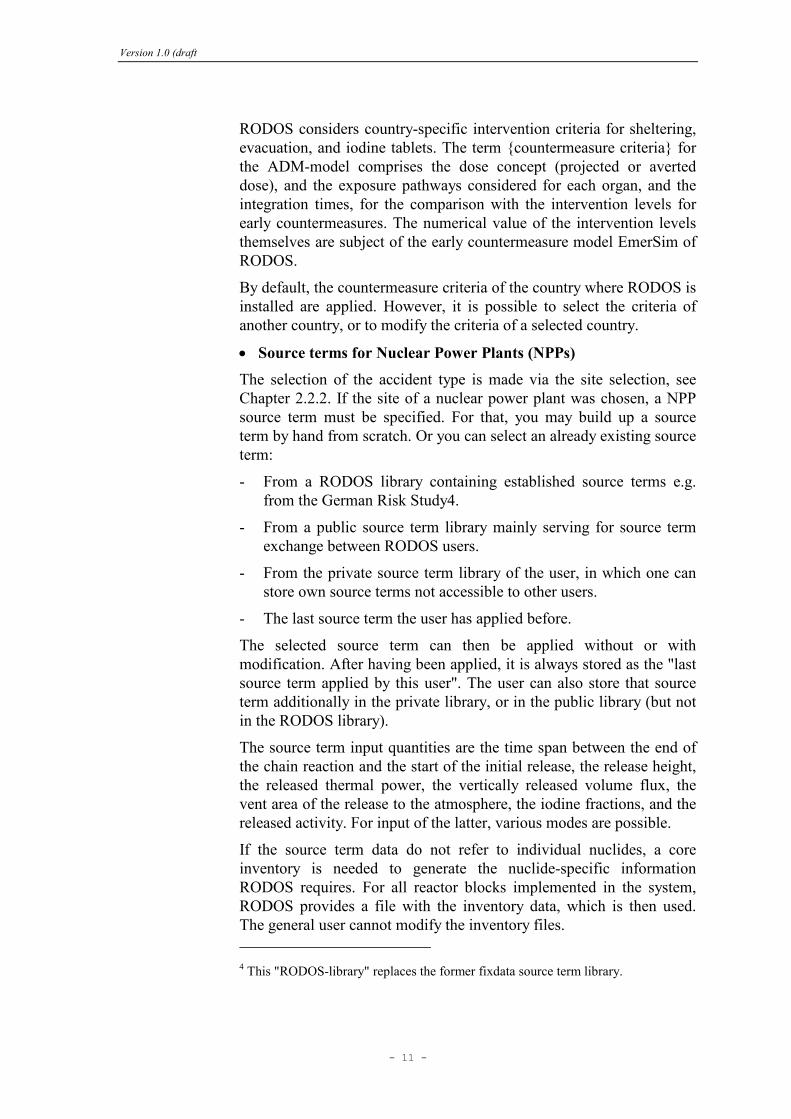
RODOS considers country-specific intervention criteria for sheltering,
evacuation, and iodine tablets. The term {countermeasure criteria} for
the ADM-model comprises the dose concept (projected or averted
dose), and the exposure pathways considered for each organ, and the
integration times, for the comparison with the intervention levels for
early countermeasures. The numerical value of the intervention levels
themselves are subject of the early countermeasure model EmerSim of
RODOS.
By default, the countermeasure criteria of the country where RODOS is
installed are applied. However, it is possible to select the criteria of
another country, or to modify the criteria of a selected country.
• Source terms for Nuclear Power Plants (NPPs)
The selection of the accident type is made via the site selection, see
Chapter 2.2.2. If the site of a nuclear power plant was chosen, a NPP
source term must be specified. For that, you may build up a source
term by hand from scratch. Or you can select an already existing source
term:
- From a RODOS library containing established source terms e.g.
from the German Risk Study4.
- From a public source term library mainly serving for source term
exchange between RODOS users.
- From the private source term library of the user, in which one can
store own source terms not accessible to other users.
- The last source term the user has applied before.
The selected source term can then be applied without or with
modification. After having been applied, it is always stored as the "last
source term applied by this user". The user can also store that source
term additionally in the private library, or in the public library (but not
in the RODOS library).
The source term input quantities are the time span between the end of
the chain reaction and the start of the initial release, the release height,
the released thermal power, the vertically released volume flux, the
vent area of the release to the atmosphere, the iodine fractions, and the
released activity. For input of the latter, various modes are possible.
If the source term data do not refer to individual nuclides, a core
inventory is needed to generate the nuclide-specific information
RODOS requires. For all reactor blocks implemented in the system,
RODOS provides a file with the inventory data, which is then used.
The general user cannot modify the inventory files.
4 This "RODOS-library" replaces the former fixdata source term library.
Version 1.0 (draft
- 12 -
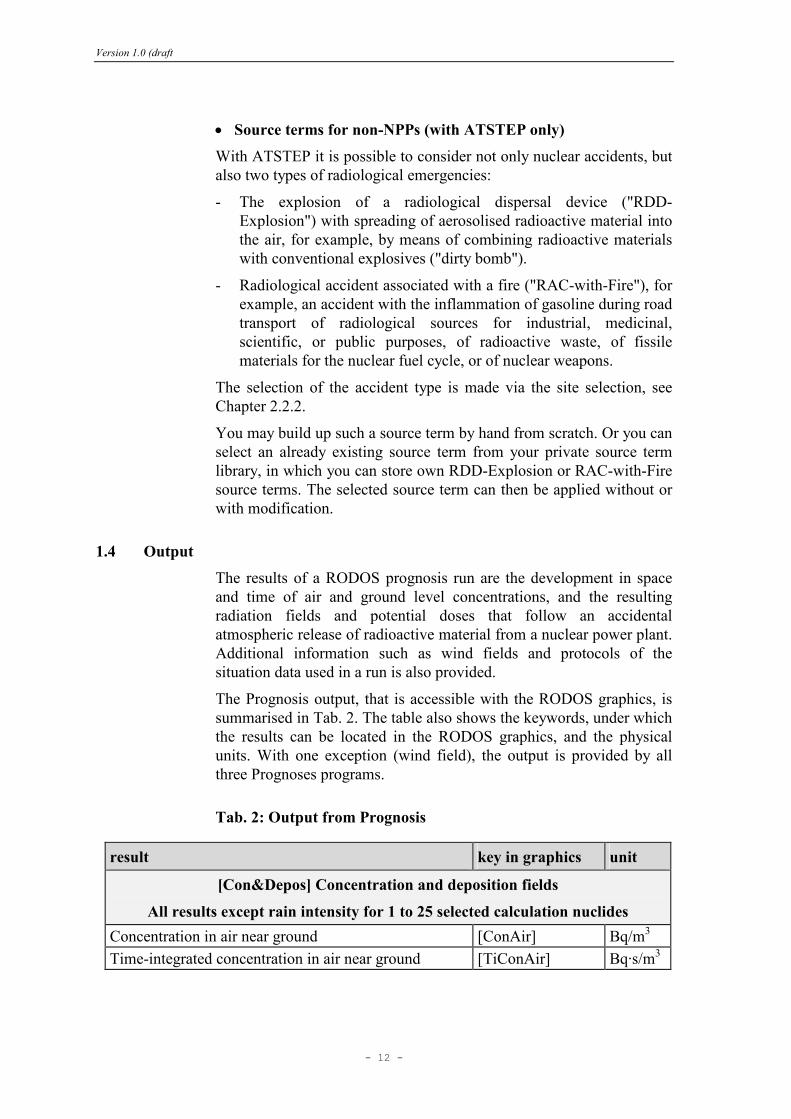
• Source terms for non-NPPs (with ATSTEP only)
With ATSTEP it is possible to consider not only nuclear accidents, but
also two types of radiological emergencies:
- The explosion of a radiological dispersal device ("RDD-
Explosion") with spreading of aerosolised radioactive material into
the air, for example, by means of combining radioactive materials
with conventional explosives ("dirty bomb").
- Radiological accident associated with a fire ("RAC-with-Fire"), for
example, an accident with the inflammation of gasoline during road
transport of radiological sources for industrial, medicinal,
scientific, or public purposes, of radioactive waste, of fissile
materials for the nuclear fuel cycle, or of nuclear weapons.
The selection of the accident type is made via the site selection, see
Chapter 2.2.2.
You may build up such a source term by hand from scratch. Or you can
select an already existing source term from your private source term
library, in which you can store own RDD-Explosion or RAC-with-Fire
source terms. The selected source term can then be applied without or
with modification.
1.4 Output
The results of a RODOS prognosis run are the development in space
and time of air and ground level concentrations, and the resulting
radiation fields and potential doses that follow an accidental
atmospheric release of radioactive material from a nuclear power plant.
Additional information such as wind fields and protocols of the
situation data used in a run is also provided.
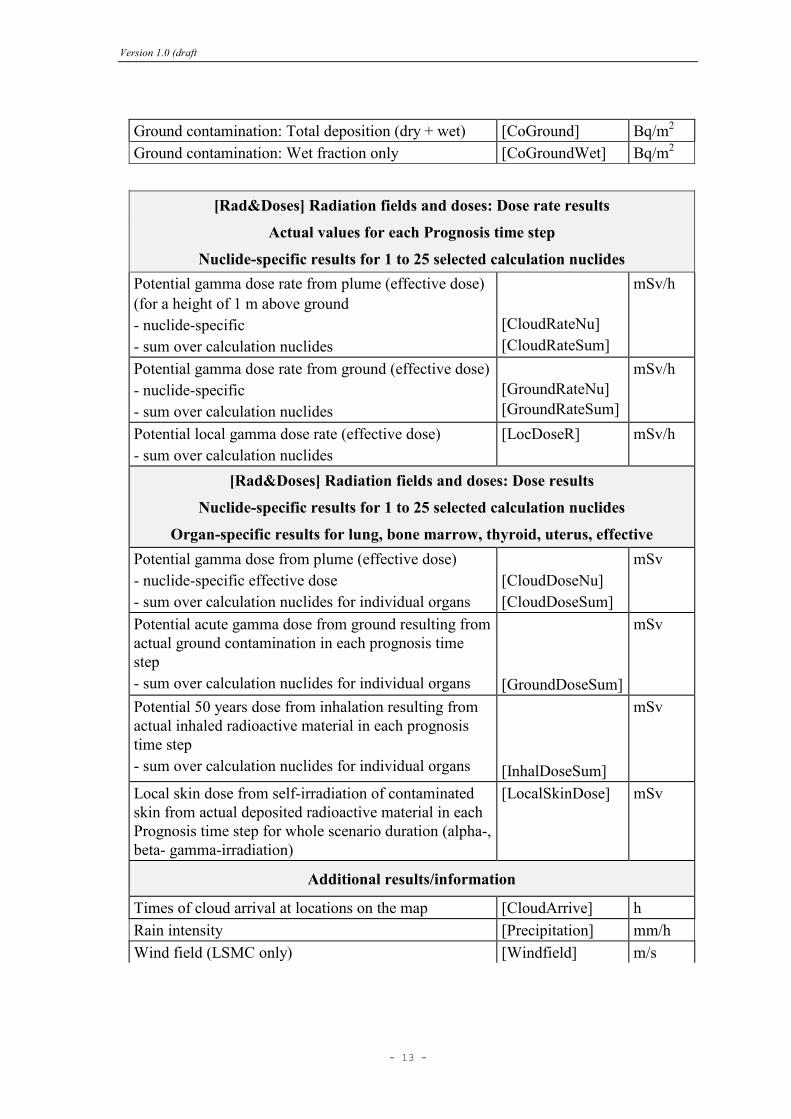
The Prognosis output, that is accessible with the RODOS graphics, is
summarised in Tab. 2. The table also shows the keywords, under which
the results can be located in the RODOS graphics, and the physical
units. With one exception (wind field), the output is provided by all
three Prognoses programs.
Tab. 2: Output from Prognosis
result key in graphics unit
[Con&Depos] Concentration and deposition fields
All results except rain intensity for 1 to 25 selected calculation nuclides
Concentration in air near ground [ConAir] Bq/m3
Time-integrated concentration in air near ground [TiConAir] Bq·s/m3
Version 1.0 (draft
- 13 -
Ground contamination: Total deposition (dry + wet) [CoGround] Bq/m2
Ground contamination: Wet fraction only [CoGroundWet] Bq/m2
[Rad&Doses] Radiation fields and doses: Dose rate results
Actual values for each Prognosis time step
Nuclide-specific results for 1 to 25 selected calculation nuclides
Potential gamma dose rate from plume (effective dose)
(for a height of 1 m above ground
- nuclide-specific
- sum over calculation nuclides
[CloudRateNu]
[CloudRateSum]
mSv/h
Potential gamma dose rate from ground (effective dose)
- nuclide-specific
- sum over calculation nuclides
[GroundRateNu]
[GroundRateSum]
mSv/h
Potential local gamma dose rate (effective dose)
- sum over calculation nuclides
[LocDoseR] mSv/h
[Rad&Doses] Radiation fields and doses: Dose results
Nuclide-specific results for 1 to 25 selected calculation nuclides
Organ-specific results for lung, bone marrow, thyroid, uterus, effective
Potential gamma dose from plume (effective dose)
- nuclide-specific effective dose
- sum over calculation nuclides for individual organs
[CloudDoseNu]
[CloudDoseSum]
mSv
Potential acute gamma dose from ground resulting from
actual ground contamination in each prognosis time
step
- sum over calculation nuclides for individual organs
[GroundDoseSum]
mSv
Potential 50 years dose from inhalation resulting from
actual inhaled radioactive material in each prognosis
time step
- sum over calculation nuclides for individual organs
[InhalDoseSum]
mSv
Local skin dose from self-irradiation of contaminated
skin from actual deposited radioactive material in each
Prognosis time step for whole scenario duration (alpha-,
beta- gamma-irradiation)
[LocalSkinDose] mSv
Additional results/information
Times of cloud arrival at locations on the map [CloudArrive] h
Rain intensity [Precipitation] mm/h
Wind field (LSMC only) [Windfield] m/s

Version 1.0 (draft
- 14 -
[Tables] Situation data protocols
Site and calculation grid [SiteData] -
Nuclides [NuclideData] -
Inventory [InventoryData]
Source term): Input from user [STermFromUser] -
Source term: Additional, derived information STermMoreInfos -
Source term: Time step source term for ADM-modell STermTStep -
Meteorological data and dispersion-related data [MeteoFromUser] -
1.5 References
ATSTEP
J. Päsler-Sauer, Description of the Atmospheric Dispersion Model
ATSTEP - Version RODOS PV6final. Internal report RODOS(RA2)-
TN(04)-03, Draft Version 2.
ATSTEP on WWW:
http://atmosphericdispersion.wikia.com/wiki/ATSTEP
RIMPUFF
S. Thykier-Nielsen, S. Deme, T. Mikkelsen, Description of the
Atmospheric Dispersion Module RIMPUFF. Internal report
RODOS(WG2)-TN(98)-02.
DIPCOT
- To be provided -
Meteorological Pre-Processor (MPP)
Wolfgang Raskob, Jürgen Päsler-Sauer, Thomas Schichtel Spyros
Andronopoulos, John Barzis, First definition of the revised
meteorological pre-processor for RODOS PV5.0. Internal report
RODOS(RA2)-TN(00)-01.
Source term model (including inventory)
C. Landman, Source Term Treatment for Nuclear Accidents in
RODOS PV6final. Internal report RODOS(RA2)-TN(04)-04, Draft
Version 2.
Nuclides in Prognosis models, nuclide naming conventions
C. Landman, FixData nuclides, near range nuclides, and far range
nuclides, in RODOS PV6final. Internal report RODOS(RA1)-TN(02)-
04, Draft Version 2.
Scenario data available for use in RODOS
C. Landman, Scenario Data Sets and Scenarios for RODOS PV6final.
Internal report RODOS(RA7)-TN(04)-02, Draft Version 2.
Version 1.0 (draft
- 15 -
2. Starting a Prognosis run in the interactive mode
2.1 Before starting the run
First, you must consider if you want to run with the site your RODOS
system is implemented for, or with another site (for example, for
exercises).
Then carry out the corresponding steps described in Chapter 2.2.
2.2 Starting the run
2.2.1 Overview
Starting an interactive Prognosis run requires the following steps:
• (Optional) Selection of a site other than the default site.
• (Cogent) Start of interactive manager.
• (Cogent) Start of the Prognosis run by clicking [Start]. As there are
no longer static initialization windows available, the button
Initialisation is insensitive and cannot be pressed. For the same
reason, the run option (default or temporary) is now without any
meaning.
After the start of the Prognosis calculation, dynamic Initialisation
Windows will open that allow the specification of the situation data.
Before the start of the Prognosis calculation, it is important that the
steps 1 to 3 are carried out in the sequence shown in the list above. All
steps are described below. You may skip the sections referring to the
optional steps if you do not want to carry them out.
The situation data used in each Prognosis run are recorded; see Chapter
7.8 for more details.
2.2.2 Selection of release location (and by this, the accident type)
In the tool bar of the Main Dialogue Window of RODOS select
(Option). A new menu pops up (not shown here). Click on (Site
selection). The Site Selection window appears (not shown here).
Choose first the country in which the release location under
consideration is located and then press [Update List]. A list of all
available release locations within the selected country appears.
New feature in RODOS PV6.0 Patch 07 and PV6final
Formerly, all release locations in RODOS were sites of a nuclear
reactor. This is still valid for all "real" countries represented by an
existing country code. However, in the list of country codes, there is a

Version 1.0 (draft
- 16 -
code XXX, which refers to sites named "MOBILE" release location.
There are several types of mobile release locations:
• "NPP" which allows the definition a new NPP at a new location.
"RDD-Explosion", which allows consideration of the explosion of a
radiological dispersion device at a new location.
• "RAC-with-Fire" for considering a radiological accident associated
with a fire, for example, an accident with the inflammation of
gasoline during road transport of radiological sources for industrial,
medicinal, scientific, or public purposes, of radioactive waste, of
fissile materials for the nuclear fuel cycle, or of nuclear weapons.
Thus, the selection of a MOBILE location determines the accident
type.
After clicking on the entry in the list, below the list the geographical
co-ordinates for the chosen block or "mobile accident" are displayed
(the name for the site and block are not updated). Finally, click on
[Apply]. An hourglass appears; you must wait until the update is
completed, that is, until the hourglass disappears.
2.2.3 Start of interactive manager
In the tool bar of the Main Dialogue window of RODOS select the
button [Interactive]. The Interactive Manager window appears.
For details about the Interactive Manager window see [RODOS User
Guide of the System Interface].
2.2.4 Start of Prognosis run
In the Interactive Manager window, click on
[QUICKPRO] for QuickPro,
[ALSMCprogn] for ALSMC,
Version 1.0 (draft
- 17 -
[RLSMCprogn] for RLSMC
[DLSMCprogn] for DIPCOT.
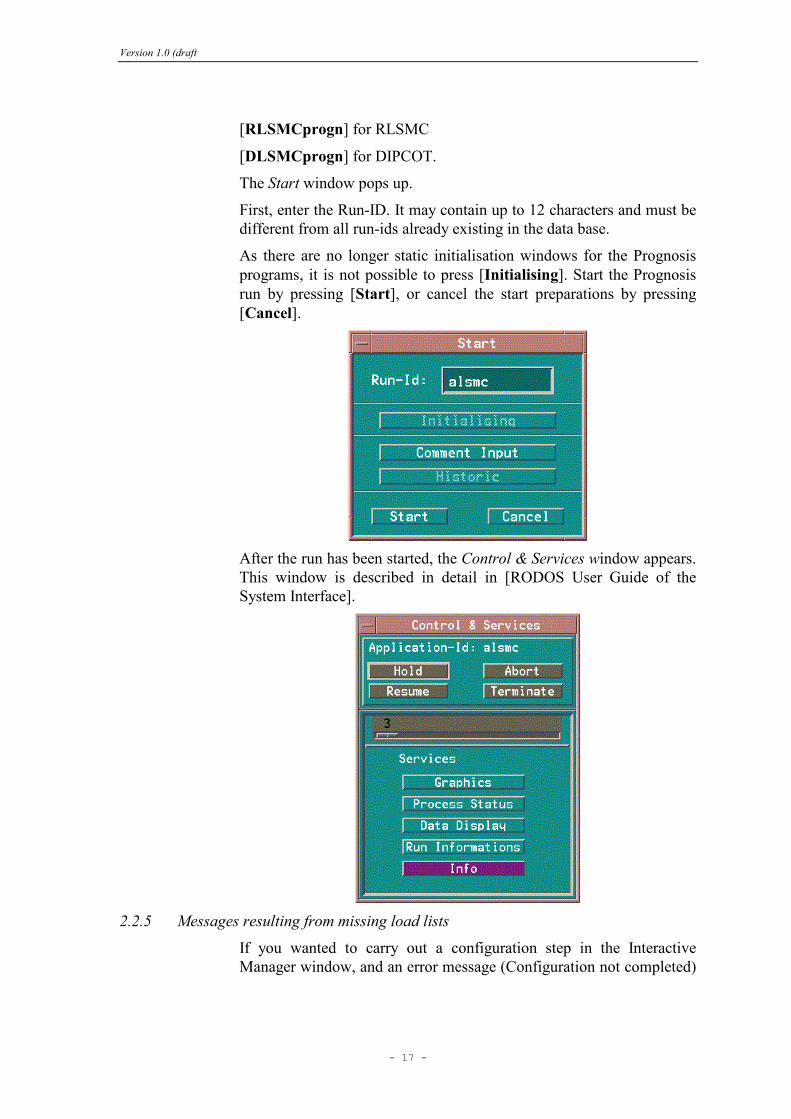
The Start window pops up.
First, enter the Run-ID. It may contain up to 12 characters and must be
different from all run-ids already existing in the data base.
As there are no longer static initialisation windows for the Prognosis
programs, it is not possible to press [Initialising]. Start the Prognosis
run by pressing [Start], or cancel the start preparations by pressing
[Cancel].
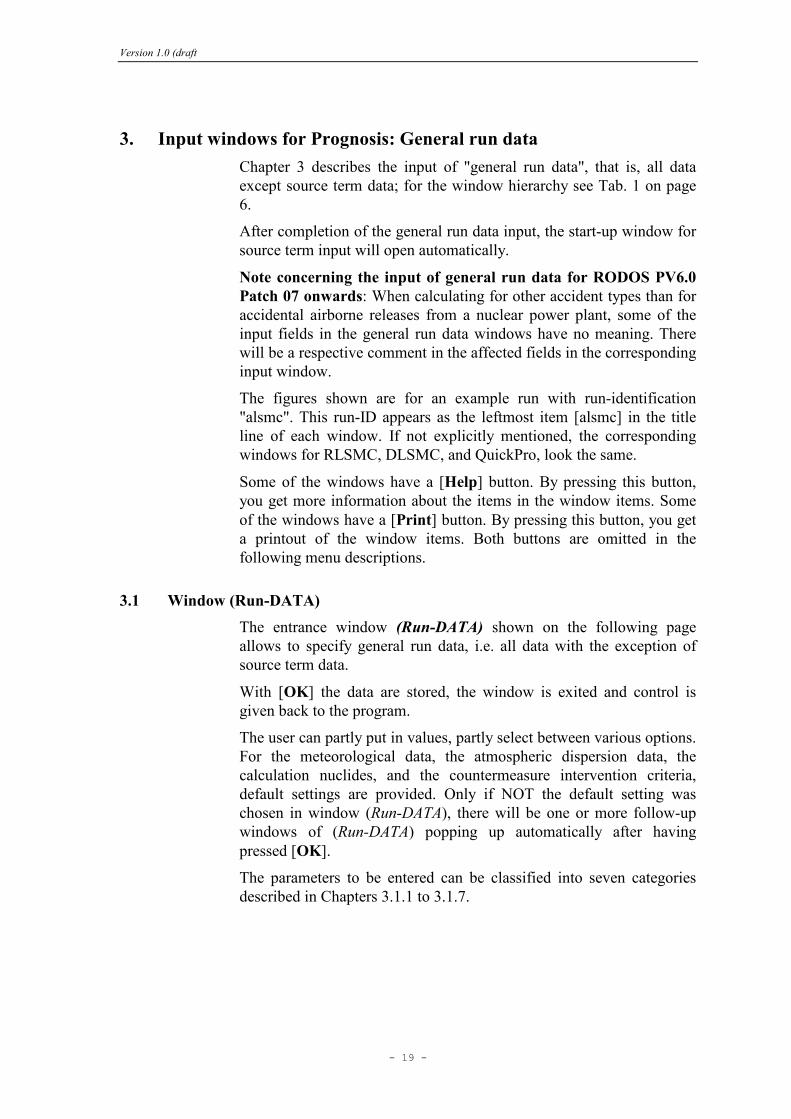
After the run has been started, the Control & Services window appears.
This window is described in detail in [RODOS User Guide of the
System Interface].
2.2.5 Messages resulting from missing load lists
If you wanted to carry out a configuration step in the Interactive
Manager window, and an error message (Configuration not completed)

Version 1.0 (draft
- 18 -
appears when the system is going to perform the configuration,
although you carried out all steps in the correct way, this means that
there is no load list. Then go to the Start window and click [Start]: The
system will generate an automatic copy. You must wait until the ready-
message appears, and then repeat the site selection (if you made one),
and the configuration step.
Version 1.0 (draft
- 19 -
3. Input windows for Prognosis: General run data
Chapter 3 describes the input of "general run data", that is, all data
except source term data; for the window hierarchy see Tab. 1 on page
6.
After completion of the general run data input, the start-up window for
source term input will open automatically.
Note concerning the input of general run data for RODOS PV6.0
Patch 07 onwards: When calculating for other accident types than for
accidental airborne releases from a nuclear power plant, some of the
input fields in the general run data windows have no meaning. There
will be a respective comment in the affected fields in the corresponding
input window.
The figures shown are for an example run with run-identification
"alsmc". This run-ID appears as the leftmost item [alsmc] in the title
line of each window. If not explicitly mentioned, the corresponding
windows for RLSMC, DLSMC, and QuickPro, look the same.
Some of the windows have a [Help] button. By pressing this button,
you get more information about the items in the window items. Some
of the windows have a [Print] button. By pressing this button, you get
a printout of the window items. Both buttons are omitted in the
following menu descriptions.
3.1 Window (Run-DATA)
The entrance window (Run-DATA) shown on the following page
allows to specify general run data, i.e. all data with the exception of
source term data.
With [OK] the data are stored, the window is exited and control is
given back to the program.
The user can partly put in values, partly select between various options.
For the meteorological data, the atmospheric dispersion data, the
calculation nuclides, and the countermeasure intervention criteria,
default settings are provided. Only if NOT the default setting was
chosen in window (Run-DATA), there will be one or more follow-up
windows of (Run-DATA) popping up automatically after having
pressed [OK].
The parameters to be entered can be classified into seven categories
described in Chapters 3.1.1 to 3.1.7.

Version 1.0 (draft
- 20 -
3.1.1 Reactor thermal power and operation time
If the user considers an NPP-type accident, the reactor thermal power
(in MW) and the operation time (in days) is displayed as taken out of
the database. If necessary, the user can modify these values for a
specific purpose.
If the user considers a non-NPP-type accident, the input fields appear
nevertheless, but their contents are meaningless.
3.1.2 Width of inner cell of calculation grid
Enter the width of the inner grid cells in [m], at least 100m.

Version 1.0 (draft
- 21 -
Fig. 1: Structure of the non-uniform calculation grid
The calculation grid is a square grid with Cartesian X and Y co-
ordinates, the X-axis showing to the East, the Y-axis to the North. It is
covered with square cells, the size of which increases with the distance
from the grid centre, where the NPP is situated. Therefore it is called
non-uniform grid.
Fig. 1 shows the grid structure. There is a square central region with
highest resolution, i.e. smallest grid cells. By default, the size of the
inner grid cells is 1 x 1 km2. Three square frames containing cells with
double size, 4-fold, and 8-fold size, surround this region.
For special applications it is sometimes desirable to have a higher
resolution very near to the site, or to calculate to even farther distances.
Therefore, the size of the grid can be scaled to smaller and larger size.
This is achieved by changing the size of the inner grid cells.

Version 1.0 (draft
- 22 -
3.1.3 Start and duration of calculation episode; duration of calculation time step
For the start time of the calculation episode, enter year (YYYY),
month (MM), day (DD), hour (HH) and minute (MM). As default, the
actual date and time appear.
Below, enter the duration of the calculation episode in hours; the
default value is 24 h; the maximum value allowed is 1128h, which
corresponds to 47 days.
From RODOS PV6.0 Patch 07 onwards it is possible to specify the
duration of the calculation time step of the ADM. The default
duration is 30 Minutes. Alternatively, there is the possibility to choose
a time step length of either 10 minutes or 60 minutes.
3.1.4 Meteorological data
The user can choose between four sources of meteorological data;
select between four different sources or input modes of meteorological
data.
Numerical Weather Prediction (Default for {A|R|D}LSMC)
The mode uses Numerical Weather Prediction (NWP) data; it is the
default for LSMC. No further window will follow. For QuickPro, this
option is not available. The use of data from meteorological stations or
the calculation of past episodes is not possible with the present version.
Hand input by the user(2 possibilities)
This mode is for input by hand of up to 48 successive meteorological
specifications each valid for a given duration starting from the time of
the initial release. Next window is Meteo-HAND (see Chapter 3.2.1).
The parameter values shown in this window are either preset with
those of the previous run or all set to 0.
Read from file (Default for QuickPro)
The meteorological data will be read from a pre-written, strictly
formatted weather information file in form of 144 meteorological
specifications each valid for 10 minutes starting from the time of the
initial release. The user must specify the file name in window Meteo-
FILE, which is described in Chapter 3.2.2. For QuickPro, this mode is
the default.
3.1.5 Atmospheric dispersion
The user can choose between the standard setup of parameters for the
atmospheric dispersion calculation or put in own values for some
parameters. In this case, window AtDis-SEL opens, which is described
in Chapter 0.
Version 1.0 (draft
- 23 -
3.1.6 Calculation nuclides
The user can choose between the standard calculation nuclides or select
own nuclides; in this case window NNuk-SEL opens and for
{A|R|D}LSMC additionally FNuk-SEL, which are described in Chapter
3.4.
If the user considers a non-NPP-type accident, the input fields appear
nevertheless, but their contents are meaningless.
3.1.7 Early countermeasure intervention criteria
The term {countermeasure intervention criteria} for the ADM-model
comprises the dose concept (projected or averted dose), and the
exposure pathways considered for each organ, and the integration
times, for the comparison with the intervention levels for early
countermeasures. The numerical value of the intervention levels
themselves are subject of the early countermeasure model EmerSim of
RODOS.
From RODOS PV6.0 Patch 07 onwards, RODOS considers country-
specific intervention criteria for sheltering, evacuation, and iodine
tablets.
By default, the countermeasure criteria of the country where RODOS is
installed are applied.
By selection of {Calculation with user-defined intervention criteria} it
becomes possible to select the criteria of another country, or to modify
the criteria of a selected country. In such a case, window (C/M-
Country) followed by (C/M-Doses) will open some time after having
left window (Run-DATA) by pressing the [OK] button.
3.2 Meteorology sub-windows of Run-DATA
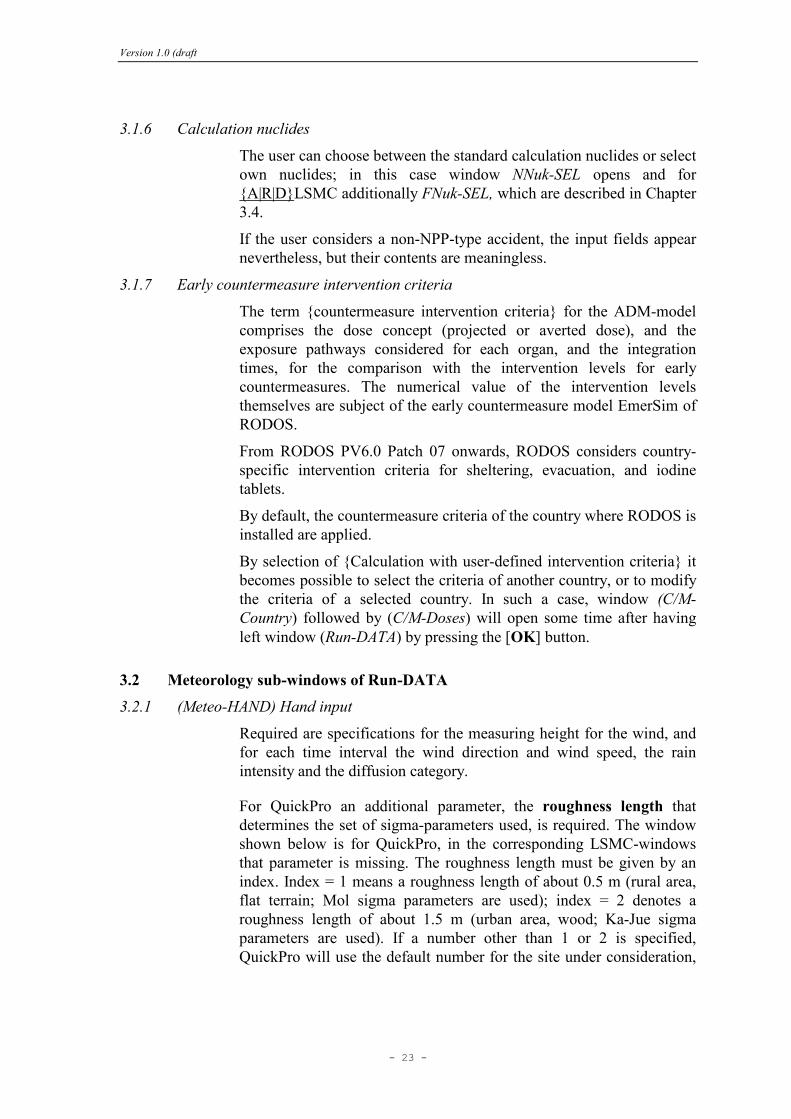
3.2.1 (Meteo-HAND) Hand input
Required are specifications for the measuring height for the wind, and
for each time interval the wind direction and wind speed, the rain
intensity and the diffusion category.
For QuickPro an additional parameter, the roughness length that
determines the set of sigma-parameters used, is required. The window
shown below is for QuickPro, in the corresponding LSMC-windows
that parameter is missing. The roughness length must be given by an
index. Index = 1 means a roughness length of about 0.5 m (rural area,
flat terrain; Mol sigma parameters are used); index = 2 denotes a
roughness length of about 1.5 m (urban area, wood; Ka-Jue sigma
parameters are used). If a number other than 1 or 2 is specified,
QuickPro will use the default number for the site under consideration,
Version 1.0 (draft
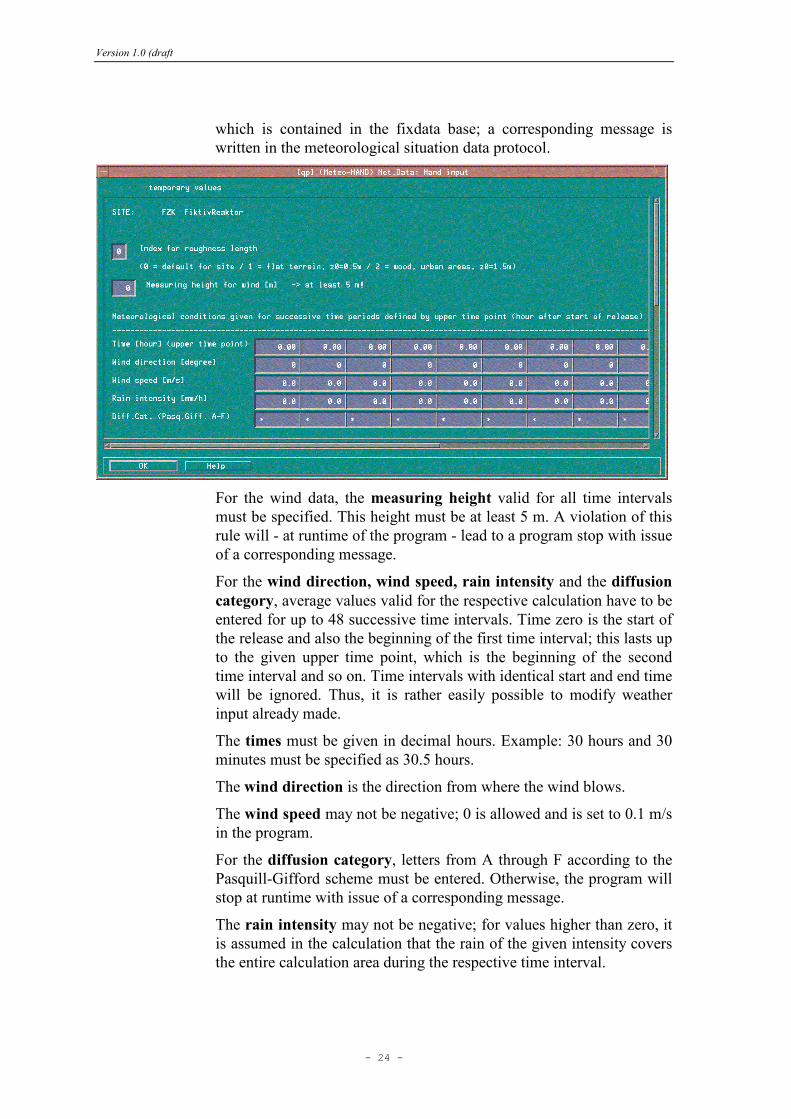
- 24 -
which is contained in the fixdata base; a corresponding message is
written in the meteorological situation data protocol.
For the wind data, the measuring height valid for all time intervals
must be specified. This height must be at least 5 m. A violation of this
rule will - at runtime of the program - lead to a program stop with issue
of a corresponding message.
For the wind direction, wind speed, rain intensity and the diffusion
category, average values valid for the respective calculation have to be
entered for up to 48 successive time intervals. Time zero is the start of
the release and also the beginning of the first time interval; this lasts up
to the given upper time point, which is the beginning of the second
time interval and so on. Time intervals with identical start and end time
will be ignored. Thus, it is rather easily possible to modify weather
input already made.
The times must be given in decimal hours. Example: 30 hours and 30
minutes must be specified as 30.5 hours.
The wind direction is the direction from where the wind blows.
The wind speed may not be negative; 0 is allowed and is set to 0.1 m/s
in the program.
For the diffusion category, letters from A through F according to the
Pasquill-Gifford scheme must be entered. Otherwise, the program will
stop at runtime with issue of a corresponding message.
The rain intensity may not be negative; for values higher than zero, it
is assumed in the calculation that the rain of the given intensity covers
the entire calculation area during the respective time interval.
Version 1.0 (draft
- 25 -
With [OK] the data are stored, the window is exited and control is
given back to the program. All constraints mentioned above will now
be checked by the program; in the case of an error, window Meteo-
TERR or Meteo-DERR appears; they are described in Chapter 3.2.3.
After pressing [Close] in the error window, brings the user back to
window Meteo-HAND to correct the input.
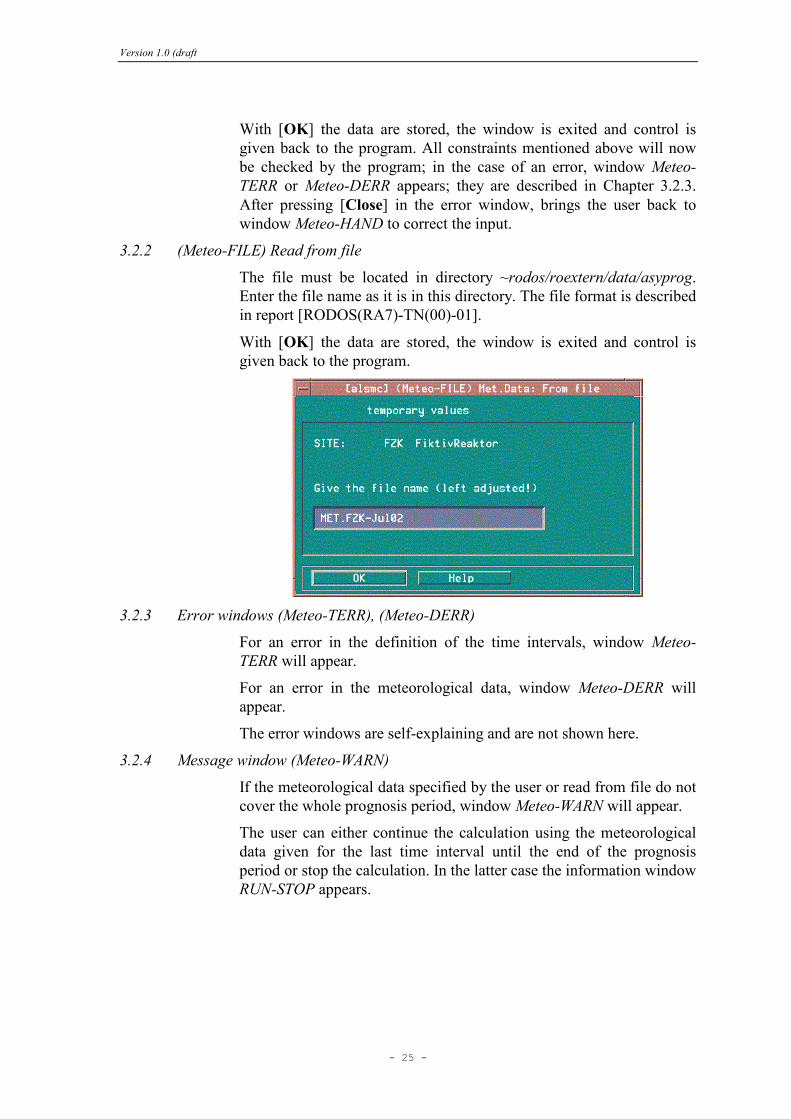
3.2.2 (Meteo-FILE) Read from file
The file must be located in directory ~rodos/roextern/data/asyprog.
Enter the file name as it is in this directory. The file format is described
in report [RODOS(RA7)-TN(00)-01].
With [OK] the data are stored, the window is exited and control is
given back to the program.
3.2.3 Error windows (Meteo-TERR), (Meteo-DERR)
For an error in the definition of the time intervals, window Meteo-
TERR will appear.
For an error in the meteorological data, window Meteo-DERR will
appear.
The error windows are self-explaining and are not shown here.
3.2.4 Message window (Meteo-WARN)
If the meteorological data specified by the user or read from file do not
cover the whole prognosis period, window Meteo-WARN will appear.
The user can either continue the calculation using the meteorological
data given for the last time interval until the end of the prognosis
period or stop the calculation. In the latter case the information window
RUN-STOP appears.
Version 1.0 (draft
- 26 -
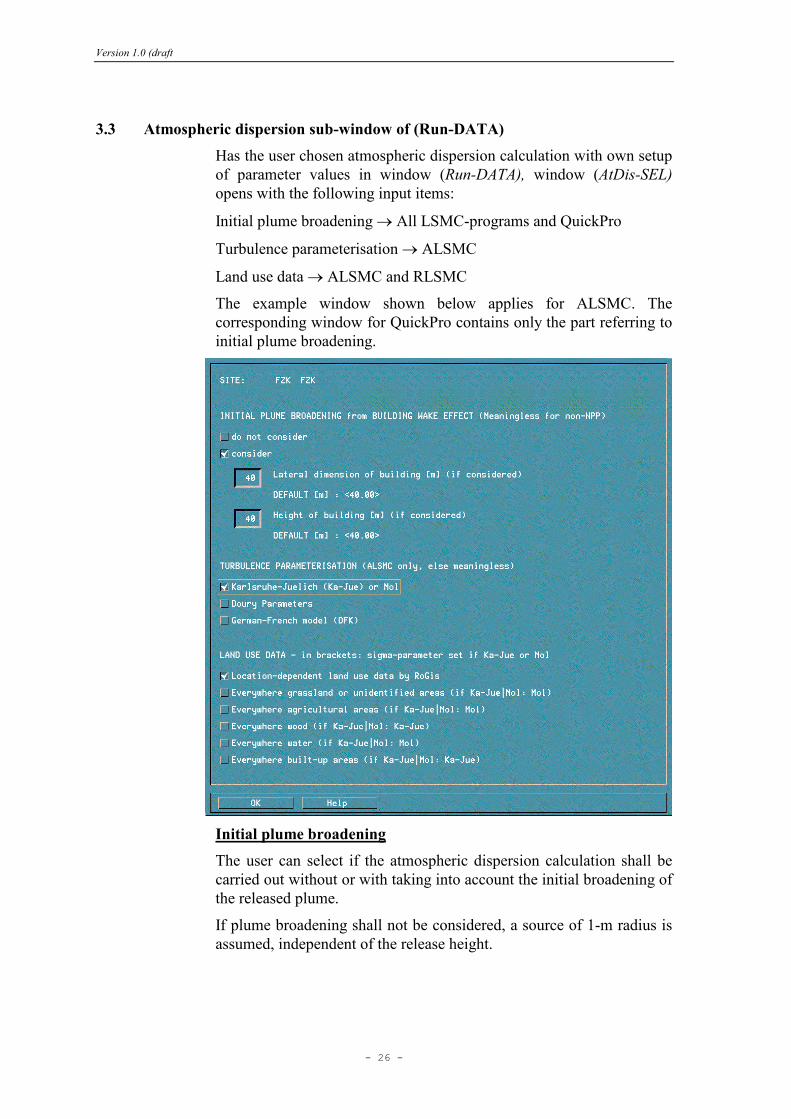
3.3 Atmospheric dispersion sub-window of (Run-DATA)
Has the user chosen atmospheric dispersion calculation with own setup
of parameter values in window (Run-DATA), window (AtDis-SEL)
opens with the following input items:
Initial plume broadening → All LSMC-programs and QuickPro
Turbulence parameterisation → ALSMC
Land use data → ALSMC and RLSMC
The example window shown below applies for ALSMC. The
corresponding window for QuickPro contains only the part referring to
initial plume broadening.
Initial plume broadening
The user can select if the atmospheric dispersion calculation shall be
carried out without or with taking into account the initial broadening of
the released plume.
If plume broadening shall not be considered, a source of 1-m radius is
assumed, independent of the release height.
Version 1.0 (draft
- 27 -
If the effect shall be considered (default), the lateral width and height
of the building relevant for the initial broadening of the plume (see
below) have to be specified, that are then taken into account for release
heights below the specified building height. For release heights above
the building height, a source of 1-m radius is assumed.
For the relevant building dimensions, in RODOS normally a
characteristic height and width of the corresponding plant will be used
for the determination of the initial plume dimension (e.g. height and
width of the reactor and generator building). For calculations with
special wind directions and stability classes, where the influence of
special building structures shall be considered, you can specify
corresponding values for the building dimensions.
Turbulence parameterisation (ALSMC)
With ALSMC5 the user can choose between three different sets of
sigma (puff width) parameterisation schemes: the Karlsruhe-Juelich /
Mol set (depending on the chosen land use) or the German-French
Model (DFK).
In RODOS PV 6.0 the table containing the mapping from land use to
roughness length is changed as the former table contained relatively
low values. They may be suitable for wind profiles, but not adequate
for the assessment of mechanically induced turbulence over mixed
landscapes (see J. Päsler-Sauer, Description of the Atmospheric
Dispersion Model ATSTEP).
Land use data ({A|R|D}LSMC)
With LSMC5, the default selection is to take the land use data from the
data base RoGis containing location-dependent data. However, the user
may also select between five location-independent land use data
classes.
3.4 Nuclide selection sub-windows of (Run-DATA)
RODOS PV6.0 contains data for 79 radionuclides in the fixdata base.
Between 1 and 25 of these can be taken into account in the near range
calculations; this subset of all possible nuclides is called "calculation
nuclides" in the following. A representative selection of 25 calculation
nuclides is provided in the system. If the calculation shall be carried
out with other nuclides, the option "Calculation with user-selected
nuclides" must be chosen in the entrance window (Run-DATA) before.
The selection of the nuclide set must be done by hand in window
(NNuk-SEL) in which all values are preset with 0.
5 With QuickPro the Ka-Jue or Mol parameters are used, depending on the roughness
length index chosen by the user in window (Meteo-HAND).
Version 1.0 (draft
- 28 -
However, the far range atmospheric dispersion models of RODOS
cannot cope with all 25 maximally possible calculation nuclides, but
only with a subset of them, which is called "far range nuclides" in the
following. The information about the far-range nuclides needs to be set
up already in runs with near range models, because they pass
information for the far-range models. The selection of the far range
nuclides is done in window (FNuk-SEL) that pops up during execution
of the near range models A/R-LSMC (not available in QuickPro).
3.4.1 (NNuk-SEL) User chosen near range nuclide
Window (NNuk-SEL) is the window for the input of the calculation
nuclides for the near range.
From the nuclide list shown between 1 and 25 nuclides can be selected
by entering "1" for "take" or "0" for "don’t take" (scroll up/down to
reach all nuclides).
The constraint "at least 1, maximally 25" will be checked by the
program after leaving this window with [OK]. A violation of the
constraint will lead to the issue of a corresponding message in an error
window (NNuk-ERR) (not shown).
Pressing [Close] brings you back to NNuk-SEL to modify your
selection.
Note: The nuclide selection made can lead to some inconsistencies
when the user reads in a library source term with the activity specified
for individual nuclides (modes F2, F6 and F7, see Chapter 4.4) which
are different from the calculation nuclides chosen in the actual run.
Also, if I-131 is not among the calculation nuclides and the user selects
source term input mode F3, there will be a problem. Most inconsistent
situations are checked by the program. If an inconsistency is detected,
an error window opens. However, in such cases, the only solution is to
abort the run and to restart a new one.
Version 1.0 (draft
- 29 -
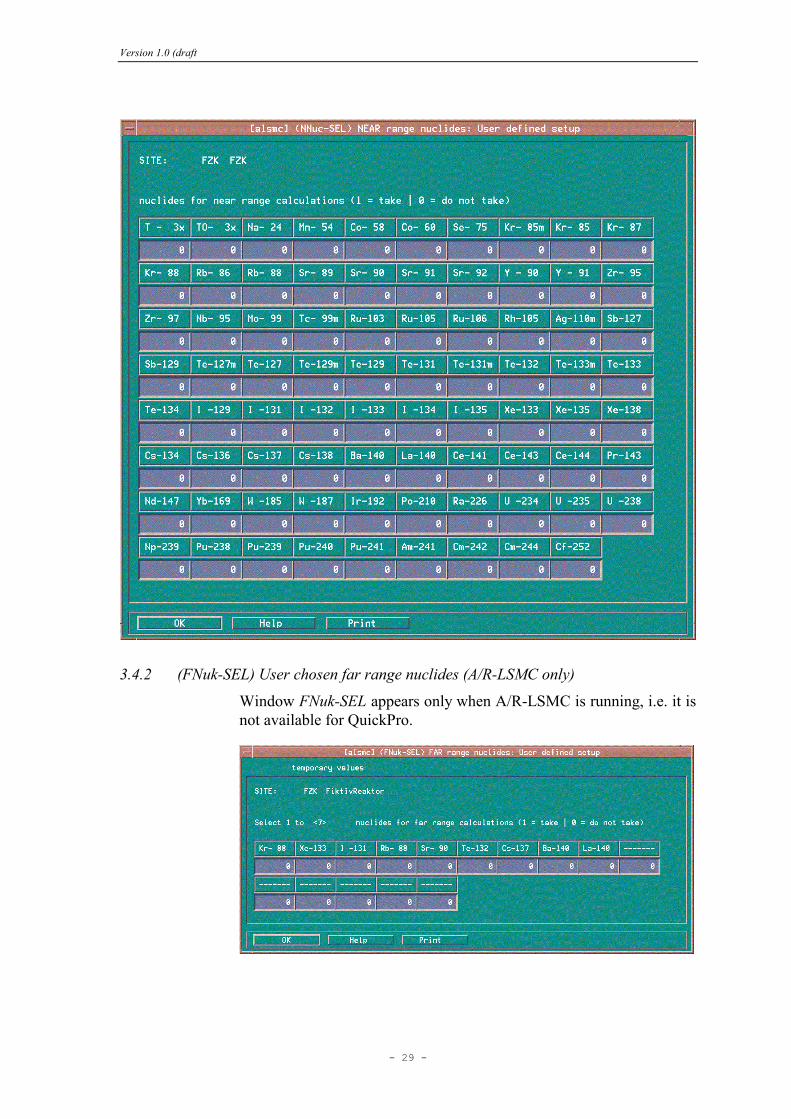
3.4.2 (FNuk-SEL) User chosen far range nuclides (A/R-LSMC only)
Window FNuk-SEL appears only when A/R-LSMC is running, i.e. it is
not available for QuickPro.
Version 1.0 (draft
- 30 -
From the list of the names of the available calculation nuclides up to 7
nuclides can be selected. The selection of is made by entering "1" for
"take" or "0" for "don't take" in the number fields below. Unused
positions are marked by hyphens instead of nuclide names.
Notes:
(a) You can specify zeroes in all fields, which means that you do not
want to select any nuclide for far range calculations.
(b) The maximal number of nuclides allowed may not be exceeded.
(c) You must not select more than one iodine nuclide.
The constraints (b) and (c) are checked by the program when leaving
the window with [OK]. A violation of the constraints will lead to the
issue of a corresponding message in an error window (FNuk-ERR) (not
shown).
Pressing [Close] brings you back to (FNuk-SEL) to modify your
selection.
3.5 Early countermeasure intervention criteria sub-windows of (Run-DATA)
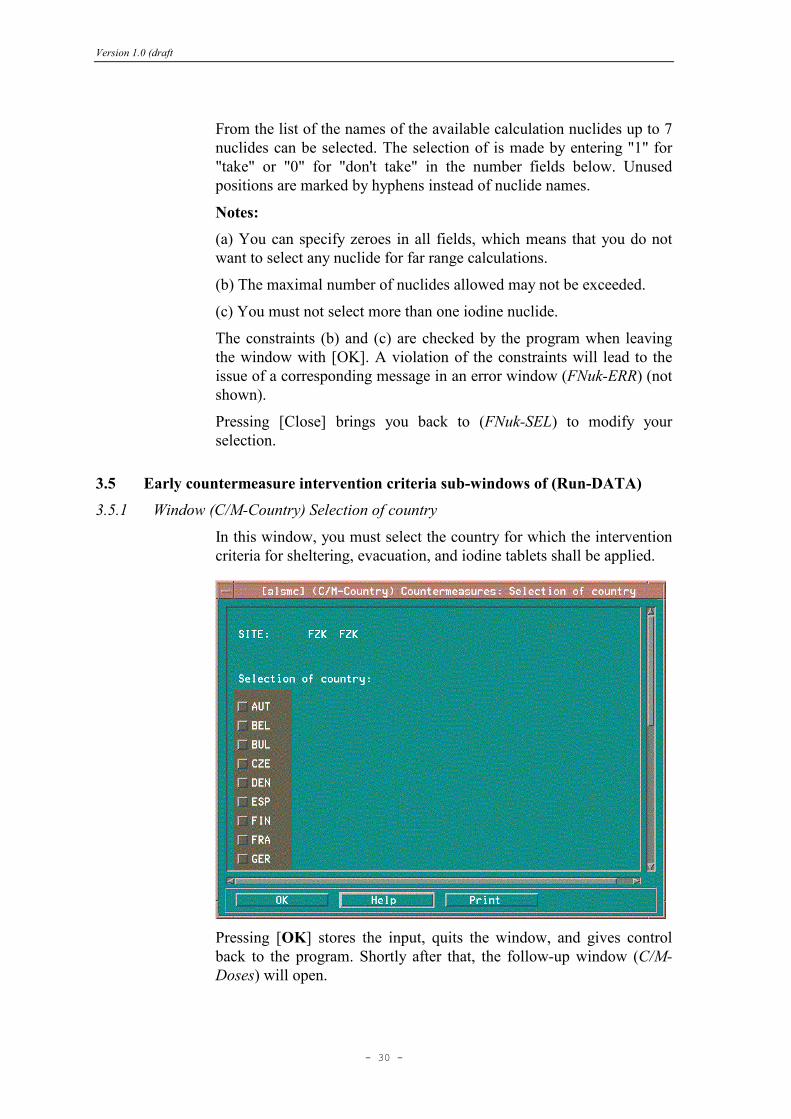
3.5.1 Window (C/M-Country) Selection of country
In this window, you must select the country for which the intervention
criteria for sheltering, evacuation, and iodine tablets shall be applied.
Pressing [OK] stores the input, quits the window, and gives control
back to the program. Shortly after that, the follow-up window (C/M-
Doses) will open.
Version 1.0 (draft
- 31 -
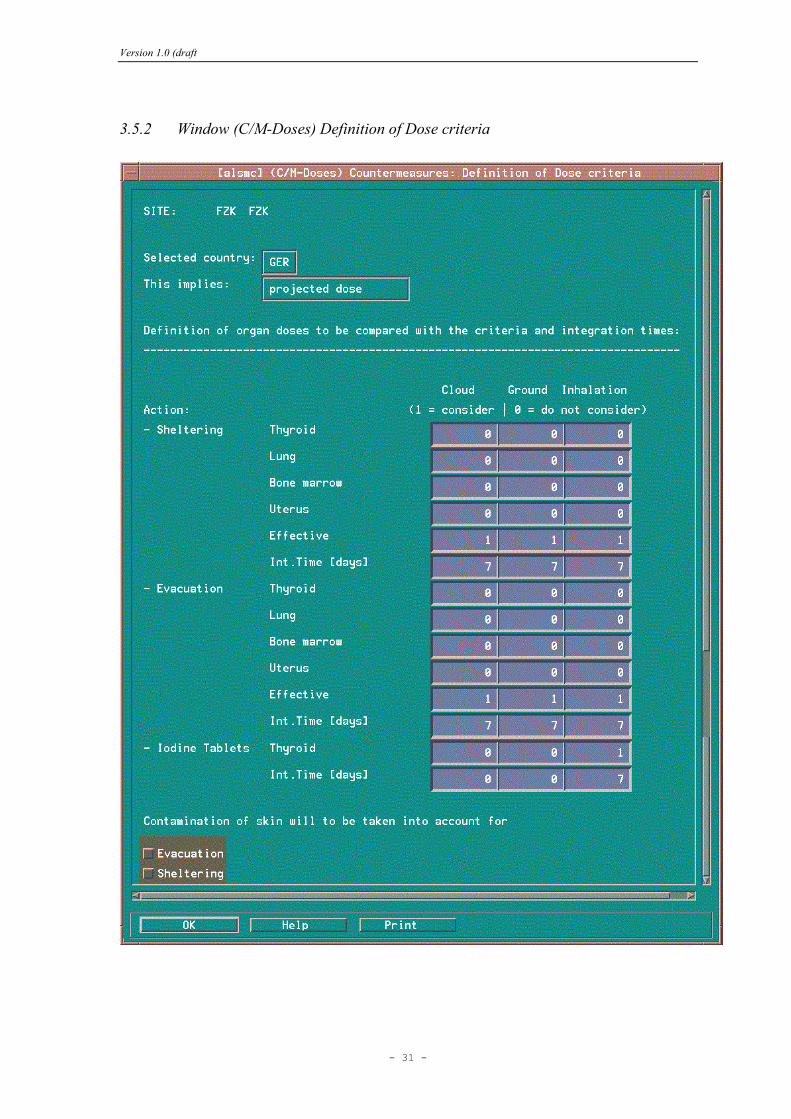
3.5.2 Window (C/M-Doses) Definition of Dose criteria
Version 1.0 (draft
- 32 -
The country selected in the previous window, (C/M-Country), fixes the
dose concept (projected or averted dose), and activates the default
values valid in the country for the exposure pathways considered for
each organ, and the integration times, for the comparison with
intervention levels.
The dose concept cannot be changed in the window. However, one can
modify the exposure pathways, organs, and integration times.
In addition, one can specify if the contamination of the skin is to be
taken into account for sheltering and/or evacuation.
Pressing [OK] stores the input, quits the window, and gives control
back to the program.
Version 1.0 (draft
- 33 -
4. Initialization windows for Prognosis: Source terms for NPPs
4.1 Overview
Chapter 4 describes the input of "NPP source terms"; for the window
hierarchy see Tab. 1 on page 6. The windows for ALSMC and
QuickPro are identical.
The figures shown are for an example run with run-identification
"alsmc". This run-ID appears as the leftmost item [alsmc] in the title
line of each window.
Some of the windows have a [Help] button. By pressing this button,
you get more information about the items in the window items. Some
of the windows have a [Print] button. By pressing this button, you get
a printout of the window items. Both buttons are omitted in the
following menu descriptions.
For a specification of a source term for RODOS, the following
information is required:
• Time span between the end of the chain reaction and the start of the
initial release (see Chapter 4.3).
• Height of release and released thermal power as a function of time
(see Chapter 4.3).
• Vertically volume flux released to the atmosphere as a function of
time (see Chapter 4.3).
• Vent area of release to the atmosphere as a function of time (see
Chapter 4.3).
• Fractions of elemental iodine, organically bound iodine and iodine
aerosols of the entire amount of iodine as a function of time (see
Chapter 4.3).
• Released activity as a function of time; this can be specified in many
different ways described in detail in Chapters 4.4 to 4.6.
After these input concerning the source term itself, there follow some
more technical windows (e.g. input of a description, storing of the
input data, modify the input, etc.) which are described in Chapters 4.8
and 4.9.
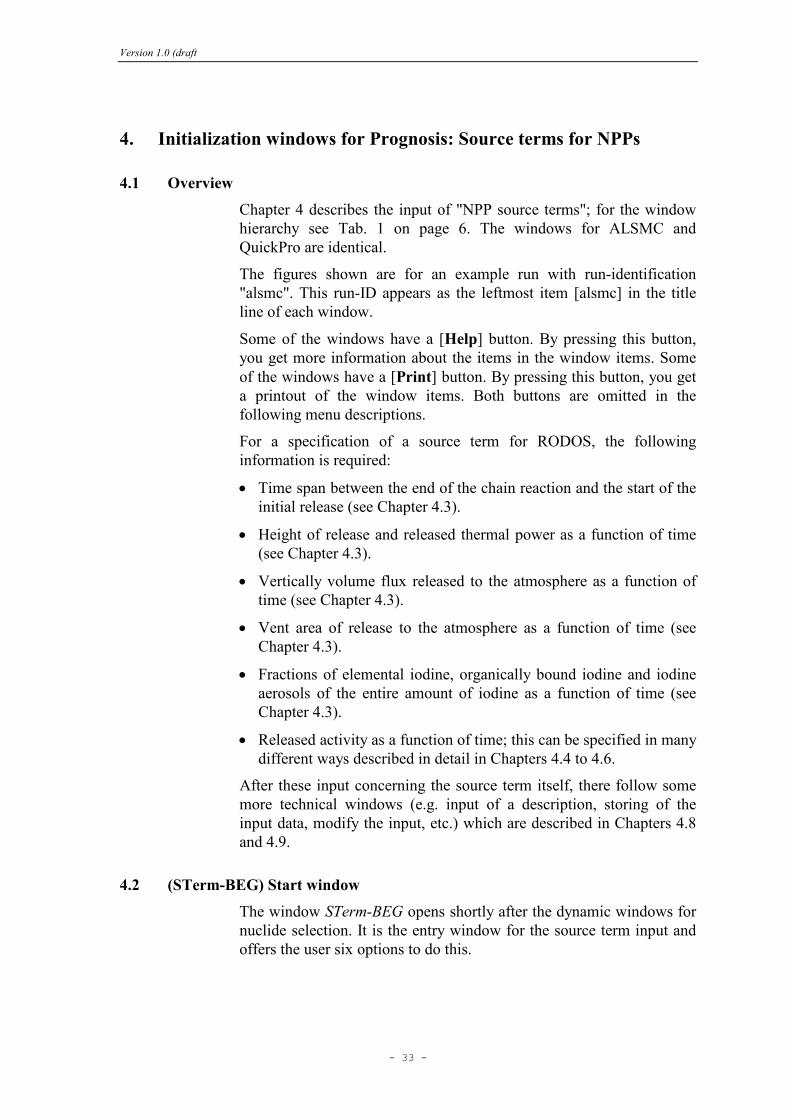
4.2 (STerm-BEG) Start window
The window STerm-BEG opens shortly after the dynamic windows for
nuclide selection. It is the entry window for the source term input and
offers the user six options to do this.
Version 1.0 (draft
- 34 -
a) Source term input from scratch (reduced/detailed):
Using this option the user will be offered a series of input windows,
starting with STerm-RED / STerm-GEN, without any preset values, i.e.
all values are 0. First the windows for the detailed input are described
(Chapters 4.3 to 4.6). Many sentences are also valid for the reduced
mask, which is therefore only briefly treated in Chapter 4.7
b) Input of source term basing on a source term from library:
The user can select a source term from one of the following three
libraries:
• RODOS library: This library replaces the former fixdata base
concerning the source terms; it contains all source terms which
could be re-asssigned from the fixdata base in RODOS PV5.0. The
source terms are stored as files in the directory
~rodos/roextern/data/sourceterm/fixdata/.
• Public library: This library contains directly after installation of
RODOS PV6.0 only the two source terms F1.Repro_FZK-Sep00
and F6.TestQuickLong. Later all those source terms which one of
the users wants to store in the public library will be added here
under a user-specified name. These source terms can be used by all
users. They are stored as files in the directory
~rodos/roextern/data/sourceterm/public/.
• Private library: Directly after installation of RODOS PV6.0 this
library is empty. All those source terms which the user wants to
store in the private library will be added here under the name
Version 1.0 (draft
- 35 -
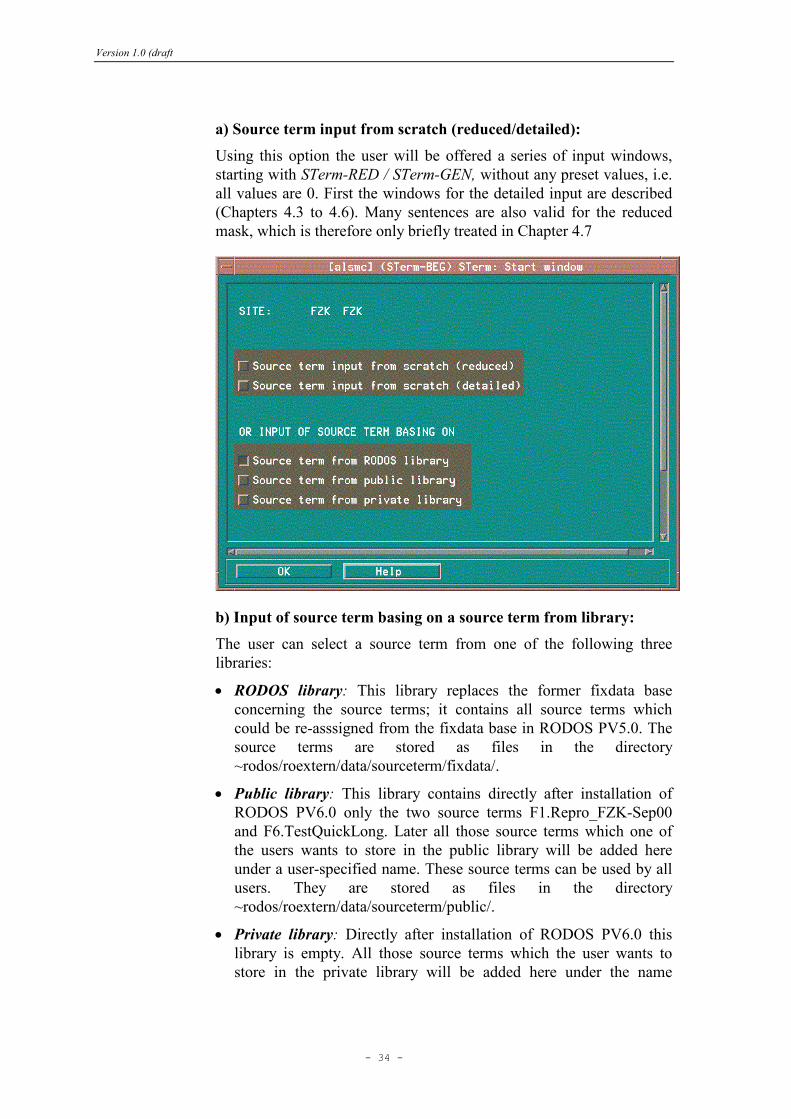
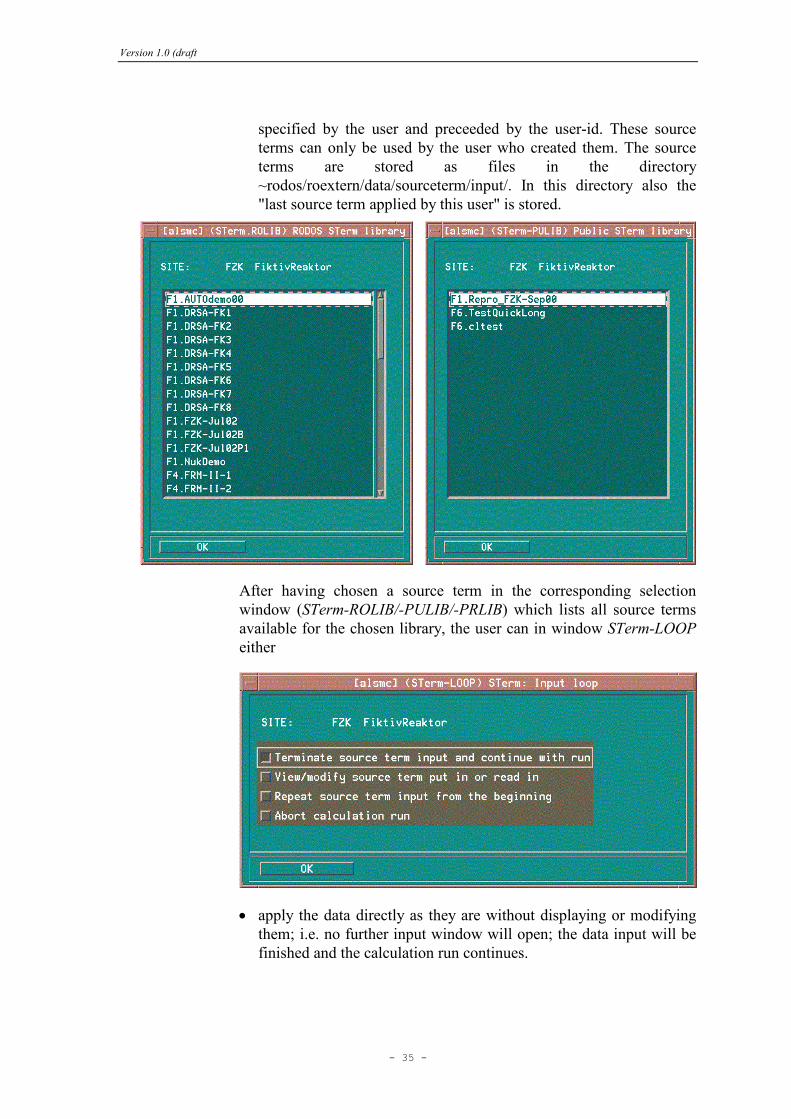
specified by the user and preceeded by the user-id. These source
terms can only be used by the user who created them. The source
terms are stored as files in the directory
~rodos/roextern/data/sourceterm/input/. In this directory also the
"last source term applied by this user" is stored.
After having chosen a source term in the corresponding selection
window (STerm-ROLIB/-PULIB/-PRLIB) which lists all source terms
available for the chosen library, the user can in window STerm-LOOP
either
• apply the data directly as they are without displaying or modifying
them; i.e. no further input window will open; the data input will be
finished and the calculation run continues.
Version 1.0 (draft
- 36 -
• or view the data with or without making changes (the same
windows, starting with STerm-GEN, will open as for source term
input from scratch, however with the preset values instead of 0; all
windows are described in Chapters 4.3 to 4.6),
• or repeat the source term input from the beginning,
• or abort the calculation run.
c) Re-use last applied source term without any modification:
This option should only be used for testing and develoment. Selecting
this option performs the calculations with the last source term applied,
without the possibility to display or modify the data; no further input
window will open. Whenever a source term was applied it is
automatically stored under the name user-id.F0. MyLastSTerm in the
private library; this is the source term used here; if no such source term
exists, an error message will appear.
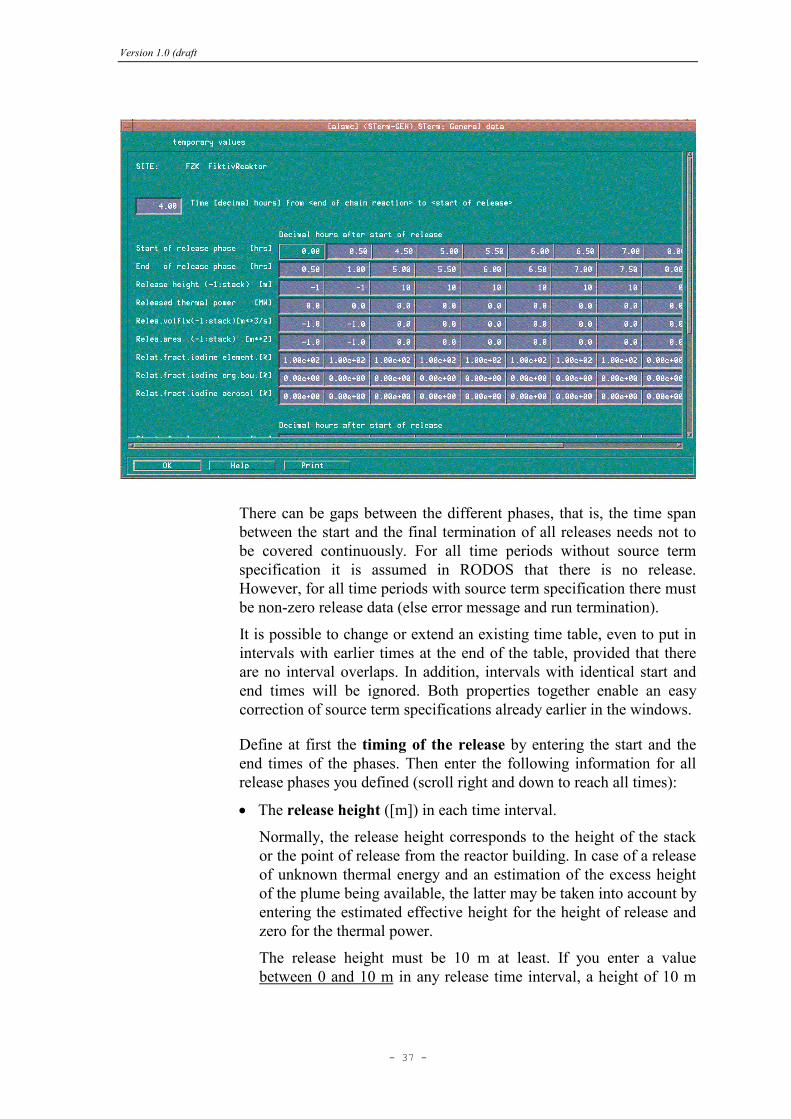
4.3 (STerm-GEN) General data: EOC, timing, height, thermal power, volume
flux, vent area, iodine fractions
Window STerm-GEN is rather large. On top, enter the time span
between the end of the chain reaction (EOC) and the start of the
initial release in decimal hours6
The release data can be entered for up to 24 time periods (release
phases) of arbitrary duration. The lower and upper boundaries of the
time intervals must be given in terms of decimal hours6 after the start
of the release. There is no principal upper limit for the duration of a
source term, provided that the specification fits into 24 time intervals;
however, there is a practical limit as the duration of an interactive
prognosis calculation is 47 days.
Please note the following peculiarities when specifying the time
periods for the source term input:
Overlaps of intervals are not allowed (else error message and run
termination).
The first release phase must start at time 0, that is directly after the
begin of the release defined above; thus, the value of the lower
boundary of the first release phase cannot be changed.
6 Example: You have to specify 1.5 hours to represent 1 hour and 30 minutes.
Version 1.0 (draft
- 37 -
There can be gaps between the different phases, that is, the time span
between the start and the final termination of all releases needs not to
be covered continuously. For all time periods without source term
specification it is assumed in RODOS that there is no release.
However, for all time periods with source term specification there must
be non-zero release data (else error message and run termination).
It is possible to change or extend an existing time table, even to put in
intervals with earlier times at the end of the table, provided that there
are no interval overlaps. In addition, intervals with identical start and
end times will be ignored. Both properties together enable an easy
correction of source term specifications already earlier in the windows.
Define at first the timing of the release by entering the start and the
end times of the phases. Then enter the following information for all
release phases you defined (scroll right and down to reach all times):
• The release height ([m]) in each time interval.
Normally, the release height corresponds to the height of the stack
or the point of release from the reactor building. In case of a release
of unknown thermal energy and an estimation of the excess height
of the plume being available, the latter may be taken into account by
entering the estimated effective height for the height of release and
zero for the thermal power.
The release height must be 10 m at least. If you enter a value
between 0 and 10 m in any release time interval, a height of 10 m

Version 1.0 (draft
- 38 -
will be substituted for that time interval, and a corresponding
message is written into the protocol of the source term data.
Specification of a negative value for the release for any release time
interval means: The stack height for the site under consideration
will be substituted for that time interval at runtime (contained in the
fixdata base). A corresponding message is written into the protocol
of the source term data.
• The thermal power ([MW]) released in each time interval:
The thermal power must be greater or equal to zero. If this
constraint is violated, the program execution will stop and a
corresponding message is written into the protocol of the source
term data.
• The vertically released volume flux ([m³/s]) in each time interval.
Specification of a negative value for the volume flux for any release
time interval means: The average volume flux through the stack
vent opening for the site under consideration will be substituted for
that time interval at runtime (contained in the fixdata base). A
corresponding message is written into the protocol of the source
term data.
• The vent area of release to the atmosphere ([m²]) in each time
interval.
Specification of a negative value for the vent area for any release
time interval means: The area of the stack vent opening for the site
under consideration will be substituted for that time interval at
runtime (contained in the fixdata base). A corresponding message is
written into the protocol of the source term data.
• The fractions of elemental iodine, organically bound iodine and
iodine aerosols, or, for short, the iodine fractions, in each time
interval:
These fractions have to be given in percent and must refer to the
total amount of iodine released for each time interval. The sum of
all three fractions must equal 100 %. If this constraint is violated,
program execution will stop and a corresponding message is written
into the protocol of the source term data.
If there is a release of iodine in a release time interval, but you did
not specify the iodine fractions, 100 % elemental iodine will be
substituted for that time interval. This represents the most
conservative assumption because elemental iodine has the strongest
deposition.
If there is no release of iodine in a release time interval, 100 %
aerosol iodine will be substituted for that time interval, and any

Version 1.0 (draft
- 39 -
specification for that time interval made by you will be ignored.
That is because the iodine resulting from mother decays after
emission from the reactor is in the aerosol form.
[OK] exits the window storing all input and returns to the program.
In case of wrong input values for the release timing or the iodine
fractions, a message will appear in the window STerm-ERR.GEN.
Closing the window with [Close] brings the user back to input window
STerm-GEN until all input is made correctly.
4.4 Input modes for the activity and mode keys
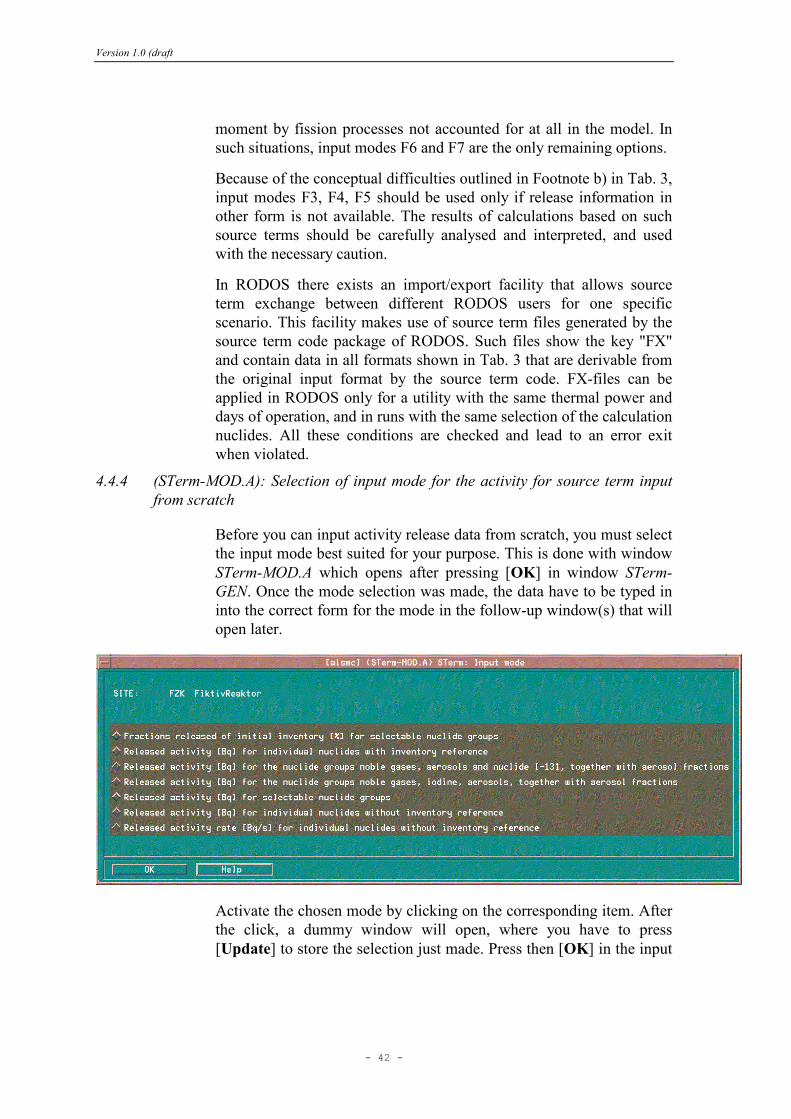
4.4.1 Available input modes for source term input from scratch
Before one can input activity release data from scratch, one must select
the input mode best suited for the particular purpose. There are eight
modes currently available, which are summarised in Tab. 3.
Mode F1 is for fractions of activities for nuclide groups, modes F3, F4
and F5 for released activities for nuclide groups or a combination of
nuclides and groups, and the modes F6 and F7 for activities and
activity rates, for single nuclides without inventory reference. Mode F2
is for activities for single nuclides with inventory reference. Reusing a
library source term with the activity specified for individual source
terms (modes F2, F6 or F7) may lead to inconsistencies with the
calculation nuclides selected for the actual run (Chapter 3.4.1).
Additionally there exists the reduced input mode F8; it is identical with
F4, only the number of time intervals is limited to five; all statements
made for F4 are also valid for F8, even it is not explicitly mentioned.

Version 1.0 (draft
- 40 -
Input modes F1 to F5 require an inventory, which is provided by
RODOS for each installed site. The inventory data used, if any, are
documented in the protocol of the inventory situation data.
Tab. 3: Possible Activity input modes for a release
Mode
key
Description a)
F1 Fractions ([%]) of the initial core inventory released for nuclide release groups..
F2c)
Released activity ([Bq]) for individual nuclides with inventory reference.
F3 Released activity ([Bq]) for the sum of calculation nuclidesb) in the nuclide release groups noble gases and total aerosol, and for the individual nuclide I-131 together with release fractions for the nuclide release groups alkaline metals, tellurium and antimony, alkaline earth, ruthenium group, lanthanides
F4 Released activity ([Bq]) for the sum of calculation nuclidesb) in the nuclide release groups noble gases, iodine, total aerosol, together with release fractions for the nuclide release groups alkaline metals, tellurium and antimony, alkaline earth, ruthenium group, lanthanides.
F5 Released activity ([Bq]) for the sum of calculation nuclides in nuclide release groups.
F6 c)
Released activity ([Bq]) for individual nuclides without inventory reference.
F7 Released activity rates ([Bq/s]) for individual nuclides without inventory reference.
Notes
a) The formats for specifying the start of initial release, the release height, the released thermal
power, the vertically released volume flux, the vent area of the release, and the iodine fractions are
the same for F1-F7.
b) Calculation nuclides are a subset of 1 to 25 nuclides from all possible nuclides selected for a
run. If, for instance, a release of 10E18 Bq is specified for the noble gas group, the results would
be different if Kr- 88 only or Kr- 88, Xe-133, Xe-135 were selected as calculation nuclides.
c) The data to be put in for modes F2 and F6 are the same. However, with mode F2 it is checked
in each time step, that the specified activity release does not exceed the activity present in the
reactor, which is calculated taking into account the activity release from the reactor and
radioactive decay and build-up from radioactive decay chains in the reactor. If the calculated
inventory is exceeded, a message is issued, the calculated value is taken, but program execution
continues.
4.4.2 Source term mode keys and connection to windows STerm-MOD.A/B/C/D
Once a source term has been generated (either by hand or otherwise),
the input mode chosen determines its mode key. A key F1, F2, ..., F8
directly shows that the source term data were parameterised in the
Version 1.0 (draft
- 41 -
respective input mode from Tab. 3. A key F0 simply characterises the
"last source term applied"; the respective mode key in that case is
invisibly contained in the data.
When a source term is used for a PROGNOSIS calculation in RODOS,
the source term code package generates a file with the key FX that
contains data for all those input modes from Tab. 3 that are derivable
from the original input format.
In case that the user starts a source term specification by selecting a
library source term with mode key F0, F1, ..., F8, the input mode is
completely determined and cannot be changed any more.
In case that source term input starts from scratch, the user may select
freely among all available input modes. This is done with window
STerm-MOD.A and described in Chapter 4.4.4.
In case that the user starts the source term specification by selecting a
source term with mode key FX, window STerm-MOD.B or STerm-
MOD.C open for the selection of the input mode, depending on the
mode key of the mother source term that served to generate the FX
source term. "Mother modes" F1 to F5 allow the conversion of the
original source term data to all other modes. "Mother modes" F6 and
F7 do not allow conversion to mode F1, because the use of an
inventory required for the generation of the "fractions of the initial core
inventory" is inhibited per definition of F6 and F7.
4.4.3 Remarks on application and applicability of the different activity input modes
The activity release data for source terms of generic nature from PSA-
studies are derived for a utility representative of its kind and usually are
given as initial release fractions (mode key F1). This parameterisation
makes it possible to apply them to reactors of similar type but different
power. They should not be applied blindly to reactors of types other
than those they were intended for.
Release data in the form "Bq or Bq/s for individual radionuclides"
(keys F6, F7) are taken in RODOS without any reference to a reactor
inventory. This allows to use them even in the case that an inventory is
by some reason not available because none was provided for the site
under consideration, or not foreseen, or not of interest in a particular
application, for example in some exercises. Release data of this type
must only be used for the special application, reactor type and state
they were originally intended for.
There exist accident scenarios without reactor shutdown prior or during
a release. This means that application of the formalism developed for
modes F1, F2, F3, F4, and F5 in RODOS ([RODOS(RA1)-TN(01)-
01]) makes no sense because nuclides are created or destroyed at any
Version 1.0 (draft
- 42 -
moment by fission processes not accounted for at all in the model. In
such situations, input modes F6 and F7 are the only remaining options.
Because of the conceptual difficulties outlined in Footnote b) in Tab. 3,
input modes F3, F4, F5 should be used only if release information in
other form is not available. The results of calculations based on such
source terms should be carefully analysed and interpreted, and used
with the necessary caution.
In RODOS there exists an import/export facility that allows source
term exchange between different RODOS users for one specific
scenario. This facility makes use of source term files generated by the
source term code package of RODOS. Such files show the key "FX"
and contain data in all formats shown in Tab. 3 that are derivable from
the original input format by the source term code. FX-files can be
applied in RODOS only for a utility with the same thermal power and
days of operation, and in runs with the same selection of the calculation
nuclides. All these conditions are checked and lead to an error exit
when violated.
4.4.4 (STerm-MOD.A): Selection of input mode for the activity for source term input
from scratch
Before you can input activity release data from scratch, you must select
the input mode best suited for your purpose. This is done with window
STerm-MOD.A which opens after pressing [OK] in window STerm-
GEN. Once the mode selection was made, the data have to be typed in
into the correct form for the mode in the follow-up window(s) that will
open later.
Activate the chosen mode by clicking on the corresponding item. After
the click, a dummy window will open, where you have to press
[Update] to store the selection just made. Press then [OK] in the input

Version 1.0 (draft
- 43 -
mode window and it will be closed and control is given back to the
program
4.4.5 (STerm-MOD.B/C): Selection of input mode for the activity when re-using FX-
Files
In case of having selected a library source term with mode key FX,
window STerm-MOD.B or STerm-MOD.C opens after pressing [OK]
in window STerm-GEN, depending on the mode key of the mother
source term that served to generate the FX source term.
These windows are not shown here. They look the same as window
STerm-MOD.A shown in Chapter 4.4.4, apart from some header lines
explaining what to do in case of keeping/altering the pre-selected
mode, and the fact that for window STerm-MOD.C the item for mode
F1 is removed.
Activate the chosen mode by clicking on the corresponding item. After
the click, a dummy window will open, where you have to press
[Update] to store the selection just made. Press then [OK] in the input
mode window and it will be closed and control is given back to the
program.
4.4.6 (STerm-MOD.D): Selection of input mode for the activity for a site with no
inventory linked
If there is for the chosen site no inventory available in the RODOS data
base, only two modes without inventory reference are available. If
defining the source term from scratch (detailed), window STterm-
MOD.D opens showing only modes F6 and F7.
When trying to use the reduced input mask or to use a library source
term needing an inventory, error window STerm-NoInv opens
informing the user about the problem. Clicking to [Close] brings the
user back to STerm-BEG to repeat the input.

Version 1.0 (draft
- 44 -
4.5 (STerm-GRP) The nuclide grouping (only for Source term input from
scratch)
This window opens only for source term input from scratch (detailed).
To transform the source term user input from the chosen input mode
into another mode and to store it in the FX-format (see Chapter 4.4.2),
the user must select one of the four given nuclide groupings.
When clicking to the desired grouping, a dummy window will open,
where you have to press [Update] to store the selection just made.
Press then [OK] in the grouping window and it will be closed.
4.6 The activity input
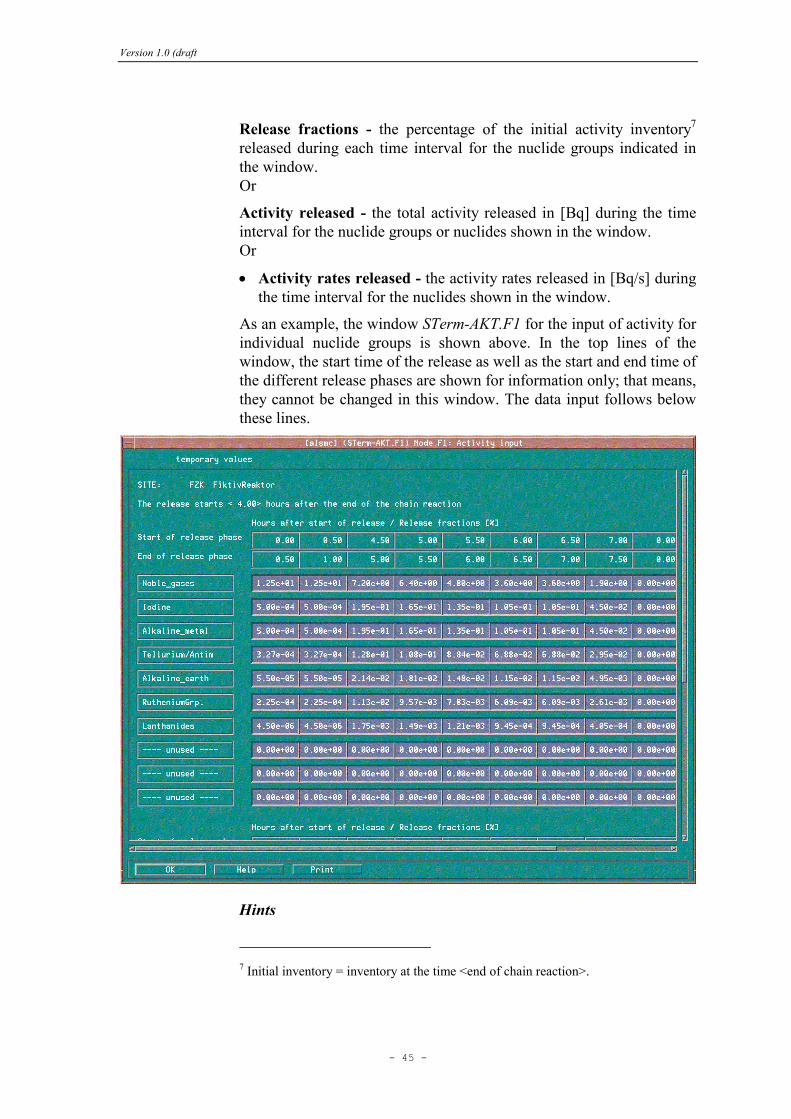
4.6.1 (STerm-AKT.F1/.F26/.F5/.F7) Input of released activity for source term input
modes F1, F2, F5, F6, F7
The release data have to be entered for all release phases defined in
window STerm-MOD.A/B/C. Which of the windows STerm-AKT.F1, -
AKT.F26, -AKT.F5, -AKT.F7 actually will appear, depends on the
input mode selected in window STerm-MOD.A/B/C. All these windows
have the same structure and differ from each other only with respect to
the release items to be specified, either:
Version 1.0 (draft
- 45 -
Release fractions - the percentage of the initial activity inventory7
released during each time interval for the nuclide groups indicated in
the window.
Or
Activity released - the total activity released in [Bq] during the time
interval for the nuclide groups or nuclides shown in the window.
Or
• Activity rates released - the activity rates released in [Bq/s] during
the time interval for the nuclides shown in the window.
As an example, the window STerm-AKT.F1 for the input of activity for
individual nuclide groups is shown above. In the top lines of the
window, the start time of the release as well as the start and end time of
the different release phases are shown for information only; that means,
they cannot be changed in this window. The data input follows below
these lines.
Hints
7 Initial inventory = inventory at the time <end of chain reaction>.

Version 1.0 (draft
- 46 -
(1) The release resulting from the input data must exceed a certain
minimum. Otherwise, a corresponding error message is issued and
programs execution stops.
(2) If the source term is put in via release fractions (in percent), no
fraction should be less than 0% or greater than 100%. Also, the sum of
all fractions must not exceed 100%.
In case of wrong input values for the release activity, a message will
appear. The window STerm-ERR.F1 shown here opens for input mode
F1. The windows STerm-ERR.Fn for input mode Fn look accordingly.
Closing the window with [Close] brings the user back to input window
STerm-AKT.Fn until all input is made correctly.
(3) If the release rates for individual nuclides are not directly specified
but derived from the user input, the following problem may occur: The
activity specified by the user for a nuclide or nuclide group exceeds the
activity, which is calculated from the inventory data as present in the
reactor. In this case, a warning message is issued after completion of
the source term input, the calculated value is taken, and execution of
the program continues.
4.6.2 Input of released activity for source term input modes F3 and F4
After selection of source term input mode F3 or F4 in window STerm-
MOD.A/B/C, three successive input selection windows will pop up to
put in the activity specification for these modes:
Firstly, input of the released activity for noble gases, I-131 (F3) or
iodine (F4), and for total aerosol (see window STerm-AKT.F3 (F3) or
STerm-AKT.F4 (F4)).
Then, the input mode of aerosol fractions, which will be used to derive
the contributions of different aerosol groups to the total aerosol activity
released (see window Aeros-SEL).
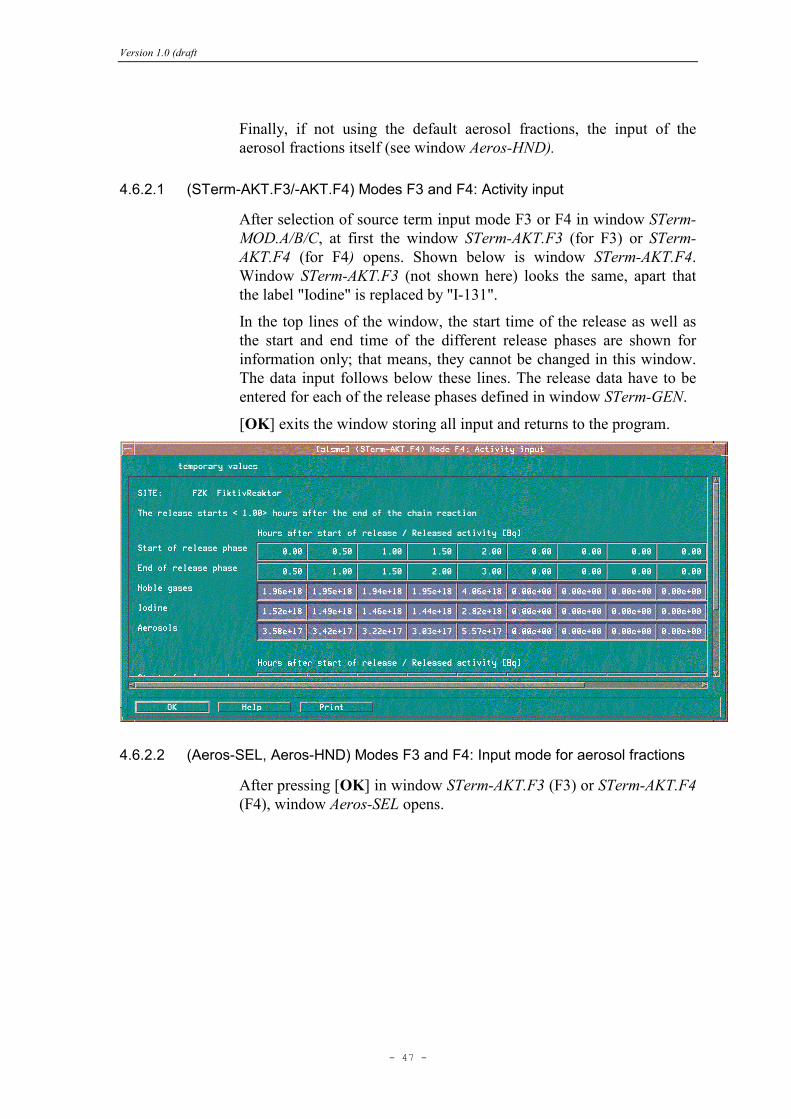
Version 1.0 (draft
- 47 -
Finally, if not using the default aerosol fractions, the input of the
aerosol fractions itself (see window Aeros-HND).
4.6.2.1 (STerm-AKT.F3/-AKT.F4) Modes F3 and F4: Activity input
After selection of source term input mode F3 or F4 in window STerm-
MOD.A/B/C, at first the window STerm-AKT.F3 (for F3) or STerm-
AKT.F4 (for F4) opens. Shown below is window STerm-AKT.F4.
Window STerm-AKT.F3 (not shown here) looks the same, apart that
the label "Iodine" is replaced by "I-131".
In the top lines of the window, the start time of the release as well as
the start and end time of the different release phases are shown for
information only; that means, they cannot be changed in this window.
The data input follows below these lines. The release data have to be
entered for each of the release phases defined in window STerm-GEN.
[OK] exits the window storing all input and returns to the program.
4.6.2.2 (Aeros-SEL, Aeros-HND) Modes F3 and F4: Input mode for aerosol fractions
After pressing [OK] in window STerm-AKT.F3 (F3) or STerm-AKT.F4
(F4), window Aeros-SEL opens.
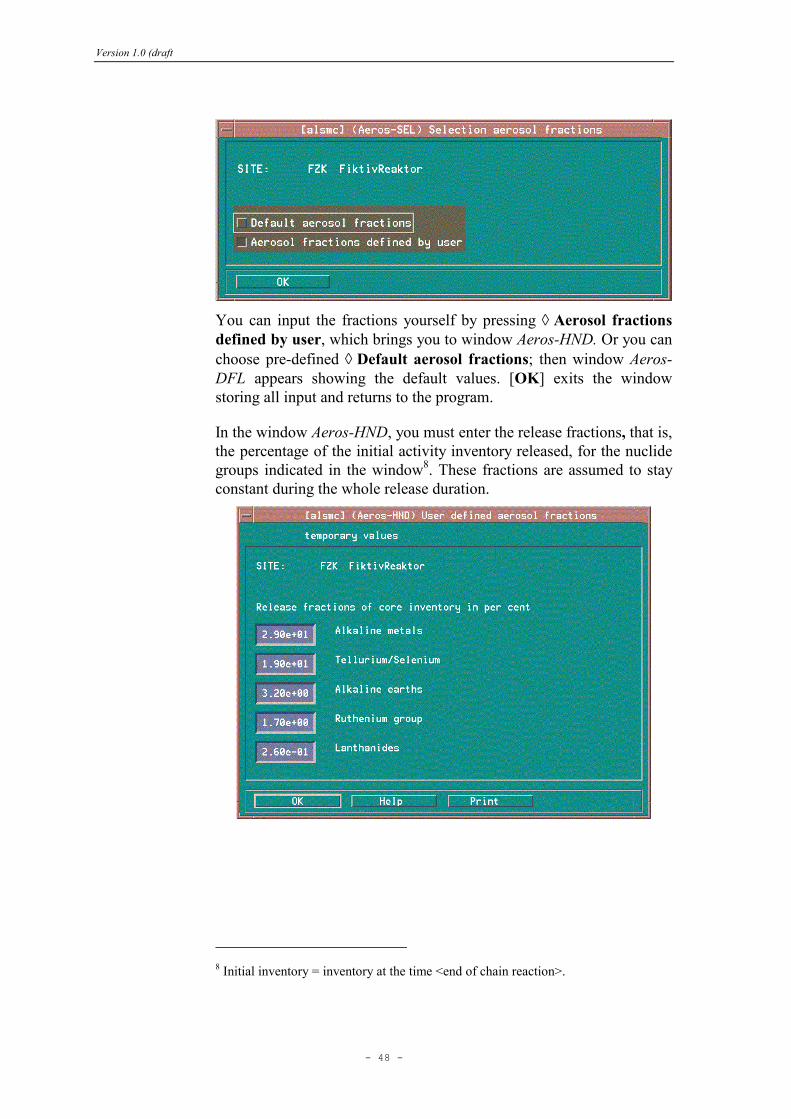
Version 1.0 (draft
- 48 -
You can input the fractions yourself by pressing ◊ Aerosol fractions
defined by user, which brings you to window Aeros-HND. Or you can
choose pre-defined ◊ Default aerosol fractions; then window Aeros-
DFL appears showing the default values. [OK] exits the window
storing all input and returns to the program.
In the window Aeros-HND, you must enter the release fractions, that is,
the percentage of the initial activity inventory released, for the nuclide
groups indicated in the window8. These fractions are assumed to stay
constant during the whole release duration.
8 Initial inventory = inventory at the time <end of chain reaction>.
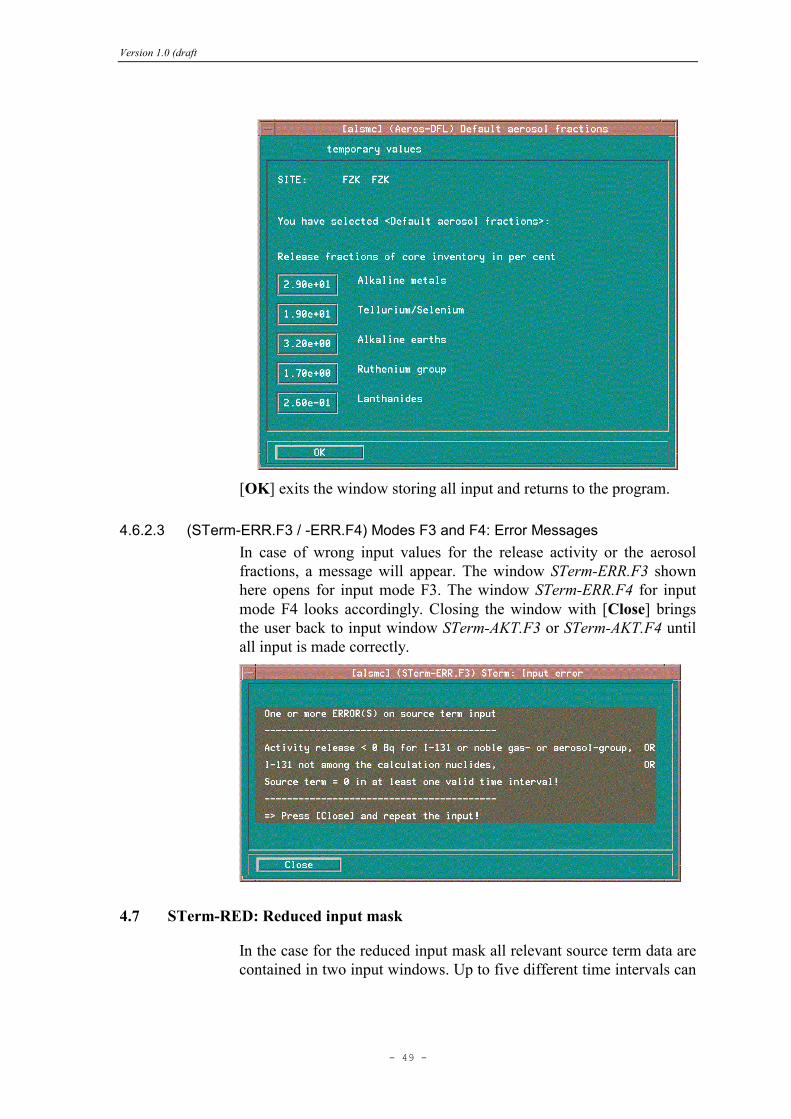
Version 1.0 (draft
- 49 -
[OK] exits the window storing all input and returns to the program.
4.6.2.3 (STerm-ERR.F3 / -ERR.F4) Modes F3 and F4: Error Messages
In case of wrong input values for the release activity or the aerosol
fractions, a message will appear. The window STerm-ERR.F3 shown
here opens for input mode F3. The window STerm-ERR.F4 for input
mode F4 looks accordingly. Closing the window with [Close] brings
the user back to input window STerm-AKT.F3 or STerm-AKT.F4 until
all input is made correctly.
4.7 STerm-RED: Reduced input mask
In the case for the reduced input mask all relevant source term data are
contained in two input windows. Up to five different time intervals can

Version 1.0 (draft
- 50 -
be defined and source term input mode F4 is assumed. Thus, window
STerm-RED is a combination of windows STerm-GEN, STerm-Akt.F4
and Aeros-SEL.
It is referred to the corresponding descriptions in Chapters 4.3 and 0.
Depending on the chosen aerosol selection at the bottom of window
STerm-RED, either window Aeros-DFL showing the default values or
Aeros-HND opens allowing the user to put in own fractions.
This mode (having key F8) is only available if there is an inventory
linked to the site under consideration. Otherwise window STerm-NoInv
shown in Chapter 4.4.6 will appear informing the user about the
problem. Pressing [Close] brings the user back to window STerm-BEG
to correct the input.
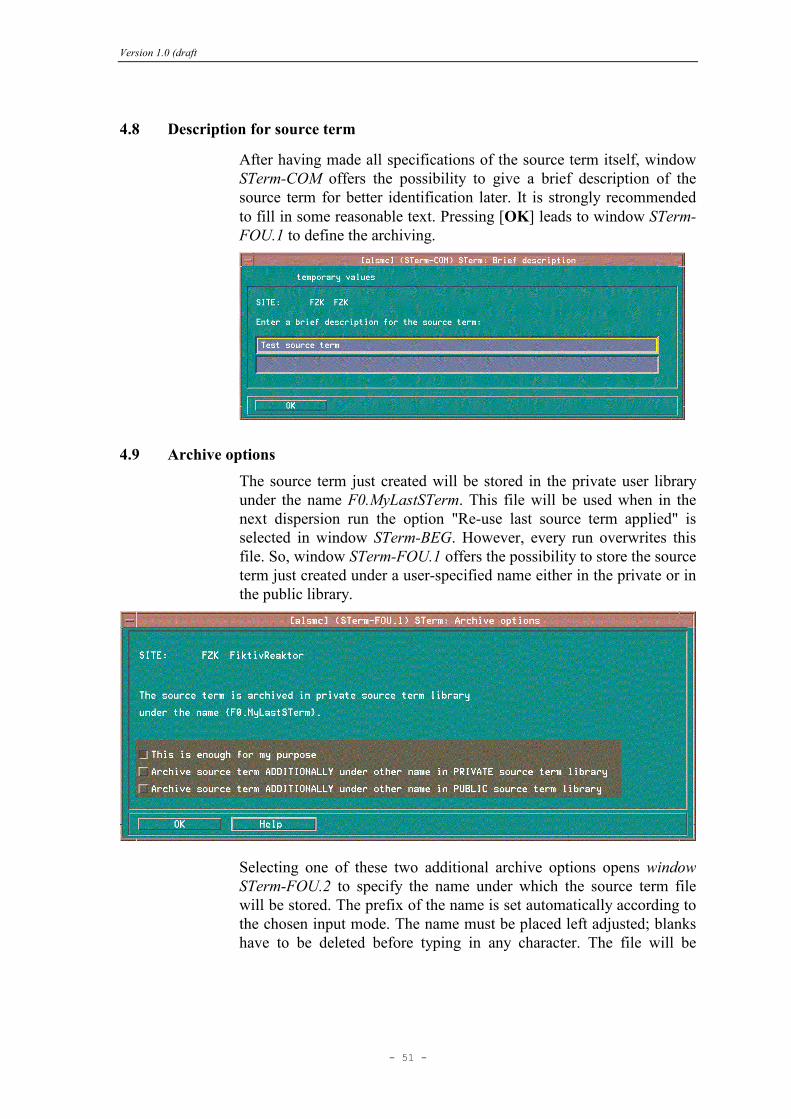
Version 1.0 (draft
- 51 -
4.8 Description for source term
After having made all specifications of the source term itself, window
STerm-COM offers the possibility to give a brief description of the
source term for better identification later. It is strongly recommended
to fill in some reasonable text. Pressing [OK] leads to window STerm-
FOU.1 to define the archiving.
4.9 Archive options
The source term just created will be stored in the private user library
under the name F0.MyLastSTerm. This file will be used when in the
next dispersion run the option "Re-use last source term applied" is
selected in window STerm-BEG. However, every run overwrites this
file. So, window STerm-FOU.1 offers the possibility to store the source
term just created under a user-specified name either in the private or in
the public library.
Selecting one of these two additional archive options opens window
STerm-FOU.2 to specify the name under which the source term file
will be stored. The prefix of the name is set automatically according to
the chosen input mode. The name must be placed left adjusted; blanks
have to be deleted before typing in any character. The file will be
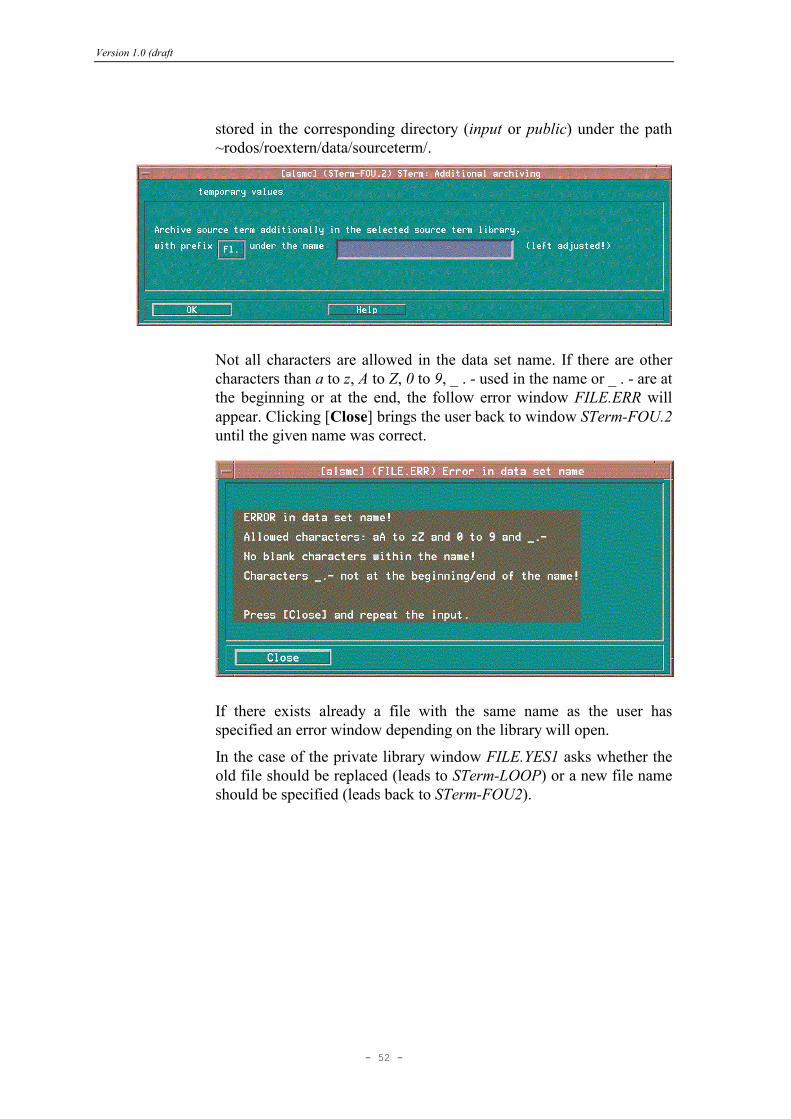
Version 1.0 (draft
- 52 -
stored in the corresponding directory (input or public) under the path
~rodos/roextern/data/sourceterm/.
Not all characters are allowed in the data set name. If there are other
characters than a to z, A to Z, 0 to 9, _ . - used in the name or _ . - are at
the beginning or at the end, the follow error window FILE.ERR will
appear. Clicking [Close] brings the user back to window STerm-FOU.2
until the given name was correct.
If there exists already a file with the same name as the user has
specified an error window depending on the library will open.
In the case of the private library window FILE.YES1 asks whether the
old file should be replaced (leads to STerm-LOOP) or a new file name
should be specified (leads back to STerm-FOU2).
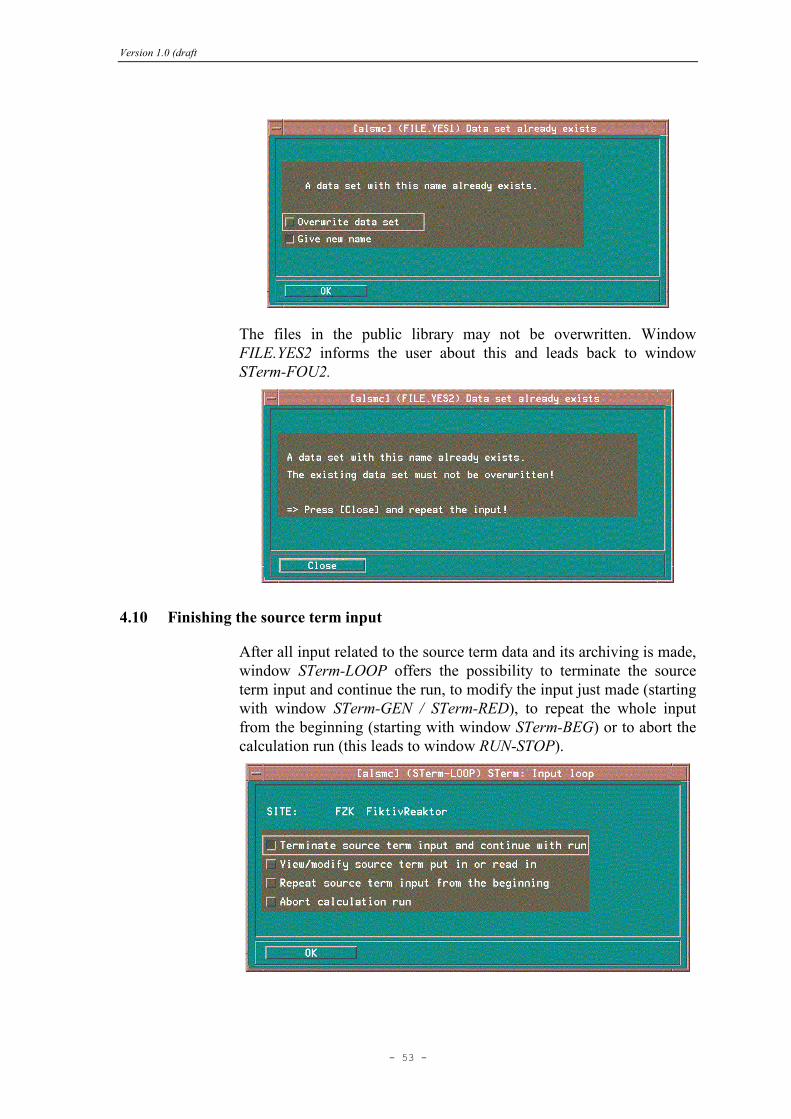
Version 1.0 (draft
- 53 -
The files in the public library may not be overwritten. Window
FILE.YES2 informs the user about this and leads back to window
STerm-FOU2.
4.10 Finishing the source term input
After all input related to the source term data and its archiving is made,
window STerm-LOOP offers the possibility to terminate the source
term input and continue the run, to modify the input just made (starting
with window STerm-GEN / STerm-RED), to repeat the whole input
from the beginning (starting with window STerm-BEG) or to abort the
calculation run (this leads to window RUN-STOP).
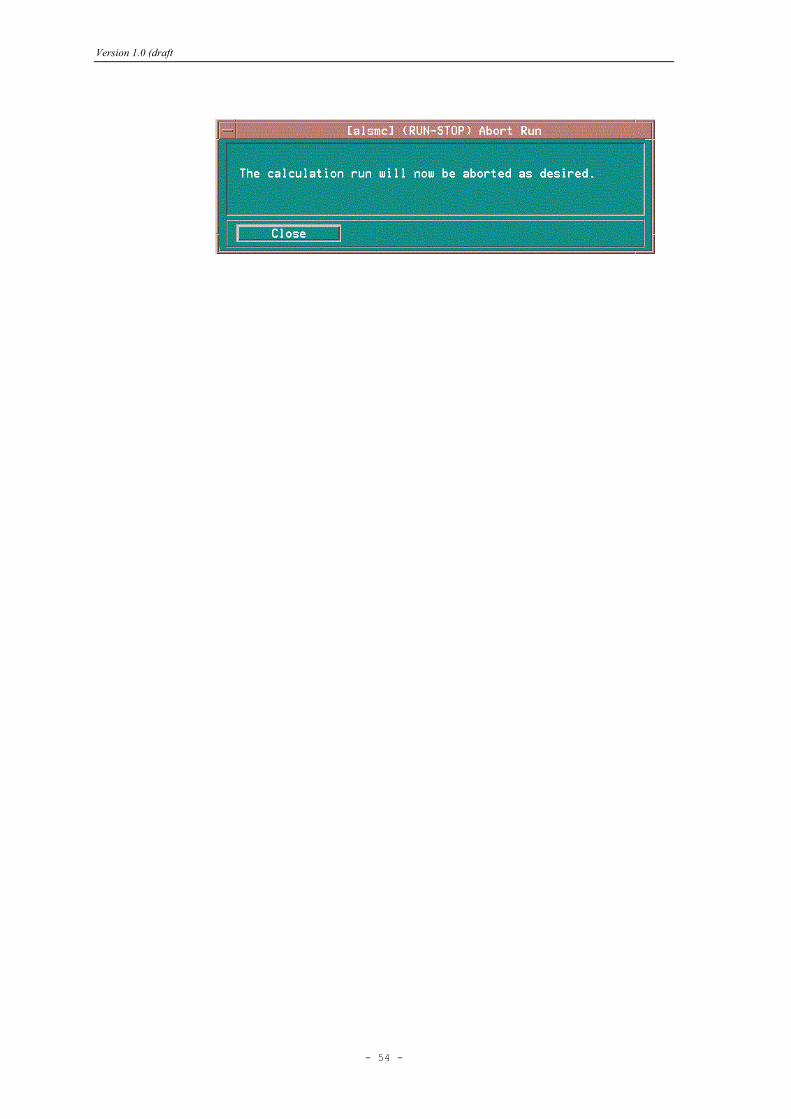
Version 1.0 (draft
- 54 -
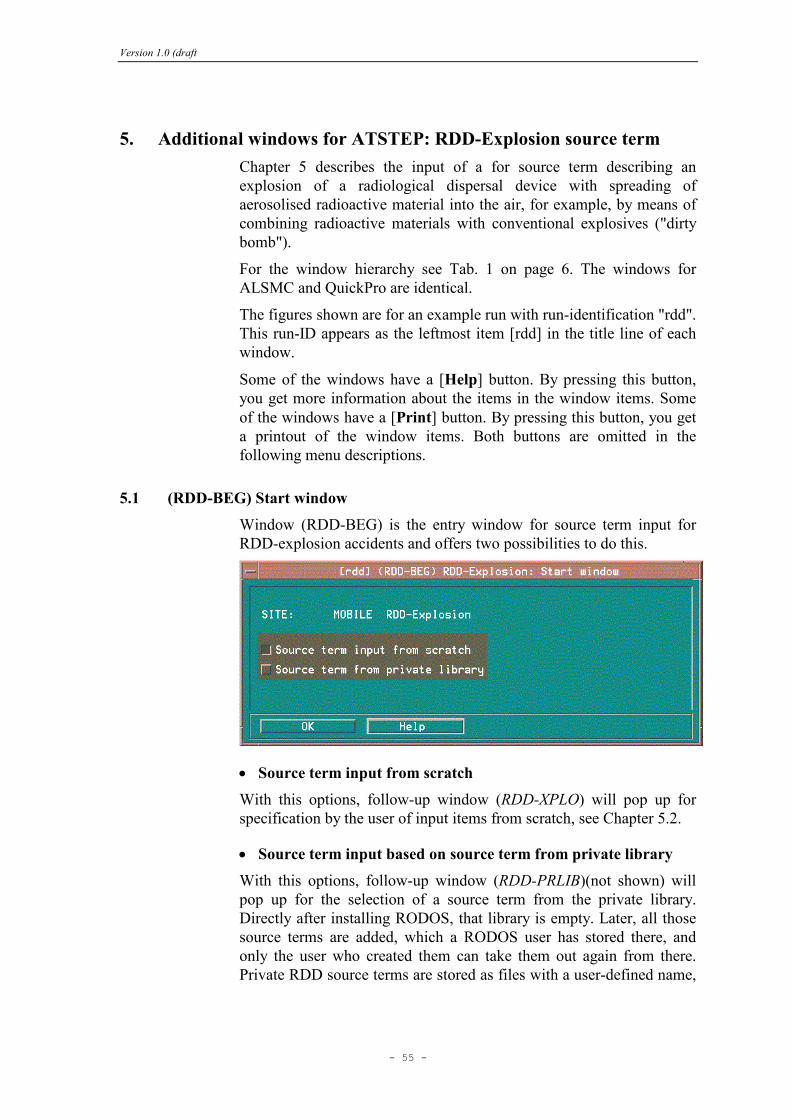
Version 1.0 (draft
- 55 -
5. Additional windows for ATSTEP: RDD-Explosion source term
Chapter 5 describes the input of a for source term describing an
explosion of a radiological dispersal device with spreading of
aerosolised radioactive material into the air, for example, by means of
combining radioactive materials with conventional explosives ("dirty
bomb").
For the window hierarchy see Tab. 1 on page 6. The windows for
ALSMC and QuickPro are identical.
The figures shown are for an example run with run-identification "rdd".
This run-ID appears as the leftmost item [rdd] in the title line of each
window.
Some of the windows have a [Help] button. By pressing this button,
you get more information about the items in the window items. Some
of the windows have a [Print] button. By pressing this button, you get
a printout of the window items. Both buttons are omitted in the
following menu descriptions.
5.1 (RDD-BEG) Start window
Window (RDD-BEG) is the entry window for source term input for
RDD-explosion accidents and offers two possibilities to do this.
• Source term input from scratch
With this options, follow-up window (RDD-XPLO) will pop up for
specification by the user of input items from scratch, see Chapter 5.2.
• Source term input based on source term from private library
With this options, follow-up window (RDD-PRLIB)(not shown) will
pop up for the selection of a source term from the private library.
Directly after installing RODOS, that library is empty. Later, all those
source terms are added, which a RODOS user has stored there, and
only the user who created them can take them out again from there.
Private RDD source terms are stored as files with a user-defined name,

Version 1.0 (draft
- 56 -
preceded by the RODOS user-id, in the directory
~rodos/roextern/data/sourceterm/input/RDDsterm.
Pressing [OK] stores the input, quits the window, and gives control
back to the program.
5.2 (RDD-XPLO) Input of RDD-Explosion source term items
Specify either the {Explosive mass [kg] TNT-equivalent}, or the
{Explosive energy yield [MJ]}, by typing a positive value in the
respective field, and typing zero in the other, unused, field.
Furthermore, one can enter the height above ground [m] in which the
RDD explodes, and a cloud rise modification factor.
Finally, the activity [Bq] released in the RDD-explosion has to be
given, for up to 25 radionuclides.
Pressing [OK] stores the input, quits the window, and gives control
back to the program, see Chapter 5.3.

Version 1.0 (draft
- 57 -
5.3 Input loop; termination of input
After having completed the data input in (RDD-XPLO) or the selection
in (RDD-PRLIB), the comment window, the archive option window,
and the input loop windows open in the same way as for NPP source
terms; see Chapters 4.8 to 4.10.

Version 1.0 (draft
- 58 -
6. Additional windows for ATSTEP: RAC-with-Fire source term
Chapter 6 describes the input of a source term describing a radiological
accident associated with a fire, for example, an accident with the
inflammation of gasoline during road transport of radiological sources
for industrial, medicinal, scientific, or public purposes, of radioactive
waste, of fissile materials for the nuclear fuel cycle, or of nuclear
weapons.
For the window hierarchy see Tab. 1 on page 6. The windows for
ALSMC and QuickPro are identical.
The figures shown are for an example run with run-identification "rac".
This run-ID appears as the leftmost item [rac] in the title line of each
window.
Some of the windows have a [Help] button. By pressing this button,
you get more information about the items in the window items. Some
of the windows have a [Print] button. By pressing this button, you get
a printout of the window items. Both buttons are omitted in the
following menu descriptions.
6.1 (RAC-BEG) Start window
Window (RAC-BEG) is the entry window for source term input for
RAC-with-Fire accidents and offers two possibilities to do this.
• Source term input from scratch
With this options, follow-up window (RAC-FIRE) will pop up for
specification by the user of input items from scratch, see Chapter 6.2.
• Source term input based on source term from private library
With this options, follow-up window (RAC-PRLIB) (not shown) will
pop up for the selection of a source term from the private library.
Directly after installing RODOS that library is empty. Later, all those
source terms are added, which a RODOS user has stored there, and
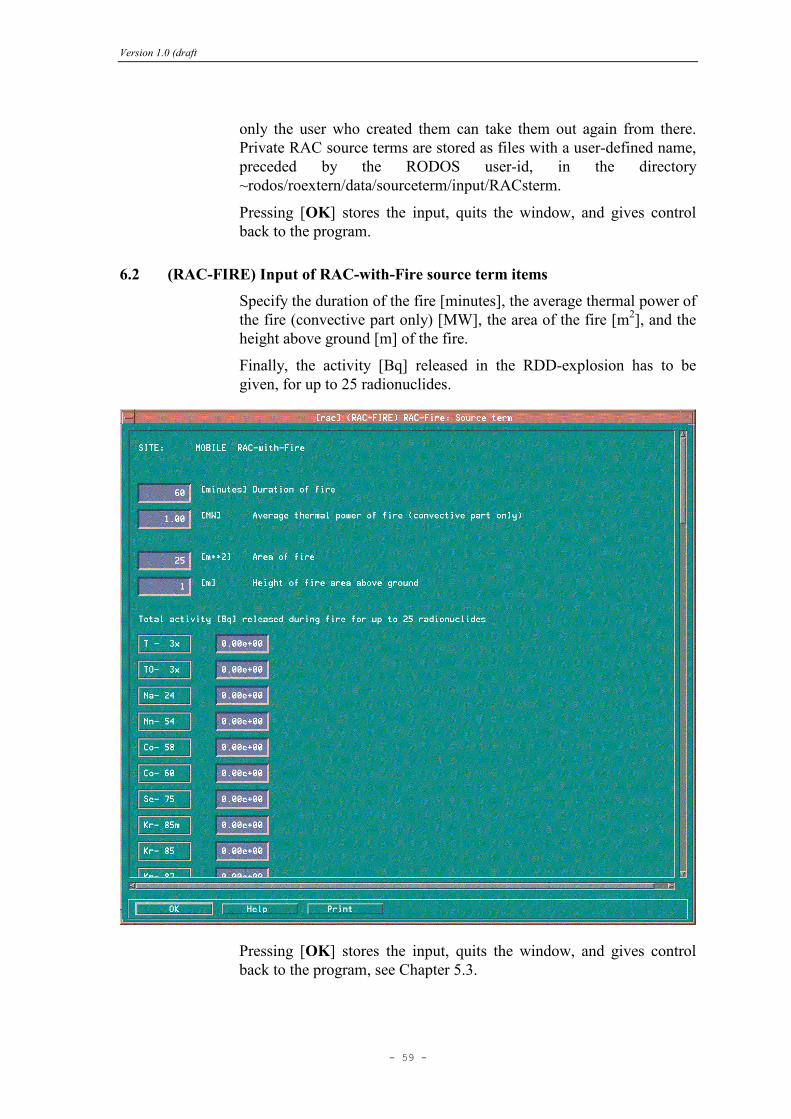
Version 1.0 (draft
- 59 -
only the user who created them can take them out again from there.
Private RAC source terms are stored as files with a user-defined name,
preceded by the RODOS user-id, in the directory
~rodos/roextern/data/sourceterm/input/RACsterm.
Pressing [OK] stores the input, quits the window, and gives control
back to the program.
6.2 (RAC-FIRE) Input of RAC-with-Fire source term items
Specify the duration of the fire [minutes], the average thermal power of
the fire (convective part only) [MW], the area of the fire [m2], and the
height above ground [m] of the fire.
Finally, the activity [Bq] released in the RDD-explosion has to be
given, for up to 25 radionuclides.
Pressing [OK] stores the input, quits the window, and gives control
back to the program, see Chapter 5.3.

Version 1.0 (draft
- 60 -
6.3 Input loop; termination of input
After having completed the data input in (RAC-FIRE) or the selection
in (RAC-PRLIB), the comment window, the archive option window,
and the input loop windows open in the same way as for NPP source
terms; see Chapters 4.8 to 4.10.

Version 1.0 (draft
- 61 -
7. Prognosis results accessible with the RODOS Graphics
7.1 Overview
Which output from Prognosis is accessible with the RODOS graphics
system was summarised in Tab. 2 on page 12. On the level of the
graphics system, there is a hierarchical output structure, which is
explained in this chapter.
The top level of the hierarchical output representation is obtained by
clicking in the Graphics Manager window on the field
1. QuickProgno for display of results from QuickPro,
2. ALSMCprogn for display of results from ALSMC,
3. RLSMCprogn for display of results from RLSMC.
Under the program name follows the button ◊Prognosis, and then the
keys [Con&Depos], [Rad&Doses], [Precipitation], [Windfield]
(ALSMC and RLSMC only), [Detectors] (ALSMC and RLSMC only),
and [Tables], which stand for
• [Con&Depos]: Concentration and deposition fields
• [Rad&Doses]: Gamma radiation and dose fields
• [Precipitation]: Rain intensity
• [Windfield]: Wind fields
• [Detectors]: Local dose rate at detector points
• [Tables]: Situation data protocols for site, grid, calculation nuclides,
inventory, source term, weather.
The field results are multi-dimensional data fields, where a local value
determined in the centre of the respective cell or a set of local values of
the result data field is assigned to each cell of the calculation grid. Such
results are displayed as colour-coded maps for all locations of the
RODOS grid. Assigning various colours to ranges of the results is
automatically done by the system. The colour range, however, can be
modified by the user with the <Edit Legend> facility of the RODOS
graphics system9. Clicking in each cell of the calculation grid shows
the numerical values, if the mouse is in the inquiry mode (then the
pointer has the form<?>).
The different Prognosis results are described in the following Chapter.
9 For more information see [RODOS User Guide of the System
Interface].

Version 1.0 (draft
- 62 -
7.2 Preparing Prognosis results for graphical display
Results of a Prognosis run still active in the Main Drawing Window
can be displayed directly. Runs, which were removed, have first to be
loaded again from the run archive.
7.3 [Con&Depos] Concentrations and deposition
By clicking on [Con&Depos] in the Graphics Manager window, a list
of keys appears as a submenu. By clicking on one of the keys, the result
array will be sent to the Main Drawing Window, where it can be
displayed in the usual way (see [RODOS User Guide of the System
Interface]).
Below, the keys are listed and marked by bold brackets. Under the keys
follow the quantities represented by them (bold), and a brief
explanation.
• [ConAir]
Concentration in air near ground
Atmospheric dispersion following the release of a nuclide causes a
field of nuclide air concentrations in the environment. This
concentration is given in Becquerel per cubic metre air [Bq/m
3] in
the entire calculation grid 1 m above ground. It is output after each
computation step of the dispersion model.
• [TiConAir]
Time-integrated concentration in air near ground
Time-integrated air concentration is output in Becquerel seconds
per cubic metre air [Bq*s/m3] in the complete calculation grid 1 m
above ground after each computation step of the dispersion model.
• [CoGround]
Ground contamination - total (dry + wet)
• [CoGroundWet]
Ground contamination -wet fraction only
Iodine nuclides and nuclides in aerosol form are subject to dry and
wet deposition resulting in contamination of the ground surface.
Contamination is output in the calculation grid in total and for the
wet fraction only in Becquerel per square meter [Bq/m2] after each
computation step of the dispersion model.
7.4 [Rad&Doses] Radiation fields and doses
By clicking on [Rad&Doses] in the Graphics Manager window, a list
of keys appears as a submenu. By clicking on one of the keys, the result
array will be sent to the Main Drawing Window, where it can be

Version 1.0 (draft
- 63 -
displayed in the usual way (see [RODOS User Guide of the System
Interface]).
Below, the keys are listed and marked by bold brackets. Note that "Nu"
indicates that the result is output in a nuclide-specific manner, and
"Sum" the dose summed up over all nuclides. Under the keys follow
the quantities represented by them (bold), and a brief explanation.
• [CloudRateNu]
Potential gamma dose rate from cloud (effective dose,
individual nuclides)
The nuclide-specific effective cloud gamma dose rate at 1 m above
ground is output in milli-Sievert per hour [mSv/h] in the entire
calculation grid after each computation step of the dispersion
model.
• [CloudDoseNu]
Potential gamma dose from cloud (effective dose, individual
nuclides)
The nuclide-specific effective cloud gamma dose at 1 m above
ground is output in milli-Sievert [mSv] in the entire calculation
grid after each computation step of the dispersion model.
• [GroundRateNu]
Potential gamma dose rate from ground (effective dose,
individual nuclides)
The nuclide-specific effective ground gamma dose rate at 1 m
above ground is output in milli-Sievert per hour [mSv/h] in the
entire calculation grid after each computation step of the dispersion
model.
• [CloudDoseSum]
Potential gamma dose from plume (individual organs, nuclide
sum)
The potential gamma organ dose of the plume at 1 m above ground
is output in milli-Sievert [mSv] in the entire calculation grid after
each computation step of the dispersion model.
• [GroundDosSum]
Potential acute gamma dose from ground (individual organs,
nuclide sum)
The potential acute ground gamma organ dose at 1 m above ground
is output in milli-Sievert [mSv] in the entire calculation grid after
each computation step of the dispersion model.
• [InhalDoseSum]
Version 1.0 (draft
- 64 -
Potential 50 years inhalation dose (individual organs, nuclide
sum)
The potential 50 years inhalation organ dose is output in milli-
Sievert [mSv] in the entire calculation grid after each computation
step of the dispersion model.
• [CloudRateSum]
Gamma dose rate from cloud (effective dose, nuclide sum)
The nuclide-integral effective cloud gamma dose rate at 1 m above
ground is output in milli-Sievert per hour [mSv/h] in the entire
calculation grid after each computation step of the dispersion
model.
• [GroundRatSum]
Gamma dose rate from ground (effective dose, nuclide sum)
The nuclide-integral effective ground gamma dose rate at 1 m
above ground is output in milli-Sievert per hour [mSv/h] in the
entire calculation grid after each computation step of the dispersion
model.
• [LocDoseR]
Local gamma dose rate (effective dose, nuclide sum)
The effective local gamma dose rate, i.e. the integral of the total
gamma dose rates of the cloud and the contaminated ground surface
at 1 m above ground is output in milli-Sievert per hour [mSv/h] in
the entire calculation grid after each computation step of the
dispersion model.
• [LocalSkinDose]
Local skin dose (nuclide sum)
The local skin dose is the potential skin dose resulting from the
self-irradiation of the unsheltered contaminated skin during the
whole scenario duration. Alpha-, beta- and gamma radiation
components are considered. The dose is put out in milli-Sievert
[mSv] in the entire calculation grid after each computation step of
the dispersion model.
• [CloudArrive]
Cloud arrival times at locations on the map
As soon as the time integral of the total activity concentration in the
air near ground exceeds 1000 [Bq.s/m3] at a place in the
surroundings of an NPP, the time elapsed since the start of release
is determined for this place in hours [h]. The entire field of the thus
defined times of arrival can be represented on the map in a colour-
coded manner.
Version 1.0 (draft
- 65 -
7.5 [Precipitation] Rain intensity
By clicking [Precipitation] in the Graphics Manager window, the
result array will be sent to the Main Drawing Window. There it can be
displayed in the usual way (see [RODOS User Guide of the System
Interface]).
For a certain period of time, rain intensity of greater than 0 mm/h may
prevail in the area of the calculation grid during dispersion calculation.
The precipitation is output in millimetres per hour [mm/h] after each
computation step of the dispersion model.
7.6 [Windfield] Wind fields (A/R-LSMC only)
By clicking [Windfield] in the Graphics Manager window, the result
array will be sent to the Main Drawing Window. There it can be
displayed in the usual way (see [RODOS User Guide of the System
Interface]).
The wind field result gives the two-dimensional wind vectors at the
height of 10 m; the wind-speed is given in meters per second [m/s].
The picture in the graphics shows coloured lines, where the wind-speed
is represented by both the colours and the lengths of the lines.
Interpreting the lines as wind-vanes derives the wind direction.
7.7 [Detectors] Local dose rate at detector points (A/R-LSMC only)
By clicking [Detectors] in the Graphics Manager window, the result
array will be sent to the Main Drawing Window. There it can be
displayed in the usual way (see [RODOS User Guide of the System
Interface]).
The local dose rate results are shown at given detector points; they are
shown in milli-Sievert per hour [mSv/h]. After opening the Toolbox
and activating there the item 'Text results', the separate text window
shows the calculated local dose rate and the measured values at the grid
cell clicked with the mouse.
7.8 [Tables] Situation data protocols
By clicking on [Tables] in the Graphics Manager window, a list of
keys appears as a submenu. The keys are given in brackets, the
situation data represented by them are written behind the keys.
[SiteData]: Site and calculation grid
[NuclideData]: Nuclide selection
[InventoryData]: Reactor inventory
[STermFromUser]: User input of source term
Version 1.0 (draft
- 66 -
[STermMoreInfos]: Further information about the source term
(derived from user input)
[STermTStep]: Source term data that are passed to the ADM in each
time step.
[MeteoFromUser]: Meteorological and dispersion-related information
All tables are also recorded on disk (see Chapter 8.3).

Version 1.0 (draft
- 67 -
8. Trouble shooting
8.1 General remarks
When executing, the Prognosis programs perform checks on the
situation data as well as on other data used in the calculations, and
attempt an analysis of encountered problems.
Wrong situation data
• For interactive runs with dynamic input windows there appear
windows containing corresponding error messages. Pressing [Close]
in the error window leads the user back to the window, in which the
wrong input was made, as long as all input is accepted.
Nevertheless it can happen that input errors occur leading to an
abnormal program stop (e.g. the actually selected calculation
nuclides do not fit to the source term read in).
• For runs without active dynamic input windows (e.g. the RODOS-
HTML-B-interface), input errors are checked as far as possible in
the special interface. However, not in all cases can be tested, as
there is e.g. no access to the data base available. So, it happens more
often that the program run is stopped; a short message is flashed on
the screen to inform you about the error exit, and where to look to
find more information.
Other data errors
In rare cases, a fatal error is caused by some mistake made when
RODOS was installed10. Such errors are termed installation errors. The
respective problem is recorded in the "RODOS run protocol”. Contact
your system manager if you encounter such a problem11.
If a Prognosis run terminates normally, the results may be so that you
are puzzled by them. This may or may not be an indication of a
problem with RODOS. Chapter 8.2 gives some guideline what to do in
such a case and where to find some more information.
Chapter 8.3 shows the pathnames of all protocols on disk. The
"RODOS run protocol” is stored only on disk. The situation data
protocols are recorded on disk and are also known to the RODOS
10 Errors of this type can be caused for example by missing entries in the fixdata base,
or wrong entries in data files requested by the user for the particular installation.
11 Hints for reasons and remedies for installation errors can be found in
[RODOS(WG7)-TN(00)-01].
Version 1.0 (draft
- 68 -
graphics; however, if the run has terminated abnormally, the graphic
items under [Tables] must first be reloaded from the archive.
8.2 Strange results
If you have the feeling that the results of a Prognosis run are not as you
expected, in other words, they look strange to your eyes, this can have
two different reasons:
(A) The run was carried out with other data than you thought.
(B) The radiological situation is complicated and you do not fully
understand the implication of the otherwise correctly specified
scenario.
This Chapter gives some guideline how to find out if reason (A) is
responsible. Carry out the steps described below. If they fail, reason
(B) is likely to be the active agent.
Inspection of situation data protocols
Take a thorough look at the situation data protocols. They show the
data the Prognosis model actually saw when executing.
Do the protocols contain the data you think they should contain? If the
answer is YES, the problem lies elsewhere (e.g. in reason II), and we
cannot help you further here.
Inspection of run protocol
The run protocol contains a lot of lines which are only meant for the
developers. Nevertheless, in the case of unexpected program crashes,
there are some hints or error messages given at the end of the protocol
file.
8.3 Location of situation data protocols and Prognosis run protocol on disk
The situation data used in each Prognosis run, some additional
information derived from these data, and eventual error messages and
warnings are recorded on disk in tabular form. This recording is done
independent from the fact if any optional input or modification of the
situation data was performed. The path for the directory is
~rodos/roextern/outall/{user-Id}/{run-Id}, the file names are listed
below.
• Site/grid: <Prognose.SiteData>
• Nuclides: <Prognose.NuclideData>
• Inventory: <Prognose.InventoryData>
• Source term, user input: <Prognose.STermFromUser>
Version 1.0 (draft
- 69 -
• Source term, further information: <Prognose.STermMoreInfo>
• Source term, sent to ADM in each time step:
<Prognose.STermTStep>
• Meteorology/Dispersion, user input: <Prognose.MeteoFromUser>
• Meteorology/Dispersion information, sent to ADM in each time
step: <Prognose.MeteoTStep>
Installation errors and other fatal errors not coming from the input of
situation data are recorded in the Prognosis run protocol on disk. The
path for the directory is ~rodos/roextern/outall/{user-Id}/{run-Id}, the
file name is {program name}.termlog.

Version 1.0 (draft
- 70 -
Document History
Document Title: User Guide for the Prognosis Models of RODOS PRTY 6.0L
Version and status: Version 1.0 (draft)
Author/Editor: Irmgard Hasemann ([email protected]), Claudia
Landman (Email: [email protected]) and Jürgen
Päsler-Sauer (Email: [email protected])
Address: Forschungszentrum Karlsruhe, Technik und Umwelt, PO Box
3640, D-76021, Karlsruhe, Germany
Issued by: FZK RODOS Team
File Name: ProgGuide_60L.doc
Date of print: November 30, 2007
Distribution: RODOS Homepage