Embed Size (px)
Citation preview
© Copyright Medtech Limited
Page 1 of 24
EMPOWERING HEALTH
User Guide
Medtech32
ACC eSchedule
(July 2016)
These release notes contain important information for Medtech32 users involved with
ACC claiming. Please ensure that they are circulated amongst all relevant staff. We
suggest that they are filed safely for future reference.
© Copyright Medtech Limited
Page 2 of 24
EMPOWERING HEALTH
Table of Contents
Intended Audience 3
ACC eSchedule Functionality 3
INTRODUCTION 3
Workflow diagram 4
ACC Setup Configurations 5
LOCATION SETUP SCREEN 6
TO ASSOCIATE NON-REGULATORY CONTRACTS FOR ACC SERVICES: 7
TO ASSOCIATE REGULATORY CONTRACTS FOR ACC SERVICES: 7
STAFF SETUP SCREEN 9
TO ASSOCIATE NON-REGULATORY CONTRACTS FOR ACC SERVICES: 10
TO ASSOCIATE REGULATORY CONTRACTS FOR ACC SERVICES: 11
ACC ESCHEDULE SWITCHOVER EXE 11
ACC Main Application 12
ELECTRONIC CLAIMS MENU – UTILITIES 12
INVOICE CREATION 12
CLAIMS – PREVIEW AND FINALISE 14
AUTOMATED SETTING UP OF ACC ACCOUNT FOR A VENDOR ID 16
UPLOADING THE CLAIMS THROUGH MESSAGE TRANSFER 18
DISPLAY OF STATUS OF CLAIMS SENT TO ACC 19
PAYMENT ALLOCATION FOR CLAIMS FOR MULTIPLE PROVIDERS 20
PAYMENT ALLOCATION FOR INDIVIDUAL PROVIDER: 20
AUTOMATIC PAYMENT ALLOCATION FOR MULTIPLE PROVIDERS: 21
REPORT GENERATION FOR ACC TRANSFERS ON NEW PAYMENT ALLOCATION 23
© Copyright Medtech Limited
Page 3 of 24
EMPOWERING HEALTH
Intended Audience
This document is targeted towards healthcare professionals involved with claiming
for Accident Compensation Corporation (ACC) services, such as GPs, Nurses,
Physiotherapists and Practice Managers, etc. This User Guide highlights the process of
a new ACC claiming solution known as ACC eSchedule within Medtech32.
ACC eSchedule Functionality
Introduction
Currently ACC Invoice claims are being generated based on providers in the practice.
This involves sending multiple claims to ACC based on providers and not the billing
account for their organisation.
The claim files are sent via HealthLink’s Electronic Data Capture (EDC) service. EDC can
only accept one ACC Identifier (ACC Provider Number) per schedule/claim.
This User Guide highlights the ACC eSchedule solution, which has been developed in
conjunction with ACC.
This new claiming solution will enable the generation of invoices based on the practice
or organisation rather than the providers. This will provide a more flexible solution
when submitting ACC ‘invoice’ claims, allowing multiple payees and contracts to be
differentiated within a healthcare facility with the aim of streamline funding with ACC.
© Copyright Medtech Limited Page 4 of 24
EMPOWERING HEALTH
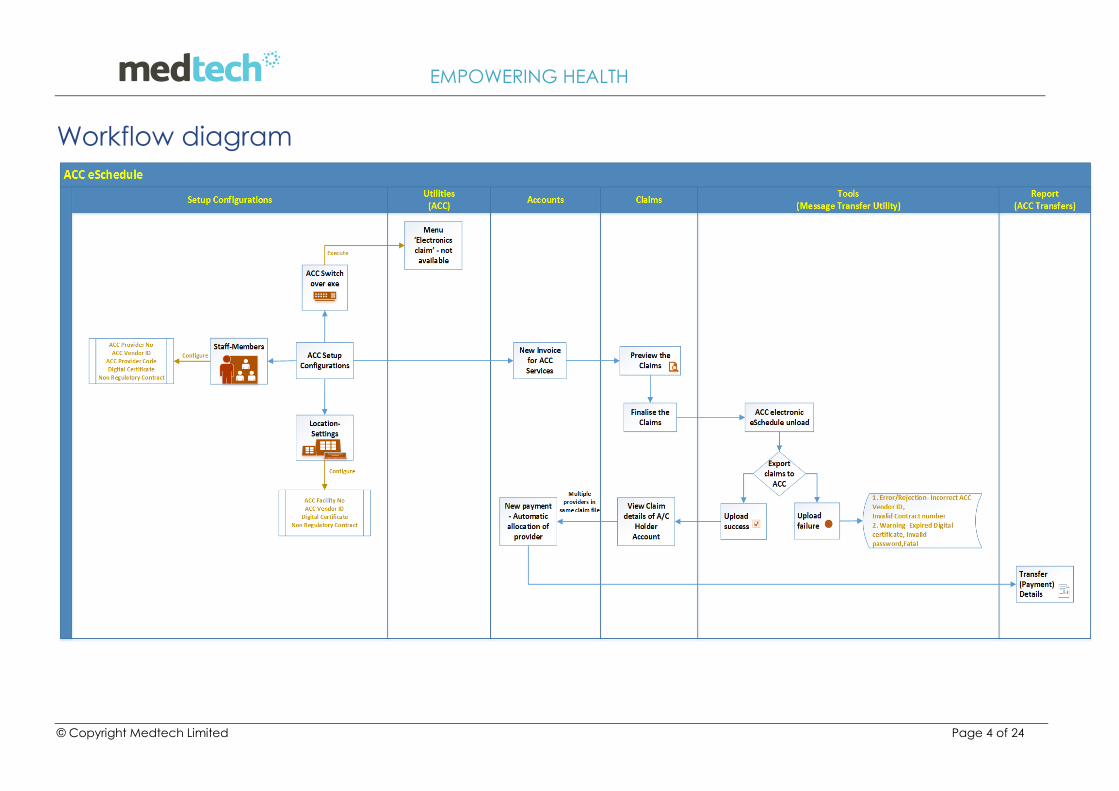
Workflow diagram
© Copyright Medtech Limited Page 5 of 24
EMPOWERING HEALTH
ACC Setup Configurations
During the ACC eSchedule rollout, ACC will provide:
The Digital Certificates via HealthLink
Non-Regulatory Contract Numbers based on the contract your practice or staff has with
ACC
The correct ACC Vendor IDs for each Location (if there are multiple) at the practice
The correct ACC Vendor IDs for individual staff at the practice (if they get paid for the ACC
services directly)
The ACC Facility No for the Location
There are three possible scenarios based on which the practice may receive the above
information:
Scenario 1:
Some practices will only receive ACC Vendor IDs for individual staff. In such cases,
configure the ‘Staff Setup’ and proceed with the ACC eSchedule functionality
activation.
Scenario 2:
Some practices will receive an ACC Vendor ID for the whole organisation or each
location within the organisation will receive different ACC Vendor IDs.
In such cases, configure the ‘Location Setup’ and proceed with the ACC eSchedule
functionality activation.
Scenario 3:
Some practices may receive both ACC Vendor IDs at the Staff and Location levels. In
such cases, configure both the ‘Staff Setup’ and ‘Location Setup’ and proceed with
the ACC eSchedule functionality activation.
The following steps explain how to configure the Staff and Location Setup screens.

© Copyright Medtech Limited Page 6 of 24
EMPOWERING HEALTH
Location Setup Screen
Navigate to Setup ► Location ► Location Settings ► Codes & Defaults tab
Enter the ACC Facility No provided
Enter the ACC Vendor ID provided
Each ACC Vendor ID must be associated with a unique Digital Certificate.
If an ACC Vendor ID is entered without associating the Digital Certificate, then clicking the
‘OK’ button will generate the following message:
If the user tries to associate a Digital Certificate or enter a Non-Regulatory Contract
number in the Contract screen without entering an ACC Vendor ID in the ‘ACC Vendor
ID’ field, the following message will be displayed:
After entering the ACC Vendor ID, click on the Digital Certificate icon to associate a
Digital Certificate to the ACC Vendor ID provided for the Location. A Digital Certificate
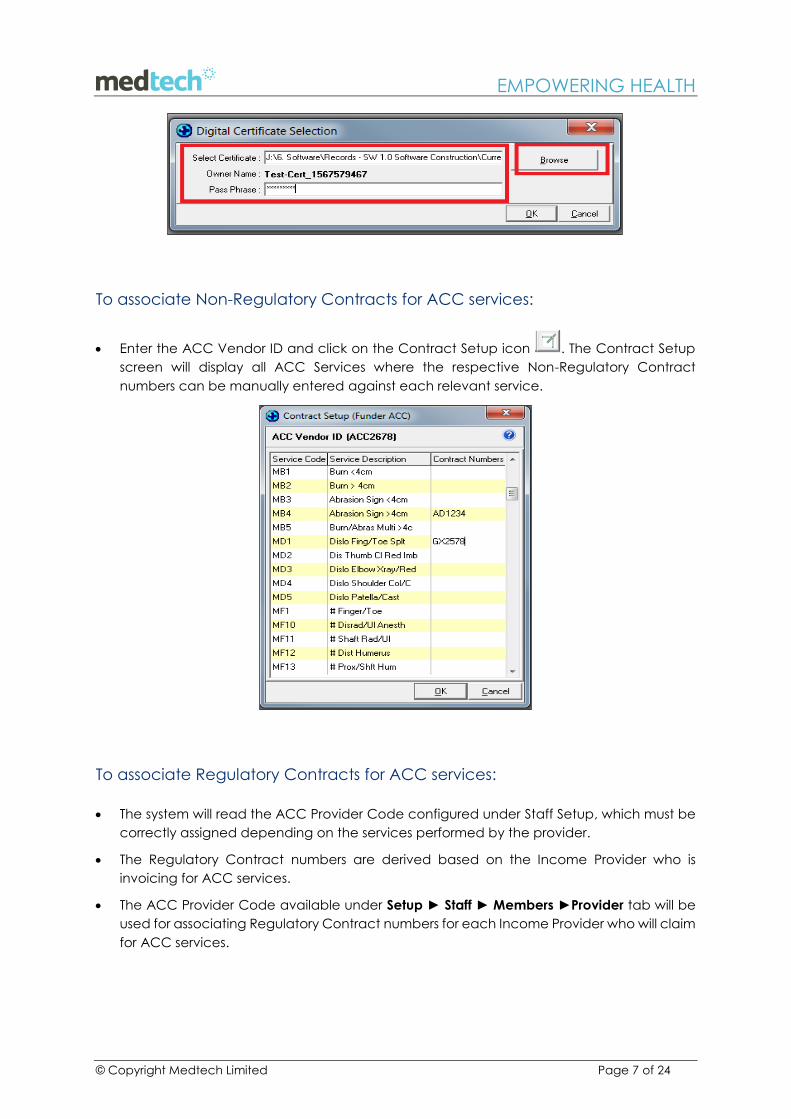
pop up screen will appear. Click the ‘Browse’ button and select the associated Digital
Certificate to be used for ACC eSchedule. Add the correct Pass Phrase for the certificate.
© Copyright Medtech Limited Page 7 of 24
EMPOWERING HEALTH
To associate Non-Regulatory Contracts for ACC services:
Enter the ACC Vendor ID and click on the Contract Setup icon . The Contract Setup
screen will display all ACC Services where the respective Non-Regulatory Contract
numbers can be manually entered against each relevant service.
To associate Regulatory Contracts for ACC services:
The system will read the ACC Provider Code configured under Staff Setup, which must be
correctly assigned depending on the services performed by the provider.
The Regulatory Contract numbers are derived based on the Income Provider who is
invoicing for ACC services.
The ACC Provider Code available under Setup ► Staff ► Members ►Provider tab will be
used for associating Regulatory Contract numbers for each Income Provider who will claim
for ACC services.
© Copyright Medtech Limited Page 8 of 24
EMPOWERING HEALTH
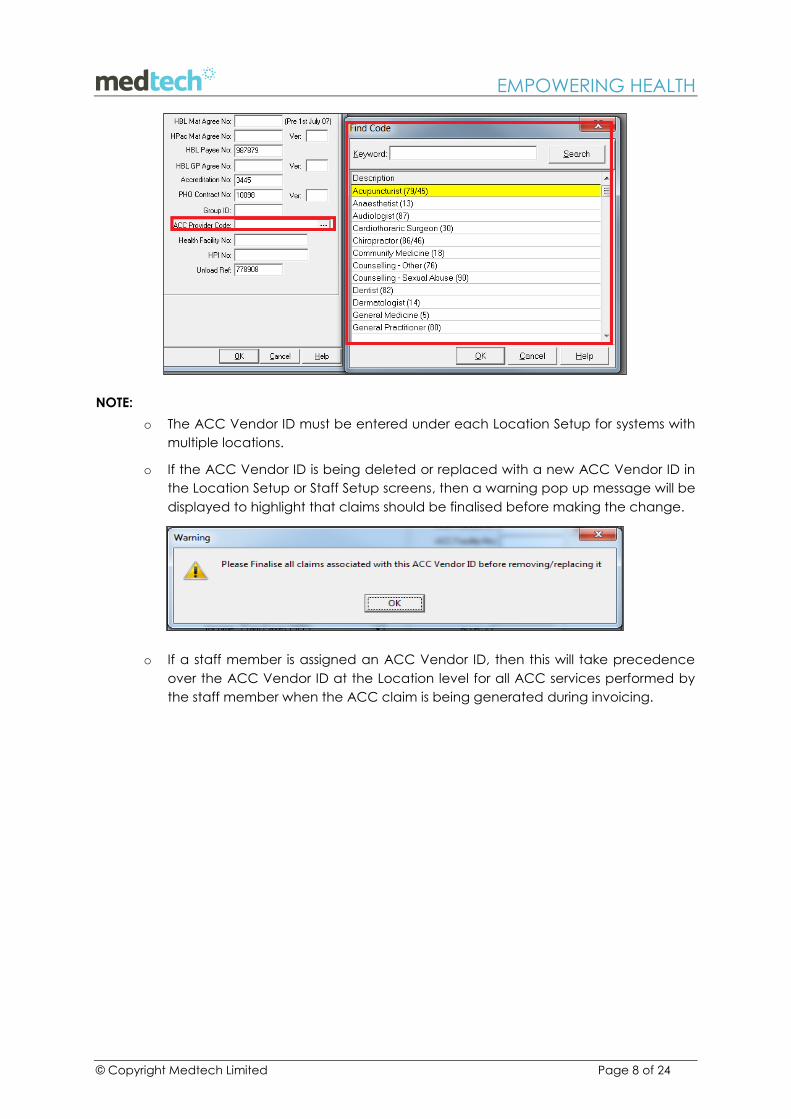
NOTE:
o The ACC Vendor ID must be entered under each Location Setup for systems with
multiple locations.
o If the ACC Vendor ID is being deleted or replaced with a new ACC Vendor ID in
the Location Setup or Staff Setup screens, then a warning pop up message will be
displayed to highlight that claims should be finalised before making the change.
o If a staff member is assigned an ACC Vendor ID, then this will take precedence
over the ACC Vendor ID at the Location level for all ACC services performed by
the staff member when the ACC claim is being generated during invoicing.
© Copyright Medtech Limited Page 9 of 24
EMPOWERING HEALTH
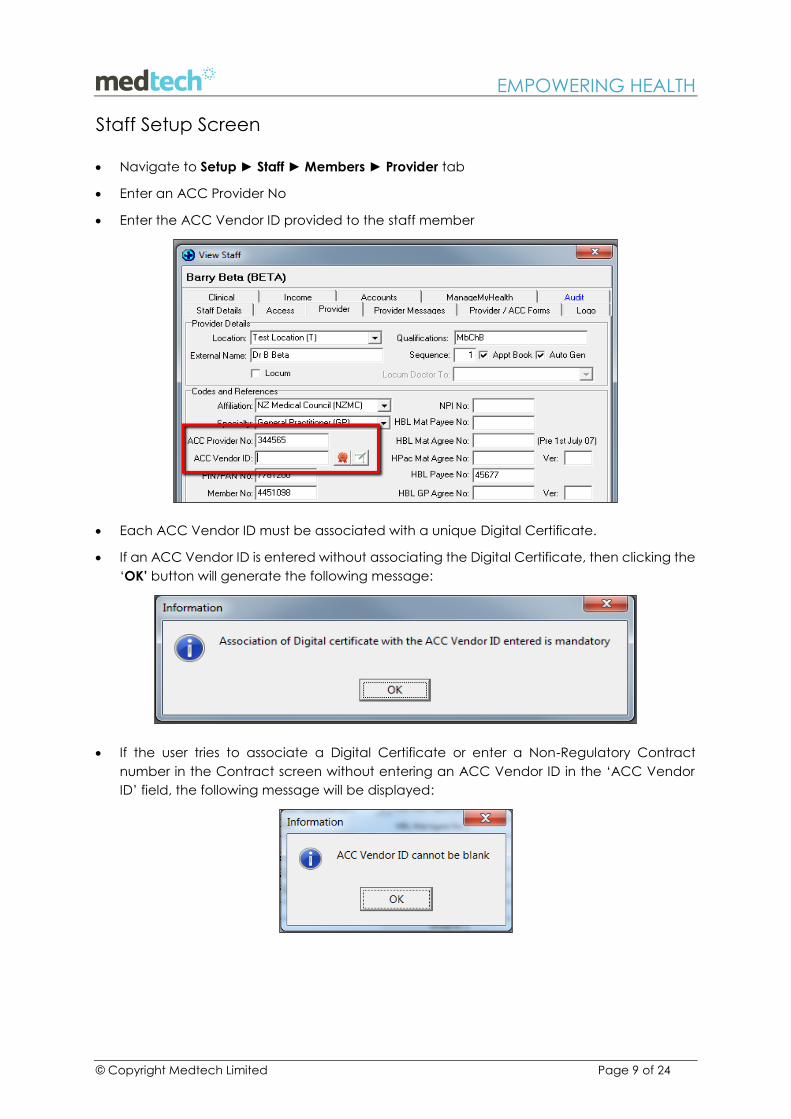
Staff Setup Screen
Navigate to Setup ► Staff ► Members ► Provider tab
Enter an ACC Provider No
Enter the ACC Vendor ID provided to the staff member
Each ACC Vendor ID must be associated with a unique Digital Certificate.
If an ACC Vendor ID is entered without associating the Digital Certificate, then clicking the
‘OK’ button will generate the following message:
If the user tries to associate a Digital Certificate or enter a Non-Regulatory Contract
number in the Contract screen without entering an ACC Vendor ID in the ‘ACC Vendor
ID’ field, the following message will be displayed:
© Copyright Medtech Limited Page 10 of 24
EMPOWERING HEALTH
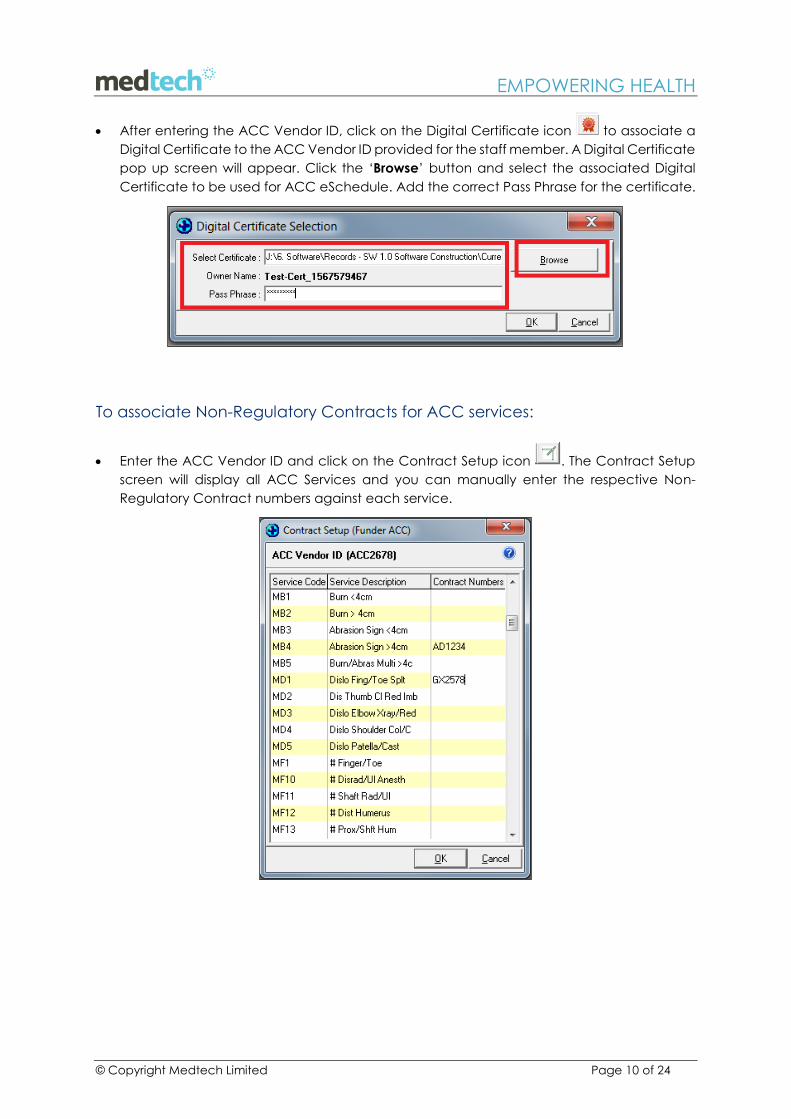
After entering the ACC Vendor ID, click on the Digital Certificate icon to associate a
Digital Certificate to the ACC Vendor ID provided for the staff member. A Digital Certificate
pop up screen will appear. Click the ‘Browse’ button and select the associated Digital
Certificate to be used for ACC eSchedule. Add the correct Pass Phrase for the certificate.
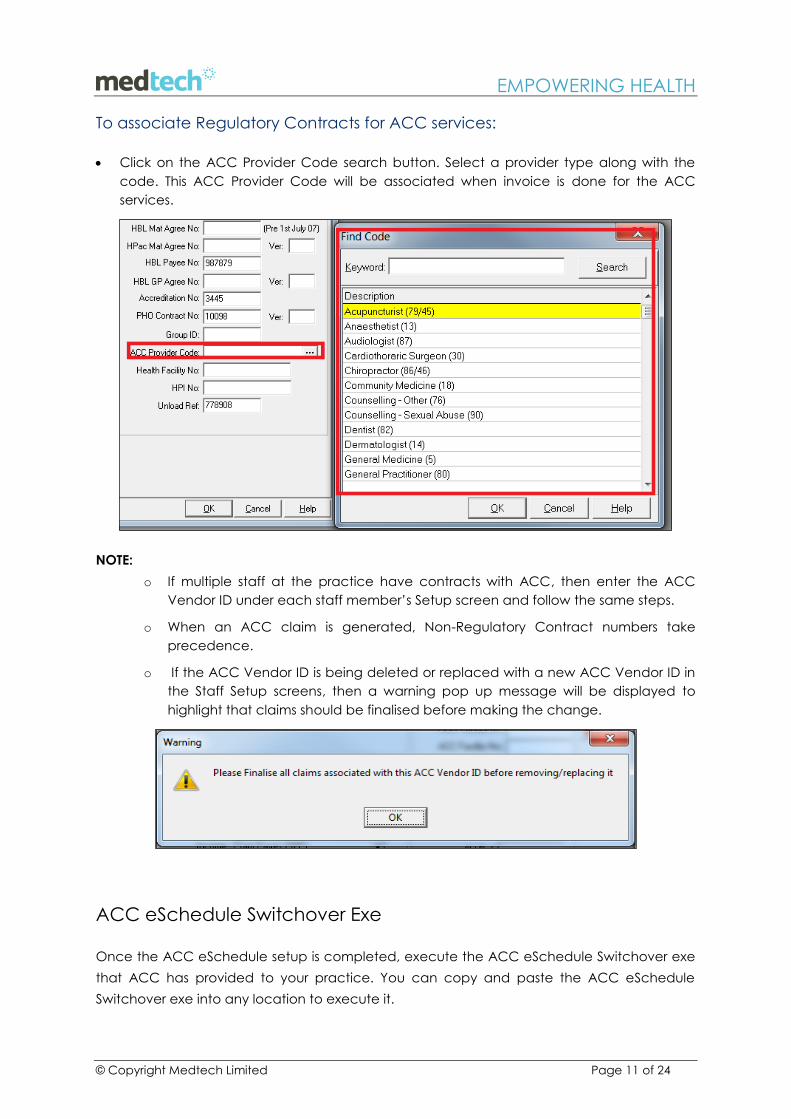
To associate Non-Regulatory Contracts for ACC services:
Enter the ACC Vendor ID and click on the Contract Setup icon . The Contract Setup
screen will display all ACC Services and you can manually enter the respective Non-
Regulatory Contract numbers against each service.
© Copyright Medtech Limited Page 11 of 24
EMPOWERING HEALTH
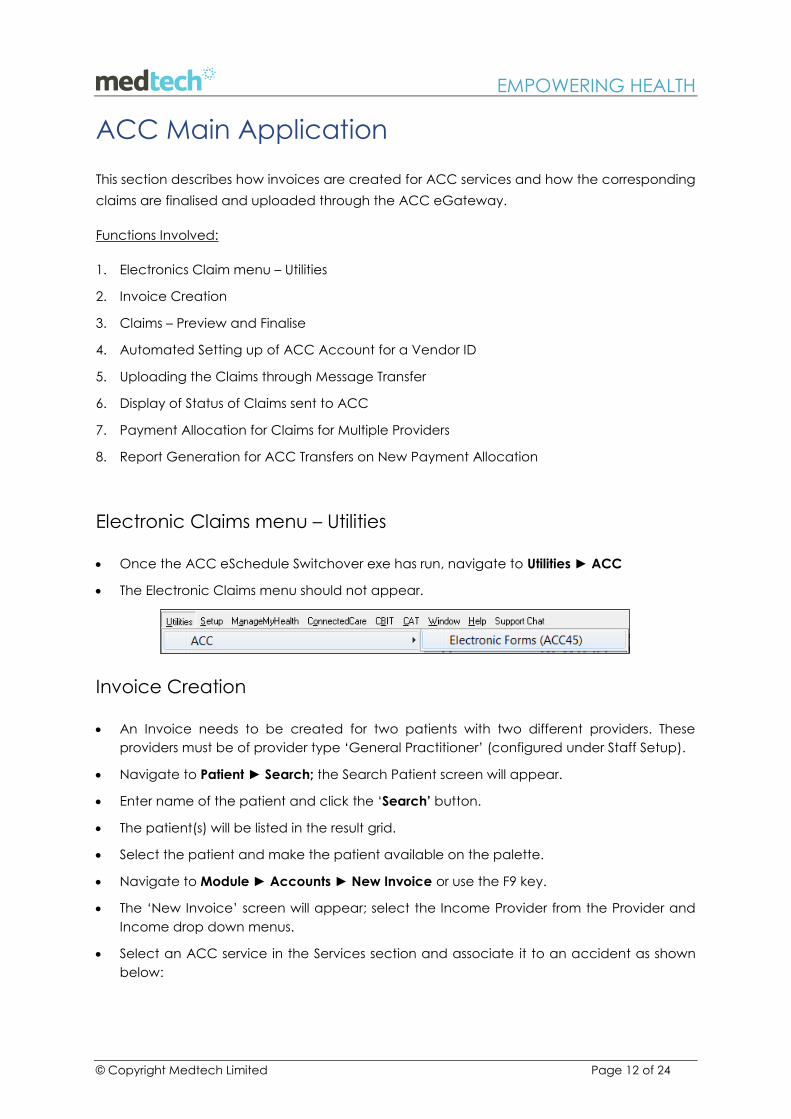
To associate Regulatory Contracts for ACC services:
Click on the ACC Provider Code search button. Select a provider type along with the
code. This ACC Provider Code will be associated when invoice is done for the ACC
services.
NOTE:
o If multiple staff at the practice have contracts with ACC, then enter the ACC
Vendor ID under each staff member’s Setup screen and follow the same steps.
o When an ACC claim is generated, Non-Regulatory Contract numbers take
precedence.
o If the ACC Vendor ID is being deleted or replaced with a new ACC Vendor ID in
the Staff Setup screens, then a warning pop up message will be displayed to
highlight that claims should be finalised before making the change.
ACC eSchedule Switchover Exe
Once the ACC eSchedule setup is completed, execute the ACC eSchedule Switchover exe
that ACC has provided to your practice. You can copy and paste the ACC eSchedule
Switchover exe into any location to execute it.
© Copyright Medtech Limited Page 12 of 24
EMPOWERING HEALTH
ACC Main Application
This section describes how invoices are created for ACC services and how the corresponding
claims are finalised and uploaded through the ACC eGateway.
Functions Involved:
1. Electronics Claim menu – Utilities
2. Invoice Creation
3. Claims – Preview and Finalise
4. Automated Setting up of ACC Account for a Vendor ID
5. Uploading the Claims through Message Transfer
6. Display of Status of Claims sent to ACC
7. Payment Allocation for Claims for Multiple Providers
8. Report Generation for ACC Transfers on New Payment Allocation
Electronic Claims menu – Utilities
Once the ACC eSchedule Switchover exe has run, navigate to Utilities ► ACC
The Electronic Claims menu should not appear.
Invoice Creation
An Invoice needs to be created for two patients with two different providers. These
providers must be of provider type ‘General Practitioner’ (configured under Staff Setup).
Navigate to Patient ► Search; the Search Patient screen will appear.
Enter name of the patient and click the ‘Search’ button.
The patient(s) will be listed in the result grid.
Select the patient and make the patient available on the palette.
Navigate to Module ► Accounts ► New Invoice or use the F9 key.
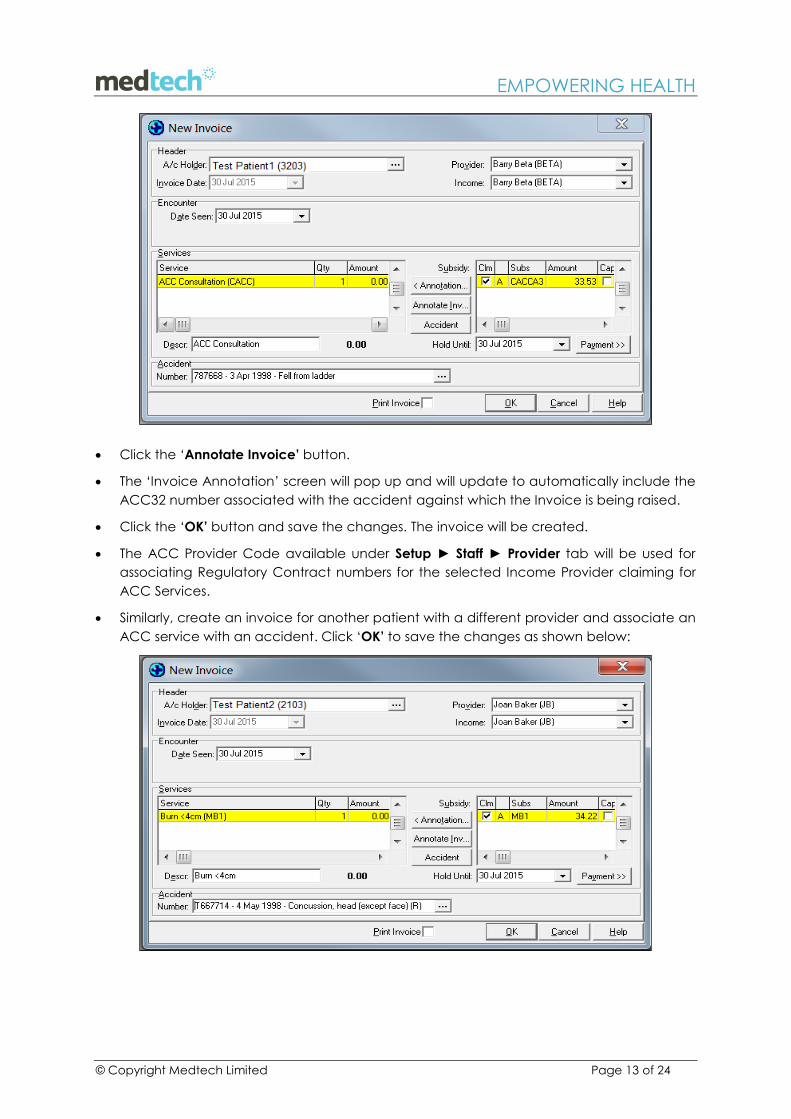
The ‘New Invoice’ screen will appear; select the Income Provider from the Provider and
Income drop down menus.
Select an ACC service in the Services section and associate it to an accident as shown
below:
© Copyright Medtech Limited Page 13 of 24
EMPOWERING HEALTH
Click the ‘Annotate Invoice’ button.
The ‘Invoice Annotation’ screen will pop up and will update to automatically include the
ACC32 number associated with the accident against which the Invoice is being raised.
Click the ‘OK’ button and save the changes. The invoice will be created.
The ACC Provider Code available under Setup ► Staff ► Provider tab will be used for
associating Regulatory Contract numbers for the selected Income Provider claiming for
ACC Services.
Similarly, create an invoice for another patient with a different provider and associate an
ACC service with an accident. Click ‘OK’ to save the changes as shown below:
© Copyright Medtech Limited Page 14 of 24
EMPOWERING HEALTH
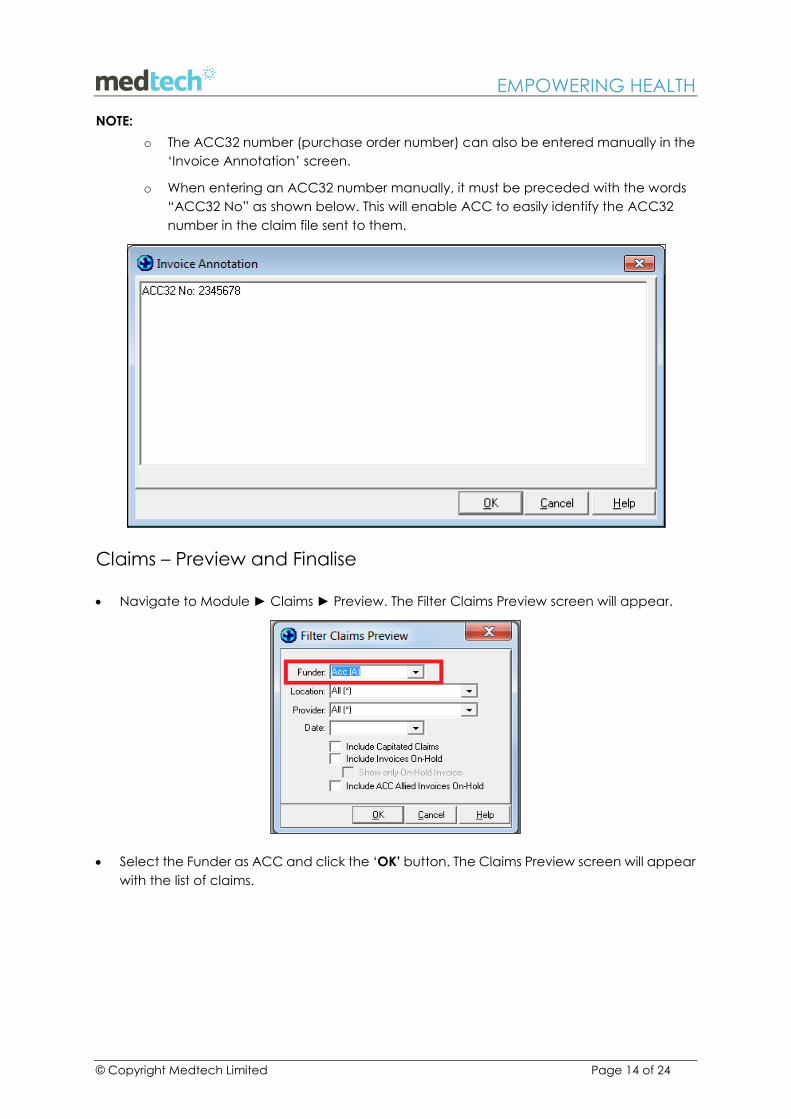
NOTE:
o The ACC32 number (purchase order number) can also be entered manually in the
‘Invoice Annotation’ screen.
o When entering an ACC32 number manually, it must be preceded with the words
“ACC32 No” as shown below. This will enable ACC to easily identify the ACC32
number in the claim file sent to them.
Claims – Preview and Finalise
Navigate to Module ► Claims ► Preview. The Filter Claims Preview screen will appear.
Select the Funder as ACC and click the ‘OK’ button. The Claims Preview screen will appear
with the list of claims.
© Copyright Medtech Limited Page 15 of 24
EMPOWERING HEALTH
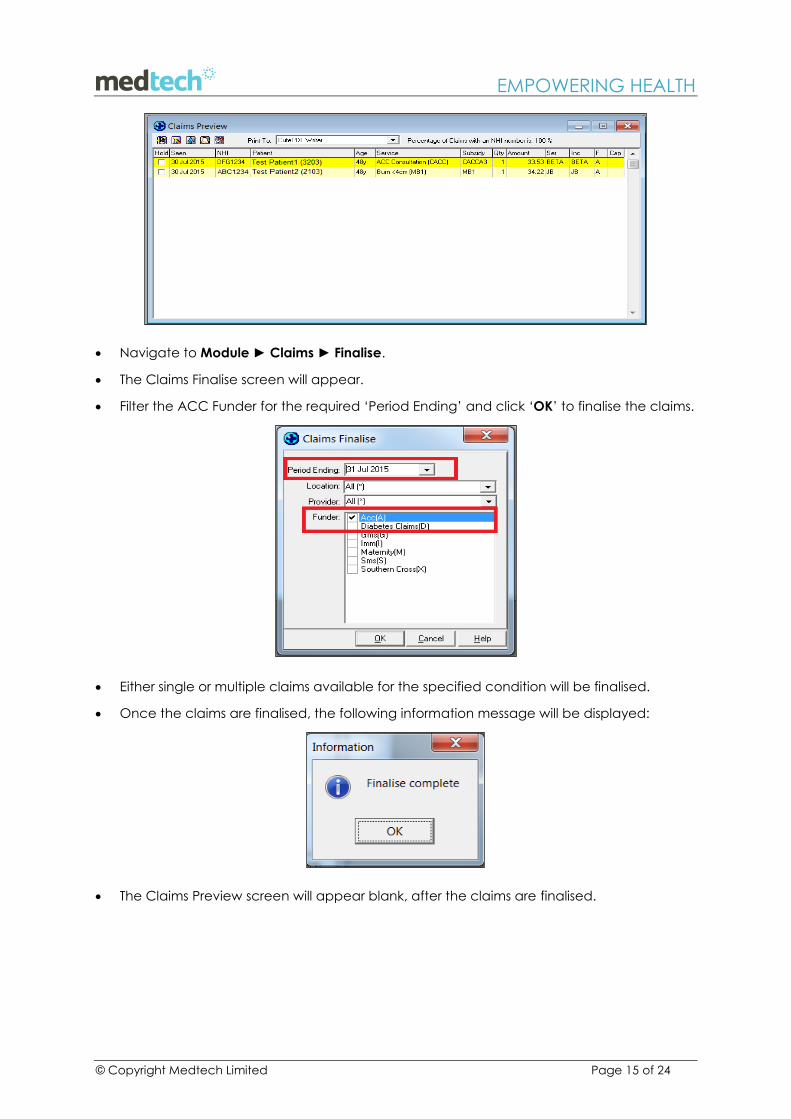
Navigate to Module ► Claims ► Finalise.
The Claims Finalise screen will appear.
Filter the ACC Funder for the required ‘Period Ending’ and click ‘OK’ to finalise the claims.
Either single or multiple claims available for the specified condition will be finalised.
Once the claims are finalised, the following information message will be displayed:
The Claims Preview screen will appear blank, after the claims are finalised.
© Copyright Medtech Limited Page 16 of 24
EMPOWERING HEALTH
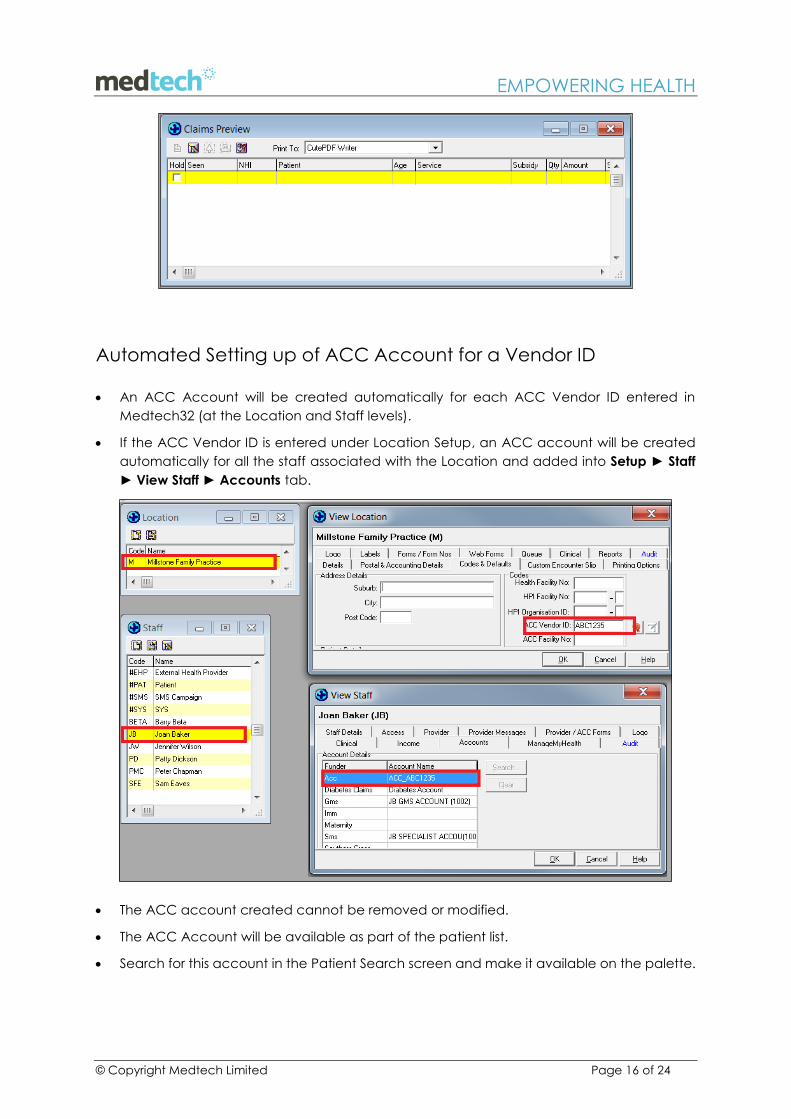
Automated Setting up of ACC Account for a Vendor ID
An ACC Account will be created automatically for each ACC Vendor ID entered in
Medtech32 (at the Location and Staff levels).
If the ACC Vendor ID is entered under Location Setup, an ACC account will be created
automatically for all the staff associated with the Location and added into Setup ► Staff
► View Staff ► Accounts tab.
The ACC account created cannot be removed or modified.
The ACC Account will be available as part of the patient list.
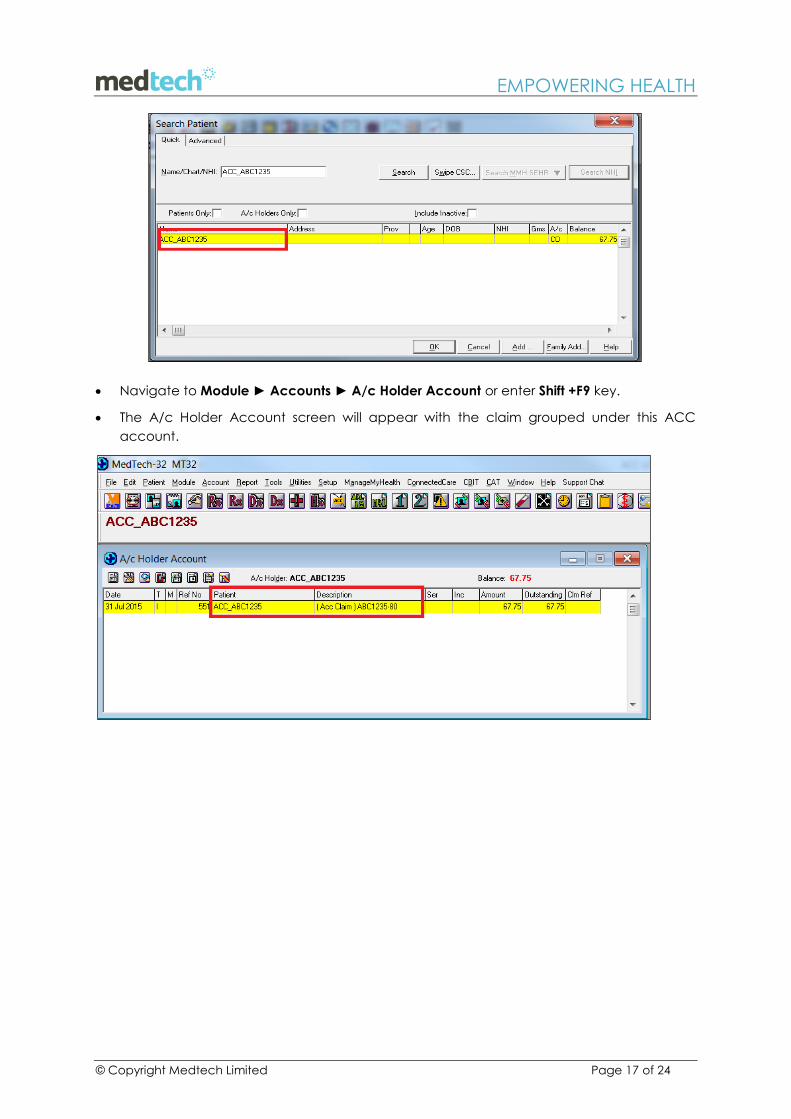
Search for this account in the Patient Search screen and make it available on the palette.
© Copyright Medtech Limited Page 17 of 24
EMPOWERING HEALTH
Navigate to Module ► Accounts ► A/c Holder Account or enter Shift +F9 key.
The A/c Holder Account screen will appear with the claim grouped under this ACC
account.
© Copyright Medtech Limited Page 18 of 24
EMPOWERING HEALTH
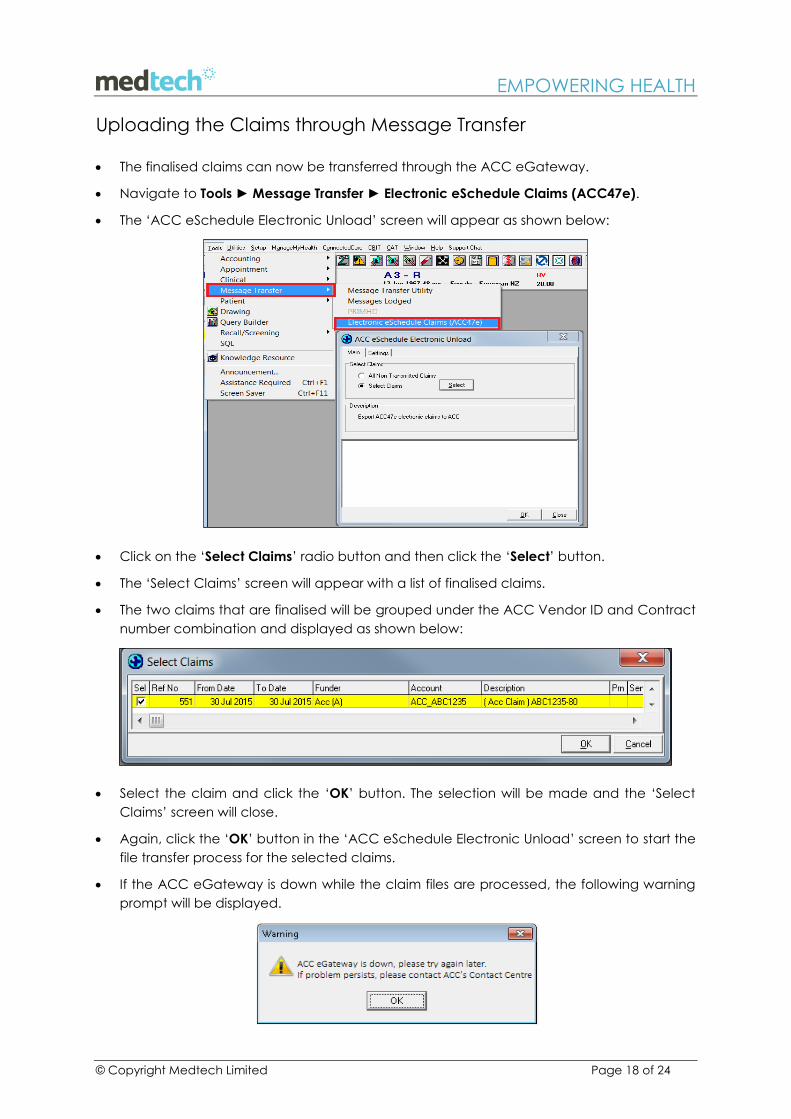
Uploading the Claims through Message Transfer
The finalised claims can now be transferred through the ACC eGateway.
Navigate to Tools ► Message Transfer ► Electronic eSchedule Claims (ACC47e).
The ‘ACC eSchedule Electronic Unload’ screen will appear as shown below:
Click on the ‘Select Claims’ radio button and then click the ‘Select’ button.
The ‘Select Claims’ screen will appear with a list of finalised claims.
The two claims that are finalised will be grouped under the ACC Vendor ID and Contract
number combination and displayed as shown below:
Select the claim and click the ‘OK’ button. The selection will be made and the ‘Select
Claims’ screen will close.
Again, click the ‘OK’ button in the ‘ACC eSchedule Electronic Unload’ screen to start the
file transfer process for the selected claims.
If the ACC eGateway is down while the claim files are processed, the following warning
prompt will be displayed.
© Copyright Medtech Limited Page 19 of 24
EMPOWERING HEALTH
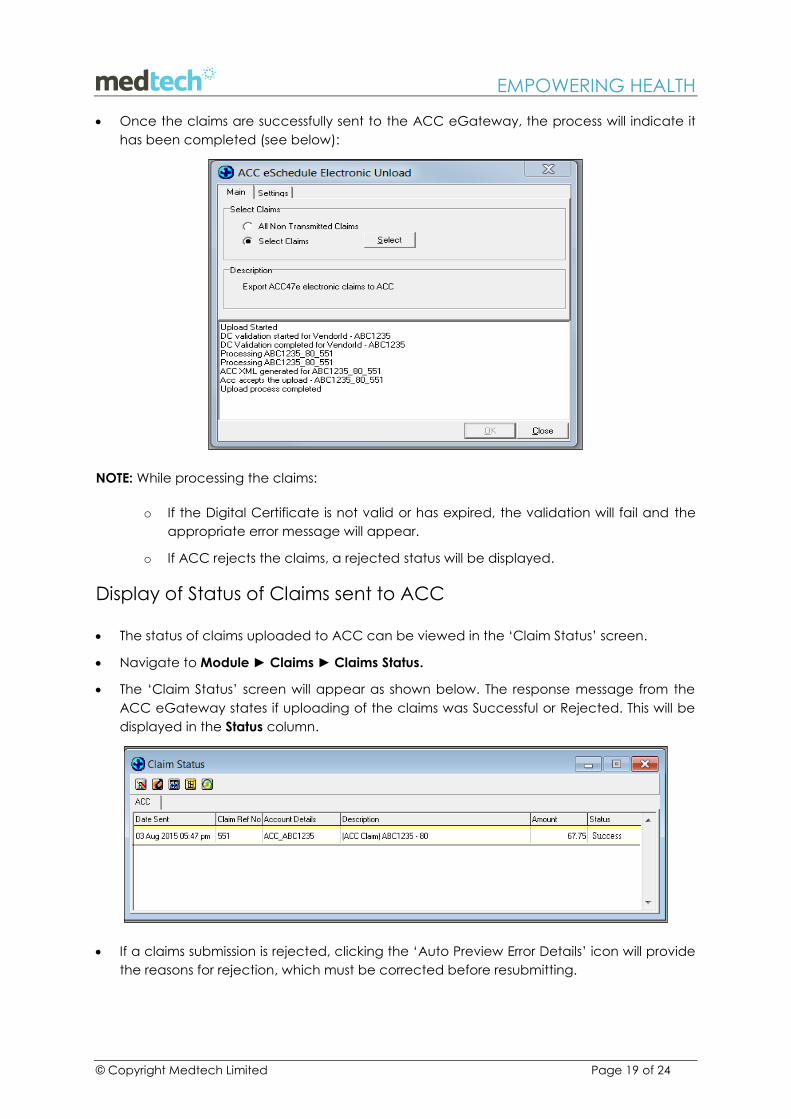
Once the claims are successfully sent to the ACC eGateway, the process will indicate it
has been completed (see below):
NOTE: While processing the claims:
o If the Digital Certificate is not valid or has expired, the validation will fail and the
appropriate error message will appear.
o If ACC rejects the claims, a rejected status will be displayed.
Display of Status of Claims sent to ACC
The status of claims uploaded to ACC can be viewed in the ‘Claim Status’ screen.
Navigate to Module ► Claims ► Claims Status.
The ‘Claim Status’ screen will appear as shown below. The response message from the
ACC eGateway states if uploading of the claims was Successful or Rejected. This will be
displayed in the Status column.
If a claims submission is rejected, clicking the ‘Auto Preview Error Details’ icon will provide
the reasons for rejection, which must be corrected before resubmitting.
© Copyright Medtech Limited Page 20 of 24
EMPOWERING HEALTH
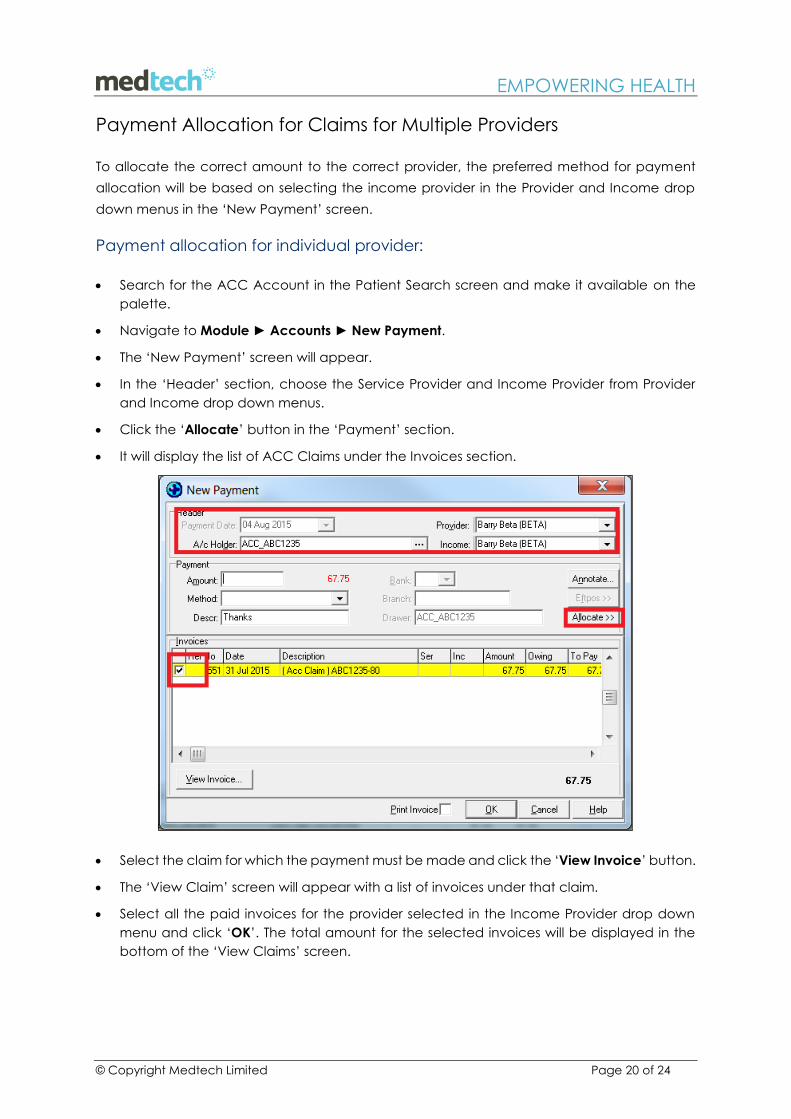
Payment Allocation for Claims for Multiple Providers
To allocate the correct amount to the correct provider, the preferred method for payment
allocation will be based on selecting the income provider in the Provider and Income drop
down menus in the ‘New Payment’ screen.
Payment allocation for individual provider:
Search for the ACC Account in the Patient Search screen and make it available on the
palette.
Navigate to Module ► Accounts ► New Payment.
The ‘New Payment’ screen will appear.
In the ‘Header’ section, choose the Service Provider and Income Provider from Provider
and Income drop down menus.
Click the ‘Allocate’ button in the ‘Payment’ section.
It will display the list of ACC Claims under the Invoices section.
Select the claim for which the payment must be made and click the ‘View Invoice’ button.
The ‘View Claim’ screen will appear with a list of invoices under that claim.
Select all the paid invoices for the provider selected in the Income Provider drop down
menu and click ‘OK’. The total amount for the selected invoices will be displayed in the
bottom of the ‘View Claims’ screen.
© Copyright Medtech Limited Page 21 of 24
EMPOWERING HEALTH
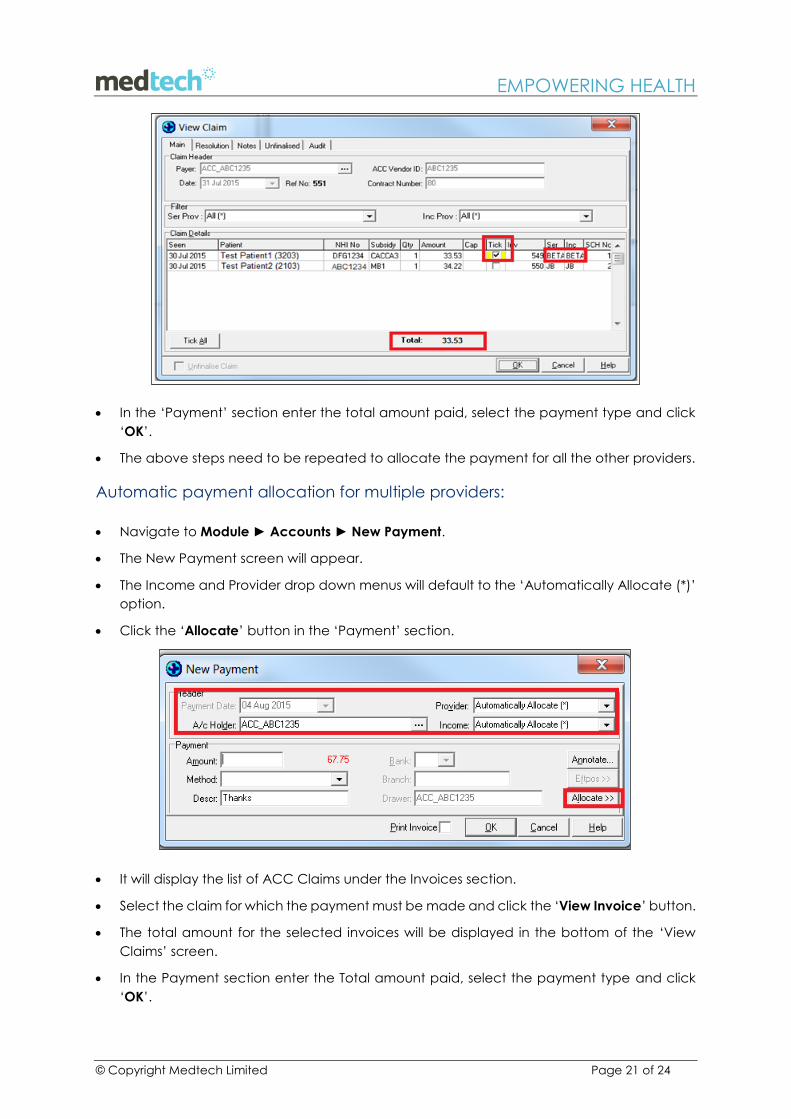
In the ‘Payment’ section enter the total amount paid, select the payment type and click
‘OK’.
The above steps need to be repeated to allocate the payment for all the other providers.
Automatic payment allocation for multiple providers:
Navigate to Module ► Accounts ► New Payment.
The New Payment screen will appear.
The Income and Provider drop down menus will default to the ‘Automatically Allocate (*)’
option.
Click the ‘Allocate’ button in the ‘Payment’ section.
It will display the list of ACC Claims under the Invoices section.
Select the claim for which the payment must be made and click the ‘View Invoice’ button.
The total amount for the selected invoices will be displayed in the bottom of the ‘View
Claims’ screen.
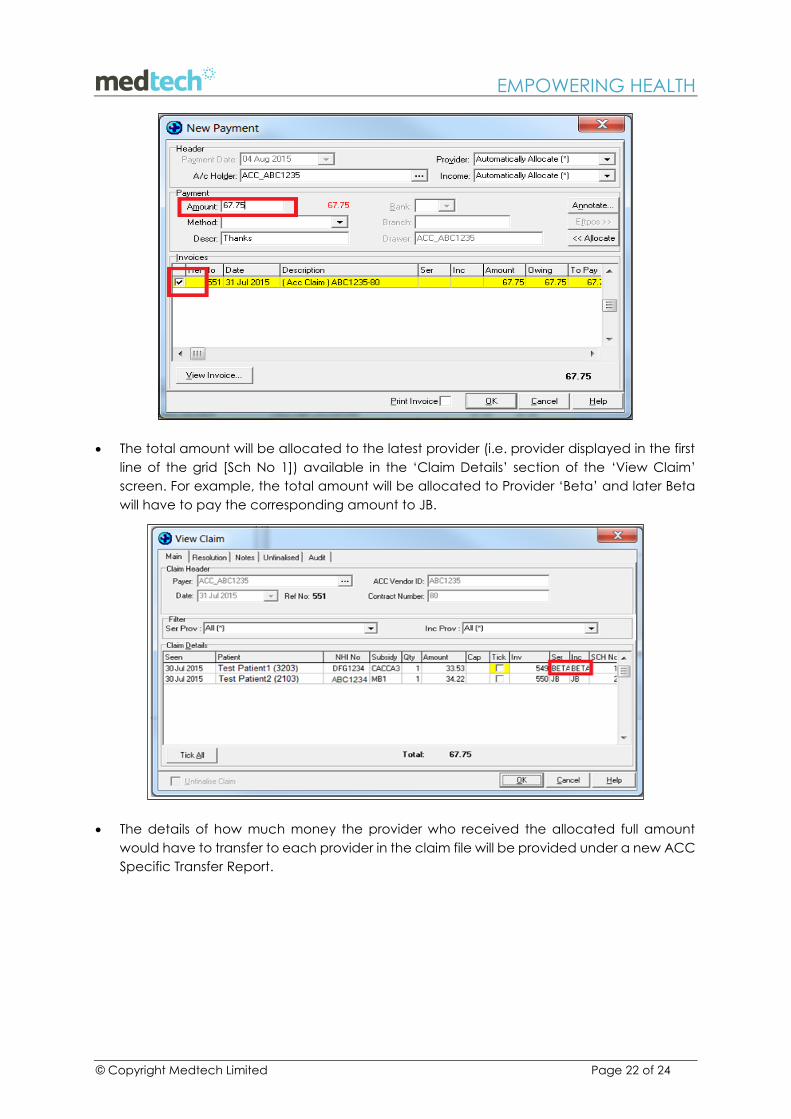
In the Payment section enter the Total amount paid, select the payment type and click
‘OK’.
© Copyright Medtech Limited Page 22 of 24
EMPOWERING HEALTH
The total amount will be allocated to the latest provider (i.e. provider displayed in the first
line of the grid [Sch No 1]) available in the ‘Claim Details’ section of the ‘View Claim’
screen. For example, the total amount will be allocated to Provider ‘Beta’ and later Beta
will have to pay the corresponding amount to JB.
The details of how much money the provider who received the allocated full amount
would have to transfer to each provider in the claim file will be provided under a new ACC
Specific Transfer Report.
© Copyright Medtech Limited Page 23 of 24
EMPOWERING HEALTH
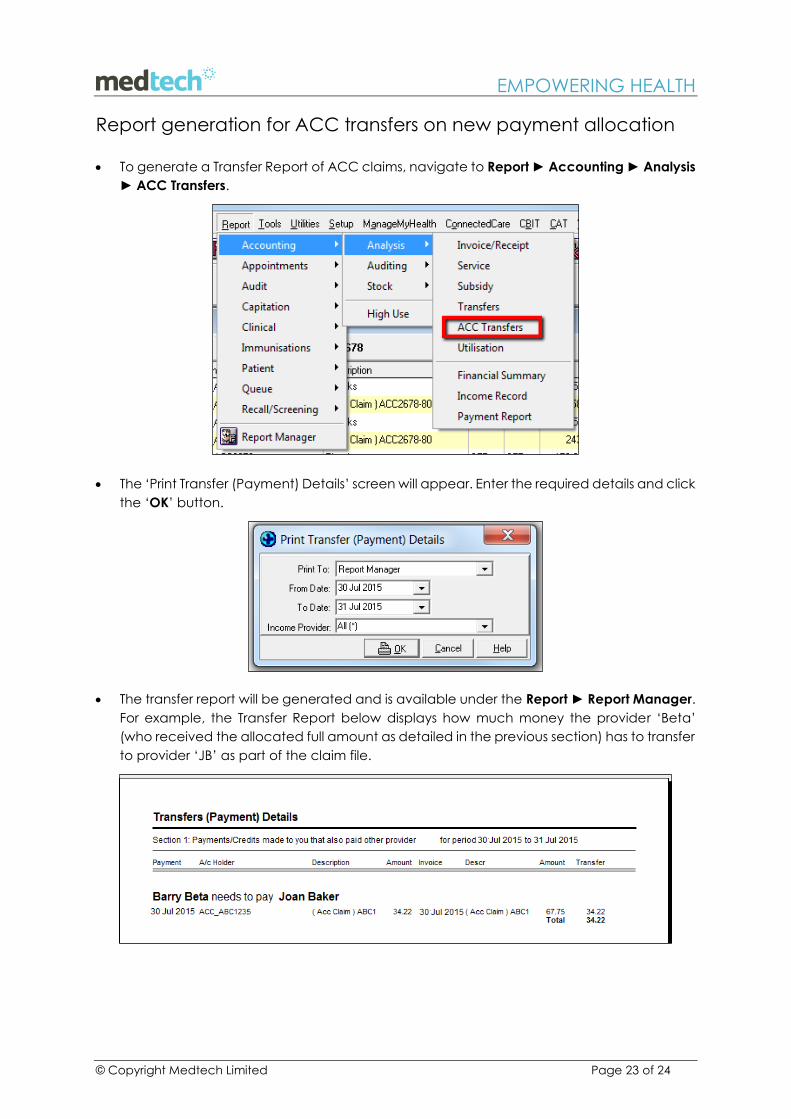
Report generation for ACC transfers on new payment allocation
To generate a Transfer Report of ACC claims, navigate to Report ► Accounting ► Analysis
► ACC Transfers.
The ‘Print Transfer (Payment) Details’ screen will appear. Enter the required details and click
the ‘OK’ button.
The transfer report will be generated and is available under the Report ► Report Manager.
For example, the Transfer Report below displays how much money the provider ‘Beta’
(who received the allocated full amount as detailed in the previous section) has to transfer
to provider ‘JB’ as part of the claim file.

© Copyright Medtech Limited Page 24 of 24
EMPOWERING HEALTH
For further information, or any other queries regarding the changes in this user guide, please
contact Medtech Support via one of the following options:
Medtech32 application [Help ► Contact Support]
Online Chat: www.medtechglobal.com
Email: [email protected]
Phone: 0800 2 MEDTECH (633 832)