Embed Size (px)
Citation preview
User guide
Xperia™ XZ1G8341/G8343
Contents
Getting started.............................................................................. 6About this User guide.......................................................................6Overview........................................................................................... 7Assembly...........................................................................................8Screen Protection..............................................................................8Starting Your Device for the First Time.............................................9Why do I need a Google account?................................................... 9
Device security............................................................................. 11Ensuring your device is protected................................................... 11Screen lock....................................................................................... 11Fingerprint Manager........................................................................12Unlocking your device automatically..............................................13SIM Card Protection......................................................................... 13Finding the IMEI number of your device........................................ 14Finding a lost device using Find my device.................................... 15Using Location Services...................................................................15
Learning the basics...................................................................... 17Using the touchscreen.....................................................................17Locking and unlocking the screen................................................. 20Home screen...................................................................................20Application screen.......................................................................... 22Shortcuts for easy actions.............................................................. 23Navigating Applications..................................................................24Widgets........................................................................................... 25Shortcuts and folders......................................................................26Background and Themes................................................................27Taking a screenshot........................................................................ 27Notifications.................................................................................... 28Icons in the status bar.................................................................... 30Applications overview.....................................................................32
Battery and Maintenance........................................................... 34Charging your device......................................................................34Battery and power management................................................... 35Updating your device......................................................................37Maintenance Using a Computer.....................................................38Storage and memory......................................................................40Backing Up and Restoring Content.................................................41
Downloading applications..........................................................44Downloading applications from Google Play™.............................44
2
Downloading Applications from Other Sources............................ 44
Internet and networks.................................................................45Browsing the web...........................................................................45Internet and MMS settings ............................................................ 45Wi-Fi................................................................................................ 46Sharing your cellular data connection........................................... 48Controlling Data Usage...................................................................50Selecting cellular networks.............................................................50
Synchronizing data on your device............................................ 52Synchronizing with Online Accounts..............................................52Synchronizing with Microsoft® Exchange ActiveSync®.................. 52
Basic settings.............................................................................. 54Accessing settings.......................................................................... 54Volume settings.............................................................................. 54Do Not Disturb Mode...................................................................... 55Screen settings................................................................................56Application settings........................................................................ 57Resetting Your Applications........................................................... 58Screen Saver....................................................................................59Language Settings..........................................................................59Date and time................................................................................. 60X-Reality™ for mobile.....................................................................60Color gamut and contrast...............................................................60Enhancing the Sound Output.........................................................60Noise cancellation........................................................................... 61Multiple User Accounts...................................................................62
Typing text...................................................................................64On-Screen Keyboards..................................................................... 64Editing text......................................................................................65Auto-fill........................................................................................... 65
Calling..........................................................................................66Making calls.................................................................................... 66Receiving Calls.................................................................................67Smart call handling.........................................................................68Blocking calls and messages..........................................................68
Contacts.......................................................................................70Adding and editing contacts.......................................................... 70Grouping contacts........................................................................... 71Transferring contacts....................................................................... 71Backing up Contacts....................................................................... 72
Messaging and chat.................................................................... 73Reading and sending messages.................................................... 73
3
Messaging settings......................................................................... 74Video Chat....................................................................................... 74Setting Up Email..............................................................................75
Music............................................................................................76Transferring music to your device.................................................. 76Listening to music...........................................................................76
Camera.........................................................................................79Getting to know your camera.........................................................79Exposure, color, and light conditions.............................................82Setting the right focus.................................................................... 85People, selfies, and smiling faces.................................................. 85Moving objects............................................................................... 86Using camera apps......................................................................... 88Resolution and memory.................................................................89Diagnosing your camera................................................................. 91Additional camera settings............................................................. 91
Photos and videos in Album.......................................................94Viewing photos and videos............................................................94Album home screen menu.............................................................95Sharing and managing photos and videos....................................96Hiding photos and videos...............................................................97
Connectivity.................................................................................98Mirroring the Screen of Your Device Wirelessly on a TV................98Connecting Your Device to USB Accessories................................. 98Near Field Communication (NFC)................................................... 98Bluetooth® wireless technology................................................... 100
Smart Apps and Features That Save You Time......................... 103Google Feed.................................................................................. 103Using your Device as a Wallet....................................................... 103Xperia™ Actions............................................................................ 103
Clock and Calendar....................................................................105Calendar........................................................................................ 105Clock.............................................................................................. 105
Accessibility............................................................................... 108Magnification................................................................................ 108Font size........................................................................................ 108Color Correction.............................................................................108TalkBack.........................................................................................108Mono Audio...................................................................................109Switch Access................................................................................ 109
4
Support and Legal......................................................................110Support application....................................................................... 110Restarting, Resetting, and Repairing............................................ 110Warranty, SAR, and usage guidelines............................................ 111Legal information........................................................................... 111
5
Getting started
About this User guideThis is the Xperia™ XZ1 User guide for the Android™ 8.0 software version. If you'renot sure which software version your device is running, you can check it in theSettings menu.
System and application updates can present the features in your device in another way thandescribed in this User guide. The Android version might not be affected in an update. Formore information about software updates, see Updating your device on page 37.
To check the current software version of your device• Find and tap Settings > System > About phone.
The current software version is displayed under Build number.
To find the model number of your device• Find and tap Settings > System > About phone.
The device model number is displayed under Model.
Limitations to Services and FeaturesSome of the services and features described in this User Guide may not besupported in all countries or regions, or by all networks or service providers. TheGSM International Emergency Number can always be used in all countries, regions,networks and by all service providers, provided that the device is connected to thecellphone network. Please contact your network operator or service provider todetermine the availability of any specific service or feature and whether additionalaccess or usage fees apply.
The use of certain features and applications described in this guide may requireaccess to the internet. You may incur data connection charges when you connectto the internet with your device. Contact your wireless service provider for moreinformation.
6
This is an internet version of this publication. © Print only for private use.
Overview
7
This is an internet version of this publication. © Print only for private use.
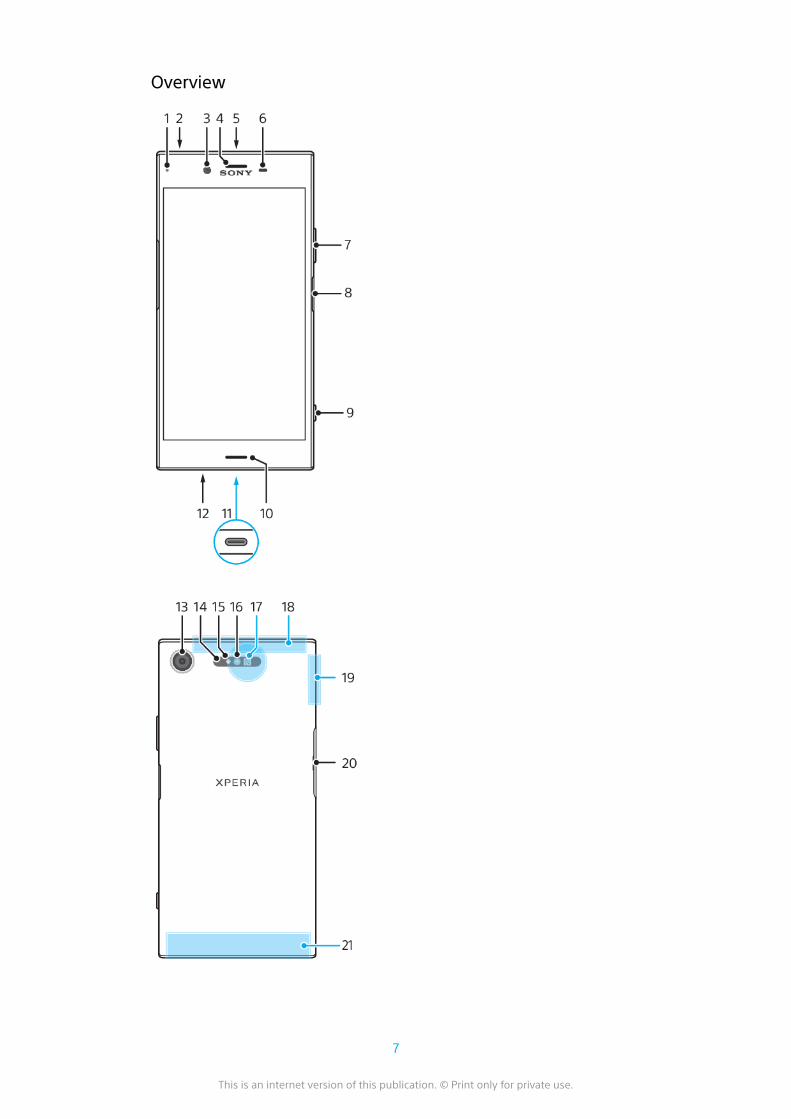
1. Charging/Notification light
2. Headset jack
3. Front camera lens
4. Ear speaker/Second loudspeaker
5. Second microphone
6. Proximity/Light sensor
7. Volume/Zoom key
8. Power key/Fingerprint sensor
9. Camera key
10. Main loudspeaker
11. Charger/USB Type-C™ cable port
12. Main microphone
13. Camera lens
14. Laser AF sensor
15. RGBC-IR sensor
16. Flash LED
17. NFC detection area
18. GPS antenna
19. Wi-Fi/Bluetooth® antenna area
20. Nano SIM/Memory card slot cover
21. Main cellular antenna area
Fingerprint functionality is not available in the US market.
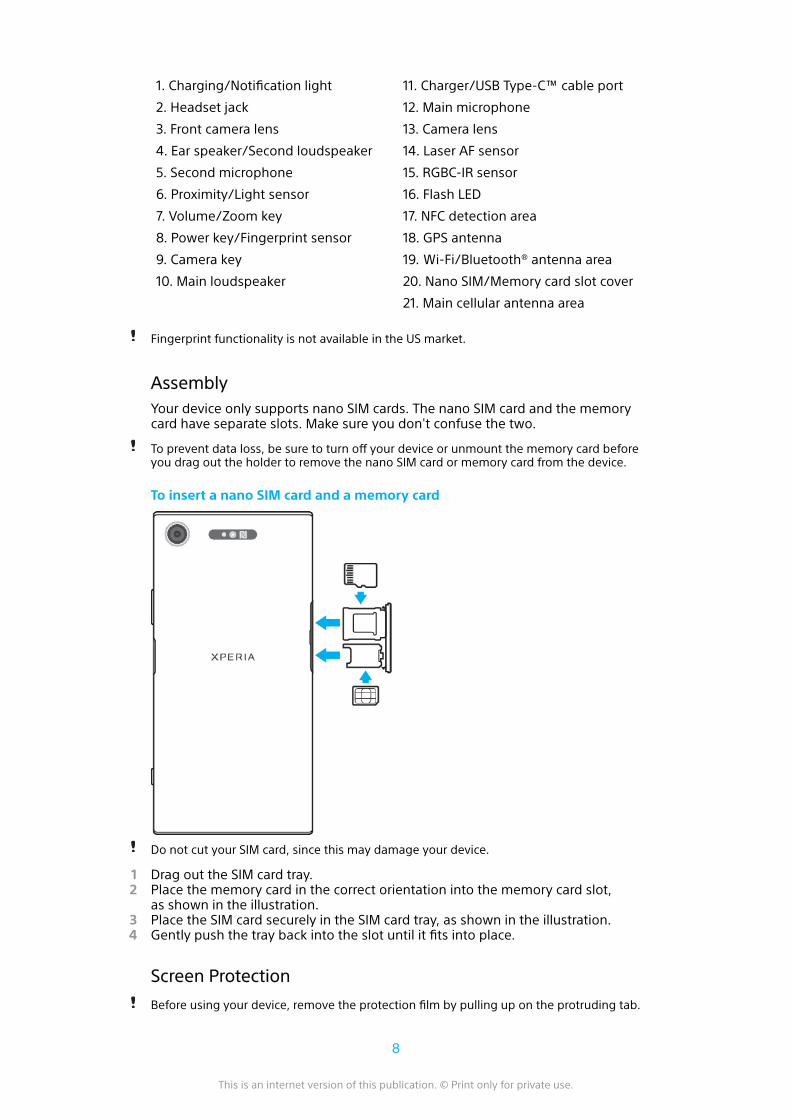
AssemblyYour device only supports nano SIM cards. The nano SIM card and the memorycard have separate slots. Make sure you don't confuse the two.
To prevent data loss, be sure to turn off your device or unmount the memory card beforeyou drag out the holder to remove the nano SIM card or memory card from the device.
To insert a nano SIM card and a memory card
Do not cut your SIM card, since this may damage your device.
1 Drag out the SIM card tray.2 Place the memory card in the correct orientation into the memory card slot,
as shown in the illustration.3 Place the SIM card securely in the SIM card tray, as shown in the illustration.4 Gently push the tray back into the slot until it fits into place.
Screen Protection
Before using your device, remove the protection film by pulling up on the protruding tab.
8
This is an internet version of this publication. © Print only for private use.

Screen covers and protectors may help you to protect your device against damage.We recommend that you use only those screen covers intended for your Xperia™device. The use of third-party screen protection accessories may prevent yourdevice from working correctly by covering sensors, lenses, speakers, ormicrophones, and can invalidate the warranty.
Starting Your Device for the First TimeIt is recommended that you charge the battery for at least 30 minutes beforestarting up your device for the first time. You can still use your device while it ischarging. For more information on charging, see Charging your device onpage 34.
The first time you start your device, a setup guide helps you to configure basicsettings, personalize your device, and sign in to your accounts, for example aGoogle™ account.
To turn on your device
It is important to use the USB Type-C cable provided when charging your device, since othertypes of USB cables can damage your device. It is recommended to charge the battery for atleast 30 minutes before you turn on your device for the first time.
1 Press and hold down the power key until your device vibrates.2 Enter your SIM card PIN when requested, then tap .3 Wait a moment for your device to start.
Your SIM card PIN is initially supplied by your service provider, but you can change it laterfrom the Settings menu. To correct a mistake made while entering your SIM card PIN, tap
.
To Turn off the Device
1 Press and hold down the power key until the options menu opens.2 In the options menu, tap Power off.
It may take a while for the device to shut down.
Why do I need a Google account?Your Xperia™ device from Sony runs on the Android™ platform developed byGoogle. A range of Google applications and services are available on your devicewhen you purchase it, for example, Gmail™, Google Maps™, YouTube™, and thePlay Store™ application, which gives you access to the Google Play™ online storefor downloading Android applications. To get the most out of these services, youneed a Google account. For example, a Google account enables you to do thefollowing:
• Download and install applications from Google Play.• Synchronize your email, contacts and calendar using Gmail.• Chat with friends using the Duo™ application.• Synchronize your browsing history and bookmarks using the Google Chrome™
web browser.• Identify yourself as the authorized user after a software repair using Xperia™
Companion.• Remotely find, lock or clear a lost or stolen device using the Find my device
services.
For more information about Android and Google, go tohttp://support.google.com.
It is crucial that you remember your Google account username and password. In somesituations, you may need to identify yourself for security reasons using your Googleaccount. If you fail to give your Google username and password in such situations, yourdevice is locked. Also, if you have more than one Google account, be sure to enter thedetails for the relevant account.
9
This is an internet version of this publication. © Print only for private use.
To set up a Google account on your device
1 Find and tap Settings > Users & accounts > Add account > Google.2 Follow the on-screen instructions to create a Google account, or sign in if
you already have an account.
You can also create a Google account using the setup guide when you first start yourdevice, or go online later and create an account at http://www.google.com/accounts.
To remove a Google account
1 Find and tap Settings > Users & accounts.2 Select the Google account that you want to remove.3 Tap REMOVE ACCOUNT.4 Tap REMOVE ACCOUNT again to confirm.
If you remove your Google account, any security features that are linked to your Googleaccount will no longer be available.
10
This is an internet version of this publication. © Print only for private use.
Device security
Ensuring your device is protectedYour device includes security options—strongly recommended in case of loss ortheft:
• Set a secure screen lock on your device using a PIN, password, or pattern toprevent anyone from accessing or resetting your device.
• Add a Google account to prevent others from using your device if it gets stolen orwiped.
• Activate the Find my device web service. Using this service, you can remotelylocate, lock, or clear a lost device.
Verifying the ownership of your deviceCertain protection features require you to either unlock your screen with your PIN,password, or pattern, or enter your Google™ account information. Below areexamples of protection features and their required credentials:
Factory data resetprotection
You must unlock your screen before you are allowed to performa Factory Data Reset.
Find my device If you remotely reset your device using this service, you mustenter the username and password for a Google account. Thedevice must be connected to the internet before the setupprocess can be completed. Otherwise, you will not be able to useyour device after the reset.
Xperia™Companionsoftware repair
You must enter your Google account username and passwordwhen you start the device after the repair is complete.
For Find my device, it is necessary to enter information from a Google account. This can beany Google account that you have set up on the device as an owner. If you cannot providethe relevant account information during a setup process, you won't be able to use thedevice at all.
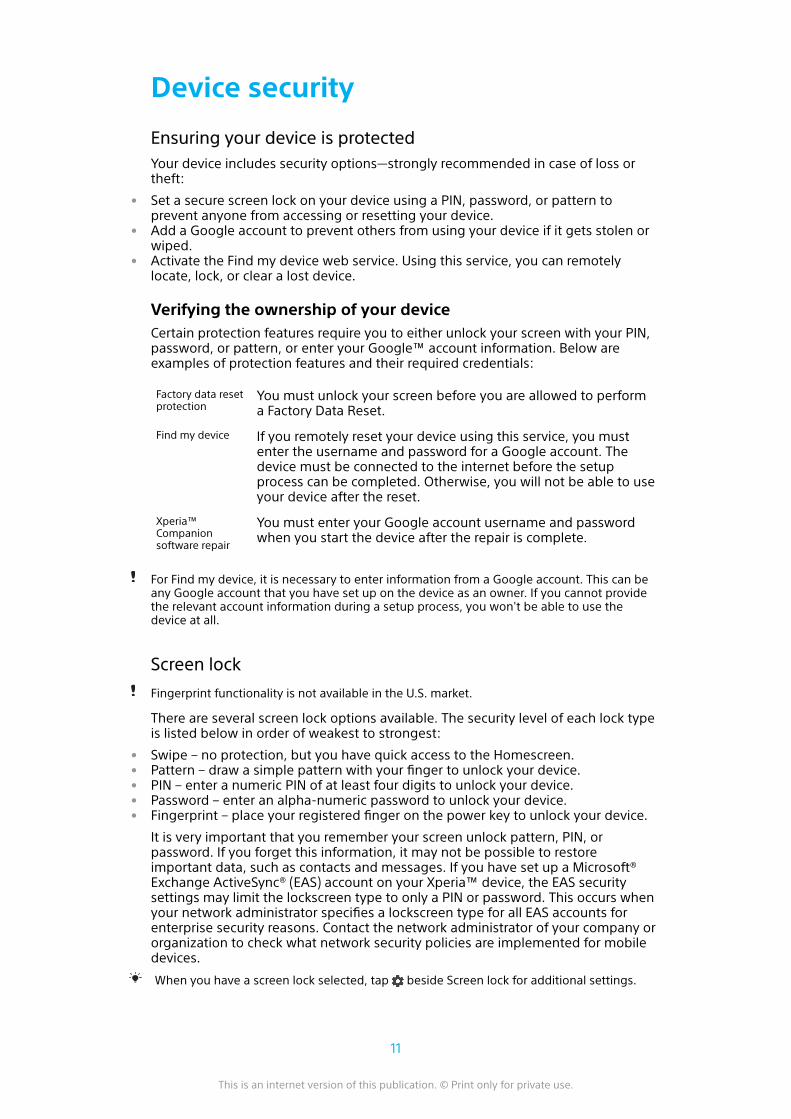
Screen lock
Fingerprint functionality is not available in the U.S. market.
There are several screen lock options available. The security level of each lock typeis listed below in order of weakest to strongest:
• Swipe – no protection, but you have quick access to the Homescreen.• Pattern – draw a simple pattern with your finger to unlock your device.• PIN – enter a numeric PIN of at least four digits to unlock your device.• Password – enter an alpha-numeric password to unlock your device.• Fingerprint – place your registered finger on the power key to unlock your device.
It is very important that you remember your screen unlock pattern, PIN, orpassword. If you forget this information, it may not be possible to restoreimportant data, such as contacts and messages. If you have set up a Microsoft®Exchange ActiveSync® (EAS) account on your Xperia™ device, the EAS securitysettings may limit the lockscreen type to only a PIN or password. This occurs whenyour network administrator specifies a lockscreen type for all EAS accounts forenterprise security reasons. Contact the network administrator of your company ororganization to check what network security policies are implemented for mobiledevices.
When you have a screen lock selected, tap beside Screen lock for additional settings.
11
This is an internet version of this publication. © Print only for private use.

To change your screen lock type
1 Find and tap Settings > Lock screen & security > Screen lock.2 Confirm your current screen lock, choose an option, and then follow the on-
screen instructions.
To create a screen lock pattern
1 Find and tap Settings > Lock screen & security > Screen lock > Pattern.2 Draw your pattern, then tap CONTINUE.3 Re-draw your pattern, then tap CONFIRM.
If you enter an incorrect lock pattern five times in a row, you must wait 30 seconds beforetrying again.
To change the screen lock pattern
1 Find and tap Settings > Lock screen & security > Screen lock.2 Draw your screen unlock pattern.3 Tap Pattern, and follow the on-screen instructions to create your pattern.
To create a screen lock PIN
1 Find and tap Settings > Lock screen & security > Screen lock. If prompted,confirm your current screen lock.
2 Select PIN.3 Enter a numeric PIN, then tap CONTINUE.4 Re-enter and confirm your PIN, then tap OK.
To create a screen lock password
1 Find and tap Settings > Lock screen & security > Screen lock. If prompted,confirm your current screen lock.
2 Select Password.3 Enter a password and tap CONTINUE > OK. Choose an option and follow the
instructions on your device.
To activate the Swipe unlock function
1 Find and tap Settings > Lock screen & security > Screen lock. If prompted,confirm your current screen lock and tap CONTINUE.
2 Select Swipe, then tap YES, REMOVE.
Fingerprint unlock
Fingerprint functionality is not available in the U.S. market.
You can use your fingerprint to quickly unlock your device. To use this feature, youneed to register a fingerprint and enable this feature in the Fingerprint Managerfirst.
The pattern, PIN, or password screen lock you set up serves as a backup unlockmethod if you enable the Fingerprint unlock option. Selecting other screen locktypes will clear all fingerprint settings.
To Unlock the Device Using Your Fingerprint• With the lockscreen active, place your finger on the power key so that the
device can scan your fingerprint and unlock the screen. Be sure to use afinger that you have registered in Fingerprint Manager.
If you fail to unlock the screen using your fingerprint after five attempts, you can use yourbackup pattern, PIN, or password instead.
Fingerprint Manager
Fingerprint functionality is not available in the US market.
12
This is an internet version of this publication. © Print only for private use.
Fingerprint Manager registers fingerprint information that can be used as anadditional security method for unlocking your device or authenticating purchases.You are allowed to register a maximum of 5 fingerprints on your device.
Before using the Fingerprint sensor, make sure the sensor is clean and without any visiblemoisture.
To register a fingerprint for the first time
1 Find and tap Settings > Lock screen & security > Fingerprint Manager.2 Tap NEXT, then confirm your pattern, PIN, or password.3 Tap NEXT and follow the on-screen instructions to complete fingerprint
registration.
When registering a fingerprint for the first time, you are also prompted to set up a pattern,PIN, or password as a security backup if you have not already done so.
The fingerprint sensor is on the power key and not on the screen of your device. Beforeusing the fingerprint sensor, be sure the sensor is clean and without any visible moisture.
To register additional fingerprints
1 Find and tap Settings > Lock screen & security > Fingerprint Manager.2 Confirm your pattern, PIN, or password.3 Tap Add fingerprint, then follow the on-screen instructions.
To delete a registered fingerprint
1 Find and tap Settings > Lock screen & security > Fingerprint Manager.2 Confirm your pattern, PIN, or password.3 Tap the registered fingerprint, then tap DELETE > DELETE.
To rename a registered fingerprint
1 Find and tap Settings > Lock screen & security > Fingerprint Manager.2 Select a registered fingerprint in the list and then enter a name.3 Tap OK.
Unlocking your device automaticallyThe Smart Lock feature lets you set your device to unlock automatically in certainsituations, for example, when connected to a Bluetooth® device or carrying it withyou.
The Smart Lock feature is available in most markets, countries, or regions.
Go to http://www.support.google.com/ and search “smart lock” for moreinformation about the Smart Lock feature.
To Enable Smart Lock
1 Set a pattern, PIN, or password as a screen lock if you have not already doneso.
2 Find and tap Settings > Lock screen & security > Trust agents.3 Tap the Smart Lock (Google) slider to enable the function.4 Tap .5 Find and tap Smart Lock.6 Enter your pattern, PIN, or password. You need to enter these credentials to
change your Smart Lock settings.7 Select a Smart Lock type.
SIM Card ProtectionYou can lock and unlock each SIM card that you use in your device with a PIN(Personal Identification Number). When a SIM card is locked, the subscriptionlinked to the card is protected against misuse, meaning you have to enter a PINevery time you start your device.
13
This is an internet version of this publication. © Print only for private use.
If you enter the PIN incorrectly too many times, your SIM card will get blocked. Youthen need to enter your PUK (Personal Unblocking Key) and a new PIN. Your PINand PUK are supplied by your service provider.
To set up a SIM card lock
1 Find and tap Settings > Lock screen & security > SIM card lock.2 Tap the slider beside Lock SIM card to enable.3 Enter the SIM card PIN and tap OK. The SIM card lock is now active and you
will be prompted to enter your PIN every time you restart your device.
To change the SIM card PIN
1 Find and tap Settings > Lock screen & security > SIM card lock.2 Tap Change SIM PIN.3 Enter the old SIM card PIN and tap OK.4 Enter the new SIM card PIN and tap OK.5 Re-type the new SIM card PIN and tap OK.
To Unlock a Blocked SIM Card Using the PUK Code
1 Enter the PUK code and tap .2 Enter a new PIN code and tap .3 Re-enter the new PIN code and tap .
If you enter an incorrect PUK code too many times, you need to contact your networkoperator to get a new SIM card.
Finding the IMEI number of your deviceYour device has a unique identification number that is referred to as the IMEI orProduct ID. You should keep a copy of this number. You may require it if yourdevice is stolen, or when contacting support.
To view your IMEI number using the dialpad
1 Find and tap .2 Tap .3 Enter *#06# into the dialpad. The IMEI number pops up automatically.
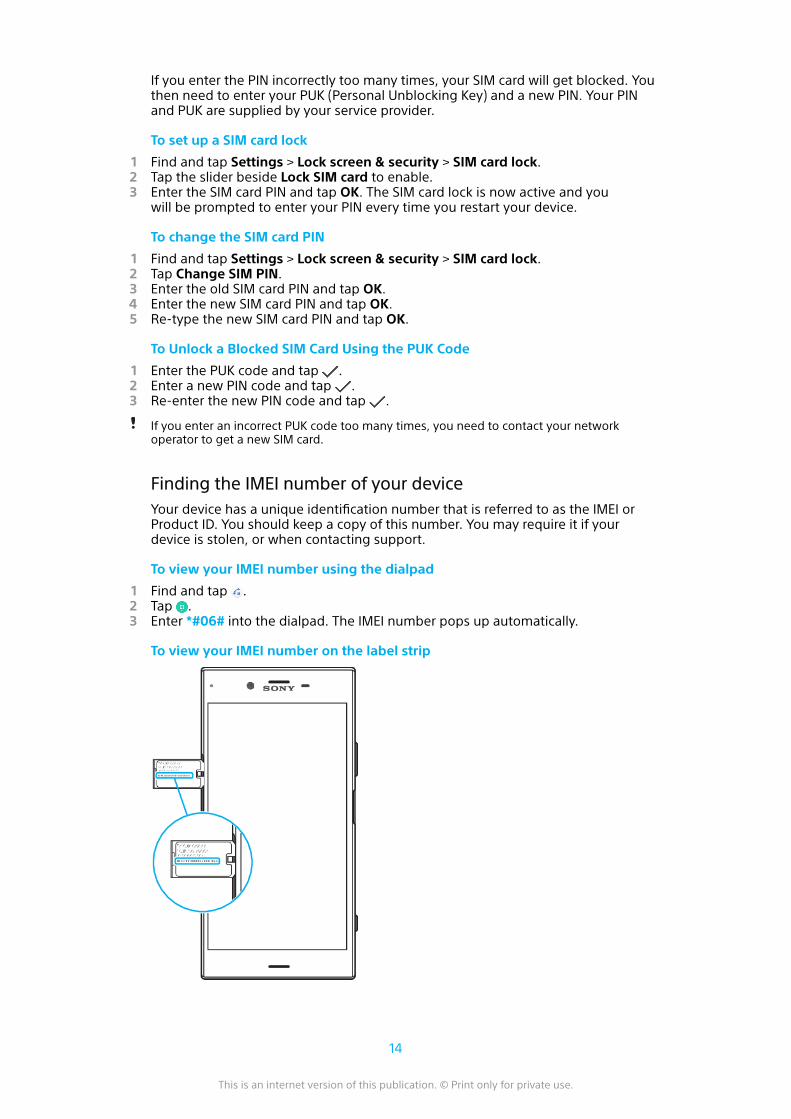
To view your IMEI number on the label strip
14
This is an internet version of this publication. © Print only for private use.
1 Drag out the memory card tray and the SIM card tray.2 Drag the strip outward using your fingernail. The strip displays the IMEI
number.
Finding a lost device using Find my deviceGoogle offers a location and security web service called Find my device. If you loseyour device, you can use Find my device to:
• Find and show where your device is located.• Ring or lock your device, erase everything on it, or add a phone number to the lock
screen.
For additional information about Find my device, go tohttps://www.support.google.com/.
Find my device does not work if your device is turned off or does not have an internetconnection. The Find my device service may not be available in all countries or regions.
To activate Find my device
1 If you are sharing a device with multiple users, make sure that you arelogged in as the owner.
2 Make sure that you have an active data connection and that location servicesare enabled.
3 Find and tap Settings > Google > Security > Find my device.4 Tap the sliders beside Remotely locate this device and Allow remote lock
and erase to enable both functions.5 If prompted, agree to the Terms and Conditions by tapping Activate this
device admin app.6 To verify that Find my device can locate your device after you activate the
service, go to http://www.google.com/android/find and sign in using yourGoogle account.
You can also activate Find my device from Lock screen & security under Device admin apps.
Using Location ServicesLocation services allow applications such as Maps and the camera to useinformation from your cellphone or Wi-Fi network as well as Global PositioningSystem (GPS) information to determine your approximate location. If you're notwithin a clear line of sight of GPS satellites, your device can determine yourlocation using the Wi-Fi function. And if you're not within range of a network, yourdevice can determine your location using your cellphone network.
In order to use your device to find out where you are, you need to enable locationservices.
You may incur data connection charges when you connect to the internet from your device.
To enable or disable location services• Find and tap Settings > Lock screen & security > Location. Tap the slider to
enable or disable location services.
You can also enable location services from Settings > Google > Location.
To enable or disable Google Location Sharing
1 Find and tap Settings > Lock screen & security > Location. Tap GoogleLocation Sharing.
2 Tap , select the time span you want to have the function turned on, andchoose an option to select the contact you want to share your location with.You can also choose the way to share your location by tapping More.
You can also keep track of your location history under Location services.
15
This is an internet version of this publication. © Print only for private use.
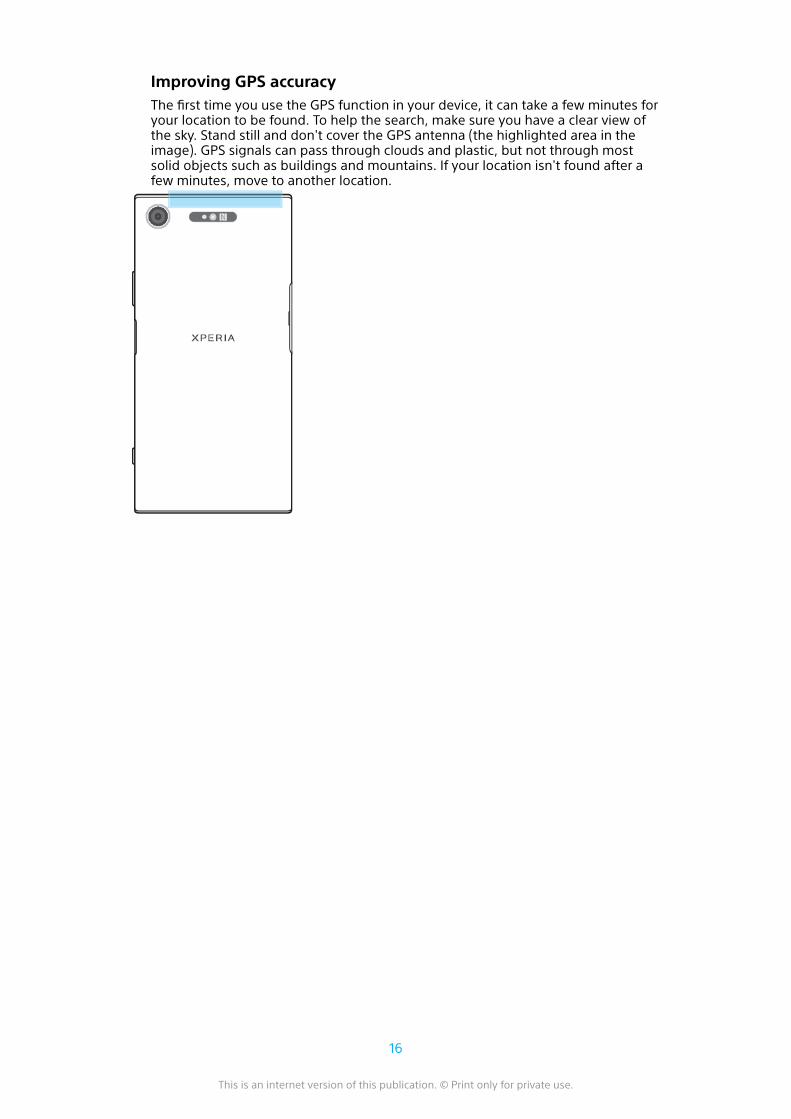
Improving GPS accuracyThe first time you use the GPS function in your device, it can take a few minutes foryour location to be found. To help the search, make sure you have a clear view ofthe sky. Stand still and don't cover the GPS antenna (the highlighted area in theimage). GPS signals can pass through clouds and plastic, but not through mostsolid objects such as buildings and mountains. If your location isn't found after afew minutes, move to another location.
16
This is an internet version of this publication. © Print only for private use.
Learning the basics
Using the touchscreen
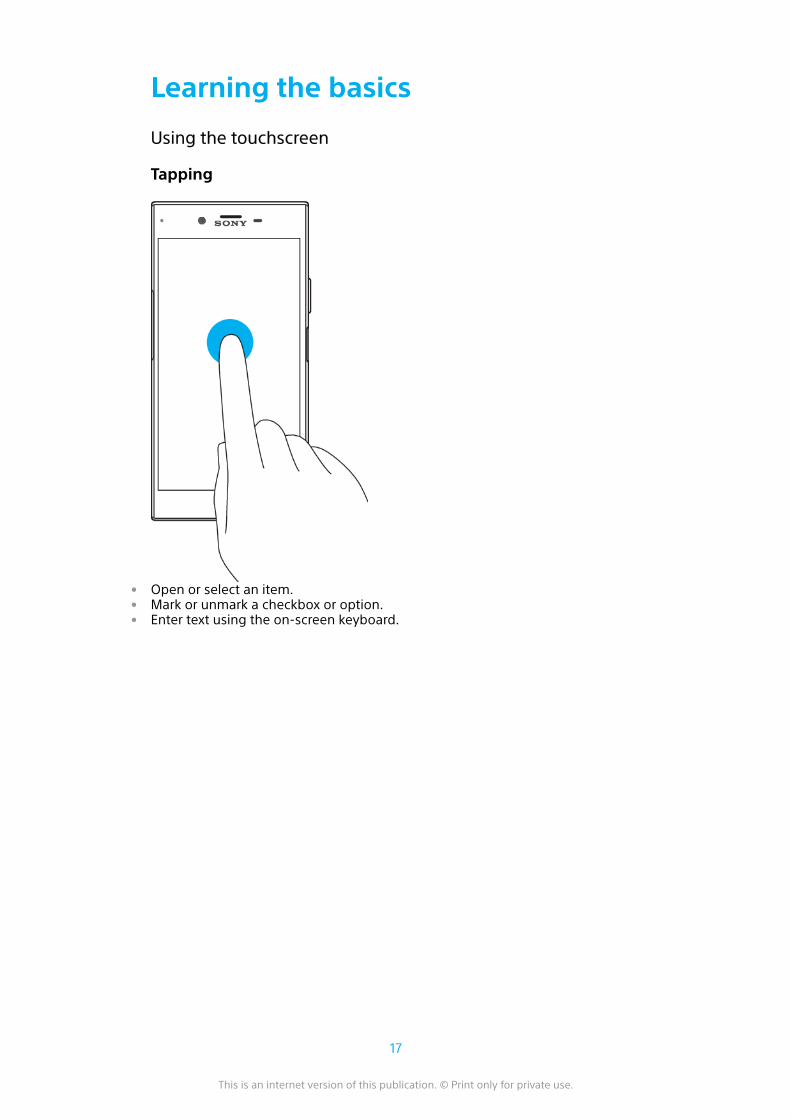
Tapping
• Open or select an item.• Mark or unmark a checkbox or option.• Enter text using the on-screen keyboard.
17
This is an internet version of this publication. © Print only for private use.
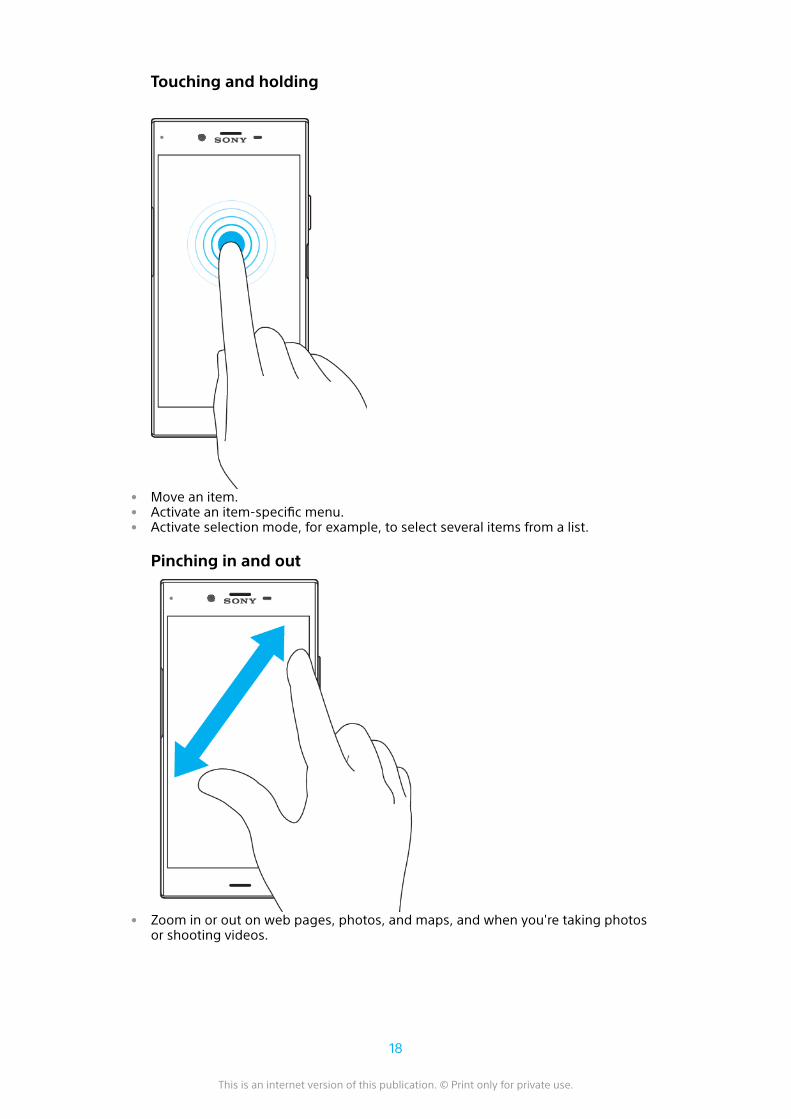
Touching and holding
• Move an item.• Activate an item-specific menu.• Activate selection mode, for example, to select several items from a list.
Pinching in and out
• Zoom in or out on web pages, photos, and maps, and when you're taking photosor shooting videos.
18
This is an internet version of this publication. © Print only for private use.
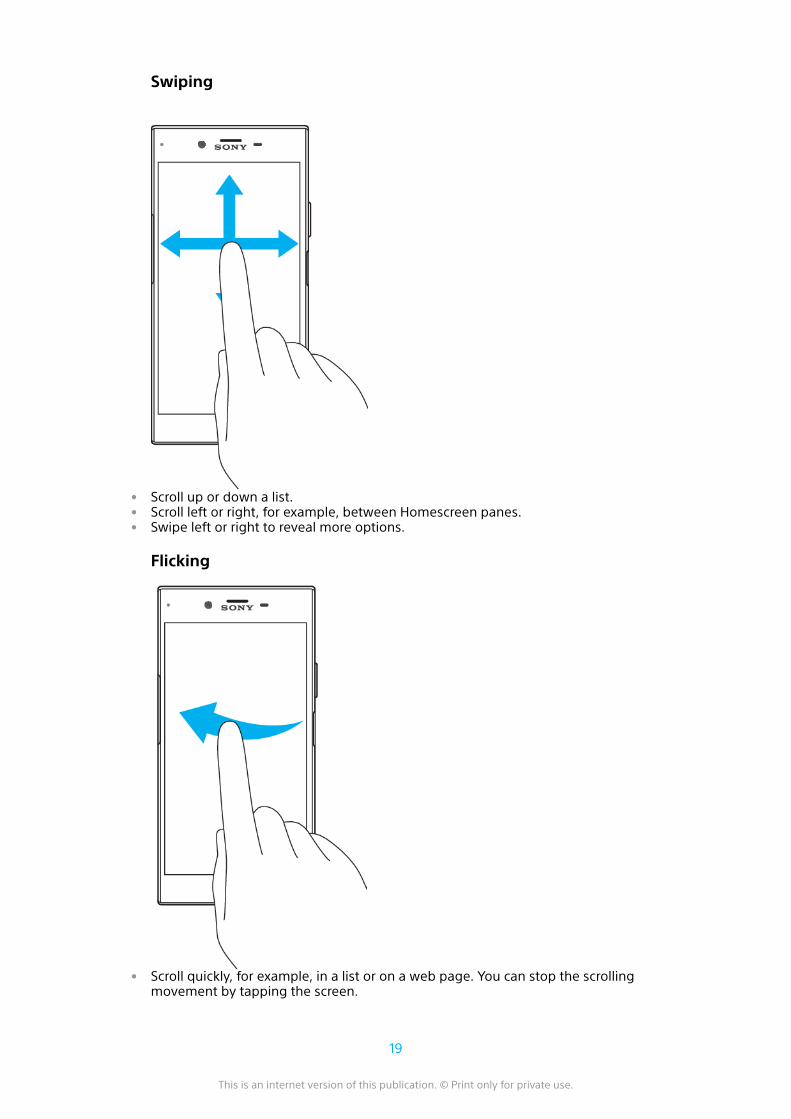
Swiping
• Scroll up or down a list.• Scroll left or right, for example, between Homescreen panes.• Swipe left or right to reveal more options.
Flicking
• Scroll quickly, for example, in a list or on a web page. You can stop the scrollingmovement by tapping the screen.
19
This is an internet version of this publication. © Print only for private use.
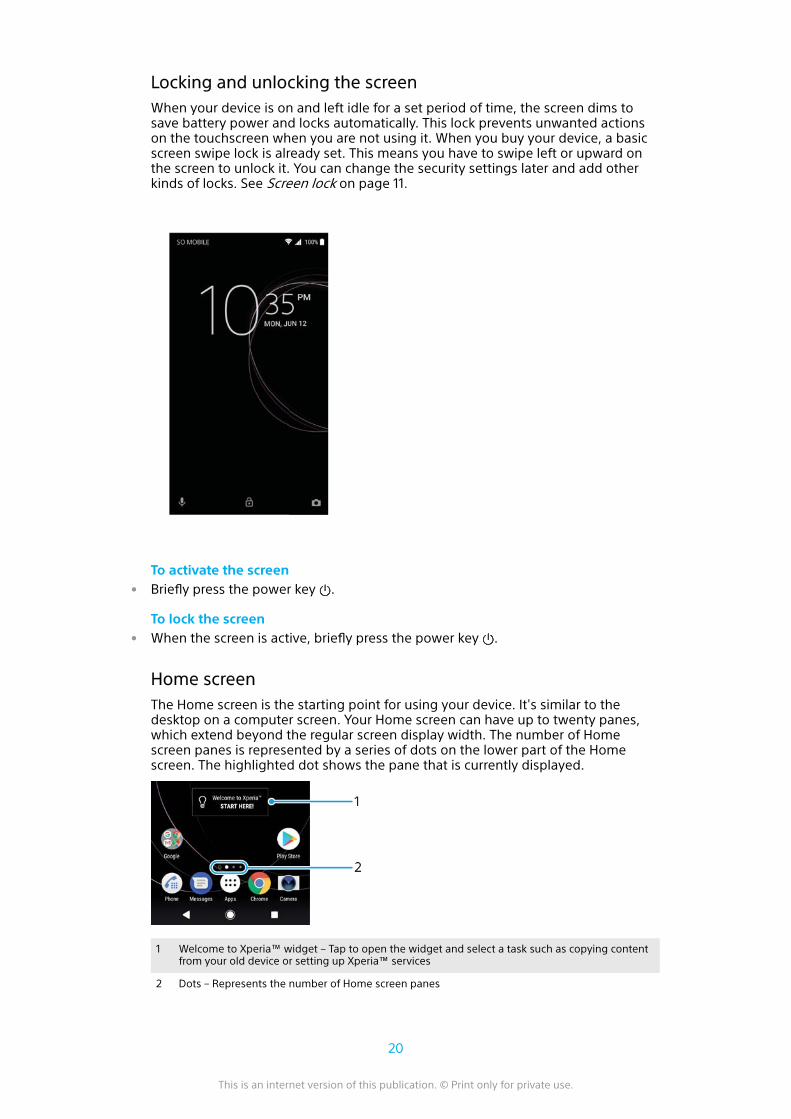
Locking and unlocking the screenWhen your device is on and left idle for a set period of time, the screen dims tosave battery power and locks automatically. This lock prevents unwanted actionson the touchscreen when you are not using it. When you buy your device, a basicscreen swipe lock is already set. This means you have to swipe left or upward onthe screen to unlock it. You can change the security settings later and add otherkinds of locks. See Screen lock on page 11.
To activate the screen• Briefly press the power key .
To lock the screen• When the screen is active, briefly press the power key .
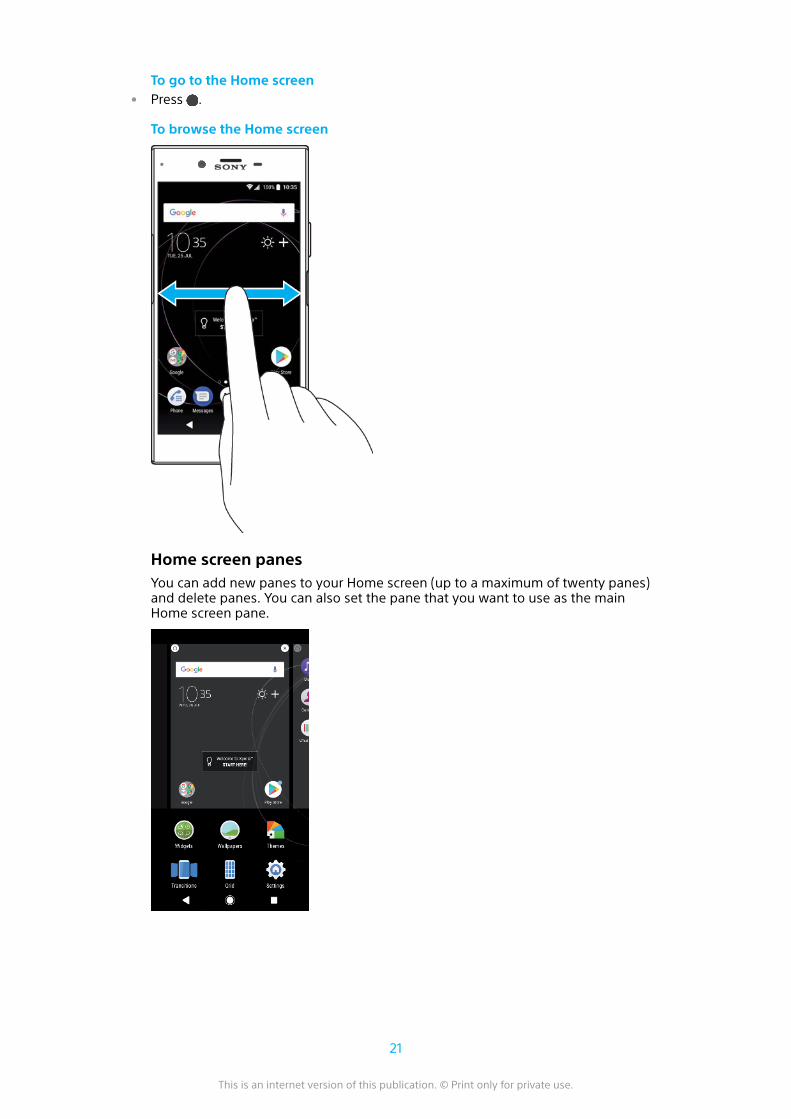
Home screenThe Home screen is the starting point for using your device. It's similar to thedesktop on a computer screen. Your Home screen can have up to twenty panes,which extend beyond the regular screen display width. The number of Homescreen panes is represented by a series of dots on the lower part of the Homescreen. The highlighted dot shows the pane that is currently displayed.
1 Welcome to Xperia™ widget – Tap to open the widget and select a task such as copying contentfrom your old device or setting up Xperia™ services
2 Dots – Represents the number of Home screen panes
20
This is an internet version of this publication. © Print only for private use.
To go to the Home screen• Press .
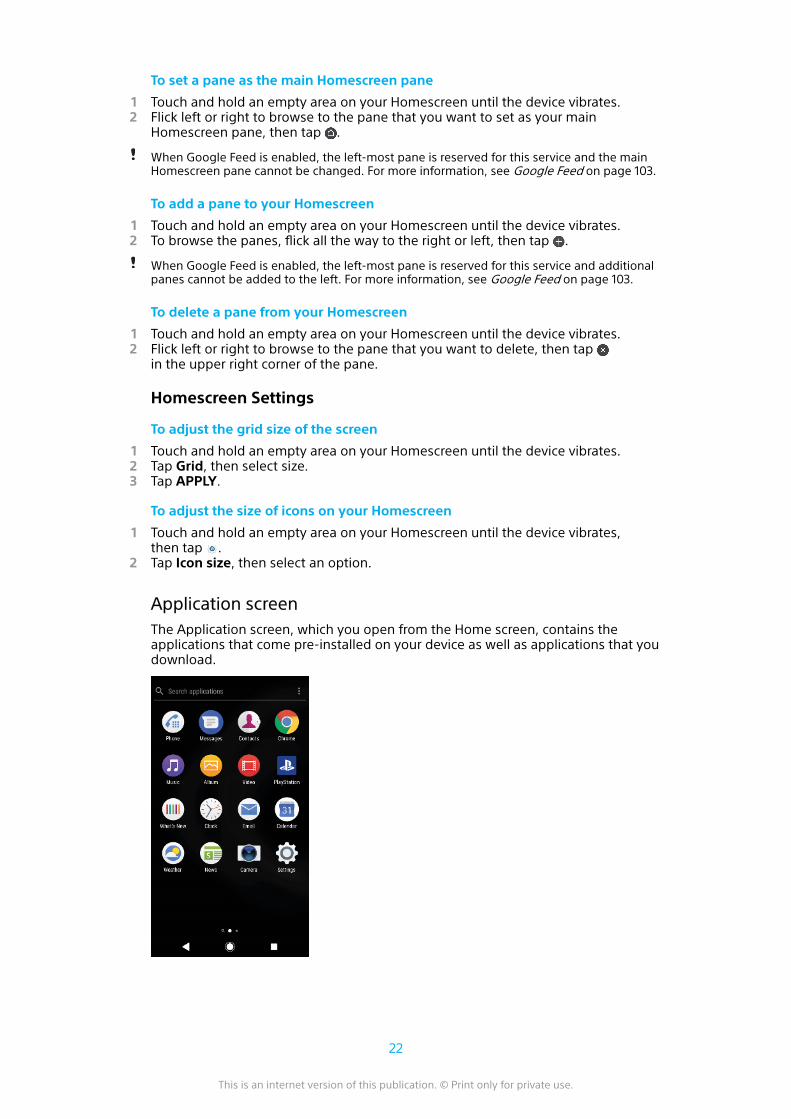
To browse the Home screen
Home screen panesYou can add new panes to your Home screen (up to a maximum of twenty panes)and delete panes. You can also set the pane that you want to use as the mainHome screen pane.
21
This is an internet version of this publication. © Print only for private use.
To set a pane as the main Homescreen pane
1 Touch and hold an empty area on your Homescreen until the device vibrates.2 Flick left or right to browse to the pane that you want to set as your main
Homescreen pane, then tap .
When Google Feed is enabled, the left-most pane is reserved for this service and the mainHomescreen pane cannot be changed. For more information, see Google Feed on page 103.
To add a pane to your Homescreen
1 Touch and hold an empty area on your Homescreen until the device vibrates.2 To browse the panes, flick all the way to the right or left, then tap .
When Google Feed is enabled, the left-most pane is reserved for this service and additionalpanes cannot be added to the left. For more information, see Google Feed on page 103.
To delete a pane from your Homescreen
1 Touch and hold an empty area on your Homescreen until the device vibrates.2 Flick left or right to browse to the pane that you want to delete, then tap
in the upper right corner of the pane.
Homescreen Settings
To adjust the grid size of the screen
1 Touch and hold an empty area on your Homescreen until the device vibrates.2 Tap Grid, then select size.3 Tap APPLY.
To adjust the size of icons on your Homescreen
1 Touch and hold an empty area on your Homescreen until the device vibrates,then tap .
2 Tap Icon size, then select an option.
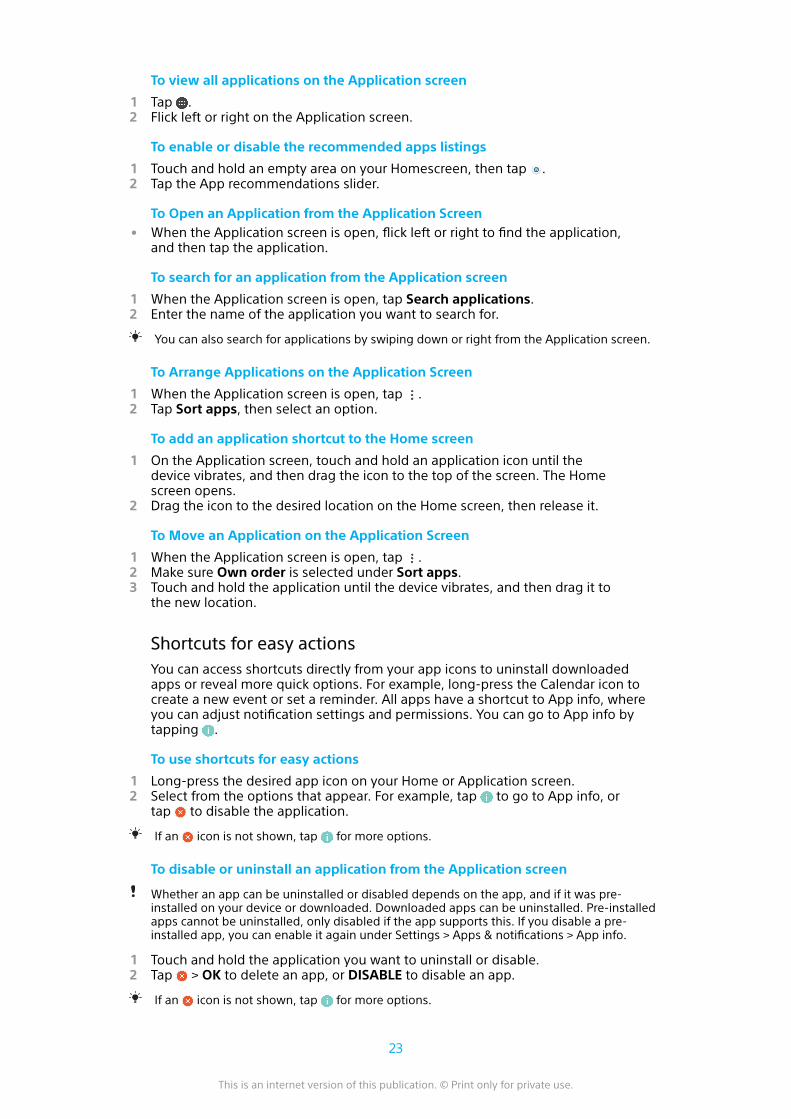
Application screenThe Application screen, which you open from the Home screen, contains theapplications that come pre-installed on your device as well as applications that youdownload.
22
This is an internet version of this publication. © Print only for private use.
To view all applications on the Application screen
1 Tap .2 Flick left or right on the Application screen.
To enable or disable the recommended apps listings
1 Touch and hold an empty area on your Homescreen, then tap .2 Tap the App recommendations slider.
To Open an Application from the Application Screen• When the Application screen is open, flick left or right to find the application,
and then tap the application.
To search for an application from the Application screen
1 When the Application screen is open, tap Search applications.2 Enter the name of the application you want to search for.
You can also search for applications by swiping down or right from the Application screen.
To Arrange Applications on the Application Screen
1 When the Application screen is open, tap .2 Tap Sort apps, then select an option.
To add an application shortcut to the Home screen
1 On the Application screen, touch and hold an application icon until thedevice vibrates, and then drag the icon to the top of the screen. The Homescreen opens.
2 Drag the icon to the desired location on the Home screen, then release it.
To Move an Application on the Application Screen
1 When the Application screen is open, tap .2 Make sure Own order is selected under Sort apps.3 Touch and hold the application until the device vibrates, and then drag it to
the new location.
Shortcuts for easy actionsYou can access shortcuts directly from your app icons to uninstall downloadedapps or reveal more quick options. For example, long-press the Calendar icon tocreate a new event or set a reminder. All apps have a shortcut to App info, whereyou can adjust notification settings and permissions. You can go to App info bytapping .
To use shortcuts for easy actions
1 Long-press the desired app icon on your Home or Application screen.2 Select from the options that appear. For example, tap to go to App info, or
tap to disable the application.
If an icon is not shown, tap for more options.
To disable or uninstall an application from the Application screen
Whether an app can be uninstalled or disabled depends on the app, and if it was pre-installed on your device or downloaded. Downloaded apps can be uninstalled. Pre-installedapps cannot be uninstalled, only disabled if the app supports this. If you disable a pre-installed app, you can enable it again under Settings > Apps & notifications > App info.
1 Touch and hold the application you want to uninstall or disable.2 Tap > OK to delete an app, or DISABLE to disable an app.
If an icon is not shown, tap for more options.
23
This is an internet version of this publication. © Print only for private use.
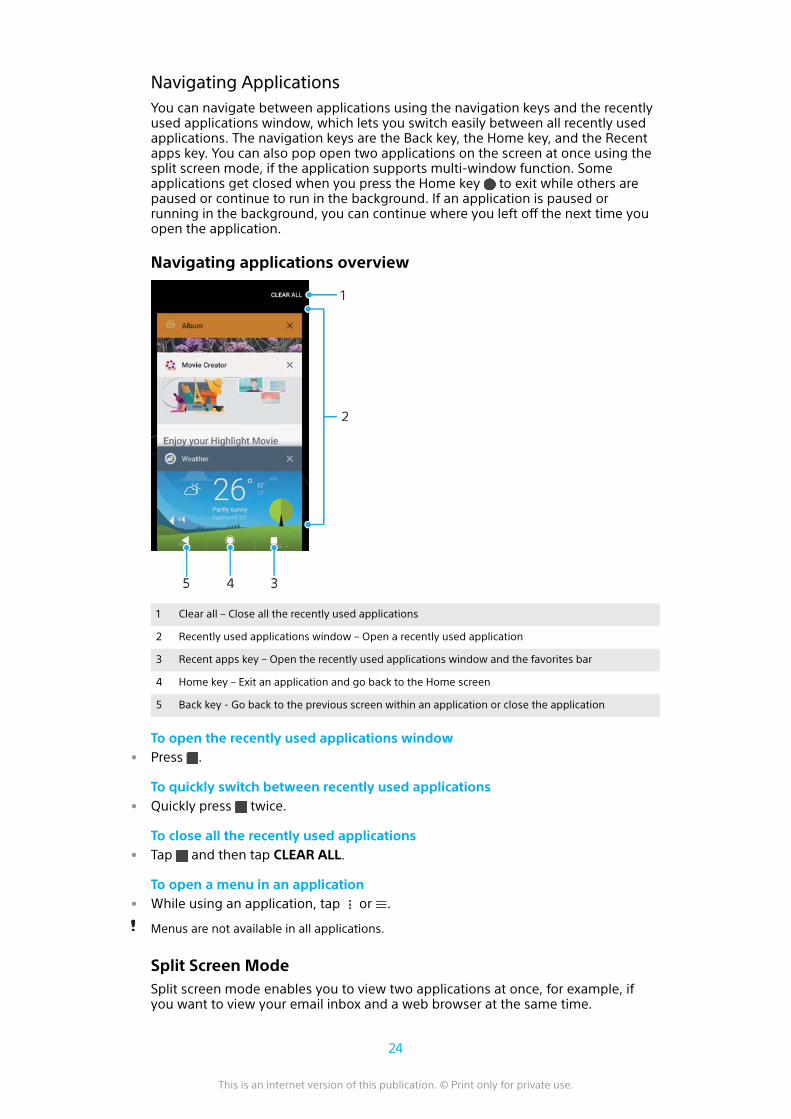
Navigating ApplicationsYou can navigate between applications using the navigation keys and the recentlyused applications window, which lets you switch easily between all recently usedapplications. The navigation keys are the Back key, the Home key, and the Recentapps key. You can also pop open two applications on the screen at once using thesplit screen mode, if the application supports multi-window function. Someapplications get closed when you press the Home key to exit while others arepaused or continue to run in the background. If an application is paused orrunning in the background, you can continue where you left off the next time youopen the application.
Navigating applications overview
1 Clear all – Close all the recently used applications
2 Recently used applications window – Open a recently used application
3 Recent apps key – Open the recently used applications window and the favorites bar
4 Home key – Exit an application and go back to the Home screen
5 Back key - Go back to the previous screen within an application or close the application
To open the recently used applications window• Press .
To quickly switch between recently used applications• Quickly press twice.
To close all the recently used applications• Tap and then tap CLEAR ALL.
To open a menu in an application• While using an application, tap or .
Menus are not available in all applications.
Split Screen ModeSplit screen mode enables you to view two applications at once, for example, ifyou want to view your email inbox and a web browser at the same time.
24
This is an internet version of this publication. © Print only for private use.
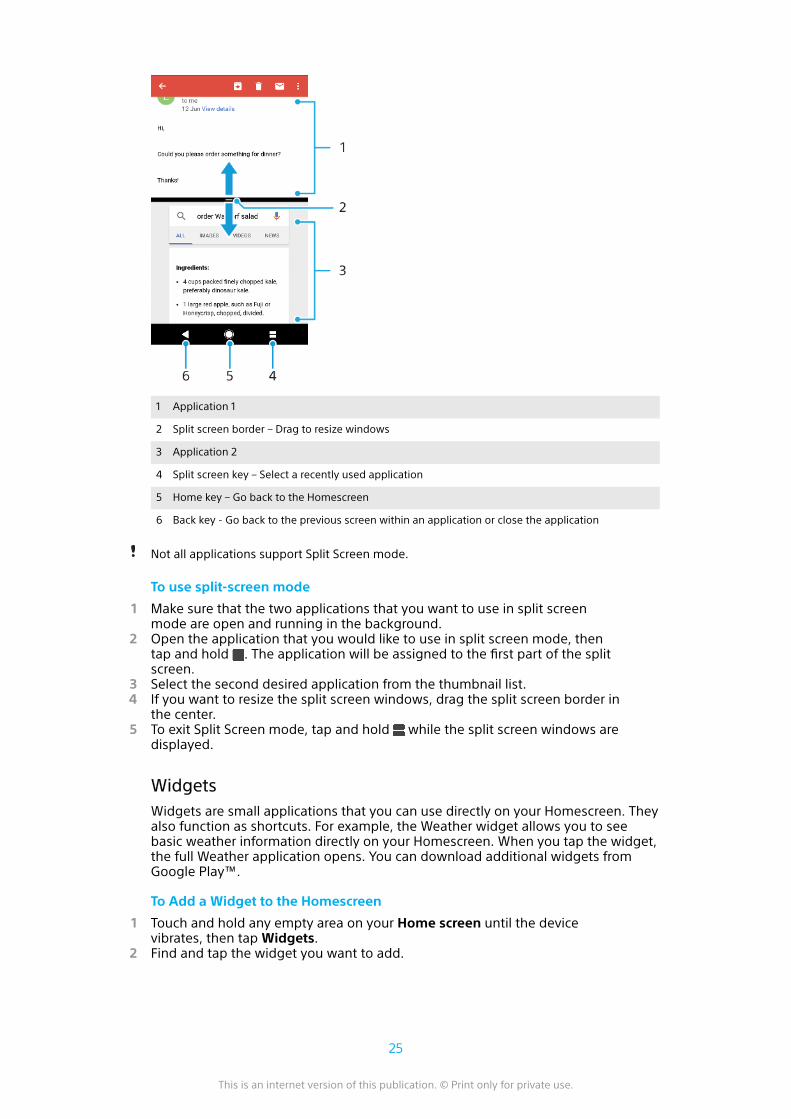
1 Application 1
2 Split screen border – Drag to resize windows
3 Application 2
4 Split screen key – Select a recently used application
5 Home key – Go back to the Homescreen
6 Back key - Go back to the previous screen within an application or close the application
Not all applications support Split Screen mode.
To use split-screen mode
1 Make sure that the two applications that you want to use in split screenmode are open and running in the background.
2 Open the application that you would like to use in split screen mode, thentap and hold . The application will be assigned to the first part of the splitscreen.
3 Select the second desired application from the thumbnail list.4 If you want to resize the split screen windows, drag the split screen border in
the center.5 To exit Split Screen mode, tap and hold while the split screen windows are
displayed.
WidgetsWidgets are small applications that you can use directly on your Homescreen. Theyalso function as shortcuts. For example, the Weather widget allows you to seebasic weather information directly on your Homescreen. When you tap the widget,the full Weather application opens. You can download additional widgets fromGoogle Play™.
To Add a Widget to the Homescreen
1 Touch and hold any empty area on your Home screen until the devicevibrates, then tap Widgets.
2 Find and tap the widget you want to add.
25
This is an internet version of this publication. © Print only for private use.
To Resize a Widget
1 Touch and hold a widget until the device vibrates, and then release it. If thewidget can be resized, for example, the Calendar widget, then a highlightedframe and resizing dots appear.
2 Drag the dots inward or outward to shrink or expand the widget.3 To confirm the new size of the widget, tap anywhere on the Home screen.
To Move a Widget• Touch and hold the widget until the device vibrates, and then drag it to the
new location.
To Remove a Widget• Touch and hold the widget until the device vibrates, and then drag it to
Remove from home screen.
Shortcuts and foldersUse shortcuts and folders to manage your applications and keep your Homescreen tidy.
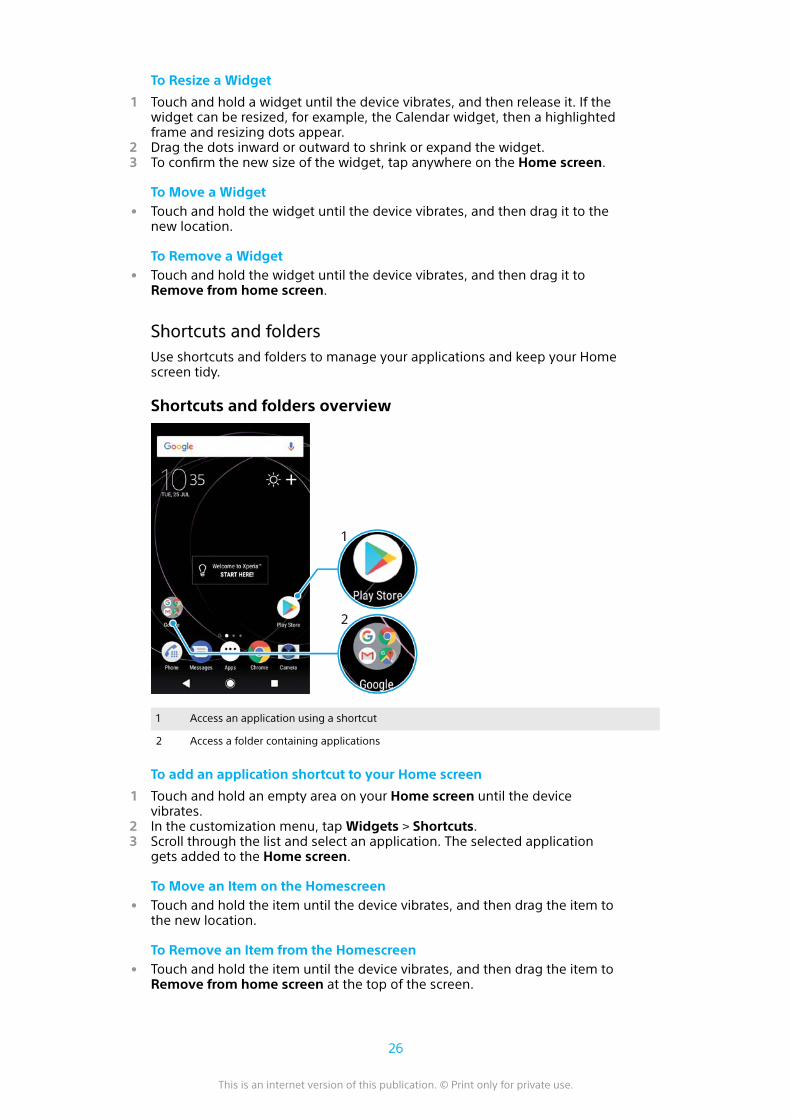
Shortcuts and folders overview
1 Access an application using a shortcut
2 Access a folder containing applications
To add an application shortcut to your Home screen
1 Touch and hold an empty area on your Home screen until the devicevibrates.
2 In the customization menu, tap Widgets > Shortcuts.3 Scroll through the list and select an application. The selected application
gets added to the Home screen.
To Move an Item on the Homescreen• Touch and hold the item until the device vibrates, and then drag the item to
the new location.
To Remove an Item from the Homescreen• Touch and hold the item until the device vibrates, and then drag the item to
Remove from home screen at the top of the screen.
26
This is an internet version of this publication. © Print only for private use.
To Create a Folder on the Homescreen• Touch and hold an application icon or a shortcut until the device vibrates,
and then drag and drop it on top of another application icon or shortcut.
To Add Items to a Folder on the Homescreen• Touch and hold an item until the device vibrates, and then drag the item to
the folder.
To rename a folder on the Home screen
1 Tap the folder to open it.2 Tap the folder's title bar to show the Folder name field.3 Enter the new folder name and tap Done.
Background and ThemesYour device comes with a default background, but you can adapt the Home screenand Lock screen to your own style using wallpapers and themes featuring differentcolors and patterns.
A wallpaper may be used without changing any of the other elements of yourHomescreen and Lockscreen. Live wallpapers add visual effects to yourinteractions with the touch screen, letting the display change dynamically.
Themes can include a wallpaper, a screensaver, title bars, and a sound schemethat all fit together to create a unique look and feel for your device.
To change your wallpaper
1 Touch and hold any empty area on your Home screen until the devicevibrates.
2 Tap Wallpapers.3 To set the same wallpaper for the Lock and Home screens, select the
wallpaper and tap APPLY. To set different wallpapers, first tap the Lock orHome screen preview. Choose a wallpaper for that screen and tap SELECT >APPLY.
You can also use a photo as your wallpaper. Instead of selecting a wallpaper from theoptions shown, tap Photos. Choose a photo and tap SELECT.
To set a theme
1 Touch and hold an empty area on your Home screen until the devicevibrates.
2 Tap Themes.3 Choose an option:
• To use an existing theme, select the theme, then tap APPLY THEME.• To download a new theme, tap GET MORE THEMES.
When you change a theme, the background also changes in some applications.
Taking a screenshotYou can capture still images of any screen on your device as a screenshot.Screenshots you take are automatically saved in the Album application.
To take a screenshot
1 Long-press the power key until a prompt window appears.2 Tap .
You can also take a screenshot by pressing and holding the power key and volume downkey at the same time.
27
This is an internet version of this publication. © Print only for private use.
To view your screenshot
1 Double-tap the status bar to display the Notification panel.2 Tap the screenshot.
NotificationsNotifications inform you of events such as new messages and calendarnotifications, as well as activities in progress like file downloads. Notificationsappear in the following places:
• The status bar• The notification panel• The lock screen• The app icon
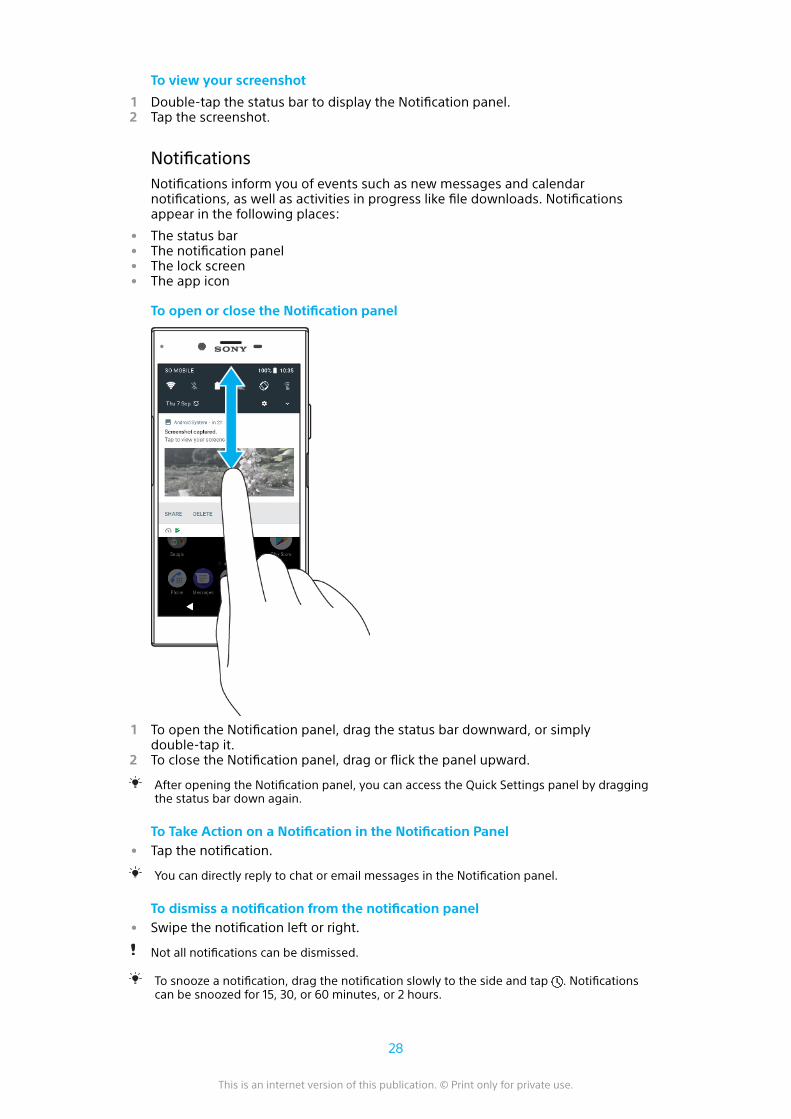
To open or close the Notification panel
1 To open the Notification panel, drag the status bar downward, or simplydouble-tap it.
2 To close the Notification panel, drag or flick the panel upward.
After opening the Notification panel, you can access the Quick Settings panel by draggingthe status bar down again.
To Take Action on a Notification in the Notification Panel• Tap the notification.
You can directly reply to chat or email messages in the Notification panel.
To dismiss a notification from the notification panel• Swipe the notification left or right.
Not all notifications can be dismissed.
To snooze a notification, drag the notification slowly to the side and tap . Notificationscan be snoozed for 15, 30, or 60 minutes, or 2 hours.
28
This is an internet version of this publication. © Print only for private use.
To expand a notification on the Notification panel• Tap to expand and view more information about the notification without
opening the app.
Not all notifications are expandable.
To clear all notifications from the Notification panel• Tap CLEAR ALL.
If there is a long list of notifications, scroll down to find the CLEAR ALL button.
To Take Action on a Notification from the Lockscreen• Double-tap the notification.
To Dismiss a Notification from the Lockscreen• Swipe the notification left or right.
To Expand a Notification on the Lockscreen• Drag the notification downward.
Not all notifications are expandable.
Notification display options on the lockscreen
Don’t shownotifications at all
You won't get any notifications on the lockscreen.
Show allnotification content
Get all notifications on the lockscreen. When you have this setting turned on,keep in mind that all content (including the content of incoming email and chatmessages) will be visible on your lockscreen unless you designate the relevantapps as Hide sensitive content in the Notifications settings menu.
Hide sensitivenotification content
You must have a PIN, password, or pattern set up as your screen lock in orderfor this setting to be available. Contents hidden is displayed on the lockscreenwhen sensitive notifications arrive. For example, you'll get a notification for anincoming email or chat, but the content won't be visible on your lockscreen.
To select the notifications to display on the lock screen
1 Find and tap Settings > Apps & notifications > Configure notifications.2 Tap On the lock screen.3 Select an option.
You can keep notifications on the lock screen until you swipe to dismiss them. To enablethis feature, tap the Keep notifications on lock screen slider under Configure notifications.
Setting the notification level for an app
Allow notification dot Show notification dots.
Allow sound Allow all notifications from the selected app.
On the lock screen Show or hide all notification content on the lock screen.
Interrupts Priority only Receive notifications from this app even when Do not disturb is set toPriority only.
You can set notification channels to categorize notification levels. Long-press a notificationto change the notification categories.
To set the notification level for an app
1 Find and tap Settings > Apps & notifications > App info.2 Select the desired app, then tap Notifications.3 Tap the sliders to adjust notification settings as desired.
29
This is an internet version of this publication. © Print only for private use.
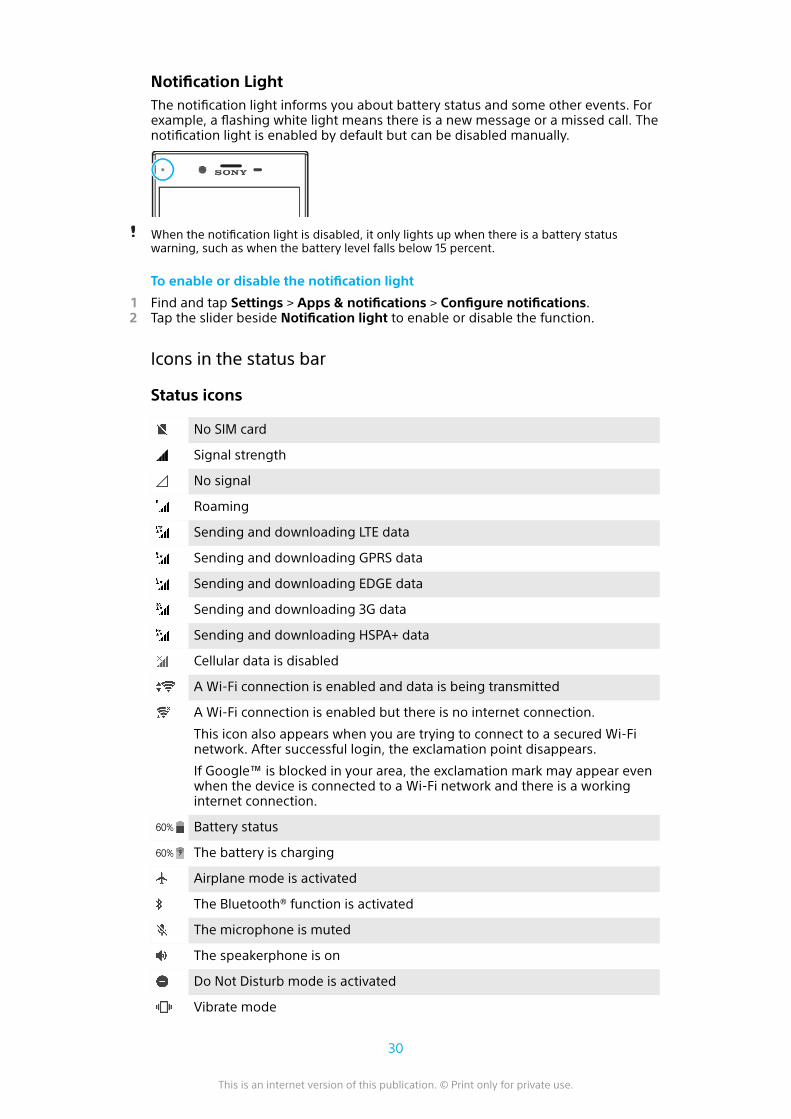
Notification LightThe notification light informs you about battery status and some other events. Forexample, a flashing white light means there is a new message or a missed call. Thenotification light is enabled by default but can be disabled manually.
When the notification light is disabled, it only lights up when there is a battery statuswarning, such as when the battery level falls below 15 percent.
To enable or disable the notification light
1 Find and tap Settings > Apps & notifications > Configure notifications.2 Tap the slider beside Notification light to enable or disable the function.
Icons in the status bar
Status icons
No SIM card
Signal strength
No signal
Roaming
Sending and downloading LTE data
Sending and downloading GPRS data
Sending and downloading EDGE data
Sending and downloading 3G data
Sending and downloading HSPA+ data
Cellular data is disabled
A Wi-Fi connection is enabled and data is being transmitted
A Wi-Fi connection is enabled but there is no internet connection.
This icon also appears when you are trying to connect to a secured Wi-Finetwork. After successful login, the exclamation point disappears.
If Google™ is blocked in your area, the exclamation mark may appear evenwhen the device is connected to a Wi-Fi network and there is a workinginternet connection.
Battery status
The battery is charging
Airplane mode is activated
The Bluetooth® function is activated
The microphone is muted
The speakerphone is on
Do Not Disturb mode is activated
Vibrate mode
30
This is an internet version of this publication. © Print only for private use.
An alarm is set
GPS is activated
Synchronization is ongoing
Problem with sign-in or synchronization
Depending on your service provider, network, or region, the functions or servicesrepresented by some icons in this list may not be available.
To manage status bar icons
1 Find and tap Settings > Display> System icons.2 Mark the checkboxes for the system icons that you want to appear in the
status bar.
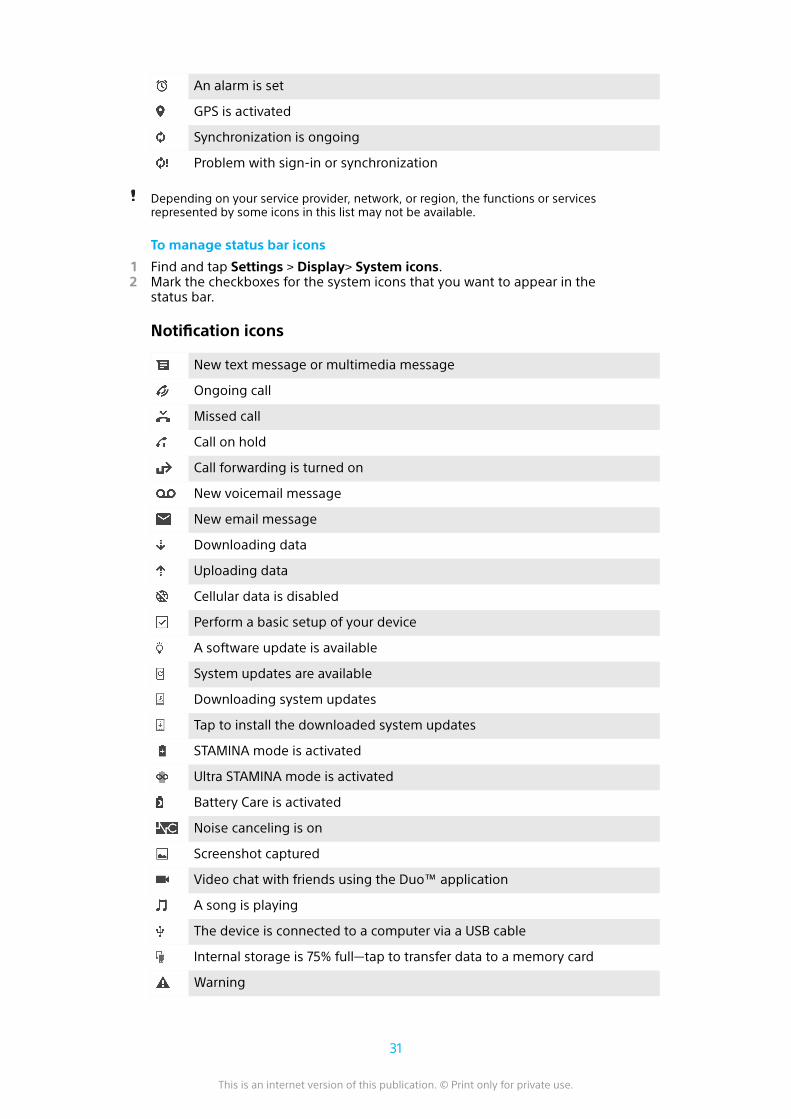
Notification icons
New text message or multimedia message
Ongoing call
Missed call
Call on hold
Call forwarding is turned on
New voicemail message
New email message
Downloading data
Uploading data
Cellular data is disabled
Perform a basic setup of your device
A software update is available
System updates are available
Downloading system updates
Tap to install the downloaded system updates
STAMINA mode is activated
Ultra STAMINA mode is activated
Battery Care is activated
Noise canceling is on
Screenshot captured
Video chat with friends using the Duo™ application
A song is playing
The device is connected to a computer via a USB cable
Internal storage is 75% full—tap to transfer data to a memory card
Warning
31
This is an internet version of this publication. © Print only for private use.
More undisplayed notifications
Not all icons that may appear on your device are listed here. This list is for referencepurposes only, and changes may be made without notice.
To block an application from sending notifications
1 Find and tap Settings > Apps & notifications > Configure notifications >Notifications.
2 Select an application.3 Tap the slider beside On to block application notifications.
Applications overview
Some applications may not be included on your device or may not be supported by allnetworks or service providers in all areas.
Use the 3D Creator application to scan people and objects with yourphone's camera.
Use the Album application to manage, view, and edit your photos andvideos.
Use the Amazon Shopping application to browse, search, and buythousands of products right from your device.
Use the Amazon Kindle application to explore, shop, and read books onyour device.
Use the AVG Protection PRO application to protect your device againstviruses, malware, spyware, phishing attempts, and online exploitation.
Use the Calculator application to perform basic calculations.
Use the Calendar application to keep track of events and manage yourappointments.
Use the camera to take photos and record video clips.
Use the Chrome web browser to navigate and view web pages, text, andimages, and to manage bookmarks.
Use the Clock application to set various alarms and timers.
Use the Contacts application to manage phone numbers, email addressesand other contact information.
Use the Files application to access your downloaded applications,documents, and pictures.
Use the Duo application to make video calls.
Use the Google Docs application to create, edit, and collaborate with otherson documents.
Use Google Drive application to save your documents and files for easyaccess from any device, share them with your friends, and collaborate withcolleagues.
Use the Email application to send and receive emails through both personaland work accounts.
Use the Facebook™ application for social networking with friends, familymembers, and coworkers around the world.
Use the Gmail application to read, write, and organize email messages.
32
This is an internet version of this publication. © Print only for private use.
Search for information on your device and on the web.
Enjoy music, movies, apps, and games on your device, and get exclusiveaccess to unique content available only with Xperia™ devices.
View your current location, find other locations, and plan routes usingGoogle Maps.
Use the Messages application to send and receive text and multimediamessages.
The Xperia™ Movie Creator automatically creates short video collagesusing your existing photo and video collection.
Use the Music application to organize and play music and audio books.
View news stories from News Suite.
Make phone calls by dialing the number manually or by using the smartdial function.
Organize, search, or browse through all your photos and videos.
Use the Google Play Movies & TV application to watch movies and TVshows purchased or rented on Google Play.
Discover and play thousands of songs with the Google Play Musicapplication.
Use the Play Store application to find applications to buy or download forfree.
Stay connected with your gaming friends and the games you love to play,shop on the PlayStation® Store, and more.
Optimize settings to suit your own requirements.
Use the Google Sheets application to create, edit, and collaborate withothers on spreadsheets.
Use the Sketch application to create and explore images, then share themwith your friends.
Use Google Slides to create, edit, and collaborate with others onpresentations.
Stream music, browse through your friend's collections or through artist'sdiscographies, or create your own radio station.
Use the Support application to access user support on your device. Forexample, you can access the User guide and troubleshooting information,plus tips and tricks.
Use the Video application to play videos on your device and share contentwith your friends.
Use the Weather application to view weather forecasts.
Use the What's New application to discover new games, apps, and mediacontent.
Use YouTube to watch videos from users around the world, and share yourown.
33
This is an internet version of this publication. © Print only for private use.
Battery and Maintenance
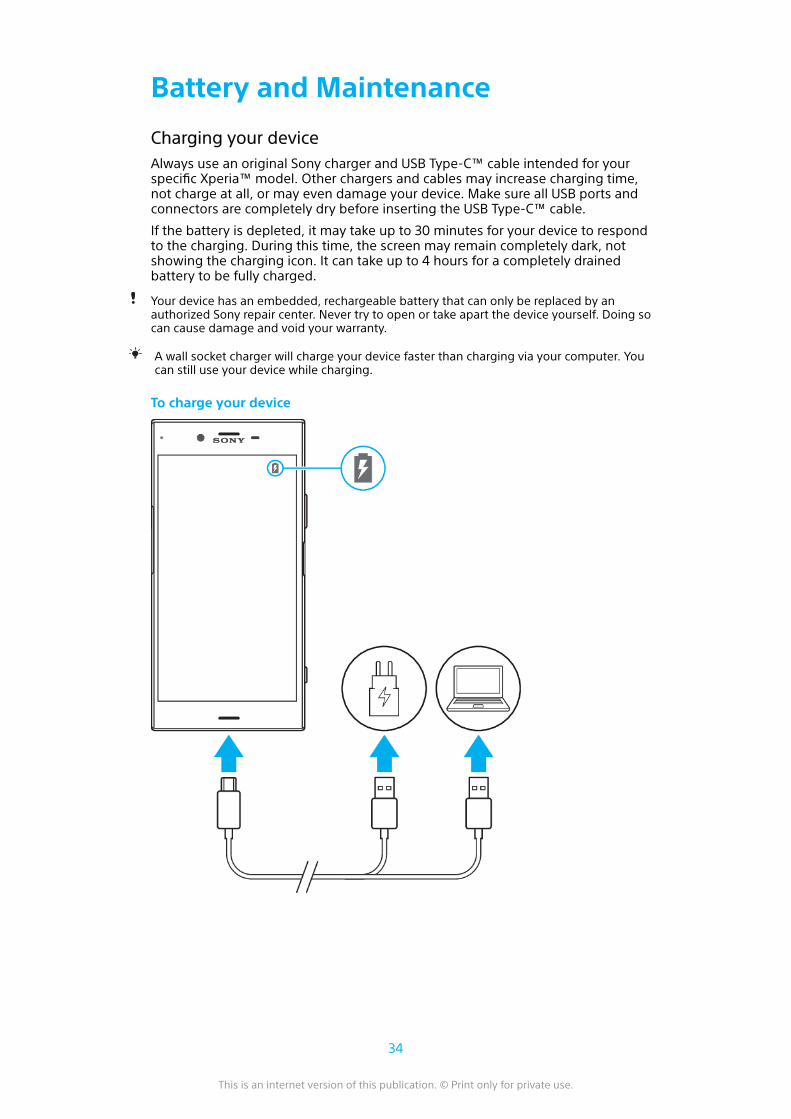
Charging your deviceAlways use an original Sony charger and USB Type-C™ cable intended for yourspecific Xperia™ model. Other chargers and cables may increase charging time,not charge at all, or may even damage your device. Make sure all USB ports andconnectors are completely dry before inserting the USB Type-C™ cable.
If the battery is depleted, it may take up to 30 minutes for your device to respondto the charging. During this time, the screen may remain completely dark, notshowing the charging icon. It can take up to 4 hours for a completely drainedbattery to be fully charged.
Your device has an embedded, rechargeable battery that can only be replaced by anauthorized Sony repair center. Never try to open or take apart the device yourself. Doing socan cause damage and void your warranty.
A wall socket charger will charge your device faster than charging via your computer. Youcan still use your device while charging.
To charge your device
34
This is an internet version of this publication. © Print only for private use.
1 Connect one end of the USB Type-C cable to the charger (or to the USB portof a computer).
2 Connect the other end of the cable to the USB Type-C port on your device.The notification light illuminates when charging begins.
3 When the device is fully charged, disconnect the cable from your device bypulling it straight out. Be sure to not bend the connector.
It is important to use the USB Type-C cable provided, as other types of USB cables candamage your device.
If the battery is completely depleted, it may take a few minutes before the notification lightilluminates and the charging icon appears.
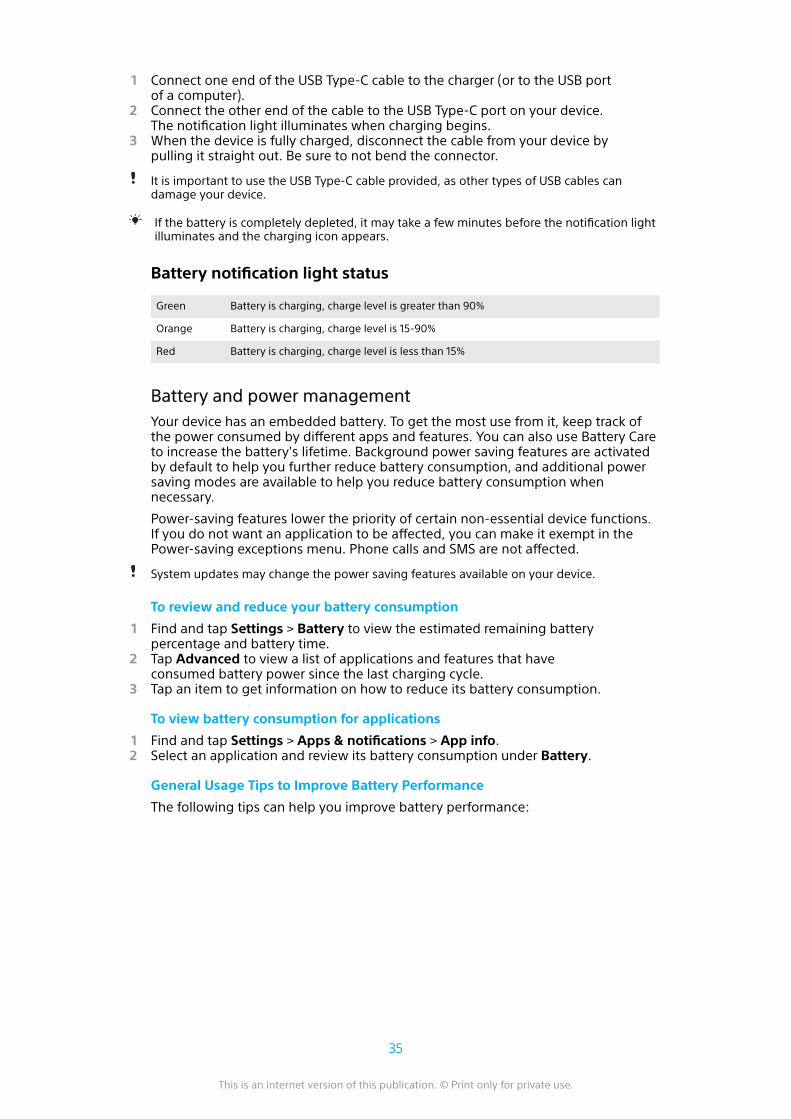
Battery notification light status
Green Battery is charging, charge level is greater than 90%
Orange Battery is charging, charge level is 15-90%
Red Battery is charging, charge level is less than 15%
Battery and power managementYour device has an embedded battery. To get the most use from it, keep track ofthe power consumed by different apps and features. You can also use Battery Careto increase the battery's lifetime. Background power saving features are activatedby default to help you further reduce battery consumption, and additional powersaving modes are available to help you reduce battery consumption whennecessary.
Power-saving features lower the priority of certain non-essential device functions.If you do not want an application to be affected, you can make it exempt in thePower-saving exceptions menu. Phone calls and SMS are not affected.
System updates may change the power saving features available on your device.
To review and reduce your battery consumption
1 Find and tap Settings > Battery to view the estimated remaining batterypercentage and battery time.
2 Tap Advanced to view a list of applications and features that haveconsumed battery power since the last charging cycle.
3 Tap an item to get information on how to reduce its battery consumption.
To view battery consumption for applications
1 Find and tap Settings > Apps & notifications > App info.2 Select an application and review its battery consumption under Battery.
General Usage Tips to Improve Battery Performance
The following tips can help you improve battery performance:
35
This is an internet version of this publication. © Print only for private use.
• Lower the screen brightness level, see Screen settings on page 56.• Turn off Bluetooth®, Wi-Fi, and location services when you don't need these
features.• Turn off your device or use Airplane mode if you are in an area with no or
low network coverage. Otherwise, your device repeatedly scans for availablenetworks, and this consumes power.
• Use a Wi-Fi network instead of roaming when abroad. Roaming is scanningfor your home network and puts additional demands on your battery as yourdevice must transmit with a higher output power, see Wi-Fi on page 46.
• Change the synchronization settings for your email, calendar, and contacts,see Synchronizing with Online Accounts on page 52.
• Check the applications that have a high battery consumption and considerthe battery saving tips provided on your device for these applications.
• Change the notification level for an application, see Notifications on page 28.• Turn off the location-sharing permission for an application, see Application
settings on page 57.• Uninstall applications that you are not using, see Application screen on
page 22.• Use a Sony original handsfree device to listen to music. Handsfree devices
consume less battery than your device's loudspeakers.• Restart your device every now and then.
To make specific applications exempt from optimization
You can make applications exempt from being optimized.
1 Find and tap Settings > Battery.2 Tap and select Power-saving exceptions. You will see a list of
applications that are not optimized.3 To add or remove applications from this exemption list, tap Apps and select
or de-select an application from the list to edit its exception settings.4 The list of applications that are exempt will get updated according to your
settings.
You can also configure Power-saving exceptions from Settings > Apps & notifications >Advanced > Special app access > Power-saving feature.
STAMINA modeDepending on the STAMINA level, different features will be restricted or disabled inorder to reduce battery consumption. These include rendering performance,animation, and screen brightness, video image enhancement, background appdata syncing, vibration except for incoming calls, streaming, and GPS while thescreen is off. appears in the status bar.
To activate or deactivate STAMINA mode
1 Find and tap Settings > Battery.2 Tap STAMINA mode and tap the slider to activate or deactivate the function.
When STAMINA mode is activated you can select additional options, forexample you can adjust the Auto-start percentage according to yourpreferences.
You can exempt applications from being restricted by STAMINA mode in the Power-savingexceptions menu.
Ultra STAMINA modeYour battery time is extensively prolonged, but available apps are limited, andmobile data and Wi-Fi are disabled. Calling and SMS are still available. YourHomescreen is changed and appears in the status bar.
If you are sharing a device with multiple users, you may need to log in as the owner, that is,the primary user, to activate or deactivate Ultra STAMINA mode.
36
This is an internet version of this publication. © Print only for private use.
To activate Ultra STAMINA mode
1 Find and tap Settings > Battery.2 Tap Ultra STAMINA mode and then tap Activate.3 Tap OK to activate.
You cannot exempt applications from being restricted by Ultra STAMINA mode.
To deactivate Ultra STAMINA mode
1 Drag down the status bar to access the Notification panel.2 Tap the notification Ultra STAMINA mode active.3 Tap OK.
Deactivating Ultra STAMINA mode will restart your device.
Battery CareUse Battery Care to increase the lifespan of your battery. This feature detects yourcharging patterns and estimates the start and end times of your regular chargingperiod. The rate of charging is controlled so that your battery reaches 100% justbefore you disconnect the charger.
Battery Care will not control the charging rate until it detects a regular charging cycle of atleast 4 hours over a period of several days.
To enable or disable Battery Care
1 Find and tap Settings > Battery > Battery Care.2 Tap the slider to enable or disable Battery Care.
Learned patterns of the regular charging cycle are saved by Battery Care. Even if thefunction has been disabled, it adopts to the learned patterns after enabling the functionagain.
Updating your deviceYou should update the software on your device to get the latest functionality,enhancements, and bug fixes in order to ensure optimal performance. When asoftware update is available, appears in the status bar. You can also check fornew updates manually, or schedule an update.
The easiest way to install a software update is to do it wirelessly from your device.However, some updates are not available for wireless download. You then need touse the Xperia™ Companion software on a PC or on an Apple® Mac® computer toupdate your device.
Before updating your device, consider the following:• Ensure you have sufficient storage capacity before attempting to update.• If you are using a device with multiple users, you must log in as the owner, that is,
the primary user, to update the device.• System and application updates can present the features on your device in another
way than described in this User Guide. The Android version might not be affectedafter an update.
For more information about software updates, go to http://support.sonymobile.com/software/.
To check for new software
1 If you are using a device with multiple users, make sure you are logged in asthe owner.
2 Find and tap Settings > System > Software update.
If your Xperia™ device has less than 500 MB of free internal memory available, you are notnotified about new software. Instead, you receive a warning in the Notification panel:
37
This is an internet version of this publication. © Print only for private use.
"Storage space running out. Some system functions may not work." If you receive thisnotification, free up internal memory to get notifications about new available software.
Updating Your Device WirelesslyUse the Software update application to update your device software wirelessly. Theupdates you can download over a cellphone network depend on your serviceprovider. It is recommended to use a Wi-Fi network instead of a cellphone networkto download new software so you can avoid data traffic costs.
To install a system update
1 If you are sharing a device with multiple users, make sure you are logged inas the owner.
2 Find and tap Settings > System > Software update.3 If a system update is available, tap CONTINUE, then tap INSTALL NOW.
To schedule a system update
1 If you are sharing a device with multiple users, make sure you are logged inas the owner.
2 Find and tap Settings > System > Software update.3 If a system update is available, tap CONTINUE, then tap the Schedule
installation slider.4 Tap OK > Set time.5 Set the desired time for the software update, then tap OK.6 Your device will be updated at the set time automatically.
To set up automatic download of system updates
1 Find and tap Settings > System > Software update.2 Tap , then tap Settings > Auto download system updates.3 Select the preferred option.
Updating your device using Xperia™ Companion
To enable or disable automatic updates for applications
1 Find and tap Settings > System > Software update.2 Tap , then tap Settings > Auto update apps.3 Select the preferred option.
To update your device using a computer
1 Using a USB Type-C cable, connect your device to the computer.2 Make sure that the screen of your device is unlocked, and that the USB
connection mode on the device is set to Transfer files.3 Open Xperia™ Companion, if it is not automatically launched.4 Be sure the computer can access the internet.5 Computer: If a new software update is detected, a pop-up window appears.
Follow the on-screen instructions to run the relevant software updates.
If you don’t have the Xperia™ Companion software installed on the relevant computer,connect your device to the computer and follow the on-screen installation instructions.Make sure you are using the USB Type-C cable that came with your device and it is properlyconnected to the device and computer.
Maintenance Using a Computer
Xperia™ CompanionXperia™ Companion is a software service which provides a collection of tools andapplications you can use when you connect your device to a computer. WithXperia™ Companion, you can:
• Update or repair your device’s software.
38
This is an internet version of this publication. © Print only for private use.
• Transfer your content from an old device using Xperia™ Transfer.• Back up and restore content on your computer.• Sync multimedia content—photos, videos, music, and playlists—between your
device and computer.• Browse files on your device.
To use Xperia™ Companion, you need an internet-connected computer runningone of the following operating systems:
• Microsoft® Windows® 7 or later• Mac OS® X 10.11 or later
Learn more and download Xperia™ Companion for Windows or Mac athttp://support.sonymobile.com/global-en/xperia-companion/.
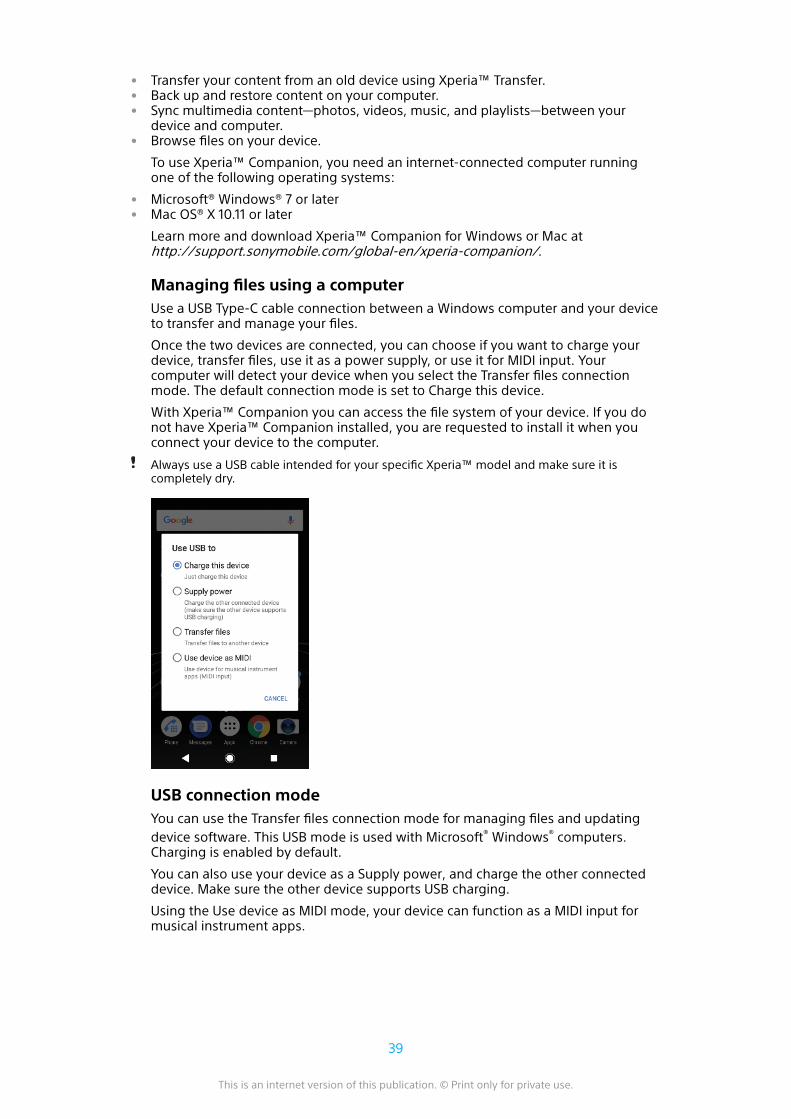
Managing files using a computerUse a USB Type-C cable connection between a Windows computer and your deviceto transfer and manage your files.
Once the two devices are connected, you can choose if you want to charge yourdevice, transfer files, use it as a power supply, or use it for MIDI input. Yourcomputer will detect your device when you select the Transfer files connectionmode. The default connection mode is set to Charge this device.
With Xperia™ Companion you can access the file system of your device. If you donot have Xperia™ Companion installed, you are requested to install it when youconnect your device to the computer.
Always use a USB cable intended for your specific Xperia™ model and make sure it iscompletely dry.
USB connection modeYou can use the Transfer files connection mode for managing files and updatingdevice software. This USB mode is used with Microsoft® Windows® computers.Charging is enabled by default.
You can also use your device as a Supply power, and charge the other connecteddevice. Make sure the other device supports USB charging.
Using the Use device as MIDI mode, your device can function as a MIDI input formusical instrument apps.
39
This is an internet version of this publication. © Print only for private use.
To change USB connection mode
1 Attach a USB Type-C connector to your device.2 Drag down the Status bar, and then tap Charge this device.3 Tap Transfer files, Supply power or Use device as MIDI to enable the
desired mode.
Storage and memoryYour device has several different storage and memory options:
• The internal storage stores downloaded or transferred content along with personalsettings and data.
• You can use a removable memory card to get more storage space. Media files canbe moved to this type of memory to free up internal storage.
• The dynamic memory (RAM) cannot be used for storage. RAM is used to handlerunning applications and the operating system.
You can purchase a memory card separately.
Improving Memory PerformanceYour device memory tends to fill up as a result of normal usage. If the device startsto slow down, or applications suddenly shut down, you should consider thefollowing:
• Always try to keep at least 500 MB of free internal storage available.• Close running applications that you are not using.• Clear the cache memory for all applications.• Uninstall downloaded applications that you don't use.• Transfer photos, videos, and music from the internal memory to the memory card.• If your device can't read content on the memory card, you may need to format the
card. Note that when you format the card, all content is erased.
If you are sharing a device with multiple users, you must log in as the owner, that is, theprimary user, to be able to perform certain actions, like transferring data to the memorycard and formatting the memory card.
To view the memory status• Find and tap Settings > Storage.
To clear the cache memory for all applications
1 Find and tap Settings > Storage.2 Tap Other apps, then tap the desired application.3 Tap CLEAR CACHE.
When you clear the cache memory, you don't lose any important information or settings.
To Transfer Media Files to the Memory Card
1 Make sure you have a memory card inserted into your device.2 Find and tap Settings > Storage > Transfer data to SD card.3 Mark the files that you want to transfer to the memory card.4 Tap Transfer.
To stop applications and services from running
1 Find and tap Settings > Apps & notifications > App info.2 Select an application or service, then tap FORCE STOP > OK.
40
This is an internet version of this publication. © Print only for private use.
To format the memory card
1 Find and tap Settings > Storage.2 Tap SD card > , then tap Storage settings > Format > Erase & format.
All content on the memory card gets erased when you format it. Be sure you first makebackups of all data you want to save. To back up your content, you can copy it to acomputer. For more information, see Managing files using a computer on the 39 page.
Smart CleanerUsing Smart cleaner, you can improve device performance by automaticallyoptimizing storage and memory depending on the frequency of app use.
To enable or disable Smart cleaner
1 Find and tap Settings > Assistant > Smart cleaner.2 Tap the slider beside Smart cleaner.
You can also modify, copy, or delete files manually if you find and tap Files application.
Backing Up and Restoring ContentGenerally, you should not save photos, videos, and other personal content solelyon the internal memory of your device. If your device is damaged, lost or stolen,the data stored on its internal memory may be impossible to recover. It isrecommended to use the Xperia™ Companion software to make backups whichsave your data safely to an external device. This method is especiallyrecommended if you are updating your device software to a newer Androidversion.
The Xperia™ Backup & Restore application is recommended for backing up databefore you do a factory data reset. With this application you can back up data toan online account, an SD card or to an external USB storage device that you haveconnected to your device using a USB host adapter:
With the Google Backup & Restore application, you can back up data to a Googleserver.
Backing up data to a computerUse the Xperia™ Companion software to back up data from your device to a PC oran Apple Mac® computer. You can back up the following types of data:
• Call logs• Text messages• Calendar• Settings• Media files such as music and videos• Photos and images
To back up your data using a computer
1 Unlock the screen of your device and connect it to the computer using a USBType-C cable.
2 Open the Xperia™ Companion software on your computer if it is notautomatically launched. After a few moments, the computer detects yourdevice. Make sure to select Transfer files mode on your device.
3 Click Backup on the Xperia™ Companion main screen.4 Follow the on-screen instructions to back up data from your device.
If you do not have Xperia™ Companion installed, you are requested to install it when youconnect your device to the computer.
41
This is an internet version of this publication. © Print only for private use.
To restore your data using a computer
1 Unlock the screen of your device and connect it to the computer using a USBType-C cable.
2 Open the Xperia™ Companion software on your computer if it is notautomatically launched. After a few moments, the computer detects yourdevice. Make sure to select Transfer files mode on your device.
3 Click Restore on the Xperia™ Companion main screen.4 Select a backup file from the backup records, then click Next and follow the
on-screen instructions to restore data to your device.
If you do not have Xperia™ Companion installed, you are requested to install it when youconnect your device to the computer.
Backing up Data with the Xperia™ Backup & Restore ApplicationUsing the Xperia™ Backup & restore application, you can make an online or a localdata backup. You can do so manually or turn on the automatic backup function tosave data periodically.
The Xperia™ Backup & restore application is recommended for backing up databefore you do a factory data reset. With this application, you can back up thefollowing types of data to an online account, to an SD card, or to an external USBstorage device that you have connected to your device using a USB host adapter:
• Contacts• Conversations• Call Log• Calendar• Email Accounts• Wi-Fi Accounts• Device Settings• Applications• Xperia™ Home layout
To set up the automatic backup function
1 If you are backing up content to a USB storage device, be sure the storagedevice is connected to your device using a USB host adapter. If you arebacking up to an SD card, make sure that the SD card is mounted properlyinto your device. If you are backing up content to an online account, makesure you have signed in to your Google account.
2 Find and tap Settings > System.3 Under Xperia™ Backup & restore, tap Automatic backup.4 To enable the automatic backup function, tap the slider.5 Select where to save backup files.6 If desired, select a backup frequency, when to back up, and the specific data
to back up. Otherwise, the backup is completed according to the defaultsettings.
7 To save your settings, tap .
To back up content manually
1 If you are backing up content to a USB storage device, be sure the storagedevice is connected to your device using a USB host adapter. If you arebacking up to an SD card, make sure the SD card is properly inserted intoyour device. If you are backing up content to an online account, make sureyou have signed in to your Google account.
2 Find and tap Settings > System.3 Under Xperia™ Backup & restore, tap More.4 Tap Manual backup, then select a backup destination and the data that you
want to back up.5 Tap Backup.6 After the data is backed up, tap Finish.
42
This is an internet version of this publication. © Print only for private use.
To edit a backup file
1 Find and tap Settings > System.2 Under Xperia™ Backup & restore, tap More.3 Tap Edit backup file, then select a backup source and the data types that
you want to delete.4 Tap Delete data.5 Tap OK to confirm.6 After the data is deleted, tap Finish.
To Restore Backed-Up Content
1 If you are restoring content from a USB storage device, make sure thestorage device is connected to your device using the USB Host adapter. Ifyou are restoring content from an SD card, make sure that the SD card isproperly inserted into your device. If you are restoring content from XperiaBackup & Restore service, make sure you have signed in to your Googleaccount.
2 Find and tap Settings > System.3 Under Xperia™ Backup & restore, tap Restore data, then select a restore
source and the data that you want to restore.4 Tap Restore data.5 After the content is restored, tap Finish.
Remember that any changes that you make to your data and settings after you create abackup—such as any new apps you install—get deleted during any subsequent restoreprocedure.
Backing Up Data With the Google Backup & Restore ApplicationUsing the Google Backup & restore application, you can back up data to a Googleserver. You can also turn on the automatic restore function to restore applicationdata and settings when you reinstall an application.
With this application you can back up the following types of data:
• Applications• Bookmarks• Wi-Fi networks• Other settings
To back up data to a Google account
1 Find and tap Settings > System > Backup.2 Under Back up to Google Drive tap Backup account to choose which
account you want to back up your files to.
To enable or disable automatic restore when you reinstall an application
1 Find and tap Settings > System > Backup.2 Tap the Back up to Google Drive slider to enable or disable the automatic
restore.
43
This is an internet version of this publication. © Print only for private use.
Downloading applications
Downloading applications from Google Play™Google Play™ is the official online Google store for downloading applications,games, music, movies, and books. It includes both free and paid applications.Before you start downloading from Google Play, be sure that you have a workinginternet connection, preferably over Wi-Fi to limit data traffic charges. For moreinformation, see Updating your device on page 37.
To use Google Play, you need to have a Google™ account. Google Play may not be availablein all countries or regions.
To download an application from Google Play
1 Find and tap Play Store.2 Find an item you wish to download by browsing categories, or by using the
search function.3 Tap the item to view its details. Follow the on-screen instructions to
complete the installation.
Some applications may need to access data, settings, and various functions on your devicein order to work properly. Only install and give permissions to applications that you trust.
You can view the permissions granted to a downloaded application by tapping theapplication under Settings > Apps & notifications > App permissions.
Downloading Applications from Other SourcesWhen your device is set to allow downloads from sources other than GooglePlay™, you can download applications directly from other websites by followingthe relevant download instructions.
Installing applications of unknown or unreliable origin can damage your device. Downloadapplications only from reliable sources. Contact the application provider if you have anyquestions or concerns.
If you are using a device with multiple users, only the owner, that is, the primary user, canallow downloads from sources other than Google Play™. Changes made by the owneraffect all other users.
To enable or disable the downloading of applications from other sources
1 Find and tap Settings > Apps & notifications > App permissions.2 Tap the app to view its permissions. Tap the slider to enable or disable.
44
This is an internet version of this publication. © Print only for private use.
Internet and networks
Browsing the webThe Google Chrome™ web browser for Android™ devices comes pre-installed inmost markets. Go to http://support.google.com/chrome and click the "Chrome forMobile" link to get more detailed information about how to use this web browser.
To browse the web
1 Find and tap .2 If you are using Google Chrome for the first time, select to either sign in to a
Google account or browse with Google Chrome anonymously.3 Enter a search term or web address in the search and address field, then tap
on the keyboard.
Internet and MMS settingsTo access the internet, or send multimedia messages without Wi-Fi, you need acellular data connection with correct internet and Multimedia Messaging Service(MMS) settings. Here are some tips:
• For most cellular networks and operators, these settings come pre-installed onyour device so you can start using the internet and sending multimedia messagesright away.
• You can manually check for updates to the internet and MMS settings. If youchange or delete an internet or MMS setting by mistake, download the internetand MMS settings again.
• Refer to troubleshooting tips for your device at http://support.sonymobile.com fornetwork coverage, cellular data, and MMS issues.
• If the Battery time preferred setting of STAMINA mode is activated to save power,all cellular data traffic gets paused when the screen is off. If this causes connectionproblems, try excluding some applications and services from being paused, ordeactivate STAMINA mode temporarily.
• If you are sharing a device with multiple users, only the owner, that is, the primaryuser, can download internet and messaging settings from the Settings menu, butthe downloaded settings are applicable to all users.
To download internet and MMS settings
1 Find and tap Settings > Network & Internet > Internet settings.2 Tap ACCEPT. Once the settings are downloaded successfully, appears in
the status bar and cellular data traffic is turned on automatically.
If the settings cannot be downloaded to your device, check the signal strength of yourcellphone or Wi-Fi network connections. Move to an open location free from obstructionsor get close to a window and then try again.
To add internet and MMS settings
1 Find and tap Settings > Network & Internet > Mobile network.2 Tap Access Point Names > .3 Tap Name and enter a name of your choice, then tap OK.4 Tap APN and enter the access point name, then tap OK.5 Enter all other required information. If you don't know what information is
required, contact your network operator for more details.6 When you're done, tap , and then tap Save.
To view downloaded internet and MMS settings
1 Find and tap Settings > Network & Internet > Mobile network.2 Tap Access Point Names.3 To view more details, tap any of the available items.
45
This is an internet version of this publication. © Print only for private use.
Wi-FiUse Wi-Fi to surf the internet, download applications, or send and receive emails.Once you have connected to a Wi-Fi network, your device remembers the networkand automatically connects to it the next time you come within range.
Some Wi-Fi networks require you to log in to a web page before you can getaccess. Contact the relevant Wi-Fi network administrator for more information.
Available Wi-Fi networks may be open or secured. Secured networks are indicatedby next to the Wi-Fi network name.
Some Wi-Fi networks do not show up in the list of available networks because they do notbroadcast their network name (SSID). If you know the network name, you can add itmanually to your list of available Wi-Fi networks.
To turn Wi-Fi on or off
1 Find and tap Settings > Network & Internet > Wi-Fi.2 Tap the slider to enable or disable Wi-Fi.
It may take a few seconds before Wi-Fi is enabled.
To connect to a Wi-Fi network
1 Find and tap Settings > Network & Internet > Wi-Fi.2 Tap the slider to turn on Wi-Fi. All available Wi-Fi networks are displayed.3 Tap a Wi-Fi network to connect to it. For secured networks, enter the relevant
password. is displayed in the status bar once you are connected.
The list of available Wi-Fi networks refreshes automatically. If you cannot connect to a Wi-Finetwork successfully, refer to the relevant troubleshooting tips for your device athttp://support.sonymobile.com.
To add a Wi-Fi network manually
1 Find and tap Settings > Network & Internet > Wi-Fi.2 Scroll down and tap Add network.3 Enter the Network name information.4 To select a security type, tap the Security field.5 If required, enter a password.6 To edit advanced options, such as proxy and IP settings, tap Advanced
options and then edit the options as desired.7 Tap SAVE.
Contact your Wi-Fi network administrator to get the network SSID and password.
46
This is an internet version of this publication. © Print only for private use.
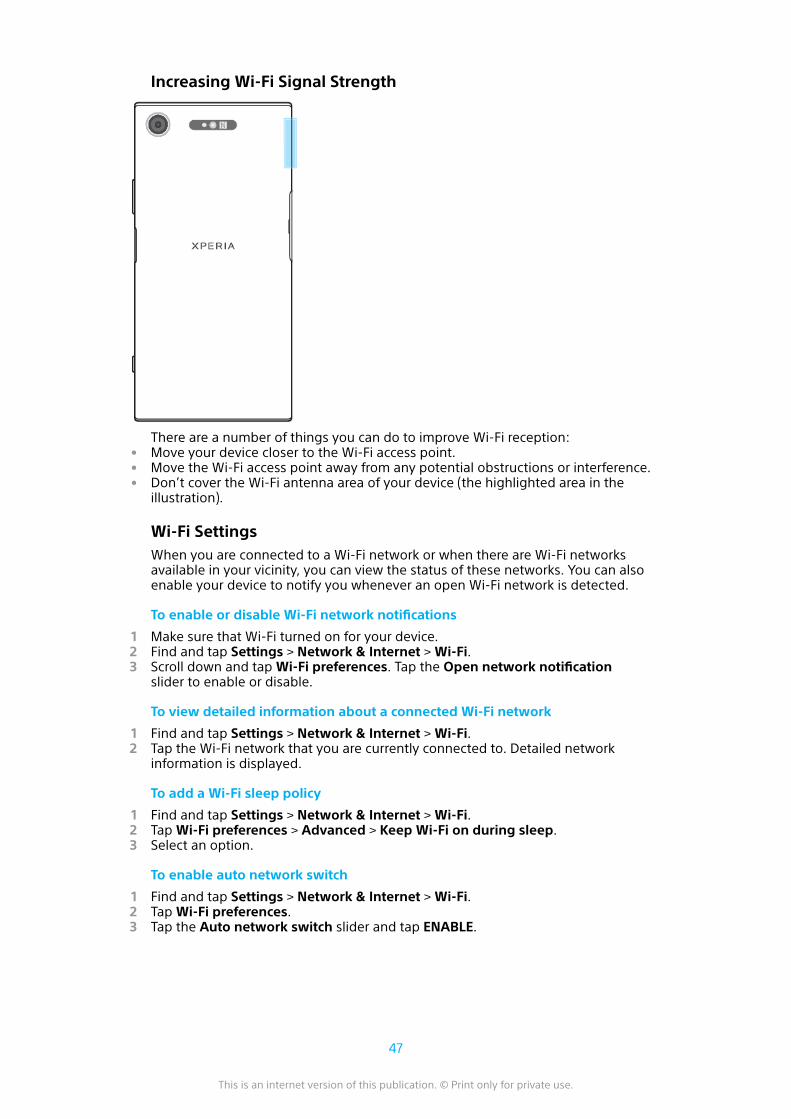
Increasing Wi-Fi Signal Strength
There are a number of things you can do to improve Wi-Fi reception:• Move your device closer to the Wi-Fi access point.• Move the Wi-Fi access point away from any potential obstructions or interference.• Don’t cover the Wi-Fi antenna area of your device (the highlighted area in the
illustration).
Wi-Fi SettingsWhen you are connected to a Wi-Fi network or when there are Wi-Fi networksavailable in your vicinity, you can view the status of these networks. You can alsoenable your device to notify you whenever an open Wi-Fi network is detected.
To enable or disable Wi-Fi network notifications
1 Make sure that Wi-Fi turned on for your device.2 Find and tap Settings > Network & Internet > Wi-Fi.3 Scroll down and tap Wi-Fi preferences. Tap the Open network notification
slider to enable or disable.
To view detailed information about a connected Wi-Fi network
1 Find and tap Settings > Network & Internet > Wi-Fi.2 Tap the Wi-Fi network that you are currently connected to. Detailed network
information is displayed.
To add a Wi-Fi sleep policy
1 Find and tap Settings > Network & Internet > Wi-Fi.2 Tap Wi-Fi preferences > Advanced > Keep Wi-Fi on during sleep.3 Select an option.
To enable auto network switch
1 Find and tap Settings > Network & Internet > Wi-Fi.2 Tap Wi-Fi preferences.3 Tap the Auto network switch slider and tap ENABLE.
47
This is an internet version of this publication. © Print only for private use.
To find the MAC address for your device
1 Find and tap Settings > Network & Internet > Wi-Fi.2 Tap Wi-Fi preferences > Advanced.3 MAC address is displayed in the list.
The Wi-Fi Mac address is also displayed under Settings > System > About phone > Status >Wi-Fi MAC address.
WPSWPS (Wi-Fi Protected Setup) is a wireless networking standard that helps youestablish secure wireless network connections. WPS makes it easy for you to set upWPA (Wi-Fi Protected Access) encryption to secure your network. You can also addnew devices to an existing network without entering long passwords.
Use one of these methods to enable WPS:
• Push button method – simply push a button on a WPS-supported device, forexample, a router.
• PIN method – your device creates a random PIN (Personal Identification Number),which you enter on the WPS-supported device.
To connect to a Wi-Fi network using a WPS button
1 Find and tap Settings > Network & Internet > Wi-Fi.2 Turn on Wi-Fi if it is not already on.3 Tap Wi-Fi preferences > Advanced > WPS Push Button, then press the WPS
button on the WPS-supported device.
To connect to a Wi-Fi network using a WPS PIN
1 Find and tap Settings > Network & Internet > Wi-Fi.2 Turn on Wi-Fi if it is not already on.3 Tap Wi-Fi preferences > Advanced > WPS PIN Entry.4 On the WPS-supported device, enter the PIN that appears on your device.
Sharing your cellular data connectionYou can share your cellular data connection with other devices in several ways.
• USB tethering: Share your cellular data connection with a single computer using aUSB cable.
• Portable hotspot: Share your cellular data connection with up to 10 other devicessimultaneously, including devices that support WPS technology.
• One-touch portable hotspot: Touch devices to start sharing your cellularconnection over Wi-Fi.
• Bluetooth tethering: Share your cellular data connection with up to four otherdevices via Bluetooth.
To share your data connection using a USB cable
1 Connect your device to a computer, using the USB cable that came with it.2 Find and tap Settings > Network & Internet > Hotspot & tethering.3 Tap the USB tethering slider, then tap OK if prompted. is displayed in the
status bar once you are connected.4 To stop sharing your data connection, tap the USB tethering slider or
disconnect the USB cable.
You cannot share your device's data connection and SD card over a USB cable at the sametime.
48
This is an internet version of this publication. © Print only for private use.

To share your mobile connection by One-touch portable hotspot
1 Make sure that both devices have the NFC function turned on, and that bothscreens are active.
2 Find and tap Settings > Network & Internet > Hotspot & tethering.3 Tap One-touch portable hotspot. Hold the devices together so that the NFC
detection areas of each device touch, then tap CONNECT.
This function only works with devices that also support NFC Wi-Fi tethering.
To share your cellular data connection with another Bluetooth device
1 Make sure that your device and the other Bluetooth device are paired witheach other and that cellular data traffic is activated on your device.
2 Your device: Find and tap Settings > Network & Internet > Hotspot &tethering. Tap the Bluetooth tethering slider to enable the function.
3 Bluetooth device: Set up the device so that it obtains its networkconnection using Bluetooth. If the device is a computer, refer to the relevantinstructions to complete the setup. If the device runs on the Androidoperating system, tap the settings icon beside the name of the device that itis paired with under Settings > Device connection > Bluetooth > Paireddevices, then mark the Internet access checkbox.
4 Your device: Wait for to appear in the status bar. Once it appears, thesetup is complete.
5 Tap the Bluetooth tethering slider again to disable the function.
The Bluetooth tethering function is turned off every time you turn off your device or turn offthe Bluetooth function.
To use your device as a portable Wi-Fi hotspot
1 Find and tap Settings > Network & Internet > Hotspot & tethering.2 Tap Portable hotspot settings > Configure hotspot.3 Enter the Network name information.4 To select a security type, tap the Security field. If required, enter a password.5 Tap SAVE.6 Tap and tap the Portable hotspot slider to enable the function.7 If prompted, tap OK to confirm. appears in the status bar when the
portable Wi-Fi hotspot is active.8 To stop sharing your data connection via Wi-Fi, tap the Portable hotspot
slider to disable the function.
To allow a WPS-supported device to use your cellular data connection
1 Make sure that your device is functioning as a portable Wi-Fi hotspot.2 Find and tap Settings > Network & Internet > Hotspot & tethering.3 Enable the Portable hotspot slider, then tap Portable hotspot settings >
Discoverable.4 Under Configure hotspot, make sure that your portable hotspot is secured
by a password.5 Tap WPS Push Button, then follow the on-screen instructions. Alternatively,
tap > WPS PIN Entry, then enter the PIN that appears on the WPS-supported device.
To rename or secure your Portable Hotspot
1 Find and tap Settings > Network & Internet > Hotspot & tethering.2 Tap Portable hotspot settings > Configure hotspot.3 Enter the Network name information.4 To select a security type, tap the Security field.5 If required, enter a password.6 Tap SAVE.
49
This is an internet version of this publication. © Print only for private use.
Controlling Data UsageYou can keep track of the amount of data transferred to and from your device overyour cellular data or Wi-Fi connection during a given period. For example, you canview the amount of data used by individual applications. For data transferred overyour cellular data connection, you can also set data usage warnings and limits toavoid additional charges.
If you are using a device that has multiple users, only the owner (that is, the primary user)can adjust data usage settings. Adjusting data usage settings can help you keep greatercontrol over data usage but cannot guarantee the prevention of additional charges.
To help reduce data usage
1 Find and tap Settings > Network & Internet > Data usage > Data Saver.2 Tap the slider to enable or disable the function.
To turn data traffic on or off
1 Find and tap Settings > Network & Internet > Data usage.2 Tap the Mobile data slider to turn data traffic on or off.
When data traffic is turned off, your device can still establish Wi-Fi and Bluetoothconnections.
To set a data usage warning
1 Make sure that cellular data traffic is turned on.2 Find and tap Settings > Network & Internet > Data usage > Billing cycle.3 To set the warning level, tap the slider beside Set data warning.4 Tap Data warning, enter the desired data limit and tap SET. You receive a
warning notification when the amount of data traffic reaches the level youset.
To set a cellular data limit
1 Make sure that cellular data traffic is turned on.2 Find and tap Settings > Network & Internet > Data usage.3 Tap Billing cycle and tap the slider beside Set data limit, then tap OK.4 To set the data usage limit, tap Data limit, enter the desired data limit and
tap SET.
Once your cellular data usage reaches the set limit, cellular data traffic on your device getsturned off automatically.
To control the data usage of individual applications
1 Find and tap Settings > Apps & notifications > App info.2 Tap the application that you want to control, then tap Data usage.
The performance of individual applications may be affected if you change the related datausage settings.
To check your data usage
1 Find and tap Settings > Network & Internet > Data usage.2 To view information about the amount of data transferred via cellular data
connection, tap Cellular data usage. To view information about the amountof data transferred via Wi-Fi connection, tap Wi-Fi data usage.
Selecting cellular networksYour device supports the use of up to three different networks at the same time.You can select from the following network mode combinations:
• One WCDMA network• One GSM network
50
This is an internet version of this publication. © Print only for private use.
• One WCDMA and one GSM network• One LTE, one WCDMA and one GSM network
Your device automatically switches between cellphone networks depending onwhich cellphone networks are available where you are. You can also manually setyour device to use a particular cellphone network mode, for example, WCDMA orGSM.
Different status icons are displayed in the status bar depending on the type ormode of network that you are connected to. Refer to Status icons on page 30 tosee what the different status icons look like.
To select a network mode
1 Find and tap Settings > Network & Internet > Mobile network.2 Tap Preferred network type, then select a network mode.
To select another network manually
1 Find and tap Settings > Network & Internet > Mobile network.2 Tap Network operators > Search networks.3 Select a network.
If you select a network manually, your device will not search for other networks, even if youmove out of range of the manually selected network.
To activate automatic network selection
1 Find and tap Settings > Network & Internet > Mobile network.2 Tap Service providers > Automatic.
51
This is an internet version of this publication. © Print only for private use.
Synchronizing data on your device
Synchronizing with Online AccountsSynchronize your device with contacts, email, calendar events, and otherinformation from online accounts, for example, email accounts such as Gmail™and Exchange ActiveSync, Facebook™, and Flickr™. You can synchronize dataautomatically for such accounts by activating the auto-sync function, or you cansynchronize each account manually.
To set up an online account for synchronization
1 Tap Settings > Users & accounts > Add account, then select the accountthat you want to add.
2 Follow the on-screen instructions to create or sign in to an account.
To synchronize manually with an online account
1 Find and tap Settings > Users & accounts.2 Tap the name of the account that you want to synchronize with. A list of
items appears showing what can be synchronized with the account.3 Tap the slider next to the item that you want to synchronize.
To remove an online account
1 Find and tap Settings > Users & accounts.2 Select the account, then tap REMOVE ACCOUNT.3 Tap REMOVE ACCOUNT again to confirm.
Synchronizing with Microsoft® Exchange ActiveSync®
If your company uses a Microsoft Exchange ActiveSync account, you can accessyour corporate email messages, calendar appointments, and contacts directly onyour device. After setup, you can find your information in the Email, Calendar, andContacts applications.
Fingerprint functionality is not available in the United States.
If you have set up a Microsoft Exchange ActiveSync (EAS) account on your Xperia™ device,the EAS security settings may limit the lock screen type to only a PIN or password. Thisoccurs when your network administrator specifies a lock screen type for all EAS accountsfor enterprise security reasons. Contact the network administrator of your company ororganization to check what network security policies are implemented for cellular devices.
To set up an EAS account for synchronization
1 Tap Settings > Users & accounts > Add account > Exchange ActiveSync.2 Enter your corporate email address and password.3 Tap NEXT. If a failure occurs, enter the domain and server details for your
account manually and then tap NEXT.4 Tap OK to allow your corporate server to control your device.5 Select a synchronization method, a synchronization interval and the data
that you want to sync with your device.6 Tap NEXT, then select how you want to be notified when a new email
arrives.7 Tap NEXT, enter a name for the corporate account, then tap Finish setup.8 If prompted, activate the device administrator to allow your corporate server
to set certain security rules on your device, like disabling voice recording andusing storage encryption.
52
This is an internet version of this publication. © Print only for private use.
To remove an EAS account
1 Find and tap Settings > Users & accounts.2 Select the EAS account that you want to remove.3 Tap REMOVE ACCOUNT.4 Tap REMOVE ACCOUNT again to confirm.
53
This is an internet version of this publication. © Print only for private use.
Basic settings
Accessing settingsView and change settings for your device from the Settings menu. The Settingsmenu is accessible from both the Application screen and the Quick settings panel.
To open the device settings menu from the Application screen• Find and tap Settings.
To view information about your device• Find and tap Settings > System > About phone.
To Access the Quick Settings Panel• Drag the status bar downward using two fingers.
To Turn On the Flashlight
1 Drag the status bar downward using two fingers.2 Tap .
To Select Which Settings to Display on the Quick Settings Panel
1 Using two fingers, drag the status bar fully downward, then tap .2 To add a setting to the Quick settings panel, drag and drop the icon into the
upper part of the screen. To remove a setting, drag and drop the icon intothe lower part of the screen.
To Rearrange the Quick Settings Panel
1 Drag the status bar fully downward, then tap .2 Touch and hold an icon, and then move it to the desired position.
Volume settingsYou can adjust the ringtone volume for incoming calls and notifications as well asfor music and video playback.
To adjust the ringtone volume with the volume key• Press the volume key up or down.
To Adjust the Media Playing Volume with the Volume Key• When playing music or watching video, press the volume key up or down,
even when the screen is locked.
To Turn on Vibrate Mode• Press the volume key up or down until appears.
To adjust the volume levels
1 Find and tap Settings > Sound.2 Drag the volume sliders to the desired positions.
You can also press the volume key up or down and tap to adjust the ringtone, mediaplayback, or alarm volume levels separately.
To set your device to vibrate for incoming calls
1 Find and tap Settings > Sound.2 Tap the Also vibrate for calls slider to enable the function.
54
This is an internet version of this publication. © Print only for private use.
To set a ringtone
1 Find and tap Settings > Sound > Phone ringtone.2 Select an option from the list or tap and select a music file that is saved on
your device.3 To confirm, tap OK.
To select the notification sound
1 Find and tap Settings > Sound > Notification sound.2 Select an option from the list or tap and select a music file that is saved on
your device.3 To confirm, tap OK.
Some applications have their own specific notification sounds, which you can select fromthe application settings.
To enable touch tones
1 Find and tap Settings > Sound > Advanced.2 Tap the sliders to enable or disable the different touch tones as desired.
Do Not Disturb ModeYou can set your device to Do not disturb mode and decide how long your devicewill be in Do not disturb mode manually. You can also preset when your device willbe in Do not disturb mode automatically.
To activate Do not disturb mode
1 Using two fingers, drag the status bar fully downward to access the QuickSettings panel.
2 Tap to turn on Do not disturb.3 For more options, tap the setting name below and select a setting. You
can also set a time limit as desired.4 Tap DONE.
To Quickly Shift Between Do Not Disturb/Vibrate/Sound Mode
1 Press the volume key up or down until , , or appears.2 Tap or to quickly shift between Vibrate/Sound mode. To activate Do not
disturb mode, press the volume key down when in vibrate mode.
To schedule Do not disturb mode time intervals
1 Find and tap Settings > Sound > Do not disturb.2 Select from the rules under Automatic rules, or tap to add a new rule.3 Choose a rule type.4 Enter the desired name for the rule, then tap OK.5 Select the settings for the rule you have created. For a Time rule, you can
select the days and time. For an Event rule, you can select an event fromyour calendar to synchronize with.
Setting Exceptions for Do Not Disturb ModeYou can select which types of notifications are allowed to sound in Do not disturbmode and you can filter exceptions based on who the notifications come from. Themost common types of exceptions include:
• Events and reminders• Calls• Messages• Alarms
55
This is an internet version of this publication. © Print only for private use.
To associate exceptions with specific contact types
1 Find and tap Settings > Sound > Do not disturb > Allowed in Priority only.2 Tap Calls or Messages.3 Select an option.
Screen settings
To adjust the screen brightness manually regardless of lighting condition
1 Find and tap Settings > Display and tap the Adaptive brightness slider todisable this function, if it is not already disabled.
2 Tap Brightness level.3 Drag the slider to adjust the brightness.
Lowering the brightness level helps the battery last longer.
To enable or disable vibrate on touch
1 Find and tap Settings > Sound > Advanced.2 Tap the Vibrate on tap slider to enable or disable the function.
To adjust the idle time before the screen turns off
1 Find and tap Settings > Display > Sleep.2 Select an option.
To turn off the screen quickly, briefly press the power key .
To adjust the font size
1 Find and tap Settings > Display > Font size.2 Select the preferred option.
To adjust the display size
1 Find and tap Settings > Display > Display size.2 Drag the slider to select the preferred option.
To adjust the white balance of the display
1 Find and tap Settings > Display > White balance.2 Drag the sliders to the desired positions to adjust the white balance.
To revert the white balance setting back to its default values, tap > Default values.
Smart backlight controlThe smart backlight control keeps the screen on as long as the device is held inyour hand. Once you put down the device, the screen turns off according to yoursleep setting.
To enable or disable the Smart backlight control function
1 Find and tap Settings > Display > Smart backlight control.2 Tap the slider to enable or disable the function.
Glove modeUsing glove mode, you can wear gloves and still navigate the screen on yourdevice. When you use glove mode, a cursor ring appears on the area of the screenwhere a touch is registered.
56
This is an internet version of this publication. © Print only for private use.
To enable or disable glove mode
1 Find and tap Settings > Display > Glove mode.2 Tap the slider to enable or disable this function.
The sensitivity depends on the size of the contact area between the screen and the glovedfinger that you use to navigate the screen.
Screen PinningUse screen pinning to set your device to display only the screen for a specificapplication. For example, if you are playing a game and you accidentally touch theHome navigation key, the screen pinning feature prevents the active game appscreen from being minimized. You can also use this feature when you lend yourdevice to another person to make it harder for them to access more than oneapplication. For example, you can lend your device to somebody to take a photoand pin the screen to the Camera application so that the person can't easily useother apps such as Email.
Screen pinning is not a security feature and does not fully prevent other users fromunpinning a screen and accessing your device. To protect your data, you should set up yourdevice to request a screen lock PIN, password, or pattern before someone can unpin thescreen.
To enable or disable screen-pinning
1 Find and tap Settings > Lock screen & security > Screen pinning.2 Tap the slider to enable or disable the function.3 To unpin your screen, touch and hold and at the same time.
A pattern, PIN, or password is not mandatory for screen pinning to work.
To pin a screen
1 Make sure screen pinning is activated on your device.2 Open an app and go to the screen that you want to pin.3 Tap .4 To display the screen pinning icon , swipe upward.5 Tap .6 In the pop-up window that appears, tap Got it.
To Unpin a Screen
1 On the pinned screen, touch and hold and at the same time.2 Release both buttons.
If you selected a security option when you activated the screen pinning function, you haveto enter your pattern, PIN, or password to unlock the device before the screen can beunpinned.
Application settingsSome apps will ask for permissions once you start using them. You can allow ordeny permissions individually for each app, either from the Settings menu or fromthe Permission confirm dialog. Permission requirements depend on the app’sdesign.
Allowing or denying permissionsYou can choose whether to allow or deny permissions when the dialog is shown. Ifyou have used another Android version previously, most apps will have alreadybeen granted the necessary permissions.
To allow a permission• To allow a permission, tap Allow. You can mark the Don't ask again
checkbox if you wish.
57
This is an internet version of this publication. © Print only for private use.
To deny a permission• To deny a permission, tap Deny when the dialog is shown.
Some applications can still be used even if you have denied permissions.
Critical permissionsSome permissions are mandatory for apps to work as intended. In such cases, adialog will inform you.
To configure applications
1 Find and tap Settings > Apps & notifications.2 Select a configuration option, for example App permissions, then choose an
application that you want to configure.
To allow critical permissions
1 Find and tap Settings > Apps & notifications > App permissions.2 Select an option, then tap the relevant slider to adjust permissions.
Allowing or Denying Automatic Application UpdatesIf the automatic update feature is enabled, your applications get updated withoutyou being asked, so you may not realize that large volumes of data are beingdownloaded. In order to avoid potentially high data transfer costs, you can disableautomatic updates or enable automatic updates only over Wi-Fi connection. Youhave to disable the automatic update feature both in the Play Store™ app and theWhat's New app (where available) to avoid the automatic updating of apps.
To enable or disable automatic updates for all applications in the Play Store
1 Find and tap .2 Tap , then tap Settings > Auto-update apps.3 Select the preferred option.
To enable or disable automatic updates for all applications in What's New
1 Find and tap .2 Tap , then tap Settings > Auto-update apps.3 Select the preferred option.
Application linkingYour device can determine the default app to handle a particular web link. Thismeans that if the link is set, you don’t need to select an app each time you open alink. You can change the default app any time you want.
To manage app links from the Settings menu
1 Find and tap Settings > Apps & notifications.2 Tap Advanced > Default apps > Opening links.3 Select an app, and adjust the settings as desired.
Resetting Your ApplicationsYou can reset an application or clear application data if your application stopsresponding or causes issues with your device.
To reset application preferences
1 Find and tap Settings > Apps & notifications.2 Tap App info > > Reset app preferences, then tap > Reset apps.
Resetting application preferences does not delete any application data from your device.
58
This is an internet version of this publication. © Print only for private use.
To clear application data
1 Find and tap Settings > Apps & notifications > App info.2 Select an application or service, then tap Storage > CLEAR DATA > OK.
When you clear application data, data for the selected application is deleted from yourdevice permanently. The option to clear application data is not available for everyapplication or service.
To clear application cache
1 Find and tap Settings > Apps & notifications > App info.2 Select an application or service, then tap Storage > CLEAR CACHE.
The option to clear the application cache is not available for every application or service.
To clear the application default setting
1 Find and tap Settings > Apps & notifications > App info.2 Select an application or service, then tap Open by default > CLEAR
DEFAULTS.
The option to clear the application default setting is not available for every application orservice.
Screen SaverSet up an interactive screen saver that automatically displays colours, photos, or aslideshow while your device is docked or charging and the screen is idle.
On a device with multiple users, each user can have individual Screen saver settings.
To enable or disable the screen saver
1 Find and tap Settings > Display > Screen saver.2 Tap the slider to enable or disable the function.
To select content for the Screen saver
1 Find and tap Settings > Display > Screen saver.2 Tap the slider to enable the function.3 Select what you want to display when the screen saver is active.
To start the screen saver manually
1 Find and tap Settings > Display > Screen saver.2 Tap the slider to enable the function.3 To activate the Screen saver immediately, tap , then tap Start now.
Language SettingsYou can select a default language for your device and change it again at a latertime. You can also change the writing language for text input.
To change the language
1 Find and tap Settings > System > Languages & input > Languages.2 To change the language, drag and drop the desired language to the top of
the list. If the desired language is not currently listed, tap to add it.
If you select the wrong language and cannot read the menu texts, find and tap . Then,select the text beside and select the first entry in the menu that opens. You can thenselect the language you want.
59
This is an internet version of this publication. © Print only for private use.
Date and timeYou can change the date and time on your device.
To set the date manually
1 Find and tap Settings > System > Date & time.2 Disable the Automatic date & time function by tapping the slider.3 Tap Set date.4 Flick left or right, or use the arrows to set the desired date.5 Tap OK.
To set the time manually
1 Find and tap Settings > System > Date & time.2 Disable the Automatic date & time function by tapping the slider.3 Tap Set time.4 Select the relevant values for the hour and minute.5 Tap OK.
To set the time zone
1 Find and tap Settings > Date & time.2 Disable the Automatic time zone function by tapping the slider.3 Tap Select time zone.4 Select an option.
X-Reality™ for mobileSony's X-Reality™ for mobile technology improves the viewing quality of videos,giving you clearer, sharper and more natural images. X-Reality™ for mobile isturned on by default, but you can turn it off if you want to reduce batteryconsumption.
To enable or disable X-Reality™ for mobile
1 Find and tap Settings > Display > Video image enhancement.2 Tap the slider to enable or disable.
Color gamut and contrastProfessional, Standard, and Super-vivid modes enhance the color brightness andsaturation of your photos and videos while you view them on your device.
To apply an image enhancement mode
1 Find and tap Settings > Display > Color gamut and contrast.2 Select an option.
Enhancing the Sound OutputYou can enhance the sound of your device by manually enabling individual soundsettings such as Equalizer and Surround sound. You can enable the Dynamicnormalizer to minimize volume differences between songs or videos. You can alsoimprove the quality of compressed music files to near high-resolution audioquality when you are using wired headphones.
To enhance the sound output automatically
1 Find and tap Settings > Sound > Audio settings.2 Disable the DSEE HX function by tapping the slider, if it is enabled.3 Enable the ClearAudio+ function by tapping the slider.
60
This is an internet version of this publication. © Print only for private use.
To adjust the sound settings manually using the Equalizer
1 Find and tap Settings > Sound > Audio settings.2 If the ClearAudio+ function or the DSEE HX function is enabled, tap the
slider to disable it.3 Tap Sound effects > Equalizer.4 To adjust the sound manually, drag the frequency band buttons. To choose a
preset arrangement, tap , select an arrangement, then tap OK to confirm.
The manual adjustment of sound output settings has no effect on voice communicationapplications. For example, there is no change in the voice call sound quality.
To turn on the Surround sound feature
1 Find and tap Settings > Sound > Audio settings > Sound effects > Surroundsound (VPT).
2 Flick left or right to select a setting, then tap OK to confirm.
To minimize volume differences using the Dynamic normalizer
1 Find and tap Settings > Sound > Audio settings.2 Disable the DSEE HX function by tapping the slider, if it is enabled.3 Enable the Dynamic normalizer function by tapping the slider.
To upgrade the quality of compressed music files
1 Find and tap Settings > Sound > Audio settings.2 Enable the DSEE HX function by tapping the slider.
This setting is only available for wired headphones that support High-Resolution Audio.
Noise cancellationYour device supports noise canceling headsets. By using a noise canceling headsetwith your device, you can get much clearer audio quality when listening, forexample, to music in a noisy environment, such as on a bus, a train or a plane. Youcan also use this feature to create a silent environment in which to study, work orread.
To ensure optimal performance, noise canceling headsets from Sony are recommended.
To use a noise-canceling headset
1 Connect the noise-canceling headset to your device.2 Find and tap Settings > Sound > Accessory settings > Noise canceling, then
enable the Noise canceling function by tapping the slider.3 Tap Headset/Headphone type, and select the type of your headset/
headphone.4 If you want Noise canceling to be enabled only during music or video
playback or when the screen is active, tap the Power save mode slider toenable this function.
5 If you want Noise canceling to be enabled for as long as the headset isconnected, tap the Power save mode slider to disable this function.
A noise canceling headset may not be included with your device at purchase.
You can also enable the Noise canceling function via the notification on the Quick settingspanel when a noise-canceling headset is connected to your device.
To Adjust the Settings to the Noise Environment
1 Make sure a noise-canceling headset is connected to your device.2 Find and tap Settings > Sound > Accessory settings > Noise canceling >
Noise environment.3 Select the relevant noise environment type, then tap OK.
61
This is an internet version of this publication. © Print only for private use.
Multiple User AccountsYour device supports multiple user accounts so that different users can log inseparately to the device and use it. Multiple user accounts work well in situationswhere you share the same device with other people or lend your device tosomeone to use for a while. The user who sets up the device for the first timebecomes the owner of the device. Only the owner can manage the accounts ofother users. Apart from the owner account, there are two different types ofaccounts:
• Regular User: This account type is suitable for someone who regularly uses yourdevice.
• Guest User: Enable the guest account option for someone who just wants to useyour device temporarily.
Some features are only available to the owner. For example, only the owner can allowdownloads from sources other than Google Play™.
About the Regular User AccountBy adding Regular User accounts, you can allow different users to have differenthomescreens, wallpapers, and general settings. They also get separate access toapplications and memory storage for files such as music and photos. You can addup to seven Regular User accounts on your device.
To add a regular user account
1 Make sure you are logged in as the owner, that is, the user who set up thedevice for the first time.
2 Find and tap Settings > Users & accounts > Users > Add user.3 Tap OK. The new account is now created.4 Tap Set up now. The screen locks and an icon representing the newly added
user appears in the top-right corner.5 Unlock the screen by swiping upwards.6 Follow the on-screen instructions to set up the account for the user.
You can also add a regular user account from the status bar on any screen. Just drag thestatus bar fully downward and tap the user icon, and then tap Add user.
To delete a regular user account from your device
1 Make sure you are logged in as the owner.2 Find and tap Settings > Users & accounts > Users.3 Tap beside the name of the user that you want to delete, then tap
Remove user > Delete.
About the Guest User AccountIf someone just wants to use your device temporarily, you can enable a guestaccount for that user. In Guest mode, your device starts up as a freshly installedsystem with only the preinstalled apps. Once your guest is finished using yourdevice, you can wipe the session clean so that the next guest can start fresh. TheGuest User account is preinstalled and cannot be deleted.
To Activate the Guest User Account
1 Make sure you are logged in as the owner, that is, the user who set up thedevice for the first time.
2 Drag the status bar downward using two fingers and tap the user icon.3 Tap Add guest.
62
This is an internet version of this publication. © Print only for private use.
To clear the guest session data
1 Make sure you are logged in to the guest account.2 Find and tap Settings > Users & accounts > Users.3 Find and tap Remove guest.4 Tap Remove.
You can also clear the guest session from the status bar on any screen as long as you arelogged in to the guest account. Just drag the status bar downward and tap the user icon,and then tap Remove guest.
Switching between Multiple User Accounts
To switch between multiple user accounts
1 To view the list of users, drag the status bar downward, then tap the usericon.
2 Tap the icon representing the user account that you want to switch to. Thelock screen for that user account appears.
When you switch to the guest account, tap Start over if you want to wipe the previoussession or tap Yes, continue to continue the previous session.
Settings for Multiple User AccountsThere are three different types of settings on devices with multiple users:
• Settings that can be changed by any user and affect all users. Examples includelanguage, Wi-Fi, Airplane mode, NFC, and Bluetooth®.
• Settings that only affect an individual user account. Examples include automaticdata syncing, screen lock, various accounts added, and wallpaper.
• Settings that are only visible to the owner and affect all users, for example, VPNsettings.
63
This is an internet version of this publication. © Print only for private use.
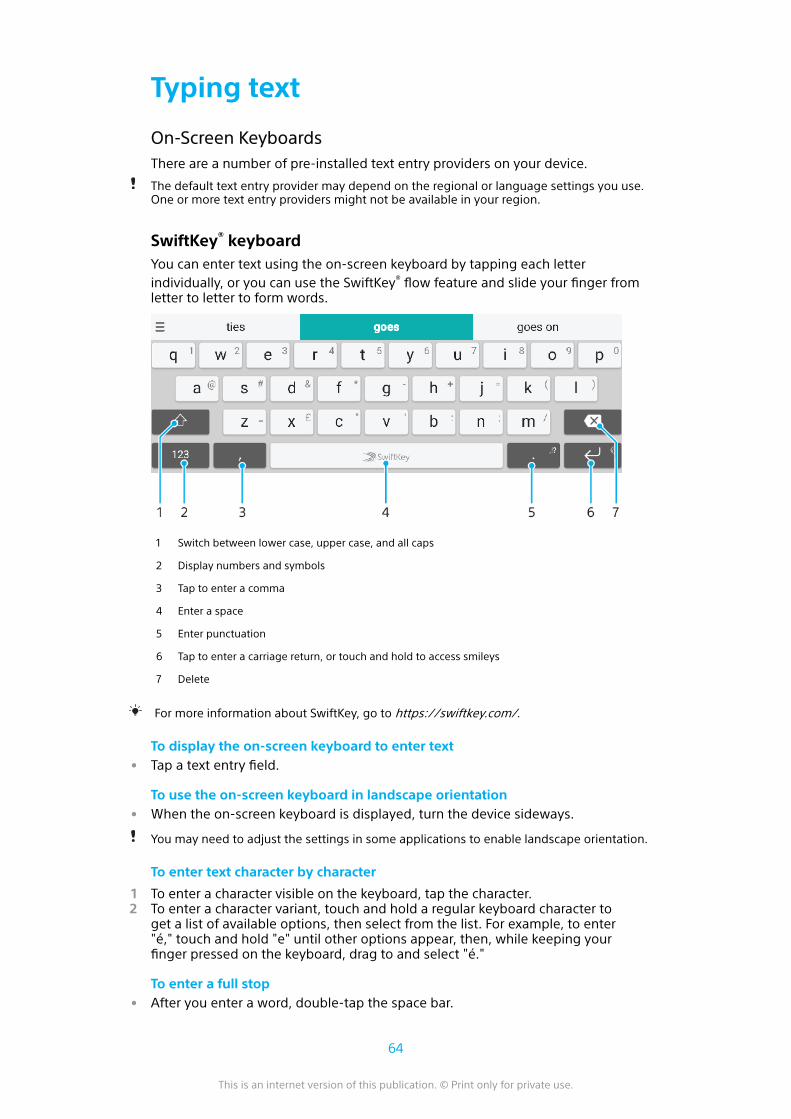
Typing text
On-Screen KeyboardsThere are a number of pre-installed text entry providers on your device.
The default text entry provider may depend on the regional or language settings you use.One or more text entry providers might not be available in your region.
SwiftKey® keyboardYou can enter text using the on-screen keyboard by tapping each letterindividually, or you can use the SwiftKey® flow feature and slide your finger fromletter to letter to form words.
1 Switch between lower case, upper case, and all caps
2 Display numbers and symbols
3 Tap to enter a comma
4 Enter a space
5 Enter punctuation
6 Tap to enter a carriage return, or touch and hold to access smileys
7 Delete
For more information about SwiftKey, go to https://swiftkey.com/.
To display the on-screen keyboard to enter text• Tap a text entry field.
To use the on-screen keyboard in landscape orientation• When the on-screen keyboard is displayed, turn the device sideways.
You may need to adjust the settings in some applications to enable landscape orientation.
To enter text character by character
1 To enter a character visible on the keyboard, tap the character.2 To enter a character variant, touch and hold a regular keyboard character to
get a list of available options, then select from the list. For example, to enter"é," touch and hold "e" until other options appear, then, while keeping yourfinger pressed on the keyboard, drag to and select "é."
To enter a full stop• After you enter a word, double-tap the space bar.
64
This is an internet version of this publication. © Print only for private use.
To Enter Text Using the Gesture Input Function
1 When the on-screen keyboard is displayed, slide your finger from letter toletter to trace the word you want to write.
2 After you finish entering a word, lift up your finger. A word suggestionappears based on the letters you have traced.
3 If the word that you want does not appear, tap to see other options andselect accordingly. If the desired option does not appear, delete the entireword and trace it again, or enter the word by tapping each letter individually.
Editing textYou can select, cut, copy and paste text as you write. You can access the editingoptions by double-tapping the entered text. The editing options then becomeavailable via an application bar.
Application barThe following actions are available on the selected text:
• Cut• Copy• Paste• Share• Select all
The Paste option only appears when you have text saved on the clipboard.
To Select Text
1 Double-tap a word to highlight it.2 You can drag the tabs on both sides of the highlighted word to select more
text.
To Edit Text
1 Double-tap a word to make the application bar appear.2 Select the text you want to edit, and then use the application bar to make
your desired changes.
Auto-fillAutofill helps you save time when filling out forms. When you enable an Autofillservice, information like names, phone numbers, addresses, credit cardinformation, and more is saved for re-use. Auto-fill with Google is enabled bydefault, but you can disable it or change to another app as desired.
To select an auto-fill app
1 Find and tap Settings > System > Languages & input.2 Tap Advanced > Autofill service.3 Tap to download a different Autofill service, or tap None to disable the use
of Autofill apps.
65
This is an internet version of this publication. © Print only for private use.
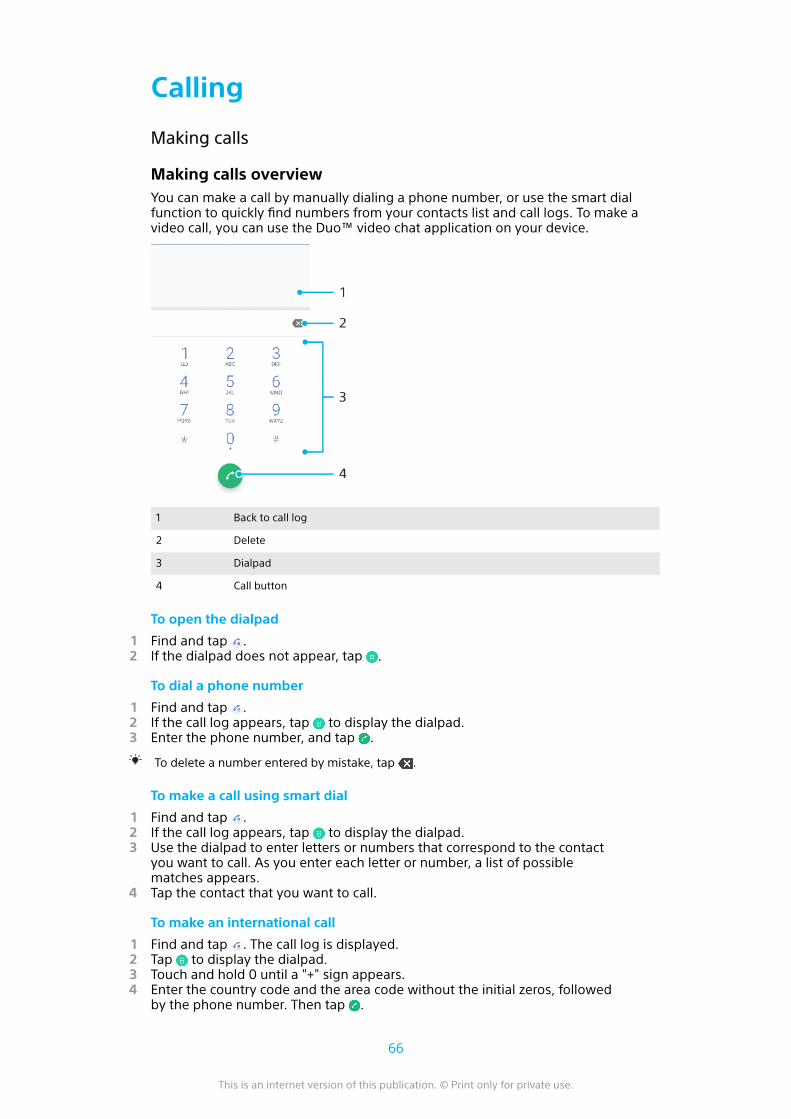
Calling
Making calls
Making calls overviewYou can make a call by manually dialing a phone number, or use the smart dialfunction to quickly find numbers from your contacts list and call logs. To make avideo call, you can use the Duo™ video chat application on your device.
1 Back to call log
2 Delete
3 Dialpad
4 Call button
To open the dialpad
1 Find and tap .2 If the dialpad does not appear, tap .
To dial a phone number
1 Find and tap .2 If the call log appears, tap to display the dialpad.3 Enter the phone number, and tap .
To delete a number entered by mistake, tap .
To make a call using smart dial
1 Find and tap .2 If the call log appears, tap to display the dialpad.3 Use the dialpad to enter letters or numbers that correspond to the contact
you want to call. As you enter each letter or number, a list of possiblematches appears.
4 Tap the contact that you want to call.
To make an international call
1 Find and tap . The call log is displayed.2 Tap to display the dialpad.3 Touch and hold 0 until a "+" sign appears.4 Enter the country code and the area code without the initial zeros, followed
by the phone number. Then tap .
66
This is an internet version of this publication. © Print only for private use.
To add a direct dial number to your Home screen
1 In the customization menu, tap Widgets > Shortcuts.2 Scroll through the list of applications and select Direct dial.3 Select the contact and the number that you want to use as the direct dial
number.
Showing or hiding your phone numberYou can select to show or hide your phone number on call recipients' devices whenyou call them.
To show or hide your phone number during outgoing calls
1 Find and tap .2 Tap > Settings > Calls.3 Tap Additional settings > Caller ID, and choose an option.
This option may not be provided by every operator.
Receiving CallsIf you receive an incoming call when the device is in sleep mode or the screen islocked, the phone application opens in fullscreen format. If you receive anincoming call when the screen is active, the incoming call is displayed as a floatingnotification, that is, in a minimized window that floats at the top of whateverscreen is open. When such a notification arrives, you can choose to answer the calland open the phone application screen, or you can reject the call and stay on thecurrent screen.
To answer a call when the screen is inactive• When a call comes in, swipe up.
To Answer an Incoming Call When the Screen is Active• When a call comes in, in the heads-up notification that appears at the top of
the screen, tap ANSWER.
Instead of answering the call, you can go to the main phone application screen by tappingthe heads-up notification window. Using this method, you get more options to manage thecall. For example, you can decide to reject the call with a message.
To reject a call when the screen is inactive• When a call comes in, swipe down.
To Reject a Call When the Screen is Active• When a call comes in, in the heads-up notification that appears at the top of
the screen, tap DECLINE.
Instead of rejecting the call, you can go to the main phone application screen by tappingthe heads-up notification window. This way you get more options to manage the call. Forexample, you can decide to reject the call with a message.
To mute the ringtone for an incoming call• When you receive the call, press the volume key.
Rejecting a Call with a Text MessageYou can reject a call with a text message, sent automatically to the caller andstored in the Messaging conversation with the contact.
You can select from a number of predefined messages available on your device, oryou can create a new message. You can also create your own personalizedmessage by edit the predefined ones.
67
This is an internet version of this publication. © Print only for private use.
To reject a call with a text message when the screen is inactive
1 When an incoming call arrives, drag to the center of the screen.2 Select a predefined message or tap Write new message.
To Reject a Call With a Text Message When the Screen is Active
1 When an incoming call arrives, tap the heads-up notification window wherethe phone number or the name of the contact is displayed.
2 Drag to the center of the screen.3 Select a predefined message or tap Write new message.
To reject a second call with a text message
1 When you hear repeated beeps during a call, drag to the center of thescreen.
2 Select a predefined message or tap Write new message.
To edit the text message used to reject a call
1 Find and tap .2 Tap > Settings > Calls.3 Tap Reject call with message.4 Tap the message that you want to edit, then make the necessary changes.5 Tap OK.
Smart call handlingYou can handle incoming calls without touching the screen by turning on theSmart call handling function. Once activated, you can handle calls in the followingway:
• Answer: bring the device to your ear.• Reject: shake the device.• Ringer off: place the device face down.
To enable or disable Smart call handling
1 Find and tap .2 Tap > Settings > Calls.3 Tap Smart call handling.4 Tap the slider under Smart call handling.
Blocking calls and messagesYou can block certain numbers from calling you and from sending you messages.Select from stored numbers or type in a number yourself.
To block a stored number
1 Find and tap .2 Touch and hold the number you want to block.3 Tap Block number, then tap BLOCK. Calls and texts from this number are
blocked.
To block a number by typing the number
1 Find and tap .2 Tap > Settings > Block numbers > Add a number.3 Enter the phone number you want to block, then tap BLOCK. Calls and texts
from this number are blocked.
68
This is an internet version of this publication. © Print only for private use.
To unblock a blocked number
1 Find and tap .2 Tap > Settings > Block numbers.3 Tap next to the phone number you want to unblock, then tap Unblock.
Calls and texts from this number are no longer blocked.
69
This is an internet version of this publication. © Print only for private use.
Contacts
Adding and editing contacts
To add a contact
1 Find and tap .2 Tap .3 If you have synchronized your contacts with one or more accounts and you
are adding a contact for the first time, you must select the account that youwant to add the contact to. Alternatively, tap > Phone contact if you onlywant to use and save this contact on your device.
4 Enter or select the desired information for the contact.5 When you are done, tap SAVE.
Once you save a contact to an account, that account will show as the default account tosave to the next time you add a contact. If you want to change which account a contact issaved to, you need to create the contact again and save it to the correct account.
If you add a plus sign and the country code before a contact's phone number, you do nothave to edit the number again when you make calls from abroad.
To edit a contact
1 Find and tap .2 Tap the contact that you want to edit, then tap .3 Edit the desired information.4 When you are done, tap SAVE.
Some synchronization services do not allow you to edit contact details.
To add a picture to a contact
1 Find and tap .2 Tap the contact that you want to edit, then tap .3 Tap , then select a method for adding the contact picture and edit it as
desired.4 After you add the picture, tap SAVE.
You can also add a picture to a contact directly from the Album application. If you want toadd a picture that is saved to an online account, you must download the picture first.
To personalize the ringtone for a contact
1 Find and tap .2 Tap the contact that you want to edit, then tap > Set ringtone.3 Select an option from the list.4 Select a music file saved on your device, then tap OK.
To send all calls to voicemail for a contact
1 Find and tap .2 Select the desired contact.3 Tap > Route to voicemail.
To delete contacts
1 Find and tap .2 Touch and hold the contact that you want to delete.3 Tap , then tap DELETE.4 To delete several or all contacts, mark the checkboxes beside the contacts
that you want to delete.5 Tap , then tap DELETE.
70
This is an internet version of this publication. © Print only for private use.
To edit contact information about yourself
1 Find and tap .2 Tap > My info.3 Tap , then enter the new information or make the changes you want.4 When you are done, tap SAVE.
To create a new contact from a text message
1 Find and tap .2 Tap the icon next to the phone number, then tap ADD CONTACT.3 Select an existing contact, or tap Create new contact.4 Edit the contact information and tap SAVE.
Grouping contactsYou can create contact labels to organize groups of related contacts. You can nameyour groups as "Family" or "Friends" to differentiate them from your other contacts.
To create a new label for a group
1 Find and tap .2 Tap , then tap Create label.3 Choose an account where your contacts are saved.4 Type a Label name, then tap OK.
To delete a group label
1 Find and tap .2 Tap , then tap the label you want to delete.3 Tap , then tap Delete label.
Transferring contactsThere are several ways to transfer contacts to your new device. You can synccontacts from an online account or import contacts directly from another device.
Transferring Contacts Using an Online AccountIf you sync the contacts in your old device or your computer with an onlineaccount, for example, Google Sync™ or Microsoft® Exchange ActiveSync®, you cantransfer your contacts to your new device using that account.
To turn auto-sync data on or off
1 Find and tap .2 Tap , then tap Settings.3 Tap Accounts, then tap the Automatically sync data slider to enable or
disable the function.
You need to be signed in to the relevant sync account before you can sync your contactswith it.
Other methods for transferring contactsThere are several other ways to transfer contacts from your old device to your newdevice. For example, you can copy contacts to a memory card, use Bluetooth®
technology, or save contacts to a SIM card. For more specific information abouttransferring the contacts from your old device, refer to the relevant User guide.
71
This is an internet version of this publication. © Print only for private use.
To import contacts from a memory card
1 Find and tap .2 Tap , then tap Settings > Import > SD card or internal storage (.vcf file).3 Select where to store your contacts.4 Tap , then select SD card.5 Select the files that you want to import by tapping them.
To import contacts using Bluetooth® technology
1 Make sure you have the Bluetooth® function turned on and that your deviceis set to visible.
2 When you are notified of an incoming file to your device, drag the status bardownward and tap the notification to accept the file transfer.
3 Tap Accept to start the file transfer.4 Drag the status bar downward. When the transfer is complete, tap the
notification.5 Tap the received file and select where to store your contacts.
To import contacts from a SIM card
1 Find and tap .2 Tap , then tap Settings > Import.3 Tap Import from SIM card.4 Select contacts to import, then tap Import.
Backing up ContactsYou can use internal storage, a memory card, or a SIM card to back up contacts.See Transferring contacts on page 71 for more information about how to restorecontacts to your device.
To export all contacts to a memory card
1 Find and tap .2 Tap > Settings > Export > to SD card or internal storage (.vcf file).3 Tap > SD card.4 Select a destination folder, then tap SAVE.
To export contacts to a SIM card
When you export contacts to a SIM card, not all information may get exported. This is due tomemory limitations on SIM cards.
1 Find and tap .2 Tap > Settings > Export.3 Tap Export to SIM card.4 Tap OK.
To export all contacts to internal storage
1 Find and tap .2 Tap > Settings > Export > to SD card or internal storage (.vcf file).3 Tap > Show internal storage.4 Tap , then tap your device's model number beside .5 Select a destination folder or simply tap SAVE.
72
This is an internet version of this publication. © Print only for private use.
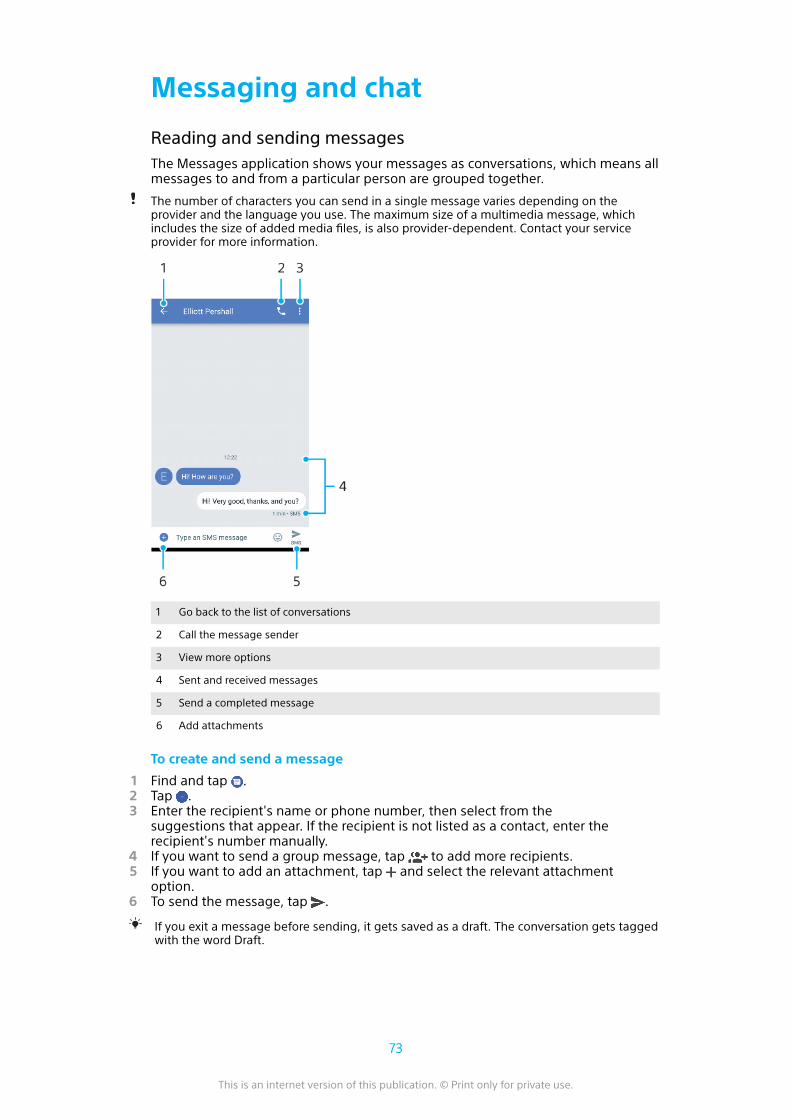
Messaging and chat
Reading and sending messagesThe Messages application shows your messages as conversations, which means allmessages to and from a particular person are grouped together.
The number of characters you can send in a single message varies depending on theprovider and the language you use. The maximum size of a multimedia message, whichincludes the size of added media files, is also provider-dependent. Contact your serviceprovider for more information.
1 Go back to the list of conversations
2 Call the message sender
3 View more options
4 Sent and received messages
5 Send a completed message
6 Add attachments
To create and send a message
1 Find and tap .2 Tap .3 Enter the recipient's name or phone number, then select from the
suggestions that appear. If the recipient is not listed as a contact, enter therecipient's number manually.
4 If you want to send a group message, tap to add more recipients.5 If you want to add an attachment, tap and select the relevant attachment
option.6 To send the message, tap .
If you exit a message before sending, it gets saved as a draft. The conversation gets taggedwith the word Draft.
73
This is an internet version of this publication. © Print only for private use.
To read a received message
1 Find and tap .2 Tap the desired conversation.3 If the message has not been downloaded yet, tap it.
All received messages are saved by default to the device memory.
To reply to a message
1 Find and tap .2 Tap the conversation containing the message.3 Enter your reply and tap .
To forward a message
1 Find and tap .2 Tap the conversation containing the desired message.3 Touch and hold the desired message, then tap .4 Select a recent contact from the list or tap NEW MESSAGE and enter the
recipient's name or phone number, then select from the suggestions thatappear. If the recipient is not listed as a contact, enter the recipient's numbermanually.
5 Edit the message if necessary, then tap .
To save a file contained in a received message
1 Find and tap .2 If the message has not been downloaded yet, tap it.3 Touch and hold the file you want to save, then select the desired option.
Messaging settings
To change your message notification settings
1 Find and tap .2 Tap , then tap Settings.3 To set a notification sound, tap Notifications > Sound, then select an option
or tap and select a music file that is saved on your device.4 To confirm, tap DONE.5 To adjust additional notification settings, tap the sliders.
To enable or disable delivery reports for outgoing messages
1 Find and tap .2 Tap , then tap Settings > Advanced.3 Tap the Get SMS delivery reports slider to enable or disable the function.
After delivery reports are turned on, a check mark is displayed for messages that have beensuccessfully delivered.
Video ChatYou can use the Google Duo™ video chat application on your device to chat withfriends who also use the application on Android™ and iOS devices.
Go to https://support.google.com/duo/ to get more detailed information abouthow to use this application.
The video call function only works on devices with a front camera.
To use the Duo™ application• Find and tap Google > Duo.
74
This is an internet version of this publication. © Print only for private use.
Setting Up EmailUse the email application on your device to send and receive email messagesthrough your email accounts. You can have one or several email accounts at thesame time, including corporate Microsoft Exchange ActiveSync accounts.
To set up an email account
1 Find and tap Email.2 Follow the instructions that appear on the screen to complete the setup.
For some email services, you may need to contact your email service provider forinformation on detailed settings for the email account.
To add an extra email account
1 Find and tap Email.2 Tap , then tap Settings > Add account.3 Follow the on-screen instructions. If the settings for the email account
cannot be downloaded automatically, complete the setup manually.4 When you are done, tap NEXT.
75
This is an internet version of this publication. © Print only for private use.
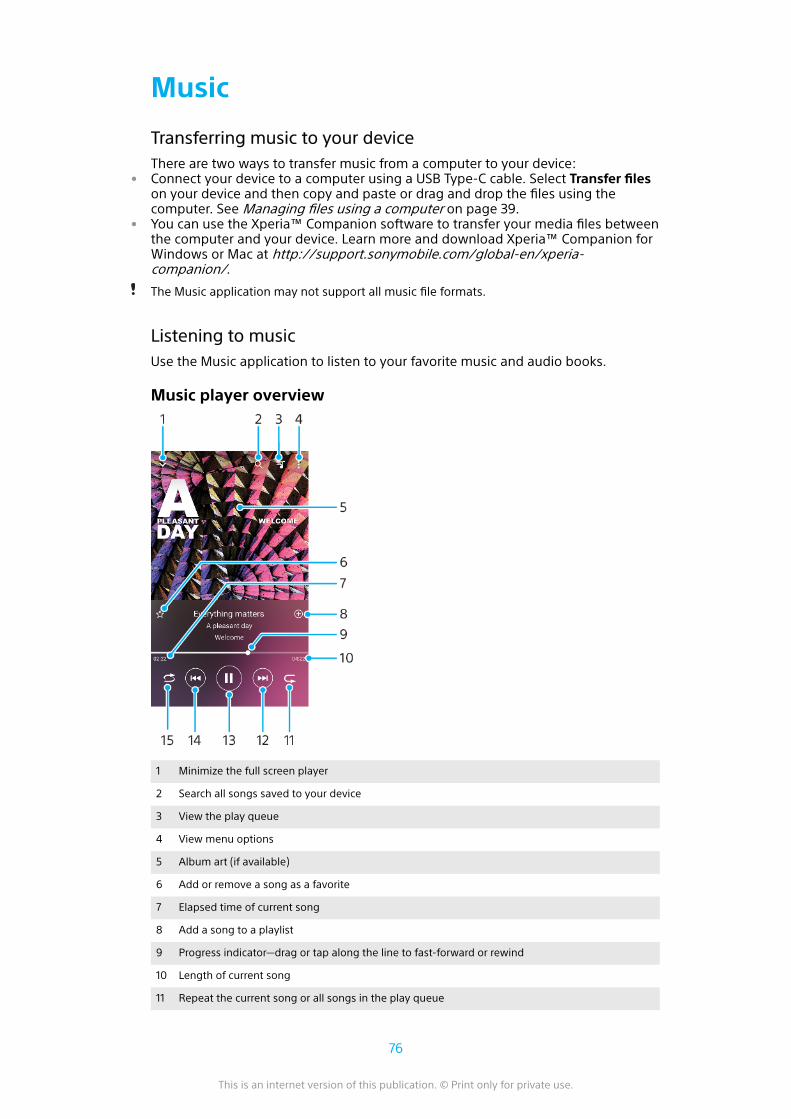
Music
Transferring music to your deviceThere are two ways to transfer music from a computer to your device:
• Connect your device to a computer using a USB Type-C cable. Select Transfer fileson your device and then copy and paste or drag and drop the files using thecomputer. See Managing files using a computer on page 39.
• You can use the Xperia™ Companion software to transfer your media files betweenthe computer and your device. Learn more and download Xperia™ Companion forWindows or Mac at http://support.sonymobile.com/global-en/xperia-companion/.
The Music application may not support all music file formats.
Listening to musicUse the Music application to listen to your favorite music and audio books.
Music player overview
1 Minimize the full screen player
2 Search all songs saved to your device
3 View the play queue
4 View menu options
5 Album art (if available)
6 Add or remove a song as a favorite
7 Elapsed time of current song
8 Add a song to a playlist
9 Progress indicator—drag or tap along the line to fast-forward or rewind
10 Length of current song
11 Repeat the current song or all songs in the play queue
76
This is an internet version of this publication. © Print only for private use.
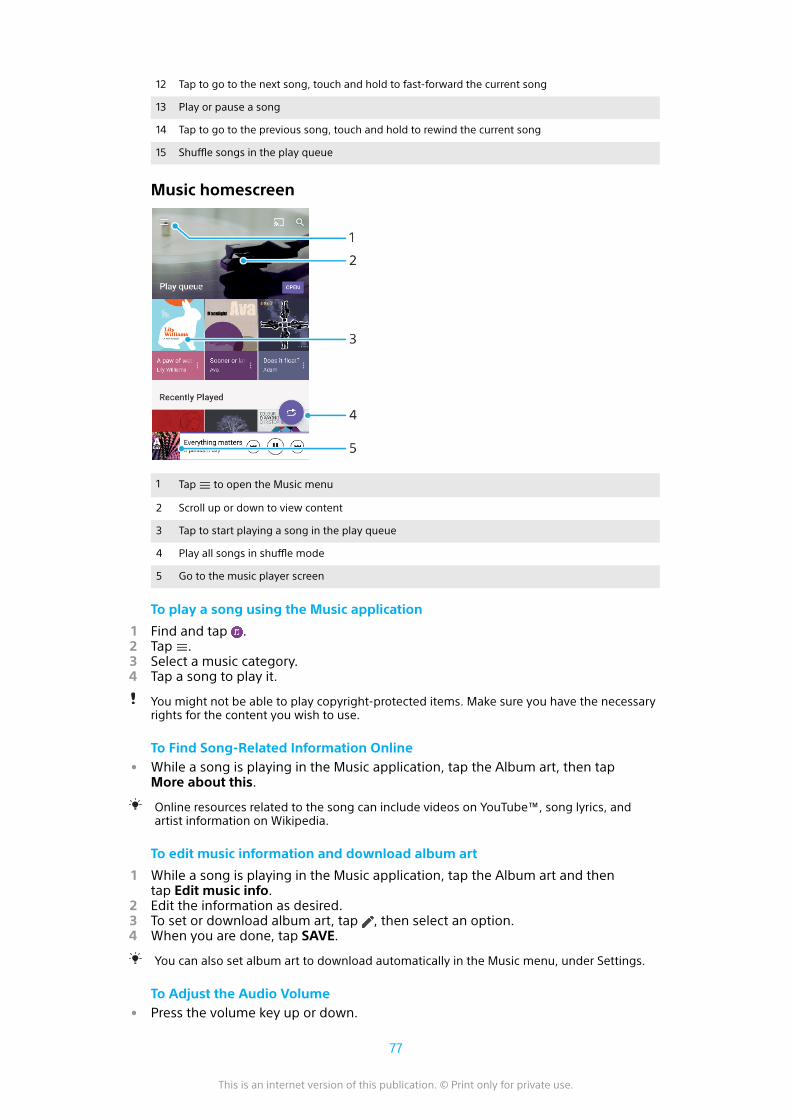
12 Tap to go to the next song, touch and hold to fast-forward the current song
13 Play or pause a song
14 Tap to go to the previous song, touch and hold to rewind the current song
15 Shuffle songs in the play queue
Music homescreen
1 Tap to open the Music menu
2 Scroll up or down to view content
3 Tap to start playing a song in the play queue
4 Play all songs in shuffle mode
5 Go to the music player screen
To play a song using the Music application
1 Find and tap .2 Tap .3 Select a music category.4 Tap a song to play it.
You might not be able to play copyright-protected items. Make sure you have the necessaryrights for the content you wish to use.
To Find Song-Related Information Online• While a song is playing in the Music application, tap the Album art, then tap
More about this.
Online resources related to the song can include videos on YouTube™, song lyrics, andartist information on Wikipedia.
To edit music information and download album art
1 While a song is playing in the Music application, tap the Album art and thentap Edit music info.
2 Edit the information as desired.3 To set or download album art, tap , then select an option.4 When you are done, tap SAVE.
You can also set album art to download automatically in the Music menu, under Settings.
To Adjust the Audio Volume• Press the volume key up or down.
77
This is an internet version of this publication. © Print only for private use.
To Minimize the Music Application• When a song is playing, tap to go to the Home screen. The Music
application keeps running in the background.
To Open the Music Application when it is Playing in the Background
• While a song is playing in the background, drag the status bar downwardand tap the Music application.
• Alternatively, find and tap .
78
This is an internet version of this publication. © Print only for private use.

Camera
Getting to know your camera
1 Front camera lens
2 Select the capturing mode
3 Switch between the front and main camera
4 Zoom in or out
5 Use the camera key to activate the camera, take photos, or record videos
6 Tap the thumbnail to view, share, or edit photos and videos
7 Save your location
8 Use the shutter button to take photos or record videos
9 Go back or exit the camera
10 Capturing mode settings
11 Flash settings
Basic camera tips• Be sure the lens is clean. A fingerprint or a little dirt can diminish photo quality.• Use the self-timer when you need extra time to prepare, or to avoid blurred
photos.• Check your device's memory status often. High-resolution photos and videos
consume more memory.• Read more about Taking great pictures with your Xperia™ Camera or Xperia™
Camera Photography.
To launch the camera
• Press the camera key fully down, swipe from the lock screen or tap fromthe Application screen.
Capturing modesYour camera is equipped with four capturing modes. Two are for taking photos, theSuperior auto mode and the Manual mode.
Superior auto optimizes settings automatically for many different scenarios.Manual mode is useful when you want more creative control.
Available settings depend on the capturing mode selected.
79
This is an internet version of this publication. © Print only for private use.
To select a capturing mode• When using the camera, swipe the screen to select from photo, video, or
camera apps modes.
Capturing modes overview
Manual
Take photos and manually adjust camera settings
Superior auto
Take photos with settings automatically optimized
Video
Record videos
Camera apps
Use photo and video apps
To switch between the main and front camera• When using the camera, tap to switch between the main and front
camera.
To use the zoom• When using the camera, pinch in or out on the camera screen or use the
volume key to zoom.
If you zoom in three or more times, this can affect image quality. Instead, take the photowithout zoom, then crop it.
To take a photo• When using the camera, press the camera key or tap the shutter button to
take a photo.
To record a video
1 When using the camera, swipe the screen to select .2 Press the camera key or tap the shutter button to start or stop recording.
The maximum recording time is six hours.
To launch the camera and take a photo at the same time
1 When using the camera, tap , then tap More > Quick launch > Launch andcapture.
2 Close the settings menu and exit the camera. The setting is saved for allcapturing modes.
3 Press and hold the camera key to launch the camera and take a photo.
This feature can also be used for videos.
To take a photo by tapping the screen
1 When using the camera, tap , then tap More > Touch capture > On or Onlyfront camera.
2 Close the settings menu. The setting is saved in all capturing modes.3 Tap anywhere on the screen to take a photo or record a video.
This feature can also be used for videos.
To take a photo when recording a video• When recording a video, tap . The photo is taken as soon as you release
the shutter button.
80
This is an internet version of this publication. © Print only for private use.
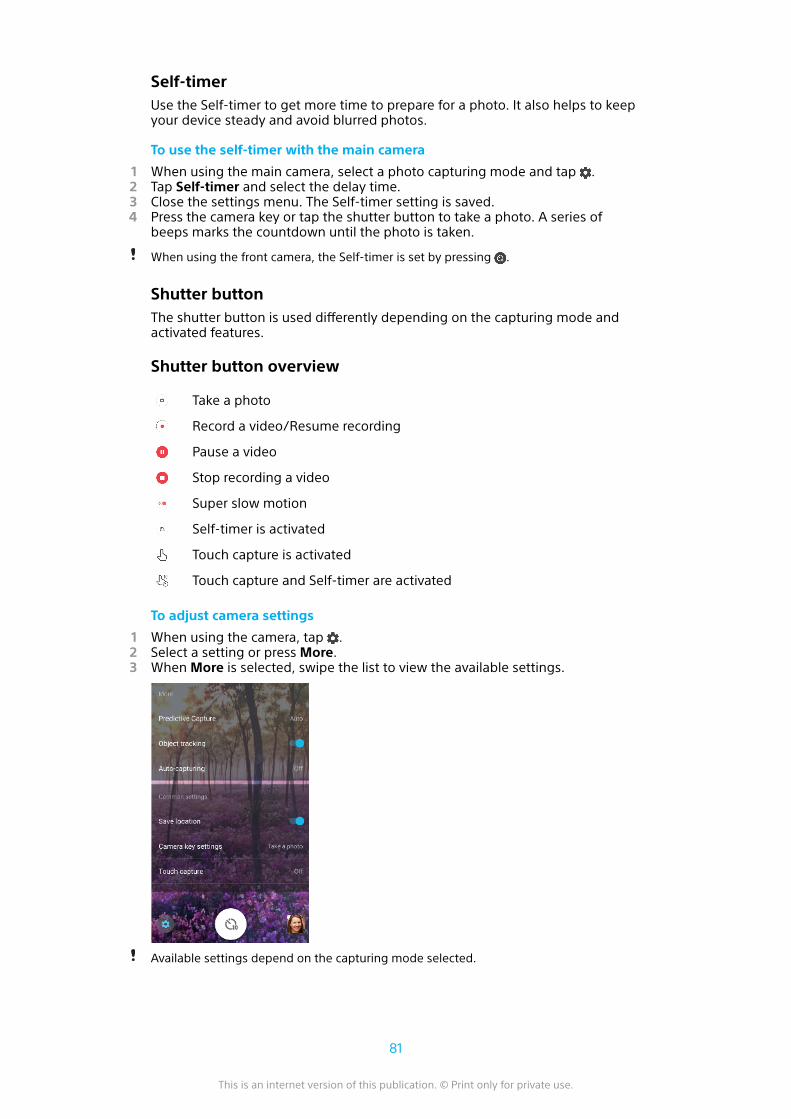
Self-timerUse the Self-timer to get more time to prepare for a photo. It also helps to keepyour device steady and avoid blurred photos.
To use the self-timer with the main camera
1 When using the main camera, select a photo capturing mode and tap .2 Tap Self-timer and select the delay time.3 Close the settings menu. The Self-timer setting is saved.4 Press the camera key or tap the shutter button to take a photo. A series of
beeps marks the countdown until the photo is taken.
When using the front camera, the Self-timer is set by pressing .
Shutter buttonThe shutter button is used differently depending on the capturing mode andactivated features.
Shutter button overview
Take a photo
Record a video/Resume recording
Pause a video
Stop recording a video
Super slow motion
Self-timer is activated
Touch capture is activated
Touch capture and Self-timer are activated
To adjust camera settings
1 When using the camera, tap .2 Select a setting or press More.3 When More is selected, swipe the list to view the available settings.
Available settings depend on the capturing mode selected.
81
This is an internet version of this publication. © Print only for private use.
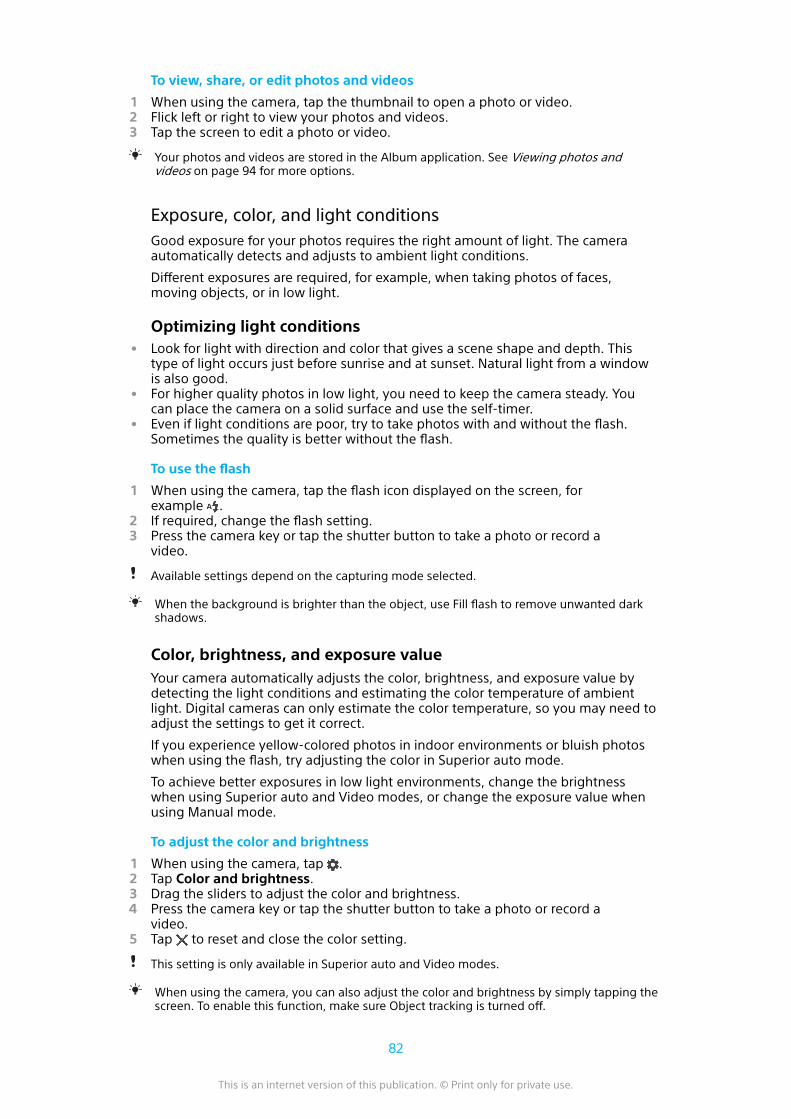
To view, share, or edit photos and videos
1 When using the camera, tap the thumbnail to open a photo or video.2 Flick left or right to view your photos and videos.3 Tap the screen to edit a photo or video.
Your photos and videos are stored in the Album application. See Viewing photos andvideos on page 94 for more options.
Exposure, color, and light conditionsGood exposure for your photos requires the right amount of light. The cameraautomatically detects and adjusts to ambient light conditions.
Different exposures are required, for example, when taking photos of faces,moving objects, or in low light.
Optimizing light conditions• Look for light with direction and color that gives a scene shape and depth. This
type of light occurs just before sunrise and at sunset. Natural light from a windowis also good.
• For higher quality photos in low light, you need to keep the camera steady. Youcan place the camera on a solid surface and use the self-timer.
• Even if light conditions are poor, try to take photos with and without the flash.Sometimes the quality is better without the flash.
To use the flash
1 When using the camera, tap the flash icon displayed on the screen, forexample .
2 If required, change the flash setting.3 Press the camera key or tap the shutter button to take a photo or record a
video.
Available settings depend on the capturing mode selected.
When the background is brighter than the object, use Fill flash to remove unwanted darkshadows.
Color, brightness, and exposure valueYour camera automatically adjusts the color, brightness, and exposure value bydetecting the light conditions and estimating the color temperature of ambientlight. Digital cameras can only estimate the color temperature, so you may need toadjust the settings to get it correct.
If you experience yellow-colored photos in indoor environments or bluish photoswhen using the flash, try adjusting the color in Superior auto mode.
To achieve better exposures in low light environments, change the brightnesswhen using Superior auto and Video modes, or change the exposure value whenusing Manual mode.
To adjust the color and brightness
1 When using the camera, tap .2 Tap Color and brightness.3 Drag the sliders to adjust the color and brightness.4 Press the camera key or tap the shutter button to take a photo or record a
video.5 Tap to reset and close the color setting.
This setting is only available in Superior auto and Video modes.
When using the camera, you can also adjust the color and brightness by simply tapping thescreen. To enable this function, make sure Object tracking is turned off.
82
This is an internet version of this publication. © Print only for private use.
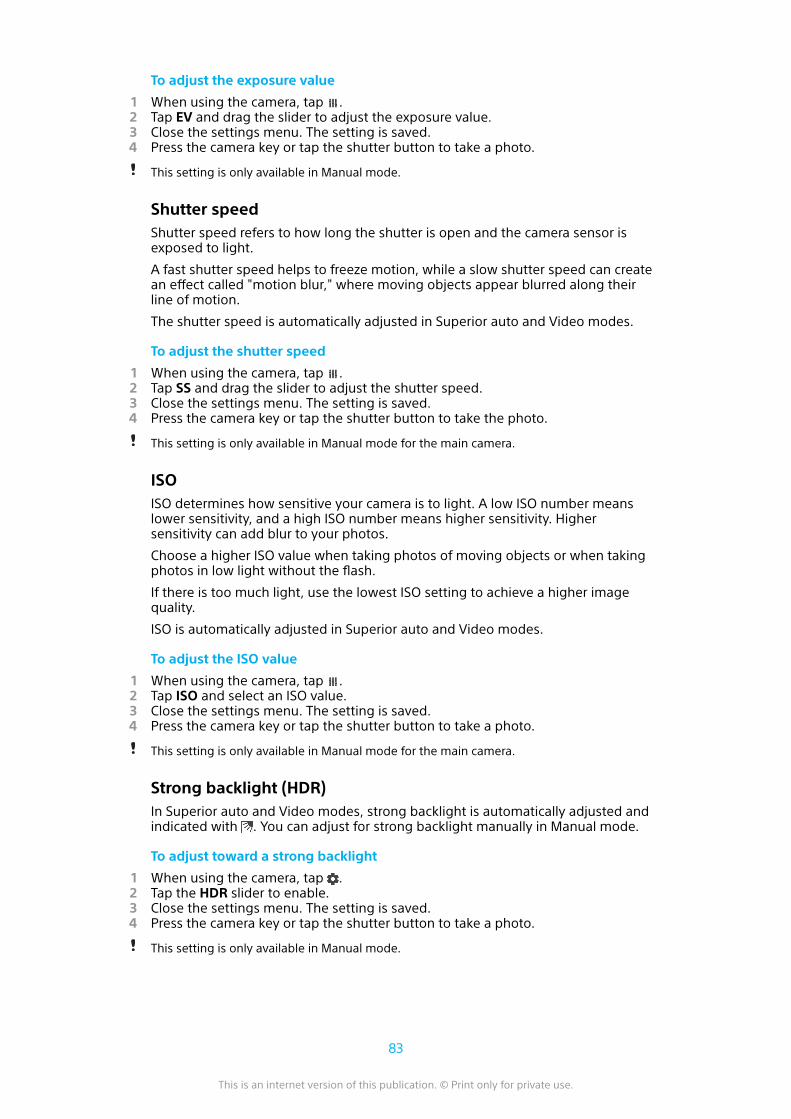
To adjust the exposure value
1 When using the camera, tap .2 Tap EV and drag the slider to adjust the exposure value.3 Close the settings menu. The setting is saved.4 Press the camera key or tap the shutter button to take a photo.
This setting is only available in Manual mode.
Shutter speedShutter speed refers to how long the shutter is open and the camera sensor isexposed to light.
A fast shutter speed helps to freeze motion, while a slow shutter speed can createan effect called "motion blur," where moving objects appear blurred along theirline of motion.
The shutter speed is automatically adjusted in Superior auto and Video modes.
To adjust the shutter speed
1 When using the camera, tap .2 Tap SS and drag the slider to adjust the shutter speed.3 Close the settings menu. The setting is saved.4 Press the camera key or tap the shutter button to take the photo.
This setting is only available in Manual mode for the main camera.
ISOISO determines how sensitive your camera is to light. A low ISO number meanslower sensitivity, and a high ISO number means higher sensitivity. Highersensitivity can add blur to your photos.
Choose a higher ISO value when taking photos of moving objects or when takingphotos in low light without the flash.
If there is too much light, use the lowest ISO setting to achieve a higher imagequality.
ISO is automatically adjusted in Superior auto and Video modes.
To adjust the ISO value
1 When using the camera, tap .2 Tap ISO and select an ISO value.3 Close the settings menu. The setting is saved.4 Press the camera key or tap the shutter button to take a photo.
This setting is only available in Manual mode for the main camera.
Strong backlight (HDR)In Superior auto and Video modes, strong backlight is automatically adjusted andindicated with . You can adjust for strong backlight manually in Manual mode.
To adjust toward a strong backlight
1 When using the camera, tap .2 Tap the HDR slider to enable.3 Close the settings menu. The setting is saved.4 Press the camera key or tap the shutter button to take a photo.
This setting is only available in Manual mode.
83
This is an internet version of this publication. © Print only for private use.
White balanceIn Superior auto and Video modes, white balance adjustments are automatic. Youcan adjust the white balance manually in Manual mode.
To adjust the white balance
1 When using the camera, tap .2 Tap WB and select one of the pre-defined light conditions, for example .3 Close the settings menu. The setting is saved.4 Press the camera key or tap the shutter button to take a photo.
This setting is only available in Manual mode.
White balance settings
Auto
Adjust the color balance automatically
Cloudy
Adjust the color balance for a cloudy sky
Daylight
Adjust the color balance for sunny outdoor conditions
Fluorescent
Adjust the color balance for fluorescent lighting
Incandescent
Adjust the color balance for warm lighting conditions, like under light bulbs
Optimizing exposureExposure metering measures the amount of light that strikes an object, to optimizeexposure.
Exposure metering is automatically adjusted in Superior auto and Video modes.You can adjust the exposure manually in Manual mode, for example to change theexposure for a specific part of the photo.
To adjust the exposure with metering
1 When using the camera, tap .2 Tap More > Metering.3 Select an exposure option and close the settings menu. The setting is saved.4 Press the camera key or tap the shutter button to take your photo.
This setting is only available in Manual mode.
Metering settings
Face
Measures the amount of light on a face, and adjusts the exposure so that the faceis neither too dark nor too bright
Multi
Divides the image into several parts, and measures each part to optimize theexposure
Center
Determines the center of the image, and sets the exposure based on thebrightness of the object
84
This is an internet version of this publication. © Print only for private use.
Spot
Adjusts the exposure for a very small part of the object
Touch
Allows you to touch the screen to determine the object or area where exposureshould be optimized
Setting the right focusThe camera automatically sets the focus and detects faces in all capturing modes.It can also detect and track a moving object. A yellow frame indicates the face ormoving object that is in focus.
One way to change the focus area is to move your camera around with the camerakey half-pressed. Once the focus is set, the circular frame turns blue. Thistechnique can be used, for example, to change the focus to a person who is at theside of a group photo.
You can also tap the screen to focus on a specific area, or set a specific focusdistance. These options are only available for the main camera and depend on thecapturing mode selected.
To set the focus distance
1 Tap .2 Tap .3 Tap the slider to adjust the focus distance.4 Close the settings menu. The setting is saved.5 Press the camera key or tap the shutter button to take a photo.
This setting is only available in Manual mode for the main camera.
People, selfies, and smiling facesFaces in focus are indicated with a colored frame. Tap any frame to select a face tofocus on.
Use Smile Shutter to automatically take a photo when a person smiles. If you arerecording a video, a photo is taken each time a smile is detected.
85
This is an internet version of this publication. © Print only for private use.
Taking photos and videos of people• Consider the camera orientation. Use portrait for close-up photos, to fill the frame.
Use landscape for close-up group photos, or to capture an object in thebackground.
• Place the camera on a solid surface and use the self-timer to prevent blurredphotos.
To focus on another face• Before taking a photo or recording a video, tap one of the white frames to
select a face to focus on.
To take a photo when someone smiles
1 When using the camera, tap .2 Tap Auto capturing or Auto capturing (video) > Smile Shutter.3 Close the settings menu. The setting is saved for the capturing mode
selected.4 When a smile is detected, the camera automatically takes a photo.
To take a selfie
1 When using the camera, select a photo or video capturing mode for yourselfie.
2 Tap to activate the front camera.3 Tap if you want to use the self-timer.4 Press the camera key or tap the shutter button to take a selfie.
Turn on the Soft skin effect to soften skin tones when taking selfies.
To activate the selfie timer with the palm of your hand
1 When using the camera, tap to activate the front camera.2 Tap .3 Tap More > Auto capturing > Hand Shutter and close the settings menu.
The setting is saved.4 Turn your palm with your fingers straight up toward the camera.5 When the camera detects your hand, the timer starts and a selfie is taken.
Moving objectsWhen taking photos and recording videos of moving objects, timing is importantfor good results.
Predictive Capture automatically takes photos the instant an object enters thecamera frame, before you press a button. Object tracking can track a movingobject automatically.
Use Burst shot to find the best photo from a burst of images.
When recording videos, you can use SteadyShot™ to compensate for cameramovements and steady the frame.
Capturing moving objects• Try not to follow the object. Instead, find a position where the object has to pass in
front of you.• Consider changing the exposure to a faster shutter speed or a higher ISO to freeze
motion.
86
This is an internet version of this publication. © Print only for private use.
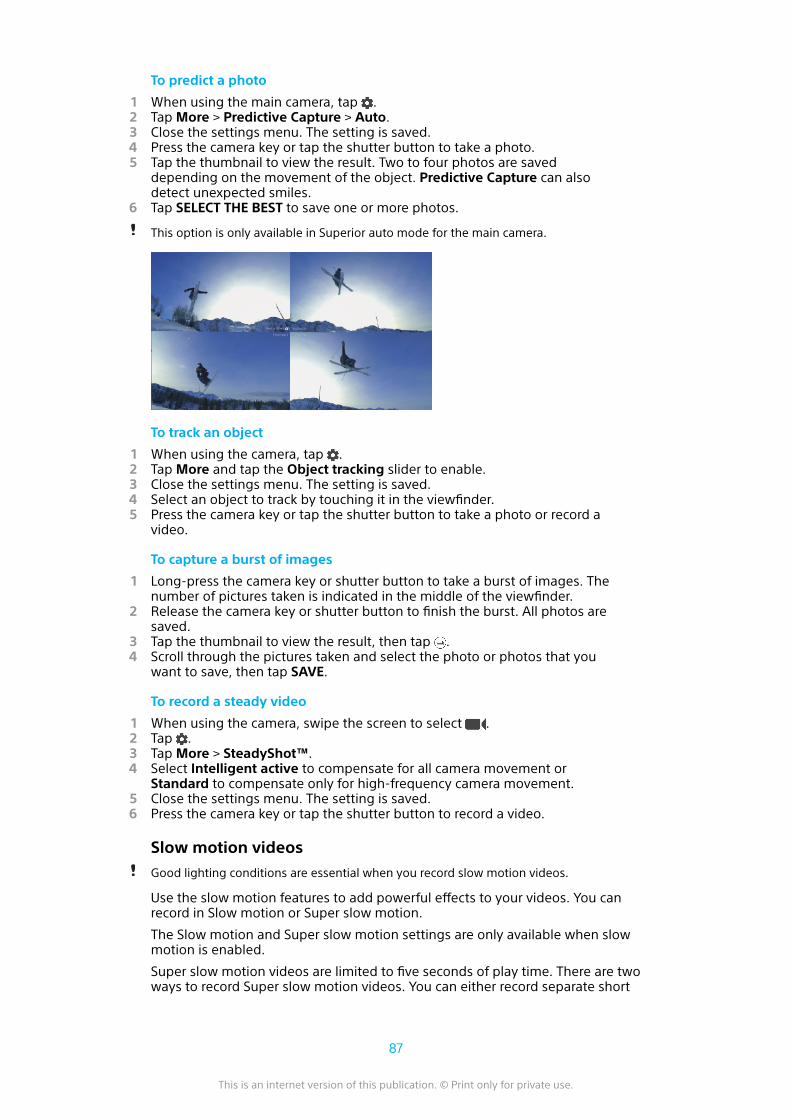
To predict a photo
1 When using the main camera, tap .2 Tap More > Predictive Capture > Auto.3 Close the settings menu. The setting is saved.4 Press the camera key or tap the shutter button to take a photo.5 Tap the thumbnail to view the result. Two to four photos are saved
depending on the movement of the object. Predictive Capture can alsodetect unexpected smiles.
6 Tap SELECT THE BEST to save one or more photos.
This option is only available in Superior auto mode for the main camera.
To track an object
1 When using the camera, tap .2 Tap More and tap the Object tracking slider to enable.3 Close the settings menu. The setting is saved.4 Select an object to track by touching it in the viewfinder.5 Press the camera key or tap the shutter button to take a photo or record a
video.
To capture a burst of images
1 Long-press the camera key or shutter button to take a burst of images. Thenumber of pictures taken is indicated in the middle of the viewfinder.
2 Release the camera key or shutter button to finish the burst. All photos aresaved.
3 Tap the thumbnail to view the result, then tap .4 Scroll through the pictures taken and select the photo or photos that you
want to save, then tap SAVE.
To record a steady video
1 When using the camera, swipe the screen to select .2 Tap .3 Tap More > SteadyShot™.4 Select Intelligent active to compensate for all camera movement or
Standard to compensate only for high-frequency camera movement.5 Close the settings menu. The setting is saved.6 Press the camera key or tap the shutter button to record a video.
Slow motion videos
Good lighting conditions are essential when you record slow motion videos.
Use the slow motion features to add powerful effects to your videos. You canrecord in Slow motion or Super slow motion.
The Slow motion and Super slow motion settings are only available when slowmotion is enabled.
Super slow motion videos are limited to five seconds of play time. There are twoways to record Super slow motion videos. You can either record separate short
87
This is an internet version of this publication. © Print only for private use.
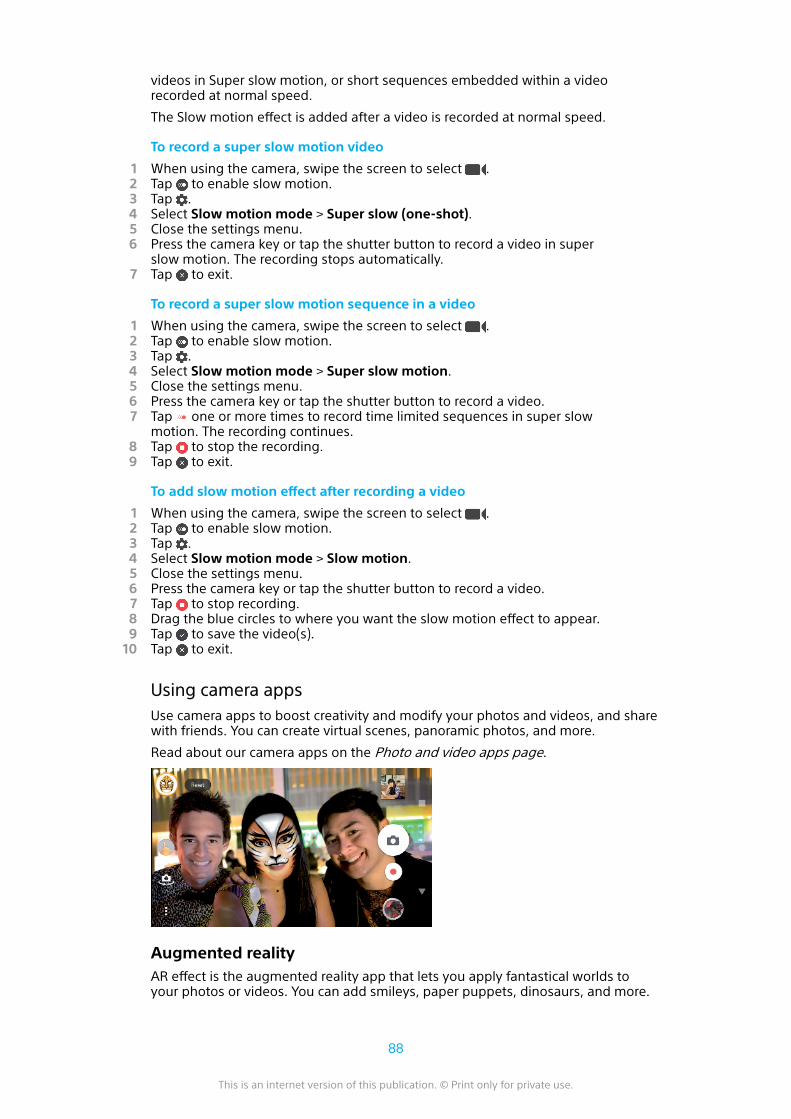
videos in Super slow motion, or short sequences embedded within a videorecorded at normal speed.
The Slow motion effect is added after a video is recorded at normal speed.
To record a super slow motion video
1 When using the camera, swipe the screen to select .2 Tap to enable slow motion.3 Tap .4 Select Slow motion mode > Super slow (one-shot).5 Close the settings menu.6 Press the camera key or tap the shutter button to record a video in super
slow motion. The recording stops automatically.7 Tap to exit.
To record a super slow motion sequence in a video
1 When using the camera, swipe the screen to select .2 Tap to enable slow motion.3 Tap .4 Select Slow motion mode > Super slow motion.5 Close the settings menu.6 Press the camera key or tap the shutter button to record a video.7 Tap one or more times to record time limited sequences in super slow
motion. The recording continues.8 Tap to stop the recording.9 Tap to exit.
To add slow motion effect after recording a video
1 When using the camera, swipe the screen to select .2 Tap to enable slow motion.3 Tap .4 Select Slow motion mode > Slow motion.5 Close the settings menu.6 Press the camera key or tap the shutter button to record a video.7 Tap to stop recording.8 Drag the blue circles to where you want the slow motion effect to appear.9 Tap to save the video(s).
10 Tap to exit.
Using camera appsUse camera apps to boost creativity and modify your photos and videos, and sharewith friends. You can create virtual scenes, panoramic photos, and more.
Read about our camera apps on the Photo and video apps page.
Augmented realityAR effect is the augmented reality app that lets you apply fantastical worlds toyour photos or videos. You can add smileys, paper puppets, dinosaurs, and more.
88
This is an internet version of this publication. © Print only for private use.

To take a photo or record a video with an AR effect
1 When using the camera, swipe the screen to select .2 Tap and select a scene.3 Press the camera key or tap the shutter button to take a photo or record a
video.
PanoramaUse the Panorama app to take wide-angle and panoramic photos.
To take a panoramic photo
1 When using the camera, swipe the screen to select .2 Tap .3 Press the camera key or tap the shutter button.4 Move the camera slowly and steadily in the direction of movement indicated
on the screen.
Creative effectWith the Creative effect app you can preset effects and color filters before taking aphoto or recording a video.
To take a photo or record a video with a creative effect
1 When using the camera, swipe the screen to select .2 Tap .3 Swipe to browse filters, or tap a filter to preview the effect.4 Tap to apply the filter and return to the camera screen.5 Press the camera key or tap the shutter button to take a photo or record a
video.6 Tap to switch filters.
Sound photoRecord a background sound and take a photo at the same time with the SoundPhoto app.
To record a background sound with a photo
1 When using the camera, swipe the screen to select .2 Tap .3 Press the camera key or tap the shutter button to start recording and take a
photo. The recording stops automatically.
Resolution and memoryThe number of photos and videos you can store depends on the resolution or MP(megapixel) value used and video length.
High-resolution photos and videos take up more memory, so keep in mind that alower resolution can be suitable for everyday use.
Check the memory status from time to time. When the memory is full, you cantransfer photos and videos to another storage device to free up memory. SeeManaging files using a computer on page 39.
Choose whether to store photos and videos on your device's internal storage or onan SD card using the Data storage option in the camera settings menu.
89
This is an internet version of this publication. © Print only for private use.
To change the resolution
1 When using the camera, tap .2 Tap Resolution or Video resolution.3 Select the resolution and close the settings menu. The setting is saved.
When using the main camera, the resolution can be set separately for each of the capturingmodes. The front camera resolution options are the same in all capturing modes.
Photo resolutionsMain camera:
19MP
5056×3792 (4:3). 19 MP resolution with 4:3 aspect ratio. Suitable for photos youwant to view on non-widescreen displays or print in high resolution.
17MP
5504×3096 (16:9). 17 MP resolution with 16:9 aspect ratio. Suitable for photos youwant to view on widescreen displays.
12MP
4000×3000 (4:3). 12 MP resolution with 4:3 aspect ratio. Suitable for photos youwant to view on non-widescreen displays or print in high resolution.
12MP
4608×2592 (16:9). 12 MP resolution with 16:9 aspect ratio. Suitable for photos youwant to view on widescreen displays.
Front camera:
13MP
4160×3120 (4:3). 13 MP resolution with 4:3 aspect ratio. Suitable for photos youwant to view on non-widescreen displays or print in high resolution.
10MP
4192×2358 (16:9). 10 MP resolution with 16:9 aspect ratio. Suitable for photos youwant to view on widescreen displays.
Video resolutionsHD refers to high definition, while fps refers to frames per second. A higher fps rateprovides a smoother video, at the cost of a larger file size. The aspect ratio is therelationship between the width and the height, where the width is the firstnumber.
Main camera:
4K
3840×2160 (16:9). 4K format with 16:9 aspect ratio. With 4K, you can recordvideos in four times the resolution of Full HD.
Full HD (30 fps)
1920×1080 (16:9). Full HD format with 30 fps and 16:9 aspect ratio.
Full HD (60 fps)
1920×1080 (16:9). Full HD format with 60 fps and 16:9 aspect ratio.
HD
1280×720 (16:9). HD format with 16:9 aspect ratio.
90
This is an internet version of this publication. © Print only for private use.
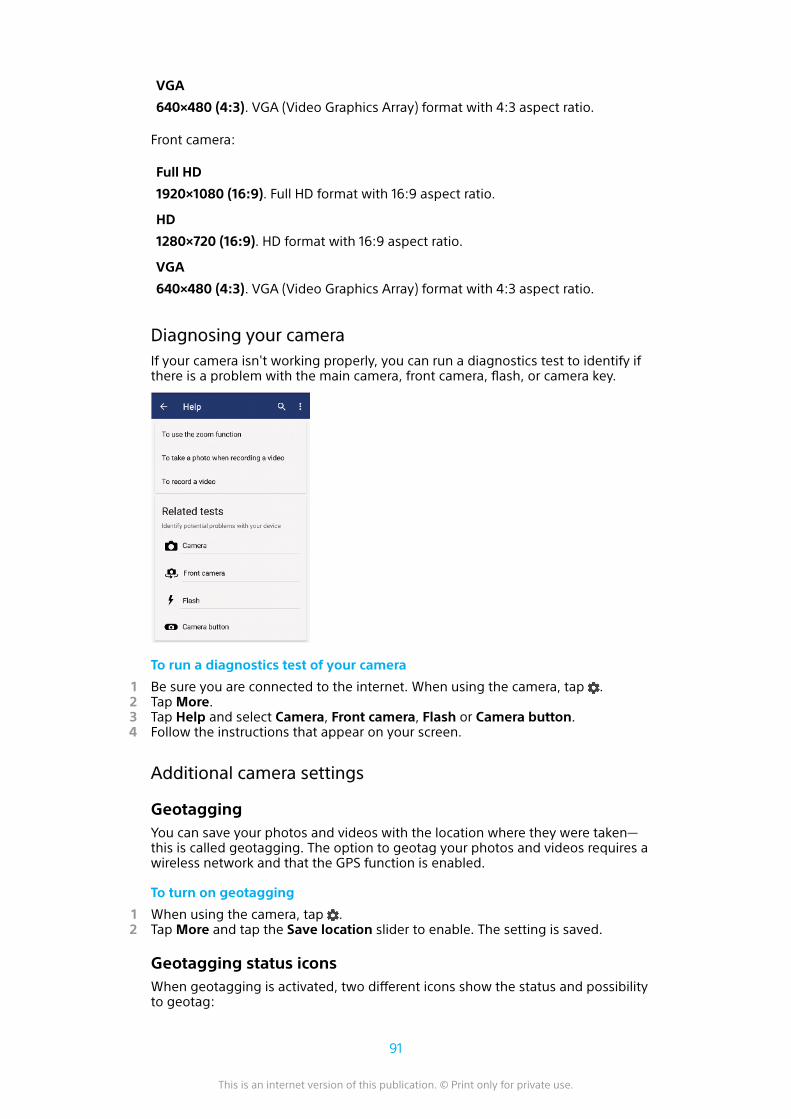
VGA
640×480 (4:3). VGA (Video Graphics Array) format with 4:3 aspect ratio.
Front camera:
Full HD
1920×1080 (16:9). Full HD format with 16:9 aspect ratio.
HD
1280×720 (16:9). HD format with 16:9 aspect ratio.
VGA
640×480 (4:3). VGA (Video Graphics Array) format with 4:3 aspect ratio.
Diagnosing your cameraIf your camera isn't working properly, you can run a diagnostics test to identify ifthere is a problem with the main camera, front camera, flash, or camera key.
To run a diagnostics test of your camera
1 Be sure you are connected to the internet. When using the camera, tap .2 Tap More.3 Tap Help and select Camera, Front camera, Flash or Camera button.4 Follow the instructions that appear on your screen.
Additional camera settings
GeotaggingYou can save your photos and videos with the location where they were taken—this is called geotagging. The option to geotag your photos and videos requires awireless network and that the GPS function is enabled.
To turn on geotagging
1 When using the camera, tap .2 Tap More and tap the Save location slider to enable. The setting is saved.
Geotagging status iconsWhen geotagging is activated, two different icons show the status and possibilityto geotag:
91
This is an internet version of this publication. © Print only for private use.
The geographical position is saved.
The geographical position has not been found.
Grid linesWith Grid lines, you can apply the "Rule of Thirds" and place important objectsalong the grid lines or their intersections. By not always having the object in themiddle of the frame, you can make your photos and videos more interesting.
To activate or deactivate the grid lines
1 When using the camera, tap .2 Tap More and tap the Grid lines slider to enable or disable. The setting is
saved.
Previewing photosYou can choose to preview photos as soon as you take them.
To activate or deactivate previewing
1 When using the camera, tap .2 Tap More > Auto photo preview and select an option. The setting is saved.
Previewing settingsOn
After you take a photo, a preview appears in the lower right corner of the screenfor three seconds before it is saved.
Only front camera
After you take a photo with the front camera, a preview appears in the lower rightcorner of the screen for three seconds before it is saved.
Off
No preview appears. The photo is saved directly.
Different ways to use the volume keyYou can change the way you use the volume key.
To change how the volume key is used
1 When using the camera, tap .2 Tap More > Use Volume key as and select an option. The setting is saved.
Volume key settingsZoom
Use the volume key to zoom in or out.
Volume
The volume key is deactivated for the camera.
Shutter
Use the volume key as a shutter button for photos and videos.
92
This is an internet version of this publication. © Print only for private use.
SoundWhen Sound is activated, the camera makes a sound when you take a photo orwhen you start or stop a video recording. Additionally, when you use the self-timerthe countdown is indicated by a series of beeps.
To activate or deactivate sound
1 When using the camera, tap .2 Tap More and tap the Sound slider to enable or disable. The setting is
saved.
93
This is an internet version of this publication. © Print only for private use.
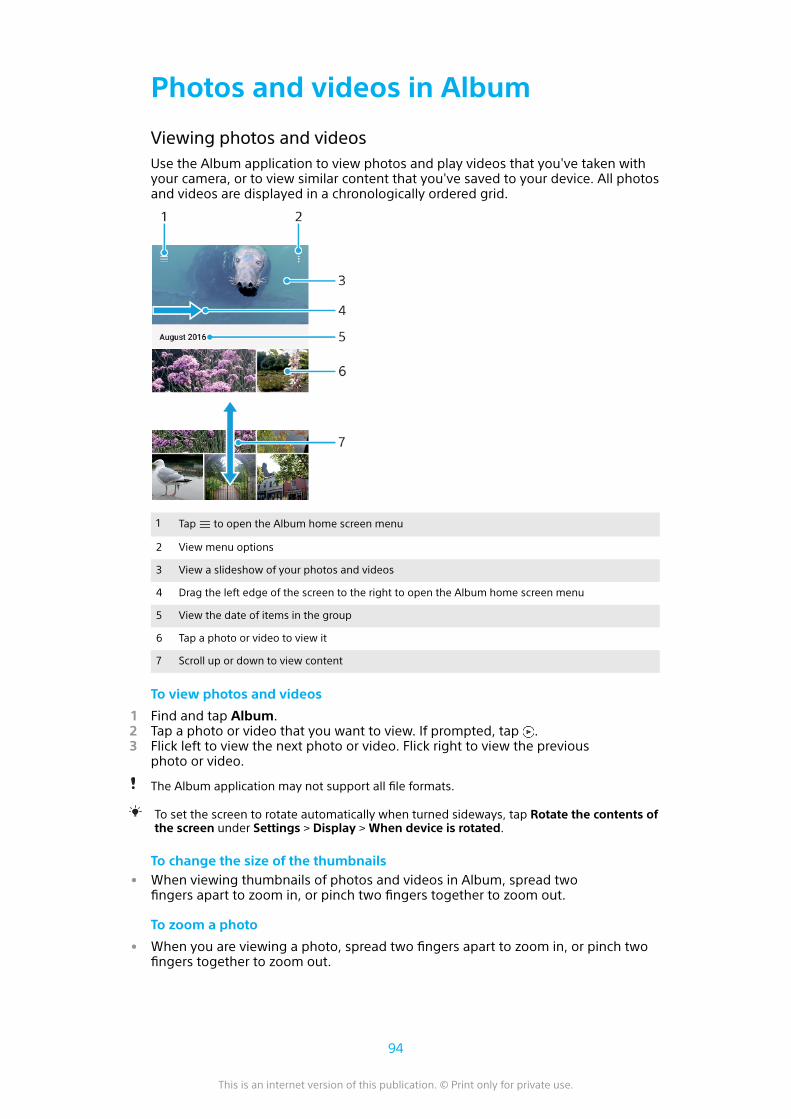
Photos and videos in Album
Viewing photos and videosUse the Album application to view photos and play videos that you've taken withyour camera, or to view similar content that you've saved to your device. All photosand videos are displayed in a chronologically ordered grid.
1 Tap to open the Album home screen menu
2 View menu options
3 View a slideshow of your photos and videos
4 Drag the left edge of the screen to the right to open the Album home screen menu
5 View the date of items in the group
6 Tap a photo or video to view it
7 Scroll up or down to view content
To view photos and videos
1 Find and tap Album.2 Tap a photo or video that you want to view. If prompted, tap .3 Flick left to view the next photo or video. Flick right to view the previous
photo or video.
The Album application may not support all file formats.
To set the screen to rotate automatically when turned sideways, tap Rotate the contents ofthe screen under Settings > Display > When device is rotated.
To change the size of the thumbnails• When viewing thumbnails of photos and videos in Album, spread two
fingers apart to zoom in, or pinch two fingers together to zoom out.
To zoom a photo
• When you are viewing a photo, spread two fingers apart to zoom in, or pinch twofingers together to zoom out.
94
This is an internet version of this publication. © Print only for private use.
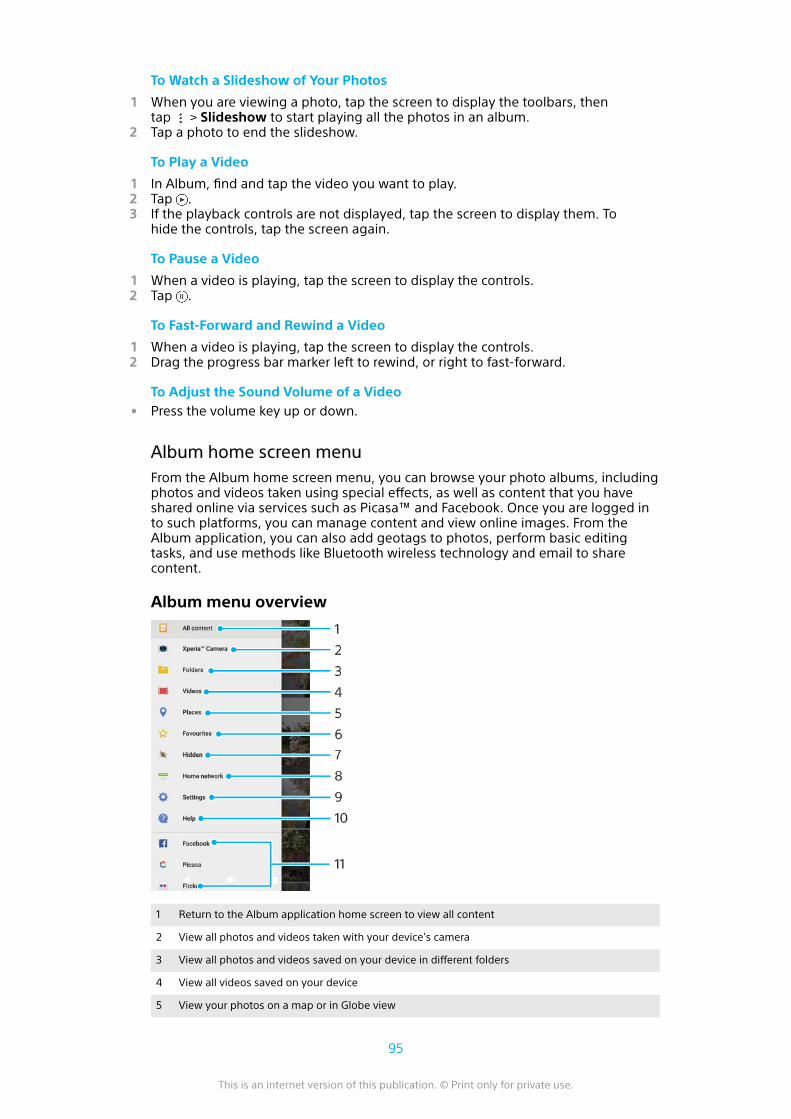
To Watch a Slideshow of Your Photos
1 When you are viewing a photo, tap the screen to display the toolbars, thentap > Slideshow to start playing all the photos in an album.
2 Tap a photo to end the slideshow.
To Play a Video
1 In Album, find and tap the video you want to play.2 Tap .3 If the playback controls are not displayed, tap the screen to display them. To
hide the controls, tap the screen again.
To Pause a Video
1 When a video is playing, tap the screen to display the controls.2 Tap .
To Fast-Forward and Rewind a Video
1 When a video is playing, tap the screen to display the controls.2 Drag the progress bar marker left to rewind, or right to fast-forward.
To Adjust the Sound Volume of a Video• Press the volume key up or down.
Album home screen menuFrom the Album home screen menu, you can browse your photo albums, includingphotos and videos taken using special effects, as well as content that you haveshared online via services such as Picasa™ and Facebook. Once you are logged into such platforms, you can manage content and view online images. From theAlbum application, you can also add geotags to photos, perform basic editingtasks, and use methods like Bluetooth wireless technology and email to sharecontent.
Album menu overview
1 Return to the Album application home screen to view all content
2 View all photos and videos taken with your device's camera
3 View all photos and videos saved on your device in different folders
4 View all videos saved on your device
5 View your photos on a map or in Globe view
95
This is an internet version of this publication. © Print only for private use.
6 View your favorite photos and videos
7 View photos and videos that you have hidden from view
8 View photos and videos on other devices in the same network
9 Open the Settings menu for the Album application
10 Open web support
11 View photos from online services
To view photos from online services in Album
1 Find and tap Album, then tap .2 Tap the desired online service, then follow the on-screen instructions to get
started. All available online albums that you have uploaded to the serviceare displayed.
3 Tap any album to view its content, and then tap a photo in the album.4 Flick left to view the next photo or video. Flick right to view the previous
photo or video.
Sharing and managing photos and videosYou can share photos and videos that are saved on your device. You can alsomanage photos in batches or link photos to contacts. To free up space and avoidunpredictable data loss, regularly transfer your photos and videos to a computer orexternal storage device. See Managing files using a computer on page 39.
You might not be able to copy, send, or transfer copyright-protected items. Some items maynot send if the file size is too large.
To Share a Photo or Video
1 In Album, find and tap the photo or video you want to share.2 Tap the screen to display the toolbars, then tap .3 Tap the application you want to use to share the photo, then follow the steps
to send it.
To Use a Photo as a Contact Picture
1 When you are viewing a photo, tap the screen to display the toolbars, thentap > Use as > Contact photo.
2 Select a contact, then edit the photo as desired.3 Tap SAVE.
To Use a Photo as Wallpaper
1 When you are viewing a photo, tap the screen to display the toolbars, thentap > Use as > Wallpaper.
2 Follow the instructions on the screen.
To Rotate a Photo
1 When you are viewing a photo, tap the screen to display the toolbars, thentap .
2 Tap Rotate, and then select an option. The photo is saved in the neworientation.
To Delete a Photo or Video
1 When you are viewing a photo, tap the screen to display the toolbars, thentap .
2 Tap Delete.
96
This is an internet version of this publication. © Print only for private use.
To Work with Batches of Photos or Videos in Album
1 When viewing thumbnails of photos and videos in Album, touch and hold anitem until it’s highlighted.
2 Tap other items you want to work with to select them. If you want to selectall items, tap , then tap Select all.
3 Use the tools in the toolbar to work with your selected items.
Hiding photos and videosYou can hide any photos and videos from the Album homescreen. Once photosand videos are hidden from the Album homescreen, they can only be viewed fromthe Hidden folder.
To Hide a Photo or Video
1 In Album, find and tap the photo or video you want to hide.2 Tap the screen to display the toolbars, then tap .3 Tap Hide > OK.
To View Your Hidden Photos and Videos
1 In Album, tap , then tap Hidden.2 Tap a photo or video to view it.3 Flick left to view the next photo or video. Flick right to view the previous
photo or video.
To Unhide a Photo or Video
1 In Album, tap , then tap Hidden.2 Tap a photo or video that you want to unhide.3 Tap the screen to display the toolbars, then tap .4 Tap Don't hide.
97
This is an internet version of this publication. © Print only for private use.
Connectivity
Mirroring the Screen of Your Device Wirelessly on a TVYou can use the Screen mirroring feature to show the screen of your device on a TVor other large display without using a cable connection. Wi-Fi Direct™ technologycreates a wireless connection between the two devices, so you can sit back andenjoy your favorite photos from the comfort of your couch. You can also use thisfeature to listen to music from your device using the TV's speakers.
When using Screen mirroring, the image quality may sometimes be negatively impacted ifthere is interference from other Wi-Fi networks.
To mirror the screen of your device on a TV screen
1 TV: Follow the instructions in the User Guide of your TV to turn on the Screenmirroring function.
2 Your device: Find and tap Settings > Device connection > Screenmirroring.
3 Tap Start.4 Tap OK and select a device.
Your TV must support Screen mirroring based on Wi-Fi CERTIFIED Miracast™ for the functionto work. If your TV does not support Screen mirroring, you may need to purchase a wirelessdisplay adapter separately. Also, when using Screen mirroring, do not cover the Wi-Fiantenna area of your device.
To stop screen mirroring between devices
1 Find and tap Settings > Device connection > Screen mirroring.2 Tap Disconnect, then tap OK.
You can also stop screen mirroring by tapping the notification in the status bar of yourdevice. Drag the status bar downward and tap Disconnect, then tap OK.
Connecting Your Device to USB AccessoriesYou can use a USB Type-C™ host adapter to connect your device to USBaccessories such as USB mass storage devices, game controllers, USB keyboards,and USB mice. If the USB accessory has a USB Type-C connector, a USB Type-C hostadapter is not necessary.
USB Type-C host adapters are sold separately. Sony does not guarantee that allUSB accessories are supported by your device.
This device has a capless USB Type-C port. If your device gets exposed to water, ensure thatthe port is completely dry before connecting a USB Type-C cable.
Near Field Communication (NFC)Use Near Field Communication (NFC) to share data with other devices, like videos,photos, web page addresses, music files, or contacts. You can also use NFC to scantags that give you more information about a product or service, and tags thatactivate certain functions on your device.
NFC is a wireless technology with a maximum range of one centimeter, so thedevices sharing data must be held close to each other. Before you can use NFC,you must first turn on the NFC function, and the screen of your device must beactive and unlocked.
The NFC detection area is located on the back of the device. Hold your device closeto another device or an NFC reader so that the NFC detection areas touch.
98
This is an internet version of this publication. © Print only for private use.
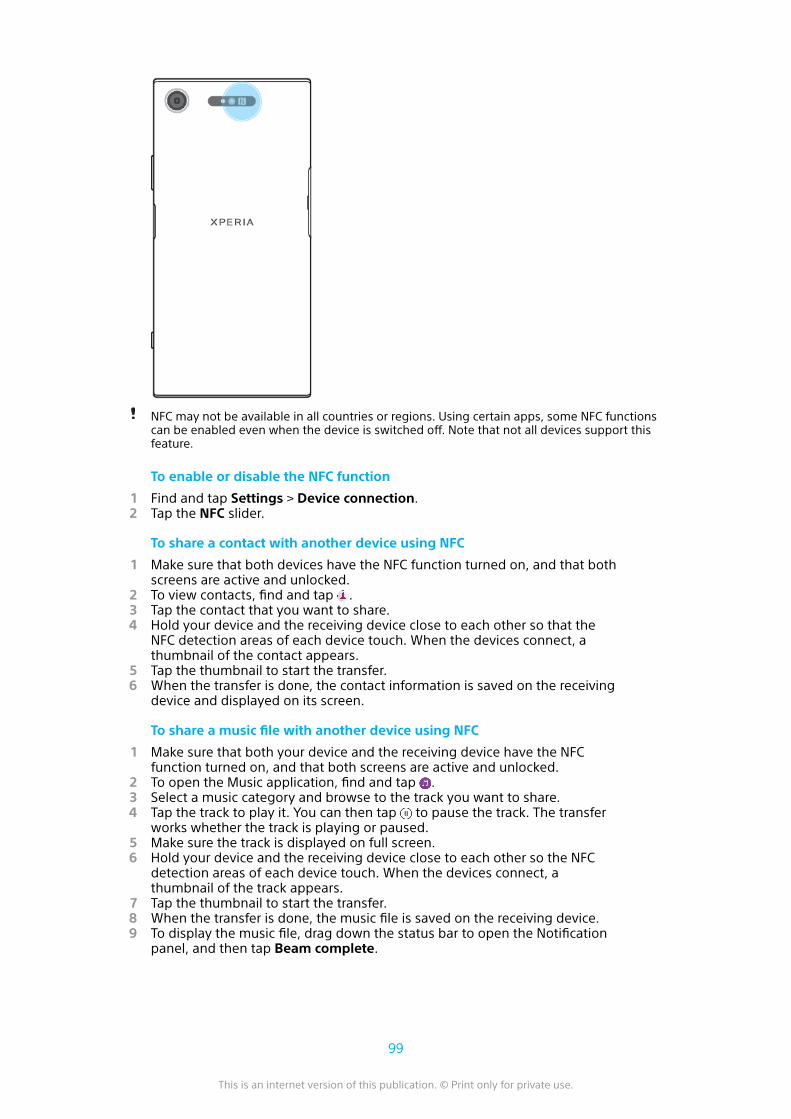
NFC may not be available in all countries or regions. Using certain apps, some NFC functionscan be enabled even when the device is switched off. Note that not all devices support thisfeature.
To enable or disable the NFC function
1 Find and tap Settings > Device connection.2 Tap the NFC slider.
To share a contact with another device using NFC
1 Make sure that both devices have the NFC function turned on, and that bothscreens are active and unlocked.
2 To view contacts, find and tap .3 Tap the contact that you want to share.4 Hold your device and the receiving device close to each other so that the
NFC detection areas of each device touch. When the devices connect, athumbnail of the contact appears.
5 Tap the thumbnail to start the transfer.6 When the transfer is done, the contact information is saved on the receiving
device and displayed on its screen.
To share a music file with another device using NFC
1 Make sure that both your device and the receiving device have the NFCfunction turned on, and that both screens are active and unlocked.
2 To open the Music application, find and tap .3 Select a music category and browse to the track you want to share.4 Tap the track to play it. You can then tap to pause the track. The transfer
works whether the track is playing or paused.5 Make sure the track is displayed on full screen.6 Hold your device and the receiving device close to each other so the NFC
detection areas of each device touch. When the devices connect, athumbnail of the track appears.
7 Tap the thumbnail to start the transfer.8 When the transfer is done, the music file is saved on the receiving device.9 To display the music file, drag down the status bar to open the Notification
panel, and then tap Beam complete.
99
This is an internet version of this publication. © Print only for private use.
To share a photo or video with another device using NFC
1 Make sure that both devices have the NFC function turned on, and that bothscreens are active and unlocked.
2 To view photos and videos on your device, find and tap Album.3 Tap the photo or video that you want to share.4 Hold your device and the receiving device close to each other so that the
NFC detection areas of each device touch. When the devices connect, athumbnail of the photo or video appears.
5 Tap the thumbnail to start the transfer.6 When the transfer is done, the photo or video is saved on the receiving
device.
To Share a Web Address With Another Device Using NFC
1 Make sure that both devices have the NFC function turned on, and that bothscreens are active and unlocked.
2 To open the web browser, find and tap .3 Load the web page that you want to share.4 Hold your device and the receiving device close to each other so that the
NFC detection areas of each device touch. When the devices connect, athumbnail of the web page appears.
5 Tap the thumbnail to start the transfer.6 When the transfer is done, the web page is displayed on the screen of the
receiving device.
Scanning NFC TagsYour device can scan various kinds of NFC tags to receive additional information,such as a web address. For example, it can scan embedded tags on a poster, on abillboard advertisement, or beside a product in a retail store.
To Scan an NFC Tag
1 Make sure your device has the NFC function turned on and the screen isactive and unlocked.
2 Place your device over the tag so the NFC detection area touches it. Yourdevice scans the tag and displays the content collected. Tap the content ofthe tag to open it.
Connecting to an NFC-Compatible DeviceYou can connect your device to other NFC-compatible devices produced by Sony,such as a speaker or a headphone. When establishing this kind of connection, referto the User Guide of the compatible device for more information.
You may need to have Wi-Fi or Bluetooth® activated on both devices for the connection towork.
Bluetooth® wireless technologyUse the Bluetooth® function to send files to other Bluetooth-compatible devices, orto connect to handsfree accessories. Bluetooth connections work better within 33feet (10 meters), with no solid objects in between. In some cases, you have tomanually pair your device with other Bluetooth devices.
Interoperability and compatibility among Bluetooth devices can vary.
If you are using a device with multiple users, each user can change the Bluetooth settings,and the changes affect all users.
To turn the Bluetooth function on or off
1 Find and tap Settings > Device connection > Bluetooth.2 Tap the Bluetooth slider to enable or disable the function.
100
This is an internet version of this publication. © Print only for private use.
Naming your deviceYou can give your device a name. This name is shown to other devices after youhave turned on the Bluetooth® function and your device is set to visible.
To give your device a name
1 Make sure that the Bluetooth function is turned on.2 Find and tap Settings > Device connection > Bluetooth.3 Tap > Rename this device.4 Enter a name for your device.5 Tap RENAME.
Pairing with another Bluetooth® deviceWhen you pair your device with another device, you can for example connect yourdevice to a Bluetooth® headset or a Bluetooth car kit, and use these other devicesto share music.
Once you pair your device with another Bluetooth device, your device remembersthis pairing. When pairing your device with a Bluetooth device for the first time,you may need to enter a passcode. Your device will automatically try the genericpasscode 0000. If this does not work, refer to the user guide for your Bluetoothdevice to get the device passcode. You do not need to re-enter the passcode thenext time you connect to a previously paired Bluetooth device.
Some Bluetooth devices, for example, most Bluetooth headsets, require you to both pairand connect with the other device.
You can pair your device with several Bluetooth devices, but you can only connect to oneBluetooth profile at the same time.
To pair your device with another Bluetooth device
1 Make sure that the device you want to pair with has the Bluetooth functionactivated and is visible to other Bluetooth devices.
2 Find and tap Settings > Device connection > Bluetooth.3 Tap the Bluetooth slider to enable the function. A list of the available
Bluetooth devices appears.4 Tap the Bluetooth device that you want to pair with.5 Enter a passcode, if required, or confirm the same passcode on both devices.
To connect your device to another Bluetooth device
1 Find and tap Settings > Device connection > Bluetooth.2 Tap the Bluetooth device that you want to connect to.
To unpair a Bluetooth device
1 Find and tap Settings > Device connection > Bluetooth.2 Under Paired devices, tap beside the name of the device that you want to
unpair.3 Tap FORGET.
Sending and receiving items using Bluetooth® technology
Use Bluetooth® technology to share items with other Bluetooth compatible deviceslike phones or computers. You can send and receive the following kinds of items:
• Photos and videos• Music and other audio files• Web pages
101
This is an internet version of this publication. © Print only for private use.
To send items using Bluetooth®
1 Be sure the Bluetooth® function is turned on for the receiving device, andthat the device is visible to other Bluetooth devices.
2 Open the application on the sending device that contains the item that youwant to send. Scroll to the item.
3 Depending on the application and on the item that you want to send, youmay need to, for example, touch and hold the item, open the item, andpress .
4 Select Bluetooth.5 Turn on Bluetooth if prompted.6 Tap the name of the receiving device.7 On the receiving device, accept the connection if prompted.8 On the sending device, confirm the transfer to the receiving device, if
prompted.9 Accept the incoming item on the receiving device.
To receive items using Bluetooth®
1 Ensure that the Bluetooth® function is on and is visible to other Bluetoothdevices.
2 The sending device now starts sending data to your device.3 If prompted, enter the same passcode on both devices, or confirm the
suggested passcode.4 When you are notified of an incoming file to your device, drag the status bar
downward and tap the notification to accept the file transfer.5 Tap Accept to start the file transfer.6 To view the progress of the transfer, drag the status bar downward.7 To open a received item, drag the status bar downward and tap the relevant
notification.
To view files you have received using Bluetooth
1 Find and tap Settings > Device connection > Bluetooth.2 Press and select Show received files.
102
This is an internet version of this publication. © Print only for private use.
Smart Apps and Features That SaveYou Time
Google FeedUse the Google app to search the internet. You can also enable a feed for regularupdates, for example, you can get traffic information before commuting to work,find popular restaurants in your area, see your favorite team's current score, andmore. The app can be accessed by tapping in the application list, or you canreserve a pane on your Home screen for quick access and easy reading.
To enable or disable Your feed
1 Find and tap Settings > Google > Search > Your feed.2 Tap the slider to enable or disable the feed.
To reserve a pane on the Home screen for Google Feed
1 Touch and hold any area on your Home screen.2 Tap , then tap the Google feed slider.3 You can now swipe to the left-most pane on the Home screen to access the
Google Feed interface.
If you reserve the left-most pane for Google Feed, the main Home screen pane cannot bechanged and additional panes cannot be added to the left. Only the left-most pane can bereserved.
Using your Device as a WalletYou can use your device to pay for goods without reaching for your real wallet andmanage all payment services in one place. When making a payment, remember toturn on the NFC function before you touch your device to a card reader. For moreinformation about NFC, see Near Field Communication (NFC) on page 98.
Mobile payment services may not be available in all regions.
To manage payment services
1 Make sure NFC is enabled on your device.2 Find and tap Settings > Apps & notifications > Advanced > Default apps >
Tap & pay. A list of payment services appears.3 Manage the payment services as desired. For example, you can change your
default payment service.
Xperia™ ActionsUse Xperia™ Actions to customize phone settings for different circumstances. Youcan select and schedule separate phone settings for nighttime, specific days,hours, or locations, and when you travel abroad. For example, have your deviceautomatically turn on Flight or Do Not Disturb mode for times when you do notwant to receive notifications. You can also set which apps use data when roaming,or have STAMINA mode automatically turn on when you travel abroad.
To activate Good night actions
1 Find and tap Settings > Assistant > Xperia™ Actions.2 Tap Good night.3 Tap the time span to edit it. Select the desired values for the days and time
span. Tap and mark the checkboxes as desired.4 Tap Save.
You can also add your location for a more accurate experience.
103
This is an internet version of this publication. © Print only for private use.

To activate Focus actions
1 Find and tap Settings > Assistant > Xperia™ Actions.2 Tap Focus.3 Tap the time span to edit it. Select the desired values for the days and time
span. Tap and mark the checkboxes as desired.4 Tap Save.
You can also add your location for a more accurate experience.
To activate Abroad actions
1 Find and tap Settings > Assistant > Xperia™ Actions.2 Tap Abroad.3 Tap the time span to edit it. Select the desired values for the days and time
span. Tap and mark the checkboxes as desired.4 Tap Save.
You can also add your location for a more accurate experience.
To activate Commute actions
1 Find and tap Settings > Assistant > Xperia™ Actions.2 Tap Commute.3 Tap the time span to edit. Select the desired values for the days and time
span. Tap and mark the checkboxes as desired.4 Tap Save.
You can also add your location for a more accurate experience.
To activate Gaming actions
1 Find and tap Settings > Assistant > Xperia™ Actions.2 Tap Gaming.3 Tap the time span to edit it. Select the desired values for the days and time
span. Tap and mark the checkboxes as desired.4 Tap Save.
You can also add your location for a more accurate experience.
104
This is an internet version of this publication. © Print only for private use.
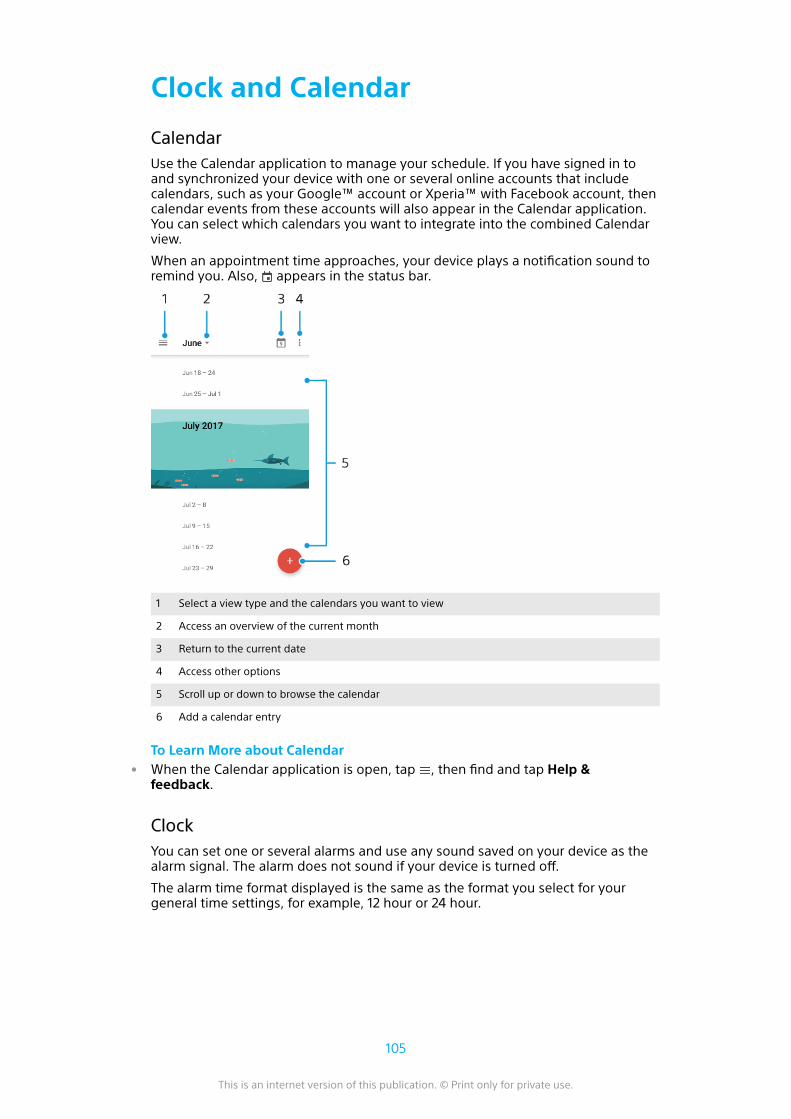
Clock and Calendar
CalendarUse the Calendar application to manage your schedule. If you have signed in toand synchronized your device with one or several online accounts that includecalendars, such as your Google™ account or Xperia™ with Facebook account, thencalendar events from these accounts will also appear in the Calendar application.You can select which calendars you want to integrate into the combined Calendarview.
When an appointment time approaches, your device plays a notification sound toremind you. Also, appears in the status bar.
1 Select a view type and the calendars you want to view
2 Access an overview of the current month
3 Return to the current date
4 Access other options
5 Scroll up or down to browse the calendar
6 Add a calendar entry
To Learn More about Calendar• When the Calendar application is open, tap , then find and tap Help &
feedback.
ClockYou can set one or several alarms and use any sound saved on your device as thealarm signal. The alarm does not sound if your device is turned off.
The alarm time format displayed is the same as the format you select for yourgeneral time settings, for example, 12 hour or 24 hour.
105
This is an internet version of this publication. © Print only for private use.
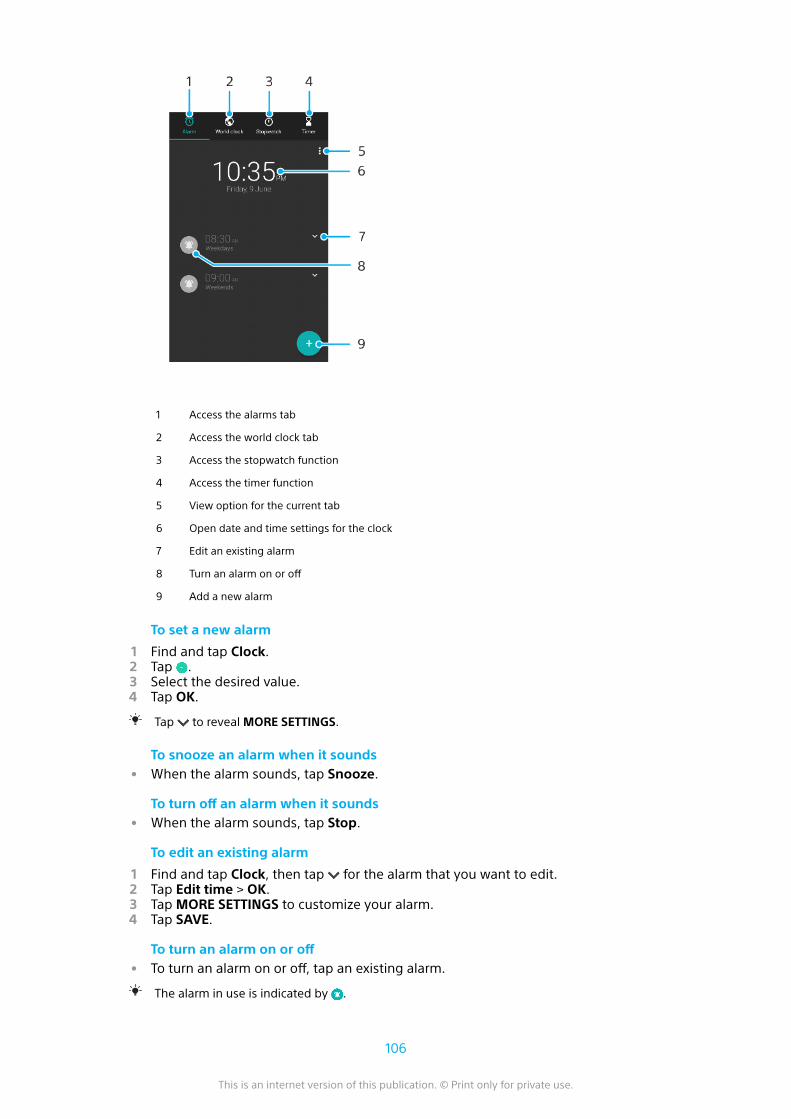
1 Access the alarms tab
2 Access the world clock tab
3 Access the stopwatch function
4 Access the timer function
5 View option for the current tab
6 Open date and time settings for the clock
7 Edit an existing alarm
8 Turn an alarm on or off
9 Add a new alarm
To set a new alarm
1 Find and tap Clock.2 Tap .3 Select the desired value.4 Tap OK.
Tap to reveal MORE SETTINGS.
To snooze an alarm when it sounds• When the alarm sounds, tap Snooze.
To turn off an alarm when it sounds• When the alarm sounds, tap Stop.
To edit an existing alarm
1 Find and tap Clock, then tap for the alarm that you want to edit.2 Tap Edit time > OK.3 Tap MORE SETTINGS to customize your alarm.4 Tap SAVE.
To turn an alarm on or off• To turn an alarm on or off, tap an existing alarm.
The alarm in use is indicated by .
106
This is an internet version of this publication. © Print only for private use.
To delete an alarm• Find and tap Clock, then touch and hold the alarm that you want to delete,
then tap .
To set the sound for an alarm
1 Find and tap Clock, then tap for the alarm that you want to edit.2 Tap MORE SETTINGS > Alarm sound and select an option, or tap and
select a music file.3 Tap OK, then tap SAVE.
To adjust the volume level for an alarm
1 Find and tap Clock, then tap for the alarm that you want to edit.2 Tap MORE SETTINGS, then drag the slider for Volume increase.
To set a recurring alarm
1 Find and tap Clock, then tap for the alarm that you want to edit.2 Tap the checkbox Repeat.3 Mark the relevant days as desired.
To select the alarm type for an alarm
1 Find and tap Clock, then tap for the alarm that you want to edit.2 Tap MORE SETTINGS > Alarm type, then select an option.3 Tap SAVE.
To set the side keys behavior
1 Find and tap Clock, and then tap for the alarm that you want to edit.2 Tap MORE SETTINGS, then tap Side keys behavior.3 Select the desired behavior of side keys.4 Tap SAVE.
107
This is an internet version of this publication. © Print only for private use.

Accessibility
MagnificationMagnification allows you to zoom in to parts of the screen by tapping an area ofthe touch screen three times in succession.
To enable or disable Magnification
1 Find and tap Settings > Accessibility > Magnification.2 Select an option and tap the slider to enable the function.
To magnify an area and pan across the screen
1 Make sure Magnification is enabled.2 To temporarily magnify an area, tap it three times.3 Move the area by dragging it with two or more fingers.4 To exit zoom mode, tap the area three times again.
With certain applications, you can also zoom in or out by pinching an area.
Font sizeYou can enable the Font size option to increase the default size of text displayedon your device.
To set Font size
1 Find and tap Settings > Accessibility.2 Tap Font size, and then set the desired font size by tapping the scale.
Color CorrectionThe Color correction setting adjusts how colors are displayed on the screen forusers who are color blind or have difficulty distinguishing between colors.
To enable or disable Color correction
1 Find and tap Settings > Accessibility > Color correction.2 Tap the slider under Color correction to enable or disable the function.3 Tap Correction mode, and select the appropriate color sensitivity.
Color correction is currently an experimental feature and may affect device performance.
TalkBackTalkBack is a screen reader service for visually impaired users. TalkBack usesspoken feedback to describe any events or actions performed on your Androiddevice. TalkBack describes the user interface and reads out software errors,notifications, and messages.
To enable TalkBack
1 Find and tap Settings > Accessibility > TalkBack.2 Tap the slider and then tap OK.
To change speech, feedback, and touch preferences for TalkBack, tap Settings, then tap thescreen twice.
TalkBack launches a tutorial immediately after you enable the feature. To exit the tutorial,tap , then tap the screen twice.
108
This is an internet version of this publication. © Print only for private use.
To disable TalkBack
1 Find and tap Settings, then tap anywhere on the screen twice.2 Find and tap Accessibility by scrolling through the list with two or more
fingers, then tap anywhere on the screen twice.3 Find and tap TalkBack by scrolling through the list with two or more fingers,
then tap anywhere on the screen twice.4 Tap the on-off switch, and then tap anywhere on the screen twice.5 Tap OK, and then tap anywhere on the screen twice.
Mono AudioThe Mono audio setting makes both left and right audio channels get played backsimultaneously when playing audio. Using Mono instead of Stereo playback ismost useful for users with certain types of hearing loss or for safety reasons, forexample when you need to listen to your surroundings.
To enable or disable Mono audio
1 Find and tap Settings > Accessibility.2 Tap the slider beside Mono audio to enable or disable this function.
Switch AccessWith Switch Access, you can interact with your Xperia™ device using one or moreswitches. A switch is a device used to send a keystroke signal to your Androiddevice. These can be helpful for users with mobility limitations. For moreinformation about Switch Access, see Settings > Accessibility > Switch Access >SETTINGS > Help & feedback.
To enable or disable Switch Access
1 Find and tap Settings > Accessibility > Switch Access.2 Tap the slider to enable or disable the function, then tap OK.3 Follow the on-screen instructions, then tap Finish.
109
This is an internet version of this publication. © Print only for private use.
Support and Legal
Support applicationUse the Support application on your device to browse User guides,troubleshooting guides, and to find contact information, software, and otherproduct-related information.
Even if you don’t have a network connection, you can access support contact informationon your device. Depending on the country or region where you purchased your device, youcan find this information using the Support application.
To access the Support app• Find and tap Settings > .
Connect to the internet when using Support application for the best available support.
Restarting, Resetting, and RepairingYou can force your device to restart or shut down if it stops responding or won'trestart normally. No settings or personal data get deleted.
You can also reset your device to its original factory settings. This action issometimes necessary if your device stops functioning properly, but note that if youwant to keep any important data, you should first back up this data to a memorycard or other non-internal memory. For more information, see Backing Up andRestoring Content on page 41.
If your device fails to turn on or you want to reset your device’s software, you canuse Xperia™ Companion to repair your device. For more information on usingXperia™ Companion, see Xperia™ Companion on page 38.
If you are sharing a device with multiple users, you may need to log in as the owner, that is,the primary user, to reset your device to its original factory settings.
To Restart Your Device
Your device may fail to restart if the battery level is low. Connect your device to a chargerand try restarting again.
1 Press and hold down the power key .2 In the menu that opens, tap Restart. The device restarts automatically.
To Force the Device to Restart or Shutdown
1 Press and hold down the power key and the volume up key at the sametime for 6 seconds.
2 Your device vibrates once. Depending on whether you wish to force thedevice to restart or shut down, proceed as follows.• If you wish to force restart the device: Release the keys at this point. The
device restarts.• If you wish to force shut down the device: Continue pressing the keys.
After a few more seconds, the device vibrates three times and turns off.
To perform a factory data reset
To avoid permanent damage to your device, do not interrupt a factory data reset procedure.
110
This is an internet version of this publication. © Print only for private use.
1 Back up any important data that is saved on the internal memory of yourdevice to a memory card or other non-internal memory. If you have anyencrypted files stored on an SD card, you should also remove the encryptionto ensure you can still access them after the reset.
2 Find and tap Settings > System > Reset.3 Tap Factory data reset > Reset phone.4 If required, draw your screen unlock pattern or enter your screen unlock
password or PIN to continue.5 To confirm, tap Erase everything.
Your device does not revert to an earlier software version of Android when you perform afactory data reset.
Repairing the device softwareIf you forget your screen unlock password, PIN, or pattern, you can use the devicerepair feature in Xperia™ Companion to erase the security layer. You need toprovide your Google account login details to perform this operation. By runningthe repair feature, you reinstall software for your device and you may lose somepersonal data in the process.
If you can't turn off your device before performing a software repair, force it to shutdown.
When you receive a new Google account username or password, you might not be able touse them to log in.
To find out the recovery time, visit Google’s support pagehttp://support.google.com.
To Repair the Device Software Using Xperia™ Companion
Before performing a software repair, make sure you know your Google™ account usernameand password. Depending on your security settings, you may need to enter them in order torestart the device after a software repair.
If your device seems to have frozen, restarts repeatedly or doesn’t start at all afteryou updated the Xperia™ software or after you performed a software repair or afactory data reset, try forcing the device to shut down then try turning it back on. Ifthe problem still exists, force the device to shut down then perform a softwarerepair by following the steps below:
1 Make sure Xperia™ Companion is installed on your PC or Mac®.2 Open the Xperia™ Companion software on the computer and click on
Software repair on the main screen.3 Follow the instructions that appear on the screen to reinstall the software
and complete the repair.
Warranty, SAR, and usage guidelinesFor information about warranty, SAR (Specific Absorption Rate), and safetyguidelines, please read the Important information provided under Settings >System > About phone > Legal information on your device.
Legal information
Sony G8341/G8343This User guide is published by Sony Mobile Communications Inc. or its local affiliated company, withoutany warranty. Improvements and changes to this User guide necessitated by typographical errors,inaccuracies of current information, or improvements to programs and/or equipment, may be made bySony Mobile Communications Inc. at any time and without notice. Such changes will, however, beincorporated into new editions of this user guide. All illustrations are for illustrative purposes only and maynot accurately depict the actual device.
111
This is an internet version of this publication. © Print only for private use.

All product and company names mentioned herein are the trademarks or registered trademarks of theirrespective owners. All other trademarks are property of their respective owners. Any rights not expresslygranted herein are reserved. Visit www.sonymobile.com/us/legal/ for more information.This User guide may reference services or applications provided by third parties. Use of such programmingor services may require separate registration with the third-party provider, payment of fees, or provision ofcredit card information, as well as be subject to additional terms of use, change, interruption, ordiscontinuance at any time. For applications accessed on or through a third-party website, please reviewsuch websites' terms of use and applicable privacy policy in advance. Sony does not warrant or guaranteethe availability or performance of any third-party application, websites, or offered services.Your device has the capability to download, store, and forward additional content, for example, ringtones.The use of such content may be restricted or prohibited by rights of third parties, including, but not limitedto, restriction under applicable copyright laws. You, and not Sony, are entirely responsible for additionalcontent that you download to or forward from your device. Prior to your use of any additional content,please verify that your intended use is properly licensed or is otherwise authorized. Sony does notguarantee the accuracy, integrity or quality of any additional content or any other third-party content.Under no circumstances will Sony be liable in any way for your improper use of additional content or otherthird-party content.This product is licensed under the MPEG-4 visual and AVC patent portfolio licenses for the personal andnon-commercial use of a consumer for; (i) encoding video in compliance with the MPEG-4 visual standard("MPEG-4 video") or the AVC standard ("AVC video"); and/or (ii) decoding MPEG- 4 or AVC video that wasencoded by a consumer engaged in a personal and non-commercial activity and/or was obtained from avideo provider licensed by MPEG LA to provide MPEG-4 and/or AVC video. No license is granted or shall beimplied for any other use. Additional information, including that relating to promotional, internal andcommercial uses and licensing may be obtained from MPEG LA, L.L.C. See www.mpegla.com. MPEG Layer-3audio decoding technology licensed from Fraunhofer IIS and Thomson.SONY MOBILE WILL NOT BE LIABLE FOR ANY LOSS, DELETION AND/OR DATA OVERWRITING OF PERSONALDATA OR FILES STORED ON YOUR DEVICE (INCLUDING BUT NOT LIMITED TO CONTACTS, MUSIC TRACKS, ANDPICTURES) ARISING OUT OF ANY UPDATE OF YOUR DEVICE BY ANY OF THE METHODS DESCRIBED IN THISUSER GUIDE OR DOCUMENTATION. IN NO EVENT SHALL SONY MOBILE OR ITS SUPPLIERS’ TOTAL LIABILITYTO YOU FOR ANY AND ALL DAMAGES, LOSSES AND CAUSES OF ACTION (WHETHER IN CONTRACT OR TORT,INCLUDING, BUT NOT LIMITED TO NEGLIGENCE OR OTHERWISE) EXCEED THE AMOUNT ACTUALLY PAID BYYOU FOR YOUR DEVICE.© 2017 Sony Mobile Communications Inc.All rights reserved.
112
This is an internet version of this publication. © Print only for private use.