Embed Size (px)
Citation preview

User Guide
MHS700L

Contents 1. Getting Started ............................................................................................................................................................... 1
Overview ................................................................................................................................................................................................ 2 System Requirements ................................................................................................................................................................ 2
Components .......................................................................................................................................................................................... 3
Device Display ..................................................................................................................................................................................... 4 Display Indicators ........................................................................................................................................................................ 4
Battery Management ........................................................................................................................................................................ 5
2. Using Your Jetpack ....................................................................................................................................................... 6
Accessing the Network ..................................................................................................................................................................... 7 Mobile Broadband with 4G LTE* .......................................................................................................................................... 7 Wi-Fi 802.11b/g/n ...................................................................................................................................................................... 7
Using Your Jetpack for the First Time ........................................................................................................................................ 8 System Requirements ................................................................................................................................................................ 8 Installing the 4G LTE SIM Card .............................................................................................................................................. 8 Removing the 4G LTE SIM Card ............................................................................................................................................ 8 Charging the Battery .................................................................................................................................................................. 9 Powering the Jetpack On and Off .......................................................................................................................................... 9
Connecting to Your Jetpack .......................................................................................................................................................... 10 Wi-Fi Name (SSID) and Password ...................................................................................................................................... 10 Connecting to the Internet ..................................................................................................................................................... 10
Using Your Jetpack after Setup is Complete .......................................................................................................................... 11 Mobile Hotspot to share connections ............................................................................................................................... 11 Wi-Fi and Web UI Admin Security ..................................................................................................................................... 11 Monitoring Data Usage ............................................................................................................................................................ 11
3. Jetpack Settings .......................................................................................................................................................... 12
Managing Your Jetpack ................................................................................................................................................................. 13 Using the Web User Interface ............................................................................................................................................... 13
My Jetpack Home .............................................................................................................................................................................. 14 Manage My Jetpack ................................................................................................................................................................... 14 My Account & Tools .................................................................................................................................................................. 15 Help & Support ........................................................................................................................................................................... 15
Data Usage.......................................................................................................................................................................................... 16
Connected Devices ........................................................................................................................................................................... 17 Connected Devices .................................................................................................................................................................... 17 Edit a Connected Device ......................................................................................................................................................... 18 Changing the Maximum Number of Connected Devices .......................................................................................... 18 Blocked Devices .......................................................................................................................................................................... 19
Jetpack Settings ................................................................................................................................................................................ 20 Jetpack ............................................................................................................................................................................................ 20 Jetpack Admin Password ........................................................................................................................................................ 20

Preferences ................................................................................................................................................................................... 22 Software Update ......................................................................................................................................................................... 22 Factory Reset ............................................................................................................................................................................... 23 Wi-Fi ................................................................................................................................................................................................ 24 Advanced ....................................................................................................................................................................................... 25 Manual DNS .................................................................................................................................................................................. 26 SIM .................................................................................................................................................................................................... 27 Firewall .......................................................................................................................................................................................... 30 LAN ................................................................................................................................................................................................... 31 Port Filtering ................................................................................................................................................................................ 32
Messages .............................................................................................................................................................................................. 34 On the Jetpack ............................................................................................................................................................................. 34 On the Web User Interface..................................................................................................................................................... 34
About Jetpack ..................................................................................................................................................................................... 35 Internet Status ............................................................................................................................................................................ 35 Jetpack Info ................................................................................................................................................................................... 36 Diagnostics ................................................................................................................................................................................... 36 Logs .................................................................................................................................................................................................. 37 Jetpack Support .......................................................................................................................................................................... 37
4. Troubleshooting ......................................................................................................................................................... 38
Overview .............................................................................................................................................................................................. 39
First Steps ............................................................................................................................................................................................ 39
Common Problems and Solutions .............................................................................................................................................. 39
Technical Support ............................................................................................................................................................................ 40
5. Product Specifications and Regulatory Information .................................................................................... 41
Regulatory Statements .................................................................................................................................................................. 42 FCC Equipment Authorization ID: XHG-R700 ............................................................................................................... 42 Body-Worn Operation ............................................................................................................................................................. 42
Safety Hazards .................................................................................................................................................................................. 43
Limited Warranty and Liability ................................................................................................................................................. 44
Trademark .......................................................................................................................................................................................... 45
Document Revision History .......................................................................................................................................................... 45
6. Glossary ......................................................................................................................................................................... 46
Glossary ................................................................................................................................................................................................ 47

1
1
Getting Started
2
Overview Thank you for choosing the Ellipsis Jetpack! Having the Ellipsis Jetpack at your fingertips will allow you to access Verizon’s 4G LTE network for fast uploads and downloads. You can also connect up to eight Wi-Fi capable devices to the Internet at once – laptops, tablets, eReaders, gaming consoles and more* - and experience ten times faster speeds of solid 4G LTE, without dropping down to 3G or other slower speed technologies.
System Requirements
Compatible with all IEEE802.11b/g/n Wi-Fi enabled devices.
Works with the latest versions of most browsers**.
IMPORTANT!
* Be aware when multiple users are connected to the device, they are contributing to the total data usage on your mobile broadband data plan. ** It is recommended to use the latest versions of Internet browsers. Outdated versions may not be
compatible with the Jetpack Web User Interface, http://my.jetpack .

3
Components
1. Power/Menu Button – Power the Jetpack on/off and switch the menu
Operations Actions
Power On Press and hold the Power button for 2 seconds to turn on.
Power Off Press and hold the Power button 3 seconds to turn off.
Display Wake-Up
When the display is off (sleep mode), the first quick press of the Power button wakes up the display.
Info Display When the display is on, each time in the Power button is pressed quickly, selected information displays.
Colors Charging Status
Off The Jetpack is not connected to a charger.
Red The Jetpack is connected to a charger.
Green
The Jetpack is connected to a charger and the battery is fully charged.
2. SIM Slot / Power Reset – The SIM card installation slot and Jetpack Power Reset are
accessed by lifting the slide cover. 3. Charging Port – The USB charger connects here. 4. Display – Provides connection and battery status, network signal strength, roaming status,
and the number of users connected with Wi-Fi.

4
Device Display
Display Indicators
5
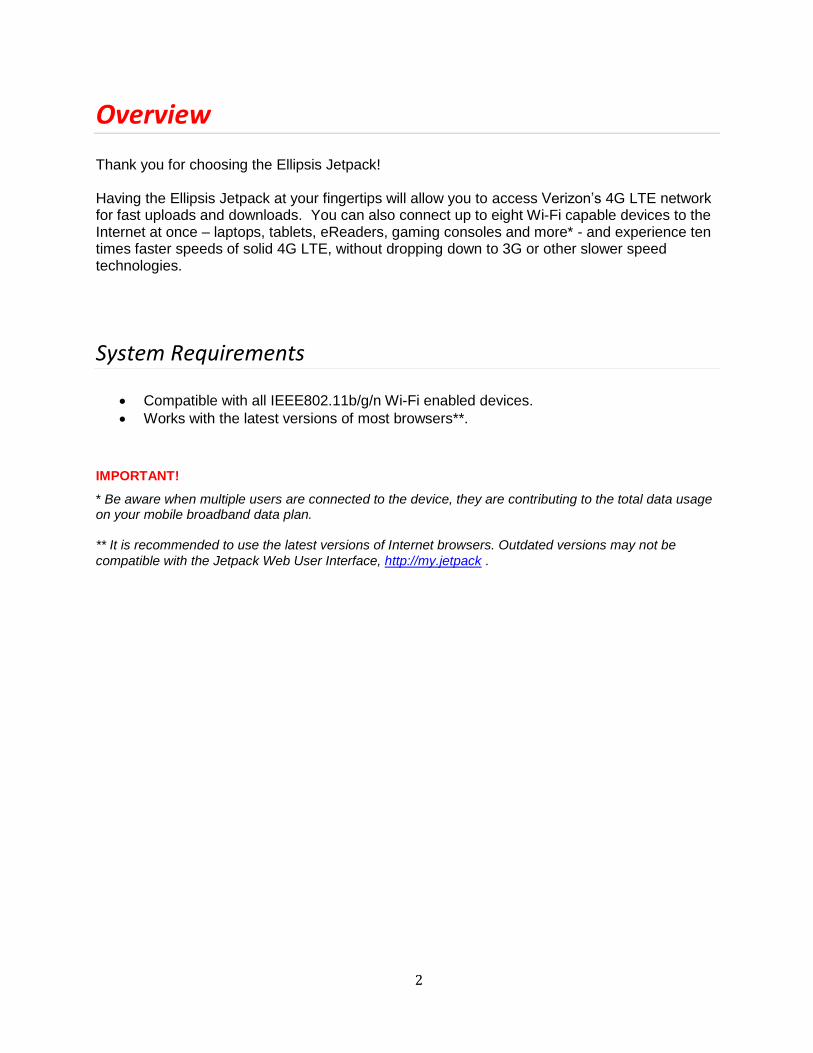
Battery Management Your Jetpack is equipped with an internal, non-removable, rechargeable battery. It will work from its charged battery alone, or when the device is plugged into a power source. Note: Please do not attempt to open or disassemble this Jetpack. Doing so may cause damage that voids your warranty. Charge the battery by plugging in the wall charger or to the USB port of a computer. While the
battery is charging, the battery charging icon displays , and the power button illuminates red
. When the battery is fully charged, the battery icon is solid , the power button
illuminates green .
IMPORTANT! Please use only an approved charger to charge your Jetpack. Improper handling of the charging port, as well as the use of an incompatible charger, may cause damage to your device and void the warranty.
6
2
Using Your Jetpack
7
Accessing the Network Work effectively outside the home or office with the reliable broadband speed that the 4G LTE service provides. You can connect to the internet at speeds that are up to 10 times faster than 3G, and keep up-to-date on all your email correspondence, download attachments, and access your corporate intranet.
Mobile Broadband with 4G LTE*
Download: typical speeds of 5-12 Mbps.
Upload: typical speeds of 2-5 Mbps.
NOTE: This Jetpack supports 4G LTE only. 3G fallback is not supported.
Wi-Fi 802.11b/g/n
802.11b uses the 2.4 GHz frequency with a bandwidth of 11 Mbps.
802.11g uses the 2.4 GHz frequency with a bandwidth of 54 Mbps.
802.11n uses the 2.4 GHz frequency with a bandwidth of 150 Mbps.
* Speeds shown are those published by Verizon Wireless, Inc. and are theoretical in nature. Actual throughput speed and coverage may vary. Speed claims not applicable when roaming.
8
Using Your Jetpack for the First Time
System Requirements Your computer, tablet, or other wireless devices need Wi-Fi capability and Internet browser software only. Your Jetpack is compatible with all major operating systems and the latest versions of browsers.
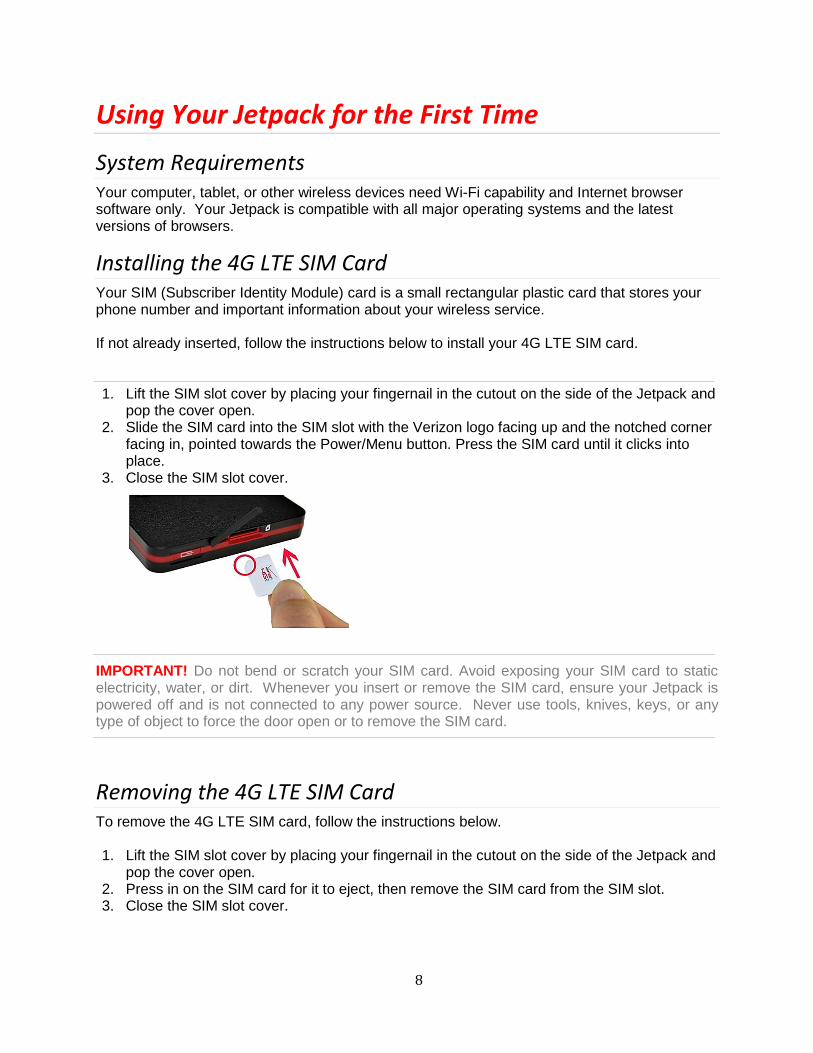
Installing the 4G LTE SIM Card Your SIM (Subscriber Identity Module) card is a small rectangular plastic card that stores your phone number and important information about your wireless service. If not already inserted, follow the instructions below to install your 4G LTE SIM card. 1. Lift the SIM slot cover by placing your fingernail in the cutout on the side of the Jetpack and
pop the cover open. 2. Slide the SIM card into the SIM slot with the Verizon logo facing up and the notched corner
facing in, pointed towards the Power/Menu button. Press the SIM card until it clicks into place.
3. Close the SIM slot cover.
IMPORTANT! Do not bend or scratch your SIM card. Avoid exposing your SIM card to static electricity, water, or dirt. Whenever you insert or remove the SIM card, ensure your Jetpack is powered off and is not connected to any power source. Never use tools, knives, keys, or any type of object to force the door open or to remove the SIM card.
Removing the 4G LTE SIM Card To remove the 4G LTE SIM card, follow the instructions below. 1. Lift the SIM slot cover by placing your fingernail in the cutout on the side of the Jetpack and
pop the cover open. 2. Press in on the SIM card for it to eject, then remove the SIM card from the SIM slot. 3. Close the SIM slot cover.
9
NOTE: Should your 4G SIM card be lost or damaged, contact Verizon Customer Care for a replacement.
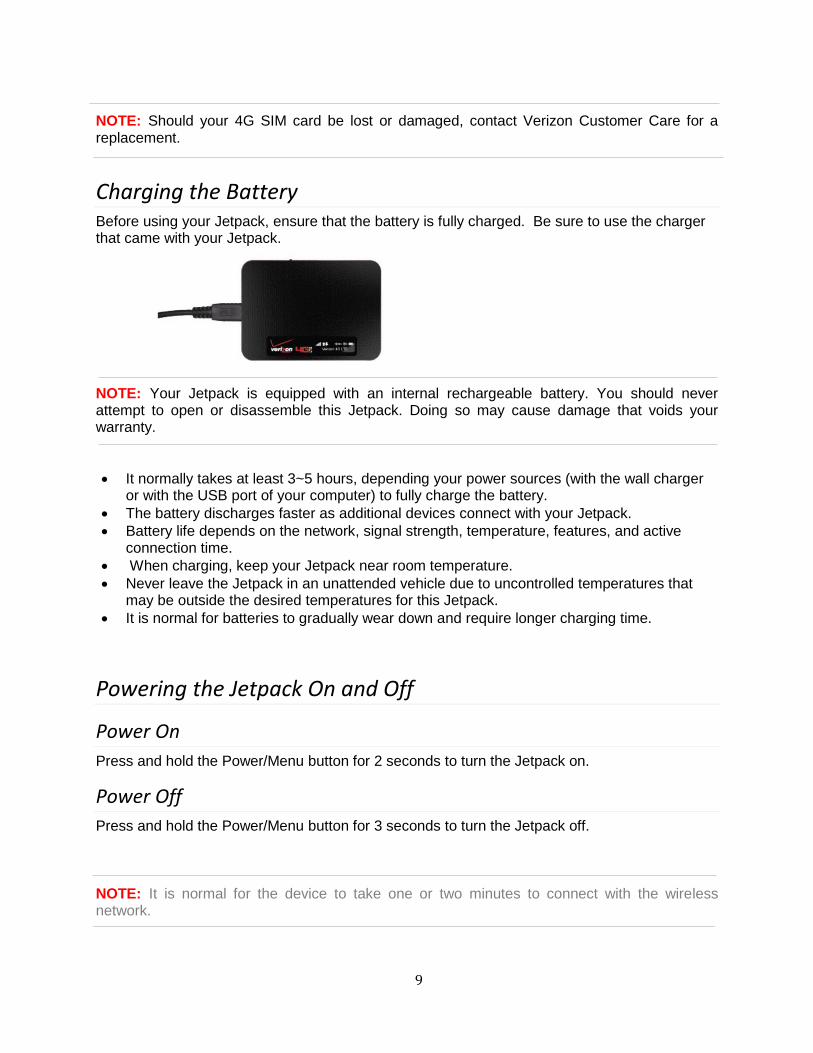
Charging the Battery Before using your Jetpack, ensure that the battery is fully charged. Be sure to use the charger that came with your Jetpack.
NOTE: Your Jetpack is equipped with an internal rechargeable battery. You should never attempt to open or disassemble this Jetpack. Doing so may cause damage that voids your warranty.
It normally takes at least 3~5 hours, depending your power sources (with the wall charger or with the USB port of your computer) to fully charge the battery.
The battery discharges faster as additional devices connect with your Jetpack.
Battery life depends on the network, signal strength, temperature, features, and active connection time.
When charging, keep your Jetpack near room temperature.
Never leave the Jetpack in an unattended vehicle due to uncontrolled temperatures that may be outside the desired temperatures for this Jetpack.
It is normal for batteries to gradually wear down and require longer charging time.
Powering the Jetpack On and Off
Power On
Press and hold the Power/Menu button for 2 seconds to turn the Jetpack on.
Power Off
Press and hold the Power/Menu button for 3 seconds to turn the Jetpack off. NOTE: It is normal for the device to take one or two minutes to connect with the wireless network.
10
Connecting to Your Jetpack
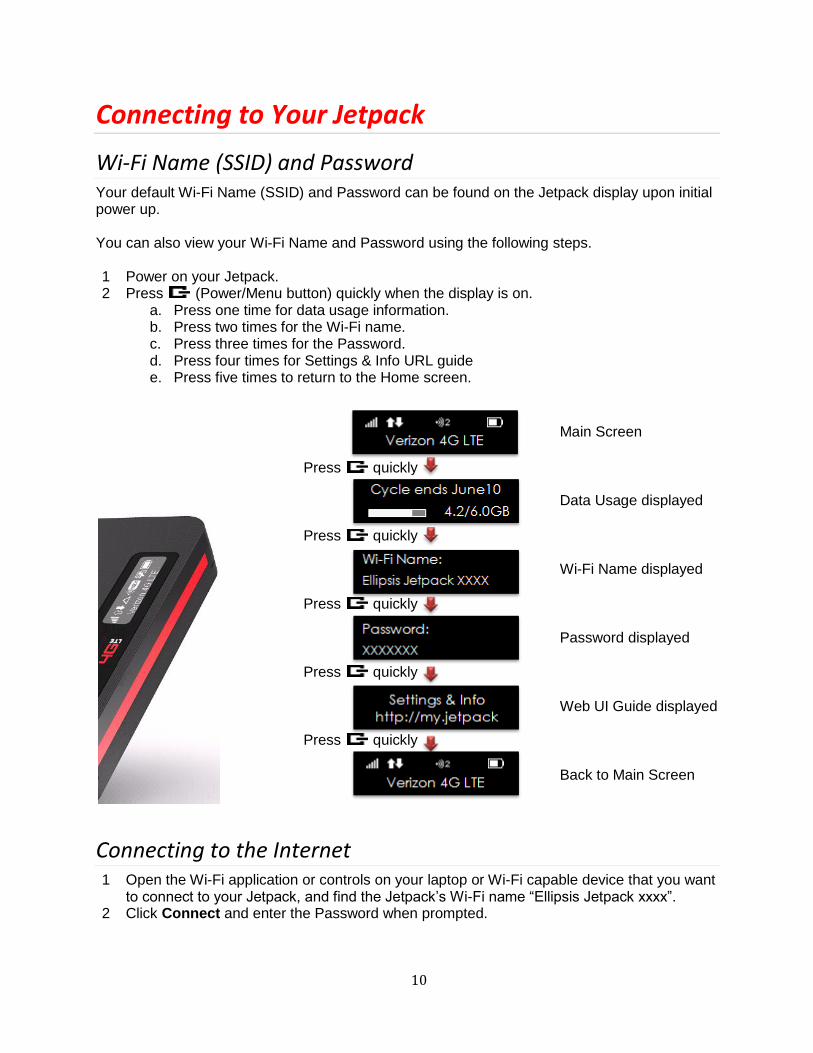
Wi-Fi Name (SSID) and Password Your default Wi-Fi Name (SSID) and Password can be found on the Jetpack display upon initial power up. You can also view your Wi-Fi Name and Password using the following steps. 1 Power on your Jetpack. 2 Press (Power/Menu button) quickly when the display is on.
a. Press one time for data usage information. b. Press two times for the Wi-Fi name. c. Press three times for the Password. d. Press four times for Settings & Info URL guide e. Press five times to return to the Home screen.
Connecting to the Internet 1 Open the Wi-Fi application or controls on your laptop or Wi-Fi capable device that you want
to connect to your Jetpack, and find the Jetpack’s Wi-Fi name “Ellipsis Jetpack xxxx”. 2 Click Connect and enter the Password when prompted.
Main Screen
Press quickly
Data Usage displayed
Press quickly
Press quickly
Press quickly
Press quickly
Wi-Fi Name displayed
Password displayed
Web UI Guide displayed
Back to Main Screen
11
Using Your Jetpack after Setup is Complete
Mobile Hotspot to share connections You can use the Jetpack as a wireless mobile hotspot to connect up to a total of eight Wi-Fi capable devices to the mobile broadband network.
Wi-Fi and Web UI Admin Security The Jetpack comes from the factory with security turned on. By default your Wi-Fi and Admin Password are the same. Your Admin Password will always be the same as your Wi-Fi Password unless you create a separate Admin Password in the Web User Interface. If you change your Wi-Fi Password, your Admin Password changes as well. To create a separate password for signing in to the Web User Interface in order to change settings on this device, a new Admin Password must be created. After you create the Admin Password, you will be required to use one password to connect with the Jetpacks Wi-Fi network and one password to Sign In to the http://my.Jetpack Web User Interface. You can change the security settings using the Jetpack Web User Interface (Web UI). To change your Jetpack security settings:
1 Connect your Wi-Fi capable device to the Jetpack. 2 Open a web browser on your connected device and enter http://my.jetpack or
http://192.168.1.1. 3 Click on Sign In, enter your password in the Admin Password box, and then click
Sign In. (Click the Power/Menu button quickly three times to see password) 4 To change Web UI Admin Password, see page 20 of this guide. 5 To change Wi-Fi Password, see page 24 of this guide.
Monitoring Data Usage You can monitor your data usage from your Jetpack. Press the Power/Menu button one time to see data usage, and when your billing cycle ends.
You can also monitor your data usage detail from your My Jetpack Home page at http://my.jetpack or by selecting the Data Usage link (see page 16 of this guide).
12
3
Jetpack Settings
13
Managing Your Jetpack
Using the Web User Interface You can connect to the Web UI and customize your Jetpack settings. 1 Connect your Wi-Fi capable device to the Jetpack. 2 Open a web browser on your connected device and enter either of these URLs:
http://my.jetpack, or, http://192.168.1.1. 3 Sign in using the Admin Password. By default your Admin Password is the same as your
Wi-Fi Password unless a separate Admin Password has been created. 4 You are now able to customize your Jetpack settings. The menu column to the left of the
web page is the primary navigation for the Jetpack Web User Interface. You can access each feature under the applicable menu.
14
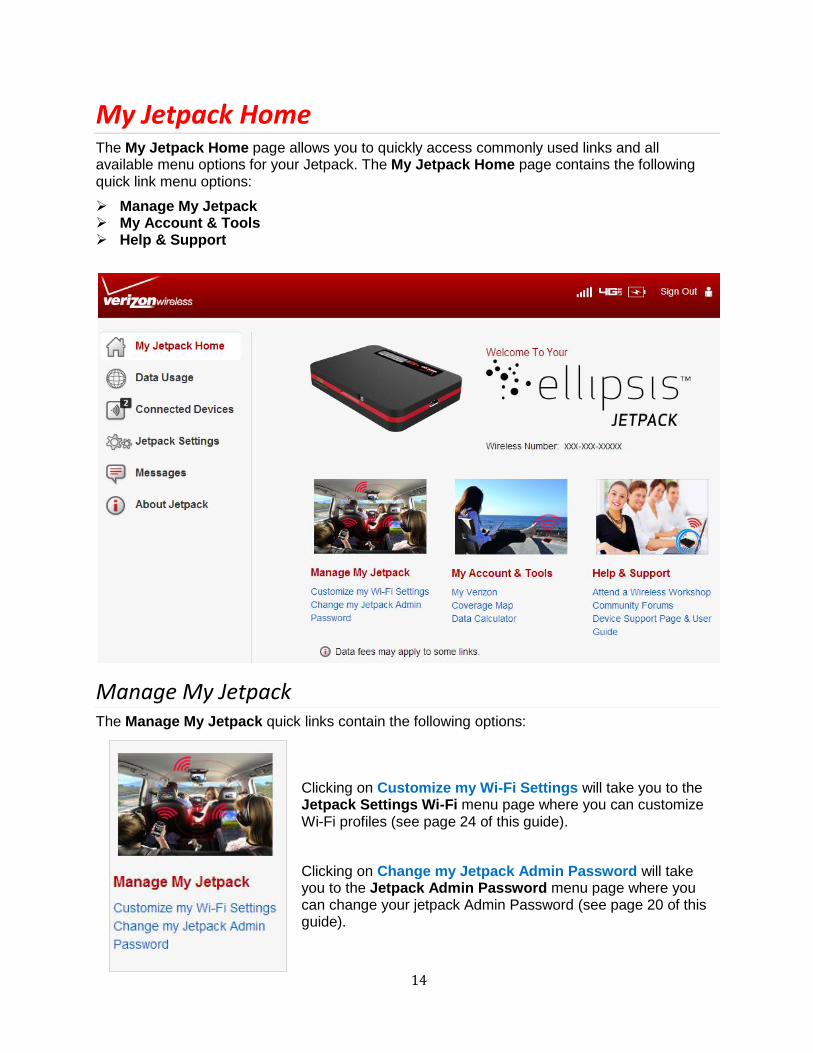
My Jetpack Home The My Jetpack Home page allows you to quickly access commonly used links and all available menu options for your Jetpack. The My Jetpack Home page contains the following quick link menu options:
Manage My Jetpack My Account & Tools Help & Support
Manage My Jetpack The Manage My Jetpack quick links contain the following options:
Clicking on Customize my Wi-Fi Settings will take you to the Jetpack Settings Wi-Fi menu page where you can customize Wi-Fi profiles (see page 24 of this guide).
Clicking on Change my Jetpack Admin Password will take you to the Jetpack Admin Password menu page where you can change your jetpack Admin Password (see page 20 of this guide).
15
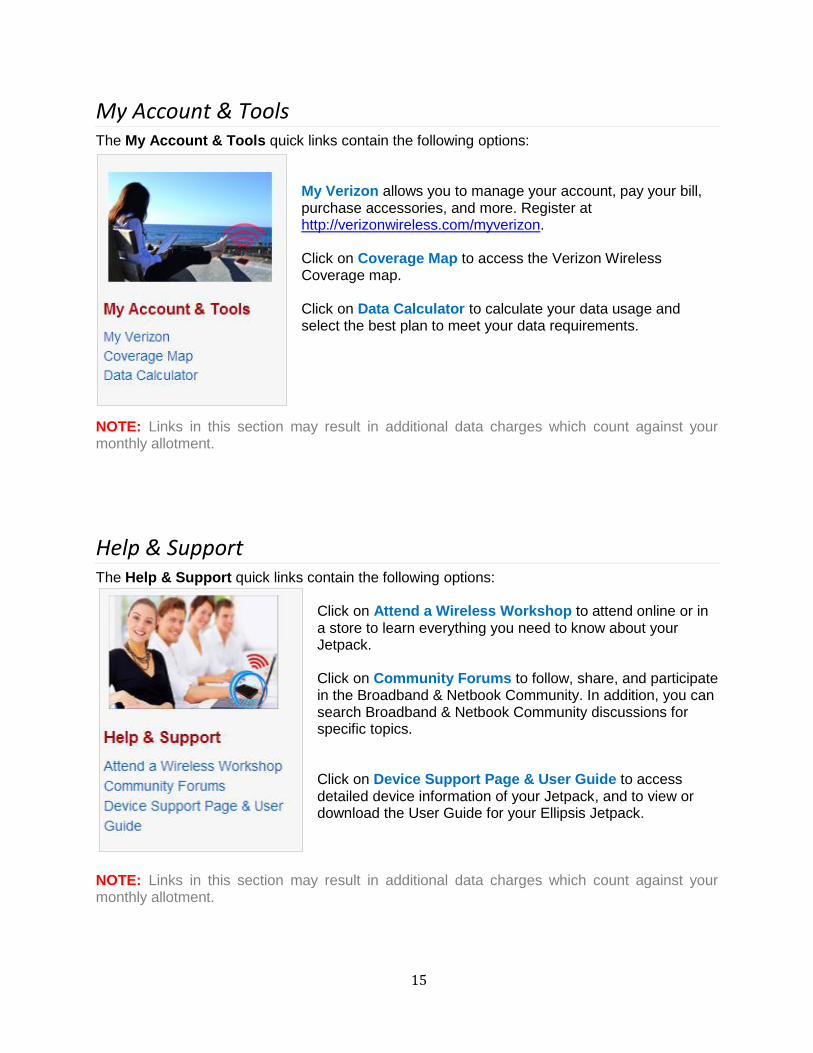
My Account & Tools The My Account & Tools quick links contain the following options:
My Verizon allows you to manage your account, pay your bill, purchase accessories, and more. Register at http://verizonwireless.com/myverizon. Click on Coverage Map to access the Verizon Wireless Coverage map. Click on Data Calculator to calculate your data usage and select the best plan to meet your data requirements.
NOTE: Links in this section may result in additional data charges which count against your monthly allotment.
Help & Support The Help & Support quick links contain the following options:
Click on Attend a Wireless Workshop to attend online or in a store to learn everything you need to know about your Jetpack. Click on Community Forums to follow, share, and participate in the Broadband & Netbook Community. In addition, you can search Broadband & Netbook Community discussions for specific topics. Click on Device Support Page & User Guide to access detailed device information of your Jetpack, and to view or download the User Guide for your Ellipsis Jetpack.
NOTE: Links in this section may result in additional data charges which count against your monthly allotment.
16
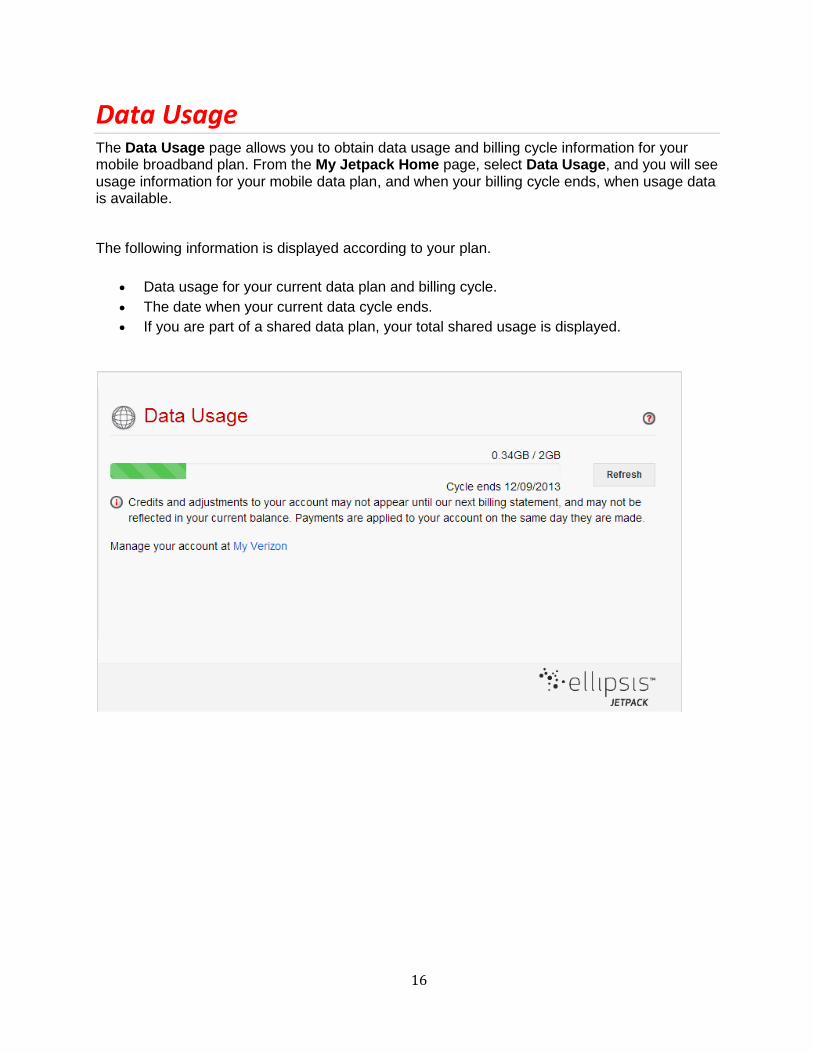
Data Usage The Data Usage page allows you to obtain data usage and billing cycle information for your mobile broadband plan. From the My Jetpack Home page, select Data Usage, and you will see usage information for your mobile data plan, and when your billing cycle ends, when usage data is available.
The following information is displayed according to your plan.
Data usage for your current data plan and billing cycle.
The date when your current data cycle ends.
If you are part of a shared data plan, your total shared usage is displayed.
17
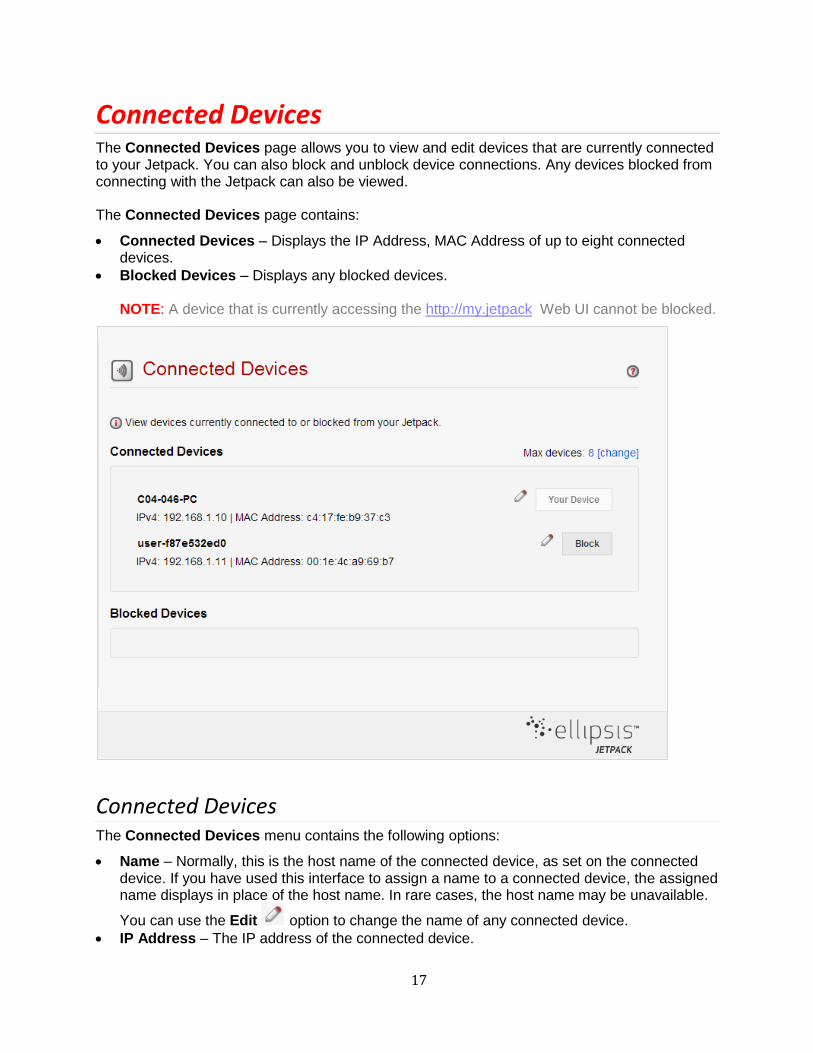
Connected Devices The Connected Devices page allows you to view and edit devices that are currently connected to your Jetpack. You can also block and unblock device connections. Any devices blocked from connecting with the Jetpack can also be viewed. The Connected Devices page contains:
Connected Devices – Displays the IP Address, MAC Address of up to eight connected devices.
Blocked Devices – Displays any blocked devices. NOTE: A device that is currently accessing the http://my.jetpack Web UI cannot be blocked.
Connected Devices The Connected Devices menu contains the following options:
Name – Normally, this is the host name of the connected device, as set on the connected device. If you have used this interface to assign a name to a connected device, the assigned name displays in place of the host name. In rare cases, the host name may be unavailable.
You can use the Edit option to change the name of any connected device.
IP Address – The IP address of the connected device.
18
MAC Address – The MAC address is a unique network identifier for this connected device.
Edit – Click the pencil icon or the device Name to edit a connected device Name.
Max Device – Clicking it allows you to go to the Wi-Fi Settings menu to change the maximum number of connected devices.
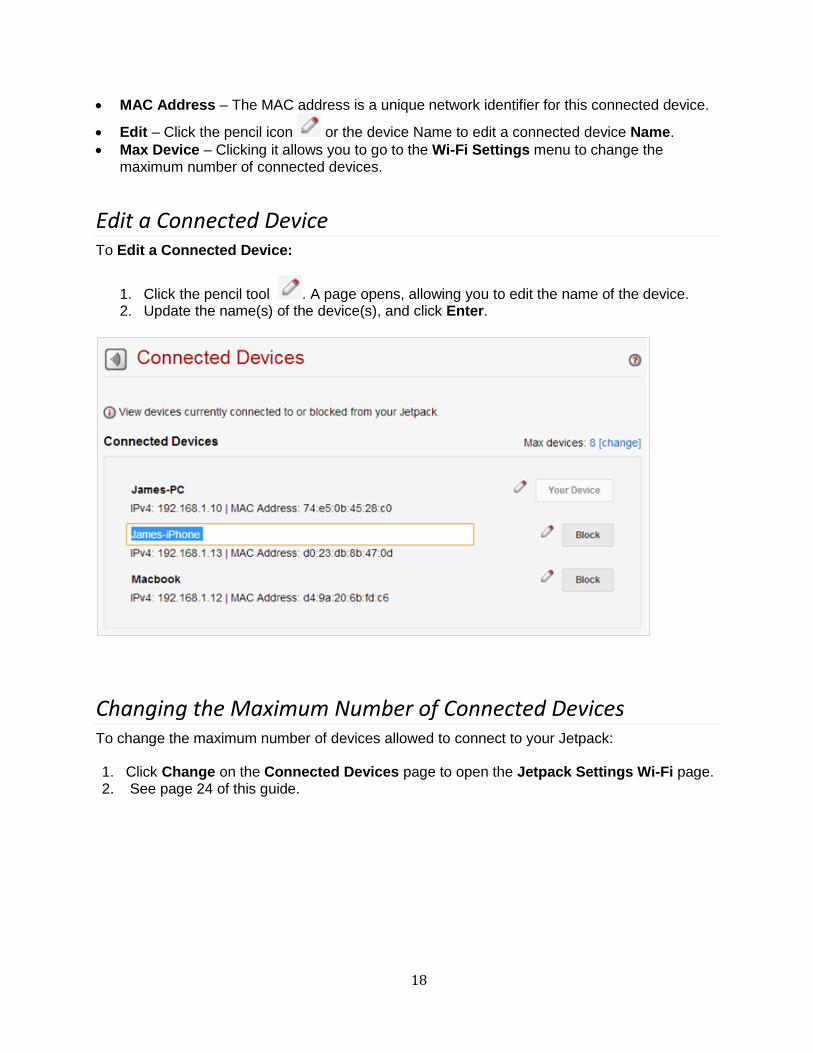
Edit a Connected Device To Edit a Connected Device:
1. Click the pencil tool . A page opens, allowing you to edit the name of the device. 2. Update the name(s) of the device(s), and click Enter.
Changing the Maximum Number of Connected Devices To change the maximum number of devices allowed to connect to your Jetpack: 1. Click Change on the Connected Devices page to open the Jetpack Settings Wi-Fi page. 2. See page 24 of this guide.
19
Blocked Devices The Blocked Devices menu contains the following options:
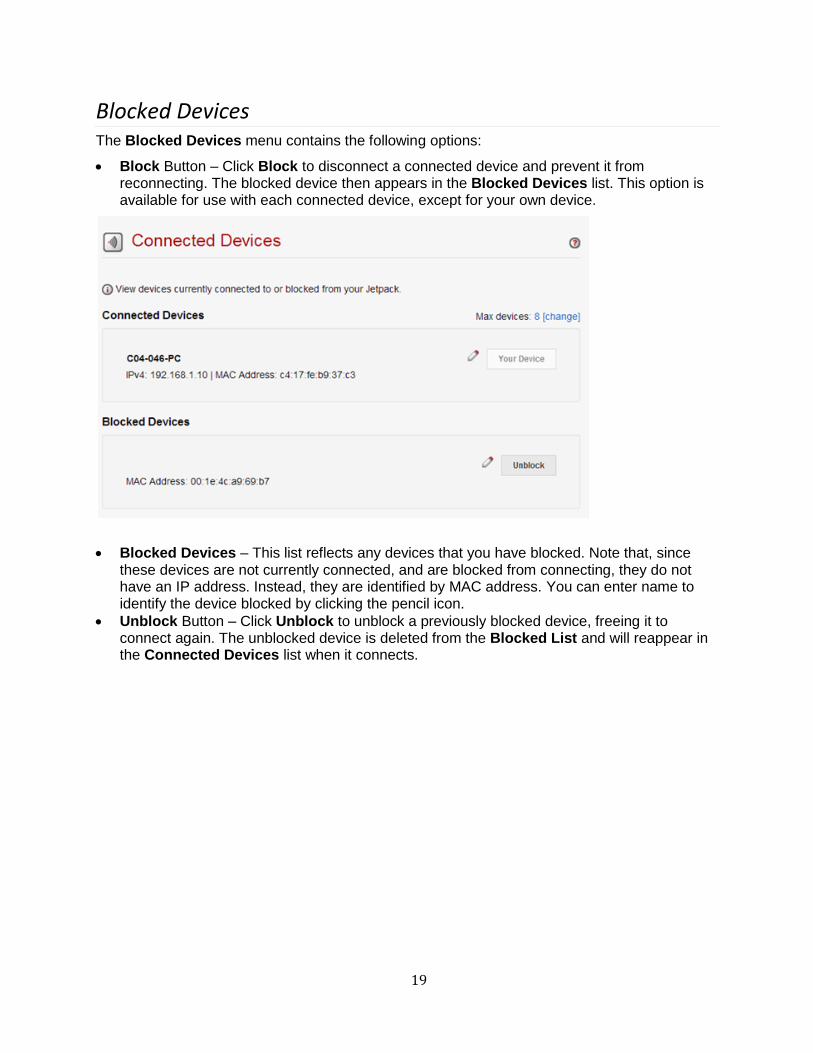
Block Button – Click Block to disconnect a connected device and prevent it from reconnecting. The blocked device then appears in the Blocked Devices list. This option is available for use with each connected device, except for your own device.
Blocked Devices – This list reflects any devices that you have blocked. Note that, since these devices are not currently connected, and are blocked from connecting, they do not have an IP address. Instead, they are identified by MAC address. You can enter name to identify the device blocked by clicking the pencil icon.
Unblock Button – Click Unblock to unblock a previously blocked device, freeing it to connect again. The unblocked device is deleted from the Blocked List and will reappear in the Connected Devices list when it connects.
20
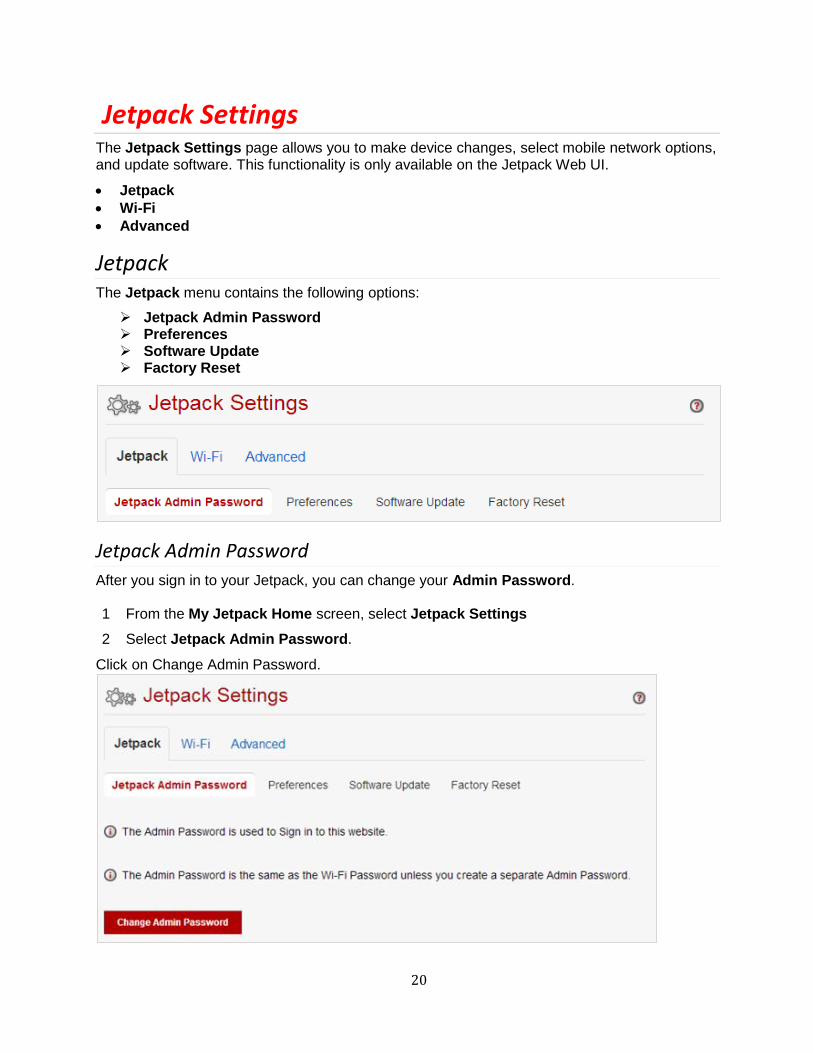
Jetpack Settings The Jetpack Settings page allows you to make device changes, select mobile network options, and update software. This functionality is only available on the Jetpack Web UI.
Jetpack
Wi-Fi
Advanced
Jetpack The Jetpack menu contains the following options:
Jetpack Admin Password Preferences Software Update Factory Reset
Jetpack Admin Password
After you sign in to your Jetpack, you can change your Admin Password. 1 From the My Jetpack Home screen, select Jetpack Settings
2 Select Jetpack Admin Password.
Click on Change Admin Password.
21
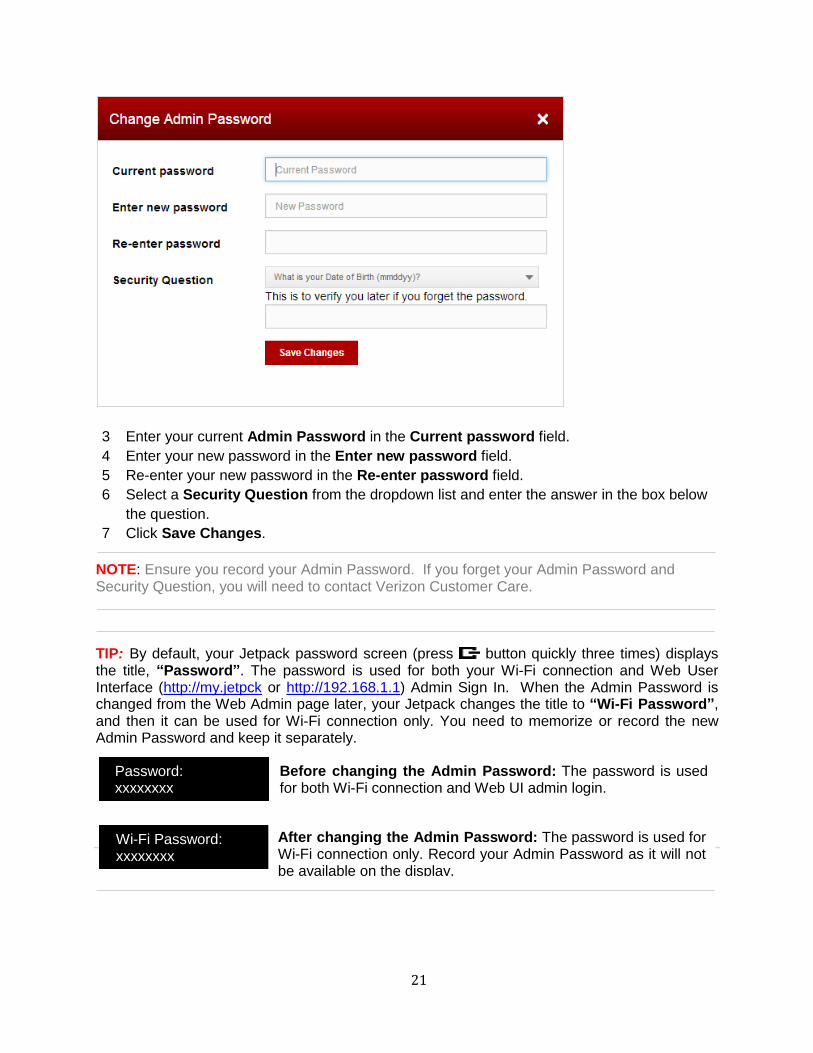
3 Enter your current Admin Password in the Current password field.
4 Enter your new password in the Enter new password field.
5 Re-enter your new password in the Re-enter password field.
6 Select a Security Question from the dropdown list and enter the answer in the box below
the question.
7 Click Save Changes.
NOTE: Ensure you record your Admin Password. If you forget your Admin Password and Security Question, you will need to contact Verizon Customer Care.
TIP: By default, your Jetpack password screen (press button quickly three times) displays the title, “Password”. The password is used for both your Wi-Fi connection and Web User Interface (http://my.jetpck or http://192.168.1.1) Admin Sign In. When the Admin Password is changed from the Web Admin page later, your Jetpack changes the title to “Wi-Fi Password”, and then it can be used for Wi-Fi connection only. You need to memorize or record the new Admin Password and keep it separately.
Password: xxxxxxxx
Wi-Fi Password: xxxxxxxx
Before changing the Admin Password: The password is used for both Wi-Fi connection and Web UI admin login.
After changing the Admin Password: The password is used for Wi-Fi connection only. Record your Admin Password as it will not be available on the display.
22
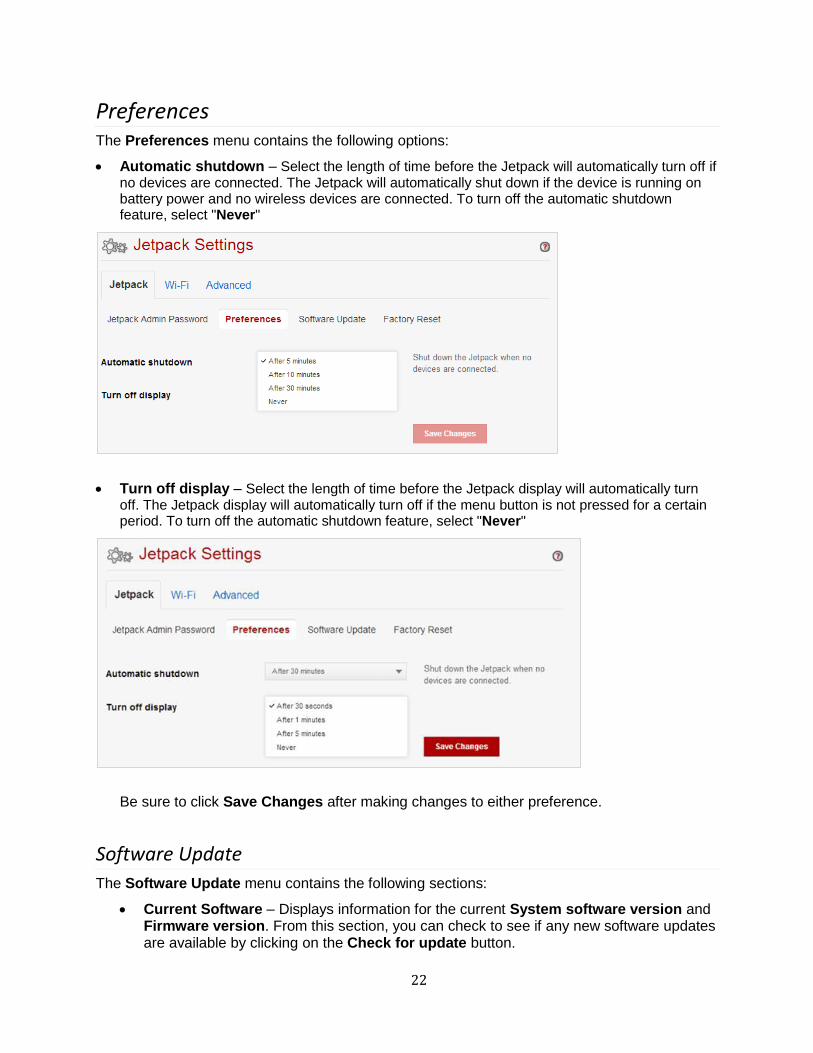
Preferences The Preferences menu contains the following options:
Automatic shutdown – Select the length of time before the Jetpack will automatically turn off if no devices are connected. The Jetpack will automatically shut down if the device is running on battery power and no wireless devices are connected. To turn off the automatic shutdown feature, select "Never"
Turn off display – Select the length of time before the Jetpack display will automatically turn off. The Jetpack display will automatically turn off if the menu button is not pressed for a certain period. To turn off the automatic shutdown feature, select "Never"
Be sure to click Save Changes after making changes to either preference.
Software Update
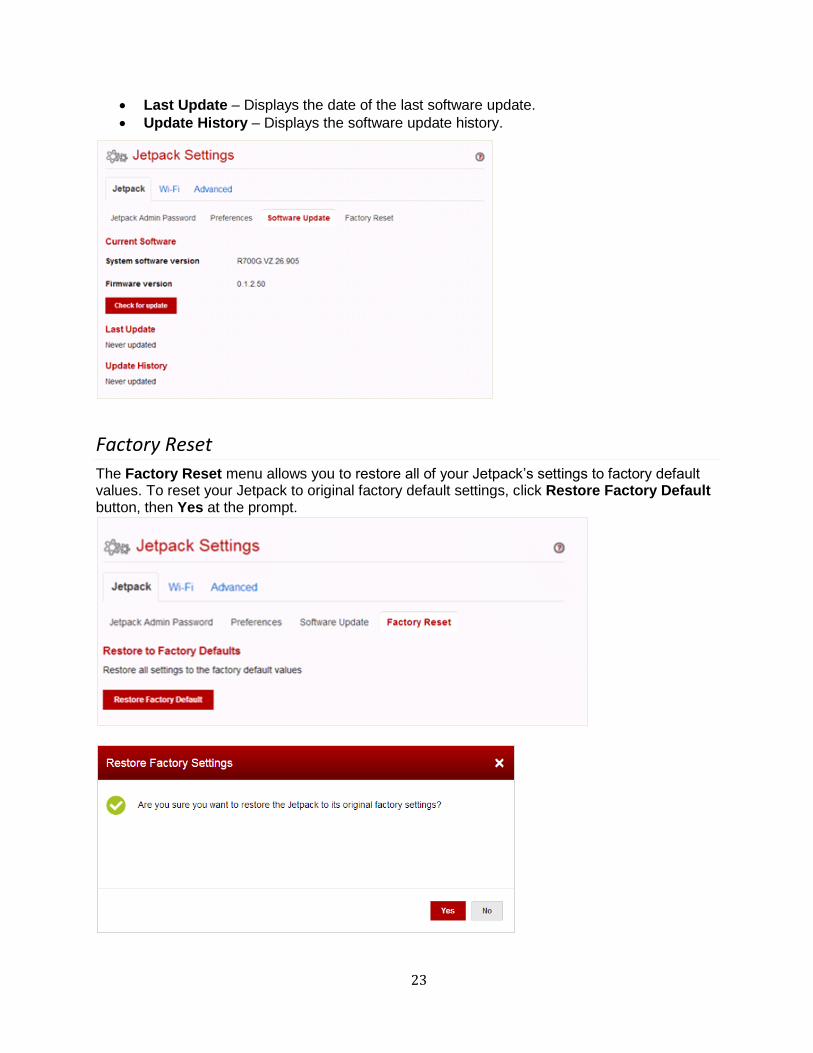
The Software Update menu contains the following sections:
Current Software – Displays information for the current System software version and Firmware version. From this section, you can check to see if any new software updates are available by clicking on the Check for update button.
23
Last Update – Displays the date of the last software update.
Update History – Displays the software update history.
Factory Reset
The Factory Reset menu allows you to restore all of your Jetpack’s settings to factory default values. To reset your Jetpack to original factory default settings, click Restore Factory Default button, then Yes at the prompt.
24
Please note that performing a Factory Reset is a different process than performing a Power Reset.
Factory Reset – returns device to factory default settings. Power Reset – restarts the device. (Please refer to Section 4: Troubleshooting for more
details on Power Resets on page 39 of this guide)
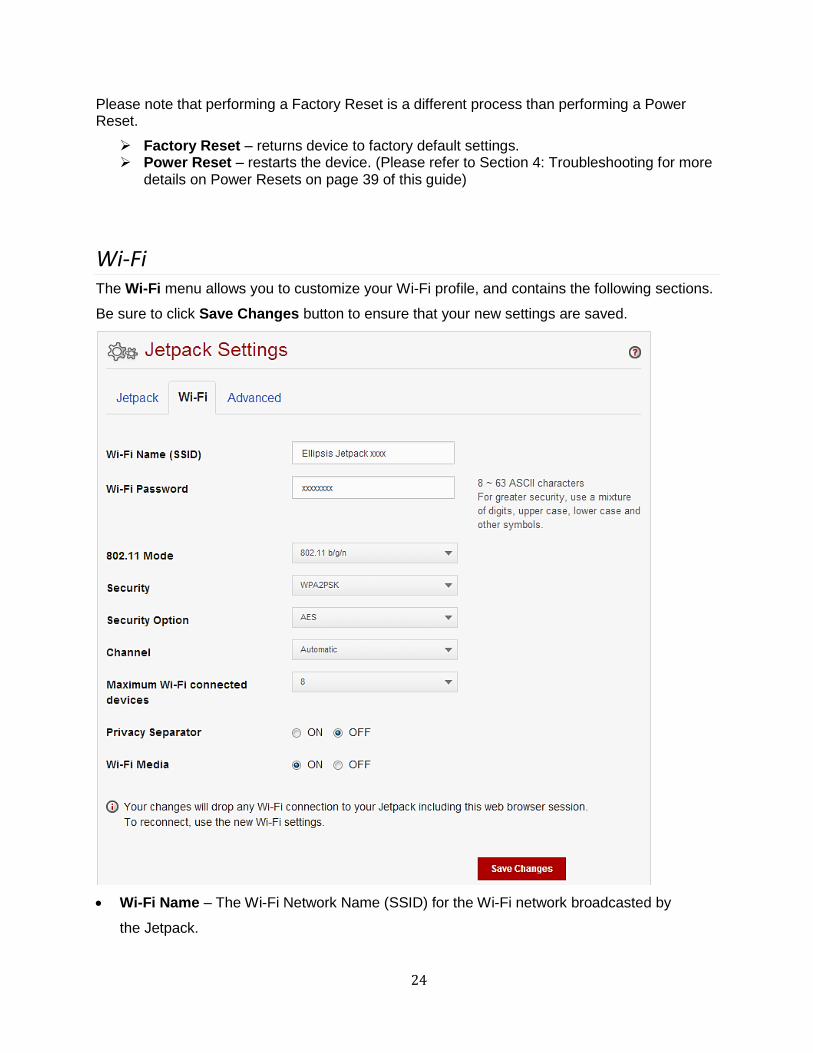
Wi-Fi The Wi-Fi menu allows you to customize your Wi-Fi profile, and contains the following sections.
Be sure to click Save Changes button to ensure that your new settings are saved.
Wi-Fi Name – The Wi-Fi Network Name (SSID) for the Wi-Fi network broadcasted by
the Jetpack.
25
Wi-Fi Password – Use this setting to enter your desired Wi-Fi password.
802.11 Mode – Use this setting to change the Wi-Fi mode. The Jetpack allows devices
using 802.11b, 802.11g, and 802.11n to connect to the wireless network.
Security – Use this setting to select the desired type of Wi-Fi security used to encrypt the
wireless network. WPA2 is the latest and most secure method, and should be used
whenever possible.
Security Option – Use this setting to select the desired Wi-Fi security option used to
encrypt the wireless network. Advanced Encryption Standard (AES) is the latest and most
secure option and should be used whenever possible.
Maximum Wi-Fi connected devices – Use this setting to specify how many devices can
simultaneously connect to your Jetpack.
Privacy Separator – If this setting is turned On, each connected device is isolated from all
other connected devices. This provides additional security if some connected devices are
unknown or not completely trusted. For normal operation, this option should be turned Off.
Wi-Fi Media – WMM provides higher priority for multi-media traffic. This setting should
normally be turned ON to assist throughput. If you are using 802.11n, WMM is mandatory.
IMPORTANT! Any change you have made on the Wi-Fi Settings page will reset Wi-Fi connection, disconnecting any connected devices. If Wi-Fi Name and Password are not changed, your Jetpack automatically reconnects your devices. If either or both Wi-Fi Name and Password were changed, you need to reconnect using the new Wi-Fi Name and Password from your device Wi-Fi connection application or controls. Otherwise, your devices could create authentication error because of the old Wi-Fi connection credential saved in your devices.
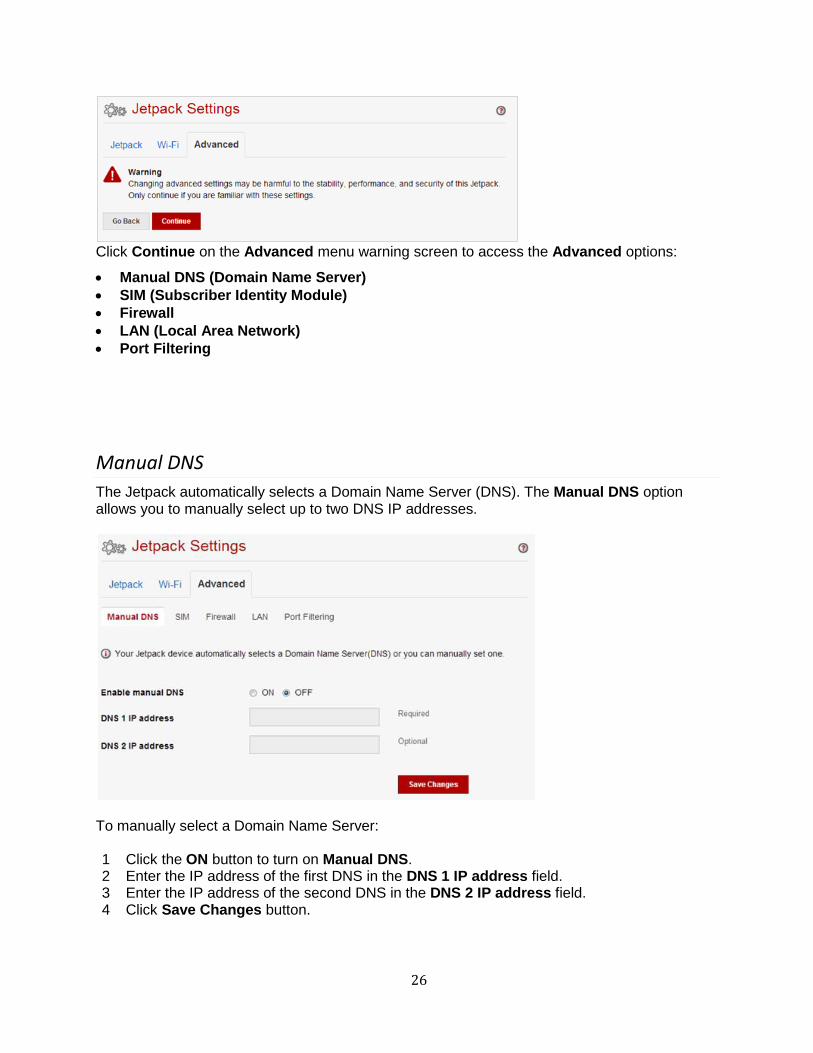
Advanced The Advanced menu allows you to change Jetpack advanced settings. The Advanced page provides options for updating DNS, SIM, Firewall, LAN, and Port Filtering settings. IMPORTANT! Changing the advanced settings can adversely affect stability, performance, and security of your Jetpack.
26
Click Continue on the Advanced menu warning screen to access the Advanced options:
Manual DNS (Domain Name Server)
SIM (Subscriber Identity Module)
Firewall
LAN (Local Area Network)
Port Filtering
Manual DNS
The Jetpack automatically selects a Domain Name Server (DNS). The Manual DNS option allows you to manually select up to two DNS IP addresses.
To manually select a Domain Name Server: 1 Click the ON button to turn on Manual DNS. 2 Enter the IP address of the first DNS in the DNS 1 IP address field. 3 Enter the IP address of the second DNS in the DNS 2 IP address field. 4 Click Save Changes button.
27
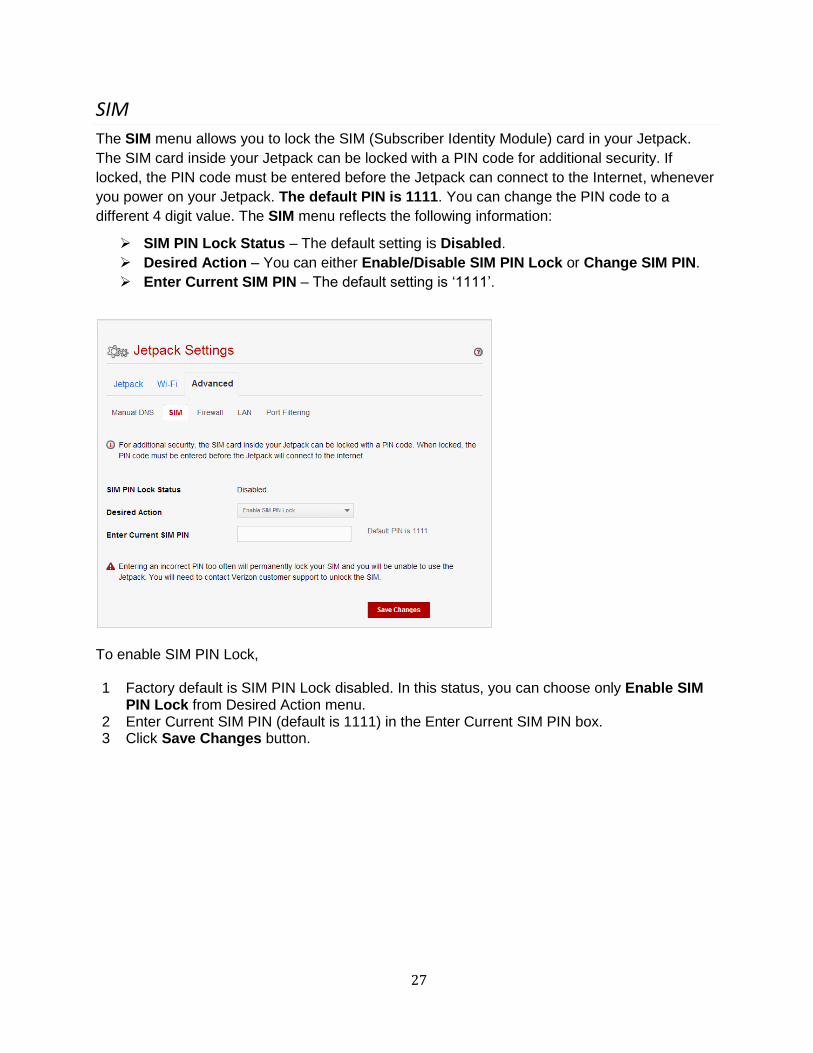
SIM
The SIM menu allows you to lock the SIM (Subscriber Identity Module) card in your Jetpack.
The SIM card inside your Jetpack can be locked with a PIN code for additional security. If
locked, the PIN code must be entered before the Jetpack can connect to the Internet, whenever
you power on your Jetpack. The default PIN is 1111. You can change the PIN code to a
different 4 digit value. The SIM menu reflects the following information:
SIM PIN Lock Status – The default setting is Disabled.
Desired Action – You can either Enable/Disable SIM PIN Lock or Change SIM PIN.
Enter Current SIM PIN – The default setting is ‘1111’.
To enable SIM PIN Lock, 1 Factory default is SIM PIN Lock disabled. In this status, you can choose only Enable SIM
PIN Lock from Desired Action menu. 2 Enter Current SIM PIN (default is 1111) in the Enter Current SIM PIN box. 3 Click Save Changes button.
28
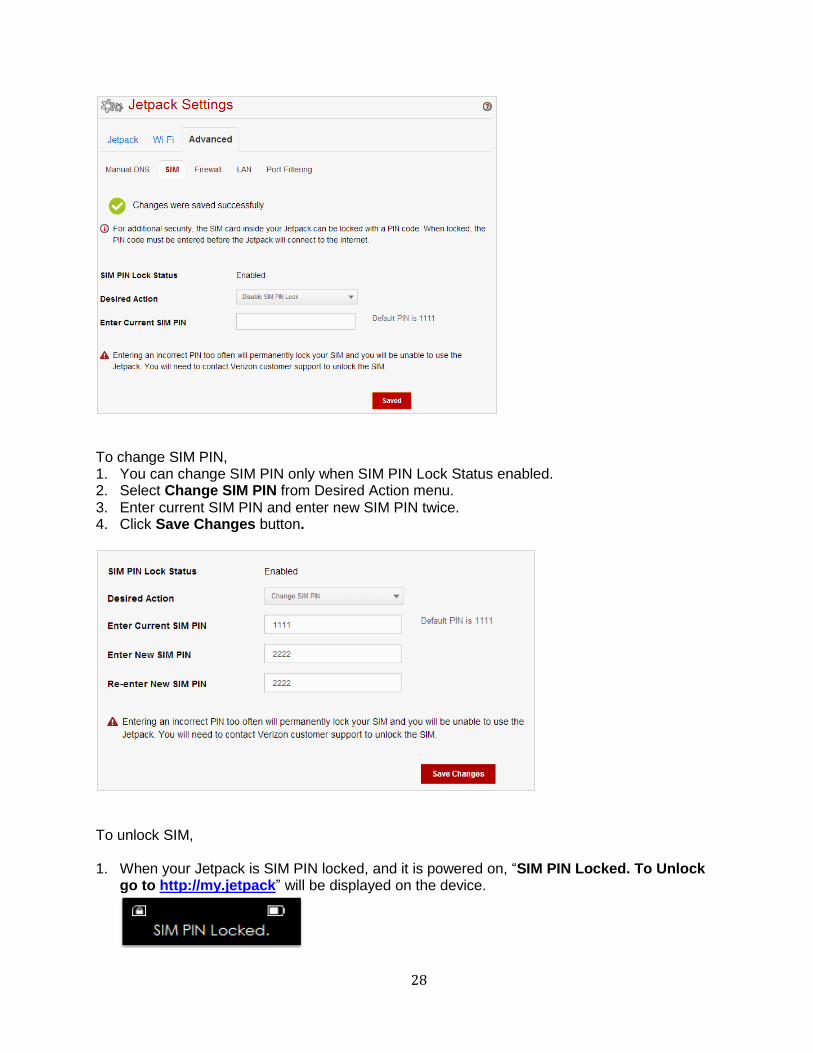
To change SIM PIN, 1. You can change SIM PIN only when SIM PIN Lock Status enabled. 2. Select Change SIM PIN from Desired Action menu. 3. Enter current SIM PIN and enter new SIM PIN twice. 4. Click Save Changes button.
To unlock SIM, 1. When your Jetpack is SIM PIN locked, and it is powered on, “SIM PIN Locked. To Unlock
go to http://my.jetpack” will be displayed on the device.
29
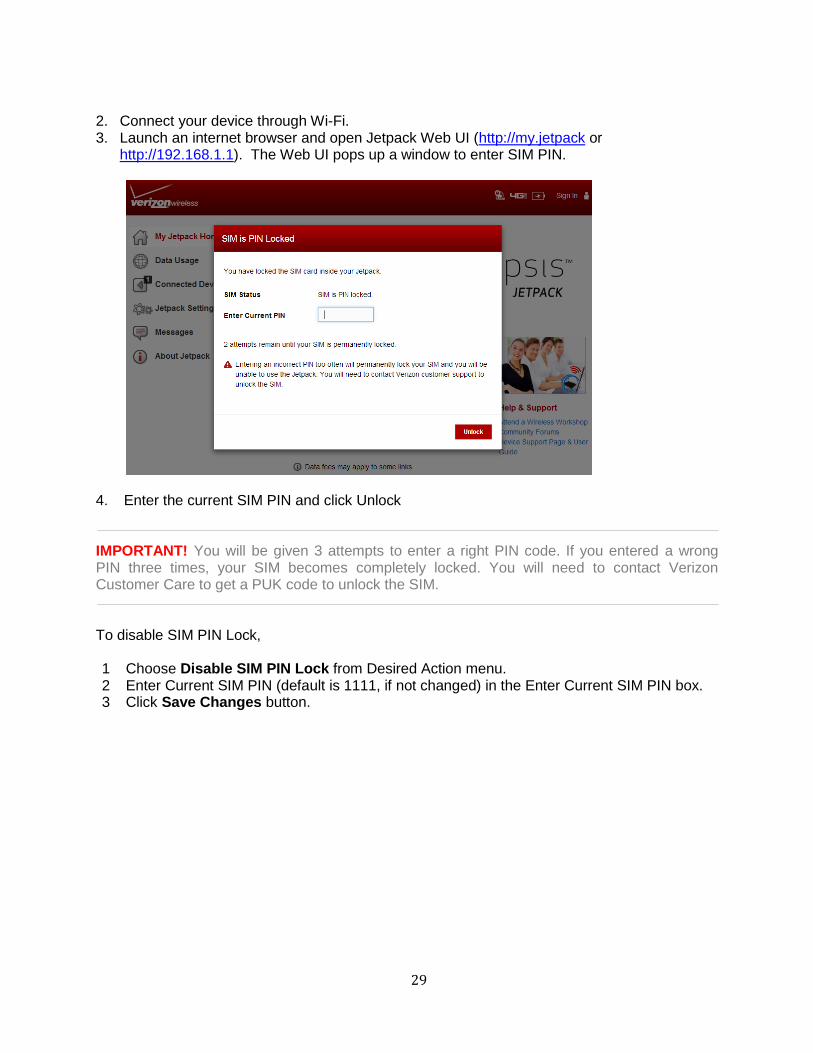
2. Connect your device through Wi-Fi. 3. Launch an internet browser and open Jetpack Web UI (http://my.jetpack or
http://192.168.1.1). The Web UI pops up a window to enter SIM PIN.
4. Enter the current SIM PIN and click Unlock
IMPORTANT! You will be given 3 attempts to enter a right PIN code. If you entered a wrong PIN three times, your SIM becomes completely locked. You will need to contact Verizon Customer Care to get a PUK code to unlock the SIM.
To disable SIM PIN Lock, 1 Choose Disable SIM PIN Lock from Desired Action menu. 2 Enter Current SIM PIN (default is 1111, if not changed) in the Enter Current SIM PIN box. 3 Click Save Changes button.
30
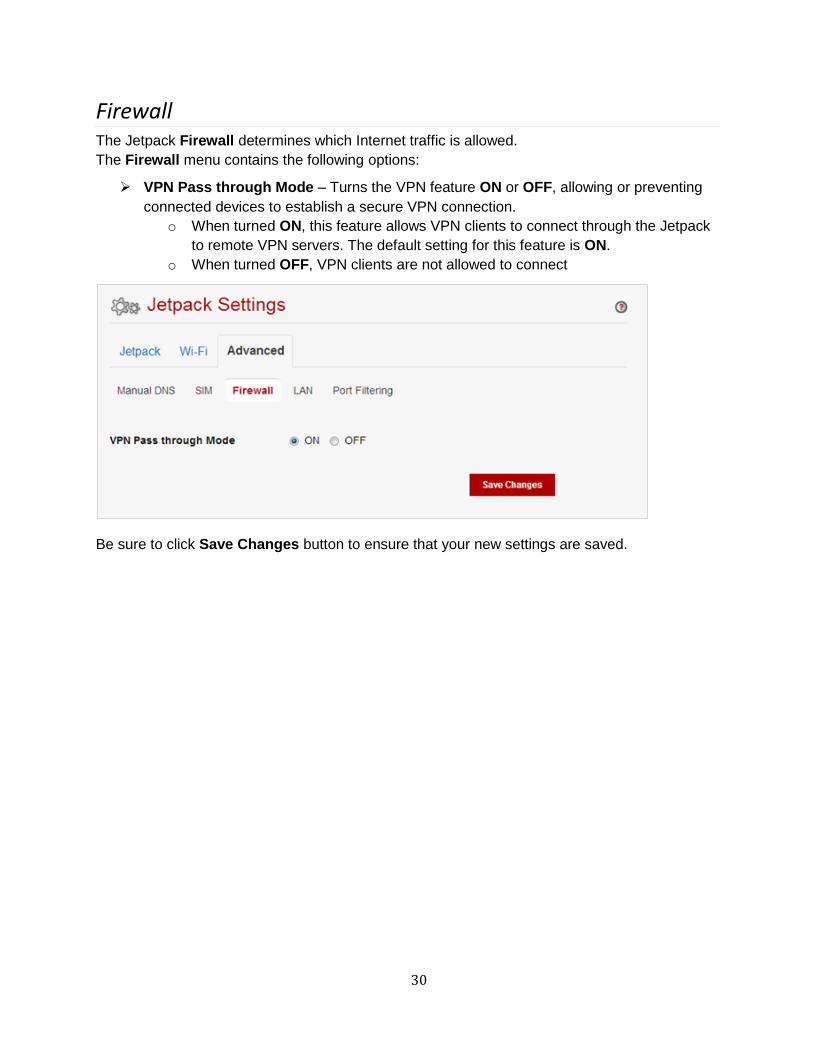
Firewall The Jetpack Firewall determines which Internet traffic is allowed.
The Firewall menu contains the following options:
VPN Pass through Mode – Turns the VPN feature ON or OFF, allowing or preventing
connected devices to establish a secure VPN connection.
o When turned ON, this feature allows VPN clients to connect through the Jetpack
to remote VPN servers. The default setting for this feature is ON.
o When turned OFF, VPN clients are not allowed to connect
Be sure to click Save Changes button to ensure that your new settings are saved.
31
LAN
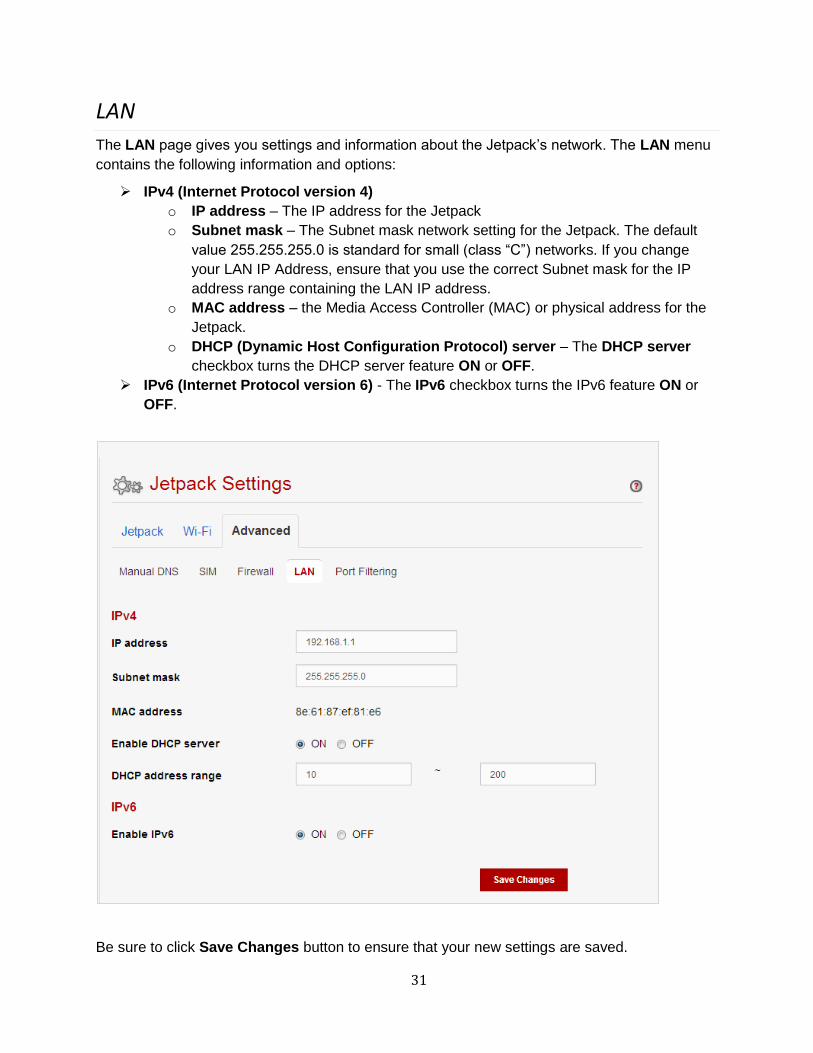
The LAN page gives you settings and information about the Jetpack’s network. The LAN menu
contains the following information and options:
IPv4 (Internet Protocol version 4)
o IP address – The IP address for the Jetpack
o Subnet mask – The Subnet mask network setting for the Jetpack. The default
value 255.255.255.0 is standard for small (class “C”) networks. If you change
your LAN IP Address, ensure that you use the correct Subnet mask for the IP
address range containing the LAN IP address.
o MAC address – the Media Access Controller (MAC) or physical address for the
Jetpack.
o DHCP (Dynamic Host Configuration Protocol) server – The DHCP server
checkbox turns the DHCP server feature ON or OFF.
IPv6 (Internet Protocol version 6) - The IPv6 checkbox turns the IPv6 feature ON or
OFF.
Be sure to click Save Changes button to ensure that your new settings are saved.
32
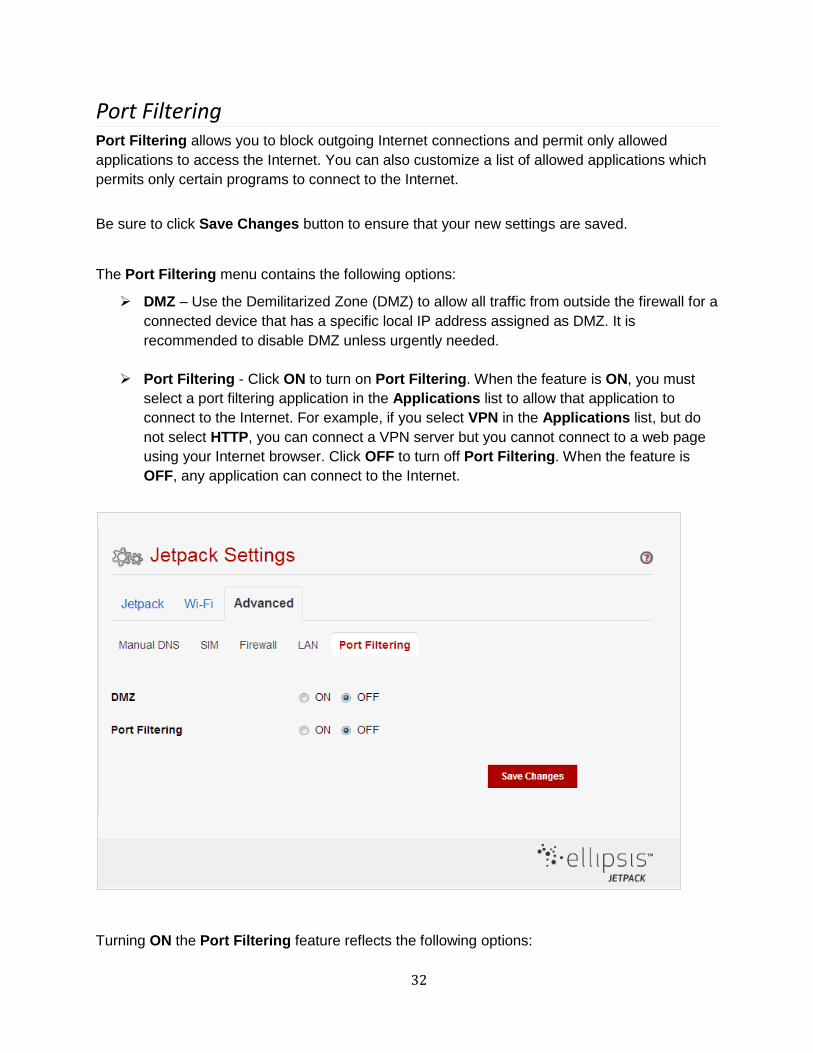
Port Filtering Port Filtering allows you to block outgoing Internet connections and permit only allowed
applications to access the Internet. You can also customize a list of allowed applications which
permits only certain programs to connect to the Internet.
Be sure to click Save Changes button to ensure that your new settings are saved.
The Port Filtering menu contains the following options:
DMZ – Use the Demilitarized Zone (DMZ) to allow all traffic from outside the firewall for a
connected device that has a specific local IP address assigned as DMZ. It is
recommended to disable DMZ unless urgently needed.
Port Filtering - Click ON to turn on Port Filtering. When the feature is ON, you must
select a port filtering application in the Applications list to allow that application to
connect to the Internet. For example, if you select VPN in the Applications list, but do
not select HTTP, you can connect a VPN server but you cannot connect to a web page
using your Internet browser. Click OFF to turn off Port Filtering. When the feature is
OFF, any application can connect to the Internet.
Turning ON the Port Filtering feature reflects the following options:
33
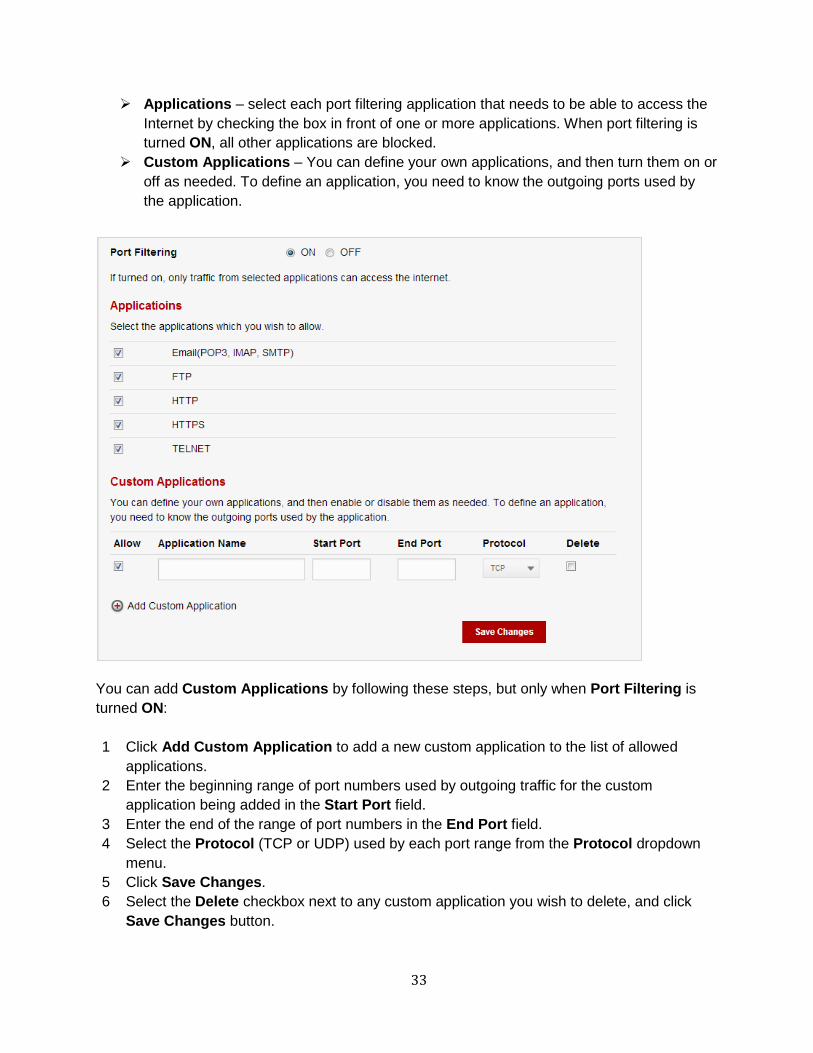
Applications – select each port filtering application that needs to be able to access the
Internet by checking the box in front of one or more applications. When port filtering is
turned ON, all other applications are blocked.
Custom Applications – You can define your own applications, and then turn them on or
off as needed. To define an application, you need to know the outgoing ports used by
the application.
You can add Custom Applications by following these steps, but only when Port Filtering is
turned ON:
1 Click Add Custom Application to add a new custom application to the list of allowed
applications.
2 Enter the beginning range of port numbers used by outgoing traffic for the custom
application being added in the Start Port field.
3 Enter the end of the range of port numbers in the End Port field.
4 Select the Protocol (TCP or UDP) used by each port range from the Protocol dropdown
menu.
5 Click Save Changes.
6 Select the Delete checkbox next to any custom application you wish to delete, and click
Save Changes button.
34
Messages Messages display SMS messages sent to you by Verizon Wireless, and include a counter to reflect the number of messages received.
On the Jetpack The status indicator on the Home screen displays the number of messages to the right of the message icon.
When a new message arrives, the message counter increases and “To view messages: http://my.jetpack” displays, which will disappear when the Power/Menu button is pressed quickly. Maximum 5 messages can be stored. When this limit is reached, the Jetpack will remove the oldest message as new messages are received.
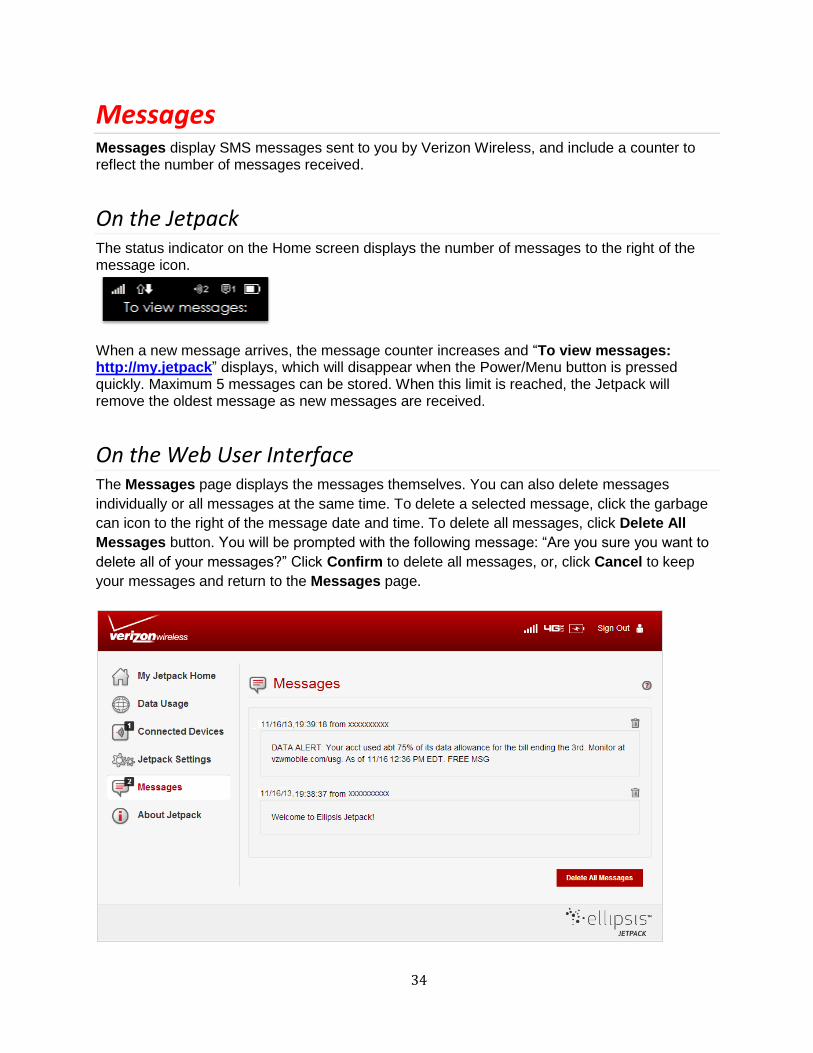
On the Web User Interface The Messages page displays the messages themselves. You can also delete messages
individually or all messages at the same time. To delete a selected message, click the garbage
can icon to the right of the message date and time. To delete all messages, click Delete All
Messages button. You will be prompted with the following message: “Are you sure you want to
delete all of your messages?” Click Confirm to delete all messages, or, click Cancel to keep
your messages and return to the Messages page.
35
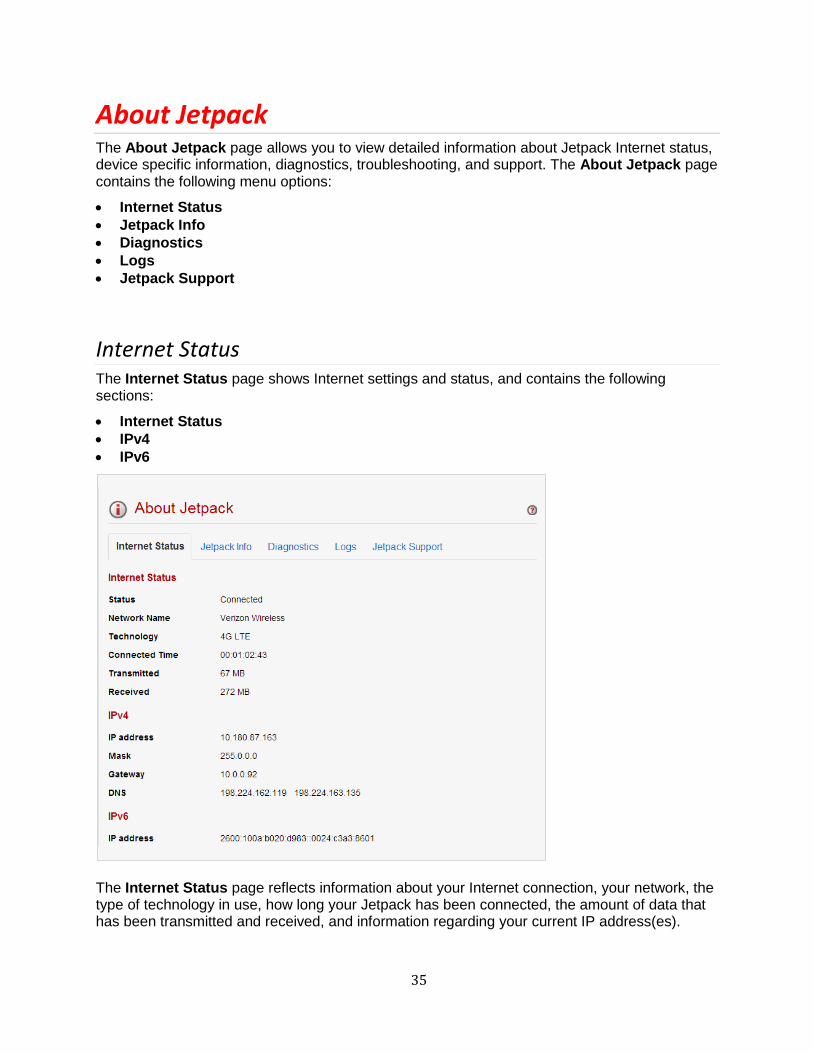
About Jetpack The About Jetpack page allows you to view detailed information about Jetpack Internet status, device specific information, diagnostics, troubleshooting, and support. The About Jetpack page contains the following menu options:
Internet Status
Jetpack Info
Diagnostics
Logs
Jetpack Support
Internet Status The Internet Status page shows Internet settings and status, and contains the following sections:
Internet Status
IPv4
IPv6
The Internet Status page reflects information about your Internet connection, your network, the type of technology in use, how long your Jetpack has been connected, the amount of data that has been transmitted and received, and information regarding your current IP address(es).
36
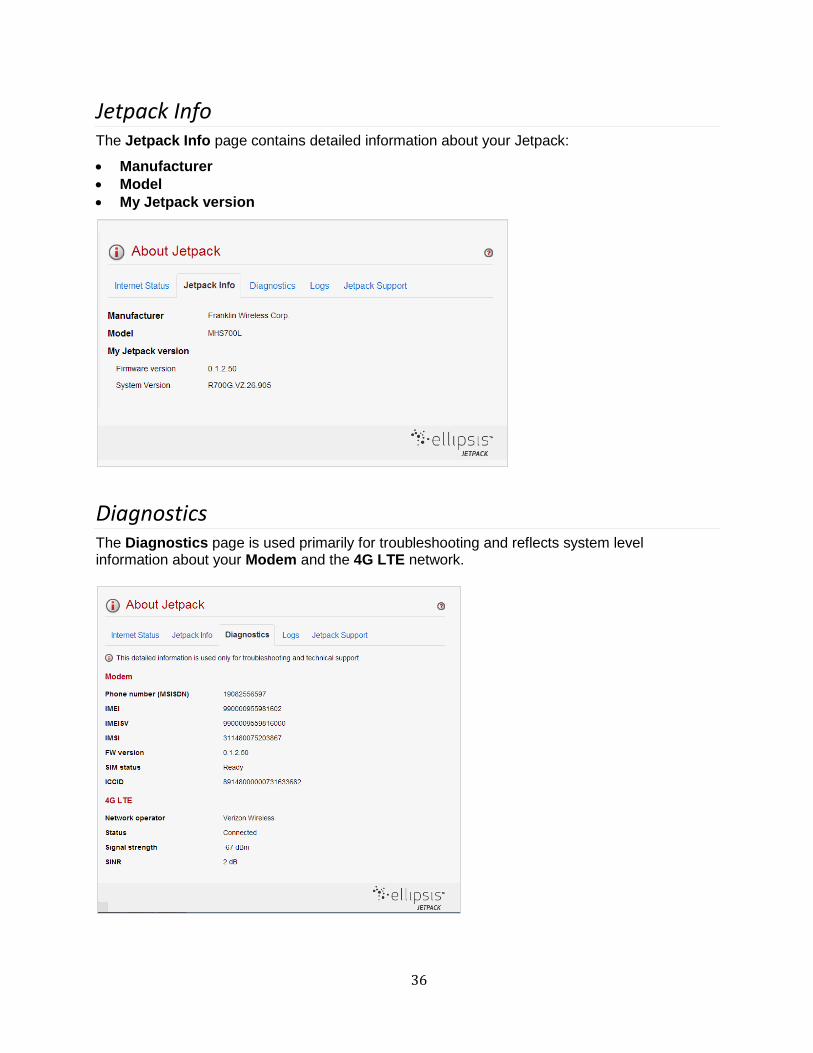
Jetpack Info The Jetpack Info page contains detailed information about your Jetpack:
Manufacturer
Model
My Jetpack version
Diagnostics The Diagnostics page is used primarily for troubleshooting and reflects system level information about your Modem and the 4G LTE network.
37
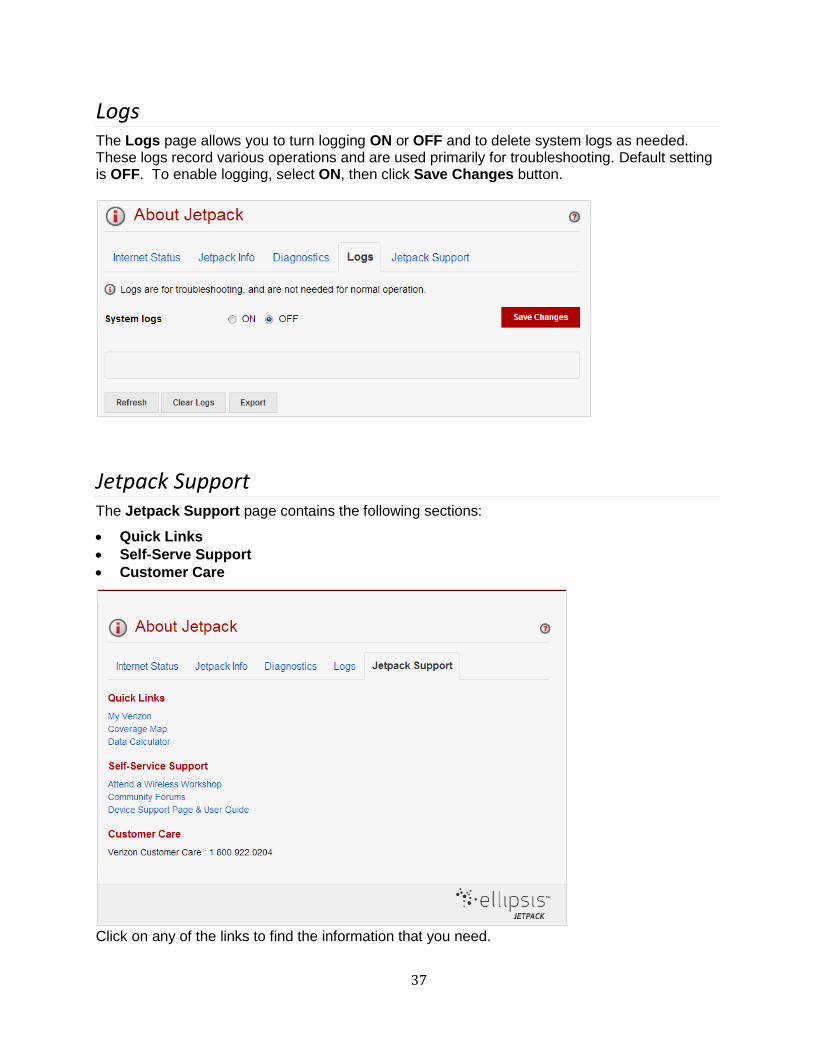
Logs The Logs page allows you to turn logging ON or OFF and to delete system logs as needed. These logs record various operations and are used primarily for troubleshooting. Default setting is OFF. To enable logging, select ON, then click Save Changes button.
Jetpack Support The Jetpack Support page contains the following sections:
Quick Links
Self-Serve Support
Customer Care
Click on any of the links to find the information that you need.

38
4
Troubleshooting

39
Overview When used properly, the Jetpack is a highly reliable product. Most problems can be attributed to one of the following issues:
System resources required by the Jetpack are being used by other devices.
Network coverage is unavailable due to the coverage area, account problems, or a network problem.
The following tips can help solve many common problems encountered while using the Jetpack.
First Steps 1 Make sure you are using the Jetpack in the correct geographic region (within coverage). 2 Ensure that your wireless coverage extends to your current location by using the interactive
Verizon coverage map tool. 3 Ensure that you have an active service plan. 4 Restarting your computer and your Jetpack can resolve many issues.
IMPORTANT! Before contacting Verizon Customer Care, be sure to restart both your Jetpack and any device that is currently connected.
Common Problems and Solutions My Jetpack just powered off without pressing the Power/Menu button. Why? This may occur under any of the following circumstances:
Pressing the Power Reset button.
Switching profiles.
Battery depletion.
To restore battery power, manually press and hold the Power/Menu button to turn the Jetpack back on. If the battery is depleted, charge the Jetpack with the wall charger. What is the difference between a Power Reset and a Factory Reset? A Power Reset simply resets (or, restarts) your Jetpack and is done on the device. A Factory reset restores your Jetpack to factory default settings and is performed from the Web User Interface. How do I perform a Power Reset on my Jetpack? Open the SIM slot cover, and place one end of a small, unfolded paper clip into the reset button. Press down until the Jetpack automatically restarts. If a large paper clip is used it may not fit properly into the hole and so device restart may not occur.
40
How do I perform a Factory Reset? To reset your Jetpack back to factory default settings, connect to your Jetpack via the Web User Interface (http://my.jetpack, or, http://192.168.1.1). Select Jetpack Settings>Factory Reset. I cannot connect to Wi-Fi after changing Wi-Fi password. Why? Your Wi-Fi devices tend to save previously used Wi-Fi names associated with the password used to access the Wi-Fi network. When you change the Wi-Fi password only from your Jetpack, the devices try to connect to your Jetpack with the same Wi-Fi name and saved Wi-Fi password, causing Wi-Fi authentication error. Devices vary how to delete old Wi-Fi credentials. Refer to your device manual how to delete old Wi-Fi credentials. I cannot access the http://my.jetpack . Why? Ensure that your Wi-Fi is enabled on your device and that you have selected the correct Wi-Fi name (SSID) for your Jetpack connection. Also, make certain that you are entering the correct full URL address as http://my.jetpack. If this URL address does not work for you, then try to access with the IP address http://192.168.1.1 . I cannot Sign In to http://my.jetpack. Why? Ensure that you are entering the correct Admin Password to Sign in. The default Admin Password is the same as the default Wi-Fi Password unless you have previously changed the Admin Password in the Web User Interface settings. If you have forgotten your password, click on the “Forgot the Admin Password?” link and you will be prompted to answer the security question that you selected when initially setting up your Admin Password.
Technical Support For additional information and technical support, Contact Verizon Customer Care at 1.800.922.0204, or go to any Verizon Wireless store. IMPORTANT! Before contacting Verizon Customer Care, be sure to restart both your Jetpack and any device that is currently connected.

41
5
Product Specifications and Regulatory Information
42
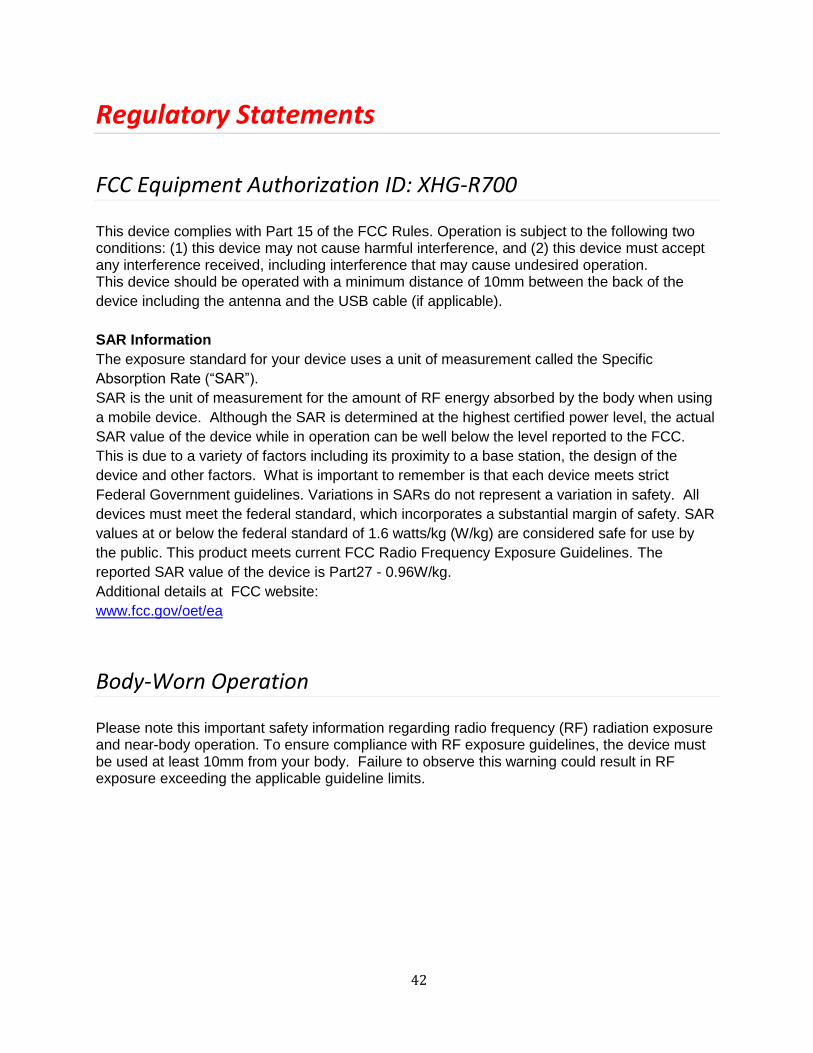
Regulatory Statements
FCC Equipment Authorization ID: XHG-R700 This device complies with Part 15 of the FCC Rules. Operation is subject to the following two conditions: (1) this device may not cause harmful interference, and (2) this device must accept any interference received, including interference that may cause undesired operation. This device should be operated with a minimum distance of 10mm between the back of the
device including the antenna and the USB cable (if applicable).
SAR Information
The exposure standard for your device uses a unit of measurement called the Specific
Absorption Rate (“SAR”).
SAR is the unit of measurement for the amount of RF energy absorbed by the body when using
a mobile device. Although the SAR is determined at the highest certified power level, the actual
SAR value of the device while in operation can be well below the level reported to the FCC.
This is due to a variety of factors including its proximity to a base station, the design of the
device and other factors. What is important to remember is that each device meets strict
Federal Government guidelines. Variations in SARs do not represent a variation in safety. All
devices must meet the federal standard, which incorporates a substantial margin of safety. SAR
values at or below the federal standard of 1.6 watts/kg (W/kg) are considered safe for use by
the public. This product meets current FCC Radio Frequency Exposure Guidelines. The
reported SAR value of the device is Part27 - 0.96W/kg.
Additional details at FCC website:
www.fcc.gov/oet/ea
Body-Worn Operation Please note this important safety information regarding radio frequency (RF) radiation exposure and near-body operation. To ensure compliance with RF exposure guidelines, the device must be used at least 10mm from your body. Failure to observe this warning could result in RF exposure exceeding the applicable guideline limits.
43
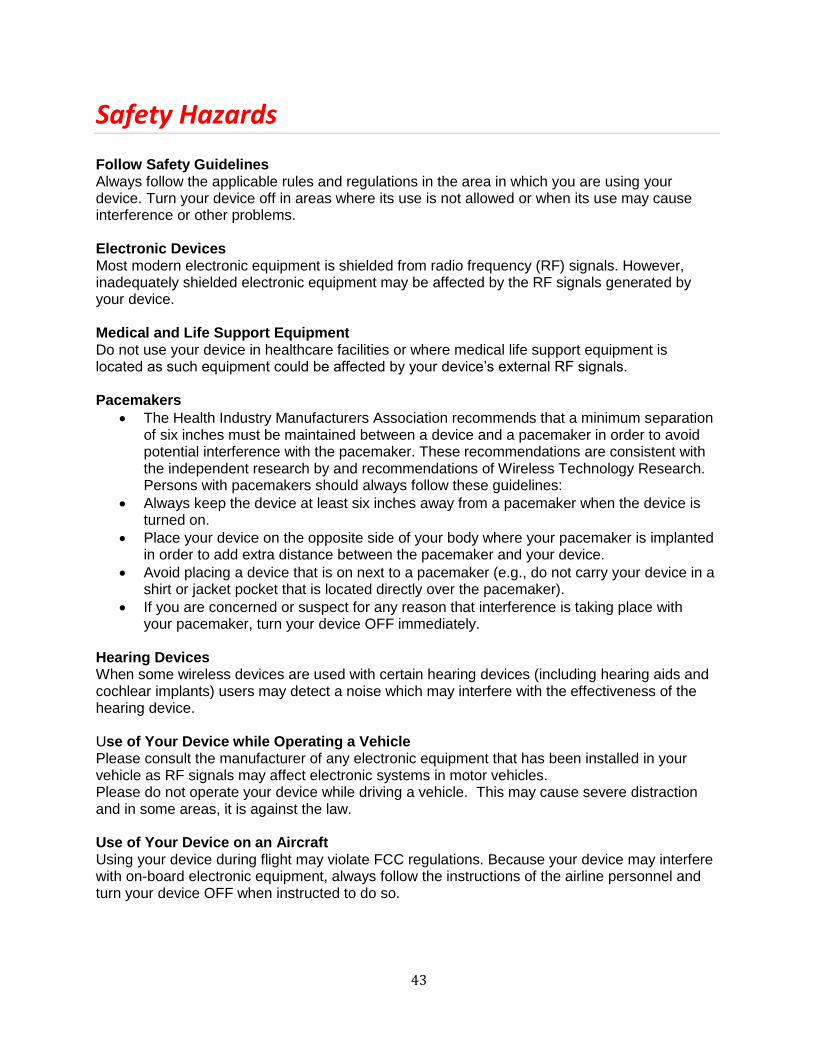
Safety Hazards Follow Safety Guidelines Always follow the applicable rules and regulations in the area in which you are using your device. Turn your device off in areas where its use is not allowed or when its use may cause interference or other problems. Electronic Devices Most modern electronic equipment is shielded from radio frequency (RF) signals. However, inadequately shielded electronic equipment may be affected by the RF signals generated by your device. Medical and Life Support Equipment Do not use your device in healthcare facilities or where medical life support equipment is located as such equipment could be affected by your device’s external RF signals. Pacemakers
The Health Industry Manufacturers Association recommends that a minimum separation of six inches must be maintained between a device and a pacemaker in order to avoid potential interference with the pacemaker. These recommendations are consistent with the independent research by and recommendations of Wireless Technology Research. Persons with pacemakers should always follow these guidelines:
Always keep the device at least six inches away from a pacemaker when the device is turned on.
Place your device on the opposite side of your body where your pacemaker is implanted in order to add extra distance between the pacemaker and your device.
Avoid placing a device that is on next to a pacemaker (e.g., do not carry your device in a shirt or jacket pocket that is located directly over the pacemaker).
If you are concerned or suspect for any reason that interference is taking place with your pacemaker, turn your device OFF immediately.
Hearing Devices When some wireless devices are used with certain hearing devices (including hearing aids and cochlear implants) users may detect a noise which may interfere with the effectiveness of the hearing device. Use of Your Device while Operating a Vehicle Please consult the manufacturer of any electronic equipment that has been installed in your vehicle as RF signals may affect electronic systems in motor vehicles. Please do not operate your device while driving a vehicle. This may cause severe distraction and in some areas, it is against the law. Use of Your Device on an Aircraft Using your device during flight may violate FCC regulations. Because your device may interfere with on-board electronic equipment, always follow the instructions of the airline personnel and turn your device OFF when instructed to do so.

44
Blasting Areas In order to avoid interfering with blasting operations, your device should be turned OFF when in a blasting area or in an area with posted signs indicating that people in the area must turn off two-way radios. Please obey all signs and instructions when you are in and around a blasting area.
Limited Warranty and Liability
Manufacturer’s Limited One-Year Warranty: Franklin Wireless (the ”Company”) warrants to the original retail purchaser of this device, that should the product or any part thereof, during normal consumer usage conditions, be defective in material or workmanship that results in product failure within the first twelve (12) month period from the date of purchase, such defects will be repaired or replaced, with a new or refurbished product at the Company’s discretion, without charge for parts and labor directly related to the defect(s). This warranty extends to consumers who purchase the product in the United States, and it is not transferable or assignable. This warranty does not apply to: (a) Products subject to abnormal use or conditions, accident, mishandling, neglect, unauthorized alteration, misuse, improper installation or repair or improper storage; (b) Products whose mechanical serial number or electronic serial number have been removed, altered, or defaced; (c) Damage from exposure to moisture, humidity, excessive temperature or extreme environmental conditions; (d) Damage resulting from connection to, or use of any accessory or other product not approved or authorized by the Company; (e) Defects in appearance, cosmetic, decorative or structural items such as framing and non-operative parts; (f) Damage from external causes such as fire, flooding, dirt, sand, weather conditions, battery leakage, a blown fuse, theft or improper usage of any electrical source. The Company disclaims liability for removal or reinstallation of the product, for geographic coverage, for inadequate signal reception by the antenna or for communications range or operation of the cellular system as a whole. Franklin Wireless is not responsible for and does not guarantee restoration of any third-party software, personal information or memory data contained in, stored on, or integrated with any wireless device, whether under warranty or not, returned to an authorized service center for repair or service. To obtain repairs or replacement within the terms of this warranty, the product should be delivered with proof of warranty coverage (e.g., a dated bill of sale), the consumer’s return address, daytime phone number and/or fax number and complete description of the problem, transportation prepaid, to the place of purchase or to an authorized service center for repair or replacement processing. In order to be referred to an authorized service center in your area, please contact Verizon Wireless Customer Service at (800) 922-0204 or visit www.verizonwireless.com/support
45
The extent of the Company’s liability under this warranty is limited to the repair or replacement provided above and, in no event, shall the Company’s liability exceed the purchase price paid by purchaser for the product. Any implied warranties, including any implied warranty of merchant ability or fitness for a particular purpose, shall be limited to the duration of this written warranty. In no case shall the Company be liable for any special consequential or incidental damages for breach of this or any other warranty, express or implied, whatsoever. The Company shall not be liable for the delay in service under this warranty or loss of use during the time the product is being repaired or replaced. No person or representative is authorized to assume for the Company any liability other than expressed herein in connection with the sale, repair or replacement of this product. Some states do not allow limitations on how long an implied warranty lasts on the exclusion or limitation of incidental or consequential damage so the above limitation or exclusions may not apply to you. This warranty gives you specific legal rights, and you may also have other rights, which vary from state to state. Franklin Wireless Corp. 6205 Lusk Blvd. San Diego, CA 92121
Trademark ©2013 Franklin Wireless, Inc. All rights reserved. The information contained in this document should not be construed as a commitment by Franklin Wireless and is subject to change without notice by Franklin Wireless. Trademarks and Service Marks Franklin Wireless is a trademark of Franklin Wireless, Inc., and all other trademarks, logos, and service marks used in this user manual are the property of Franklin Wireless or their respective owners. Nothing contained in this user guide should be construed as granting by implication, or otherwise, a license or right of use of Franklin Wireless or any other Trademark displayed in this user manual without the written permission of Franklin Wireless or its respective owners. The names of actual companies and products mentioned in this user manual may be the trademarks of their respective owners.
Document Revision History Revision: Rev.1.0 Date: Dec. 4, 2013

46
6
Glossary
47
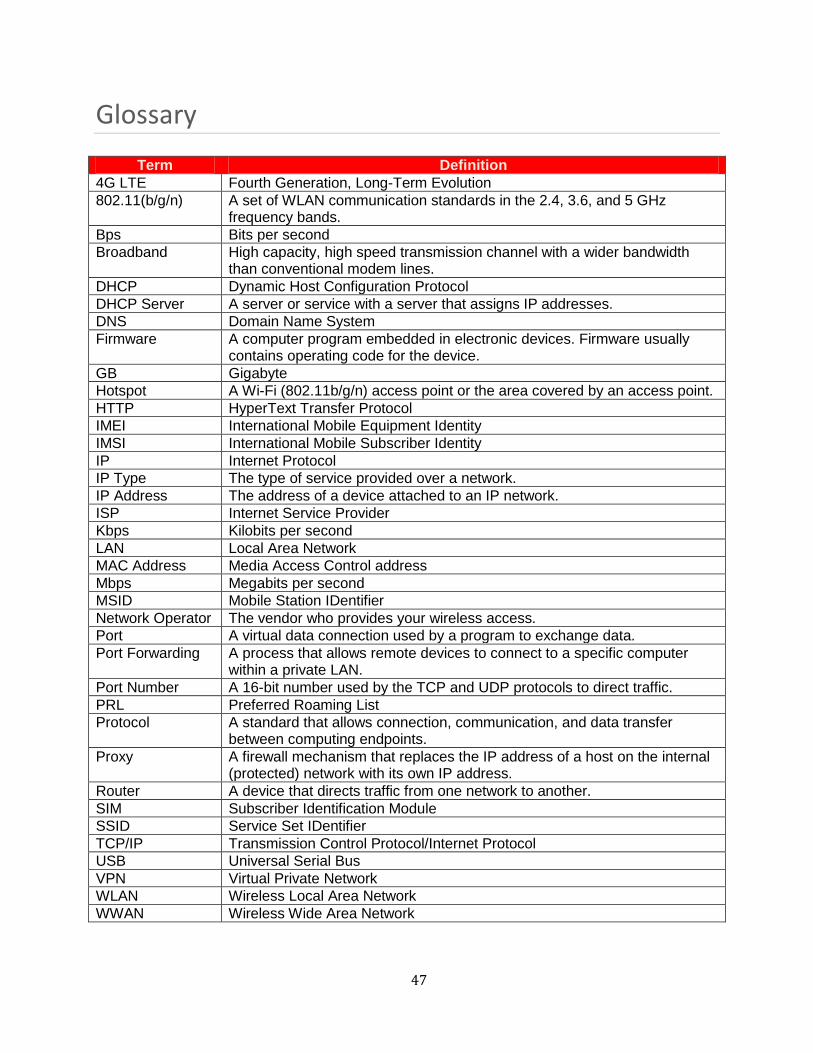
Glossary
Term Definition
4G LTE Fourth Generation, Long-Term Evolution
802.11(b/g/n) A set of WLAN communication standards in the 2.4, 3.6, and 5 GHz frequency bands.
Bps Bits per second
Broadband High capacity, high speed transmission channel with a wider bandwidth than conventional modem lines.
DHCP Dynamic Host Configuration Protocol
DHCP Server A server or service with a server that assigns IP addresses.
DNS Domain Name System
Firmware A computer program embedded in electronic devices. Firmware usually contains operating code for the device.
GB Gigabyte
Hotspot A Wi-Fi (802.11b/g/n) access point or the area covered by an access point.
HTTP HyperText Transfer Protocol
IMEI International Mobile Equipment Identity
IMSI International Mobile Subscriber Identity
IP Internet Protocol
IP Type The type of service provided over a network.
IP Address The address of a device attached to an IP network.
ISP Internet Service Provider
Kbps Kilobits per second
LAN Local Area Network
MAC Address Media Access Control address
Mbps Megabits per second
MSID Mobile Station IDentifier
Network Operator The vendor who provides your wireless access.
Port A virtual data connection used by a program to exchange data.
Port Forwarding A process that allows remote devices to connect to a specific computer within a private LAN.
Port Number A 16-bit number used by the TCP and UDP protocols to direct traffic.
PRL Preferred Roaming List
Protocol A standard that allows connection, communication, and data transfer between computing endpoints.
Proxy A firewall mechanism that replaces the IP address of a host on the internal (protected) network with its own IP address.
Router A device that directs traffic from one network to another.
SIM Subscriber Identification Module
SSID Service Set IDentifier
TCP/IP Transmission Control Protocol/Internet Protocol
USB Universal Serial Bus
VPN Virtual Private Network
WLAN Wireless Local Area Network
WWAN Wireless Wide Area Network