Embed Size (px)
Citation preview
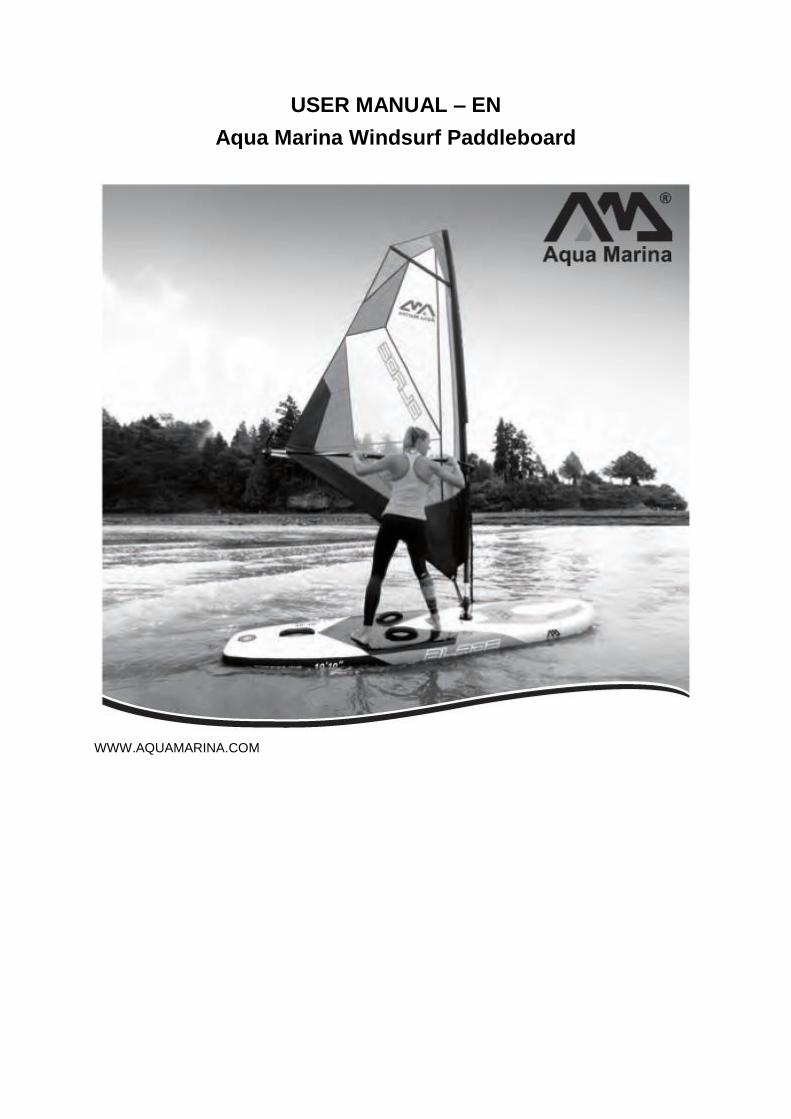
USER MANUAL – EN
Aqua Marina Windsurf Paddleboard
WWW.AQUAMARINA.COM
2
CONTENTS
IMPORTANT GENERAL INFORMATION ............................................................................................... 3
GENERAL PADDLING INFORMATION .................................................................................................. 4
SAFETY ............................................................................................................................................... 4
SAFETY CHECK LIST ......................................................................................................................... 4
HOW TO PADDLE ............................................................................................................................... 5
SPECIFICATIONS AND FEATURES ...................................................................................................... 5
Standard equipment ............................................................................................................................. 5
Product features ................................................................................................................................... 6
INSTRUCTIONS FOR RIGGING THE SAIL ......................................................................................... 10
SET-UP PREPARATION ....................................................................................................................... 12
INFLATION STEPS AND PRECAUTIONS ........................................................................................ 12
VALVE OPERATION ......................................................................................................................... 12
BOARD INFLATION STEPS.............................................................................................................. 13
HIGH PRESSURE PUMP USE ......................................................................................................... 13
BOARD DEFLATION ......................................................................................................................... 15
INFLATION TIPS AND PRECAUTIONS ........................................................................................... 15
FIN INSTALLATION ........................................................................................................................... 15
SAIL RIGGING GUIDE ...................................................................................................................... 16
MAINTENANCE AND STORAGE ......................................................................................................... 21
FOLDING THE BOARD ..................................................................................................................... 21
FOLDING THE SAIL .......................................................................................................................... 22
INFLATABLE VALVE SEALING WASHER BLOW-OUT ................................................................... 22
LEAK DETECTION AND REPAIR......................................................................................................... 24
ABOUT PVC ...................................................................................................................................... 24
AIR LEAK DETECTION ..................................................................................................................... 24
SMALL REPAIRS .............................................................................................................................. 24
SAFETY PRECAUTIONS ...................................................................................................................... 24
TERMS AND CONDITIONS OF WARRANTY, WARRANTY CLAIMS ................................................. 26
3
WARNING
For your own safety and that of your equipment, make sure to read the entire manual. Failure to follow the warning notices and instructions may result in property damage, serious injury or death.
IMPORTANT GENERAL INFORMATION
This manual has been compiled to help you operate your Inflatable Stand Up Paddle Board (hereinafter referred to as ISUP) safely and enjoyably. It contains detailed description of the ISUP, the equipment supplied, and information on their operation. Please read it carefully and familiarize yourself with the ISUP before using it.
This user’s manual is not a course in boating safety or seamanship. If this is your first ISUP, or if you have bought a type of ISUP you are not familiar with, for your own comfort and safety, please ensure that you obtain experience in handling and operating it before going off on your own. Your dealer, national sailing federation or a yacht club will be pleased to refer you to local sea schools or competent instructors.
Make sure that the anticipated wind and sea conditions will correspond to the design category of your ISUP and that you are able to handle the ISUP in these conditions.
This user’s manual is not a detailed maintenance or trouble-shooting guide. In case of difficulties, refer to the safety characteristics of the ISUP. The ISUP manufacturer cannot be held responsible for modifications that have not been approved.
Any ISUP, no matter how strong it may be, can be severely damaged if not being used properly. This is not compatible with safe boating. Always adjust the speed and direction of the ISUP to the sea conditions.
All userss should wear a suitable buoyancy aid (life jacket/personal floatation device) when using an ISUP. Note that in some countries it is a legal requirement to wear a buoyancy aid. You must comply with local regulations at all times.
PLEASE KEEP THIS MANUAL IN A SECURE PLACE, AND HAND IT OVER TO THE NEW OWNER IF YOU SELL THE ISUP.
4
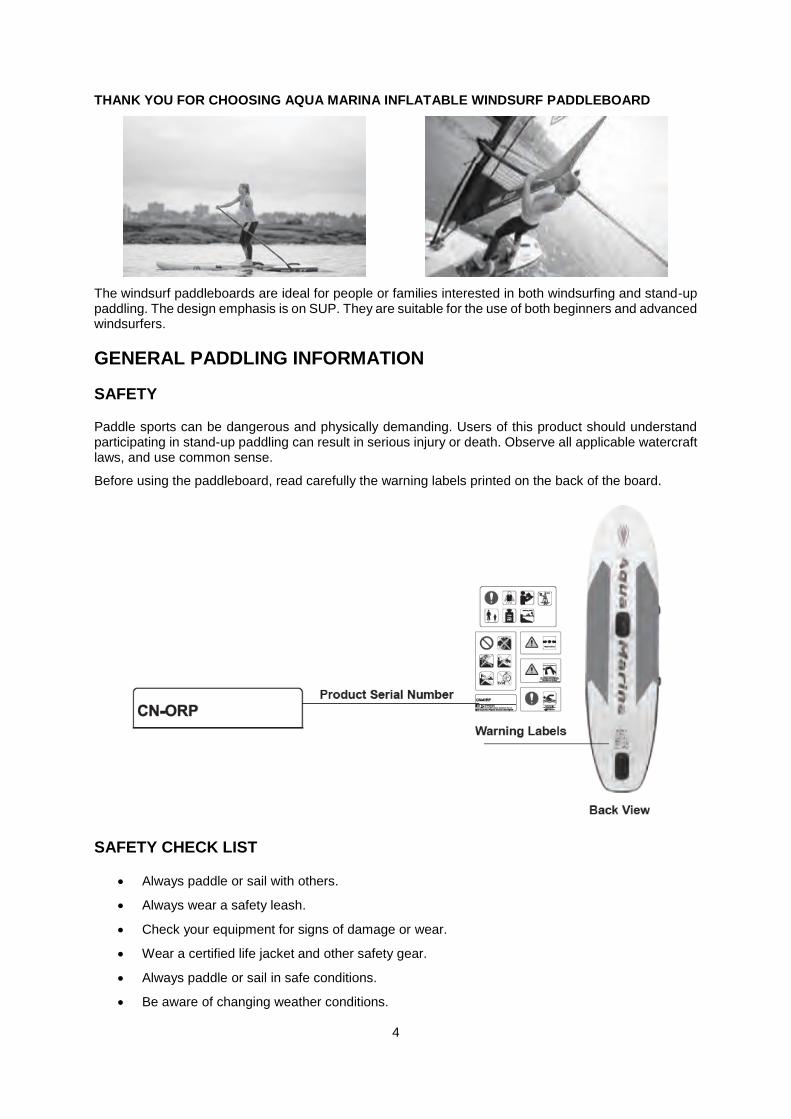
THANK YOU FOR CHOOSING AQUA MARINA INFLATABLE WINDSURF PADDLEBOARD
The windsurf paddleboards are ideal for people or families interested in both windsurfing and stand-up paddling. The design emphasis is on SUP. They are suitable for the use of both beginners and advanced windsurfers.
GENERAL PADDLING INFORMATION
SAFETY
Paddle sports can be dangerous and physically demanding. Users of this product should understand participating in stand-up paddling can result in serious injury or death. Observe all applicable watercraft laws, and use common sense.
Before using the paddleboard, read carefully the warning labels printed on the back of the board.
SAFETY CHECK LIST
Always paddle or sail with others.
Always wear a safety leash.
Check your equipment for signs of damage or wear.
Wear a certified life jacket and other safety gear.
Always paddle or sail in safe conditions.
Be aware of changing weather conditions.
5
Avoid paddling or sailing in offshore wind or windy conditions.
Do not exceed your paddling abilities. Be aware of your limitations.
Do not use alcohol or mind-altering drugs prior to using this product.
HOW TO PADDLE
Assume a comfortable stand with your feet positioned roughly a shoulder width apart. Bend your knees slightly in a relaxed upright stance, push your shoulders back and look straight ahead.
Paddle grip: place your top hand on the end of the handle and your bottom hand approximately 60 cm (24ʺ) down the shaft of the paddle. Paddle in a comfortable forward motion, with arms slightly bent.
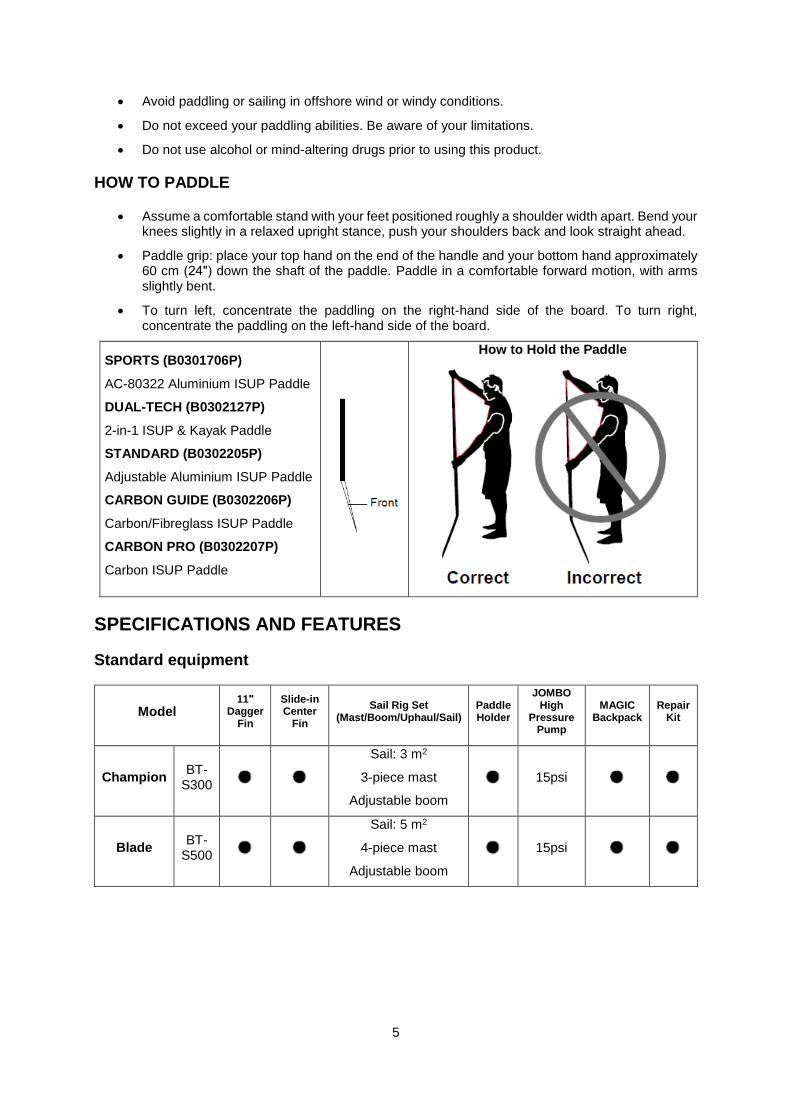
To turn left, concentrate the paddling on the right-hand side of the board. To turn right, concentrate the paddling on the left-hand side of the board.
SPORTS (B0301706P)
AC-80322 Aluminium ISUP Paddle
DUAL-TECH (B0302127P)
2-in-1 ISUP & Kayak Paddle
STANDARD (B0302205P)
Adjustable Aluminium ISUP Paddle
CARBON GUIDE (B0302206P)
Carbon/Fibreglass ISUP Paddle
CARBON PRO (B0302207P)
Carbon ISUP Paddle
How to Hold the Paddle
SPECIFICATIONS AND FEATURES
Standard equipment
Model 11ʺ
Dagger Fin
Slide-in Center
Fin
Sail Rig Set (Mast/Boom/Uphaul/Sail)
Paddle Holder
JOMBO High
Pressure Pump
MAGIC Backpack
Repair Kit
Champion BT-
S300
Sail: 3 m2
3-piece mast
Adjustable boom
15psi
Blade BT-
S500
Sail: 5 m2
4-piece mast
Adjustable boom
15psi
6
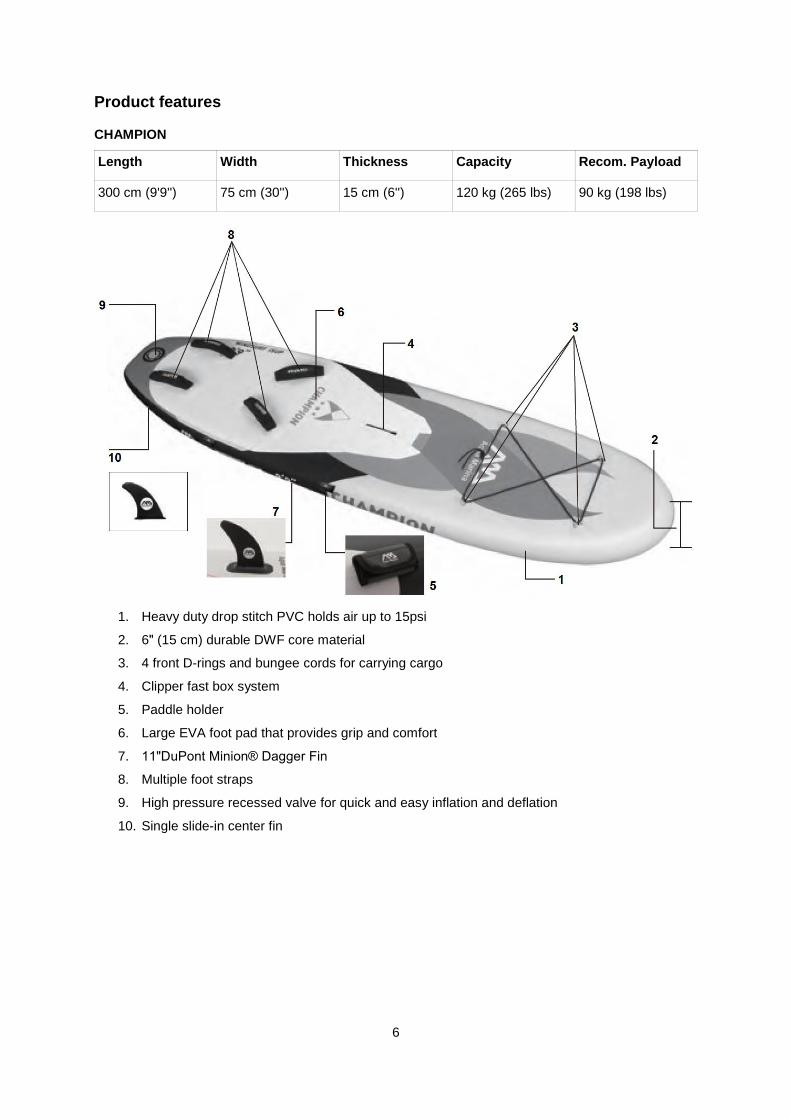
Product features
CHAMPION
Length Width Thickness Capacity Recom. Payload
300 cm (9'9'') 75 cm (30'') 15 cm (6'') 120 kg (265 lbs) 90 kg (198 lbs)
1. Heavy duty drop stitch PVC holds air up to 15psi
2. 6ʺ (15 cm) durable DWF core material
3. 4 front D-rings and bungee cords for carrying cargo
4. Clipper fast box system
5. Paddle holder
6. Large EVA foot pad that provides grip and comfort
7. 11ʺDuPont Minion® Dagger Fin
8. Multiple foot straps
9. High pressure recessed valve for quick and easy inflation and deflation
10. Single slide-in center fin
7
8
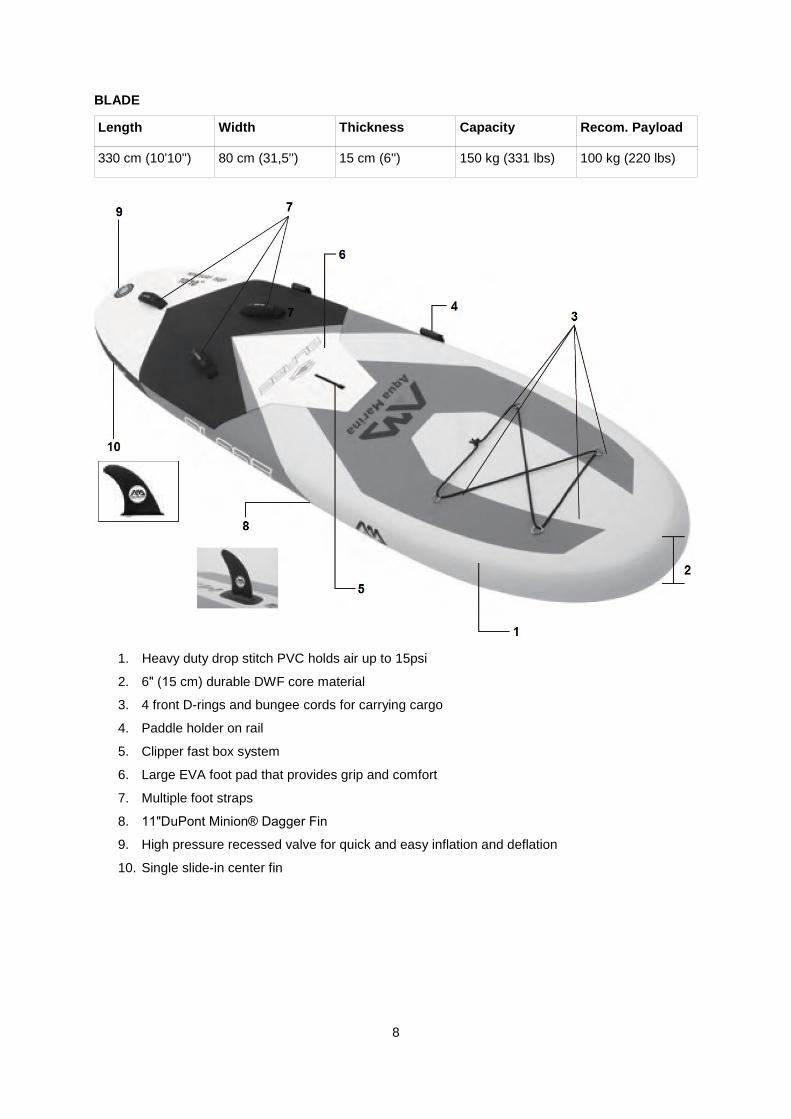
BLADE
Length Width Thickness Capacity Recom. Payload
330 cm (10'10'') 80 cm (31,5'') 15 cm (6'') 150 kg (331 lbs) 100 kg (220 lbs)
1. Heavy duty drop stitch PVC holds air up to 15psi
2. 6ʺ (15 cm) durable DWF core material
3. 4 front D-rings and bungee cords for carrying cargo
4. Paddle holder on rail
5. Clipper fast box system
6. Large EVA foot pad that provides grip and comfort
7. Multiple foot straps
8. 11ʺDuPont Minion® Dagger Fin
9. High pressure recessed valve for quick and easy inflation and deflation
10. Single slide-in center fin
9

10
INSTRUCTIONS FOR RIGGING THE SAIL
CHAMPION S300 – Package contents:
1. 1 set of aluminium boom and outhaul
2. 3 pieces of fibreglass mast
3. Uphaul (attaches to the boom to raise the sail from water)
4. Mast foot with universal joint
5. Mast extension and downhaul
6. Sail of 3 m2
11
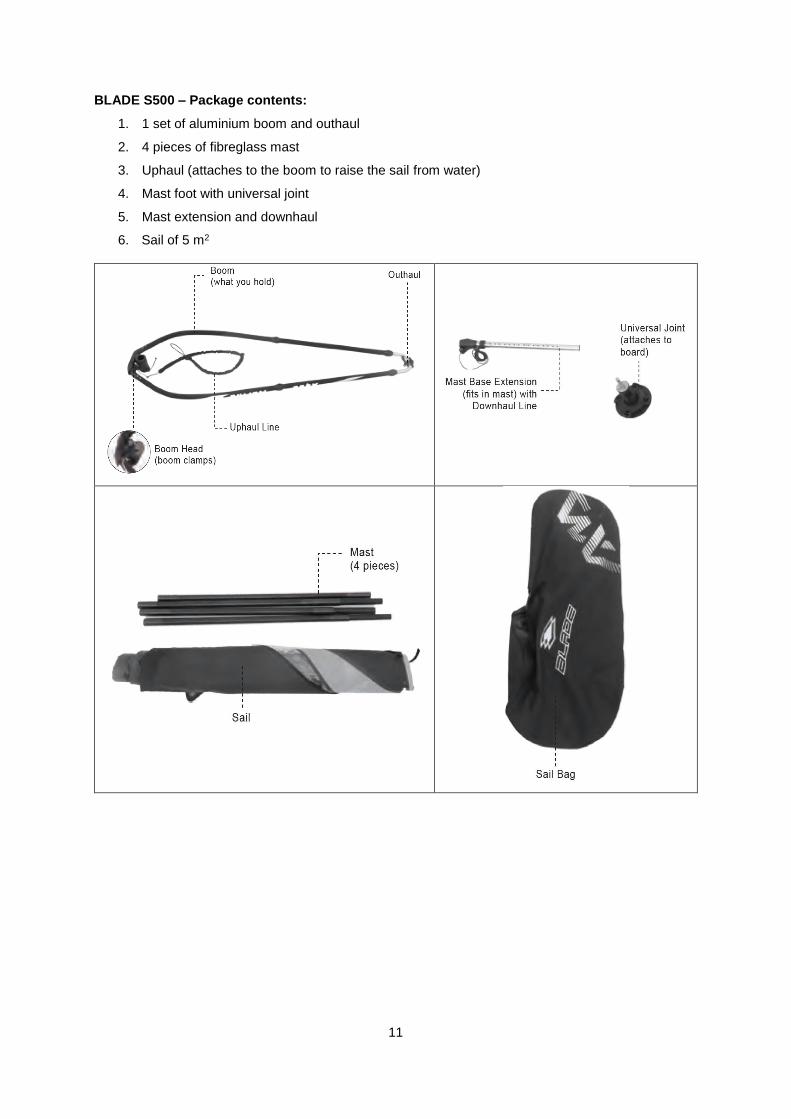
BLADE S500 – Package contents:
1. 1 set of aluminium boom and outhaul
2. 4 pieces of fibreglass mast
3. Uphaul (attaches to the boom to raise the sail from water)
4. Mast foot with universal joint
5. Mast extension and downhaul
6. Sail of 5 m2
12
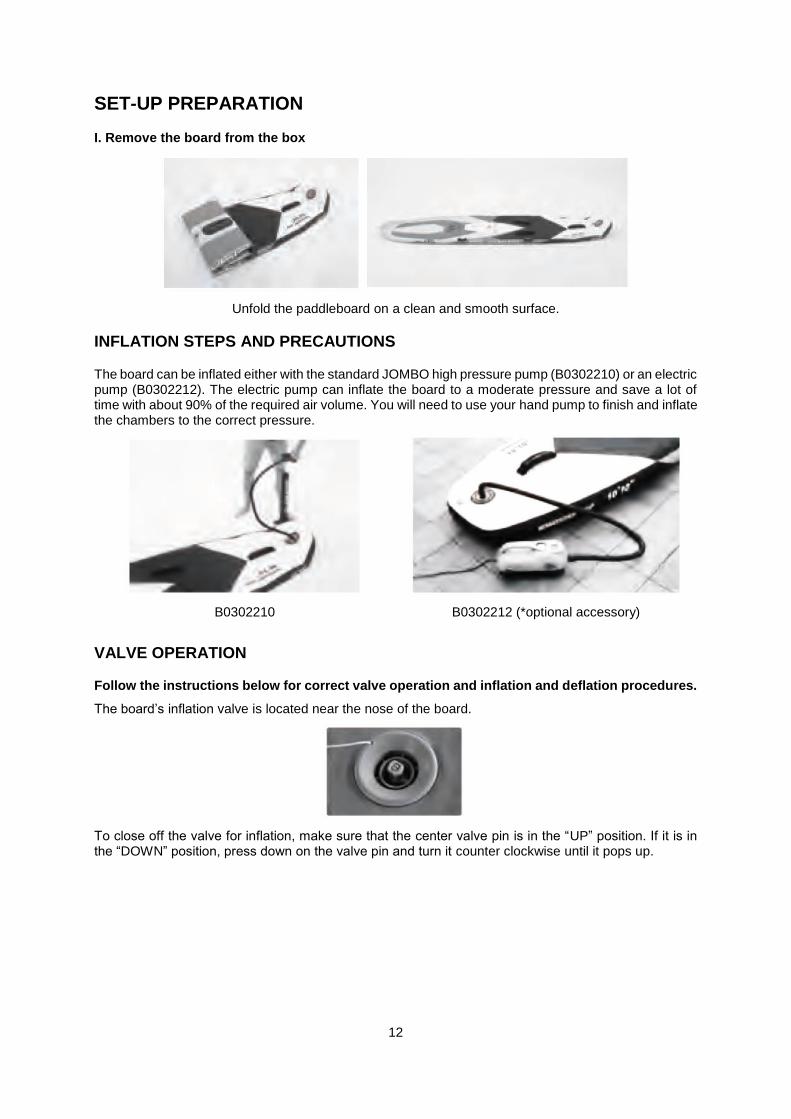
SET-UP PREPARATION
I. Remove the board from the box
Unfold the paddleboard on a clean and smooth surface.
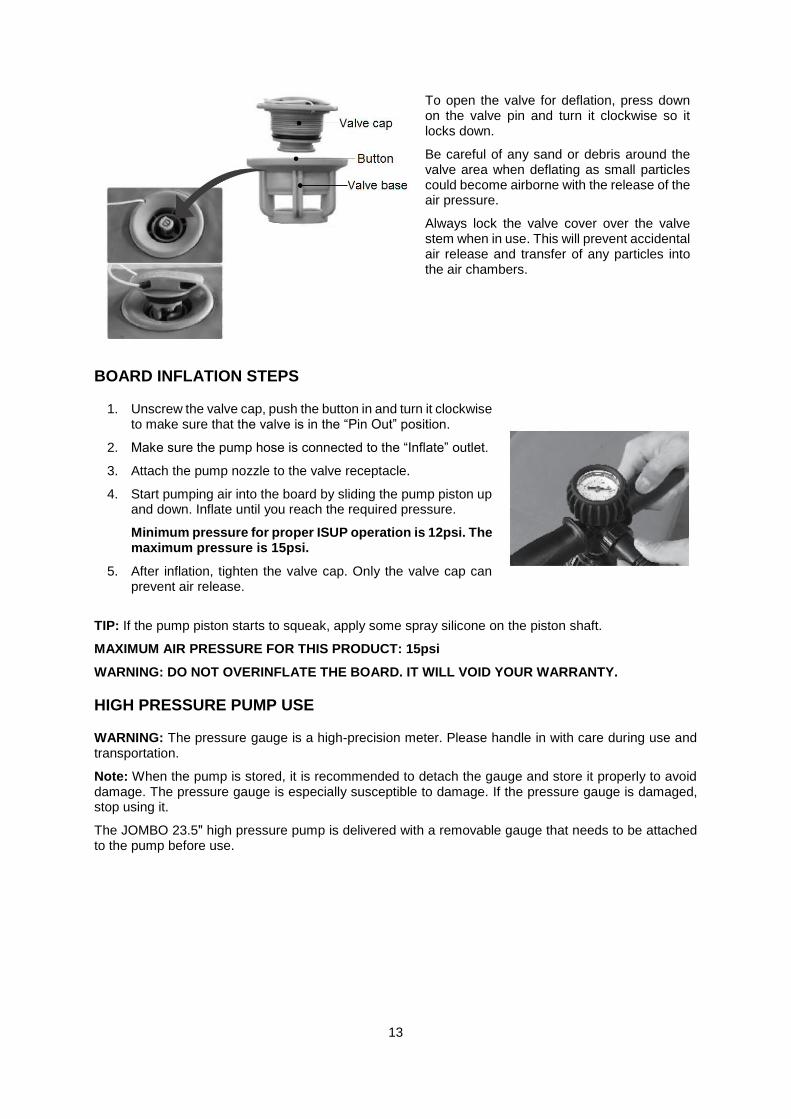
INFLATION STEPS AND PRECAUTIONS
The board can be inflated either with the standard JOMBO high pressure pump (B0302210) or an electric pump (B0302212). The electric pump can inflate the board to a moderate pressure and save a lot of time with about 90% of the required air volume. You will need to use your hand pump to finish and inflate the chambers to the correct pressure.
B0302210 B0302212 (*optional accessory)
VALVE OPERATION
Follow the instructions below for correct valve operation and inflation and deflation procedures.
The board’s inflation valve is located near the nose of the board.
To close off the valve for inflation, make sure that the center valve pin is in the “UP” position. If it is in the “DOWN” position, press down on the valve pin and turn it counter clockwise until it pops up.
13
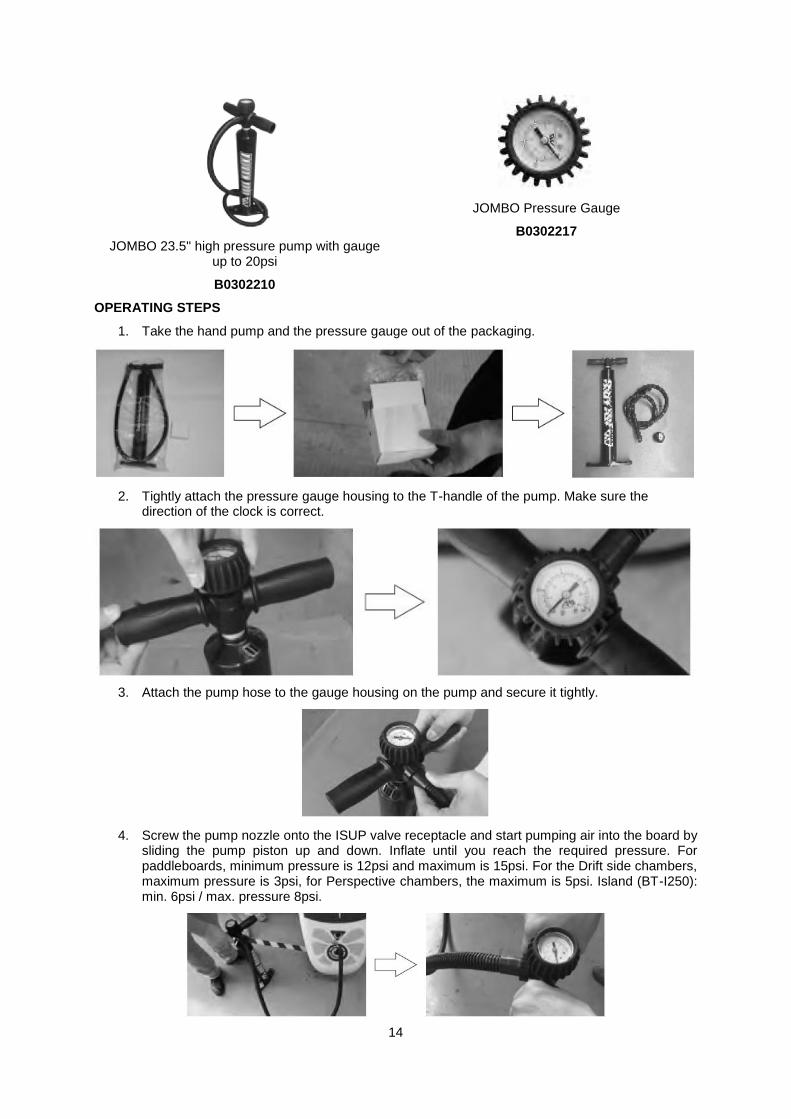
To open the valve for deflation, press down on the valve pin and turn it clockwise so it locks down.
Be careful of any sand or debris around the valve area when deflating as small particles could become airborne with the release of the air pressure.
Always lock the valve cover over the valve stem when in use. This will prevent accidental air release and transfer of any particles into the air chambers.
BOARD INFLATION STEPS
1. Unscrew the valve cap, push the button in and turn it clockwise to make sure that the valve is in the “Pin Out” position.
2. Make sure the pump hose is connected to the “Inflate” outlet.
3. Attach the pump nozzle to the valve receptacle.
4. Start pumping air into the board by sliding the pump piston up and down. Inflate until you reach the required pressure.
Minimum pressure for proper ISUP operation is 12psi. The maximum pressure is 15psi.
5. After inflation, tighten the valve cap. Only the valve cap can prevent air release.
TIP: If the pump piston starts to squeak, apply some spray silicone on the piston shaft.
MAXIMUM AIR PRESSURE FOR THIS PRODUCT: 15psi
WARNING: DO NOT OVERINFLATE THE BOARD. IT WILL VOID YOUR WARRANTY.
HIGH PRESSURE PUMP USE
WARNING: The pressure gauge is a high-precision meter. Please handle in with care during use and transportation.
Note: When the pump is stored, it is recommended to detach the gauge and store it properly to avoid damage. The pressure gauge is especially susceptible to damage. If the pressure gauge is damaged, stop using it.
The JOMBO 23.5ʺ high pressure pump is delivered with a removable gauge that needs to be attached to the pump before use.
14
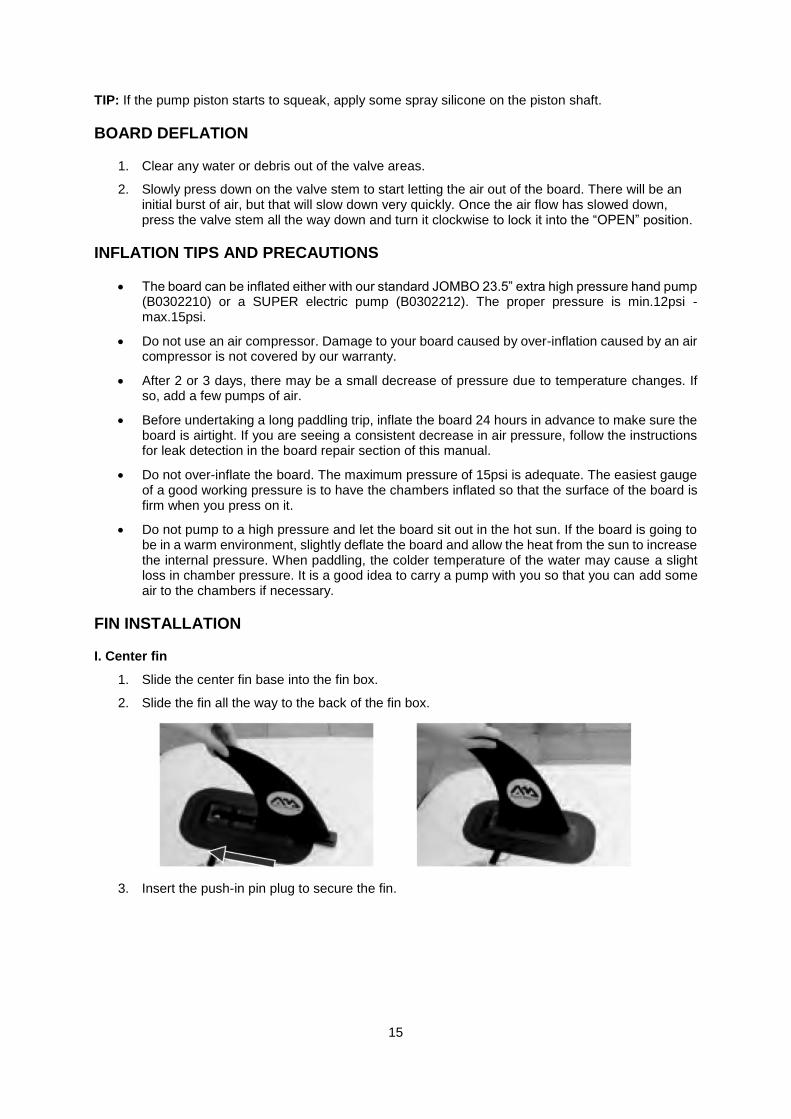
JOMBO 23.5" high pressure pump with gauge up to 20psi
B0302210
JOMBO Pressure Gauge
B0302217
OPERATING STEPS
1. Take the hand pump and the pressure gauge out of the packaging.
2. Tightly attach the pressure gauge housing to the T-handle of the pump. Make sure the direction of the clock is correct.
3. Attach the pump hose to the gauge housing on the pump and secure it tightly.
4. Screw the pump nozzle onto the ISUP valve receptacle and start pumping air into the board by sliding the pump piston up and down. Inflate until you reach the required pressure. For paddleboards, minimum pressure is 12psi and maximum is 15psi. For the Drift side chambers, maximum pressure is 3psi, for Perspective chambers, the maximum is 5psi. Island (BT-I250): min. 6psi / max. pressure 8psi.
15
TIP: If the pump piston starts to squeak, apply some spray silicone on the piston shaft.
BOARD DEFLATION
1. Clear any water or debris out of the valve areas.
2. Slowly press down on the valve stem to start letting the air out of the board. There will be an initial burst of air, but that will slow down very quickly. Once the air flow has slowed down, press the valve stem all the way down and turn it clockwise to lock it into the “OPEN” position.
INFLATION TIPS AND PRECAUTIONS
The board can be inflated either with our standard JOMBO 23.5” extra high pressure hand pump (B0302210) or a SUPER electric pump (B0302212). The proper pressure is min.12psi - max.15psi.
Do not use an air compressor. Damage to your board caused by over-inflation caused by an air compressor is not covered by our warranty.
After 2 or 3 days, there may be a small decrease of pressure due to temperature changes. If so, add a few pumps of air.
Before undertaking a long paddling trip, inflate the board 24 hours in advance to make sure the board is airtight. If you are seeing a consistent decrease in air pressure, follow the instructions for leak detection in the board repair section of this manual.
Do not over-inflate the board. The maximum pressure of 15psi is adequate. The easiest gauge of a good working pressure is to have the chambers inflated so that the surface of the board is firm when you press on it.
Do not pump to a high pressure and let the board sit out in the hot sun. If the board is going to be in a warm environment, slightly deflate the board and allow the heat from the sun to increase the internal pressure. When paddling, the colder temperature of the water may cause a slight loss in chamber pressure. It is a good idea to carry a pump with you so that you can add some air to the chambers if necessary.
FIN INSTALLATION
I. Center fin
1. Slide the center fin base into the fin box.
2. Slide the fin all the way to the back of the fin box.
3. Insert the push-in pin plug to secure the fin.
16
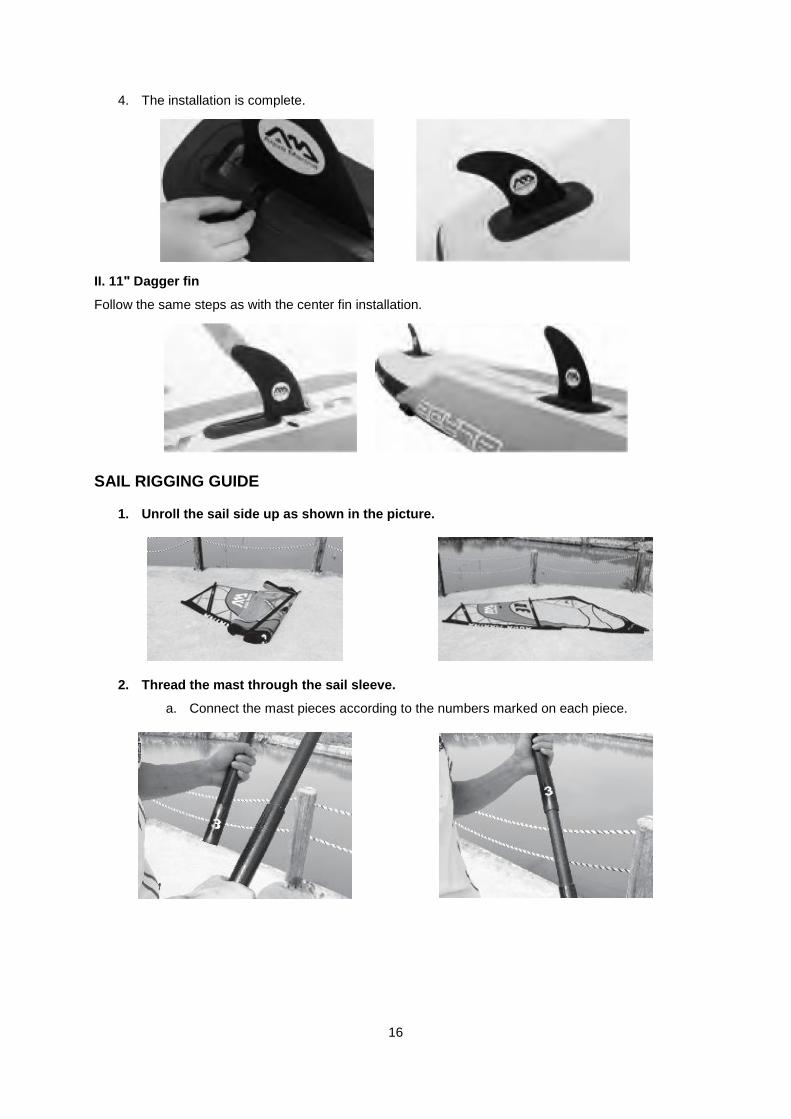
4. The installation is complete.
II. 11ʺ Dagger fin
Follow the same steps as with the center fin installation.
SAIL RIGGING GUIDE
1. Unroll the sail side up as shown in the picture.
2. Thread the mast through the sail sleeve.
a. Connect the mast pieces according to the numbers marked on each piece.
17
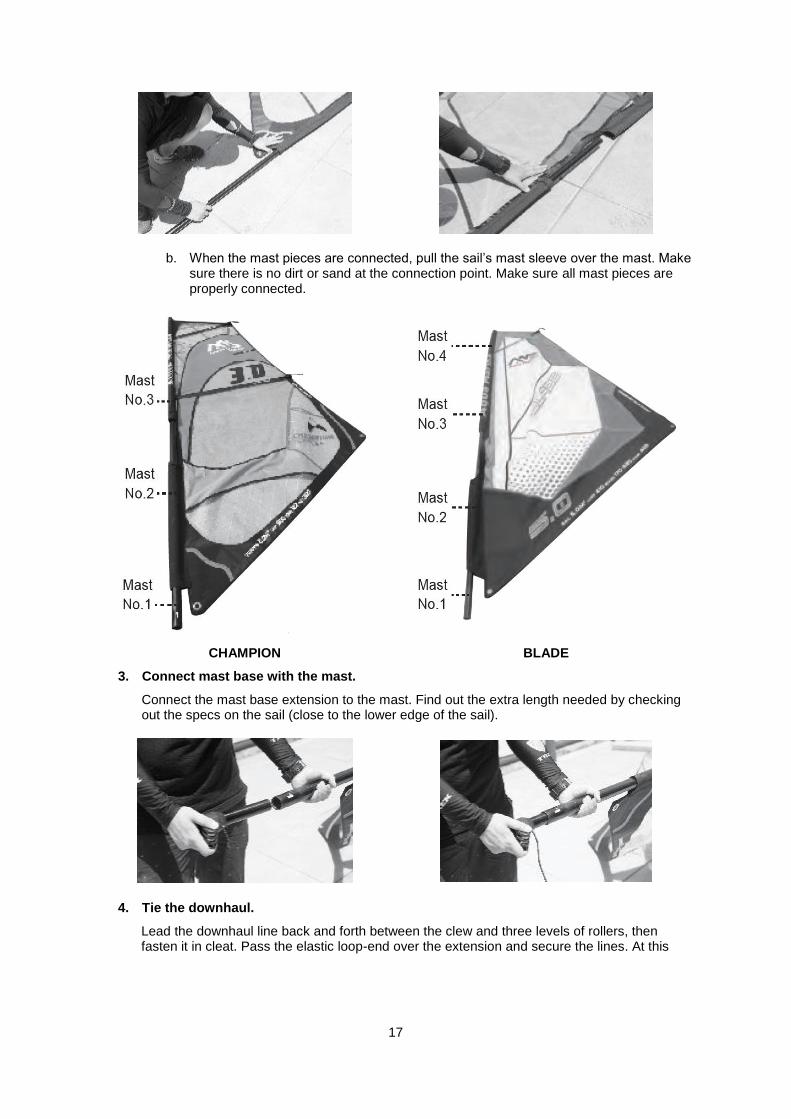
b. When the mast pieces are connected, pull the sail’s mast sleeve over the mast. Make sure there is no dirt or sand at the connection point. Make sure all mast pieces are properly connected.
CHAMPION BLADE
3. Connect mast base with the mast.
Connect the mast base extension to the mast. Find out the extra length needed by checking out the specs on the sail (close to the lower edge of the sail).
4. Tie the downhaul.
Lead the downhaul line back and forth between the clew and three levels of rollers, then fasten it in cleat. Pass the elastic loop-end over the extension and secure the lines. At this
18
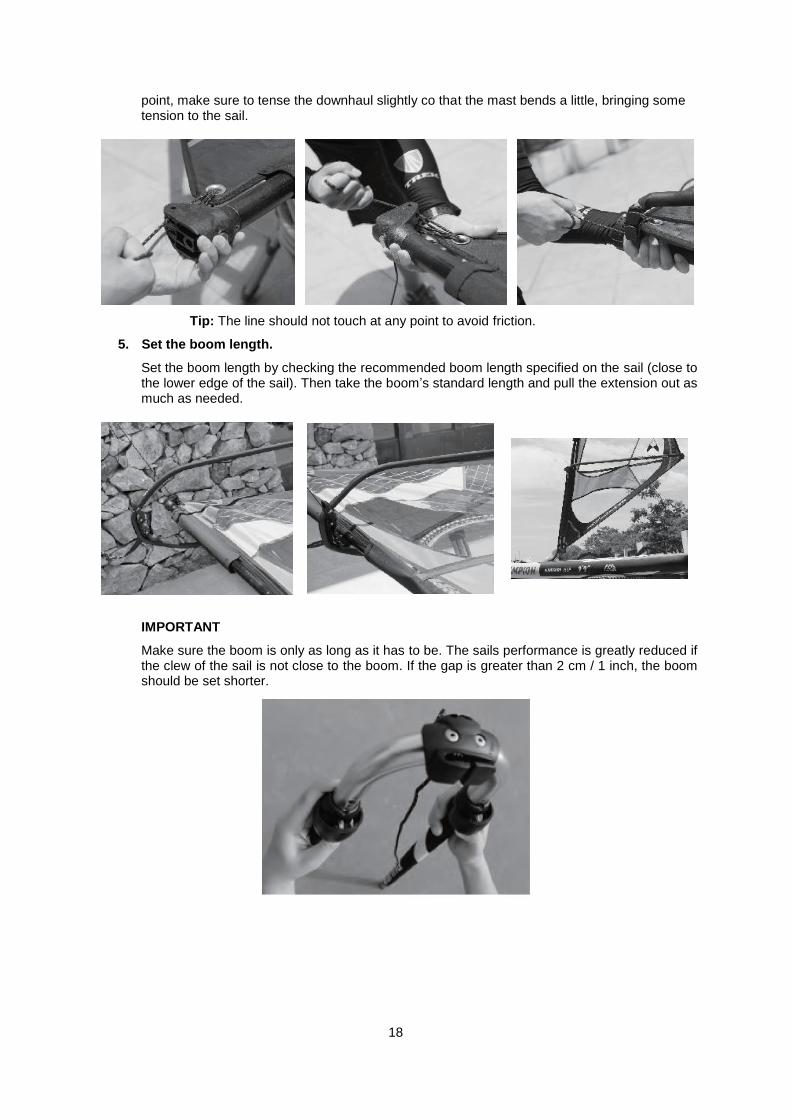
point, make sure to tense the downhaul slightly co that the mast bends a little, bringing some tension to the sail.
Tip: The line should not touch at any point to avoid friction.
5. Set the boom length.
Set the boom length by checking the recommended boom length specified on the sail (close to the lower edge of the sail). Then take the boom’s standard length and pull the extension out as much as needed.
IMPORTANT
Make sure the boom is only as long as it has to be. The sails performance is greatly reduced if the clew of the sail is not close to the boom. If the gap is greater than 2 cm / 1 inch, the boom should be set shorter.
19
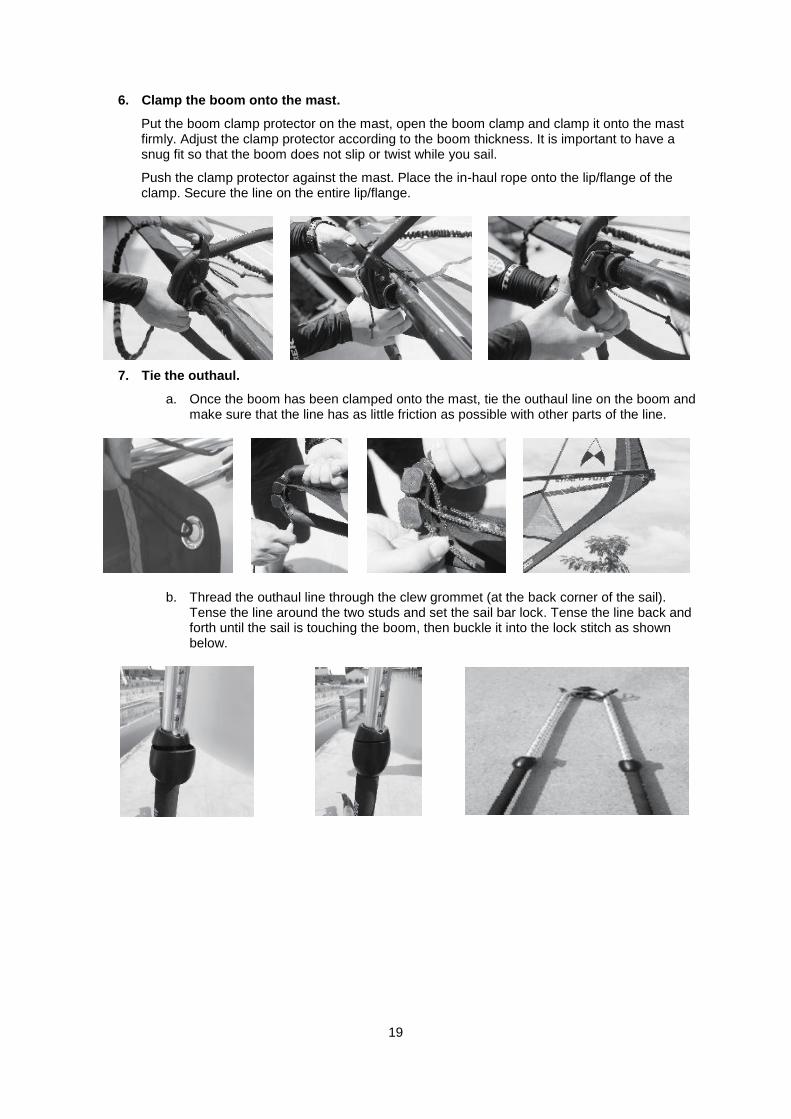
6. Clamp the boom onto the mast.
Put the boom clamp protector on the mast, open the boom clamp and clamp it onto the mast firmly. Adjust the clamp protector according to the boom thickness. It is important to have a snug fit so that the boom does not slip or twist while you sail.
Push the clamp protector against the mast. Place the in-haul rope onto the lip/flange of the clamp. Secure the line on the entire lip/flange.
7. Tie the outhaul.
a. Once the boom has been clamped onto the mast, tie the outhaul line on the boom and make sure that the line has as little friction as possible with other parts of the line.
b. Thread the outhaul line through the clew grommet (at the back corner of the sail). Tense the line around the two studs and set the sail bar lock. Tense the line back and forth until the sail is touching the boom, then buckle it into the lock stitch as shown below.
20
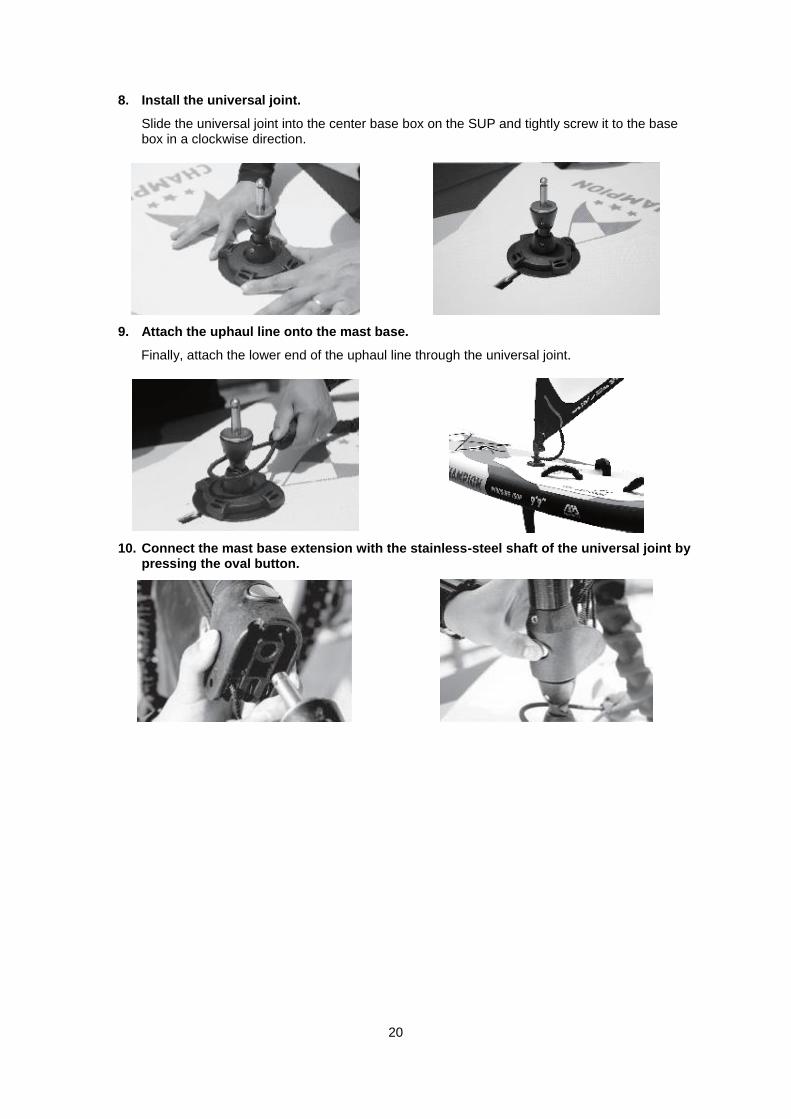
8. Install the universal joint.
Slide the universal joint into the center base box on the SUP and tightly screw it to the base box in a clockwise direction.
9. Attach the uphaul line onto the mast base.
Finally, attach the lower end of the uphaul line through the universal joint.
10. Connect the mast base extension with the stainless-steel shaft of the universal joint by pressing the oval button.
21
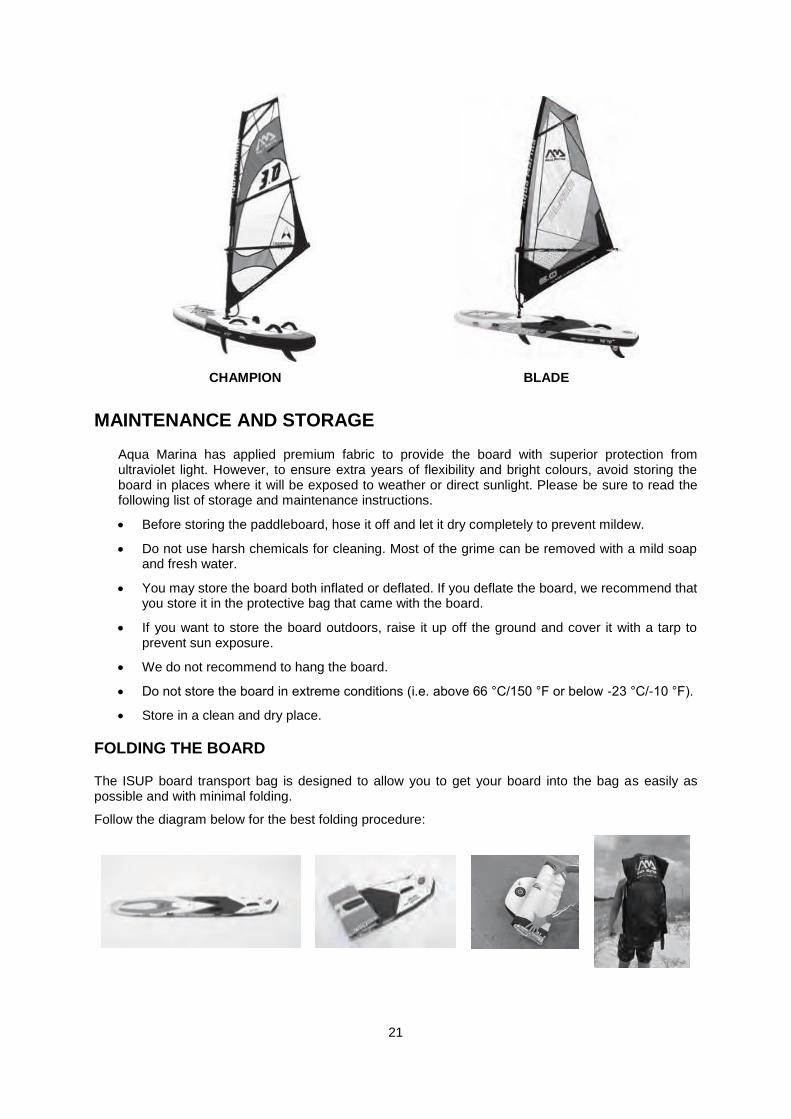
CHAMPION BLADE
MAINTENANCE AND STORAGE
Aqua Marina has applied premium fabric to provide the board with superior protection from ultraviolet light. However, to ensure extra years of flexibility and bright colours, avoid storing the board in places where it will be exposed to weather or direct sunlight. Please be sure to read the following list of storage and maintenance instructions.
Before storing the paddleboard, hose it off and let it dry completely to prevent mildew.
Do not use harsh chemicals for cleaning. Most of the grime can be removed with a mild soap and fresh water.
You may store the board both inflated or deflated. If you deflate the board, we recommend that you store it in the protective bag that came with the board.
If you want to store the board outdoors, raise it up off the ground and cover it with a tarp to prevent sun exposure.
We do not recommend to hang the board.
Do not store the board in extreme conditions (i.e. above 66 °C/150 °F or below -23 °C/-10 °F).
Store in a clean and dry place.
FOLDING THE BOARD
The ISUP board transport bag is designed to allow you to get your board into the bag as easily as possible and with minimal folding.
Follow the diagram below for the best folding procedure:
22
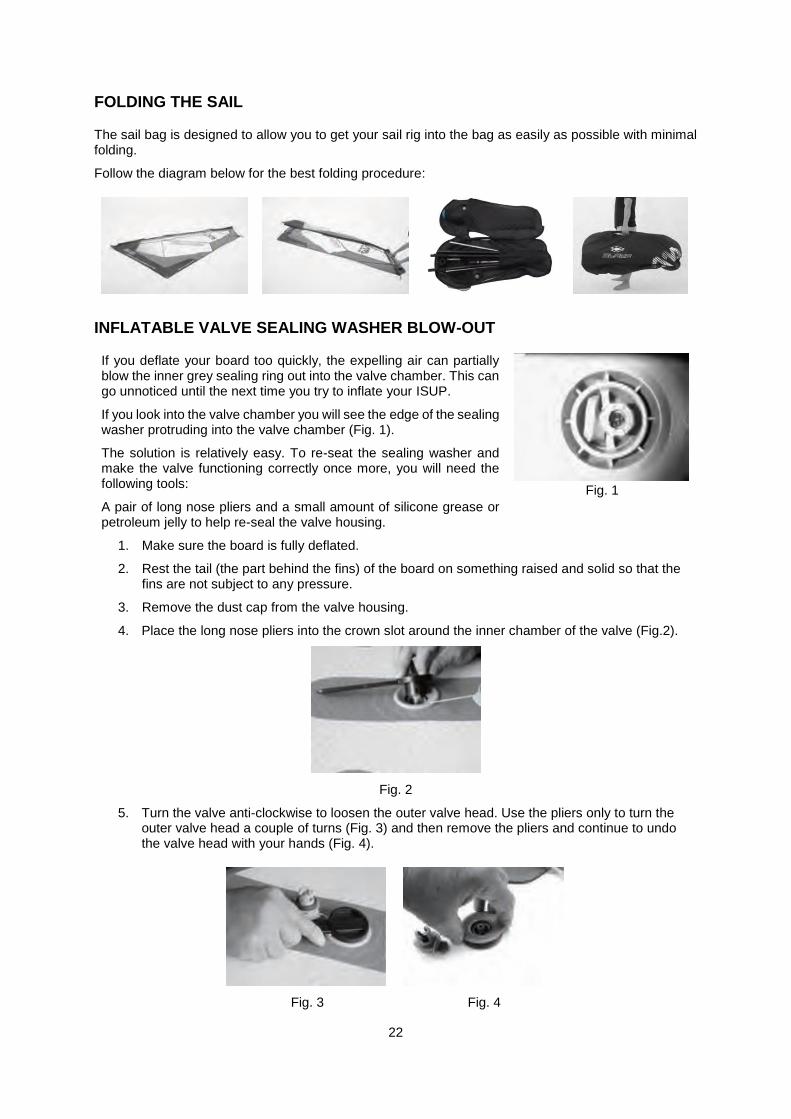
FOLDING THE SAIL
The sail bag is designed to allow you to get your sail rig into the bag as easily as possible with minimal folding.
Follow the diagram below for the best folding procedure:
INFLATABLE VALVE SEALING WASHER BLOW-OUT
If you deflate your board too quickly, the expelling air can partially blow the inner grey sealing ring out into the valve chamber. This can go unnoticed until the next time you try to inflate your ISUP.
If you look into the valve chamber you will see the edge of the sealing washer protruding into the valve chamber (Fig. 1).
The solution is relatively easy. To re-seat the sealing washer and make the valve functioning correctly once more, you will need the following tools:
A pair of long nose pliers and a small amount of silicone grease or petroleum jelly to help re-seal the valve housing.
Fig. 1
1. Make sure the board is fully deflated.
2. Rest the tail (the part behind the fins) of the board on something raised and solid so that the fins are not subject to any pressure.
3. Remove the dust cap from the valve housing.
4. Place the long nose pliers into the crown slot around the inner chamber of the valve (Fig.2).
Fig. 2
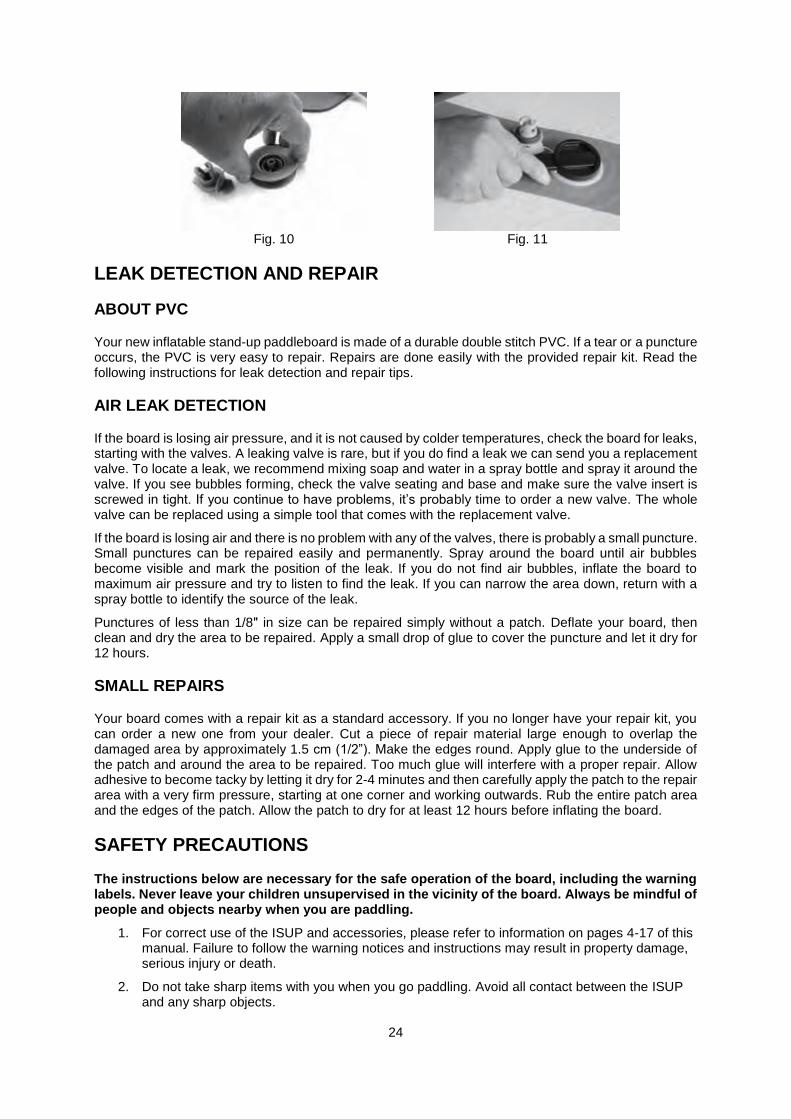
5. Turn the valve anti-clockwise to loosen the outer valve head. Use the pliers only to turn the outer valve head a couple of turns (Fig. 3) and then remove the pliers and continue to undo the valve head with your hands (Fig. 4).
Fig. 3
Fig. 4

23
6. Once fully un-screwed, you can remove the outer valve head from the inner valve seat to expose the partially un-seated sealing washer (Fig. 5).
Fig. 5
Fig. 6
7. Use your thumb to depress the inner valve sealing mechanism. You will be able to expose the partially un-seated sealing washer (Fig. 6).
8. Using only your fingers, ease the sealing washer back into position so that it is seated within the slot of the supporting plate (Fig. 7).
Fig. 7
9. Once you have the sealing washer back in its correct position, you can then screw the outer valve assembly back into the inner valve seat by reversing the removal procedure.
10. Before reassembly, smear a very small amount of silicone grease or petroleum jelly to help re-seal the valve housing. You may also put some of this lubricant around the black rubber O-ring on the outer valve body to ensure a good seal (Fig. 8, 9).
Fig. 8
Fig. 9
11. Make sure there are no particles of grit or any other foreign bodies on any part of the valve assembly as this could damage the working parts of the valve and likely cause air leakage
Reattach the outer valve assembly back to the inner valve seat by reversing the removal procedure. Make sure you do not cross-thread the valve assembly and only use your hands to re-fit the outer valve into the inner valve seat.
Only once fully inserted and screwed, use the pliers to finish the final turn. Be sure not to overtighten the assembly. It would damage the valve and its ability to hold air pressure.
24
Fig. 10
Fig. 11
LEAK DETECTION AND REPAIR
ABOUT PVC
Your new inflatable stand-up paddleboard is made of a durable double stitch PVC. If a tear or a puncture occurs, the PVC is very easy to repair. Repairs are done easily with the provided repair kit. Read the following instructions for leak detection and repair tips.
AIR LEAK DETECTION
If the board is losing air pressure, and it is not caused by colder temperatures, check the board for leaks, starting with the valves. A leaking valve is rare, but if you do find a leak we can send you a replacement valve. To locate a leak, we recommend mixing soap and water in a spray bottle and spray it around the valve. If you see bubbles forming, check the valve seating and base and make sure the valve insert is screwed in tight. If you continue to have problems, it’s probably time to order a new valve. The whole valve can be replaced using a simple tool that comes with the replacement valve.
If the board is losing air and there is no problem with any of the valves, there is probably a small puncture. Small punctures can be repaired easily and permanently. Spray around the board until air bubbles become visible and mark the position of the leak. If you do not find air bubbles, inflate the board to maximum air pressure and try to listen to find the leak. If you can narrow the area down, return with a spray bottle to identify the source of the leak.
Punctures of less than 1/8ʺ in size can be repaired simply without a patch. Deflate your board, then clean and dry the area to be repaired. Apply a small drop of glue to cover the puncture and let it dry for 12 hours.
SMALL REPAIRS
Your board comes with a repair kit as a standard accessory. If you no longer have your repair kit, you can order a new one from your dealer. Cut a piece of repair material large enough to overlap the damaged area by approximately 1.5 cm (1/2”). Make the edges round. Apply glue to the underside of the patch and around the area to be repaired. Too much glue will interfere with a proper repair. Allow adhesive to become tacky by letting it dry for 2-4 minutes and then carefully apply the patch to the repair area with a very firm pressure, starting at one corner and working outwards. Rub the entire patch area and the edges of the patch. Allow the patch to dry for at least 12 hours before inflating the board.
SAFETY PRECAUTIONS
The instructions below are necessary for the safe operation of the board, including the warning labels. Never leave your children unsupervised in the vicinity of the board. Always be mindful of people and objects nearby when you are paddling.
1. For correct use of the ISUP and accessories, please refer to information on pages 4-17 of this manual. Failure to follow the warning notices and instructions may result in property damage, serious injury or death.
2. Do not take sharp items with you when you go paddling. Avoid all contact between the ISUP and any sharp objects.
25
3. Avoid sandbanks, coral reefs and rocks. Navigate near the shore or beach and the designated boating area.
4. Always wear a personal flotation device (PFD). There should be one personal flotation device (i.e. life jacket) per person.
5. Avoid improper towing or being towed.
6. Do not use your board if you suspect a puncture or a leak. Read the Repair Section in this manual. In case one of the air chambers fails during navigation, keep calm and paddle back to the shore using the buoyancy of the remaining air chamber.
7. Check the working condition of the ISUP and other equipment every time before you use it:
Check inflation pressure.
Inspect the valve caps.
Check if the load is evenly distributed over the entire surface area of the paddleboard.
8. Do not use the craft in a wind with the force of 4 and higher and waves over 0.3 m.
9. Check local weather forecast and be aware of local currents and wind conditions. Remember that weather conditions can rapidly deteriorate. Always be sure that you can reach a shelter rapidly. Children cannot use the board without adult supervision.
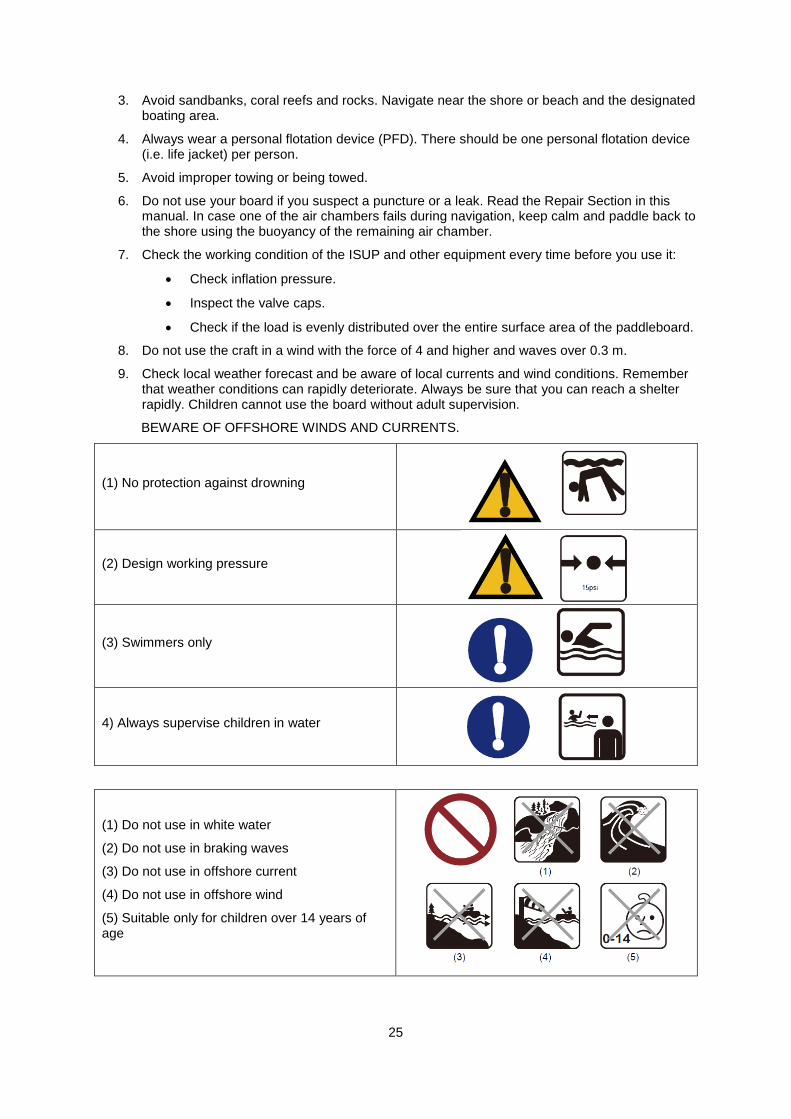
BEWARE OF OFFSHORE WINDS AND CURRENTS.
(1) No protection against drowning
(2) Design working pressure
(3) Swimmers only
4) Always supervise children in water
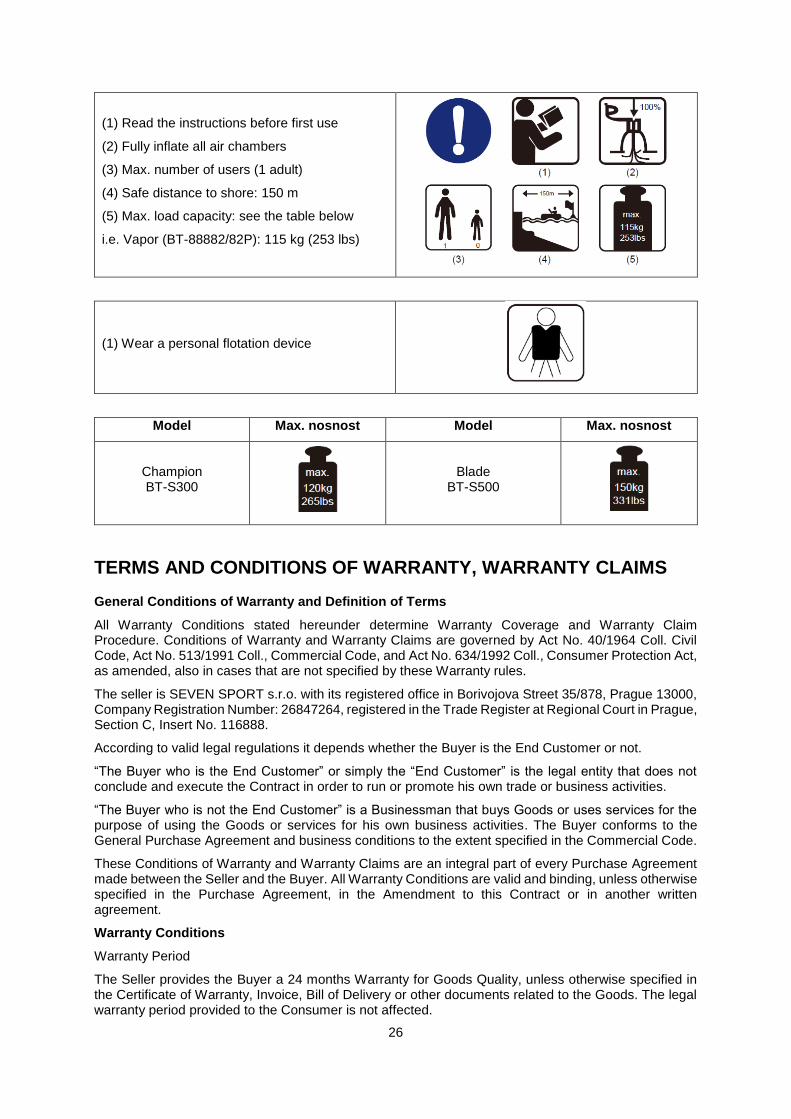
(1) Do not use in white water
(2) Do not use in braking waves
(3) Do not use in offshore current
(4) Do not use in offshore wind
(5) Suitable only for children over 14 years of age
26
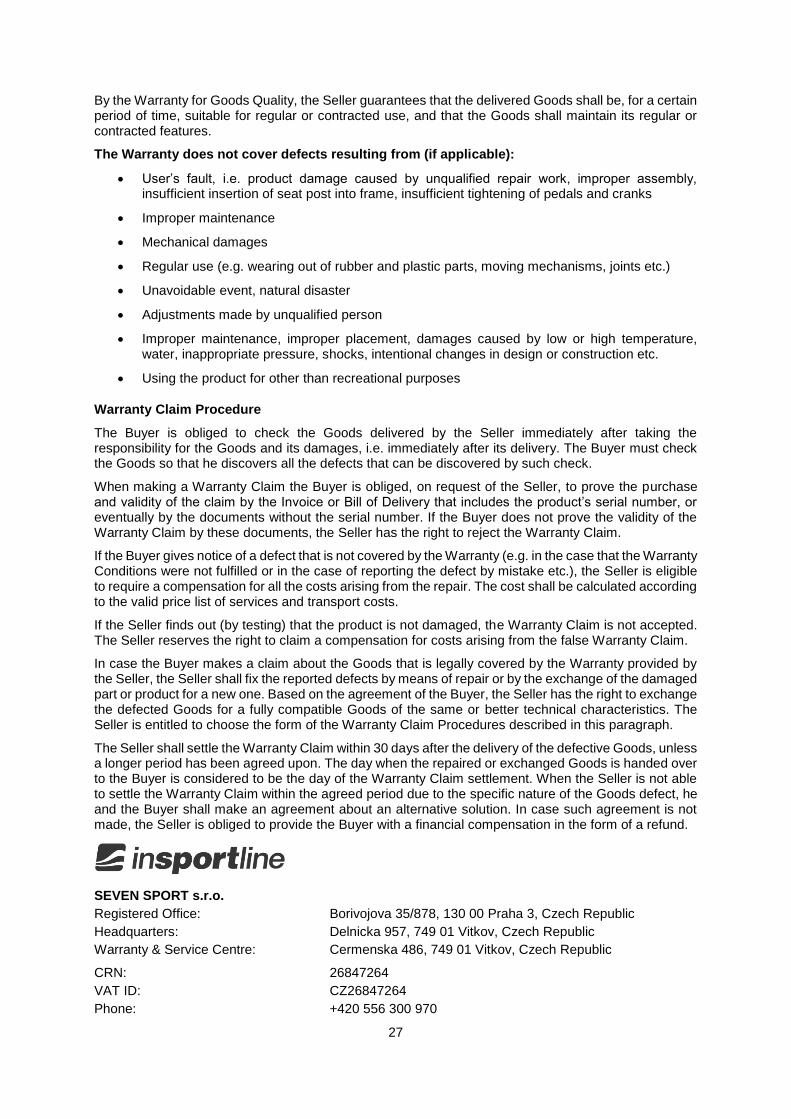
(1) Read the instructions before first use
(2) Fully inflate all air chambers
(3) Max. number of users (1 adult)
(4) Safe distance to shore: 150 m
(5) Max. load capacity: see the table below
i.e. Vapor (BT-88882/82P): 115 kg (253 lbs)
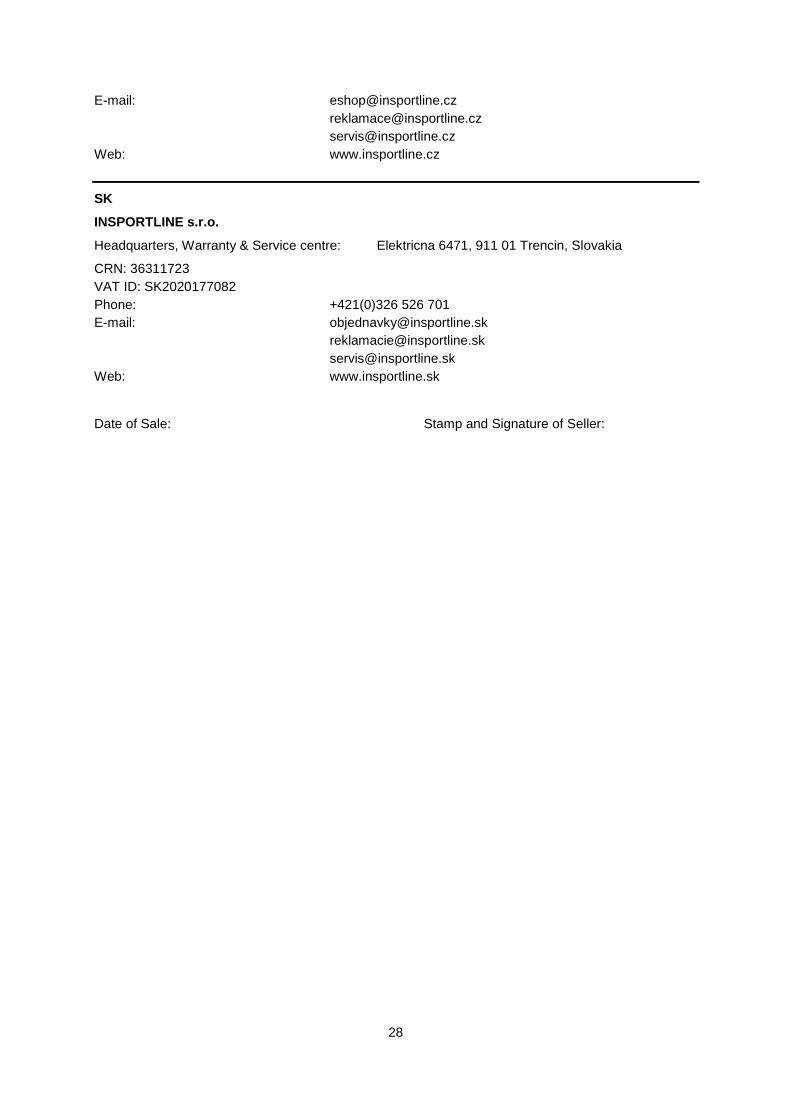
(1) Wear a personal flotation device
Model Max. nosnost Model Max. nosnost
Champion BT-S300
Blade BT-S500
TERMS AND CONDITIONS OF WARRANTY, WARRANTY CLAIMS
General Conditions of Warranty and Definition of Terms
All Warranty Conditions stated hereunder determine Warranty Coverage and Warranty Claim Procedure. Conditions of Warranty and Warranty Claims are governed by Act No. 40/1964 Coll. Civil Code, Act No. 513/1991 Coll., Commercial Code, and Act No. 634/1992 Coll., Consumer Protection Act, as amended, also in cases that are not specified by these Warranty rules.
The seller is SEVEN SPORT s.r.o. with its registered office in Borivojova Street 35/878, Prague 13000, Company Registration Number: 26847264, registered in the Trade Register at Regional Court in Prague, Section C, Insert No. 116888.
According to valid legal regulations it depends whether the Buyer is the End Customer or not.
“The Buyer who is the End Customer” or simply the “End Customer” is the legal entity that does not conclude and execute the Contract in order to run or promote his own trade or business activities.
“The Buyer who is not the End Customer” is a Businessman that buys Goods or uses services for the purpose of using the Goods or services for his own business activities. The Buyer conforms to the General Purchase Agreement and business conditions to the extent specified in the Commercial Code.
These Conditions of Warranty and Warranty Claims are an integral part of every Purchase Agreement made between the Seller and the Buyer. All Warranty Conditions are valid and binding, unless otherwise specified in the Purchase Agreement, in the Amendment to this Contract or in another written agreement.
Warranty Conditions
Warranty Period
The Seller provides the Buyer a 24 months Warranty for Goods Quality, unless otherwise specified in the Certificate of Warranty, Invoice, Bill of Delivery or other documents related to the Goods. The legal warranty period provided to the Consumer is not affected.
27
By the Warranty for Goods Quality, the Seller guarantees that the delivered Goods shall be, for a certain period of time, suitable for regular or contracted use, and that the Goods shall maintain its regular or contracted features.
The Warranty does not cover defects resulting from (if applicable):
User’s fault, i.e. product damage caused by unqualified repair work, improper assembly, insufficient insertion of seat post into frame, insufficient tightening of pedals and cranks
Improper maintenance
Mechanical damages
Regular use (e.g. wearing out of rubber and plastic parts, moving mechanisms, joints etc.)
Unavoidable event, natural disaster
Adjustments made by unqualified person
Improper maintenance, improper placement, damages caused by low or high temperature, water, inappropriate pressure, shocks, intentional changes in design or construction etc.
Using the product for other than recreational purposes
Warranty Claim Procedure
The Buyer is obliged to check the Goods delivered by the Seller immediately after taking the responsibility for the Goods and its damages, i.e. immediately after its delivery. The Buyer must check the Goods so that he discovers all the defects that can be discovered by such check.
When making a Warranty Claim the Buyer is obliged, on request of the Seller, to prove the purchase and validity of the claim by the Invoice or Bill of Delivery that includes the product’s serial number, or eventually by the documents without the serial number. If the Buyer does not prove the validity of the Warranty Claim by these documents, the Seller has the right to reject the Warranty Claim.
If the Buyer gives notice of a defect that is not covered by the Warranty (e.g. in the case that the Warranty Conditions were not fulfilled or in the case of reporting the defect by mistake etc.), the Seller is eligible to require a compensation for all the costs arising from the repair. The cost shall be calculated according to the valid price list of services and transport costs.
If the Seller finds out (by testing) that the product is not damaged, the Warranty Claim is not accepted. The Seller reserves the right to claim a compensation for costs arising from the false Warranty Claim.
In case the Buyer makes a claim about the Goods that is legally covered by the Warranty provided by the Seller, the Seller shall fix the reported defects by means of repair or by the exchange of the damaged part or product for a new one. Based on the agreement of the Buyer, the Seller has the right to exchange the defected Goods for a fully compatible Goods of the same or better technical characteristics. The Seller is entitled to choose the form of the Warranty Claim Procedures described in this paragraph.
The Seller shall settle the Warranty Claim within 30 days after the delivery of the defective Goods, unless a longer period has been agreed upon. The day when the repaired or exchanged Goods is handed over to the Buyer is considered to be the day of the Warranty Claim settlement. When the Seller is not able to settle the Warranty Claim within the agreed period due to the specific nature of the Goods defect, he and the Buyer shall make an agreement about an alternative solution. In case such agreement is not made, the Seller is obliged to provide the Buyer with a financial compensation in the form of a refund.
SEVEN SPORT s.r.o.
Registered Office: Borivojova 35/878, 130 00 Praha 3, Czech Republic
Headquarters: Delnicka 957, 749 01 Vitkov, Czech Republic
Warranty & Service Centre: Cermenska 486, 749 01 Vitkov, Czech Republic
CRN: 26847264
VAT ID: CZ26847264
Phone: +420 556 300 970
28
E-mail: [email protected]
Web: www.insportline.cz
SK
INSPORTLINE s.r.o.
Headquarters, Warranty & Service centre: Elektricna 6471, 911 01 Trencin, Slovakia
CRN: 36311723
VAT ID: SK2020177082
Phone: +421(0)326 526 701
E-mail: [email protected]
Web: www.insportline.sk
Date of Sale: Stamp and Signature of Seller: