Embed Size (px)
Citation preview

User Manual - Finance
Event planning software
Version 2.00
Ljubljana, 04.08.2017
Wise Technologies Ltd.
Event planner software – User manual
Page 1 of 21
Introduction – system overview .............................................................................................................. 2
Logging into the system .......................................................................................................................... 2
Navigating through the application ......................................................................................................... 4
General navigation .............................................................................................................................. 4
Legend ................................................................................................................................................. 5
Tables .................................................................................................................................................. 6
Types of Users ......................................................................................................................................... 8
Staff ..................................................................................................................................................... 9
Administrator .................................................................................................................................. 9
Scientific Committee ....................................................................................................................... 9
Finance ............................................................................................................................................ 9
Event Planners ................................................................................................................................. 9
Clients ................................................................................................................................................ 10
Participants ........................................................................................................................................ 10
Event Life cycle ...................................................................................................................................... 11
Stage New (Code 0, Color: ) ........................................................................................................ 13
Stage Requested (Code 1 Color: ) ............................................................................................... 13
Stage Initialized (Code 2, Color: ) ............................................................................................... 14
Stage Documents Submitted (Code 3, Color: ) ........................................................................... 14
Stage Documents in Review (Code 4, Color: ) ............................................................................ 15
Stage Accepted (Code 5, Color: ) ................................................................................................ 15
Stage Accepted in review (Code 6, Color: ) ................................................................................ 16
Stage Confirmed (Code 7, Color: ) .............................................................................................. 16
Stage Pending (Code 8, Color: ) .................................................................................................. 16
Stage Rejected (Code 9, Color: ) .................................................................................................. 17
Stage Canceled (Code 10, Color: ) ............................................................................................... 17
User Manual for Finance Users ............................................................................................................. 18

Event planner software – User manual
Page 2 of 21
Introduction – system overview
Event planning software system was made in order to make the whole Event planning process easier
for all the involved users: Event hosts, organizers and participants. Application is available through
the web server, allowing users to login remotely, yet – all the data is secured and system
components available only for the authorized personnel.
The whole process is streamlined and customized according to Event host decision flow, providing
clear information on Event lists, statuses and Client/Participant involvement.
The system consists of three main parts:
• Event host administration and approval system
• Client (event organizer) user interface
• Participant’s user interface
All the components are interconnected through the common database, which provides accurate
status of all the current Events and archived history of previous events.
Logging into the system
The system is accessed through the Event host web pages as single web link, providing login screen
(figure 1) common for all system users – having a unique login name and password.
For new users, there are two possibilities to sign in. First is dedicated for new Event organizers and is in form of a link Venue Booking. The link opens a new screen containing a sign in form shown on figure 2, where new users can enter their data. Organizer of the Event will be referenced as the Client throughout this document. Second link Register for Event, is for new Participants. The link opens sign in form shown on figure 3.

Event planner software – User manual
Page 3 of 21
Figure 1: Login screen
Figure 2: Sign in form for Client (Event organizer) Figure 3: Sign in form for Participants
Event planner software – User manual
Page 4 of 21
Navigating through the application
After logging into the system, user is prompted to the main screen. Main screens vary, depending on
which type of user is logged in and what role it has. This chapter will cover basic navigation, that is
common to all users. For detailed navigation instructions please refer to user specific manuals.
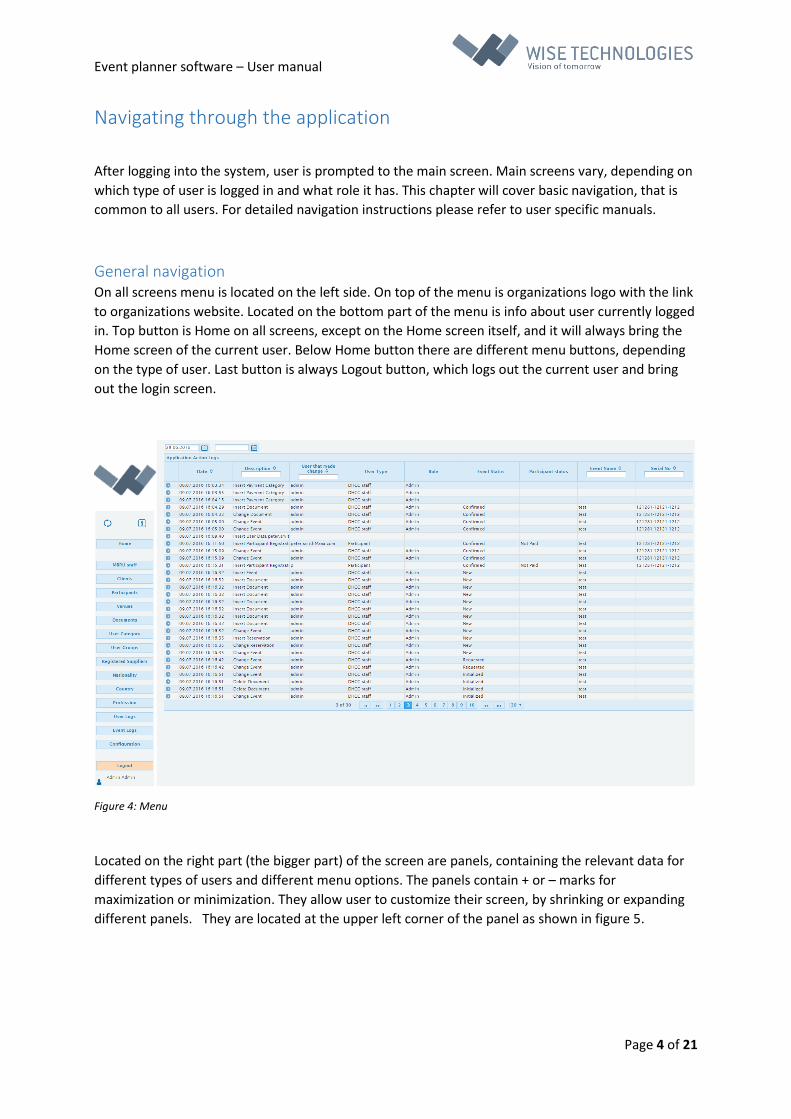
General navigation On all screens menu is located on the left side. On top of the menu is organizations logo with the link
to organizations website. Located on the bottom part of the menu is info about user currently logged
in. Top button is Home on all screens, except on the Home screen itself, and it will always bring the
Home screen of the current user. Below Home button there are different menu buttons, depending
on the type of user. Last button is always Logout button, which logs out the current user and bring
out the login screen.
Figure 4: Menu
Located on the right part (the bigger part) of the screen are panels, containing the relevant data for
different types of users and different menu options. The panels contain + or – marks for
maximization or minimization. They allow user to customize their screen, by shrinking or expanding
different panels. They are located at the upper left corner of the panel as shown in figure 5.

Event planner software – User manual
Page 5 of 21
Figure 5: Panels
Legend There are different types of navigation options used in different segments of the application. Her we
will list them and explain the actions they perform.
• Refresh the current screen (keyboard: F5)
• Opens the User Manual document
• * Marks the required input fields of different forms
• Adding new item to table
• Deleting all items of the current table
• Editing of the selected item in the table
• Deleting the selected item in the table
• Exports all the Data of the current table to Excel spreadsheet
• Exports the displayed Data of the current table to Excel spreadsheet (after filtering)
• Saves data from form to database
• Minimizes the expanded panel
• Expands the panel
• Shows additional information on the row
• Displays participants attending the event
• and Change month on a calendar view (keyboard: LEFT and RIGHT)
• and Change week on a calendar view (keyboard: UP and DOWN)
Event planner software – User manual
Page 6 of 21
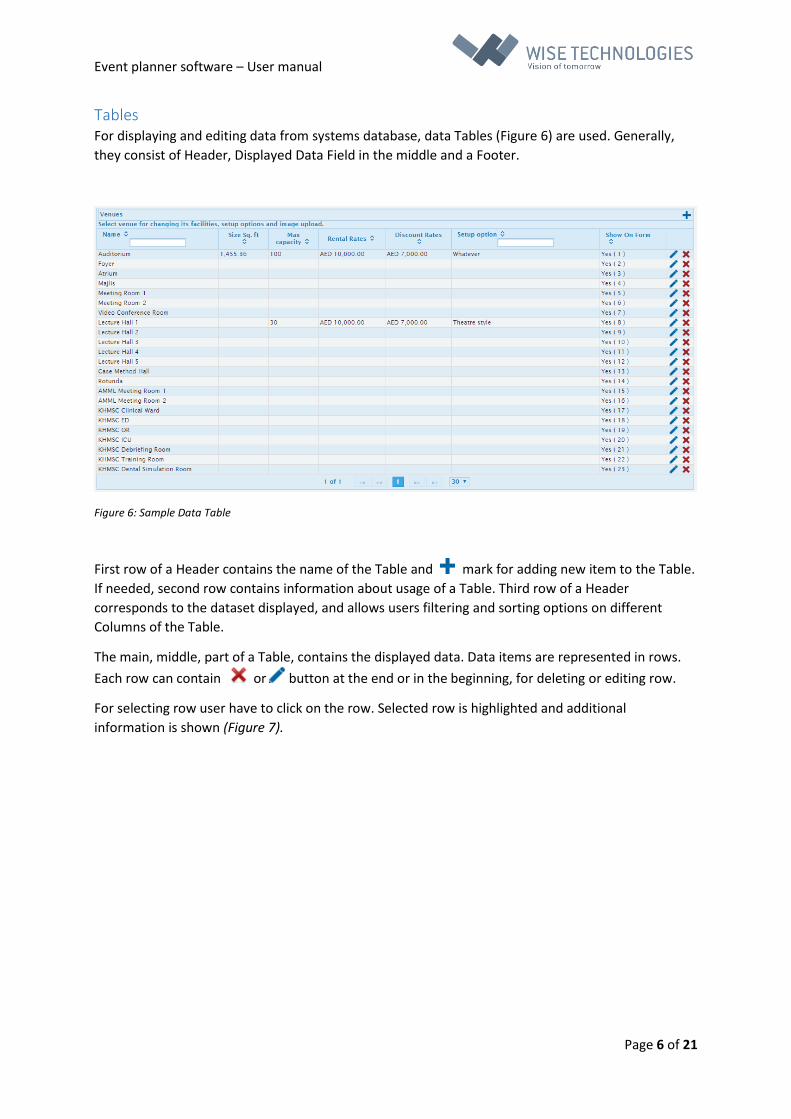
Tables For displaying and editing data from systems database, data Tables (Figure 6) are used. Generally,
they consist of Header, Displayed Data Field in the middle and a Footer.
Figure 6: Sample Data Table
First row of a Header contains the name of the Table and mark for adding new item to the Table.
If needed, second row contains information about usage of a Table. Third row of a Header
corresponds to the dataset displayed, and allows users filtering and sorting options on different
Columns of the Table.
The main, middle, part of a Table, contains the displayed data. Data items are represented in rows.
Each row can contain or button at the end or in the beginning, for deleting or editing row.
For selecting row user have to click on the row. Selected row is highlighted and additional
information is shown (Figure 7).

Event planner software – User manual
Page 7 of 21
Figure 7: Selected row
The footer of the Table contains some navigation and display options. It also shows the current
position in the dataset. The number of items per page is predefined to 30 and is also adjustable from
the Tables Footer.
Some Tables have option to expand row. For example: Client Table (Figure 8) has options to review
all Clients’ events by expanding row.
Figure 8: Clients table: two rows extended

Event planner software – User manual
Page 8 of 21
Some Tables have export to excel option. As figures 9 and 10 shows, by clicking on marked icon, the
Excel document (.xls) is created and downloaded to local hard drive. The document can be further
edited by user on a local machine.
Figure 9: Clients table: two export icons
Figure 10: Exported Excel document
Types of Users
The application is designed to be used by different types of users. Each of these types have different
roles and authorities in the system. This chapter will explain each of those user types in detail.
There are three main user types:
Staff (users employed by the organization, we will further divide this group, based on the
user’s role)
• Clients (users that are organizing the events)
• Participants (users who are attending events)

Event planner software – User manual
Page 9 of 21
Staff
As mentioned, first group of users are those employed by the organization. Based on their roles and
authorities we will further divide this group into four subgroups. These are: Administrator, Scientific
Committee, Finance and Event Planers.
Administrator
Administrator role group has all the privileges in the system. They also have the authorities as any of
the other group, so they can take same actions as Scientific Committee or Finance or any other user
group for that matter. Additionally, they are responsible for the administration registers and code
lists. We will cover this more in detail in the Administrator User Manual chapter.
Scientific Committee
The role of the scientific committee is to decide if the Event is scientifically relevant to the
institutions context. They make their decision based on the documentation supplied by the Clients
(organizers of the Event). Their decision can go three ways: Approved, Disapproved or Pending.
Scientific committee has possibility to send mail with automatically attached documents supplied by
the Client.
Finance
The role of this group is to create invoice for Event and to confirm Event once it is paid by the Client.
During process of invoice creation, they should add invoice number and validate pricing and
discounts as well as additional costs. After receiving payment from the Client they have to confirm
the Event. Finance role allows user to reject Event if they found out that payment is not completed.
Event Planners
Users from this group have a role to communicate with Clients and Participants, and supply relevant
information to others decision makers i.e. Scientific committee and Finance. Their role consists of
various actions:
• reviewing the documentation provided by Clients
• making reservations for venues based on Clients wishes or confirm reservations made by
Clients
• setting the discount amount or confirm those set by the system, based on the type of Client
(Business Partner, Government etc.)
• confirm certain stages of Event

Event planner software – User manual
Page 10 of 21
• …
They are further divided in groups by Administrator, giving them jurisdiction on group specific set of
venues. Every Event Planner assigned to group can book only venues of that group.
Clients
Clients are group of users who organize different Events. They are responsible for the initiation of
each Event. They suggest new Event to Event Planners, providing name and short description of the
Event. As well as the contact person and company details. They can make reservation for the desired
venues on desired dates, if those are still available. They are also obliged to provide documentation,
depending on their category, about Event, for Scientific Committee to review. They provide some
specific details, like information about purpose of Event, estimated number of participants, desired
venue set up, requirements for dental simulation room, AV, CME application, Tele Conf and catering
wishes. If Event is exhibition they have to upload exhibition floor plan and list of contractors and
suppliers. Last, but not lest they are responsible for covering all the costs prior to Event dates.
Participants
Participants are the attendants of the Events. Not all Events are opened for participants, moreover
by default, the Event is not opened for Participants, and Event Planner has to open it. They provide
the basic user information. They choose which Events to attend and they are obliged to make the
payment prior to Event, if Event is payable.
Event planner software – User manual
Page 11 of 21
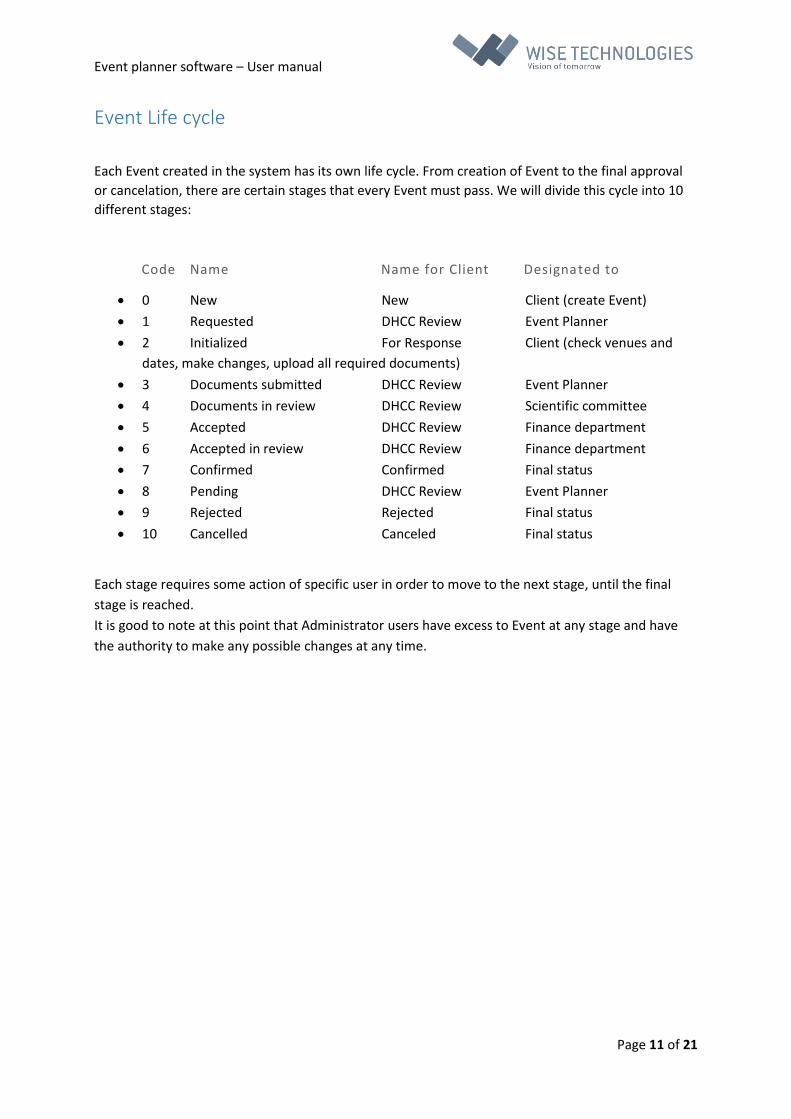
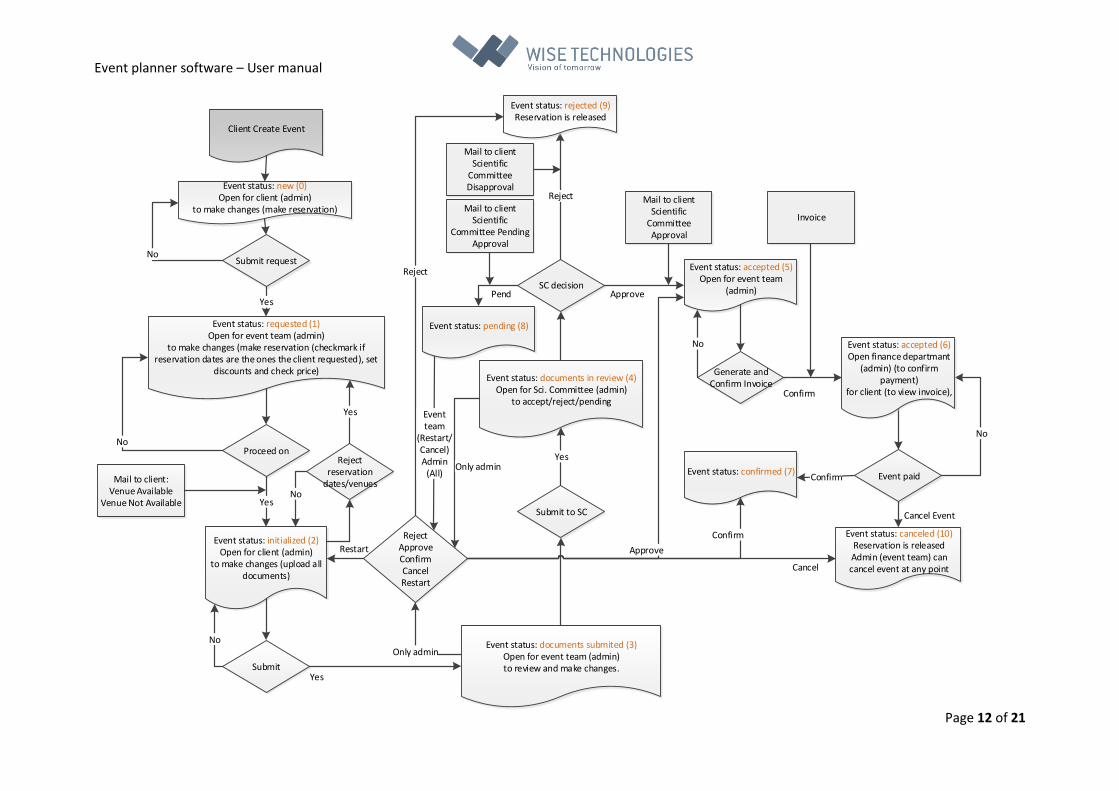
Event Life cycle
Each Event created in the system has its own life cycle. From creation of Event to the final approval
or cancelation, there are certain stages that every Event must pass. We will divide this cycle into 10
different stages:
Code Name Name for Client Designated to
• 0 New New Client (create Event)
• 1 Requested DHCC Review Event Planner
• 2 Initialized For Response Client (check venues and
dates, make changes, upload all required documents)
• 3 Documents submitted DHCC Review Event Planner
• 4 Documents in review DHCC Review Scientific committee
• 5 Accepted DHCC Review Finance department
• 6 Accepted in review DHCC Review Finance department
• 7 Confirmed Confirmed Final status
• 8 Pending DHCC Review Event Planner
• 9 Rejected Rejected Final status
• 10 Cancelled Canceled Final status
Each stage requires some action of specific user in order to move to the next stage, until the final
stage is reached.
It is good to note at this point that Administrator users have excess to Event at any stage and have
the authority to make any possible changes at any time.
Event planner software – User manual
Page 12 of 21
Submit request
Event status: requested (1)Open for event team (admin)
to make changes (make reservation (checkmark if reservation dates are the ones the client requested), set
discounts and check price)
Yes
Proceed on
Submit
Event status: initialized (2)Open for client (admin)
to make changes (upload all documents)
YesSubmit to SC
No Event status: documents submited (3)Open for event team (admin)to review and make changes.
Yes
Event status: documents in review (4)Open for Sci. Committee (admin)
to accept/reject/pending
Yes
SC decision
Event status: pending (8)
Pend
Mail to clientScientific
Committee Pending Approval
Mail to clientScientific
Committee Approval
Invoice
Event status: accepted (5)Open for event team
(admin)Approve
No
Event paid
No
Event status: confirmed (7)Confirm
RejectApproveConfirmCancelRestart
Mail to client:Venue Available
Venue Not Available
Reject
Client Create Event
Event status: canceled (10)Reservation is releasedAdmin (event team) can cancel event at any pointCancel
Confirm
Mail to clientScientific
Committee Disapproval
Event status: rejected (9)Reservation is released
Reject
Approve
Only admin
Restart
Only admin
Generate andConfirm Invoice
Event status: accepted (6)Open finance departmant
(admin) (to confirm payment)
for client (to view invoice), Confirm
Reject reservation
dates/venues
Yes
No
Event team
(Restart/Cancel)Admin
(All)
Cancel Event
No
Event status: new (0)Open for client (admin)
to make changes (make reservation)
No
Event planner software – User manual
Page 13 of 21
Stage New (Code 0, Color: )
Stage New is the first stage in the Events life cycle. It is designated to Client users who want to
organize new Event. Client has to provide: name of the Event, description, dates of the Event i.e.
start date and time and end date and time, expected number of attendees as well as purpose of
Event. Information about organizer i.e. name of Event organizer, contact person, telephone number,
email address, are automatically prefilled with data from Client account. Client has possibility to
change them. Client also has possibility to make reservation for desired venue or multiple venues on
desired date or dates. If venue is not available on the selected date, reservation cannot be made.
Once Event is submitted it goes to next stage, in status requested. Client can only review event in
that status and cannot make any changes.
Stage Requested (Code 1 Color: )
This stage of Event is designated to the Event Planner to review Client’s request. Before initializing
reservation, it is required from user to check venues and dates, user category, tariff type, prices and
discounts. If needed Event Planner can set additional costs and add new documents or delete
existing. Event Planner can also assign serial number to event. Event Planner should review due dates
for Client to respond as well as due date for Client to upload all documents. Events, when these dates
are not met, will be displayed on list of Events with issue. Issue list contains Events that:
• Should be already confirmed. (Start date of event is less then X days (parameter is set by
Administrator in configuration page) from current date.
• Date for submitting documents is passed. (Date is set on event)
• Due date for response is passed. (Date is set on event)
• Event has pending status.
• Invoice due date is passed. (Date is set on event when invoice is created)
• Client is not satisfied with booking. (Client rejects venue booking)
Event can be canceled at this stage if it does not meet Organization standards. Event can be canceled
by Administrator at any stage. Event can be also restarted by Administrator.
After proceeding on next status the mail is automatically sent to the Client informing him about
Event progress and venue availability. If Event Planner cannot confirm requests dates or venues they
should state that on the form, by setting no next to the question ‘Are requested dates/venues equal
to selected dates’ and mail about ‘Venue not available’ are automatically sent to the Client.
Otherwise, mail ‘Venue available’ is send to the Client.
Event Planner has possibility, at any stage, to send mails to Client through application. Predefined
templates for mails are:
• Venue Available
• Venue Not Available
• Scientific Committee Approval
• Scientific Committee Disapproval
• Scientific Committee Pending Approval
• Reminder
Event planner software – User manual
Page 14 of 21
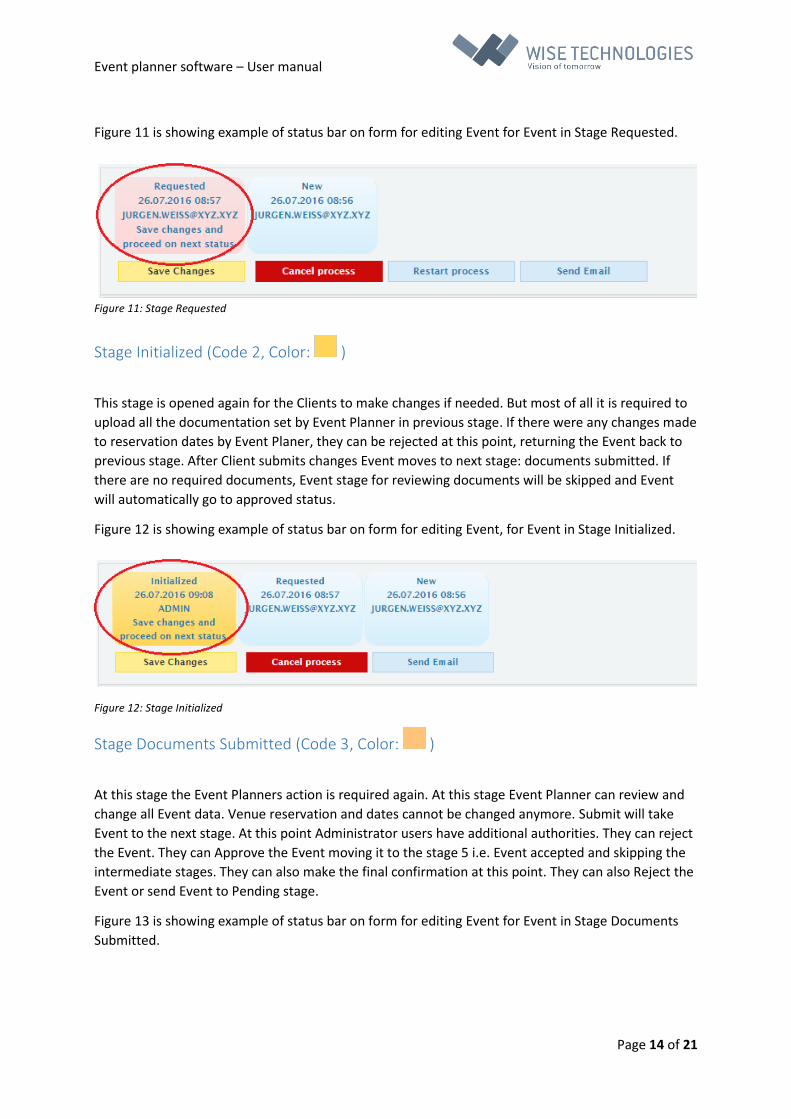
Figure 11 is showing example of status bar on form for editing Event for Event in Stage Requested.
Figure 11: Stage Requested
Stage Initialized (Code 2, Color: )
This stage is opened again for the Clients to make changes if needed. But most of all it is required to
upload all the documentation set by Event Planner in previous stage. If there were any changes made
to reservation dates by Event Planer, they can be rejected at this point, returning the Event back to
previous stage. After Client submits changes Event moves to next stage: documents submitted. If
there are no required documents, Event stage for reviewing documents will be skipped and Event
will automatically go to approved status.
Figure 12 is showing example of status bar on form for editing Event, for Event in Stage Initialized.
Figure 12: Stage Initialized
Stage Documents Submitted (Code 3, Color: )
At this stage the Event Planners action is required again. At this stage Event Planner can review and
change all Event data. Venue reservation and dates cannot be changed anymore. Submit will take
Event to the next stage. At this point Administrator users have additional authorities. They can reject
the Event. They can Approve the Event moving it to the stage 5 i.e. Event accepted and skipping the
intermediate stages. They can also make the final confirmation at this point. They can also Reject the
Event or send Event to Pending stage.
Figure 13 is showing example of status bar on form for editing Event for Event in Stage Documents
Submitted.

Event planner software – User manual
Page 15 of 21
Figure 13: Stage Documents submitted
Stage Documents in Review (Code 4, Color: )
This stage is meant for user with Scientific Committee role. Since it is necessary for all members of
Scientific Committee to review all the documents provided by the Client, user with Scientific
Committee role has possibility to send mail with all Client documents attached. Decision can go three
ways at this point. Event can be either Approved, or Rejected or Pended. In any case the mail is sent
automatically to the Client with appropriate information. Administrator, at this point, has all the
authorities as in the previous stage. When Event is rejected or pended it is required to specify
reason.
Figure 14 is showing example of status bar on form for editing Event for Event in Stage Documents in
Review.
Figure 14: Stage Documents in Review
Stage Accepted (Code 5, Color: )
At this stage Event is open for the Finance department. Invoice should be generated and submitted
at this stage. Finance department should provide invoice number and invoice due date. After
confirmation Event moves to the next stage.
Figure 15 is showing example of status bar on form for editing Event for Event in Stage Accepted.
Figure 15: Stage Accepted
Event planner software – User manual
Page 16 of 21
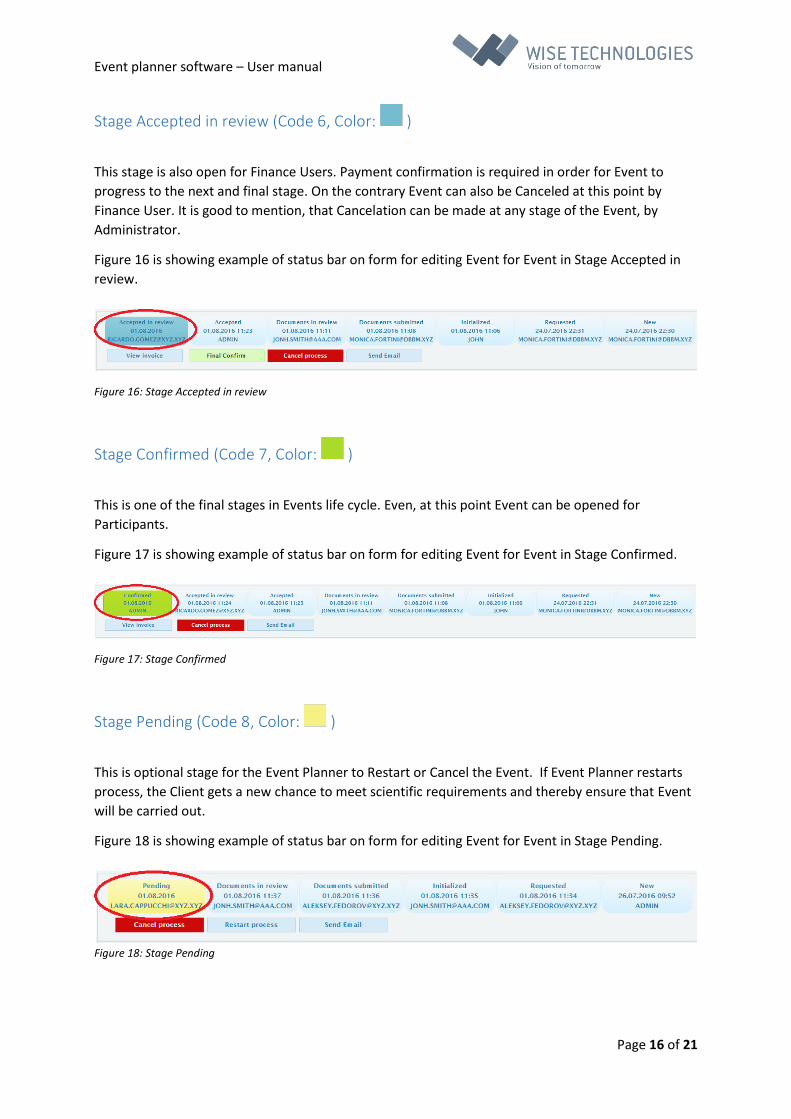
Stage Accepted in review (Code 6, Color: )
This stage is also open for Finance Users. Payment confirmation is required in order for Event to
progress to the next and final stage. On the contrary Event can also be Canceled at this point by
Finance User. It is good to mention, that Cancelation can be made at any stage of the Event, by
Administrator.
Figure 16 is showing example of status bar on form for editing Event for Event in Stage Accepted in
review.
Figure 16: Stage Accepted in review
Stage Confirmed (Code 7, Color: )
This is one of the final stages in Events life cycle. Even, at this point Event can be opened for
Participants.
Figure 17 is showing example of status bar on form for editing Event for Event in Stage Confirmed.
Figure 17: Stage Confirmed
Stage Pending (Code 8, Color: )
This is optional stage for the Event Planner to Restart or Cancel the Event. If Event Planner restarts
process, the Client gets a new chance to meet scientific requirements and thereby ensure that Event
will be carried out.
Figure 18 is showing example of status bar on form for editing Event for Event in Stage Pending.
Figure 18: Stage Pending
Event planner software – User manual
Page 17 of 21
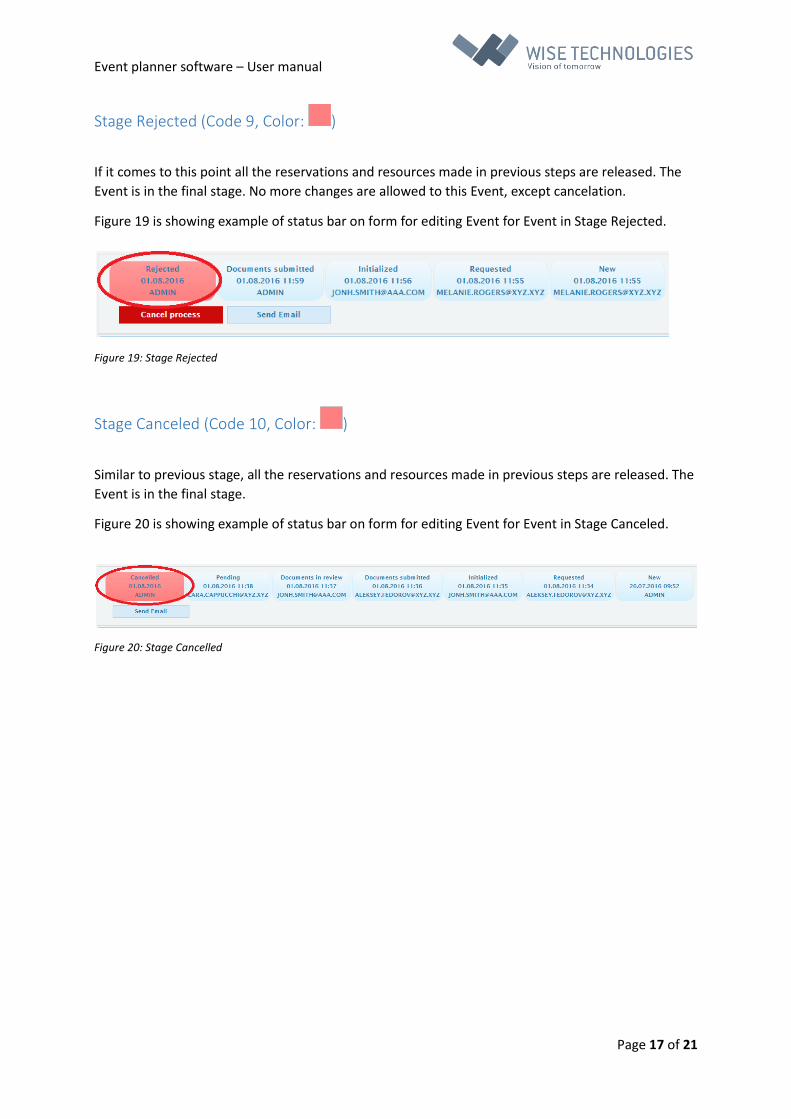
Stage Rejected (Code 9, Color: )
If it comes to this point all the reservations and resources made in previous steps are released. The
Event is in the final stage. No more changes are allowed to this Event, except cancelation.
Figure 19 is showing example of status bar on form for editing Event for Event in Stage Rejected.
Figure 19: Stage Rejected
Stage Canceled (Code 10, Color: )
Similar to previous stage, all the reservations and resources made in previous steps are released. The
Event is in the final stage.
Figure 20 is showing example of status bar on form for editing Event for Event in Stage Canceled.
Figure 20: Stage Cancelled

Event planner software – User manual
Page 18 of 21
User Manual for Finance Users
After logging in as a Finance user the following screen appears (Figure 21). On the right side there are
two tables with all Events that need Finance response. First table lists Events that need invoice
creation and the second one, Events that are waiting for confirmation.
Figure 21: Finance home screen
After clicking on Event in the first table the screen is updated as follows (Figure 22):
Figure 22: Create Invoice
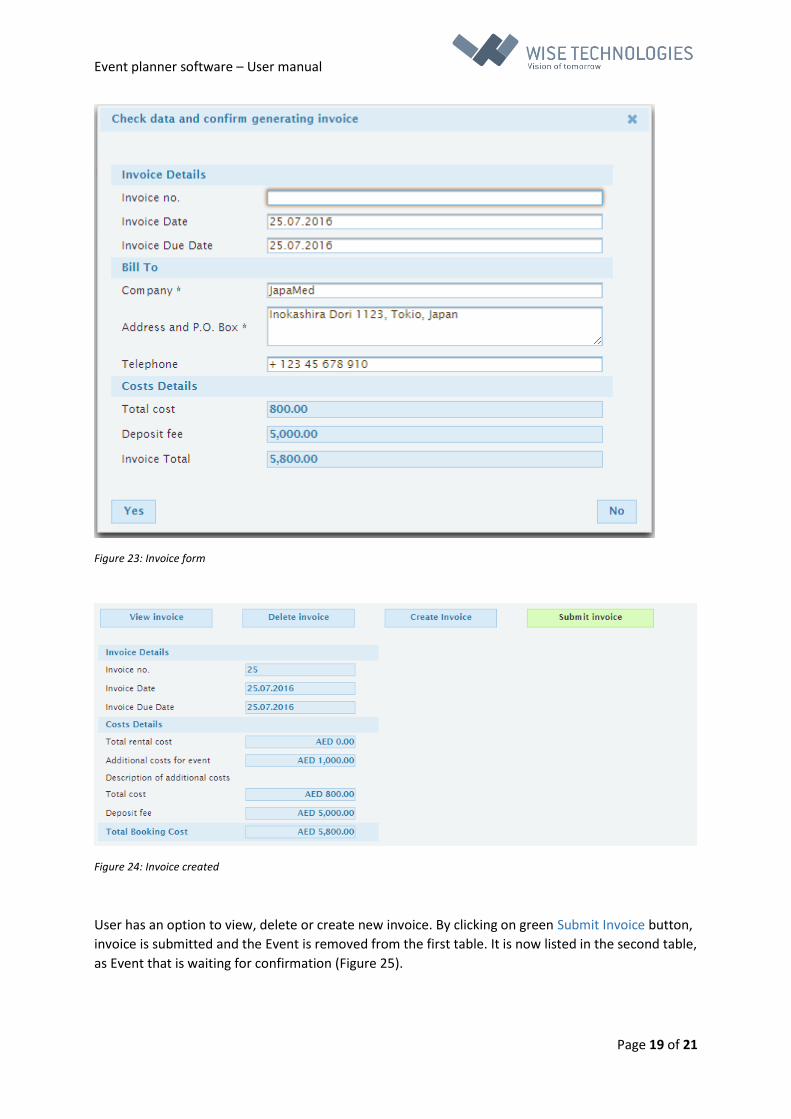
Here Finance user can create invoice by clicking on a Create Invoice button. Figure 23 shows the form
that appears. Invoice number needs to be added. The rest of data can also be modified, except the
Cost Details. After clicking Yes button invoice is created and new buttons appear on the screen, as
shown in figure 24.
Event planner software – User manual
Page 19 of 21
Figure 23: Invoice form
Figure 24: Invoice created
User has an option to view, delete or create new invoice. By clicking on green Submit Invoice button,
invoice is submitted and the Event is removed from the first table. It is now listed in the second table,
as Event that is waiting for confirmation (Figure 25).

Event planner software – User manual
Page 20 of 21
Figure 25: Event waiting for confirmation
At this point only Client’s payment is separating Event from final confirmation (Figure 26).
Figure 26: Event waiting for confirmation – Administrator screen