Embed Size (px)
Citation preview
User Manual for e-TDS Module
D e p t . o f V a l u e A d d e d T a x
U . T o f D a d r a & N a g a r H a v e l i
Summary
This document is a step by step user guide for the
registered TDS Authorities at UT of Dadra & Nagar Haveli
to use the e-TDS module of the VATSoft application.
Using this module, the TDS Authorities can make TDS
entries, take printouts of TDS Certificate (DVAT 45A) and
Annual Return of Tax Deducted (DVAT 45D).
Dept. of Value Added Tax [USER MANUAL FOR E-TDS MODULE]
Dept. of Value Added Tax 1
Contents
1. Logging into e-TDS module for the first time .................................................................................. 2
2. Making a new TDS Entry ................................................................................................................. 5
2.1 Entry of Bill Details .................................................................................................................. 7
2.2 Entry of Remittance Details .................................................................................................. 10
3. Generation of TDS Certificate ....................................................................................................... 14
4. Annual Return of Tax Deducted (DVAT 45D) ................................................................................ 16
5. Change of Password ...................................................................................................................... 18
Dept. of Value Added Tax [USER MANUAL FOR E-TDS MODULE]
Dept. of Value Added Tax 2
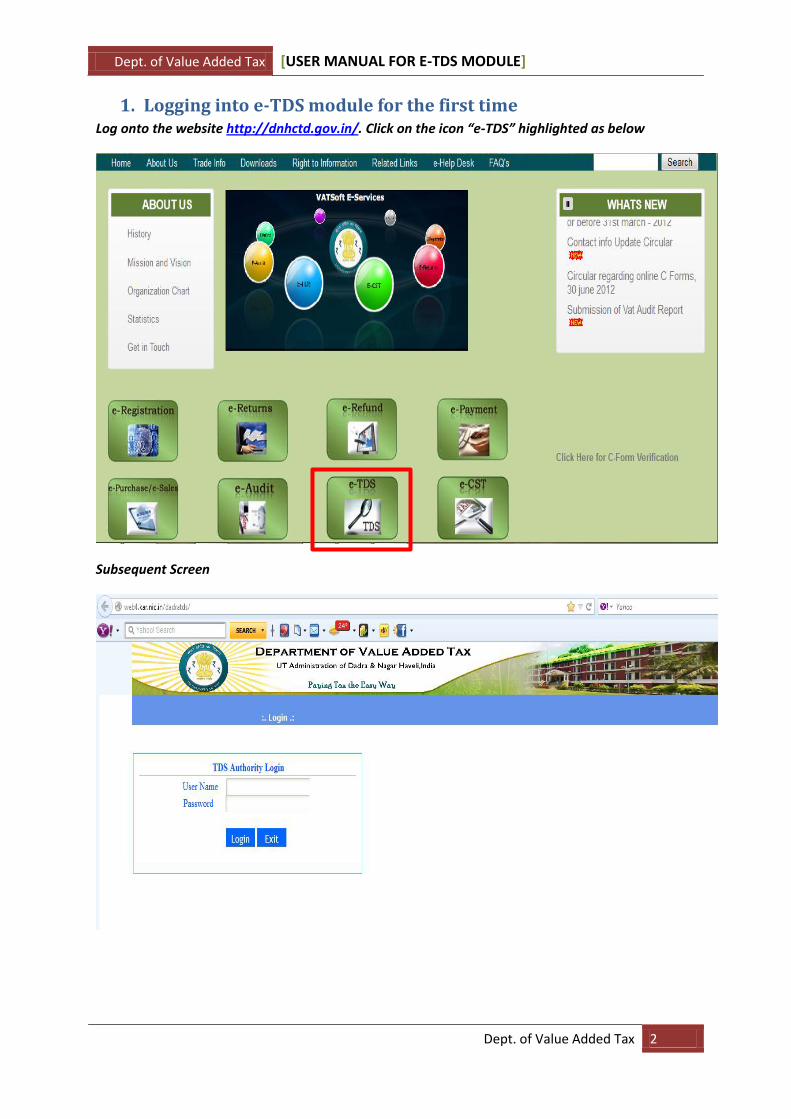
1. Logging into e-TDS module for the first time Log onto the website http://dnhctd.gov.in/. Click on the icon “e-TDS” highlighted as below
Subsequent Screen
Dept. of Value Added Tax [USER MANUAL FOR E-TDS MODULE]
Dept. of Value Added Tax 3
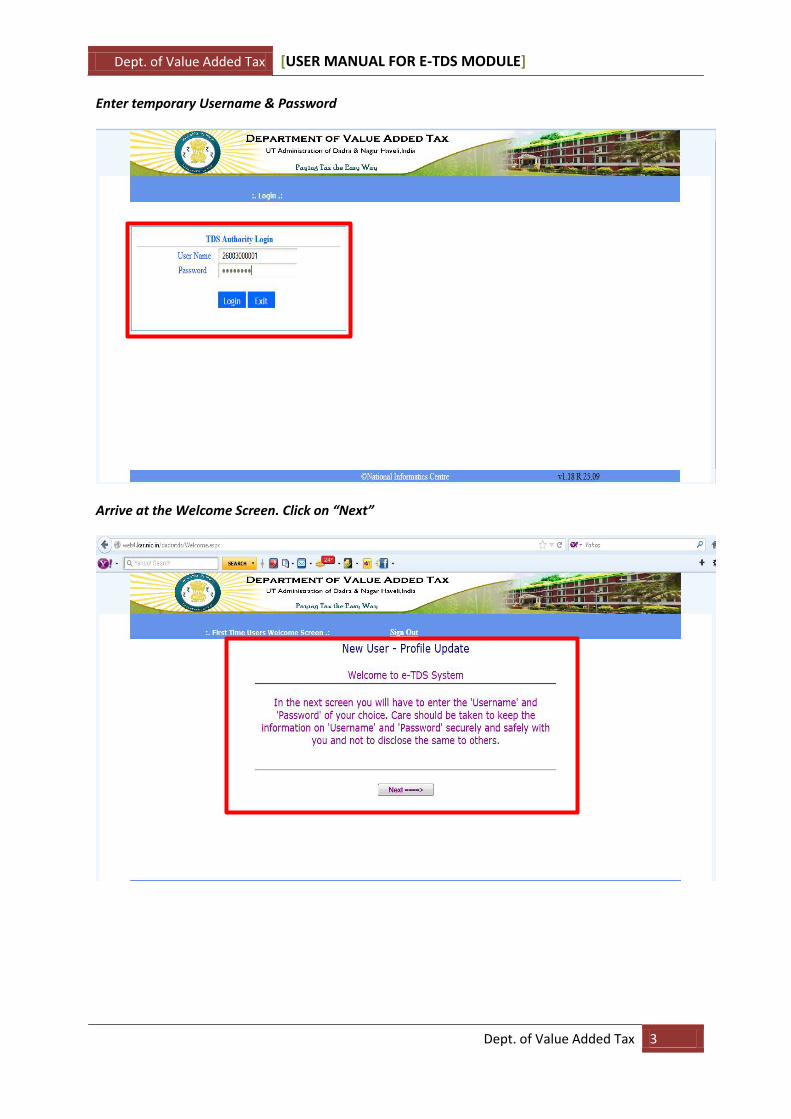
Enter temporary Username & Password
Arrive at the Welcome Screen. Click on “Next”
Dept. of Value Added Tax [USER MANUAL FOR E-TDS MODULE]
Dept. of Value Added Tax 4
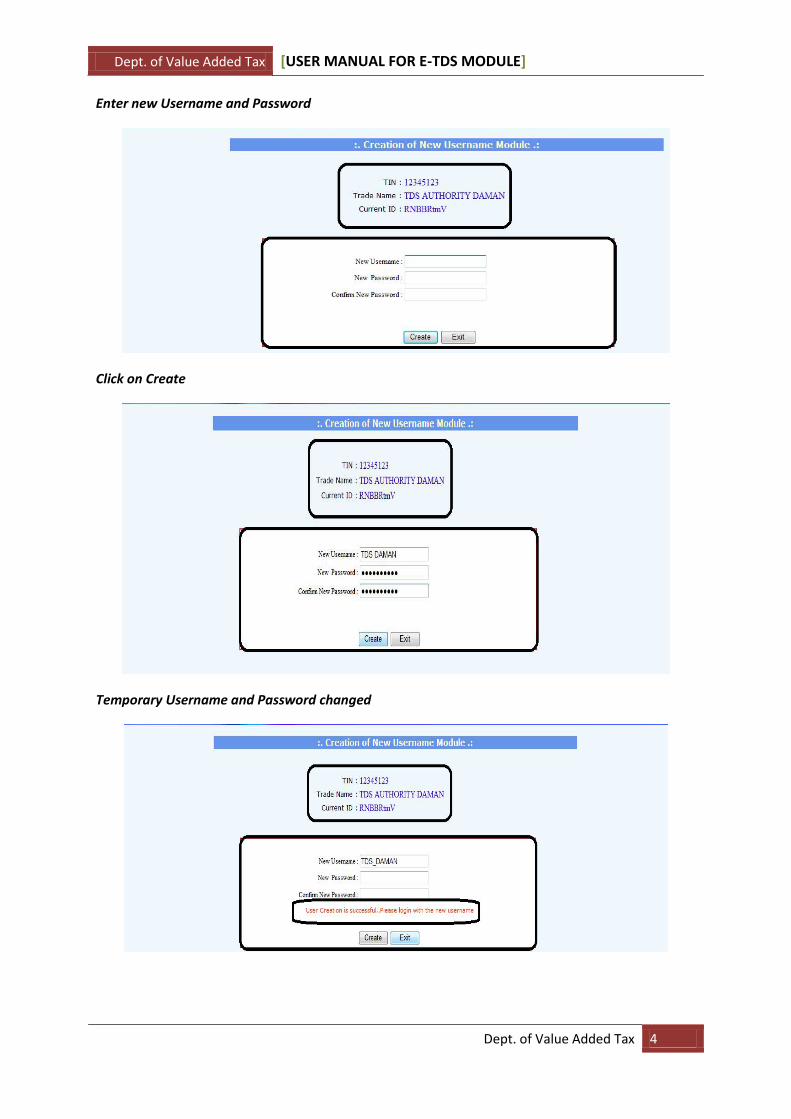
Enter new Username and Password
Click on Create
Temporary Username and Password changed
Dept. of Value Added Tax [USER MANUAL FOR E-TDS MODULE]
Dept. of Value Added Tax 5
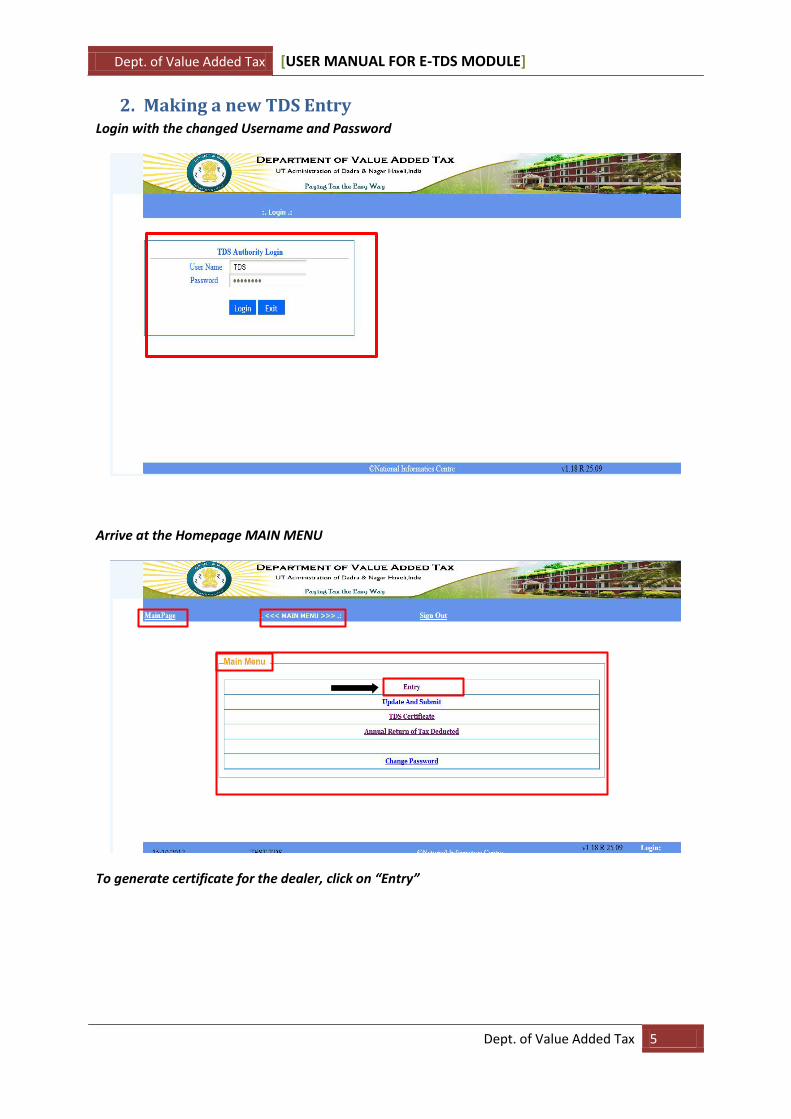
2. Making a new TDS Entry Login with the changed Username and Password
Arrive at the Homepage MAIN MENU
To generate certificate for the dealer, click on “Entry”
Dept. of Value Added Tax [USER MANUAL FOR E-TDS MODULE]
Dept. of Value Added Tax 6
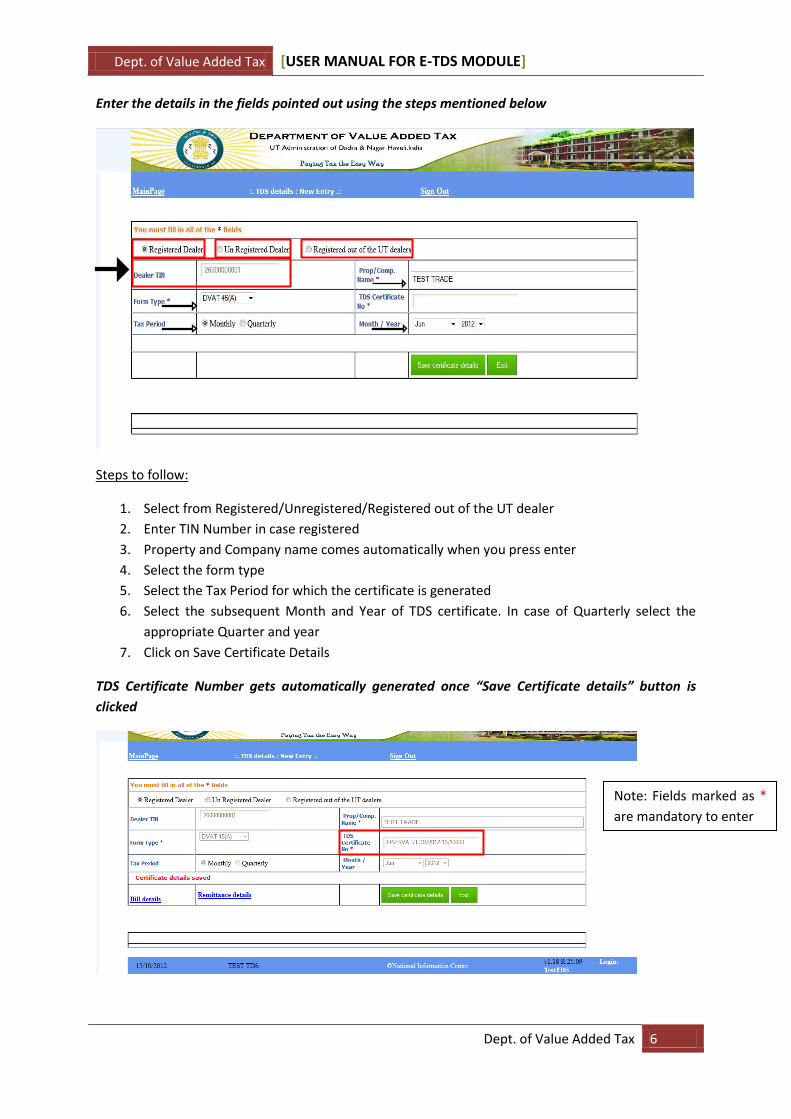
Enter the details in the fields pointed out using the steps mentioned below
Steps to follow:
1. Select from Registered/Unregistered/Registered out of the UT dealer
2. Enter TIN Number in case registered
3. Property and Company name comes automatically when you press enter
4. Select the form type
5. Select the Tax Period for which the certificate is generated
6. Select the subsequent Month and Year of TDS certificate. In case of Quarterly select the
appropriate Quarter and year
7. Click on Save Certificate Details
TDS Certificate Number gets automatically generated once “Save Certificate details” button is
clicked
Note: Fields marked as *
are mandatory to enter
Dept. of Value Added Tax [USER MANUAL FOR E-TDS MODULE]
Dept. of Value Added Tax 7
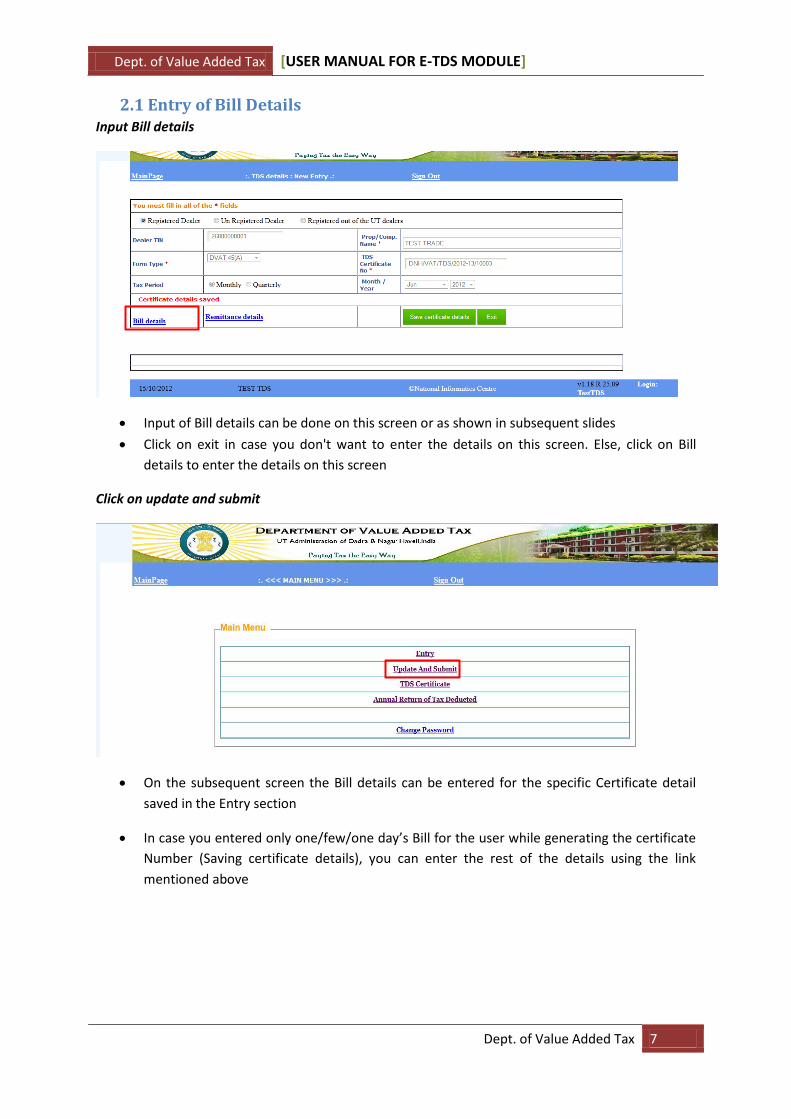
2.1 Entry of Bill Details Input Bill details
Input of Bill details can be done on this screen or as shown in subsequent slides
Click on exit in case you don't want to enter the details on this screen. Else, click on Bill
details to enter the details on this screen
Click on update and submit
On the subsequent screen the Bill details can be entered for the specific Certificate detail
saved in the Entry section
In case you entered only one/few/one day’s Bill for the user while generating the certificate
Number (Saving certificate details), you can enter the rest of the details using the link
mentioned above
Dept. of Value Added Tax [USER MANUAL FOR E-TDS MODULE]
Dept. of Value Added Tax 8
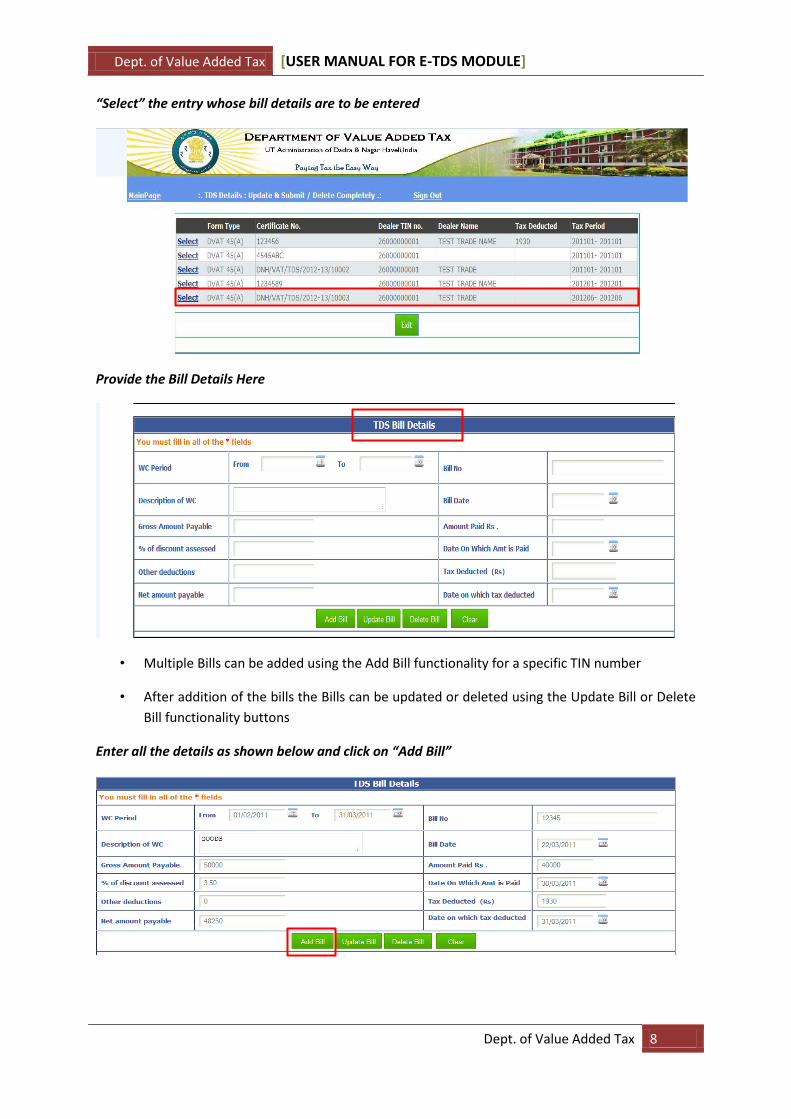
“Select” the entry whose bill details are to be entered
Provide the Bill Details Here
• Multiple Bills can be added using the Add Bill functionality for a specific TIN number
• After addition of the bills the Bills can be updated or deleted using the Update Bill or Delete
Bill functionality buttons
Enter all the details as shown below and click on “Add Bill”
Dept. of Value Added Tax [USER MANUAL FOR E-TDS MODULE]
Dept. of Value Added Tax 9
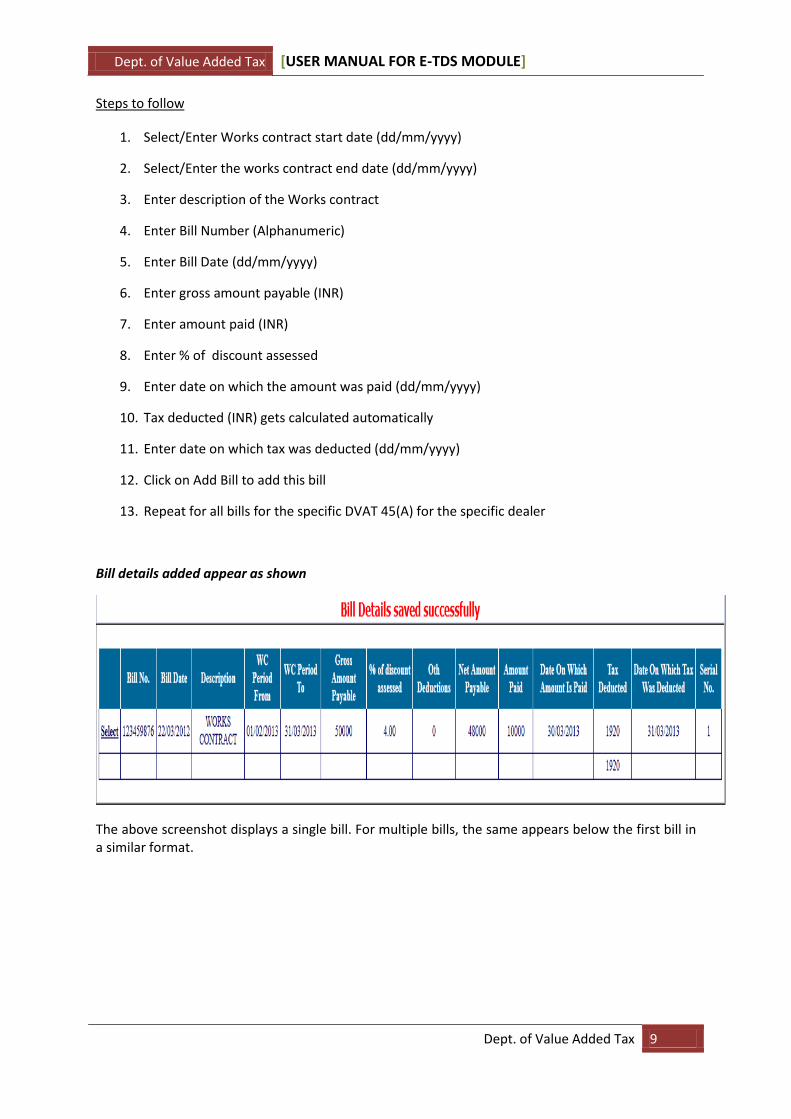
Steps to follow
1. Select/Enter Works contract start date (dd/mm/yyyy)
2. Select/Enter the works contract end date (dd/mm/yyyy)
3. Enter description of the Works contract
4. Enter Bill Number (Alphanumeric)
5. Enter Bill Date (dd/mm/yyyy)
6. Enter gross amount payable (INR)
7. Enter amount paid (INR)
8. Enter % of discount assessed
9. Enter date on which the amount was paid (dd/mm/yyyy)
10. Tax deducted (INR) gets calculated automatically
11. Enter date on which tax was deducted (dd/mm/yyyy)
12. Click on Add Bill to add this bill
13. Repeat for all bills for the specific DVAT 45(A) for the specific dealer
Bill details added appear as shown
The above screenshot displays a single bill. For multiple bills, the same appears below the first bill in a similar format.
Dept. of Value Added Tax [USER MANUAL FOR E-TDS MODULE]
Dept. of Value Added Tax 10
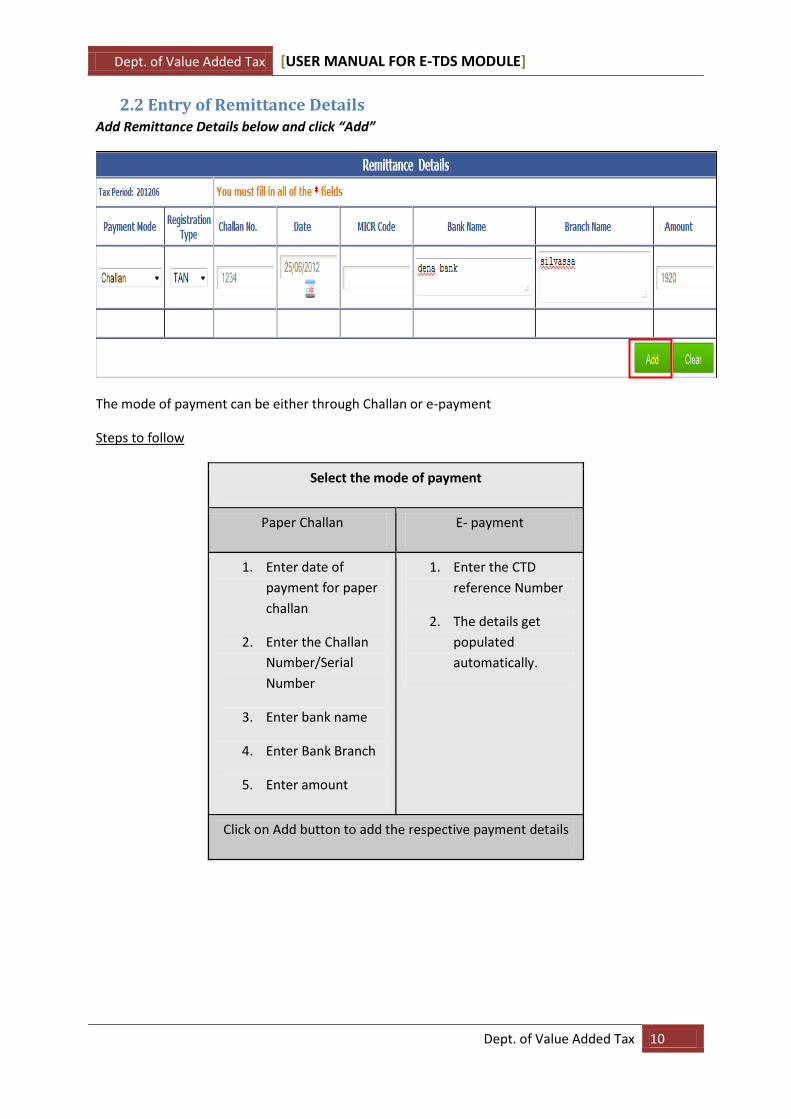
2.2 Entry of Remittance Details Add Remittance Details below and click “Add”
The mode of payment can be either through Challan or e-payment
Steps to follow
Select the mode of payment
Paper Challan E- payment
1. Enter date of
payment for paper
challan
2. Enter the Challan
Number/Serial
Number
3. Enter bank name
4. Enter Bank Branch
5. Enter amount
1. Enter the CTD
reference Number
2. The details get
populated
automatically.
Click on Add button to add the respective payment details
Dept. of Value Added Tax [USER MANUAL FOR E-TDS MODULE]
Dept. of Value Added Tax 11
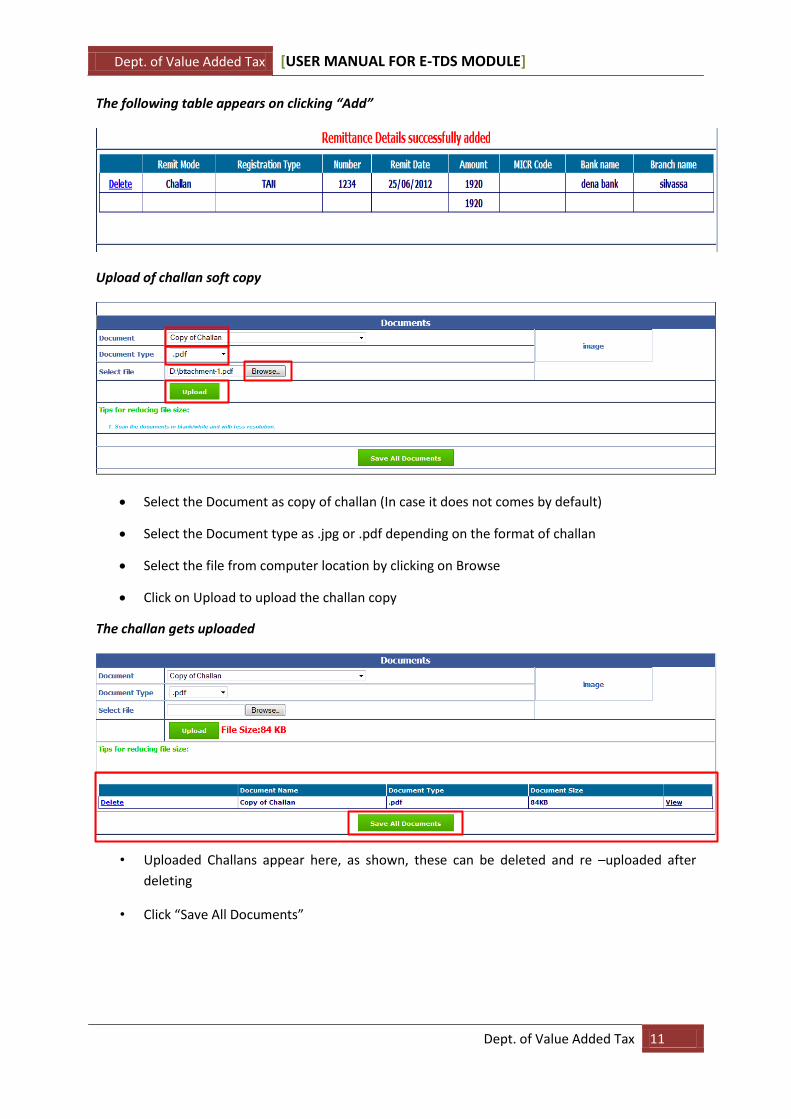
The following table appears on clicking “Add”
Upload of challan soft copy
Select the Document as copy of challan (In case it does not comes by default)
Select the Document type as .jpg or .pdf depending on the format of challan
Select the file from computer location by clicking on Browse
Click on Upload to upload the challan copy
The challan gets uploaded
• Uploaded Challans appear here, as shown, these can be deleted and re –uploaded after
deleting
• Click “Save All Documents”
Dept. of Value Added Tax [USER MANUAL FOR E-TDS MODULE]
Dept. of Value Added Tax 12
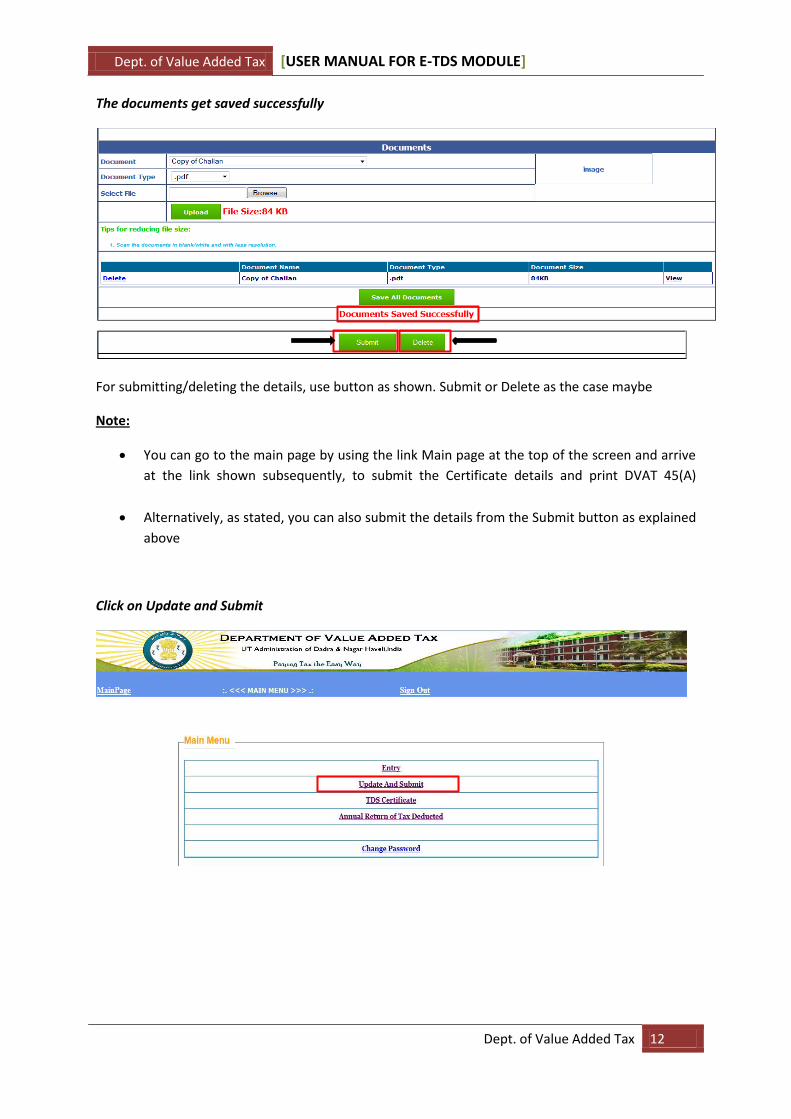
The documents get saved successfully
For submitting/deleting the details, use button as shown. Submit or Delete as the case maybe
Note:
You can go to the main page by using the link Main page at the top of the screen and arrive
at the link shown subsequently, to submit the Certificate details and print DVAT 45(A)
Alternatively, as stated, you can also submit the details from the Submit button as explained
above
Click on Update and Submit
Dept. of Value Added Tax [USER MANUAL FOR E-TDS MODULE]
Dept. of Value Added Tax 13
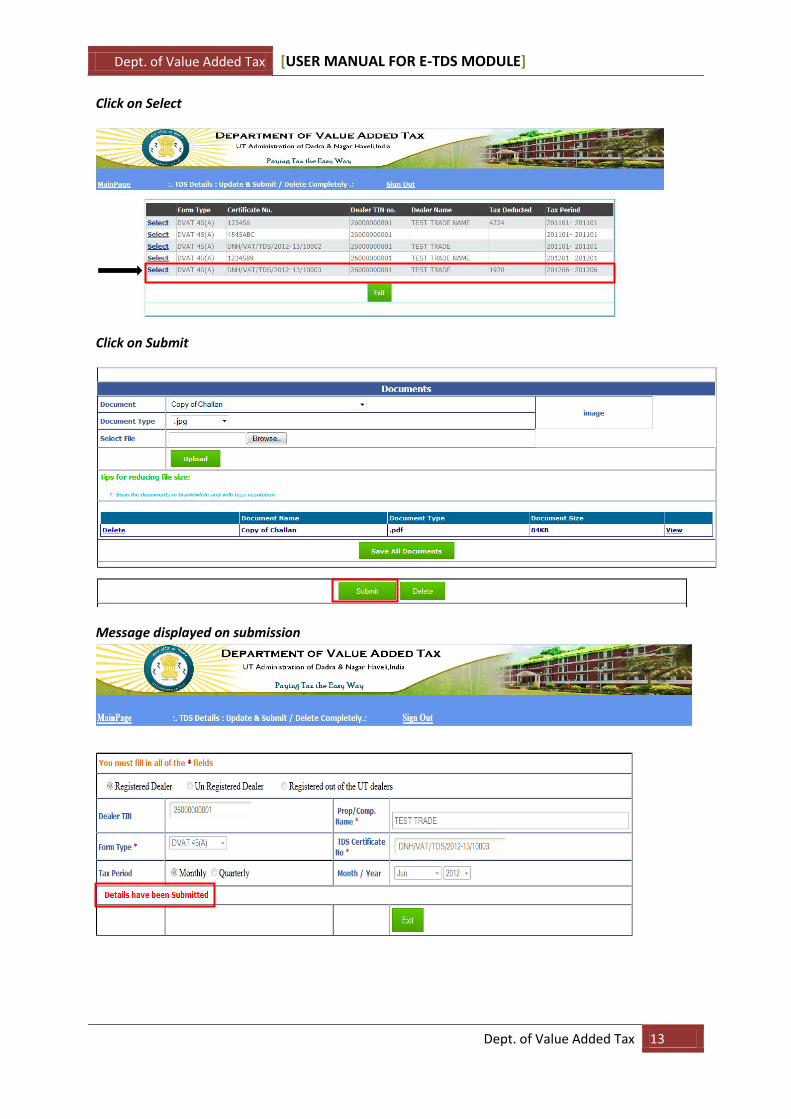
Click on Select
Click on Submit
Message displayed on submission
Dept. of Value Added Tax [USER MANUAL FOR E-TDS MODULE]
Dept. of Value Added Tax 14
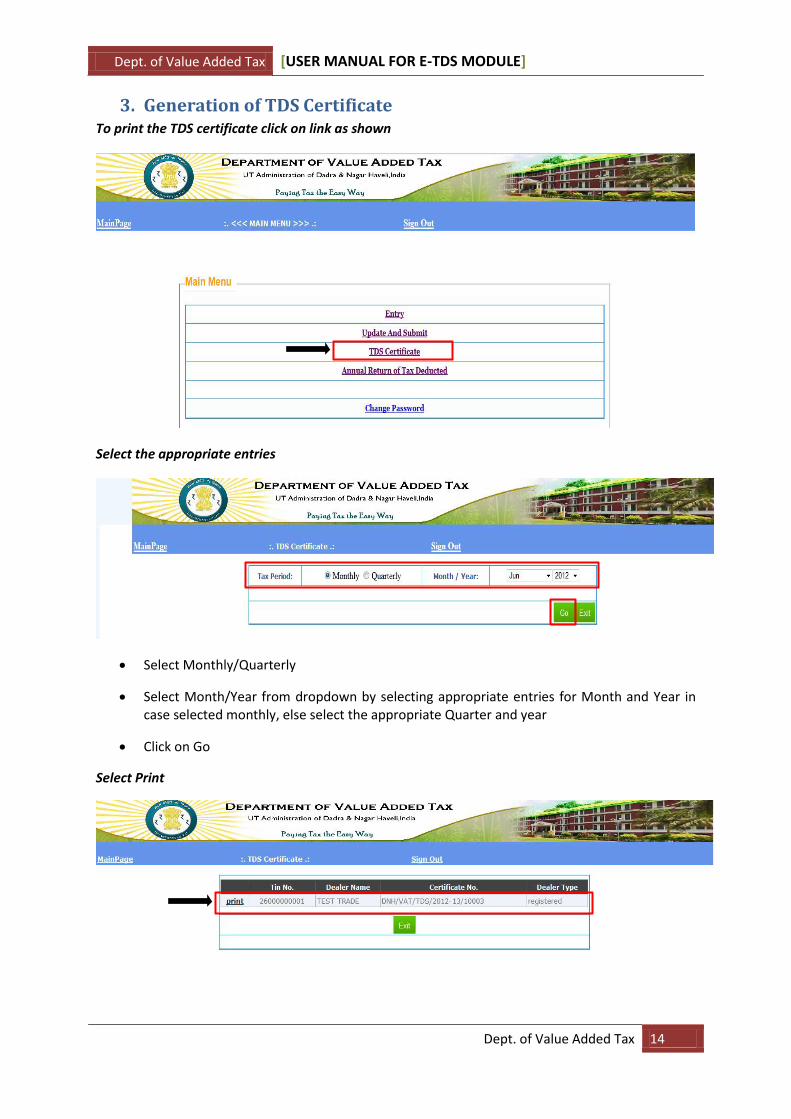
3. Generation of TDS Certificate To print the TDS certificate click on link as shown
Select the appropriate entries
Select Monthly/Quarterly
Select Month/Year from dropdown by selecting appropriate entries for Month and Year in case selected monthly, else select the appropriate Quarter and year
Click on Go
Select Print
Dept. of Value Added Tax [USER MANUAL FOR E-TDS MODULE]
Dept. of Value Added Tax 15
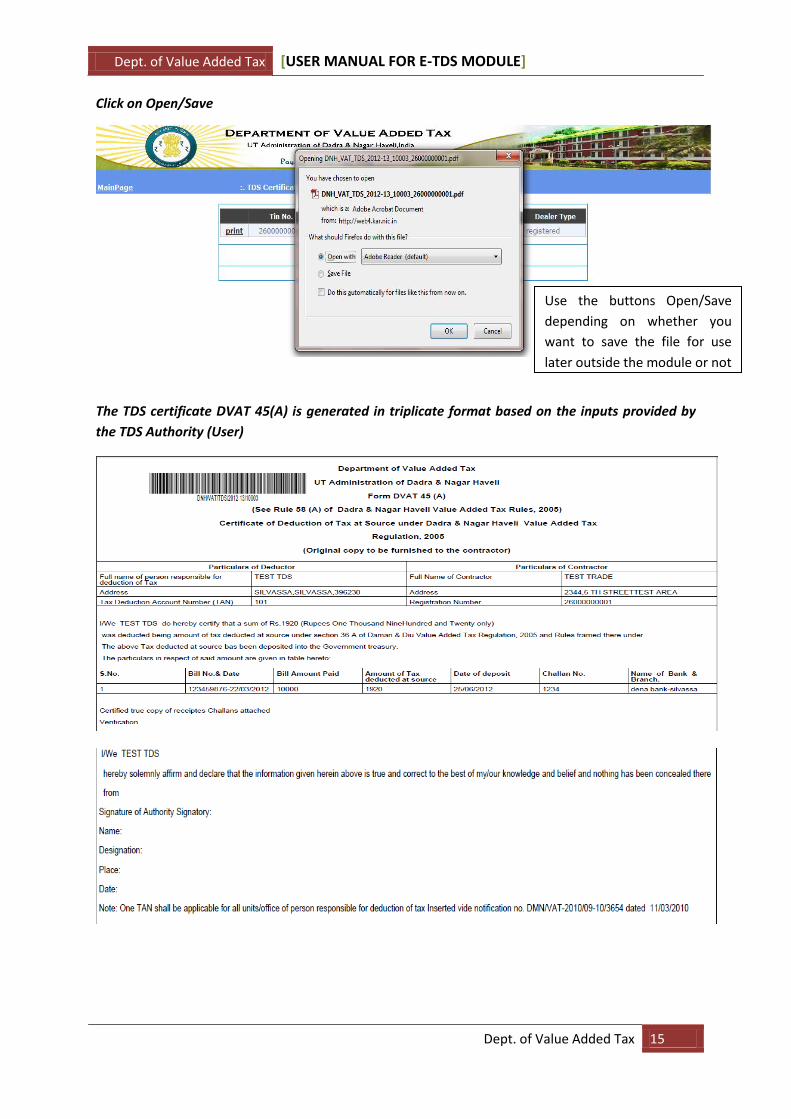
Click on Open/Save
The TDS certificate DVAT 45(A) is generated in triplicate format based on the inputs provided by
the TDS Authority (User)
Use the buttons Open/Save
depending on whether you
want to save the file for use
later outside the module or not
Dept. of Value Added Tax [USER MANUAL FOR E-TDS MODULE]
Dept. of Value Added Tax 16
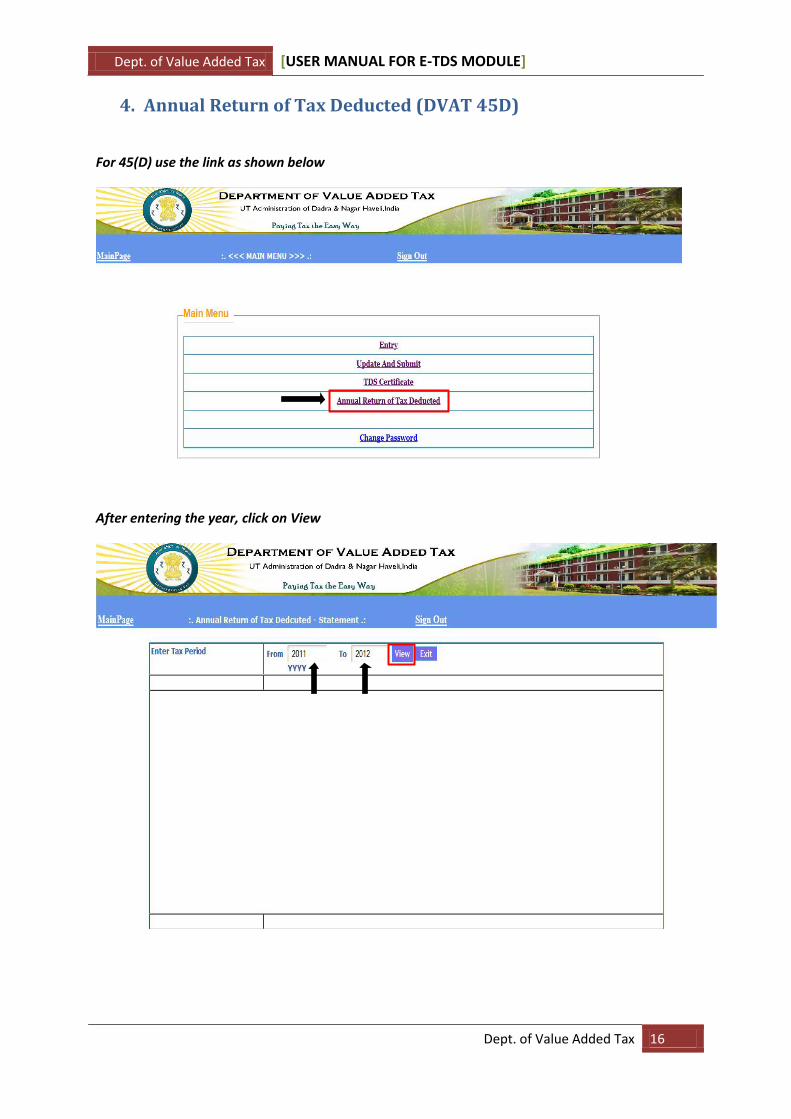
4. Annual Return of Tax Deducted (DVAT 45D)
For 45(D) use the link as shown below
After entering the year, click on View
Dept. of Value Added Tax [USER MANUAL FOR E-TDS MODULE]
Dept. of Value Added Tax 17
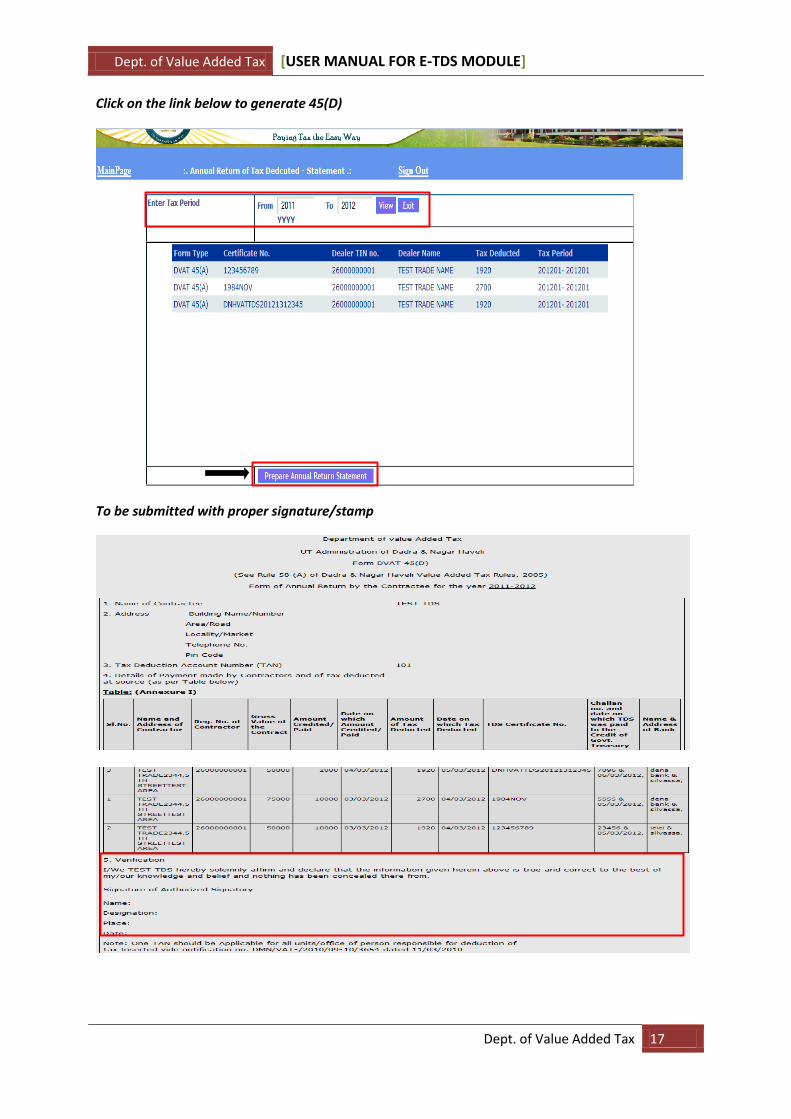
Click on the link below to generate 45(D)
To be submitted with proper signature/stamp

Dept. of Value Added Tax [USER MANUAL FOR E-TDS MODULE]
Dept. of Value Added Tax 18
Click on Exit to go to main page
5. Change of Password Link to Change Password (if required)
To change password at a later date, click on the link as displayed above
Dept. of Value Added Tax [USER MANUAL FOR E-TDS MODULE]
Dept. of Value Added Tax 19
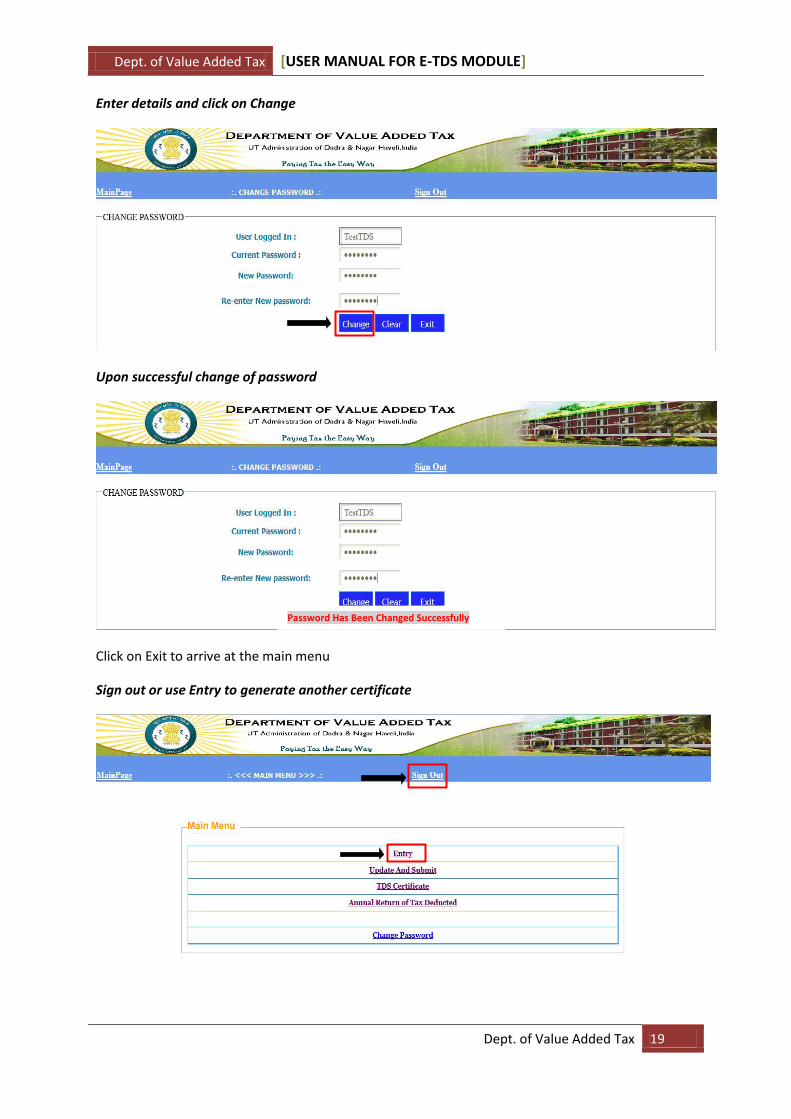
Enter details and click on Change
Upon successful change of password
Click on Exit to arrive at the main menu
Sign out or use Entry to generate another certificate
Password Has Been Changed Successfully