Embed Size (px)
Citation preview

PL 614 REV B 04/2017
BOILER TUBE CLEANER™ (BTC)USER MANUAL
2 866-795-1586 • WWW.STONEAGETOOLS.COM
MANUFACTURER’S INFORMATION . . . . . . . . . . . . . . . . . . . . . . . . . . . . . . . . . . . . . . . . . . . . . . . . . . . . . . . . . . . . . . . . 3
SPECIFICATIONS . . . . . . . . . . . . . . . . . . . . . . . . . . . . . . . . . . . . . . . . . . . . . . . . . . . . . . . . . . . . . . . . . . . . . . . . . . . . . . . . . . . . . . . . 3
DESCRIPTION OF EQUIPMENT AND INTENDED USE . . . . . . . . . . . . . . . . . . . . . . . . . . . . . . . . . . . 3
WARNING AND SAFETY INSTRUCTIONS . . . . . . . . . . . . . . . . . . . . . . . . . . . . . . . . . . . . . . . . . . . . . . . . . . . . . . . 4
OPERATOR TRAINING . . . . . . . . . . . . . . . . . . . . . . . . . . . . . . . . . . . . . . . . . . . . . . . . . . . . . . . . . . . . . . . . . . . . . . . . . . . . . . . . . 4
PERSONAL PROTECTIVE EQUIPMENT REQUIREMENTS . . . . . . . . . . . . . . . . . . . . . . . . . . . . . . 4
OVERVIEW - BTC-100 BOILER TUBE CLEANER . . . . . . . . . . . . . . . . . . . . . . . . . . . . . . . . . . . . . . . . . . . . . 5
OVERVIEW - CB-BTC CONTROL BOX . . . . . . . . . . . . . . . . . . . . . . . . . . . . . . . . . . . . . . . . . . . . . . . . . . . . . . . . . . . 6
ASSEMBLY, INSTALLATION, AND CONNECTION. . . . . . . . . . . . . . . . . . . . . . . . . . . . . . . . . . . . . . . . . . . . 7
RAILS AND SUPPORT TO MUD DRUM . . . . . . . . . . . . . . . . . . . . . . . . . . . . . . . . . . . . . . . . . . . . . . . . . . . . . . . . 7
JOIN RAIL EXTENSIONS AND CLAMP TO MUD DRUM . . . . . . . . . . . . . . . . . . . . . . . . . . . . . . . . . 8
ROTATOR AND TRACTOR TO RAIL . . . . . . . . . . . . . . . . . . . . . . . . . . . . . . . . . . . . . . . . . . . . . . . . . . . . . . . . . . . . . . 9
HELIX HOSE INSTALLATION . . . . . . . . . . . . . . . . . . . . . . . . . . . . . . . . . . . . . . . . . . . . . . . . . . . . . . . . . . . . . . . . . . . . . . . 10
GEARPACK REMOVAL INSTRUCTIONS . . . . . . . . . . . . . . . . . . . . . . . . . . . . . . . . . . . . . . . . . . . . . . . . . . . . . . . 11
GEARPACK INSTALLATION INSTRUCTIONS . . . . . . . . . . . . . . . . . . . . . . . . . . . . . . . . . . . . . . . . . . . . . . . . . 12
CONTROL BOX DETACHABLE LEGS . . . . . . . . . . . . . . . . . . . . . . . . . . . . . . . . . . . . . . . . . . . . . . . . . . . . . . . . . . . 16
PNEUMATIC SUPPLY LINES . . . . . . . . . . . . . . . . . . . . . . . . . . . . . . . . . . . . . . . . . . . . . . . . . . . . . . . . . . . . . . . . . . . . . . . . 17
OPERATION. . . . . . . . . . . . . . . . . . . . . . . . . . . . . . . . . . . . . . . . . . . . . . . . . . . . . . . . . . . . . . . . . . . . . . . . . . . . . . . . . . . . . . . . . . . . . . . . . . . . . . 18
CONTROL PANEL . . . . . . . . . . . . . . . . . . . . . . . . . . . . . . . . . . . . . . . . . . . . . . . . . . . . . . . . . . . . . . . . . . . . . . . . . . . . . . . . . . . . . . . 18
PNEUMATIC DUMP CONTROL AND AIR SUPPLY FITTING . . . . . . . . . . . . . . . . . . . . . . . . . . . . 18
PRE-RUN SAFETY CHECK . . . . . . . . . . . . . . . . . . . . . . . . . . . . . . . . . . . . . . . . . . . . . . . . . . . . . . . . . . . . . . . . . . . . . . . . . . 19
TEST RUN PROCEDURE . . . . . . . . . . . . . . . . . . . . . . . . . . . . . . . . . . . . . . . . . . . . . . . . . . . . . . . . . . . . . . . . . . . . . . . . . . . . . 19
STORAGE, TRANSPORTATION, AND HANDLING . . . . . . . . . . . . . . . . . . . . . . . . . . . . . . . . . . . . . . . . . . . 19
MAINTENANCE . . . . . . . . . . . . . . . . . . . . . . . . . . . . . . . . . . . . . . . . . . . . . . . . . . . . . . . . . . . . . . . . . . . . . . . . . . . . . . . . . . . . . . . . . . . . . . . . 20
MANUAL TUBE LOCATION INSTRUCTIONS . . . . . . . . . . . . . . . . . . . . . . . . . . . . . . . . . . . . . . . . . . . . . . . . . . . 20
PARTS DIAGRAM . . . . . . . . . . . . . . . . . . . . . . . . . . . . . . . . . . . . . . . . . . . . . . . . . . . . . . . . . . . . . . . . . . . . . . . . . . . . . . . . . . . . . . . . . . . . . 21
BTC-100 BOILER TUBE CLEANER . . . . . . . . . . . . . . . . . . . . . . . . . . . . . . . . . . . . . . . . . . . . . . . . . . . . . . . . . . . . . . . 21
BTC 120 CLAMP AND BTC 140 SUPPORT . . . . . . . . . . . . . . . . . . . . . . . . . . . . . . . . . . . . . . . . . . . . . . . . . . 22
HLXR 040 ELBOW ASSEMBLY AND HLXR 015 FLARE . . . . . . . . . . . . . . . . . . . . . . . . . . . . . . . . . . 23
CAM-100 CAMERA SYSTEM . . . . . . . . . . . . . . . . . . . . . . . . . . . . . . . . . . . . . . . . . . . . . . . . . . . . . . . . . . . . . . . . . . . . . . . 24
HLXR-100 HELIX ROTATOR . . . . . . . . . . . . . . . . . . . . . . . . . . . . . . . . . . . . . . . . . . . . . . . . . . . . . . . . . . . . . . . . . . . . . . . . . 25
HLXT-100 HELIX TRACTOR . . . . . . . . . . . . . . . . . . . . . . . . . . . . . . . . . . . . . . . . . . . . . . . . . . . . . . . . . . . . . . . . . . . . . . . . . . 26
HLXD-100.1 HELIX DRIVE WITHOUT SPROCKET KIT. . . . . . . . . . . . . . . . . . . . . . . . . . . . . . . . . . . . 27
HLXD-BTC-100 HELIX DRIVE WITH SPROCKET KIT (CHANGE DIAGRAM) . . . . . 28
HLXD-60X HELIX DRIVE SPROCKET KIT . . . . . . . . . . . . . . . . . . . . . . . . . . . . . . . . . . . . . . . . . . . . . . . . . . . . . . 29
HCS-HLXC HOSE CONTAINMENT SYSTEM WITH DRIVE. . . . . . . . . . . . . . . . . . . . . . . . . . . . . . 30
HCS-100 HOSE CONTAINMENT SYSTEM WITHOUT DRIVE . . . . . . . . . . . . . . . . . . . . . . . . . . 31
HLXC-100.1 HOSE CONTAINMENT DRIVE WITHOUT SPROCKET KIT . . . . . . . . . . 33
HLXC-100 HELIX CONTAINMENT DRIVE . . . . . . . . . . . . . . . . . . . . . . . . . . . . . . . . . . . . . . . . . . . . . . . . . . . . . . 34
HLXC-60X HELIX CONTAINMENT DRIVE SPROCKET KIT . . . . . . . . . . . . . . . . . . . . . . . . . . . . . 35
TERMS AND CONDITIONS . . . . . . . . . . . . . . . . . . . . . . . . . . . . . . . . . . . . . . . . . . . . . . . . . . . . . . . . . . . . . . . . . . . . . . . . . . . . . . 36
TABLE OF CONTENTS

3866-795-1586 • WWW.STONEAGETOOLS.COM
StoneAge Inc.
466 S. Skylane Drive
Durango, CO 81303
Phone: 970-259-2869
Toll Free: 866-795-1586
www.stoneagetools.com
This manual must be used in accordance with all applicable national laws. The manual shall be regarded as a part of the machine and shall be kept for reference until the final dismantling of the machine, as defined by applicable national law(s).
SPECIFICATIONS
TRAVEL: 18 IPM TO 90 IPM CONTROLLED BY VALVE HANDLE POSITION
ROTATION: 1 RPM TO 4 RPM CONTROLLED BY VALVE HANDLE POSITION
HOSE SPEED: 9 FT/MIN TO 50 FT/MIN CONTROLLED BY NEEDLE VALVE SPEED CONTROLS
MANUFACTURER’S INFORMATION
Weight Pressure Flow Speed Dimensions Connections
Helix Hose 5mm 0.35 lb per foot
.16 kg per meter
20 ksi 5 gpm .49 inch OD
Length up to 75 ft
Inlet M 9/16
Outlet 3/8 MP RH
Helix Hose 6mm 0.40 lb per foot
.18 kg per meter
20 ksi 10 gpm .64 inch OD Inlet M 9/16
Outlet 3/8 MP RH
Helix Drive 20 lb ( 9 kg) 20 cfm9-50 FT/MIN
1 inch extension clamped to HLXT-100
Helix Tractor 20 lb ( 9 kg) 10 cfm 14-70 IPM Rollers on Box Rail
Helix Rotator 20 lb ( 9 kg) 10 cfm 1-4 RPM Rollers on Box Rail
Helix Take up 40 lb ( 18 kg) 5 cfm 24 inch diameter x 12 inch high
Position Held by Pin
Control Panel 30 lb ( 13.6 kg) 90 psi air, 20 cfm
Video Camera 2 lb ( .9 kg) 5x7 inch display 12v Battery or 120v AC
DESCRIPTION OF EQUIPMENT AND INTENDED USE
The Boiler Tube Cleaner was developed as a safe and efficient alternative to manual cleaning requiring vessel entry and cleaning of tube bundles such as steam generator tubes in fossil fueled boilers. Specifically designed for the mud drum of small package boilers that are used for process steam in chemical and petroleum refining plants. The Boiler Tube Cleaner can be adapted to fit other types of boilers by modifying the size of a few components.
This system automates the cleaning process, increasing both safety and efficiency, yet remains flexible, portable, and fast.
KEY FEATURES:
• Cleans vertical and horizontal tubing
• Removes thin, hard scale and corrosion.
• Will work with manways as small as 16 inches wide
• Optional Camera System, can be mounted to the BTC-100, gives the operator the ability to quickly align with each boiler tube inside of the mud drum.
• Can be paired with any StoneAge rotary pipe or tube cleaning tool. StoneAge recommends utilizing the 2” Badger or the Banshee Beetle Rotating Nozzle for boiler tube cleaning. Both tools are capable of navigating the bends commonly found in boiler tubes
Tool Benefits:
• Safely operated from outside the water blast zone
• Requires a single operator to run

4 866-795-1586 • WWW.STONEAGETOOLS.COM
OPERATOR TRAINING
Managers, supervisors, and operators MUST be trained in Health and Safety Awareness of High-pressure Water Jetting and hold a copy the Water Jetting Association (WJA) Code of Practice, or equivalent (see www.waterjetting.org.uk).
Operators MUST be trained to identify and understand all applicable standards for the equipment supplied. Operators should be trained in manual handling techniques to prevent bodily injury.
Operators MUST read, understand, and follow the Operational and Training Requirements (Section 7.0) of WJTA-IMCA’s Recommended Practices For The Use Of High-pressure Waterjetting Equipment, or equivalent.
Operators MUST read, understand and follow the Warnings, Safety Information, Assembly, Installation, Connection, Operation, Transport, Handling, Storage, and Maintenance Instructions detailed in this manual.
WARNING AND SAFETY INSTRUCTIONS
PERSONAL PROTECTIVE EQUIPMENT REQUIREMENTS
Use of Personal Protective Equipment (PPE) is dependent on the working pressure of water and the cleaning application. Managers, Supervisors, and Operators MUST carry out a job specific risk assessment to define the exact requirements for PPE. See Protective Equipment for Personnel (Section 6) of WJTA-IMCA’s Recommended Practices For The Use Of High-pressure Waterjetting Equipment for additional information.
Hygiene - Operators are advised to wash thoroughly after all waterjetting operations to remove any waterblast residue which may contain traces of harmful substances.
First aid provision - users MUST be provided with suitable first aid facilities at the operation site.
PPE may include:
• Eye protection: Full face visor
• Foot protection: Kevlar® brand or steel toe capped, waterproof, non-slip safety boots
• Hand protection: Waterproof gloves
• Ear protection: Ear protection for a minimum of 85 dBA
• Head protection: Hard hat that accepts a full face visor and ear protection
• Body protection: Multi-layer waterproof clothing approved for waterjetting
• Hose protection: Hose shroud
• Respiratory protection: May be required; refer to job specific risk assessment
StoneAge has designed and manufactured this equipment considering all hazards associated with its operation. StoneAge assessed these risks and incorporated safety features in the design. StoneAge WILL NOT accept responsibility for the results of misuse.
IT IS THE RESPONSIBILITY OF THE INSTALLER/OPERATOR to conduct a job specific risk assessment prior to use. Job specific risk assessment MUST be repeated for each different set up, material, and location.
The risk assessment MUST conform to the Health and Safety at Work Act 1974 and other relevant Health and Safety legislation.
The risk assessment MUST consider potential material or substance hazards including:
• Aerosols • Biological and microbiological (viral or bacterial) agents• Combustible materials • Dusts • Explosion • Fibers • Flammable substances• Fluids• Fumes• Gases• Mists• Oxidizing Agents
WARNING Operations with this equipment can be potentially hazardous. Caution MUST be exercised prior to and during machine and water jet tool use. Please
read and follow all of these instructions, in addition to the guidelines in the WJTA Recommended Practices handbook, available online at www.wjta.org.
Deviating from safety instructions and recommended practices can lead to severe injury and/or death.
• Do not exceed the maximum operating pressure specified for any component in a system. The immediate work area MUST be marked off to keep out untrained persons.
• Inspect the equipment for visible signs of deterioration, damage, and improper assembly. Do not operate until repaired. Make sure all threaded connections are tight and free of leaks.
• Users of the Boiler Tube Cleaner™ (BTC) MUST be trained and/or experienced in the use and application of high-pressure technology and cleaning, as well as all associated safety measures, according to the WJTA Recommended Practices for the use of High-pressure Waterjetting Equipment.
• The Control Box should be located in a safe location where the operator has good visibility of the mud drum entrance. The Boiler Tube Cleaner (BTC) and Control Box MUST be supervised at all times and should never be left unattended.
• Always de-energize the system before attempting to service or replace any parts. Failure to do so can result in severe injury and/or death.

5866-795-1586 • WWW.STONEAGETOOLS.COM
WARNING AND SAFETY INSTRUCTIONS
BTC-100™ (Boiler Tube Cleaner)
HLXD-100 HELIX DRIVE
BU 004-XX SLOTTED DRIVE RAIL
HCS-100 HELIX HOSE CONTAINMENT SYSTEM
HLXC-100 HELIX HOSE CONTAINMENT DRIVE
HLXR-100 HELIX ROTATOR
HLXR 040 HELIX ROTATINGELBOW ASSEMBLY
BTC 140 BOILER TUBE SUPPORT
BTC 120CLAMP ASSEMBLY
HLXT-100 HELIX TRACTOR
HLXR-100 HELIX ROTATORThe Helix Rotator aligns the Helix Hose and water jet tool with the boiler tubes. The Helix Rotator is comprised of an air motor drive, double worm gear reduction, overload slip clutch, and elbow. The Helix Hose and water jet tool exit the HLXR 040 Helix Rotator Elbow and enter the boiler tubes. Helix Rotator extension tubes are available through StoneAge to match the internal dimension of the boiler tube. The Helix Rotator and the Helix Tractor allow the operator to align the Helix Hose with each individual boiler tube before launching the Helix Hose.
HLXT-100 HELIX TRACTORThe Helix Tractor moves the entire Boiler Tube Cleaner unit along the rail.
HLXD-100 HELIX DRIVEThe Helix Drive will feed or retract the Helix Hose through the assembly into the boiler tube ports. The Helix Drive can exert up to 50 lbs (23 Kg) of push when needed to clear plugged tubes or travel long distances.
HELIX HOSEThe Helix Hose is a wire-wrapped hose engineered to engage with the sprockets of the Helix Drive, giving the operator precise control over forward and reverse travel. This allows for consistent cleaning throughout the length of the tube. The spring coils provide strength, protection, and flexibility. The Helix Hose is available in 5mm, 6mm, and 8mm, hose sizes and are specified by flow limits and the tool being used.
NOTE: If there is any question about the appropriate hose size for the flow limit or water jet tool being used, please contact your StoneAge Customer Service Representative. 1-866-795-1586
HLXC-100 HOSE CONTAINMENT DRIVEThe Helix Hose Containment Drive is a hose drive with an air motor, directly driving, sprocket that engages the Helix Hose.
HCS-100 HOSE CONTAINMENT SYSTEM The Helix Hose Containment System is designed to keep the Helix Hose managed and protected. Aluminum drum water swivel rolls along rail and locks into position.
HELIX HOSE WITH
PRO LANCE AND TYPE M SWIVEL
OVERVIEW- BTC-100 BOILER TUBE CLEANER

6 866-795-1586 • WWW.STONEAGETOOLS.COM
AIR SUPPLY FITTING
PNEUMATIC DUMP CONTROL FITTING(FOR ¼ IN OD TUBING)
CONTROL BOXREAR VIEW
DETACHABLE LEGS
COLOR CODED JIC FITTINGS WITH DUST CAPS
DIRECTION CONTROL
HOSE FEED SPEED CONTROLS
CONTROL BOXFRONT VIEW
CONTROL PANEL
ELBOW ROTATION CONTROL
BTC TRAVEL CONTROL
OVERVIEW - CB-BTC CONTROL BOX

7866-795-1586 • WWW.STONEAGETOOLS.COM
BU 004-XX RAIL
The slotted box rail with BTC-140 Support and BTC-120 Clamps act as the support for the BTC-100 system components. Rails are available to match the length of any mud drum. The BTC will ship with standard stock rails, or the BTC components can be customized to fit the dimensions of your mud drum interior and external obstructions.
BTC-140 SUPPORT
1. Before attaching to the rail, set the BTC-140 Support in the drum. Check the height of the bearing surface to be sure it is level with the manway. Adjust the extendable feet if needed to level the support 6” (15.24 cm) below the drum centerline. Attach to rail with rail slots positioned on the right and Spring Plungers on the left, when looking into the mud drum.
2. Pull up on the ring of the Spring Plunger Pin to unlock the swivel mechanism of the BTC-140 Support.
3. Swivel the Support until it allows for insertion into the mud drum.
4. Insert the BTC-140 Support and the rail into the mud drum with the extendable feet facing down.
5. Swivel the Support so the feet touch the sides of the mud drum and lock the Spring Plunger Pin in place.
6. The distance you insert the rail into the mud drum is dependent on the length of the mud drum. If the rail span exceeds 20 ft. (6096 mm), use two supports evenly spaced.
NOTE: If the manway is higher than 12” (30.48 cm), block up the rail to center the HLXR-100 Rotator.
SPRING PLUNGER SWIVEL LOCK AND
RELEASE
END OF RAIL
MANWAY
BTC-140 SUPPORT
BU 004-XX RAIL
BTC-140 SUPPORT INSIDE MUD DRUM WITH EXTENDED FEET
ASSEMBLY, INSTALLATION, AND CONNECTION
MUD DRUMTOP VIEW
20 FT. (6096 mm) MAX. USE TWO
SUPPORTS FOR LONGER
DRUMS
25 FT. (7620 mm)

8 866-795-1586 • WWW.STONEAGETOOLS.COM
JOINING RAILS
Additional rail length may be needed when the assembly is slid into the inside of the mud drum. Tighten the wedge bolts evenly to synchronize the rail slots.
1. Slide Rail Extension over the Splice Tube. When joining multiple rails, it is important to align the drive slots as illustrated.
2. Make sure the slots are clear to allow the gears of the Boiler Tube Cleaner to engage freely.
3. Install Wedge Bolt through both Rail and Splice Tube and tighten the bolt to expand the diameter and secure the rails together. Make sure the rail edges are match to allow rollers to travel freely across joints.
4. There must be at least 6 ft. (1829 mm) of rail outside the manway to allow the Elbow, Rotator, Tractor, Hose Drive, and Hose Containment System to be assembled. Setup on site is easier if all components are installed on a rail section.
BTC-120 CLAMP
1. Place the BTC-120 Clamp under the rail at the point where the rail contacts the man way. Make sure the clamp end is outside the manway and the hook end is inside the man way. Hook the clamps inside the manway flange.
2. Hand-tighten the two Acme nuts onto the threaded rods to pull the BTC-120 Clamp against the face of the man way. Use a wrench to tighten the two clamps to 100 in-lb (11.3 Nm).
ASSEMBLY, INSTALLATION, AND CONNECTION
20 FT. (6096 mm)
MAX.
BR 008-BU-001 WEDGE BOLT
EXPANSION PARALLEL TO RAIL
SLOTTED RAIL
DRIVE SLOTS
DRIVE SLOTS
MUD DRUM

9866-795-1586 • WWW.STONEAGETOOLS.COM
HELIX ROTATOR AND HELIX TRACTOR TO RAIL ASSEMBLY
HLXR-100 HELIX ROTATOR
1. Install the Helix Rotator onto the rail. Loosen the bar knobs, position it on the rail, and tighten the bar knobs to 50 in-lbs (5.65 Nm). Make sure the roller grooves engage the rail and the Chassis Clamp is completely closed.
Note: the Helix Rotator can also be installed by sliding it over the end of the rail.
HLXT-100 HELIX TRACTOR
1. Install the Helix Tractor onto the rail behind the Helix Rotator, as illustrated. Loosen the bar knobs, position it on the rail, and tighten the bar knobs to 50 in-lbs (5.65 Nm). Make sure the roller grooves engage the rail and the Chasis Clamp is completely closed. There is a clutch to allow the Tractor gear to rotate on the gearbox output shaft with 50lbs of thrust applied in the direction of travel. Check this by forcing the Tractor forward and back. See NOTE below for adjustment.
2. Connect the link coupler from the tractor to the rotator.
CHASSISCLAMP
HLXR-100 ROTATOR
ASSEMBLY
RAIL ROLLERS
NOTE: Tighten to 65 in-lbs. Do not over tighten
ASSEMBLY, INSTALLATION, AND CONNECTION

10 866-795-1586 • WWW.STONEAGETOOLS.COM
HELIX HOSE INSTALLATION
The Helix Hose is a spring-wrapped hose precisely engineered to engage with the sprockets of the Helix Drive and Helix Containment Drive, giving the operator precise control over forward and reverse travel. This allows for consistent cleaning throughout the length of the tube. The spring coils provide strength, protection, and flexibility.
The Helix Hose, Split Bushings, and Gearpacks are labeled with size 5 mm or 6 mm. Make sure all parts match.
NOTE: If there is any question about the appropriate hose size for the flow rate or tool being used, please contact your StoneAge Customer Service Representative. 1-866-795-1586
1. Keep a cap or protective covering onto the Pro Lance MP6R end of the Helix Hose to protect the sealing surface and threads and keep debris out of the hose.
2. Insert the Helix Hose end into the Helix Tractor, Helix Rotator, and Helix Rotator Elbow. Loosen the bar knobs above the clamp in the Helix Tractor.
3. Thread the Type M Swivel End of the Helix Hose onto the tube connection inside the Hose Containment Drum and coil the remaining hose inside the drum.
Elbow and Swivel
Tube Connection
Rail Lock
Size Tag
TOP VIEWHose Containment Drum
Coiled Hose inside the Hose Containment Drum
Helix Rotator
Helix Hose End
Helix Rotator Elbow Helix Tractor
Type M Swivel End
ASSEMBLY, INSTALLATION, AND CONNECTION
11866-795-1586 • WWW.STONEAGETOOLS.COM
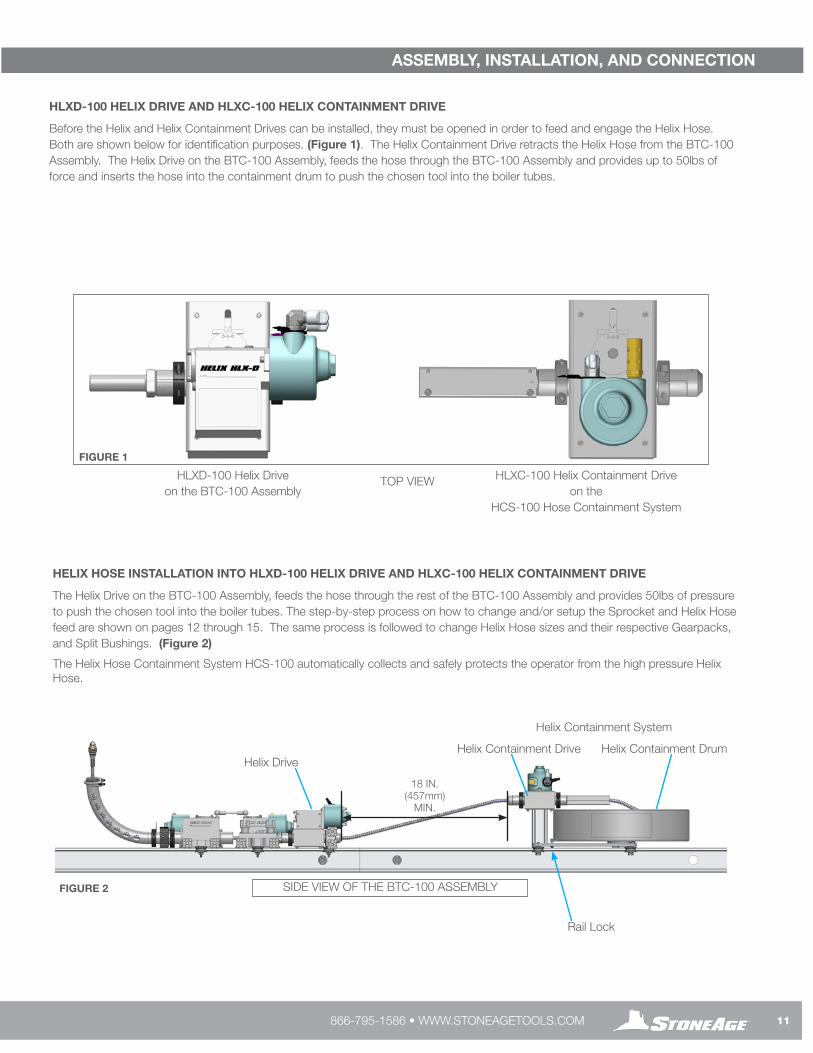
HLXD-100 HELIX DRIVE AND HLXC-100 HELIX CONTAINMENT DRIVE
Before the Helix and Helix Containment Drives can be installed, they must be opened in order to feed and engage the Helix Hose. Both are shown below for identification purposes. (Figure 1). The Helix Containment Drive retracts the Helix Hose from the BTC-100 Assembly. The Helix Drive on the BTC-100 Assembly, feeds the hose through the BTC-100 Assembly and provides up to 50lbs of force and inserts the hose into the containment drum to push the chosen tool into the boiler tubes.
HELIX HOSE INSTALLATION INTO HLXD-100 HELIX DRIVE AND HLXC-100 HELIX CONTAINMENT DRIVE
The Helix Drive on the BTC-100 Assembly, feeds the hose through the rest of the BTC-100 Assembly and provides 50lbs of pressure to push the chosen tool into the boiler tubes. The step-by-step process on how to change and/or setup the Sprocket and Helix Hose feed are shown on pages 12 through 15. The same process is followed to change Helix Hose sizes and their respective Gearpacks, and Split Bushings. (Figure 2)
The Helix Hose Containment System HCS-100 automatically collects and safely protects the operator from the high pressure Helix Hose.
FIGURE 1
FIGURE 2
HLXD-100 Helix Driveon the BTC-100 Assembly
TOP VIEW
SIDE VIEW OF THE BTC-100 ASSEMBLY
HLXC-100 Helix Containment Drive on the
HCS-100 Hose Containment System
Helix Containment Drive Helix Containment Drum
Helix Containment System
Helix Drive
ASSEMBLY, INSTALLATION, AND CONNECTION
Rail Lock
18 IN. (457mm)
MIN.

12 866-795-1586 • WWW.STONEAGETOOLS.COM
GEARPACK REMOVAL
NOTE: This process will be typical all sizes of Gearpacks on the HLXD-100 and HLXC-100 Assemblies.
WARNING Always de-energize the system before servicing or replacing any parts. Failure to do so can result in severe injury and/or death.Keep hands, hair, and clothing clear of rotating parts.
1. Remove the protective Gearbox Cover Plates by unhinging the two Hinged Collar Assemblies and unscrewing the 4 socket head cap screws with flat washers. (Figure 1) The Socket head cap screw Assemblies stay with each Gearbox Cover Plate as they are held in by a Self Locking Retaining Ring and Spring Mechanisms. (Figure 1.1)
2. Slide the Upper and Lower Cover Plates off in opposing directions and set all parts aside. (Figure 2)
3. Remove the Follow Gear by removing the 3/8” bolt from the Back Washer. Keep these parts together for re-installation. (Figure 3)
FIGURE 1FIGURE 1.1
FIGURE 2
UPPER COVER PLATE
SOCKET HEAD CAP SCREWS WITH FLAT WASHERS (X 4)
LOWERCOVER PLATE
HINGED COLLAR
SELF LOCKING RETAINING RING AND SPRING MECHANISMS
FIGURE 3
FOLLOWGEAR
BACK WASHER
3/8” BOLT
GEARPACK REMOVAL INSTRUCTIONS

13866-795-1586 • WWW.STONEAGETOOLS.COM
GEARPACK REMOVAL INSTRUCTIONS
4. Remove the two #10-24 socket head cap screws and replace them into the holes two positions in the counter-clockwise direction.(Figure 4)
5. Thread them in until the Sprocket Flange within the Drive Gear Releases the Sprocket Pack. (Figure 5)
FIGURE 4 FIGURE 5
FIGURE 1
SPROCKET FLANGE
GEARPACK INSTALLATION INSTRUCTIONS
GEARPACK INSTALLATION
NOTE: This process will be typical all sizes of Gearpacks on the HLXD-100 and HLXC-100 Assemblies.
WARNING Always de-energize the system before servicing or replacing any parts. Failure to do so can result in severe injury and/or death.Keep hands, hair, and clothing clear of rotating parts.
1. Install the Follow Gear with Back Washer and 3/8” bolt,and Drive Gear from the 5mm Gearpack. (Figure 1)
14 866-795-1586 • WWW.STONEAGETOOLS.COM
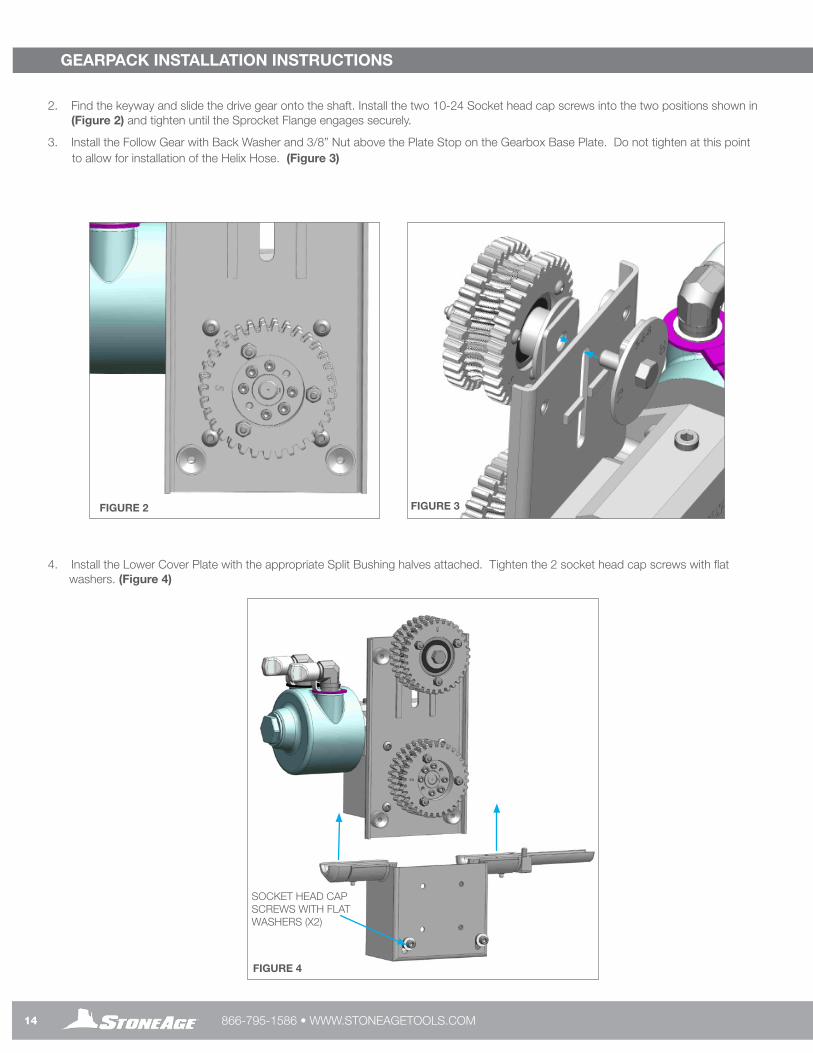
2. Find the keyway and slide the drive gear onto the shaft. Install the two 10-24 Socket head cap screws into the two positions shown in (Figure 2) and tighten until the Sprocket Flange engages securely.
3. Install the Follow Gear with Back Washer and 3/8” Nut above the Plate Stop on the Gearbox Base Plate. Do not tighten at this point to allow for installation of the Helix Hose. (Figure 3)
4. Install the Lower Cover Plate with the appropriate Split Bushing halves attached. Tighten the 2 socket head cap screws with flat washers. (Figure 4)
FIGURE 2 FIGURE 3
GEARPACK INSTALLATION INSTRUCTIONS
FIGURE 4
SOCKET HEAD CAP SCREWS WITH FLAT WASHERS (X2)

15866-795-1586 • WWW.STONEAGETOOLS.COM
GEARPACK INSTALLATION INSTRUCTIONS
FIGURE 6
FIGURE 6.1
FIGURE 6.2
FIGURE 5
FIGURE 5.1
FIGURE 5.2
5. Install the Helix Hose End onto the Gearpack and through the Back Out Preventer. Slide the Follow Gear down onto the Helix Hose. (Figure 5) Ensure the gears on both Sprocket Packs engage the Helix Hose (Figure 5.1) and the Back Washer indicates the appropriate hose size in the 12-O’Clock position and before tightening the 3/8” Bolt. (Figure 5.2)
6. Fasten the Upper Cover Plate with Hinged Collars with the two #10-24 socket head cap screws. Then fasten the hinged collars with the hex bolt thumb screw. (Figure 6)
PROPER POSITION FOR 5, 6, AND 8 mm HELIX HOSE
COMPLETE BACK VIEW
COMPLETE FRONT VIEW
3/8” BOLT
GEAR ENGAGEMENT WITH HELIX HOSE
GEARPACK INSTALLATION INSTRUCTIONS

16 866-795-1586 • WWW.STONEAGETOOLS.COM
LOWER BOLTS
TUBE INSERT
CAMERA SCREEN MOUNTING HOLES
CB-BTC CONTROL BOX
The Control Box may be operated with or without installing the detachable legs. Remove the legs for portability or to operate the Control Box in smaller spaces.
1. Remove the lower bolts and nuts from the Control Box frame.
2. Install the detachable legs onto the tube inserts.
3. Install the lower bolts and nuts through the legs and tube inserts. Use a 7/16 in wrench and socket to tighten the bolts.
ASSEMBLY, INSTALLATION, AND CONNECTION

17866-795-1586 • WWW.STONEAGETOOLS.COM
HOSE FEEDOUT
IN
RIGHT
LEFT
HLXR-100 HELIX ROTATOR HLXT-100 HELIX TRACTORHLXD-100 HELIX DRIVEHLXC-100HELIX CONTAINMENT DRIVE
PNEUMATIC SUPPLY LINES
1. Remove the dust caps from the Joint Industry Council (JIC) fittings of the Control Box and the BTC.
2. Connect and blow out the hoses, remove the port cap then immediately apply the hose to the motor.
3. Connect the seven pneumatic supply lines to the Control Box and the BTC using the color coding on the JIC fittings. Use a 7/8 in. wrench to tighten the JIC Swivel nuts.
4. Test the Control Box before operating the BTC with high-pressure water to verify the control valves move the hose in the intended direction, and that the dump valve is working properly.
HOSE FEED SPEED REVERSE
PNEUMATIC SUPPLY LINE COLOR CHART
HOSE FEED SPEED FORWARD
SHROUDED HOSE ASSEMBLY
HELIX ROTATOR
HELIX DRIVE
HELIX CONTAINMENT DRIVE
HELIX TRACTOR
ASSEMBLY, INSTALLATION, AND CONNECTION
CONNECTIONS TO CONTROL BOX
CONNECTIONS TO BTC-100 ASSEMBLY

18 866-795-1586 • WWW.STONEAGETOOLS.COM
AIR SUPPLY FITTING
A universal AIR SUPPLY FITTING (Chicago style) is located on the back of the Control Box. Connect a compatible compressed air line (not included) according to the manufacturer’s instructions. If another pneumatic connection is preferred, this fitting can be removed and any male ½ in NPT fitting may be used.
PNEUMATIC DUMP CONTROL FITTING AND LINE
A MOMENTARY PNEUMATIC DUMP CONTROL TOGGLE is located on the control panel and should be set up to control an air actuated dump valve. Install ¼ in OD nylon tubing (not included) by pushing the tubing into the fitting to connect the PNEUMATIC DUMP CONTROL FITTING to the pneumatic dump valve.
AIR SUPPLY FITTING
¼ IN OD
TUBING
(NOT INCLUDED)
CONTROL BOX REAR VIEW
PNEUMATIC DUMP CONTROL FITTING
MOMENTARY PNEUMATIC DUMP CONTROL TOGGLE
HOSE DIRECTION CONTROL
HOSE FEED SPEED CONTROLS
WARNING Always turn off pump system before servicing or replacing any parts. Failure to do so can result in severe injury and/or death.
ELBOW ROTATION CONTROL
BTC TRAVEL CONTROL
CB-BTC CONTROL PANEL
The TRAVEL CONTROL moves the BTC-100 Assembly in and out of the mud drum along the rail. The OFF position is at the 12 O’clock position.
The HOSE DIRECTION CONTROL will move the hose in the forward (feeding) and reverse (retracting) directions. The OFF position is at the 12 O’clock position.NOTE: Ensure that the elbow is lined up with a boiler tube before advancing the hose. Use remote camera to line up elbow. A manual tube locating instruction is in the “Maintenance” section of this manual.
The HOSE FEED SPEED CONTROLS will move the hose in the forward direction at 9-50 ft/min, and independently in the reverse direction at 9-65 ft/min. The control acts on the motor exhaust in the return hoses. Turn the controls clockwise to decrease the feed rate, and counter-clockwise to increase the feed rate.
The ROTATION CONTROL rotates elbow. There is a stop on the Elbow that will contact the rail and activate the internal slip clutch if you over-rotate the elbow to either side. This prevents damage to the tool. Adjust the elbow length, so you can see the tool move out of the tube and there is a gap between the elbow and the tube.
NOTE: Do not travel or rotate while the hose extended into a boiler tube. This can damage hose. Always retract the tool into the elbow before moving the Helix Tractor or Helix Rotator controls.
To use the MOMENTARY PNEUMATIC DUMP CONTROL TOGGLE, hold it in the HIGH PRESSURE ON position to route the high-pressure water to the tool. Release the toggle to the OFF position to release the high-pressure water away from the tool.NOTE: Ensure that the tool end is inside a boiler tube before going to high pressure
To pause the system, turn the HOSE DIRECTION CONTROL to the OFF, 12 O’clock position and release the MOMENTARY PNEUMATIC
DUMP CONTROL TOGGLE to the OFF position. This will stop the assembly from moving and reroute the high-pressure water away from the Boiler Tube Cleaner™ (BTC).
OPERATION

19866-795-1586 • WWW.STONEAGETOOLS.COM
OPERATION
STORAGE, TRANSPORTATION, AND HANDLING
PRE-RUN SAFETY CHECK
Refer to WJTA-IMCA’s, Recommended Practices For The Use Of High-pressure Waterjetting Equipment and/or The Water Jetting Association’s, WJA Code of Practice for additional safety information.
• Complete a job specific risk assessment and act on the resulting actions.
• Ensure the waterblasting zone is properly barricaded and that warning signs are posted.
• Adhere to all site safety procedures.
• Ensure no personnel are in the hydroblasting zone.
• Ensure the work place is free of unnecessary objects (e.g. loose parts, hoses, tools).
• Ensure all operators are using the correct Personal Protective Equipment (PPE).
• Ensure whip checks (hose whips), and all other applicable safety devices are installed and set-up properly.
• Check that the air hoses are properly connected and tight.
• Check all hoses and accessories for damage prior to use. Do not use damaged items. Only high quality hoses intended for waterblast applications should be used as high-pressure hoses.
• Ensure that operators never connect, disconnect, or tighten hoses, adapters, or accessories with the high-pressure water pump unit running.
• Test the Control Box before operating the Boiler Tube Cleaner (BTC) with high-pressure water to verify the control valves move the hose in the intended direction, and that the dump valve is working properly.
• Check that the Boiler Tube Cleaner (BTC) is anchored securely for the application and pressure of the waterjet tool being used.
• Check all high-pressure threaded connections for tightness.
• Check - air supply attachment, high pressure pump function, air controlled dump function
INSERTING ASSEMBLY THROUGH MANWAY
• Use the HLXR 050 spanner tool to loosen the knurled nut that holds the elbow onto the Helix Rotator. Do NOT remove it or the elbow.
• Rotate and/or tilt the elbow into a position that will allow it to fit through the manway, into the mud drum.
• Once the elbow is inside the mud drum, the elbow will return to it’s operating position. Tighten the collar to the minimum needed to hold the elbow in position.
• NOTE: The end of the elbow will be approximately 2 1/2” from the inside surface of the 24” mud drum. The boiler tubes may project 1/2” inside the drum. There should be 2” clearance between the end of the elbow and the tubes. Depending on field conditions, you may need to shorten or lengthen the elbow. This can be easily done by replacing the entire elbow, or saw off and form flare. StoneAge has HLXR-015 Flares available in custom lengths.
TEST RUN PROCEDURE
• Adjust the hose feed speed controls. Proper forward and reverse speeds will vary, depending on the type of material being removed. Adjustment of the hose feed speed controls may be necessary during operation in order to optimize cleaning and overall productivity.
• Operate the high-pressure water at full pressure and use the MOMENTARY PNEUMATIC DUMP CONTROL TOGGLE to verify
• When moving the BTC (BTC-100) , lift with care to prevent bodily injury.
• When storing the unit, use compressed air to blow out the air lines to remove debris and moisture. Use mild soapy water to clean the machine in order to remove corrosive materials.
• Store unit in a clean and dry area.
• Apply a small amount of air tool oil directly into the motor forward and reverse fittings. Then, briefly operate the controls at slow speed for a short duration in each direction to coat the interior parts of the motor. Install the dust caps onto all three fittings to keep moisture and dirt out.
KNURLED NUT
ROTATE ELBOWEITHER DIRECTION
TILT ELBOWEITHER DIRECTION
HLXR 050 SPANNER TOOL

20 866-795-1586 • WWW.STONEAGETOOLS.COM
Contact StoneAge for Safety Data Sheets for material usage, a complete list of spare part numbers, and service instructions for the Boiler Tube Cleaner (BTC-100) and Control Box.
Mobil® and SCH™ are registered trademarks and/or trademarks of Exxon Mobil®. Loctite® and Threadlocker Blue 242® are registered trademarks of Henkel AG & Co. KGaA.
Maintenance Item Frequency Maintenance Required
Gearbox oil level for HLXT-100, HLXR-100, and HLXD-100
Every 100 Hours of use Fill with Mobil® and SCH™ 634 synthetic gear oil. See individual part diagram pages for gearbox fill orientations.
All air fittings Before each use Inspect threads for wear or damage. Carriage rollers may continue to function normally after some wear. Roller replacement is required when wear begins to affect the Drive movement in forward or reverse.
All air fittings After each use Apply a small amount of air tool oil directly into the forward and reverse fittings. Then, briefly operate the controls at slow speed for a short duration in each direction to coat the interior parts of the motor. Install the dust caps onto all three fittings to keep moisture and dirt out.
Carriage rollers Every 100 Hours of use Lubricate Zerks on all Carriage Rollers using any multipurpose NLGI 2 grease.
Sprockets Often Inspect teeth for wear and replace if hose skips or jams.
MAINTENANCE
MANUAL TUBE LOCATION INSTRUCTIONS
It is possible to track the distance location of each tube using a flexible tape measure.
1. Align the end of the tape measure with the center of the flange on the top end of the elbow. Fasten the tape where it lies on the HLXR-100 Rotator to the square head cap screw and washer on the HLXR-100 Rotator. It should measure approximately18”+/- at the washer.
2. Zip tie the end of the tape measure back onto itself, so that it does not get caught up in the assembly. 3. Once the tape is fastened to the HLXR-100 Rotator, drape the other end over the frame of the control box and clip it to the frame. The
distance measurement should be checked at the face of the mud drum. For a tutorial on this procedure go to the YouTube page below.
StoneAge® Boiler Tube Cleaner BTC-100 Traininghttps://www.youtube.com/watch?v=17SZ34so9L4
FASTEN TAPE MEASURE HERE AND ZIP TIE IT BACK ONTO ITSELF.
DRAPE TAPE MEASURE OVER CONTROL BOX FRAME

21866-795-1586 • WWW.STONEAGETOOLS.COM
MAINTENANCE
MANUAL TUBE LOCATION INSTRUCTIONS
NOTES:
1. LOOSEN SIDE BAR KNOBS, ENGAGE GEAR IN RAIL SLOTS, TIGHTEN BAR KNOBS. MAKE SURE ROLLER GROOVES ENGAGE RAIL.
2. LOOSEN TOP BAR KNOBS, RAISE UPPER CLAMP, SLIDE HLXD TUBE INTO HLXT CLAMP, TIGHTEN BAR KNOBS.
3. LOOSEN SIDE BAR KNOBS, SET HLXR ASSY OVER BU 004 RAIL, TIGHTEN BAR KNOBS.
4. SNAP HLXT 041 SOCKET ONTO HLXT 040 BALL ON HLXT AND HLXR ASSY.
5. HLX HOSE, FLARE, ADDITIONAL RAIL, CONTROL BOX, & HOSE BUNDLE PER CUSTOMER SPECIFICATIONS (OPTIONAL)
BTC-100-XX-CAM™ (Boiler Tube Cleaner with Camera)
PARTS DIAGRAM
BTC-100-XX-CAM HLXD-BTC-100-XX
BTC-100-5-CAM HLXD-BTC-100-5
BTC-100-6-CAM HLXD-BTC-100-6
BTC-100-8-CAM HLXD-BTC-100-8
# PART NUMBER QTY.
1 BR 006-BU-001 SPLICE TUBE 1
2 BR 008-BU-001 WEDGE BOLT 2
3 BTC 004-XX BOX RAIL EXTENSION 1
4 BTC 104-001 SERIAL PLATE 1
5 BTC 120 CLAMP 2
6 BTC 140 SUPPORT 2
7 CAM 101 CAMERA ASSEMBLY 1
8 CAM 102 MONITOR ASSEMBLY 1
9 CAM 103 BATTERY BOX ASSY 1
10CAM 125 BATTERY CHARGER COMPLETE 1
11 CAM 149 10-24 WING NUT 2
12 CAM 155 BTC LED BRACKET ASSY 1
13 CAM 156 CAMERA BRACKET ASSY 1
14 GS 319-06 SHCS .19-24 X 1.50 SS 2
15GSB 313-0075 BHCS 6-32 X .188 LG SS 4
16 GW 319-F FLAT WASHER SS 2
17 HLXD-BTC-100-XX 1
18 HLXR 040 ELBOW ASSEMBLY 1
19 HLXR-100 1
20 HLXT-100 1

22 866-795-1586 • WWW.STONEAGETOOLS.COM
# PART NUMBER QTY.1 BR 060-D RAIL CLAMP, DRILLED 2
2 BTC 121 CLAMP WELDMENT 1
3 BTC 122 ACME WELDMENT 2
4 BTC 123 ACME NUT 2
5 BTC 124 SUPPORT PLATE 1
6 GB 537-04 BOLT, HEX .37-16 X 1.00 4
7 GB 550-06 BOLT, HEX .50-13 X 1.50 1
# PART NUMBER QTY.1 BR 060-D RAIL CLAMP, DRILLED 2
2 GB 537-04 BOLT, HEX .37-16 X 1.00 4
3 GB 537-05 BOLT, HEX .37-16 X 1.25 2
4 GB 550-14 BOLT, HEX .50-13 X 1.50 1
5 GN 550-L NYLOCK NUT 1
6 GW 550-F FLAT WASHER 2
7 BTC 143 PIVOT PLATE 1
8 BTC 144 SPRING PLUNGER 1
9 BTC 141 TUBE, OUTER WELDMENT 1
10 BTC 142 TUBE, INNER WELDMENT 2
BTC 120™ (Clamp)
BTC 140™ (Support)
NOTE:
1. DO NOT TIGHTEN COMPLETELY, ASSEMBLY MUST ROTATE FREELY.
PARTS DIAGRAM

23866-795-1586 • WWW.STONEAGETOOLS.COM
PARTS DIAGRAM
# PART NUMBER QTY.1 HLXR 010 ELBOW, WELDMENT 1
2 HLXR 011 KNURLED NUT 1
3 HLXR 012 WAVE SPRING, ELBOW 1
4 HLXR 013 STOP, ELBOW 1
5 HLXR 014 U-BOLT CLAMP 1
HLXR 040™ (Elbow Assembly)
HLXR 015-XX™ (FLARE)
NOTES:
1. ALIGN ELBOW STOP VERTICALLY TO ELBOW AS SHOWN.
2. ASSEMBLY TO BE SUPPLIED WITH (1) HLXR 050 TOOL.

24 866-795-1586 • WWW.STONEAGETOOLS.COM
CAM-100™ (Camera System)
PARTS DIAGRAM
# PART NUMBER QTY.
1 CAM 101 CAMERA ASSEMBLY 1
2 CAM 102 MONITOR ASSEMBLY 1
3 CAM 103 BATTERY BOX ASSY 1
4 CAM 145 CAMERA CABLE ASSEMBLY 1
5 CAM 146 LED CABLE ASSEMBLY 1

25866-795-1586 • WWW.STONEAGETOOLS.COM
HLXR-100™ (Helix Rotator)
NOTES:1. ADD 2.5 OUNCES OF MOBIL SYNTHETIC OIL SCH 634
(SA PART# GP 146.1)2. LOT NUMBER TO BE ADDED BY STONEAGE TOOLS.3. THIS WORM CAP WILL BOTTOM ON BEARING, WILL
NOT BOTTOM ON HOUSING WHEN TIGHTENED.
PARTS DIAGRAM
SET ON BENCH IN THIS POSITION TO FILL
# PART NUMBER QTY.
1 BC 009 BEARING 2
2 BR 052-2.0-90 AXLE-ZERK 3
3 BR 055 ROLLER ASSY 3
4 BR 167 90° DUST CAP 2
5 GC SP-36-F COLLAR ASSY 1
6 GN 337-L NYLOK NUT SS 1
7 GP 010-G GREEN PLASTIC ID WASHER P8
1
8 GP 010-R RED PLASTIC ID WASHER P8 1
9 GP 025-P4SS HEX SOCKET PLUG 1
10 GS 325-02 SHCS .25-20 X .50 SS 1
11 GS 325-03 SHCS .25-20 X .75 SS (TB 050)
8
12 GS 325-16 SHCS .25-20 X 4.00 SS 2
13 GSB 319-0125 BHCS .19-24 X .31 LG SS
1
14 GW 325-F FLAT WASHER SS 1
15 HLXD 007 WOODRUFF KEY 1
16 HLXD 012 KEYED BUSHING 1
17 HLXD 013 SEAL, INPUT 1
18 HLXD 017 CAP O-RING, INPUT 1
19 HLXR 001 DRIVE TUBE, OUTPUT WELDMENT
1
20 HLXR 004 BUSHING, OUTPUT 2
21 HLXR 005 SPACER, OUTPUT 1
22 HLXR 006 WORM CAP, OUTPUT 2
23 HLXR 007 O-RING OUTER, FINAL 3
24 HLXR 008 O-RING INNER, FINAL 2
25 HLXR 009 PIVOT COLLET 1
26 HLXR 021 AXLE DRIVE, MID 1
27 HLXR 022 WORM GEAR, MID 1
28 HLXR 023 SPACER UPPER, MID 1
29 HLXR 024 SPACER LOWER, MID 1
30 HLXR 025 WORM CAP, MID 1
31 HLXR 030 HOUSING 1
32 HLXR 031 SPLIT CLAMP 1
33 HLXR 033 .50-13 THREADED ROD SS 2
34 HLXT 015 AXLE, INPUT 1
35 HLXT 016 WORM, MID-MAIN 2
36 HLXT 017 SPACER, INPUT 1
37 HLXT 018 WORM CAP, INPUT 1
38 HLXT 025 WAVE SPRING, MID 3
39 HLXT 038 BAR KNOB-.50 2
40 HLXT 040-16MM BALL STUD 1
41 HRS 573 FITTING 90 DEG P8J8 2
42 RJ 009 BEARING 1
43 SG 055 AIR MOTOR 1
PARTS DIAGRAM

26 866-795-1586 • WWW.STONEAGETOOLS.COM
HLXT-100™ (Helix Tractor)
NOTES:
1. ADD 1.5 ONCES OF MOBIL SYNTHETIC OIL SCH 634 (SA# GP 146.1).
2. LOT# TO BE ADDED BY STONEAGE TOOLS.
3. THIS WORM CAP WILL BOTTOM ON BEARING, WILL NOT BOTTOM ON HOUSING WHEN TIGHTENED
4. ADD BLUE LOCTITE® 242 TO EACH END OF ALL THREAD AT SET DISTANCE.
5. ALL SEALS MUST HAVE LIP WITH SPRING FACING GEAR BOX.
SET ON BENCH IN THIS POSITION TO FILL
# PART NUMBER QTY.
1 BC 009 BEARING 2
2 BR 052-2.0-90 AXLE-ZERK 3
3 BR 055 ROLLER ASSY 3
4 BR 167 90° DUST CAP 2
5 GN 337-L NYLOK NUT SS 1
6 GN 350-L-20 NYLOK NUT SS 1
7 GP 010-B BLUE PLASTIC ID WASHER P8 1
8 GP 010-Y YELLOW PLASTIC ID WASHER P8
1
9 GP 025-P4SS HEX SOCKET PLUG 1
10 GS 325-03 SHCS .25-20 X .75 SS (TB 050)
4
11 GS 325-16 SHCS .25-20 X 4.00 SS 2
12 GS 331-025 SHCS .31-18 X .62 SS 1
13 HLXD 007 WOODRUFF KEY 1
14 HLXD 012 KEYED BUSHING 1
15 HLXD 013 SEAL, INPUT 1
16 HLXD 017 CAP O-RING, INPUT 1
17 HLXR 035 M10X1.5 THREADED ROD SS 1
18 HLXT 001 AXLE, OUTPUT 1
19 HLXT 002 SPUR GEAR, OUTPUT 1
20 HLXT 003 BUSHING, OUTPUT 1
21 HLXT 004 34 X 48 X 7 TC SEAL, FINAL 1
22 HLXT 005 WORM GEAR, OUTPUT 2
23 HLXT 006 SPACER, OUTPUT 2
24 HLXT 007 20 X 36 X 7 TC SEAL, FINAL 1
25 HLXT 008 BELLVILLE WASHER 2
26 HLXT 009 SEAL SLEEVE, OUTPUT 1
27 HLXT 010 O-RING, FINAL 2
28 HLXT 015 AXLE, INPUT 1
29 HLXT 016 WORM, MID-MAIN 2
30 HLXT 017 SPACER, INPUT 1
31 HLXT 018 WORM CAP, INPUT 1
32 HLXT 021 AXLE, MID 1
33 HLXT 022 GEAR SPACER, MID 1
34 HLXT 023 WORM CAP, MID 1
35 HLXT 024 O-RING, MID 1
36 HLXT 025 WAVE SPRING, MID 3
37 HLXT 030 HOUSING 1
38 HLXT 031 LOWER CHASIS CLAMP 1
39 HLXT 032 UPPER CHASIS CLAMP 1
40 HLXT 033 .50-13 THREADED ROD 2
41 HLXT 037 BAR KNOB-.38 2
42 HLXT 038 BAR KNOB-.50 2
43 HLXT 039 .37-16-2.5 THREADED ROD 2
44 HLXT 040-16MM BALL STUD 1
45 HLXT 041-16MM BALL SOCKET 2
46 HLXT 042-FLAT WASHER. .375 SS 1
47 HRS 573 FITTING 90 DEG P8J8 2
48 RJ 009 BEARING 3
49 SG 055 AIR MOTOR 1
PARTS DIAGRAM

27866-795-1586 • WWW.STONEAGETOOLS.COM
HLXD-100.1™ (Helix Drive Assembly)WITHOUT SPROCKET KIT
NOTES:
1. ADD 1.0 OUNCES OF MOBIL SYNTHETIC OIL SCH 634 (SA PART# GP 146.1)
2. THIS WORM CAP WILL BOTTOM ON BEARING, WILL NOT BOTTOM ON HOUSING WHEN TIGHTENED.
# PART NUMBER QTY.
1 BR 167 90° DUST CAP 2
2 GN 350-L NYLOK NUT SS 1
3 GP 010-BK BLACK PLASTIC ID WASHER P8
1
4 GP 010-P PURPLE PLASTIC ID WASHER P8
1
5 GP 025-P4SS HEX SOCKET PLUG 2
6 GS 325-03 SHCS .25-20 X .75 SS (TB 050)
4
7 GSB 325-02 BHCS .25-20 X .50 LG SS 8
8 HLXD 001 AXLE, OUTPUT 1
9 HLXD 002 BEARING, OUTPUT 2
10 HLXD 003 SEAL, OUTPUT 1
11 HLXD 004 WORM GEAR 1
12 HLXD 005 BULKHEAD, OUTPUT 1
13 HLXD 006 O-RING, OUTPUT 1
14 HLXD 007 WOODRUFF KEY 1
15 HLXD 011 SPACER 1
16 HLXD 012 KEYED BUSHING 1
17 HLXD 013 SEAL, INPUT 1
18 HLXD 014 WORM, INPUT 1
19 HLXD 015 AXLE, INPUT 1
20 HLXD 016 WORM CAP, INPUT 1
21 HLXD 017 CAP O-RING, INPUT 1
22 HLXD 018 MAIN GEARBOX 1
23 HLXD 048 .188 X .3125 RETAINING RING CLEVIS PIN
2
24 HLXD 060 BOLT ASSY 4
25 HLXD 061 GEARBOX BASE PLATE ASSY
1
26 HLXD 063 GEARBOX COVER 2
27 HLXD 080 HINGED COLLAR ASSY 1
28 HRS 573 FITTING 90 DEG P8J8 2
29 RJ 009 BEARING 1
30 SG 055 AIR MOTOR 1
PARTS DIAGRAM PARTS DIAGRAM

28 866-795-1586 • WWW.STONEAGETOOLS.COM
HLXD-BTC-100™ (Helix Drive)WITH SPROCKET KIT
HLXD-046™ (Clamp Trolley Assembly)
# PART NUMBER QTY.
1 BR 052-2.0-90 AXLE-ZERK 2
2 BR 055 ROLLER ASSEMBLY 2
3 HLXD 046.1 CLAMP TROLLEY BLOCK, LEFT 1
4 HLXD 046.2 CLAMP TROLLEY BLOCK, RIGHT 1
5 HLXD 046.3 .37-16-0 THREADED ROD 2
6 HLXT 037 BAR KNOB-.38 2
HLXD-BTC-100-XX HOSE SIZE HLXD DRIVE ASSYQTY. 1
HLXD SPROCKET KITQTY. 1
HLXD CLAMP TROLLEYQTY. 1
HLXD CLEVIS PINQTY. 1
HLXD-BTC-100-5 5mm HLXD-100.1 HLXD 605 HLXD 046 HLXD 048
HLXD-BTC-100-6 6mm HLXD-100.1 HLXD 606 HLXD 046 HLXD 048
PARTS DIAGRAM

29866-795-1586 • WWW.STONEAGETOOLS.COM
# HLXD 605 PART NUMBERS HLXD 606 PART NUMBERS QTY.1 GB 337-04 BOLT, HEX .37-16 X 1.00 SS GB 337-04 BOLT, HEX .37-16 X 1.00 SS 2
2 GN 319-L-24 NYLOK NUT SS GN 319-L-24 NYLOK NUT SS 6
3 GS 316-02 SHCS .16-32 X .50 SS (HC 014) GS 316-02 SHCS .16-32 X .50 SS (HC 014) 4
4 GS 319-040 SHCS .19-24 X 1.00 SS GS 319-040 SHCS .19-24 X 1.00 SS 2
5 GSB 319-07 BHC .19-24 X 1.75 LG SS GSB 319-07 BHC .19-24 X 1.75 LG SS 6
6 HLXD 023 SPROCKET FLANGE PLATE HLXD 023 SPROCKET FLANGE PLATE 1
7 HLXD 024 SPROCKET FLANGE CAP HLXD 024 SPROCKET FLANGE CAP 1
8 HLXD 025 SPROCKET FLANGE BUSHING HLXD 025 SPROCKET FLANGE BUSHING 1
9 HLXD 031-5-33t IDLER GEAR HLXD 031-6-30t IDLER GEAR 4
10 HLXD 035-5-33t SPROCKET HLXD 035-6-30t SPROCKET 2
11 HLXD 038 LG BACK WASHER HLXD 038 LG BACK WASHER 1
12 HLXD 039 LG IDLER AXLE HLXD 039 LG IDLER AXLE 1
13 HLXD 042 FRONT WASHER HLXD 042 FRONT WASHER 1
14 HLXD 065-L 5mm SPLIT BUSHING, LONG HLXD 066-L 6mm SPLIT BUSHING, LONG 1
15 HLXD 065-S 5mm SPLIT BUSHING, SHORT HLXD 066-S 6mm SPLIT BUSHING, SHORT 1
16 LM 071.05-JE BEARING LM 071.05-JE BEARING 2
NOTES:
1. ASSEMBLE IDLER GEARS WITH ENGRAVED # FACING OUTWARD (BOTH SIDES).
2. PACKAGE SPROCKET ASSEMBLIES AND BUSHINGS TOGETHER.
3. ADD BLUE LOCTITE® 242 TO NOTED THREADED HARDWARE.
4. BLUE GOOP IS A SWAGELOK BRAND ANTI-SEIZE. AN EQUIVALENT ALTERNATIVE IS ACCEPTABLE.
PARTS DIAGRAM PARTS DIAGRAM
HLXD 60X™ Helix Drive Sprocket Kit(THIS IS SHOWN AS THE HLXD 605 5mm)

30 866-795-1586 • WWW.STONEAGETOOLS.COM
HCS-HLXC™ (Helix Containment System with Helix Containment Drive)
TABLE 1
ASSEMBLY NUMBERPART NUMBER OF:
CONTAINMENT SYSTEM HELIX DRIVE
HCS-HLXC-5 HCS-100-MP12TM9-24 HLXC-100-5
HCS-HLXC-6 HCS-100-MP12TM9-24 HLXC-100-6
# PART NUMBER QTY.1 GSB 325-025 BHSC, 1/4-20 UNC X 0.625 L 4
2 GW 325-L-HC WASHER LOCK, HIGH-COLLAR 1/4” SS 4
PARTS DIAGRAM

31866-795-1586 • WWW.STONEAGETOOLS.COM
HCS-100™ (Helix Hose Containment System)
CONTINUED ON NEXT PAGE.....
PARTS DIAGRAM PARTS DIAGRAM

32 866-795-1586 • WWW.STONEAGETOOLS.COM
HCS-100™ (Helix Hose Containment System) CONTINUED
TABLE 1
ASSEMBLY NUMBERPART NUMBER OF:
SWIVEL ELBOW TUBE GLAND COLLAR
HCS-100-MP12TM9-24 SG-P12K-62-90 HCS 105 HCS 108 AF 070-MP9 AF 071-MP9
HCS-100-MP12TM9-24 SG-MP12K-62-90 HCS 105 HCS 108 AF 070-MP9 AF 071-MP9
NOTES:
1. BLUE GOOP IS A SWAGELOK BRAND ANTI-SEIZE. AN EQUIVALENT ALTERNATIVE IS ACCEPTABLE.
2. BLUE LOCTITE: PN: 242 OR EQUIVALENT
3. SWIVEL, FLANGE, DRUM, ELBOW & LOCKING PLATE INSTALLATION:
A) SECURE SWIVEL WITHIN CLAMP ON BASE PLATE AT HEIGHT SHOWN IN SIDE VIEW.
B) SLIDE ADAPTER FLANGE FULLY ONTO SWIVEL SHAFT (PROFILED SIDE TOWARD SWIVEL) AND TIGHTEN SECURELY.
C) PLACE DRUM ON ADAPTER FLANGE (5 OF THE 6 HOLES WILL BE USED). ATTACH DRUM TO ADAPTER FLANGE WITH ALL 5 SCREWS.
D) (CRITICAL) TIGHTEN ELBOW ONTO SWIVEL. (CRITICAL)
E) PLACE FLAT SIDE OF LOCKING PLATE UP AGAINST ONE OF THE SIDES OF ELBOW. DETERMINE THE BEST SIDE AND ORIENTATION OF PLATE BY ASSURING 2 SCREWS CAN SECURE THE PLATE. REMOVE THOSE 2 SCREWS, PLACE PLATE FIRMLY AGAINST THE SIDE OF THE ELBOW, ADD FLAT WASHERS AND REINSTALL SCREWS. SEE SECTION VIEW A-A SHOWING EXAMPLE OF PLATE INSTALLED.
4. CLEAN ALL DEBRIS & OILS BEFORE INSTALLING. INSTALL AT APPROXIMATE ORIENTATION AND LOCATION & AT ROOM TEMP.
PARTS DIAGRAM
#. PART NUMBER QTY.
1 BR 055-SS ROLLER ASSY 4
2 GB 350-07 BOLT, HEX .50-13 X 1.75 SS 4
3 GS 325-03 SHCS .25-20 X .75 SS 4
4 GS 325-05 SHCS .25-20 X 1.25 SS 1
5 GSB 331-03 BHCS .31-18 X .75 LG 5
6 GW 325-L LOCK WASHER SS 4
7 GW 325-L-HC LOCK WASHER SS 1
8 GW 331-F FLAT WASHER SS 2
9 GW 350-L LOCK WASHER SS 4
10 HCS 101 DRUM BASE PLATE WELDMENT 1
11 HCS 102 2.5IN BOX RAIL, CUT AND TAPPED 1
12 HCS 103 DRUM ADAPTER FLANGE 1
13 HCS 110 HOSE DRUM 1
14 HCS 115 RETRACTABLE SPRING PLUNGER 1
15 HCS 120 ELBOW LOCKING PLATE 1
16 PL 180 GENERIC STONEAGE DECAL 2.5X13 1

33866-795-1586 • WWW.STONEAGETOOLS.COM
HLXC-100.1™ (Helix Containment Drive Assembly)WITHOUT SPROCKET KIT
# PART NUMBER QTY.
1 BR 155 MUFFLER 1
2 BR 167 90° DUST CAP 1
3 GP 010-BK BLACK PLASTIC ID WASHER P8 1
4 GSB 325-02 BHCS .25-20 X .50 LG SS 3
5 HLXC 061 GEARBOX BASE PLATE ASSY 1
6 HLXD 007 WOODRUFF KEY 1
7 HLXD 048 .188 X .3125 RETAINING RING CLEVIS PIN 2
8 HLXD 060 BOLT ASSY 4
9 HLXD 063 GEARBOX COVER 2
10 HLXD 080 HINGED COLLAR ASSY 2
11 HRS 573 FITTING 90 DEG P8J8 1
12 SG 055 AIR MOTOR 1
PARTS DIAGRAM PARTS DIAGRAM

34 866-795-1586 • WWW.STONEAGETOOLS.COM
HLXC-100™ (Helix Containment Drive Assembly)WITH SPROCKET KIT
SPROCKET KIT CHARTASSEMBLY NUMBER HOSE SIZE HLXD DRIVE ASSEMBLY SPROCKET KIT
HLXC-100-5 5mm HLXC-100.1 HLXC 605
HLXC-100-6 6mm HLXC-100.1 HLXC 606
PARTS DIAGRAM

35866-795-1586 • WWW.STONEAGETOOLS.COM
HLXC 60X™ Helix Containment Drive Sprocket Kit(THIS IS SHOWN AS THE HLXC 605 5mm)
# HLXC 605 PART NUMBERS HLXC 606 PART NUMBERS QTY.1 GB 337-04 BOLT, HEX .37-16 X 1.00 SS GB 337-04 BOLT, HEX .37-16 X 1.00 SS 2
2 GN 319-L-24 NYLOK NUT SS GN 319-L-24 NYLOK NUT SS 6
3 GS 316-02 SHCS .16-32 X .50 SS (HC 014) GS 316-02 SHCS .16-32 X .50 SS (HC 014) 4
4 GS 319-040 SHCS .19-24 X 1.00 SS GS 319-040 SHCS .19-24 X 1.00 SS 2
5 GSB 319-07 BHC .19-24 X 1.75 LG SS GSB 319-07 BHC .19-24 X 1.75 LG SS 6
6 HLXC 065-L 5mm SPLIT BUSHING, LONG HLXC 066-L 6mm SPLIT BUSHING, LONG 1
7 HLXD 023 SPROCKET FLANGE PLATE HLXD 023 SPROCKET FLANGE PLATE 1
8 HLXD 024 SPROCKET FLANGE CAP HLXD 024 SPROCKET FLANGE CAP 1
9 HLXD 025 SPROCKET FLANGE BUSHING HLXD 025 SPROCKET FLANGE BUSHING 1
10 HLXD 031-5-33t IDLER GEAR HLXD 031-6-30t IDLER GEAR 4
11 HLXD 035-5-33t SPROCKET HLXD 035-6-30t SPROCKET 2
12 HLXD 038 LG BACK WASHER HLXD 038 LG BACK WASHER 1
13 HLXD 039 LG IDLER AXLE HLXD 039 LG IDLER AXLE 1
14 HLXD 042 FRONT WASHER HLXD 042 FRONT WASHER 1
15 HLXD 065-S 5mm SPLIT BUSHING, SHORT HLXD 066-S 6mm SPLIT BUSHING, SHORT 1
16 LM 071.05-JE BEARING LM 071.05-JE BEARING 2
NOTES:
1. ASSEMBLE IDLER GEARS WITH ENGRAVED # FACING OUTWARD (BOTH SIDES).
2. PACKAGE SPROCKET ASSEMBLIES AND BUSHINGS TOGETHER.
3. ADD BLUE LOCTITE® 242 TO NOTED THREADED HARDWARE.
4. BLUE GOOP IS A SWAGELOK BRAND ANTI-SEIZE. AN EQUIVALENT ALTERNATIVE IS ACCEPTABLE.
PARTS DIAGRAM PARTS DIAGRAM

36 866-795-1586 • WWW.STONEAGETOOLS.COM
1. Acceptance of Terms and Conditions. These Terms and Conditions shall operate as Seller’s acceptance of Buyer’s purchase order, and such acceptance is made expressly conditional on assent by Buyer to the Terms and Conditions. Such assent shall be deemed to have been given unless written notice of objection to any of such Terms and Conditions (including inconsistencies between Buyer’s purchase order and this acceptance) is given by Buyer to Seller promptly on receipt hereof.
Seller desires to provide its Buyer with prompt and efficient service. However, to negotiate individually the terms of each sales contract would substantially impair Seller’s ability to provide such service. Accordingly, products furnished and services rendered by Seller are sold only on the Terms and Conditions stated herein. Notwithstanding any Terms or Conditions on Buyer’s order, Seller’s performance of any contract is expressly made conditional on Buyer’s agreement to Seller’s Terms and Conditions of sale unless otherwise specifically agreed to in writing by Seller. In the absence of such agreement, commencement of performance, shipment and/or delivery shall be for Buyer’s convenience only and shall not be deemed or construed to be an acceptance of Buyer’s Terms and Conditions. PRODUCTS SOLD BY SELLER ARE DESIGNED AND INTENDED TO BE USED AT HIGH PRESSURES AND SPEEDS, AND MAY BE DANGEROUS IF OPERATED IMPROPERLY OR WITHOUT THE USE OF APPROPRIATE SAFETY DEVICES AND GUARDS. BUYER IS CAUTIONED TO CAREFULLY READ AND UNDERSTAND THESE TERMS AND CONDITIONS, AS THEY HAVE IMPORTANT LEGAL CONSEQUENCES.
2. Payment/Prices. Unless other arrangements have been made in writing between Seller and Buyer, payment for product delivered shall be made upon receipt of invoice. The prices shown on the face hereof are those currently in effect. Prices invoiced shall be per price list in effect at the time of shipment. Prices are subject to increase for inclusion of any and all taxes which are applicable and which arise from the sale, delivery or use of Seller’s products or services and for the collection of which Seller is or may be responsible to any governmental authority unless acceptable exemption certificates are provided by Buyer in accordance with law. Buyer shall pay all charges for transportation and delivery and all excise, order, occupation, use or similar taxes, duties, levies, charges or surcharges applicable to the equipment or services being purchased, whether now in effect or hereafter imposed by any governmental authority, foreign or domestic.
3. Warranty. Subject to the limitations and conditions hereinafter set forth, Seller warrants to the original Buyer that its products are free from defects in workmanship and material for a period of one (1) year months from shipment. Seller’s obligation under this warranty shall be limited to repairing, replacing or issuing a credit for, at Seller’s option, any products or services it finds to be defective in material or workmanship. In no event shall Seller be liable for any incidental, consequential or indirect damages of any kind. THIS WARRANTY SHALL BE IN LIEU OF ANY OTHER WARRANTY, EXPRESSED OR IMPLIED, INCLUDING ANY WARRANTY FOR MERCHANTABILITY OR FITNESS FOR ANY PARTICULAR PURPOSE. No statement or recommendation made by Seller or its representative to Buyer or User shall constitute a warranty by Seller or a waiver or modification to any of the provisions hereof or create any liability for Seller. All warranty claims are subject to the exclusions and limitations set forth below:
a. The warranty shall not apply if the product or service (1) has been subject to misuse, negligence or accident; (2) has not been installed or
operated in accordance with Seller’s recommendations; (3) has been operated under more severe conditions than those specified for the particular product or service; (4) has been operated beyond the rated capacity of the product; or (5) has been repaired or altered outside Seller’s facilities or in any way so as, in Seller’s judgment, to affect its stability or reliability.
b. Products that Seller furnishes, but does not manufacture, carry only the warranty of the manufacturer of such products. Where other manufacturers’ or suppliers’ products used in Seller’s products or services prove defective, Seller’s liability shall exist only to the extent that Seller is able to recover from such manufacturers or suppliers for such defects.
c. Any warranty granted by Seller to the Buyer shall be deemed void if any goods covered by such warranty are used for any purpose not recommended or permitted. In addition, the Buyer shall indemnify Seller and hold Seller harmless from and against any and all claims, damages, losses, costs, expenses and other liability of whatever nature that Seller suffers or incurs by reason of any such unintended use.
d. Notice of defective product or service must be given in writing to Seller by Buyer or User within fifteen (15) business days following receipt of goods. Buyer or User shall keep such products or services in an unaltered condition for examination by Seller’s representative. No goods may be returned for credit or adjustment without prior written permission from Seller.
4. Product Liability. Buyer specifically acknowledges that the products being purchased may be operated at high speeds and/or pressures, and that as such they may be inherently dangerous if not used correctly. Buyer shall be solely responsible for the safe operation of the products at all times and for determining the safety devices and guards that may be required for the safe operation of the products. Buyer shall undertake to specify and order all safety devices and guards necessary for the safe operation of the equipment covered. All safety devices and guards offered in Seller’s quotations are recommended for purchase. Seller may provide necessary safety devices and guards not offered in this quotation at an extra price in accordance with the specifications of Buyer. Buyer shall at all times use and require its employees to use all necessary and appropriate safety devices, guards and proper safe operating procedures. Buyer shall not remove or modify any such devices, guards or warning signs and shall insist on safe operating practices on the part of its personnel. In no event shall Seller be responsible for any injuries to persons or property caused by defects in any equipment, including by way of illustration and not limitation, any pumps, compressors, fittings, connections, components, piping or hoses up to the point that same are connected to the product. Buyer agrees to indemnify and to save Seller harmless from any and all liability or obligation incurred by or against Seller, including costs and attorneys’ fees, to or by any persons injured directly or indirectly in the operation of the equipment furnished under the following conditions:
a. if Buyer fails to purchase and use necessary and appropriate safety devices and guards as determined and/or recommended by Seller;
b. if Buyer fails to maintain in good working order such safety devices and guards as are purchased from Seller;
c. if Buyer adds, omits, repairs, modifies, replaces or substitutes any components on the equipment without permission from Seller;
TERMS AND CONDITIONSTERMS AND CONDITIONS

37866-795-1586 • WWW.STONEAGETOOLS.COM
TERMS AND CONDITIONS
d. if Buyer exceeds at any time the maximum safe loads, pressures or speeds recommended by Seller for the equipment furnished hereunder without the specific written consent of Seller; or
e. if Buyer otherwise fails to operate the product or equipment in accordance with Seller’s printed instructions or otherwise negligently operates the equipment.
5. Delivery. Seller is not obligated to make delivery by a specified date, but will always use its best efforts to make delivery within the time requested. All deliveries are based on F.O.B. Seller’s factory, unless specifically agreed otherwise, and Buyer shall pay all shipping costs and insurance from that point. Seller, in its sole discretion, will determine and arrange the means and manner of transportation of the products. Responsibility of Seller shall cease and Buyer assumes all risk of loss or damages upon Seller’s delivery to and receipt by a common carrier. Carriers shall be responsible for goods lost or damaged in transit and Buyer shall immediately notify the carrier in writing of such loss or damage. At Buyer’s request Seller will offer its assistance. THE PROPOSED SHIPMENT DATE IS AN ESTIMATE. UNDER NO CIRCUMSTANCES SHALL SELLER HAVE ANY LIABILITY WHATSOEVER FOR LOSS OF USE OR FOR ANY DIRECT OR CONSEQUENTIAL DAMAGES RESULTING FROM DELAY REGARDLESS OF THE REASON(S). Shortages or errors must be reported within fifteen (15) business days from receipt of shipment to secure adjustment. No merchandise may be returned without securing written approval from Seller. Seller will notify Buyer promptly of any material delay and will specify the revised delivery date as soon as practicable. Seller shall not be liable for any delay in delivery or performance, or for any failure to manufacture, deliver or perform due to (a) any cause beyond its reasonable control; (b) any act of God, act of Buyer, act of civil or military authority, governmental priority, strike or other labor disturbance, flood, epidemic, war, riot, delay in transportation or car shortage; or (c) inability on account of any cause beyond the reasonable control of Seller to obtain necessary materials, components, services or facilities. In the event of any such delay, the date of delivery or of performance shall be extended for a period equal to the time lost by reason of the delay.
6. Technical Advice. All technical advice, recommendations and services of Seller are intended for use by persons having adequate skill, at their own risk, and Seller assumes no responsibility, and Buyer hereby waives all claims against Seller, for results obtained or damages incurred from the use of Seller’s advice, recommendations and services.
7. Modification. These Terms and Conditions are intended by Seller and Buyer to constitute a final, complete and exclusive expression of agreement and cannot be supplemented or amended without Seller’s prior written approval. Seller’s waiver of any breach, or failure to enforce any of the Terms and Conditions at any time, shall not in any way affect, limit or waive Seller’s right thereafter to enforce and compel strict compliance with every Term and Condition thereof. If any provisions of these Terms and Conditions are held to be invalid or unenforceable, such invalidity or unenforceability shall not affect the validity or enforceability of the other portions hereof.
8. Disputes. Buyer and Seller shall attempt in good faith promptly to resolve any dispute arising under these Terms and Conditions by negotiations between representatives who have authority to settle the controversy. If unsuccessful, Buyer and Seller shall further attempt in good faith to settle the dispute by nonbinding third-party mediation, with
fees and expenses of such mediation apportioned equally to each side. Any dispute not so resolved by negotiation or mediation may then be submitted to a court of competent jurisdiction in accordance with the terms hereof. These procedures are the exclusive procedures for the resolution of all such disputes between the parties. All sales, agreements for sale, offers to sell, proposals, acknowledgments and contracts of sale, including, but not limited to, purchase orders accepted by Seller, shall be considered a contract under the laws of the State of Colorado and the rights and duties of all persons, and the construction and effect of all provisions hereof shall be governed by and construed according to the laws of such state. A state or federal court located within the State of Colorado shall have sole and exclusive jurisdiction over any litigation concerning any such matters as well as any alleged defects of any products or equipment covered thereby or damages sustained as a result of such alleged defects. If any litigation is commenced between Seller and Buyer, or their personal representatives, concerning any provision hereof, the party prevailing in the litigation shall be entitled, in addition to such other relief that is granted, to a reasonable sum as and for their attorneys’ fees and costs in such litigation or arbitration.
STONEAGE TRADEMARK LIST View the list of StoneAge’s trademarks and service marks and learn how the trademarks should be used. Use of StoneAge trademarks may be prohibited, unless expressly authorized.
http://www.StoneAgetools.com/trademark-list/
STONEAGE PATENT DATA View the list of StoneAge’s current U.S. patent numbers and descriptions.
http://www.sapatents.com
TERMS AND CONDITIONS

38 866-795-1586 • WWW.STONEAGETOOLS.COM
This page is intentionally left blank.
NOTES

39866-795-1586 • WWW.STONEAGETOOLS.COM
NOTES
This page is intentionally left blank.
NOTES

1-866-795-1586 • www.STONEAGETOOLS.com
© 2014 StoneAge, Inc. All Rights Reserved