Embed Size (px)
Citation preview

1 dBase, LLC 2017 – All rights reserved.
Users Guide

2 dbDOS™ PRO 6 – © 2017 | dBase, LLC.
dBase, LLC may have patents and/or pending patent applications covering subject matter in this document. The
furnishing of this document does not give you any license to these patents.
COPYRIGHT © 2017 dBase, LLC All rights reserved. All dbDOS™ product names are trademarks or registered
trademarks of dBase, LLC. Other brand and product names are trademarks or registered trademarks of their
respective holders.
Printed in the U.S.A.

3 dbDOS™ PRO 6 – © 2017 | dBase, LLC.
Contents
Welcome to dbDOS™ PRO 6 ................................................................................................................... 6
What’s New in dbDOS™ PRO 6? ............................................................................................................ 7
Installing dbDOS™ PRO 6 ........................................................................................................................ 8
Activating dbDOS™ PRO 6 ................................................................................................................ 10
Using the EASY DOS Feature................................................................................................................. 11
Using dbDOS_Config.exe ....................................................................................................................... 17
Initial dbDOS™ PRO 6 – Configuration Manager .......................................................................... 19
Screen Breakdown............................................................................................................................ 20
New Configuration .......................................................................................................................... 25
Wizard Approach to building a dbDOS™ Windows® shortcut: .................................................. 26
Step 1: Mounted Drive Configuration: ......................................................................................... 28
Step 2: Create a mounted drive ..................................................................................................... 30
Creating an Executable configuration: ...................................................................................... 33
Creating a Command Prompt: ................................................................................................... 38
Step 3: Regional Settings: ............................................................................................................... 40
Step 4: Printer Settings: ................................................................................................................... 43
Step 5: Display options: .................................................................................................................. 49
Step 6: Launcher & Shortcut Options: .......................................................................................... 52
Step 7: Test Configuration:............................................................................................................. 53
Returns to the Main page: ............................................................................................................... 55
Configuration Wizard Footer-bar explained: ............................................................................... 56
Advanced Approach to building a dbDOS™ Windows® shortcut: ............................................. 57
Configuration Manager Advanced ................................................................................................... 58
Configuration Settings and Options: ................................................................................................. 59
Change Area 1: Configuration Details: ........................................................................................ 60
Change Area 2: Mounted Drives .................................................................................................. 60
Creating an Executable configuration: ...................................................................................... 64

4 dbDOS™ PRO 6 – © 2017 | dBase, LLC.
Creating a Command Prompt: ................................................................................................... 68
Change Area 3: Regional Settings: ................................................................................................ 69
Change Area 4: Printer Settings: ................................................................................................... 71
Change Area 5: Display Options: ................................................................................................. 77
Change Area 6: CPU Options: ....................................................................................................... 79
Change Area 7: Autoexec (Customization) ................................................................................. 79
Change Area 8: Launcher & Shortcut Options: .......................................................................... 80
Change Area 7: Footer-bar ............................................................................................................. 81
Returns to the Main page: ............................................................................................................... 82
Running dBASE DOS after the dbDOS Configuration Utility (dbDOS_Config.exe) ................. 83
The About… the menu item ........................................................................................................... 85
Networking features of dbDOS™ 6................................................................................................... 86
New Native file system and network support combined for the dbDOS™ Engine .............. 86
New – 4DOS Integration ................................................................................................................. 87
New features of dbDOS™ 6 ............................................................................................................... 90
33% Faster than prior releases ........................................................................................................ 90
Optimized Screen Drawing with use of the DDraw option....................................................... 90
New Sort features in the dbDOS™ Config Manager .................................................................. 90
Verify close on the main dbDOS™ engine window ................................................................... 90
Updated – Look & Feel .................................................................................................................... 91
(Improved) dbDOS™ PRO 6 automatic configuration upgrades ............................................. 92
dbDOS PRO 6 general set of small issues resolved and most known bugs removed ............ 92
Great Features included with dbDOS™ PRO 6 ............................................................................... 93
Paste From Windows (CTRL|F9) .................................................................................................. 93
Print to the dbDOS clipboard (Ctrl-F8). ........................................................................................ 94
Print screen to dbDOS Clipboard (Ctrl-PrnScr) ........................................................................... 96
Better Printing with dbDOS PRO 6 ....................................................................................................... 97
Quick Keyboard shortcuts .................................................................................................................... 103

5 dbDOS™ PRO 6 – © 2017 | dBase, LLC.
Glossary of Terms: ................................................................................................................................. 104

6 dbDOS™ PRO 6 – © 2017 | dBase, LLC.
Welcome to dbDOS™ PRO 6 The new dbDOS™ PRO 6 is 33% faster than before and has been optimized to make it the
easiest way for developers and end-users to continue to use MS-DOS / DOS based programs on
the latest and greatest Windows Operating System hardware and software. dbDOS™ uses an
advanced DOS Virtual Machine (VM) that enables the DOS-based application to run on the
latest and greatest hardware and software just as they did on older DOS machines.
This is an incredible way for individuals and companies to save time and money. Now users of
dbDOS™ PRO 6 can run stand-alone or with network based programs. They can deploy their
existing DOS-based dBASE applications on almost any hardware and Microsoft® Windows®
Operating System (Vista, 2008, 7, 2012, 10, and 2016) 64-bit editions. This is done without
changing any of the existing programs or applications.
dBase’s dbDOS™ PRO 6 makes it incredibly easy to create Windows shortcuts that allow
running of almost any DOS-based programs, and this allows access to data in a few simple
mouse-clicks.
dbDOS™ PRO 6 is the best life extenders for dBASE for DOS products on the market today.
Simply move your programs and data to the new hardware, install dbDOS, run the dbDOS™
Configuration Utility, and then double-click on the shortcut and the product(s) are up and
running and ready to use.
The dbDOS™ PRO 6 product supports both stand-alone and networking solutions for fast, easy
to use an approach that saves time and money.

7 dbDOS™ PRO 6 – © 2017 | dBase, LLC.
What’s New in dbDOS™ PRO 6?
(NEW) 33% base faster than prior releases!
(NEW) Optimized Look & Feel additional speed increase (15%)
(NEW) Sort features inside the Configuration Manager
(NEW) Verify Close on Red X close
(Updated) Look & Feel
(Improved) dbDOS™ PRO 6 automatic configuration upgrades
dbDOS PRO 6 general set of small issues resolved and most known bugs removed
More can be found on these exciting new features in the New
Features in dbDOS™ 6 section in this User’s Guide.

8 dbDOS™ PRO 6 – © 2017 | dBase, LLC.
Installing dbDOS™ PRO 6 Installing dbDOS™ is the same as installing any other Microsoft Windows program and uses a
standard installation program to do the job.
Simply click the downloaded setup program located in the download directory, to start the
installer.
If you are installing on Windows Vista or newer, the first question will be whether to run the
installer. This is a condition of the Windows UAC (User Access Control) and is part of the
Windows security system.
By clicking Yes to the UAC question, the installer will execute:
Press Next > button
Accept the license and press
Next > button
Review the install
information and press Next >
button to install.
Installation process
Press the Finish button and it
will start the dbDOS™ PRO 6

9 dbDOS™ PRO 6 – © 2017 | dBase, LLC.
Configuration Utility.
That is the complete install process. As stated above, the install finishes when the Finish button
is clicked and that will kick off the dbDOS Configuration Utility, which you can learn about in
the next section.

10 dbDOS™ PRO 6 – © 2017 | dBase, LLC.
Activating dbDOS™ PRO 6
Once the installation is complete, the next step in running dbDOS™ PRO 6 is Activating the
software on each computer it is installed. The process is the same regardless if you are using
the software as a single user version or the networking version, except that dbDOS™ PRO 6 will
need to be installed on all network nodes and activated on each node before it can be used.
It is recommended that YOU REGISTER THE PRODUCT FROM THE INSTALLER! This will
ensure that that Windows® Operating System has the proper elevations for UAC (User Access
Control) on Vista and higher OSs.
Click the Activate dbDOS™ PRO 6 link
Select the option that best fits your situation.
Normally this will be to Activate dbDOS™
PRO 6 Online
Enter user License ID and your Password that
was emailed to you.
The new dbDOS™ PRO 6 EasyDOS is the
quickest way to a configuration just three (3)
steps.
11 dbDOS™ PRO 6 – © 2017 | dBase, LLC.
Using the EASY DOS Feature
One of the exciting features of dbDOS PRO 6 is the EASY DOS configuration utility. This utility
is designed to make creating a dbDOS configuration that runs a DOS application very simple
and straightforward. No need to understand mounted drives, display types, etc., it is a
straightforward approach. Now, to get this ease of use, dbDOS Configuration utility must
make some assumptions about what is being created. Therefore, before you start to use the new
EASY DOS feature, make sure the following is correct:
• All DOS based programs, applications, and data are located under a single directory
• Have a Windows 7 or above machine with a good processor and memory
• Be able to use the standard location/CodePage (95% of the customers) use 437
If those three things are true, then making a new Configuration is just three simple steps, as
defined below:

12 dbDOS™ PRO 6 – © 2017 | dBase, LLC.
Page one of the EASY DOS configuration creator
If you can answer the above question with a Yes, then press the Yes button to continue. If you
need more help, click the help button, and if the answer is No then press the No button to exit
the utility.
Note: A word about answering No to the question in the wizard. Just because you
answer No to the first question does not mean you cannot use dbDOS, it just means that
you have a more complicated setup and must use the standard dbDOS Configuration
Utility. This feature is covered in the next section of the Users Guide.
After answering Yes to the question, the utility will take you to the second page. However,
before you get to the second page, the utility will show you a directory / file list dialog:

13 dbDOS™ PRO 6 – © 2017 | dBase, LLC.
Pick your Executable that will be run in the dbDOS environment
A few things to notice from the above dialog. Notice the dialog is pointing to the Computer >
OS (C:) > dbase directory or in DOS terms: C:\dbase\>
Note: Keep in mind that your DOS applications do not need to be in C:\dbase\>
directory. It can be located anywhere on the hard drive. So for instance if you had
Word Perfect 5.1 for DOS loaded, it may be in c:\wp51\ so you would point to that
directory… again, wherever the DOS applications, programs, and data are located on
the hard drive.
Second, notice that only .exe(s) and .com(s) are being shown. The EASY DOS utility only
recognizes those two DOS executable types. If you have a .bat file, you should use the full
utility for creating a DOS configuration.
Once you select an executable (.exe or .com) and press the Open button, the following screen
will appear:

14 dbDOS™ PRO 6 – © 2017 | dBase, LLC.
Showing the Selected file to create the configuration
Therefore, the configuration is created in this example is pointing to an executable located in
c:\dbase\ directory. The DBASE.exe will be started when the dbDOS configuration is executed
after the shortcut is created. Now, if everything looks good, press the OK button to continue. If
you need more help, press the Help button or if you want to exit press the Cancel button.
Note: Notice the folder located on the right-hand side of the edit box. At any time, the
user can click the folder image the Folder dialog will be shown again, where the user can
reselect a new folder or executable.

15 dbDOS™ PRO 6 – © 2017 | dBase, LLC.
The last page of the utility will appear:
Final Page of the wizard
The final page, as shown above, is straightforward if you want to run the application in dbDOS
click the Yes button. If not, hit the No button and it will exit the utility and of course, you can
always get Help by pressing the help button.
This page is designed to review what will appear on the Windows Desktop. Take note of the
graphic that should be on the desktop with the name under it, as shown below:

16 dbDOS™ PRO 6 – © 2017 | dBase, LLC.
Configuration created on Desktop and ready to use

17 dbDOS™ PRO 6 – © 2017 | dBase, LLC.
Using dbDOS_Config.exe One of the main features of dbDOS™ PRO 6 is the dbDOS_Config.exe program. This program
works the same on single user installs and networking installs. This program is responsible for
configuring your dBASE programs to run in dbDOS and for creating the shortcuts that make
using dbDOS so easy to use.
dbDOS™ PRO 6, we enhanced the ability to pick the way the developer wants to create
configurations. The new wizard gives a much simpler approach to creating the dBASE for DOS
shortcuts for the latest Windows® operating systems.
Note: Shortcuts created with dbDOS™ 1.5.1 and above should automatically be updated to the
latest standard, not action will be required from the end-user.
Starting the dbDOS_Config.exe interface has two main approaches, it will be started as the last
step in the installing of dbDOS™, or it can be started at any time using the Start|All
Apps|dbDOS Pro 6|dbDOS Pro 6 Config; as shown below:

18 dbDOS™ PRO 6 – © 2017 | dBase, LLC.
Using the Start|All Apps|dbDOS Pro 6|dbDOS Pro 6 Config
19 dbDOS™ PRO 6 – © 2017 | dBase, LLC.
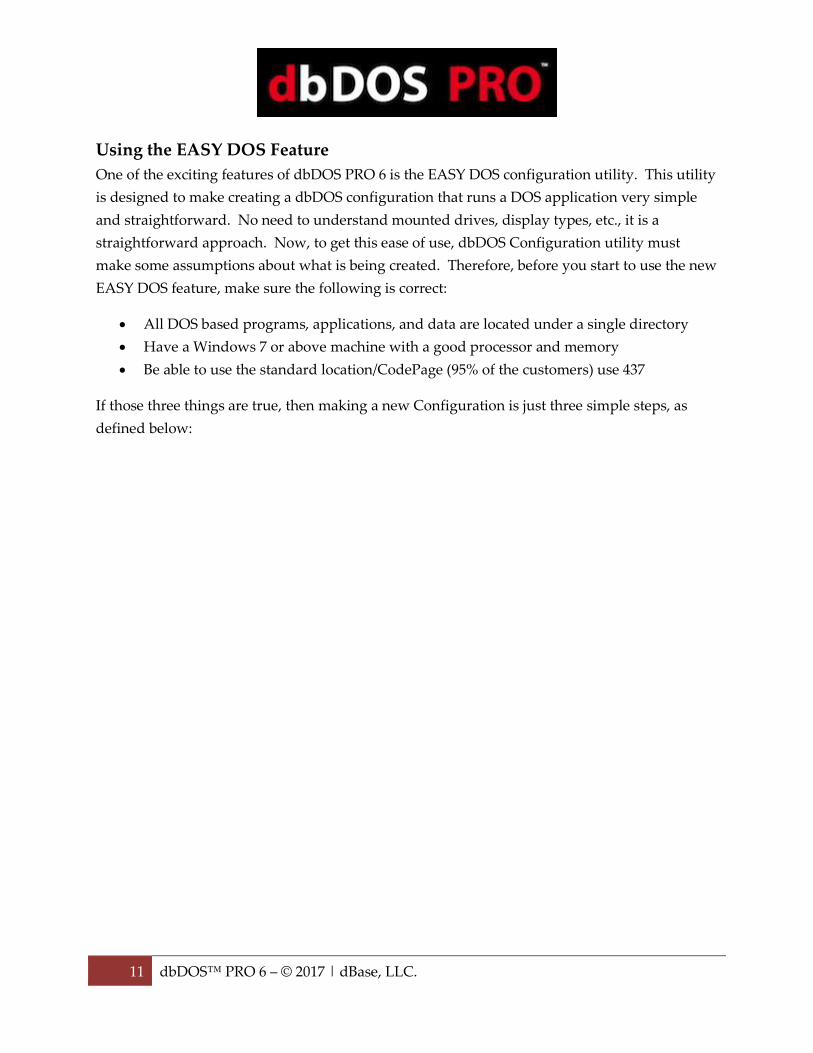
Initial dbDOS™ PRO 6 – Configuration Manager
The updated dbDOS Configuration adds significant features to manage Windows® shortcuts
for running dBASE for DOS applications. The focus with the dbDOS™ PRO 6 Configuration
Manager was that end-users need to be able to manage the shortcuts, they wanted to be able to
delete them, and they wanted a way to share them.
The new dbDOS_Config.exe interface will always show the initial start screen.
dbDOS Configuration Manager main screen

20 dbDOS™ PRO 6 – © 2017 | dBase, LLC.
Screen Breakdown
Clicking the dbDOS icon gives the ability to get the About… window. The red ‘x’ is the
standard way to close the dbDOS Config.
The Execution Bar – allows you to pick the operation you want to perform inside the dbDOS
Config.
Bottom Toolbar
The Sort Toolbar – This allows the user to sort on Configuration Title or Description. The sort
order only changes for that session and when restarted it will show in classic date order.
Sort Toolbar
The Shortcut browser – allows you to see all of the created shortcuts for your DOS programs.
This is the area where you can manage those configurations.

21 dbDOS™ PRO 6 – © 2017 | dBase, LLC.
This is the list of configurations created to be used by dbDOS™
The execution bar has a number of buttons that can be activated to do certain operations as
defined below:
The New Configuration button will create a new shortcut that will be placed
on the Windows® desktop and can be placed inside the dbDOS folder off the
Start menu.
The Import Configuration button allows the end-user to modify an existing
configuration. This means that once a Windows® shortcut is created, it can
now be updated, and can be deleted if needed.
When the Import Configuration button is pressed, the end-user can import a
saved configuration. This will also allow you to then modify or customize
that configuration to meet their needs on the system.

22 dbDOS™ PRO 6 – © 2017 | dBase, LLC.
Import a configuration: it asks the location of the configuration to be
imported
Press the Show Backups button to show all the backup configurations. This is
NEW in dbDOS™ PRO 6 and helps keep the configuration listing much more
organized and easier to read.
Press the User’s Guide button to show the PDF version of this write-up from
within the dbDOS™ Configuration manager.
Press the Help icon to watch the help video – Clicking this link will start the
video that includes an overview of the dbDOS Config and how to use the
dbDOS™ PRO 6 interface.

23 dbDOS™ PRO 6 – © 2017 | dBase, LLC.
After a Windows® shortcut is created
The shortcut created
on the Windows®
desktop
The above shows the outcome of running the dbDOS PRO 6 – Configuration Manager, it shows
that a new Windows® shortcut was created and it now lists that shortcut in the Configuration
Manager for better on-going support.
There are some additional Icons on the page that need to be defined.
Pressing this icon will execute the shortcut
Pressing this icon will allow you to Edit the selected configuration.
[ADVANCED END-USERS] Pressing this icon will allow the end-user to edit the
dbDOS™ configuration file, this is for advanced end-users only. The program will
display a warning making sure you do want to edit the configuration as below:
24 dbDOS™ PRO 6 – © 2017 | dBase, LLC.
Pressing the Yes button will take you to the configuration file.
This icon represents the Export function, this will now allow you to export out a
configuration and share it with other end-users
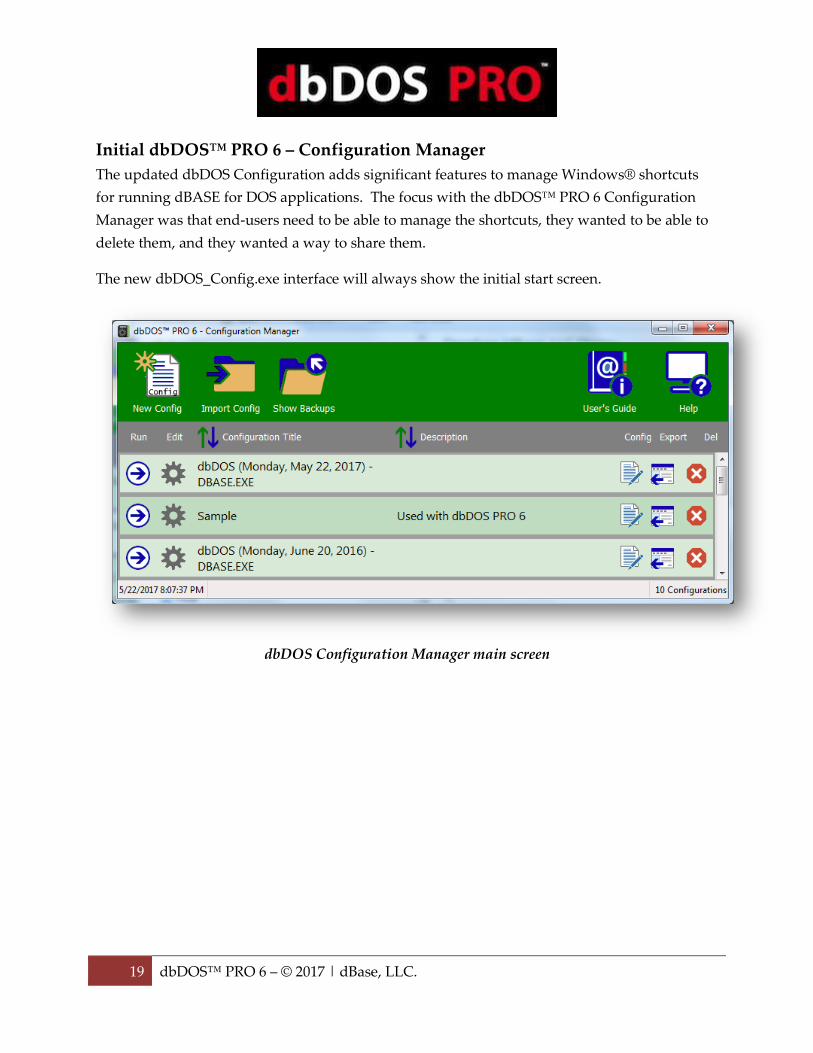
This icon represents the Delete function and anytime it is pressed a confirmation
dialog will be displayed asking the end-user if they are sure they do want to delete the
configuration:
Pressing the Yes button will Delete and pressing the No button will return the end-
user back to the main screen.
25 dbDOS™ PRO 6 – © 2017 | dBase, LLC.
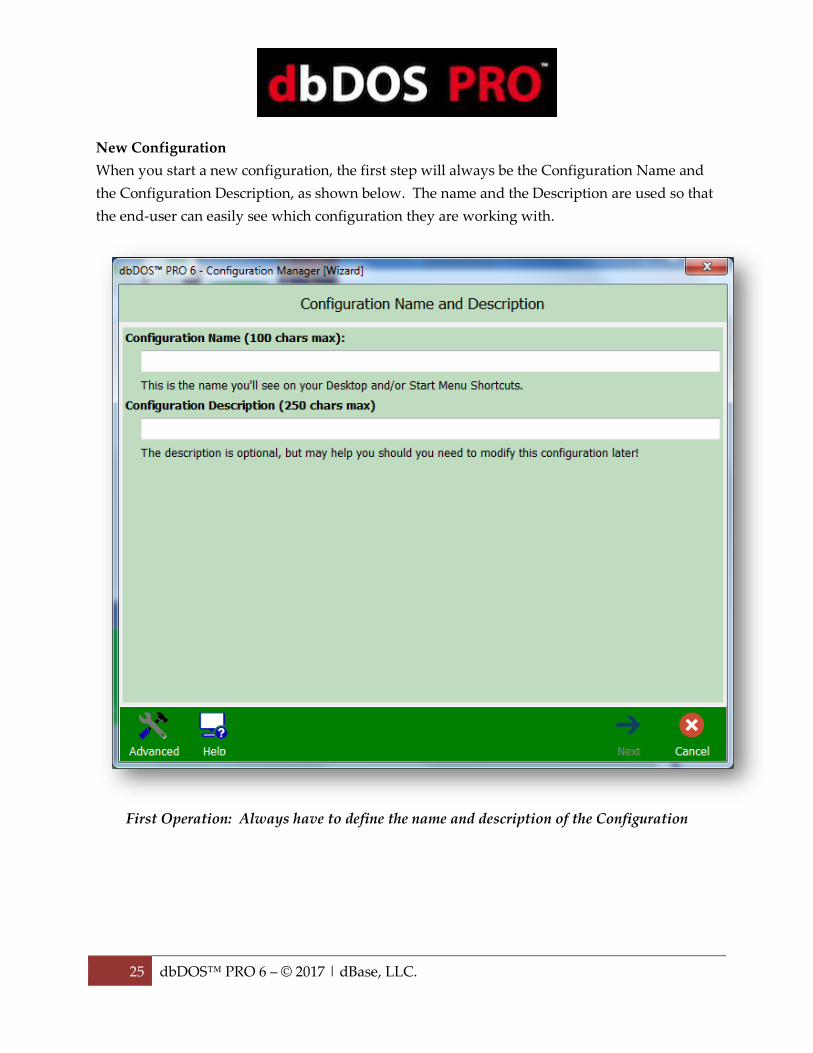
New Configuration
When you start a new configuration, the first step will always be the Configuration Name and
the Configuration Description, as shown below. The name and the Description are used so that
the end-user can easily see which configuration they are working with.
First Operation: Always have to define the name and description of the Configuration

26 dbDOS™ PRO 6 – © 2017 | dBase, LLC.
Wizard Approach to building a dbDOS™ Windows® shortcut:
Once the Name and Description of the dbDOS™ configuration have been defined, pressing the
Next button will start the dbDOS Configuration Wizard. Keep in mind that the Configuration
Name will be the name of the shortcut created.
Name and Describe the new configuration
Notice above, that the naming and description fields are available for text, also notice that at the
bottom of the dialog there are three (3) buttons. The first button to the left is called Advanced
this button will take you to the single-page configuration screen found in the

27 dbDOS™ PRO 6 – © 2017 | dBase, LLC.
original dbDOS™ 1.0 product. If you want to learn more about the Advanced approach please
go to the Advanced Approach to building a dbDOS™ Windows® shortcut section in this
document. After the Advanced button, you will see a Next button , which will take
you to the first step in the Configuration Wizard and the Cancel button , which will
take you back to the New Configuration screen.
28 dbDOS™ PRO 6 – © 2017 | dBase, LLC.
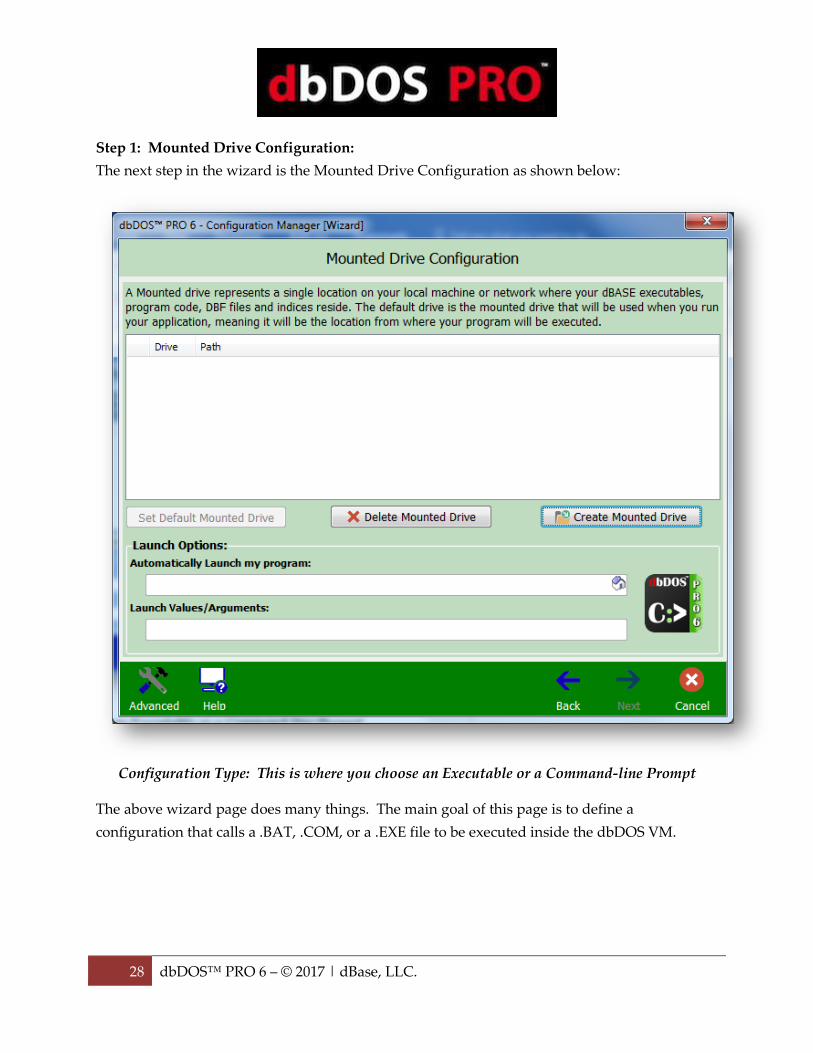
Step 1: Mounted Drive Configuration:
The next step in the wizard is the Mounted Drive Configuration as shown below:
Configuration Type: This is where you choose an Executable or a Command-line Prompt
The above wizard page does many things. The main goal of this page is to define a
configuration that calls a .BAT, .COM, or a .EXE file to be executed inside the dbDOS VM.

29 dbDOS™ PRO 6 – © 2017 | dBase, LLC.
Running the dBASE™ application in dbDOS™ PRO 6!

30 dbDOS™ PRO 6 – © 2017 | dBase, LLC.
Or, the other option is to have a shortcut that takes the end-user to a command prompt:
Step 2: Create a mounted drive
Depending on the information you put into the wizard page, it will determine if the
configuration will be pointing to a DOS program or creating a configuration that takes you to a
command prompt.
Mounted drives within dbDOS™ represent a location on either your local hard drive or a
network-mapped drive. Creating a Mounted Drive in dbDOS is the process of making a storage
device on the host system, such as a hard drive, CD-ROM, or even a network drive, usable on
the dbDOS VM system. You do not need to make every drive on your host system available to
dbDOS. As an example, Microsoft Windows 7 would be the host system, the C: drive on
Windows 7 would be the storage device you want to mount in dbDOS in order to make it
available to the Virtual DOS machine.
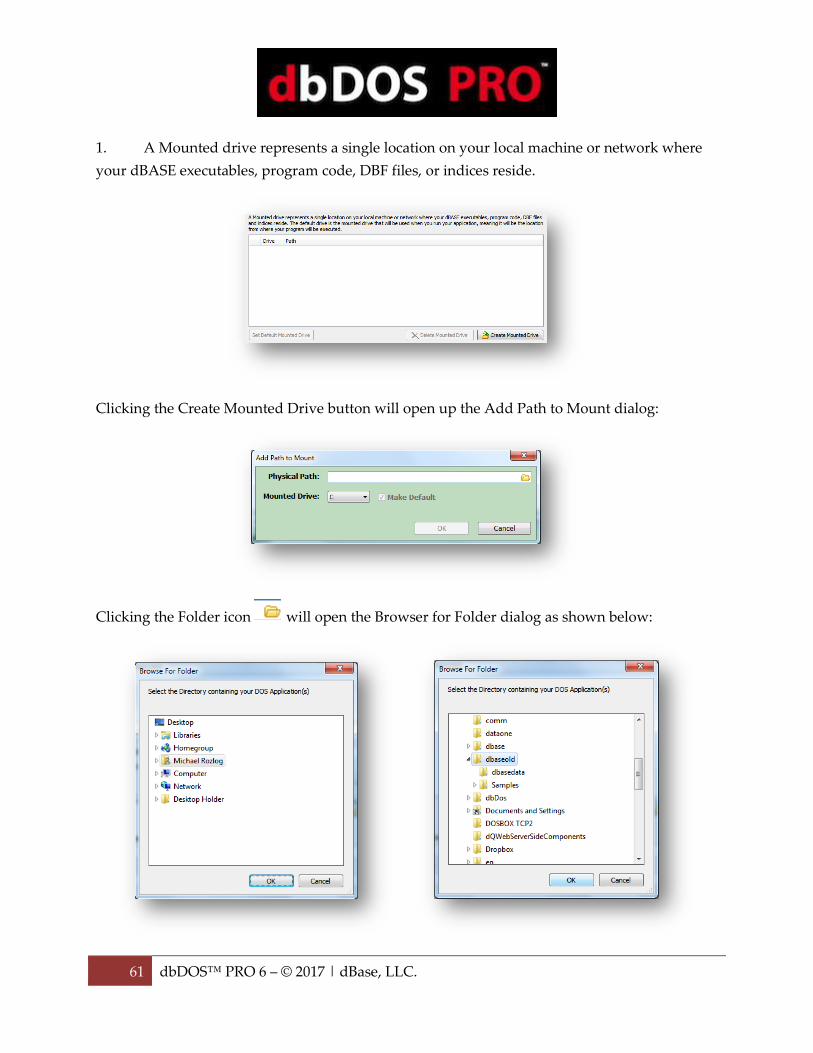
1. A Mounted drive represents a single location on your local machine or network
where your dBASE executables, program code, DBF files, or indices reside.

31 dbDOS™ PRO 6 – © 2017 | dBase, LLC.
Clicking the Create Mounted Drive button will open the Path to Mount dialog:
Clicking the Folder icon will open the Browser for Folder dialog as shown below:

32 dbDOS™ PRO 6 – © 2017 | dBase, LLC.
The above dialog shows that the C:\dbaseold path has been chosen and when you click
the OK button is clicked, the following will be displayed:
The next option the end-user is to choose the Drive letter to represent the Physical Path
from within dbDOS, for the above example a Mounted Drive: of C has been set as the
default drive within dbDOS. Then press the OK when complete.
The dbDOS™ configuration now has defined a “C” drive in your dbDOS configuration
and it points to the directory of C:\dBaseTest\. From this point, you can choose to have
the configuration run an Executable, COM, Bat or other file or start at the Mounted C:\
drive Command Prompt.

33 dbDOS™ PRO 6 – © 2017 | dBase, LLC.
Press this button to create a new Mounted Drive. You can have
multiple Mounted drives in dbDOS, just as you can have multiple
drives on your local hard drive.
You can have up to 26 mounted drives and you can select
exactly which drive letter (A-Z) that you want to use for each
location.
Pressing this button will delete a Mounted Drive.
Press this button to set a Mounted Drive as default. The default
Mounted drive will be the location that dbDOS is set to as soon as
you run your configured dbDOS shortcut (similar to the way that C:\
is the default drive in Windows).
The default drive is the mounted drive that will be used when
you run your application, meaning it will be the location from
where your program will be executed and by default, the
directory structure in which the application code, databases,
and indices must reside in.
Any additional Mounted drives can be accessed within your dBASE DOS application (running
in dbDOS) by using SET DIRECTORY TO "<mounted drive>" or by referencing the new
Mounted drive when accessing files or folders under that directory in your code.
Note: (e.x. do D:\filename.prg-- where D is the newly mounted drive and filename.prg
is a program in that directory).
Creating an Executable configuration:
Once you have created a mounted drive, you can now set up the configuration to either run an
Executable at startup or just go into a Command Line where you can then execute any exe or
another runnable file by typing it in and hitting enter. In the following, the focus will be on
generating a shortcut that runs an Executable at startup.

34 dbDOS™ PRO 6 – © 2017 | dBase, LLC.
If you know the name of the program, you can type it into the Automatically Launch my
program edit box. Alternatively, you can click the House icon and it will display the valid
executables available in the Default Mounted Drive as shown below.

35 dbDOS™ PRO 6 – © 2017 | dBase, LLC.
Select Application: this allows you to pick .bat, .com, or .exe
Now the only programs that will be displayed are the valid ones of .bat, .com, or .exe. Again, if
you want to override this setting you can type anything into the edit box. Once you select the
program, for this example do.exe (in older versions of dBASE the end-users used to rename
dbase.exe to do.exe to make working with the dot-prompt easier), you can then press the OK
button to continue. If you decide not to select an executable, they can click the Cancel button
and it will return you to the prior dialog.

36 dbDOS™ PRO 6 – © 2017 | dBase, LLC.
Notice a couple of things about the above portion of the dialog. The Automatically Launch my
program edit box now has c:\do.exe and that the Icon to the right has changed to represent an
executable configuration. In addition, the Launch Values/Arguments: edit box is
now editable.
This is where you can add any additional launch options that may be needed. For example,
many people want the Windows® shortcut to load up an initial program on launch. Therefore,
adding TMemory.prg to the Launch Values/Arguments will start dBASE for DOS and also load
the TMemory.prg when the shortcut is executed:
Selected Application: Showing using the Launch Parameters

37 dbDOS™ PRO 6 – © 2017 | dBase, LLC.
Here is the example of how this would execute using dBASE V for DOS calling the
TMemory.prg as a Launch Parameter:
Example: Running dBASE V for DOS using a Launch Parameter
When you are done setting both of the options, you can click the Next button to continue to the
next wizard page.

38 dbDOS™ PRO 6 – © 2017 | dBase, LLC.
Creating a Command Prompt:
If you chose to create a configuration that simply starts a Command-prompt, it is very simple.
Leave the ‘Automatically Launch My Program’ field blank then this dbDOS configuration will
start in Command Window mode (with your default Mounted drive as the current directory).
Creating a Command-Line configuration

39 dbDOS™ PRO 6 – © 2017 | dBase, LLC.
Notice in the above dialog, the icon to the right of the Launch Options, it represents the
Command-Line configuration. When you are done setting the directory, you can
click the Next button to continue to the next wizard page.

40 dbDOS™ PRO 6 – © 2017 | dBase, LLC.
Step 3: Regional Settings:
One of the advances in dbDOS™ PRO 6 is better support for internationalization. This means
dbDOS™ PRO 6 will be able to better handle the keyboard layout, character set used, and the
printer characters used. The following is the dialog that will be displayed:
Regional Settings: Base wizard displayed
In the above wizard page, the Use Codepages will only show the valid Codepages on the
machine.

41 dbDOS™ PRO 6 – © 2017 | dBase, LLC.
Available Codepages on the current machine
Select the proper Codepage for your location. In this example 437 – MS-DOS United States is
being used as the standard CodePage. Once that option has been selected, the Keyboard layout
will be dictated from that selection. Only the valid Keyboard layouts will be displayed in the
dropdown list box:
Possible Keyboard layout countries under the Codepage
Normally you would pick US – United States, but let’s say, for example, the only option picked
was the UK – the United Kingdom. This will then cause only the proper keyboards supported
by that Codepage as shown below:
Pick the proper Keyboard support

42 dbDOS™ PRO 6 – © 2017 | dBase, LLC.
NOTE: if you don’t know which Codepage or Keyboard you are using, it is
recommended that you use Codepage – 437, pick the US – the United States, and US103
for the keyboard.
When you are done selecting the Regional Settings, you can click the Next button to continue to
the next wizard page.

43 dbDOS™ PRO 6 – © 2017 | dBase, LLC.
Step 4: Printer Settings:
Many advances have been made in the dbDOS™ PRO 6 product around printing. The new
printing interface allows you to change many more options than before. The following is the
wizard page:
Printer Settings: Standard wizard page
Printing DOS based outputs have always been a challenge for dbDOS. Keep in mind that in
many cases dbDOS is trying to print reports or output from 20 – 30 years ago on modern or new
equipment (printers).
We now have five ways to print:

44 dbDOS™ PRO 6 – © 2017 | dBase, LLC.
• RAW (legacy) – output stream from the DOS program goes directly to the printer. This
is a legacy feature, and it is recommended that if you are having issues with printing
that you go to the new enhanced printing.
o NOTE: RAW does not support the picking of a default printer.
• Interpreted (legacy) – Output stream from DOS program is generated and sent to a text
preview window. This output type is for legacy reasons; if you are having print issues,
it is recommended that you move towards the Enhanced print option. There are many
limitations with Interpreted printing.
o NOTE: While Interpreted can be helpful with the print preview functionality,
additional features to strip leading pages, convert lf (linefeed) to cr (carriage
return) and picking the font are extra capabilities to help generate better output.
The only 2 print drivers recommended for Interpreted include ASCII.pr2 and
GENERIC.pr2 which are included in the dbDOS install process.
• Enhanced – The best way to get printouts the way they used to print. This new feature
uses a stripping process for the ASCII characters going into the print channel. The new
functionality strips any text decorations related to DOS and applies the Windows text
decorations, thus giving a more respectable output format.
o NOTE: Enhanced print is recommended to use any of the FX80_1, 2, or 3.pr2
print drivers for the best results across multiple printer types, including HP.
• Direct – The new RAW approach. This is a hybrid approach that takes the best features
of the RAW approach and applies the Enhanced as well. This should be the first choice
if the Enhanced print setting does not work.
o NOTE: The Direct option needs to have a printer selected at the time of
selection. This means the configuration will be limited to that default printer.
When selecting the Direct option please select a printer in the default printer
section or it will default to the first item in the list.

45 dbDOS™ PRO 6 – © 2017 | dBase, LLC.
• PDF – The new output to PDF. This option allows for both printing only to PDF or
optionally printing to PDF and the selected Printer.
o NOTE: PDF printing is only available in Enhanced and Interpreted print modes.
The long-term plan is that everybody will move towards the Enhanced approach. Both RAW
and Interpreted will be supported for the foreseeable future, but in time we hope that they can
be removed from the options set, thus making the printing options much easier to use and work
with.
Pre-defined Printer settings
A few items to know about concerning setting a Default Printer. First, you cannot set a default
printer for the RAW options. Interpreted and Enhanced can have a default printer set for each,
and as noted above, the Direct print option REQUIRES you to pick a default printer when
selecting that option.
General Printing Options: set the timeout, Font, and PDF settings
The above is used to set the printer timeout. dbDOS is set to 5 seconds by default, but this
setting can be tweaked by you as needed. Every 1000 represents 1 second of actual time.
The new Default Font allows the users to set the font for both the Enhanced and Interpreted
print modes. The user is allowed to choose any font available to them; however, it is
recommended that the user sticks with the following fonts:

46 dbDOS™ PRO 6 – © 2017 | dBase, LLC.
• Courier (default) Regular (font style) and 10 (font size)
• Times Roman – Regular, (font style) and 10 (font size)
• Helvetia – Regular, (font style) and 10 (font size)
NOTE: The size of the font can drastically change the appearance of the printout. If you
want to have ELITE (12 characters per inch) or CONDENSED (16.66 characters per inch)
you may set the size here if these items are not set in the dBASE program. Again, these
features give the end-user ultimate control of the output.

47 dbDOS™ PRO 6 – © 2017 | dBase, LLC.
The last option is the Save to PDF; this is only available in either Enhanced or the legacy
Interpreted print modes. The options for PDF are shown below:
PDF Output Options
The new PDF print system has many new features that many people will be very excited about
and want to know the details. The first is the Default Output Directory. If an output directory
is inserted, the PDF will automatically be printed to that directory WITHOUT any user
interaction. If there is NO default output directory, the user will be asked each time to pick the
location and name the PDF file. Keep in mind that the default name when a directory is used is
the name of the configuration and a time and date stamp with the .pdf extension.
Remember that for PDF there is no printer. It is recommended that you select the proper size
for your printing. dbDOS Config tries to help by giving the option for setting the page size (A4,
Letter, Legal), Orientation (Portrait or Landscape), and setting the number of lines per page or

48 dbDOS™ PRO 6 – © 2017 | dBase, LLC.
lines per inch. A custom size can be selected and the user can define the page size and
structure.
NOTE: For U.S. Letter there are 60, 66, or 78 lines in PICA, ELITE, and CONDENSED
respectably. There are 45 lines with printing Landscape with U.S. Letter paper for Pica.
The user can also set the margins for the paper, currently, the margins are set to 0.0.
Physical Print with PDF generation
In the above image, notice that you can select the “Also send to printer” option; this will send
the output to the PDF generator and also to the physical printer!
NOTE: Please keep in mind that if this option is not set and output to PDF is selected
that NO physical print will occur. You must select the “Also send to printer” option if
you want a physical print, regardless if you have selected a default printer for the
configuration.
After selecting your options, you can either Save or Cancel the operation. If you press the
Cancel button all changes will be lost!
When you are done selecting the Printer Settings, you can click the Next button to continue to
the next wizard page.

49 dbDOS™ PRO 6 – © 2017 | dBase, LLC.
Step 5: Display options:
dbDOS™ PRO 6 offers many new optimizations in the Display Options dialog. This dialog will
help you with various hardware settings to determine the best, most useful settings for the
hardware when it comes to drawing the screen.
Display Options – this will help draw the screen in Windows and full-screen mode
Use “DirectDraw” rendering The first option is DirectDraw and it is the fastest screen
display possible on Windows® based machines. This uses the
Windows® DirectDraw® interface and increases the speed by
about 15% on average. This is the default for new
configurations. Note: DirectDraw only support 800x600

50 dbDOS™ PRO 6 – © 2017 | dBase, LLC.
Use “OpenGL” rendering The second option is OpenGL and ironically, it is the fastest on
Nvidia cards, but it does require newer hardware because the
processing is delegated to the Graphics Processor Unit (GPU)
and it does support full-screen mode.
Use “Overlay” rendering Overlay is slightly more optimized but still has good backward
hardware compatibility. This is a little faster than the Basic
drawing and this setting does support full-screen mode.
Use Basic rendering Basic rendering is usually the most compatible with most
hardware, however, Basic does not support full-screen mode
on most hardware. This setting should be used when the other
two (2) options do not work. (Basic) is the default
In the Additional Options section, it gives you two options if and only if the “Overlay” or the
“OpenGL” options are picked. Only “Overlay” and “OpenGL” can set the configuration to start
in full-screen mode. Select the Start in full-screen mode option and when the configuration is
executed, the windows will be full-screen and the underlying Windows® desktop will not be
seen.
Alt-Enter – will take the dbDOS window from Full-Screen to Windows screen. If it is in a
windowed setting pressing the Alt-Enter will take it back to full screen. Hitting the Alt-Enter
again will put it back into a windowed setting.
NOTE: Moving from full-screen mode to window, and window to full-screen mode may not
always work with different graphics cards. This mode is supported but due to the differences in
the way graphics cards work, the presentation may become unstable.

51 dbDOS™ PRO 6 – © 2017 | dBase, LLC.
The second option besides full-screen is to pick the size of the screen you may want to use.
dbDOS™ PRO 6 reads your hardware and shows only the valid options that you may pick. The
default size is 640x480; however, you can pick the size you would like to start in:
Note: Picking a size from the Resolution dropdown does not mean the screen will look good.
This option scales the size of the screen to the size picked. Some sizes may look as good as the
default and some may look much worse. This is a trial and error setting, and it depends on your
hardware, screen size, and application being displayed.
Now it is also possible to manually enter a custom resolution for the best display. Keep in mind
that the best resolutions are based on the 4:3 aspect ratio on a 25x80 screen. That means that a
multiple of 320x200 will offer a better picture. Therefore setting a 960x600 would maintain that
4:3 ratio and give a fairly clean representation of the DOS screen. Also, keep in mind that if you
use the advance display options for 43 or 50 lines, then the aspect ratio does change so the
resolution picked may have to be based on that as well. Using at 43/50 lines, give an 800x600, or
a multiple of that which would be 1600x1200 for a multiple in-between.
When you are done selecting the Display Options, you can click the Next button to continue to
the next wizard page.

52 dbDOS™ PRO 6 – © 2017 | dBase, LLC.
Step 6: Launcher & Shortcut Options:
These are additional options that can be set with the configuration to make the product run as
desired. None of the following options are mandatory, but they can make your experience
better.
Launcher & Shortcut Options: Pick the ones you think will give the best experience
Create a Start Menu shortcut This option will add a shortcut to the Windows shortcut menu.
Create a Desktop shortcut This option will add a shortcut to the Windows Desktop and is
selected by default. You must de-select to remove this option.

53 dbDOS™ PRO 6 – © 2017 | dBase, LLC.
Step 7: Test Configuration:
The Test Configuration option is just that, after you have set all the options for the
configuration, the program now gives you an opportunity to test to see if you like it. Press the
Test Configuration button and the configuration will execute.
Test Configuration: Press the button to test
After you exit the test, if there was something you did not like, you can hit the back button until
you reach the page containing the setting you wish to change. You can then make a change and

54 dbDOS™ PRO 6 – © 2017 | dBase, LLC.
retest as needed. You can then make a change and retest as needed. If everything works as
defined, click the Finish button to complete the wizard.

55 dbDOS™ PRO 6 – © 2017 | dBase, LLC.
Returns to the Main page:
After the wizard is complete, you will be taken back to the main page. On the main screen, you
should see the new configuration you created in the prior wizard steps as shown below:
Configuration Manager: Showing the new configuration added
The shortcut created
on the Windows®
desktop
56 dbDOS™ PRO 6 – © 2017 | dBase, LLC.
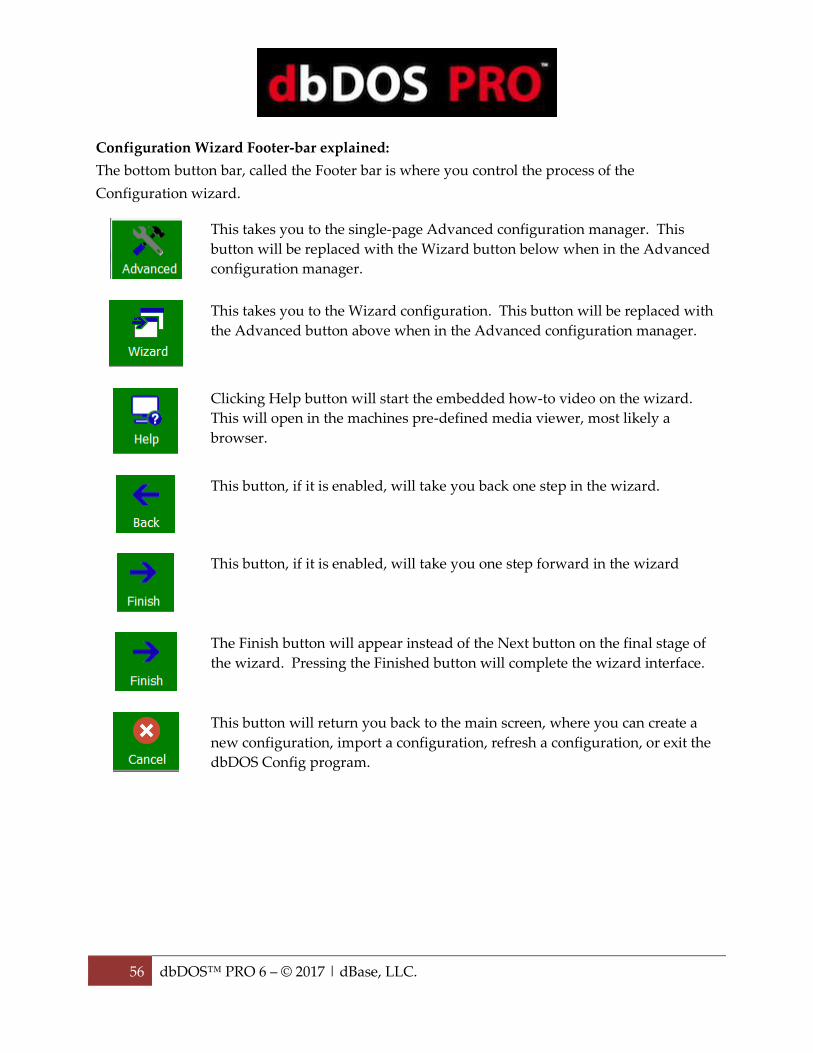
Configuration Wizard Footer-bar explained:
The bottom button bar, called the Footer bar is where you control the process of the
Configuration wizard.
This takes you to the single-page Advanced configuration manager. This
button will be replaced with the Wizard button below when in the Advanced
configuration manager.
This takes you to the Wizard configuration. This button will be replaced with
the Advanced button above when in the Advanced configuration manager.
Clicking Help button will start the embedded how-to video on the wizard.
This will open in the machines pre-defined media viewer, most likely a
browser.
This button, if it is enabled, will take you back one step in the wizard.
This button, if it is enabled, will take you one step forward in the wizard
The Finish button will appear instead of the Next button on the final stage of
the wizard. Pressing the Finished button will complete the wizard interface.
This button will return you back to the main screen, where you can create a
new configuration, import a configuration, refresh a configuration, or exit the
dbDOS Config program.

57 dbDOS™ PRO 6 – © 2017 | dBase, LLC.
Advanced Approach to building a dbDOS™ Windows® shortcut:
The dbDOS_Config.exe Advanced interface is a very straightforward and easy to use single-
page interface.
We added the wizard to help more novice end-users in a systematic fashion to create
configurations.
However, if you understand the options and settings for a configuration, the advanced single-
page interface is very fast and as easy to use as the wizard. It also includes various additional
items that can be set for greater flexibility and support. However, just like in the Wizard
approach, the first page you will be shown is the Main configuration Manager page.
First Operation: Always have to define the name and description of the Configuration

58 dbDOS™ PRO 6 – © 2017 | dBase, LLC.
Configuration Manager Advanced
As stated above, all of the options are available on this single page. The following section of
this guide reviews the available options, and how to configure them. The advanced manager is
built for speed, not for aesthetics as the wizard is created and used. The advanced manager is
base gray color and very little “eye-candy.”
Configuration Manager [Advanced] – Single-page interface
There are four (4) sections to this interface and they include:
1. Top panel – it is responsible for picking the product you want to configure. It also is
used to represent the shortcut icon on the desktop and an example of what the screen
may look like. These things will change with the options selected.

59 dbDOS™ PRO 6 – © 2017 | dBase, LLC.
or
2. Configuration options and settings – These options are on a scroll pane so you can set
all the needed options and settings on one single page. For a review of those options
and settings go to the Configuration Settings and Options section below.
3. Footer-bar – This is where the four (4) basic options come into play. You can go to the
wizard, Test Configuration, Save Configuration, or Cancel out of the configuration
wizard.
Footer-bar – this is the button bar of options.
Configuration Settings and Options:
This is really the heart of the single-page interface. This allows you to set any of the options
that are required to create a configuration for dbDOS™ 1.5.
NOTE: If you used dbDOS™ 1.0 and created a configuration using that version, those
configurations will not work in version 1.5 of dbDOS, dbDOS PRO 2 and dbDOS PRO 6.
Please delete and recreate your configurations, as that will ensure proper execution of the dBASE
for DOS products.
The following will break down each section of the Settings and Options:

60 dbDOS™ PRO 6 – © 2017 | dBase, LLC.
Change Area 1: Configuration Details:
Configuration Details – put in the name of the configuration and a description
The above section will be filled in by you on the first page of the Configuration Manager, where
you are asked to input the Name of the configuration and the Description. However, it should
be pointed out that you can change these values at any time on this screen.
Change Area 2: Mounted Drives
Mount Drives – Pick a Mounted Drive
Depending on the type of configuration you are creating, you will have one of two possible
Wizards screens displayed.
Mounted drives represent a location on either your local hard drive or a network-mapped
drive. Creating a Mounted Drive in dbDOS is the process of making a storage device on the
host system, such as a hard drive, CD-ROM, or even a network drive, usable on the dbDOS VM.
You do not need to make every drive on your host system available to dbDOS. As an example,
Microsoft Windows 7 would be the host system, the C: drive on Windows 7 would be the
storage device you want to mount in dbDOS in order to make it available to the dbDOS VM for
DOS.
61 dbDOS™ PRO 6 – © 2017 | dBase, LLC.
1. A Mounted drive represents a single location on your local machine or network where
your dBASE executables, program code, DBF files, or indices reside.
Clicking the Create Mounted Drive button will open up the Add Path to Mount dialog:
Clicking the Folder icon will open the Browser for Folder dialog as shown below:

62 dbDOS™ PRO 6 – © 2017 | dBase, LLC.
The above dialog shows that the C:\dbasegold path has been chosen and when you click OK,
the following will be displayed:
The next option allows you to choose the Drive letter to represent the Physical Path within
dbDOS, for the above example a Mounted Drive: of C is used to represent “c:\dbasegold’. Click
OK when complete.
The dbDOS™ configuration now has defined a Mounted “C” drive which points to the
directory of C:\dbaseold\. From this point, you can define if the configuration starts an
Executable or start a Command Prompt.
Press this button to create a new Mounted Drive. You can have
multiple Mounted drives in dbDOS, just as you can have multiple
drives on your local hard drive.

63 dbDOS™ PRO 6 – © 2017 | dBase, LLC.
You can have up to 26 mounted drives and you can select
exactly which drive letter (A-Z) that you want to use for each
location.
Pressing this button will delete a Mounted Drive.
Press this button to set a Mounted Drive as default. The default
Mounted drive will be the location that dbDOS is set to as soon as
you run your configured dbDOS shortcut (similar to the way that C:\
is the default drive in Windows).
The default drive is the mounted drive that will be used when
you run your application, meaning it will be the location from
where your program will be executed and by default, the
directory structure in which the application code, databases,
and indices must reside in.
Any additional Mounted drives can be accessed within your dBASE DOS application (running
in dbDOS) by using SET DIRECTORY TO "<mounted drive>" or by referencing the new
Mounted drive when accessing files or folders under that directory in your code.
Note: (e.x. do D:\filename.prg-- where D is the newly mounted drive and filename.prg
is a program in that directory).
Now proceed to the next section of the Create Mounted Drive dialog where you can define the
type of configuration you want, either starting dbDOS with an Executable or just with a
Command-Line type.
64 dbDOS™ PRO 6 – © 2017 | dBase, LLC.
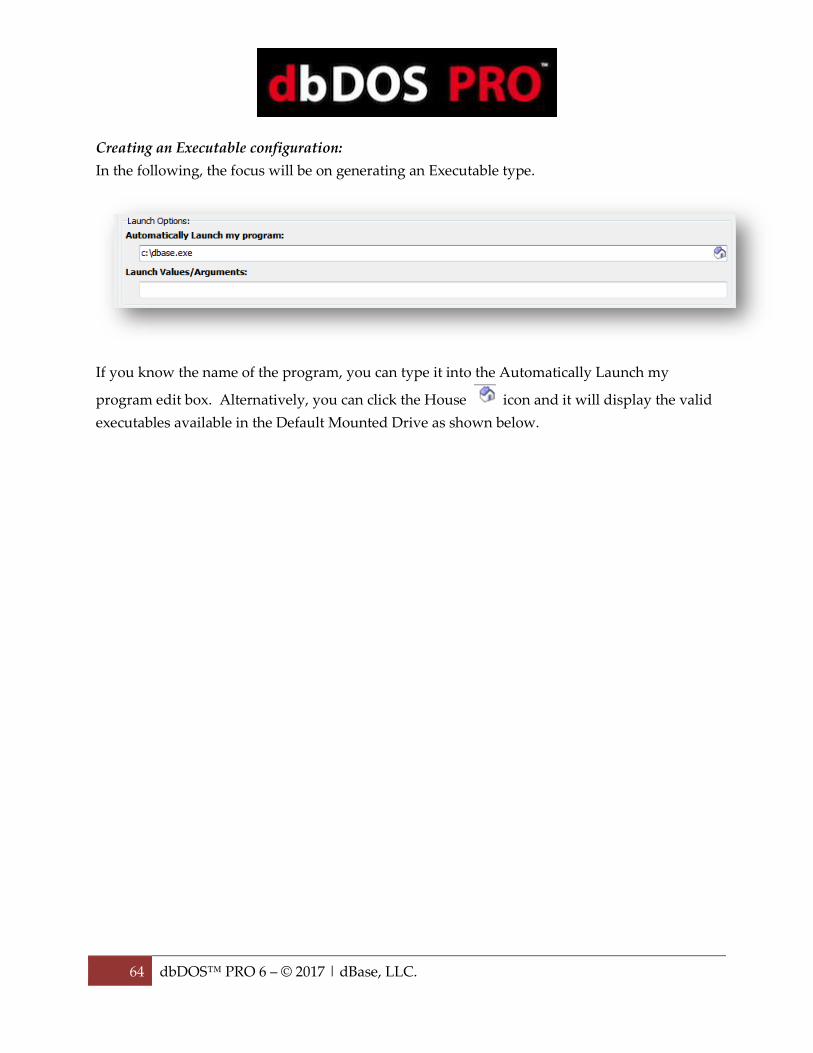
Creating an Executable configuration:
In the following, the focus will be on generating an Executable type.
If you know the name of the program, you can type it into the Automatically Launch my
program edit box. Alternatively, you can click the House icon and it will display the valid
executables available in the Default Mounted Drive as shown below.

65 dbDOS™ PRO 6 – © 2017 | dBase, LLC.
Select Application: this allows you to pick .bat, .com, or .exe
Now the only programs that will be displayed are the valid ones of .bat, .com, or .exe. Again, if
you want to override this setting you can type anything into the edit box. Once you select the
program, for this example do.exe (in older versions of dBASE the end-users used to rename
dbase.exe to do.exe to make working with the dot-prompt easier), you can then press the OK
button to continue. If you decide not to select an executable, they can click the Cancel button
and it will return you to the prior dialog.

66 dbDOS™ PRO 6 – © 2017 | dBase, LLC.
Notice a couple of things about the above changed portion of the dialog. The Automatically
Launch my program edit box now has c:\do.exe and that the Icon to the right has changed to
represent an executable configuration. In addition, the Launch Values/Arguments:
edit box is now editable.
This is where you can add any additional launch options that may be needed. For example,
many people want the Windows® shortcut to load up an initial program on launch. Therefore,
Adding TMemory.prg to the “Launch Values/Arguments” edit box will start dBASE for DOS
(the do.exe program) and also load the TMemory.prg when the shortcut is executed:
Selected Application: Showing using the Launch Parameters

67 dbDOS™ PRO 6 – © 2017 | dBase, LLC.
Here is the example of how this would execute using dBASE V for DOS calling the
TMemory.prg as a Launch Parameter:
Example: Running dBASE V for DOS using a Launch Parameter

68 dbDOS™ PRO 6 – © 2017 | dBase, LLC.
Creating a Command Prompt:
If you chose to create a Command-prompt configuration, it is very simple. If you leave, the
‘Automatically Launch My Program’ field blank then this dbDOS configuration will start in
Command Window mode (with your default Mounted drive as the current directory).
Creating a Command-Line configuration
Notice in the above dialog, the icon to the right of the Launch Options, it represents the
Command-Line configuration.

69 dbDOS™ PRO 6 – © 2017 | dBase, LLC.
Change Area 3: Regional Settings:
One of the advances in dbDOS™ PRO 6 is better support for internationalization. This means
dbDOS™ PRO 6 will be able to better handle the keyboard layout, character set used, and the
printer characters used. The following is the dialog that will be displayed:
Regional Settings: Base wizard displayed
In the above area, the “Use Codepages” option will only show the valid Codepages on the
machine.
Available Codepages on the current machine
Select the proper Codepage for the end-users location. In this example 437 – MS-DOS United
States is being used as the standard CodePage. Once that option has been selected, the
Keyboard layout will be dictated from that selection. Only the valid Keyboard layouts will be
displayed in the dropdown list box:

70 dbDOS™ PRO 6 – © 2017 | dBase, LLC.
Possible Keyboard layout countries under the Codepage
As for this example, normally the end-user would pick US – United States, but in this example,
the only option picked was the UK – the United Kingdom. This will then cause only the proper
keyboards supported by that Codepage to be available, as shown below:
Pick the proper Keyboard support
NOTE: if you don’t know which Codepage or Keyboard you are using, it is recommended that
you use Codepage – 437, pick the US – the United States, and US103 for the keyboard.
When you are done selecting the Regional Settings, you can move down to the next areas of the
single page interface.

71 dbDOS™ PRO 6 – © 2017 | dBase, LLC.
Change Area 4: Printer Settings:
Many advances have been made in the dbDOS™ PRO 6 product around printing. The new
printing interface allows you to decide many more options than before.
Printer Settings: Standard wizard page
NOTE: In the single page interface, you may have to scroll down to see all of the options on the
scroll pane. Click the scroll bar and pull down with the mouse.
Printing DOS based outputs have always been a challenge for dbDOS. Keep in mind that in
many cases dbDOS is trying to print reports or output from 20 – 30 years ago on modern or new
equipment (printers).
We now have five ways to print:
• RAW (legacy) – output stream from the DOS program goes directly to the printer. This
is a legacy feature, and it is recommended that if you are having issues with printing
that you go to the new enhanced printing.

72 dbDOS™ PRO 6 – © 2017 | dBase, LLC.
o NOTE: RAW does not support the picking of a default printer.
• Interpreted (legacy) – Output stream from DOS program is generated and sent to a text
preview window. This output type is for legacy reasons; if you are having print issues,
it is recommended that you move towards the Enhanced print option. There are many
limitations with Interpreted printing.
o NOTE: While Interpreted can be helpful with the print preview functionality,
additional features to strip leading pages, convert lf (linefeed) to cr (carriage
return) and picking the font are extra capabilities to help generate better output.
The only 2 print drivers recommended for Interpreted include ASCII.pr2 and
GENERIC.pr2 which are included in the dbDOS install process.
• Enhanced – The best way to get printouts the way they used to print. This new feature
uses a stripping process for the ASCII characters going into the print channel. The new
functionality strips any text decorations related to DOS and applies the Windows text
decorations, thus give a more respectable output format.
o NOTE: Enhanced print is recommended to use any of the FX80_1, 2, or 3.pr2
print drivers for the best results across multiple printer types, including HP.
• Direct – The new RAW approach. This is a hybrid approach that takes the best features
of the RAW approach and applies the Enhanced as well. This should be the first choice
if the Enhanced print setting does not work.
o NOTE: The Direct option needs to have a printer selected at the time of
selection. This means the configuration will be limited to that default printer.
When selecting the Direct option please select a printer in the default printer
section or it will default to the first item in the list.
• PDF – The new output to PDF. This option allows for both printing only to PDF or
optionally printing to PDF and the selected Printer.
o NOTE: PDF printing is only available in Enhanced and Interpreted print modes.
73 dbDOS™ PRO 6 – © 2017 | dBase, LLC.
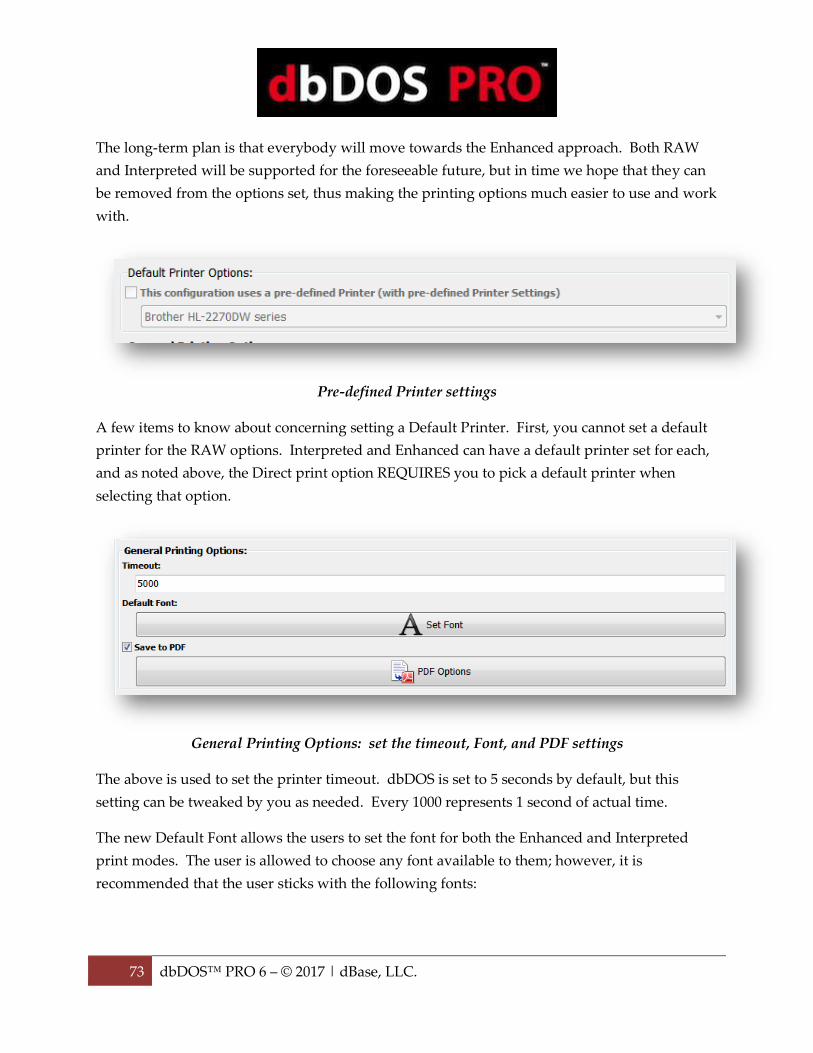
The long-term plan is that everybody will move towards the Enhanced approach. Both RAW
and Interpreted will be supported for the foreseeable future, but in time we hope that they can
be removed from the options set, thus making the printing options much easier to use and work
with.
Pre-defined Printer settings
A few items to know about concerning setting a Default Printer. First, you cannot set a default
printer for the RAW options. Interpreted and Enhanced can have a default printer set for each,
and as noted above, the Direct print option REQUIRES you to pick a default printer when
selecting that option.
General Printing Options: set the timeout, Font, and PDF settings
The above is used to set the printer timeout. dbDOS is set to 5 seconds by default, but this
setting can be tweaked by you as needed. Every 1000 represents 1 second of actual time.
The new Default Font allows the users to set the font for both the Enhanced and Interpreted
print modes. The user is allowed to choose any font available to them; however, it is
recommended that the user sticks with the following fonts:

74 dbDOS™ PRO 6 – © 2017 | dBase, LLC.
• Courier (default) Regular (font style) and 10 (font size)
• Times Roman – Regular, (font style) and 10 (font size)
• Helvetia – Regular, (font style) and 10 (font size)
NOTE: The size of the font can drastically change the appearance of the printout. If you
want to have ELITE (12 characters per inch) or CONDENSED (16.66 characters per inch)
you may set the size here if these items are not set in the dBASE program. Again, these
features give the end-user ultimate control of the output.

75 dbDOS™ PRO 6 – © 2017 | dBase, LLC.
The last option is the Save to PDF; this is only available in either Enhanced or the legacy
Interpreted print modes. The options for PDF are shown below:
PDF Output Options
The new PDF print system has many new features that many people will be very excited about
and want to know the details. The first is the Default Output Directory. If an output directory
is inserted, the PDF will automatically be printed to that directory WITHOUT any user
interaction. If there is NO default output directory, the user will be asked each time to pick the
location and name the PDF file. Keep in mind that the default name when a directory is used is
the name of the configuration and a time and date stamp with the .pdf extension.
Remember that for PDF there is no printer. It is recommended that you select the proper size
for your printing. dbDOS Config tries to help by giving the option for setting the page size (A4,
Letter, Legal), Orientation (Portrait or Landscape), and setting the number of lines per page or
lines per inch. A custom size can be selected and the user can define the page size and
structure.

76 dbDOS™ PRO 6 – © 2017 | dBase, LLC.
NOTE: For U.S. Letter there are 60, 66, or 78 lines in PICA, ELITE, and CONDENSED
respectably. There are 45 lines with printing Landscape with U.S. Letter paper for Pica.
The user can also set the margins for the paper, currently, the margins are set to 0.0.
Physical Print with PDF generation
In the above image, notice that you can select the “Also send to printer” option; this will send
the output to the PDF generator and also to the physical printer!
NOTE: Please keep in mind that if this option is not set and output to PDF is selected
that NO physical print will occur. You must select the “Also send to printer” option if
you want a physical print, regardless if you have selected a default printer for the
configuration.
After selecting your options, you can either Save or Cancel the operation. If you press the
Cancel button all changes will be lost!
77 dbDOS™ PRO 6 – © 2017 | dBase, LLC.
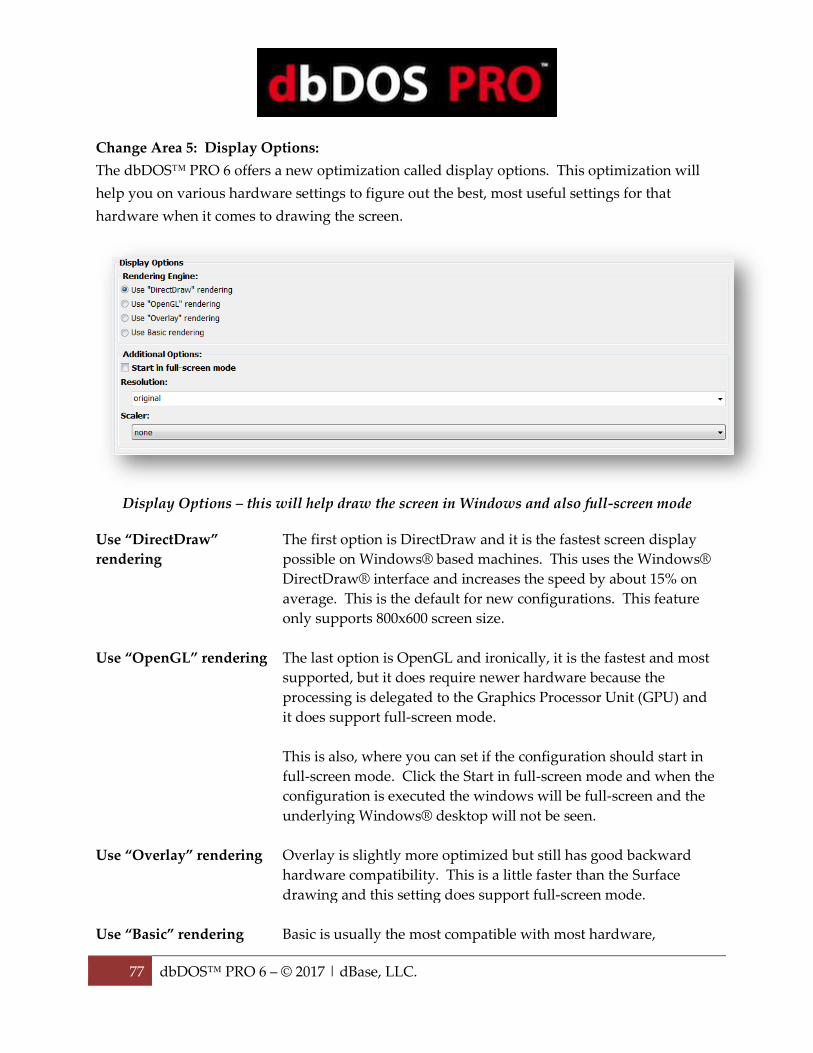
Change Area 5: Display Options:
The dbDOS™ PRO 6 offers a new optimization called display options. This optimization will
help you on various hardware settings to figure out the best, most useful settings for that
hardware when it comes to drawing the screen.
Display Options – this will help draw the screen in Windows and also full-screen mode
Use “DirectDraw”
rendering
The first option is DirectDraw and it is the fastest screen display
possible on Windows® based machines. This uses the Windows®
DirectDraw® interface and increases the speed by about 15% on
average. This is the default for new configurations. This feature
only supports 800x600 screen size.
Use “OpenGL” rendering The last option is OpenGL and ironically, it is the fastest and most
supported, but it does require newer hardware because the
processing is delegated to the Graphics Processor Unit (GPU) and
it does support full-screen mode.
This is also, where you can set if the configuration should start in
full-screen mode. Click the Start in full-screen mode and when the
configuration is executed the windows will be full-screen and the
underlying Windows® desktop will not be seen.
Use “Overlay” rendering Overlay is slightly more optimized but still has good backward
hardware compatibility. This is a little faster than the Surface
drawing and this setting does support full-screen mode.
Use “Basic” rendering Basic is usually the most compatible with most hardware,

78 dbDOS™ PRO 6 – © 2017 | dBase, LLC.
however, Basic does not support full-screen mode on most
hardware. This setting should be used when the other two (2)
options do not work.
In the Additional Options section, it gives you two options if and only if the “Overlay” or the
“OpenGL” options are picked. If and only if “Overlay” and “OpenGL” can set the
configuration to start in full-screen mode. Select the Start in full-screen mode option and when
the configuration has executed the windows will be full-screen and the underlying Windows®
desktop will not be seen.
Alt-Enter – will take the dbDOS window from Full-Screen to Windows screen. If it is in a
windowed setting pressing the Alt-Enter will take it back to full screen. Hitting the Alt-Enter
again will put it back into a windowed setting.
NOTE: Moving from full-screen mode to window and window to full-screen mode may not
always work with different graphics cards. This mode is supported but due to the differences in
the way graphics cards work, the presentation may become unstable.
The second option besides full-screen is the resolution of the screen you may want to use.
dbDOS™ PRO 6 reads your hardware and shows only the valid options that you may pick. The
default size is 640x480; however, you can pick the size you would like to start in:
Note: Picking a size from the Resolution dropdown does not mean the screen will look
good. This option scales the size of the screen to the size picked. Some sizes may look

79 dbDOS™ PRO 6 – © 2017 | dBase, LLC.
as good as the default and some may look much worse. This is a trial and error setting,
and it depends on your hardware, screen size, and application being displayed.
Now it is also possible to manually enter a custom resolution for the best display. Keep in mind
that the best resolutions are based on the 4:3 aspect ratio on a 25x80 screen. That means that a
multiple of 320x200 will offer a better picture. Therefore setting a 960x600 would maintain that
4:3 ratio and give a fairly clean representation of the DOS screen. Also, keep in mind that if you
use the advance display options for 43 or 50 lines then the aspect ratio does change so the
resolution picked may have to be based on that as well. Using 43/50 lines gives an 800x600 or a
multiple of that which would be 1600x1200 for a multiple in-between.
Change Area 6: CPU Options:
In dbDOS™ PRO 6 we have added settings for CPU Options, to allow users to customize the
instruction set used by the CPU to maximize performance. This new exposure reduces the need
for a 3rd Party Memory Management product to be included, which drastically reduces
hardware conflicts and better memory management.
Change Area 7: Autoexec (Customization)
In dbDOS™ PRO 6 there is a new option on the Advanced Wizard (ONLY) that allows for
customization of the Autoexec section of the configuration. The Autoexec section is what
controls the DOS programs being called and allows for additional batch processing. This along
with 4DOS integration gives a strong and powerful combination that allows for easier
customization and adds more power to the support for DOS products.
To overwrite or customize the Autoexec section, the user must be in the Advanced Wizard and
click the Custom Autoexec Section option. Once selected it will unlock the editor and
customization can begin. All updates will be saved to the Configuration when the wizard is
completed.

80 dbDOS™ PRO 6 – © 2017 | dBase, LLC.
This gives you the ability to change the Autoexec area of a configuration
Change Area 8: Launcher & Shortcut Options:
These are additional options that can be set with the configuration to make the product run as
desired. None of the following options are mandatory, but they can make the experience better
for you.
Launcher & Shortcut Options: Pick the ones you think will give the best experience
Create a Start Menu shortcut This option will add a shortcut to the Windows shortcut menu.
Create a Desktop shortcut This option will add a shortcut to the Windows Desktop and is
selected by default. You must de-select to remove this option.
Automatically Exit dbDOS
when you close your
Application
When an application is executed and then closed if this option is
not selected it will return to a command-prompt. If you want to
close the command prompt, clicking the red ‘x’ or type in the
exit at the prompt and hitting return will close the session.
Open status window on
startup
When this option is selected, an additional status window will
be opened. This window displays additional information from
the dbDOS™ VM. This is primarily used for advanced

81 dbDOS™ PRO 6 – © 2017 | dBase, LLC.
debugging purposes.
Change Area 7: Footer-bar
The bottom toolbar is the location where you can complete the single interface configuration
manager.
Footer-bar: All the options for completing a configuration
Now to explain what each button on the footer bar does:
This takes you to the Wizard configuration. This button will be replaced with the
Advanced button above when in the Advanced configuration manager.
Clicking Help button will start the embedded how-to video on the wizard. This
will open in the machines pre-defined media viewer, most likely a browser.
The Test Configuration option is just that, after you have set all the options for the
configuration, the program now gives you an opportunity to test to see if you like
it. Press the Test Configuration button and the configuration will execute.
After you exit the test, if there was something you did not like, you can change the
settings, then retest if needed. If everything works as defined, click the Save
Configuration to complete the task.
The Save Configuration button allows you to Save the configuration settings at
any point. Pressing the Save Configuration button will complete the interface.
This button will return you back to the main screen, where you can create a new
configuration, import a configuration, refresh a configuration, or exit the dbDOS
Config program.

82 dbDOS™ PRO 6 – © 2017 | dBase, LLC.
Returns to the Main page:
After the wizard is complete, the wizard will take you back to the main page. On the main
screen, you should see the new configuration you created in the prior wizard steps as shown
below:
Updated after creating a configuration using the Single Page
approach
The shortcut created on
the Windows® desktop

83 dbDOS™ PRO 6 – © 2017 | dBase, LLC.
Running dBASE DOS after the dbDOS Configuration Utility
(dbDOS_Config.exe) Once the dbDOS™ Configuration Utility has been completed, you should now see icons on
your Windows desktop. There can be four different icons for dbDOS:
This icon represents the dbDOS™ product (without any configuration
settings). Used internally in the dbDOS™ VM.
This icon represents the specific configured programs’ command-
prompt. It is found on the Windows® desktop and menu shortcuts and
will be used to start a dbDOS™ session. Double-clicking on the icon
from the Windows® desktop will start the program’s command prompt.
From there you can execute various DOS commands.
Example: You have configured dbDOS™ to work with dBASE V
DOS. Double-clicking this will take you to {drive}:\> (which is
actually pointing to the root folder of the dBASE V DOS program) if
you execute a DIR command the directory contents are shown; if you
type in dbase.exe the dBASE program will execute.

84 dbDOS™ PRO 6 – © 2017 | dBase, LLC.
This icon is used to represent a specific executable program configured
to run inside the dbDOS™ VM. This will usually have a name under
the icon on the desktop or on the start menu, which describes what
program will be executed when selected.
For Example:
double-click – executes:
This icon represents the dbDOS™ Configuration Utility, by double-
clicking on this icon, the dbDOS™ Configuration Utility will be
executed and run. Once in the configuration utility, you can make
additional shortcuts to other programs, those programs will be assigned
one of the above icons depending on if you are starting from a DOS
prompt or executing a program.
This program allows building a configuration in 3 steps.

85 dbDOS™ PRO 6 – © 2017 | dBase, LLC.
This is the image that is displayed when starting a dbDOS™ PRO 6
configuration on a machine. It is only on the screen for less than a
second. The program cannot be run alone it must be executed from the
shortcut that is created.
The About… the menu item is available on the system menu of the
dbDOS window. Clicking the menu item will show you the about box,
with information about the release.
Note: Please watch the video on configuring dbDOS, this will answer many of the questions
and show you exactly how the program works and can be configured.

86 dbDOS™ PRO 6 – © 2017 | dBase, LLC.
Networking features of dbDOS™ 6
These are exciting new features found in dbDOS™ PRO 6, plus you can find other unique
features of dbDOS in the Additional Features for dbDOS™ section.
New Native file system and network support combined for the dbDOS™ Engine
In dbDOS™ PRO 6 the underlying file system used by the dbDOS™ VM is brand new and adds
significant functionality. It addition, the new engine adds the Networking Capability to
dbDOS™ PRO 6! This now allows for multi-user network dBASE applications to work as they
did back in the MS-DOS days.
While combining these features we did not lose any speed and maintain the speed dbDOS™
PRO 4 had. The new dbDOS VM engine increases the speed of the system by as much as 38%
over the prior engine. It also adds what is called a live file system; which means files are
automatically updated in the VM even when a file is modified outside the VM’s protected area.
What does that mean? It means you can use outside editors. For example, if you want to
upgrade a program (.prg) you could open Notepad++ and make changes to the file outside the
VM and when you save the file outside the VM those changes will be automatically reflected in
the VM’s space. This feature does not require a “rescan” to see the changes.
The last improvement in the engine is that because it is a live file system, it makes doing
network communications and multiuser programs easier and safer in most cases. This feature
alone is why dbDOS™ now supports multi-user programs in a Network environment.
The below is an example of an application in Network mode; one instance is in edit mode on a
record and the other is trying to edit at the same time. The program reports an error to the
second user because the first user has the records locked.
Application in Edit record mode Application getting error on locked record

87 dbDOS™ PRO 6 – © 2017 | dBase, LLC.
Please review the dbDOS™ PRO 6 Networking Quick Start Guide for more information on
multi-user use with dbDOS™ PRO 6.
New – 4DOS Integration
One of the other great features we have added to dbDOS™ PRO 6 is full feature DOS Command
processor replacement. Many people over the years have brought to our attention that the
dbDOS™ VM does not support all the commands found in MS-DOS and this is certainly true.
However, with the addition of 4DOS to the product, this limitation has been removed and now
dbDOS™ VM has one of the most powerful Command-Processor for DOS commands on the
planet. Some of the features include over 120 commands that can be used for batch processing
or .bat files.
Here is how you start 4DOS in a configuration. Simply type 4DOS at a configurations C:\> as
shown below:
Once the new command processor is loaded you can start to work with it, a quick example is
the type Memory at the C:\> prompt and hit return:

88 dbDOS™ PRO 6 – © 2017 | dBase, LLC.
This is a simple configuration that goes to a command prompt
dbDOS™ PRO 6 configuration manager adds the 4DOS command-processor directory to each
configuration. This can be turned off if needed in the Advanced Wizard settings under the
Autoexec Options functionality. Once at a C:> type help and hit return – the following is what
you will see.
4DOS integrated help system

89 dbDOS™ PRO 6 – © 2017 | dBase, LLC.
When in the 4DOS help system, use the {ESC} button to go back one step or to the prior help
page.
As an example, at the C:> one of the new commands is the PROMPT command, and by typing
in the following:
Prompt $D $t $g
The following changes will happen to your command prompt as shown below:
Notice the command prompt now states: Fri May 1, 2015, 11:06:47 >
Therefore, as you can see the addition of 4DOS will help casual and advanced users alike take
advantage of the dbDOS™ VM product in ways they could not even do back in the MS-DOS
days.
There is a full reference guide included with 4DOS and it is located in the 4DOS directory. That
guide can be found here: C:\Program Files (x86)\dBASE\dbDOS Pro 5\4DOS and is called
4DOS_ref50.pdf.

90 dbDOS™ PRO 6 – © 2017 | dBase, LLC.
New features of dbDOS™ 6
In each new release of dbDOS,™ the development team tries to outdo themselves. dbDOS™
PRO 6 is no exception. Review these awesome new features included in this release!
33% Faster than prior releases
The team was able to squeeze another 33% speed increase out of the product. You, as a user,
will not have to do anything to realize this speed increase. There were significant optimizations
found in the running and print areas that yielded the impressive speed increase.
Optimized Screen Drawing with use of the DDraw option
The team tested a new Display Option called DDraw, which stands for the Microsoft®
DirectDraw® library. This is the display library that Microsoft® uses for their OS and Gaming
features. It is all about speed and with this new standard option for new configurations, we
have been seeing an additional 15% speed increase. That speed increase is on top of the
impressive 33% increase in speed from the optimizations done on the product.
New Sort features in the dbDOS™ Config Manager
Now in dbDOS™ PRO 6, you can sort your configurations by name or by description. This
should help those users that have many configurations and need to find that special one.
Verify close on the main dbDOS™ engine window
This new option will be displayed when you hit the Red X button at the top-right corner of the
screen.
New Confirm Exit dialog

91 dbDOS™ PRO 6 – © 2017 | dBase, LLC.
This was one of the top features requested by existing customers. This should stop that
unwanted window closes that happen from time to time.
Updated – Look & Feel
dbDOS™ PRO 6 also introduces a new look & feel to the product. It has a more modern feel
and a cleaner and more easily understood graphics for increasing the ease of use. Testing has
confirmed that users believe it is easier to understand, view, and use. We agree.

92 dbDOS™ PRO 6 – © 2017 | dBase, LLC.
(Improved) dbDOS™ PRO 6 automatic configuration upgrades
dbDOS™ PRO 6 updates the existing configuration found on the machine to be optimized for
dbDOS™ PRO 6 no matter which version is being upgraded. ***Warning*** this does not
update the DDraw option in the Display options. The configurations will need to be updated
by hand for this option.
dbDOS PRO 6 general set of small issues resolved and most known bugs removed
We are constantly fixing and updating our products and dbDOS™ PRO 6 is no exception. The
team has fixed the majority of the outstanding reported bugs in the PRO 6 release.

93 dbDOS™ PRO 6 – © 2017 | dBase, LLC.
Great Features included with dbDOS™ PRO 6
By clicking the system menu button in the dbDOS PRO 6 VM you get the following menu:
System Menu: Mouse click the top icon for advanced features
Paste From Windows (CTRL|F9)
From Windows, if you copy text, usually Ctrl-c in a windows application you can paste that text
into the dbDOS™ system by pressing Ctrl-F9 or clicking the dbDOS™ PRO 6 VM System menu
as shown above and select the option from the menu.

94 dbDOS™ PRO 6 – © 2017 | dBase, LLC.
Print to the dbDOS clipboard (Ctrl-F8).
dbDOS™ PRO 6 adds a new capability to copy from the dbDOS™ PRO 6 environment to the
Windows environment. This is not as easy as one would think, as DOS did not have a clipboard
support. The way that dbDOS™ accomplishes this is a suggestion from on our dbDOS™ users.
The system accomplishes this task by capturing any output to the printer in a windows buffer
and allowing users to copy from the popup window into the Windows OS. This option can be
turned on, and left on, as long as you can print Interpreted using the Print option. ALL output
when this option is on is put into the popup window, as shown below:
Copy contents from dbDOS - Paste into a Windows Program
There are some limitations to this approach, one you must be able to use the Print features that
will be captured out in the new buffer. We have implemented multiple windows for multiple
outputs, so you need to keep track of all the output windows.
This will allow for the Print of the buffer using the Interpreted Print
functionality.
Pressing this button will put the contents of the display into the
standard Windows® clipboard feature. This can then be copied like any
other clipboard item.

95 dbDOS™ PRO 6 – © 2017 | dBase, LLC.
This will close the window and clear the clipboard buffer.

96 dbDOS™ PRO 6 – © 2017 | dBase, LLC.
Print screen to dbDOS Clipboard (Ctrl-PrnScr)
The next feature has been requested since the introduction of dbDOS™. In the old DOS based
programs, there was the ability to print the screen contents to a printer. We have now
implemented that functionality in dbDOS™ PRO 6.
Pressing the Ctrl-PrnScr button or clicking the dbDOS™ PRO 6’s System menu and selecting the
menu item will take a screenshot of the current screen.
Actual Screen – Screen Print Interface
Notice that the Screen Capture interface has four options:
dbDOS™ PRO 6 gives the ability for the user to save the picture for future
review or printout.
dbDOS™ PRO 6 gives the ability to copy the contents of the screen capture into
the Windows clipboard feature and can be used as any other item in the
Windows clipboard.
dbDOS™ PRO 6 gives the ability to Print the Screen Capture to a printer
dbDOS™ PRO 6 gives the ability to close the picture and it will be discarded
from memory.

97 dbDOS™ PRO 6 – © 2017 | dBase, LLC.
Better Printing with dbDOS PRO 6
dbDOS PRO 6 comes with multiple ways of printing. As stated above this is one of the hardest
parts of dbDOS to get working consistently. In dbDOS PRO 6, we introduce three (3) major
features around printing, one being the new Enhanced Printing and also the ability to output
the reports into PDF format.
In addition to those improvements, we have also included a set of new printer drivers (old
printer drivers actually) and found that a few offer better support than the generic that has been
included in the products before. These new drivers use more cross-printer escape codes to give
a more standard print or output. The most consistent driver we have found for going across a
number of printers is the Epson FX80 print driver.
The easiest way to support the driver is to add the driver line to your code. Make sure the
driver is located in the dbase directory and also the directory if you have a compiled
application. Adding the line is simple:
_pdriver = “ fx80_1.pr2”
When using the new Enhanced Print settings this will produce fairly consistent reports. Again,
remember that the printer drivers from back in the 80’s and 90’s were responsible for doing the
advanced features like: Bold, Underline, Italics, Superscript, Subscript, and character graphics
output. For example, if you use the ASCII.pr2 driver that is included with both dBASE IV and
V for DOS it does not support any of those advanced features and will not recognize the
commands if found in the code. While another driver, HPLASER.pr2 may support those
commands and many others. The output power is in the printer driver.
This does mean that you need to have access to your code so that it can be switched. If access to
the code is not possible, then it may be possible to set the default FONT in the dbsetup.exe.
This option would only be available to dBASE IV and V users and dbBASE III+ did not offer the
print driver options.
If those options are exhausted then it is recommended that you try the Direct print option.
Remember that you will have to pick a default printer with that option and the configuration
can have only one printer. This means if you need different printouts that you may need
multiple configurations.
If all else fails, you must use one of the legacy printer approaches of RAW or Interpreted. In
addition, if you are not having print issues, it is recommended that you do not change what is

98 dbDOS™ PRO 6 – © 2017 | dBase, LLC.
working. If you want to play or test another driver, make a copy of the configuration by
exporting it and then reimporting it and then change the copy as a best practice.
DOES THIS ELIMINATE ALL PRINT ISSUES? Unfortunately, no! There are still instances
where the printer hardware and dbDOS will just not communicate. In that instance, either the
code has to be changed to work with the existing hardware or new known hardware needs to
be purchased by the users.

99 dbDOS™ PRO 6 – © 2017 | dBase, LLC.
Here is an example of how to use the dbDOS Command prompt (configured to use dBASE V
DOS) Double-clicking on the will take you to the {drive}:\> as shown below:

100 dbDOS™ PRO 6 – © 2017 | dBase, LLC.
Execute a DIR command and the following displays:
As you can see this is the main directory from dBASE V DOS and if the dbase.exe command is
executed the following will appear:
dBASE V executes as expected. Keep in mind that NO changes have been made to dBASE DOS
and all functions that you normally have in a dBASE V DOS running on a Microsoft DOS
machine will work in dbDOS’s VM. As you can see below the AREACODE.PRG is ready for
modification:

101 dbDOS™ PRO 6 – © 2017 | dBase, LLC.
Using the mouse with dbDOS™ PRO 6 is automatic If you click with the mouse inside the
window; dbDOS™ will properly show the mouse cursor inside the window. If you want to exit
the mouse in the window, press the CTRL-F10 and the mouse will be returned to the
Windows® operating system. An example is shown below:

102 dbDOS™ PRO 6 – © 2017 | dBase, LLC.
Also be aware that all dBASE “.” commands work as expected. This is essentially running the
dBASE program in a DOS window. You can also run Compile, Debug, Run, and Link dBASE
programs as you normally would. An example of the Areacode.exe sample shown:

103 dbDOS™ PRO 6 – © 2017 | dBase, LLC.
Quick Keyboard shortcuts dbDOS™ supports a number of different keyboard shortcuts that end-users can use to make the
experience with dbDOS™ even better. All the standard keyboard commands of MS-DOS are
supported, and some additional ones listed below:
• Alt-Enter – This will take the end-user from Full-Screen to Windows screen. If end-user
is in a windowed setting pressing the Alt-Enter will take the product full screen. Hitting
the Alt-Enter again will put the end-user back into a windowed setting.
Note: Moving from full-screen mode to window and window to full-screen mode may not
always work with different graphics cards. This mode is supported but due to the differences
in the way graphics card word, the presentation may become unstable.
Activate: Hold the Alt key down and press the Enter key
• CTRL-F9 – This will KILL the dbDOS™ windows or session. If for some reason the end-
user needs to exit or kill the running program pressing the CTRL-F9 key combination,
will close the dbDOS™ window and thus will kill the dbDOS™ session as well.
**Please be aware the closing a window with CTRL-F9 could cause corruption as the
window/session is automatically killed with no regard to open files or mid-process, use with
caution.
Activate: Hold the CTRL key down and press the F9 key
• CTRL-F10 – This will enable or release the mouse. If you have mouse control for the
DOS application and the end-user would want to escape back to the Windows OS, press
the CTRL-F10 and the mouse control will be released from the dbDOS™ window.
While on a dbDOS™ window, if CTRL-F10 is pressed the mouse will be activated inside
that window.
Activate: Hold the CTRL key down and press the F10 key

104 dbDOS™ PRO 6 – © 2017 | dBase, LLC.
Glossary of Terms: • Microsoft DOS® or MS-DOS®
This is a reference to Microsoft Disk Operating System or DOS environment. Microsoft
DOS and MS-DOS can be used interchangeably and is sometimes shorted to just DOS.
dbDOS™ PRO 6 is designed to run MS-DOS application from version 3.0 – 6.0.
• dbDOS™ PRO 6
dbDOS™ PRO 6 is a complete approach to running MS-DOS-based application and
specifically dBASE version of the DOS programs. dbDOS™ PRO 6 comes with the DOS
emulation virtual machine, a configuration program, and the ability to print either local
or networked based printers. ***Each network node must be licensed separately***
• dbDOS™ PRO 6 VM or VM
The dbDOS™ VM or VM stands for Virtual Machine and with dbDOS,™ it is an MS-
DOS emulation that allows products developed for DOS based application to run inside
the virtual machine. The VM supports the Windows® Operating Systems (XP, 2003,
Vista, 2008, 7) in either 32 or 64-bit editions.
• DOS Compatible software
Software that was compiled to run specifically on the DOS system.
• Program Executable
On a DOS-based system, this could be either a file name with the extension of .com or
.exe
• Program Command-Prompt
The base directory where the Program Executable would be located. Using dBASE V for
DOS as an example it was usually installed on the main drive under the en directory.
Therefore, the Program Command-Prompt for dBASE.exe would be {drive}:\en\>
• Windows Shortcut to Program Command-Prompt
This is an Icon or menu item that points to a program’s default or executable directory.
Double-clicking on the shortcut will take the end-user to the Command-Prompt for that
105 dbDOS™ PRO 6 – © 2017 | dBase, LLC.
directory. dbDOS_Config.exe can be used to create this shortcut.
• Windows Shortcut to Program Executable
This is an Icon or Menu item that points to the Program itself and when double-clicked
to execute that program. dbDOS_Config.exe can be used to create this shortcut.
• Local Print
dbDOS™ PRO 6 will allow you to print to a local printer. In the DOS days, this printer
would be referred to as LPT1. dbDOS™ allows you to print to any connected Printer.
• Network Print
dbDOS™ PRO 6 will allow for network printing as well. When you create a shortcut for
a program you can assign the networked printer’s IP address. (advanced end-users only)
• dbDOS_Config.exe
The main program for building shortcuts in dbDOS™ 1.5. This program will allow you
to configure each shortcut with specific options to optimize the end-users experience.
• Program Directory
The directory on the Windows based machine that has the needed executable (.com or
.exe).
• Data Directory
The directory on the Windows based machine that has the program or application data.
• Program & Data Directory
The directory on the Windows based machine that has the needed programs and data
located.