Embed Size (px)
Citation preview

Wired 1000 DPI & Wireless 1600 DPI
The new paradigm in Shape, Design and Use for computer mice
User’s Guide
The ORTHOMOUSE was nominated for the “ERGOCUP” Award during the 7th Applied Ergonomic Conference, hosted by the
Institute of Industrial Engineers (IIE) in Orlando, Florida – USA.
The ORTHOMOUSE won the “Excellence in R&D” Award, by Plano Editorial, São Paulo – Brazil.
Selected to “IDEABrasil” Award of the Associacao Objeto Brazil
Won the “FINEP 2010 Award of TECHNOLOGIC INNOVATION” Brazil.
V 05/2013
1
INDEX INDEX 02 INTRODUCTION 03 HEALTH PRECAUTIONS 03 EXCLUSIVE CHARACTERISTICS 04 WIRELESS ORTHOMOUSE VERSION 05 CONECTING THE ORTHOMOUSE TO YOUR COMPUTER (WIRELESS) 05 SETTING UP/REPLACING THE BATTERIES 06 CONECTING THE ORTHOMOUSE TO YOUR COMPUTER (WIRED) 07 RECOMENDATIONS TO THE USER 08 ACCESSORIES 09
ADAPTERS FOR THE PALM OF THE HAND 09
UPPER ADAPTERS 10
THE FIVE BUTTONS 11 SPECIAL CONFIGURATIONS - WINDOWS 12 CARE AND MAINTAINANCE 13 TECHNICAL DATA 14 PATENTS 15 TECHNICAL SERVICE 15 WARRANTY 15
NOTE: It is very important to read this User’s Guide carefully
before you start using your ORTHOMOUSE.
2
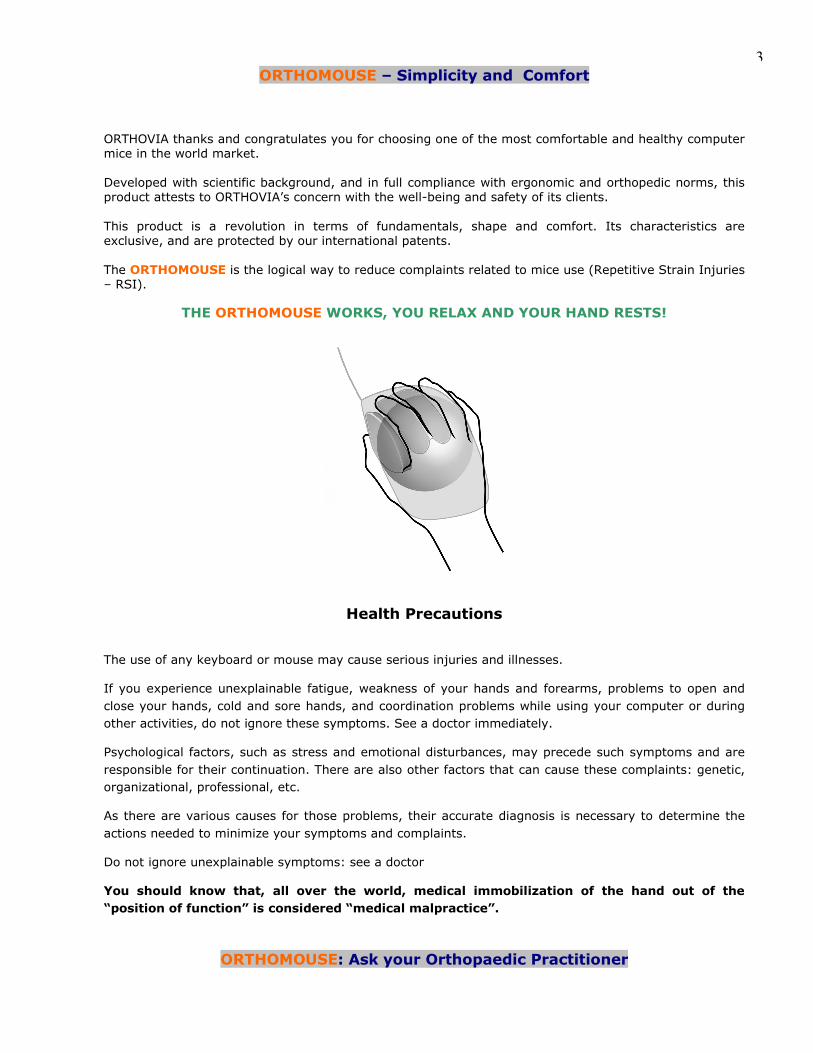
ORTHOMOUSE – Simplicity and Comfort ORTHOVIA thanks and congratulates you for choosing one of the most comfortable and healthy computer mice in the world market. Developed with scientific background, and in full compliance with ergonomic and orthopedic norms, this product attests to ORTHOVIA’s concern with the well-being and safety of its clients. This product is a revolution in terms of fundamentals, shape and comfort. Its characteristics are exclusive, and are protected by our international patents. The ORTHOMOUSE is the logical way to reduce complaints related to mice use (Repetitive Strain Injuries – RSI).
THE ORTHOMOUSE WORKS, YOU RELAX AND YOUR HAND RESTS!
Health Precautions
The use of any keyboard or mouse may cause serious injuries and illnesses.
If you experience unexplainable fatigue, weakness of your hands and forearms, problems to open and
close your hands, cold and sore hands, and coordination problems while using your computer or during
other activities, do not ignore these symptoms. See a doctor immediately.
Psychological factors, such as stress and emotional disturbances, may precede such symptoms and are
responsible for their continuation. There are also other factors that can cause these complaints: genetic,
organizational, professional, etc.
As there are various causes for those problems, their accurate diagnosis is necessary to determine the
actions needed to minimize your symptoms and complaints.
Do not ignore unexplainable symptoms: see a doctor
You should know that, all over the world, medical immobilization of the hand out of the
“position of function” is considered “medical malpractice”.
ORTHOMOUSE: Ask your Orthopaedic Practitioner
3
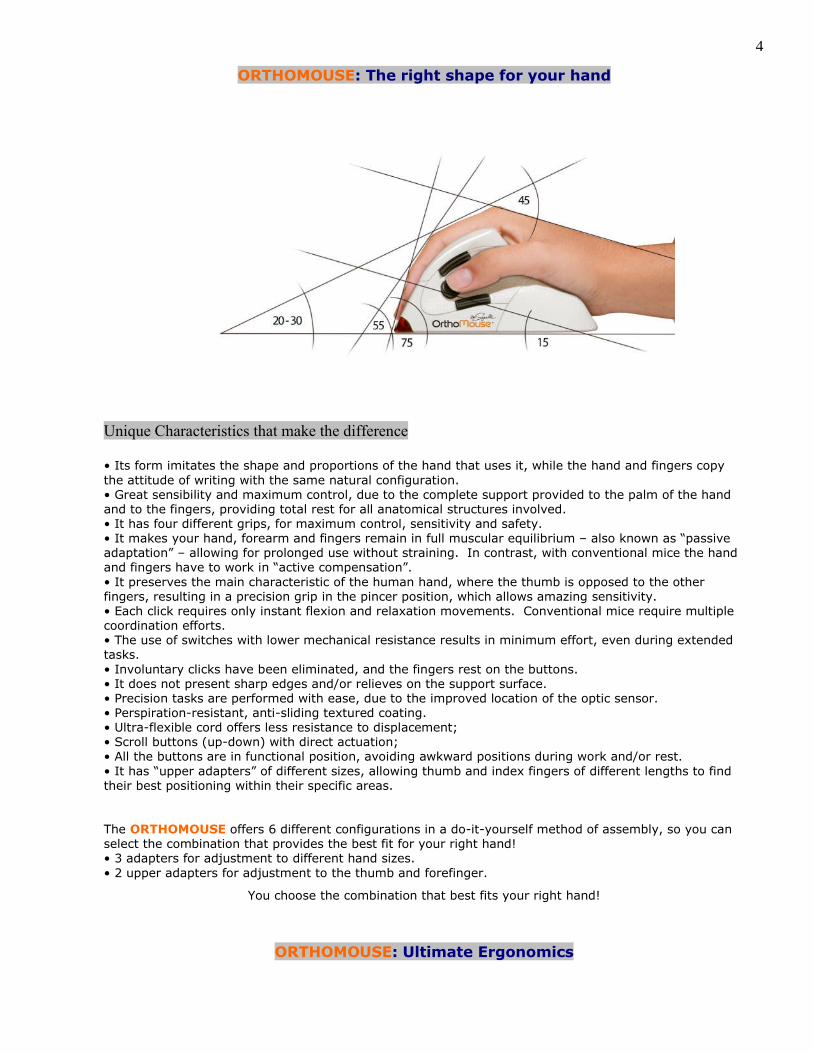
ORTHOMOUSE: The right shape for your hand
Unique Characteristics that make the difference
• Its form imitates the shape and proportions of the hand that uses it, while the hand and fingers copy the attitude of writing with the same natural configuration. • Great sensibility and maximum control, due to the complete support provided to the palm of the hand and to the fingers, providing total rest for all anatomical structures involved. • It has four different grips, for maximum control, sensitivity and safety. • It makes your hand, forearm and fingers remain in full muscular equilibrium – also known as “passive adaptation” – allowing for prolonged use without straining. In contrast, with conventional mice the hand and fingers have to work in “active compensation”. • It preserves the main characteristic of the human hand, where the thumb is opposed to the other fingers, resulting in a precision grip in the pincer position, which allows amazing sensitivity. • Each click requires only instant flexion and relaxation movements. Conventional mice require multiple coordination efforts. • The use of switches with lower mechanical resistance results in minimum effort, even during extended tasks. • Involuntary clicks have been eliminated, and the fingers rest on the buttons. • It does not present sharp edges and/or relieves on the support surface. • Precision tasks are performed with ease, due to the improved location of the optic sensor. • Perspiration-resistant, anti-sliding textured coating. • Ultra-flexible cord offers less resistance to displacement; • Scroll buttons (up-down) with direct actuation; • All the buttons are in functional position, avoiding awkward positions during work and/or rest. • It has “upper adapters” of different sizes, allowing thumb and index fingers of different lengths to find their best positioning within their specific areas. The ORTHOMOUSE offers 6 different configurations in a do-it-yourself method of assembly, so you can select the combination that provides the best fit for your right hand! • 3 adapters for adjustment to different hand sizes. • 2 upper adapters for adjustment to the thumb and forefinger.
You choose the combination that best fits your right hand!
ORTHOMOUSE: Ultimate Ergonomics
4
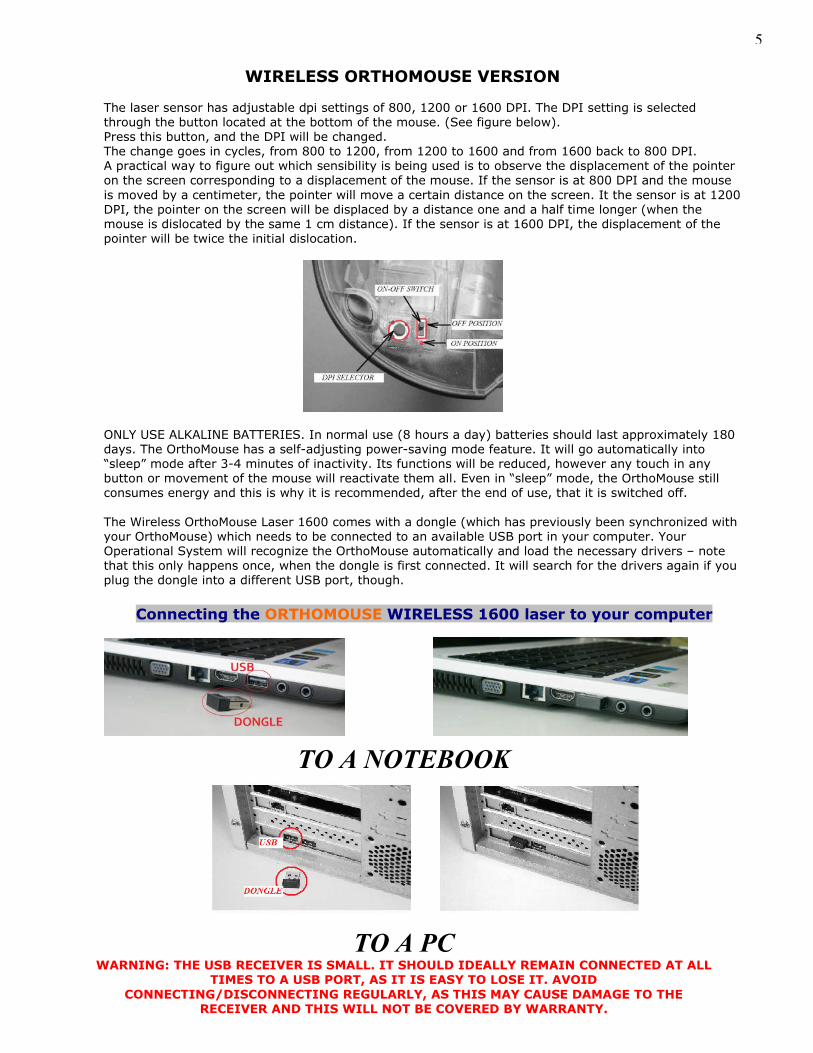
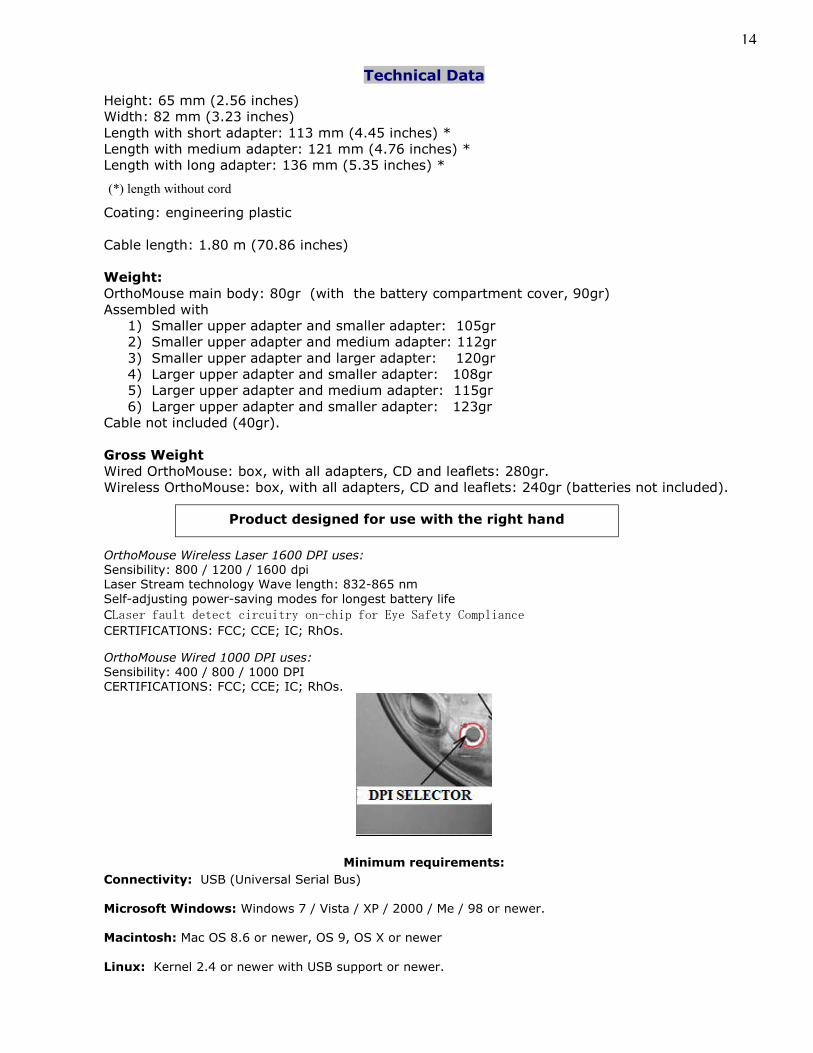
WIRELESS ORTHOMOUSE VERSION The laser sensor has adjustable dpi settings of 800, 1200 or 1600 DPI. The DPI setting is selected through the button located at the bottom of the mouse. (See figure below). Press this button, and the DPI will be changed. The change goes in cycles, from 800 to 1200, from 1200 to 1600 and from 1600 back to 800 DPI. A practical way to figure out which sensibility is being used is to observe the displacement of the pointer on the screen corresponding to a displacement of the mouse. If the sensor is at 800 DPI and the mouse is moved by a centimeter, the pointer will move a certain distance on the screen. It the sensor is at 1200 DPI, the pointer on the screen will be displaced by a distance one and a half time longer (when the mouse is dislocated by the same 1 cm distance). If the sensor is at 1600 DPI, the displacement of the pointer will be twice the initial dislocation.
ONLY USE ALKALINE BATTERIES. In normal use (8 hours a day) batteries should last approximately 180 days. The OrthoMouse has a self-adjusting power-saving mode feature. It will go automatically into “sleep” mode after 3-4 minutes of inactivity. Its functions will be reduced, however any touch in any button or movement of the mouse will reactivate them all. Even in “sleep” mode, the OrthoMouse still consumes energy and this is why it is recommended, after the end of use, that it is switched off. The Wireless OrthoMouse Laser 1600 comes with a dongle (which has previously been synchronized with your OrthoMouse) which needs to be connected to an available USB port in your computer. Your Operational System will recognize the OrthoMouse automatically and load the necessary drivers – note that this only happens once, when the dongle is first connected. It will search for the drivers again if you plug the dongle into a different USB port, though.
Connecting the ORTHOMOUSE WIRELESS 1600 laser to your computer
TO A NOTEBOOK
TO A PC WARNING: THE USB RECEIVER IS SMALL. IT SHOULD IDEALLY REMAIN CONNECTED AT ALL
TIMES TO A USB PORT, AS IT IS EASY TO LOSE IT. AVOID CONNECTING/DISCONNECTING REGULARLY, AS THIS MAY CAUSE DAMAGE TO THE
RECEIVER AND THIS WILL NOT BE COVERED BY WARRANTY.
5
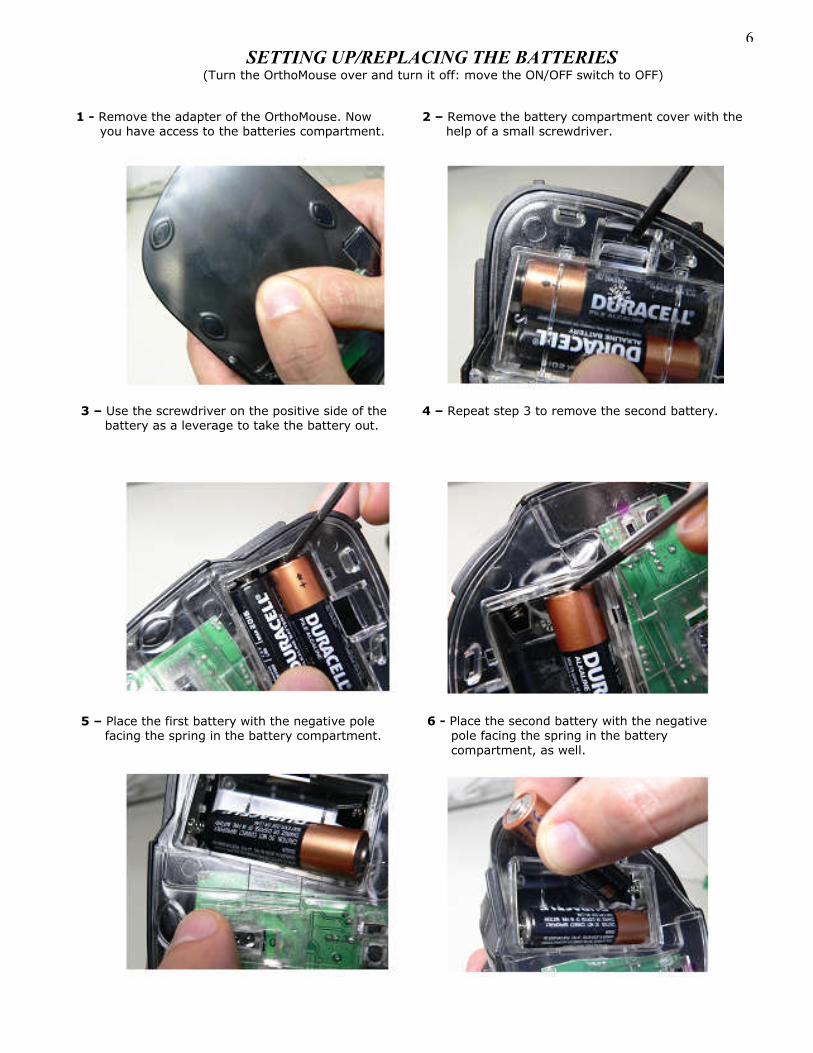
1 - Remove the adapter of the OrthoMouse. Now you have access to the batteries compartment.
2 – Remove the battery compartment cover with the help of a small screwdriver.
3 – Use the screwdriver on the positive side of the battery as a leverage to take the battery out.
SETTING UP/REPLACING THE BATTERIES (Turn the OrthoMouse over and turn it off: move the ON/OFF switch to OFF)
4 – Repeat step 3 to remove the second battery.
5 – Place the first battery with the negative pole facing the spring in the battery compartment.
6 - Place the second battery with the negative pole facing the spring in the battery compartment, as well.
6
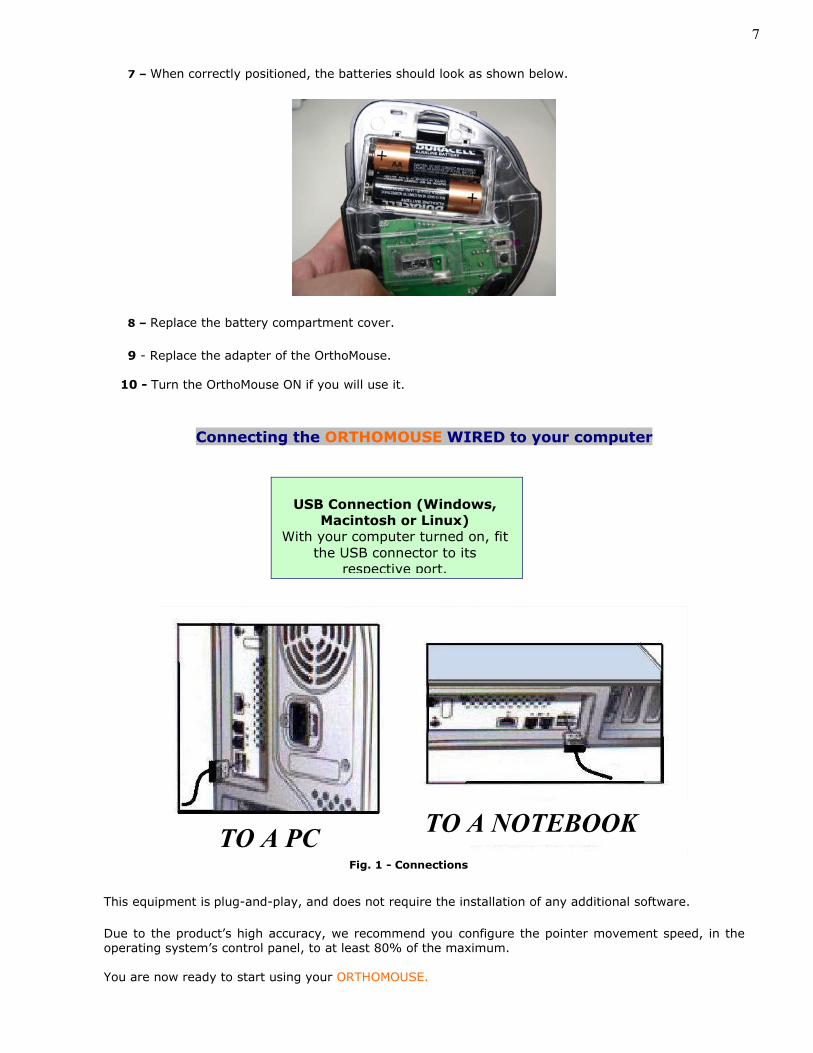
7 – When correctly positioned, the batteries should look as shown below.
8 – Replace the battery compartment cover.
9 - Replace the adapter of the OrthoMouse.
10 - Turn the OrthoMouse ON if you will use it.
Connecting the ORTHOMOUSE WIRED to your computer
Fig. 1 - Connections
This equipment is plug-and-play, and does not require the installation of any additional software.
Due to the product’s high accuracy, we recommend you configure the pointer movement speed, in the operating system’s control panel, to at least 80% of the maximum. You are now ready to start using your ORTHOMOUSE.
USB Connection (Windows, Macintosh or Linux)
With your computer turned on, fit the USB connector to its
respective port.
7
TO A PC
interessante. Você pode posicionar a
TO A NOTEBOOK
interessante. Você pode posicionar a caixa
Recommendations to the User
This product aims specifically at protecting your comfort and your health during the use of a computer. For optimum results, please pay attention to a few details:
1. The ORTHOMOUSE has been designed to comply with the concept of “passive adaptation” or total rest. Thus, during the use of ORTHOMOUSE your hand will remain at rest, assuming the so-called “position of function”. This is the only position known and accepted by medical/ergonomic science in which the whole hand, the fingers and the forearm muscles and joints are in perfect balance. It is also the only position allowed by orthopedics for any immobilization of the hand and forearm – and immobilization is what happens to your hand when you are using a computer mouse.
Then, remember: the main idea is to RELAX!!!
2. Using the ORTHOMOUSE is simple. However, you may need a few days to get completely adapted. That is necessary for the change of bad habits induced by the use of unsuitably designed conventional mice. Just as with the use of a new writing or designing tool, it takes time to achieve dexterity. On the other hand, those who have never used a mouse will adapt faster.
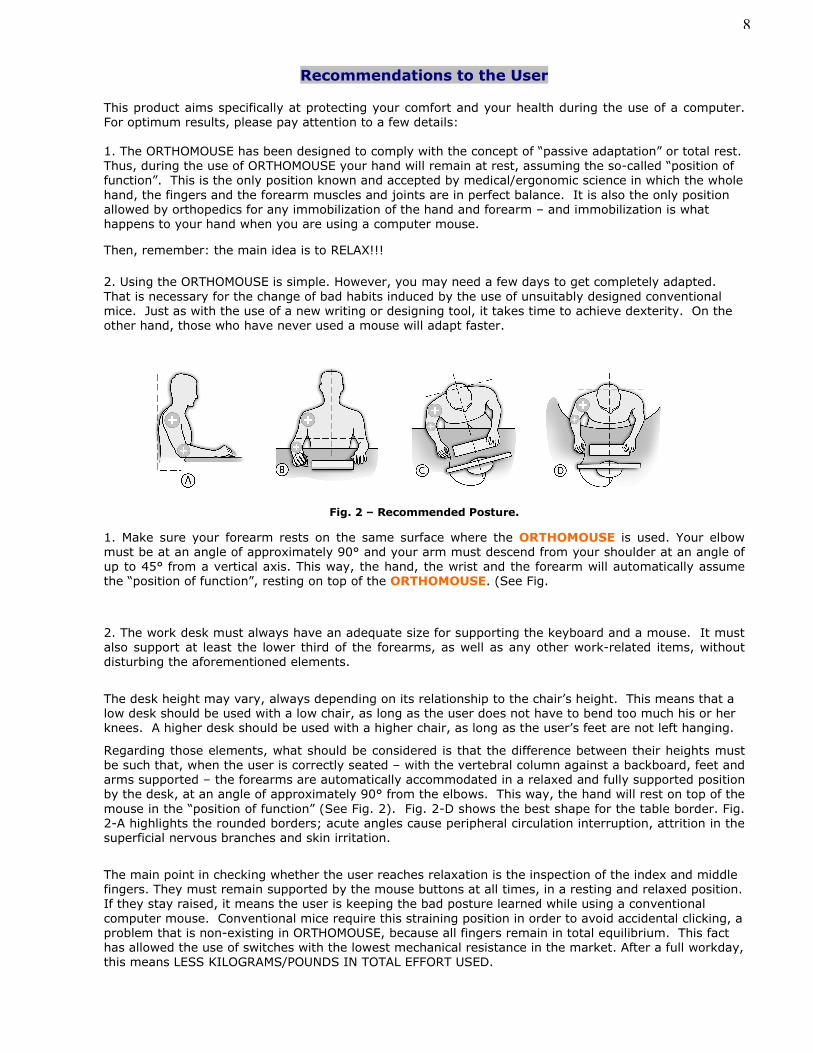
Fig. 2 – Recommended Posture.
1. Make sure your forearm rests on the same surface where the ORTHOMOUSE is used. Your elbow must be at an angle of approximately 90° and your arm must descend from your shoulder at an angle of up to 45° from a vertical axis. This way, the hand, the wrist and the forearm will automatically assume the “position of function”, resting on top of the ORTHOMOUSE. (See Fig.
2. The work desk must always have an adequate size for supporting the keyboard and a mouse. It must also support at least the lower third of the forearms, as well as any other work-related items, without disturbing the aforementioned elements.
The desk height may vary, always depending on its relationship to the chair’s height. This means that a low desk should be used with a low chair, as long as the user does not have to bend too much his or her knees. A higher desk should be used with a higher chair, as long as the user’s feet are not left hanging.
Regarding those elements, what should be considered is that the difference between their heights must be such that, when the user is correctly seated – with the vertebral column against a backboard, feet and arms supported – the forearms are automatically accommodated in a relaxed and fully supported position by the desk, at an angle of approximately 90° from the elbows. This way, the hand will rest on top of the mouse in the “position of function” (See Fig. 2). Fig. 2-D shows the best shape for the table border. Fig. 2-A highlights the rounded borders; acute angles cause peripheral circulation interruption, attrition in the superficial nervous branches and skin irritation.
The main point in checking whether the user reaches relaxation is the inspection of the index and middle fingers. They must remain supported by the mouse buttons at all times, in a resting and relaxed position. If they stay raised, it means the user is keeping the bad posture learned while using a conventional computer mouse. Conventional mice require this straining position in order to avoid accidental clicking, a problem that is non-existing in ORTHOMOUSE, because all fingers remain in total equilibrium. This fact has allowed the use of switches with the lowest mechanical resistance in the market. After a full workday, this means LESS KILOGRAMS/POUNDS IN TOTAL EFFORT USED.
8
If the tendons of the fingers extensors are in evidence, there is still effort. Usually there will be an evolution leading to the relaxation, as the user continuously works with the Dr. Segalle ORTHOMOUSE. FULL ELIMINATION OF THE AFOREMENTIONED SIGNS OF EFFORT SHOULD BE ACHIEVED BEFORE EVALUATION OF THE COMFORT LEVEL AND USABILITY.
This is the logical way to avoid RSI disorders and to work with comfort and safety.
ORTHOMOUSE: Forces your hand to rest
Accessories
The accessories accompanying the ORTHOMOUSE (three adapters and two upper adapters) make it possible to assemble six different combinations of shape and size in a do-it-yourself manner, so that it adapts perfectly to the shape, size and function of your hand.
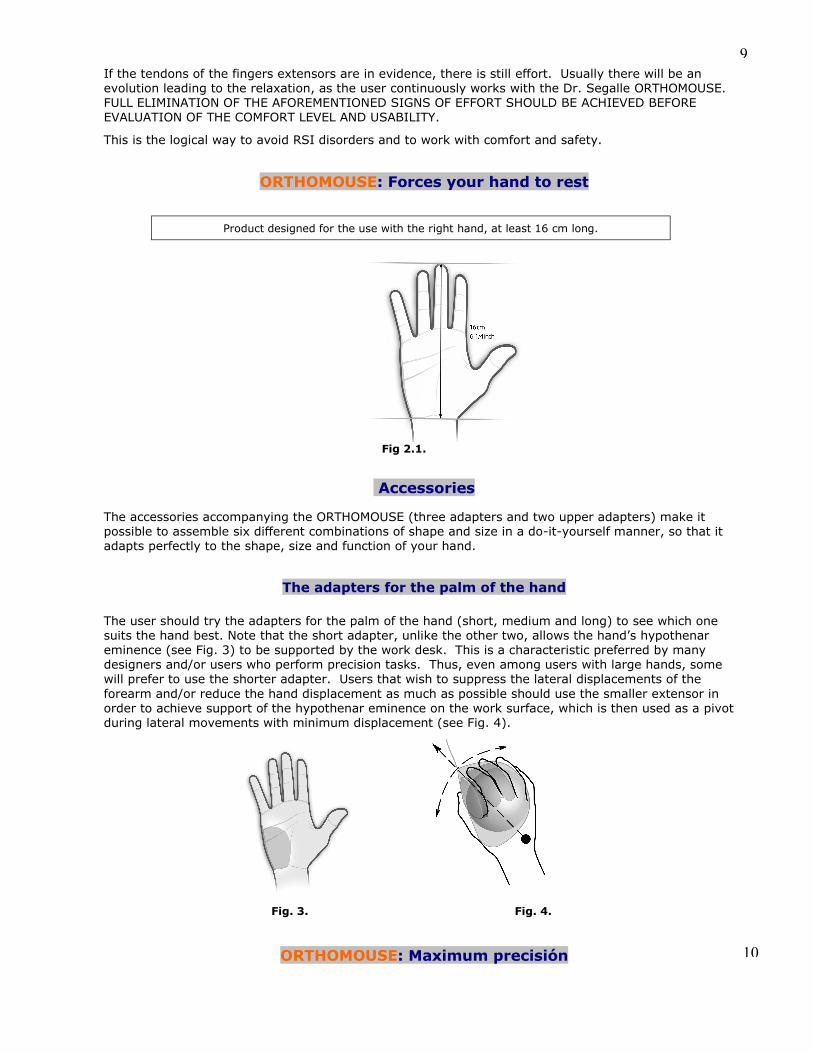
The adapters for the palm of the hand
The user should try the adapters for the palm of the hand (short, medium and long) to see which one suits the hand best. Note that the short adapter, unlike the other two, allows the hand’s hypothenar eminence (see Fig. 3) to be supported by the work desk. This is a characteristic preferred by many designers and/or users who perform precision tasks. Thus, even among users with large hands, some will prefer to use the shorter adapter. Users that wish to suppress the lateral displacements of the forearm and/or reduce the hand displacement as much as possible should use the smaller extensor in order to achieve support of the hypothenar eminence on the work surface, which is then used as a pivot during lateral movements with minimum displacement (see Fig. 4).
ORTHOMOUSE: Maximum precisión
Product designed for the use with the right hand, at least 16 cm long.
Fig 2.1.
Fig. 3. Fig. 4.
9
10
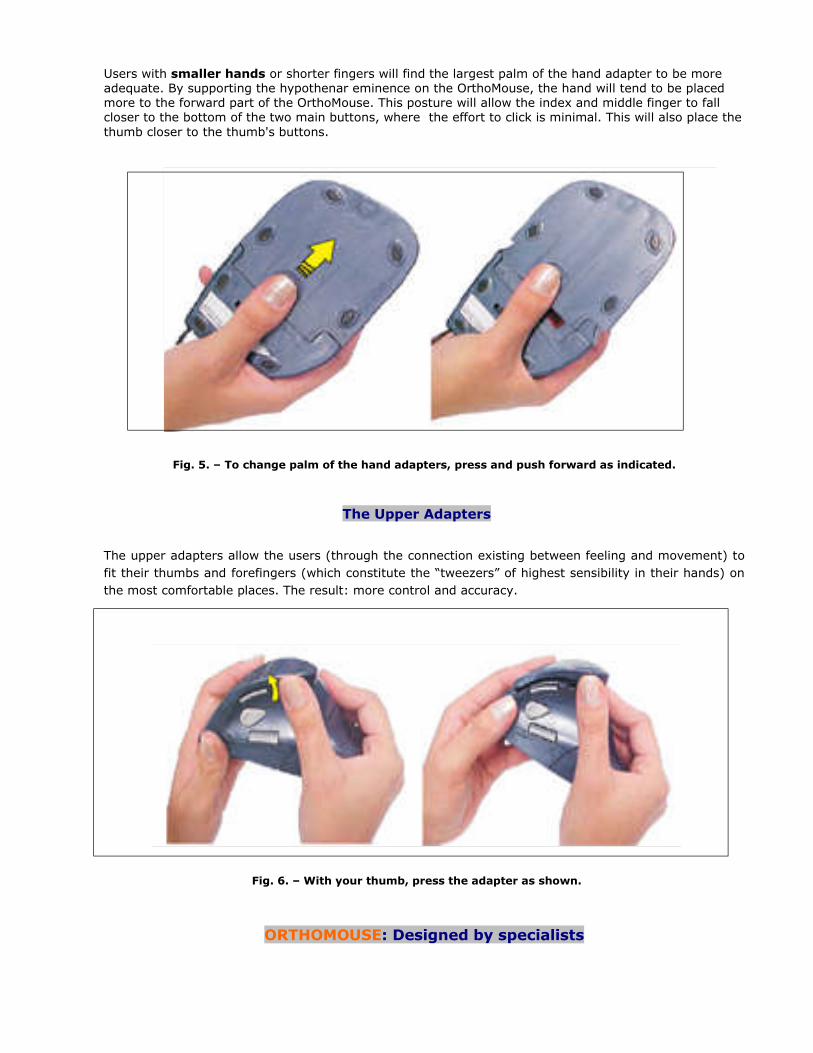
Users with smaller hands or shorter fingers will find the largest palm of the hand adapter to be more adequate. By supporting the hypothenar eminence on the OrthoMouse, the hand will tend to be placed more to the forward part of the OrthoMouse. This posture will allow the index and middle finger to fall closer to the bottom of the two main buttons, where the effort to click is minimal. This will also place the thumb closer to the thumb's buttons.
Fig. 5. – To change palm of the hand adapters, press and push forward as indicated.
The Upper Adapters
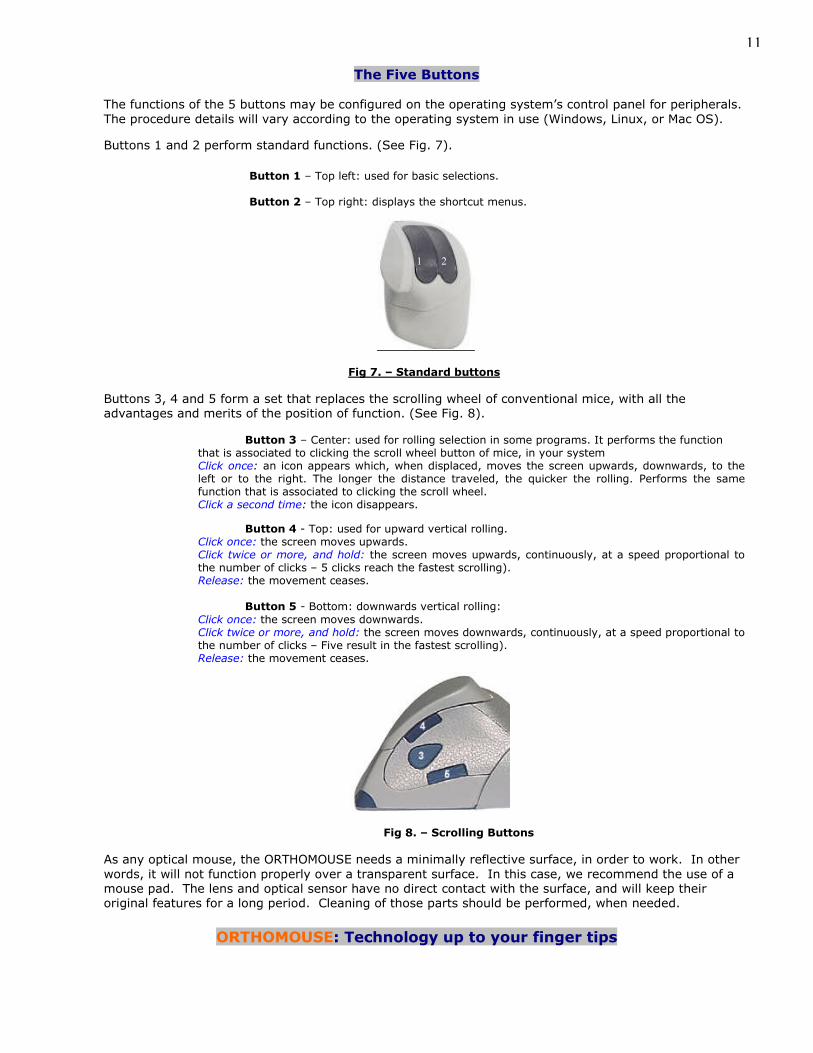
The upper adapters allow the users (through the connection existing between feeling and movement) to
fit their thumbs and forefingers (which constitute the “tweezers” of highest sensibility in their hands) on
the most comfortable places. The result: more control and accuracy.
Fig. 6. – With your thumb, press the adapter as shown.
ORTHOMOUSE: Designed by specialists
The Five Buttons The functions of the 5 buttons may be configured on the operating system’s control panel for peripherals. The procedure details will vary according to the operating system in use (Windows, Linux, or Mac OS).
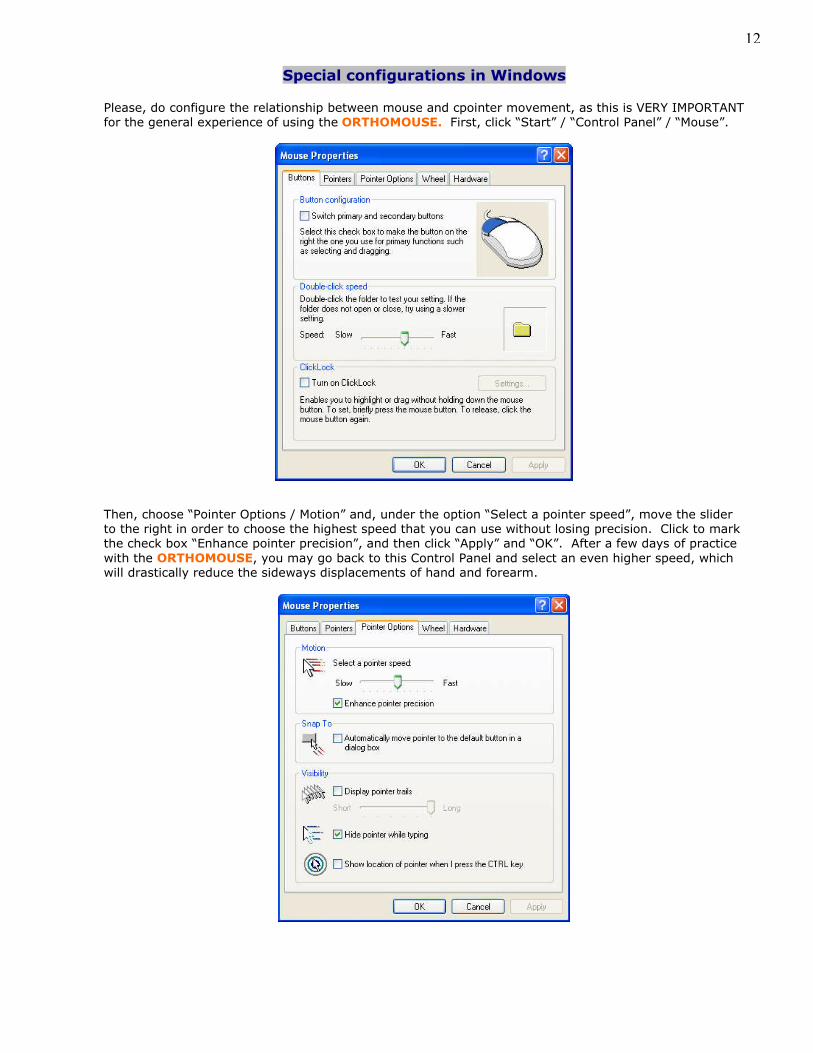
Buttons 1 and 2 perform standard functions. (See Fig. 7).
Button 1 – Top left: used for basic selections. Button 2 – Top right: displays the shortcut menus.
11
1 2
Fig 7. – Standard buttons
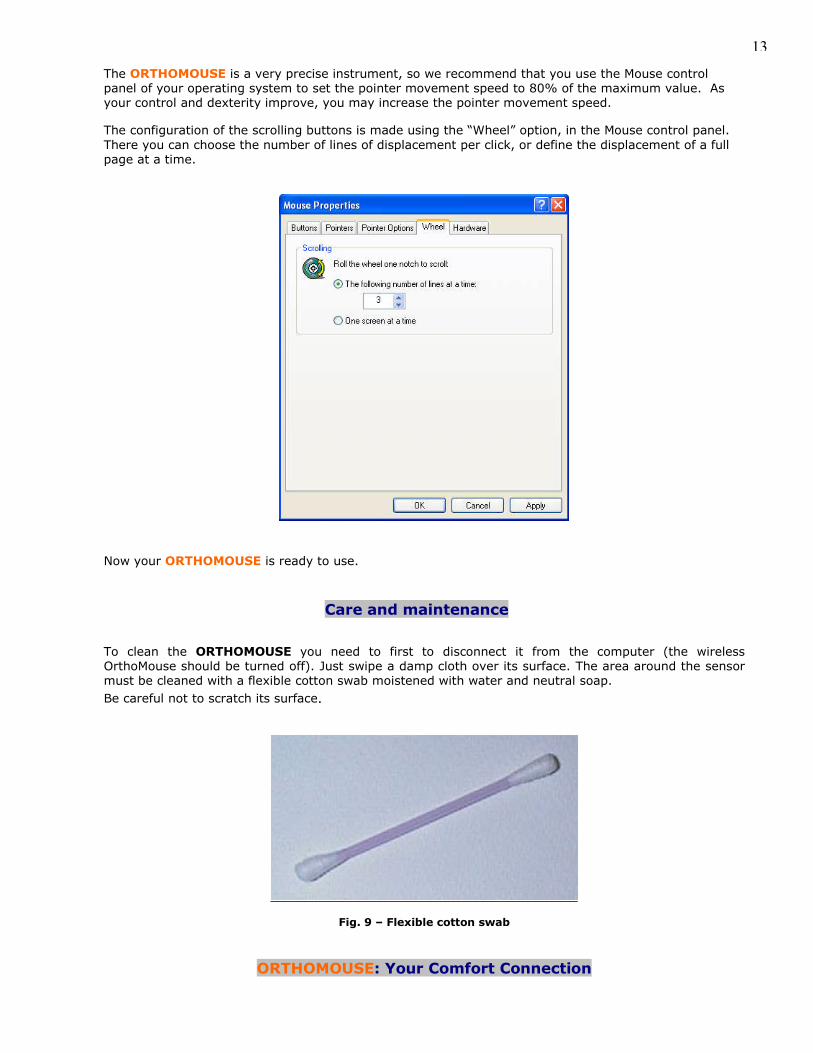
Buttons 3, 4 and 5 form a set that replaces the scrolling wheel of conventional mice, with all the advantages and merits of the position of function. (See Fig. 8).
Button 3 – Center: used for rolling selection in some programs. It performs the function that is associated to clicking the scroll wheel button of mice, in your system Click once: an icon appears which, when displaced, moves the screen upwards, downwards, to the left or to the right. The longer the distance traveled, the quicker the rolling. Performs the same function that is associated to clicking the scroll wheel. Click a second time: the icon disappears.
Button 4 - Top: used for upward vertical rolling. Click once: the screen moves upwards. Click twice or more, and hold: the screen moves upwards, continuously, at a speed proportional to the number of clicks – 5 clicks reach the fastest scrolling). Release: the movement ceases.
Button 5 - Bottom: downwards vertical rolling: Click once: the screen moves downwards.
Click twice or more, and hold: the screen moves downwards, continuously, at a speed proportional to the number of clicks – Five result in the fastest scrolling).
Release: the movement ceases.
Fig 8. – Scrolling Buttons
As any optical mouse, the ORTHOMOUSE needs a minimally reflective surface, in order to work. In other words, it will not function properly over a transparent surface. In this case, we recommend the use of a mouse pad. The lens and optical sensor have no direct contact with the surface, and will keep their original features for a long period. Cleaning of those parts should be performed, when needed.
ORTHOMOUSE: Technology up to your finger tips
11
Special configurations in Windows
Please, do configure the relationship between mouse and cpointer movement, as this is VERY IMPORTANT for the general experience of using the ORTHOMOUSE. First, click “Start” / “Control Panel” / “Mouse”.
Then, choose “Pointer Options / Motion” and, under the option “Select a pointer speed”, move the slider to the right in order to choose the highest speed that you can use without losing precision. Click to mark the check box “Enhance pointer precision”, and then click “Apply” and “OK”. After a few days of practice with the ORTHOMOUSE, you may go back to this Control Panel and select an even higher speed, which will drastically reduce the sideways displacements of hand and forearm.
12
The ORTHOMOUSE is a very precise instrument, so we recommend that you use the Mouse control panel of your operating system to set the pointer movement speed to 80% of the maximum value. As your control and dexterity improve, you may increase the pointer movement speed.
The configuration of the scrolling buttons is made using the “Wheel” option, in the Mouse control panel. There you can choose the number of lines of displacement per click, or define the displacement of a full page at a time.
Now your ORTHOMOUSE is ready to use.
Care and maintenance
To clean the ORTHOMOUSE you need to first to disconnect it from the computer (the wireless OrthoMouse should be turned off). Just swipe a damp cloth over its surface. The area around the sensor must be cleaned with a flexible cotton swab moistened with water and neutral soap.
Be careful not to scratch its surface.
Fig. 9 – Flexible cotton swab
ORTHOMOUSE: Your Comfort Connection
13
Technical Data
Height: 65 mm (2.56 inches) Width: 82 mm (3.23 inches) Length with short adapter: 113 mm (4.45 inches) * Length with medium adapter: 121 mm (4.76 inches) * Length with long adapter: 136 mm (5.35 inches) *
(*) length without cord
Coating: engineering plastic Cable length: 1.80 m (70.86 inches) Weight: OrthoMouse main body: 80gr (with the battery compartment cover, 90gr) Assembled with
1) Smaller upper adapter and smaller adapter: 105gr 2) Smaller upper adapter and medium adapter: 112gr 3) Smaller upper adapter and larger adapter: 120gr 4) Larger upper adapter and smaller adapter: 108gr 5) Larger upper adapter and medium adapter: 115gr 6) Larger upper adapter and smaller adapter: 123gr
Cable not included (40gr). Gross Weight Wired OrthoMouse: box, with all adapters, CD and leaflets: 280gr. Wireless OrthoMouse: box, with all adapters, CD and leaflets: 240gr (batteries not included).
OrthoMouse Wireless Laser 1600 DPI uses: Sensibility: 800 / 1200 / 1600 dpi Laser Stream technology Wave length: 832-865 nm Self-adjusting power-saving modes for longest battery life
CLaser fault detect circuitry on-chip for Eye Safety Compliance CERTIFICATIONS: FCC; CCE; IC; RhOs.
OrthoMouse Wired 1000 DPI uses: Sensibility: 400 / 800 / 1000 DPI CERTIFICATIONS: FCC; CCE; IC; RhOs.
Minimum requirements:
Connectivity: USB (Universal Serial Bus) Microsoft Windows: Windows 7 / Vista / XP / 2000 / Me / 98 or newer. Macintosh: Mac OS 8.6 or newer, OS 9, OS X or newer Linux: Kernel 2.4 or newer with USB support or newer.
Product designed for use with the right hand
14

Patents
This product is innovative, and is protected by the following granted patents:
USA: No. 6,300,941, No. 6,532,002 and 7,755,609. Canada: No. 2,347,082. Mexico: No. 226,639. Brazil: No. 5,901,042-8, No. 7,903,331 and No. 8,400,186-0 Argentina: No. 009,205 B4. Japan: 4,414,101. Patents pending in other countries. (EEC). Currently, the DR.SEGALLE patent is the only one granted the title “orthopedic computer mouse”, indicating the placement of the hand in the “position of function”.
Technical Service
FCC Class B Radio Frequency Interference Statement Warning: Changes or modifications to this unit not expressly approved by the party responsible for compliance could void the user’s authority to operate the equipment. NOTE: This equipment has been tested and found to comply with the limits for a Class B digital device, pursuant to Part 15 of the FCC Rules. These limits are designed to provide reasonable protection against harmful interference in a residential installation. This equipment generates, uses and can radiate radio frequency energy and, if not installed and used in accordance with the instructions, may cause harmful interference to radio communications. However, there is no guarantee that interference will not occur in a particular installation. If this equipment does cause harmful interference to radio or television reception, which can be determined by turning the equipment off and on, the user is encouraged to try to correct the interference by one or more of the following measures: Reorient or relocate the receiving antenna. Increase the separation between the equipment and receiver. Connect the equipment into an outlet on a circuit different from that to which the receiver is connected. Consult the dealer or an experienced radio/TV technician for help. According to Industry Canada Notice ICES – 003 Issue 2. According to R&TTE Directive 1999/5/EC. RHoS compliance.
Warranty
1 year warranty
ORTHOPEDICS: State-of-the-art ergonomics
Please, send email to: [email protected]
15


![Model: ZR61KCE-TFD - RESLUK.COM...Model: ZR61KCE-TFD Data Type: Scroll compressor Producer: Copeland Series: ZR Technical data Nominal motor power [HP]: 5 Displacement [m³/h]: 14,4](https://img.pdfslide.net/doc/110x75/5ea3dbf82f792f397e531945/model-zr61kce-tfd-model-zr61kce-tfd-data-type-scroll-compressor-producer.jpg)
![Model: ZR48K3E-TFD€¦ · Model: ZR48K3E-TFD Data Type: Scroll compressor Producer: Copeland Series: ZR Technical data Nominal motor power [HP]: 4 Displacement [m³/h]: 11,5](https://img.pdfslide.net/doc/110x75/5ead5fa4c892d72c765253bc/model-zr48k3e-tfd-model-zr48k3e-tfd-data-type-scroll-compressor-producer-copeland.jpg)


![Owner’s Manual - MI7...2 Hookup 2.2 Rear-Panel Connections PS49 Owner’s Manual 4 [Oct +] buttons at the same time, then release them; then you can use the buttons to scroll up](https://img.pdfslide.net/doc/110x75/60c87c9118373501f2659d1e/owneras-manual-mi7-2-hookup-22-rear-panel-connections-ps49-owneras-manual.jpg)