Embed Size (px)
Citation preview

www.emrax.com
User’s Manual for
One Man Rigging Aid
User’s manual for advanced axial flux synchronous motors and generators
www.emrax.com Version 1.1 / November 2016 2
Contents 1. One Man Rigging Aid features .................................................................................................................................................... 4
2. One Man Rigging Aid parts ......................................................................................................................................................... 5
3. Adjustments of One Man Rigging Aid ......................................................................................................................................... 6
3. How to use the One Man Rigging Aid? ........................................................................................................................................ 8
4. How to use Remote Control?...................................................................................................................................................... 9
5. Testing of One Man Rigging Aid on a bigger glider plane .......................................................................................................... 11

User’s manual for advanced axial flux synchronous motors and generators
www.emrax.com Version 1.1 / November 2016 3
Table of Figures Figure 1: Wing geometry definitions .............................................................................................................................................. 4
Figure 2: One Man Rigging Aid parts .............................................................................................................................................. 5
Figure 3: 12 V battery connection and fixation ............................................................................................................................... 5
Figure 4: Wing stand ...................................................................................................................................................................... 6
Figure 5: Manually adjustable vertical cradle position from 62 to 100 cm ...................................................................................... 6
Figure 6: Manually adjustable horizontal cradle position - 3 positions spaced 80 mm .................................................................... 7
Figure 7: Adjustable screws for wing curvature .............................................................................................................................. 7
Figure 8: Manually adjustable wing clamp for different chord lengths of the wing (up to 100 cm) ................................................. 8
Figure 9: Manually adjustable wing clamp for different thickness of the wing ................................................................................ 8
Figure 10: Supporting bracket position must be parallel during dragging the rigging aid. Remote control must not be used in this
position of the supporting bracket. ................................................................................................................................................ 9
Figure 11: Remote control .............................................................................................................................................................. 9
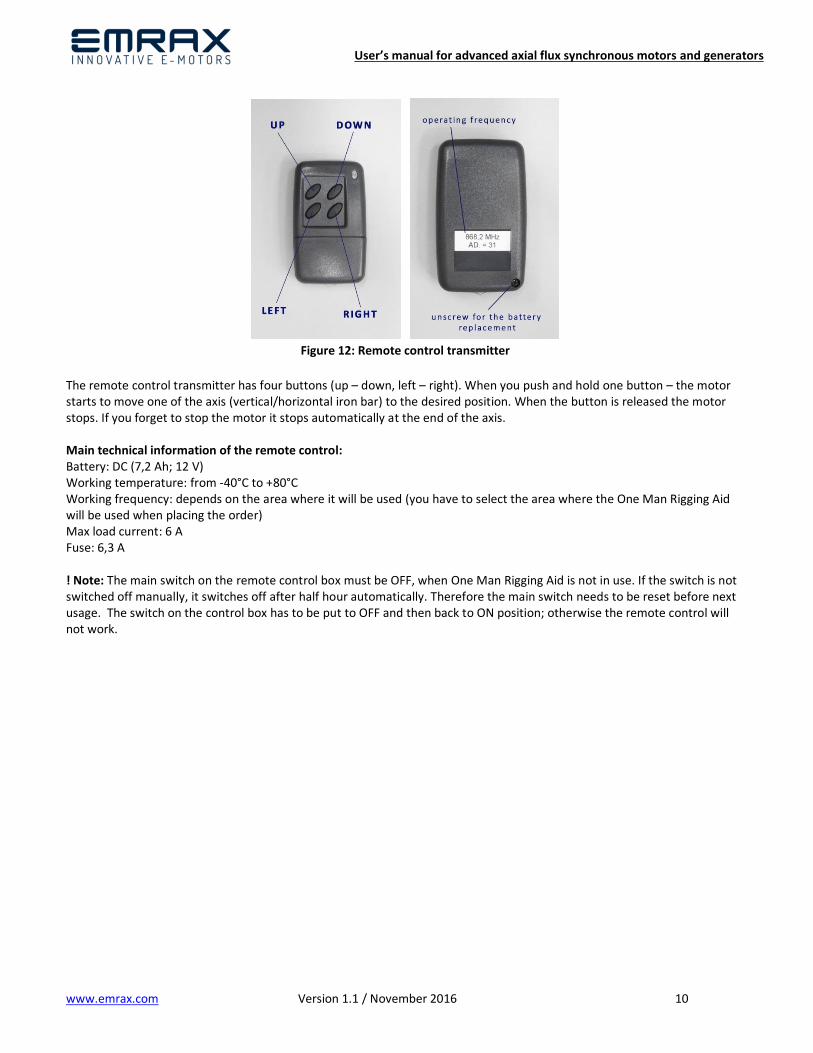
Figure 12: Remote control transmitter ......................................................................................................................................... 10
Figure 13: Global frequency bands - you have to select the area where the One Man Rigging Aid will be used when placing the
order ............................................................................................................................................................................................ 11
Figure 14: Testing on Duo Discus glider plane............................................................................................................................... 11

User’s manual for advanced axial flux synchronous motors and generators
www.emrax.com Version 1.1 / November 2016 4
Dear Customer, Congratulations on your purchase of the EMRAX One Man Rigging Aid. This is a device for quick and easy assembly of a glider plane. Assembly can be done by only one person in 15 minutes from arrival to the airfield till preparation for the flight. It is a Slovenian product. The device was developed by Mr. Roman Sušnik, dipl. ing. (Company EMRAX d.o.o.; till March 2016 company name was Enstroj d.o.o.). The first prototype was tested on Apis EA1 in 2006. After that it was also tested on a bigger glider plane – Duo Discus.
1. One Man Rigging Aid features
Remote controlled
Compact and high-quality product
Galvanized iron construction and fibreglass cradle
It can be used on the grass (even higher grass)
Lifting weight is 150 kg (tested on Duo Discus, ASH etc.)
It has 19 kg – it is easy to move and to handle
It can be simply and quickly disassembled into smaller parts (convenient for putting the Rigging Aid in the underneath compartment of the trailer or in the car boot)
It can be used for most of one and two seaters’ glider planes
Figure 1: Wing geometry definitions
Manually adjustable parts:
Cradle
vertical cradle position from 62 to 100 cm (also useable for planes that have wings on higher position)
horizontal cradle position – 3 positions spaced 80 mm (for different gravity centre of the wing)
adjustable screws for wing curvature
Wing Clamp telescopic adjustments to different chord length and thickness of the wing
Horizontal tilt limiter on the vertical iron bar allows the cradle to stop at desired wing angle
Remote controlled parts:
Cradle vertical cradle position adjustments up to 24 cm
horizontal cradle position adjustments up to 24 cm
* Special customizations can be made - for example customized wing clamp for wings with longer chord line (up to 120 cm). Customizations have to be discussed before placing an order by EMRAX Company.

User’s manual for advanced axial flux synchronous motors and generators
www.emrax.com Version 1.1 / November 2016 5
2. One Man Rigging Aid parts
Figure 2: One Man Rigging Aid parts
12 V / 7,2 Ah battery is not included. One charging of the battery lasts for one season (for approximately 50
assemblies).
We offer also a wing stand, which can be ordered separately.
Figure 3: 12 V battery connection and fixation

User’s manual for advanced axial flux synchronous motors and generators
www.emrax.com Version 1.1 / November 2016 6
Figure 4: Wing stand
3. Adjustments of One Man Rigging Aid
Figure 5: Manually adjustable vertical cradle position from 62 to 100 cm

User’s manual for advanced axial flux synchronous motors and generators
www.emrax.com Version 1.1 / November 2016 7
Figure 6: Manually adjustable horizontal cradle position - 3 positions spaced 80 mm
Figure 7: Adjustable screws for wing curvature

User’s manual for advanced axial flux synchronous motors and generators
www.emrax.com Version 1.1 / November 2016 8
Figure 8: Manually adjustable wing clamp for different chord lengths of the wing (up to 100 cm)
Figure 9: Manually adjustable wing clamp for different thickness of the wing
3. How to use the One Man Rigging Aid?
Step 1: Move the One Man Rigging Aid parallel to the glider fuselage with cradle facing to the plane and place the supporting bracket perpendicular to the horizontal iron bar. Cradle must be in vertical position.
Step 2: Pull out the wing from the trailer and put it on the cradle at the wing gravity centre position. Secure the wing with the wing clamp.
Step 3: Wheel the wing on the One Man Rigging Aid away from the fuselage and rotate in to the horizontal position. Position the wing perpendicular to the fuselage and insert the bolts in wing holes in the fuselage. You may need to make horizontal and vertical adjustments of the wing using a remote control to properly align the holes where the bolts will be inserted.
Step 4: Insert the bolts securely.
Step 5: Place the wing stand under the wing tip and move the One Man Rigging Aid to the opposite side of the fuselage.
Step 6: Repeat the procedure with the other wing as described above.
Step 7: Remove the wing stand and the One Man Rigging Aid from the wings and pull the plane from the fuselage cradle.
! Note:
- When the One Man Rigging Aid is being moved around without a wing on it the supporting bracket must be parallel (in the
same line) as the horizontal iron bar.
- Never push the button on the remote control transmitter if the supporting bracket is parallel to the horizontal iron bar.

User’s manual for advanced axial flux synchronous motors and generators
www.emrax.com Version 1.1 / November 2016 9
Figure 10: Supporting bracket position must be parallel during dragging the rigging aid. Remote control must not be used
in this position of the supporting bracket.
Video of the One Man Rigging Aid usage (no editing was done from the beginning to an end): https://youtu.be/XyWSmN_3spM
4. How to use Remote Control?
Figure 11: Remote control
User’s manual for advanced axial flux synchronous motors and generators
www.emrax.com Version 1.1 / November 2016 10
Figure 12: Remote control transmitter
The remote control transmitter has four buttons (up – down, left – right). When you push and hold one button – the motor starts to move one of the axis (vertical/horizontal iron bar) to the desired position. When the button is released the motor stops. If you forget to stop the motor it stops automatically at the end of the axis. Main technical information of the remote control: Battery: DC (7,2 Ah; 12 V) Working temperature: from -40°C to +80°C Working frequency: depends on the area where it will be used (you have to select the area where the One Man Rigging Aid will be used when placing the order) Max load current: 6 A Fuse: 6,3 A ! Note: The main switch on the remote control box must be OFF, when One Man Rigging Aid is not in use. If the switch is not switched off manually, it switches off after half hour automatically. Therefore the main switch needs to be reset before next usage. The switch on the control box has to be put to OFF and then back to ON position; otherwise the remote control will not work.

User’s manual for advanced axial flux synchronous motors and generators
www.emrax.com Version 1.1 / November 2016 11
Figure 13: Global frequency bands - you have to select the area where the One Man Rigging Aid will be used when placing
the order
5. Testing of One Man Rigging Aid on a bigger glider plane
Figure 14: Testing on Duo Discus glider plane


![Pre Rigging - boats-yachts.ro control si... · 01/2010 [B]3.a Pre Rigging Pre Rigging kit examples Pre Rigging kits: Twin digital gauge kit example 2x • Pre Rigging Dual Top Mount](https://img.pdfslide.net/doc/110x75/5b01b56a7f8b9a6a2e8ea25d/pre-rigging-boats-control-si012010-b3a-pre-rigging-pre-rigging-kit-examples.jpg)